

Page 1

TM
Installation
TM
Instructions
Models:
TR342, TR344, TV342
Round Termination Cap and
Storm Collar
These chimney termination caps have been tested for use with specifi c Hearth & Home Technologies inc. fi replaces and
are UL listed as fi replace parts. Refer to the installation instructions supplied with the fi replace for the correct accessories
to be used. Check with your local building code agency before you begin installation to ensure compliance with local codes,
including the need for permits and follow-up inspections. If you encounter any problems regarding code approvals, or if you
need clarifi cation of any of the instructions contained here, contact the Heatilator Technical Services Dept., Hearth & Home
Technologies Inc., phone 1-800-927-6841 or 1-888-427-3973.
Note: An arrow () found in the text signifi es change in content.
CAUTION
Sharp Edges
• Wear protective gloves and safety
glasses during installation.
Description Qty
Termination Cap 1
Storm Collar 1
Fastener Package 1
32 in.
32-3/8 in.
(822 mm)
15-3/4 in.
34-3/8 in.
(873 mm)
TR342 TR344
Note: The chimney must extend at least 3 ft (.91 m) above the highest point where it passes through the roof and at least
2 ft (.61 m) above any portion of the building within 10 ft (3.05 m). These minimum distances comply with national code
construction requirements but do not guarantee smoke free operation.
(400 mm)
TV342
(813 mm)
34-1/4 in.
(870 mm)
Hearth & Home Technologies Inc. • TR342/TR344 Term Cap • 31445 Rev H • 03/06
1
Page 2
A. TR344 Round Termination Cap
m
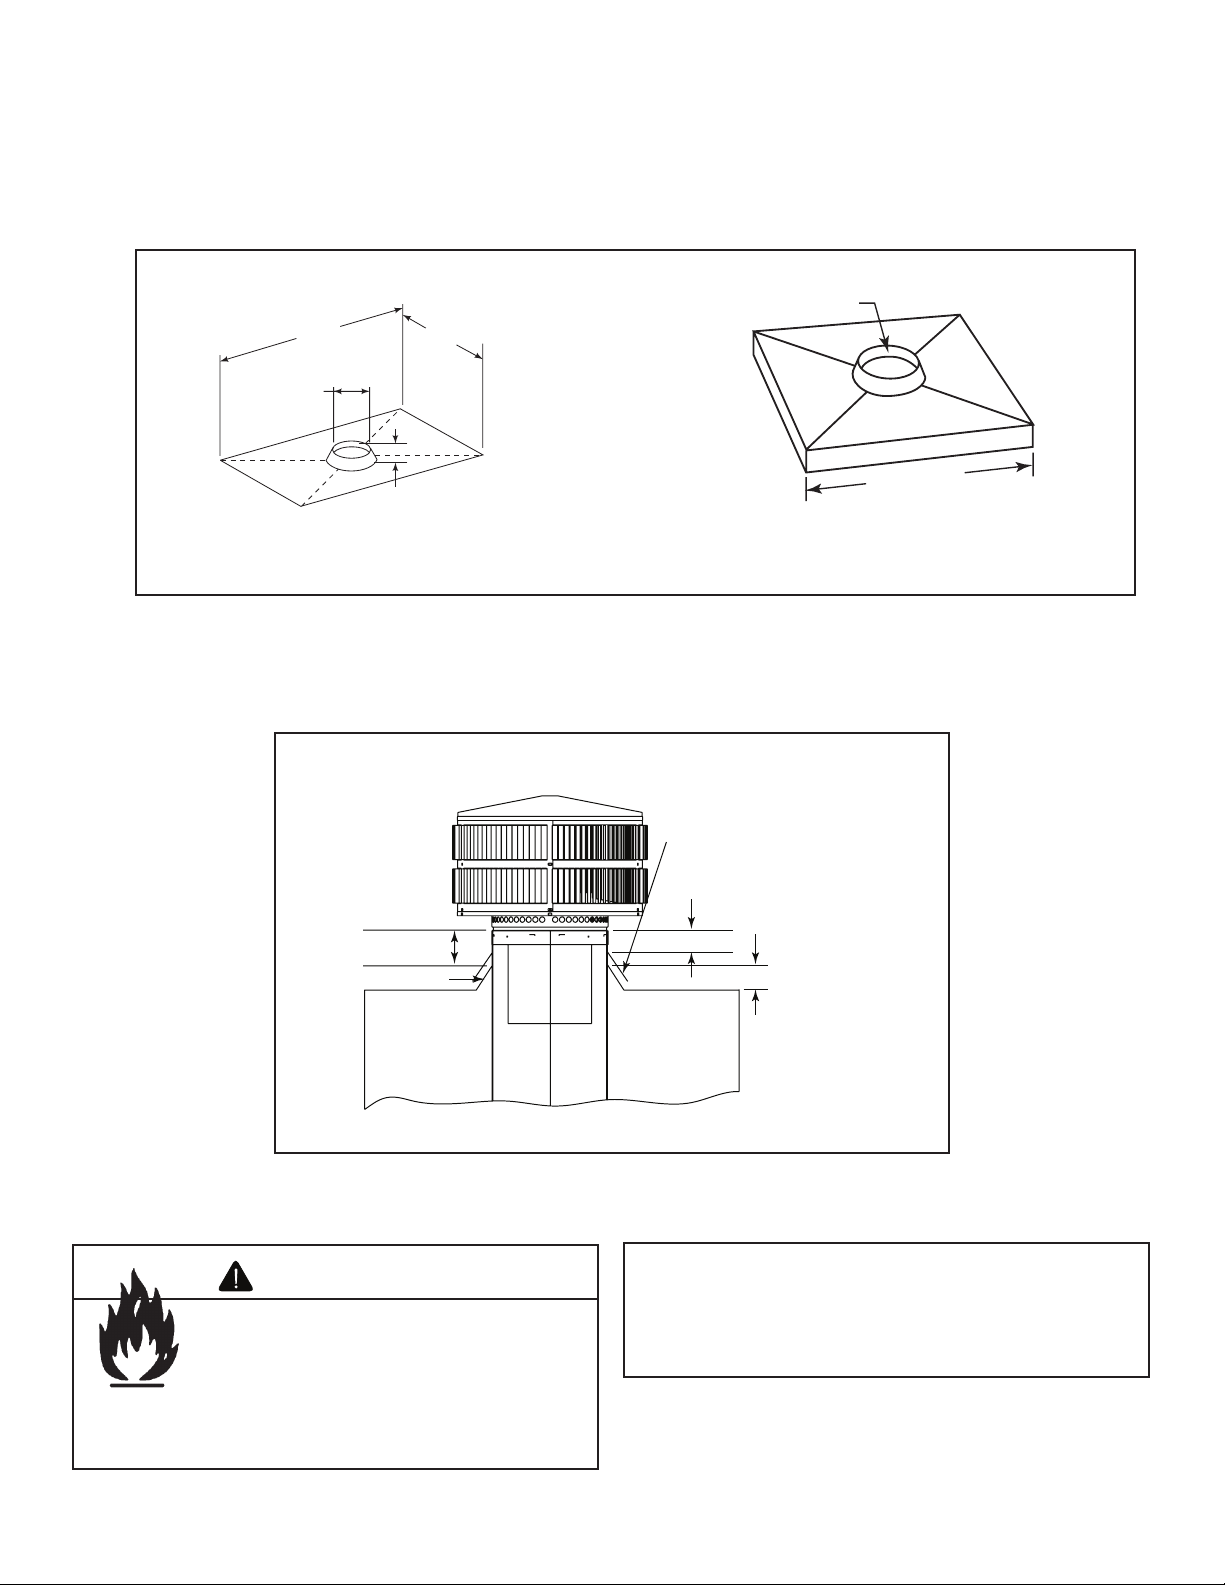
• Install the roof fl ashing or the chase top. See Table 1 for required dimensions of the chase top if using a shroud.
• Fabricate a chase top as shown in Figure 1 or use catalog number CT35.
• The uppermost chimney section must extend 4 in. (102) above the top of the chase top collar to allow for the installation
of the termination cap and the storm collar.
10-7/8 in. dia.
2 in. deep
72 in.
(1829 mm)
10-7/8 in.
(276 mm)
36 in. (914
2 in. (51 mm)
As Required
.018 (26 ga) Galvanized
CT35
Figure 1 Chase Top
• Install the storm collar over the uppermost chimney section and secure in place with the provided bolt. Caulk the gaps
between the chimney and the top of the storm collar to prevent leaks. Any seams along the storm collar must also be
sealed.
Minimum 1-1/2 in. (38 mm) overlap of cap over pipe
Storm Collar
2 in. (51 mm) min.
6 in. (152mm) min.
Flashing Collar
2 in. (51 mm) min. collar
Figure 2 Installing a TR344 Round Termination Cap
• Position the round termination cap over the uppermost chimney section and snap-lock it into position.
WARNING
Note: If you do not want to snap-lock the round termination
cap in place, crush the snap-lock tabs on the termination
Fire Risk
• The minimum overlap of cap to pipe
cap collar fl at and attach to the uppermost chimney section
with three self-tapping screws.
MUST be met or chimney may separate
from cap.
Separation allows sparks, heat and embers
to escape.
2
Hearth & Home Technologies Inc. • TR342/TR344 Term Cap • 31445 Rev H • 03/06
Page 3

B. TR342 and TV342 Telescoping Round Termination Cap
• The uppermost chimney section must terminate no more than 14-1/2 in. (368 mm) below the top of the fl ashing collar on
the chase top. See Figure 3 for additional details.
• Position the telescoping round termination cap above the collar of the chase top and lower the cap assembly until the
stainless steel telescoping slip section engages a minimum of 4 in. (102 mm) into the uppermost chimney section. Push
the termination cap down until the three support brackets contact with the chase top collar.
• Attach the three support brackets to the chase top collar with the screws provided.
• Wrap the storm collar around the outer slip section.
Fasten the ends of the storm collar together with a
screw at the bottom and a nut and bolt through the
clamp lock at the top. Slide the storm collar down
Storm Collar
until it contacts the chase top and tighten the clamp
lock.
Flashing Collar
2 in. (51 mm) min.
• Caulk the gaps between the outer slip section
and the top of the storm collar to prevent leaks.
Any seams along the storm collar must also be
sealed.
14-1/2 in.
(368 mm) max.
Note: To protect against the effect of corrosion
on those parts exposed to the weather, the
termination cap can be painted with a rustresistant paint.
Top of Pipe
1-1/2 in. (38 mm) min.
overlap
Figure 3 I
nstalling TR342, TV342 Round Telescoping Termination Cap
(TR342 shown)
C. Shrouds
• Field Constructed Shrouds
- Different shroud designs have been tested for Hearth Technologies fi replace systems using the TR342 and TR344
termination caps. These shrouds may be fi eld constructed if the dimensional requirements specifi ed in Table 1 are
maintained. Some examples are shown in Figure 4. These shrouds must be constructed from a minimum .018 in.
(26 ga) thick aluminized steel. The wire mesh is optional but recommended and must be .018 in. thick minimum
aluminized steel with a maximum 1/2 in. (13 mm) mesh opening.
- The TR-TVK Round Termination Top Vent Kit is available to reduce the minimum sizes required for shrouds. See
Table 1.
17-1/2 in.
(444 mm)
28-1/4 in.
(718 mm)
*
Figure 4 Shroud Dimensions
Dia. centered
3-3/4 in.
(95 mm)
*
*
3 in.
(76 mm)
* See Table 1 for measurements
17-1/2 in.
(444 mm)
Dia. centered
17-1/4 in.
(438 mm)
*
3/4 in.
(19 mm)
*
3 in. (76 mm)
(4 sides)
2 in.
(51 mm)
• Installation of the Shroud
• Center the hole in the bottom pan (if required) of the shroud over the termination cap and lower the shroud down to
the chase top.
• Be sure to keep the shroud centered over the chimney termination and fasten the shroud to the chase top with
screws.
• Be sure to caulk or seal around the screw heads to prevent leaks.
Hearth & Home Technologies Inc. • TR342/TR344 Term Cap • 31445 Rev H • 03/06
3
Page 4

Shroud
TS345/T445
(Top Vent)
TABLE 1
TV342
TR342/TR344*
TR342/TR344
TR442/TR444
OPEN TOP with solid sides and 3 in. (76 mm) opening at the bottom
TR442/TR444*
(* with TR-TVK installed) TR11/TR11T
TV11/TV11T
TR11/TR11T*
(* with TR-TVK installed)
Mnimum Base
Dimensions
Minimum Top
Dimensions
Minimum Base
Dimensions
Minimum Height N/A
Minimum Base
Dimensions
23 in. x 23 in.
(584 x 584 mm)
20 x 20 in.
(508 x 508 mm)
N/A
ROOFED STYLE with 12 x 22 in. (264 sq. in.) (305 x 559 mm) opening on each side and 3 in. (76 mm) space between the
N/A
28 x 28 in.
(711 x 711 mm)
with Radiation Shield
25 x 25 in.
(635 x 635 mm)
MAILBOX STYLE with open ends and 3 in. (76 mm) opening at the bottom of the sides.
26.5 x 28 in.
(673 x 711 mm)
with Radiation Shield
28 1/4 in.
(718 mm)
27 x 27 in.
(686 x 686 mm)
with Radiation Shield
26 x 26 in.
(660 x 660 mm)
23 x 23 in.
(584 x 584 mm)
28 x 30 in.
(711 x 762 mm)
27 1/2 in.
(699 mm)
radiation shield and chase top.
27 x 27 in.
(686 x 686 mm)
with Radiation Shield
32 x 32 in.
(813 x 813 mm)
with Radiation Shield
29 x 29 in.
(737 x 737 mm)
34 x 34 in.
(864 x 864 mm)
with Radiation Shield
28 1/4 in.
(718 mm)
34 x 34 in.
(864 x 864 mm)
with Radiation Shield
with Radiation Shield or
with Radiation Shield
26 x 26 in.
(660 x 660 mm)
23 x 23 in.
(584 x 584 mm)
28 x 30 in.
(711 x 762 mm)
34 x 34 in.
(864 x 864 mm)
27 1/2 in.
(699 mm)
34 x 34 in.
(864 x 864 mm)
Minimum Height N/A
Minimum Height is measured from the bottom of the termination cap:
Minimum height is established with the bottom of the termination cap 7 in. (178 mm) above the chase top. Minimum height must increase
accordingly for any height above 7 in. (178 mm).
4
Hearth & Home Technologies Inc. • TR342/TR344 Term Cap • 31445 Rev H • 03/06
23 in.
(584 mm)
All dimensions are INSIDE dimensions.
23 in.
(584 mm)
23 in.
(584 mm)
23 in.
(584 mm)
 Loading...