

Page 1
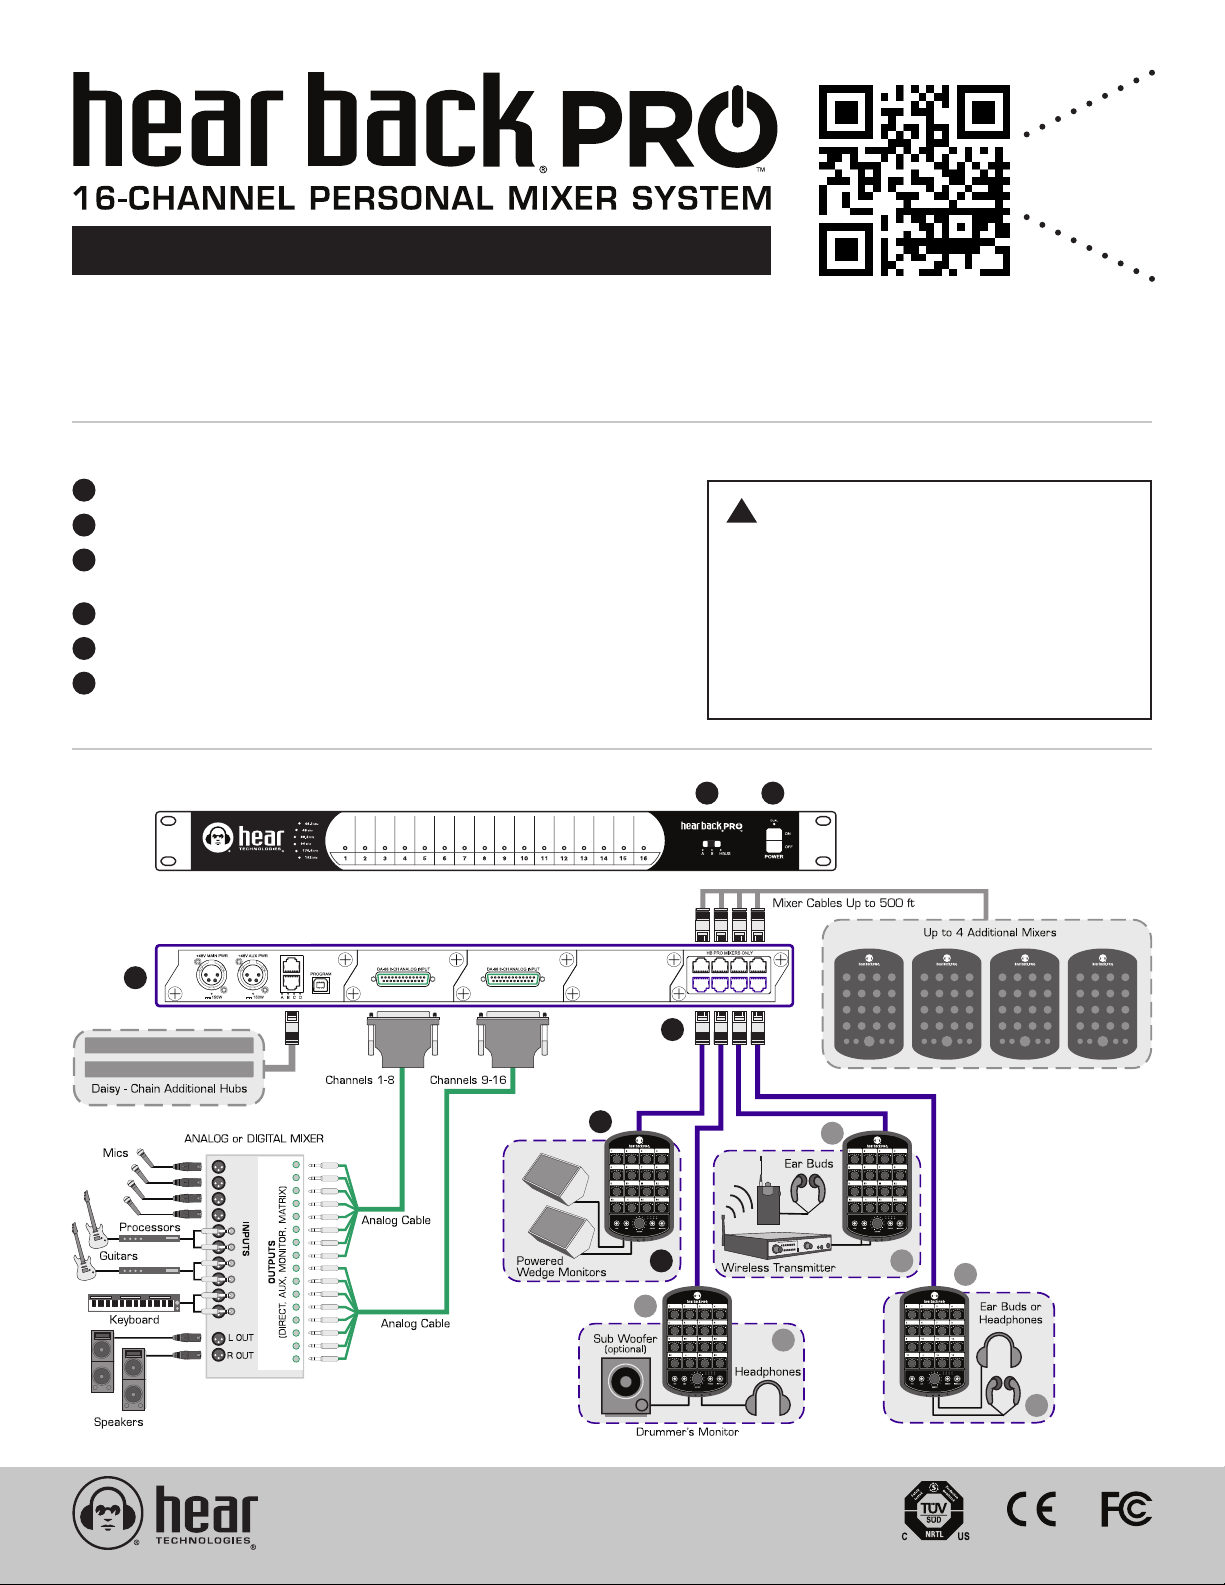
CONNECTING THE SYSTEM
SCAN
CODE
FOR USER
GUIDE
QUICK START GUIDE
Thank you for purchasing the Hear Back PRO 16-channel personal monitor mixer system!
Use this Quick Start Guide to setup quickly and easily. Refer to the User Guide for complete
instructions, available online at www.hearback.com/support or scan the QR code above.
1
Connect the appropriate input(s) as shown in the hook-up diagram.
!
2
Select the desired input using the front panel switch.
3
Connect Hear Back PRO Mixers to the Network Card outputs
using CAT6* cables.
4
Turn on Hub Power.
5
Set all Mixer Channels and Master Volume levels to 0%.
6
Connect the headphones, in-ear monitors, and/or line outputs
for connecting to wireless in-ear systems, powered monitors, or
other devices requiring line-level inputs.
WARNING
• The Hear Back PRO is capable of
driving most headphones to extreme
levels that can damage your HEARING!
• ALWAYS turn down the Mixer “Master”
volume down before putting on in-ear
headsets or headphones.
HOOK-UP DIAGRAM
HUB FRONT PANEL
HUB REAR PANEL
1
2
3
5
6
5
4
5
6
6
5
*Cable complying with the National authorities (cable with an outer jacket or sleeving rated VW-1 or better).
6
Hear Back PRO is proudly designed & assembled
in the U.S.A. by musicians and audio engineers.
Page 2
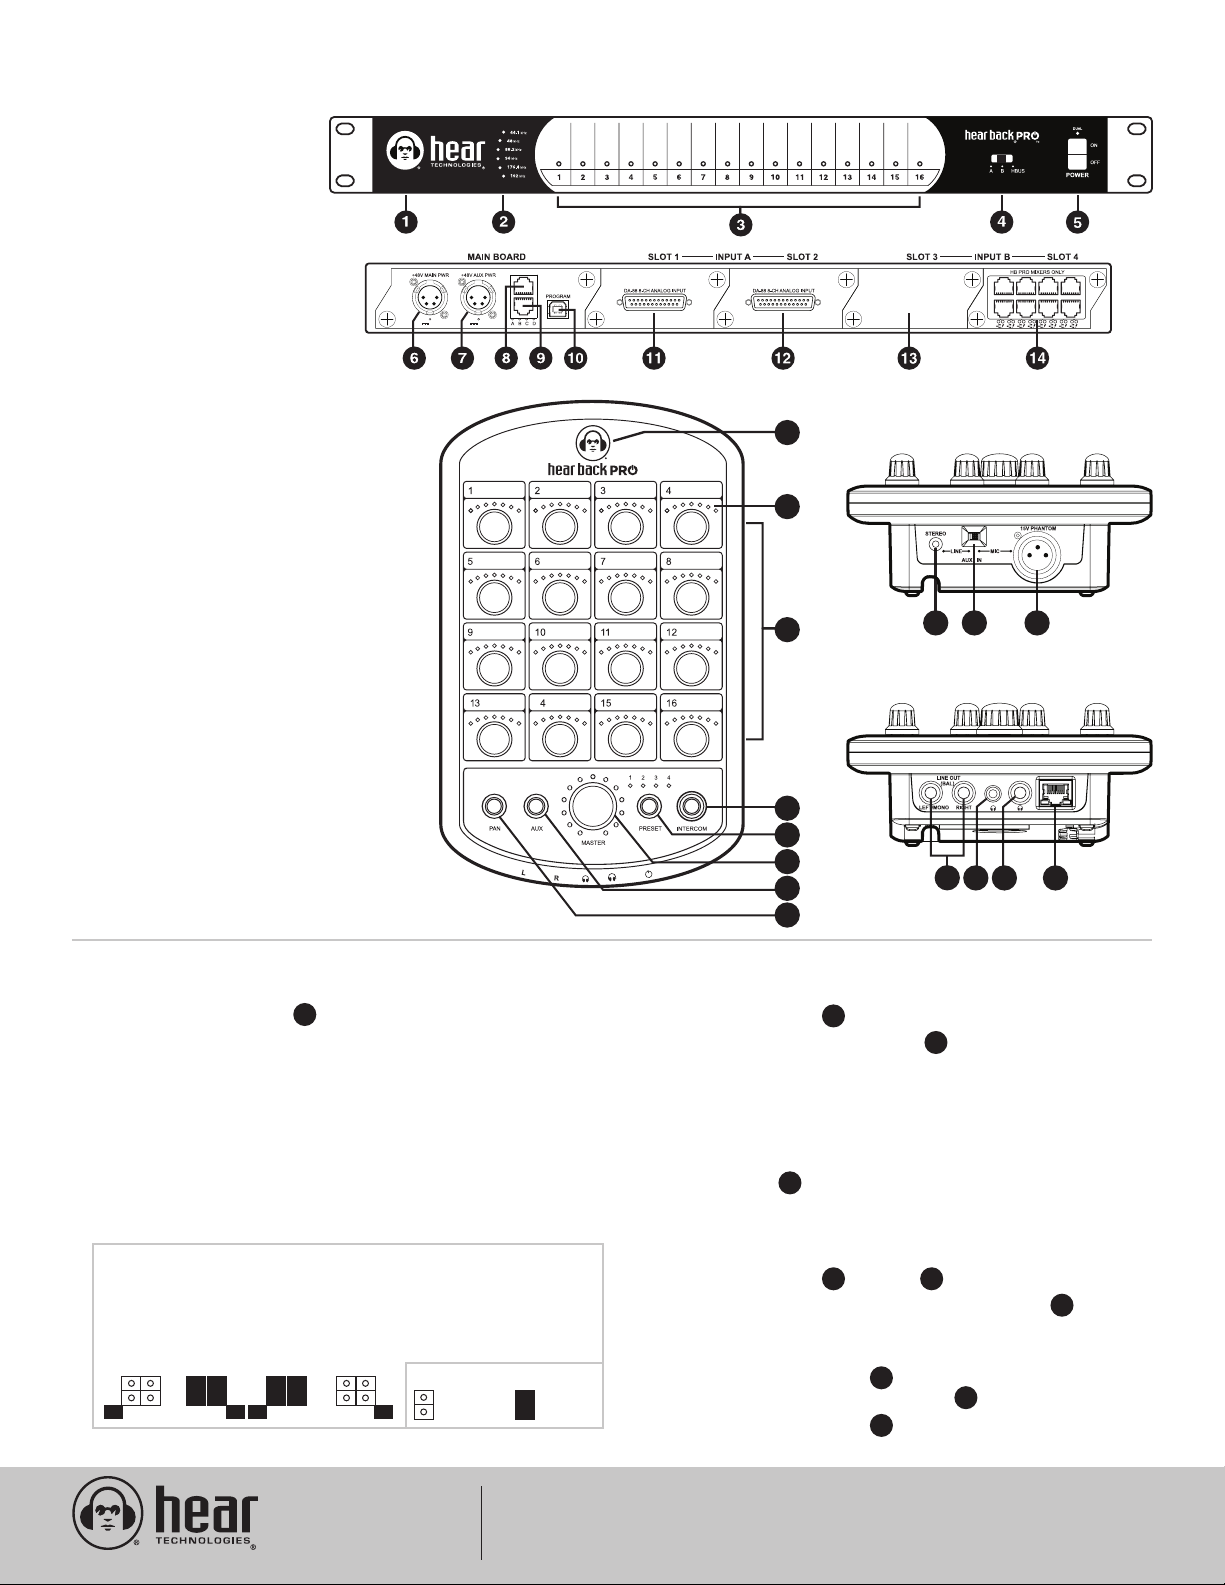
HUB DETAIL
HUB ADJUSTMENT
MIXER ADJUSTMENT
AUX IN ADJUSTMENT
1 - LED Status Indicator
2 - Sample Rate LED Indicators
3 - Audio Input Channels 1-16
Level LED Metering
4 - Input Selector Switch
5 - Power Switch
6 - Main 48V Power Input
7 - Secondary 48V Power Input
8 - HBus Input
9 - HBus Output
10 - USB Connection
11 - Card Slot 1 (shown with
8-channel Analog Input)
12 - Card Slot 2 (shown with
8-channel Analog Input)
13 - Card Slot 3 (shown unpopulated)
14 - Card Slot 4 (shown with
8-port Network Card)
FRONT PANEL
REAR PANEL
150W 150W
15
TOP PANEL
MIXER DETAIL
15 - LED Status Indicator
16 - LED Level Indicators
17 - Volume/Pan Control Knob for
Each Audio Channel
18 - “Intercom” Button
19 - “Preset” Button
20 - “Master” Control Knob (Volume / Aux)
21 - “Aux” Input Button
22 - “Pan” Button
23 - Auxiliary 1/8” Stereo Unbalanced Audio Input
24 - Auxiliary Input Switch
25 - Auxiliary Balanced XLR Microphone Input
with 15V Phantom Power
26 - 1/4” Balanced Left/Mono and Right Outputs
27 - 1/8” TRS Headphone Output
28 - 1/4” TRS Headphone Output
29 - Gigabit Ethernet (GbE) Connection with PoE+
(Power over Ethernet)
FRONT PANEL
A. Adjust the level at the input source (DAW, mixer, etc.)
until the red clip LED’s on the Hub just come on.
B. Reduce the levels on the input source until you have
a “green” LED.
C. Adjust the source for as much signal into the Hub as
possible without clipping. Higher input levels improve
signal-to-noise and dynamic range. If you are unable to
adjust your source without overdriving the Hear Back
PRO system, follow the “-10dB Pad” instructions below to
achieve and extra 10db of headroom. Remember, higher
input levels improve signal-to-noise and dynamic range.
3
16
17
BOTTOM PANEL
18
19
20
21
22
23 24 25
27 28 29
26
A. After you have the signals optimized on the Hub, turn the
“Master” Volume up to about 10 o’clock
B. Raise each channel’s volume to a comfortable level.
20
17
C. Avoid adjusting the master volume too high and running
the inputs too low.
D. To stereo-link any channels, enter the stereo-link control
interface as described in the User Guide, and toggle them on.
E. To Pan any mono channels within the stereo field, press the
“PAN” button to make adjustments.
22
-10dB PAD: The Analog input card provides 2 jumpers per channel
(16 total) that can be removed to achieve a -10dB pad per channel.
These jumpers are labeled 1-8 (corresponding to each input
channel), and located one inch away from the DB-25 connector.
So, in this example, input channels 1 & 4 will be reduced by 10dB,
while input channels 2 & 3 are at 0dB:
1 2 3 4
LEGEND
No Jumpe r
Connected
Hear Technologies
991 Discovery Drive
Huntsville, AL 35806
Jumper
Connected
®
www.HearTechnologies.com
Phone: 1-256-922-1200
Fax: 1-256-922-1221
F. If using an auxiliary input, connect it to the Mixer via the
appropriate “LINE” or “MIC” input.
G. Select the appropriate input via the “AUX IN” switch.
23 24
25
H. If possible, adjust the input source for maximum volume
without clipping.
I. Press the “AUX” button to turn the “Master” knob LEDs “red”
and slowly turn the “Master” knob to a comfortable level.
J. Press the “AUX” button again to exit auxiliary volume control.
21
20
21
Printed in U.S.A. ©2015
MAR 2015
 Loading...