

Page 1
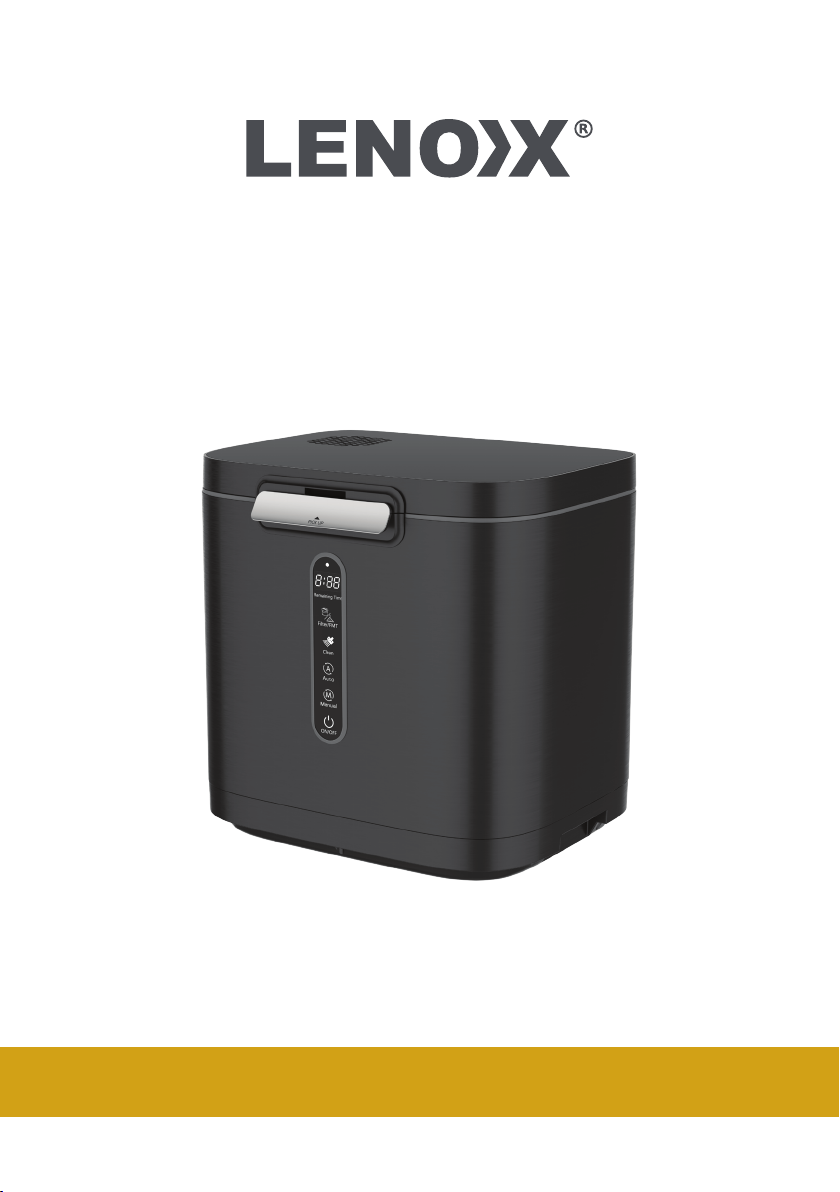
Electric Food Waste Composter
Model: CMP380 | Batch: PR5196
Carefully read all instructions before use and save for future reference.
Page 2

Page 3

SAFETY INSTRUCTIONS
This instruction manual will help you familiarise yourself with the features and
functions of your appliance. It also provides guidance on how to use and care for the
appliance. To ensure safe and effective use, please read this manual before operating
the appliance.
This product is intended for household use only. Please follow these basic safety
guidelines when using the appliance:
1. Keep all electrical components (plugs, cords) away from water or other liquids to
prevent electric shock.
2. The appliance is not intended for use by persons (including children) with physical,
sensory, or mental impairments, or those lacking experience and knowledge.
3. Switch off and unplug the appliance from the socket when not in use, during
servicing, or when adding/removing parts. To unplug, grasp the plug—not the
cord—and pull it out of the socket.
4. Allow the unit to cool before assembling, disassembling, or cleaning to avoid burns.
5. Do not use the appliance if the power cord or plug is damaged, or if the appliance
shows signs of malfunction or has been dropped.
6. Do not operate the appliance outdoors.
7. Do not use the appliance in freezing temperatures.
8. Keep the power cord away from heat sources and sharp objects.
9. The appliance must be plugged into a properly grounded outlet.
10. Do not place the appliance on or near hot gas or electric burners.
11 . Use the appliance only for its intended purpose. Do not disassemble, alter, or
modify the appliance in any way.
12. Do not immerse the appliance in water or any other liquid.
13. Keep the appliance and power cord out of the reach of children.
14. When opening and closing the cover, ensure the surface of the unit is free of foreign
objects.
15. Be cautious when touching the drum during or immediately after the cycle, as the
drum may still be hot.
16. Avoid touching any parts still in operation. Do not attempt to override any safety
locking mechanisms of the device.
Common Error Codes:
OPEN: Lid is open.
E01: No food waste bin detected.
Page 4
1.
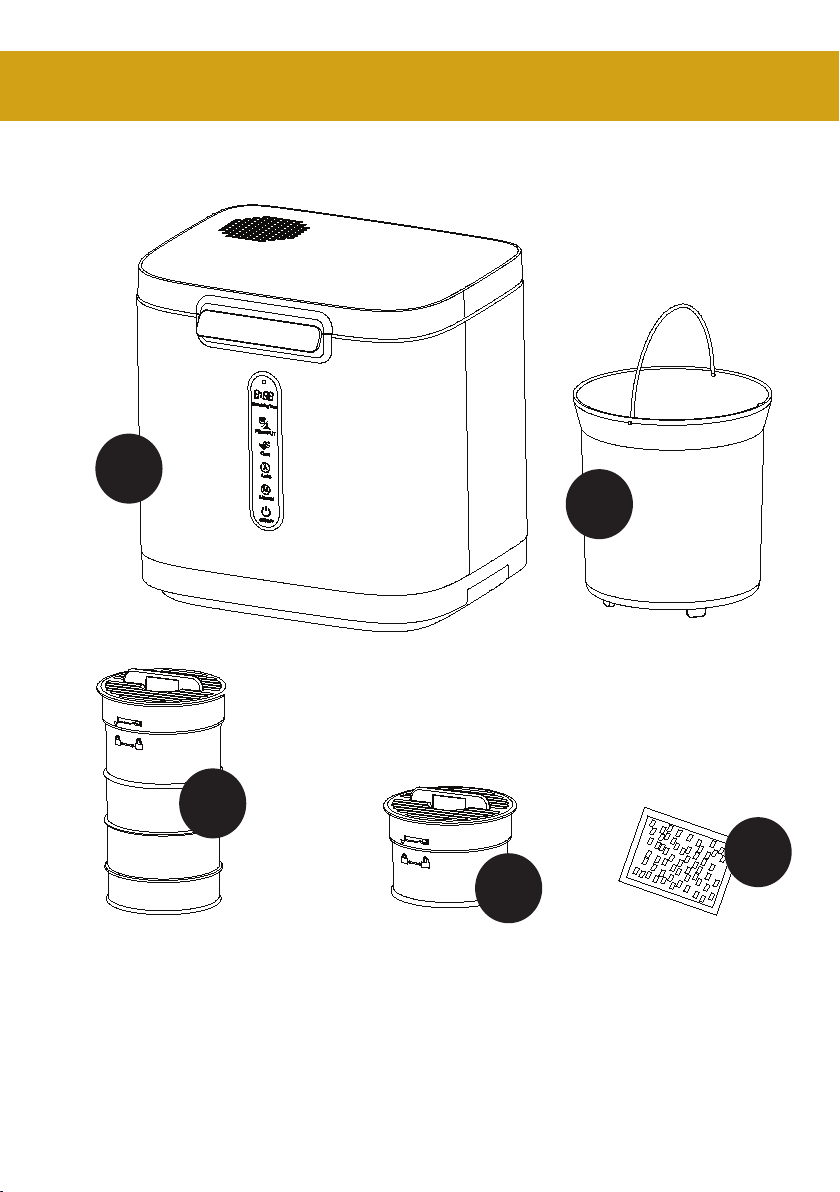
COMPONENTS
2.
3.
1. Composter
2. Inner Bucket
3. Filter 1
4. Filter 2
5. Activated Charcoal Packet
5.
4.
Page 5
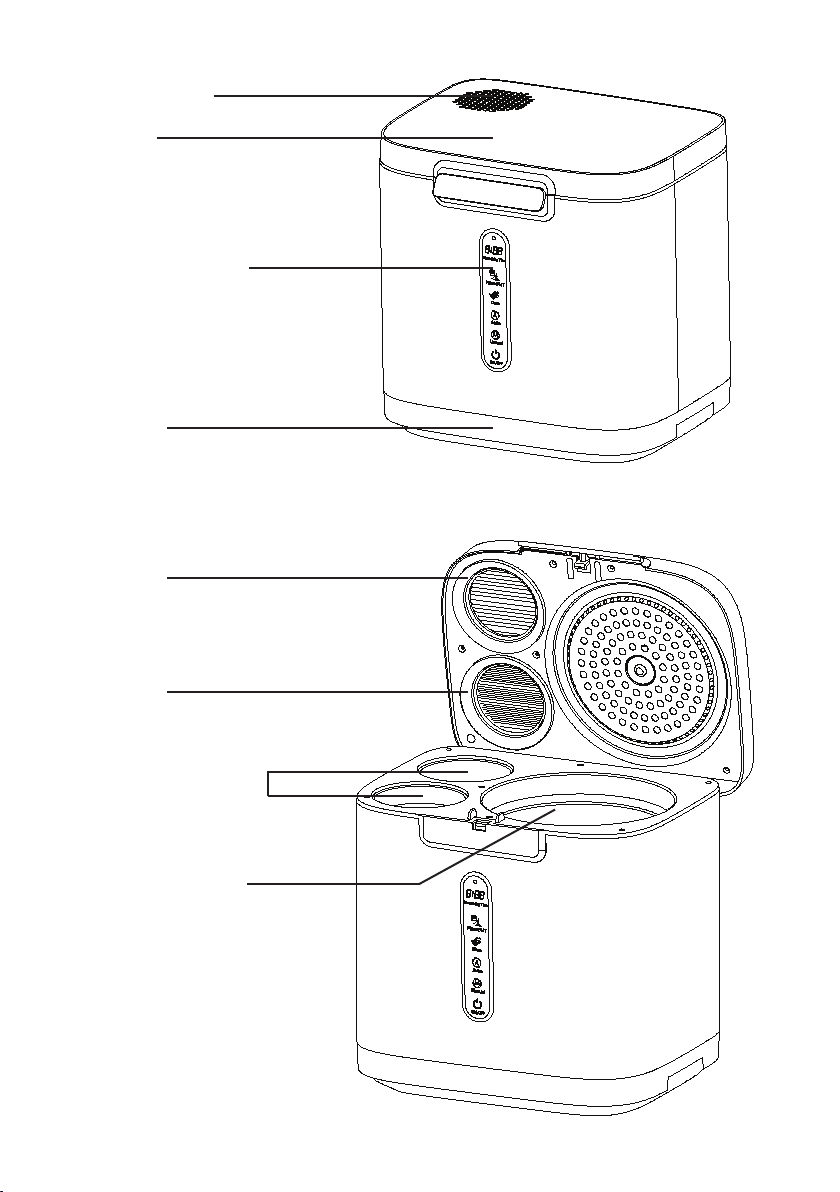
Air Outlet
Lid
Control Panel
Base
Seal
Seal
Charcoal Filters
Inner Bucket
Page 6
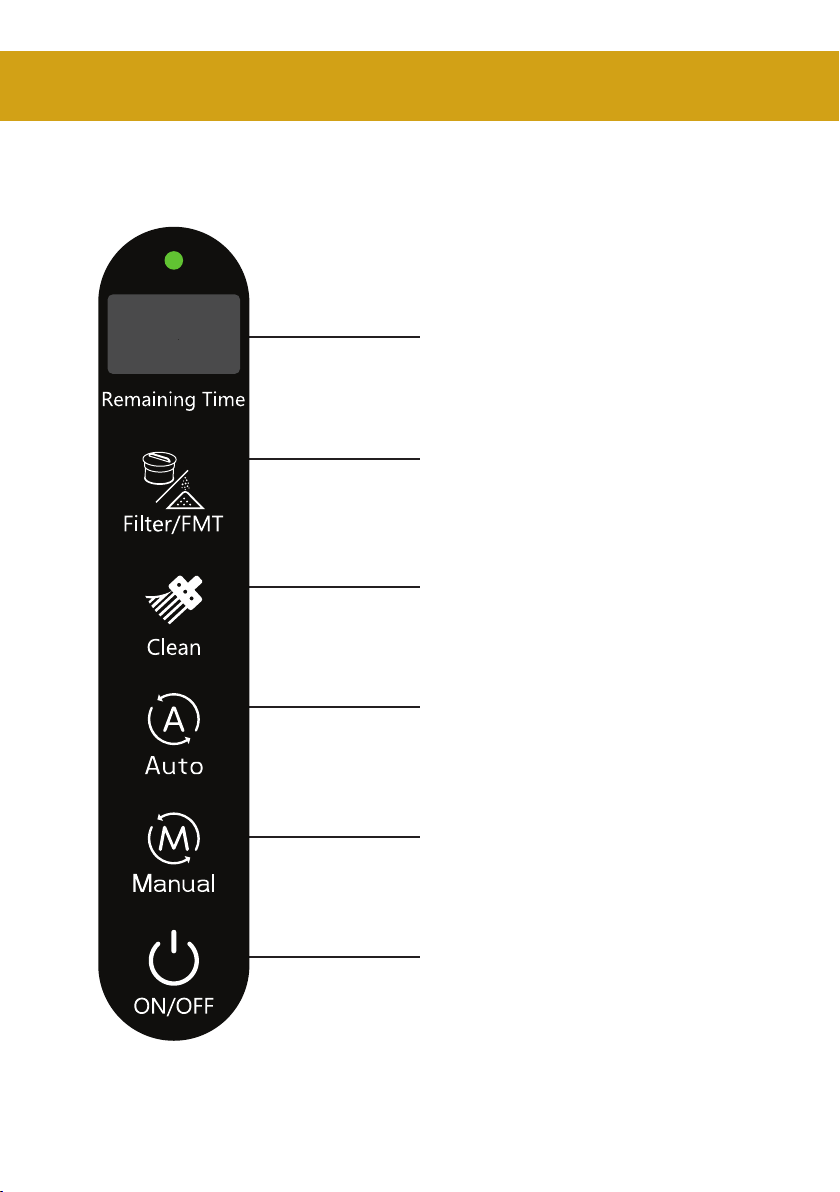
CONTROL PANEL
Processing Progress
Activated carbon replacement reminder
(recommended to be replaced every 3
months for better odour removal).
/Start fermenting mode.
Self-cleaning mode, which can be
activated after the inner bucket has been
filled with water.
Automatic mode, automatically adjusts
working time based on the weight of the
food waste.
Manual mode, 1-6 hours manual
selection of working hours.
Power
Page 7
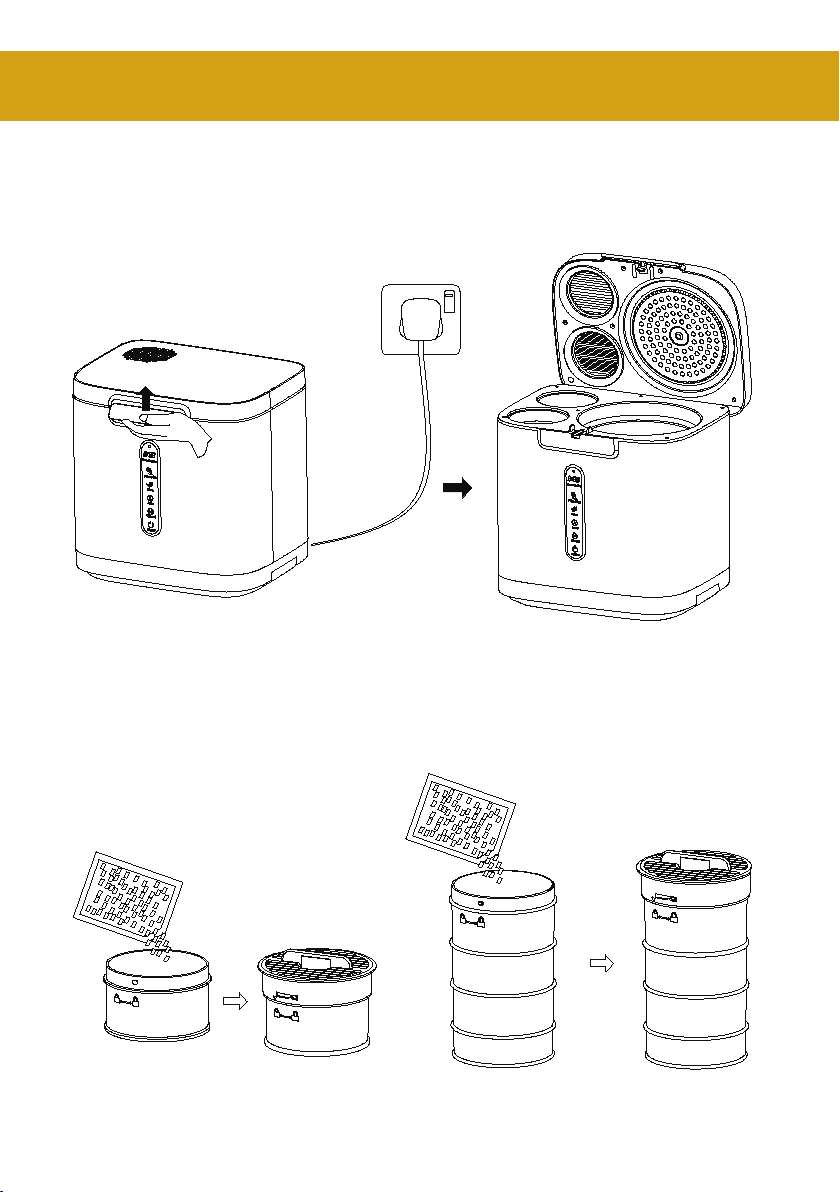
USING YOUR COMPOSTER
Step 1: Connect the main unit to the power supply. Gently pull the latch
upwards to open the lid.
Step 2: Remove the filters, open their lids, and fill each with the appropriate
amount of charcoal pellets. Secure the lids by twisting left to open and right
to lock.
Page 8
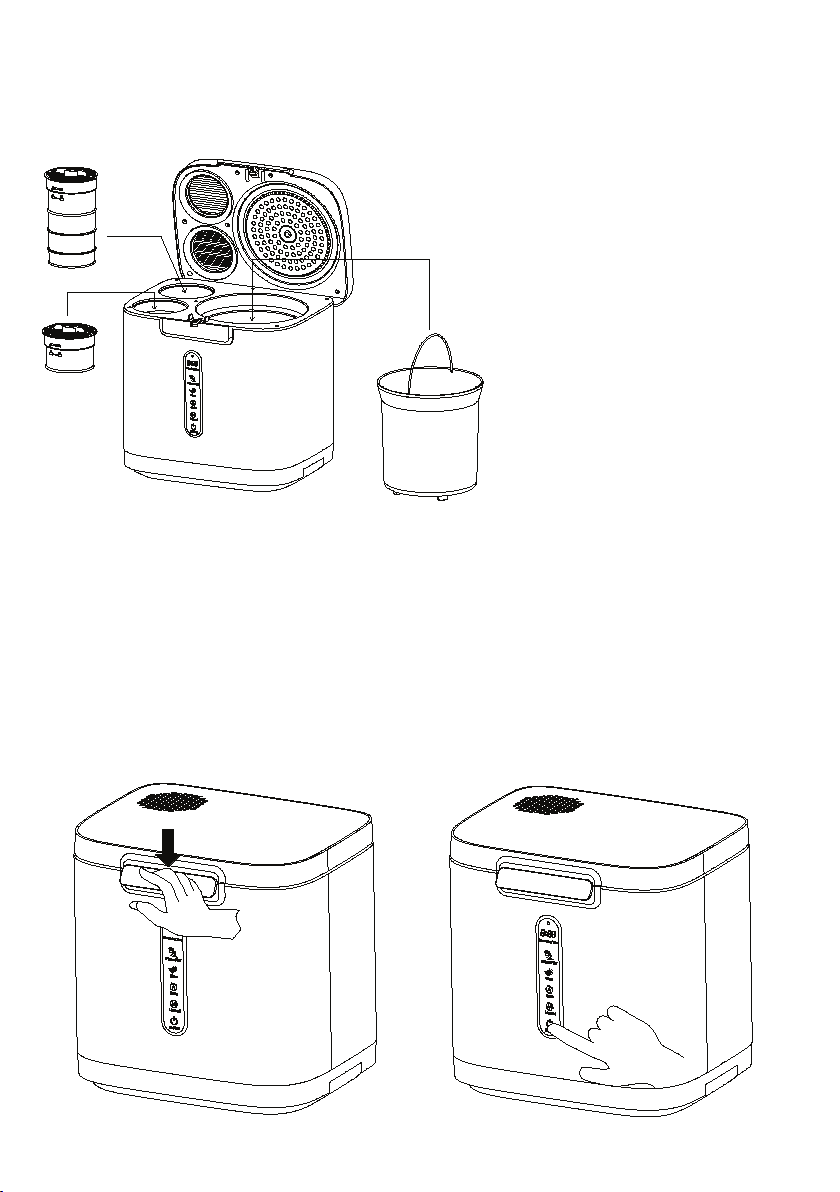
Step 3: Reinsert the filters with the charcoal pellets. Add food waste into the
food waste bucket and place it in the corresponding cavity of the main unit.
Note: Gently rotate the inner
bucket left or right. Once you
hear a “click” and the bucket
drops noticeably, it is securely
installed and flush with the
chamber surface.
Step 4: Close the lid and press down until you hear a “click,” indicating
the flap is secure. Tap the power key on the control panel to turn on the
machine. After 3 seconds of initialisation, select your desired working
mode (automatic or manual) to start the machine. When the processing is
complete, wait for the food waste bucket to cool down naturally before
removing it (take care as it may still be hot).
Page 9
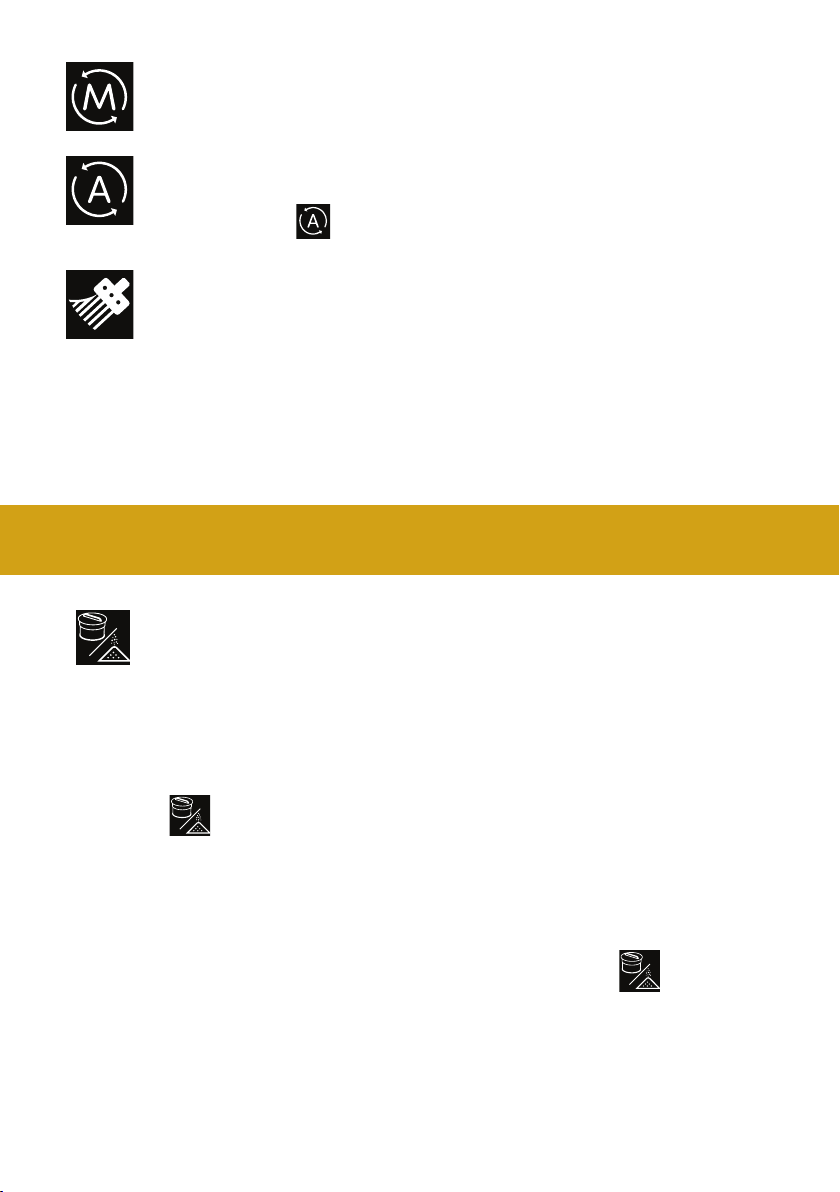
Manual Mode: Select the desired duration (1-6 hours), then press the
power button to confirm and start the process.
Automatic Mode: The system will automatically determine the
duration based on the weight of the food waste. Activate this mode
by pressing the button.
Note: It’s normal to have residue in the kitchen waste bucket, and
it will not affect performance. To clean, add 1/3 of water into
the bucket, start the self-cleaning mode, and the water will be
automatically heated. The hot water, combined with stirring, will
effectively clean the bucket.
MAINTENANCE
Activated Carbon Replacement
The machine has an activated carbon replacement prompt function (it’s
recommended to replace the carbon every 3 months for better odour
removal performance).
When the flashes, it’s time to replace the activated carbon. To do so,
follow these steps:
• Remove the charcoal filter.
• Unscrew the lid and replace the charcoal pellets with new ones.
• Place the filters into the corresponding cavities of the main unit.
• Once the replacement is complete, press and hold the until the
light goes out.
Page 10
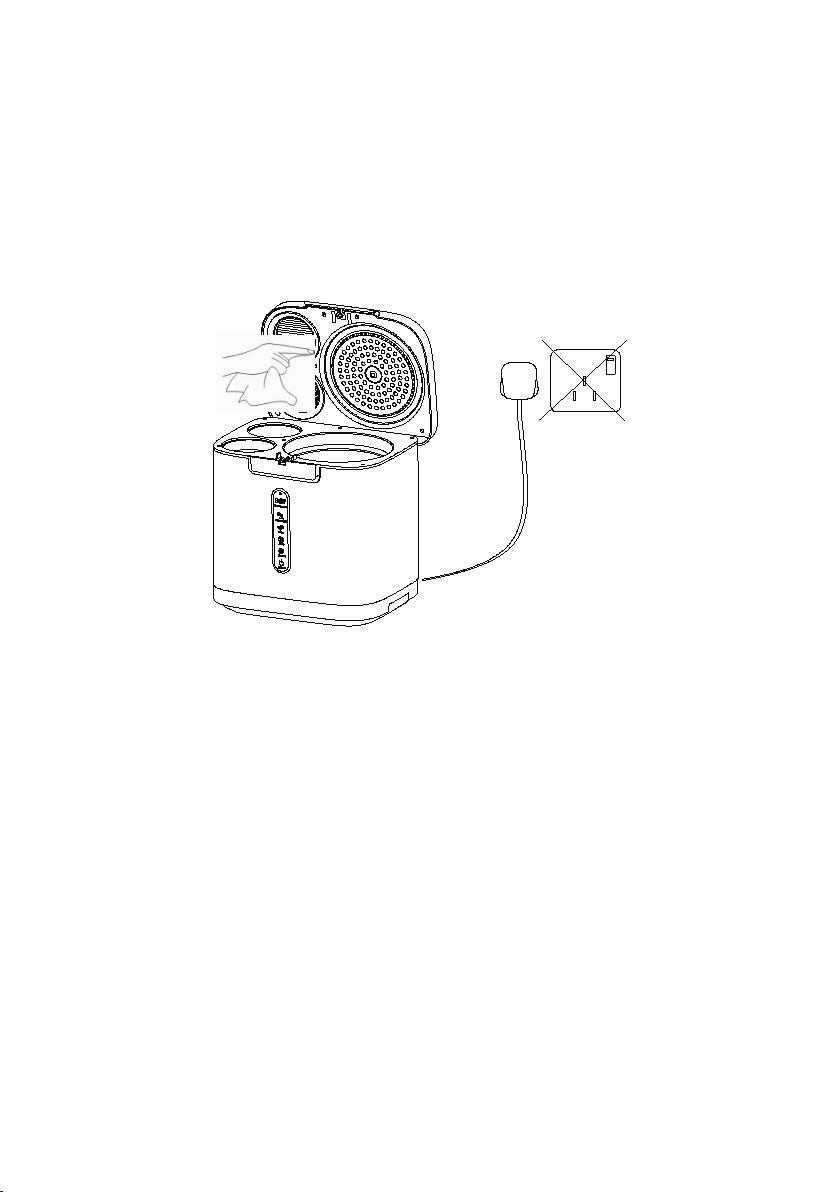
Unit Maintenance and Cleaning
Regularly wipe the inside and outside of the lid and the main body of the
machine with a soft cloth to effectively prevent odour buildup.
Note: Do not rinse the entire machine directly with water. Always unplug
the machine before cleaning the surfaces with a soft cloth.
Food Waste Tank Cleaning and Maintenance
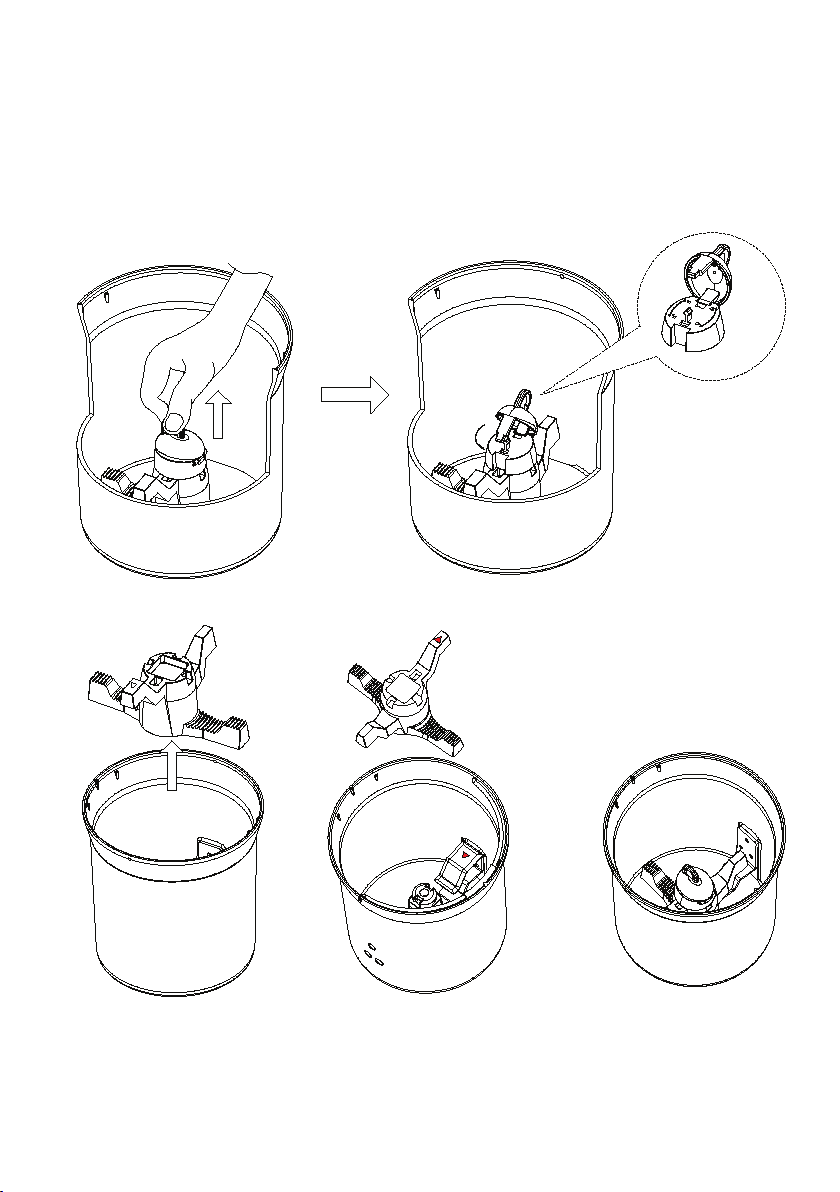
For a more thorough cleaning of the food waste bucket, you can remove
the mixing paddle as follows:
Step 1: Hold the lock cover with your fingers and pull it up to release the
locking mechanism inside.
Step 2: Turn the lock cover 90 degrees to loosen it. Then, rotate the lock
cover 90 degrees to the left and remove it when the lock seat slot is
loosened.
Step 3: After removing the lock seat, you can take out the mixing paddle
inside.
Step 4: After cleaning, reinstall the mixing paddle first, followed by the lock
seat. Turn it 90 degrees to the right and press the lock cover flat. When you
hear a click sound, the locking mechanism installation is complete.
Page 11
Note: It is recommended to use the machine’s self-cleaning function
regularly. The removal of the mixing paddle should only be done when
necessary.
Page 12
COMPOSTING GUIDELINES
1. When you have food waste to dispose of, simply place it into the
bucket.
2. Press the button, and the machine will automatically determine
the required operating time based on the weight of the waste. It will
maximize power savings and then switch to standby mode (4-6 hours)
once completed. If you need to add more food waste during the
process, open the top lid, add the waste, and close the lid. The system
will continue from the planned time until completion. (You can also
manually increase the time for optimal processing results).
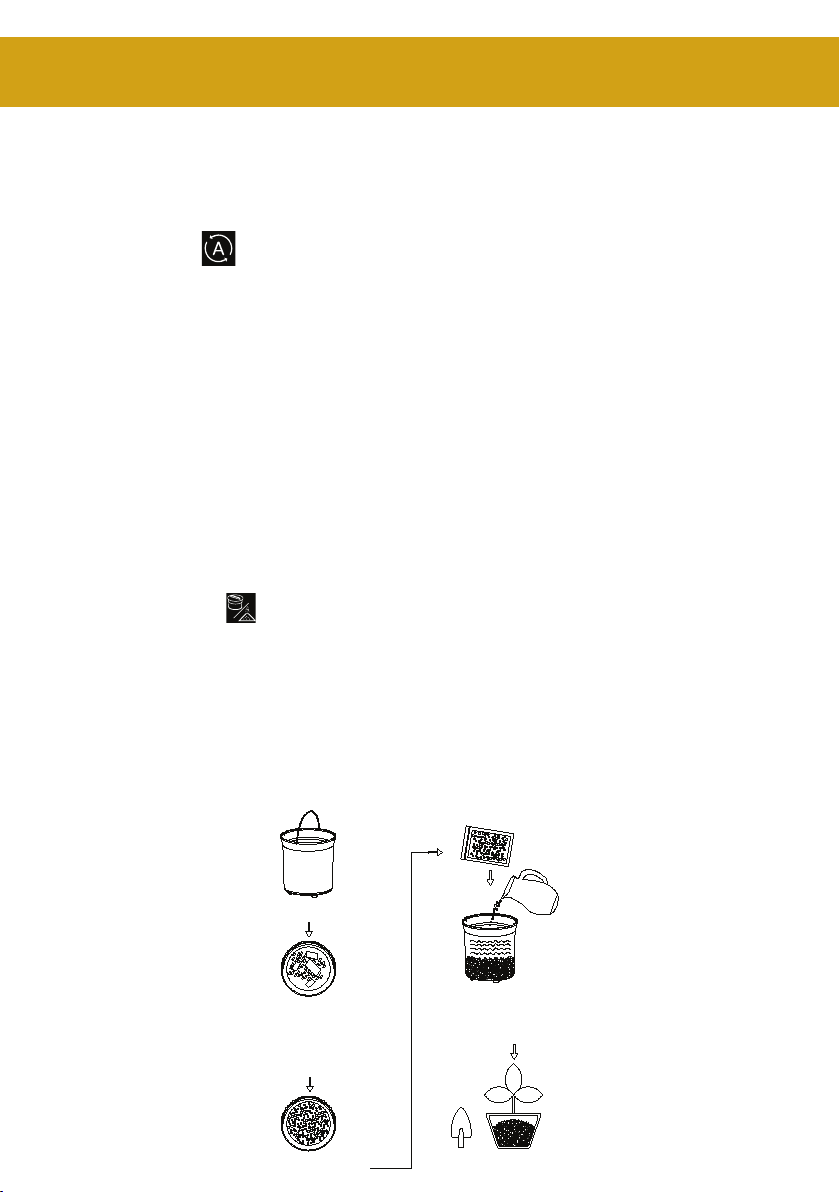
3. After a single treatment, the waste can be stored in a sealed bag (it
can also be disposed of directly as dry waste). If you wish to make
compost, follow these steps:
a. Add 50% water (400g) to 800g of treated food waste.
b. Press to start the composting mode.
c. After 3 hours of operation, add microorganisms (yeast) to
accelerate the maturation process.
d. The curing process takes approximately 12 hours to complete.
After curing, store the compost in a sealed container for 1 week.
Mix the compost with soil in a 1:10 ratio before planting. Avoid
root burning.
Page 13

Composting Compatibility Chart
Can be handled
directly
Vegetable leaves
Melon peel, fruit
peel, potato peel
Fish, fish bones,
chicken bones
Eggs, eggshells
Coffee grounds,
tea grounds
Legumes
Weeds, dead
leaves
Corn pieces, corn
husks
Cut to pieces
before handling
Whole corn
Whole celery
Whole carrots
Big leaves, flowers
and plants
Biodegradable
tableware
Biodegradable
bags
Small amount
(not more than 60g)
Starch
Rice (cooked)
Breads
Pasta
Jams
Salads
Dairy products
Jellies
Unprocessable
Cooking oil
Large bones
Beef bones
Clams
Oyster shells
Scallops
Snails
Confectionery
Chewing gums
Coffee capsules
Fibrous plants
Vegetables and
fruits
Whole chilli
Prawn shells,
seafood shells
Non-
biodegradable
tableware
Chipboard
Page 14

FREQUENTLY ASKED QUESTIONS
1. How should the equipment be placed?
The unit can be placed in any area of the house (including the basement)
where there is an electrical outlet and sufficient space. Ensure the unit is on
a flat, dry surface—avoid areas prone to water accumulation. Do not place
the appliance next to heaters or kitchen appliances that generate excessive
heat. The unit should not be stored outdoors or in places exposed to moisture
or freezing temperatures. Do not use the unit in environments above 40°C or
below 0°C. Ensure adequate ventilation around the appliance, and do not
block any air outlets during operation. Avoid placing any objects on top of
the appliance.
2. What types of food waste can the equipment treat?
This machine works best with a diverse mix of food waste. For optimal results,
include various types of food waste in each cycle. Greasy or hard-to-process
ingredients can be mixed with lighter or drier ones for the best outcome.
Avoid placing large quantities of the following kitchen waste alone:
• Starch (e.g., bread, cakes, rice, noodles, mashed potatoes, stuffing)
• Condiments, dressings, sauces, and large amounts of grease
• Nut butters, jellies
Due to their high starch content, these foods tend to solidify and stick to the
mixing paddle. If this happens, the machine will stop processing and switch
to self-protection mode (error code displayed). Clean off the cured starch to
continue.
3. What should you not put into the device?
Do not attempt to treat non-food items such as glass, metal, or wood.
Avoid placing large pork or beef bones, candy, or chewing gum. These can
damage the unit or overload the motor, causing it to enter self-protection
mode.
Do not add cooking oil, flammable materials, or compounds, as they are
beyond the intended use of the appliance.
Page 15

4. Is it normal to hear “knocking” or “squeaking” when the machine
is running?
Yes, the knocking sound is a normal part of the machine’s food waste
processing. It occurs as the machine chops up food waste. The noise may
increase when handling particularly hard or stemmed foods.
Page 16

 Loading...