


Instruction Manual
Cube Mate™ Humidier
Item #: 40-682-000
Instructions for Use: Please read these
instructions carefully and keep them for future reference.
Includes: 1 Cube Mate™ Ultrasonic Cool Mist Humidier
HealthSmart
®
2
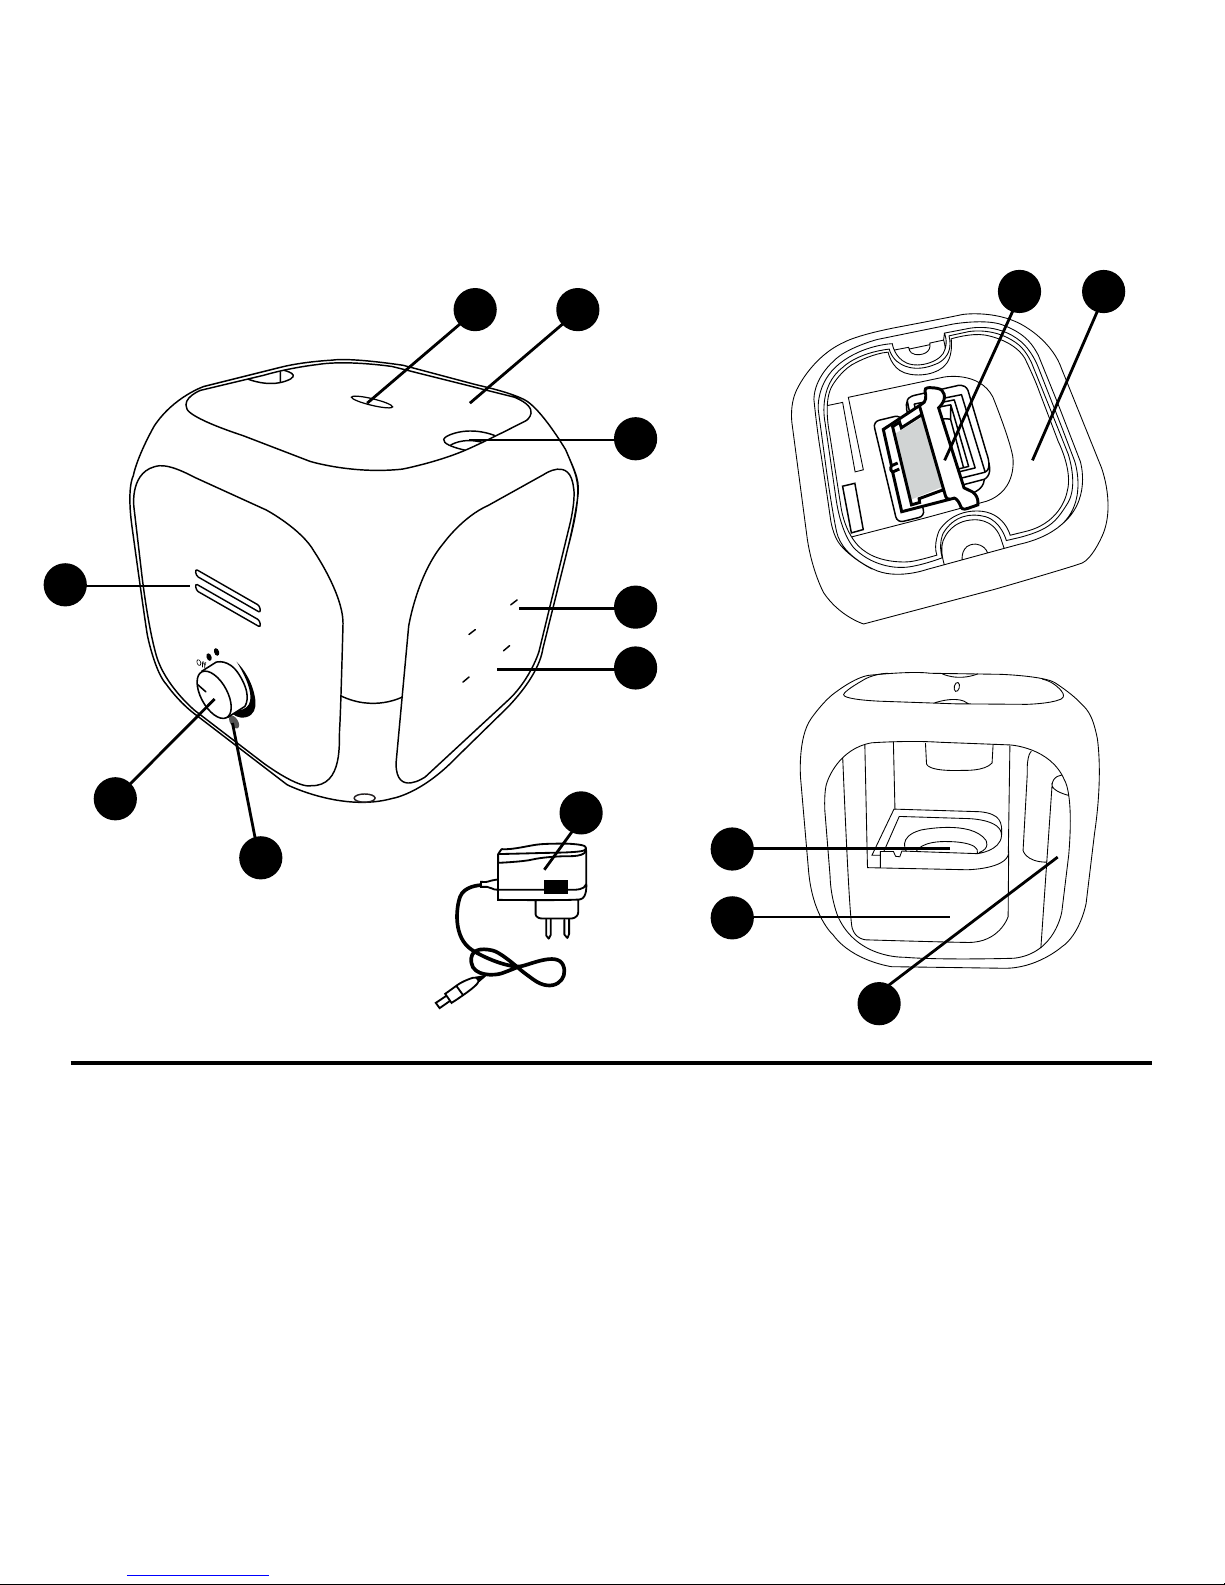
KEY TO SYMBOLS
1 4
5
13
9
12
1. Mist Output Opening
2. Aromatherapy Tray
3. Water Tank
4. Tank Cover
5. Finger Holds
6. Power Knob / Adjustable Mist Knob
7. Power / Rell Indicator Light
8. Ultrasonic Transducer
9. Air Inlet
10. Power Adapter Input
11. Power Adapter
12. Minimum Fill Level Line
13. Maximum Fill Level Line
14. Corner Drainage Columns
Max level
Min
Min level
2
3
6
10
8
14
7
11

3
Important Safety Instructions:
- After removing all packaging materials, ensure that the humidier has not been damaged
during transportation.
- Do not leave any packaging materials within the reach of children to avoid injury.
- Do not move, tilt or tip the humidier during use. Doing so may cause water leakage.
- Before connecting the equipment, ensure that the rated voltage (AC 100-240V)
corresponds to the main voltage supply of the electrical outlet.
- Do not use additional power strip adapters, and/or extension cords to avoid the risk of re,
shock or injury.
- Only place the humidier on at and stable surfaces.
- Only use clean, cool tap, ltered or distilled water to ll the water tank. Do not use hot
water. Do not add salt, fragrance/essential oils, medication or descaling tablets to the water
or water tank.
- Do not operate on wood or other water sensitive surfaces, as condensation may occur.
- Do not leave the humidier unattended in a closed room during use, as the air could
become too saturated and leave condensation on furniture or walls.
- Always disconnect the equipment from the power outlet when it is left unattended or not
in use.
- Before performing any cleaning or maintenance, disconnect the equipment from the power
adapter and outlet.
- This product is not a toy. Keep out of reach of children.
- This equipment is a household humidier for indoor use only. Do not operate outdoors.
- Do not use accessories, spare parts, or any component not supplied or approved by the
manufacturer.
- Never touch the equipment with wet or damp hands.
- If the equipment is damaged and/or not working properly, turn the unit o by
disconnecting the unit from the power adapter and the plug from the power outlet.
- Never submerge the equipment in water or any other liquid.
- Do not touch the equipment if it accidentally falls into the water.

4
- Do not direct the vapor ow towards furniture or electrical appliances.
- Do not touch the ultrasonic transducer with your hands or tools while the unit is
plugged in.
- Do not operate the humidier without water.
- Do not attempt to empty or ll the tank while the unit is plugged in.
- Clean and dry the humidier at the end of every operating cycle.
- Dispose of any worn accessories and/or the equipment at an appropriate collection point,
as required by state regulations.
How to prepare and use the equipment:
Check that the equipment is completely clean, the power knob is in the OFF position and
that the power adapter is not connected to the unit or power outlet.
Gently remove the tank cover from the base using the nger holds, and ll the water tank to
the peak level in between the minimum and maximum ll lines. Do NOT ll water past the
maximum ll level line.
If fragrance is desired, remove the aromatherapy tray and place one or two drops of
fragrance or essential oil directly onto the pad inside the tray. Replace the aromatherapy tray
back into the top of the water tank.
Note: Do NOT add fragrance or essential oil directly to the water or water tank, as this may
cause damage to the internal electrical components.
Replace the tank cover, making sure it is properly secured in place.
Connect the equipment to the adapter and connect to a power outlet.
Use the mist regulation knob to turn the unit ON by moving the knob clockwise, and the
power indicator light will illuminate blue.
Vapor will start to exit.
Use the mist regulation knob to control the amount of vapor ow desired.
To turn the unit OFF, turn the knob counterclockwise.

5
When water has reached the minimum ll level in the tank, the humidier stops
automatically and the power rell indicator light will illuminate red.
Cleaning and Maintenance:
- Before cleaning the equipment, always turn the humidier OFF, and disconnect the unit
from the adapter and plug from the power outlet.
- Do not place the humidier directly under running water.
- Do not wet the adapter or air inlet.
- Do not scrape the ultrasonic transducer with metallic materials, tools or objects.
- Do not leave water in the water tank when the equipment is not in use.
Daily Cleaning:
Remove the tank cover from the base and slowly pour out all remaining water.
Clean the cover, tank and transducer of the humidier with a soft, clean cloth and dry
thoroughly.
Dry all parts thoroughly before storage.
Weekly Cleaning:
Remove the tank cover from the base, and quickly pour out all remaining water.
Note: The unit is equipped with four drainage columns located on each inside corner of the unit.
When pouring out the water, it may ow into these columns, thus causing water to drain from the
bottom of the unit. It is recommended to always drain the water over a sink to avoid potential spills.
Pour a water solution prepared with 50% white vinegar into the water tank. Do not ll the
tank all the way to the brim.
Replace the tank cover and leave soak for at least 4 hours (overnight is ideal). Do NOT turn
the humidier ON and run the unit with the water and vinegar cleaning solution.
Remove the tank cover and pour out all of the water/white vinegar solution, and rinse the
tank with cool, clean water.

6
Wipe the cover and tank of the humidier with a soft, clean cloth and dry thoroughly.
Clean the outer surfaces of the humidier with a soft, damp cloth.
Do not use abrasive products, alcohol, solvents or similar products which may cause
permanent damage to the outer surface.
To clean the aromatherapy tray, remove the pad and gently rinse thoroughly with water.
Allow the pad to air dry before replacing into the tray.
Troubleshooting:
Problem Solution
If the humidier does
not work
• Check that the adapter and plug are connected correctly.
• Check that the switch is in the ON position.
• Check that there is sucient water in the water tank
(water ll level must be in between the minimum and
maximum ll line).
If the power knob is in the
ON position but there is no
vapor ow
• Check whether there are hard water deposits on the
ultrasonic transducer.
• Check whether there is sucient water in the water tank.
Strange odor • Clean the water tank and reservoir with water and vinegar
solution, then rinse with clean water.
• Aerate the water tank in a cool, dry place for 12 hours.

7
Technical Specications:
Run Time: Min. up to 5 hours/Max. up to 2 ½ hours
Tank Capacity: 8.45 . oz. between minimum and maximum ll lines
Ideal Room Size: Small
Average Humidity Output*: 55 ml/hr
Power Consumption: AC 100-240V, 50-60Hz, 12W
Sound Level: <35 dBA
*Humidity output may vary based on indoor room temperature and humidity, and the mist
output setting.
This product has been tested and complies with the requirements for Federal
Communications Commission, Part 18 for Radio/TV/Communication interference. Although
tested, it may aect these devices. If the humidier is found to interfere, separate the device
and/or the humidier. Conduct only the user maintenance found in this manual. Other
maintenance and servicing can cause harmful interference and can void the required FCC
compliance.
Conforms to UL STD. 998.

8
Manufactured for:
Briggs Healthcare
1931 Norman Drive
Waukegan, IL 60085
#91-682-000 06/13
©2013 Briggs Healthcare
Limited Three-Year Warranty
Your Cube Mate™ Ultrasonic Cool Mist Humidifier is guaranteed to be free of
manufacturing defects for a period of three years from the date of purchase under
normal use, certain exclusions apply. This limited warranty does not apply to use in
any clinical or commercial applications. If the unit fails to operate during the three year
period of the original registered purchaser, please call our Customer Care Help Line
at 800-622-4714 and we will try to resolve the issue as soon as possible. If Briggs
Healthcare® determines that the unit failed to operate due to a manufacturing defect,
the unit will be replaced at the option of Briggs Healthcare®. Replacement of the unit is
the sole remedy under this limited warranty. This warranty gives you specific legal rights,
which vary from state to state.
This Limited Warranty constitutes Briggs Healthcare’s only responsibility and obligation
to replace the unit. We make no other express or implied warranties, arising by operation
of law or otherwise, or any warranty of merchantability or fitness for a particular use or
purpose whether or not the use or purpose has been disclosed to Briggs Healthcare® in
specifications, drawings or otherwise, and whether or not Briggs Healthcare’s products
are specifically designed and/or manufactured by Briggs Healthcare® for the buyer’s use
or purposes, except for the limited warranty stated above. Briggs will not be responsible
for any indirect, incidental, special, consequential, or punitive damages or other loss,
including, but not limited to, damage to or loss of other property or equipment and
personal injuries, whether to purchaser or others. Briggs shall in no event be liable to
the purchaser for any amount in excess of the cost of replacement of the unit.

Manual de instrucciones
Humidicador Cube Mate™
Artículo n.º: 40-682-000
Instrucciones de uso: Lea estas instrucciones
detenidamente y guárdelas para referencia futura.
Incluye: 1 humidicador ultrasónico de niebla fría Cube Mate™
HealthSmart
®

10
REFERENCIAS DE LOS SÍMBOLOS
1 4
5
13
9
12
1. Abertura de salida de niebla
2. Bandeja para aromaterapia
3. Tanque de agua
4. Tapa de tanque
5. Asideros para dedos
6. Perilla de encendido / perilla de niebla ajustable
7. Luz indicadora de encendido / recarga
8. Transductor ultrasónico
9. Entrada de aire
10. Entrada para el adaptador de corriente
11. Adaptador de corriente
12. Línea de nivel de llenado mínimo
13. Línea de nivel de llenado máximo
14. Columnas de drenaje en las esquinas
Max level
Min
Min level
2
3
6
10
8
14
7
11

11
Instrucciones de seguridad importantes:
- Después de retirar todo el material de empaque, asegúrese de que el humidicador no se
haya dañado durante el transporte.
- No deje ningún material de empaque al alcance de los niños para evitar lesiones.
- No mueva, incline ni voltee el humidicador durante el uso. Esto puede provocar pérdida
de agua.
- Antes de conectar el equipo, asegúrese de que el voltaje nominal (CA 100 a 240 V) coincida
con el suministro de voltaje principal del tomacorriente.
- No use adaptadores adicionales de varias salidas ni cables de extensión para evitar el riesgo
de incendio, descarga eléctrica o lesiones.
- Coloque el humidicador únicamente sobre supercies planas y estables.
- Use únicamente agua de grifo limpia y fresca, ltrada o destilada para llenar el tanque
de agua. No use agua caliente. No agregue sal, aceites de esencias/con fragancias,
medicamentos ni tabletas para eliminar sarro al agua ni al tanque de agua.
- No lo haga funcionar sobre madera u otras supercies sensibles al agua, ya que puede
producirse condensación.
- No deje el humidicador sin supervisión en una habitación cerrada durante el uso, ya que el
aire podría saturarse demasiado y dejar condensación en muebles o paredes.
- Desconecte siempre el equipo del tomacorriente cuando esté sin supervisión o no esté en
uso.
- Antes de realizar cualquier limpieza o mantenimiento, desconecte el equipo del adaptador
de corriente y del tomacorriente.
- Este producto no es un juguete. Manténgalo fuera del alcance de los niños.
- Este equipo es un humidicador para el hogar de uso interno únicamente. No lo haga
funcionar en exteriores.
- No use accesorios, piezas de repuesto ni ningún componente que no haya sido
suministrado o aprobado por el fabricante.
- Nunca toque el equipo con las manos húmedas o mojadas.
- Si el equipo está dañado y/o no funciona correctamente, apague la unidad desconectando
la unidad del adaptador de corriente y el enchufe del tomacorriente.

12
- Nunca sumerja el equipo en agua o en cualquier otro líquido.
- No toque el equipo si este cae al agua de manera accidental.
- No dirija el ujo de vapor hacia muebles o artefactos eléctricos.
- No toque el transductor ultrasónico con sus manos o con herramientas mientras la unidad
está enchufada.
- No haga funcionar el humidicador sin agua.
- No intente vaciar o llenar el tanque mientras la unidad está enchufada.
- Limpie y seque el humidicador al nalizar cada ciclo de funcionamiento.
- Deseche cualquier accesorio gastado y/o el equipo en un punto de recolección apropiado,
según lo exigen las normativas estatales.
Cómo preparar y usar el equipo:
Verique que el equipo esté completamente limpio, la perilla de encendido esté en
posición de apagado (OFF) y el adaptador de corriente no esté conectado a la unidad ni al
tomacorriente.
Retire con cuidado la tapa del tanque de la base usando los asideros para dedos y llene el
tanque de agua hasta el nivel pico entre las líneas de llenado mínimo y máximo. NO llene
con agua por encima de la línea de nivel de llenado máximo.
Si desea una fragancia, retire la bandeja de aromaterapia y coloque una o dos gotas de
fragancia o aceite esencial directamente en la almohadilla dentro de la bandeja. Vuelva a
colocar la bandeja de aromaterapia en la parte superior del tanque de agua.
Nota: NO agregue fragancia o aceite esencial directamente en el agua ni en el tanque de
agua, ya que podría dañar los componentes eléctricos internos.
Vuelva a colocar la tapa del tanque, asegurándose de que esté bien colocada en su lugar.
Conecte el equipo al adaptador y conéctelo a un tomacorrientes.
Use la perilla de regulación de niebla para encender la unidad moviendo la perilla hacia la
derecha y la luz indicadora de corriente se encenderá de azul.
Comenzará a salir vapor.

13
Use la perilla de regulación de niebla para controlar la cantidad de ujo de vapor deseada.
Para apagar la unidad, gire la perilla hacia la izquierda.
Cuando el agua haya alcanzado el nivel de llenado mínimo del tanque, el humidicador se
detendrá automáticamente y la luz indicadora de encendido/relleno se iluminará de rojo.
Limpieza y mantenimiento:
- Antes de limpiar el equipo, apague siempre el humidicador y desconecte la unidad del
adaptador y el enchufe del tomacorriente.
- No coloque el humidicador directamente debajo del agua corriente.
- No moje el adaptador ni la entrada de aire.
- No raspe el transductor ultrasónico con materiales, herramientas u objetos metálicos.
- No deje agua en el tanque cuando el equipo no esté en uso.
Limpieza diaria:
Quite la tapa del tanque de la base y vierta lentamente toda el agua restante.
Limpie la tapa, el tanque y el transductor del humidicador con un paño limpio y suave, y
seque bien.
Seque bien todas las piezas antes de guardar la unidad.
Limpieza semanal:
Quite la tapa del tanque de la base y vierta rápidamente toda el agua restante.
Nota: La unidad está equipada con cuatro columnas de drenaje ubicadas en las esquinas interiores
de la unidad. Al verter el agua hacia fuera, podría caer en estas columnas y hacer que el agua drene
desde la parte inferior de la unidad. Se recomienda drenar siempre el agua sobre una pileta para
evitar posibles derrames.
Vierta en el tanque de agua una solución de agua preparada con 50% de vinagre blanco. No
llene el tanque con agua hasta el borde.
Vuelva a colocar la tapa del tanque y deje que la solución actúe durante al menos 4 horas
(toda la noche es ideal). NO encienda el humidicador ni ponga en funcionamiento la unidad

14
con la solución limpiadora de agua y vinagre.
Retire la tapa del tanque y vierta toda la solución de agua y vinagre blanco, y enjuague el
tanque con agua limpia y fresca.
Limpie la tapa y el tanque del humidicador con un paño limpio y suave, y seque bien.
Limpie las supercies exteriores del humidicador con un paño suave húmedo.
No use productos abrasivos, alcohol, solventes ni productos similares que pueden
provocar daño permanente a la supercie exterior.
Para limpiar la bandeja de aromaterapia, retire la almohadilla y suavamente enjuague
completamente con agua. Permita que la almohadilla seque con el aire antes de poner
adentro de bandeja.
Identicación y resolución de problemas
Problema Solución
Si el humidicador no
funciona
• Verique que el adaptador y el enchufe estén conectados
correctamente.
• Verique que el interruptor esté en la posición de encendido
(ON).
• Verique que haya suciente agua en el tanque (el nivel de
llenado de agua debe estar entre la línea de llenado mínimo
y máximo).
Si la perilla de encendido está en posición
de encendido (ON) pero
no hay ujo de vapor
• Verique si hay depósitos de agua dura en el transductor
ultrasónico.
• Verique que haya suciente agua en el tanque de agua.
Olor extraño • Limpie el tanque de agua y el depósito con una solución de
agua y vinagre, y luego enjuague con agua limpia.
• Ventile el tanque de agua en un lugar fresco y seco durante
12 horas.

15
Especicaciones técnicas
Tiempo de funcionamiento: mín. hasta 5 horas / máx. hasta 2 ½ horas
Capacidad del tanque: 8,45 onzas líquidas (250 ml) entre las líneas de llenado mínimo y
máximo
Tamaño ideal de la habitación: pequeño
Salida promedio de humedad*: 55 ml/hr
Consumo de energía: CA 100-240 V, 50-60 Hz, 12 W
Nivel de sonido: <35 dBA
*La salida de humedad puede variar en función de la temperatura interior de la habitación, la
humedad y el ajuste de salida de niebla.
Este producto ha sido probado y cumple con los requisitos de la Comisión Federal de
Comunicaciones (Federal Communications Commission), parte 18, para interferencia en las
comunicaciones de radio/TV. Si bien ha sido probado, puede afectar estos dispositivos. Si se
detecta que el humidicador causa interferencia, separe el dispositivo y/o el humidicador.
Realice únicamente el mantenimiento del usuario que se detalla en este manual. Otro
tipo de mantenimiento y servicio puede causar interferencia perjudicial y puede anular el
cumplimiento de la FCC requerido.
Cumple con la norma UL STD 998.

16
Manufactured for:
Briggs Healthcare
1931 Norman Drive
Waukegan, IL 60085
#91-682-000 06/13
©2013 Briggs Healthcare
Garantía limitada de tres años
Se garantiza que su humidificador de niebla fría ultrasónico Cube Mate™ está libre de
defectos de fabricación durante un período de tres años a partir de la fecha de compra
con un uso normal. Se aplican ciertas exclusiones. Esta garantía limitada no se aplica al
uso en ninguna aplicación clínica o comercial. Si la unidad deja de funcionar durante el
período de tres años de la compra original registrada, llame a nuestra Línea de Ayuda para
Clientes al 800-622-4714 e intentaremos resolver el problema tan pronto como sea posible.
Si Briggs Healthcare® determina que la unidad tuvo una falla en su funcionamiento debido
a un defecto de fabricación, la unidad será reemplazada a elección de Briggs Healthcare®.
El reemplazo de la unidad es el único recurso cubierto por esta garantía limitada. Esta
garantía le otorga derechos legales específicos que varían de un estado a otro.
Esta Garantía Limitada constituye la única responsabilidad y obligación de Briggs
Healthcare® para reemplazar la unidad. No realizamos ninguna otra garantía expresa
o implícita, que surja por aplicación de la ley o de otro modo, ni ninguna garantía de
comerciabilidad o aptitud para un uso o propósito particular, ya sea que el uso o propósito
haya sido divulgado o no a Briggs Healthcare® en especificaciones, planos o de otro
modo, y si los productos de Briggs Healthcare® están o no diseñados y/o fabricados
específicamente por Briggs Healthcare® para el uso o los fines del comprador, excepto
para la garantía limitada que se menciona arriba. Briggs no será responsable de ningún
daño indirecto, incidental, especial, consecuente o punitivo u otra pérdida, que incluya,
entre otros, daño o pérdida de otros bienes o equipos y lesiones personales, ya sea para
el comprador u otros. Briggs no será responsable ante el comprador en ningún caso por
ningún monto que exceda el costo del reemplazo de la unidad.
 Loading...