

HealthSmart 04-610-001 Instruction Manual

Semi-Automatic
Digital Blood
Pressure Monitor
Instruction Manual
Please read this guidebook
completely before operating this unit.
Item # 04-610-001
English • Spanish

3
The warrantor guaranteesthat its Digital Blood Pressure Monitor will be free frommanufacturing defects
under normal use for three years from the original purchase date. This warranty covers only
normal use, and does not apply to use in any clinical or commercial applications.This warranty does not
cover batteries or other power sources thatmay be provided with or used with the Digital Blood Pressure
Monitor.This warranty is voided if the DigitalBlood Pressure Monitor product is misused or abused inany
manner.
If the Digital Blood Pressure Monitor fails to operate during the first three years from the time originally
purchased, please call our Customer Care Help Line at 800-622-4714 and we will try to resolve the issue
as soon as possible.If the warrantor determines the unit failed to operate due to a manufacturing defect,
the unit will be replaced at the option of the warrantor. Replacement is the sole remedy under this
limited warranty. This warranty gives you specific legal rights, which vary from state to state. As a
condition of this warranty, the enclosed warranty registration card must be completed and sent to us
within 10 days of the purchase date or can be filled out online at www.mabisdmi.com.
This warranty constitutes the warrantor’s only responsibility and obligation to replace materials or
components.
We make no other express or implied warranties, arising by operation of law or
otherwise, or any warranty of merchantability or fitness for a particular use or purpose whether or
not the use or purpose has been disclosed to the warrantor in specifications, drawings or
otherwise, and whether or not the warrantor’s products are specifically designed and/or
manufactured by the warrantor for the buyer’s use or purposes, except for the limited
warranty stated above. The warrantor will not be responsible for any indirect, incidental, special,
consequential, or punitive damages or other loss, including, but not limited to, damage to or loss of
other property or equipment and personal injuries, whether to purchaser or others. The
warrantor shall in no event be liable to the purchaser for any amount in excess of the cost of repair
and/or replacement of the unit.
Introduction . . . . . . . . . . . . . . . . . . . . . . . . . . . . . . . . . . . . . . . . . . . . . . . . . . . . . . . . . . . . . . . . . . . . . . 3
Product Identification & Caution . . . . . . . . . . . . . . . . . . . . . . . . . . . . . . . . . . . . . . . . . . . . . . . . . . 4
General Blood Pressure Information . . . . . . . . . . . . . . . . . . . . . . . . . . . . . . . . . . . . . . . . . . . . . 5-7
Important Information Before Use. . . . . . . . . . . . . . . . . . . . . . . . . . . . . . . . . . . . . . . . . . . . . . . . . 7
World Health Organization (WHO) Indicator . . . . . . . . . . . . . . . . . . . . . . . . . . . . . . . . . . . . . . . 8
Irregular Heartbeat Detection . . . . . . . . . . . . . . . . . . . . . . . . . . . . . . . . . . . . . . . . . . . . . . . . . . . . . 9
Battery Installation/Replacement . . . . . . . . . . . . . . . . . . . . . . . . . . . . . . . . . . . . . . . . . . . . . . . . 10
Setting the Date/Time . . . . . . . . . . . . . . . . . . . . . . . . . . . . . . . . . . . . . . . . . . . . . . . . . . . . . . . . . . . 11
Applying Your Blood Pressure Cuff . . . . . . . . . . . . . . . . . . . . . . . . . . . . . . . . . . . . . . . . . . . . . . . 12
Taking Your Blood Pressure Reading. . . . . . . . . . . . . . . . . . . . . . . . . . . . . . . . . . . . . . . . . . . . . . 13
Recalling Measurements in Memory . . . . . . . . . . . . . . . . . . . . . . . . . . . . . . . . . . . . . . . . . . . . . 14
Description of Display Symbols . . . . . . . . . . . . . . . . . . . . . . . . . . . . . . . . . . . . . . . . . . . . . . . . . . 15
Troubleshooting. . . . . . . . . . . . . . . . . . . . . . . . . . . . . . . . . . . . . . . . . . . . . . . . . . . . . . . . . . . . . . . . . 15
Care and Maintenance. . . . . . . . . . . . . . . . . . . . . . . . . . . . . . . . . . . . . . . . . . . . . . . . . . . . . . . . . . . 16
Product Specifications . . . . . . . . . . . . . . . . . . . . . . . . . . . . . . . . . . . . . . . . . . . . . . . . . . . . . . . . . . . 16
Blood Pressure Logs . . . . . . . . . . . . . . . . . . . . . . . . . . . . . . . . . . . . . . . . . . . . . . . . . . . . . . . . . . 17-18
Toachievethe maximum benefit from your bloodpressure monitor, we recommend that you firstconsult
with your physician or trained healthcareprofessional.
Thank you forpurchasinga Semi-Automatic Digital Blood Pressure Monitor.With proper care and
use, your monitor will provide you with many years of reliable readings.
The method of measurementthat your Semi-AutomaticMonitor uses iscalled the oscillometric
method.The monitor detects your blood’s movement through the artery in yourarm and
converts the movements into a digital reading.The oscillometric method does not require a
stethoscope, making the monitor easy to use.
Blood pressure readings determinedwith thisdeviceare equivalentto measurements obtained by a
trainedobserverusing the cuff/stethoscopeauscultation method, within the limits prescribed by the
AmericanNationalStandard for Electronic or Automated Sphygmomanometers.
Limited Three-Year Warranty
1931 Norman Drive South • Waukegan, IL 60085
Toll-Free Customer Care Help Line: 1-800-622-4714
Monday - Friday 8:00 am - 4:30 pm CST
Index
Introduction

CAUTION:
You can stop the inflation or deflation process anytime by pressing the Release button.
S
Y
S
D
I
A
m
m
H
g
P
U
L
/
m
i
n
m
m
H
g
H
e
a
l
t
h
S
m
a
r
t
T
M
What is Blood Pressure?
Blood pressure is the pressure that is exerted by blood flowing against the walls of the blood vessels
throughout your body.
Your heart, which is the center of the circulatory system, provides the force for the blood to flow or
circulate.When your heart contracts or“beats”,the blood is forced through the blood vessels increasing
the pressure. This is the highest pressure in the cycle or what is referred to as SYSTOLIC blood
pressure. In between beats, your heart relaxes and your blood pressure decreases.This is referred to as
DIASTOLIC blood pressure.
This completeseries of events, which occurs in a single heartbeat, is knownas the CARDIAC CYCLE.
Your Semi-Automatic Blood Pressure Monitor will automatically read your blood pressure and display
both systolic and diastolic readings on the screen. Your systolic will be positioned as the upper
numberand the diastolicreadingwill be thelowernumber.
(systolic) 120
/80 (diastolic)
Blood pressure is measured in millimeters (mm) of mercury (Hg) and is generally recorded with the
systolic pressure (120) listed first and the diastolic pressure (80) listed second. The numbers are
typically separated by a slash mark (/) as shown.
Both pressure readings, the SYSTOLIC and DIASTOLIC, are necessary for a physician to evaluate the
status of a patient’s blood pressure.
Please contact your physician for specific information regarding your own blood pressure.
What Influences Blood Pressure?
Many factors such as genetics, age, sex, altitude, physical activity, anxiety, muscular development,
certain medications or even the time of day can influence blood pressure. Influences such as sleep
or relaxation decrease blood pressure, while anxiety or exercise increase blood pressure.
54
Inflation Bulb
Arm Cuff
Digital Display
Tubing
Connector
MEMORY Recall
Button
POWER Button
(on/off)
Release
Button
Product Identification
General Blood Pressure Information
Variations in Blood Pressure
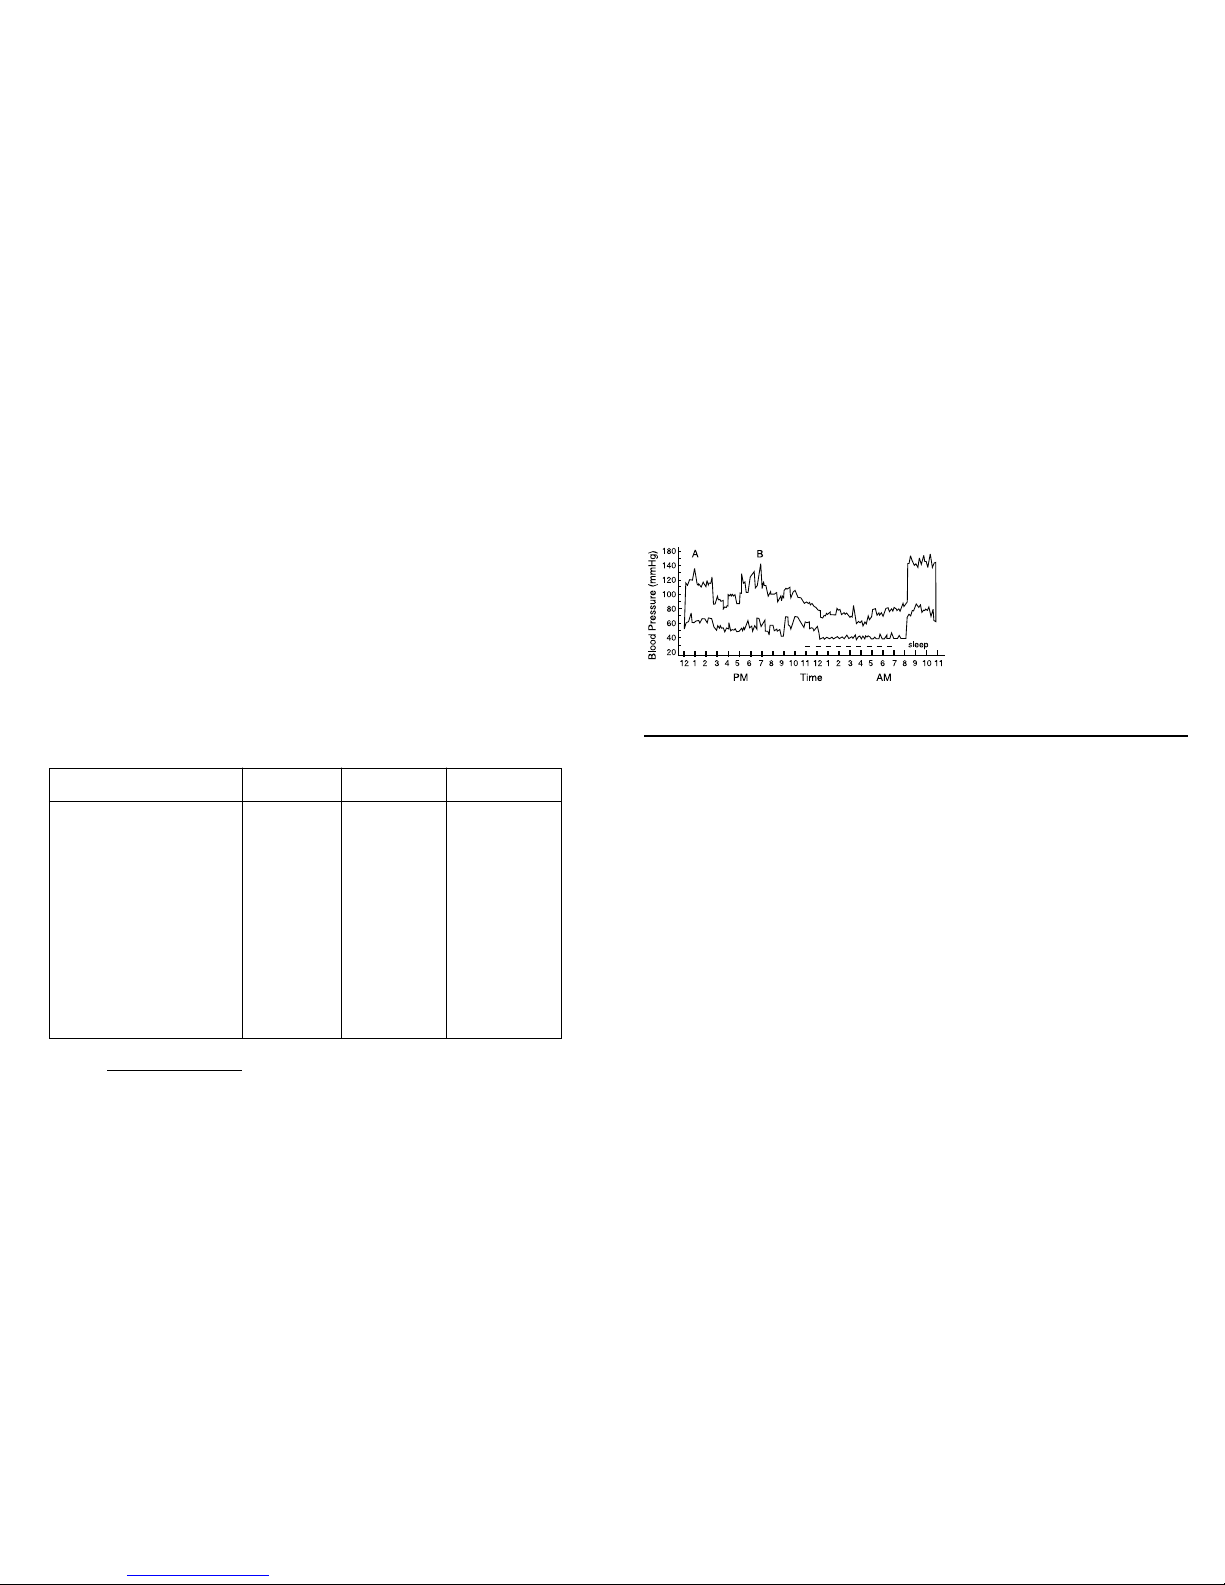
Blood pressure is influenced by many factors and can change from moment to moment. Normally,
blood pressure is lowest during sleeping periods and rises during the day. The graph below
represents variations in blood pressure shown over a day with measurements taken every 5
minutes.
The dotted line represents the sleep
period. The rise in blood pressure at 1
p.m. (A in the graph) corresponds to a
stressful occurrence and at 7 p.m. (B in
the graph) a period of exercise.
1. Blood pressure readings should be interpreted by a physician or trained healthcare
professional, who is familiar with your medical history.
2. Perform your measurement in a quiet place. You should be seated and relaxed.
3. Avoid smoking, eating, taking medication, alcohol consumption or physical activity 30
minutes prior to taking a reading. If you are exhibiting signs of stress, avoid taking your
measurement until the feeling subsides.
4. Rest 15 minutes prior to taking a reading.
5. Remove any constrictive clothing or jewelry that may interfere with the cuff placement.
6. Keep the monitor stable during measurements. Remain still; do not talk during
measurements.
7. Record your daily readings on the chart provided.
8. Take your readings at the same time, each day (or as recommended by your physician).
9. Wait a minimum of 15 minutes between readings. The wait time may vary depending on
individual physiological characteristics.
10. This device is intended for adult use.
11. The inflation or deflation process can be stopped by pressing the Release button.
7
Why Monitor Your Blood Pressure at Home?
A visit to a physician’s office can be a stressful situation for a patient. Anxiety is a known factor in
raising blood pressure. This temporary occurrence of elevated blood pressure at the physician’s
office is commonly referred to as “white coat syndrome”.
Whether or not you experience “white coat syndrome”, home blood pressure monitoring provides
you with the opportunity to supplement your physician’s office measurements. These home
readings, when taken over a period of time, can show an accurate indication of change.
Furthermore, your records can assist your physician in evaluating your health and in making
important decisions in the diagnosis and treatment of your condition. Because of this, it is
important to take consistent, daily measurements of your blood pressure.
The variations in your individual readings should only be interpreted by your physician or a trained
health care professional.
WHO Blood Pressure Classifications
Standards for assessment of high or low blood pressure have been established by the World Health
Organization (WHO) as shown on the following chart:
This chart is only a general guideline.
Contact your physician or trained healthcare professional to
determine your NORMAL blood pressure.
6
Optimal
Normal
High - Normal
Stage 1 - Mild
Borderline Hypertension
Stage 2 - Moderate
Hypertension
Stage 3 - Severe Hypertension
Isolated Systolic Hypertension
CATEGORY
<120
120-129
130-139
140-159
160-179
≥180
≥140
140-159
160-179
≥180
<80
80-84
85-89
90-99
100-109
≥110
<90
<90
<90
<90
SYSTOLIC
(mmHg)
DIASTOLIC
(mmHg)
COLOR
INDICATOR
GREEN
GREEN
GREEN
YELLOW
ORANGE
RED
YELLOW
ORANGE
RED
Important Information Before Use
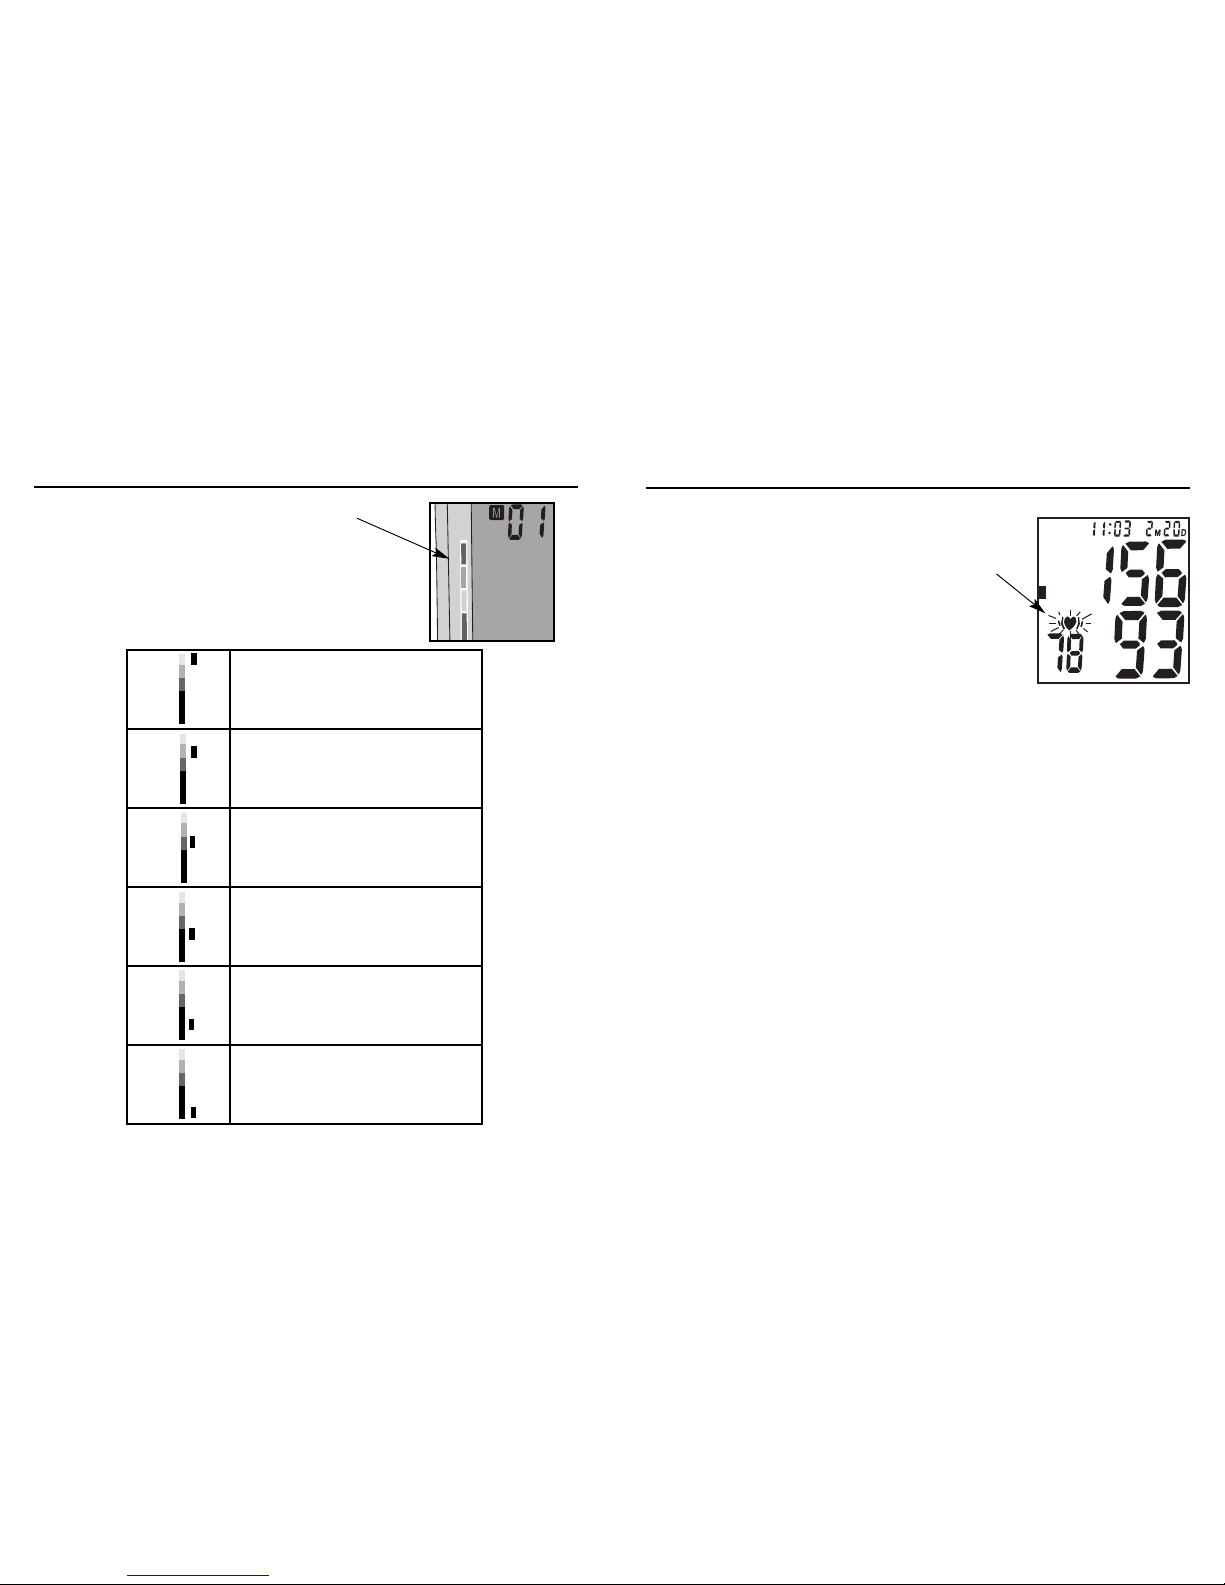
The WHO Indicator, located on the left side of the
display, will identify your reading within a range in
accordance with the guidelines set by the World Health
Organization (WHO). See the chart below for reference.
8
Stage 3 Hypertension
Systolic pressure: ≥180 mmHg
-or-
Diastolic pressure:
≥110 mmHg
Stage 2 Hypertension
Systolic pressure: 160-179 mmHg
-or-
Diastolic pressure: 100-109 mmHg
Stage 1 Hypertension
Systolic pressure: 140-159 mmHg
-or-
Diastolic pressure: 90-99 mmHg
High Normal
Systolic pressure: 130-139 mmHg
-or-
Diastolic pressure: 85-89 mmHg
Normal
Systolic pressure: 120-129 mmHg
-or-
Diastolic pressure: 80-84 mmHg
Optimal
Systolic pressure: <120 mmHg
-and-
Diastolic pressure: <80 mmHg
DIA
SYS
DIA
SYS
DIA
SYS
DIA
SYS
DIA
SYS
DIA
SYS
World Health Organization (WHO) Indicator
9
Irregular Heartbeat Detection
Your digital blood pressure monitor features Irregular
Heartbeat Detection. This feature allows users to accurately
monitor blood pressure even if an irregular heartbeat should
occur.
When an irregular heartbeat is detected, the IHB icon will
appear on the display, Fig. 1.
NOTE: Please consult with your physician or trained healthcare
professional for further information regarding an irregular
heartbeat if this symbol appears frequently at the end of a
reading.
Fig. 1
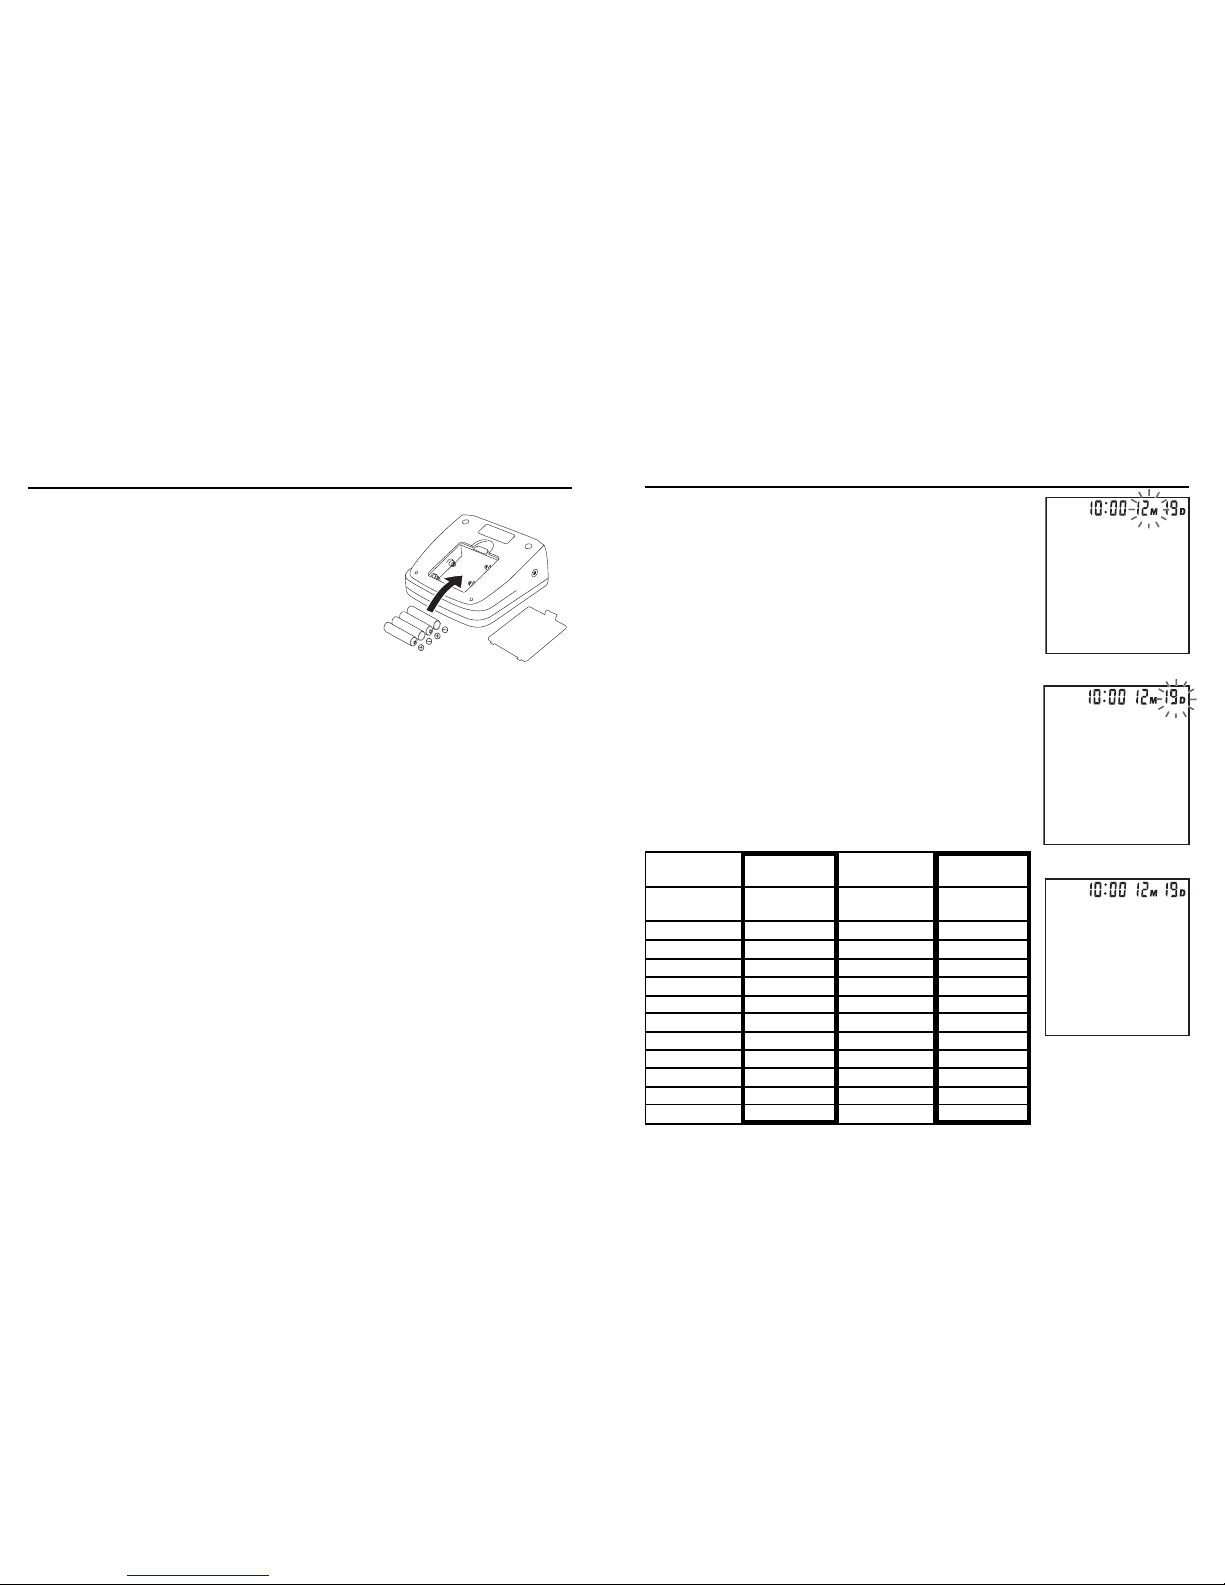
NOTE: When the unit is off, the date and time will still appear at the
top of the screen.
1. When the unit is off, press and release both the POWER and
MEMORY button at the same time. The month will begin to flash,
Fig. 1.
2. Press the MEMORY button to change until the desired
number appears.
NOTE: To scroll through the numbers quicker, hold down the
MEMORY button.
3. Press the POWER button to set the entry.
4. The date, Fig. 2, followed by the hour and minutes will blink.
Repeat steps 2 and 3 to adjust the date/time setting.
5. After setting the minutes, the unit will automatically exit out of the
date/time setting mode, Fig. 3.
NOTE: The time is expressed in 24hr military time. The chart below
explains the time conversion.
11
Fig. 2
Fig. 1
Fig. 3
Regular Time
(12 hours)
Military Time
(24 hours)
Regular Time
(12 hours)
Military Time
(24 hours)
12 am
Midnight
0
12 pm
Noon
12
1 am 1 1 pm 13
2 am 2 2 pm 14
3 am 3 3 pm 15
4 am 4 4 pm 16
5 am 5 5 pm 17
6 am 6 6 pm 18
7 am 7 7 pm 19
8 am 8 8 pm 20
9 am 9 9 pm 21
10 am 10 10 pm 22
11 am 11 11 pm 23
Setting the Date/Time
10
Battery Installation/Replacement
1. Press down on tab and lift the cover.
2. Insert or replace 4 “AA”batteries into the compartment,
matching the indicated polarity symbols, Fig. 1.
3. To close, match up and connect the bottom hooks of the
cover, then push the top end.
NOTE: Replace the batteries when the Low Battery
symbol appears on the display or when the display remains
blank when the POWER button is pressed.
4. It is recommended to remove the batteries if the unit will not be used for an extended period
of time.
Fig. 1
 Loading...