

HealthSmart 04-174-021, 04-174-026 Instruction Manual
Product Identification
Thankyou forpurchasing aHealthSmart Self-TakingBlood PressureKit.
Withproper careand use,yourk itwill provideyou withmany yearsof
reliablereadings.
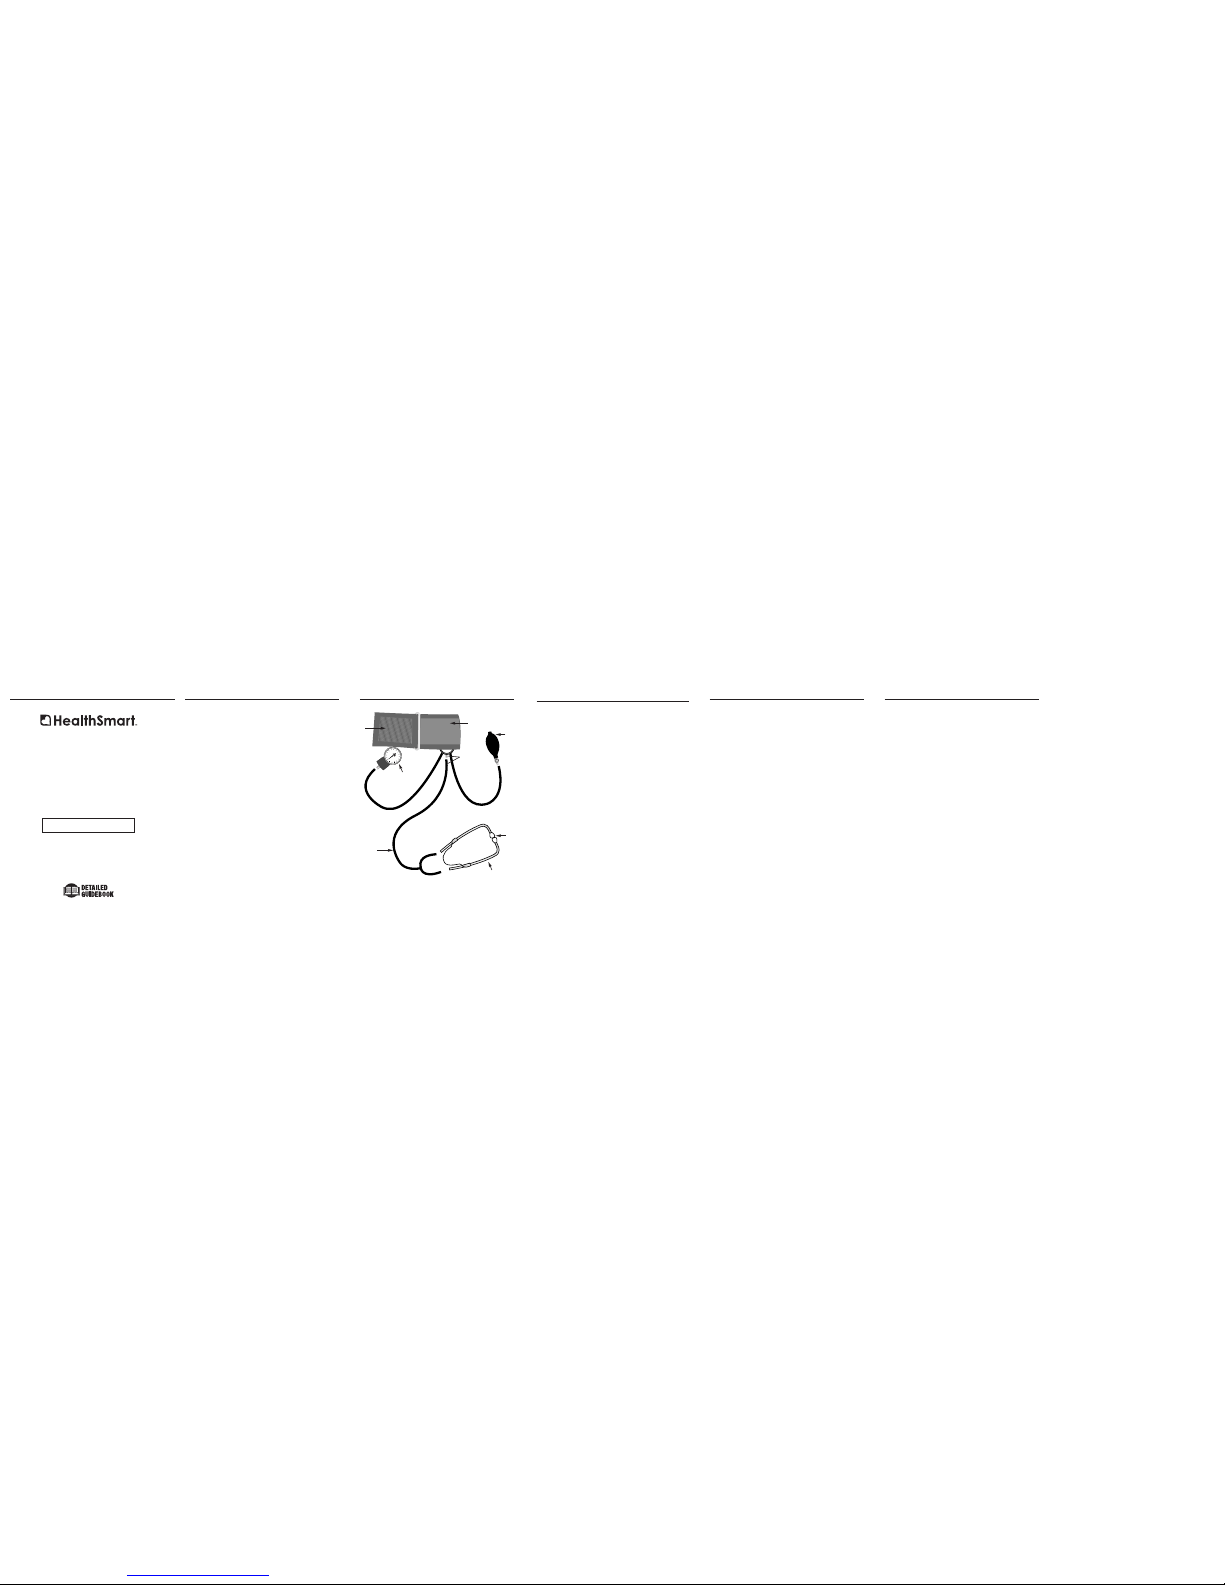
Laycuff ona flatsurface withthemetal “D”ringto theleft andthe
metalchestpiece facingup.The unitcan beassembled asoutlined
below:
Step1: Foldthe rightend ofthe cuffover thechestpiece andinsert
theend ofthe cuffthrough themetal“D” ring.
Step2: Insert thesingle endof the“Y”tubing intothe stemofthe
chestpieceto forma stethoscope.
Step3: Removethe metalbinaurals fromthe polybagandinsert the
endsinto the“Y”tubing.
Step4: Attachthe gaugeto thetubing totheleft ofthe stethoscope.
Step5: Attachthe inflationbulb tothe tubingtothe rightof the
stethoscope.
NOTE:THE WHITEARTERY PATCHWILL BEONTHE OUTSIDEAND THE
CHESTPIECEIS ONTHE INSIDEOFTHE CUFF.Also, iffolded correctly,the
hookand loopmaterial willbe ontheoutside ofthe cuff.
Theadult cuff(Model 04-174-021)fits anarmcircumference of10” –14”.
Thelarge adultcuff (Model04-174-026) fitsanarm circumferenceof
13”– 17”.
Product Assembly
GeneralBlood PressureInformation
Whatis BloodPressure?
Bloodpressure isthe pressurethat isexerted byblood flowingagainst
thewalls ofthe bloodvessels throughoutyourbody.
Yourheart, whichis thecenterof thecirculatory system,provides the
forcefor theblood toflowor circulate.When yourheart contractsor
beats,the bloodis forcedthroughthe bloodvessels increasingthe
pressure.This isthe highestpressurein thecycle orwhat isreferredto
asSYSTOLIC PRESSURE.In betweenbeats, yourheart relaxesand your
bloodpressure decreases.This isreferredto asDIASTOLIC PRESSURE.
Howis BloodPressure Measured? 120/80
(systolic)/(diastolic)
Bloodpressure ismeasured inmillimeters (mm)of Mercury(Hg) andis
generallyrecorded withthe systolicpressure(120) listedfirst andthe
diastolicpressure (80)listed second.Thenumbers aretypically
separatedby aslash mark(/) asshownabove.
Pleasecontact yourphysicianto discussyour “normal”bloodpressure
reading.
GeneralBlood PressureInformation
WhatInfluences BloodPressure?
Manyfactors suchas genetics,age, sex,altitude,physical activity,
anxiety,muscular development,certain medicationsor eventhe timeof
daycan influenceblood pressure.Influences suchas sleepor relaxation
decreaseblood pressure,while anxietyor exerciseincrease blood
pressure.
WhyMonitor YourBlood Pressureat Home?
Homemonitoring allowsyou tosupplement yourphysician’s office
measurements.These homereadings, whentakenover aperiod of
time,can showan accurateindication ofchange. Furthermore,your
recordscan assistyour physicianinevaluating yourhealth andin
makingimpor tantdecisions inthe diagnosisand treatmentofyour
condition.Because ofthis, itis importanttotake consistent,daily
measurements.
IMPORTANT:
Priorto use,yourphysician ortrained healthcareprovider shouldbe
consultedto determineyour“normal” bloodpressure, evaluateyour
techniqueusing thisunit andto interpretyourblood pressure
measurements.
Helpful Hintsfor AccurateReadings
I Relaxat leastfifteen minutesbefore takingareading.
I Alwaysplace thecuff directlyon theskin.Remove anyclothing or
jewelrythat mayinterfere withthe cuffplacement.
I Makesure thecuff issnug, butnottoo snug.One ortwo fingers
shouldfit betweenthe cuffand thearm.
I Makesure thestethoscope headis directlyoverthe brachialartery.
I Tryto usethe samearm forall readingsunless instructed
otherwiseby yourphysician.
I Deflatethe cuffat 2or 3mmHgper second.
I Remainstill withyour palmup andarmextended keepingthe cuff
atthe samelevel asyour heart.
I Smileand relax.
23456
1
2
3
4
5
Hook
Material
Loop
Material
Inflation
Bulb
Eartips
Metal
Binaural
Y-tubing
Gauge
Instruction Manual
Self-Taking
HomeBlood Pressure Kit
Item # 04-174-021& 04-174-026
Pleaseread thisguidebook
completelybefore operatingthis unit.
ApplyingYourBlood PressureCuff
IMPORTANT:Make surethat theunit isassembled correctly.Check
eartipsto makesure theyare securelyfastened.
1. Situpright butrelaxed ina chairwith aback. Keepyourfeet flat
onthe floor.Remove anyconstrictiveclothing fromyour leftarm.
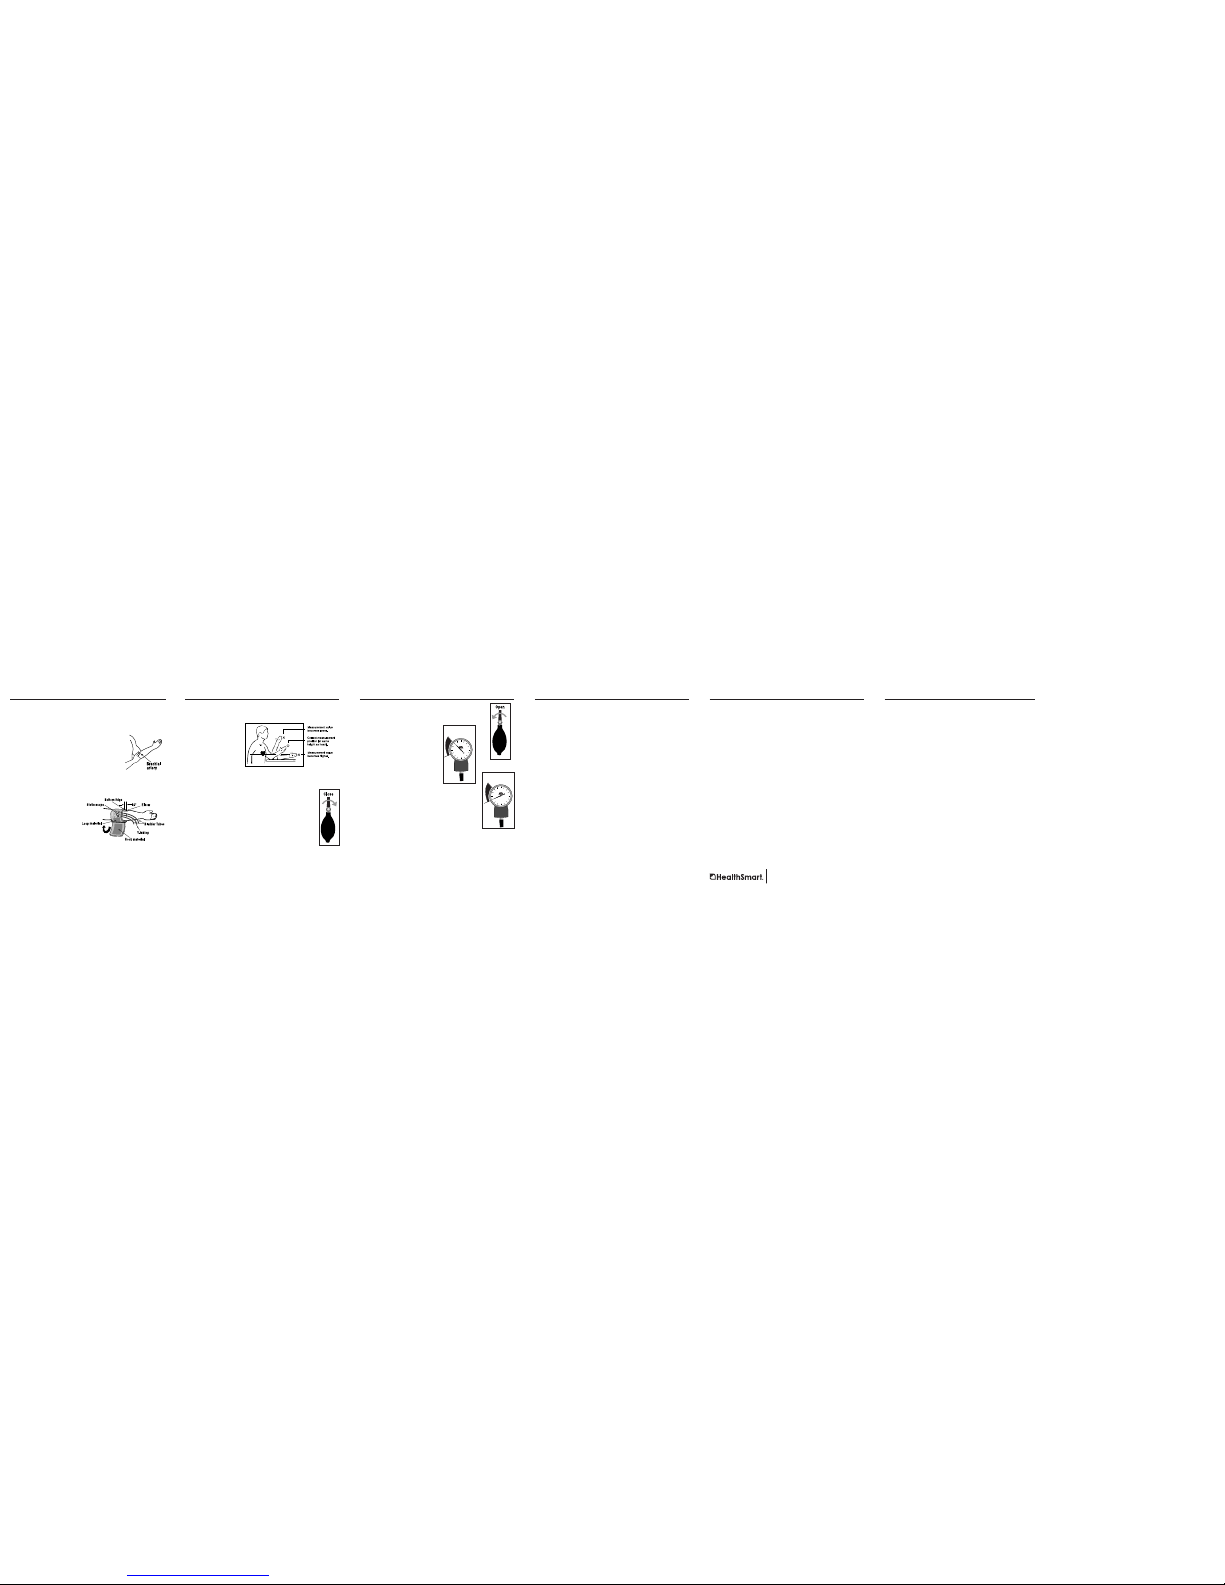
2. Extendyour leftarm.*Find yourbrachial
artery,which isat theinner aspectofyour
elbow.You mayormay notfeel yourpulse.
3. Openthe cuffso thatyoucan slideyour arm
intoit. Donot extendthe cuffbeyondthe
metalbar.
4. Insertyour leftarm intothecuff. Positionthe bottomedge ofthe
cuffapproximately one-halfinch ABOVEyour elbow.The chestpiece
mustdirectly touchthe insideof yourarm,over yourbrachial artery
(seestep 2).
5. Withyour armextended,
palmfacing upwardand
tubespositioned downthe
centerof yourarm, use
yourright handto pullthe
endof thecuff andsecure
thehook andloop material.
MAKESURE THECHESTPIECE
REMAINSOVER THEBRACHIAL ARTERY.
6. Thecuff shouldfit comfortably,yet snuglyaround yourarm. Check
forany gapsbetween thearm andthecuff.
*
Theleft armshould beusedunless youareunable toor shouldnot useyour
leftarm. Consultwith yourphysician toassesswhich armis bestforyou to
use.
TakingYourBloodPressureReading
1. Insertthe eartipsinto yourears.You canadjust themetal
binauralfor comfort.
2. Restyour elbowon a
tablewith yourarm
facingupward.
Elevateyour handso
thatthe cuffis atthe
samelevel asyour
heart.Relax yourleft
hand.
3. Positionthe gaugeso itcan beread withoutbeing moved.Itcan
beclipped tosomething suchas akitchentowel for
stability.
4. Holdthe inflationbulb withyourright handand turn
theair releasevalve clockwiseto close.
5. Begininflating thecuff, SLOWLYAND STEADILY,
bypumping theinflation bulbuntil thegaugereads
30mmHG ABOVEyour lastknown SYSTOLIC
measurement.
Ifyou donot knowyour lastknownSYSTOLIC measurement,inflate to
approximately180-200 mmHg.
CAUTION: Toprevent injuryto yourselfand/orthe unit,neverinflate
thecuff above280mmHg.
TakingYourBloodPressureReading
6. Uponreaching theproper inflationlevel, SLOWLY
ANDSTEADILY, turntheair valvecounter clockwise
ata rateof 2-3mmHg persecond.
7. Asthe pressurebegins todrop,
carefullylisten foryour pulse
beat.Note andrecord thefirst
thumpingsound youhear. This
isyour SYSTOLICpressure.
8. Allowthe cuffto continueto
deflate.You willhearchanges in
thesounds andthen nosound
atall. Whenyou hearthelast sound,note the
readingand record.This isyourDIASTOLIC
pressure.
9. Rapidlyturn thevalve counterclockwiseto
deflatethe remainingair. Removethecuff and
recordyour measurementon yourrecording
chart.
NOTE:If youneed totake anothermeasurement, waita minimumof
15minutes betweenreadings toallow forthe bloodvessels toreturn to
normal.The waittime mayvary dependingon yourhealth.
Careand Maintenance
1. Donot washor moistenthe cuff.
2. Avoiddropping orhitting thesurface ofthe gaugeor
stethoscopechestpiece.
NOTE: Aswithany sensitiveinstrument, thequality andreliabilityof
themanometer gaugeshould bechecked annually.When thecuff is
fullydeflated, makesure thegauge needleis atzero (withinthe zero
square).A needleoutside thesquare meansthegauge needsto be
recalibratedor replacedby aqualified technician.
LimitedOne-YearWarranty
YourHealthSmart Home BloodPressure Kitis guaranteedto be free of
manufacturingdefects foraperiod ofoneyear fromthedate ofpurchase
subjectto thefollowing termsand conditions:
1. Thiswarranty islimitedto theaccuracyof themanometer gaugeonly.
It does not include the inflation system (bulb, valves, cuff and
bladder). Ifthe manometer gaugefailes to operate duringthe one
yearperiod fromthe timeit wasoriginally purchased,please callour
Customer Care HelpLine at800-622-4714 andwe willtry to resolve
the issue assoon aspossible. Ifthe warrantordetermines theunit to
be inaccurate due tonor mal use, the manometer gauge will be
replacedat theoption ofthewarrantor. Thisdoes notinclude gauges
that havebeen misusedor abused.A return shippingand handling
feemay beapplied forall returns.
2. The warrantor shallincur no liability under this Warranty for any
damagefrom anycause otherthan inherentmanufacturing defects.
3. ALL IMPLIED WARRANTIES, INC LUDING MERCHANTABILIT Y AND
FITNESS ARELIMITED TO THEDURATION OF THIS WARRANTY. THIS
WARRANTY DOES NOTINCLUDE ANYLIABILITY FORINCIDENTAL OR
CONSEQUENTIALDAMAGES. Somestates donot allowlimitations on
how long animplied warrantylasts ordo notallow theexclusion or
limitation of incidental or consequential damages, so the above
limitationsor exclusionsmay notapply toyou.
4. This warranty gives you specific legal rights and you may also
haveother rights,which varyfrom statetostate.
QuickStartGuide
1) Assemblethe contentsof yourkit.
2) A15-minute restingperiod isrecommended tostabilize the
bodyprior totaking areading.
3) Findyour brachialartery, whichis atthe inneraspect ofyour
elbow.
4) Removeany constrictiveclothing orjewelry thatmayinterfere
withthe cuffplacement. Wrapthecuff snuglyaround yourleft
armwith thecuff’s bottomedge approximately1/2” aboveyour
elbowjoint withthe chestpiecepositioned overthe brachial
artery.
5) Restyour elbowon atable makingsurethe cuffis atthe same
levelas yourheart.
6) Positionthe gaugein astable, readablelocation.
7) Slowlyand steadily,inflate thecuff30 mmHgabove yourlast
knownSYSTOLIC reading.If notknown, inflatebetween180-200
mmHg.
8) Ata rateof 2-3mmHg persecond,begin todeflate thecuff.
9) Thefirst “thumping”soundheard isyour SYSTOLICrate.
10) Thelast soundheard isyour DIASTOLICrate.
11) Recordyour measurements.
12) A15-minute restperiod isneeded betweenreadings toallow
theblood vesselsto returnto normal.
CAUTION: Never inflatethecuff above280mmHg.
Specificationsare subjectto changewithout notice.
#91-032-174 02/11
©2011Briggs MedicalService Company
78910 11 12
NoteReading
atFirst Sound
NoteReading
atLast Sound
1931Norman Drive •Waukegan, IL 60085
Toll-FreeCustomer CareHelpLine: 1-800-622-4714
Monday- Friday8:00 am-4:30 pmCST
 Loading...