

HealthRider HRMC05080 Quick Start Manual
Before the chest pulse sensor can be used, the
included receiver must be installed. Follow the steps
below to install the receiver.
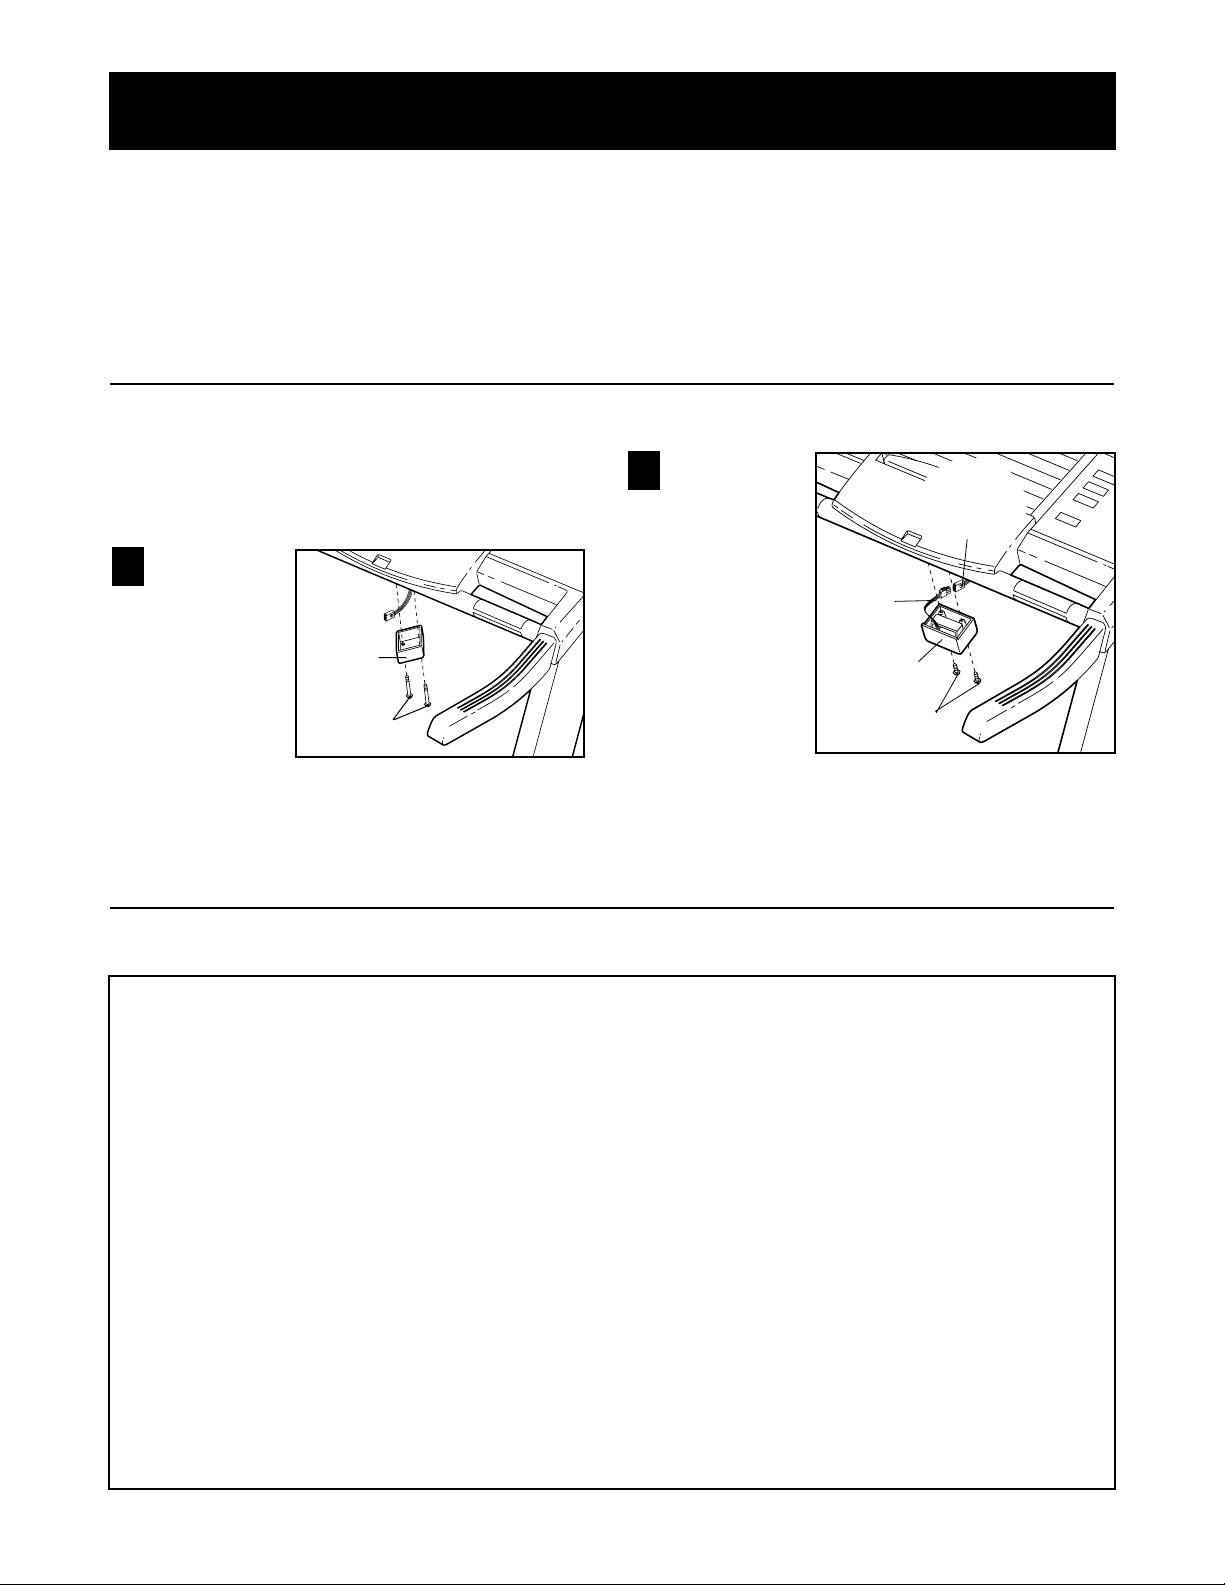
Locate the
pulse sensor cover
beneath
your treadmill console.
Using a
standard
screwdriver (not
included), remove the two screws from the pulse
sensor cover. Discard the pulse sensor cover and
the screws.
Next, look
under the
console and
locate the
console wire
harness.
Plug the
receiver wire
harness fully
into the
console wire
harness.
Finally,
attach the
receiver to the console with the two included
screws. Be careful to avoid pinching the wire
harnesses.
2
1
HealthRider®Chest Pulse Sensor
How to Install the Receiver
Limited Warranty
Receiver
Screws
Receiver
Wire
Harness
Model No.
HRMC05080
WHAT IS COVERED—The HealthRider®Chest Pulse Sensor (“product”) is
warranted to be free of all defects in material and workmanship.
WHO IS COVERED—The original purchaser or any person receiving the
product as a gift from the original purchaser.
HOW LONG IS IT COVERED—ICON Health & Fitness, Inc. (“ICON”), warrants the product for one year after the date of purchase.
WHAT WE DO TO CORRECT COVERED DEFECTS—We will ship to you,
without charge, any replacement part or component, or, at our option, we will
replace the product.
WHAT IS NOT COVERED—Any failures or damage caused by unauthorized service, misuse, accident, negligence, improper assembly or installation, alterations, modifications without our written authorization or by failure
on your part to use, operate, and maintain as set out in this manual (“manual”). This warranty does not extend to products used for commercial or
rental purposes or to products used as store display models.
WHAT YOU MUST DO—Always retain proof of purchase, such as your bill
of sale; store, operate, and maintain the product as specified in the manual;
notify our Customer Service Department of any defect within 10 days after
discovery of the defect; as instructed, return any defected part for replacement or, if necessary, the entire product, for repair.
MANUAL—It is VERY IMPORTANT THAT YOU READ THIS MANUAL before using the product. Remember to follow the instructions specified in this
manual to assure proper operation and your continued satisfaction.
HOW TO GET PARTS AND SERVICE—Simply call our Customer Service
Department at 1-800-999-3756 and tell them your name and address and
the model number of your product. They will tell you how to get a part replaced, or advise you how to ship the product for service. Before shipping,
always obtain a Return Authorization Number (RA No.) from our Customer
Service Department; securely pack your product (save the original shipping
carton if possible); put the RA No. on the outside of the carton and insure the
product. Include a letter explaining the product or problem and a copy of
your proof of purchase if you believe the service is covered by warranty.
ICON is not responsible or liable for indirect, special or consequential damages arising out of or in connection with the use or performance of the product or damages with respect to any economic loss, loss of property, loss of
revenues or profits, loss of enjoyment or use, costs of removal, installation or
other consequential damages of whatsoever nature. Some states do not
allow the exclusion or limitation of incidental or consequential damages.
Accordingly, the above limitation may not apply to you.
The warranty extended hereunder is in lieu of any and all other warranties
and any implied warranties of merchantability or fitness for a particular purpose is limited in its scope and duration to the terms set forth herein. Some
states do not allow limitations on how long an implied warranty lasts.
Accordingly, the above limitation may not apply to you. No one is authorized
to change, modify or extend the terms of this limited warranty. This warranty
gives you specific legal rights and you may have other rights which vary from
state to state.
ICON HEALTH & FITNESS, INC., 1500 S. 1000 W., LOGAN, UT 84321
Pulse
Sensor
Cover
Screws
Console
Wire
Harness
Congratulations for selecting the state-of-the-art
HealthRider®chest pulse sensor. The HealthRider
®
chest pulse sensor is designed to continuously monitor
your heart rate as you exercise on your treadmill. In
addition, the chest pulse sensor enables you to use
the console’s two pulse programs.
Before using the chest pulse sensor, please read
this manual carefully. If you have questions after
reading this manual, please call our Customer
Service Department toll-free at 1-800-999-3756,
Monday through Friday, 6 a.m. until 6 p.m.
Mountain Time (excluding holidays).

The chest pulse sensor consists of two components:
the chest strap and the sensor unit. Follow the steps
below to put on the chest pulse sensor.
Refer to the inset drawing above. Insert the tab
on one end of the chest strap through one end of
the sensor unit as shown. Make sure to press the
end of the sensor unit under the buckle on the
chest strap.
Wrap the
sensor unit
and the
chest strap
around your
chest.
Attach the
free end of
the chest strap to the sensor unit as described
above. Adjust the length of the chest strap, if necessary. The chest pulse sensor should be under
your clothing, against your skin, and as high
under the pectoral muscles or breasts as is comfortable. Make sure that the logo is facing forward
and is right-side-up.
Pull the
sensor unit
away from
your body a
few inches
and locate
the two
electrode
areas on the inner side. Using a saline solution
such as saliva or contact lens solution, wet both
electrode areas. Return the sensor unit to a position against your chest.
CHEST PULSE SENSOR TROUBLE-SHOOTING
If the chest pulse sensor does not function properly,
or if the displayed pulse is excessively high or low,
try the trouble-shooting steps below.
• Make sure that the chest pulse sensor is under your
clothing, against your skin, and as high under the
pectoral muscles or breasts as is comfortable. Note:
If the chest pulse sensor does not function when positioned as described, try moving it slightly lower or
higher on your chest.
• Make sure that the logo on the sensor unit is facing
forward and is right-side-up.
• Each time you use the chest pulse sensor, use saline
solution such as saliva or contact lens solution to wet
the two electrode areas on the sensor unit (see the
drawing near the bottom of this page). If pulse readings do not appear until you begin perspiring, re-wet
the electrode areas.
• As you walk or run on the treadmill, make sure that
you are near the center of the walking belt and within
arm’s length of the console. For the console to dis-
play pulse readings, the user must be within
arm’s length of the console.
• The chest pulse sensor is designed to work with
people who have normal heart rhythms. Pulse reading problems may be caused by medical conditions
such as premature ventricular contractions (pvcs),
tachycardia bursts, and arrhythmia.
• The operation of the chest pulse sensor can be affected by magnetic interference caused by high
power lines or other sources. If it is suspected that
magnetic interference may be causing a problem,
try relocating the treadmill.
• If the chest pulse sensor still does not function properly, test the chest pulse sensor in the following way:
Hold the chest pulse sensor and place your thumbs
over the electrode areas as shown at the left.
Next, hold the chest pulse sensor near the console.
While holding one thumb stationary, begin tapping
the other thumb against the electrode area at a rate
of about one tap per second. Check the pulse reading
on the console.
3
2
1
How to Put On the Chest Pulse Sensor
2
Logo
Electrode Areas
Chest Strap
Sensor Unit
Tab
Buckle
Sensor
Unit
 Loading...