

Healthrider H450I User Manual
ModelNo.HRTL61706.1
SedalNo.
SerialNumberDecal
Asamanufacturer,wearecom-
mittedtoprovidingcomplete
customersatisfaction.Ifyou
havequestions,orif partsare
damagedormissing,PLEASE
CONTACTOURCUSTOMER
SERVICEDEPARTMENT
DIRECTLY.
®
@
J
'S
CALLTOLL-FREE:
Mon.=Fd.,6a.m.=6p.m.MST
ONTHEWEB:
www.healthriderservice.com
CAUTION
Read all precautions and instruc-
tions in this manual before using
this equipment. Save this manual
for future reference.
www°healthrider°com
new products, prizes,
fitness tips, and much more!

TABLE OF CONTENTS
iMPORTANT PRECAUTIONS ................................................................ 3
BEFORE YOU BEGIN ...................................................................... 5
ASSEMBLY ............................................................................... 6
OPERATION AND ADJUSTMENT ............................................................ 12
HOW TO FOLD AND MOVE THE TREADMHLL .................................................. 20
TROUBLESHOOTHNG ..................................................................... 22
CONDiTiONiNG GUiDELiNES ............................................................... 24
PART LiST .............................................................................. 26
ORDERING REPLACEMENT PARTS ......................................................... 27
EXPLODED DRAWHNG .................................................................... 28
LHMHTEDWARRANTY .............................................................. Back Cover
HeaHthRider is a registered trademark of HCON HP,Hnc,
2

iMPORTANT PRECAUTIONS
WAR NmNG:Toreducethe.s. ofburns,f re,e ectdeshoe.,orinjurytopersons,readthe
following important precautions and information before operating the treadmill.
it is the responsibility of the owner to ensure
that all users of 1his treadmill are adequately
informed of aHwarnings and precautions.
2,
Use the treadmill only as described.
3.
Place the treadmill on a level surface, with at
least eight feet of clearance behind it and two
feet on each side. Do not place the treadmill 12. Failure to use a properJy functioning surge
on any surface that blocks air openings. To suppressor could resuJt in damage to the con-
protect the floor or carpet from damage, place troi system of the treadmill, if the control syso
a mat under the treadmill, tern is damaged, the walking beJt may change
4. Keep the treadmill indoors, away from mois-
ture and dust. Do not put the treadmill in a
garage or covered patio, or near water.
5. Do not operate the treadmill where aerosol
products are used or where oxygen is being 14. Never move the waJking belt while the power
administered, is turned off. Do not operate the treadmill if
6. Keep children under the age of 12 and pets treadmill is not working properly. (See TROU-
away from the treadmill at all times. BLESHOOTmNG on page 22 if the treadmill is
7. The treadmill shouH be used onny by persons
weighing 300 pounds or less. 15. Read, understand, and test the emergency
8. Never allow more than one person on the
treadmill at a time.
9. Wear appropriate exercise clothes when
using the treadmill. Do not wear loose cJothes
that couJd become caught in the treadmill.
AtHetic support clothes are recommended for
both men and women. A/ways wea/'athletie
shoes. Never use the treadmillwithbare feet,
wearing onlyatockinqa,orinsandals.
18. When connecting the power cord (see page
12), plug the power cord into a surge sup-
pressor (not ineJuded) and pJugthe surge
suppressor into a grounded circuit capable of
carrying 15 or more amps. No other appliance
should be on the same circuit. Do not use an .....
extension cord.
11. Use only a single-outJet surge suppressor
that meets aH of the specifications described
on page 12. To purchase a surge suppressor_
see your IocaJ HealthRider dealer or call the
toll-free telephone number on the front cover
of this manual and order part number 146148,
or see your total electronics store.
speed, accelerate, or stop une×pectedJy,
which may result in a fall and serious injury.
13. Keep the power cord and the surge suppres-
sor away from heated surfaces.
the power cord or plug is damaged, or if the
not working properly.)
stop procedure before using the treadmill (see
HOW TO TURN ON THE POWER on page 14).
18. Never start the treadmill while you are stand-
ing on the walking bent.Always hoJd the
handrails while using the treadmill
17. The treadmill is capabJe of high speeds.
Adjust the speed in small increments to avoid
sudden jumps in speed.
18. The pulse sensor is not a medical device.
Various factors, including the user's move-
ment, may affect the accuracy of heart rate
readings. The puJse sensor is intended only
as an exercise aid in determining heart rate
trends in general
19.Neverleavethetreadmillunattendedwhileit 23.Inspect and properly tighten all parts of the
is running. Always remove the key, unplug
the power cord, and switch the reset/off cir=
cuit breaker to the off position when the
treadmill is not in use. (See the drawing on
page 5 for the location of the circuit breaker.)
20. Do not attempt to raise, lower, or move the
treadmill until it is properly assembled. (See
ASSEMBLY on page 6, and HOW TO FOLD
AND MOVE THE TREADMILL on page 20.)
You must be able to safeJy tilt 45 pounds (20
kg} to raise, lower, or move the treadmill
21, When folding or moving the treadmill, make
sure that the storage latch is fully dosed.
22. Never insert any object into any opening on
the treadmill.
treadmHJ regularly.
24.DANGER: Alwaysunplugthepower
cord immediately after use, before cleaning the
treadmill and before performing the mainte-
nance and adjustment procedures described in
this manual Never remove the motor hood un-
less instructed to do so by an authorized sero
vice representative. Servicing other than the
procedures in this manual should be performed
by an authorized service representative only.
25. This treadmill is intended for in-home use
only. Do not use this treadmill in a commer-
cial rental or institutionaJ setting.
WARNING: Beforebeginningth sora,yexerciseprogram,consultyo,rphysician.Th s
is especially important for persons over the age of 35 or persons with pre-existing health problems.
Read aH instructions before using, mCONassumes no responsibility for personal injury or property
damage sustained by or through the use of this product.
SAVE THESE iNSTRUCTiONS
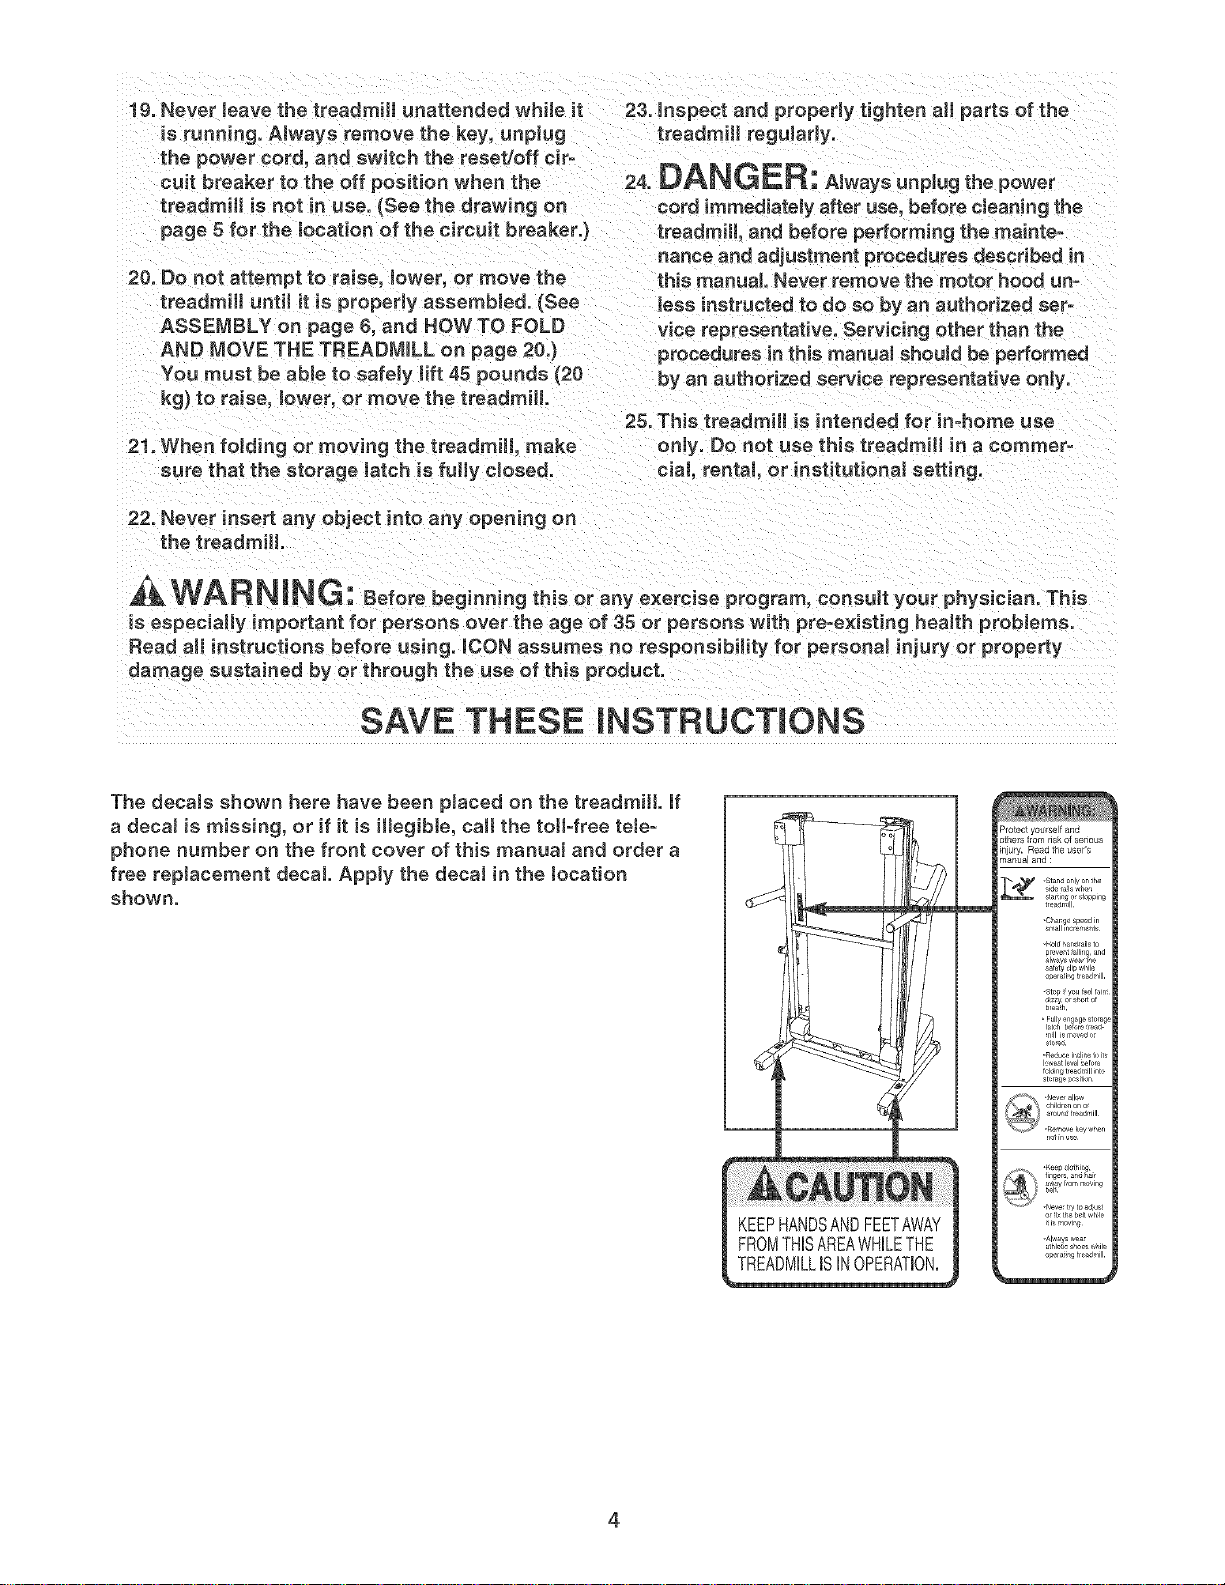
The decaJs shown here have been placed on the treadmill, if
a decal is missing, or if it is illegible, call the toll-free tele-
phone number on the front cover of this manuaJ and order a
free replacement decal Apply the decaJ in the tocation
shown.
_fotect yourself and
_thers f_om risk of serious
m
_Stand_nly_n_he
_tar_J_0_ _t0ppin_
treadmill
-¢h_Lng_Sp_d in
,H01d_an_,ail_t_
_f_ty _lJ__hJl_
_er_J_gtreadmill¸
Fullyen_ag__t_ra_
I_e_t I_v_l_r_r_
fcl_Jn_tre_mJllint_
_ _h_l_r_n_no_
_Y "_no_k ........
4
BEFORE YOU BEGIN
Thank you for sebcting the revoUutionary HeaUthRide¢_
PRO H450i treadmill The PRO H450i treadmHUoffers
an impressive array of features designed to make your
workouts at home more enjoyabb and effective, And
when you're not exercising, the unique PRO H450i
treadmHUcan be foUdedup, requiring bss than haft the
floor space of other treadmHUs,
For your benefit, read this manua! carefully before
using the treadmill, ff you have questions after read-
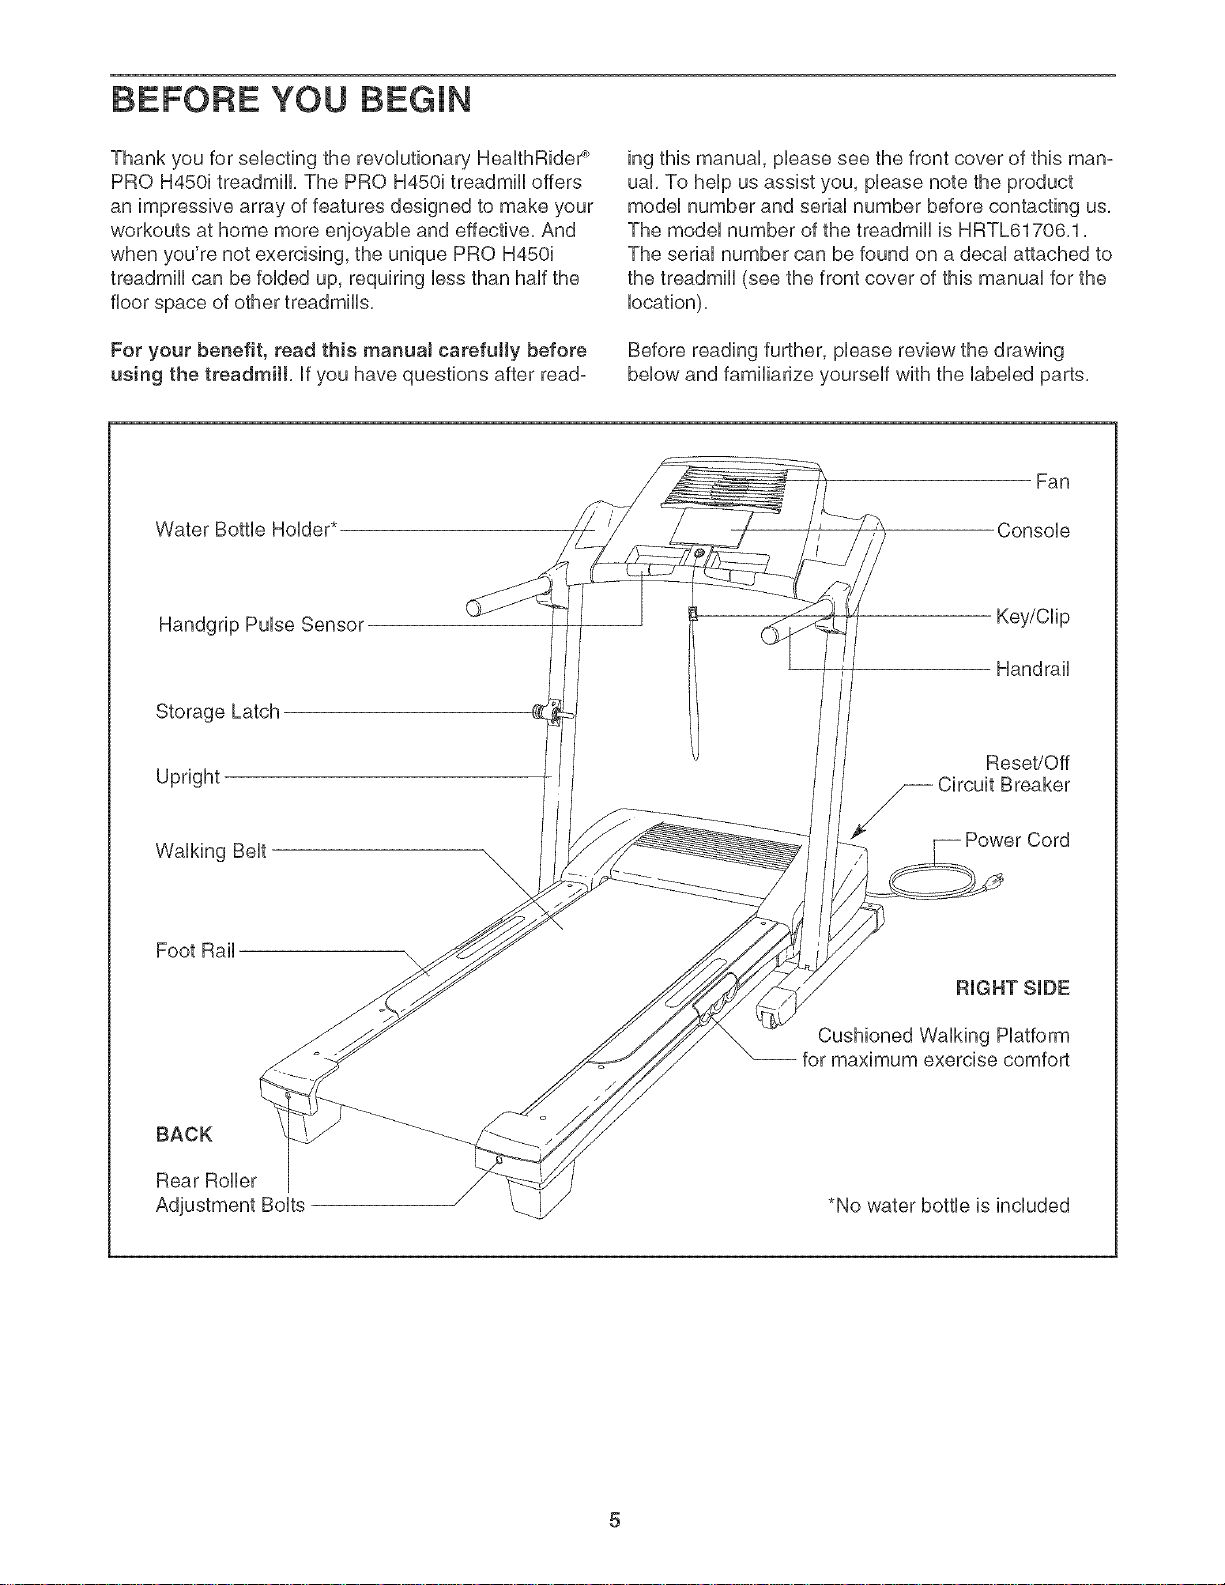
Water Bottle Holder*
Handgrip Pulse Sensor
Storage Latch
ing this manuaU,phase see the front cover of this man-
uaL To heUpus assist you, phase note the product
modeUnumber and seriaUnumber before contacting us,
The modeUnumber of the treadmill is HRTL61706,1,
The serial number can be found on a decal attached to
the treadmill (see the front cover of this manual for the
location),
Before reading further, please review the drawing
below and familiarize yourself with the labeled parts,
Fan
Console
Key/Clip
Handrail
Upright
Walking Belt
Foot Rail
BACK
Rear Roller
Reset/Off
Breaker
RIGHT SIDE
Cushioned Walking Platform
for maximum exercise comfort
*No water bottle is included
AssembJyrequirestwopersons.Setthetreadmillinacbaredareaandremoveallpackingmaterials,Donot
disposeofthepackingmatedaJsuntilassemMyiscompleted.
Note:Theundersideofthetreadmillwalkingbeltiscoatedwithhigh@erformancelubricant,Duringshipping,a
smallamountoflubricantmaybetransferredtothetopofthewalkingbeltortheshippingcarton,Thisisanormal
conditionanddoesnotaffecttreadmillperformance,ifthereislubricantontopofthewalkingbelt,simplywipeoff
thelubricantwithasoftclothandamild,non-abrasivecleaner,
Assembly requires the included hex key _ and your own phillips screwdriver
Use the drawings below to identify the hardware used during assembly, Note: if a part is not in the parts bag,
check to see if it has been preattached to one of the parts to be assembled. To avoid damaging plastic
parts, do not use power tooJs for assemMy.
E
< 38
3/4" Screw (23)-6
0
3/8" Star
Washer (83)-4
2 3/4" Upright Bolt (85)-2
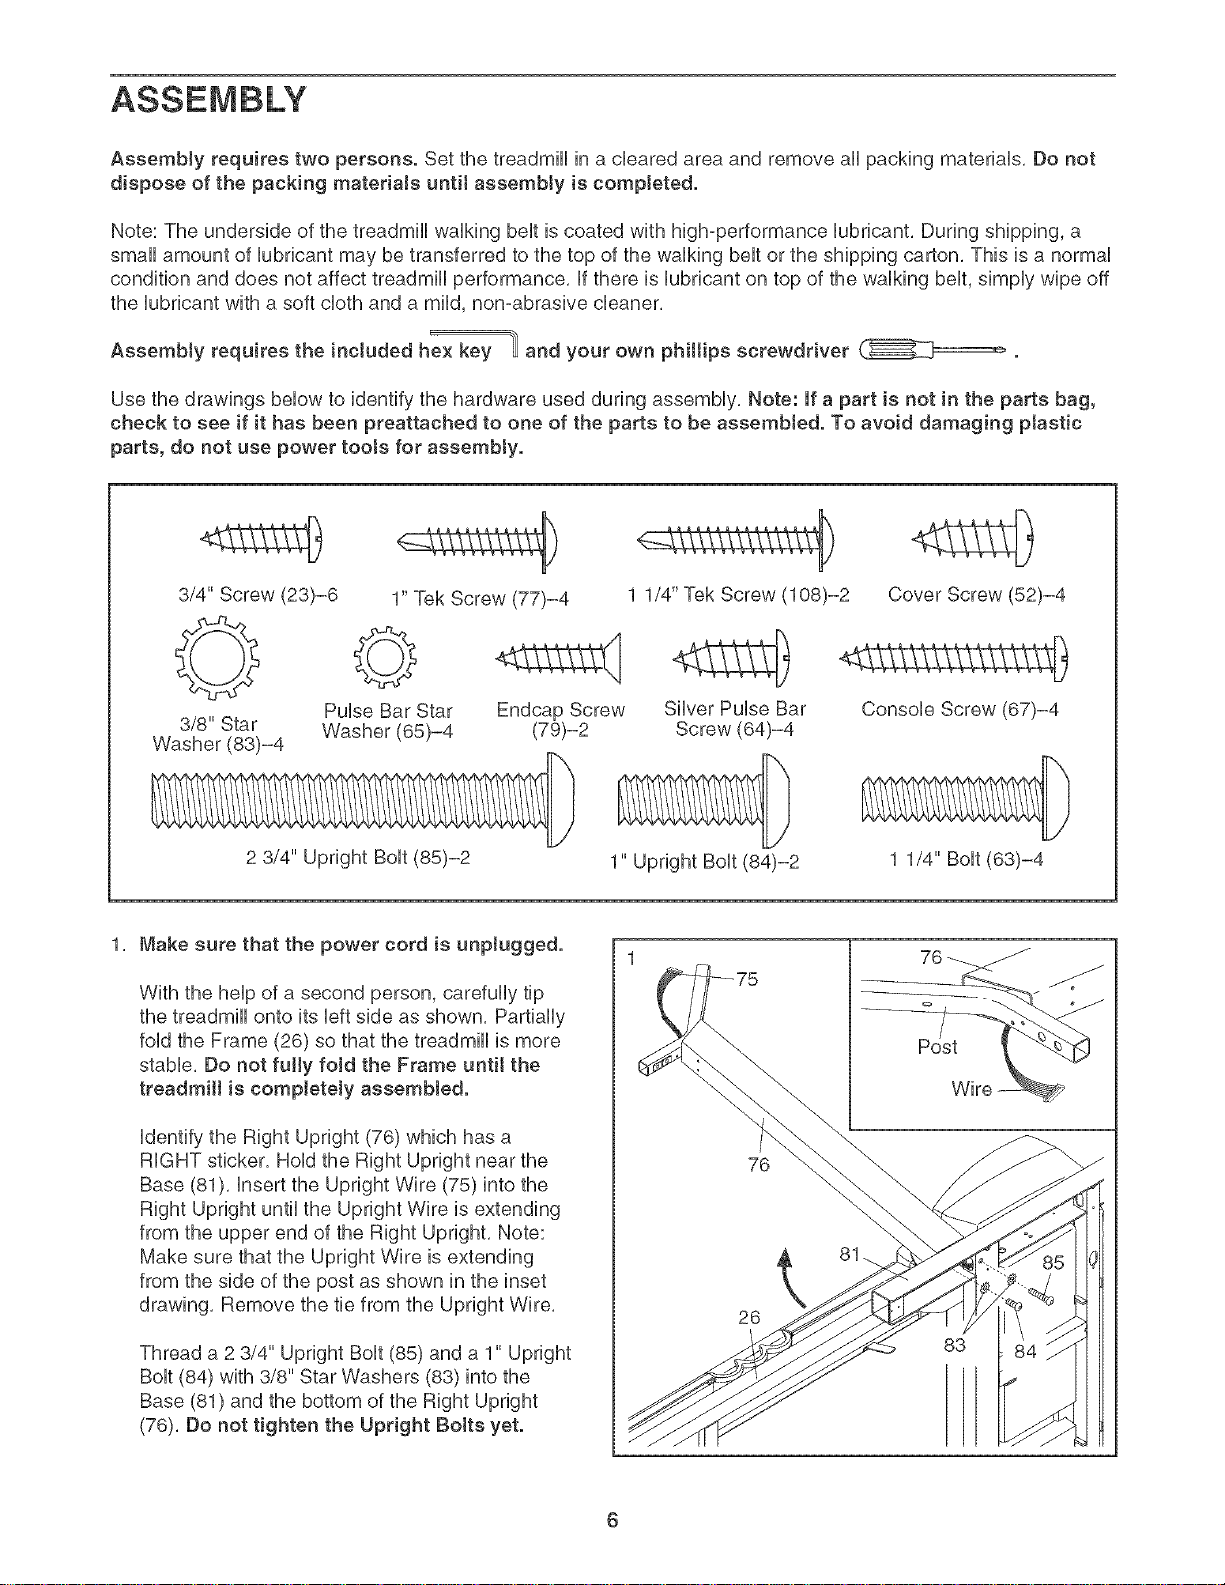
1, Make sure that the power cord is unplugged.
With the help of a second person, carefully tip
the treadmill onto its left side as shown, Partially
fold the Frame (26) so that the treadmill is more
stable, Do not fully fold the Frame until the
treadmill is completely assemMed.
identify the Right Upright (76) which has a
RIGHT sticker, Hold the Right Upright near the
Base (81), insert the Upright Wire (75) into the
Right Upright until the Upright Wire is extending
from the upper end of the Right Upright, Note:
Make sure that the Upright Wire is extending
from the side of the post as shown in the inset
drawing, Remove the tie from the Upright Wire,
Thread a 2 3/4" Upright Bolt (85) and a 1" Upright
Bolt (84) with 3/8" Star Washers (83) into the
Base (81) and the bottom of the Right Upright
(76), Do not tighten the Upright Bolts yet,
Pulse Bar Star
Washer (65)-4
1" Tek Screw (77)-4
©
Endcap Screw
(79)-2
1 1/4" Tek Screw (108)-2
Silver Pulse Bar
Screw (64)-4
1" Upright Bolt (84)-2
76
26
Cover Screw (52)-4
Console Screw (67)-4
1 1/4" Bolt (63)-4
83
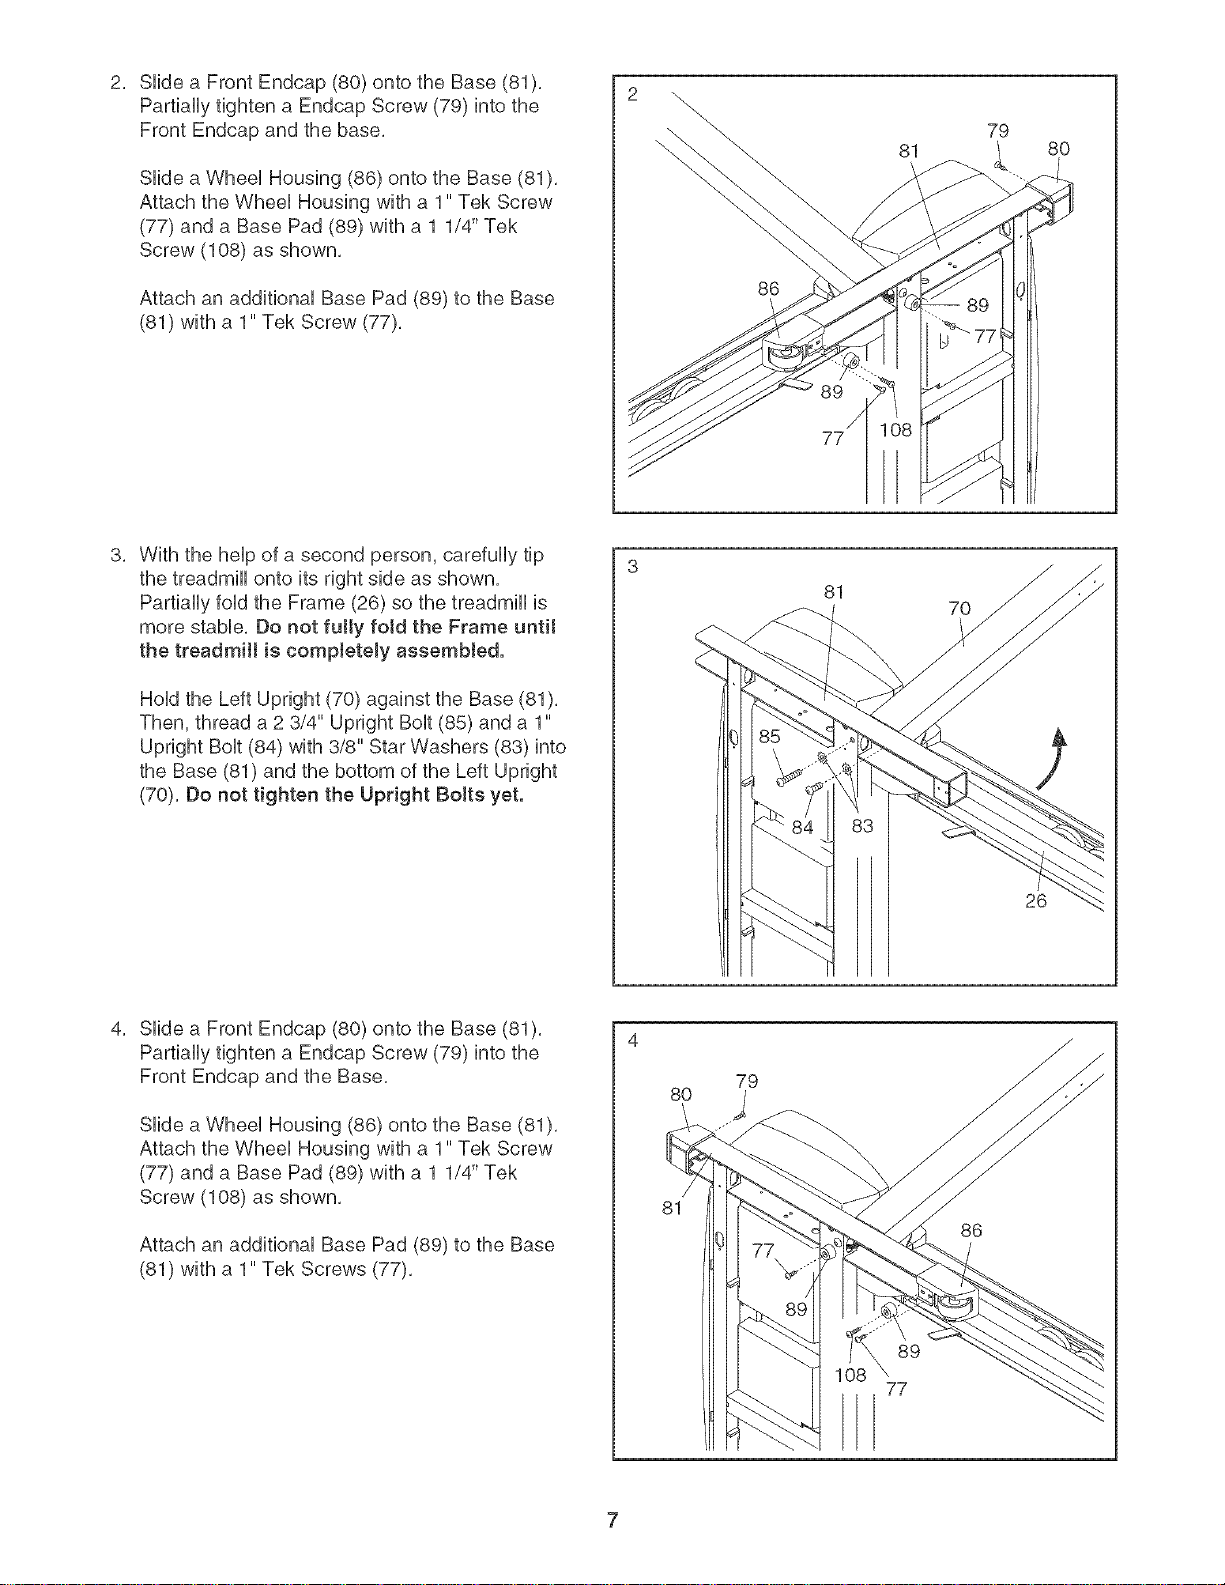
SHdeaFrontEndcap(80)ontotheBase(81).
Partiaflytightena EndcapScrew(79)intothe
2. 2 _
FrontEndcapandthebase,
Sfidea WheeUHousing(86)ontotheBase(81).
AttachtheWheeUHousingwitha1"TekScrew
(77)anda BasePad(89)witha11/4"Tek
Screw(108)asshown,
81
79
8O
AttachanadditionaUBasePad(89)totheBase
(81)witha1"TekScrew(77),
WiththeheUpofasecondperson,carefuflytip
thetreadmHUontoitsrightsideasshown,
PartiaflyfeudtheFrame(26)sothetreadmHUis
morestaMe.Donotfully foldtheFrameuntil
thetreadmilliscompletelyassembled.
HoUdtheLeftUpright(70)againsttheBase(81).
Then,threada23/4"UprightBoUt(85)anda 1"
UprightBoUt(84)with3/8"StarWashers(83)into
theBase(81)andthebottomoftheLeftUpright
(70),DonottightentheUprightBoltsyet.
86
81
70
SlideaFrontEndcap(80)ontotheBase(81).
PartiallytightenaEndcapScrew(79)intothe
FrontEndcapandtheBase,
SlideaWheelHousing(86)ontotheBase(81).
AttachtheWheelHousingwitha1"TekScrew
(77)anda BasePad(89)witha11/4"Tek
Screw(108)asshown,
AttachanadditionalBasePad(89)totheBase
(81)witha1"TekScrews(77),
8O
81
26
79
86
89
77
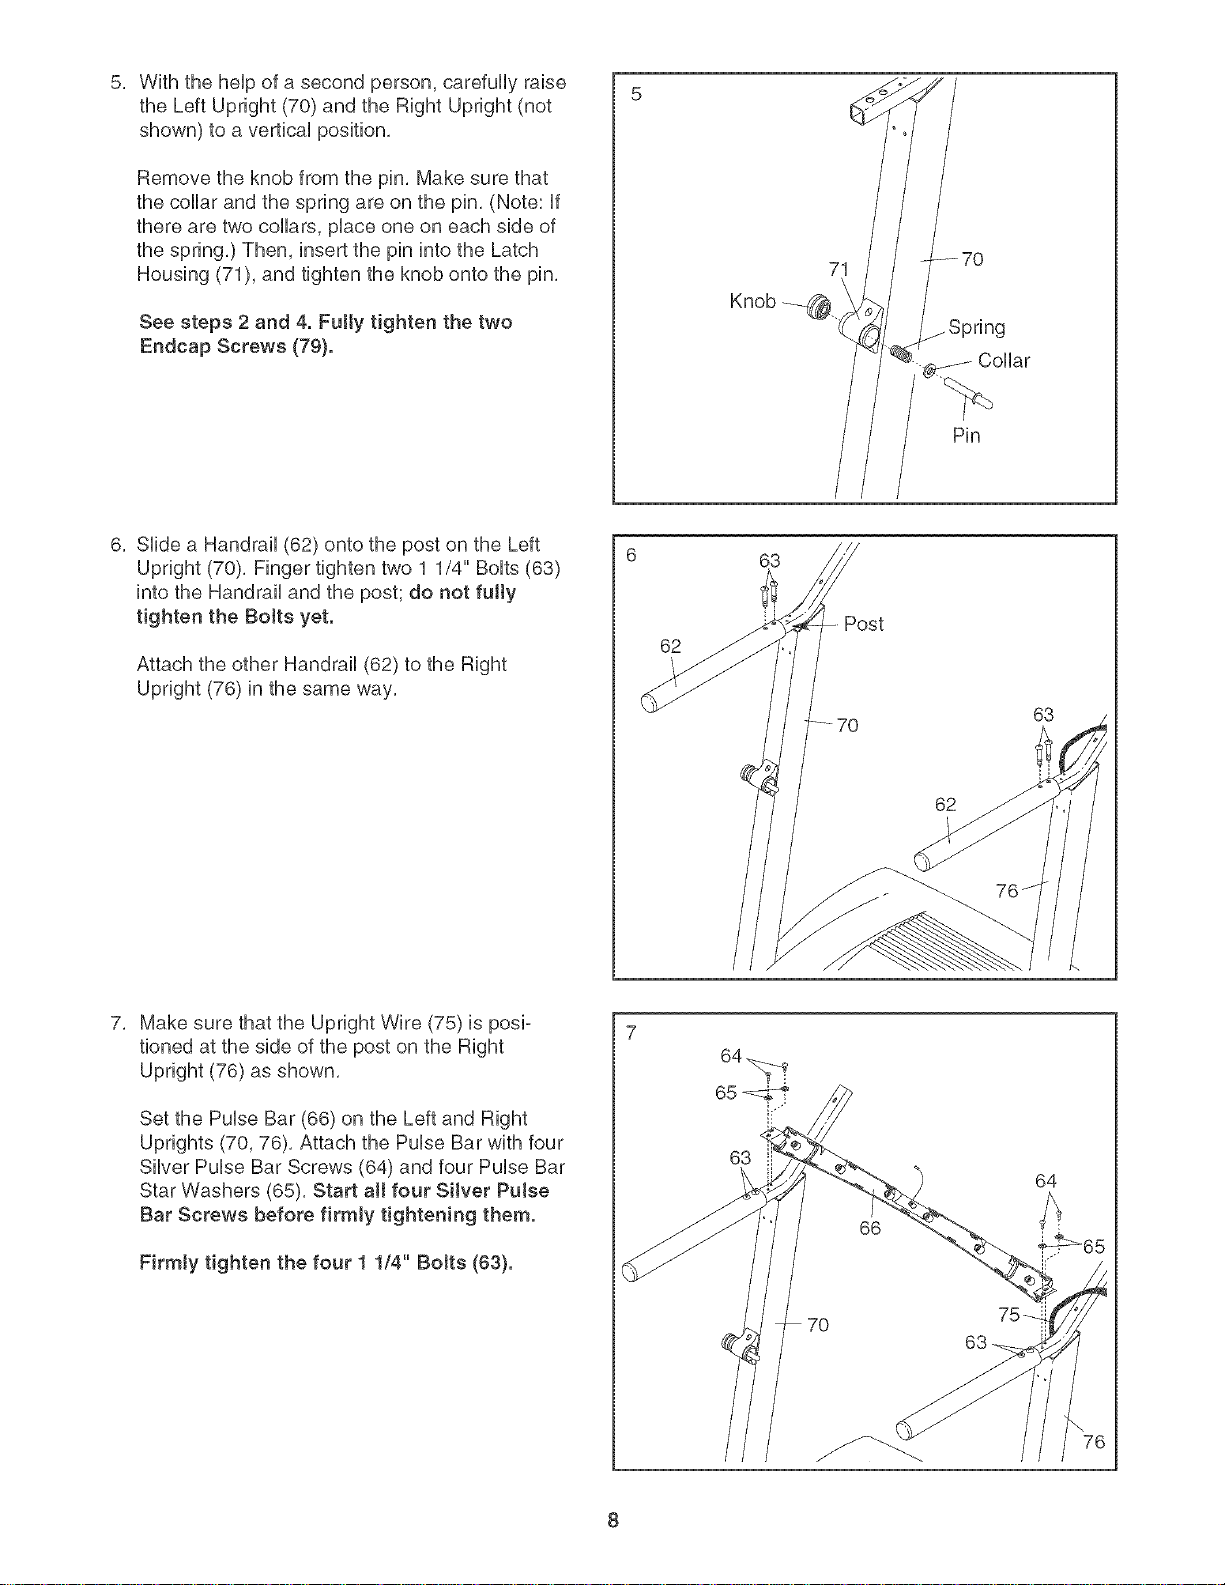
WiththeheUpofasecondperson,carefullyraise
5, 5
theLeftUpright(70)andtheRightUpright(not
shown)toavertbaUposition,
Removetheknobfromthepin,Makesurethat
thecollarandthespringareonthepin,(Note:if
therearetwocollars,pUaceoneoneachsideof
thespring,)Then,insertthepinintotheLatch
Housing(71),andtightentheknobontothepin,
Seesteps2and4.Fullytightenthetwo
EndcapScrews(79}.
Collar
Pin
6, Slidea Handrail(62)ontothepostontheLeft
Upright(70),Fingertightentwo11/4"Bolts(63)
intotheHandrailandthepost;donotfully
tightentheBoJtsyet.
AttachtheotherHandrail(62)totheRight
Upright(76)inthesameway,
MakesurethattheUprightWire(75)isposio
tionedatthesideofthepostontheRight
Upright(76)asshown,
SetthePulseBar(66)ontheLeftandRight
Uprights(70,76),AttachthePulseBarwithfour
SilverPulseBarScrews(64)andfourPulseBar
StarWashers(65),StartallfourSilverPulse
BarScrewsbeforefirmlytighteningthem.
63
Post
62
62
65
63
64
66
Firmlytightenthefour11/4"BoJts(63}.
7O
63
8
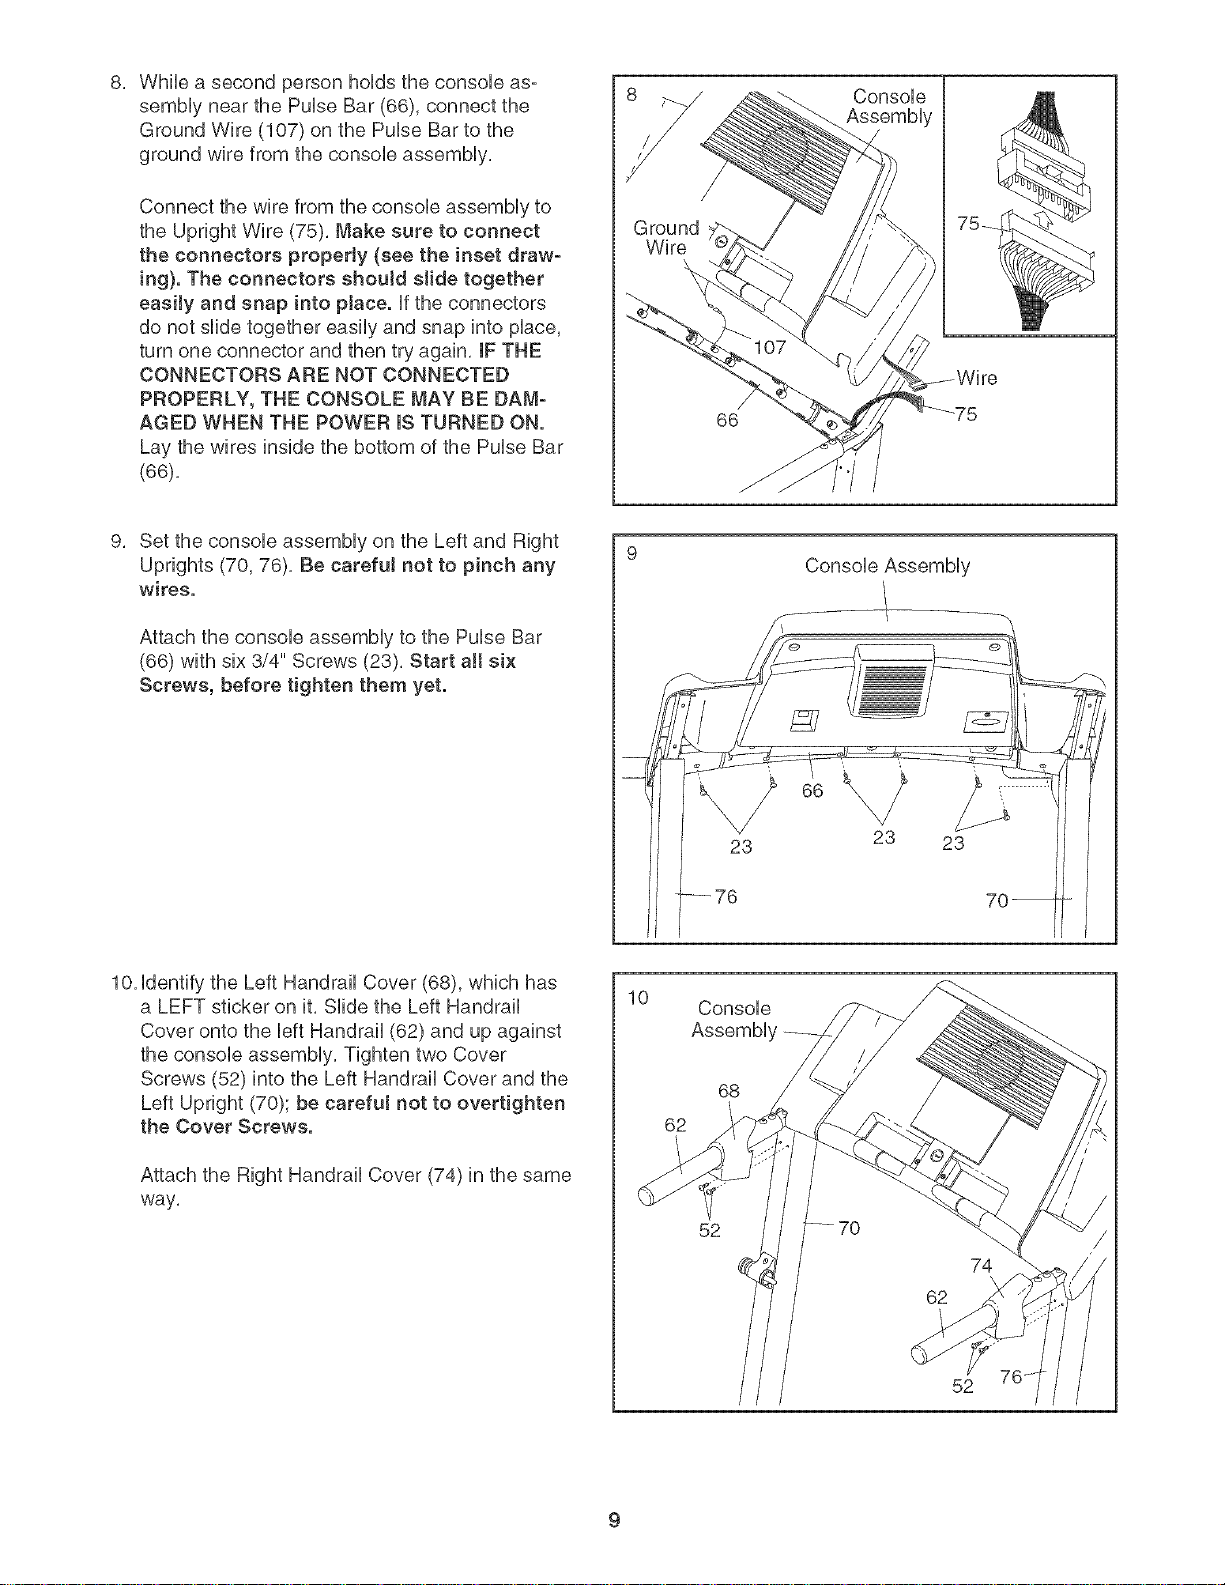
While a second person holds the console as°
sembly near the Pulse Bar (66), connect the
Ground Wire (107) on the Pulse Barto the
ground wire from the console assembly,
Console
Assembly
Connect the wire from the console assembly to
the Upright Wire (75), Make sure to connect
the connectors properJy (see the inset draw-
ing}. The connectors shouJd sJide together
easiJy and snap into place, if the connectors
do not slide together easily and snap into place,
turn one connector and then try again, IF THE
CONNECTORS ARE NOT CONNECTED
PROPERLY, THE CONSOLE MAY BE DAM-
AGED WHEN THE POWER mSTURNED ON.
Lay the wires inside the bottom of the Pulse Bar
(66),
Set the console assembly on the Left and Right
Uprights (70, 76), Be careful not to pinch any
wires.
Attach the console assembly to the Pulse Bar
(66) with six 3/4" Screws (23), Start all six
Screws, before tighten them yet.
Ground
Wire
66
Console Assembly
10, identify the Left Handrail Cover (68), which has
a LEFT sticker on it, Slide the Left Handrail
Cover onto the left Handrail (62) and up against
the console assembly, Tighten two Cover
Screws (52) into the Left Handrail Cover and the
Left Upright (70); be careful not to overtighten
the Cover Screws.
Attach the Right Handrail Cover (74) in the same
way,
10
--76
Assembl,
62
23
Console
68
52
23
23
70--
52
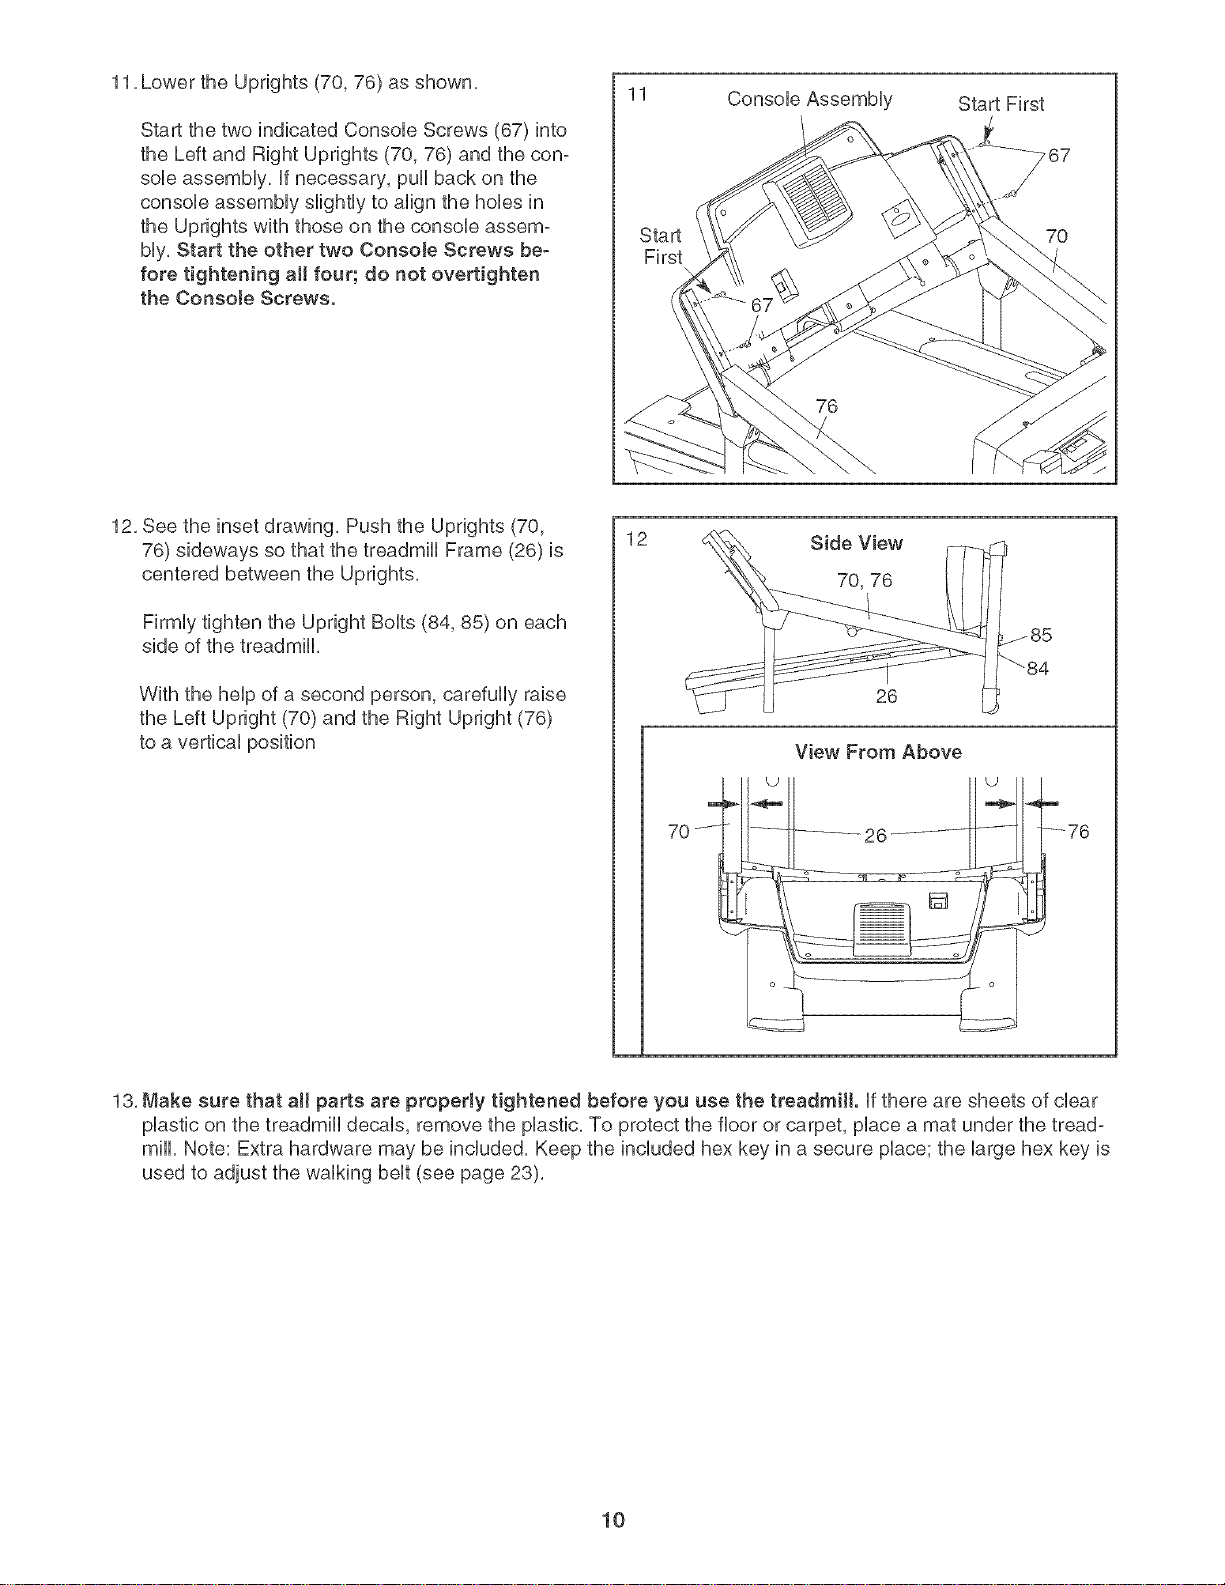
11,LowertheUprights(70,76)asshown,
StartthetwoindicatedConsoleScrews(67)into
theLeftandRightUprights(70,76)andthecon-
sobassembly,ifnecessary,pullbackonthe
consoleassemblyslightlytoalignthehobsin
theUprightswiththoseontheconsoleassem-
bly,Starttheothertwo ConsoJeScrewsbe_
foretighteningaHfour;donotovertighten
theConsoleScrews.
11 ConsoleAssembly
Start
First
76
StartFirst
7O
12,Seetheinsetdrawing,PushtheUprights(70,
76)sidewayssothatthetreadmillFrame(26)is
centeredbetweentheUprights,
12
SideView
70,76
FirmlytightentheUprightBolts(84,85)oneach
sideofthetreadmill,
WiththeheUpofasecondperson,carefullyraise
26
theLeftUpright(70)andtheRightUpright(76)
toaverticalposition
m
70 /
13, Make sure that aH parts are properly tightened before you use the treadmill, if there are sheets of clear
plastic on the treadmill decals, remove the plastic, To protect the floor or carpet, place a mat under the tread°
mill, Note: Extra hardware may be included, Keep the included hex key in a secure place; the large hex key is
used to adjust the walking belt (see page 23),
View From Above
10
 Loading...