

Page 1

0
Page 2

1
Page 3

2
CONTENTS
Introduction and Features 4
Safety Instructions
5
Connectors
6
Remote Control Unit Key Layout
7
Remote Control Unit Key Functions
8
Remote Control - Battery Care / Preparation / Distance / Tips
9
Installation – HDMI Output Plug / AV lead for CVBS Composite
10
Start Up
11
Time Zone
11
Manual Scan
12
Up/Down Channel Change / Numeric Input Channel Change
13
Volume Adjustment / Volume Mute
13
TV or Radio Selection
13
INFO Key
13
EPG – Electronic Program Guide
14
Closed Captions
14
Installation Menu
15
My Box Menu
16
TV Set Up Menu
17
Password Menu
19
Navi Key Functions
21
Fav Key
24
Recording Functions – Formatting Your USB Storage Device
26
Recording Functions – Instant Record
27
Recording Functions – Timer Record
28
Recording Functions – Playback / Fast Forward & Rewind
29
Recording Functions – Manage Files / Time Shift
30
Recording Functions – USB Storage Device Capacity
32
Multimedia Functions – Photo Files / Music Files / Movie Files
32
Troubleshooting
36
Specifications
37
Page 4

3
Page 5

4
INTRODUCTION
Thank you for choosing a healing HHH640 ‘micro’ high definition digital
television receiver.
This sophisticated receiver has a host of exciting features and will enable
you to receive and enjoy high definition and standard definition digital
terrestrial TV channels that are available in your location - including
freeview channels.
The units USB recorder will enable you to record your favorite programs,
Time Shift live TV and playback various media files
For a complete listing of our digital television terrestrial receivers please
view our website: www.healingdigital.com
HHH640 FEATURES
Excellent High Definition & Standard Definition ‘Wide Horizon’ picture
quality
Receives all 'freeview' Channels
USB Record and TimeShift live TV
Flexible Media Player – Plays a host of media files – Photo, Music,
Movies
Resolutions 1080i, 720p, 520p and 576i
HDMI Output Plug for direct screen connection
Rotating HDMI Plug assists total receiver concealment
IR Receiver Extender enables unit to be concealed
Composite CVBS Video/Audio Output included
Electronic Program Guide (EPG) with 8
th
day cross over
Centre Cut option displays aspect of 16:9 on 4:3 screens
Closed Captions subtitles
Parental Lock
Signal Strength and Quality bars colour coded
Games, Calender, Calculator Function
Low Energy Consumption – MEPS compliant
Saves program parameters at Power Fail
Attractive On Screen Display structure
Page 6

5
SAFETY INSTRUCTIONS
Operating and Safety instructions should be read prior to connecting and
operating the unit.
Please adhere to all Safety Instructions listed in this operating manual.
DO NOT INSTALL YOUR RECEIVER:-
In a closed or poorly ventilated cabinet
Directly on top or under any other equipment.
DO NOT EXPOSE THIS RECEIVER OR ITS ACCESSORIES:
To water or intense moisture
To direct sunlight
To any equipment that generates heat
To intense vibration
To any magnetic objects such as loudspeakers, transformers etc.
Never open the cover: High voltage electrical hazards make it
extremely dangerous to touch the inside of the receiver. Note: Your
warranty will be void if the receiver panel/s has been opened.
If the receiver is not to be used for an extended period, unplug the
receiver power cord from the wall power socket.
When installing the receiver and connecting AV and cables, initially
disconnect the unit from mains power.
Do not operate the unit if the power lead is damaged.
Protect the power cord from being walked on or pinched
Clean the Receiver and its panels only with a dry cloth.
Only use attachments/accessories specified by the manufacturer
Page 7
6
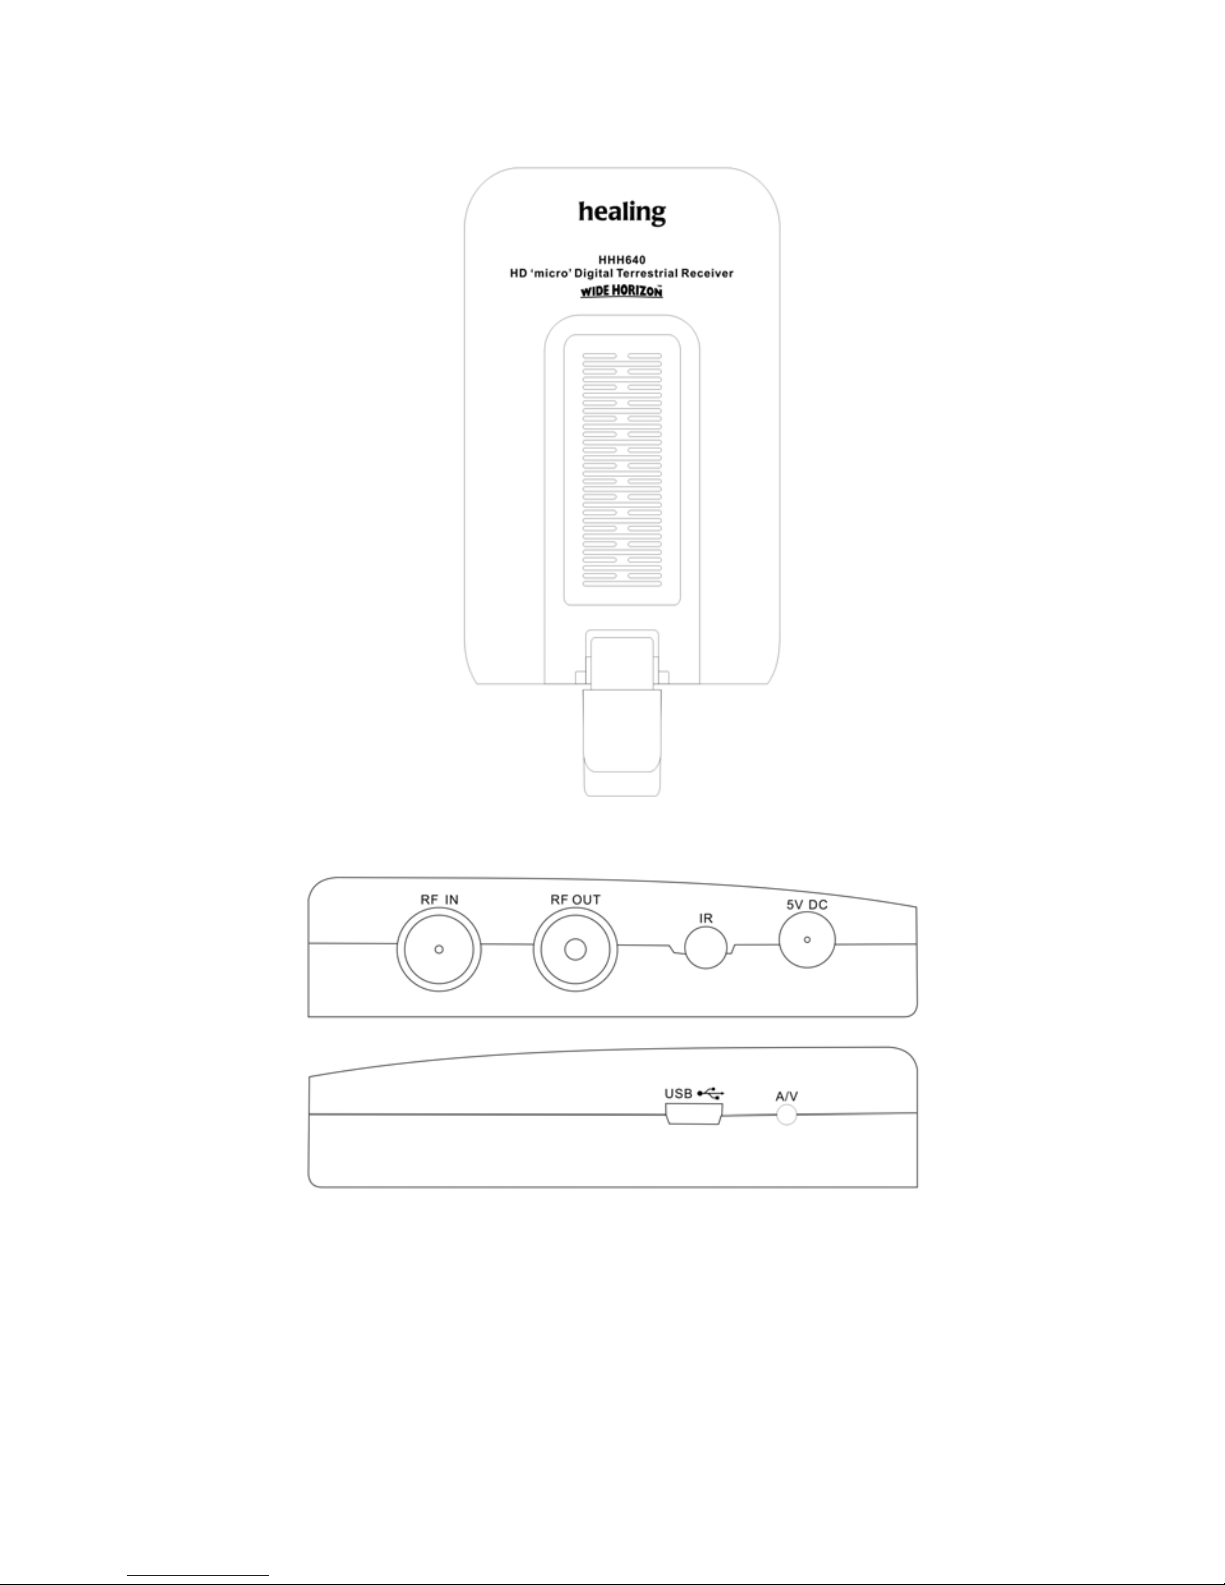
CONNECTORS
HDMI OUTPUT PLUG – Combined Video & Audio
RF IN: Television antenna input
RF OUT: Loop through to pass the antenna signal to another receiver.
IR: Connection for the supplied Infrared Remote Extender
DC5V: Connection for the supplied Power Pack.
USB: USB-2 host connection for storage devices including Memory
Sticks and Hard Disk Drives for Recording, TimeShift, Media file
playback and firmware upgrade.
A/V: Connection for the supplied 3.5mm plug to RCA AV lead
(if HDMI plug connection is not used)
Page 8
7
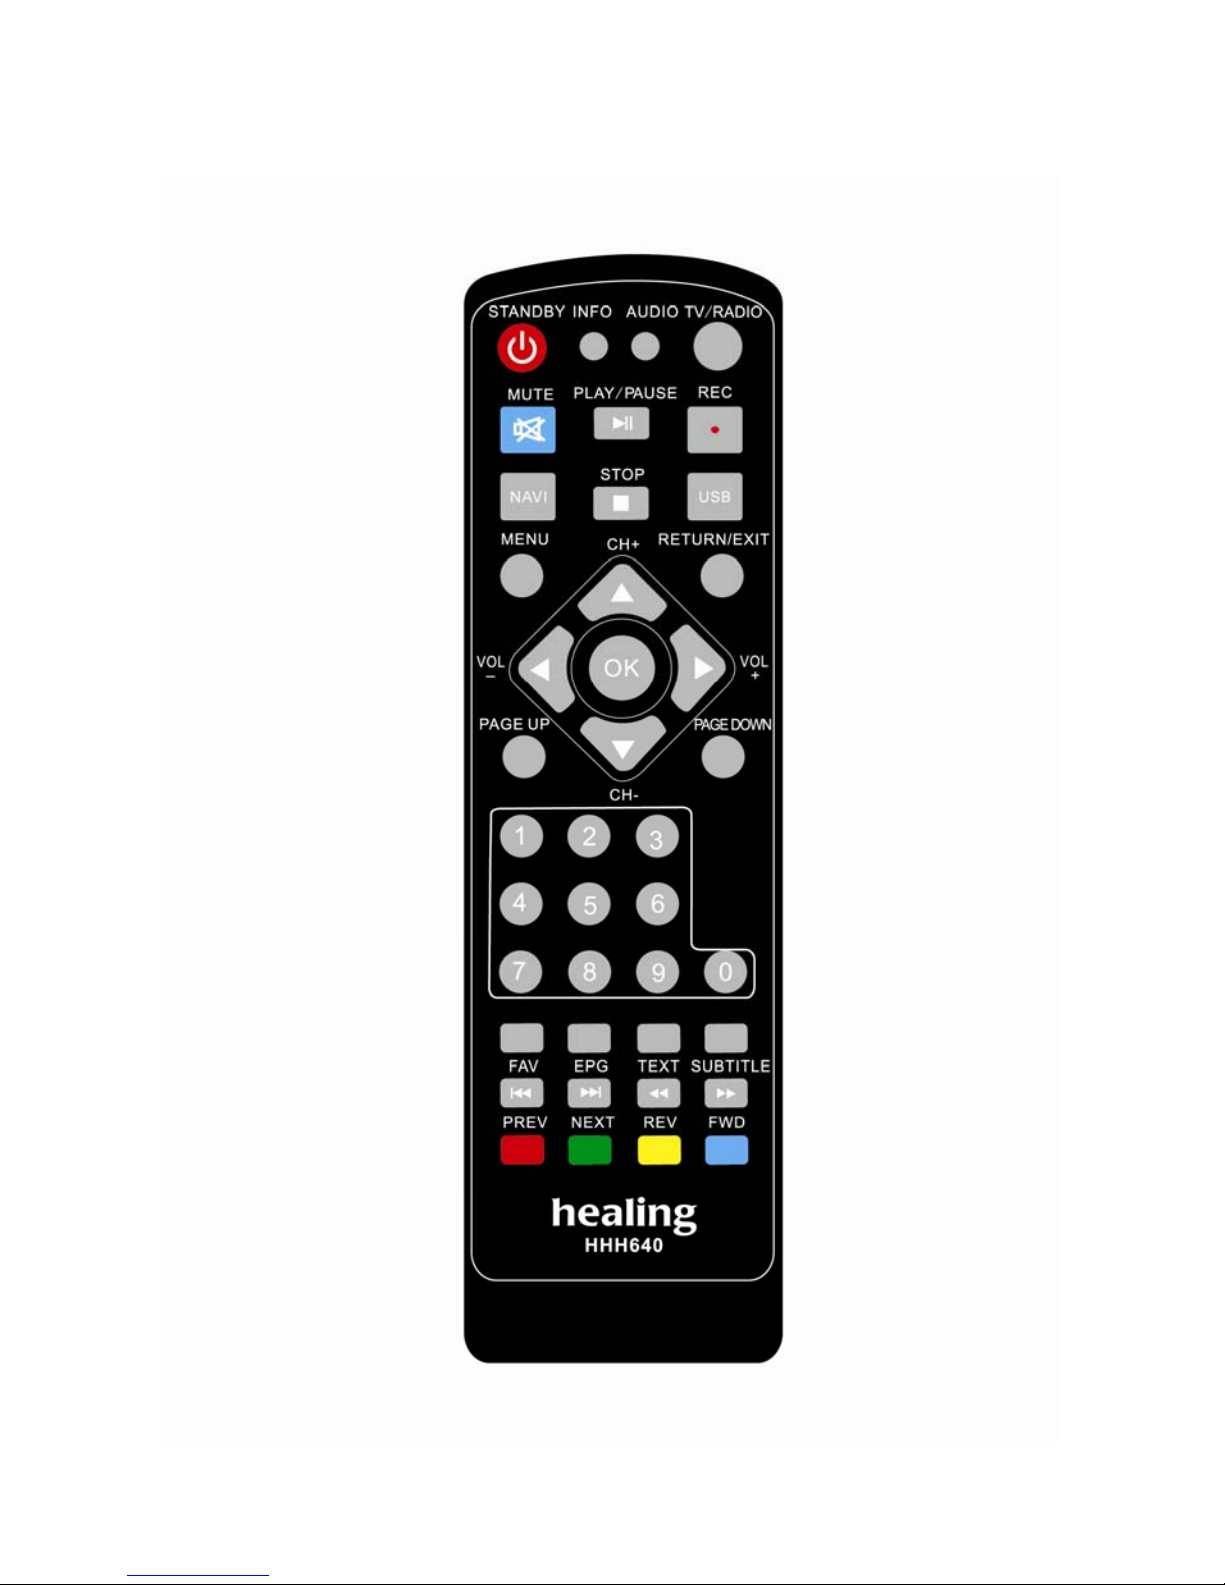
REMOTE CONTROL UNIT KEY LAYOUT
Page 9

8
REMOTE CONTROL UNIT KEY FUNCTIONS
STANDBY: Press to Operate your receiver or place it in Standby mode.
INFO: First press shows the Basic Information bar on screen.
Second press shows the Detail program Info panel.
Third press shows Program Info with signal Strength & Quality.
AUDIO: Press to enter Audio Setting menu.
TV/RADIO: Switches between TV and Radio channels.
MUTE: Enables or Disables sound, returning to previous level.
Mute is also disabled by pressing Pressing the <Vol+/-> keys.
PLAY: Press to Play a file from storage, or resume Play from pause.
PAUSE: Pause or resume play from a USB storage device.
REC: Records tuned program to connected USB storage device.
NAVI: Enter Navigation menu bar, a short cut to various functions.
STOP: Stops Recording or Playback of files to USB storage device.
USB: Enters Recorded file list for connected USB storage device.
MENU: Enter main Menu.
RETURN/EXIT: Leave a Menu or function.
CH+: Channel select Up.
CH- : Channel select Down.
VOL+: Sound Volume level up or increase.
VOL-: Sound Volume level down or decrease.
PAGE UP: Move up page list.
PAGE DOWN: Move down page list.
0 – 9: Select Channel or enter number values from a menu mode.
FAV: Press to select channels from Favourites list.
EPG: Selects Electronic Program Guide and EPG Record functions.
TEXT: Enter or exit Teletext menu (Teletext generally not available).
SUBTITLE: Acceses menu to turn Closed Captions (Subtitles) On or Off.
◄◄ REV: Fast Rewind through recordings – 8 speeds up to 32x.
►► FWD: Fast Forward through recordings – 8 speeds up to 32x.
Coloured keys: Red, Green, Yellow and Blue,
provide a variety of functional shortcuts.
Page 10
9
REMOTE CONTROL BATTERY CARE
To ensure long life from your Remote Control Unit:-
1. Check that the polarity indicators of batteries and the remote control
terminals correspond.
2. Do not mix new and old or different types of batteries together.
3. Never leave old or exhausted batteries in the remote control.
4. If storing your receiver for an extended period, remove the RCU batteries.
5. Only rechargeable cells (NiMh etc) should be recharged, and on a
purpose built charger.
6. Do not attempt to disassemble or short circuit the batteries.
7. Do not expose the batteries to heat sources.
8. In the event of electrolyte fluid does leak from a battery inside the remote
control, wipe away with a damp cloth and insert new batteries.
9. Damage caused by leaking batteries is not covered by warranty.
PREPARING THE REMOTE CONTROL FOR USE
Load fresh batteries for your remote control unit to operate reliably.
1. Open the battery compartment lid on the back of the RCU.
2. Insert the batteries, negative terminals first. Take care that the battery
polarity markings correspond with those of the remote control.
3. Close the battery compartment lid, checking that it locks in place.
4. Your RCU should now be ready for use.
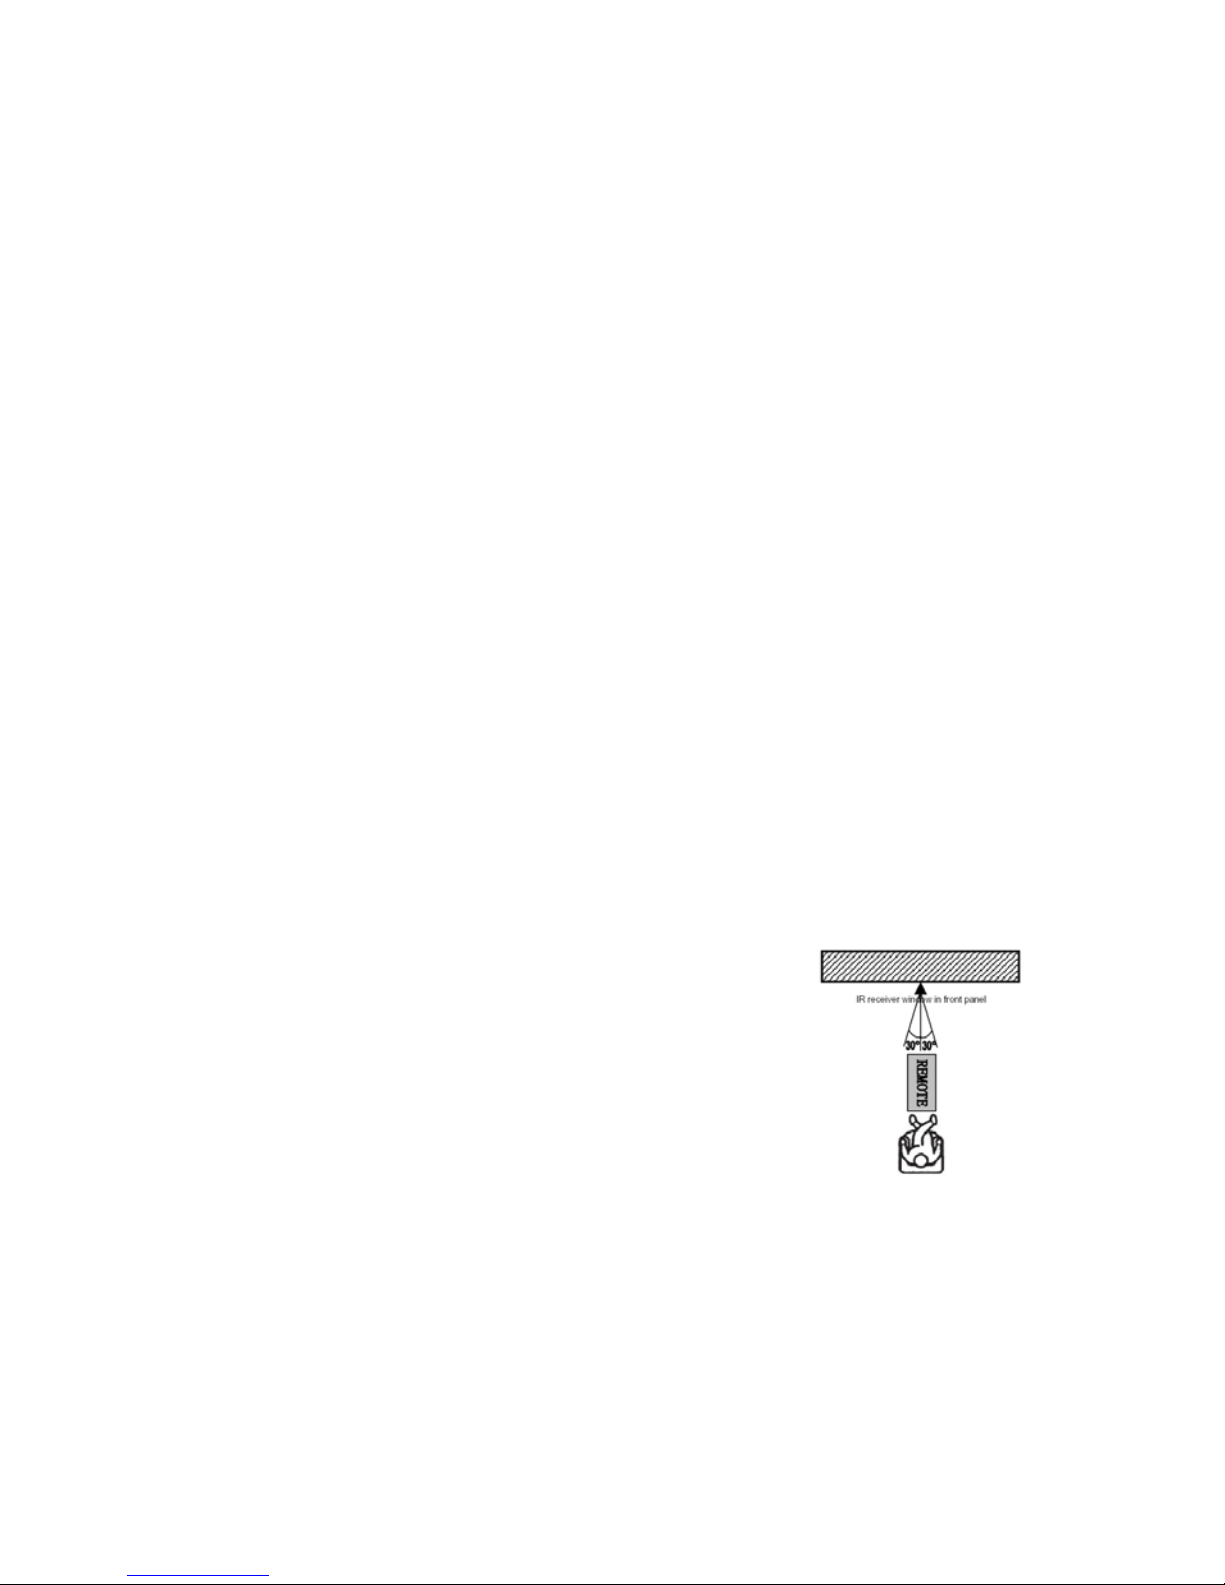
REMOTE CONTROL OPERATING DISTANCE & ANGLE
With an uninterrupted view of your receivers
Front panel IR window, point the RCU towards
your receiver and press any key.
1. Distance: The remote control should work up to
7 meters from the front of your receiver…
2. Angle: and about + or – 30 degrees from directly
facing the receiver (see drawing).
USEFUL REMOTE CONTROL TIPS
1. For prolonged receiver life, intervals of continuous switching action
should be kept to less than one minute.
2. Should receiver stop responding to RCU commands or freeze up,
disconnect the batteries and or power for 10 seconds and restart.
3. Daylight and some electric light can compromise the distance over which
a RCU is effective. You can solve this by re-adjusting receiver position
and room lighting as necessary.
Page 11

10
INSTALLATION
Connecting the HHH640 - Video and Audio
HDMI OUTPUT PLUG
The HDMI Output Plug of the HHH640 provides Video and Audio.
. Set your TV Video mode to HDMI via your TV Video Source.
. Connect the HHH640 with the units HDMI Output plug to the HDMI Input
connector of your television.
. Connect the antenna lead to the RF IN connector socket of the HHH640.
. Connect the supplied Infrared Remote Extender to the IR connector
socket of the HHH640 and position the IR to enable clear uninterrupted
remote control signal.
. Connect the supplied Power Pack to the DC5V connector socket of the
HHH640 and to mains power.
A/V Output Connection
If a HDMI Input connector is not available on your TV, you can make
connection by the A/V connector on the HHH640 to your TV’s RCA Video
and Audio Input connectors.
Set your TV Video mode to Composite (CVBS) via your TV Video Source.
. Connect the supplied RCA AV lead (3.5mm plug) to A/V connector socket
of the HHH640.
. Connect the 3 RCA connectors of the supplied AV lead to the RCA Video
connector of your TV and the left and right RCA audio connectors of your
TV.
Yellow Connector = Video
White Connector = Left Audio
Red Connector = Right Audio
. Connect the antenna lead to the RF IN connector socket of the HHH640.
. Connect the supplied Infrared Remote Extender to the IR connector
socket of the HHH640 and position the IR to enable clear uninterrupted
remote control signal.
. Connect the supplied Power Pack to the DC5V connector socket of the
HHH640 and to mains power.
Page 12
11
START UP
Once you have made your video connection to the HHH640 and to your TV,
connected the antenna, IR Extender and Power Pack, please action the
following Start Up procedure:-
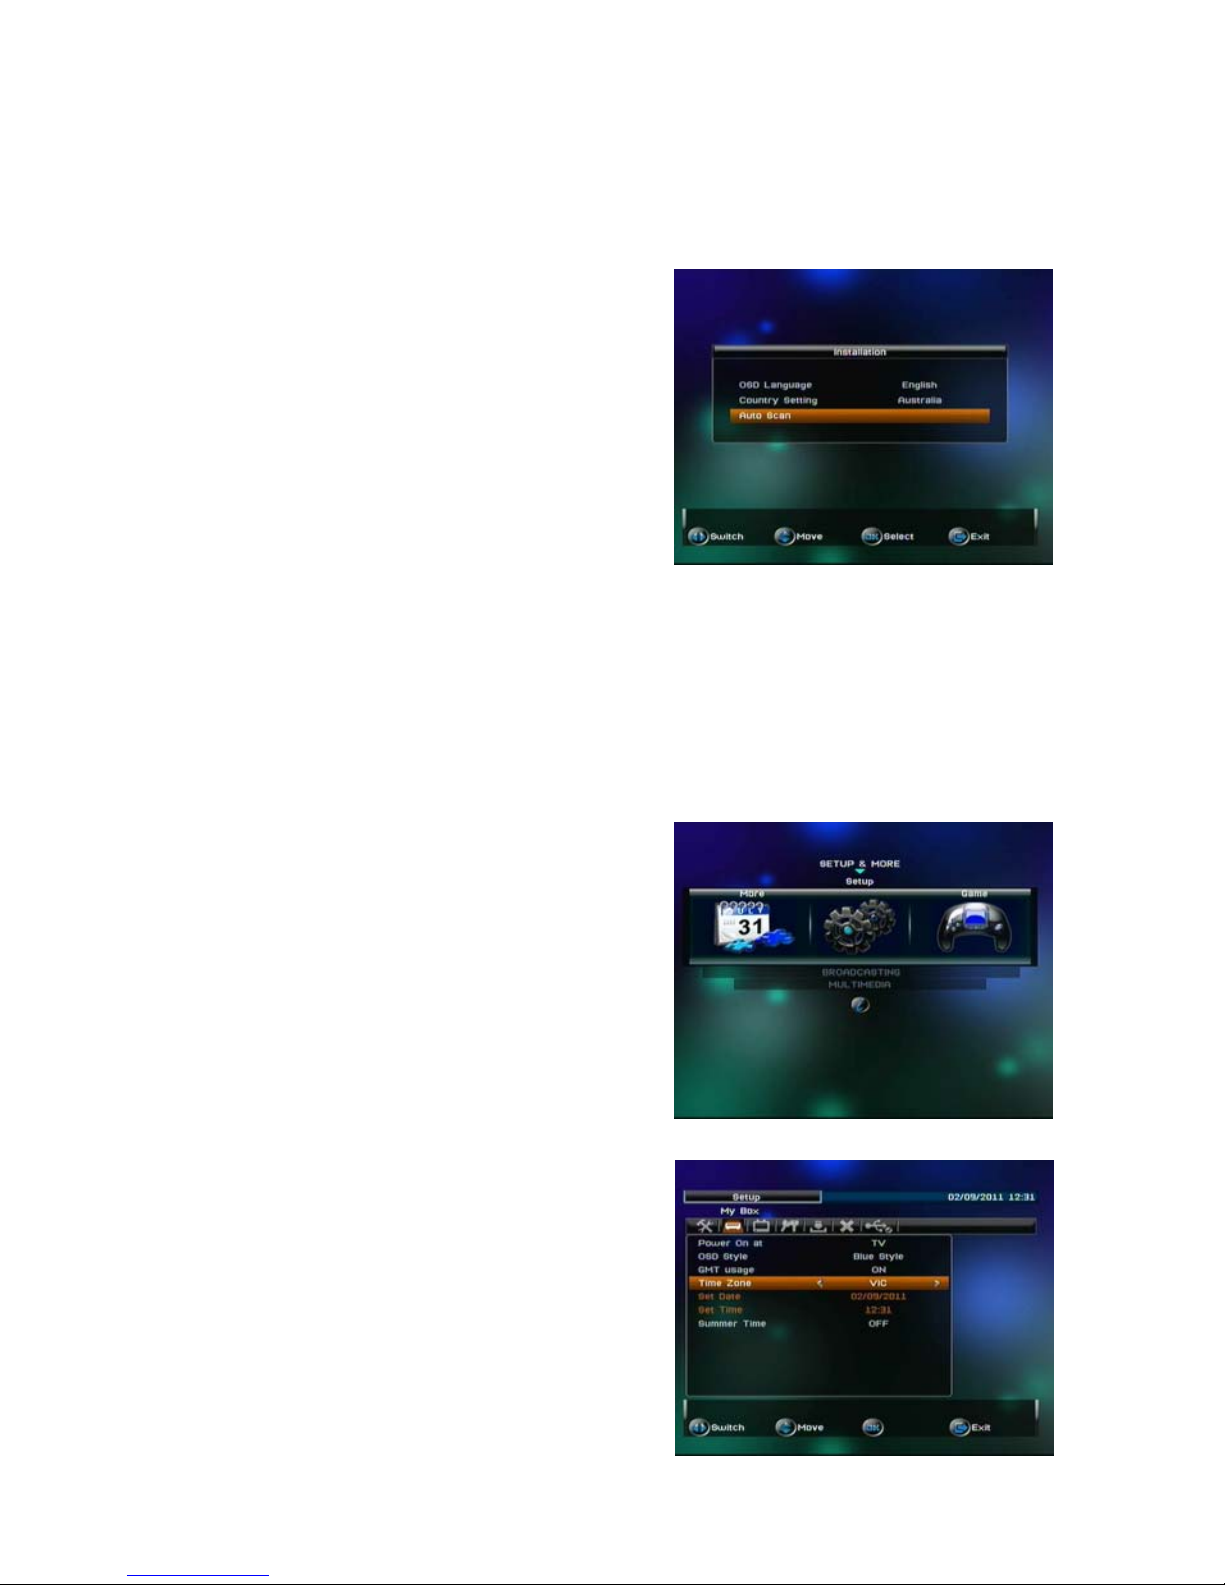
. Power On the HHHH640 and a healing
banner will be displayed for a few
seconds and - - - will appear in the units
orange LED display.
. INSTALLATION page will now display
with AUTO SCAN highlighted.
. Push the OK key on the remote control,
Auto Scan will commence.
. The receiver will scan and then save
the TV & Radio channels in your
location and this will take a few
minutes.
. Once all channels have been scanned,
the receiver will automatically revert to
normal TV viewing.
TIME ZONE (For your Location)
It is important to set up your STATE so
that the Time signal automatically
generated by the broadcaster is properly
corrected for your location.
VIC is the default in the unit. To select
your State, please action the following:-
. Press the Menu key on the remote
control and SET UP & MORE page will
display.
. Press the Up/Down arrow keys on the
remote control and select SET UP.
. Press the Left/Right arrow keys on the
remote control to locate SET UP in the
middle of the screen.
. Press the OK key on the remote control
and SET UP page will be displayed.
. You will note 7 menu symbols at the top
of the page.
Page 13

12
. Use the Left/Right arrow keys on the remote control and select MY BOX.
. Push OK key on remote control and the seven MY BOX parameters will
list.
. Press the Up/Down arrow keys on the remote control and select TIME
ZONE.
. Press the Left/Right arrow keys on the remote control and set your State.
. Press Return/Exit button on the remote control to return to normal TV
viewing.
With installation complete, the unit will function normally.
The following pages describe operational details
and other function parameters that can also be chosen.
Manual Scan
The automatic scan that you actioned at first installation of the unit finds the
available channels in your location.
You can also manually search individual channels from within the
INSTALLATION Menu.
. To select the INSTALLATION Menu, press the Menu key on the remote
control.
. Press the Up/Down arrow keys on the remote control and select SET UP.
. Press the Left/Right arrow keys on the remote control to locate SET UP in
the middle of the screen.
. Press the OK key on the remote control and SET UP page will be
displayed.
. You will note 7 menu symbols at the top of the page.
. Select INSTALLATION. Press the Down arrow key on the remote control
and then the Right arrow key to select MANUAL SCAN.
. Press OK key on the remote control and Manual Scan banner will be
displayed.
. You can choose to scan by Channel number or by centre Frequency.
. To scan by Channel, press the Down arrow key on the remote control and
select the Channel No bar.
. Press the Left/Right arrow keys on the remote control and select a channel
number.
. To scan by Frequency, press the Down arrow key on the remote control
and select the Frequency bar.
. Input the TV channel Frequency number that you want to scan by using
the number keys on the remote control.
. Press the OK key on the remote control and the receiver will scan the
Channel or Frequency you have specified.
. Once the scan has finished, the receiver will save channels found and
return to normal TV viewing.
Page 14
13
Up/Down Channel Change
Press the Up/Down arrow keys on the remote control to select a channel to
view.
Numeric Input Channel Change
Press the number keys on the remote control to select a channel to view.
Volume Adjustment
Volume Increase: Press the Right arrow key on the remote control.
Volume Decrease: Press the Left arrow key on the remote control.
Volume Mute
To suspend the audio, press the Mute key on the remote control.
TV or Radio Selection
Press the TV/Radio Key on the remote control to change between TV and
Radio Channels.
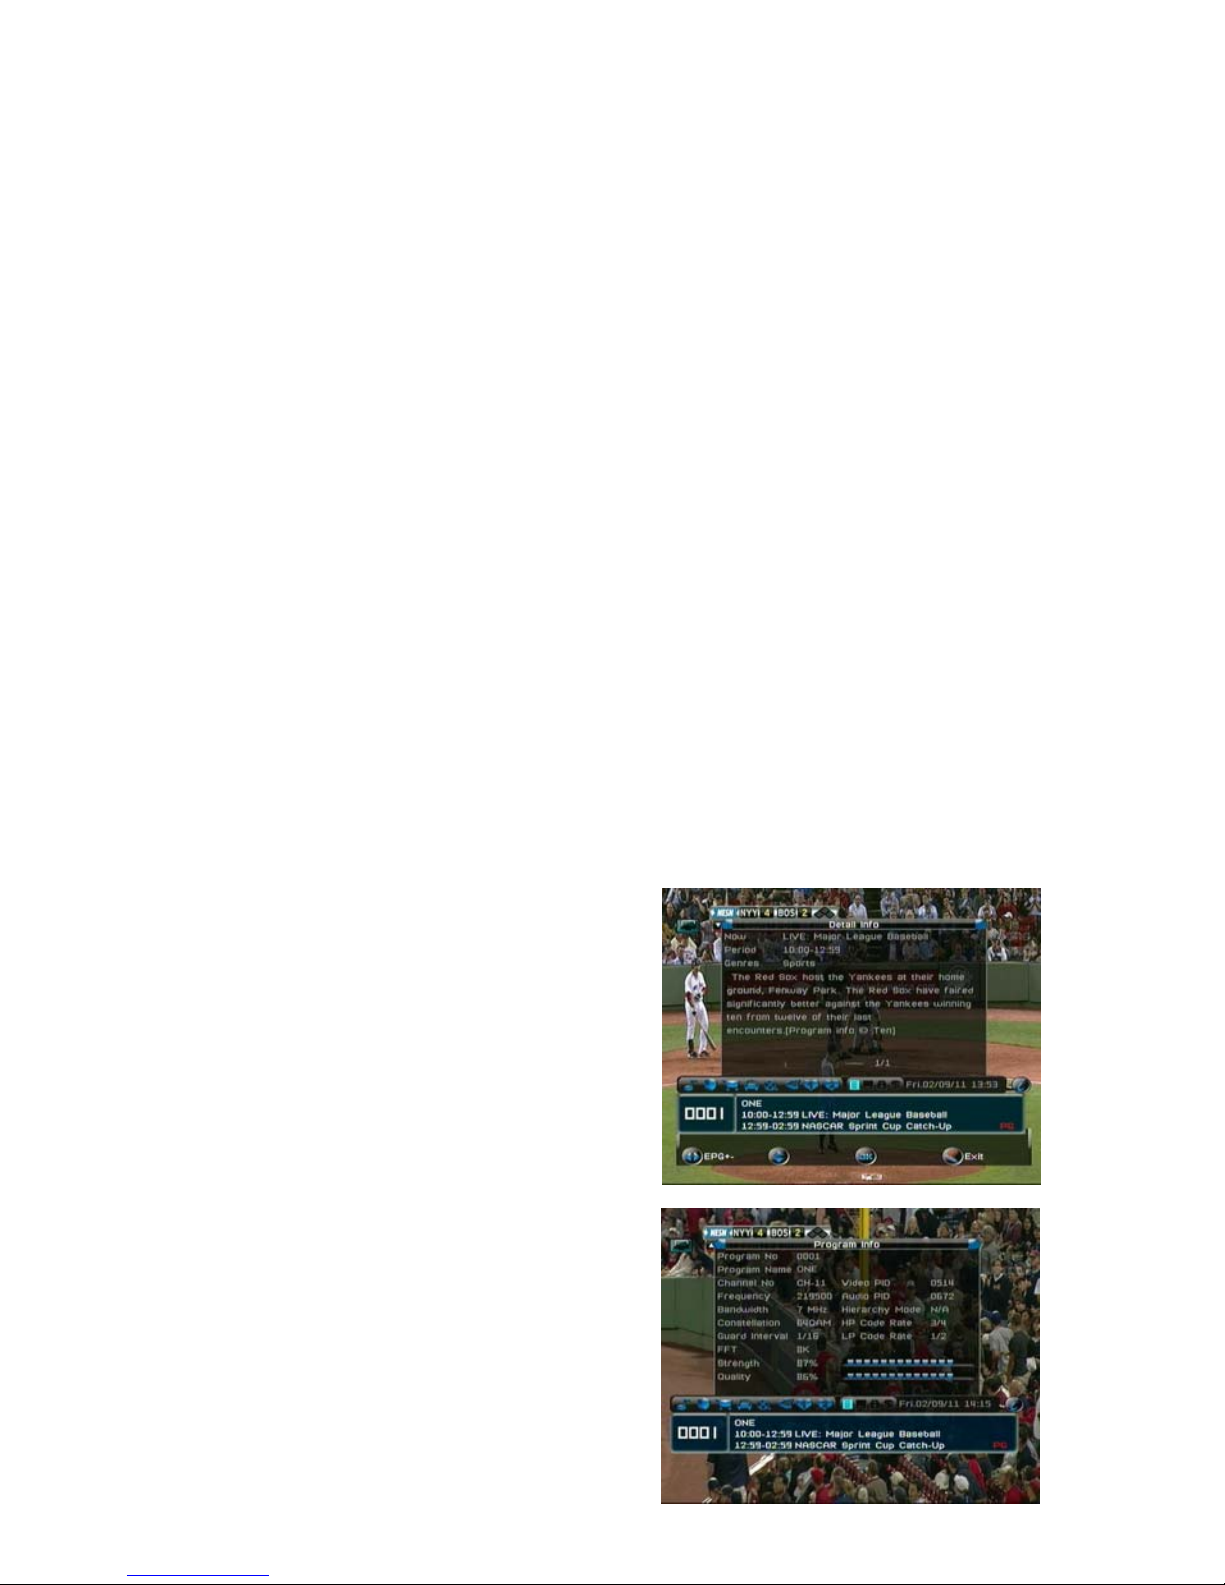
INFO Key
By pressing the INFO key on the remote control, you can access TV
program information which includes channel number, program title and
program duration.
. Press Once: to see Channel number, Channel name and Program
duration.
. Press Twice: to see Program details.
. Press Three Times: to see Program
Information including channel Signal
Strength and Quality %.
Page 15
14
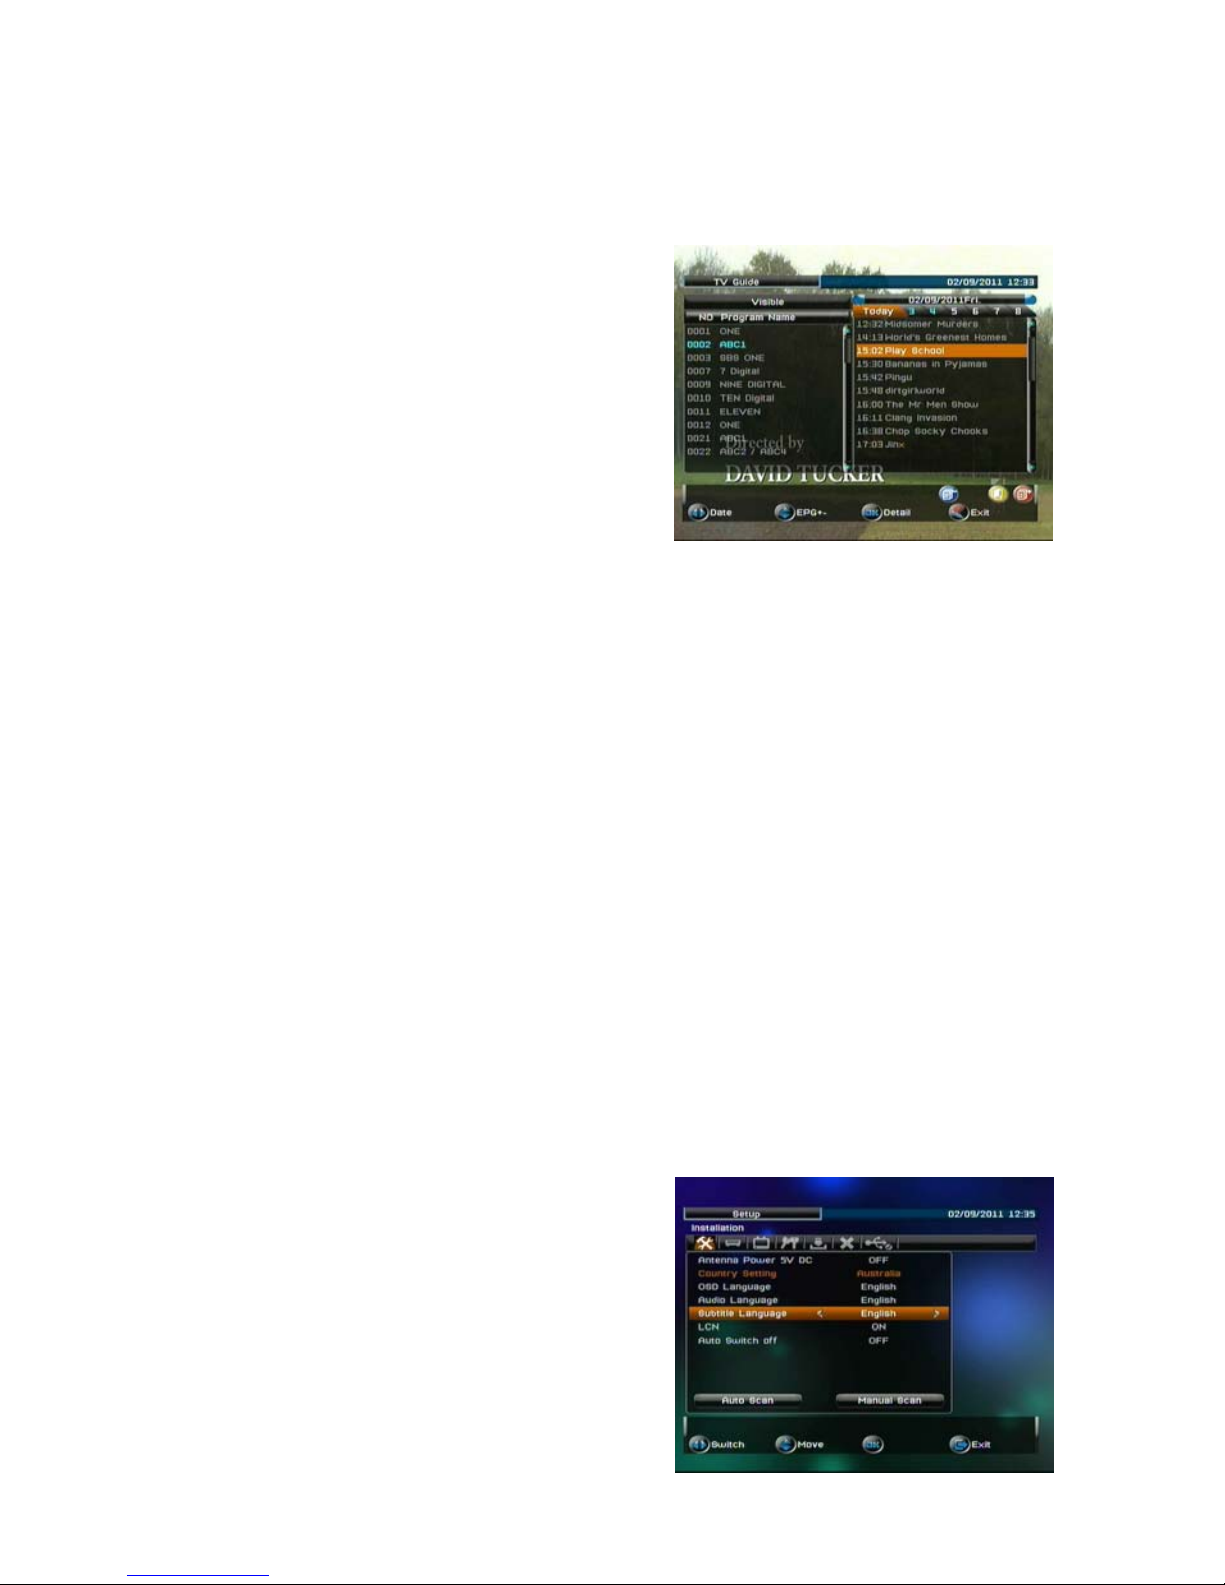
EPG – Electronic Program Guide
EPG is a chronological listing of broadcasters programming schedules over
an extended period (normally 7 days plus) which includes detailed program
descriptions.
. Press the EPG button on the remote
control and TV Guide page will be
displayed.
. Press the UP/Down key to highlight a
channel and you will note the channel
program names for that day are listed
on the right.
. Press the Right arrow key to highlight
program names.
. Press the Up/Down arrow key to
highlight any program.
. With the program name highlighted, press the OK key to see program
information details.
. You will note ‘Today’ is highlighted. To view an upcoming day’s list of
programs, press the Left/Right arrow keys and day can be selected
accordingly.
Closed Captions
Closed Captions is a method of displaying SubTitles on the TV screen, of
particular assistance to the hearing impaired.
You can choose to set Closed Captions to be operating at all times (when
broadcast) by setting up Closed Captions in the Installation Menu.
. Press the Menu key on the remote control and SET UP & MORE page will
be displayed.
. Press the Up/Down arrow keys on the remote control and select SET UP.
. Press the Left/Right arrow keys on the remote control to locate SET UP in
the middle of the screen.
. Press the OK key on the remote control
and SET UP page will be
displayed and you will note 7 menu
symbols at the top of the page.
. Press the Left/Right arrow keys on the
remote control and select
INSTALLATION.
. Push OK key on remote control and
seven INSTALLATION parameters
will be listed.
Page 16

15
. Press the Up/Down arrow keys on the remote control and select
SUBTITLE LANGUAGE.
. Press the Return/Exit key 3 times to return to normal TV viewing. Closed
Captions will now display at all times when broadcast.
Closed Captions – By Subtitle Key
If you decide not to set up Closed Captions in the Installation menu; you can
choose to turn On closed captions for each particular channel by actioning
the following:
. Press the Subtitle key on the remote control and subtitle banner will
display.
. Press the Left/Right arrow key to select TTX SUBTITLE.
. Press the Up/Down arrow key and select eng.
. Press the OK button on the remote control.
If closed captions are being broadcast they will now be displayed.
Note: If you select Closed Captions by Subtitle Key, Cc’s must be activated
Channel by Channel.
Note: ‘Temporary’ Closed Captions can also be enabled via the NAVI key
explained In NAVI KEY Functions.
INSTALLATION Menu
In the INSTALLATION sub menu, seven parameters can be set: Antenna
Power / Country Setting (default Australia) / OSD Language / Audio
Language / Subtitle Language / LCN / Auto Switch.
. To select the INSTALLATION Menu, press the Menu key on the remote
control.
. Press the Up/Down arrow keys on the remote control and select SET UP.
. Press the Left/Right arrow keys on the remote control to locate SET UP in
the middle of the screen
. Press the OK key on the remote control and SET UP page will be
displayed.
. You will note 7 menu symbols at the top of the page.
. Use the Left/Right arrow keys on the remote control and select
INSTALLATION.
. Push OK key on remote control and the seven INSTALLATION
parameters will be listed.
. To select each parameter, press the Up/Down arrow keys on the remote
control.
Note: Once you have set a parameter, you can return to normal TV viewing
by pressing the Return/Exit key on the remote control 3 times.
Page 17

16
Antenna Power:
The default setting is Off. If you have a 5Volt DC ‘active’ antenna, press the
Left/Right arrow key and select ‘Yes’.
Country Setting:
Australia is set as default.
OSD Language:
The On Screen Display default is English. Handle carefully as this option
presents the possibility of getting lost in an unfamiliar language!
Audio Language
English is set as default and is usually the only language option broadcast
in Australia.
Subtitle Language
Used to display Closed Captions. Closed Captions is a method of displaying
text on the TV channel to assist the hearing impaired.
. Off is set as a default.
. To turn On Closed Captions, press the Left/Right arrow key and select
English.
. Push the Return/Exit key 3 times to return to TV viewing.
. Closed Captions will now be displayed on all programs that broadcast
Closed Captions.
LCN (Logical Channel Numbering)
On is set as a default. If you do not want channels listed in logical channel
number sequence, press Left/Right arrow key and select OFF.
Auto Switch OFF
You can choose to set the unit to automatically turn Off after a designated
time period:
The selections are: Off (default) / 3 hours / 4 hours / 5 hours.
MY BOX Menu
In the MY BOX sub menu, 7 parameters can be set:
Power On At – TV is set as default, do not alter this setting / OSD Style –
Blue is set as default / GMT Usage – On is set as default / Time Zone ( VIC
is set as default) / Set Date / Set Time / Summer Time.
. To select the My Box Menu, Press the Menu key on the remote control
and SET UP & MORE page will be displayed.
. Press the Up/Down arrow keys on the remote control to select SET UP.
. Press the Left/Right arrow keys on the remote control to locate SET UP in
the middle of the screen.
. You will note 7 menu symbols at the top of the page.
. Use the Left/Right arrow keys on the remote control and select MY BOX.
. Push OK button on remote control and the seven MY BOX parameters will
be listed.
Page 18
17
Note: Once you have set a parameter, you can return to normal TV viewing
by pressing the Return/Exit Key on the remote control 3 times.
Power On
TV is set as default, do not alter this setting.
OSD Style
All On Screen Displays are set as Blue default. If you wish to have OSD in
Green, press Left/Right arrow keys and select Green.
GMT Usage
The default setting is OFF. Time follows a GMT or UTC reference
generated by the broadcaster.
Time Zone
Selects an offset from GMT or UTC by State. VIC is set as default. To
change to location, press the Left/Right arrow keys.
Set Date
Detected from broadcast automatically.
Set Time
Detected from broadcast automatically.
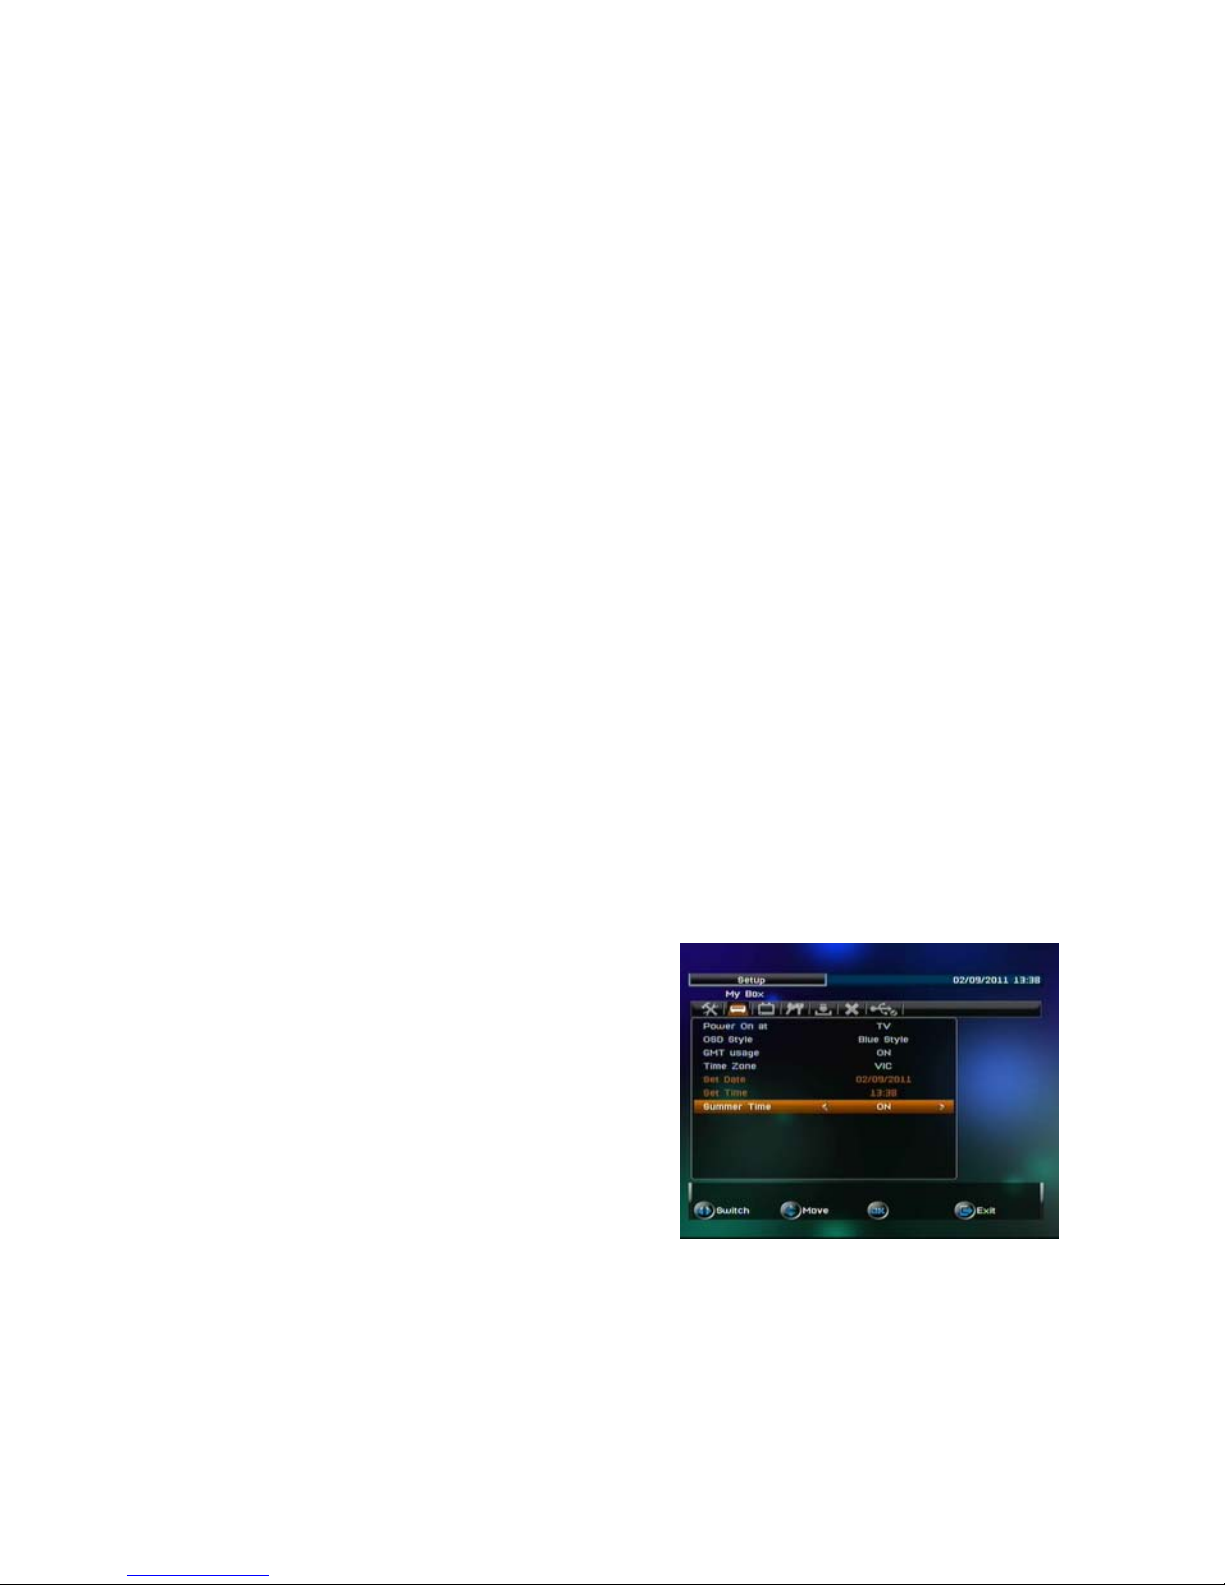
Summer Time
Provides an additional offset from GMT or UTC as required in some states
in the Summer months. The default setting is OFF which matches the
Winter months. To account for Daylight Saving time, set Summer Time to
ON by actioning the following:. Press the Up/Down arrow keys and
select GMT Usage.
. Press the Left/Right arrow keys to
select GMT Usage ON.
. Press the Up/Down arrow keys and
select Summer Time.
. Press the Left/Right arrow keys and
select ON.
. Press the Up/Down arrow keys and
select GMT Usage OFF.
Note: To change summer time to OFF,
select GMT usage ON, then select Sumer
Time OFF, then select GMT Usage Off.
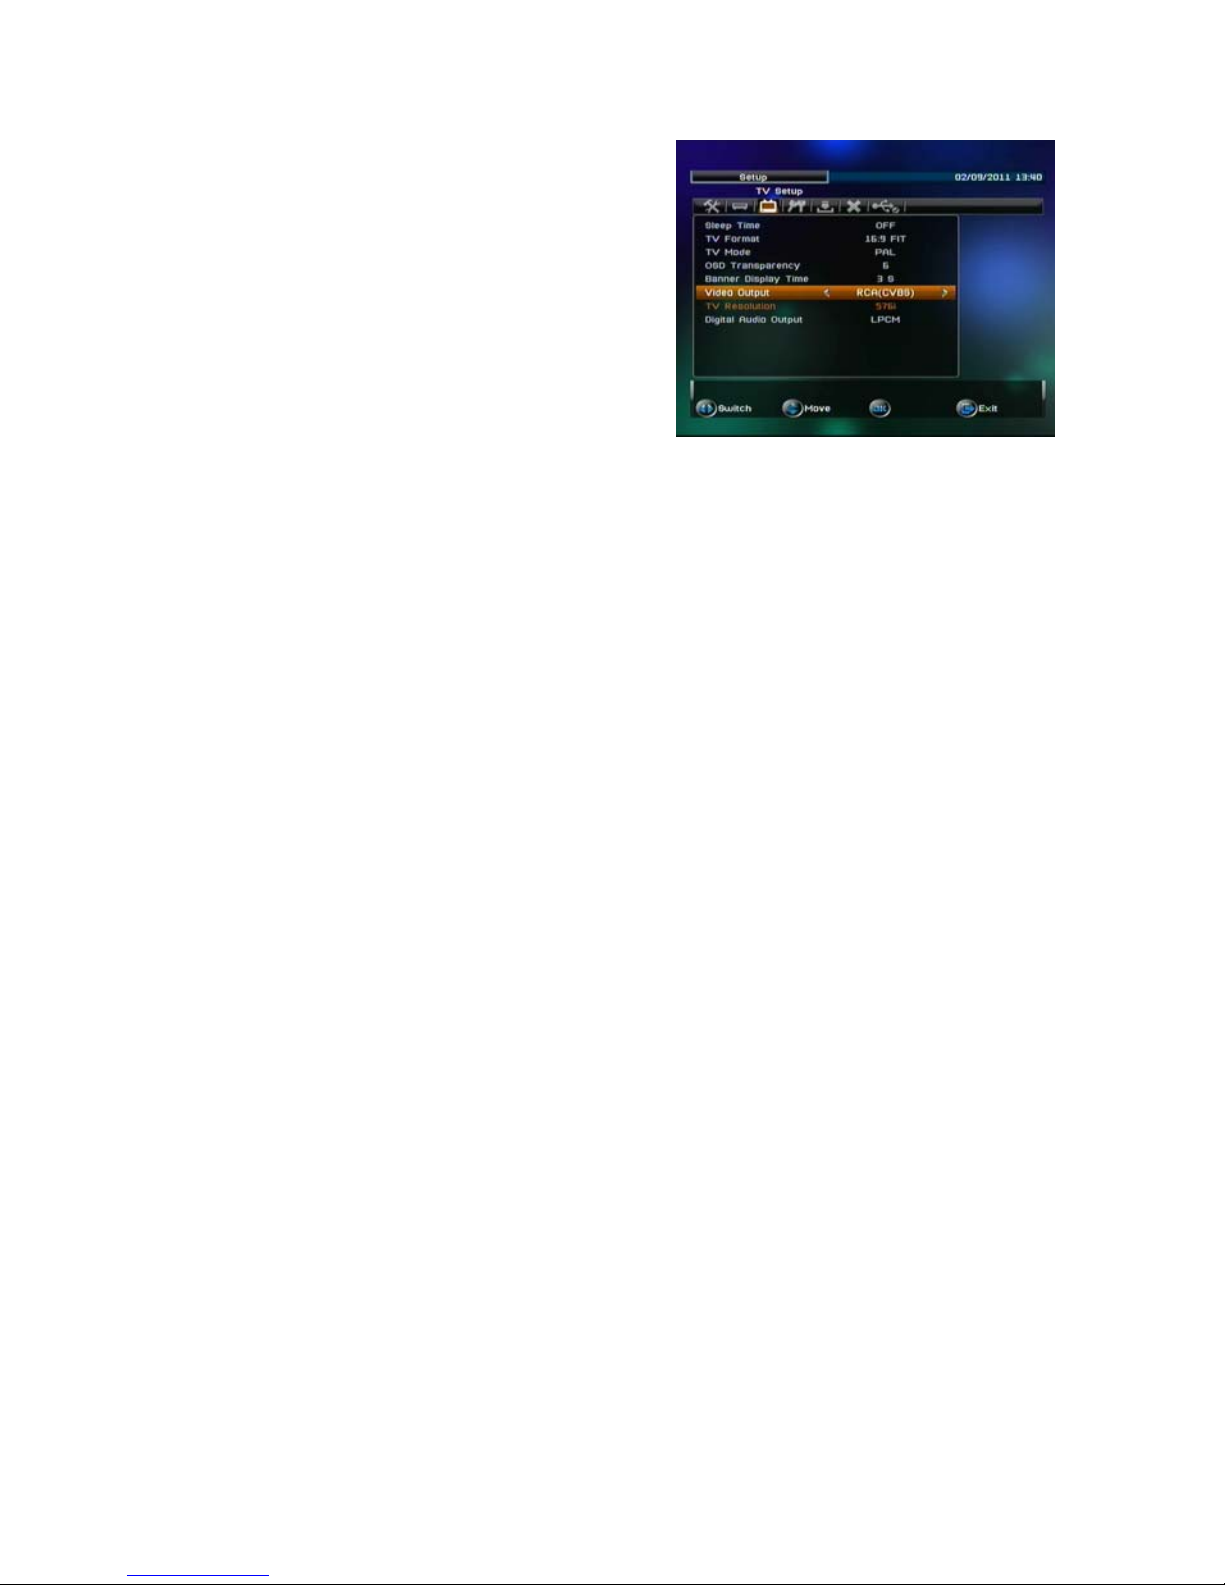
TV SETUP Menu
In the TV SET Up sub menu, 8 parameters can be set:
Sleep Time Off / TV Format / TV Mode / OSD Transparency / Banner
Display Time / Video Output / TV Resolution / Digital Audio Output
. To select the TV SETUP Menu, Press the Menu key on the remote control.
Page 19
18
. Press the Up/Down arrow keys on the remote control to select SET UP.
. Press the Left/Right arrow keys on the
remote control to locate SET UP in
the middle of the screen.
. You will note 7 symbols at the top of the
page.
. Use the Left/Right arrow keys on the
remote control and select TV SETUP.
. Push OK button on remote control and
the 8 TV SETUP parameters will be
listed.
Note: Once you have set a parameter, you can return to normal TV viewing
by pressing the Return/Exit Key on the remote control 3 times.
Sleep Time Off
You can choose to set the unit to automatically turn Off after designated
Minute selections:
The minute selections are: Off (default) / 15 / 30 / 45 / 60 / 90 /120.
Press the Left/Right arrow keys to make your selection.
TV Screen Format
You can select the screen format to best match your display screen.
16:9, 16:9 fit, 4:3 LB, 4:3 Centre Cut.
Press the Left/Right arrow keys to make your selection.
TV Mode
The TV mode default is set to PAL; do not alter this selection.
ODS Transparency
You can set the Transparency of On Screen Displays.
The options are: 1, 2, 3, 4, 5, 6 (default), 7 or 8.
Press the Left/Right arrow keys to change selection.
Banner Display Time
You can set the amount of time each information page is displayed in
seconds.
The seconds options are: 1, 3 (default), 5, 10, 30, always.
Press the Left/Right arrow key to make your selection.
Video Output
You will not need to make any adjustment.
. If you connect the HHH640 to the TV by the receivers HDMI output plug,
the HHH640 Video Output menu will automatically list as HDMI.
. If you connect the HHH640 to the TV by Receivers A/V connector socket,
the HHH640 Video Output menu will automatically list as RCA (CVBS).
Page 20

19
TV Resolution
Enables selection of Video Resolution type.
Optimal video resolution depends on which video output that you have
connected from the HHT650 and the TV displays capability:
. HDMI- You can select: 1080i, Auto, 720P
. RCA (CVBS) In this Composite output video resolution 576i is the default
and cannot be altered.
. YCbCr (YUV) – In this Component output video resolutions are 1080i,
720p, 576p, 576i.
Digital Audio Output
Incorporated with the HDMI output connector.
PASSWORD MENU
In the PASSWORD menu, 4 parameters can be set:
Menu Lock / Channel Lock / Censorship Lock / Password Lock
. To select the PASSWORD Menu, Press the Menu key on the remote
control.
. Press the Up/Down arrow keys on the remote control to select SET UP.
. Press the Left/Right arrow keys on the remote control to locate SET UP in
the middle of the screen.
. You will note 7 symbols at the top of the page.
. Use the Left/Right arrow keys on the remote control and select
PASSWORD.
. Push OK button on remote control and the 4 PASSWORD parameters will
be listed: Menu Lock / Channel Lock Off / Censorship Lock / Change
Password.
Note: Once you have set a parameter, you can return to normal TV viewing
by pressing the Return/Exit Key on the remote control 3 times.
Menu Lock
The default setting is Off, however to avoid inadvertent changes to the main
menu function parameters that you have set up, you can choose to lock the
main menu items: The Menus that will be locked are: Installation / My Box /
Password / Set Default / Device Remove.
. To set Menu Lock ON, in the PASSWORD menu page press the Up/Down
arrow keys on the remote control and select Menu Lock.
. Press the Left/Right arrow key on the remote control and select ON.
. Press the Return/Exit key on the remote control 3 times to return to normal
TV viewing.
Page 21
20
. With the Menu Lock ON, if any of the above listed menus are accessed, a
banner will display ‘The Menu Is Locked. Please Enter Password’.
. To temporarily unlock, enter password (the default password is o, o, o, o,).
. The Menu parameters can now be altered.
. Once you EXIT and return to normal TV viewing, Menu Lock will be on.
Channel Lock
If Channel Lock is set to ON, the Password must be entered to access TV
LIST and RADIO LIST Menus.
The default setting is Channel Lock OFF. To select Channel Lock ON,
action the following:-
. In the PASSWORD menu page, press the Up/Down arrow keys on the
remote control and select channel lock.
. Press the Left/Right on the remote control and select ON.
. Press the Return/Exit key on the remote control to return to normal TV
viewing.
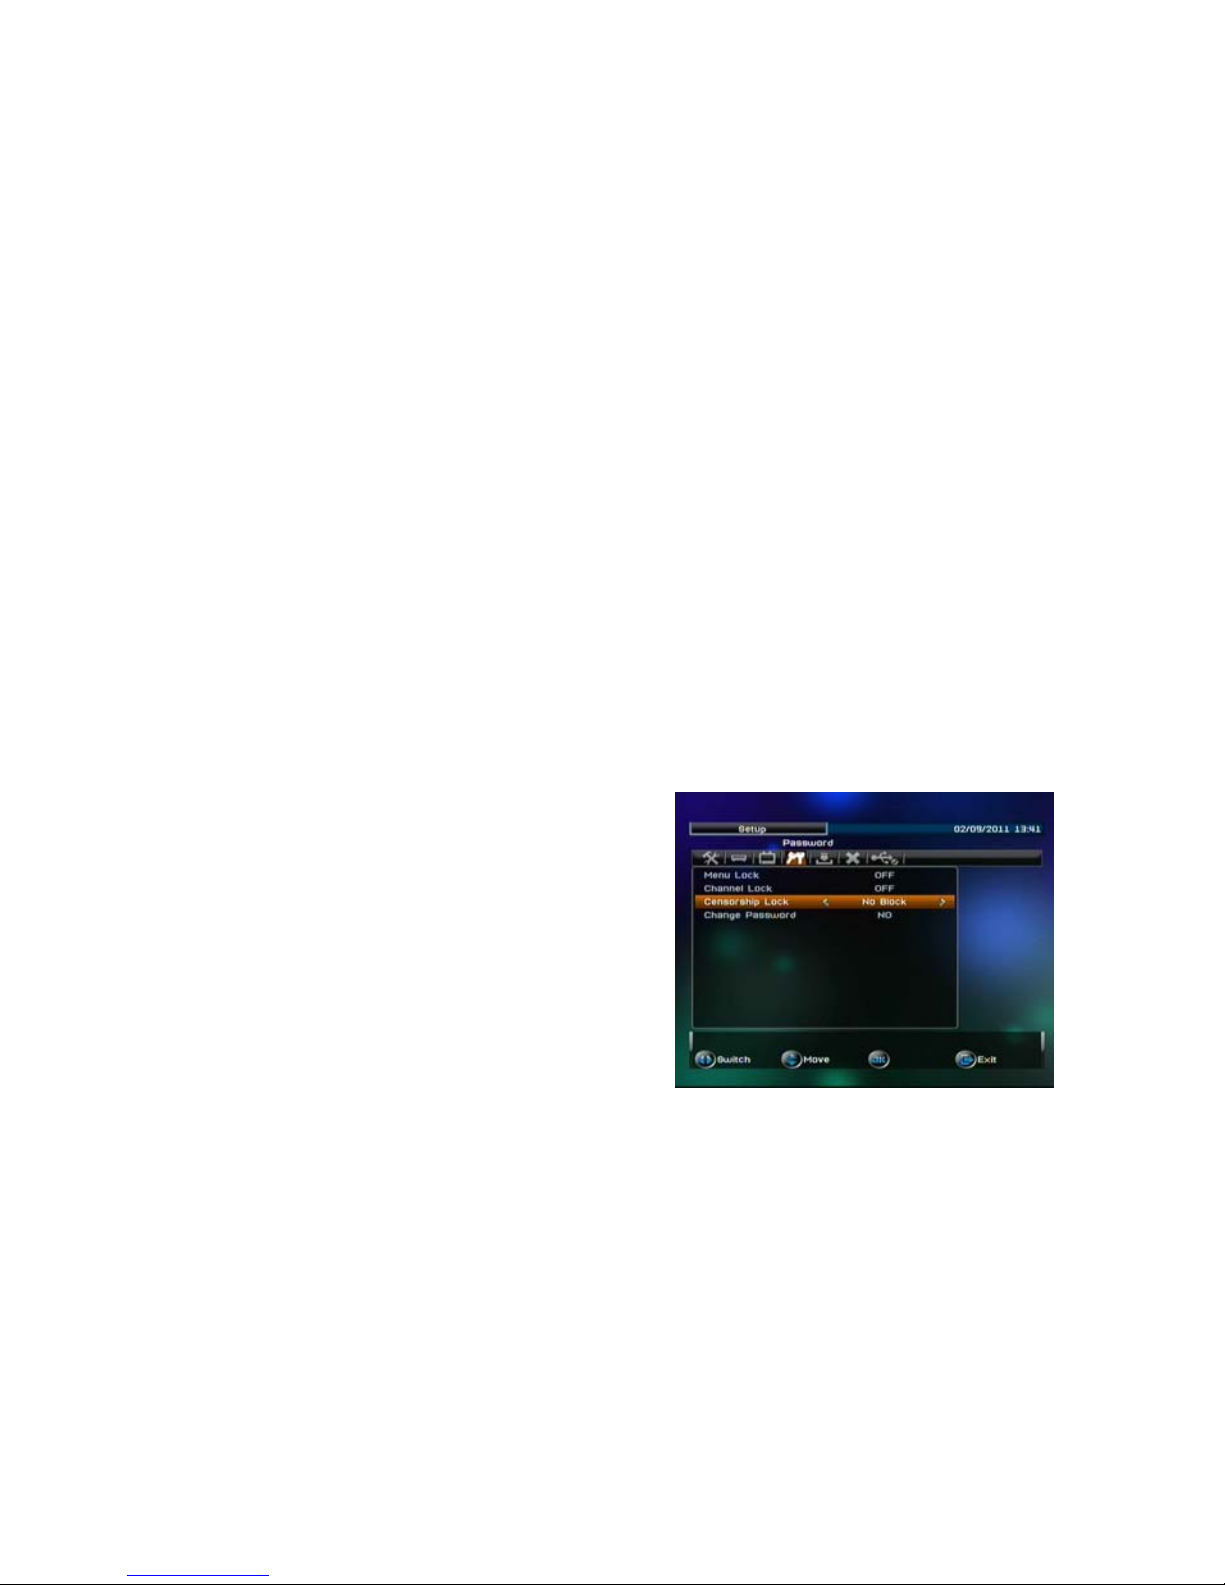
Censorship Lock
You can choose to block selected programs based on rating classifications:
No Block / Total Block / Block G / Block PG / Block M / Block MA / Block AV
/ Block R.
Note: No Block is the default setting.
. In the PASSWORD Menu press the
Up/Down key and select Censorship
lock.
. Press the Left Right Key and make a
selection.
. Press the Return/Exit key 3 times to
return to normal TV viewing.
Change Password
WARNING – RECORD YOUR NEW PASSWORD
You can choose to change the Password to any four numbers
The units default password is 0, 0, 0, 0.
. In the PASSWORD Menu, press the Up/Down key and select Change
Password.
. Press either the Left or Right arrow key and banner will display ‘Enter Old
Password’.
. Enter the old password (units factory default password is 0,0,0,0.) and
banner will display ‘Enter New Password’.
. Enter your selected new 4 digit password and banner will display ‘Confirm
Page 22
21
New Password’.
. Enter again your new password and banner will display ‘Pin Code
Changed’.
. Press the OK key on the remote control.
. Press the Return/Exit key 3 times to return to normal TV viewing.
SW Update: To enable firmware updates that may occur in the future.
Set Default: Returns the receiver to its factory default settings
. In the SET DEFAULT page, press the Down arrow key to select Set
Default.
. Press the OK key on the remote control and banner will display ‘Set
Default’.
. Press the Left arrow key to select ‘O’ and press the OK key; unit will now
revert back to factory default settings and Installation banner will be
displayed prompting Auto Scan.
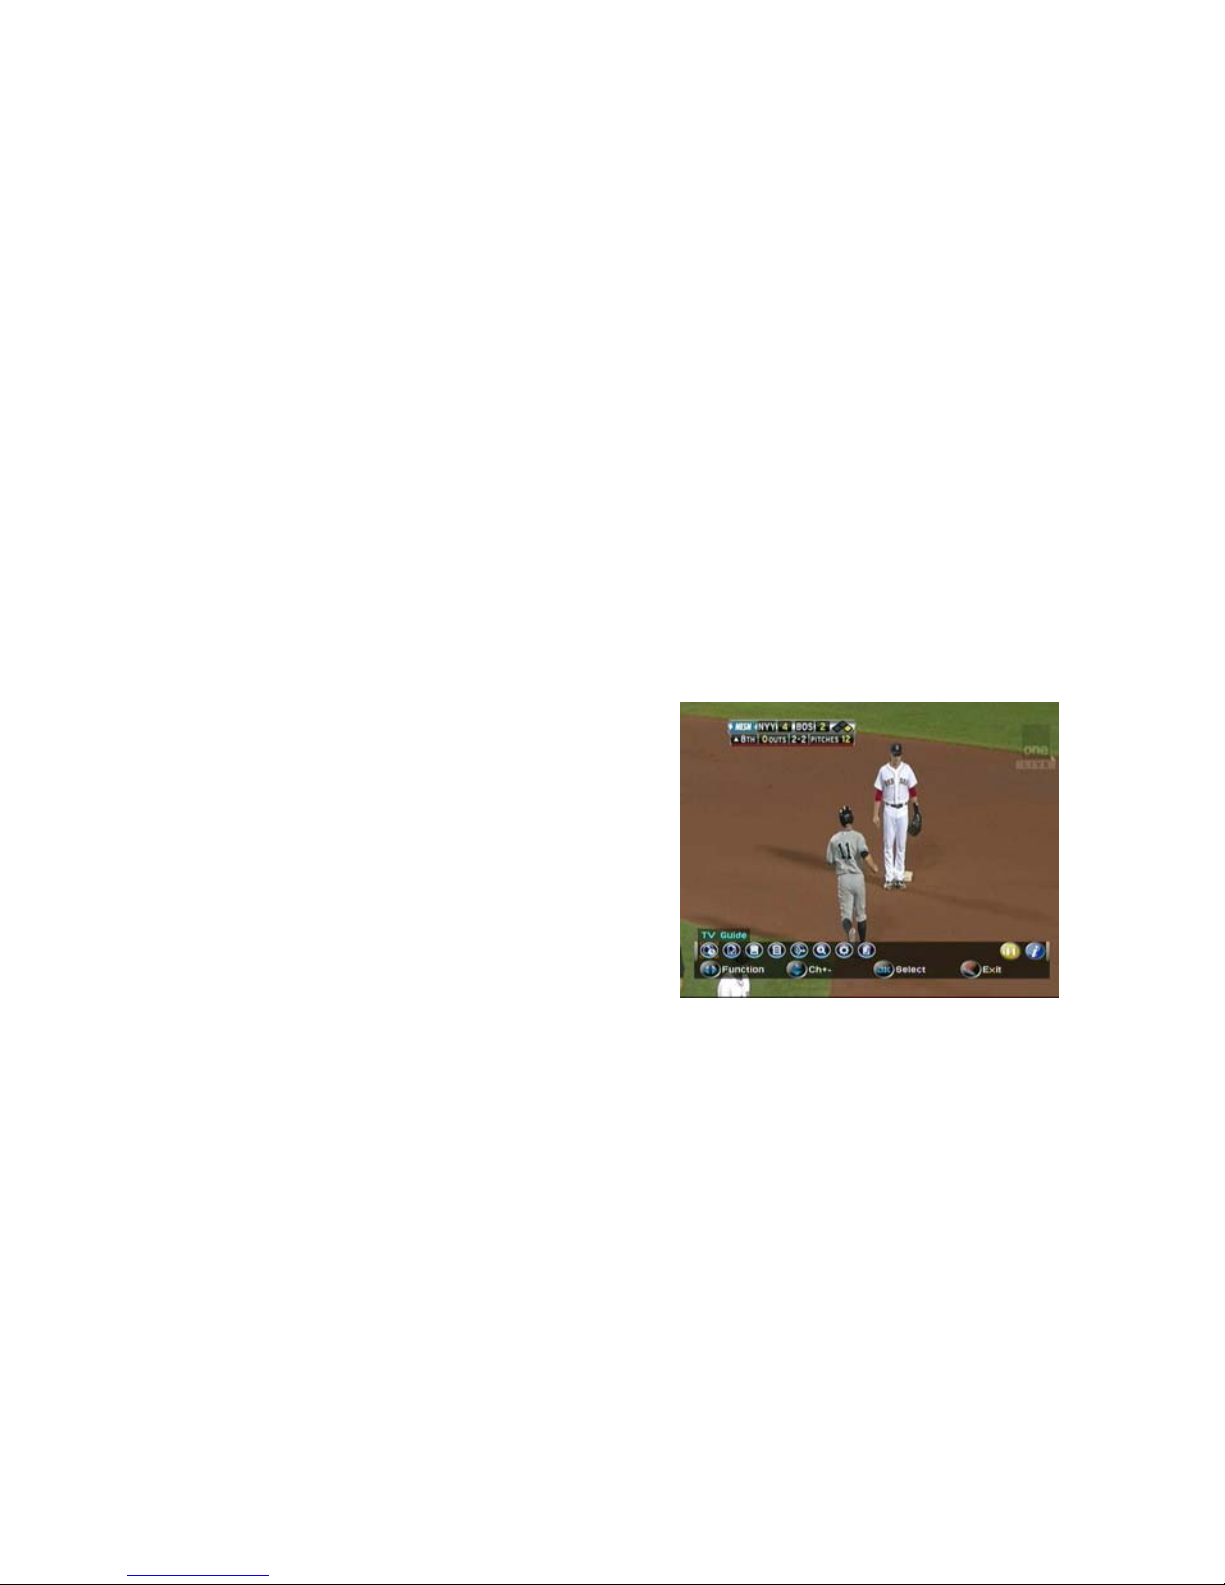
NAVI KEY FUNCTIONS
Press the NAVI key on the remote
control and 8 menu symbols will be
listed at the bottom of the screen.
Navi Key – TV Guide
. Press the Left/Right arrow key on the
remote control and select TV
Guide.
. Press OK Key on the remote control and TV Channel list and channel
program names will be displayed.
. Press the RED key on the remote control to select Page Up list of
channels.
. Press the BLUE key on the remote control to select Page Down list of
channels
.
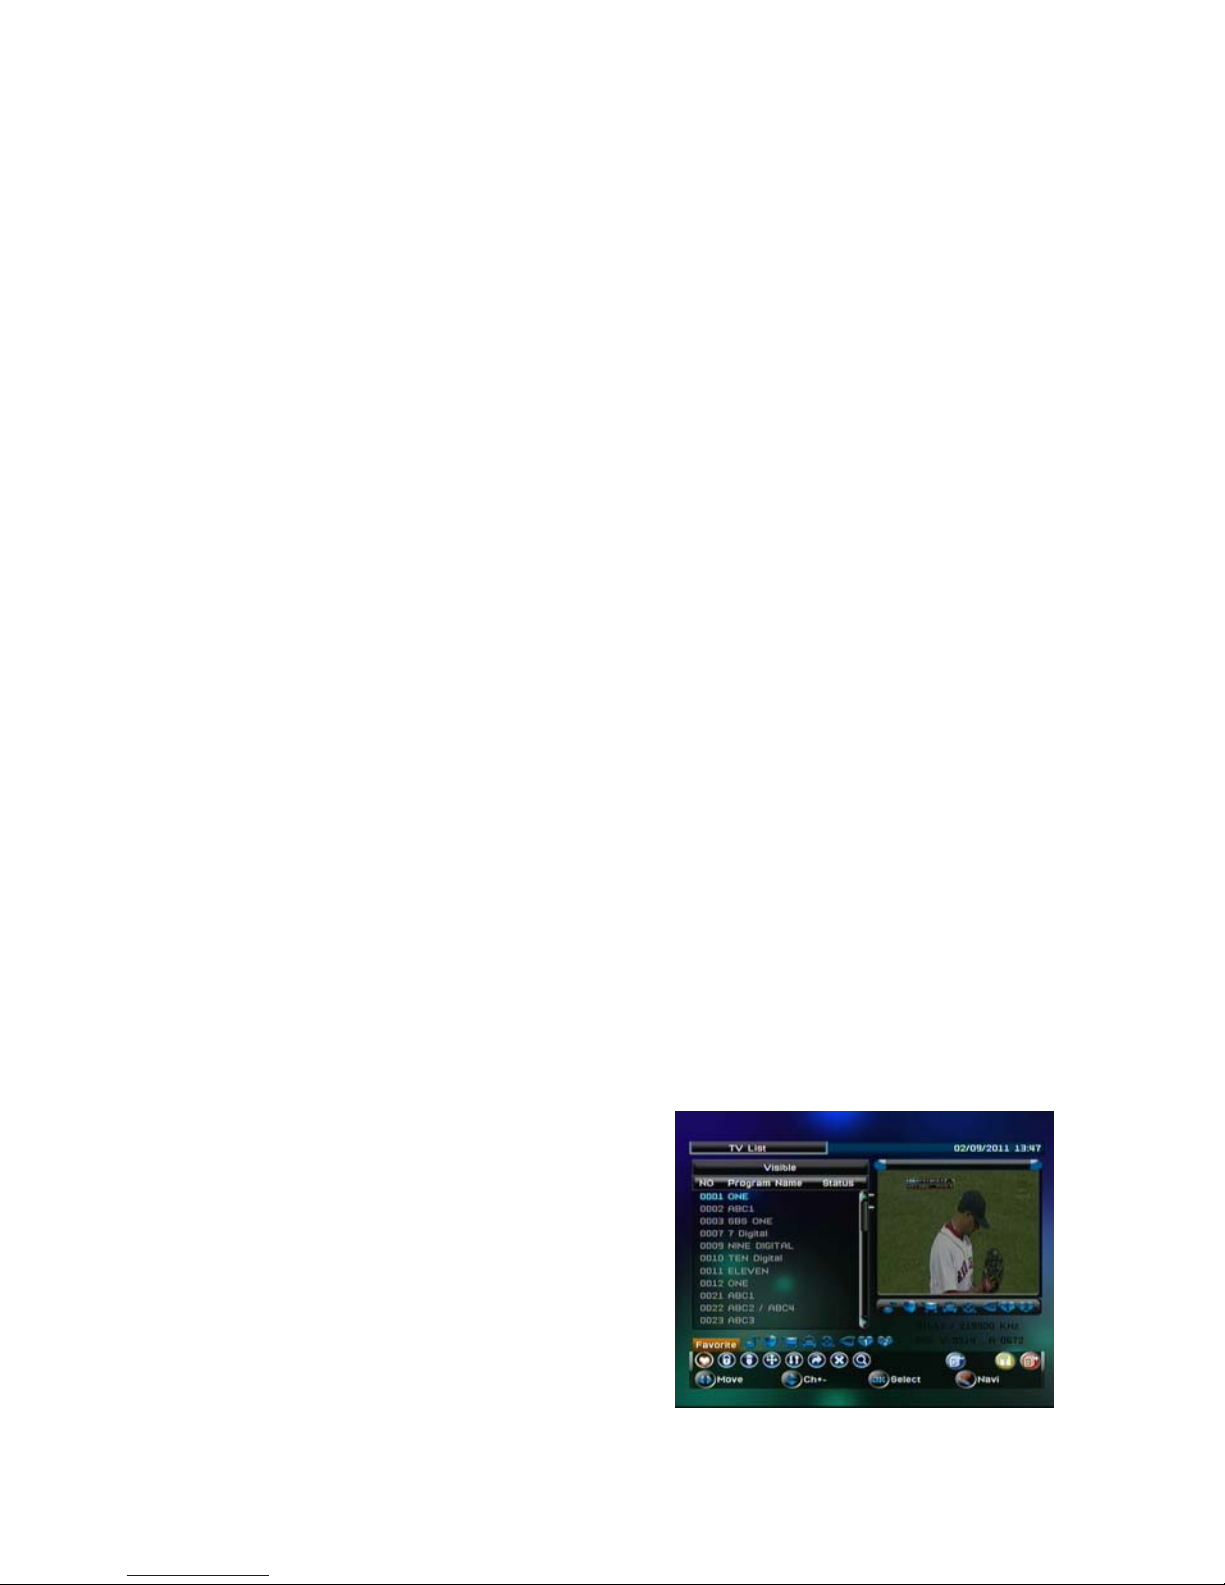
Navi Key – TV List
. Press the Left/Right arrow key on the remote control and select TV List.
. Press Ok key on the remote control and beneath the group heading
‘Visible’, all TV channels will be listed as well as program viewing of the
Page 23

22
selected channel.
. Press the Up/Down arrow key on the remote control to change channels.
. Press the RED key on the remote control to select Page Up list of
channels.
. Press the BLUE key on the remote control to select Page Down list of
channels.
Note: Within the TV List you can select other channel Groups that you
have set up (such as Favorites list)
. To change to other Group Lists, press the GREEN key on the remote
control and the group heading (Visible) will be highlighted.
. Press the Left/Right arrow key to change to other List groups.
. To access the list names, press the GREEN key again.
Navi Key – Subtitle
Press the Left/Right arrow key on the remote control and select Subtitle.
Press the OK key on the remote control and a subtitle banner will be
viewed.
. Press the Left/Right arrow key to select TTX SUBTITLE.
. Press the Up/Down arrow key and select ‘eng’.
. Press the OK button on the remote control.
If closed captions are being broadcast they will now be displayed.
Note: Once you change channels, Closed Captions will stop being
displayed. If you want to have Closed Captions operating at all times, set up
Closed Captions via the INSTALLATION Menu.
Navi Key – Teletext
The HHH640 includes the facility to receive Teletext when broadcast.
Note: Currently broadcasters are not transmitting Teletext but use page
801 to send Closed Caption Subtitles.
Note: Teletext can also be actioned via the Teletext key on the remote
control.
Navi Key – Audio Language
The audio default is set for Left and Right Channels; do not adjust.
Navi Key – Zoom
You can choose to Zoom out the picture 125%, 150%, 200%.
Page 24
23
. Press the Left/Right arrow key on the remote control and select Zoom.
. Press the OK key in turn to select Zoom %.
. Press the Up/Down and Left/Right arrow keys on the remote control to
adjust the picture view position.
Navi Key - Adv Timer
The Adv Timer menu is used to set up your timer recordings: For
explanation please refer to Timer Recording - Program and TV Channel
Specific.
Navi Key – Option
. Press the Left/Right arrow key on the remote control and select Option
. 3 Banner headings will be viewed: press the Left/Right arrows key to
select – TV Set Up / Password / PVR
a. TV Set Up:
. Press the Up/Down arrow keys to highlight each set up mode and the
left/Right arrow keys to select your preferred set up.
b. Password
Refer PASSWORD MENU.
c. PVR
Refer to RECORDING FUNCTIONS – Instant Record and Time Shift.
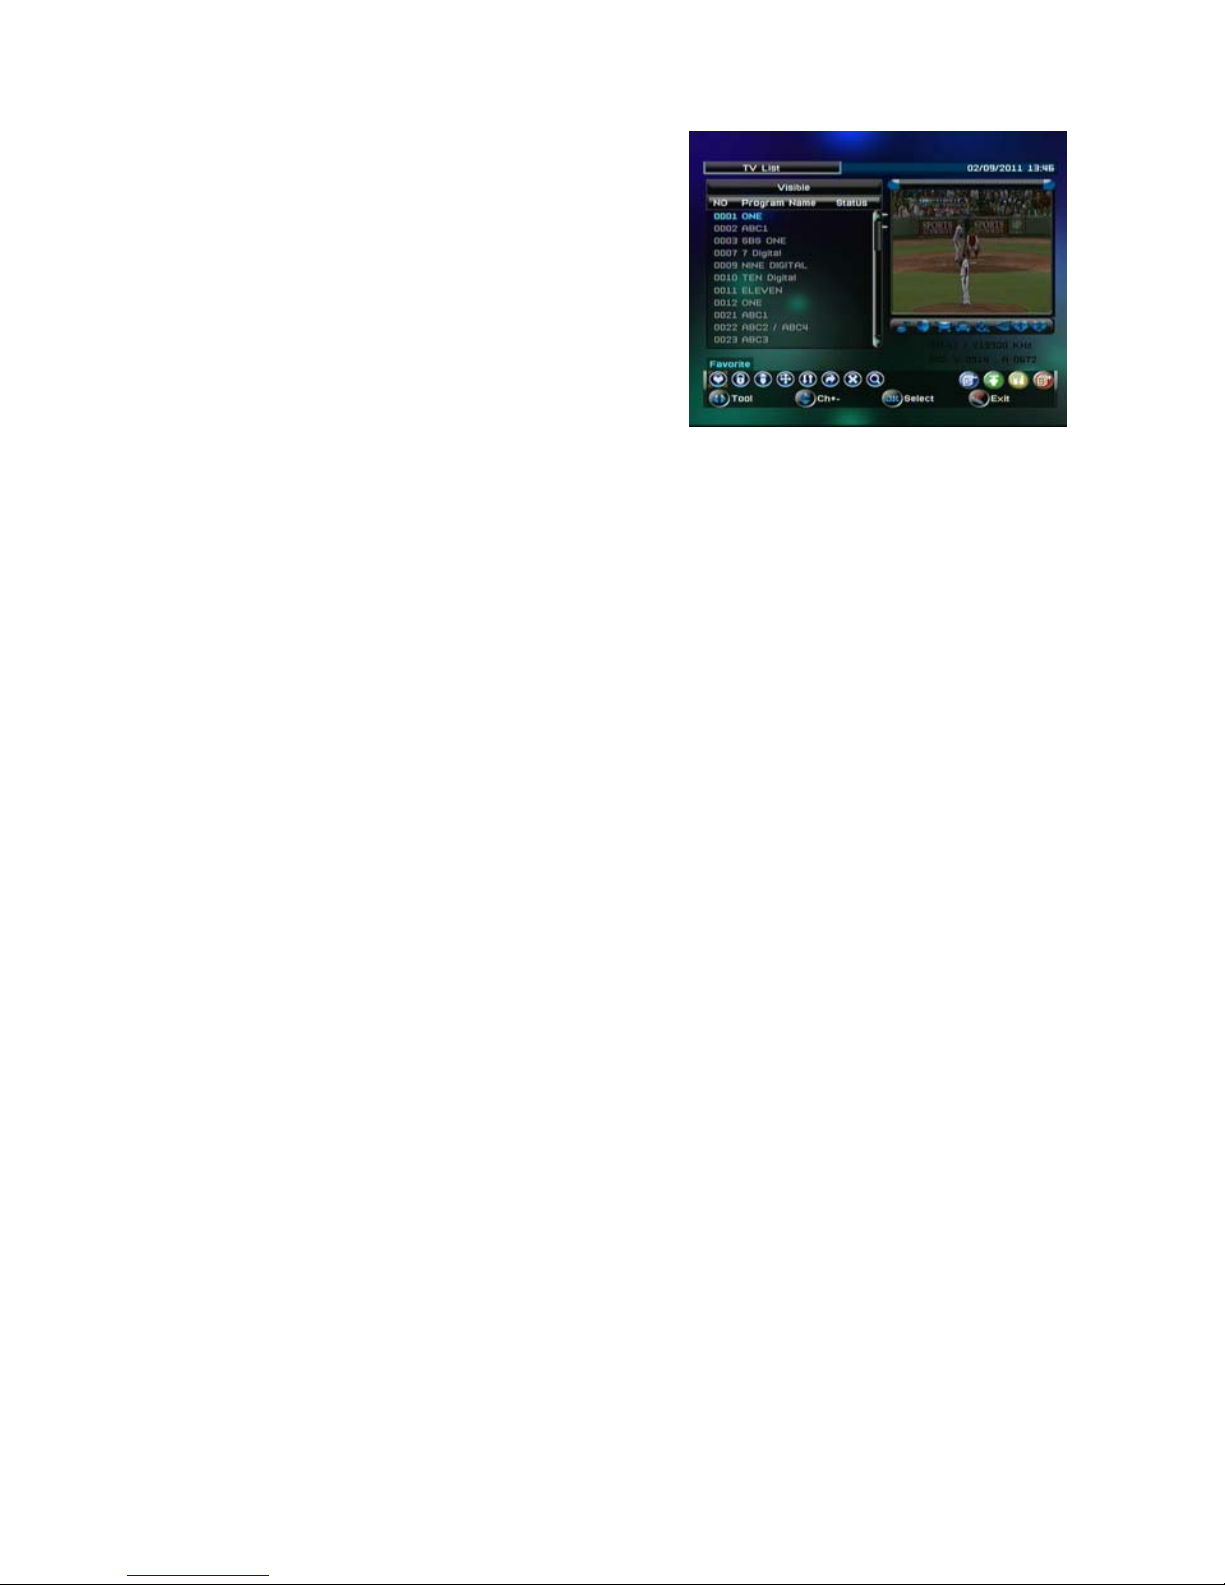
Navi Key - Favorite Channels
You can set up channels into a Favorites List with a choice of 8 favorites
symbols; however we recommend identifying Favorite channels with
favorites symbol 1 and symbol 2.
. Press the NAVI key on the remote
control and press the Left/Right arrow
keys to select TV List at bottom of the
page.
. Press the OK key and TV list will be
displayed. (‘Visible’ group is all
channels).
Page 25
24
. With the Visible TV list displayed,
press the NAVI key again and menu
symbols will appear at the bottom of
the page.
. Press the Left/Right arrow key to
select Favorites.
. With a channel selected, press the
OK key on the remote control and 8
Favorites Symbols will display.
. With a channel selected, press the
right arrow key and select symbol 1.
. Press the OK key to highlight symbol 1.
. Press the Yellow key on the remote control and banner will display
‘Save Changes?.
. Select ‘O’ and press OK key on the remote control.
. Press the Up/Down key to select other channels and repeat the process
above to add other channels to your Favorites List.
Fav Key
. To access your Favorites List, press the FAV key on the remote control.
. On the channel you are currently viewing, a Favorites symbol will be
displayed at the right of the screen.
. Whilst the symbol is displayed, press the OK key on the remote control
and your Favorites List will be displayed.
. Press the Up/Down arrow keys to select each channel and push the OK
key to view the selected channel.
In the TV List page, when you press the NAVI button again, as well as
the Favorite menu symbols you will note other menu symbols as
follows:
Lock: Refer Channel Lock details in the PASSWORD Menu details.
Edit: You can rename channels: Rename the channel in the key board
page then select the floppy disk symbol on the keyboard page and press
the OK key on the remote control to save the changes.
Move: You can move channels to different position in your TV Channel List.
Sort: You can sort channels in order; example A to Z.
Skip: You can identify channels that you want to skip when switching
channels.
Del: You can select channels that you want to delete.
Page 26

25
Search: ‘Search’ is based on the current channel list. With the Search
menu, you can identify channels you want to search for within the channel
list
Page 27
26
RECORDING FUNCTIONS
Connect a USB memory stick or hard disk drive storage device to the host
USB-2 connector on the receiver.
Your receiver has been tested with a wide range of USB Storage Devices of
sizes of up to 2TB including
those USB powered, however it may not be
compatible with every USB storage device available. Your receiver is
special in that it reads / writes in either FAT32 or NTFS format, resulting in
broader compatibility with existing files and drive formats.
Note: New Technology File System volumes use advanced data structures
that improve disk performance, reliability, space utilization and manage disk
errors more readily.
Formatting your USB Storage Device
Formatting a storage device configures it with a file system that enables
your receiver to store information on it, clearing all available space for
reliable record and replay. This receiver even formats storage devices to
their FAT32 or NTFS default, resulting in better device compatibility.
Formatting a storage device with recordings o r files on it deletes existing
files and recordings, permanently!
To format a storage device, action the following:-
. Press the USB key on the remote control and MY RECORDER page will
be displayed.
. Press the NAVI key and the 7 Navi menu symbols will display at bottom
left of screen.
. Press the right arrow key on the remote control until Device is selected.
. Press the OK key and the Format menu displays showing storage device,
Free Used and Total capacity.
. Press the down arrow key on the remote control until Format is selected.
. Press the OK key to start. Display asks: Formatting this partition? Press
the OK key to start Formatting.
. The larger the drive, the more seconds will be required. Success will flash
on screen momentarily. Confirmation display shows disk Free, Used and
Total space. Successful Formatting renders the Used space as 0MB.
Page 28
27
Instant Record
Please note the following prior to actioning an Instant Recording:
In the PVR page within the OPTION menu, you can choose to have One
Button Timer Recording ON or OFF.
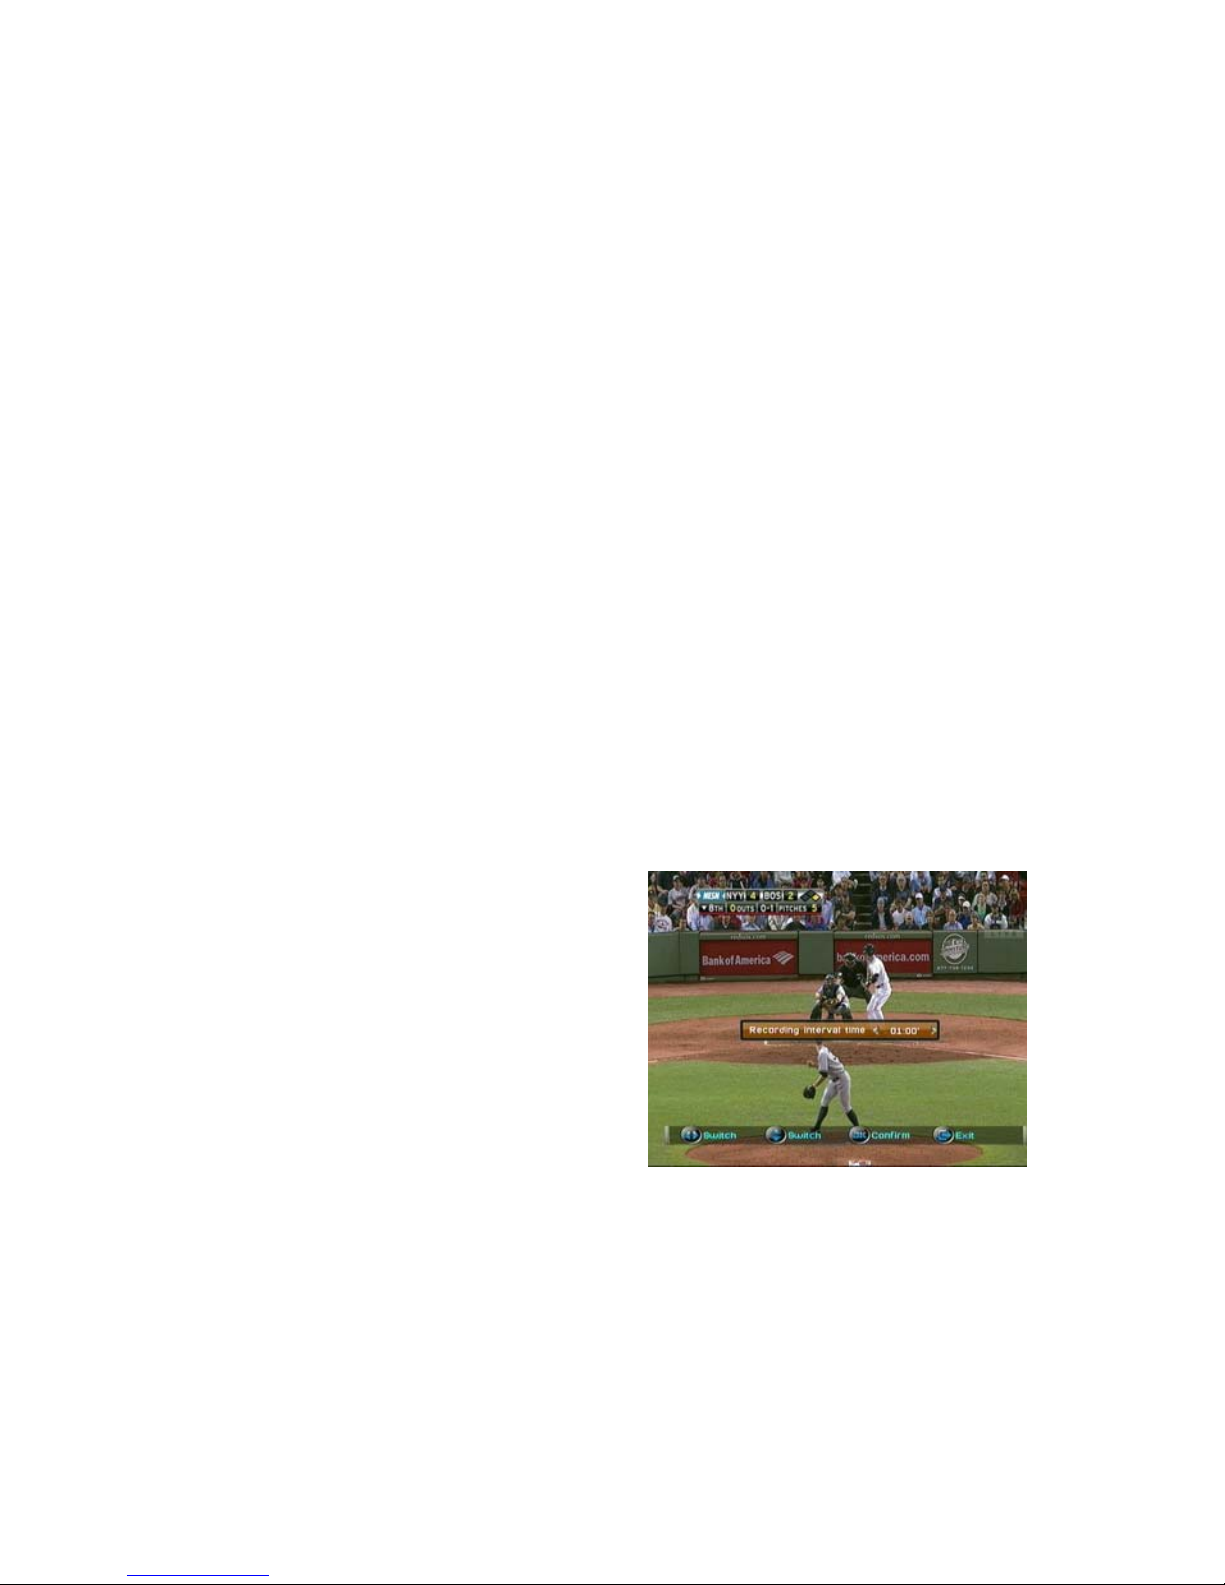
The Units default is OFF; and in this mode a Recording Interval Banner will
display when you press the REC key on the Remote control allowing you to
set a recording finish time.
In the ON mode, Recording Interval Time Banner does not appear and the
recording will continue until you manually stop the recording by pressing the
STOP key on the remote control. If you want to change the setting to ON,
please action the following:
. Press the NAVI key on the remote control.
. Press the Left arrow key on the remote control and select the OPTION
menu symbol at the bottom of the page.
. Press OK and you will note 3 banner headings: TV Set Up / Password /
PVR.
. Press the right arrow key and select PVR.
. Press the Down arrow key and select One Button Timer Recording and
select ON.
Instant Recordings can now be actioned as follo ws:
. With your selected TV program, press
the REC key on the remote control
and a Recording Interval Time B
will be d
anner
isplayed. (i.e. when One
Left/Right arrow keys on
s).
mote control.
will be displayed.
n the
Button Timer Recording mode is
‘OFF’).
. Press the
the remote control and select a
recording duration (you will note
increments of 15 minute selection
. Once you have selected recording
duration, press the OK key on the re
. Recording will commence and a time elapsed box
. You can choose to Stop the recording prior to the completion of the
recording duration that you originally set by pressing the STOP key o
remote control and a banner will display ‘Stop Recording?’. Press the OK
key on the remote control and recording will stop.
Page 29
28
T
imer Recording – Program Specific
l and TV Guide page will be
p/Down arrow key on the
Right arrow key on the
nels
imer page, Start and End time of the selected program will
ist ONCE: Press the right arrow key on the remote control to
IMPORTANT: Make certain the Timer Mode is listed as RECORDER.
nel Specific
Press the EPG key on the remote
e
trol to select a TV Channel.
trol to select an Event line.
elect each of the
e
mote control number keys.
. Press the EPG key on the remote contro
displayed.
. Press the U
remote control to select a TV
Channel.
. Press the
remote control to move to the Chan
programs on the right side of the page.
. Press the Up/Down arrow key on the
remote control to select a program.
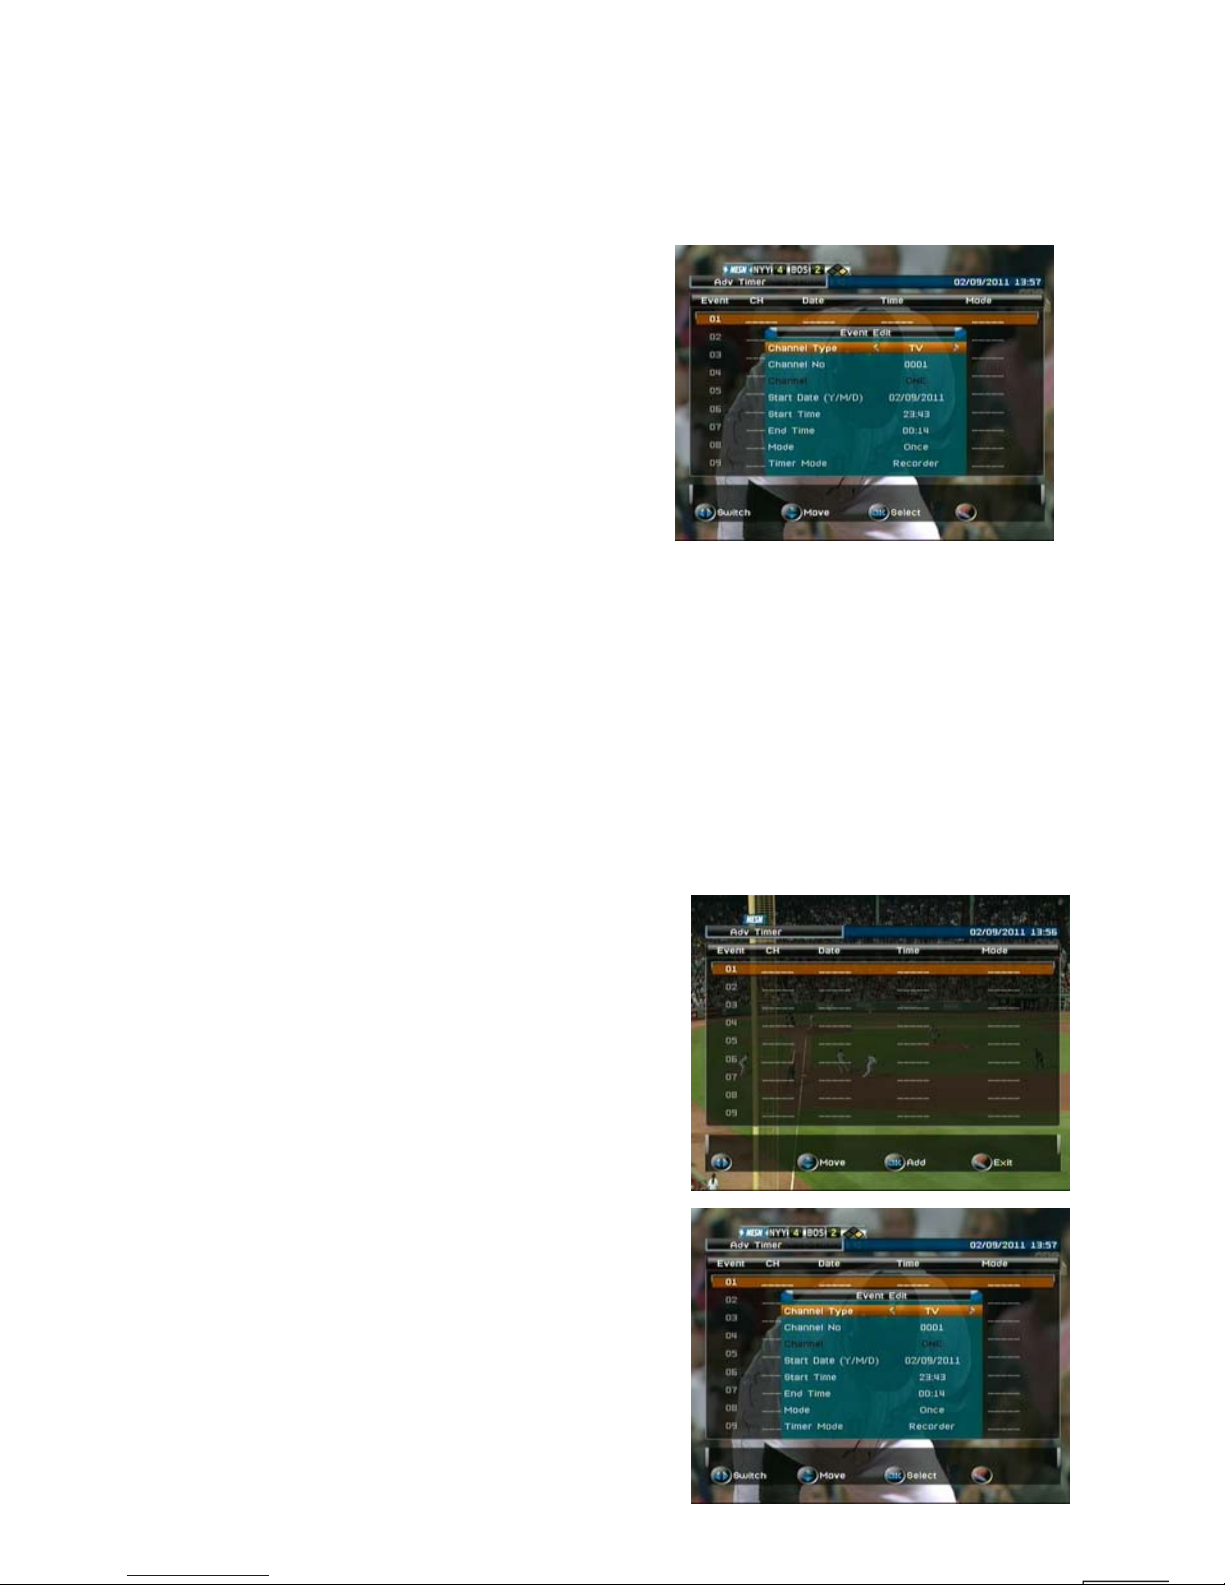
. Press the YELLOW key on the remote
control and ADV TIMER page will be
displayed overlaid by an EVENT EDIT
TIMER page.
. On the Event T
be listed.
. Mode will l
change to other modes: Weekly / Weekenday / Week Day / Daily.
.
. Push the OK key on the remote control and the complete ADV TIMER
page will be viewed listing your timer recording as confirmation.
. Press EXIT key on the remote control to return to normal TV viewing.
Timer Recording – TV Chan
.
control and TV Guide page will be
displayed.
. Press the Up/Down arrow key on th
remote con
. Press the YELLOW key on the remote
control and ADV TIMER page will be
displayed.
. Press the Down arrow key on the
remote con
. Press the OK key on the remote
control and EVENT EDIT TIMER page
will be displayed.
. Press the Down arrow key on the
remote control to s
following:-
- Start Date: input your required Dat
using the re
Page 30
29
- Start Time: Input recording commenceme
nt time using the number
e
ncy.
the remote control and the ADV TIMER will be
rmal
the ADV TIMER page at any time to view your list of
pcoming Timer Recordings
e remote control and select ADV TIMER
ge.
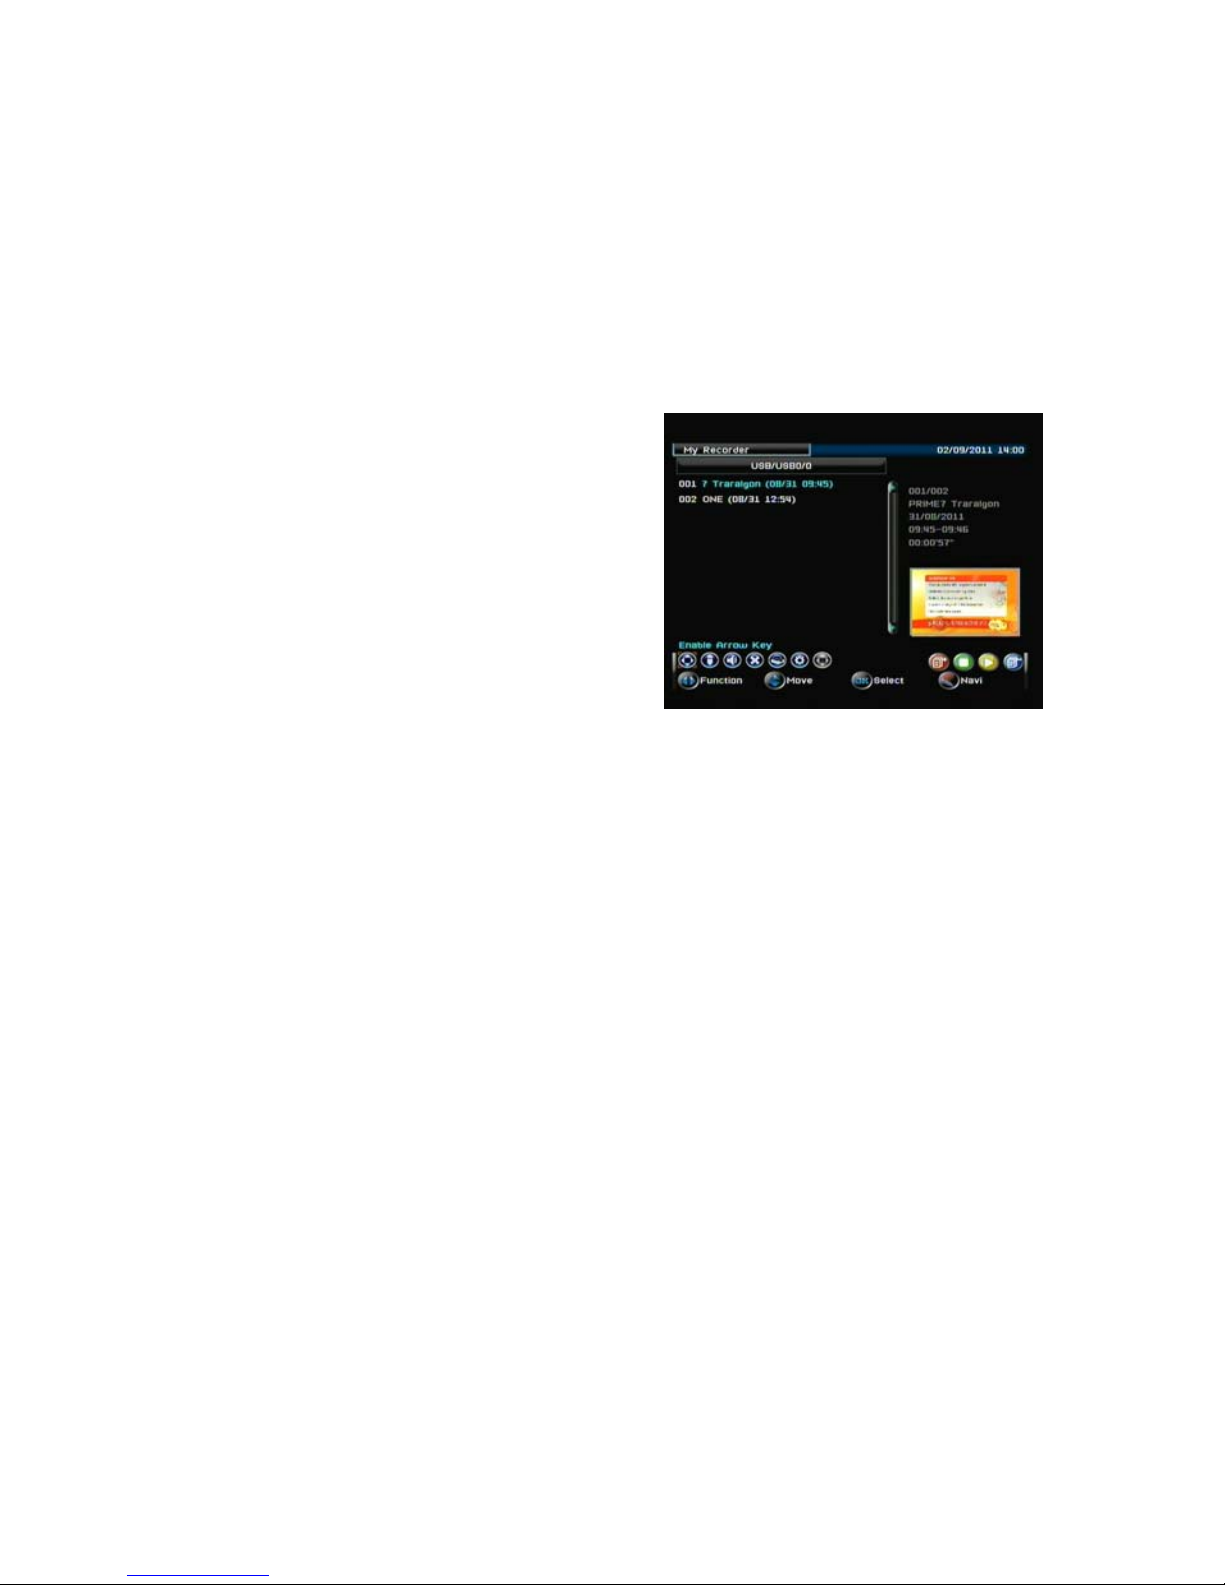
laying Back Your Recorded Files
To play back you recorded files, press
l and as you select each
deo
n.
cording from the beginning of the recording select, X
us last viewing position, Select
ing plays, by pressing the INFO key on the remote
e /
keys on the remote control.
- End Time: Input recording finishing time using the number keys on th
remote control.
- Mode: Press the right arrow key on the remote control to select
recording freque
- Timer Mode: Make certain RECORDER is selected.
. Press the OK key on
displayed listing your timer recording as confirmation.
. Press the Return/Exit key on the remote control 3 times to return to no
TV viewing.
You can view
u
. Press the Navi key on the remote control.
. Press the right arrow key on th
listed in the symbols at the bottom of the pa
. Push Ok key on the remote control and ADV Timer list will be displayed.
P
.
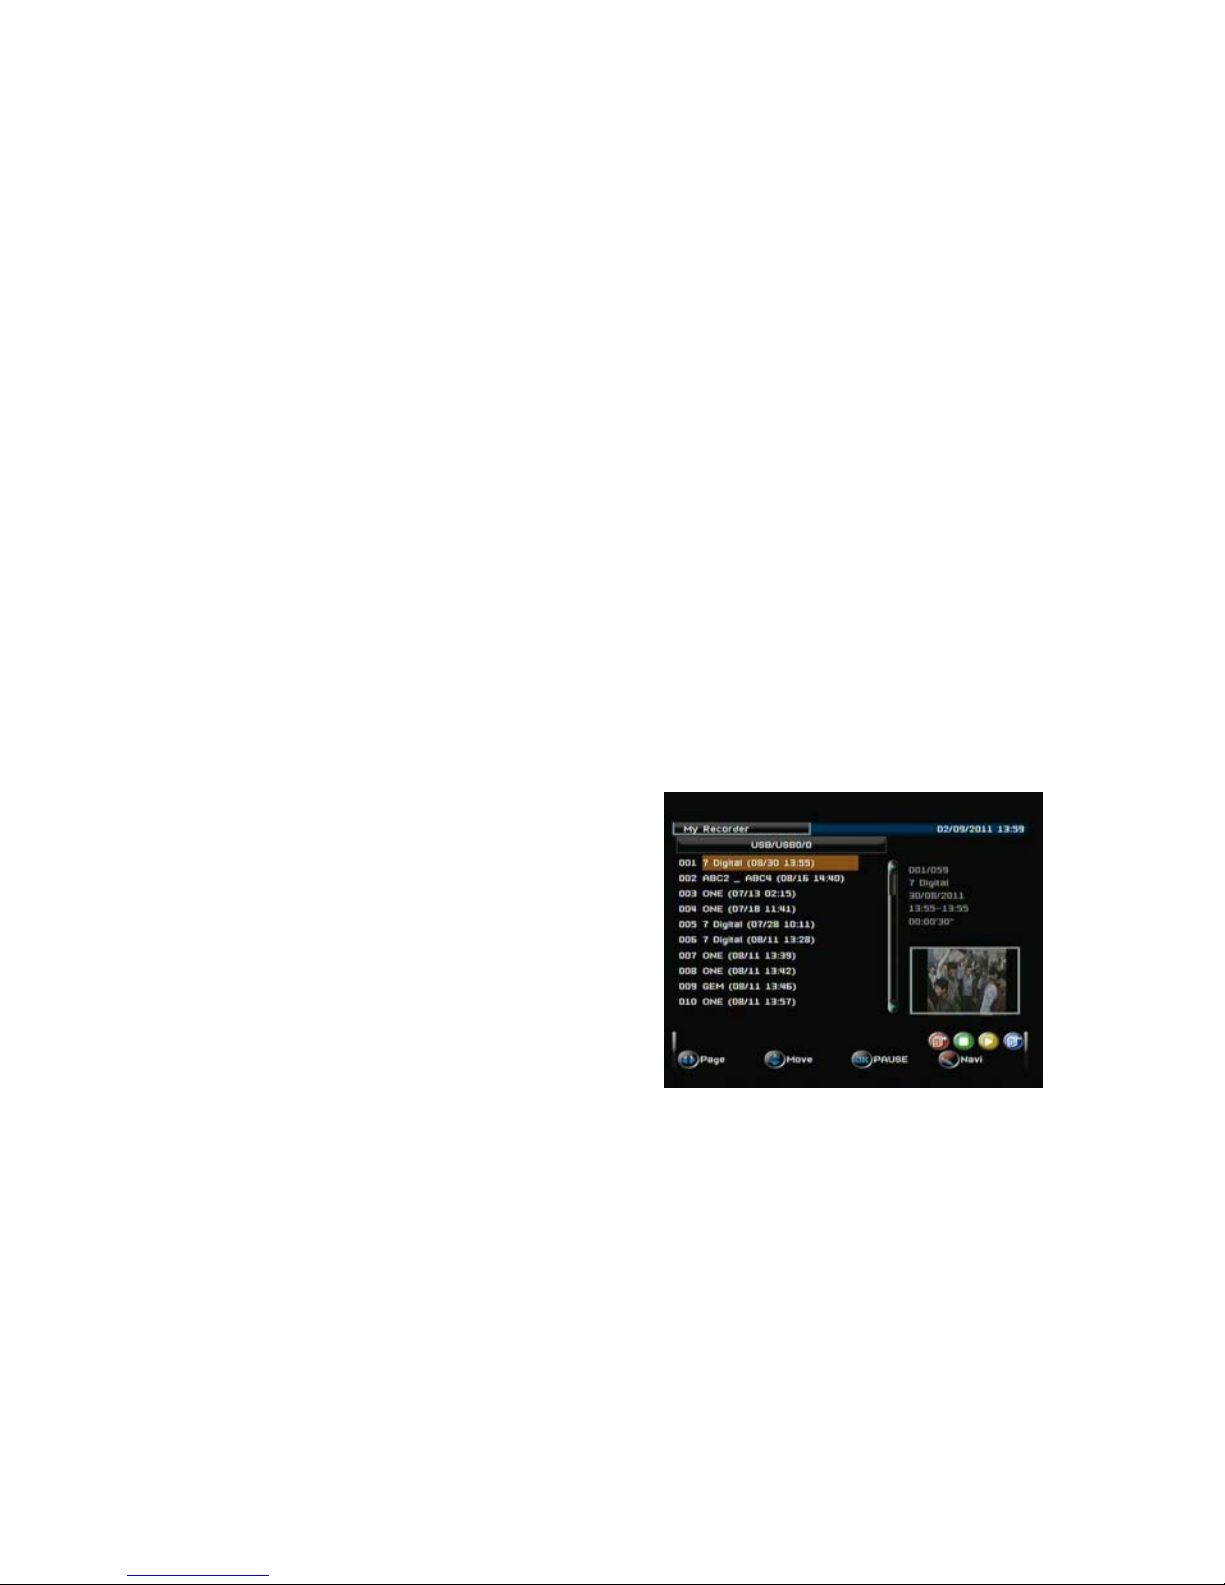
the USB key on the remote control
and a MY RECORDER page will be
displayed with a list of your recorded
files.
. Press the Up/Down key on the remote
contro
program, the first frame of the
recording will be viewed in the vi
window on the right of the scree
. Press the YELLOW key on the remote
control and a ‘Playback Last’ box
will be displayed.
. To play back the re
and press OK button on the remote control
. To play back the recording from your previo
O and press OK button on the remote Control and recording will
commence play.
Note: As the record
control a banner will be displayed with various file information: File Nam
File Number / File Length / File Size (capacity).
Page 31
30
F
ast Forward through a recording
can select by pressing the ►►FWD
t any time to revert to normal play.
ast Rewind through a recording
can select by pressing the ◄◄ REV
y time to revert to normal play.
ANAGE YOUR RECORDED FILES
ress the USB key on the remote
will
I key on the remote
g
nable Arrow Key: Marks selected files
u can rename your recorded files: Rename the file in the key board
e
ol: Enables Volume up and down.
el: You can delete a recorded file: You must have previously marked the
evice: Refers to the attached USB device and enables formatting of your
ption: Refers to PVR Time Shift as explained in Time Shift below.
IME SHIFT
onnect a compatible USB storage device. A proportion of the available
There are 8 Forward speeds that you
key on the remote control in turn.
Press Play key on remote control a
F
There are 8 Rewind speeds that you
key on the remote control in turn.
Press Play on remote control at an
M
P
control and MY RECORDER page
be displayed.
Press the NAV
control and you will note the followin
symbols at the bottom of the page:-
E
that you want to delete. (See Del below)
Edit: Yo
page then select the floppy disk symbol on the key board page (Yellow
when highlighted) and press the OK key on the remote control to save th
changes.
V
D
file; refer Enable Arrow key above.
D
USB storage device.
O
T
C
storage space is allocated automatically for TimeShift.
Page 32
31
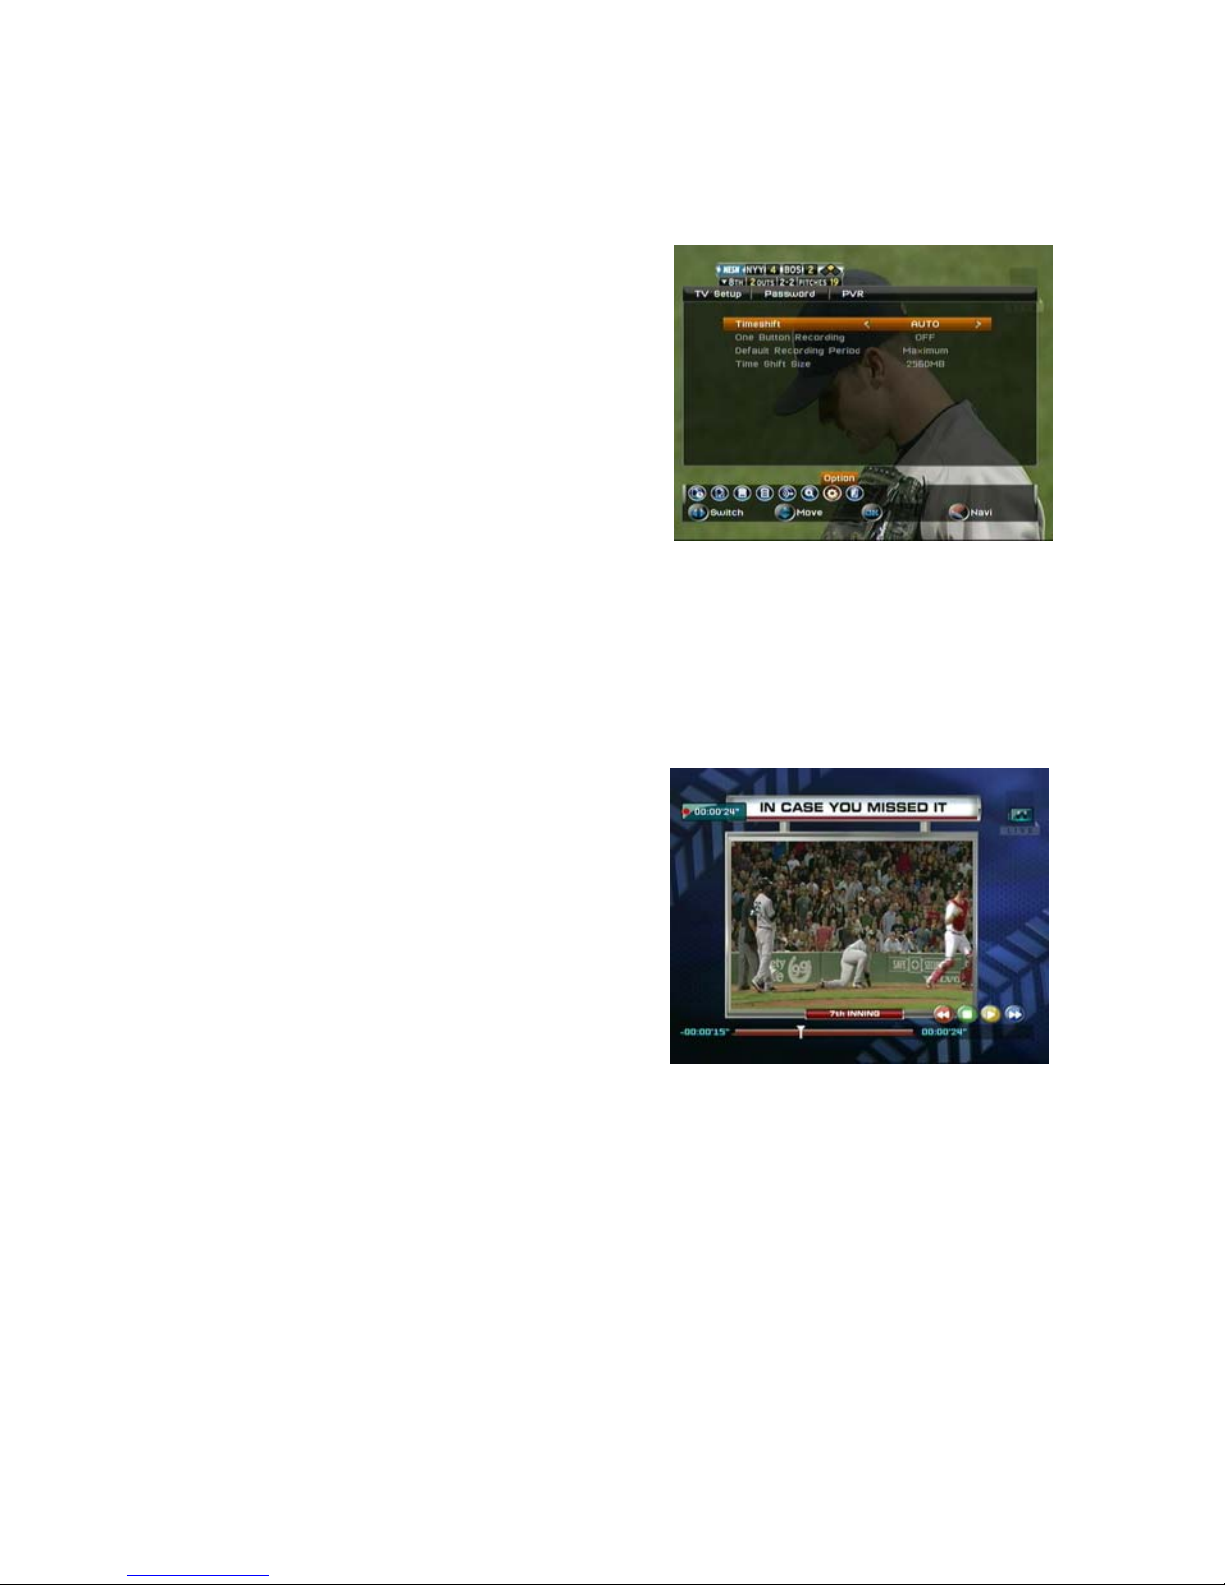
Time shifted live TV gives the flexibility of pausing and rewinding live TV
programs at any time.
Time Shift can be set as: Off / Pause / Auto.
. In PAUSE mode, time shift is operated
by pressing the PAUSE key.
. In AUTO mode, time shift is always
operating.
. Press the NAVI key on the remote
control and 8 menu symbols will be
listed at the bottom of the screen.
. Press the Right arrow key on the
remote control and select OPTION.
. Press the OK key on the remote control
and 3 Banner headings will be viewed.
. Press the Right arrow key on the
remote control to select PVR.
. Press the Down arrow key on the
remote control and select Time shift.
. Select either Pause or Auto.
. When viewing TV programs, press the
◄◄REV key on the remote control to
go back to any position in the time shift
program.
. When viewing TV programs, press the
►►FWD key on the remote control
to move forward within the time shift
program.
The time shift data is held within the
buffer of your attached USB device and when the data buffer is full, the
oldest time shift recorded data is deleted to enable space for new time shift
recorded data. However, if you want to keep the time shift program content;
it can be recorded to hold in your recorded files within the MY RECORDER
page.
. To record time shift content, press REC button on the remote control and a
Recording Interval Time Banner will be displayed. Press the Left/Right
arrow keys on the remote control and select a recording duration (you will
note increments of 15 minute selections).
. Once you have selected recording duration, press the OK key on the
remote control. Recording will commence and a time elapsed box will be
viewed.
Page 33
32
USB Storage Device Capacity
As the size of and space available on your USB storage device impacts the
amount of recorded content that can be stored, following is an overview of
what you can expect.
The receiver captures the broadcaster’s stream, which they vary in bit rate
balancing program quality and available bandwidth. Therefore, exact
figures are complicated to calculate but the following can be considered a
guide:-
· An average of 3GB per recorded hour is need for Standard
Definition content in MEPG2.
· An average of 9GB per recorded hour is needed for High
Definition content in MPEG2.
· Based on this, a 1TB Storage Device can hold an average of
110 hours of HD and 330 hours of SD program content in MPEG2.
MPEG2 is the default encoding broadcast in Australia, although
your receiver is equipped to decode H.264 or MPEG4 which
approximately doubles the amount of recorded content per
gigabyte.
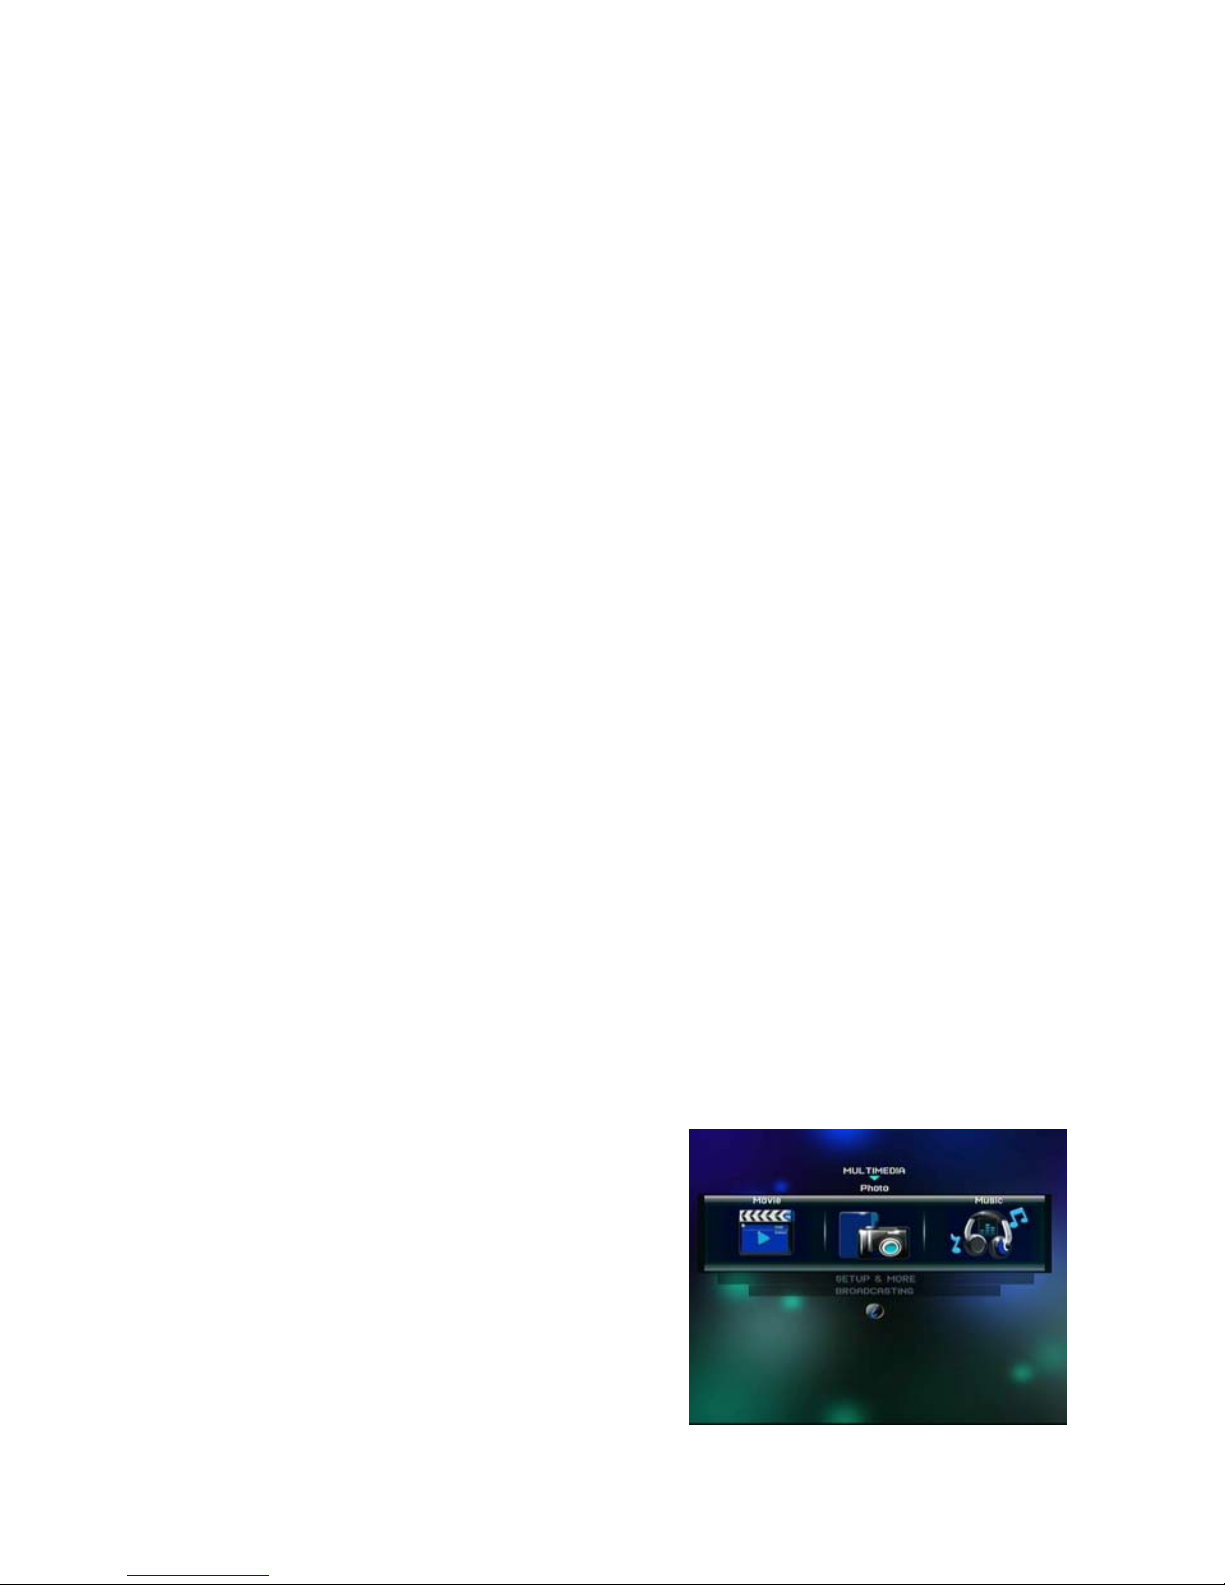
MULTIMEDIA
Attach a USB storage device with the files you wish to play saved on it.
Play PHOTO Files
. Press the Menu key on the remote
control and SET UP & MORE page
will display.
. Press the Up/Down arrow keys on the
remote control and select
MULTIMEDIA.
. Press the Left/Right arrow keys on the
remote control to locate PHOTO in the
middle of the screen.
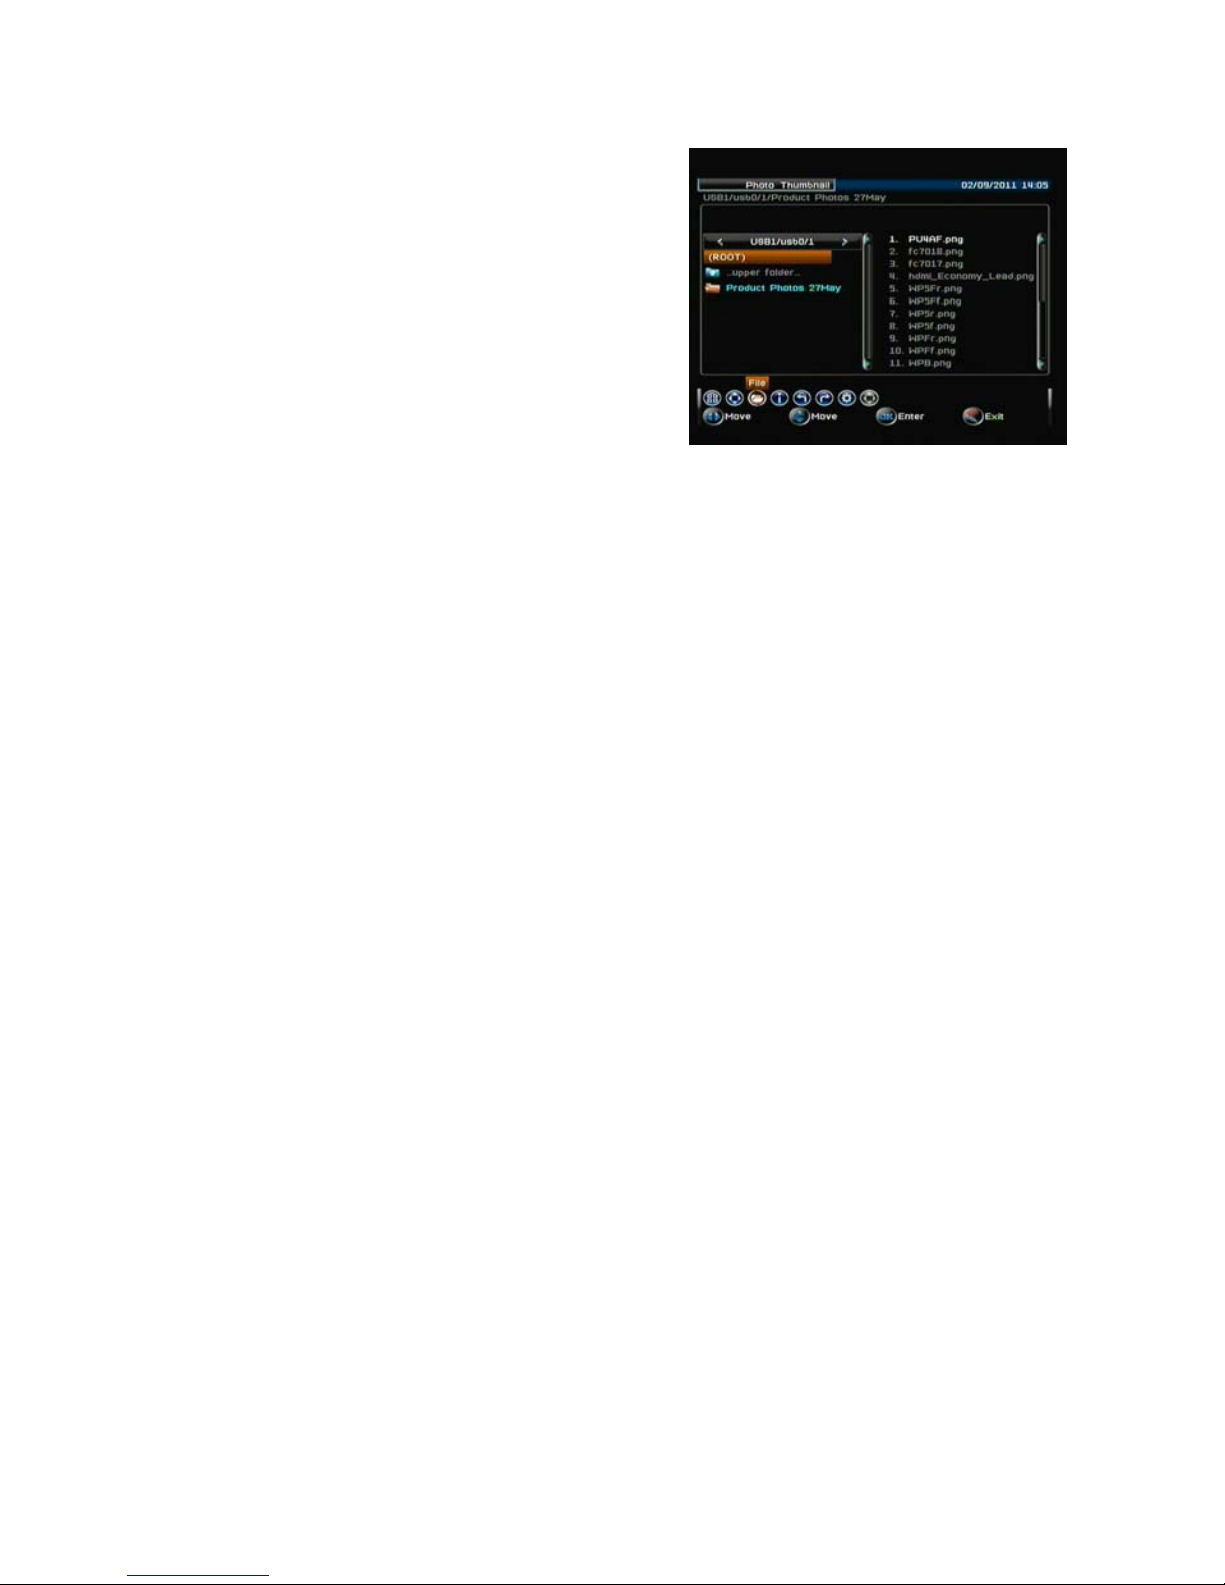
. Press the OK key on the remote control
and Photo Thumbnail page will display.
Page 34
33
. On the left of the page your files will be
listed.
. Press the Up/Down arrow key on the
remote control to select a Photo file.
. With a Photo file selected, press OK
key on the remote control and all
photos in the file will be listed on the
right of the screen.
. Press the Right arrow key on the remote
control to move to the list on
the right and press the Up/Down arrow
keys to select a photo.
. Press OK key on remote control (or Yellow key) and Photo will display.
With a photo displayed, there are other functions that can be actioned as
follows:
Press the NAVI key on the remote control and 8 menu symbols will be listed
at the bottom of the page as follows:
Turn Left: Orientate photo to the left.
Turn Right: Orientate photo to the right.
Zoom+: Zoom out.
Zoom-: Zoom In.
Music:
If you also have music files, you can play music while photos are in view.
With the Music menu symbol selected, press OK key on remote control and
press OK. Files will be listed. Select a music file and push OK.
Vol: To increase or decrease volume.
Info: details the photo file information.
Option:
With Option logo selected, press OK key on remote control and a banner
will display the following:
- Random: To run the photos in random order, select ON.
- Repeat: To enable all photos (multiple) in the file to run automatically,
select ALL.
- Interval Time: When running multiple photo files, you can set the interval
between – Medium / Fast / Slow.
- Effect: A visual graphic ‘effect’ for each photo file. Select On or OFF.
Play MUSIC Files
. Press the Menu key on the remote control and SET UP & MORE page will
display.
. Press the Up/Down arrow keys on the remote control and select
MULTIMEDIA.
Page 35
34
. Press the Left/Right arrow keys on the remote control to locate MUSIC in
the middle of the screen.
. Press the OK key on the remote control and MUSIC THUMBNAIL page
will be displayed.
. On the left of the page your files will be listed.
. Press the Up/Down arrow key on the remote control to select a music file.
. With a music file selected, press OK key on the remote control and all
music files will be listed on the right of the screen.
. Press the Right arrow key on the remote control to move to the list on the
right and press the Up/Down arrow keys to select a music file.
. Press OK key on remote control (or Yellow key) and music will play.
On the left of screen you can choose to have either Lyrics or Information.
For the right of screen, you can choose to have Equalization displayed or
music Cover displayed.
. As the music is playing, press the NAVI key on the remote control and 2
menu symbols will be listed at the bottom of the page.
. Press the Right arrow key on the remote control and select the menu
symbol Option.
. Press the OK key on the remote control and a banner will display enabling
you to make display selections.
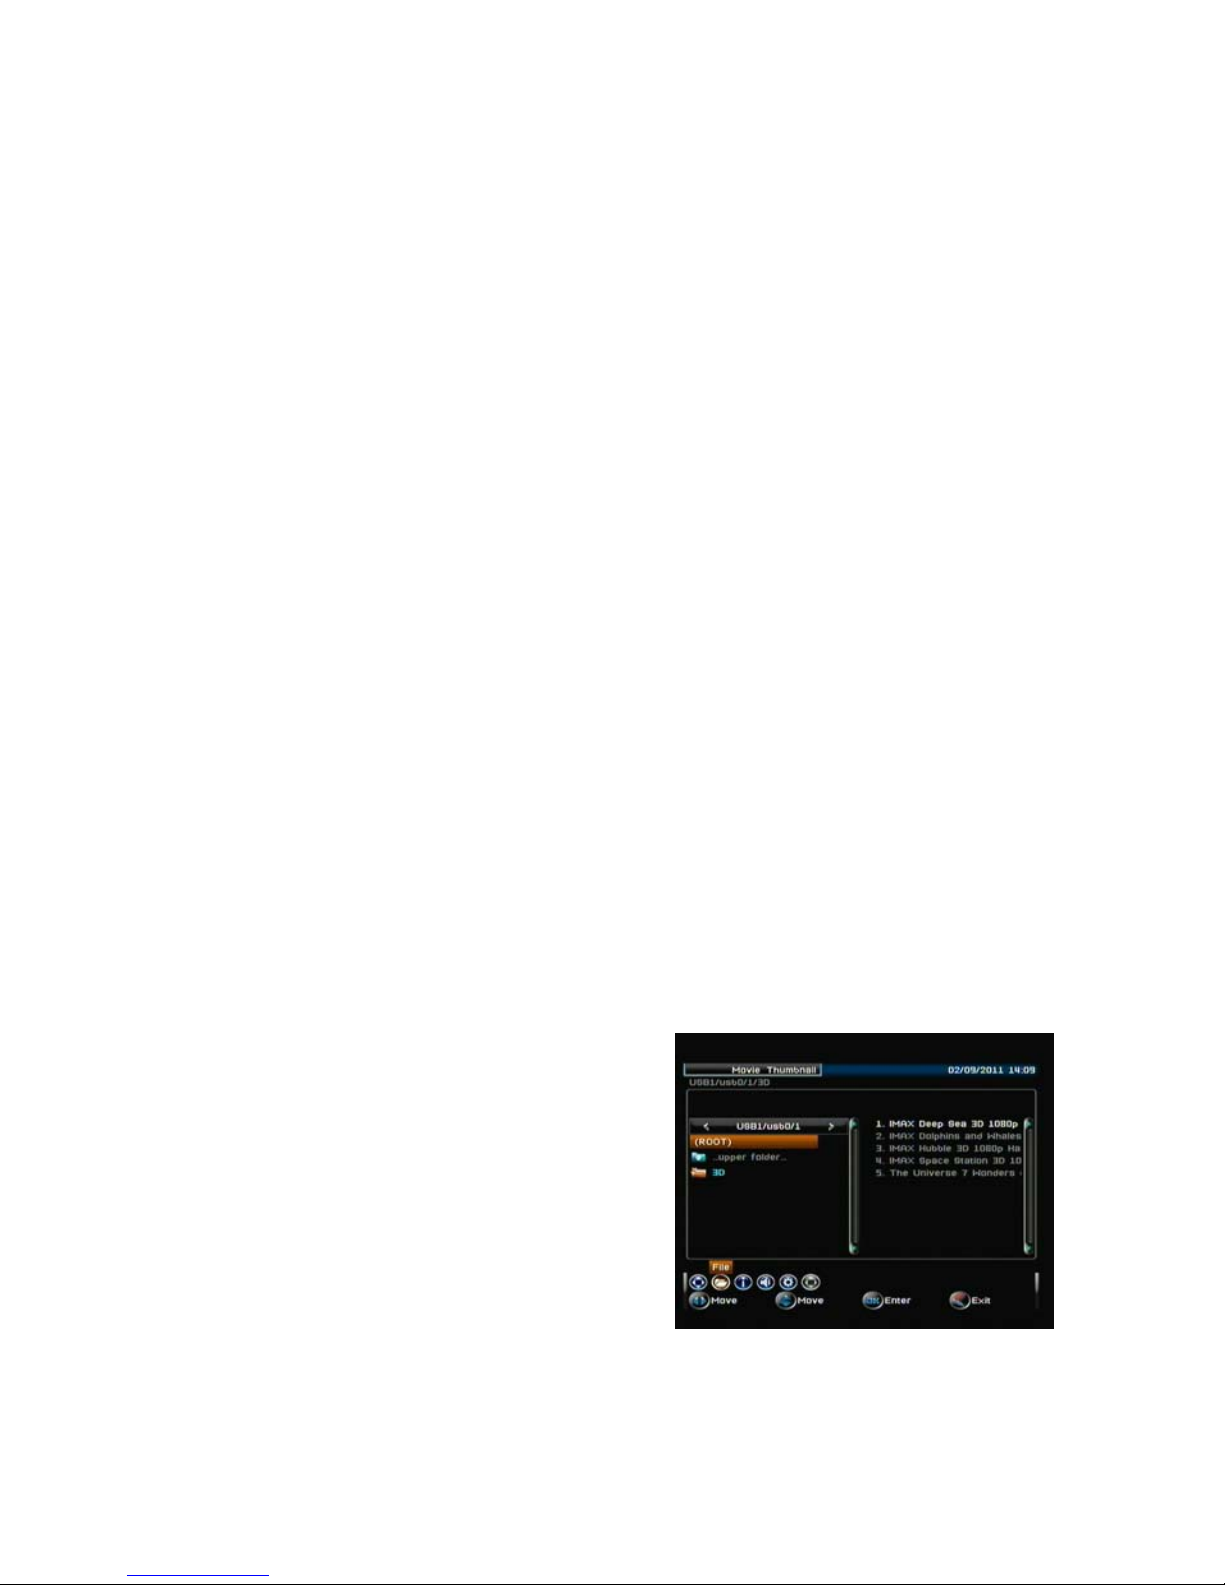
Play MOVIE Files
. Press the Menu key on the remote control and SET UP & MORE page will
display.
. Press the Up/Down arrow keys on the remote control and select
MULTIMEDIA.
. Press the Left/Right arrow keys on the remote control to locate MOVIE in
the middle of the screen.
. Press the OK key on the remote control
and MOVIE THUMBNAIL page will be
displayed.
. On the left of the page your files will be
listed.
. Press the Up/Down arrow key on the
remote control to select a MOVIE file.
. With a Movie file selected, press OK
key on the remote control and all
movies in the file will be listed on the
right of the screen.
. Press the Right arrow key on the remote control to move to the list on the
right and press the Up/Down arrow keys on the remote control to select a
movie file.
. Press OK key on remote control (or Yellow key) and movie will play.
Page 36

35
With a movie playing, there are other functions that can be actioned as
follows:
Press the NAVI key on the remote control and 8 menu symbols will be listed
at the bottom of the page as follows:-
Go To: To move to any section of the movie.
- Select Go To and press the OK key on the remote control. A counter time
banner will be displayed.
- Using the remote control number keys, input the time section of the movie
you wish to move to.
- Press OK and the movie will move to that point.
Step: You can forward the movie in steps of one video frame.
- Select Step and press the OK key on the remote control to forward a step
at each press.
- At each press, the frame will be ‘Paused’.
- Press the Yellow key on the remote control to return to normal speed.
Vol: To increase or decrease volume.
Zoom +: Zoom out.
Zoom-: Zoom in.
Info: Details the movie information.
Option: There is no need to change the setting.
Audio Language: Parameters have been set as a default. (there is a
banner that appears, but the settings cannot be changed).
Subtitle: If Closed Captions have been embedded in the movie, select
Subtitle and press the OK key on the remote control. In the Subtitle banner
displayed, select YES.
Note: This receiver stores Secondary transmitter or Translator channels by
assigning a 35# prefix to each channel number. This point is helpful to
understand as this receiver can receive channels not intended for your
area. Secondary transmitters serve difficult reception areas and are
usually less powerful, so a Primary transmitter can be a more reliable
source of your TV signal.
Page 37
36
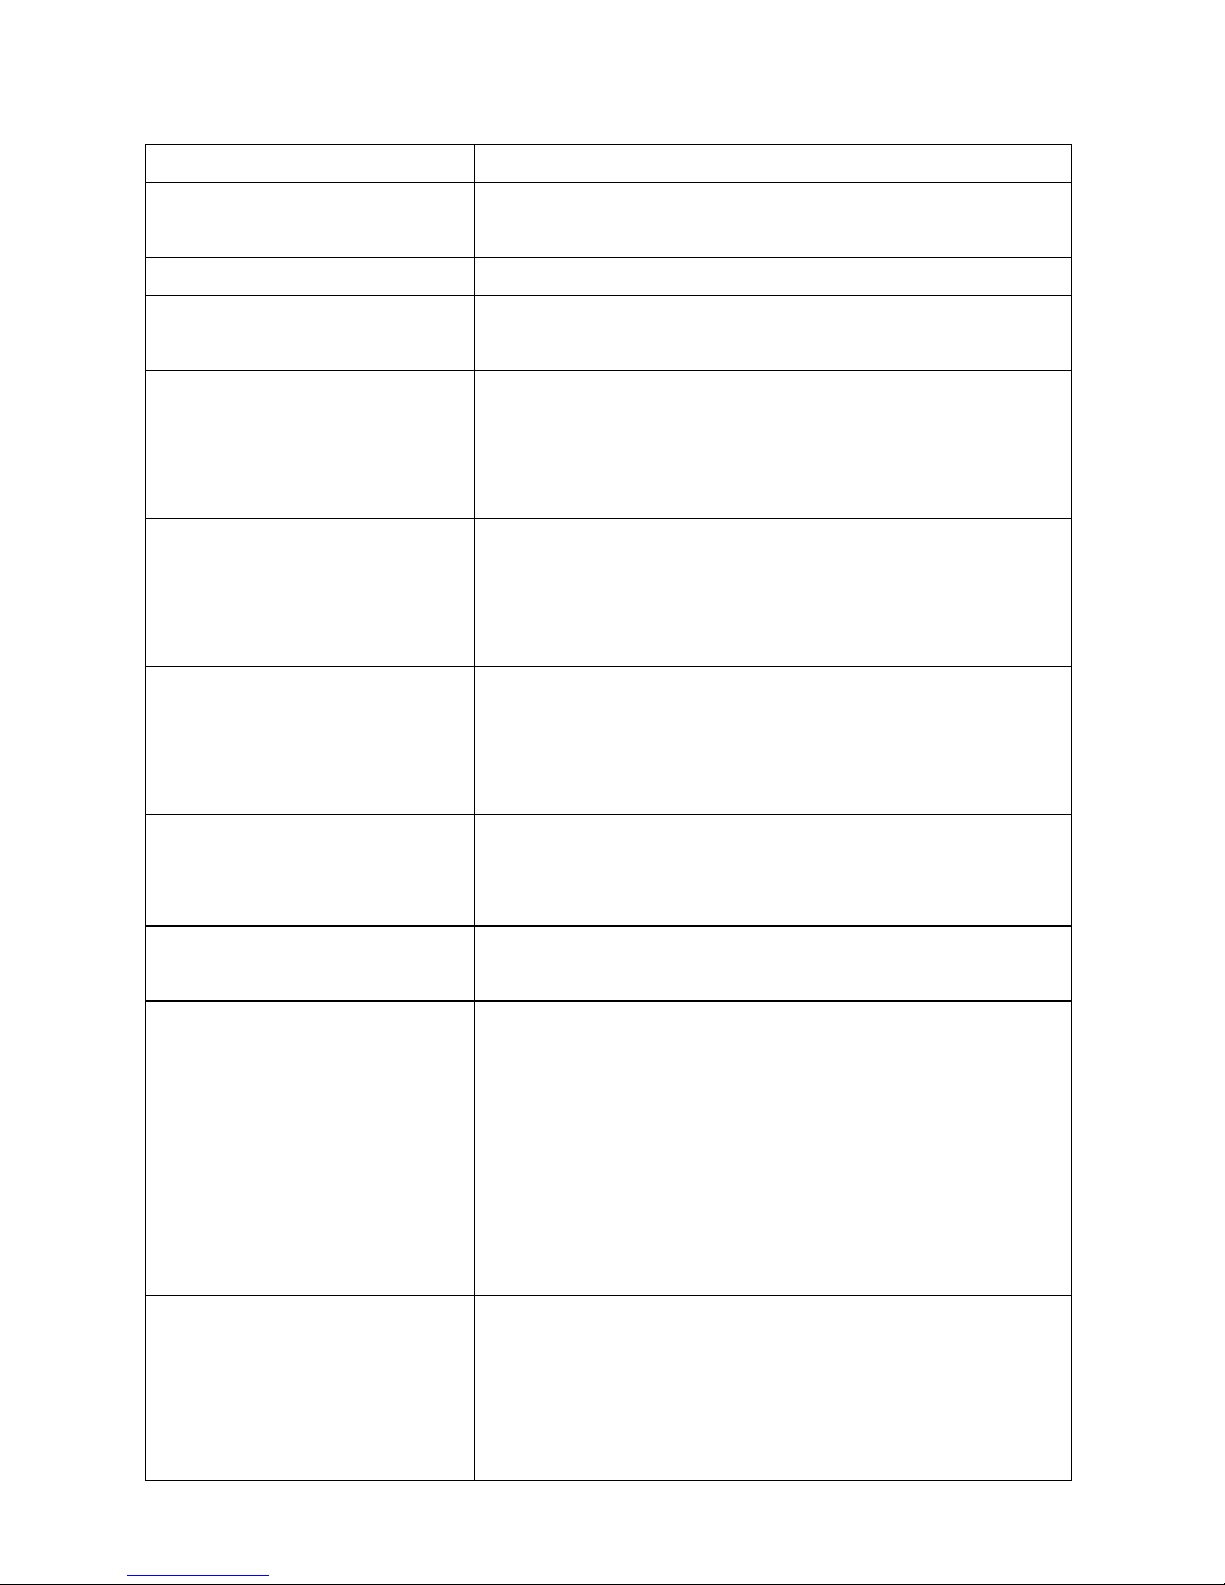
TROUBLESHOOTING:
Check your receiver with the suggestions below.
PROBLEM SUGGESTION
No Power Check the power cord is plugged in at both
ends
No Reception Check operational antenna: is cable connected?
Receiver not responding
to the Remote Control
Check Remote Control batteries are fresh and
battery contacts are free from corrosion.
The receiver is not
responding to the remote
control or front panel
Disconnect the receivers’ mains power. Wait
about 1 minute and power the unit up again.
You may need to reset to Factory Default and
rescan.
I can see the menu but
cannot view any
channels
First check a functional antenna is properly
connected. Then scan for Digital channels
available in your area by selecting Main Menu,
Set Up, and Installation sub menu.
Receiver On but I cannot
see Video or Audio
Check the HDMI plug is properly connected, or
if the AV lead is used, check it is properly
connected to the HHH640 and to the correct
RCA connectors of your TV.
After scanning I cannot
see all of the channels
available in my area
Your antenna system may need to be updated
for Digital reception by an experienced
specialist.
Channels ‘breakup’ while
viewing
This also indicates that your antenna may need
professional attention.
No Audio
1. Check the HDMI output plug is properly
connected. Or if the AV lead is used, check it is
properly connected to the HHH640 and to the
correct RCA audio connectors of your TV
(White left audio / Red right audio).
2. Check the Mute is not activated on the
receiver. / 3. Check the receivers’ volume level
is high enough.
Receiver does not
display ‘Closed Captions’
or Teletext
Make sure you have turned Closed Captions on
in the menu or by the subtitle key. Allow 30
seconds for it to commence. Not all programs
include Cc’s. SBS seldom sends Cc’s opting for
on screen subtitling instead.
Page 38

37
SPECIFICATIONS
. Decodes High Definition and Standard Definition Digital Terrestrial TV &
Radio.
. Video Outputs: HDMI via the HDMI Output Plug / Composite CVBS via
the A/V lead
. Video Resolutions: 1920 x 1080i, 1280 x 720p, 720 x 576p or 720 x 576i.
. Aspect Ratios: Widescreen 16:9, Centre Cut 4:3 or Letterbox 4:3.
. Audio Modes: Stereo, Dual Channel or Mono.
. Teletext via integrated software decoder – where broadcast.
. Closed Captions via Teletext decoder (page 801).
. EPG Information: 7 day SI EIT p/f tables (including crossover).
. Tuner Sensitivity: Typical -79dB.
. Frequency Range: VHF & UHF 175 – 860MHz.
. Channel Bandwidth: 7 MHz,
. Modulation Mode: COFDM 8K or 2K, automatic detection.
. Constellation: QPSK, 16QAM or 64QAM.
. Guard Interval: ¼, 1/8, 1/16 or 1/32.
. IR Receiver 38KHz.
. USB-2: Host connection for NTFS or FAT32 formatted storage devices.
. Media Player plays .dat, .mpg, .mpeg, .ts, .mp4, divx, .avi, .mjpg, .mp3,
.aac, .wma, .ac3 files and more.
. Power Consumption rated at 7W, < 1W standby.
. Energy Safe – MEPS compliant.
. Operating Temperature 0-40°.
. Case Dimension 145mm Wide x 65mm High x 23mm Deep
. Weight: 0.1Kg.
. Accessories Included:
1 x Remote Control Unit
2 x AAA Batteries
1 x 3.5mm plug to RCA AV lead
1 x IR Extender
1 x Power Plug Pack
1 x Operating Manual.
Page 39

38
WARRANTY
Subject to the conditions stated below, healing digital warrants your new
receiver to be free of defects in workmanship and materials for 12 months
from the date of purchase. For the period of warranty healing digital’s
obligation includes labour and materials, but excludes neglect, accident,
abuse and transportation to and from healing digital’s service station.
Healing digital will not be liable for consequential loss or damage arising
from any function of the receiver. healing digital reserves the right to
determine at is sole discretion fault cause. In the event of a claim, proof of
purchase in the form of your Tax invoice and this warranty slip may be
required. This warranty applies to the original purchaser only and is not
transferable. The benefits conferred by this warranty are in addition to
rights provided under relevant State or Federal legislation, but excludes
any other expressed or implied warranty.
www.healingdigital.com
42 Brunel Road, Seaford VIC 3198, Australia
Page 40

39
Copyright © 2011 www.healingdigital.com
Designed and produced in Australia
 Loading...