

Page 1

Quickstart Guide
Guía de inicio rápido
Guide d’utilisation rapide
Guida rapida
Schnellstart-Anleitung
Appendix
English (3–14)
Español (15–26)
Français (27–38)
Italiano (39–50)
Deutsch (51–62)
English (63)
Page 2

2
Page 3

Quickstart Guide (English)
Introduction
Your Perfect Tone is Just a Touch Away
Thank you for purchasing the HeadRush Pedalboard!
®
Featuring a finely tuned quad-core DSP system and powered by its exclusive Eleven
HeadRush Pedalboard delivers the most versatile, realistic-sounding and responsive amplifier, cabinet,
microphone and effects models ever found in a floorboard guitar effects processor.
The HeadRush Pedalboard delivers a new generous and diverse offering of classic vintage and modern amp and
effects models, including exclusive original boutique effects that can’t be found anywhere else, as well as the
ability to load your own custom impulse response (IR) files. There are also exclusive features that can’t be found on
any other guitar processor, including gapless preset-switching with delay/reverb tail spillover, a looper with over 20
minutes of record time, the ability to peel off loop layers in the reverse order they were added, and much more.
The heart of the HeadRush Pedalboard is the 7-inch touch display and its guitarist-oriented user interface,
enabling you to touch, swipe, and drag-and-drop to instantly create and edit your rigs in an unprecedented
realistic and intuitive way. The large display also gives ultra-clear feedback when performing live, especially when
making slight changes to your tone using the Hands-Free Mode.
HD Expanded platform, the
The following information is a quick-start guide to get you up and running, but you can also find a complete
manual, tutorial videos, as well as share your feedback by visiting us at headrushfx.com.
Oh. One more thing. This one goes to 11.
Box Contents
HeadRush Pedalboard
USB Cable
Power Cable
Software Download Card
Quickstart Guide
Safety & Warranty Manual
Important: Visit headrushfx.com to download the complete user guide.
Support
For the latest information about this product (documentation, technical specifications, system requirements,
compatibility information, etc.) and product registration, visit headrushfx.com.
For additional product support, visit headrushfx.com/support.
3
Page 4
Features
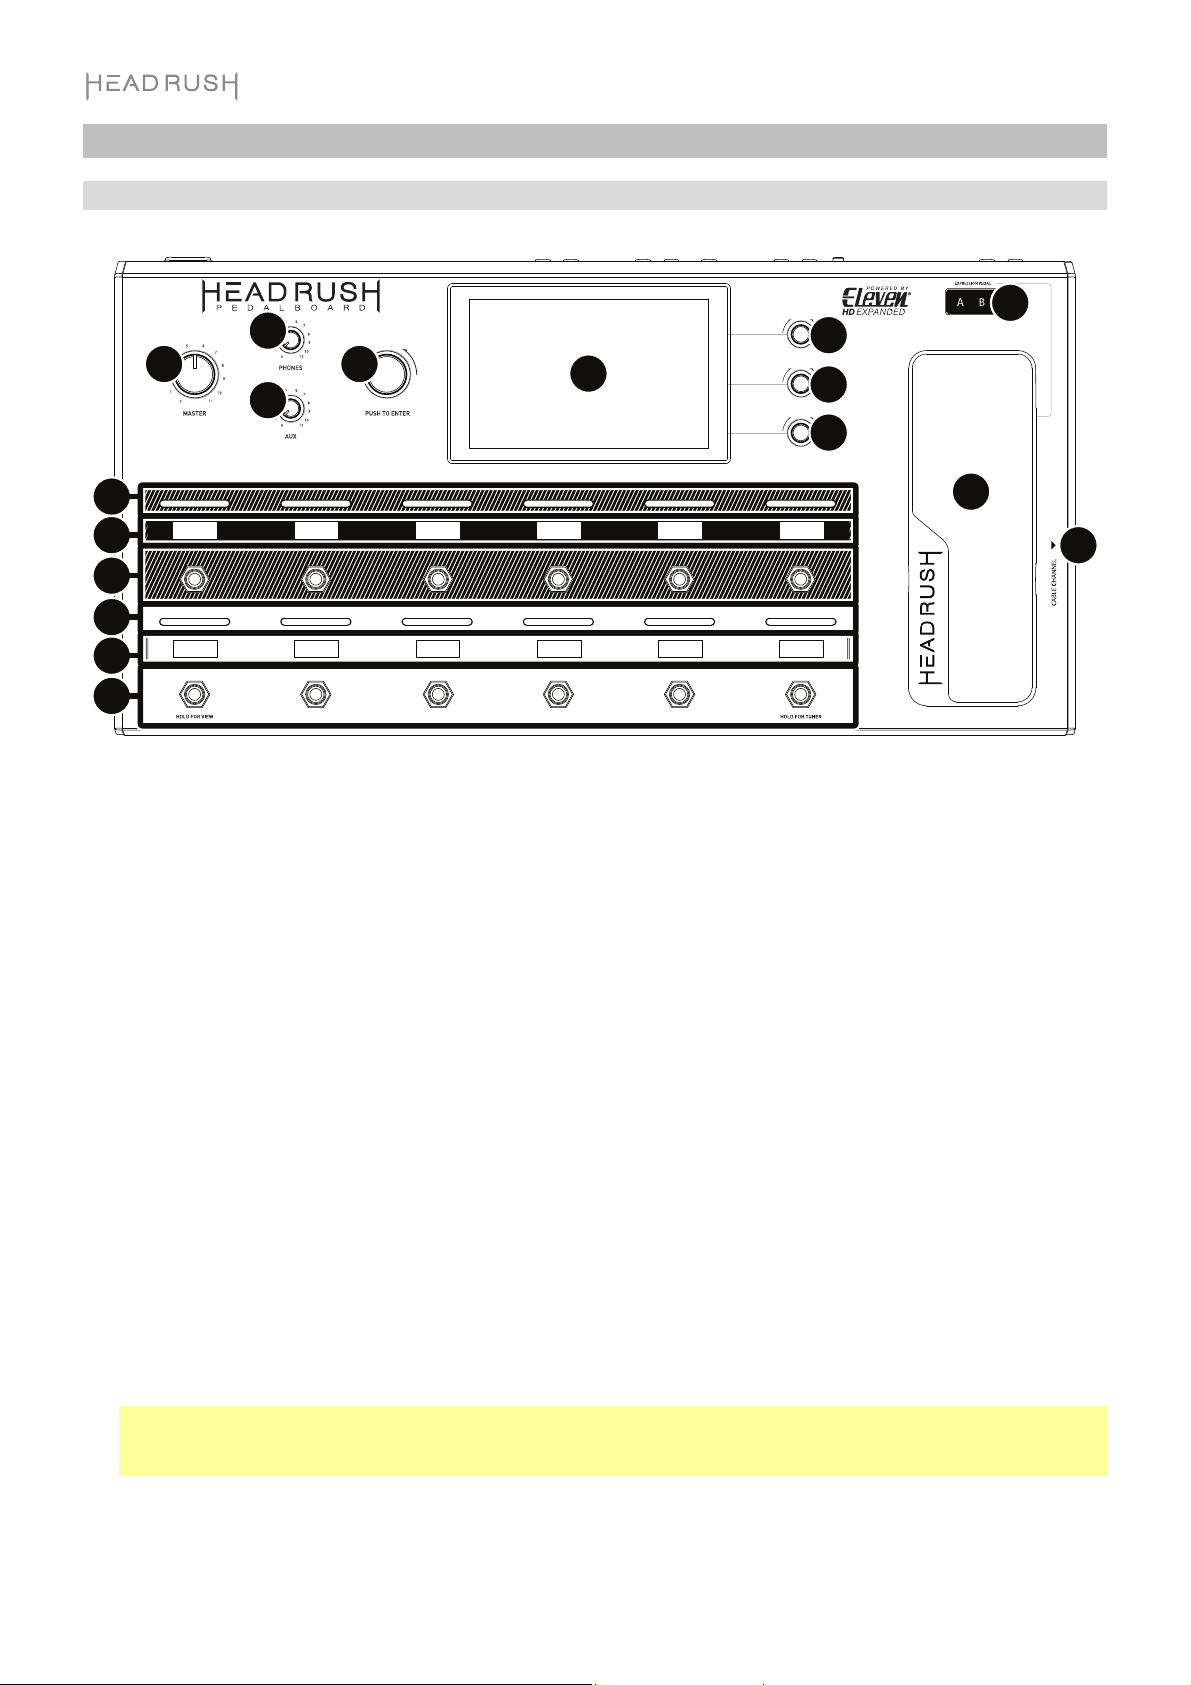
Top Panel
9
8
10
11
3
1
2
2
2
6
5
7
12
4
6
5
4
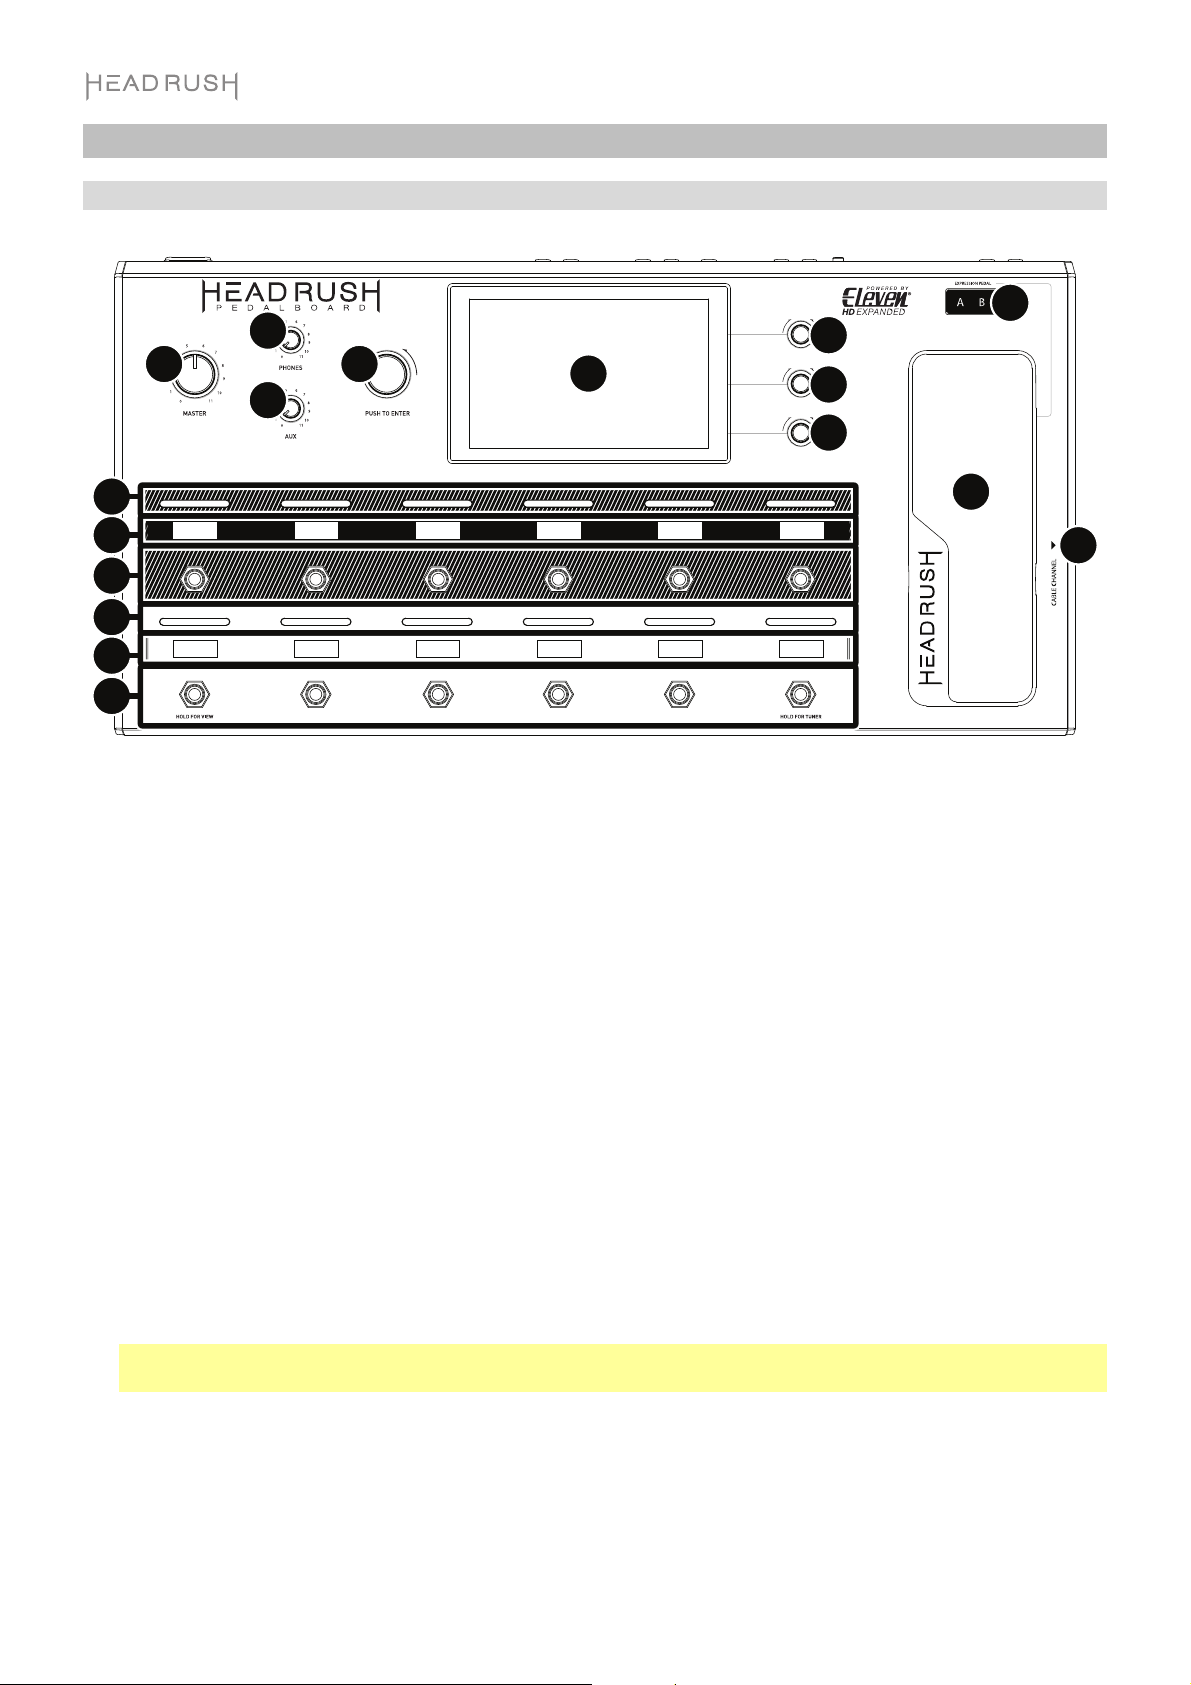
1. Main Display: This full-color multi-touch display shows information relevant to HeadRush Pedalboard’s
current operation. Touch the display (and use the hardware controls) to control the interface. See Basic
Operation to learn how it works.
2. Parameter Knobs: Turn these knobs to adjust the parameters or settings shown next to them in the main
display.
3. Encoder: Turn this encoder to scroll through the available menu options or adjust the parameter values of the
selected field in the display. Push the encoder to confirm your selection.
4. Footswitches: Press these footswitches to activate or deactivate the assigned model or to load the assigned rig.
5. Footswitch Displays: These display strips indicate the model or rig assigned to each footswitch.
6. Footswitch Indicators: These lights indicate whether the model or rig assigned to each footswitch is on
(brightly lit) or off (dimly lit).
7. Expression Pedal: Use this pedal to adjust the assigned parameter/parameters. See Basic Operation >
Hardware Assign > Expression Pedal for more information.
8. Expression Pedal Status LCD: This small LCD indicates the current status of the expression pedal. See
Basic Operation > Hardware Assign > Expression Pedal for more information.
9. Master Volume: Turn this knob to adjust the volume level of the outputs.
10. Phones Volume: Turn this knob to adjust the volume level of the phones output.
11. Aux Volume: Turn this knob to adjust the volume level of the aux input.
Important: The audio signal from the aux input is routed directly to the outputs of HeadRush Pedalboard
without any modeling applied. It is also unaffected by the master volume or phones volume knobs.
12. Cable Channel: Place your cables under and through this indent on the underside of HeadRush Pedalboard
to keep your stage clutter-free and prevent people from tripping over cables.
4
Page 5
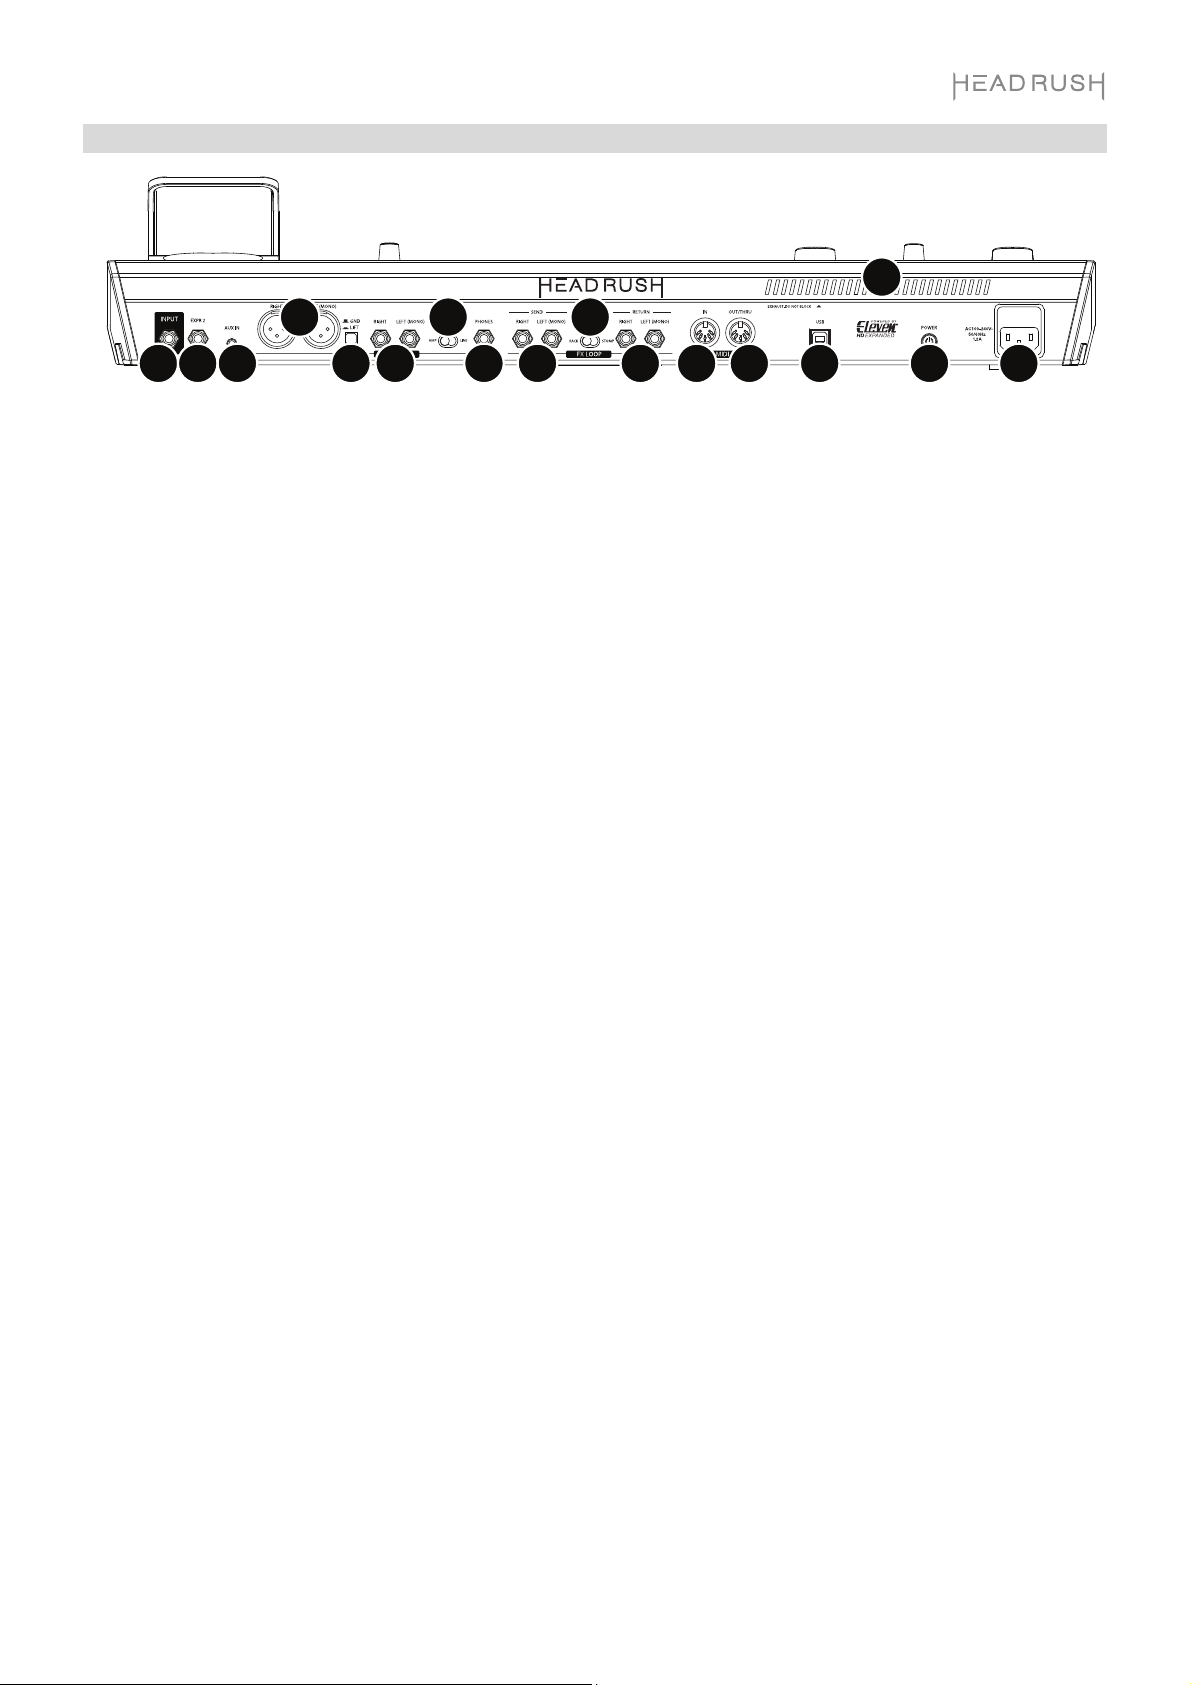
Rear Panel
3
9
10
11
7
4
5
6
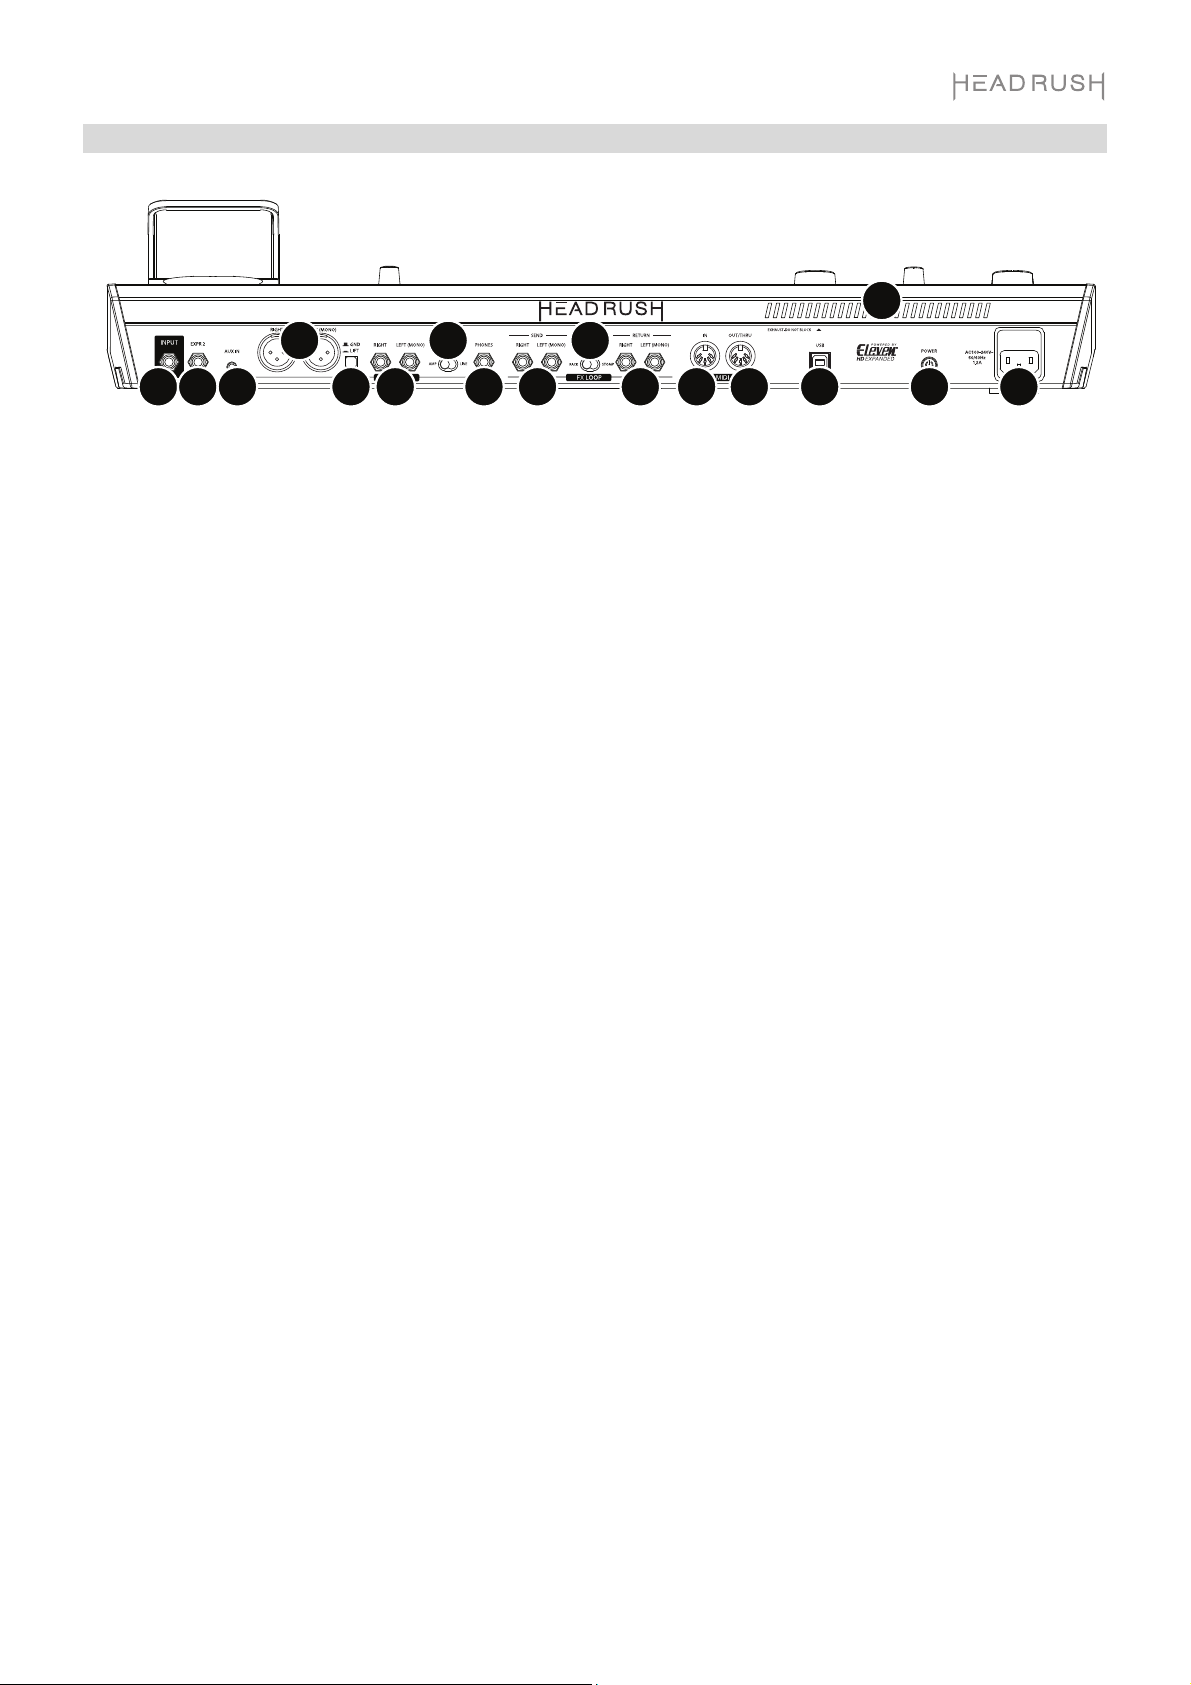
1. Power Input (IEC): Connect this input to a power outlet using the included power cable.
2. Power Switch: Press this button to turn HeadRush Pedalboard’s power on. Press and hold this button to
turn HeadRush Pedalboard’s power off.
3. Vent: Make sure this vent is unobstructed while using HeadRush Pedalboard.
4. Guitar Input (1/4”/6.35 mm, TS): Connect your guitar to this input using a standard instrument cable.
5. Expression Pedal Input (1/4”/6.35 mm, TRS): Connect an optional secondary expression pedal to this input
using a standard instrument cable.
6. Aux Input (1/8”/3.5 mm, TRS): Connect an optional audio source (e.g., smartphone, tablet, etc.) to this input
using an 1/8”/3.5 mm stereo cable.
7. Outputs (XLR): Connect these outputs to the inputs of your mixer, active loudspeaker, etc. If you only need to
use one output, use the one labeled L/Mono.
8. Ground-Lift Switch: Engage (depress) this switch to reduce hum or noise.
9. Outputs (1/4”/6.35 mm, TRS): Connect these outputs to the inputs of your amplifier, audio interface, etc. Set
the Amp/Line selector to the setting appropriate for the connected device. If you only need to use one
output, use the one labeled L/Mono.
8
12
14
13
15
16
17
2
1
10. Amp/Line Selector: Use this switch to select the level of the signal sent from the 1/4”/6.35 mm outputs.
When set to Amp, the output level will be +6 dBu for a standard guitar amplifier. When set to Line, output
level will be line-level, +18 dBu.
11. Phones Output (1/4”/6.35 mm, TRS): Connect standard 1/4” (6.35 mm) stereo headphones to this output.
Use the phones volume knob to control the volume level.
12. Send Outputs (1/4”/6.35 mm, TRS): Connect these outputs to the inputs of another effects module, an effect
pedal, or the effects loop return of an amplifier. Set the Rack/Stomp selector to the setting appropriate for
the connected device. If you only need to use one output, use the one labeled L/Mono.
13. Return Inputs (1/4”
pedal, or the effects loop send of an amplifier. Set the Rack/Stomp selector to the setting appropriate for the
connected device. If you only need to use one output, use the one labeled L/Mono.
14. Rack/Stomp Selector: Use this switch to select the level of the signal sent from the send outputs to the
return inputs. When set to Rack, output level will be line-level, +18 dBu. When set to Stomp, the output level
will be +6 dBu like a standard guitar pedal (“stompbox”).
15. MIDI Input (5-pin DIN): Use a standard MIDI cable to connect this input to the MIDI output of an optional
external MIDI device.
16. MIDI Output (5-pin DIN): Use a standard MIDI cable to connect this output to the MIDI input of an optional
external MIDI device.
17. USB Port: Connect this USB port to a computer using a standard USB cable. This connection allows
HeadRush Pedalboard to send and receive the digital audio signal to and from your computer. You can also
use this connection to import or export rigs, model presets, and setlists.
/6.35 mm, TRS): Connect these inputs to the outputs of another effects module, an effect
5
Page 6

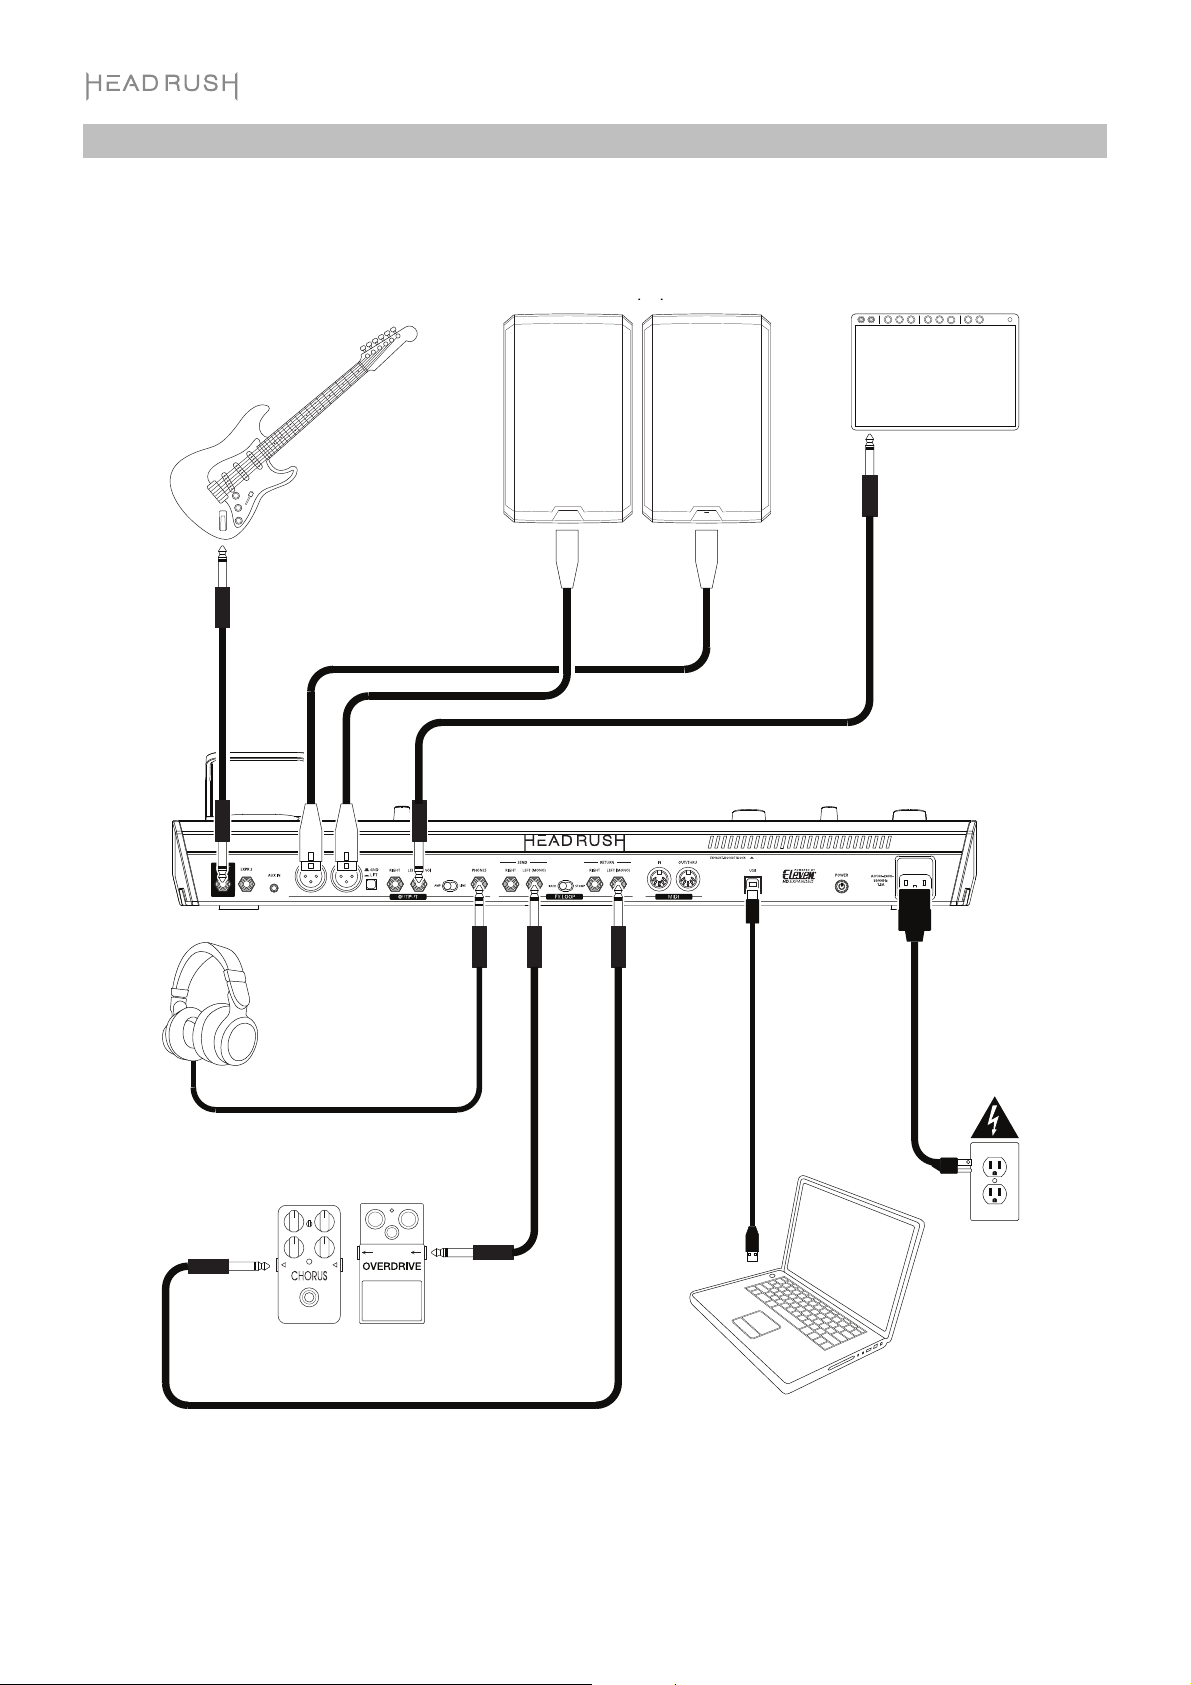
Setup
Items not listed under Introduction > Box Contents are sold separately.
Guitar PA loudspeakers or mixer Guitar amplifier
6
Headphones
External effect stompboxes,
modules, etc.
Power
outlet
Computer
Page 7
Basic Operation
This chapter describes some of HeadRush Pedalboard’s basic functions. You can visit headrushfx.com to
download the complete user guide for even more information.
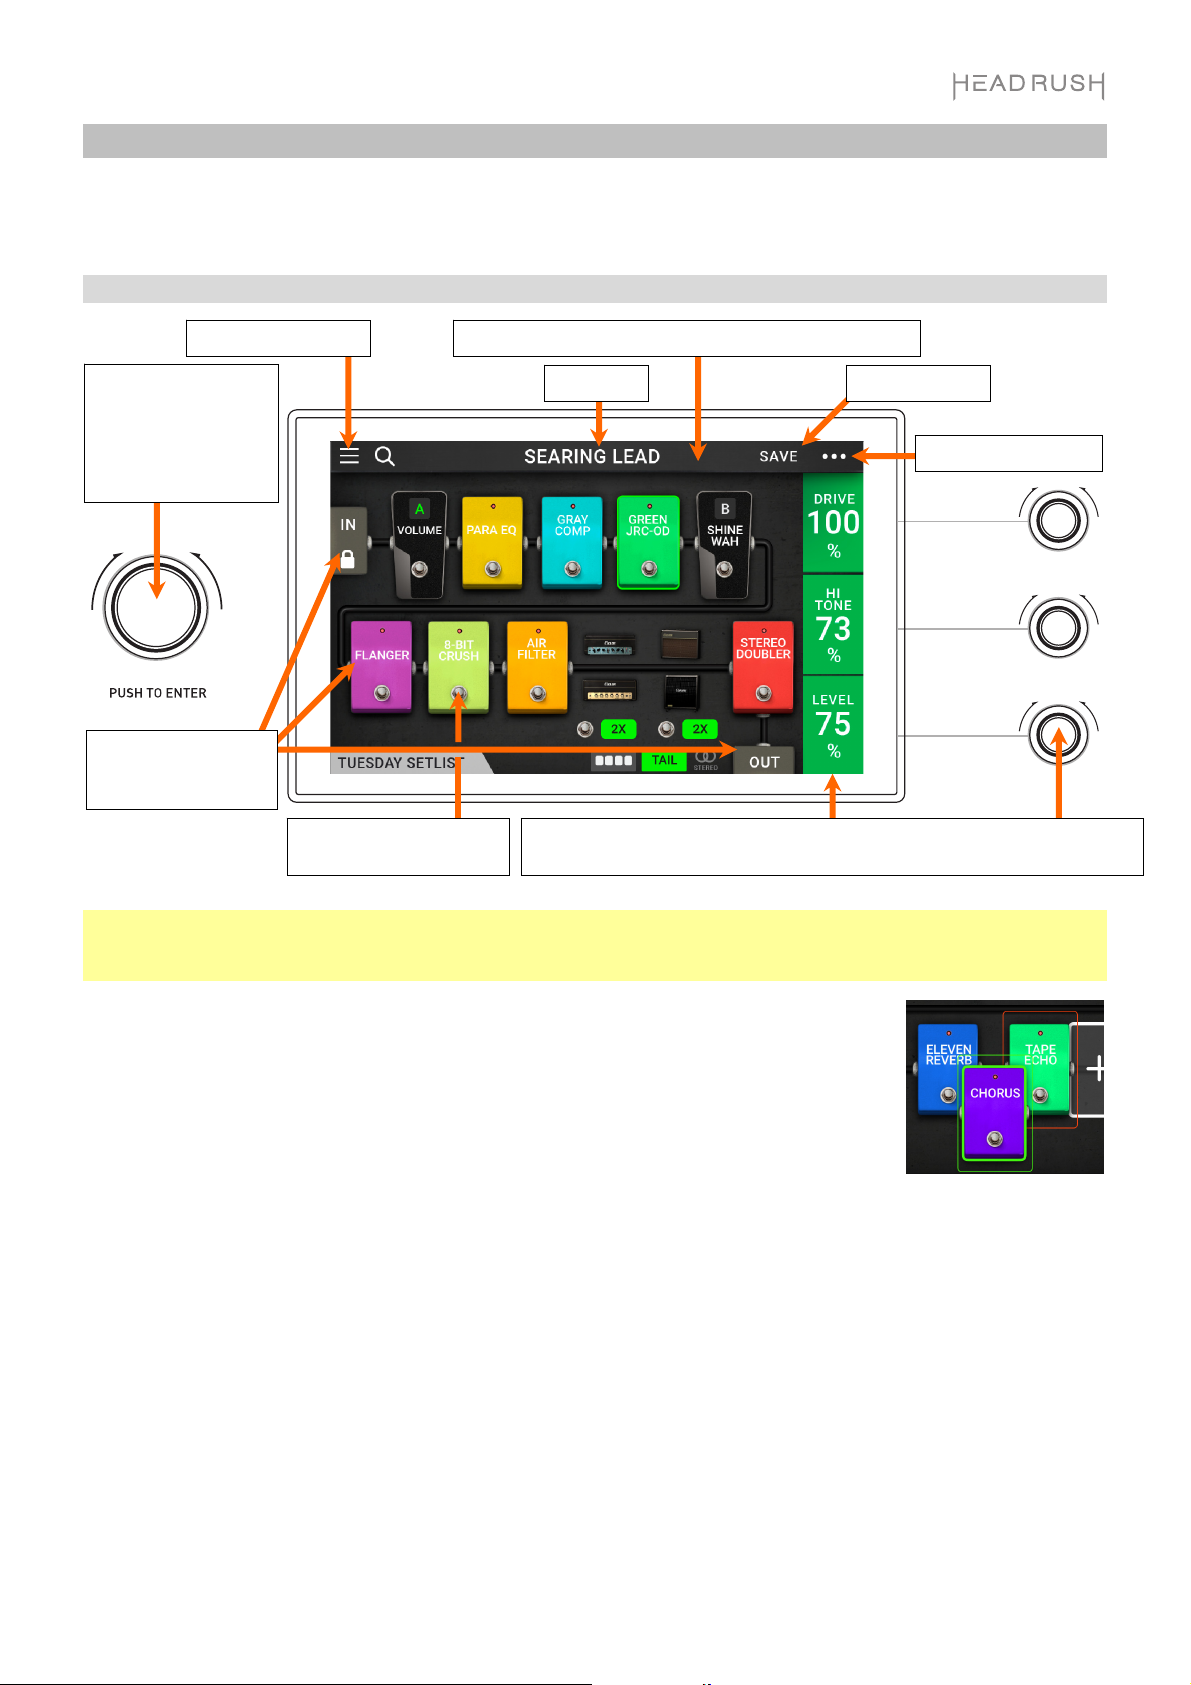
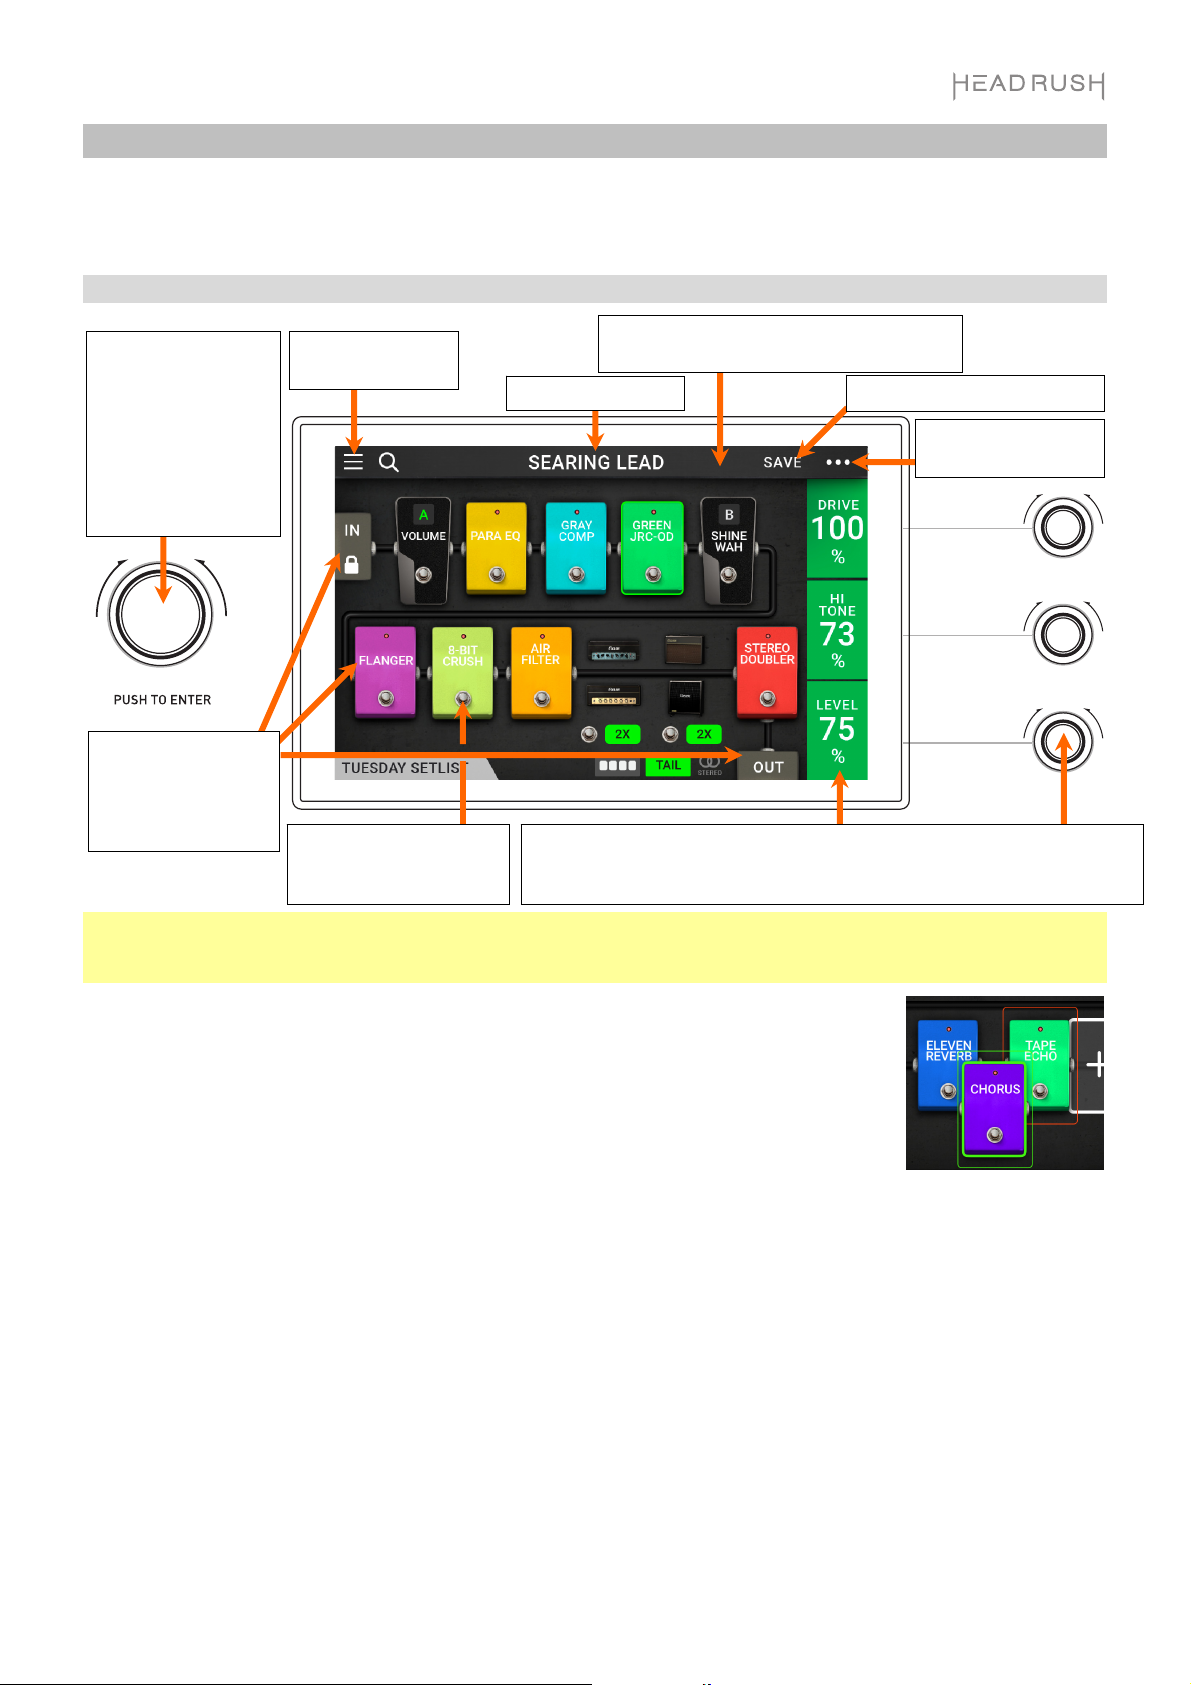
Main Screen
Tap to view setlists.
Turn encoder to move
through selectable
items onscreen or to
adjust parameters.
Press encoder as an
Double-tap a model,
In, or Out to show its
parameters.
Tap its footswitch to
activate or deactivate it.
Important: The sequence of models in your signal chain is not necessarily reflected in the footswitches. You can
freely assign models to available footswitches without changing your signal chain at all—and vice versa. See
Hardware Assign to learn about this.
Tap and drag this bar downward to view list of rigs.
Rig name.
Tap to save rig.
Turn the parameter knobs to adjust these parameters. When a model is
selected, tap anywhere in this column to show the next three parameters.
Tap for more options.
To assign a model (amp, cab, or effect) to an empty slot, tap it () and then use the list
that appears. See Rigs > Creating a Rig to learn about this.
To show a model’s parameters on the right edge of the screen, tap the model so it is
outlined in green. You can then turn the parameter knobs to adjust the parameters to
their left. Tap anywhere in the column of those three parameters to show the next three (if
the model has more than three parameters).
When no model is selected, these parameters will be ones that you assign in the
Hardware Assign screen.
To show a model’s settings screen, double-tap it. Its settings screen will appear with
its preset menu, parameters, and assigned color.
To activate or deactivate a model, press the footswitch assigned to it, or tap the
model’s footswitch in the display.
To load another rig (preset):
• Press the upper-left (Rig ) or lower-left (Rig ) footswitch to load the previous
or next rig immediately.
• Tap the or next to the name of the current rig on the screen.
• Tap the name of the rig on the screen and then turn the encoder.
To view other options, tap the button in the upper-right corner, and then tap an option.
To rearrange the
models in your signal
chain, tap and drag a
model to another slot
or between two other
models (the ones after
that position will shift
one slot further down
the signal chain).
7
Page 8
Views
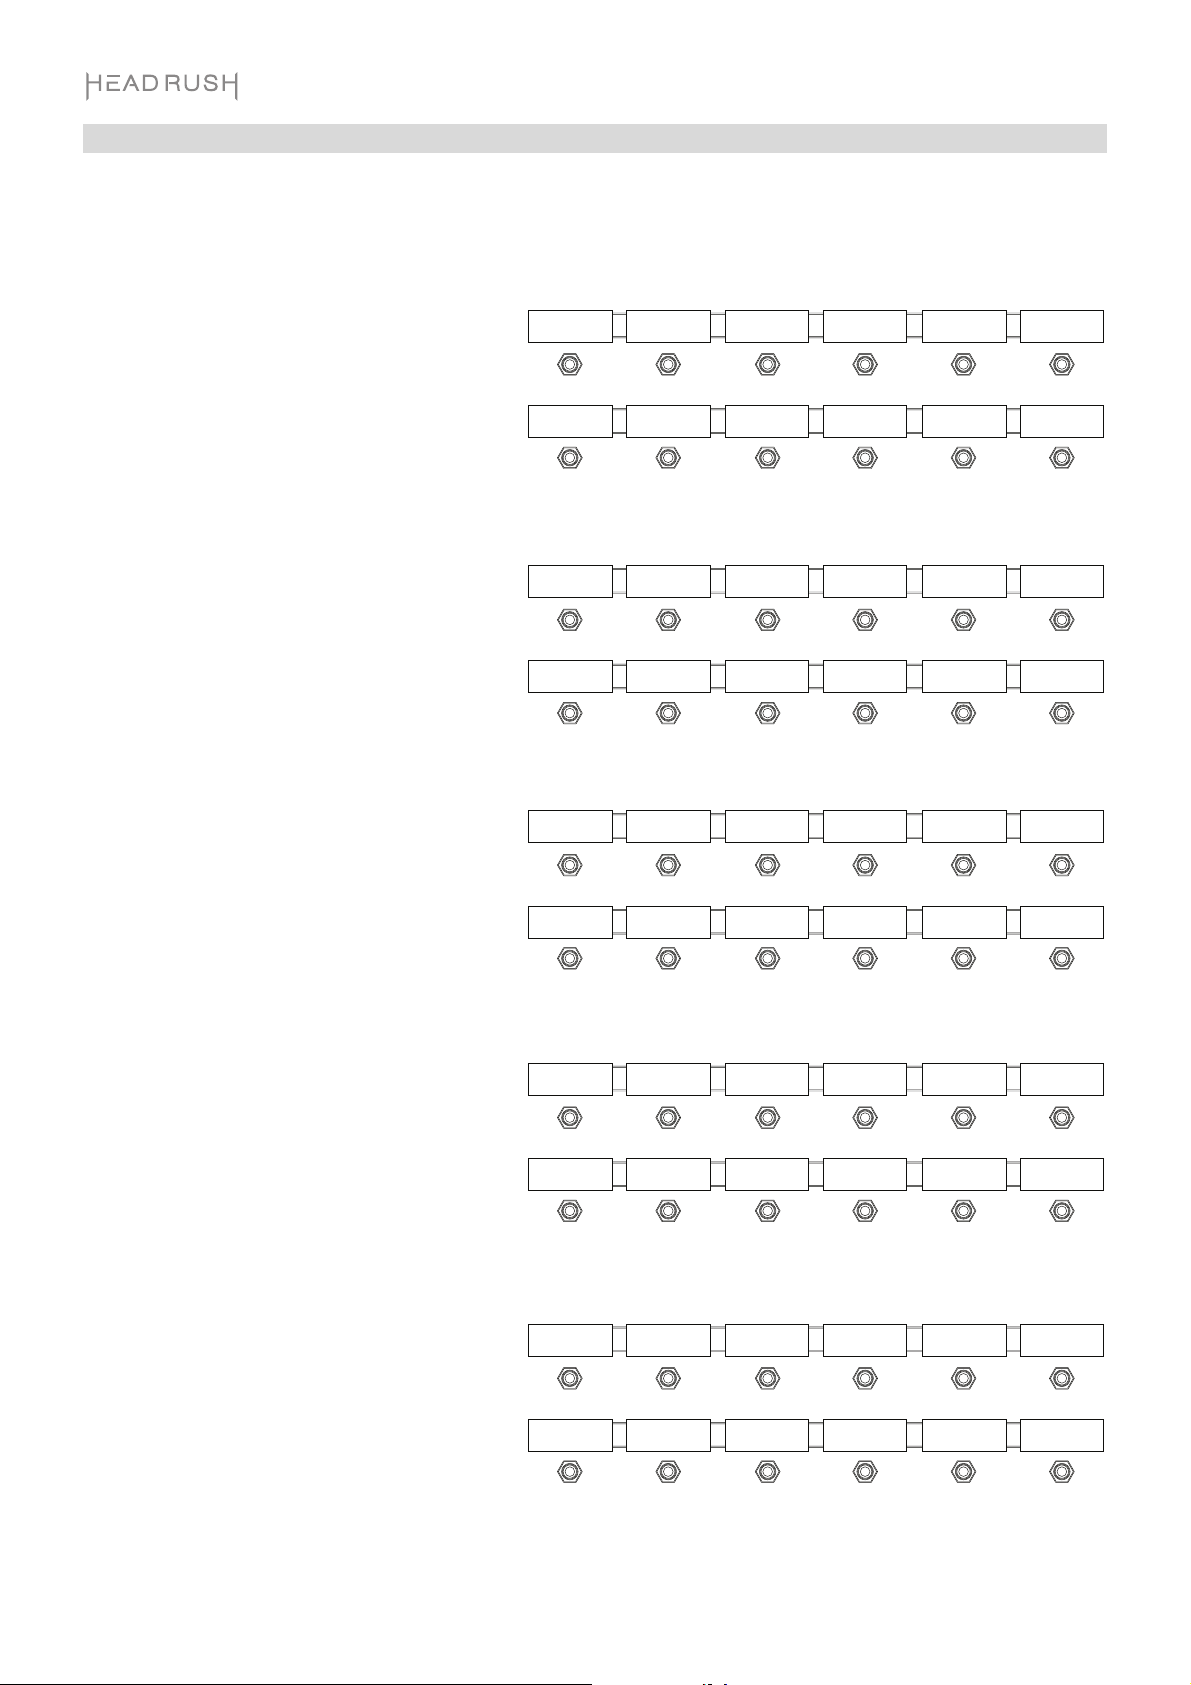
HeadRush Pedalboard’s footswitches can be used not only to activate or deactivate models (amps, cabs, or
effects) but also to select rigs or setlists. The middle eight footswitches are always in one of four modes:
To change the view:
1. Press and hold the lower-left footswitch until
Exit appears in its display. The adjacent four
footswitches now correspond to the four
views: Stomp, Rig, Hybrid, and Setlist.
2. Press a footswitch to enter that view.
Stomp View
The middle eight footswitches correspond to
models (amps, cabs, or effects) in your signal
chain. Press a footswitch to activate or deactivate
its model.
Rig View
The middle eight footswitches correspond to rigs
you have saved. Press a footswitch to load its rig.
To show the previous or next four rigs, press
the upper-left (Bank ) or lower-left (Bank )
footswitch.
Stomp Rig Hybrid Setlist
Exit
Rig Model 1 Model 2 Model 3 Model 4 Looper
Rig
Model 5 Model 6 Model 7 Model 8
Bank Rig 1 Rig 2 Rig 3 Rig 4 Looper
Bank
Rig 5 Rig 6 Rig 7 Rig 8
Tuner
Tuner
Hybrid View
The upper middle four footswitches correspond
to rigs you have saved. Press one of these
footswitches to load its rig. The lower middle four
footswitches correspond to models (amps, cabs,
or effects) in your signal chain. Press one of these
footswitches to activate or deactivate its model.
Setlist View
The middle eight footswitches correspond to
setlists you have saved. Press a footswitch to
load its setlist.
Bank Rig 1 Rig 2 Rig 3 Rig 4 Looper
Bank
Bank Setlist 1 Setlist 2 Setlist 3 Setlist 4
Bank
Model 1 Model 2 Model 3 Model 4
Setlist 5 Setlist 6 Setlist 7 Setlist 8
Tuner
8
Page 9
A
A
Rigs
While using HeadRush Pedalboard, a rig is a preset: the combination of assigned models—the amps, cabs, and
effects—and the parameter settings of each of them. You can create, edit, save, and load rigs, making it easy to
recall the perfect sound for each part of your performance.
Each rig has 11 slots, each of which can have one model (amp, cab, or effect) assigned to it. Assigned slots will
show graphical representations of the models, and empty slots will show a symbol.
Creating a New Rig
To create a new rig, tap the button in the upper-right corner
of the screen, and tap New Rig.
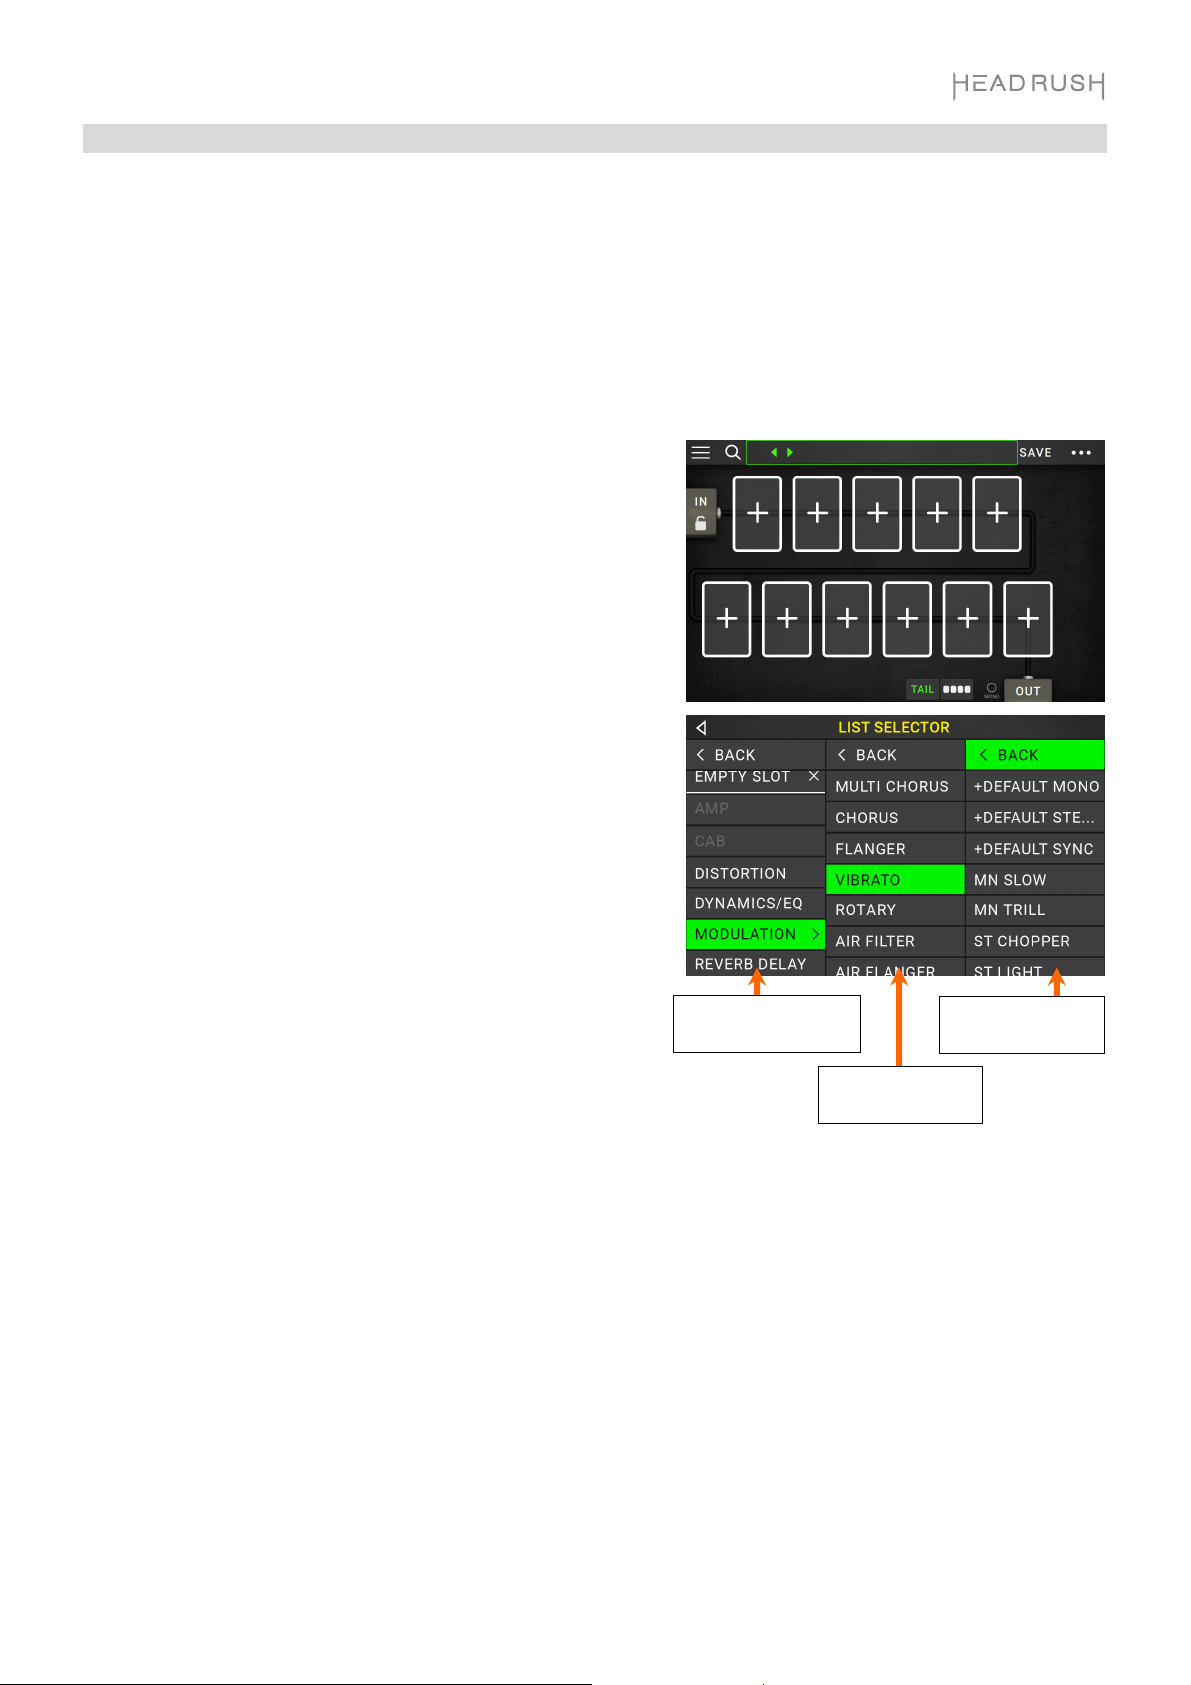
To assign a model (amp, cab, or effect) to an empty slot:
1. Tap the empty slot ().
2. In the list that appears, tap the type of model you want to
assign: Amp, Cab, or effect (Distortion, Dynamics/EQ,
Modulation, Reverb/Delay, FX-Loop, or Expression).
3. In the list that appears, tap the model you want to assign.
4. In the next list that appears, tap the preset you want to load
for that model.
If you load an amp or cab to a slot with an empty adjacent slot, a
matching amp or cab will be loaded automatically to the other
slot. After that, you can configure them independently: you can
separate them in the signal chain, you can change the type of the
amp or cab, and you can delete each model separately.
Optimizing Your Signal Chain
Model types: amps,
cabs & effects
for each type.
vailable presets
for each model.
vailable models
The signal chain is the path that the audio signal follows from your guitar through your selected models and ends
at the outputs of HeadRush Pedalboard. You can use the touchscreen to arrange your selected models in any
sequence, but you may find that some configurations will sound better than others.
Here are some common model placement suggestions for creating tones with HeadRush Pedalboard:
• Dynamics (e.g., compressors), filters (e.g., wah, pitch shifters), and volume pedals generally are placed
at the beginning of the signal chain. Alternatively, you can place volume pedals at the end of the signal
chain to provide a slight variance in functionality.
• Gain-based effects (e.g., overdrive/distortion, fuzz) usually come next.
• Equalization (EQ) is often used to shape the tonal characteristics of overdrive/distortion and fuzz effects, so
put an EQ after them. Alternatively, place it before them to shape the guitar’s general tone—cutting
unwanted frequencies—before the gain pedals.
• Modulation effects like flangers, phasers, and chorus are typically placed next.
• Time-based effects like delays and reverbs are generally placed near the end of the signal chain.
• An amp and a cab are often placed at the very end of the signal chain, although you can place it wherever
you want.
9
Page 10
oots
ode
r
Saving a Rig
If you have changed the rig at all since loading it, you will see an asterisk () next to its name at the top of the
screen. You can save these changes to this rig, save these changes as another rig, or discard them altogether.
To save a rig, tap Save in the upper-right corner.
To save your changes to the current rig, tap Save.
To save your changes as a new rig, tap Save New Rig, use the
keyboard that appears to enter a name, and then tap Save.
To return to the previous screen without saving, tap Cancel at
any time.
To discard any changes you’ve made to the rig, tap the button in the upper-right corner, and tap Discard
Changes.
Adjusting Settings
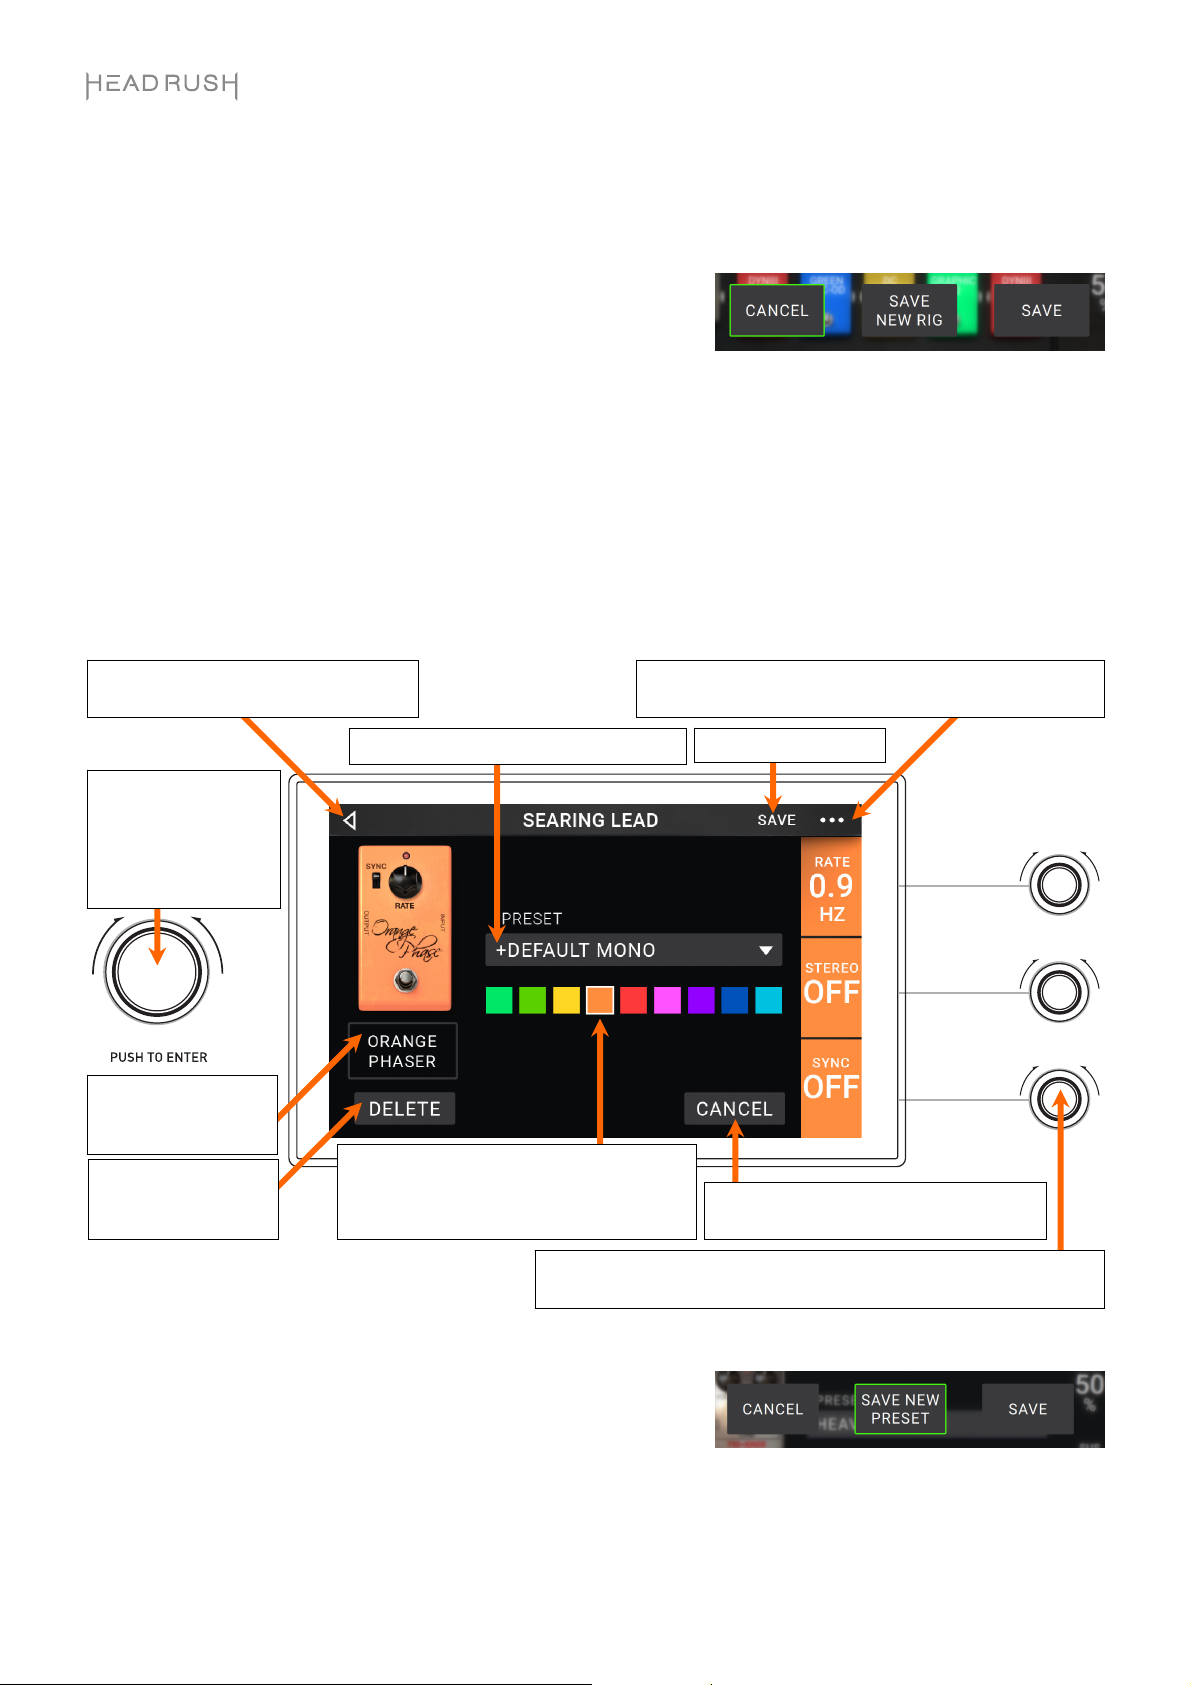
To adjust the settings of a model in your rig, double-tap it to open its settings screen.
Tap to return to retain your changes
and return to the main screen.
Turn encoder to move
through selectable
items onscreen or to
adjust parameters.
Press encoder as an
command.
Ente
Tap the Preset menu to select a preset. See Saving a Preset.
Tap this button and tap Discard Changes to discard
any changes you’ve made since opening this screen.
Tap the model name
to assign a different
model to this slot.
Tap Delete to
unassign the model
from the slot.
Tap a color to assign it to this model. That
color will be shown on the main screen, in
the Hardware Assign screen, and in the
witch indicator for this m
f
l.
Tap Cancel to return to discard your
changes and return to the main screen.
Turn the parameter knobs to adjust their parameters. Tap anywhere
in this column to show the next three parameters (if any).
Saving a Preset
To save a preset, tap Save in the upper-right corner.
To save your changes to the current preset, tap Save.
To save your changes as a new preset, tap Save New Preset,
use the keyboard that appears to enter a name, and then tap Save.
To return to the previous screen without saving, tap Cancel at
any time.
10
Page 11
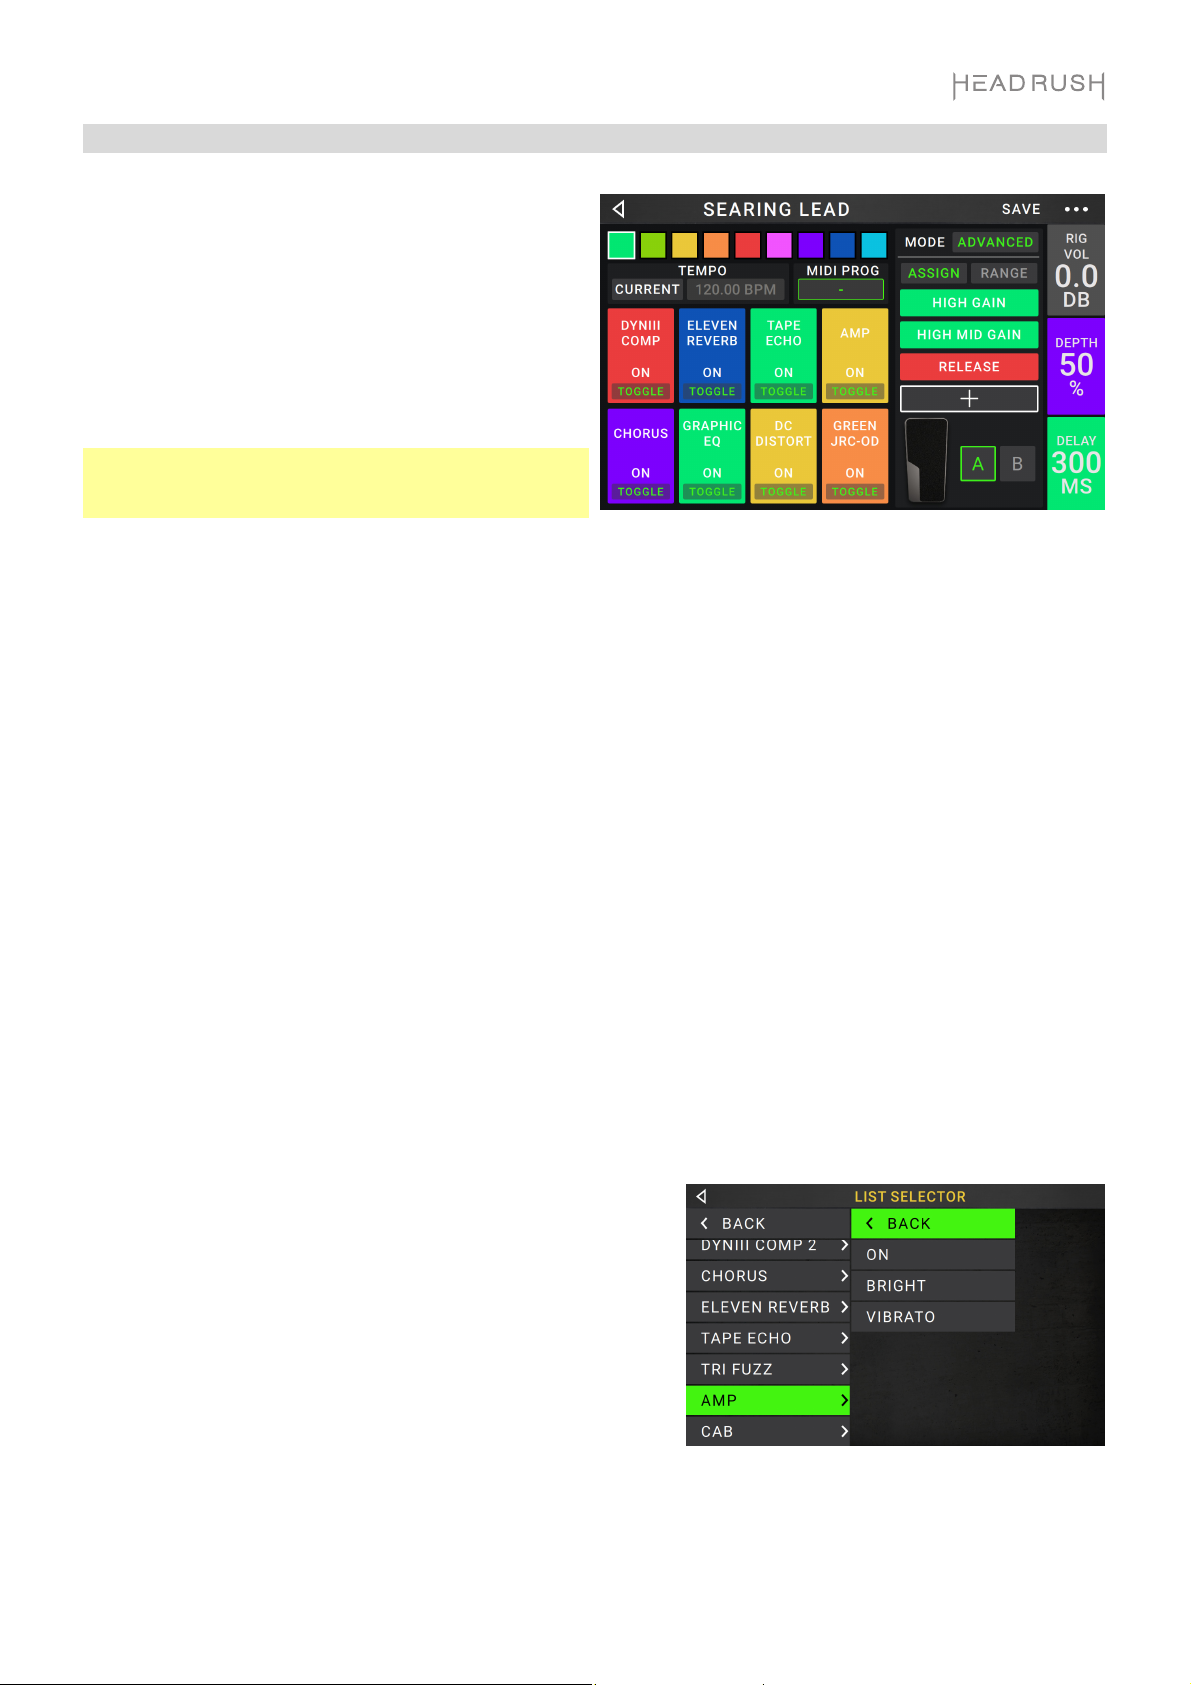
Hardware Assign
The Hardware Assign screen enables you to customize
how HeadRush Pedalboard’s footswitches, expression
pedal, and parameter knobs control each rig.
To open the Hardware Assign screen, tap the
button in the upper-right corner of the main screen,
and then tap Hardware Assign.
To return to the main screen, tap the button in the
upper-left corner.
Important: The Hardware Assign settings are all part of
the overall rig, so remember to save your changes you
want to keep.
To set the color associated with the rig, tap it in the upper-left part of the screen. This color will appear next to
the rig name when you view a list of all available rigs or when you view and create setlists. It will also be the color
of the corresponding footswitch indicator when HeadRush Pedalboard is in Rig View.
To set the tempo of the rig’s time-based effects (delays, modulation, etc.), tap the button under Tempo to
select Current or Fixed.
• Current: The rig will use the last-used tempo or the one set by the Tempo footswitch.
To set the tempo, press the Tempo footswitch (the lower-right-most one) at the desired tempo 3–8 times to
set the new tempo in beats per minute (BPM). You can do this anytime that footswitch display shows Tempo.
• Fixed: The rig will use a tempo that you set here.
To set the tempo, turn the encoder to set the desired tempo in beats per minute (BPM). You can set the
tempo only in this Hardware Assign screen.
Footswitches
The eight boxes in the lower-left corner represent the middle eight footswitches of HeadRush Pedalboard. You
can assign any switch-based parameters (ones with only two states) to any of the footswitches—regardless of
their location in the signal chain.
To assign a parameter to a footswitch:
1. Tap a box. indicates an empty box.
2. In the list that appears, tap the model with the parameter you
want to assign.
3. In the list that appears, tap the parameter you want to assign.
Usually, the parameter will simply be On (to activate or
deactivate it).
Tap Unassigned to unassign that footswitch.
To swap two assignments, tap and drag one of them over the
other, and then release it.
11
Page 12
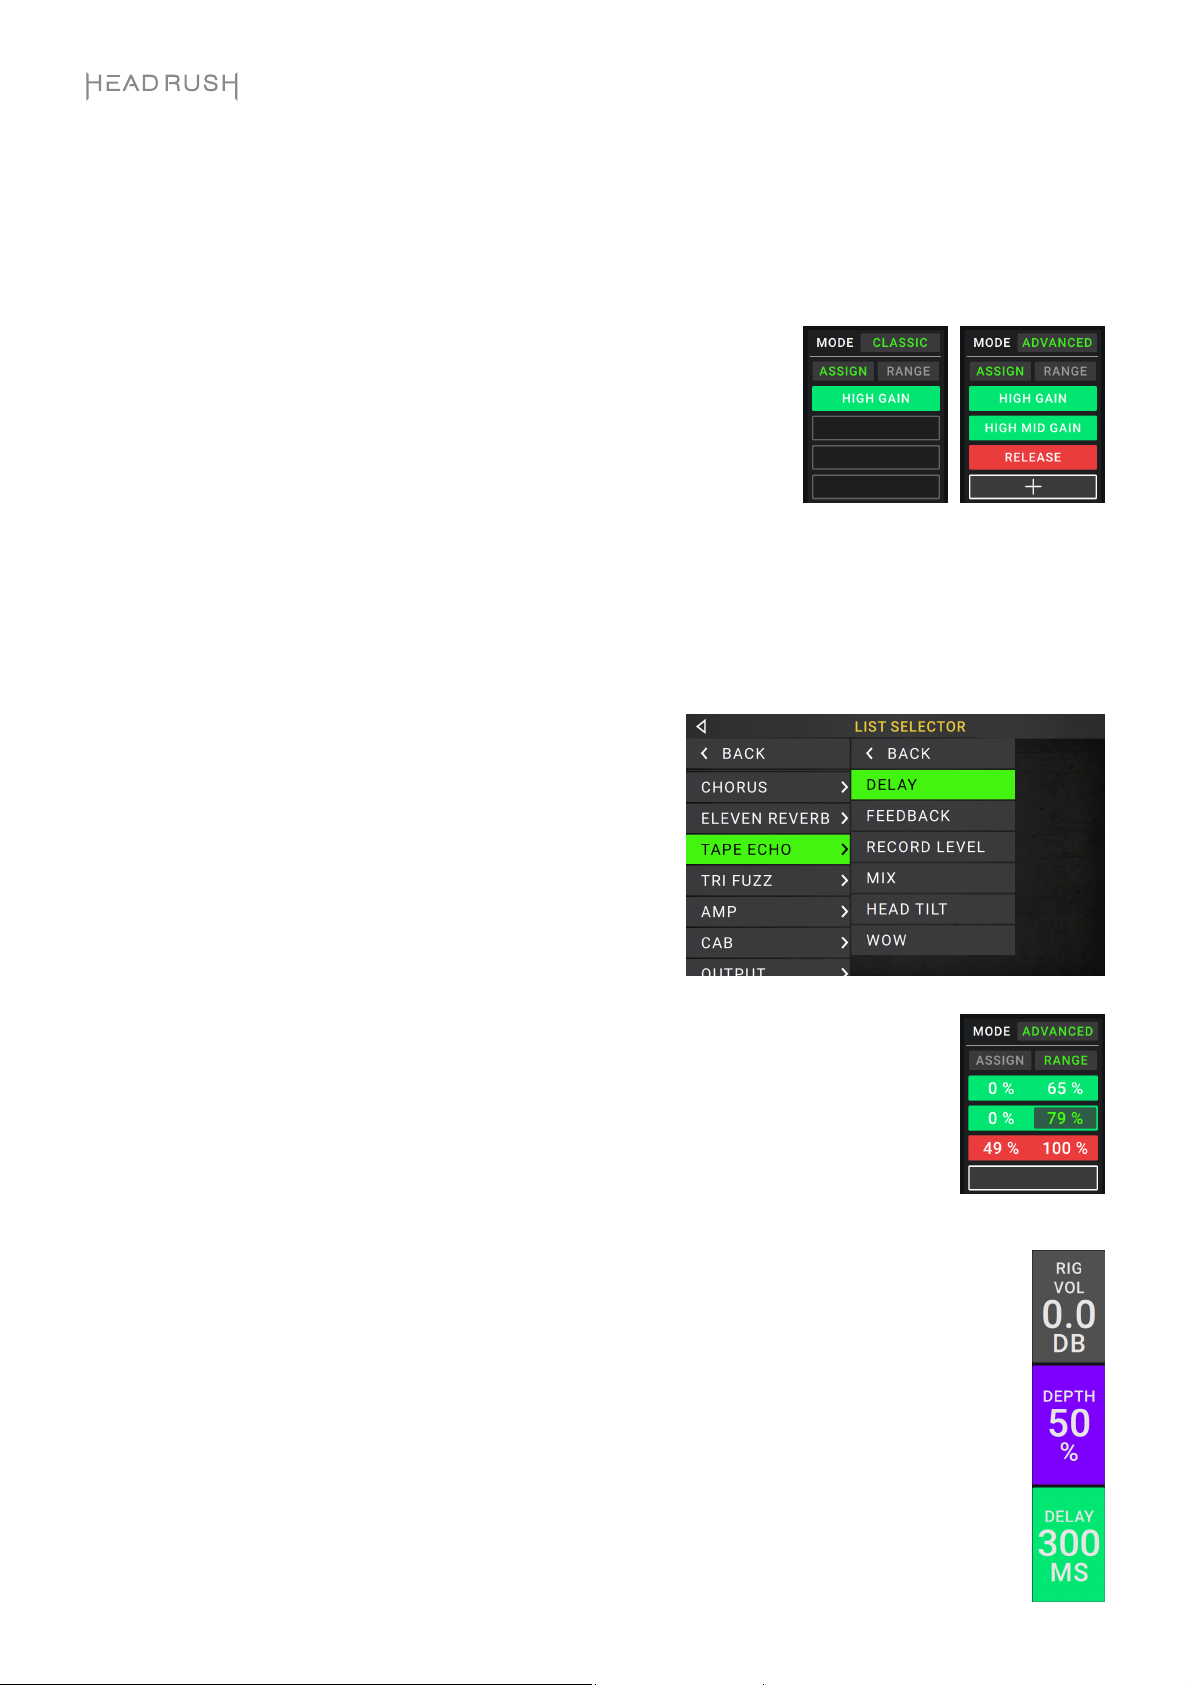
Expression Pedal
The expression pedal can control two parameters (in Classic Mode) or two sets of parameters (in Advanced
Mode). Use the toe switch to switch between them—Expression Pedal A or B.
To activate the toe switch, move the “toe end” of the expression pedal so it touches the pedalboard, and then
press down. The expression pedal status LCD will indicate A or B.
The column of four boxes represents the expression pedal settings. You can
assign one or more continuously adjustable parameters (ones with a range of
values) to the expression pedal.
To set the expression pedal mode, tap the button above Range in the
upper-right corner to select Classic or Advanced.
• Classic: You can assign one parameter to each expressional pedal (A
and B). Using the toe switch will select the other expression pedal and
deactivate (bypass) the current expression pedal’s parameter. For
instance, if you assign a wah pedal to Expression Pedal A and a volume
pedal to Expression Pedal B, only one of them will be active at any time;
when you are controlling the wah pedal, the volume pedal will be
bypassed, and vice versa.
• Advanced: You can assign up to four parameters to each expression pedal (A and B). Moving the pedal
will adjust all of its assigned parameters simultaneously. Using the toe switch will select the other
expression pedal and leave the current pedal’s parameters active and at their maximum values.
To assign a parameter to the expression pedal:
1. If the Assign button is not on, tap it.
2. Tap a box under the Assign button. indicates an empty box.
3. In the list that appears, tap the model with the parameter you
want to assign.
4. In the list that appears, tap the parameter you want to assign.
Tap Unassigned to unassign that box.
To swap two assignments (while in Advanced Mode), tap and
drag one of them over the other, and then release it.
To set the range of an assigned parameter:
1. If the Range button is not on, tap it.
2. Tap a value under the Range
3. Turn the encoder to set the desired value as a percentage of the parameter’s entire range.
Press the encoder or tap elsewhere to confirm the value.
button.
Quick Parameters
The right edge of the screen shows a column of fields for three parameters. These are the three parameters
that are shown first whenever you load a rig. When no model is selected on the main screen, you can turn
the three parameter knobs to adjust these parameters. You can assign any continuous parameters to
these knobs (parameters with a range of values rather than ones with only “on” and “off” states).
To assign a parameter to a parameter knob:
1. Tap the field to which you want to assign a parameter. indicates an empty field.
2. In the list that appears, tap the model with the parameter you want to assign. You can also select
parameters for the incoming signal (Input) or outgoing signal (Output).
3. In the list that appears, tap the parameter you want to assign.
Tap Unassigned to unassign that parameter knob.
12
Page 13
Setlists
You can use setlists to organize your rigs. A setlist is a saved collection of rigs, which you can save and recall at a
later time. This is useful, for instance, if you only need some of your rigs for a performance; you can save a setlist
of just those rigs so you don’t have to spend time searching through all of your rigs before playing the next song.
To view your setlists, tap the ≡ button in the upper-left corner of the main screen. The Setlists screen will appear.
To return to the main screen, tap the button in the upper-left corner.
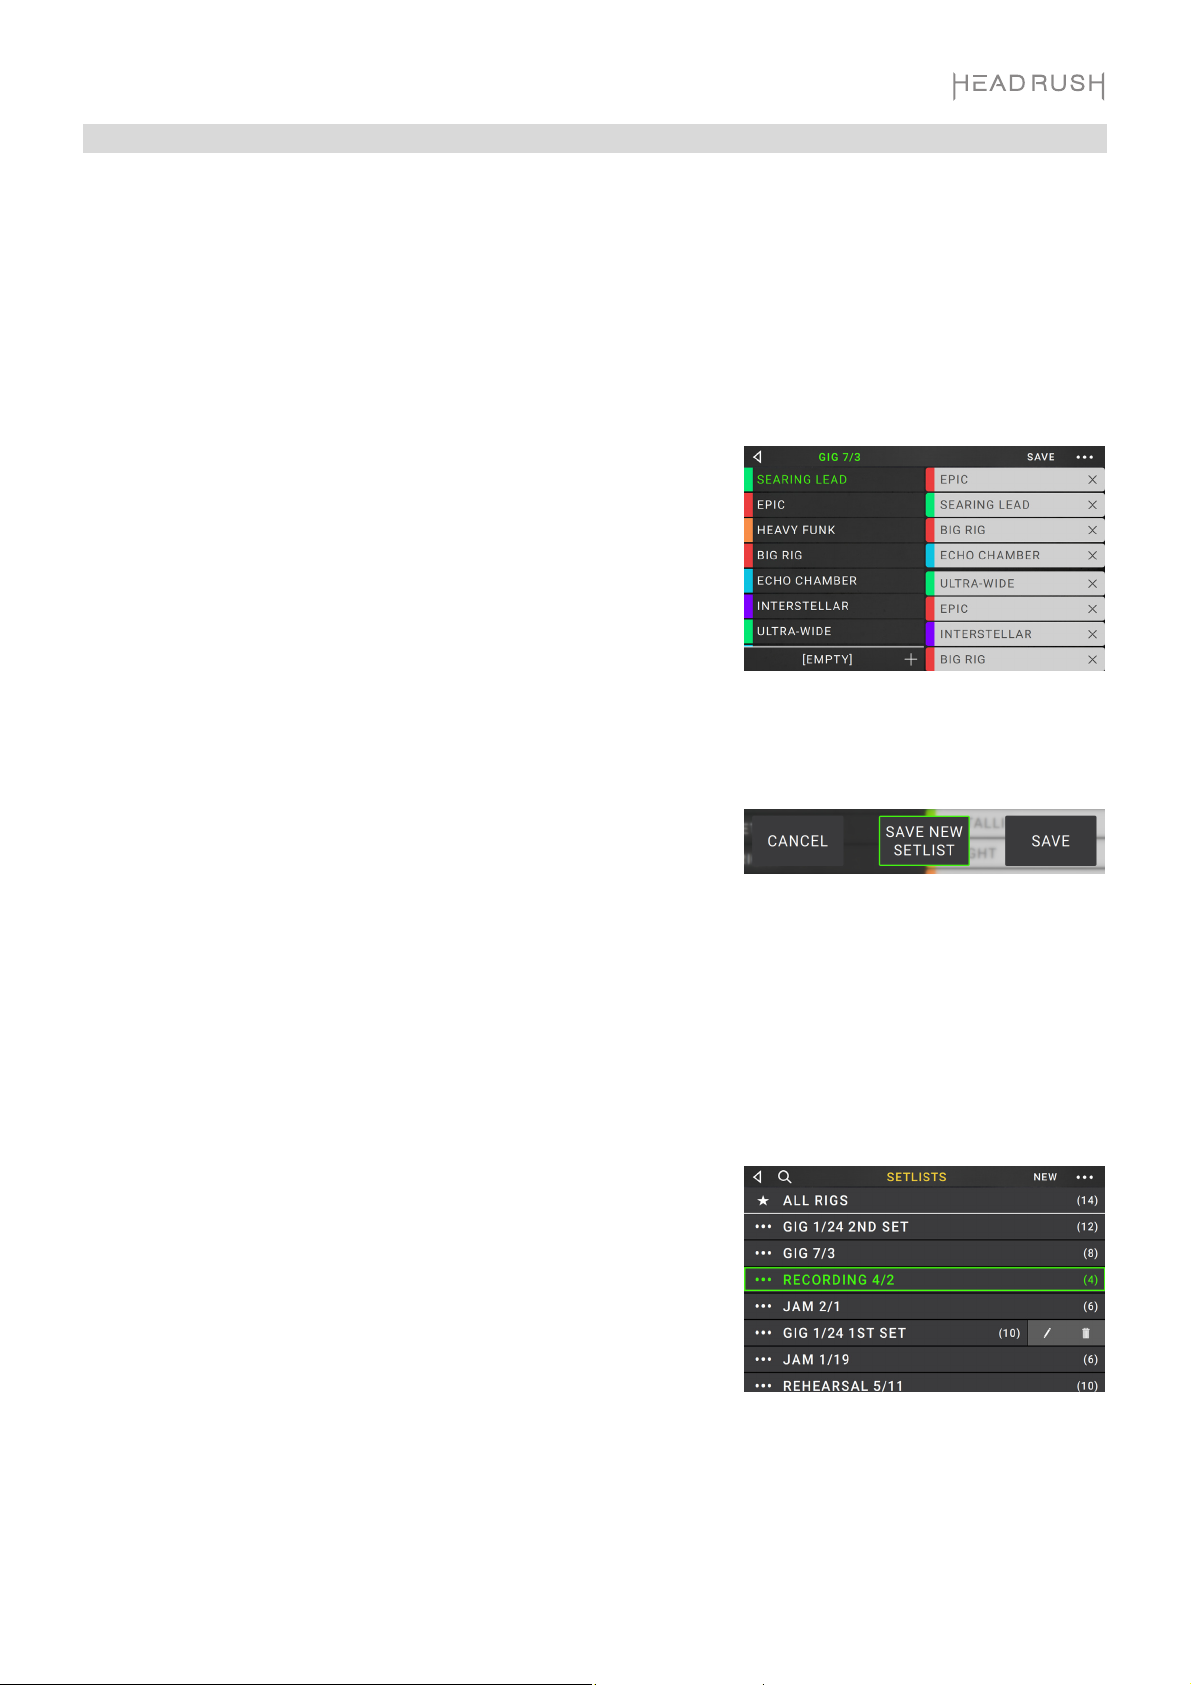
To create a setlist:
1. Tap New in the upper-right corner.
2. In the screen that appears, the left half is a list of all available rigs,
and the right half is the list of rigs in the setlist.
To add a rig to the setlist, tap it to add it to the end of the list.
Alternatively, tap and hold it, and then drag it to the desired location
in the list. You can add the same rig to a setlist more than once.
The [Empty ] rig in the lower-left corner is a slot to use as a
placeholder to make rearranging the setlist easier; it will not be
available as a selectable rig when moving through rigs in the setlist.
To rearrange the setlist, tap and hold a rig in the list on the right
half, and then drag it to the desired location in the list.
To remove a rig from the setlist, tap the on its right edge.
To save a setlist, tap Save in the upper-right corner.
To save your changes to the current setlist, tap Save.
To save your changes as a new setlist, tap Save New Setlist,
use the keyboard that appears to enter a name, and then tap Save.
(At any time) To return to the previous screen without saving, tap
Cancel.
To discard any changes you’ve made to the setlist, tap the button
in the upper-left corner, and tap Discard Changes.
To load a setlist:
1. While viewing the main screen, tap the ≡ button in the upper-left
corner to view the Setlists screen. Each setlist will show the number
of rigs in parentheses (including multiple instances of the same rig).
2. Tap the desired setlist. The first rig of that setlist will load
immediately. Tap All Rigs to view all rigs instead of a specific setlist.
To edit a setlist, tap the button on its left side, and then tap the
pencil icon. You will see the same screen you used to create the setlist,
where you can edit and save it.
To delete a setlist, tap the button on its left side, and then tap the
trash can icon. Tap Yes to confirm the deletion or Cancel to return to
the Setlists screen without deleting it.
13
Page 14

Hands-Free Mode
Hands-Free Mode enables you to adjust any of the settings
on your models by using just the footswitches and
expression pedal.
To enter Hands-Free Mode, press and hold a footswitch
assigned to a model for over one second. While in HandsFree Mode, the screen will show a single parameter and its
value, and the top six footswitches will correspond to six
parameters of that model.
To exit Hands-Free Mode, press the lower-left most (Exit)
footswitch.
To change the value, move the expression pedal.
To show another parameter, press the corresponding
footswitch. If that model has more than six parameters,
press the lower-middle two ( or ) footswitches to show
the previous or next six parameters.
14
Page 15

Guía de inicio rápido (Español)
Introducción
El tono perfecto está a un toque de distancia
Gracias por comprar la HeadRush Pedalboard!
®
Con su finamente afinado sistema DSP de cuádruple núcleo e impulsado por su exclusiva plataforma Eleven
Expanded, la HeadRush Pedalboard le ofrece los modelos de amplificadores, gabinetes, micrófonos y efectos
más versátiles, de mejor respuesta y de sonido más real jamás incluidos en el procesador de una pedalera de
efectos de guitarra.
La HeadRush Pedalboard brinda una nueva oferta generosa y diversa de modelos de amplificadores y efectos
clásicos y modernos, incluyendo los exclusivos efectos boutique originales que no se pueden encontrar en otro
lado, así como también la capacidad de cargar sus propios archivos de respuesta al impulso (IR) personalizados.
También existen características exclusivas que no se puede encontrar en ningún otro procesador de guitarra,
incluyendo la conmutación entre presets sin interrupciones con efecto de cascada de cola de
retardo/reverberación, un generador de bucles con más de 20 minutos de tiempo de grabación, la capacidad de
eliminar capas de los bucles en el orden inverso en el que fueron agregadas y mucho más.
El corazón de la HeadRush Pedalboard es su pantalla táctil de 7 pulgadas y su interfaz de usuario diseñada para
guitarristas, el cual le permite tocar, deslizar y arrastrar y soltar para crear y editar instantáneamente sus equipos
de una manera realista e intuitiva sin precedentes. Su gran pantalla también brinda una respuesta ultra clara al
tocar en vivo, especialmente al realizar cambios mínimos en su tono usando el modo Manos libres.
HD
La siguiente información es una guía de inicio rápido para que pueda ponerse en marcha rápidamente, pero
también puede encontrar el manual completo y videos tutoriales, así como también comentarnos sus experiencias,
en headrushfx.com.
Oh. Solo una cosa más. Esta sigue hasta 11.
Contenido de la caja
HeadRush Pedalboard
Cable USB
Cable de corriente
Tarjeta de descarga de software
Guía de inicio rápido
Manual sobre la seguridad y garantía
Importante: Visite headrushfx.com para descargar la guía del usuario completa.
Soporte
Para obtener la información más reciente acerca de este producto (documentación, especificaciones técnicas,
requisitos de sistema, información de compatibilidad, etc.) y registrarlo, visite headrushfx.com.
Para obtener soporte adicional del producto, visite headrushfx.com/support.
15
Page 16
Características
Panel superior
10
9
11
3
1
8
2
2
2
6
5
7
12
4
6
5
4
1. Pantalla principal: Esta pantalla multitáctil a todo color muestra información relevante para la operación
actual de la HeadRush Pedalboard. Toque la pantalla (y utilice los controles de hardware) para controlar la
interfaz. Consulte Funcionamiento básico para aprender cómo funciona.
2. Perillas de parámetros: Gire estas perillas para ajustar los parámetros o los ajustes que se muestran junto a
ellas en la pantalla principal.
3. Codificador: Utilice este codificador para desplazarse por las opciones de menú disponibles o ajustar los valores
de los parámetros del campo seleccionado en la pantalla. Pulse el codificador para introducir su selección.
4. Interruptores de pedal: Pulse estos interruptores de pedal para activar o desactivar el modelo asignado o
para cargar el equipo asignado.
5. Pantallas de los interruptores de pedal: Estas bandas de visualización indican el modelo o equipo
asignado a este interruptor de pedal.
6. Indicadores de los interruptores de pedal: Estas luces indican si el modelo o equipo asignado a cada
interruptor de pedal se encuentra encendido (con luz fuerte) o apagado (con luz tenue).
7. Pedal de expresión: Utilice este pedal para ajustar el/los parámetro(s) asignado(s). Consulte
Funcionamiento básico > Asignación de Hardware > Pedal de expresión para obtener más información.
8. LCD de estado del pedal de expresión: Este pequeño LCD indica el estado actual del pedal de expresión.
Consulte Funcionamiento básico > Asignación de Hardware > Pedal de expresión para obtener más
información.
9. Master Volume: Gire esta perilla para ajustar el volumen de las salidas.
10. Phones Volume: Gire esta perilla para ajustar el volumen de la salida para auriculares.
11. Aux Volume: Gire esta perilla para ajustar el volumen de la entrada auxiliar.
Importante: La señal de audio proveniente de la entrada auxiliar se encamina directamente hacia las salidas
de la HeadRush Pedalboard sin aplicarle ningún modelado. Tampoco se ve afectada por las perillas de
volumen maestro o de volumen de los auriculares.
12. Cable Channel: Coloque sus cables por debajo y a través de esta muesca del lado inferior de la HeadRush
Pedalboard para mantener el escenario prolijo y evitar que la gente se tropiece con los cables.
16
Page 17
Panel trasero
3
9
10
11
7
4
5
6
1. Entrada de corriente (IEC): Conecte esta entrada a una toma de corriente utilizando el cable de corriente
incluido.
2. Interruptor de encendido: Pulse este botón para encender la HeadRush Pedalboard. Mantenga pulsado
este botón para apagar la HeadRush Pedalboard.
3. Ventilación: Asegúrese de que esta ventilación no se encuentre obstruida mientras utiliza la HeadRush
Pedalboard.
4. Entradas de guitarra (6,35 mm/1/4 pulg., TRS): Conecte su guitarra a esta entrada utilizando un cable para
instrumentos estándar.
5. Entrada del pedal de expresión (6,35 mm/1/4 pulg., TRS): Conecte a esta entrada un pedal de expresión
secundario opcional utilizando un cable para instrumentos estándar.
6. Entrada auxiliar (3,5 mm/1/8 pulg., TRS): Conecte una fuente de audio opcional (por ej., un teléfono
inteligente [smartphone], tableta, etc.) a esta entrada mediante un cable estéreo de 3,5 mm (1/8 pulg.).
7. Salidas (XLR): Conecte estas salidas a las entradas de su mezclador, altavoz activo, etc. Si sólo precisa
utilizar una salida, utilice la que tiene el rótulo L/Mono.
8. Interruptor de levantamiento de tierra: Acople (baje) este interruptor para reducir el zumbido o ruido.
9. Salidas (6,35 mm/1/4 pulg., TRS): Conecte estas salidas a las entradas de su amplificador, interfaz de audio,
etc. Coloque el selector Amp/Line en la posición que corresponde al dispositivo conectado. Si sólo precisa
utilizar una salida, utilice la que tiene el rótulo L/Mono.
10. Selector Amp/Line: Utilice este interruptor para seleccionar el nivel de la señal enviada desde las salidas de
6,35 mm/1/4 pulg. Cuando se lo coloque en Amp, el nivel de la salida será de +6 dBu para un amplificador
de guitarra estándar. Cuando se lo coloque en Line, la salida tendrá nivel de línea, +18 dBu.
11. Salida para auriculares (6,35 mm/1/4 pulg., TRS): Conecte auriculares estéreo estándar de 6,35 mm (1/4
pulg.) a esta salida. Use las perillas phones volume para controlar el nivel de volumen.
12. Salidas de envío (6,35 mm/1/4 pulg., TRS): Conecte estas salidas a las entradas de otro módulo de efectos,
un pedal de efectos o el retorno del bucle de efectos de un amplificador. Coloque el selector Rack/Stomp
en la p
el rótulo L/Mono.
13. Entradas del retorno (6,35 mm/1/4 pulg., TRS): Conecte estas entradas a las salidas de otro módulo de
efectos, un pedal de efectos o el envío del bucle de efectos de un amplificador. Coloque el selector
Rack/Stomp en la posición correspondiente al dispositivo conectado. Si sólo precisa utilizar una salida,
utilice la que tiene el rótulo L/Mono.
14. Selector Rack/Stomp: Utilice este interruptor para seleccionar el nivel de la señal enviada desde las salidas de
envío a las entradas de retorno. Cuando se lo coloque en Rack, la salida tendrá nivel de línea, +18 dBu. Cuando
se lo coloca en Stomp, el nivel de la salida será de +6 dBu para un pedal de guitarra estándar (
15. Entrada de MIDI: (DIN de 5 patillas): Use un cable MIDI estándar para conectar esta entrada a la salida MIDI
de un dispositivo MIDI externo opcional.
16. Salida MIDI (DIN de 5 patillas): Use un cable MIDI estándar de para conectar esta salida a la entrada MIDI de
un dispositivo MIDI externo.
17. Puerto USB: Conecte este puerto USB a un ordenador utilizando un cable USB estándar. Esta conexión
permite que la HeadRush Pedalboard envíe y reciba la señal de audio digital desde y hacia su ordenador.
También puede utilizar esta conexión para importar o exportar equipos, presets de modelos y listas de equipos.
osición correspondiente al dispositivo conectado. Si sólo precisa utilizar una salida, utilice la que tiene
8
12
14
13
15
16
17
2
“stompbox”).
1
17
Page 18
A
Instalación
Los elementos que no se enumeran en Introducción > Contenido de la caja se venden por separado.
Guitarra
ltavoces amplificados o
Amplificador de guitarra
18
Auriculares
Stompboxes, módulos, etc. de
efectos externos.
Toma de
corriente
Ordenador
Page 19
p
r
Funcionamiento básico
Este capítulo describe algunas de las funciones básicas de la HeadRush Pedalboard. Puede visitar headrushfx.com
para descargar la guía de usuario completa y obtener más información.
Pantalla principal
Gire el codificador
para desplazarse por
los elementos
seleccionables en la
pantalla o para ajustar
los parámetros. Pulse
un codificador para
efectuar un comando
.
Ente
Toque para ver las
listas de equipos.
Nombre del equipo.
Haga un doble toque
sobre un modelo,
entrada o salida
para mostrar sus
arámetros.
Toque su interruptor de
pedal para activarlo o
desactivarlo.
Gire las perillas de parámetros para ajustar estos parámetros. Una vez
seleccionado un modelo, toque en cualquier lugar de esta columna para
mostrar los siguientes tres parámetros.
Importante: La secuencia de modelos en su cadena de señal no se refleja necesariamente en los interruptores
de pedal. Puede asignar libremente modelos a los interruptores de pedal disponibles sin modificar su cadena de
señal en lo absoluto—y viceversa. Consulte Asignación de hardware para aprender sobre esto.
Para asignar un modelo (amplificador, gabinete o efecto) a una ranura vacía, tóquelo ()
y luego utilice la lista que aparece. Consulte Equipos > Creación de un equipo nuevo
para aprender sobre esto.
Para mostrar los parámetros de un modelo en el lado derecho de la pantalla,
tóquelo de manera que quede resaltado en verde. Entonces podrá utilizar las perillas de
parámetros para ajustar los parámetros a su izquierda. Toque en cualquier lugar de la
columna de esos tres parámetros para mostrar los siguientes tres (si el modelo tiene más
de tres parámetros).
Cuando no se seleccione ningún modelo, estos parámetros serán los que asigne en la
pantalla Asignación de hardware.
Para mostrar la pantalla de ajustes de un modelo, tóquela dos veces. Su pantalla de
ajustes aparecerá con su menú predefinido, parámetros y color asignado.
Para activar o desactivar un modelo, pulse el interruptor de pedal asignado a él o
toque el interruptor de pedal del modelo en la pantalla.
Para cargar otro equipo (preset):
• Pulse el interruptor de pedal superior izquierdo (Rig ) o inferior derecho (Rig
) para cargar el equipo anterior o siguiente inmediatamente.
• Toque el o junto al nombre del equipo actual en la pantalla.
• Toque el nombre del equipo en la pantalla y luego gire el codificador.
Para ver otras opciones, toque el botón en la esquina superior derecha y luego
toque una opción.
Toque y arrastre esta barra hacia abajo
para ver la lista de equipos.
Toque para guardar el equipo.
Toque para ver más
opciones.
Para reacomodar los
modelos de su cadena
de señal, toque y
arrastre un modelo
hacia otra ranura o
entre los dos otros
modelos (los que le
siguen a esa posición
se desplazarán una
ranura hacia abajo en la
cadena de señal).
19
Page 20
Vistas
Los interruptores de pedal de la HeadRush Pedalboard no sólo se pueden utilizar para activar o desactivar
modelos (amplificadores, gabinetes o efectos) sino también para seleccionar equipos o listas de equipos. Los
ocho interruptores de pedal del medio se encuentran siempre en uno de cuatro modos:
Para cambiar la vista:
1. Mantenga pulsado el interruptor de pedal
inferior izquierdo hasta que aparezca Exit en
la pantalla. Los cuatro interruptores de pedal
adyacentes ahora se corresponden con las
cuatro vistas: Stomp, Rig, Hybrid y Setlist.
2. Pulse un interruptor de pedal para entrar a
esa vista.
Vista Stomp
Los ocho interruptores de pedal del medio
corresponden a modelos (amplificadores,
gabinetes o efectos) de su cadena de señal.
Pulse un interruptor de pedal para activar o
desactivar su modelo.
Vista Rig
Los ocho interruptores de pedal del medio
corresponden a equipos que ha guardado. Pulse
un interruptor de pedal para cargar su equipo.
Stomp Rig Hybrid Setlist
Exit
Rig Model 1 Model 2 Model 3 Model 4 Looper
Model 5 Model 6 Model 7 Model 8
Rig
Bank Rig 1 Rig 2 Rig 3 Rig 4 Looper
Tuner
Para mostrar los cuatro equipos anteriores o
siguientes, pulse el interruptor de pedal superior
izquierdo (Bank ) o inferior izquierdo (Bank ).
Vista híbrida
Los cuatro interruptores de pedal superiores del
medio corresponden a equipos que ha guardado.
Pulse uno de estos interruptores de pedal para
cargar su equipo. Los cuatro interruptores de
pedal inferiores del medio corresponden a
modelos (amplificadores, gabinetes o efectos) de
su cadena de señal. Pulse uno de estos
interruptores de pedal para activar o desactivar
su modelo.
Vista de lista de equipos
Los ocho interruptores de pedal del medio
corresponden a listas de equipos que ha
guardado. Pulse un interruptor de pedal para
cargar su lista de equipos.
20
Bank
Bank Rig 1 Rig 2 Rig 3 Rig 4 Looper
Bank
Bank Setlist 1 Setlist 2 Setlist 3 Setlist 4
Bank
Rig 5 Rig 6 Rig 7 Rig 8
Model 1 Model 2 Model 3 Model 4
Setlist 5 Setlist 6 Setlist 7 Setlist 8
Tuner
Tuner
Page 21

Equipos
Al utilizar la HeadRush Pedalboard, un equipo es un preset: la combinación de modelos
efectos
para recuperar fácilmente el sonido perfecto para cada parte de su interpretación.
Cada equipo tiene 11 ranuras, cada una de las cuales puede tener un modelo (amplificador, gabinete o efectos)
asignado a ella. Las ranuras asignadas exhibirán representaciones gráficas de los modelos y las ranuras vacías
exhibirán un símbolo .
—asignados y los ajustes de los parámetros de cada uno de ellos. Puede crear, editar, guardar y cargar equipos
—amplificadores, gabinetes y
Creación de un equipo nuevo
Para crear un equipo nuevo, toque el botón ubicado en la
esquina superior derecha de la pantalla y toque New Rig.
Para asignar un modelo (amplificador, gabinete o efecto) a una
ranura vacía:
1. Toque la ranura vacía ().
2. En la lista que aparece, toque el tipo de modelo que desea
asignar: Amp, Cab o efecto (Distortion, Dynamics/EQ,
Modulation, Reverb/Delay, FX-Loop o Expression).
3. En la lista que aparece, toque el modelo que desea asignar.
4. En la siguiente lista que aparece, toque el preset que desea
cargar para ese modelo.
Si carga un amplificador o gabinete en una ranura que tiene
adyacente otra ranura vacía, se cargará automáticamente en la otra
ranura un amplificador o gabinete que coincida con el de la primera
ranura. A continuación, podrá configurarlos de forma independiente:
puede separarlos en la cadena de señal, puede modificar el tipo de
amplificador o gabinete y puede eliminar cada modelo por separado.
Tipos de modelos: amplificadores,
gabinetes y efectos.
Presets disponibles
para cada modelo.
Optimización de su cadena de señal
La cadena de señal es el recorrido realizado por la señal de audio desde su guitarra, a través de sus modelos
seleccionados y hasta las salidas de la HeadRush Pedalboard. Puede utilizar la pantalla táctil para acomodar sus
modelos seleccionados en cualquier orden, pero encontrará que algunas configuraciones suenan mejor que otras.
Estas son algunas sugerencias sobre las ubicaciones más comunes de modelos para crear tonos con la HeadRush
Pedalboard:
• Los controles dinámicos (por ej., compresores), los filtros (por ej., wah, desplazadores de tono) y los pedales
de volumen generalmente se ubican al comienzo de la cadena de señal. Como alternativa, puede colocar los
pedales de volumen al final de la cadena de señal para lograr una leve variación de la funcionalidad.
• Los efectos basados en la ganancia (por ej., overdrive/distorsión, fuzz) suelen venir a continuación.
• La ecualización (EQ) se suele usar para dar forma a las características tonales a los efectos de overdrive/distorsión
y fuzz, así que coloque un ecualizador después de ellos. Como alternativa, colóquelo antes de ellos para darle
forma al tono general de la guitarra
• Los efectos de modulación tales como flangers, phasers y coros suelen colocarse a continuación.
• Los efectos basados en el tiempo tales como retardos y reverberaciones se suelen colocar cerca del final de la
cadena de señal.
• Al final de la cadena de señal se suelen colocar un amplificador y un gabinete, aunque los puede colocar en
donde desee.
—eliminando frecuencias no deseadas—antes de los pedales de ganancia.
Modelos disponibles para cada tipo.
21
Page 22

p
y
Guardado de un equipo
Si ha modificado el equipo desde que lo cargó, verá un asterisco () junto a su nombre en la parte superior de la
pantalla. Puede guardar estos cambios en este equipo, guardar estos cambios como otro equipo o descartarlos.
Para guardar un equipo, toque Save en la esquina superior derecha.
Para guardar sus cambios en el equipo actual, toque Save.
Para borrar sus cambios como un equipo nuevo, toque Save
New Rig, utilice el teclado que aparece para introducir un
nombre y luego toque Save.
Para regresar a la pantalla anterior sin guardar, toque Cancel en
cualquier momento.
Para descartar cualquier cambio realizado al equipo, toque el botón de la esquina superior derecha y
toque Discard Changes.
Modificación de los ajustes
Para modificar los ajustes de un modelo de su equipo, tóquelo dos veces para abrir su pantalla de ajustes.
Toque a fin de conservar sus cambios y
regresar a la pantalla principal.
Toque este botón y toque Discard Changes para
descartar cualquier cambio realizado desde la
apertura de esta pantalla.
Gire el codificador para
desplazarse por los
elementos seleccionables
en la pantalla o para
ajustar los parámetros.
Pulse un codificador
para efectuar un
comando Enter.
Toque el menú Preset para
seleccionar un preset.
Consulte Guardado de un preset.
Toque el nombre del
modelo para asignar un
modelo diferente a esta
ranura.
Toque Delete para
desasignar el modelo
de la ranura.
Toque un color para asignarlo a este modelo. Este
color se mostrará en la pantalla principal, en la
pantalla de Asignación de hardware y en el
indicador del interruptor de pedal de este modelo.
Gire las perillas de parámetros para ajustar sus parámetros. Toque en cualquier lugar de
esta columna
ara mostrar los siguientes tres parámetros (si existen).
Toque Cancel a fin de volver para descartar
sus cambios
regresar a la pantalla principal.
Guardado de un preset
Para guardar un preset, toque Save en la esquina superior derecha.
Para guardar sus cambios en el equipo actual, toque Save.
Para guardar sus cambios como un preset nuevo, toque Save
New Preset, utilice el teclado que aparece para introducir un
nombre y luego toque Save.
Para regresar a la pantalla anterior sin guardar, toque Cancel en
cualquier momento.
22
Page 23

Asignación de hardware
La pantalla Hardware Assign le permite personalizar la
manera en que los interruptores de pedal, pedales de
expresión y perillas de parámetros de la HeadRush
Pedalboard controlan cada equipo.
Para abrir la pantalla Hardware Assign, toque el
botón en la esquina superior derecha de la pantalla
principal y luego toque Hardware Assign.
Para regresar a la pantalla principal, toque el botón
de la esquina superior derecha.
Importante: Los ajustes de Hardware Assign son todos
parte del equipo general, así que recuerde guardar los
cambios que desea conservar.
Para ajustar el color asociado con el equipo, tóquelo en la parte superior izquierda de la pantalla. Este color
aparecerá junto al nombre del equipo cuando visualice la lista de los equipos disponibles o cuando vea y cree
listas de equipos. También será el color del indicador del interruptor de pedal correspondiente cuando la
HeadRush Pedalboard se encuentre en vista de Equipo.
Para ajustar el tempo de los efectos basados en el tiempo del equipo (retardos, modulaciones, etc.), toque el
botón bajo Tempo para seleccionar Current o Fixed.
• Current: El equipo usará el último tempo que usó o el tempo ajustado por el interruptor de pedal de Tempo.
Para ajustar el tempo, pulse el interruptor de pedal de Tempo (el de más abajo a la derecha) a la
velocidad deseada 3-8 veces para ajustar el nuevo tempo en pulsos por minuto (BPM). Puede hacer esto
en cualquier momento en el que en la pantalla del interruptor de pedal aparezca Tempo.
• Fixed: El equipo usará el tempo que defina aquí.
Para ajustar el tempo, gire el codificador para ajustar el tempo deseado en pulsos por minuto (BPM).
Puede ajustar el tempo únicamente desde esta pantalla de Asignación de hardware.
Interruptores de pedal
Las ocho casillas en la esquina inferior izquierda representan los ocho interruptores de pedal del medio de la
HeadRush Pedalboard. Puede asignar cualquier parámetro basado en interruptores (aquellos que sólo tienen dos
estados) a cualquiera de los interruptores de pedal
Como asignar un parámetro a un interruptor de pedal:
1. Toque una casilla. indica una casilla vacía.
—independientemente de su ubicación en la cadena de señal.
2. En la lista que aparece, toque el modelo con el parámetro que
desea asignar.
3. En la lista que aparece, toque el parámetro que desea
asignar. Generalmente, el parámetro simplemente estará en
On (para activarlo o desactivarlo).
Toque Unassigned para desasignar ese interruptor de pedal.
Para intercambiar dos asignaciones, toque y arrastre una de
ellas sobre la otra y luego suéltela.
23
Page 24

Pedal de expresión
El pedal de expresión puede controlar dos parámetros (en modo Clásico) o dos conjuntos de parámetros (en
modo Avanzado). Utilice el interruptor de punta del pie para conmutar entre ellos
Para activar el interruptor de punta del pie, mueva la
“punta del pie” del pedal de expresión de manera que
—pedal de expresión A o B.
toque la pedalera y luego píselo. El LCD de estado del pedal de expresión indicará A o B.
La columna de cuatro casillas representa los ajustes del pedal de expresión.
Puede asignar uno o más parámetros continuamente ajustables (aquellos con
un rango de valores) al pedal de expresión.
Para ajustar el modo del pedal de expresión, toque el botón encima de
Range en la esquina superior derecha para seleccionar Classic o Advanced.
• Clásico: Puede asignar un parámetro a cada pedal de expresión (A y
B). Al utilizar el interruptor de punta del pie se seleccionará el otro pedal
de expresión y se desactivará (omitirá) el parámetro del pedal de
expresión actual. Por ejemplo, si le asigna un pedal de wah al Pedal de
expresión A y un pedal de volumen al Pedal de expresión B, sólo uno
de ellos podrá estar activo a la vez; cuando esté controlando el pedal
de wah, el pedal de volumen se omitirá y viceversa.
• Avanzado: Puede asignar hasta cuatro parámetros a cada pedal de expresión (A y B). Al mover el pedal se
ajustarán todos sus parámetros asignados simultáneamente. Al usar el interruptor de punta del pie se
seleccionará el otro pedal de expresión y se dejarán los parámetros del pedal actual activos y en sus
valores máximos.
Como asignar un parámetro al pedal de expresión:
1. Si el botón Assign no está encendido, tóquelo.
2. Toque una casilla debajo del botón Assign. indica una
casilla vacía.
3. En la lista que aparece, toque el modelo con el parámetro que
desea asignar.
4. En la lista que aparece, toque el parámetro que desea asignar.
Toque Unassigned para desasignar esa casilla.
Para intercambiar dos asignaciones, (estando en modo Avanzado)
toque y arrastre una de ellas sobre la otra y luego suéltela.
Para ajustar el rango de un parámetro asignado:
1. Si el botón Range no está encendido, tóquelo.
2. Toque un valor debajo del botón Range.
Gire el codificador para ajustar el valor deseado como un porcentaje del rango completo
3.
del parámetro. Pulse el codificador o to que en cualquier otro lugar para confirmar el valor.
Parámetros rápidos
El borde derecho de la pantalla muestra una columna de campos para tres parámetros. Estos son los tres
parámetros que se muestran primero siempre que carga un equipo. Cuando no se selecciona ningún
modelo en la pantalla principal, puede girar las tres perillas de parámetros para ajustar estos
parámetros. Puede asignar cualquier parámetro continuo a estas perillas (parámetros con un rango de
valores en lugar de parámetros que sólo pueden encontrarse en un único estado, encendido o apagado).
Como asignar un parámetro a una perilla de parámetro:
1. Toque el campo al cual le desea asignar un parámetro. indica un campo vacío.
2. En la lista que aparece, toque el modelo con el parámetro que desea asignar. También puede
seleccionar parámetros para la señal entrante (Input) o la señal saliente (Output).
3. En la lista que aparece, toque el parámetro que desea asignar.
Toque Unassigned para desasignar esa perilla de parámetro.
24
Page 25

Listas de equipos
Puede utilizar listas de equipos para organizar sus equipos. Una lista de equipos es una colección guardada de
equipos, la cual puede guardar y recuperar más tarde. Esto resulta útil, por ejemplo, si sólo necesita algunos de sus
equipos para una interpretación; puede guardar una lista de equipos con sólo aquellos equipos de manera que no sea
necesario perder tiempo recorriendo todos sus equipos antes de tocar la siguiente canción.
Para visualizar sus listas de equipos, toque el botón ≡ en la esquina superior izquierda de la pantalla principal.
Aparecerá la pantalla Setlists.
Para regresar a la pantalla principal, toque el botón de la esquina superior derecha.
Para crear una lista de equipos:
1. Toque New en la esquina superior derecha.
2. En la pantalla que aparecerá a continuación, la mitad izquierda es una
lista de todos los equipos disponibles y la mitad derecha es la lista de
los equipos que se agregarán a la lista de equipos.
Para agregar un equipo a la lista de equipos, tóquelo a fin de
agregarlo al final de la lista. Como alternativa, manténgalo tocado y
arrástrelo hasta la posición deseada de la lista. Puede agregar el
mismo equipo más de una vez a una lista de equipos. El equipo
[Empty ] en la esquina inferior izquierda es una ranura que se utiliza
para guardar equipos temporalmente facilitando así la reorganización
de la lista de equipos; no estará disponible como un equipo
seleccionable al desplazarse por los equipos de la lista de equipos.
Para reorganizar la lista de equipos, mantenga tocado un equipo de
la lista en la mitad derecha y luego arrástrelo hacia la ubicación
deseada de la lista.
Para eliminar un equipo de la lista de equipos, toque la en su
borde derecho.
Para guardar una lista de equipos, toque Save en la esquina superior
derecha.
Para guardar sus cambios en la lista de equipos actual, toque Save.
Para guardar sus cambios como una lista de equipos nueva, toque
Save New Setlist, utilice el teclado que aparece para introducir un
nombre y luego toque Save.
(En cualquier momento) Para regresar a la pantalla anterior sin guardar,
toque Cancel.
Para descartar cualquier cambio realizado a la lista de equipos, toque
el botón de la esquina superior izquierda y toque Discard Changes.
Para cargar una lista de equipos:
1. Desde la pantalla principal, toque el botón ≡ en la esquina superior
izquierda para visualizar la pantalla Setlists. Cada lista de equipos
mostrará la cantidad de equipos entre paréntesis (incluyendo las
instancias repetidas del mismo equipo).
2. Toque la lista de equipos deseada. El primer equipo de esa lista de
equipos se cargará inmediatamente. Toque All Rigs para visualizar
todos los equipos en lugar de una lista de equipos específica.
Para editar una lista de equipos
y luego toque el icono del lápiz. Observará la misma pantalla utilizada para
crear la lista de equipos, en donde podrá editarla y guardarla.
Para eliminar una lista de equipos, toque el botón en su lado
izquierdo y luego toque el icono del cesto de basura. Toque Yes para
confirmar la eliminación o Cancel para regresar a la pantalla de listas de
equipos sin eliminarla.
, toque el botón en su lado izquierdo
25
Page 26

Modo Manos libres
El modo Manos libres le permite modificar cualquiera de los
ajustes en sus modelos con solo usar los interruptores de
pedal y el pedal de expresión.
Para entrar al modo Manos libres, mantenga pulsado un
interruptor de pedal asignado a un modelo durante más de
un segundo. Una vez en modo Manos libres, la pantalla
mostrará un único parámetro y su valor, y los seis
interruptores de pedal de más arriba corresponderán a seis
parámetros de ese modelo.
Para salir del modo Manos libres, pulse el interruptor de
pedal de más abajo a la izquierda (Exit).
Para modificar el valor, mueva el pedal de expresión.
Para mostrar otro parámetro, pulse el interruptor de pedal
correspondiente. Si ese modelo tiene más de seis
parámetros, pulse los dos interruptores de pedal de más
abajo al medio ( o ) para mostrar los seis parámetros
anteriores o siguientes.
26
Page 27

Guide d’utilisation rapide (Français)
Présentation
La sonorité parfaite au simple touché
Merci d’avoir choisi le HeadRush Pedalboard.
Doté d’un processeur de signal numérique quadricoeur réglé avec précision et alimenté par sa plateforme Eleven
HD Expanded exclusive, le HeadRush Pedalboard propose des modélisations d’amplificateurs, d’enceintes, de
microphones et d’effets offrant un rendu sonore des plus réactifs, réalistes et polyvalents, jamais offerts dans un
processeur d’effets de guitare au sol.
Le HeadRush Pedalboard offre un vaste choix de modèles d’amplificateurs et d’effets classiques, vintages et
modernes, dont une collection d’effets originale et exclusive inédite, ainsi que la possibilité de charger vos
propres fichiers de réponse impulsionnelle. Il dispose également de fonctionnalités exclusives, dont le passage
d’un préréglage à un autre sans blanc avec queue de délais/réverbération, un module de boucles avec plus de 20
minutes d’enregistrement, la capacité de séparer les niveaux des boucles dans l’ordre inverse de celui
dans lequel ils ont été ajoutés, et bien plus encore.
Au cœur du HeadRush Pedalboard se trouve un écran tactile de 18 cm avec une interface utilisateur créée
spécialement pour les guitaristes, qui leur permettent de toucher, glisser et déposer afin de créer et de modifier
des configurations personnalisées à la volée de manière intuitive et réaliste comme jamais auparavant. Le grand
écran affiche également des informations utiles sur les opérations, comme lorsque des modifications sont
apportées en mode mains libres.
®
Les informations contenues dans ce guide de démarrage vous permettront de commencer à utiliser le pédalier
rapidement, mais vous trouverez un guide d’utilisation complet, des didacticiels vidéo, ainsi qu’un endroit où
partager vos commentaires en visitant le site headrushfx.com.
Ce pédalier dispose de 11 emplacements.
Contenu de la boîte
HeadRush Pedalboard
Câble USB
Câble d’alimentation
Carte de téléchargement de logiciel
Guide de démarrage
Consignes de sécurité et informations concernant la garantie
Important : Veuillez visiter headrushfx.com afin de télécharger le guide d’utilisation complet.
Assistance technique
Pour les toutes dernières informations concernant la documentation, les spécifications techniques, la
configuration requise, la compatibilité et l’enregistrement du produit, veuillez visiter headrushfx.com.
Pour de l’assistance supplémentaire, veuillez visiter le site headrushfx.com/support.
27
Page 28

Caractéristiques
Panneau supérieur
10
9
11
3
1
8
2
2
2
6
5
7
12
4
6
5
4
1. Écran principal : Cet écran tactile multipoint couleur affiche les informations pertinentes aux opérations en
cours du HeadRush Pedalboard. Touchez l’écran (et utilisez les commandes matérielles) pour contrôler
l’interface. Veuillez consulter la section Fonctionnement de base pour plus d’information.
2. Boutons des paramètres : Utilisez ces boutons afin de modifier les valeurs des paramètres ou réglages
correspondants à l’écran.
3. Encodeur : Ce bouton permet de parcourir les options de menu disponibles ou d’ajuster les valeurs de
paramètre du champ sélectionné à l’écran. Appuyez sur le bouton pour confirmer la sélection.
4. Commutateurs au pied : Ces commutateurs au pied permettent d’activer ou de désactiver la configuration
personnalisée (rig) ou le modèle assigné.
5. Bandes d’affichage des commutateurs au pied : Ces bandes affichent le nom de la configuration
personnalisée ou du modèle assigné à chaque commutateur.
6. Indicateurs des commutateurs au pied : Ces voyants indiquent si la configuration personnalisée ou le
modèle assigné à chaque commutateur est activé (forte intensité) ou désactivé (faible intensité).
7. Pédale d’expression : Cette pédale permet d’ajuster le ou les paramètres assignés. Veuillez consulter la
section Fonctionnement de base > Assignation matérielle > Pédale d’expression afin d’en savoir plus.
8. Écran d’état ACL de la pédale d’expression : Ce petit écran ACL indique l’état actuel de la pédale
d’expression. Veuillez consulter la section Fonctionnement de base > Assignation matérielle > Pédale
d’expression afin d’en savoir plus.
9. Master Volume : Ce bouton permet d’ajuster le volume des sorties.
10. Phones : Ce bouton permet de régler le volume de la sortie casque.
11. Aux : Ce bouton permet d’ajuster le volume de l’entrée auxiliaire.
Important : Les signaux audio provenant de l’entrée auxiliaire sont transmis directement sans modélisation aux
sorties du HeadRush Pedalboard. Il n’est également pas affecté par les boutons de volume principal ou casque.
12. Passage pour câbles : Ce passage permet de faire passer les câbles sous le HeadRush Pedalboard afin de
désencombrer la scène et d’éviter que les gens ne trébuchent sur les câbles.
28
Page 29

Panneau arrière
3
9
10
11
7
4
5
6
1. Entrée d’alimentation (CEI) : Utilisez le câble d’alimentation secteur fourni pour relier cette entrée à une prise
secteur.
2. Interrupteur d’alimentation : Enfoncer cette touche permet de mettre le HeadRush Pedalboard sous
tension. Maintenir cette touche enfoncée permet de mettre le HeadRush Pedalboard hors tension.
3. Orifice de ventilation : Cet orifice de ventilation doit rester non obstrué lors de l’utilisation de HeadRush
Pedalboard.
4. Entrée guitare (6,35 mm, TS) : Cette entrée permet de brancher une guitare en utilisant un câble pour
instrument standard.
5. Entrée pour pédale d’expression (6,35 mm, TRS) : Cette entrée permet de brancher une pédale
d’expression supplémentaire en utilisant un câble pour instrument standard.
6. Entrée auxiliaire (3,5 mm, TRS) : Cette entrée permet de brancher une source audio (smartphone, tablette,
etc.) en utilisant un câble stéréo de 3,5 mm.
7. Sorties (XLR) : Ces sorties permettent de relier les entrées d’une console de mixage, d’une enceinte active,
etc. Lorsqu’une seule sortie est requise, utilisez la sortie L/Mono.
8. Interrupteur de mise à la terre : Enfoncer cette touche permet de réduire le ronflement ou les bruits parasitaires.
9. Sorties (6,35 mm, TRS) : Ces sorties permettent de relier les entrées d’un amplificateur, d’une interface
audio, etc. Veillez à régler le sélecteur Amp/Line sur le réglage approprié en fonction de l’appareil branché.
Lorsqu’une seule sortie est requise, utilisez la sortie L/Mono.
10. Sélecteur Amp/Line : Ce sélecteur permet de régler le niveau du signal provenant des sorties 6,35 mm. Si
vous sélectionnez le réglage Amp, le niveau de sortie sera de +6 dBu pour un amplificateur de guitare
standard. Si vous sélectionnez le réglage Line, le niveau de sortie sera à niveau ligne de +18 dBu.
11. Sortie casque (6,35 mm, TRS) : Cette sortie permet de brancher un casque d’écoute stéréo 6,35 mm. Le
niveau de cette sortie est commandé par le bouton Phones.
12. Sorties Send (6,35 mm, TRS) : Ces sorties permettent de relier
pédale d’effets, ou du retour de boucle d’effets d’un amplificateur. Veillez à régler le sélecteur Rack/Stomp
sur le réglage approprié en fonction de l’appareil branché. Lorsqu’une seule sortie est requise, utilisez la
sortie L/Mono.
13. Entrées Return (6,35 mm, TRS) : Ces entrées permettent de relier les sorties d’un autre module d’effets,
d’une pédale d’effets, ou du départ de boucle d’effets d’un amplificateur. Veillez à régler le sélecteur
Rack/Stomp sur le réglage approprié en fonction de l’appareil branché. Lorsqu’une seule sortie est requise,
utilisez la sortie L/Mono.
14. Sélecteur Rack/Stomp : Ce sélecteur permet de régler le niveau du signal acheminé des sorties Send aux
entrées Return. Si vous sélectionnez le réglage Rack, le niveau de sortie sera à niveau ligne de +18 dBu. Si
vous sélectionnez le réglage Stomp, le niveau de sortie sera de +6 dBu comme une pédale de guitare
standard (stompbox).
15. Entrée MIDI (DIN à 5 broches) : Cette entrée permet de relier la sortie MIDI d’un appareil MIDI externe en
utilisant un câble MIDI standard.
16. Sortie MIDI (DIN à 5 broches) : Cette sortie permet de relier l’entrée MIDI d’un appareil MIDI externe en
utilisant un câble MIDI standard.
17. Port USB : Ce port USB permet de brancher un ordinateur en utilisant un câble USB standard. Cette
connexion permet au HeadRush Pedalboard de transmettre et de recevoir un signal audionumérique vers et
depuis un ordinateur. Vous pouvez également utiliser cette connexion pour importer ou exporter des
configurations personnalisées, des préréglages de modèle et des setlists.
8
12
14
13
16
15
les entrées d’un autre module d’effets, d’une
17
2
1
29
Page 30

A
Installation
Les articles qui ne figurent pas dans la section Présentation > Contenu de la boîte sont vendus séparément.
Guitare Enceintes ou console de mixage Amplificateur de guitare
30
Casque d’écoute
Stompbox et modules d’effets
externes, etc.
limentation
secteur
Ordinateur
Page 31

Fonctionnement de base
Cette section explique certaines des fonctions de base du HeadRush Pedalboard. Veuillez visiter headrushfx.com pour
télécharger le guide d’utilisation complet pour plus d’informations.
Fenêtre d’accueil
Tapez pour afficher les setlists. Tapez et faites glisser cette barre vers le bas pour
Tournez l’encodeur
pour parcourir les
éléments
sélectionnables ou
pour modifier les
paramètres. Appuyez
sur l’encodeur pour
confirmer la sélection.
Double-tapez sur un
modèle, sur In ou sur
Out pour afficher ses
paramètres.
Tapez son commutateur
au pied pour l’activer ou
le désactiver.
Important : L’ordre des modèles de la chaîne du signal ne reflète pas nécessairement l’ordre des commutateurs au
pied. Vous pouvez assigner des modèles aux commutateurs au pied disponibles sans modifier la chaîne du signal, et
également modifier la chaîne du signal sans modifier les modèles assignés aux commutateurs au pied. Veuillez
consulter la section Assignation matérielle afin d’en savoir plus.
Pour assigner un modèle (d’amplificateur, d’enceinte ou d’effet) à un emplacement vide,
tapez sur l’emplacement (), puis sélectionnez un des modèles dans la liste qui s’affiche.
Veuillez consulter la section Configurations personnalisées (rigs) > Création d’une
configuration personnalisée afin d’en savoir plus.
Pour afficher les paramètres d’un modèle sur le bord droit de l’écran, tapez sur le modèle afin
qu’il soit surligné en vert. Vous pouvez maintenant utiliser les boutons des paramètres afin de
régler les paramètres qui se trouvent à gauche. Tapez n’importe où dans la colonne de ces trois
paramètres pour afficher les trois prochains paramètres (si le modèle a plus de trois paramètres).
Lorsqu’aucun modèle n’est sélectionné, ces paramètres seront ceux que vous assignerez à la
page Assignation matérielle.
Pour afficher la page des paramètres du modèle, double-tapez sur le modèle. La fenêtre
des paramètres devrait s’afficher avec le menu des préréglages, des paramètres et la couleur
qui lui est assignée.
Pour activer ou désactiver un modèle, appuyez sur le commutateur au pied qui lui est
assigné, ou tapez sur le « commutateur au pied » du modèle à l’écran.
Pour charger une autre configuration personnalisée (rig) :
• Appuyez sur le commutateur au pied supérieur gauche (Rig ) ou inférieur gauche (Rig
) pour charger immédiatement la configuration personnalisée précédente ou suivante.
• Tapez ou à côté du nom de la configuration personnalisée à l’écran.
• Tapez sur le nom de la configuration personnalisée à l’écran, puis tournez l’encodeur.
Pour afficher les autres options, tapez sur le bouton dans le coin supérieur droit et
sélectionnez une option.
afficher la liste des réglages personnalisés.
Nom du préréglage personnalisé. Tapez pour sauvegarder.
Tapez pour afficher
Tournez les boutons des paramètres afin de régler ces paramètres.
Lorsqu’un modèle est sélectionné, vous pouvez taper n’importe où
dans cette colonne pour afficher les trois paramètres suivants.
plus d’options.
Pour réorganiser les
modèles dans votre
chaîne du signal, tapez
et faites glisser un
modèle vers un autre
emplacement ou entre
deux autres modèles
(tous ceux placés après
seront décalés d’un
emplacement dans la
chaîne du signal).
31
Page 32

g
g
g
g
g
g
g
g
pRigHy
Modes d’affichage des commutateurs
Les commutateurs au pied du HeadRush Pedalboard peuvent être utilisés pour activer et désactiver des modèles
(d’amplificateur, d’enceinte ou d’effet) mais également pour sélectionner des configurations personnalisées ou des
setlists. Les huit commutateurs au pied du milieu peuvent basculer entre quatre modes :
Pour modifier l’affichage :
1. Maintenez le commutateur au pied en bas à
gauche jusqu’à ce qu’Exit s’affiche. Les quatre
commutateurs adjacents correspondent désormais
aux quatre modes suivants : Stomp, Rig, Hybrid et
Setlist.
2. Appuyez sur le commutateur au pied
correspondant afin d’accéder à ce mode
d’affichage.
Affichage Stomp
Exit
Stom
brid Setlist
Les huit commutateurs au pied du milieu
correspondent aux modèles (d’amplificateur,
d’enceinte ou d’effet) dans la chaîne du signal.
Appuyez sur un commutateur au pied pour activer
ou désactiver le modèle assigné.
Affichage Rig
Les huit commutateurs au pied du milieu
correspondent aux configurations personnalisées
que vous avez sauvegardées. Appuyez sur un des
commutateurs au pied afin de charger la
configuration personnalisée assignée.
Pour afficher les quatre configurations
personnalisées précédentes ou suivantes,
appuyez sur le commutateur au pied supérieur
gauche (Bank ) ou inférieur gauche (Bank ).
Affichage Hybrid
Les quatre premiers commutateurs au pied du milieu
correspondent aux configurations personnalisées
que vous avez sauvegardées. Appuyez sur un de
ces commutateurs au pied afin de charger la
configuration personnalisée assignée. Les quatre
derniers commutateurs au pied du milieu
correspondent aux modèles (d’amplificateur,
d’enceinte ou d’effet) dans la chaîne du signal.
Appuyez sur un de ces commutateurs au pied pour
activer ou désactiver le modèle assigné.
Rig Model 1 Model 2 Model 3 Model 4 Looper
Ri
Model 5 Model 6 Model 7 Model 8
Bank Rig1Ri
Bank
Ri
5Ri
Bank Rig1Ri
Bank
Model 1 Model 2 Model 3 Model 4
2Ri
6Ri
2Ri
3 Rig 4Looper
7 Rig 8
3 Rig 4Looper
Tuner
Tuner
Tuner
Affichage Setlist
Les huit commutateurs au pied du milieu
correspondent aux setlists que vous avez
sauvegardées. Appuyez sur un des commutateurs
au pied afin de charger la setlist assignée.
32
Bank Setlist 1 Setlist 2 Setlist 3 Setlist 4
Bank
Setlist 5 Setlist 6 Setlist 7 Setlist 8
Page 33

Configurations personnalisées (rigs)
Dans le HeadRush Pedalboard, un rig est une configuration personnalisée : un ensemble de modèles assignés (modèles
d’amplificateurs, d’enceintes et d’effets) et les paramètres de chacun d’eux. Vous pouvez créer, modifier, sauvegarder et
charger des configurations personnalisées, facilitant le rappel des sons parfaits pour chaque partie de votre prestation.
Chaque configuration personnalisée dispose de 11 emplacements, chacun pouvant être assigné qu’à un seul modèle
(d’amplificateur, d’enceinte ou d’effet). Les emplacements assignés sont identifiés par des représentations graphiques
des modèles, et les emplacements vides sont identifiés par le symbole .
Création d’une configuration personnalisée
Pour créer une nouvelle configuration personnalisée, tapez sur le
bouton dans le coin supérieur droit et tapez sur New Rig.
Pour assigner un modèle (d’ampli, d’enceinte ou d’effet) à un
emplacement vide :
1. Tapez l’emplacement vide ().
2. Dans la liste qui s’affiche, tapez sur le type de modèle que vous
souhaitez assigner : Amp, Cab, ou effet (Distortion, Dynamics/EQ,
Modulation, Reverb/Delay, FX-Loop ou Expression).
3. Dans la liste qui s’affiche, tapez sur le modèle que vous souhaitez
assigner.
4. Dans la liste qui s’affiche ensuite, tapez sur le préréglage que
vous souhaitez assigner.
Si vous chargez un modèle d’amplificateur ou d’enceinte à un
emplacement adjacent à un emplacement vide, un modèle
d’amplificateur ou d’enceinte similaire sera chargé automatiquement
à l’autre emplacement. Après quoi vous pourrez les configurer
indépendamment : vous pourrez les séparer dans la chaîne du
signal, modifier le type d’amplificateur ou d’enceinte, et supprimer
chaque modèle séparément.
Optimisation de la chaîne du signal
La chaîne du signal représente le trajet qu’emprunte le signal audio de votre guitare pour traverser les modèles que vous
avez sélectionnés et se rendre aux sorties du HeadRush Pedalboard. Vous pouvez utiliser l’écran tactile pour organiser les
modèles sélectionnés dans n’importe quel ordre, mais certaines configurations auront un meilleur son que d’autres.
Voici quelques suggestions pour organiser les modèles afin de créer des sons avec HeadRush Pedalboard :
• Les pédales pour la dynamique (p. ex., compresseurs), les filtres (p. ex., wah-wah, transpositeur de la hauteur
tonale) et le volume sont généralement placées au début de la chaîne du signal. Il est également possible de
placer des pédales de volume à la fin de la chaîne du signal.
• Les pédales d’effets basés sur le gain (p. ex., l’overdrive/distorsion, fuzz) sont généralement placées ensuite.
• Comme l’égalisation (EQ) est souvent utilisée pour façonner les caractéristiques tonales des effets
overdrive/distorsion et fuzz, placez une pédale d’égalisation après une pédale de gain. Il est également possible
d’en placer une avant les pédales de gain afin de façonner la tonalité générale de la guitare, coupant ainsi les
fréquences indésirables.
• Les effets de modulation tels que flanger, phaser et chorus sont généralement placés ensuite.
• Les effets temporels comme les délais et les réverbérations sont généralement placés vers la fin de la chaîne
du signal.
• Les amplificateurs et les enceintes sont généralement placés à la fin de la chaîne du signal, vous pouvez
cependant les placer où vous le souhaitez.
Types de modèles : amplificateurs,
enceintes et effets.
Modèles disponibles pour chaque type.
Préréglages disponibles
pour chaque modèle.
33
Page 34

V
Sauvegarder une configuration personnalisée
Si vous avez modifié la configuration personnalisée après l’avoir chargée, un astérisque () apparaît à côté de son nom
dans le haut de l’écran. Vous pouvez sauvegarder ces modifications dans cette configuration, sauvegarder ces
modifications en tant que nouvelle configuration, ou les supprimer.
Pour sauvegarder une configuration personnalisée, tapez sur Save
dans le coin supérieur droit.
Pour sauvegarder les modifications dans la configuration
personnalisée en cours, tapez sur Save.
Pour sauvegarder les modifications en tant que nouvelle
configuration personnalisée, tapez sur Save New Rig, puis utilisez
le clavier qui s’affiche afin d’entrer un nom, puis tapez sur Save.
Pour revenir à la fenêtre précédente sans sauvegarder, vous pouvez taper sur Cancel à tout moment.
Pour supprimer les modifications apportées à la configuration personnalisée, tapez sur le bouton dans le coin
supérieur droit et tapez sur Discard Changes.
Modification des réglages
Pour modifier les réglages d’un modèle dans une configuration personnalisée, double-tapez le modèle pour ouvrir
sa fenêtre des réglages.
Tapez sur pour sauvegarder les
modifications et revenir à la fenêtre principale.
Tournez l’encodeur pour
parcourir les éléments
sélectionnables ou pour
modifier les paramètres.
Appuyez sur l’encodeur
pour confirmer la sélection.
Tapez sur le menu Preset pour
sélectionner un préréglage.
Tapez sur ce bouton puis sur Discard Changes pour supprimer
les modifications apportées à la configuration personnalisée.
euillez consulter la section
Sauvegarder un préréglage.
Tapez le nom du
modèle afin d’assigner
un autre modèle à cet
emplacement.
Tapez sur Delete afin de
supprimer l’assignation du
modèle pour cet emplacement.
Tapez une couleur pour l’assigner à ce
modèle. Cette couleur s’affichera dans la
fenêtre principale, dans la fenêtre Hardware
Assign et dans l’indicateur de commutateur
au pied pour ce modèle.
Tournez les boutons des paramètres afin de régler leurs paramètres. Tapez n’importe
où dans la colonne pour afficher les trois prochains paramètres (le cas échéant).
Tapez sur Cancel pour annuler les
modifications et revenir à la fenêtre principale.
Sauvegarder un préréglage
Pour sauvegarder un préréglage, tapez sur Save dans le coin
supérieur droit.
Pour sauvegarder les modifications dans la configuration
personnalisée en cours, tapez sur Save.
Pour sauvegarder les modifications en tant que nouveau
préréglage, tapez sur Save New Preset, puis utilisez le clavier qui
s’affiche afin d’entrer un nom, puis tapez sur Save.
Pour revenir à la fenêtre précédente sans sauvegarder, vous pouvez taper sur Cancel à tout moment.
34
Page 35

Assignation matérielle
La fenêtre Hardware Assign vous permet de
personnaliser comment les commutateurs au pied, les
boutons des paramètres et la pédale d’expression du
HeadRush Pedalboard commande chaque configuration
personnalisée.
Pour ouvrir la fenêtre Hardware Assign, tapez sur le
bouton dans le coin supérieur droit de l’écran
principal, puis tapez sur Hardware Assign.
Pour retourner à la fenêtre principale, tapez sur le
bouton dans le coin supérieur gauche.
Important : Les réglages Hardware Assign font partie
de la configuration personnalisée, alors n’oubliez pas
de sauvegarder les modifications que vous désirez
conserver.
Pour définir la couleur de la configuration personnalisée, tapez sur la couleur dans la partie supérieure gauche
de la fenêtre. Cette couleur apparaîtra à côté du nom de la configuration personnalisée lorsque la liste de toutes
les configurations personnalisées disponibles s’affiche ou lorsque vous affichez et créez des setlists. Elle sera
également la couleur de l’indicateur du commutateur au pied lorsque le HeadRush Pedalboard est en mode Rig.
Pour définir le tempo des effets temporels de la configuration personnalisée (délais, modulation, etc.), tapez
le bouton sous Tempo afin de sélectionner Current ou Fixed.
• Current : La configuration utilisera le dernier tempo que vous avez utilisé ou le tempo réglé par le commutateur
au pied Tempo.
Pour définir le tempo, appuyez sur le commutateur au pied Tempo (côté inférieur droit) au tempo désiré 3
à 8 fois afin de définir le nouveau tempo en battements par minute (BPM). Vous pouvez le faire à tout
moment lorsque cette pédale affiche Tempo.
• Fixed : La configuration personnalisée utilisera le tempo réglé ici.
Pour définir le tempo, tournez l’encodeur au tempo désiré en battements par minute (BPM). Vous pouvez
définir le tempo uniquement à partir de cette fenêtre Hardware Assign.
Commutateurs au pied
Les huit cases dans le coin inférieur gauche représentent les huit commutateurs au pied milieu du HeadRush
Pedalboard. Vous pouvez assigner n’importe lequel des paramètres de commutation à l’un des commutateurs au
pied indépendamment de leur position dans la chaîne du signal.
Pour assigner un paramètre à un commutateur au pied :
1. Tapez sur un des emplacements. indique une case vide.
2. Dans la liste qui s’affiche, tapez sur le modèle pour lequel
vous désirez assigner le paramètre.
3. Dans la liste qui s’affiche, tapez sur le paramètre que vous
souhaitez assigner. Généralement, le paramètre sera
simplement réglé sur On (pour l’activer ou le désactiver).
Tapez sur Unassigned afin de supprimer l’assignation de
ce commutateur au pied.
Pour permuter deux assignations, tapez et faites glisser l’un
des modèles sur l’autre, puis soulevez le doigt de l’écran.
35
Page 36

Pédale d’expression
La pédale d’expression peut commander deux paramètres (en mode Classic) ou deux ensembles de paramètres (en
mode Advanced). Utilisez le contacteur au pied pour commuter entre la pédale d’expression A et B.
Pour activer le contacteur au pied, déplacez la pédale d’expression de façon à ce que le côté contacteur touche au
pédalier, puis appuyez. L’écran d’état ACL de la pédale d’expression indiquera A ou B.
La colonne de quatre cases représente les paramètres de la pédale d’expression.
Vous pouvez assigner un ou plusieurs paramètres réglables en continu (ceux avec
une plage de valeurs) à la pédale d’expression.
Pour définir le mode de la pédale d’expression, tapez sur le bouton au-dessus
de Range dans le coin supérieur droit pour sélectionner Classic ou Advanced.
• Classic : Vous pouvez assigner un paramètre à chaque pédale d’expression
(A et B). L’utilisation du contacteur au pied permet de sélectionner l’autre
pédale d’expression et de désactiver (déviation) le paramètre de la pédale
d’expression actuelle. Par exemple, si vous assignez une pédale wah-wah à
la pédale d’expression A et une pédale de volume à la pédale d’expression
B, qu’une seule pédale sera active à la fois ; lorsque vous commandez la
pédale wah-wah, la pédale de volume est désactivée, et vice versa.
• Advanced : Vous pouvez assigner jusqu’à quatre paramètres à chaque pédale d’expression (A et B). Déplacer la
pédale permet de modifier simultanément tous les paramètres qui lui sont assignés. L’utilisation du contacteur
au pied permet de sélectionner l’autre pédale d’expression tout en laissant les paramètres de la pédale
d’expression actuelle activés et à leurs valeurs maximales.
Pour assigner un paramètre à la pédale d’expression :
1. Si le bouton Assign n’est pas allumé, tapez-le.
2. Tapez sur une des cases sous le bouton Assign. indique une
case vide.
3. Dans la liste qui s’affiche, tapez sur le modèle avec le paramètre
que vous souhaitez assigner.
4. Dans la liste qui s’affiche, tapez sur le paramètre que vous
souhaitez assigner.
Tapez sur Unassigned afin de supprimer l’assignation pour
cette case.
Pour permuter deux assignations (en mode Avanced), tapez et faites
glisser l’un des modèles sur l’autre, puis soulevez le doigt de l’écran.
Pour définir la plage d’un paramètre assigné :
1. Si le bouton Range n’est pas allumé, tapez-le.
2. Tapez sur une des valeurs sous le bouton Range.
3. Tournez l’encodeur pour définir la valeur pour l’ensemble de la plage du paramètre en pourcentage.
Appuyez sur l’encodeur ou tapez ailleurs sur l’écran afin de confirmer la valeur.
Paramètres rapides
Le bord droit de l’écran affiche une colonne de champs pour trois paramètres. Ce sont les trois paramètres
qui apparaissent chaque fois que vous chargez une configuration personnalisée. Lorsqu’aucun modèle n’est
sélectionné sur la fenêtre principale, vous pouvez utiliser les trois boutons des paramètres pour modifier ces
paramètres. Vous pouvez assigner n’importe quels paramètres continus à ces boutons (paramètres avec une
plage de valeurs, plutôt que ceux à commutation).
Pour assigner un paramètre à un bouton de paramètre :
1. Tapez sur le champ auquel vous souhaitez affecter un paramètre. indique un champ vide.
2. Dans la liste qui s’affiche, tapez sur le modèle avec le paramètre que vous souhaitez assigner. Vous
pouvez également sélectionner des paramètres pour le signal d’entrée (Input) ou le signal sortant (Output).
3. Dans la liste qui s’affiche, tapez sur le paramètre que vous souhaitez assigner.
Tapez sur Unassigned afin de supprimer l’assignation de ce bouton de paramètre.
36
Page 37

Setlists
Vous pouvez utiliser des setlists pour organiser les configurations personnalisées. Une setlist est une collection de
configurations personnalisées que vous pouvez sauvegarder et rappeler. Ceci s’avère utile lorsque vous avez
uniquement besoin de certaines de vos configurations personnalisées pour une prestation ; vous pouvez sauvegarder
une setlist avec uniquement les configurations personnalisées dont vous avez besoin et de cette façon vous n’aurez
pas cherché à travers toutes vos configurations pour trouver la prochaine chanson.
Pour afficher vos setlists, tapez sur le bouton ≡ dans le coin supérieur gauche de la fenêtre principale. La fenêtre
Setlists s’affiche.
Pour retourner à la fenêtre principale, tapez sur le bouton dans le coin supérieur gauche.
Pour créer une setlist :
1. Tapez sur New dans le coin supérieur droit.
2. Dans la fenêtre qui s’affiche, la partie gauche est une liste de toutes les
configurations personnalisées disponibles, et la partie droite est la liste
des configurations personnalisées dans la setlist.
Pour ajouter une configuration personnalisée à la setlist, tapez-la
afin de l’ajouter à la fin de la liste. Vous pouvez également cliquer sur la
configuration et la faire glisser à l’endroit souhaité dans la liste. Vous
pouvez ajouter la même configuration à une setlist plus d’une fois.
L’emplacement pour configuration personnalisée vide [Empty ] dans
le coin inférieur gauche est un emplacement réservé pour faciliter la
réorganisation des setlists ; il n’est pas sélectionnable lorsque vous
parcourez les configurations personnalisées dans la setlist.
Pour réorganiser la setlist, tapez sur la configuration dans la liste de
droite, puis faites-la glisser à l’endroit désiré dans la liste.
Pour supprimer une configuration personnalisée de la setlist, tapez
sur le à droite.
Pour sauvegarder une setlist, tapez sur Save dans le coin supérieur droit.
Pour sauvegarder les modifications dans la setlist en cours, tapez
sur Save.
Pour sauvegarder les modifications en tant que nouvelle setlist,
tapez sur Save New Setlist, puis utilisez le clavier qui s’affiche afin
d’entrer un nom, puis tapez sur Save.
Pour revenir à la fenêtre précédente sans sauvegarder, vous pouvez
cliquer sur Cancel à tout moment.
Pour supprimer les modifications apportées à la setlist, tapez sur le
bouton dans le coin supérieur droit et tapez sur Discard Changes.
Pour charger une setlist :
1. À partir de la fenêtre principale, tapez sur le bouton ≡ dans le coin
supérieur gauche pour afficher la fenêtre Setlists. Chaque setlist affiche
le nombre de configurations personnalisées entre parenthèses (prend en
compte les multiples occurrences d’une configuration personnalisée).
2. Tapez sur la setlist désirée. La première configuration personnalisée de
cette setlist sera chargée immédiatement. Tapez sur
toutes les configurations personnalisées au lieu d’une setlist précise.
Pour modifier une setlist, tapez sur le bouton sur le côté gauche, puis
tapez sur l’icône du crayon. La même fenêtre utilisée pour créer la setlist
s’affichera, vous permettant de modifier et de sauvegarder la setlist.
Pour supprimer une setlist, tapez sur le bouton sur le côté gauche,
puis tapez sur l’icône de la poubelle. Tapez sur Yes afin de confirmer la
suppression ou sur Cancel afin d’annuler l’opération et de revenir à la
fenêtre Setlists.
All Rigs pour afficher
37
Page 38

Mode mains libres
Le mode mains libres vous permet de régler l’un des paramètres
des modèles en utilisant seulement le commutateur au pied et la
pédale d’expression.
Pour accéder au mode mains libre, appuyez sur un commutateur
au pied assigné à un modèle pendant plus d’une seconde. En
mode mains libres, la fenêtre affiche un seul des paramètres et sa
valeur, et les six premiers commutateurs au pied correspondront
aux six paramètres de ce modèle.
Pour quitter le mode mains libres, appuyez sur le commutateur
inférieur gauche (Exit).
Pour modifier la valeur, déplacez la pédale d’expression.
Pour afficher un autre paramètre, appuyez sur le commutateur
au pied correspondant. Si ce modèle a plus de six paramètres,
appuyez sur les deux derniers commutateurs au pied du milieu
( ou ) pour afficher les six paramètres précédents ou suivants.
38
Page 39

Guida rapida (Italiano)
Introduzione
La tua tonalità perfetta è a un solo tocco di distanza
Grazie per aver acquistato l’HeadRush Pedalboard.
Dotata di un sistema DSP quad-core finemente messo a punto e alimentato dalla sua esclusiva piattaforma
®
Eleven
e modelli di effetti mai trovati in un processore di effetti a pedale per chitarra.
L’HeadRush Pedalboard garantisce una generosa e variegata offerta di amp classici vintage e moderni e di
modelli di effetti, inclusi esclusivi effetti originali che è impossibile trovare altrove, oltre alla possibilità di caricare i
propri file impulse response (IR) personalizzati. Presenta inoltre caratteristiche esclusive introvabili in altri
processori per chitarra tra cui la commutazione senza soluzione di continuità tra preset con effetti diffusivi di coda
di tipo delay/reverb, un looper con oltre 20 minuti di tempo di registrazione, la possibilità di sfogliare gli strati del
loop in ordine inverso rispetto a quello in cui sono stati aggiunti e molto altro.
Il cuore dell’HeadRush Pedalboard è il display tattile da 7 pollici e la sua interfaccia utente concepita per i
chitarristi che consente di toccare, far scorrere ed effettuare il drag-and-drop per creare e modificare
istantaneamente i propri impianti in una maniera realistica e intuitiva senza precedenti. Il display di grandi
dimensioni offre inoltre un feedback chiarissimo quando ci si esibisce dal vivo, soprattutto quando si apportano
lievi modifiche alle tonalità servendosi della modalità a mani libere.
HD Expanded, l’HeadRush Pedalboard offre i più versatili, realistici e reattivi amplificatori, casse, microfono
Le seguenti informazioni rappresentano una guida rapida che consente di iniziare a utilizzare il prodotto, ma è
possibile trovare un manuale completo, video di tutorial e condividere le proprie esperienze recandosi alla pagina
headrushfx.com.
Ah. Ancora una cosa. Questo arriva fino a 11.
Contenuti della confezione
HeadRush Pedalboard
Cavo USB
Cavo di alimentazione
Scheda di download del Software
Guida rapida
Istruzioni di sicurezza e garanzia
Importante: recarsi alla pagina headrushfx.com per scaricare la guida per l’uso completa.
Assistenza
Per le ultime informazioni in merito a questo prodotto (documentazione, specifiche tecniche, requisiti di sistema,
informazioni sulla compatibilità, ecc.) e per effettuarne la registrazione, recarsi alla pagina headrushfx.com.
Per ulteriore assistenza sul prodotto, recarsi alla pagina headrushfx.com/support.
39
Page 40

Caratteristiche
Pannello superiore
10
9
11
3
1
8
2
2
2
6
5
7
12
4
6
5
4
1. Display principale: questo display multi-touch a colori mostra informazioni specifiche per l’operazione
corrente dell’HeadRush Pedalboard. Toccare il display (e servirsi dei comandi hardware) per controllare
l’interfaccia. Si veda Operazioni base per saperne di più sul suo funzionamento.
2. Manopole parametri: girare queste manopole per regolare i parametri o le impostazioni illustrate accanto ad
esse sul display principale.
3. Codificatore: girare il codificatore per scorrere tra le opzioni disponibili del menù o regolare i valori dei
parametri del campo selezionato a display. Premere il codificatore per confermare la scelta.
4. Interruttori a pedale: premere questi interruttori a pedale per attivare o disattivare il modello assegnato o per
caricare l’impianto assegnato.
5. Display dell’interruttore a pedale: questi piccoli display indicano il modello o l’impianto assegnato a ciascun
interruttore a pedale.
6. Indicatori dell’interruttore a pedale: queste spie indicano se il modello o l’impianto assegnato a ciascun
interruttore a pedale è acceso (spia illuminata in maniera intensa) o spento (spia illuminata in maniera smorzata).
7. Pedale di espressione: servirsi di questo pedale per regolare il parametro/i parametri assegnati. Per maggiori
informazioni, si veda Operazioni base > Assegnazione hardware > Pedale di espressione.
8. LCD di stato del pedale di espressione: questo piccolo schermo LCD mostra lo stato corrente del pedale di
espressione. Per maggiori informazioni, si veda Operazioni base > Assegnazione hardware > Pedale di
espressione.
9. Master Volume: girare questa manopola per regolare il volume delle uscite.
10. Phones Volume: girare questa manopola per regolare il volume dell’uscita cuffie.
11. Aux Volume: girare questa manopola per regolare il volume dell’ingresso aux.
Importante: il segnale audio proveniente dall’ingresso aux è convogliato direttamente alle uscite
dell’HeadRush Pedalboard senza che venga applicato alcun modeling. Inoltre non è influenzato dal dalle
manopole volume master o volume cuffie.
12. Cable Channel: collocare i cavi in modo da farli passare attraverso questa fessura a livello del lato inferiore
dell’HeadRush Pedalboard per mantenere il palco ordinato ed evitare il rischio che qualcuno possa inciampare.
40
Page 41

Pannello posteriore
3
9
10
11
7
4
5
6
1. Ingresso di alimentazione (IEC): collegare questo ingresso ad una presa di alimentazione servendosi del
cavo di alimentazione in dotazione.
2. Interruttore di alimentazione: premere questo tasto per accendere l’HeadRush Pedalboard. Tenere premuto
il tasto per spegnere l’HeadRush Pedalboard.
3. Ventola: assicurarsi che questa ventola sia libera da ostacoli quando si utilizza l’HeadRush Pedalboard.
4. Ingresso chitarra (6,35 mm/1/4”, TS): collegare la chitarra a questo ingresso servendosi di un cavo strumentale
standard.
5. Ingresso pedale di espressione (6,35 mm/1/4”, TRS): collegare un pedale di espressione secondario
opzionale a questo ingresso servendosi di un cavo strumentale standard.
6. Ingresso Aux (3,5 mm/1/8”, TRS): collegare una fonte audio opzionale (ad es. smartphone, tablet, ecc.) a
questo ingresso servendosi di un cavo stereo da 3,5 mm (1/8”).
7. Uscite (XLR): collegare queste uscite agli ingressi del mixer, dell’altoparlante, ecc. Se occorre utilizzare una
sola uscita, servirsi di quella denominata L/Mono.
8. Interruttore di messa a terra: premere questo interruttore per ridurre ronzio o rumore.
9. Uscite (6,35 mm/1/4”, TRS): collegare queste uscite agli ingressi dell’amplificatore, dell’interfaccia audio, ecc.
Impostare il selettore Amp/Linea sulla configurazione adeguata al dispositivo collegato. Se occorre utilizzare
una sola uscita, servirsi di quella denominata L/Mono.
10. Selettore Amp/Line: servirsi di questo interruttore per selezionare il livello del segnale inviato dalle uscite da
6,35 mm/1/4”. Quando impostato su Amp, il livello di uscita sarà pari a +6 dBu per un amplificatore standard
per chitarra. Quando impostato su Line, il livello di uscita sarà a livello di linea, +18 dBu.
11. Uscita cuffie (6,35 mm/1/4”, TRS): collegare cuffie stereo standard da 6,35 mm (1/4”) a questa uscita.
Servirsi della manopola phones volume per controllarne il volume.
12. Uscite Send (6,35 mm
effetti o al loop di effetti di ritorno di un amplificatore. Impostare il selettore Rack/Stomp sulla configurazione
adeguata al dispositivo collegato. Se occorre utilizzare una sola uscita, servirsi di quella denominata L/Mono.
13. Ingressi Return (6,35 mm/1/4”, TRS): collegare questi ingressi alle uscite di un altro modulo effetti, un pedale
effetti o al loop di effetti “send” di un amplificatore. Impostare il selettore Rack/Stomp sulla configurazione
adeguata al dispositivo collegato. Se occorre utilizzare una sola uscita, servirsi di quella denominata L/Mono.
14. Selettore Rack/Stomp: servirsi di questo interruttore per selezionare il livello del segnale inviato dalle uscite
send alle uscite return. Quando impostato su Rack, il livello di uscita sarà a livello di linea, +18 dBu. Quando
impostato su Stomp, il livello di uscita sarà pari a +6 dBu come un pedale standard per chitarra (“stompbox”).
15. Ingresso MIDI (DIN a 5 poli): servirsi di un cavo MIDI standard per collegare questo ingresso all’uscita MIDI di
un dispositivo MIDI esterno opzionale.
16. Uscita MIDI (DIN a 5 poli): servirsi di un cavo MIDI standard per collegare questa uscita all’ingresso MIDI di
un dispositivo MIDI esterno opzionale.
17. Porta USB: collegare questa porta USB al computer servendosi di un cavo USB standard Questo collegamento
consente all’HeadRush Pedalboard di inviare e ricevere il segnale audio digitale da/verso il computer. Si può
anche utilizzare questo collegamento per importare o esportare impianti, preset di modelli e setlist.
8
/1/4”, TRS): collegare queste uscite agli ingressi di un altro modulo effetti, un pedale
12
14
13
15
16
17
2
1
41
Page 42

Configurazione
Gli elementi non elencati sotto Introduzione > Contenuti della confezione sono venduti separatamente.
Chitarra Altoparlanti PA o mixer Amplificatore per chitarra
42
Cuffie
Stompbox effetti esterni,
moduli, ecc.
Presa di
alimentazione
Computer
Page 43

p
Operazioni base
Questo capitolo descrive alcune delle funzioni base dell’HeadRush Pedalboard. È possibile recarsi alla pagina
headrushfx.com per scaricare la guida per l’uso completa per ottenere ulteriori informazioni.
Schermo principale
Girare il codificatore
per scorrere tra le
voci selezionabili su
schermo o per
regolare i parametri.
Premere il
codificatore come se
fosse un comando
Invio.
Toccare due volte un
modello, In, o Out
per visualizzare i suoi
parametri.
Importante: la sequenza dei modelli contenuti nella catena di segnale non è necessariamente riflessa negli
interruttori a pedale. Si possono assegnare liberamente modelli agli interruttori a pedale disponibili senza
modificare la catena di segnale e viceversa. Si veda Assegnazione hardware per saperne di più.
Per assegnare un modello (amp, cab, o effetto) a uno slot vuoto, toccarlo () e servirsi
dell’elenco che compare. Si veda Impianti > Creazione di un impianto per saperne di più.
Per visualizzare i parametri di un modello sul bordo destro dello schermo, toccare il
modello in modo che sia delimitato di verde. Girare quindi le manopole dei parametri
per regolare i parametri a sinistra. Toccare qualsiasi punto della colonna di questi tre
parametri per visualizzare i tre successivi (se il modello dispone di più di tre parametri).
Quando non viene selezionato alcun modello, questi parametri saranno quelli assegnati
nella schermata Assegnazione Hardware.
Per visualizzare la schermata delle impostazioni di un modello, toccarlo due volte. La
relativa schermata delle impostazioni comparirà con il rispettivo menù di preset,
parametri e colore assegnato.
Per attivare o disattivare un modello, premere l’interruttore a pedale ad esso assegnato
o toccare l’interruttore a pedale del modello nel display.
Per caricare un altro impianto (preset):
• Premere l’interruttore a pedale superiore sinistro (Rig ) o inferiore sinistro (Rig
) per caricare immediatamente l’impianto precedente o quello successivo.
• Toccare o accanto al nome dell’impianto corrente sullo schermo.
• Toccare il nome dell’impianto sullo schermo e girare il codificatore.
Toccare per
visualizzare le setlist.
Toccare il suo interruttore
a pedale per attivarlo o
disattivarlo.
Toccare e trascinare questa barra verso il basso per
visualizzare l’elenco degli impianti.
Nome impianto.
Toccare per salvare l’impianto.
Toccare per
visualizzare
altre o
Girare le manopole dei parametri per regolare questi parametri.
Quando è stato selezionato un modello, toccare qualsiasi punto
della colonna per visualizzare i tre parametri successivi.
Per riorganizzare i
modelli nella catena
di segnale, toccare e
trascinare un modello
in un altro slot o tra
due altri modelli (quelli
dopo quella posizione
scivoleranno di un
ulteriore slot lungo la
catena di segnale).
zioni.
Per visualizzare altre opzioni, toccare il tasto presente nell’angolo superiore destro
e quindi toccare un’opzione.
43
Page 44

g
g
g
g
g
g
pRigHy
Viste
Gli interruttori a pedale dell’HeadRush Pedalboard possono essere utilizzati non solo per attivare o disattivare
modelli (amp, cab o effetti), ma anche per selezionare impianti o setlist. Gli interruttori a pedale centrale sono
sempre in una di quattro modalità:
Per cambiare la vista:
1. Tenere premuto l’interruttore a pedale
all’estremità inferiore sinistra fino a quando Exit
non compare a display. I quattro interruttori a
pedale adiacenti corrispondono ora alle quattro
viste: Stomp, Rig, Hybrid e Setlist.
2. Premere un interruttore a pedale per entrare
in quella determinata vista.
Vista Stomp
Exit Stom
brid Setlist
Gli otto interruttori a pedale centrali corrispondono
a modelli (amp, cab o effetti) nella catena di
segnali. Premere un interruttore a pedale per
attivare o disattivare il relativo modello.
Vista Rig
Gli otto interruttori a pedale centrali corrispondono
a impianti salvati in precedenza. Premere un
interruttore a pedale per caricare il relativo impianto.
Per visualizzare i quattro impianti precedenti o
successivi, premere l’interruttore a pedale superiore
sinistro (Bank ) o inferiore sinistro (Bank ).
Vista ibrida
I quattro interruttori a pedale centrali corrispondono
a impianti salvati in precedenza. Premere uno di
questi interruttori a pedale per caricare il relativo
impianto. I quattro interruttori a pedale centrali
inferiori corrispondono a modelli (amp, cab o effetti)
nella catena di segnali. Premere uno di questi
interruttori a pedale per attivare o disattivare il
relativo modello.
Rig Model 1 Model 2 Model 3 Model 4 Looper
Rig Model 5 Model 6 Model 7 Model 8
Bank Rig1Ri
Bank Rig 5Ri
Bank Rig1Ri
Bank Model 1 Model 2 Model 3 Model 4
2Ri
6Ri
2Ri
3 Rig 4Looper
7 Rig 8
3 Rig 4Looper
Tuner
Tuner
Tuner
Vista Setlist
Gli otto interruttori a pedale centrali corrispondono
a setlist salvate in precedenza. Premere un
interruttore a pedale per caricare la relativa setlist.
44
Bank Setlist 1 Setlist 2 Setlist 3 Setlist 4
Bank Setlist 5 Setlist 6 Setlist 7 Setlist 8
Page 45

Impianti
Quando si utilizza l’HeadRush Pedalboard, un impianto (rig) è un preset: la combinazione di modelli assegnati (amp,
cab ed effetti) e le configurazioni dei parametri di ciascuno di essi. È possibile creare, modificare, salvare e caricare
impianti, con la massima facilità nel richiamare il suono perfetto per ciascuna parte della propria esibizione.
Ciascun impianto presenta 11 slot, a ciascuna delle quali può essere assegnato un modello (amp, cab, o effetto).
Gli slot assegnati mostreranno rappresentazioni grafiche dei modelli e gli slot vuoti presenteranno un simbolo .
Creazione di un nuovo impianto
Per creare un nuovo impianto, toccare il tasto nell’angolo
superiore destro dello schermo e toccare New Rig.
Per assegnare un modello (amp, cab o effetto) a uno slot vuoto:
1. Toccare lo slot vuoto ().
2. Nell’elenco che compare, toccare il tipo di modello che si
desidera assegnare. Amp, Cab o effetto (Distortion,
Dynamics/EQ, Modulation, Reverb/Delay, FX-Loop, o
Expression).
3. Nell’elenco che compare, toccare il modello che si desidera
assegnare.
4. Nell’elenco che compare, toccare il preset che si desidera
caricare per quel modello.
Se si carica un amp o un cab su uno slot avente uno slot vuoto
adiacente, un amp o un cab corrispondente sarà caricato
automaticamente su quest’ultimo. Dopodiché, è possibile
configurarli in maniera indipendente: è possibile infatti separarli
nella catena dei segnali, cambiare il tipo di amp o cab o
cancellare ciascun modello separatamente.
Tipi di modello: amp,
cab ed effetti.
Modelli disponibili per ciascun tipo.
Preset disponibili per
ciascun modello.
Ottimizzazione della catena di segnali
La catena dei segnali è il percorso seguito dai segnale audio dalla chitarra ai modelli selezionati e termina a
livello delle uscite dell’HeadRush Pedalboard. È possibile servirsi dello schermo tattile per sistemare i modelli
selezionati in qualsiasi sequenza, ma si potrebbe scoprire che alcune configurazioni suonano meglio di altre.
Ecco alcuni suggerimenti per una collocazione dei modelli per creare tonalità con l’HeadRush Pedalboard:
• Dinamica (ad es., compressors), filtri (ad es. wah, pitch shifters) e pedali volume sono solitamente
collocati all’inizio della catena dei segnali. Alternativamente, è possibile collocare i pedali volume alla fine
della catena dei segnali per garantire una leggera varianza a livello di funzionalità.
• Gli effetti basati sul guadagno (ad es. overdrive/distortion, fuzz) solitamente vengono dopo.
• L’equalizzazione (EQ) è spesso utilizzata per modellare le caratteristiche toniche degli effetti di
overdrive/distorsione e fuzz, quindi un EQ va collocato dopo di essi. Alternativamente, collocarli prima di essi
per modellare la tonalità generale della chitarra (tagliando frequenze indesiderate) prima dei pedali di guadagno.
• Gli effetti di modulazione quali flanger, phaser e chorus solitamente seguono.
• Gli effetti basati sul tempo quali delay e reverb sono solitamente collocati verso la fine della catena dei segnali.
• Un amp e un cab sono spesso collocati al termine della catena dei segnali, sebbene sia possibile collocarli
ovunque si desideri.
45
Page 46

Salvataggio di un impianto
Se l’impianto è stato modificato dal momento in cui è stato caricato, accanto al suo nome a livello della parte
superiore dello schermo comparirà un asterisco (). È possibile salvare le modifiche su questo impianto, salvarle
sotto forma di un altro impianto o non salvarle affatto.
Per salvare un impianto, toccare Save nell’angolo superiore destro.
Per salvare le modifiche all’impianto corrente, toccare Save.
Per salvare le modifiche come nuovo impianto, toccare Save
New Rig, servirsi della tastiera che compare per inserire un nome,
quindi toccare Save.
Per tornare alla schermata precedente senza salvare, toccare Cancel in qualsiasi momento.
Per annullare eventuali modifiche apportate all’impianto, toccare il tasto nell’angolo superiore destro e
quindi toccare Discard Changes.
Regolazione delle configurazioni
Per regolare le impostazioni di un modello in un impianto, toccarlo due volte per aprire la relativa schermata
delle impostazioni.
Toccare per mantenere le modifiche e
tornare alla schermata principale.
Girare il codificatore per
scorrere tra le voci
selezionabili su schermo
o per regolare i
parametri. Premere il
codificatore come se
fosse un comando Invio.
Toccare il menu Preset per
selezionare un preset.
Toccare questo tasto e quindi toccare Discard Changes per annullare
tutte le modifiche apportate da quando è stata aperta la schermata.
Si veda Salvataggio di un Preset.
Toccare il nome del
modello per assegnare
un modello diverso a
questo slot.
Toccare Delete per annullare
l’assegnazione del modello
allo slot.
Toccare un colore per assegnarlo a questo
modello. Tale colore sarà visualizzato sullo
schermo principale, nella schermata di
assegnazione Hardware (Hardware Assign) e
a livello dell’indicatore dell’interruttore a
pedale per questo modello.
Toccare Cancel per annullare le modifiche
e tornare alla schermata principale.
Girare le manopole dei parametri per regolare i relativi parametri. Toccare
qualsiasi punto della colonna per mostrare i tre parametri successivi (se presenti).
Salvataggio di un preset
Per salvare un preset, toccare Save nell’angolo superiore destro.
Per salvare le modifiche all’impianto corrente, toccare Save.
Per salvare le modifiche come nuovo preset, toccare Save New
Preset, servirsi della tastiera che compare per inserire un nome,
quindi toccare Save.
Per tornare alla schermata precedente senza salvare, toccare Cancel in qualsiasi momento.
46
Page 47

Assegnazione Hardware
La schermata Hardware Assign consente di
personalizzare il modo in cui gli interruttori a pedale, il
pedale di espressione e le manopole dell’HeadRush
Pedalboard controllano ciascun impianto.
Per aprire la schermata Hardware Assign, toccare il
tasto nell’angolo superiore destro della schermata
principale e quindi toccare Hardware Assign.
Per tornare alla schermata principale, toccare il
tasto nell’angolo superiore sinistro.
Importante: le impostazioni Hardware Assign sono
tutte parte dell’impianto complessivo, quindi occorre
ricordarsi di salvare le modifiche che si desidera
conservare.
Per impostare il colore associato all’impianto, toccarlo nella parte superiore sinistra dello schermo. Questo
colore comparirà accanto al nome dell’impianto quando si visualizza un elenco degli impianti disponibili o quando
si visualizzano e creano setlist. Questo sarà anche il colore dell’indicatore dell’interruttore a pedale
corrispondente quando l’HeadRush Pedalboard si trova in modalità di visualizzazione impianto (Rig View).
Per impostare il tempo degli effetti basati sul tempo dell’impianto (delay, modulazione, ecc.), toccare il tasto
sotto Tempo per selezionare Current o Fixed.
• Current: l’impianto utilizzerà l’ultimo tempo è stato utilizzato o il tempo impostato dall’interruttore a pedale
Tempo.
Per impostare il tempo, premere l’interruttore a pedale Tempo (quello all’estrema destra in basso) al
tempo desiderato 3–8 volte per impostare il nuovo tempo in battiti al minuto (BPM). Questo può essere
fatto ogni volta in cui il display dell’interruttore a pedale mostra Tempo.
• Fixed: l’impianto utilizzerà un tempo impostato qui.
Per impostare il tempo, girare il codificatore per impostare il tempo desiderato in battiti al minuto (BPM).
Il tempo può essere configurato solo nella schermata Assegnazione Hardware.
Interruttori a pedale
Le otto caselle presenti nell’angolo inferiore sinistro rappresentano gli otto interruttori a pedale centrali
dell’HeadRush Pedalboard. È possibile assegnare qualsiasi parametro basato su interruttori (quelli con soli due
stati) a qualsiasi interruttore a pedale, indipendentemente dalla loro posizione nella catena di segnale.
Per assegnare un parametro a un interruttore a pedale:
1. Toccare un box. Indica un box vuoto.
2. Nell’elenco che compare, toccare il modello con il parametro
che si desidera assegnare.
3. Nell’elenco che compare, toccare il parametro che si
desidera assegnare. Solitamente, il parametro sarà
semplicemente On (sarà possibile attivarlo o disattivarlo).
Toccare Unassigned per annullare l’assegnazione a
quell’interruttore a pedale.
Per scambiare due assegnazioni, toccare e trascinare una delle
due sull’altra, e quindi rilasciarla.
47
Page 48

Pedale di espressione
Il pedale di espressione può controllare due parametri (in modalità classica) o due set di parametri (in modalità
avanzata). Servirsi dell’interruttore di punta per commutare tra di essi (pedale di espressione A o B).
Per attivare l’interruttore di punta, spostare l’estremità “in punta” del pedale di espressione in modo tale che tocchi la
pedaliera, quindi premere verso il basso. L’LCD di stato del pedale di espressione indicherà A o B.
La colonna a quattro caselle rappresenta la configurazione del pedale di
espressione. È possibile assegnare uno o più parametri regolabili in maniera
continua (quelli aventi un intervallo di valori) al pedale di espressione.
Per configurare la modalità del pedale di espressione, toccare il tasto al di
sopra di Range nell’angolo superiore destro per selezionare Classic o Advanced.
• Classic: è possibile assegnare un parametro a ciascun pedale di
espressione (A e B). Utilizzando l’interruttore di punta si selezionerà l’altro
pedale di espressione e si disattiverà (bypass) il parametro dell’attuale
pedale di espressione. Ad esempio, se si assegna un pedale wah al pedale
di espressione A e un pedale volume al pedale di espressione B, solo uno
di essi sarà attivo in un determinato momento. Quando si controlla il pedale
wah, il pedale del volume sarà bypassato e viceversa.
• Advanced: è possibile assegnare fino a un massimo di quattro parametri a ciascun pedale di espressione (A e
B). Lo spostamento del pedale regolerà tutti i parametri ad esso assegnati contemporaneamente. Utilizzando
l’interruttore di punta si seleziona l’altro pedale di espressione e si lasciano i parametri del pedale corrente attivi
e ai loro valori massimi.
Per assegnare un parametro al pedale di espressione:
1. Se il tasto Assign non è acceso, toccarlo.
2. Toccare una casella sotto il tasto Assign. indica una casella
vuota.
3. Nell’elenco che compare, toccare il modello con il parametro che
si desidera assegnare.
4. Nell’elenco che compare, toccare il parametro che si desidera
assegnare.
Toccare Unassigned per annullare l’assegnazione a quella
casella.
Per scambiare due assegnazioni (in modalità avanzata Advanced)
toccare e trascinare una delle due sull’altra, e quindi rilasciarla.
Per impostare l’intervallo di un parametro assegnato:
1. Se il tasto Range non è acceso, toccarlo.
2. Toccare un valore presente sotto il tasto Range.
3. Girare il codificatore per impostare il valore desiderato come una percentuale dell’intervallo
complessivo del parametro. Premere il codificatore o toccare altrove per confermare il valore.
Parametri rapidi
Il margine destro dello schermo mostra una colonna di campi per tre parametri. Questi sono i tre parametri
illustrati per primi ogni qualvolta si carica un impianto. Quando non è stato selezionato alcun modello nella
schermata principale, è possibile girare le tre manopole parametro per regolare tali parametri. È possibile
assegnare qualsiasi parametro continuo a queste manopole (parametri con un intervallo di valori, anziché
quelli dotati unicamente di uno stato “on” o “off”).
Per assegnare un parametro a una manopola parametro:
1. Toccare il campo cui si desidera assegnare un parametro. indica un campo vuoto.
2. Nell’elenco che compare, toccare il modello con il parametro che si desidera assegnare. È inoltre
possibile selezionare parametri per il segnale in ingresso (Input) o per il segnale in uscita (Output).
3. Nell’elenco che compare, toccare il parametro che si desidera assegnare.
Toccare Unassigned per annullare l’assegnazione a quella manopola.
48
Page 49

Setlist
Per organizzare i propri impianti, è possibile servirsi di setlist. Una setlist è una collezione di impianti memorizzata, che
è possibile salvare e richiamare in un secondo momento. Ciò è utile, ad esempio, se si desidera utilizzare solo alcuni dei
propri impianti in un’esibizione; è possibile salvare una setlist che contenga unicamente tali impianti in modo tale che
non si debba perdere tempo cercando tra gli impianti prima di suonare la canzone successiva.
Per visualizzare le proprie setlist, toccare il tasto ≡ nell’angolo superiore sinistro della schermata principale.
Comparirà la schermata Setlists.
Per tornare alla schermata principale, toccare il tasto nell’angolo superiore sinistro.
Per creare una setlist:
1. Toccare New nell’angolo superiore destro.
2. Nella schermata che compare, la parte sinistra mostra un elenco di tutti
gli impianti disponibili e la parte destra mostra l’elenco degli impianti
inseriti nella setlist.
Per aggiungere un impianto alla setlist, toccarlo per aggiungerlo in
fondo all’elenco. Alternativamente, toccarlo e trascinarlo nel punto
desiderato dell’elenco. È possibile aggiungere più volte lo stesso
impianto a una setlist. L’impianto [Empty ] presente nell’angolo
inferiore sinistro è uno slot da utilizzarsi come placeholder che serve a
facilitare l’operazione di riorganizzazione della setlist: non sarà
disponibile come impianto selezionabile quando si scorre tra gli
impianti presenti nella setlist stessa.
Per risistemare la setlist, toccare un impianto presente nella parte
destra e trascinarlo nel punto desiderato dell’elenco.
Per rimuovere l’impianto dalla setlist, toccare il sul suo margine
destro.
Per salvare una setlist, toccare Save nell’angolo superiore destro.
Per salvare le modifiche apportate alla setlist corrente, toccare Save.
Per salvare le modifiche come nuova setlist, toccare Save New
Setlist, servirsi della tastiera che compare per inserire un nome, quindi
toccare Save.
(In qualsiasi momento) Per tornare alla schermata precedente senza
salvare, toccare Cancel.
Per annullare eventuali modifiche apportate alla setlist, toccare il tasto
nell’angolo superiore sinistro e quindi toccare Discard Changes.
Per caricare una setlist:
1. Visualizzando la schermata principale, toccare il tasto ≡ nell’angolo
superiore sinistro per visualizzare la schermata Setlists. Ciascuna
schermata mostrerà il numero di impianti tra parentesi (incluse le
occorrenze multiple di uno stesso impianto).
2. Toccare la setlist desiderata. Il primo impianto presente nella setlist
verrà caricato immediatamente. Toccare All Rigs per visualizzare tutti
gli impianti anziché una setlist specifica.
Per modificare una setlist, toccare il tasto sul lato sinistro, quindi
toccare l’icona a forma di matita. Verrà visualizzata la stessa schermata
utilizzata per creare la setlist: qui è possibile modificarla e salvarla.
Per cancellare una setlist, toccare il tasto sul lato sinistro, quindi toccare
l’icona a forma di cestino. Toccare Yes per confermare la cancellazione o
Cancel per tornare alla schermata relativa alle Setlist senza cancellarla.
49
Page 50

Modalità mani libere
La modalità mani libere consente di regolare qualsiasi
impostazione dei modelli servendosi unicamente degli
interruttori a pedale e del pedale di espressione.
Per entrare in modalità mani libere (Hands-Free), tenere
premuto un interruttore a pedale assegnato a un modello per
più di un secondo. In modalità mani libere, la schermata
mostrerà un singolo parametro e il relativo valore e i sei
interruttori a pedale superiori corrisponderanno a sei
parametri di tale modello.
Per uscire dalla modalità mani libere, premere l’interruttore
a pedale all’estrema sinistra in basso (Exit).
Per modificare il valore, spostare il pedale diespressione.
Per visualizzare un altro parametro, premere l’interruttore a
pedale corrispondente. Se quel modello presenta più di sei
parametri, premere i due interruttori a pedale inferiori centrali
( o ) per visualizzare i sei parametri precedenti o successivi.
50
Page 51

Schnellstart-Anleitung (Deutsch)
Einführung
Der perfekte Sound ist nur einen Knopfdruck entfernt
Vielen Dank für den Kauf des HeadRush Pedalboards!
Das HeadRush Pedalboard verfügt über ein fein abgestimmtes Quad-Core-DSP-System auf dem die exklusive Eleven
HD Expanded Plattform läuft. Das HeadRush Pedalboard bietet die vielseitigsten, realistischsten und überzeugendsten
Verstärker-, Cabinet-, Mikrofon- und Effektmodelle, die jemals in einem Floorboard-Gitarreneffektprozessor
zusammengefasst wurden.
Das HeadRush Pedalboard bietet ein neues, großzügiges und vielfältiges Angebot an klassischen Vintage- und
modernen Amp- und Effektmodellen mit exklusiven Boutique-Effekten, die sonst nirgends zu finden sind, sowie
die Möglichkeit eigene Impulsantwort-Dateien zu laden. Es gibt auch exklusive Features, die kein anderer
Gitarrenprozessor anbietet, einschließlich lückenlosem Preset-Switching unter Erhaltung von Delay- oder
Hallfahnen, einem Looper mit über 20 Minuten Aufnahmezeit sowie die Möglichkeit, Loop-Layers in der
umgekehrten Reihenfolge, in der sie hinzugefügt wurden, „abzuschälen“ und vieles mehr.
Das Herzstück des HeadRush Pedalboard ist sein 7-Zoll-Touchscreen-Display und seine gitarrenorientierte
Benutzeroberfläche, in der Sie Ihre Rigs über Berührungen in einer beispiellosen, realistischen und intuitiven Art und
Weise per Drag & Drop bearbeiten und erstellen können. Die große Anzeige bietet auch ein besonders klares
Feedback bei Live-Auftritten, vor allem, wenn Sie kleine Änderungen am Sound im Hands-Free-Modus vornehmen.
®
Die folgenden Informationen dienen als Schnellstartanleitung, damit Sie gleich beginnen können. Sie finden das
komplette Handbuch, Video-Tutorials und eine Feedback-Möglichkeit unter headrushfx.com.
Oh. Eine Sache noch. Dieses Pedalboard geht bis 11.
Lieferumfang
HeadRush Pedalboard
USB-Kabel
Stromkabel
Software-Download-Karte
Schnellstart-Anleitung
Sicherheitshinweise und Garantieinformationen
Wichtig: Besuchen Sie headrushfx.com, um das komplette Benutzerhandbuch herunterzuladen.
Kundendienst
Für die neuesten Informationen zu diesem Produkt (Dokumentation, technische Daten, Systemanforderungen,
Informationen zur Kompatibilität etc.) und für die Produktregistrierung besuchen Sie headrushfx.com.
Für zusätzlichen Produkt-Support besuchen Sie headrushfx.com/support.
51
Page 52

Funktionen
Oberseite
9
8
10
11
3
1
2
2
2
6
5
7
12
4
6
5
4
1. Haupt-Display: Das Vollfarb-Multitouch-Display zeigt Informationen, die den aktuellen Betrieb des HeadRush
Pedalboard betreffen. Tippen Sie auf das Display (und verwenden Sie die Hardware-Steuerelemente), um die
Schnittstelle zu bedienen. Siehe Einfacher Betrieb, um zu lernen, wie es funktioniert.
2. Parameter-Regler: Drehen Sie diese Regler, um die nebenstehenden Parameter oder Einstellungen im
Hauptdisplay einzustellen.
3. Encoder: Mit diesem Encoder können Sie durch die verfügbaren Menüoptionen navigieren oder Parameterwerte
des ausgewählten Feldes am Display einstellen. Drücken Sie den Encoder, um Ihre Auswahl zu bestätigen.
4. Fußschalter: Betätigen Sie diese Fußschalter, um das zugewiesene Model zu aktivieren/deaktivieren oder
das zugeordnete Rig zu laden.
5. Fußschalter-Displays: Diese Anzeigen zeigen das Model oder den Rig an, die jedem Fußschalter zugeordnet
sind.
6. Fußschalter-Anzeigen: Diese Leuchten zeigen an, ob das dem Fußschalter zugeordnete Model oder Rig
eingeschaltet (leuchtet hell) oder ausgeschaltet (leuchtet schwach) ist.
7. Expression-Pedal: Verwenden Sie dieses Pedal, um den zugewiesenen Parameter/die Parameter
einzustellen. Weitere Informationen finden Sie unter Einfache Bedienung > Hardwarezuweisung >
Expression-Pedal.
8. Expression Pedal Status LED: Dieses kleine LED zeigt die aktuelle Zuweisung des Expression-Pedals an.
Weitere Informationen finden Sie unter Einfache Bedienung > Hardwarezuweisung > Expression-Pedal.
9. Master Volume: Drehen Sie diesen Regler, um die Lautstärke der Ausgänge einzustellen.
10. Phones Volume: Drehen Sie diesen Regler, um die Lautstärke der Kopfhörerausgänge einzustellen.
11. Aux Volume: Drehen Sie diesen Regler, um die Lautstärke des Aux-Eingangs einzustellen.
Wichtig: Das Audiosignal vom Aux-Eingang wird direkt an die Ausgänge des HeadRush Pedalboard geleitet,
ohne dass eine Modellierung angewendet wird. Es wird auch nicht vom Master Volume oder dem Phones
Volume Regler beeinflusst.
12. Cable Channel: Verlegen Sie Ihre Kabel durch diesen Einschnitt auf der Unterseite des HeadRush Pedalboards,
um die Bühne frei von Stolperfallen zu halten.
52
Page 53

Rückseite
3
9
10
11
7
4
5
6
1. Netzeingang (IEC): Verwenden Sie das mitgelieferte Netzkabel, um diesen Eingang mit einer Steckdose zu verbinden.
2. Netzschalter: Drücken Sie diese Taste, um das HeadRush Pedalboard einzuschalten. Halten Sie diese Taste
gedrückt, um das HeadRush Pedalboard auszuschalten.
3. Entlüftung: Vergewissern Sie sich, dass diese Entlüftung während der Verwendung des HeadRush Pedalboards
nicht verdeckt oder behindert wird.
4. Gitarreneingang (6,35 mm Klinke TS): Schließen Sie Ihre Gitarre mit einem Standard-Instrumentkabel an diesen
Eingang an.
5. Expression Pedal-Eingang (6,35 mm Klinke, TRS): Schließen Sie ein optionales sekundäres Expression-Pedal
über ein Standard-Instrumentenkabel an diesen Eingang an.
6. Aux-Eingang (3,5 mm Klinke, TRS): Schließen Sie eine optionale Audioquelle (z. B. Smartphone, Tablet, etc.) mit
einem 3,5 mm Stereokabel an diesen Eingang an.
7. Ausgänge (XLR): Verbinden Sie diese Ausgänge mit den Eingängen Ihres Mischpults, Aktivlautsprechers usw. Wenn
Sie nur einen Ausgang verwenden müssen, verwenden Sie den Ausgang, der mit L/Mono gekennzeichnet ist.
8. Ground Lift-Schalter: Aktivieren (drücken) Sie diesen Schalter, um Brummgeräusche oder Rauschen zu reduzieren.
9. Ausgänge (6,35 mm Klinke, TRS): Verbinden Sie diese Ausgänge mit den Eingängen des Verstärkers, der
Audioschnittstelle usw. Stellen Sie den Amp/Line-Wahlschalter auf die für das angeschlossene Gerät passende
Einstellung ein. Wenn Sie nur einen Ausgang verwenden müssen, verwenden Sie den Ausgang, der mit L/Mono
gekennzeichnet ist.
10. Amp/Line-Wahlschalter: Mit diesem Schalter wählen Sie den Pegel des Signals aus den 6,35 mm
Klinkenausgängen aus. Bei der Einstellung Amp wird der Ausgangspegel für einen Standard-Gitarrenverstärker
+6 dBu betragen. Bei Einstellung Line ist der Ausgangspegel Line-Level und +18 dBu.
11. Kopfhörerausgang (6,35 mm Klinke, TRS): Verbinden Sie handelsübliche 6,35 mm Stereo-Kopfhörer mit diesem
Ausgang. Verwenden Sie den Regler Phones Volume, um die Lautstärke einzustellen.
12. Send-Ausgänge (6,35 mm Klinke, TRS): Verbinden Sie diese Ausgänge mit den Eingängen eines anderen
Effektmoduls, eines Effektpedals oder der Effektschleife eines Verstärkers. Stellen Sie den Rack/Stomp-
Wahlschalter auf die für das angeschlossene Gerät passende Einstellung ein. Wenn Sie nur einen Ausgang
verwenden müssen, verwenden Sie den Ausgang, der mit L/Mono gekennzeichnet ist.
13. Return-Eingänge (6,35 mm Klinke, TRS): Verbinden Sie diese Eingänge mit den Ausgängen eines anderen
Effektmoduls, eines Effektpedals oder dem Send einer Verstärkereffektschleife. Stellen Sie den Rack/St
Wahlschalter auf die für das angeschlossene Gerät passende Einstellung ein. Wenn Sie nur einen Ausgang
verwenden müssen, verwenden Sie den Ausgang, der mit L/Mono gekennzeichnet ist.
14. Rack/Stomp-Wahlschalter: Mit diesem Schalter wählen Sie den Pegel des Signals, das von den Send-Ausgängen
an die Return-Eingänge gesendet wird. Bei der Einstellung Rack ist der Ausgangspegel Line-Level und +18 dBu.
Bei der Einstellung Stomp beträgt der Ausgangspegel +6 dBu, wie ein normales Gitarrenpedal („stompbox“).
15. MIDI-Eingang (5-poliger DIN): Verwenden Sie ein standardmäßiges MIDI-Kabel, um diesen Eingang mit dem MIDIAusgang eines optionalen, externen MIDI-Gerätes zu verbinden.
16. MIDI-Ausgang (5-poliger DIN): Verwenden Sie ein standardmäßiges MIDI-Kabel, um diesen Ausgang mit dem
MIDI-Eingang eines optionalen, externen MIDI-Gerätes zu verbinden.
17. USB-Anschluss: Verwenden Sie ein Standard-USB-Kabel, um diesen USB-Port mit Ihrem Computer zu verbinden.
Mit dieser Verbindung kann HeadRush Pedalboard das digitale Audiosignal an und von Ihrem Computer senden
und empfangen. Sie können diese Verbindung auch zum Importieren oder Exportieren von Rigs, Model-Presets,
Setlisten und Impulsantwort-Dateien verwenden.
8
12
14
13
15
16
17
2
1
omp-
53
Page 54

Setup
Teile, die nicht unter Einführung > Lieferumfang angegeben sind, sind separat erhältlich.
Gitarre PA-Lautsprecher oder Mixer Gitarrenverstärker
54
Kopfhörer
Externe Effekt-Stompboxes,
Module etc.
Steckdose
Computer
Page 55

r
Einfacher Betrieb
Dieses Kapitel beschreibt einige grundlegende Funktionen des HeadRush Pedalboards. Besuchen Sie bitte
headrushfx.com, um die komplette Bedienungsanleitung für detaillierte Informationen herunterzuladen.
Hauptbildschirm
Tippen Sie hier, um
Setlisten anzuzeigen.
Drehen Sie den
Encoder, um durch
wählbare Elemente am
Bildschirm zu
navigieren oder um
Parameter einzustellen.
Drücken Sie Encoder
als Ente
-Befehl.
Tippen Sie doppelt auf
ein Model, auf In oder
Out, um seine
Parameter anzuzeigen.
Drücken Sie auf den
Fußschalter, um das Model
zu aktivieren/deaktivieren.
Wichtig: Die Reihenfolge der Models in Ihrer Signalkette spiegelt sich nicht unbedingt in den Fußschaltern wider. Sie
können Models ganz frei den verfügbaren Fußschaltern zuordnen ohne Ihre Signalkette zu verändern - und umgekehrt.
Weitere Informationen hierzu finden Sie unter Hardwarezuweisung.
Um ein Model (Amp, Cab oder Effekt) einem leeren Slot zuzuordnen, tippen Sie darauf () und
verwenden dann die angezeigte Liste. Siehe Rigs > Erstellen eines neuen Rigs um mehr
darüber zu erfahren.
Um die Parameter eines Models am rechten Bildschirmrand anzuzeigen, tippen Sie auf
das Model, so dass es grün umrandet ist. Sie können dann die Parameter-Regler drehen, um
die Parameter auf der linken Seite einzustellen. Tippen Sie auf eine beliebige Stelle in der
Spalte dieser drei Parameter, um die nächsten drei (wenn das Model mehr als drei Parameter
hat) anzuzeigen.
Wenn kein Model ausgewählt ist, sind diese Parameter diejenigen, die Sie im Fenster
Hardwarezuweisung zuordnen.
Um das Einstellungsfenster eines Models anzuzeigen, tippen Sie es doppelt an. Der
Einstellungsbildschirm wird mit dem voreingestellten Menü, den Parametern und der
zugeordneten Farbe angezeigt.
Um ein Model zu aktivieren oder zu deaktivieren, drücken Sie den ihm zugeordneten
Fußschalter oder tippen Sie im Display auf den Fußschalter des Models.
So laden Sie ein anderes Rig (Preset):
• Drücken Sie den oberen linken (Rig ) oder den unteren linken (Rig ) Fußschalter,
um das vorherige oder nächste Rig sofort zu laden.
• Tippen Sie auf oder neben dem Namen des aktuellen Rigs auf dem Bildschirm.
• Tippen Sie auf den Namen des Rigs und drehen Sie den Encoder.
Um weitere Optionen anzuzeigen, tippen Sie auf die Schaltfläche oben rechts und tippen
dann auf eine Option.
Tippen und ziehen Sie diese Leiste nach
unten, um die Rig-Liste anzuzeigen.
Rig-Name.
Tippen Sie hier, um
das Rig zu speichern.
Tippen Sie hier für
weitere Optionen.
Drehen Sie die Parameterregler, um die Parameter anzupassen. Wenn
Sie ein Model ausgewählt haben, können Sie auf eine beliebige Stelle in
dieser Spalte tippen, um die nächsten drei Parameter auszuwählen.
Um die Models in
Ihrer Signalkette neu
anzuordnen, tippen
und ziehen Sie ein
Model auf einen
anderen Speicherplatz
oder zwischen zwei
andere Models (die
Models dahinter
rücken einen Slot
weiter nach unten).
55
Page 56

g
g
g
g
g
g
g
gHy
Ansichten
Die HeadRush Pedalboard-Fußschalter können nicht nur zum Aktivieren oder Deaktivieren von Models (Amps,
Cabs oder Effekten), sondern auch zur Auswahl von Rigs oder Setlists verwendet werden. Die mittleren acht
Fußschalter befinden sich immer in einem von vier Modi:
So ändern Sie die Ansicht:
1. Halten Sie den unteren linken Fußschalter
gedrückt, bis in der Anzeige Exit erscheint. Die
angrenzenden vier Fußschalter entsprechen
nun den vier Ansichten: Stomp, Rig, Hybrid
und Setlist.
2. Drücken Sie einen Fußschalter, um in diese
Ansicht zu gelangen.
Stomp-Ansicht
Die mittleren acht Fußschalter entsprechen den
Models (Verstärker, Cabs oder Effekte) in Ihrer
Signalkette. Drücken Sie einen Fußschalter, um
das Model zu aktivieren oder zu deaktivieren.
Rig-Ansicht
Die mittleren acht Fußschalter entsprechen
denen, die Sie gespeichert haben. Drücken Sie
einen Fußschalter, um das Rig zu laden.
Um die vorherigen oder nächsten vier Rigs
anzuzeigen, drücken Sie den oberen linken (Bank
) oder unteren linken (Bank ) Fußschalter.
Exit
Stomp Ri
Rig Model 1 Model 2 Model 3 Model 4 Looper
Rig Model 5 Model 6 Model 7 Model 8
Bank Rig1Ri
Bank
Ri
5Ri
2Ri
6Ri
brid Setlist
Tuner
3 Rig 4Looper
7 Rig 8
Tuner
Hybrid-Ansicht
Die oberen, mittleren vier Fußschalter entsprechen
den Rigs, die Sie gespeichert haben. Drücken Sie
einen dieser Fußschalter, um das Rig zu laden. Die
unteren, mittleren vier Fußschalter entsprechen
den Models (Verstärker, Cabs oder Effekte) in Ihrer
Signalkette. Drücken Sie einen dieser Fußschalter,
um das Model zu aktivieren oder zu deaktivieren.
Setlist-Ansicht
Die mittleren acht Fußschalter entsprechen den
Setlists, die Sie gespeichert haben. Drücken Sie
einen Fußschalter, um eine Setlist zu laden.
56
Bank Rig1Ri
Bank
Bank Setlist 1 Setlist 2 Setlist 3 Setlist 4
Bank
Model 1 Model 2 Model 3 Model 4
Setlist 5 Setlist 6 Setlist 7 Setlist 8
2Ri
3 Rig 4Looper
Tuner
Page 57

V
V
Rigs
Wenn Sie Ihr HeadRush Pedalboard verwenden, ist ein Rig ein Preset: die Kombination der zugewiesenen
Models - die Verstärker, die Cabs und die Effekte - und ihre jeweiligen Parametereinstellungen. Sie können Rigs
erstellen, bearbeiten, speichern und laden, so dass Sie den perfekten Sound für jeden Teil Ihrer Performance
leicht abrufen können.
Jedes Rig verfügt über 11 Slots, die jeweils einem Model (Amp, Cab oder Effekt) zugeordnet sind. Zugewiesene
Speicherplätze zeigen graphische Darstellungen der Models. Leere Speicherplätze zeigen ein -Symbol.
Erstellen eines neuen Rigs
Um ein neues Rig zu erstellen, tippen Sie in der oberen rechten
Ecke des Bildschirms auf die Schaltfläche und tippen dann
auf New Rig.
So weisen Sie einem leeren Slot ein Model (Amp, Cab oder
Effekt) zu:
1. Tippen Sie auf den leeren Speicherplatz ().
2. Tippen Sie in der erscheinenden Liste auf das Model, das Sie
zuordnen möchten. Amp, Cab oder Effekt (Distortion,
Dynamics/EQ, Modulation, Reverb/Delay, FX-Loop oder
Expression).
3. Tippen Sie in der erscheinenden Liste auf das Model, das Sie
zuordnen möchten.
4. Tippen Sie in der nächsten angezeigten Liste auf das Preset,
das Sie für dieses Model laden möchten.
Wenn Sie einen Verstärker oder ein Cabinet in einen Slot mit
einem leeren benachbarten Slot laden, wird ein passender
Verstärker oder Cabinet automatisch in den anderen Slot
geladen. Danach können Sie sie unabhängig konfigurieren: Sie
können sie in der Signalkette trennen, Sie können den Typ des
Verstärkers oder Cabinets ändern und können jedes Model
separat löschen.
Optimierung Ihrer Signalkette
Die Signalkette ist der Pfad, den das Audiosignal ausgehend von Ihrer Gitarre durch Ihre ausgewählten Models
nimmt und an den Ausgängen von HeadRush Pedalboard endet. Sie können den Touchscreen verwenden, um
Ihre ausgewählten Models in beliebiger Reihenfolge zu arrangieren, Sie werden vielleicht feststellen, dass einige
Konfigurationen besser klingen als andere.
Hier sind einige populäre Model-Reihenfolgen für die Erstellung von Sounds mit dem HeadRush Pedalboard:
• Dynamik (z.B. Kompressoren), Filter (z.B. Wah, Pitch Shifters) und Lautstärke-Pedale werden
üblicherweise am Anfang der Signalkette platziert. Wahlweise können Sie die Lautstärkepedale am Ende
der Signalkette platzieren, um eine leichte Variation in der Funktionalität zu erzielen.
• Gain-basierte Effekte (z. B. Overdrive/Distortion, Fuzz) kommen in der Regel als nächstes.
• Equalization (EQ) wird häufig verwendet, um die tonalen Eigenschaften von Overdrive/Distortion und Fuzz-
Effekten zu formen, positionieren Sie also einen EQ danach. Wahlweise können Sie den EQ auch davor
platzieren, um den allgemeinen Klang der Gitarre vor den Gain-Pedalen zu formen und unerwünschte
Frequenzen zu entfernen.
• Modulationseffekte wie Flanger, Phaser und Chorus werden in der Regel als nächstes platziert.
• Zeitbasierte Effekte wie Delays und Reverbs werden meist nahe dem Ende der Signalkette platziert.
• Ein Verstärker und ein Cab sind oft ganz am Ende der Signalkette angeordnet, obwohl Sie sie überall
platziert werden können.
Model-Typen: Amps,
Cabs & Effekte.
erfügbare Models für jeden Typ.
erfügbare Presets
für jedes Model.
57
Page 58

Speichern eines Rigs
Wenn Sie das Rig seit dem Laden geändert haben, sehen Sie am oberen Bildschirmrand ein Sternchen () neben
seinem Namen. Sie können diese Änderungen auf diesem Rig speichern, diese Änderungen als ein anderes Rig
speichern oder komplett verwerfen.
Um ein Rig zu speichern, tippen Sie in der oberen rechten Ecke auf
Save.
Um die Änderungen am aktuellen Rig zu speichern, tippen Sie auf
Save.
Um Ihre Änderungen als neues Rig zu speichern, tippen Sie auf
Save New Rig und verwenden die angezeigte Tastatur, um einen
Namen einzugeben, und tippen Sie dann auf Save.
Um zum vorherigen Bildschirm zurückzukehren, ohne zu speichern, tippen Sie auf Cancel.
Um alle Änderungen am Rig zu verwerfen, tippen Sie in der rechten oberen Ecke auf die Schaltfläche und tippen
Sie auf Discard Changes.
Anpassen der Einstellungen
Um die Einstellungen eines Modells in Ihres Rigs anzupassen, tippen Sie zweimal auf das Rig, um den
Einstellungsbildschirm zu öffnen.
Tippen Sie auf , um Ihre Änderungen zu speichern und
zum Hauptbildschirm zurückzuspringen.
Drehen Sie den Encoder, um
durch wählbare Elemente am
Bildschirm zu navigieren
oder um Parameter
einzustellen. Drücken Sie den
Encoder als Enter -Befehl.
Tippen Sie auf das Preset-Menü,
um ein Preset auszuwählen.
Tippen Sie auf diese Schaltfläche und tippen Sie auf Discard
Changes, um Änderungen zu verwerfen, die Sie seit dem Öffnen
dieses Bildschirms vorgenommen haben.
Siehe Preset speichern.
Tippen Sie auf den ModelNamen, um diesem Slot
ein anderes Model
zuzuweisen.
Tippen Sie auf Delete, um das
Models von diesem Slot zu
entfernen.
Tippen Sie auf eine Farbe, die Sie dem
Model zuweisen möchten. Diese Farbe wird
auf dem Hauptbildschirm, im
Hardwarezuweisungsbildschirm und in der
Fußschalter-LED angezeigt.
Drehen Sie die Parameterregler, um die Parameter anzupassen. Tippen Sie auf eine beliebige
Stelle in dieser Spalte, um die nächsten drei Parameter (falls vorhanden) anzuzeigen.
Tippen Sie auf Cancel, um Ihre
Änderungen zu verwerfen und zum
Hauptbildschirm zurückzuspringen.
Preset speichern
Um einen Preset zu speichern, tippen Sie in der oberen rechten Ecke
auf Save.
Um die Änderungen am aktuellen Rig zu speichern, tippen Sie auf
Save.
Um Ihre Änderungen als neues Preset zu speichern, tippen Sie auf
Save New Preset und verwenden die angezeigte Tastatur, um einen
Namen einzugeben. Tippen Sie dann auf Save.
Um zum vorherigen Bildschirm zurückzukehren, ohne zu speichern, tippen Sie auf Cancel.
58
Page 59

Hardwarezuweisung
Der Bildschirm Hardware Assign ermöglicht die Zuweisung
von Parametern an die HeadRush Pedalboard-Fußschalter,
das Expression-Pedal und die Parameter-Regler.
Um den Bildschirm Hardware Assign zu öffnen, tippen
Sie oben rechts auf dem Hauptbildschirm auf die
Schaltfläche und tippen dann auf Hardware
Assign.
Um zum Hauptbildschirm zurückzukehren, tippen Sie
auf die Schaltfläche in der oberen linken Ecke.
Wichtig: Die Hardware Assign-Einstellungen sind
Bestandteil des Gesamt-Rigs, daher sollten Sie die
Änderungen, die Sie behalten möchten, speichern.
Um die Farbe des Rigs festzulegen, tippen Sie im oberen linken Teil des Bildschirms darauf. Diese Farbe wird
neben dem Rig-Namen angezeigt, wenn Sie eine Liste aller verfügbaren Rigs ansehen oder wenn Sie Setlisten
anzeigen und erstellen. Es wird auch die Farbe der entsprechenden Fußschalter-LED sein, wenn HeadRush
Pedalboard in der Rig-Ansicht ist.
Um das Tempo der zeitbasierten Rig-Effekte (Delays, Modulation usw.) einzustellen, tippen Sie auf die
Schaltfläche unter Tempo, um Current oder Fixed auszuwählen.
• Current: Im Rig wird das zuletzt verwendete oder das vom Tempo-Fußschalter eingestellte Tempo benutzt.
Um das Tempo einzustellen, drücken Sie den Tempo-Fußschalter (unten ganz rechts) mit dem
gewünschten Tempo drei bis acht mal, um das neue Tempo in Schlägen pro Minute (BPM) einzustellen. Sie
können dies immer dann tun, wenn das Fußschalter-Display Tempo zeigt.
• Fixed: Das Rig verwendet ein Tempo, das Sie hier einstellen.
Um das Tempo einzustellen, drehen Sie den Encoder, um das gewünschte Tempo in Schlägen pro Minute
(BPM) einzustellen. Sie können das Tempo nur im Bildschirm Hardware Assign einstellen.
Fußschalter
Die acht Boxen in der linken unteren Ecke repräsentieren die mittleren acht Fußschalter des HeadRush
Pedalboards. Sie können jedem beliebigen Switch-basierten Parameter (mit nur zwei Zuständen) einen beliebigen
Fußschalter zuweisen - unabhängig von seiner Position in der Signalkette.
So weisen Sie einem Fußschalter einen Parameter zu:
1. Tippen Sie auf ein Feld. zeigt ein leeres Feld an.
2. Tippen Sie in der erscheinenden Liste auf das Model mit dem
Parameter, das Sie zuordnen möchten.
3. Tippen Sie in der erscheinenden Liste auf den Parameter,
den Sie zuordnen möchten. Normalerweise ist der Parameter
einfach mit On zu aktivieren oder deaktivieren.
Tippen Sie auf Unassigned , um die Zuweisung des
Fußschalters aufzuheben.
Um zwei Zuweisungen auszutauschen, tippen und ziehen Sie
eine über die andere und lassen Sie sie dann wieder los.
59
Page 60

Expression-Pedal
Das Expression-Pedal kann zwei Parameter (im klassischen Modus) oder zwei Parameter-Sets (im erweiterten Modus)
steuern. Verwenden Sie den Zehenschalter, um zwischen Expression-Pedal A oder B zu wechseln.
Um den „Toe-Switch“, einen Schalter unter dem Expression Pedal auf Höhe der Zehen zu aktivieren, bewegen
Sie das Expression-Pedal auf Seite Ihrer Zehen soweit herunter so, dass es das Pedalboard berührt und drücken es
dann nach unten. Die Expression-Pedal-Status-LED zeigt A oder B an.
Die Spalte mit vier Feldern repräsentiert die Expression-Pedal-Einstellungen. Sie
können dem Expression-Pedal einen oder mehrere stufenlos einstellbare
Parameter (mit einem Wertebereich) zuordnen.
Um den Expression-Pedal-Modus einzustellen, tippen Sie auf die Schaltfläche
oberhalb von Range in der oberen rechten Ecke, um Classic oder Advanced
auszuwählen.
• Classic: Sie können jedem Expression-Pedal (A und B) einen Parameter
zuordnen. Die Verwendung des Zehenschalters wählt das andere
Expression-Pedal und deaktiviert (umgeht) den Parameter des aktuellen
Expression-Pedals. Wenn Sie beispielsweise dem Expression-Pedal A ein
Wah-Pedal und dem Expression-Pedal B ein Lautstärkepedal zuweisen,
wird immer nur eines von ihnen aktiv sein.
• Advanced: Sie können jedem Expressionspedal (A und B) bis zu vier Parameter zuordnen. Durch Bewegen des
Pedals werden alle zugewiesenen Parameter gleichzeitig eingestellt. Die Verwendung des „Toe Switch“ wählt das
andere Expression-Pedal und belässt die Parameter des aktuellen Pedals aktiv und bei Ihren maximalen Werten.
So weisen Sie dem Expression-Pedal einen Parameter zu:
1. Wenn die Assign-Schaltfläche nicht aktiviert ist, tippen Sie darauf.
2. Tippen Sie unter der Schaltfläche Assign auf ein Feld. zeigt ein
leeres Feld an.
3. Tippen Sie in der erscheinenden Liste auf das Model mit dem
Parameter, das Sie zuordnen möchten.
4. Tippen Sie in der erscheinenden Liste auf den Parameter, den Sie
zuordnen möchten.
Tippen Sie auf Unassigned , um die Zuweisung dieses Feldes
aufzuheben.
Um zwei Zuweisungen (im Advanced Mode) auszutauschen, tippen
und ziehen Sie eine über die andere und lassen Sie sie dann wieder los.
So stellen Sie den Bereich eines zugewiesenen Parameters ein:
1. Wenn die Range-Schaltfläche nicht aktiviert ist, tippen Sie darauf.
2. Tippen Sie unter der Schaltfläche Range auf einen Wert.
3. Drehen Sie den Encoder, um den gewünschten Wert als Prozentsatz d
Parameterbereichs festzulegen. Drücken Sie den Encoder oder tippen Sie an anderer Stelle, um
den Wert zu bestätigen.
es gesamten
Quick Parameters
Der rechte Rand des Bildschirms zeigt eine Spalte für drei Parameter. Dies sind jene drei Parameter, die
zuerst angezeigt werden, wenn Sie ein Rig laden. Wenn auf dem Hauptbildschirm kein Model ausgewählt ist,
können Sie die drei Parameterregler nutzen, um diese Parameter anzupassen. Diesen Reglern können
beliebige kontinuierliche Parameter zugewiesen werden (Parameter mit einem Wertebereich und nicht nur mit
„On“/ „Off“-Zuständen).
So weisen Sie einem Parameter-Regler einen Parameter zu:
1. Tippen Sie auf das Feld, dem Sie einen Parameter zuweisen möchten. zeigt ein leeres Feld an.
2. Tippen Sie in der erscheinenden Liste auf das Model mit dem Parameter, das Sie zuordnen möchten. Sie
können auch Parameter für das Eingangssignal (Input) oder Ausgangssignal (Output) wählen.
3. Tippen Sie in der erscheinenden Liste auf den Parameter, den Sie zuordnen möchten.
Tippen Sie auf Unassigned •, um die Zuweisung dieses Parameter-Reglers aufzuheben.
60
Page 61

Setlisten
Sie können Setlisten verwenden, um Ihre Rigs zu organisieren. Eine Setliste ist eine gespeicherte Sammlung von Rigs,
die Sie speichern und später wieder abrufen können. Dies ist zum Beispiel dann nützlich, wenn Sie nur bestimmte Rigs
für Ihre Performance benötigen; Sie können eine Setliste mit nur diesen Rigs speichern, damit Sie nicht erst durch alle
Rigs blättern müssen bevor Sie den nächsten Song spielen.
Um Ihre Setlisten anzusehen, tippen Sie auf die Schaltfläche ≡ in der oberen linken Ecke des Hauptfensters. Der
Bildschirm Setlists erscheint.
Um zum Hauptbildschirm zurückzukehren, tippen Sie auf die Schaltfläche in der oberen linken Ecke.
So erstellen Sie eine Setliste:
1. Tippen Sie New in der oberen rechten Ecke.
2. Auf dem angezeigten Bildschirm ist die linke Hälfte eine Liste aller
verfügbaren Rigs und die rechte Hälfte die Liste der Rigs in der Setliste.
Um der Setliste ein Rig hinzuzufügen, tippen Sie auf das Rig, um es
am Ende der Liste hinzuzufügen. Wahlweise können Sie auf das Rig
tippen, halten und an die gewünschte Position in der Liste ziehen. Ein
und dasselbe Rig kann einer Setliste mehr als einmal hinzugefügt
werden. Das [Empty ]-Rig in der unteren linken Ecke ist ein
Speicherplatz, der als Platzhalter verwendet werden kann, um das
Umordnen der Setliste zu erleichtern; Er scheint nicht als selektierbares
Rig auf, wenn Sie durch Rigs in der Setliste blättern.
Um die Setliste neu anzuordnen, tippen und halten Sie ein Rig in der
Liste in der rechten Hälfte und ziehen ihn an die gewünschte Position in
der Liste.
Um ein Rig aus der Setliste zu entfernen, tippen Sie auf am
rechten Rand.
Um eine Setlist zu speichern, tippen Sie in der oberen rechten Ecke auf Save.
Um die Änderungen an der aktuellen Setliste zu speichern, tippen
Sie auf Save.
Um Ihre Änderungen als neue Setliste zu speichern, tippen Sie auf
Save New Setlist und verwenden die angezeigte Tastatur, um einen
Namen einzugeben. Tippen Sie dann auf Save.
Um jederzeit zum vorherigen Bildschirm zurückzukehren, ohne zu
speichern, tippen Sie auf Cancel.
Um alle Änderungen an der Setliste zu verwerfen, tippen Sie in der linken
oberen Ecke auf die Schaltfläche und tippen Sie auf Discard Changes.
So laden Sie eine Setliste:
1. Tippen Sie im Hauptbildschirm auf die Schaltfläche ≡ in der oberen
linken Ecke, um das Fenster Setlists anzuzeigen. Jede Setliste zeigt
die Anzahl der Rigs in Klammern (einschließlich mehrerer Instanzen des
gleichen Rigs).
2. Tippen Sie auf die gewünschte Setliste. Das erste Rig dieser Setliste
wird sofort geladen. Tippen Sie auf All Rigs, um alle Rigs anstelle ein
bestimmten Setliste anzuzeigen.
Um eine Setliste zu bearbeiten, tippen Sie auf der linken Seite auf die
Schaltfläche und tippen dann auf das Bleistiftsymbol. Sie sehen den
gleichen Bildschirm, in dem Sie die Setliste erstellt haben. Hier können Sie
sie bearbeiten und speichern.
Um eine Setliste zu löschen, tippen Sie auf die Schaltfläche auf der
linken Seite und tippen Sie dann auf das Papierkorb-Symbol. Tippen Sie
auf Yes, um den Löschvorgang zu bestätigen oder auf Cancel, um zum
Bildschirm Setlisten zurückzukehren, ohne die Liste zu löschen.
er
61
Page 62

Hands-Free-Modus
Im Hands-Free-Modus können Sie alle Einstellungen auf
Ihren Models mit den Fußschaltern und dem ExpressionPedal vornehmen.
Um den Hands-Free Mode aufzurufen, halten Sie einen
Fußschalter mehr als eine Sekunde gedrückt, der einem
Modell zugewiesen wurde. Im Hands-Free-Modus zeigt der
Bildschirm einen einzelnen Parameter und seinen Wert an
und die oberen sechs Fußschalter entsprechen sechs
Parametern dieses Models.
Um den Hands-Free-Modus zu verlassen, drücken Sie den
unteren (Exit) Fußschalter.
Um den Wert zu ändern, verschieben Sie das Expression-
Pedal.
Um einen anderen Parameter anzuzeigen, drücken Sie den
entsprechenden Fußschalter. Wenn dieses Model mehr als
sechs Parameter hat, drücken Sie die unteren zwei ( oder )
Fußschalter, um die vorherigen oder nächsten sechs
Parameter anzuzeigen.
62
Page 63

Appendix (English)
Technical Specifications
Footswitches
(12) footswitches with color LEDs & OLED displays
Pedals
Knobs
(1) expression pedal
(1) 300° master volume knob
(1) 300° phones volume knob
(1) 300° auxiliary volume knob
(1) 360° navigation/data encoder
(3) 360° parameter encoders
Displays Main Display
OLED Displays
Connectors
(1) 1/4” (6.35 mm) TS input
(1) 1/4” (6.35 mm) TRS input (secondary expression pedal)
(1) 1/8” (3.5 mm) stereo input
(2) XLR outputs
(2) 1/4” (6.35 mm) TRS outputs
(2) 1/4” (6.35 mm) TRS inputs
(2) 1/4” (6.35 mm) TRS outputs
(1) 5-pin MIDI input
(1) 5-pin MIDI output/thru
(1) USB Type-B port
(1) IEC power input
(1) full-color LED-backlit display with touch interface
6.9” / 176 mm
5.9” x 3.7” / 150 x 93 mm
(diagonal)
(width x height)
(12) monochromatic OLED-backlit displays
1.2” / 30 mm
1.1” x 0.4” / 28 x 11 mm
(with ground-lift switch)
(diagonal)
(width x height)
(guitar)
(auxiliary device)
(amp- or line-level)
(sends)
(returns)
Power Connection
Input Voltage
Dimensions
(width x depth x height, pedal fully forward)
Weight
23.6” x 11.2” x 2.9”
59.9 x 28.4 x 7.4 cm
15.7 lbs.
IEC
100–240 V, 50/60 Hz, 1.2 A
7.1 kg
Specifications are subject to change without notice.
Trademarks & Licenses
HeadRush is a trademark of inMusic Brands, Inc., registered in the U.S. and other countries.
Avid and Eleven are trademarks or registered trademarks of Avid Technology, Inc. in the U.S. and other countries.
All other product names, company names, trademarks, or trade names are those of their respective owners.
63
Page 64

Manual Version 1.1
 Loading...