


Quickstart Guide
Guía de inicio rápido
English (3–21)
Español (22–40)
Guide d’utilisation rapide
Guida rapida
Schnellstart-Anleitung
Appendix
Français (41–59)
Italiano (60–78)
Deutsch (79–97)
English (98)

2

Quickstart Guide (English)
Introduction
Box Contents
HeadRush Gigboard
USB Cable
Power Adapter
Software Download Card
Quickstart Guide
Safety & Warranty Manual
Important: Visit headrushfx.com to download the complete User Guide.
Support
For the latest information about this product (documentation, technical specifications, system requirements,
compatibility information, etc.) and product registration, visit headrushfx.com.
For additional product support, visit headrushfx.com/support.
3

Features
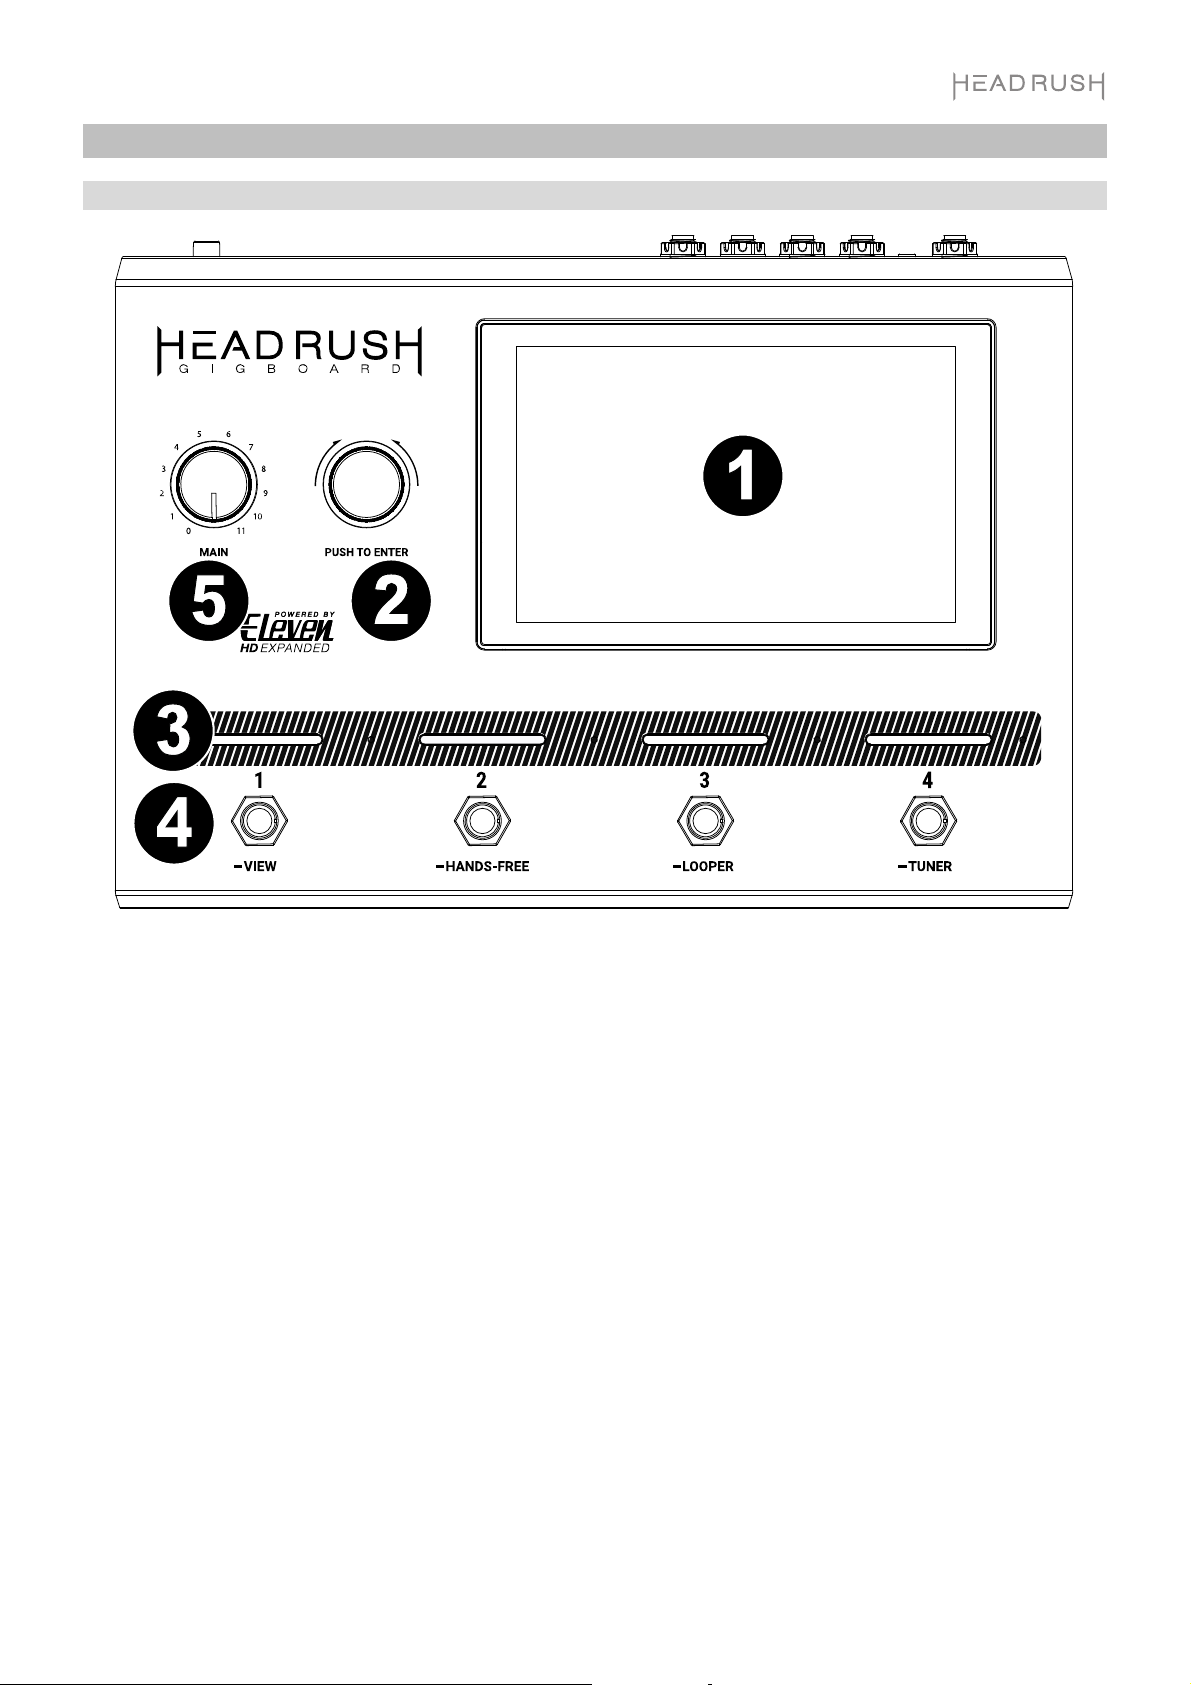
Top Panel
1
5
2
3
4
1. Display: This full-color multi-touch display shows information relevant to HeadRush Gigboard’s current
operation. Touch the display (and use the hardware controls) to control the interface. See Basic Operation to
learn how it works.
2. Encoder: Turn this encoder to scroll through the available menu options or adjust the parameter values of the
selected field in the display. Push the encoder to confirm your selection.
3. Footswitch Indicators: These lights indicate whether the stomp, rig, or scene assigned to each footswitch is
on (brightly lit) or off (dimly lit).
4. Footswitches: Press these footswitches to activate or deactivate the assigned model or scene, or to load the
assigned rig.
5. Master Volume: Turn this knob to adjust the volume level of the outputs.
4

Rear Panel
3
5
6
13
1
12
14
2
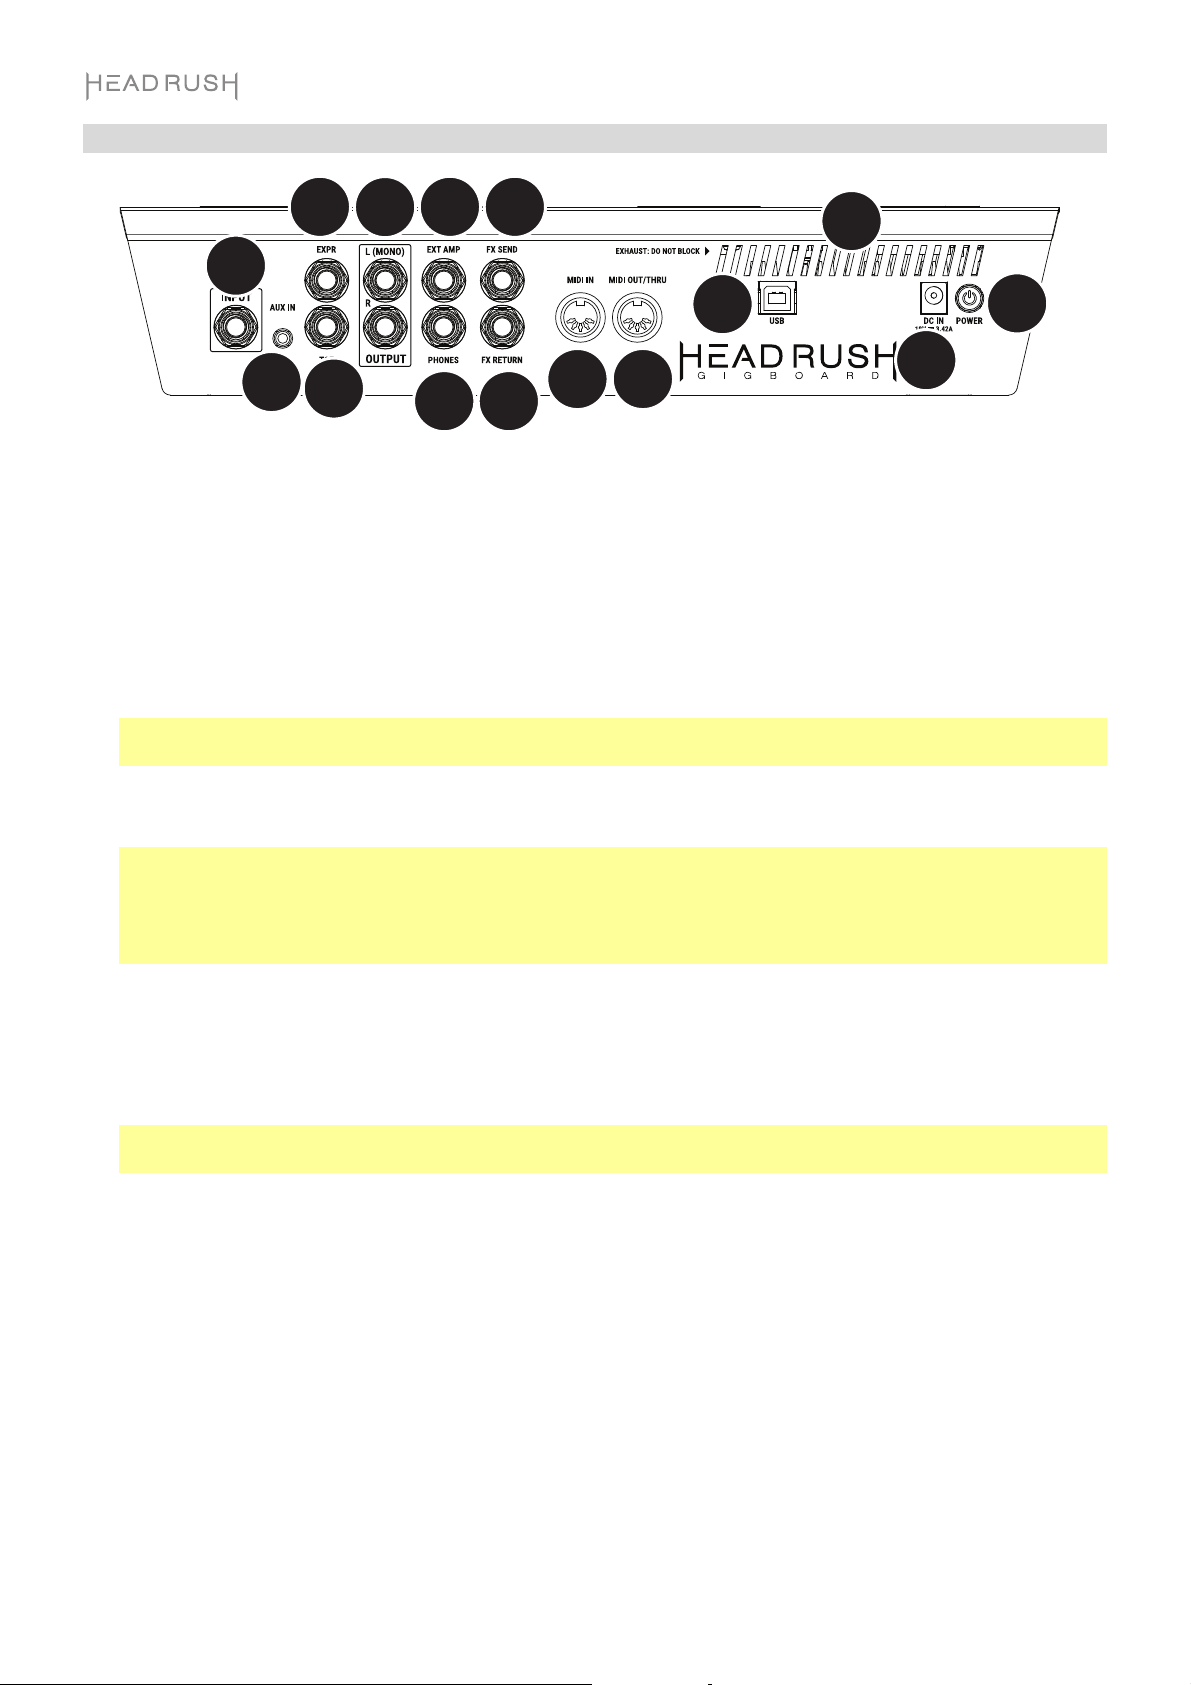
1. Guitar Input (1/4”/6.35 mm, TS): Connect your guitar to this input using a standard instrument cable.
2. Aux Input (1/8”/3.5 mm, TRS): Connect an optional audio source (e.g., smartphone, tablet, etc.) to this input
using an 1/8”/3.5 mm stereo cable.
3. Expression Pedal Input (1/4”/6.35 mm, TRS): Connect an optional expression pedal to this input using a
standard 1/4" (6.35 mm) TRS cable.
4. Expression Pedal Toe Switch Input (1/4”/6.35 mm, TS): Connect the toe switch output of your optional
expression pedal to this input using a standard 1/4" (6.35 mm) TS cable.
5. Outputs (1/4”/6.35 mm, TRS): Connect these outputs to the inputs of your amplifier, audio interface, etc. If
you only need to use one output, use the one labeled L/Mono.
Note: You can set these outputs to send signal at amp level or line level (default) in the Global Settings
Menu.
4
789
10
11
15
6. External Amp Footswitch Output (1/4”/6.35 mm, TRS): Connect this output to the footswitch input of an
external guitar amplifier to toggle channels or turn reverb on and off on the amplifier using the Gigboard.
IMPORTANT! Only connect this output to amplifiers that have a "short-to-sleeve" footswitch input. If you
connect this output to any other type of footswitch input, you may cause permanent damage to your
equipment. If you are unsure if your amplifier has a "short-to-sleeve" footswitch input, please consult the
amplifier's manual or manufacturer to confirm before attempting.
7. Phones Output (1/4”/6.35 mm, TRS): Connect standard 1/4” (6.35 mm) stereo headphones to this output.
8. FX Send Output (1/4”/6.35 mm, TRS): Connect these outputs to the inputs of another effects module, an
effect pedal, or the effects loop return of an amplifier.
9. FX Return Input (1/4”/6.35 mm, TRS): Connect these inputs to the outputs of another effects module, an
effect pedal, or the effects loop send of an amplifier.
Note: You can set the FX Return Input to receive signal at rack level or stomp level (default) in the Global
Settings Menu.
10. MIDI Input (5-pin DIN): Use a standard MIDI cable to connect this input to the MIDI output of an optional
external MIDI device.
11. MIDI Output (5-pin DIN): Use a standard MIDI cable to connect this output to the MIDI input of an optional
external MIDI device.
12. USB Port: Connect this USB port to a computer using a standard USB cable. This connection allows
HeadRush Gigboard to send and receive the digital audio signal to and from your computer. You can also use
this connection to import or export rigs, model presets, and setlists.
13. Vent: Make sure this vent is unobstructed while using HeadRush Gigboard.
14. Power Input: Connect this input to a power outlet using the included power cable.
15. Power Switch: Press this button to turn HeadRush Gigboard’s power on. Press and hold this button to turn
HeadRush Gigboard’s power off.
5

Setup
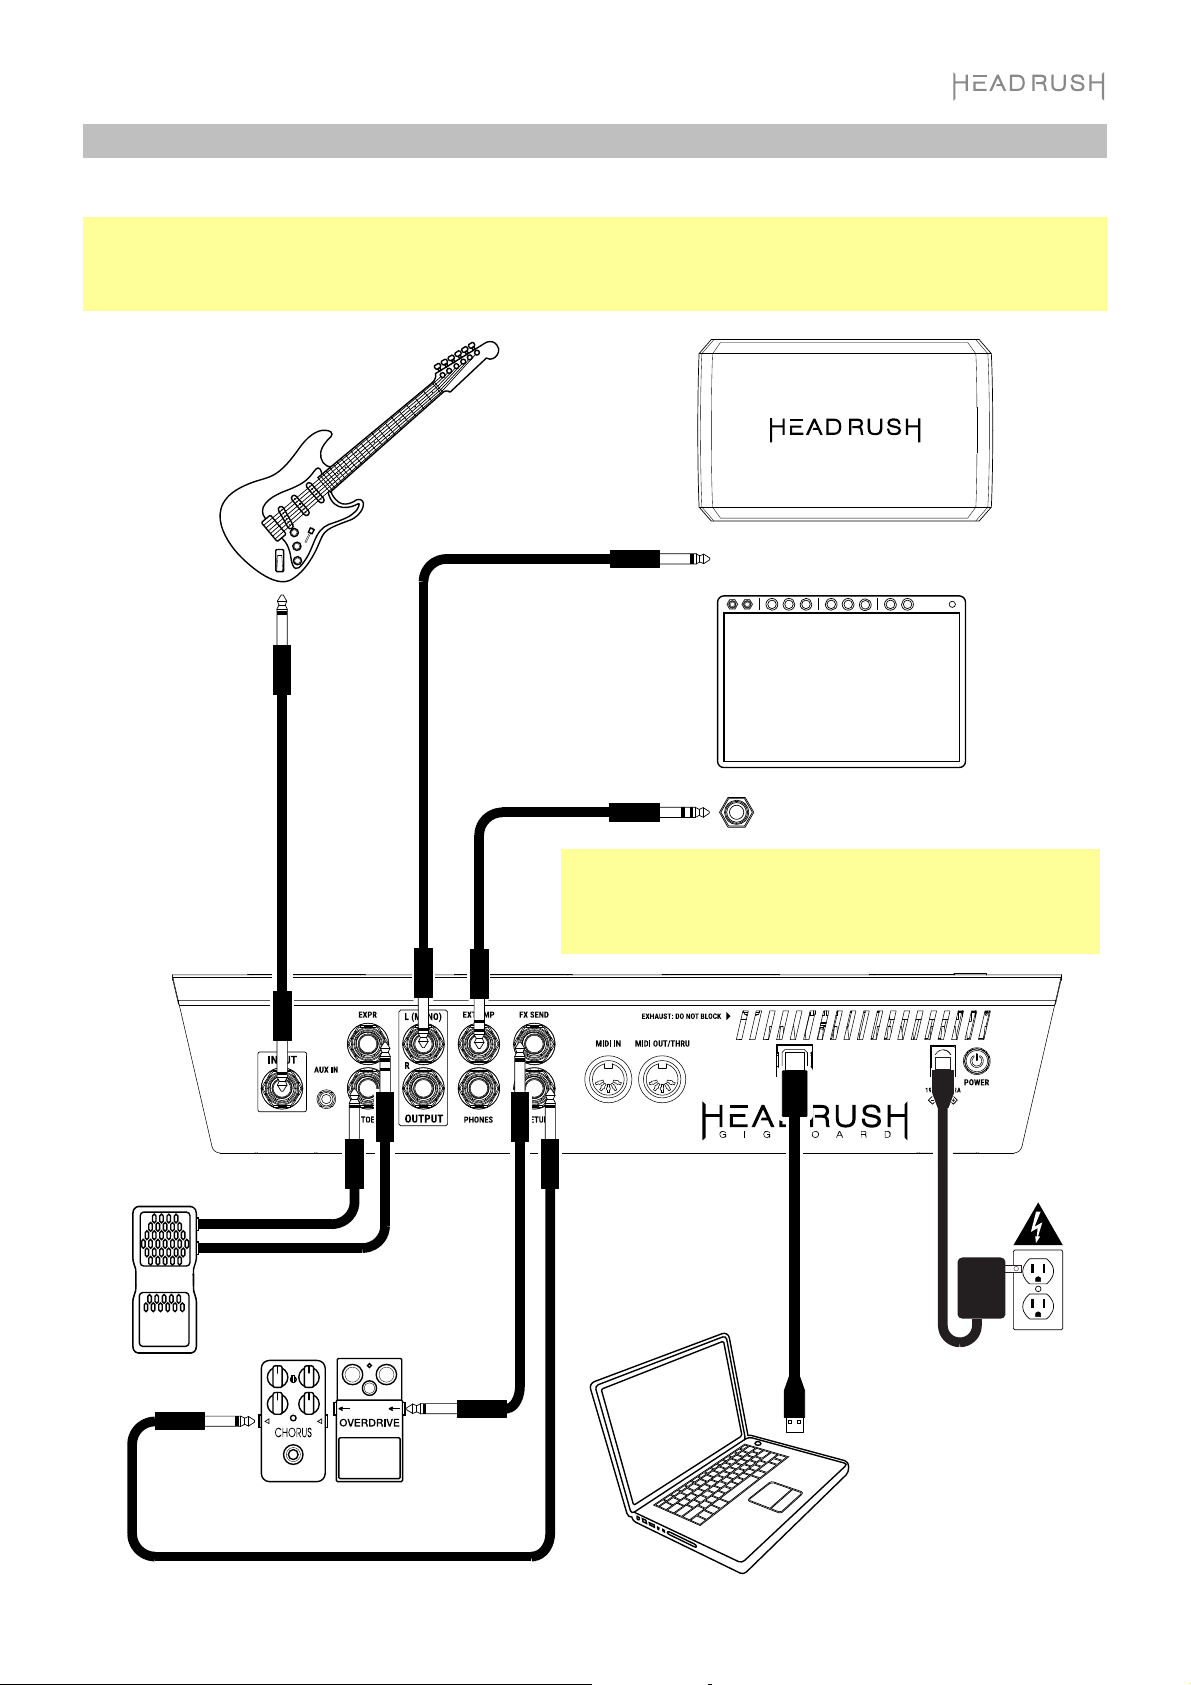
Items not listed under Introduction > Box Contents are sold separately.
IMPORTANT! In the Global Settings Menu, make sure you set the Outputs to send signal at amp level if you are
using a traditional guitar amplifier, or line level (default) if you are using a full-range flat-response amplifier, mixer,
PA speaker or audio interface.
Guitar
Full-range, flat-response amplifier or
traditional guitar amplifier
Expression
pedal
Amp Footswitch Input
IMPORTANT! Only connect this output to amplifiers that have a
"short-to-sleeve" footswitch input. If you connect this output to
any other type of footswitch input, you may cause permanent
damage to your equipment. If you are unsure if your amplifier
has a "short-to-sleeve" footswitch input, please consult the
amplifier's manual or manufacturer to confirm before attempting.
Computer
Power
outlet
6
External effect stompboxes,
modules, etc.
Basic Operation
This chapter describes some of HeadRush Gigboard’s basic functions. You can visit headrushfx.com to
download the complete user guide for even more information.
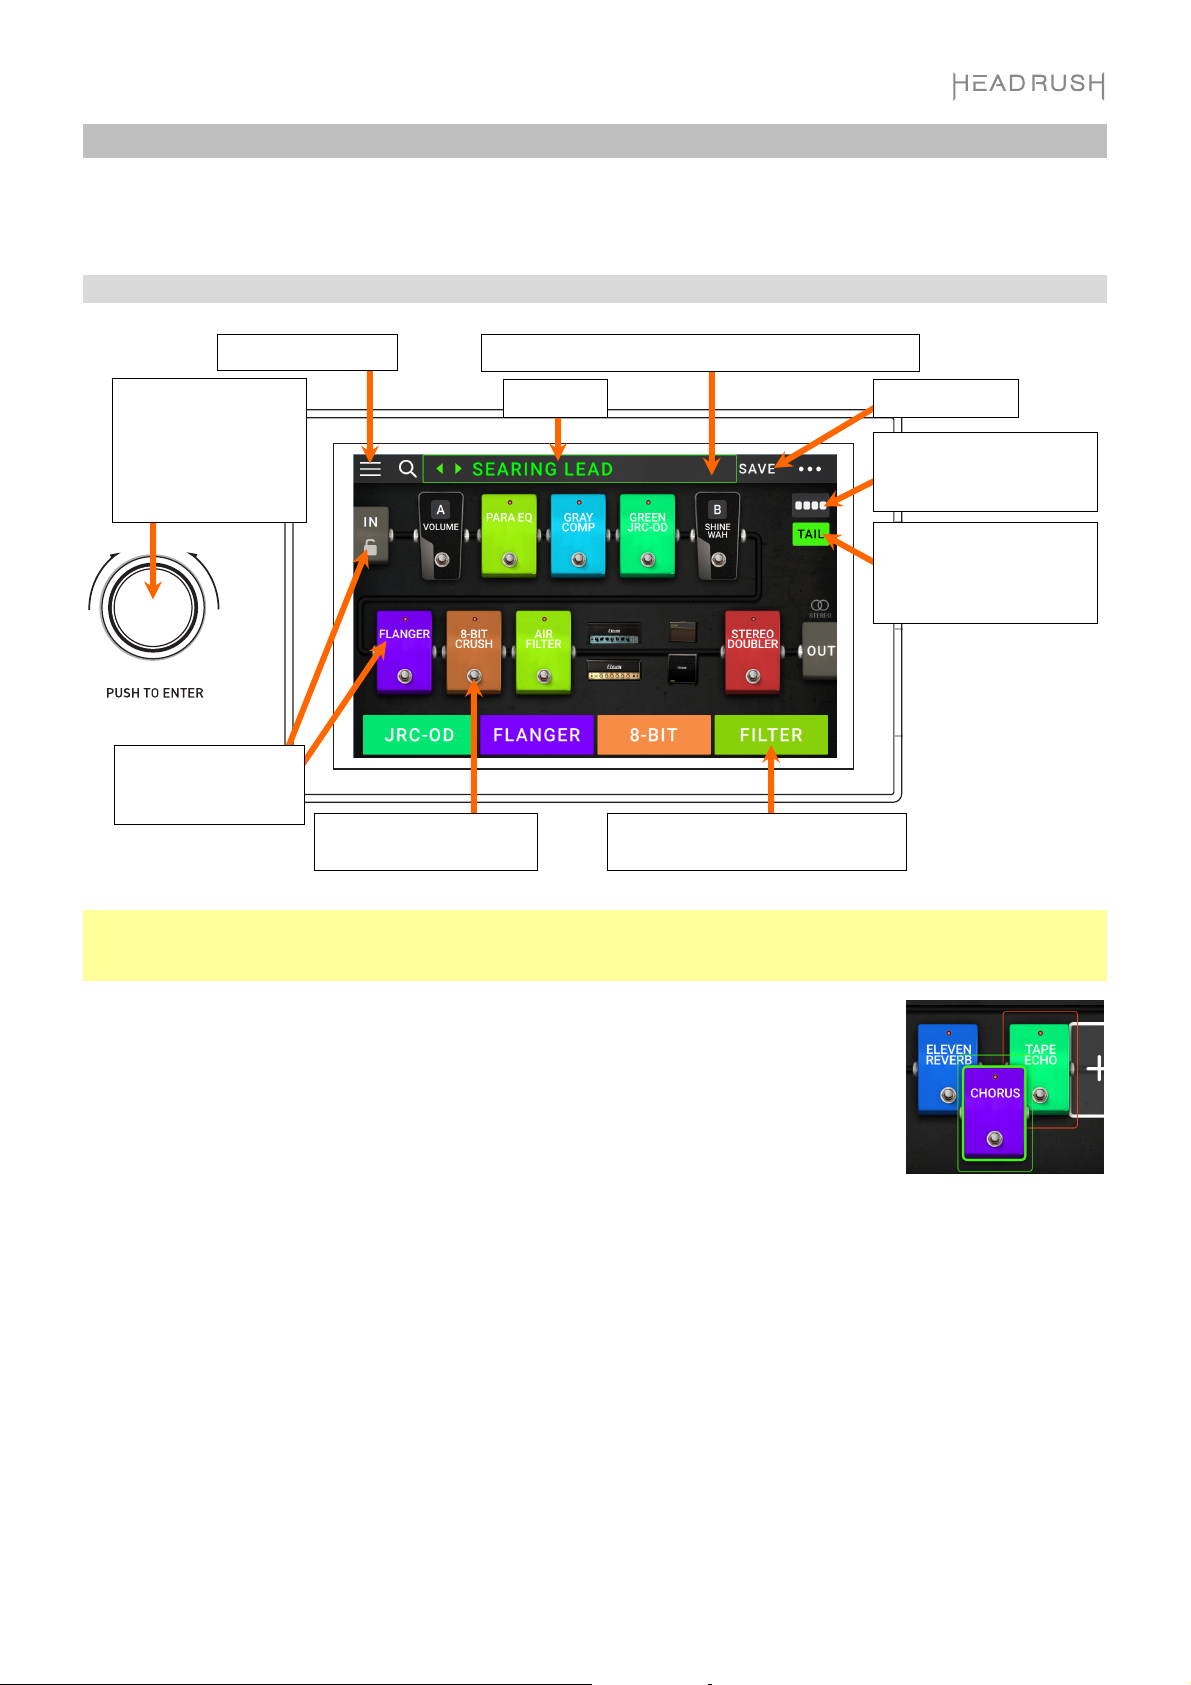
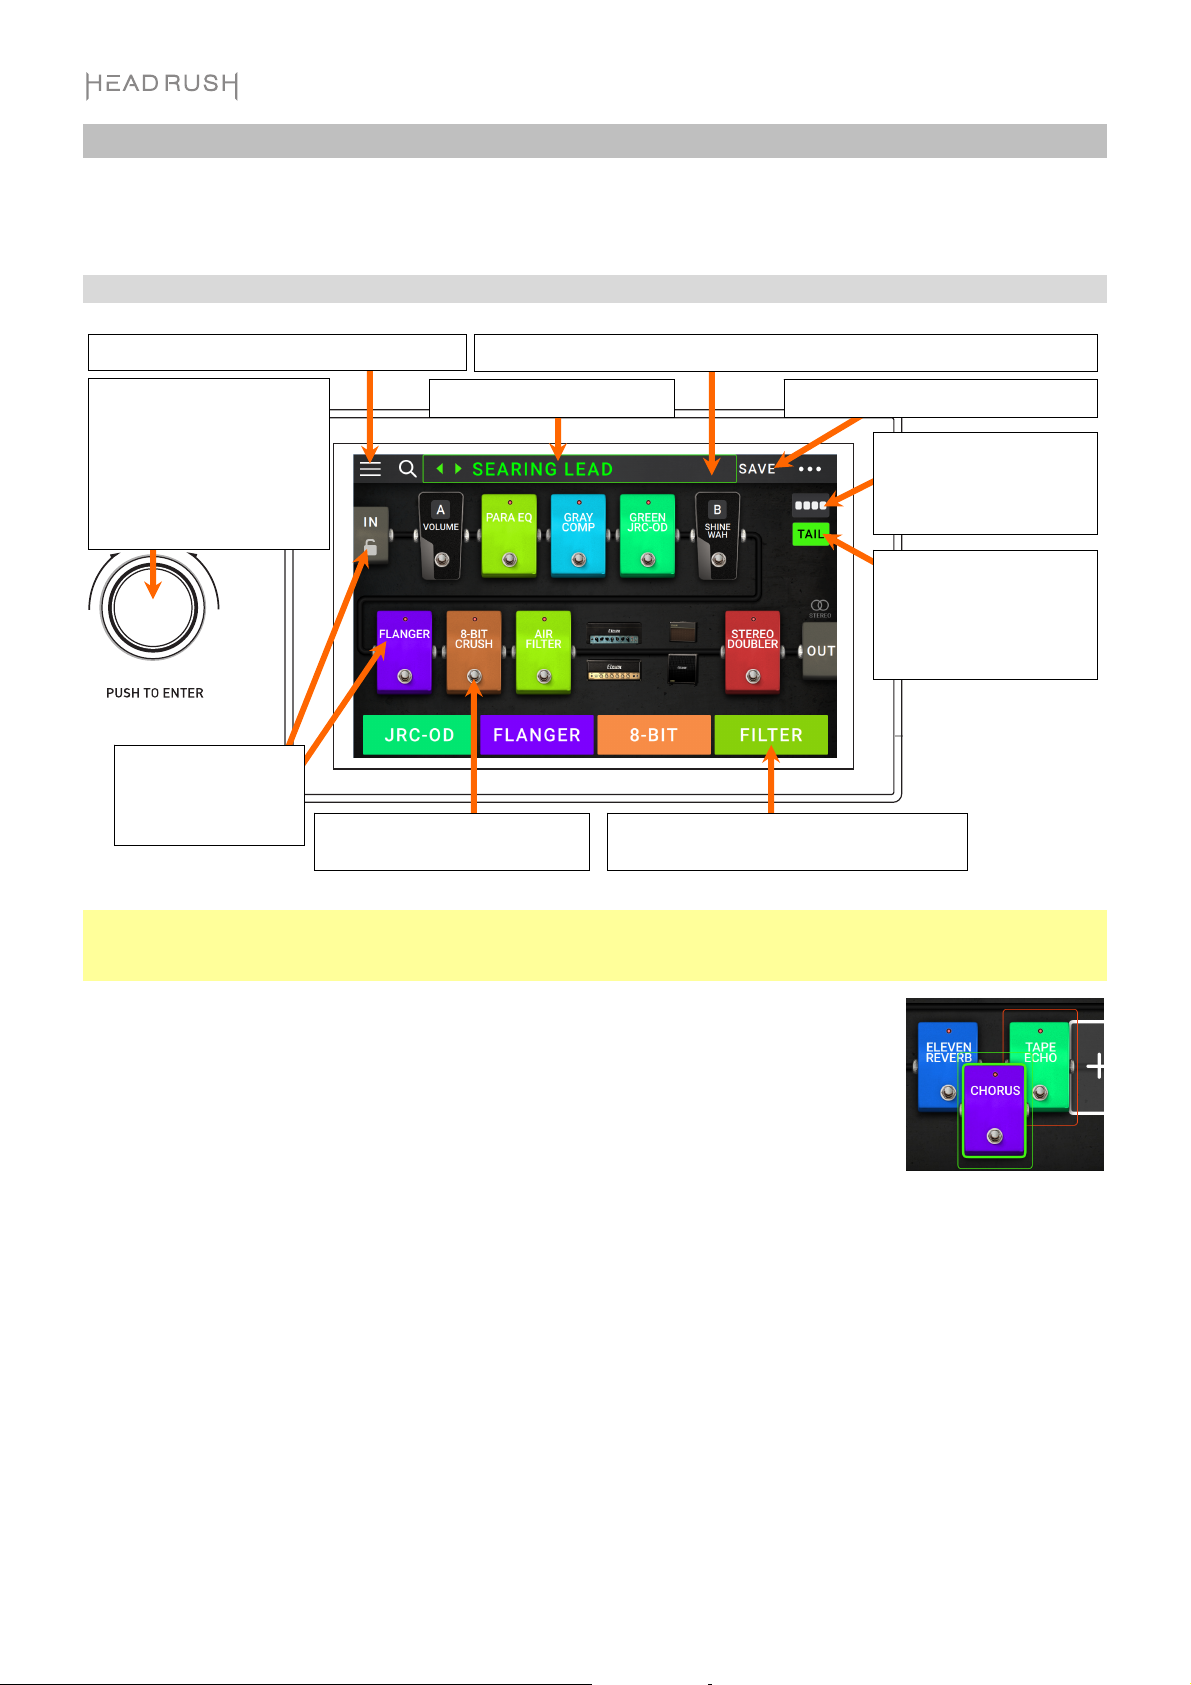
Main Screen
Turn encoder to move
through selectable
items onscreen or to
adjust parameters.
Press encoder as an
Enter command.
Double-tap a model,
In, or Out to show its
parameters.
Important: The sequence of models in your signal chain is not necessarily reflected in the footswitches. You can
freely assign models to available footswitches without changing your signal chain at all—and vice versa. See
Hardware Assign to learn about this.
Tap to view setlists.
Tap its footswitch to
activate or deactivate it.
Tap and drag this bar downward to view list of rigs.
Rig name.
These four blocks show the current
function of the 4 footswitches.
Tap to save rig.
This button toggles
between the different
routing options for a rig.
This button enables or
disables reverb and delay
tails when switching to
another rig.
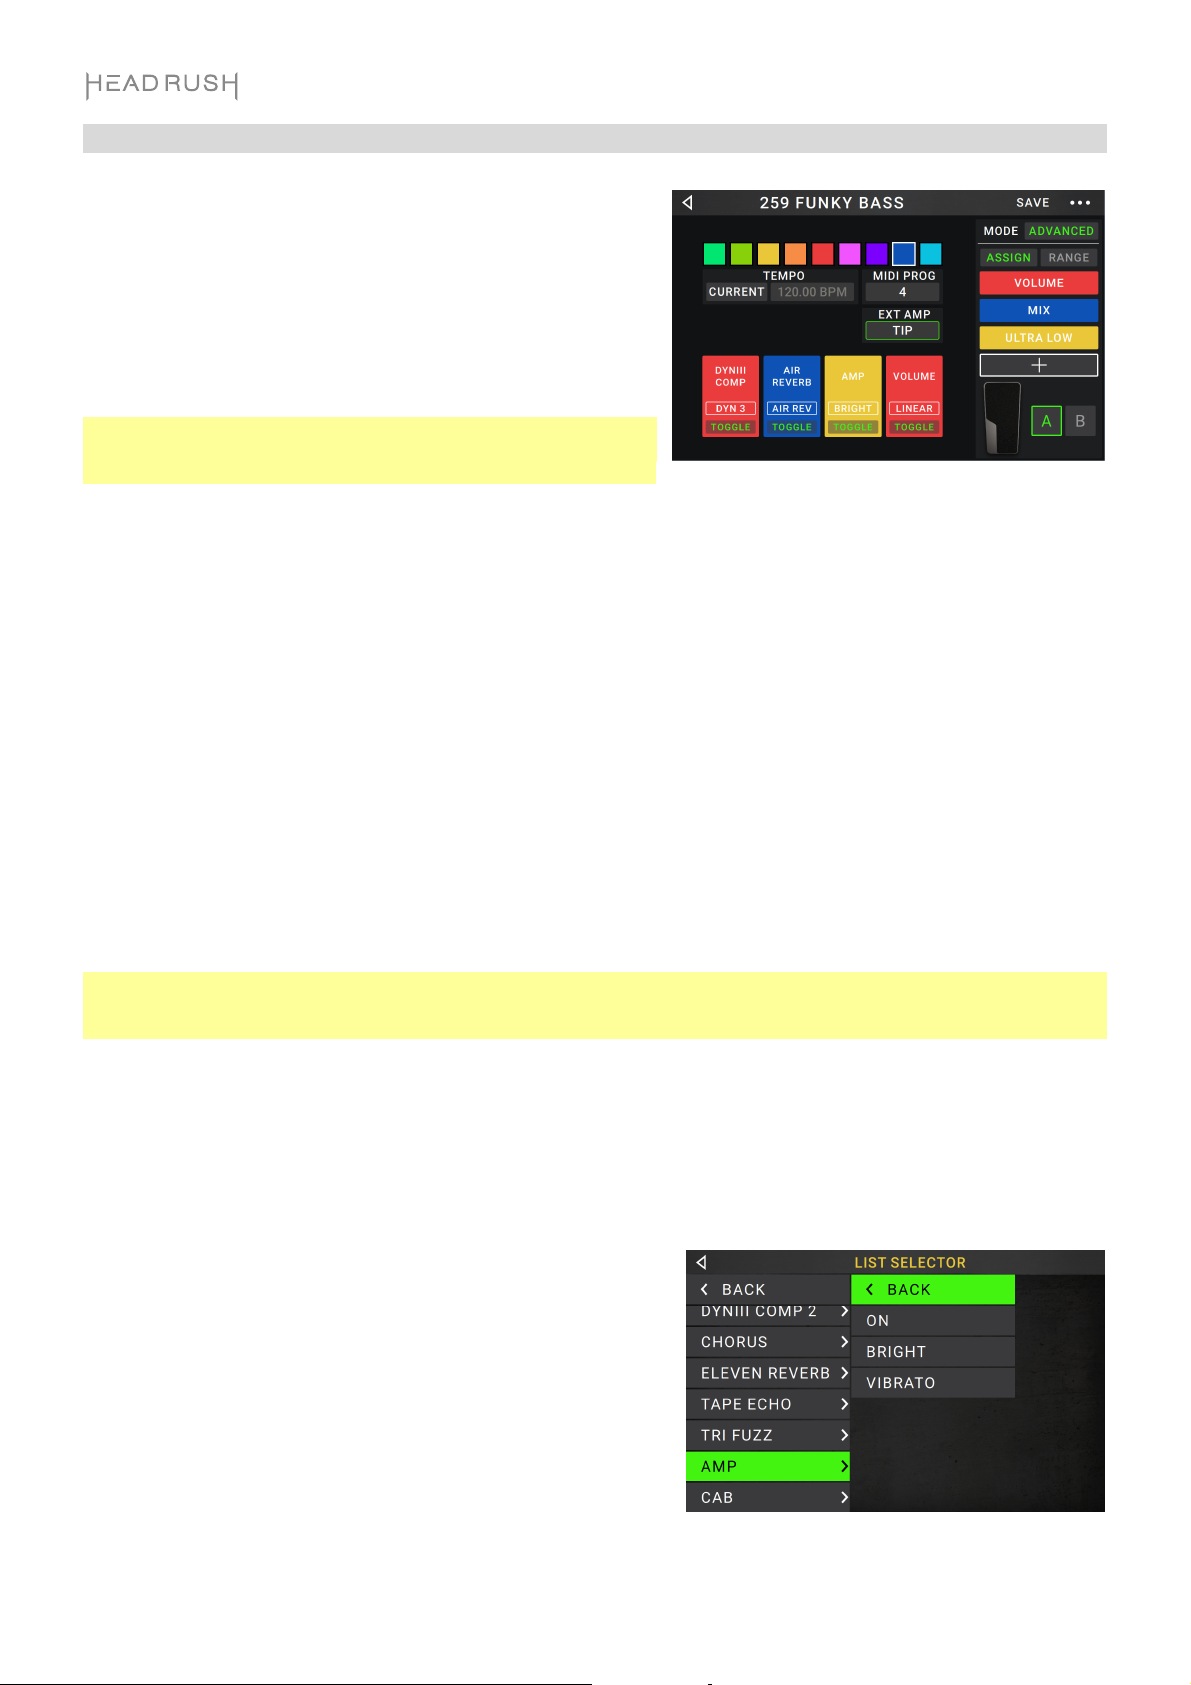
To assign a model (amp, cab, or effect) to an empty slot, tap it () and then use the list
that appears. See Rigs > Creating a Rig to learn about this.
To show a model’s settings screen, double-tap it. Its settings screen will appear with
its preset menu, parameters, and assigned color.
To activate or deactivate a model, press the footswitch assigned to it, or tap the
model’s footswitch in the display.
To load another rig (preset):
• Tap the or next to the name of the current rig on the screen.
• Tap the name of the rig on the screen and then turn the encoder.
• Press a footswitch assigned to a preset when Gigboard is in Rig View.
• Press a footswitch assigned to Prev Rig or Next Rig when Gigboard is in Hybrid
View.
To view other options, tap the button in the upper-right corner, and then tap an option.
To rearrange the
models in your signal
chain, tap and drag a
model to another slot
or between two other
models (the ones after
that position will shift
one slot further down
the signal chain).
7
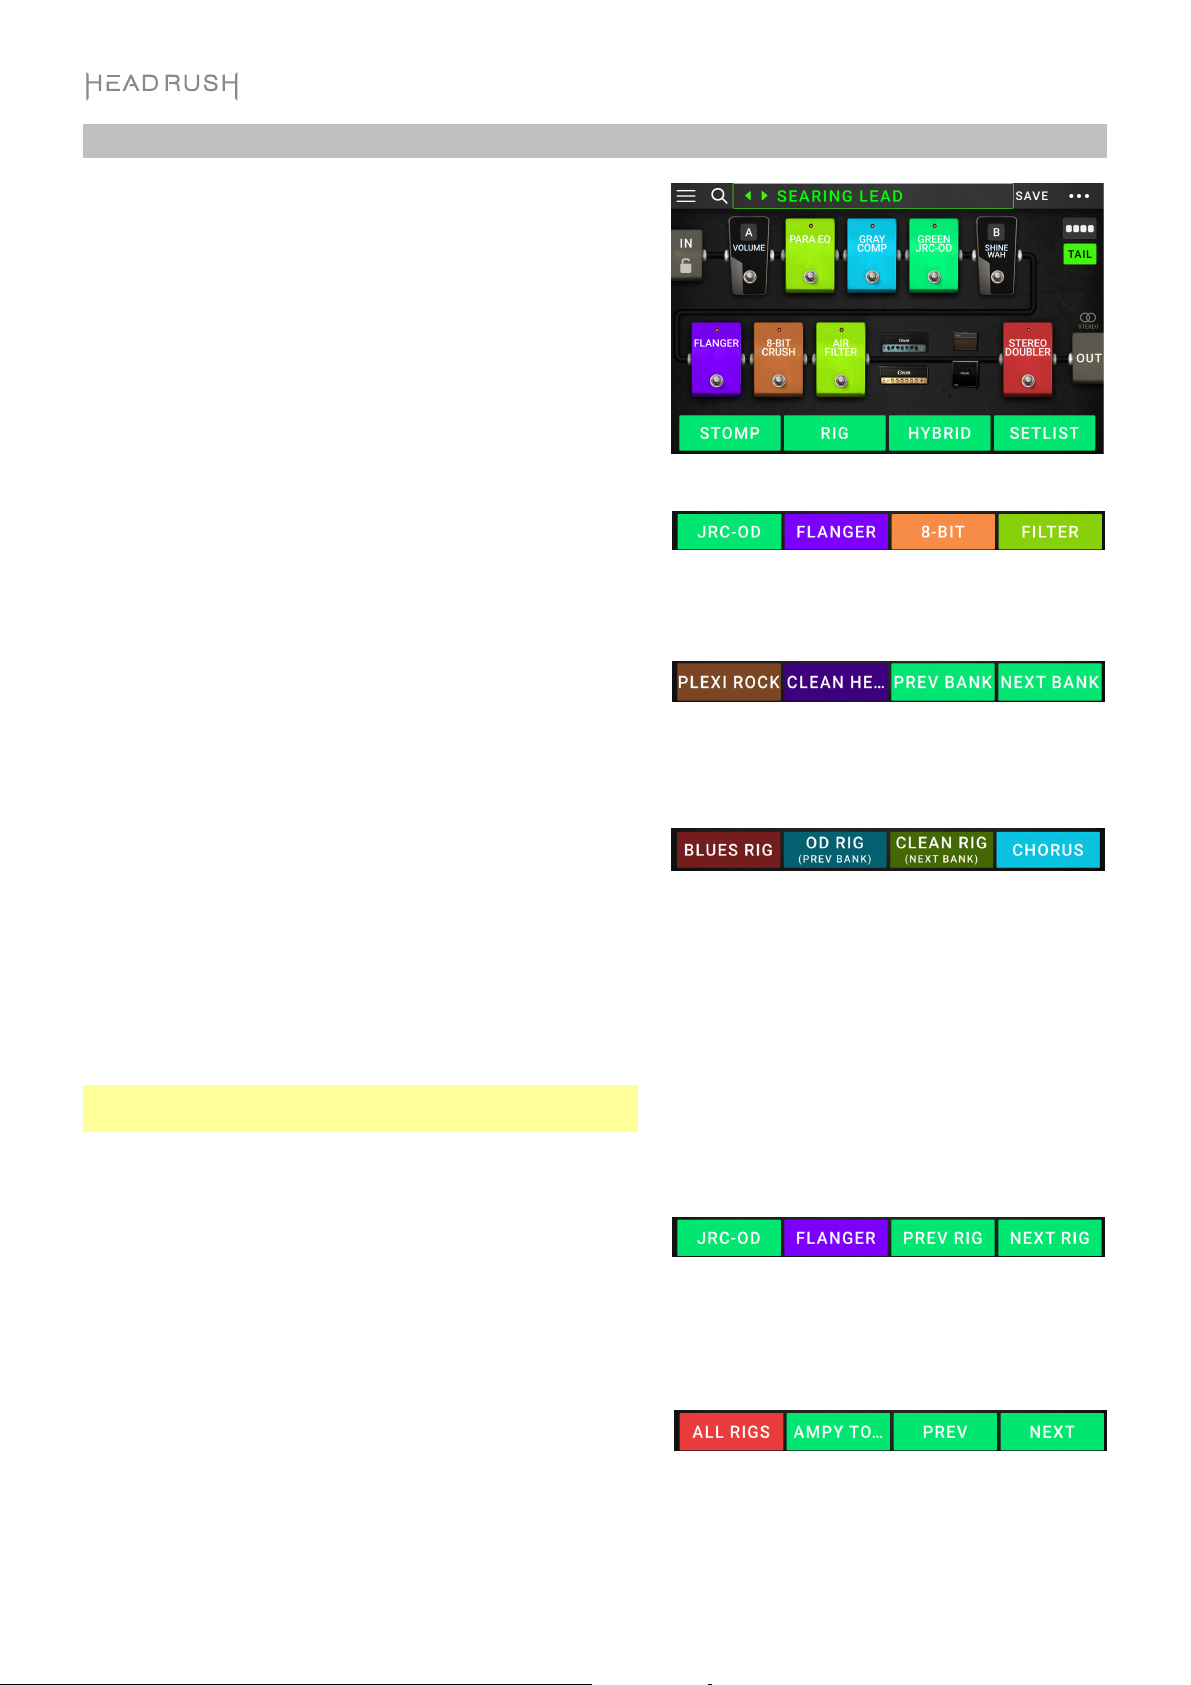
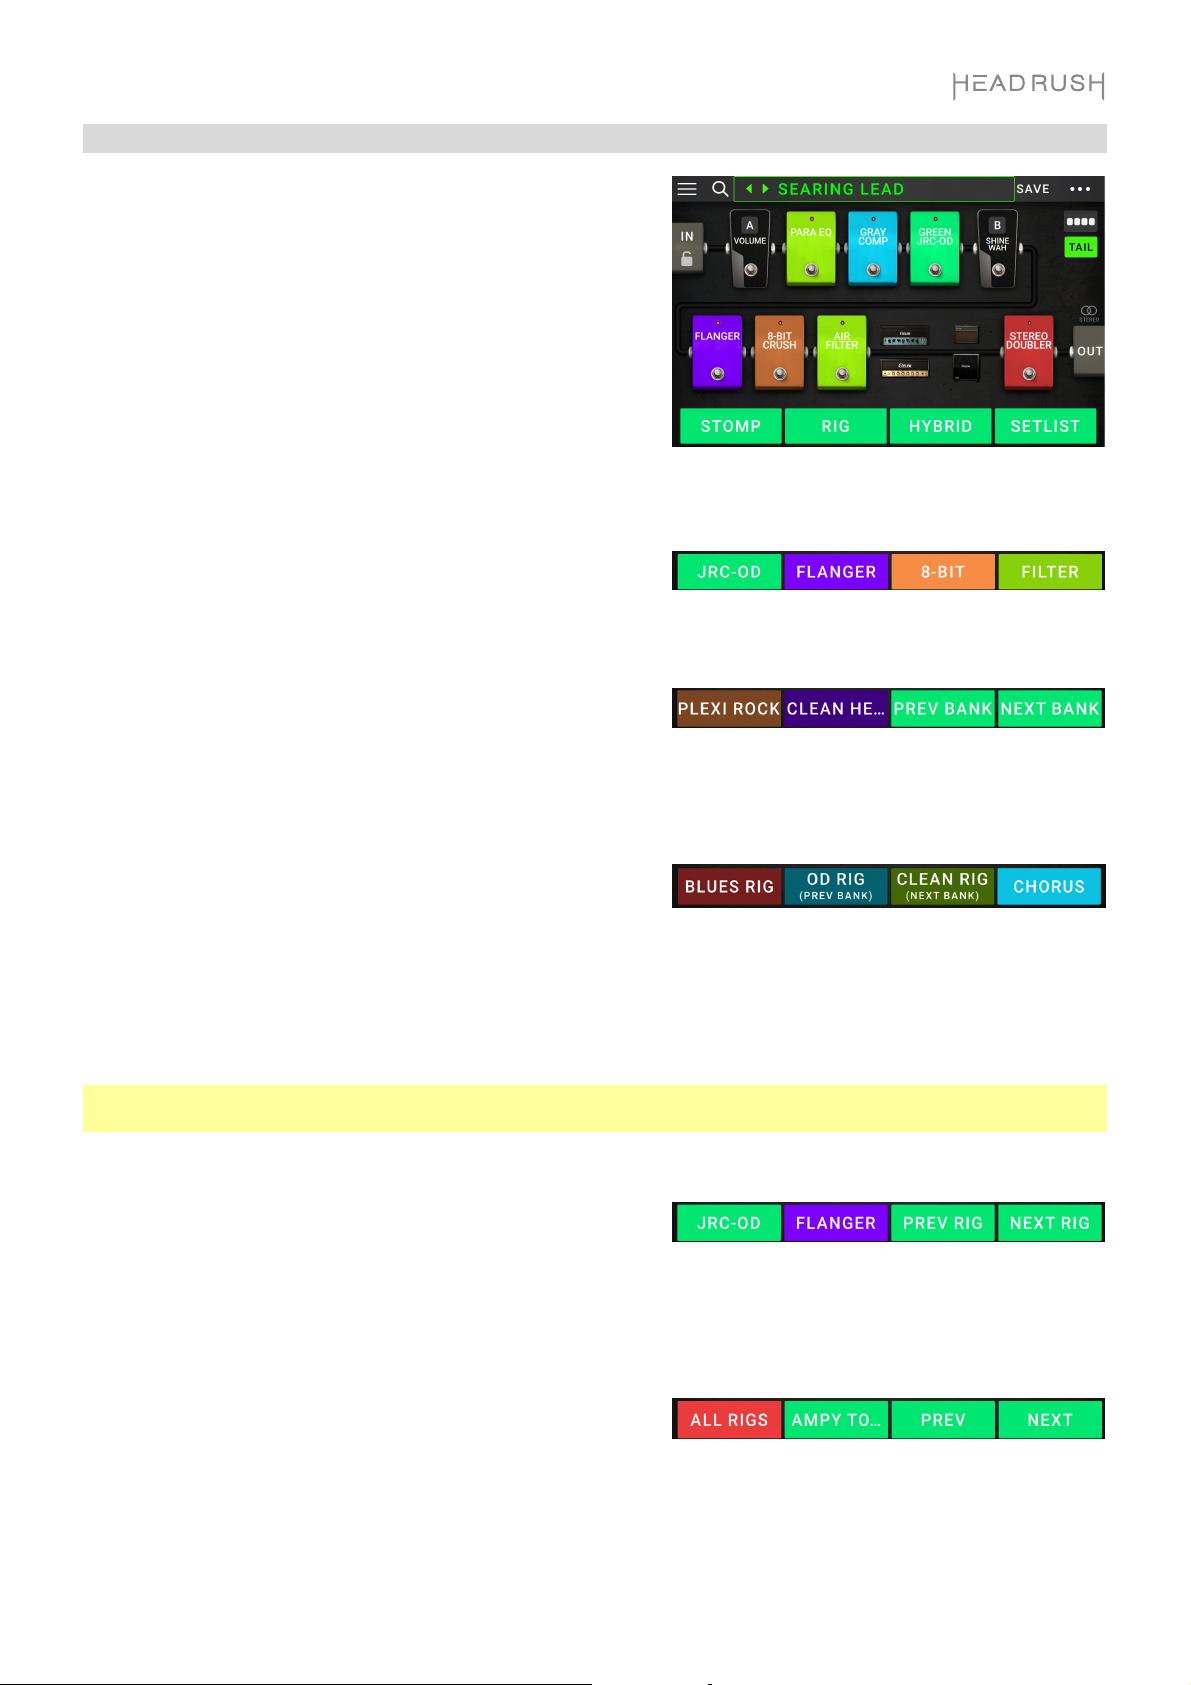
Footswitch Modes
The four footswitches can be used to activate or bypass
models (amps, cabs, or effects) as well as select scenes,
rigs, or setlists. These footswitches are always in one of four
modes: Stomp, Rig, Hybrid, or Setlist.
To change the mode:
1. Press and hold Footswitch 1. Then select from the four
footswitches which correspond to the four modes:
Stomp, Rig, Hybrid, and Setlist.
2. Press a footswitch to enter that mode.
Stomp Mode
Footswitches 1-4 correspond to models (amps, cabs, or
effects) in your signal chain. Press a footswitch to activate or
deactivate its model.
Rig Mode
The first 2 footswitches correspond to rigs you have saved.
Press a footswitch to load its rig.
To show the previous bank of two rigs, press footswitch 3.
To show the next bank of two rigs, press footswitch 4.
Alternate Rig Mode
To enter the alternate version of Rig Mode, go to page 2
of the Global Settings, and then change the 4 Rigs / No Hold
parameter to On.
Footswitches 1-4 correspond to rigs you have saved. Press a
footswitch to load its rig.
To show the previous bank of four rigs, press and hold
footswitch 2.
To show the next bank of four rigs, press and hold
footswitch 3.
Note: You cannot access hands-free mode or the looper
when using the alternate rig mode.
Hybrid Mode
The first 2 footswitches can be assigned to activate/deactivate
a model or to select a scene in the currently selected rig.
To switch to the previous rig, press footswitch 3.
To switch to the next rig, press footswitch 4.
Setlist Mode
To enter the All Rigs setlist, press footswitch 1.
To enter the currently shown setlist, press footswitch 2.
To show the previous setlist, press footswitch 3.
To show the next setlist, press footswitch 4.
8
A
A
Rigs
While using HeadRush Gigboard, a rig is a preset: the combination of assigned models—the amps, cabs, and
effects—and the parameter settings of each of them. You can create, edit, save, and load rigs, making it easy to
recall the perfect sound for each part of your performance.
Each rig has 11 slots, each of which can have one model (amp, cab, or effect) assigned to it. Assigned slots will
show graphical representations of the models, and empty slots will show a symbol.
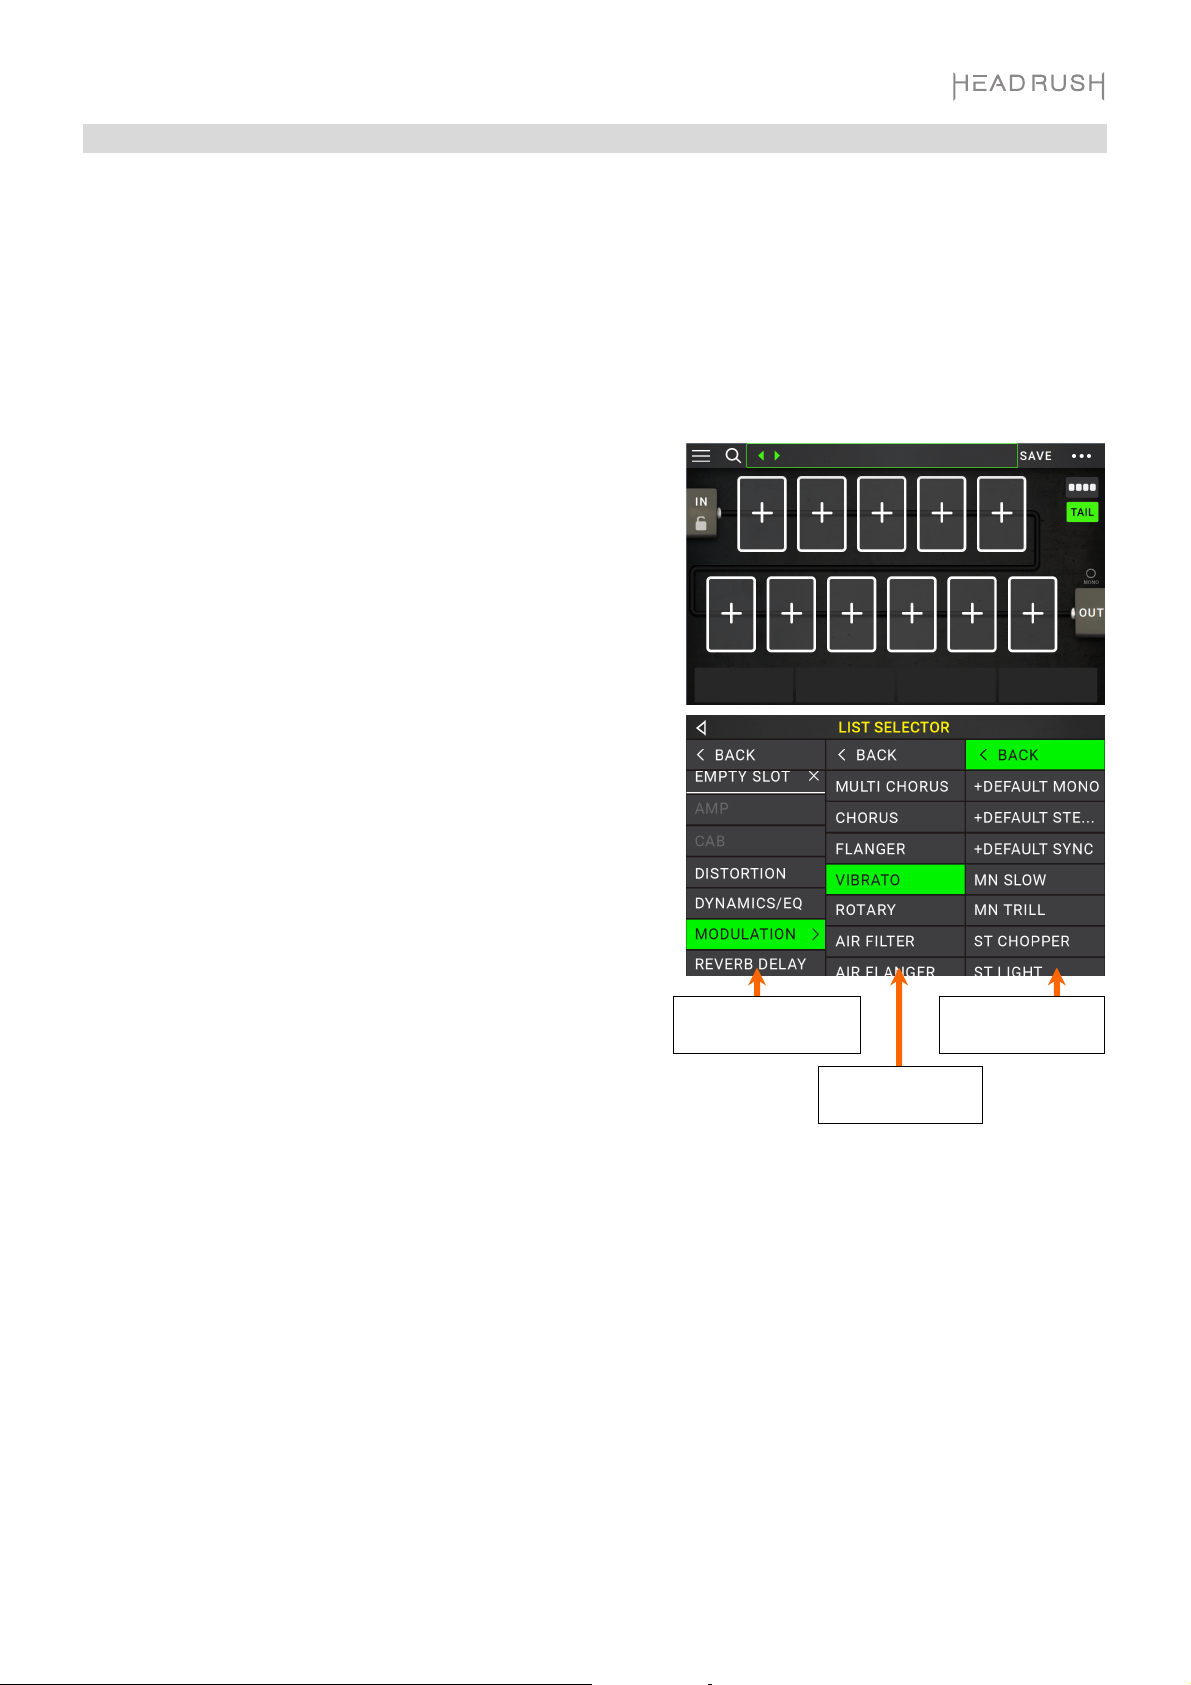
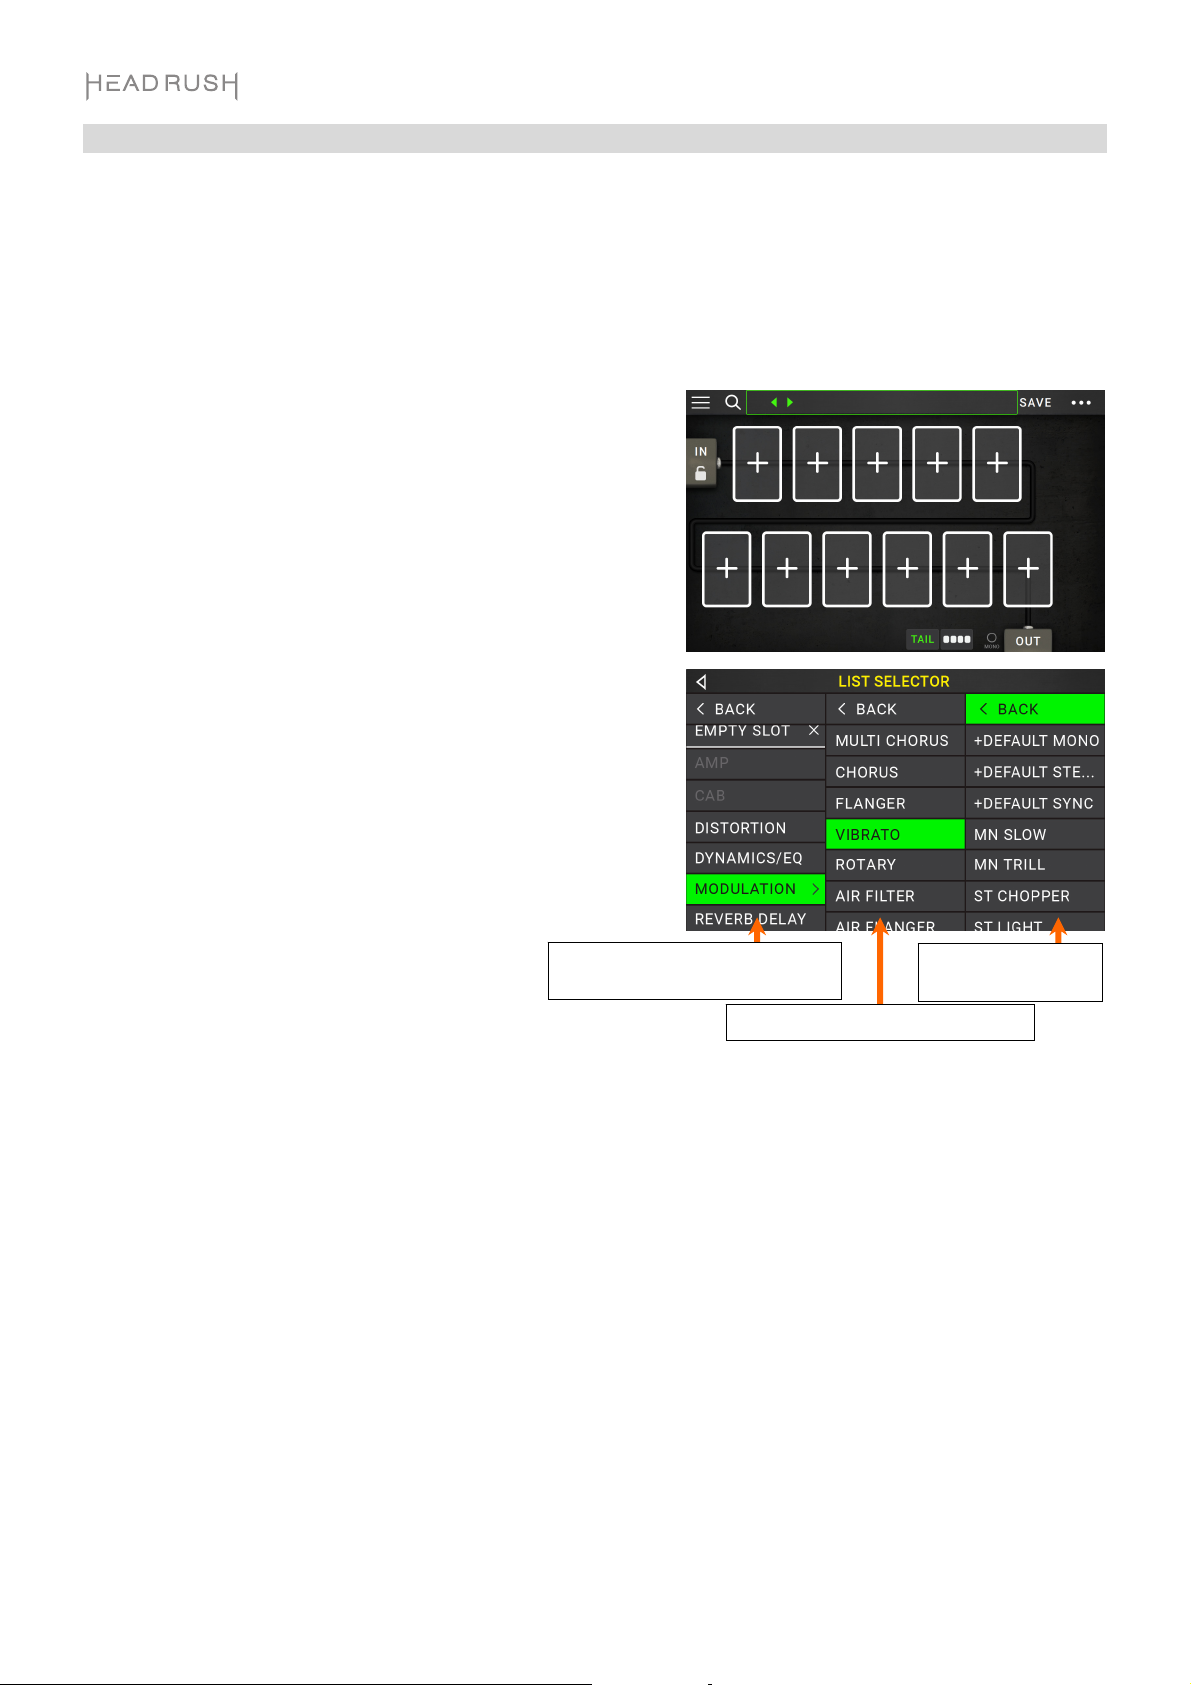
Creating a New Rig
To create a new rig, tap the button in the upper-right
corner of the screen, and tap New Rig.
To assign a model (amp, cab, or effect) to an empty slot:
1. Tap the empty slot ().
2. In the list that appears, tap the type of model you want to
assign: Amp, Cab, or effect (Distortion, Dynamics/EQ,
Modulation, Reverb/Delay, FX-Loop, or Expression).
3. In the list that appears, tap the model you want to assign.
4. In the next list that appears, tap the preset you want to load
for that model.
If you load an amp or cab to a slot with an empty adjacent slot, a
matching amp or cab will be loaded automatically to the other
slot. After that, you can configure them independently: you can
separate them in the signal chain, you can change the type of the
amp or cab, and you can delete each model separately.
Optimizing Your Signal Chain
Model types: amps,
cabs & effects.
for each type.
vailable presets
for each model.
vailable models
The signal chain is the path that the audio signal follows from your guitar through your selected models and ends
at the outputs of HeadRush Gigboard. You can use the touchscreen to arrange your selected models in any
sequence, but you may find that some configurations will sound better than others.
Here are some common model placement suggestions for creating tones with HeadRush Gigboard:
• Dynamics (e.g., compressors), filters (e.g., wah, pitch shifters), and volume pedals generally are placed
at the beginning of the signal chain. Alternatively, you can place volume pedals at the end of the signal
chain to provide a slight variance in functionality.
• Gain-based effects (e.g., overdrive/distortion, fuzz) usually come next.
• Equalization (EQ) is often used to shape the tonal characteristics of overdrive/distortion and fuzz effects, so
put an EQ after them. Alternatively, place it before them to shape the guitar’s general tone—cutting
unwanted frequencies—before the gain pedals.
• Modulation effects like flangers, phasers, and chorus are typically placed next.
• Time-based effects like delays and reverbs are generally placed near the end of the signal chain.
• An amp and a cab are often placed at the very end of the signal chain, although you can place it wherever
you want.
9
oots
ode
r
Saving a Rig
If you have changed the rig at all since loading it, you will see an asterisk () next to its name at the top of the
screen. You can save these changes to this rig, save these changes as another rig, or discard them altogether.
To save a rig, tap Save in the upper-right corner.
To save your changes to the current rig, tap Save.
To save your changes as a new rig, tap Save New Rig, use the
keyboard that appears to enter a name, and then tap Save.
To return to the previous screen without saving, tap Cancel at
any time.
To discard any changes you’ve made to the rig, tap the button in the upper-right corner, and tap Discard
Changes.
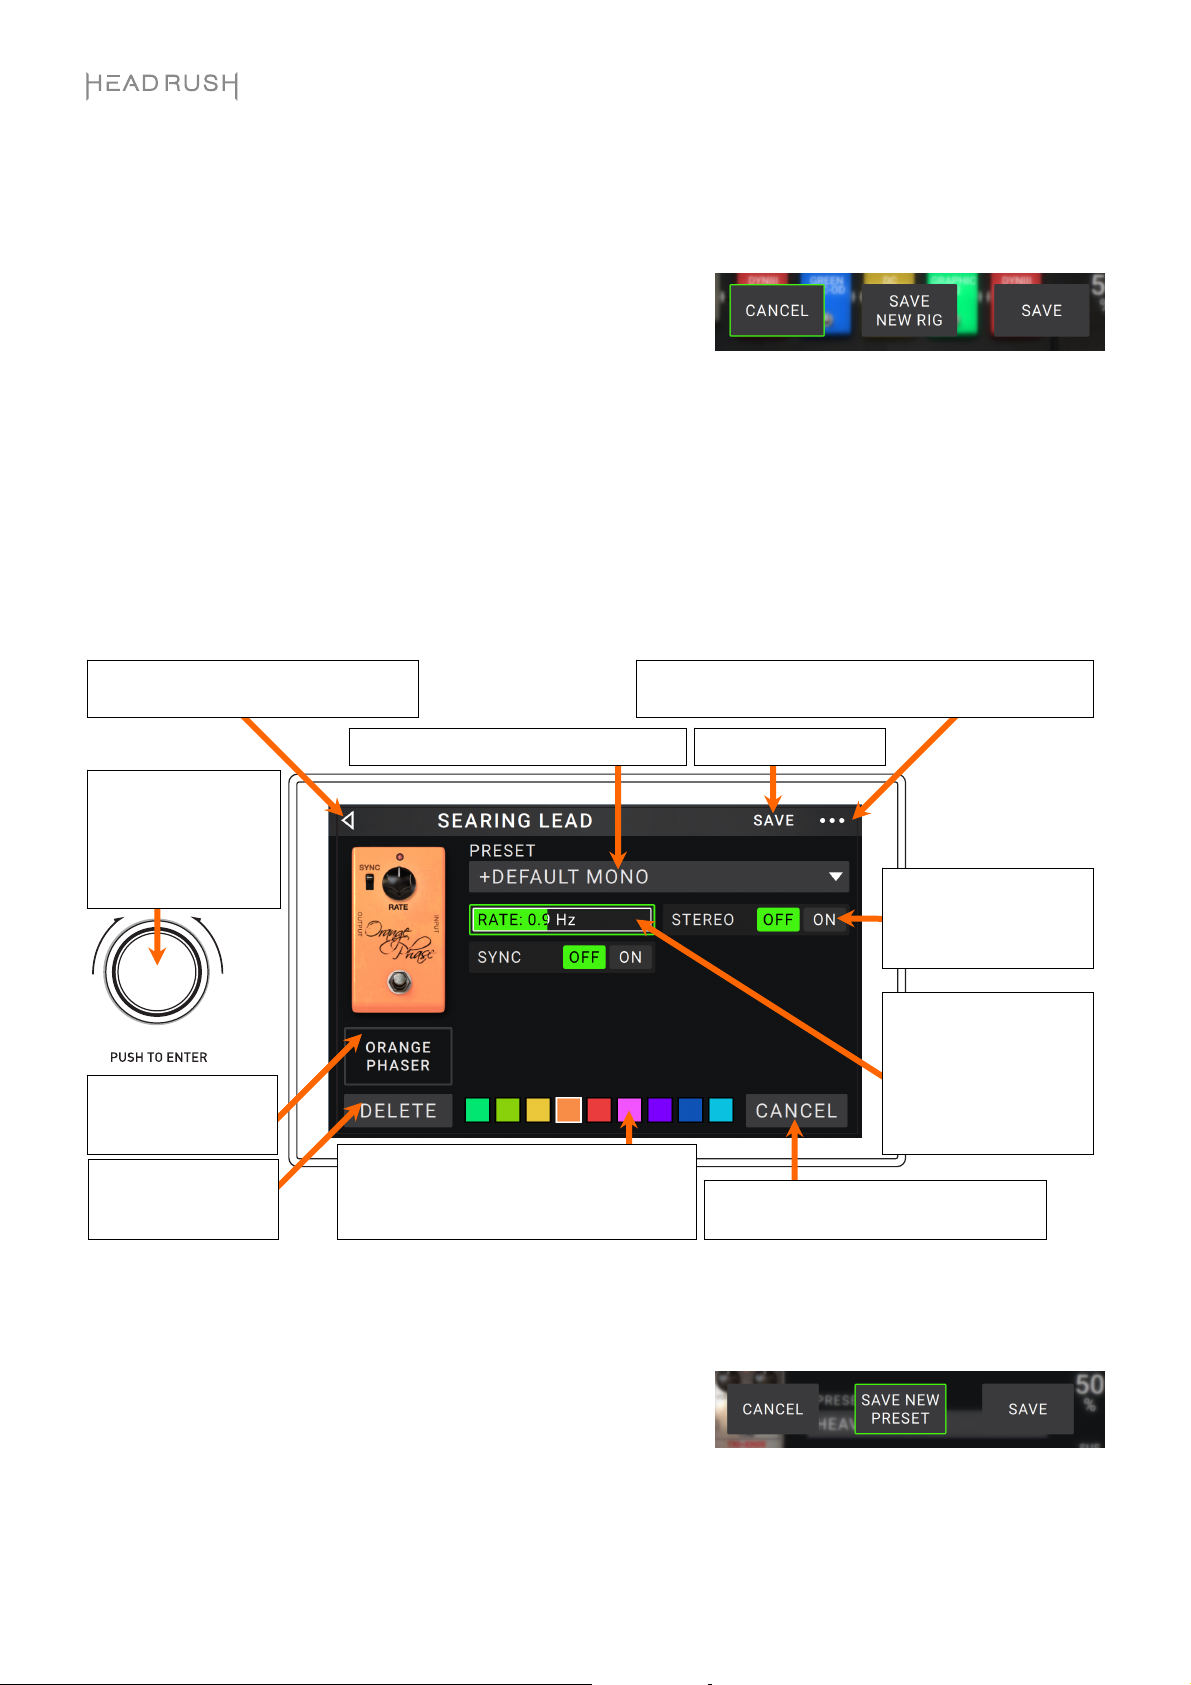
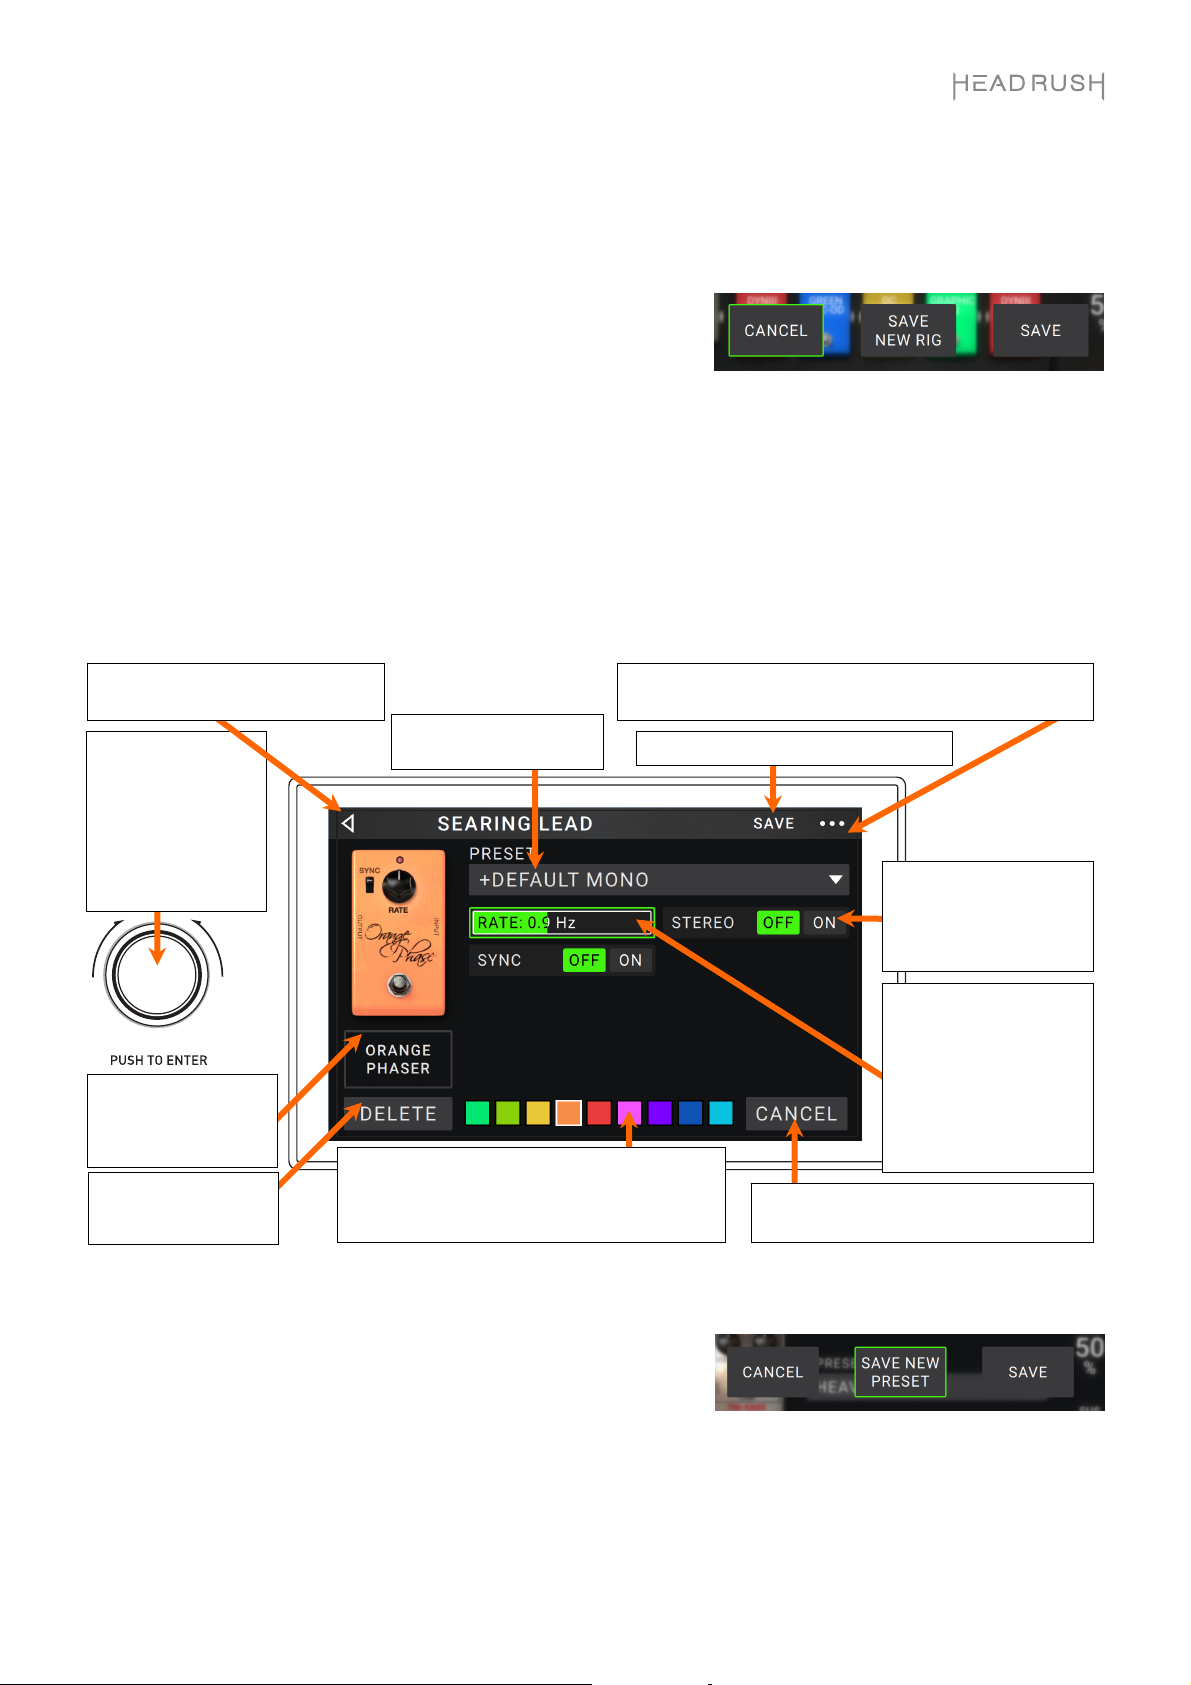
Adjusting Settings
To adjust the settings of a model in your rig, double-tap it to open its settings screen.
Tap to return to retain your changes
and return to the main screen.
Turn encoder to move
through selectable
items onscreen or to
adjust parameters.
Press encoder as an
command.
Ente
Tap the Preset menu to select a preset. See Saving a Preset.
Tap this button and tap Discard Changes to discard
any changes you’ve made since opening this screen.
Tap an Off/On
parameter button to
change the parameter's
setting accordingly.
Tap the model name
to assign a different
model to this slot.
Tap Delete to
unassign the model
from the slot.
Tap a color to assign it to this model. That
color will be shown on the main screen, in
the Hardware Assign screen, and in the
witch indicator for this m
f
l.
Tap Cancel to return to discard your
changes and return to the main screen.
Tap and drag a slider
left and right to adjust
the parameter's
settings. Alternatively,
tap the slider and use
the encoder for fine
adjustments.
Saving a Preset
To save a preset, tap Save in the upper-right corner.
To save your changes to the current preset, tap Save.
To save your changes as a new preset, tap Save New Preset, use
the keyboard that appears to enter a name, and then tap Save.
To return to the previous screen without saving, tap Cancel at
any time.
10
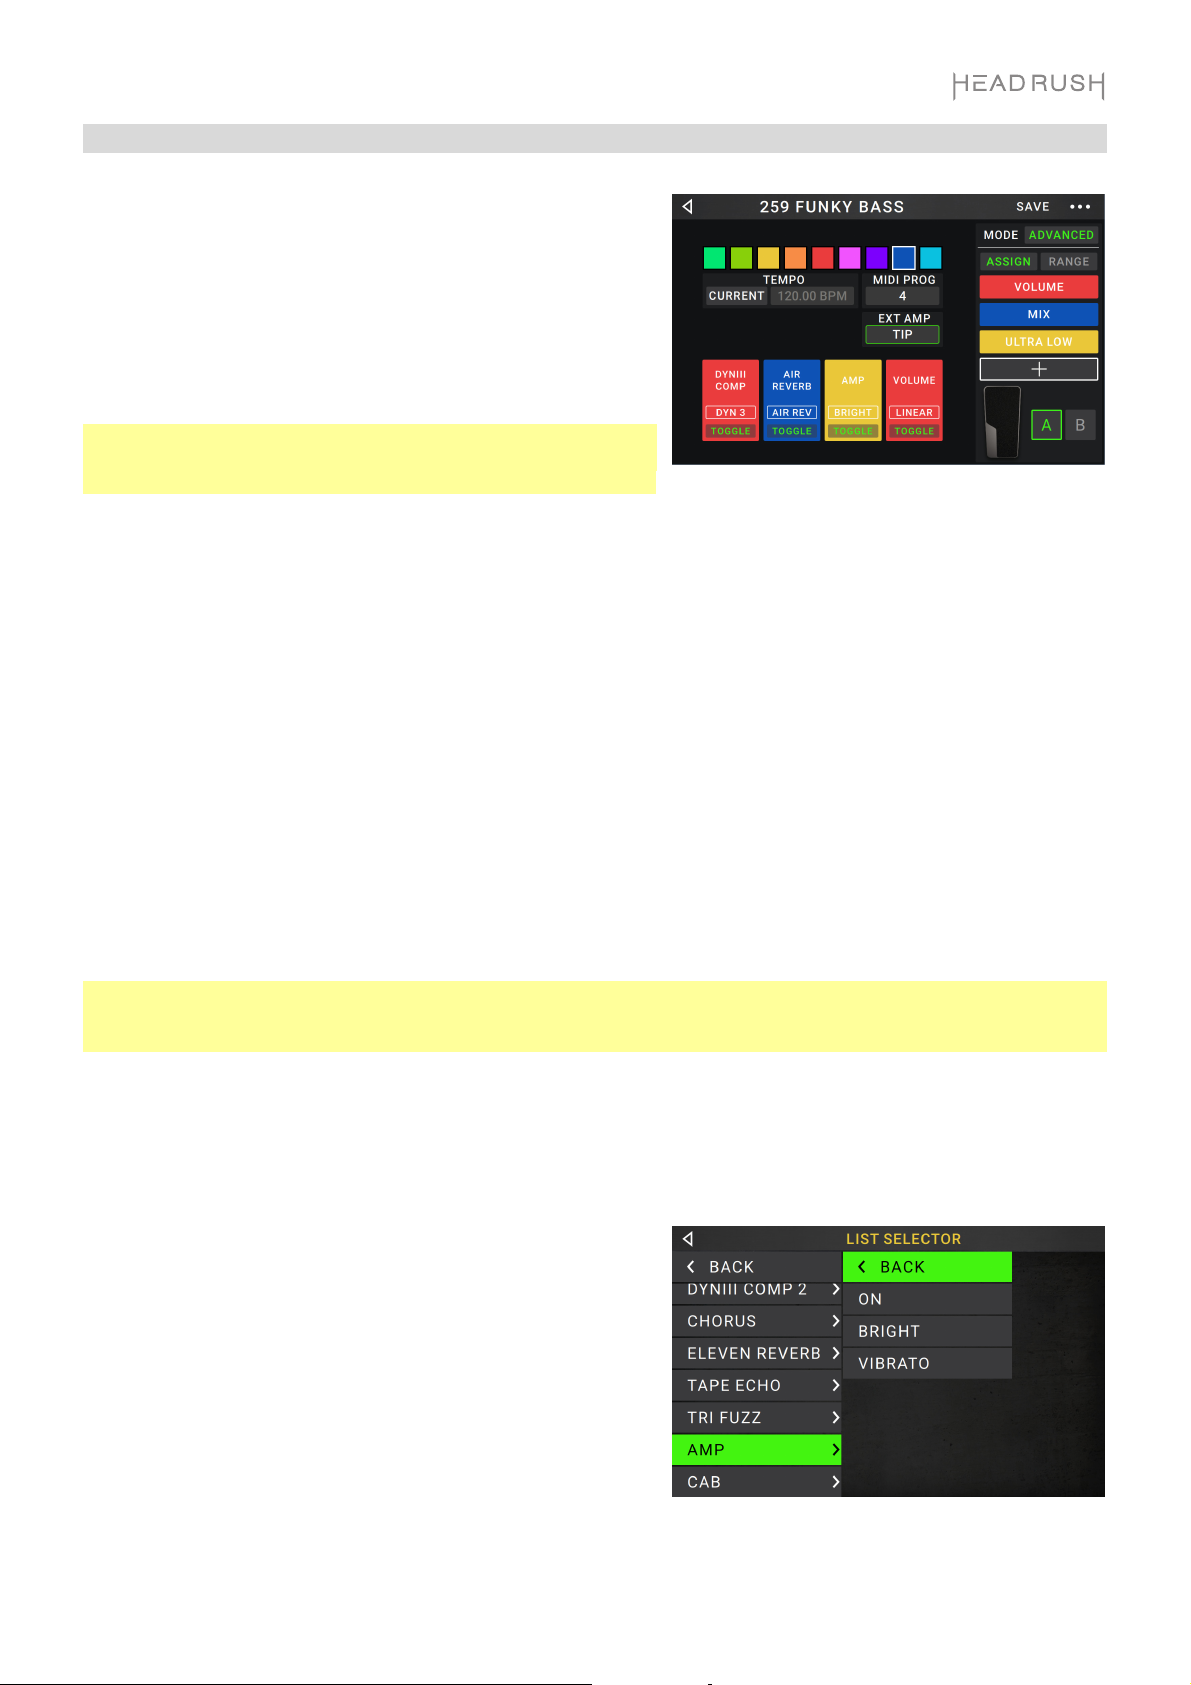
Hardware Assign
The Hardware Assign screen enables you to customize how
HeadRush Gigboard’s footswitches and an expression pedal
control each rig.
To open the Hardware Assign screen, tap the button in
the upper-right corner of the main screen, and then tap
Hardware Assign.
To return to the main screen, tap the button in the upper-
left corner.
Important: The Hardware Assign settings are all part of the
overall rig, so remember to save your changes you want to
keep.
To set the color associated with the rig, tap it in the upper-left part of the screen. This color will appear next to
the rig name when you view a list of all available rigs or when you view and create setlists. It will also be the color
of the corresponding footswitch indicator when HeadRush Gigboard is in Rig Mode.
To set the tempo of the rig’s time-based effects (delays, modulation, etc.), tap the button under Tempo to
select Current or Fixed.
• Current: The rig will use the last-used tempo or the one set by the Tempo footswitch.
To set the tempo, press the Tempo footswitch at the desired tempo 3–8 times to set the new tempo in beats
per minute (BPM).
• Fixed: The rig will use a tempo that you set here.
To set the tempo, turn the encoder to set the desired tempo in beats per minute (BPM). You can set the
tempo only in this Hardware Assign screen.
To load a rig when a MIDI program change is received from an optional external MIDI device, or to send a
MIDI program change message when a rig is loaded, tap the button under MIDI, and then turn the encoder to
select a MIDI program change number. You can adjust whether MIDI program changes are received and/or sent
in the Global Settings menu.
Note: If a rig is using a number, that number will be unavailable and cannot be assigned to another rig.
Additionally, saving a rig with a new name will save the rig but without the program change number to prevent
rigs from sharing the same number.
Footswitches
The 4 boxes in the lower-left corner represent the 4 footswitches of HeadRush Gigboard. You can assign any
switch-based parameters (ones with only two states) to any of the footswitches—regardless of their location in
the signal chain.
To assign a parameter to a footswitch:
1. Tap a box. indicates an empty box.
2. In the list that appears, tap the model with the parameter
you want to assign.
3. In the list that appears, tap the parameter you want to
assign. Usually, the parameter will simply be On (to activate
or deactivate it).
Tap Unassigned to unassign that footswitch.
To swap two assignments, tap and drag one of them over the
other, and then release it.
11
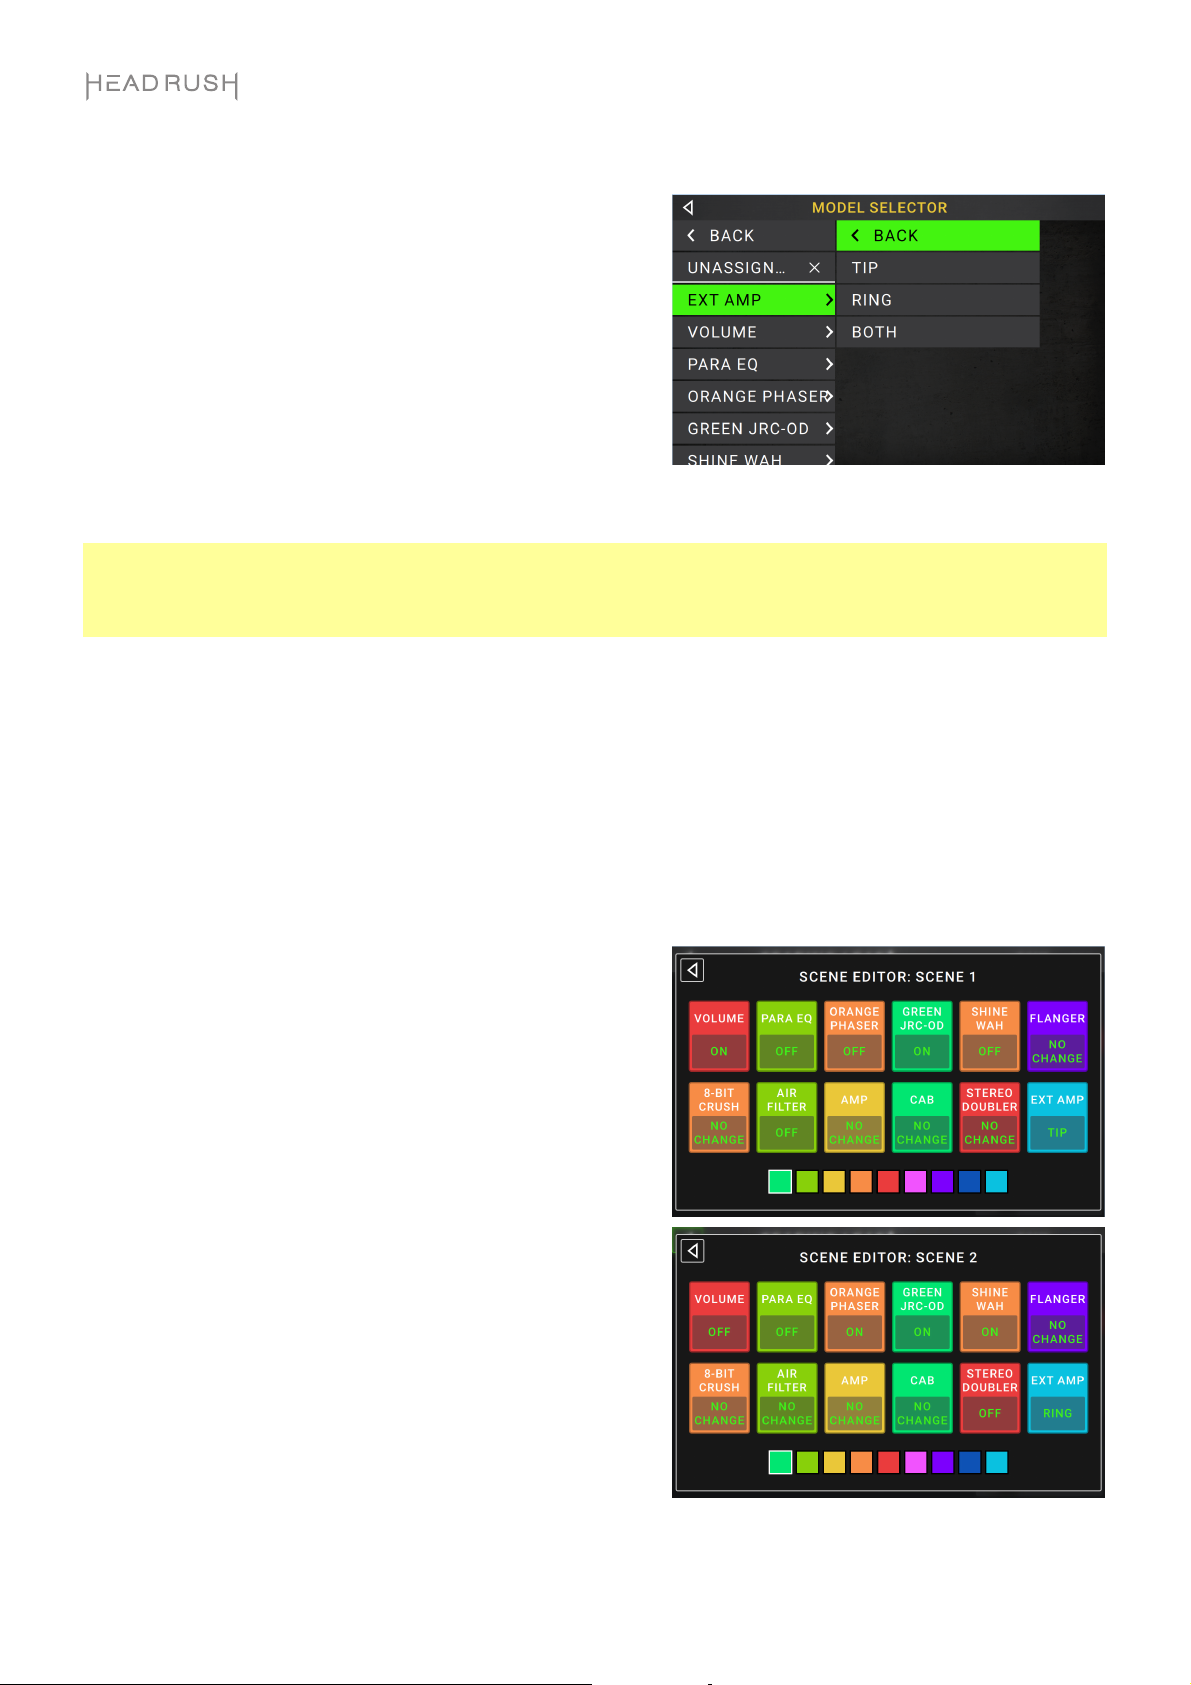
Ext. Amp
You can assign a switch to send a signal to your amplifier’s
footswitch input by using the external amp output. You can
use this feature to do things like change from the clean to dirty
channel, or turn reverb on and off on your amplifier.
To use this feature when switching to a rig, tap the button
under Ext Amp on the hardware assign page, and then select
Tip, Ring, or Both. If you are unsure of which setting to use,
please consult the amplifier's manual or manufacturer to
confirm.
This feature can also be assigned to a footswitch on the Model
Selector page that appears when you are assigning a
footswitch’s function.
This function can also be assigned to a scene by adjusting the parameter on the Scene Editor screen.
IMPORTANT! Only connect this output to amplifiers that have a "short-to-sleeve" footswitch input. If you connect
this output to any other type of footswitch input, you may cause permanent damage to your equipment. If you are
unsure if your amplifier has a “short-to-sleeve” footswitch input, please consult the amplifier’s manual or
manufacturer to confirm.
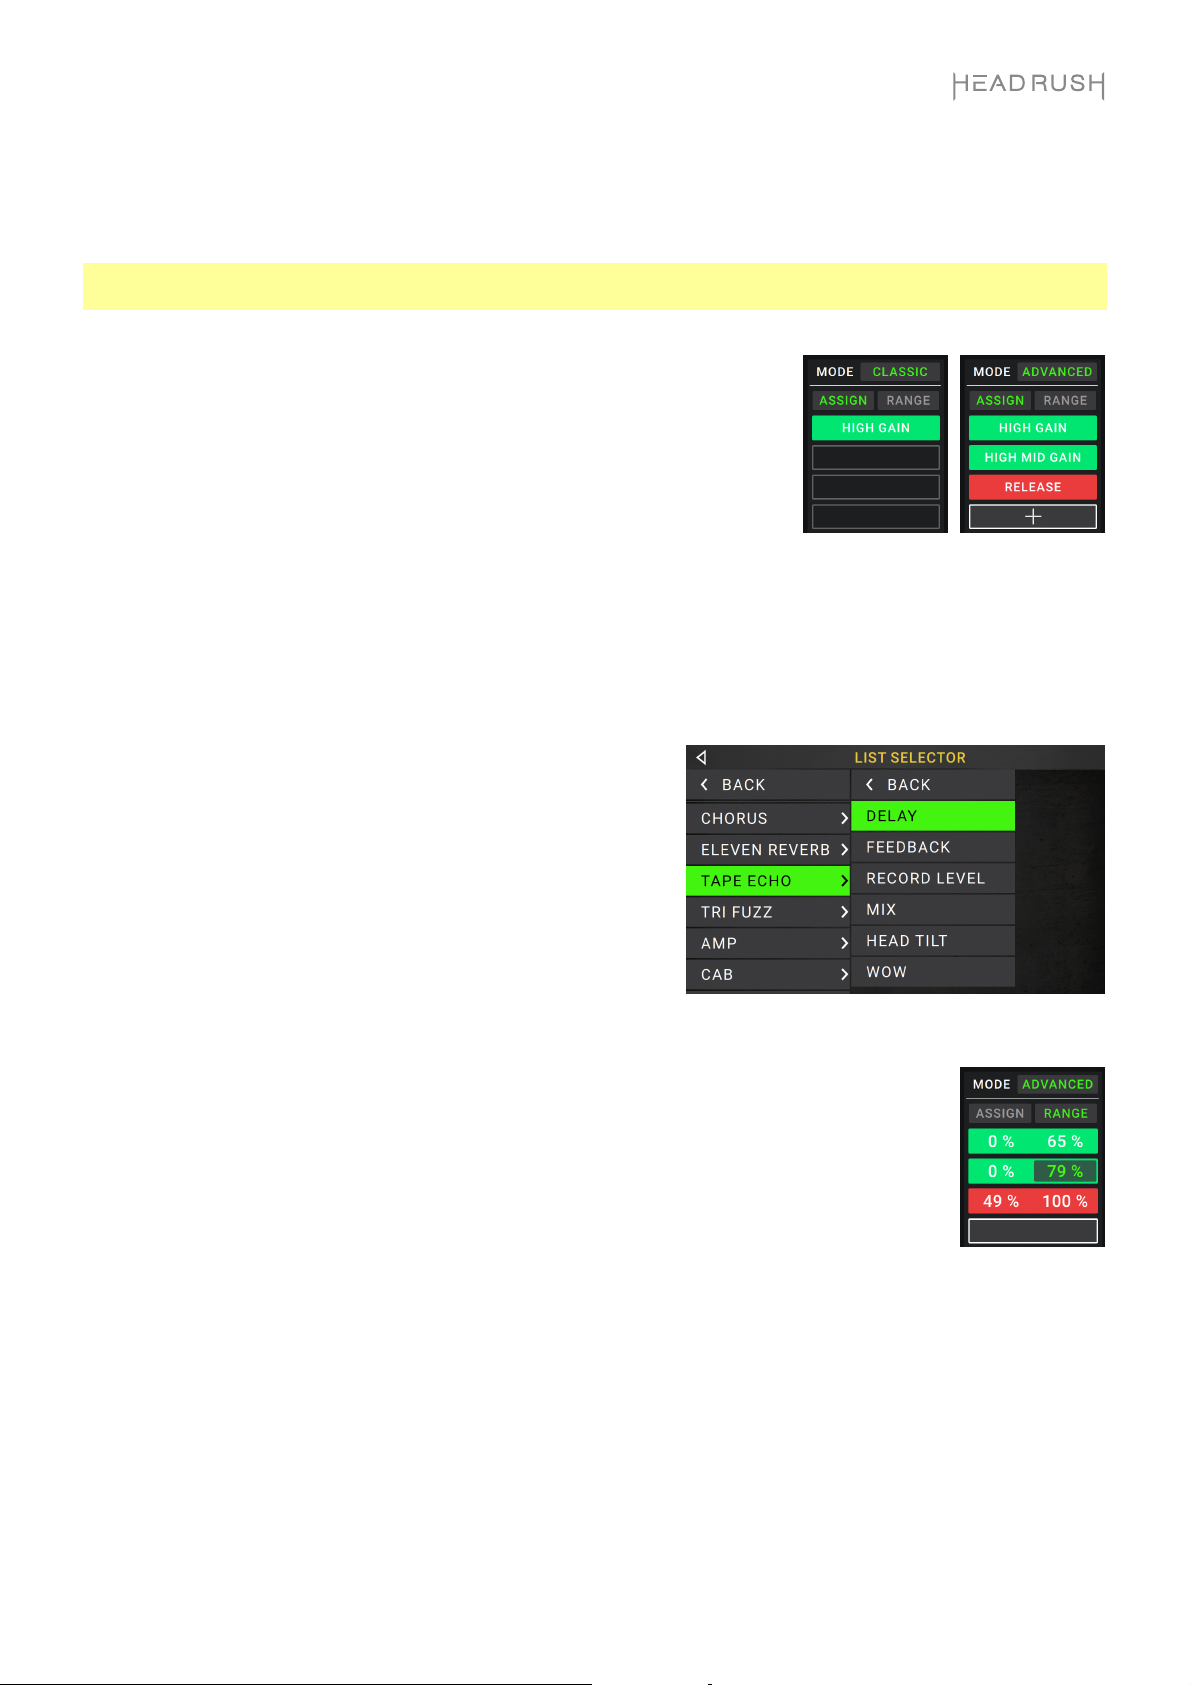
Scenes
The Scene feature allows you to turn multiple models on or off in each rig. When you press the footswitch
assigned to that scene, all models included in that scene will turn on or off, depending on how you assign them.
This is a great way to create multiple tones in the same rig. For instance, you may want a particular reverb model
to be on anytime a particular distortion model is also on. Alternatively, you may want to turn one delay model off
when you turn another one on. Scenes enable you to do this with only one footswitch press.
To create and edit a scene:
1. On the Hardware Assign screen, tap Toggle/Scene for the
desired footswitch to cycle through the available options, and
select Scene.
2. On that model, tap Edit. The Scene Editor will appear,
which shows all models in your rig.
3. For each model in the rig, tap it to cycle through the
available options:
• On: This model will turn on when you turn the scene on.
• Off: This model will turn off when you turn the scene on.
• No Change: This model will remain unaffected when
you turn the scene on.
4. Tap a color at the bottom of the touchscreen to select a
color for the scene.
5. Tap the button in the upper-left corner to return to the
Hardware Assign screen.
To rename a scene (which appears in the footswitch
indicators), tap the text in the box below Edit on the model,
use the virtual keyboard that appears to enter a name, and
then tap anywhere other than the text field.
12
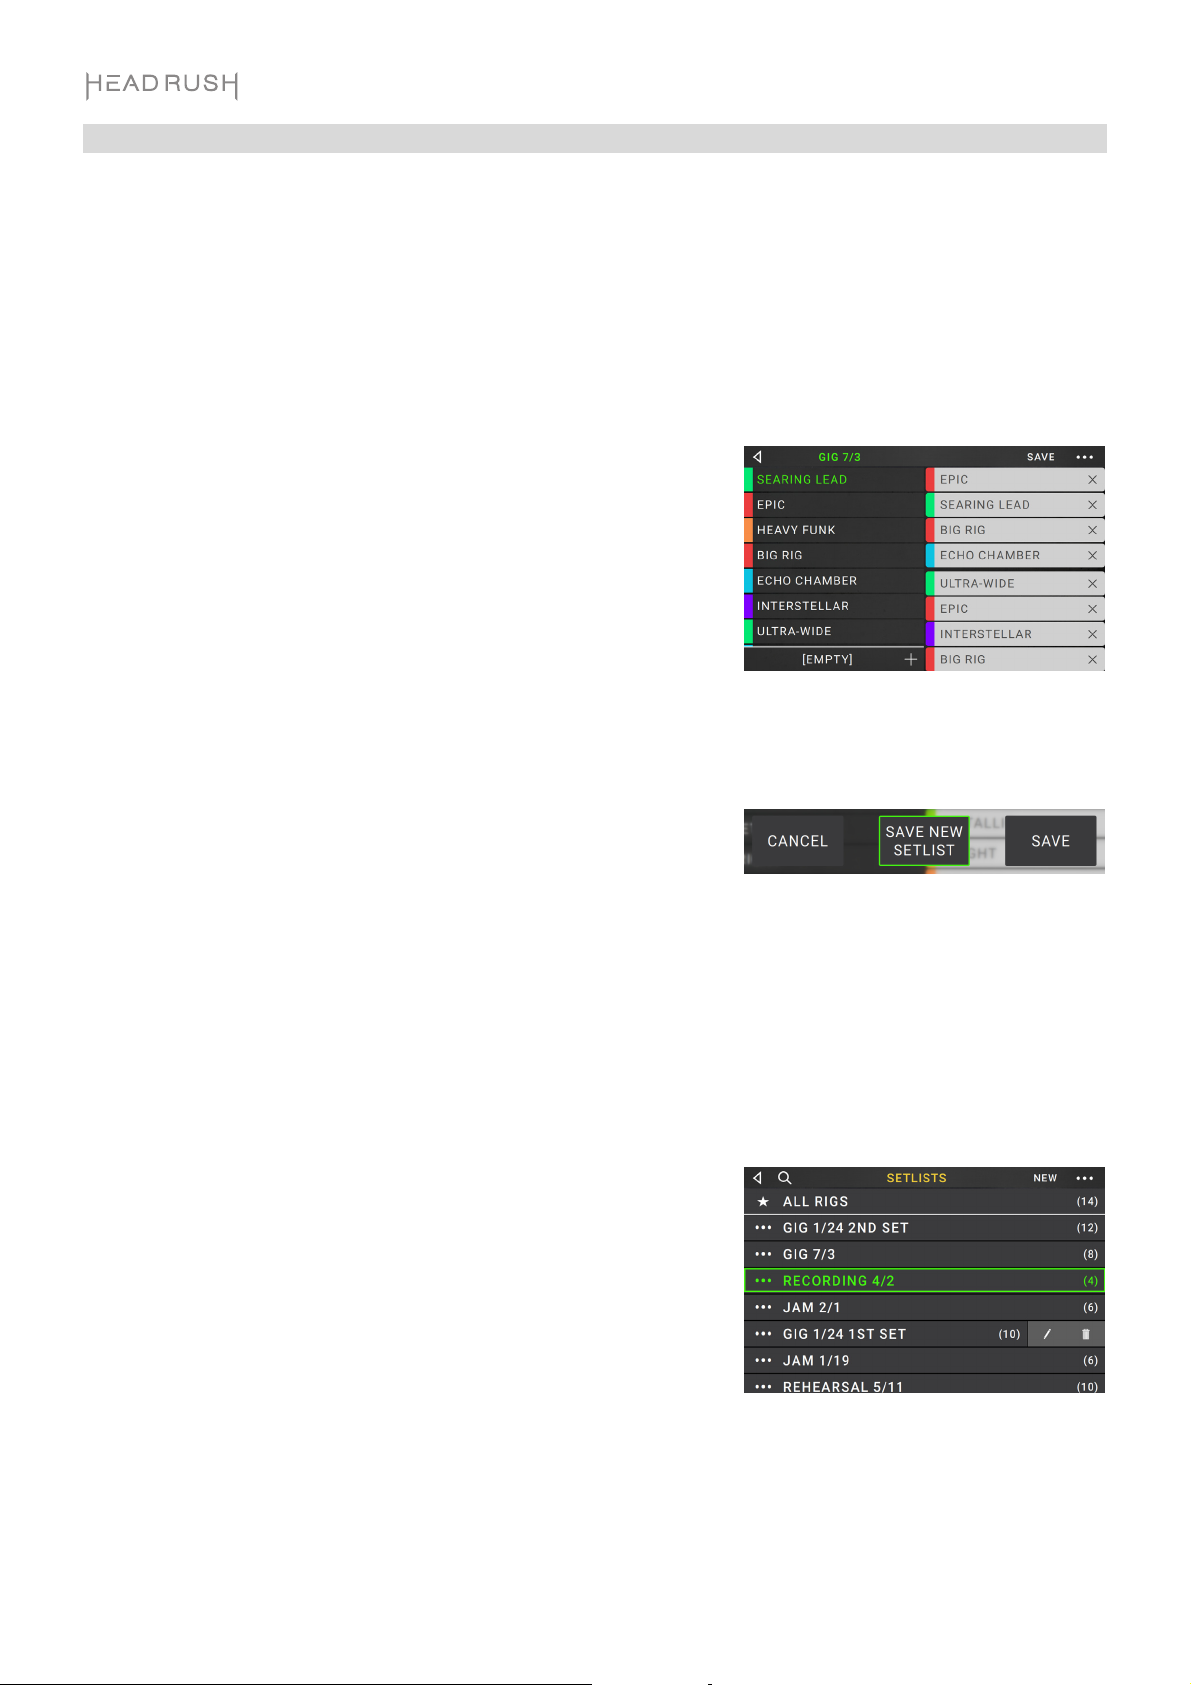
Expression Pedal
You can connect an optional expression pedal (sold separately) to control two parameters (in Classic Mode) or
two sets of parameters (in Advanced Mode). If your expression pedal has a toe switch, you can use the toe switch
to switch between them—Expression Pedal A or B.
Note: When you save your rig, the currently selected Expression Pedal state (A or B) will be saved and then
recalled when you load the rig again.
The column of four boxes represents the expression pedal settings. You can
assign one or more continuously adjustable parameters (ones with a range of
values) to the expression pedal.
To set the expression pedal mode, tap the button above Range in the
upper-right corner to select Classic or Advanced.
• Classic: You can assign one parameter to each expressional pedal (A
and B). Using the toe switch will select the other expression pedal and
deactivate (bypass) the current expression pedal’s parameter. For
instance, if you assign a wah pedal to Expression Pedal A and a volume
pedal to Expression Pedal B, only one of them will be active at any time;
when you are controlling the wah pedal, the volume pedal will be
bypassed, and vice versa.
• Advanced: You can assign up to four parameters to each expression pedal (A and B). Moving the pedal
will adjust all of its assigned parameters simultaneously. Using the toe switch will select the other
expression pedal and leave the current pedal’s parameters active and at their maximum values.
To assign a parameter to an expression pedal:
1. If the Assign button is not on, tap it.
2. Tap a box under the Assign button. indicates an empty box.
3. In the list that appears, tap the model with the parameter you
want to assign.
4. In the list that appears, tap the parameter you want to
assign.
Tap Unassigned to unassign that box.
To swap two assignments (while in Advanced Mode), tap and
drag one of them over the other, and then release it.
To set the range of an assigned parameter:
1. If the Range button is not on, tap it.
2. Tap a value under the Range button.
3. Turn the encoder to set the desired value as a percentage of the parameter’s entire range.
Press the encoder or tap elsewhere to confirm the value.
13
Setlists
You can use setlists to organize your rigs. A setlist is a saved collection of rigs, which you can save and recall at a
later time. This is useful, for instance, if you only need some of your rigs for a performance; you can save a setlist
of just those rigs so you don’t have to spend time searching through all of your rigs before playing the next song.
To view your setlists, tap the ≡ button in the upper-left corner of the main screen. The Setlists screen will appear.
To return to the main screen, tap the button in the upper-left corner.
To create a setlist:
1. Tap New in the upper-right corner.
2. In the screen that appears, the left half is a list of all available rigs,
and the right half is the list of rigs in the setlist.
To add a rig to the setlist, tap it to add it to the end of the list.
Alternatively, tap and hold it, and then drag it to the desired location
in the list. You can add the same rig to a setlist more than once.
The [Empty ] rig in the lower-left corner is a slot to use as a
placeholder to make rearranging the setlist easier; it will not be
available as a selectable rig when moving through rigs in the setlist.
To rearrange the setlist, tap and hold a rig in the list on the right
half, and then drag it to the desired location in the list.
To remove a rig from the setlist, tap the on its right edge.
To save a setlist, tap Save in the upper-right corner.
To save your changes to the current setlist, tap Save.
To save your changes as a new setlist, tap Save New Setlist,
use the keyboard that appears to enter a name, and then tap Save.
(At any time) To return to the previous screen without saving, tap
Cancel.
To discard any changes you’ve made to the setlist, tap the button
in the upper-left corner, and tap Discard Changes.
To load a setlist:
1. While viewing the main screen, tap the ≡ button in the upper-left
corner to view the Setlists screen. Each setlist will show the number
of rigs in parentheses (including multiple instances of the same rig).
2. Tap the desired setlist. The first rig of that setlist will load
immediately. Tap All Rigs to view all rigs instead of a specific setlist.
To edit
pencil icon. You will see the same screen you used to create the setlist,
where you can edit and save it.
To delete a setlist, tap the button on its left side, and then tap the
trash can icon. Tap Yes to confirm the deletion or Cancel to return to
the Setlists screen without deleting it.
14
a setlist, tap the button on its left side, and then tap the
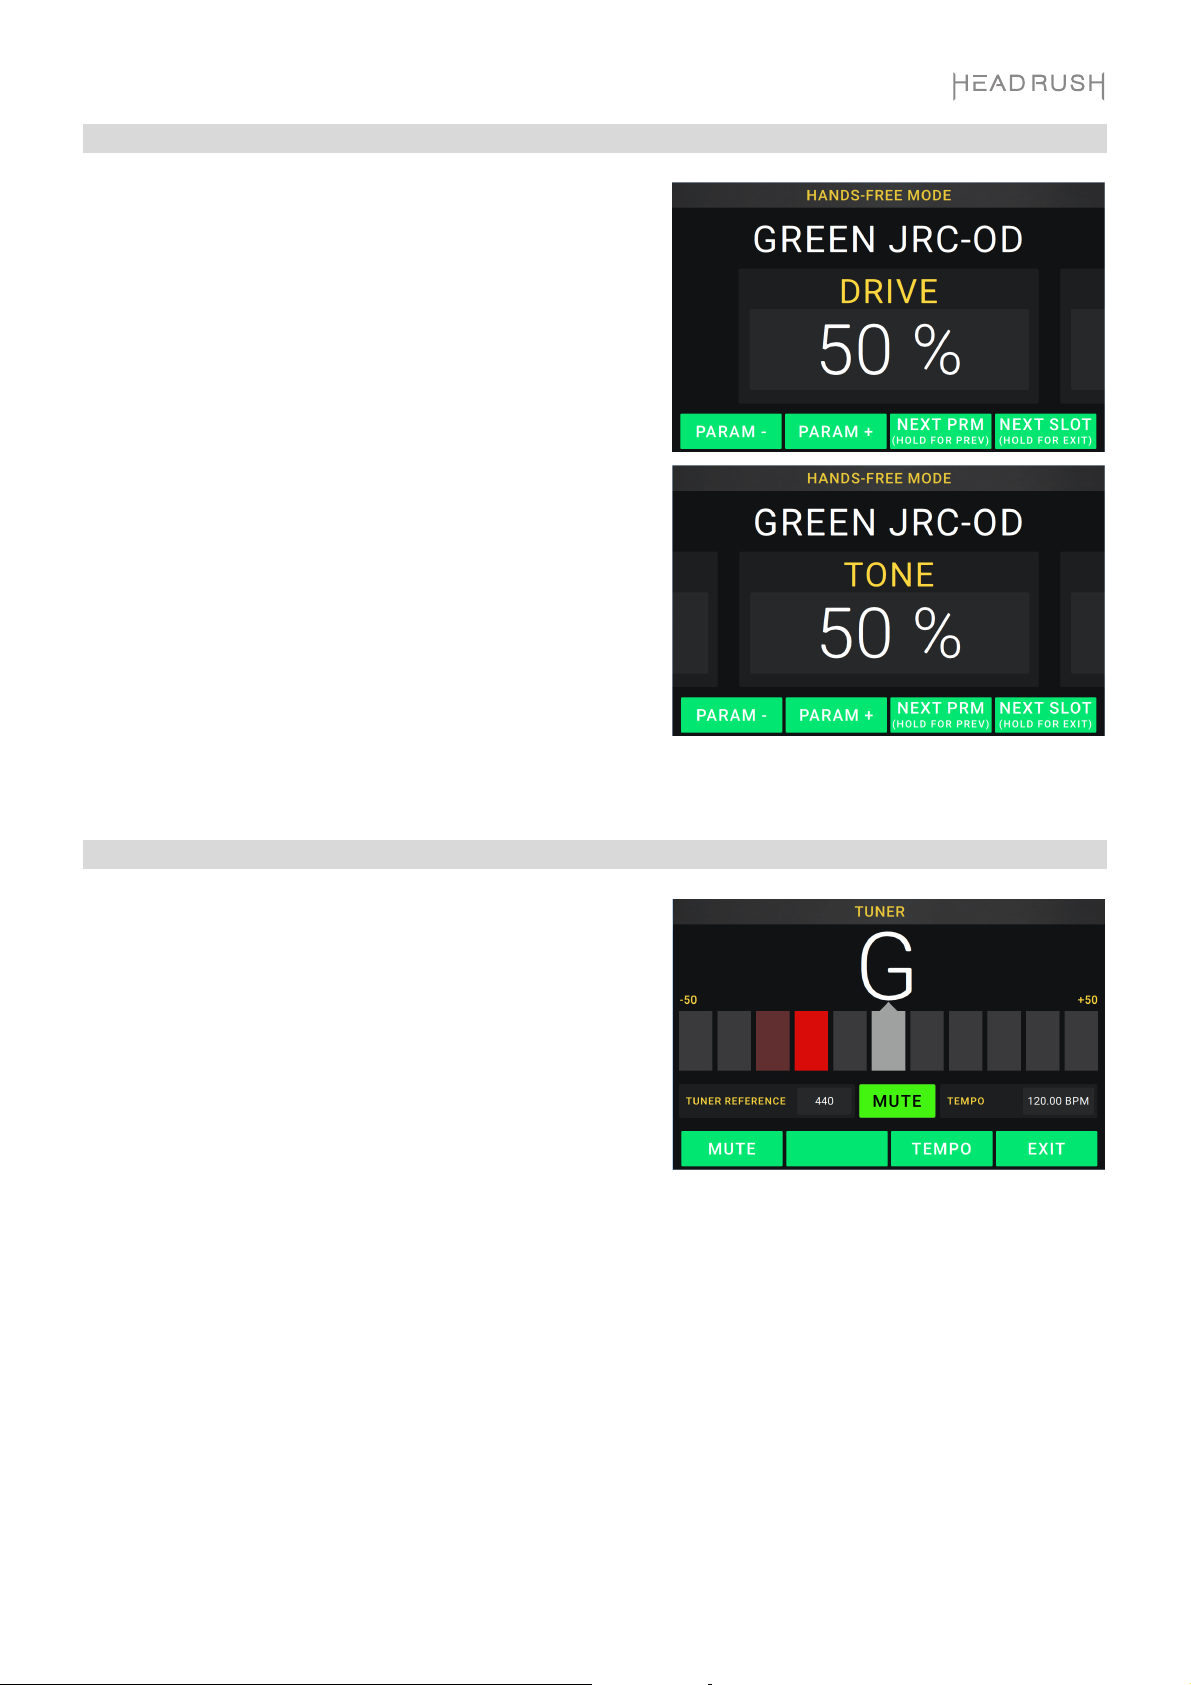
Hands-Free Mode
Hands-Free Mode enables you to adjust any of the settings on
your models by using just the footswitches and/or an optional
expression pedal. (sold separately).
To enter Hands-Free Mode, press and hold footswitch 2 for
over one second. While in Hands-Free Mode, the screen will
show a single parameter and its currently selected value.
To change the value, press footswitch 1 (down) or
footswitch 2 (up). You can also change this by moving an
external expression pedal.
To access the next available parameter, press footswitch 3.
To access the previous available parameter, press and hold
footswitch 3.
To access the next available block in your rig, press
footswitch 4.
To exit Hands-Free Mode, press and hold footswitch 4.
Tuner/Tempo
You can use the Tuner/Tempo page to tune your guitar and set
a tempo for time-based effects.
To enter Tuner/Tempo mode, press and hold footswitch 4
for over one second. While in Tuner/Tempo Mode, the screen
to the right is shown.
To change the tuner reference pitch, tap the parameter and
then turn the encoder.
To unmute your signal while tuning, press footswitch 1.
To enter a tempo via tapping a footswitch, press footswitch
3 at the desired tempo 3–8 times to set the tempo in beats per
minute (BPM).
To exit this page, press footswitch 4.
15
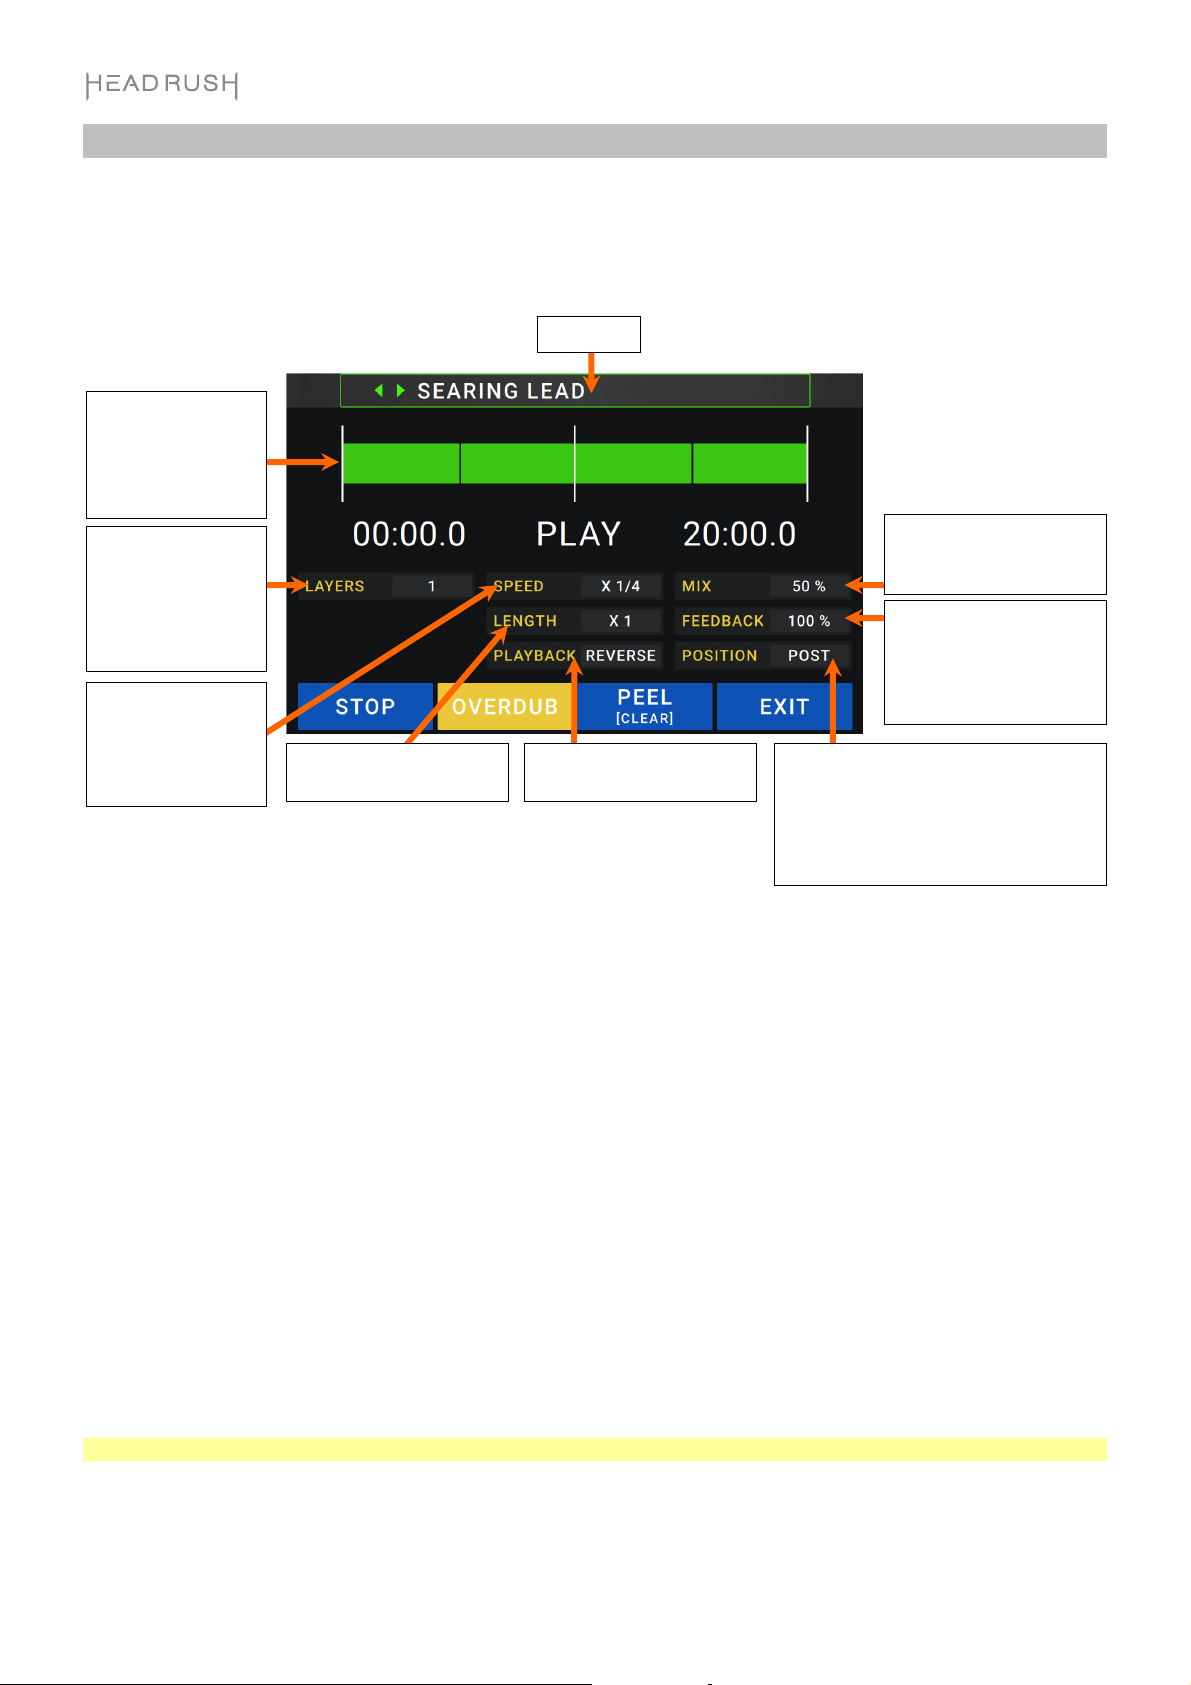
Looper
The HeadRush Gigboard has a built-in looper that you can use to layer your performances. While the looper’s
operation is shown in the display, you can control most of it conveniently with the footswitches.
The looper can hold up to 20 minutes of audio at a time across a maximum of 50 layers.
This meter indicates
your current
location in the loop
during recording or
playback.
This indicates how
many layers are
playing in the
current loop,
including the
original.
This indicates the
current speed of the
loop as a multiple or
fraction of the
original.
This indicates the length
of the current loop.
Rig name.
This indicates the direction
of playback.
This controls how much
of the looper’s signal you
hear in the outputs.
This controls how much
of the looper’s signal is
routed back through it
when recording another
layer.
This indicates whether the looper is
located before (Pre) or after (Post) your
signal chain. Moving the looper to the
Pre position enables you to edit your
rig without having to play the same riff
over and over again.
To record the first layer of a loop, press the Record footswitch. Recording will begin immediately and the
footswitch indicator will light red. Press the Record footswitch again to stop recording and start loop playback.
The footswitch is now called Overdub and the footswitch indicator is yellow.
To record additional layers onto the loop (overdub), press the Overdub footswitch. Overdubbing will begin
immediately and the footswitch indicator will light red. Press the Overdub footswitch again to stop overdubbing
and continue playback.
To erase the top-most (last-added) layer of the loop, press the Peel footswitch. The top-most layer of the loop
will be erased immediately. This process is destructive, so you can’t re-add it later.
To clear the full loop, press and hold the Clear footswitch. This process will stop playback and is destructive, so
you can't re-add it later.
To halve or double the length of the loop, tap the button next to the Length field and then turn the encoder.
The halving process is non-destructive, so you can restore your original loop and its content by doubling the
length of the loop.
To halve or double the speed of the looper, tap the button next to the Speed field and then turn the encoder.
Tip: Use this to create low bass lines or ultra-high guitar parts that you couldn’t ordinarily play.
16
To reverse looper playback, tap the button next to the Playback field and then turn the encoder.
Tip: Create eerie effects by recording layers in reverse then switching back to normal playback.
To set the looper’s location, tap the button next to the Playback field and then turn the encoder to place it
before (Pre) or after (Post) the signal chain. Moving the looper to the Pre position enables you to edit your rig
without having to play the same riff over and over again
To exit the looper and return to the main screen, press the Exit footswitch. If the looper is playing, playback
will continue.
To re-enter the looper, press the Looper footswitch again.
Tip: Use this feature to create different effect configurations (adjust parameters, activate/deactivate models, etc.)
for each layer, creating a multi-textured performance. You can also switch rigs while using the looper and use a
different rig for each layer.
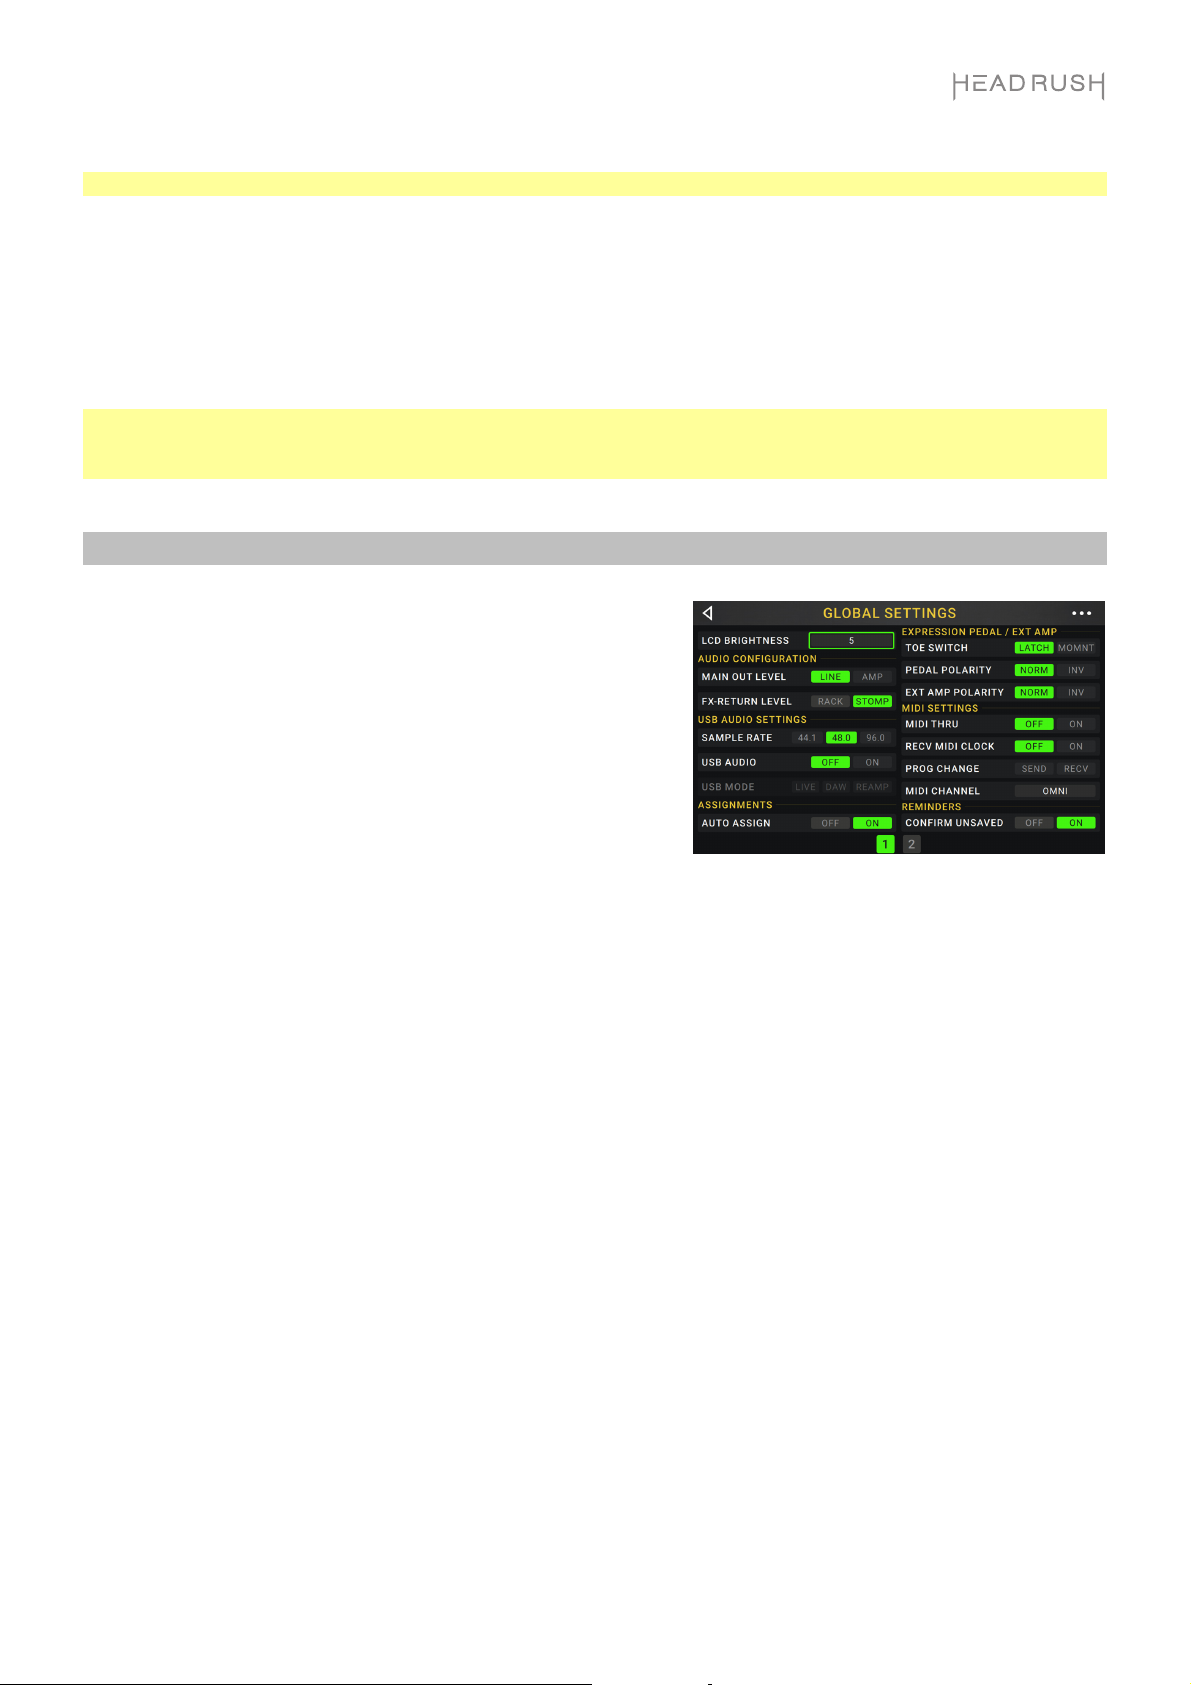
Global Settings
Use the global settings to configure the HeadRush Gigboard’s
overall operation.
To show the global settings, tap the button in the upper-
right corner of the screen, and tap Global Settings.
To select each page of the global settings, tap the number
at the bottom edge of the screen.
LCD Brightness: This setting determines the brightness of the main display. Tap this field, turn the encoder to
select 1 (dim) through 5 (bright), and then press the encoder.
Audio Configuration:
Main Out Level: This setting determines the signal level sent to the main Outputs (1/4"/6.35 mm, TRS). When
set to Line, the output level will be +18 dBu. Use this setting if you are connecting the HeadRush Gigboard
to a full-range, flat-response amplifier, PA speaker, mixer, or audio interface. When set to Amp, the output
level will be +6 dBu. Use this setting if you are connecting the HeadRush Gigboard to a traditional guitar
amplifier.
FX Return Level: This setting determines the signal level received by the FX Return Input (1/4"/6.35 mm,
TRS). When set to Rack, the output level will be line level, +18 dBu. Use this setting if you are connecting a
rack effects processor in the HeadRush Gigboard's FX-Loop. When set to Stomp, the output level will be
+6 dBu. Use this setting if you are connecting a traditional guitar pedal ("stompbox") in the FX-Loop.
17

USB Audio Settings:
Note: Download the complete HeadRush Gigboard User Guide from headrushfx.com in order to learn more
about configuring your DAW.
Important note for Windows users: Before connecting the Headrush Gigboard to your computer, download and
install the necessary drivers from headrushfx.com/support.
Sample Rate: This setting determines the sample rate of the USB audio signal: 44.1 kHz, 48.0 kHz or 96.0 kHz.
Remember to select the same sample rate as the one in your DAW. Also, set it before opening your DAW.
USB Audio: This setting determines whether or not HeadRush Gigboard is sending a USB audio signal over a
USB connection. Tap On to enable sending of the USB audio signal with the selected Sample Rate. Tap
Off to disable the USB audio signal. (To change the Sample Rate, set USB Audio to Off first, select the
correct sample rate, set USB Audio to On again, and restart your DAW.)
USB Mode: This setting determines how the HeadRush Gigboard sends its audio signal over the USB
connection and how its outputs function while doing so:
• Live: The audio signal will be sent to your computer as well as to the HeadRush Gigboard’s outputs.
• DAW: The audio signal will be sent to your computer only. The HeadRush Gigboard’s outputs will be
disabled to prevent any latency while monitoring.
• Reamp: Your computer will send an audio signal to the HeadRush Gigboard, which will process it
through the current rig and send it back to your computer. The HeadRush Gigboard’s outputs will be
disabled to prevent any latency while monitoring.
Assignments:
Auto Assign: This setting determines how models are assigned to the switches. Tap On if you want models to
be automatically assigned to the next available switch when you load them. Tap Off if you want models to load
without being assigned to a switch; you will have to assign them manually in the Hardware Assign screen.
Expression Pedal / Ext Amp:
Toe Switch: Change this parameter to Latch if your expression pedal uses a latching toe switch or Momnt if
your expression pedal uses a momentary toe switch.
Pedal Polarity: If it seems like your expression pedal is registering motion in the wrong direction, you can
change this parameter to invert the pedal polarity. Select between Norm (normal) and Inv (inverted).
Ext Amp Polarity: If it se
ems like your external amplifier is getting the opposite messages you intended,
change this parameter to invert the messages sent to the External Amp Footswitch Output. Select
between Norm (normal) and Inv (inverted).
MIDI Settings: These settings determine how the HeadRush Gigboard sends and receives MIDI information to
and from external devices. These settings affect only the HeadRush Gigboard’s MIDI input or MIDI output.
MIDI Thru: Tap On to use the MIDI output as a MIDI throughput; any MIDI information sent to the HeadRush
Gigboard’s MIDI input will be sent directly to the MIDI output. Tap Off to use the HeadRush Gigboard’s
MIDI output normally; the HeadRush Gigboard will be able to send its own MIDI information out of the MIDI
output.
Recv MIDI Clock: Tap On to enable the HeadRush Gigboard to receive MIDI clock information. Tap Off to
use the HeadRush Gigboard’s own internal MIDI clock (which will not be sent out).
Prog Change: Tap Send to enable or disable the HeadRush Gigboard’s transmission of MIDI program change
messages when you load a rig. Tap Recv to enable or disable the HeadRush Gigboard’s reception of MIDI
program change messages from an external MIDI device.
MIDI Channel: This setting determines the MIDI channel(s) that the HeadRush Gigboard will send and receive
MIDI messages. Tap this field, turn the encoder to select all channels (Omni), or 1–16, and then press the
encoder.
18
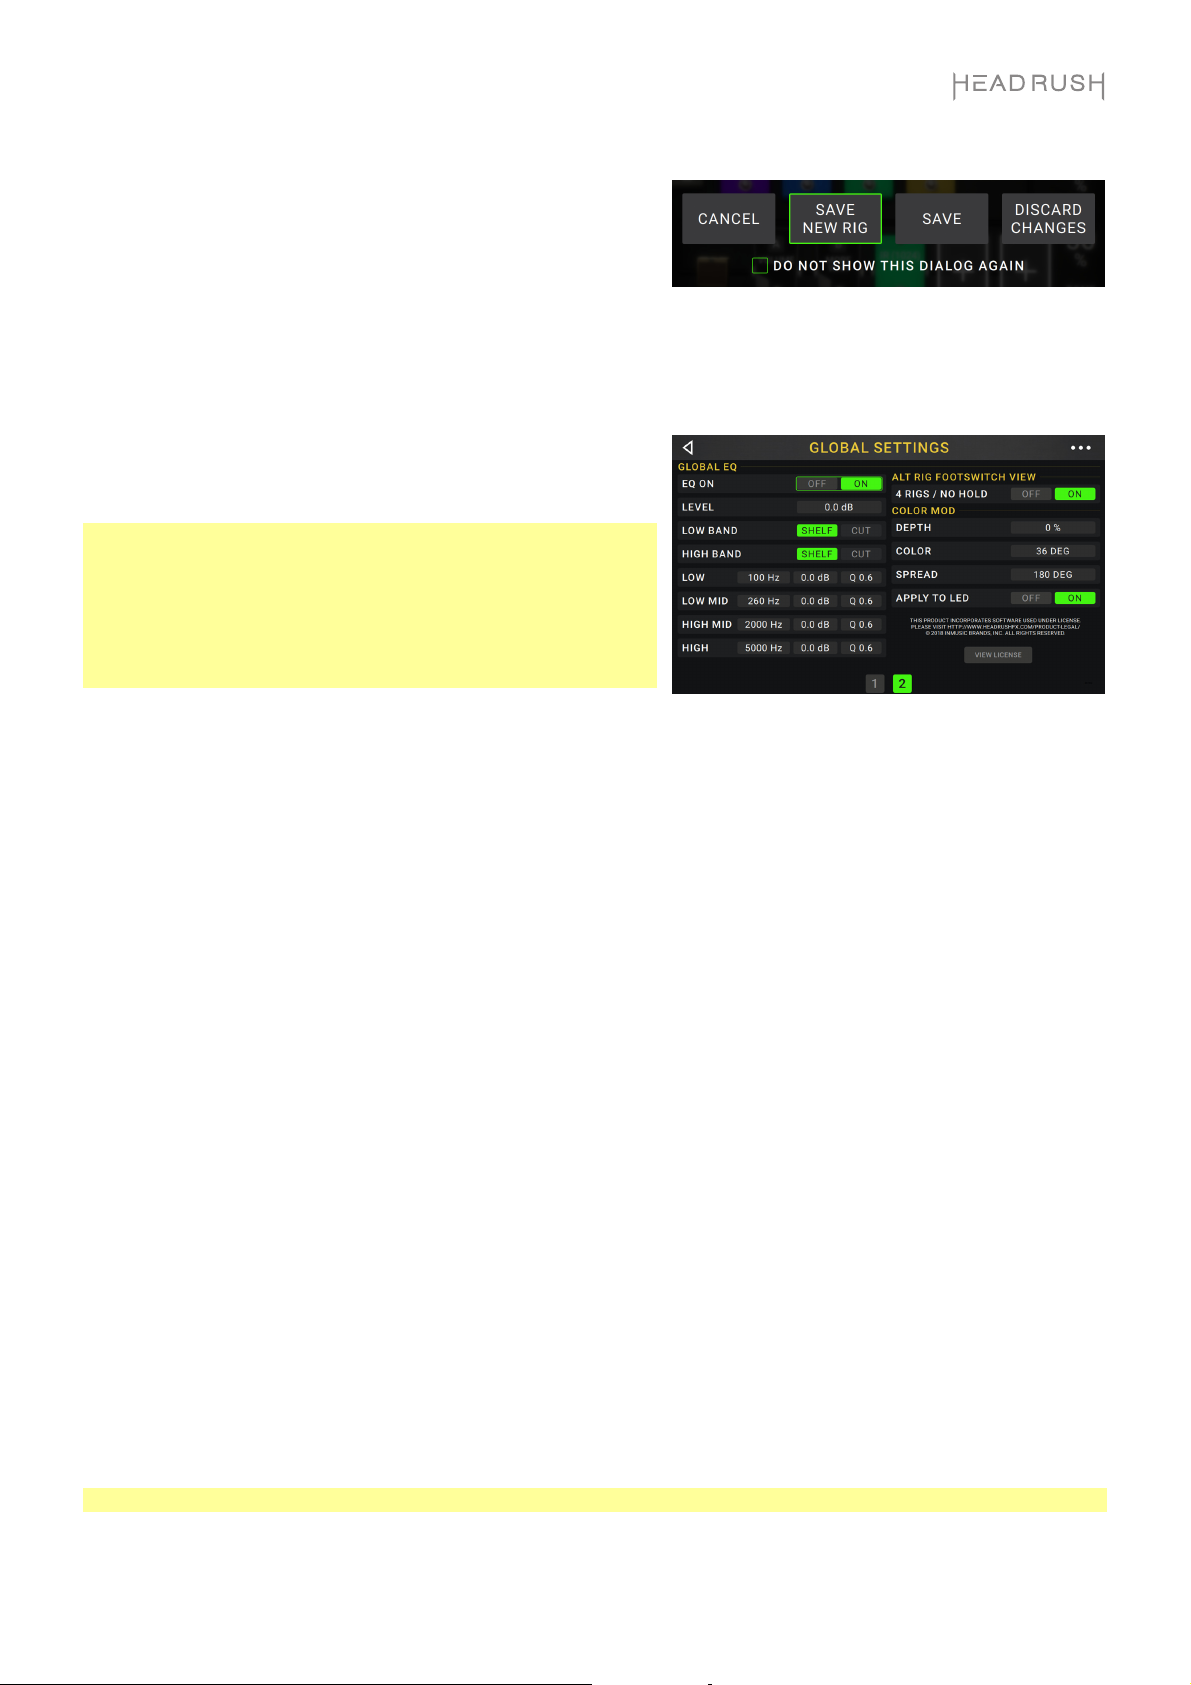
Reminders:
Confirm Unsaved: This setting determines whether or
not you will see a confirmation message if you change
the rig while there are unsaved changes on the current
one. Tap On to enable these messages or Off to
disable them.
Alternatively, tap Do not show this dialog again in the
message itself to disable them.
Global EQ:
These settings on Page 2 determine if/how equalization is
applied for your outputs. This equalizer is a four-band
parametric equalizer.
Tip: These settings are especially useful when a venue, rehearsal
space, etc. has different acoustic characteristics than the room
where you originally created your presets (e.g., the venue may
sound “boomier,” or a rehearsal space with soundproofing may
deaden some of the high end). This page lets you quickly apply
some additional equalization to all of your presets without
permanently saving them.
EQ On: This setting determines whether equalization is enabled (On) or disabled (Off) for the outputs.
Level: This setting determines if/how much the outputs’ audio signal level is boosted or cut. This value is
applied to the level set by the Master knob.
Low Band & High Band: These settings determine what type of equalization is applied to the lowest-
frequency band (Low Band) and to the highest-frequency band (High Band): Shelf or Cut.
Low, Low Mid, High & High Mid: The three settings for each of these four frequency bands determine the
shape of the equalization:
The first setting (Hz) determines the center frequency of the low-frequency band, low-mid-frequency
band, high-frequency band, or high-mid-frequency band.
The second setting (dB) determines how much the equalizer boosts or cuts the signal at the
corresponding frequency band.
The third setting (Q) determines the width of the frequency band. The higher the setting, the wider the
band will be around the center frequency (the first setting). This setting is applied whether Low Band or
High Band is set to Shelf or Cut.
Alt Rig Footswitch View:
4 Rigs / No Hold: Change this setting to On to switch from Rig Mode to Alternate Rig Mode. See Footswitch
Modes to learn more.
Color Mod:
If you have trouble distinguishing certain colors on your Gigboard’s display or if you just want to further customize
the color scheme, you can use the color mod parameters to adjust their default settings. While experimenting
with the settings, a sample of your adjustments will be shown in real time. If you want to return to the default
color scheme, the default settings are as follows:
Depth: 0% Color: 36 DEG Spread: 180 DEG
Note: The Color Mod feature is disabled when the Screen Lock feature is enabled.
19
Transferring Files & Settings
Over a USB connection, you can transfer rig, setlist, model
preset, loop and/or impulse response (IR) files between your
computer and the HeadRush Gigboard.
We recommend creating a backup copy of your files to your
computer before you make any changes.
Important:
Do not disconnect or power off the HeadRush Gigboard during
the process.
Any unsupported files will be ignored.
You cannot transfer a folder or .zip/archive folder to/from
HeadRush Gigboard. Instead, transfer any supported files
directly.
We recommend organizing the file structure of your rigs,
setlists, model presets, and/or impulse response files on your
computer so that it’s identical to the file structure as shown on
the HeadRush Gigboard “drive.”
To transfer files between the HeadRush Gigboard and your
computer:
1. Connect your computer to the HeadRush Gigboard’s USB
port using a standard USB cable.
2. With your computer powered on, power on the HeadRush
Gigboard using the power switch.
3. Tap the button in the upper-right corner of the screen,
and tap Global Settings.
4. In the Global Settings screen, tap the button in the
upper-right corner of the screen, and tap USB Transfer. On
your computer, the HeadRush Gigboard will appear as a
mass-storage device called HeadRush.
Windows users: If this is the first time you’ve connected it to this computer, you may need to wait a minute
while it installs the class-compliant drivers.
5. Open the HeadRush drive. You can now freely click and drag contents between HeadRush and your
computer. Note that any changes you make to the contents of your HeadRush are immediate and cannot be
cancelled.
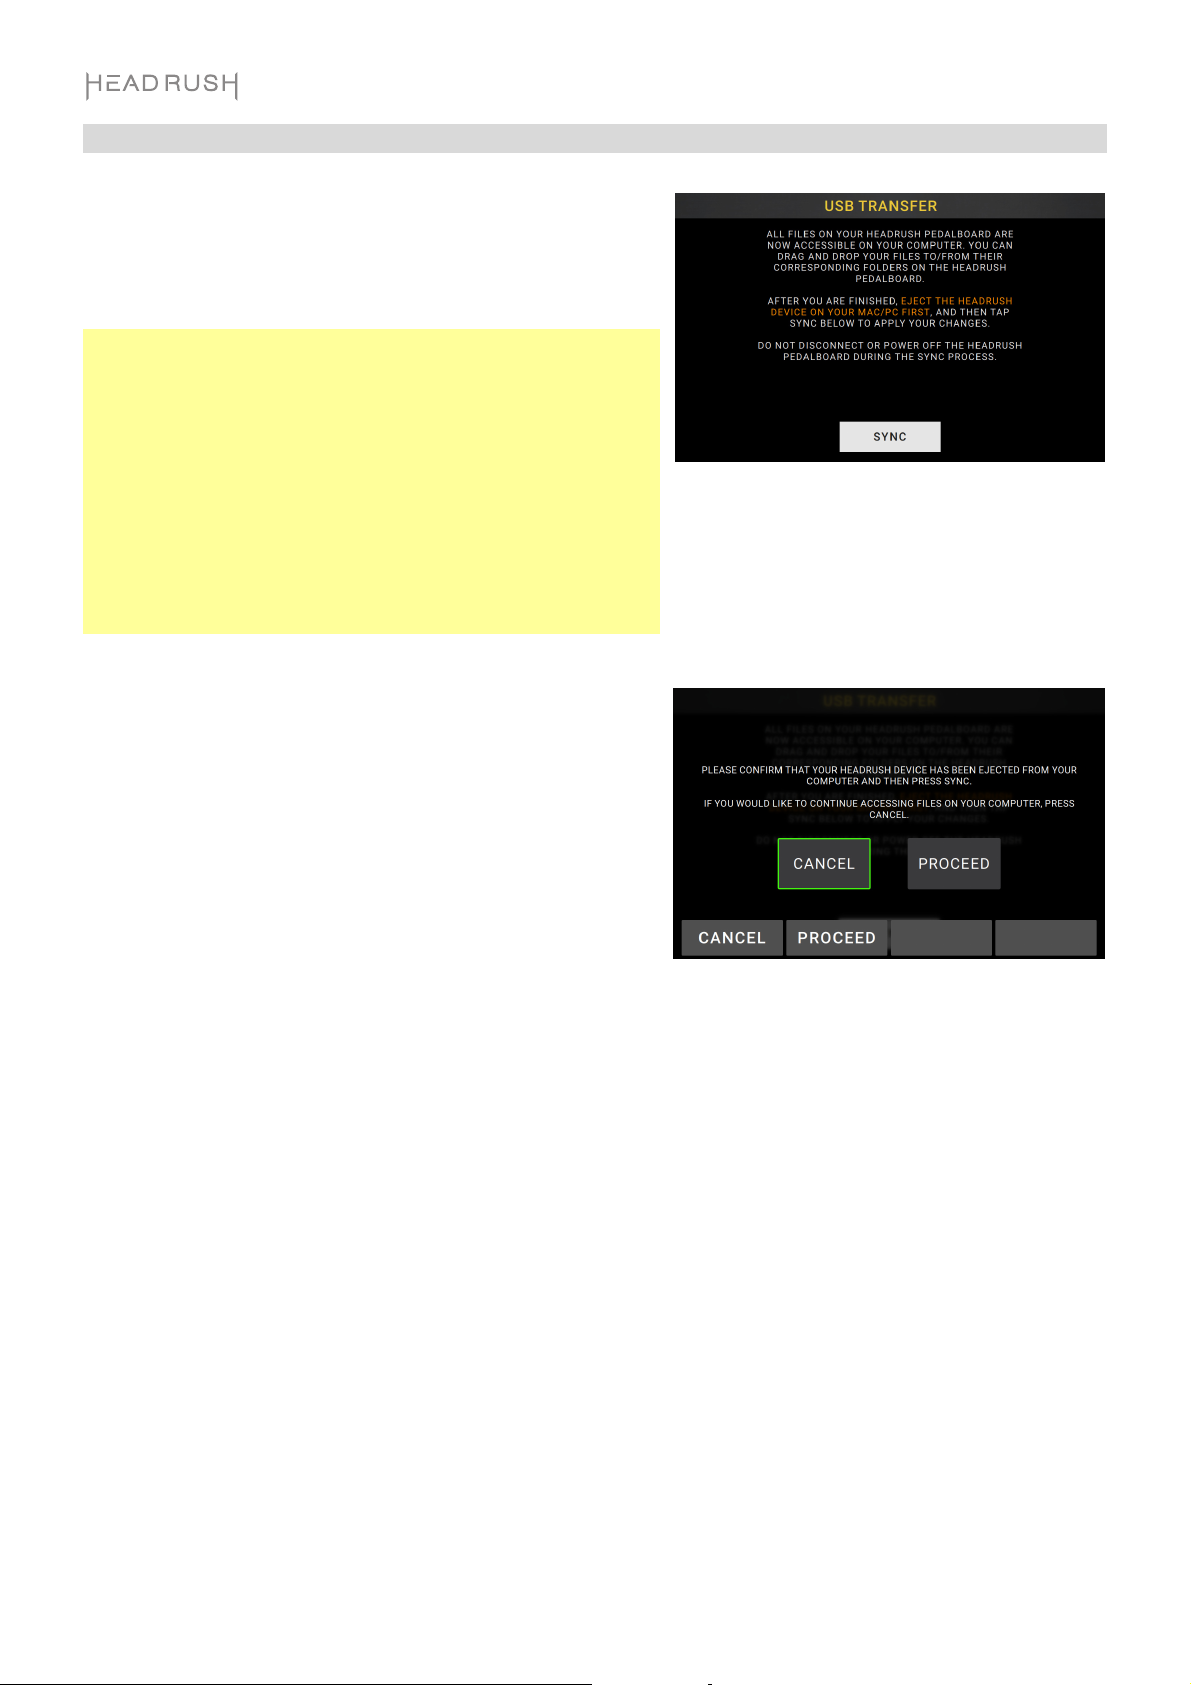
6. IMPORTANT: When you are finished transferring contents, you must unmount/eject the Headrush drive from
your computer.
7. After the drive has been ejected, tap Sync on your HeadRush Gigboard to "commit" any changes you made
to the contents of the HeadRush drive. An additional prompt will appear to confirm you have ejected the
drive. Tap Proceed to continue or Cancel to continue accessing files on your computer.
As the HeadRush Gigboard analyzes and imports the files, a meter on the display will indicate its progress.
The normal Global Settings screen will reappear when the process is finished. Do not disconnect or power off
HeadRush Gigboard during the sync process.
20

Firmware Update Instructions
1. Connect the USB port on your HeadRush device to your computer, and ensure HeadRush device and your
computer are powered on.
2. On your HeadRush device, tap the ••• icon in the upper-right corner, and tap Global Settings.
3. In the Global Settings screen, tap the ••• icon in the upper-right corner again, and tap Firmware Update. In
the screen that appears, tap OK to continue. After restarting, the screen will show Update at the bottom
edge.
4. Open the HeadRush Updater application for your operating system—Windows or macOS. (You can
download the latest updater application from headrushfx.com)
5. When the updater window appears, click Update HeadRush. Do not disconnect or power off the HeadRush
device or your computer until the update is completed.
6. When the update is completed, the updater window will display Done, and your HeadRush device will restart.
Click Done to close the updater window.
7. Confirm your Headrush device is using the latest firmware—tap the ••• icon in the upper-right corner, and tap
Global Settings. The firmware version will appear at the bottom of the screen.
21

Guía de inicio rápido (Español)
Introducción
Contenido de la caja
HeadRush Gigboard
Cable USB
Cable de corriente
Tarjeta de descarga de software
Guía de inicio rápido
Manual sobre la seguridad y garantía
Importante: Visite headrushfx.com para descargar la guía del usuario completa.
Soporte
Para obtener la información más reciente acerca de este producto (documentación, especificaciones técnicas,
requisitos de sistema, información de compatibilidad, etc.) y registrarlo, visite headrushfx.com.
Para obtener soporte adicional del producto, visite headrushfx.com/support.
22
Características
Panel superior
1. Pantalla: Esta pantalla multitáctil a todo color muestra información relevante para la operación actual de la
HeadRush Gigboard. Toque la pantalla (y utilice los controles de hardware) para controlar la interfaz. Consulte
Funcionamiento básico para aprender cómo funciona.
2. Codificador: Utilice este codificador para desplazarse por las opciones de menú disponibles o ajustar los
valores de los parámetros del campo seleccionado en la pantalla. Pulse el codificador para introducir su
selección.
3. Indicadores de los interruptores de pedal: Estas luces indican si el pedal de percusión rítmica,
configuración o escena asignada a cada interruptor de pedal se encuentra encendido (con luz fuerte) o
apagado (con luz tenue).
4. Interruptores de pedal: Pulse estos interruptores de pedal para activar o desactivar el modelo o escena
asignada o para cargar la configuración asignada.
5. Volumen principal: Gire esta perilla para ajustar el volumen de las salidas.
23
Panel trasero
3
5
6
13
1
12
14
2
1. Entradas de guitarra (1/4 pulg./6,35 mm, TRS): Conecte su guitarra a esta entrada utilizando un cable para
instrumentos estándar.
2. Entrada auxiliar (1/8 pulg./3,5 mm, TRS): Conecte una fuente de audio opcional (por ej., un teléfono
inteligente [smartphone], tableta, etc.) a esta entrada mediante un cable estéreo de 3,5 mm (1/8 pulg.).
3. Entrada del pedal de expresión (1/4 pulg./6,35 mm, TRS): Conecte un pedal de expresión opcional a esta
entrada utilizando un cable TRS estándar de 6,35 mm (1/4 pulg.).
4. Entrada para interruptor de punta del pie de pedal de expresión (1/4 pulg./6,35 mm, TS): Conecte la
salida del interruptor de punta del pie de su pedal de expresión opcional a esta entrada utilizando un cable
TS estándar de 6,35 mm (1/4 pulg.).
5. Salidas (1/4 pulg./6,35 mm, TRS): Conecte estas salidas a las entradas de su amplificador, interfaz de audio,
etc. Si sólo precisa utilizar una salida, utilice la que tiene el rótulo L/Mono.
Nota: Puede ajustar estas salidas para que envíen una señal de nivel amplificador o de nivel de línea
(predeterminado) en el menú de ajustes globales.
6. Salida del interruptor de pedal del amplificador externo (1/4 pulg./6,35 mm, TRS): Conecte esta salida a la
entrada del interruptor de pedal de un amplificador de guitarra externo para conmutar los canales o encender
y apagar la reverberación en el amplificador utilizando la Gigboard.
¡IMPORTANTE! Conectar esta salida solamente amplificadores que tengan una entrada de interruptor de
pedal con manguito en corto. Si conecta esta salida a cualquier otro tipo de entrada de interruptor de pedal
puede causar daños permanentes en su equipo. Si no está seguro si su amplificador tiene una entrada de
interruptor de pedal con manguito en corto, consulte el manual del amplificador o del fabricante para
cerciorarse antes de continuar.
7. Salida para auriculares (1/4 pulg./6,35 mm, TRS): Conecte auriculares estéreo estándar de 1/4 pulg. (6,35
mm) a esta salida.
8. Salida de envío de efectos (1/4 pulg./6,35 mm, TRS): Conecte estas salidas a las entradas de otro módulo
de efectos, un pedal de efectos o el retorno del bucle de efectos de un amplificador.
9. Entrada de retorno de efectos (1/4 pulg./6,35 mm, TRS): Conecte estas entradas a las salidas de otro
módulo de efectos, un pedal de efectos o el envío del bucle de efectos de un amplificador.
Nota: Puede ajustar esta entrada de retorno de efectos para que reciban una señal de nivel de rack o de nivel
de pedal de percusión rítmica (predeterminado) en Global Settings Menu.
10. Entrada de MIDI: (DIN de 5 patillas): Use un cable MIDI estándar para conectar esta entrada a la salida MIDI
de un dispositivo MIDI externo opcional.
11. Salida MIDI (DIN de 5 patillas): Use un cable MIDI estándar de para conectar esta salida a la entrada MIDI de
un dispositivo MIDI externo.
12. Puerto USB: Conecte este puerto USB a un ordenador utilizando un cable USB estándar. Esta conexión
permite que la HeadRush Gigboard envíe y reciba la señal de audio digital desde y hacia su ordenador.
También puede utilizar esta conexión para importar o exportar configuraciones, presets de modelos y listas
de configuraciones.
13. Ventilación: Asegúrese de que esta ventilación no se encuentre obstruida mientras utiliza la HeadRush
Gigboard.
14. Entrada de alimentación: Conecte esta entrada a una toma de corriente utilizando el cable de corriente
incluido.
15. Interruptor de encendido: Pulse este botón para encender la HeadRush Gigboard. Mantenga pulsado este
botón para apagar la HeadRush Gigboard.
24
4
789
10
11
15
A
p
Instalación
Los elementos que no se enumeran en Introducción > Contenido de la caja se venden por separado.
¡IMPORTANTE! En Global Settings Menu, asegúrese de ajustar las salidas para que envíen señales a nivel de
amplificador si está utilizando un amplificador de guitarra tradicional o a nivel de línea (predeterminado) si está
utilizando un amplificador de respuesta plana y rango completo, mezclador, sistema de megafonía o interfaz de
audio.
Guitarra
mplificador de respuesta plana y rango
completo o amplificador de guitarra tradicional
Pedal de
expresión
Entrada de interruptor de pedal de
lificador
am
¡IMPORTANTE! Conectar esta salida solamente a amplificadores que tengan
una entrada de interruptor de pedal con manguito en corto. Si conecta esta
salida a cualquier otro tipo de entrada de interruptor de pedal puede causar
daños permanentes en su equipo. Si no está seguro si su amplificador tiene
una entrada de interruptor de pedal con manguito en corto, consulte el manual
del amplificador o del fabricante para cerciorarse antes de continuar.
Computadora
Toma de
corriente
Pedales de percusión rítmica,
módulos, etc. de efectos externos.
25
Funcionamiento básico
Este capítulo describe algunas de las funciones básicas de la HeadRush Gigboard. Puede visitar
headrushfx.com para descargar la guía de usuario completa y obtener más información.
Pantalla principal
Toque para ver las listas de configuraciones.
Gire el codificador para
desplazarse por los
elementos seleccionables
en la pantalla o para ajustar
los parámetros. Pulse el
codificador como si fuera
un comando Enter.
Haga un doble toque
sobre un modelo, In
o Out para mostrar
sus parámetros.
Toque su interruptor de pedal
para activarlo o desactivarlo.
Importante: La secuencia de modelos en su cadena de señal no se reflejan necesariamente en los interruptores
de pedal. Puede asignar libremente modelos a los interruptores de pedal disponibles sin modificar su cadena de
señal en lo absoluto—y viceversa. Consulte Asignación de hardware para aprender sobre esto.
Toque y arrastre esta barra hacia abajo para ver la lista de configuraciones.
Nombre de la configuración.
Estos cuatro bloques muestran la función
actual de los 4 interruptores de pedal.
Toque para guardar la configuración.
Este botón alterna las
diferentes opciones de
encaminamiento para
una configuración.
Este botón activa o
desactiva la
reverberación y colas de
retardo al pasar a otra
configuración.
Para asignar un modelo (amplificador, gabinete o efecto) a una ranura vacía, tóquela
() y luego utilice la lista que aparece. Consulte Configuraciones > Creación de una
configuración para aprender sobre esto.
Para mostrar la pantalla de ajustes de un modelo, tóquela dos veces. Su pantalla de
ajustes aparecerá con su menú predefinido, parámetros y color asignado.
Cuando no se seleccione ningún modelo, estos parámetros serán los que asigne en la
pantalla Asignación de hardware.
Para activar o desactivar un modelo, pulse el interruptor de pedal asignado a él o
toque el interruptor de pedal del modelo en la pantalla.
Para cargar otra configuración (preset):
• Toque el o junto al nombre dela configuración actual en la pantalla.
• Toque el nombre de la configuración en la pantalla y luego gire el codificador.
• Pulse un interruptor de pedal asignado a un preset cuando la Gigboard se
encuentre en vista de configuración.
• Pulse un interruptor de pedal asignado a Prev Rig o Next Rig cuando la
Gigboard se encuentre en vista híbrida.
Para ver otras opciones, toque el botón en la esquina superior derecha y luego
toque una opción.
26
Para reacomodar los
modelos de su
cadena de señal,
toque y arrastre un
modelo hacia otra
ranura o entre los dos
otros modelos (los que
le siguen a esa
posición se
desplazarán una ranura
hacia abajo en la
cadena de señal).
Modos de los interruptores de pedal
Los cuatro interruptores de pedal de la HeadRush Gigboard se
pueden usar para activar u omitir modelos (amplificadores,
gabinetes o efectos) así como seleccionar escenas,
configuraciones o listas de configuraciones. Estos interruptores
de pedal se encuentran siempre en uno de cuatro modos:
Stomp, Rig, Hybrid o Setlist.
Para cambiar el modo:
1. Mantenga pulsado el interruptor de pedal 1. Luego
seleccione uno de los cuatro interruptores de pedal que
corresponden a los cuatro modos: Stomp, Rig, Hybrid y
Setlist.
2. Pulse un interruptor de pedal para entrar a eso modo.
Modo Stomp (pedal de percusión rítmica)
Los interruptores 1-4 corresponden a modelos (amplificadores,
gabinetes o efectos) o escenas en su configuración. Pulse un
interruptor de pedal para activar o desactivar su modelo.
Modo Rig (configuración)
Los primeros 2 interruptores de pedal corresponden a
configuraciones que ha guardado. Pulse un interruptor de
pedal para cargar su configuración.
Para mostrar el banco de dos configuraciones anterior, pulse el interruptor 3.
Para mostrar el siguiente banco de dos configuraciones, pulse el interruptor 4.
Modo Rig alternativo
Para ingresar a la versión alternativa del Modo Rig, vaya a
la página 2 de los Ajustes globales y luego cambie el
parámetro 4 Rigs / No Hold (4 configuraciones / Sin sostener)
a On.
Los interruptores de pedal 1 a 4 corresponden a configuraciones que ha guardado. Pulse un interruptor de pedal
para cargar su configuración.
Para mostrar el banco de cuatro configuraciones anterior, mantenga pulsado el interruptor de pedal 2.
Para mostrar el siguiente banco de cuatro configuraciones, mantenga pulsado el interruptor 3.
Nota: No se puede acceder al modo de manos libres o al generador de bucles cuando se utiliza el modo de
configuración alternativa.
Modo Hybrid (híbrida)
Los primeros 2 interruptores de pedal se pueden asignar a la
activación o desactivación de un modelo o a la selección de
una escena en la configuración actualmente seleccionada.
Para pasar a la configuración anterior, pulse el interruptor de pedal 3.
Para pasar a la configuración siguiente, pulse el interruptor de pedal 4.
Modo Setlist (Lista de configuraciones)
Para entrar en la lista de configuraciones Todas las
configuraciones, pulse el interruptor de pedal 1.
Para entrar en la lista de configuraciones que se muestra actualmente, pulse el interruptor de pedal 2.
Para mostrar la lista de configuraciones anterior, pulse el interruptor de pedal 3.
Para mostrar la siguiente lista de configuraciones, pulse el interruptor de pedal 4.
27
Configuraciones
Al utilizar la HeadRush Gigboard, una configuración es un preset: la combinación de modelos—amplificadores,
gabinetes y efectos—asignados y los ajustes de los parámetros de cada uno de ellos. Puede crear, editar, guardar y
cargar configuraciones para recuperar fácilmente el sonido perfecto para cada parte de su interpretación.
Cada configuración tiene 11 ranuras, cada una de las cuales puede tener un modelo (amplificador, gabinete o efectos)
asignado a ella. Las ranuras asignadas exhibirán representaciones gráficas de los modelos y las ranuras vacías
exhibirán un símbolo de .
Creación de una configuración nueva
Para crear una configuración nueva, toque el botón ubicado
en la esquina superior derecha de la pantalla y toque New Rig.
Para asignar un modelo (amplificador, gabinete o efecto) a una
ranura vacía:
1. Toque la ranura vacía ().
2. En la lista que aparece, toque el tipo de modelo que desea
asignar: Amp, Cab o efecto (Distortion, Dynamics/EQ,
Modulation, Reverb/Delay, FX-Loop o Expression).
3. En la lista que aparece, toque el modelo que desea asignar.
4. En la siguiente lista que aparece, toque el preset que desea
cargar para ese modelo.
Si carga un amplificador o gabinete en una ranura que tiene
adyacente otra ranura vacía, se cargará automáticamente en la otra
ranura un amplificador o gabinete que coincida con el de la primera
ranura. A continuación, podrá configurarlos de forma independiente:
puede separarlos en la cadena de señal, puede modificar el tipo de
amplificador o gabinete y puede eliminar cada modelo por separado.
Tipos de modelos: amplificadores,
gabinetes y efectos.
Modelos disponibles para cada tipo.
Presets disponibles
para cada modelo.
Optimización de su cadena de señal
La cadena de señal es el recorrido realizado por la señal de audio desde su guitarra, a través de sus modelos
seleccionados y hasta las salidas de la HeadRush Gigboard. Puede utilizar la pantalla táctil para acomodar sus
modelos seleccionados en cualquier orden, pero encontrará que algunas configuraciones suenan mejor que otras.
Estas son algunas sugerencias sobre las ubicaciones más comunes de modelos para crear tonos con la HeadRush
Gigboard:
• Los controles dinámicos (por ej., compresores), los filtros (por ej., wah, desplazadores de tono) y los pedales
de volumen generalmente se ubican al comienzo de la cadena de señal. Como alternativa, puede colocar los
pedales de volumen al final de la cadena de señal para lograr una leve variación de la funcionalidad.
• Los efectos basados en la ganancia (por ej., overdrive/distorsión, fuzz) suelen venir a continuación.
• La ecualización (EQ) se suele usar para dar forma a las características tonales a los efectos de
overdrive/distorsión y fuzz, así que coloque un ecualizador después de ellos. Como alternativa, colóquelo antes
de ellos para darle forma al tono general de la guitarra—eliminando frecuencias no deseadas—antes de los
pedales de ganancia
• Los efectos de modulación tales como flangers, phasers y coros suelen colocarse a continuación.
• Los efectos basados en el tiempo tales como retardos y reverberaciones se suelen colocar cerca del final de la
cadena de señal.
• Al final de la cadena de señal se suelen colocar un amplificador y un gabinete, aunque los puede colocar en
donde desee.
28
Guardado de una configuración
Si ha modificado la configuración desde que lo cargó, verá un asterisco () junto a su nombre en la parte superior de la
pantalla. Puede guardar estos cambios en esta configuración, guardar estos cambios como otra configuración o
descartarlos.
Para guardar una configuración, toque Save en la esquina superior
derecha.
Para guardar sus cambios en la configuración actual, toque Save.
Para guardar sus cambios como una configuración nueva, toque Save New Rig, utilice el teclado que aparece para
introducir un nombre y luego toque Save.
Para regresar a la pantalla anterior sin guardar, toque Cancel en cualquier momento.
Para descartar cualquier cambio realizado en la configuración, toque el botón de la esquina superior derecha y
toque Discard Changes.
Modificación de los ajustes
Para modificar los ajustes de un modelo de su configuración, tóquela dos veces para abrir su pantalla de ajustes.
Toque para conservar sus cambios
y regresar a la pantalla principal.
Gire el codificador
para desplazarse por
los elementos
seleccionables en la
pantalla o para ajustar
los parámetros. Pulse
el codificador como si
fuera un comando
Enter.
Toque el menú Preset para
seleccionar un preset.
Toque este botón y toque Discard Changes para descartar
cualquier cambio realizado desde la apertura de esta pantalla.
Consulte Guardado de un preset.
Toque el botón Off/On de
un parámetro para
modificar el ajuste del
parámetro de manera
acorde.
Toque el nombre del
modelo para asignar un
modelo diferente a esta
ranura.
Toque Delete para
desasignar el modelo
de la ranura.
Toque un color para asignarlo a este modelo. Este
color se mostrará en la pantalla principal, en la
pantalla de Asignación de hardware y en el
indicador del interruptor de pedal de este modelo.
Toque Cancel a fin de volver para descartar
sus cambios y regresar a la pantalla principal.
Toque y arrastre un
deslizador hacia la
izquierda y la derecha para
modificar los ajustes del
parámetro. Como
alternativa, toque el
deslizador y utilice el
codificador para realizar el
ajuste fino.
Guardado de un preset
Para guardar un preset, toque Save en la esquina superior
derecha.
Para guardar sus cambios en el preset actual, toque Save.
Para guardar sus cambios como un preset nuevo, toque Save New Preset, utilice el teclado que aparece
para introducir un nombre y luego toque Save.
Para regresar a la pantalla anterior sin guardar, toque Cancel en cualquier momento.
29
Asignación de hardware
La pantalla de asignación de hardware le permite personalizar la
manera en que los interruptores de pedal y el pedal de expresión
de la HeadRush Gigboard controlan cada configuración.
Para abrir la pantalla de asignación de hardware, toque el
botón en la esquina superior derecha de la pantalla principal y
luego toque Hardware Assign.
Para regresar a la pantalla principal, toque el botón de la
esquina superior izquierda.
Importante: Los ajustes de asignación de hardware son todos
parte de la configuración general, así que recuerde guardar los
cambios que desea conservar.
Para ajustar el color asociado con la configuración, tóquelo en la parte superior izquierda de la pantalla. Este color
aparecerá junto al nombre de la configuración cuando visualice la lista de configuraciones disponibles o cuando vea y
cree listas de configuraciones. También será el color del indicador del interruptor de pedal correspondiente cuando la
HeadRush Gigboard se encuentre en Modo Rig.
Para ajustar el tempo de los efectos basados en el tiempo de la configuración (retardos, modulaciones, etc.),
toque el botón bajo Tempo para seleccionar Current o Fixed.
• Current: La configuración usará el último tempo utilizado o el ajustado por el interruptor de pedal de Tempo.
Para ajustar el tempo, pulse el interruptor de pedal de Tempo a la velocidad deseada 3-8 veces para ajustar el
nuevo tempo en pulsos por minuto (BPM).
• Fixed: La configuración usará el tempo que defina aquí.
Para ajustar el tempo, gire el codificador para ajustar el tempo deseado en pulsos por minuto (BPM). Puede
ajustar el tempo únicamente desde esta pantalla de Asignación de hardware.
Para cargar una configuración cuando se recibe un cambio de programa proveniente de un dispositivo MIDI
externo opcional o para enviar un mensaje de cambio de programa MIDI cuando se carga una configuración,
toque el botón que se encuentra bajo MIDI y luego gire el codificador para seleccionar un número de cambio de
programa MIDI. Puede ajustar si los cambios de programa MIDI se reciben y/o envían en el menú Global Settings.
Nota: Si una configuración está utilizando un número, dicho número no estará disponible y no podrá asignarse otra
configuración. Adicionalmente, guardar una configuración con un nombre nuevo grabará la configuración, pero sin el
número de cambio de programa para evitar que las configuraciones compartan el mismo número.
Interruptores de pedal
Las ocho casillas en la esquina inferior izquierda representan los ocho interruptores de pedal del medio de la HeadRush
Gigboard. Puede asignar cualquier parámetro basado en interruptores (aquellos que sólo tienen dos estados) a
cualquiera de los interruptores de pedal—independientemente de su ubicación en la cadena de señal.
Como asignar un parámetro a un interruptor de pedal:
1. Toque una casilla. indica una casilla vacía.
2. En la lista que aparece, toque el modelo con el parámetro que
desea asignar.
3. En la lista que aparece, toque el parámetro que desea asignar.
Generalmente, el parámetro simplemente estará en On (para
activarlo o desactivarlo).
Toque Unassigned para desasignar ese interruptor de
pedal.
Para intercambiar dos asignaciones, toque y arrastre una de ellas
sobre la otra y luego suéltela.
30

Amp Ext.
Puede asignar un interruptor para que envíe una señal a la entrada
para interruptor de pedal de su amplificador utilizando la salida
para amplificador externos. Puede utilizar esta característica
para realizar tareas tales como cambiar de un canal limpio a un
canal sucio o encender o apagar la reverberación en su
amplificador.
Para utiliza esta característica al cambiar de configuración, toque
el botón que se encuentra debajo de Ext Amp en la página
designación de hardware y luego seleccione Tip, Ring o Both. Si
no está seguro de qué ajuste utilizar, consulte el manual del
amplificador o del fabricante para cerciorarse.
Esta característica también se puede asignar a un interruptor de
pedal en la página de selección de modelo que aparece cuando
está asignando la función de un interruptor de pedal.
Esta función también se puede asignar a una escena al ajustar el parámetro en la pantalla del editor de escena.
¡IMPORTANTE! Conectar esta salida solamente a amplificadores que tengan una entrada de interruptor de pedal con
manguito en corto. Si conecta esta salida a cualquier otro tipo de entrada de interruptor de pedal puede causar daños
permanentes en su equipo. Si no está seguro si su amplificador tiene una entrada de interruptor de pedal con manguito
en corto, consulte el manual del amplificador o del fabricante para cerciorarse.
Escenas
La característica de escena le permite encender o apagar múltiples modelos en cada configuración. Cuando pulsa el
interruptor de pedal asignado a esa escena, todos los modelos incluidos en esa escena se encenderán o apagarán
dependiendo de la manera en la que los asignó. Esta es una gran manera de crear múltiples tonos en la misma
configuración. Por ejemplo, puede que quiera que un determinado modelo de reverberación esté encendido siempre
que otro modelo de distorsión particular también lo esté. Como alternativa, puede que quiera apagar un modelo de
retardo cuando enciende otro. Las escenas le permiten lograr esto con sólo pulsar un interruptor de pedal.
Cómo crear y editar una escena:
1. En la pantalla de asignación de hardware, toque
Toggle/Scene del interruptor general deseado para recorrer
las opciones disponibles y seleccione Scene.
2. Una vez en el modelo deseado, toque Edit. Aparecerá el
editor de escenas, el cual muestra todos los modelos en su
configuración.
3. Para cada modelo en la configuración, tóquelo para alternar
las opciones disponibles:
• On: Este modelo se encenderá cuando encienda la
escena.
• Off: Este modelo se apagará cuando encienda la escena.
• No Change: Este modelo permanecerá igual cuando
encienda la escena.
4. Toque un color en la parte inferior de la pantalla táctil para
seleccionar un color para la escena.
5. Toque el botón en la esquina superior izquierda para
regresar a la pantalla de asignación de hardware.
Para renombrar una escena (que aparezca en los indicadores de
los interruptores de pedal), toque el texto en el recuadro que se
encuentra debajo de Edit en el modelo, utilice el teclado virtual
que aparece para introducir un nombre y luego toque en cualquier
otro lugar fuera del recuadro de texto.
31

Pedal de expresión
Puede conectar un pedal de expresión opcional (que se vende por separado) para controlar dos parámetros (en
modo Clásico) o dos conjuntos de parámetros (en modo Avanzado). Si su pedal de expresión cuenta con un
interruptor de punta del pie, puede utilizar dicho interruptor para conmutar entre ellos—Pedal de expresión A o B.
Nota: Cuando guarde su configuración, el estado del pedal de expresión seleccionado actualmente (A o B) se
grabará y luego recuperará cuando vuelva a cargar la configuración.
La columna de cuatro casillas representa los ajustes del pedal de expresión.
Puede asignar uno o más parámetros continuamente ajustables (aquellos con
un rango de valores) al pedal de expresión.
Para ajustar el modo del pedal de expresión, toque el botón encima de
Range en la esquina superior derecha para seleccionar Classic o Advanced.
• Clásico: Puede asignar un parámetro a cada pedal de expresión (A y
B). Al utilizar el interruptor de punta del pie se seleccionará el otro pedal
de expresión y se desactivará (omitirá) el parámetro del pedal de
expresión actual. Por ejemplo, si le asigna un pedal de wah al Pedal de
expresión A y un pedal de volumen al Pedal de expresión B, sólo uno
de ellos podrá estar activo a la vez; cuando esté controlando el pedal
de wah, el pedal de volumen se omitirá y viceversa.
• Avanzado: Puede asignar hasta cuatro parámetros a cada pedal de expresión (A y B). Al mover el pedal se
ajustarán todos sus parámetros asignados simultáneamente. Al usar el interruptor de punta del pie se
seleccionará el otro pedal de expresión y se dejarán los parámetros del pedal actual activos y en sus
valores máximos.
Como asignar un parámetro a un pedal de expresión:
1. Si el botón Assign no está encendido, tóquelo.
2. Toque una casilla debajo del botón Assign. indica una
casilla vacía.
3. En la lista que aparece, toque el modelo con el parámetro
que desea asignar.
4. En la lista que aparece, toque el parámetro que desea
asignar.
Toque Unassigned para desasignar esa casilla.
Para intercambiar dos asignaciones, (estando en modo
Avanzado) toque y arrastre una de ellas sobre la otra y luego
suéltela.
Para ajustar el rango de un parámetro asignado:
1. Si el botón Range no está encendido, tóquelo.
2. Toque un valor debajo del botón Range.
3. Gire el codificador para ajustar el valor deseado como un porcentaje del rango completo
del parámetro. Pulse el codificador o to que en cualquier otro lugar para confirmar el valor.
32

Listas de configuraciones
Puede utilizar listas de configuraciones para organizar sus configuraciones. Una lista de configuraciones es una colección
guardada de configuraciones, la cual puede guardar y recuperar más tarde. Esto resulta útil, por ejemplo, si sólo necesita
algunas de sus configuraciones para una interpretación; puede guardar una lista de configuraciones con sólo aquellas
configuraciones de manera que no sea necesario perder tiempo recorriendo todas sus configuraciones antes de tocar la
siguiente canción.
Para visualizar sus listas de configuraciones, toque el botón ≡ en la esquina superior izquierda de la pantalla principal.
Aparecerá la pantalla de listas de configuraciones.
Para regresar a la pantalla principal, toque el botón de la esquina superior izquierda.
Para crear una lista de configuraciones:
1. Toque New en la esquina superior derecha.
2. En la pantalla que aparecerá a continuación, la mitad izquierda es una lista
de todas las configuraciones disponibles y la mitad derecha es la lista de
configuraciones en la lista.
Para agregar una configuración a la lista de configuraciones, tóquela a
fin de agregarla al final de la lista. Como alternativa, manténgalo tocado y
arrástrelo hasta la posición deseada de la lista. Puede agregar la misma
configuración más de una vez a una lista. La configuración [Empty ] en la
esquina inferior izquierda es una ranura que se utiliza para almacenamiento
temporal facilitando así la reorganización de la lista de configuraciones; no
estará disponible como una configuración seleccionable al desplazarse por
las configuraciones de la lista de configuraciones.
Para reorganizar la lista de configuraciones, mantenga tocado una configuración de la lista en la mitad derecha y
luego arrástrela hacia la ubicación deseada de la lista.
Para eliminar una configuración de la lista de configuraciones, toque la en su borde derecho.
Para guardar una lista de configuraciones, toque Save en la esquina
superior derecha.
Para guardar sus cambios en la lista de configuraciones actual, toque
Save.
Para guardar sus cambios como una lista de configuraciones nueva, toque Save New Setlist, utilice el teclado que
aparece para introducir un nombre y luego toque Save.
(En cualquier momento) Para regresar a la pantalla anterior sin guardar, toque Cancel.
Para descartar cualquier cambio realizado a la lista de configuraciones, toque el botón de la esquina superior
izquierda y toque Discard Changes.
Para cargar una lista de configuraciones:
1. Desde la pantalla principal, toque el botón ≡ en la esquina superior
izquierda para visualizar la pantalla de listas de configuraciones. Cada
lista de equipos mostrará la cantidad de configuraciones entre paréntesis
(incluyendo las instancias repetidas de la misma configuración).
2. Toque la lista de configuraciones deseada. La primera configuración de
esa lista de configuraciones se cargará inmediatamente. Toque All Rigs
para visualizar todas las configuraciones en lugar de una lista de
configuraciones específica.
Para editar una lista de configuraciones, toque el botón en su lado
izquierdo y luego toque el icono del lápiz. Observará la misma pantalla utilizada
para crear la lista de configuraciones, en donde podrá editarla y guardarla.
Para eliminar una lista de configuraciones, toque el botón en su lado izquierdo y luego toque el icono del cesto de
basura. Toque Yes para confirmar la eliminación o Cancel para regresar a la pantalla de listas de configuraciones sin
eliminarla.
33

Modo de manos libres
El modo de manos libres le permite modificar cualquiera de los
ajustes en sus modelos con solo usar los interruptores de
pedal o un pedal de expresión opcional. (se vende por
separado).
Para entrar al modo de manos libres, mantenga pulsado el
interruptor de pedal 2 durante más de un segundo. En el
modo de manos libres, la pantalla mostrará un único parámetro
su valor actualmente seleccionado.
Para cambiar el valor, pulse el interruptor de pedal 1 (abajo)
o el interruptor de pedal 2 (arriba). También puede modificar
esto moviendo un pedal de expresión externa.
Para acceder al siguiente parámetro disponible, pulse el
interruptor de pedal 3.
Para acceder al parámetro disponible anterior, mantenga
pulsado el interruptor de pedal 3.
Para acceder al siguiente bloque disponible en su
configuración, pulse el interruptor de pedal 4.
Para salir del modo de manos libres, mantenga pulsado el
interruptor de pedal 4.
Afinador/Tempo
Puede utilizar la página del afinador/tempo para sintonizar su guitarra y ajustar el tempo de los efectos basados
en el tiempo.
Para entrar al modo de afinador/tempo, mantenga pulsado
el interruptor de pedal 4 durante más de un segundo. En el
modo de afinador/tempo, aparece la pantalla que se muestra a
la derecha.
Para modificar el tono de referencia del afinador, toque el
parámetro y luego gire el codificador.
Para anular el silenciamiento de su señal mientras afina,
pulse el interruptor de pedal 1.
Para introducir un tempo pulsando un interruptor de pedal,
pulse el interruptor de pedal al tempo deseado 3-8 veces
para ajustar el nuevo tempo en pulsos por minuto (BPM).
Para salir de esta página, pulse el interruptor de pedal 4.
34

Generador de bucles
La HeadRush Gigboard tiene un generador de bucles integrado que puede utilizar para organizar sus actuaciones en
capas. Si bien el funcionamiento del generador de bucles se muestra la pantalla, puede controlarlo en su mayoría
cómodamente con los interruptores de pedal.
El generador de bucles puede almacenar hasta 20 minutos de audio por vez en un máximo de 50 capas.
Este medidor indica su
posición actual dentro
del bucle durante la
grabación o
reproducción.
Indica cuántas capas
se están
reproduciendo en el
bucle actual,
incluyendo la original.
Indica la velocidad
actual del bucle como
múltiplo o fracción del
original.
Indica la longitud del bucle
actual.
Nombre de la configuración.
Indica la dirección de la
reproducción.
Controla la proporción de la
señal del generador de
bucles que se escucha por
las salidas.
Control a la proporción de la
señal del generador de
bucles que es encaminada
de regreso a través de él
cuando se graba en otra
capa.
Indica si el generador de bucles se ubica
antes (Pre) o después (Post) de su cadena
de señal. Mover el generador de bucles a la
posición Pre le permite editar su
configuración sin tener que tocar el mismo
riff una y otra vez.
Para grabar la primera capa de un bucle, pulse el interruptor de pedal Record (grabar). La grabación
comenzará inmediatamente y el indicador del interruptor de pedal se encenderá de rojo. Pulse nuevamente el
interruptor de pedal Record para detener la grabación y comenzar la reproducción del bucle. El interruptor de
pedal ahora se llama Overdub (sobregrabar) y el indicador del interruptor de pedal es amarillo.
Para grabar capas adicionales en el bucle (sobregrabar), pulse el interruptor de pedal Overdub. La
sobregrabación comenzará inmediatamente y el indicador del interruptor de pedal se encenderá de rojo. Pulse
nuevamente el interruptor de pedal Overdub para detener la sobregrabación y continuar la reproducción.
Para borrar la capa de más arriba del bucle (la que se añadió a lo último), pulse el interruptor de pedal de Peel
(eliminar la última capa grabada). La capa de más arriba del bucle se eliminará inmediatamente. Este
procedimiento es destructivo, por lo que no podrá revertirlo.
Para eliminar la totalidad del bucle, mantenga pulsado el interruptor de pedal Clear (eliminar). Este
procedimiento detiene la reproducción y es destructivo, por lo que no podrá revertirlo.
Para dividir por la mitad o duplicar la longitud de un bucle, toque el botón junto al campo Length y luego
encienda el codificador. El proceso de división no es destructivo, por lo que podrá restaurar su bucle original y
su contenido al duplicar la longitud del bucle.
Para dividir por la mitad o duplicar la velocidad del generador de bucles, toque el botón junto al campo
Speed y luego encienda el codificador.
Consejo: Utilice esto para crear líneas de graves bajos o partes de guitarra ultra altas que normalmente no podría
tocar.
35

Para invertir la reproducción del generador de bucles, toque el botón junto al campo Playback y luego
encienda el codificador.
Consejo: Cree efectos misteriosos grabando capas en sentido inverso y luego regresando a la reproducción
normal.
Para ajustar la posición del generador de bucles, toque el botón junto al campo Playback y luego encienda el
codificador para colocarlo antes (Pre) o después (Post) de la cadena de señal. Mover el generador de bucles a
la posición Pre le permite editar su configuración sin tener que tocar el mismo riff una y otra vez.
Para salir del generador de bucles y regresar a la pantalla principal, pulse el interruptor de pedal Exit (salida).
Si el generador de bucles se está reproduciendo, la reproducción continuará.
Para volver a entrar al generador de bucles, pulse nuevamente el interruptor de pedal Looper (generador de
bucles).
Consejo: Utilice esta característica para crear distintos ajustes de efectos (ajustar parámetros, activar/desactivar
modelos, etcétera.) Para cada capa, creando una actuación de múltiples texturas. También puede cambiar de
configuraciones mientras utiliza el generador de bucles y utilizar una configuración diferente para cada capa.
Ajustes globales
Utilice los ajustes globales para configurar el funcionamiento
general de la HeadRush Gigboard.
Para mostrar los ajustes globales, toque el botón
ubicado en la esquina superior derecha de la pantalla y
toque Global Settings.
Para seleccionar las páginas de los ajustes globales,
toque el número en el borde inferior de la pantalla.
LCD Brightness (Brillo del LCD): Este ajuste determina el brillo de la pantalla principal. Toque este campo, gire
el codificador para seleccionar de 1 (tenue) a 5 (brillante) y luego púlselo.
Audio Configuration (Configuración de audio):
Main Out Level: Este ajuste determina el nivel de la señal enviada a las salidas principales (1/4 pulg./6,35
mm, TRS). Cuando se lo ajusta en Line, el nivel de salida será de +18 dBu. Utilice este ajuste si está
conectando la HeadRush Gigboard a un amplificador de respuesta plana y rango completo, sistema de
megafonía, mezclador o interfaz de audio. Cuando se lo ajusta en Amp, el nivel de salida será de +6 dBu.
Utilice este ajuste si está conectando la HeadRush Gigboard a un amplificador de guitarra tradicional.
FX Return Level: Este ajuste determina el nivel de la señal recibida por la entrada de retorno de efectos
(1/4 pulg./6,35 mm, TRS). Cuando se lo ajusta en Rack, el nivel de salida será el nivel de línea, +18 dBu.
Utilice este ajuste si está conectando un procesador de efectos de rack en el bucle de efectos de la
HeadRush Gigboard. Cuando se lo ajusta en Stomp, el nivel de salida será de +6 dBu. Utilice este ajuste si
está conectando un pedal de percusión rítmica tradicional para guitarra ("stompbox") en el bucle de
efectos.
36

USB Audio Settings (Ajustes de audio USB):
Nota: Descargue la Guía del usuario completa de la HeadRush Gigboard en headrushfx.com para aprender a
configurar su DAW.
Nota importante para los usuarios de Windows: Antes de conectar la HeadRush Gigboard a su ordenador,
descargue e instale los controladores necesarios de headrushfx.com/support.
Sample Rate: Este ajuste determina tasa de muestreo de la señal de audio USB: 44,1 kHz, 48,0 kHz o 96,0
kHz. Recuerde seleccionar la misma tasa de muestreo de su DAW. Además, configúrela antes de abrir su
DAW.
USB Audio: Este ajuste determina si la HeadRush Gigboard está enviando una señal de audio USB a través
de una conexión USB. Toque On para activar el envío de la señal de audio USB con la Sample Rate (tasa
de muestreo) seleccionada. Toque Off para desactivar la señal de audio USB. (Para modificar la tasa de
muestreo, ajuste USB Audio en Off primero, seleccione la tasa de muestreo correcta, ajuste USB Audio en
On nuevamente y reinicie su DAW).
USB Mode: Este ajuste determina la manera en la que la HeadRush Gigboard envía su señal de audio a
través de la conexión USB y cómo funcionan sus salidas mientras lo hace:
• Live: La señal de audio se enviará a su ordenador, así como a las salidas de la HeadRush Gigboard.
• DAW: La señal de audio se enviará solamente a su ordenador. Las salidas de la HeadRush Gigboard
se desactivarán para evitar la latencia durante la monitorización.
• Reamp: Su ordenador enviará una señal de audio a la HeadRush Gigboard, en donde será
procesada a través de la configuración actual y enviada de regreso su ordenador. Las salidas de la
HeadRush Gigboard se desactivarán para evitar la latencia durante la monitorización.
Asignaciones:
Auto Assign: Este ajuste determina la manera en que los modelos se asignan a los interruptores. Toque On
si desea que los modelos se asignan de forma automática al siguiente interruptor disponible cuando los
carga. Toque Off si prefiere que los modelos se carguen sin estar asignados a un interruptor; deberá
asignarlos manualmente en la pantalla de asignación de hardware.
Pedal de expresión/amplificador ext:
Interruptor de dedo del pie: Cambie este parámetro a Latch (bloqueo) si su pedal de expresión utiliza un
interruptor de dedo del pie bloqueante o a Momnt (momentáneo) si su pedal de expresión utiliza un
interruptor de dedo del pie momentáneo.
Polaridad del pedal: Si le parece que su pedal de expresión está captando el movimiento en la dirección
incorrecta, puede modificar este parámetro para invertir la polaridad del peral. Seleccione entre Norm
(normal) y Inv (invertido).
Polaridad del amplificador ext: Si le parece que su amplificador externo está recibiendo los mensajes
trarios a los que usted pretende, modifique este parámetro para invertir los mensajes enviados a la
con
salida del interruptor de pedal del amplificador externo. Seleccione entre Norm (normal) y Inv
(invertido).
MIDI Settings (Ajustes MIDI): Estos ajustes determinan la manera en la que la HeadRush Gigboard envía y
recibe información MIDI desde y hacia dispositivos externos. Estos ajustes sólo afectan la entrada o salida MIDI
de la HeadRush Gigboard.
MIDI Thru: Toque On para utilizar la salida MIDI como un pasante MIDI; toda información enviada a la
entrada MIDI de la HeadRush Gigboard se enviará directamente a la salida MIDI. Toque Off para utilizar la
salida MIDI de la HeadRush Gigboard normalmente; la HeadRush Gigboard será capaz de enviar su propia
información MIDI por la salida MIDI.
Recv MIDI Clock: Toque On para que la HeadRush Gigboard sea capaz de recibir información de reloj de
MIDI. Toque Off para utilizar el reloj MIDI interno propio de la HeadRush Gigboard (el cual nos enviará hacia
fuera).
Prog Change: Toque Send para activar o desactivar la transmisión de cambio de programa MIDI de la
HeadRush Gigboard al cargar una configuración. Toque Recv para activar o desactivar la recepción por
parte de la HeadRush Gigboard de mensajes de cambio de programa MIDI provenientes de un dispositivo
MIDI externo.
MIDI Channel: Este ajuste determina los canales MIDI que usará la HeadRush Gigboard para enviar y recibir
mensajes MIDI. Toque este campo, gire el codificador para seleccionar todos los canales (Omni) o 1–16 y
luego pulse el codificador.
37

Reminders (Recordatorios):
Confirm Unsaved: Este ajuste determina si verá un
mensaje de confirmación o no al intentar cambiar de
configuración mientras hay cambios sin guardar en la
configuración actual. Toque On para activar estos
mensajes u Off para desactivarlos.
Como alternativa, toque No volver a mostrar este
cuadro de diálogo en el mensaje mismo para
desactivarlo.
Global EQ (Ecualizador global):
Estos ajustes en la Página 2 determinan si/como se aplica
ecualización a sus salidas. Este ecualizador es un ecualizador
paramétrico de cuatro bandas
Consejo: Estos ajustes son de gran utilidad cuando un
escenario, lugar de ensayo, etc. tienen diferentes propiedades
acústicas que la sala en donde creó sus presets originalmente
(por ejemplo, el escenario puede sonar con más eco o una sala
de ensayo con insonorización puede opacar las frecuencias
más altas). Esta página le permite aplicar rápidamente cierto
nivel de ecualización adicional a todos sus presets sin
guardarlos de forma permanente.
EQ On: Este ajuste determina si la ecualización se encuentra activada (On) o desactivada (Off) para las
salidas.
Level: Este ajuste determina si/cuánto se refuerza o recorta el nivel de la señal de audio de las salidas. A este
valor se le aplica el nivel determinado por la perilla Main (Principal).
Low Band y High Band: Estos ajustes determinan el tipo de ecualización que se aplica a la banda de
frecuencias bajas (Low Band) y a la banda de frecuencias altas (High Band): Shelf o Cut.
Low, Low Mid, High & High Mid: Los tres ajustes para cada una de estas cuatro bandas de frecuencia
determinan la forma de la ecualización:
El primer ajuste (Hz) determina la frecuencia central de la banda de frecuencias bajas, la banda de
frecuencias bajas-medias, la banda de frecuencias altas o la banda de frecuencias medias-altas.
El segundo ajuste (dB) determina en qué medida el ecualizador refuerza o recorta la señal en la banda
de frecuencia correspondiente.
El tercer ajuste (Q) determina el ancho de la banda de frecuencias. Cuanto mayor sea el ajuste, más
ancha será la banda alrededor de la frecuencia central (el primer ajuste). Este ajuste se aplica cuando
Low Band o High Band se ajustan a Shelf o Cut.
Alt Rig Footswitch View (Vista del interruptor de pedal del Modo Rig alternative):
4 Rigs / No Hold (4 configuraciones / Sin sostener): Cambie este ajuste a On para alternar entre el Modo
Rig y el Modo Rig alternativo. Consulte Modos de los interruptores de pedal para aprender más.
Color Mod:
Si tiene problemas para distinguir determinados colores en la pantalla de su Gigboard o si simplemente desea
personalizar aún más la paleta de colores, puede utilizar los parámetros de modificación de colores para
modificar sus ajustes predeterminados. Mientras experimenta con los ajustes, se mostrará una vista previa de los
mismos en tiempo real. Si desea regresar a la paleta de colores predeterminada, los ajustes predeterminados son
los siguientes:
Depth: 0% Color: 36 DEG Spread: 180
DEG
Nota: La característica Color Mod encuentra desactivada cuando la característica Screen Lock (bloqueo de
pantalla) se encuentra activada.
38

Transferencia de archivos y ajustes
Puede transferir archivos de configuración, lista de
configuraciones, preset de modelo, bucle y/o respuesta al
impulso (IR) a través de una conexión USB entre tu
ordenador y la HeadRush Gigboard.
Recomendamos crear una copia de seguridad de sus
archivos en su ordenador antes de realizar cualquier
cambio.
Importante:
No desconecte o apague la HeadRush Gigboard durante el
proceso.
Se ignorará cualquier archivo incompatible.
No se puede transferir una carpeta o .zip/carpeta
comprimida hacia/desde la HeadRush Gigboard. En
cambio, puede transferir cualquier archivo compatible
directamente.
Le recomendamos organizar la estructura de archivos de
sus configuraciones, listas de configuraciones, presets de
modelo, bucles y/o respuestas al impulso (IR) en su
ordenador para que sea idéntica a la que aparece en la
"unidad de disco" de la HeadRush Gigboard.
Cómo transferir archivos entre la HeadRush Gigboard y su ordenador:
1. Conecte su ordenador al puerto USB de la HeadRush Gigboard mediante un cable USB estándar.
2. Con su ordenador encendido, encienda la HeadRush Gigboard utilizando el interruptor de encendido.
3. Toque el botón en la esquina superior derecha de la pantalla y luego toque Global Settings.
4. En la pantalla de ajustes globales, toque el botón ubicado en la esquina superior derecha de la pantalla y
toque USB Transfer. En su ordenador, la HeadRush Gigboard aparecerá como un dispositivo de
almacenamiento masivo llamado HeadRush.
Usuarios de Windows: Si esta es la primera vez que usted se conecta a este ordenador, es posible que
tenga que esperar un minuto mientras se instalan los controladores que cumplen con la clase.
5. Abra la unidad HeadRush. Ahora podrá hacer clic y arrastrar el contenido libremente entre la HeadRush y su
ordenador. Tenga en cuenta que los cambios que realice al contenido de su HeadRush son inmediatos y no
se pueden cancelar.
6. IMPORTANTE: Cuando haya terminado de transferir
contenido, debe desmontar/expulsar la unidad
HeadRush de su ordenador. Si la unidad no se expulsa
correctamente antes de continuar, los archivos podrían
sufrir corrupción de datos.
7. Una vez expulsada la unidad, toque Sync en su
HeadRush Gigboard para "confirmar" todo cambio
realizado al contenido de la unidad HeadRush.
Aparecerá un aviso adicional para confirmar que ha
expulsado la unidad. Toque Proceed para continuar o
Cancel para seguir accediendo los archivos en su
ordenador.
A medida que la HeadRush Gigboard analiza e importa
los archivos, aparecerá una barra en la pantalla que
indicará el progreso. Una vez finalizado el proceso,
volverá a aparecer la pantalla Global Settings normal.
No desconecte ni apague la HeadRush Gigboard
durante el proceso desincronización.
39

Instrucciones de actualización de firmware
1. Conecte el puerto USB de su dispositivo HeadRush a un ordenador y asegúrese que ambos estén
encendidos.
2. En su dispositivo HeadRush, toque el icono ••• en la esquina superior derecha y toque Global Settings.
3. En la pantalla Global Settings, toque nuevamente el icono ••• ubicado en la esquina superior derecha y
toque Firmware Update. En la pantalla que aparece, toque OK para continuar. Luego de reiniciarse,
aparecerá Update en el borde inferior de la pantalla.
4. Ahora la aplicación HeadRush Updater correspondiente a su sistema operativo—Windows o macOS. (Puede
descargar la aplicación de actualización más reciente desde headrushfx.com)
5. Cuando aparezca la ventana de la aplicación de actualización, haga clic en Update HeadRush. No
desconecte ni apague el dispositivo HeadRush ni su ordenador hasta que se complete la actualización.
6. Una vez completada la actualización, aparecerá Done en la ventana de la aplicación de actualización y su
dispositivo HeadRush se reiniciará. Haga clic en Done para cerrar la ventana de la aplicación de
actualización.
7. Confirme que su dispositivo HeadRush esté utilizando el firmware más reciente—toque el icono ••• en la
esquina superior derecha y toque Global Settings. La versión del firmware aparecerá en la parte inferior de la
pantalla.
40

Guide d’utilisation rapide (Français)
Présentation
Contenu de la boîte
HeadRush Gigboard
Câble USB
Câble d’alimentation
Carte de téléchargement de logiciel
Guide de démarrage
Consignes de sécurité et informations concernant la garantie
Important : Veuillez visiter headrushfx.com afin de télécharger le guide d’utilisation complet.
Assistance technique
Pour les toutes dernières informations concernant la documentation, les spécifications techniques, la
configuration requise, la compatibilité et l’enregistrement du produit, veuillez visiter headrushfx.com.
Pour de l’assistance supplémentaire, veuillez visiter le site headrushfx.com/support.
41

Caractéristiques
Panneau supérieur
1. Écran : Cet écran tactile multipoint couleur affiche les informations pertinentes aux opérations en cours du
HeadRush Gigboard. Touchez l'écran (et utilisez les commandes matérielles) pour contrôler l’interface.
Veuillez consulter la section Fonctionnement de base pour plus d'information.
2. Encodeur : Ce bouton permet de parcourir les options de menu disponibles ou d'ajuster les valeurs de
paramètre du champ sélectionné à l’écran. Appuyez sur le bouton pour confirmer la sélection.
3. Indicateurs des commutateurs au pied : Ces voyants indiquent si la configuration personnalisée, la scène
ou l’effet assigné à chaque commutateur est activé (forte intensité) ou désactivé (faible intensité).
4. Commutateurs au pied : Ces commutateurs au pied permettent d’activer ou de désactiver la modélisation, la
scène ou la configuration personnalisée assignée.
5. Volume principal : Ce bouton permet d’ajuster le volume des sorties.
42

Panneau arrière
3
5
6
13
1
12
14
2
1. Entrée guitare (6,35 mm, TS) : Cette entrée permet de brancher une guitare en utilisant un câble pour instrument
standard.
2. Entrée auxiliaire (3,5 mm, TRS) : Cette entrée permet de brancher une source audio (p. ex., smartphone, tablette,
etc.) en utilisant un câble stéréo de 3,5 mm.
3. Entrée pour pédale d’expression (6,35 mm, TRS) : Cette entrée permet de brancher une pédale d’expression
supplémentaire en utilisant un câble TRS (6,35 mm) standard pour instrument.
4. Entrée pour commutateur de pédale d’expression (6,35 mm, TS) : Cette entrée permet de brancher la sortie
commutateur d’une pédale d’expression supplémentaire en utilisant un câble TS (6,35 mm) standard.
5. Sorties (6,35 mm, TRS) : Ces sorties permettent de relier les entrées d’un amplificateur, d’une interface audio, etc.
Lorsqu’une seule sortie est requise, utilisez la sortie L/Mono.
Remarque : Ces sorties peuvent être réglées afin de transmettre un signal à niveau amplificateur ou à niveau ligne
(défaut) dans le menu des réglages généraux.
6. Sortie pour pédale d’amplificateur externe (6,35 mm, TRS) : Cette sortie permet de brancher l'entrée d’une
pédale d’amplificateur externe afin de permuter entre ses canaux ou d’activer ou désactiver l’effet de réverbération
avec le Gigboard.
IMPORTANT ! Branchez seulement cette sortie à des amplificateurs qui disposent d'une entrée pour pédale avec
« coupure à la masse » (short-to-sleeve). Brancher cette sortie à tout autre type d’entrée pour pédale pourrait
endommager votre matériel. Si vous n’êtes pas certain que votre amplificateur dispose d’une entrée pour pédale
avec « coupure à la masse », veuillez consulter son guide d’utilisation ou vérifier auprès du fabricant avant de le
brancher.
7. Sortie casque (6,35 mm, TRS) : Cette sortie permet de brancher un casque d’écoute stéréo 6,35 mm.
8. Sorties de départ d’effet (6,35 mm, TRS) : Ces sorties permettent de relier les entrées d’un autre module d’effets,
d’une pédale d’effets, ou du retour de boucle d’effets d’un amplificateur.
9. Entrées de retour d’effet (6,35 mm, TRS) : Ces entrées permettent de relier les sorties d’un autre module d’effets,
d’une pédale d’effets, ou du départ de boucle d’effets d’un amplificateur.
Remarque : Les entrées de retour d’effet peuvent être réglées afin de recevoir un signal provenant d’un module
d’effet ou d’une pédale (défaut) dans le menu des réglages généraux.
10. Entrée MIDI (DIN à 5 broches) : Cette entrée permet de relier la sortie MIDI d’un appareil MIDI externe en utilisant
un câble MIDI standard.
11. Sortie MIDI (DIN à 5 broches) : Cette sortie permet de relier l'entrée MIDI d’un appareil MIDI externe en utilisant un
câble MIDI standard.
12. Port USB : Ce port USB permet de brancher un ordinateur en utilisant un câble USB standard. Cette connexion
permet au HeadRush Gigboard de transmettre et de recevoir un signal audionumérique vers et depuis un
ordinateur. Vous pouvez également utiliser cette connexion pour importer et exporter des configurations
personnalisées, des préréglages de modélisation et des setlists.
13. Grille de ventilation : Cette grille de ventilation doit rester non obstruée lors de l’utilisation du HeadRush Gigboard.
14. Entrée d'alimentation : Utilisez le câble d’alimentation secteur fourni pour relier cette entrée à une prise secteur.
15. Interrupteur d'alimentation : Enfoncer cette touche permet de mettre le HeadRush Gigboard sous tension.
Maintenir cette touche enfoncée permet de mettre le HeadRush Gigboard hors tension.
4
789
10
11
15
43

A
Installation
Les articles qui ne figurent pas dans la section Présentation > Contenu de la boîte sont vendus séparément.
IMPORTANT ! Veillez à ce que les sorties dans le menu des réglages généraux soient réglées afin de pouvoir
transmettre un signal à niveau amplificateur, si vous utilisez un amplificateur pour guitare standard, ou à niveau ligne
(défaut), si vous utilisez un amplificateur, une console de mixage, une enceinte de sonorisation ou une interface audio à
réponse en fréquence plate étendue.
Guitare
mplificateur à réponse en fréquence plate
étendue ou amplificateur pour guitare
standard
Pédale
d'expression
Entrée pour pédale d’amplificateur
IMPORTANT ! Branchez seulement cette sortie à des amplificateurs qui disposent
d'une entrée pour pédale avec « coupure à la masse » (short-to-sleeve). Brancher
cette sortie à tout autre type d’entrée pour pédale pourrait endommager votre
matériel. Si vous n’êtes pas certain que votre amplificateur dispose d’une entrée
pour commutateur au pied avec « coupure à la masse » , veuillez consulter son
guide d’utilisation ou vérifier auprès du fabricant avant de le brancher.
Ordinateur
Prise de
courant
Pédale d'effet, modules externes,
etc.
44

Fonctionnement de base
Cette section explique certaines des fonctions de base du HeadRush Gigboard. Veuillez visiter headrushfx.com pour
télécharger le guide d’utilisation complet pour plus d’informations.
Fenêtre principale
Important : L’ordre des modélisations de la chaîne du signal ne reflète pas nécessairement l’ordre des commutateurs
au pied. Vous pouvez assigner des modélisations aux commutateurs au pied disponibles sans modifier la chaîne du
signal, et également modifier la chaîne du signal sans modifier les modélisations assignées aux commutateurs au pied.
Veuillez consulter la section Assignation matérielle afin d’en savoir plus.
Tapez pour afficher les setlists.
Tournez l'encodeur pour
parcourir les éléments
sélectionnables ou pour
modifier les paramètres.
Appuyez sur l'encodeur
pour confirmer la
sélection.
Double-tapez une
modélisation, In ou Out
pour afficher ses
paramètres.
Tapez et faites glisser cette barre vers le bas pour afficher la liste des configurations
personnalisées.
Nom de la configuration personnalisée.
Tapez son commutateur au pied
pour l’activer ou le désactiver.
Tapez pour sauvegarder la configuration personnalisée.
Ces quatre boutons indiquent les
fonctions des 4 commutateurs au pied.
Ce bouton permet de
parcourir les options de
routage pour la configuration
personnalisée.
Ce bouton permet d’activer
et de désactiver la queue de
réverbération ou de délais
lors du passage d’une
configuration personnalisée
à une autre.
Pour assigner une modélisation (d’amplificateur, d’enceinte ou d’effet) à un emplacement
vide, tapez l’emplacement (), puis sélectionnez une des modélisations dans la liste qui
s’affiche. Veuillez consulter la section Configurations personnalisées (rigs) > Création
d’une configuration personnalisée afin d’en savoir plus.
Pour afficher la page des paramètres de la modélisation, double-tapez sur la modélisation.
La fenêtre des paramètres devrait s’afficher avec le menu des préréglages, des paramètres et
la couleur qui lui est assignée.
Pour activer ou désactiver une modélisation, appuyez sur le commutateur au pied qui lui
est assigné, ou tapez sur le « commutateur au pied » de la modélisation à l’écran.
Pour charger une autre configuration personnalisée (rig) :
• Tapez sur ou à côté du nom de la configuration personnalisée à l'écran.
• Tapez sur le nom de la configuration personnalisée à l'écran, puis tournez
l'encodeur.
• Appuyez sur un commutateur au pied assigné à un préréglage lorsque le Gigboard
est en affichage Rig.
• Appuyez sur un commutateur au pied assigné à Prev Rig (configuration précédente)
ou Next Rig (configuration suivante) lorsque le Gigboard est en affichage Hybrid.
Pour afficher les autres options, tapez sur le bouton dans le coin supérieur droit et
sélectionnez une option.
Pour réorganiser les
modélisations dans
votre chaîne du
signal, tapez et faites
glisser une
modélisation vers un
autre emplacement ou
entre deux autres
modélisations (toutes
celles placées après
seront décalées d’un
emplacement dans la
chaîne du signal).
45

Modes des commutateurs au pied
Les quatre commutateurs au pied du HeadRush Gigboard peuvent
être utilisés pour activer et désactiver des modélisations
(d’amplificateur, d’enceinte ou d’effet), ainsi que pour sélectionner
des configurations personnalisées ou des setlists. Les quatre
commutateurs au pied se présentent toujours dans un des quatre
modes : Stomp, Rig, Hybrid ou Setlist.
Pour modifier la mode :
1. Maintenez le commutateur au pied 1 enfoncé. Les quatre
commutateurs adjacents correspondent alors aux quatre
modes : Stomp, Rig, Hybrid et Setlist.
2. Appuyez sur le commutateur au pied correspondant afin
d’accéder à ce mode.
Mode Stomp
Les commutateurs au pied 1 à 4 correspondent aux modélisations
(d’amplificateur, d’enceinte ou d’effet) ou aux scènes de la
configuration. Appuyez sur un commutateur au pied pour activer ou
désactiver la modélisation assignée.
Mode Rig
Les deux premiers commutateurs au pied correspondent aux
configurations personnalisées sauvegardées. Appuyez sur un des
commutateurs au pied afin de charger la configuration assignée.
Pour afficher les deux configurations précédentes, appuyez sur le commutateur au pied 3.
Pour afficher les deux configurations suivantes, appuyez sur le commutateur au pied 4.
Mode Alt Rig
Pour accéder au mode Alt Rig, allez à la page 2 des réglages
généraux et ensuite réglez le paramètre 4 Rigs / No Hold sur On.
Les commutateurs au pied 1-4 correspondent aux configurations personnalisées que vous avez sauvegardées.
Appuyez sur un des commutateurs au pied afin de charger la configuration personnalisée assignée.
Pour afficher la banque de quatre configurations personnalisées précédente, maintenez le commutateur au pied 2
enfoncé.
Pour afficher la banque de quatre configurations personnalisées suivante, maintenez le commutateur au pied 3
enfoncé.
Remarque : Vous ne pouvez pas accéder au mode mains libres ou au looper en utilisant le mode des configurations
personnalisées secondaires.
Mode Hybrid
Les 2 premiers commutateurs au pied peuvent être assignés pour
activer ou désactiver une modélisation ou pour choisir une scène
dans la configuration sélectionnée.
Pour afficher la configuration précédente, appuyez sur le commutateur au pied 3.
Pour afficher la configuration suivante, appuyez sur le commutateur au pied 4.
Mode Setlist
Pour afficher la setlist de toutes les configurations, appuyez
sur le commutateur au pied 1.
Pour sélectionner la setlist affichée, appuyez sur le commutateur au pied 2.
Pour afficher la setlist précédente, appuyez sur le commutateur au pied 3.
Pour afficher la setlist suivante, appuyez sur le commutateur au pied 4.
46

Configurations personnalisées (rigs)
Dans le HeadRush Gigboard, un rig est une configuration personnalisée : un ensemble de modélisations assignées
(modélisations d’amplificateurs, d’enceintes et d’effets) et des réglages des paramètres de chacune d’entre elles. Vous pouvez
créer, modifier, sauvegarder et charger des configurations personnalisées, facilitant le rappel des sons parfaits pour chaque
partie de votre prestation.
Chaque configuration personnalisée dispose de 11 emplacements, chacun pouvant être assigné qu’à une seule modélisation
(d’amplificateur, d’enceinte ou d’effet). Les emplacements assignés sont identifiés par des représentations graphiques des
modélisations, et les emplacements vides sont identifiés par le symbole .
Création d’une configuration personnalisée
Pour créer une nouvelle configuration personnalisée, tapez sur le
bouton dans le coin supérieur droit et tapez sur New Rig.
Pour assigner une modélisation (d’amplificateur, d’enceinte ou d’effet)
à un emplacement vide :
1. Tapez l’emplacement vide ().
2. Dans la liste qui s’affiche, tapez sur le type de modélisation que
vous souhaitez assigner : Amp (amplificateur), Cab (enceinte), ou
effet (Distortion, Dynamics/EQ, Modulation, Reverb/Delay, FX-
Loop ou Expression).
3. Dans la liste qui s’affiche, tapez sur la modélisation que vous
souhaitez assigner.
4. Dans la liste qui s’affiche ensuite, tapez sur le préréglage que vous
souhaitez charger pour cette modélisation.
Si vous chargez une modélisation d'amplificateur ou d'enceinte à un
emplacement adjacent à un emplacement vide, une modélisation
d'amplificateur ou d'enceinte similaire sera chargée automatiquement à
l’autre emplacement. Après quoi vous pourrez les configurer
indépendamment : vous pourrez les séparer dans la chaîne du signal,
modifier le type d’amplificateur ou d’enceinte, et supprimer chaque
modélisation séparément.
Optimisation de la chaîne du signal
La chaîne du signal représente le trajet qu’emprunte le signal audio depuis votre guitare jusqu’aux sorties du HeadRush
Gigboard en passant par les modélisations que vous avez sélectionnées. Vous pouvez utiliser l’écran tactile pour organiser les
modélisations sélectionnées dans n’importe quel ordre, mais il est possible que certaines configurations aient un meilleur son
que d’autres.
Voici quelques suggestions pour organiser les modélisations afin de créer des sons intéressants avec HeadRush Gigboard :
• Les pédales pour la dynamique (p. ex., compresseurs), les filtres (p. ex., wah-wah, transpositeur de la hauteur
tonale) et le volume sont généralement placées au début de la chaîne du signal. Il est également possible de placer
des pédales de volume à la fin de la chaîne du signal afin d’obtenir une fonctionnalité légèrement différente.
• Les pédales d’effets basés sur le gain (p. ex., saturation/distorsion, fuzz) sont généralement placées ensuite.
• Comme l’égalisation (EQ) est souvent utilisée pour façonner les caractéristiques tonales des effets de
saturation/distorsion et fuzz, placez une pédale d’égalisation après ceux-ci. Il est également possible d’en placer une
avant les pédales de gain afin de façonner la tonalité générale de la guitare, coupant ainsi les fréquences indésirables.
• Les effets de modulation tels que flanger, phaser et chorus sont généralement placés ensuite.
• Les effets temporels comme les délais et les réverbérations sont généralement placés vers la fin de la chaîne du
signal.
• Les amplificateurs et les enceintes sont généralement placés à la fin de la chaîne du signal, bien que vous puissiez
les placer là où vous le souhaitez.
Types de modélisations : amplificateurs,
enceintes et effets.
Préréglages disponibles pour chaque modélisation.
Modélisations disponibles
pour chaque type.
47

Sauvegarder une configuration personnalisée
Si vous avez modifié la configuration après l’avoir chargée, un astérisque () apparaît à côté de son nom dans le haut
de l’écran. Vous pouvez sauvegarder ces modifications dans cette configuration, sauvegarder ces modifications en tant
que nouvelle configuration, ou les supprimer.
Pour sauvegarder une configuration, tapez sur Save dans le coin
supérieur droit.
Pour sauvegarder les modifications dans la configuration
sélectionnée, tapez sur Save.
Pour sauvegarder les modifications en tant que nouvelle configuration, tapez sur Save New Rig, puis utilisez le
clavier qui s’affiche afin d’entrer un nom, puis tapez sur Save.
Pour revenir à la fenêtre précédente sans sauvegarder, vous pouvez taper sur Cancel à tout moment.
Pour supprimer les modifications apportées à la configuration, tapez sur le bouton dans le coin supérieur droit
et tapez sur Discard Changes.
Modification des réglages
Pour modifier les réglages d'une modélisation dans une configuration personnalisée, double-tapez le modèle pour
ouvrir sa fenêtre des réglages.
Tapez sur pour sauvegarder les
modifications et revenir à la fenêtre principale.
Tournez l'encodeur pour
parcourir les éléments
sélectionnables ou pour
modifier les paramètres.
Appuyez sur l'encodeur
pour confirmer la
sélection.
Tapez sur le menu
Preset pour
sélectionner un
préréglage.
Veuillez consulter
la section
Sauvegarder un préréglage
.
Tapez sur ce bouton
puis sur Discard
Changes pour
supprimer les
modifications apportées
depuis l’affichage de
cette fenêtre.
Tapez sur un bouton de
paramètre Off/On pour
modifier le réglage du
paramètre.
Tapez le nom de la
modélisation afin d’en
assigner une autre à cet
emplacement.
Tapez sur Delete afin
de supprimer
l’assignation de
modélisation de cet
emplacement.
Tapez une couleur pour l’assigner à cette
modélisation. Cette couleur s’affichera dans la
fenêtre principale, dans la fenêtre d’assignation
matérielle et dans l’indicateur de commutateur
au pied de cette modélisation.
Tapez sur Cancel pour annuler les modifications et
revenir à la fenêtre principale.
Tapez et faites glisser le
curseur à gauche ou à
droite pour modifier les
réglages du paramètre.
Vous pouvez également
taper le curseur et utiliser
l’encodeur pour faire des
modifications plus
précises.
Sauvegarder un préréglage
Pour sauvegarder un préréglage, tapez sur Save dans le coin
supérieur droit.
Pour sauvegarder les modifications au préréglage sélectionné,
tapez sur Save.
Pour sauvegarder les modifications en tant que nouveau préréglage, tapez sur Save New Preset, puis utilisez
le clavier qui s’affiche afin d’entrer un nom, puis tapez sur Save.
Pour revenir à la fenêtre précédente sans sauvegarder, tapez Cancel à n’importe quel moment.
48

Assignation matérielle
La fenêtre d’assignation matérielle vous permet de personnaliser
comment les commutateurs au pied et la pédale d’expression du
HeadRush Gigboard commande chaque configuration
personnalisée.
Pour ouvrir la fenêtre d’assignation matérielle, tapez sur le
bouton dans le coin supérieur droit de la fenêtre principal,
puis tapez sur Assign.
Pour retourner à la fenêtre principale, tapez sur le bouton
dans le coin supérieur gauche.
Important : Les réglages d’assignation matérielle font tous partie
de la configuration personnalisée, alors n’oubliez pas de
sauvegarder les modifications que vous désirez conserver.
Pour définir la couleur associée à la configuration, tapez-la dans la partie supérieure gauche de la fenêtre. Cette
couleur apparaîtra à côté du nom de la configuration lorsque la liste de toutes les configurations disponibles s’affiche
ou lorsque vous affichez et créez des setlists. Ce sera également la couleur de l'indicateur du commutateur au pied
correspondant du HeadRush Gigboard en Mode Rig.
Pour définir le tempo des effets temporels de la configuration (délais, modulation, etc.), tapez le bouton sous
Tempo afin de sélectionner Current ou Fixed.
• Current : La configuration utilisera le dernier tempo utilisé ou celui réglé par le commutateur au pied Tempo.
Pour définir le tempo, appuyez sur le commutateur au pied Tempo 3 à 8 fois au tempo désiré pour définir le
nouveau tempo en battements par minute (BPM).
• Fixed : La configuration utilisera le tempo que vous réglez ici.
Pour définir le tempo en battements par minute (BPM), tournez l’encodeur au tempo désiré. Vous pouvez
définir le tempo uniquement à partir de cette fenêtre.
Pour charger une configuration lorsqu’un message de changement de programme MIDI est reçu d’un appareil
MIDI externe, ou pour transmettre un message de changement de programme MIDI lorsqu’une configuration est
chargée, tapez le bouton sous MIDI, puis tournez l’encodeur pour sélectionner un numéro de changement de
programme MIDI. Le menu des réglages généraux permet de définir si les messages de changement de programme
MIDI sont reçus ou transmis.
Remarque : Si un numéro de programme est déjà utilisé par une configuration, il ne pourra pas être assigné à une autre
configuration. De même, sauvegarder une configuration sous un nouveau nom entraînera la sauvegarde de cette
configuration sans son numéro de changement de programme afin d’éviter que deux configurations n’aient le même
numéro.
Commutateurs au pied
Les quatre cases dans le coin inférieur gauche représentent les quatre commutateurs au pied du HeadRush Gigboard.
Vous pouvez assigner n'importe quel paramètre de commutation (ceux n’ayant que deux états) à l’un des
commutateurs au pied indépendamment de leur position dans la chaîne du signal.
Pour assigner un paramètre à un commutateur au pied :
1. Tapez sur une des cases. indique une case vide.
2. Dans la liste qui s’affiche, tapez sur la modélisation avec le
paramètre que vous souhaitez assigner.
3. Dans la liste qui s’affiche, tapez sur le paramètre que vous
souhaitez assigner. Généralement, le paramètre sera simplement
réglé sur On (pour l’activer ou le désactiver).
Tapez sur Unassigned afin de supprimer l’assignation de ce
commutateur au pied.
Pour permuter deux assignations, tapez-en une et faites-la glisser
sur l’autre, puis relâchez-la.
49

Amplicateur externe
Vous pouvez assigner un commutateur afin de transmettre un signal à
l’entrée de la pédale de votre amplificateur en utilisant la sortie pour
pédale d’amplificateur externe. Vous pouvez utiliser cette
fonctionnalité afin de permuter entre les canaux clair et saturé de
l’amplificateur ou pour activer ou désactiver l’effet de réverbération.
Pour utiliser cette fonctionnalité durant le changement de
configuration, tapez le bouton sous Ext Amp dans la fenêtre
d’assignation matérielle, puis sélectionnez Tip (pointe), Ring (bague)
ou Both (les deux). Si vous n’êtes pas certain du réglage à utiliser,
veuillez consulter le guide d’utilisation de votre amplificateur ou
vérifier auprès du fabricant.
Cette fonctionnalité peut également être assignée à un commutateur au pied à partir de la fenêtre de sélection des
modélisations qui s’affiche lors de l’assignation des fonctions des commutateurs au pied.
Cette fonction peut également être assignée à une scène en modifiant le paramètre dans la fenêtre de modification de
scène.
IMPORTANT ! Branchez seulement cette sortie à des amplificateurs qui disposent d'une entrée pour pédale avec
« coupure à la masse » (short-to-sleeve). Brancher cette sortie à tout autre type d’entrée pour pédale pourrait
endommager votre matériel. Si vous n’êtes pas certain que votre amplificateur dispose d’une entrée pour commutateur
au pied avec « coupure à la masse », veuillez consulter son guide d’utilisation ou vérifier auprès du fabricant avant de le
brancher.
Scènes
La fonction Scène vous permet d'activer ou de désactiver plusieurs modélisations d’un coup dans chaque
configuration. Lorsque vous appuyez sur le commutateur au pied assigné à une scène, toutes les modélisations
regroupées dans cette scène s’activent ou se désactivent, selon la façon dont vous les avez assignées. C'est un
excellent moyen de créer plusieurs tonalités au sein d’une même configuration. Par exemple, vous pouvez vouloir une
modélisation de réverbération particulière chaque fois qu’une certaine modélisation de distorsion est également activée.
Ou bien, vous pouvez vouloir désactiver une modélisation de délai lorsque vous en activez une autre. Les scènes vous
permettent de faire tout cela d’une seule pression de commutateur au pied.
Pour créer et modifier une scène :
1. Dans la fenêtre d’assignation matérielle, tapez sur Toggle/Scene
pour le commutateur au pied désiré afin de parcourir les options
disponibles, puis sélectionnez Scene.
2. Sur cette modélisation, tapez sur Edit. La fenêtre de modification
de scène apparaîtra et affichera toutes les modélisations de la
configuration.
3. Tapez chaque modélisation de la configuration pour faire défiler
les options disponibles :
• On : Cette option fait en sorte que la modélisation sera activée
automatiquement lorsque la scène sera activée.
• Off : Cette option fait en sorte que la modélisation sera
désactivée automatiquement lorsque la scène sera activée.
• No Change : Cette option fait en sorte que la modélisation
ne sera pas affectée lorsque la scène sera activée.
4. Tapez sur une couleur dans le bas de l’écran tactile afin de
sélectionner une couleur pour la scène.
5. Tapez sur le bouton dans le coin supérieur gauche pour
retourner à la fenêtre d’assignation matérielle.
Pour renommer une scène (qui apparaît dans les indicateurs des commutateurs au pied), tapez le texte dans la case
située sous Edit dans la modélisation, saisissez un nom avec le clavier virtuel qui apparaît puis tapez l’écran n’importe
où ailleurs que dans le champ de texte.
50

Pédale d'expression
Vous pouvez relier une pédale d'expression (vendue séparément) afin de commander deux paramètres (en mode
Classic) ou deux ensembles de paramètres (en mode Advanced). Si la pédale dispose d’un commutateur, utilisezle pour commuter entre la pédale d’expression A et B.
Remarque : Lorsque vous sauvegardez une configuration personnalisée, l’état actuel de la pédale d’expression
sélectionnée (A ou B) est sauvegardé et ensuite rappelé lorsque vous chargez de nouveau la configuration
personnalisée.
La colonne de quatre cases représente les paramètres de la pédale
d’expression. Vous pouvez assigner un ou plusieurs paramètres réglables en
continu (ceux avec une plage de valeurs) à la pédale d’expression.
Pour définir le mode de la pédale d’expression, tapez sur le bouton
au-dessus de Range dans le coin supérieur droit pour sélectionner Classic ou
Advanced.
• Classic : Vous pouvez assigner un paramètre à chaque pédale
d’expression (A et B). L'utilisation du commutateur permet de
sélectionner l'autre pédale d'expression et de désactiver (déviation) le
paramètre de la pédale d'expression actuelle. Par exemple, si vous
assignez une pédale wah-wah à la pédale d’expression A et une pédale
de volume à la pédale d’expression B, qu’une seule pédale sera active
à la fois ; lorsque vous commandez la pédale wah-wah, la pédale de
volume est désactivée, et vice versa.
• Advanced : Vous pouvez assigner jusqu’à quatre paramètres à chaque pédale d’expression (A et B).
Déplacer la pédale permet de modifier simultanément tous les paramètres qui lui sont assignés.
L'utilisation du commutateur permet de sélectionner l'autre pédale d'expression tout en laissant les
paramètres de la pédale d'expression actuelle activés et à leurs valeurs maximales.
Pour assigner un paramètre à la pédale d’expression :
1. Si le bouton Assign n'est pas allumé, tapez-le.
2. Tapez sur une des cases sous le bouton Assign. indique une
case vide.
3. Dans la liste qui s’affiche, tapez sur la modélisation avec le
paramètre que vous souhaitez assigner.
4. Dans la liste qui s’affiche, tapez sur le paramètre que vous
souhaitez assigner.
Tapez sur Unassigned afin de supprimer l’assignation
pour cette case.
Pour permuter deux assignations (en mode Avanced), tapez-en
une et faites-la glisser sur l’autre, puis relâchez-la.
Pour définir la plage d'un paramètre assigné :
1. Si le bouton Range n'est pas allumé, tapez-le.
2. Tapez sur une des valeurs sous le bouton Range.
3. Tournez l’encodeur pour définir la valeur pour l’ensemble de la plage du paramètre en
pourcentage. Appuyez sur l’encodeur ou tap
valeur.
ez ailleurs sur l’écran afin de confirmer la
51

Setlists
Vous pouvez utiliser des setlists pour organiser les configurations personnalisées. Une setlist est une collection de
configurations que vous pouvez sauvegarder et rappeler. Ceci s’avère utile lorsque vous avez uniquement besoin de
certaines de vos configurations pour une prestation ; vous pouvez sauvegarder une setlist avec uniquement les
configurations dont vous avez besoin et de cette façon vous n’aurez pas cherché à travers toutes vos configurations
pour trouver la prochaine chanson.
Pour afficher vos setlists, tapez sur le bouton ≡ dans le coin supérieur gauche de la fenêtre principale. La fenêtre
Setlists s’affiche.
Pour retourner à la fenêtre principale, tapez sur le bouton dans le coin supérieur gauche.
Pour créer une setlist :
1. Tapez sur New dans le coin supérieur droit.
2. Dans la fenêtre qui s’affiche, la partie gauche est une liste de toutes les
configurations disponibles, et la partie droite est la liste des
configurations dans la setlist.
Pour ajouter une configuration à la setlist, tapez-la afin de l’ajouter à
la fin de la liste. Vous pouvez également cliquer sur la configuration et
la faire glisser à l’endroit souhaité dans la liste. Vous pouvez ajouter la
même configuration à une setlist plus d'une fois. La configuration
[Empty ] dans le coin inférieur gauche est un emplacement réservé
pour faciliter la réorganisation des setlists ; elle n’est pas
sélectionnable lorsque vous parcourez les configurations dans la
setlist.
Pour réorganiser la setlist, tapez sur la configuration dans la liste de droite, puis faites-la glisser à l'endroit désiré
dans la liste.
Pour supprimer une configuration de la setlist, tapez sur le à droite.
Pour sauvegarder une setlist, tapez sur Save dans le coin supérieur droit.
Pour sauvegarder les modifications que vous avez apportées à la
setlist sélectionnée, tapez sur Save.
Pour sauvegarder les modifications en tant que nouvelle setlist, tapez sur Save New Setlist, puis utilisez le
clavier qui s’affiche afin d’entrer un nom, puis tapez sur Save.
(À tout moment) Pour revenir à la fenêtre précédente sans sauvegarder les modifications apportées, tapez sur
Cancel.
Pour supprimer les modifications apportées à la setlist, tapez sur le
bouton dans le coin supérieur droit et tapez sur Discard Changes.
Pour charger une setlist :
1. À partir de la fenêtre principale, tapez sur le bouton ≡ dans le coin
supérieur gauche pour afficher la fenêtre Setlists. Chaque setlist affiche
le nombre de configurations entre parenthèses (y compris les multiples
occurrences d'une même configuration).
2. Tapez sur la setlist désirée. La première configuration de cette setlist
sera chargée immédiatement. Tapez sur All Rigs pour afficher toutes les
configurations au lieu d'une setlist précise.
Pour modifier une setlist, tapez sur le bouton
tapez sur l'ic
s’affichera, vous permettant de modifier et de sauvegarder la setlist.
Pour supprimer une setlist, tapez sur le bouton sur le côté gauche, puis tapez sur l'icône de la poubelle. Tapez
sur Yes afin de confirmer la suppression ou sur Cancel afin d’annuler l’opération et de revenir à la fenêtre Setlists.
ône du crayon. La même fenêtre utilisée pour créer la setlist
sur le côté gauche, puis
52

Mode mains libres
Le mode mains libres vous permet de modifier n’importe lequel des
réglages des modélisations en n’utilisant que les commutateurs au
pied et/ou une pédale d'expression optionnelle (vendue
séparément).
Pour accéder au mode mains libre, appuyez sur le commutateur
au pied 2 pendant plus d’une seconde. En mode mains libres, la
fenêtre affiche un seul des paramètres et sa valeur.
Pour modifier la valeur, appuyez sur le commutateur au pied 1
(diminuer) ou sur commutateur au pied 2 (augmenter). Vous
pouvez également modifier la valeur en utilisant une pédale
d'expression externe.
Pour afficher le paramètre suivant, appuyez sur le commutateur
au pied 3.
Pour afficher le paramètre précédent, maintenez le commutateur
au pied 3 enfoncé.
Pour afficher le paramètre suivant, appuyez sur le commutateur
au pied 4.
Pour quitter le mode mains libres, maintenez le commutateur au
pied 4 enfoncé.
Accordage de la guitare et réglage du tempo
Vous pouvez utiliser la fenêtre d’accordage et du réglage du tempo pour accorder votre guitare et régler le tempo
des effets temporels.
Pour afficher la fenêtre d’accordage de la guitare et du réglage
du tempo, maintenez le commutateur au pied 4 enfoncé pendant
plus d’une seconde. Lorsque le mode d’accordage de la guitare et
du réglage du tempo est activé, la fenêtre à droite s’affiche.
Pour modifier la hauteur de référence de l’accorder, tapez sur le
paramètre, puis tournez l'encodeur.
Pour désactiver la mise en sourdine du signal lors de
l’accordage, appuyez sur le commutateur au pied 1.
Pour définir le tempo en utilisant un commutateur au pied,
appuyez sur le commutateur au pied 3 de 3 à 8 fois au tempo
désiré pour définir le tempo en battements par minute (BPM).
Pour quitter, appuyez sur le commutateur au pied 4.
53

Looper
Le HeadRush Gigboard possède un looper intégré que vous pouvez utiliser pour superposer vos interprétations.
Lorsque le looper est affiché à l'écran, vous pouvez en contrôler la majeure partie de façon pratique avec les
commutateurs au pied.
Le looper peut enregistrer jusqu'à 20 minutes d’audio à la fois sur un maximum de 50 couches.
Cet indicateur
représente la position
actuelle du curseur
dans la boucle durant
l'enregistrement ou la
lecture.
Indique combien de
couches sont lues
dans la boucle
actuelle, y compris
l'interprétation
originale.
Indique la vitesse
actuelle de la boucle
sous forme de multiple
ou fraction de
l'originale.
Indique la durée de la boucle
sélectionnée.
Nom de la configuration personnalisée.
Indique le sens de lecture.
Contrôle la quantité du
signal du looper qui est
acheminée aux sorties.
Contrôle la quantité du
signal du looper qui lui est
renvoyé lors de
l'enregistrement d'une
nouvelle couche.
Indique si le looper est placé avant (Pre) ou
après (Post) votre chaîne de signal. Placer
le looper en position Pre vous permet de
modifier votre configuration sans avoir à
chaque fois à rejouer le même riff.
Pour enregistrer la première couche d'une boucle, appuyez sur le commutateur au pied Record.
L'enregistrement commencera immédiatement et l’indicateur du commutateur au pied deviendra rouge.
Appuyez de nouveau sur le commutateur au pied Record pour arrêter l'enregistrement et lancer la lecture en
boucle. Le commutateur au pied s’appelle maintenant Overdub (superposition) et son indicateur est jaune.
Pour enregistrer d’autres couches dans la boucle (les superposer), appuyez sur le commutateur au pied
Overdub. La superposition commencera immédiatement et l’indicateur du commutateur au pied deviendra
rouge. Appuyez de nouveau le commutateur au pied Overdub pour arrêter la superposition et poursuivre la
lecture.
Pour supprimer la couche la plus haute (la dernière ajoutée) de la boucle, appuyez sur le commutateur au pied
Peel. La couche la plus haute de la boucle sera immédiatement supprimée. Cette suppression est irréversible,
vous ne pourrez pas la rajouter par la suite.
Pour supprimer toute la boucle, maintenez le commutateur au pied Clear enfoncé. Ce processus arrête la
lecture et supprime la boucle. La suppression est irréversible, vous ne pourrez pas la rajouter par la suite.
Pour diviser ou multiplier par deux la durée de la boucle, tapez le bouton à côté du champ Length, puis
tournez l’encodeur. Le processus de division par deux n’est pas irréversible, de sorte que vous pouvez
restaurer votre boucle d’origine et son contenu en multipliant par deux la durée de la boucle.
Pour diviser ou multiplier par deux la vitesse du looper, tapez le bouton à côté du champ Speed, puis tournez
l’encodeur.
Astuce : Utilisez cela pour créer des lignes de basses très graves ou des parties de guitare ultra hautes que vous
ne pourriez pas jouer normalement.
54

Pour inverser le sens de lecture du looper, tapez le bouton à côté du champ Playback, puis tournez
l’encodeur.
Astuce : Créez d’inquiétants effets en enregistrant les couches à l’envers puis en revenant en lecture normale.
Pour choisir l'emplacement du looper, tapez le bouton à côté du champ Playback, puis tournez l’encodeur
afin de le placer avant (Pre) ou après (Post) la chaîne de signal. Placer le looper en position Pre vous permet de
modifier votre configuration sans avoir à chaque fois à rejouer le même riff.
Pour quitter le looper et revenir à la fenêtre principale, appuyez sur le commutateur au pied Exit. Si le looper
est en cours de lecture, la lecture se poursuit.
Pour revenir au looper, appuyez de nouveau sur le commutateur au pied Looper.
Astuce : Utilisez cette fonction afin de créer différentes configurations d’effets (réglages de paramètres,
activation/désactivation de modélisations, etc.) pour chaque couche, créant ainsi une interprétation à multiples
textures. Vous pouvez également changer de configuration pendant l’utilisation du looper et faire appel à une
configuration différente pour chaque couche.
Réglages généraux (Global Settings)
Utilisez les réglages généraux pour configurer le fonctionnement
général du HeadRush Gigboard.
Pour afficher les réglages généraux, tapez sur le bouton
dans le coin supérieur droit de la fenêtre, puis tapez sur Global
Settings.
Pour sélectionner chaque fenêtre des réglages généraux,
tapez le numéro au bas de l'écran.
LCD Brightness : Ce paramètre détermine la luminosité de l’écran principal. Tapez ce champ, tournez l'encodeur pour
sélectionner une valeur de 1 (luminosité faible) à 5 (luminosité forte) puis pressez l'encodeur.
Audio Configuration (Configuration audio) :
Main Out Level : Ce paramètre détermine le niveau du signal acheminé aux sorties principales (6.35 mm, TRS).
Lorsque ce paramètre est réglé sur Line, le niveau de sortie est de +18 dBu. Utilisez ce réglage si vous connectez
le HeadRush Gigboard à un amplificateur, une console de mixage, une enceinte de sonorisation ou une interface
audio à réponse en fréquence plate étendue. Lorsque ce paramètre est réglé sur Amp, le niveau de sortie est de
+6 dBu. Utilisez ce réglage si vous connectez le HeadRush Gigboard à un amplificateur pour guitare standard.
FX Return Level : Ce paramètre détermine le niveau du signal reçu par l’entrée de retour d’effets (6.35 mm, TRS).
Lorsque se paramètre est réglé sur Rack, la sortie est à niveau ligne, soit +18 dBu. Utilisez ce réglage si vous
connectez un processeur d’effet à la FX-Loop du HeadRush Gigboard. Lorsque ce paramètre est réglé sur
Stomp, le niveau de sortie est de +6 dBu. Utilisez ce réglage si vous connectez le une pédale d’effet standard
(stompbox) à la FX-Loop.
55

USB Audio Settings (Paramètres audio USB) :
Remarque : Veuillez visiter headrushfx.com pour télécharger le guide d'utilisation complet du HeadRush Gigboard afin
d’apprendre comment configurer votre logiciel audionumérique (DAW).
Note importante pour des utilisateurs Windows : Avant de brancher le HeadRush Gigboard à votre ordinateur,
veuillez télécharger et installer les pilotes nécessaires en visitant le site headrushfx.com/support.
Sample Rate : ce paramètre détermine la fréquence d'échantillonnage du signal audio USB : 44,1 kHz, 48,0 kHz or
96,0 kHz. Pensez bien à sélectionner la même fréquence d'échantillonnage que dans votre logiciel
audionumérique (DAW). De plus, réglez-la avant d’ouvrir votre logiciel audio numérique.
USB Audio : ce paramètre détermine si le HeadRush Gigboard transmet ou non un signal audio USB par la
connexion USB. Tapez On pour permettre la transmission du signal audio USB à la fréquence d'échantillonnage
sélectionnée selon le paramètre Sample Rate. Tapez Off pour désactiver le signal audio USB. (Pour modifier la
fréquence d'échantillonnage, commencez par régler USB Audio sur Off, sélectionnez la fréquence
d’échantillonnage souhaitée, réglez à nouveau USB Audio sur On et faites redémarrer votre logiciel
audionumérique.)
USB Mode : Ce paramètre détermine comment le HeadRush Gigboard transmet son signal audio par la connexion
USB et comment fonctionnent ses sorties :
• Live : Le signal audio est transmis à votre ordinateur ainsi qu’aux sorties du HeadRush Gigboard.
• DAW : Le signal audio est transmis à votre ordinateur seulement. Les sorties du HeadRush Gigboard sont
désactivées pour éviter toute latence pendant l’écoute.
• Reamp : Votre ordinateur transmet un signal audio au HeadRush Gigboard qui le traite au moyen de la
configuration sélectionnée et le renvoie à votre ordinateur. Les sorties du HeadRush Gigboard sont
désactivées pour éviter toute latence pendant l’écoute.
Assignments (Assignations) :
Auto Assign : Ce paramètre détermine comment les modélisations sont assignées aux commutateurs au pied.
Tapez On si vous souhaitez que les modélisations soient automatiquement assignées au prochain commutateur
au pied disponible quand vous les chargez. Tapez Off si vous souhaitez que les modélisations soient chargées
sans être assignées à un commutateur au pied ; vous aurez à les assigner manuellement dans la fenêtre
d’assignation matérielle.
Expression Pedal / Ext Amp (Pédale d’expression / amplificateur externe) :
Toe Switch : Modifiez le réglage de ce paramètre à Latch si votre pédale d’expression utilise un contacteur au
pied à bascule ou Momnt si votre pédale d’expression utilise un contacteur au pied momentané.
Pedal Polarity : Si la pédale d’expression semble enregistrer le mouvement dans la mauvaise direction, vous
pouvez modifier ce paramètre afin d’inverser sa polarité. Cette option permet de sélectionner entre une polarité
Norm (normale) et Inv (inversée).
Ext Amp Polarity : Si l’amplificateur externe semble recevoir les messages contraires à ce que vous souhaitez,
vous pouvez modifier ce paramètre afin d’inverser les messages envoyés à la sortie pour pédale d’amplificateur
externe. Cette option permet de sélectionner entre une polarité Norm (normale) et Inv (inversée).
MIDI Setting
s (Paramètres MIDI) : Ces paramètres déterminent la façon dont le HeadRush Gigboard transmet et
reçoit les informations MIDI à destination et en provenance d’appareils externes. Ces paramètres n’affectent que
l'entrée MIDI ou la sortie MIDI du HeadRush Gigboard.
MIDI Thru : Tapez On pour utiliser la sortie MIDI comme une prise de renvoi MIDI ; tout message MIDI adressé à
l’entrée MIDI du HeadRush Gigboard sera directement renvoyé par la sortie MIDI. Toapez Off pour utiliser
normalement la sortie MIDI du HeadRush Gigboard ; celui-ci pourra transmettre ses propres messages MIDI par
la sortie MIDI.
Recv MIDI Clock : Tapez On pour permettre au HeadRush Gigboard de recevoir les messages d'horloge MIDI.
Tapez Off pour utiliser l’horloge MIDI interne propre au HeadRush Gigboard (qui ne sera pas transmise).
Prog Change : Tapez Send (transmettre) pour activer ou désactiver la transmission par le HeadRush Gigboard de
messages MIDI de changement de programme lorsque vous chargez une configuration. Tapez Recv pour activer
ou désactiver la réception par le HeadRush Gigboard de messages MIDI de changement de programme venant
d'un appareil MIDI externe.
MIDI Channel : Ce paramètre détermine le ou les canaux MIDI sur lesquels le HeadRush Gigboard transmettra et
recevra les messages MIDI. Tapez ce champ, tournez l'encodeur pour sélectionner tous les canaux (Omni) ou un
canal de 1 à 16 puis appuyez sur l'encodeur.
56

Reminders (Rappels) :
Confirm Unsaved : Ce paramètre détermine si vous verrez
ou non un message de confirmation au moment de
changer de configuration alors que des modifications non
sauvegardées ont été effectuées sur celle actuellement
utilisée. Tapez On pour activer ces messages ou Off pour
les désactiver.
Sinon, tapez Do not show this dialog again (ne plus afficher cette boîte de dialogue) dans le message lui-même
pour les désactiver.
Global EQ (Égalisation générale) :
Les paramètres sur la page 2 déterminent si et comment
l’égalisation est appliquée aux sorties. Cet égaliseur est un
égaliseur paramétrique quatre bandes.
Astuce : Ces paramètres sont particulièrement utiles lorsqu’une
salle, un espace de répétition, etc. a différentes caractéristiques
acoustiques que la salle où vous avez créé vos préréglages (p. ex.,
la salle peut plus de résonnance ou un espace de répétition avec de
l'insonorisation peut amortir une partie des aigus). Cette page vous
permet d'appliquer rapidement une égalisation supplémentaire à
tous vos préréglages sans les sauvegarder.
EQ On : Ce paramètre détermine si l’égalisation est activée (On) ou désactivée (Off) sur les sorties.
Level : Ce paramètre détermine si et de combien le niveau du signal des sorties est augmenté ou coupé. Le niveau
du signal est commandé par le bouton Main (Principal).
Low Band et High Band : Ces paramètres déterminent quel type d'égalisation est appliqué à la bande de
fréquences la plus basse (Low Band) et à la bande de fréquences la plus haute (High Band): Shelf or Cut.
Low, Low Mid, High et High Mid : Les trois paramètres de chacune de ces quatre bandes de fréquences
déterminent la forme de l'égalisation :
Le premier paramètre (Hz) détermine la fréquence centrale de la bande de fréquences basses, de la bande de
fréquences basses-moyennes, de la bande de fréquences hautes ou de la bande de fréquences hautes-
moyennes.
Le deuxième paramètre (dB) détermine dans quelle mesure l'égaliseur augmente ou coupe le signal sur la
bande de fréquence correspondante.
Le troisième paramètre (Q) détermine la largeur de la bande de fréquences. Plus le réglage est élevé, plus la
bande sera large autour de la fréquence centrale (le premier paramètre). Ce paramètre est appliqué peu
importe si Low Band ou High Band est défini sur Shelf ou Cut.
Alt Rig Footswitch View (Affichage du commutateur au pied Mode Alt Rig) :
4 Rigs / No Hold : Modifiez le réglage de ce paramètre sur On pour basculer du mode Rig au Mode Alt Rig.
Veuillez consulter la section Modes des commutateurs au pied afin d’en savoir plus.
Color Mod :
Si vous ne parvenez pas à distinguer certaines couleurs sur l’écran du Gigboard ou si vous souhaitez simplement
personnaliser davantage la palette des couleurs, vous pouvez modifier les réglages par défaut des paramètres color
mod. Durant le réglage des paramètres, une partie des modifications s’affiche en temps réel. Si vous souhaitez revenir
à la palette des couleurs par défaut, les paramètres par défaut sont les suivants :
Depth: 0% Color: 36 DEG Spread: 180 DEG
Remarque : La fonction Color Mod est désactivée lorsque la fonction de verrouillage de l’écran est activée.
57

Transfert de fichiers et paramètres
Par le biais d'une connexion USB, vous pouvez transférer
des fichiers de configuration personnalisée, de setlist, de
préréglage de modèle, de boucle et/ou de réponse
impulsionnelle (IR) entre l’ordinateur et le HeadRush
Gigboard.
Nous vous recommandons de créer une copie de
sauvegarde de vos fichiers sur votre ordinateur avant
d'apporter des modifications.
Important :
Veillez à ne pas débrancher ou à éteindre le HeadRush
Gigboard pendant ce processus.
Tous les fichiers non pris en charge seront ignorés.
Vous ne pouvez transférer de dossier, dossier zip ou de
dossier d'archivage vers/depuis le HeadRush Gigboard,
transférez plutôt les fichiers pris en charge directement.
Nous vous recommandons d'organiser la structure des
fichiers de configurations personnalisées, de setlists, de
préréglages de modèle et/ou de fichiers de réponse
impulsionnelle sur votre ordinateur afin qu'elle soit identique
à la structure de fichiers indiquée sur le « lecteur » du
HeadRush Gigboard.
Pour transférer des fichiers entre le HeadRush Gigboard et votre ordinateur :
1. Reliez votre ordinateur au port USB du HeadRush Gigboard en utilisant un câble USB standard.
2. Avec l’ordinateur sous tension, allumez le HeadRush Gigboard à l'aide de l'interrupteur d'alimentation.
3. Tapez sur le bouton dans le coin supérieur droit de la fenêtre, puis tapez sur Global Settings.
4. Dans la fenêtre qui s’affiche, tapez sur le bouton dans le coin supérieur droit, puis tapez sur USB Transfer.
Sur l’ordinateur, le HeadRush Gigboard s’affichera comme périphérique de stockage de masse appelé
HeadRush.
Utilisateurs Windows : Si c'est la première fois que vous le connectez à cet ordinateur, vous devrez peut-
être attendre une minute pendant qu'il installe les pilotes.
5. Ouvrez le lecteur HeadRush. Vous pouvez maintenant cliquer et faire glisser librement le contenu entre le
lecteur HeadRush et votre ordinateur. Notez que toutes les modifications apportées au contenu du lecteur
HeadRush prennent effet immédiatement et ne peuvent être annulées.
6. IMPORTANT : Lorsque vous avez terminé de transférer
le contenu, vous devez éjecter le lecteur HeadRush de
votre ordinateur. Une corruption de fichier peut se
produire si le lecteur n'est pas correctement éjecté.
7. Une fois le lecteur éjecté, tapez sur Sync sur le
HeadRush Gigboard pour confirmer toutes les
modifications que vous avez apportées au contenu du
lecteur HeadRush. Une invite supplémentaire
s’affichera pour confirmer que vous avez éjecté le
lecteur. Tapez sur Proceed pour continuer ou sur
Cancel pour continuer à parcourir les fichiers sur votre
ordinateur.
Lorsque le HeadRush Gigboard analyse et importe les
fichiers, un indicateur indique sa progression. La fenêtre
Global Settings s’affichera une fois le processus
terminé. Veillez à ne pas débrancher ou à éteindre le
HeadRush Gigboard pendant le processus.
58

Instructions de mise à jour du micrologiciel
1. Reliez le port USB de votre appareil HeadRush à votre ordinateur et veillez à ce que l'appareil HeadRush et
votre ordinateur soient sous tension.
2. Sur votre appareil HeadRush, appuyez sur l'icône ••• dans le coin supérieur droit, puis tapez sur Global
Settings.
3. Dans la fenêtre qui s’affiche, appuyez de nouveau sur l'icône ••• dans le coin supérieur droit, puis tapez sur
Firmware Update. Dans la fenêtre qui s’affiche, appuyez sur OK pour continuer. Après le redémarrage,
Update s’affichera dans le bas de l’écran.
4. Ouvrez l'application HeadRush Updater pour votre système d'exploitation : Windows ou macOS. Vous
pouvez télécharger la dernière version de l’application de mise à jour à partir de headrushfx.com.
5. Lorsque la fenêtre de mise à jour s’affiche, cliquez sur Update HeadRush. Veillez à ne pas débrancher ou à
éteindre l’appareil HeadRush ou votre ordinateur tant que la mise à jour n’est pas terminée.
6. Lorsque la mise à jour est terminée, la fenêtre de mise à jour affiche Done et l’appareil HeadRush redémarre.
Cliquer sur Done pour fermer la fenêtre de mise à jour.
7. Pour confirmer que l’appareil HeadRush utilise bien la dernière version du micrologiciel, tapez sur l'icône •••
dans le coin supérieur droit, puis tapez sur Global Settings. La version du micrologiciel s’affichera dans le
bas de l’écran.
59

Guida rapida (Italiano)
Introduzione
Contenuti della confezione
HeadRush Gigboard
Cavo USB
Cavo di alimentazione
Scheda di download del Software
Guida rapida
Istruzioni di sicurezza e garanzia
Importante: recarsi alla pagina headrushfx.com per scaricare la guida per l’uso completa.
Assistenza
Per le ultime informazioni in merito a questo prodotto (documentazione, specifiche tecniche, requisiti di sistema,
informazioni sulla compatibilità, ecc.) e per effettuarne la registrazione, recarsi alla pagina headrushfx.com.
Per ulteriore assistenza sul prodotto, recarsi alla pagina headrushfx.com/support.
60

Caratteristiche
Pannello superiore
1. Display: questo display multi-touch a colori mostra informazioni specifiche per l'operazione corrente
dell'HeadRush Gigboard. Toccare il display (e servirsi dei comandi hardware) per controllare l'interfaccia. Si
veda Funzionamento base
2. Codificatore: girare il codificatore per scorrere tra le opzioni disponibili del menù o regolare i valori dei
parametri del campo selezionato a display. Premere il codificatore per confermare la scelta.
3. Indicatori dell’interruttore a pedale: queste spie indicano se lo stomp, l’impianto o la scena assegnati a
ciascun interruttore a pedale è acceso (spia illuminata in maniera intensa) o spento (spia illuminata in maniera
smorzata).
4. Interruttori a pedale: premere questi interruttori a pedale per attivare o disattivare il modello assegnato o la
scena, o per caricare l’impianto assegnato.
5. Main (Primario) Volume: girare questa manopola per regolare il volume delle uscite.
per saperne di più sul suo funzionamento.
61

Pannello posteriore
3
5
6
13
1
12
14
2
1. Ingresso chitarra (1/4"/6,35 mm, TS): collegare la chitarra a questo ingresso servendosi di un cavo
strumentale standard.
2. Ingresso Aux (1/8”/3,5 mm, TRS): collegare una fonte audio opzionale (ad es. smartphone, tablet, ecc.) a
questo ingresso servendosi di un cavo stereo da 1/8” (3,5 mm).
3. Ingresso pedale di espressione (1/4"/6,35 mm, TRS): collegare un pedale di espressione opzionale a questo
ingresso servendosi di un cavo TRS standard da 1/4” (6,35 mm).
4. Ingresso interruttore di punta pedale di espressione (1/4"/6,35 mm, TS): collegare l’uscita dell’interruttore
di punta di un pedale di espressione opzionale a questo ingresso servendosi di un cavo TS standard da 1/4”
(6,35 mm).
5. Uscite (1/4” / 6,35 mm, TRS): collegare queste uscite agli ingressi dell’amplificatore, dell’interfaccia audio,
ecc. Se occorre utilizzare una sola uscita, servirsi di quella denominata L/Mono.
Nota bene: è possibile configurare queste uscite in modo che inviino il segnale a livello amp o a livello di linea
(predefinito) nel Menu Global Settings (impostazioni globali).
6. Uscita interruttore a pedale amp esterno (1/4”/6,35 mm, TRS): collegare questa uscita all’ingresso
dell’interruttore a pedale di un amplificatore per chitarra esterno per commutare tra i canali o accendere e
spegnere il reverb sull’amplificatore utilizzando il Gigboard.
IMPORTANTE! Collegare questa uscita unicamente ad amplificatori dotati di un ingresso per interruttore a
pedale “short-to-sleeve". Se si collega questa uscita a qualsiasi altro tipo di ingresso per interruttore a
pedale, si può danneggiare irrimediabilmente il dispositivo. Se non si è sicuri se l’amplificatore sia dotato di
un ingresso “short-to-sleeve” per interruttore a pedale o meno, consultare il manuale dell’amplificatore o
rivolgersi al produttore per chiedere conferma prima di provare.
7. Uscita cuffie (1/4” / 6,35 mm, TRS): collegare cuffie stereo standard da 1/4" (6,35 mm) a questa uscita.
8. Uscita FX Send (1/4” / 6,35 mm, TRS): collegare queste uscite agli ingressi di un altro modulo effetti, un
pedale effetti o al loop di effetti di ritorno di un amplificatore.
9. Ingresso FX Return (1/4”/6,35 mm, TRS): collegare questi ingressi alle uscite di un altro modulo effetti, un
pedale effetti o al loop di effetti “send” di un amplificatore.
Nota bene: è possibile configurare l’ingresso FX Return in modo che invii il segnale a livello rack o a livello
stomp (predefinito) nel Global Settings Menu
10. Ingresso MIDI (DIN a 5 poli): servirsi di un cavo MIDI standard per collegare questo ingresso all’uscita MIDI di
un dispositivo MIDI esterno opzionale.
11. Uscita MIDI (DIN a 5 poli): servirsi di un cavo MIDI standard per collegare questa uscita all’ingresso MIDI di
un dispositivo MIDI esterno opzionale.
12. Porta USB: collegare questa porta USB al computer servendosi di un cavo USB standard. Questo
collegamento consente all'HeadRush Gigboard di inviare e ricevere il segnale audio digitale da/verso il
computer. Si può anche utilizzare questo collegamento per importare o esportare impianti, preset di modelli e
setlist.
13. Ventola: assicurarsi che questa ventola sia libera da ostacoli quando si utilizza l’HeadRush Gigboard.
14. Ingresso di alimentazione: collegare questo ingresso ad una presa di alimentazione servendosi del cavo di
alimentazione in dotazione.
15. Interruttore di alimentazione: premere questo tasto per accendere l’HeadRush Gigboard. Tenere premuto
questo tasto per spegnere l’HeadRush Gigboard.
4
789
10
11
15
62

A
Configurazione
Gli elementi non elencati sotto Introduzione > Contenuti della confezione sono venduti separatamente.
IMPORTANTE! Nel Global Settings Menu, assicurarsi di impostare le Uscite per inviare il segnale a livello amp
se si utilizza un amplificatore per chitarra tradizionale o a livello di linea (predefinito) se si utilizza un amplificatore
a piena risposta e a gamma completa, un mixer, un altoparlante PA o un’interfaccia audio.
Chitarra
mplificatore a piena risposta e a gamma
completa o amplificatore per chitarra
tradizionale
Pedale di
espressione
Ingresso interruttore a pedale amp
IMPORTANTE! Collegare questa uscita unicamente ad amplificatori dotati di un
ingresso per interruttore a pedale “short-to-sleeve". Se si collega questa uscita a
qualsiasi altro tipo di ingresso per interruttore a pedale, si può danneggiare
irrimediabilmente il dispositivo. Se non si è sicuri se l’amplificatore sia dotato di un
ingresso “short-to-sleeve” per interruttore a pedale o meno, consultare il manuale
dell’amplificatore o rivolgersi al produttore per chiedere conferma prima di provare.
Computer
Presa di
corrente
Stompbox effetti esterni, moduli,
ecc.
63

Funzionamento base
Questo capitolo descrive alcune delle funzioni base dell’HeadRush Gigboard. È possibile recarsi alla pagina
headrushfx.com per scaricare la guida per l’uso completa per ottenere ulteriori informazioni.
Schermo principale
Toccare per visualizzare le setlist.
Girare il codificatore per
scorrere tra le voci
selezionabili su schermo
o per regolare i
parametri. Premere il
codificatore come se
fosse un comando Invio.
Toccare due volte un
modello In o Out per
visualizzare i suoi
parametri.
Toccare il suo interruttore a
pedale per attivarlo o disattivarlo.
Importante: la sequenza dei modelli contenuti nella catena di segnale non è necessariamente riflessa negli
interruttori a pedale. Si possono assegnare liberamente modelli agli interruttori a pedale disponibili senza
modificare la catena di segnale e viceversa. Si veda Assegnazione hardware per saperne di più.
Per assegnare un modello (amp, cab, o effetto) a uno slot vuoto, toccarlo () e servirsi
dell’elenco che compare. Si veda Impianti > Creazione di un impianto per saperne di
più.
Per visualizzare la schermata delle impostazioni di un modello, toccarlo due volte. La
relativa schermata delle impostazioni comparirà con il rispettivo menù di preset,
parametri e colore assegnato.
Per attivare o disattivare un modello, premere l’interruttore a pedale ad esso
assegnato o toccare l’interruttore a pedale del modello nel display.
Per caricare un altro impianto (preset):
• Toccare o accanto al nome dell’impianto corrente sullo schermo.
• Toccare il nome dell’impianto sullo schermo e girare il codificatore.
• Premere un interruttore a pedale assegnato a un preset quando il Gigboard si
trova in vista impianto (Rig).
• Premere un interruttore a pedale assegnato a Prev Rig o Next Rig quando il
Gigboard si trova in vista ibrida (Hybrid).
Toccare e trascinare questa barra verso il basso per visualizzare l’elenco degli impianti.
Nome impianto.
Questi quattro blocchi mostrano il funzionamento
corrente dei 4 interruttori a pedale.
Toccare per salvare l’impianto.
Questo tasto commuta tra le
diverse opzioni di
convogliamento di un
impianto.
Questo tasto attiva o
disattiva effetti di coda di
tipo reverb e delay al
momento di passare a un
altro impianto.
Per riorganizzare i
modelli nella catena
di segnale, toccare e
trascinare un modello
in un altro slot o tra
due altri modelli (quelli
dopo quella posizione
scivoleranno di un
ulteriore slot lungo la
catena di segnale).
Per visualizzare altre opzioni, toccare il tasto presente nell’angolo superiore destro
e quindi toccare un’opzione.
64

Modalità degli interruttori a pedale
I quattro interruttori a pedale dell’HeadRush Gigboard possono
essere utilizzati per attivare o bypassare modelli (amp, cab o
effetti), oltre a selezionare scene, impianti o setlist. Questi
interruttori a pedale sono sempre in una di quattro modalità:
Stomp, Rig, Hybrid e Setlist.
Per cambiare la modalità:
1. Premere e tenere premuto l’interruttore a pedale 1. Quindi
selezionare uno dei quattro interruttori a pedale che
corrispondono alle quattro modalità: Stomp, Rig, Hybrid e
Setlist.
2. Premere un interruttore a pedale per entrare in quella
determinata modalità.
Modalità Stomp
Gli interruttori 1-4 corrispondono a modelli (amp, cab o effetti)
o scene nell’impianto. Premere un interruttore a pedale per
attivare o disattivare il relativo modello.
Modalità Rig
I primi 2 interruttori a pedale corrispondono a impianti salvati in
precedenza. Premere un interruttore a pedale per caricare il
relativo impianto.
Per mostrare il banco precedente di due impianti, premere l’interruttore a pedale 3.
Per mostrare il banco successivo di due impianti, premere l’interruttore a pedale 4.
Modalità Rig alternativa
Per entrare nella versione alternativa della modalità Rig,
recarsi alla pagina 2 di Global Settings e modificare il
parametro 4 Rigs / No Hold impostandolo su On.
Gli interruttori a pedale 1-4 corrispondono a impianti salvati in precedenza. Premere un interruttore a pedale per
caricare il relativo impianto.
Per mostrare il banco precedente di quattro impianti, tenere premuto l’interruttore a pedale 2.
Per mostrare il banco successivo di quattro impianti, tenere premuto l’interruttore a pedale 3.
Nota bene: quando si utilizza la modalità di impianto alternativa non è possibile accedere alla modalità mani
libere (hands-free) o al looper.
Modalità Hybrid (ibrida)
I primi 2 interruttori a pedale possono essere assegnati per
attivare o disattivare un modello o selezionare una scena
nell’impianto attualmente selezionato.
Per passare all’impianto precedente, premere l’interruttore a pedale 3.
Per passare all’impianto successivo, premere l’interruttore a pedale 4.
Modalità Setlist
Per entrare nella setlist All Rigs (tutti gli impianti), premere
l’interruttore a pedale 1.
Per entrare nella setlist attualmente illustrata, premere l’interruttore a pedale 2.
Per mostrare la setlist precedente, premere l’interruttore a pedale 3.
Per mostrare la setlist successiva, premere l’interruttore a pedale 4.
65

Impianti
Quando si utilizza l’HeadRush Gigboard, un impianto (rig) è un preset: la combinazione di modelli assegnati (amp, cab
ed effetti) e le configurazioni dei parametri di ciascuno di essi. È possibile creare, modificare, salvare e caricare impianti,
con la massima facilità nel richiamare il suono perfetto per ciascuna parte della propria esibizione.
Ciascun impianto presenta 11 slot, a ciascuno dei quali può essere assegnato un modello (amp, cab, o effetto). Gli slot
assegnati mostreranno rappresentazioni grafiche dei modelli e gli slot vuoti
Creazione di un nuovo impianto
Per creare un nuovo impianto, toccare il tasto nell’angolo
superiore destro dello schermo e toccare New Rig.
Per assegnare un modello (amp, cab o effetto) a uno slot
vuoto:
1. Toccare lo slot vuoto ().
2. Nell’elenco che compare, toccare il tipo di modello che si
desidera assegnare. Amp, Cab o effetto (Distortion,
Dynamics/EQ, Modulation, Reverb/Delay, FX-Loop o
Expression).
3. Nell’elenco che compare, toccare il modello che si desidera
assegnare.
4. Nell’elenco che compare, toccare il preset che si desidera
caricare per quel modello.
presenteranno un simbolo .
Se si carica un amp o un cab su uno slot avente uno slot vuoto
adiacente, un amp o un cab corrispondente sarà caricato
automaticamente su quest’ultimo. Dopodiché, è possibile
configurarli in maniera indipendente: è possibile infatti separarli
nella catena dei segnali, cambiare il tipo di amp o cab o
cancellare ciascun modello separatamente.
Tipi di modello: amp,
cab ed effetti.
Preset disponibili per
ciascun modello.
Ottimizzazione della catena di segnali
Modelli disponibili per ciascun tipo.
La catena dei segnali è il percorso seguito dai segnale audio dalla chitarra ai modelli selezionati e termina a
livello delle uscite dell’HeadRush Gigboard. È possibile servirsi dello schermo tattile per sistemare i modelli
selezionati in qualsiasi sequenza, ma si potrebbe scoprire che alcune configurazioni suonano meglio di altre.
Ecco alcuni suggerimenti per una collocazione tipo dei modelli per creare tonalità con l’HeadRush Gigboard:
• Dinamica (ad es., compressori), filtri (ad es. wah, pitch shifter) e pedali volume sono solitamente collocati
all’inizio della catena dei segnali. Alternativamente, è possibile collocare i pedali volume alla fine della
catena dei segnali per garantire una leggera varianza a livello di funzionalità.
• Gli effetti basati sul guadagno (ad es. overdrive/distortion, fuzz) solitamente vengono dopo.
• L’equalizzazione (EQ) è spesso utilizzata per modellare le caratteristiche toniche degli effetti di
overdrive/distorsione e fuzz, quindi un EQ va collocato dopo di essi. Alternativamente, collocarli prima di
essi per modellare la tonalità generale della chitarra (tagliando frequenze indesiderate) prima dei pedali di
guadagno.
• Gli effetti di modulazione quali flanger, phaser e chorus solitamente seguono.
• Gli effetti basati sul tempo quali delay e reverb sono solitamente collocati verso la fine della catena dei
segnali.
• Un amp e un cab sono spesso collocati al termine della catena dei segnali, sebbene sia possibile collocarli
ovunque si desideri.
66

p
Come salvare un impianto
Se l’impianto è stato modificato dal momento in cui è stato caricato, accanto al suo nome a livello della parte superiore
dello schermo comparirà un asterisco (). È possibile salvare le modifiche su questo impianto, salvarle sotto forma di
un altro impianto o non salvarle affatto.
Per salvare un impianto, toccare Save nell’angolo superiore destro.
Per salvare le modifiche all’impianto corrente, toccare Save.
Per salvare le modifiche come nuovo impianto, toccare Save New Rig, servirsi della tastiera che compare per
inserire un nome, quindi toccare Save.
Per tornare alla schermata precedente senza salvare, toccare Cancel in qualsiasi momento.
Per annullare eventuali modifiche apportate all’impianto, toccare il tasto nell’angolo superiore destro e quindi
toccare Discard Changes.
Regolazione delle configurazioni
Per regolare le impostazioni di un modello in un impianto, toccarlo due volte per aprire la relativa schermata delle
impostazioni.
Toccare per mantenere le modifiche e
tornare alla schermata principale.
Girare il codificatore per
scorrere tra le voci
selezionabili su schermo
o per regolare i
parametri. Premere il
codificatore come se
fosse un comando
Invio.
Toccare il menu Preset per
selezionare un preset.
Toccare questo tasto e quindi toccare Discard Changes per
annullare tutte le modifiche apportate da quando è stata aperta la
schermata.
Si veda Salvare un Preset.
Toccare un tasto
parametro Off/On per
modificare l’impostazione
del parametro di
conseguenza.
Toccare il nome del
modello per assegnare
un modello diverso a
questo slot.
Toccare Delete per
annullare l’assegnazione
del modello allo slot.
Toccare un colore per assegnarlo a questo modello.
Tale colore sarà visualizzato sullo schermo principale,
nella schermata di assegnazione Hardware (Hardware
Assign) e a livello dell’indicatore dell’interruttore a
edale per questo modello.
Toccare Cancel per annullare le modifiche
e tornare alla schermata principale.
Toccare e trascinare un
cursore a sinistra e a
destra per regolare
l’impostazione dei
parametri.
Alternativamente, toccare il
cursore e servirsi del
codificatore per eseguire le
regolazioni fini.
Salvataggio di un preset
Per salvare un preset, toccare Save nell’angolo superiore destro.
Per salvare le modifiche apportate al preset corrente, toccare
Save.
Per salvare le modifiche come nuovo preset, toccare Save New Preset, servirsi della tastiera che compare per
inserire un nome, quindi toccare Save.
Per tornare alla schermata precedente senza salvare, toccare Cancel in qualsiasi momento.
67

Assegnazione Hardware
La schermata Hardware Assign consente di personalizzare il
modo in cui gli interruttori a pedale e il pedale di espressione
dell’HeadRush Gigboard controllano ciascun impianto.
Per aprire la schermata Hardware Assign, toccare il tasto
nell’angolo superiore destro della schermata principale e
quindi toccare Hardware Assign.
Per tornare alla schermata principale, toccare il tasto
nell’angolo superiore sinistro.
Importante: le impostazioni Hardware Assign sono tutte parte
dell’impianto complessivo, quindi occorre ricordarsi di salvare
le modifiche che si desidera conservare.
Per impostare il colore associato all’impianto, toccarlo nella parte superiore sinistra dello schermo. Questo
colore comparirà accanto al nome dell’impianto quando si visualizza un elenco degli impianti disponibili o quando
si visualizzano e creano setlist. Questo sarà anche il colore dell’indicatore dell’interruttore a pedale
corrispondente quando l’HeadRush Gigboard si trova in Modalità Rig.
Per impostare il tempo degli effetti basati sul tempo dell’impianto (delay, modulazione, ecc.), toccare il tasto
sotto Tempo per selezionare Current o Fixed.
• Current: l’impianto utilizzerà l’ultimo tempo utilizzato o quello impostato dall’interruttore a pedale Tempo.
Per impostare il tempo, premere l’interruttore a pedale Tempo al tempo desiderato 3–8 volte per
impostare il nuovo tempo in battiti al minuto (BPM).
• Fixed: L’impianto utilizzerà un tempo impostato qui.
Per impostare il tempo, girare il codificatore per impostare il tempo desiderato in battiti al minuto (BPM).
Il tempo può essere configurato solo nella schermata Assegnazione Hardware.
Per caricare un impianto quando un MIDI Program Change è ricevuto da un dispositivo MIDI esterno
opzionale o per inviare un messaggio MIDI Program Change quando viene caricato un impianto, toccare il
tasto sotto MIDI, quindi girare il codificatore per selezionare un numero di MIDI program change. Si può regolare
se i MIDI program change vengono ricevuti e/o inviati nel menu Global Settings.
Nota bene: se un impianto utilizza un numero, quel numero sarà indisponibile e non potrà essere assegnato a un
altro impianto. Inoltre, salvando un impianto con un nuovo nome si salverà l’impianto, ma senza il numero di
cambio programma per impedire che più impianti condividano lo stesso numero.
Interruttori a pedale
Le 4 caselle nell’angolo inferiore sinistro rappresentano i 4 interruttori a pedale dell’HeadRush Gigboard. È
possibile assegnare qualsiasi parametro basato su interruttori (quelli con soli due stati) a qualsiasi interruttore a
pedale, indipendentemente dalla loro posizione nella catena di segnale.
Per assegnare un parametro a un interruttore a pedale:
1. Toccare una casella. indica una casella vuota.
2. Nell’elenco che compare, toccare il modello con il parametro
che si desidera assegnare.
3. Nell’elenco che compare, toccare il parametro che si
desidera assegnare. Solitamente, il parametro sarà
semplicemente On (per attivarlo o disattivarlo).
Toccare Unassigned per annullare l’assegnazione a
quell’interruttore a pedale.
Per scambiare due assegnazioni, toccare e trascinare una
delle due sull’altra, e quindi rilasciarla.
68

Ext. Amp
Si può assegnare un interruttore affinch* invii un segnale all’ingresso
dell’interruttore a pedale dell’amplificatore servendosi dell’uscita
amp esterno. Si può utilizzare questa funzione per compiere azioni
quali cambiare dal canale pulito a quello sporco o accendere e
spegnere il reverb sull’amplificatore.
Per utilizzare questa funzione quando si passa a un impianto,
toccare il tasto sotto Ext Amp sulla pagina hardware assign, quindi
selezionare Tip, Ring, o Both. Se non si è sicuri su quale
impostazione utilizzare, consultare il manuale dell’amplificatore o
rivolgersi al produttore per chiedere conferma.
Questa funzione può anche essere assegnata a un interruttore a pedale sulla pagina Model Selector che compare
quando si assegna una funzione a un interruttore a pedale.
Questa funzione può anche essere assegnata a una scena regolando il parametro nella schermata Scene Editor.
IMPORTANTE! Collegare questa uscita unicamente ad amplificatori dotati di un ingresso per interruttore a pedale
“short-to-sleeve". Se si collega questa uscita a qualsiasi altro tipo di ingresso per interruttore a pedale, si può
danneggiare irrimediabilmente il dispositivo. Se non si è sicuri se l’amplificatore sia dotato di un ingresso “short-tosleeve” per interruttore a pedale o meno, consultare il manuale dell’amplificatore o rivolgersi al produttore per chiedere
conferma.
Scene
La funzione Scene consente di accendere o spegnere più modelli in ciascun impianto. Quando si preme l’interruttore a
pedale assegnato a quella scena, tutti i modelli inclusi in tale scena si accenderanno o si spegneranno a seconda della
relativa assegnazione. Questo è un ottimo modo per creare più tonalità nello stesso impianto. Ad esempio si può
desiderare che un particolare modello di reverb sia acceso ogni volta che un particolare modello di distorsione è a sua
volta acceso. Alternativamente, si può voler spegnere un modello di delay quando se ne accende un altro. Le scene
consentono di farlo con un’unica pressione dell’interruttore a pedale.
Per creare e modificare una scena:
1. Nella schermata Hardware Assign, toccare Toggle/Scene
affinché l’interruttore a pedale desiderato scorra tra le opzioni
disponibili, e selezionare Scene.
2. Su quel modello, toccare Edit. Comparirà l’editor delle scene,
che mostra tutti i modelli presenti nel proprio impianto.
3. Per ciascun MODELLO contenuto nell’impianto, toccarlo per
scorrere tra le opzioni disponibili:
• On: questo modello si accende quando si accende la
scena.
• Off: questo modello si spegne quando si accende la scena.
• No Change: questo modello rimane inalterato quando si
accende la scena.
4. Toccare un colore in fondo allo schermo tattile per selezionare
il colore per quella scena.
5. Toccare il tasto nell’angolo superiore sinistro per tornare alla
schermata Hardware Assign.
Per rinominare una scena (che appare a livello degli indicatori
dell’interruttore a pedale), toccare il testo contenuto nella casella
sotto Edit sul modello, servirsi della tastiera virtuale che compare
per inserire un nome e quindi toccare in qualsiasi punto diverso dal
campo di testo.
69

Pedale di espressione
Si può collegare un pedale di espressione opzionale (venduto separatamente) per controllare due parametri (in
modalità classica) o due set di parametri (in modalità avanzata). Se il proprio pedale di espressione presenta un
interruttore di punta, è possibile utilizzare quest’ultimo per commutare tra di essi: pedale di espressione A o B.
Nota bene: quando si salva l’impianto, lo stato del pedale di espressione selezionato correntemente (A o B) sarà
salvato e quindi richiamato quando si carica nuovamente l’impianto.
La colonna a quattro caselle rappresenta la configurazione del pedale di
espressione. È possibile assegnare uno o più parametri regolabili in maniera
continua (quelli aventi un intervallo di valori) al pedale di espressione.
Per configurare la modalità del pedale di espressione, toccare il tasto al di
sopra di Range nell’angolo superiore destro per selezionare Classic o
Advanced.
• Classic: si può assegnare un parametro a ciascun pedale di
espressione (A e B). Utilizzando l’interruttore di punta si seleziona l’altro
pedale di espressione e si disattiva (bypassa) il parametro del pedale di
espressione corrente. Ad esempio, se si assegna un pedale wah al
pedale di espressione A e un pedale volume al pedale di espressione B,
solo uno di essi sarà attivo in un determinato momento. Quando si
controlla il pedale wah, il pedale del volume sarà bypassato e viceversa.
• Advanced: si può assegnare fino a un massimo di quattro parametri a ciascun pedale di espressione (A e
B). Muovendo il pedale si regolano simultaneamente tutti i parametri ad esso assegnati. Utilizzando
l’interruttore di punta si seleziona l’altro pedale di espressione e si lasciano i parametri del pedale corrente
attivi e ai loro valori massimi.
Per assegnare un parametro a un pedale di espressione:
1. Se il tasto Assign non è acceso, toccarlo.
2. Toccare una casella sotto il tasto Assign. indica una
casella vuota.
3. Nell’elenco che compare, toccare il modello con il parametro
che si desidera assegnare.
4. Nell’elenco che compare, toccare il parametro che si
desidera assegnare.
Toccare Unassigned per annullare l’assegnazione a
quella casella.
Per scambiare due assegnazioni (in modalità avanzata
Advanced) toccare e trascinare una delle due sull’altra, e quindi
rilasciarla.
Per impostare l’intervallo di un parametro assegnato:
1. Se il tasto Range non è acceso, toccarlo.
2. Toccare un valore presente sotto il tasto Range.
irare il codificatore per impostare il valore desiderato come una percentuale
3. G
dell’intervallo complessivo del parametro. Premere il codificatore o toccare altrove per
confermare il valore.
70

Setlist
Per organizzare i propri impianti, è possibile servirsi di setlist. Una setlist è una collezione di impianti memorizzata, che
è possibile salvare e richiamare in un secondo momento. Ciò è utile, ad esempio, se si desidera utilizzare solo alcuni dei
propri impianti in un’esibizione; è possibile salvare una setlist che contenga unicamente tali impianti in modo tale che
non si debba perdere tempo cercando tra gli impianti prima di suonare la canzone successiva.
Per visualizzare le proprie setlist, toccare il tasto ≡ nell’angolo superiore sinistro della schermata principale.
Comparirà la schermata Setlists.
Per tornare alla schermata principale, toccare il tasto nell’angolo superiore sinistro.
Per creare una setlist:
1. Toccare New nell’angolo superiore destro.
2. Nella schermata che compare, la parte sinistra mostra un elenco di tutti
gli impianti disponibili e la parte destra mostra l’elenco degli impianti
inseriti nella setlist.
Per aggiungere un impianto alla setlist, toccarlo per aggiungerlo in
fondo all’elenco. Alternativamente, toccarlo e trascinarlo nel punto
desiderato dell’elenco. È possibile aggiungere più volte lo stesso
impianto a una setlist. L’impianto [Empty] presente nell’angolo
inferiore sinistro è uno slot da utilizzarsi come placeholder che serve a
facilitare l’operazione di riorganizzazione della setlist: non sarà
disponibile come impianto selezionabile quando si scorre tra gli
impianti presenti nella setlist stessa.
Per risistemare la setlist, toccare un impianto presente nella parte destra e trascinarlo nel punto desiderato
dell’elenco.
Per rimuovere un impianto dalla setlist, toccare il sul suo margine destro.
Per salvare una setlist, toccare Save nell’angolo superiore destro.
Per salvare le modifiche apportate alla setlist corrente, toccare
Save.
Per salvare le modifiche come nuova setlist, toccare Save New Setlist, servirsi della tastiera che compare per
inserire un nome, quindi toccare Save.
(In qualsiasi momento) Per tornare alla schermata precedente senza salvare, toccare Cancel.
Per annullare eventuali modifiche apportate alla setlist, toccare il tasto nell’angolo superiore sinistro e quindi
toccare Discard Changes.
Per caricare una setlist:
1. Visualizzando la schermata principale, toccare il tasto ≡ nell’angolo
superiore sinistro per visualizzare la schermata Setlists. Ciascuna
schermata mostrerà il numero di impianti tra parentesi (incluse le
occorrenze multiple di uno stesso impianto).
2. Toccare la setlist desiderata. Il primo impianto presente nella setlist
verrà caricato immediatamente. Toccare All Rigs per visualizzare tutti
gli impianti anziché una setlist specifica.
Per modificare una setlist, toccare il tasto sul lato sinistro, quindi
toccare l’icona a forma di matita. Verrà visualizzata la stessa schermata
utilizzata per creare la setlist: qui è possibile modificarla e salvarla.
Per cancellare una setlist, toccare il tasto sul lato sinistro, quindi toccare l’icona a forma di cestino. Toccare Yes
per confermare la cancellazione o Cancel per tornare alla schermata relativa alle Setlist senza cancellarla.
71

Modalità mani libere
La modalità mani libere consente di regolare qualsiasi
impostazione dei modelli servendosi unicamente degli
interruttori a pedale e/o di un pedale di espressione opzionale
(Venduto separatamente).
Per entrare in modalità mani libere (Hands-Free), tenere
premuto l’nterruttore a pedale 2 per più di un secondo. In
modalità mani libere sullo schermo compare un singolo
parametro e il suo valore attualmente selezionato.
Per modificare il valore, premere l’interruttore a pedale 1
(giù) o l’interruttore a pedale 2 (su). È anche possibile
modificarlo muovendo un pedale di espressione esterno.
Per accedere al parametro disponibile successivo, premere
l’interruttore a pedale 3.
Per accedere al parametro disponibile precedente, premere
e tenere premuto l’interruttore a pedale 3.
Per accedere al blocco disponibile successivo
sull’impianto, premere l’interruttore a pedale 4.
Per entrare in modalità mani libere (Hands-Free), tenere
premuto l’nterruttore a pedale 4.
Tuner/tempo (sintonizzatore/tempo)
Si può utilizzare la pagina Tuner/Tempo per sintonizzare la
chitarra e impostare il tempo per gli effetti basati sul tempo.
Per entrare in modalità Tuner/Tempo, tenere premuto
l’interruttore a pedale 4 per più di un secondo. In modalità
Tuner/Tempo, compare la schermata a destra.
Per modificare il pitch di riferimento del sintonizzatore,
toccare il parametro e girare il codificatore.
Per annullare il silenziamento del segnale durante la
sintonia, premere l’interruttore a pedale 1.
Per impostare il tempo toccando un interruttore a pedale, premere l’interruttore a pedale 3 al tempo
desiderato 3–8 volte per impostare il tempo in battiti al minuto (BPM).
Per uscire da questa pagina, premere l’interruttore a pedale 4.
72

p
p
Looper
L’HeadRush Gigboard ha un looper incorporato che si può utilizzare per stratificare le esibizioni. Quando le azioni del
looper sono illustrate a display, è possibile controllarne la maggior parte comodamente con gli interruttori a pedale.
Il looper può contenere fino a 20 minuti di audio per volta su un massimo di 50 strati.
Questo misuratore
indica la posizione
corrente nel loop
durante la
registrazione o la
riproduzione.
Questo indica quanti
strati stanno suonando
nel loop corrente,
incluso l’originale.
Questo indica la
velocità corrente del
loop come un multiplo
o come frazione
dell’originale.
Questo indica la lunghezza
corrente.
del loo
Nome impianto.
Questo indica la direzione di
roduzione.
ri
Controlla in che misura il
segnale del looper si sente
nelle uscite.
Controlla in che misura il
segnale del looper viene
convogliato indietro al
momento di registrare un
altro strato.
Indica se il looper è situato prima (Pre) o
dopo (Post) la catena di segnale.
Spostando il looper in posizione Pre è
possibile modificare l’impianto senza dover
suonare lo stesso riff più e più volte.
Per registrare il primo strato di un loop, premere l’interruttore a pedale Record. La registrazione inizia
immediatamente e la spia dell’interruttore a pedale si accende di rosso. Premere nuovamente l’interruttore a
pedale Record per interrompere la registrazione e avviare la riproduzione del loop. L’interruttore a pedale è ora
chiamato Overdub e la spia dell’interruttore a pedale è gialla.
Per registrare ulteriori strati sul loop (overdub), premere l’interruttore a pedale Overdub. La registrazione in
overdub inizia immediatamente e la spia dell’interruttore a pedale si accende di rosso. Premere nuovamente
l’interruttore a pedale Overdub per interrompere la registrazione in overdub e continuare la riproduzione.
Per cancellare lo strato superiore (l’ultimo aggiunto) del loop, premere l’interruttore a pedale Peel. Lo strato
superiore del loop sarà cancellato immediatamente. Questo processo è distruttivo, quindi non sarà più possibile
aggiungerlo nuovamente in un secondo momento.
Per cancellare il loop completo, tenere premuto l’interruttore a pedale Clear. Questo processo interromperà la
riproduzione ed è distruttivo, quindi non sarà più possibile aggiungerlo nuovamente in un secondo momento.
Per dimezzare o raddoppiare la lunghezza del loop, toccare il pulsante accanto al campo Length e quindi
girare il codificatore. Il processo di dimezzamento non è distruttivo, quindi è possibile ripristinare il loop originale
e il relativo contenuto raddoppiando la lunghezza del loop.
Per dimezzare o raddoppiare la velocità del loop, toccare il pulsante accanto al campo Speed e quindi girare il
codificatore.
Suggerimento: servirsi di questo comando per creare linee di basso basse o parti di chitarra ultra alte che non si
potrebbero suonare normalmente.
73

Per invertire la riproduzione del looper, toccare il tasto accanto al campo Playback e quindi girare il
codificatore.
Suggerimento: crea effetti inquietanti registrando gli strati al contrario per poi tornare alla riproduzione normale
Per impostare la posizione del looper, toccare il tasto accanto al campo Playback e quindi girare il
codificatore per posizionarlo prima (Pre) o dopo (Post) la catena di segnale. Spostando il looper in posizione
Pre è possibile modificare l’impianto senza dover suonare lo stesso riff più e più volte.
Per uscire dal looper e tornare alla schermata principale, premere l’interruttore a pedale Exit. Se il looper sta
suonando, la riproduzione continua.
Per rientrare nel looper, premere nuovamente l’interruttore a pedale Looper.
Suggerimento: servirsi di questa funzione per creare diverse configurazioni di effetti (regolare parametri,
attivare/disattivare modelli, ecc.) per ciascuno strato, creando prestazioni multi-testurizzate. Si possono anche
commutare gli impianti quando si usa il looper e utilizzare un impianto diverso per ciascuno strato.
Impostazioni globali (global settings)
Servirsi delle impostazioni globali per configurare il
funzionamento complessivo dell’HeadRush Gigboard.
Per mostrare le impostazioni globali, toccare il tasto
nell’angolo superiore destro dello schermo e toccare
Global Settings.
Per selezionare ciascuna pagina delle impostazioni
globali, toccare il numero sul bordo inferiore dello
schermo.
LCD Brightness: questa impostazione determina la luminosità del display principale. Toccare questo campo,
girare il codificatore per selezionare da 1 (smorzato) a 5 (luminoso), quindi premere il codificatore.
Audio Configuration (Configurazione audio):
Main Out Level: questa impostazione determina il livello di segnale inviato alle Uscite Main (1/4"/6.35 mm,
TRS). Quando impostato su Line, il livello di uscita sarà pari a +18 dBu Servirsi di questa impostazione se si
sta collegando l’HeadRush Gigboard a un amplificatore a piena risposta e a gamma completa, un
altoparlante PA, un mixer o un’interfaccia audio. Quando impostato su Amp, il livello di uscita sarà pari a +6
dBu Servirsi di questa impostazione se si collega l’HeadRush Gigboard a un amplificatore standard per
chitarra.
FX Return Level: questa impostazione determina il livello di segnale ricevuto dall’ingresso FX Return
(1/4"/6.35 mm, TRS). Quando impostato su Rack, il livello di uscita sarà pari a +18 dBu a livello di linea.
Servirsi di questa impostazione se si sta collegando un processore di effetti rack all’FX-Loop dell’HeadRush
Gigboard. Quando impostato su Stomp, il livello di uscita sarà pari a +6 dBu Servirsi di questa impostazione
se si sta collegando un pedale per chitarra tradizionale (“stompbox”) all’FX-Loop.
74

USB Audio Settings (Impostazioni audio USB):
Nota bene: scaricare la Guida per l’uso completa dell’HeadRush Gigboard dalla pagina headrushfx.com per
sapere come configurare il DAW.
Nota importante per gli utenti Windows: prima di collegare l’HeadRush Gigboard al computer, scaricare e
installare i driver necessari da headrushfx.com/support.
Sample Rate: questa impostazione determina la frequenza di campionamento del segnale audio USB: 44.1
kHz, 48.0 kHz o 96.0 kHz. Non va dimenticato di selezionare la stessa frequenza di campionamento del
DAW. Impostarla prima di aprire il DAW.
USB Audio: questa impostazione determina se l’HeadRush Gigboard sta inviando o meno un segnale audio
USB tramite un collegamento USB. Toccare On per abilitare l’invio del segnale audio USB con la Sample
Rate selezionata. Toccare Off per disabilitare il segnale audio USB. (Per modificare la frequenza di
campionamento, impostare innanzitutto USB Audio su Off, selezionare la giusta frequenza di
campionamento, impostare nuovamente USB Audio su On e riavviare il DAW.)
USB Mode: questa impostazione determina il modo in cui l’HeadRush Gigboard invia il suo segnale audio
tramite il collegamento USB e come funzionano le sue uscite mentre lo fa:
• Live: il segnale audio verrà inviato al computer e alle uscite dell’HeadRush Gigboard.
• DAW: il segnale audio sarà inviato unicamente al computer. Le uscite dell’HeadRush Gigboard
saranno disabilitate per impedire qualsiasi latenza durante il monitoraggio.
• Reamp: il computer invierà un segnale audio all’HeadRush Gigboard, che lo elaborerà attraverso
l’impianto corrente e lo invierà nuovamente al computer. Le uscite dell’HeadRush Gigboard saranno
disabilitate per impedire qualsiasi latenza durante il monitoraggio.
Assignments (Assegnazioni):
Auto Assign: questa impostazione determina in che modo i modelli sono assegnati agli interruttori. Toccare
On se si desidera che i modelli siano automaticamente assegnati al primo interruttore disponibile quando
vengono caricati. Toccare Off se si desidera che i modelli vengano caricati senza essere assegnati a un
interruttore; dovranno essere assegnati manualmente nella schermata Hardware Assign.
Expression Pedal / Ext Amp (Pedale di espressione / Amp est):
Interruttore di punta: impostare questo parametro su Latch se il proprio pedale di espressione impiega un
interruttore di punta con blocco o Momnt se impiega un interruttore di punta momentaneo.
Polarità del pedale: qualora dovesse sembrare che il pedale di espressione stesse registrando movimento
nella direzione sbagliata, è possibile modificare questo parametro per invertire la polarità del pedale.
Scegliere tra Norm (normale) e Inv (invertito).
Polarità amp est: se dovesse sembrare che l’amplificatore esterno stesse ricevendo i messaggi opposti
rispetto a quanto desiderato, modificare questo parametro per invertire i messaggi inviati all’uscita
dell’interruttore a pedale amp esterno. Scegliere tra Norm (normale) e Inv (inv
ertito).
MIDI Settings (Impostazioni MIDI): queste impostazioni determinano il modo in cui l’HeadRush Gigboard invia e
riceve informazioni MIDI da e verso dispositivi esterni. Le impostazioni influiscono unicamente sull’ingresso MIDI
o sull’uscita MIDI dell’HeadRush Gigboard.
MIDI Thru: toccare On per utilizzare l’uscita MIDI come flusso MIDI; qualsiasi informazione MIDI inviata
all’ingresso MIDI dell’HeadRush Gigboard sarà inviata direttamente all’uscita MIDI. Toccare Off per
utilizzare normalmente l’uscita MIDI dell’HeadRush Gigboard; l’HeadRush Gigboard potrà inviare le proprie
informazioni MIDI dall’uscita MIDI.
Recv MIDI Clock: toccare On per abilitare l’HeadRush Gigboard a ricevere informazioni MIDI clock. Toccare
Off per utilizzare il MIDI clock interno dell’HeadRush Gigboard (che non sarà inviato).
Prog Change: toccare Send per abilitare o disabilitare la trasmissione da parte dell’HeadRush Gigboard’ di
messaggi MIDI Program Change quando si carica un impianto. Toccare Recv per abilitare o disabilitare la
ricezione da parte dell’HeadRush Gigboard di messaggi MIDI Program Change da un dispositivo MIDI
esterno.
MIDI Channel: questa impostazione determina i canali MIDI cui l’HeadRush Gigboard invierà messaggi MIDI
e da cui li riceverà. Toccare questo campo, girare il codificatore per selezionare tutti i canali (Omni) o 1–16,
quindi premere il codificatore.
75

Reminders (Promemoria):
Confirm Unsaved: Questa impostazione determina se
si vedrà o meno un messaggio di conferma se si
modifica l’impianto quando ci sono modifiche non
salvate su quello corrente. Toccare On per abilitare i
messaggi o Off tper disabilitarli.
Alternativamente, toccare Do not show this dialog
again (non mostrare più questo messaggio) nel
messaggio stesso per disabilitarli.
Global EQ:
Queste impostazioni a pagina 2 determinano se/come
l’equalizzazione viene applicata alle uscite. L’equalizzatore è un
equalizzatore parametrico a quattro bande.
Suggerimento: queste impostazioni sono particolarmente utili
quando la sede di un evento, lo spazio per le prove, ecc. ha
un’acustica diversa rispetto alla sala in cui sono stati creati
originariamente i preset (ad es. il posto può avere un suono più
“rimbombante” o una sala prove con isolamento acustico può
smorzare alcuni dei suoni alti). Questa pagina consente di
applicare rapidamente un’equalizzazione aggiuntiva a tutti i
preset senza doverli salvare in via permanente.
EQ On: questa impostazione determina se l’equalizzazione è abilitata (On) o disabilitata (Off) a livello delle
uscite.
Level (livello): questa impostazione determina se/in che misura il segnale audio delle uscite è amplificato o
tagliato. Questo valore è applicato al livello impostato dalla manopola Main (Primario).
Low Band e High Band: queste impostazioni determinano quale tipo di equalizzazione è applicata alla banda
dalla frequenza più bassa (Low Band) e a quella dalla frequenza più alta (High Band): Shelf o Cut.
Low, Low Mid, High&High Mid: le tre impostazioni di ciascuna di queste quattro bande di frequenza
determinano la forma dell’equalizzazione:
La prima impostazione (Hz) determina la frequenza centrale della banda a bassa frequenza (low), della
banda a bassa-media frequenza (low-mid), della banda ad alta frequenza (high) o della banda a
frequenza medio-alta (high-mid).
La seconda impostazione (dB) determina in che misura l’equalizzatore spinge o taglia il segnale alla
banda di frequenza corrispondente.
La terza impostazione (Q) determina l’ampiezza della banda di frequenza. Più l’impostazione è alta, più
la banda sarà ampia attorno alla frequenza centrale (la prima impostazione). Questa impostazione è
applicata se Low Band o High Band sono impostati su Shelf o Cut.
Alt Rig Footswitch View (Vista Alt Rig Footswitch):
4 Rigs / No Hold: portare questa impostazione su On per commutare tra la Modalità Rig e la Modalità Rig
alternativa. Per saperne di più, si veda Modalità degli interruttori a pedale.
Color Mod:
In caso di difficoltà nel distinguere determinati colori sul display del Gigboard o se si desidera semplicemente
personalizzare ulteriormente lo schema cromatico, è possibile utilizzare i parametri color mod per regolarne le
impostazioni predefinite. Mentre si sperimenta con le impostazioni, un campione delle regolazioni verrà
visualizzato in tempo reale. Se si desidera tornare allo sch
ema cromatico predefinito, le impostazioni predefinite
sono le seguenti:
Depth (profondità): 0% Color (colore): 36 DEG Spread (diffusione): 180 DEG
Nota bene: quando la funzione Screen Lock è attiva, la funzione Color Mod viene disattivata.
76

Trasferimento di file e impostazioni
Tramite una connessione USB è possibile trasferire
impianto, setlist, preset di modelli, loop e/o file di risposte a
impulsi (IR) tra il computer e la HeadRush Gigboard.
Si raccomanda di creare una copia di backup dei file sul
computer prima di apportare eventuali cambiamenti.
Importante:
Non scollegare o spegnere la HeadRush Gigboard durante il
processo.
I file non supportati verranno ignorati.
Non è possibile trasferire una cartella o una cartella
.zip/archivio da/a HeadRush Gigboard. Qualsiasi file
supportato va trasferito direttamente.
Si raccomanda di organizzare la struttura dei file di impianti,
setlist, preset di modelli e/o file di risposte a impulsi sul
computer in modo tale che sia identica alla struttura dei file
illustrata nel “drive” della HeadRush Gigboard.
Per trasferire file tra la HeadRush Gigboard e il computer:
1. Collegare il computer alla porta USB della HeadRush Gigboard servendosi di un cavo USB standard.
2. Con il computer acceso, accendere la HeadRush Gigboard utilizzando l’interruttore di alimentazione
power.
3. Toccare il tasto nell’angolo superiore destro dello schermo, quindi toccare Global Settings.
4. Nella schermata Global Settings, toccare il tasto nell’angolo superiore destro dello schermo, quindi
toccare USB Transfer. Sul computer, la HeadRush Gigboard comparirà sotto forma di dispositivo di memoria
di massa chiamato HeadRush.
Utenti Windows: se questa fosse la prima volta che si collega il prodotto a questo computer, potrebbe
essere necessario attendere un minuto per l’installazione dei driver compatibili.
5. Aprire il drive HeadRush. È ora possibile cliccare sui contenuti e trascinarli tra l’HeadRush e il computer.
Nota bene: eventuali cambiamenti apportati ai contenuti dell’HeadRush sono immediati e non possono
essere annullati.
6. IMPORTANTE: una volta finito di trasferire i contenuti,
occorre effettuare l’espulsione sicura del drive
HeadRush dal computer. Se il drive non viene espulso
correttamente prima di continuare si può verificare la
corruzione del file.
7. Una volta espulso il drive, toccare Sync sull’HeadRush
Gigboard per "fissare" qualsiasi cambiamento apportato
ai contenuti del driveHeadRush. Un ulteriore messaggio
comparirà per confermare che il drive è stato espulso.
Toccare Proceed per andare avanti o Cancel per
continuare ad accedere a file sul computer.
Mentre l’HeadRush Gigboard analizza e importa i file, un
misuratore a display ne indicherà lo stato di
avanzamento. La schermata normale Global Settings
ricomparirà una volta completato il procedimento. Non
scollegare o spegnere la HeadRush Gigboard durante il
processo di sincronizzazione.
77

Istruzioni per l'aggiornamento del Firmware
1. Collegare la porta USB sul proprio dispositivo HeadRush al computer e assicurarsi che HeadRush e
computer siano accesi.
2. Sull’HeadRush, toccare l’icona ••• nell’angolo superiore destro e toccare Global Settings.
3. Nella schermata Global Settings, toccare l’icona ••• nuovamente nell’angolo superiore destro dello schermo,
quindi toccare Firmware Update. Nella schermata che compare, toccare OK per continuare. Dopo il riavvio,
la schermata mostrerà Update a livello del bordo inferiore.
4. Aprire l’applicazione HeadRush Updater per il proprio sistema operativo, Windows o macOS. (è possibile
scaricare l’ultima applicazione di aggiornamento da headrushfx.com)
5. Quando compare la finestra dell’updater, fare clic su Update HeadRush. Non scollegare né spegnere il
dispositivo HeadRush o il computer fino a quando l’aggiornamento non è stato completato.
6. Una volta completato l'aggiornamento, la finestra dell’updater mostrerà la scritta Done, e l’HeadRush si
riavvierà Fare clic su Done per chiudere la finestra.
7. Per confermare che il proprio dispositivo HeadRush impiega il firmware più recente, toccare l’icona •••
nell’angolo superiore destro e toccare Global Settings. La versione del firmware comparirà in fondo allo
schermo.
78

Schnellstart-Anleitung (Deutsch)
Einführung
Lieferumfang
HeadRush Gigboard
USB-Kabel
Stromkabel
Software-Download-Karte
Schnellstart-Anleitung
Sicherheitshinweise und Garantieinformationen
Wichtig: Besuchen Sie headrushfx.com, um das komplette Benutzerhandbuch herunterzuladen.
Kundendienst
Für die neuesten Informationen zu diesem Produkt (Dokumentation, technische Daten, Systemanforderungen,
Informationen zur Kompatibilität etc.) und für die Produktregistrierung besuchen Sie headrushfx.com.
Für zusätzlichen Produkt-Support besuchen Sie headrushfx.com/support.
79

Funktionen
Oberseite
1. Display: Das Vollfarb-Multitouch-Display zeigt Informationen, die den aktuellen Betrieb des HeadRush
Gigboard betreffen. Tippen Sie auf das Display (und verwenden Sie die Hardware-Steuerelemente), um die
Schnittstelle zu bedienen. Siehe Einfacher Betrieb, um zu lernen, wie es funktioniert.
2. Encoder: Mit diesem Encoder können Sie durch die verfügbaren Menüoptionen navigieren oder
Parameterwerte des ausgewählten Feldes am Display einstellen. Drücken Sie den Encoder, um Ihre Auswahl
zu bestätigen.
3. Fußschalter-Anzeigen: Diese Leuchten zeigen an, ob die dem Fußschalter zugeordnete Stomp, Rig oder
Szene eingeschaltet (leuchtet hell) oder ausgeschaltet (leuchtet schwach) ist.
4. Fußschalter: Betätigen Sie diese Fußschalter, um das zugewiesene Model oder die Szene zu
aktivieren/deaktivieren oder den zugeordneten Rig zu laden.
5. Main (Haupt) Volume: Drehen Sie diesen Regler, um die Lautstärke der Ausgänge einzustellen.
80

Rückseite
3
5
6
13
1
12
14
2
1. Gitarreneingang (1/4 "/ 6,35 mm, TS): Schließen Sie Ihre Gitarre mit einem Standardinstrumentkabel an diesen
Eingang an.
2. Aux-Eingang (1/8”/3,5 mm, TRS): Schließen Sie eine optionale Audioquelle (Smartphone, Tablet etc.) an diesen
Eingang mit einem handelsüblichen 1/8" (3,5 mm) Stereokabel an.
3. Expression Pedal-Eingang (1/4 "/ 6,35 mm, TRS): Schließen Sie ein optionales Expression-Pedal mit einem 1/4"
(6,35mm) Standard-TRS-Kabel an diesen Eingang an.
4. Expression-Pedal Fußschaltereingang (1/4"/6,35 mm, TS): Verbinden Sie den Fußschalterausgang Ihres
optionalen Expression-Pedals mit diesem Eingang unter Verwendung eines 1/4" (6,35 mm) Standard-TS-Kabels.
5. Ausgänge (1/4”/6,35 mm, TRS): Verbinden Sie diese Ausgänge mit den Eingängen des Verstärkers, der
Audioschnittstelle usw. Wenn Sie nur einen Ausgang verwenden müssen, verwenden Sie den Ausgang, der mit
L/Mono gekennzeichnet ist.
Hinweis: Sie können diese Ausgänge im Menü Globale Einstellungen so einstellen, dass sie ein Signal mit Amp-
Pegel oder Line-Pegel (Standard) senden.
6. Externer Amp-Fußschalterausgang (1/4"/ 6,35 mm, TRS): Schließen Sie diesen Ausgang an den
Fußschaltereingang eines externen Gitarrenverstärkers an, um über das Gigboard Kanäle umzuschalten oder Hall
am Verstärker ein- und auszuschalten.
WICHTIG! Schließen Sie diesen Ausgang nur an Verstärker an, die einen "Short-to-Sleeve" Fußschaltereingang
haben. Wenn Sie diesen Ausgang an einen anderen Fußschaltereingang anschließen, können Sie Ihr Gerät
dauerhaft beschädigen. Wenn Sie sich nicht sicher sind, ob Ihr Verstärker einen "Short-to-Sleeve"
Fußschaltereingang hat, konsultieren Sie bitte das Handbuch des Verstärkers oder den Hersteller, bevor Sie es
versuchen.
7. Kopfhörerausgang (1/4”/6,35 mm, TRS): Verbinden Sie handelsübliche 1/4" (3,5 mm) Stereo-Kopfhörer mit
diesem Ausgang.
8. FX-Sendeausgänge (1/4"/6,35 mm, TRS): Verbinden Sie diese Ausgänge mit den Eingängen eines anderen
Effektmoduls, eines Effektpedals oder der Effektschleife eines Verstärkers.
9. FX-Return-Eingänge (1/4"/ 6,35 mm, TRS): Verbinden Sie diese Eingänge mit den Ausgängen eines anderen
Effektmoduls, eines Effektpedals oder dem Send eines Verstärkereffekt-Loops.
Hinweis: Sie können den FX Return-Eingang im Global Settings Menu so einstellen, dass er Signale im RackLevel oder Stomp-Level (Standard) empfängt.
10. MIDI-Eingang (5-poliger DIN): Verwenden Sie ein standardmäßiges MIDI-Kabel, um diesen Eingang mit dem MIDIAusgang eines optionalen, externen MIDI-Gerätes zu verbinden.
11. MIDI-Ausgang (5-poliger DIN): Verwenden Sie ein standardmäßiges MIDI-Kabel, um diesen Ausgang mit dem
MIDI-Eingang eines optionalen, externen MIDI-Gerätes zu verbinden.
12. USB-Anschluss: Verwenden Sie ein Standard-USB-Kabel, um diesen USB-Port mit Ihrem Computer zu verbinden.
Mit dieser Verbindung kann HeadRush Gigboard das digitale Audiosignal an und von Ihrem Computer senden und
empfangen. Sie können diese Verbindung auch zum Importieren oder Exportieren von Rigs, Model-Presets oder
Setlisten verwenden.
13. Entlüftung: Vergewissern Sie sich, dass diese Entlüftung während der Verwendung von HeadRush Gigboard nicht
behindert wird.
14. Netzeingang: Verwenden Sie das mitgelieferte Netzkabel, um diesen Eingang mit einer Steckdose zu verbinden.
15. Netzschalter: Drücken Sie diese Taste, um das HeadRush Gigboard einzuschalten. Halten Sie diese Taste
gedrückt, um das HeadRush Gigboard auszuschalten.
4
789
10
11
15
81

Setup
Teile, die nicht unter Einführung > Lieferumfang angegeben sind, sind separat erhältlich.
WICHTIG! Stellen Sie im Global Settings Menu sicher, dass Sie die Ausgänge so einstellen, dass sie ein Signal auf
Amp-Level senden, wenn Sie einen herkömmlichen Gitarrenverstärker verwenden bzw. oder Line-Level (Standard),
wenn Sie einen Full-Range Flat-Response-Verstärker, Mixer, PA-Lautsprecher oder Audio-Schnittstelle verwenden.
Gitarre
Full-Range-, Flat-Response-Verstärker
oder traditioneller Gitarrenverstärker
Expression-
Pedal
Amp-Fußschaltereingang
WICHTIG! Schließen Sie diesen Ausgang nur an Verstärker an, die einen
"Short-to-Sleeve" Fußschaltereingang haben. Wenn Sie diesen Ausgang an
einen anderen Fußschaltereingang anschließen, können Sie Ihr Gerät
dauerhaft beschädigen. Wenn Sie sich nicht sicher sind, ob Ihr Verstärker
einen "Short-to-Sleeve" Fußschaltereingang hat, konsultieren Sie bitte das
Handbuch des Verstärkers oder den Hersteller, bevor Sie es versuchen.
Computer
Steckdose
82
Externe Effekt-Stompboxes,
Module etc.

r
Einfacher Betrieb
Dieses Kapitel beschreibt einige grundlegende Funktionen des HeadRush Gigboards. Besuchen Sie bitte
headrushfx.com, um die komplette Bedienungsanleitung für detaillierte Informationen herunterzuladen.
Hauptbildschirm
Tippen Sie, um die Setlisten anzuzeigen.
Drehen Sie den Encoder,
um durch wählbare
Elemente am Bildschirm
zu navigieren oder um
Parameter einzustellen.
Drücken Sie Encoder als
Enter-Befehl.
Doppeltippen Sie auf In
oder Out eines Models,
um seine Parameter
anzuzeigen.
Tippen Sie auf den Fußschalter,
um sie zu aktivieren/deaktivieren.
Wichtig: Die Reihenfolge der Models in Ihrer Signalkette spiegelt sich nicht unbedingt in den Fußschaltern wider. Sie
können Models ganz frei den verfügbaren Fußschaltern zuordnen ohne Ihre Signalkette zu verändern - und umgekehrt.
Weitere Informationen hierzu finden Sie unter Hardwarezuweisung.
Tippen und ziehen Sie diese Leiste nach unten, um die Rig-Liste anzuzeigen.
Rig-Name.
Diese vier Blöcke zeigen die aktuelle
Funktion de
4 Fußschalter.
Tippen Sie, um den Rig zu
speichern.
Diese Taste schaltet
zwischen den verschiedenen
Routing-Optionen für ein Rig
um.
Diese Taste aktiviert oder
deaktiviert Reverb- und
Delay-Tails, wenn Sie zu
einem anderen Rig
wechseln.
Um ein Model (Amp, Cab oder Effekt) einem leeren Speicherplatz zuzuordnen, tippen Sie
darauf () und verwenden dann die angezeigte Liste. Siehe Rigs > Rig erstellen um mehr
darüber zu erfahren.
Um das Einstellungsfenster eines Models anzuzeigen, tippen Sie es doppelt an. Der
Einstellungsbildschirm wird mit dem voreingestellten Menü, den Parametern und der
zugeordneten Farbe angezeigt.
Um ein Model zu aktivieren oder zu deaktivieren, drücken Sie den ihm zugeordneten
Fußschalter oder tippen Sie im Display auf den Fußschalter des Models.
So laden Sie einen anderen Rig (Preset):
• Tippen Sie auf oder neben dem Namen des aktuellen Rigs auf dem Bildschirm.
• Tippen Sie auf den Namen des Rigs und drehen Sie den Encoder.
• Drücken Sie einen Fußschalter, der einem Preset zugewiesen ist, wenn sich das
Gigboard in der Rig-Ansicht befindet.
• Drücken Sie einen Fußschalter, der Prev Rig oder Next Rig zugewiesen ist, wenn
sich das Gigboard in der Hybrid-Ansicht befindet.
Um weitere Optionen anzuzeigen, tippen Sie auf die Schaltfläche oben rechts und tippen
dann auf eine Option.
Um die Models in
Ihrer Signalkette neu
anzuordnen, tippen
und ziehen Sie ein
Model auf einen
anderen Speicherplatz
oder zwischen zwei
andere Models (die
Models dahinter
rücken einen Slot
weiter nach unten).
83

Fußschalter-Modi
Die vier Fußschalter am HeadRush Gigboard können
verwendet werden, um Modelle (Verstärker, Boxen oder
Effekte) zu aktivieren oder zu umgehen sowie um Szenen, Rigs
oder Setlisten auszuwählen. Die Fußschalter befinden sich
immer in einem von vier Modi: Stomp, Rig, Hybrid und Setlist.
So ändern Sie den Modus:
1. Halten Sie Fußschalter 1 gedrückt. Wählen Sie dann aus
den vier Fußschaltern aus, die den vier Modi entsprechen:
Stomp, Rig, Hybrid und Setlist.
2. Drücken Sie einen Fußschalter, um in diesen Modus zu
gelangen.
Stomp-Modus
Fußschalter 1-4 entsprechen Modellen (Verstärkern, Cabs oder
Effekten) bzw. Szenen in Ihrem Rig. Drücken Sie einen
Fußschalter, um das Model zu aktivieren oder zu deaktivieren.
Rig-Modus
Die ersten 2 Fußschalter entsprechen den gespeicherten Rigs.
Drücken Sie einen Fußschalter, um den Rig zu laden.
Um die vorherige Bank von zwei Rigs zu zeigen, drücken Sie Fußschalter 3.
Um die nächste Bank von zwei Rigs anzuzeigen, drücken Sie Fußschalter 4.
Alternativer Rig-Modus
Um die alternative Version des Rig-Modus aufzurufen,
wechseln Sie auf Seite 2 der globalen Einstellungen und
ändern Sie den Parameter 4 Rigs / Kein Halten auf Ein.
Die Fußschalter 1-4 entsprechen den von Ihnen gespeicherten Rigs. Drücken Sie einen Fußschalter, um den Rig
zu laden.
Halten Sie den Fußschalter 2 gedrückt, um die vorherige Bank mit vier Rigs anzuzeigen.
Halten Sie den Fußschalter 3 gedrückt, um die nächste Bank mit vier Rigs anzuzeigen.
Hinweis: Im alternativen Rig-Modus können Sie nicht auf den Hands-Free-Modus oder den Looper zugreifen.
Hybrid-Modus
Die ersten beiden Fußschalter können zugewiesen werden, um
ein Modell zu aktivieren oder zu deaktivieren, oder um eine
Szene im aktuell ausgewählten Rig auszuwählen.
Um zum vorherigen Gerät zu wechseln, drücken Sie Fußschalter 3.
Um zum nächsten Gerät zu wechseln, drücken Sie Fußschalter 4.
Setlist-Modus
Um in die All Rigs-Setlist zu gelangen, drücken Sie
Fußschalter 1.
Um in die aktuell angezeigte Setlist zu gelangen, drücken Sie Fußschalter 2.
Um die vorherige Setliste anzuzeigen, drücken Sie Fußschalter 3.
Um die nächste Setliste anzuzeigen, drücken Sie Fußschalter 4.
84

V
Rigs
Wenn Sie Ihr HeadRush Gigboard verwenden, ist ein Rig ein Preset: die Kombination der zugewiesenen Models - die
Verstärker, die Cabs und die Effekte - und ihre jeweiligen Parametereinstellungen. Sie können Rigs erstellen, bearbeiten,
speichern und laden, so dass Sie den perfekten Sound für jeden Teil Ihrer Performance leicht abrufen können.
Jeder Rig verfügt über 11 Speicherplätze, die jeweils einem Model (Amp, Cab oder Effekt) zugeordnet sind.
Zugewiesene Speicherplätze zeigen graphische Darstellungen der Models. Leere Speicherplätze zeigen ein -Symbol.
Erstellen eines neuen Rigs
Um einen neuen Rig zu erstellen, tippen Sie in der oberen
rechten Ecke des Bildschirms auf die Schaltfläche und tippen dann
auf New Rig.
So weisen Sie einem leeren Slot ein Model (Amp, Cab oder Effekt)
zu:
1. Tippen Sie auf den leeren Speicherplatz ().
2. Tippen Sie in der erscheinenden Liste auf das Model, das Sie
zuordnen möchten. Amp, Cab oder Effekt (Distortion,
Dynamics/EQ, Modulation, Reverb/Delay, FX-Loop oder
Expression).
3. Tippen Sie in der erscheinenden Liste auf das Model, das Sie
zuordnen möchten.
4. Tippen Sie in der nächsten angezeigten Liste auf das Preset,
das Sie für dieses Model laden möchten.
Wenn Sie einen Verstärker oder ein Cabinet in einen Speicherplatz
mit einem leeren benachbarten Steckplatz laden, wird ein passender
Verstärker oder Cabinet automatisch in den anderen Speicherplatz
geladen. Danach können Sie sie unabhängig konfigurieren: Sie
können sie in der Signalkette trennen, Sie können den Typ des
Verstärkers oder Cabinets ändern und Sie können jedes Model
separat löschen.
Optimierung Ihrer Signalkette
Die Signalkette ist der Pfad, den das Audiosignal ausgehend von Ihrer Gitarre durch Ihre ausgewählten Models nimmt
und an den Ausgängen von HeadRush Gigboard endet. Sie können den Touchscreen verwenden, um Ihre
ausgewählten Models in beliebiger Reihenfolge zu arrangieren, Sie werden vielleicht feststellen, dass einige
Konfigurationen besser klingen als andere.
Model-Typen: Amps,
Cabs & Effekte.
Verfügbare Models für jeden Typ.
erfügbare Presets
für jedes Model.
Hier sind einige gern verwendete Model-Platzierungen für die Erstellung von Sounds mit dem HeadRush Gigboard:
• Dynamik (z.B. Kompressoren), Filter (z.B. Wah, Pitch Shifters) und Lautstärke-Pedale werden üblicherweise
am Anfang der Signalkette platziert. Wahlweise können Sie die Lautstärkepedale am Ende der Signalkette
platzieren, um eine leichte Variation in der Funktionalität zu erzielen.
• Gain-basierte Effekte (z. B. Overdrive/Distortion, Fuzz) kommen in der Regel als nächstes.
• Equalization (EQ) wird häufig verwendet, um die tonalen Eigenschaften von Overdrive/Distortion und Fuzz-
Effekten zu formen, positionieren Sie also einen EQ nach ihnen. Wahlweise können Sie den EQ auch vor ihnen
platzieren, um den allgemeinen Tone der Gitarre vor den Gain-Pedalen zu formen und unerwünschte Frequenzen
zu entfernen.
• Modulationseffekte wie Flanger, Phaser und Chorus werden in der Regel als nächstes platziert.
• Zeitbasierte Effekte wie Delays und Reverbs werden meist nahe dem Ende der Signalkette platziert.
• Ein Verstärker und ein Cab sind oft ganz am Ende der Signalkette angeordnet, obwohl Sie sie überall platziert
werden können.
85

e
ese
auszuwähle
ode
g
Speichern eines Rigs
Wenn Sie den Rig seit dem Laden geändert haben, sehen Sie am oberen Bildschirmrand ein Sternchen () neben
seinem Namen. Sie können diese Änderungen auf diesem Rig speichern, diese Änderungen als ein anderes Rig
speichern oder komplett verwerfen.
Um einen Rig zu speichern, tippen Sie in der oberen rechten Ecke auf
Save.
Um die Änderungen am aktuellen Rig zu speichern, tippen Sie auf
Save.
Um Ihre Änderungen als neuen Rig zu speichern, tippen Sie auf Save New Rig und verwenden die angezeigte Tastatur,
um einen Namen einzugeben, und tippen Sie dann auf Save.
Um zum vorherigen Bildschirm zurückzukehren, ohne zu speichern, tippen Sie auf Cancel.
Um alle Änderungen am Rig zu verwerfen, tippen Sie in der rechten oberen Ecke auf die Schaltfläche und tippen
Sie auf Discard Changes.
Anpassen der Einstellungen
Um die Einstellungen eines Modells in Ihres Rigs anzupassen, tippen Sie zweimal auf das Rig, um den
Einstellungsbildschirm zu öffnen.
Tippen Sie, um Ihre Änderungen zu speichern
und zum Hauptbildschirm zurückzuspringen.
Tippen Sie auf diese Schaltfläche und tippen Sie auf Discard Changes, um
Änderungen zu verwerfen, die Sie seit dem Öffnen dieses Bildschirms
enommen haben.
vor
Drehen Sie den
Encoder, um durch
wählbare Elemente am
Bildschirm zu
navigieren oder um
Parameter einzustellen.
Drücken Sie Encoder
als Enter -Befehl.
Tippen Sie auf das Preset-Menü, um
in Pr
t
n.
Siehe Preset speichern.
Tippen Sie auf eine Off/On
-Parametertaste, um die
Parametereinstellungen
entsprechend zu ändern.
Tippen Sie auf den ModelNamen, um diesem
Speicherplatz ein anderes
M
l zuzuweisen.
Tippen Sie auf Delete, um
die Zuordnung eines Models
zum Speicherplatz
aufzuheben.
Tippen Sie auf eine Farbe, die Sie dem Model
zuweisen möchten. Diese Farbe wird am
Hauptbildschirm, im Bildschirm Hardware zuweisen
und in der Fußschalter-Anzeige angezeigt.
Tippen Sie auf Cancel, um Ihre Änderungen zu
verwerfen und zum Hauptbildschirm
zurückzuspringen.
Tippen und ziehen Sie
einen Schieberegler nach
links und rechts, um die
Parametereinstellungen
anzupassen. Wahlweise
können Sie auch auf den
Schieberegler tippen und
den Encoder für
Feineinstellungen
verwenden.
Preset speichern
Um einen Preset zu speichern, tippen Sie in der oberen rechten
Ecke auf Save.
Um die Änderungen am aktuellen Preset zu speichern, tippen
Sie auf Save.
Um Ihre Änderungen als neues Preset zu speichern, tippen Sie auf Save New Preset und verwenden die
angezeigte Tastatur, um einen Namen einzugeben. Tippen Sie dann auf Save.
Um zum vorherigen Bildschirm zurückzukehren, ohne zu speichern, tippen Sie auf Cancel.
86

Hardwarezuweisung
Im Bildschirm Hardwarezuweisung kann eingestellt werden, wie
die HeadRush Gigboard-Fußschalter und das Expression-Pedal
jeden Rig steuern.
Um den Bildschirm Hardware Assign zu öffnen, tippen Sie oben
rechts auf dem Hauptbildschirm auf die Schaltfläche und
tippen dann auf Hardware Assign.
Um zum Hauptbildschirm zurückzukehren, tippen Sie auf die
Schaltfläche in der oberen linken Ecke.
Wichtig: Die Hardware Assign-Einstellungen sind Bestandteil des
Gesamt-Rigs, daher sollten Sie die Änderungen, die Sie behalten
möchten, speichern.
Um die Farbe des Rigs festzulegen, tippen Sie im oberen linken Teil des Bildschirms darauf. Diese Farbe wird neben
dem Rig-Namen angezeigt, wenn Sie eine Liste aller verfügbaren Rigs ansehen oder wenn Sie Setlisten anzeigen und
erstellen. Dies wird auch die Farbe der entsprechenden Fußschalteranzeige sein, wenn HeadRush Gigboard in der RigModus ist.
Um das Tempo der zeitbasierten Rig-Effekte (Delays, Modulation usw.) einzustellen, tippen Sie auf die Schaltfläche
unter Tempo, um Current oder Fixed auszuwählen.
• Current: Der Rig verwendet das zuletzt verwendete Tempo oder das vom Tempo-Fußschalter eingestellte
Tempo.
Um das Tempo einzustellen, drücken Sie den Tempo-Fußschalter (unten ganz rechts) mit dem gewünschten
Tempo 3-8 mal, um das neue Tempo in Schlägen pro Minute (BPM) einzustellen.
• Fixed: Der Rig verwendet ein Tempo, das Sie hier einstellen.
Um das Tempo einzustellen, drehen Sie den Encoder, um das gewünschte Tempo in Schlägen pro Minute
(BPM) einzustellen. Sie können das Tempo nur im Bildschirm "Hardwarezuweisung" einstellen.
Um einen Rig zu laden, wenn eine MIDI-Programmänderung von einem optionalen externen MIDI-Gerät
empfangen wird, oder um eine MIDI-Programmwechselmeldung zu senden, wenn ein Rig geladen ist, tippen Sie
auf die Schaltfläche unter MIDI und drehen den Encoder, um eine MIDI-Programmwechselnummer auszuwählen . Sie
können einstellen, ob MIDI-Programmänderungen im Menü Global Settings empfangen und/oder gesendet werden.
Hinweis: Wenn ein Rig eine Nummer verwendet, ist diese Nummer nicht verfügbar und kann keinem anderen Rig
zugewiesen werden. Wenn Sie einen Rig mit einem neuen Namen speichern, wird der Rig zwar gespeichert, jedoch
ohne Programmwechselnummer, um zu verhindern, dass Rigs die gleiche Nummer teilen.
Fußschalter
Die 4 Kästchen in der unteren linken Ecke repräsentieren die 4 Fußschalter von HeadRush Gigboard. Sie können jedem
beliebigen Switch-basierten Parameter (mit nur zwei Zuständen) einen beliebigen Fußschalter zuweisen - unabhängig
von seiner Position in der Signalkette.
So weisen Sie einem Fußschalter einen Parameter zu:
1. Tippen Sie auf ein Feld. zeigt ein leeres Feld an.
2. Tippen Sie in der erscheinenden Liste auf das Model mit dem
Parameter, das Sie zuordnen möchten.
3. Tippen Sie in der erscheinenden Liste auf den Parameter, den
Sie zuordnen möchten. Normalerweise ist der Parameter
einfach mit On zu aktivieren oder deaktivieren.
Tippen Sie auf Unassigned, um die Zuweisung des
Fußschalters aufzuheben.
Um zwei Zuweisungen auszutauschen, tippen und ziehen Sie
eine über die andere und lassen Sie sie dann wieder los.
87

Erw. Amp
Sie können einen Schalter zuweisen, um über den Ausgang des
externen Verstärkers ein Signal an den Fußschaltereingang des
Verstärkers zu senden. Sie können diese Funktion verwenden, um
etwa vom "Clean"- zum "Dirty"-Kanal zu wechseln bzw. um den Hall
am Verstärker ein- oder auszuschalten.
Um diese Funktion beim Wechseln zu einem Rig zu verwenden,
tippen Sie in der Hardwarezuweisungsseite auf die Schaltfläche
unter Ext Amp und wählen Sie dann Tip, Ring oder Both. Wenn Sie
sich nicht sicher sind, welche Einstellung Sie verwenden sollen,
konsultieren Sie bitte das Handbuch des Verstärkers oder den
Hersteller, um dies zu bestätigen.
Diese Funktion kann auch einem Fußschalter auf der Seite Modellauswahl zugewiesen werden, die angezeigt wird,
wenn Sie eine Fußschalter-Funktion zuweisen.
Diese Funktion kann auch einer Szene zugewiesen werden, indem Sie den Parameter im Szeneneditor-Bildschirm
anpassen.
WICHTIG! Schließen Sie diesen Ausgang nur an Verstärker an, die einen "Short-to-Sleeve" Fußschaltereingang haben.
Wenn Sie diesen Ausgang an einen anderen Fußschaltereingang anschließen, können Sie Ihr Gerät dauerhaft
beschädigen. Wenn Sie sich nicht sicher sind, ob Ihr Verstärker einen "Short-to-Sleeve" Fußschaltereingang hat,
konsultieren Sie bitte das Handbuch des Verstärkers oder den Hersteller.
Szenen
Mit der Szenenfunktion können Sie mehrere Modelle in jedem Rig aktivieren oder deaktivieren. Wenn Sie den
Fußschalter drücken, der dieser Szene zugeordnet ist, werden alle in dieser Szene enthaltenen Modelle abhängig von
ihrer Zuweisung ein- oder ausgeschaltet. Dies ist der ideale Weg, mehrere Sounds im selben Rig zu erstellen. Vielleicht
möchten Sie, dass ein bestimmtes Hall-Modell eingeschaltet ist, wenn ein bestimmtes Verzerrungsmodell ebenfalls
eingeschaltet ist. Alternativ können Sie ein Delay-Modell deaktivieren, wenn Sie ein anderes einschalten. Szenen
ermöglichen dies mit nur einem Druck auf den Fußschalter.
So erstellen und bearbeiten Sie eine Szene:
1. Tippen Sie im Bildschirm Hardwarezuweisung auf Toggle/Scene
für den gewünschten Fußschalter, um durch die verfügbaren
Optionen zu blättern und wählen Sie Scene.
2. Tippen Sie in diesem Modell auf Edit. Der Szeneneditor wird
nun aufgerufen und zeigt alle Modelle in Ihrem Rig.
3. Tippen Sie auf jedes Modell im Rig, um durch die verfügbaren
Optionen zu blättern:
• On: Dieses Modell schaltet sich ein, wenn Sie die Szene
einschalten.
• Off: Dieses Modell schaltet sich aus, wenn Sie die Szene
einschalten.
• No Change: Dieses Modell wird ausgeschaltet, wenn Sie
die Szene einschalten.
4. Tippen Sie auf eine Farbe am unteren Rand des Touchscreens,
um eine Farbe für die Szene auszuwählen.
5. Um zum Bildschirm Hardwarezuweisung zurückzukehren,
tippen Sie auf die Schaltfläche in der oberen linken Ecke.
Um eine Szene umzubenennen (die in den Fußschalteranzeigen
angezeigt wird), tippen Sie auf dem Modell auf den Text im Feld
unter Edit, verwenden die angezeigte virtuelle Tastatur, um einen
Namen einzugeben und tippen dann auf eine andere Stelle als das
Textfeld.
88

Expression-Pedal
Sie können ein optionales Expression-Pedal (separat erhältlich) anschließen, um zwei Parameter (im klassischen
Modus) oder zwei Parameter-Sets (im erweiterten Modus) zu steuern. Wenn Ihr Expression-Pedal einen
Zehenschalter hat, können Sie mit dem Zehenschalter zwischen Expression Pedal A oder B wechseln.
Hinweis: Wenn Sie Ihren Rig speichern, wird der aktuell ausgewählte Expression-Pedal-Status (A oder B)
gespeichert und dann wieder aufgerufen, wenn Sie den Rig erneut laden.
Die Spalte mit vier Feldern repräsentiert die Expression-Pedal-Einstellungen.
Sie können dem Expression-Pedal einen oder mehrere stufenlos einstellbare
Parameter (mit einem Wertebereich) zuordnen.
Um den Expression-Pedal-Modus einzustellen, tippen Sie auf die
Schaltfläche oberhalb von Range in der oberen rechten Ecke, um Classic
oder Advanced auszuwählen.
• Classic: Sie können jedem Expressionspedal (A und B) einen
Parameter zuordnen. Die Verwendung des Zehenschalters wählt das
andere Expression-Pedal und deaktiviert (umgeht) den Parameter des
aktuellen Expression-Pedals. Wenn Sie beispielsweise dem ExpressionPedal A ein Wah-Pedal und dem Expression-Pedal B ein
Lautstärkepedal zuweisen, wird immer nur eines von ihnen aktiv sein.
• Advanced: Sie können jedem Expressionspedal (A und B) bis zu vier Parameter zuordnen. Durch Bewegen
des Pedals werden alle zugewiesenen Parameter gleichzeitig eingestellt. Die Verwendung des
Zehenschalters wählt das andere Expression-Pedal und belässt die Parameter des aktuellen Pedals aktiv
und bei Ihren maximalen Werten.
So weisen Sie dem Expression-Pedal einen Parameter zu:
1. Wenn die Assign-Schaltfläche nicht aktiviert ist, tippen Sie
darauf.
2. Tippen Sie unter der Schaltfläche Assign auf ein Feld. zeigt
ein leeres Feld an.
3. Tippen Sie in der erscheinenden Liste auf das Model mit
dem Parameter, das Sie zuordnen möchten.
4. Tippen Sie in der erscheinenden Liste auf den Parameter,
den Sie zuordnen möchten.
Tippen Sie auf Unassigned , um die Zuweisung dieses
Feldes aufzuheben.
Um zwei Zuweisungen (im Advanced Mode) auszutauschen, tippen und ziehen Sie eine über die andere und
lassen Sie sie dann wieder los.
So stellen Sie den Bereich eines zugewiesenen Parameters ein:
1. Wenn die Range-Schaltfläche nicht aktiviert ist, tippen Sie darauf.
2. Tippen Sie unter der Schaltfläche Range auf einen Wert.
3. Drehen Sie den Encoder, um den gewünschten Wert als Prozentsatz des gesamten
Parameterbereichs festzulegen. Drücken Sie den Encoder oder tippen Sie an anderer
Stelle, um den Wert zu bestätigen.
89

Setlisten
Sie können Setlisten verwenden, um Ihre Rigs zu organisieren. Eine Setliste ist eine gespeicherte Sammlung von Rigs,
die Sie speichern und später abrufen können. Dies ist zum Beispiel dann nützlich, wenn Sie nur bestimmte Rigs für Ihre
Performance benötigen; Sie können eine Setliste mit nur diesen Rigs speichern, damit Sie nicht erst durch alle Rigs
blättern müssen bevor Sie den nächsten Song spielen.
Um Ihre Setlisten anzusehen, tippen Sie auf die Schaltfläche ≡ in der oberen linken Ecke des Hauptfensters. Der
Bildschirm Setlists erscheint.
Um zum Hauptbildschirm zurückzukehren, tippen Sie auf die Schaltfläche in der oberen linken Ecke.
So erstellen Sie eine Setliste:
1. Tippen Sie New in der oberen rechten Ecke.
2. Auf dem angezeigten Bildschirm ist die linke Hälfte eine Liste aller
verfügbaren Rigs und die rechte Hälfte die Liste der Rigs in der Setliste.
Um der Setliste einen Rig hinzuzufügen, tippen Sie auf den Rig, um
ihn am Ende der Liste hinzuzufügen. Wahlweise können Sie auf den Rig
tippen, halten und an die gewünschte Position in der Liste ziehen. Ein
und derselbe Rig kann einer Setliste mehr als einmal hinzugefügt
werden. Der [Empty ]-Rig in der unteren linken Ecke ist ein
Speicherplatz, der als Platzhalter verwendet werden kann, um das
Umordnen der Setliste zu erleichtern; Er scheint nicht als selektierbarer
Rig auf, wenn Sie durch Rigs in der Setliste blättern.
Um die Setliste neu anzuordnen, tippen und halten Sie einen Rig in der
Liste in der rechten Hälfte und ziehen ihn an die gewünschte Position in
der Liste.
Um einen Rig aus der Setliste zu entfernen, tippen Sie auf am
rechten Rand.
Um einen Setlist zu speichern, tippen Sie in der oberen rechten Ecke
auf Save.
Um die Änderungen an der aktuellen Setliste zu speichern, tippen
Sie auf Save.
Um Ihre Änderungen als neue Setliste zu speichern, tippen Sie auf Save New Setlist und verwenden die
angezeigte Tastatur, um einen Namen einzugeben. Tippen Sie dann auf Save.
(Jederzeit) Um zum vorherigen Bildschirm zurückzukehren, ohne zu speichern, tippen Sie auf Cancel.
Um alle Änderungen an der Setliste zu verwerfen, tippen Sie in der linken oberen Ecke auf die Schaltfläche und
tippen Sie auf Discard Changes.
So laden Sie eine Setliste:
1. Tippen Sie im Hauptbildschirm auf die Schaltfläche ≡ in der oberen
linken Ecke, um das Fenster Setlists anzuzeigen. Jede Setliste zeigt die
Anzahl der Rigs in Klammern (einschließlich mehrerer Instanzen des
gleichen Rigs).
2. Tippen Sie auf die gewünschte Setliste. Der erste Rig dieser Setliste wird
sofort geladen. Tippen Sie auf All Rigs, um alle Rigs anstelle einer
bestimmten Setliste anzuzeigen.
Um eine Setliste
Schaltfläche und tipp
gleichen Bildschirm, in dem Sie die Setliste erstellt haben. Hier können Sie
sie bearbeiten und speichern.
Um eine Setliste zu löschen, tippen Sie auf die Schaltfläche auf der linken Seite und tippen Sie dann auf das
Papierkorb-Symbol. Tippen Sie auf Yes, um den Löschvorgang zu bestätigen oder auf Cancel, um zum Bildschirm
Setlisten zurückzukehren, ohne die Liste zu löschen.
90
zu bearbeiten, tippen Sie auf der linken Seite auf die
en dann auf das Bleistiftsymbol. Sie sehen den

Hands-Free-Modus
Im Hands-Free-Modus können Sie alle Einstellungen auf Ihren
Models mit den Fußschaltern und/oder einem optionalen
Expression-Pedal vornehmen. (separat erhältlich)
Um den Hands-Free Mode aufzurufen, halten Sie
Fußschalter 2 länger als eine Sekunde gedrückt. Im Hands-
Free-Modus zeigt der Bildschirm einen einzelnen Parameter
und den aktuell ausgewählten Wert an.
Um den Wert zu ändern, drücken Sie Fußschalter 1 (nach
unten) oder Fußschalter 2 (nach oben). Sie können dies auch
ändern, indem Sie ein externes Expression-Pedal bewegen.
Um auf den nächsten verfügbaren Parameter zuzugreifen,
drücken Sie Fußschalter 3.
Um auf den vorherigen verfügbaren Parameter zuzugreifen,
halten Sie den Fußschalter 3 gedrückt.
Um auf den nächsten verfügbaren Block in Ihrem Gerät
zuzugreifen, drücken Sie Fußschalter 4.
Um den Freisprechmodus zu beenden, drücken und halten
Sie Fußschalter 4.
Tuner/Tempo
Sie können die Tuner/Tempo-Seite verwenden, um Ihre Gitarre
zu stimmen und ein Tempo für zeitbasierte Effekte einzustellen.
Um den Tuner/Tempo-Modus aufzurufen, halten Sie
Fußschalter 4 länger als eine Sekunde gedrückt. Im
Tuner/Tempo-Modus wird der Bildschirm rechts angezeigt.
Um die Tuner-Referenztonhöhe zu ändern, tippen Sie auf
den Parameter und drehen Sie den Encoder.
Um die Stummschaltung beim Tuning aufzuheben, drücken
Sie Fußschalter 1.
Um ein Tempo durch Tippen auf einen Fußschalter
einzugeben, drücken Sie den Fußschalter 3 3-8 Mal im
gewünschten Tempo, um das Tempo in Schlägen pro Minute
(BPM) einzustellen.
Um diese Seite zu verlassen, drücken Sie Fußschalter 4.
91

Looper
Das HeadRush Gigboard verfügt über einen eingebauten Looper, mit dem Sie Ihre Performances überlagern
können. Während der Betrieb des Looper im Display angezeigt wird, können Sie das meiste bequem mit den
Fußschaltern steuern.
Der Looper kann bis zu 20 Minuten Audio auf einmal über maximal 50 Layers speichern.
Diese Anzeige zeigt
während der
Aufnahme oder
Wiedergabe Ihre
aktuelle Position im
Loop an.
Dies gibt an, wie viele
Ebenen im aktuellen
Loop wiedergegeben
werden, einschließlich
des Originals.
Dies zeigt die aktuelle
Geschwindigkeit des
Loops als Vielfaches
oder Bruchteil des
Originals an.
Dies gibt die Länge des
aktuellen Loops an.
Um die erste Layer eines Loops aufzunehmen, drücken Sie den Fußschalter Aufnahme. Die Aufnahme beginnt
sofort und die Fußschalteranzeige leuchtet rot. Drücken Sie den Aufnahme-Fußschalter erneut, um die
Aufnahme zu stoppen und die Loop-Wiedergabe zu starten. Der Fußschalter heißt jetzt Overdub und der
Fußschalter ist gelb.
Rig-Name.
Dies zeigt die Richtung der
Wiedergabe an.
Dies steuert, wie viel Signals
des Loopers Sie in über die
Ausgänge hören.
Dies steuert, wie viel vom
Signal des Loopers
zurückgeleitet wird, wenn
eine andere Layer
aufgenommen wird.
Dies zeigt an, ob der Looper Ihrer
Signalkette vor- (Pre) oder nachgeschaltet
(Post) ist. Wenn Sie den Looper auf die
Pre-Position bewegen, können Sie Ihren
Rig bearbeiten, ohne das gleiche Riff immer
wieder neu spielen zu müssen.
Um weitere Layer im Loop aufzunehmen (Overdub), drücken Sie den Overdub-Fußschalter. Die Overdub-
Aufnahme beginnt sofort und die Fußschalteranzeige leuchtet rot. Drücken Sie den Overdub-Fußschalter
erneut, um das Overdubbing zu beenden und die Wiedergabe fortzusetzen.
Um die oberste (zuletzt hinzugefügte) Layer eines Loops zu löschen, drücken Sie den Peel-Fußschalter. Die
oberste Layer des Loops wird sofort gelöscht. Dieser Prozess ist destruktiv, Sie können die Layer später nicht
erneut hinzufügen.
Um den gesamten Loop zu löschen, halten Sie den Clear-Fußschalter gedrückt. Dieser Vorgang stoppt die
Wiedergabe und ist destruktiv. Sie können dies später nicht mehr rückgängig machen.
Um die Länge der Schleife zu halbieren oder zu verdoppeln, tippen Sie auf die Schaltfläche neben dem Feld
Length und drehen Sie dann den Encoder. Der Halbierungsprozess ist nicht-destruktiv, so dass Sie den
ursprünglichen Loop und seinen Inhalt wiederherstellen können, indem Sie die Länge des Loops verdoppeln.
Um die Länge des Loops zu halbieren oder zu verdoppeln, tippen Sie auf die Schaltfläche neben dem Feld
Speed und drehen Sie dann den Encoder.
Tipp: Verwenden Sie diese Option, um tiefe Basslinien oder besonders hohe Gitarrenspuren zu erzeugen, die Sie
normalerweise nicht spielen könnten.
92
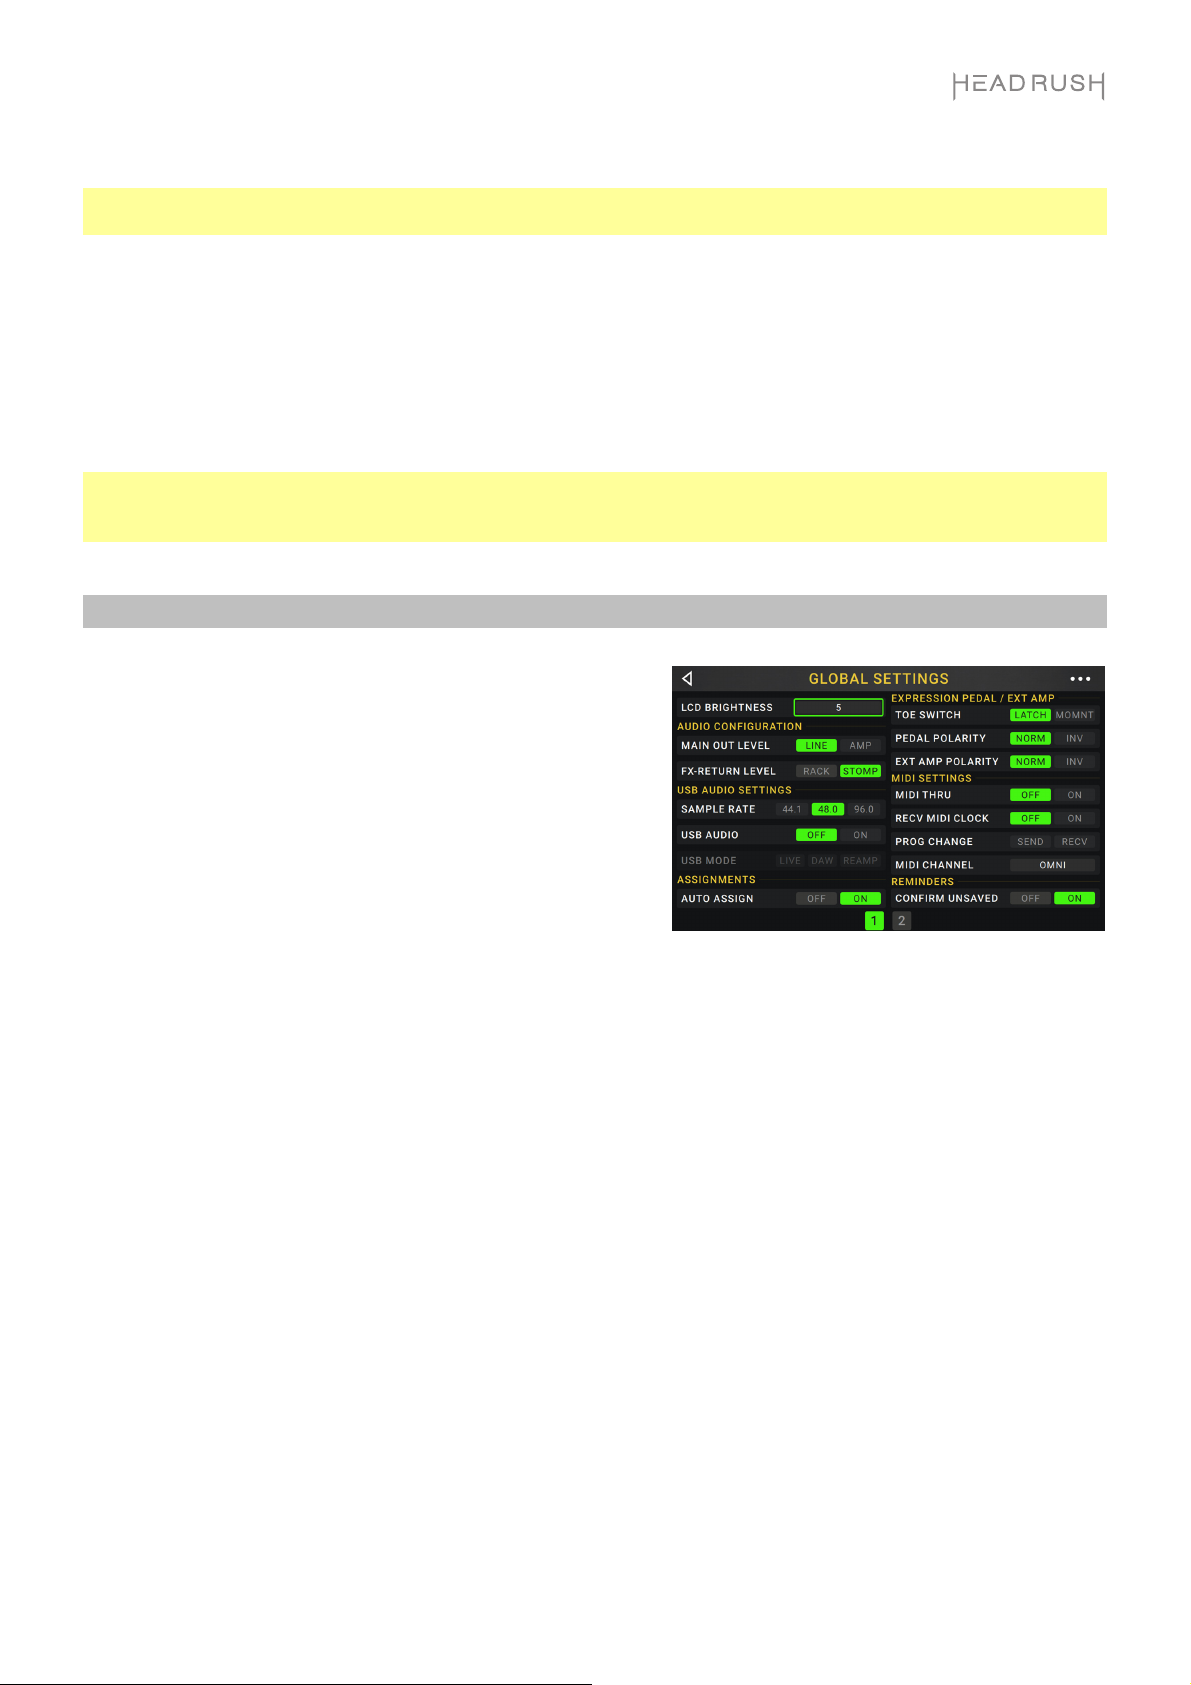
Um die Looper-Wiedergabe umzukehren, tippen Sie auf die Schaltfläche neben dem Feld Playback und drehen
Sie den Encoder.
Tipp: Erstellen Sie unheimliche Effekte, indem Sie die Layers rückwärts aufnehmen und dann zur normalen
Wiedergabe zurückkehren.
Um die Position des Looper einzustellen, tippen Sie auf die Schaltfläche neben dem Feld Playback und drehen
Sie den Encoder, um ihn vor(Pre) oder nach (Post) der Signalkette zu platzieren. Wenn Sie den Looper auf die
Pre -Position bewegen, können Sie Ihren Rig bearbeiten, ohne das gleiche Riff immer wieder neu spielen zu
müssen.
Um den Looper zu verlassen und zum Hauptbildschirm zurückzukehren, drücken Sie den Exit-Fußschalter.
Wenn der Looper spielt, wird die Wiedergabe fortgesetzt.
Um den Looper erneut aufzurufen, drücken Sie den Looper-Fußschalter erneut.
Tipp: Verwenden Sie diese Funktion, um für jede Ebene verschiedene Effektkonfigurationen zu erstellen
(Parameter anpassen, Modelle aktivieren/deaktivieren usw.) und eine Multi-Textur-Performance zu erstellen. Sie
können auch Rigs wechseln, während Sie den Looper verwenden und für jeden Layer ein anderes Rig verwenden.
Globale Einstellungen
Verwenden Sie die globalen Einstellungen, um den gesamten
Betrieb des HeadRush Gigboard zu konfigurieren.
Um die Globalen Einstellungen anzuzeigen, tippen Sie
in der oberen rechten Ecke des Bildschirms auf die
Schaltfläche und tippen Sie auf Global Settings.
Um jede einzelne Seite der globalen Einstellungen
auszuwählen, tippen Sie auf die Nummer am unteren
Bildschirmrand.
LCD Brightness (LCD-Helligkeit): Diese Einstellung bestimmt die Helligkeit des Hauptdisplays. Tippen Sie auf dieses
Feld, drehen Sie den Encoder, um vom Wert 1 (dunkel) bis 5 (hell) auszuwählen und drücken dann den Encoder.
Audio Configuration (Audiokonfiguration):
Main Out Level: Diese Einstellung bestimmt den Signalpegel, der an die Hauptausgänge gesendet wird (1/4"/ 6,35
mm, TRS). Bei der Einstellung Line ist der Ausgangspegel +18 dBu. Verwenden Sie diese Einstellung, wenn Sie
das HeadRush Gigboard an einen Full-Range-Verstärker, PA-Lautsprecher, Mixer oder eine Audio-Schnittstelle
anschließen. Bei der Einstellung Amp ist der Ausgangspegel +6 dBu. Verwenden Sie diese Einstellung, wenn Sie
das HeadRush Gigboard an einen herkömmlichen Gitarrenverstärker anschließen.
FX Return Level: Diese Einstellung bestimmt den Signalpegel, der vom FX Return Eingang (1/4"/ 6,35 mm, TRS)
empfangen wird. Bei der Einstellung Rack ist der Ausgangspegel Line-Level und +18 dBu. Verwenden Sie diese
Einstellung, wenn Sie einen Rack-Effektprozessor an die FX-Loop des HeadRush Gigboard angeschlossen
haben. Bei der Einstellung Stomp ist der Ausgangspegel +6 dBu. Verwenden Sie diese Einstellung, wenn Sie ein
traditionelles Gitarrenpedal ("Stompbox") im FX-Loop anschließen.
93

USB Audio Settings (USB-Audioeinstellungen):
Hinweis: Bitte laden Sie das komplette HeadRush Gigboard Benutzerhandbuch auf headrushfx.com herunter, um zu
erfahren, wie Sie Ihre DAW konfigurieren.
Wichtiger Hinweis für Windows-Benutzer: Bevor Sie das HeadRush Gigboard an Ihren Computer anschließen, laden
Sie die erforderlichen Treiber von headrushfx.com/support herunter und installieren Sie sie.
Sample Rate: Diese Einstellung bestimmt die Abtastrate des USB-Audiosignals: 44.1 kHz, 48.0 kHz oder 96.0 kHz.
Denken Sie daran, dieselbe Abtastrate wie in Ihrer DAW zu wählen. Denken Sie auch daran, diese vor dem Öffnen
Ihrer DAW einzustellen.
USB Audio: Diese Einstellung legt fest, ob HeadRush Gigboard ein USB-Audiosignal über eine USB-Verbindung
sendet. Tippen Sie auf On, um das Senden des USB-Audiosignals mit der ausgewählten Sample Rate zu
aktivieren. Tippen Sie auf Off, um das USB-Audiosignal zu deaktivieren. (Um die Sample-Rate zu ändern, stellen
Sie USB Audio zuerst auf Off, wählen Sie die richtige Sample-Rate, setzen Sie USB Audio erneut auf On und
starten Sie Ihre DAW neu.)
USB Mode: Diese Einstellung legt fest, wie das HeadRush Gigboard sein Audiosignal über die USB-Verbindung
sendet und wie seine Ausgänge funktionieren:
• Live: Das Audiosignal wird sowohl an Ihren Computer als auch an die Ausgänge des HeadRush Gigboard
gesendet.
• DAW: Das Audiosignal wird nur an Ihren Computer gesendet. Die Ausgänge des HeadRush Gigboard sind
deaktiviert, um beim Monitoring keine Latenz zu erzeugen.
• Reamp: Ihr Computer sendet ein Audiosignal an das HeadRush Gigboard, welches es über das aktuelle
Rig verarbeitet und an Ihren Computer zurücksendet. Die Ausgänge des HeadRush Gigboard sind
deaktiviert, um beim Monitoring keine Latenz zu erzeugen.
Assignments (Zuweisungen):
Auto Assign: Diese Einstellung bestimmt, wie den Schaltern Modelle zugewiesen werden. Tippen Sie auf On, wenn
Modelle beim Laden automatisch dem nächsten verfügbaren Schalter zugewiesen werden sollen. Tippen Sie auf
Off, wenn Sie Modelle laden möchten, die keinem Schalter zugewiesen sind. Sie müssen sie manuell im Bildschirm
Hardware Assign zuweisen.
Expression Pedal / Ext Amp:
Zehen-Schalter: Ändern Sie diesen Parameter auf Einrasten, wenn Ihr Expression-Pedal einen rastenden
Zehenschalter verwendet, oder Momnt, wenn Ihr Expression-Pedal einen momentanen Zehenschalter verwendet.
Pedalpolarität: Wenn es so scheint, als würde Ihr Expression-Pedal eine Bewegung in die falsche Richtung
registrieren, können Sie diesen Parameter ändern, um die Pedalpolarität umzukehren. Wählen Sie zwischen
Norm (normal) und Inv (invertiert).
Ext Amp Polarität: Wenn Sie den Eindruck haben, dass Ihr externer Verstärker die entgegengesetzten Meldungen
empfängt, ändern Sie diesen Parameter, um die Meldungen umzukehren, die an den
Fußschaltera
usgang gesendet werden. Wählen Sie zwischen Norm (normal) und Inv (invertiert).
externen Amp-
MIDI Settings (MIDI-Einstellungen): Diese Einstellungen bestimmen, wie das HeadRush Gigboard MIDI-Informationen
von und zu externen Geräten sendet und empfängt. Diese Einstellungen betreffen nur den MIDI-Eingang oder MIDIAusgang des HeadRush Gigboard.
MIDI Thru: Tippen Sie auf On, um den MIDI-Ausgang als MIDI-Thru zu verwenden; Alle MIDI-Informationen, die an
den MIDI-Eingang des HeadRush Gigboard gesendet werden, werden direkt an den MIDI-Ausgang gesendet.
Tippen Sie auf Off, um den MIDI-Ausgang des HeadRush Gigboard normal zu verwenden. Das HeadRush
Gigboard kann seine eigenen MIDI-Informationen aus dem MIDI-Ausgang senden.
Recv MIDI Clock: Tippen Sie auf On, damit das HeadRush Gigboard MIDI-Clock-Informationen empfangen kann.
Tippen Sie auf Off, um die eigene interne MIDI Clock des HeadRush Gigboard zu verwenden (die nicht gesendet
wird).
Prog Change: Tippen Sie auf Send, um die Übertragung von MIDI-Programmwechselnachrichten durch das
HeadRush Gigboard zu aktivieren oder zu deaktivieren, wenn Sie ein Rig laden. Tippen Sie auf Recv, um den
Empfang von MIDI-Programmwechseln von HeadRush Gigboard von einem externen MIDI-Gerät zu aktivieren oder
zu deaktivieren.
MIDI Channel: Diese Einstellung bestimmt die MIDI-Kanäle, über die das HeadRush Gigboard MIDI-
Nachrichten senden und empfangen soll. Tippen Sie auf dieses Feld, drehen Sie den Encoder, um alle
Kanäle (Omni) oder 1–16 auszuwählen, und drücken Sie dann den Encoder.
94

Reminders (Erinnerungen):
Confirm Unsaved: Diese Einstellung legt fest, ob eine
Bestätigungsmeldung angezeigt wird, wenn Sie den Rig
ändern, während der aktuelle nicht gespeicherte
Änderungen enthält. Tippen Sie auf On, um diese
Nachrichten zu aktivieren, oder auf Off, um sie zu
deaktivieren.
Tippen Sie wahlweise auf Diesen Dialog nicht mehr
anzeigen in der Nachricht selbst, um sie zu deaktivieren.
Global EQ:
Diese Einstellungen auf Seite 2 bestimmen, ob und wie die
Entzerrung für Ihre Ausgänge angewendet wird. Dieser Equalizer
ist ein parametrischer Vierband-Equalizer.
Tipp: Diese Einstellungen sind besonders nützlich, wenn ein
Veranstaltungsort, Probenraum usw. andere akustische
Eigenschaften haben als der Raum, in dem Sie ursprünglich Ihre
Voreinstellungen erstellt haben (z. B. kann der Veranstaltungsort
mehr "dröhnen" oder ein Proberaum mit Schalldämmung einen Teil
der hohen Frequenzen reduzieren). Auf dieser Seite können Sie
schnell einige zusätzlichen Entzerrungen auf alle Ihre Presets
anwenden, ohne sie dauerhaft zu speichern.
EQ On: Diese Einstellung legt fest, ob die Entzerrung für die Ausgänge aktiviert (Ein) oder deaktiviert (Aus) ist.
Level: Diese Einstellung legt fest, ob und wie stark der Audiosignalpegel der Ausgänge erhöht oder verringert wird.
Dieser Wert wird auf den vom Main (Haupt)-Regler festgelegten Pegel angewendet.
Low Band & High Band: Diese Einstellungen legen fest, welche Art von Entzerrung auf das niedrigste
Frequenzband (Low Band) und das höchste Frequenzband (High Band) angewendet wird: Shelf oder Cut.
Low, Low Mid, High & High Mid: Die drei Einstellungen für jedes dieser vier Frequenzbänder bestimmen die Form
der Entzerrung:
Die erste Einstellung (Hz) bestimmt die Mittenfrequenz des Niederfrequenzbandes, des Niedrig-
Mittelfrequenzbandes, des Hochfrequenzbandes oder des Hoch-Mittelfrequenzbandes.
Die zweite Einstellung (dB) bestimmt, wie stark der Equalizer das Signal im entsprechenden Frequenzband
verstärkt oder abschwächt.
Die dritte Einstellung (Q) bestimmt die Breite des Frequenzbandes. Je höher die Einstellung, desto breiter ist
das Band um die Mittenfrequenz (die erste Einstellung). Diese Einstellung wird angewendet, wenn Low Band
oder High Band auf Shelf oder Cut eingestellt ist.
Alt Rig Footswitch View (Alt Rig Fußschalter-Ansicht):
4 Rigs / Kein Halten: Ändern Sie diese Einstellung auf Ein, um vom Rig-Modus in den Alternativen Rig-Modus zu
wechseln. Weitere Informationen finden Sie unter Fußschalter-Modi.
Farb-Variation:
Wenn Sie Schwierigkeiten haben, bestimmte Farben auf dem Display Ihres Gigboards zu unterscheiden oder das
Farbschema noch weiter anpassen möchten, können Sie die Standardeinstellungen mit den Farbmod-Parametern
anpassen. Während Sie mit den Einstellungen experimentieren, wird ein Beispiel Ihrer Einstellungen in Echtzeit
angezeigt. Wenn Sie zum Standardfarbschema zurückkehren möchten, sind die Standardeinstellungen wie folgt:
Depth (Tiefe): 0% Color (Farbe): 36 DEG Spread (Verteilung): 180 DEG
Hinweis: Die Farb-Variationsfunktion ist deaktiviert, wenn die Bildschirmsperre aktiviert ist.
95

Übertragen von Dateien und Einstellungen
Über eine USB-Verbindung können Sie Rig-, Setlist-,
Modell-Preset, Loop- und/oder Impulsantwortdateien (IR)
zwischen Ihrem Computer und dem HeadRush Gigboard
übertragen.
Wir empfehlen, eine Sicherungskopie Ihrer Dateien auf
Ihrem Computer zu erstellen, bevor Sie Änderungen
vornehmen.
Wichtig:
Schalten Sie das HeadRush Gigboard während des Vorgangs
nie aus und trennen die Verbindung nicht.
Nicht unterstützte Dateien werden ignoriert.
Sie können weder Ordner noch .zip/Archivordner auf bzw.
vom HeadRush Gigboard übertragen. Übertragen Sie alle
unterstützten Dateien stattdessen direkt.
Wir empfehlen, die Dateistruktur Ihrer Rigs, Setlisten,
Modellvoreinstellungen und/oder Impulsantwortdateien auf
Ihrem Computer so zu organisieren, dass sie mit der
Dateistruktur identisch ist, die auf dem HeadRush
Gigboard-Laufwerk angezeigt wird.
So übertragen Sie Dateien zwischen dem HeadRush Gigboard und Ihrem Computer:
1. Schließen Sie Ihren Computer mit einem handelsüblichen USB-Kabel an den USB-Anschluss des HeadRush
Gigboard an.
2. Schalten Sie bei eingeschaltetem Computer das HeadRush Gigboard über den Netzschalter ein.
3. Tippen Sie in der oberen rechten Ecke des Bildschirms auf die Schaltfläche und tippen Sie auf Global
Settings.
4. Tippen Sie im Bildschirm Globale Einstellungen in der oberen rechten Ecke auf die Schaltfläche und tippen
Sie anschließend auf USB Transfer. Auf Ihrem Computer wird HeadRush Gigboard als Massenspeichergerät
mit dem Namen HeadRush angezeigt.
Windows -Benutzer: Wenn Sie es zum ersten Mal mit diesem Computer verbunden haben, müssen Sie
möglicherweise eine Minute warten, während die klassenkonformen Treiber installiert werden.
5. Öffnen Sie das HeadRush-Laufwerk. Sie können jetzt frei auf Inhalte zwischen HeadRush und Ihrem
Computer klicken und diese ziehen. Beachten Sie, dass alle Änderungen, die Sie am Inhalt Ihres HeadRush
vornehmen, sofort erfolgen und nicht abgebrochen werden können.
6. WICHTIG: Wenn Sie mit dem Übertragen der Inhalte
fertig sind, müssen Sie das HeadRush-Laufwerk von
Ihrem Computer trennen/auswerfen. Eine
Dateibeschädigung kann auftreten, wenn das Laufwerk
vor dem Fortfahren nicht ordnungsgemäß ausgeworfen
wird.
7. Tippen Sie nach dem Auswerfen des Laufwerks auf
Ihrem HeadRush Gigboard auf Sync, um alle
Änderungen zu übernehmen, die Sie am Inhalt des
HeadRush-Laufwerks vorgenommen haben. Eine
zusätzliche Eingabeaufforderung bestätigt, dass Sie das
Laufwerk ausgeworfen haben. Tippen Sie auf Proceed,
um fortzufahren oder auf Cancel, um weiterhin auf
Dateien auf Ihrem Computer zuzugreifen.
Während das HeadRush Gigboard die Dateien analysiert und importiert, zeigt ein Balken am Display den
Fortschritt an. Der normale Bildschirm Globale Einstellungen wird wieder angezeigt, wenn der Vorgang
abgeschlossen ist. Schalten Sie das HeadRush Gigboard während des Synchronisationsvorgangs nicht aus
und trennen die Verbindung nicht.
96

Anweisungen zum Firmware-Update
1. Verbinden Sie den USB-Anschluss Ihres HeadRush-Geräts mit Ihrem Computer und stellen Sie sicher, dass
das HeadRush-Gerät und Ihr Computer eingeschaltet sind.
2. Tippen Sie auf Ihrem HeadRush-Gerät oben rechts auf das Symbol ••• und anschließend auf Global
Settings.
3. Tippen Sie im Bildschirm Globale Einstellungen erneut auf das Symbol ••• in der oberen rechten Ecke und
anschließend auf Firmware Update. Tippen Sie im angezeigten Bildschirm auf OK, um fortzufahren. Nach
dem Neustart wird am unteren Rand Update angezeigt.
4. Öffnen Sie die HeadRush Updater-Anwendung für Ihr Betriebssystem - Windows oder macOS. (Sie können
die neueste Updater-Anwendung von headrushfx.com herunterladen.)
5. Wenn das Updater-Fenster angezeigt wird, klicken Sie auf Update HeadRush. Trennen oder schalten Sie
das HeadRush-Gerät oder Ihren Computer erst aus, wenn das Update abgeschlossen ist.
6. Wenn das Update abgeschlossen ist, wird im Updater-Fenster Done angezeigt und Ihr HeadRush-Gerät wird
neu gestartet. Klicken Sie auf Done, um das Updater-Fenster zu schließen.
7. Vergewissern Sie sich, dass Ihr HeadRush-Gerät die neueste Firmware verwendet. Tippen Sie oben rechts
auf das Symbol ••• und anschließend auf Global Settings. Die Firmware-Version wird am unteren
Bildschirmrand angezeigt.
97

Appendix (English)
Technical Specifications
Footswitches
(4) footswitches with color LEDs
Knobs
Display
Connectors
Power Connection
Input Voltage
(1) 300° master volume knob
(1) 360° navigation/data encoder
(1) full-color LED-backlit display with touch interface
6.9” / 176 mm
5.9” x 3.7” / 150 x 93 mm
(1) 1/4” (6.35 mm) TS input
(1) 1/4” (6.35 mm) TRS input (expression pedal)
(1) 1/4” (6.35 mm) TS input (expression pedal toe switch)
(1) 1/8” (3.5 mm) stereo input
(1) 1/4” (6.35 mm) TRS output
(1) 1/4” (6.35 mm) TRS input
(1) 1/4” (6.35 mm) TRS output
(1) 5-pin MIDI input
(1) 5-pin MIDI output/thru
(1) USB Type-B port
(1) IEC power input
(diagonal)
(width x height)
(guitar)
(auxiliary device)
(external amp switch)
(send)
(return)
DC power adapter input
19 VDC, 3.42 A, center-positive
Dimensions
(width x depth x height)
Weight
Specifications are subject to change without notice.
12.96" x 8.88" x 2.64"
32.92 x 22.56 x 6.71 cm
7.14 lbs.
3.24 kg
Trademarks & Licenses
HeadRush is a trademark of inMusic Brands, Inc., registered in the U.S. and other countries.
Avid and Eleven are trademarks or registered trademarks of Avid Technology, Inc. in the U.S. and other countries.
Windows is a registered trademark of Microsoft Corporation in the United States and other countries.
All other product names, company names, trademarks, or trade names are those of their respective owners.
98

99

Manual Version 2.1.3
 Loading...