

Page 1

User Guide
English
1
Page 2

User Guide
Introduction
Box Contents
HeadRush Gigboard
USB Cable
Power Adapter
Software Download Card
Quickstart Guide
Safety & Warranty Manual
Support
For the latest information about this product (documentation, technical specifications, system requirements,
compatibility information, etc.) and product registration, visit headrushfx.com.
For additional product support, visit headrushfx.com/support.
2
Page 3
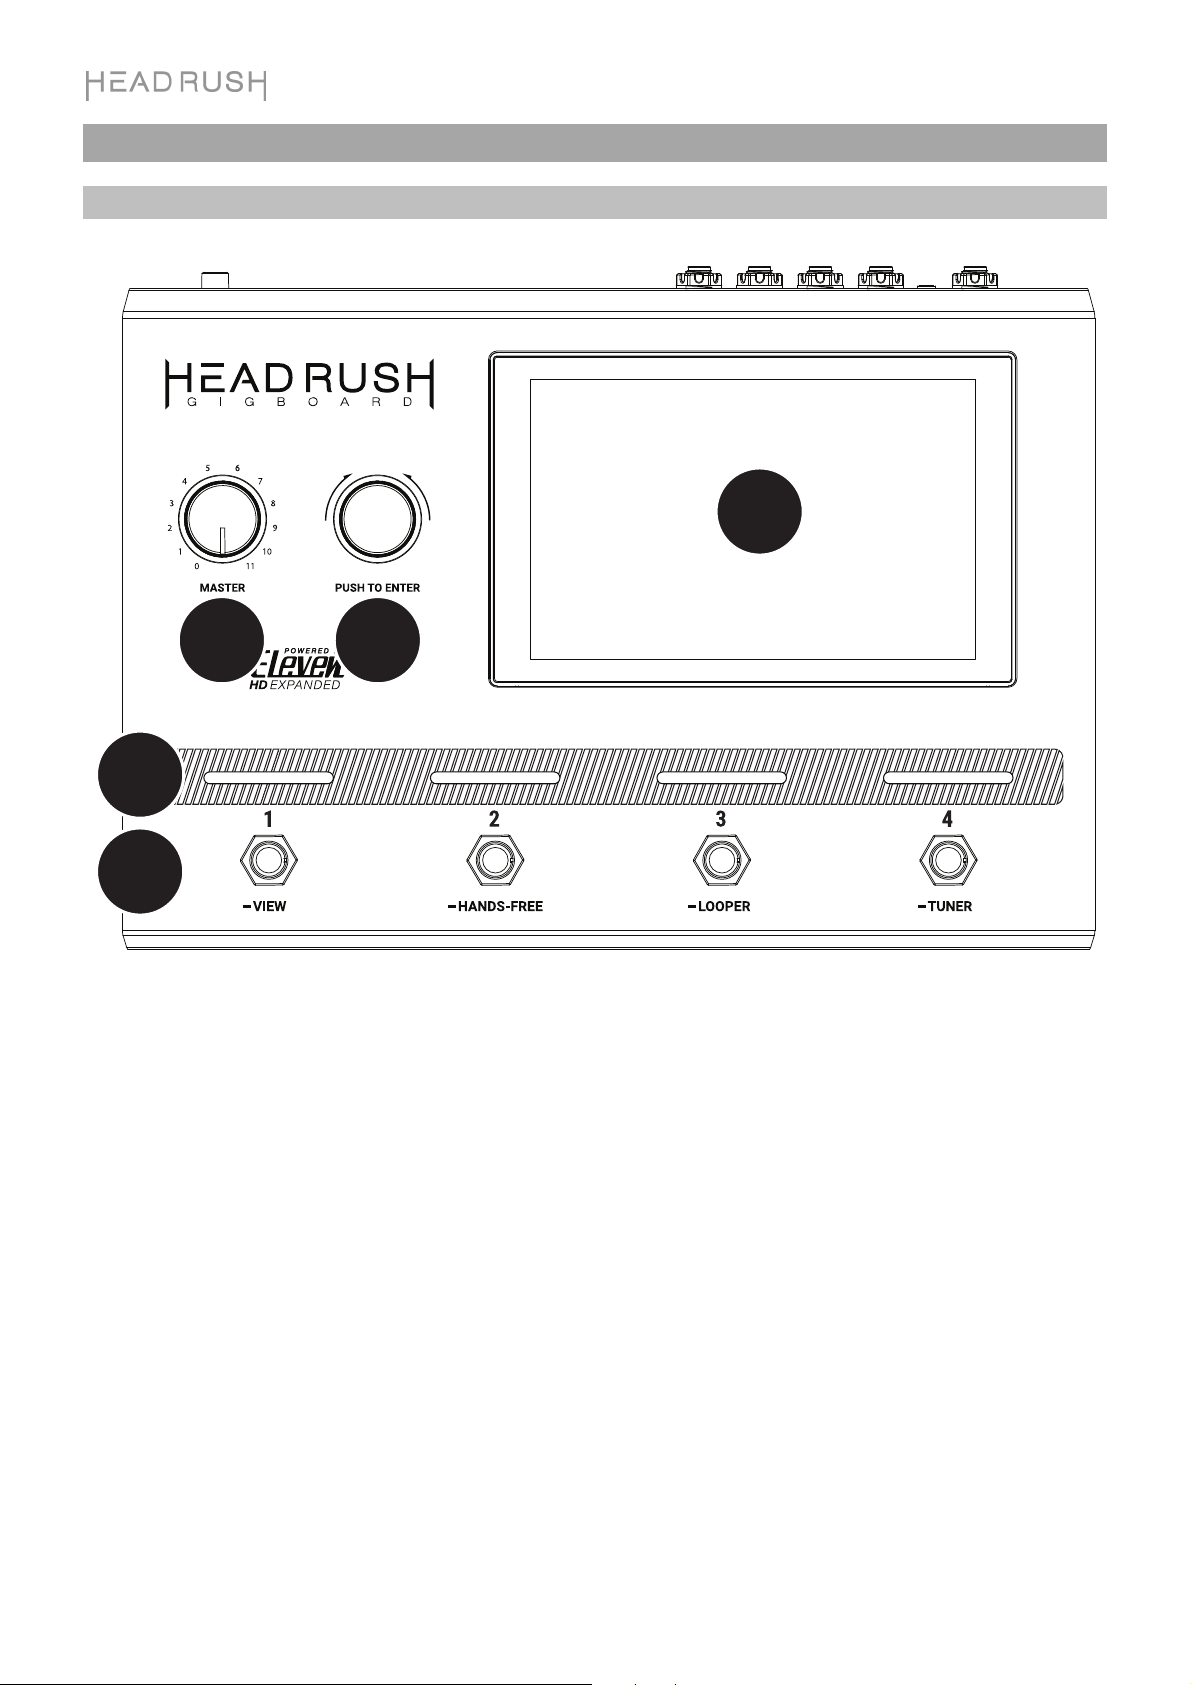
Features
Top Panel
1
5
2
3
4
1. Main Display: This full-color multi-touch display shows information relevant to the HeadRush Gigboard’s
current operation. Touch the display (and use the hardware controls) to control the interface. See Operation
> Main Screen to learn how it works.
2. Encoder: Turn this encoder to scroll through the available menu options or adjust the parameter values of the
selected field in the display. Push the encoder to confirm your selection.
3. Footswitch Indicators: These lights indicate whether the stomp, rig, or scene assigned to each footswitch is
on (brightly lit) or off (dimly lit).
4. Footswitches: Press these footswitches to activate or deactivate the assigned model or scene, or to load the
assigned rig.
5. Master Volume: Turn this knob to adjust the volume level of the outputs.
3
Page 4
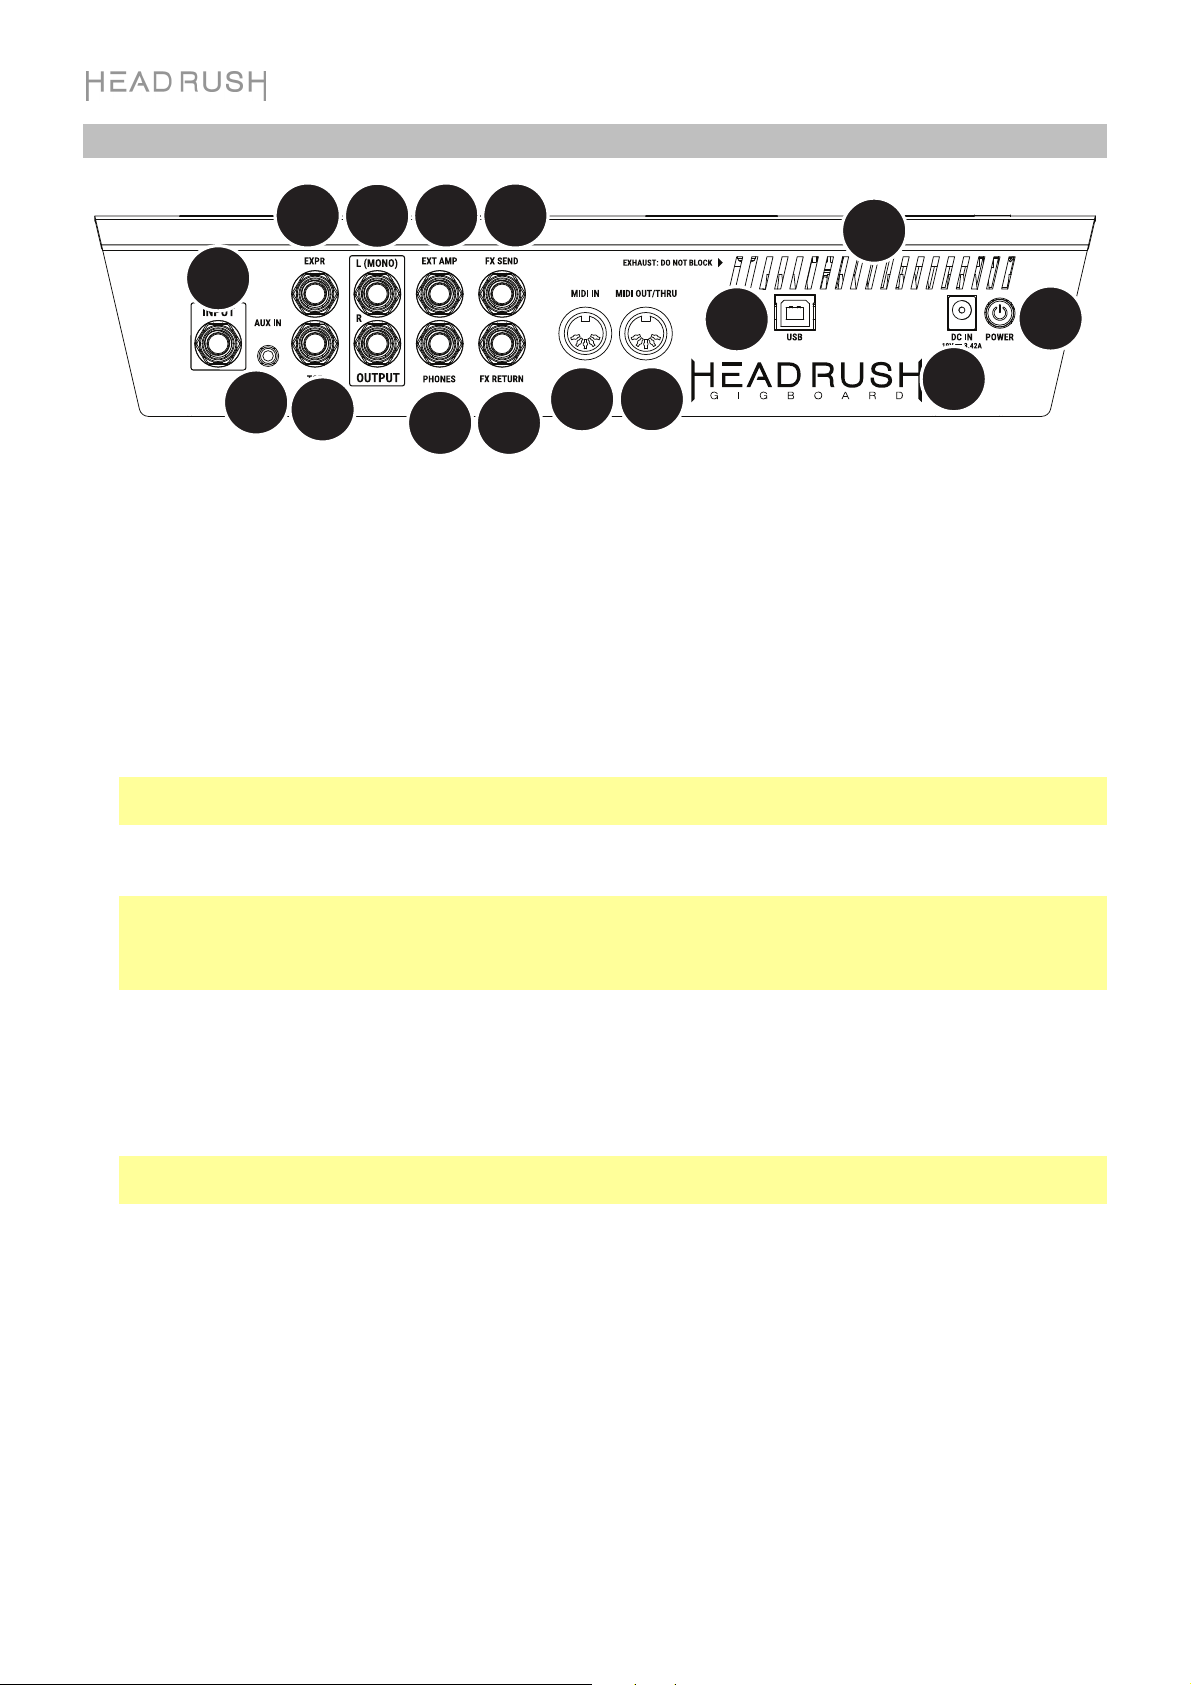
Rear Panel
3
5
6
13
1
12
14
2
1. Guitar Input (1/4”/6.35 mm, TS): Connect your guitar to this input using a standard instrument cable.
2. Aux Input (1/8”/3.5 mm, TRS): Connect an optional audio source (e.g., smartphone, tablet, etc.) to this input
using an 1/8”/3.5 mm stereo cable.
3. Expression Pedal Input (1/4”/6.35 mm, TRS): Connect an optional expression pedal to this input using a
standard 1/4" (6.35 mm) TRS cable.
4. Expression Pedal Toe Switch Input (1/4”/6.35 mm, TS): Connect the toe switch output of your optional
expression pedal to this input using a standard 1/4" (6.35 mm) TS cable.
5. Outputs (1/4”/6.35 mm, TRS): Connect these outputs to the inputs of your amplifier, audio interface, etc. If
you only need to use one output, use the one labeled L/Mono.
Note: You can set these outputs to send signal at amp level or line level (default) in the Global Settings
Menu.
4
789
10
11
15
6. External Amp Footswitch Output (1/4”/6.35 mm, TRS): Connect this output to the footswitch input of an
external guitar amplifier to toggle channels or turn reverb on and off on the amplifier using the Gigboard.
IMPORTANT! Only connect this output to amplifiers that have a "short-to-sleeve" footswitch input. If you
connect this output to any other type of footswitch input, you may cause permanent damage to your
equipment. If you are unsure if your amplifier has a "short-to-sleeve" footswitch input, please consult the
amplifier's manual or manufacturer to confirm before attempting.
7. Phones Output (1/4”/6.35 mm, TRS): Connect standard 1/4” (6.35 mm) stereo headphones to this output.
8. FX Send Output (1/4”/6.35 mm, TRS): Connect these outputs to the inputs of another effects module, an
effect pedal, or the effects loop return of an amplifier.
9. FX Return Input (1/4”/6.35 mm, TRS): Connect these inputs to the outputs of another effects module, an
effect pedal, or the effects loop send of an amplifier.
Note: You can set the FX Return Input to receive signal at rack level or stomp level (default) in the Global
Settings Menu.
10. MIDI Input (5-pin DIN): Use a standard MIDI cable to connect this input to the MIDI output of an optional
external MIDI device.
11. MIDI Output (5-pin DIN): Use a standard MIDI cable to connect this output to the MIDI input of an optional
external MIDI device.
12. USB Port: Connect this USB port to a computer using a standard USB cable. This connection allows
HeadRush Gigboard to send and receive the digital audio signal to and from your computer. You can also use
this connection to import or export rigs, model presets, and setlists.
13. Vent: Make sure this vent is unobstructed while using HeadRush Gigboard.
14. Power Input: Connect this input to a power outlet using the included power cable.
15. Power Switch: Press this button to turn HeadRush Gigboard’s power on. Press and hold this button to turn
HeadRush Gigboard’s power off.
4
Page 5
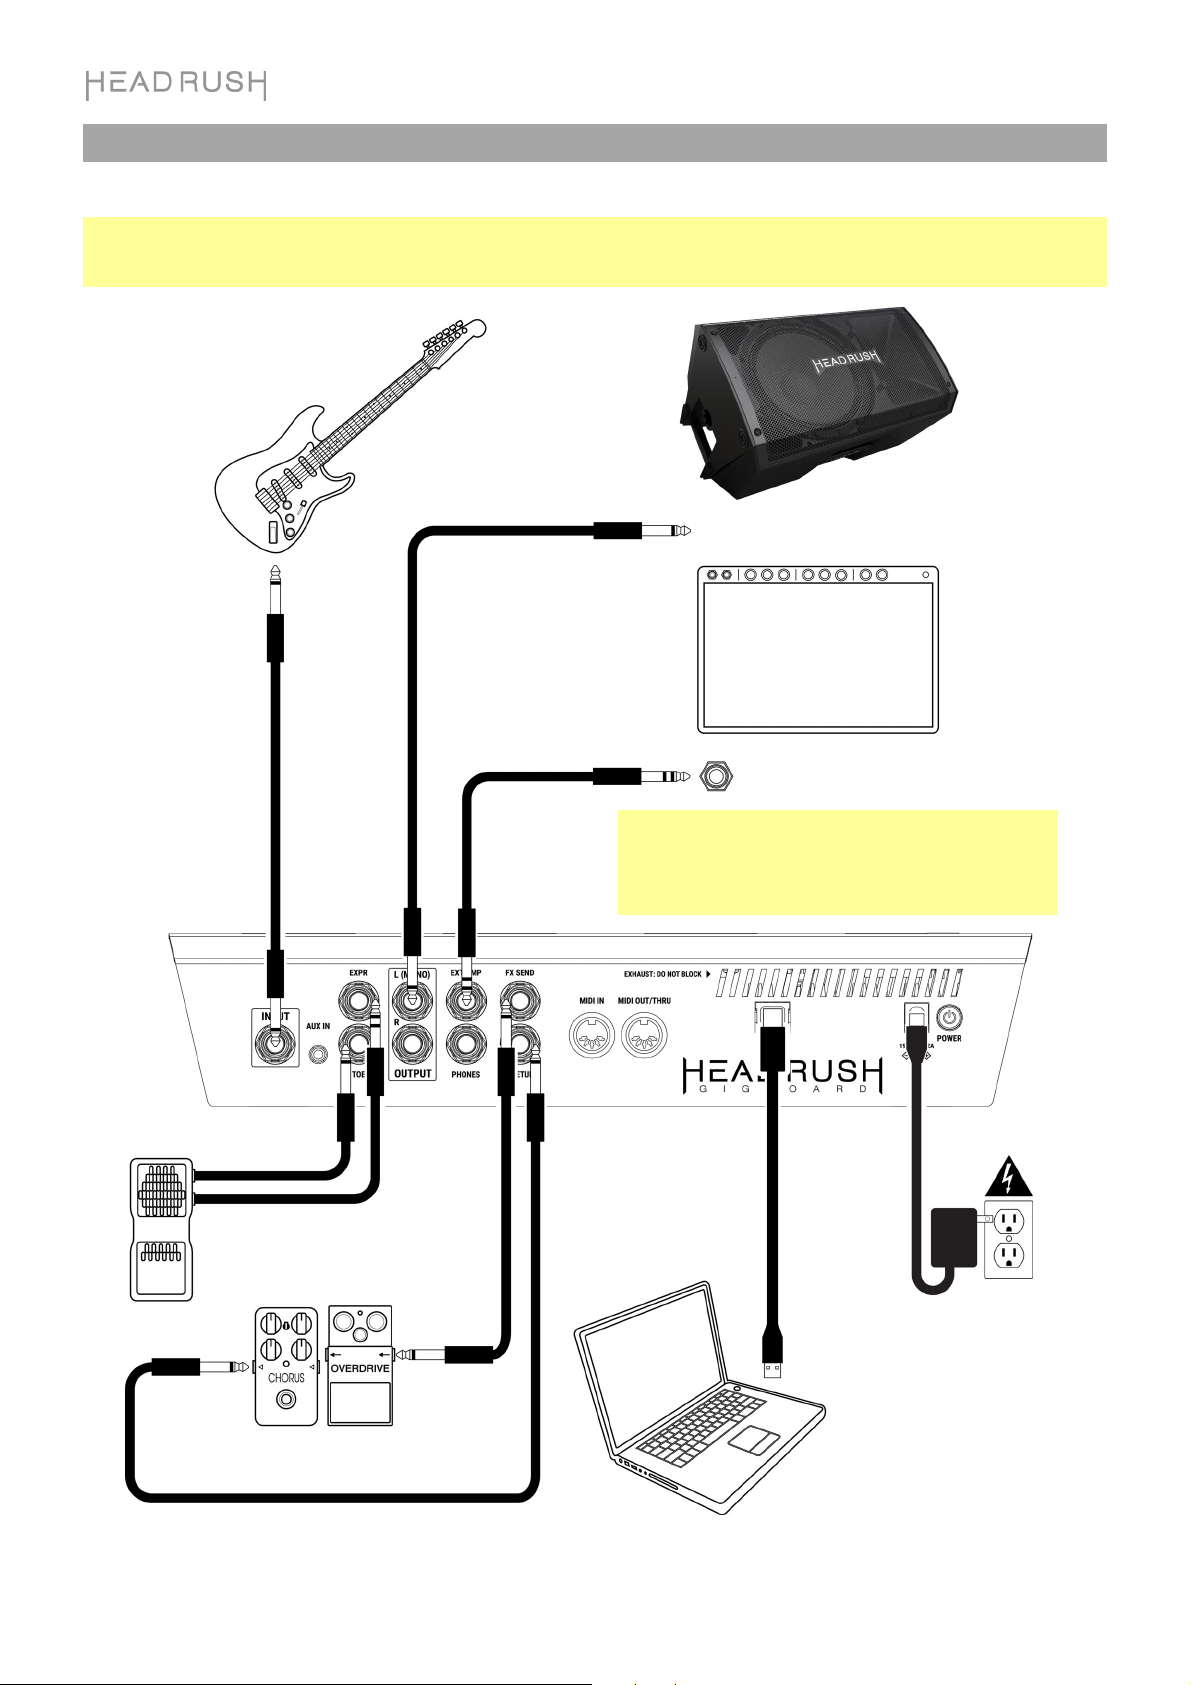
Setup
Items not listed under Introduction > Box Contents are sold separately.
IMPORTANT! In the Global Settings Menu, make sure you set the Outputs to send signal at amp level if you are
using a traditional guitar amplifier, or line level (default) if you are using a full-range flat-response amplifier, mixer,
PA speaker or audio interface.
Guitar
Expression
pedal
External effect stompboxes,
modules, etc.
Full-range, flat-response amplifier or
traditional guitar amplifier
Amp Footswitch Input
IMPORTANT! Only connect this output to amplifiers that have a
"short-to-sleeve" footswitch input. If you connect this output to
any other type of footswitch input, you may cause permanent
damage to your equipment. If you are unsure if your amplifier
has a "short-to-sleeve" footswitch input, please consult the
amplifier's manual or manufacturer to confirm before attempting.
Computer
Power
outlet
5
Page 6
Operation
This chapter describes the HeadRush Gigboard’s functions.
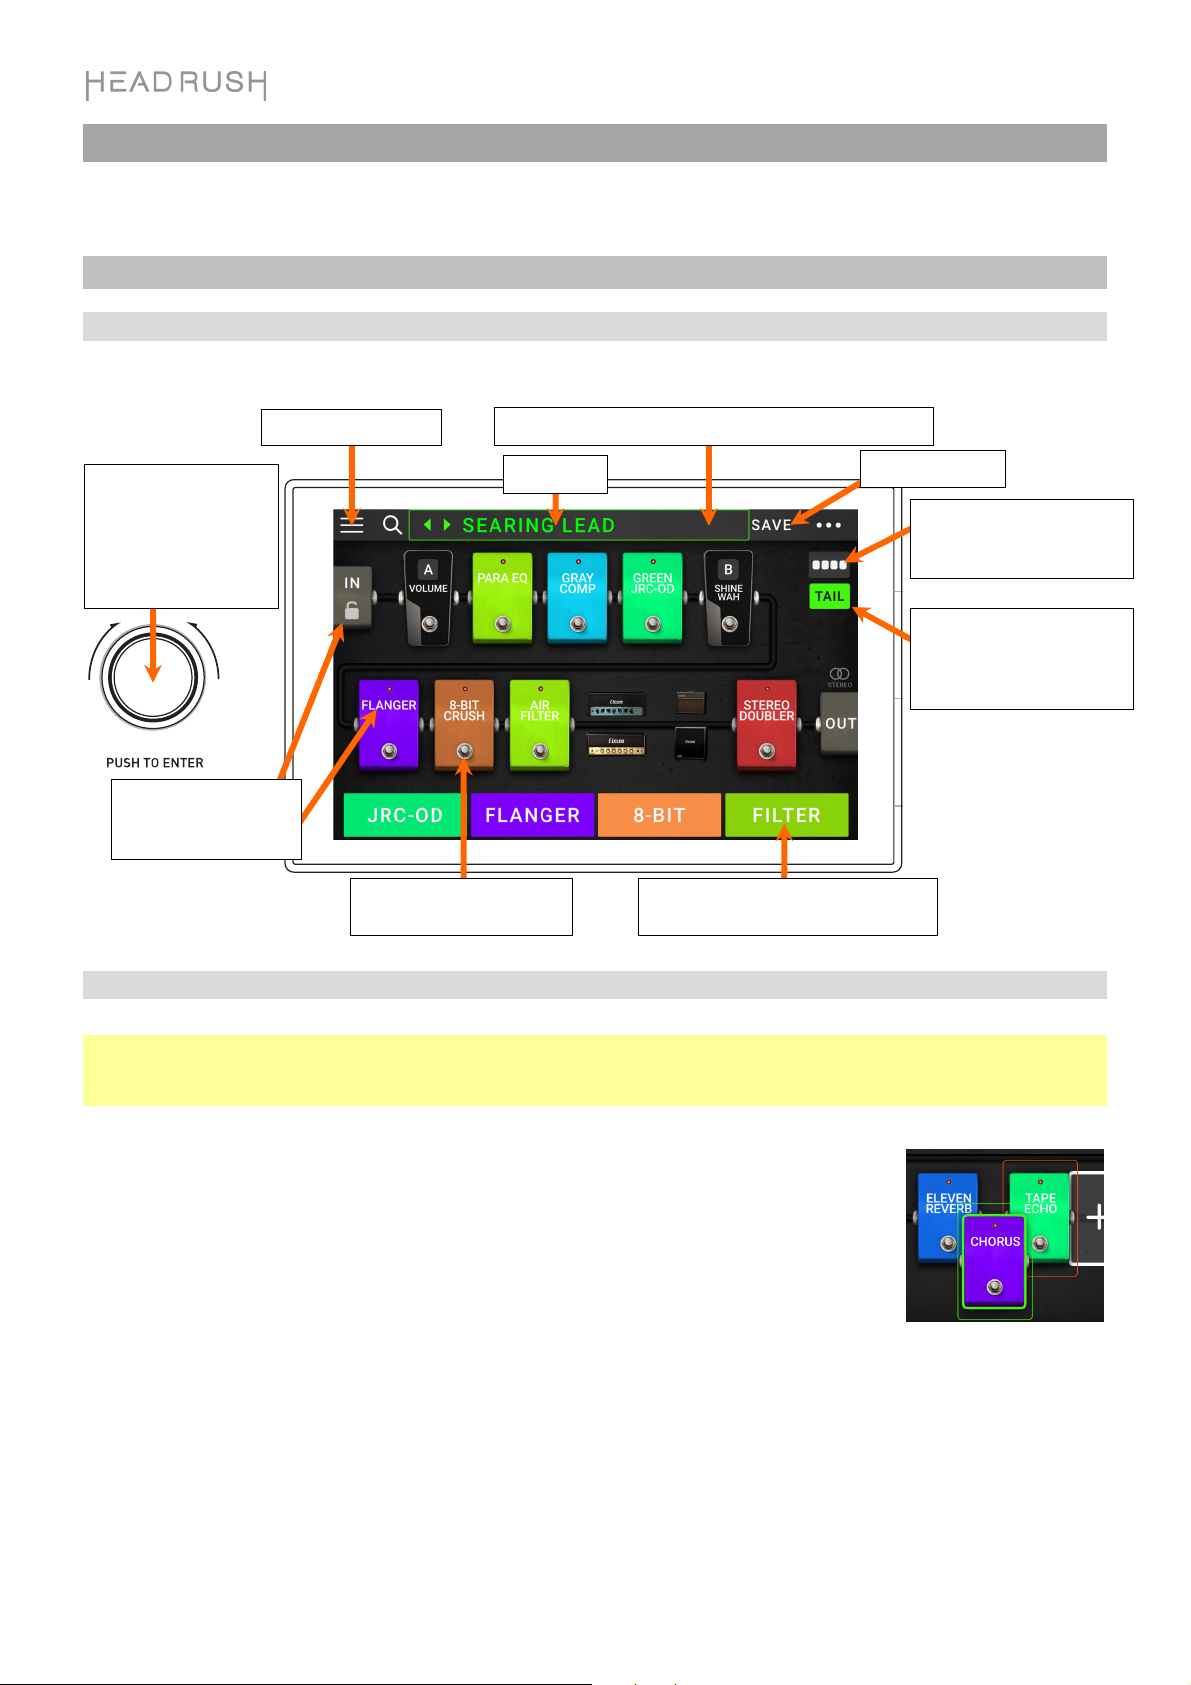
Main Screen
Overview
Tap to view setlists.
Turn encoder to move
through selectable
items onscreen or to
adjust parameters.
Press encoder as an
Enter command.
Double-tap a model,
In, or Out to show its
parameters.
Basic Operations
Tap its footswitch to
activate or deactivate it.
Tap and drag this bar downward to view list of rigs.
Rig name.
Tap to save rig.
This button toggles
between the different
routing options for a rig.
This button enables or
disables reverb and delay
tails when switching to
another rig.
These four blocks show the current
function of the 4 footswitches.
Important: The sequence of models in your signal chain is not necessarily reflected in the footswitches. You can
freely assign models to available footswitches without changing your signal chain at all—and vice versa. See
Hardware Assign to learn about this.
To assign a model (amp, cab, or effect) to an empty slot, tap it () and then use the list
that appears. See Rigs > Creating a New Rig to learn about this.
To show a model’s parameters on the right edge of the screen, tap the model so it is
outlined in green.
To show a model’s settings screen, double-tap it. Its settings screen will appear with
its preset menu, parameters, and assigned color.
To activate or deactivate a model, press the footswitch assigned to it, or tap the
model’s footswitch in the display.
To rearrange the
models in your signal
chain, tap and drag a
model to another slot
or between two other
models (the ones after
that position will shift
one slot further down
the signal chain).
6
Page 7

To switch an amp and/or cab between a dual and single configuration, tap the 2X button next to it.
To load another rig (preset), do any one of the following:
• Tap the or next to the name of the current rig on the screen.
• Tap the name of the rig on the screen and then turn the encoder.
• Press a footswitch assigned to a preset when Gigboard is in Rig View.
• Press a footswitch assigned to Prev Rig or Next Rig when Gigboard is in Hybrid
View.
To create a new rig, tap the button in the upper-right corner, and then tap New Rig.
To delete the current rig, tap the button in the upper-right corner, and then tap Delete Rig, and then tap
Yes to continue or No to cancel.
Reverb/Delay Tail Spillover
If you have a reverb or delay effect active on your rig and then switch to a different rig, the reverb or
delay will continue to decay after switching to the second rig.
To enable or disable this feature for the current rig, tap Tail on the main screen.
The feature is unavailable if you are using an effects loop or if you are using USB audio.
7
Page 8
P
P
Signal Path
You can easily reconfigure the path of your signal chain to split, which will create more complex routings.
To reconfigure the signal path, tap toward the top right of the main screen. The icon will change to
match one three possible signal paths (as shown below).
This straight signal path is the default
and the most common.
This signal path splits in the middle
and rejoins near the end. This
configuration is useful if you want to
use two types of effects (or chains of
effects) but want to keep their signals
separate.
See Adjusting Settings >
arameters > Mix to learn how to
mix the split paths together.
This signal path splits immediately
from the source and rejoins near the
end. Like the second configuration,
this one is useful for using two types
of effects (or chains of effects
independently, but it allows for more
models in the split paths and the
rejoined one.
See Adjusting Settings >
arameters > Mix to learn how to
mix the split paths together.
8
Page 9

Stereo vs. Mono
The outgoing signal from the HeadRush Gigboard can be mono or stereo, depending on the models in your rig,
the signal path, and which outputs you are using. An indicator near the end of the signal path indicates the
current configuration.
The signal will be stereo if you do any one of the following:
• Use any stereo effect model in your signal chain. Even if you have placed mono effect models after it.
(This is possible because the mono effect is simply applied identically to both channels and not summed).
• Use a split signal path, even if the split paths rejoin before the output.
• Use a double-amp and/or double-cab configuration (i.e., if 2X is on).
The signal will be mono if you do all of the following:
• Use no stereo effect models in your signal chain.
• Use the linear (not split) signal path.
• Use only single-amp and single-cab configurations, if you use an amp or cab model at all.
Alternatively, the signal will be mono if you do any one of the following:
• Use only the L/Mono output (of a stereo pair) on the rear panel.
• Reduce the Rig Width output setting to 0%.
To adjust the width of the stereo field, tap the Out icon at the end of your signal path, and turn the third
parameter knob to adjust the Rig Width output setting. This affects stereo signals only, not mono signals. 100%
uses the full stereo field, while 0% produces a mono signal.
9
Page 10
Views
The four footswitches can be used to activate or bypass models (amps, cabs, or effects) as well as select scenes,
rigs, or setlists. These footswitches are always in one of four views: Stomp View, Rig View, Hybrid View, and
Setlist View.
To change the view:
1. Press and hold Footswitch 1. Then select
from the four footswitches which
correspond to the four views: Stomp, Rig,
Hybrid, and Setlist.
2. Press a footswitch to enter that view.
Stomp View
Footswitches 1-4 correspond to models (amps, cabs, or effects)
in your signal chain. Press a footswitch to activate or deactivate
its model.
Rig View
The first 2 footswitches correspond to rigs you have saved.
Press a footswitch to load its rig.
To show the previous bank of two rigs, press footswitch 3.
To show the next bank of two rigs, press footswitch 4.
Hybrid View
The first 2 footswitches can be assigned to activate or
deactivate a model, or select a scene in the currently selected
rig.
To switch to the previous rig, press footswitch 3.
To switch to the next rig, press footswitch 4.
Setlist View
To enter the All Rigs setlist, press footswitch 1.
To enter the currently shown setlist, press footswitch 2.
To show the previous setlist, press footswitch 3.
To show the next setlist, press footswitch 4.
10
Page 11

Rigs
For the HeadRush Gigboard, a rig is a preset: the combination of assigned models—the amps, cabs, and
effects—and the parameter settings for each of them. You can create, edit, save, and load rigs, making it easy to
recall the perfect sound for each part of your performance.
Each rig has 11 slots, each of which can have one model (amp, cab, or effect) assigned to it. An exception is
when a slot is using an amp and/or cab in a dual configuration (when the 2X button next to it is enabled).
Assigned slots will show graphical representations of the models, and empty slots will show a symbol.
Creating a New Rig
To create a new rig, tap the button in the upper-right
corner of the screen, and tap New Rig.
To assign a model (amp, cab, or effect) to an empty slot:
1. Tap the empty slot ().
2. In the list that appears, tap the type of model you want to
assign: Amp, Cab, or effect (Distortion, Dynamics/EQ,
Modulation, Reverb/Delay, FX-Loop, or Expression).
3. In the list that appears, tap the model you want to assign.
4. In the next list that appears, tap the preset you want to load
for that model.
If you load an amp or cab to a slot with an empty adjacent slot,
the first selectable cab or amp will be loaded automatically to the
other slot. After that, you can configure them independently: you
can separate them in the signal chain, you can change the type
of the amp or cab, and you can delete each model separately.
Model types: amps,
cabs & effects
Available models
for each type.
Available presets
for each model.
11
Page 12

Optimizing Your Signal Chain
The signal chain is the path that the audio signal follows from your guitar through your selected models and ends at
the outputs of the HeadRush Gigboard. You can use the touchscreen to arrange your selected models in any sequence,
but you may find that some configurations will sound better than others.
Here are some common model placement suggestions for creating great rigs with the HeadRush Gigboard:
• Dynamics (e.g., compressors), filters (e.g., wah, pitch shifters), and volume pedals generally are placed at the
beginning of the signal chain. Alternatively, you can place volume pedals at the end of the signal chain to provide
a slight variance in functionality.
• Gain-based effects (e.g., overdrive/distortion, fuzz) usually come next.
• Equalization (EQ) is often used to shape the tonal characteristics of overdrive/distortion and fuzz effects, so put an
EQ after them. Alternatively, place it before them to shape the guitar’s general tone—cutting unwanted frequencies—
before the gain pedals.
• Modulation effects like flangers, phasers, and chorus are typically placed next.
• Time-based effects like delays and reverbs are generally placed near the end of the signal chain.
• An amp and a cab are often placed at the very end of the signal chain, although you can place it wherever you want.
Saving a Rig
If you have made certain changes to a rig, you will see an asterisk () next to its name at the top of the screen, indicating
that you have changed the rig in some way and may want to save it.
You will see an asterisk if you have done any of the following:
• assigned a model to the rig
• deleted a model from the rig
• moved a model in the signal chain
• changed a model’s preset (see Adjusting Settings to learn more)
• made any change in the Hardware Assign screen (see Hardware Assign to learn more)
Activating or deactivating a model, using the parameter knobs on any screen, or using the expression pedal on any
screen will not cause the asterisk to appear.
You can save these changes to this rig, save these changes as another rig, or discard them altogether.
If the asterisk is shown and you try to load a different rig, you will be asked to select one of these options:
Cancel: This option returns to the previous screen without saving the current rig or loading a new rig.
Discard Changes: This option loads a new rig without saving any changes to the previous rig.
Save as a New Rig: This option lets you save the current rig as a new rig. In the screen that appears, use the
keyboard that appears to enter a name, and then tap Save. That rig will be saved, and the new rig will load.
Save Changes to Rig: This option saves any changes you made to the rig and then loads the new rig.
To save a rig, tap Save in the upper-right corner.
To save your changes to the current rig, tap Save.
To save your changes as a new rig, tap Save New Rig, use
the keyboard that appears to enter a name, and then tap Save.
To return to the previous screen without saving, tap Cancel at any time.
To rename a rig, tap the button in the upper-right corner, and then tap Edit Rig Name.
To discard any changes you’ve made to the rig, tap the button in the upper-right corner, and tap Discard Changes.
12
Page 13

r
Deleting a Rig
To delete the current rig, tap the button in the upper-right corner, and then tap Delete Rig, and then tap Yes to
continue or No to cancel.
Adjusting Settings
To adjust the settings of an item in your rig, double-tap it to open its settings screen. You can adjust the settings
of any model (amp, cab, or effect), the input (the In/Lock icon), the output (the Out icon), or mix (the Mix icon).
Overview
Tap to return to retain your changes
and return to the main screen.
Turn encoder to move
through selectable
items onscreen or to
adjust parameters.
Press encoder as an
Ente
command.
Tap the model name
to assign a different
model to this slot.
Tap Delete to
unassign the model
from the slot.
Tap the Preset menu to select a preset. See Saving a Preset.
Tap a color to assign it to this model. That
color will be shown on the main screen, in
the Hardware Assign screen, and in the
footswitch indicator for this model.
Tap this button and tap Discard Changes to discard
any changes you’ve made since opening this screen.
Tap an Off/On
parameter button to
change the parameter's
setting accordingly.
Tap and drag a slider
left and right to adjust
the parameter's
settings. Alternatively,
tap the slider and use
the encoder for fine
adjustments.
Tap Cancel to return to discard your
changes and return to the main screen.
13
Page 14

Parameters
These are some of the parameters that you can adjust for each type of item in a rig. This includes amps, cabs,
effects, input settings, output settings, and mix settings (if you are using a split signal path). See Saving a Preset
to learn how to save your preset after adjusting its parameters.
Amp
The Amp category is a list of popular guitar amplifiers.
Preset: This is the current amp preset, which
includes the model, all of its settings, and its color
assignment.
Model: This is the amp model.
Amp Settings: These are the settings for the
selected amp model (different models may have
more or fewer settings).
Color: This is the assigned color, which will appear in
the Hardware Assign screen and the switch indicator
if the amp is assigned to a switch.
Cab
The Cab category is a list of popular amp cabinets,
which contain the speakers. The HeadRush Gigboard
recreates not only the sound of the cabinet but also the
type of microphone recording it.
Preset: This is the current cab preset, which includes
the model, all of its settings, and its color assignment.
Cab Type: This is the cab type. Numbers notated as
_X__ indicate the number of speakers it has and the
size of each speaker (e.g., 2X12 denotes a cab with
two 12-inch speakers, 4X10 denotes a cab with four
10-inch speakers). Numbers notated as __W indicate
the emulated wattage (output power) of the speaker.
Mic Type: This is the type of microphone being used
on the cab. You can select different models of
dynamic (Dyn), condenser (Cond), or ribbon (Ribbon)
microphones.
Mic Settings: These are the settings for the microphone:
Break Up: This determines the amount of speaker “breakup”—the natural distortion that occurs when the
audio signal overdrives the speaker.
On-Axis: This determines the microphone position relative to the cab. On-axis placement (On) positions the
microphone at the center of the speaker, usually resulting in a brighter sound with more definition. Off-axis
placement (Off) is slightly offset at and angle from the center of the speaker and often sounds darker in tone.
Out Gain: This is the cab’s output gain level.
Color: This is the assigned color, which will appear in the Hardware Assign screen and the switch indicator if
the cab is assigned to a switch.
14
Page 15

Effects
There are several types of available effects. Their adjustable settings depend on the type of effect.
In
These input settings control the signal into the models
of your rig:
Preset: This is the current input preset, which
includes its settings on the right edge of the display
and its locked/unlocked state.
Parameters: This menu determines whether these
input settings are locked or unlocked.
When unlocked, the settings will change to the
new rig’s input settings each time you load a
new rig. The lock icon on the main screen will be
grey.
When locked, the settings will be retained as
“global” input settings, regardless of the rig. The
lock icon on the main screen will be red.
Rig Input: This setting determines whether the rig’s input signal is taken from the guitar input (Guitar) or the
right (R) return input (FX Ret R). This menu is shown only when Rig Input is set to Per Rig (in the global
settings (see Global Settings to learn about this).
Input Level Meter: This level meter indicates the current level of your input signal before the input controls
shown on this screen.
Input Gain: This setting controls the gain level of the signal sent from your guitar into your rig. The available
range is -60.0 to 12.0 dB.
Gate Thrsh (Threshold): This setting controls the signal level required to open the noise gate, enabling the
guitar signal to be sent to the rig. The available range is -120.0 to 0.0 dB. The threshold is represented by a
white line on the input level meter.
Gate Rel (Release): This setting controls the amount of time it will take for the noise gate to close once the
incoming guitar signal stops. The available range is 1–3000 ms.
USB IN VOL: This setting controls the level of the audio signal sent from your computer to the HeadRush
Gigboard over a USB connection. The available range is -60.0 to 12.0 dB.
NOISE FILT (Filter): This setting controls the filter sweep, which allows you to reduce the high frequency
humming sometimes produced by guitars with single coil pickups. The available range is -120.0 to -60.0 dB.
15
Page 16

Out
These output settings control the signal sent to the
HeadRush Gigboard outputs:
Preset: This is the current output preset, which includes
its settings on the right edge of the display.
Rig Output: This level meter indicates the current level
of your output signal after the output controls shown on
this screen. You can set which outputs will send this
signal in the Global Settings screen. See Global
Settings to learn about this.
Rig Volume: This setting controls the level of the audio
signal sent from the outputs. The available range is -
60.0 to 36.0 dB.
Rig Width: This setting controls how much of the stereo field the output signal uses. 100% uses the full stereo
field, while 0% produces a mono signal. This affects stereo signals only, not mono signals. See Main Screen
> Stereo vs. Mono to learn how the HeadRush Gigboard handles stereo and mono signals.
Mix
These settings control mix of a split signal path. This is
available only for rigs with split signal paths (see Main
Screen > Signal Path to learn more):
Preset: This is the current mix preset, which includes its
settings on the right edge of the display.
A Lev / B Lev (Level): These settings control the volume
levels the upper (A) and lower (B) branches of the signal
path. The range is -60.0 dB to +12.0 dB.
A Pan / B Pan: These settings control the panning
(position in the stereo field) the upper (A) and lower (B)
branches of the signal path. The range is -100% to
+100%.
A/B Delay: This setting controls a timing offset between the upper (A) and lower (B) branches of the signal
path. The range is -30000μs to +30000μs. If the value is negative (-), the A branch is delayed. If the value is
positive (+), the B branch is delayed.
Saving a Preset
To save a preset, tap Save in the upper-right corner.
To save your changes to the current preset, tap Save.
To save your changes as a new preset, tap Save New
Preset, use the keyboard that appears to enter a name, and
then tap Save.
To return to the previous screen without saving, tap Cancel at any time.
16
Page 17

Hardware Assign
The Hardware Assign screen enables you to customize how
HeadRush Gigboard’s footswitches and an expression pedal
control each rig.
To open the Hardware Assign screen, tap the button in
the upper-right corner of the main screen, and then tap
Hardware Assign.
To return to the main screen, tap the button in the upper-
left corner.
Important: The Hardware Assign settings are all part of the
overall rig, so remember to save your changes you want to
keep.
To set the color associated with the rig, tap it in the upper-left part of the screen. This color will appear next to
the rig name when you view a list of all available rigs or when you view and create setlists. It will also be the color
of the corresponding footswitch indicator when the HeadRush Gigboard is in Rig View.
To set the tempo of the rig’s time-based effects (delays, modulation, etc.), tap the button under Tempo to
select Current or Fixed.
Current: The rig will use the last-used tempo or the one set by the Tempo footswitch.
To set the tempo, press the Tempo footswitch at the desired tempo 3–8 times to set the new tempo in beats
per minute (BPM).
Fixed: The rig will use a tempo that you set here.
To set the tempo, turn the encoder to set the desired tempo in beats per minute (BPM). You can set the
tempo only in this Hardware Assign screen.
The MIDI Prog field determines the MIDI program change number of the rig. Use the Prog Change setting in the
Global Settings screen to determine whether the HeadRush Gigboard can send and/or receive MIDI program
change messages (see Global Settings > MIDI Settings for more information).
To set the MIDI program change number, turn the encoder to select it (0–127).
Important: If a rig is using a number, that number will be unavailable and cannot be assigned to another rig. Also,
saving a rig with a new name will save the rig but without this program change number (to prevent rigs from
sharing the same number).
17
Page 18

Footswitches
The 4 boxes in the lower-left corner represent the 4 footswitches of the HeadRush Gigboard. You can assign any
switch-based parameters (ones with only two states) to any of the footswitches—regardless of their location in
the signal chain.
To assign a parameter to a footswitch:
1. Tap a box. indicates an empty box.
2. In the list that appears, tap the model with the parameter
you want to assign.
3. In the list that appears, tap the parameter you want to
assign. Usually, the parameter will simply be On (to
activate or deactivate it).
Tap Unassigned to unassign that footswitch.
4. On the Hardware Assign screen, tap Toggle/Hold for that
footswitch to determine how it works.
When set to Toggle, each press will turn the model on or
off.
When set to Hold, pressing and holding the footswitch will
activate it, and releasing the footswitch will deactivate it.
To swap two assignments, tap and drag one of them over the other, and then release it.
Ext. Amp
You can assign a switch to send a signal to your amplifier’s
footswitch input by using the external amp output. You can
use this feature to do things like change from the clean to dirty
channel, or turn reverb on and off on your amplifier.
To use this feature when switching to a rig, tap the button
under Ext Amp on the hardware assign page, and then select
Tip, Ring, or Both. If you are unsure of which setting to use,
please consult the amplifier's manual or manufacturer to
confirm.
This feature can also be assigned to a footswitch on the Model
Selector page that appears when you are assigning a
footswitch’s function.
This function can also be assigned to a scene by adjusting the parameter on the Scene Editor screen.
IMPORTANT! Only connect this output to amplifiers that have a "short-to-sleeve" footswitch input. If you connect
this output to any other type of footswitch input, you may cause permanent damage to your equipment. If you are
unsure if your amplifier has a “short-to-sleeve” footswitch input, please consult the amplifier’s manual or
manufacturer to confirm.
18
Page 19

Scenes
The Scene feature allows you to turn multiple models on or off in each rig. When you press the footswitch
assigned to that scene, all models included in that scene will turn on or off, depending on how you assign them.
This is a great way to create multiple tones in the same rig. For instance, you may want a particular reverb model
to be on anytime a particular distortion model is also on. Alternatively, you may want to turn one delay model off
when you turn another one on. Scenes enable you to do this with only one footswitch press.
To create and edit a scene:
1. On the Hardware Assign screen, tap Toggle/Scene for the
desired footswitch to cycle through the available options, and
select Scene.
2. On that model, tap Edit. The Scene Editor will appear,
which shows all models in your rig.
3. For each model in the rig, tap it to cycle through the
available options:
• On: This model will turn on when you turn the scene on.
• Off: This model will turn off when you turn the scene on.
• No Change: This model will remain unaffected when
you turn the scene on.
4. Tap a color at the bottom of the touchscreen to select a
color for the scene.
5. Tap the button in the upper-left corner to return to the
Hardware Assign screen.
To rename a scene (which appears in the footswitch
indicators), tap the text in the box below Edit on the model,
use the virtual keyboard that appears to enter a name, and
then tap anywhere other than the text field.
19
Page 20

Expression Pedal
You can connect an optional expression pedal (sold separately) to control two parameters (in Classic Mode) or
two sets of parameters (in Advanced Mode). If your expression pedal has a toe switch, you can use the toe switch
to switch between them—Expression Pedal A or B.
The column of four boxes represents the expression pedal settings. You can
assign one or more continuously adjustable parameters (ones with a range of
values) to the expression pedal.
To set the expression pedal mode, tap the button above Range in the
upper-right corner to select Classic or Advanced.
Classic: You can assign one parameter to each expressional pedal (A and
B). Using the toe switch will select the other expression pedal and deactivate
(bypass) the current expression pedal’s parameter. For instance, if you
assign a wah pedal to Expression Pedal A and a volume pedal to Expression
Pedal B, only one of them will be active at any time; when you are controlling
the wah pedal, the volume pedal will be bypassed, and vice versa.
Advanced: You can assign up to four parameters to each expression pedal
(A and B). Moving the pedal will adjust all of its assigned parameters
simultaneously. Using the toe switch will select the other expression pedal
and leave the current pedal’s parameters active and at their maximum values.
Important: You cannot edit any parameters assigned to the expression pedal
in Classic Mode (they will show a lock icon and be greyed out in other
screens to indicate this). You can edit any parameters assigned to the
expression pedal in Advanced Mode (they will show a pedal icon in other
screens to indicate this).
To assign a parameter to an expression pedal:
1. If the Assign button is not on, tap it.
2. Tap a box under the Assign button. indicates an empty box.
3. In the list that appears, tap the model with the parameter you
want to assign.
4. In the list that appears, tap the parameter you want to assign.
Tap Unassigned to unassign that box.
To swap two assignments (while in Advanced Mode), tap and drag one of them over the other, and then release
it.
To set the range of an assigned parameter:
1. If the Range button is not on, tap it.
2. Tap a value under the Range button.
Turn the encoder to set the desired value as a percentage of the parameter’s entire range.
3.
Press the encoder or tap elsewhere to confirm the value.
20
Page 21

Setlists
You can use setlists to organize your rigs. A setlist is a saved collection of rigs, which you can save and recall at a
later time. This is useful, for instance, if you only need some of your rigs for a performance; you can save a setlist
of just those rigs so you don’t have to spend time searching through all of your rigs before playing the next song.
To view your setlists, tap the ≡ button in the upper-left corner of the main screen. The Setlists screen will appear.
To return to the main screen, tap the button in the upper-left corner.
To create a setlist:
1. Tap New in the upper-right corner.
2. In the screen that appears, the left half is a list of all available rigs,
and the right half is the list of rigs in the setlist.
To add a rig to the setlist, tap it to add it to the end of the list.
Alternatively, tap and hold it, and then drag it to the desired location
in the list. You can add the same rig to a setlist more than once.
The [Empty ] rig in the lower-left corner is a slot to use as a
placeholder to make rearranging the setlist easier; it will not be
available as a selectable rig when moving through rigs in the setlist.
To rearrange the setlist, tap and hold a rig in the list on the right
half, and then drag it to the desired location in the list.
To remove a rig from the setlist, tap the on its right edge.
To save a setlist, tap Save in the upper-right corner.
To save your changes to the current setlist, tap Save.
To save your changes as a new setlist, tap Save New Setlist,
use the keyboard that appears to enter a name, and then tap Save.
(At any time) To return to the previous screen without saving,
tap Cancel.
To discard any changes you’ve made to the setlist, tap the button
in the upper-left corner, and tap Discard Changes.
To load a setlist:
1. While viewing the main screen, tap the ≡ button in the upper-left
corner to view the Setlists screen. Each setlist will show the number
of rigs in parentheses (including multiple instances of the same rig).
2. Optional: Tap the magnifying-glass icon
and use the virtual keyboard that appears to enter a search term
(e.g., part of the setlist name). The results will appear below.
3. Tap the desired setlist. The first rig of that setlist will load immediately.
Tap All Rigs to view all rigs instead of a specific setlist.
To edit a setlist, tap the button on its left side, and then tap the
pencil icon. You will see the same screen you used to create the setlist,
where you can edit and save it.
To delete a setlist, tap the button on its left side, and then tap the
trash can icon. Tap Yes to confirm the deletion or Cancel to return to
the Setlists screen without deleting it.
in the upper-left corner,
21
Page 22

Hands-Free Mode
Hands-Free Mode enables you to adjust any of the settings on
your models by using just the footswitches and/or an optional
expression pedal. (sold separately).
To enter Hands-Free Mode, press and hold footswitch 2 for
over one second. While in Hands-Free Mode, the screen will
show a single parameter and its currently selected value.
To change the value, press footswitch 1 (down) or
footswitch 2 (up). You can also change this by moving an
external expression pedal.
To access the next available parameter, press footswitch 3.
To access the previous available parameter, press and hold
footswitch 3.
To access the next available block in your rig, press
footswitch 4.
To exit Hands-Free Mode, press and hold footswitch 4.
Tuner/Tempo
You can use the Tuner/Tempo page to tune your guitar and set
a tempo for time-based effects.
To enter Tuner/Tempo mode, press and hold footswitch 4
for over one second. While in Tuner/Tempo Mode, the screen
to the right is shown.
To change the tuner reference pitch, tap the parameter and
then turn the encoder.
To unmute your signal while tuning, press footswitch 1.
To enter a tempo via tapping a footswitch, press footswitch
3 at the desired tempo 3–8 times to set the tempo in beats per
minute (BPM).
To exit this page, press footswitch 4.
22
Page 23

g
g
Looper
The HeadRush Gigboard has a built-in looper that you can use to layer your performances. While the looper’s
operation is shown in the display, you can control most of it conveniently with the footswitches.
The looper can hold up to 20 minutes of audio at a time across a maximum of 100 layers.
This meter indicates
your current
location in the loop
during recording or
playback.
This indicates how
many layers are
playing in the
current loop,
including the
inal.
ori
This indicates the
current speed of the
loop as a multiple or
fraction of the
inal.
ori
This indicates the length
of the current loop.
Rig name.
This indicates the direction
of playback.
This controls how much
of the looper’s signal you
hear in the outputs.
This controls how much
of the looper’s signal is
routed back through it
when recording another
layer.
This indicates whether the looper is
located before (Pre) or after (Post) your
signal chain. Moving the looper to the
Pre position enables you to edit your
rig without having to play the same riff
over and over again.
To record the first layer of a loop, press the Record footswitch. Recording will begin immediately and the
footswitch indicator will light red. Press the Record footswitch again to stop recording and start loop playback.
The footswitch is now called Overdub and the footswitch indicator is yellow.
To record additional layers onto the loop (overdub), press the Overdub footswitch. Overdubbing will begin
immediately and the footswitch indicator will light red. Press the Overdub footswitch again to stop overdubbing
and continue playback.
To erase the top-most (last-added) layer of the loop, press the Peel footswitch. The top-most layer of the loop
will be erased immediately. This process is destructive, so you can’t re-add it later.
To clear the full loop, press and hold the Clear footswitch. This process will stop playback and is destructive, so
you can't re-add it later.
To halve or double the length of the loop, tap the button next to the Length field and then turn the encoder.
The halving process is non-destructive, so you can restore your original loop and its content by by doubling the
length of the loop.
To halve or double the speed of the looper, tap the button next to the Speed field and then turn the encoder.
Tip: Use this to create low bass lines or ultra-high guitar parts that you couldn’t ordinarily play.
23
Page 24

To reverse looper playback, tap the button next to the Playback field and then turn the encoder.
Tip: Create eerie effects by recording layers in reverse then switching back to normal playback.
To set the looper’s location, tap the button next to the Playback field and then turn the encoder to place it
before (Pre) or after (Post) the signal chain. Moving the looper to the Pre position enables you to edit your rig
without having to play the same riff over and over again.
To exit the looper and return to the main screen, press the Exit footswitch. If the looper is playing, playback
will continue. Press and hold the Looper footswitch for one second to stop looper playback without re-entering
the looper.
To re-enter the looper, press the Looper footswitch again.
Tip: Use this feature to create different effect configurations (adjust parameters, activate/deactivate models, etc.)
for each layer, creating a multi-textured performance. You can also switch rigs while using the looper and use a
different rig for each layer.
Global Settings
Use the global settings to configure the HeadRush Gigboard’s
overall operation.
To show the global settings, tap the button in the upper-
right corner of the screen, and tap Global Settings.
To select each page of the global settings, tap the number
at the bottom edge of the screen.
LCD Brightness: This setting determines the brightness of the main display. Tap this field, turn the encoder to select 1 (dim) through 5 (bright), and then press the encoder.
Audio Configuration:
Main Out Level: This setting determines the signal level sent to the main Outputs (1/4"/6.35 mm, TRS). When
set to Line, the output level will be +18 dBu. Use this setting if you are connecting the HeadRush Gigboard
to a full-range, flat-response amplifier, PA speaker, mixer, or audio interface. When set to Amp, the output
level will be +6 dBu. Use this setting if you are connecting the HeadRush Gigboard to a traditional guitar
amplifier.
FX Return Level: This setting determines the signal level received by the FX Return Input (1/4"/6.35 mm,
TRS). When set to Rack, the output level will be line level, +18 dBu. Use this setting if you are connecting a
rack effects processor in the HeadRush Gigboard's FX-Loop. When set to Stomp, the output level will be
+6 dBu. Use this setting if you are connecting a traditional guitar pedal ("stompbox") in the FX-Loop.
24
Page 25

USB Audio Settings:
Important note for Windows users: Before connecting the Headrush Gigboard to your computer, download and
install the necessary drivers from headrushfx.com/support.
Sample Rate: This setting determines the sample rate of the USB audio signal: 44.1 kHz, 48.0 kHz or 96.0 kHz.
Remember to select the same sample rate as the one in your DAW. Also, set it before opening your DAW.
USB Audio: This setting determines whether or not HeadRush Gigboard is sending a USB audio signal over a
USB connection. Tap On to enable sending of the USB audio signal with the selected Sample Rate. Tap
Off to disable the USB audio signal. (To change the Sample Rate, set USB Audio to Off first, select the
correct sample rate, set USB Audio to On again, and restart your DAW.)
USB Mode: This setting determines how the HeadRush Gigboard sends its audio signal over the USB
connection and how its outputs function while doing so:
• Live: The audio signal will be sent to your computer as well as to the HeadRush Gigboard’s outputs.
• DAW: The audio signal will be sent to your computer only. The HeadRush Gigboard’s outputs will be
disabled to prevent any latency while monitoring.
• Reamp: Your computer will send an audio signal to the HeadRush Gigboard, which will process it
through the current rig and send it back to your computer. The HeadRush Gigboard’s outputs will be
disabled to prevent any latency while monitoring
MIDI Settings: These settings determine how the HeadRush Gigboard sends and receives MIDI information to and from external devices. These settings affect only the HeadRush Gigboard’s MIDI input or MIDI output.
MIDI Thru: Tap On to use the MIDI output as a MIDI throughput; any MIDI information sent to the HeadRush
Gigboard’s MIDI input will be sent directly to the MIDI output. Tap Off to use the HeadRush Gigboard’s
MIDI output normally; the HeadRush Gigboard will be able to send its own MIDI information out of the MIDI
output.
Recv MIDI Clock: Tap On to enable the HeadRush Gigboard to receive MIDI clock information. Tap Off to
use the HeadRush Gigboard’s own internal MIDI clock (which will not be sent out).
Prog Change: Tap Send to enable or disable the HeadRush Gigboard’s transmission of MIDI program change
messages when you load a rig. Tap Recv to enable or disable the HeadRush Gigboard’s reception of MIDI
program change messages from an external MIDI device.
MIDI Channel: This setting determines the MIDI channel(s) that the HeadRush Gigboard will send and receive
MIDI messages. Tap this field, turn the encoder to select all channels (Omni), or 1–16, and then press the
encoder.
Reminders:
Confirm Unsaved: This setting determines whether or
not you will see a confirmation message if you change
the rig while there are unsaved changes on the current
one. Tap On to enable these messages or Off to
disable them.
Alternatively, tap Do not show this dialog again in the
message itself to disable them.
25
Page 26

Assignments:
Auto Assign: This setting determines how models are assigned to the switches. Tap On if you want models to
be automatically assigned to the next available switch when you load them. Tap Off if you want models to load
without being assigned to a switch; you will have to assign them manually in the Hardware Assign screen.
Global EQ:
These settings on Page 2 determine if/how equalization is
applied for your outputs. This equalizer is a four-band
parametric equalizer.
Tip: These settings are especially useful when a venue, rehearsal
space, etc. has different acoustic characteristics than the room
where you originally created your presets (e.g., the venue may
sound “boomier,” or a rehearsal space with soundproofing may
deaden some of the high end). This page lets you quickly apply
some additional equalization to all of your presets without
permanently saving them.
EQ On: This setting determines whether equalization is enabled (On) or disabled (Off) for the outputs.
Level: This setting determines if/how much the outputs’ audio signal level is boosted or cut. This value is
applied the level set by the Master knob.
Low Band & High Band: These settings determine what type of equalization is applied to the lowest-
frequency band (Low Band) and to the highest-frequency band (High Band): Shelf or Cut.
Low, Low Mid, High & High Mid: The three settings for each of these four frequency bands determine the
shape of the equalization:
The first setting (Hz) determines the center frequency of the low-frequency band, low-mid-frequency
band, high-frequency band, or high-mid-frequency band.
The second setting (dB) determines how much the equalizer boosts or cuts the signal at the
corresponding frequency band.
The third setting (Q) determines the width of the frequency band. The higher the setting, the wider the
band will be around the center frequency (the first setting). This setting is applied whether Low Band or
High Band is set to Shelf or Cut.
26
Page 27

USB
You can use the HeadRush Gigboard’s USB connection to your computer for Transferring Files & Settings (e.g.,
rigs, setlists, presets, etc.), Recording (to a digital audio workstation [DAW]), or Reamping.
Transferring Files & Settings
Over a USB connection, you can transfer rig, setlist, model preset, and/or impulse response (IR) files between
your computer and the HeadRush Gigboard.
We recommend creating a backup copy of your files to your computer before you make any changes.
Important:
Do not disconnect or power off the HeadRush Gigboard during the process.
Any unsupported files will be ignored.
We recommend organizing the file structure of your rigs, setlists, model presets, and/or impulse response files on
your computer so that it’s identical to the file structure as shown on the HeadRush Gigboard “drive.”
To transfer files between the HeadRush Gigboard and your computer:
1. Connect your computer to the HeadRush Gigboard’s USB port using a standard USB cable.
2. With your computer powered on, power on the HeadRush Gigboard using the power switch.
3. Tap the button in the upper-right corner of the screen, and tap Global Settings.
4. In the Global Settings screen, tap the button in the upper-right corner of the screen, and tap USB Transfer.
On your computer, the HeadRush Gigboard will appear as a mass-storage device called HeadRush.
Windows users: If this is the first time you’ve connected it to this computer, you may need to wait a minute
while it installs the class-compliant drivers.
5. Open the HeadRush drive. You can now freely click and drag contents between HeadRush and your
computer. Note that any changes you make to the contents of your HeadRush will not be final until after the
next step, but any changes you make to the files on your computer are immediate.
6. To apply your changes to the contents of HeadRush, tap Sync. This will “commit” any changes you made.
As the HeadRush Gigboard analyzes and imports the files, a meter on the display will indicate its progress.
The normal Global Settings screen will reappear when the process is finished.
To cancel your changes the contents of HeadRush, tap in the upper-left corner. This will cancel any
changes you made. Any changes you made to files on your computer will remain, though.
27
Page 28

Recording
When the HeadRush Gigboard’s USB port is connected to your computer, you can select and use the HeadRush
Gigboard as a 24-bit audio interface, enabling you to play audio through it or to send its audio signal to the
computer. It can use sample rates of 44.1 kHz, 48 kHz, or 96 kHz.
Important Note for Windows Users: Before connecting the HeadRush Gigboard to your computer, download
the necessary drivers from headrushfx.com/support and install them.
To use the HeadRush Gigboard as an audio interface with your computer, open your computer’s Control
Panel (Windows) or System Preferences (Mac OS X), open its sound/audio settings, and select HeadRush
Gigboard as the device for recording/input and/or for playback/output.
The HeadRush Gigboard can send four separate audio signal channels to your computer. Before recording the
HeadRush Gigboard’s audio signal into your digital audio workstation (DAW), select the channel/channels you
want to record:
1: the left channel of the master outputs with all active effects applied.
2: the right channel of the master outputs with all active effects applied.
3: a mono channel of the guitar input with no effects applied.
4: identical audio signal to 3.
The HeadRush Gigboard can receive four separate audio signal channels from your computer. The channels are
named and routed as follows:
1: the left channel of your computer’s output audio signal, which will be sent directly out of the HeadRush
Gigboard’s master outputs and phones output.
2: the right channel of your computer’s output audio signal, which will be sent directly out of the HeadRush
Gigboard’s master outputs and phones output.
3: a mono channel of your computer’s audio signal, which will be sent back through the HeadRush Gigboard
(see Reamping below).
4: not used in this scenario.
Important: Remember to set your DAW’s master outputs to be sent to 1/2.
Reamping
Reamping is a process that adds the tone coloration of an amp to a pre-recorded audio signal—in this case,
sending audio from your DAW through the HeadRush Gigboard and then recording it back into your DAW. This is
useful for saving time because you can change the sound of an already-recorded guitar track without having to
manually play the same part again.
To use the HeadRush Gigboard to reamp an audio signal:
1. In your DAW, make sure HeadRush Gigboard is selected as your audio interface for both recording/input
and playback/output.
2. Assign the output of the desired track to 3.
3. On the HeadRush Gigboard, tap the button in the upper-right corner of the screen, and tap Global Settings.
4. In the Global Settings screen, tap Reamp next to USB Mode.
Also, make sure the Sample Rate is set to the same sample rate as the one in your DAW. To change the
Sample Rate, set USB Audio to Off first, select the correct sample rate, set USB Audio to On again, and restart
your DAW.
5. In your DAW again, create a new audio track and assign its input. For a stereo input signal, select 1/2. For a
mono input signal, select 1.
6. Locate the point in your track where you want to start reamping.
7. On the HeadRush Gigboard, select the rig, models, or other parameters to achieve the sound you want.
8. In your DAW, start audio recording. The track you want to reamp will be sent through the HeadRush Gigboard
and recorded into the audio track you created earlier.
28
Page 29

29
Page 30

g
Appendix
Technical Specifications
Footswitches
(4) footswitches with color LEDs
Knobs
(1) 300° master volume knob
(1) 360° navigation/data encoder
Display
Connectors
(1) full-color LED-backlit display with touch interface
6.9” / 176 mm
5.9” x 3.7” / 150 x 93 mm
(1) 1/4” (6.35 mm) TS input
(1) 1/4” (6.35 mm) TRS input
(diagonal)
(width x height)
(guitar)
(expression pedal)
(1) 1/4” (6.35 mm) TS input (expression pedal toe switch)
(1) 1/8” (3.5 mm) stereo input
(1) 1/4” (6.35 mm) TRS output
(1) 1/4” (6.35 mm) TRS input
(1) 1/4” (6.35 mm) TRS output
(auxiliary device)
(external amp switch)
(send)
(return)
(1) 5-pin MIDI input
(1) 5-pin MIDI output/thru
(1) USB Type-B port
(1) IEC power input
Power Connection
Input Voltage
DC power adapter input
19 VDC, 3.42 A, center-positive
Dimensions
(width x depth x height)
Weight
12.96" x 8.88" x 2.64"
32.92 x 22.56 x 6.71 cm
7.14 lbs.
3.24 k
Specifications are subject to change without notice.
Trademarks & Licenses
HeadRush is a trademark of inMusic Brands, Inc., registered in the U.S. and other countries.
Avid and Eleven are trademarks or registered trademarks of Avid Technology, Inc. in the U.S. and other countries.
Windows is a registered trademark of Microsoft Corporation in the United States and other countries.
All other product names, company names, trademarks, or trade names are those of their respective owners.
30
Page 31

31
Page 32

Manual Version 1.0
 Loading...