

Page 1
1
The Micro Amp Manual
headphone amplier
Owner’s Manual
Toll Free: 800-828-8184
Phone: 406-587-9466
Fax: 406-587-9484
2020 Gilkerson Drive
Bozeman, MT 59715
www.headphone.com
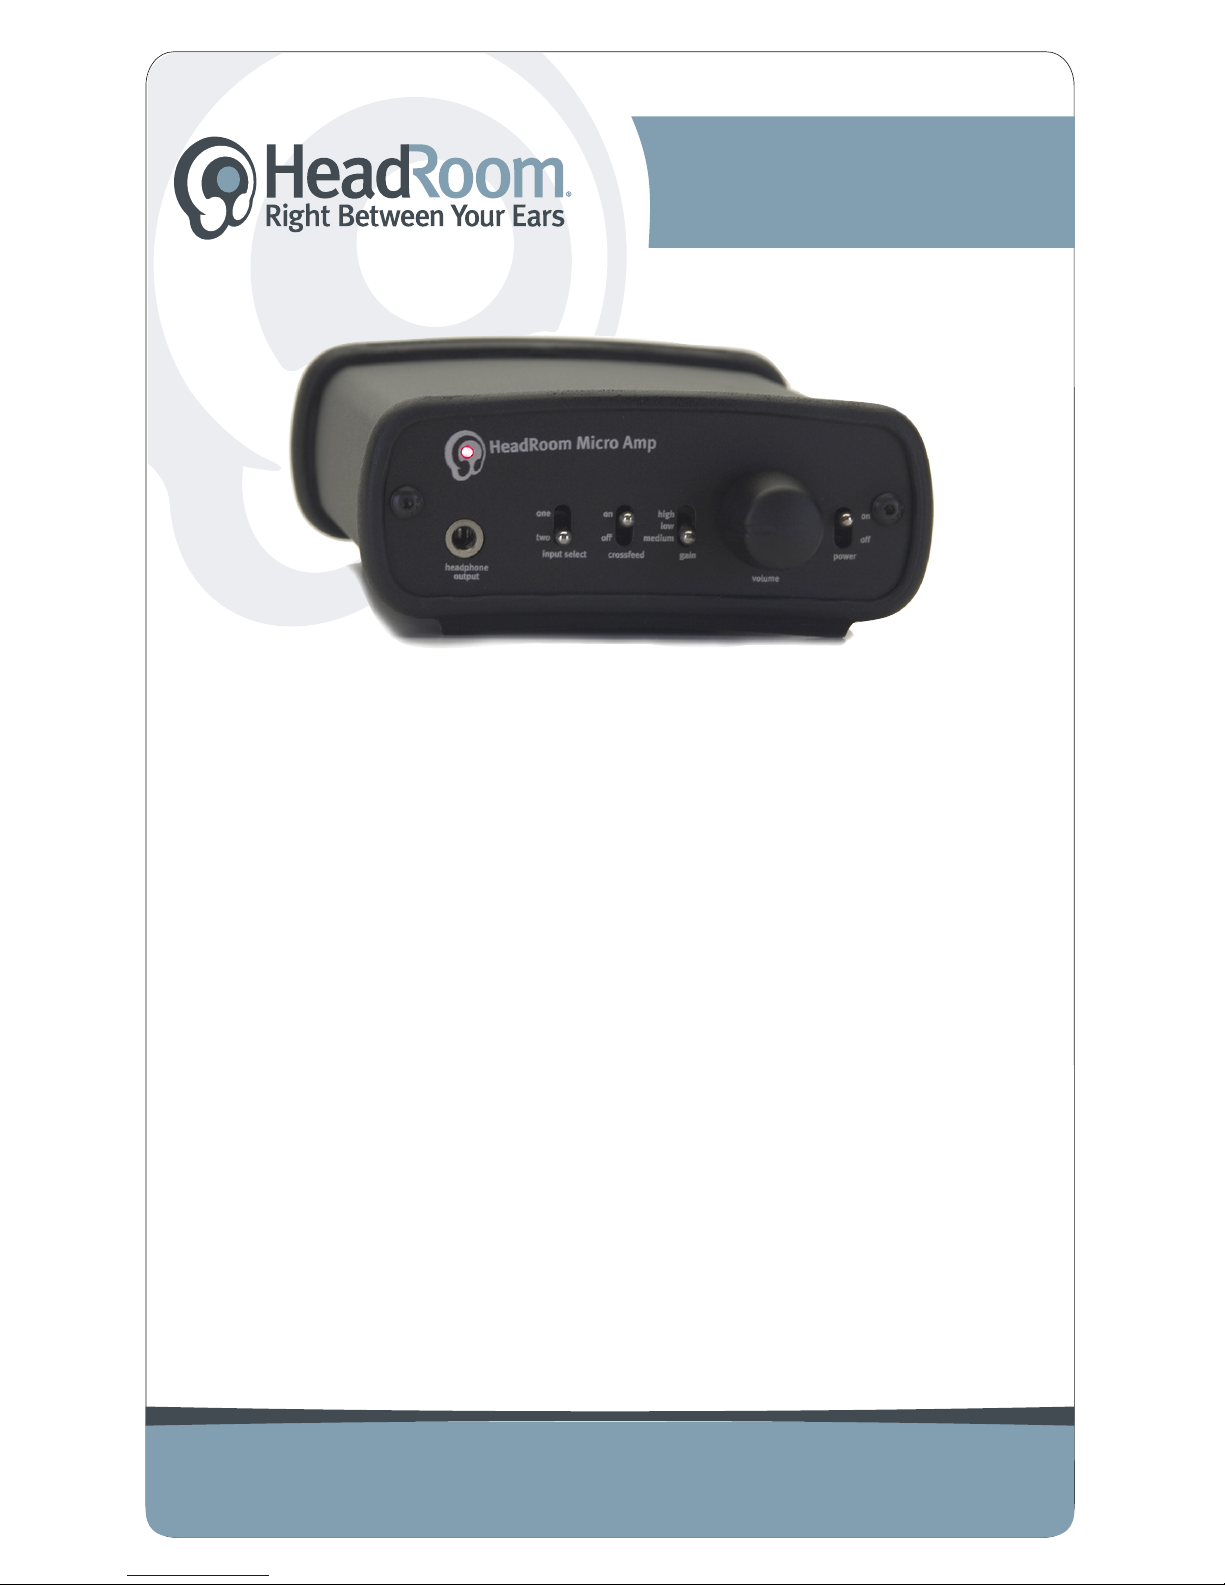
Congratulations on your purchase of what’s probably the
highest performance per cubic-inch audio device on the
planet! Your new Micro Amp will take up very little space
on your desktop, but it will completely ll the space right
between your ears with glorious music.
Enough with the front of the manual, already! Read on, set
it up, and go have a great headphone listening session. And
for those moments you may not need headphones, don’t
forget to use the pre-amp out on the rear panel as a source
for desktop speaker power amp or self powered speakers.
Page 2
2
1.
Headphone
Output
2.
Input
Selector
Switch
3.
Crossfeed
Switch
5.
Volume
Control
6.
Power
Switch
4.
Gain
Switch
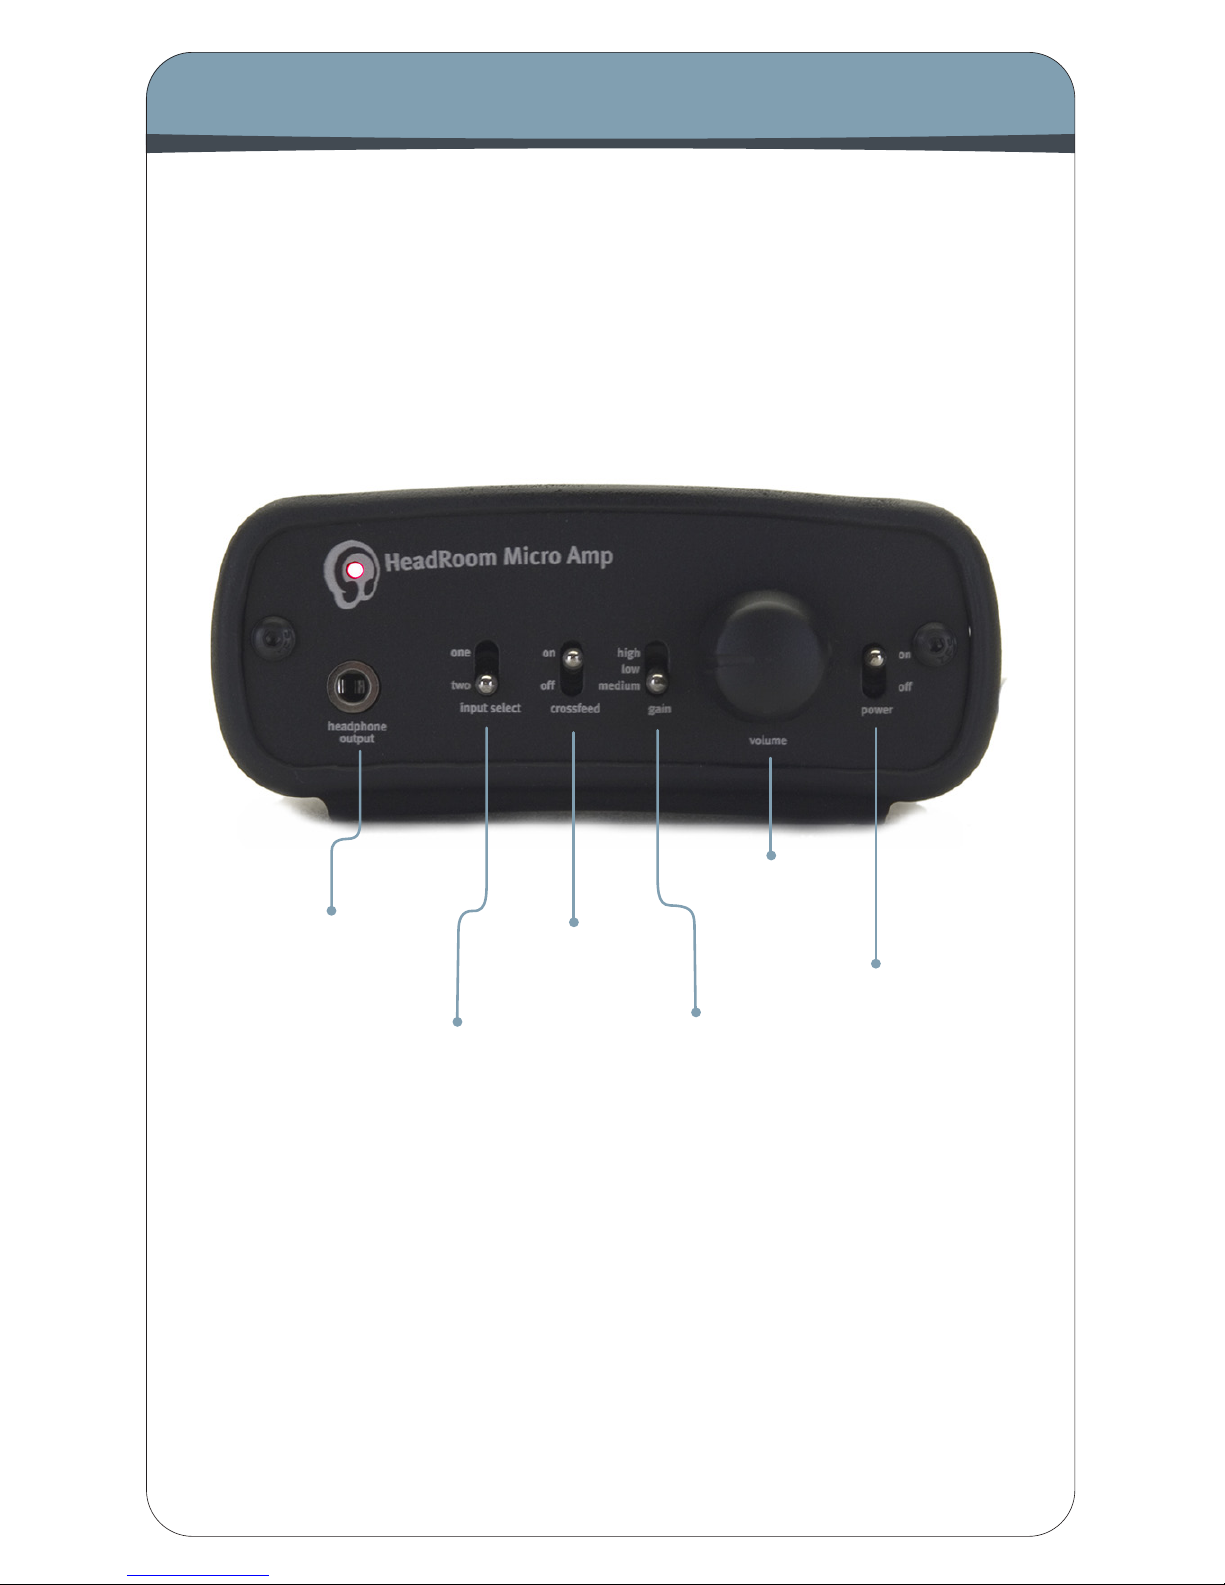
The Micro Amp Front Panel
Page 3

3
1. Headphone Output The headphone out is where you plug in your
headphones. If you want to use two pair of headphones, headphone splitters
are available on our website. There isn’t room for a full sized jack, but this 1/8”
mini-plug will take the small plug of all 1/8” headphone jacks. We also sell a
short exible Grado 1/4”-1/8” adaptor as well as Cardas replacement cables
with 1/8” inputs for certain headphones, please contact us or visit our website
for more information.
2. Input Selector Switch Choose between inputs one or two with this
switch. Leave both of your inputs hooked up (inputs are found on the rear of
the amp) and simply switch between them with this handy feature. Be sure to
turn the volume down before switching, as source impedance may vary greatly,
and Micro volume control may need to be adjusted accordingly.
3. Crossfeed Switch This switch engages the crossfeed circuit. The audio
image on headphones is often not very good; typically the image is a blob on
the left, a blob on the right, and a blob in the middle. The HeadRoom crossfeed
provides the natural acoustic cross-feed normally heard at the left and right ear
as heard from the left and right speaker. Adding back the normally occurring
cross-feed signal gives your brain enough information to build the stable and
natural audio image needed to have a quality listening experience. See pg.7
for more info on the HeadRoom crossfeed.
4. Gain Switch The 3-position Gain Switch accomodates various headphones’
power needs. For instance, the Low Gain setting would be used for ear canal
headphones (which are extremely efcient), allowing a larger range on the
volume control pot. Experiementing with your headphones and the gain switch
will help you to determine which setting you prefer.
5. Volume Control As you turn the volume control knob clockwise, the volume
increases. You never know where the volume control should be set as different
headphones often have widely different impedances and efciencies, so use your
ears to choose your listening level, not the level on the dial. We recommend you
choose a moderate level so as not to blow out your ears; a general rule of thumb
is to adjust the volume only one or two knotches above ‘sounding too quiet’. It
is important to turn the amp OFF or ALL THE WAY DOWN before plugging in or
unplugging your headphones to avoid short-circuiting the amp.
6. Power Switch Use this switch to turn your Micro Amp on. The red LED will
illuminate in the center of the HeadRoom logo in the upper left hand corner of
the amp. There is nothing wrong with leaving your amp ‘on’ or ‘off’ for lengthy
periods of time; however we recommed that you unplug your amplier if you’re
storing it for a long period of time.
Front Panel Description
Page 4
4
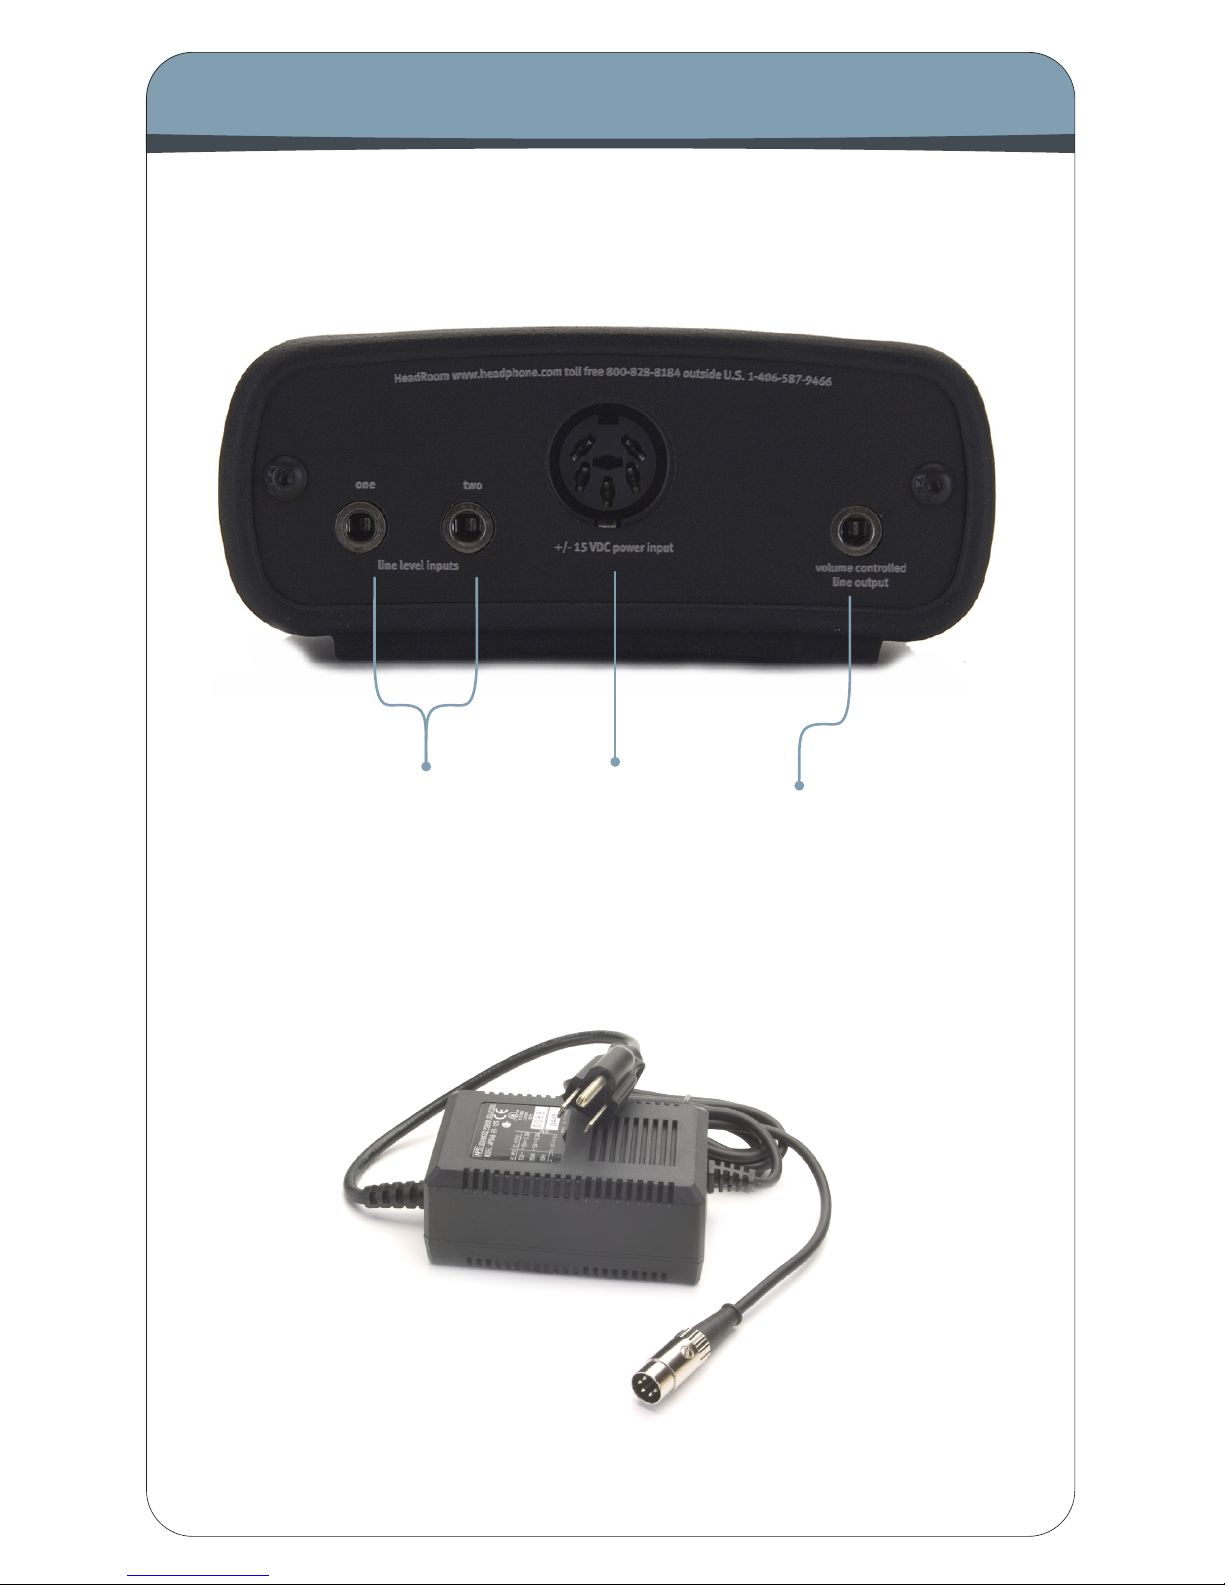
The Micro Amp Rear Panel
7.
Line
Inputs
9.
Pre-Amp
Output
8.
+/- 15 VDC
Power
Input
Included Power Supply
Page 5

5
Rear Panel Description
7. Line Inputs Plug your source into the Micro Amp here, using either a
mini-mini cable if your source has a line-out or a RCA-mini cable if your source
has RCA outputs. If you’re using the Micro DAC, you will use a mini-mini cable
and run the Micro DAC into the amp here (see page 9 for more info on hooking
up your Micro Amp). Note the two inputs on the Micro Amp, thus allowing you
to have two sources plugged in at the same time, such as an iPod and your
computer running through the Micro DAC, for example. The source that is
playing will be determined by the input selector switch on the front of the unit.
8. +/- 15VDC Power Input Plug in your power supply here. The ‘brick’
power supply is included with the Micro Amp; upon purchase you will have
chosen a voltage appropriate to your country’s voltage requirement, either
110v (North America, Japan, Singapore and others) or 220v (Europe, Australia, China, etc). We also recommend the Astrodyne switching power supply
or the larger Desktop Power Supply (both accomodate any country’s voltage
requirement) as available power upgrades, these upgrades are particularly
useful with the Ultra Micro Amp. Visit our website for more information about
these power supply upgrades.
9. Pre-Amp Output The Pre-Amp Output on the rear of the Micro Amp
is an excellent way to provide a volume controlled output to your desktop
self-powered speakers or as a source for a speaker power amp. The output
is in parallel to the headphone jacks, so you will hear music from both your
headphones and your speakers (although volume levels may vary). In true
pre-amp fashion, the volume pot provides a variable-controlled signal output
to speakers; the louder the volume setting, the louder your speaker signal.
While this output can be used as a second headphone jack, avoid connecting
two highly efcient ear canal headphones to each output, use a splitter from
the front jack instead.
Page 6
6
Features
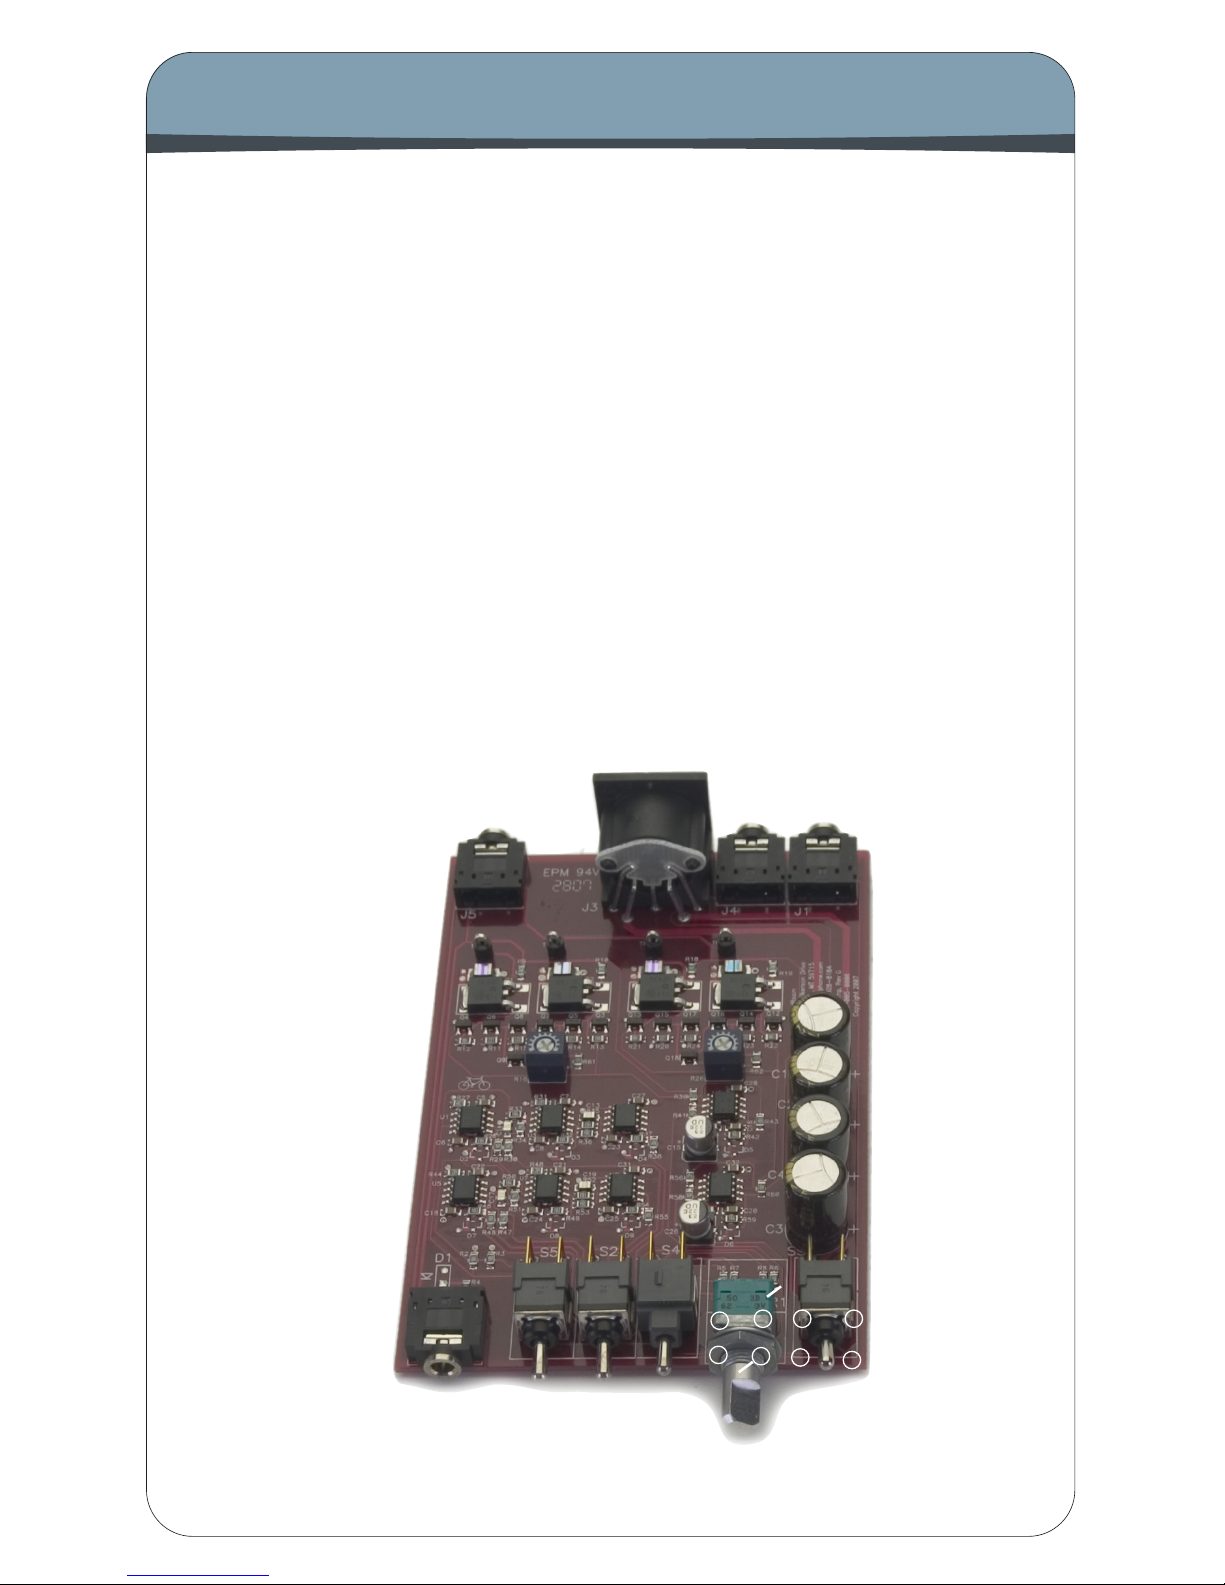
Micro Amp Features
• Dual Input
• Headphone Output and rear Pre-Amp Output
• Selectable Gain settings (3)
• Selectable Crossfeed Function
• +/-15V Power Supply
• DC coupled signal path, from input to output
• Discrete emitter follower ouput stage, biased into class A operation (the
Diamond buffer)
• Resistors are low noise, low drift .1% metal lm types
• Local device decoupling with low-ESR, tight tolerance PPS lm capacitors
• Power supply decoupling with ultra low ESR electrolytics
• Shortest signal path possible, PCB routed with high-speed signal integrity
and low noise in mind
• Multi-layer PCB with dedicated, low impedance power and ground layers
Micro Amp circuit board
Page 7
7
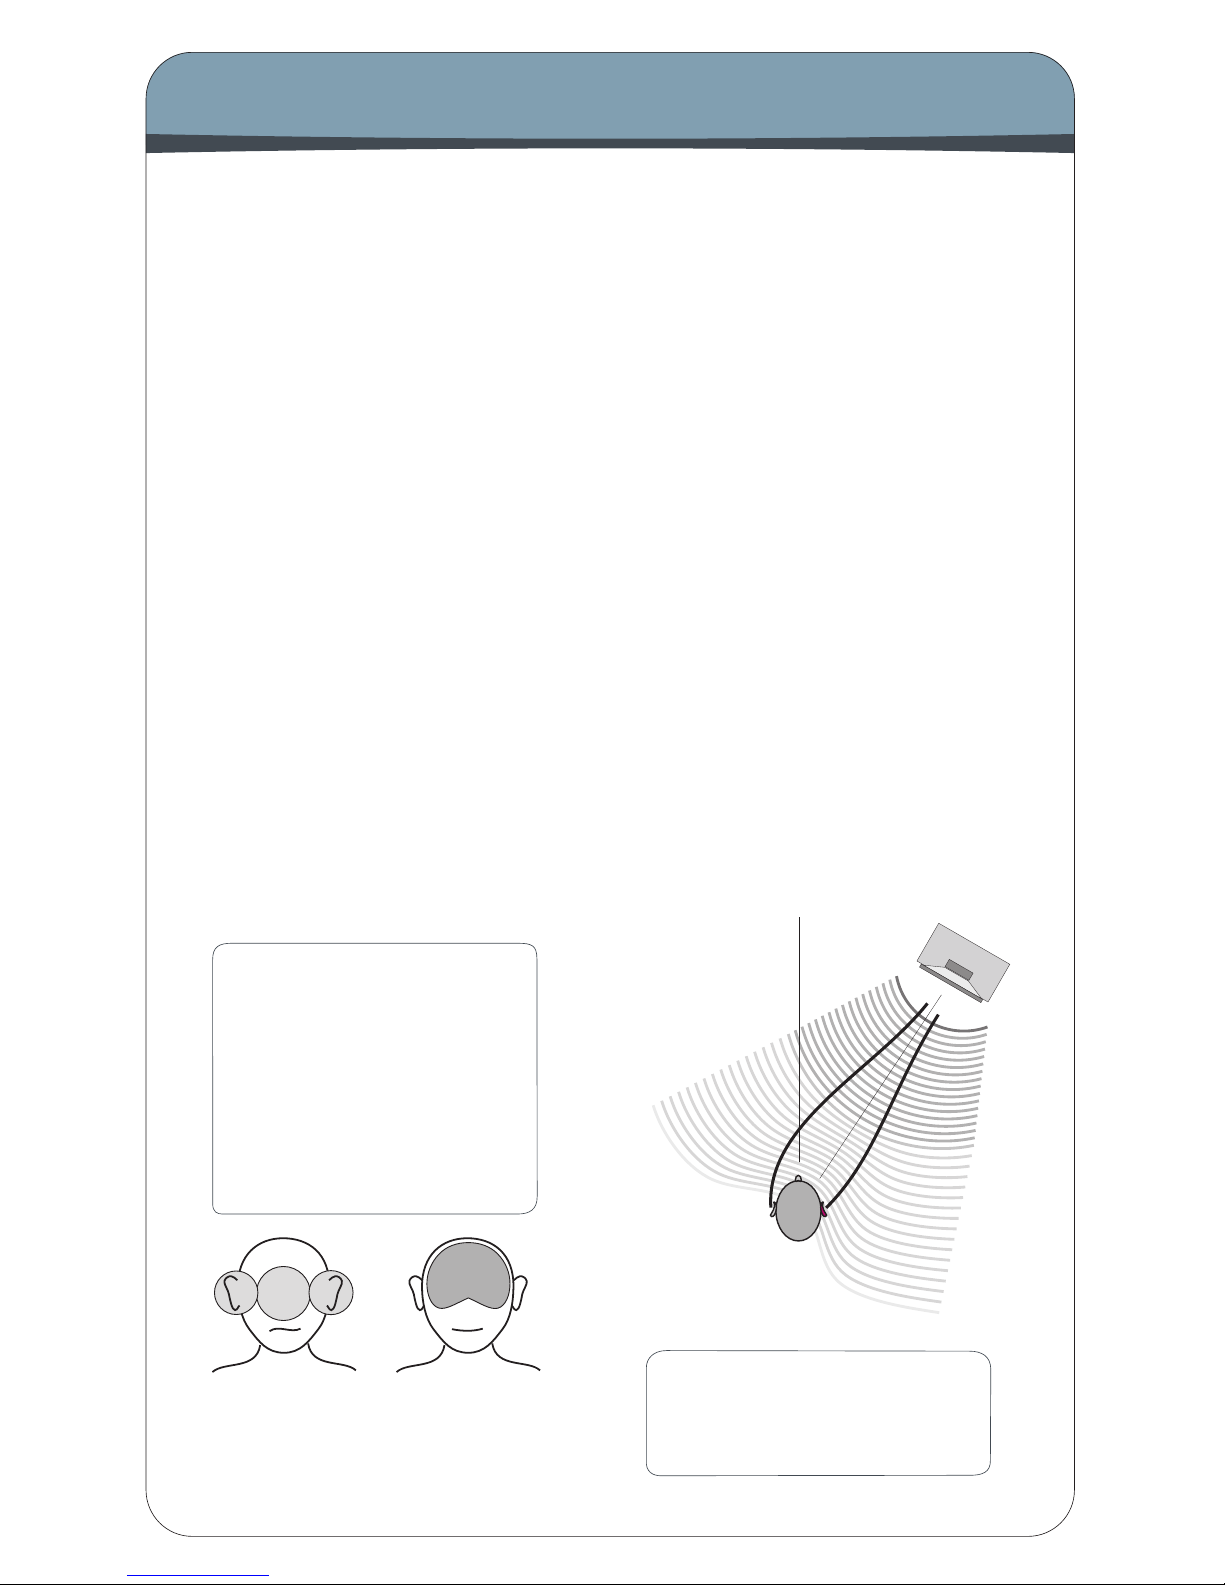
What is the HeadRoom Crossfeed?
Imagine you are listening to a pair of speakers. If you turn off the left speaker,
both ears hear the sound from the right speaker. But because the left ear is
slight farther away than the right ear, it hears the speaker’s sound slightly
after the right ear; about 300 microSeconds. This time difference is called the
“inter-aural time difference” and it is the main thing your brain listens for in
order to tell where to place sound left-to-right.
But in headphones if you turn off the left channel, only the right ear hears the
sound. In headphones, if there is any sound that is only in the left channel, or
only in the right channel, then only that ear hears the sound. This is not natural, and you brain becomes fatigued trying to gure out where sound is coming from when only one ear is hearing it. This tends to create an audio image
that is a blob on the left, blob on the right and a blob in the middle.
HeadRoom ampliers cure the problem by allowing you to cross-feed a little
of the left and right channels across to each other through a short time delay
using the crossfeed switch. The usefulness of the circuit varies depending on
what type of recording you are listening to; mono and binaural recordings
need no processor at all. Old studio recordings that have instruments panned
hard left or right, benet greatly from the processor. Live and classical recordings miked from a distance benet somewhat less, and can often be listened
to without the processor quite comfortably.
Plain
Headphones
With
HeadRoom
The crossfeed switch in
HeadRoom ampliers allow you to cross-feed a
little of the left and right
channels across to eachother through a short time
delay.
Far ear
hears
slight delay.
Near ear
hears sound
rst.
30 degrees
off axis
Page 8
8
Connecting Your Micro Amp
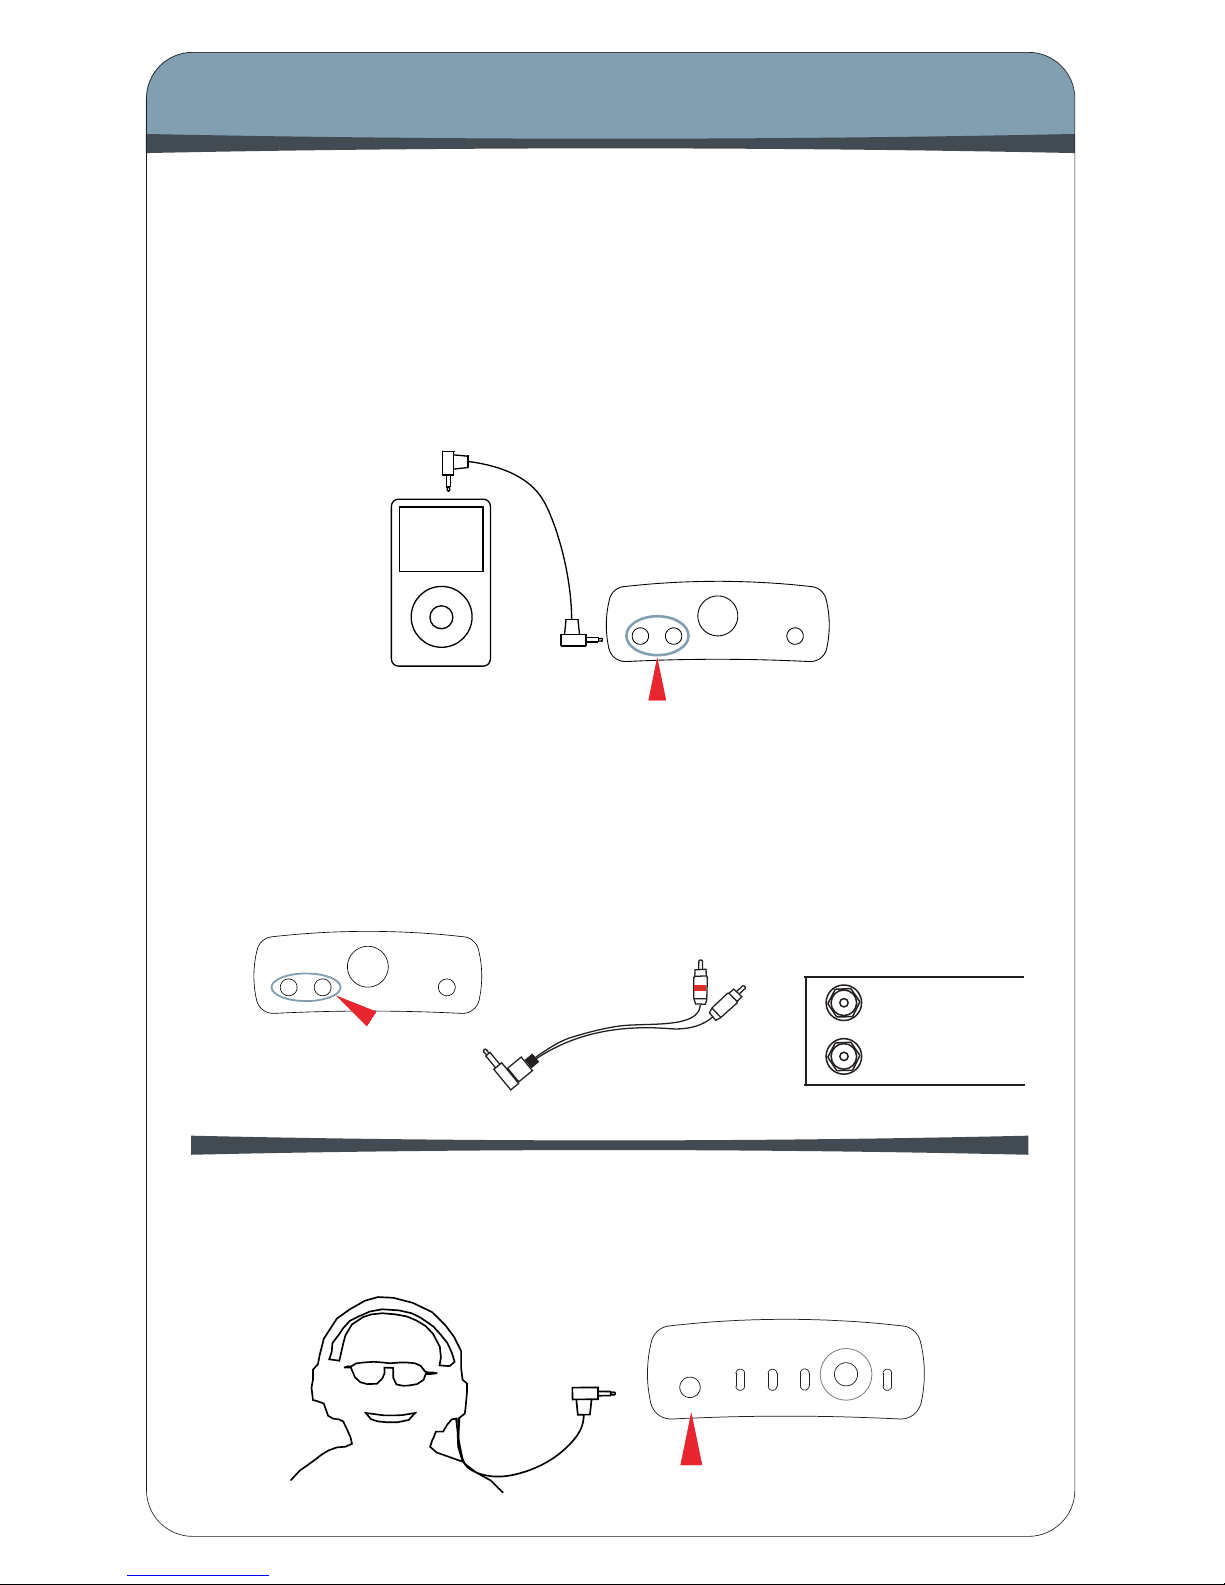
Hook the Micro Amp to your iPod, portable CD player, or any other source with a headphone jack using a mini-mini cable. If your source happens to have a line-output, then
even better; use the line output rather than the headphone jack (using line-out will completely bypass the player’s volume control).
Simply run the mini-mini cable from the line-out or headphone jack of your player into
line input ‘1’ or ’2’ on the back of the amp. On the front panel, switch the input selector
switch to the corresponding line input you are using.
line inputs 1 & 2
Connecting the Micro Amp to Analog source:
line inputs
1& 2
Home CD player
with RCA outputs
Portable
cable
If your CD player has a set of RCA outputs, an RCA to Mini Cable will allow you to connect the RCA outputs of your player into one of the line inputs on the Micro Amp. Be
sure to note that as always, red or ‘R’, designates right channel on RCA inputs. On the
front panel, switch the input selector switch to the corresponding line input you are
using.
Headphone input
source
Micro Amp
Source with line out or headphone jack:
Source with RCA outputs:
Now, for the best part: simply plug your headphones into the headphone jack on the
front of the Micro Amp (be sure to turn the volume down rst). If your headphone
jack is a 1/4” termination, or if you need to power more than one pair of headphones,
please see our explanation in #1 on page 2.
Page 9
9
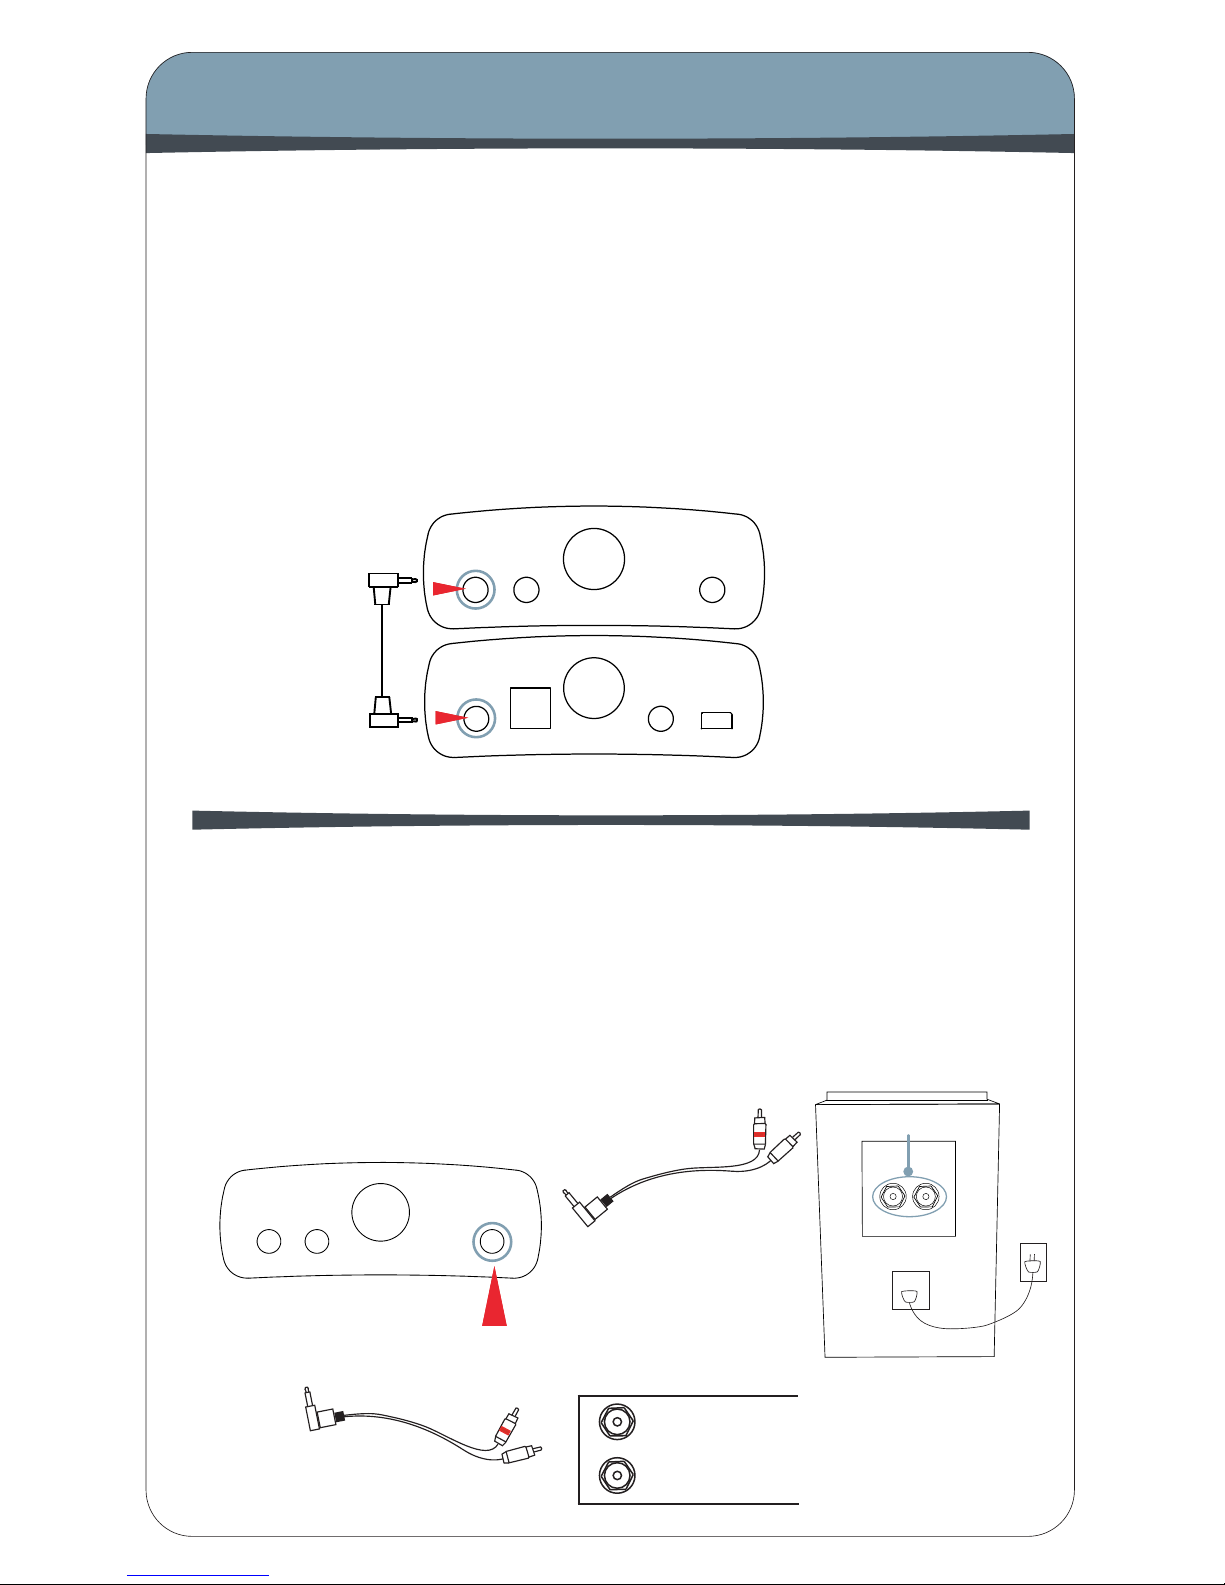
mini-mini
cable
If you have a source that provides a digital output (such as a computer), using HeadRoom’s Micro DAC will provide even better sound quality. The Micro Amp and Micro
DAC are designed to work together, and stack on top of eachother to conserve desk
space. To hook up your Micro Amp to the Micro DAC, just plug the mini-to-mini cable
into the line input of the Amp and line output of the DAC. See your Micro DAC owner’s
manual for more information about hooking up the DAC to a digital source.
Connecting Micro Amp to Micro DAC:
Connecting Your Micro Amp & Micro DAC
Mini-RCA Cable
RCA Inputs
You can use your Micro Amp as a miniature pre-amp for self powered speakers or as a
pre-amp to your power amp for powered speakers. Use a mini-RCA cable for connecting to a power amp. Most self-powered speakers have RCA inputs, in which case you
will use a mini-RCA cable to attach to the Micro Amp. Attach the mini end of your cable
to the pre-amp output of the Micro Amp. Plug the other RCA cables into the back of
your speakers. If your self-powered speakers have a mini input, use a mini-mini cable
to connect your Micro Amp.
Using Self Powered Speakers with the Micro Amp
Using the Micro Amp with Micro DAC & a Digital Source
Micro DAC
Micro Amp
Line Input
Line Output
pre-amp output
Mini-RCA Cable
Self Powered
Speakers
Power Amp
Page 10

10
30 Day Guaranty & Warranty
HeadRoom 30 Day Guaranty
Unless specically stated otherwise, all HeadRoom purchases come with a
30-day satisfaction guaranty in order to give you the opportunity to evaluate
your purchases. We’re happy to provide you with the opportunity to refund or
exchange your product, but to keep costs down we do have a few conditions.
Products must be returned to us within 30 days of the date you receive the
product. So make sure you try your purchase out right away! Products must
be in “as-new” condition. This means that they’re in pristine cosmetic condition, functioning perfectly, and include ALL materials (plastic bags, warranty
cards, tie wraps, etc). In other words, please send products back exactly as
you received them. If a product is returned within the 30-day return period,
but is not in “as-new” condition, we will charge you a 15% restocking fee plus
any labor and materials required to return the product to “as-new” condition.
Sorry, but after your 30 day trial, products are no longer exchangeable or refundable.
If you’re having trouble with a headphone amp or system, please contact us
rst to troubleshoot the problem. You can email Sales, (sales@headphone.
com) or call 800.828.8184. If we can x it while you’ve still got the product,
everyone’s happy!
Micro Amp Warranty:
The HeadRoom Micro Amp is warrantied for two years. If anytime within the
rst two years of your purchase you have a problem with your Micro, you can
return it for repairs under the terms of our 30 Day Guaranty. HeadRoom is the
only authorized service center for HeadRoom products, either in or out of warranty. If a unit is under warranty, there is no cost for the repair labor, parts, or
shipping from HeadRoom back to you (i.e., You’re responsible for paying the
shipping charges to get the product to us).
Out of Warranty Repairs
If you have an older HeadRoom amp that is out of warranty, call us at
800.828.8184 ext.104 or email [email protected] to troubleshoot the
problem with our Service Department. Upgrades fees are calculated by labor
and parts costs. HeadRoom’s non-warranty repair rate is $100 per hour (billed
in 1/2 hour increments) plus parts. If the cost of the repair is over $100, we
will call you with an estimate. Repairs are conducted only on HeadRoom products. When we receive the equipment, we will initiate repairs and upgrades
within 1-2 weeks and return the unit to you. You are responsible for shipping
costs to and from HeadRoom for all non-warranty repair items.
Page 11

11
Exchanges & Returns
Equipment Exchanges
If you would like to exchange your purchase for another item, you have two
options. You can simply purchase the item you want, and send the item you
don’t want back for refund within 30 days of the original purchase (don’t for-
get to ll out the back of the Return & Exchange card and include it with your
return). We will refund your credit card after we receive the item. Or, you can
send your product back as an exchange, and indicate the product you would
like on the Return card. We will adjust your credit card accordingly and ship
you the new item. Replacement products are shipped to you as soon as possible, typically within 3-5 days provided the replacement item is in stock.
Defective Equipment Exchanges
In the uncommon event of receiving a defective product, contact us and we
will ship out a replacement product to you at no cost as soon as possible,
typically within 3-5 days provided the replacement item is in stock. You will
receive the replacement item along with a return shipping label and a card to
include with the defective item to return to HeadRoom. Important: Fill in your
name and original invoice number of your order on the card and return the
item to HeadRoom within 2 weeks. If we have not received the product after 2
weeks (allowing shipping time) we will charge your credit card the amount of
the defective item. Please understand that we enforce this policy as an incentive for customers to get defective equipment back to us as soon as possible.
Shipping Products back to HeadRoom
Please ship products back in the original shipping box (or another that is comparable); please don’t send headphones back in JUST the headphone box,
as it’s a sure bet that they will no longer be in “as-new” condition when we
receive them! We HIGHLY recommend that you ship returns using an insured
and “signature required” delivery method—we can’t be responsible for lost or
damaged packages. Finally, don’t forget to include the completed Return &
Exchange card and WRITE YOUR NAME on the outside of the box!
Return Products to:
HeadRoom
Attn: Returns
2020 Gilkerson Drive
Bozeman, MT 59715
Contact Us:
www.headphone.com
Toll Free: 800-828-8184
Phone: 406-587-9466
Fax: 406-586-9484
Page 12
12
Toll Free: 800-828-8184
Phone: 406-587-9466
Fax: 406-587-9484
2020 Gilkerson Drive
Bozeman, MT 59715
www.headphone.com
Contacting HeadRoom
A Word About
Your Hearing
People have a natural tendency to listen to music at much louder levels with
headphones than they would with speakers. To avoid permanent hearing
damage, it’s important to be careful not to listen at extremely loud levels (or
to listen for too long at moderately loud levels). Because HeadRoom amps
need to be able to drive even the most inefcient dynamic headphones to satisfactory listening levels, they are also able to drive headphones of average
or higher efciencies to extremely high levels. As a result, even though the
volume control on your HeadRoom amp may appear to be set to a low level,
you may not be listening at a safe level. Generally speaking, when listening
to headphones you should only turn up the volume to the point at which the
sound isn’t too quiet.
As a general rule, sound pressure levels under 80 decibels will not damage
hearing, even if experienced continually. On the other hand, anything over
100 decibels may cause permanent damage very quickly. Sustained exposure
to sound pressure levels anywhere in between can also be damaging —the
louder the sound, the shorter the time required to cause permanent damage.
Just to drive this message home, here’s a bit of information about hearing
damage. The most common type of damage caused by prolonged or excessively loud sound is called tinnitus. It manifests itself as a sustained buzzing
and/or ringing in the ears, and can become a permanent condition.
If you nd that your ears are ringing or that there is a sensation of pressure or
fatigue, your body is trying to tell you that your ears need a break. Give them
a rest for a few days (or until they feel fresh). If you ignore these symptoms,
you’re risking permanent hearing damage.
In addition, don’t fool yourself into thinking that you either have full-blown
tinnitus or you don’t have it at all—there are different degrees of hearing damage. For example, you might have a mild case where you only notice ringing
in your ears in the quiet of your bedroom at night. However, once you have a
slight case of tinnitus, your ears are much more susceptible to further damage. So if you do experience mild symptoms, it’s important to be much more
careful about your exposure to loud sounds.
Sorry to sound so sobering, but a lifetime of musical enjoyment requires ears
in tiptop shape. Now that we’ve told you to be careful, don’t blame us if you
blow it. If you have any more questions about hearing damage, call a doctor.
 Loading...