

Page 1
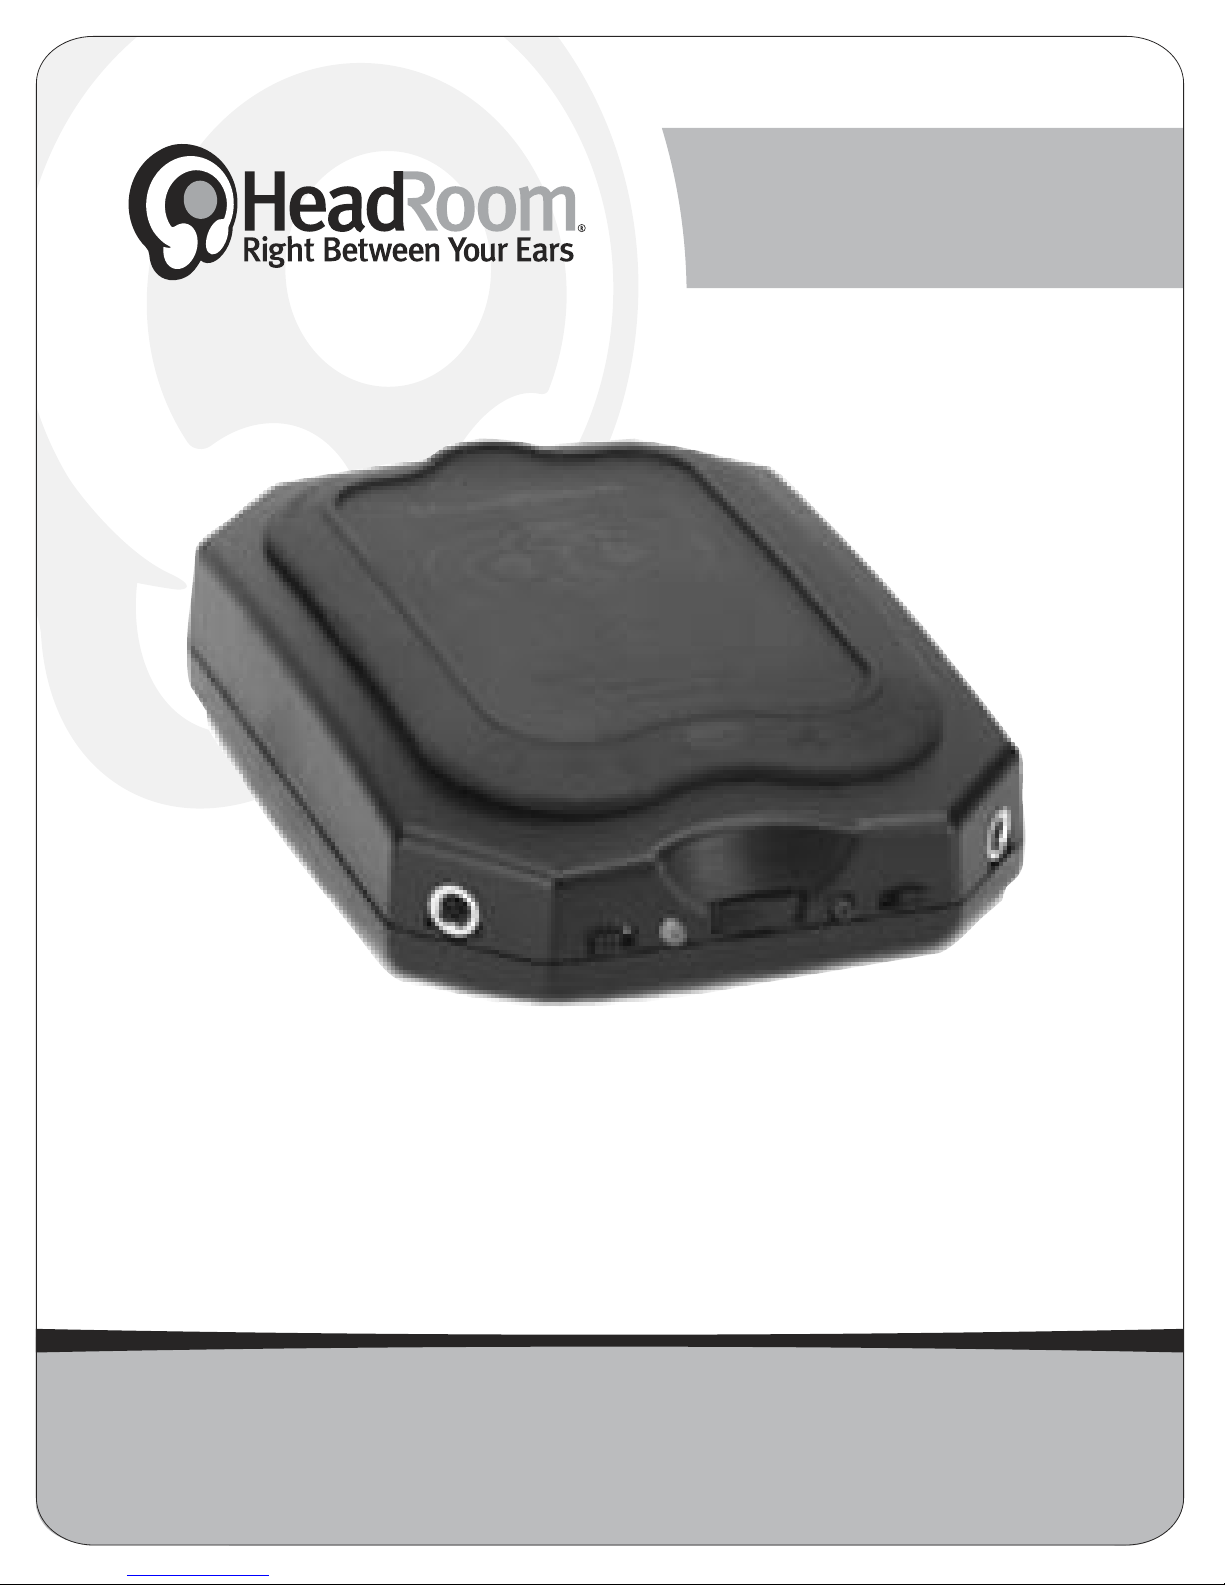
The BitHead & Total BitHead
headphone amplifier
owner’s manual
Toll Free: 8 0 0 - 8 2 8 - 8 1 8 4
Phone: 4 0 6 - 5 8 7 - 9 4 6 6
Fax: 4 0 6 - 5 8 7 - 9 4 8 4
Package Contents
1 BitHead/Total BitHead
1 mini-to-mini cable
1 USB cable
3 rubber adhesive feet
assorted adhesive velcroe feet
2020 Gilkerson Drive
Bozeman, MT 59715
w w w . h e a d p h o n e . c o m
Page 2

Getting to Know Your BitHead Amplifier
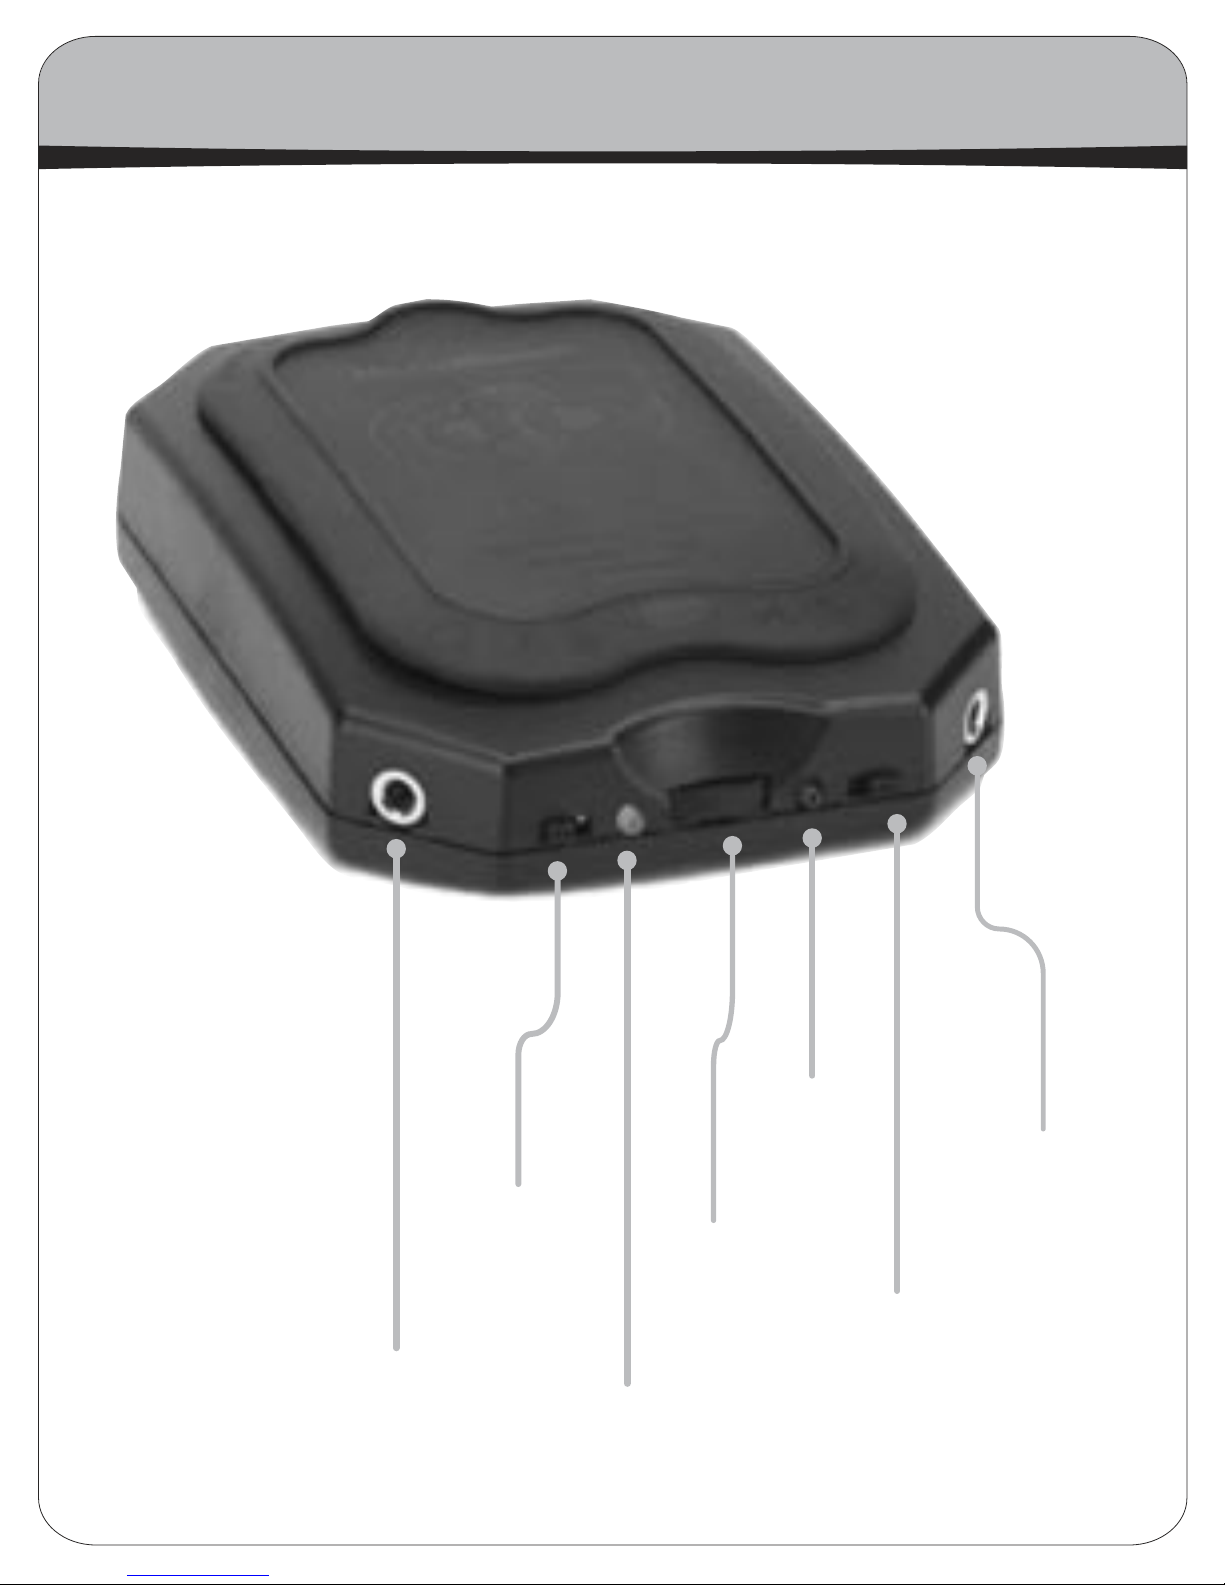
Hold the BitHead so the controls are facing you and the rubber battery door is up. Across
the front of the Bithead are a number of connections and controls.
1. Headphone Jack 1-On the far left is one of two headphone jacks that fit any 1/8” (mini)
headphone plug. (An adapter is needed if your headphones are terminated to a 1/4” plug.)
2. Power Switch- The switch on the left is the power selector. While attached to a computer,
having this switch in the left position will power the BitHead entirely from the computer
power over the USB; having the switch to the right will switch the DA converter and amplifier stages over to battery power. While attached to a portable player through the line input,
power will be “off” with this switch to the left and “on” with the switch to the right.
3. Power LED- To the right of the power switch is the green power LED, which indicates whether the unit is ON (lit) or OFF (unlit).
4. Volume Control- Just to the right of the power LED is the volume control. Rotate the volume
control to the left to increase volume, and to the right to decrease volume. If using different pairs of headphones with your AirHead, different headphone efficiencies will most likely
mean that the volume level will need to be adjusted to achieve adequate sound levels in the
headphones.
5. Clipping Indicator- The clipping indicator flashes when the amp doesn’t have enough
voltage to drive the headphones. This can happen at peak passages when listening at a fairly
loud level and/or with high impedance headphones. It will also flash when the batteries get
too low in voltage to drive the headphones. Mainly, when the clipping indicator starts to
flash at music peaks, it’s time to change the batteries.
6. Crossfeed Switch- To the right of the clipping LED is the HeadRoom Crossfeed switch. Turn
the switch to the right to the ON position, and the crossfeed is engaged (for normal stereo
headphone listening). In the OFF position, the crossfeed is bypassed (for listening to mono
or binaural recordings).
7. Headphone Jack2- On the far right is the second headphone jack. You can connect two
headphones to the BitHead at the same time. It’s best to use the same type of headphone, as
the volumes will be somewhat different unless both headphones are the same efficiency.
2
Page 3
The BitHead
1
Headphone
Jack
2
Power
Switch
3
Power
LED
4
Volume
Control
5
Clipping
Indicator
Crossfeed
Switch
7
Headphone
Jack 2
6
3
Page 4
The Back of the BitHead
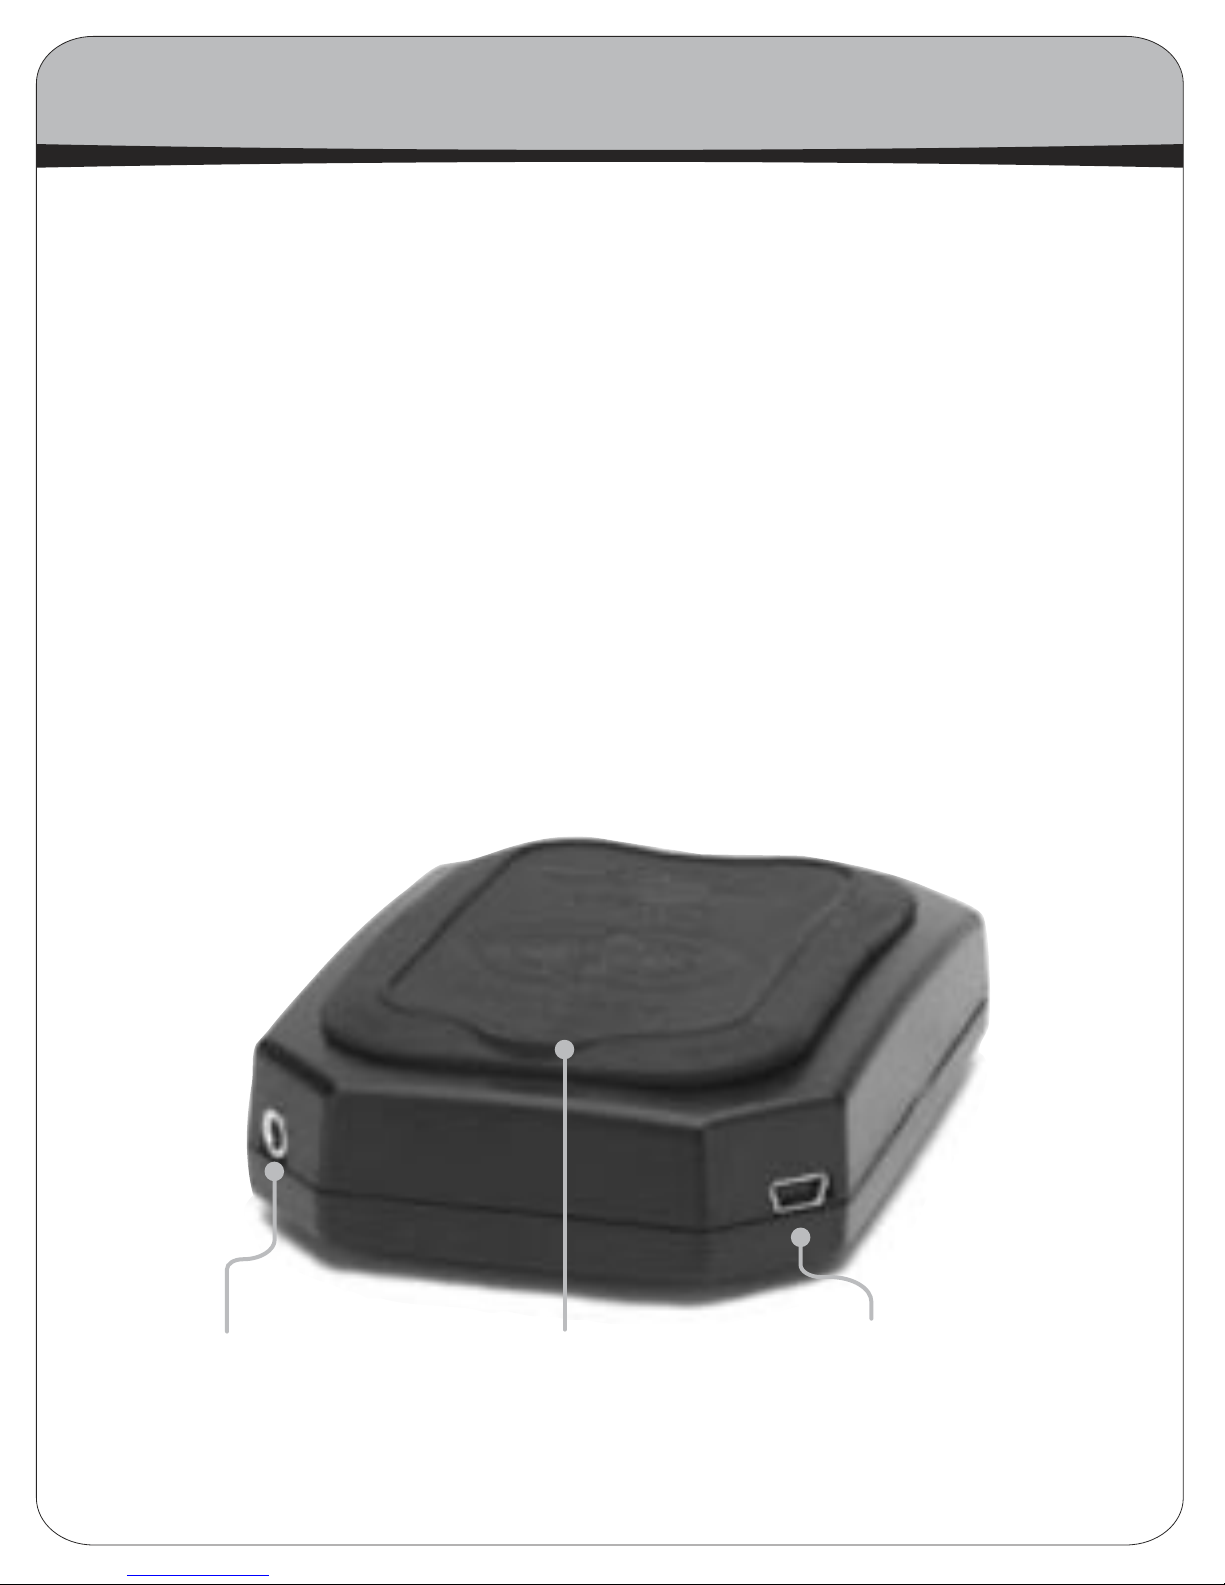
If you rotate the BitHead 1/2 turn, you’ll see the back of the unit, with two additional inputs,
one on each corner.
8. Battery Door-On the top of the BitHead is a battery door. To replace your batteries (the
BitHead requires 4 AAA cells), gently pull up on the small tab sticking out of the back of the
battery door. This will lift the entire rubber door. This exposes the battery compartment;
remove the old batteries and insert four new ones. (Always replace all four batteries at
once.)
9. Audio Line Input-The jack on the left is the audio input. Inserting a stereo mini-plug into
this input will disable the audio from the USB input (if present). The included mini-to-mini
cable connects the BitHead to your portable player via this input.
10. USB Input-The jack on the right is the USB input. The BitHead uses a mini-B USB connector,
and a short cable for use with laptops is included with your purchase.
9.
Audio Line Input
4
8.
Battery Door
10.
USB Input
Page 5
How to Mount Your BitHead Amp
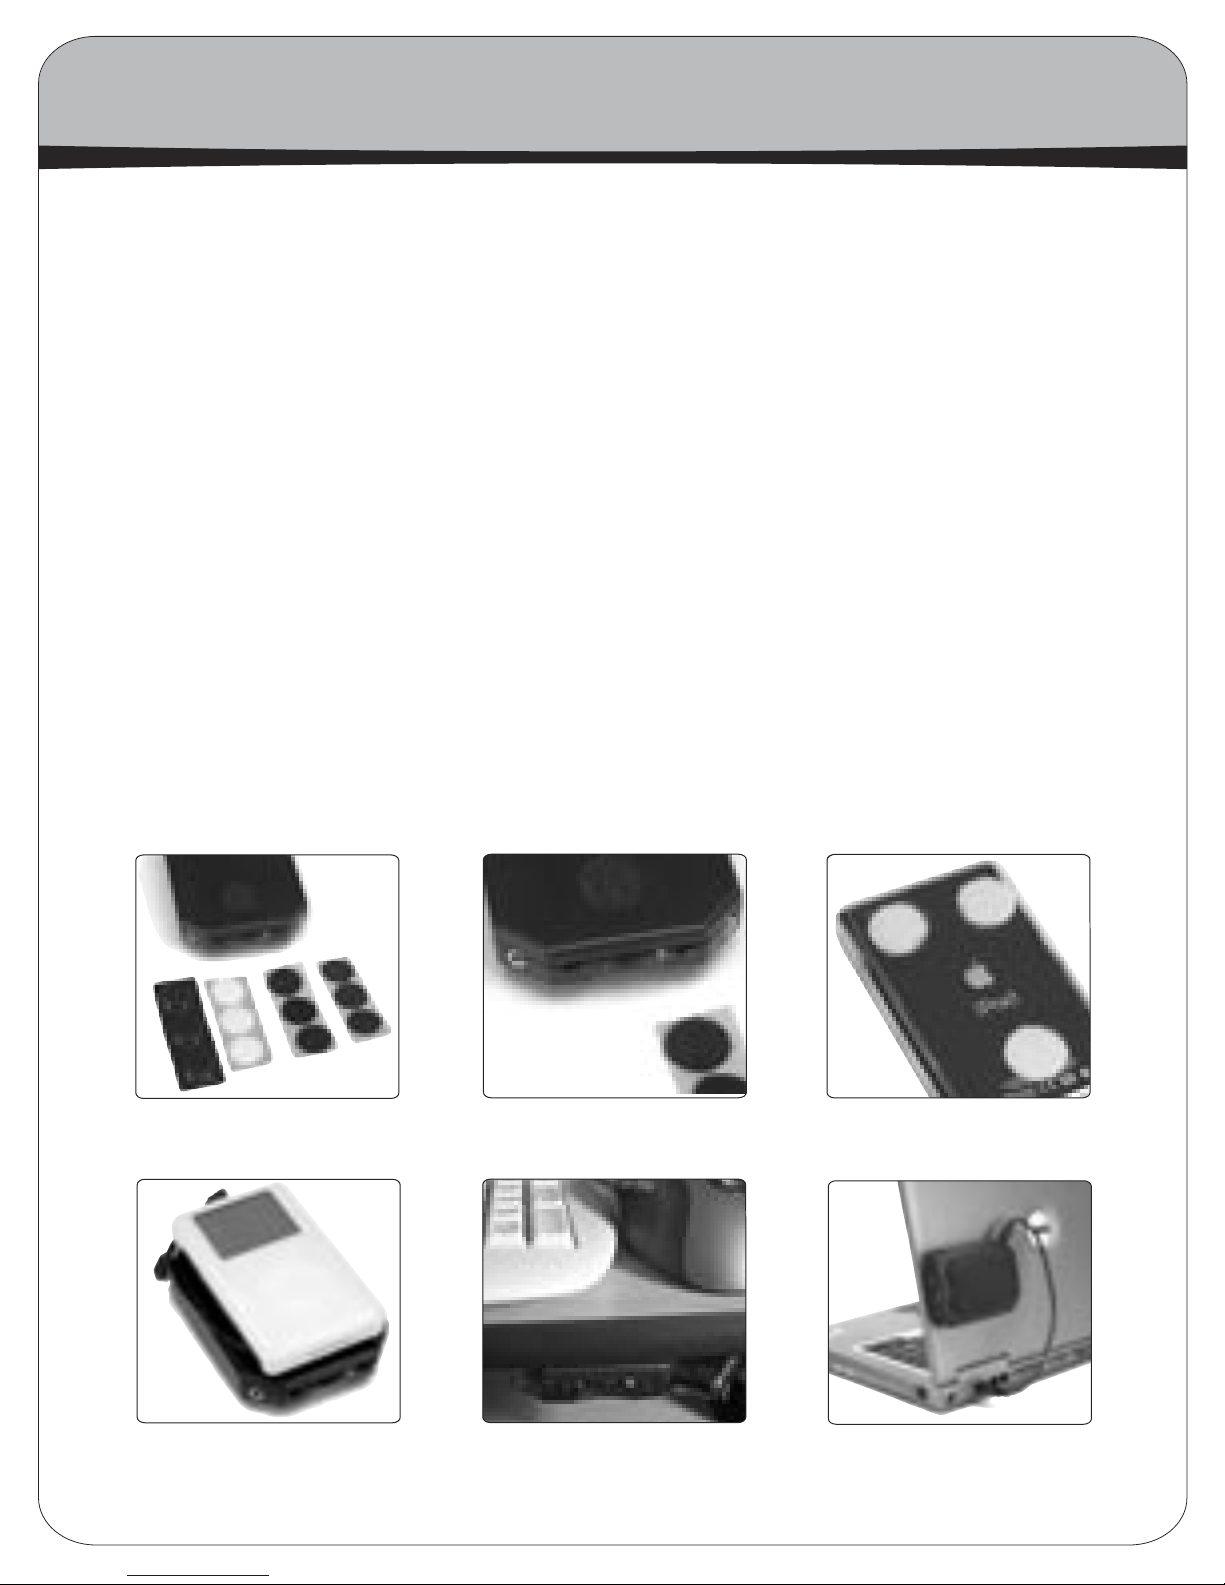
Your BitHead has been supplied with a number of different feet. The rubber feet can be stuck
to the bottom of the amp if you are simply going to place it on a tabletop. But we like to attach
the amp to the various source devices with the enclosed Velcoins. First, remove the hook coins
(the scratchy ones with all the miniature hooks) from their adhesive strip and stick them into
the three circular foot wells on the bottom of the amp.
Then, clean the surface where you want to mount your BitHead. On portable players we recommend mounting the amp to the bottom side of your portable player with the amp controls facing
towards you. In this configuration the rubber door will act as a non-slip foot and the players’
controls will tilt slightly towards you for easy access. When used with laptop computers, we
recommend sticking the amp on the back of the display with the amp controls about even with
the right or left hand side of the display so they can be easily reached. With home computers
you can attach the amp to the tower or to the bottom of your desk for easy fingertip access.
Then, remove the loop coins from the strip, and stick them to the hook coin in the feet of the
BitHead, adhesive side out. Carefully position the BitHead just above the desired spot, then
slowly and firmly push the BitHead against the surface. This should stick the loop Velcoins
into proper position. Carefully remove the BitHead leaving the loop coins, and then press
each more firmly into place by hand.
Additional Velcoins are available for purchase through our website.
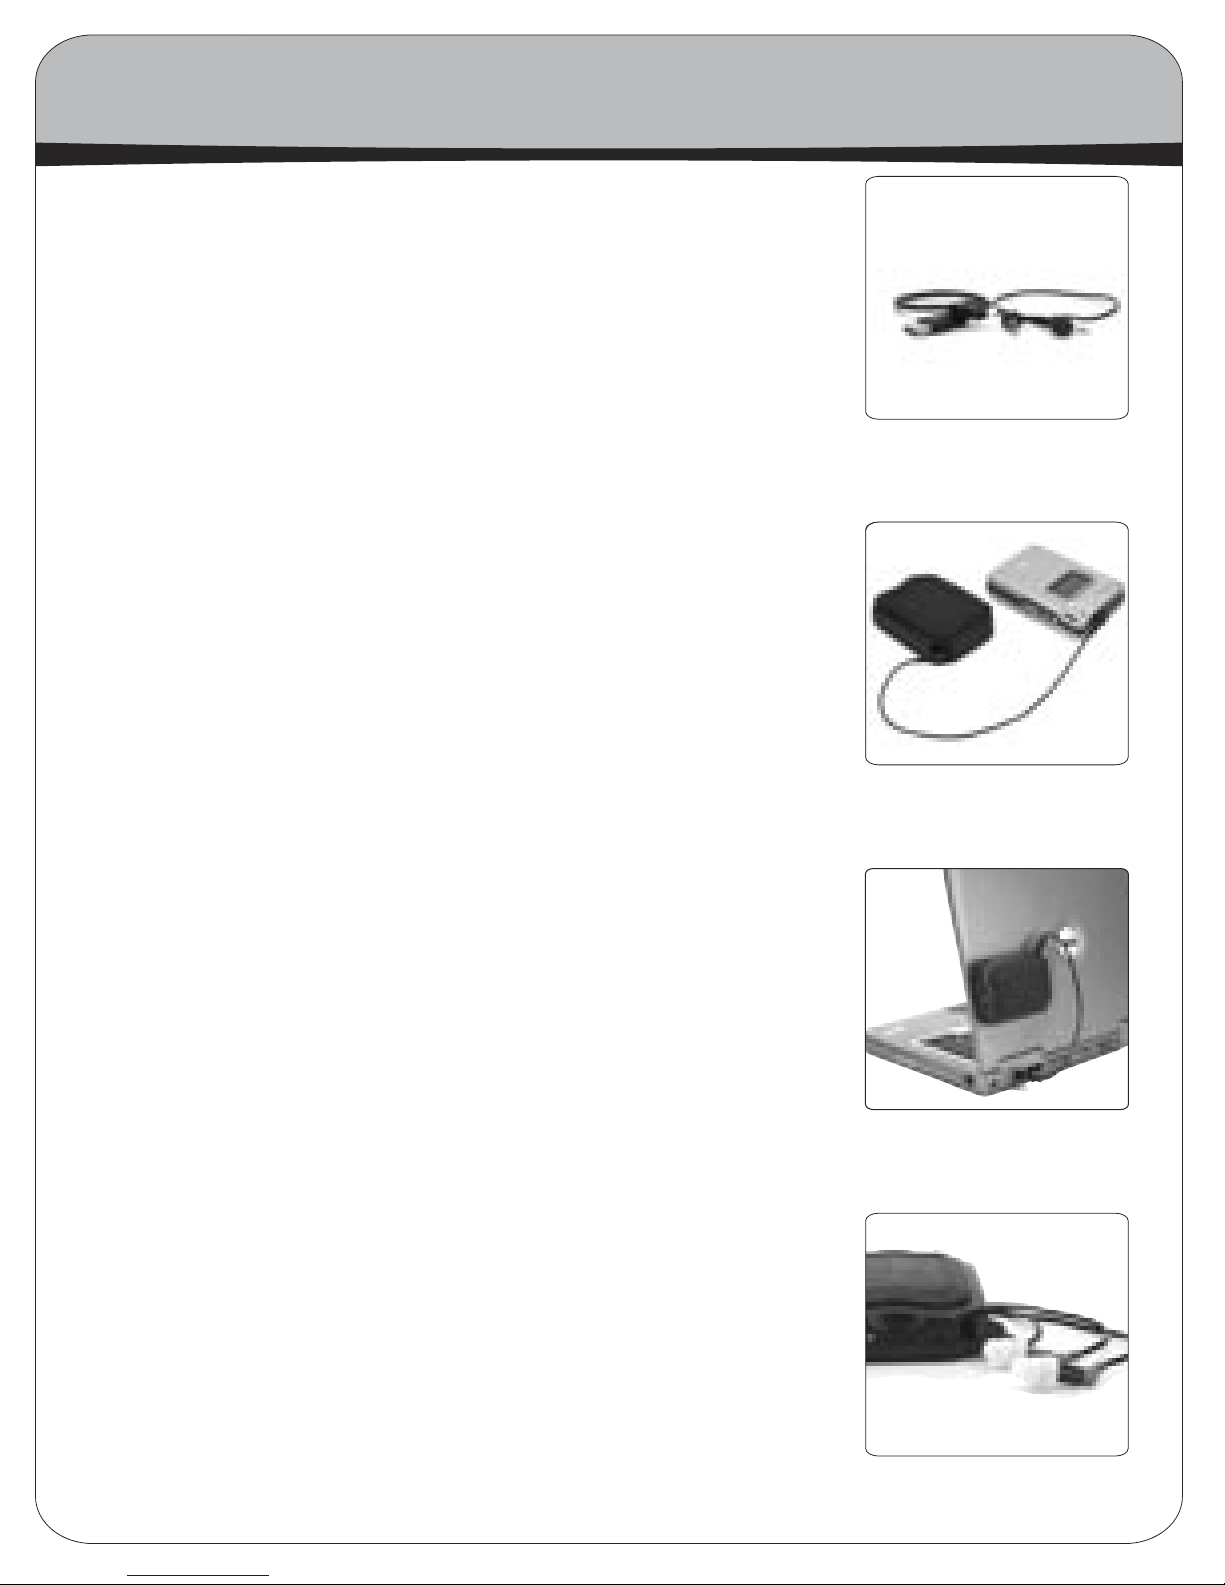
BitHead & Velcoins
attaching the Velcoins
player with Velcoins
BitHead & player
attached
BitHead attached
to desk
BitHead attached
to laptop
5
Page 6
How to Hook Up Your BitHead Amp
The BitHead is a portable headphone amplifier that can be used
both with a portable music player through the line input, and
with a computer or laptop as a USB audio device.
When hooking-up to a portable music player (like a portable
CD or MP3 player) simply use the included mini-to-mini cable
and connect the line output of the player to the line-in of the
BitHead. If no line out is available, use the headphone jack with
the volume knob set to 3/4, or two steps less than full volume
on digital players. On home audio equipment, connect the linein of the BitHead to any line-out using an RCA to stereo miniplug cable.
How to Hook Up Your Bithead Amp
mini-mini & USB cables
When hooking-up to the USB port on a computer simply connect
a USB A to mini-B cable between the BitHead and the computer
or USB hub. The computer should automatically recognize the
BitHead and configure it as the default sound device. You may
have to close and reopen currently running media applications
in order for them to recognize the audio device change. Apple
users may have to go to the computer control panel and select
the BitHead as the new sound audio device. In order to get the
highest sound quality, you should raise the computers software volume control to full volume and adjust the volume control thumbwheel on the BitHead for the desired listening level
in your headphones. The BitHead can also act as a very good,
but simple sound card by connecting its headphone jack to your
desktop speaker system’s line-in.
Lastly, (it seems kind of obvious) plug your headphones into
either of the two headphone jacks on the BitHead. If your headphones are terminated to a large 1/4” headphone plug, the 1/4”
plug may detach to reveal an 1/8” plug underneath. If not, you’ll
need a 1/4”-to-1/8” adapter plug. HeadRoom sells these adapters if you need to purchase one, visit headphone.com for more
information.
BitHead, mini cable,
player
BitHead, USB cable,
laptop
6
BitHead with Etymotics
Page 7

Frequently Asked Questions
Q. What’s the difference between the regular and Total models, in terms of parts and in
terms of sound quality?
A. The Total BitHead uses higher quality resistors and capacitors in the audio signal path.
See headphone.com for more details.
Q. Does the BitHead require software?
A. No the BitHead does not require any software.
Q. Does the BitHead support 24 bit audio?
A. While the computer application you are using may be able to read and play files with
various different sampling rates and word widths successfully on the BitHead, the BitHead
itself uses a good 16-bit DA converter.
Q. Can I upgrade my BitHead to a Total BitHead, or change my BitHead into a AirHead?
A. No. If you purchase an BitHead and would like to exchange it for a Total BitHead, AirHead,
or Total AirHead within the first 30 days of your purchase, you can exchange it for a full credit
towards the other unit.
Q. Why is the volume control scratchy when I turn it?
A. Because we had to make an engineering compromise in order to get the best sound qual-
ity. We could suppress the noise, but only by putting capacitors in the signal path around
the volume control to block the DC offsets. The problem is, capacitors in the signal path
would degrade the audio somewhat. We figure it’s better to have a little pot noise when you
adjust the volume, and better audio purity while you listen.
Q. Can I use the line-in and USB at the same time?
A. No. While the BitHead may be powered from the USB connector, connecting an input to
the line-in disconnects the audio from the DA converter of the USB section.
Q. Will I damage my amp or headphones if I plug them in with the volume up?
A. Yes, possibly! The BitHead is a miniature power amp, and is quite capable of blowing its
miniature self up if it has to drive the short circuit of not-fully-inserted headphones. Please
be careful to have the unit off, or the volume fully down, and see that the plug is fully inserted when connecting headphones to the amp.
Q. Does it matter what kind of soundcard I have?
A. No. Successfully connecting the BitHead completely bypasses your computer’s other
sound devices.
Q. Can the unit drain the batteries even when it’s turned off?
A. It will not drain your batteries, but if you are storing the unit for a period of time, it is a
good idea to remove the batteries to prevent accidental leakage.
Q. How long do the batteries last on my BitHead?
A. The BitHead and Total BitHead can be powered for 40+ hours on 4 AAA batteries.
7
Page 8
What does the HeadRoom Crossfeed Do?
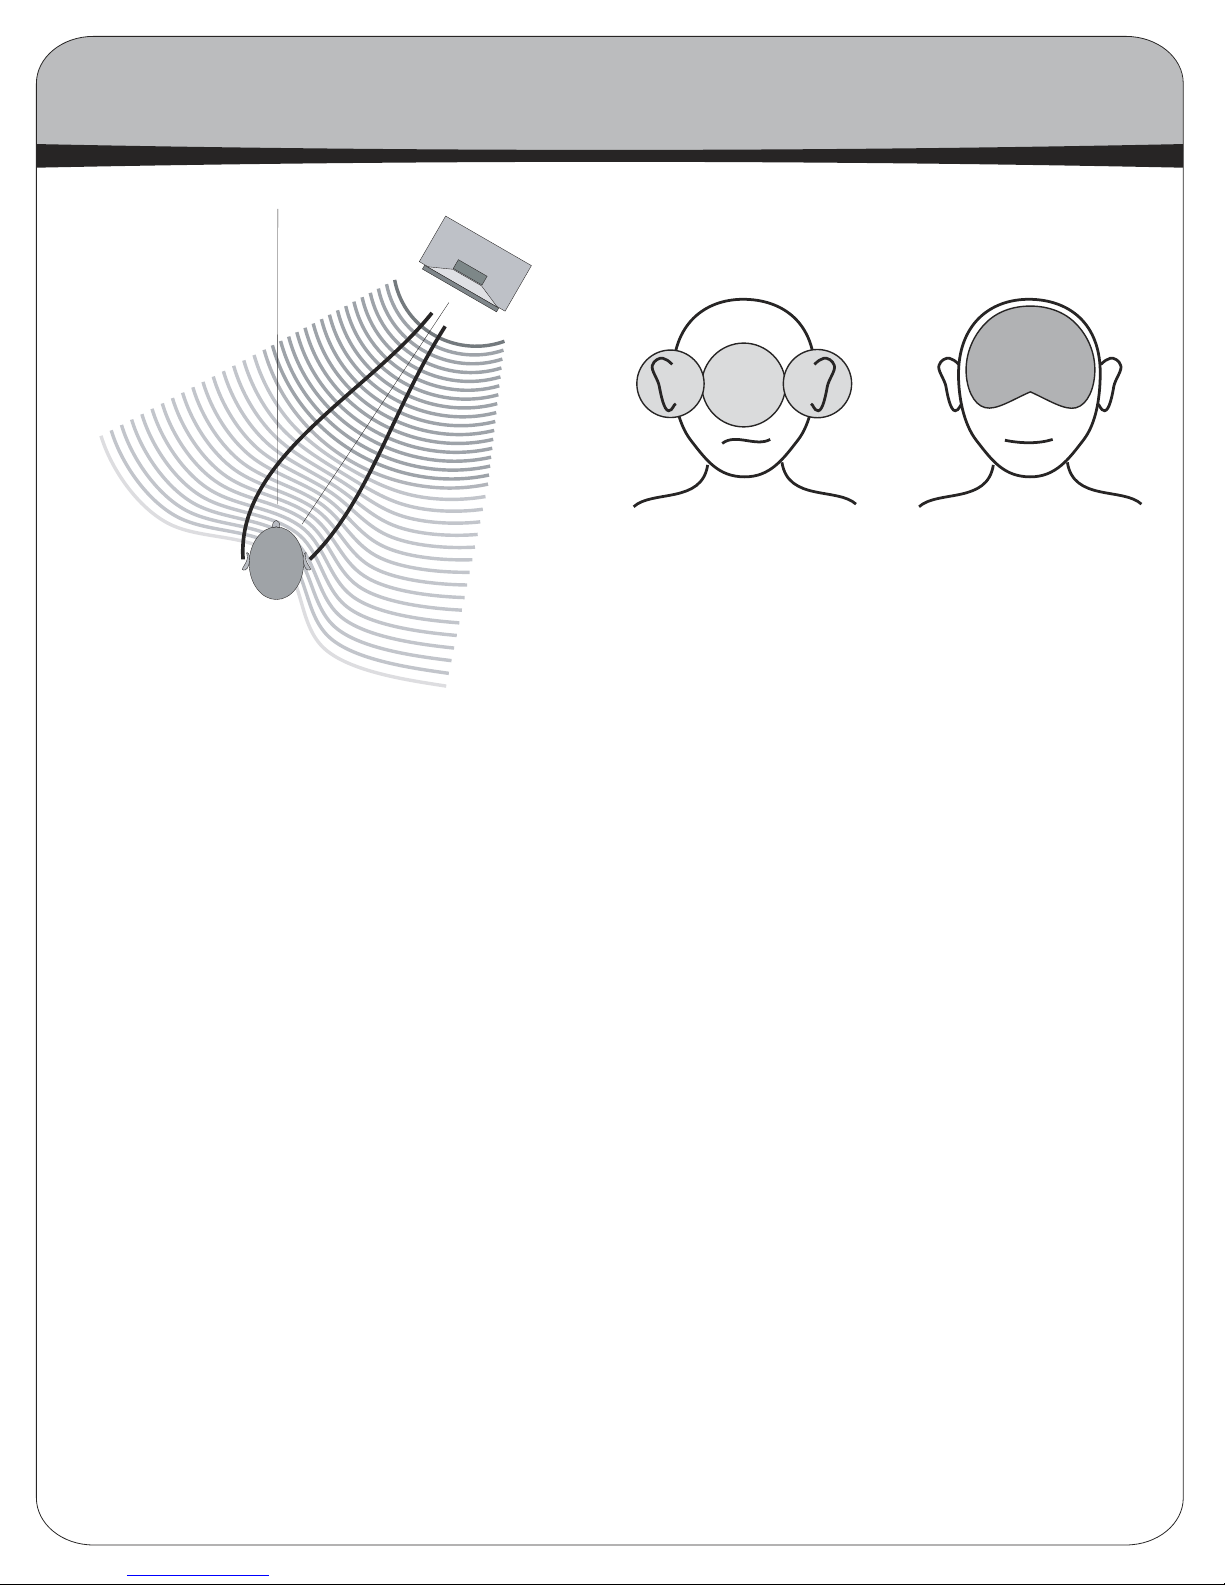
30 degrees
Plain Headphones With HeadRoom
off axis
The crossfeed switch in HeadRoom amplifiers allow you to cross-feed a little of the
left and right channels across to eachother
through a short time delay.
Far ear
hears
slight delay
Near ear
hears
sound first
Imagine you are listening to a pair of speakers and you turn off the left speaker, both ears
continue to hear the sound from the right speaker. But because the left ear is slight farther
away than the right, it hears the sound slightly after the right ear. This time difference is
called the “inter-aural time difference” and it is the main thing your brain listens to for leftto-right sound imaging.
But in headphones if you turn off the left channel, only the right ear hears the sound. In
headphones, if there is any sound that is only in the left channel, or only in the right channel, then only that ear hears the sound. This is not natural, and you brain becomes fatigued
trying to figure out where sound is coming from. This problem with headphones tends to
create an audio image that is three blobs, left, right, and center.
HeadRoom amplifiers cure this problem by allowing you to cross-feed a little of the left and
right channels through a short time delay using the crossfeed switch. The usefulness of the
circuit varies depending on what type of recording you are listening to: old studio recordings
(beatles and old jazz for example) that have instruments hard panned left or right, benefit
greatly from the processor; mono and binaural recordings need no processor at all; live and
classical recordings miked from a distance benefit somewhat less, and can often be listened
to without the processor quite comfortably.
8
8
Page 9
What does the Clipping Indicator Do?
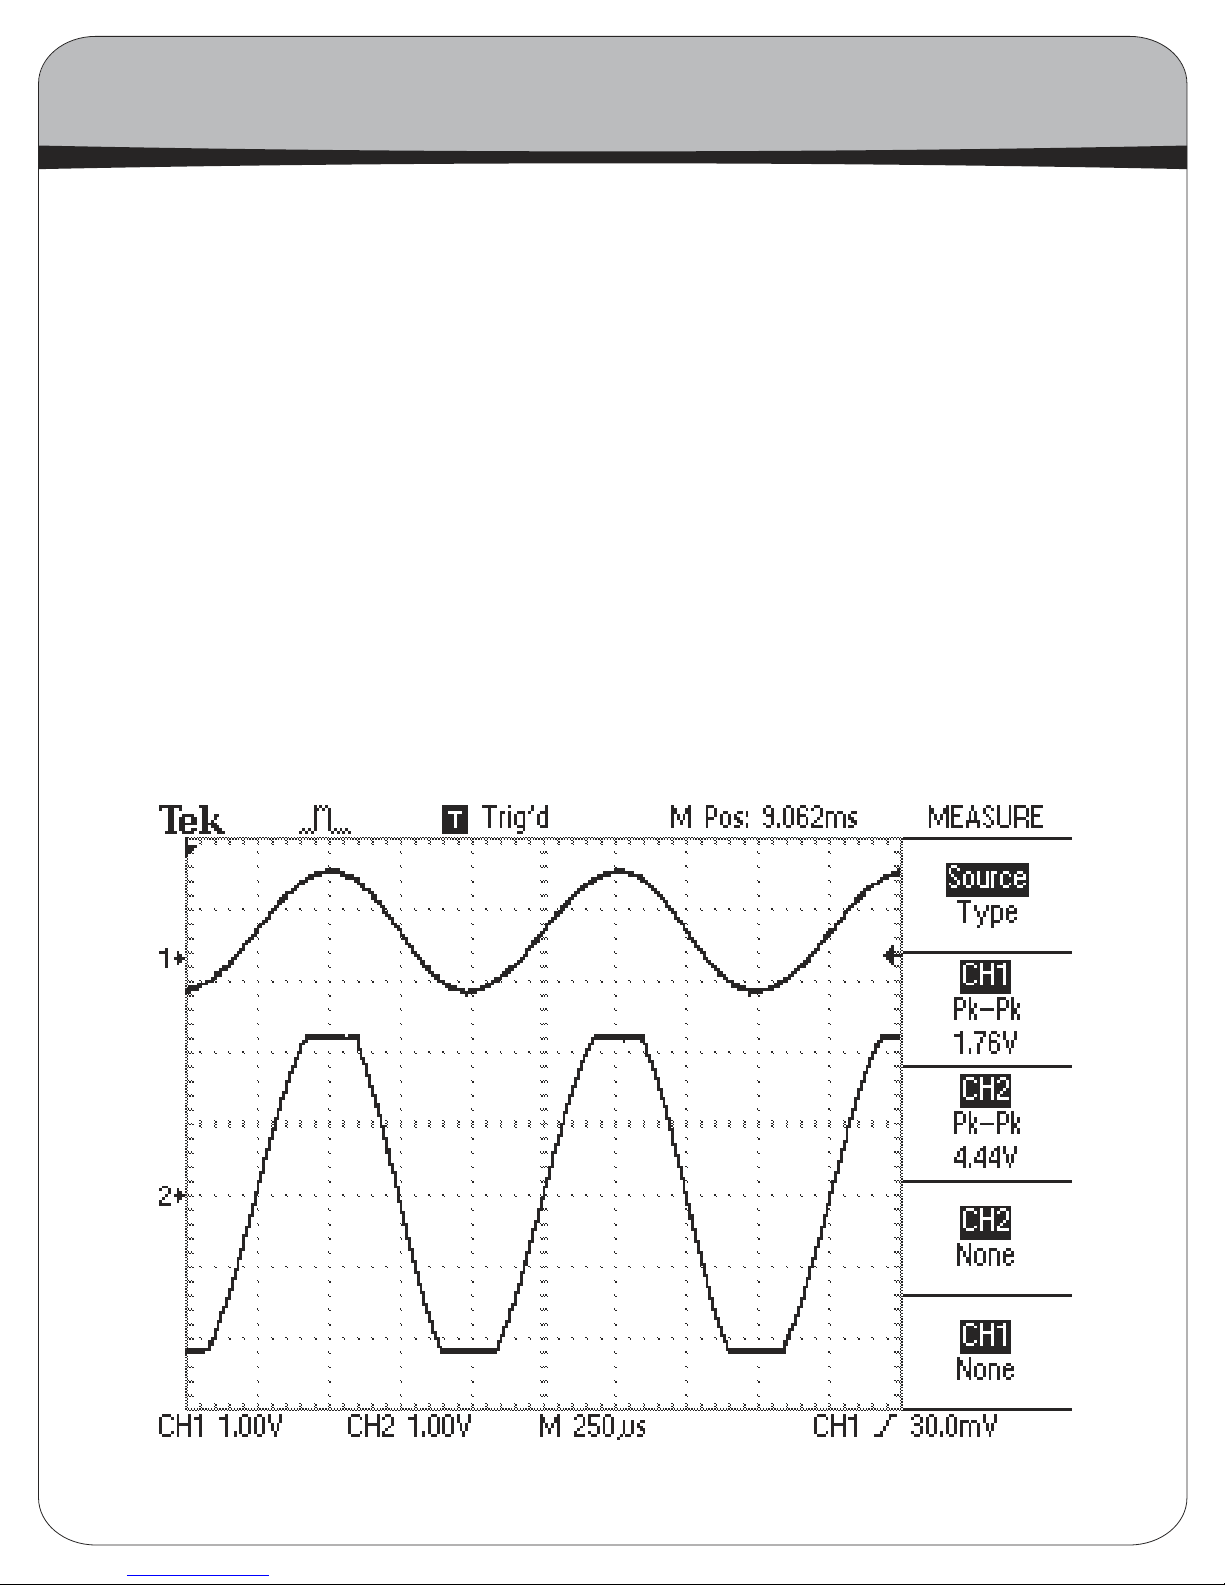
Next is the clipping indicator, a frosted red LED that lights up every time the amp clips.
“Clipping” is what happens when the signal tries to get bigger than the power supply voltage, which it can’t, and the peaks in the signal get “clipped” off. The result is a miserable
crackling sound.
But in the case of the BitHead, the clipping indicator not only tells you when you’ve got a hot
signal, it also tells you when your batteries are low. Because we’re using some of those new
multi-voltage “rail-to-rail” interated circuit chips, the BitHead will run on a wide range of voltages. And because “normal listening level” will vary widely due to the varying impedances
of headphones on the market, we can’t really estimate how long the BitHead “should” run
on a set of batteries. (The battery voltage may lower to clipping after 20 hours of use with
a difficult-to-drive pair of AKGs, but you might get 60 or more hours of use at a comfortable
listening level when driving a pair of efficient Grados.) We realized that a clipping indicator
on the ever-diminishing voltage of a set of batteries would be the best low battery indicator of
all. For a given volume level at your headphones, the battery voltage will eventually get lower
than the signal, and the clipping indicator will start to blink with the louder bits of the music.
If the clipping indicator starts blinking more and more at your normal listening volume, it’s a
sign that your batteries are on their way out and need to be changed soon.
An example of the input signal, and the output signal clipping
9
Page 10

HeadRoom Product Guaranty & Warranty
HeadRoom 30 Day Guaranty
Unless specifically stated otherwise, all HeadRoom purchases come with a 30-day satisfaction guaranty in order to give you the opportunity to evaluate your purchases. We’re happy
to provide you with the opportunity to refund or exchange your product, but to keep costs
down we do have a few conditions.
Products must be returned to us within 30 days of the date you receive the product. So
make sure you try your purchase out right away! Products must be in “as-new” condition.
This means that they’re in pristine cosmetic condition, functioning perfectly, and include
ALL materials (plastic bags, warranty cards, tie wraps, etc). In other words, please send
products back exactly as you received them. If a product is returned within the 30-day return
period, but is not in “as-new” condition, we will charge you a 15% restocking fee plus any
labor and materials required to return the product to “as-new” condition. Sorry, but after
your 30 day trial, products are no longer exchangeable or refundable
If you’re having trouble with a headphone amp or system, please contact us first to troubleshoot the problem. You can email Sales, ([email protected]) or call 800.828.8184. If
we can fix it while you’ve still got the product, everyone’s happy!
HeadRoom Manufactured Products under warranty:
The HeadRoom BitHead and Total BitHead amps are warrantied for two years. If anytime
within the first two years of your purchase you have a problem with your BitHead or Total
BitHead, you can return it for repairs under the terms of our 30 Day Guaranty.
HeadRoom is the only authorized service center for HeadRoom products, either in or out of
warranty. If a unit is under warranty, there is no cost for the repair labor, parts, or shipping
from HeadRoom back to you (i.e., You’re responsible for paying the shipping charges to get
the product to us).
Out of warranty repairs & Upgrades
Non warranty repairs are assessed at an hourly rate of $50 per hour plus parts, and are only
conducted on HeadRoom products. If the cost of the repair is over $100, we will call you with
an estimate. If you have an older HeadRoom amp that is out of production, we may not be
able to repair the amp, however please contact us and we will let you know if we are able to.
Upgrades are typically set on a flat fee calculated by labor and parts costs. When we receive
the equipment, we will initiate repairs and upgrades within 1-2 weeks and return the unit to
you. The customer pays for shipping to HeadRoom and we pay for return shipping.
10
Page 11

Product Exchanges & Shipping
Equipment Exchanges
If you would like to exchange your purchase for another item, you have two options. You can
simply purchase the item you want, and send the item you don’t want back for refund within
30 days of the original purchase (don’t forget to fill out the back of this card and include it
with your return). We will refund your credit card after we receive the item. Or, you can send
your product back as an exchange, and indicate the product you would like on the return
card. We will adjust your credit card accordingly and ship you the new item. Replacement
products are shipped to you as soon as possible, typically within 3-5 days provided the
replacement item is in stock.
Defective Equipment Exchanges
In the uncommon event of receiving a defective product, call us right away and we will ship
out a replacement product to you at no cost as soon as possible, typically within 3-5 days
provided the replacement item is in stock. You will receive the replacement item along with
a return shipping label and a card to include with the defective item to return to HeadRoom.
Important: Fill in your name and original invoice number of your order on the card and
return the item to HeadRoom within 2 weeks. If we have not received the product after 2
weeks (allowing shipping time) we will charge your credit card the amount of the defective
item. Please understand that we enforce this policy as an incentive for customers to get
defective equipment back to us as soon as possible.
Shipping Products back to HeadRoom
Please ship the product back in the original shipping box (or another that is comparable);
please don’t send headphones back in JUST the headphone box, as it’s a sure bet that they
will no longer be in “as-new” condition when we receive them! We HIGHLY recommend that
you ship returns using an insured and “signature required” delivery method—we can’t be
responsible for lost or damaged packages. Finally, don’t forget to include this completed
card and WRITE YOUR NAME on the outside of the box!
Return Products to:
HeadRoom
2020 Gilkerson Drive
Bozeman, MT
59715
Contact Us:
www.headphone.com
Toll Free: 800-828-8184
Phone: 406-587-9466
Fax: 406-587-9484
11
Page 12

A Word About Your Hearing
People have a natural tendency to listen to music at much louder levels with headphones
than they would with speakers. To avoid permanent hearing damage, it’s important to be
careful not to listen at extremely loud levels (or to listen for too long at moderately loud
levels). Because HeadRoom amps need to be able to drive even the most inefficient dynamic
headphones to satisfactory listening levels, they are also able to drive headphones of average or higher efficiencies to extremely high levels. As a result, even though the volume
control on your HeadRoom amp may appear to be set to a low level, you may not be listening
at a safe level. Generally speaking, when listening to headphones you should only turn up
the volume to the point at which the sound isn’t too quiet.
As a general rule, sound pressure levels under 80 decibels will not damage hearing, even
if experienced continually. On the other hand, anything over 100 decibels may cause permanent damage very quickly. Sustained exposure to sound pressure levels anywhere in
between can also be damaging —the louder the sound, the shorter the time required to
cause permanent damage.
Just to drive this message home, here’s a bit of information about hearing damage. The
most common type of damage caused by prolonged or excessively loud sound is called tinnitus. It manifests itself as a sustained buzzing and/or ringing in the ears, and can become
a permanent condition.
If you find that your ears are ringing or that there is a sensation of pressure or fatigue, your
body is trying to tell you that your ears need a break. Give them a rest for a few days (or until
they feel fresh). If you ignore these symptoms, you’re risking permanent hearing damage.
In addition, don’t fool yourself into thinking that you either have full-blown tinnitus or you
don’t have it at all—there are different degrees of hearing damage. For example, you might
have a mild case where you only notice ringing in your ears in the quiet of your bedroom at
night. However, once you have a slight case of tinnitus, your ears are much more susceptible to further damage. So if you do experience mild symptoms, it’s important to be much
more careful about your exposure to loud sounds.
Sorry to sound so sobering, but a lifetime of musical enjoyment requires ears in tiptop
shape. Now that we’ve told you to be careful, don’t blame us if you blow it. If you have any
more questions about hearing damage, call a doctor.
Contacting HeadRoom
Toll Free: 8 0 0 - 8 2 8 - 8 1 8 4
Phone: 4 0 6 - 5 8 7 - 9 4 6 6
Fax: 4 0 6 - 5 8 7 - 9 4 8 4
2020 Gilkerson Drive
Bozeman, MT 59715
w w w . h e a d p h o n e . c o m
12
 Loading...