

Page 1
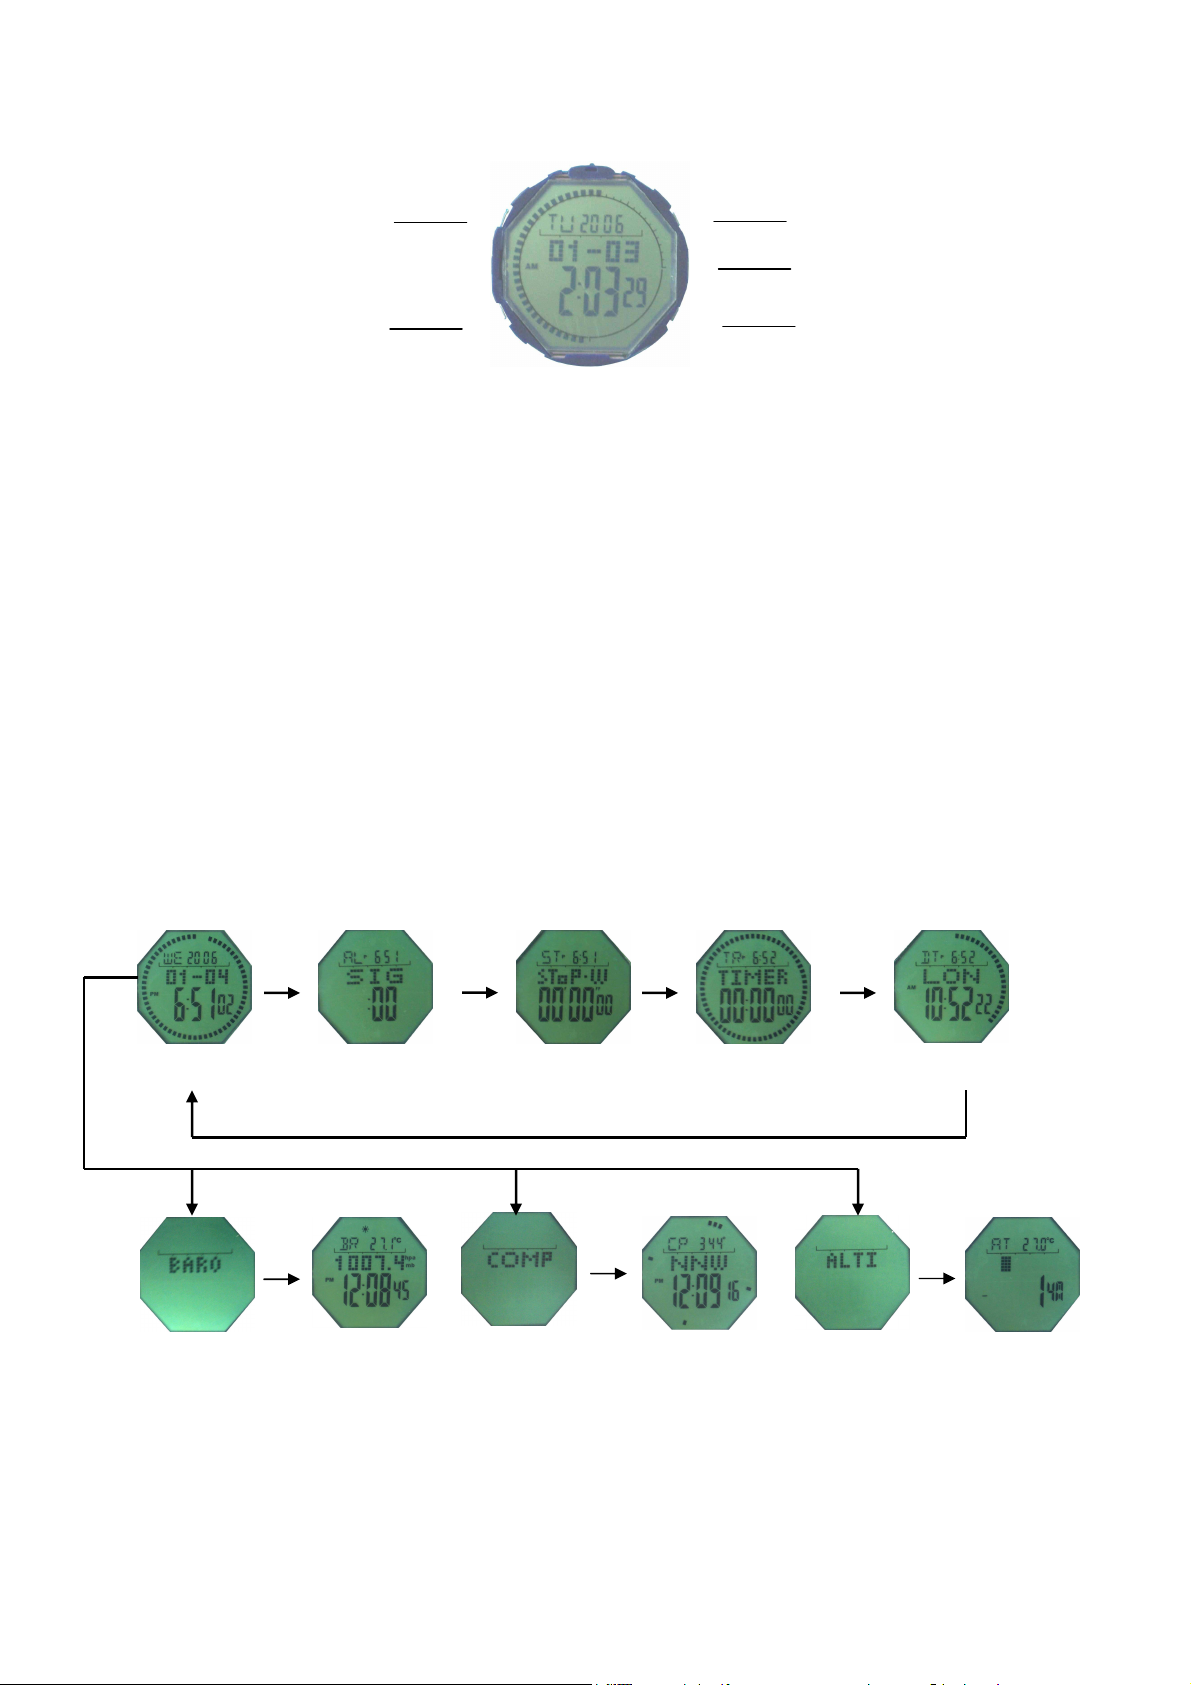
C key
E key
SET /LIGHT(
A key
B key
D key
(
((
))))
((((
))))
UP/BARO
((((
MODE(
A. Features
Hour, minute, second, year, month, date and week day display, year range is 2000 ~ 2099.
5 groups of alarm functions: one with snooze feature, four ring on specified date.
Chime on every hour
Stopwatch, 99 groups of stopwatch record checking, maximum time-keeping is 23 hours, 59 minutes, 59
seconds.
Counting down, maximum 99: 59: 59
Compass, height, air pressure, temperature, weather forecast, as well as the correction of compass, air
pressure, height and temperature.
12/24 hours format
Universal time, time of 28 cities in the world and daylight saving time (DST) may be displayed.
Contrast of LCD may be set
3 seconds EL backlight
Low voltage prompt
(
((
))))
((((
))))
COMP
))))
DOWN/ALTI
B . Product function modes
B key
Time mode Stopwatch mode Alarm mode
E key D key C key
2 sec
Measurement mode for weather
forecast, temperature, and air pressure
1. Press A key once, EL illuminates for 3 seconds, except for setting mode.
2. Time mode
P
ress B key to enter alarm clock mode.
Press A key once, EL illuminates for 3 seconds; press and hold A key for 2 seconds to enter time setting
mode.
B key B key
Counting down timer
2 sec
Measurement mode
for compass
B key
Universal time mode
B key
2 sec
Measurement mode for
temperature and height
Page 2
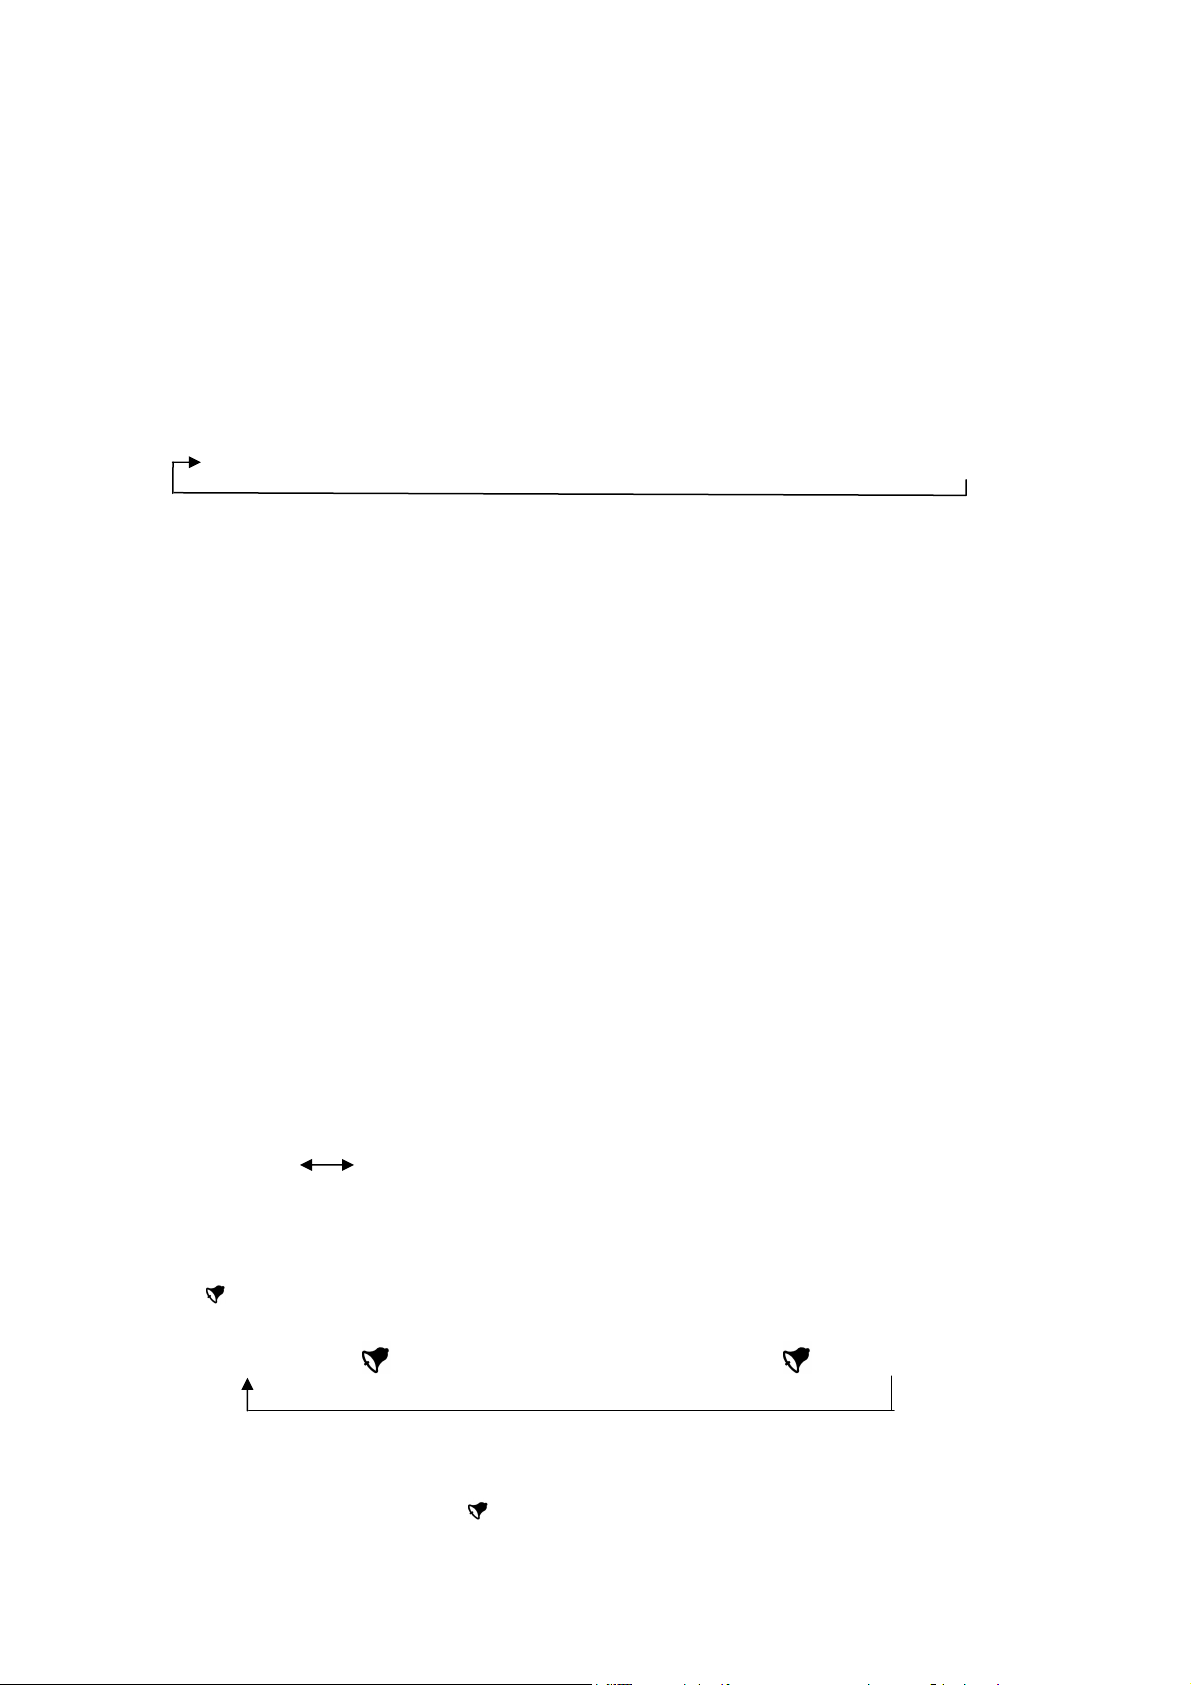
Press E key to enter measurement mode for air pressure, temperature and weather forecast.
Press D key to enter compass measurement mode.
Press C key to enter measurement mode for temperature and height.
Time setting mode
Press and hold A key for 2 seconds to enter time zone setting mode along with a tick sound and blink, it
will exit the setting screen if without any keystroke operation within 1 minute, the current setting value
will be stored.
a).Press B key to step sequentially through the following items (blink) :
3. Alarm tone setting mode
In SIG(Chime on every hour) mode, press E key to turn on or off this function. ‘CHIME’ will display
In the alarm tone mode, press C key to step sequentially through the chime and five alarms: SIG(Chime
In the first alarm ‘AL’ mode, press and hold A key for 2 seconds, the “hour” blink, press B key to
Press E key to increase 1 to the desired item, press and hold E key for 2 seconds to advance quickly.
Press C key to decrease 1 to the desired item, press and hold C key for 2 seconds to decrease quickly.
When the time goes to the alarm time you set, it will ring bell for 20 seconds along with the symbol
Press E key to turn on or turn off this alarm, the first alarm clock is switched in the following order:
Press A key to exit the setting mode.
With the snooze function on, after the alarm ring stop, it will ring 20 seconds every 5 minutes for five
Time zone→DST→second→hour→minute→year→month→date→12/24H→contrast
b).Press E key for 1 increment in the desired setting item, press and hold E key for 2 seconds to advance
quickly.
c).Press C key for 1 descending in the desired setting item, press and hold C key for 2 seconds to
decrease quickly.
d).In second setting, in the range of 30~59 second, press E or C key to return to zero, and add 1 in
minute; in the range of 0~29 second, press E or C key to clear.
e).Daylight saving time (DST) setting, press E or C key to turn on or turn off (OFF. ON). “DST” will
display when DST is activated. No “DST” will display when DST is turned off.
f). When set 12/24-hour format, press E or C key to switch between 12/24 format.
g). When set contrast, press E to increase 1 in the desired item. Press and hold E key for 2 seconds to
increase quickly. Press C key to decrease 1 in the desired item. Press and hold C key for 2 seconds to
decrease quickly. The contrast range is 1~16.
h). When set time zone, press E to adjust time zone up. Press C key to adjust time zone down.
I). Press A key to exit the setting mode.
when turn on, no ‘CHIME’ display when turn off. Press C key to change these five alarms sequentially.
on every hour)→AL→A2→A3→A4→A5
change “ hour minute’.
“ ” blinking.
times, along with the symbol “ ”and “SNZ” blinking. The snooze function apply for this alarm
clock only, not for A2~A5.
Alarm ring“ ”→ring plus snooze“SNZ”→all off“ ”“SNZ”
Page 3

When in the snooze alarm ringing, press C key once to stop. Press C key for a second time to cancel the
snooze ringing. After the bell ring stop, only “SNZ”blink, now press C key once can turn off the snooze
alarm or enter into time or alarm clock setting mode. The snooze alarm can also be turned off, without
“SNZ” blinking.
Press C key to cycle through the 2nd~5th alarm mode (A2~A5). There are 4 combinations for each
alarm mode, as below:
Every day ringing:
a).
Set the Hour and Minute only, the Month and Date set to
Timing ringing:
Ring within the set month:
Ring at the same time each month:
when the time goes to the set time.
a).
Set the Month, Date, Hour and Minute, the bell will ring when the time goes to the specified date and
time.
a).
Set the Month, Hour and Minute only, input
when the time goes to the specified time within the set month.
a). Set the Date, Hour and Minute only, input "----" to the Month location, the bell will ring when the
time goes to the same specified date and time for each month.
"----", so that the bell will ring every day
"----" to the Date location, the bell will ring every day
A2~A5 Alarm setting:
In alarm clock (A2~A5) mode, press E key to turn on or turn off the alarm symbol“ ”, press and
hold A key for 2 seconds to enter alarm clock setting mode. Press B key to change between the
following:
Month→Date→Hour→Minute
Press E key to increase 1 in the desired item, press and hold E key for 2 seconds to advance quickly.
Press C key to decrease 1 in the desired item, press and hold C key for 2 seconds to decrease quickly.
Press A key to exit the setting mode.
Note: The setting methods for the 2nd to 5th alarm clock (A2~A5) are similar.
4.
Stopwatch mode
The maximum timing range of the stopwatch is 23 hours 59 minutes and 59 seconds. When reach the
maximum timing and stop, press C key to reset.
In stopwatch mode, press E key to start or stop the second going. Press C key to reset after the
stopwatch stop.
During stopwatch running, press C key to choose 01~99 groups of LAP.
The record inquiry range is 01~99 groups of LAP.
In LAP mode, press and hold A key for 2 seconds to enter LAP inquiry mode. It will be invalid if
without LAP chosen.
Press E key to check up LAP, press and hold E for 2 seconds to check up quickly.
Press C key to check down LAP, press and hold C for 2 seconds to check down quickly.
Press and hold A key for 2 seconds to exit stopwatch LAP inquiry mode, or pressing B key has the same
function.
Page 4
5. Counting down function
The maximum counting down range is: 99 hours, 59 minutes and 59 seconds.
When count down to 0:00 00, the bell will ring for 30 seconds.
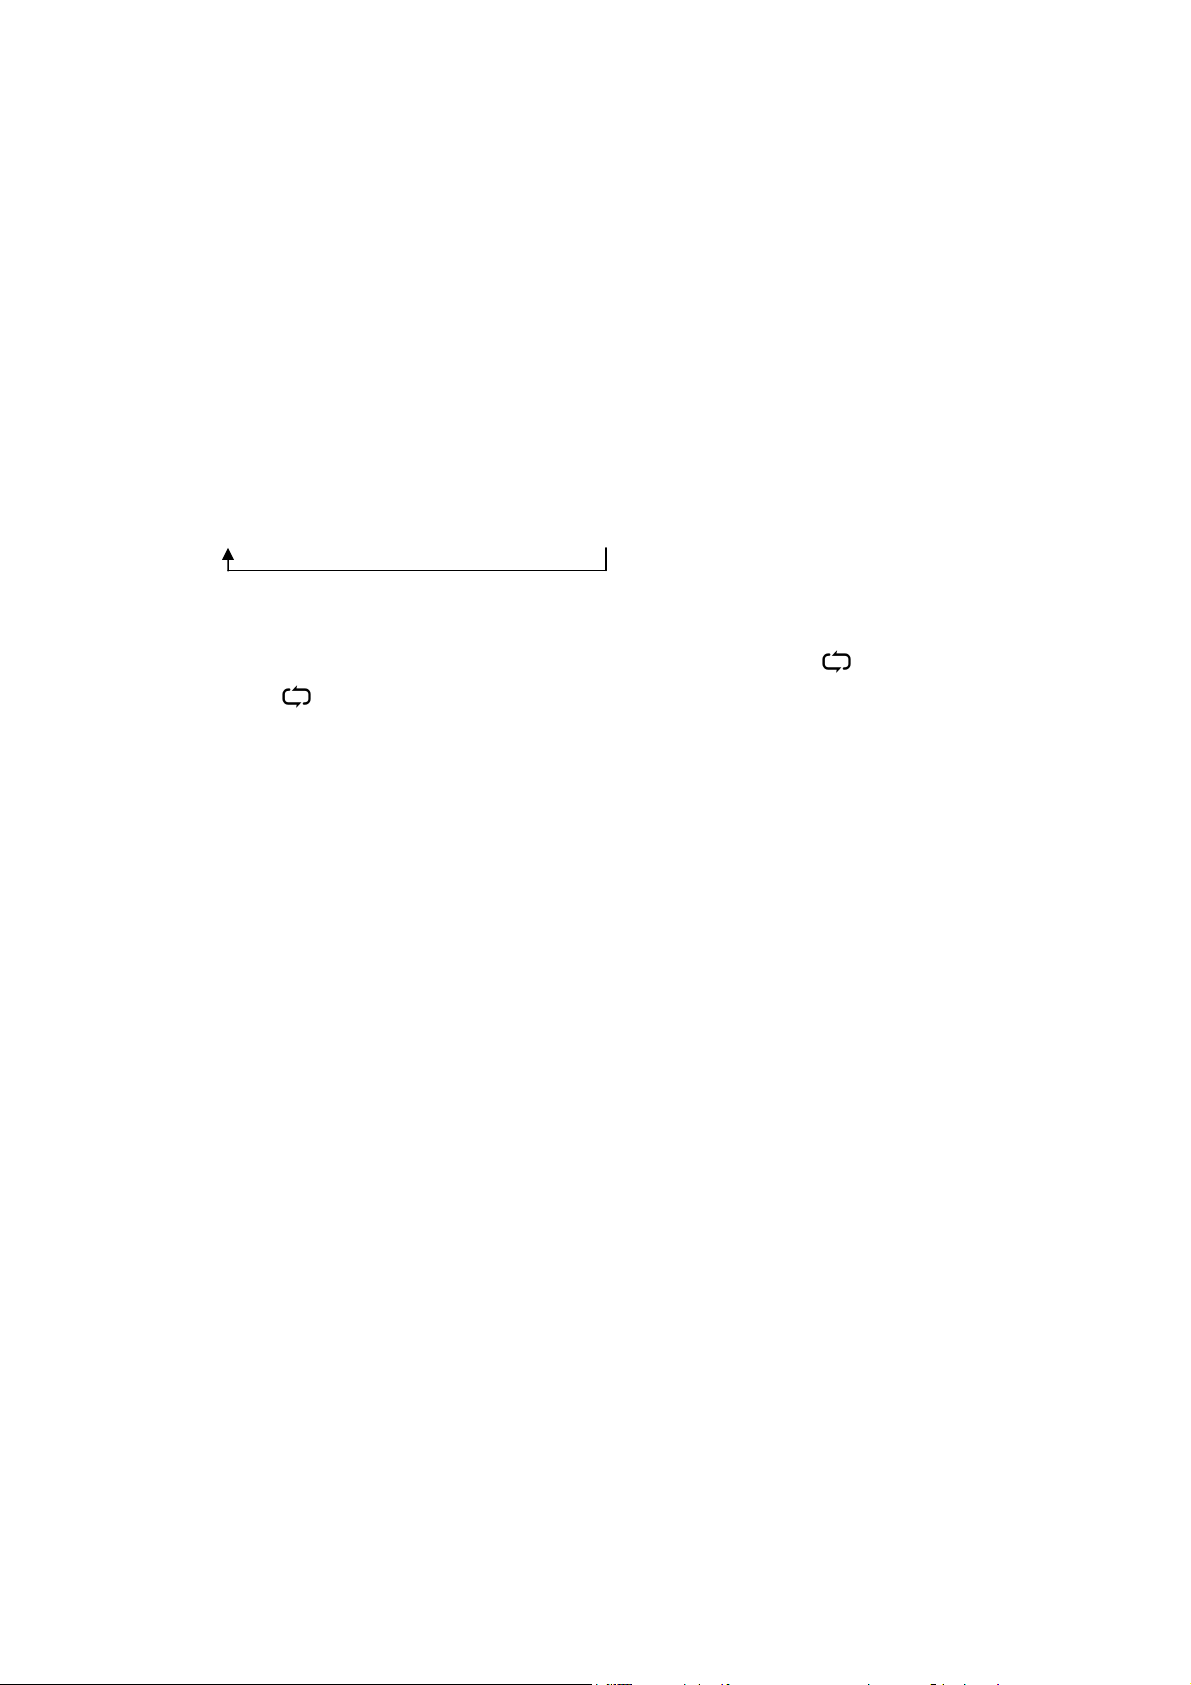
This product has circle counting down function. If the circle counting down switch is turned on, when
the counting down is finished, it will return to the original value to count down again. If the circle
counting down switch is turned off, it will change to counting up mode after the counting down is
finished.
Set the counting down timer
a) In the counting down mode, press and hold A key for 2 seconds to enter counting down setting mode.
b) Press B key to select the following items for setting sequentially:
Hour→→→→Minute→→→→Second→→→→Circle setting
c) Press E key to increase 1 in the desired item. Press and hold E key for 2 seconds to advance quickly.
d) Press C key to decrease 1 in the desired item. Press and hold C key for 2 seconds to decrease quickly.
e) Press E or C key to turn on or off the circle counting down function. ‘ ’will display when turned
on, no‘ ’will display when turned off.
f)Press A key to exit.
The use of counting down function
a). Press E key to start counting down.
b).During counting down process, press E key to pause. Press E key again to resume the counting down.
c).To stop counting down completely, press E key to pause, then press C key to return to the initial set
value.
The use of circle counting down
a).Press E key to start counting down.
b).During the counting down process, press E key to pause it. Press E key again to resume the counting
down function.
c).To stop the counting down completely, press E key to pause it, press C key to return to the initial set
value.
d).When count down to zero, it will return to the initial set value automatically and continue with
counting down.
If the counting down timer is not stopped, the timer will count down continually even the it’s menu is
exit.
6. Universal time function
In universal time mode, press A key for 2 seconds to turn on or off Daylight Saving Time. When
“DST” is displayed, it indicates that the DST function is turned on. If no “DST” displayed, it indicates
that the DST function is turned off.
Press E key to check up the time zone and time. Press and hold E key for 2 seconds to check up quickly.
Press C key to check down the time zone and time. Press and hold C key for 2 seconds to check down
quickly.
7. Measurement of air pressure, temperature and weather forecast
Page 5
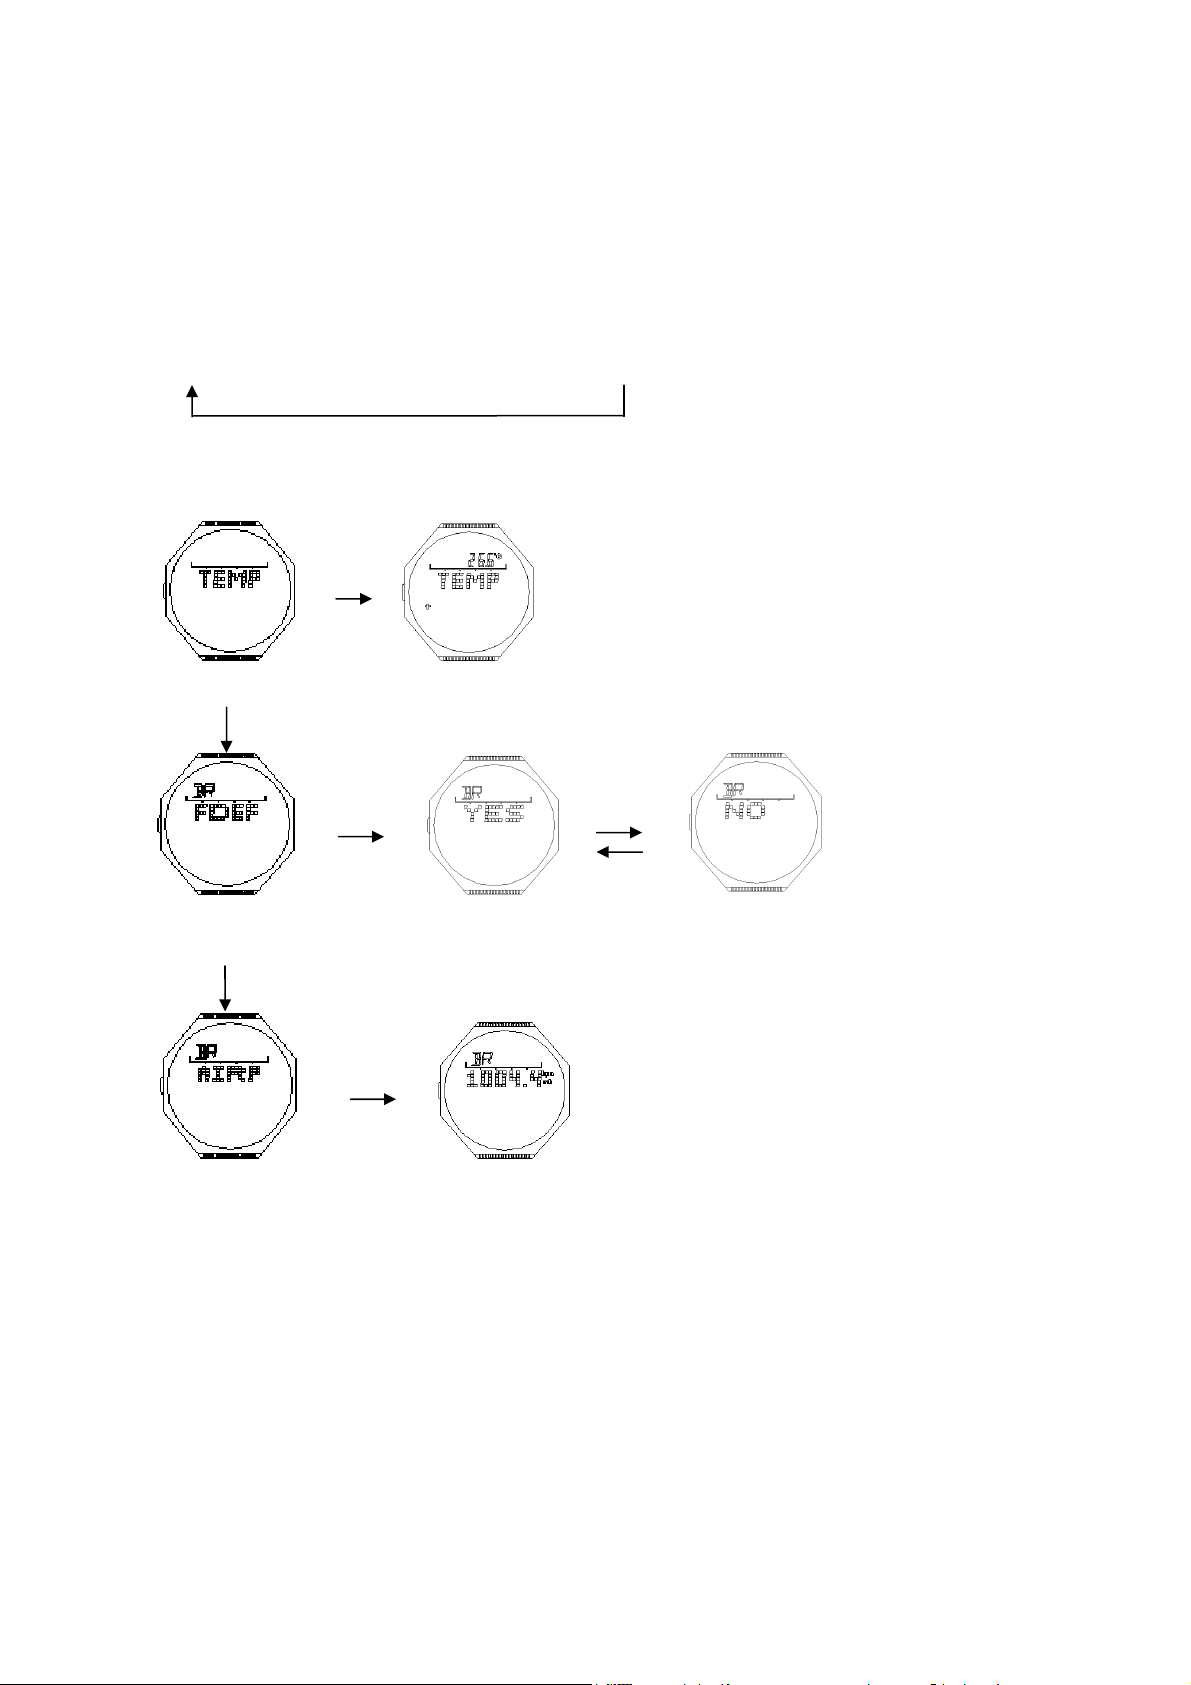
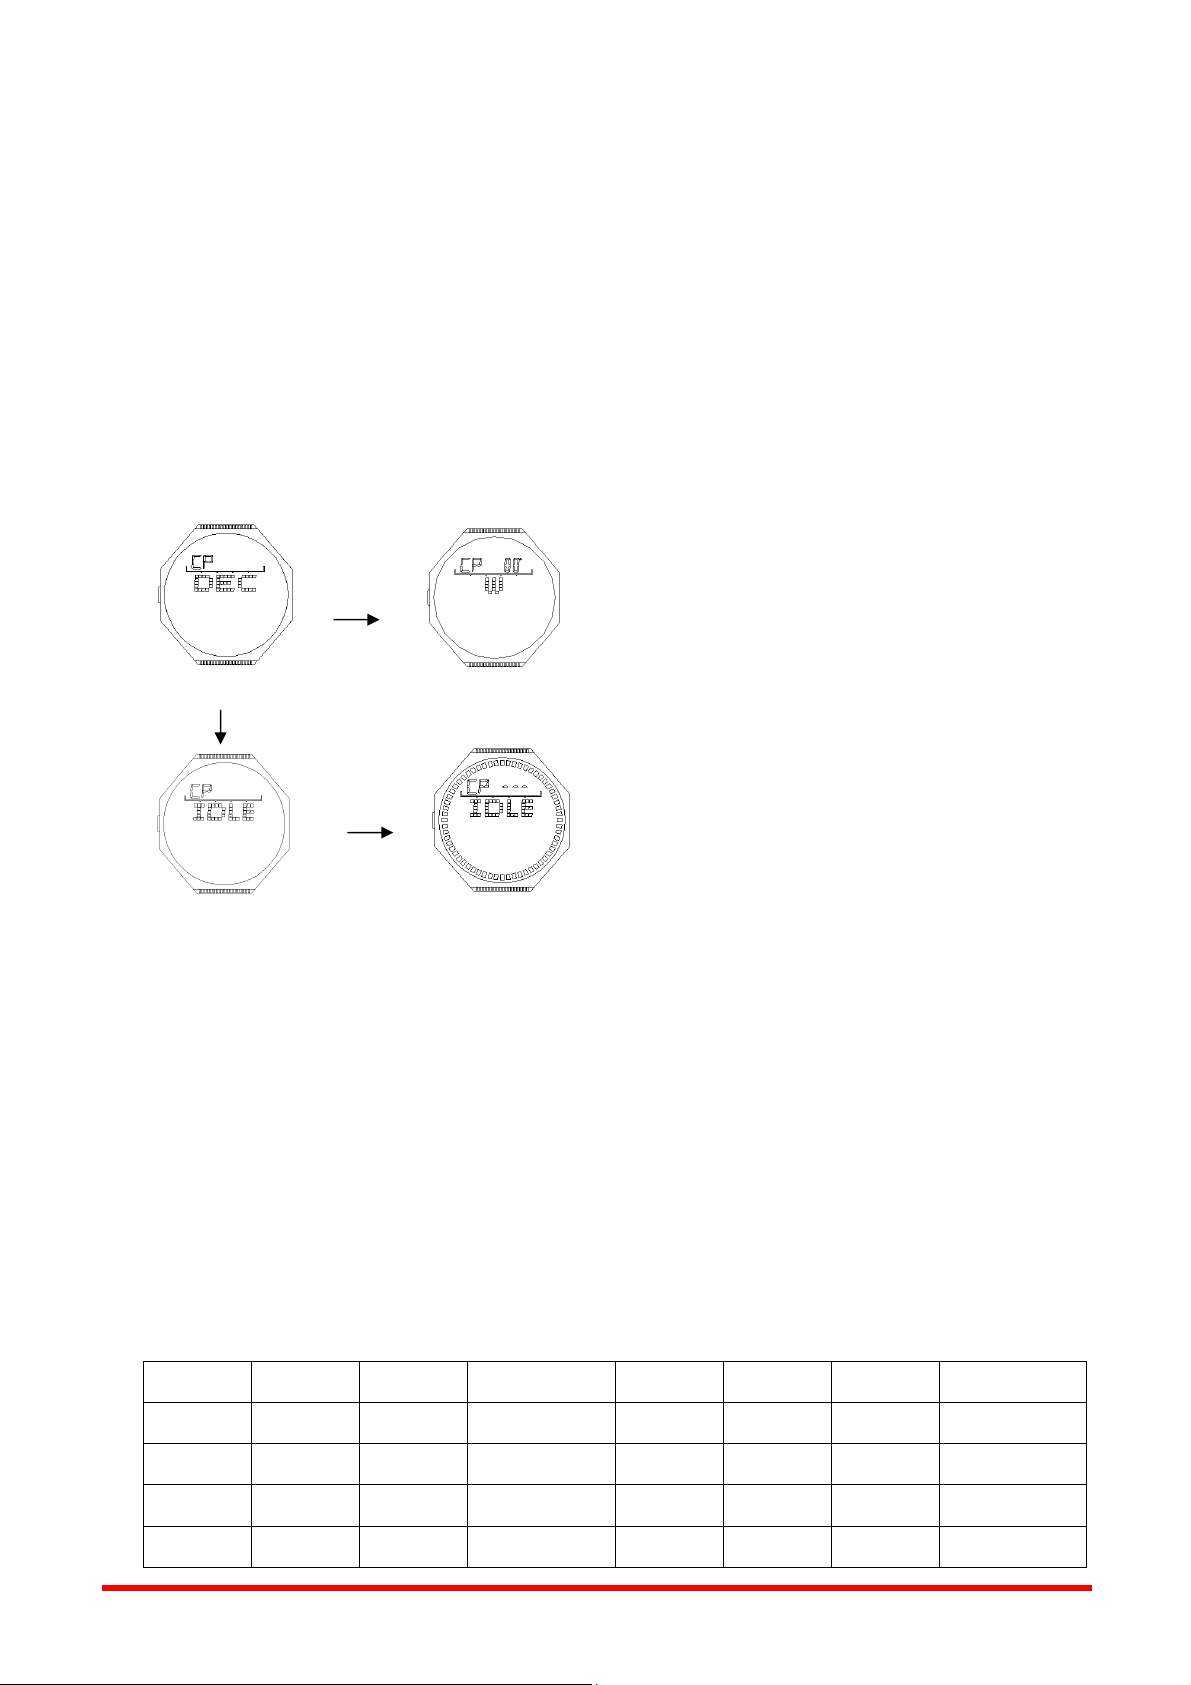
In normal time or measurement mode, press E key to enter the air pressure measurement “BARO”
directly. After displayed “BARO” for about 2 seconds, it will enter the measurement mode of air
℃℃℃℃, hpa/mb→℃
Temperature correction mode
Factory default air pressure mode during the factory default air pressure setting
Input the current air pressure value during current air pressure value inputting
pressure, temperature and weather forecast.
In the measurement mode of air pressure, temperature and weather forecast, press E key for 2 seconds to
switch between units of temperature and air pressure, as below:
→℃, Inhg→℉
→℃→℃
→℉, hpa/mb→℉
→℉→℉
→℉, Inhg
→℉→℉
In the measurement mode of air pressure, temperature and weather forecast, press A key for 2 seconds to
enter the correction mode of air pressure and temperature. Press B key to switch the correction items:
B key
During the setting process, press B key to change.
In temperature correction mode, press E or C key to switch between “+” and “-” temperature.
In temperature correction mode, press B key to select the desired set value with blinking. Press E key to
adjust the desired set item with 1 increment. Press and hold E key for 2 seconds to increase quickly.
In temperature correction mode, press B key to select the desired set value with blinking. Press C key to
adjust the desired set item with 1 descending. Press and hold C key for 2 seconds to decrease quickly.
Factory default air pressure setting:
In factory default air pressure setting mode, press E or C key to switch between “YES” and “NO” for
selecting or not selecting factory default air pressure value(default is 1010.00mb).
Input the current air pressure value mode:
B key
E/C key
during the temperature correction
E/C key E/C key
E/C key
Page 6
North
In the current air pressure inputting mode, press E or C key to enter correction mode, press B key to
switch. Press E key to adjust the desired item with 1 increment. Press and hold E key for 2 seconds to
increase quickly. Press C key to adjust the desired item with 1 descending. Press C key for 2 seconds to
Digital correction mode during digital correction mode
Manual correction mode during manual correction
2007-11-30 Model: BJ2947 Page: 6 /13 Edition: A
decrease quickly.
Press A key to confirm the corrected value and return to normal measurement mode.
8....Compass measurement mode
In normal time or measurement mode, press D key to enter compass measurement mode (COMP). With
COMP displayed, electronic needle will sweep two circles clockwise and then enter the compass
measurement mode. It will measure in the first 30 seconds and lock up in the last 30 seconds. It will
return to clock mode automatically if no keystroke is done.
In compass correction mode, press and hold A key for 2 seconds to enter correction selection mode.
Press B key to change the following:
E/C key
N
E
W
B key
E/C key
Meaning Direction
S
North
East
South
West
NNE North-north-east
ESE
SSW South-south-west SW
WNW West-north-west
Meaning
East-south-east
Direction Meaning Direction
NE
North-east
SE
South-east
South-west WSW West-south-west
NW
North-west NNW
ENE
SSE South-south-east
East-north-east
Meaning
-north-west
Digital correction mode
In digital correction mode, press E or C key to set direction “W” or “E”. After confirm the direction,
press B key to select azimuth angle value sequentially. Press E key to set the value with 1 increment.
Press C key to adjust the value with 1 descending.
The maximum correction angle range is ±45°(“W” “E”±45°).
Press A key to confirm the corrected value, and return to normal measurement mode.
Auto correction mode
In auto correction mode, press E or C key, then turn the watch slowly, both clockwise and
anti-clockwise are ok. This watch will exit the correction mode automatically and return to compass
measurement mode after simply turning two circles in the same direction. During compass correction,
after 60 direction points illuminate and go out one by one sequentially, it will confirm this correction
automatically.
The follow table indicated the meaning of each acronym for each direction.
Direction
Page 7
9....Temperature and height measurement mode
In temperature and height measurement mode, press C key for 2 seconds to change the units of
temperature and height sequentially, as below::
℃℃℃℃, M→℃
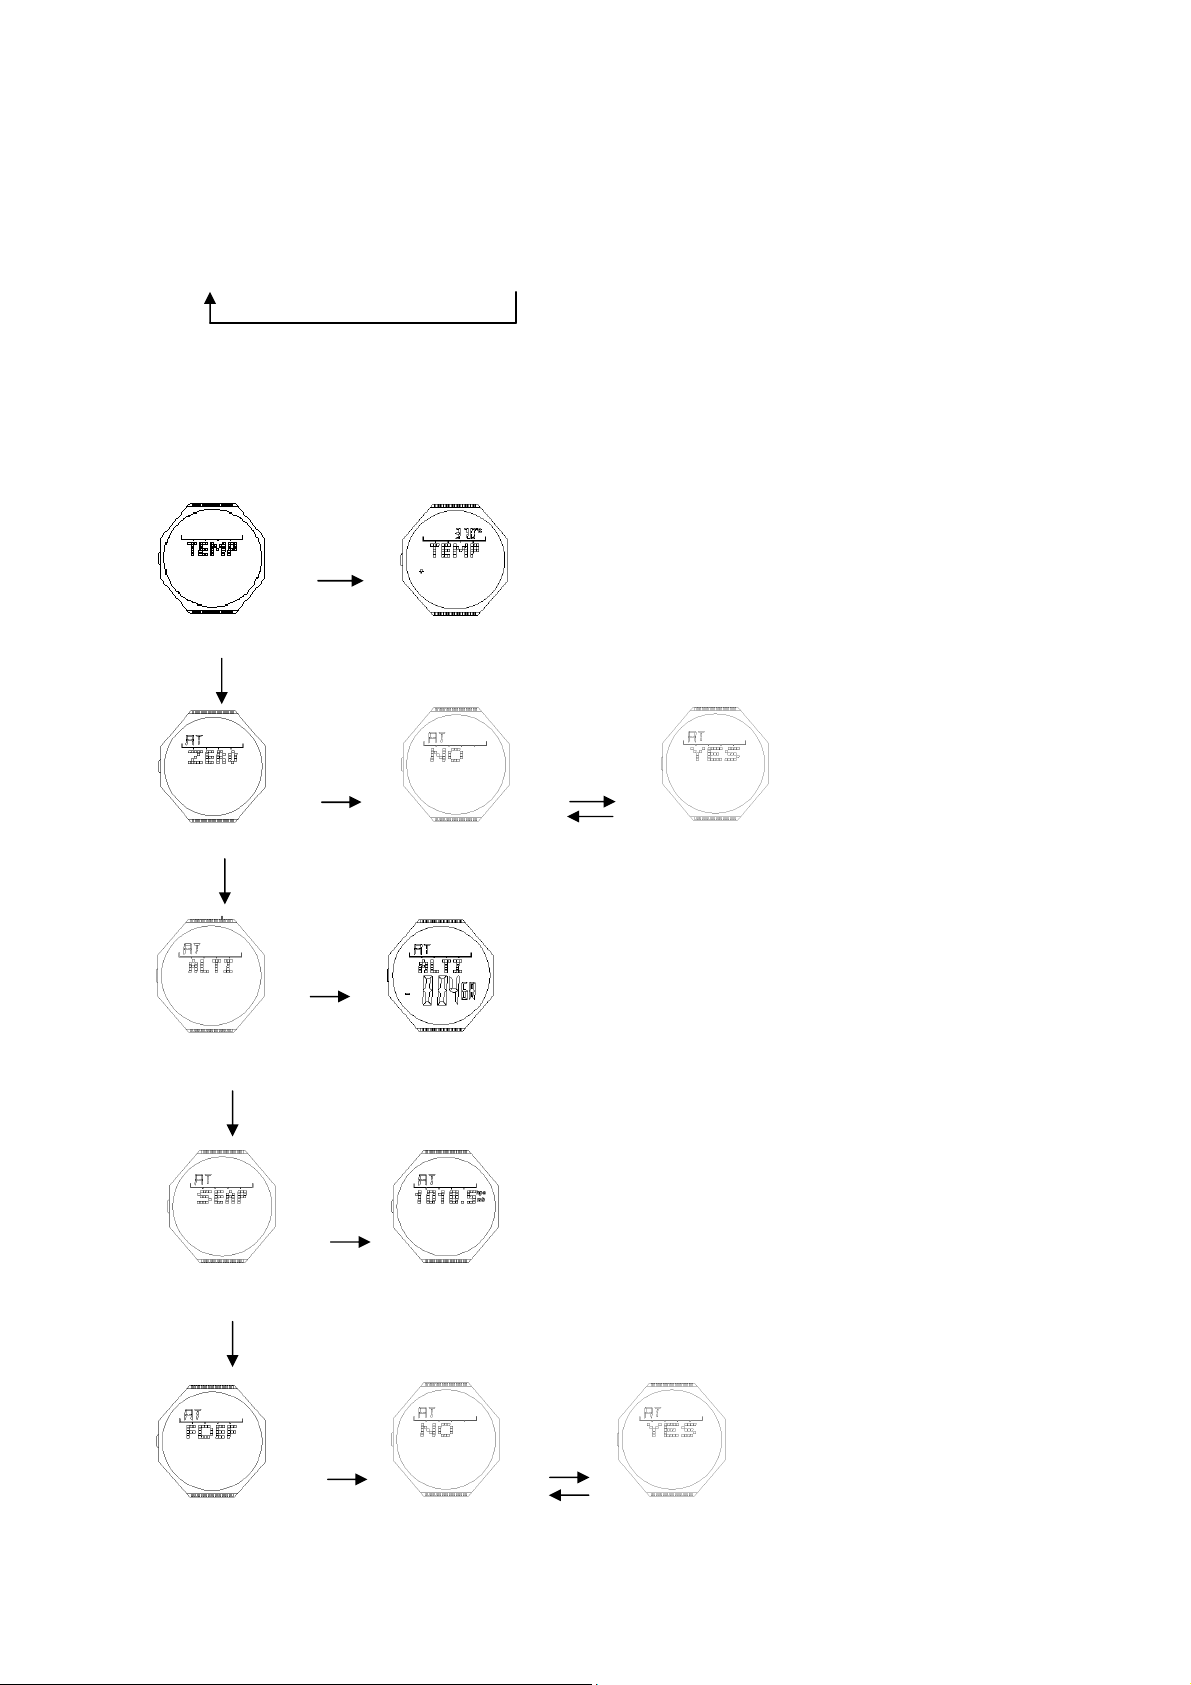
In time or measurement mode, press
Temperature correction during temperature correction
Input sea level air pressure during sea level air pressure inputting
Factory default height during factory default height setting
displayed for 2 seconds, it will enter temperature or height measurement mode.
In temperature or height measurement mode, it will not exit this mode until you exit it by hand.
In temperature or height measurement mode, press A key for 2 seconds to enter temperature or height
correction mode. Press B key to select setting:
Set relative height “0” mode during relative height setting
Input the location height during location height inputting
→℃, F→℉
→℃→℃
→℉, M→℉
→℉→℉
E/C key
B key
B key
E/C key E/C key
E/C key
B key
E/C key
B key
C key
→℉, F
→℉→℉
C key to enter (ALTI) high temperature measurement. After “ALTI”
E/C key
Page 8

During the setting process, press B key to switch.
Temperature correction mode
In temperature correction mode, press E or C key to switch between “+” and “-” temperature.
In temperature correction mode, press B key to select the desired item with blinking. Press E key to
adjust the desired item with 1 increment. Press and hold E key for 2 seconds to increase quickly.
In temperature correction mode, press B key to select the desired item with blinking. Press C key to
adjust the desired value with 1 descending. Press and hold C key for 2 seconds to decrease quickly.
Press A key to confirm the corrected value and return to normal measurement mode.
Set relative height
Relative height setting (ZERO) mode, press E or C key to switch between
not selecting relative height as “0”.
Press A key to confirm the corrected value and return back to normal measurement mode.
Input location height
In location height inputting mode (ALTI), press C or E key to switch between “+” and “-” height.
Press B key to select the desired item with blinking.
Press E key to adjust the value with 1 increment. Press and hold E key for 2 seconds to increase quickly.
Press C key to adjust the value with 1 descending. Press and hold C key for 2 seconds to decrease quickly.
Press A key to confirm the corrected value and return back to normal measurement mode.
Input sea level air pressure mode (height above sea level)
In sea level air pressure inputting mode (SEAP), press C or E key to enter sea level air pressure inputting
status, press B key to change the set value with blinking.
Press E key to adjust the value with 1 increment. Press and hold E key for 2 seconds to increase quickly.
Press C key to adjust the value with 1 descending. Press and hold C key for 2 seconds to decrease quickly.
Press A key to confirm the corrected value and return back to normal measurement mode.
Factory default height mode
In factory default value status(FDEF), press E or C key to switch between
selecting or not selecting factory default height. It is the height value which is calculated according to
the default sea level air pressure (1013.25mb).
“YES” and “NO” for selecting or
“YES” and “NO”, indicates
10. Low voltage detection
In all modes, low voltage detection is done once every hour. When the voltage is less than 2.5 volts, the
low voltage reminding symbol “ ” will be displayed on the screen and blink.
C. Description
After entering the compass measurement mode, the measurement will stop after 30 seconds. In the last
30 seconds, it will lock up and exit this mode, and then return back to time mode.
After entering air pressure, temperature and weather forecasting measurement mode, it will measure
once every second. And it will return back to time mode if without keystroke operation for 1 minute.
After entering height and temperature measurement mode, it will measure data once every 5 seconds
within first 3 minutes, and measure once every 2 minutes after the first 3 minutes. It will not exit this
mode.
In correction mode, press B key to exit. If displaying “ERROR”, which means correction error. If
displaying “DONE”, which means that the correction is correct.
In setting mode, the set item will blink every 1HZ. It will exit the setting mode if no keystroke operation
within 1 minute.
Page 9
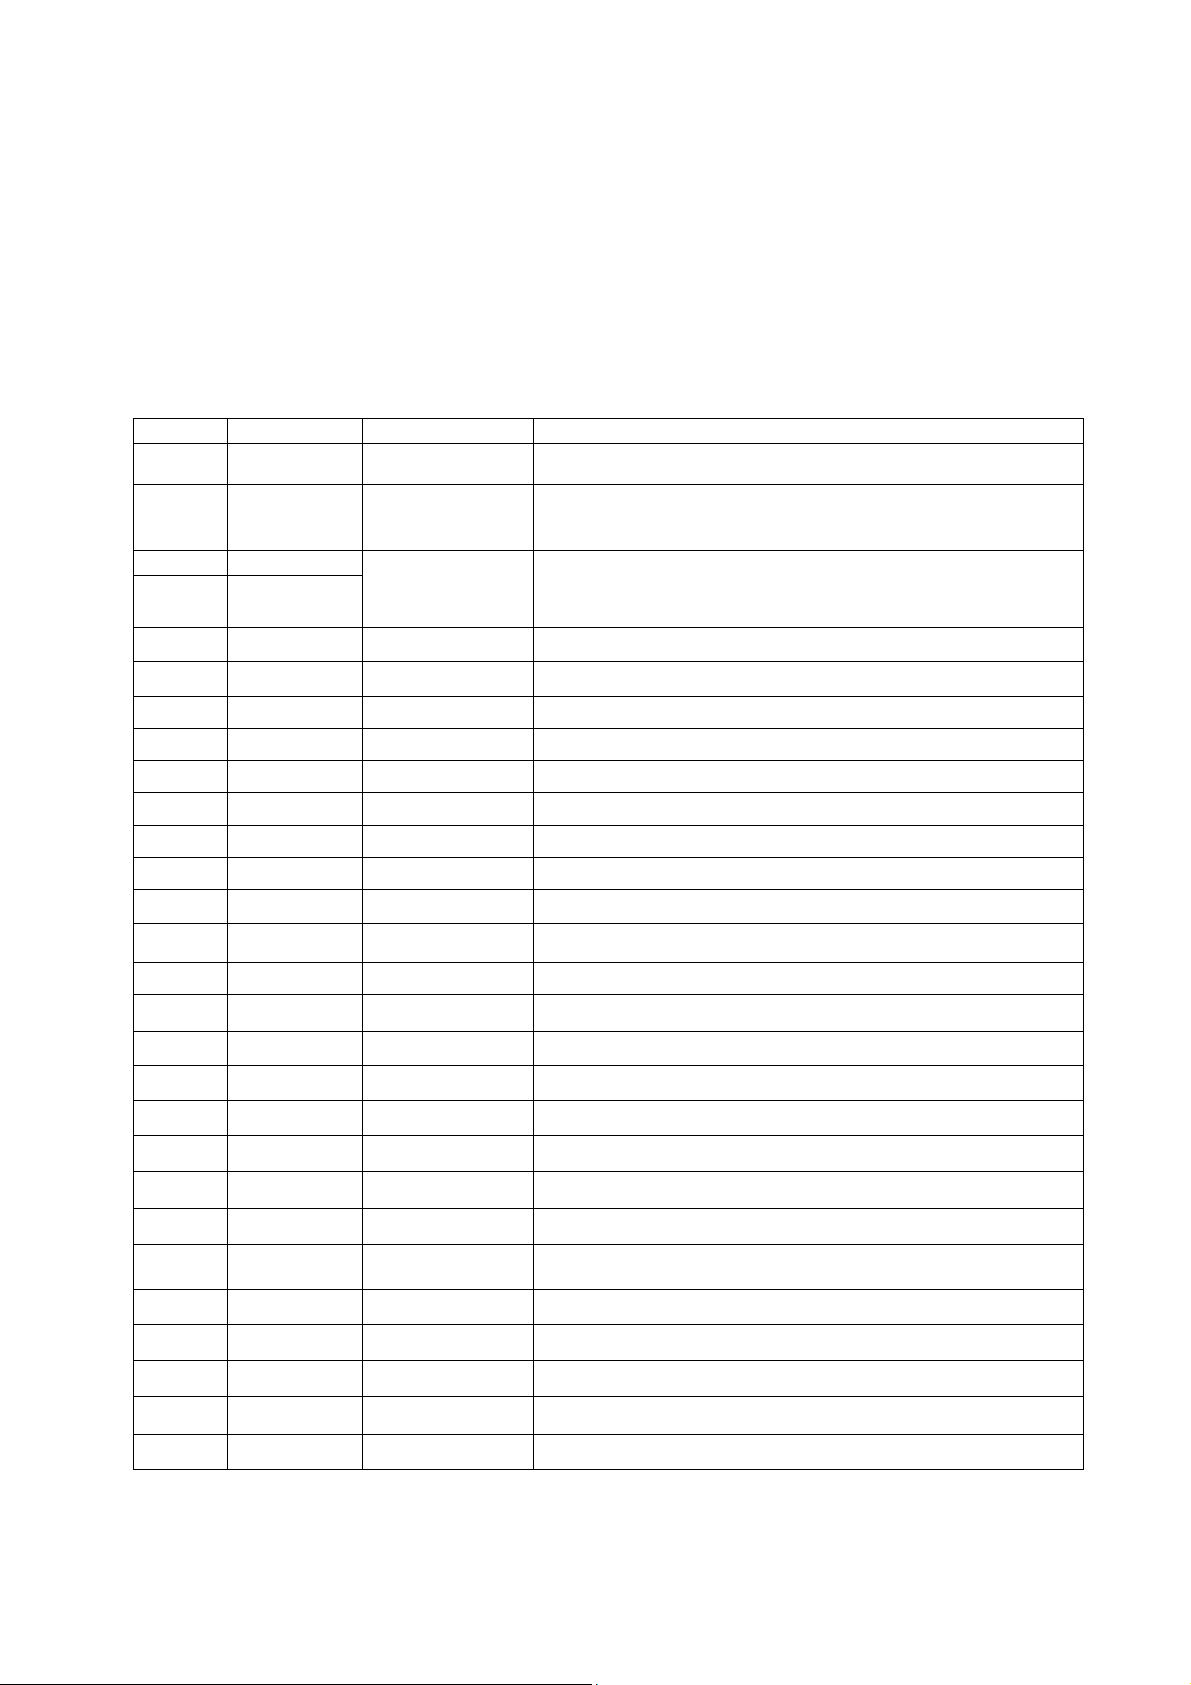
The city name order for universal time as below:
LON→PAR→CAI→JRS→JED→THR→DXB→KBL→KHI→DEL→DAC→RGN→BKK→HKG→
TYO→ADL→SYD→NOU→WLG→PPG→HNL→ANC→LAX→DEN→CHI→NYC→CCS→RIO
→
Please see the universal time comparison table for detailed city description for universal
time, as below:
Universal time comparison table:
City code
LON London
PAR Paris
CAI
JRS
JED
THR
DXB
KBL
KHI
DEL
DAC
RGN Yangon
BKK Bangkok
HKG HongKong
TYO Tokyo
ADL Adelaide
City GMT Differential Other major cities in same time zone
+00.0 Dublin,Lisbon 伦敦 Casablanca,Dakar,Abidjan
Cairo 开罗(
Jerusalem
耶路撒冷
Jeddah 吉达 +03.0
Tehran 德黑兰
Dubai 迪拜( +04.0
Kabul 喀布尔 +04.5
Karachi卡拉奇
Delhi 德里 +05.5
Dhaka 达卡 +06.0
+01.0
+02.0
+03.5
+05.0
+06.5 Yangon 仰光
+07.0 Jakarta,Phnom Penh,Hanoi Vientiane 曼谷
+08.0 Singapore Kuala Lumpur Beijing Taipei Manlla Perth Ulaanbaatar 香港
+09.0 Seoul Pyongyang 东京(SEL 汉城)
+09.5 Darwin 阿德莱德
巴黎 Milan
Rome,Madrid,Amsterdam,Algiers.Hamburg,
Frankfurt,Vienna,Stockhoim,Berlin.
Athens Helsinki,Istanbul,Beirut Damascus Cape town
Kuwait Riyad,Aden Addis Ababa Nairobi Moscow Shiraz
Shiraz
Abu Dhabi Muscat
Male
Mumbai Kolkata
Colombo
SYD Sydney
NOU Noumea
WLG Wellington
PPG Pago Pago
HNL Honolulu
ANC Anchorage
LAX Los Angeles
DEN Denver
CHI Chicago
NYC New York
CCS Caracas
+10.0 Melboume Guam Rabaul 悉尼
+11.0 Pt Vila 努美阿
+12.0 Christchrch Nadi Nauru Is 惠灵顿
-11.0 帕果 帕果 Pago Pago
-10.0 檀香山 Papeete
-09.0 安克雷奇 Nome
-08.0
-07.0 丹佛 El Paso,Edmonton
-06.0 芝加哥 Houston,Dallas/Ft,worth,New Orleans,Mexico City,Winnipeg
-05.0 Montreal,Detroit,Miami,Boston,Panam 纽约 a City,Havana,Lima,Bogota
-04.0 加拉加斯 La Paz,Santiago,Pt Of Spain
洛杉矶 San Francisco,Las Vegas,Vancouver,Seattle/Tacoma,Dawson
City
RIO Rio De Janeiro
-03.0 里约热内卢 Sao Paulo, Buenos Aires,Brasilia,Montevideo
60 points cartoon change with the change of seconds in Time mode, counting down, Stopwatch, and
Universal time mode.
Page 10

Air pressure measurement range is 300~1100 mbar or 8.84~32.44 inHg
Temperature measurement range is -10~60℃ or 14~140℉
Height measurement range is -700~9000m or -2300~30000f
When above the measurement range, HI will display. When under the measurement range, Lo will
display.
Weather forecast measurement method: estimate the weather every hour (estimate the weather according
to the air pressure diversification within the former 4 hours). If air pressure value goes up gradually,
it indicates that the weather will turn into better. If the air pressure value goes down gradually, it
indicates that the weather will turn into bad. There are 4 kinds of weather status (from good to bad):
Fine, Cloudy, Overcast sky, Rain.
Notice for Digital compass
This watch has a magnetic direction sensor, which can detect geomagnetism. That means that the
north indicated by this watch is the magnetic north pole, it is a little different from the real North Pole.
The magnetic north pole is located in the north of Canada, and the magnetic South Pole is located in
the south of Australia. Please note that, when measure using magnetic compass, the more close to the
magnetic pole of the earth, the bigger difference between the magnetic north pole and real North Pole.
In addition, some maps marked with real North Pole (not the magnetic north pole). Thus when using
that kind of maps with this watch, proper adjustment is needed.
Location mensuration
When mensurate direction near a strong magnetic field, a huge error will be created. Thus the
following objects shall be avoided when mensurating direction: eternal magnet (magnetic necklace),
metal block (iron door, metal store ark, etc.), high voltage electrical wire, antenna, home electrical
appliance (TV set, personnel computer, washing machine, refrigerator, etc.).
When in the train, ship or plan, etc. the direction can not be mensurated correctly.
When in doors, especially in a building made up of many metals, the direction can not be mensurated
correctly. This is because the metal structure within the building will absorb the magnetic force from
the electrical appliance.
Preservation
If this watch is magnetized, the definition of the direction sensor will be reduced. Thus please don’t
put this watch in a place near a magnet or any object which gives off strong magnetic force. These
objects include: eternal magnet (magnetic necklace, etc.) and home electrical appliance (TV set,
computer, washing machine, refrigerator, etc.).
If you doubt that your watch may have been magnetized, please conduct digital correction and manual
correction in the “Direction sensor correction”.
The reason why the direction mensurated is incorrect:
If the direction is incorrect, please conduct direction correction. If mensurate direction near strong
magnetic field, such as home electrical appliance, large iron bridge, steel pillar, overhead cable, etc. or
mensurate the direction in a train or ship, it will result in error. Please move away from the large metal
object and measure the direction once again. Please note that the digital compass can not be used in
train or ship.
Page 11
Why different results will be produced when mensurate direction in a same place?
The magnetic force from high voltage cable nearby give interference to the geomagnetic detection by
this watch. Please move away from high voltage cable and do detection once again.
Why problem occurs when measurate direction indoor?
TV set, personnel computer, speaker or other objects will interfere in the geomagnetic detection by this
watch. Please keep away from interferential objects or do detection outdoor. It will be more difficult
when do direction detection within a building made of reinforced concrete. Please note that the
direction detection can not be conducted in train or plane.
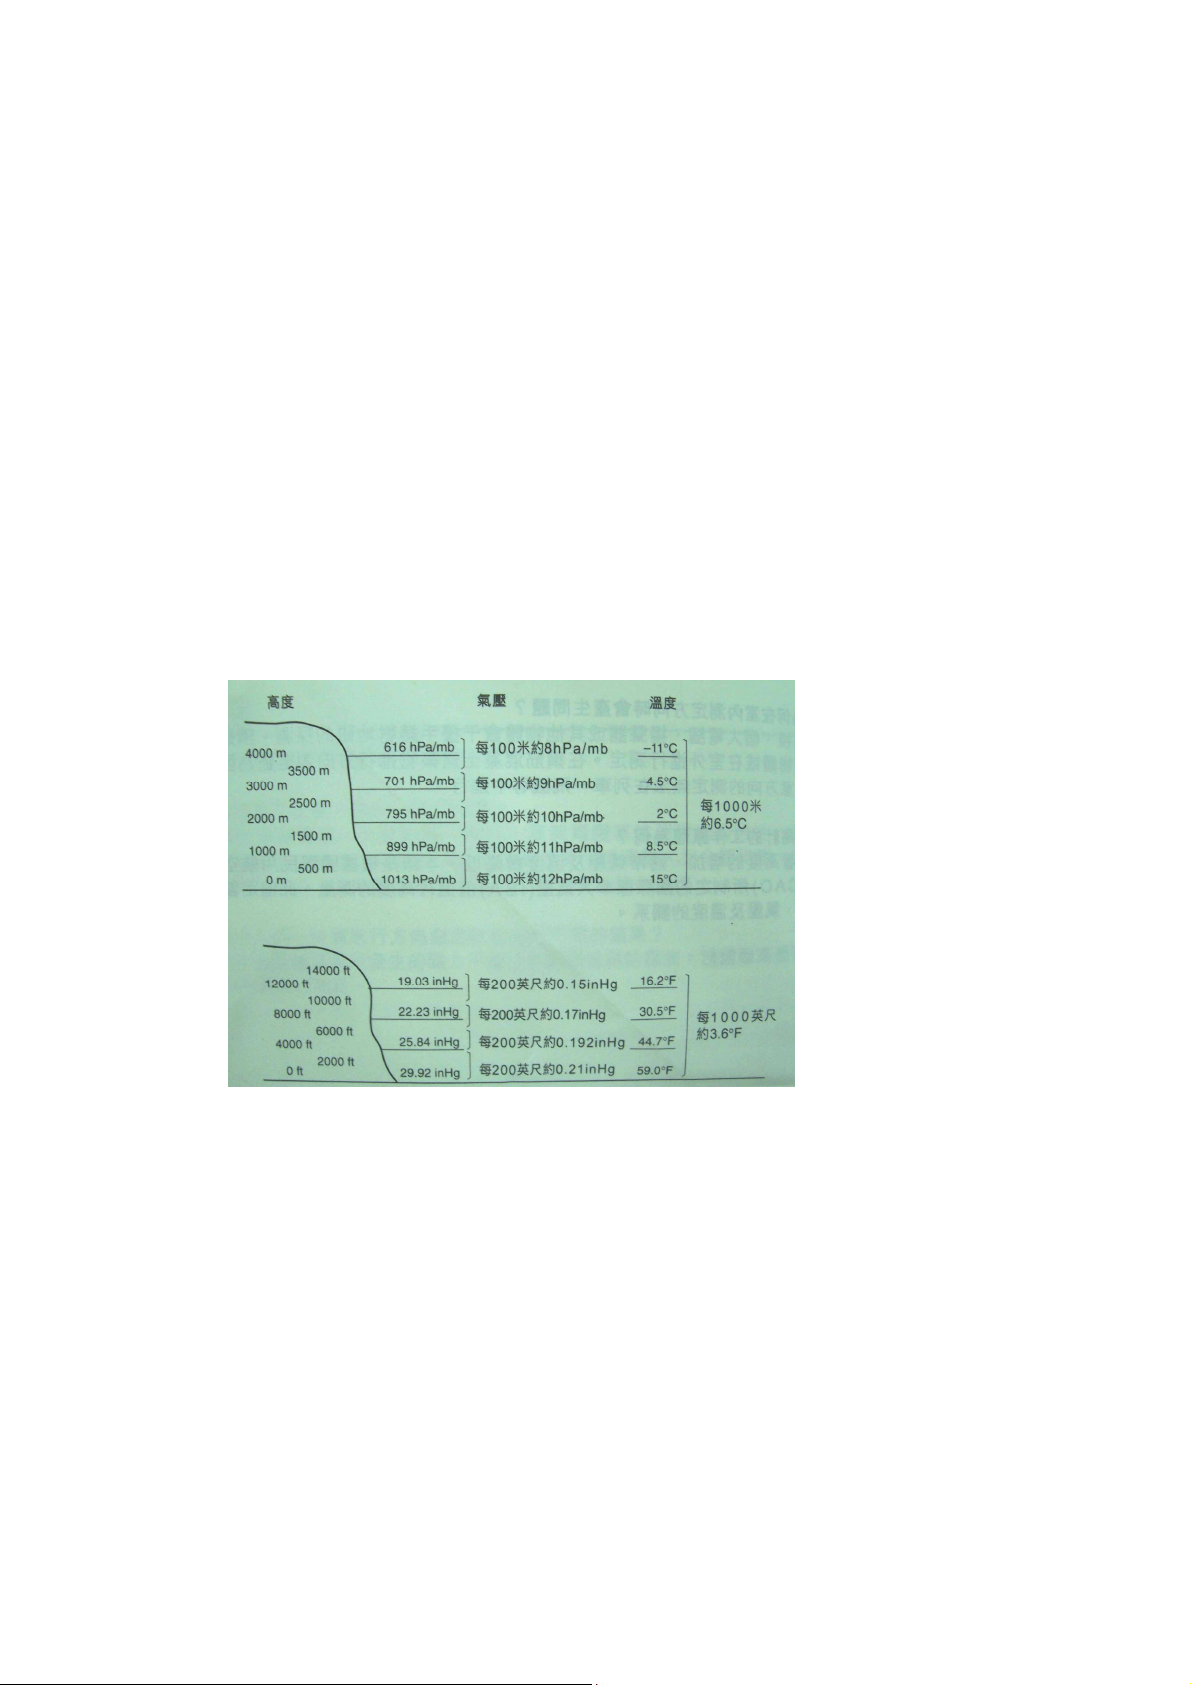
The work principle of hypsometer:
With the height increasing, usually air pressure and temperature will reduce. This watch measure the
height according to the international standard air pressure (ISA) made by International Civil Aviation
Organization (ICAO). This value defines the relation between height, air pressure and temperature.
Excerpt from: International Civil Aviation Organization
Note that the veracity of the value measured will be affected in the following situations:
When air pressure changed with the weather change;
When temperature changed extremely;
When this watch is bumped strongly
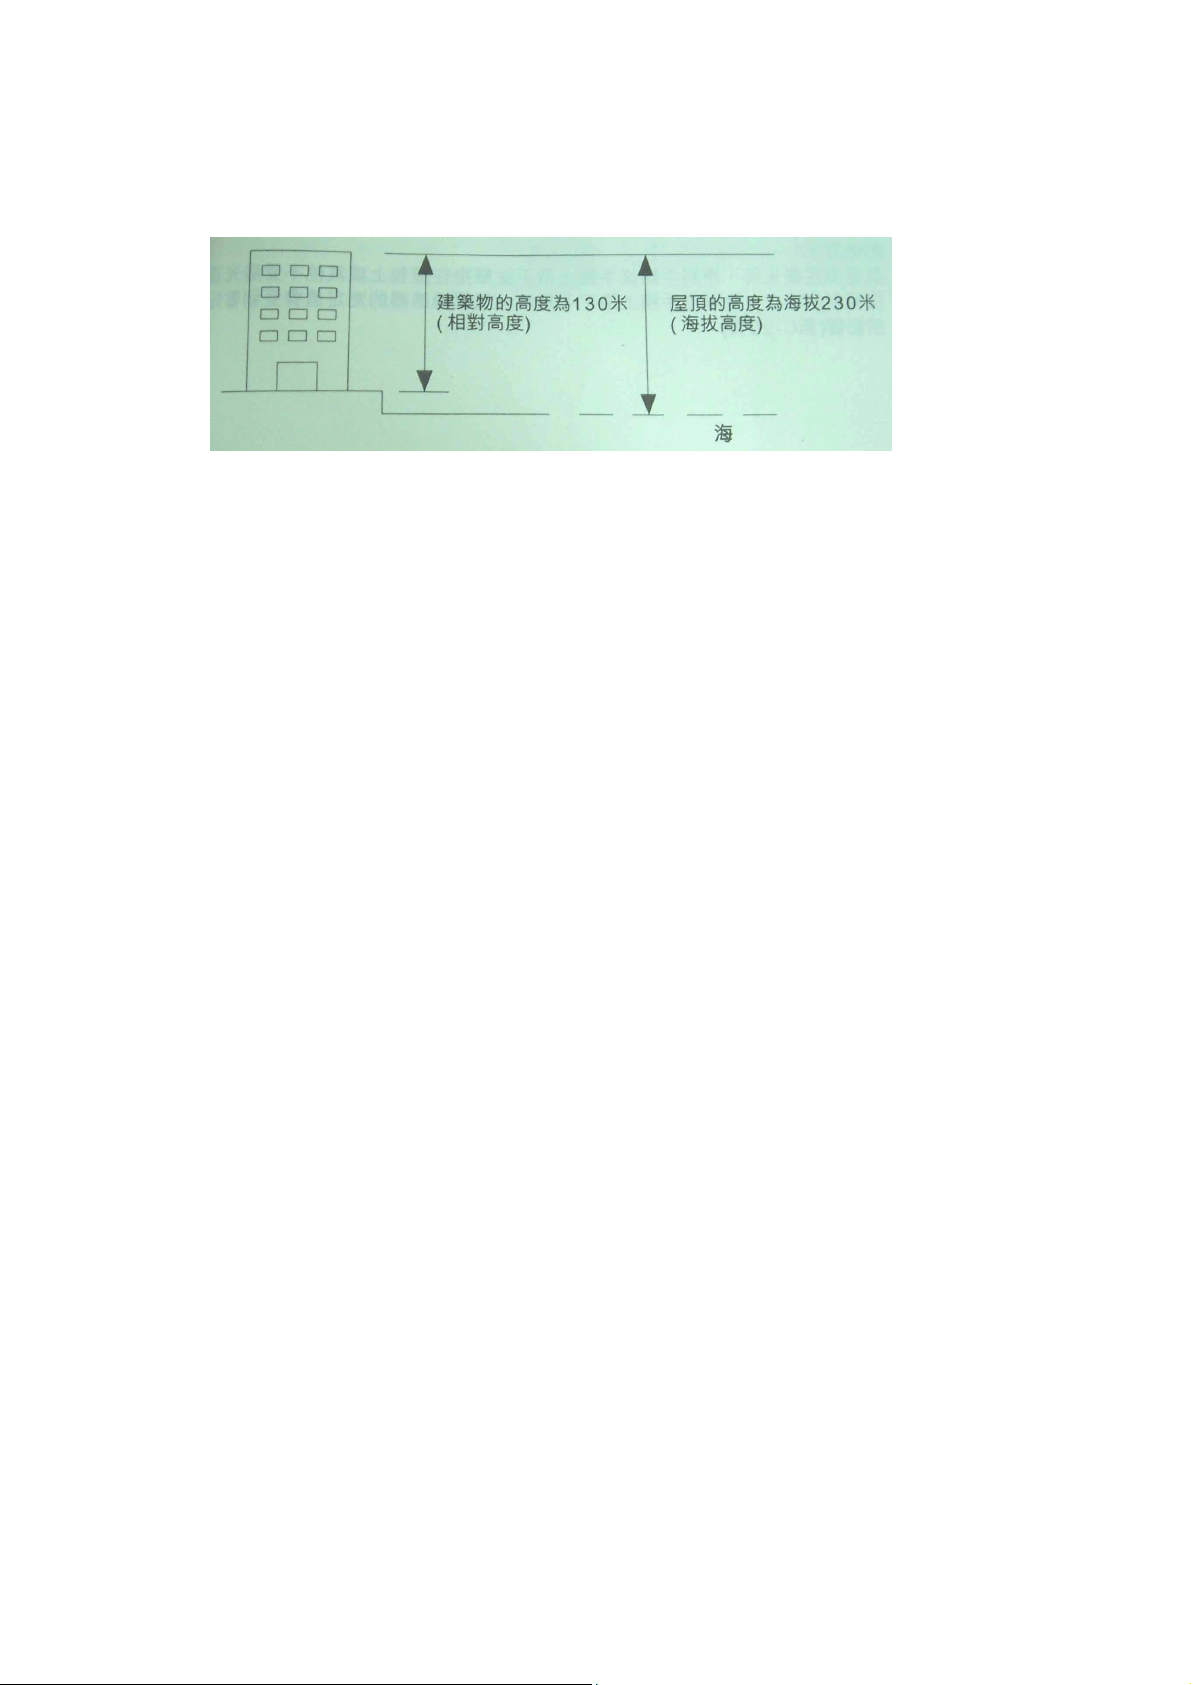
There are four kinds of methods to denote height: 1. relative height, 2. location height, 3. height above
sea level, 4. Factory default height. The figure below introduces the relative height and height above
sea level. Absolute height indicates the height above sea level. Relative height indicates the height
difference between two different locations.
Page 12
Notes when measure height and temperature at the same time:
Though the height and air temperature can be measured at the same time, please note that the condition
needed in each measurement is different to get the best result. When measure air temperature, you’d
better take your watch from your wrist to minimize the affection to the measurement result by your
body heat. However, when measure height, you’d better wear your watch on your wrist. Because this
can improve the accuracy of the measurement by keeping constant watch temperature.
The following actions need to be take first before measuring height or temperature:
When height measurement is priority, please wear your watch on your wrist or put it in a place where
your watch temperature can be kept constant.
When air temperature measurement is priority, please take your watch off from your wrist and hang it
on your handbag or any place not exposed to direct sun shine. Please note that when take your watch
from your wrist, the measurement value of air pressure sensor will be affected temporarily. The air
pressure sensor in this watch can be used to measure the change of air pressure for your reference to
forecast weather. This sensor is not a precise device for official weather forecast.
The sudden change of air temperature can affect the measurement result of the sensor.
Air temperature measurement can be affected by body temperature (when you wear your watch), direct
sun shine and humidity. To get a more exact air temperature measurement, please take your watch
from your wrist, put it in a place where does not exposed to direct sun shine and in drafty condition,
and wipe the watchcase dry. It will take 20 to 30 minutes for the watchcase to reach actual
environmental temperature.
The work principle of barometer:
The air pressure reflects the change of atmosphere. Through observing the atmosphere change, you
can forecast the weather in a rational veracity range. Atmosphere pressure going up indicates fine
weather, but atmosphere pressure going down indicates the weather is turning into bad.
The atmosphere pressure value published in newspaper or reported in television weather forecast
programme is the measurement value after being modified to the value at sea level (elevation is 0 m).
Page 13

C. Specification
Movement dimension : Ф37 mm
Thickness (exclude buzzer) : 8.6 mm
Work temperature : -10℃~60℃
Work voltage : 3V
TimeVeracity : ±60 seconds/month(T=25℃)
Thermometer precision :±2℃(-10℃~60℃)
Barometer precision : ±3mb(-10℃~40℃)
Altimeter precision ( altitude ascent every 1000m) : ±5m(-10℃~40℃)
Digital compass precision : ±11°(-10℃~40℃)
Battery type : CR2032
Static maximum drive current : ≤12 u A(T=25℃)
Static average drive current : ≤10 u A(T=25℃)
Alarm ring current : ≤2.5 m A
Current for digital compass operation : ≤0.7 m A
Current for air pressure and height sensor operation : ≤10.0 m A
Lighting current : ≤8 m A
Battery life term : 18 months(Japan battery)
(Calculate according to these standards: using digital
compass thrice each week for 30 seconds each time; using
air pressure and height sensor once each month for 6 hours
each time; pressing light once every day for 3 seconds each
time; ringing once every day for 20 seconds each time.)
Page 14

 Loading...