

Page 1
USER
ᴗ
S MANUAL
hdSPPPci
p
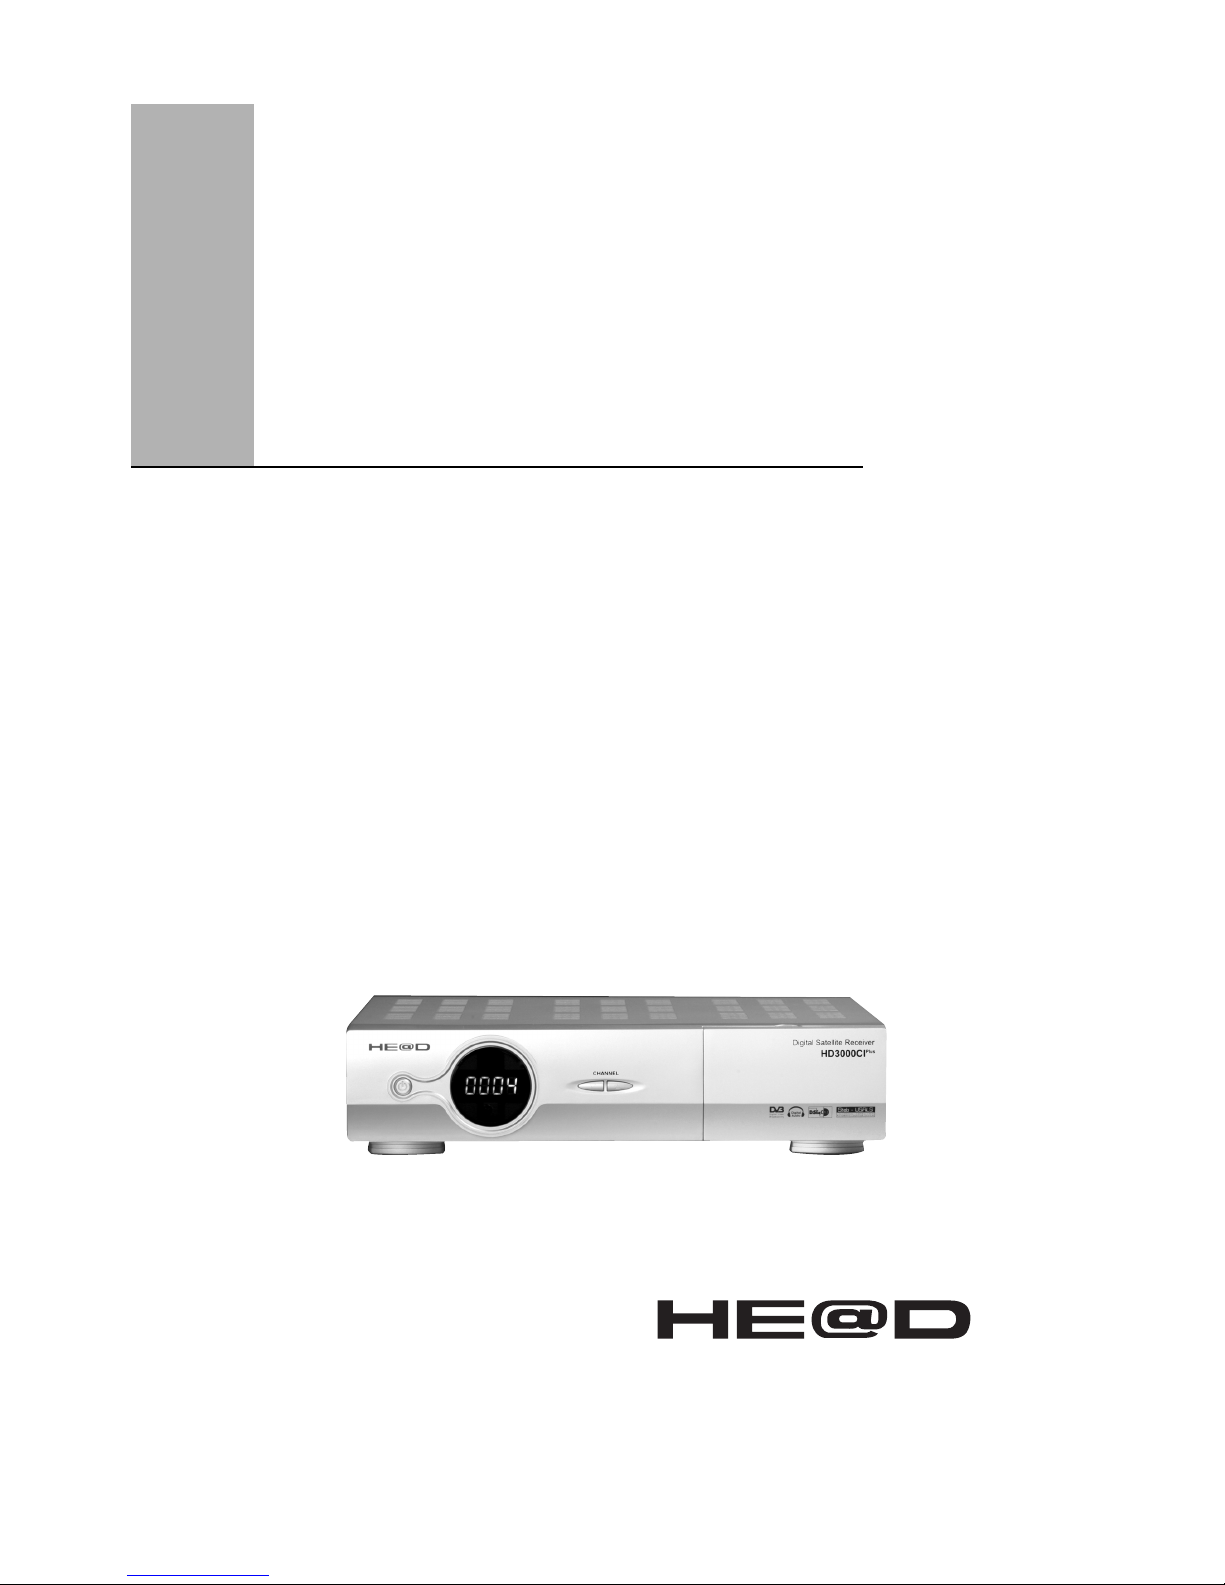
Digital Satellite Receiver
Page 2

Safety
1. Main supply : 90 - 240V AC 50/60 Hz
2. Please the receiver in a well-ventilated environment.
3. Directly on top of or under any another equipment.
4. Do not connect or modify cable when the STB is plugged in.
5. Service should be carried out only at a authorized service center, contact
Your local dealer for more information.
6. Clean only with a damp cloth
7. Protect the power cord from being walked on or pinched particularly at plugs,
convenience receptacles, and the point where they exit from the apparatus.
8. Use only the attachments/accessories specified by the manufacture.
9. Use only with a cart, stand, tripod, backer, or table specified by the manufacturer,
or sold with the apparatus combination to avoid injury form tip-cover.
10. To rain or intense moisture.
11. To any magnetic objects, such as loudspeakers, transformers, etc..
12. Do not use a damaged power cord, It may cause a fire or an electrical shock.
S a f e t y
2
Page 3

1. Safety
2. Controls and Functions
2.1 Front Panel
2.2 Real Panel
2.3 Remote Control Unit
3. STB Connction
4. Setting and Operations
4.1 Installation
4.2 Basic Settings
4.3 Edit
4.4 Setup
4.5 Miscellany
4.6 Hot Keys
4.7 Teletext
4.8 Sleep
4.9 History
4.10 Common Interface
Additional Information
Trouble Shooting
Technical Specfications
2
4
4
5
6
8
9
9
11
15
16
19
21
22
22
23
23
24
24
25
C o n t e n t s
3
Page 4
4
2. Controls and Functions
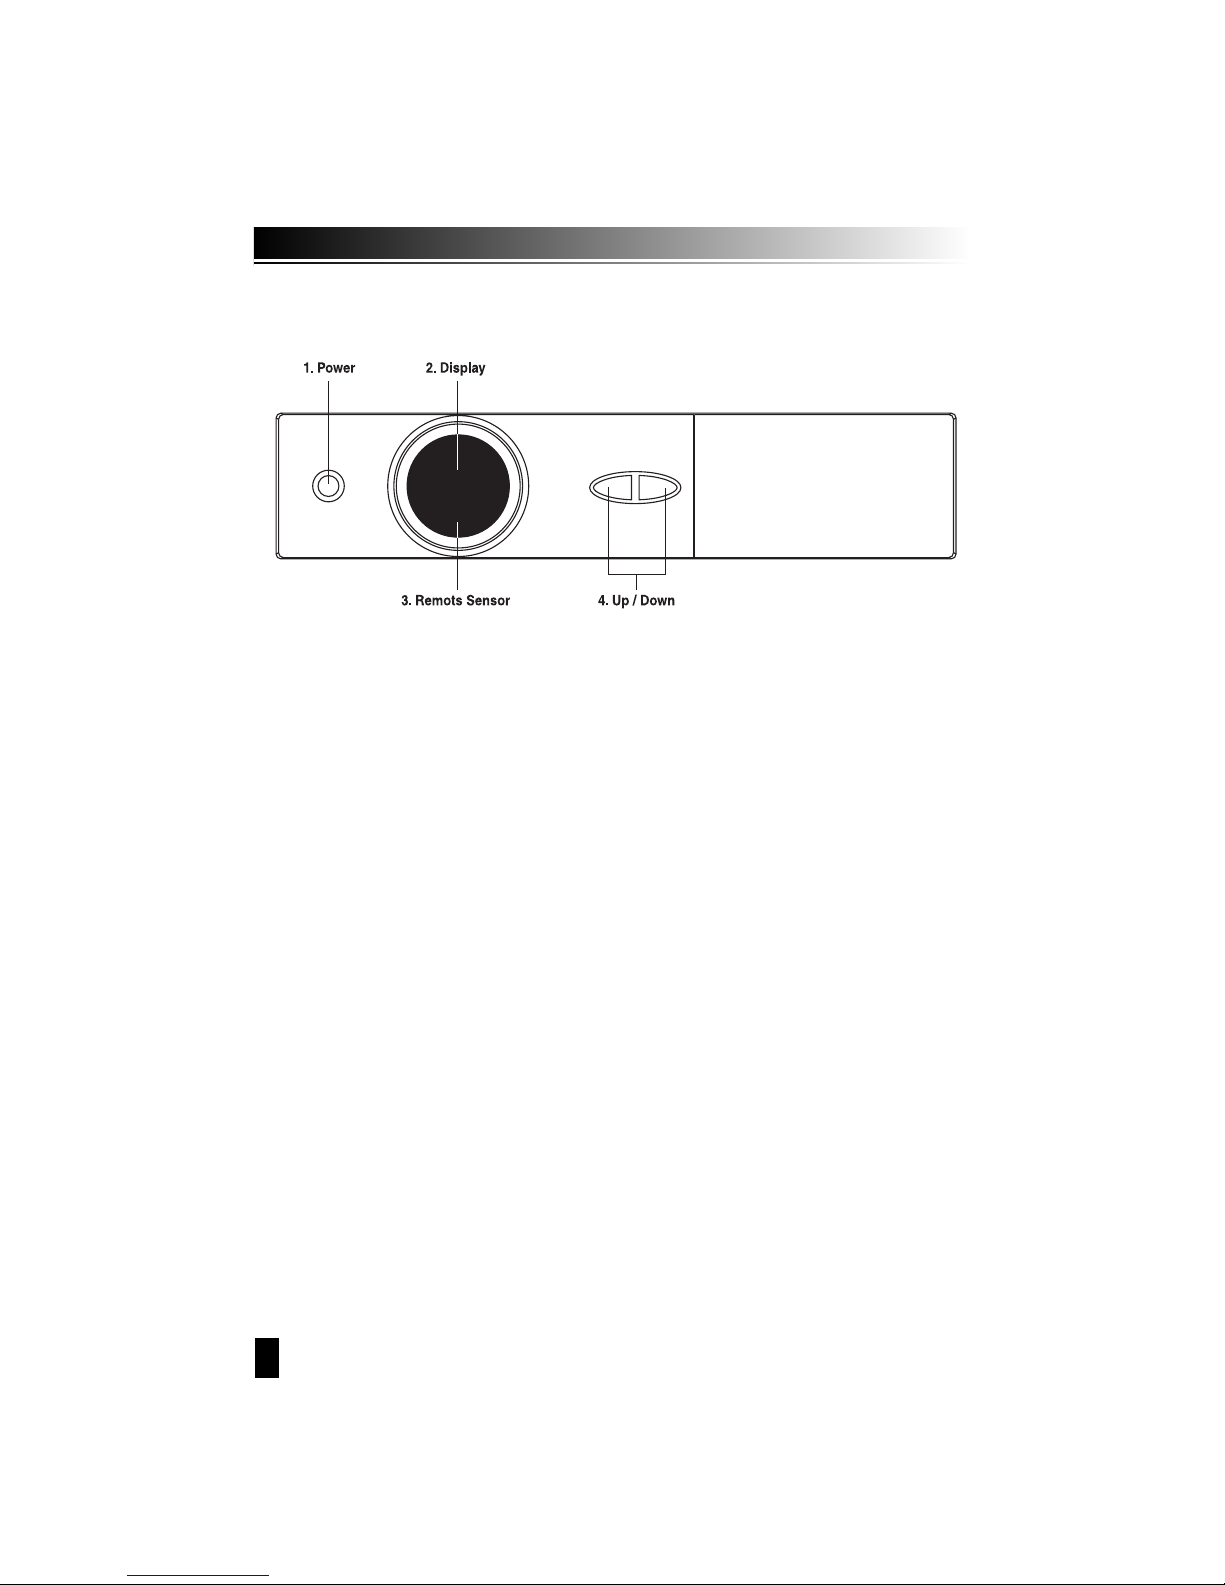
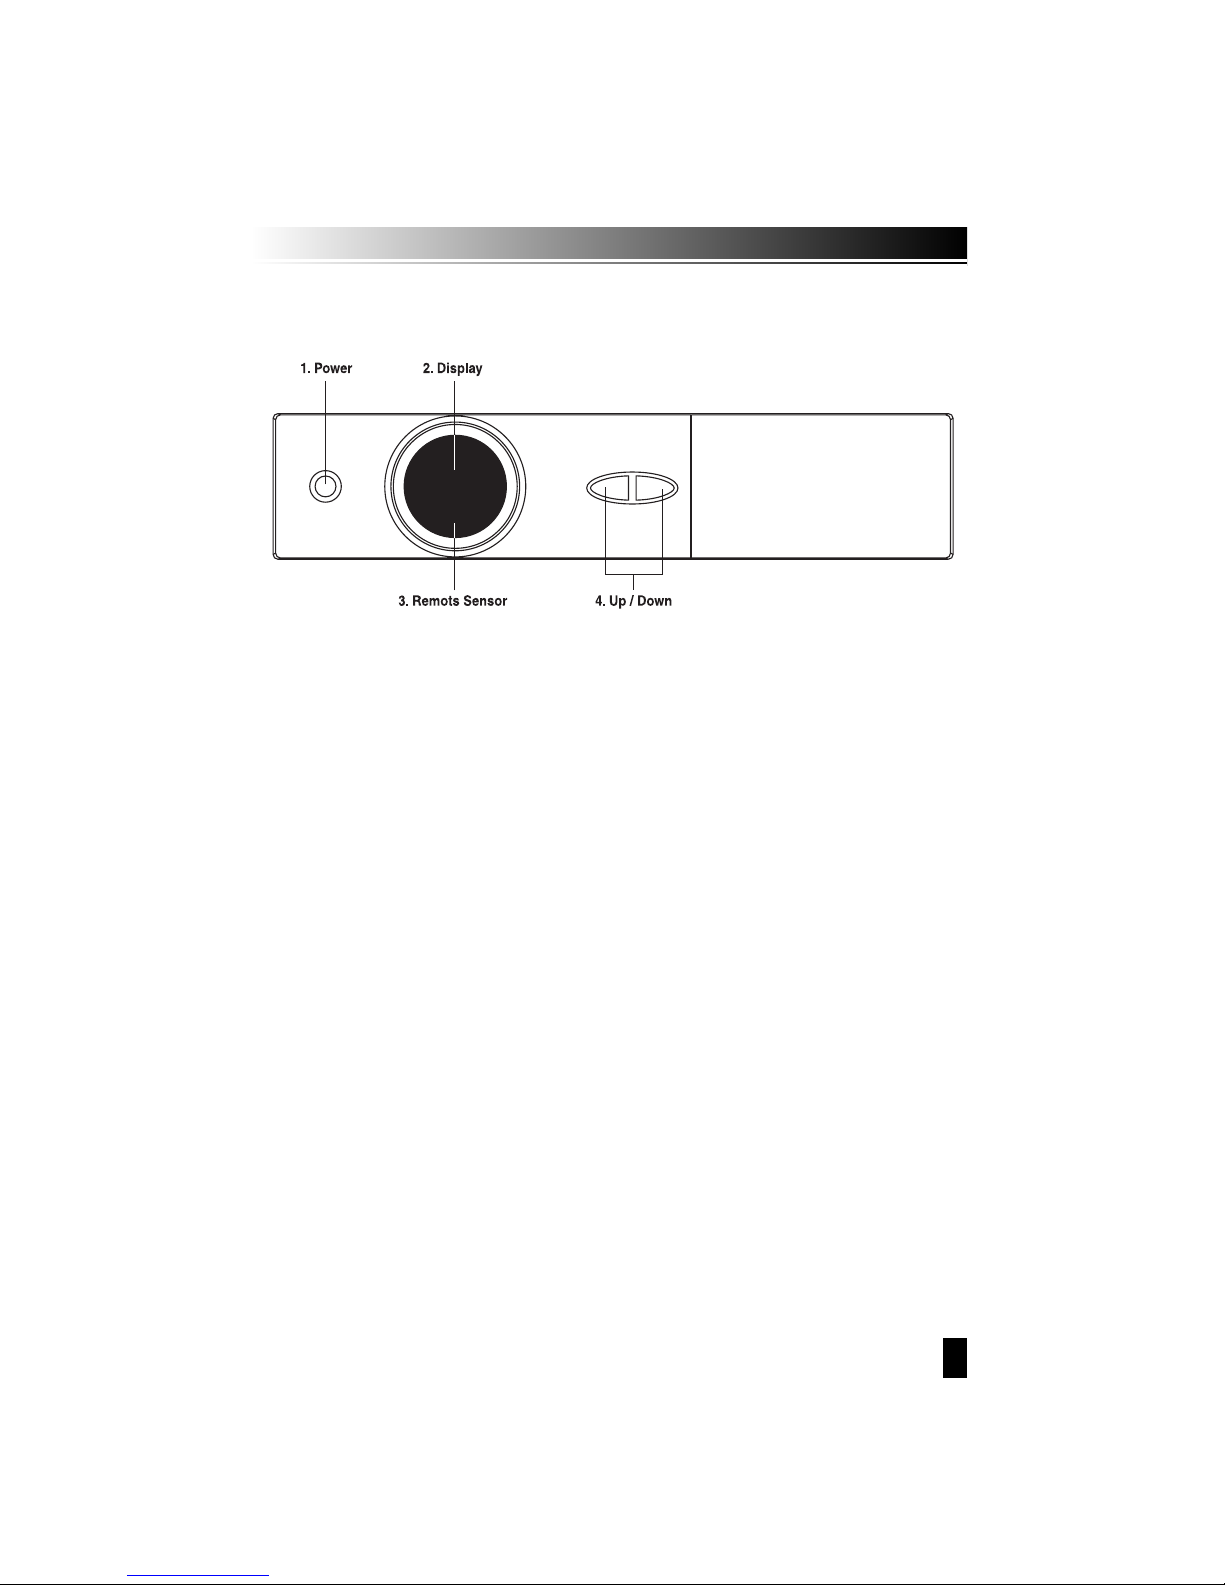
2.1 Front Panel
1. Power Button
Turn the receiver On/Off.
2. Display (4-digit/7-Segment)
The 4-digit displays channel information. In STANDBY mode, the 7-segment displays local time.
3. Remote Sensor
Detects infrared signal from Remote Control Unit.
4. Up/Down Button
Changes channels in the No-menu State and moves the cursor up/down in the Menu state.
Page 5
5
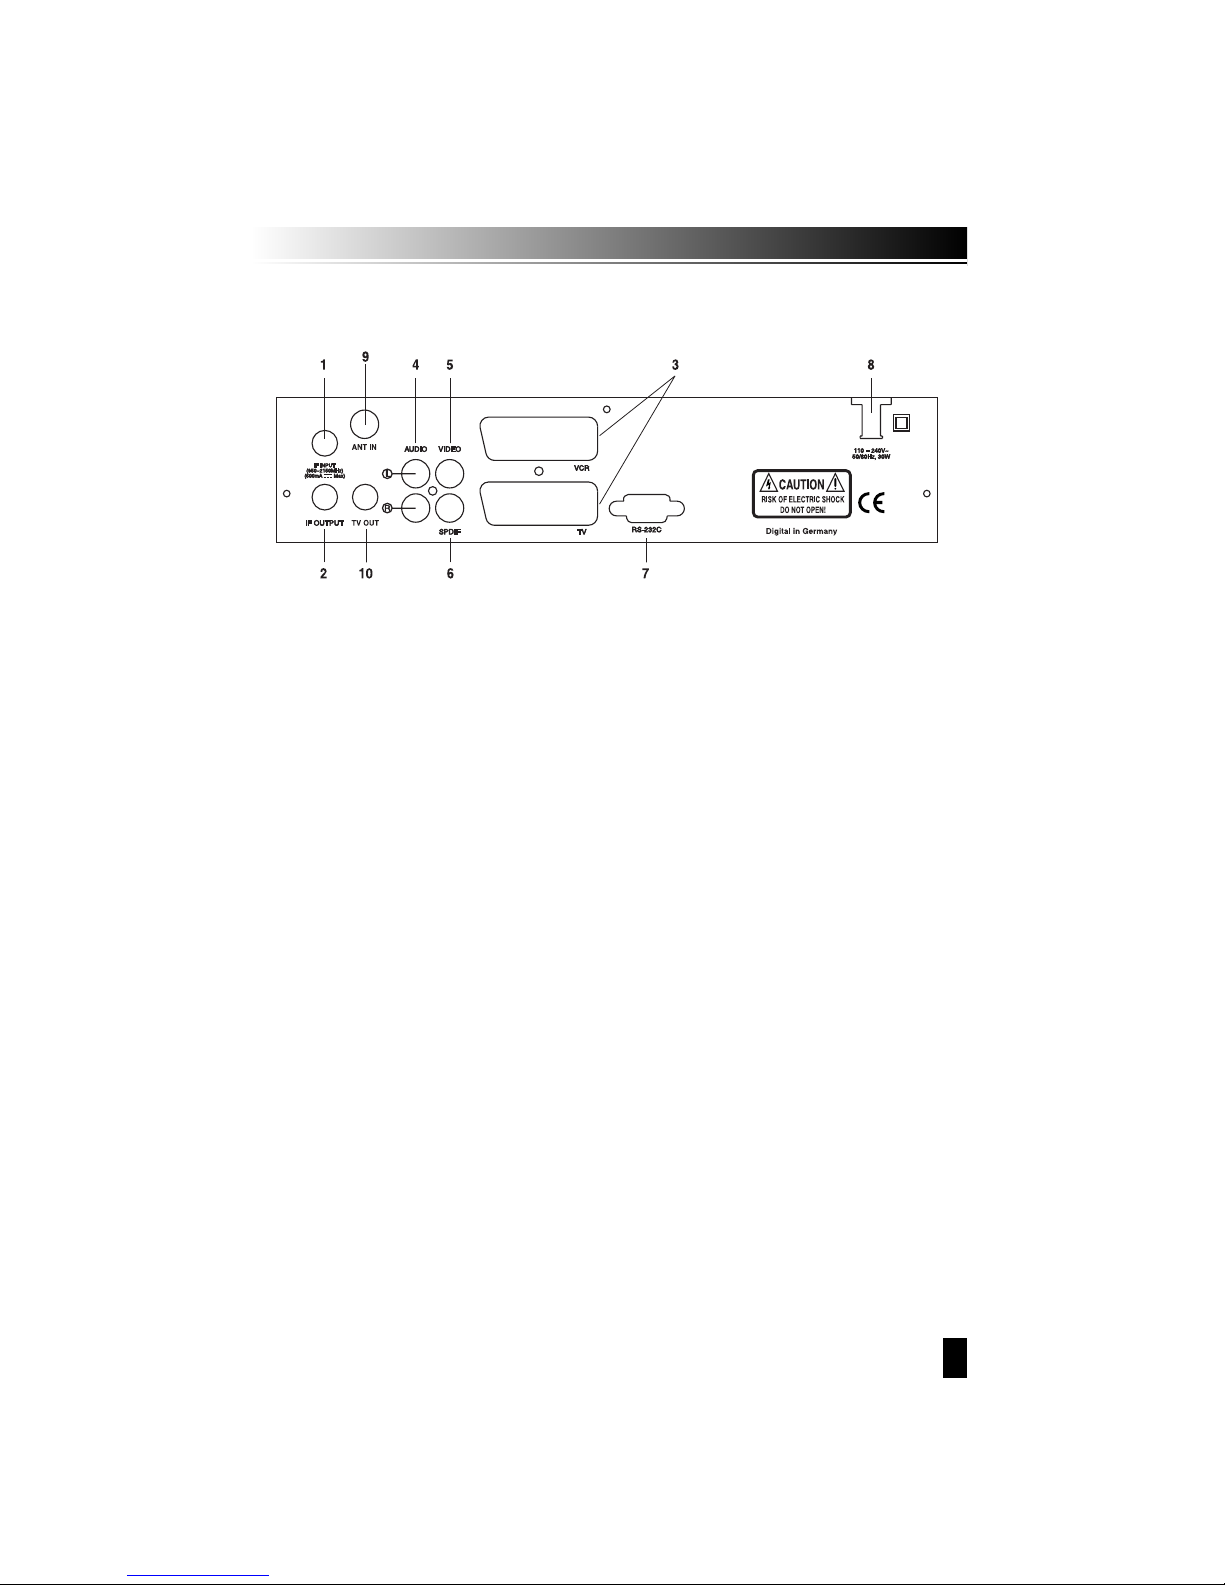
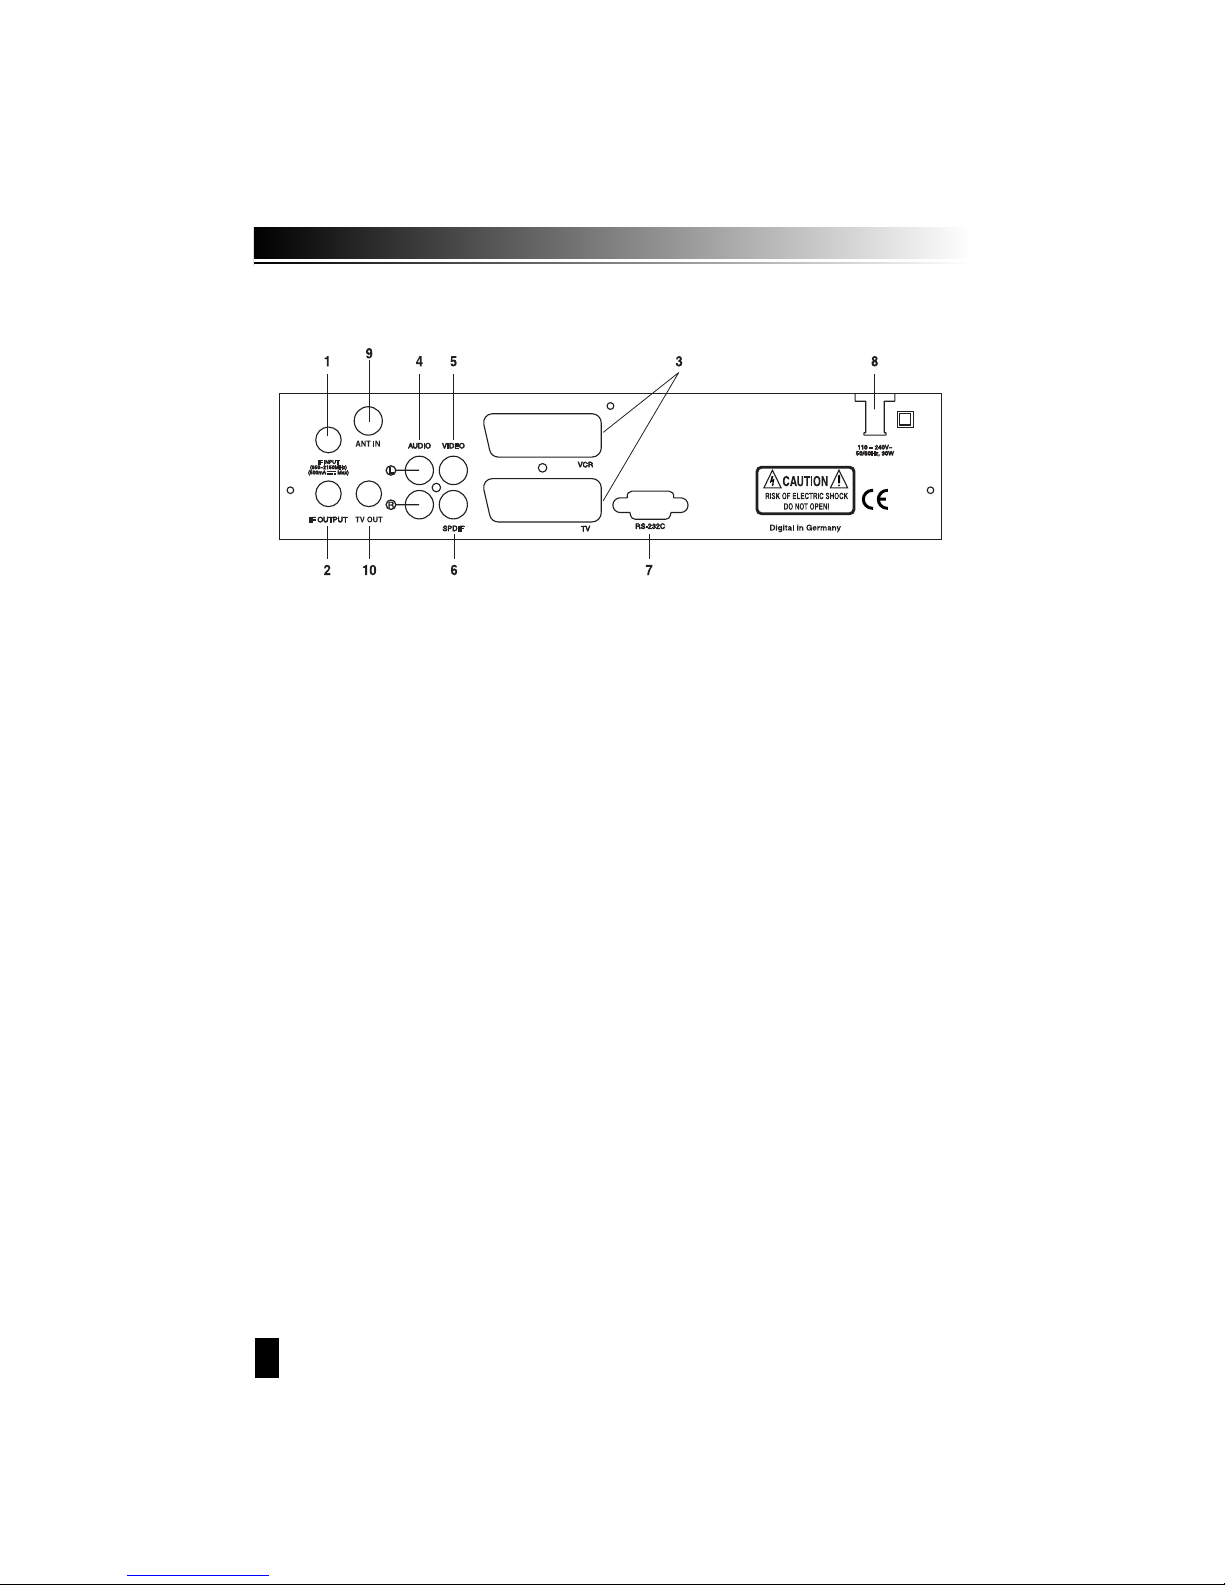
2.2 Rear Panel
1. LNB IN (13/18V 500mA MAX)
connect the coaxial cable from LNB.
2. LNB OUT
connect to other STB.
3. SCART TV, VCR
connect the TV/VCR of TV/VCR to TV/VCR with a SCART cables.
4. AUDIO
This audio sockets provide stereo audio output.
5. VIDEO (Video Output)
This video jack provides a composite video output.
6. S/PDIF
S/PDIF connects digital audio terminal for digital audio output.
7. RS-232C
Connect a PC. RS-232C transfers data to the external computer (Baud rate 115200)
8. POWER
100~240V AC(Auto-selectable), 50~60Hz+/-5%
Make sure to check the power specification.
9. ANT IN
Connects the TV antenna.
10. TV OUT
Connects the TV output.
Page 6
6
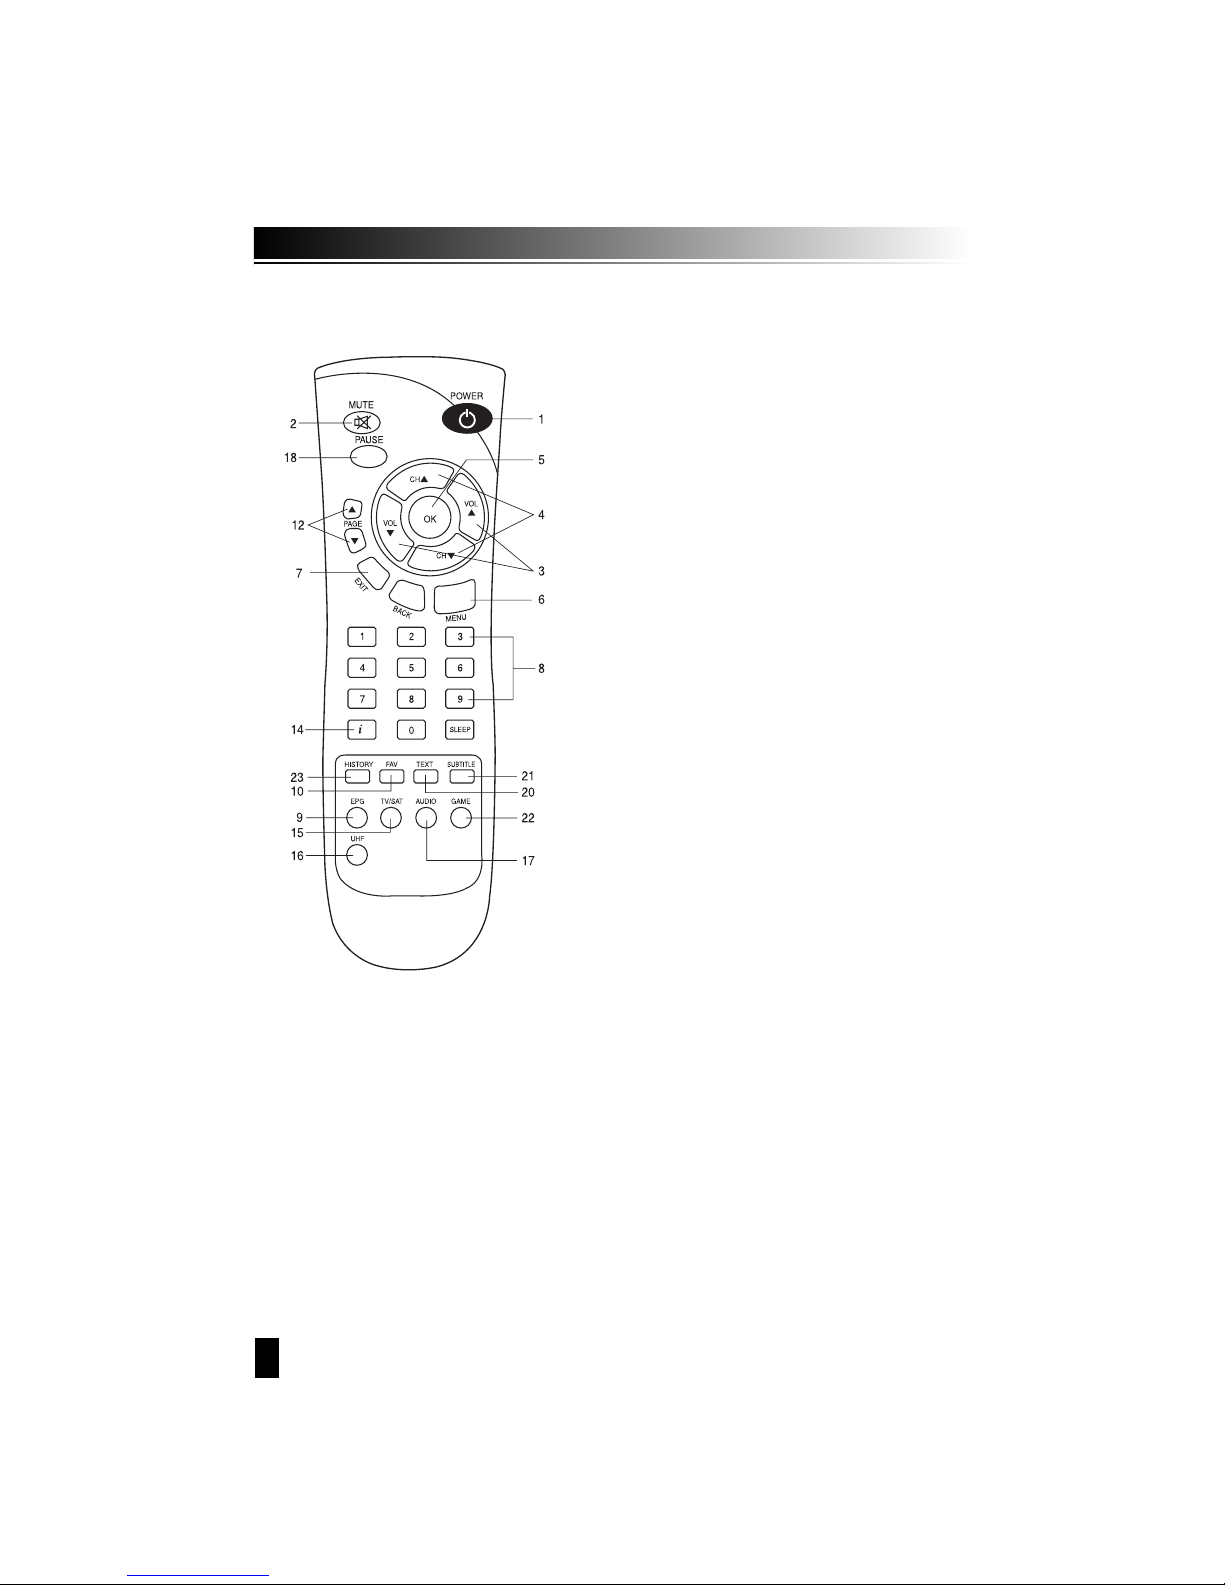
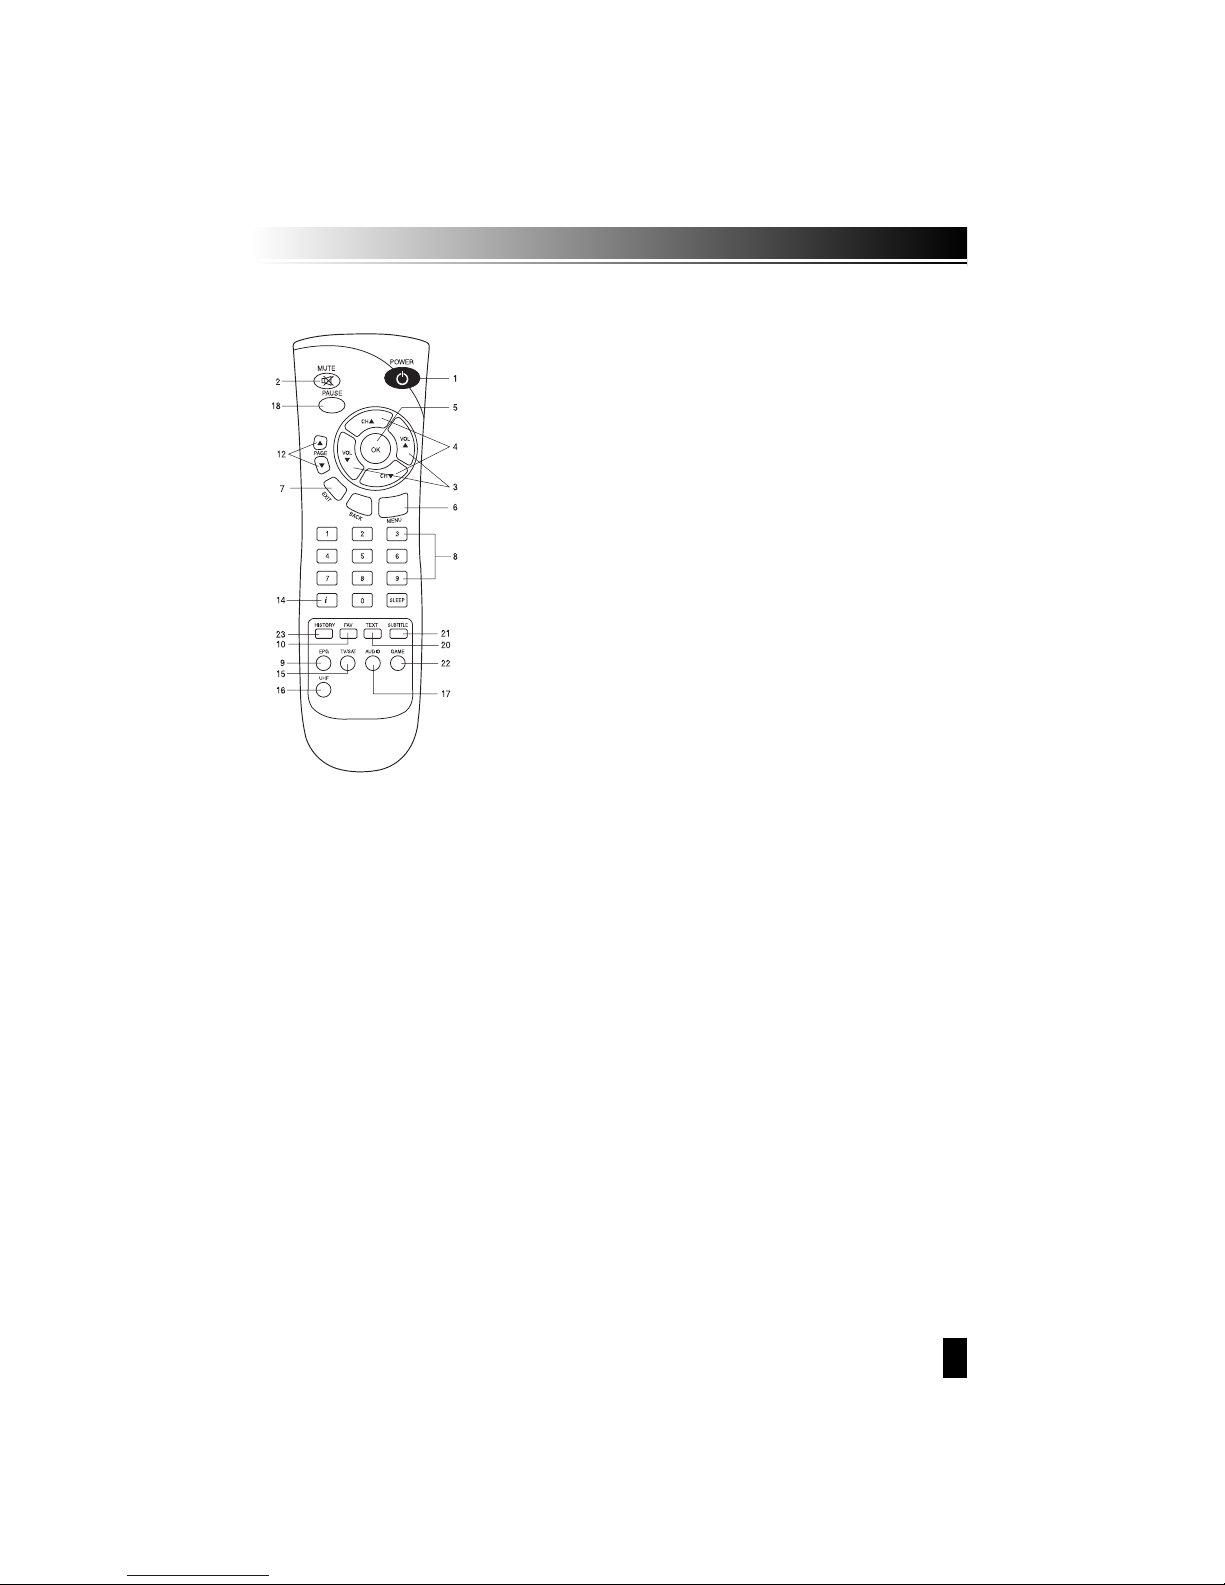
2.3 Remote Control Unit
1. STAND BY
Turns the receiver On/Off.
2. MUTE
Mutes audio output.
3. LEFT/RIGHT (ᵾᵾ/ᶀᶀ)
ῡ If you press Left/Right button while watching
channel, you can adjust Volume level.
ῢ If you press Left/Right button on the menu
status you can move to left/Right side.
4. UP/DOWN (
ᵋᵋOOᵍᵍII
Changes channels in the No-menu state and
moves up/down in the menu state.
5. OK
Confirms the choice with the highlighed menu item.
When you press the OK button watching TV or
listening to Radio, the channel list will appear.
If you press the EXIT button on the final menu state,
you can move to the previous menu.
6. MENU
Shows the Main menu in No-menu and the
TV-Radio program screen in the Menu state.
7. EXIT
Exits from present menu and moves to the previous menu.
8. NUMERIC KEYS (0-9)
Control the numerical operation and especially change channels directly.
9. EPG
Display the TV/Radio Program Guide.
10. FAV
Make favorite by statellite, TV, Radio and by your Choice.
Page 7

7
14. INFO
Shows the information of current program. If you press the INFO button, the channel
info box will be shown continuously even though the present time for channel info box
elapsed. If you press the INFO or EXIT button again, the channel info box will be disappeared.
15. TV/SAT
Select TV Mode and set-Top Box mode.
16. UHF
Sets UHF Menu.
17. AUDIO
Select Audio Mode as Stereo, Left or Right and Audio Language.
18. PAUSE
To pause the Video Screen.
20. TEXT
Pressing the TEXT button will open a Teletext page.
21. SUBT
Displays “Sub-title”
22. GAME
Use game
23. History
Previous channel selects.
Page 8
8
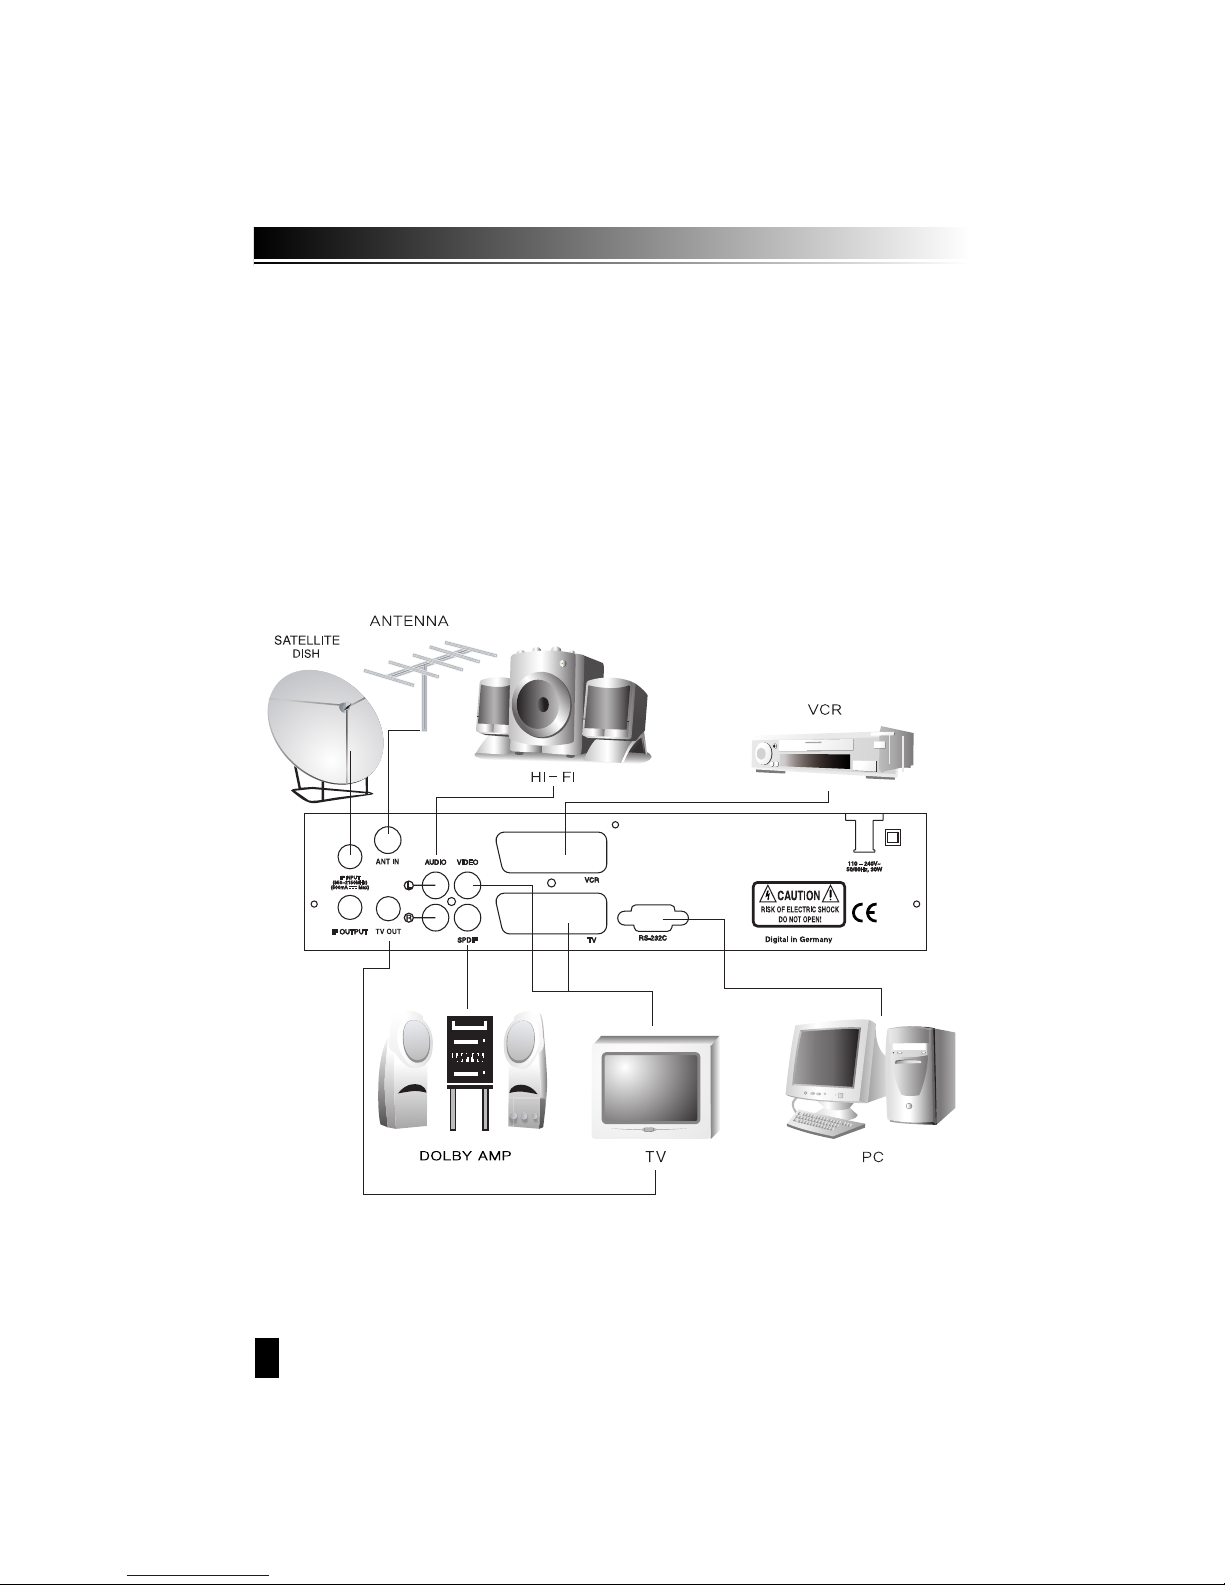
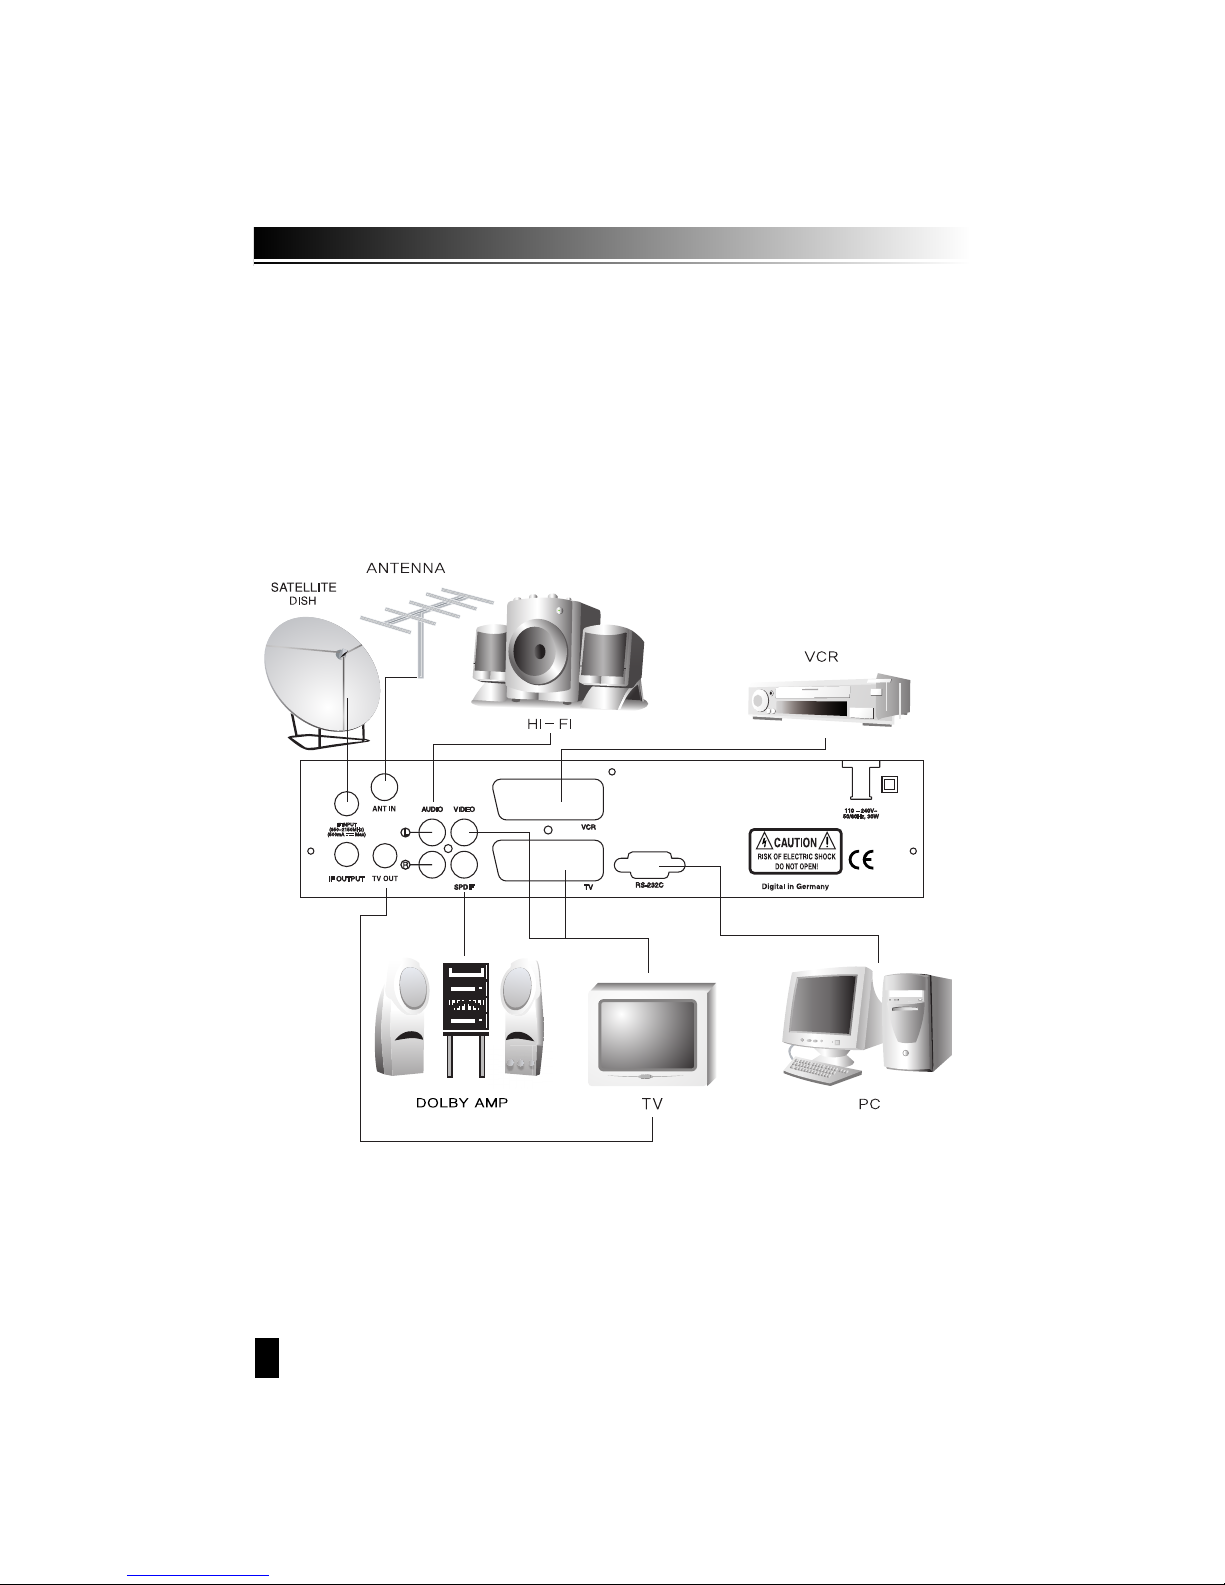
STB Connections
Connect your Digital Stallite Receiver as shower below, according to your peripheral
equipment.
You can connect several devices like VCR, DVD Player and Analog Statellite Recevier the
VCR SCATR of the unit. In standby mode your recevier switches VCR input TV SCART output.
Page 9
9
4. Setting and Operations
4.1 Installation (First time Installation)
ᵉ Turn on your TV and receiver.
ᵉ If it is the first time using a receiver, you should set parameters for system configuration.
Press the MENU button. Refer to the following section for detailed information about
System configuration.
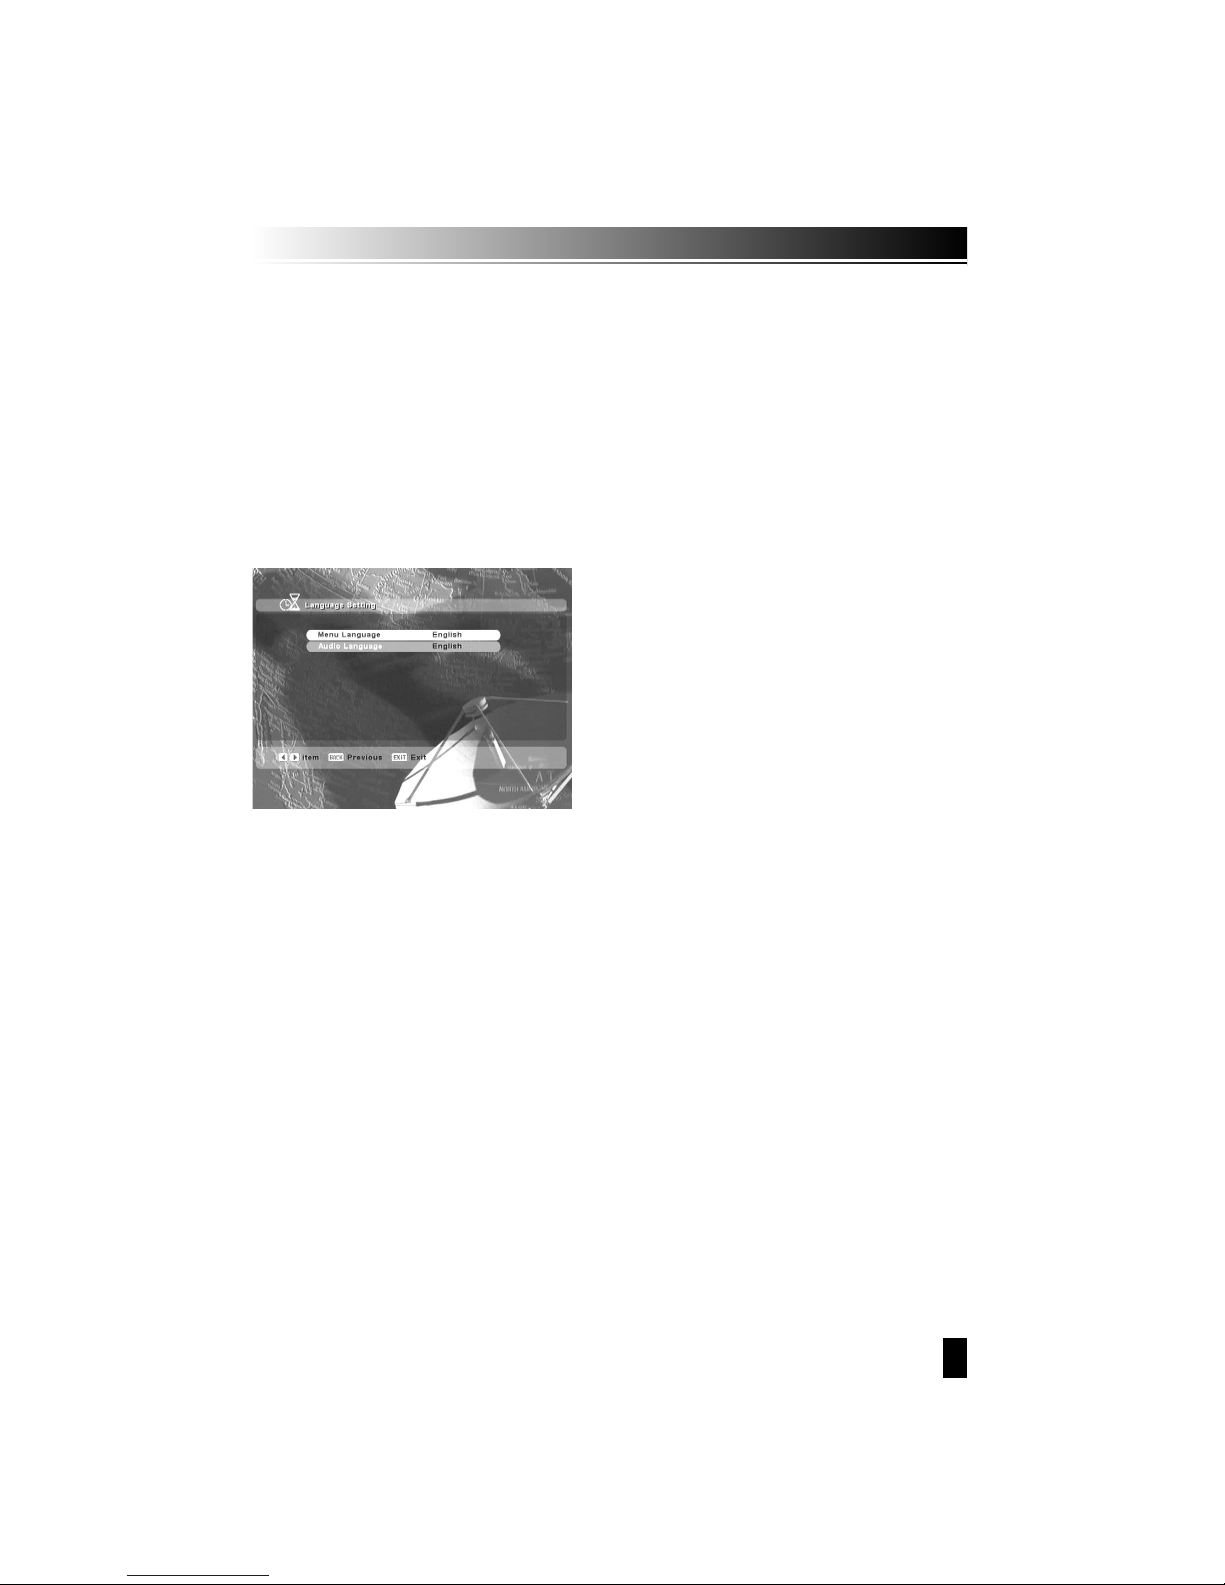
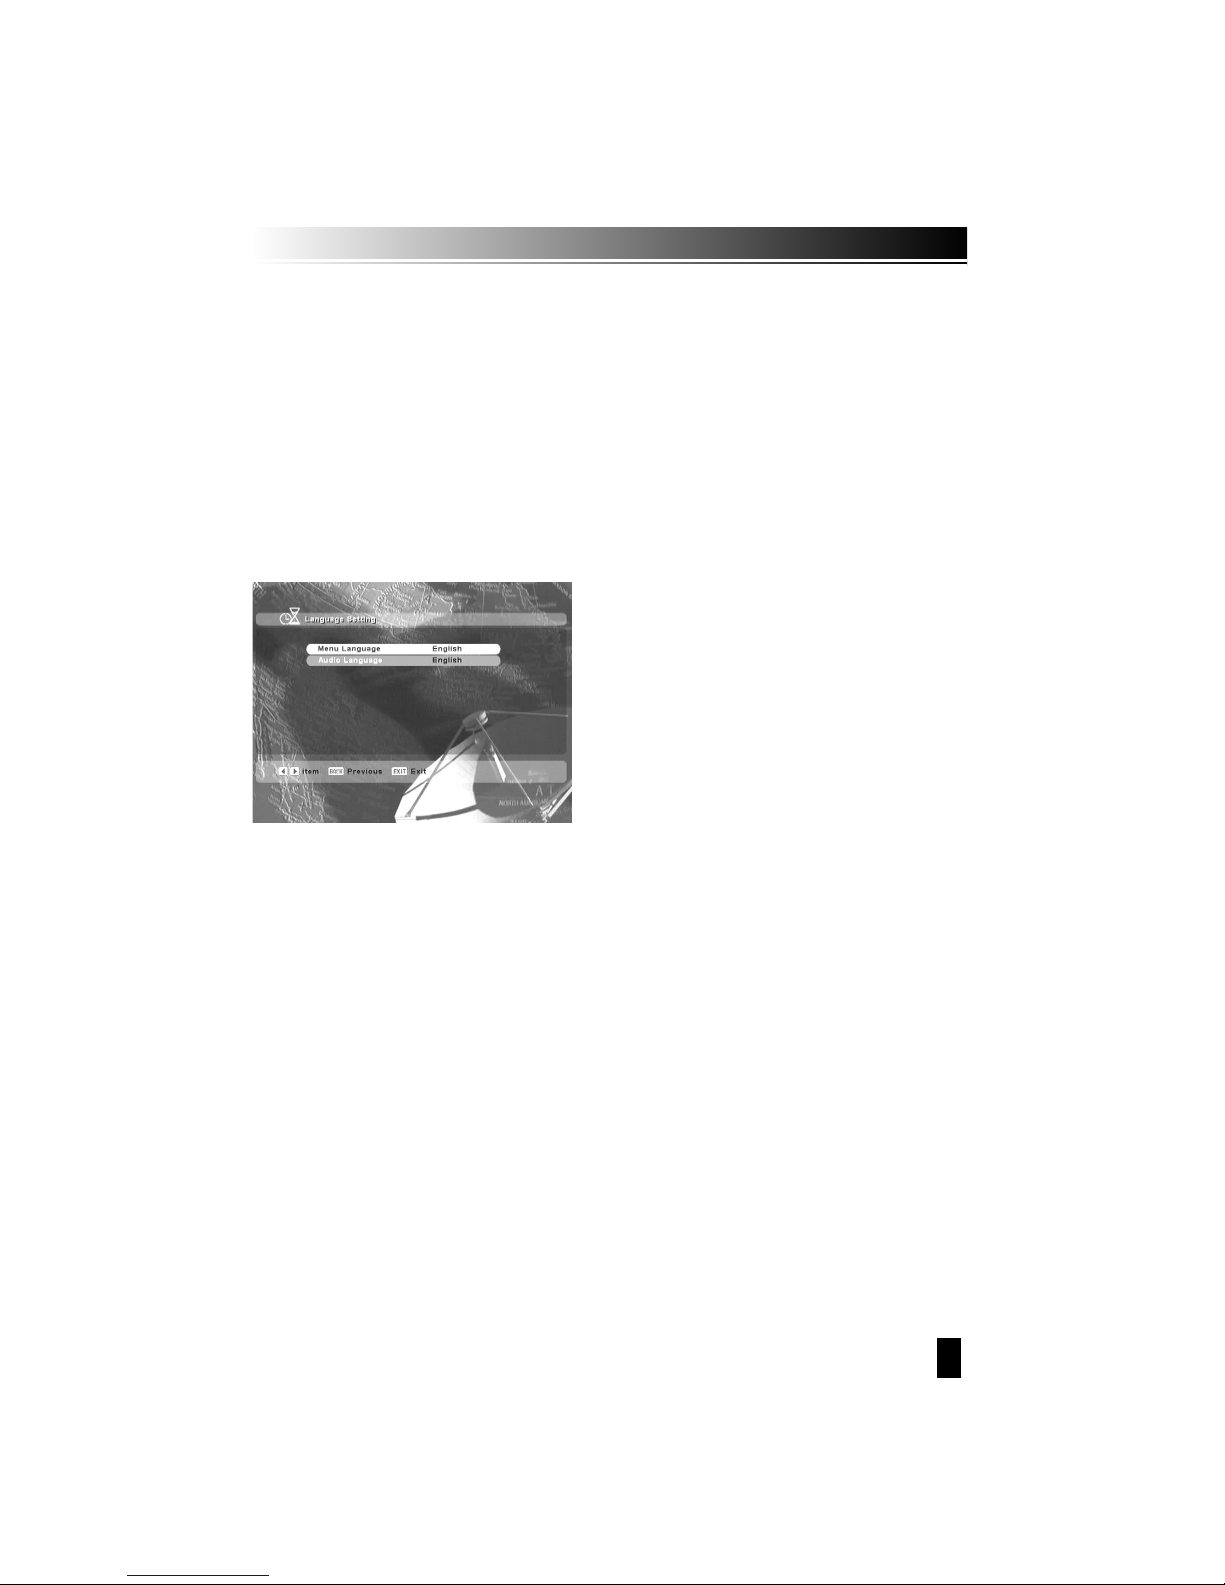
1. Language setting
Choose your preferable language.
Page 10
10
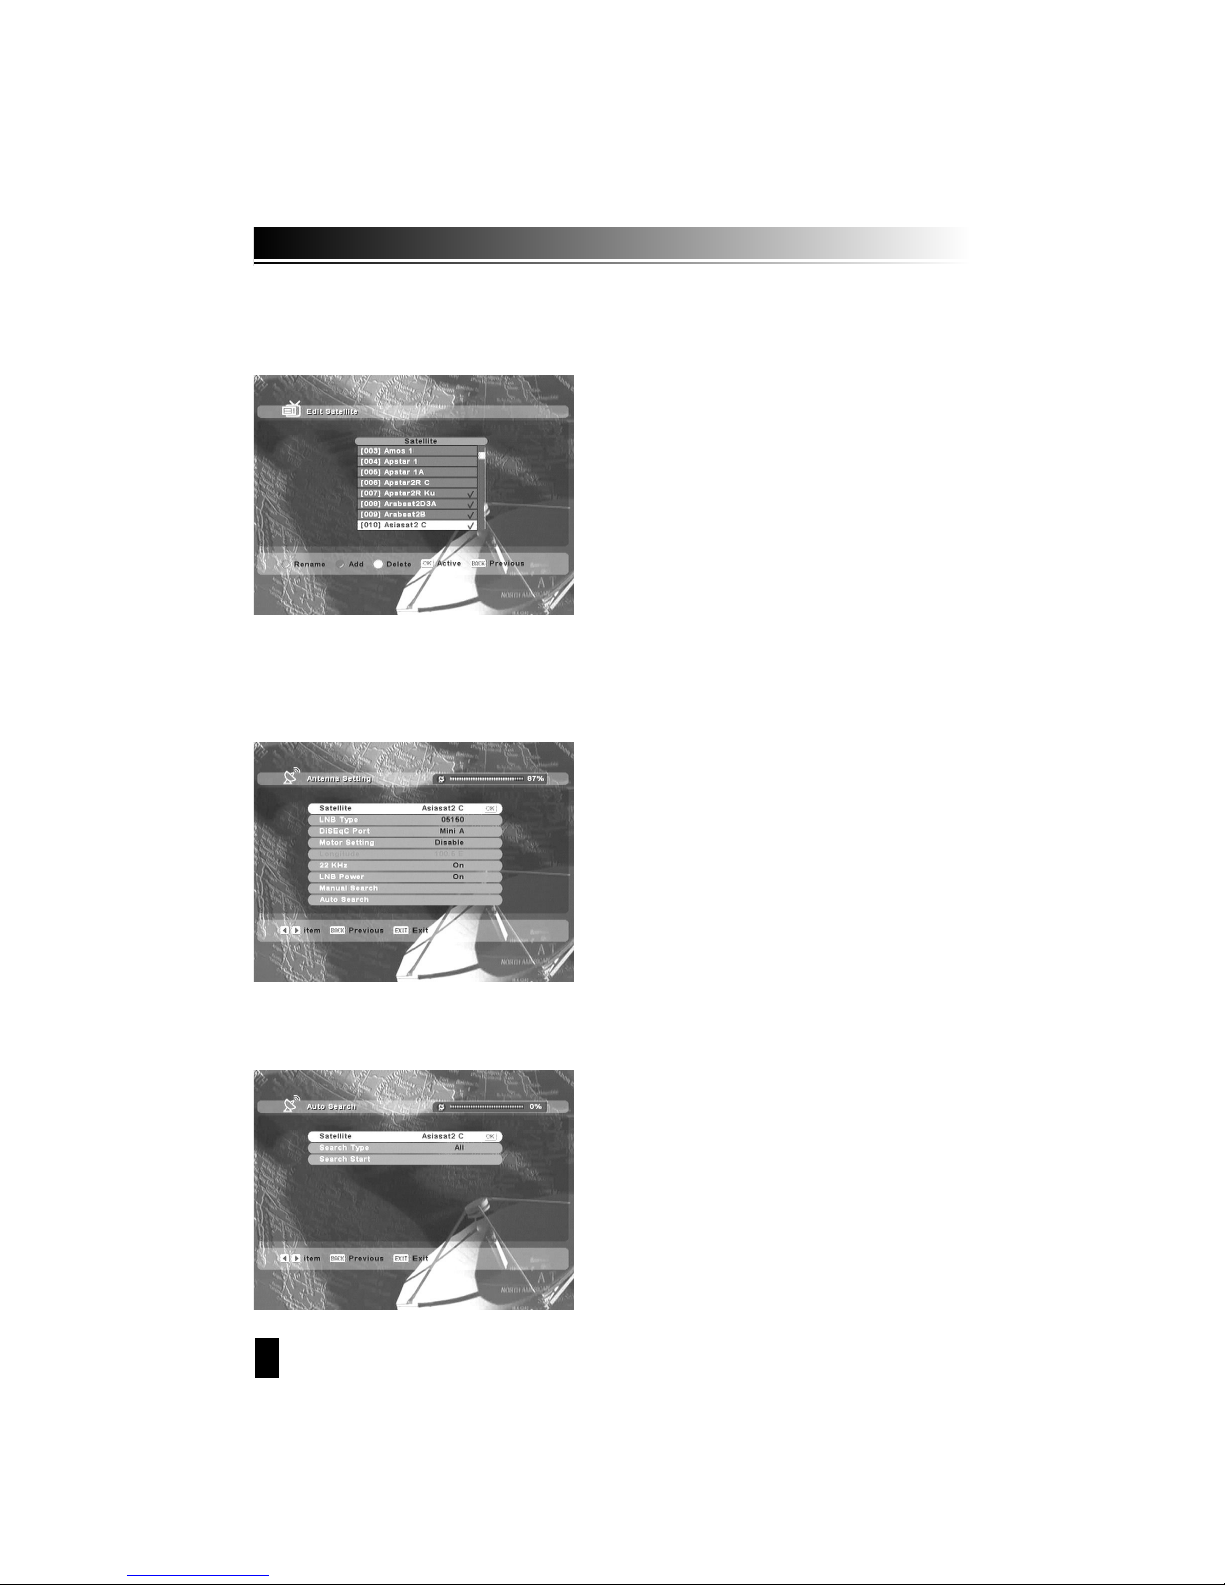
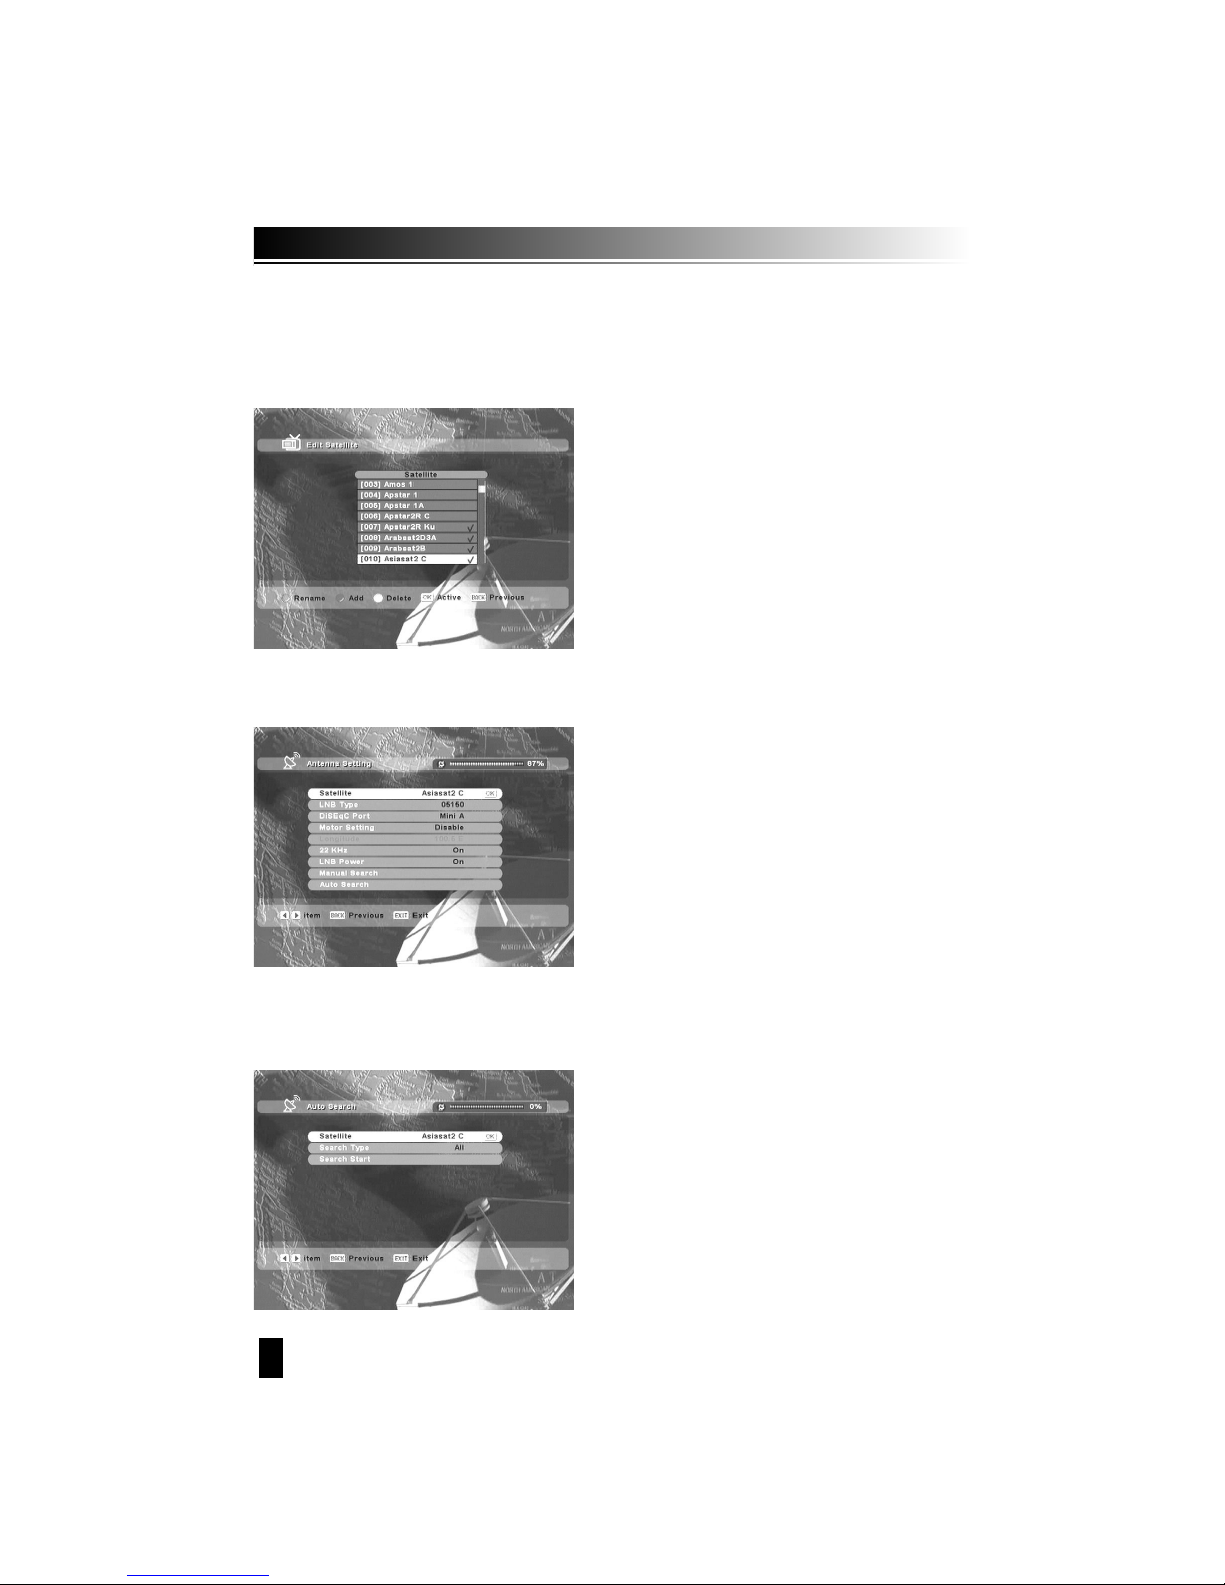
3. Edit Statellite
Choose your preferable satellite by OK button. If you don’t choose satellite, press OK button again.
If you want to do the next performance, press EXIT button.
4. Antenna Setting
While cursor key is on satellite, if you press OK button and right key, you can select satellite.
While cursor key is on LNB Type, if you press OK button, it will show LNB frequency.
While cursor key is on motor setting, if you select “enable” and press OK button, it will show
how to set up DisEqc 1.2.
5. Automatic Search
After antenna setting, Automatic Search can be used
for easier search.
Press ok button, it will show satellite list. You can select
satellite by RED button.
ῡ Press “BACK” button
ῢ Search start
Page 11
11
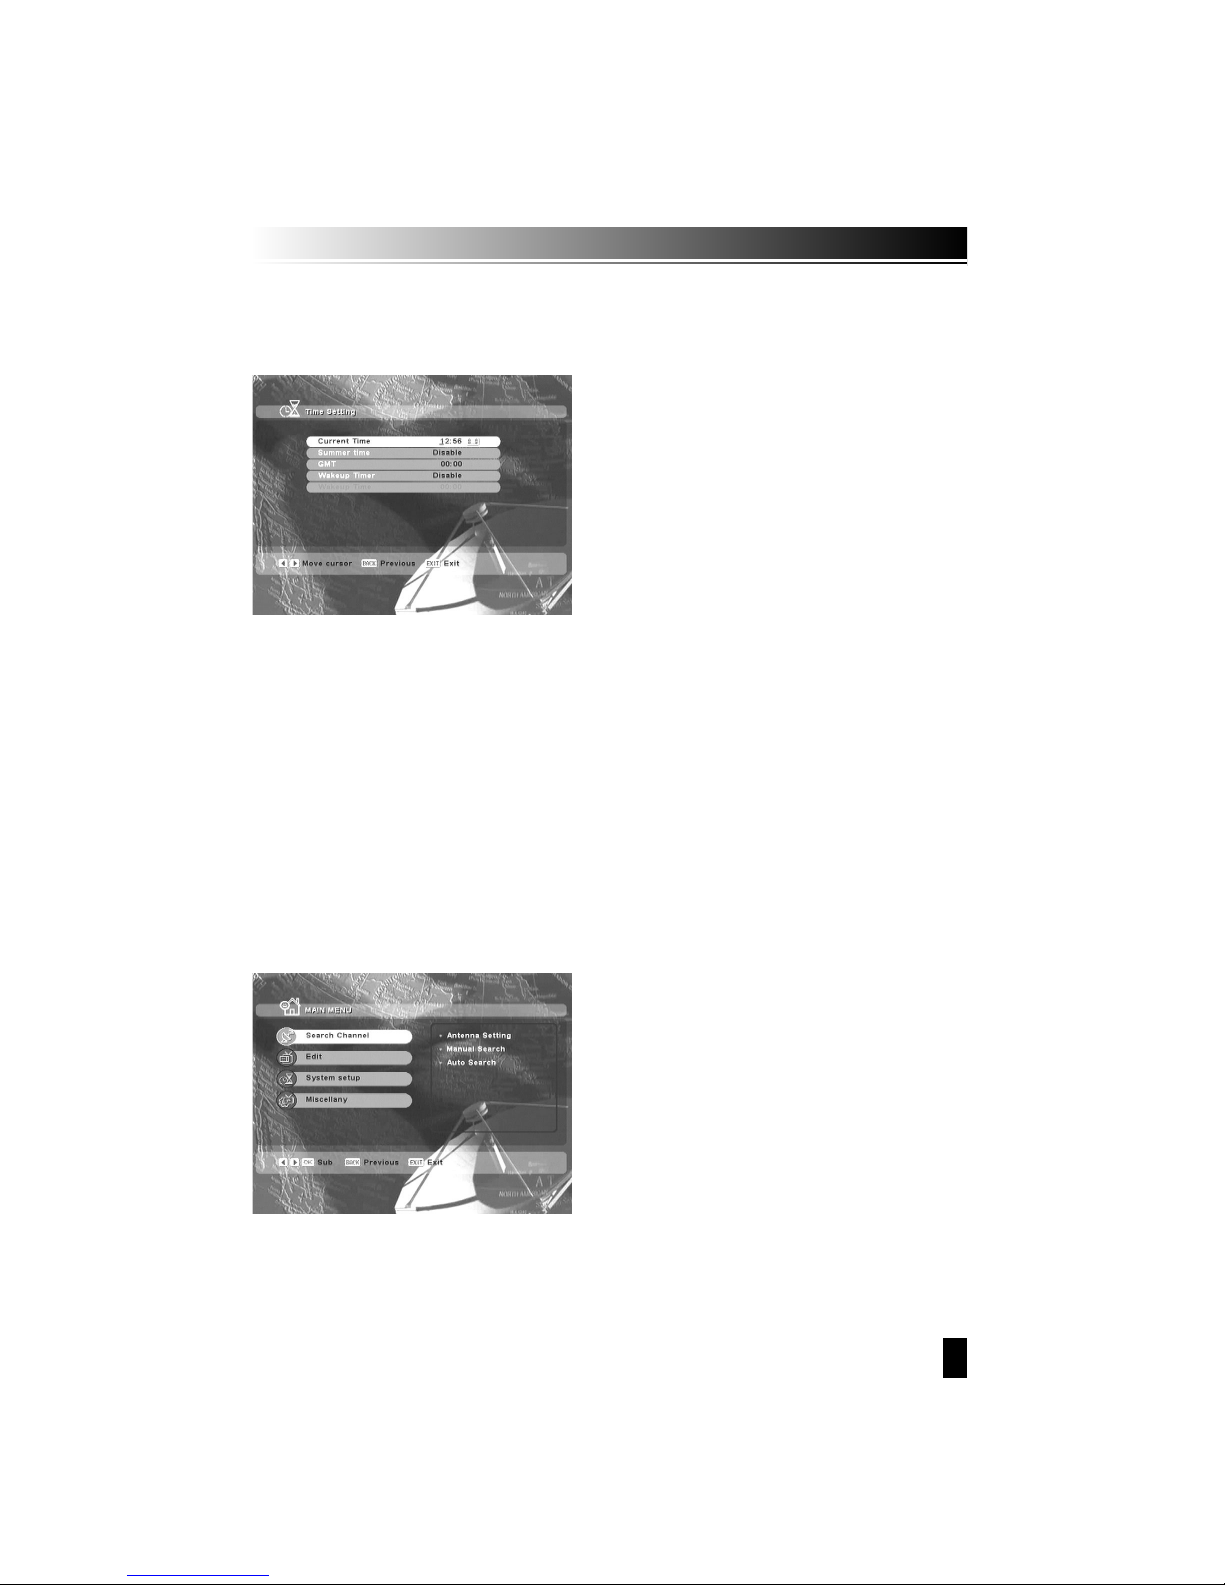
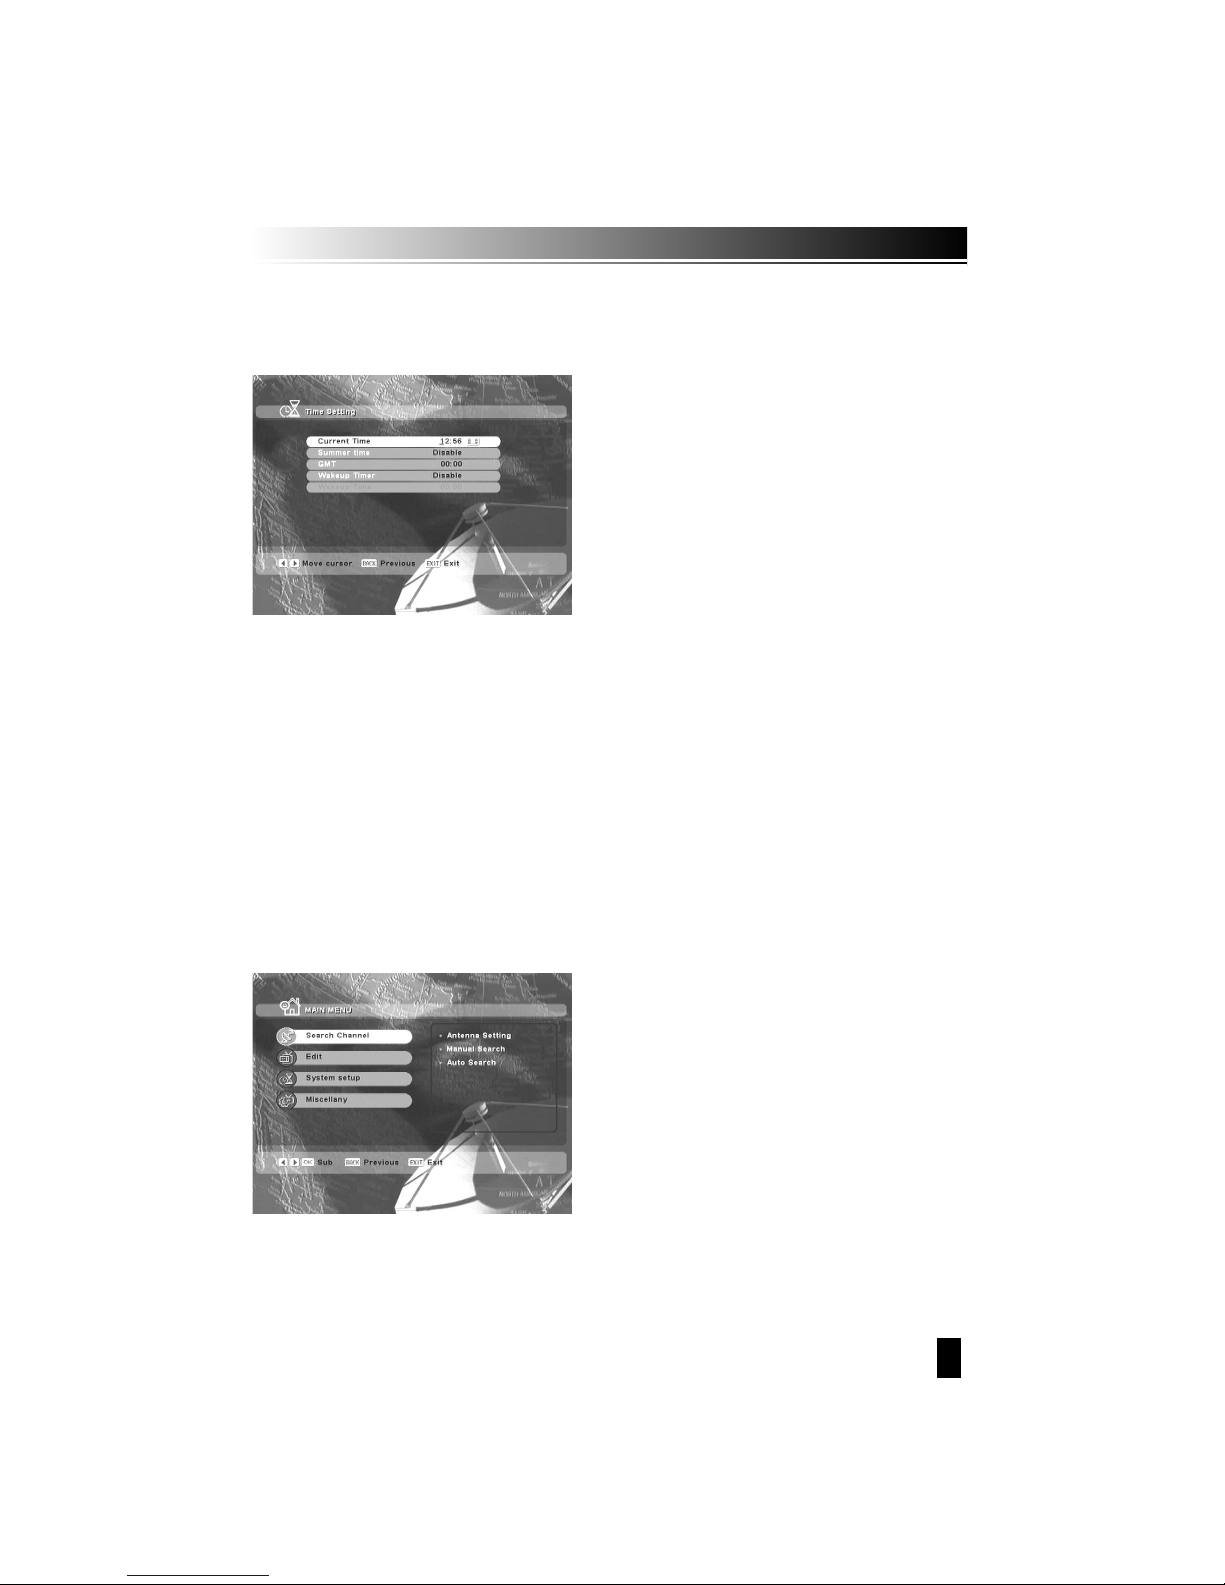
6. Time Setting
Adjust your time.
1. Search Channel
In order to install the receiver properly you have perform a Basic Settings.
When you have finished the setup procedure, you can start watching TV or listening to
Radio.
During the basic settings, a short information is displayed at the bottom of the menu
screen.
ῡ Turn on your TV and receiver.
ῢ Press the Menu button to display the Search channel menu.
This mode is to start the receiver finding channels.
4.2 Basic Settings
Page 12
12
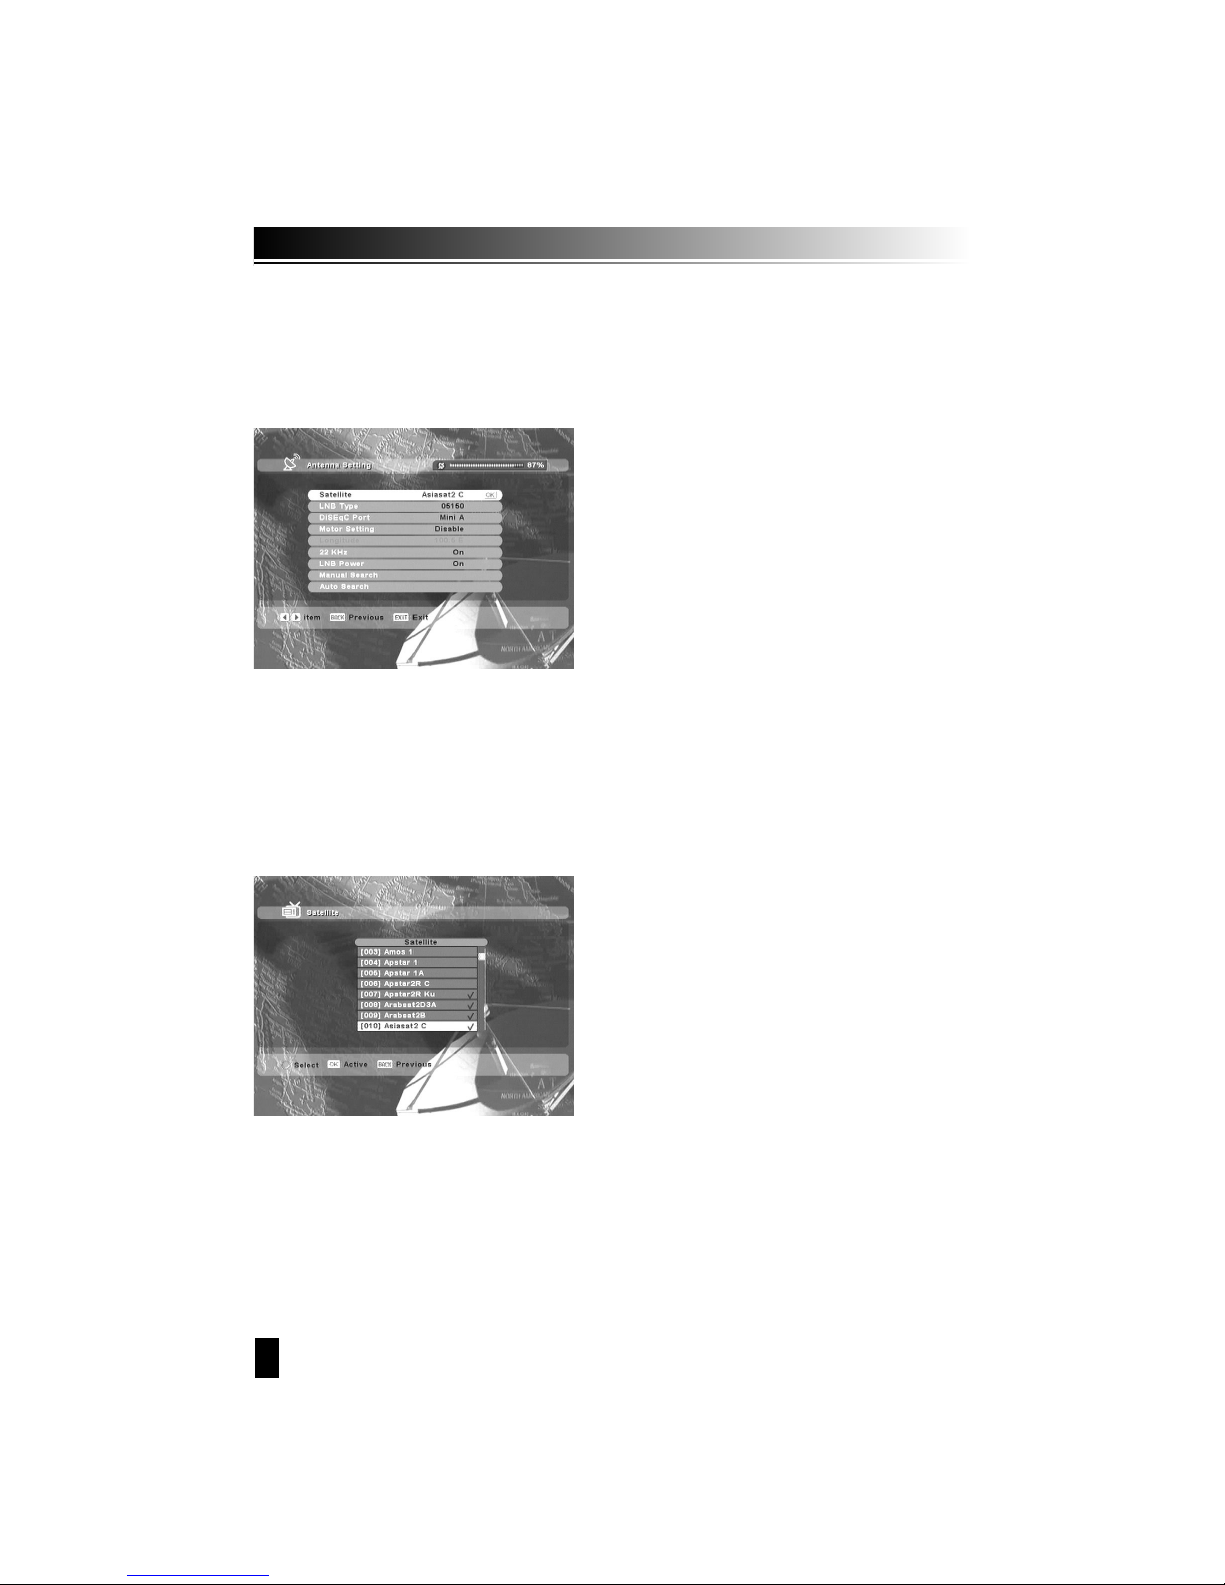
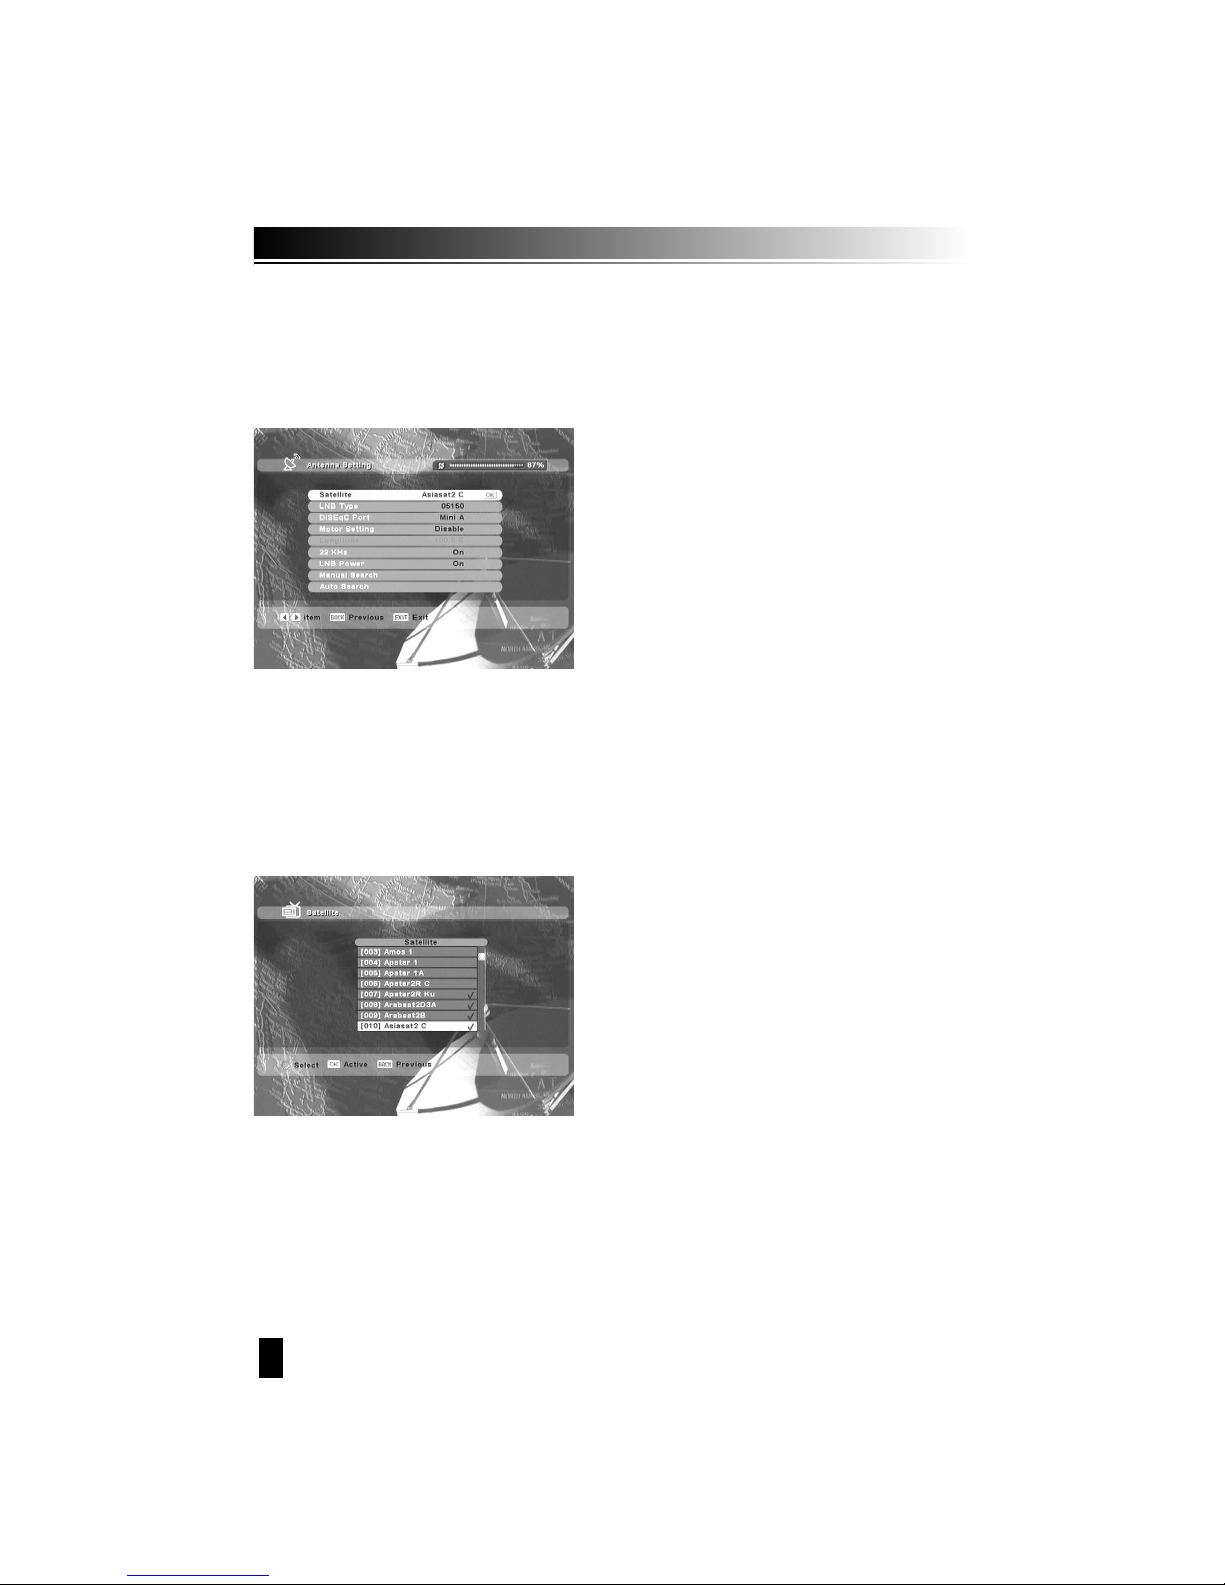
1-1. Antenna Setting
This mode is to make setting equipment outside. Press the OK button on the Antenna Setting of the
Search Channel. The Following window will appear. Select one the alternative satellite names,
specify the LNB frequency, set the Tone switch & the DiSEqC switch according to the installed
switch box & DiSEqC. Other parameter values are changed automatically according to satellite name.
ῡ If you press OK button, satellite list shows up, then you can select your favorite satellite.
Left or right button shows selected satellite list.
ῢ When the Cusor is on LNB TYPE, if you press OK button, it will show LNB Low, High Frequency.
You can edit Frequency.
ΰ When the Cursor is on motor setting, if you choose “enable” and press OK button, it will show
DiSEqC 1.2 setting.
ᵉ 22KHz : Select “On” or “Off” for setting
ᵉ 0/12Volt Switch (ᵀ Optional) :
Select “0 Volt” or “12 Volt” for setting
ᵉ LNB Power : Select “On” or “Off” for setting
Page 13
13
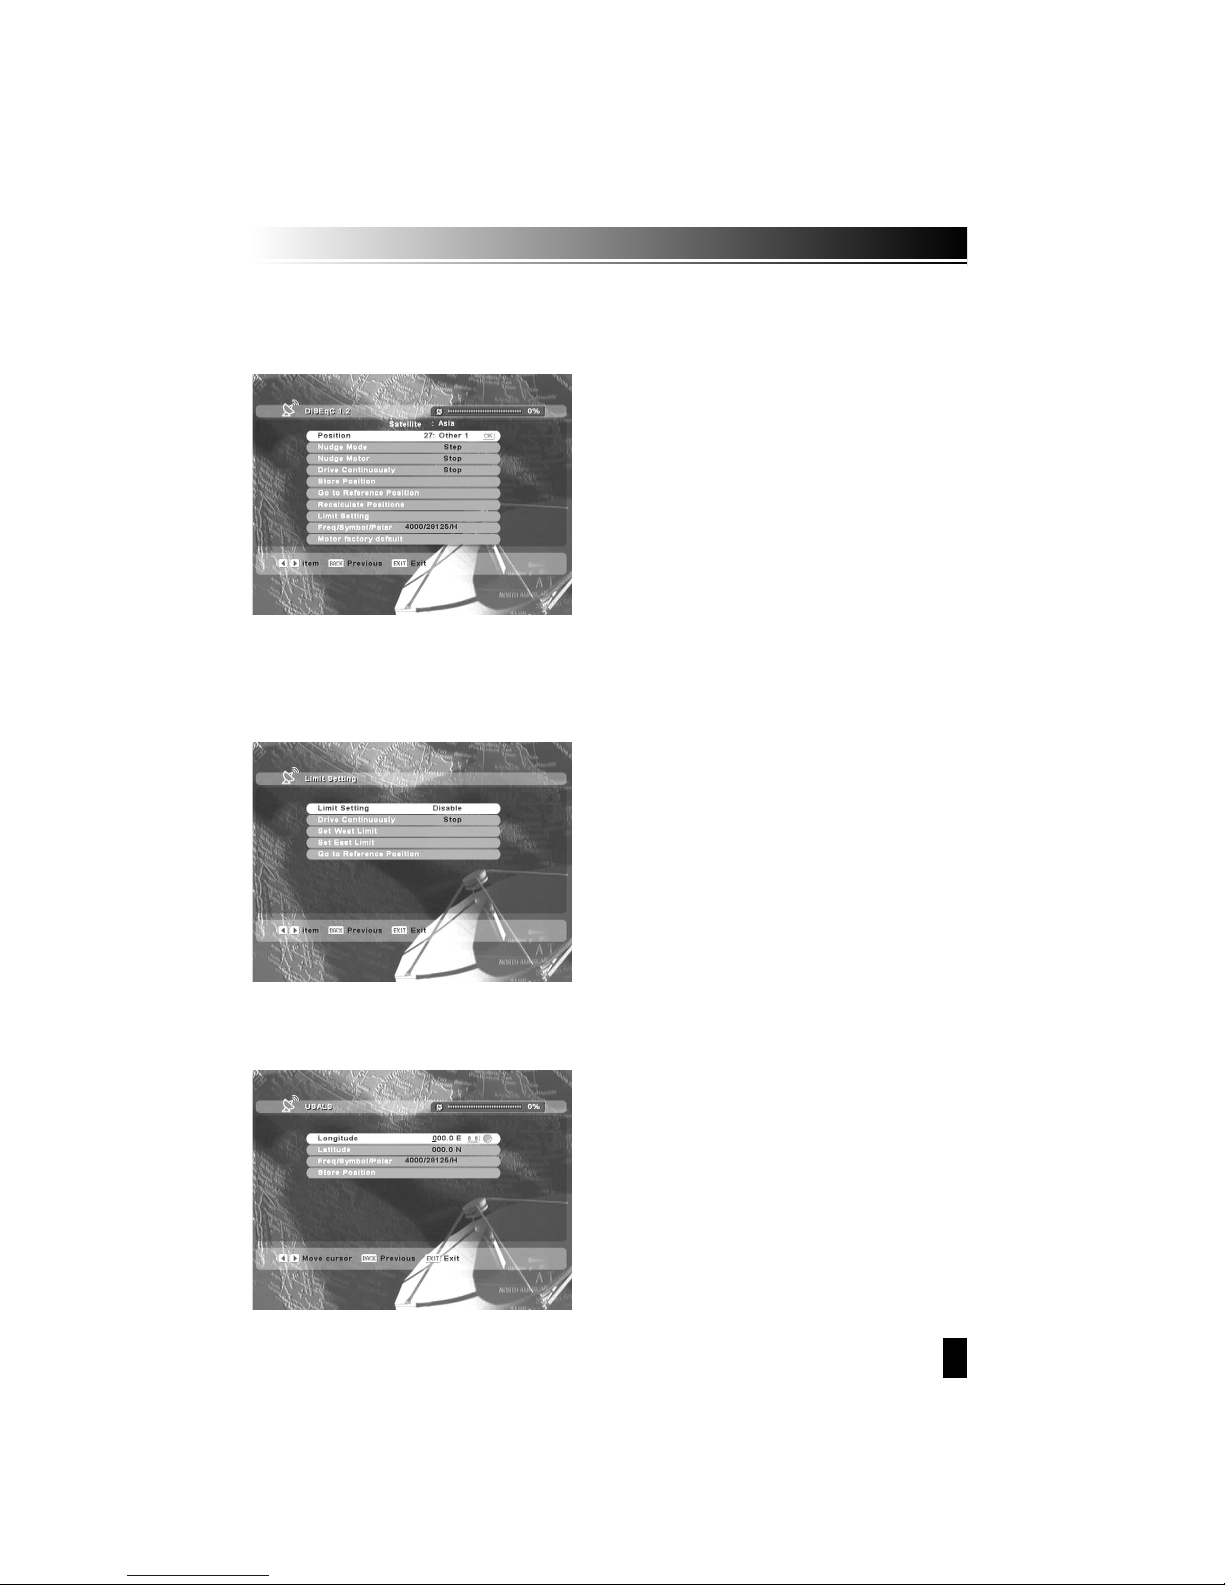
A. DiSEqC 1.2
Select necessary parameter to use Motor.
B. Limit setting
To avoid malfunction of motor, make a limit for motor from east to west.
C. USALS
Set longitude and latitude of the present location and then adjust antenna to proper
direction.
Page 14
14
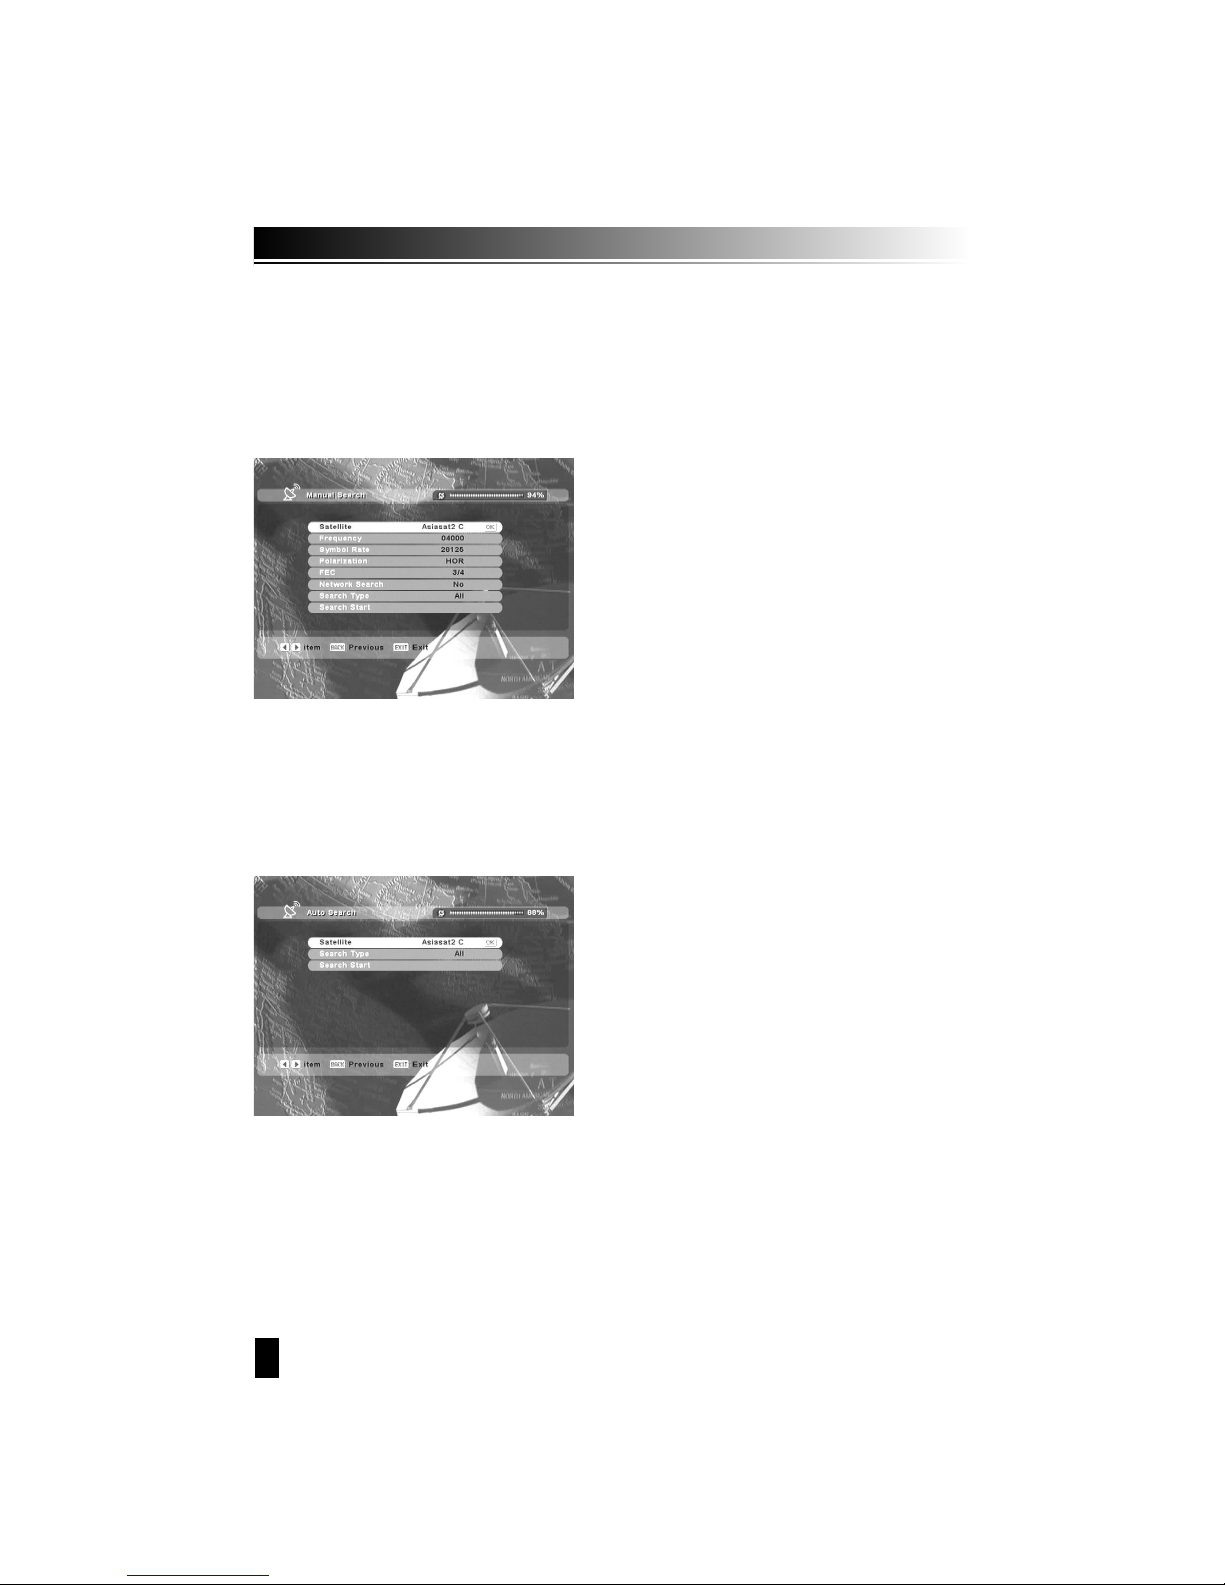
1-2. Manual Search
After antenna setting, this menu can find help find particular chanels.
Make a suitable parameter on Frequency, Symbol rate, Polarization, FEC. While cursor
key is on satellite, if you press OK button and right key, you can select satellite.
While the cursor key is on Frequency, if you press OK button, satellite list shows uo, then you
can select your favorite satellite. Left or right button shows selected satellite list.
While cursor key is on search start.
1-3. Automatic search
After antenna setting, Automatic search can be used for easier search.
Press ok button, it will show satellite list. You can select
satellite by RED button.
ῡ Press “BACK” button
ῢ Search start
Page 15
15
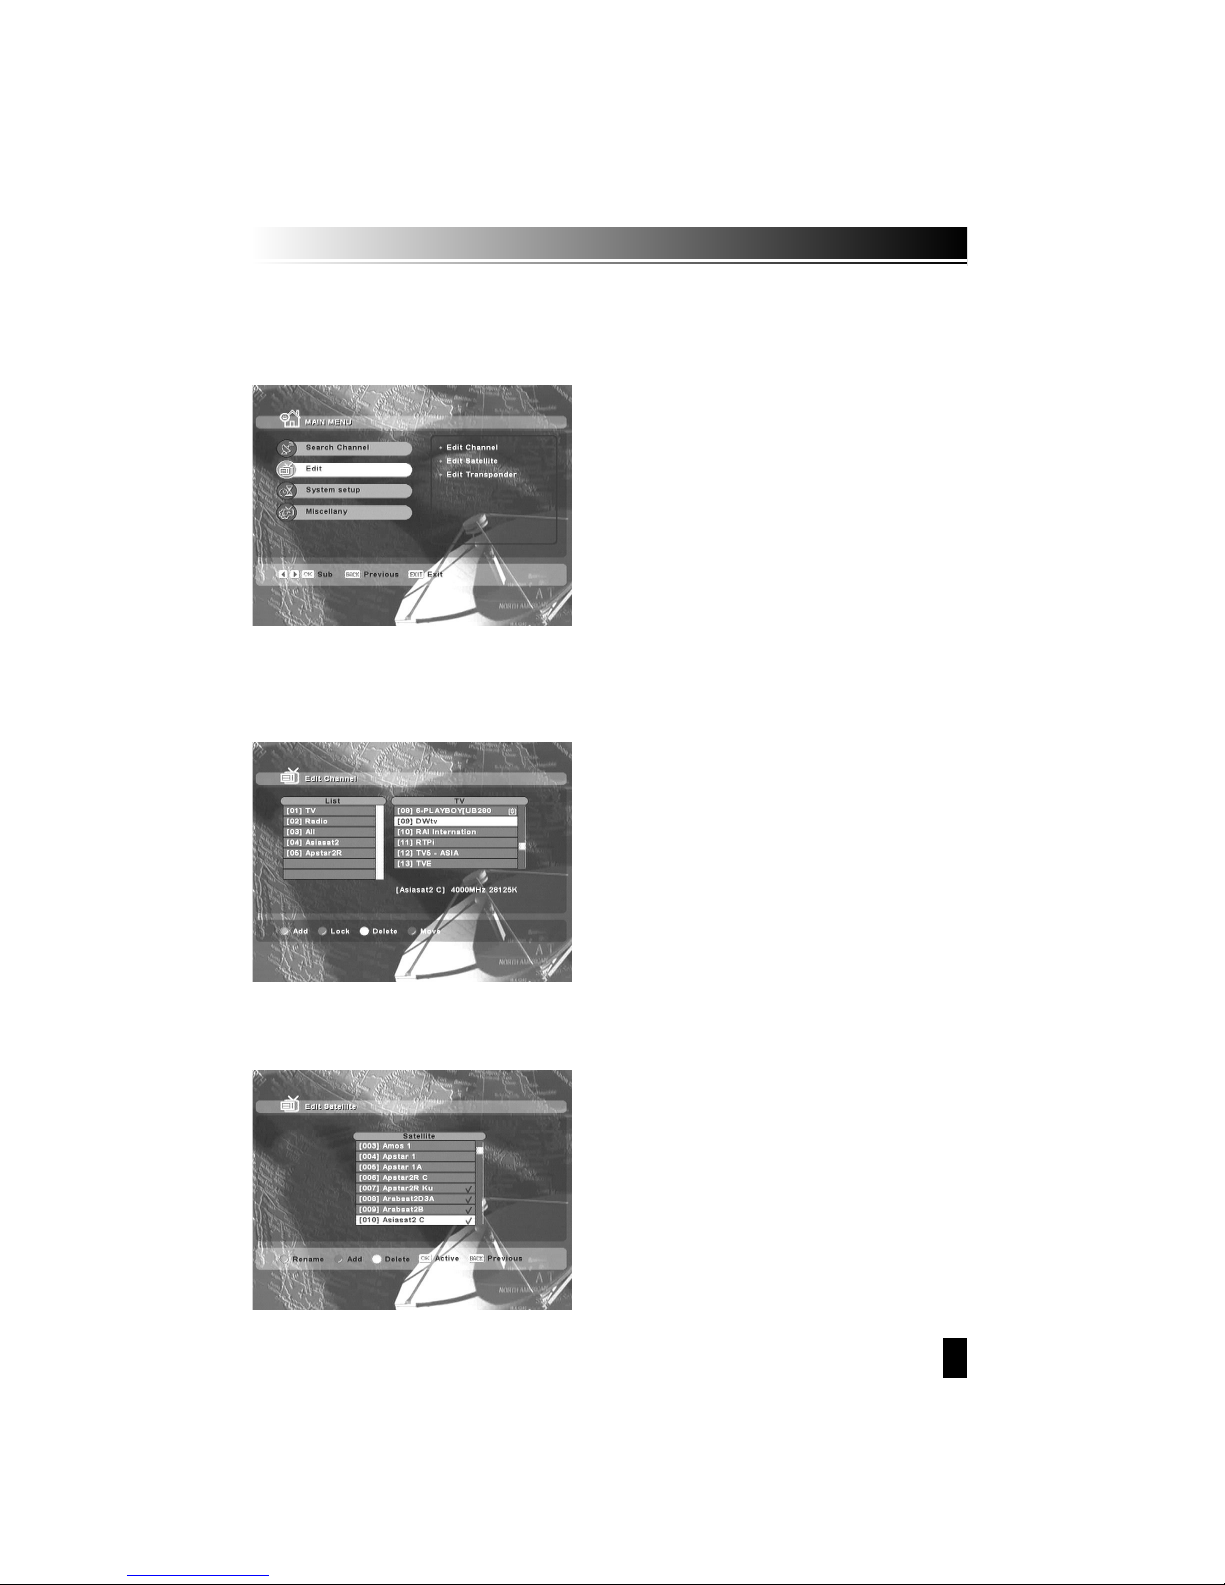
After finishing setting, edit screen will show as below.
1. Edit Channel
Edit a channel by adding, lock, moving, and delecting.
2. Edit satellite
Edit a satellite by renaming, adding, and deleting
4.3 EDIT
Page 16
16
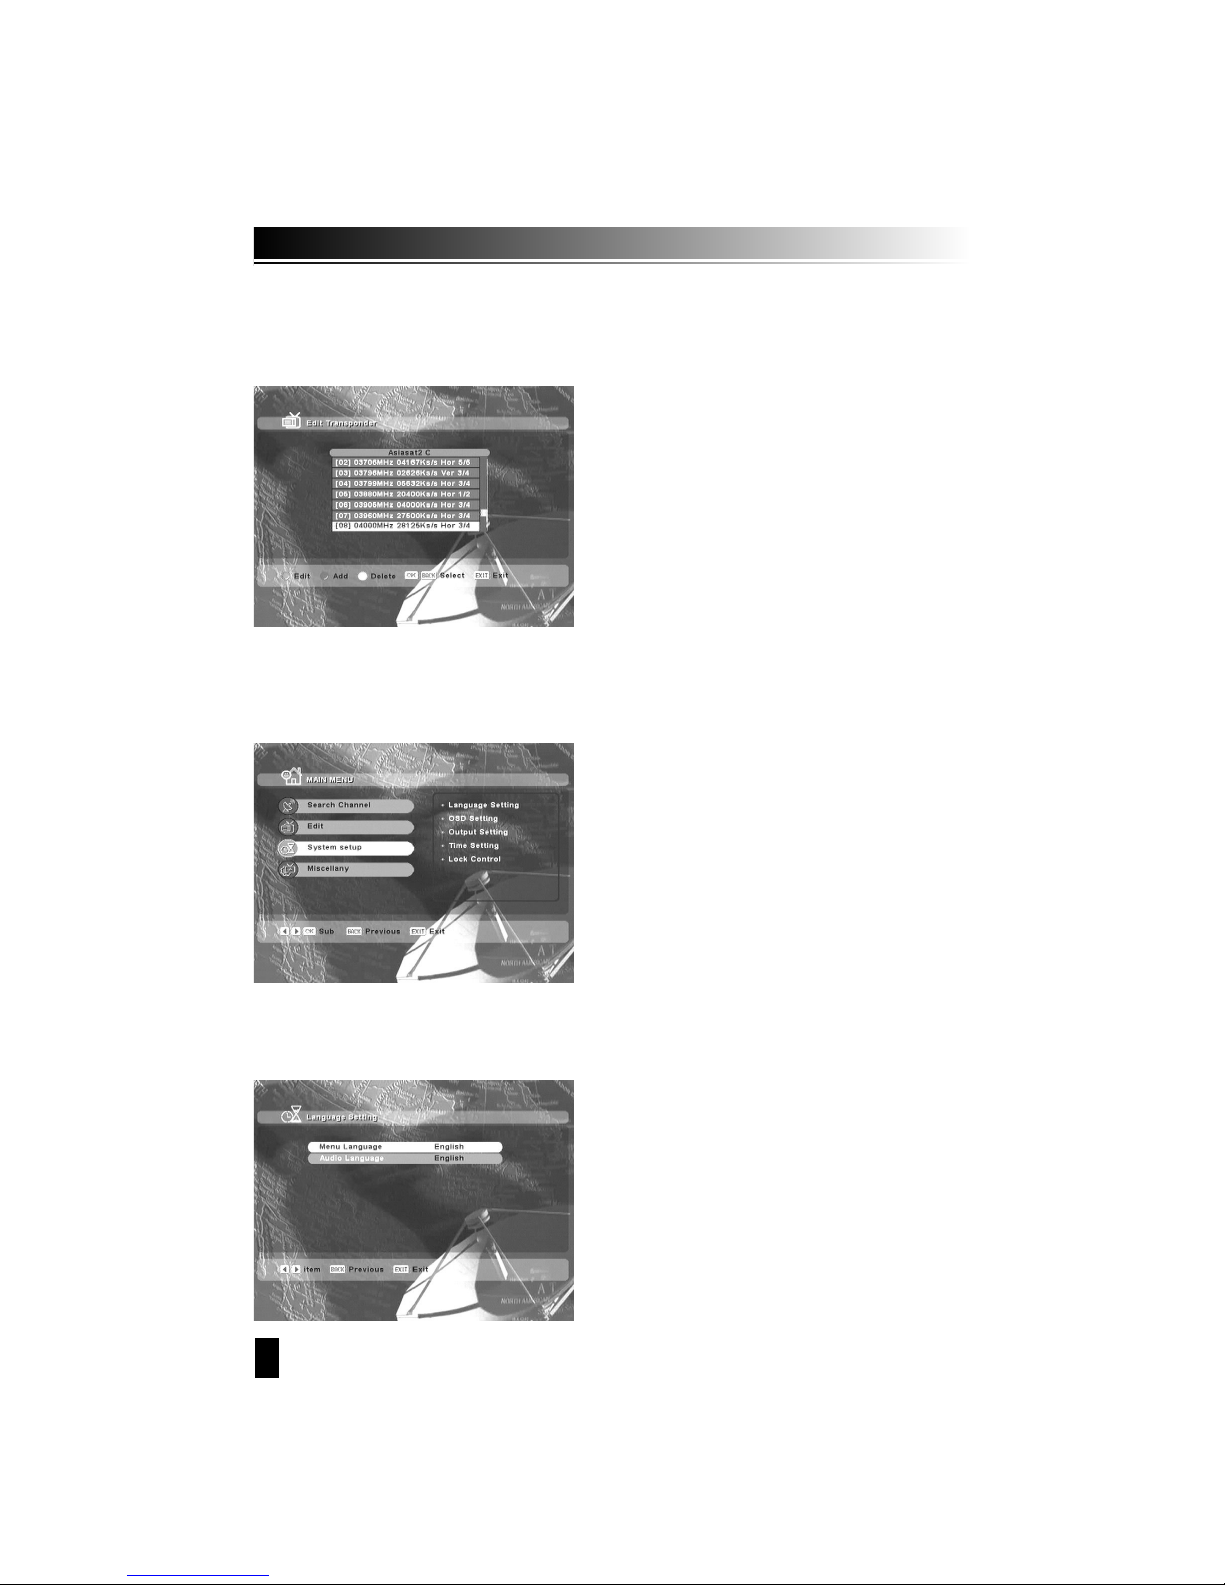
3. Edit Transponder
Edit a transponder by editing, adding, and deleting.
This helps set additional function such as language, OSD, Output, Time, lock control,
and UHF control.
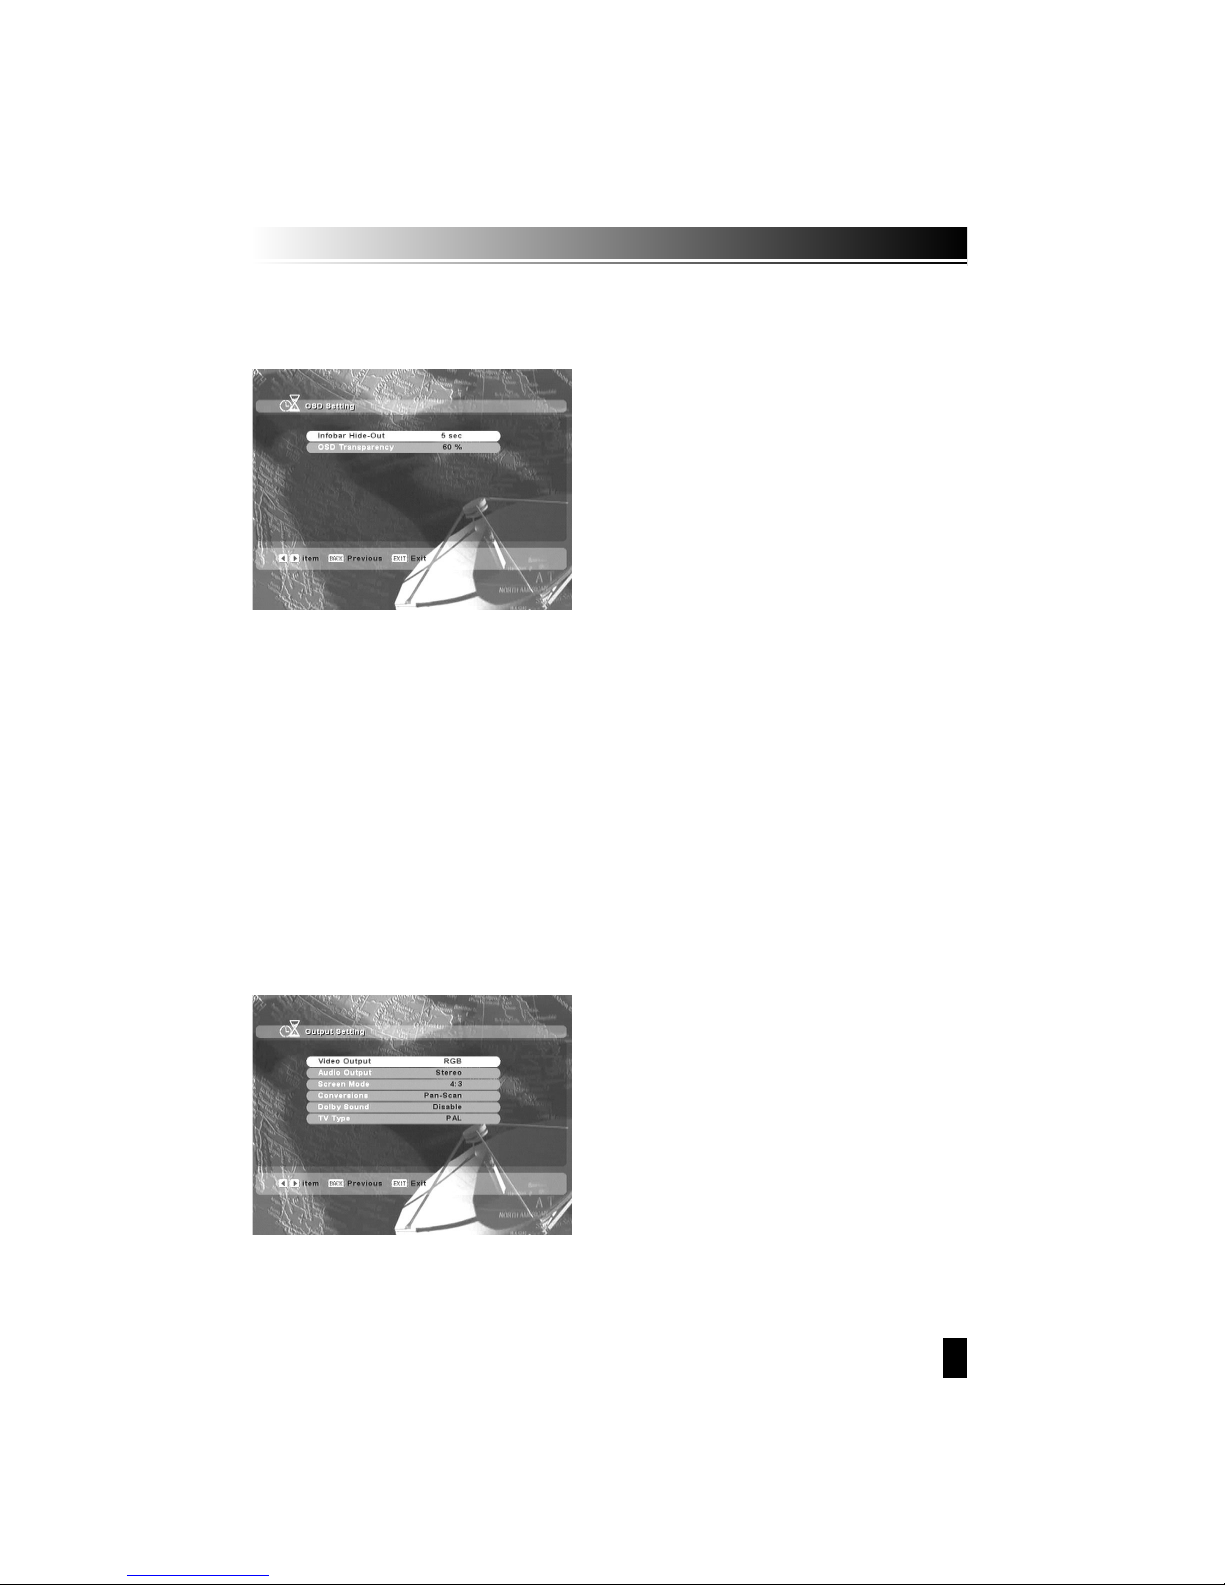
1. Language Setting
Select language for menu and Audio language and Subtitle language. select “Language setting”
with ᵾOᶀ key and the press the OK button. Select a desired language as English or others.
4.4 SETUP
Page 17
17
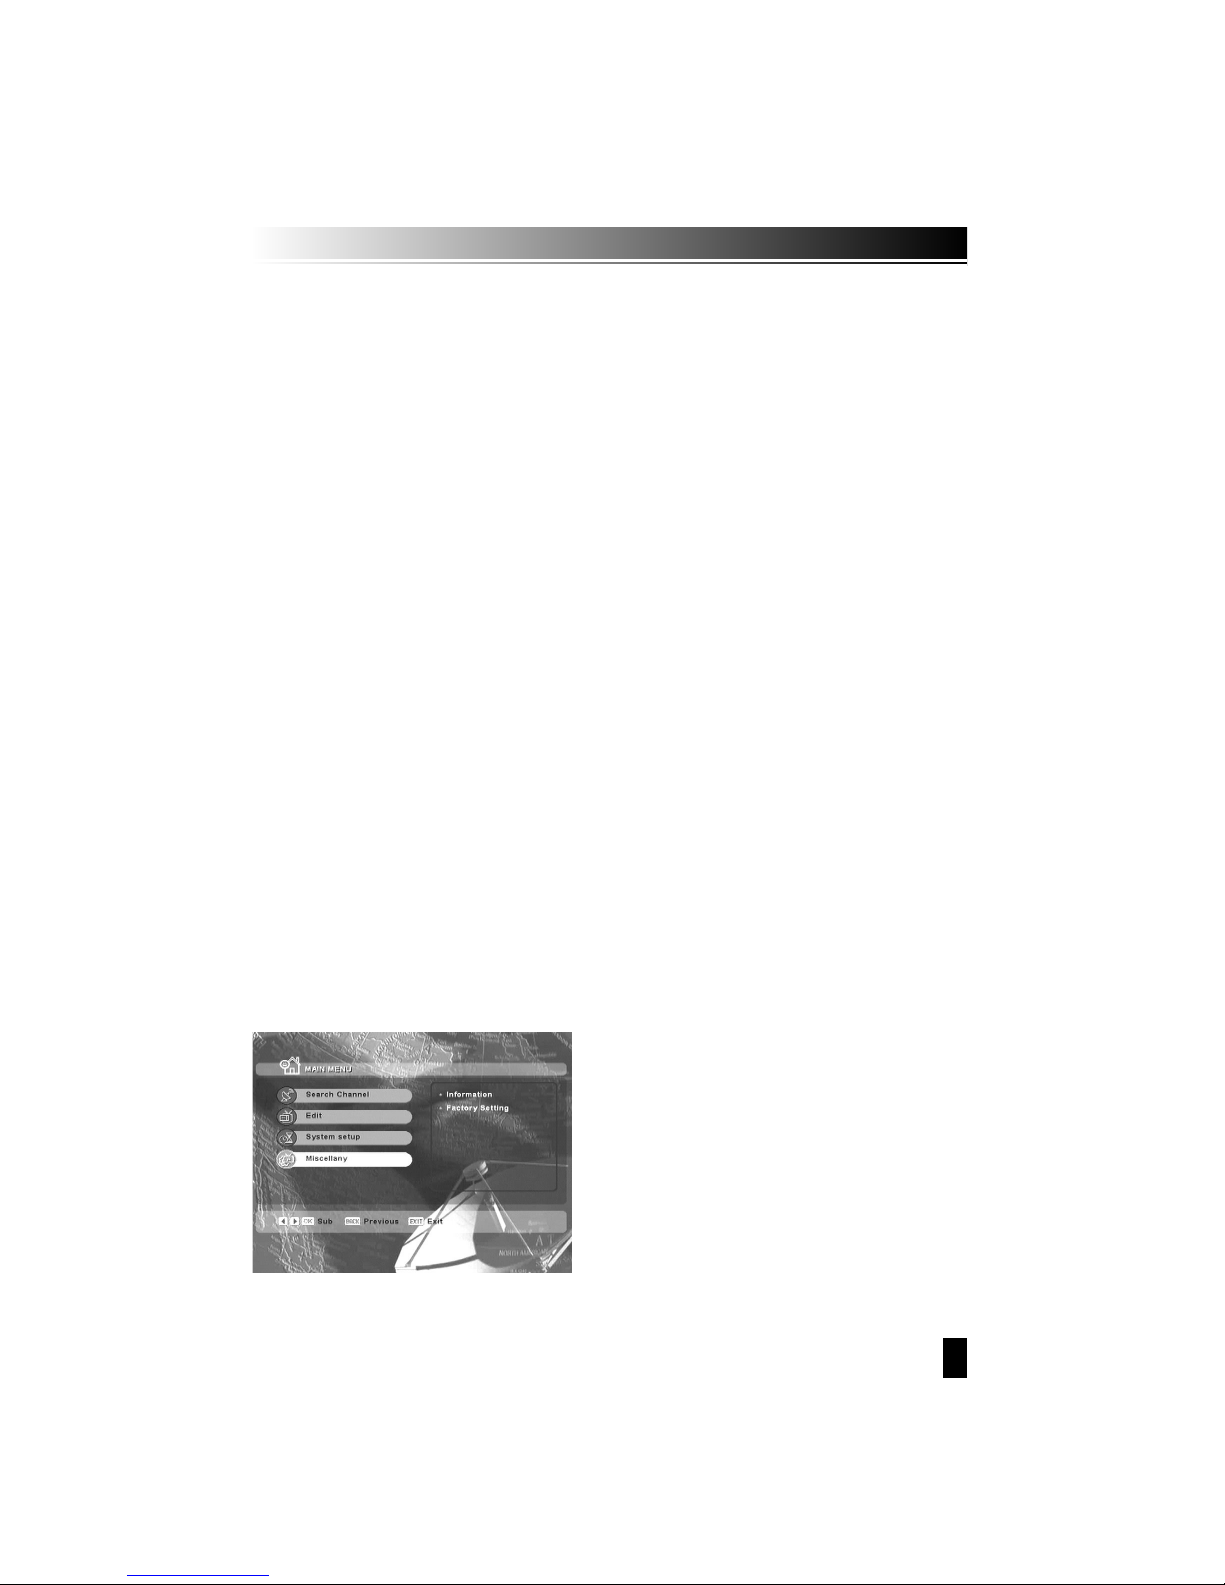
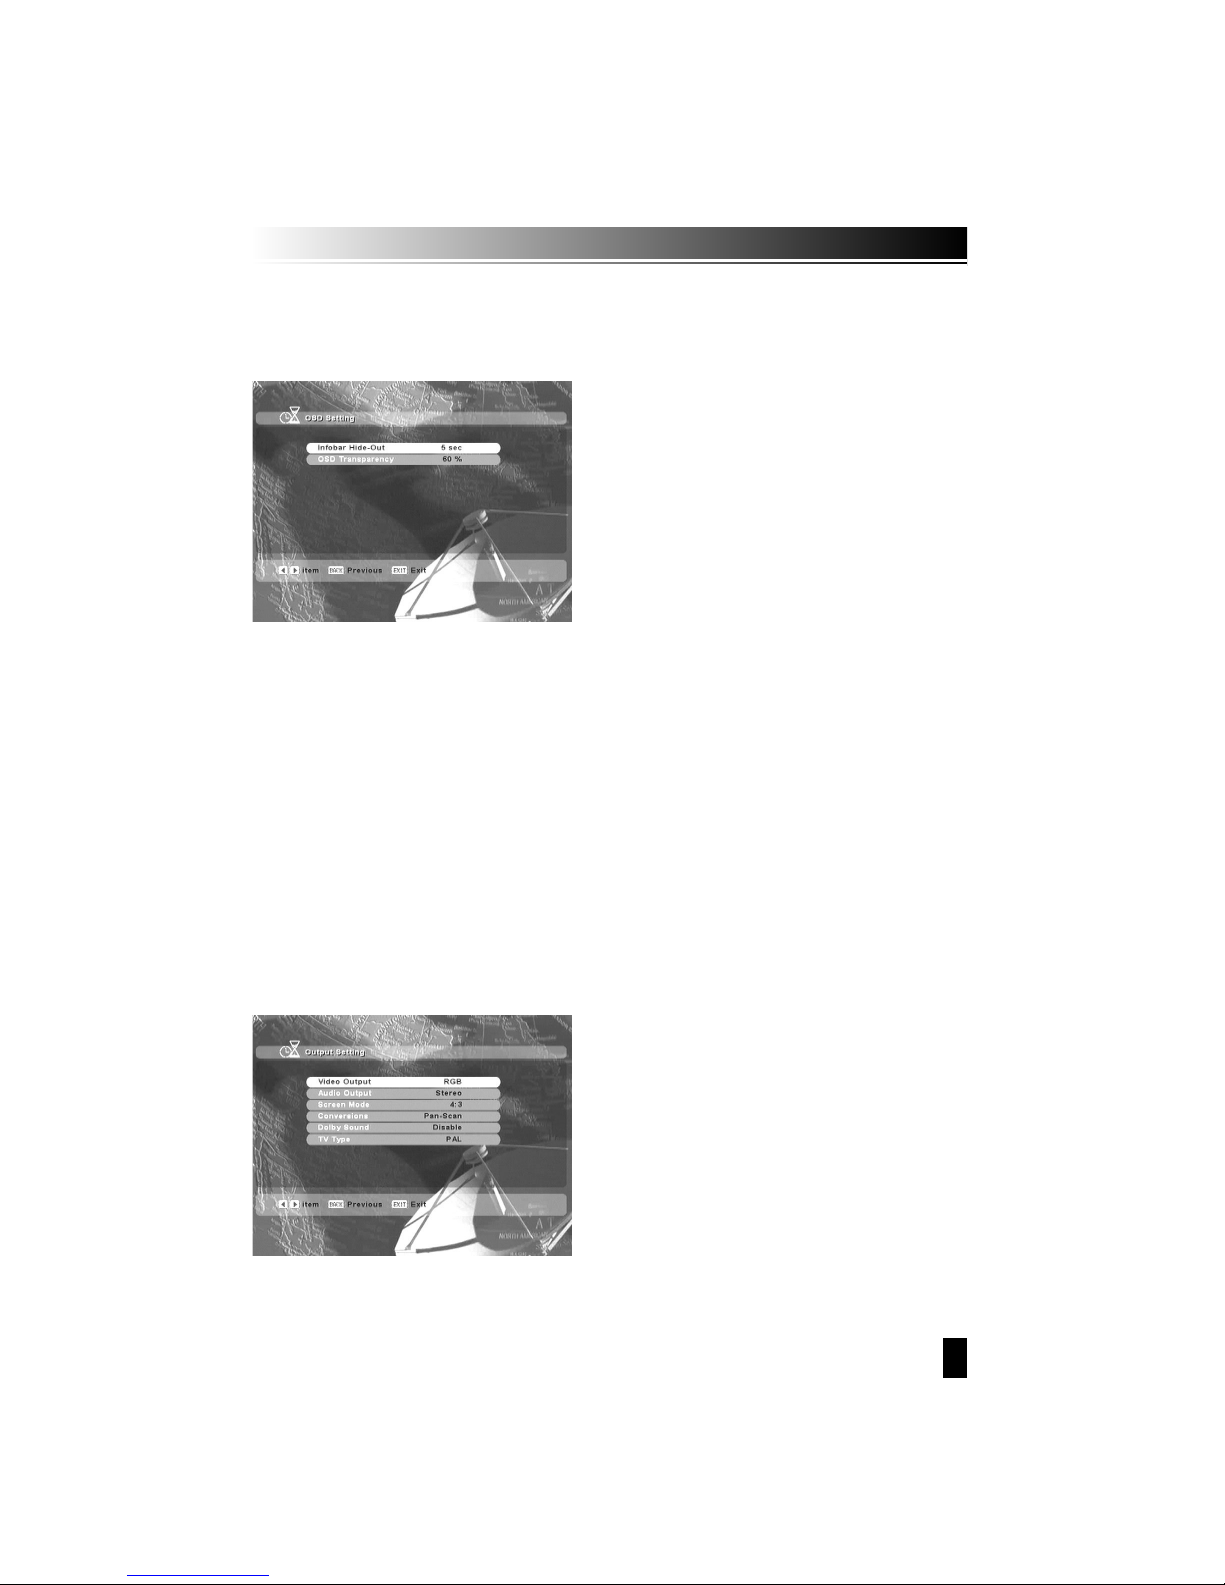
2. OSD Setting
Changes wanted mode for info bar hide-out time, Background, Sound effect, OSD
Transparency or Load default.
A. Infobar hide-out
1. Select “OSD Setting” with ᵾOᶀ key.
B. OSD Transparency
1. Change the transparency of OSD by ᵾOᶀ key.
3. Output Setting
Set suitable setting for connecting equipment such as TV .
Page 18

18
4. Time Setting
Set time current time, wake up time, and sleep time.
A. Current Time
1. Press ᵾOᶀ key to select “current Time”
2. Input the local time by pressing number button.
B. Wakeup Timer
1. Press ᵾOᶀ key to select “Wakeup Timer”
2. To set Wakeup Timer in work, Select “Enable”
C. Wakeup Time
1. Press ᵾOᶀ key to select “Wakeup Time”
2. Time Enter the time in which the STB will power on.
5. lock Control
This menu helps prevent wrong usage receiver.
Use Age limit, menu lock, and password.
Page 19
19
A. Age Lock
1. Press ᵾOᶀ key to select “Age Lock”
2. To block certain channels by viewer’s age, select “Yes” by using the ᵾOᶀ keys.
B. Age Limit
1. Press ᵋOᵍ key to select “Age Limit”
2. Enter desired age to be blocked to certain channel by ᵾOᶀ keys.
C. Menu Lock
1. Press ᵋOᵍ key to select “Menu Lock”
2. To restrict entry to certain menu for securing program settings or installation.
3. Select “Yes” by using the ᵾOᶀ keys.
D. Current Password
Enter current password by pressing number.
E. New Password
Enter 4 digit number, which you want as new password after entering the current one.
F. Confirm Password
To Confirm the new password, input same password.
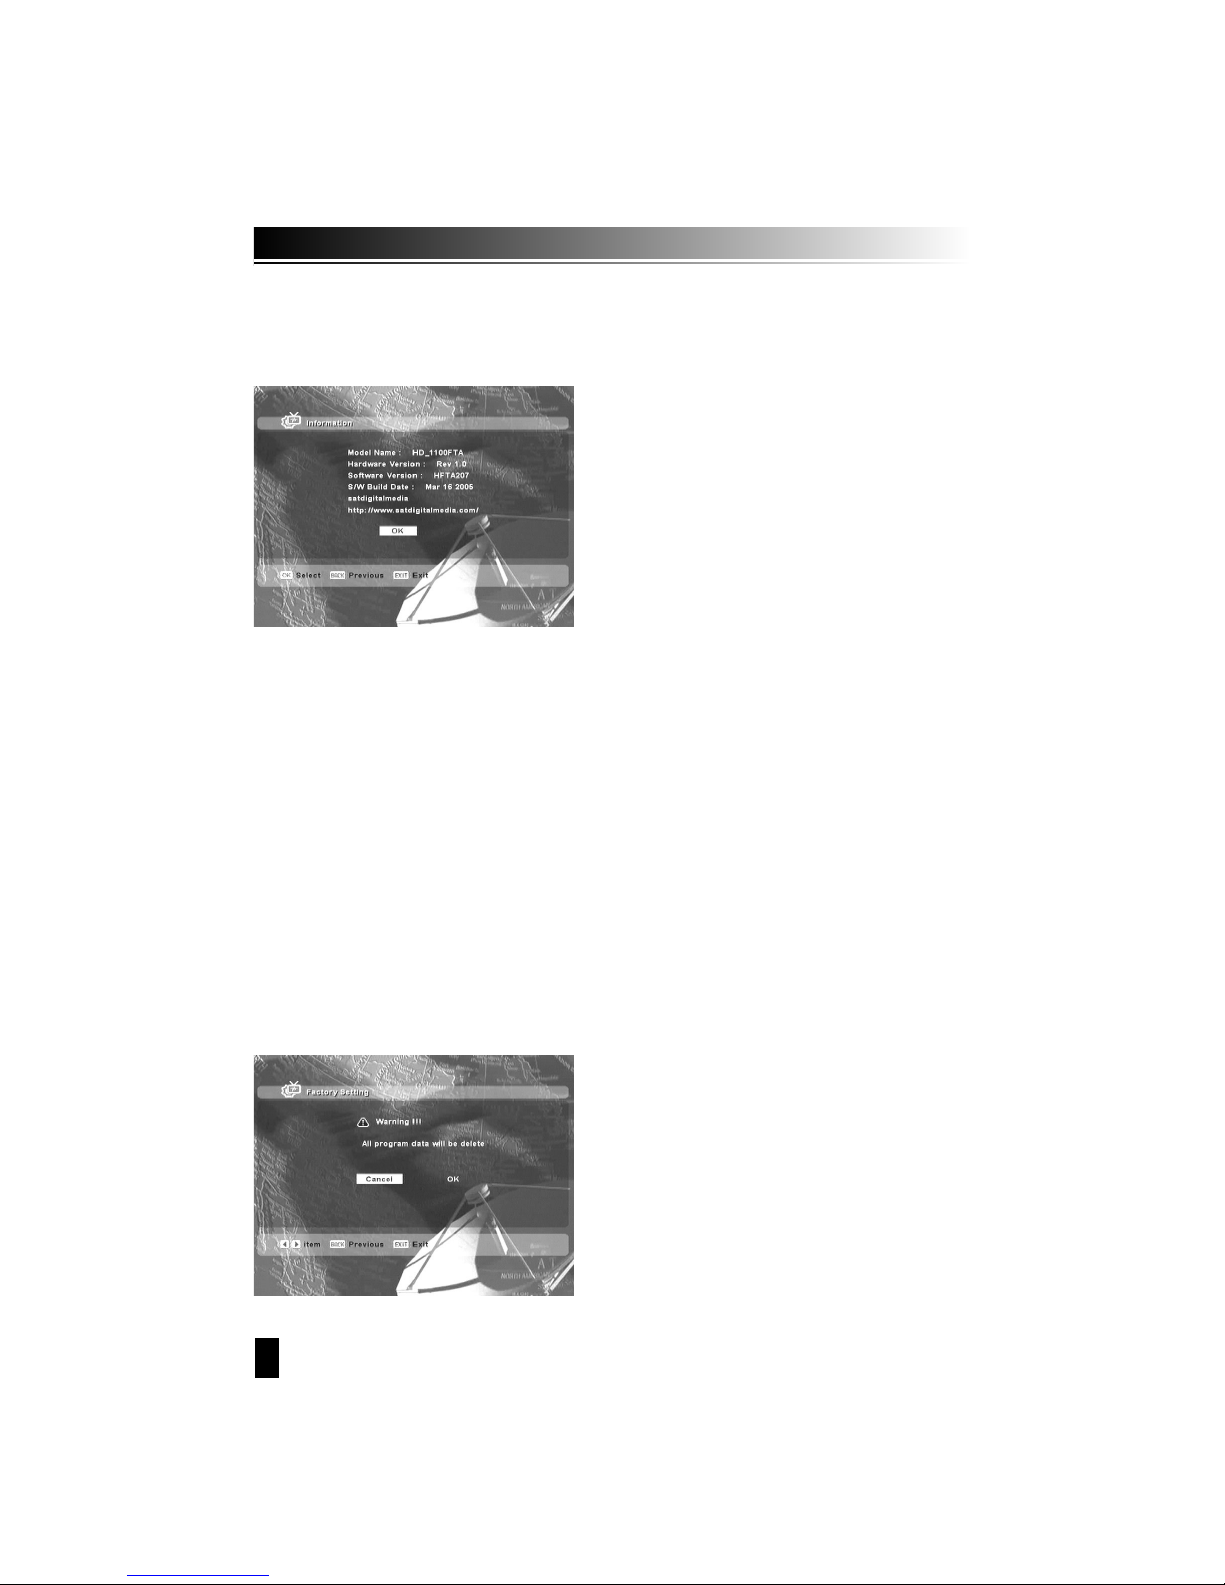
This menu helps see information of receiver and make FACTORY SETTING on receiver.
4.5 Miscellany
Page 20
20
1. Information
Shows H/W and S/W version, Database.
3. Factory Setting
This menu helps receiver make the state of first-time usage.
Page 21
21
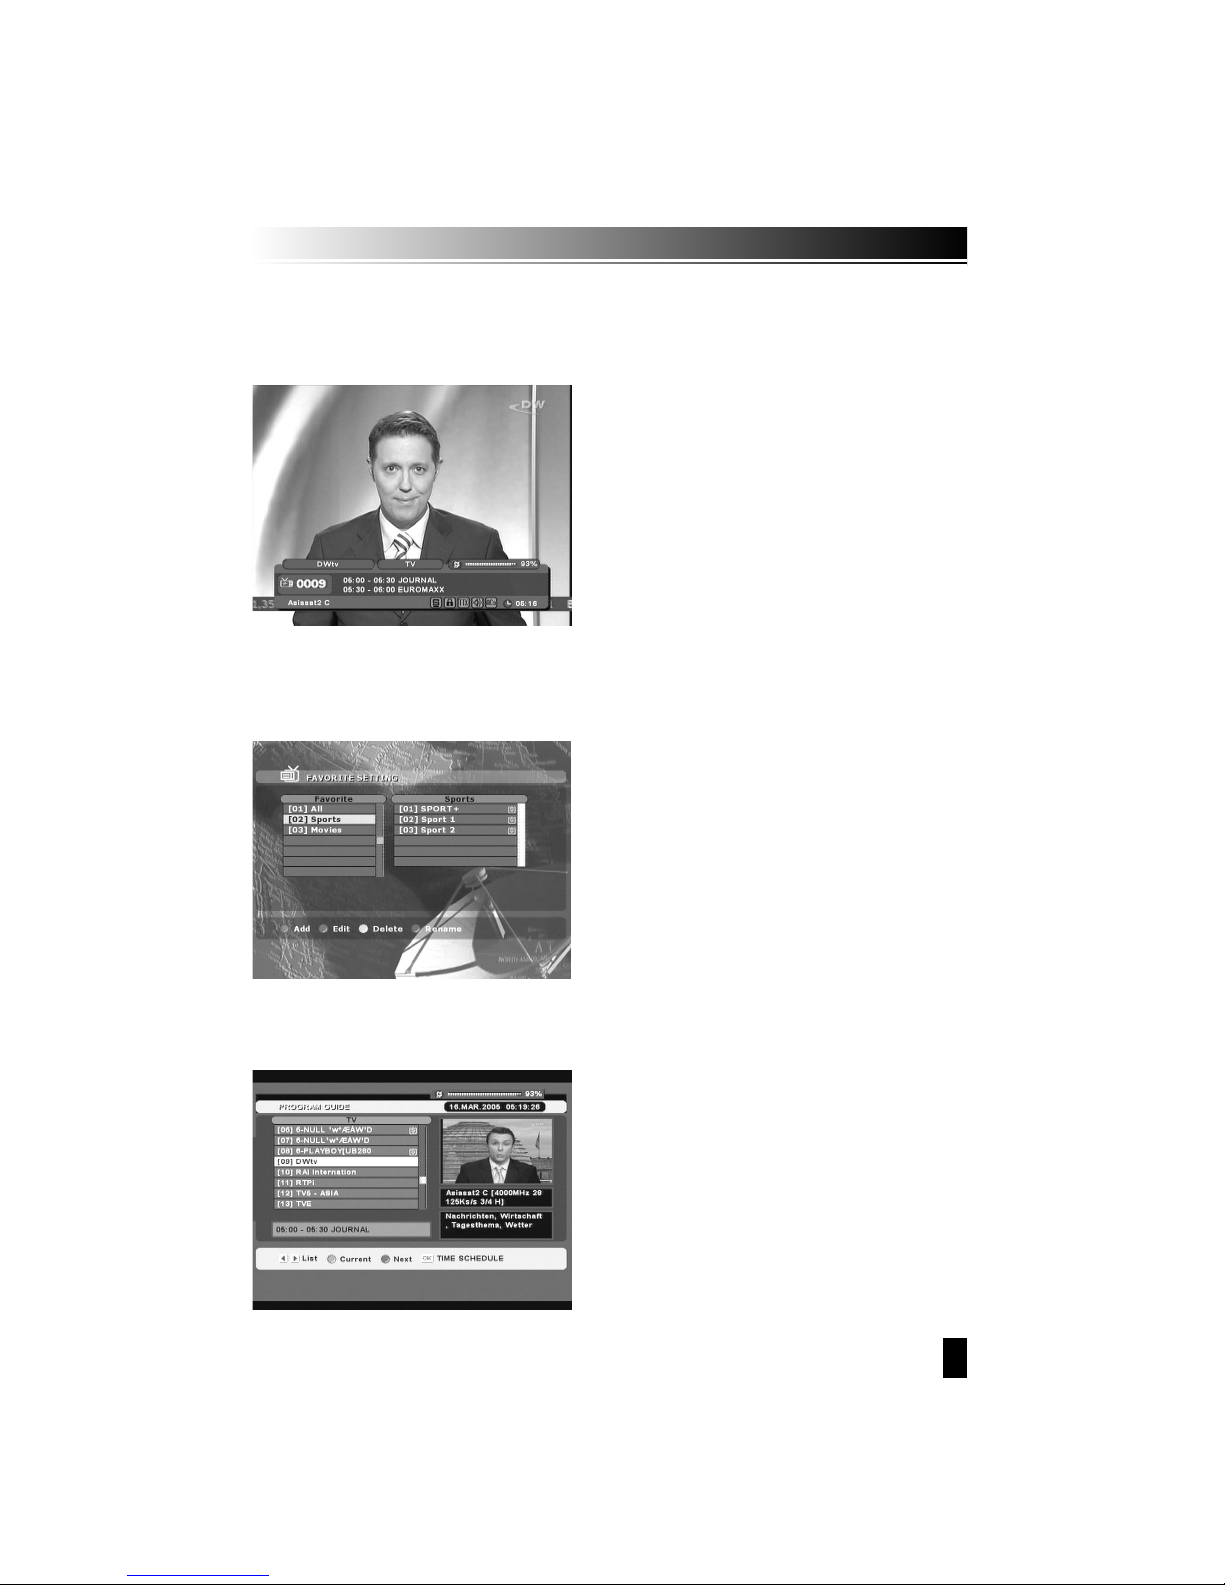
This section explains the general information while watching TV or listening to Radio.
2. “LIST(FAV)” Keys LISTS
You can make favorite channel each fovorite list.
3. Program Guide (EPG)
Press EPG button on the remote control, you can get the TV Program guide.
It is possible only if the broadcater supplies the service.
4.6 HOT KEYS
1. “INFO” Key
Whenever you change the channe(or volume) by
pressing the CH+/CH-(ᵋOᵍ), program information
window will appear for a few seconds. You can select
how long the information will be shown in the User
Preference menu.
Page 22
22
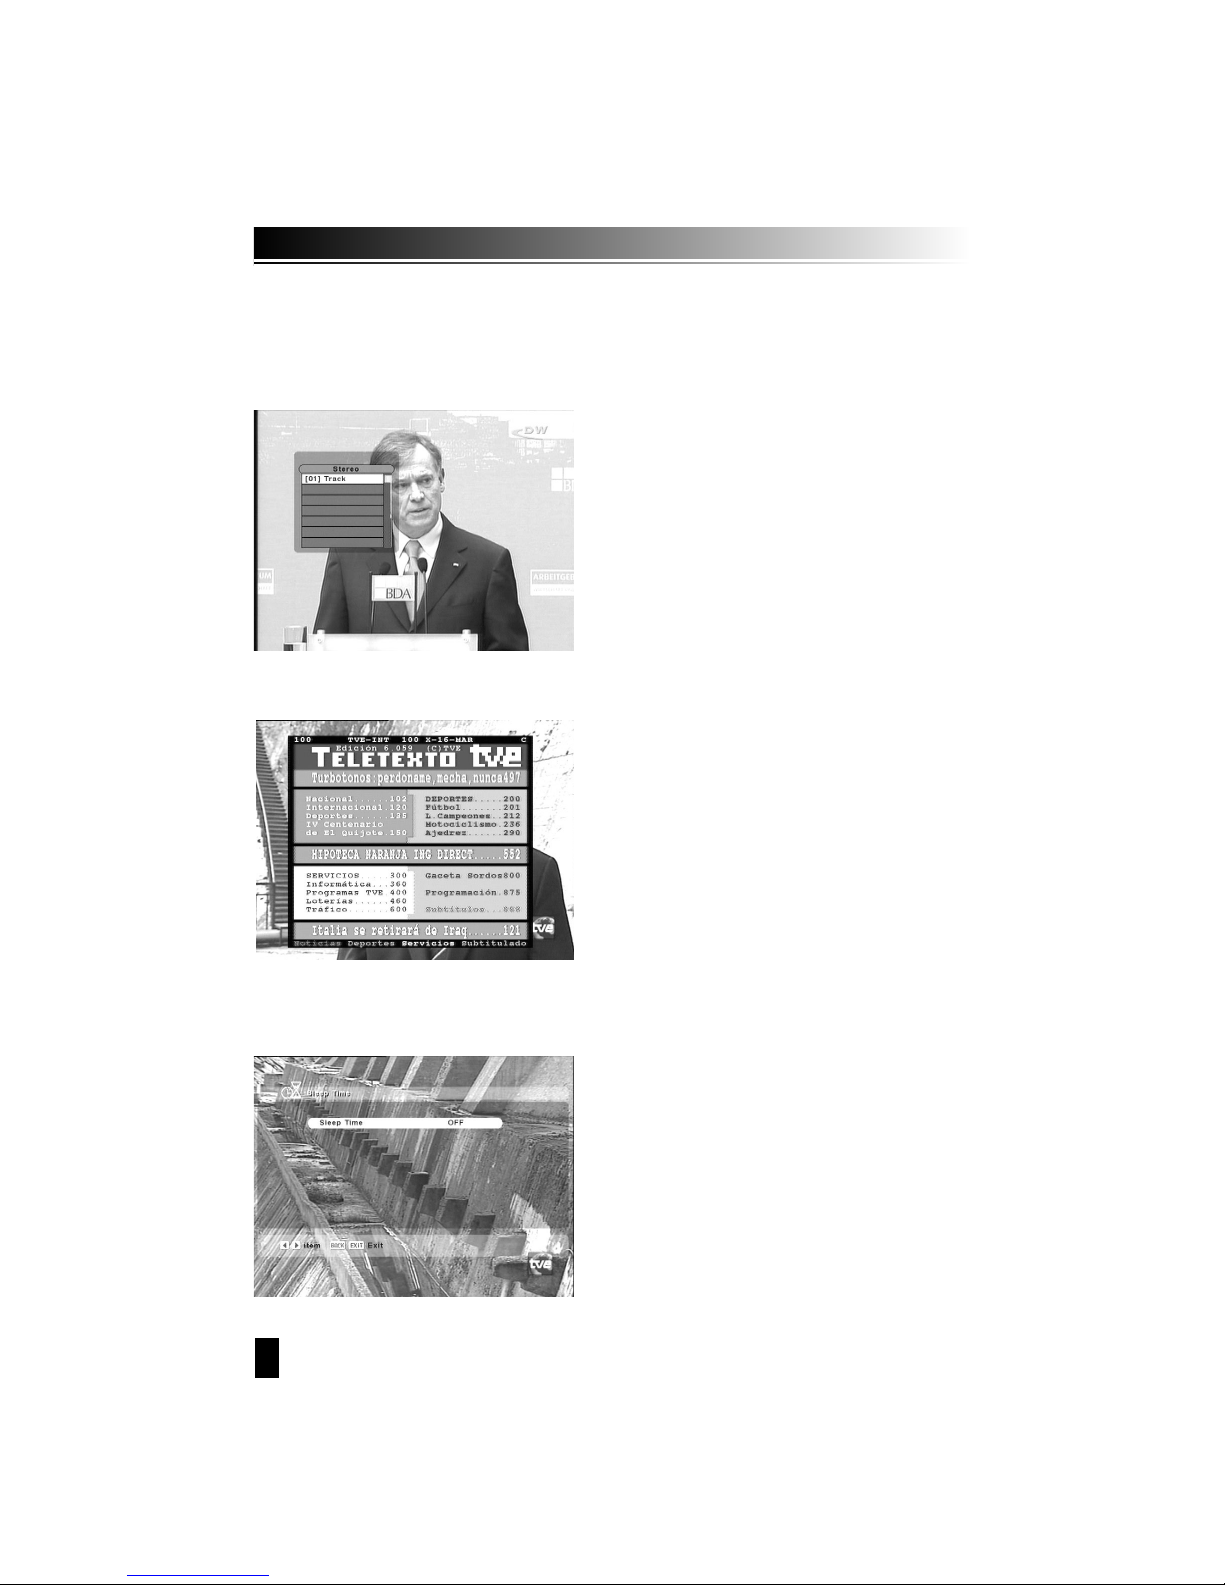
4. Audio Information
Select “AUDIO” button to change audio Stereo, Mono, Left, Right
Press the “Audio” button on the remote control, you can select the Audio language and Mode.
The Language Information window shows the input audio language and you can select the
Audio language. Press the Up/down button to move to another item.
ᵉ Pressing the TEXT button will open a Teletext page
(If Teletext is transmitted).
select Teletext pages with the numeric button on the
remote control.
ᵉᵋOᵍwill show the next or previous Teletext page.
ᵉ Press EXIT or TEXT to return to TV/Radio mode.
4.7 TELETEXT
It will show the sleep timer and you can choose at 15, 30, 45, 60, 90, 120 minutes and
off function.
4.8 SLEEP
Page 23
23
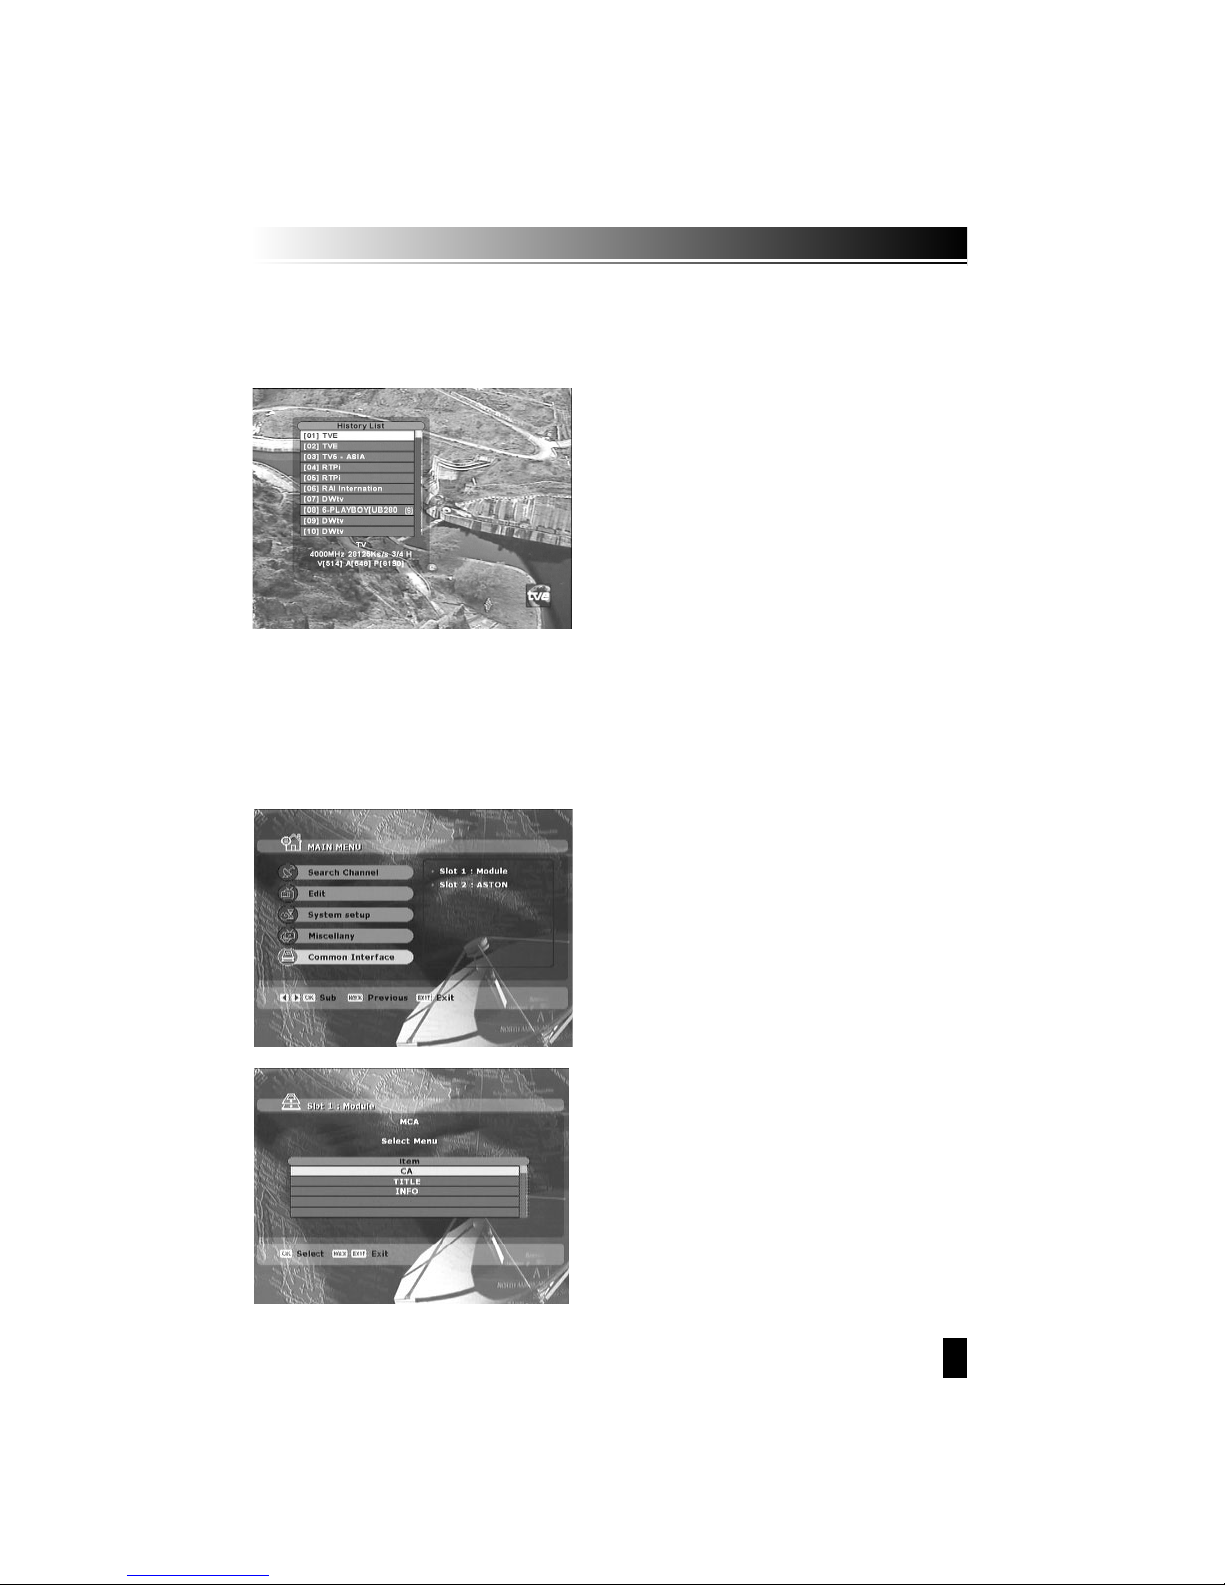
If you want to previous channel, Press “history” key.
4.9 HISTORY
You can enjoy not only scrambled service using the Conditional Access Modules But also Free To Air
services. The receiver current supports various types of CAM(Dragon, Magic, Nagravision, Conax,
Crytoworks, Viacess, Aston and more) Common Interface Modules from your dealer or from your
service provider.
If no CAM is used, the only free channel will be received.
4.10 Common Interface
Page 24

24
Additional Information
Trouble Shooting
There may be various reasons for the abnormal operation of the receiver Check the receiver
according to the procedure shown below.
If the receiver does not work properly after checking the trouble shooting section, Please
contact your dealer. Do not open the receiver cover, it may cause an electrical Shock due to
high current voltage and warranty of your receiver will be void if the Receiver has been
opened.
S y m p t o m s
The display on the frontPanel
does not light up.
The power cord or rearPower
switch is not pluggedIn.
Check that the power cordOr rear
Power switch isPlugged into the
powerSocket.
TV is set to wrong channel
Check if the TV is switchedOn
and set your TV to theCorrect
EXT/AV or UHFchannel
Problem in cable connect--ions
between receiverand TV
Check if the Scart and /orRF
cable is connected co--rrectly to
the TV and tothe back of the
receivers
Wrong alignment of the dish
Check the signal strengthWith a
spectrum analyzerAnd adjust
your dish corre--ctly.
Incorrect values of someTuner
parameters
Set the values of tunerParameter
correctly in theInstallation menu
Audio muting
Press the TV/SAT button
The display on the frontPanel
does not light up.
No picture
The remote control unit
Does not working
No or Bad signal
C a u s e
R e m e d y
Audio muting
Press the TV/SAT button
Receiver Hang-up
Switch off/on receiver
No batteries
Change the batteries (both)
Wrong satellite selected
Check the terrestrial signal
Page 25

25
D e modulation
TS Demultiplexer
V i d e o D e c o d e r
A u d i o D e c o d e r
RS 232 Interface
T u n e r
Input Frequency
Input Connector
950-2150 MHz
F-Type IEC 169-24
75 Ohms
-25 ~ -65dBm
13/18VDC, Max 500mA
22KHzᴦ4KHz, 0.6Vp-pᴦ 0.2Vp-p
DiSEqC Ver 1 .2
QPSK
2 -45MS/s
0.35
RS 204, 188, 8
1/2, 2/3, 3/4, 5/6, 7/8, Auto
ISO/IEC 13818-1
60Mbps(Serial)/7.5Mbps(Parallel)
ISO/IEC 13818-2, MPEG-2MP@ML
4:3 or 16:9
Max 720 x 576
ISO/IEC 13818-3 Layer 1 & 2
Mono, Dual-channel, Stereo,
Joint Stereo
32, 44.1, 48KHz
9pin D-sub
RS 232 asynchronous
RS 232, 115.2Kbps
Input Impedance
Input Level
LNB Power
22KHz Tone
DiSEqC
Waveform
Symbol rate
Roll off factor
Reed Solomon decoder
Viterbi Decoder rate
Demultiplex
Input Max, Bit rate
Standard
Video aspect ratio
Resolution
Standard
Audio channel
Sampling frequency
Connector
Protocol
Signals
Technical Specifications
Page 26

26
Remote Control Unit
Model
Video de-emphasis
IR, 38KHz
CCIR REC 405-1, 625 Lines
5.5MHz
75 Ohms
1.0Vp-p
20Hz ~ 20KHz
600 ή Unbalanced
0 dBm
Mono, Left/Right, Stereo
Channel number, Status
Power/up/down
38KHz
F-Type connector
F-Type connector
CH 21~ 69
4 RCA(Video, Audio L/R, SPDIF)
TV/ VCR
9pin D-sub
AC 110 ~ 240V, 50/60Hz
Max 30 Watts
Video bandwidth
Video output impedance
Video output level
Audio output frequency
Audio output impedance
Audio output level
Audio output
4-digit LED Display
3 Buttons
IR Receiver
IF Input
IF Loop through output
RF Modulator(Option)
RCA output
SCART output
RS 232 Interface
Power Supply
Power Consumption
A / V O u t p u t
F r o n t P a n e l
R e a r P a n e l
A m b i e n t
Page 27
b
Digital Satellite Receiver
Page 28

I n h a l t s v e r z e i c h n i s
28
1. Bedienung und Funktionen
1.1 Frotseite des Garäts
1.2 Rückseite des Geräts
1.3 Fembedienung
2. Anschlussmöglichkeiten
2.1 Verbindung zum TV und Video
2.2 Verbindung zur Satelliten Antenne
3. Einstellungen und Bedienung
3.1 Installations-Assistent
3.2 Grundeinstellungen
3.3 Editieren von Listen
3.4 Einstellungen
3.5 Sonstiges
3.6 Hot Keys
3.7 TELETEXT
3.8 Sleep - Taste
3.9 HISTORY - Taste
3.10 Common Interface
Zusätzlich Informationen
A.1 Fehlebehebung
Page 29
29
1. Bedienung und Funktionen
1.1 Frontseite des Geräts
1. Power Taste
Schaltet den Receiver aus und ein.
2. Display (4Zeichen/7-Segment)
Das 4stellige Display zeigt ihnen die Programmnummer und andere Informationen an.
Im Stand By Modul zeigt es die Uhrzeit an. Die rote Leuchtdiode zeigt den
Stand By Modus an.
3. Infrarot-Empfänger
Empfängt die Signale der Fernbedienung.
4. Pfeiltaste links/rechts
Mit diesen Tasten bewegen Sie sich im Menü
Page 30
30
1.2 Rückeite des Geräts
1. LNB IN (13/18V 500mA MAX)
Eingang des Satelliten Signals (Koaxialkabel vom LNB anschließen).
2. LNB OUT
Satellitensignalausgang mit Durchschleiffunktion (für den Anschluss anderer
Satellitenreceiver).
3. SCART TV, VCR
Anschluss für TV oder Videorecorder.
4. AUDIO
Audio-Ausgang für den Anschluss mittels Chinchstecker.
5. VIDEO
Video-Ausgang für den Anschluss mittels Chinchstecker.
6. S/PDIF
Anschlussbuchse für separate Schaltspannung, z.B. für Schalterlaise.
7. RS-232C
Serieller Anschluss für den Anschluss eines PC’s.
8. Strom Anschlusskabel
9. ANT IN
Für den Anschluss einer terrestrische Antenne.
10. TV OUT
Für den Anschluss an ein TV-Gerät, Z. B. ohne freie Scartbuchse.
Page 31
31
1.3 Fernbedienung
1. Standby
Einschalten in Betrieb bzw. in den Standby Modul.
2. MUTE
Stummschaltung.
3. Pfeitasten Links / rechts
Während des normalen Betriebes verändern Sie die Lautstärke.
Innerhalb der menüfunktionen diese Tasten zur
Auswahl des jeweiligen menüpunktes.
4. Pfeiltasten auf / ab
Innerhalb der Menüfunktionen dienen diese Tasten zur
Auswahl des jeweiligen Menüpunktes.
5. OK
Bestätigen eines Menüpunktes bzw. einer Auswahl.
6. MENU
Aufruf des Hauptmenüs.
7. EXIT
Rückkehr zum vorherigen Status im Menü oder verlassen
des Hauptmenüs.
8. Zifferntasten (0-9)
Programmauswahl, Eingabe der Kanalinformation order des PIN-Codes.
9. EPG
Zeigh die Informationen des elektronischen Programmführers.
10. FAV
Für die Erstellung von Favoritenliisten.
14. INFO
Zeigt Informationen über das laufende Programm.
15. TV/SAT
Umschaltung des TV-ausgangs zwischen Satelliteneingang und UHF/VHF-Eingang.
16. UHF (Optional)
Einstellung des UHF-Kanals für den RF-Modulator.
17. AUDIO
Auswahl des Audio-Modus (Stereo, Mono bzw. Tonspur).
18. PAUSE
Standbildfunktion
20. TEXT
Durch Drücken der TEXT-Taste öffnet sich die Teletextseite,
21. SUBT (Optional)
Zeigh Untertitel
22. GAME-Tasste
Aufruf der Spiele.
23. History-Taste
Frühere aufgerufene Programme werden aufgelistet.
Page 32
32
STB Connections
Page 33
33
3. Einstellungen und Bedienung
3.1 Installations (erste Inbetriebnhme)
એ Schalten Sie ihr TV-Gerät und ihren Receiver ein.
એ Wenn es das erste Mal ist, dass Sie den Receiver benutzen, werden Sie aufgefordert
einige Parameter einzugeben und ihr system zu konfigurieren. Folgen Sie den einzelnen
Schritten.
1. Einstellung der menÜ Sprache
Wählen Sie ihre bevorzugte Sprache aus.
Page 34
34
3. Auswahl der Satelliten
Wählen Sie ihre bevorzugts satelliten aus in dem Sie Satelliten mit der OK Taste
bestätigen und damit markieren. Eventuell beraits markierte Satelliten wählen mit der OK
Taste wieder ab. Wenn Sie ihre Auswahl getroffen haben gelangen Sie mit der Exit Taste
in den nächsten Abschnitt.
4. Antenneneinstellungen
Bewegen Sie den Cursor mit Hilfe der Pfeiltasten ઑOઓ um auf den gewünschten Punkt zu
gelangen, mit den Pfeiltasten ૄO können Sie die gewünschten Änderungen durchführen,
5. Automatischer Suchlauf
Die automatische Suchart wird empfohlen.
Page 35
35
6. Zeiteinstellungen
Heir können Sie die Zeit einstellen, und ggf. Timerfunktionen aktivieren.
1. Kanalsuchlauf
Bevor Sie mit der Installation beginnen müssen Sie noch Grundeinstellungen
vornehmen.
- Schalten Sie ihr TV-gerät und ihren Receiver ein.
- Drücken Sie die MENÜ Taste um in die Menü Übersicht zu gelangen.
3.2 Grundeinstellungen
Page 36
36
1-1. Antenneneinstellungen
THeir werden ihre Receivereinstellungen an ihre Antennenanlage angepasst. Wählen Sie
Antenneneinstellungen aus und bestätigen Sie Auswahl mit der OK Taste. Es öffnet
Sie eine neue Übersicht. Wählen Sie in der ersten Zelie den Namen des gewünschten
Satelliten aus. In den folgenden Zeilen passen Sie bitte ihre Parameter den ihrer
Antennenanlage an.
- Wenn Sie auf der Zelile Satellit auf die OK Taste drücken, öffnet sich ein Fenster mit
allen verfügbren Satelliten. Wählen Sie hier den bevorzugten Satelliten aus.
- Wenn Sie auf der Zeile LNB Typ auf die OK Taste drücken, öffnet sich ein Fenster mit
allen verfügbaren LNB-Typen. Wählen Sie den Typ ihres installierten LNB’s
(normalerweise Universal).
- Auf der Zeile DiSEqC-Motor können sie mit Pfeiltasten diese ᵾOᶀ Funktion
aktivieren bzw. Deaktivieren.
Page 37
37
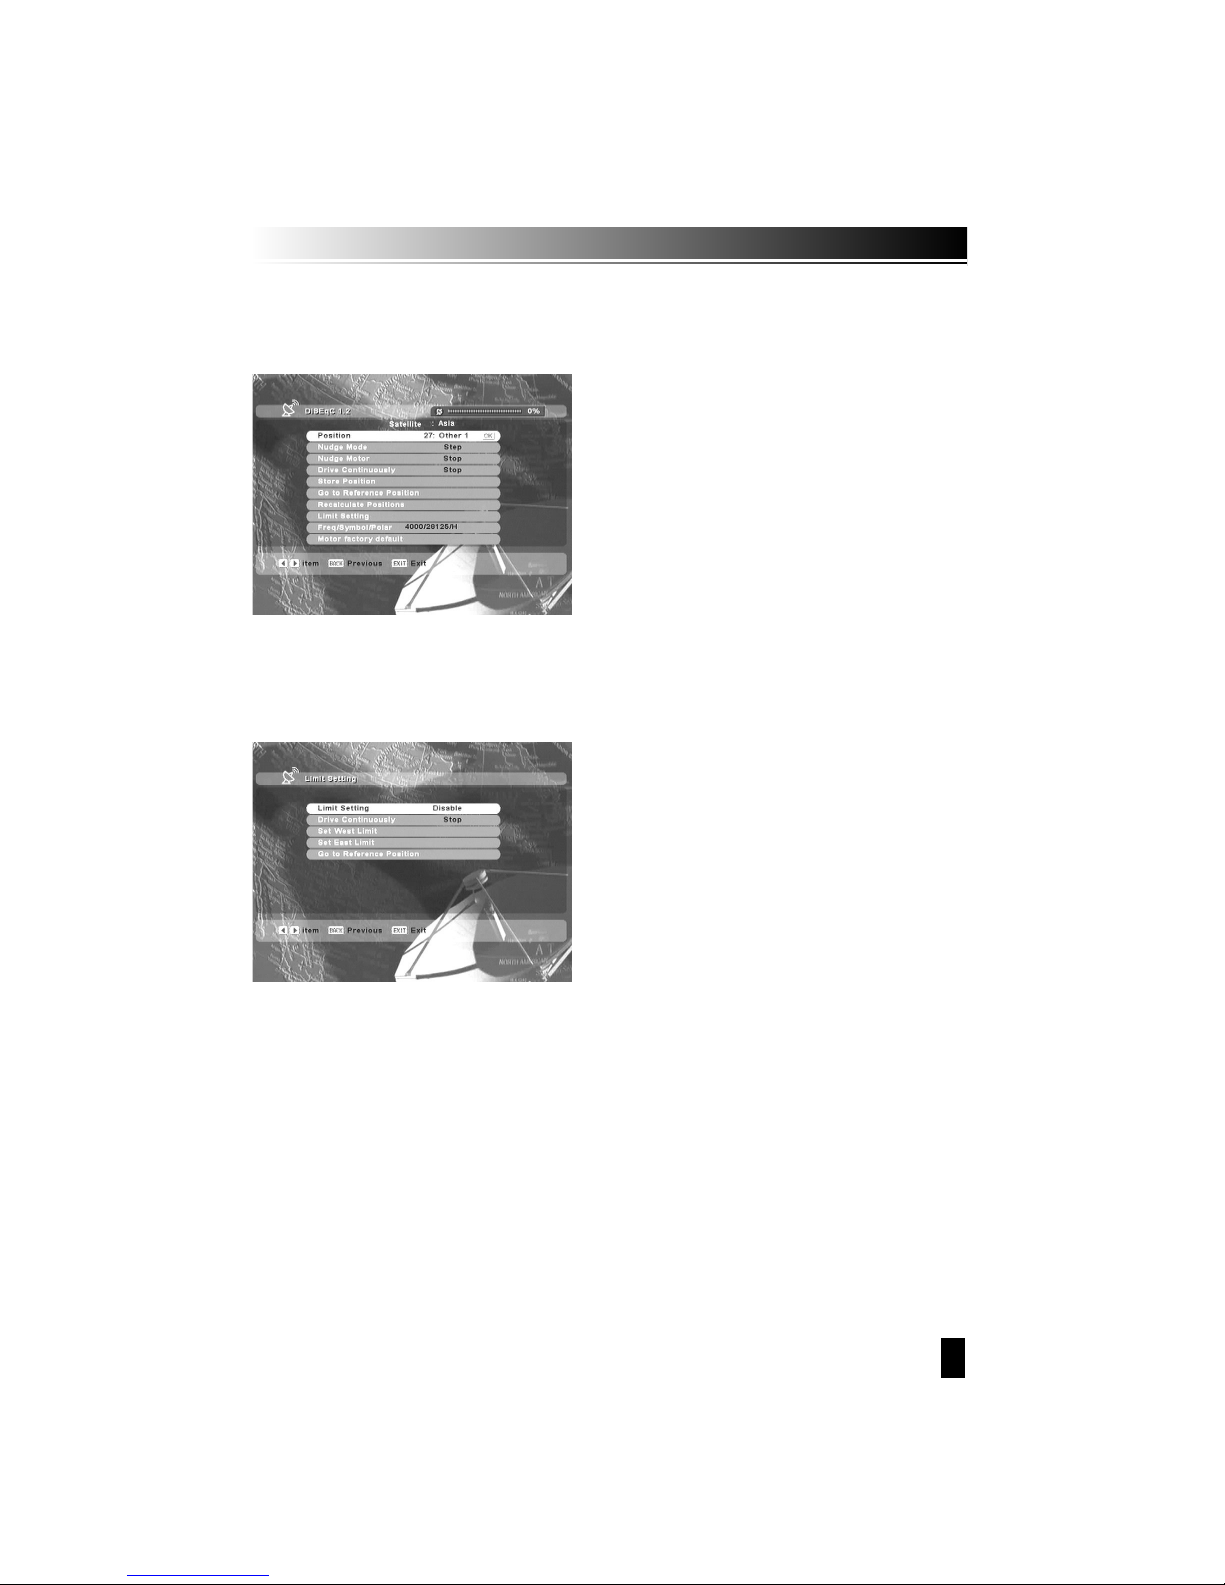
1.2 DiSEqC 1.2
Wählen Sie hier alle benötigten Einstellung für ihre Motor-Steuerung.
1.3 Einstellung der begrenzung
Um eventuelle Fehlfunktionen des Motors zu vermeiden, müssen hier die Begrenzungen für den
Motor für die bewegung Richtung Osten und Westen gesetzt werden,
Page 38
38
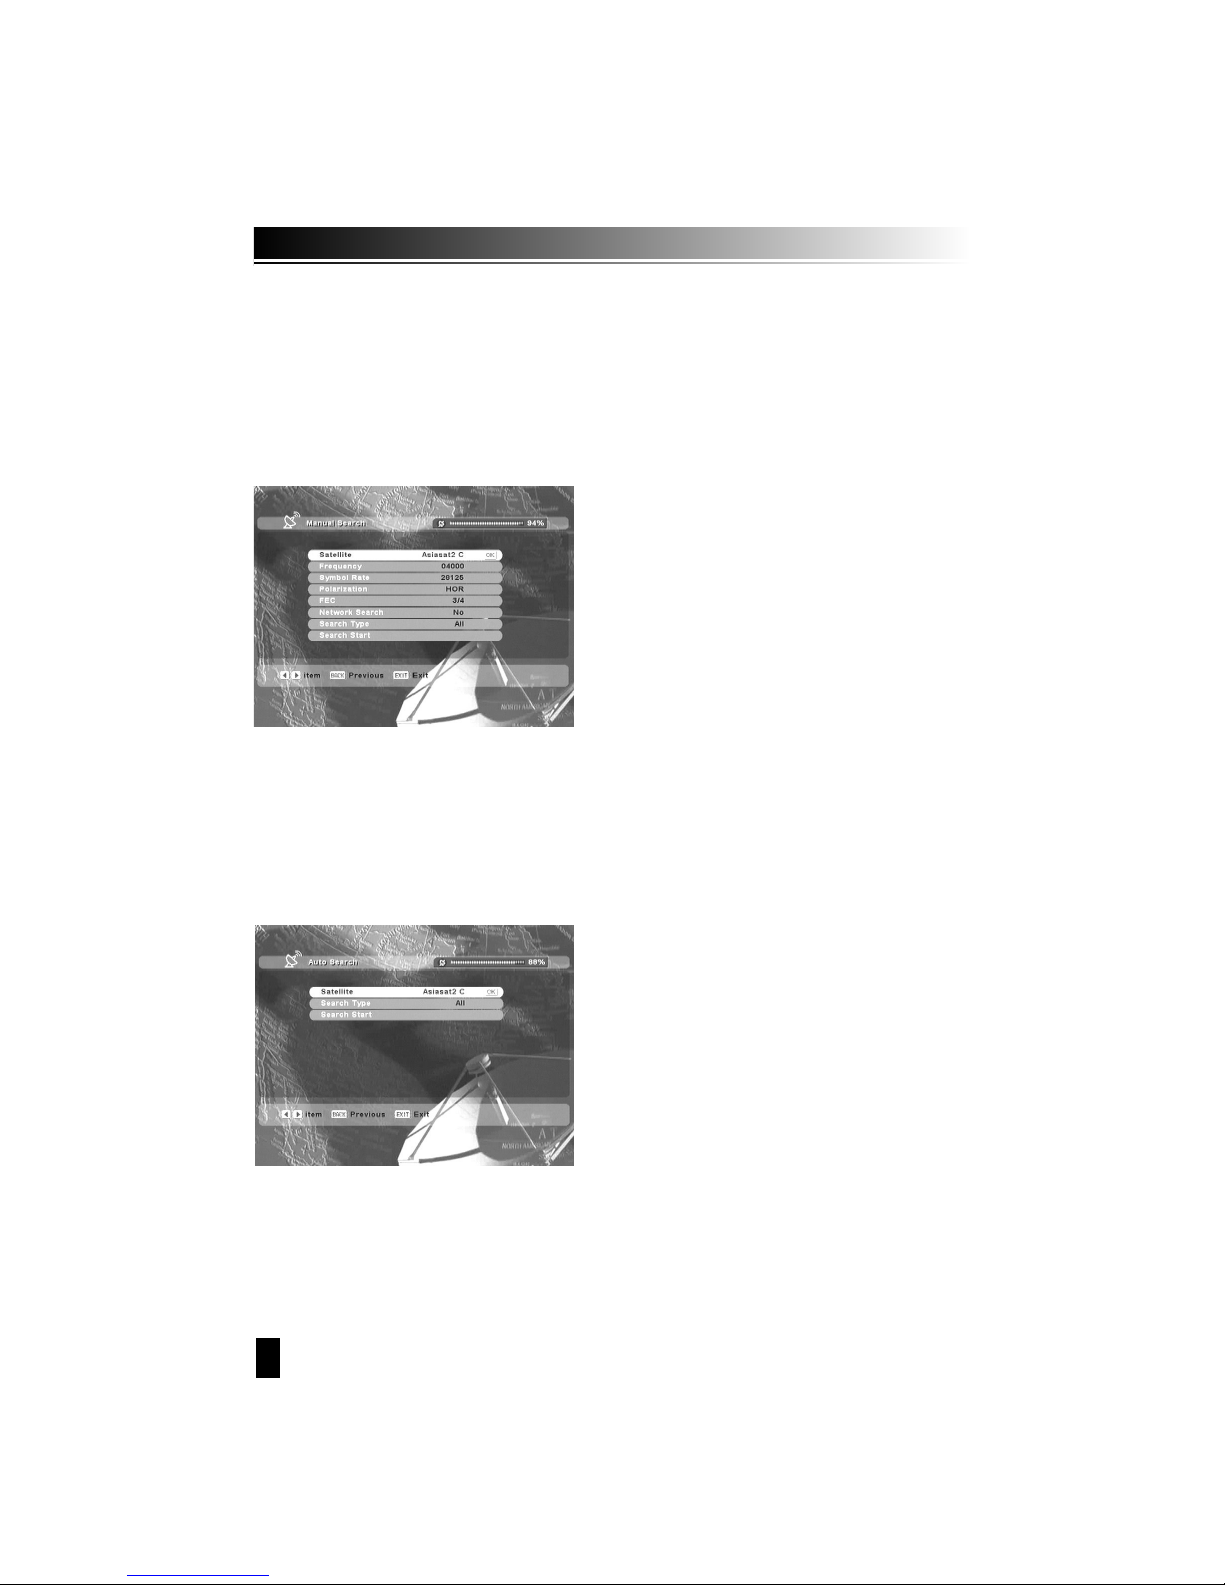
1.4 Manuelle Suche
Nachdem Sie nun die Antenneneinstellungen durchgeführt haben, können Sie in diesem
Menüpunkt einzelne Programme suchen.
Wählen Sie den Satelliten aus, geben Sie die Frequenz und die Symbolrate mit ihren
Ziffernten ein.
Wählen Sie die FEC mit den Pfeiltasten ᵾOᶀ aus. Sollten Sie einen bestimmten Anbieter
Suchen wählen Sie in der Zelie Abbieter JA aus.
When Sie nur frei Programme suchen wollen (keine verschlüsselten Programme) wählen
Sie in der Zeile Nur frei JA aus. Starten Sie den Suchlauf mit der roten Taste
1.5 Automatische Suche
Die automatische Suchart wird empfohlen.
Page 39
39
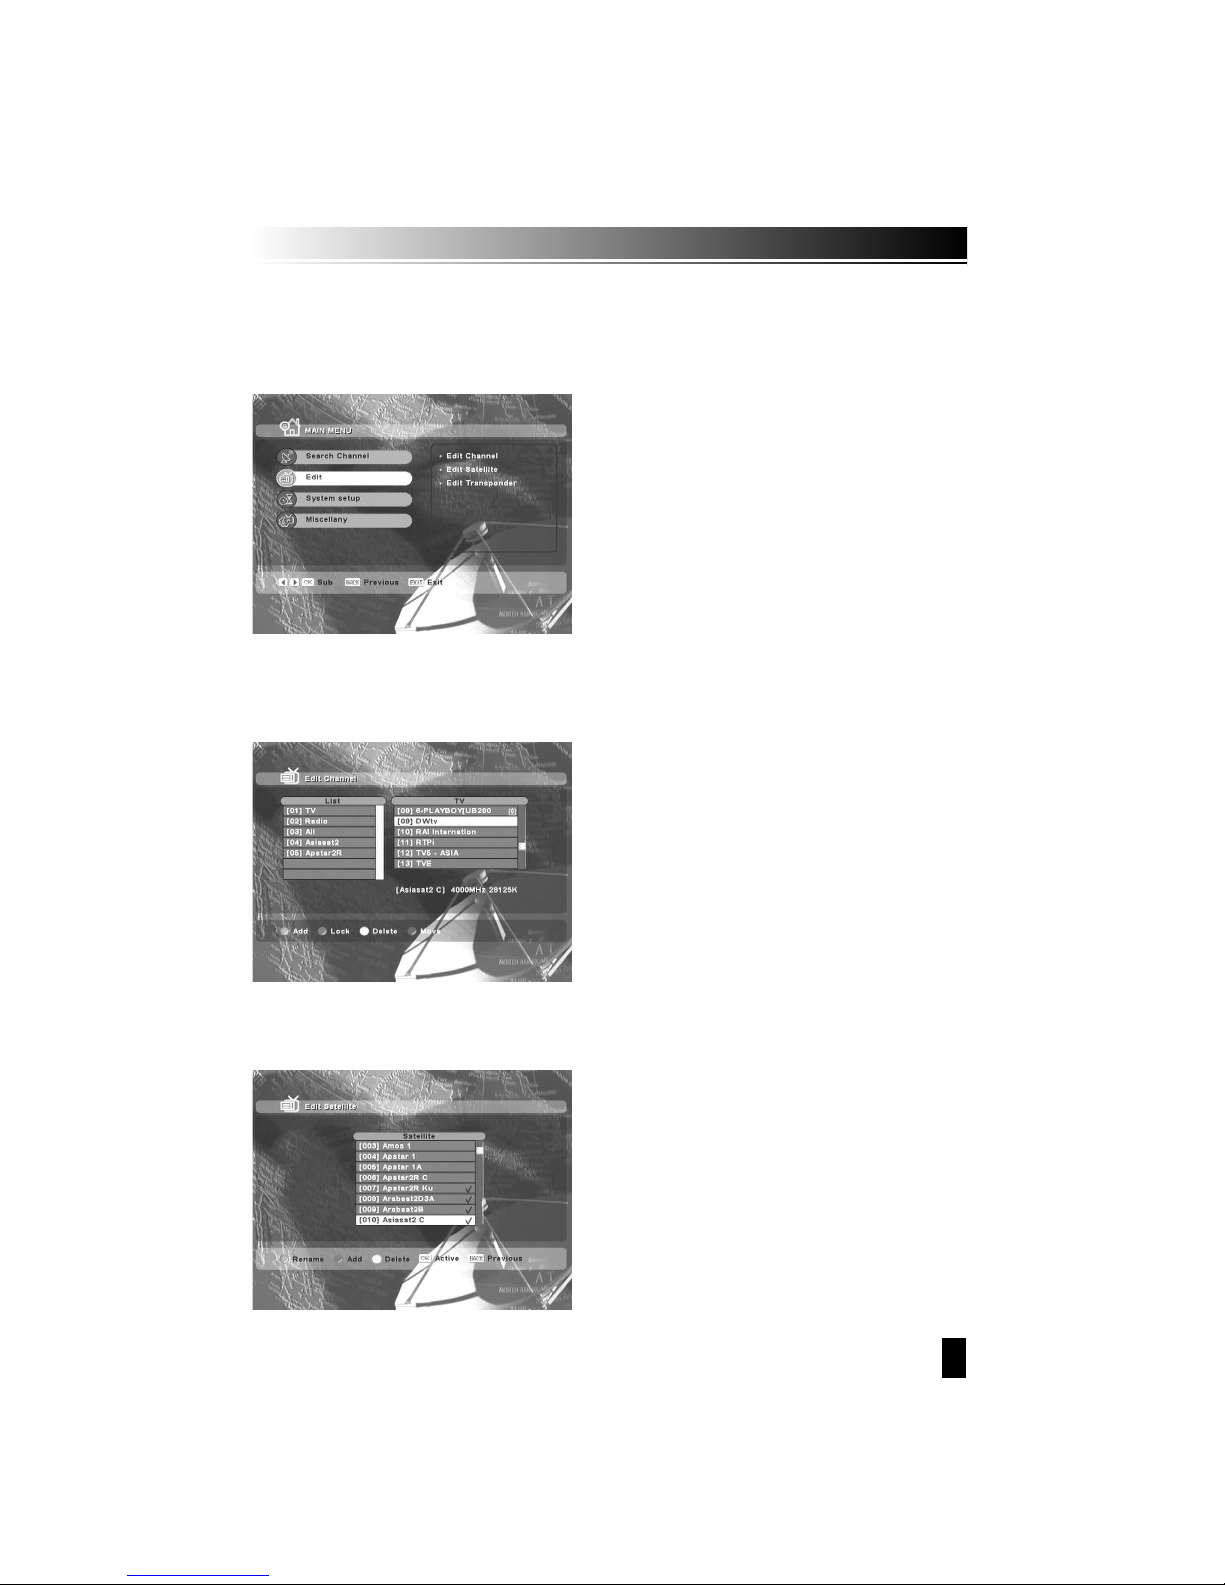
1. Programme editieren
Bearbeiten Sie ein Programm, in dem Sie es erstellen, verschieben order löschen.
2. Satelliten editieren
Bearbeiten Sie einen Satellliten, in dem Sie ihn umbenennen, hinzufügen oder löschen.
3.3 Editieren von Listen
Page 40
40
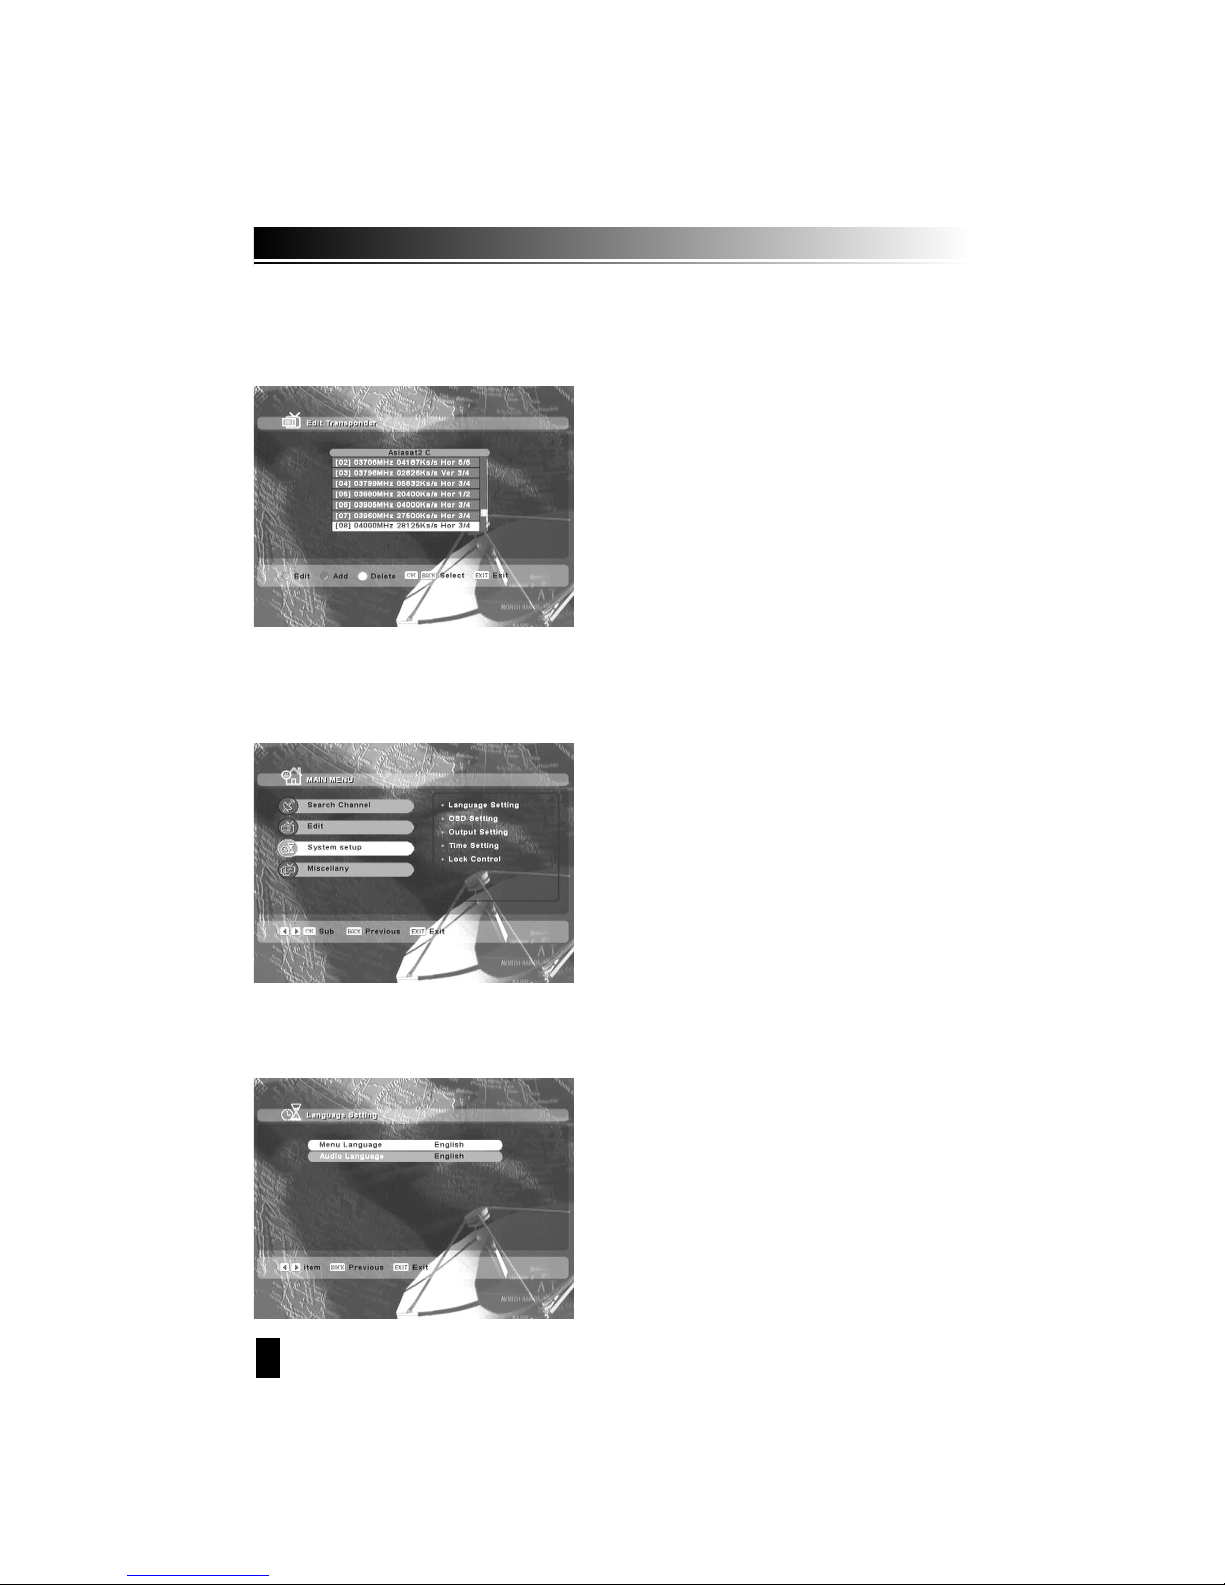
3. Transponder editieren
Bearbeiten Sie einen Transponder, in dem Sie diesen anlegen, hinzufügen oder löschen.
In diesem Menüpunkt lassen sich die Einstellungen ihres Receiver bearbeiten z.B. Sprache,
OSD, Ausgänge, Uhrzeit, usw.
1. Spracheinstellung
Auswahl der Sprache für das Menü und für die Audioausgabe. Die Auswahl erfologt über
die Pfeiltasten ᵾOᶀ und der OK Taste.
3.4 Einstellungen
Page 41
41
2. OSD-Einstellungen
Änderungen für die verschiedenen Bildschirmdarstellungen
A. Dauer der Einblendung der Infozeile
Stellen Sie hier die Dauer der Einblendung der Infozeile ein. Verwenden Sie die Pfeiltasten
zur Auswahl und die OK Taste zur Bestätigung.
B. OSD -Transparenz
Stellen Sie hier mit Hilfe der PfeitastenᵾOᶀ die Transparenz der eigeblendeten Information
während des Betriebes ein.
3. Anschlusseinstellungen
Konfigurieren Sie die Anschlüsse ihres Receivers in diesem Abschnitt.
Page 42
42
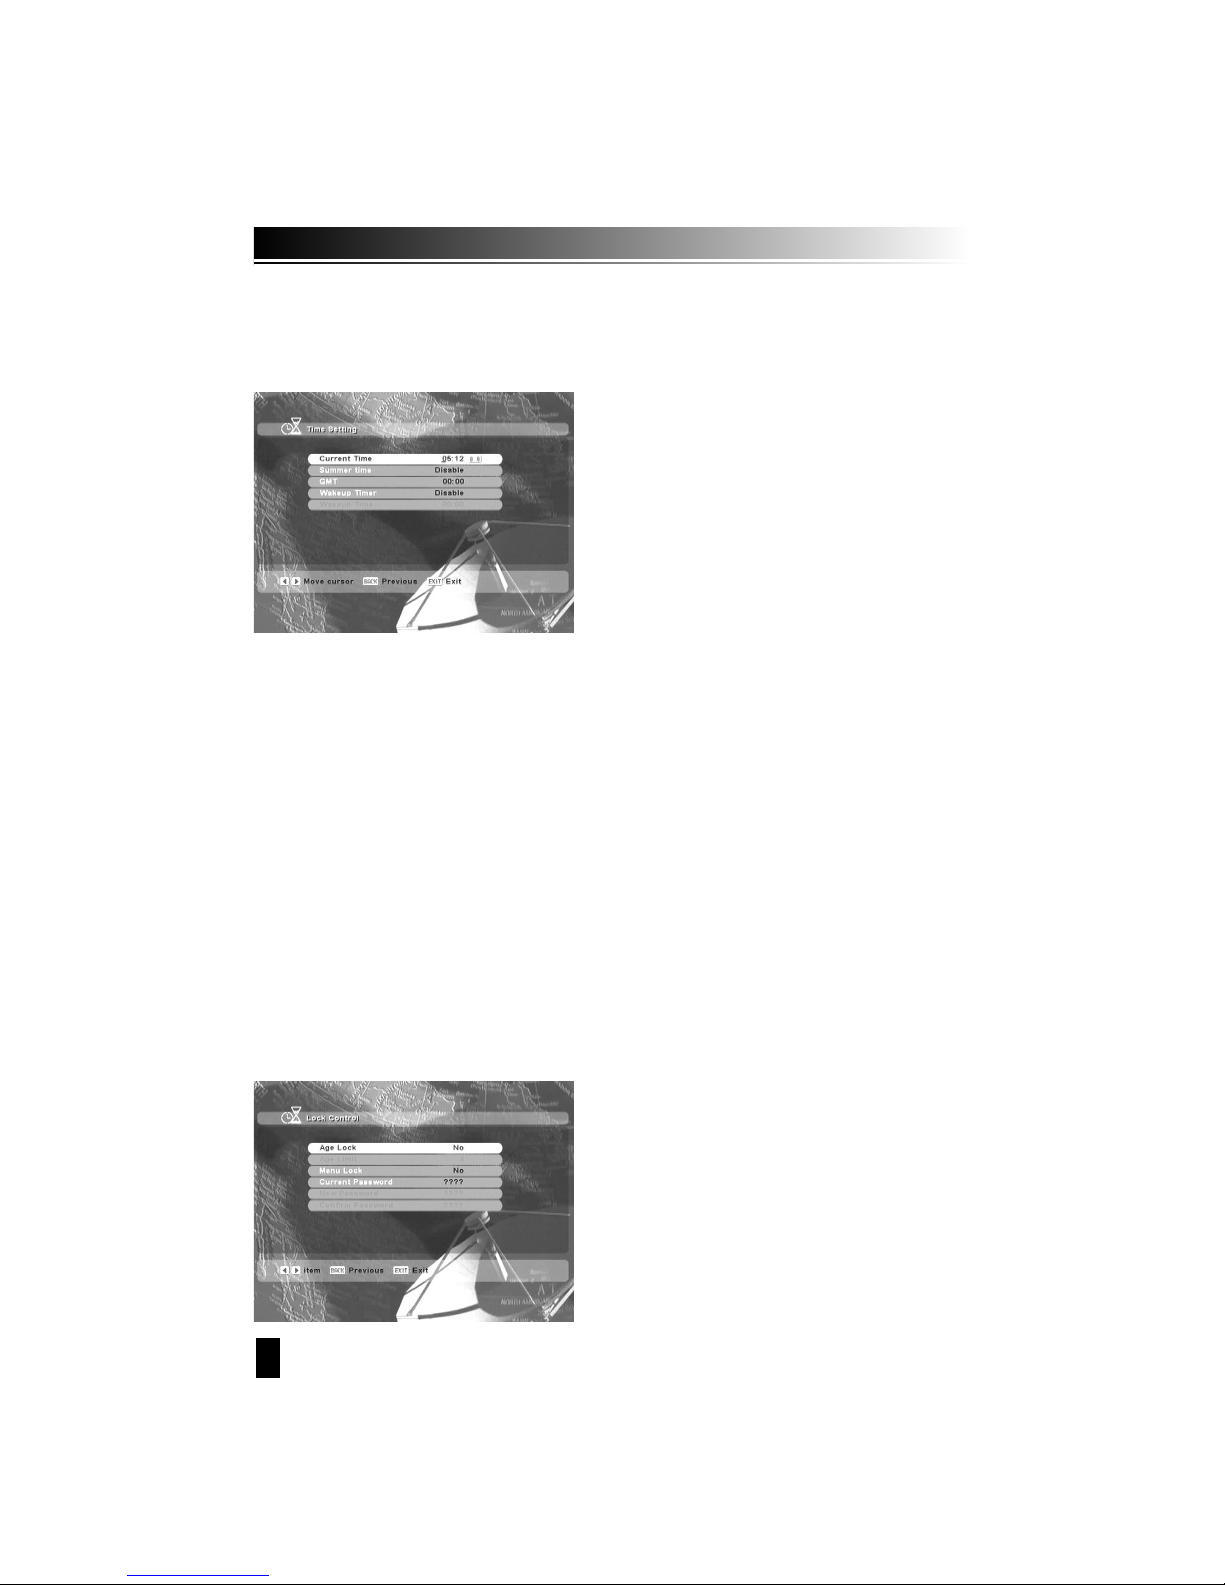
4. Zeiteinstellungen
Stellen Sie hier die Uhrzeit ein, Weckfunktion oder die Ausschaltautomatik.
A. Uhrzeit
Drücken Sie die Pfeiltasten ᵾOᶀ um die aktuelle Zeit einzustellen
Oder geben Sie die Uhrzeit Uhrzeit über die Zifferntasten ein.
B. Einschalttimer
Drücken Sie die Pfeiltasten ᵾOᶀ um die Funktion zu aktivieren bzw. zu deaktivieren.
C. Einschaltzeit
Ist der Einschalttimer aktiviert können Sie mit den Zifferntasten die Einschaltzeit eingeben
Zur angegebebeb Zeit schaltet sich dann Receiver automatisch ein.
5. Zugangsberechtigung
Dieses Menü hilft ihnen ihren Receiver vor unberechtigten Zugriff zu schützen. Kindersicherung,
Menüsperre und Passworteingabe können Sie hier eingeben.
Page 43

43
A. Kindersicherung
Schalten Sie mit Hife von den Pfeiltasten ᵾOᶀ die Kindersicherung ein bzw. Aus.
B. Altersgrenze
bei eingeschalteter Kindersicherung, können Sie mit den Pfeiltasten ᵾOᶀ die Altersgrenze
auswählen.
C. Menü sperren
Schalten Sie mit Hilfe von den Pfeiltasten ᵾOᶀ die Menu Sperre ein bzw. aus. Bei
eingeschalteter Sperre können Sie das Menü nur roch mit ihrem Passwort anwählen.
D. Aktuelles Passwort
Um ihr Passwort zu wechseln geben Sie hier ihr aktuelles Passwort (Werksseitig 0000)
mit Hilfe der Zifferntasten ein
E. neues Passwort
Geben Sie ihr neues Passwort 4-stellig ein mit Hilfe der Zifferntasten.
F. Passwort bestätigen
Um ihr neues Passwort zu bestätigen wiederholen Sie die Eingabe des 4-stelligen Codes
aus Punkt E
Page 44
44
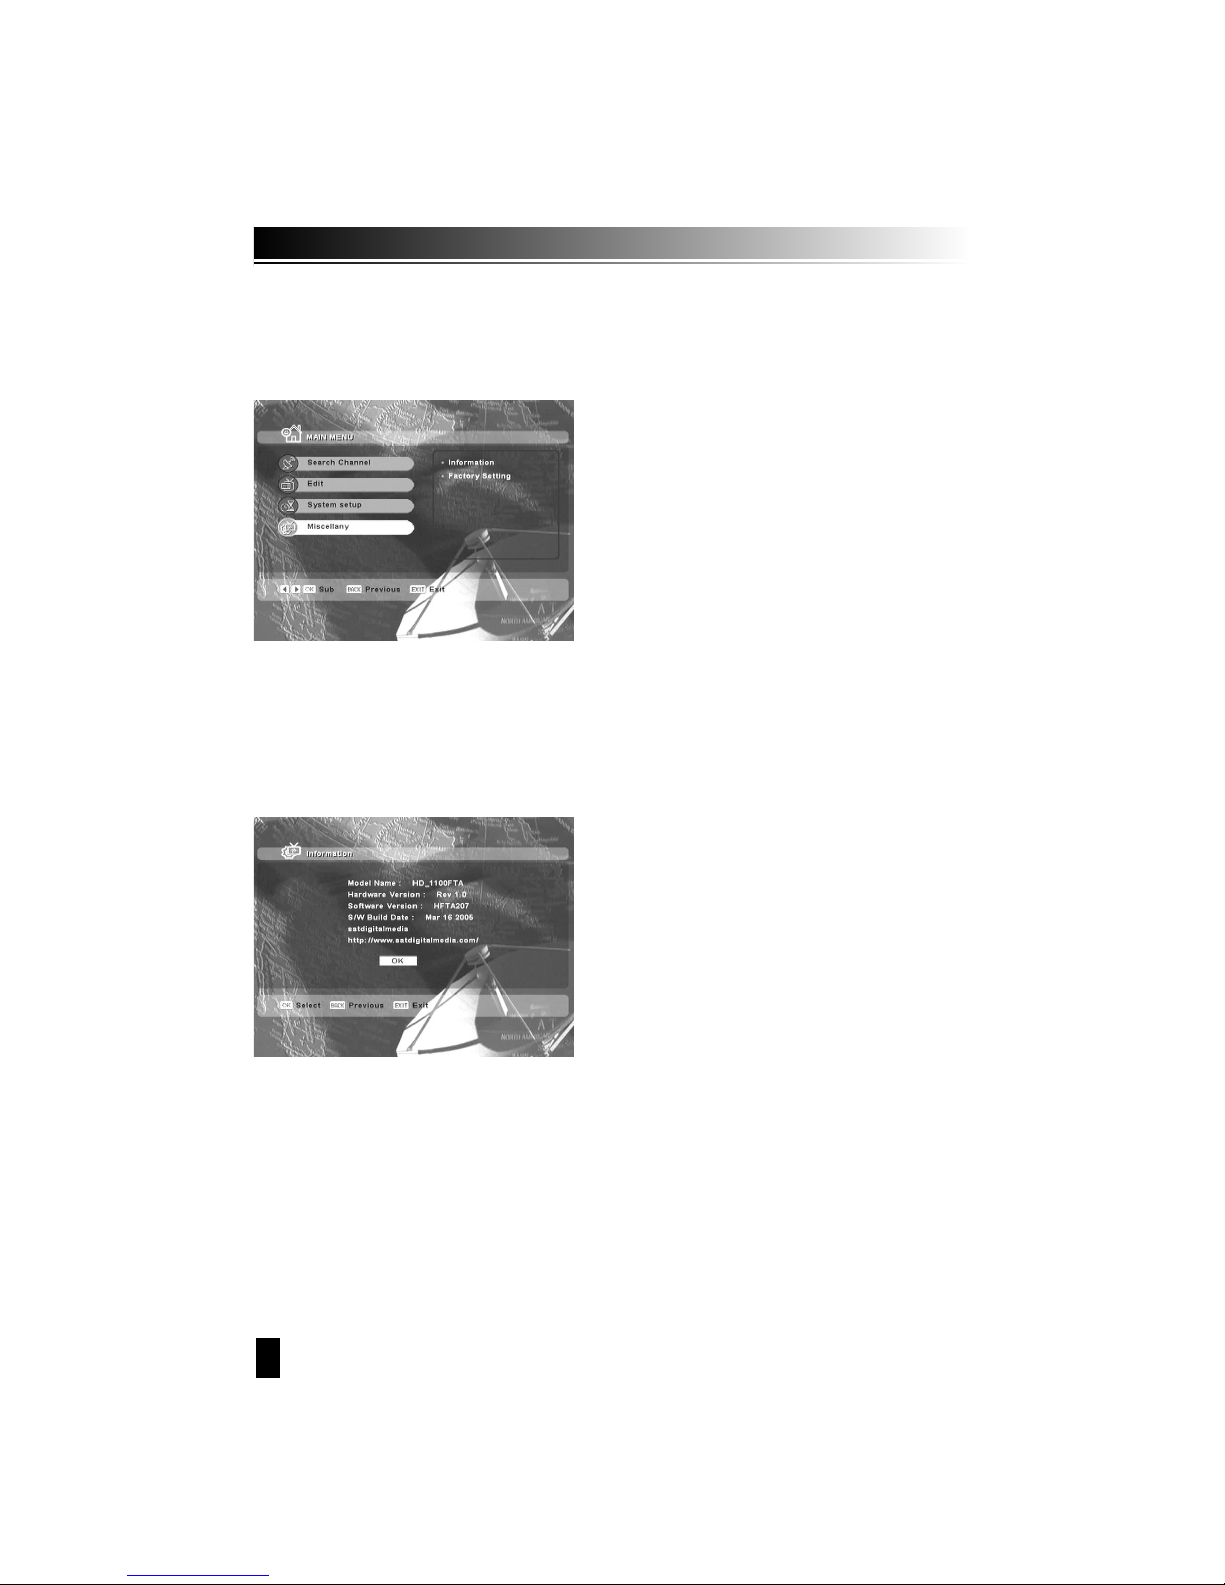
In diesem Menu können Sie Informationen aus ihrem Gerät leseb und auf die Werkseinstellung
zurückstellen.
3.5 Sonstiges
1. Information
Zeigh die Hardware-, aktuelle Softwareversion und die Datenbankversion an.
Page 45
45
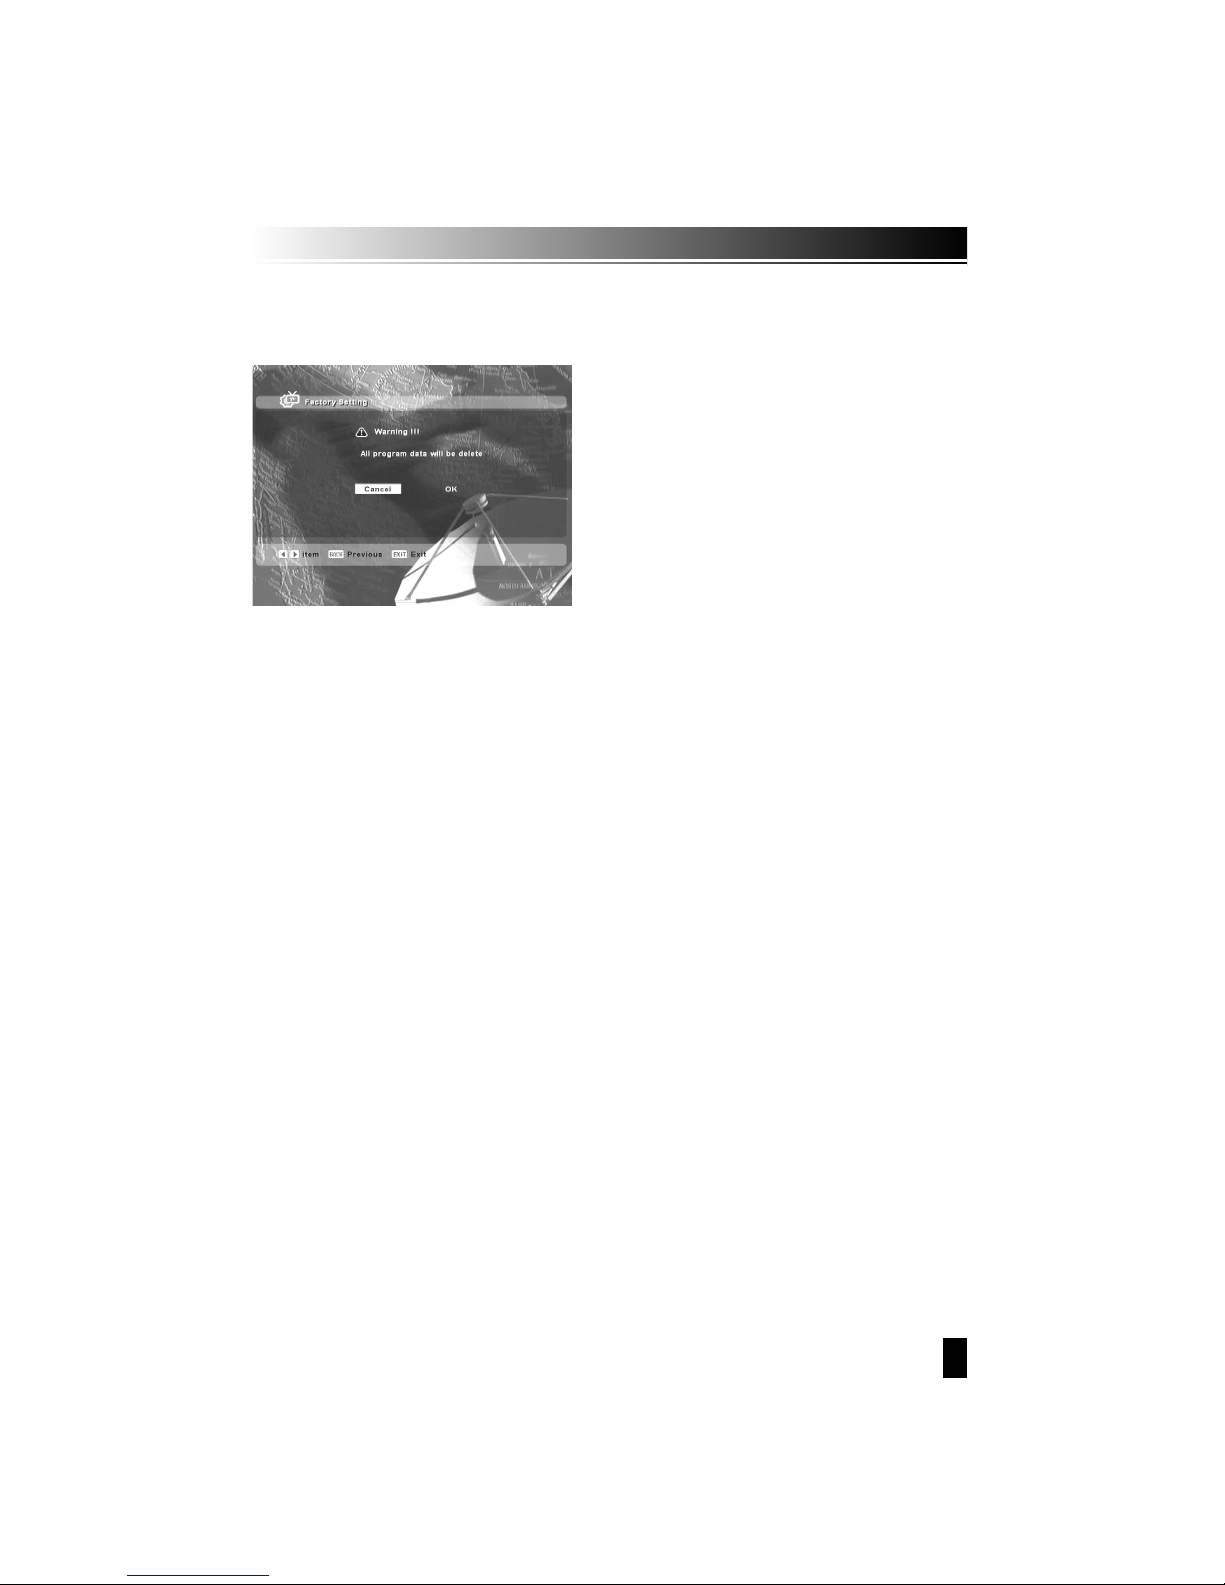
3. Werkseinstellungen
Mit dieser Funktion löschen Sie alle ihre Einstellungen, das Gerät wird in den
Auslieferungszustand versetzt.
Page 46
46
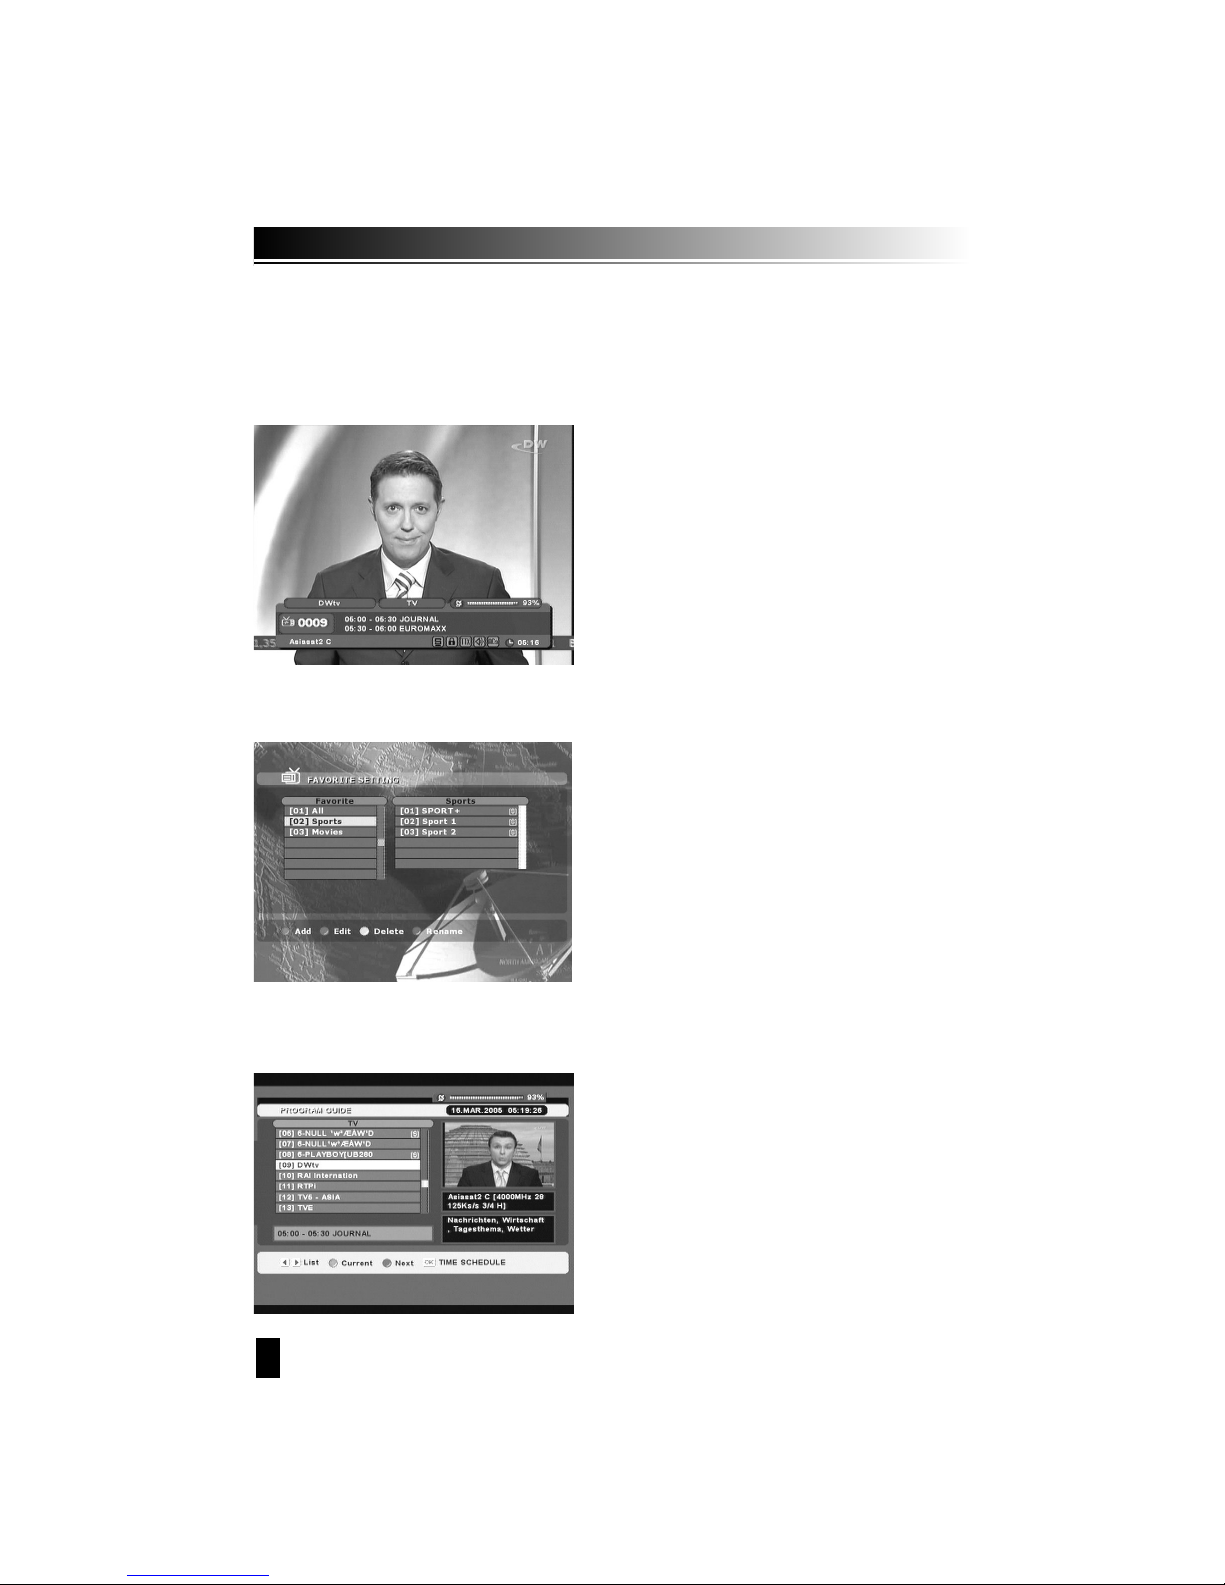
1. INFO Taste
wenn Sie ein programm umschalten oder die Lautstärke verändern erscheint eine Anzeige
in ihrem Bild für einige Sekunden. Sie können im menüpunkt Elnstellungen die Dauer der
Anzeige einstellen.
2. LIST (FAV) Tasten
Durch Auswahl eines Senders mit den Pfeiltasten Können Sie diesen mit “OK”-Taste lhrer Favoritenliste
hinzufügen. Mit der “grünen”-Taste können Sie auf eine andere Favoritenliste “springen”.
3. EPG (Elektronischer Programmführer)
Drücken Sie die EPG Taste auf ihrer Fernbedienung, um Informationen zum TV-Programm zu
erhaiten. Die Funktion steht nur zur Verfügung wenn der Sender die entsprechenden Daten zur
Verfügung stellt und diesen Dienst unterstützt.
3.6 HOT KEYS
Page 47
47
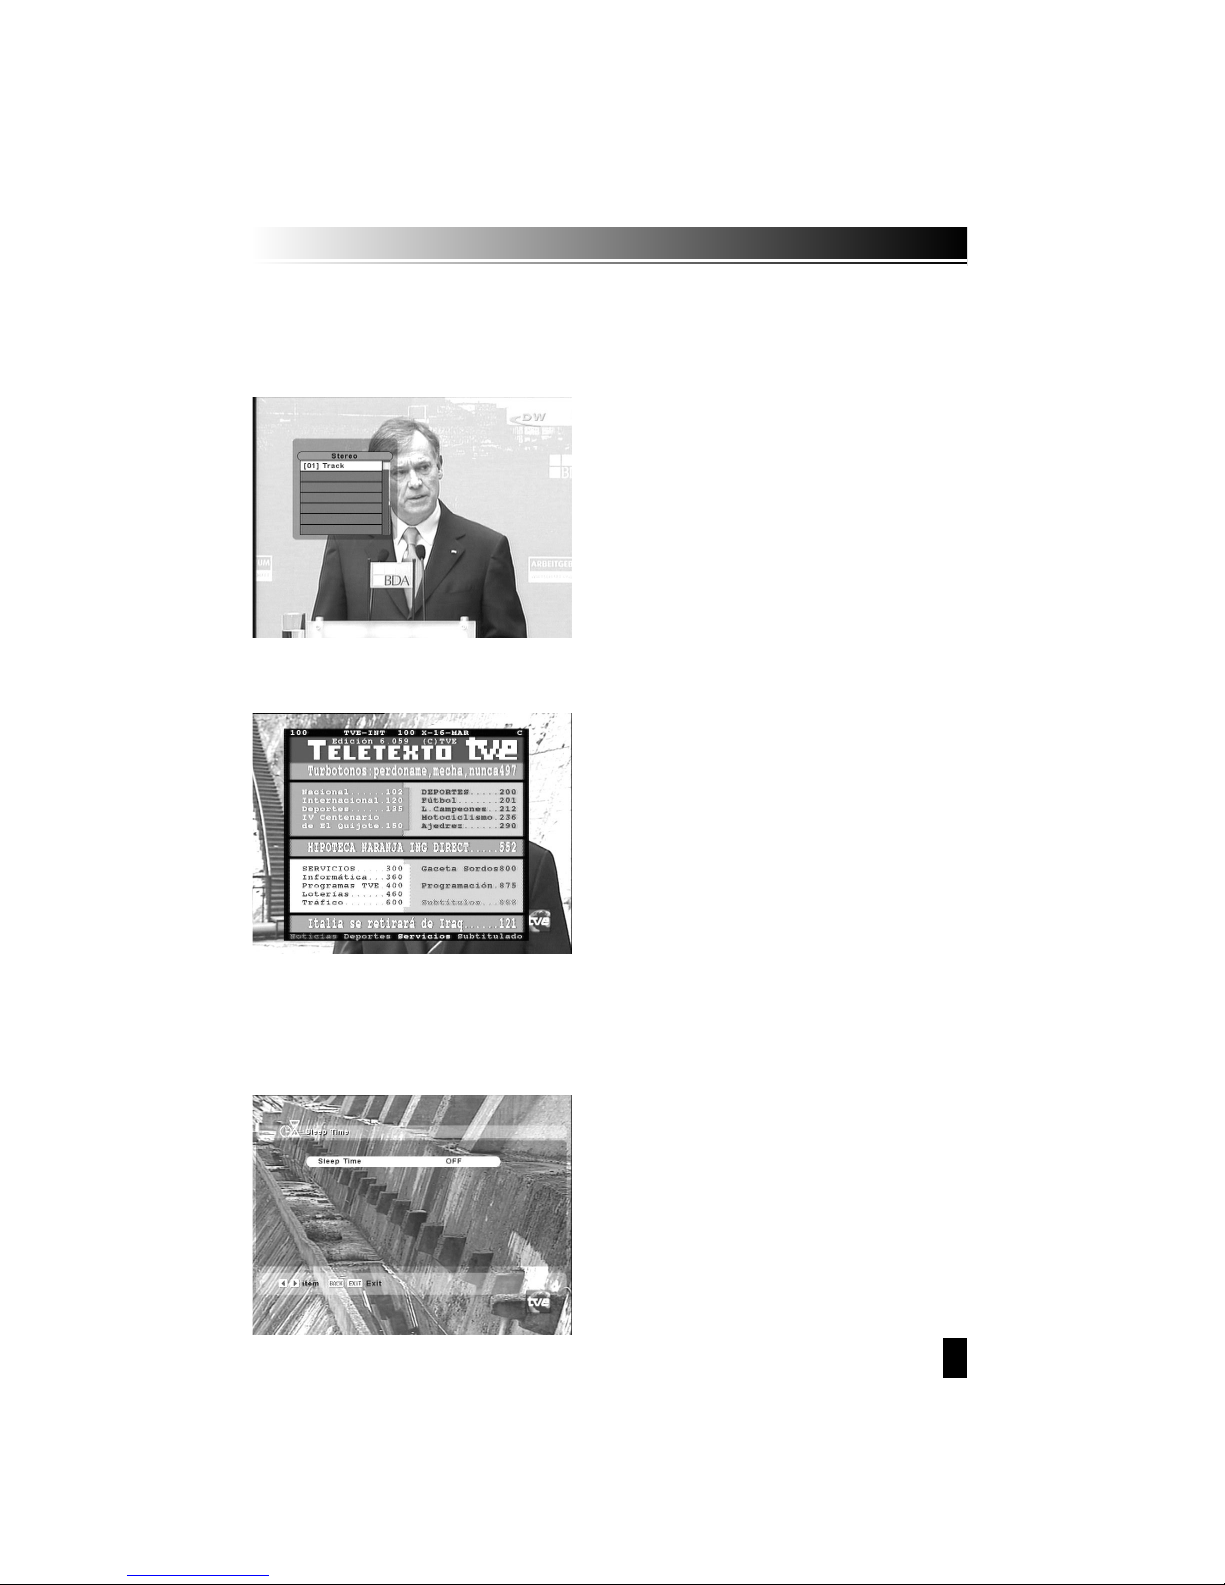
4. Audio Informationen
Mit der AUDIO Taste können Sie das Audio Menü aufrufen. In diesem Menü können Sie die
angebotenen Sprachen auswählen, bzw. zwischen Stereo, Mono usw. umschalten. Die Auswahl
treffen Sie mit den Pfeiltasten. Das Menü verlassen Sie mit der EXIT Taste.
ᵉ Das Drücken der TEXT-Teaste wird eine teletextseite
(sofern teletext übermittelt wird)
öffnen. Wählen Sie die Teletextseite mit den N
ummerntaste der Fernbedienung.
ᵉᵋOᵍzeigt die nächste oder vorherige Seite an.
ᵉ Um zum TV/Radio-Modus zurückzukehren, drücken
Sie EXIT oder TEXT.
3.7 TELETEXT
Durch Drücken der “SLEEP”-Taste kann die übrige betriebszeit eingestellt werden
(15, 30, 45, 60, 90, 120 minuten). Ebenso kann der SLEEP-Timer ausgestellt
werden (“OFF”)
3.8 SLEEP - Taste
Page 48
48
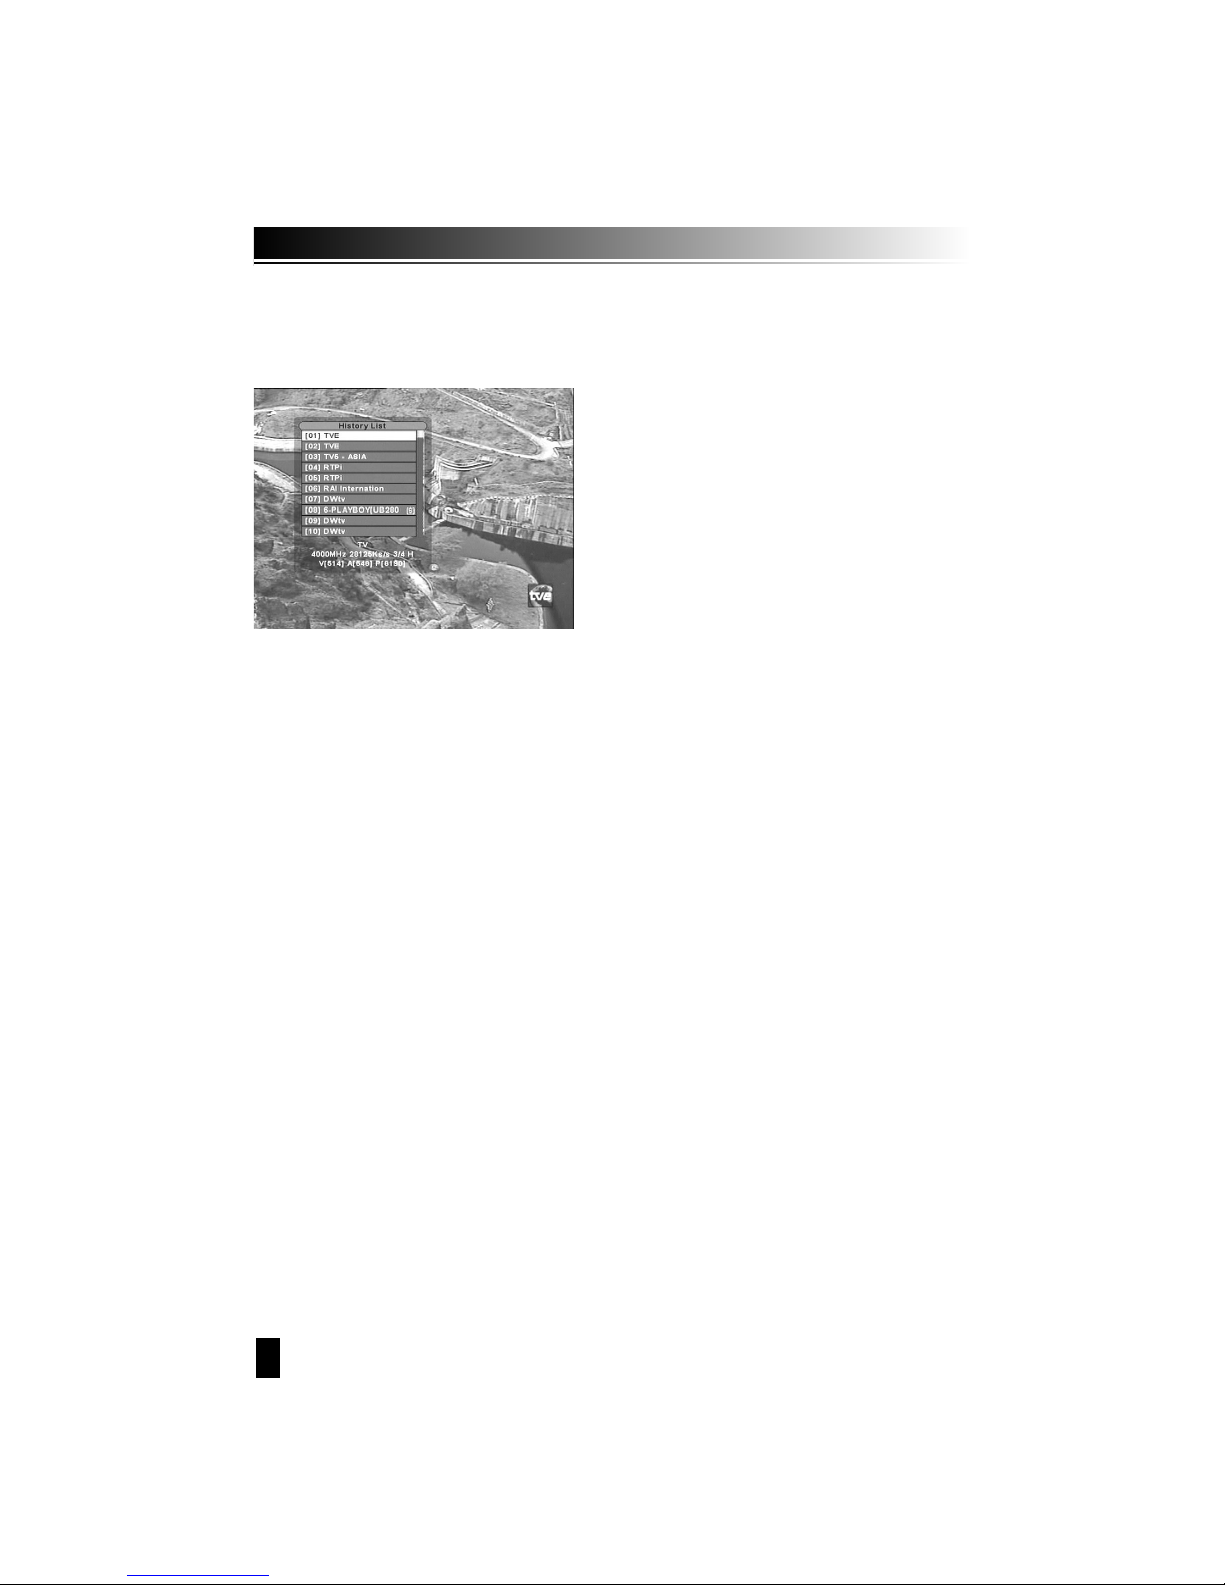
Druch Betätigen der “HISTORY-taste wird der zuvor gesehene Sender aufgerufen.
3.9 HISTORY - Taste
3.10 Common Interface
Page 49

S y m p t o m e
K e i n B i l d .
Falsche Ausrichtung der
Parabolantenne
Bitten Sie Ihren Händler, die
Aussenanlage und das
Antennenkabel zu überprüfen.
Im Menü sind die falschen
Parameter eingestellt worden.
Das ist normal. Das schlechte
Wetter beeinträchtigt das Signal.
Überprüfen Sie die Einstellungen
in den Setup-Menüs für die
Antenne und die Sender.
Drücken Sie die “MUTE”-Taste
Wenn sich das Wetter bessert,
wird das Bild wieder erscheinen.
Wenn nicht: Überprüfen Sie, ob
auf Ihrer Antenne Schnee liegt.
Schlechter Empfang
Nehmen Sie bitte Kontakt mit
dem Händler auf.
K e i n T o n .
D e r R e c e i v e r z e i g t b e i
s c h l e c h t e m W e t t e r d i e
N a c h r i c h t “ K e i n S i g n a l ”
o d e r “ S c h l e c h t e s S i g n a l ”
a n .
D e r R e c e i v e r z e i g t d i e
N a c h r i c h t “ K e i n S i g n a l ”
o d e r “ S c h l e c h t e s S i g n a l ”
a n .
D e r R e c e i v e r z e i g t d i e
N a c h r i c h t “ K e i n S i g n a l ”
o d e r “ S c h l e c h t e s S i g n a l ”
a n .
U r s a c h e
B e h e b u n g
Im Menü sind die falschen
Parameter eingestellt worden
Überprüfen Sie die Einstellungen
in den Einstellungs-Menüs für die
Antenne und die Sender.
F e r n b e d i e n u n g
f u n k t i o n i e r t n i c h t .
Es sind keine Batterien eingelegt
oder sie sind leer.
Überprüfen Sie, ob die Batterien
korrekt eingelegt sind. Wechseln
Sie sie aus, wenn sie leer sind.
49
Page 50

M E M O
50
Page 51

M E M O
51
Page 52

 Loading...