

Page 1

Photomatix Pro 3.0 User Manual
Photomatix Pro User Manual
Page 2

Introduction
Photomatix Pro proc es s es multiple photogra phs of a high cont ras t s c ene into a single imag e
with details in both high lights and s hadows.
This manual offers st ep-by-ste p ins t ructions fo r using the main featu res of t he Photo m at ix Pro
software. The first s ec t ion of f ers tips for t ak ing photogr aphs intended for High Dynamic R ange
(HDR) proc es s ing. The s ec ond secti on describes how to cre at e HDR images and pr oc es s t hem
through to ne mappin g. T he t hird secti on deals wit h t he Exposure Blending f unctions , and t he
fourth section with th e Batch Proc es s ing tool. Fi nally, sect ion f iv e provides s ome advanced tips
and techni ques for wo rk ing with im ages in Photo m at ix Pro.
The follo wi ng ic ons are used throug hout the m anual:
Useful informat ion and im portant not es .
Tips and recommendati ons .
Photomatix Pro User Manual
Page 3
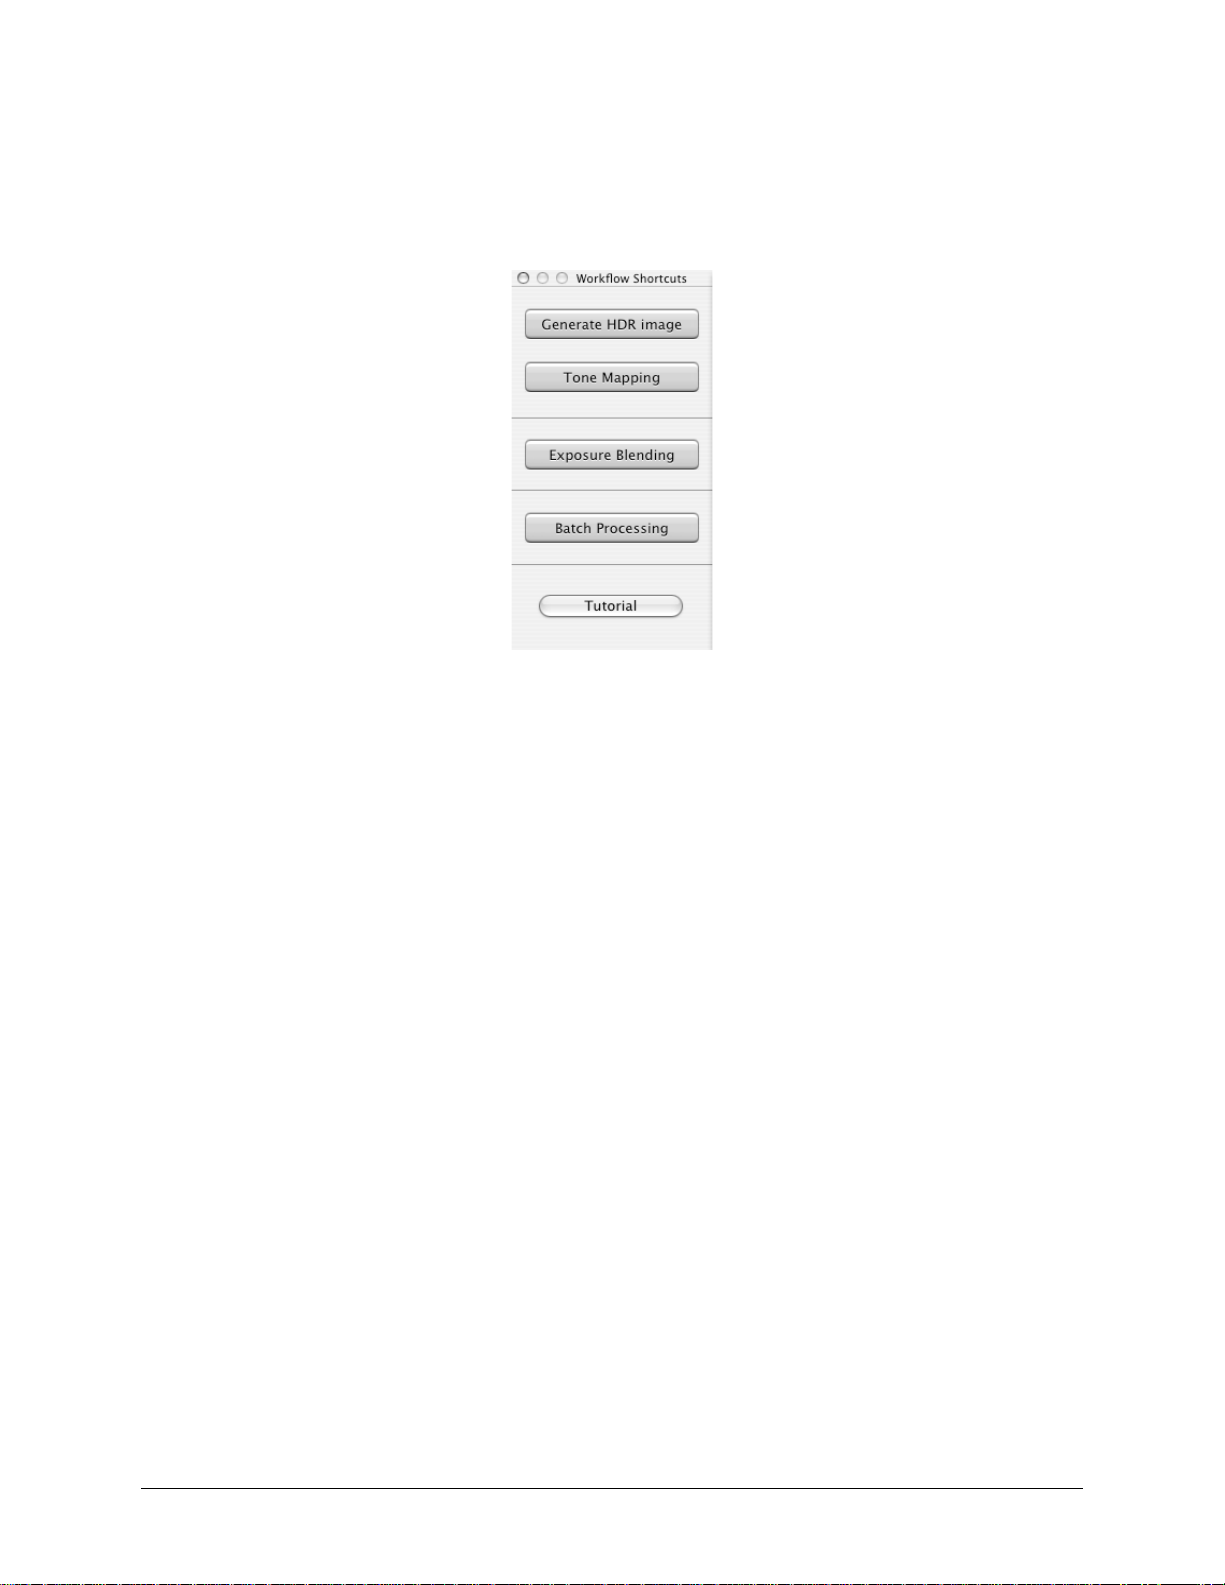
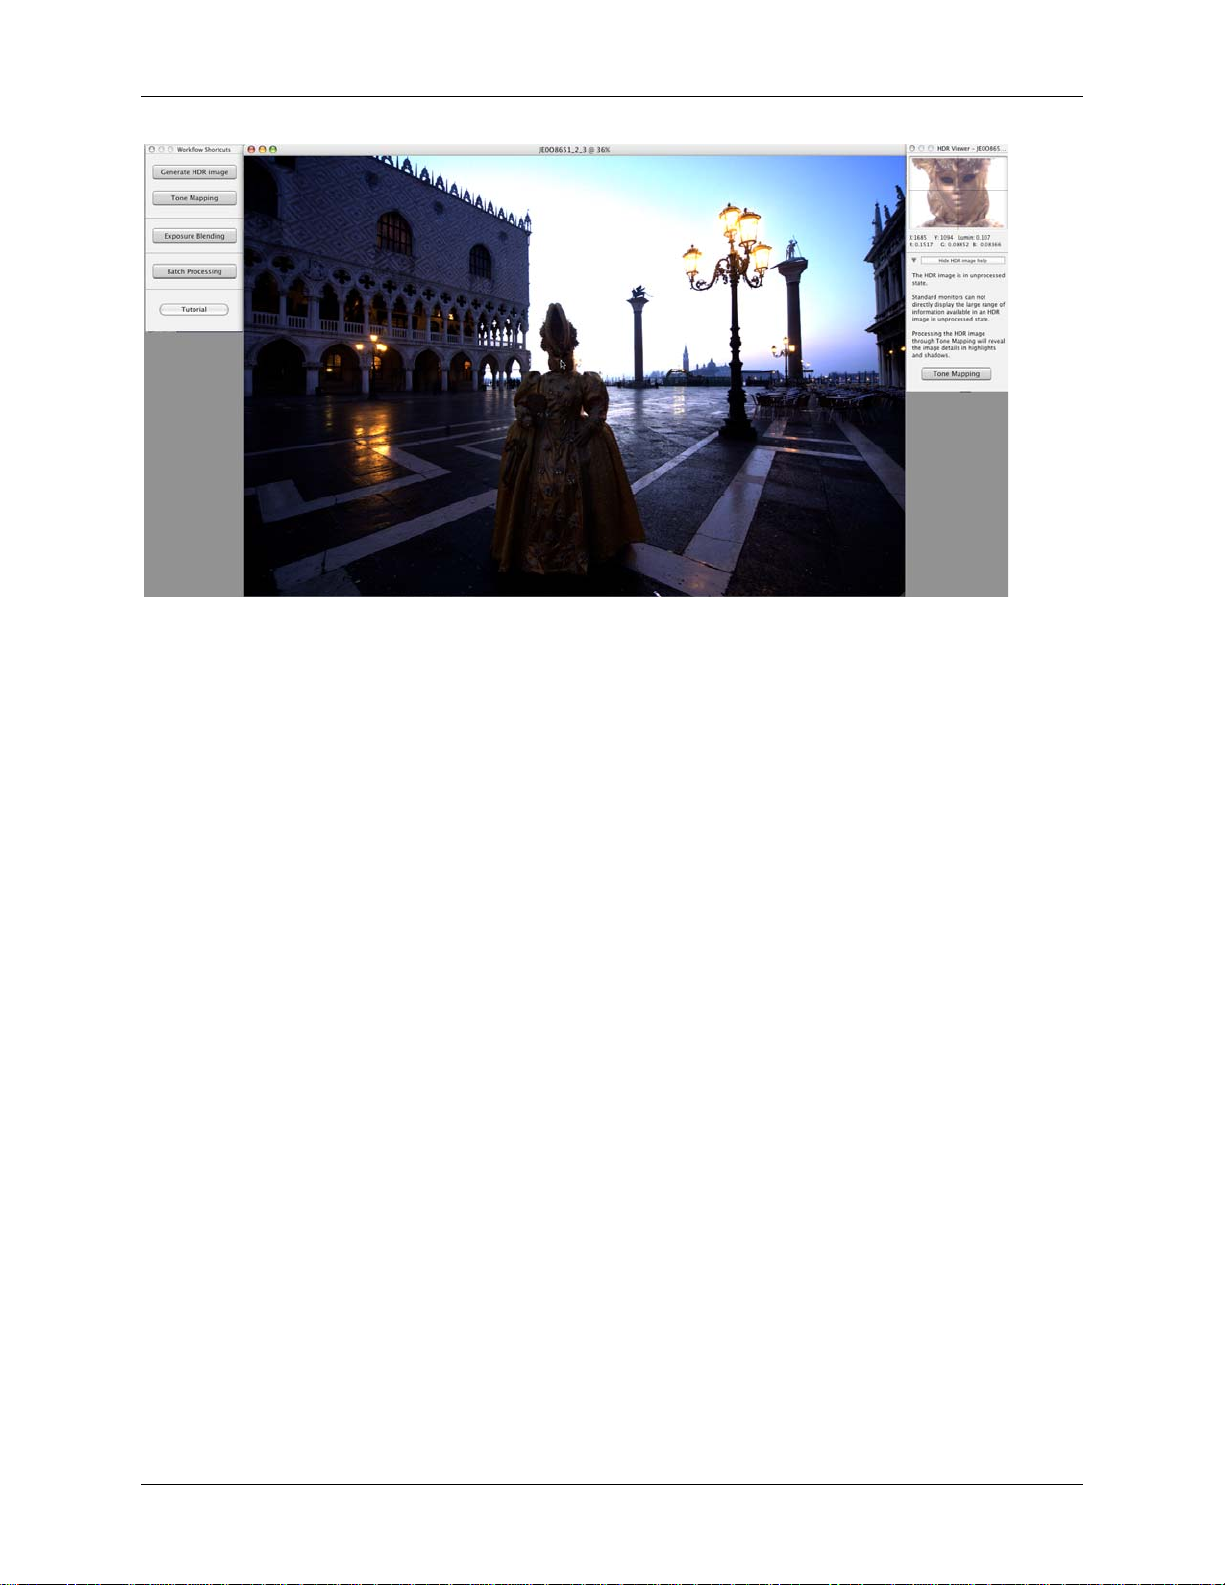
Wor kflow S h ort c ut s Pa ne l
The functi ons of Photo matix Pro can be ac c es s ed via the me nus . To allow faster access , s ome
core funct ions c an be launc hed via the “Workflow Short cuts ” panel shown here:
Workflow Sh ortcut s Pane l
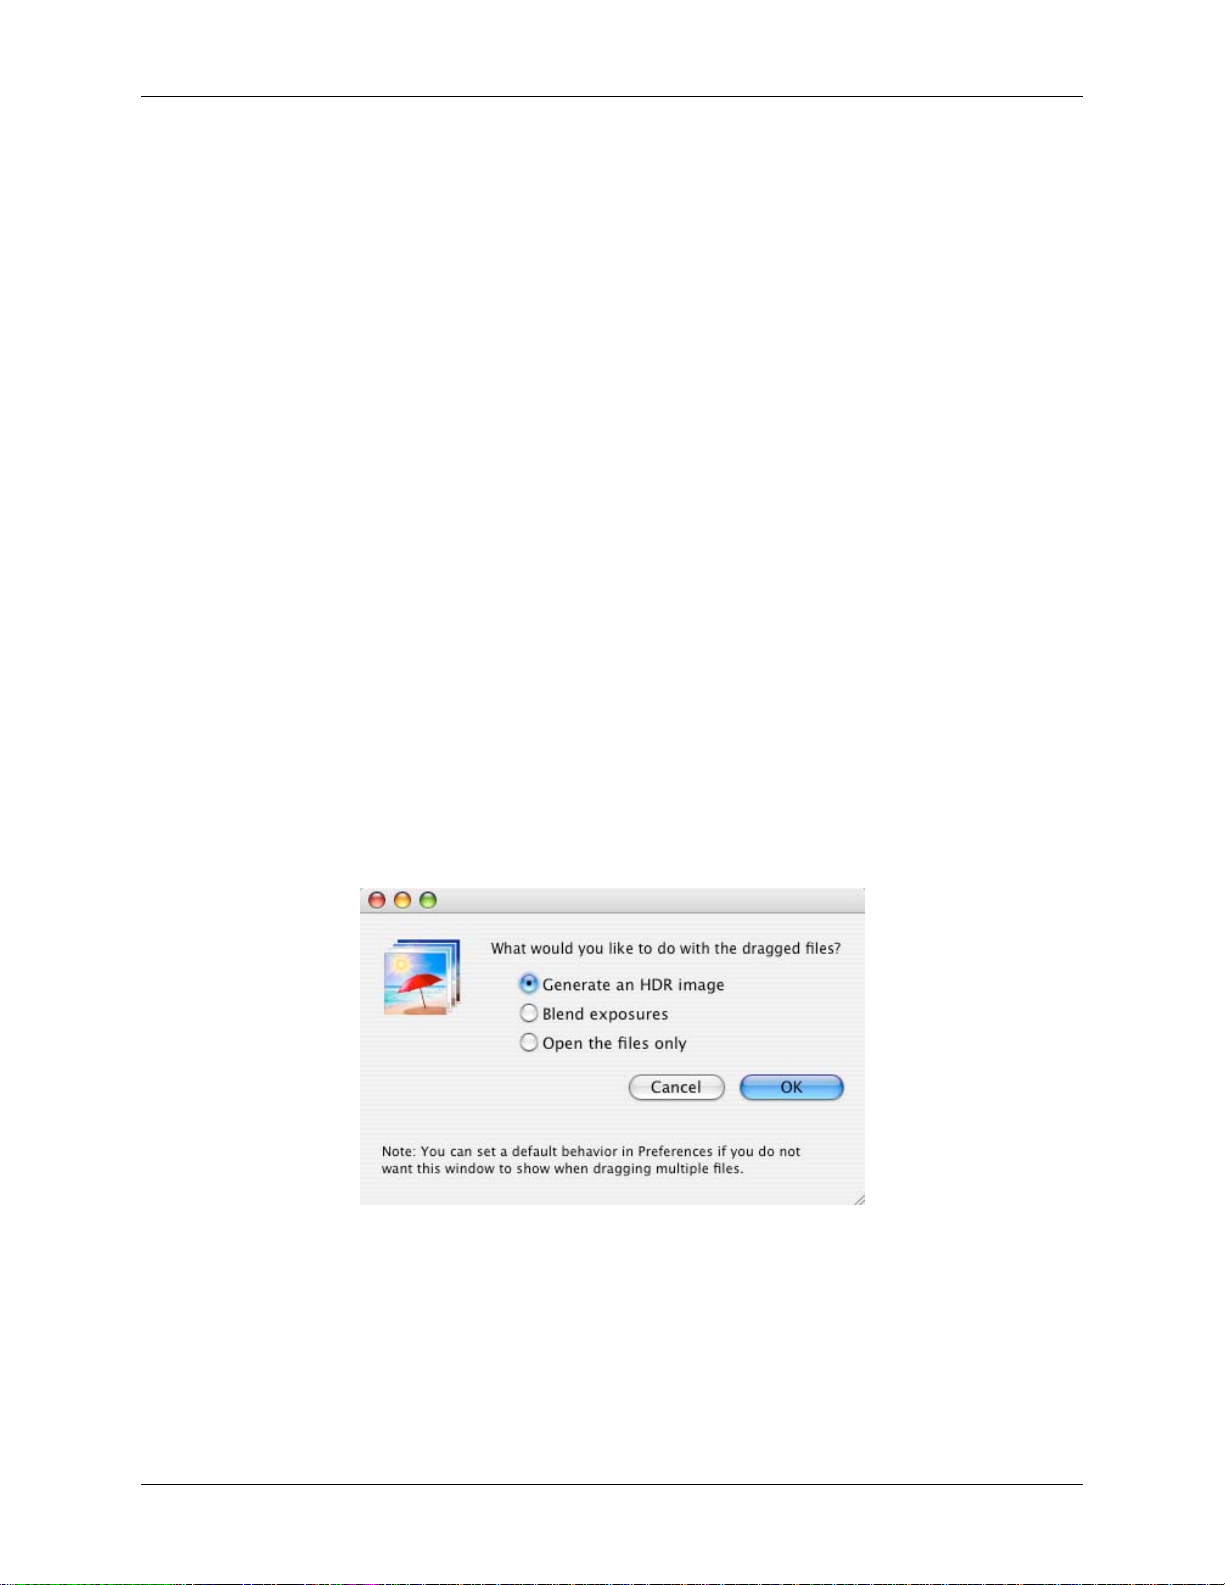
Drag & Drop
You can drag files fro m the Finder or ot her imag e browsers a nd drop them to the Photomatix
Pro icon on y our Dock. I f y ou drag & drop multiple im age files, you will be abl e t o ac c es s t he
HDR creation or Exp os ure Blending processes.
Photomatix Pro User Manual
Page 4

Table of Contents
Table of Contents
Section 1: Tips for taking photographs intended for HDR processing ..........................................1
1.1 Automatic Exposure Bracketing (AEB)..............................................................................1
1.2 Manual Exposure Bracketing for DSLR cameras...............................................................3
1.2.1 Manual Exposure Bracketing with Compact Digital Cameras .....................................4
1.3 Film photo techniques for creating HDR source images....................................................4
Section 2: HDR Generation and Tone Mapping...........................................................................5
2.1 HDR Generation................................................................................................................5
General settings for Generate HDR.....................................................................................8
Generate H DR settin gs when the sourc e images are JPEG, TIF F or PSD files:..................8
Generate HDR settings when the source images are RAW files:.........................................9
2.2 Tone Mapping.................................................................................................................11
2.2.1 Tone Mapping with Details Enhancer ....................................................................... 11
2.2.2 Tone Mapping with Tone Compressor......................................................................17
Additional To ne Map ping Set tings .....................................................................................19
Section 3: Exposure Blending ...................................................................................................22
3.1 Blending Exposures ........................................................................................................23
3.1.1 Highlights & Shadows – Adjust.................................................................................24
3.1.2 Highlights & Shadows – Auto ...................................................................................24
3.1.3 Highlights & Shadows – 2 Images............................................................................25
3.1.4 Highlights & Shadows – Intensive.............................................................................25
3.1.5 Average....................................................................................................................25
Section 4: Automate ..................................................................................................................28
4.1 Batch Processing............................................................................................................29
4.1.1 Batch Processing Settings ........................................................................................29
4.2 Single File Conv ers ion ....................................................................................................37
Section 5: Advanced Tips and Techniques................................................................................38
5.1 Chromatic Ab err ations (C A) ............................................................................................38
5.2 Image Alignment.............................................................................................................40
5.3 Process ing RA W files in 3rd party raw converters............................................................41
5.4 Blurred Images................................................................................................................42
5.5 ISO and Noise.................................................................................................................42
5.6 Photomatix Pro and Color Management ..........................................................................42
Resources.................................................................................................................................43
Photomatix Pro User Manual
Page 5

Section 1: Tips for Taking Successful Source Images
Section 1: Tips for taking photographs intended for HDR processing
Photographing a high contras t s c ene requires t ak ing several exposures in orde r t o c apture
information in both the brightest highlight s and deepest shadows of t he s c ene.
Photographs can be made with di git al or film- based cameras . The only requirement is t hat t he
exposur e c an be adjusted when tak ing pictures . I f y ou use a film- bas ed camera, y ou will nee d t o
scan them i nt o y our comput er before processin g t hem. Photo m at ix Pro can mer ge image files
saved in JPEG, 8-bit or 16-bit TI F F, and PSD formats. I t als o s upports RA W files of s everal
camera models .
There are t w o general rec ommendations fo r c reat ing differently exp os ed source images:
1) Make sure t o t ake a suffic ient number of exposures to p roperly cov er t he dyna mic
range of th e s c ene, from the darkest s hadows to the brightest highlights.
2) Use a tripod whenever possibl e. Photomat ix Pro incorpo rat es Image Alignment
functions , but us ing a tripod is s t ill recomm ended.
1.1 Automatic Exposure Bracketing (AEB)
Shoot with availabl e light whenever possible. The f las h may try to ba lance the exposure
of all the images, whe n a range of exposures is t he goal.
Select a lo w ISO to minim iz e image n ois e.
Select Continuous shooting mode on the cam era’s drive s et t ing (Note: Co nt inuous
shooting m ode may not always be the best strat egy because cam era shake m ay build
up. We recommend us ing a method that ens ures the leas t pos s ible shake f or each
single shot, e. g. mirror lock -up functi onality, if available). Consult yo ur camera m anual
for model-specific i ns t ruc t ions on using this sett ing.
If possible, use the ca m era’s self-timer setting, or a cable releas e t o minimize camera
shake.
Set your camera to Aperture priority (A setting) so that on ly t he s hutter spe ed v aries
between the exposures.
Set the cam era to Auto Ex posure B rac k et ing (AEB), wh ic h t ak es s everal ph ot ographs of
a scene in a r ow: one at the proper ex pos ure, on e or more underexposed, and one or
more over ex posed.
o Most ca mer as allow you t o s elec t t he amount of over/under exposur e in one-thir d
or one-half increment s . T he suggest ed exposure incre m ent is +/- 2 for optim al
exposur e range. If your c amera do es not of f er +/- 2 exposure increments , s elec t
the maxim um possibl e. Consult the c amera ma nual for model-specif ic
instructio ns on choosing this sett ing.
Photomatix Pro User Manual Page
1
Page 6
Section 1: Tips for Taking Successful Source Images
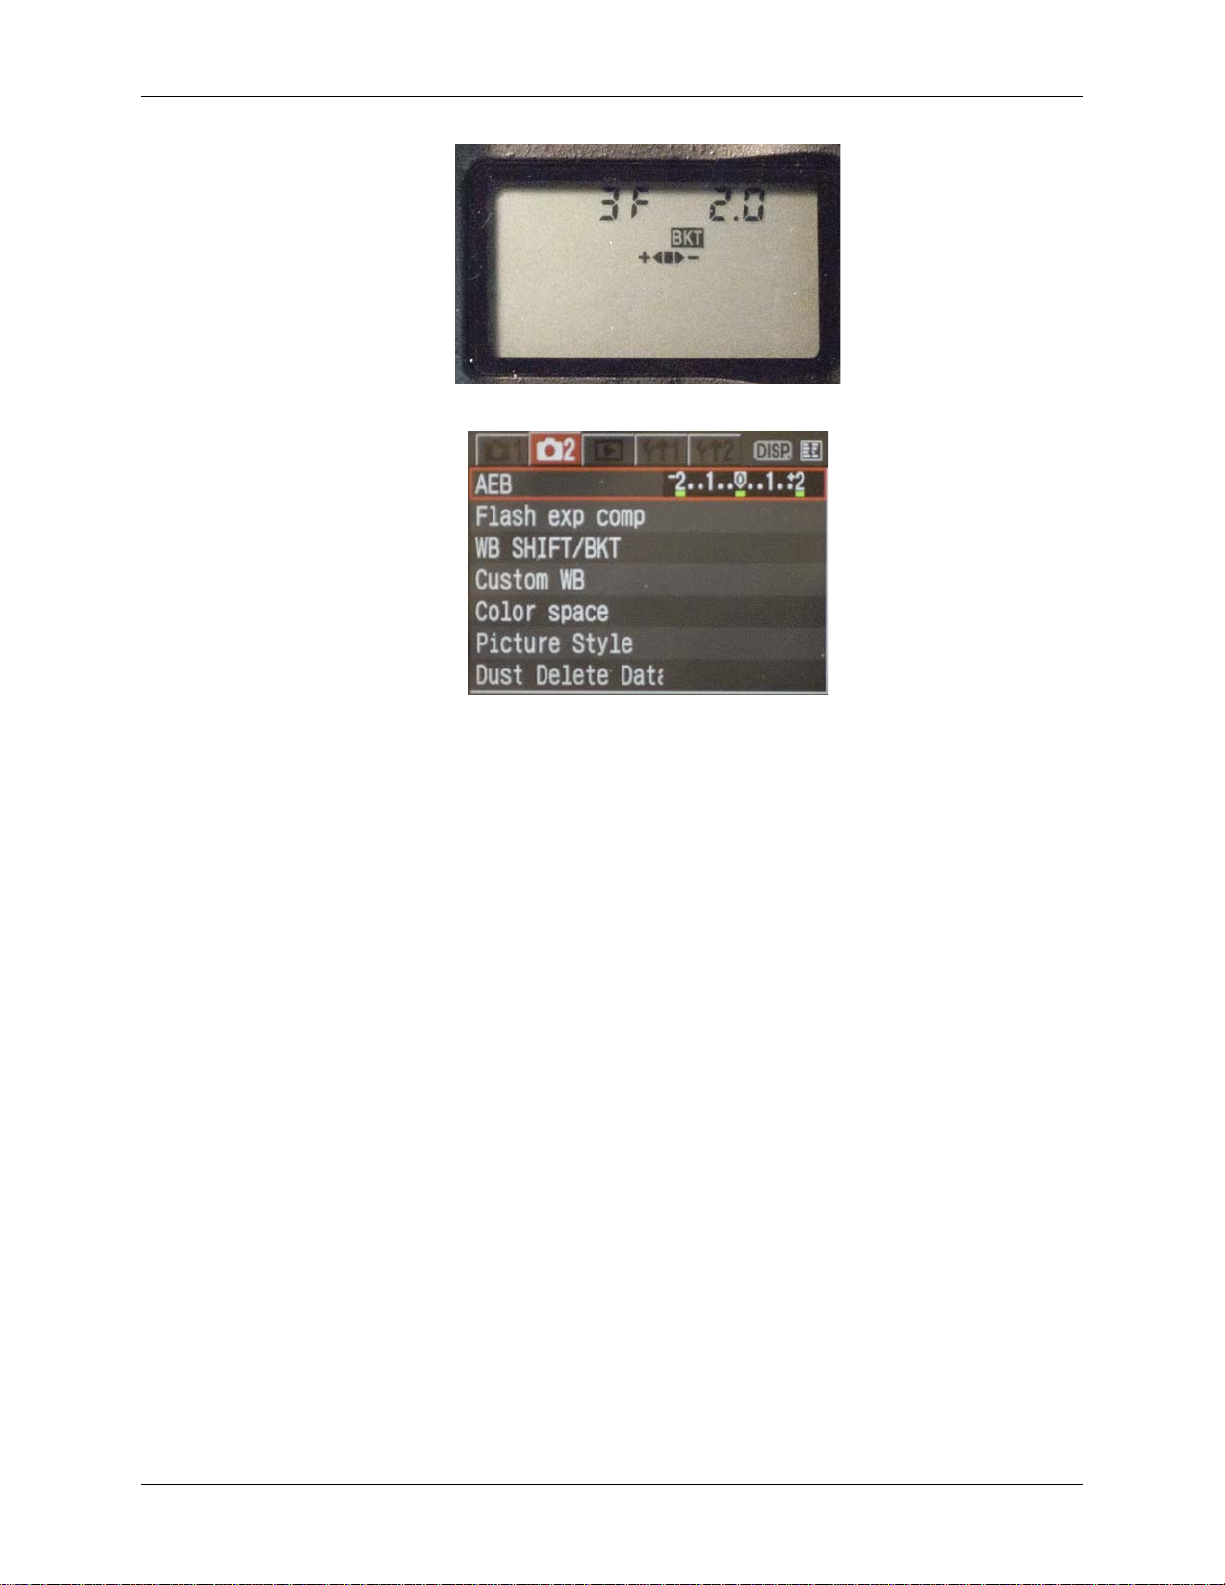
AEB Settings on top LCD of a Nikon D80 (3 shots with +/- 2EV)
Canon Rebel XTi/400D LCD showing AEB with +/-2 i ncrements selected.
o Select an a ppropriat e number of auto-brack eted frames if your c amera offe rs
different opt ions for th e number of f rames. For ins tance, if y our camera c an autobracket at a m ax imum of +/- 1 EV increments, then s elec t 5 or more frames if
your camera allows it . Five frames spaced by +/- 1 EV incr ements will g iv e y ou
the same dy namic range coverage as three f rames s pac ed by +/- 2 EV
increments .
After capt uring the bracketed im ages, check t he histogram previews in play bac k
mode to ensure that y ou have capt ured an adequate range of expos ures.
It is important t o remember that the n umber of ex posures needed depends on th e dynamic
range of th e s c ene, in addition to the ex posure increment. Fo r most outdoor scenes, t hree
exposur es t ak en at +/- 2 expos ure incre m ent will be suf f ic ient , provided the scene does not
include th e s un. Howeve r, f or t he interior of a room with a bright view out of t he windo w, y ou will
need at leas t f iv e images taken with an ex posure i nc rement of +/- 2, or nine imag es t ak en with
an exposu re increment of +/- 1.
Photomatix Pro User Manual Page
2
Page 7
Section 1: Tips for Taking Successful Source Images
1.2 Manual Exp os ure B racketing for DS LR cam er a s
In scenes with extrem e dif f erences between light and dark detail, m anual expos ure bracket ing
over a great er exposure value ra nge may prov ide better s ource images than A ut o Exposure
Bracketing. t is the only opt ion if your c amera do es not offer automatic bracketing over a wide
enough ra nge to cove r y our scene. Th e f ollowing s uggestions w ill help you to t ak e optimal
pictures us ing manu al ex posure b rac k et ing.
Choose a l ow ISO to minimize nois e.
Keep a cons t ant apertur e and ISO. C ont rol image ex posure by c hanging th e s hut t er
speed in ful l-s t op incre me nt s . W hen taking pic t ures, us e eit her the A or M set t ing,
Either of which will allow you to fix t he aperture.
Shoot a ser ies of images starting wit h y our brightest image elements (highlights)
being slight ly underex posed (see Figure 2.1 below ) t o t he darkest i ma ge elements
(shadows) being sli ght ly overexposed (see Figure 2.2 below). You may or m ay not
want or nee d t o use every ex posure in the series f or HDR proces s ing, but it is eas ier
to delete a picture at processin g t im e t han to return to a locati on t o t ake additional
images. Ex periment with different comb inations of t he brac keted s ource images in
Photomatix Pro to achieve your desired eff ec t .
Check yo ur DSLR's Histogra m pr ev iew in playback mode t o ensure that you hav e
captured the entire tonal range of t he image. You should have at leas t one picture
without a large peak at t he left side of t he histogram and one pic t ure without a large
peak at the right side of t he image.
Use self-timer mode and mirro r loc k -up, or a cable releas e and mirro r loc k -up
options, if av ailable. These will help minimiz e any camer a s hake, esp ec ially for
exposur es s lower than 1/ 15 second.
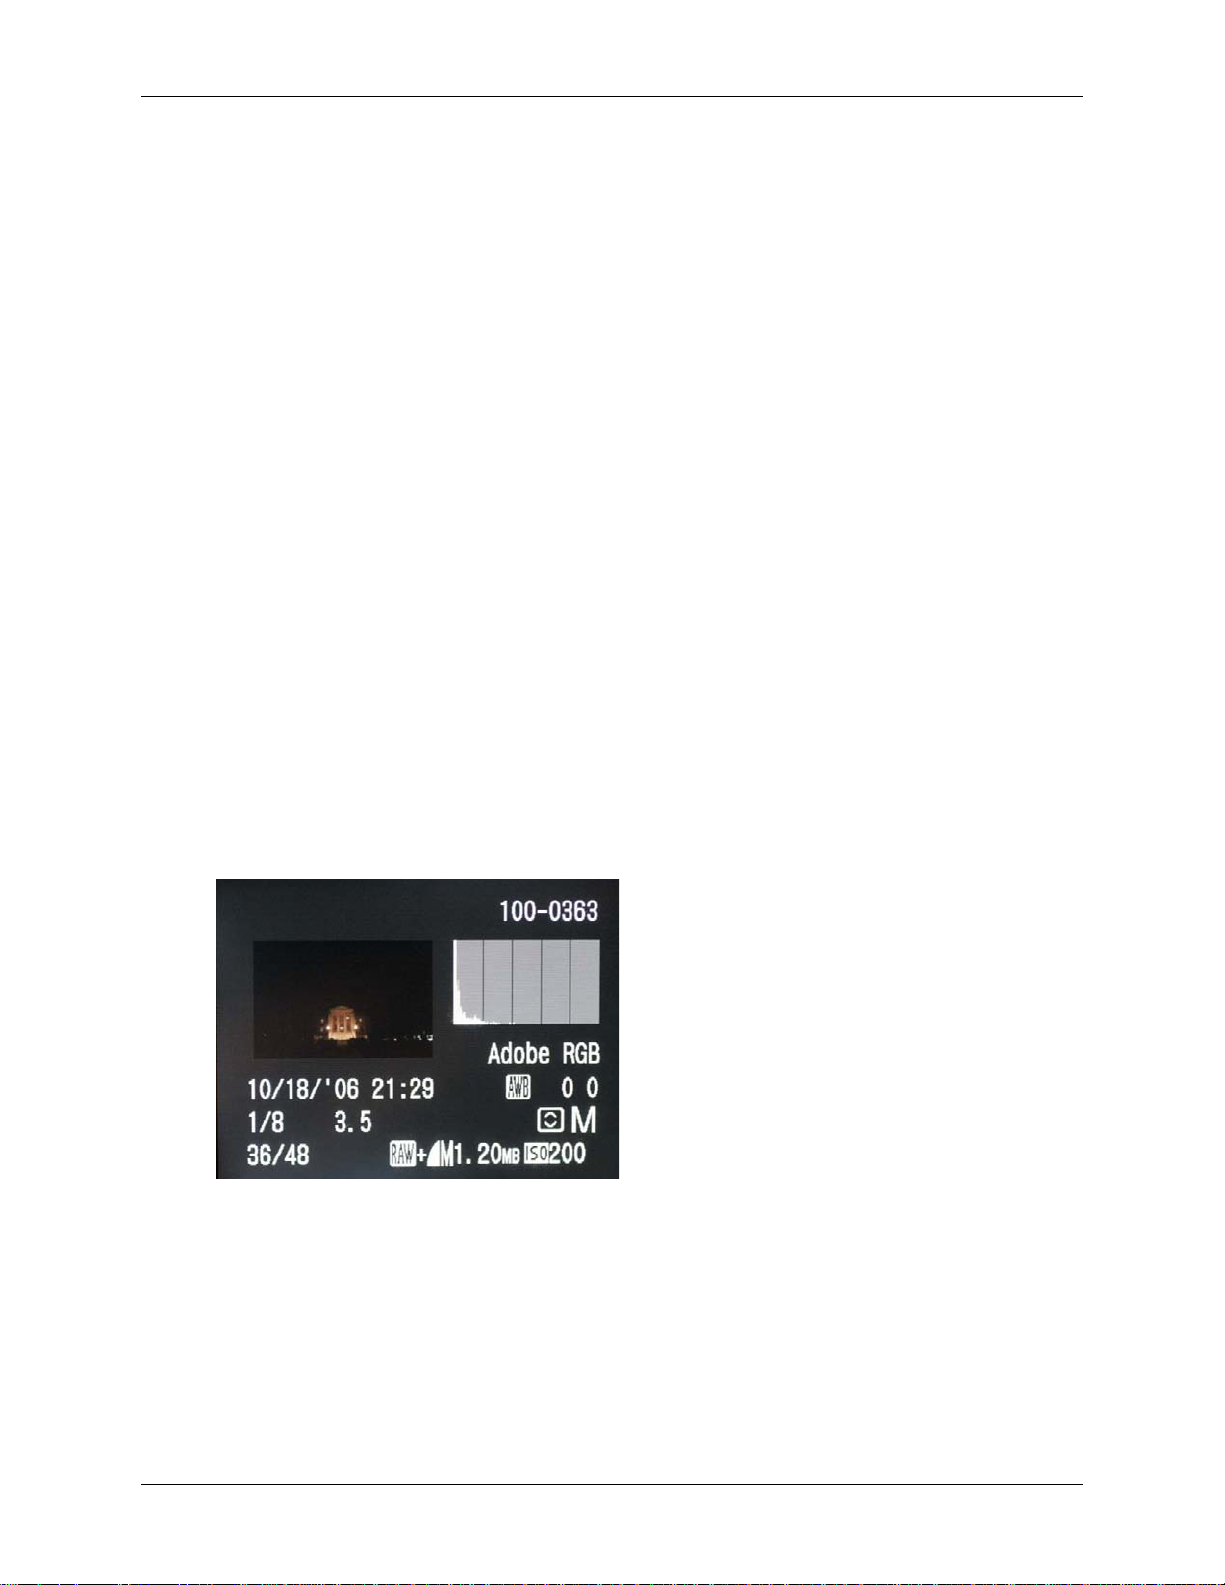
Figure 2.1 Histogram depicts the brightest
elements (highlights) underexposed.
Photomatix Pro User Manual Page
3
Page 8
Section 1: Tips for Taking Successful Source Images
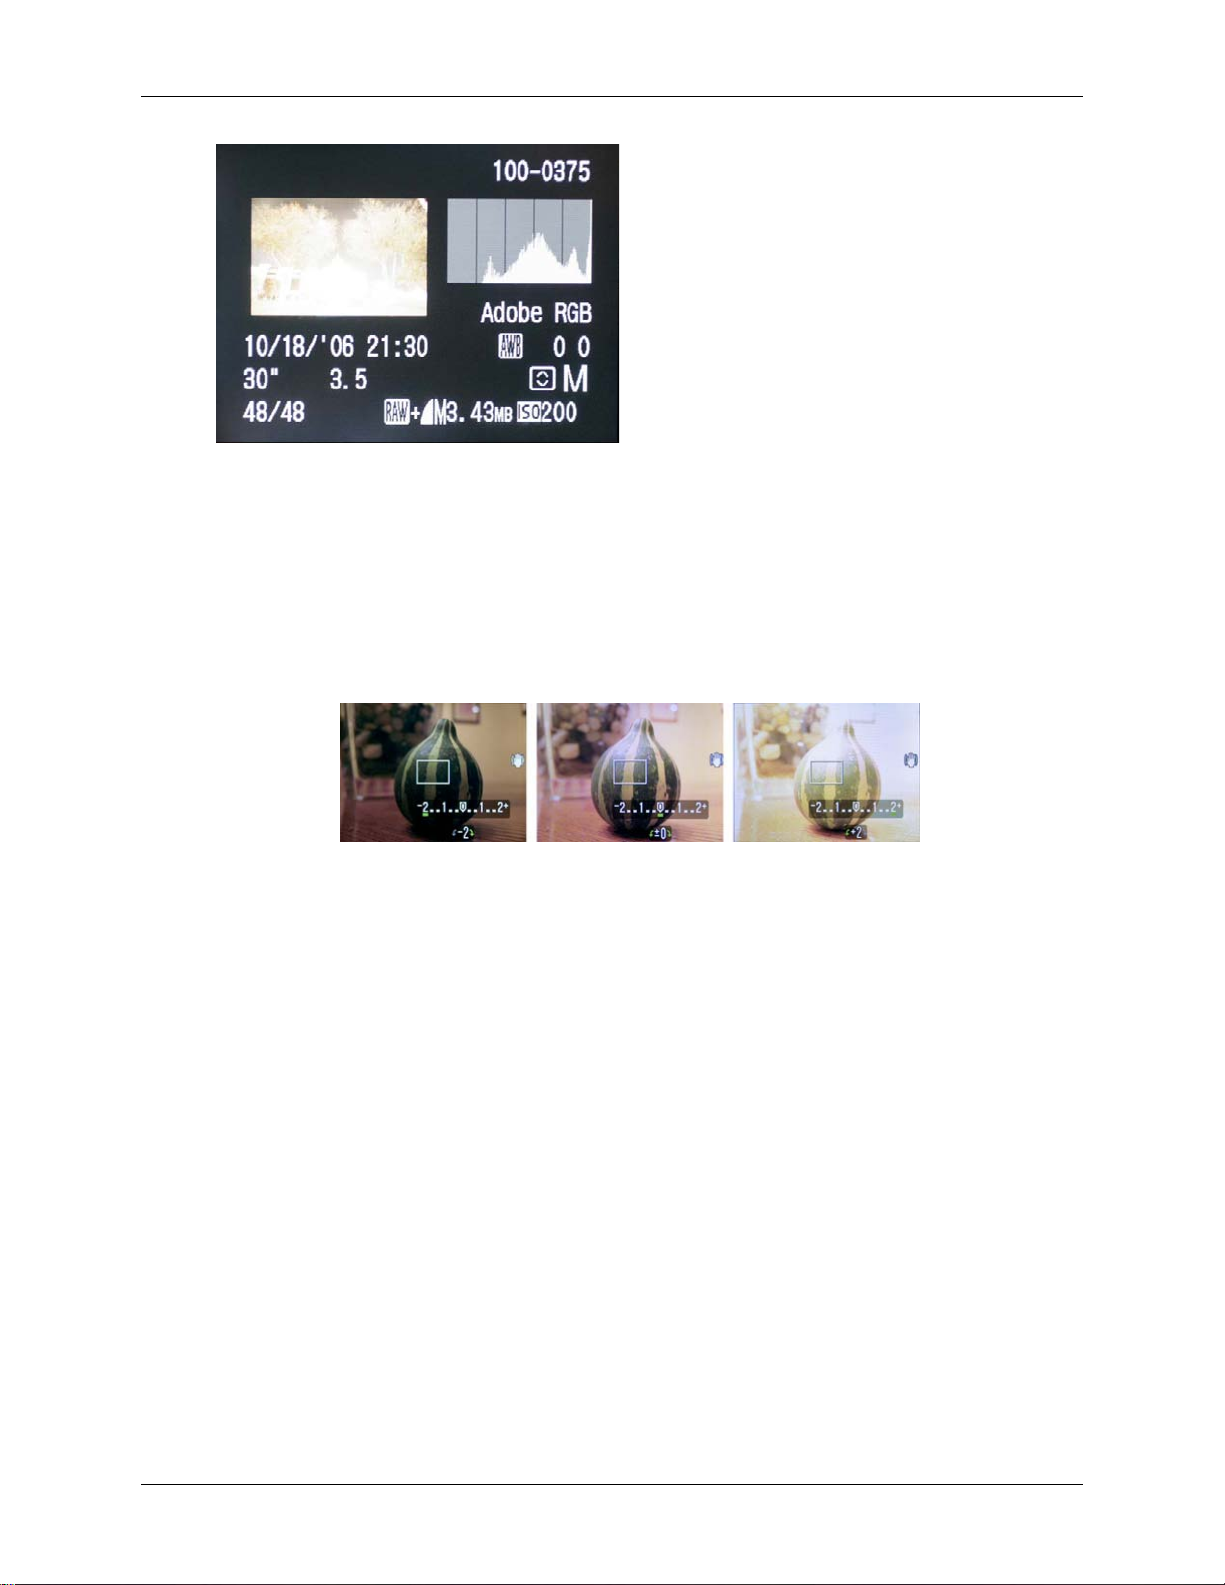
Figure 2.2 Histogram depicts the darkest
image elements (shadows) overexposed.
1.2.1 Manual Exposure Bracketing with Compact Digital Cameras
Consult y our c amera’s user manual to determine if ma nual exposu re is possible. I f t his is
possible, y ou can follow the steps f or Manual Exposur e Bracketin g with a DSLR.
If your com pac t c amera do es not have an A EB setting, or allow you t o s et t he exposure
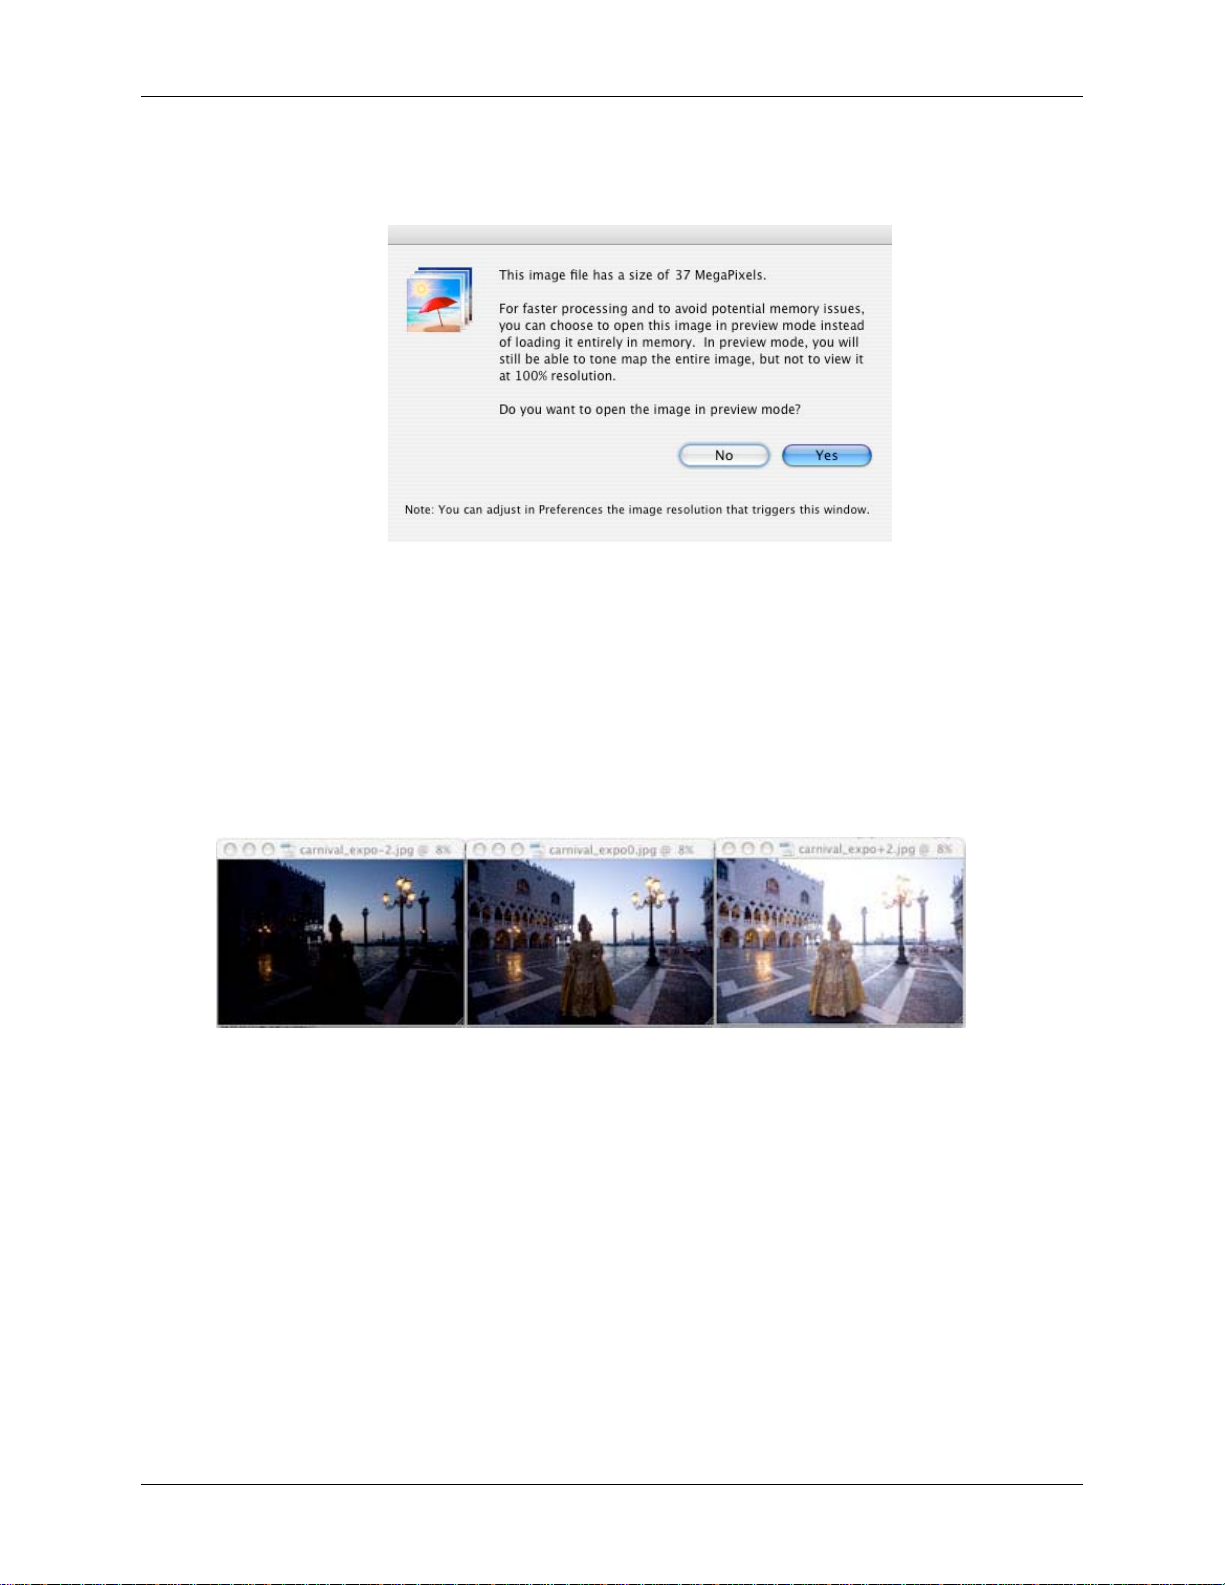
manually , y ou c an use the ex posure compensat ion setting to manually bracket . Th e s eries
below shows the same scene captured at -2, 0 and +2.
LCD display
1.3 Film photo techniques for creating HDR source images
Follow the advice for shooting with a digital camera. Keep in mind that you wil l not have
the option of prev iewing the live hist ogram to det ermine your exposure range.
Scan your film or slides , not prints. Ph ot o labs will at t empt to mak e t he best print f rom
each of your s ource i ma ges , and you will not achiev e good result s s c anning these f or
HDR generat ion.
Turn off yo ur s c anner's auto-expos ure options . This allo ws y ou to manually contr ol t he
exposure.
Make sure y ou select the Align im ages option in Photo m at ix Pro when combinin g y our
images.
Photomatix Pro User Manual Page
4
Page 9
Section 2: HDR Generation and Tone Mapping
Section 2: HDR Generation and Tone Mapping
Creating i m ages that display the High Dyna m ic Range captured by photogr aphs taken under
different ex posure set t ings is a two-s t ep process :
The first st ep is t o merge your different ly ex posed photographs int o a single 3 2-bit
HDR imag e. Because of it s high dyna mic range, a n H D R i m age will not display
properly on c onventional monitors.
In the seco nd s t ep, the H D R i ma ge is t hen processed, or ‘dev eloped, ’ v ia t he Tone
Mapping t ool. Tone Mapping will 'reveal' the dy namic range captured in the H D R
image and produce an image which can be properly dis played on conventional
monitors. T his c an t hen be properly printed.
The order of f iles in a bracket ing seque nc e does not m at t er. Photomat ix Pro will
systematically sort the ima ge f iles based on exposure infor m at ion retrieved from th e
EXIF data. I t will use their rel at iv e brightness levels wh en t he exposure infor mation is not
available.
2.1 HDR Generation
The easiest way to start t he generat ion of the H D R i m age is by dragging your brackete d images
that cover the desire d ex posure ra nge to the Ph ot omatix Pro icon. Then s elec t t he option
Generate H DR imag e
As an alter nat iv e, y ou can also c lic k on the Generate HDR Image button of the Work f low
Shortcuts , or go t o t he Process menu and select t he G enerate HDR item.
Photomatix Pro User Manual Page
5
Page 10
Section 2: HDR Generation and Tone Mapping
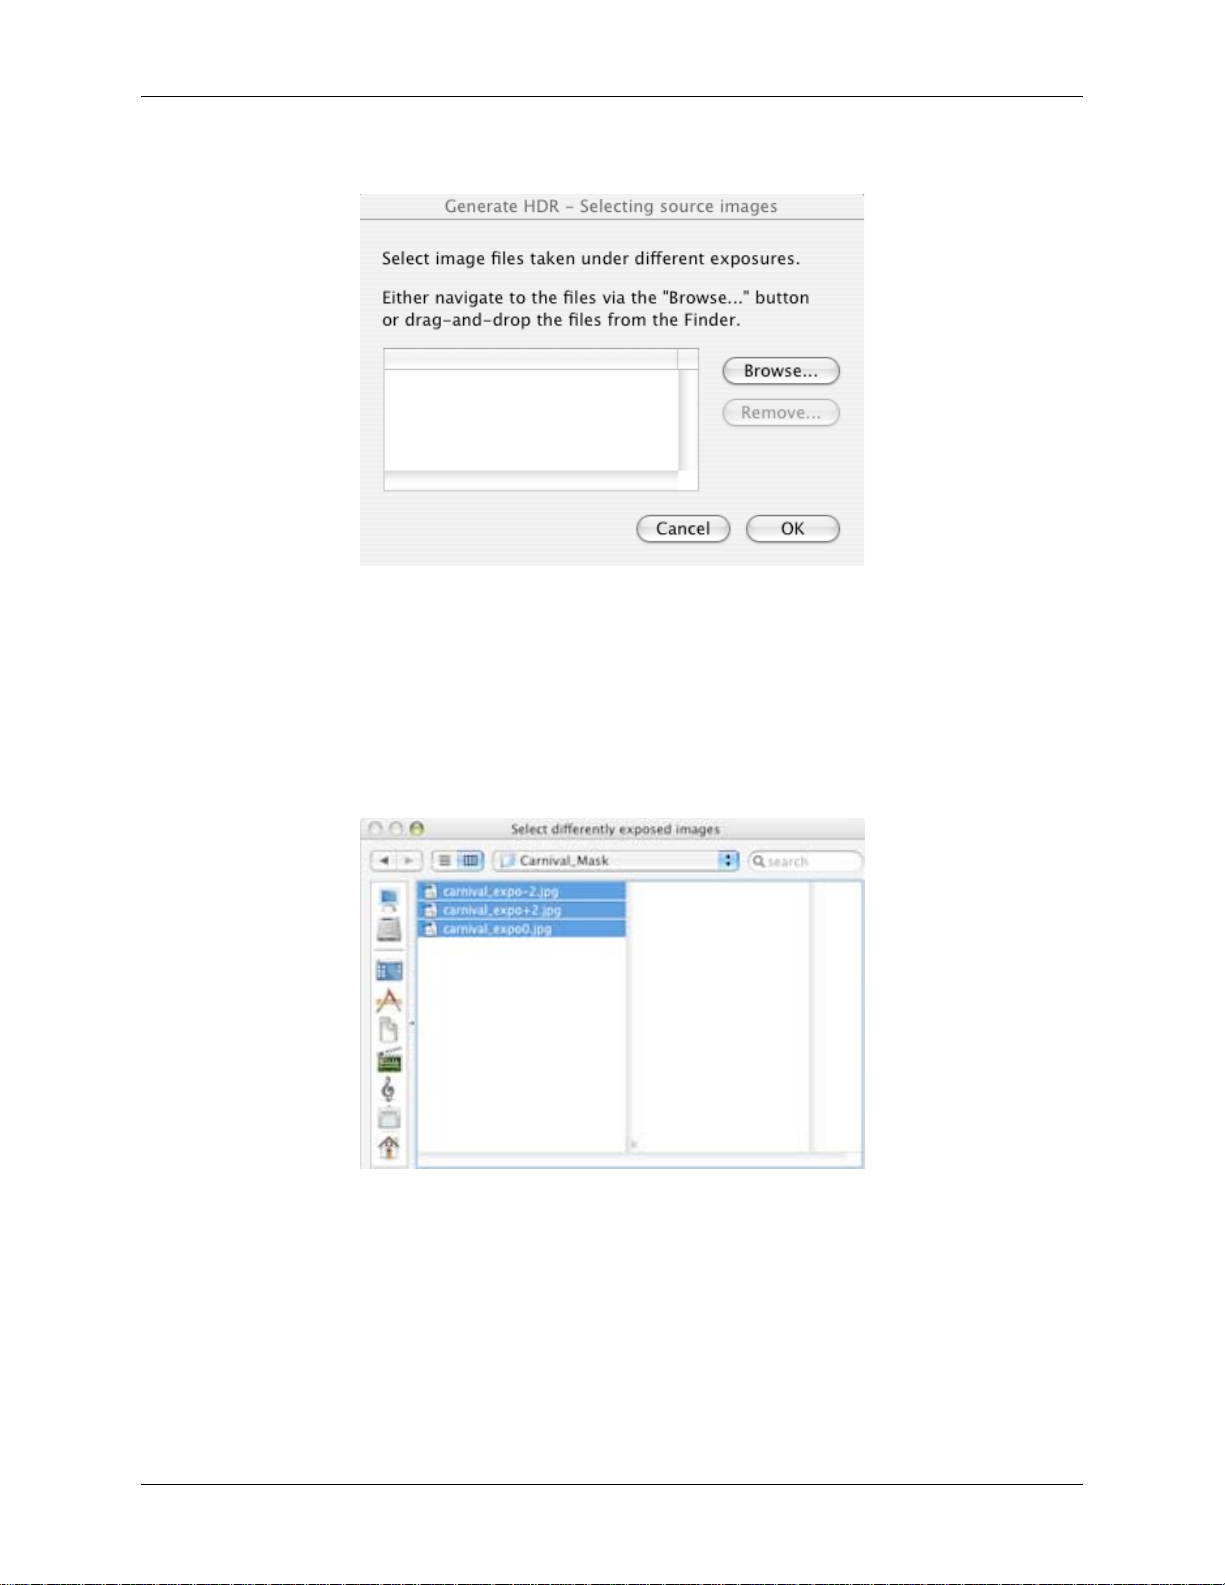
The Gener ate HD R – Selecting sourc e images windo w will display .
Click Browse. The Select differently exp os ed imag es wi ndow will dis play to allow you to selec t
the source images t o be c ombine d.
Highlight the images that you wish to use for HDR Generation. Then click on the Select button.
The select ed image files will be liste d on the Gen erate HD R - S elec t ing source images wi n do w.
Photomatix Pro User Manual Page
6
Page 11

Section 2: HDR Generation and Tone Mapping
Photom at ix Pro can gen erate an HD R i m age fro m 8- bit , 16-bit and RAW source files.
Supported f ile types include JP EG, TIFF, PS D, DNG and RA W f iles from m any c amera
models. As t he lis t of s upported camera mo dels often changes whe n a new sub-v ersion
of Photo matix Pro is rele as ed, we sug ges t t hat y ou consult t he Photomat ix Pro FAQ o n
the www.hdrsoft.com
camera mo del is recent, y ou may have to upgrade to a new versi on, or wait till
Photomatix Pro adds s upport for it.
Click OK t o procee d f urt her.
If the exposure information can not be found i n t he metadat a of t he image fil es ,
Photomatix will show a w indow where you can input the relative Ex posure Val ues f or
each one of y our images. T his window wi ll also show if two or mor e s ource images
share the same expos ure infor m at ion.
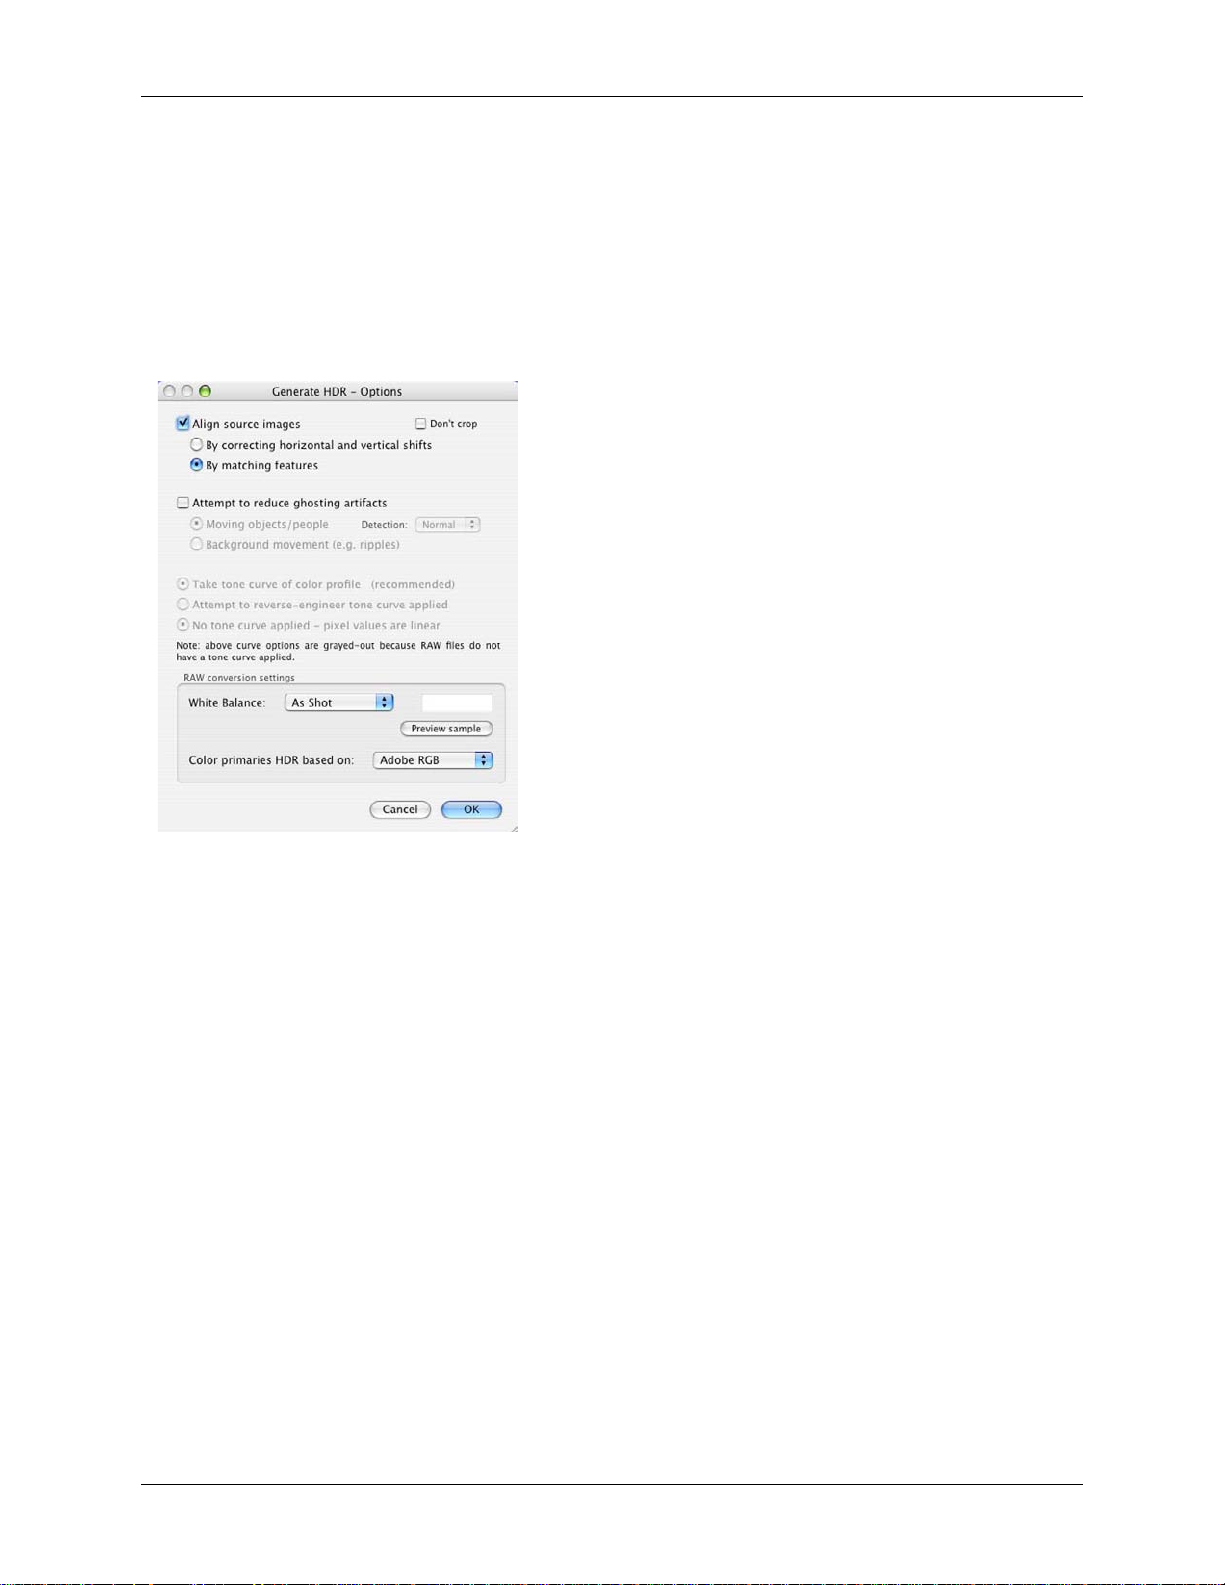
The Generate HDR - Options windo w will appear.
website t o c heck whether your camera model is supported. If your
This window will displ ay when the s ource images are JPE G, TIFF or PSD files. Whe n t hey are
RAW files, a different wi ndow will be displayed (read mo re below).
Photomatix Pro User Manual Page
7
Page 12

Section 2: HDR Generation and Tone Mapping
General settings for Generate HDR
Alignment s et t ings
The Align source images option is c hec ked by default. The Align im ages option corrects for
misalign m ent problems if t he c amera moved slightly betwe en t he bracket ed frames. This is
the case with hand-held photo graphs, but may also ha ppen when shooting with the aid of a
tripod.
Photomatix offers tw o alignment methods based on diff erent algor it hms. The first one By
correcting horizontal and vertical shifts is fast but corrects for translation movements only.
The second one By match in g features correct s f or both rotat ion and transl at ion.
The Don't crop option is usefu l w hen the result ing imag es must have t he same wi dt h and
height as the source images. As an example, Real viz Stitcher requires th is of images it
processes.
Ghosting r eduction s et t ings
If the scene has movi ng objects a nd y ou find the resulting ' ghosts' are not desira ble, t hen
check Attempt to reduce ghosting artifacts with th e option Moving objects/people selected. If
there are elements i n t he s c ene that foll ow a rhyth mic pattern (f lowing wat er f or instanc e)
oscillating between s hadows and highlights, then select the opt ion Back grou nd mov em ents
instead. I n bot h cases, f irs t t ry leav ing the Detection option set to Normal. If you find that the
resulting H D R i m age still sho ws t oo much ghosting, t hen t ry again with t he option set t o High.
Only check t he At t empt to re duce ghost ing artifacts box with t he Moving objects/people
option if it is nec es s ary. Check ing the m in other cases wi ll lower the qu alit y of t he resulting
HDR imag e.
Generate HDR settings when the source images are JPEG, TIFF or PSD
files:
The reco m m ended opti on Take ton e c urve of colo r prof ile is selected by default. This is us ually
the best ch oic e when the images f iles c ome from a D SLR came ra or have be en c onverted
from RAW files. This option loads the To ne Repro duc t ion Curve data from the ICC color profile
associat ed with the source images in orde r t o det ermine the non-linear function applied to the
raw sensors data. If no profile is av ailable, it us es t he t one reproduc t ion curve of t he Adobe
RGB color prof ile.
When the i m ages are sc anned fil ms or t ak en with a c ompact camera, it may be worthw hile to
check the o pt ion Attem pt t o rev erse-en gineer tone c urv e applied.
If your source images are 16-bit TIFF files th at have been converted f rom RAW files with a
special option in the RA W converter to leave t he image in li near space, t hen check the opt ion
No tone curv e applied – pixel values are linear. O nly check this option if you are 100% sure that
Photomatix Pro User Manual Page
8
Page 13
Section 2: HDR Generation and Tone Mapping
the tonal values of the i m ages are lin ear relative to the values of light capt ured. Please note that
the terminology line ar may be us ed with a different meaning depending on t he RAW co nv ert er
(in Adobe Ca m era RAW, for instanc e, linear is rel at iv e t o t he Adobe R GB color space and not to
the values of light).
Generate HDR settings when the source images are RAW files:
The Generate HDR - Options windo w will dis play with ad dit ional opti ons :
It is important t o note that the selecte d c olor space is used fo r t he c olor prima ries only, and not
for the tone reproduc t ion c urve. Sinc e t he HDR i m age values are in linear s pace, they do not
have a ton e c urv e. The tone c urve of the pr of ile assoc iat ed with the i m age will only be applied
during the tone mapping step, and not to the HDR image itself
Once you a re s at is f ied with th e s et t ings of the G enerate H D R - O pt ions window, click OK to
create the 32-bit HD R i m age.
A progress bar will display in the Ge nerat e HDR - Options window. Once the HDR is
generated, t he HDR image and th e HDR Vie we r w indow will dis play on-sc reen.
By default, Photomat ix w ill use the As Shot
White Bal anc e (read fro m the EXI F
metadata) when converting the RAW data to
HDR. You can adjust t he White Balance by
selecting a pre-defi ned white balance from
the drop-down menu, or by specify ing the
color temperature i n Kelvin. A prev iew lets
you see the ef f ec t of t he c hange on t he
source i ma ge.
The RAW data is in a col or s pace spec if ic t o
the camera. Photomat ix will conve rt t he data
into a standardized color space (by default
Adobe RGB). You can, however, s elec t
sRGB or Pr oPhoto RGB instead.
.
Photomatix Pro User Manual Page
9
Page 14
Section 2: HDR Generation and Tone Mapping
• Step one of t he t w o-s t ep process is now comp let e.
• Until Tone Mapping is applied, t he 32-bit image seen on s c reen cann ot dis play its full
tonal range.
• The small v iew on top of the “HDR viewer” window shows a local sec t ion of the H D R
image vie w ed at t he appropriate exposure.
Savin g t he 32-bit H D R i mage at this point will allow you to a pply different Tone Mapping
settings to t he HDR source image without r epeatedly following the G enerate HDR procedur e.
Since version 3.0, Photomatix Pro saves t he name of t he c olor profile i n t he header of H D R
images sav ed in the Radiance (.hdr) format . T his means y ou will not hav e t o re-assign t he color
profile, pr ov ided the HD R i m age file have been sa v ed as Radiance and the color profil e is eit her
sRGB, Adobe RGB o r ProPhot o R GB
. However, the color profile information of t he source
images will n ot be preserved if the H D R i ma ge has been s av ed in the Op enEXR format.
Photomatix Pro allows you to cre at e a 32-bit HD R i mage from a single RA W file. To do
this, open one RAW fil e us ing File->Open, and P hotomatix will conv ert it int o a pseudoHDR imag e. I t is imp ort ant to note that an image created with a singl e RAW file cannot
really be co ns idered Hi gh Dynamic Range. T he important c haracteris t ic of t his ps eudoHDR image is that it is unprocessed. Its dynamic range is not much larger than the range
of an already c onverted f ile.
Photomatix Pro User Manual Page
10
Page 15
Section 2: HDR Generation and Tone Mapping
2.2 Tone Mapping
The generated HD R i m age cannot be repres ented properly on screen without further
processing. An unp roc es sed HD R i m age is some w hat s imilar to a fil m n egative or t he RAW file
of a digital camera. It needs furth er process ing for display or printing. In Photomat ix Pro, this
processing is called Tone Mapping.
There are t w o t one mappi ng methods f or processi ng t he HDR image: Details Enh an cer and
Tone Compre ss or.
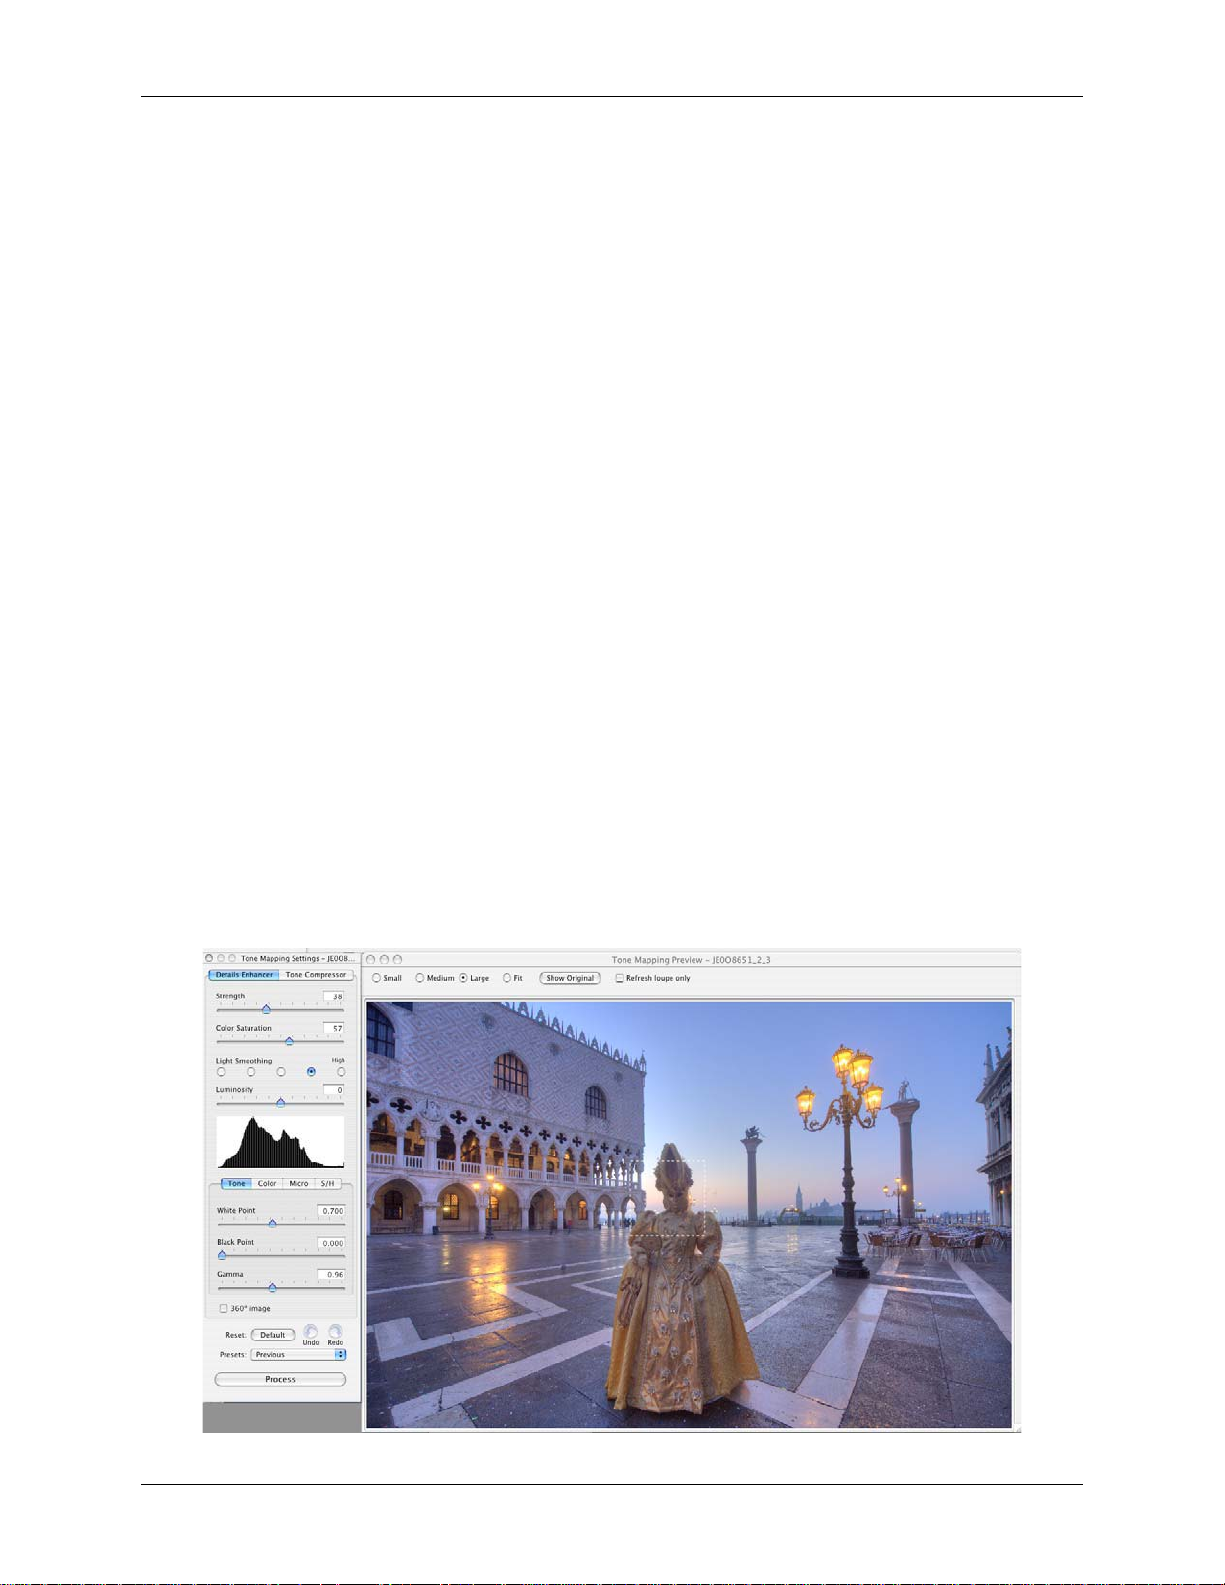
2.2.1 Tone Mapping with Details Enhancer
Photomatix Pro defa ult s t o t his opt ion when the Tone Ma ppi ng wi nd ow is opened. Details
Enhancer ut ilizes a loc al operato r t o ‘develop’ the HDR image. This me ans t hat it takes int o
account t he local brig ht nes s c ontext -- a pixel of a given value in the HDR ima ge will be m apped
differently depending on wheth er it is loc at ed in a bright or dark area of t he image.
Click on the Tone Mappi ng button on eit her the HDR Viewer window, the Workflow Shortcuts
window or the Process > Tone M appin g me nu t o launch the Tone Ma pping tool for t he active
open HD R i m age. If you hav e used the G enerate HDR proc es s t o c reate a new H D R source
image, it wil l be t he active i m age. Otherwise, ope n a saved H D R i m age file via th e File>Open
menu.
Use the slid er c ontrols to adjust the i ma ge. The preview on the right provides an approx imation
of what the i m age will look lik e once Det ails Enhanc er is applied to the entire H D R source
image. In t he c as e of the Details Enha nc er tone mapping meth od, t he previe w is not always an
accurate representation of t he f inal tone map ped imag e.
Photomatix Pro User Manual Page
11
Page 16

Section 2: HDR Generation and Tone Mapping
Details Enhancer incorporat es t he f ollowing i m age adjustment sliders :
General adjustments
Strength: Controls t he s t rength of c ont rast enhance me nt s . A v alue of
100 gives the maxim um increas e in both local and global contrast
enhancements.
Color Saturation: C ont rols the saturation of t he RGB color c hannels .
The great er t he s aturation, t he more intense the c olor. A value of z ero
produces a grayscal e image. Th e v alue affects each color c hannel
equally.
Light Smoothing: Controls smoot hing of contr as t v ariat ions throughout
the image. A higher v alue tends t o reduce hal os and give a mo re
natural look t o t he resulting image. A lower value tends to i nc rease
sharpness.
Luminosity: Controls the c ompressi on of t he t onal range, which has
the effect of adjusting t he global lum inosity level. Movin g t he s lider to
the right has t he effect of boosting s hadow details and brightening the
image. Mov ing it to the l ef t giv es a more natural look to t he resulting
image.
Tone adjustments
White Point - Black P oint: Both s liders contr ol how
the minimum and max imum val ues of t he tone mapped
image are s et . M ov ing the sliders to the ri ght inc reases
global contrast. Moving them to the left reduces
clipping at t he ex t remes. The White Point slider s ets
the value for t he maxim um of the tone mappe d image
(pure whit e or level 255 ). T he Black Point s lider sets
the value for t he minimum of the tone mappe d image
(pure black or level 0).
Gamma: adjusts t he mid-tone of t he t one mapp ed
image, bri ght ening or darkenin g t he image glo bally.
Photomatix Pro User Manual Page
12
Page 17

Section 2: HDR Generation and Tone Mapping
Color adjustments
Color Te mperature: Adjusts the color tem peratu re of
the tone ma pped imag e relative to the t emperature of
the HDR source image. Movin g t he s lider to the right
will give a “ wa rmer”, mor e y ellow-ora nge colore d look.
Moving the s lider to the lef t gives a “col der” more
bluish look . A v alue of zero will preserv e t he original
color temperature of t he HDR source image.
Saturation Highlights: Adjusts the color saturation of
the highlight s relative t o t he c olor saturat ion set wi t h
the Color Saturation slider. Values higher t han zero
increase the color sat uration in the highlight s ; v alues
lower than zero decr ease it.
Saturation Shadows: Adjusts the color saturation of
the shado ws relative t o t he c olor saturat ion set with the Color Saturation slider. Values highe r
than zero will i nc rease the c olor saturat ion in the shadows. Va lues lower t ha n zero will dec rease
it.
Micro co ntra s t : Sets the level of acce nt uation of loc al
details.
Micro-smoothing: Smoothes out loc al detail
enhancements. T his has t he effect of reducing n oise
in the sky for instance, and tends to give a "cleaner"
look to the res ulting image.
Important note: The Loupe may not properly show
the effect of the Micro-smoothing setting when the area
magnified is uniform. If you want to see the effect of the
micro-smoothing setting at 100% resolution on a uniform
area such as the sky, you will have to select an area that
contains an object in the scene in addition to the sky.
Micro adjustments
Photomatix Pro User Manual Page
13
Page 18

Section 2: HDR Generation and Tone Mapping
how much of t he s hadows range is clipped. This c ontrol is useful to cut out no is e in t he
dark area of a photo tak en under low -light situation.
Shadows/Highlights adjustments
Highlights Smoothing: Reduces the contras t
enhancements in the highlight s . T he v alue of the
slider sets how much of t he highlight s range is
affected. This control is useful to p revent white
highlights f rom turning grey, or unif orm light blue
skies bec oming dark blue-grey . I t is als o us ef ul
reducing halos aro und objects placed against bright
backgrounds.
Shadows Smoothing: Reduces the contrast
enhancements in the shado ws. The value of t he
slider sets how much of t he s hadows range is
affected.
Shadows Clipping: The value of th e slider sets
Other setting
360º image: This optio n needs to be c hec ked when the image process ed is an equi-
rectangu lar image intended to be v iewed as a 360º panorama. This is because Details
Enhancer t akes into account loc al c ontrast a nd will assign different ton al v alues to the
360º sea ms of t he panorama. This wi ll produce a v is ible s eam once t he resulting image
is rendered in a panorama view er. Checkin g t his option corrects for t his .
The 360º i ma ge option should only be c hecked f or equi-rectangular 360º
images. C hec k ing it in other cases may produc e less opti m al results.
Checking t he 360º image optio n inc reases t he amount of m emory nec es s ary
to process t he image by m ore than 50 %. Processi ng t imes will also be
increased.
Once you a re s at is f ied with th e results of t he Details Enh ancer adjustments Click Process to
create the t one mapp ed image.
Photomatix Pro User Manual Page
14
Page 19

Section 2: HDR Generation and Tone Mapping
Edit>Undo T one Ma pping wi ll undo the tone mapping settings applied t o t he original
HDR imag e. T he t one-ma pped imag e w ill revert to a 32-bit HDR image, which can then be
tone mappe d again.
The resulting tone mapped image always has a bit depth of 16 bits/channel. This is even
the case if the s ource i ma ges were JPEGs or 8-bit TIFF files.
Saving th e tone map p ed image
Save the resulting file us ing the File >Save As menu. .
TIFF – 16bit: Best choice for further processing
TIFF – 8bit: For use in applicat ions that cannot deal w it h 16
bit
JPEG: For use on the we b without furt her editin g
Process> Save settings will sav e t he applied tone map ping settin gs as an .x m p file so you can
easily repr oduce the s ame Tone Mapping p rocess in the f ut ure.
Photomatix Pro User Manual Page
15
Page 20
Section 2: HDR Generation and Tone Mapping
If you open a l arge HDR file (larger than t he threshold set in preferences , by default
30 Megapixe ls) the follo wing wind o w will show:
If you click y es t he H D R file will be o pened in preview. Yo u will get the same tone
mapping window and the preview as show n above . The only differenc e is t hat y ou cannot
view the file at 100% in the L oupe. The s ame dial og s hows for b ot h T one Mappi ng
methods.
The Tone Map ping win dow off ers additi onal sett ings , which are explai ne d after ‘Ton e
Mapping with To ne Co mpress or’ instr uct ions.
In the example above, the HDR image was generated from these three source images.
Photomatix Pro User Manual Page
16
Page 21

Section 2: HDR Generation and Tone Mapping
2.2.2 Tone Mapping with Tone Compressor
From the T one Ma pping windo w, s elec t t he Tone Compresso r tab.
Use the slid er c ontrols to adjust the i ma ge. The preview on the right provides a v iew of wh at t he
image will look like once Ton e Compr ess or is applied to the entire H DR source im age.
Photomatix Pro User Manual Page
17
Page 22

Section 2: HDR Generation and Tone Mapping
Tone Co mp res sor incorporates t he f ollowing i m age adjustment slide rs :
Brightness: Influenc es t he tone mapping process done on the HDR
image in regards to ov erall imag e brightness .
Tonal Range Compression: Controls how the tonal range of t he 32bit image is c ompress ed into the 0-256 range of 8-bit monitors. The
higher the v alue, the m ore both shadows and highlight s will be
shifted to w ard t he center of t he histogram. The Tone Compressor
tone mappin g method ign ores loc al contex t.
Contrast Adaptation: Sets how much the cont rast is adapted to the
intensity of t he pixel values proces s ed.
White Point - Black P oint: Both s liders contr ol how the mi nimum
and maxi m um values of t he t one map ped image are set. Mov ing the
sliders to t he right increases global contras t . Moving the m to the left
reduces clipping at the extrem es . T he White Cli p s lider sets the v alue
for the maxi m um (pure wh it e or level 255 ). T he Black Cl ip s lider sets
the value for t he minimum (pure bl ac k or level 0).
Color Te mperature: Adjusts the color tem peratu re of t he t one
mapped image relative to the temperature of the H D R source i ma ge.
Moving the s lider to the right gives a “warmer”, m ore yello w- orange
colored look . Moving th e s lider to the lef t giv es a “colder” mo re bluish
look. A value of zero preserves the original c olor te mp erature of the
HDR source image.
Color Saturation: Adjusts the color saturation of the tone mapped
image. The greater the saturat ion, the mor e intense t he c olor. The
value affec t s eac h color channel equa lly.
Once you a re s at is f ied with th e results of t he T one Compressor adjustments c lic k Process to
create the t one mapp ed image.
Photomatix Pro User Manual Page
18
Page 23

Section 2: HDR Generation and Tone Mapping
Edit>U ndo Tone Ma pping will u ndo the tone mappin g s et t ings appli ed t o t he original HDR
image. The t one map ped image will r ev ert to a 32-bit HDR im age which c an t hen be to ne
mapped again.
Saving th e tone map p ed image
Save the resultant f ile us ing the File >S ave As m enu (you h av e t he same opt ions as sh own in
the previo us s ec t ion on Details Enhanc er).
Process> Save settings will sav e t he applied tone map ping settin gs as an .x m p file so you can
easily repr oduce the s ame Tone Mapping p rocess in the f ut ure.
Additional Tone Mapping Settings
In addition to t he image adjustme nt c ont rols, the Tone Mappi ng Settings and Previe w wi ndows
include several oth er options and settings, which apply to both th e Details En hancer an d Tone
Comp r es so r me th o ds .
Preview: Photo m at ix Pro offers four previe w sizes: small, mediu m, large and fit. Select
the radio but t on f or desire d s iz e.
Click the mouse on the preview to zoo m i n t o 100% mag nif ic at ion. Click t he mouse
again to ret urn to full ima ge previe w.
Reset, Undo & Redo: Reset lets you chang e t he values t o t he
Photomatix defa ult values . Undo (arrow to the left) and Redo
(arrow to the right) allo w for quick s witching between the current
and previous settings done in th e T one Mappi ng window.
Tone Mapping Presets
Photomatix allows y ou t o s t ore settings f or use at a lat er t ime.
Default: Default settings. Sam e as t he “Default ” button.
Previous: Recalls s et t ings used t he las t t ime you us ed t he
tone mappin g tool.
List of saved preset s: e.g. here “carnival_manual”, whic h had
been save d during a prev ious session usin g “Save Sett ings”
Load Setting s..: Load settin gs previously s av ed via “Save Settings ” as XMP file out s ide of the
Presets f older.
Save Settings..: Sav e settings either in the Prese t s f older or elsewhe re. When they are saved
in the Pres et s f older, they will s how in the lis t of Preset for q uic k ac c es s .
Delete Se ttings..: Del et e presets that are not ne eded any m ore.
Photomatix Pro User Manual Page
19
Page 24

Section 2: HDR Generation and Tone Mapping
Inspecti ng the pr e vie w wi th the Lo upe tool
Loupe shows 100% pixel view
Both Tone M apping methods feat ure a Loupe panel so that you can inspect fine details in your
image. If y ou m ov e t he mouse ov er the preview you se e a s quare mar quee. If you c lic k at s ome
position the content of t hat s quare will sho w up in the Loupe panel.
The option Refres h loupe only c an be used to avoid refreshing the main pr ev iew when y ou
change sett ings. This will speed up the view ref resh inside t he loupe wi ndow.
Photomatix Pro User Manual Page
20
Page 25

Section 2: HDR Generation and Tone Mapping
If you sav e t he tone ma pped imag e as a TIFF file, t he t one mappi ng s et t ings will be
automatic ally embedded as X M P metadat a in t he TIFF file. I f y ou open the file in
Photosh op, y ou can then v iew the ton e mapping settings u nd er File->Info->Advanced.
Photomatix Pro User Manual Page
21
Page 26

Section 4: Batch Processing
Section 3: Exposure Blending
In addition to t he two-step HDR pr oc es s ing described in the prev ious pag es , Photomat ix Pro
also offers several single-step exposure blending methods . T hese will co m bine differently
exposed i m ages to sho w det ail in both shadows and highlights.
These ble nding methods com bine different ly exposed photogr aphs into a si ngle image. It
uses the ex is t ing shado w a nd highlight detail from t he s ource images t o make a sin gle
final ‘blended’ imag e with an exp anded tonal range.
Exposur e Blending of f ers s everal advantages over the H D R an d Tone Mapping workf low
describe d in t he previo us s ec t ion:
• Blending the images has the ef f ec t of reducing noi s e w hereas HD R and tone
mapping amplify it.
• The blended image does not differ much fr om the source images, giv ing it a more
natural look .
• Exposur e Blending is a s imple and e as y t o understand process , with no or fe w
paramet er s et t ings.
Exposur e Blending may not al ways work well w hen the dynamic range of t he scene is high. This
can result in a lack of local contras t and a "flat” look. The memory requi red for blen ding
exposur es inc reases with the nu mb er of s ource images and bit-d epth.
Photomatix Pro User Manual Page
22
Page 27

Section 4: Batch Processing
3.1 Blending Exposures
To start Exposure Bl ending, dra g y our images t o the Photomatix P ro ic on, and select the opti on
Blend exposures
Alternatively, you can also click on the Exposure Ble nding button of the Workflow Shortcuts, or
go to the Process me nu and select t he Ex pos ure Ble ndi ng item.
The Expos ure Blending – Select source images wi ndow will dis play . L oad your i ma ges v ia t he
Browse b ut t on (not need ed if y ou use dra g & drop).
The Align So urce images option is c hec k ed by default . T his option corrects for m is alignment
problems if t he camera moved sli ght ly between t he bracket ed f rames. This is t he case with
hand-hel d photogra phs and may happen w hen shootin g with the aid of a t ripod.
Photomatix Pro User Manual Page
23
Page 28

Section 4: Batch Processing
Click on OK and the Exposure Blendin g dialog will s how.
Select the Exposure Blending method of y ou r c hoice. Som e methods a llow settings and some
are fully automatic. T ry dif f erent meth ods t o get the most pleasing r es ults. The default method
Highlight s & Shadows – Adjust is oft en a good c hoice.
3.1.1 Highlights & Shadows – Adjust
Adjust t he s ettings sli d er s
Strength: Controls t he s t rength of loc al contras t
enhancements.
Color Saturation: Allows the increase or d ec rease of image
saturation.
Blending Point: Co nt rols t he weighting given to the sourc e
images. W hen moving t his slider t o t he right, the o v er-exposed
images ar e f av ored This has t he effect of brighten ing t he
image. The reverse applies wh en moving t he s lider to the lef t .
3.1.2 Highlights & Shadows – Auto
This blend ing method is automat ic . I f y ou lik e t he result, you are done. Ot herwise, t ry one of t he
manual optio ns.
Photomatix Pro User Manual Page
24
Page 29

Section 4: Batch Processing
3.1.3 Highlights & Shadows – 2 Images
This meth od blends o nly t w o images. Th e displayed dialog
allows you t o s elect which images get blended.
3.1.4 Highlights & Shadows – Intensive
Strength: Controls t he s t rength of loc al c ontrast e nhancements.
Color Saturation: Allows the increase or d ec rease of image
saturation.
Radius: Controls the area use d t o c alculate th e weighting of the
source i ma ges . A higher radius reduces halos, but increas es
processing times significant ly .
3.1.5 Average
The Average method c ombines t he images us ing the same average formula everywhere,
regardless of whether t he process ed pixels is in a dark or bright ar ea. This is why av eraging c an
not produc e t he dyna mic range extension you can get wit h one of the Hi ghlights & Shadows
blending m et hods. The Av erage method offers better nois e reduction (it is equivale nt t o t he
process c alled Image Stackin g).
Photomatix Pro User Manual Page
25
Page 30

Section 4: Batch Processing
Click Process. Photomatix P ro will creat e an Exposure Blended image.
Highlight & Shadows – Adjust : Resul ting blended image
Save the pr oc es sed file us ing the File>Save As menu.
Available file formats
The TIFF 16-bit option is only available if the s ource i mag es were also 16 bits/channel.
Exposur e Blending does not c hange the cha nnel bit-d ept h. The result ing image wil l have
the same c hannel bit- depth as the source i ma ges .
Photomatix Pro User Manual Page
26
Page 31

Section 4: Batch Processing
Inspecti ng the pr e vie w wi th the Lo upe tool
Loupe shows 100% pixel view
Exposur e Blending f eat ures a Lou pe panel so that you can inspect f ine details in y our image.
Moving the mouse ov er t he previe w d is plays a sq uare marqu ee. I f y ou c lic k at s ome positi on,
the content of t hat s quare will show up in the Loupe pa nel.
The option Refres h loupe only c an be used to av oid refreshing the mai n preview w hen
you chang e s et t ings. This s peeds up the refreshing of the vie w i ns ide the lou pe window.
Photomatix Pro User Manual Page
27
Page 32

Section 4: Batch Processing
Section 4: Automate
Photomatix s upports t w o dif f erent batc h process functions:
Batch Proce ssi ng: Process es m ult iple phot os t ak en at dif f erent exposures
Single File Conversion: Processes single image f iles
Batch Processing may be use d t o:
Process an exposure series t o c reate HDR im age files ready to be t one mappe d
individually . I f y ou open anot her session of Photomat ix Pro, you ca n s t art w ork ing on
the first images while Batch Proc es s ing is still pr ocessing the remai ning exposure
series.
Apply several different tone m apping or ex posure ble nding methods to one set of
source i ma ges .
Apply the same tone mapping or ex posure b lending s et t ings t o s everal diff erent sets
of source im ages.
Apply bot h of t he above pr oc es s es at once: apply ing many dif f erent tone mappin g or
exposur e blending m et hods to several sets of s ource images .
Photomatix Pro User Manual Page
28
Page 33

Section 4: Batch Processing
4.1 Batch Processing
Click on the Automate menu and select Bat ch Pro cess ing or use the Batch Processi ng button
on the Workf low Sh ortcut s p anel.
The batch c an process s ub-folde rs w it h dif f erent nu mb ers of s ource images in
each folde r.
It is import ant t o note that wh en y ou are proc essing different set s of s ourc e images in
a single fol der, each set must c ontain the s ame nu m ber of sourc e images. If eac h s et
contains a dif f erent nu m ber of sourc e images, you will need to place them into separate
folders an d s elect the All option for t he numbe r of f iles t o process.
4.1.1 Batch Processing Settings
Select the processes t o be auto m at ed. At least one opt ion described below (Options A-G) must
be selected t o run the B at c h Processi ng.
Option A: Generate HDR image
Photomatix Pro User Manual Page
29
Page 34

Section 4: Batch Processing
p
Check this option if y ou want to creat e a 32-bit H D R i m age. Click t he Settings button to open an
option windo w.
The first chec k box will force the EV spacing to
the specifi ed v alue. This opt ion can b e us ed
when the exposure i nf ormation is not availabl e
in the EXI F data (or if two o r m ore images have
the same ex posure information), or to force the
EV spacin g in all cases. I n t he latter case, t he
exposur e inf ormation in t he EXIF dat a will be
ignored.
If there are moving objec t s in t he source
images an d y ou find the resulting ' ghosts' are
not desira ble, c heck Attempt to reduc e
ghosting a rt if ac t s with the option Movi ng
objects/people selected. If there a re elements
in the scene t hat follow a r hy t hmic pattern
(flowing water for insta nc e) oscillat ing between
shadows and highlights, then s elect the o pt ion
Backgro und move me nt.
Only check the Attempt to reduce ghosting
artifacts o
tion if it is needed.
If the source images are large TIFF files, chec k t he option P rocess st rip by s t rip. With this
option, the HDR image file will be c reated in several passes, processing and loading only one
strip of eac h image into memory at a t ime. One s t rip is c omposed of a limited number of rows
set to not exc eed around 512 MB of RAM. This option is part ic ularly usef ul when processing
large pan oramas.
If the source images are RAW fil es , W hit e Balanc e and Color Primaries may be s elected.
Please ref er t o t he HDR Ge neration chapter of s ection 2 for d et ails on thos e s et t ings.
Photomatix Pro User Manual Page
30
Page 35

Section 4: Batch Processing
Option B: Process wi th Details Enhanc er
Check this option if y ou want to automatical ly t one map the HD R i mage with the Details
Enhancer method. Click the Settings butt on t o open a window w hic h allows th e ad justment of
the Details Enhancer settings ( des c ribed in Sec t ion 2). You may load settings , which we re
saved in an XMP file in this windo w.
When the o pt ion Save is checked, the set t ings will be s av ed in an XM P f ile alongsi de t he tone
mapped images. This option is c hec k ed by default.
Photomatix Pro User Manual Page
31
Page 36

Section 4: Batch Processing
Option C: Process wi th Tone C o mpressor
Check this option is you want to automatically tone-map the HDR image with the Tone
Compressor method. Click the Settings b utton to open a window th at allows the adjus tment of
the Tone Compr essor settings ( describe d in Sect ion 2). You may lo ad set tings th at were s aved
in an XMP fil e in t his windo w.
Batch Processi ng lets you tone map your HDR i m ages with Details Enha nc er and
Tone Compres s or simult aneo usly .
Photomatix Pro User Manual Page
32
Page 37

Section 4: Batch Processing
Option D: Average
Check this option if y ou want to combine the s ource images us ing the average method. Ther e
are no other options av ailable.
Option E: Hig hl ig ht s & S ha do w s – A ut o
Check this option if y ou want to combine the s ource images with the exposure bl ending met hod
Highlight s & Shadows – Auto. The re are no oth er options av ailable.
Option F: Highlights & Shadows – Adjust
Check this option if y ou want to combine the s ource images with the exposure bl ending met hod
Highlight s & Shadows – Adjust. Clic k t he Settings button to open a windo w to adjust t he
Strength, Color Saturation a nd Blending Point.
Option G: Highlights & Shadows – Inte n si ve
Check this option if y ou want to combine the s ource images with the exposure bl ending met hod
Highlight s & Shadows – I nt ensive.
Photomatix Pro User Manual Page
33
Page 38

Section 4: Batch Processing
Num ber of S ource Im a ge s t o pro ce s s
Select the number of s ource images to proc es s at a t im e: 2-11 or All.
All shoul d only be selec t ed if you are us ing the Pr oc es s Subfolde rs opt ion, or if the folder
processed contains only one set of brackete d ex posures. W hen All is selec t ed, Photomatix will
attempt to process al l images in each folder, s o it is im port ant that o nly one set of source
images be i n each subf older.
It is possible t o Batch Process mult iple series of source i m ages with vary ing num bers
of source im ages, if each series is in it s own subfo lder, and All is s elected.
If all sourc e images f rom multipl e s eries are i n a s ingle folde r, eac h series m us t
have the same number of sourc e images. I ma ges are proc es s ed alphabet ically.
Image Alig nme nt Opti ons
Check Al ign Images , if correction for slight camera movements between source photographs is
needed.
When Align images is checked, the images will be cropped af t er alignment in order to r emove
invalid areas on the edge due to the correction for misalignment shifts. If you want to skip the
cropping, t hen check the Don't crop option. This option may be useful if you are processi ng
images intended to b e s t it c hed together to create a panoram a.
Select a so urce location
Photomatix allows m ultip le ways to select source im ages .
By Folder: Click on the Select Sourc e Folder b ut t on and select a f older with im ages
to process . All images in t hat f older will show up in the f ile lis t .
By individual files: In this single files can be add ed t o the file list .
In the case wh en Folder is selected, the Process s ubf olders option may be c hecked.
This option of f ers two sub-options.
o Sequentially: Processes t he image files in one sub-folder, t hen moves on t o t he
next sub-f older, all of w hic h are contained in the main, p arent folder.
o Grouped by Exposures: In this cas e t he sub-folders ar e organize d by
exposur es . As an example, if y ou have tak en a s eries of thre e brackete d images,
one sub-f older contains all underexposed images, t he nex t all normal exposed
images an d t he t hird one all overexposed images. Inside a s ub-folde r, t he images
that belon g t o one image group (to be merged) need to be at t he s ame relativ e
alphabetic al position inside the s ub-folder.
Use Proces s Subfolders if y ou have multiple se ries of s ource images which vary in
the numb er of s ource images they contain. Th e Batch Proc es s ing can pr oc es s s eries
Photomatix Pro User Manual Page
34
Page 39

Section 4: Batch Processing
with varyi ng numbers of s ource images if eac h s eries is in its own subfol der and All is
selected.
Select a file t y pe f rom the Filte r by File Type dr opdown. Opt ions are: All, TIFF, JPEG, PSD and
RAW.
This opt ion is usef ul if a s ource folder c ontain s RA W+JPEG f rom a came ra, and you
are proces s ing only on e f ile t y pe.
Select a Destination location
By default, Same as so urc e is s elected. W it h t his option, t he Batch Proc es s ing will sav e t he
resulting i m ages in a subf older within t he source folder. T he resulting f older will b e prefixed by
‘Photom at ixResult’. C hec k ing Select allows you t o select a spec if ic (different ) location on your
computer.
Select a file t y pe f or saving (J PEG or TIF F ). I f applicable, s elec t an HDR file t y pe f or saving t he
HDR imag e f ile (Radiance RGBE or OpenEXR). If you want t o s ave only t he Tone Mapping
results and not the 32-bit HDR im age, check Remov e generat ed HDR image after proc es s ing.
Click Naming Options to cho os e a naming st rategy.
Start with Set Numbe r or Start with Filename of first ima ge in the set ar e t he main
options. Start with Set numb er will yield long names s uc h as :
Set01Enh anc er3fr o m_I MG_3 42 1.jpg. Ch eckin g Us e s hort ened version will yield shorter
names that do not refere nc e the sourc e f iles : Set01E nhancer.jpg, for exa m ple. St art with
Filenam e of f irs t im age in the set y ields file nam es that start with t he first im age in the
set: IMG_3431_2_3Enhancer.jpg, for example. Suffix (optional) will append ad dit ional
file name information t o t he end of the assigned file names .
Photomatix Pro User Manual Page
35
Page 40

Section 4: Batch Processing
Start Batch Pr oces sing
Click Run to start batch proc es s ing.
The window belo w the Run button wi ll s how the stat us of each proces s in real time.
Photomatix Pro User Manual Page
36
Page 41

Section 4: Batch Processing
4.2 Single File Conversion
Single File Convers ion lets you b at c h t one map existing H D R i m age files or cr eat e pseudo H D R
images from single RAW files.
• Click on the Automate menu and s elect Single File Pr oc es s ing.
• Check the desired conversion option.
Tone Map HDR image files: Processes H DR ima ge files with Details Enhanc er
and/or To ne Compres s or. For Setti ngs , read more in t he Batch Proc es s ing secti on of
this manual.
Convert RAW files to pseudo HDR-image: Creates HDR files in the format of your
choice.
Remove water mar k: This option is enabled w it h licensed v ers ions of Photomatix
Pro. You ca n use it to re move the wat ermark fro m im ages that have been cr eated
when usin g Photomat ix Pro in trial mo de. The remov al c an only work properly if t he
size and bri ghtness of t he image h av e not change d af t er the water mark has be en
applied.
• Select the source folder.
• Select the destinati on f older.
• Click Run.
Photomatix Pro User Manual Page
37
Page 42

Section 4: Batch Processing
Section 5: Advanced Tips and Techniques
5.1 Chromatic Aberrations (CA)
Often you may see on your tone m apped or me rged imag e art if ac t s lik e t hese:
CA shown in Photomatix Pro after merging
This is the result of chro m at ic aberrati ons (s ometim es c alled fringi ng).
What are chromatic aberrations? Most le ns es are not pe rf ec t and can som et imes focus t he red,
green and blue chann els on different planes (re lat ive to the sensor). This can produc e
green/purple fring es at higher contrast edges. The effect is s t ronger t owards t he c orners than in
the center. Ev en top rated z oom and wi de-angle prime lenses c an sho w this art if ac t .
A tone map ped or blended imag e c an s how stro nger chro m at ic aberratio ns t han in the source
images. C aref ul inspect ion of the so urc e images can reveal t hem.
Fortunately , s ome RAW converters like Adob e Camera R aw and Lightroom can help to fix
chromatic aberratio ns . Below, the correction of c hromatic a berrations us ing Light room is sho w n.
The Lightr oom Devel op module has an extra fu nc t ion f or removing chromat ic aberrati ons .
Photomatix Pro User Manual Page
38
Page 43

Section 4: Batch Processing
• Correct c hromatic ab errations in all RAW fil es ins ide Lightr oom
CA correct ion in Lightr oom
Setting Defringe to All Edges c an improve t he correct ion.
• Copy (Sync h) the chromatic ab errations s et t ings to all RAW files that you will merge in
Photomatix Pro.
• Export all files as 16-bit TI F F files from Li ght room.
• Merge the i m ages in Ph ot omatix Pro with your method of ch oic e (HDR + tone mapp ing
or exposu re blending).
Here is the res ult in Photomatix using this wo rk f low:
Fixed result
Photomatix Pro User Manual Page
39
Page 44

Section 4: Batch Processing
5.2 Image Alignment
It is believe d t hat us ing a tripo d c an avoid any mis-alignment of the photos. T his is often not t he
case because of:
• Wind
• Shutter slap (even using mirro r loc k up)
• Shaky ground
This can be c hecked us ing a 200m m telephot o lens. I t is surpris ing how much the exposures
can be out of alignme nt . Th e good news is t hat the Phot omatix Pr o alignment func t ions can
often prop erly align the m. Photo matix s upports t w o dif f erent alignment met hods, based on
different algorith ms. I f one doesn’t w ork , t he ot her shou ld be tried.
Photomatix Pro User Manual Page
40
Page 45

Section 4: Batch Processing
5.3 Processi n g RAW fil es in 3rd party raw converters
If a RAW conv erter is use d (e. g. Adobe Lightroo m o r Camera R aw), images should be
processed with the following set t ings:
• WB ( Whit e Bal ance ): Same WB f or all involved photos.
• Basic settings: Should be all set to zero.
Sample Settin gs
• Curves: Both Par ametric an d Point Curves s hould be linear.
Photomatix Pro User Manual Page
41
Page 46

Section 4: Batch Processing
5.4 Blurred Images
If bracketed images are merg ed and the resulting i m age is blurre d, t he reason can be one of t he
following:
• Images are t oo far out of alignment an d t he image alignment f unc t ions cannot handle it.
• One or more images s how motio n blur due to too long shutter speed (even usin g image
stabilized lenses or a t ripod). In t his c as e, it is rec ommended t hat the indiv idual ima ges
are checked for moti on blur.
5.5 ISO and Noise
As the ISO v alue of your image increases, so does the noise in the shadows. Exposure
Blending can help reduce noise, but it is st ill a good practic e t o photogra ph at t he lowest I SO
level possible.
5.6 Photomatix Pro and Color Management
Photomatix Pro supp ort s c olor mana ge ment even if RA W files are pr ocessed. I t is
recommended that t he same w ork ing space be used in Photomat ix Pro as you us e in other
image edit ors (e.g. Phot os hop).
Photomatix s upports t he t hree most popular wo rk ing spaces :
• sRGB: Used if your images are on ly c reated for th e w eb.
• Adobe RGB: Pop ular working space for printing if ex treme saturated colors are not
used.
• ProPhoto RGB: Extreme wide ga mut working s pace. This should neve r be used for 8-
bit images.
For all JPE G and TIFF fil es Photomat ix Pro preser v es t he c olor spaces of t he s ource files .
Photomatix Pro User Manual Page
42
Page 47

Section 4: Batch Processing
Resources
For more information, we recom m end the Ph ot omatix Pro F AQ on the HD Rsoft websit e at
http://www.hdrsoft.com/support/faq_photomatix.html
.
Photomatix Pro User Manual Page
43
 Loading...