

Page 1
HDRsoft
Photomatix Essentials
Version 4.0
User Manual
Photomatix Essentials 4.0 User Manual
© 2014 HDRsoft. All rights reserved.
i
Page 2

Table of Contents
Introduction 1
Section 1: HDR (High Dynamic Range) Photography
1.1 What is HDR Photography? 2
1.2 How to Take Photos for HDR Processing 3
1.3 Set Up Your Camera 3
1.4 Recommended 2 EV Separation 4
1.5 Three Essential Steps 5
Section 2: Using Photomatix Essentials
2.1 Step 1: Load Bracketed Photos 6
2.1.1 Step 1 Overview 6
2.1.2 Drag and Drop Photos 6
2.1.3 Browse for Photos 8
2.1.4 Select / Deselect Loaded Photos 9
2.1.5 Load Other Photos 9
2.1.6 Alignment and Deghosting Options 10
2.2 Step 2: Adjust & Preview 11
2.2.1 Step 2 Overview 11
2.2.2 Working With Presets 12
2.2.3 Details Enhancer Settings 12
2.2.4 Contrast Optimizer Settings 13
2.2.5 Tone Compressor Settings 13
2.2.6 Exposure Fusion Settings 14
2.3 Step 3: Finish & Save 15
2.3.1 Step 3 Overview 15
2.3.2 Apply Finishing Trouches 15
2.3.3 Save and Return to Step 1 16
Section 3: Preferences
3.1 Single Image Thumbnail Selection 17
3.2 Skip Merge Dialog 17
3.3 Noise Reduction Options 18
3.4 Refresh Preview Continuously 18
Glossary 19
Getting More Information and Help 21
Photomatix Essentials 4.0 User Manual
ii
Page 3
Introduction
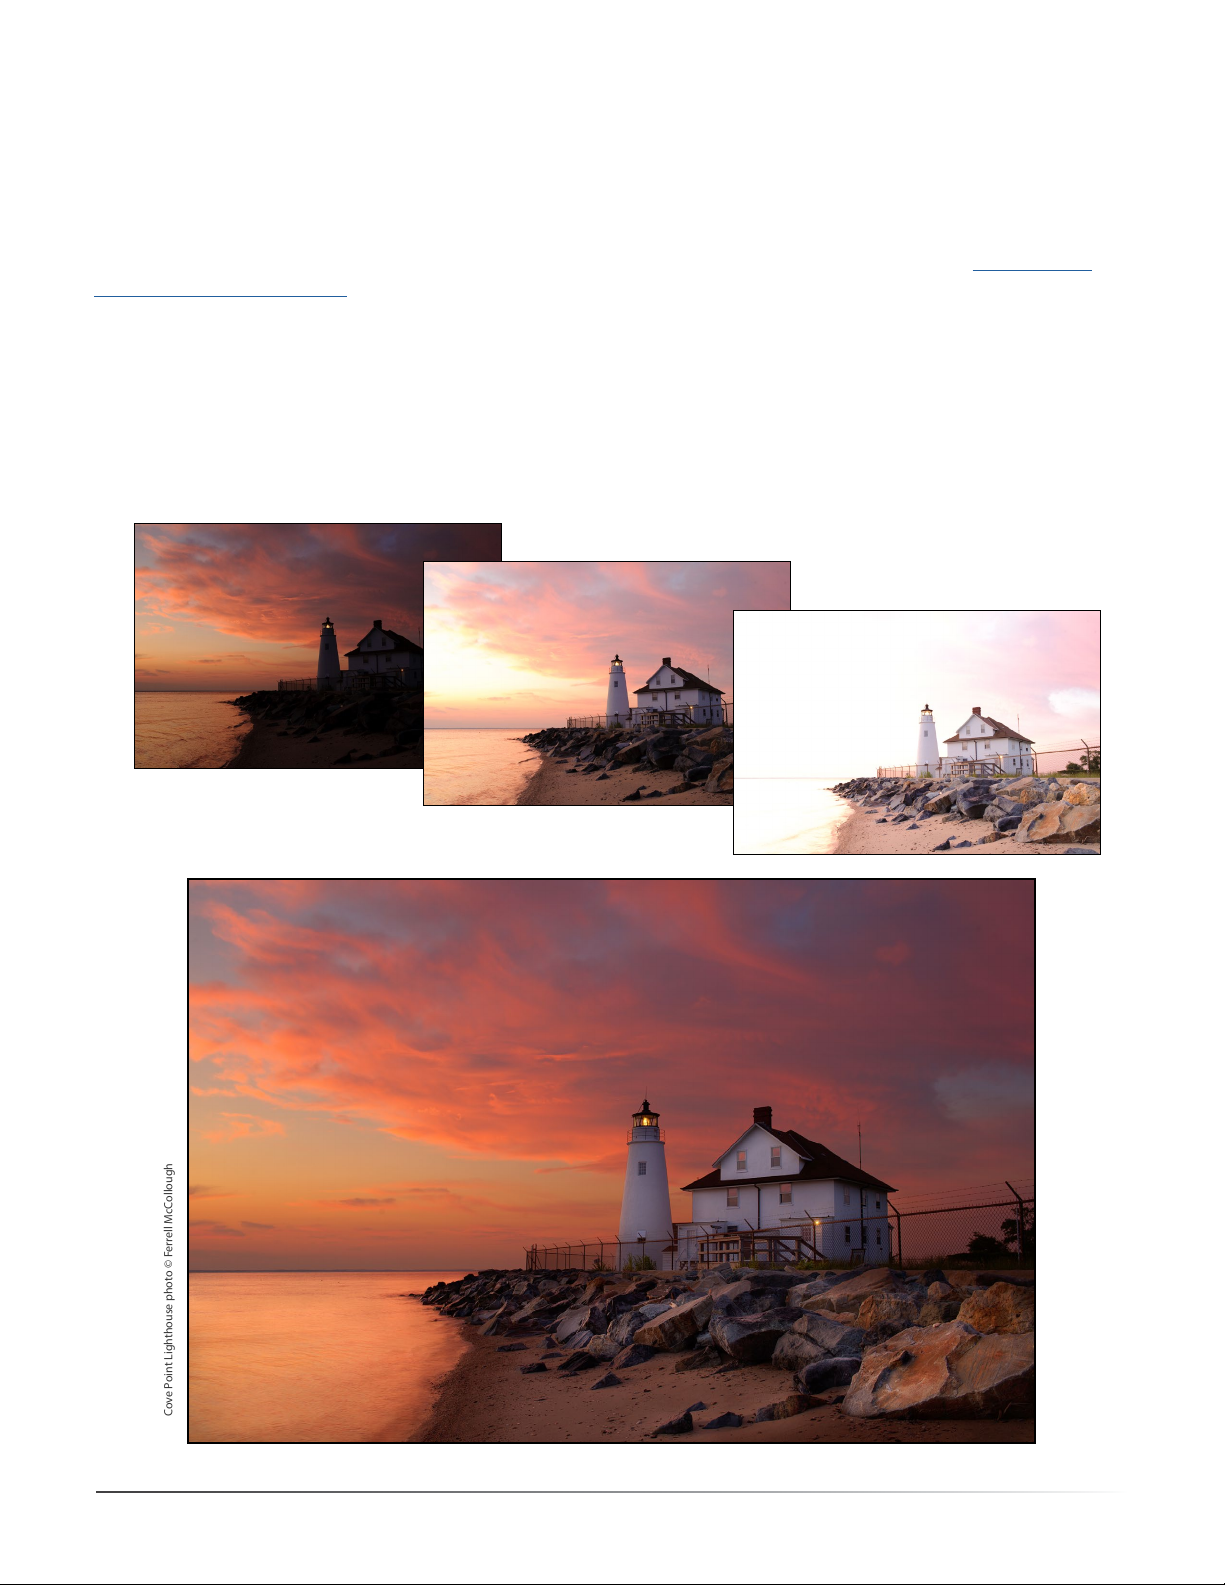
Cove Point Lighthouse photo © Ferrell McCollough
Photomatix Essentials works with photographs of the same scene taken under dierent exposure settings.
These dierently exposed images of the same scene are often called “bracketed” images, in reference to the autobracketing exposure functions available on many camera models. If you have not taken any bracketed photo
sets, you will be able to start using Photomatix Essentials with sample images available from the Photomatix
Essentials download page.
This manual rst explains the steps for capturing your own bracketed photo sets. You are then guided through
these 3 simple steps, which constitute the workow of Photomatix Essentials:
“Step 1: Load Photos”: - Load your bracketed photos into the app.
“Step 2: Adjust & Preview”: - Adjust the HDR image to get the results you want.
“Step 3: Finish & Save”: - Add nishing touches, and save.
Photomatix Essentials 4.0 User Manual
1
Page 4
Section 1: HDR (High Dynamic Range) Photography
1.1 What Is HDR Photography?
The central premise of HDR photography is that there are few situations where a single photograph can capture
the true dynamic range (the total range of light in a scene, from very dark to very light) of a scene accurately.
In other words, today’s digital camera can’t properly expose everything at the same time in scenes with even
moderate contrast ratios. This results in two main problems (which sometimes happen together in the same
photo):
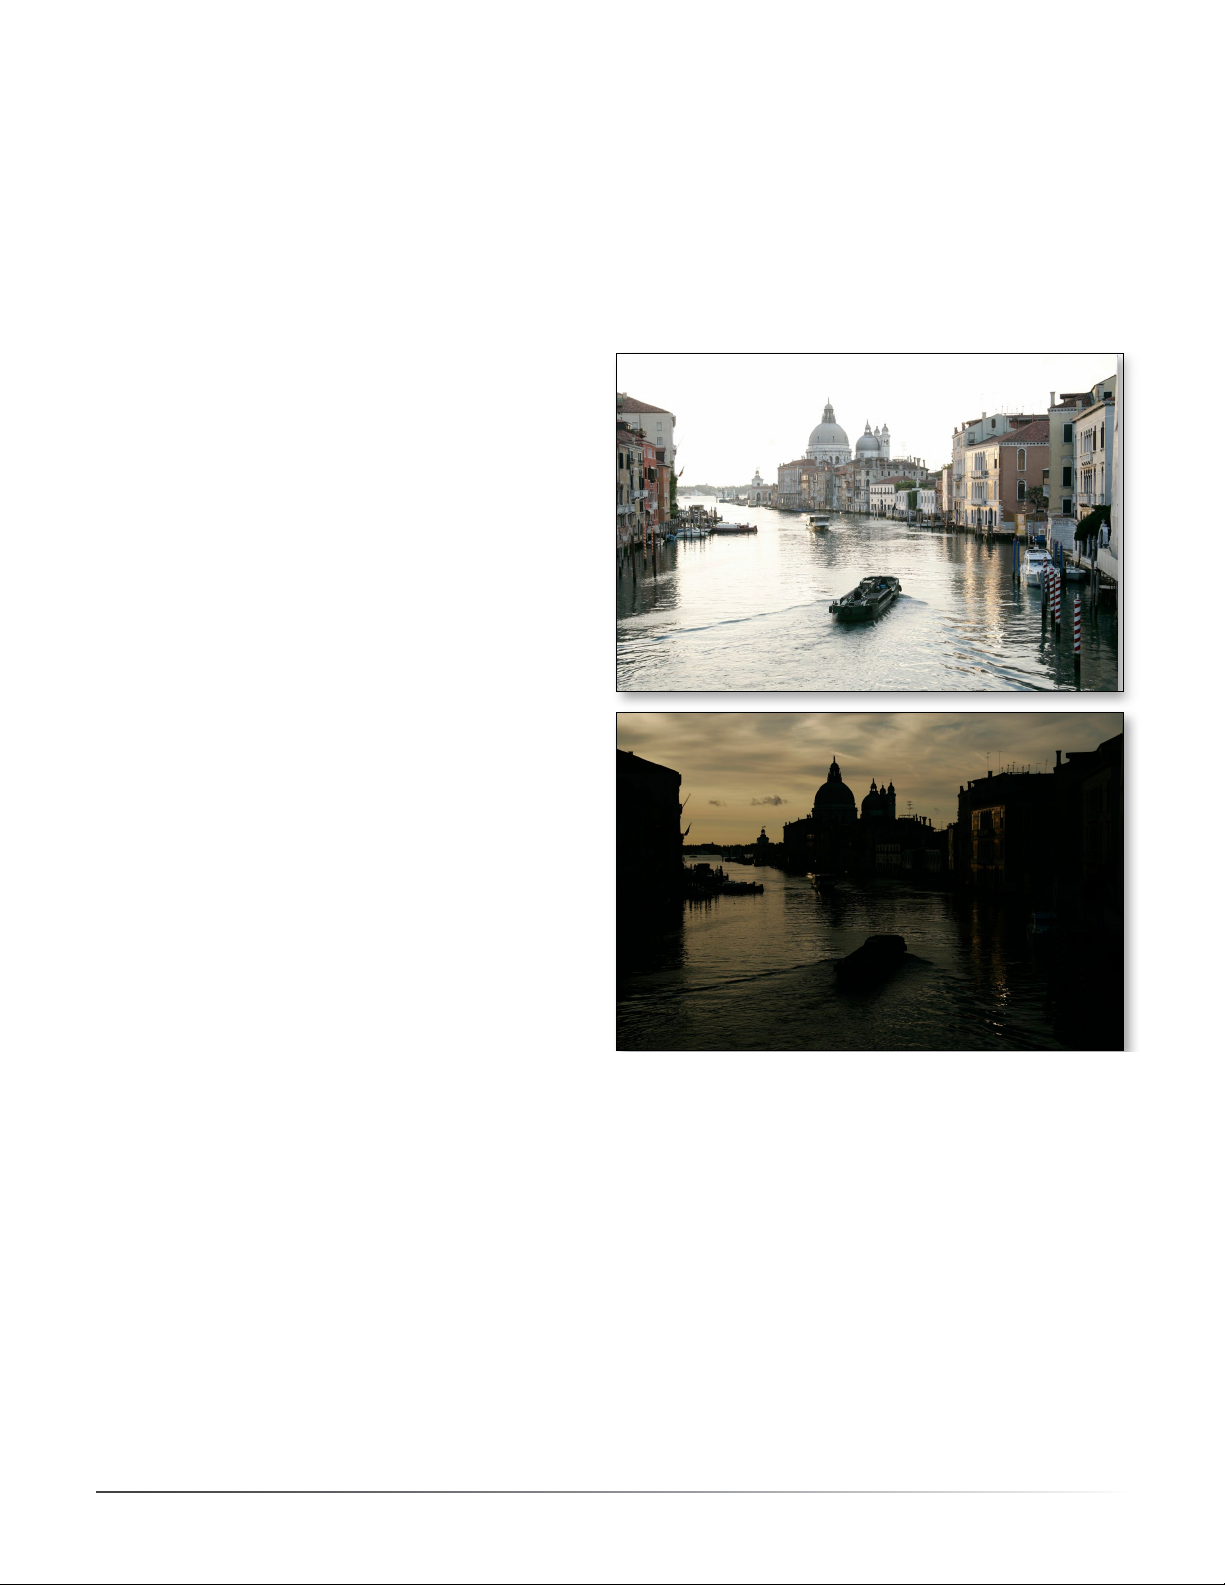
• Blown highlights
When the exposure is raised to make sure the
foreground or subject is properly exposed,
brighter ar eas of the scene suer. They “blow out”
and turn white because they have very little or no
usable data in them.
• Lost detail in the shadows
Conversely, when bright areas of a scene are
pro tected (by lowering exposure), there is not
enough light to register details on the camera’s
sensor in dark areas of the scene. These turn to
shadow and black ness.
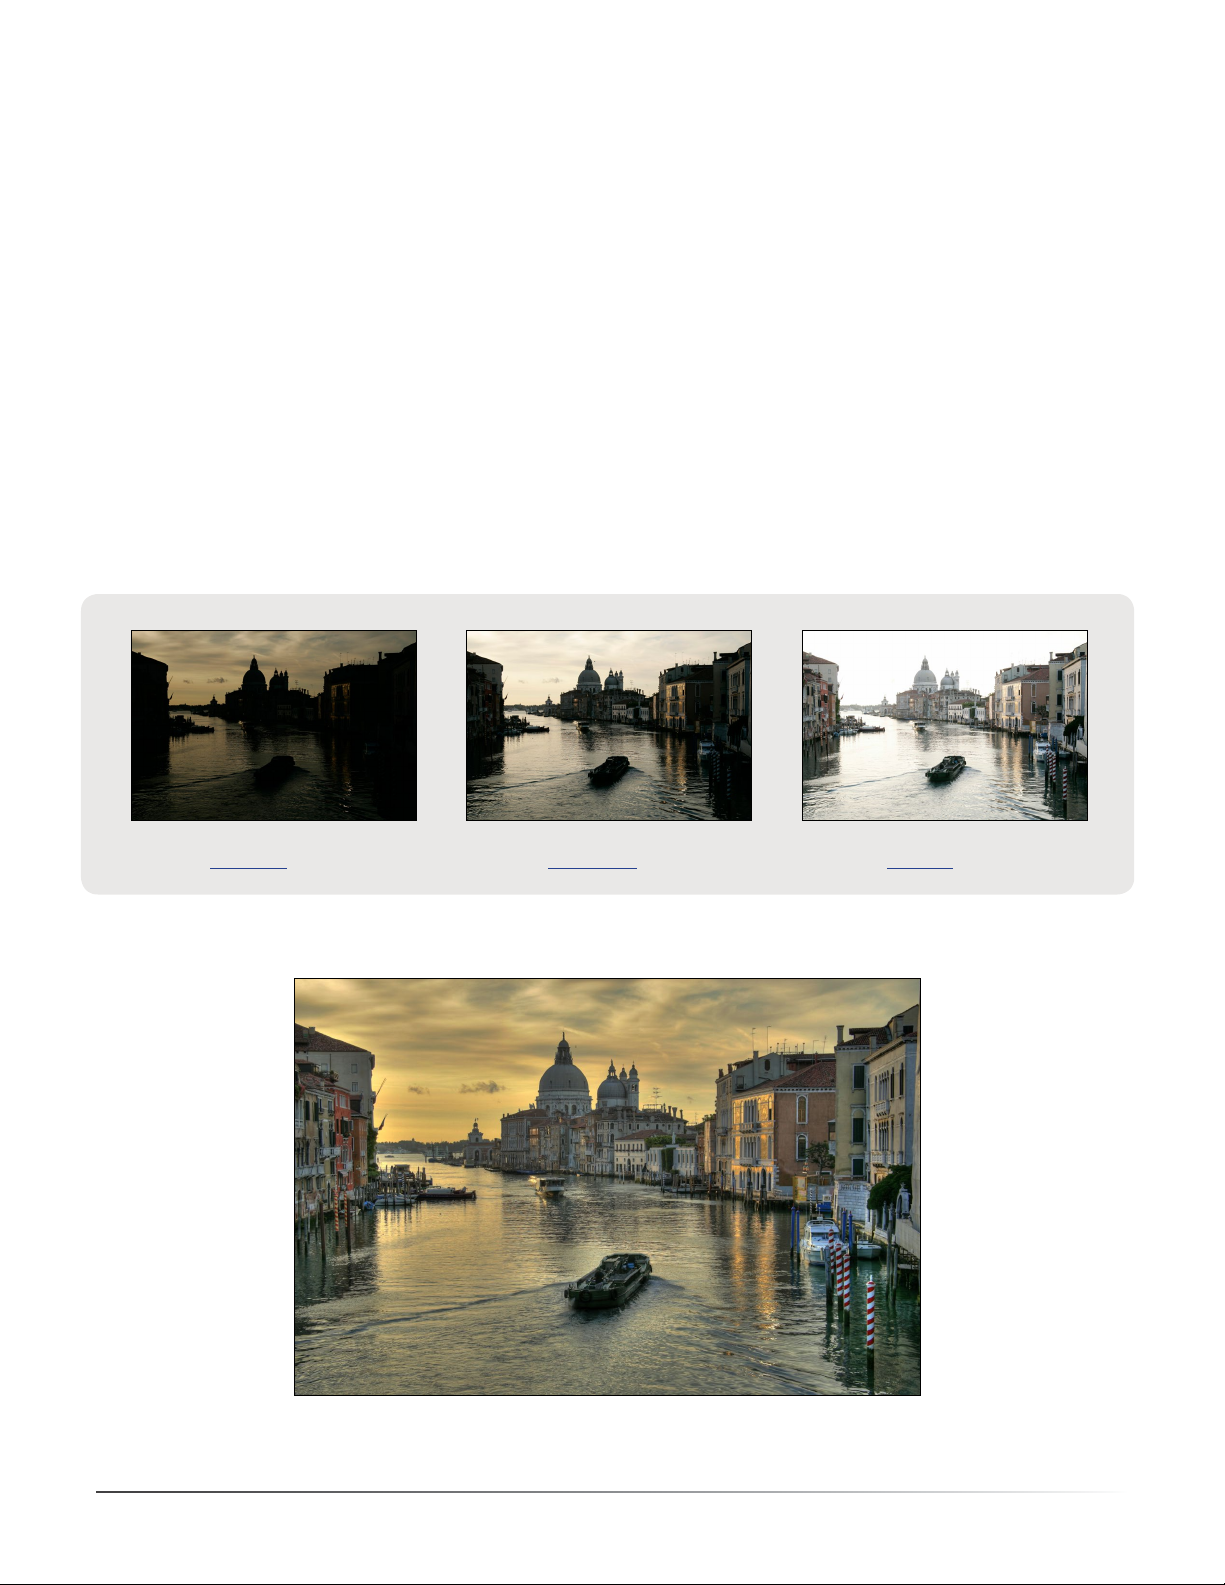
HDR photography solves these problems by taking enough photos (typically 3, separated by 2 EV steps) to
contain the entire exposure range of a scene. With that data in hand, Photomatix Essentials can merge the different photos and process them to rescue details from shadows and keep highlights from blow ing out.
For many photographers the key purpose and signicance of HDR is its ability to increase photographic realism.
HDR to this photographer is not an “eect”, but is a remedy to the dynamic range limitation of camera image
sensors. To some of these photographers, in fact, it is the standard photograph which is somewhat non-realistic,
in that it does not accurately capture the full dynamic range of most photographed scenes
For many other photographers, HDR is approached more as a creative tool, and one that aords great artistic
latitude. From a practical point of view, however, every style of HDR photography is built on the same
foundation, a well shot bracketed set.
The next section provides guidelines and best practices for properly capturing bracketed sets.
Photomatix Essentials 4.0 User Manual
2
Page 5

1.2 How to Take Photos for HDR Processing
Taking photos for HDR is easy. All it takes is a dierent mindset than for traditional photography, which
emphasizes taking and editing a single photo, independent from any others.
Instead of taking a single exposure of a scene, for HDR you take at least 3 exposures: one optimized for midrange
tones (as normal), plus one optimized for highlights and one optimized for shadows. This strategy for capturing
more of a scene’s true dynamic range, with exposures above and below a standard exposure, is called “exposure
bracketing”.
The resulting “bracketed set” of photos contains, as a group, more complete and true exposure information
than any single image capture can possibly contain. The purpose of HDR software like Photomatix Essentials
is to artfully combine this bracketed set into a single image, to achieve more faithful realism, or heightened
realism, or artistic eect.
But these artistic choices come later. The rst step is capturing good bracketed sets.
1.3 Set Up Your Camera
HDR photography requires that you set up your camera a bit dierently than normal:
• Set your camera to Aperture Priority (“A” setting) so that only the shutter speed varies between the
exposures.
• Select a low ISO, such as ISO 100 or lower.
• Turn o the ash. The ash may try to balance the exposure of all the images, when the goal is a range of
exposures.
• A tripod is typically recommended, but is not required, as Photomatix Essentials includes options to
automatically align hand-held bracketed sets.
DSLR cameras and some compact digital cameras oer Automatic
Exposure Bracketing (AEB). This enables you to automatically take three
or more exposures in a row: one at the proper exposure, one or more
underexposed, and one or more overexposed. Follow these steps if your
camera oers an AEB mode:
• Select the Continuous Shooting mode on the camera’s drive setting.
Consult your camera manual for model-specic instructions for using
this setting.
• Set the camera to Auto Exposure Bracketing (AEB)
• If possible, use the camera’s self-timer setting, a remote control or a
cable release to minimize camera shake.
• Set the exposure increment to +/- 2 EV for optimal exposure range. If
your camera does not oer +/- 2 EV exposure increments, select the
maximum possible. Consult your camera’s manual for model-specic
instructions for choosing this setting.
Canon Rebel T2i/550D LCD showing
AEB with +/- 2 EV increments selected
You can watch brief video tutorials on taking bracketed photos at:
www.hdr-photography.com/videos
Photomatix Essentials 4.0 User Manual
AEB settings on a Nikon D7000
(3 frames, at +/- 2 EV)
3
Page 6
1.4 Recommended EV Separation
Bracketing allows you to extend the dynamic range of your camera so it can capture the full range of light in a
scene. Mechanically, you accomplish this by taking multiple photos with dierent exposure settings. Although
there is no single method that is better than all others in every circumstance (indeed, cameras vary in their
abilities), a good rule of thumb is to shoot three photos, separated by 2.0 EV using AEB. However, not all cameras
have the same AEB capabilities. Some limit you to a 1 EV spacing or less.
For many outdoors scenes, 3 exposures spaced one or two EVs apart is usually sucient. However, this won’t be
sucient for an interior with an outside view on a sunny day, for instance.
An EV (Exposure Value) increment is also referred to as a “stop” or “f-stop”. One EV increment corresponds to a
doubling of the amount of light hitting the camera’s sensors. For instance, this means that you can capture a
range of 8 EV steps, by using exposures ranging from 1/250 to 1 second (assuming a xed aperture and ISO
setting). If you use +/-1EV step increments, you will need 9 frames to capture 8 EV of dynamic range. If you set
it to +/-2EV, you will need just 5 frames to capture 8 EV of dynamic range. Photomatix Essentials can process
bracketed sets of up to 5 images, so 2 EV spacing would be preferable in this example.
Under-exposure (-2 EV):
Captures highlight detail
Well-balanced exposure (0 EV):
Captures mid-range detail
Over-exposure (+2 EV):
Captures shadow detail
Photomatix Essentials 4.0 User Manual
4
Page 7
1.5 Three Essential Steps
The Photomatix Essentials workow is comprised of three main steps:
Step 1. Load a bracketed photo set into Photomatix Essentials.
Step 2. Adust the Preview of the combined image to your liking.
Step 3. Add optional nishing adjustments to the image, and then save it.
Once your image is saved at the completion of Step 3, you are returned to Step 1 ready to load your next
bracketed set.
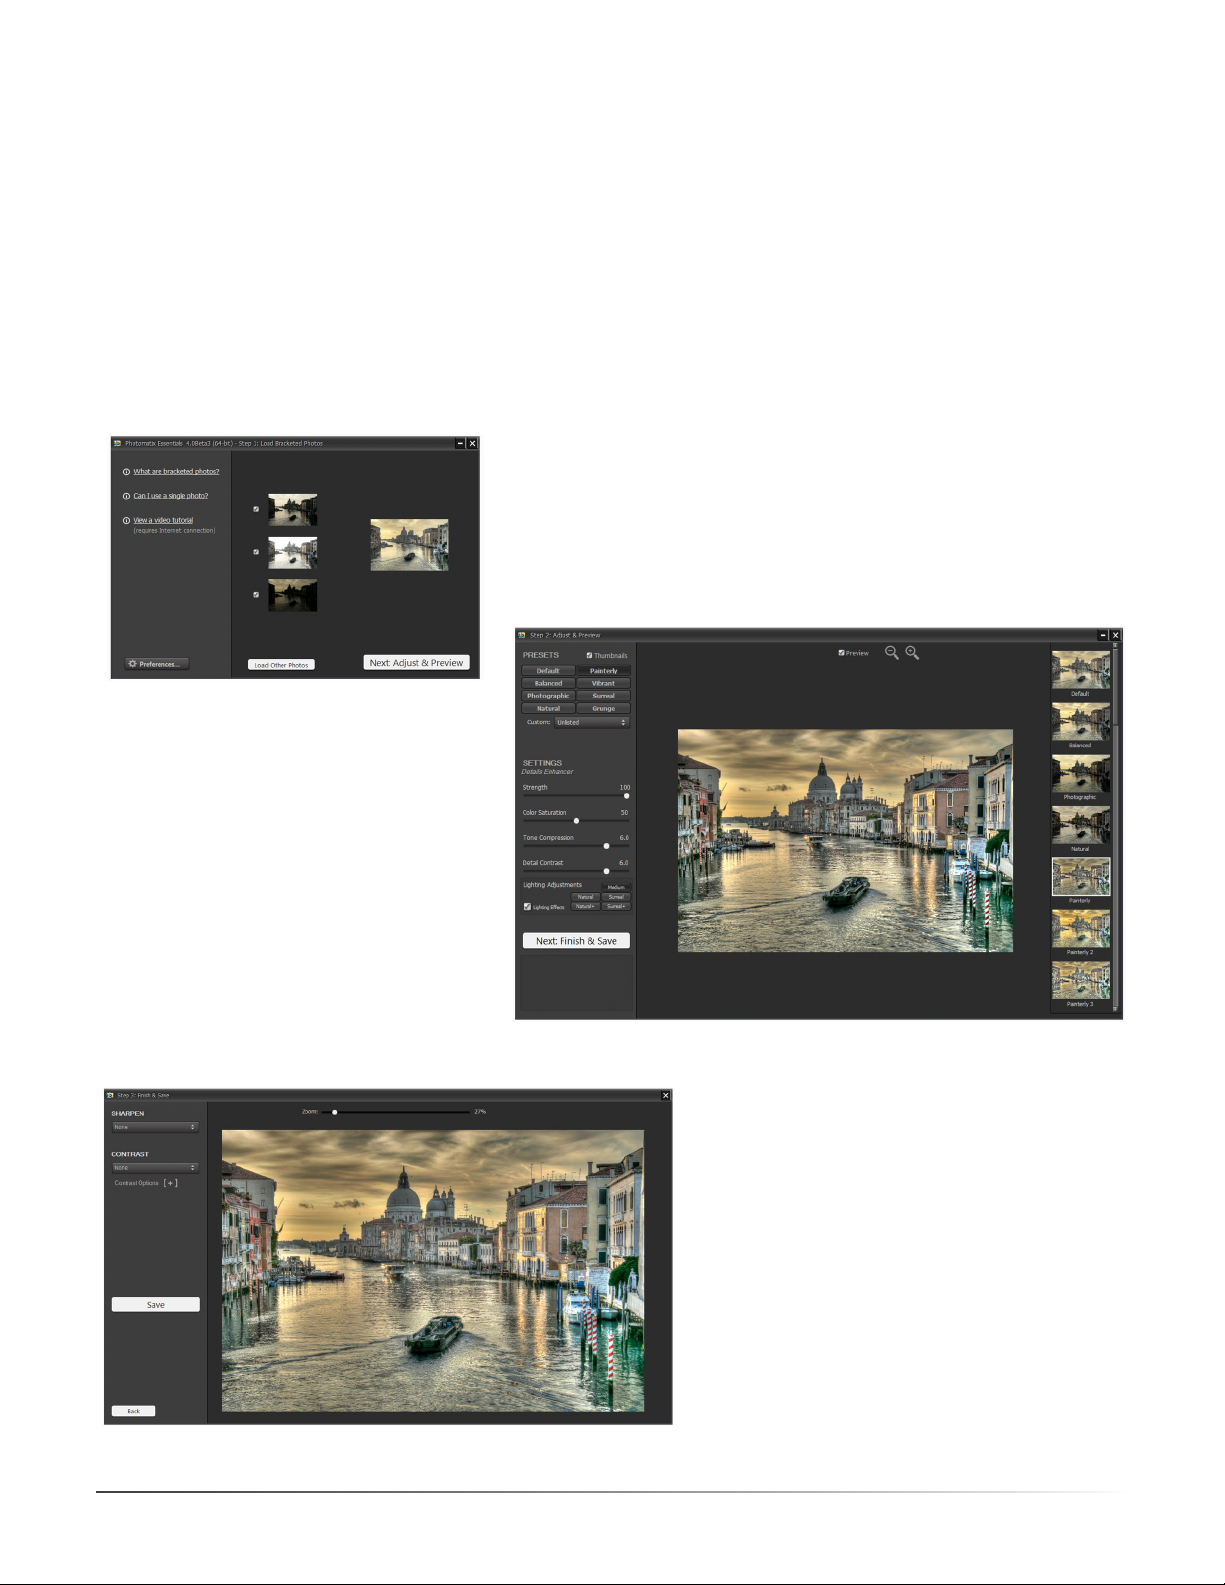
The Step 1 window • Load Photos
The Step 2 window • Adjust & Preview
The Step 3 window • Finish & Save
Photomatix Essentials 4.0 User Manual
5
Page 8
Section 2: Using Photomatix Essentials
2.1 Step 1: Load Bracketed Photos
2.1.1 Step 1 Overview
To use Photomatix Essentials, rst load a bracketed photo set, or a single photo that you wish to process.
There are two ways to do this:
• Drag and drop: Drag the photos from a folder on your computer and drop them onto Photomatix Essentials.
• Browse: Use the Open dialog box to navigate to the source photos and load them into Photomatix Essentials.
NOTE: It is possible to select a single photo if you like. Click on the “Can I use a single photo?” li nk for details.
Sections 2.1.2 through 2.1.3 provide detailed instructions for loading and working with photo sets in Photomatix
Essentials.
2.1.2 Drag and Drop Photos
To drag and drop one or more photos into Photomatix Essentials, follow these steps:
1. Launch Photomatix Essentials.
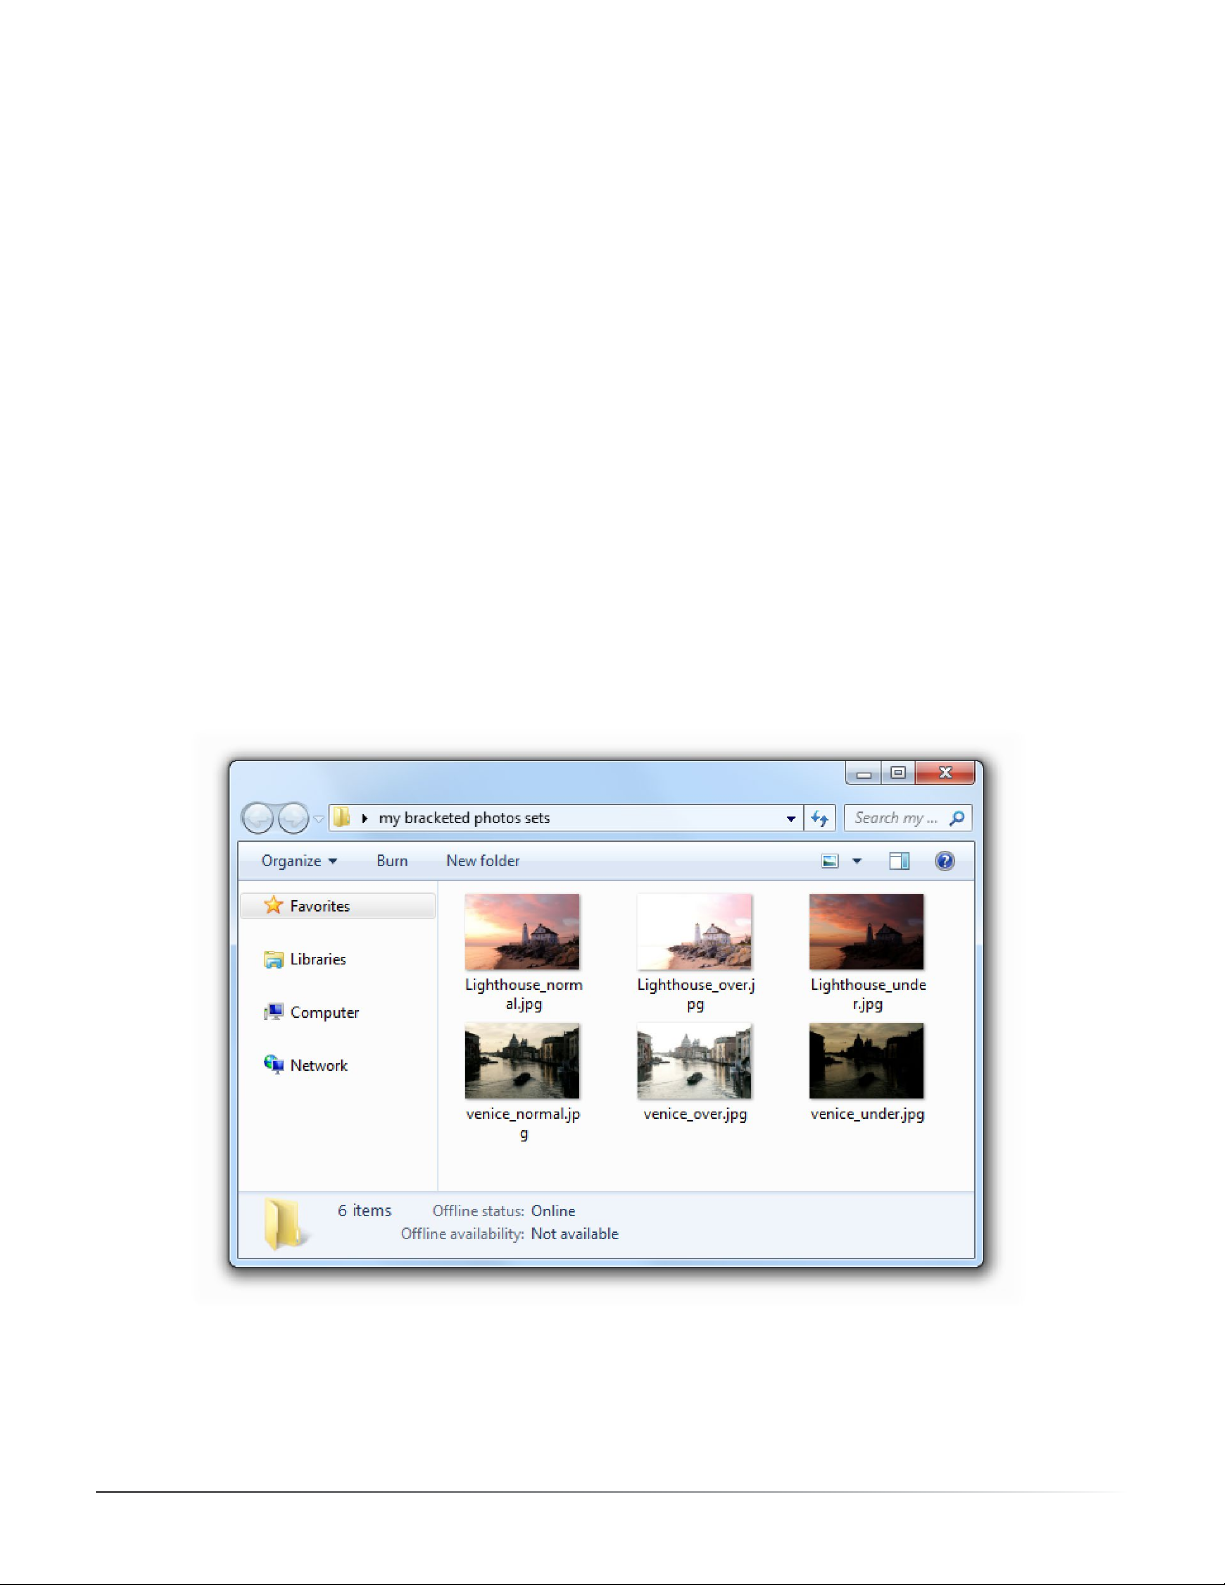
2. Open the folder on your computer that contains the photo or photos you want to work with.
Photomatix Essentials 4.0 User Manual
6
Page 9

3. Arrange the folder and Photomatix Essentials so you can drag les from the folder and drop them onto the
Photomatix Essentials Step 1 window.
4. Select the les as you would normally.
5. Drag and drop the photos to Photomatix Essentials.
You can drag and drop les individually or in groups.
Photomatix Essentials 4.0 User Manual
7
Page 10

2.1.3 Browse for Photos
To browse to one or more photos using a le selection dialog box, follow these steps:
1. Launch Photomatix Essentials.
The Step 1 window • No photos loaded
2. Click Browse and navigate to the folder on
your system where the photo(s) are stored.
3. Select the les as you would normally.
4. Choose Open.
Photomatix Essentials 4.0 User Manual
8
Page 11
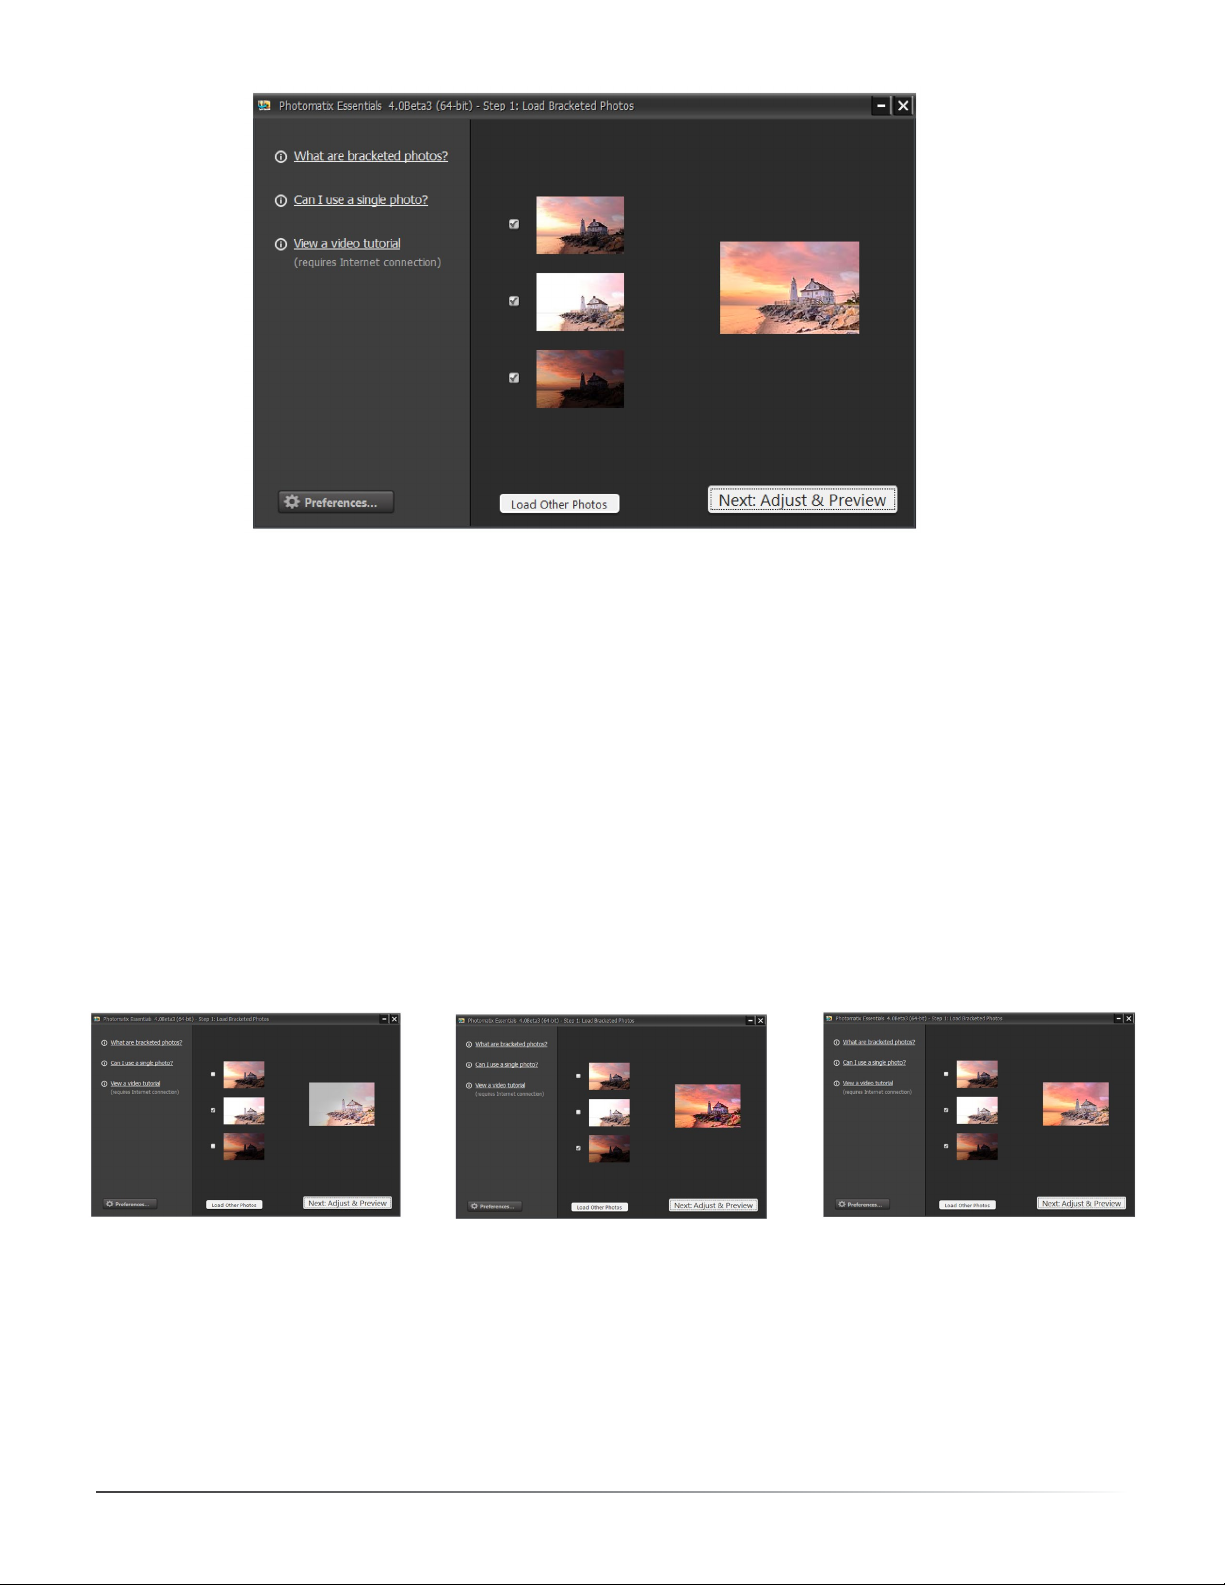
The Step 1 window, with a 3-photo bracketed set loaded
2.1.4 Select / Deselect Loaded Photos
Once you load your photos into Photomatix Essentials, you should notice a few things in the interface:
First, each photo is displayed as a thumbnail. This makes it easy to verify that the photos are of the same subject
and see their relative exposure compared to their bracketed companions.
Addition ally, there is a larger combined thumbnail that shows a preview of the result of processing the photos
using default settings.
Finally, there is a checkbox beside each photo’s thumbnail (this is checked by default unless you loaded only one
photo). A checked box signies that the photo will be included in subsequent processing. Uncheck a photo to
take it out of the process. You’ll see the larger thumbnail update to show the processing preview using just the
currently checked photos. Re-check the photo to put it back into the mix.
Unchecking alternate source photos gives a dierent merged image result, as shown in the large preview thumbnail.
2.1.5 Load Other Photos
To start over, select Load Other Photos. You’ll jump back to a clean interface and be ready to select new
bracketed photos. To continue to Step 2 with the currently loaded and selected photos, select Next: Adjust &
Preview.
Photomatix Essentials 4.0 User Manual
9
Page 12

2.1.6 Alignment and Deghosting Options
After you click Next: Adjust & Preview in the Step 1 window, the Alignment and Deghosting Options dialog
appears. Note that you can set an option in Preferences to skip this dialog.
Because bracketed photos are always misaligned when shot hand held, image alignment is an essential feature
of HDR processing. Photos are often slightly misaligned even when shot using a tripod, due to wind or other
sources of minor camera disturbances. The Align bracketed photos option is therefore is on by default in
Photomatix Essentials.
The Alignment and Deghosting Options dialog
NOTE: There are cases when images should not be aligned. One example is when you have derived the
dierent exposures from a single RAW le, by adjusting the Exposure setting of your RAW converter. Another
example is when you are processing stitched panoramas.
The Crop aligned images option removes the unneeded borders resulting from alignment adjustments.
Unchecking it disables this, so that the resulting image has exactly the same width and height as the source
images, but may have white areas around the edges.
Ghost removal addresses the problem of artifacts that appear when combining bracketed images of a scene
with some moving elements. For example, if pedestrians are moving through a scene while you capture your
bracketed photos, multiple faint images of the people will appear in the combined image, as if they were
“ghosts”.
To reduce these artifacts, select Remove ghosts and set a Deghosting strength. There are 5 levels of deghosting
strength, from Very Mild to Very Strong. Since deghosting lowers image quality, always choose the most
mild deghosting setting possible. If some ghosts remain visible in the Step 2 Preview, you may close the Step 2
window to return to Step 1, then select a higher deghosting setting, before returning to Step 2.
Photomatix Essentials 4.0 User Manual
10
Page 13

2.2 Step 2: Adjust & Preview
2.2.1 Step 2 Overview
The heart of Photomatix Essentials is Step 2. In Step 2 you adjust the tone mapping settings or apply saved
presets, to get the look that you want.
Follow these steps when you enter Step 2:
1 Click on the thumbnails on the right side to select a preset that gives you the result you prefer.
(Refer to section 2.2.2 on the next page for details on working with presets)
2 If desired, adjust the settings on the left to rene, overhaul or experiment with the eect.
3 Once you are satised with your result, select Next: Finish & Save.
The Step 2 window: Adjust & Preview
Photomatix Essentials 4.0 User Manual
11
Page 14

2.2.2 Working with Presets
Photomatix Essentials displays presets as thumbnails on theright side of the Step 2 window. Each thumbnail is
a small preview of theeect of that preset on your image. When you click a thumbnail, that preset is selected
and applied to the main preview. The parameters at the left of the screen are also updated to reect the settings
contained in a clicked preset.
These built-in thumbnail presets are “factory” presets that are provided with thesoftware. Photomatix Essentials oers
31 built-in presets when you are working withbracketed photo sets, 26 presets when you load just a single photo.
The built-in presets use a range of dierent settings combinations that provide pleasing results with a wide
variety of image types. Built-in presets are a good starting point for exploring your own custom settings, netuned to your specic image.
Dierent combinations of settings produce a wide range of image eects and styles. When you nd a new
settings combination that works well for a given type of image, you may wish to save this settings combination
for future use with similar images. To save your own “custom preset” for convenient access later, in the Presets
drop-down list:
1. Click the Presets drop-down list.
2. Select Save Preset from the list.
3. Enter a name for the preset in the File name eld and click Save.
If you save the preset in the default location (which is also the Presets folder used by the Photomatix Pro
application), the preset is automatically added to the Presets combo-box list. If you save it in another location,
you can access it by clicking on the Presets drop-down list and selectingLoad Presetfrom the list.
2.2.3 Details Enhancer Settings
The following settings belong to the Details Enhancer method, which is used
by these Presets: Default, Painterly, Painterly 2, Painterly 3, Painterly 4, Enhanced,
Surreal, Grunge, Grunge 2, Creative, Creative 2, Creative 3, Soft 2, Soft 3, Smooth,
Smooth 2, Monochrome, Monochrome 2, B&W Artistic.
• Strength: Aects the amount of enhancement given to contrast and detail in
the image. A value of 100 gives the greatest enhancement. Moving the slider
to the left gives a more natural eect. The default value is 70.
• Saturation: Adjusts the color saturation of the image. The greater the
saturation, the more intense the color. Setting the slider to its lowest
value (0) produces a grayscale image. The default value is 46.
• Tone Compression: Adjusts the dynamic range of the tone mapped image. Moving the slider to the right
decreases the dynamic range, brightening the shadows and darkening the highlights. Moving to the left has
the opposite eect, giving a more ‘natural’ look.
• Detail Contrast: Controls the amount of contrast applied to detail in the image. Moving the slider to the
right increases the contrast of details and gives a sharper look to the image, but also has a darkening eect.
Moving to the left decreases the contrast of details and brightens the image.
Details Enhancer settings
• Lighting Adjustments slider: Aects the overall ‘look’, controlling the extent to which the image looks
natural or surreal.
Photomatix Essentials 4.0 User Manual
12
Page 15
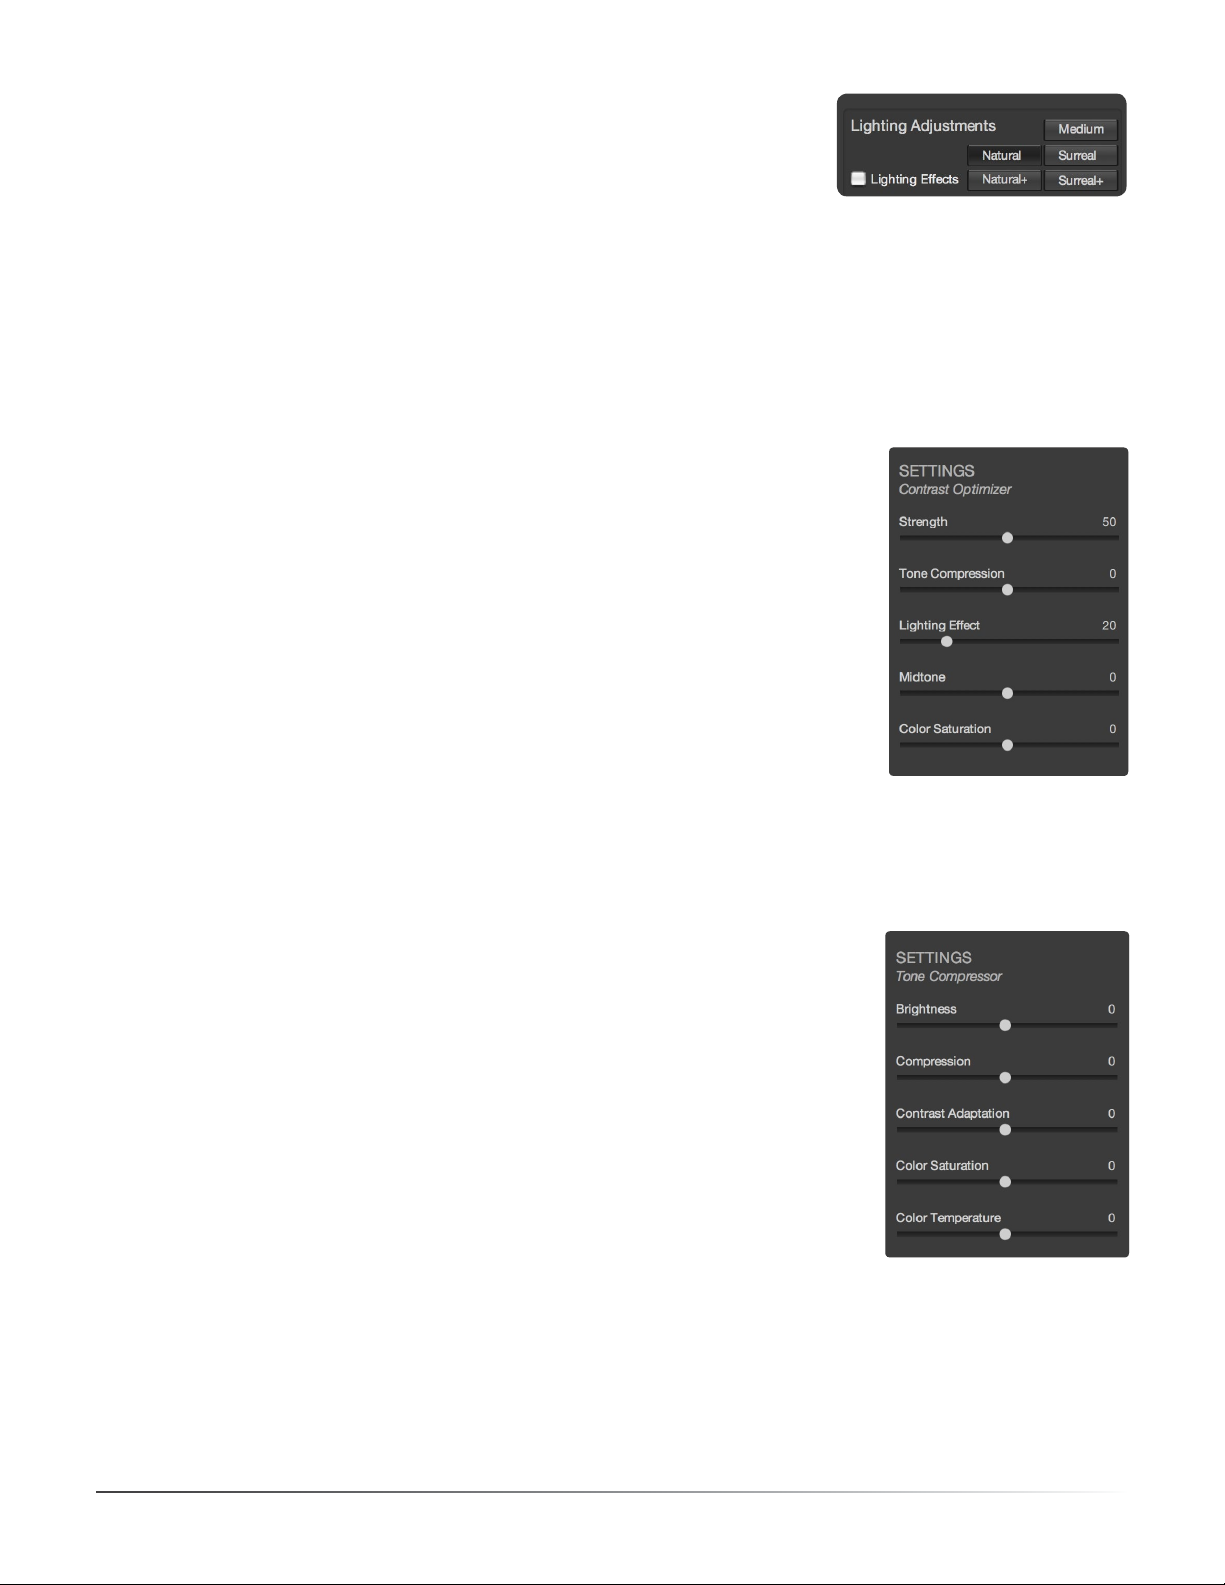
• Lighting Eects Mode checkbox: Lighting Eects Mode lets you switch
between two modes for the Lighting Adjustments setting, where each mode
produces slightly dierent results. Checking the box tends to produce results
with a type of ‘Magic Light’ eect. Note that ner control is not possible in
this mode.
Details Enhancer –
Lighting Adjustment Settings
2.2.4 Contrast Optimizer Settings
The following settings belong to the Contrast Optimizer method, which is
used by these Presets: Balanced, Vibrant, Enhanced 2, Soft, Monochrome 3.
• Strength: Aects the amount of enhancement given to contrast and detail in the image. A value of 100 gives
the greatest enhancement. Moving the slider to the left gives a more natural eect. The default value is 50.
• Tone Compression: Alters the dynamic range of the tone mapped image. Moving
the slider to the right decreases the dynamic range, brightening the shadows and
darkening the highlights. Moving to the left has the opposite eect, giving a more
‘natural’ look to the image.
• Lighting Eect: Controls the prominence of the shadows, aecting the overall
look of the image. Moving the slider to the right brightens the shadows, giving
a more ‘vibrant’ or surreal look. A value of zero disables the eect, leaving the
shadows unaected. The default value is 20.
• Midtone: Adjusts the brightness of the midtones, which also has an impact on
the overall contrast. Moving the slider to the right brightens the midtones and
decreases contrast. Moving to the left darkens the midtones and increases contrast.
• Color Saturation: Adjusts the color saturation of the image. The greater
the saturation, the more intense the color. Setting the slider to its lowest
value (-10) produces a grayscale image.
2.2.5 Tone Compressor Settings
The following settings belong to the Tone Compressor method, which is used
by these Presets: Photographic, Deep, B&W Photographic.
• Brightness: Adjusts the overall brightness of the tone mapped image.
The default value is 0.
• Compression: Controls the compression of the tonal range. Moving the
slider to the right has the eect of shifting both shadows and highlights
toward the midtones.
• Contrast Adaptation: Adjusts the contrast in relation to the average
brightness. Moving the slider to the right tends to decrease contrast and give
more ‘pronounced’ colors. Moving to the left tends to increase contrast and
give a more ‘natural’ look.
• Color Saturation: Adjusts the color saturation of the image. The greater the
saturation, the more intense the color. Setting the slider to its lowest value
(-10) produces a grayscale image.
Contrast Optimizer settings
Tone Compressor settings
• Color Temperature: Adjusts the color temperature of the tone mapped image relative to the temperature of the
HDR source image. Move the slider to the right for a warmer, more yellow-orange colored look. Move it to the left for
a colder, more bluish look. A value of 0 (default) preserves the original color temperature of the HDR source image.
Photomatix Essentials 4.0 User Manual
13
Page 16
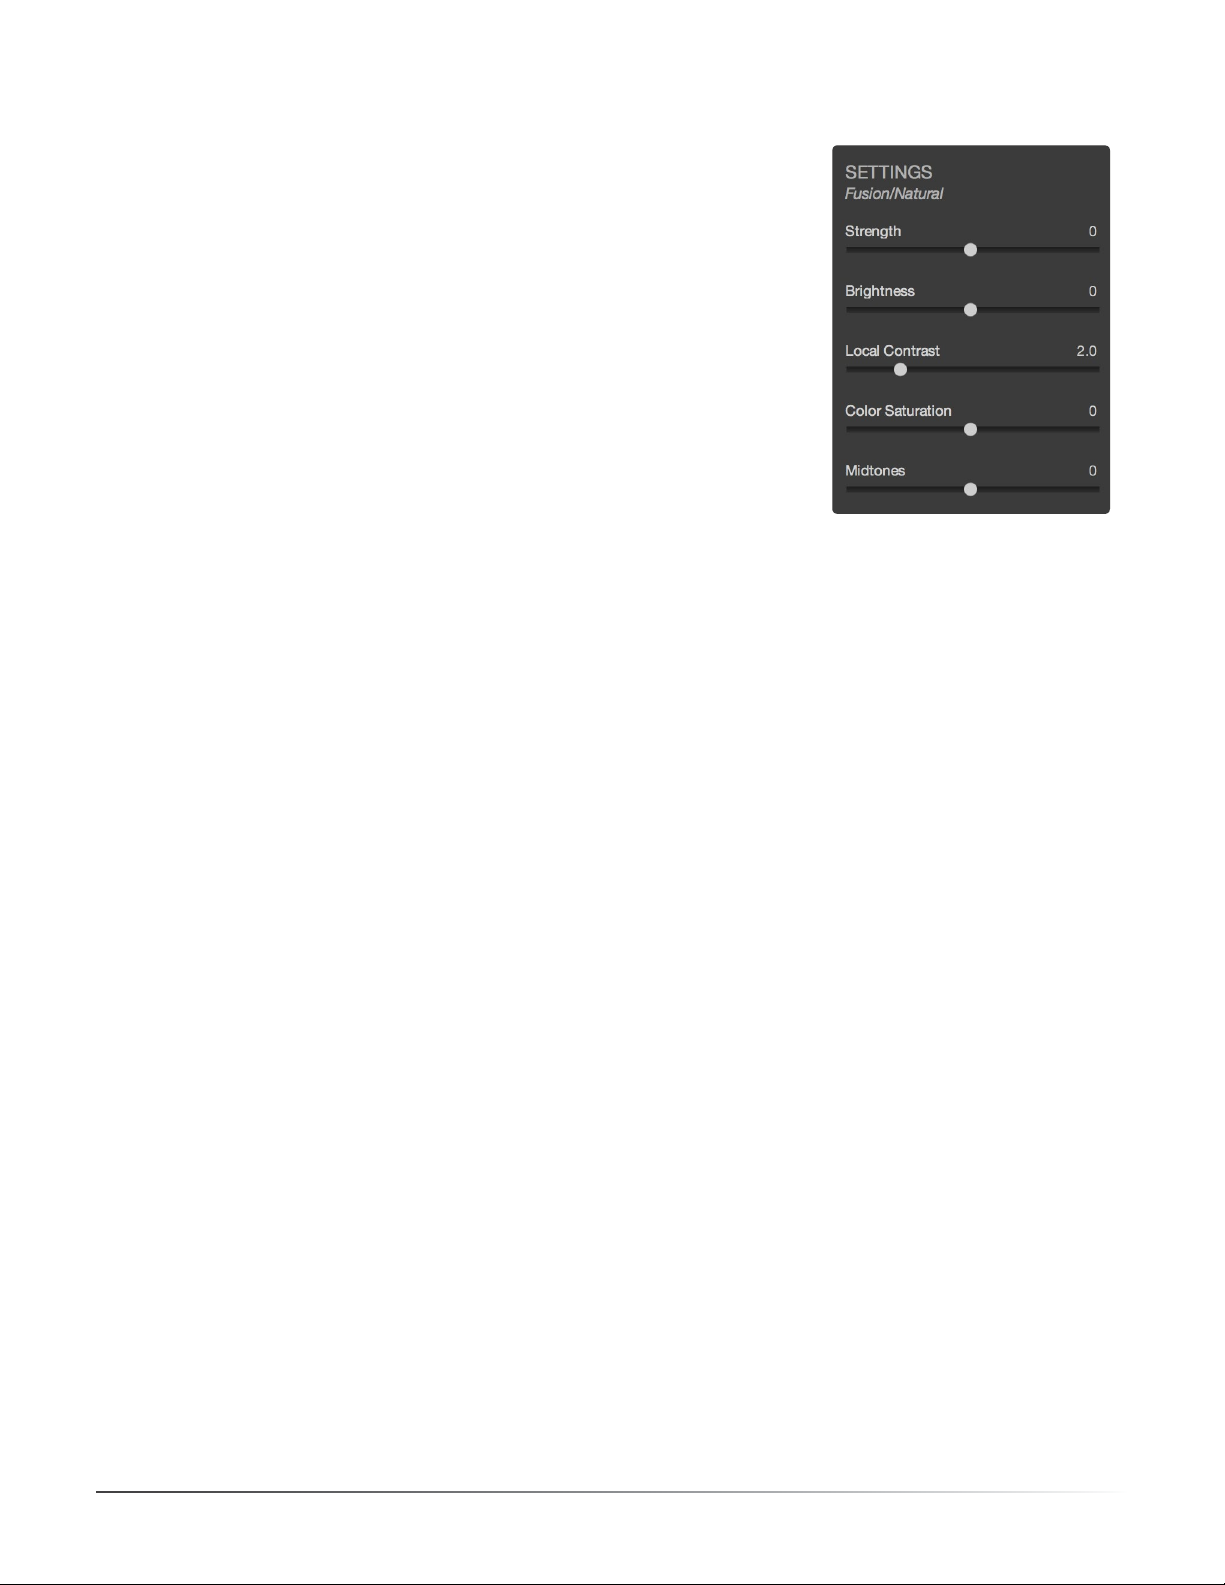
2.2.6 Exposure Fusion/Natural Settings
The following settings belong to the Exposure Fusion method, which is
used by these Presets: Natural, Painterly 5, Surreal 2, Soft 4, B&W Natural.
• Strength: Sets by how much local contrast is accentuated. Moving the
slider to the right tends to brighten the shadows and to show more details
in the highlights. Moving to the left produces a more ‘natural’ eect.
• Brightness: Controls the brightness of the fused image by adjusting the
inuence each of the input photos has on the nal result. Moving the slider to
the right gives the overexposed photos more inuence, resulting in a brighter
result. Moving to the left darkens the result by giving the underexposed
photos more inuence.
• Local Contrast: Increases the contrast and sharpness of details in the
image. Increasing local contrast may have the side eect of making noise
more visible and of creating thin halo eects around strong luminosity
edges. Values near the maximum tend to give a surreal look to the image.
The default value is 2.
• Color Saturation: Adjusts the color saturation of the image. The greater the saturation, the more
intense the color. Setting the slider to its lowest value (-10) produces a grayscale image.
• Midtones: Adjusts the brightness of the midtones, which also has an impact on the overall contrast.
Moving the slider to the right brightens the midtones and decreases contrast. Moving to the left
darkens the midtones and increases contrast.
Fusion/Natural Settings
Photomatix Essentials 4.0 User Manual
14
Page 17
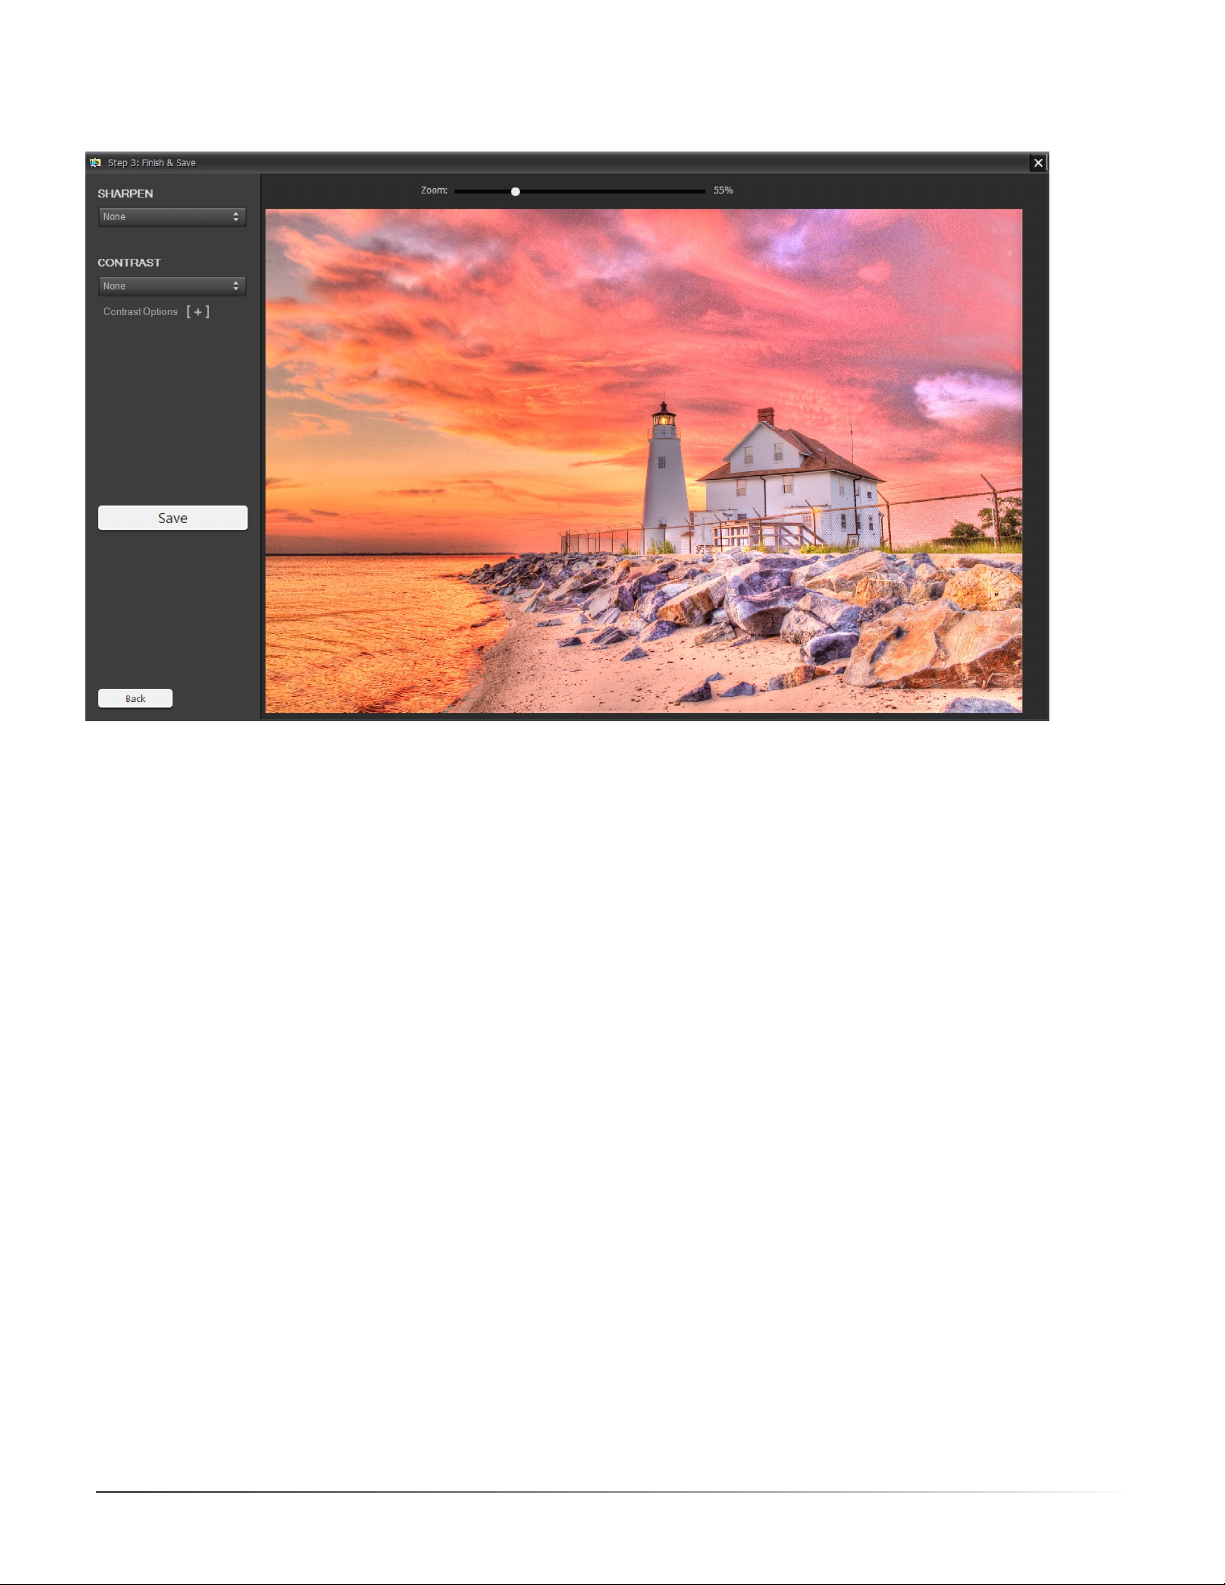
2.3 Step 3: Finish & Save
The Step 3 window: Finish & Save
2.3.1 Step 3 Overview
The settings that you chose in Step 2 have now been applied to the bracketed set source image les, and the
resulting full resolution processed image is shown in Step 3.
The Back button gives you the option to return to Step 2, if you wish to adjust the image again using dierent
settings or a dierent Preset.
The primary purposes of Step 3 are to allow you to apply any nishing touches you may wish, and to save your
les before returning you to Step 1.
2.3.2 Apply Finishing Touches
Before saving, you may wish to adjust sharpening or contrast. Sharpening is available in three presets. You may
wish to use the Zoom tool to view the eect of Sharpening on your image. Contrast adjustment is available in
four presets, as well as the option to directly adjust tone levels using sliders.
Photomatix Essentials 4.0 User Manual
15
Page 18
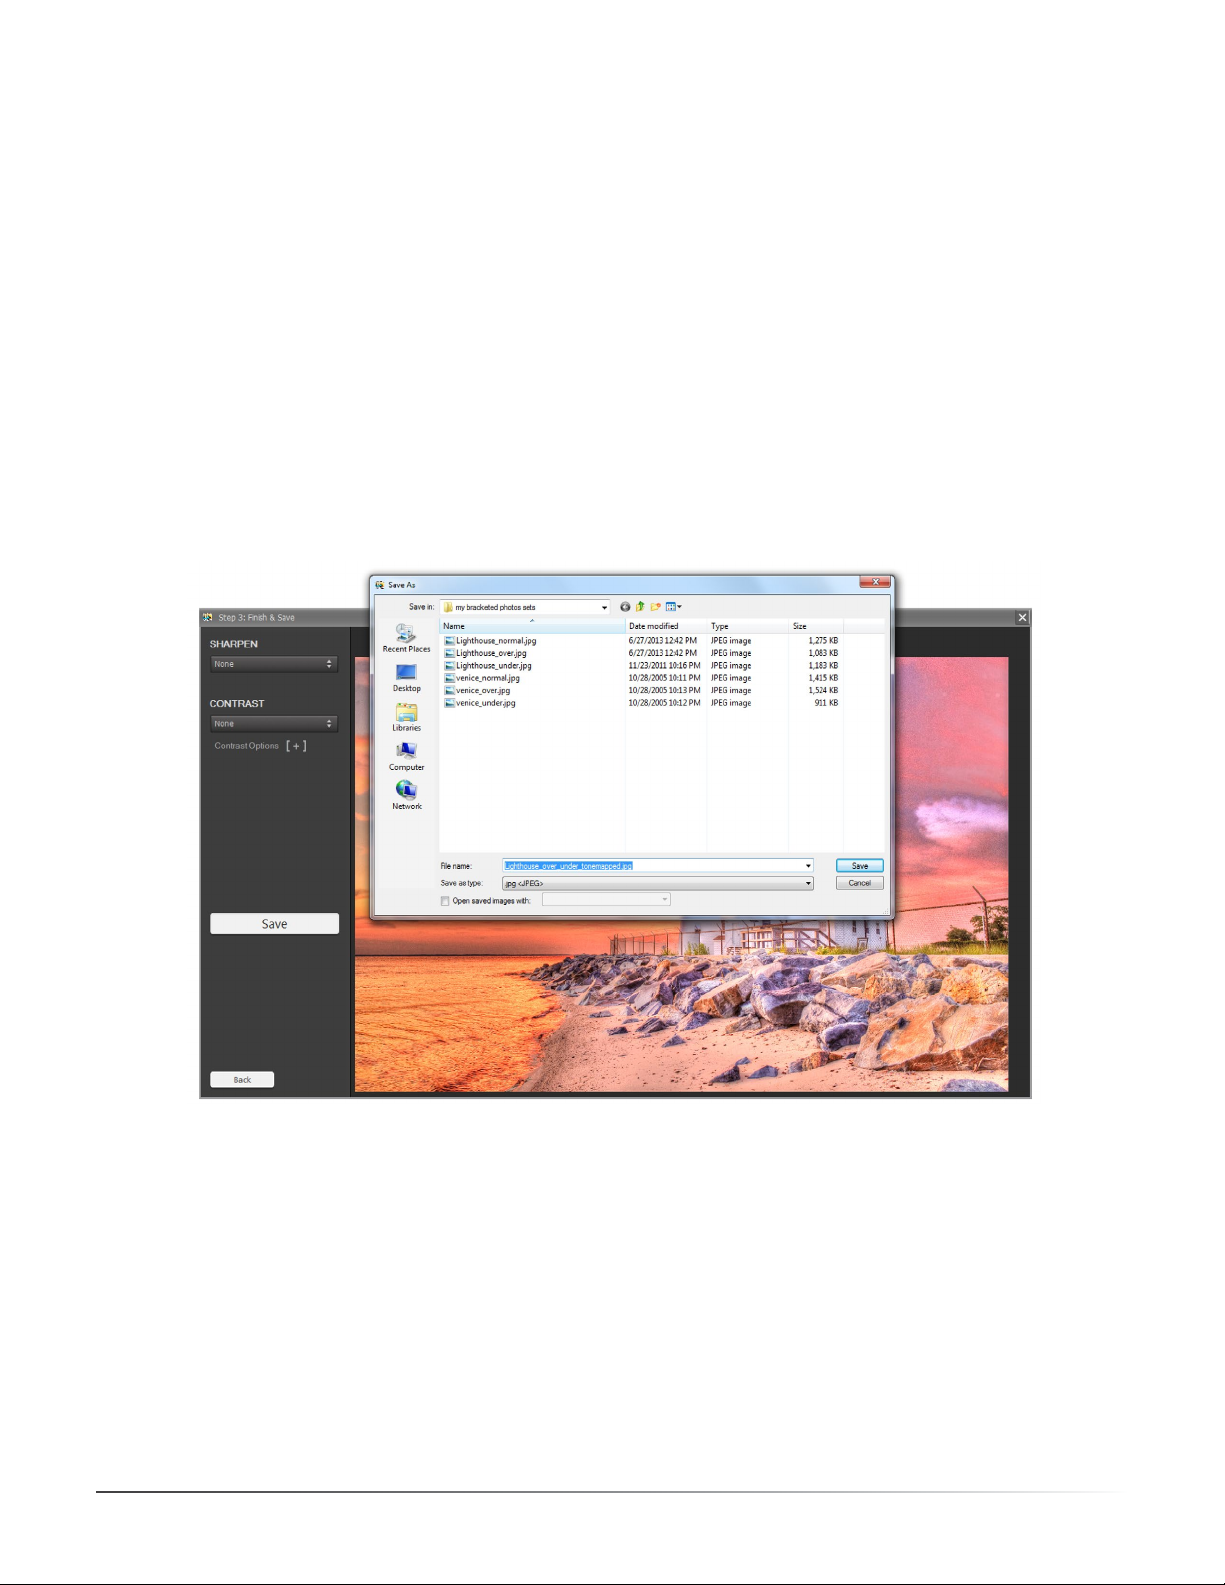
2.3.3 Save and Return to Step 1
Once you are happy with your image, follow these steps to save it:
1. Click Save
2. Enter a new le name or navigate to a new save location, if desired, and select a le type:
• JPEG: JPEG is best if you want to go straight to the Web or other medium with no further processing.
• TIFF 16-bit: This is the highest quality output available and is the best format if you plan on processing
the image further in an image edi tor.
3. If you want to automatically open the processed image in an image editor, select Open saved image with,
then choose an image editor.
4. Choose Save.
Your image is saved to disk, and you are returned to Step 1, ready to load and process the next bracketed set.
Photomatix Essentials 4.0 User Manual
Saving the processed image
16
Page 19

Section 3: Preferences
Photomatix Essentials oers a few options that you can adjust in the Preferences window.
To access Preferences, click the Preferences… button located at the bottom left of the Step 1 window.
The Preferences window
3.1 Single Image Selection
The Select thumbnail when a single image is loaded in Step 1 option applies to the case when you load
a single photo instead of a set of bracketed photos. By default, the box for the single image’s thumbnail is
unchecked and you will need to check it to go further. If you enable the Select thumbnail when a single image
is loaded in Step 1 option, then the thumbnail box will be already checked when you load a single image.
3.2 Skip Merge Dialog
When the Skip dialog for alignment and deghosting options is selected, alignment and cropping defaults
are set here in Preferences. When it is not selected, you will have the opportunity to set alignment options
individually for each bracketed set as you process it, using the Alignment and Deghosting dialog which appears
just before Step 2. Refer to the Alignment and Deghosting Dialog section on page 10.
3.3 Noise Reduction Options
Noise Reduction is often useful when using presets such as Painterly, Surreal or Grunge, because these
presets enhance local detail, which has the drawback of accentuating noise. Noise reduction is particularly
recommended when processing RAW les directly in Photomatix Essentials, or when processing just one photo,
especially when this photo is underexposed.
You can turn Noise Reduction on or o, using the Reduce noise menu options, or you can be prompted after
Step 2 whether or not to apply it. Noise reduction is most helpful when applied to the darkest images in a
bracketed set. Since reducing noise takes time, you can choose to process just a subset of your source images
with noise reduction by adjusting the Apply noise reduction on option.
Photomatix Essentials 4.0 User Manual
17
Page 20

3.4 Refresh Preview Continuously
Normally, when you adjust a parameter slider in Steps 2, the image Preview is adjusted to the new setting
immediately after you release the slider thumb. Not before.
If you select the Refresh Preview continuously as slider moves option, the Step 2 image Preview is updated
every time a parameter slider is moved. Image adjustment feedback is thus more immediate, when this option is
selected.
NOTE: This feature is not available in the 32-bit version of Photomatix Essentials.
Photomatix Essentials 4.0 User Manual
18
Page 21

Glossary
AEB mode
Aperture priority
Bit
Bit depth
Bracketed images
dSLR
Dynamic range
(Automatic Exposure Bracketing). DSLR cameras and some compact digital
cameras oer this feature. It enables you to automatically take three or more
exposures in a row: one at the proper exposure, one or more underexposed, and
one or more overexposed.
In Aperture Priority mode, you select the aperture and the camera determines
the correct shutter speed for the available light. The shutter speed also depends
on ISO sensitivity. This is the right mode for shooting bracketed shots for HDR
(refer to Section 1 for more information).
Bits represent digital data in computers. Digital Images are made of bits. A bit
depth corresponds to 2^(Bit Depth) levels (e.g. 256 levels for 8-bit).
The number of bits a le type uses to represent a pixel’s color at a given location
in an image.
A group of photos taken with the Automatic Exposure Bracketing function of a
camera, resulting in photos of the same scene taken with dierent exposures.
Digital Single Lens Reex camera.
In the context of HDR photography, the total range of light intensity in a scene,
from the deepest shadows to the brightest highlights.
Exposure
Exposure fusion
EV (Exposure Value)
HDR
HDR image
The amount of light that enters a camera for the length of time the shutter is
open. Exposure depends on aperture and shutter speed, as well as the camera’s
sensitivity to light (controlled by the ISO). “Exposure” is also shorthand for a
photograph or frame (a frame of lm).
Combination of photos of the same scene taken under dierent exposure
settings in such a way that highlight details are taken from the underexposed
photos and shadow details from the overexposed ones.
A measure of exposure which is the equivalent of a stop. In the absolute sense,
EV is dened as the exposure from a photo taken at 1 second, f/1, and ISO 100.
In the relative sense, the correct exposure is normally 0 EV and any deviation is
measured in positive or negative EV from that mark.
High Dynamic Range.
Strictly speaking, an HDR image is an intermediary image with 32 bits per color
channel (96 bits per pixel). An HDR image is the result of merging photos of the
same scene taken under dierent exposure settings and stored in special HDR
image format. The 32-bit intermediary HDR image must be processed with tone
mapping for proper display on standard monitors and prints. It has become very
common to dene “HDR image” as the result of processing the 32-bit HDR image
with tone mapping, i.e. the tone mapped output, but this is not technically
correct.
Photomatix Essentials 4.0 User Manual
19
Page 22

JPEG
A common image le format with two primary strengths – a relatively small le
size and universal compatibility. JPEGs use a lossy compression scheme and
should not be edited and re-saved.
Noise
Pixel
PPI
RAW le
TIFF
Tone mapping
Statistical variations inherent in the sensor system cause noise. Noise is always
present, but higher sensitivities and smaller sensors usually generate more
noise.
Digital pictures consist of pixels, the smallest units. Each pixel has a color that
can be represented by 8 or 16 bits or as a oating-point number (32-bit HDR).
Pixels per Inch. Can be used to describe the actual pixels per inch of a print. Often confused with DPI (Dots per Inch), used by color printers to print an image.
A le containing the raw data from the camera sensor. RAW les do not have a
color prole or other stylistic preferences permanently applied.
A comprehensive image format that oers lossless compression schemes for
smaller le sizes with higher quality. This format is suitable for editing and
printing but not publishing on the Web.
Processing a 32-bit HDR image into an image that can be properly viewed on
monitors and in prints.
Photomatix Essentials 4.0 User Manual
20
Page 23

Getting More Information and Help
The Photomatix FAQ on the HDRsoft.com website oers several tips, as well as general information.
If you cannot nd the answer to your question in the FAQs, you are welcome to contact us.
Please refer to the Photomatix Support page for contact information.
Additionally, the resources page at www.hdrsoft.com/resources lists Internet tutorials, books and DVDs on
the subject of HDR photography.
Photomatix Essentials 4.0 User Manual
21
Page 24

www.HDRsoft.com
Photomatix Essentials 4.0 User Manual
22
 Loading...