

Page 1
USER MANUAL
RoHS
Page 2

Preface
The information in this document has been carefully checked for accuracy; however, no guarantee is
given as to the correctness of the contents. This information is subject to change without notice. This
document contains proprietary information protected by copyright. No part of this manual may be
reproduced by any mechanical, electronic or other means, in any form, without prior written permission.
Safety Information
Please read the following safety instructions, and keep the user manual for future reference.
Do not operate your HD Max Cam while moving.
Only handle the camera when it is safe for you and for others.
Do not place your HD Max Cam near sources of heat or near extremely high temperatures, as doing so
could damage the housing and main components. Take care to only use the camera within its
operating temperature range.
Your camera includes a class 2 laser pointing device (CDRH Class II, IEC Class 2).
Routine care
Clean your HD Max Cam with a soft cloth. Do not use abrasive powders or solvents, such as benzene or
thinner.
Disclaimer
HD Max Cam will not, under any circumstances, be responsible for injuries or property damage
incurred during the use of its products. HD Max Cam digital video cameras are exclusively intended for
sports video recording and must be used in compliance with local copyright laws. The user assumes
full responsibility for the use, reproduction and distribution of any sounds/images/videos captured
with HD Max Cam devices.
1
Never look directly into the laser beam and never view the laser beam using an optical
instrument. Do not point the laser beam at people or animals.
Page 3

Technical specifications
2
1. Recording resolution:1920 x 1080 (30 fps) / 1280 x 720 (60 fps)
2. Image sensor: 5 Mega pixel, 1/2.5-inch CMOS sensor
3. White Balance: Auto
4. Wide angle lens : 135° in 720p, 110° in 1080p
5. Alignment:Cross laser positioning
6. Video output: HDMI CTS1.2 Compliant
7. Composite video output (AV-OUT)
8. Video signal format: H.264 encode/decode format bit rate: 15 Mbit/s
9. Recording format: MOV (AVC1)
10. Lens design rotates 200° to allow multiple camera mounting positions
11. Video Rotation 180°
12. Built-in microphone(single channel), Adjustable recording volume level
13. USB 2.0 / HDMI / 3.5 AV OUT, 1/4-inch to 20 tripod thread
14. Support external Micro SD Card up to 32Gb (Class 6)
15. Overwrite recording, Real-time stamp
16. System Language:English / русский / Italiano / Deutsch / 日本語 / 中文
17. PC Compatibility: Windows XP, Vista, Windows 7; Mac OS X 10.5 and 10.6
18. Built-in high capacity li-ion battery, 3.7V/1100mAh
19. Working humidity: 10% ~ 98%
16. Temperature: -10 ~ 60℃
17. Dimensions (H x W x D): 3.35" x 2" x 1.3" (85mm x 51mm x 33 mm)
18. Camera weight- 112 grams
Page 4
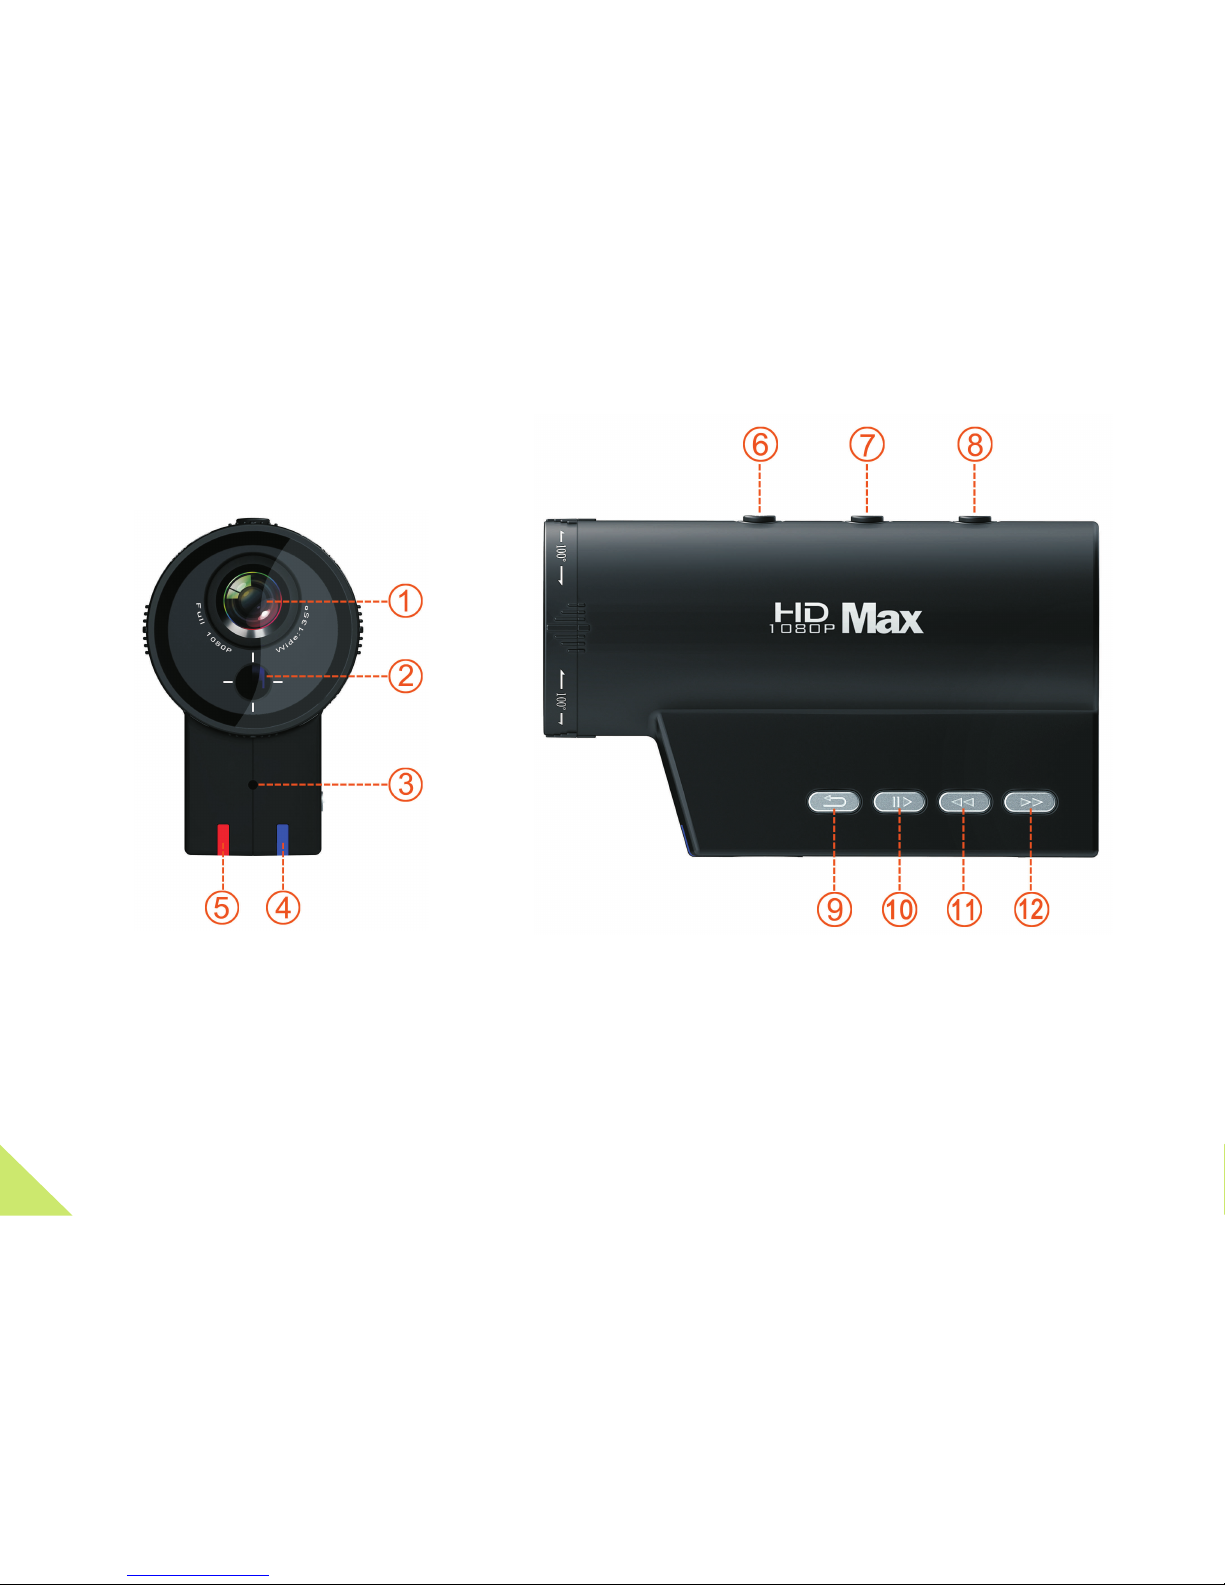
ABOUT THE CAMERA
Quick Start Guide
1. 135° lens
2. Cross laser positioning
3. Microphone
4. Recording indicator
5. Power / Memory Status indicator
6. Turn on or turn off the Cross laser positioning
7. Recording key
8. Press and Hold for 3 seconds to
power on or power off the Cam
9. Press and Hold for 3 seconds to Menu
Return key / Delete key
10. Play / Stop key
11. FWD / Select key
12. REV / Select key
3
Page 5
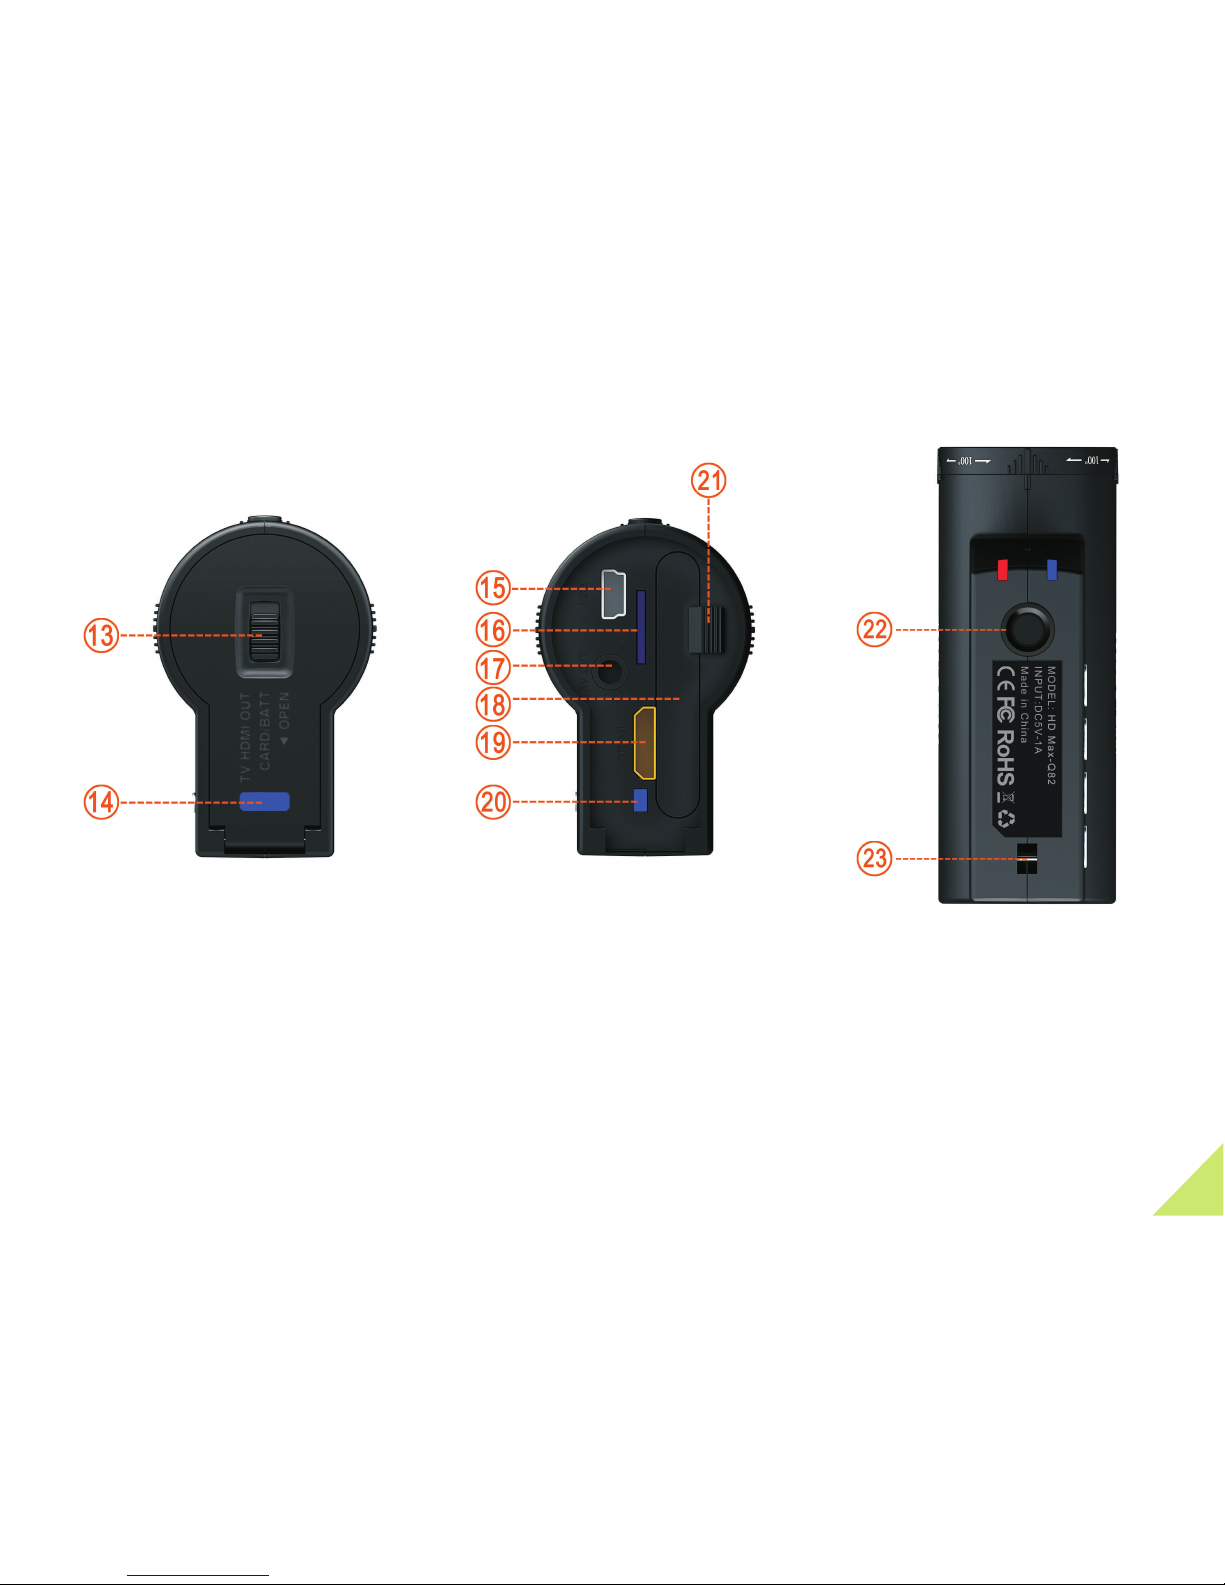
ABOUT THE CAMERA
Quick Start Guide
13. Locking key of rear cover
14. Recording indicator
15. USB 2.0 Port (file transfer/charging)
16. Micro-SD Holder
17. AV OUT connectors
18. Battery Holder
19. HDMI Port (cable not included)
20. Recording indicator
21. Battery Latch
22. 1/4-inch to 20 tripod thread
23. LEASH
4
Page 6
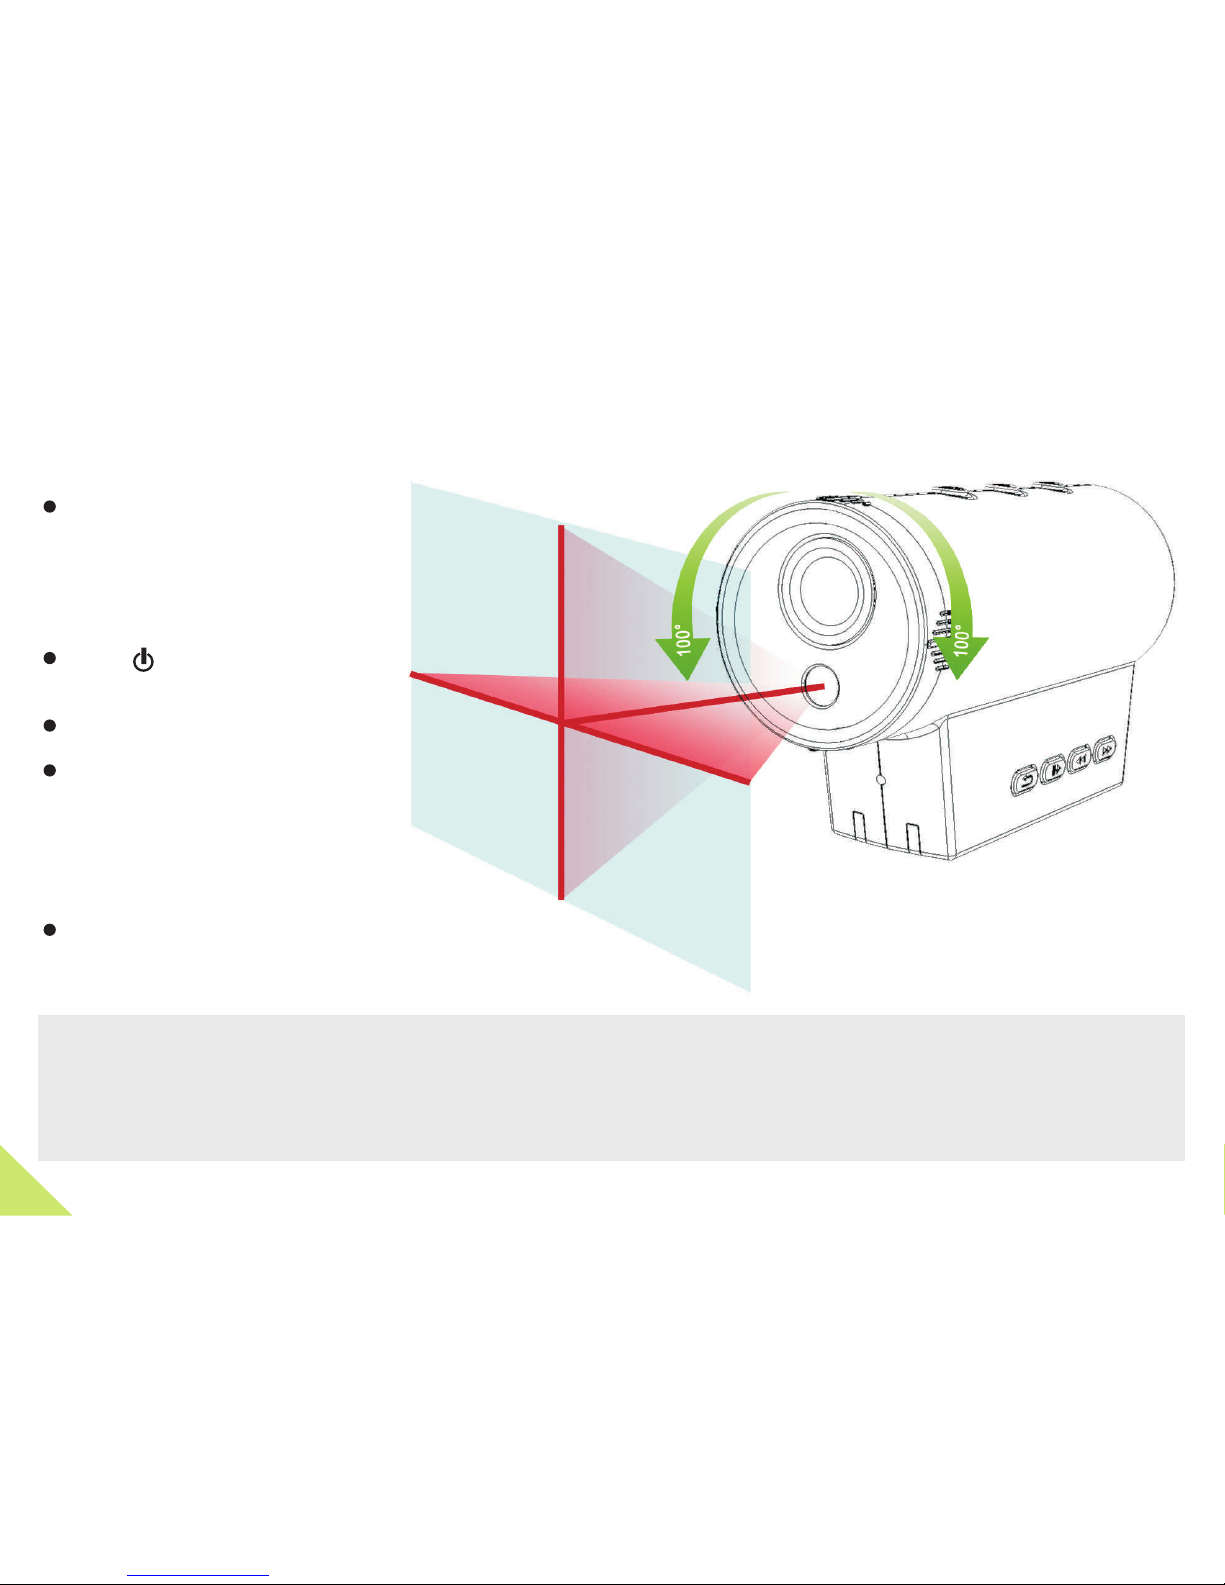
Using your LASER p ointing devic e (please read th e safety inform ation)
The laser pointing device indicates the positi on of the rotatin g lens. Rotate th e lens until the la ser line is perfe ctly
horizon tal. The laser will come on for 10 seconds wh en you start reco rding and then go o ut automatica lly. To switch th e
laser bac k on while record ing, quickly press and release the reco rd button. To swi tch it back off, pr ess the record
button again.
ABOUT THE CAMERA
Quick Start Guide
Choose th e appropriate mount and
ensure it is fitte d securely and
tightly so that it can not
come loose while shootin g your
videos.
Press [ ] key and hold f or 3
seconds to power up the camera.
Adjust the lens to the proper angle
Face a blan k surface and pre ss the
laser button to turn on the lasers
(The lasers will disappe ar in 15
seconds). The laser can be turned on
or off at any time wi th the laser ligh t
button.
Check whe ther the laser li ght is
horizon tally aligned . If not, rotate the
lens unti l it is in the.
5
Page 7
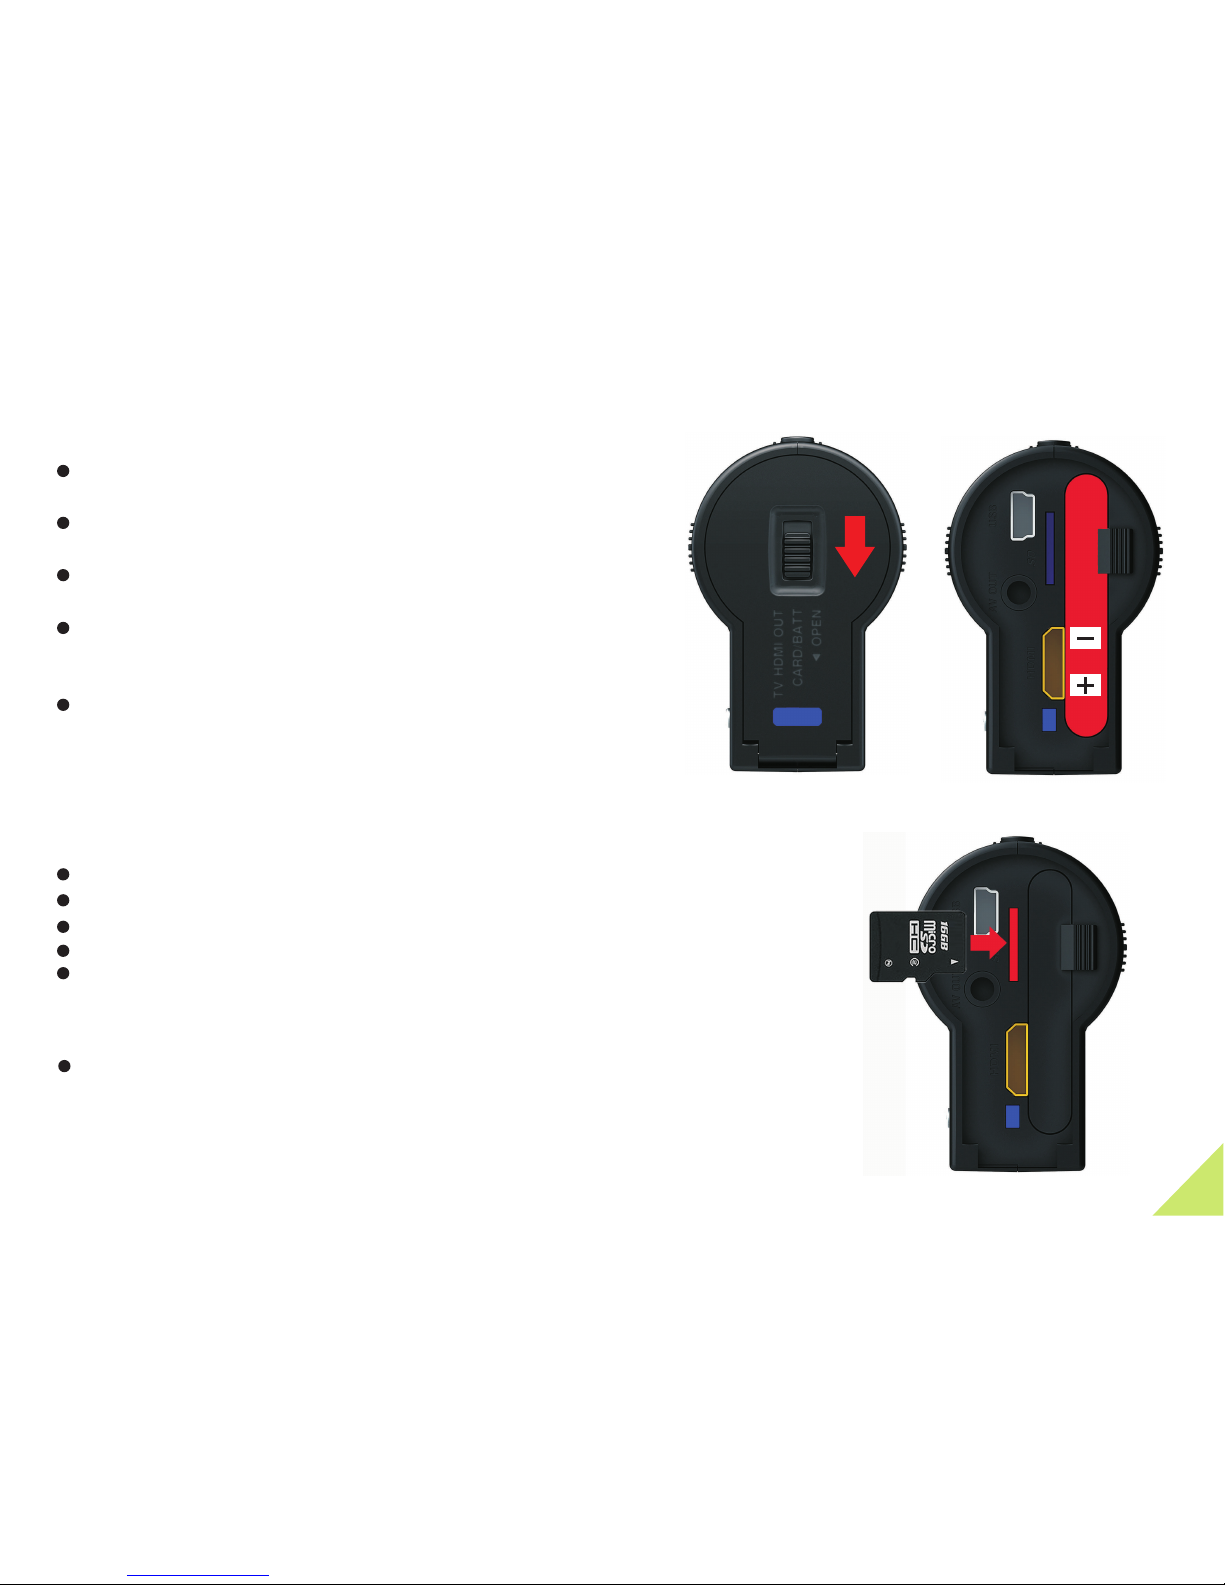
- Slide the lock on th e rear cover and it w ill automatic ally open.
Follow the instructions. Inse rt the SD card in the c orrect direct ion.
Push the back cove r to the closed pos ition.
When SD card cannot be accessed, The Memo ry Status LED wil l flash green.
When SD card is full, The Memory Status LED w ill be green.
You will n eed to purchase a m icroSD storag e card. The HD Max is
compatible wit h:
- SDHC (high capacity) class 4, 6, or 1 0 microSD Cards u p to a maximum
capacity of 32GB .
All microSD Cards must be formatt ed before use in th e HD Max camera.
Installing the battery
- Slide the lock on th e rear cover and it w ill automatic ally
open.
- Follow the instructions. Inse rt the battery wi th the correct
Polarity (+/-)
- Push the rear cove r closed.
- NOTE: If you do not in tend to use the pro duct for a long
time, please remove the battery.
- Batteries contain chemical su bstances so the y should be
handled a nd disposed of co rrectly.
Installing the micro-SD card
6
Page 8
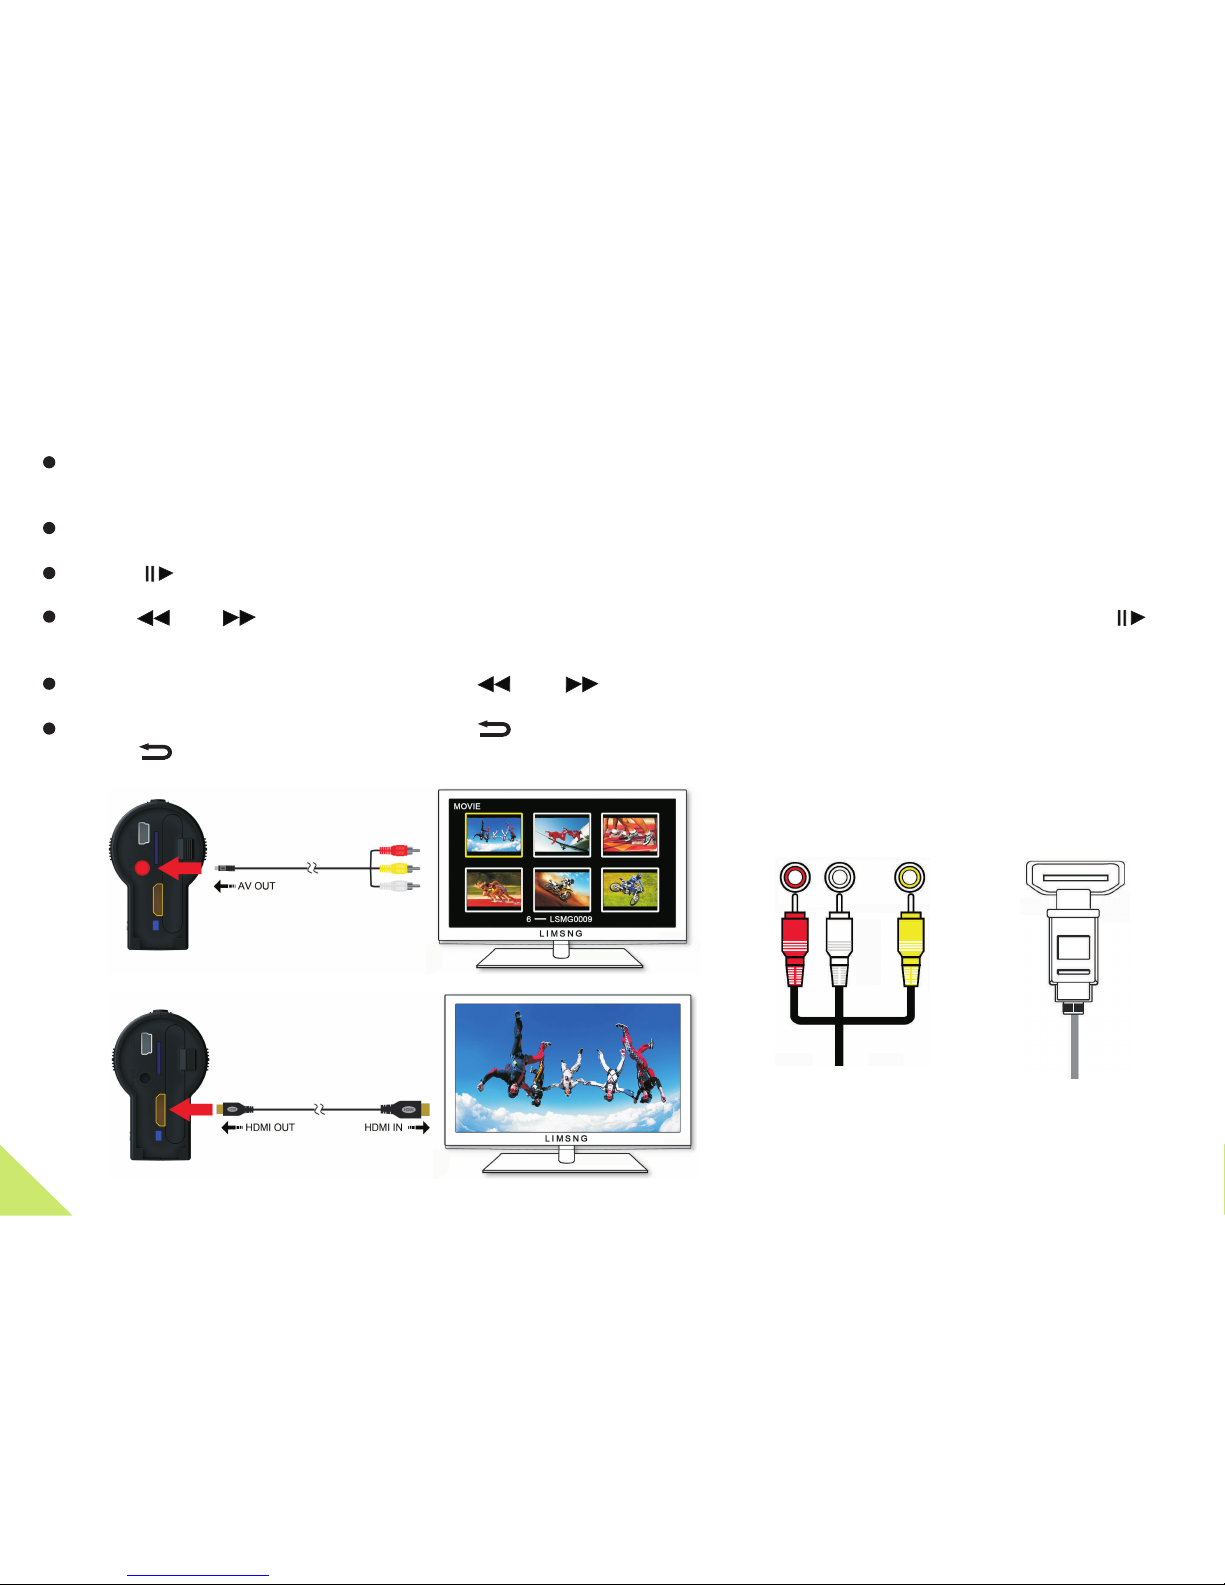
Playback on TV/display device
Connect one end of AV-out cabl e / HDMI cable to the DIGITAL in terface on the ba se of the camera, a nd connect the
other end o f AV-out ca ble / HDMI cable to your TV or other d isplay device .
Turn on the TV or display device, and enter into the AV-in / HDMI mode .
Press【 】to switch to P lay Mode, the scr een shows 6 video f iles per page in gr id form.
Press【 】 【 】to choose which v ideo to play, the video will be highlight ed with yellow bo rders, press【 】
to start recordi ng, and press aga in to stop.
When playing video, user can Long press【 】【 】to Fast forw ard or reverse at X 2/X4/X8.
When playing video, user can Long press【 】to delete vi deo file.
Press【 】to stop playback, and retur n to the video file s list.
7
HDMI
AUDIO VIDEO
HDM I
Yell owWhit eRed
Page 9
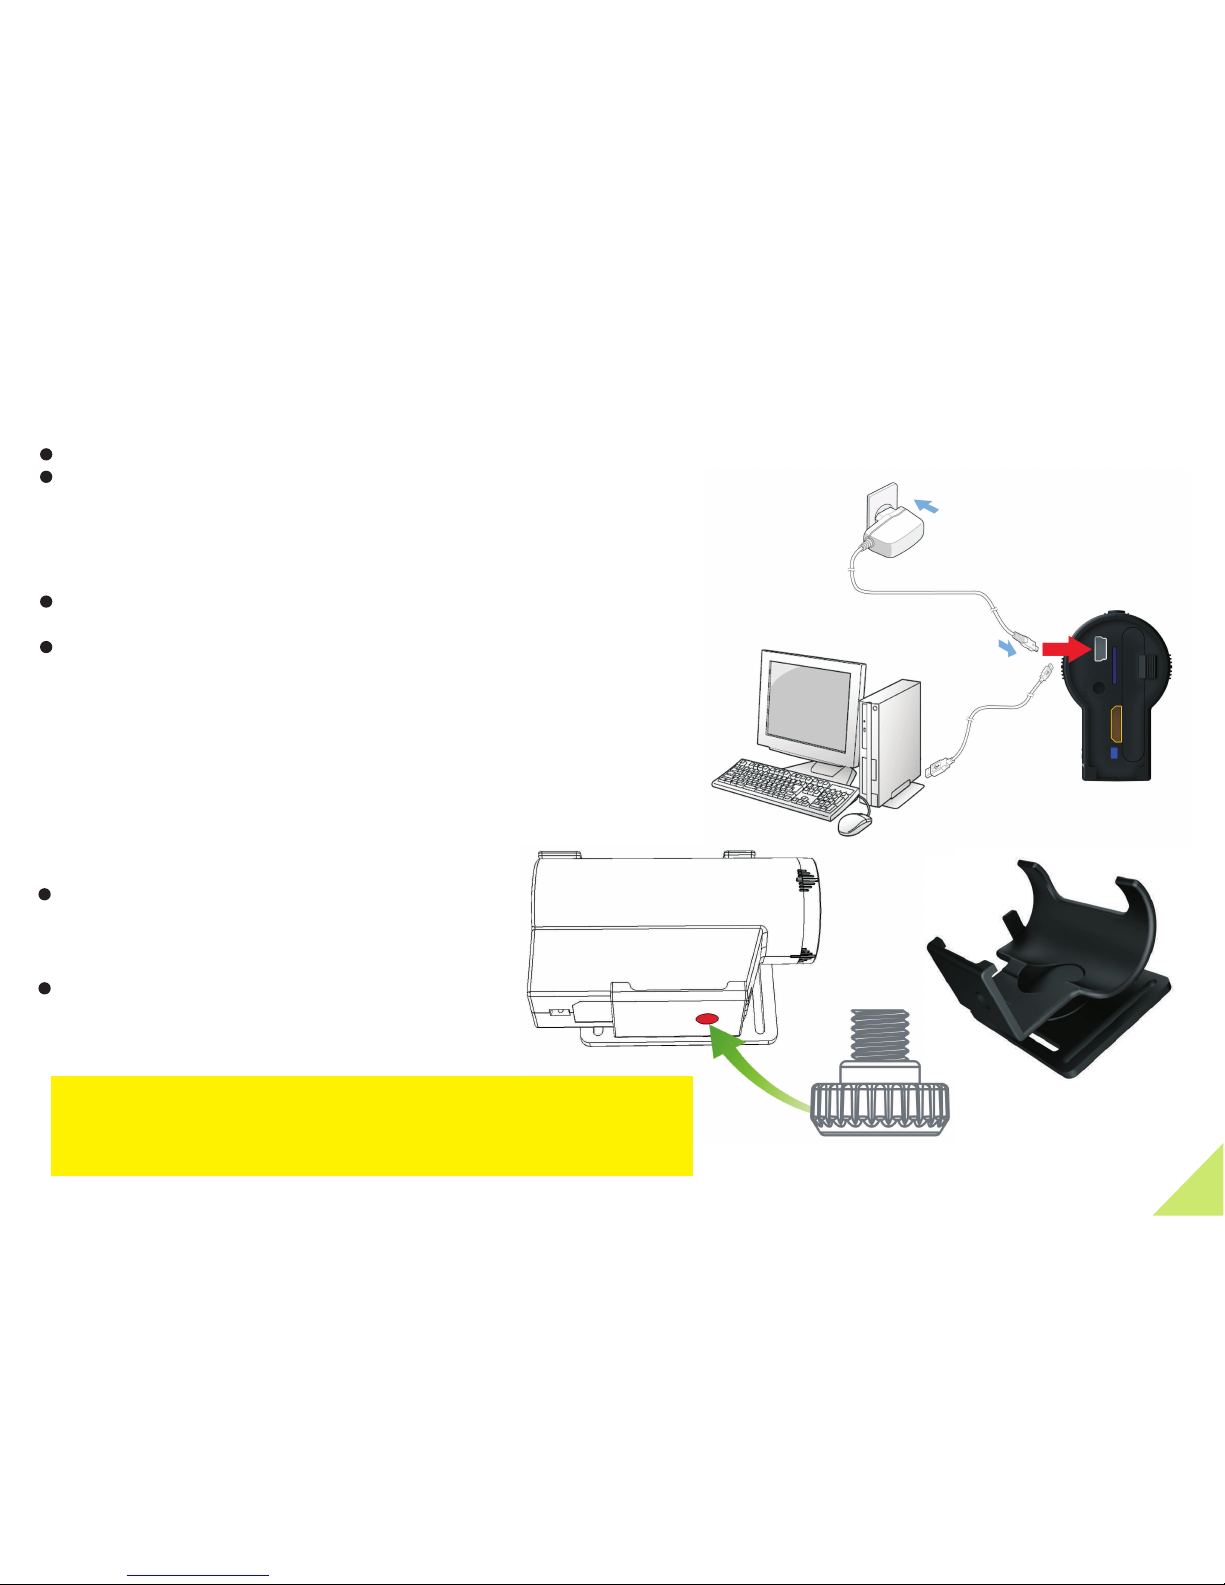
picture 2
DO ATTACH THE MOUNTS TO THE CAMERA WHEN THE
CAMERA IS MOUNTED ON HELMET; MAKE SU RE IT DOES NOT
COME LOOSE FROM TH E MOUNTS AND CAME RA TETHERED
BY THE SCREW CAP.
Playback on a PC
Connect the USB cable to the camcor der properly, and then c onnect the othe r end to a USB port of a PC .
Charge th e battery using the AC power adaptor or the USB cable.
8
Installing the mounts
Follow the instructions. Fix th e mounts to the
camera in the correct direction .
(Refer to picture 1)
Follow the instructions. Usin g the screw cap to
fix the mount to the 1 /4 thread of
camera (Or it can be fixed on other 1/4 t read
mounts). (Refe r to picture 2)
picture 1
Recharging the b attery from you r computer:
If the camera fail s to start record ing, the batter y has probably run
down and needs to be recharged.
Recharge the battery as follows :
• Connect the USB ca ble supplied to t he mini-USB por t of your
camera
• Connect the cabl e USB connector t o your computer ( in most cases,
your computer mu st be switched on f or the battery to r echarge) or
connect the USB co nnector to the AC wa ll charger supp lied.
The camera shoul d take a maximum of 3 h ours to fully rec harge
using a computer U SB port. When rec harging, the LE D record
indicator will be red. At full charg e, the LED will tur n off. I f the device
has not been used fo r a long time, it is be tter to recharg e battery
before use.
AC Adaptor
Page 10
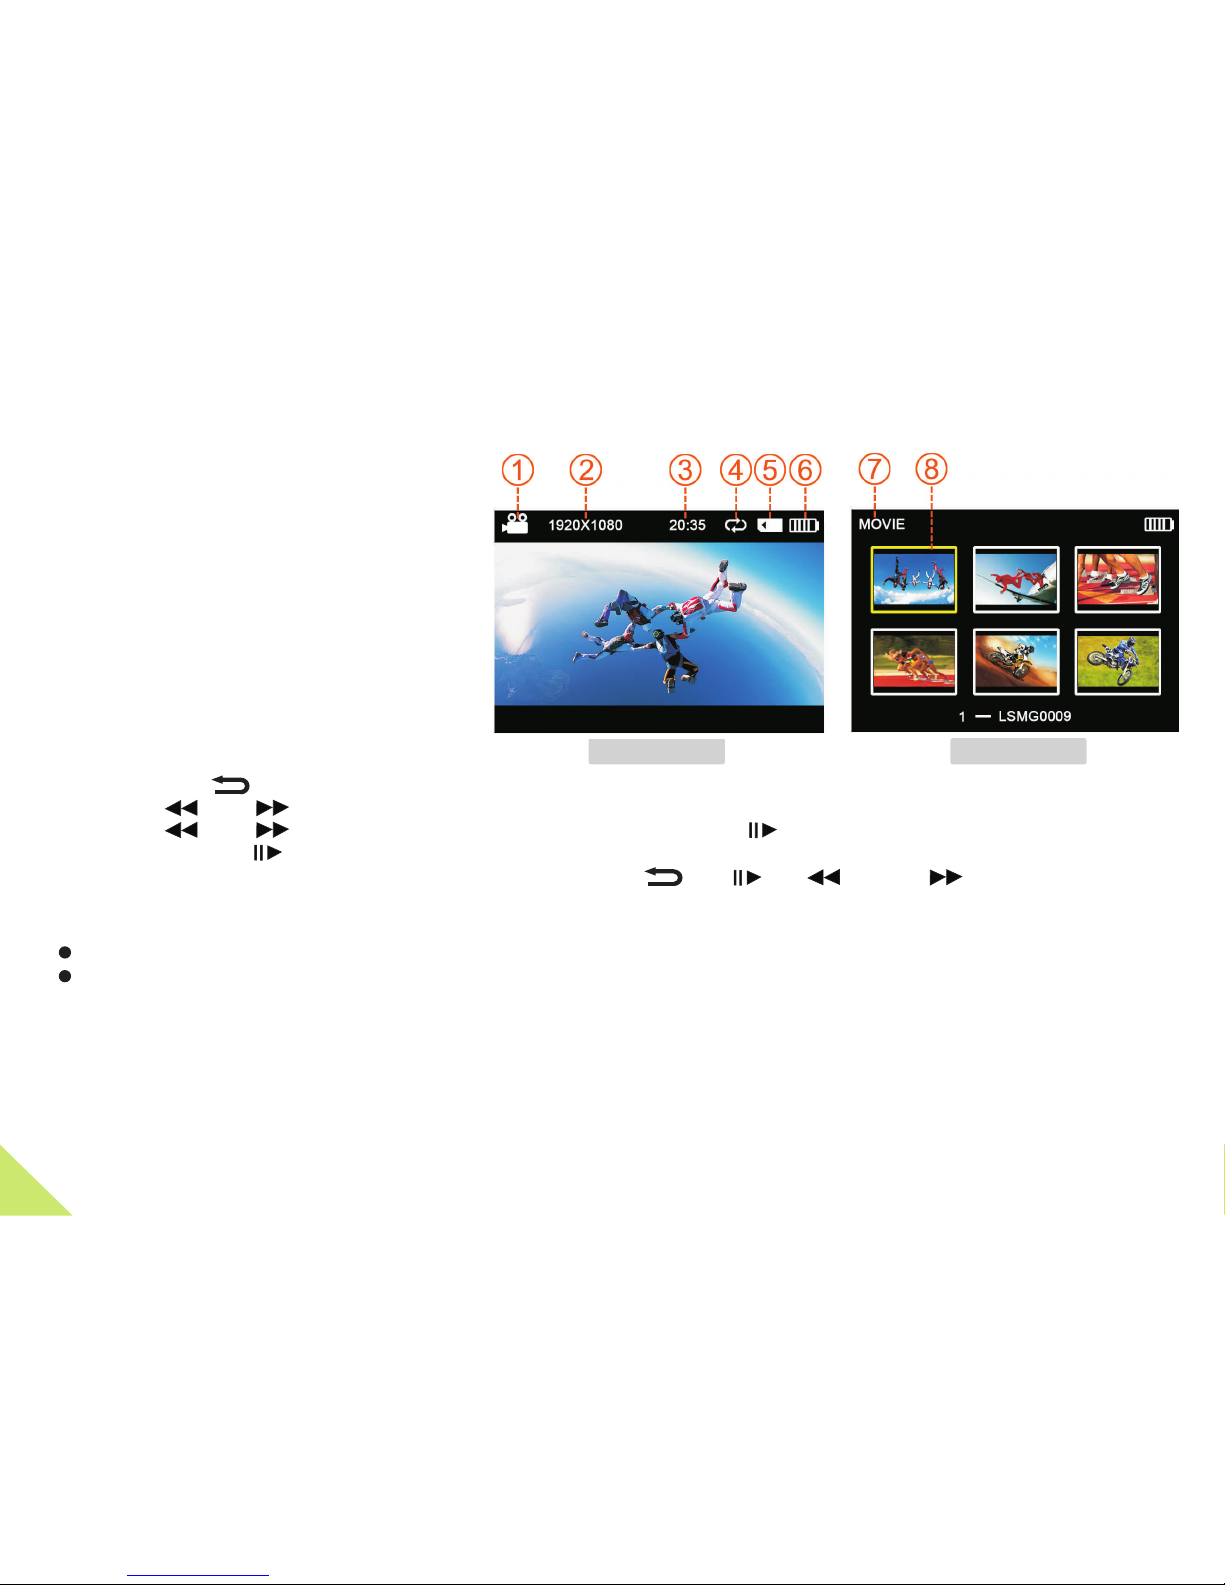
Description of Function Icons
1. Long press key to enter the set tings menu.
2.
【 】
press 【 】【 】 key to shift t he blue cursor, ch oose the functi on.
3. Press 【 】【 】 key to choo se the needed fun ction, press 【 】 ag ain.
4. After Pressing 【 】 k ey it will automa tically retur n to the main menu.
5. When the AV OUT and HDMI do not acces s, the four key 【 】【 】【 】 and【 】 will be locked.
To avoid the misoperation when reco rding.
SIZE:
1920 X 1080p 30 frame per second (fps ) bit rate: 15 Mbit /s, Field of View:
1280 X 720p 60 frame p er second (fps) b it rate: 15 Mbit/ s,
110°(Default).
Field of View:1 35°.
TV OUT:
Choose th e correct video output system when connecting AV OUT to TV. The ima ge on the TV will be
flickering if the TV system is inco rrect. Choose PAL or NTS C(Default).
VOLUME:
The volume of internal MIC can be set a nd there are 0- 7 gra des to be selecte d,7 grades(De fault).
RECYCLE:
When set as the mode, the video will default to 30 minute per file. When the card
is full it will start overwriting t he earliest rec orded files,
【 YES 】
【 NO 】(Default).
9
1. Record Mode
2. Video Resolu tion
3. System time
6. Battery Life
7.
4. Record Overwrite Mode
5. SD card icon
Video Mode
8. Current Selection video file
System function settings
Video ModeRecord Mode
Page 11

VIDEO FLIP:
Using this setti ng you can invert t he image being re corded. This is usefu l if you wish to film w ith the
camera in the upside down position. The image will be flipped the right way up using this sett ing.
- OFF : Choose this se tting when the ca mera is install ed in the normal po sition
- On : Choose this set ting when the cam era is installe d in the inverted p osition .(Defaul t)
System function settings
FORMAT:
Choose and press REC key to format the mic ro SD Card.【YES】 【 】 【 O】
Note: All files in the MICRO SD will be deleted and will be unrecoverable after formatt ing.
We suggest you format yo ur memory card on a r egular basis.
Should you have a problem wi th your camera, format ting the memory c ard will quite of ten solve the iss ue.
N (Defaul t).
SYS.RESET:
Choose and press REC key to sys reset.
When select this function item, a ll settings sha ll be reset to the ex -factory valu es.
【YES】 【 】 【 O】
Note:
N (Default).
VERSION:
The user may view th e software vers ion.
LANGUAGE:
Select the needed langua ge
English(Default) / русский / Italiano / Deutsch / 日本語 / 中文
10
STAMP:
With this settin g, the current ti me will be stampe d on the video and th e recording tim e can be seen
during pl ayback.
OFF: No DATE and CLO CK stamp
DATE: DATE only
CLOCK: CLOCK onl y
DATE/C LOCK: both DATE/CLOC K
(Default)
DATE/ CLOCK:
There is day / month / y ear / hour / minute t o set up on the camer a.
Page 12
INFORMATION FOR USERS a ccording to Eur opean Directi ves 2002/95/E C and 2003/108/EC on the r estriction of
the use of hazardo us substances i n electrical an d electronic eq uipment and waste disp osal.
The symbol of the cr ossed-out whe eled bin printe d on the packagin g indicates tha t this product mu st be collected
separat ely from other waste at th e end of its workin g life.
The user must hand the product over t o a designated co llection site f or waste electr ical and electr onic equipmen t or
return it to the ret ailer on a one-fo r-one basis whe n buying a new simi lar product.
By correctly sep arating this pr oduct for recyc ling, process ing or environm entally frien dly disposal, y ou will be helpin g
to prevent possible negative impacts on the envi ronment and hum an health, and co ntributing to t he recycling of i ts
compone nt materials.
Users who dispose of this product i llegally may be l iable to prosec ution under app licable laws.
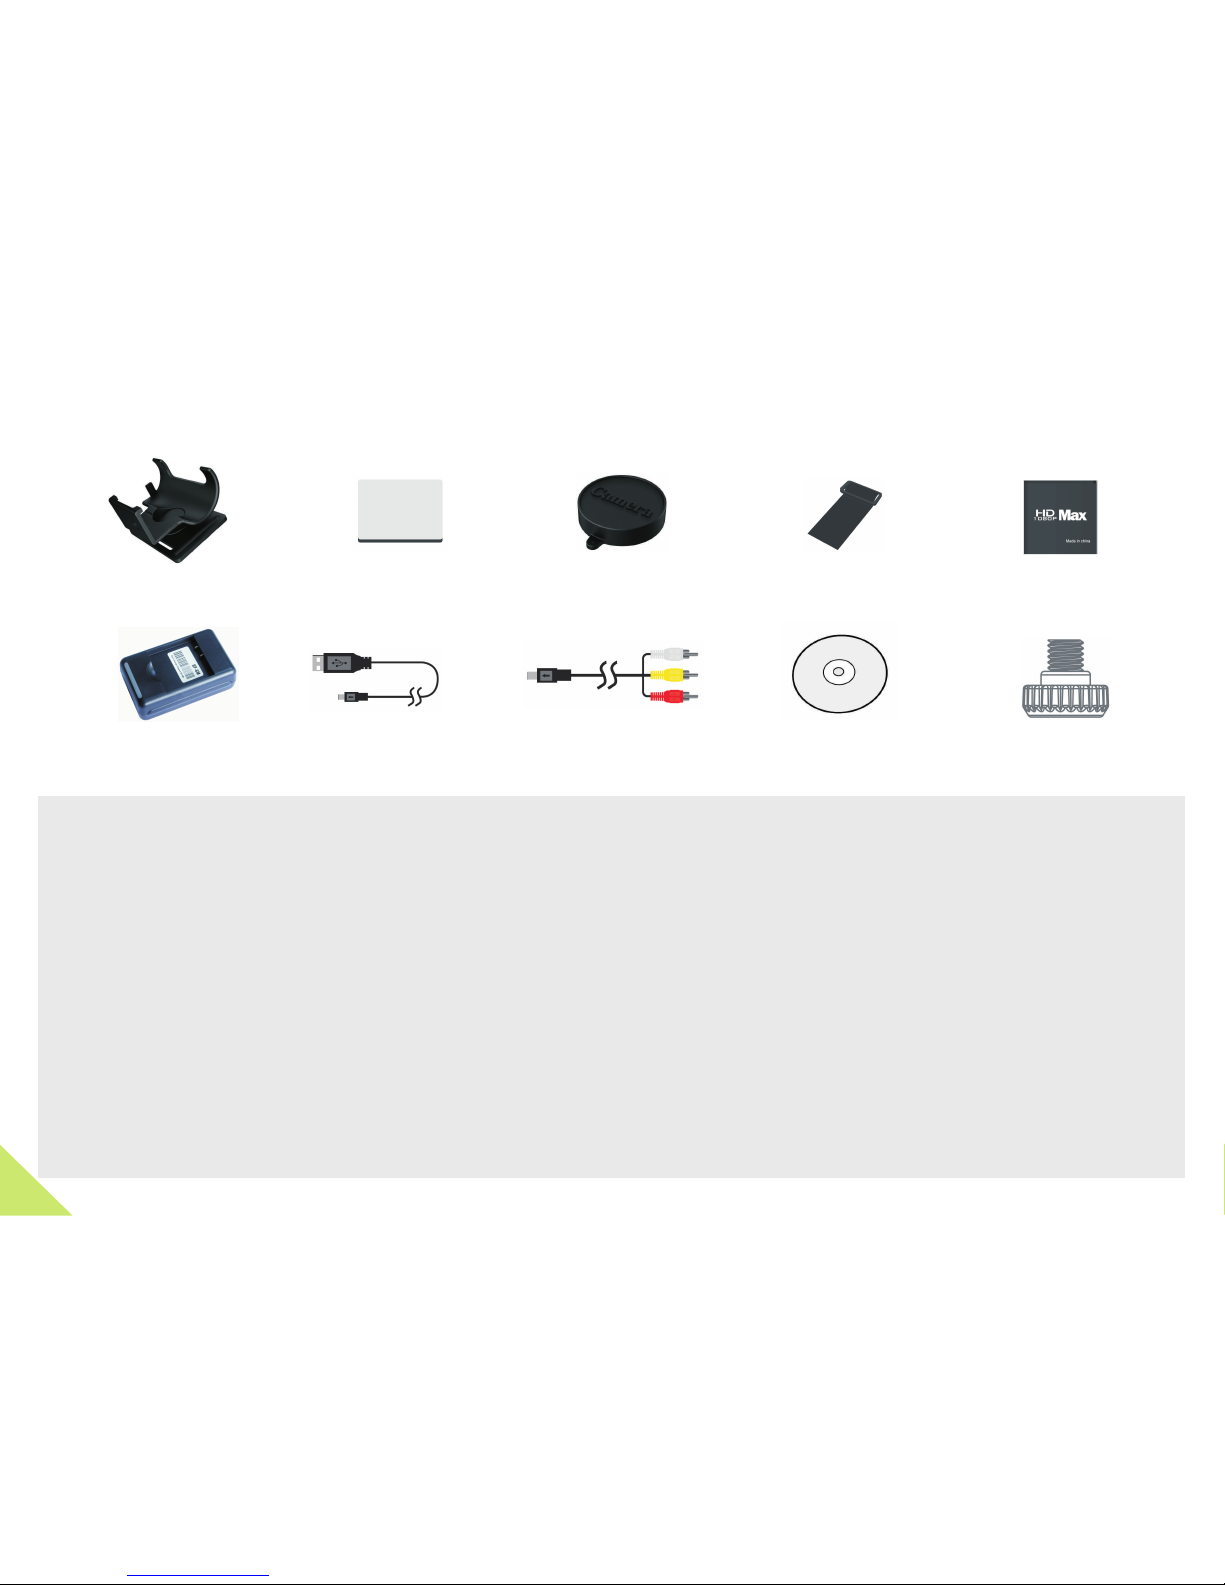
PACKAGE CONTENT
11
Vented He lmet Mount 3M sticker x 2
Dust Proof Cover
Elastic Strap Battery
User Manu al CDUSB Cable AV-OUT Cable
Battery Charger
Screw cap
Page 13

12
Warranty
Warning:
Failure to follow these safety in structions co uld result in fir e, electric sho ck, or other inju ry or damage.
This product is guaranteed against manufactu ring defects fo r one (1) year from t he original dat e of purchase. HD M ax
sole obli gation in the eve nt of such defects durin g this period is to r epair or replac e the defective p art or product wi th a
compara ble part or produ ct at HD Max sole discreti on. Except for su ch replacemen t, the sale, or oth er handling of th is
product is without warranty, co ndition or othe r liability eve n though the defe ct or loss is cause d by negligence o r other
fault. Damage resulting from us e, accident, or n ormal wear and te ar is not covered b y this or any warra nty. HD Max
assumes no liability for any accident, injury, death, loss, or ot her claim relat ed to or resultin g from the use of thi s
product. In no eve nt shall HD Max be li able for incide ntal or consequ ential damage s relating to or re sulting from th e
use of this product or any of its parts . Because of poss ible user resea ling error, thi s product is not wa rranted again st
water housing leakage or a ny resulting damage.
Free maintain wo n’t be given unde r the following circumstance:
1. Repair label ripped off.
2. The breakdown caused by the manipulation that h asn’t follow th e requests of the M anual.
3. The damage caused by the dismantle movement of a no n-our-compa ny authorized m aintainer.
4. The breakdown, row harm or damag ed because of the m ove or drop.
5. The damage caused by customer in appropriate preservation , maintain, or th e usage.
6. Easy damaged pieces and present accessories a re not concerne d.
7. The breakdown and the damage caused by the Force ma jeure.
Page 14

Recycled paper
Copyright c 2011 All rights reserved
 Loading...