

Page 1
iMiniCam 1080p Wireless Spy Camera
User Manual
Page 2
2
iMini Spy Camera User Manual
Introduction
Thank you for choosing the iMini Spy Camera. Experience cutting edge
technology and enjoy the security that the iMini Spy Camera system
brings to your home, office, or anywhere you are. We hope you enjoy
your new wireless spy system.
User and Installation Guide
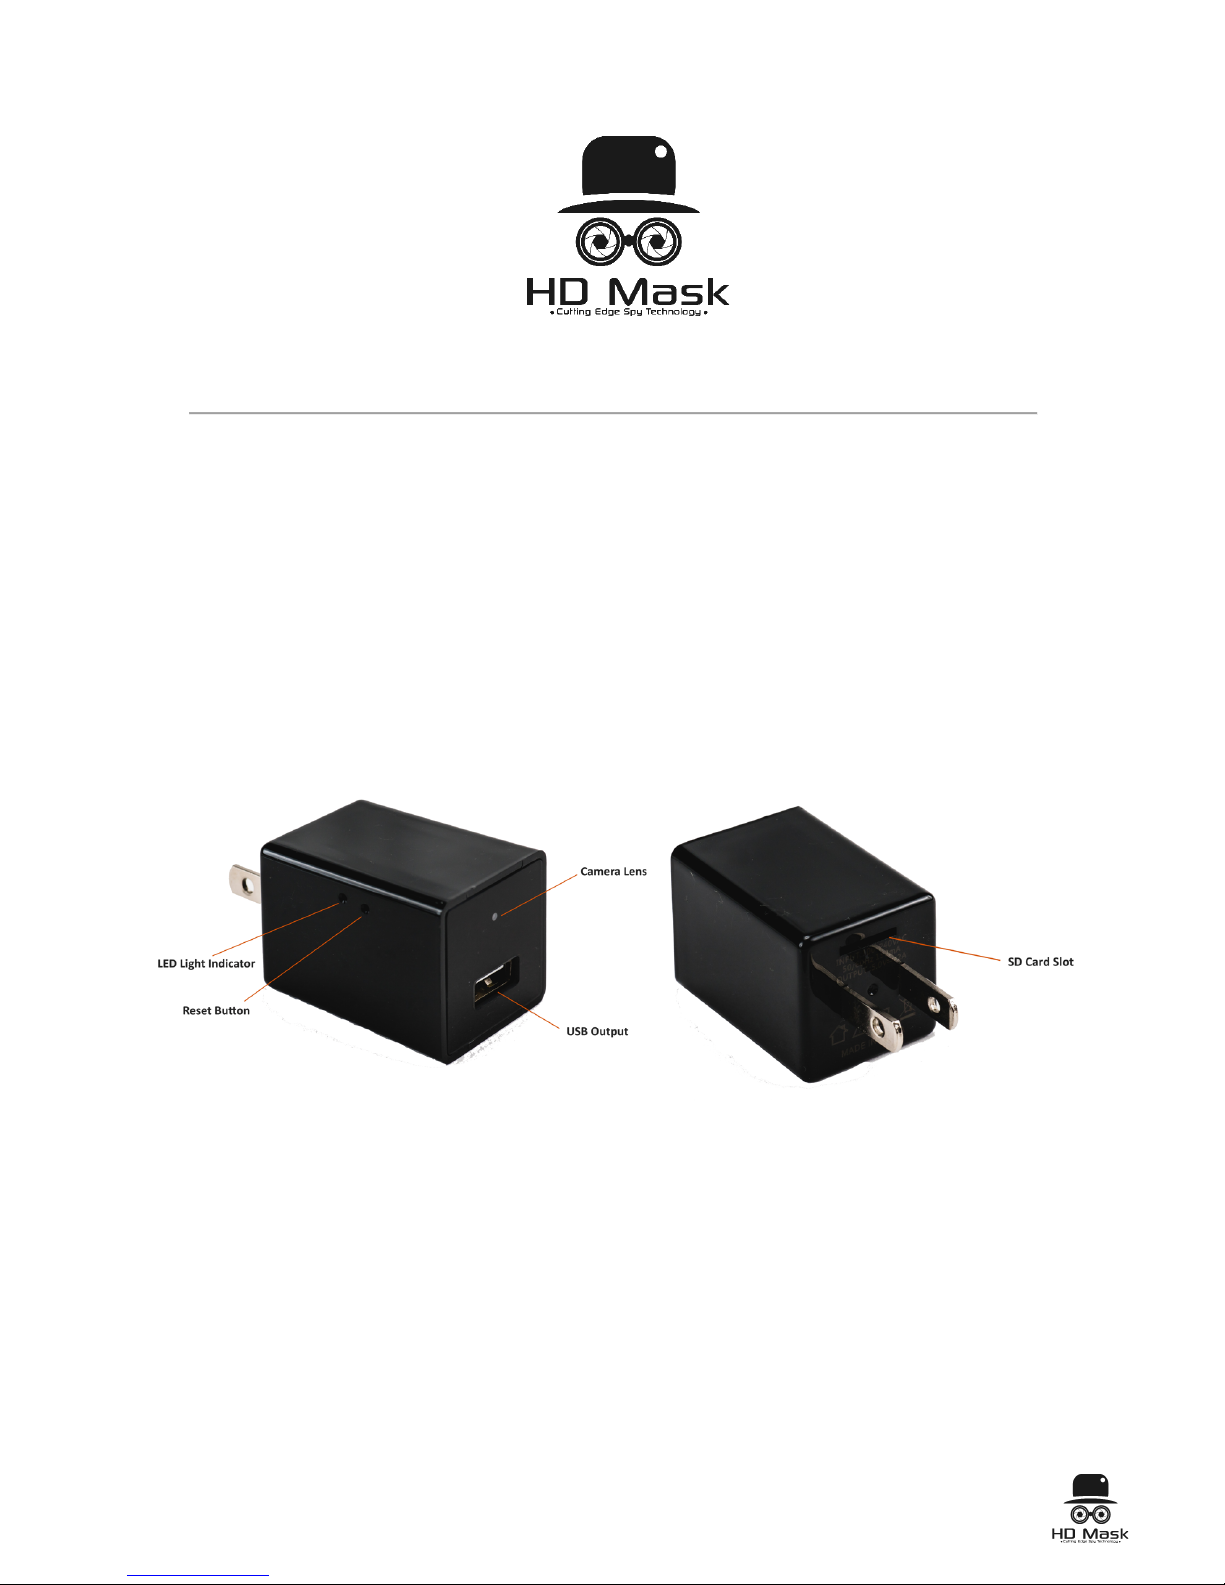
Product Structure
Package Includes:
• USB Spy Camera
• USB SD Reader
• Pin
Note: The instructions outlined in this manual are specifically for the
iPhone, but Android setup instructions are similar.
Page 3
3
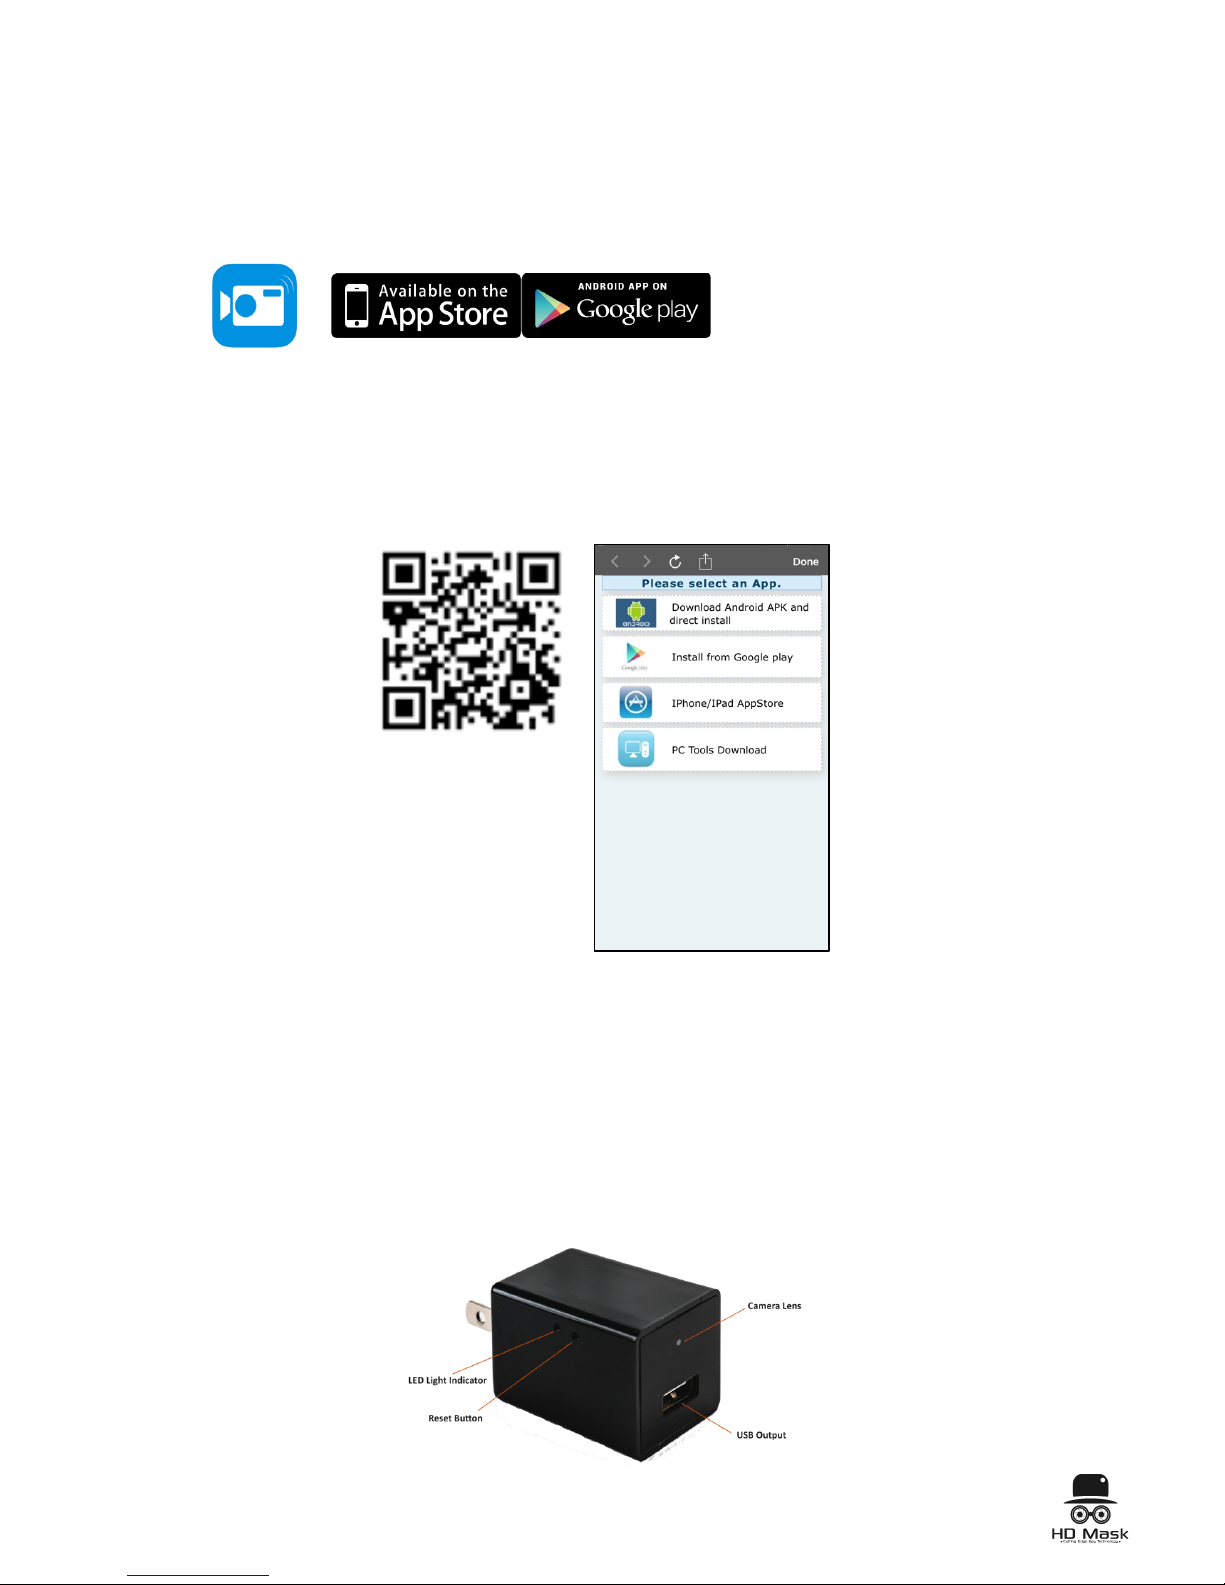
Download the iMiniCam App
Option 1: Search “iMiniCam” on the App Store or Google Play and
download.
iMiniCam
Option 2: Scan the QR code below through any QR scanning app. You
will be navigated to the following page. Select a means of downloading
that is suitable for your device.
Setting up your iMiniCam
Add a new online camera via the iMiniCam app and Wi-Fi
1. Plug the iMiniCam device into a functioning electrical outlet.
2. Reset the device by taking the included pin tool and push and hold
the button for about 5 seconds. Wait another 30 seconds for the
reset to complete. The indicator light should flash and when
complete, will stop flashing and turn off entirely.
Page 4
4
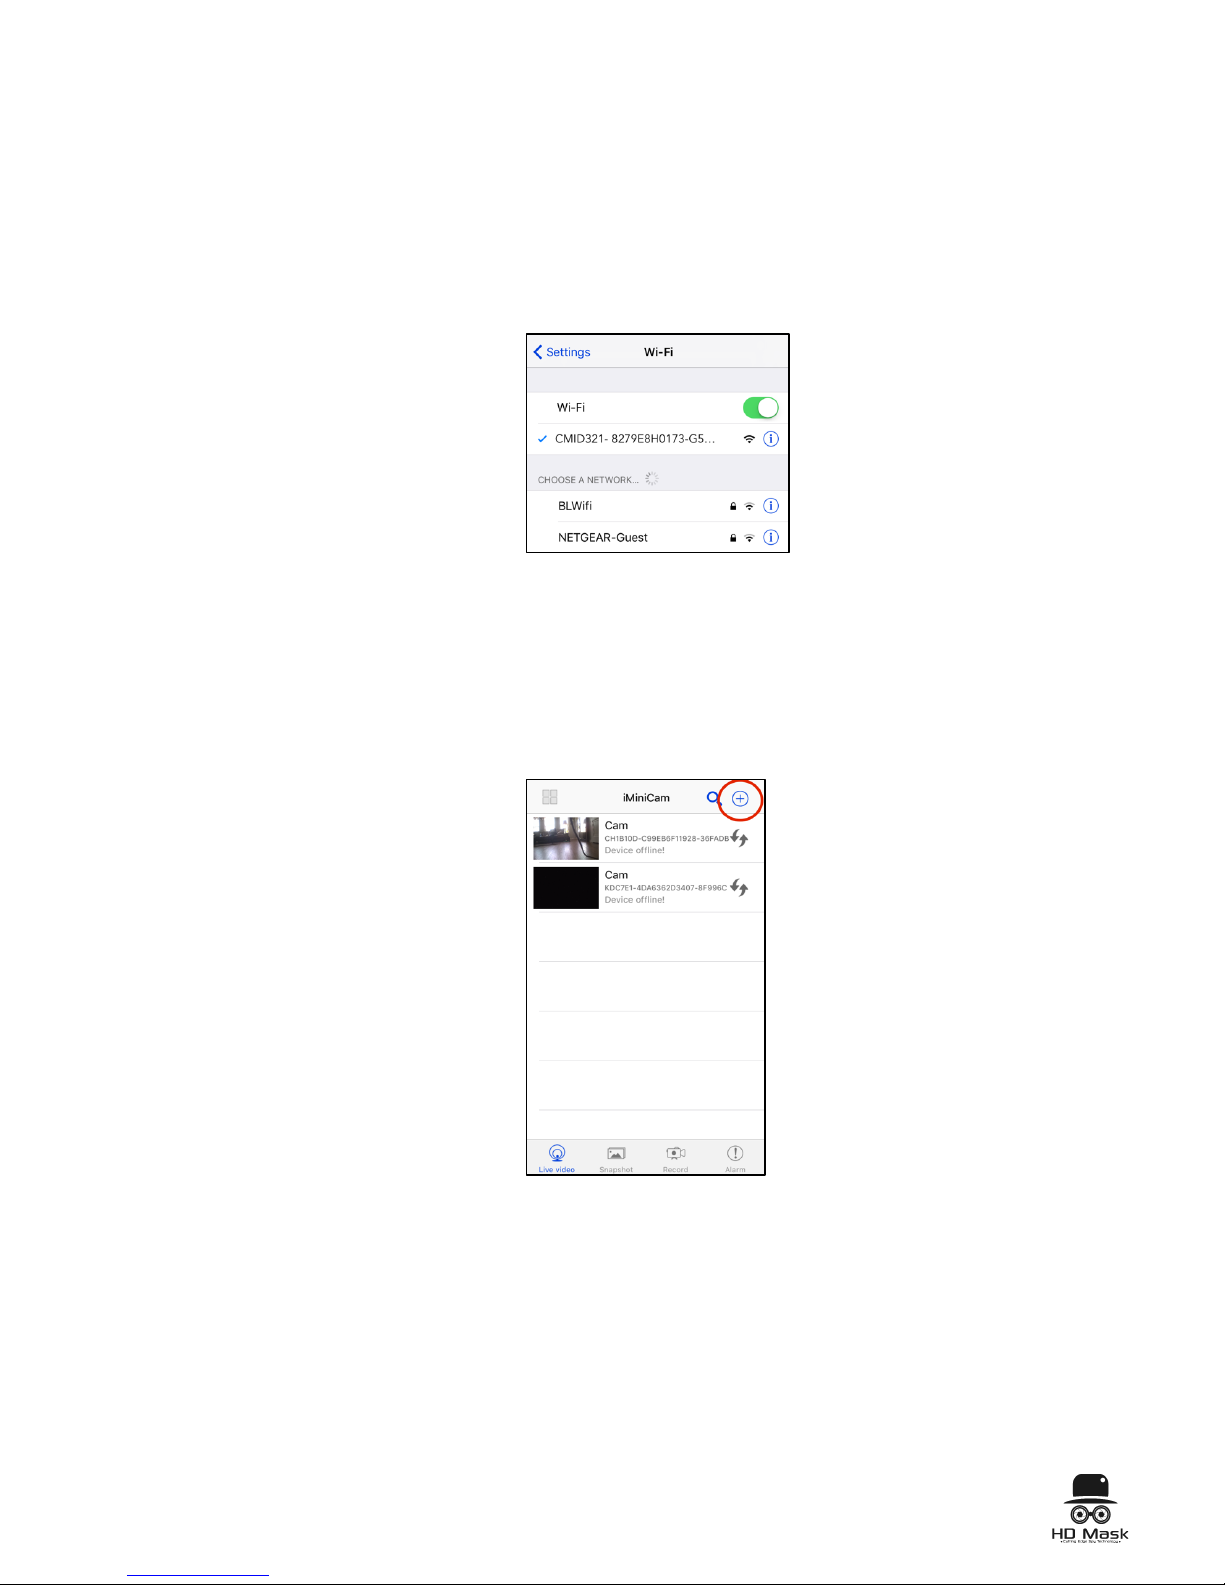
3. Open your phone’s Wi-Fi settings and search for the iMiniCam’s
Wi-Fi signal. The Wi-Fi address will be a long series of letters and
numbers and also acts as the device’s unique UID. This UID can
also be found on a sticker on the side of the iMiniCam device. This
sticker also has a QR code you can scan to easily copy the UID.
4. Once found, connect your phone to this Wi-Fi. If after 3 minutes
the iMiniCam’s Wi-Fi does not appear, reset the device and try
again.
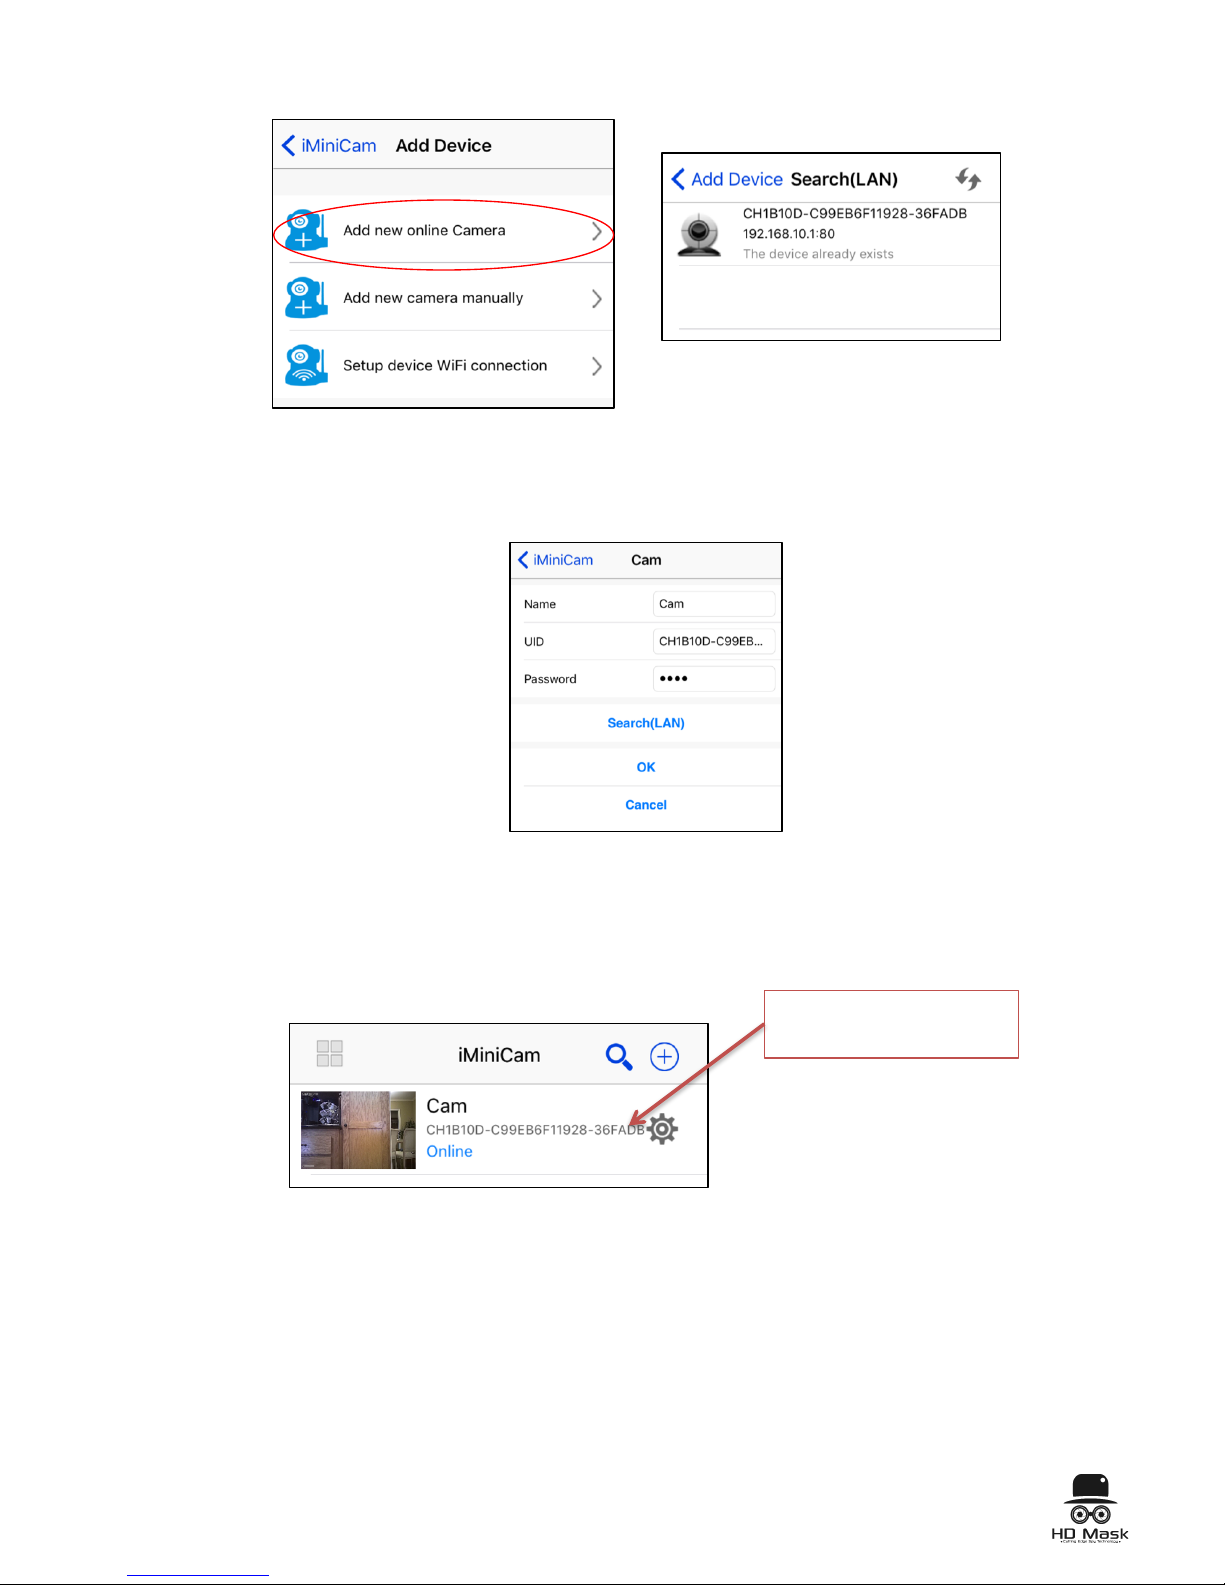
5. Open the iMiniCam app on your phone and click the (+) button in
the top right corner to add the new camera.
6. Click “Add new online camera” and the device’s Wi-Fi address
should appear in the following page titled “Search(LAN)”. Select it
to add it as a new device. If the device does not appear, check that
your phone is connected to the iMiniCam’s Wi-Fi with the UID.
Page 5
5
7. When prompted for a password, the default password is 8888.
8. Navigate back to the home screen “Live Video” and the newly
added camera should appear online. It will display its UID, which
will also match its Wi-Fi code.
Adding a New Camera Manually
1. Once a camera has already been previously set up, you have the
option to later connect the camera manually using the camera’s
UID.
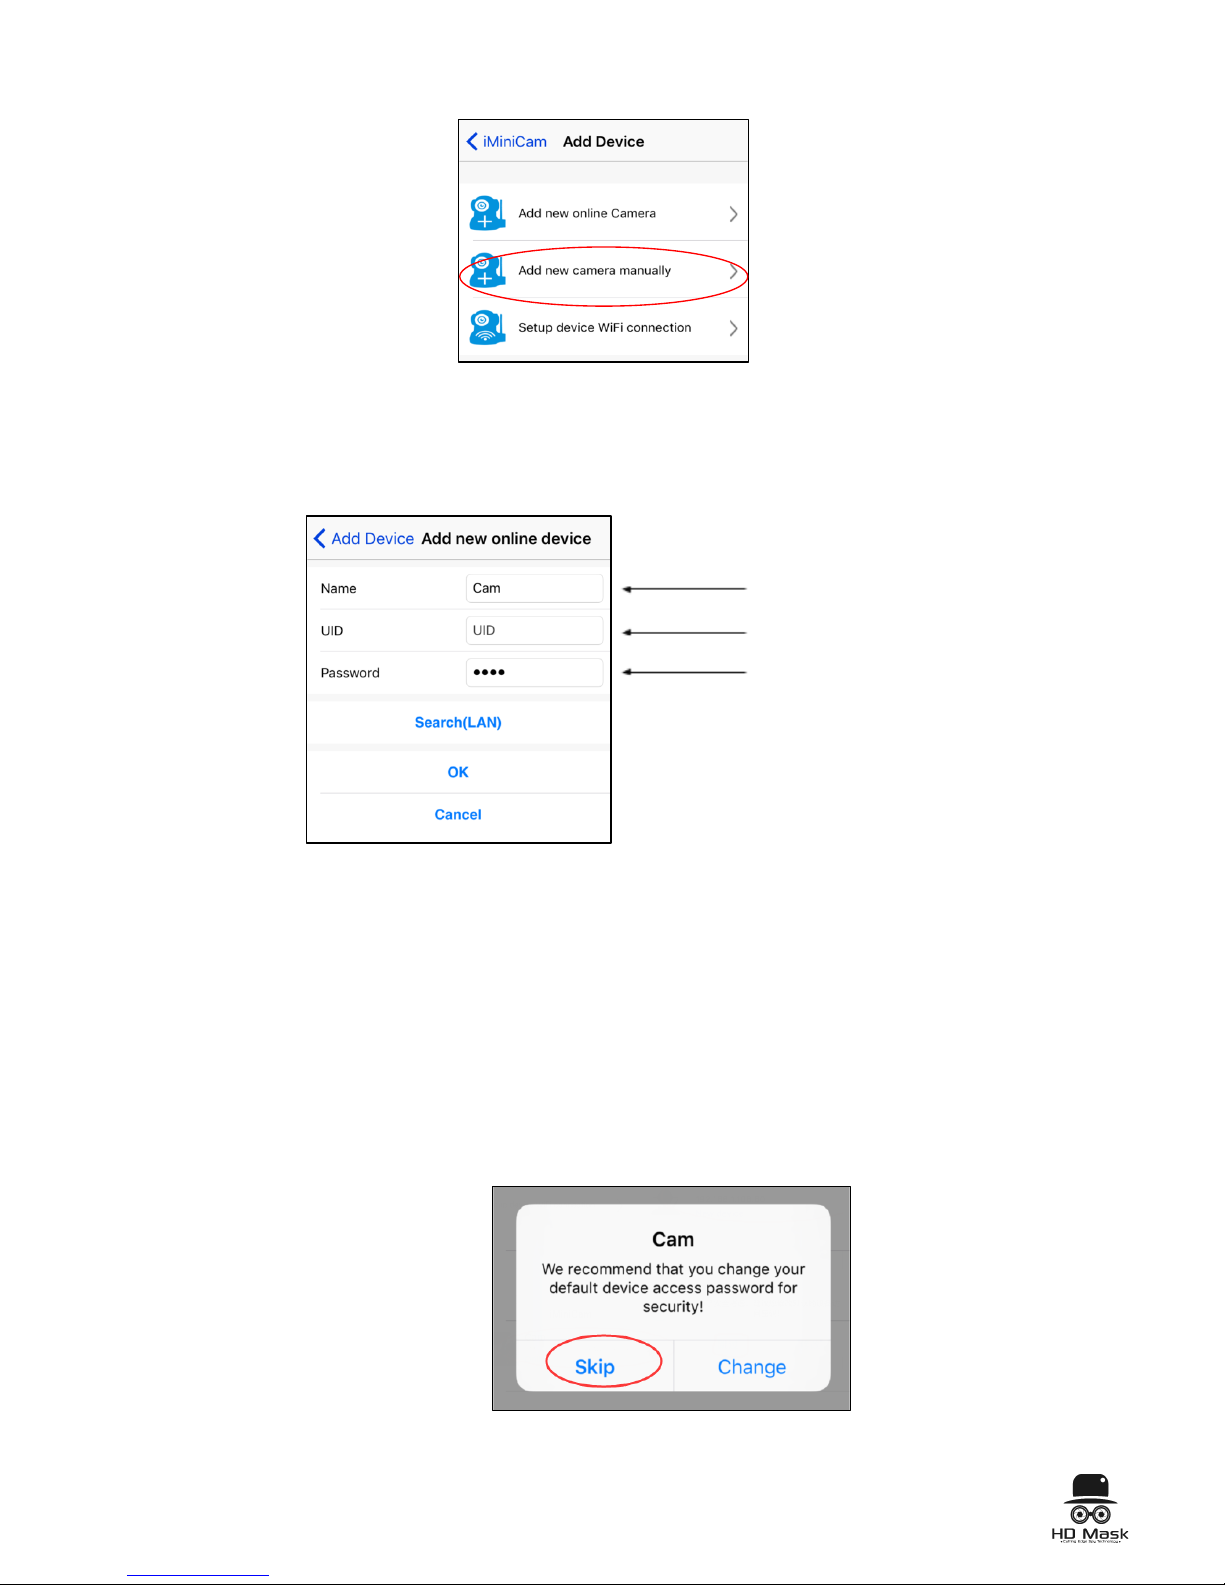
2. In the iMiniCam app, click the (+) button in the top right corner and
select the option to “Add new camera manually.”
The camera’s UID and
matching Wi-Fi code
Page 6
6
3. Here, you can rename your camera to something like “Living
Room” or “Office.”
4. Retrieve the device’s UID (either on the outside surface of the
iMiniCam or from it’s Wi-Fi address) and manually input it into the
UID space. Tip: Use a QR scanner to scan the sticker code to
easily copy and paste the UID into the app.
5. Here, you can also update the device’s password. The default
password is 8888. If you choose not to update the password, you
will later be prompted to change it for added security. You can
choose to Skip that step or Change your password.
Rename device
UID
Change password
Page 7
7
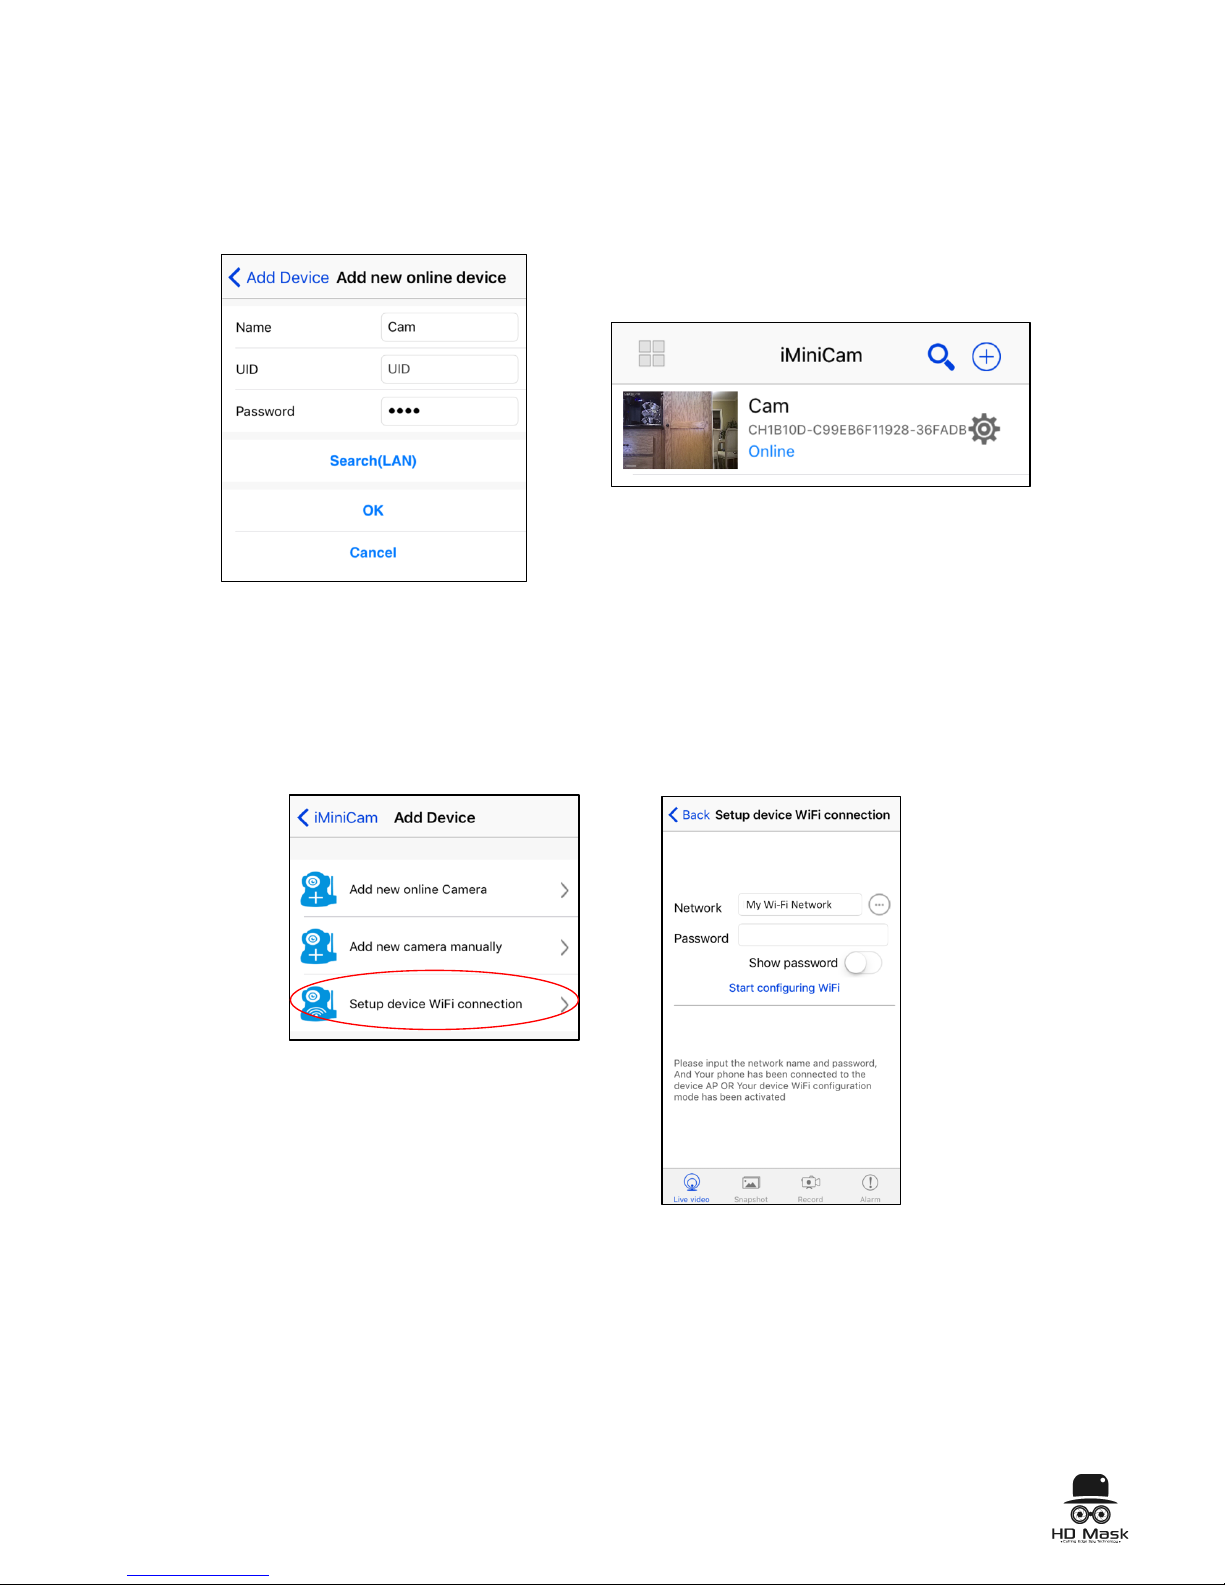
Set up device Wi-Fi connection:
This aspect of iMiniCam is still under development and will be fully
functional in the next update of the app. For now, you can disregard this
section and still enjoy all of other features your iMiniCam app.
Live Feed
When your camera or cameras are online, they will appear in the Live
Video feed on the app’s home page and will display their individual
UIDs. To view a single live feed, click on the camera. If you have not
updated your password, you will be prompted to either change your
password or skip that step.
6. Press “OK” to set up
the new device.
7.Navigate back to the home
screen “Live Video” and the
newly added camera should
appear online.
Page 8
8
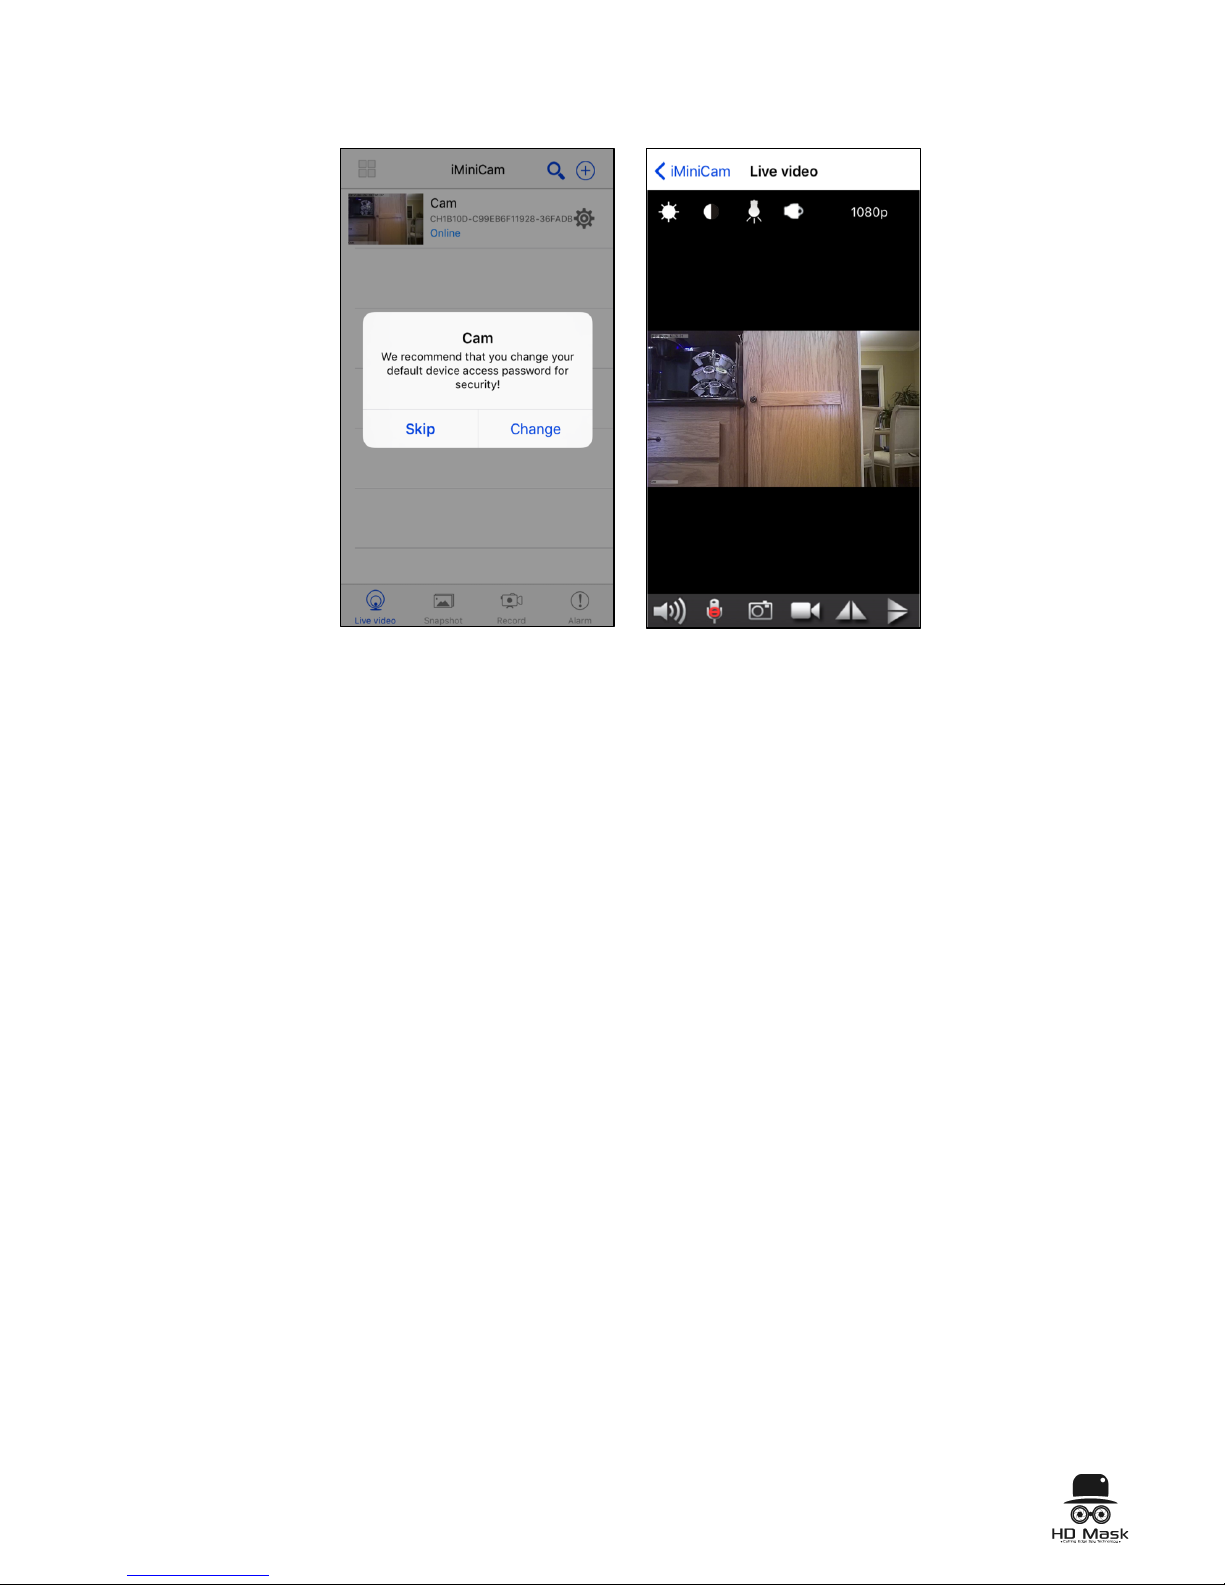
In Live Video viewing mode, there are helpful buttons to enhance your surveillance
experience. Note: Numbers are shown for representative purposes only. They do not appear
in Live Video mode.
Live Video Feed Key:
1. Color Correcting: click to adjust color of video
2. Brightness: click to adjust brightness
3. Night Vision Mode: turn on Night Vision mode for use in low light
4. LED light: click to turn LED light on/off
5. Resolution: adjust resolution / video quality
6. Speaker: turn speaker on/off (N/A)
7. Microphone: turn microphone on/off (N/A)
8. Snapshot: click to take a picture of your recording
9. Record: click to begin recording video
10. Horizontal Flip: click to flip the camera’s view horizontally. This will
update the view for others who have access to your camera.
11. Vertical Flip: click to flip the camera’s view vertically. This will
update the view for others who have access to your camera.
1 2 3 4 5
6 7 8 9 10 11
Page 9
9
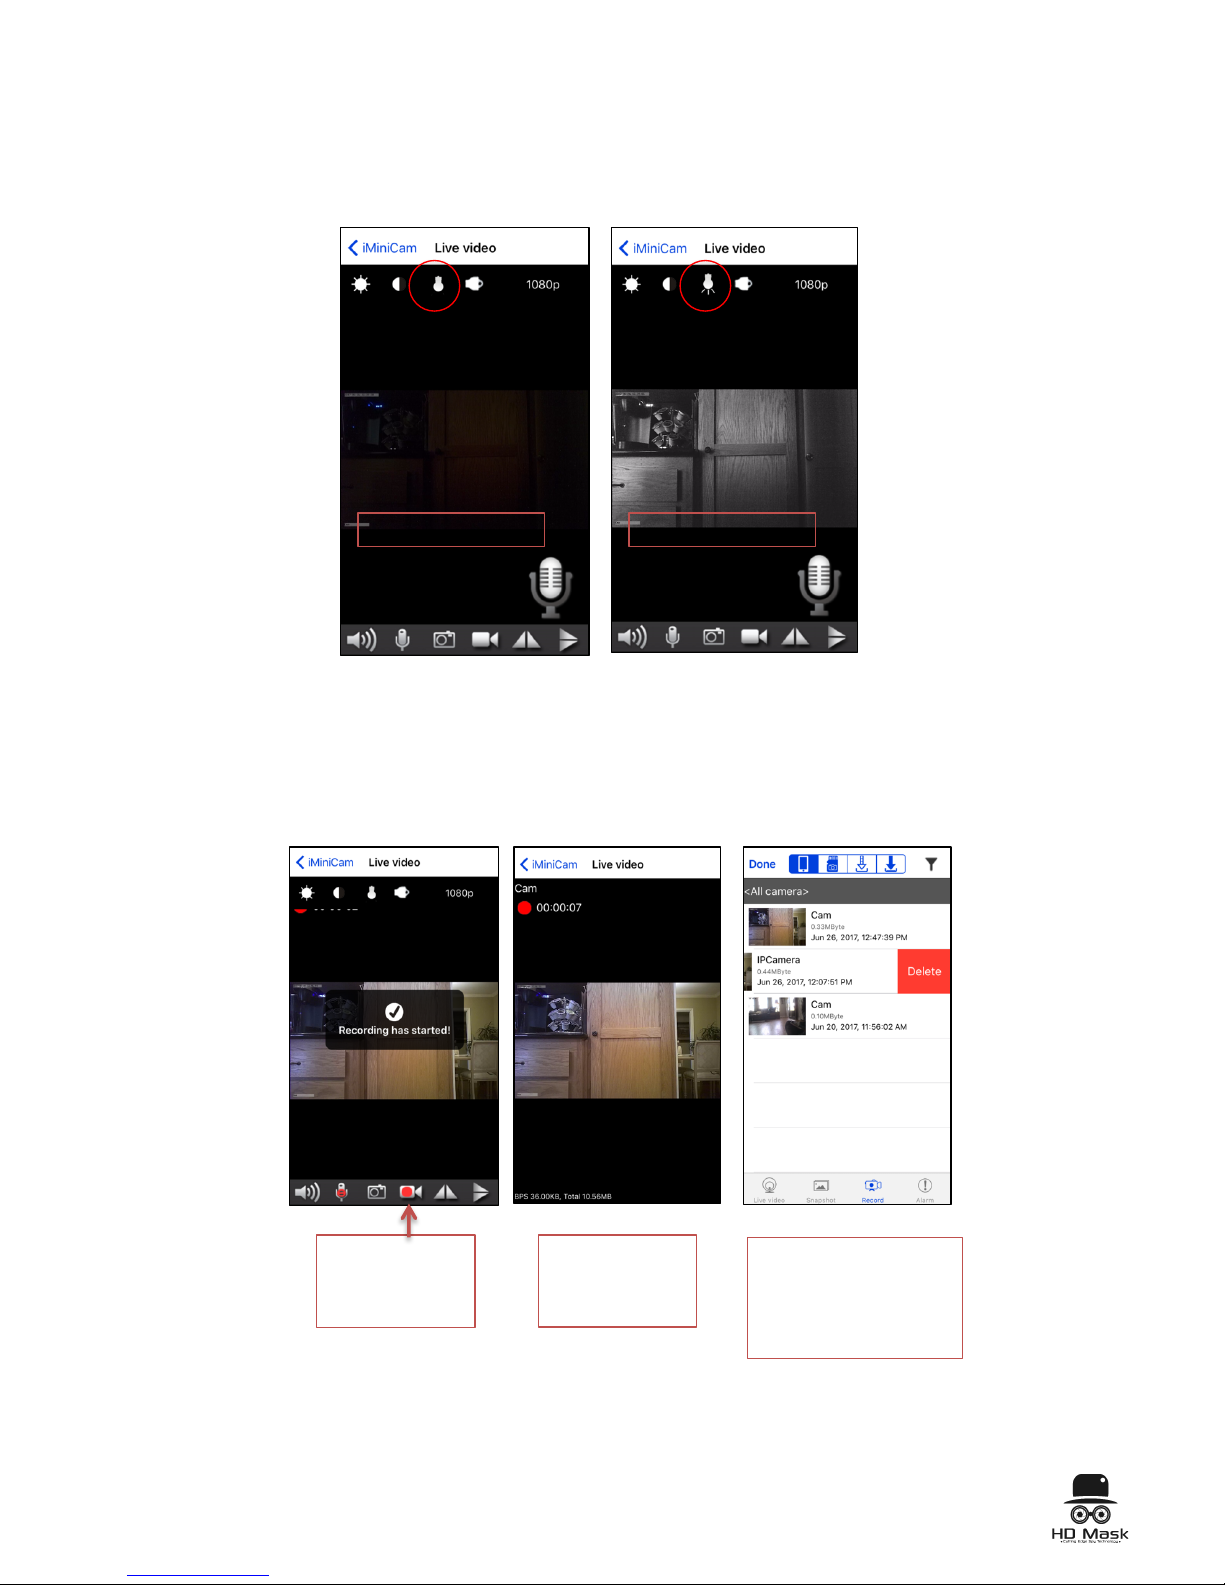
Night Vision Mode
The camera still captures sharp images even with limited or no light.
Record
The Record feature allows you to begin live recording camera feedback.
You can watch and save recordings in the app and have the option to
save it to an SD or share it with others.
Night Vision Off
Night Vision On
In Live Video
mode, click this
record button
Recording will
begin. Stop
recording
Recordings are saved
under the “Record”
section where they
can be saved, shared,
or deleted.
Page 10
10
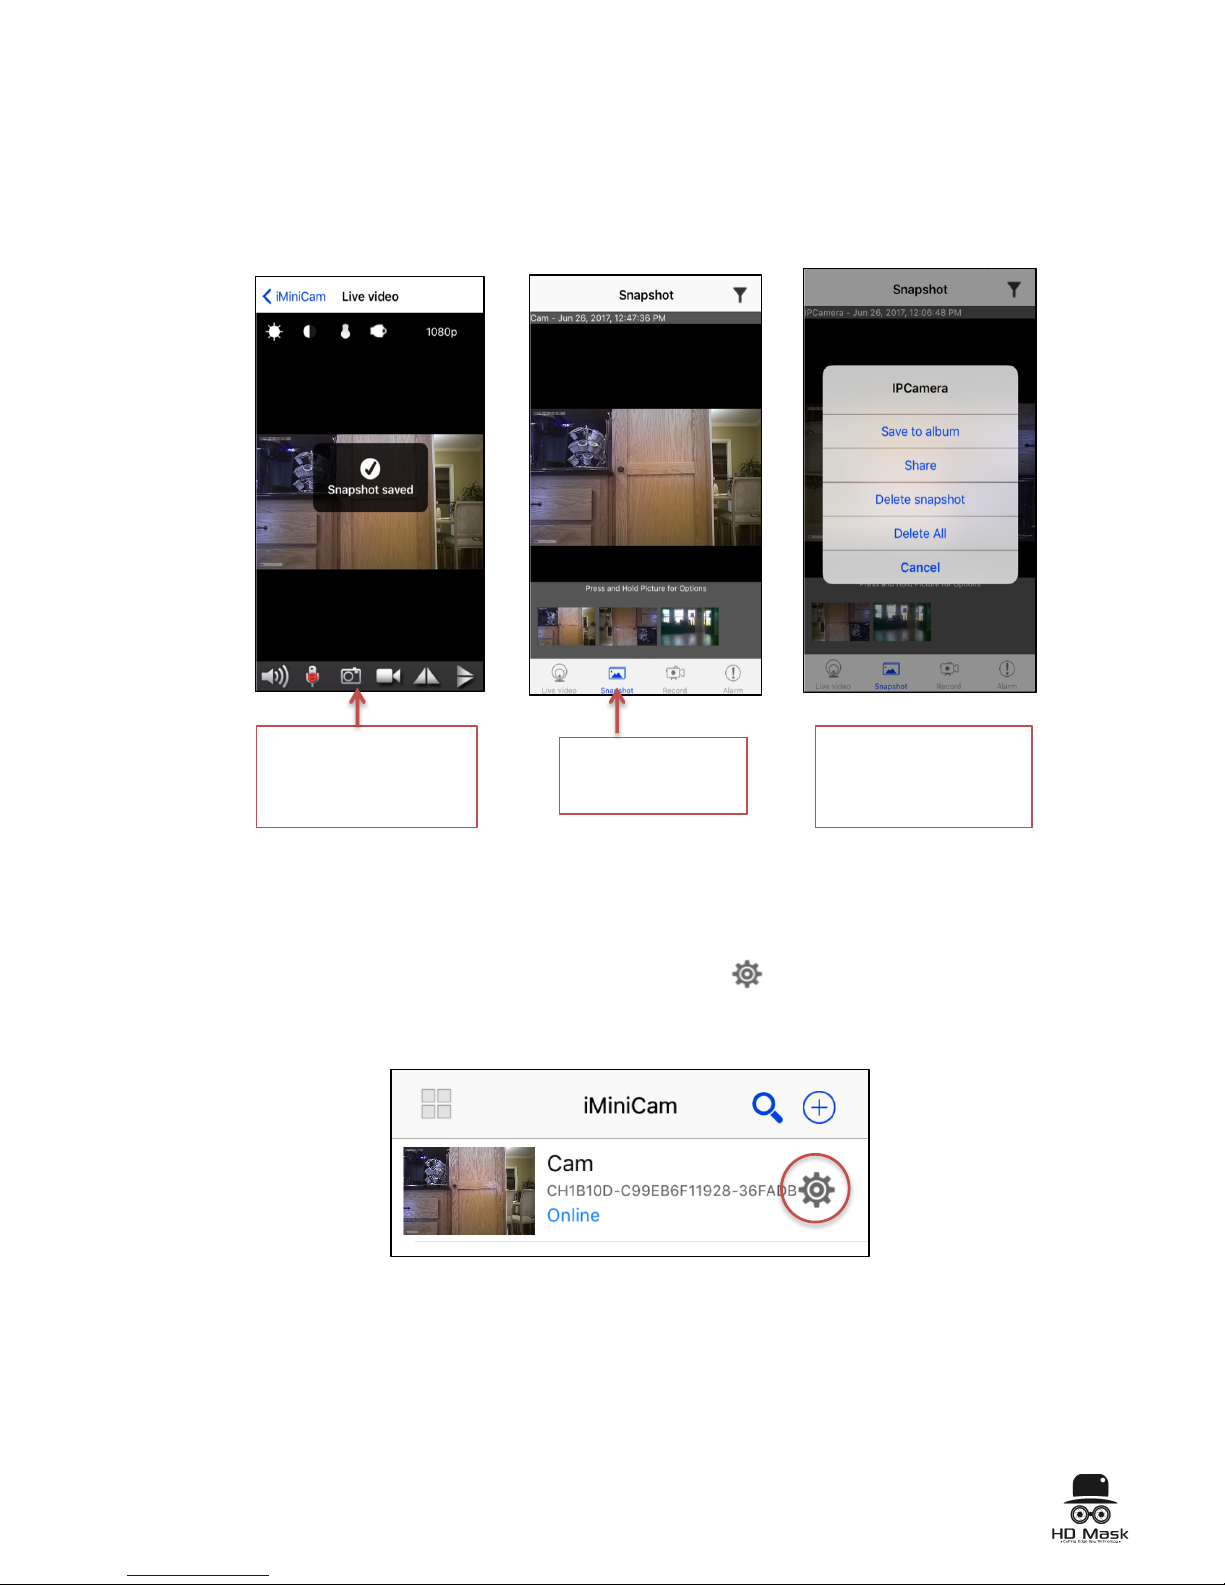
Snapshots
The Snapshot feature allows you to take still images of recordings and
save them to your photos or share them with others.
Camera Settings
To manage each device’s settings, click the gear icon on the right
of the camera’s feed.
In Live Video mode,
click this snapshot
button to take a picture
of your recording.
Snapshots will be
saved in the
Snapshot section.
Press and hold the
snapshot to save,
share or delete a
snapshot.
Page 11
11
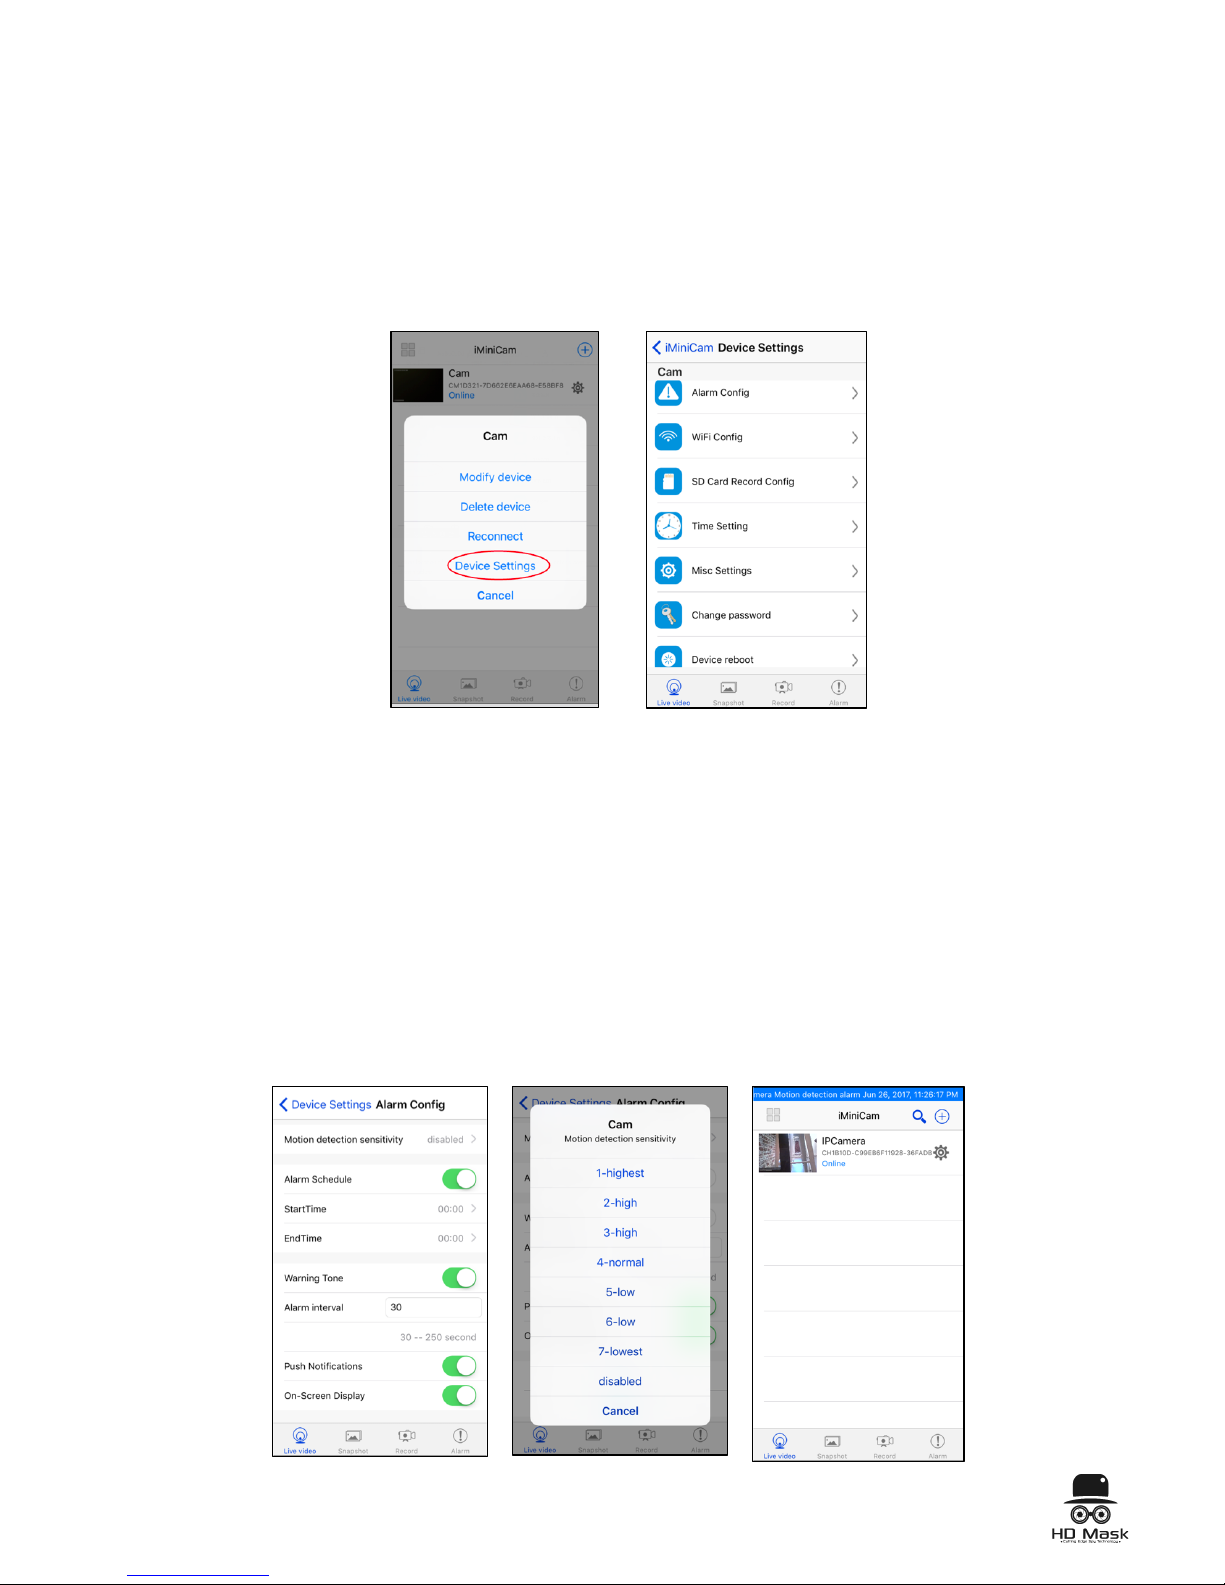
Device Settings
Here, you can modify, delete or reconnect the device and also manage
the device’s individual settings. In Device Settings you can configure
advanced settings like specific alarm notifications, motion detection
settings, time, recording settings and much more.
Specific Device Settings:
1. Alarm Configuration
Alarm Config. Settings contain the most important and helpful features of
the iMiniCam. These settings allow you to manage your push
notifications and activity alerts from your camera. Adjust motion
detection sensitivity or disable it altogether. Set an alarm schedule of
when and how you want to receive alerts. You can choose to get push
notifications and/or on-screen display alerts when the camera notices
movement. See following page for detailed alarm settings.
Page 12
12
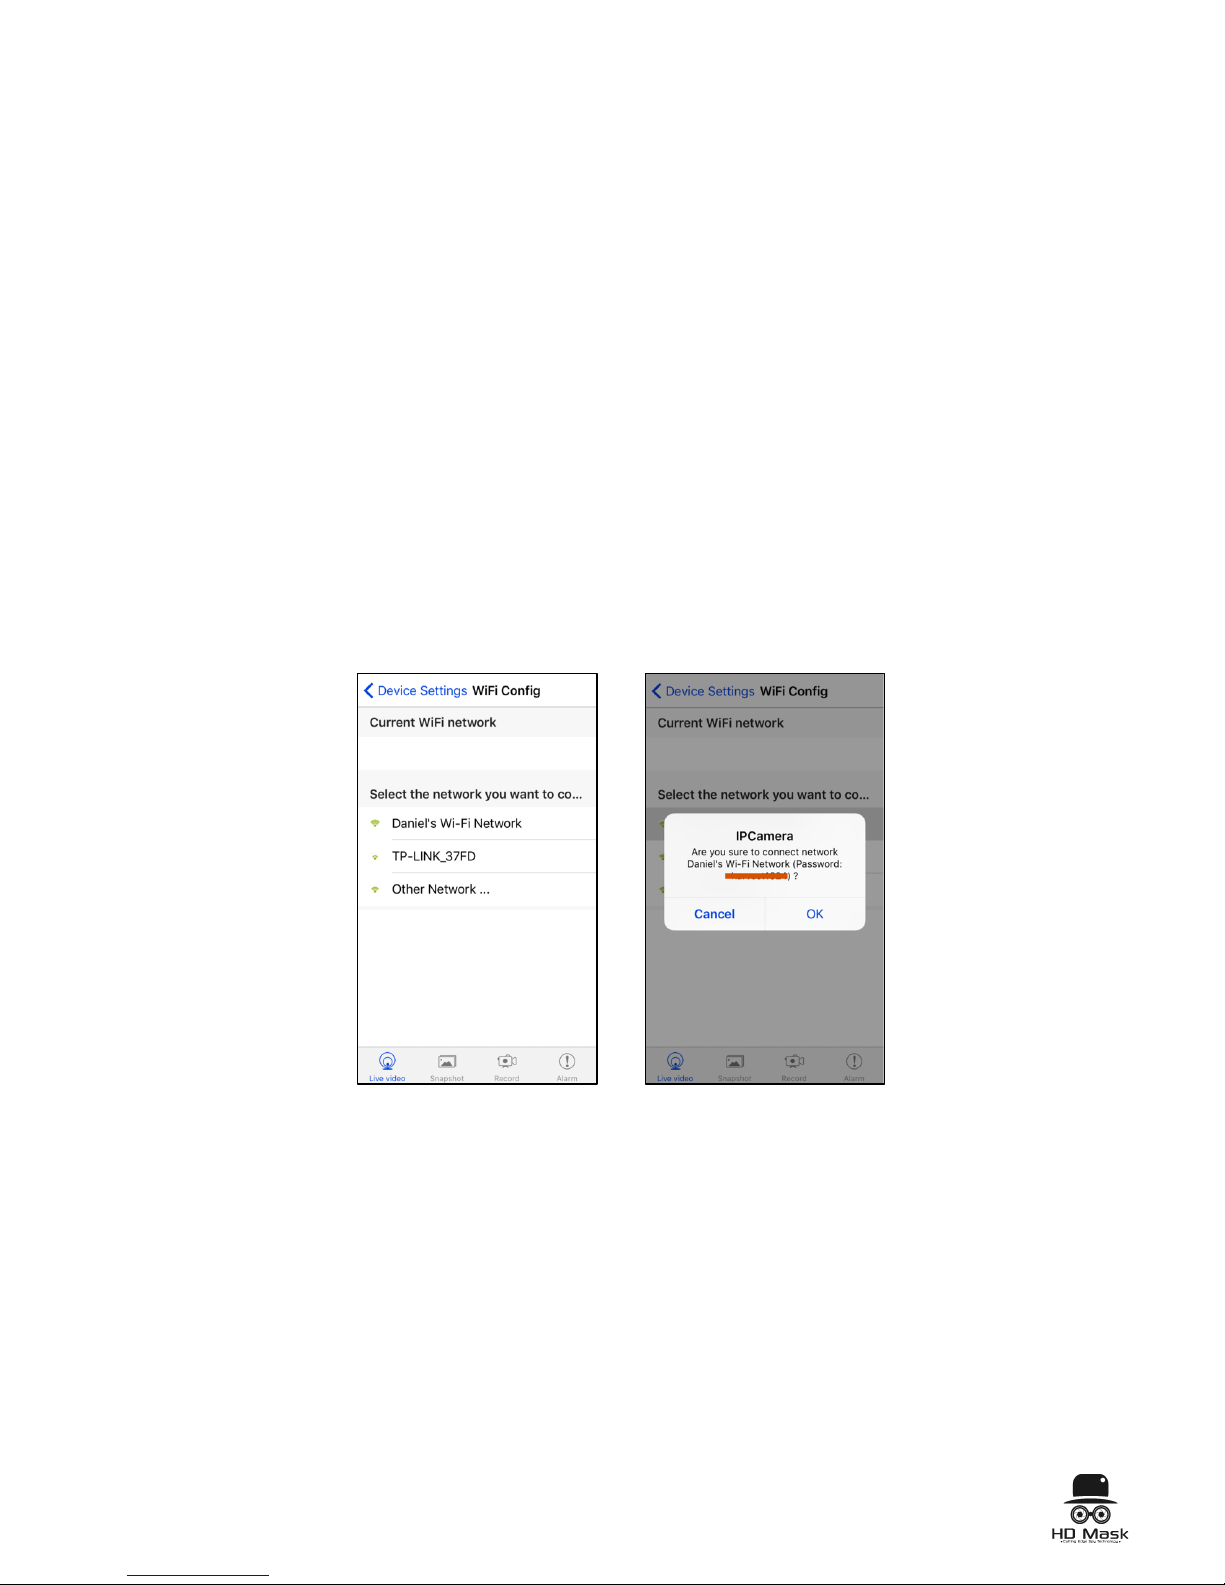
Motion Detection Sensitivity: adjust your camera’s motion detection
sensitivity on a scale of 1-7 or disable it altogether.
Alarm Schedule: set a specific start and end time range of when to
receive alerts.
Warning Tone: choose to receive a warning sound with your alert.
Alarm Interval: specify how often you want to receive alerts by
specifying an interval of time in seconds.
Push Notifications: choose to receive push notifications or turn them
off.
On-Screen Display: choose to receive on-screen alerts (third picture) or
turn them off.
2. Wi-Fi Configuration
Connect the device to your own Wi-Fi network to allow for remote
viewing. See instructions for setup below.
Remote Viewing Set Up
1. In Device Settings, go to Wi-Fi Config. and select your network.
2. Input the password and select OK.
3. The app will prompt you to allow the device to reboot. Click OK.
4. Reboot will take about 40 seconds.
5. Once reboot is complete, the device is ready for remote viewing
and you and anyone else with the iMiniCam app who has
connected this camera will be able to watch your feed either while
connected to your Wi-Fi network or to a cellular network.
Page 13
13
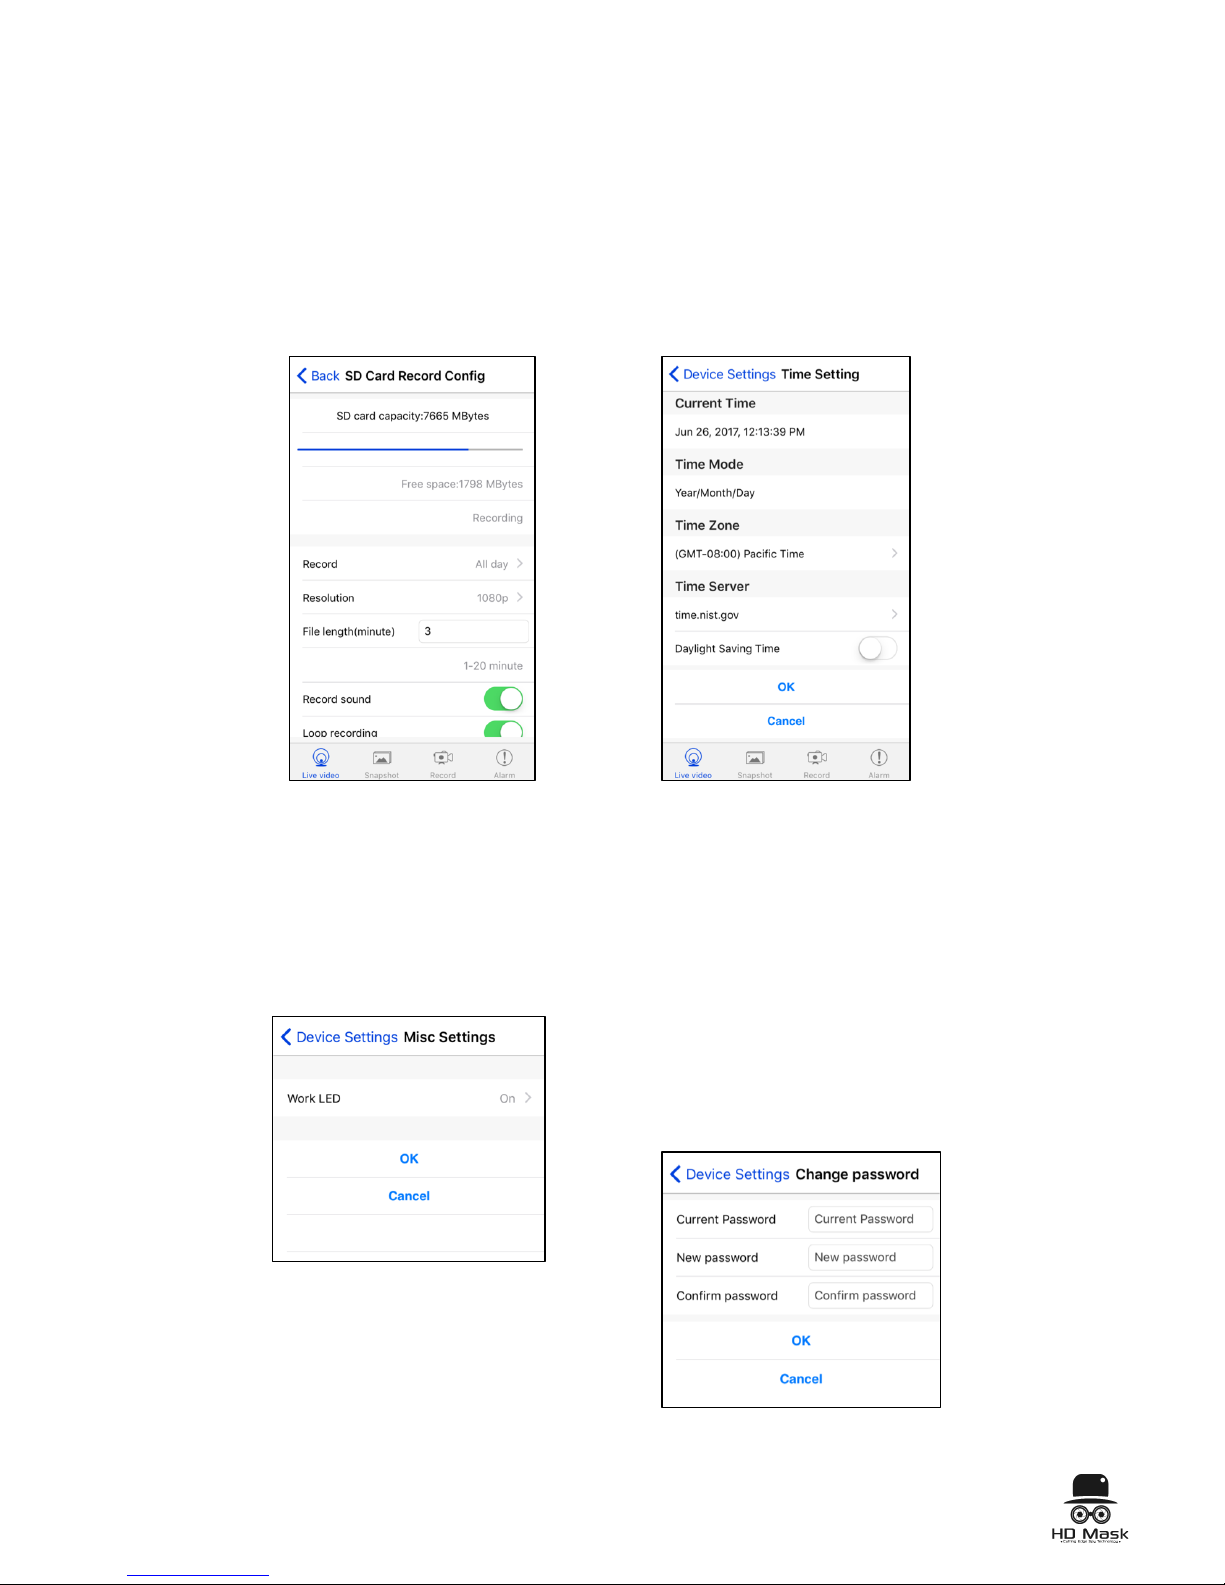
4. Time Settings
Adjust your time zone and
preferred time telling format.
Even indicate whether to
observe Daylight Saving Time.
6. Change Password
Change your password any time. If
you forget your current password,
reset the device by using the included
pin and holding the button for 10
seconds. The default password is
8888.
3. SD Card Record Configuration
Manage your SD card recording
settings, resolution, and set a
length of time you want the camera
to record. Click “Record”
5. Miscellaneous Settings
Choose whether to keep the
LED indicator light on or off.
Page 14
14
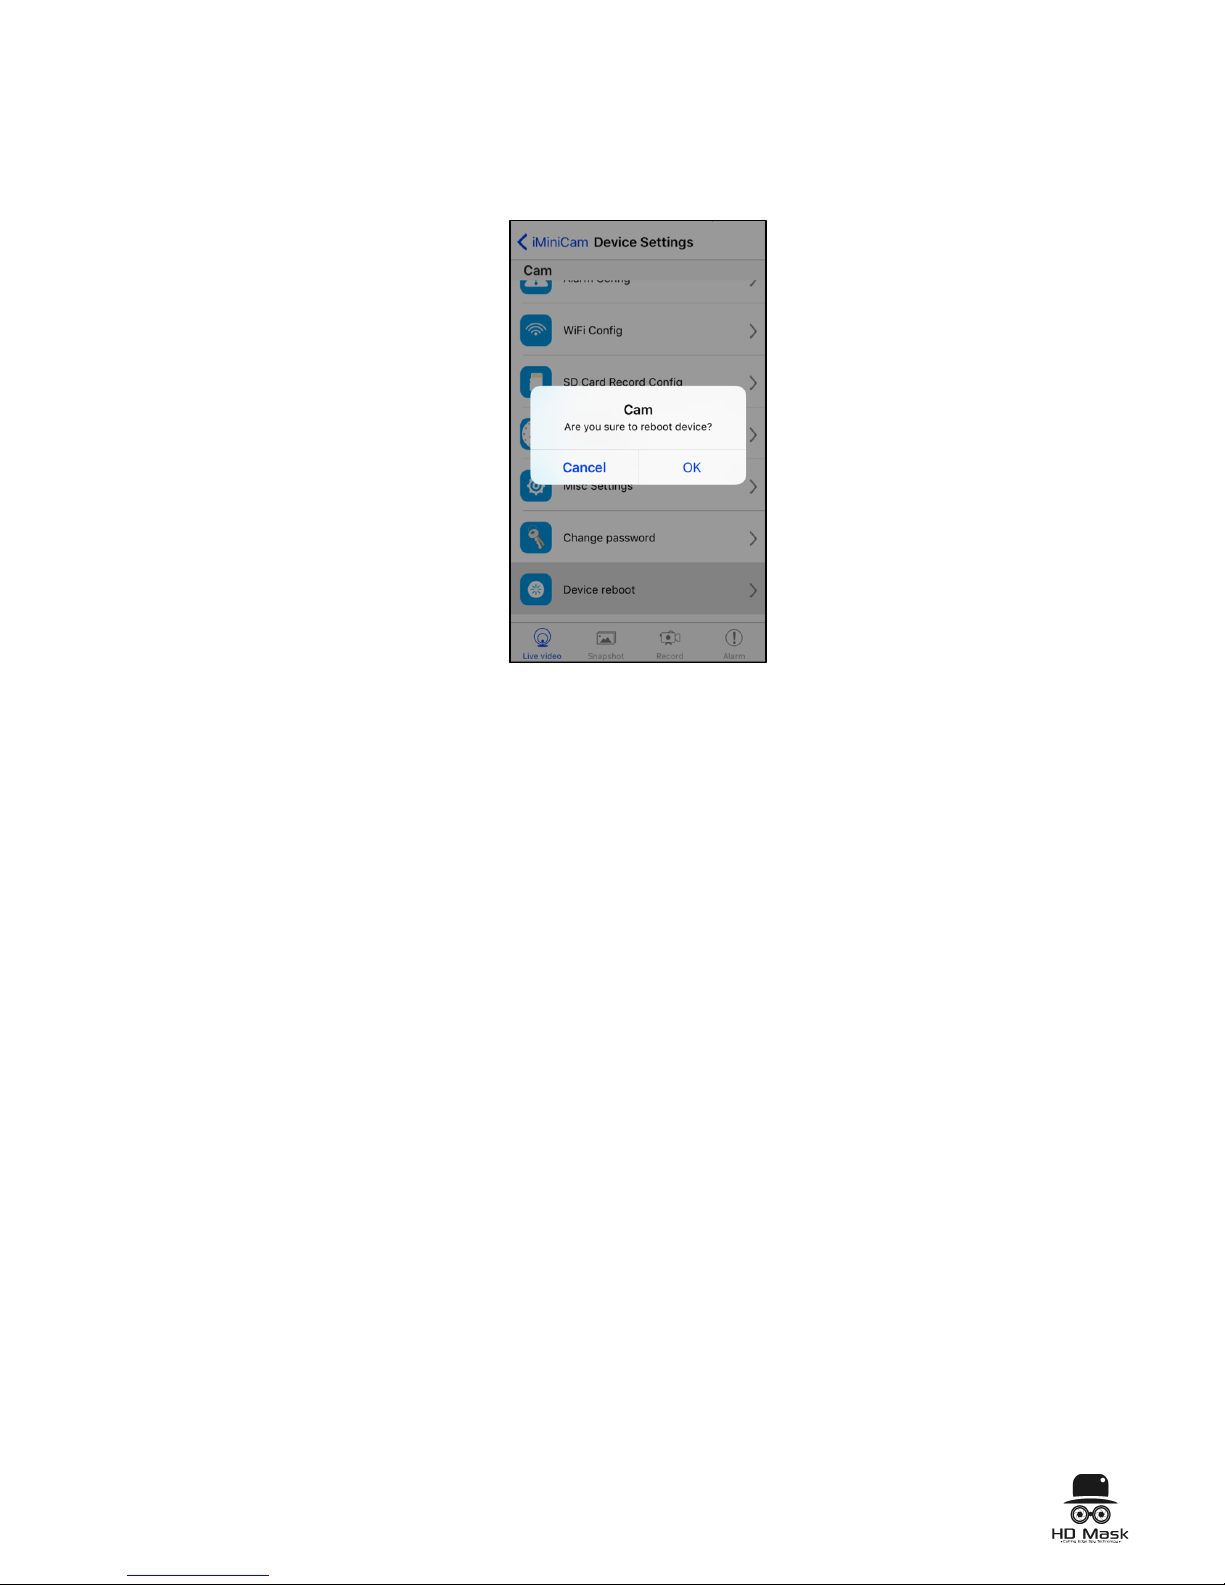
7. Device Reboot
Reboot the device if necessary.
Once you configure the device settings to your specifications, your
iMiniCamera system is now ready for use. Enjoy!
Additional Information
LED Light Flash Key:
● Blue light: power on
● Red light: Wi-Fi
● Purple (red and blue) light flashing: connecting
● Solid light: camera is operating
Product Features
● Wireless Camera and USB Charger
● Secure Wi-Fi connectivity
● 1080p / 720p / 640p video recording
● Motion Detection up to 6 meters
● 32GB built-in memory
● USB Charging
● SD Card slot for additional memory
● Indicator light with On-Off functionality
● Reset button
Page 15

15
Product Specifications
● 1200 Mega CMOS
● Video recording format: AVI
● TF memory card (included)
● Compatible with iOS and Android devices
● Operating temperature: -10 oC to 60 oC
● Storage temperature: -20 oC to 80 oC
Warranty Service
Our company provides a 1 (one) year limited Warranty guarantee. If you
have any problems during this time, please contact your vendor. This
Warranty does not apply: (a) to consumable parts, such as batteries or
protective coatings that are designed to diminish over time, unless
failure has occurred due to a defect in materials or workmanship; (b) to
cosmetic damage, including but not limited to scratches, dents and
broken plastic on ports unless failure has occurred due to a defect in
materials or workmanship; (c) to damage caused by use with a third
party component or product outside of package contents; (d) to damage
caused by accident, abuse, misuse, fire, liquid contact, earthquake or
other external cause; (e) to damage caused by operating the Product
outside HD Mask’s published guidelines; (f) to damage caused by
service (including upgrades and expansions) performed by anyone who
is not a representative of HD Mask; (g) to a Product that has been
modified to alter functionality or capability without the written permission
of HD Mask; (h) to defects caused by normal wear and tear or otherwise
due to the normal aging of the Product; (i) if any serial number has been
removed or defaced from the Product; or (j) if HD Mask receives
information from relevant public authorities that the product has been
stolen or if you are unable to deactivate passcode-enabled or other
security measures designed to prevent unauthorized access to the
Product, and you cannot prove in any way that you are the authorized
user of the product (eg. by presenting proof of purchase).
 Loading...