

HDJ WIRELESS ENTERPRISE d b a NIVIS TITAN Users Manual

Nivis Versa Router 1100
Titan - User Guide
Version 1.2
Nivis Versa Router 1100 Titan - User Guide v1.2 Page 1 of 111

Table of Contents
1 Introduction ........................................................................................................................................................4
1.1 Document purpose .....................................................................................................................................4
1.2 Audience .....................................................................................................................................................4
1.3 Abbreviations and acronyms ......................................................................................................................4
2 The Versa Router™ VR1100 “Titan” Overview and Key Features ......................................................................5
2.1 About the Versa Router™ 1100 “Titan” ......................................................................................................5
2.2 Platform architecture .................................................................................................................................5
2.3 The Edge Router Functional Features ........................................................................................................8
2.4 Package content ...................................................................................................................................... 10
2.4.1 Versa Router VR1100 Titan US ........................................................................................................ 10
2.4.2 Versa Router VR1100 Titan US OEM ............................................................................................... 11
3 Getting Started ................................................................................................................................................ 12
3.1 Power up the Versa Router™ 1100 Titan ................................................................................................ 12
3.2 Configure the SIM card ............................................................................................................................ 15
3.3 Verify the Cell backhaul starts up properly ............................................................................................. 16
3.4 Verify the Cell backhaul works using NMS .............................................................................................. 16
3.5 Verify the Cell backhaul works using the cell IPv4 accessible from the PC ............................................. 16
3.6 Configure the PC static IP address to access the Edge Router ................................................................ 17
3.7 Optional: Ensure the Edge Router is accessible from PC over ETH ......................................................... 19
3.8 Versa Router™ 1100 Titan US hardware description .............................................................................. 20
3.8.1 General product view ...................................................................................................................... 20
3.8.2 Versa Router™ 1100 Titan US .......................................................................................................... 21
3.8.3 Versa Router™ 1100 Titan US OEM ................................................................................................. 22
3.8.4 Connectors, buttons, LEDs............................................................................................................... 23
3.8.5 The Titan “Reset to Default” button ................................................................................................ 26
3.8.6 Power supply specifications ............................................................................................................ 26
3.9 The Edge Router (Versa Router™ 1000 Quark and Versa Router™ 1100 Titan) Software ...................... 27
4 Upgrading the Edge Router (Versa Router™ 1000 Quark and Versa Router™ 1100 Titan) components ....... 75
4.1 Overview .................................................................................................................................................. 75
4.2 Upgrading the Edge Router Transceiver firmware using Edge Router web interface ............................ 75
4.3 Upgrading the Edge Router Transceiver firmware using Edge Router /admin/ interface ...................... 75
4.4 Upgrading the Edge Router software using Edge Router web interface ................................................ 75
4.5 Upgrading the Edge Router using Edge Router /admin/ interface ......................................................... 75
Nivis Versa Router 1100 Titan - User Guide v1.2 Page 2 of 111

4.6 Upgrading the Edge Router software using Cloud-based NOC website ................................................. 75
4.7 Upgrading the Edge Router website using Edge Router /admin/ interface ............................................ 75
5 Configuring the Edge Router (Versa Router™ 1000 Quark and Versa Router™ 1100 Titan) .......................... 76
5.1 Overview .................................................................................................................................................. 76
5.2 Accessing the configuration interface on Edge Router ........................................................................... 76
5.3 Enable/disable DTLS on the Edge Router ................................................................................................ 77
5.4 Change the DTLS Certificate / pre-shared Key ........................................................................................ 78
5.4.1 Overview .......................................................................................................................................... 78
5.4.2 Change the DTLS Key/Certificate ..................................................................................................... 78
5.5 Change the PANA Certificate / pre-shared Join Key ................................................................................ 80
5.5.1 Change the PANA Certificate ........................................................................................................... 80
5.5.2 Change the pre-shared Join Key ...................................................................................................... 81
5.6 Change the Network ID ........................................................................................................................... 82
5.7 Set-up Edge Router - Cloud-Based NOC communication ........................................................................ 83
5.7.1 Add Edge Router in the Cloud-Based NOC Whitelist ....................................................................... 83
5.7.2 Set-up Edge Router and NMS communication using VPN [RECOMMENDED] ................................ 85
5.7.3 [Alternate] Set-up Edge Router / NMS plain-text communication (Use for lab tests only) ............ 91
6 Use Cases ......................................................................................................................................................... 95
6.1 Setting the PC-to-device communication using Edge Router in transparent mode ............................... 95
6.1.1 PC-to-device IPv6 communication for Windows user, VPN based .................................................. 95
6.1.2 PC-to-device IPv6 communication for Windows user, non-VPN based .......................................... 99
6.1.3 PC-to-device IPv6 communication for Linux user, VPN based ...................................................... 101
6.1.4 PC-to-device IPv6 communication for Linux user, non-VPN based ............................................... 105
7 Troubleshooting ............................................................................................................................................ 108
Appendix A: List of Standards Supported in the Smart Object Platform .............................................................. 109
Appendix B: FCC and IC Compliance Information .......................................................................................... 110
Nivis Versa Router 1100 Titan - User Guide v1.2 Page 3 of 111

1 Introduction
Versa Router™ 1000
Quark
The Versa Router™ 1000 Quark is comprised of the Phytec-designed and built
phyCORE-AM335x, with “Smart Object” attached for the Transceiver.
Versa Router™ 1100
Titan
The Versa Router™ 1100 Titan is comprised of the Phytec-designed and built
phyCORE-AM335x, with “Smart Object” attached for the Transceiver, along with RF
amplifier, battery backup, ability to detect and report tamper and power outage,
outdoor enclosure and 3G cell connectivity
VR1000
Short name for Versa Router™ 1000 Quark
VR1100
Short name for Versa Router™ 1100 Titan
Quark
Short name for Versa Router™ 1000 Quark
Titan
Short name for Versa Router™ 1100 Titan
Edge Router
Short name for Versa Router™ 1000 Quark or Versa Router™ 1100 Titan
Versa Router
Short name for Versa Router™ 1000 Quark or Versa Router™ 1100 Titan
phyCORE-AM335x
Phytec-designed and built board based on AM335x processor
Network and Application
Monitoring Tool
Windows-based monitoring and management tool supplied by Nivis that will to allow
the end user to evaluate the performance of the Smart Object network
Smart Object
Nivis-built, manufactured, and sold MK60DN512ZVMC10 + MC12311CHN Radio
Module
NMS
Network Management System – centralized management system allowing
management of multiple networks controlled by VR1000 or VR1100
1.1 Document purpose
This user guide describes the usage of Versa Router™ 1100 Titan, the outdoor version of Nivis Edge Router for
Internet of Things and Smart Object technology, including hardware and software installation, configuration, use
of the Network and Application Monitoring Tool and connection to Cloud-based NOC/NMS Website.
1.2 Audience
This document is intended for the users of the Versa Router™ 1100 Titan and more generally, to the users of
NMS.
1.3 Abbreviations and acronyms
The document will use the term Edge Router when referring to either Versa Router™ 1100 Titan or Versa
Router™ 1000 Quark – describing functionality that is common to both Routers.
Nivis Versa Router 1100 Titan - User Guide v1.2 Page 4 of 111

2 The Versa Router™ VR1100 “Titan” Overview and Key Features
2.1 About the Versa Router™ 1100 “Titan”
The Versa Router™ 1100 Titan plays the same role and inherits all of the functional features of Versa Router™
1000 Quark, packing additional features on top of Quark’s.
NOTE For a more detailed description of the Versa Router™ 1100 Titan hardware platform, please consult
section Versa Router™ 1100 Titan US hardware description
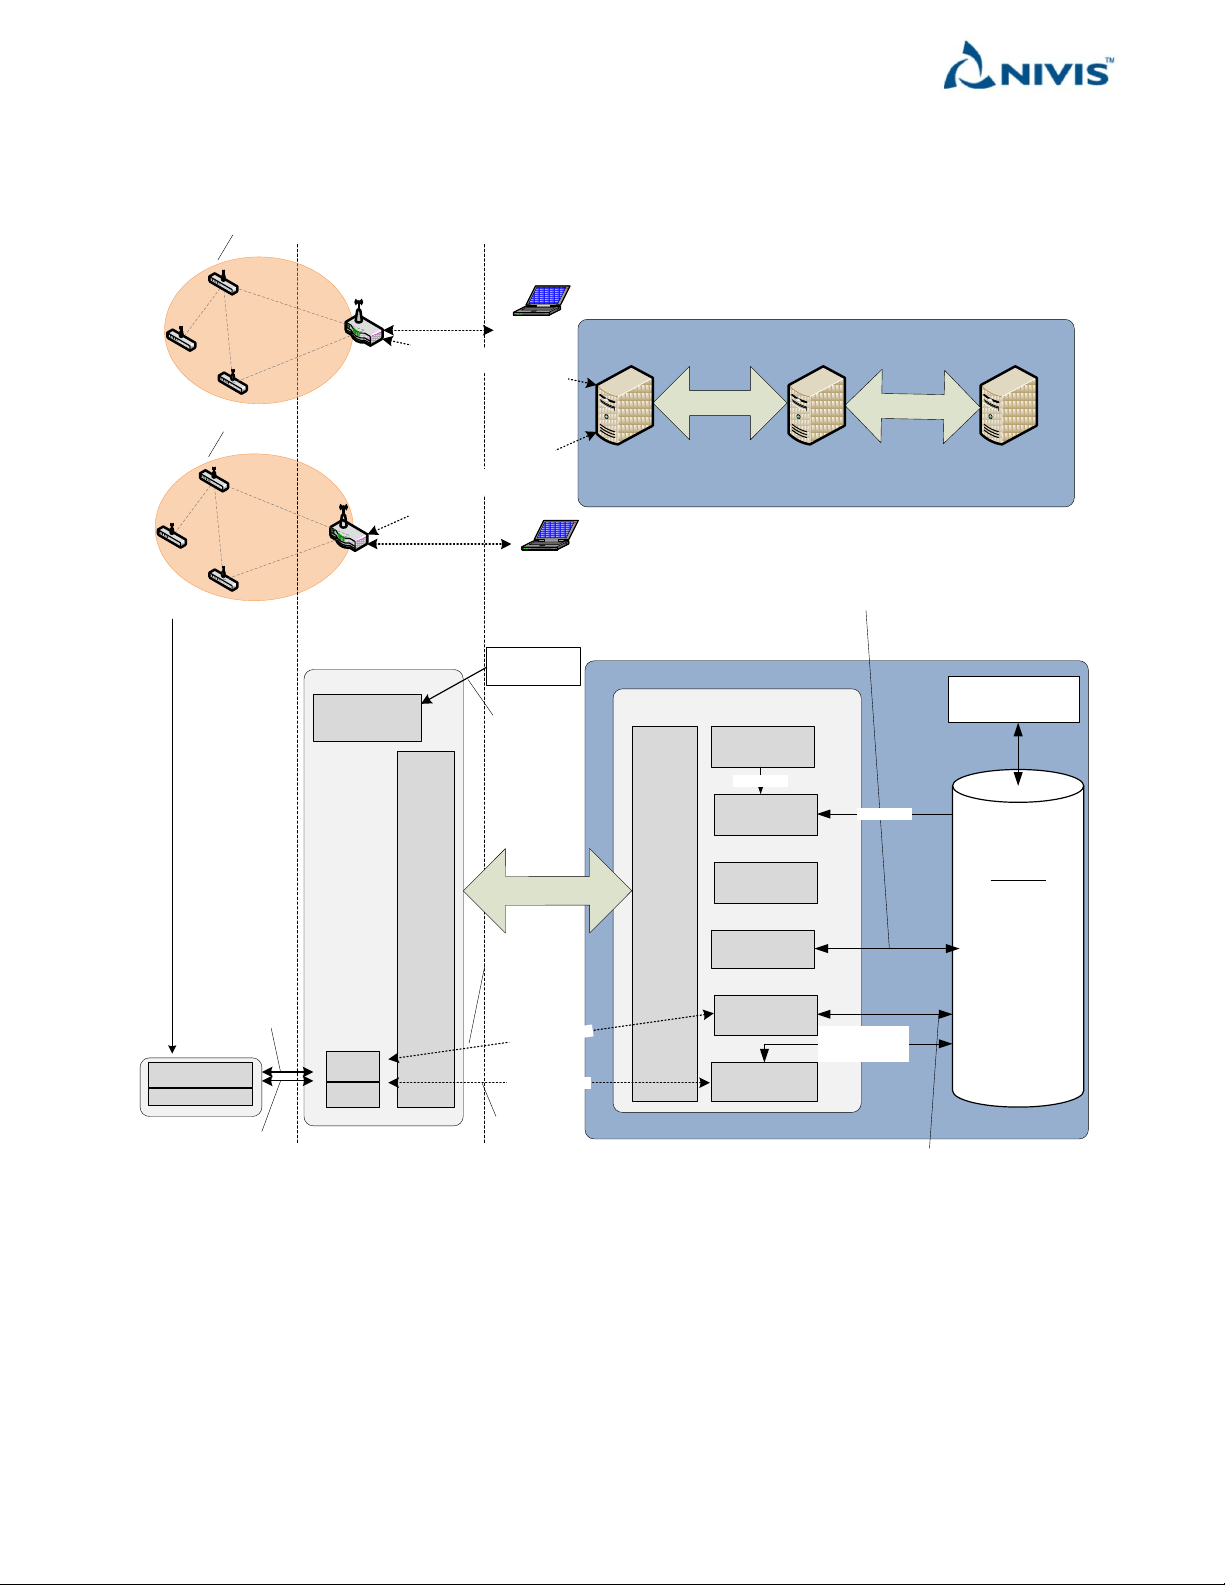
2.2 Platform architecture
There are two possible architectures:
- With Edge Router running in “transparent” mode, used for real-life deployments. This is the normal
operating topology.
- With Edge Router running in “non-transparent” mode, used for evaluation purposes. This is to be used
only in laboratory
Nivis Versa Router 1100 Titan - User Guide v1.2 Page 5 of 111
Cloud-based NOC
Cloud-based NOC
NMS DB:
Main Whitelist
Routers,
Nodes,
Networks Topology,
Networks Stats,
Firmware,
Data (Application
Payload)
NMS inside the Cloud-based NOC
Smart Object
RPL Stack
UDP, CoAP, EXI
6LoWPAN/RPL/4e/4g
Router
RPL
Stack
RPL
Root
UDP, Nivis Mgmt
UDP, Nivis Mgmt
Web UI: admin,
configuration,
network monitoring
Web Browser
TCP, HTTP, JSON
EXI, CoAP to
XML, HTML
Proxy
EntryPoint
FWD Join Req/Rsp,
Topology
FW Upgrades
UDP, CoAP, (EXI,
XML)
and
UDP, Nivis Mgmt
DNS Server
NMS Administrative
website
IP
Gateway(s)
(MUST
have
publicly
available
IPv4)
Backhaul
Manager
IPv
6
over IPv
4
tunnel
,
VPN
FWD Event
-
based
FWD Event-based
6LoWPAN/RPL/4e/4g
Web Server,
Windows
VPN
,
IPv
6
over IPv
4
tunnel
Network Events
,
Data
,
Commands
VPN
,
IPv
6
over IPv
4
tunnel
Network Events
,
Data
,
Commands
Stored
Procedures
NOC website
Router local admin
Web-based
Router local admin
Web-based
Association between
devices symbolic names and their IPv6
NMS config.
interface
JSON/HTTP
JSON/HTTP
Data:
Proxy use SP to store the data payload.
Call_SP(Device, mimetype, payload raw)
COAP Resources management:
The operation towards the network sent by the NOC as XML/HTTP
(observable subscribe / unsubscribe / GET / PUT)
COAP Resources management: Resources + observed list saved as SP,
incrementally as new resources get discovered / subscribed / unsubscribed
SNMP Proxy
DB,
Windows
NMS,
Linux
Platform Architecture with
Edge Router in transparent mode
The platform architecture for Edge Router running in “transparent” mode is illustrated in the image below.
Nivis Versa Router 1100 Titan - User Guide v1.2 Page 6 of 111
Platform Architecture with
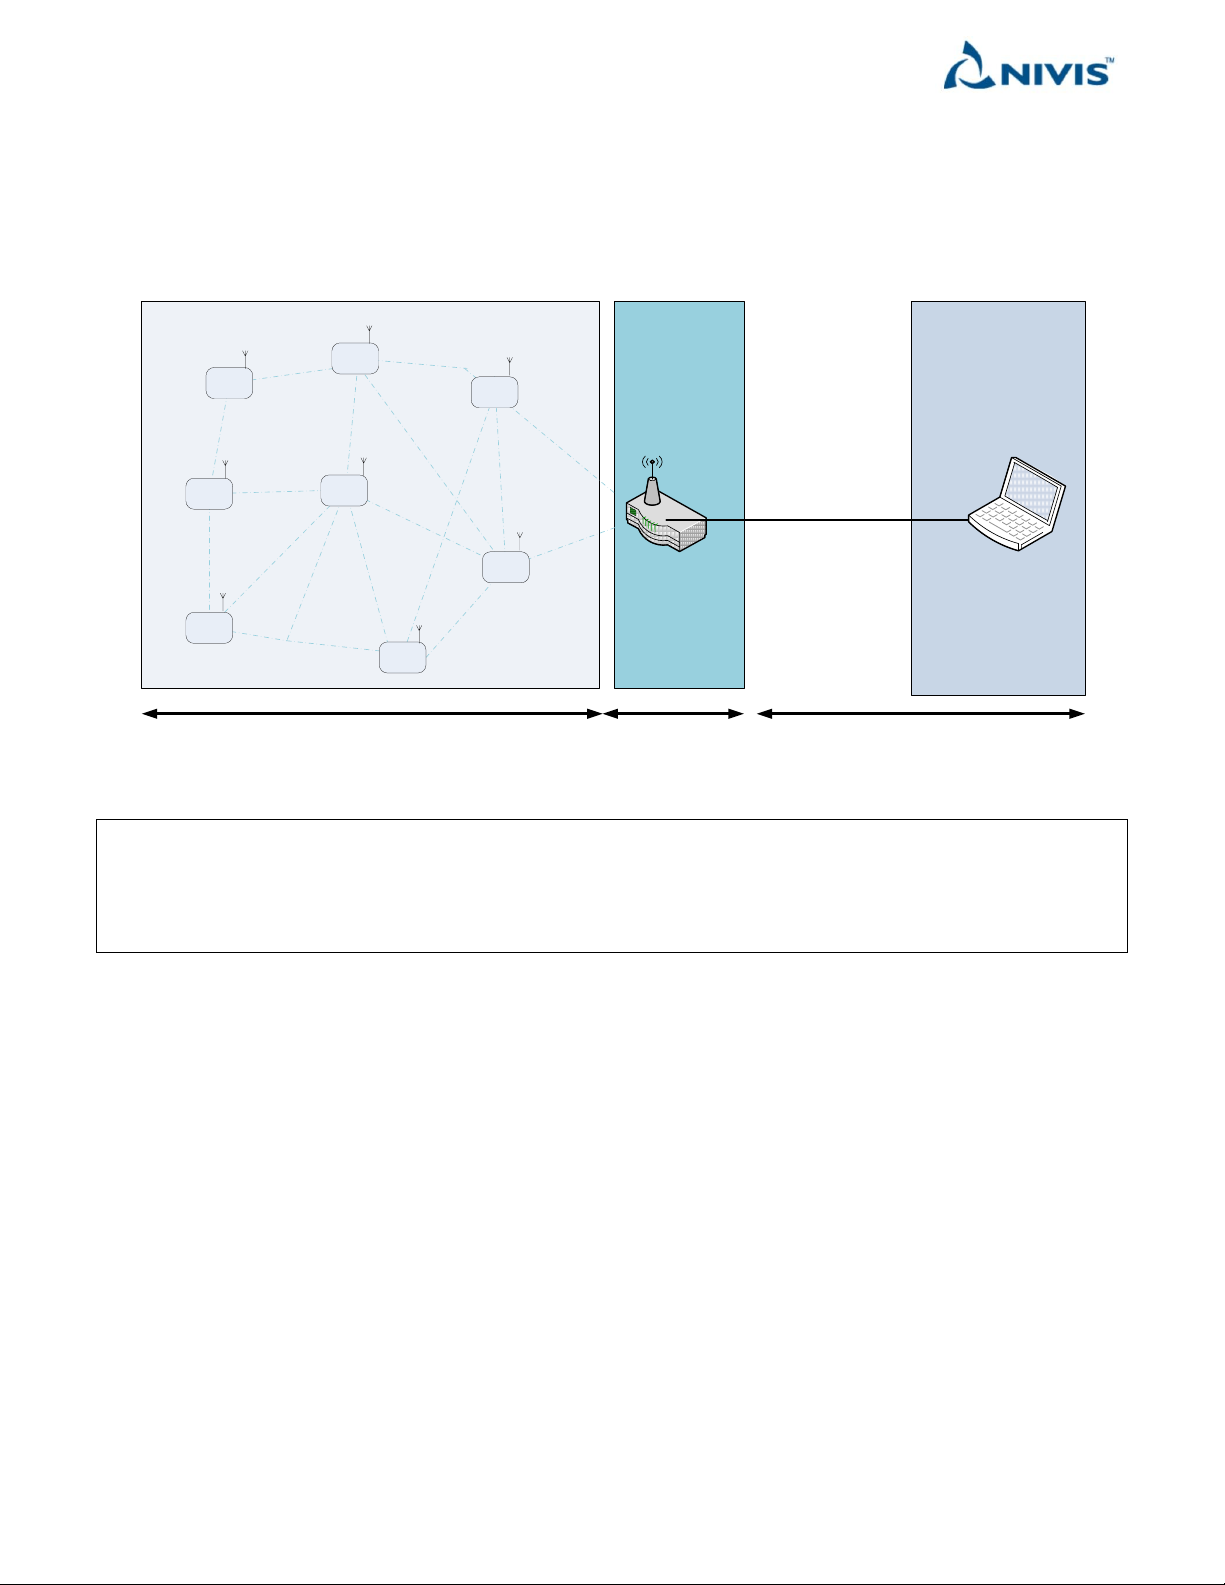
Edge Router in non-transparent mode
Versa Router
Versa RouterWireless Network Composed of Smart Objects Network and Application Monitoring Tool
NAMT
IP-enabled
backbone
infrastructure
SO
SO
SO
SO
SO
SO
SO
SO
The platform architecture for Edge Router running in “non-transparent” mode is illustrated in the image below.
NOTE The NAMT uses a large amount of bandwidth for its operation. Do not connect to Versa Router™ 1100
Titan, on top of a low bandwidth or low data limit cellular data link.
The NAMT is currently not designed to handle networks larger than 500 nodes. Do not attempt to use NAMT
with Titans controlling networks in excess of 500 nodes.
Nivis Versa Router 1100 Titan - User Guide v1.2 Page 7 of 111

2.3 The Edge Router Functional Features
Functional Feature
Notes
Supports connectivity between the Smart Object WLAN and entities
residing on the Internet.
A good example is the PC that hosts the
Network and Application Monitoring
Tool (NAMT).
Provides central arbitration for the WLAN formed of Smart Objects by
acting as a MAC WLAN coordinator.
This is accomplished through the
distribution of an 802.15.4e-compliant
network maintenance slotframe.
Collects network and communication diagnostics sent by Smart
Objects, such as:
1. Channel statistics
2. Neighbor-related statistics
3. Routing (RPL) -related information such as the topology of the
network
Network- and communication-related
statistics and parameters are displayed
in the NAMT.
Acts as the link layer security manager and the termination of hop-tohop security.
Acts as an extraction point for application-related as well as
management parameters. Parameters are extracted utilizing HTTP
requests and methods via a COAP/HTTP proxy.
Host a web server for router administration: management of network
profiles, whitelist, configuration parameters, and network
configuration of the Router
VR1000 Quark: Can store application layer payloads for up to 24 hours
for up to 500 Smart Objects with a reporting interval of 5 minutes.
Historical data can be retrieved from HTTP/COAP Proxy using XML
over HTTP requests.
Values specific for VR1000 Quark
See below the storage capabilities of
VR1100 Titan
Allows management for application-related parameters:
Allows extraction of the most recent as well as historical COAP
resources, translating to XML if necessary
Allows observation of (subscription to) COAP-observable
resources on the devices
Allows getting and setting of the reporting interval for
observable resources
The Edge Router is the network entity responsible for arbitrating and managing the WLAN formed of Smart
Objects. It also mitigates between the WLAN and entities present on the backbone infrastructure (such as the
NAMT). The functional features of the Edge Router are described in the table below, separating the features
common to VR1000 Quark and VR1100 Titan by the features specific to VR1100 Titan.
Nivis Versa Router 1100 Titan - User Guide v1.2 Page 8 of 111

The features below are VR1100 Titan specific, features on top of
VR1000 Quark features
VR1100 Titan specific features below
Has IP65 enclosure allowing outdoor operation
Provides 3G cellular backhaul
Verified in US with AT&T and Emnify
(MVNO)
Amplified RF, 30 dB/1W
LOS range 2.2 km / 1.35 miles
Support up to 4000 Smart Objects in RF mesh network
Has a battery backup allowing continuous operation after the main
power failed
At least 8 hours; up to 24 hours
depending on operating conditions
Can store application layer payloads for at least 1 year for up to 4000
Smart Objects with a reporting interval of 6 hours. Historical data can
be retrieved from HTTP/COAP Proxy using XML over HTTP requests.
SD-card for extended storage and data/configuration back-up/restore
in another unit
Extended storage: Allow storing at
least 1 year of CoAP data from up to
4000 Smart Objects with a reporting
interval of 6 hours.
Configuration and data back-up and
restore: allow fast and simple
replacement of a broken Titan: just
move the SD-card to another Titan and
power on the new Titan; the network
will join to the new Titan and data
gathering will resume automatically, no
other configuration necessary.
Tamper detection and reporting
Power fail/restore detection and reporting
Nivis Versa Router 1100 Titan - User Guide v1.2 Page 9 of 111
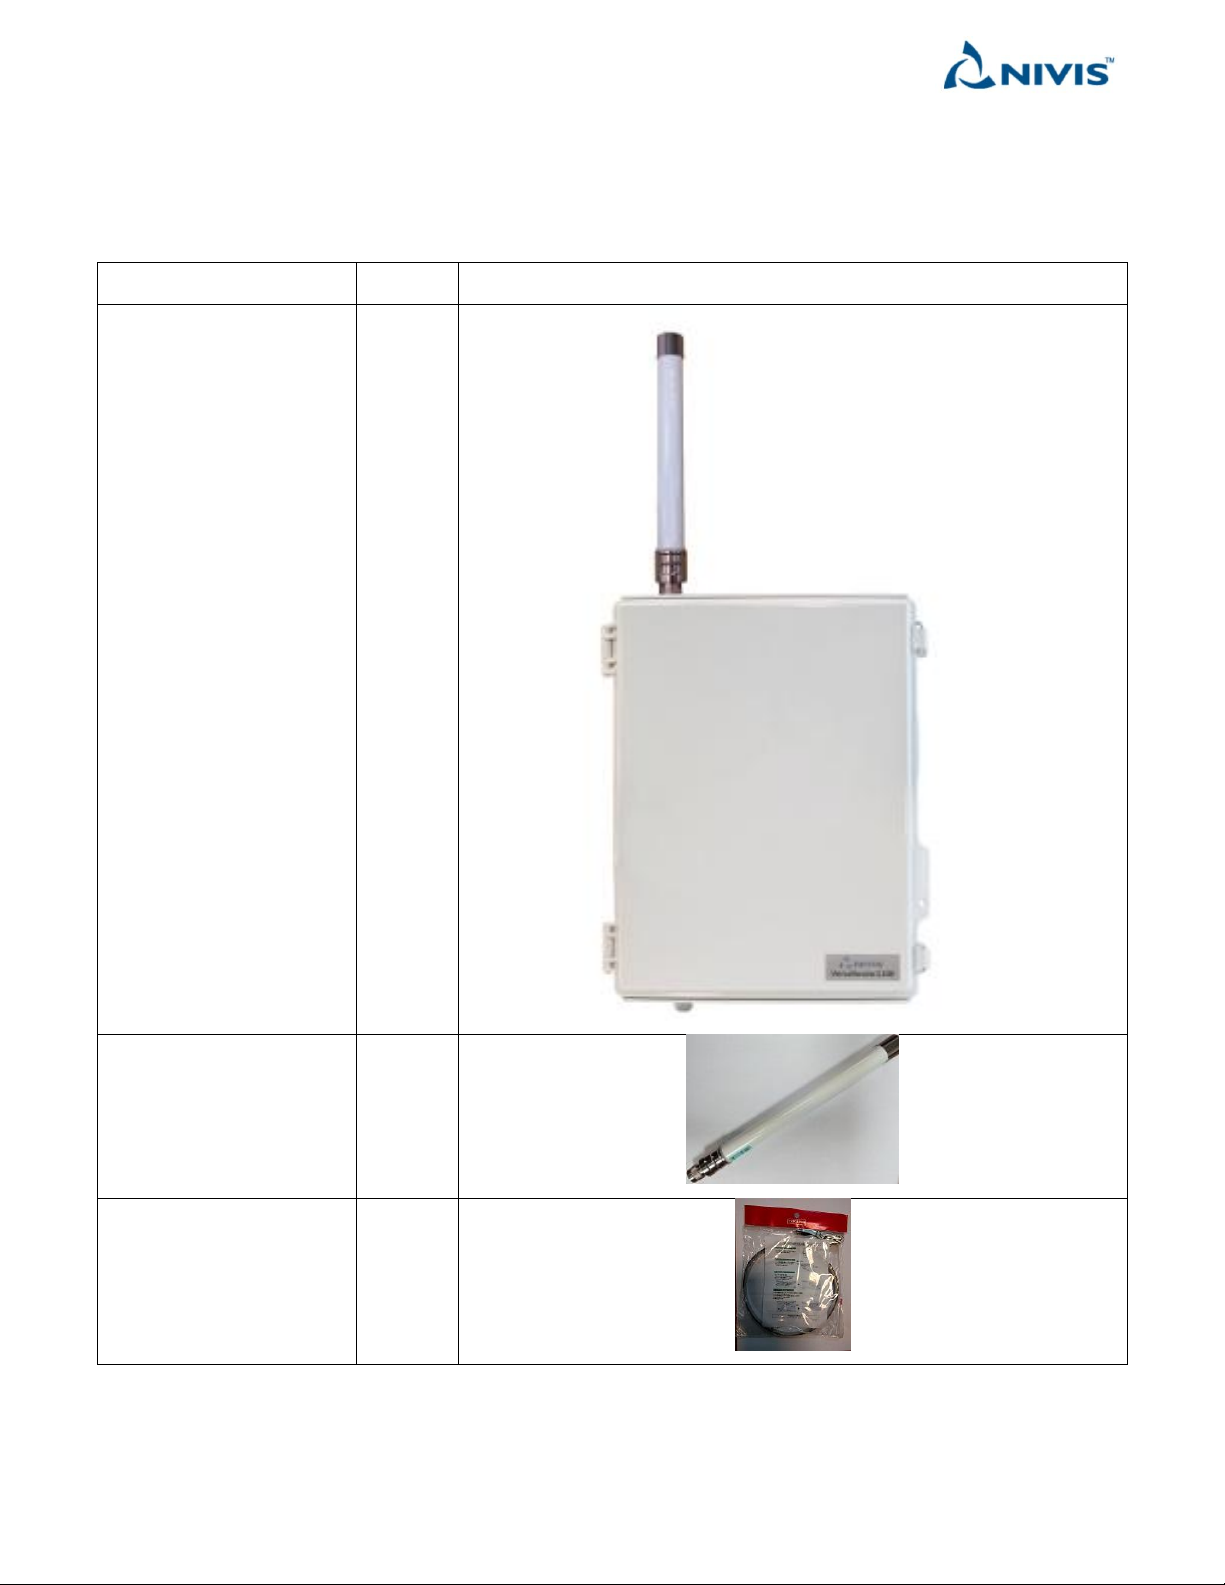
2.4 Package content
Component
Quantity
Picture
Versa Router™ 1100 Titan
(Pictured here with
antenna mounted. The
Titan is shipped with
antenna un-mounted and
wrapped separately)
1
Antenna
1
Mounting brackets
2
2.4.1 Versa Router VR1100 Titan US
The Versa Router VR1100 Titan US package includes the components listed below.
Nivis Versa Router 1100 Titan - User Guide v1.2 Page 10 of 111
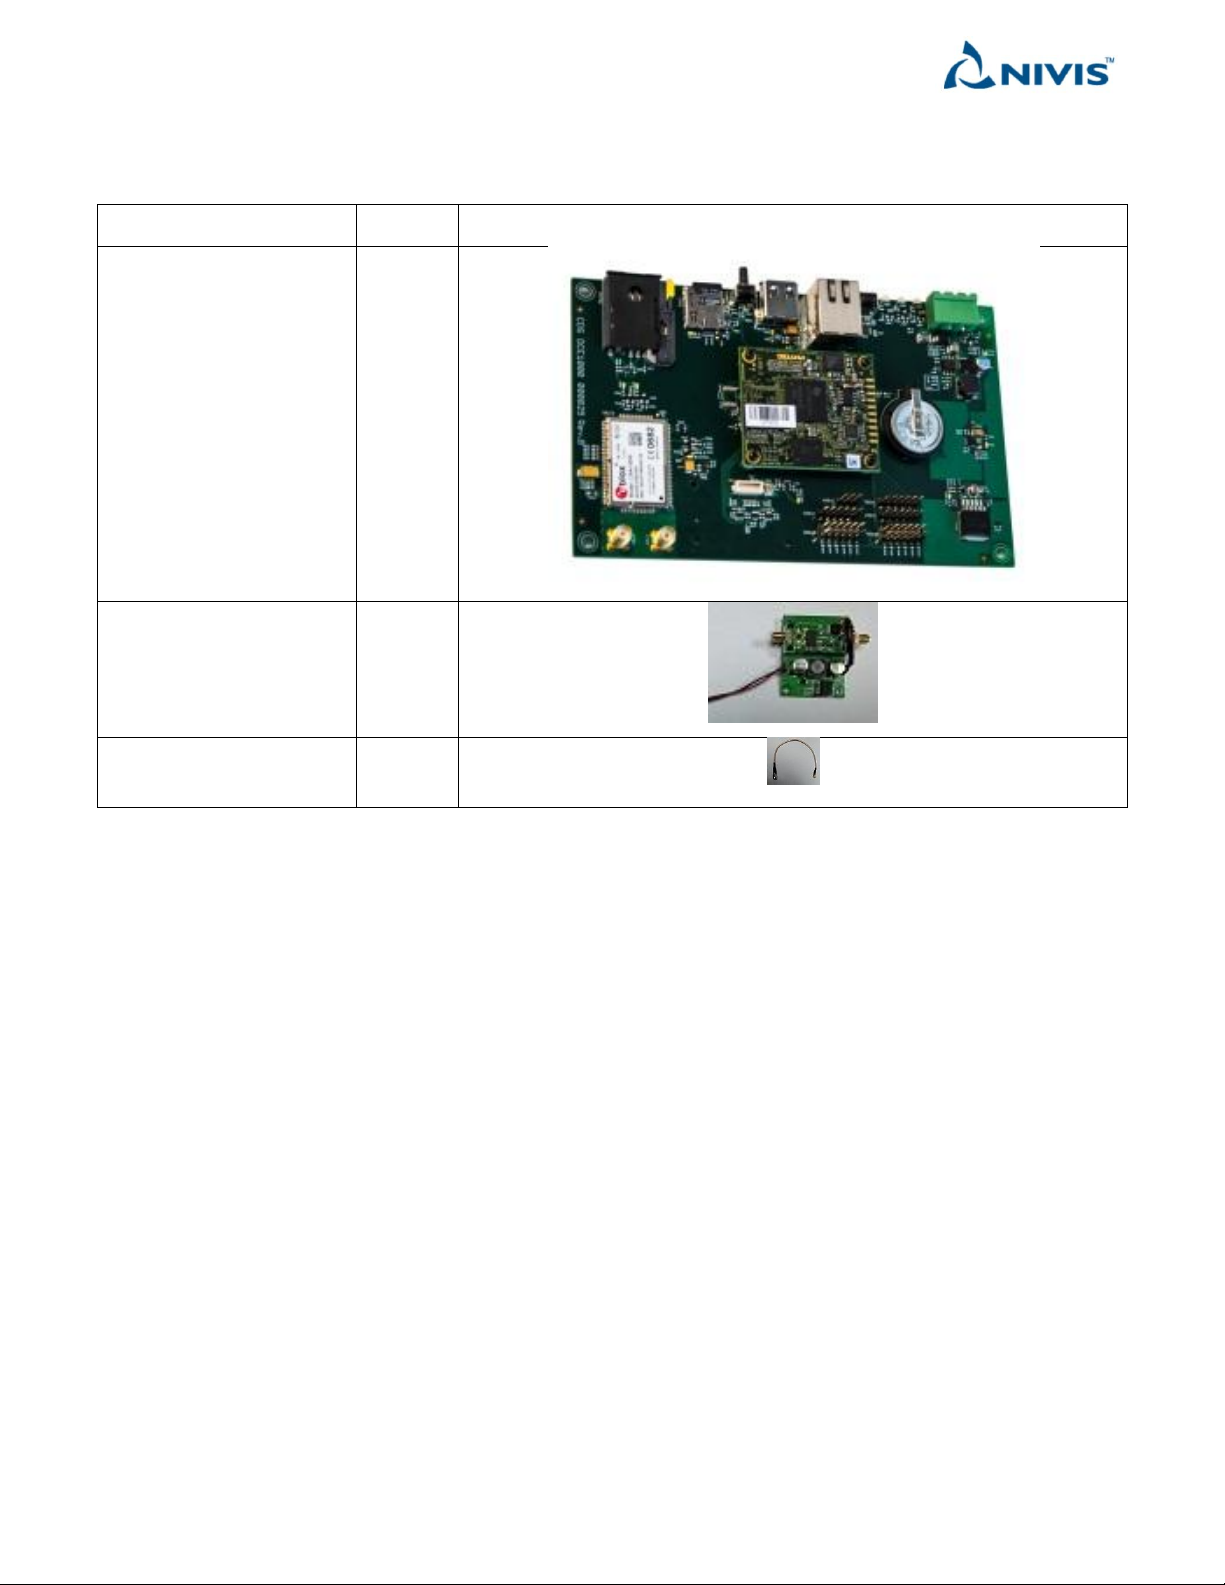
2.4.2 Versa Router VR1100 Titan US OEM
Component
Quantity
Picture
Versa Router™ 1100 Titan
board
1
RF Amplifier with
associated power supply
1
RF cable between Titan
Radio and RF Amplifier
1
The Versa Router VR1100 Titan US OEM package includes the components listed below.
Nivis Versa Router 1100 Titan - User Guide v1.2 Page 11 of 111
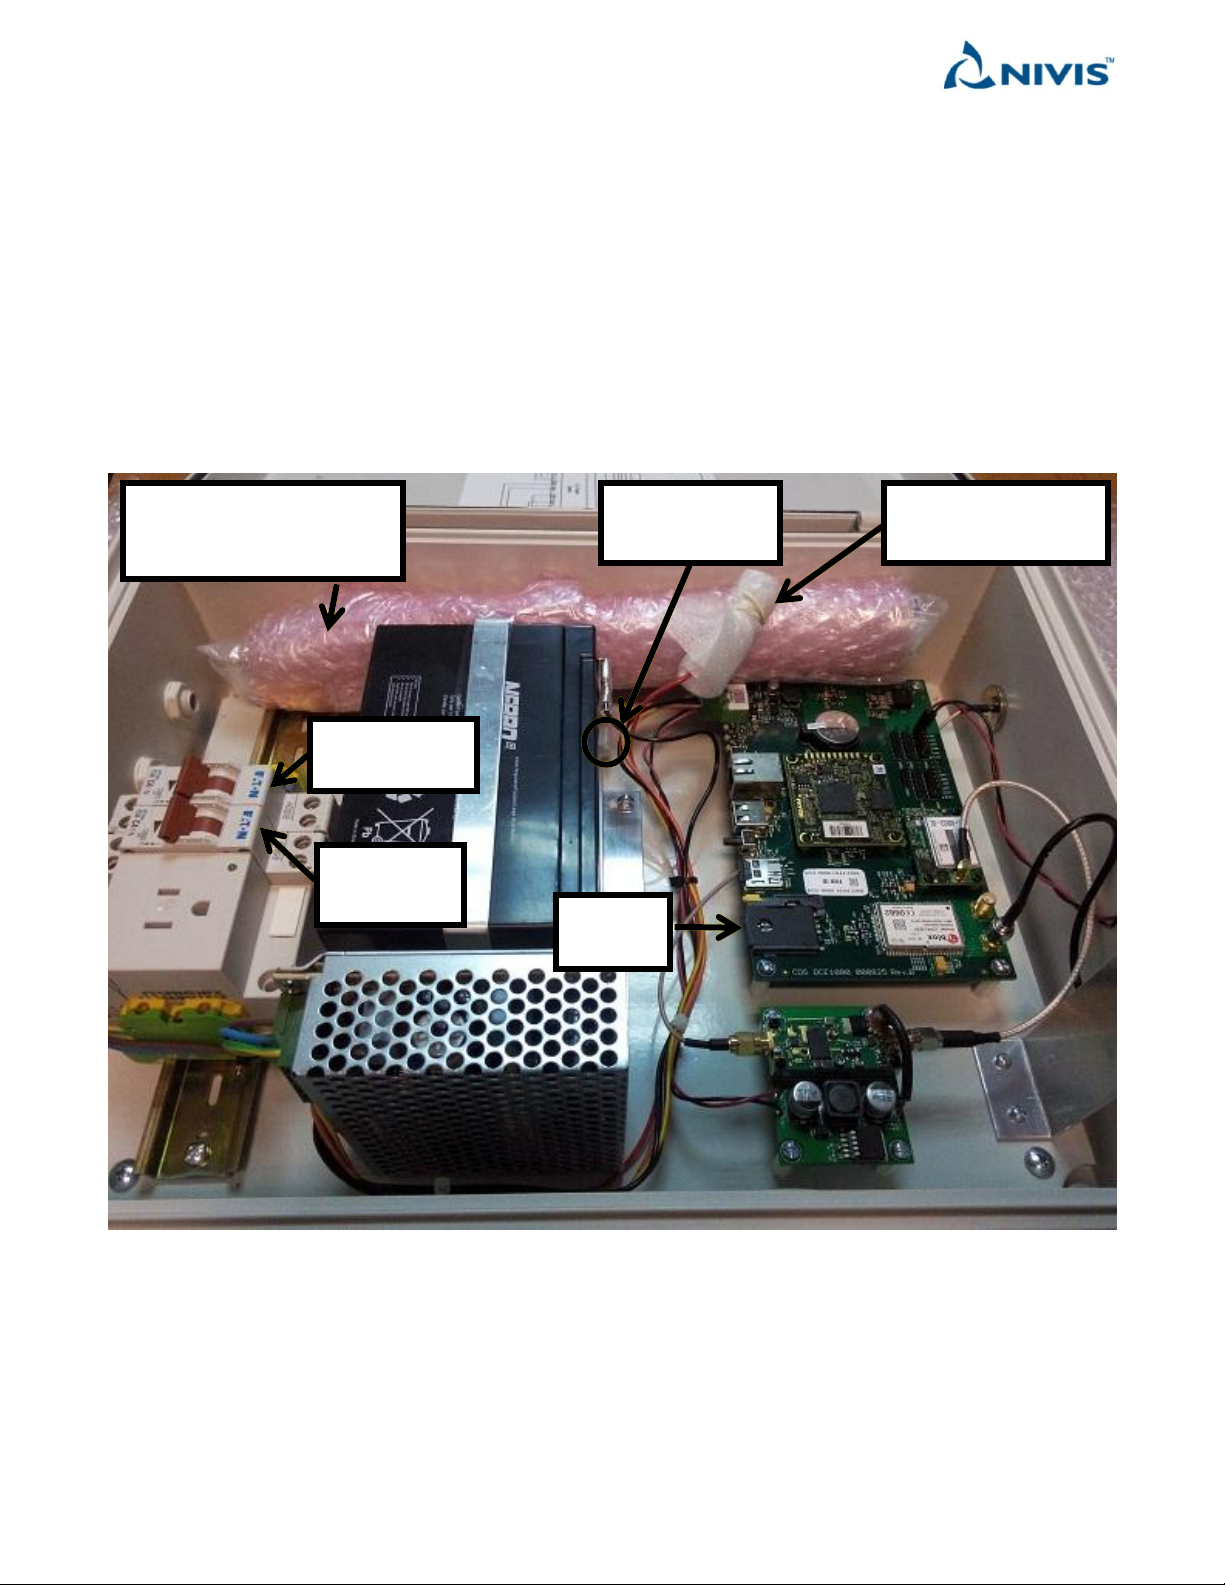
3 Getting Started
Antenna in bubble wrap
Battery positive
connector, insulated
Power socket
circuit breaker
Titan circuit
breaker
Battery positive
terminal
SIM card
holder
3.1 Power up the Versa Router™ 1100 Titan
The following steps are to be executed exactly in the order listed below.
1. Take the Titan out of the box and out of the protective bubble wrap.
2. Open Titan case. The Titan is delivered with:
a. Antenna bubble wrapped and placed inside Titan enclosure
b. Battery positive connector disconnected from battery and insulated
c. Both automated circuit breakers switched to “OFF” position.
3. Take Antenna out of Titan enclosure
Nivis Versa Router 1100 Titan - User Guide v1.2 Page 12 of 111

4. Pass the power cable (max 6.5 mm / 0.256 inch) through one of the cable glands (recommend the one
Connector
for 110V AC
Power cable
gland
N L PE
farthest to the circuit breakers, as it makes connecting the power easier)
5. Make sure the power cable is not connected to the mains at this point!
6. Connect the power cable PE/L/N wires as indicated in the label below the connectors
Optional while in the lab but mandatory at deployment: install an standard format SIM card (active, with data
plan associated, details in the section
Nivis Versa Router 1100 Titan - User Guide v1.2 Page 13 of 111
7. Optional while in the lab but mandatory at deployment: unwrap the RF antenna and mount it on top of
the enclosure.
8. Optional, if necessary: connect the ETH connector to Titan. This option is available only in the laboratory
as it will keep the enclosure lid open; there is no provision to take the ETH cable out of the enclosure
with the lid closed.
9. Configure the SIM card below)
10. Unwrap the battery positive connector can connect it to the battery positive terminal.
This action will start up on the Titan and power on the RF amplifier; several LED’s on the Titan board
will light up as well as a LED on the RF amplifier. At this point Titan draws power from the battery.
11. Connect the power cable to the mains (110 VAC) then switch the circuit breakers into “ON” position. At
this point Titan draws power from the mains, and the battery gets charged from the mains.
12. Titan is fully powered on now.
NOTE Titan is delivered without a mains power plug/power connector, as the method to connect to the
mains depend on the local conditions and the utility. The utility should use an appropriate connection
cord and connection solution to the mains find appropriate, with the restriction that the power cable
diameter must not exceed 6.5 mm / 0.256 inch – that is the inner diameter of the power cable gland.
NOTE Any mechanical operation involving Titan SIM card, SD-card, RF/Cell Antennae, ETH cable must be
performed with Titan fully powered off (Titan disconnected from mains and battery positive connector
disconnected from battery)
Nivis Versa Router 1100 Titan - User Guide v1.2 Page 14 of 111

3.2 Configure the SIM card
In order to use the 3G backhaul, a properly configured SIM card is necessary. The SIM card is NOT provided.
See below the steps for a properly configured SIM card.
1. Acquire a SIM card (standard format) associated with a data plan. The monthly data volume
depends on the number of nodes and data acquisition frequency.
2. Activate the SIM card (cell carrier dependent procedure, not described here)
3. Get from the cell carrier the settings associated with the data plan: (APN, user, password, etc. for
carrier-specific MCC/MNC)
4. In case the SIM card is delivered with PIN active: Disable the PIN associated with the SIM card. Use
on of the alternatives below:
o Use a phone to disable PIN
o Use Titan /admin/ UI section Edit Versa Router™ 1100 Titan SIM Settings [Titan ONLY].
5. Titan is delivered preconfigured with a set of APN/user/pass for US cell carriers. If the
APN/user/pass for carrier-specific MCC/MNC are not already configured, or are improperly
configured on Titan: Configure the cell carrier settings (APN/user/pass matching the carrier-specific
MCC/MNC), see section Edit Versa Router™ 1100 Titan GPRS provider – Titan ONLY below.
6. Make sure the Titan is powered off. Power it off if necessary: disconnect Titan from mains and
disconnect battery positive connector from battery
7. Insert the SIM into the SIM card holder
8. At this point the Titan and its SIM card are properly configured for cell backhaul.
9. Recommended action: verify the 3G backhaul starts up and works properly, as described in the
section below.
NOTE It is strongly recommended to use a data plan with full unrestricted internet access (all ports including
ports below 1024, TCP/UDP/ICMP)
Nivis Versa Router 1100 Titan - User Guide v1.2 Page 15 of 111

3.3 Verify the Cell backhaul starts up properly
1. This section only checks whether the cell connectivity is stable (meaning SIM was properly
configured with an active data plan). It does not check whether the Titan is accessible over cellular
link or whether Titan can access the NMS.
2. Power off Titan
3. Remove Titan ETH connection
4. Make sure a properly configured and activated SIM card is inserted in titan SIM slot
5. Power on Titan
6. Wait for about 2-3 minutes for Titan to boot up
7. Check whether Titan “WEB” blue LED is solid on – and stay on for more than a minute without
turning off.
3.4 Verify the Cell backhaul works using NMS
1. Have available and running a NMS instance
2. Have Titan connected over ETH
3. Power on Titan
4. Set Titan in “transparent” mode, connecting it to the instance mentioned above
5. Power off Titan
6. Remove Titan ETH connection
7. Make sure a properly configured and activated SIM card is inserted in titan SIM slot
8. Power on Titan
9. Check whether Titan is accessible from the NMS Web interface
3.5 Verify the Cell backhaul works using the cell IPv4 accessible from the PC
1. The procedure below works ONLY if the cell provider has assigned an IPv4 accessible from the PC to
the SIM card.
o One case is when the IPv4 associated with the SIM card is accessible from the Internet.
o Another case is when the PC itself has an IPv4 provided by a cell modem using a SIM card in
the same private IP class as SIM on Titan.
2. Power off Titan
3. Remove Titan ETH connection
4. Make sure a properly configured and activated SIM card is inserted in titan SIM slot
5. Power on Titan
6. Check whether Titan Web interface is accessible using the cell provider-assigned IP4
Nivis Versa Router 1100 Titan - User Guide v1.2 Page 16 of 111
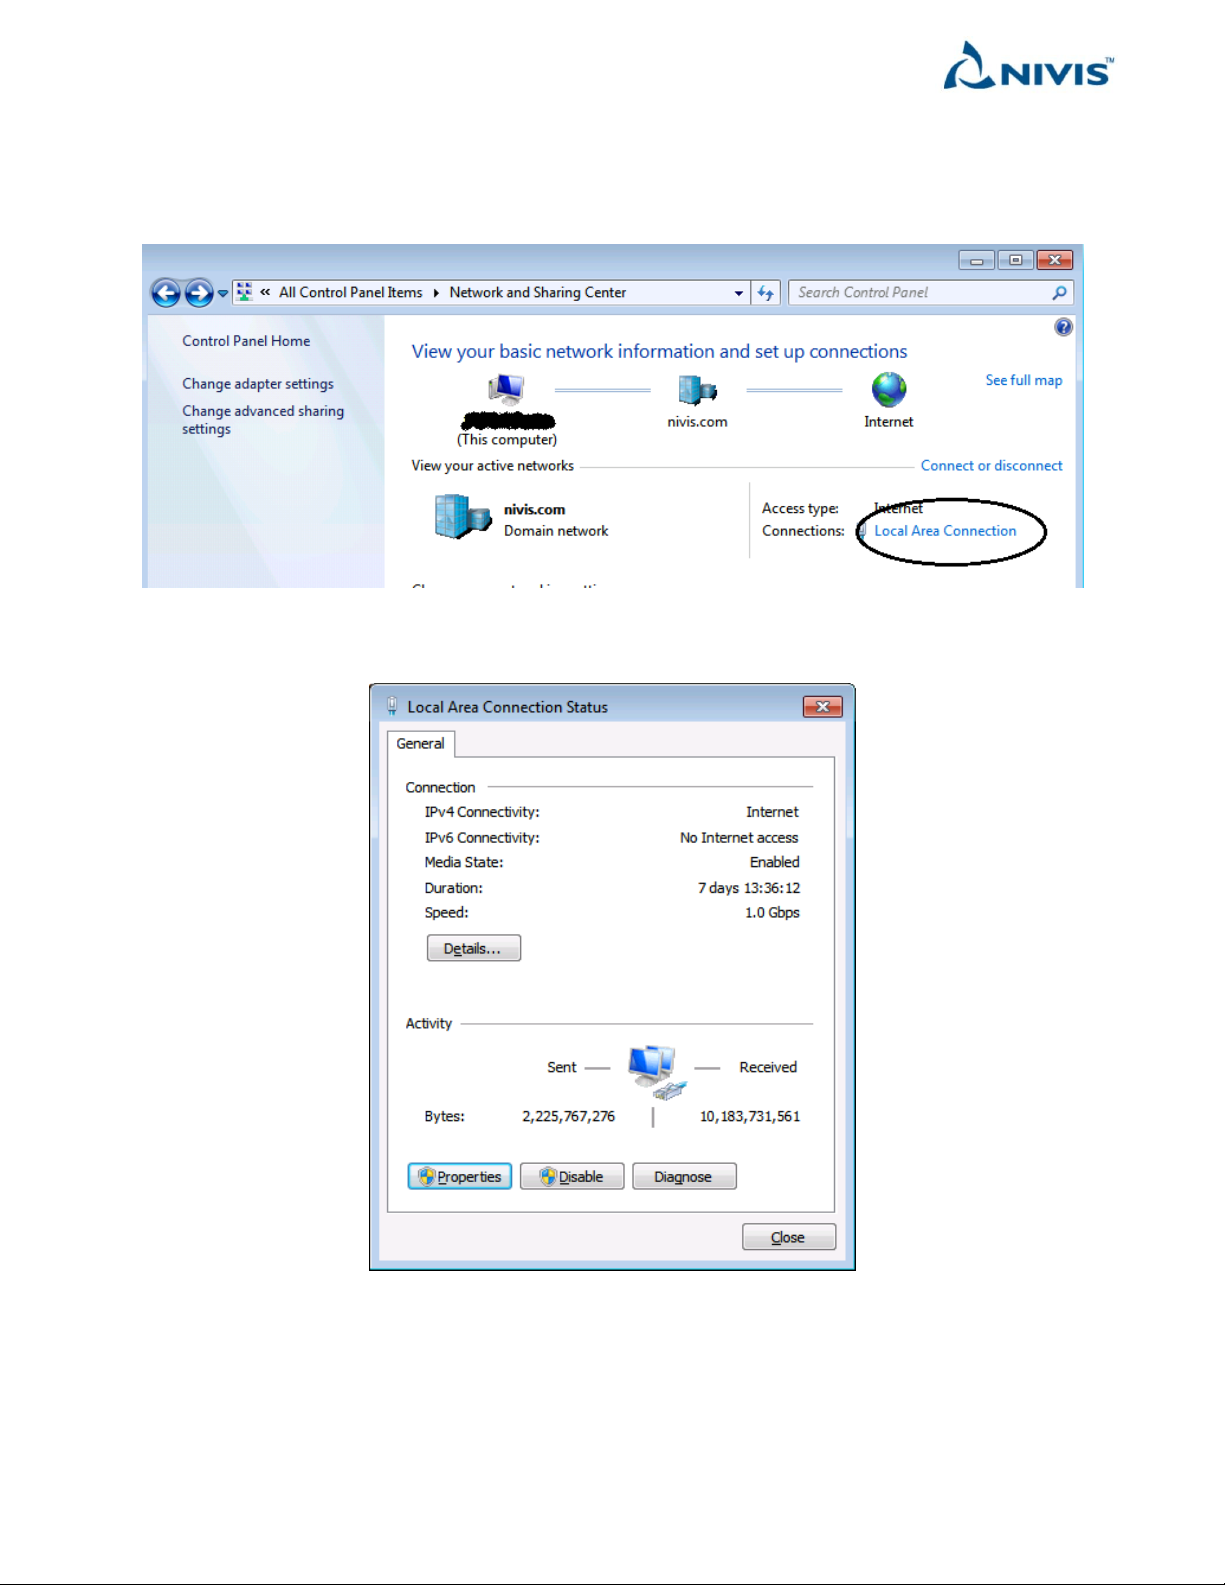
3.6 Configure the PC static IP address to access the Edge Router
Step-by-step instructions for Windows 7:
1. Open Control PanelNetwork and Sharing Center and click on Local Area Connection.
2. Click on Properties.
Nivis Versa Router 1100 Titan - User Guide v1.2 Page 17 of 111

3. Click on Internet Protocol Version 4 (TCP IPv4) and then click on Properties.
4. Enter IPv4: 192.168.0.201, Subnet Mask: 255.255.255.0, Default Gateway 192.168.0.1. (NOTE Any
other available IPv4 EXCEPT 192.168.0.101/192.168.0.1 can be used as PC IPv4).
5. Check Validate settings upon exit.
6. Click OK.
Nivis Versa Router 1100 Titan - User Guide v1.2 Page 18 of 111
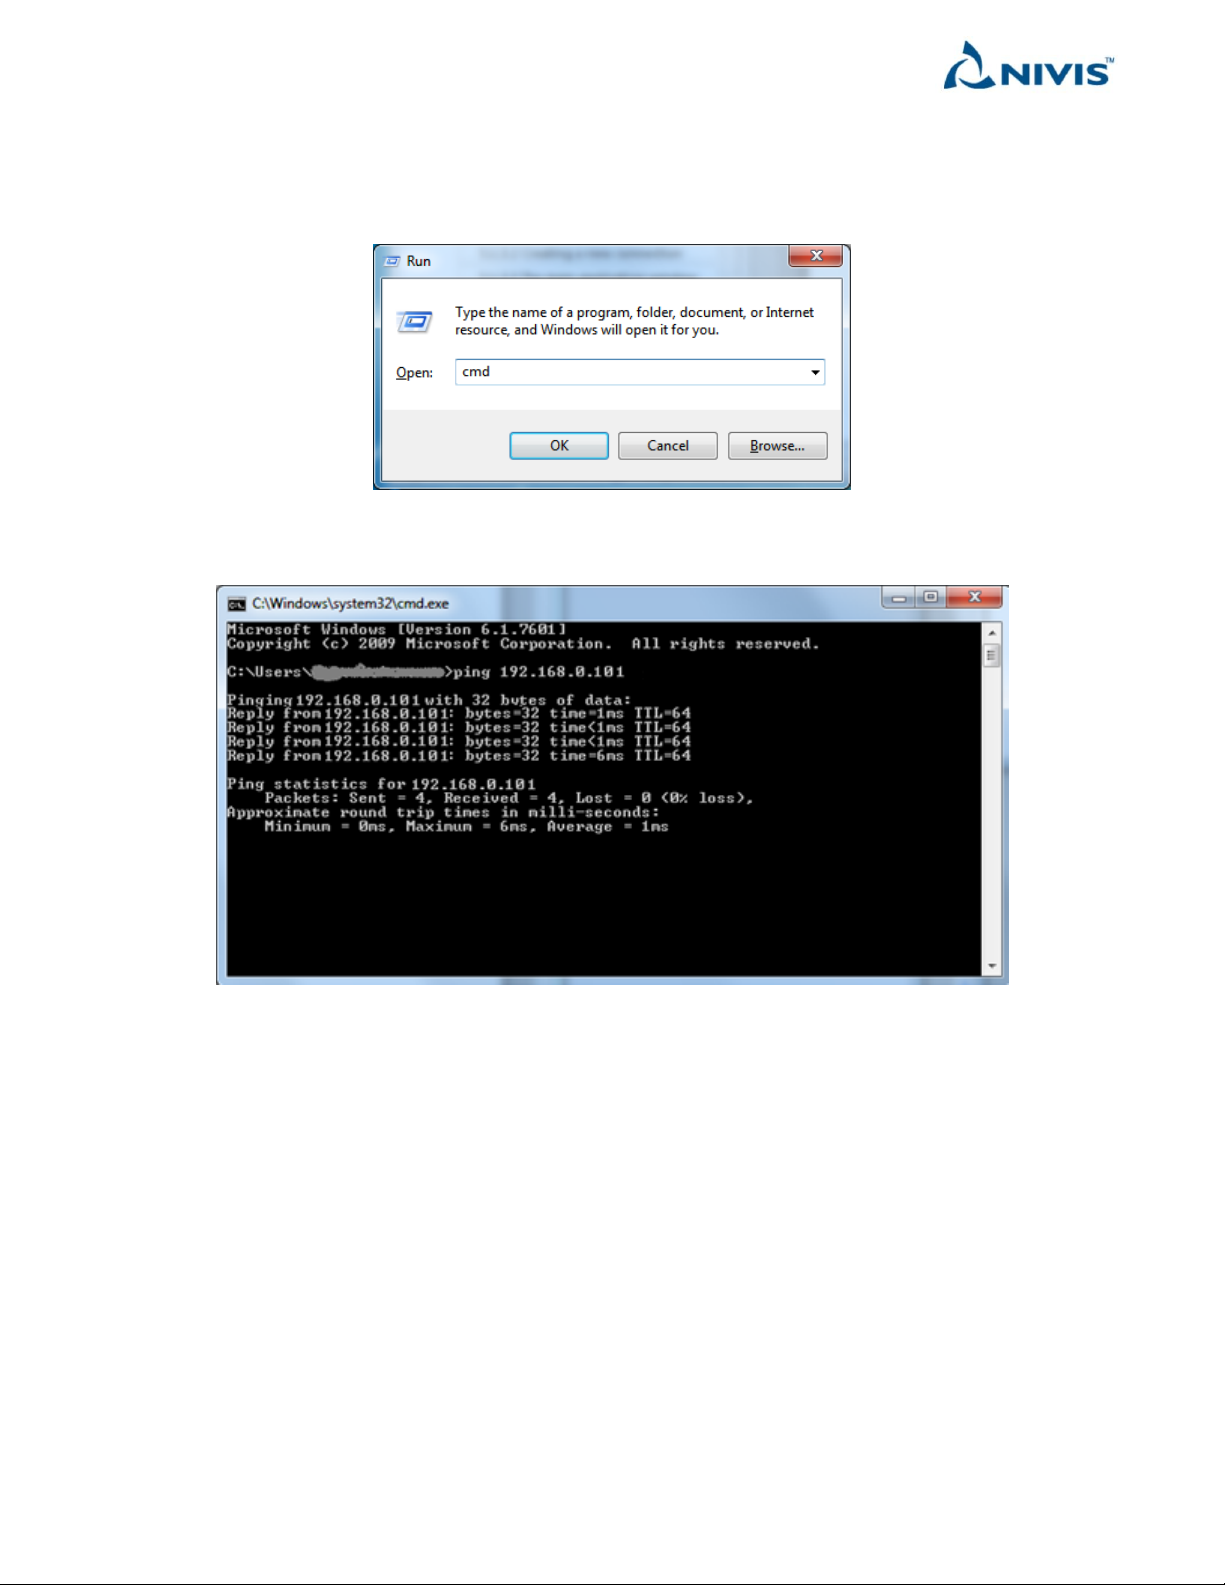
3.7 Optional: Ensure the Edge Router is accessible from PC over ETH
Use ping to verify Edge Router connectivity from the PC:
1. Click Start, Run, and type cmd.
2. Type ping 192.168.0.101. The expected result is shown below.
Nivis Versa Router 1100 Titan - User Guide v1.2 Page 19 of 111

3.8 Versa Router™ 1100 Titan US hardware description
3.8.1 General product view
The Versa Router™ 1100 Titan is running on Phytec designed and built phyCORE-AM335x, built around the
AM335x processor with the functionality of a network router, same as the Versa Router™ 1000 Quark. The Titan
packs more memory and flash space and runs at a higher frequency compared to Quark.
The Versa Router™ 1100 Titan requires only a 3G SIM card and a power cord connected to the mains 110 VAC in
order to run the hardware. The power cord is not provided. The Smart Object’s wireless connection is
established via the on-board amplified radio connected to the antenna connector on the case.
See the VR1100 datasheet on the Nivis website www.nivis.com for additional details.
Nivis Versa Router 1100 Titan - User Guide v1.2 Page 20 of 111
3.8.2 Versa Router™ 1100 Titan US
The standard version includes the OEM version enclosed in an IP65 enclosure, adding battery back-up
and power supply RF antenna, 3G antenna, plus accessories – circuit breakers, power socket. See below an
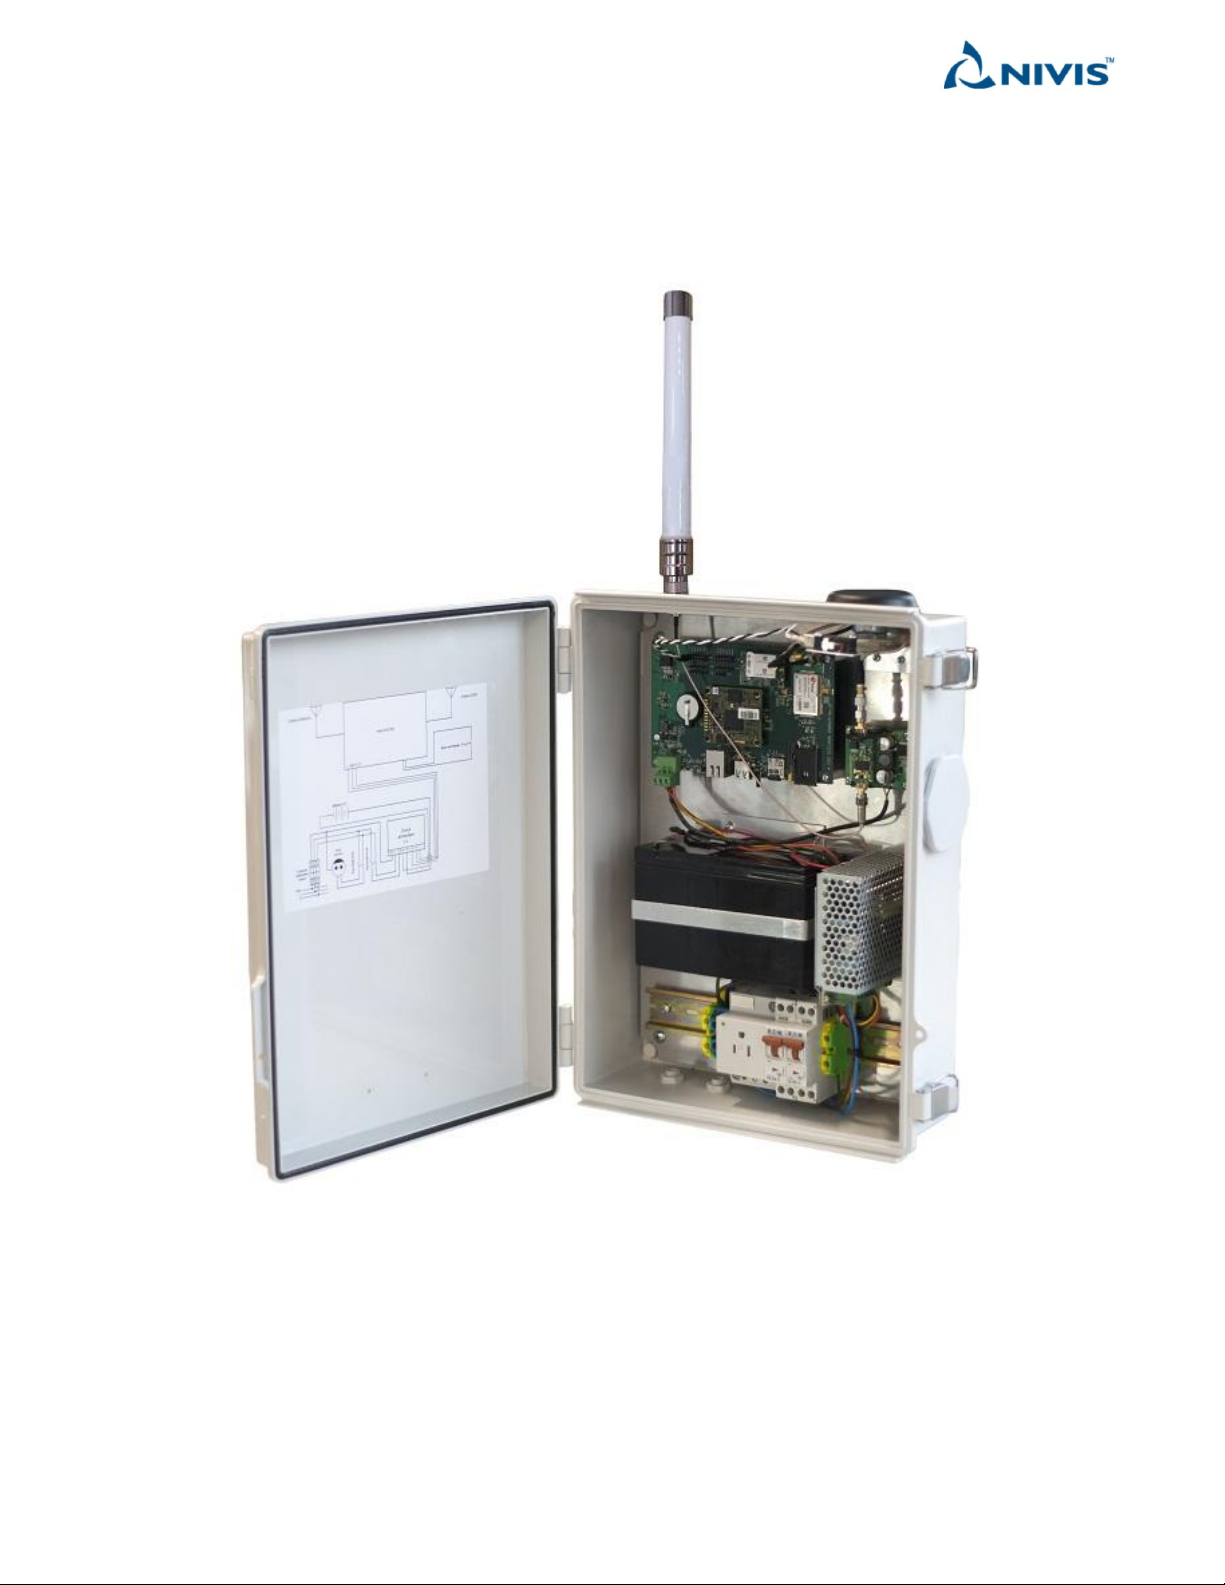
image of VR1100 Titan US with enclosure lid open:
Nivis Versa Router 1100 Titan - User Guide v1.2 Page 21 of 111
3.8.3 Versa Router™ 1100 Titan US OEM
Power Source
Detection:
ON: >12V / OFF: < 4V
GND
+12 VDC
+ 12 VDC
GND
RF cable
VN400
RF
amplifier
X701
connector
Tamper switch
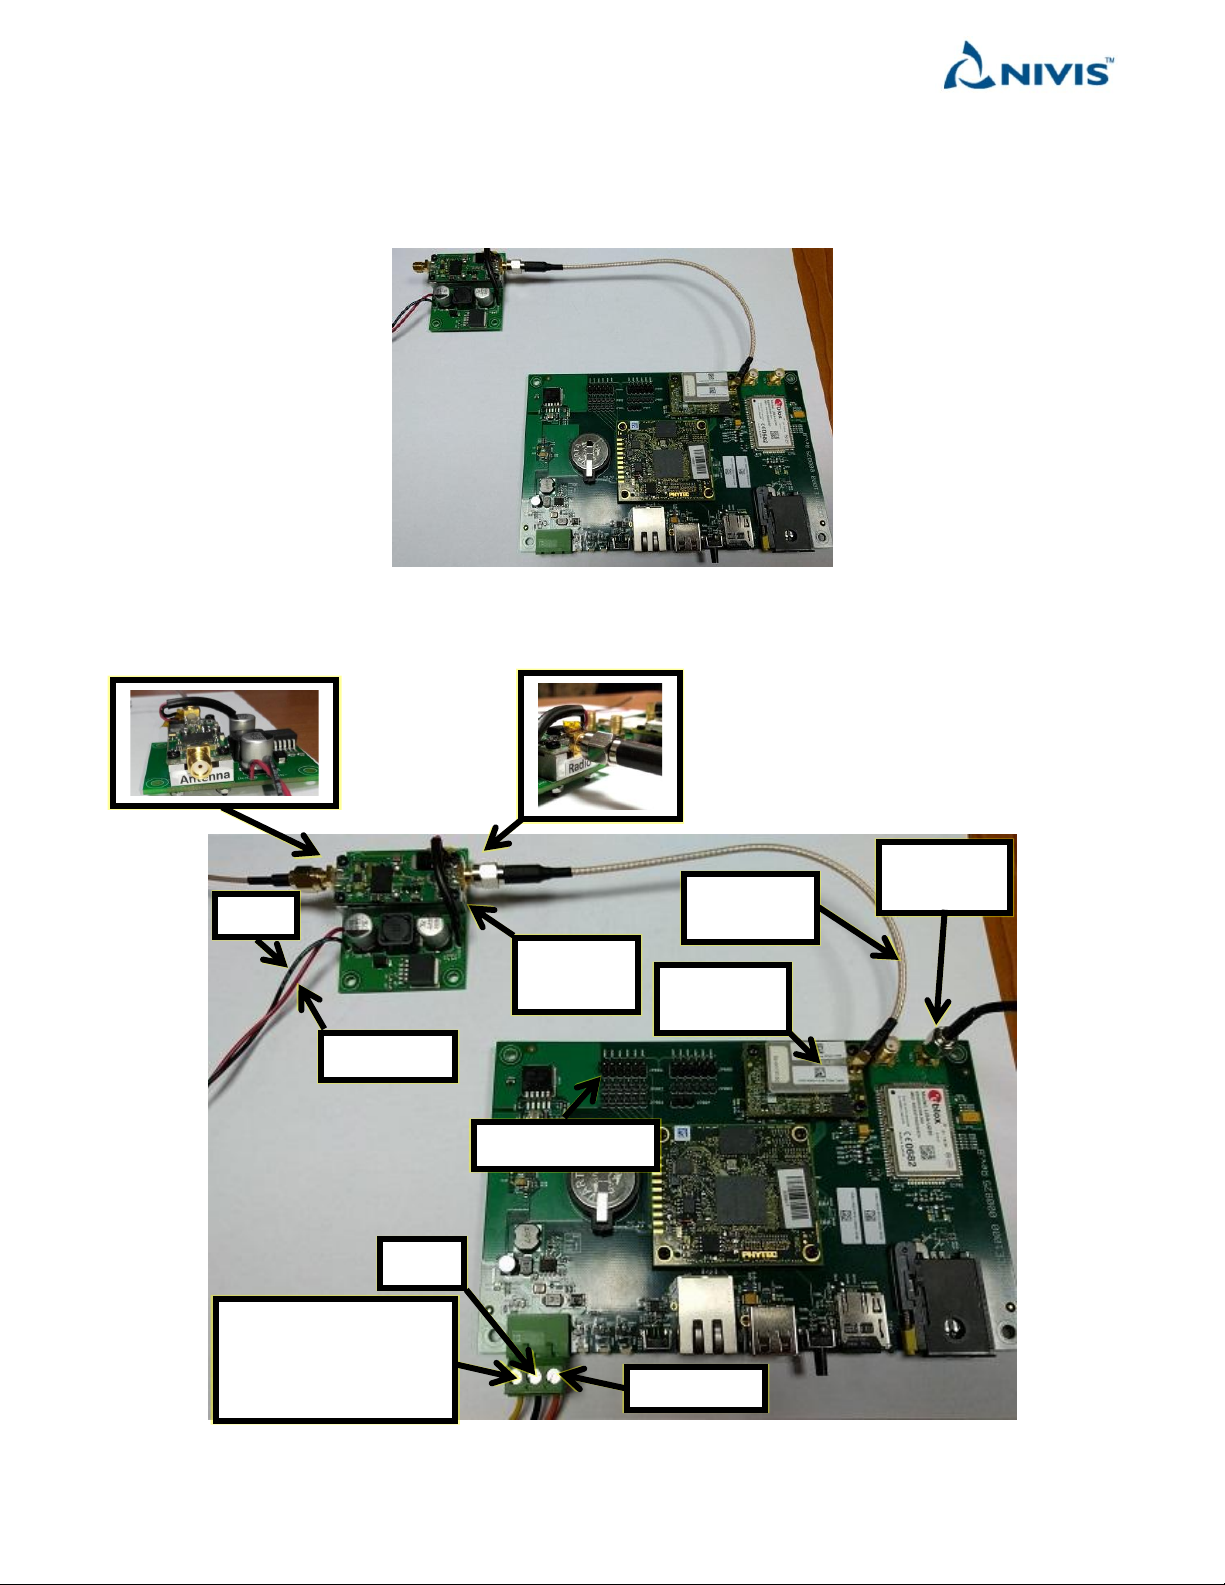
The VR1100 Titan US OEM version includes the Titan board with VN400 radio on it, the RF amplifier and
the RF cable to connect the VN400 radio to the amplifier:
The VR1100 Titan OEM fully connected:
Nivis Versa Router 1100 Titan - User Guide v1.2 Page 22 of 111
3.8.4 Connectors, buttons, LEDs
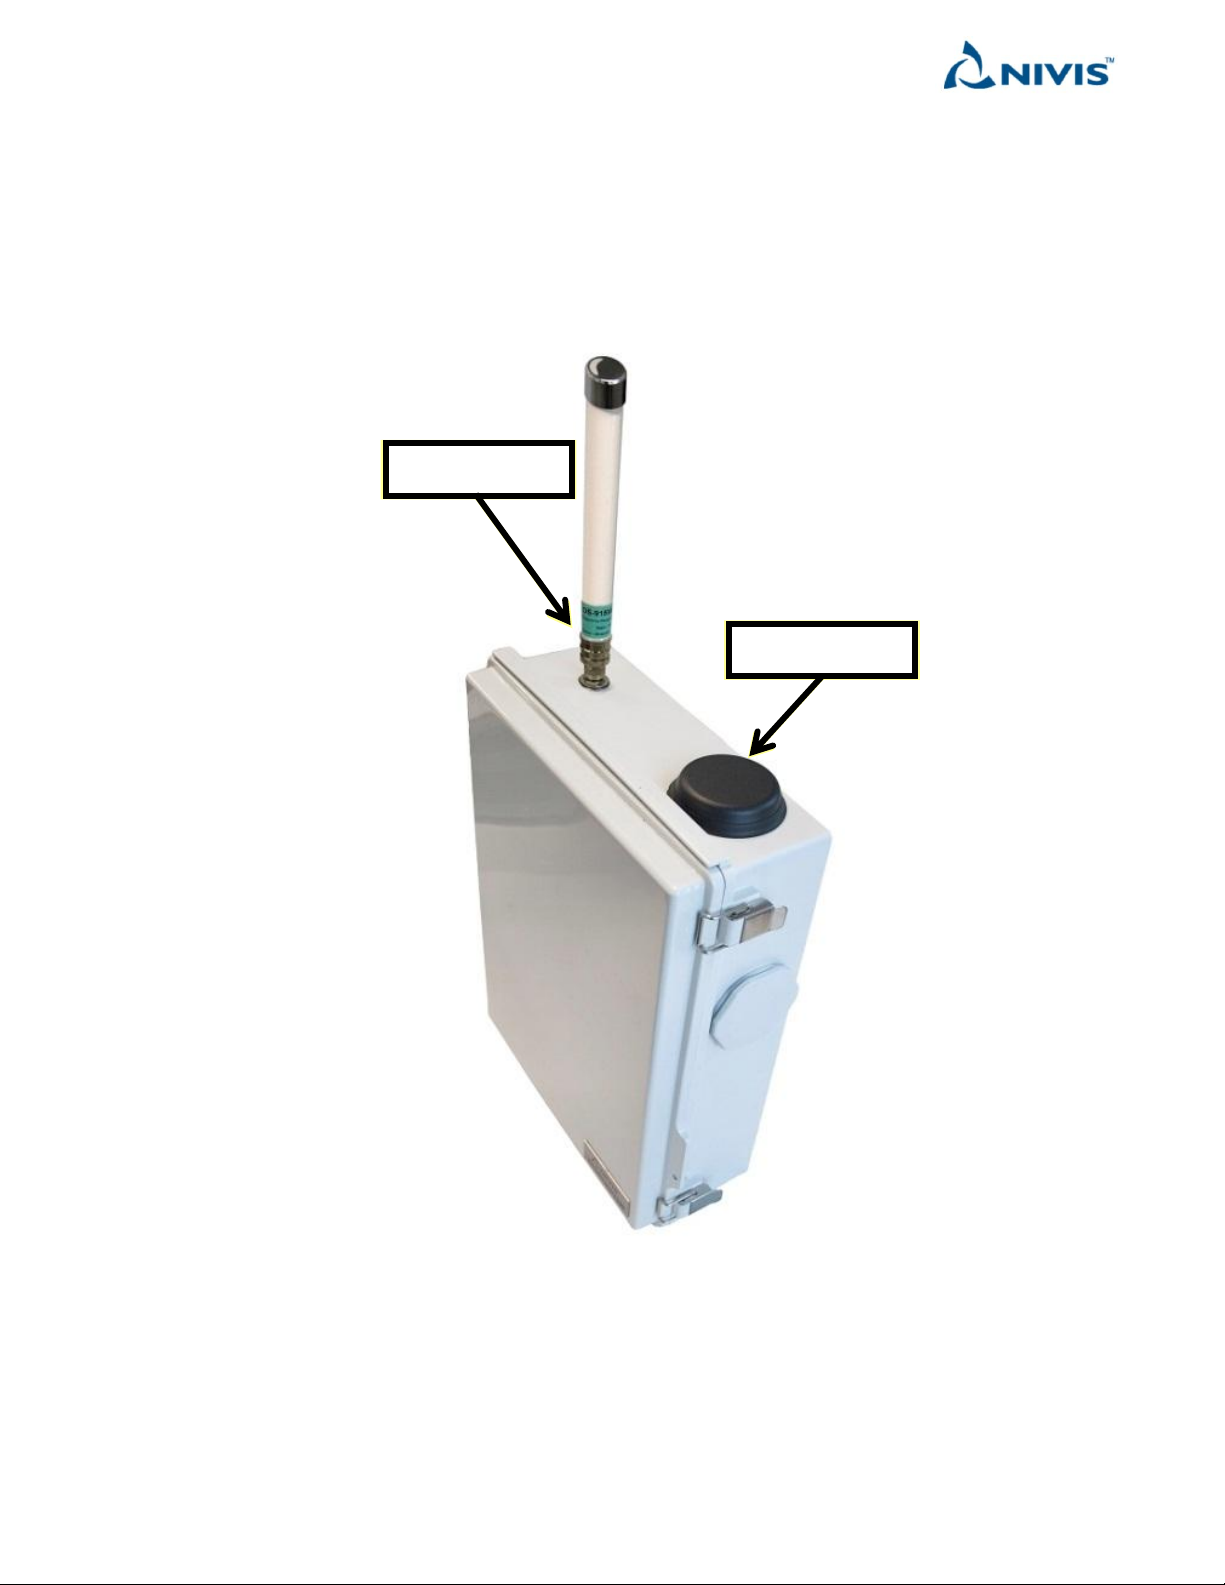
(2) Cell antenna
(1) RF antenna
On the Titan enclosure is the antenna connector (1). The antenna is shown connected in the picture
below.
Titan is delivered with cell antenna (2) already mounted. There user should not operate the cell
antenna.
Nivis Versa Router 1100 Titan - User Guide v1.2 Page 23 of 111
There are no LED/Buttons accessible on the Titan enclosure.
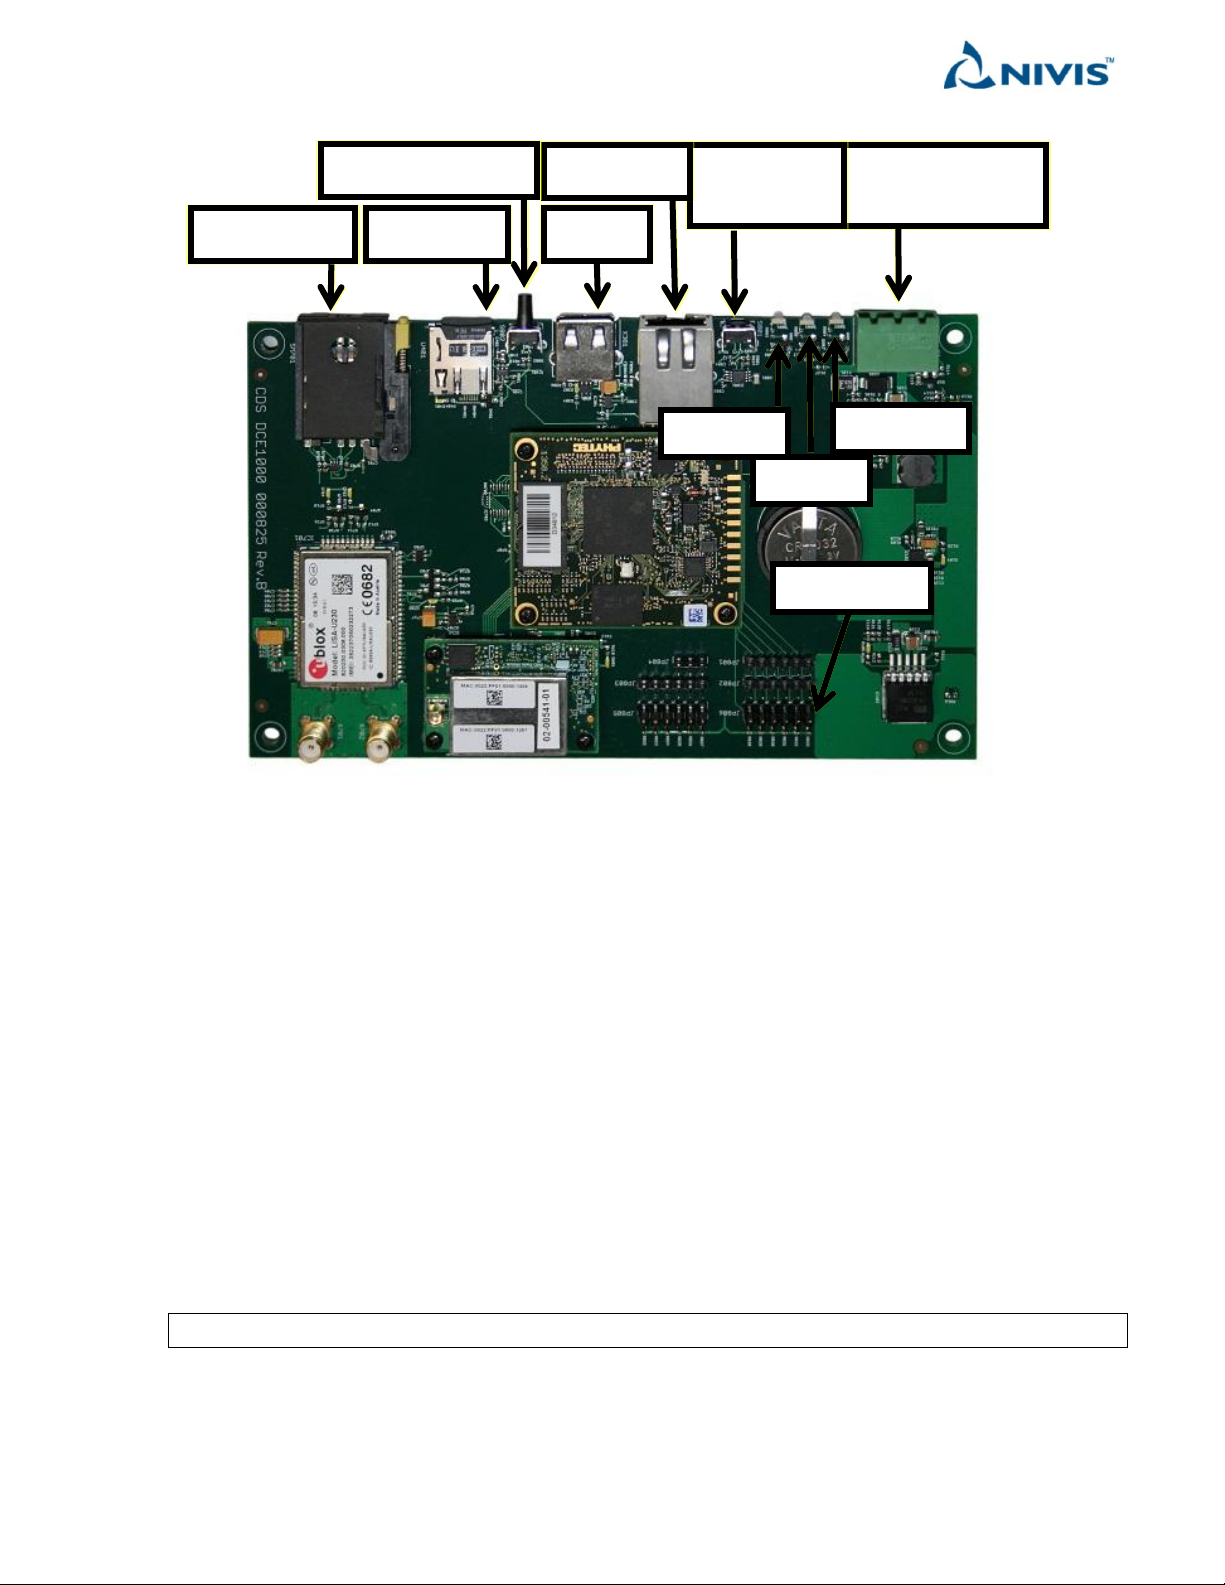
Inside of enclosure, the following LED’s, buttons and connectors are available:
(11) Tamper
(1) Power supply
and detection
(5) Processor
reset
(6) Ethernet
(7) USB
(8) Reset to default
(9) SD-card
(10) SIM card
(2) ALARM
(3) WAN
(4) CELL
The green connector (1) in the left is for power supply connection.
There are 3 main LEDs on the Titan board next to the power supply connection: “ALARM”, “WAN”, and “CELL”
The other two secondary LEDs are the ETH link/activity LEDs
The “ALARM” LED (2, red) lights solid on when the SD-card is not detected or is malfunctioning.
The “ALARM” LED (2, red) is blinking while the board is in the process of reset to factory defaults.
The “WAN” LED (3, green) lights solid on when there is a NAMT or a browser connected to the Versa Router™
1100 Titan.
The “CELL” LED (4, blue) lights solid on when the cell link is established.
To the left is the RJ-45 connector (6) for WLAN connectivity.
Next there is the USB connector. The USB currently has no functionality for Titan.
Next to the left there is the “Reset to Defaults” button (6). It serves to reset the settings to the factory defaults.
See the following section for additional details.
To the left there is the SD-card holder. It must have a working SD-card at all times.
NOTE Titan does NOT function without a properly working SD-card
Nivis Versa Router 1100 Titan - User Guide v1.2 Page 24 of 111

Next to the SD-card holder there is the SIM holder.
NOTE Titan needs an active SIM card, with an active data plan associated, and with PIN disabled in order
to activate the cell backhaul link. It also requires coverage from the SIM card provider for the same
purpose.
On titan board, amplifier or power supply there are several other LED’s. They have no functional significance for
Titan user. It is not in the scope of this document to describe the rest of the LED’s on Titan main board, power
amplifier or power supply.
Nivis Versa Router 1100 Titan - User Guide v1.2 Page 25 of 111
3.8.5 The Titan “Reset to Default” button
If the Titan network settings (for example, the IP) are lost or if for any reason the configuration becomes nonfunctional, you can use the “Reset to defaults” button to reset all application configurations and Quark Network
configurations.
To do this, press and hold the “Reset to Defaults” button (located inside the enclosure, position 8 in the picture
above). Keep the button pressed for up to 10 seconds, until the “ALARM” LED (2, red) starts blinking. At that
time, the Titan connectivity settings and the application configuration are reset to factory defaults. The LED will
keep blinking for 10 seconds, and then the board will perform a reboot.
A “Reset to default” action will reset the following setting to their factory default value:
- IPv4 settings
- All Application settings
- OpenVPN/DTLS certificates/configurations
- Communication profiles, including Vendor Network ID
A “Reset to default” action will NOT reset the license files existing on Titan.
NOTE After the reboot, the Titan IPv4 network configuration will be: IPv4 192.168.0.101, network mask
255.255.255.0, gateway 192.168.0.1.
3.8.6 Power supply specifications
VR1100 Titan needs a power supply of 85 – 264 VAC 50/60Hz or 120 – 370VDC, max 35W (normal consumption
is 5.5W). Max power cable diameter 0.256 inch/ 6.5 mm – that is the inner diameter of the power cable gland
VR1100 Titan OEM needs a power supply 12 VDC, max 2.6A on the green connector (1 in the image above).
NOTE Any mechanical operation involving Titan SIM card, SD-card, RF/Cell Antennae, ETH cable must be
performed with Titan fully powered off (Titan disconnected from mains and battery positive connector
disconnected from battery)
Nivis Versa Router 1100 Titan - User Guide v1.2 Page 26 of 111

3.9 The Edge Router (Versa Router™ 1000 Quark and Versa Router™ 1100 Titan) Software
The software features described below are inherited by Versa Router™ 1100 Titan from Versa Router™ 1000
Quark and are available on both Versa Router™ 1000 Quark and Versa Router™ 1100 Titan, unless otherwise
noted. Any features available on Titan only are marked clearly below.
3.9.1.1 HTTP-COAP proxy
The HTTP-COAP proxy is a translator from HTTP to COAP and a proxy for COAP resources.
The client apps can query directly the COAP resources on the Smart Objects using COAP; however, this is not
recommended, as it may exceed with ease the bandwidth available.
We recommend sending the queries as XML on top of HTML. The proxy on the Edge Router will serve the
resource from the cache or query the SO if necessary; at the same time, it will translate from COAP to HTTP. If
configured, the proxy will subscribe to observable resources on the Smart Objects, further reducing the
bandwidth requirements.
Advantages of using a HTTP – COAP proxy against interrogating the Smart Objects directly include:
Controllable bandwidth requirements
Reduced bandwidth requirements ensured through use of caching on the proxy
Reduced bandwidth requirements ensured through use of subscription to observable resources from
the proxy
Fast development by using XML/HTTP
3.9.1.1.1 COAP – HTTP proxy interface description
The proxy interface allows a client application to list the observable resources, get the device list and topology,
and observe resources (including the configuration of the resources observed).
Nivis Versa Router 1100 Titan - User Guide v1.2 Page 27 of 111

3.9.1.1.2 HTTP status codes
CoAP Code
HTTP Status Code
65
201 Created
66
204 No Content
67
304 Not Modified
68
204 No Content
69
200 OK
128
400 Bad Request
129
401 Unauthorized
130
400 Bad Request
131
403 Forbidden
132
404 Not Found
133
405 Method Not Allowed
134
406 Not Acceptable
140
412 Precondition Failed
141
413 Request Entity Too Large
143
415 Unsupported Media Type
160
500 Internal Server Error
161
501 Not Implemented
162
502 Bad Gateway
163
503 Service Unavailable
164
504 Gateway Timeout
165
505 HTTP Version Not Supported
The CoAP – HTTP status code translation is performed according to the following table.
Nivis Versa Router 1100 Titan - User Guide v1.2 Page 28 of 111

While most HTTP status codes returned are a direct translation from the CoAP corresponding response code,
HTTP Request
HTTP Error
Code
Details
Any request
504 Gateway
Timeout
The request could not be handled in the configured time interval.
Response string: “Gateway Timeout”
501 Not
Implemented
The request could not be parsed.
Response string: “Can't parse Http request”
400 Bad
Request
The HTTP request is not valid and therefore cannot be handled.
Response string: “Invalid request”
Device resource
request
501 Not
Implemented
The request could not be sent over the CoAP interface at this time.
Response string: “Can't SendRequestToCoap”
The requested resource could not be created locally.
Response string: “Can't AddReqRspResource”
502 Bad
Gateway
Decoding error.
Response string: “Can't convert Coap response to Http response, Exi to
Xml failed”
409 Conflict
A no-cache HTTP request was made for an observed resource. Requests
for observed resources may not bypass the cache and such a request
should not be attempted.
Response string: “Can't bypass cache for an observed resource”
504 Gateway
Timeout
There was no response from the CoAP interface in the configured
timeout interval.
Response string: “Gateway Timeout”
Another request for the same resource was already made and has not yet
been answered.
Response string: “Another request for this resource was sent before”
An observable resource is in the subscribing process, and thus a new
request for the resource will not be made and data will only be available
once the subscription is established.
Response string: ”Resource is in subscription process”
Observe
resources
400 Bad
Request
The XML observation request was badly formed.
Response string: “Invalid query”
there are several error codes that may be sent by the proxy.
Nivis Versa Router 1100 Titan - User Guide v1.2 Page 29 of 111

HTTP Request
HTTP Error
Code
Details
request
The individual observable element request was badly formed.
Response string: “Observing resources request is bad formed”
The XML observation request is not a PUT request.
Response string: “Request is bad formed, invalid method, it should be
PUT”
The XML observation request content type is invalid.
Response string: “Request is bad formed, invalid content type, it should
be application/xml”
The XML observation request content is invalid.
Response string: “Request is bad formed, invalid Xml content.”
Response string: “Request is bad formed, error processing Xml
Observation List elements”
Response string: “Request is bad formed, Xml Observation List invalid
finish”
Storage data
retrieval request
400 Bad
Request
The request query has invalid or conflicting elements.
Response string: “Storage-data-get request is bad formed”
Device list
request
400 Bad
Request
The device list search query is badly formed.
Response string: “Invalid query”
3.9.1.1.3 Communicating with HTTP CoAP Proxy
If the HTTP Client is a web-browser, the HTTP client has to manually set the proxy configuration, by setting the
Proxy IP to the value of Edge Router IP, and the port to 9999.
EXAMPLE:
Considering CoAP server [2001::1:101]
Considering Edge Router (HttpCoapProxy): 10.32.0.160, listens by default on TCP port 9999
The client web browser must be configured for “Manual proxy configuration”:
HTTP Proxy: 10.32.0.160 Port: 9999
Nivis Versa Router 1100 Titan - User Guide v1.2 Page 30 of 111
 Loading...