

Page 1
Page1of
22
HDi Mobi OS™ Multi-touch Screen
Operation Manual
Remarks:
Technical parameters and pictures in this manual are for reference only and subject to change without notice. The
actual product may differ.
Before using our product please read this manual carefully and keep for future reference if required.
This manual should not be copied fully or partially in any kind or manner without written approval of HDi.
Page 2

Page2of
22
Introduction
Thank you for buying our new generation interactive multi-touch HDTV product. This manual provides you with the necessary
information to assist in the operations of this device. If you have further queries please do not hesitate to contact our support
team.
HDi is dedicated to developing and improving the performance and reliability of our products. We have designed and
manufactured this device with one objective in mind and that is to ensure that our customers’ needs and user experience are
fulfilled.
Thank you for purchasing this product.
Page 3

Page3of
22
Safety considerations
WARNING
1. Do not place containers with liquid on or near this product.
2. Use only dry cloth to clean.
3. Do not block any ventilation holes.
4. Install this product according to manufacturer’s specifications
5. A distance of at least 160mm must be kept from this product and other objects and/or walls.
6. Do not install this product near heat sources.
7. This product must be connected to a power point which is appropriately earthed.
8. Use the earthed power plug supplied with this product.
9. Keep the power cord tangle free.
10. Use a properly functioning power point at all times.
11. Disconnect the power plug during a storm or if you intend not to use for a long period of time.
12. This device is a heavy product and when moving, use appropriate equipment to avoid injury.
13. Use qualified technicians to mount the device on the wall and/or mobile trolley. Abide by manufacturers’ mounting
instructions.
14. Use only qualified technicians for all repairs.
15. Follow instructions when inserting batteries into the remote control unit. Discard all batteries appropriately.
16. Do not use mixed batteries (old and new, carbon-zinc and alkaline).
Page 4

Page 4 of 22
Contents
Introduction
.....................................................................................................................................................
2
Safety considerations
.......................................................................................................................................
3
Main functions
.............................................................................................................................................
5
Technical specification
.................................................................................................................................
5
Front panel of interactive display
................................................................................................................
8
Rear view of interactive display
...................................................................................................................
9
Side/rear port description
..........................................................................................................................
10
RCU (Remote Control Unit)
........................................................................................................................
12
Introduction of OSD
.......................................................................................................................................
13
Operation of OSD — How to choose analog channel
................................................................................
13
Full touch
....................................................................................................................................................
19
Connecting PC...........................................................................................................................................19
Page 5
Page 5 of 22
The HDi multi-touch display is a combination of two advanced technologies. The IR (Infrared) touch technology and high
definition (HD) digital display technology (HDTV) creating the HD Interactive Android Version Multi Touch Screen (MTS). This
combination provides the user the ability to interact with an HDTV screen using a finger or any solid object.
Main functions
Acute touch
The MTS HDTV is a high resolution touch display screen. Users interact with the MTS using finger, pen or other non-transparent
object.
HD display
The MTS HDTV is a high resolution display monitor.
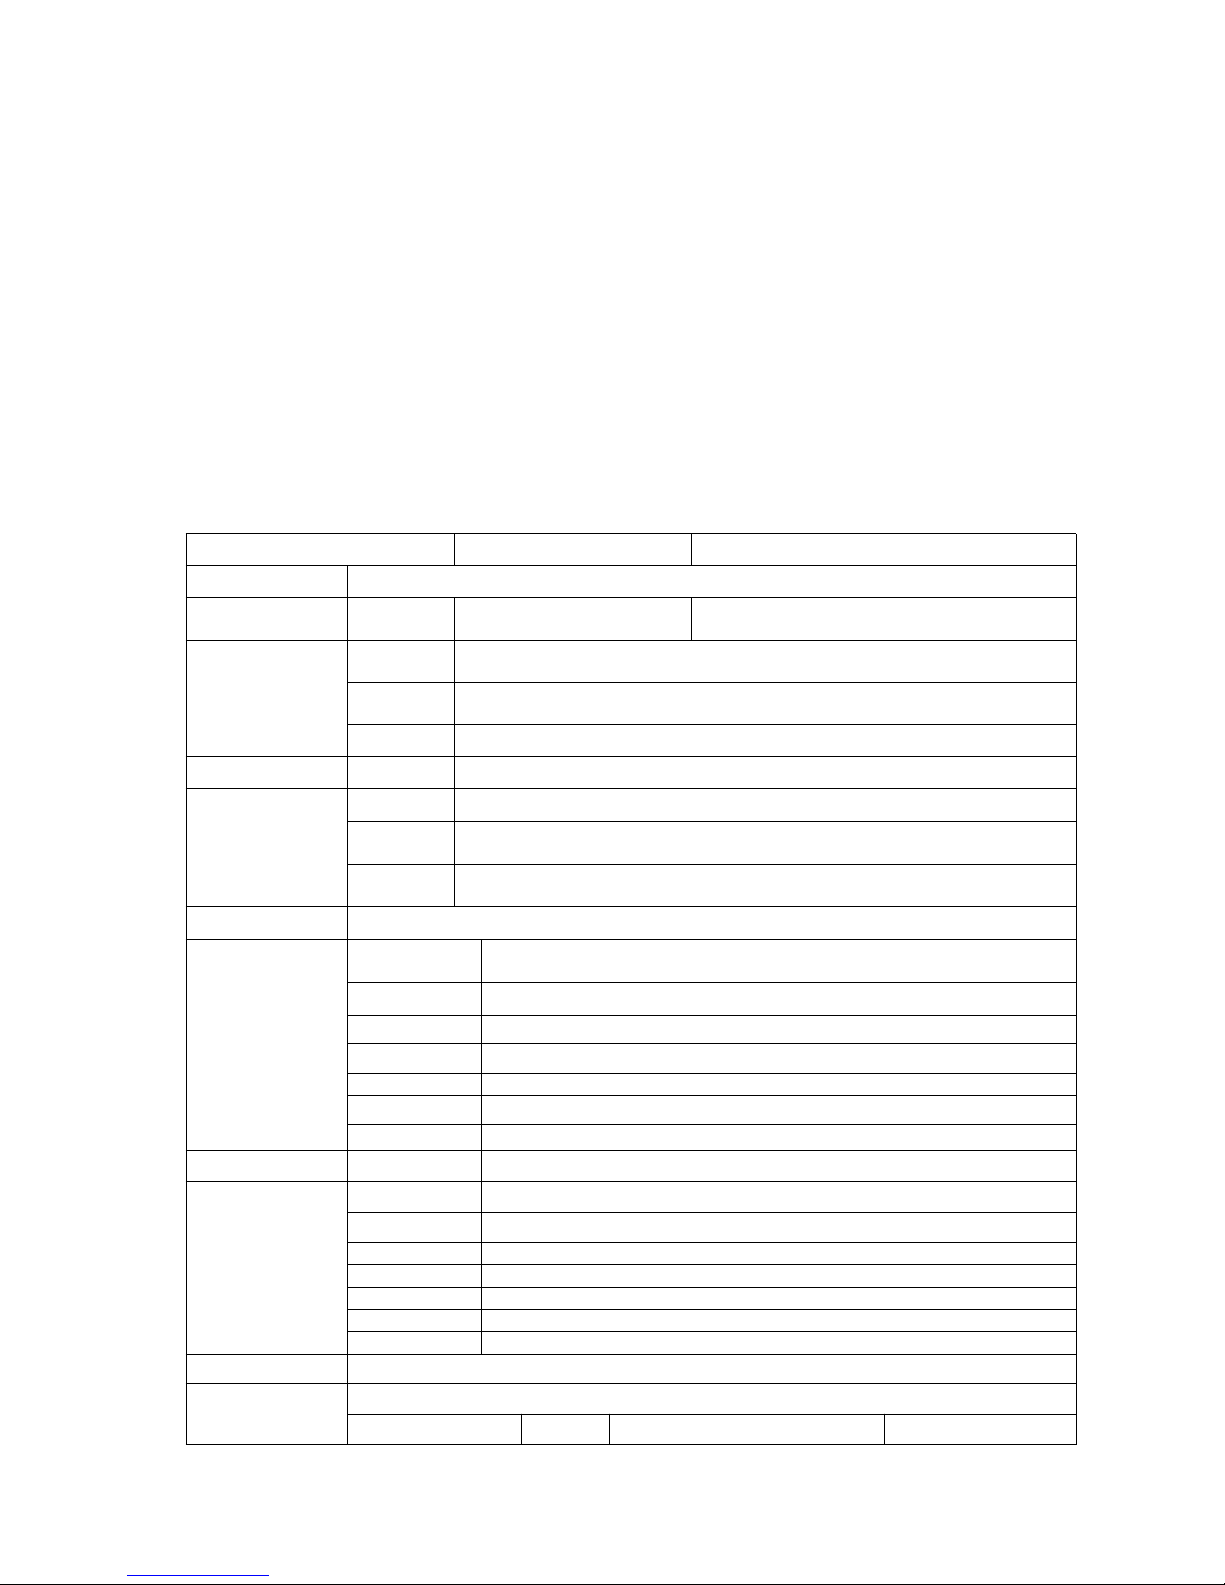
Technical specification
size
55’’
65’’
OSD language
English
Panel
Resolution
Up to 1920X1080
Up to 1920X1080(standard)
Up to 3840 X 2160 (4K/2K)(optional)
AV
Color
System
PAL / NTSC / SECAM
Composite
(in)
1.0 Vp-p±5%@75ohm
Audio (in)
500mV rms
Analog RGB (PC)
Mode
Up to 1920X1080@60Hz
YPbPr/HDMI
Component
Y: 1.0Vp-p@75 Ω, PbPr: 0.7Vp-p@75 Ω
Support
format
Up to 1080P
HDMI
Format
HDMI 1.4 /HDCP 1.2
USB file system
FAT32, FAT16, NTFS (NTFS compressed file is not supported)
Input
terminals
CVBS/Audio
Input
1 X 3RCA (yellow, white, red)
YPbPr
1 X MINI3.5MM (three-in-one terminal)
USB input
1X USB 3.0-A (horizontal), 2X USB 2.0-A(Vertical)
PC-RGB Input
1 X D-SUB 15Pin (blue)
PC Audio Input
1 X 3.5mm Stereo audio-in jack
HDMI input
3 X HDMI-A (horizontal), one inside.
RS232
1XRS232
Output terminals
AV OUT
1 X 3.5mm Stereo audio-in jack
Mobi OS™
specification
Processor
Mobi OS™ (Built on Android 4.2.2)
Frequency
1.5GHz
RAM
1GB
ROM
INAND 4GB
wifi
2.4G
SD CARD port
1
RJ 45 port
1
Voltage range
AC(90~240)V-50/60HZ
Power consumption
Standby: <1W
Rated Consumption:
<150W
<220W
<250W
Page 6
Page 6 of 22
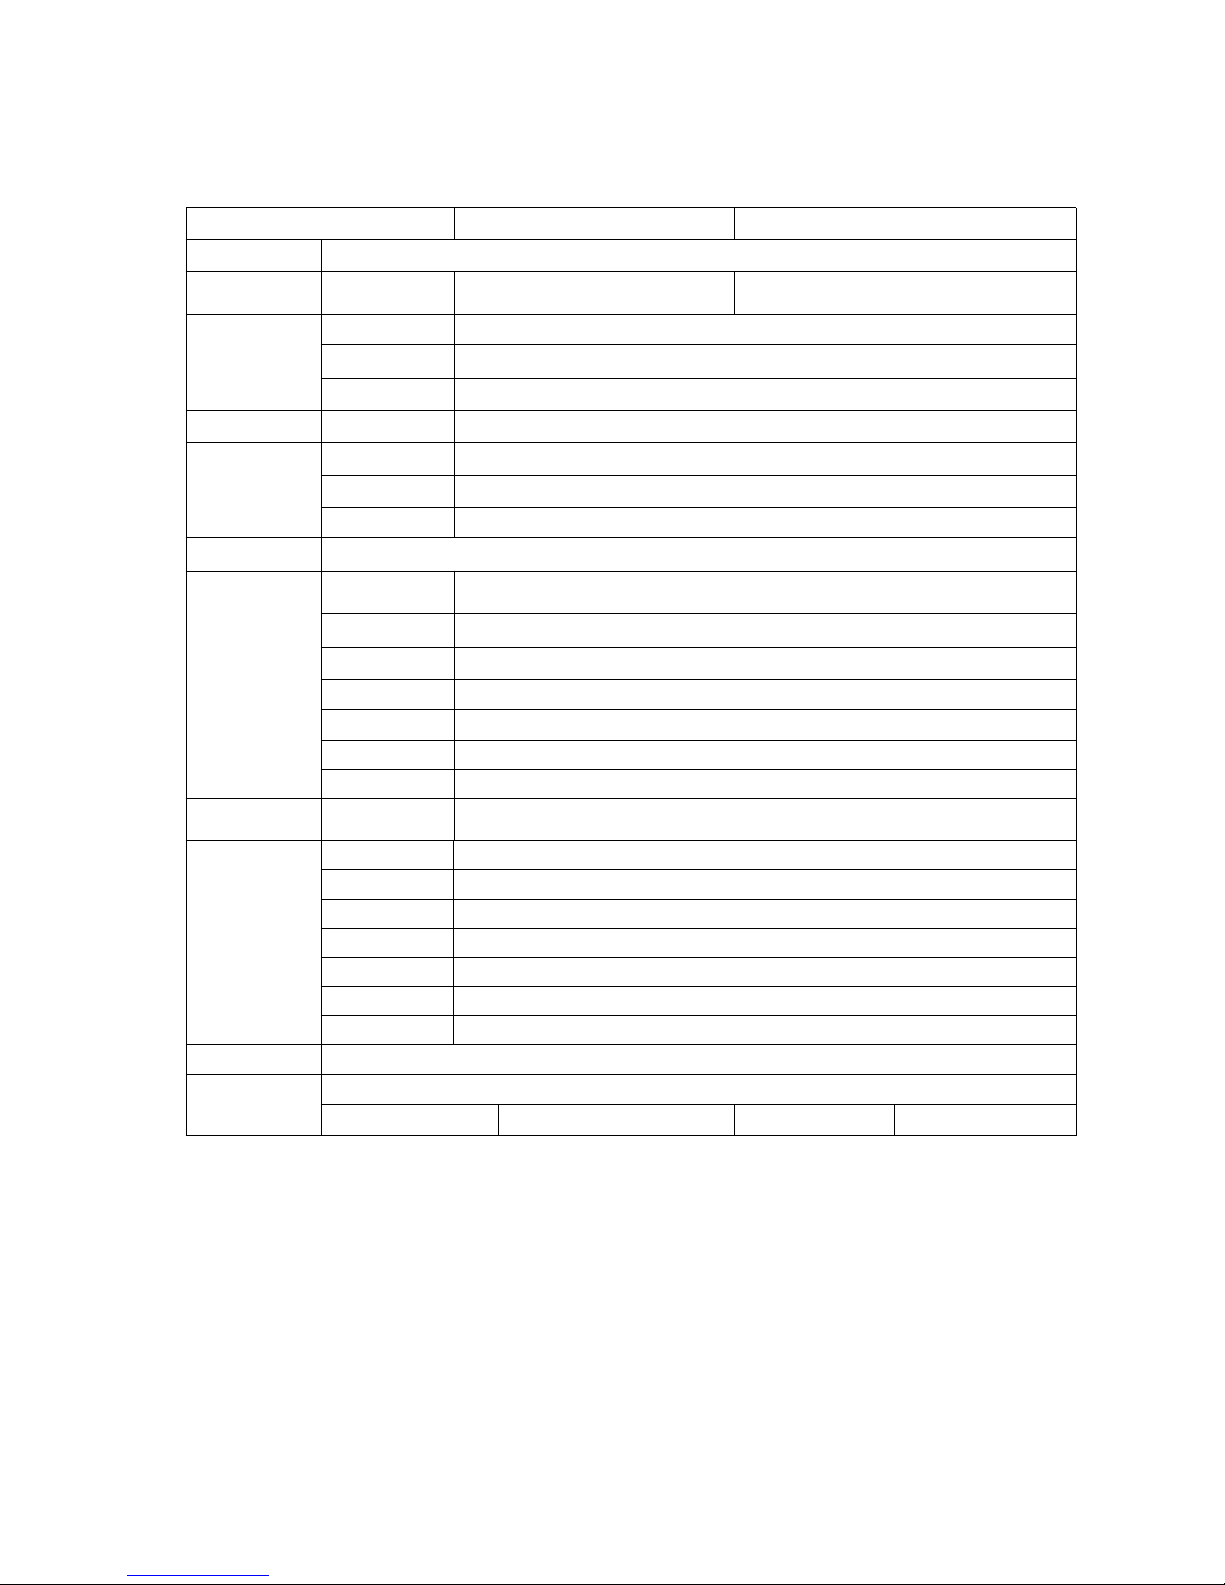
Technical Specification (continued)
size
75’’
84’’
OSD language
English
Panel
Resolution
Up to 1920X1080(standard)
Up to 3840 X 2160 (4K/2K)(optional)
Up to 3840 X 2160 (4K/2K)
AV
Color System
PAL / NTSC / SECAM
Composite (in)
1.0 Vp-p±5%@75ohm
Audio (in)
500mV rms
Analog RGB (PC)
Mode
Up to 1920X1080@60Hz
YPbPr/HDMI
Component
Y: 1.0Vp-p@75 Ω, PbPr: 0.7Vp-p@75 Ω
Support format
Up to 1080P
HDMI Format
HDMI 1.4 /HDCP 1.2
USB file System
FAT32, FAT16, NTFS (NTFS compressed file is not supported)
Input
terminals
CVBS/Audio
Input
1 X 3RCA (yellow, white, red)
YPbPr
1 X MINI3.5MM (three-in-one terminal)
USB input
1X USB 3.0-A (horizontal), 2X USB 2.0-A(Vertical)
PC-RGB Input
1 X D-SUB 15Pin (blue)
PC Audio Input
1 X 3.5mm Stereo audio-in jack
HDMI input
3 X HDMI-A (horizontal), one inside.
RS232
1XRS232
Output
terminals
AV OUT
1 X 3.5mm Stereo audio-in jack
Mobi OS™
specification
Processor
Mobi OS™ (Built on Android 4.2.2)
Frequency
1.5GHz
RAM
1GB
ROM
INAND 4GB
wifi
2.4G
SD CARD port
1
RJ 45 port
1
Voltage range
AC(90~240)V-50/60HZ
Power
consumption
Standby: <1W
Rated Consumption:
<250W
<415W
<510W
Page 7
Page 7 of 22
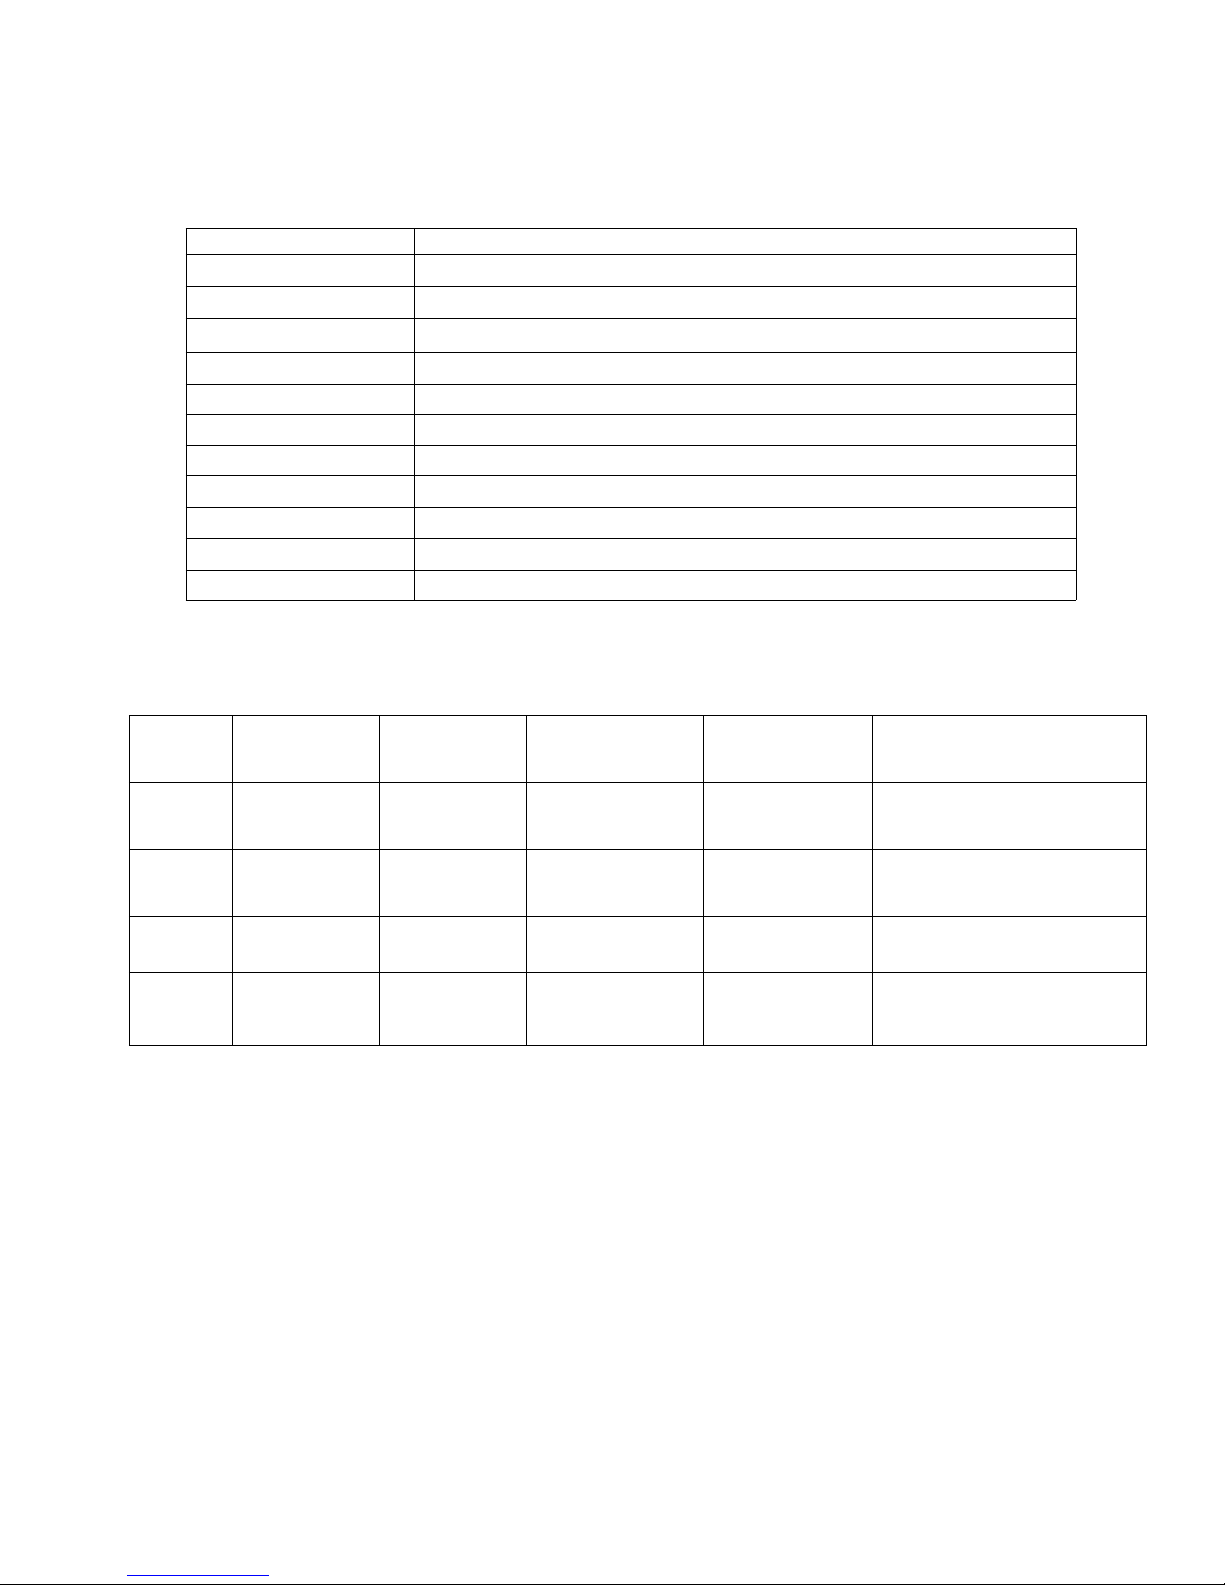
Technical Specification (touch parameters)
Working temperature
0°C~40°C
Set up
As per this Operations Manual
Touch points
Single/Two/Four/Six points available
Writing mode
Finger, writing pen or any non-transparent object
Positioning technology
IR technology
Positioning accuracy
<2mm
Positioning resolution
4096*4096/16384*16384/32768*32768
Writing response time
<8ms
Cursor speed
>180 dot/sec
Communication port
USB
Operating system
WINDOWS/LINUX/MAC /Android
PC response
System auto response
Remark:
Above mentioned parameters are for standard models and are subject to change without notice.
Dimensions and weights
Note: Reference only
size
N.W. (KGS)
G.W(KGS)
Display size
Dimension(outline)
Dimension(package)
55’’
40±2KGS
53±2KGS
1209.6*680.4 mm
1283.5*781*81mm
1430*910*190mm(carton)
65’’
68±2KGS
84±2KGS
1428.5*803.5 mm
1547*936*93mm
1680*1050*220mm(carton)
75’’
82±2KGS
104±2KGS
1650*928mm
1714*1012*90mm
1845*1145*220mm(carton)
84’’
107±2KGS
125±2KGS
1860.48*1046.52mm
1942*1154*84mm
2084*1325*225mm(carton)
Page 8
Page 8 of 22
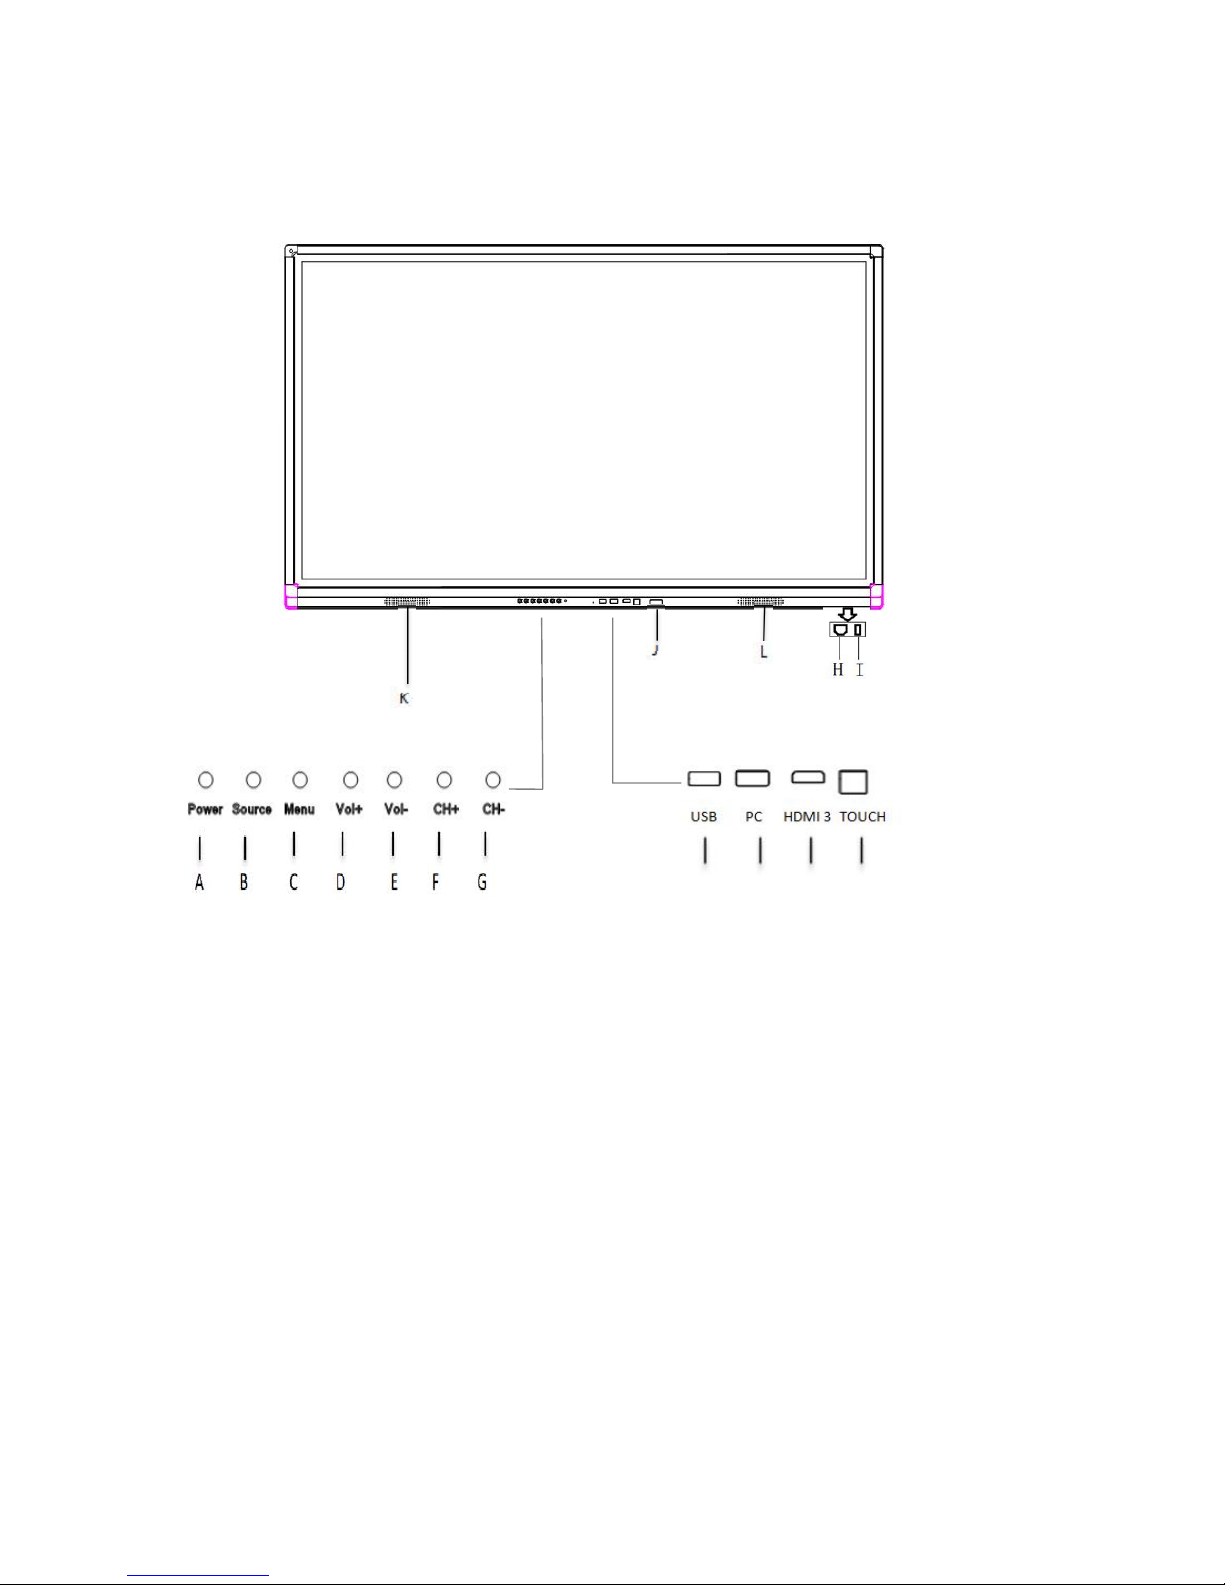
Front panel of interactive display
55’’
P Q R S
J-RCU receiver and button lamp
A-Turn On/Off P-Android USB
B-Source input Q-PC USB
C-Menu R- HDMI 3
D-Volume+ S-TOUCH USB
E- VolumeF- Channel+
G-Channel-(Menu item+/-)
H-Power in, AC110-220V
I-Switch
K & L - Speaker
Note: Front panel picture for reference only may differ from actual product
Page 9
Page 9 of 22
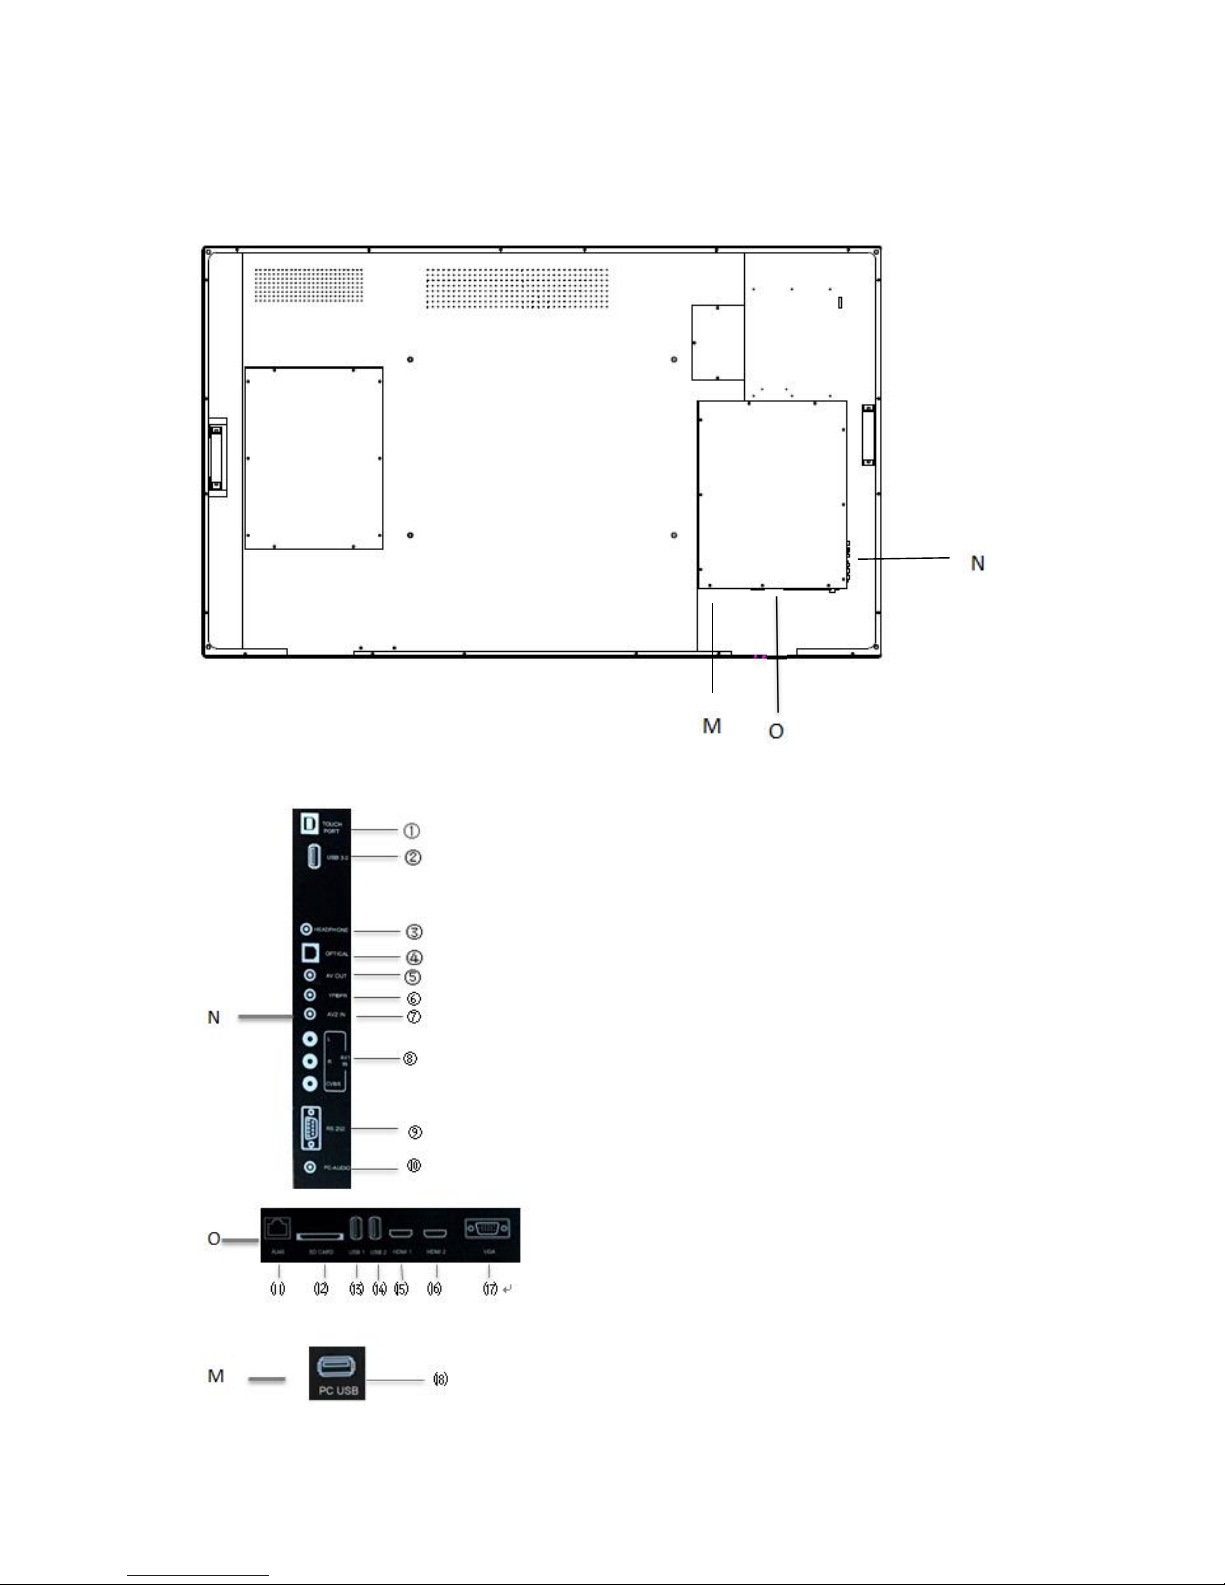
Rear view of interactive display
Note: Reference only may differ from actual product
1.Touch port
2.USB 3.0
3.Headphone
4.OPTICAL
5.AV OUT
6.YPBPR
7.AV2 IN
8.AV1 IN
9.RS 232
10.PC audio
11.RJ 45
12.SD CARD
13.USB 1 (2.0)
14.USB 2 (2.0)
15.HDMI 1
16.HDMI 2
17.VGA
18.PC USB
Page 10
Page 10 of 22
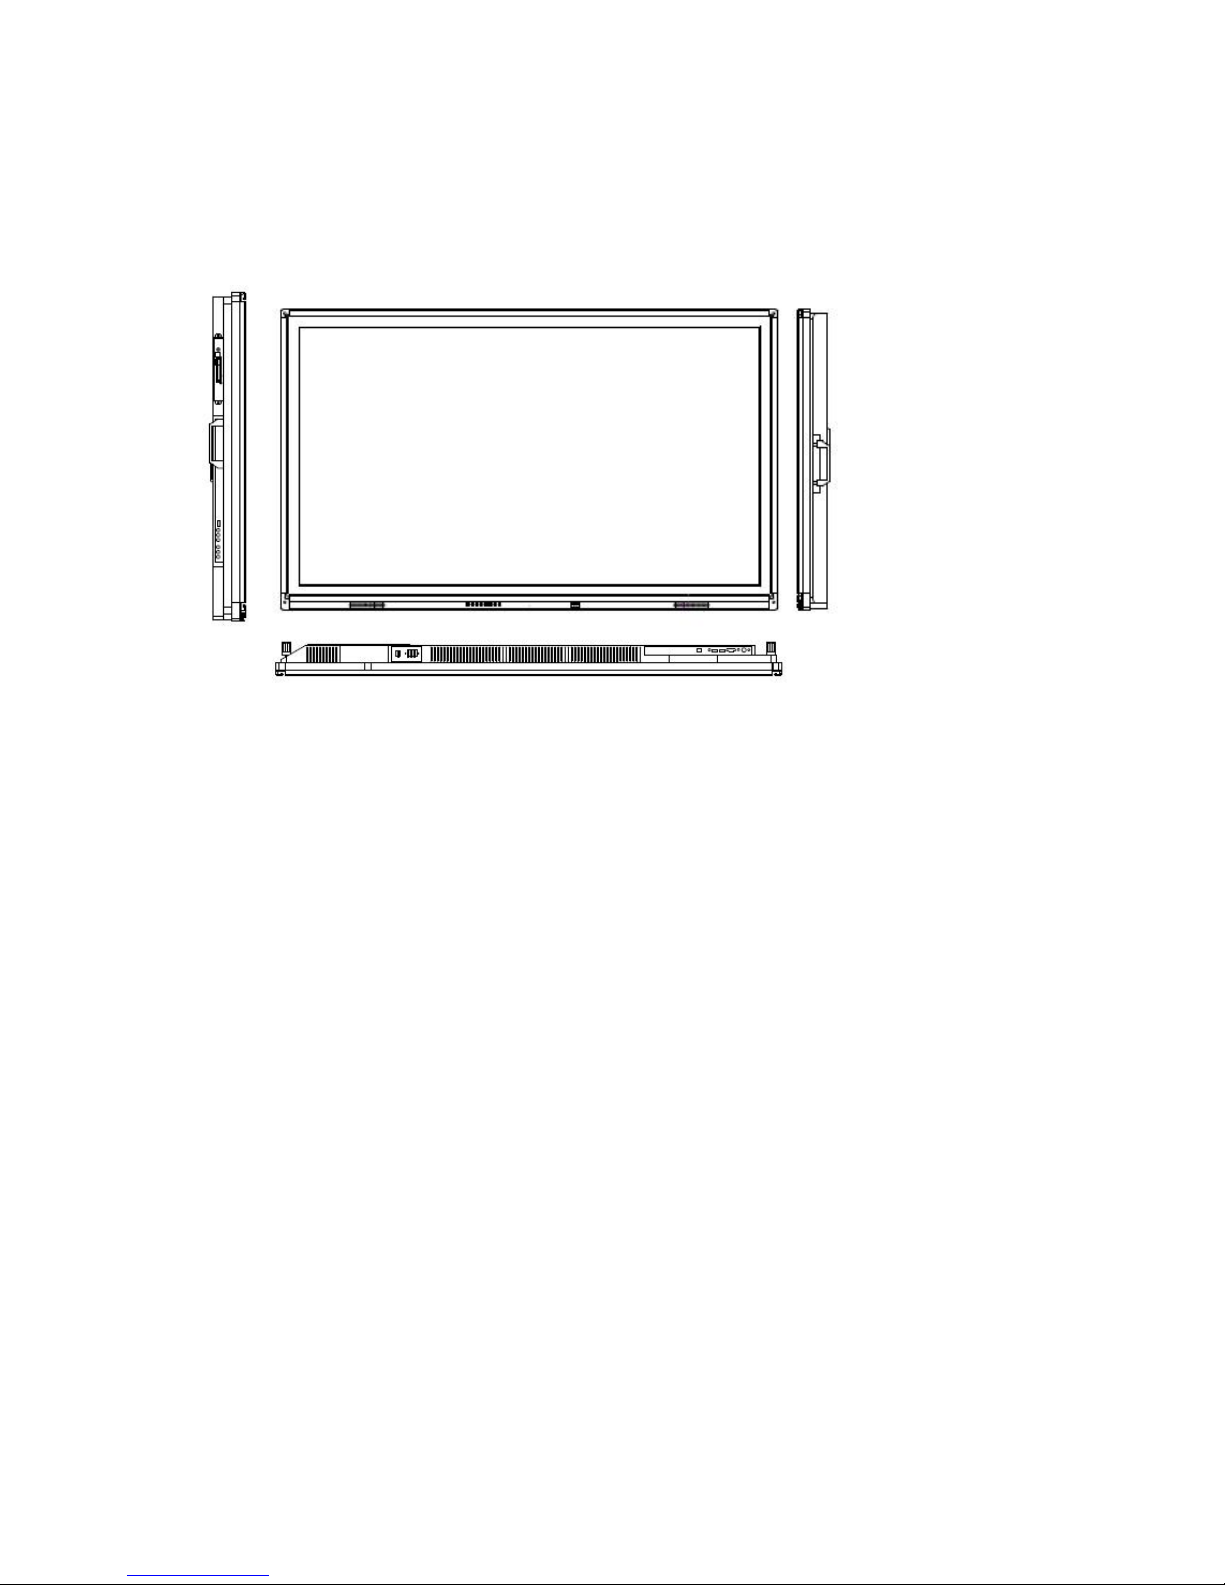
Side/rear port description
Side View
Remark: For reference only.
Video Input: Connect VGA cable with interactive touch HDTV and source.
Audio Input: When using VGA input, an audio cable is needed to connect PC and HDTV.
Touch Input: Using a USB cable to connect PC and interactive touch HDTV
Page 11
Page 11 of 22
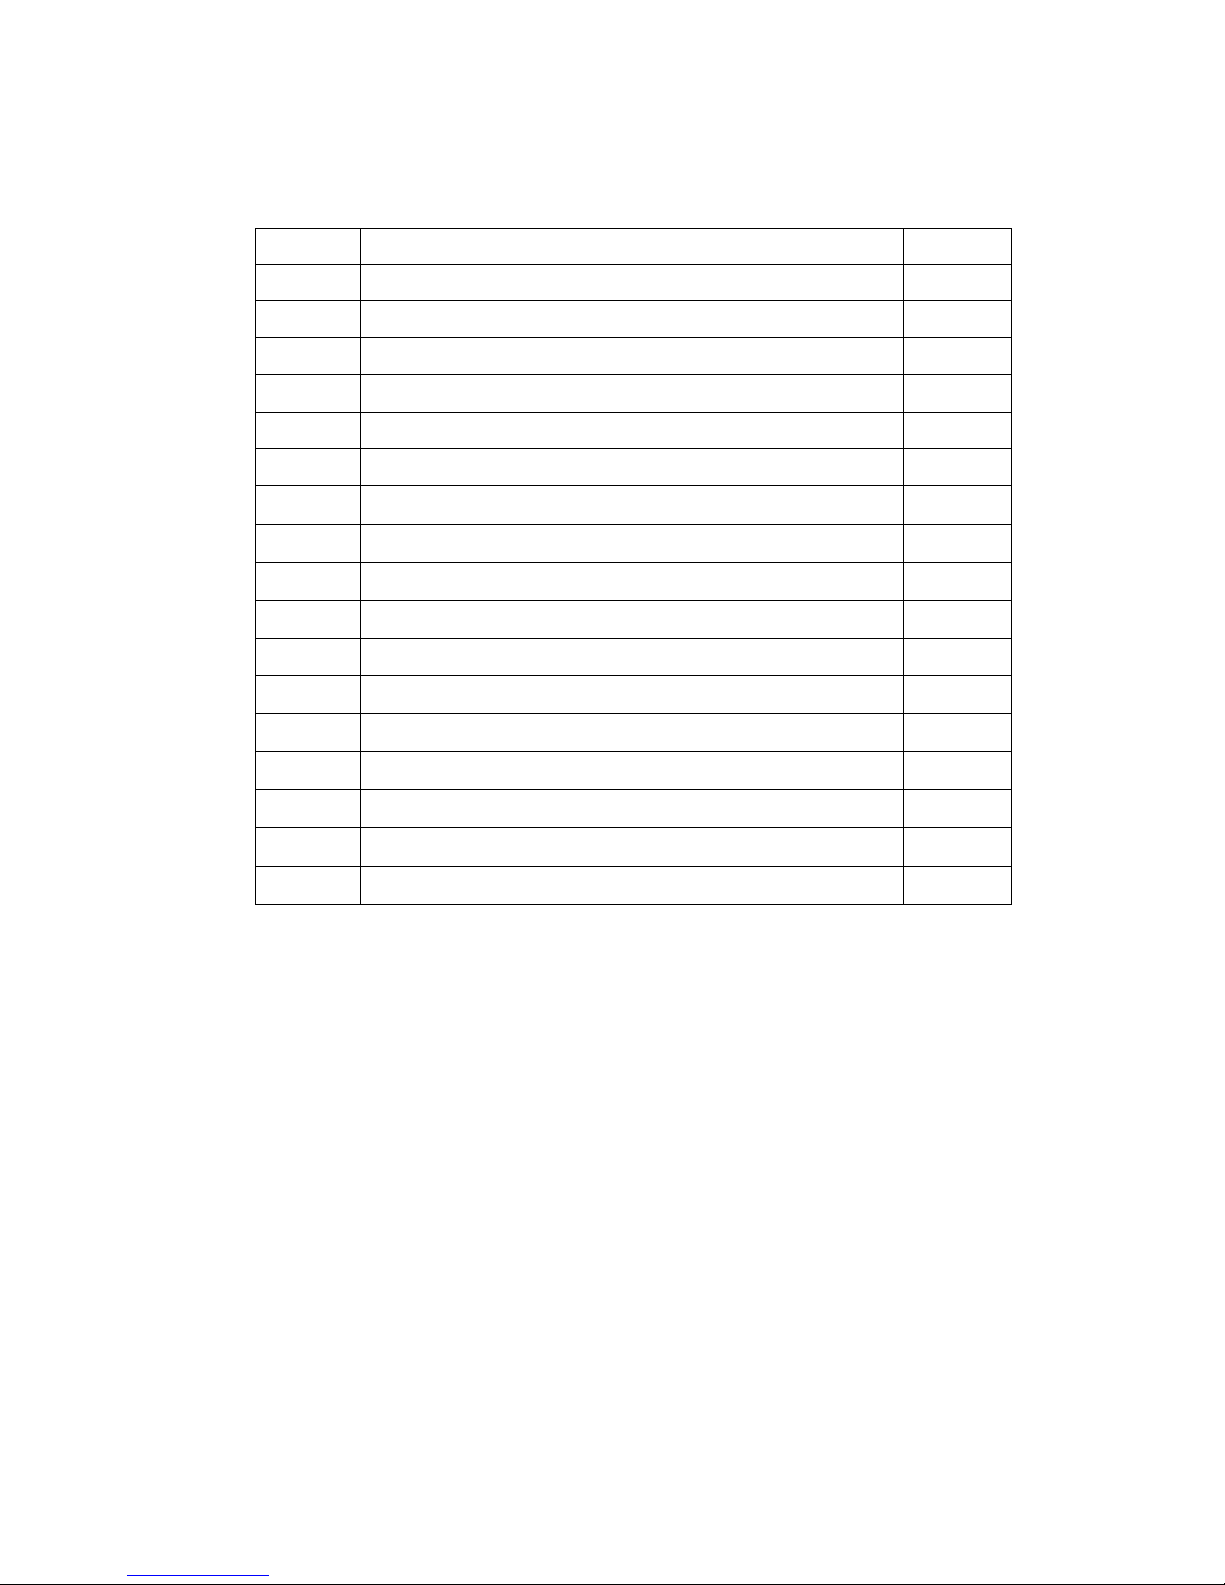
Packing List
No.
Part name
Quantity
1
RCU (Remote Control Unit)
1
2
Warranty Card
1
3
USB cable (1.5 Meter, B-type)
1
4
USB cable (1.5 Meter, A-type)
1
5
Writing Pen (3 pieces with different color)
1
6
Marker
1
7
Accessory Box
1
8
CD for Touch frame
1
9
User Manual
1
10
Wall Mount Brackets
1
11
Wall Mount Screws
4
12
Power cable (1.8 meter, Australia specification)
1
13
VGA cable (1.8 meter, black)
1
14
HDMI cable (2 meter, black)
1
15
Audio cable (1.5 meter, black)
1
16
AAA Batteries
2
17
Desiccant Packs
2
Page 12
Page 12 of 22
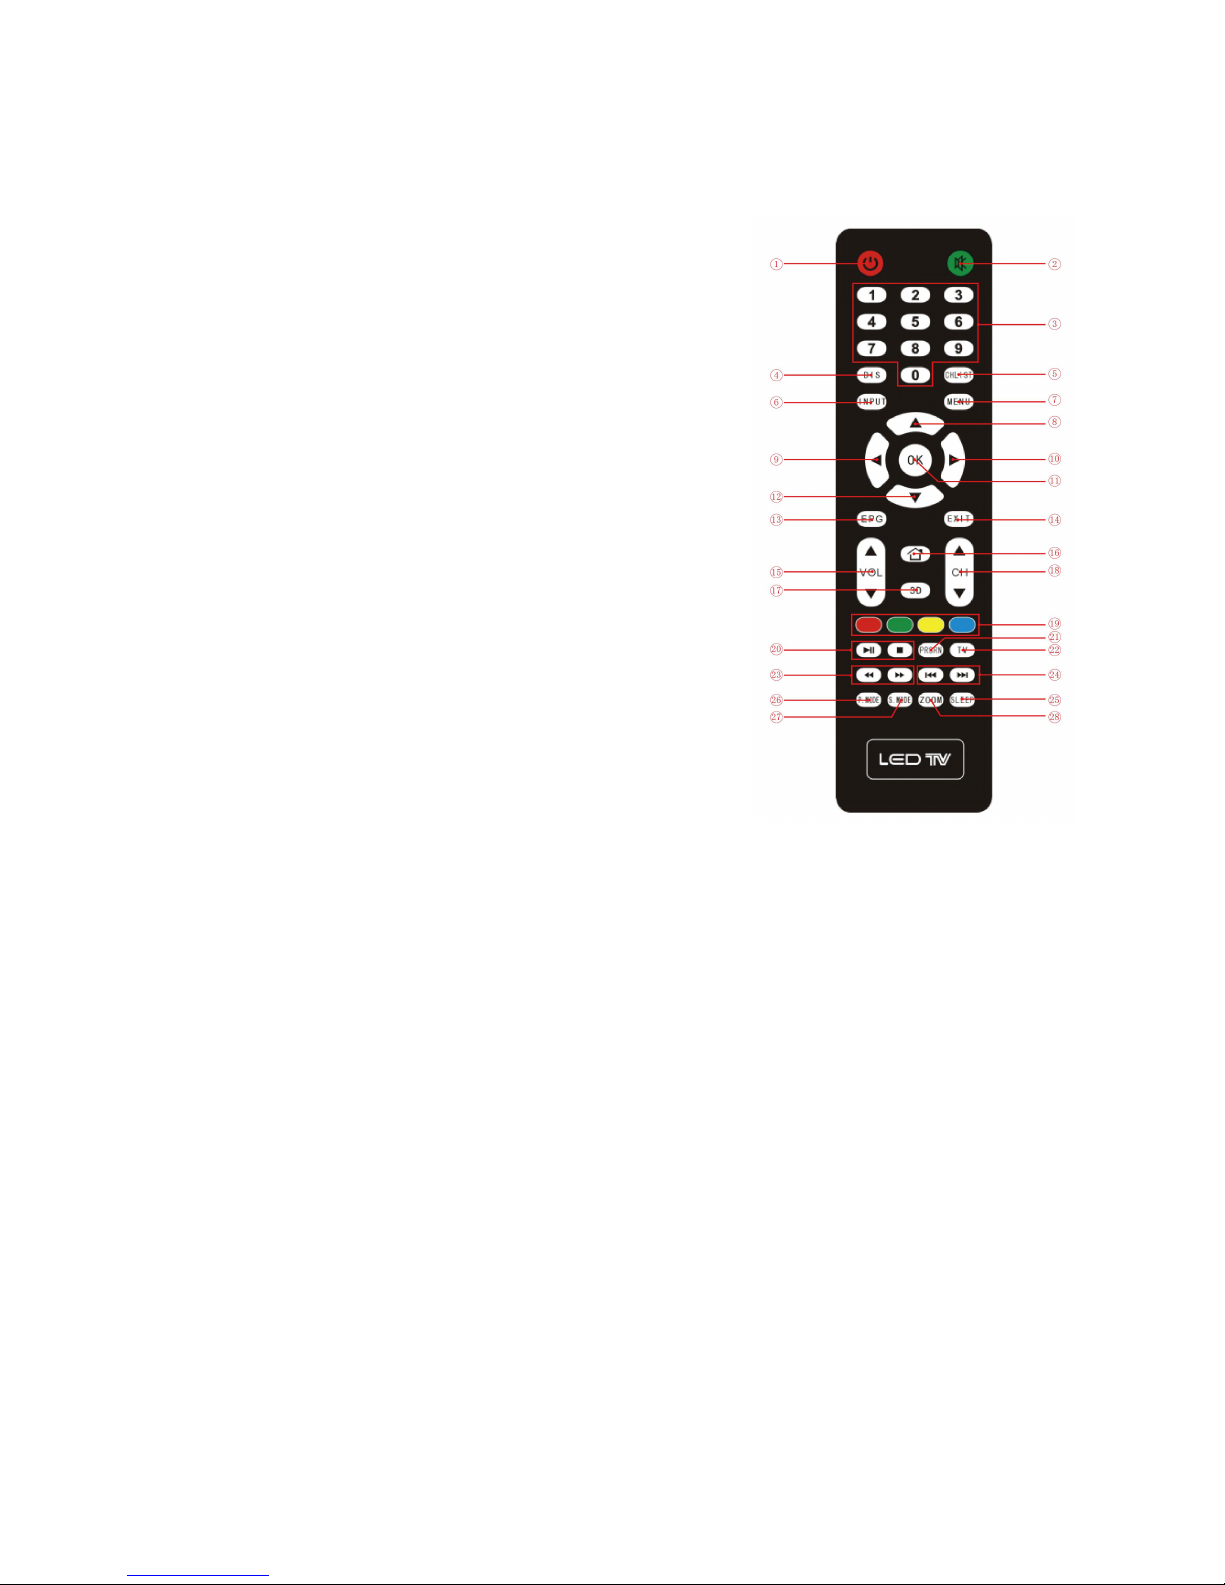
RCU (Remote Control Unit)
1)Standby: turn on or turn off the machine
2)Mute: mute or restore the sound
3)0-9 numeric key: selection or input number
4)DIS: display the screen
5)CHLISI: program list under TV ,can be edited,deleted or skipped etc
6)INPUT:enter or select source channel
7)MENU: enter or exit from the menu
8),12),9),10) up/down/left/right: select up/down/left/right
11)OK: confirm the selection
13)EPG: EPG: application key for DTV
14)Exit: Exit
15)VOL+/-: VOL+/ VOL- to
16)HOME: enter the main page
17)3D: save energy
18)CH+/-: select previous channel or next channel
19)Screen Display: display the screen
20)Play/Pause,Stop: play audio/video or pause audio/video, stop the playing
audio/video
21)PRSRN: insert a SD card before screen shot
22)TV:select TV channel
23)Forward/Rewind: Forward or Rewind the audio/video
24)Previous/Next: select previous or next page
25)Sleep: set start and off time of the sleep
26)P.MODE:select image mode as standard, soft etc
27)S.Mode: select sound mode as: standard, music, theater etc
Note: not all features are applicable.
Page 13
Page 13 of 22
Introduction of OSD
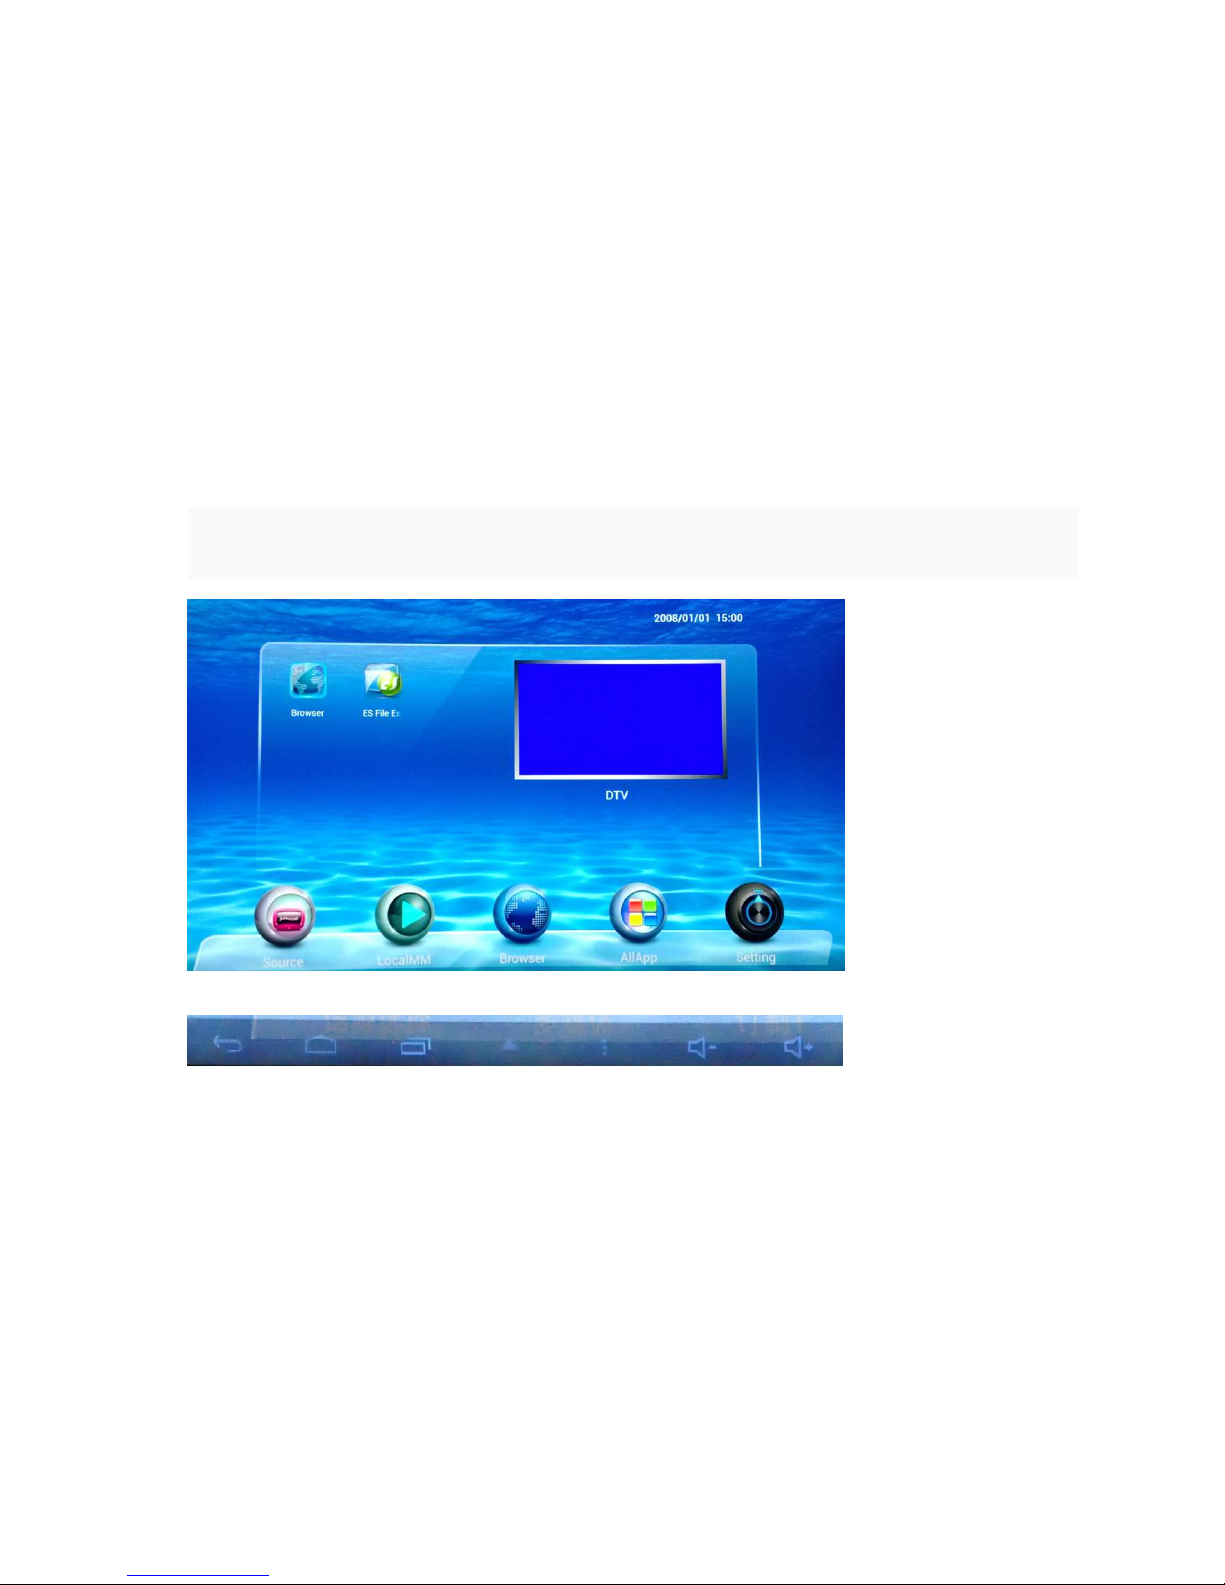
Operation of OSD — How to choose source input
1. The source input can be selected by three different methods.
1.1 Press “Source” to choose
1.2 Press“▲(Source)”as follows to choose
1.3 Press“Source”on the front panel or remote control to choose.
Page 14
Page 14 of 22
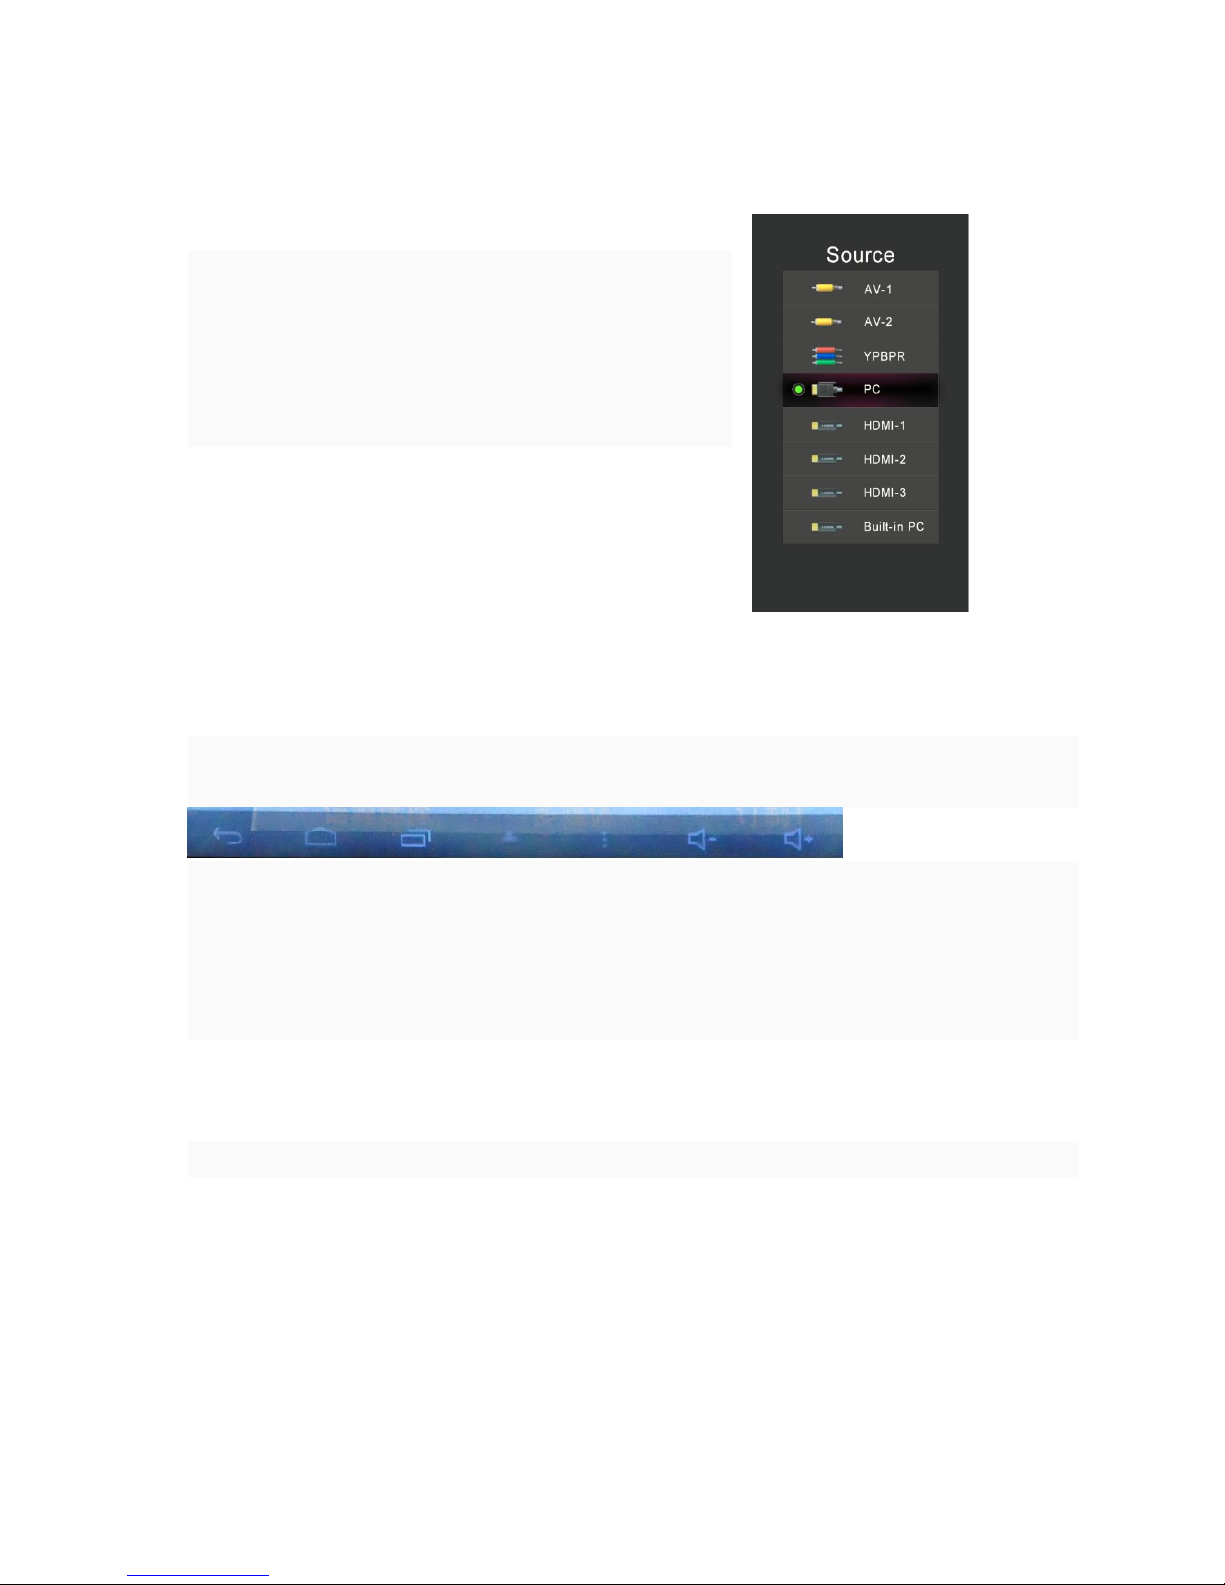
2. It will showed as follows after choosing the “Source”
3. When “Source”showed as above, there are three ways to enter it:
3.1 Directly click.
3.2 Select "source" and then automatically enter it.
3.3 Press “▲▼”to select the signal channel wanted and then press "OK" to
confirm.
4. Source can also be selected by the Full Touch Menu. Please refer to the
details at the introduction of Full Touch Menu.
Introduction of “Set” Menu
1. The “Set” Menu can be selected by three different methods.
1.1 Enter from "Menu" which is at the bottom of the screen;
1.2 Enter from the "Menu" by the remote control.
1.3 Enter from the "Menu" on the front panel.
2. “Set” Menu options can be selected by two methods.
2.1 Directly click the icon to choose.
2.2 Press "▲▼" to select. (Setting: Picture, Sound, Adjust,Function)
*Picture
1.1 Directly click on the icon to choose.
1.2 Press“ ▲▼”to select. Press " ◄► " to confirm the submenu and adjust the value. Press " ◄► " to move the submenu (purple
color light means to be selected)
Page 15
Page 15 of 22
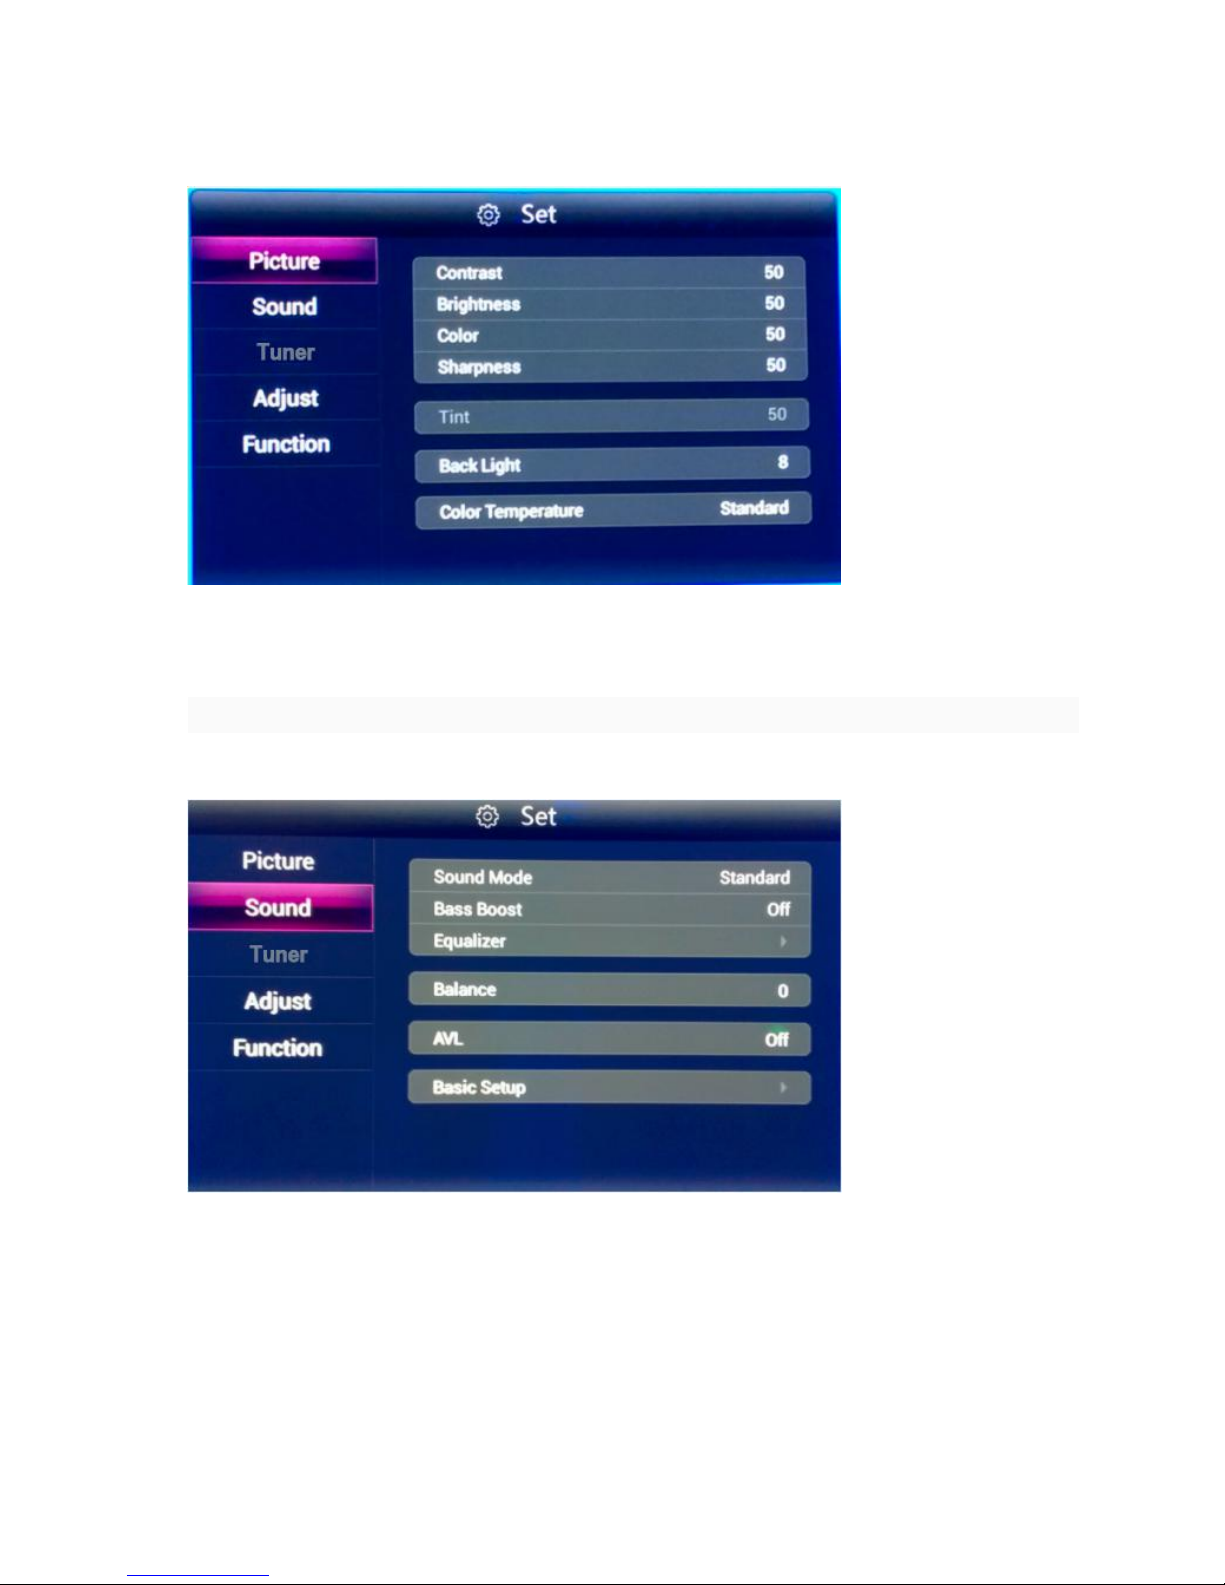
*Sound
1.1 Directly click on the icon to choose.
1.2 Press“ ▲▼”to select. Press " ◄► " to confirm the submenu and adjust the value. Press " ◄► " to move the wanted
submenu(purple color light means to be selected)
*Adjust
1.1 Press “Adjust”to select the submenu.
1.2 Press“ ▲▼”to select. Press " ◄► " to confirm the submenu and adjust the value. Press " ◄► " to move the wanted
submenu(purple color light means to be selected)
Page 16
Page 16 of 22
How to use
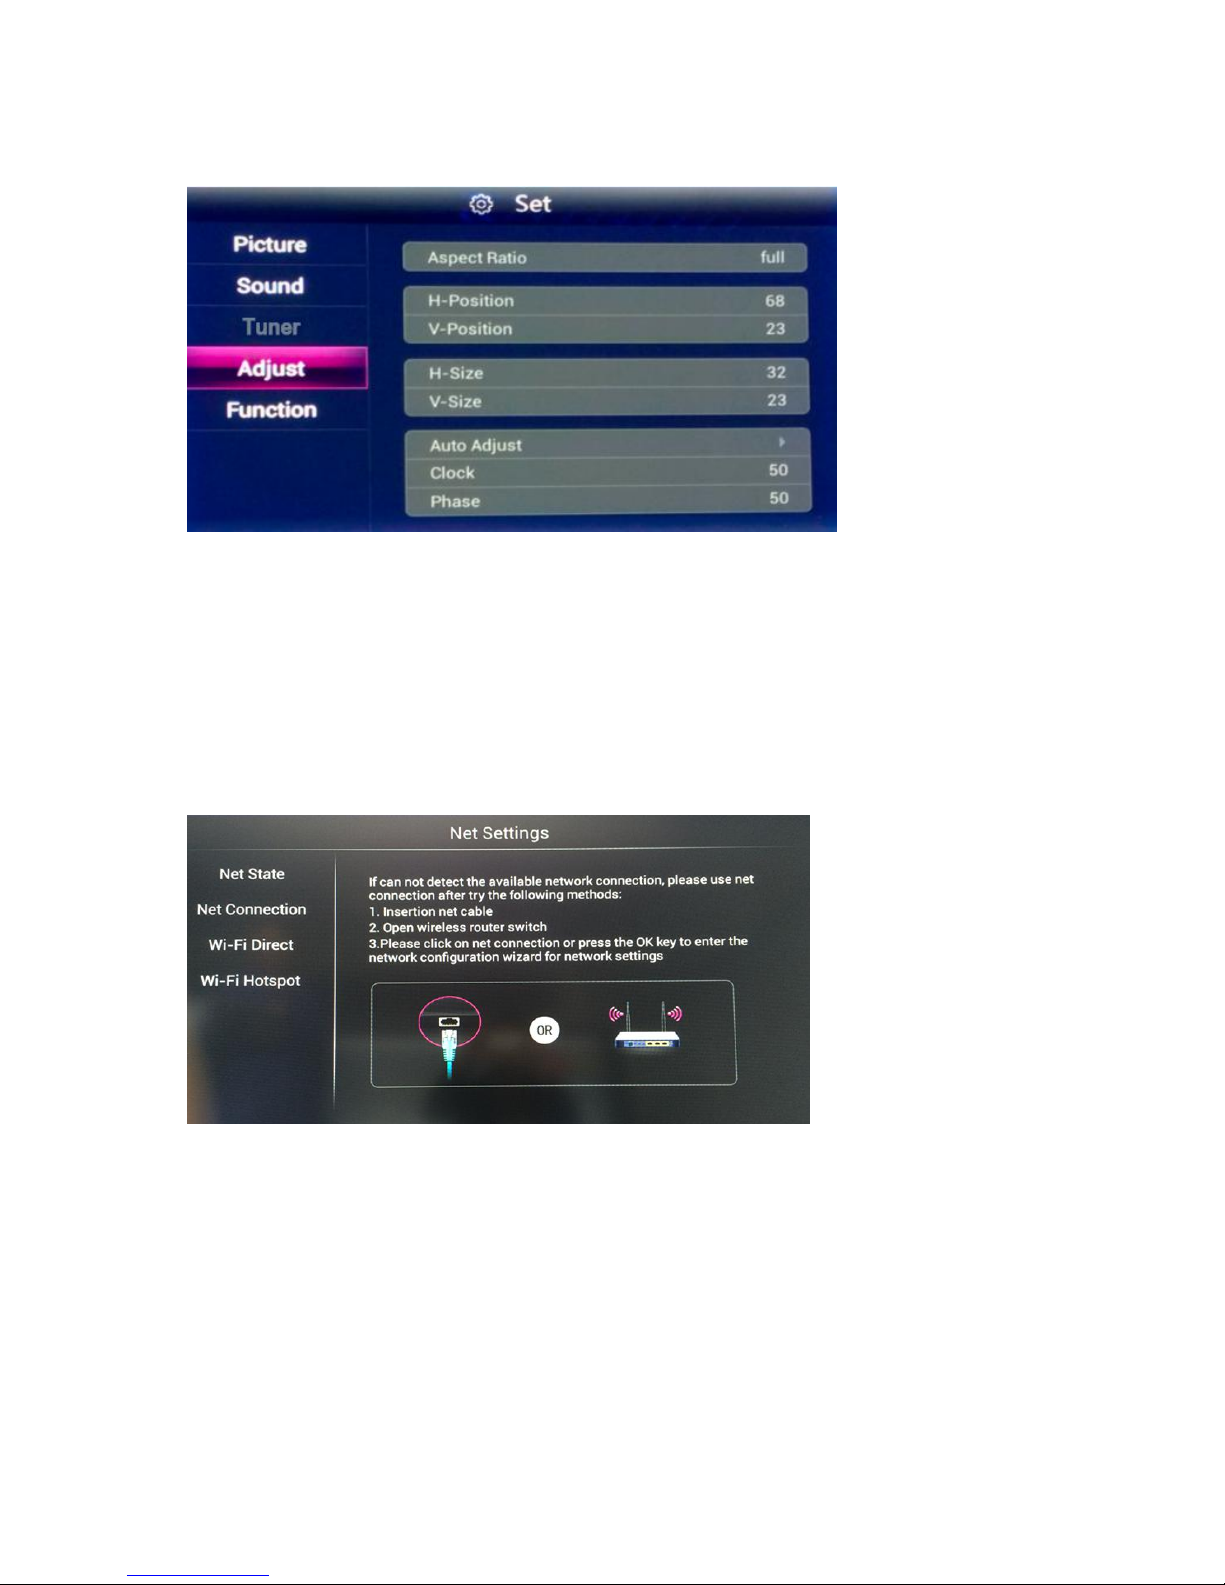
Network setting
Choosing the net connection mode and setting up the right number.
Press “main page” to enter, press " ▲▼◄► " button to select [system setting] and press “enter”. Press " ▲▼ " button to select
“
Net Settings”and press“enter”to enter. Press " ▲▼ " to select between WIFI and WIRED.
A.Wired Network Setup
It will be automatically equipped with an IP number if LAN is connected and DHCP(set automatically) is supported.
Follow the steps to set the IP manually:
1) Press " ◄► " to select”automatically to get IP address” [Close]
2) Press " ▲▼◄► " to select the number to be changed, press numeric keys to input the [IPv4 Address], [Subnet Mask]、[Default
Gateway]、[DNS address]
3) Press [Save] and press“Enter”to save the IP address . Press " ▼ " to select [Next] to enter wired network setting
B.Wireless Network Setup
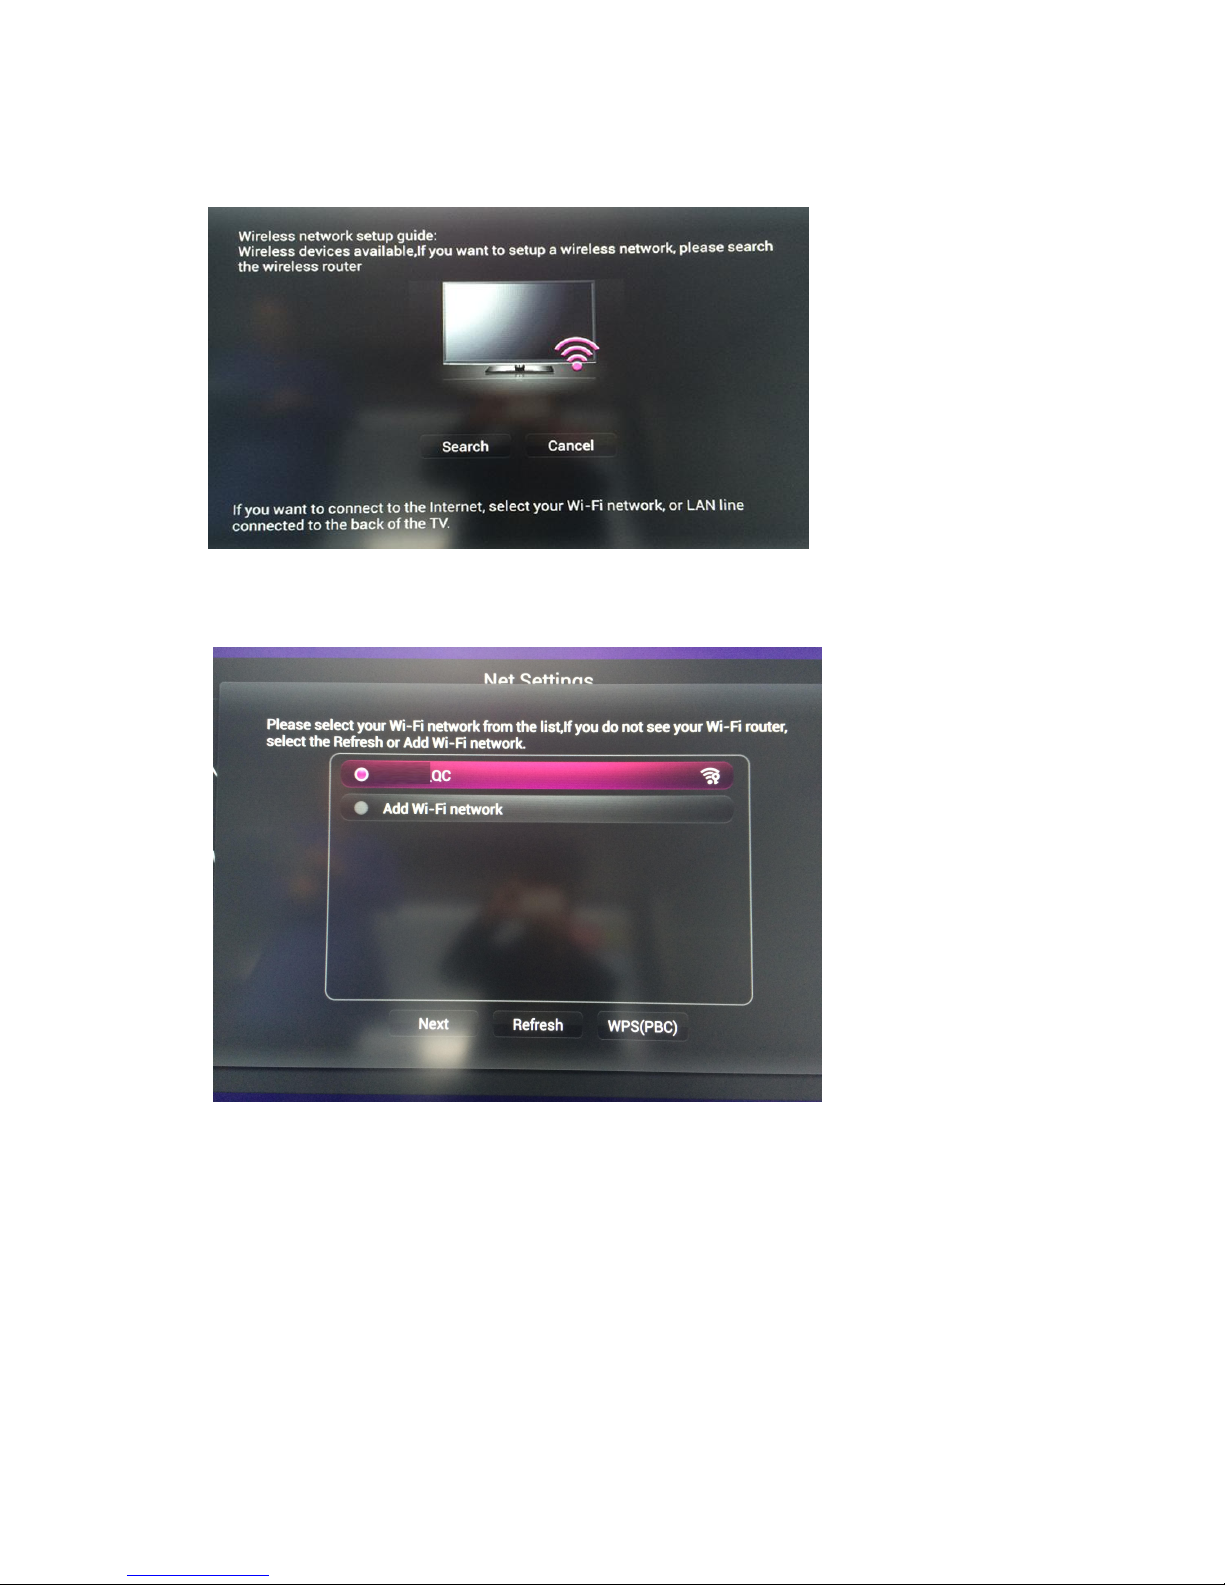
1) The system will search the available wired and wireless network automatically, press“◄►”to select [Wireless Network] and
Page 17
Page 17 of 22
press“Enter”to enter the wireless network setting.
2) Press "◄► " to select [Search] to enter the network setting, press " ▲▼ " to select the WI-FI network from the list, press "
▲▼" to select[Next ] and press enter
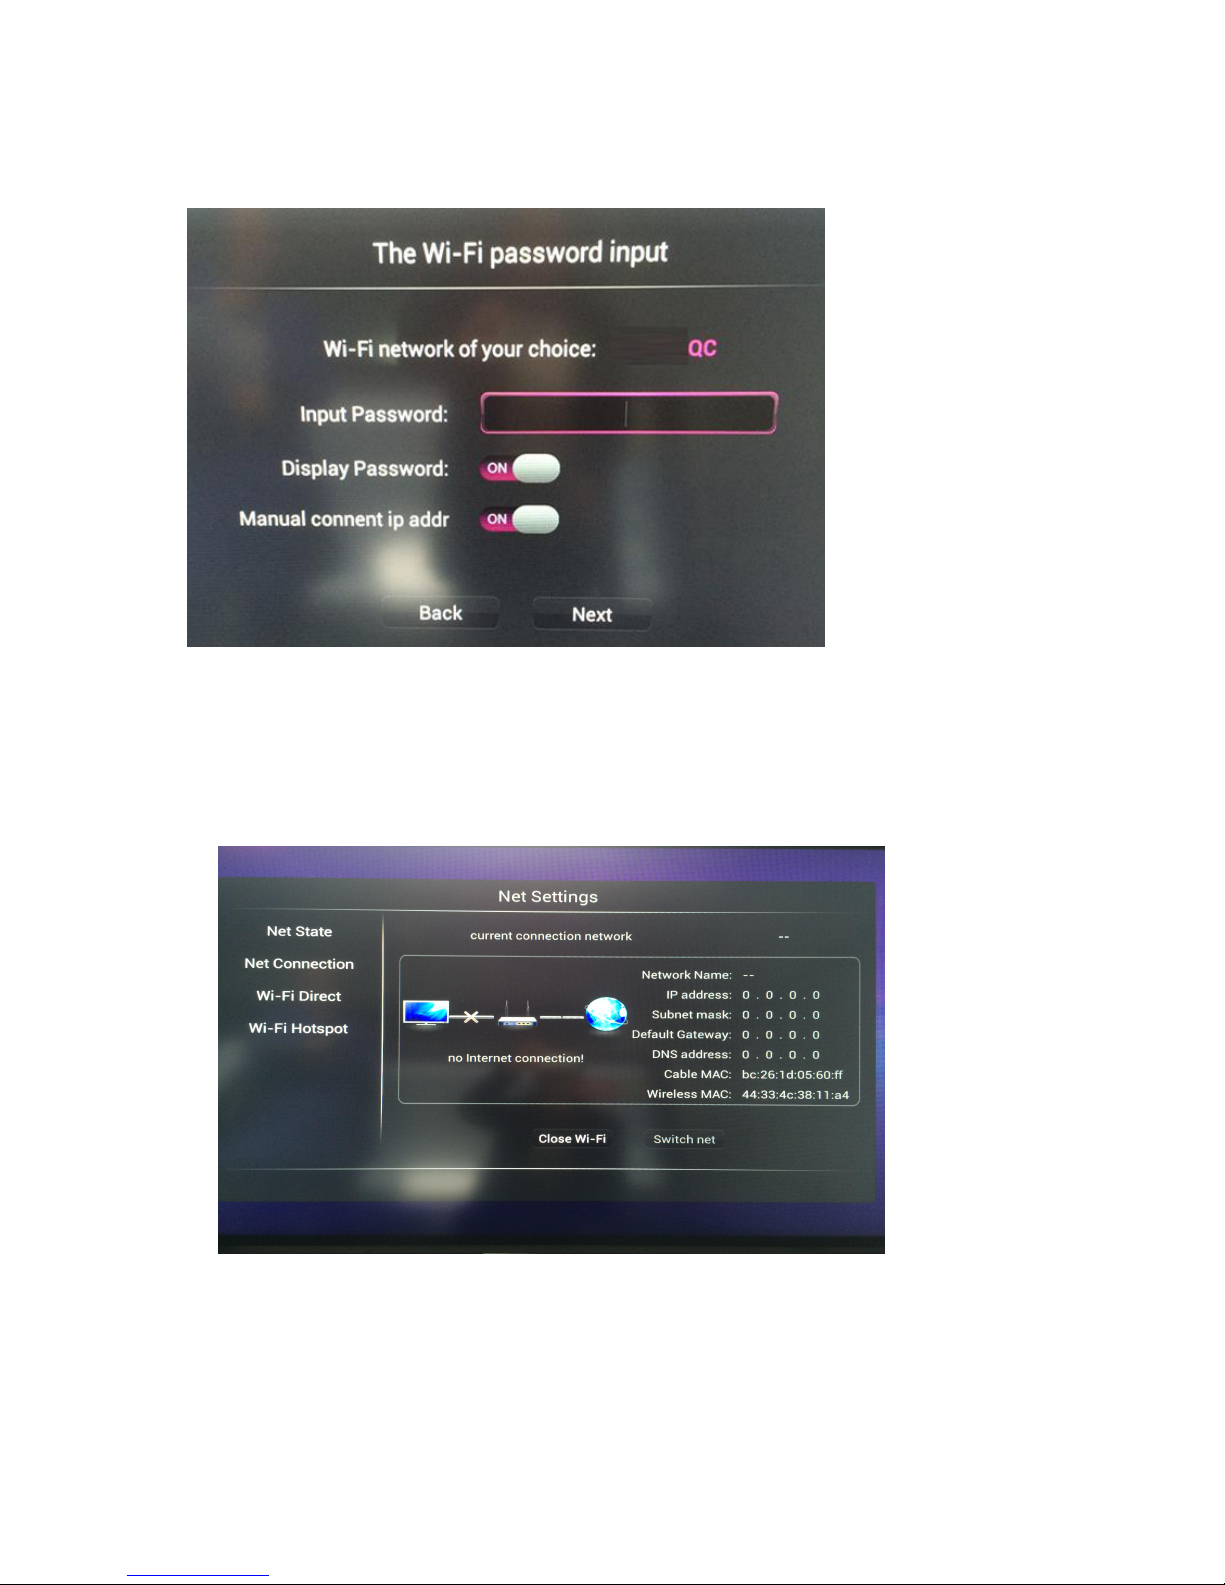
3) Password: Input the WI-FI password, press“Enter”and then press " ▲▼◄► " to select [Finish] and press“Enter”, then press "
Page 18
Page 18 of 22
▲▼◄►" to select “Next”to start the wireless connection.
Network Status Lookup
Check the connection status.
Remote control
Page 19
Page 19 of 22
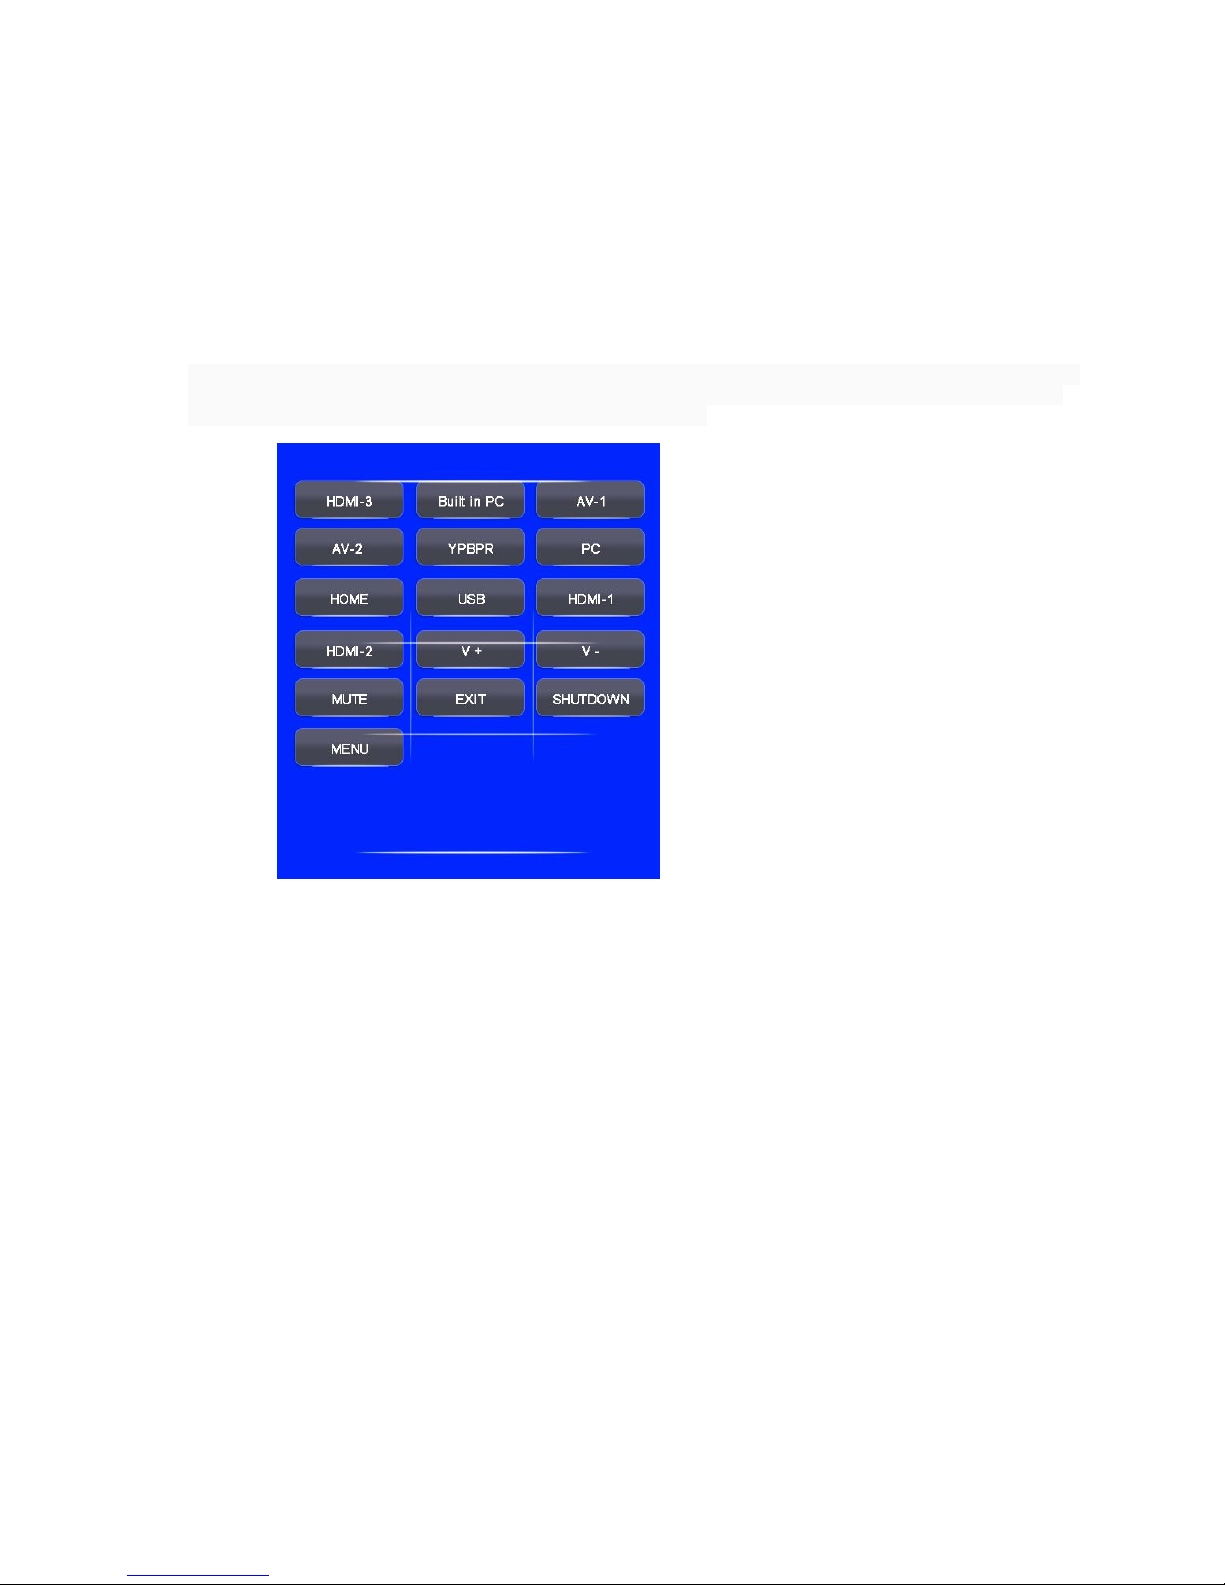
Full Touch
Open the MTS, Android characters will disappear on the bottom right corner of screen, and then using finger or touch pen draws
straight line upwardly (the line should be longer then 10CMS) in the middle of the border-bottom. If the menu of the full touch
does not appear, please try it again, and see the picture of Menu as follow:
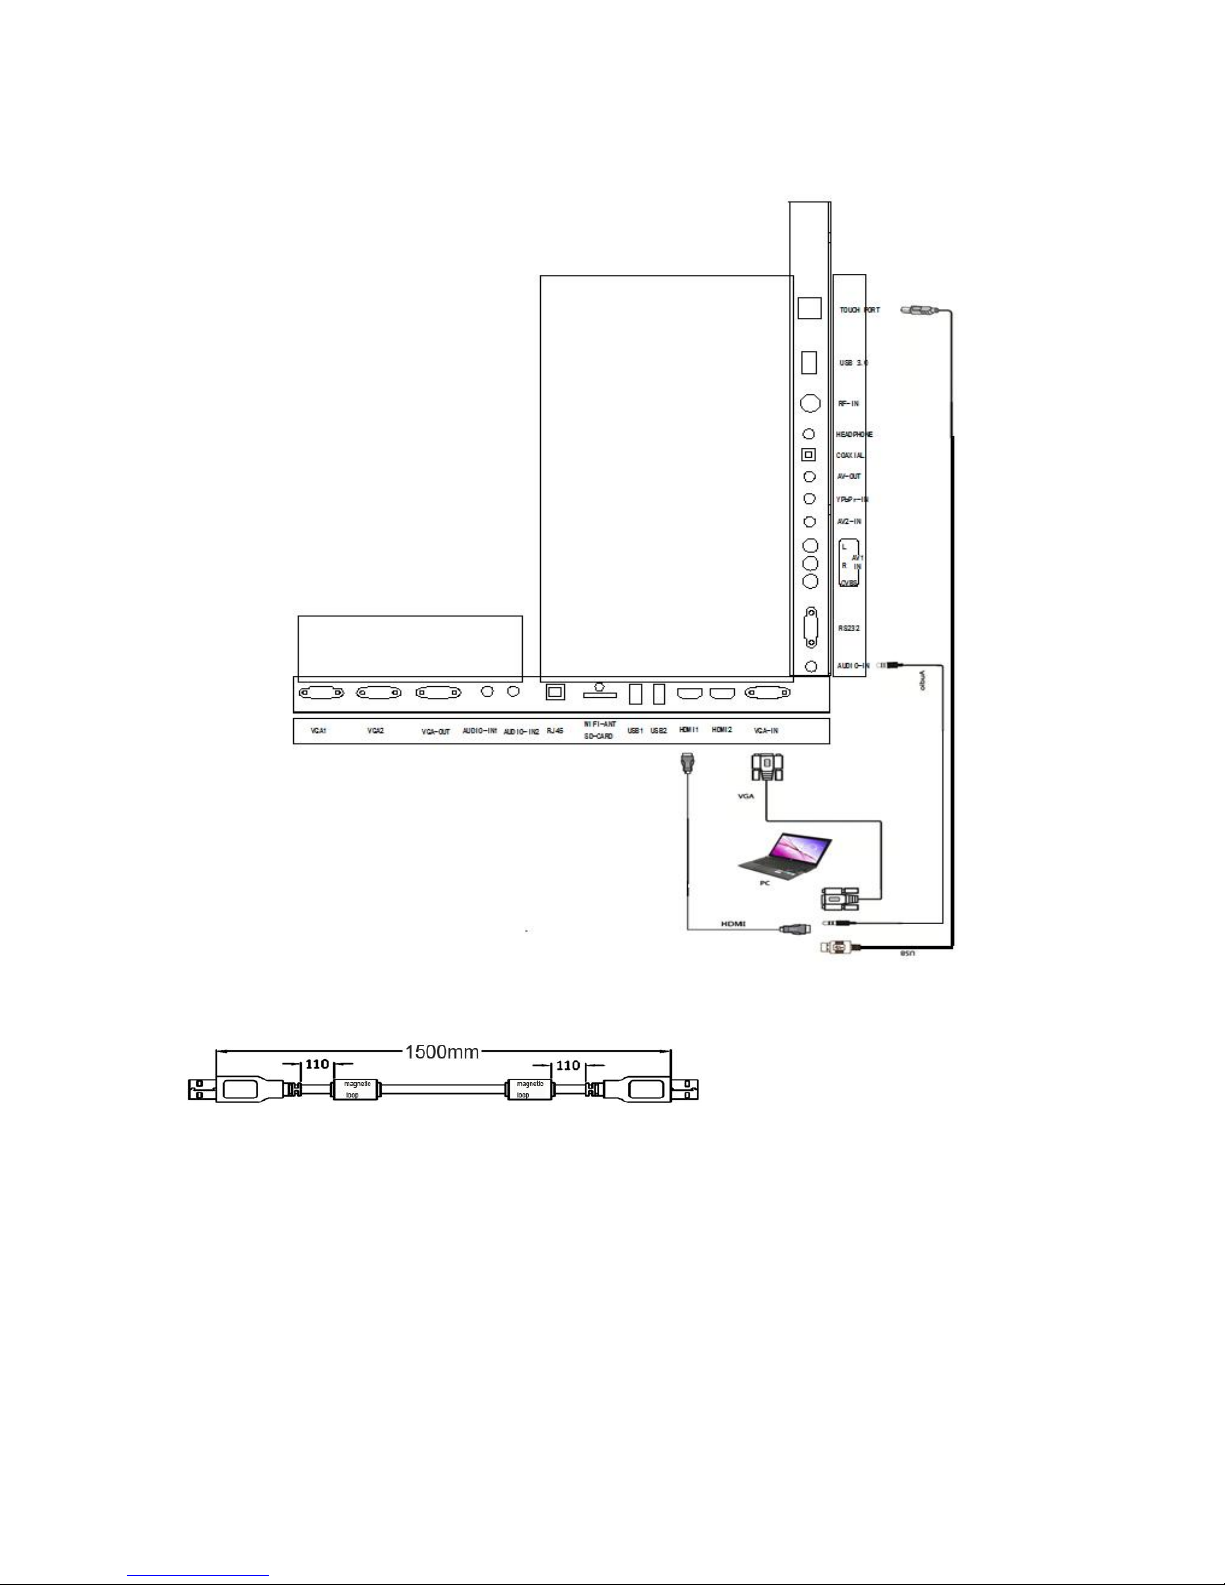
Connecting PC
1) Leave the HDTV unit powered off
2) Using the VGA or HDMI cable connect the HDTV unit VGA or HDMI port with that of the PC
Page 20
Page 20 of 22
1) Connect USB cable to the PC and to the touch port of the HDTV unit.
2) Power up the HDTV unit and use the remote control unit (RCU) to select input source (HDMI Source)
3) Use cables supplied together with this HDTV unit.
The HDTV unit has a driver-less touch frame.
Connect the USB cable to
Once the USB cable is connected, the touch function means to be ready..
Allow a few seconds for the HDTV to register the connected PC.
Maintenance of touch frame
1) The IR technology is sensitive to excessive dust
2) Keep the screen surface free from dust
3) Clean with a soft dry cloth
Trouble shooting
No Signal
● Possible Causes: Connecting ports damage, VGA or HDMI line failure, Source input selection error, VGA or HDMI line not
fixed connected
Page 21

Page 21 of 22
● Corrective actions: Re-connect VGA or HDMI line and check if it is fixed firmly
● Select the right input source
No Audio
● Possible causes: audio line not connected, check audio output from PC (e.g. volume, mute, etc.)
● Corrective actions: Ensure audio cable is connected if using VGA, check volume and mute output in PC
Touch frame issues
● Off calibration
● Corrective action: Re-do the calibration, using Windows or IR frame calibration software included with the HDTV unit,
Check display resolution of your PC
Touch point drift.
● When the cursor drifts away from the touch point.
● Corrective action: Ensure there are no ‘other’ accidental touches from sleeves, elbows, etc.
Only single touch
● Check if your PC has installed WIN7 or higher version OS
● Check that the software you are using is multi touch capable
● Corrective action: Install and use multi touch capable OS and application software.
Trouble shooting for HDTV problems
No audio and picture
● Check if the power is on and power cord connected firmly with power supply
● Check if you have turned the power button on – rendering the unit on standby
● Check brightness and contrast setting
● Check volume
● Check the Source selection is appropriate
Picture but no audio
● Check volume
● Check if the mute button is activated in the RCU
No picture or only black and white picture
● Adjust color setting
● Check if the color format is right
Disturbance in audio and picture
● Relocated HDTV unit
● Plug the power line to another power socket
Non responsive RCU
Change batteries
Clean RCU emitting window
Unblock the receiving window at the HDTV unit
Check batteries’ contact points.
RoHS Standards
Marking for toxic and hazardous substances and elements
Part name
Toxic and Hazardous Substances or Elements
Lead
(Pb)
Mercury
(Hg)
Cadmium
(Cd)
Hexavalent Chromium
Cr(VI))
Polybrominated
Biphenyl
(PBB)
Polybrominated Diphenyl Ether
(PBDE)
Housing
○○○○○
○
LED screen
ⅹ
○○○○○
PCB parts
ⅹ
○○○○○
Power line/Connection
line
ⅹ
○○○○○
Page 22

Page 22 of 22
RCU
○○○○○
○
Accessories
ⅹ
○○○○○
* : PCB parts includes PCB board and its components, such as resistor, capacitor, IC, connector etc.
○: Represents toxic and hazardous substance content contained in all homogeneous materials of designated part below
National Standards of SJ/T 1364-2006.
X: Represents toxic and hazardous substance content contained in one of homogeneous materials of designated part all meet
EU ROHS standard, and PCB parts related Lead is exempted from Eu RoHS, and the maximum content is 946166.7 ppm.
Remark: Environmental protection life time 10 years. Use under temperature of 5℃∽35℃, all toxic and hazardous substances
will not leak.
Environmental protection life time of this product does not include batteries.
 Loading...