

Page 1
4K Vertex 18Gbps
User Manual 4K Vertex Rev 1.0
Page 2

2
4K Vertex – User Manual
Disclaimer: 3rd party and/or custom firmware providing extra features are not covered in this manual.
Page 3

3
4K Vertex – User Manual
Table of Contents
Overview …...................................................................................................... 4
Connecting Cables …........................................................................................ 5
Power Status/OLED …...................................................................................... 6
Reset HPD/Factory Default…...........................................................................7
EDID Mode Selection .......................................................................................8
OLED Control ………........................................................................................... 9
Input Switching and Matrix Mode...................................................................10
HDCP Settings………………………..……………………………………………………………………. 11
Scaler Settings…............................................................................................... 12
Combo RST + INP.............................................................................................. 13
List of Custom EDID available.......................................................................... 14
Backside Sticker............................................................................................... 17
OLED Display.................................................................................................... 18
Selecting the Windows PC driver for USB GUI and Firmware Update......…… 19
Update the Vertex Firmware with a Windows PC...................................…… 20
Vertex USB GUI for Windows PC..............................................................…… 24
Vertex RS232 Control.................................................................................…… 44
Vertex Total Control APP............................................................................... 49
IR Codes List..................................................................................................... 51
Frequently Asked Questions (FAQ) ................................................................ 81
Highlight Features ........................................................................................... 85
Specifications................................................................................................... .88
Certifications.................................................................................................... 90
Pro Tips............................................................................................................. 91
Disclaimer: 3rd party and/or custom firmware providing extra features are not covered in this manual.
Page 4

4
4K Vertex – User Manual
Overview
The HDfury team would like to thank you personally for purchasing the 4K Vertex!
This unique HDMI2.0b and HDCP2.2 device supports true full 4K60 4:4:4 600MHz 18Gbps bandwidth
signals. It will allow you to solve any HDCP error, Split or Matrix any SD/HD/FHD/UHD/HDR/DV or PC
signals up to 600MHz, scale up or scale down any channel individually, display relevant information on
OLED/OSD, select between multiple edid banks, Inject Infoframe and more. Control can be completed
with IR codes, through slide switch or push buttons on the unit, via a wired USB connection to a
Windows PC, via RS232 (MAC/WIN/Linux) or through wireless Bluetooth connection with any
Smartphone or Tablet running Android or iOS. (GoBlue mandatory)
Disclaimer: 3rd party and/or custom firmware providing extra features are not covered in this manual.
Page 5
5
4K Vertex – User Manual
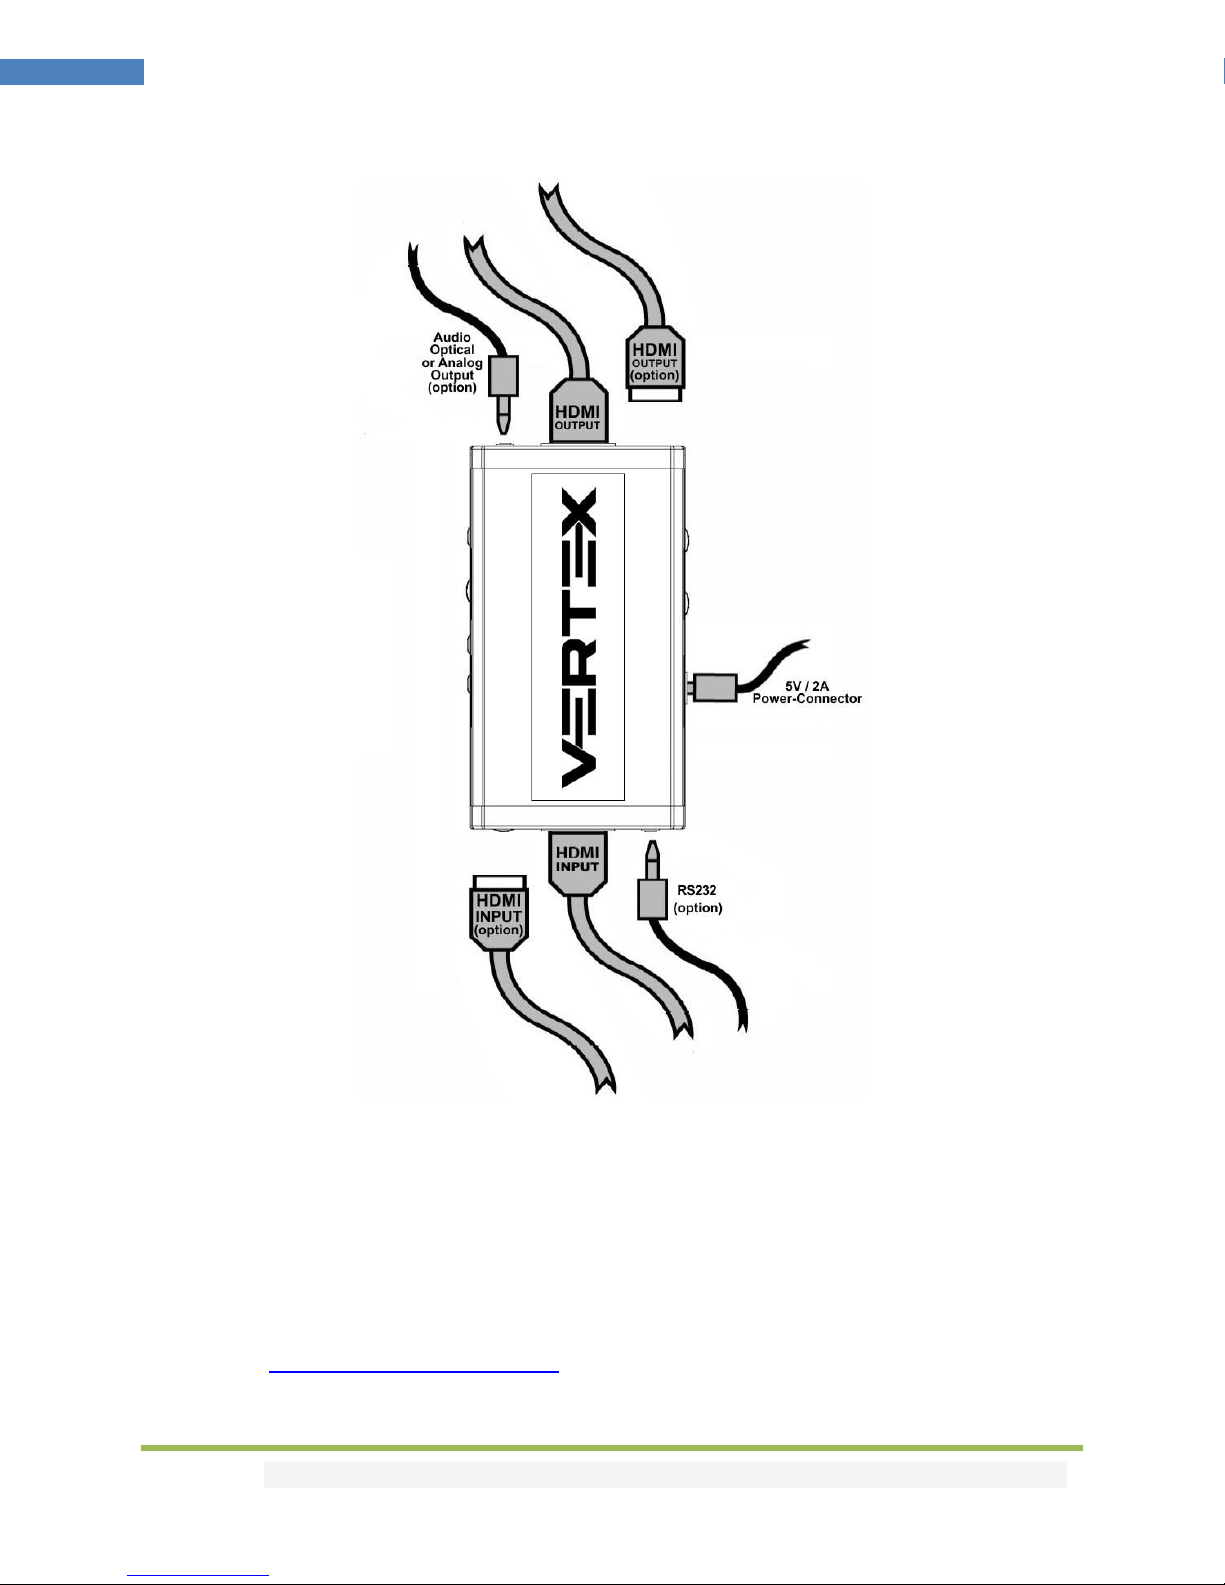
Connecting Cables
To use your 4K Vertex:
• Connect a HDMI input cable to the HDMI input.
• Connect a HDMI output cable to the HDMI output.
• Connect the Vertex power supply.
• Connect any additional HDMI input/output cable, RS232 or any audio output cable (optional).
HDMI/HDCP 1.x devices at output must be connected to TOP (Downscale) Output port. Make sure that
you are using 600MHz certified HDMI 4K cable if you plan to set up a 4K60 4:4:4 8b or 4K60 4:2:2 12b
600MHz 18Gbps link in your setup.
Disclaimer: 3rd party and/or custom firmware providing extra features are not covered in this manual.
Page 6

6
4K Vertex – User Manual
Power/Status OLED
The Vertex OLED will turn ON when power supply is applied, Vertex side-logo will glow Green to indicate
that the HDCP handshake has been completed.
The status of the OLED and green side-logo may be used for troubleshooting:
[OLED OFF]: Insufficient power or OLED turned OFF. Use the Vertex power supply; make sure
the OLED is ON (refer to p.9).
[OLED ON]: The Vertex unit is receiving power and is ready to accept an HDMI signal.
[OLED ON and SIDE Logo ON]: The Vertex is powered and receiving and decoding a HDMI signal.
Disclaimer: 3rd party and/or custom firmware providing extra features are not covered in this manual.
Page 7
7
4K Vertex – User Manual
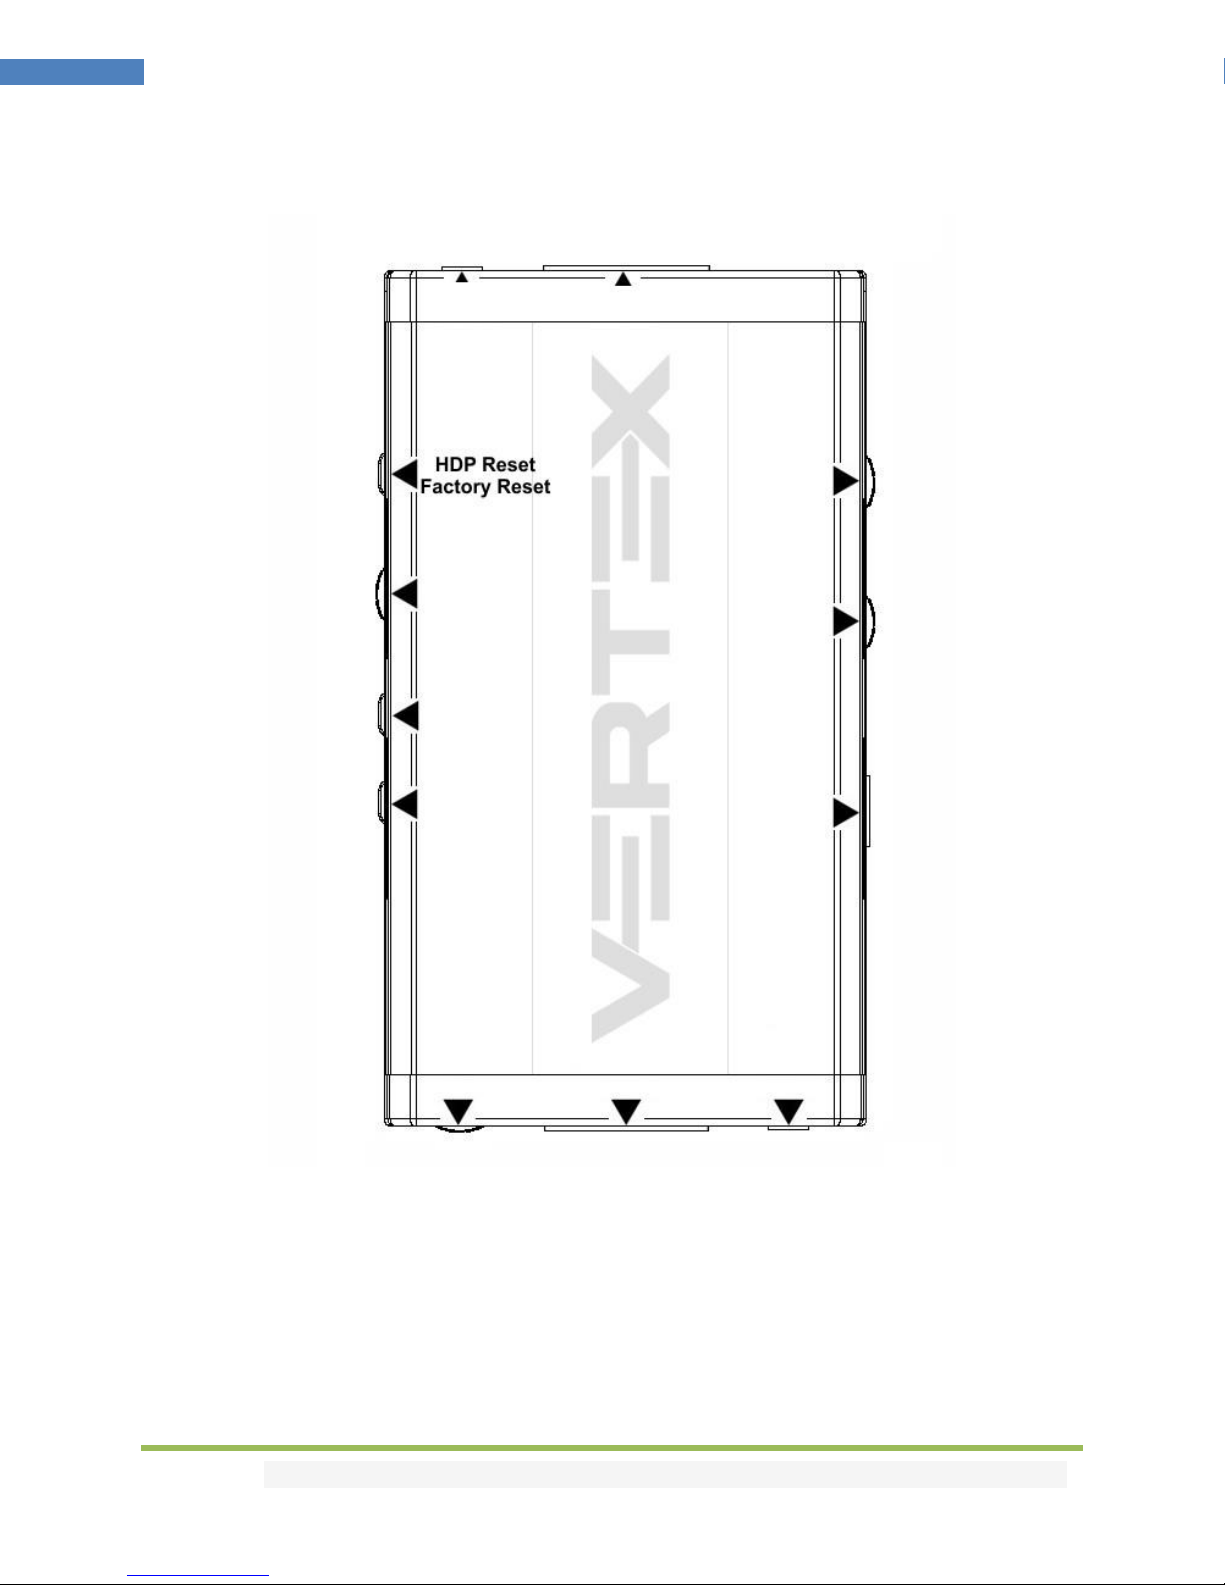
Reset HPD (Short Press) or Reset to factory default (Long Press)
The 4K Vertex offers 2 functions per push button.
[Short Press] on Reset Button will generate Hot Plug Detection event.
[Long Press] (over 10s for security) will reset the Vertex to factory default.
Note: You can also Reset the unit or perform any others control with IR codes, from the USB GUI for
Windows PC, through RS232 for MAC/WIN/Linux or via smartphone/tablet APP for Android and iOS.
Disclaimer: 3rd party and/or custom firmware providing extra features are not covered in this manual.
Page 8

8
4K Vertex – User Manual
EDID Mode Selection
EDID slide switch has 3 positions.
Switch should be set to middle position to allow control via USB, IR, RS232 or Bluetooth device.
[Automix Mode]: Create EDID based on mutual sink capabilities controlled by a selectable algorithm
with enforceable flags so both sinks will always show a picture and audio. .
[Custom Use / BT]: Pick and use EDID from a selection of preloaded EDID tables (see p.14) or load any
EDID bank of your choice. By default the selected EDID table is a 4K60 4:4:4 BT2020 HDR 600MHz with
Full Audio capabilities. Leave the slide in this position to allow remote control via USB/IR/RS232 or
Android/iOS APP and/or to pick and use any of the 100 different EDID tables available. Please note that
Vertex can hold a specific EDID for each input.
[Fixed EDID with L/R Audio]: This mode is a 4K60 4:2:0 8b SDR 2channel stereo 300MHz basic table. It
can be used as a security EDID to ensure a picture in mostly every setup/situation.
Note: You can also switch EDID mode and any others control with IR codes, from the USB GUI for
Windows PC, RS232 for MAC/WIN/Linux or via smartphone/tablet APP for Android/iOS using GoBlue.
Disclaimer: 3rd party and/or custom firmware providing extra features are not covered in this manual.
Page 9
9
4K Vertex – User Manual
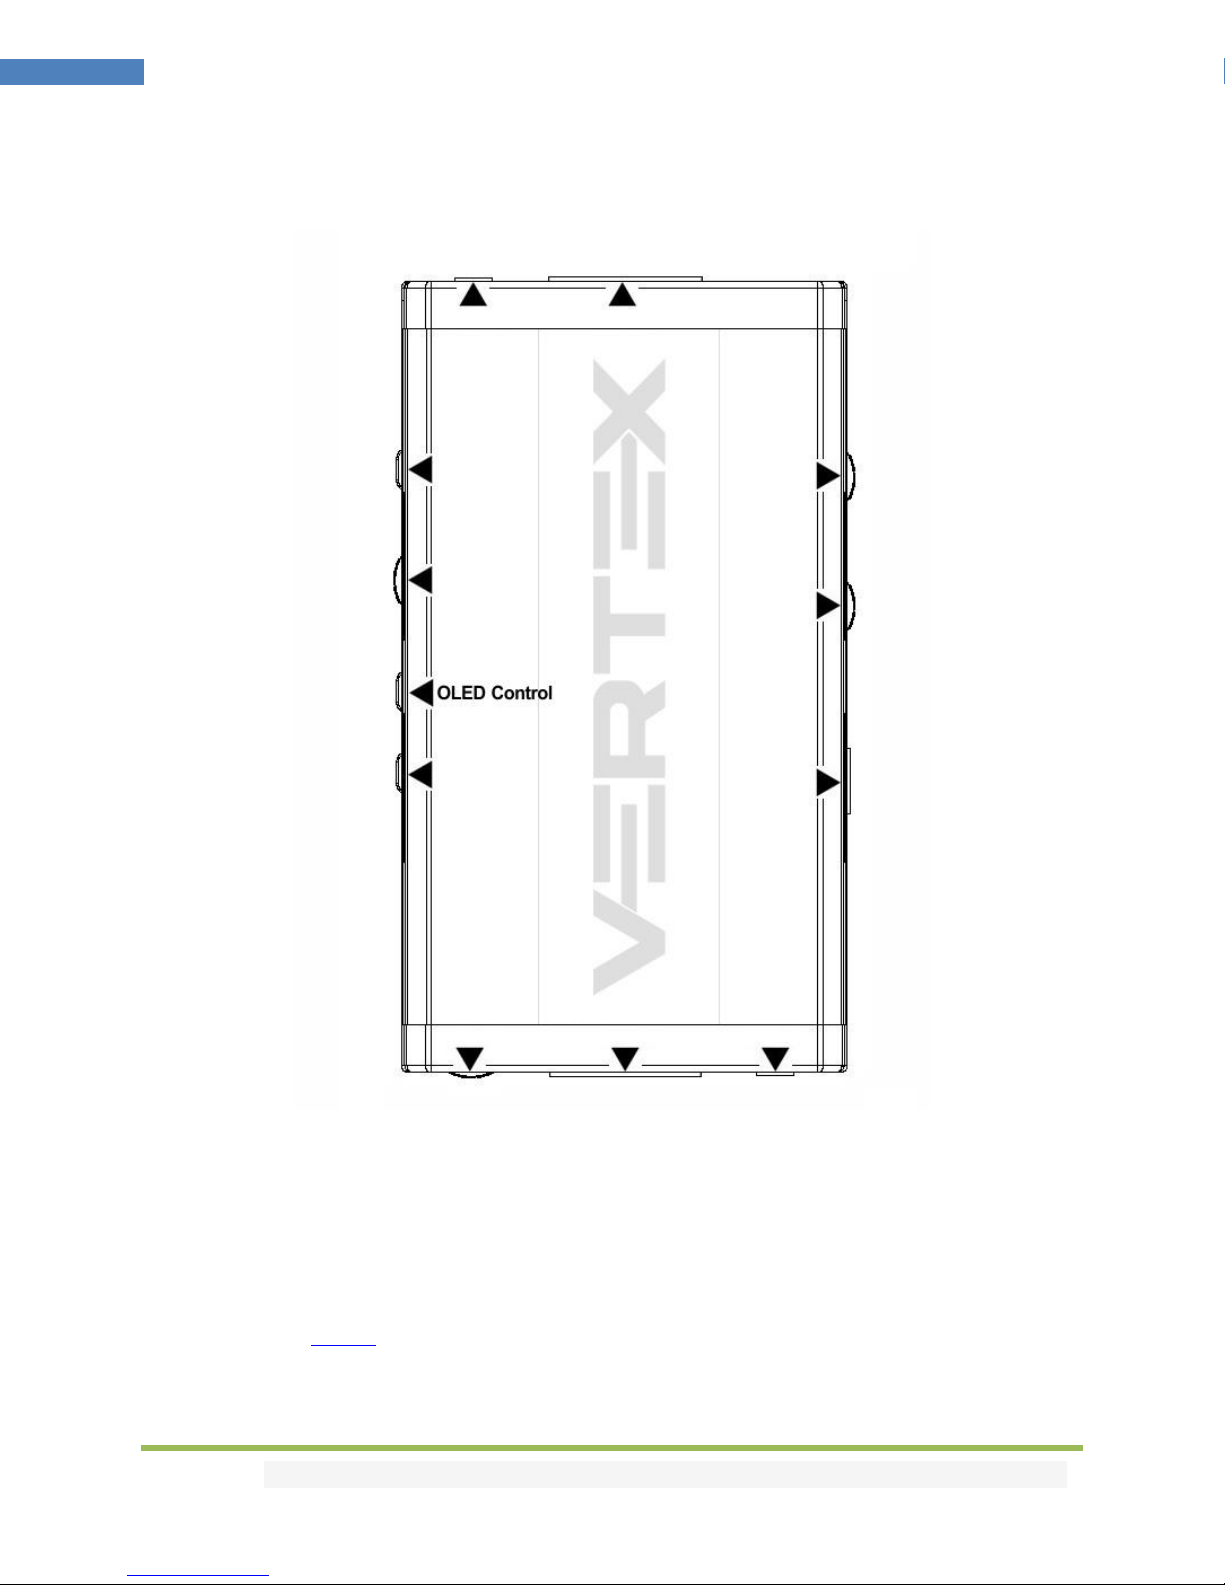
OLED Control
OLED Control Button allows you to control the OLED infopage displayed and the light in your setup.
[Short Press] will cycle through the OLED infopage available or wake up from sleep/fade mode.
[Long Press] (over 2sec) will cycle through OLED + Vertex side logo, OLED alone, None (no lights at all)
Note: You can also switch OLED infopage and control light in your setup and any others control with IR
codes, from the USB GUI for Windows PC, RS232 for MAC/WIN/Linux or via smartphone/tablet APP for
Android/iOS using GoBlue.
Disclaimer: 3rd party and/or custom firmware providing extra features are not covered in this manual.
Page 10

10
4K Vertex – User Manual
Input Switching and Matrix mode
Input Switch / Matrix Mode Button allow you to switch active inputs or enter/exit the Matrix mode.
[Short Press] will switch the active input channels in Splitter Mode and swap/cross signals in Matrix
mode.
[Long Press] (over 2sec) will enter/exit the Matrix Mode
Vertex OLED/OSD will report the two active inputs in Matrix mode while only the current active input is
reported via OLED/OSD in Splitter mode.
Note: You can also switch inputs and Matrix, Splitter mode and any others control with IR codes, from
the USB GUI for Windows PC, RS232 for MAC/WIN/Linux or via smartphone/tablet APP for Android/iOS
using GoBlue.
Disclaimer: 3rd party and/or custom firmware providing extra features are not covered in this manual.
Page 11
11
4K Vertex – User Manual
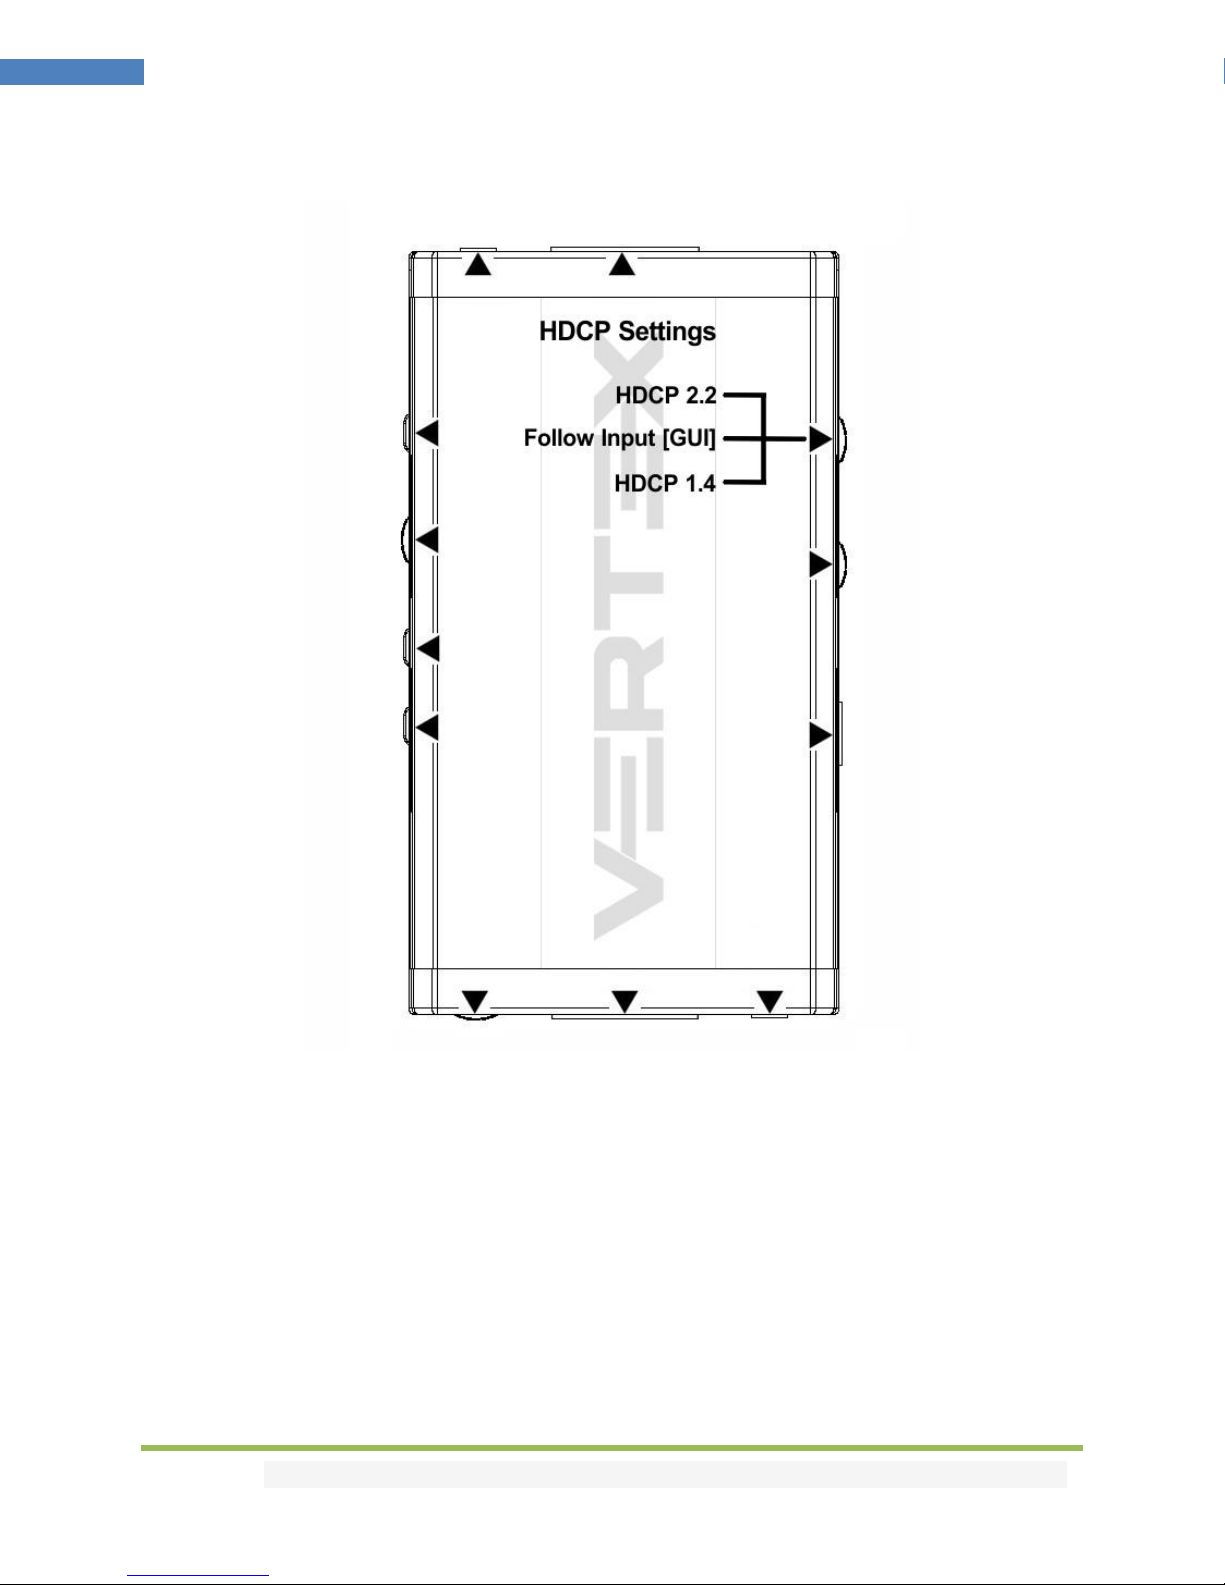
HDCP Settings
HDCP slide switch has 3 positions.
The switch should be set to the middle position to allow control via USB, IR, RS232 or a Bluetooth
device.
[HDCP 2.2 Mode]: In this mode you always have HDCP 2.2 (if supported) on both output ports.
[HDCP Auto / GUI]: In this mode the Vertex unit makes sure that the conversion will always output a
working signal. Both outputs are dynamic.
[HDCP 1.4]: In this mode, you always have HDCP1.4 on both output ports.
Note on HDCP:
Both inputs accept HDCP1.4/2.2. Both outputs can work with HDCP1.4/2.2 devices.
Disclaimer: 3rd party and/or custom firmware providing extra features are not covered in this manual.
Page 12

12
4K Vertex – User Manual
Scaler Settings
Scale slide switch has 3 positions.
The switch should be set to the middle position to allow control via USB, IR, RS232 or a Bluetooth
device.
[No Scaling/Passthru]: What comes in/goes out, untouched.
[Custom Scaling/GUI]: This slide switch position will make use of custom defined scaling rules and allow
change via Bluetooth, IR, RS232 or via USB.
[Auto Scaling]: In this mode, Vertex will auto-scale signals based on sink capabilities.
Disclaimer: 3rd party and/or custom firmware providing extra features are not covered in this manual.
Page 13

13
4K Vertex – User Manual
Combo Hold RST + Press INP
Disclaimer: 3rd party and/or custom firmware providing extra features are not covered in this manual.
Work underway, reserved for future use.
Page 14

14
4K Vertex – User Manual
List of Custom EDID available.
User can select an EDID from all below EDID tables or force the creation of an Automix EDID with below
options.
[FIXED EDID with L/R stereo]
4K60 4:2:0 300MHz 8b 2ch audio
[CUSTOM USE]
1. CUSTOM 1 [Default FULL no DV]
2. CUSTOM 2 [FULL + LG DV]
3. CUSTOM 3 [FULL + Vizio DV]
4. CUSTOM 4
5. CUSTOM 5
6. CUSTOM 6
7. CUSTOM 7
8. CUSTOM 8
9. CUSTOM 9
10. CUSTOM 10
11. 4K60-444 600MHz HDR BT2020 All Sound
12. 4K60-444 600MHz HDR BT2020 SPDIF
13. 4K60-444 600MHz HDR BT2020 Stereo
14. 4K60-444 600MHz BT2020 All Sound
15. 4K60-444 600MHz BT2020 SPDIF
16. 4K60-444 600MHz BT2020 Stereo
17. 4K60-444 600MHz All Sound
18. 4K60-444 600MHz SPDIF
19. 4K60-444 600MHz Stereo
20. 4K50-444 600MHz HDR BT2020 All Sound
21. 4K50-444 600MHz HDR BT2020 SPDIF
22. 4K50-444 600MHz HDR BT2020 Stereo
23. 4K50-444 600MHz BT2020 All Sound
24. 4K50-444 600MHz BT2020 SPDIF
25. 4K50-444 600MHz BT2020 Stereo
26. 4K50-444 600MHz All Sound
27. 4K50-444 600MHz SPDIF
28. 4K50-444 600MHz Stereo
29. 4K60-420 12bit HDR BT2020 All Sound
30. 4K60-420 12bit HDR BT2020 SPDIF
31. 4K60-420 12bit HDR BT2020 Stereo
32. 4K60-420 12bit BT2020 All Sound
33. 4K60-420 12bit BT2020 SPDIF
34. 4K60-420 12bit BT2020 Stereo
35. 4K60-420 12bit All Sound
36. 4K60-420 12bit SPDIF
37. 4K60-420 12bit Stereo
38. 4K60-420 8-bit 300MHz HDR BT2020 All Sound
Disclaimer: 3rd party and/or custom firmware providing extra features are not covered in this manual.
Page 15

15
4K Vertex – User Manual
39. 4K60-420 8-bit 300MHz HDR BT2020 SPDIF
40. 4K60-420 8-bit 300MHz HDR BT2020 Stereo
41. 4K60-420 8-bit 300MHz BT2020 All Sound
42. 4K60-420 8-bit 300MHz BT2020 SPDIF
43. 4K60-420 8-bit 300MHz BT2020 Stereo
44. 4K60-420 8-bit 300MHz All Sound
45. 4K60-420 8-bit 300MHz SPDIF
46. 4K60-420 8-bit 300MHz Stereo
47. 4K30-444 300MHz HDR BT2020 All Sound
48. 4K30-444 300MHz HDR BT2020 SPDIF
49. 4K30-444 300MHz HDR BT2020 Stereo
50. 4K30-444 300MHz BT2020 All Sound
51. 4K30-444 300MHz BT2020 SPDIF
52. 4K30-444 300MHz BT2020 Stereo
53. 4K30-444 300MHz All Sound
54. 4K30-444 300MHz SPDIF
55. 4K30-444 300MHz Stereo
56. 4K30-RGB 300MHz HDR BT2020 ALL audio
57. 4K30-RGB 300MHz HDR BT2020 SPDIF
58. 4K30-RGB 300MHz HDR BT2020 Stereo
59. 4K30-RGB 300MHz BT2020 ALL audio
60. 4K30-RGB 300MHz BT2020 SPDIF
61. 4K30-RGB 300MHz BT2020 Stereo
62. 4K30-RGB 300MHz ALL audio
63. 4K30-RGB 300MHz SPDIF
64. 4K30-RGB 300MHz Stereo
65. 4K24-422 12-bit HDR BT2020 All Sound
66. 4K24-422 12-bit HDR BT2020 SPDIF
67. 4K24-422 12-bit HDR BT2020 Stereo
68. 4K24-422 12-bit BT2020 All Sound
69. 4K24-422 12-bit BT2020 SPDIF
70. 4K24-422 12-bit BT2020 Stereo
71. 4K24-422 12-bit All Sound
72. 4K24-422 12-bit SPDIF
73. 4K24-422 12-bit Stereo
74. 1080p60-444 12-bit HDR BT2020 All Sound
75. 1080p60-444 12-bit HDR BT2020 SPDIF
76. 1080p60-444 12-bit HDR BT2020 Stereo
77. 1080p60-444 12-bit BT2020 All Sound
78. 1080p60-444 12-bit BT2020 SPDIF
79. 1080p60-444 12-bit BT2020 Stereo
80. 1080p60-444 12-bit All Sound
81. 1080p60-444 12-bit SPDIF
82. 1080p60-444 12-bit Stereo
83. 1080p24-444 12-bit HDR BT2020 All Sound
84. 1080p24-444 12-bit HDR BT2020 SPDIF
85. 1080p24-444 12-bit HDR BT2020 Stereo
86. 1080p24-444 12-bit BT2020 All Sound
Disclaimer: 3rd party and/or custom firmware providing extra features are not covered in this manual.
Page 16

16
4K Vertex – User Manual
87. 1080p24-444 12-bit BT2020 SPDIF
88. 1080p24-444 12-bit BT2020 Stereo
89. 1080p24-444 8-bit All Sound
90. 1080p24-444 8-bit SPDIF
91. 1080p24-444 8-bit Stereo
92. 1080i60-444 8-bit All Sound
93. 1080i60-444 8-bit SPDIF
94. 1080i60-444 8-bit Stereo
95. 720p60-444 8-bit All Sound
96. 720p60-444 8-bit SPDIF
97. 720p60-444 8-bit Stereo
98. 480p60-444 8-bit All Sound
99. 480p60-444 8-bit SPDIF
100. 480p60-444 8-bit Stereo
[AUTOMIX]
Enforceable flags available in Automix mode:
2.0 Stereo, 5.1 Multi, 7.1 Full Sound, Native, BT.2020/xvYcc, HDR10+, HLG, Dolby Vision, 3D Remove,
YCbCr Remove
Selectable algorithms available in Automix mode:
Min Mixed Capabilities, Max Audio/Min Video, Top Output Priority, Bot Output Priority, Max Audio/Max
Video
Note: All options are also available via IR, USB GUI, RS232 or Android/iOS APP.
To upload a custom EDID or Sniff EDID from sink device, please refer to GUI section p.24
Disclaimer: 3rd party and/or custom firmware providing extra features are not covered in this manual.
Page 17

17
4K Vertex – User Manual
Backside Sticker
A sticker is available on the back of the unit to remind you the basic configuration options available from
the physical button and slide switches as well as the Short Press [SP] and Long Press [LP] functions of
each button.
Disclaimer: 3rd party and/or custom firmware providing extra features are not covered in this manual.
Page 18

18
4K Vertex – User Manual
OLED Display
Immediately upon power up, the Vertex splash screen will appears on the OLED Display.
By default, Vertex will start on its signal info page, from this page you can easily see all signals coming in
and going out as well as the capabilities of your connected equipment. Please note that you can define
the default Vertex starting page from IR, GUI, RS232 or Android/iOS APP. You can also cycle through all
available page using the INFO/OLED button. (see p.9)
HDR and more signal detailed information are available through the selectable OLED pages.
Disclaimer: 3rd party and/or custom firmware providing extra features are not covered in this manual.
Page 19

19
4K Vertex – User Manual
Selecting your Windows PC Driver for USB GUI and Firmware update
Make sure to install the right Silabs driver for Windows PC based on your Windows OS version and USB
port version.
Silabs Driver 4.0.0 for XP/VISTA/WIN7/WIN8/WIN10
Silabs Driver 4.0.0 - ZIP - 9.18 Mo
USB2.0: WIN XP / VISTA / WIN7 / WIN8 / WIN10
USB3.0: WIN10 / Partial support for others Windows version.
Silabs Driver 3.9.2 for XP/VISTA/WIN7/WIN8
Silabs Driver 3.9.2 - ZIP - 1.65 Mo
USB2.0: WIN XP / VISTA / WIN7 / WIN8
USB3.0: WIN XP / VISTA / WIN7 / WIN8
If you are using Windows 10, the Silabs Driver 4.0.0 is mandatory.
However, Silabs driver 4.0.0 only have partial support for USB3.0 on Win8 and previous Windows
version, so you might prefer the 3.9.2 in such case.
If you are using Windows XP, the Silabs Driver 3.9.2 is mandatory. It is recommended to try the 4.0.0
version first on any Windows version other than XP.
For installation simply download from the above link, unzip and then run the .EXE file
Silabs 3.9.2 driver: run the USBXpressInstaller.exe
Silabs 4.0.0 driver: USBXpressInstaller_x86. exe for 32bit or USBXpressInstaller_x64.exe for 64bit.
Once you have correctly selected, downloaded and installed the right driver, you can proceed with
either updating Firmware (p.20) or using GUI utility (p.24)
Both Firmware update and GUI utility provides 2 directories labelled as per Driver version, make sure to
use the right directory matching your driver version.
Ex: If you installed 3.9.2 driver, Use the 3.9.2 directory to run Firmware update or the 3.9.2 directory to
run the GUI utility.
Note: You can install or remove any driver any time:
Control Panel > Program > Remove Software.
Disclaimer: 3rd party and/or custom firmware providing extra features are not covered in this manual.
Page 20
20
4K Vertex – User Manual
Updating your Vertex Firmware with a Windows PC
The Vertex Firmware Updater is compatible with all Windows from Win XP to Win 10.
Make sure you have installed the right Silabs driver based on your Windows version and USB port as
described in previous page.
You can download the latest Firmware version for your Vertex device from the Download Tab on the
Vertex Product page: here. If you are unsure about your Firmware version currently in use, simply use
the Total Control APP for Android/iOS info page or the USB GUI for Windows PC to retrieve it.
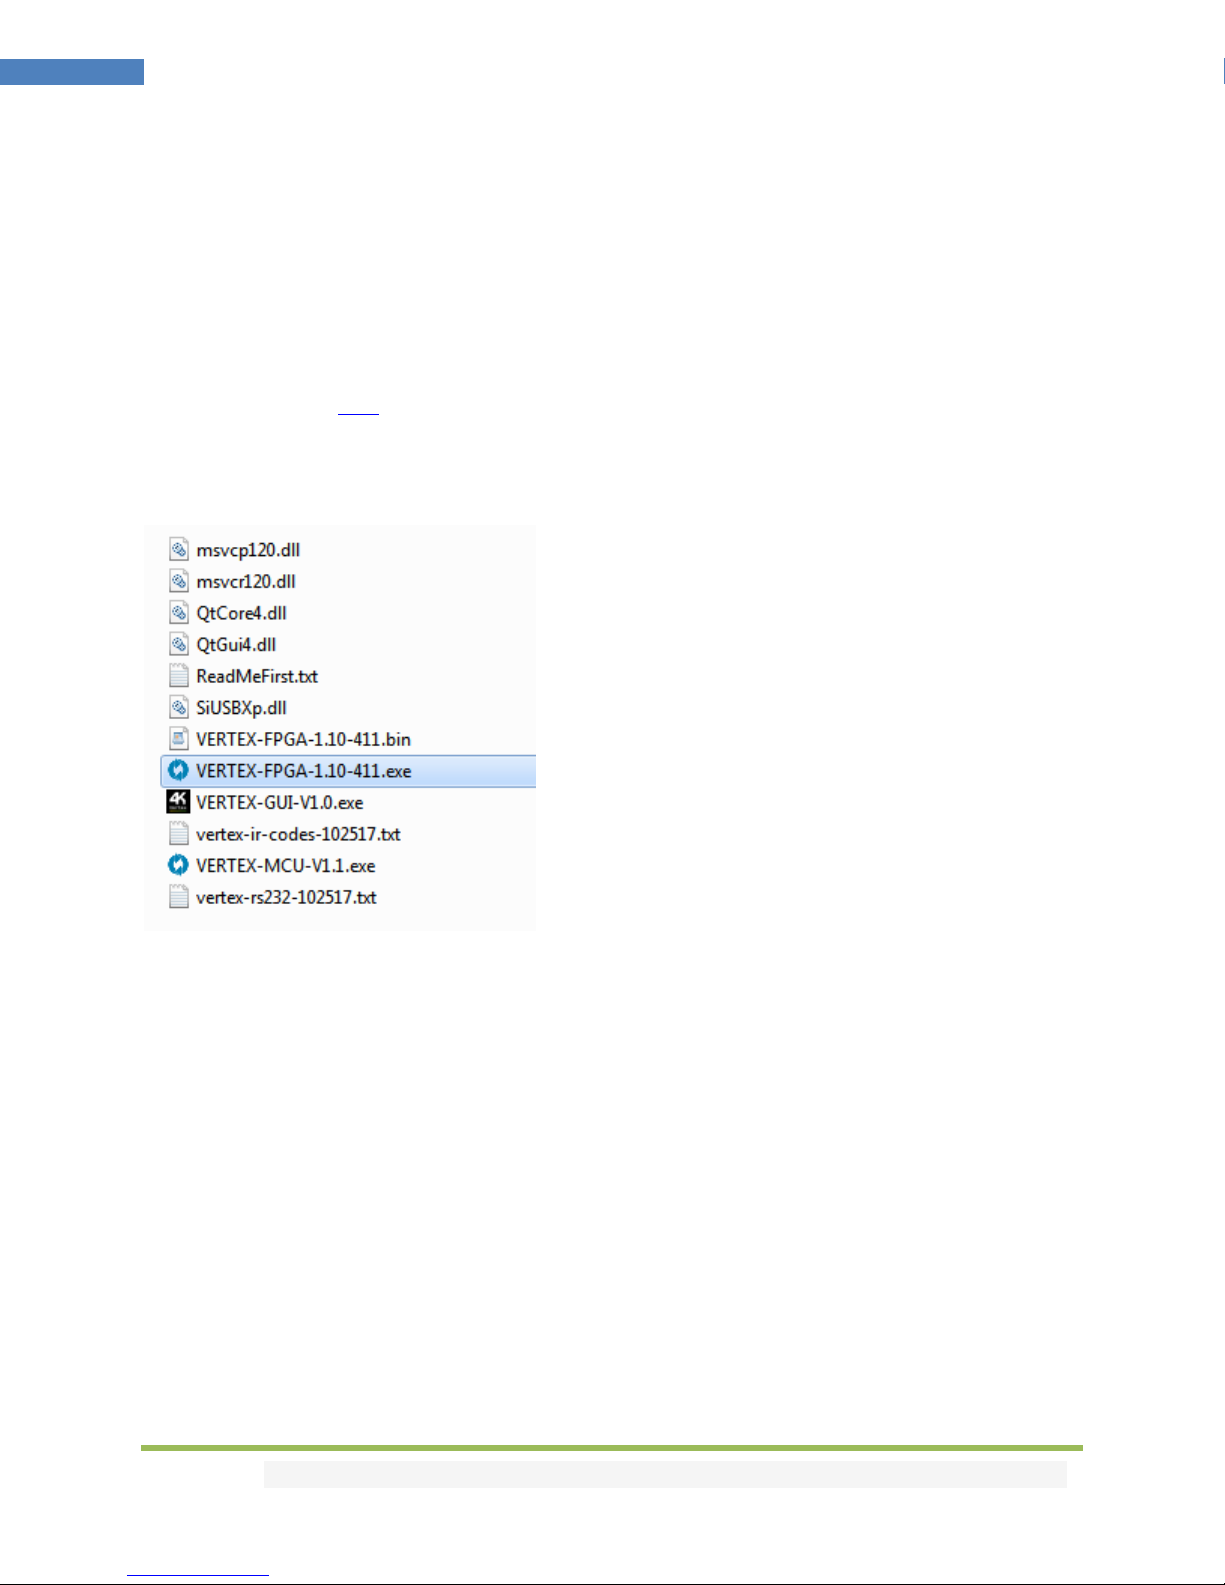
Once downloaded and extracted, you should have a directory on your computer with the following files
You will have to run both Update FPGA and Update MCU to successfully upgrade your Vertex unit.
Note: Version number could be different depending on the FW revision you downloaded.
You can start by any of them; there is no particular order to respect.
FPGA update will take about 50s while MCU update is taking less than 5s.
After updating the FPGA firmware, you will be prompted to power cycle your Vertex unit, you won’t see
any light or OLED info for about 15s as the unit is reconfiguring itself. Once ready, OLED and light will
come back on. This is only valid for any FPGA update.
Disclaimer: 3rd party and/or custom firmware providing extra features are not covered in this manual.
Page 21

21
4K Vertex – User Manual
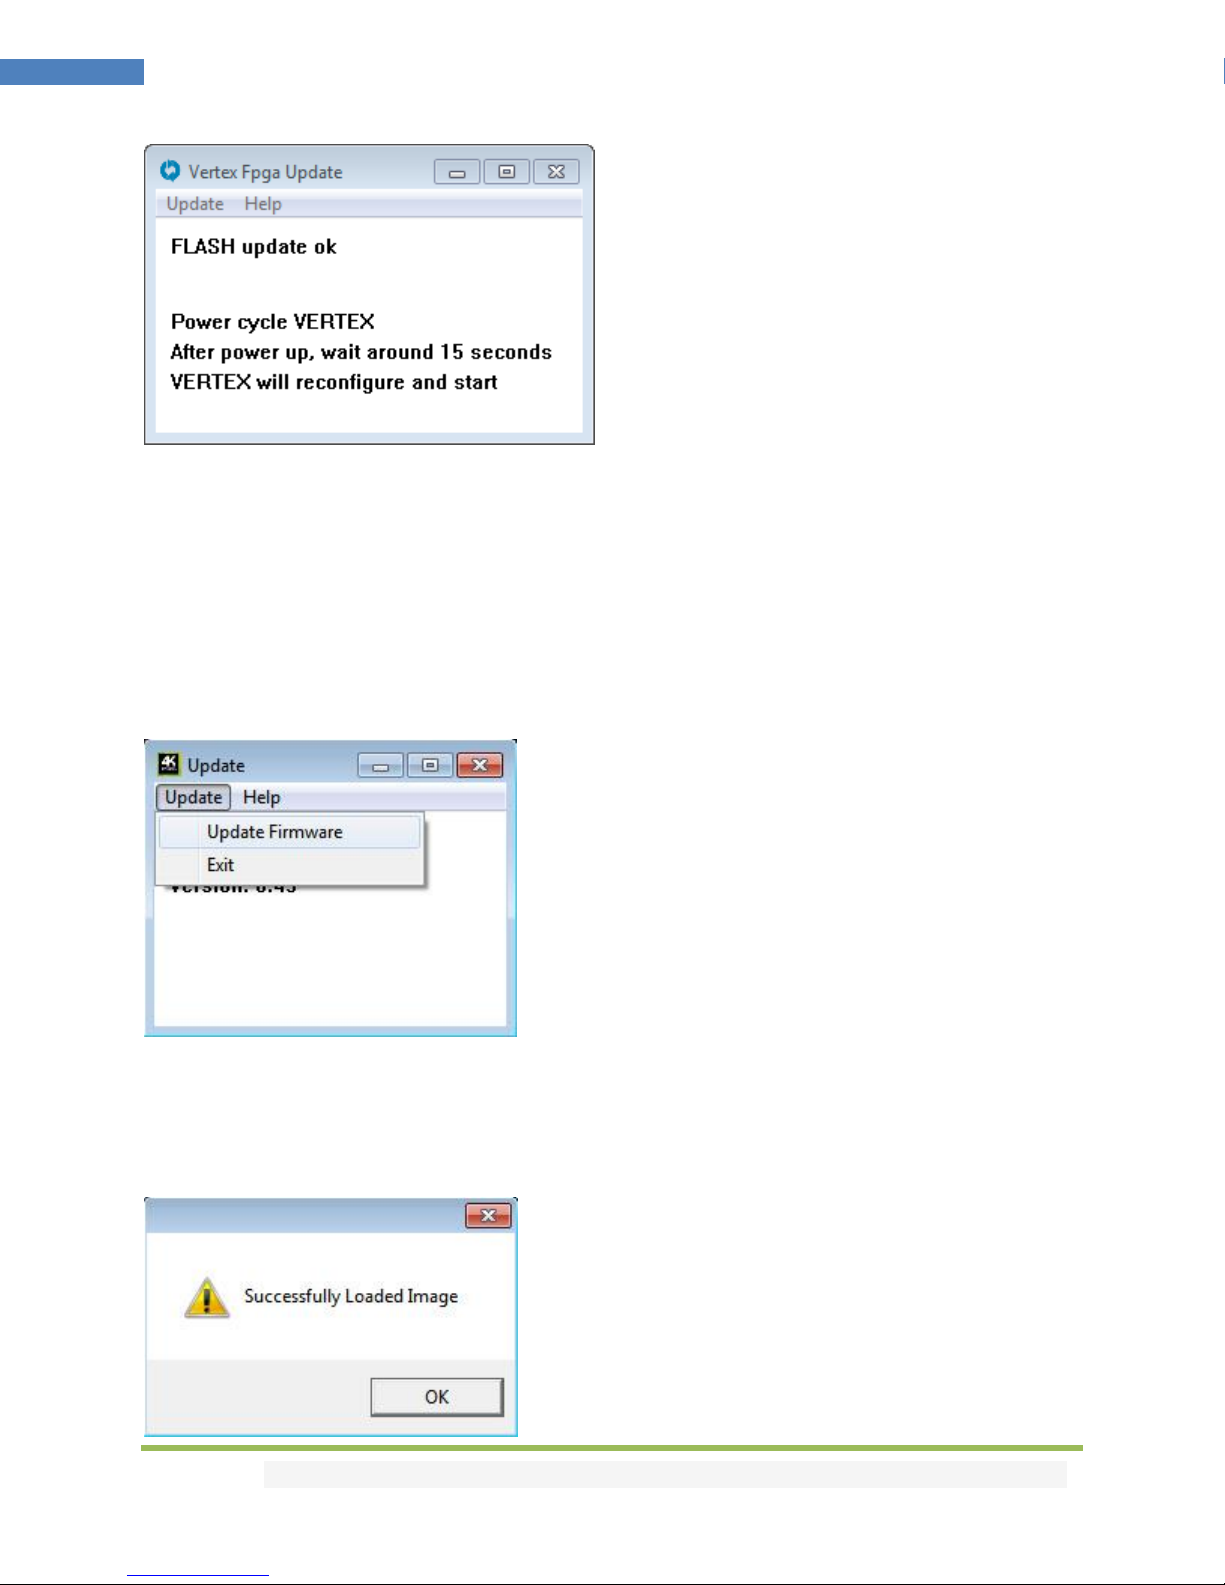
FPGA Update Instructions
Double-click Vertex FPGA executable (if needed, right-click and select Run as Administrator)
The below window will open.
Click Update Firmware as shown on the above picture.
Flashing time is around 50 seconds
Do not disconnect your device while the upgrade process is running.
Once completed, you will hear a windows notification sound and the below window will pop up.
Simply click OK and the main updater will display the below message.
Disclaimer: 3rd party and/or custom firmware providing extra features are not covered in this manual.
Page 22
22
4K Vertex – User Manual
This confirms the FPGA update process is completed; you can process to next step.
After power cycling your Vertex unit, you won’t see any light or OLED for about 15s as the unit is
reconfiguring itself. Once ready, OLED and light will come back on. This is only valid for any FPGA
update.
MCU Update Instructions
Double-click UpdateMCU executable (if needed, right-click and select Run as Administrator)
The below window will open.
Click Update Firmware as shown on the above picture.
Flashing time is less than 5 seconds.
Once completed, you will hear a windows notification sound and the below window will pop up.
Disclaimer: 3rd party and/or custom firmware providing extra features are not covered in this manual.
Page 23

23
4K Vertex – User Manual
Simply click OK and the main updater will display the below message.
Congratulations, you have successfully updated both the MCU and FPGA and your unit is now ready to
operate with the benefits from the latest software additions.
Disclaimer: 3rd party and/or custom firmware providing extra features are not covered in this manual.
Page 24
24
4K Vertex – User Manual
Vertex USB GUI (Software for Windows PC)
The USB GUI is compatible with all Microsoft Windows version from Win XP to Win 10.
Make sure you have installed the right Silabs driver based on your Windows version and USB port as
described in p.19
You can download the latest GUI version for your Vertex device from the Download Tab on the Vertex
Product page: here. Always run latest FW when running latest GUI to benefit from all new features.
The USB GUI for Windows PC allows the following control:
- Display Information on Source device when available.
- Display Input signal resolution, refresh rate and bandwidth.
- Display Input signal Color Space and Deep Color.
- Display Input signal encryption.
- Display Input signal detected Audio type.
- Display Information on Sink device when available.
- Display Output signal resolution, refresh rate and bandwidth.
- Display Output signal Color Space and Deep Color.
- Display Output signal encryption.
Disclaimer: 3rd party and/or custom firmware providing extra features are not covered in this manual.
Page 25

25
4K Vertex – User Manual
- Display the Firmware version and Windows GUI revision.
- Display Active input information.
- Switch Active Input or enter/exit Matrix modes.
- Select EDID Mode (Sink, Custom, Fixed)
- Select the default EDID table from a selection of 100 preloaded EDID banks.
- Use similar or different EDID for each input.
- Select forced flags for Automix mode. (2.0, 5.1, 7.1, Full, BT.2020/xvYcc, HDR10+, HLG, DV, 3D, YCbCr)
- Select Automix Algo
- Sniff EDID from connected sink devices. (Read EDID from TOP and BOT output)
- Read, Write, Load, and Save and Upload any custom EDID bank.
- Define Scaling rules (No Scaling, Custom Scaling, Auto Scaling)
- Select preferred Custom Scaling Modes
- Select Scaling rules from available 4K30 presets
- Select Scaling rules from available 4K60 and 4K60 4:2:2 presets
- Set preferred Scaling options (Downscale, Thru and Up)
- Defines Color Space and Deep Color for Downscale, Thru and Up.
- Display Captured HDR Metadata.
- Send Live HDR Metadata created with Custom HDR metadata generator.
- Autofill CRC for HDR infoframe.
- Disable HDR by cancelling all incoming HDR metadata (JVC PJ mode)
- Display Captured AVI and Vendor Specific InfoFrame.
- Send Custom AVIand Vendor Specific Infoframe.
- Disable AVI and VSI.
- Save Dobly Vision mandatory string from connected sink.
- Display captured SPD, Audio, HDMI Vendor Specific and HDMI Forum VSIF Infoframe.
- Enable/Disable OSD notification.
- Set OSD location, color, transparency, background.
- Select OSD info to be displayed (Source, Video Field, Video IF, HDR RX/TX, HDR IF, Audio, RX HDR.
- Select OSD timer for OSD fade out.
- Enable or Disable OSD Mask.
- Set location and OSD mask transparency.
- Enable or Disable OSD custom text.
- Set location for OSD custom text.
- Edit OSD custom text.
- Send Live HDMI CEC command.
- Turn ON/OFF CEC processing.
- Define CEC ID# (Either AVR ID#5 for ARC feature or processor ID#14)
- Turn ON or OFF the Autoswitch feature.
- Set Input Priority for Autoswitch mode (Normal/Forced)
- Select HDCP output revision.
- Enable or disable the Side Logos.
- Enable or disable the OLED
- Rotate OLED by 180 degrees
- Reverse OLED colors
- Set OLED fade out timer
- Issue Hotplug (Soft Reset)
- Set OLED Startup page
- Reset the unit to Factory Default.
Disclaimer: 3rd party and/or custom firmware providing extra features are not covered in this manual.
Page 26

26
4K Vertex – User Manual
- Reset EDID to Factory Default.
- Import or Export Config file.
Note:
When you select an EDID bank from the dropdown list of preloaded EDID banks, there is nothing else to
do, once clicked, the EDID of your choice will be loaded and HPD events will reset the signal to present
your selected EDID automatically.
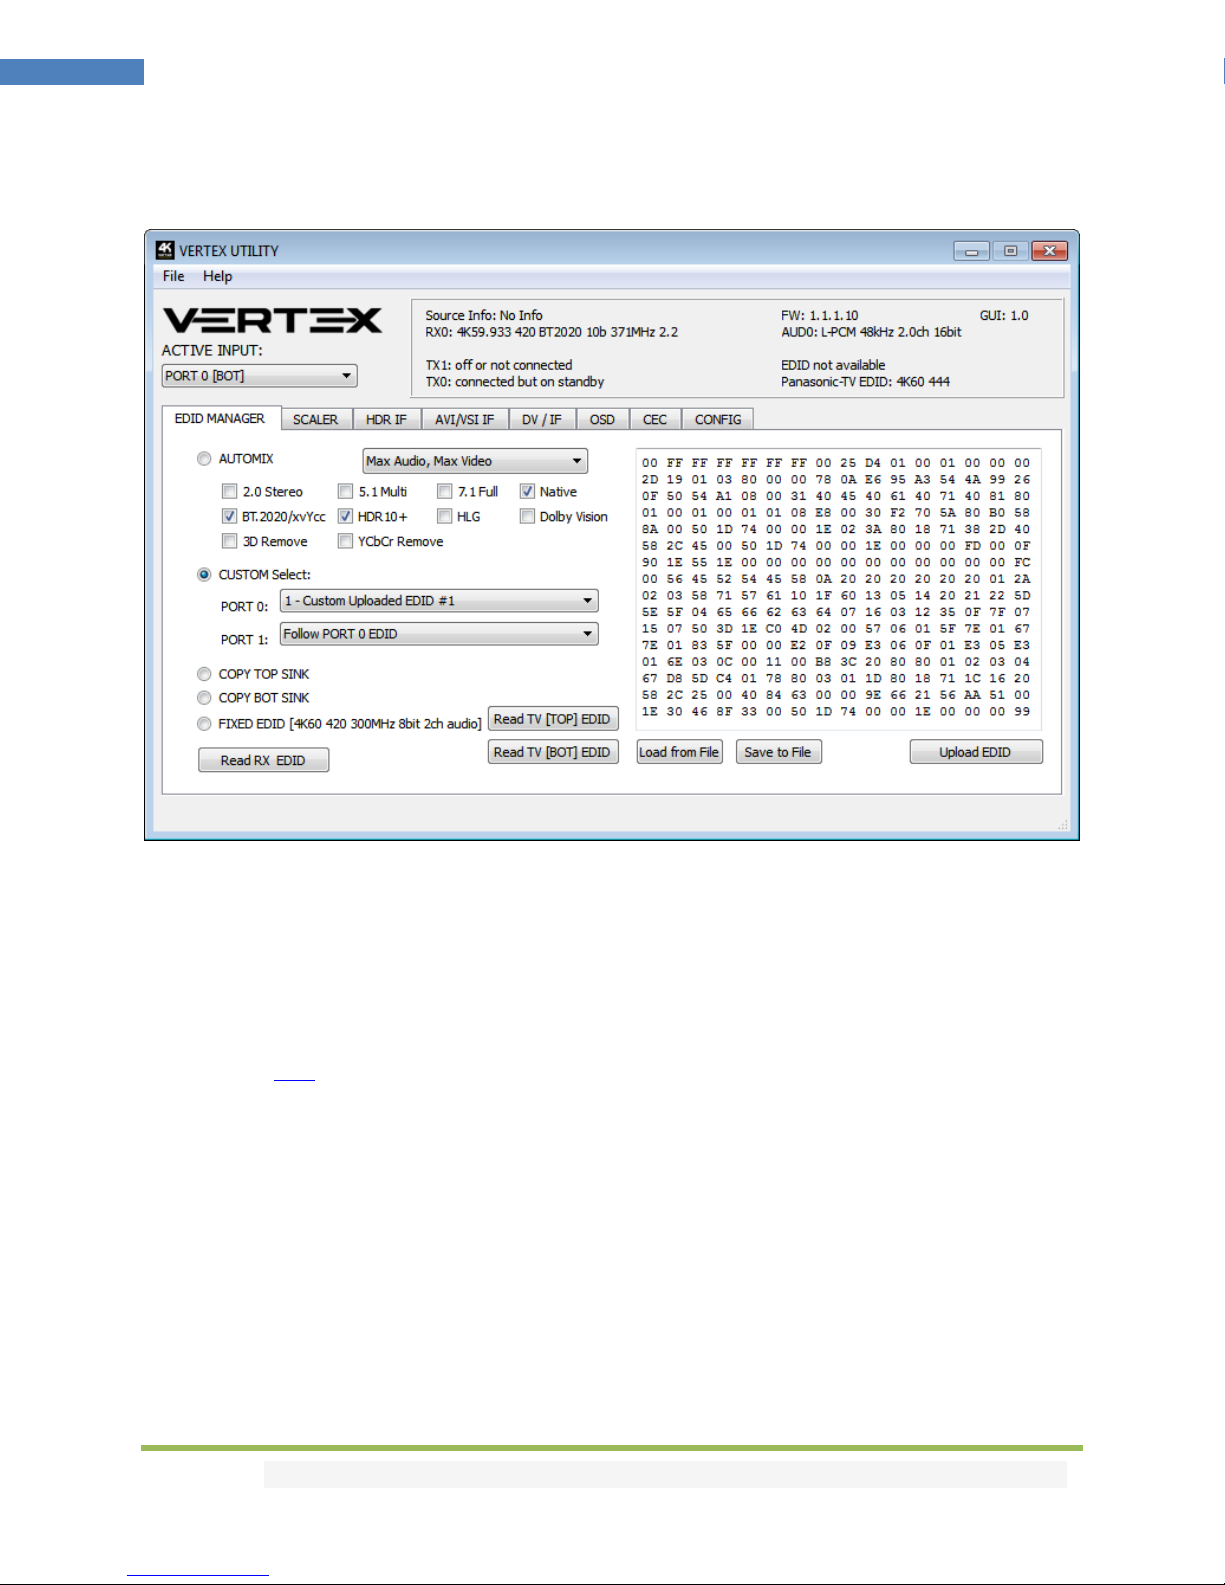
The TOP SECTION of the USB GUI for Windows PC:
The right boxed area will provide you with the following information:
FW: 1.1.1.10 on the top right corner indicates the current FW version of your Vertex unit.
GUI: 1.0 on the top right corner indicates the current Windows GUI version in use.
Source Info: When available it will display information about the source device in use.
RX0: Display Input signal resolution at RX0 input; refresh rate, color, bandwidth and HDCP information.
AUD0: Display sound information for the RX0 input.
RX1: Display Input signal resolution at RX1 input; refresh rate, color, bandwidth and HDCP information.
AUD1: Display sound information for the RX1 input.
TX1: Display Status or Output signal resolution at TX1; refresh rate, color, bandwidth, HDCP and EDID
TX0: Display Status or Output signal resolution at TX0; refresh rate, color, bandwidth, HDCP and EDID
On the left, below the Vertex logo:
Active Input: Allow you to select the current active input port or enter both Matrix modes available.
Similarly to what you can do from the push button on the unit (see page 9)
Disclaimer: 3rd party and/or custom firmware providing extra features are not covered in this manual.
Page 27

27
4K Vertex – User Manual
The EDID MANAGER section of the USB GUI for Windows PC:
[Automix Mode]: Create EDID based on mutual capabilities so both sinks will always show a picture and
audio. Some Flags can be checked or unchecked so you can force and override some parameters to
match your needs. Ex: If your TV is stereo and your AVR full sound and both are connected to each
Vertex outputs port, then by default, Automix will report Stereo as sound capabilities, by checking Full
Audio flag you will force Automix to always report Full Audio no matter the real sound capabilities of the
connected sink devices.
[Automix Algo]: Select the mixing algo of your choice, available algo are: Min Mixed Capabilities, Max
Audio/Min Video, Top Output Priority, Bot Output Priority, Max Audio/Max Video
[Custom Use / BT]: Pick and use EDID from a selection of preloaded EDID tables or load any EDID bank
of your choice. By default the selected EDID table is a 4K60 4:4:4 600MHz with Full Audio capabilities.
Leave the slide in this position to allow remote control via USB/IR or Android/iOS APP and/or to pick and
use any from up to 100 different EDID tables available (4K60 4:4:4 HDR, 4K60 4:2:0 10bit, see p.13 for
the full list). When you select an EDID bank from the dropdown list of preloaded EDID banks, there is
nothing else to do, once you click one, the EDID of your choice will be loaded and HPD events will reset
the signal to present your selected EDID automatically. Each input can have an individual EDID assigned.
[Copy TOP Sink]: Use EDID from TOP Sink
[Copy BOT Sink]: Use EDID from BOT Sink
[Fixed EDID with L/R Audio]: This mode is a 4K60 4:2:0 8b 300MHz stereo EDID table. It can be used as
a security EDID to ensure a picture in every setup/situation. (Except for FHD and 4K30 Max display)
[Read RX EDID}: This option could be useful if for example you want to double check the build
capabilities of an Automix EDID in your setup using external software such as AWEE (AW EDID Editor
from Analog Way). In such case, you would simply use the Read Vertex EDID button and then the Save
to File button in order to be able to open the EDID file with an external EDID editor software.
Disclaimer: 3rd party and/or custom firmware providing extra features are not covered in this manual.
Page 28

28
4K Vertex – User Manual
[Read TV [TOP] EDID]: Allow you to sniff the EDID from the sink device connected to the TOP output
port of your Vertex unit. You could then use it as the Custom EDID by using the Upload EDID to Vertex
button or export it as a file using the Save to File button in order to be able to open the EDID file with an
external EDID editor software.
[Read TV [BOT] EDID]: Allow you to sniff the EDID from the sink device connected to the BOTTOM
output port of your Vertex unit. You could then use it as the Custom EDID by using the Upload EDID to
Vertex button or export it as a file using the Save to File button in order to be able to open the EDID file
with an external EDID editor software.
[Load from File]: Allow you to open and load any EDID file of your choice. You could then use it as the
Custom EDID by using the Write EDID to Vertex button.
[Save to File]: Allow you to save the current EDID into a file for backup or for editing using external
software such as AWEE (AW EDID Editor from Analog Way).
[Upload EDID]: This button will write the current manually uploaded EDID file into Vertex custom bank.
Note on HDCP:
Both inputs accept HDCP1.4/2.2. Both outputs can work with HDCP1.4/2.2 devices.
The SCALER section of the USB GUI for Windows PC:
Disclaimer: 3rd party and/or custom firmware providing extra features are not covered in this manual.
Page 29

29
4K Vertex – User Manual
[No Scaling]: Set your unit to No Scaling for the signal to pass-through untouched
[Custom Scaling]: Set your Vertex unit to Custom Scaling to manually define the scaling parameters.
You can select between various type of resolutions, color space and deep color settings for both the
upscale and downscale output ports.
Available Color Space options: Follow Input (default), RGB FULL, RGB BT2020, 4:4:4 BT.709, 4:4:4
BT2020, 4:2:2 BT.709, 4:2:2 BT2020, 4:2:0 BT.709, 4:2:0 BT2020.
Available Deep Color options: Follow Input (default), 8-bit/24-bit, 10-bit/30-bit, 12-bit/36-bit, 16-bit/48bit
[Auto Scaling]: Set your unit to Auto Scaling to use automatic pre-sets for TX1 [TOP].
[4K60 PRESET]: This forces any 4k60 input to come out as 4k60 420 8bit 300MHz or 1080p60 444
8/10/12-bit. A neat profile for people who only have a 300MHz display with 4K60 420 8-bit support. If
EDID allows the player to send HDMI 2.0 formats, such as all HDR modes, they will be accepted by the
display due to Vertex scaling/chroma changes.
[4K60 422 HDR PRESET]: This forces 4K60 420 HDR input to come out as 4K60 420 10-bit, 4k60 420 8-bit
300MHz or 1080p60 444 8/10/12-bit. A neat profile for people who only have a 300MHz display with
4K60 420 8-bit support. If EDID allows the player to send HDMI 2.0 formats, such as all HDR modes, they
will be accepted by the display due to Vertex scaling/chroma changes.
[4K30 PRESET]: This forces any 4k24/25/30 to come out as 4k24/25/30 444 8-bit 300MHz, 1080p30 444
8/10/12-bit or 4k24/25/30 422 12-bit 300MHz. A neat profile if you have a 300MHz display. If EDID
allows the player to send HDMI 2.0 formats, such as all HDR modes, they will be accepted by the display
due to Vertex scaling/chroma changes.
Disclaimer: 3rd party and/or custom firmware providing extra features are not covered in this manual.
Page 30

30
4K Vertex – User Manual
The HDR INFOFRAME section of the USB GUI for Windows PC:
[CAPTURED HDR METADATA]: If the source at input is sending HDR InfoFrame metadata then the
information is captured, extracted and displayed in this text box on GUI. HDR metadata is also
deciphered and displayed in human readable format on both the Windows GUI and OSD.
[CUSTOM HDR METADATA GENERATOR]: This GUI section will allow you to create your own custom
HDR metadata and inject it on the current signal by adding it or replacing the existing HDR metadata.
[ENABLE CUSTOM HDR]: Unchecked by default, once activated it will turn ON the HDR mode of any HDR
display. Upon clicking ENABLE CUSTOM HDR the CUSTOM HDR IF that is defined by dropdown and input
field and then created and displayed in the text box gets sent. This way you can define what the
InfoFrame actually is. This is stored also in Vertex and is persistent over hotplugs and power cycles.
[Disable HDR]: Once activated this option will allow Linker to intercept and cancel all incoming HDR
metadata. This mode was introduced to allow JVC PJ owners to apply their own Gamma curves for HDR
content and allow their PJ DI to work when content is HDR.
[EOTF]: Select between SDR Luminance Range, HDR Luminance Range or SMPTE ST 2084 values to be
used in the custom HDR metadata creation.
[Primaries]: Select between DCI P3, ITU-R BT 709-5 or ITU-R BT2020-2 values to be used in the custom
HDR metadata creation.
Disclaimer: 3rd party and/or custom firmware providing extra features are not covered in this manual.
Page 31

31
4K Vertex – User Manual
[White Point]: Select the white point value to be used in the custom HDR metadata creation.
[Max Luminance]: Select the Max Luminance value to be used in the custom HDR metadata creation
(valid from 1 to 65535)
[MaxCLL]: Select the MaxCLL value to be used in the custom HDR metadata creation (valid from 1 to
65535)
[Min Luminance]: Select the Min Luminance value to be used in the custom HDR metadata creation
(valid from 1 to 65535)
[MaxFALL]: Select the MaxFALL value to be used in the custom HDR metadata creation (valid from 1 to
65535)
[Create IF]: Use the previous defined values to create the Custom HDR metadata.
[Send HDR]: Send the custom created HDR metadata. Please note that upon clicking, Enable Custom
HDR will get activated automatically, to stop the sending of the custom HDR metadata, uncheck Enable
Custom HDR. If Enable Custom HDR is activated then by pressing the Send HDR button, the metadata
injection does not stop, it just changes values, useful to avoid TV resync.
Note: There are two ways to reset the strings. Either hold the RESET button 10 seconds on Vertex or go
to the GUI "config" page and apply reset. After GUI reset close and reopen GUI. Then the fields are
populated with reset values.
Public API/DLL: We have created a set of DLL/API package for Vertex so anyone can interface their
Windows software with Vertex capabilities and build evaluation, testing, measurement, calibration and
content creation workflows system.
IR/RS232: Vertex can be fully controlled via IR or from any serial based computer such as Win, Max or
Linux using RS232 interface. Complete list of IR and RS232 commands are included as a text file for
convenience on all Firmware updater and GUI utility package.
Disclaimer: 3rd party and/or custom firmware providing extra features are not covered in this manual.
Page 32

32
4K Vertex – User Manual
The AVI/VSI IF section of the USB GUI for Windows PC:
[CAPTURED AVI INFOFRAME]: If the source is sending AVI infoFrame then the information is captured,
extracted and displayed in this text box on GUI.
[CUSTOM AVI INFOFRAME]: Enter the AVI Infoframe of your choice in this text field in HEX format.
If you are not sure about how to format your AVI Infoframe, we recommend you to visit our Infoframe
Injection thread in our support forum. (Advanced Users only)
[Send AVI]: Replaces the current incoming AVI with the custom defined one in the text box. This way
customer can for example activate BT2020 mode in the TV even though content doesn't sent the correct
InfoFrame. This string is also saved in Vertex and is persistent over hotplugs and power cycles.
The AVI mod is really meant for advanced users only because incorrect values can blank the screen and
since the settings are saved even power up won't help until reset. Please note that upon clicking,
Enable Custom AVI will get activated automatically, to stop the sending of the custom AVI infoframe,
uncheck Enable Custom AVI. If Enable Custom AVI is activated then by pressing the Send AVI button,
the infoframe injection does not stop, it just changes values, useful to avoid TV resync.
[Disable AVI]: When checked, Disable AVI will prevent AVI InfoFrame from source to reach the
connected sink at Vertex output and also stop sending Custom AVI if set previously. This feature can be
useful for some DVI display or some monitor that do not work well when receiving an AVI InfoFrame.
[Enable Custom AVI]: Upon clicking Enable Custom AVI, the IF that is defined in the Custom AVI text box
gets used. This way you can define what the InfoFrame actually is. This is stored also in Vertex and is
Disclaimer: 3rd party and/or custom firmware providing extra features are not covered in this manual.
Page 33

33
4K Vertex – User Manual
persistent over hotplugs and power cycles. This way customer can for example activate BT2020 mode in
the TV even though content doesn't sent the correct InfoFrame. The AVI mod is really meant for
advanced users only because incorrect values can blank the screen and since the settings are saved even
power up won't help until reset.
[CAPTURED VENDOR SPECIFIC INFOFRAME]: If the source is sending Vendor Specific Infoframe then the
information is captured, extracted and displayed in this text box on GUI.
[CUSTOM VENDOR SPECIFIC INFOFRAME]: Enter the Vendor Specific Infoframe of your choice in this
text field in HEX format. If you are not sure about how to format your AVI Infoframe, we recommend
you to visit our Infoframe Injection thread in our support forum. (Advanced Users only)
[Send VSI]: Replaces the current incoming VSI with the custom defined one in the text box. This string is
also saved in Vertex and is persistent over hotplugs and power cycles. Please note that upon clicking,
Enable Custom VSI will get activated automatically, to stop the sending of the custom VSI infoframe,
uncheck Enable Custom VSI. If Enable Custom VSI is activated then by pressing the Send VSI button, the
infoframe injection does not stop, it just changes values.
[Disable VSI]: When checked, Disable VSI will prevent DSI InfoFrame from source to reach the
connected sink at Vertex output and also stop sending Custom VSI if set previously.
[Enable Custom VSI]: Upon clicking Enable Custom VSI, the IF that is defined in the Custom VSI text box
gets used. This way you can define what the InfoFrame actually is. This is stored also in Vertex and is
persistent over hotplugs and power cycles.
Note: There are two ways to reset the strings. Either hold the RESET button 10 seconds on Vertex or go
to the GUI "config" page and apply reset. After GUI reset close and reopen GUI. Then the fields are
populated with reset values.
Public API/DLL: We have created a set of DLL/API package for Vertex so anyone can interface their
Windows software with Vertex capabilities and build evaluation, testing, measurement, calibration and
content creation workflows system.
IR/RS232: Vertex can be fully controlled via IR or from any serial based computer such as Win, Max or
Linux using RS232 interface. Complete list of IR and RS232 commands are included as a text file for
convenience on all Firmware updater and GUI utility package.
Disclaimer: 3rd party and/or custom firmware providing extra features are not covered in this manual.
Page 34

34
4K Vertex – User Manual
The DV/IF section of the USB GUI for Windows PC:
[SAVED DOLBY VISION METADATA BLOCK]: Vertex will automatically sniff, display and save any Dolby
Vision mandatory string from a connected sink at BOT output. Once stored, this mandatory string can be
used in Automix to ensure that the DV stream from the source is compatible with the sink. Once the DV
string of a display is saved, you can insert other equipment like an AVR in between in the chain and still
have the right DV signal passthru to the sink.
[CAPTURED SPD INFOFRAME]: Display Source Product InfoFrame.
[CAPTURED AUDIO INFOFRAME]: Current Audio Format information, if PCM this usually gives the
sample rate and number of speakers, if bitstream then usually this infoframe just inform the default
which is “refer stream header”
[CAPTURED HDMI VENDOR SPECIFIC INFOFRAME]: Display HDMI Vendor Specific InfoFrame.
[CAPTURED HDMI FORUM VSIF]: Display HDMI2.0 version of HDMI VSIF
Disclaimer: 3rd party and/or custom firmware providing extra features are not covered in this manual.
Page 35

35
4K Vertex – User Manual
The OSD section of the USB GUI for Windows PC:
[OSD Enabled]: Enable or Disable the OSD feature of Vertex.
[OSD LOCATION X, Y]: Set the X and Y value of the OSD location at 1080p, values are multiplied by 2
when the stream is 4K
[OSD COLOR INDEX FG, BG, BG level]: Set the Text Color, Background Color and Background
transparency for the OSD.
[OSD INFO]: Select or unselect the information that must be displayed on your Vertex OSD. Available
options are: Source name, Video Field, Video IF, HDR TX/TX info, HDR IF, Audio field, RX HDR info only.
[OSD FADE]: Set the timer before OSD fade out, 0 = never.
[SEND]: For any changes in the above parameters, click SEND to upload them to your Vertex unit.
[OSD Mask]: Enable of Disable the use of OSD Mask.
[MASK LOCATION x0,y0,x1,y1]: Defines the coordinates of the top left and bottom right corner of your
OSD Mask at 1080p. Values are multiplied by 2 when the stream is 4K
[OSD Mask level]: Select the level of transparency for your OSD Mask
Disclaimer: 3rd party and/or custom firmware providing extra features are not covered in this manual.
Page 36

36
4K Vertex – User Manual
[SEND]: For any changes in the above parameters, click SEND to upload them to your Vertex unit.
[OSD CUSTOM TEXT]: Enable or disable the OSD Custom Text, once activated, the custom text defined
in the text field will be displayed on screen.
[LOCATION X,Y]: Set the X and Y value of the OSD Custom Text at 1080p, values are multiplied by 2
when the stream is 4K
[SEND]: For any changes in the above parameters, click SEND to upload them to your Vertex unit.
The CEC COMMANDER section of the USB GUI for Windows PC:
[CEC COMMAND]: Enter the CEC command of your choice in this text field in HEX format.
If you are not sure about how to format your command, we recommend you to visit the very well done
cec-o-matic website made by Kwikwai.
[SEND CEC]: By clicking this option, the CEC command you entered in the CEC COMMAND text field will
be sent out by the Vertex unit.
[VERTEX CEC DEVICE TYPE]: Video Processor by default (ID#5)
CEC ENABLED must be ON in order to apply the selected dropdown options to the Vertex unit.
Disclaimer: 3rd party and/or custom firmware providing extra features are not covered in this manual.
Page 37

37
4K Vertex – User Manual
Video Processor (Default) is the device type to choose if you have an AVR in your setup and if you want
to use that AVR for ARC or CEC.
Audio System w/ARC is the device type to choose if you want Vertex ARC feature to be ON (Sound from
TV ARC to Vertex 5.1 Optical Out or Jack Analog Stereo output. You can also use this method if you want
Vertex to replace your AVR as CEC Commander.
[CEC ENABLED]: Unchecked by default, once activated it allows Vertex to answer and process CEC
requests and commands and appear on the CEC network map. Uncheck it if you do not want Vertex to
answer external CEC requests or process Internal CEC commands. Unchecking will remove Vertex from
the Root network map but CEC commands for connected sinks or sources will still pass-thru.
Note: CEC/ARC master is BOT OUTPUT, if you want ARC from the TV; you need to connect your TV ARC
capable input to Vertex BOT OUTPUT and set the unit as Audio System w/ARC under Vertex CEC device
type.
A few examples for testing CEC commands are provided on the GUI.
Using the Android or iOS APP, it is possible to create custom menu for CEC commands.
Feel free to join our forum in order to know more about it.
The MACROS section of the USB GUI for Windows PC:
Work underway, this section will be detailed and updated later.
Disclaimer: 3rd party and/or custom firmware providing extra features are not covered in this manual.
Page 38

38
4K Vertex – User Manual
The CONFIG section of the USB GUI for Windows PC:
[AUTO SWITCH]: When activated, the Auto Switch feature will force the Vertex unit to automatically
switch to the active signal if the selected signal is lost.
[PRIORITY]: When in FORCED input priority mode, as soon as a new active input is detected, Vertex will
switch to it.
[HDCP VERSION]: Allow you to select/force the HDCP revision of the TOP Output Port. Similarly to what
you can do from the push button on the unit (see page 10)
[LOGO LED]: Enable by default, GREEN Vertex side logo can be turned ON/OFF at will. Some users might
found Vertex side logo visually disturbing in their HT setup. You have the possibility to turn them off.
[OLED DISPLAY]: Enable by default, Vertex OLED display can be turned ON/OFF at will. Some users
might found the Vertex OLED display visually disturbing in their HT setup. You have the possibility to
turn it off.
[ROTATE 180 DEG]: OFF by default, based on your setup, you might prefer to flip the OLED display, once
activated, this option will flip the Vertex OLED.
[REVERSE COLORS]: OFF by default, once activated this option will reverse the Vertex colors.
Disclaimer: 3rd party and/or custom firmware providing extra features are not covered in this manual.
Page 39

39
4K Vertex – User Manual
[OLED FADE]: Allow you to define a custom timing in seconds before OLED FADE, set it to 0 for OLED to
always stay active.
[ISSUE HOTPLUG]: Click Send button to perform a soft-reset in your setup.
[START UP MENU PAGE]
You can select which one of the 5 info pages available will be displayed first as default.
- Page 1: Info [Default]
- Page 2: RX Info
- Page 3: HDR 1
- Page 4: HDR 2
- Page 5: IF info
[CLEAR ALL SETTINGS TO FACTORY DEFAULTS]: Similar as [LP] Long Press on the RESET button (see
page 7). Click the available check box to clear all settings to factory defaults and type RESET in the test
field. Finally click the OK button and unit will be reset to factory defaults. Vertex power cycle needed.
[EDID FACTORY RESET]: Click the available check box to clear all EDID settings to factory defaults and
type RESET in the test field. Finally click the OK button and unit EDID will be reset to factory defaults.
Disclaimer: 3rd party and/or custom firmware providing extra features are not covered in this manual.
Page 40

40
4K Vertex – User Manual
CONFIG Import/Export section of the USB GUI for Windows PC:
By using the [FILE] > [EXPORT] option, you will be able to save the current Vertex configuration and
settings in a text file.
The file can then be shared with others, for support reason or simply to be loaded back after a newer
firmware update by using [FILE] > [IMPORT] option.
Exported config file will present the active signal informations, the EDID set for each RX and TX as well as
the list of parameters that can be edited in the text file directly before importing the file back.
################################################################
# HDFURY VERTEX CONFIGURATION FILE
# [4.10.2017 17:42:40]
################################################################
# STATUS INFO START - DO NOT MODIFY VALUES
################################################################
RX0: 4K23.974 RGB 8b 297MHz 2.2T1
AUD0: L-PCM 48kHz 2.0ch 24bit
TX0: 4K23.974 RGB 8b 297MHz 2.2
TX1: off or not connected
SAMSUNG EDID: 4K60 444 HDR BT2020
EDID not available
Source Info: OPPO UDP -203
AVI: 82:02:0d:3f:00:28:08:00:00:00:00:00:00:00:00:00:00
AUDIO: 84:01:0a:70:01:00:00:00:00:00:00:00:00:00
Disclaimer: 3rd party and/or custom firmware providing extra features are not covered in this manual.
Page 41

41
4K Vertex – User Manual
HVS:
81:01:18:34:03:0c:00:20:03:00:00:00:00:00:00:00:00:00:00:00:00:00:00:00:00:00
:00:00
SPD:
83:01:19:50:4f:50:50:4f:20:55:44:50:2d:32:30:33:00:00:00:00:00:00:00:00:00:00
:00:00:0a
#RX0 EDID
00 FF FF FF FF FF FF 00 59 3A 18 10 01 01 01 01
00 1B 01 03 80 6E 3E 78 2A 62 6D AD 4F 48 AA 25
0C 47 4A A5 CE 00 D1 C0 01 01 01 01 01 01 01 01
01 01 01 01 01 01 04 74 00 30 F2 70 5A 80 B0 58
8A 00 48 68 42 00 00 1E 02 3A 80 18 71 38 2D 40
58 2C 45 00 48 68 42 00 00 1E 00 00 00 FC 00 4D
35 30 2D 45 31 0A 20 20 20 20 20 20 00 00 00 FD
00 17 4C 0F 8C 3C 00 0A 20 20 20 20 20 20 01 63
02 03 64 71 50 5F 64 5D 62 61 66 10 22 20 05 04
07 06 03 02 01 32 57 06 00 00 00 00 00 00 00 00
00 00 09 07 07 15 07 50 83 01 00 00 6F 03 0C 00
11 00 38 3C A0 5B 5B 00 60 01 03 04 F9 01 46 D0
00 02 34 AD 4E E6 41 A8 0B 27 0C 14 50 54 CC 07
B5 28 00 00 00 00 E2 00 FF E2 0F 30 E3 06 07 01
E3 05 E0 00 00 00 00 00 00 00 00 00 00 00 00 00
00 00 00 00 00 00 00 00 00 00 00 00 00 00 00 57
#RX1 EDID
00 FF FF FF FF FF FF 00 59 3A 18 10 01 01 01 01
00 1B 01 03 80 6E 3E 78 2A 62 6D AD 4F 48 AA 25
0C 47 4A A5 CE 00 D1 C0 01 01 01 01 01 01 01 01
01 01 01 01 01 01 04 74 00 30 F2 70 5A 80 B0 58
8A 00 48 68 42 00 00 1E 02 3A 80 18 71 38 2D 40
58 2C 45 00 48 68 42 00 00 1E 00 00 00 FC 00 4D
35 30 2D 45 31 0A 20 20 20 20 20 20 00 00 00 FD
00 17 4C 0F 8C 3C 00 0A 20 20 20 20 20 20 01 63
02 03 64 71 50 5F 64 5D 62 61 66 10 22 20 05 04
07 06 03 02 01 32 57 06 00 00 00 00 00 00 00 00
00 00 09 07 07 15 07 50 83 01 00 00 6F 03 0C 00
12 00 38 3C A0 5B 5B 00 60 01 03 04 F9 01 46 D0
00 02 34 AD 4E E6 41 A8 0B 27 0C 14 50 54 CC 07
B5 28 00 00 00 00 E2 00 FF E2 0F 30 E3 06 07 01
E3 05 E0 00 00 00 00 00 00 00 00 00 00 00 00 00
00 00 00 00 00 00 00 00 00 00 00 00 00 00 00 56
#TX0 EDID
00 FF FF FF FF FF FF 00 4C 2D 01 0C 01 06 00 01
2A 18 01 03 80 69 3B 78 0A 23 AD A4 54 4D 99 26
0F 47 4A BD EF 80 71 4F 81 C0 81 00 81 80 95 00
A9 C0 B3 00 01 01 08 E8 00 30 F2 70 5A 80 B0 58
8A 00 50 1D 74 00 00 1E 02 3A 80 18 71 38 2D 40
58 2C 45 00 50 1D 74 00 00 1E 00 00 00 FD 00 18
4B 0F 87 3C 00 0A 20 20 20 20 20 20 00 00 00 FC
00 53 41 4D 53 55 4E 47 0A 20 20 20 20 20 01 56
02 03 58 F1 57 61 10 1F 04 13 05 14 20 21 22 5D
5E 5F 60 65 66 62 63 64 07 16 03 12 29 09 07 07
15 07 50 3D 04 C0 83 01 00 00 E2 00 0F E3 05 C0
00 76 03 0C 00 10 00 B8 3C 21 D0 88 01 02 03 04
01 40 3F FF 50 60 80 90 67 D8 5D C4 01 78 80 03
Disclaimer: 3rd party and/or custom firmware providing extra features are not covered in this manual.
Page 42

42
4K Vertex – User Manual
E3 06 05 01 E3 0F 01 E0 01 1D 80 D0 72 1C 16 20
10 2C 25 80 50 1D 74 00 00 9E 66 21 56 AA 51 00
1E 30 46 8F 33 00 50 1D 74 00 00 1E 00 00 00 A6
#TX1 EDID
00 00 00 00 00 00 00 00 00 00 00 00 00 00 00 00
00 00 00 00 00 00 00 00 00 00 00 00 00 00 00 00
00 00 00 00 00 00 00 00 00 00 00 00 00 00 00 00
00 00 00 00 00 00 00 00 00 00 00 00 00 00 00 00
00 00 00 00 00 00 00 00 00 00 00 00 00 00 00 00
00 00 00 00 00 00 00 00 00 00 00 00 00 00 00 00
00 00 00 00 00 00 00 00 00 00 00 00 00 00 00 00
00 00 00 00 00 00 00 00 00 00 00 00 00 00 00 00
00 00 00 00 00 00 00 00 00 00 00 00 00 00 00 00
00 00 00 00 00 00 00 00 00 00 00 00 00 00 00 00
00 00 00 00 00 00 00 00 00 00 00 00 00 00 00 00
00 00 00 00 00 00 00 00 00 00 00 00 00 00 00 00
00 00 00 00 00 00 00 00 00 00 00 00 00 00 00 00
00 00 00 00 00 00 00 00 00 00 00 00 00 00 00 00
00 00 00 00 00 00 00 00 00 00 00 00 00 00 00 00
00 00 00 00 00 00 00 00 00 00 00 00 00 00 00 00
#STATUS END
#
################################################################
#
#SETTINGS START - MODIFY VALUES PERMITTED
#
################################################################
InputPort bot
AutoSw on
AutoSwPrio normal
EncLevel 14
ScaleSel auto
EdidCustomModeSel custom
EdidCustomTableTop 1
EdidCustomTableBot 1
EdidAudio native
EdidHdr10 off
EdidHlg off
EdidBt2020 on
EdidYuvRemove off
Edid3dRemove off
EdidDv off
HdrCustom off
HdrDisable off
AviCustom off
AviDisable off
VsiCustom off
VsiDisable off
AutoPreset4k30 PRESET_4K30_444_8
AutoPreset4k60Hdr PRESET_4K60_420_8
AutoPreset4k60 PRESET_4K60_420_8
LogoLed on
Oled on
OledRotate off
OledReverse off
Disclaimer: 3rd party and/or custom firmware providing extra features are not covered in this manual.
Page 43

43
4K Vertex – User Manual
OledFadeValue 0
OledMenuPage 1
Osd on
OsdMask off
OsdFadeValue 0
OsdLocX 20
OsdLocY 945
OsdMaskX0 1
OsdMaskY0 950
OsdMaskX1 1920
OsdMaskY1 1080
OsdMaskRate 3
OsdColorFg 25
OsdColorBg 0
OsdColorBgRate 7
OsdField1 on
OsdField2 on
OsdField3 on
OsdField4 on
OsdField5 on
OsdField6 on
OsdField7 off
OsdCustTextEnable off
OsdCustTextLocX 20
OsdCustTextLocY 20
Cec off
CecLa video
CustomHdrText
87:01:1a:b0:02:00:c2:33:c4:86:4c:1d:b8:0b:d0:84:80:3e:13:3d:42:40:a0:0f:32:00
:e8:03:90:01
CustomAviText 82:02:0d:ae:40:c0:60:61:00:00:00:00:00:00:00:00:00
CustomVsiText
81:01:1b:63:00:00:00:00:00:00:00:00:00:00:00:00:00:00:00:00:00:00:00:00:00:00
:00:00:00:00:00
CustomCecText ef:36
#SETTINGS END
#
################################################################
Disclaimer: 3rd party and/or custom firmware providing extra features are not covered in this manual.
Page 44

44
4K Vertex – User Manual
RS232 Control
VERTEX RS232 COMMAND LIST 102517:
Vertex RS232 jack expects the following plug signals:
TIP = TX [sends data out from Vertex]
RING = RX [receives data to Vertex]
SLEEVE = GND
Parameters: 115200, 8, n, 1, no handshake
Every command must start with # character and must end with a carriage return \r or a newline \n
Use only lowercase characters
Example commands:
#get edidmode
#get hdrcustom
#set edidmode automix
#set hdrstr 87:01:1a:b0:02:00:c2:33:c4:86:4c:1d:b8:0b:d0:84:80:3e:13:3d:42:40:a0:0f:32:00:e8:03:90:01
#set hdrcustom on
#set avistr 82:02:0d:ae:40:c0:60:61:00:00:00:00:00:00:00:00:00
#set avicustom on
#set vsistr
81:01:1b:63:00:00:00:00:00:00:00:00:00:00:00:00:00:00:00:00:00:00:00:00:00:00:00:00:00:00:00
#set vsicustom on
#set cecstr 0f:36
Command list:
#get ver
Shows the current Vertex FW versions
#get status
Shows the current status
#hotplug
Issue hotplug event to the sources
#set input x / #get input
Change the input port. x can be top/bot/thru/swap
#set autosw x / #get autosw
Toggle the input port auto switching capability.
If on, the input port will change to an active input if the current input is switched off.
x can be on/off
#set autoswprio x / #get autoswprio
Disclaimer: 3rd party and/or custom firmware providing extra features are not covered in this manual.
Page 45

45
4K Vertex – User Manual
Toggle the input port auto switching priority.
If on, the input port will force change when a new source is connected.
x can be on/off
#set scale x / #get scale
Change the scaling mode if the scale-slide switch is in the middle position.x can be auto/custom/none
#set hdcp x / #get hdcp
change the output hdcp level if the hdcp-slide switch is in the middle position. x can be 14/22
#set edidmode x / #get edidmode
change the output hdcp level if the hdcp-slide switch is in the middle position.
x can be automix/custom/fixed/copytop/copybot
#set edidtable x / #get edidtable
Selects the custom edidtable for port 0 (and port 1 if not separately selected). Range is 1-100
#set edidtabletop x / #get edidtabletop
Selects the custom edid table for port 1. Select value of 0 to follow the Port 0 EDID. Range is 0-100
#set edidalgo x / #get edidalgo
Select the automix EDID mixing algorithm. Applicable only in the AUTOMIX EDID mode.
Algorithms:
0 = "Min Mixed Capabilities"
1 = "Max Audio, Min Video"
2 = "BOT Output Priority"
3 = "TOP Output Priority"
4 = "Max Audio, Max Video"
#set osd x / #get osd
Toggle on-screen-display activity. x can be on/off
#set osdfadevalue x / #get osdfadevalue
Set the duration in seconds how long the OSD will be visible when any video paramater change.
A value of 0 will never fade.
#set osdtext x / #get osdtext
Toggle the OSD custom text activity. x can be on/off
#set osdtextstr x / #get osdtextstr
Set the custom text string that will be visible on OSD. The text must be
Example: #set osdtextstr "HdFury Vertex"
#set osdmask x / #get osdmask
Toggle the OSD masking region. x can be on/off
#set oled x / #get oled
Toggle the OLED display. x can be on/off
Disclaimer: 3rd party and/or custom firmware providing extra features are not covered in this manual.
Page 46

46
4K Vertex – User Manual
#set oledrotate x / #get oledrotate
Toggle the OLED display rotate 180 degrees. x can be on/off
#set oledreverse x / #get oledreverse
Toggle the OLED display reverse colors. x can be on/off
#set oledfadevalue x / #get oledfadevalue
Set the duration in seconds how long the OLED display will be visible when any video paramater change.
A value of 0 will never fade.
#set oledpage x / #get oledpage
Set the current OLED display page. The setting is saved for power cycle
#set logoled x / #get logoled
Toggle the Vertex side logo led activity. x can be on/off
#set edidaudio x / #get edidaudio
Select AUTOMIX audio flag parameters. The setting will force audio capability advertised by the EDID.
x can be stereo/51/71/native
native is the current connected sink capabilities mixed with the current EDID algorithm
#set edidbt2020 x / #get edidbt2020
Select AUTOMIX BT2020 flag parameter. When enabled, will force BT2020 capability to the source.
When not in force, will follow the sink capabilities.
x can be on/off
#set edidhdr10 x / #get edidhdr10
Select AUTOMIX HDR10 flag parameter. When enabled, will force HDR10 capability to the source.
When not in force, will follow the sink capabilities.
x can be on/off
#set edidhlg x / #get edidhlg
Select AUTOMIX HLG flag parameter. When enabled, will force HLG capability to the source.
When not in force, will follow the sink capabilities.
x can be on/off
#set ediddv x / #get ediddv
Select AUTOMIX DOLBY VISION flag parameter. When enabled, will force DV capability to the source.
When not in force, will follow the sink capabilities.
x can be on/off
#set edidyuvremove x / #get edidyuvremove
Select AUTOMIX YCbCr color space flag parameter. When enabled, will remove YCbCr 444/422
capability.
When not in force, will follow the sink capabilities.
x can be on/off
Disclaimer: 3rd party and/or custom firmware providing extra features are not covered in this manual.
Page 47

47
4K Vertex – User Manual
#set edid3dremove x / #get edid3dremove
Select AUTOMIX 3D flag parameter. When enabled, will remove 3D capability.
When not in force, will follow the sink capabilities.
x can be on/off
#set hdrstr x / #get hdrstr
Defines a custom HDR string that will be sent to the sink if "hdrcustom" is enabled.
x must be of the format where data bytes are separated by a : -character
example #set hdrstr 87:01:1a:b0:.......
#set hdrcustom x / #get hdrcustom
Toggles the sending of the custom HDR string. When enabled will disable the input HDR from traveling
to the output and replace with a defined custom string.
x can be on/off
#set hdrdisable x / #get hdrdisable
Toggles the sending of any HDR string. When enabled will disable all HDR info to the sink
x can be on/off
#set avistr x / #get avistr
Defines a custom AVI string that will be sent to the sink if "avicustom" is enabled.
x must be of the format where data bytes are separated by a : -character
example #set avistr 82:02:0d:ae:40:c0:60:61:.......
#set avicustom x / #get avicustom
Toggles the sending of the custom AVI string. When enabled will disable the input AVI from traveling to
the output and replace with a defined custom string.
x can be on/off
#set avidisable x / #get avidisable
Toggles the sending of any AVI string. When enabled will disable all AVI info to the sink.
Be careful in using avidisable as most TVs will no longer show any signal.
x can be on/off
#set vsistr x / #get vsistr
Defines a custom Vendor Specific Infoframe [VSI] string that will be sent to the sink if "vsicustom" is
enabled.
x must be of the format where data bytes are separated by a : -character
example #set vsistr 81:01:1b:63:00:00:00:0:.......
#set vsicustom x / #get vsicustom
Toggles the sending of the custom VSI string. When enabled will disable the input VSI from traveling to
the output and replace with a defined custom string.
Sending a custom VSI will not disable the potential input HDMI Vendor Specific Infoframe and both will
flow to the sink.
However, sometimes sending both will confuse the TV depending on the sink capabilities.
x can be on/off
Disclaimer: 3rd party and/or custom firmware providing extra features are not covered in this manual.
Page 48

48
4K Vertex – User Manual
#set vsidisable x / #get vsidisable
Toggles the sending of any VSI string. When enabled will disable all VSI info to the sink.
x can be on/off
#set cec x / #get cec
Toggles the CEC capability.
x can be on/off
#set cecla x / #get cecla
Switches the CEC Logical Address between Audio System and Video Processor.
In order to process ARC the CEC device must be setup as Audio System.
x can be audio/video
#set cecstr x
Transmits a CEC string to the network if CEC is enabled.
x must be of the format where data bytes are separated by a : -character
example to turn off devices, #set cecstr 0f:36
Disclaimer: 3rd party and/or custom firmware providing extra features are not covered in this manual.
Page 49

49
4K Vertex – User Manual
4K Vertex Total Control APP 1.0.0 for Android and iOS
Disclaimer: 3rd party and/or custom firmware providing extra features are not covered in this manual.
Page 50

50
4K Vertex – User Manual
Main Features of the Android/iOS Total Control APP for Vertex
This APP request Bluetooth authorization and SD card/file writing permissions when installing.
The app will allow you to control and operate your HDfury Vertex and CEC components within your
Home Theater setup. It can perform the following:
- Reset/HPD/Read/Modify and Upload Configuration.
- Switch Input channel and Matrix/Splitter mode.
- Set Auto switching mode.
- Set Input Priority mode.
- Turn Logo LED and OLED ON/OFF. Set OLED startup page
- Set OLED fade timer, OLED rotation or OLED reverse color.
- Define HDCP rules and fix HDCP error.
- Set EDID mode (Automix, Custom, Copy Top, Copy Bot, Fixed)
- Set Automix Algo with Min Mixed Capabilities, Max Audio/Min Video, Bot Output Priority, Top Output
Priority, Max Audio/Max Video.
- Set Automix enforceable video flags (BT2020, HDR10+, HDR HLG, Dolby Vision, 3D Remove, YCbCr)
- Set Automix enforceable audio flags (2.0, 5.1, full, native)
- Set the Custom EDID of your choice for Port 0 and 1 separately (choose from a list of 100 EDID)
- Select the scaling type (Auto, Custom, none)
- Define Auto Scaling for Port 1 from available presets.
- Define Custom Scaling mode for Port 0 and 1 (Upscale or Downscale)
- Set Mode, Colorspace and Deepcolor settings for any input types.
- Disable HDR, AVI or VSI and replace current metadata and infoframe by a custom one.
- Activate and configure OSD data, position, colors and transparency.
- Activate and configure OSD Mask position, colors and transparency.
- Activate and set OSD Text position, colors and transparency.
- Set CEC device with Video Processor or Audio System with ARC.
- Send live CEC command to the HDMI/CEC network.
- Display current link speed and infoframe information.
- Display incoming signal information and active link(s)
- Display GUI, FW and GoBlue version in use.
Get the APP from Google Play Market: here. For iOS, get it from APPstore: here.
On Android, you can create your own menu and add custom commands at any time through an editable
XML menu file. You can connect to Vertex and use the Bluetooth APP even when no signals is going
through the Vertex
Note: Do not pair your phone to Vertex using Android BT Menu, just launch APP and it will autoconnect
Disclaimer: 3rd party and/or custom firmware providing extra features are not covered in this manual.
Page 51

51
4K Vertex – User Manual
IR Code List
For convenience, the complete list of IR codes is supplied in Pronto HEX files, it is recommended to
always use the latest IR codes list that is included as a text file format with each firmware and GUI
update. Vertex IR codes have also been submitted to Logitech Harmony and iRule.
vertex_autoswoff: NEC 0x70 0x25
0000 006e 0000 0022 0156 00ab 0015 0015 0015 0015 0015 0015 0015 0015 0015 003f 0015 003f 0015
003f 0015 0015 0015 003f 0015 003f 0015 003f 0015 003f 0015 0015 0015 0015 0015 0015 0015 003f
0015 003f 0015 0015 0015 003f 0015 0015 0015 0015 0015 003f 0015 0015 0015 0015 0015 0015 0015
003f 0015 0015 0015 003f 0015 003f 0015 0015 0015 003f 0015 003f 0015 05d5
vertex_autoswon: NEC 0x70 0x24
0000 006e 0000 0022 0156 00ab 0015 0015 0015 0015 0015 0015 0015 0015 0015 003f 0015 003f 0015
003f 0015 0015 0015 003f 0015 003f 0015 003f 0015 003f 0015 0015 0015 0015 0015 0015 0015 003f
0015 0015 0015 0015 0015 003f 0015 0015 0015 0015 0015 003f 0015 0015 0015 0015 0015 003f 0015
003f 0015 0015 0015 003f 0015 003f 0015 0015 0015 003f 0015 003f 0015 05d5
vertex_autoswpriooff: NEC 0x70 0x27
0000 006e 0000 0022 0156 00ab 0015 0015 0015 0015 0015 0015 0015 0015 0015 003f 0015 003f 0015
003f 0015 0015 0015 003f 0015 003f 0015 003f 0015 003f 0015 0015 0015 0015 0015 0015 0015 003f
0015 003f 0015 003f 0015 003f 0015 0015 0015 0015 0015 003f 0015 0015 0015 0015 0015 0015 0015
0015 0015 0015 0015 003f 0015 003f 0015 0015 0015 003f 0015 003f 0015 05d5
vertex_autoswprioon: NEC 0x70 0x26
0000 006e 0000 0022 0156 00ab 0015 0015 0015 0015 0015 0015 0015 0015 0015 003f 0015 003f 0015
003f 0015 0015 0015 003f 0015 003f 0015 003f 0015 003f 0015 0015 0015 0015 0015 0015 0015 003f
0015 0015 0015 003f 0015 003f 0015 0015 0015 0015 0015 003f 0015 0015 0015 0015 0015 003f 0015
0015 0015 0015 0015 003f 0015 003f 0015 0015 0015 003f 0015 003f 0015 05d5
vertex_avicustomoff: NEC 0x70 0x1a
0000 006e 0000 0022 0156 00ab 0015 0015 0015 0015 0015 0015 0015 0015 0015 003f 0015 003f 0015
003f 0015 0015 0015 003f 0015 003f 0015 003f 0015 003f 0015 0015 0015 0015 0015 0015 0015 003f
0015 0015 0015 003f 0015 0015 0015 003f 0015 003f 0015 0015 0015 0015 0015 0015 0015 003f 0015
0015 0015 003f 0015 0015 0015 0015 0015 003f 0015 003f 0015 003f 0015 05d5
vertex_avicustomon: NEC 0x70 0x19
0000 006e 0000 0022 0156 00ab 0015 0015 0015 0015 0015 0015 0015 0015 0015 003f 0015 003f 0015
003f 0015 0015 0015 003f 0015 003f 0015 003f 0015 003f 0015 0015 0015 0015 0015 0015 0015 003f
Disclaimer: 3rd party and/or custom firmware providing extra features are not covered in this manual.
Page 52

52
4K Vertex – User Manual
0015 003f 0015 0015 0015 0015 0015 003f 0015 003f 0015 0015 0015 0015 0015 0015 0015 0015 0015
003f 0015 003f 0015 0015 0015 0015 0015 003f 0015 003f 0015 003f 0015 05d5
vertex_avidisableoff: NEC 0x70 0x1c
0000 006e 0000 0022 0156 00ab 0015 0015 0015 0015 0015 0015 0015 0015 0015 003f 0015 003f 0015
003f 0015 0015 0015 003f 0015 003f 0015 003f 0015 003f 0015 0015 0015 0015 0015 0015 0015 003f
0015 0015 0015 0015 0015 003f 0015 003f 0015 003f 0015 0015 0015 0015 0015 0015 0015 003f 0015
003f 0015 0015 0015 0015 0015 0015 0015 003f 0015 003f 0015 003f 0015 05d5
vertex_avidisableon: NEC 0x70 0x1b
0000 006e 0000 0022 0156 00ab 0015 0015 0015 0015 0015 0015 0015 0015 0015 003f 0015 003f 0015
003f 0015 0015 0015 003f 0015 003f 0015 003f 0015 003f 0015 0015 0015 0015 0015 0015 0015 003f
0015 003f 0015 003f 0015 0015 0015 003f 0015 003f 0015 0015 0015 0015 0015 0015 0015 0015 0015
0015 0015 003f 0015 0015 0015 0015 0015 003f 0015 003f 0015 003f 0015 05d5
vertex_ceclaaudioproc: NEC 0x70 0x32
0000 006e 0000 0022 0156 00ab 0015 0015 0015 0015 0015 0015 0015 0015 0015 003f 0015 003f 0015
003f 0015 0015 0015 003f 0015 003f 0015 003f 0015 003f 0015 0015 0015 0015 0015 0015 0015 003f
0015 0015 0015 003f 0015 0015 0015 0015 0015 003f 0015 003f 0015 0015 0015 0015 0015 003f 0015
0015 0015 003f 0015 003f 0015 0015 0015 0015 0015 003f 0015 003f 0015 05d5
vertex_ceclavideoproc: NEC 0x70 0x33
0000 006e 0000 0022 0156 00ab 0015 0015 0015 0015 0015 0015 0015 0015 0015 003f 0015 003f 0015
003f 0015 0015 0015 003f 0015 003f 0015 003f 0015 003f 0015 0015 0015 0015 0015 0015 0015 003f
0015 003f 0015 003f 0015 0015 0015 0015 0015 003f 0015 003f 0015 0015 0015 0015 0015 0015 0015
0015 0015 003f 0015 003f 0015 0015 0015 0015 0015 003f 0015 003f 0015 05d5
vertex_cecoff: NEC 0x70 0x2f
0000 006e 0000 0022 0156 00ab 0015 0015 0015 0015 0015 0015 0015 0015 0015 003f 0015 003f 0015
003f 0015 0015 0015 003f 0015 003f 0015 003f 0015 003f 0015 0015 0015 0015 0015 0015 0015 003f
0015 003f 0015 003f 0015 003f 0015 003f 0015 0015 0015 003f 0015 0015 0015 0015 0015 0015 0015
0015 0015 0015 0015 0015 0015 003f 0015 0015 0015 003f 0015 003f 0015 05d5
vertex_cecon: NEC 0x70 0x2e
0000 006e 0000 0022 0156 00ab 0015 0015 0015 0015 0015 0015 0015 0015 0015 003f 0015 003f 0015
003f 0015 0015 0015 003f 0015 003f 0015 003f 0015 003f 0015 0015 0015 0015 0015 0015 0015 003f
0015 0015 0015 003f 0015 003f 0015 003f 0015 0015 0015 003f 0015 0015 0015 0015 0015 003f 0015
0015 0015 0015 0015 0015 0015 003f 0015 0015 0015 003f 0015 003f 0015 05d5
vertex_edid3dremoveoff: NEC 0x70 0x45
Disclaimer: 3rd party and/or custom firmware providing extra features are not covered in this manual.
Page 53

53
4K Vertex – User Manual
0000 006e 0000 0022 0156 00ab 0015 0015 0015 0015 0015 0015 0015 0015 0015 003f 0015 003f 0015
003f 0015 0015 0015 003f 0015 003f 0015 003f 0015 003f 0015 0015 0015 0015 0015 0015 0015 003f
0015 003f 0015 0015 0015 003f 0015 0015 0015 0015 0015 0015 0015 003f 0015 0015 0015 0015 0015
003f 0015 0015 0015 003f 0015 003f 0015 003f 0015 0015 0015 003f 0015 05d5
vertex_edid3dremoveon: NEC 0x70 0x44
0000 006e 0000 0022 0156 00ab 0015 0015 0015 0015 0015 0015 0015 0015 0015 003f 0015 003f 0015
003f 0015 0015 0015 003f 0015 003f 0015 003f 0015 003f 0015 0015 0015 0015 0015 0015 0015 003f
0015 0015 0015 0015 0015 003f 0015 0015 0015 0015 0015 0015 0015 003f 0015 0015 0015 003f 0015
003f 0015 0015 0015 003f 0015 003f 0015 003f 0015 0015 0015 003f 0015 05d5
vertex_edidalgo0: NEC 0x70 0x60
0000 006e 0000 0022 0156 00ab 0015 0015 0015 0015 0015 0015 0015 0015 0015 003f 0015 003f 0015
003f 0015 0015 0015 003f 0015 003f 0015 003f 0015 003f 0015 0015 0015 0015 0015 0015 0015 003f
0015 0015 0015 0015 0015 0015 0015 0015 0015 0015 0015 003f 0015 003f 0015 0015 0015 003f 0015
003f 0015 003f 0015 003f 0015 003f 0015 0015 0015 0015 0015 003f 0015 05d5
vertex_edidalgo1: NEC 0x70 0x61
0000 006e 0000 0022 0156 00ab 0015 0015 0015 0015 0015 0015 0015 0015 0015 003f 0015 003f 0015
003f 0015 0015 0015 003f 0015 003f 0015 003f 0015 003f 0015 0015 0015 0015 0015 0015 0015 003f
0015 003f 0015 0015 0015 0015 0015 0015 0015 0015 0015 003f 0015 003f 0015 0015 0015 0015 0015
003f 0015 003f 0015 003f 0015 003f 0015 0015 0015 0015 0015 003f 0015 05d5
vertex_edidalgo2: NEC 0x70 0x62
0000 006e 0000 0022 0156 00ab 0015 0015 0015 0015 0015 0015 0015 0015 0015 003f 0015 003f 0015
003f 0015 0015 0015 003f 0015 003f 0015 003f 0015 003f 0015 0015 0015 0015 0015 0015 0015 003f
0015 0015 0015 003f 0015 0015 0015 0015 0015 0015 0015 003f 0015 003f 0015 0015 0015 003f 0015
0015 0015 003f 0015 003f 0015 003f 0015 0015 0015 0015 0015 003f 0015 05d5
vertex_edidalgo3: NEC 0x70 0x63
0000 006e 0000 0022 0156 00ab 0015 0015 0015 0015 0015 0015 0015 0015 0015 003f 0015 003f 0015
003f 0015 0015 0015 003f 0015 003f 0015 003f 0015 003f 0015 0015 0015 0015 0015 0015 0015 003f
0015 003f 0015 003f 0015 0015 0015 0015 0015 0015 0015 003f 0015 003f 0015 0015 0015 0015 0015
0015 0015 003f 0015 003f 0015 003f 0015 0015 0015 0015 0015 003f 0015 05d5
vertex_edidalgo4: NEC 0x70 0x64
0000 006e 0000 0022 0156 00ab 0015 0015 0015 0015 0015 0015 0015 0015 0015 003f 0015 003f 0015
003f 0015 0015 0015 003f 0015 003f 0015 003f 0015 003f 0015 0015 0015 0015 0015 0015 0015 003f
0015 0015 0015 0015 0015 003f 0015 0015 0015 0015 0015 003f 0015 003f 0015 0015 0015 003f 0015
003f 0015 0015 0015 003f 0015 003f 0015 0015 0015 0015 0015 003f 0015 05d5
Disclaimer: 3rd party and/or custom firmware providing extra features are not covered in this manual.
Page 54

54
4K Vertex – User Manual
vertex_edidaudio2ch: NEC 0x70 0x3e
0000 006e 0000 0022 0156 00ab 0015 0015 0015 0015 0015 0015 0015 0015 0015 003f 0015 003f 0015
003f 0015 0015 0015 003f 0015 003f 0015 003f 0015 003f 0015 0015 0015 0015 0015 0015 0015 003f
0015 0015 0015 003f 0015 003f 0015 003f 0015 003f 0015 003f 0015 0015 0015 0015 0015 003f 0015
0015 0015 0015 0015 0015 0015 0015 0015 0015 0015 003f 0015 003f 0015 05d5
vertex_edidaudio51ch: NEC 0x70 0x3f
0000 006e 0000 0022 0156 00ab 0015 0015 0015 0015 0015 0015 0015 0015 0015 003f 0015 003f 0015
003f 0015 0015 0015 003f 0015 003f 0015 003f 0015 003f 0015 0015 0015 0015 0015 0015 0015 003f
0015 003f 0015 003f 0015 003f 0015 003f 0015 003f 0015 003f 0015 0015 0015 0015 0015 0015 0015
0015 0015 0015 0015 0015 0015 0015 0015 0015 0015 003f 0015 003f 0015 05d5
vertex_edidaudio71ch: NEC 0x70 0x40
0000 006e 0000 0022 0156 00ab 0015 0015 0015 0015 0015 0015 0015 0015 0015 003f 0015 003f 0015
003f 0015 0015 0015 003f 0015 003f 0015 003f 0015 003f 0015 0015 0015 0015 0015 0015 0015 003f
0015 0015 0015 0015 0015 0015 0015 0015 0015 0015 0015 0015 0015 003f 0015 0015 0015 003f 0015
003f 0015 003f 0015 003f 0015 003f 0015 003f 0015 0015 0015 003f 0015 05d5
vertex_edidaudionative: NEC 0x70 0x41
0000 006e 0000 0022 0156 00ab 0015 0015 0015 0015 0015 0015 0015 0015 0015 003f 0015 003f 0015
003f 0015 0015 0015 003f 0015 003f 0015 003f 0015 003f 0015 0015 0015 0015 0015 0015 0015 003f
0015 003f 0015 0015 0015 0015 0015 0015 0015 0015 0015 0015 0015 003f 0015 0015 0015 0015 0015
003f 0015 003f 0015 003f 0015 003f 0015 003f 0015 0015 0015 003f 0015 05d5
vertex_edidautomix: NEC 0x70 0x22
0000 006e 0000 0022 0156 00ab 0015 0015 0015 0015 0015 0015 0015 0015 0015 003f 0015 003f 0015
003f 0015 0015 0015 003f 0015 003f 0015 003f 0015 003f 0015 0015 0015 0015 0015 0015 0015 003f
0015 0015 0015 003f 0015 0015 0015 0015 0015 0015 0015 003f 0015 0015 0015 0015 0015 003f 0015
0015 0015 003f 0015 003f 0015 003f 0015 0015 0015 003f 0015 003f 0015 05d5
vertex_edidbt2020off: NEC 0x70 0x3b
0000 006e 0000 0022 0156 00ab 0015 0015 0015 0015 0015 0015 0015 0015 0015 003f 0015 003f 0015
003f 0015 0015 0015 003f 0015 003f 0015 003f 0015 003f 0015 0015 0015 0015 0015 0015 0015 003f
0015 003f 0015 003f 0015 0015 0015 003f 0015 003f 0015 003f 0015 0015 0015 0015 0015 0015 0015
0015 0015 003f 0015 0015 0015 0015 0015 0015 0015 003f 0015 003f 0015 05d5
vertex_edidbt2020on: NEC 0x70 0x3a
0000 006e 0000 0022 0156 00ab 0015 0015 0015 0015 0015 0015 0015 0015 0015 003f 0015 003f 0015
003f 0015 0015 0015 003f 0015 003f 0015 003f 0015 003f 0015 0015 0015 0015 0015 0015 0015 003f
Disclaimer: 3rd party and/or custom firmware providing extra features are not covered in this manual.
Page 55

55
4K Vertex – User Manual
0015 0015 0015 003f 0015 0015 0015 003f 0015 003f 0015 003f 0015 0015 0015 0015 0015 003f 0015
0015 0015 003f 0015 0015 0015 0015 0015 0015 0015 003f 0015 003f 0015 05d5
vertex_edidcopybot: NEC 0x70 0x14
0000 006e 0000 0022 0156 00ab 0015 0015 0015 0015 0015 0015 0015 0015 0015 003f 0015 003f 0015
003f 0015 0015 0015 003f 0015 003f 0015 003f 0015 003f 0015 0015 0015 0015 0015 0015 0015 003f
0015 0015 0015 0015 0015 003f 0015 0015 0015 003f 0015 0015 0015 0015 0015 0015 0015 003f 0015
003f 0015 0015 0015 003f 0015 0015 0015 003f 0015 003f 0015 003f 0015 05d5
vertex_edidcopytop: NEC 0x70 0x13
0000 006e 0000 0022 0156 00ab 0015 0015 0015 0015 0015 0015 0015 0015 0015 003f 0015 003f 0015
003f 0015 0015 0015 003f 0015 003f 0015 003f 0015 003f 0015 0015 0015 0015 0015 0015 0015 003f
0015 003f 0015 003f 0015 0015 0015 0015 0015 003f 0015 0015 0015 0015 0015 0015 0015 0015 0015
0015 0015 003f 0015 003f 0015 0015 0015 003f 0015 003f 0015 003f 0015 05d5
vertex_edidcustom: NEC 0x70 0x21
0000 006e 0000 0022 0156 00ab 0015 0015 0015 0015 0015 0015 0015 0015 0015 003f 0015 003f 0015
003f 0015 0015 0015 003f 0015 003f 0015 003f 0015 003f 0015 0015 0015 0015 0015 0015 0015 003f
0015 003f 0015 0015 0015 0015 0015 0015 0015 0015 0015 003f 0015 0015 0015 0015 0015 0015 0015
003f 0015 003f 0015 003f 0015 003f 0015 0015 0015 003f 0015 003f 0015 05d5
vertex_edidcustomtable1: NEC 0x70 0x91
0000 006e 0000 0022 0156 00ab 0015 0015 0015 0015 0015 0015 0015 0015 0015 003f 0015 003f 0015
003f 0015 0015 0015 003f 0015 003f 0015 003f 0015 003f 0015 0015 0015 0015 0015 0015 0015 003f
0015 003f 0015 0015 0015 0015 0015 0015 0015 003f 0015 0015 0015 0015 0015 003f 0015 0015 0015
003f 0015 003f 0015 003f 0015 0015 0015 003f 0015 003f 0015 0015 0015 05d5
vertex_edidcustomtable10: NEC 0x70 0x9a
0000 006e 0000 0022 0156 00ab 0015 0015 0015 0015 0015 0015 0015 0015 0015 003f 0015 003f 0015
003f 0015 0015 0015 003f 0015 003f 0015 003f 0015 003f 0015 0015 0015 0015 0015 0015 0015 003f
0015 0015 0015 003f 0015 0015 0015 003f 0015 003f 0015 0015 0015 0015 0015 003f 0015 003f 0015
0015 0015 003f 0015 0015 0015 0015 0015 003f 0015 003f 0015 0015 0015 05d5
vertex_edidcustomtable100: NEC 0x70 0xf4
0000 006e 0000 0022 0156 00ab 0015 0015 0015 0015 0015 0015 0015 0015 0015 003f 0015 003f 0015
003f 0015 0015 0015 003f 0015 003f 0015 003f 0015 003f 0015 0015 0015 0015 0015 0015 0015 003f
0015 0015 0015 0015 0015 003f 0015 0015 0015 003f 0015 003f 0015 003f 0015 003f 0015 003f 0015
003f 0015 0015 0015 003f 0015 0015 0015 0015 0015 0015 0015 0015 0015 05d5
vertex_edidcustomtable11: NEC 0x70 0x9b
Disclaimer: 3rd party and/or custom firmware providing extra features are not covered in this manual.
Page 56

56
4K Vertex – User Manual
0000 006e 0000 0022 0156 00ab 0015 0015 0015 0015 0015 0015 0015 0015 0015 003f 0015 003f 0015
003f 0015 0015 0015 003f 0015 003f 0015 003f 0015 003f 0015 0015 0015 0015 0015 0015 0015 003f
0015 003f 0015 003f 0015 0015 0015 003f 0015 003f 0015 0015 0015 0015 0015 003f 0015 0015 0015
0015 0015 003f 0015 0015 0015 0015 0015 003f 0015 003f 0015 0015 0015 05d5
vertex_edidcustomtable12: NEC 0x70 0x9c
0000 006e 0000 0022 0156 00ab 0015 0015 0015 0015 0015 0015 0015 0015 0015 003f 0015 003f 0015
003f 0015 0015 0015 003f 0015 003f 0015 003f 0015 003f 0015 0015 0015 0015 0015 0015 0015 003f
0015 0015 0015 0015 0015 003f 0015 003f 0015 003f 0015 0015 0015 0015 0015 003f 0015 003f 0015
003f 0015 0015 0015 0015 0015 0015 0015 003f 0015 003f 0015 0015 0015 05d5
vertex_edidcustomtable13: NEC 0x70 0x9d
0000 006e 0000 0022 0156 00ab 0015 0015 0015 0015 0015 0015 0015 0015 0015 003f 0015 003f 0015
003f 0015 0015 0015 003f 0015 003f 0015 003f 0015 003f 0015 0015 0015 0015 0015 0015 0015 003f
0015 003f 0015 0015 0015 003f 0015 003f 0015 003f 0015 0015 0015 0015 0015 003f 0015 0015 0015
003f 0015 0015 0015 0015 0015 0015 0015 003f 0015 003f 0015 0015 0015 05d5
vertex_edidcustomtable14: NEC 0x70 0x9e
0000 006e 0000 0022 0156 00ab 0015 0015 0015 0015 0015 0015 0015 0015 0015 003f 0015 003f 0015
003f 0015 0015 0015 003f 0015 003f 0015 003f 0015 003f 0015 0015 0015 0015 0015 0015 0015 003f
0015 0015 0015 003f 0015 003f 0015 003f 0015 003f 0015 0015 0015 0015 0015 003f 0015 003f 0015
0015 0015 0015 0015 0015 0015 0015 0015 003f 0015 003f 0015 0015 0015 05d5
vertex_edidcustomtable15: NEC 0x70 0x9f
0000 006e 0000 0022 0156 00ab 0015 0015 0015 0015 0015 0015 0015 0015 0015 003f 0015 003f 0015
003f 0015 0015 0015 003f 0015 003f 0015 003f 0015 003f 0015 0015 0015 0015 0015 0015 0015 003f
0015 003f 0015 003f 0015 003f 0015 003f 0015 003f 0015 0015 0015 0015 0015 003f 0015 0015 0015
0015 0015 0015 0015 0015 0015 0015 0015 003f 0015 003f 0015 0015 0015 05d5
vertex_edidcustomtable16: NEC 0x70 0xa0
0000 006e 0000 0022 0156 00ab 0015 0015 0015 0015 0015 0015 0015 0015 0015 003f 0015 003f 0015
003f 0015 0015 0015 003f 0015 003f 0015 003f 0015 003f 0015 0015 0015 0015 0015 0015 0015 003f
0015 0015 0015 0015 0015 0015 0015 0015 0015 0015 0015 003f 0015 0015 0015 003f 0015 003f 0015
003f 0015 003f 0015 003f 0015 003f 0015 0015 0015 003f 0015 0015 0015 05d5
vertex_edidcustomtable17: NEC 0x70 0xa1
0000 006e 0000 0022 0156 00ab 0015 0015 0015 0015 0015 0015 0015 0015 0015 003f 0015 003f 0015
003f 0015 0015 0015 003f 0015 003f 0015 003f 0015 003f 0015 0015 0015 0015 0015 0015 0015 003f
0015 003f 0015 0015 0015 0015 0015 0015 0015 0015 0015 003f 0015 0015 0015 003f 0015 0015 0015
003f 0015 003f 0015 003f 0015 003f 0015 0015 0015 003f 0015 0015 0015 05d5
Disclaimer: 3rd party and/or custom firmware providing extra features are not covered in this manual.
Page 57

57
4K Vertex – User Manual
vertex_edidcustomtable18: NEC 0x70 0xa2
0000 006e 0000 0022 0156 00ab 0015 0015 0015 0015 0015 0015 0015 0015 0015 003f 0015 003f 0015
003f 0015 0015 0015 003f 0015 003f 0015 003f 0015 003f 0015 0015 0015 0015 0015 0015 0015 003f
0015 0015 0015 003f 0015 0015 0015 0015 0015 0015 0015 003f 0015 0015 0015 003f 0015 003f 0015
0015 0015 003f 0015 003f 0015 003f 0015 0015 0015 003f 0015 0015 0015 05d5
vertex_edidcustomtable19: NEC 0x70 0xa3
0000 006e 0000 0022 0156 00ab 0015 0015 0015 0015 0015 0015 0015 0015 0015 003f 0015 003f 0015
003f 0015 0015 0015 003f 0015 003f 0015 003f 0015 003f 0015 0015 0015 0015 0015 0015 0015 003f
0015 003f 0015 003f 0015 0015 0015 0015 0015 0015 0015 003f 0015 0015 0015 003f 0015 0015 0015
0015 0015 003f 0015 003f 0015 003f 0015 0015 0015 003f 0015 0015 0015 05d5
vertex_edidcustomtable2: NEC 0x70 0x92
0000 006e 0000 0022 0156 00ab 0015 0015 0015 0015 0015 0015 0015 0015 0015 003f 0015 003f 0015
003f 0015 0015 0015 003f 0015 003f 0015 003f 0015 003f 0015 0015 0015 0015 0015 0015 0015 003f
0015 0015 0015 003f 0015 0015 0015 0015 0015 003f 0015 0015 0015 0015 0015 003f 0015 003f 0015
0015 0015 003f 0015 003f 0015 0015 0015 003f 0015 003f 0015 0015 0015 05d5
vertex_edidcustomtable20: NEC 0x70 0xa4
0000 006e 0000 0022 0156 00ab 0015 0015 0015 0015 0015 0015 0015 0015 0015 003f 0015 003f 0015
003f 0015 0015 0015 003f 0015 003f 0015 003f 0015 003f 0015 0015 0015 0015 0015 0015 0015 003f
0015 0015 0015 0015 0015 003f 0015 0015 0015 0015 0015 003f 0015 0015 0015 003f 0015 003f 0015
003f 0015 0015 0015 003f 0015 003f 0015 0015 0015 003f 0015 0015 0015 05d5
vertex_edidcustomtable21: NEC 0x70 0xa5
0000 006e 0000 0022 0156 00ab 0015 0015 0015 0015 0015 0015 0015 0015 0015 003f 0015 003f 0015
003f 0015 0015 0015 003f 0015 003f 0015 003f 0015 003f 0015 0015 0015 0015 0015 0015 0015 003f
0015 003f 0015 0015 0015 003f 0015 0015 0015 0015 0015 003f 0015 0015 0015 003f 0015 0015 0015
003f 0015 0015 0015 003f 0015 003f 0015 0015 0015 003f 0015 0015 0015 05d5
vertex_edidcustomtable22: NEC 0x70 0xa6
0000 006e 0000 0022 0156 00ab 0015 0015 0015 0015 0015 0015 0015 0015 0015 003f 0015 003f 0015
003f 0015 0015 0015 003f 0015 003f 0015 003f 0015 003f 0015 0015 0015 0015 0015 0015 0015 003f
0015 0015 0015 003f 0015 003f 0015 0015 0015 0015 0015 003f 0015 0015 0015 003f 0015 003f 0015
0015 0015 0015 0015 003f 0015 003f 0015 0015 0015 003f 0015 0015 0015 05d5
vertex_edidcustomtable23: NEC 0x70 0xa7
0000 006e 0000 0022 0156 00ab 0015 0015 0015 0015 0015 0015 0015 0015 0015 003f 0015 003f 0015
003f 0015 0015 0015 003f 0015 003f 0015 003f 0015 003f 0015 0015 0015 0015 0015 0015 0015 003f
Disclaimer: 3rd party and/or custom firmware providing extra features are not covered in this manual.
Page 58

58
4K Vertex – User Manual
0015 003f 0015 003f 0015 003f 0015 0015 0015 0015 0015 003f 0015 0015 0015 003f 0015 0015 0015
0015 0015 0015 0015 003f 0015 003f 0015 0015 0015 003f 0015 0015 0015 05d5
vertex_edidcustomtable24: NEC 0x70 0xa8
0000 006e 0000 0022 0156 00ab 0015 0015 0015 0015 0015 0015 0015 0015 0015 003f 0015 003f 0015
003f 0015 0015 0015 003f 0015 003f 0015 003f 0015 003f 0015 0015 0015 0015 0015 0015 0015 003f
0015 0015 0015 0015 0015 0015 0015 003f 0015 0015 0015 003f 0015 0015 0015 003f 0015 003f 0015
003f 0015 003f 0015 0015 0015 003f 0015 0015 0015 003f 0015 0015 0015 05d5
vertex_edidcustomtable25: NEC 0x70 0xa9
0000 006e 0000 0022 0156 00ab 0015 0015 0015 0015 0015 0015 0015 0015 0015 003f 0015 003f 0015
003f 0015 0015 0015 003f 0015 003f 0015 003f 0015 003f 0015 0015 0015 0015 0015 0015 0015 003f
0015 003f 0015 0015 0015 0015 0015 003f 0015 0015 0015 003f 0015 0015 0015 003f 0015 0015 0015
003f 0015 003f 0015 0015 0015 003f 0015 0015 0015 003f 0015 0015 0015 05d5
vertex_edidcustomtable26: NEC 0x70 0xaa
0000 006e 0000 0022 0156 00ab 0015 0015 0015 0015 0015 0015 0015 0015 0015 003f 0015 003f 0015
003f 0015 0015 0015 003f 0015 003f 0015 003f 0015 003f 0015 0015 0015 0015 0015 0015 0015 003f
0015 0015 0015 003f 0015 0015 0015 003f 0015 0015 0015 003f 0015 0015 0015 003f 0015 003f 0015
0015 0015 003f 0015 0015 0015 003f 0015 0015 0015 003f 0015 0015 0015 05d5
vertex_edidcustomtable27: NEC 0x70 0xab
0000 006e 0000 0022 0156 00ab 0015 0015 0015 0015 0015 0015 0015 0015 0015 003f 0015 003f 0015
003f 0015 0015 0015 003f 0015 003f 0015 003f 0015 003f 0015 0015 0015 0015 0015 0015 0015 003f
0015 003f 0015 003f 0015 0015 0015 003f 0015 0015 0015 003f 0015 0015 0015 003f 0015 0015 0015
0015 0015 003f 0015 0015 0015 003f 0015 0015 0015 003f 0015 0015 0015 05d5
vertex_edidcustomtable28: NEC 0x70 0xac
0000 006e 0000 0022 0156 00ab 0015 0015 0015 0015 0015 0015 0015 0015 0015 003f 0015 003f 0015
003f 0015 0015 0015 003f 0015 003f 0015 003f 0015 003f 0015 0015 0015 0015 0015 0015 0015 003f
0015 0015 0015 0015 0015 003f 0015 003f 0015 0015 0015 003f 0015 0015 0015 003f 0015 003f 0015
003f 0015 0015 0015 0015 0015 003f 0015 0015 0015 003f 0015 0015 0015 05d5
vertex_edidcustomtable29: NEC 0x70 0xad
0000 006e 0000 0022 0156 00ab 0015 0015 0015 0015 0015 0015 0015 0015 0015 003f 0015 003f 0015
003f 0015 0015 0015 003f 0015 003f 0015 003f 0015 003f 0015 0015 0015 0015 0015 0015 0015 003f
0015 003f 0015 0015 0015 003f 0015 003f 0015 0015 0015 003f 0015 0015 0015 003f 0015 0015 0015
003f 0015 0015 0015 0015 0015 003f 0015 0015 0015 003f 0015 0015 0015 05d5
vertex_edidcustomtable3: NEC 0x70 0x93
Disclaimer: 3rd party and/or custom firmware providing extra features are not covered in this manual.
Page 59

59
4K Vertex – User Manual
0000 006e 0000 0022 0156 00ab 0015 0015 0015 0015 0015 0015 0015 0015 0015 003f 0015 003f 0015
003f 0015 0015 0015 003f 0015 003f 0015 003f 0015 003f 0015 0015 0015 0015 0015 0015 0015 003f
0015 003f 0015 003f 0015 0015 0015 0015 0015 003f 0015 0015 0015 0015 0015 003f 0015 0015 0015
0015 0015 003f 0015 003f 0015 0015 0015 003f 0015 003f 0015 0015 0015 05d5
vertex_edidcustomtable30: NEC 0x70 0xae
0000 006e 0000 0022 0156 00ab 0015 0015 0015 0015 0015 0015 0015 0015 0015 003f 0015 003f 0015
003f 0015 0015 0015 003f 0015 003f 0015 003f 0015 003f 0015 0015 0015 0015 0015 0015 0015 003f
0015 0015 0015 003f 0015 003f 0015 003f 0015 0015 0015 003f 0015 0015 0015 003f 0015 003f 0015
0015 0015 0015 0015 0015 0015 003f 0015 0015 0015 003f 0015 0015 0015 05d5
vertex_edidcustomtable31: NEC 0x70 0xaf
0000 006e 0000 0022 0156 00ab 0015 0015 0015 0015 0015 0015 0015 0015 0015 003f 0015 003f 0015
003f 0015 0015 0015 003f 0015 003f 0015 003f 0015 003f 0015 0015 0015 0015 0015 0015 0015 003f
0015 003f 0015 003f 0015 003f 0015 003f 0015 0015 0015 003f 0015 0015 0015 003f 0015 0015 0015
0015 0015 0015 0015 0015 0015 003f 0015 0015 0015 003f 0015 0015 0015 05d5
vertex_edidcustomtable32: NEC 0x70 0xb0
0000 006e 0000 0022 0156 00ab 0015 0015 0015 0015 0015 0015 0015 0015 0015 003f 0015 003f 0015
003f 0015 0015 0015 003f 0015 003f 0015 003f 0015 003f 0015 0015 0015 0015 0015 0015 0015 003f
0015 0015 0015 0015 0015 0015 0015 0015 0015 003f 0015 003f 0015 0015 0015 003f 0015 003f 0015
003f 0015 003f 0015 003f 0015 0015 0015 0015 0015 003f 0015 0015 0015 05d5
vertex_edidcustomtable33: NEC 0x70 0xb1
0000 006e 0000 0022 0156 00ab 0015 0015 0015 0015 0015 0015 0015 0015 0015 003f 0015 003f 0015
003f 0015 0015 0015 003f 0015 003f 0015 003f 0015 003f 0015 0015 0015 0015 0015 0015 0015 003f
0015 003f 0015 0015 0015 0015 0015 0015 0015 003f 0015 003f 0015 0015 0015 003f 0015 0015 0015
003f 0015 003f 0015 003f 0015 0015 0015 0015 0015 003f 0015 0015 0015 05d5
vertex_edidcustomtable34: NEC 0x70 0xb2
0000 006e 0000 0022 0156 00ab 0015 0015 0015 0015 0015 0015 0015 0015 0015 003f 0015 003f 0015
003f 0015 0015 0015 003f 0015 003f 0015 003f 0015 003f 0015 0015 0015 0015 0015 0015 0015 003f
0015 0015 0015 003f 0015 0015 0015 0015 0015 003f 0015 003f 0015 0015 0015 003f 0015 003f 0015
0015 0015 003f 0015 003f 0015 0015 0015 0015 0015 003f 0015 0015 0015 05d5
vertex_edidcustomtable35: NEC 0x70 0xb3
0000 006e 0000 0022 0156 00ab 0015 0015 0015 0015 0015 0015 0015 0015 0015 003f 0015 003f 0015
003f 0015 0015 0015 003f 0015 003f 0015 003f 0015 003f 0015 0015 0015 0015 0015 0015 0015 003f
0015 003f 0015 003f 0015 0015 0015 0015 0015 003f 0015 003f 0015 0015 0015 003f 0015 0015 0015
0015 0015 003f 0015 003f 0015 0015 0015 0015 0015 003f 0015 0015 0015 05d5
Disclaimer: 3rd party and/or custom firmware providing extra features are not covered in this manual.
Page 60

60
4K Vertex – User Manual
vertex_edidcustomtable36: NEC 0x70 0xb4
0000 006e 0000 0022 0156 00ab 0015 0015 0015 0015 0015 0015 0015 0015 0015 003f 0015 003f 0015
003f 0015 0015 0015 003f 0015 003f 0015 003f 0015 003f 0015 0015 0015 0015 0015 0015 0015 003f
0015 0015 0015 0015 0015 003f 0015 0015 0015 003f 0015 003f 0015 0015 0015 003f 0015 003f 0015
003f 0015 0015 0015 003f 0015 0015 0015 0015 0015 003f 0015 0015 0015 05d5
vertex_edidcustomtable37: NEC 0x70 0xb5
0000 006e 0000 0022 0156 00ab 0015 0015 0015 0015 0015 0015 0015 0015 0015 003f 0015 003f 0015
003f 0015 0015 0015 003f 0015 003f 0015 003f 0015 003f 0015 0015 0015 0015 0015 0015 0015 003f
0015 003f 0015 0015 0015 003f 0015 0015 0015 003f 0015 003f 0015 0015 0015 003f 0015 0015 0015
003f 0015 0015 0015 003f 0015 0015 0015 0015 0015 003f 0015 0015 0015 05d5
vertex_edidcustomtable38: NEC 0x70 0xb6
0000 006e 0000 0022 0156 00ab 0015 0015 0015 0015 0015 0015 0015 0015 0015 003f 0015 003f 0015
003f 0015 0015 0015 003f 0015 003f 0015 003f 0015 003f 0015 0015 0015 0015 0015 0015 0015 003f
0015 0015 0015 003f 0015 003f 0015 0015 0015 003f 0015 003f 0015 0015 0015 003f 0015 003f 0015
0015 0015 0015 0015 003f 0015 0015 0015 0015 0015 003f 0015 0015 0015 05d5
vertex_edidcustomtable39: NEC 0x70 0xb7
0000 006e 0000 0022 0156 00ab 0015 0015 0015 0015 0015 0015 0015 0015 0015 003f 0015 003f 0015
003f 0015 0015 0015 003f 0015 003f 0015 003f 0015 003f 0015 0015 0015 0015 0015 0015 0015 003f
0015 003f 0015 003f 0015 003f 0015 0015 0015 003f 0015 003f 0015 0015 0015 003f 0015 0015 0015
0015 0015 0015 0015 003f 0015 0015 0015 0015 0015 003f 0015 0015 0015 05d5
vertex_edidcustomtable4: NEC 0x70 0x94
0000 006e 0000 0022 0156 00ab 0015 0015 0015 0015 0015 0015 0015 0015 0015 003f 0015 003f 0015
003f 0015 0015 0015 003f 0015 003f 0015 003f 0015 003f 0015 0015 0015 0015 0015 0015 0015 003f
0015 0015 0015 0015 0015 003f 0015 0015 0015 003f 0015 0015 0015 0015 0015 003f 0015 003f 0015
003f 0015 0015 0015 003f 0015 0015 0015 003f 0015 003f 0015 0015 0015 05d5
vertex_edidcustomtable40: NEC 0x70 0xb8
0000 006e 0000 0022 0156 00ab 0015 0015 0015 0015 0015 0015 0015 0015 0015 003f 0015 003f 0015
003f 0015 0015 0015 003f 0015 003f 0015 003f 0015 003f 0015 0015 0015 0015 0015 0015 0015 003f
0015 0015 0015 0015 0015 0015 0015 003f 0015 003f 0015 003f 0015 0015 0015 003f 0015 003f 0015
003f 0015 003f 0015 0015 0015 0015 0015 0015 0015 003f 0015 0015 0015 05d5
vertex_edidcustomtable41: NEC 0x70 0xb9
0000 006e 0000 0022 0156 00ab 0015 0015 0015 0015 0015 0015 0015 0015 0015 003f 0015 003f 0015
003f 0015 0015 0015 003f 0015 003f 0015 003f 0015 003f 0015 0015 0015 0015 0015 0015 0015 003f
Disclaimer: 3rd party and/or custom firmware providing extra features are not covered in this manual.
Page 61

61
4K Vertex – User Manual
0015 003f 0015 0015 0015 0015 0015 003f 0015 003f 0015 003f 0015 0015 0015 003f 0015 0015 0015
003f 0015 003f 0015 0015 0015 0015 0015 0015 0015 003f 0015 0015 0015 05d5
vertex_edidcustomtable42: NEC 0x70 0xba
0000 006e 0000 0022 0156 00ab 0015 0015 0015 0015 0015 0015 0015 0015 0015 003f 0015 003f 0015
003f 0015 0015 0015 003f 0015 003f 0015 003f 0015 003f 0015 0015 0015 0015 0015 0015 0015 003f
0015 0015 0015 003f 0015 0015 0015 003f 0015 003f 0015 003f 0015 0015 0015 003f 0015 003f 0015
0015 0015 003f 0015 0015 0015 0015 0015 0015 0015 003f 0015 0015 0015 05d5
vertex_edidcustomtable43: NEC 0x70 0xbb
0000 006e 0000 0022 0156 00ab 0015 0015 0015 0015 0015 0015 0015 0015 0015 003f 0015 003f 0015
003f 0015 0015 0015 003f 0015 003f 0015 003f 0015 003f 0015 0015 0015 0015 0015 0015 0015 003f
0015 003f 0015 003f 0015 0015 0015 003f 0015 003f 0015 003f 0015 0015 0015 003f 0015 0015 0015
0015 0015 003f 0015 0015 0015 0015 0015 0015 0015 003f 0015 0015 0015 05d5
vertex_edidcustomtable44: NEC 0x70 0xbc
0000 006e 0000 0022 0156 00ab 0015 0015 0015 0015 0015 0015 0015 0015 0015 003f 0015 003f 0015
003f 0015 0015 0015 003f 0015 003f 0015 003f 0015 003f 0015 0015 0015 0015 0015 0015 0015 003f
0015 0015 0015 0015 0015 003f 0015 003f 0015 003f 0015 003f 0015 0015 0015 003f 0015 003f 0015
003f 0015 0015 0015 0015 0015 0015 0015 0015 0015 003f 0015 0015 0015 05d5
vertex_edidcustomtable45: NEC 0x70 0xbd
0000 006e 0000 0022 0156 00ab 0015 0015 0015 0015 0015 0015 0015 0015 0015 003f 0015 003f 0015
003f 0015 0015 0015 003f 0015 003f 0015 003f 0015 003f 0015 0015 0015 0015 0015 0015 0015 003f
0015 003f 0015 0015 0015 003f 0015 003f 0015 003f 0015 003f 0015 0015 0015 003f 0015 0015 0015
003f 0015 0015 0015 0015 0015 0015 0015 0015 0015 003f 0015 0015 0015 05d5
vertex_edidcustomtable46: NEC 0x70 0xbe
0000 006e 0000 0022 0156 00ab 0015 0015 0015 0015 0015 0015 0015 0015 0015 003f 0015 003f 0015
003f 0015 0015 0015 003f 0015 003f 0015 003f 0015 003f 0015 0015 0015 0015 0015 0015 0015 003f
0015 0015 0015 003f 0015 003f 0015 003f 0015 003f 0015 003f 0015 0015 0015 003f 0015 003f 0015
0015 0015 0015 0015 0015 0015 0015 0015 0015 0015 003f 0015 0015 0015 05d5
vertex_edidcustomtable47: NEC 0x70 0xbf
0000 006e 0000 0022 0156 00ab 0015 0015 0015 0015 0015 0015 0015 0015 0015 003f 0015 003f 0015
003f 0015 0015 0015 003f 0015 003f 0015 003f 0015 003f 0015 0015 0015 0015 0015 0015 0015 003f
0015 003f 0015 003f 0015 003f 0015 003f 0015 003f 0015 003f 0015 0015 0015 003f 0015 0015 0015
0015 0015 0015 0015 0015 0015 0015 0015 0015 0015 003f 0015 0015 0015 05d5
vertex_edidcustomtable48: NEC 0x70 0xc0
Disclaimer: 3rd party and/or custom firmware providing extra features are not covered in this manual.
Page 62

62
4K Vertex – User Manual
0000 006e 0000 0022 0156 00ab 0015 0015 0015 0015 0015 0015 0015 0015 0015 003f 0015 003f 0015
003f 0015 0015 0015 003f 0015 003f 0015 003f 0015 003f 0015 0015 0015 0015 0015 0015 0015 003f
0015 0015 0015 0015 0015 0015 0015 0015 0015 0015 0015 0015 0015 003f 0015 003f 0015 003f 0015
003f 0015 003f 0015 003f 0015 003f 0015 003f 0015 0015 0015 0015 0015 05d5
vertex_edidcustomtable49: NEC 0x70 0xc1
0000 006e 0000 0022 0156 00ab 0015 0015 0015 0015 0015 0015 0015 0015 0015 003f 0015 003f 0015
003f 0015 0015 0015 003f 0015 003f 0015 003f 0015 003f 0015 0015 0015 0015 0015 0015 0015 003f
0015 003f 0015 0015 0015 0015 0015 0015 0015 0015 0015 0015 0015 003f 0015 003f 0015 0015 0015
003f 0015 003f 0015 003f 0015 003f 0015 003f 0015 0015 0015 0015 0015 05d5
vertex_edidcustomtable5: NEC 0x70 0x95
0000 006e 0000 0022 0156 00ab 0015 0015 0015 0015 0015 0015 0015 0015 0015 003f 0015 003f 0015
003f 0015 0015 0015 003f 0015 003f 0015 003f 0015 003f 0015 0015 0015 0015 0015 0015 0015 003f
0015 003f 0015 0015 0015 003f 0015 0015 0015 003f 0015 0015 0015 0015 0015 003f 0015 0015 0015
003f 0015 0015 0015 003f 0015 0015 0015 003f 0015 003f 0015 0015 0015 05d5
vertex_edidcustomtable50: NEC 0x70 0xc2
0000 006e 0000 0022 0156 00ab 0015 0015 0015 0015 0015 0015 0015 0015 0015 003f 0015 003f 0015
003f 0015 0015 0015 003f 0015 003f 0015 003f 0015 003f 0015 0015 0015 0015 0015 0015 0015 003f
0015 0015 0015 003f 0015 0015 0015 0015 0015 0015 0015 0015 0015 003f 0015 003f 0015 003f 0015
0015 0015 003f 0015 003f 0015 003f 0015 003f 0015 0015 0015 0015 0015 05d5
vertex_edidcustomtable51: NEC 0x70 0xc3
0000 006e 0000 0022 0156 00ab 0015 0015 0015 0015 0015 0015 0015 0015 0015 003f 0015 003f 0015
003f 0015 0015 0015 003f 0015 003f 0015 003f 0015 003f 0015 0015 0015 0015 0015 0015 0015 003f
0015 003f 0015 003f 0015 0015 0015 0015 0015 0015 0015 0015 0015 003f 0015 003f 0015 0015 0015
0015 0015 003f 0015 003f 0015 003f 0015 003f 0015 0015 0015 0015 0015 05d5
vertex_edidcustomtable52: NEC 0x70 0xc4
0000 006e 0000 0022 0156 00ab 0015 0015 0015 0015 0015 0015 0015 0015 0015 003f 0015 003f 0015
003f 0015 0015 0015 003f 0015 003f 0015 003f 0015 003f 0015 0015 0015 0015 0015 0015 0015 003f
0015 0015 0015 0015 0015 003f 0015 0015 0015 0015 0015 0015 0015 003f 0015 003f 0015 003f 0015
003f 0015 0015 0015 003f 0015 003f 0015 003f 0015 0015 0015 0015 0015 05d5
vertex_edidcustomtable53: NEC 0x70 0xc5
0000 006e 0000 0022 0156 00ab 0015 0015 0015 0015 0015 0015 0015 0015 0015 003f 0015 003f 0015
003f 0015 0015 0015 003f 0015 003f 0015 003f 0015 003f 0015 0015 0015 0015 0015 0015 0015 003f
0015 003f 0015 0015 0015 003f 0015 0015 0015 0015 0015 0015 0015 003f 0015 003f 0015 0015 0015
003f 0015 0015 0015 003f 0015 003f 0015 003f 0015 0015 0015 0015 0015 05d5
Disclaimer: 3rd party and/or custom firmware providing extra features are not covered in this manual.
Page 63

63
4K Vertex – User Manual
vertex_edidcustomtable54: NEC 0x70 0xc6
0000 006e 0000 0022 0156 00ab 0015 0015 0015 0015 0015 0015 0015 0015 0015 003f 0015 003f 0015
003f 0015 0015 0015 003f 0015 003f 0015 003f 0015 003f 0015 0015 0015 0015 0015 0015 0015 003f
0015 0015 0015 003f 0015 003f 0015 0015 0015 0015 0015 0015 0015 003f 0015 003f 0015 003f 0015
0015 0015 0015 0015 003f 0015 003f 0015 003f 0015 0015 0015 0015 0015 05d5
vertex_edidcustomtable55: NEC 0x70 0xc7
0000 006e 0000 0022 0156 00ab 0015 0015 0015 0015 0015 0015 0015 0015 0015 003f 0015 003f 0015
003f 0015 0015 0015 003f 0015 003f 0015 003f 0015 003f 0015 0015 0015 0015 0015 0015 0015 003f
0015 003f 0015 003f 0015 003f 0015 0015 0015 0015 0015 0015 0015 003f 0015 003f 0015 0015 0015
0015 0015 0015 0015 003f 0015 003f 0015 003f 0015 0015 0015 0015 0015 05d5
vertex_edidcustomtable56: NEC 0x70 0xc8
0000 006e 0000 0022 0156 00ab 0015 0015 0015 0015 0015 0015 0015 0015 0015 003f 0015 003f 0015
003f 0015 0015 0015 003f 0015 003f 0015 003f 0015 003f 0015 0015 0015 0015 0015 0015 0015 003f
0015 0015 0015 0015 0015 0015 0015 003f 0015 0015 0015 0015 0015 003f 0015 003f 0015 003f 0015
003f 0015 003f 0015 0015 0015 003f 0015 003f 0015 0015 0015 0015 0015 05d5
vertex_edidcustomtable57: NEC 0x70 0xc9
0000 006e 0000 0022 0156 00ab 0015 0015 0015 0015 0015 0015 0015 0015 0015 003f 0015 003f 0015
003f 0015 0015 0015 003f 0015 003f 0015 003f 0015 003f 0015 0015 0015 0015 0015 0015 0015 003f
0015 003f 0015 0015 0015 0015 0015 003f 0015 0015 0015 0015 0015 003f 0015 003f 0015 0015 0015
003f 0015 003f 0015 0015 0015 003f 0015 003f 0015 0015 0015 0015 0015 05d5
vertex_edidcustomtable58: NEC 0x70 0xca
0000 006e 0000 0022 0156 00ab 0015 0015 0015 0015 0015 0015 0015 0015 0015 003f 0015 003f 0015
003f 0015 0015 0015 003f 0015 003f 0015 003f 0015 003f 0015 0015 0015 0015 0015 0015 0015 003f
0015 0015 0015 003f 0015 0015 0015 003f 0015 0015 0015 0015 0015 003f 0015 003f 0015 003f 0015
0015 0015 003f 0015 0015 0015 003f 0015 003f 0015 0015 0015 0015 0015 05d5
vertex_edidcustomtable59: NEC 0x70 0xcb
0000 006e 0000 0022 0156 00ab 0015 0015 0015 0015 0015 0015 0015 0015 0015 003f 0015 003f 0015
003f 0015 0015 0015 003f 0015 003f 0015 003f 0015 003f 0015 0015 0015 0015 0015 0015 0015 003f
0015 003f 0015 003f 0015 0015 0015 003f 0015 0015 0015 0015 0015 003f 0015 003f 0015 0015 0015
0015 0015 003f 0015 0015 0015 003f 0015 003f 0015 0015 0015 0015 0015 05d5
vertex_edidcustomtable6: NEC 0x70 0x96
0000 006e 0000 0022 0156 00ab 0015 0015 0015 0015 0015 0015 0015 0015 0015 003f 0015 003f 0015
003f 0015 0015 0015 003f 0015 003f 0015 003f 0015 003f 0015 0015 0015 0015 0015 0015 0015 003f
Disclaimer: 3rd party and/or custom firmware providing extra features are not covered in this manual.
Page 64

64
4K Vertex – User Manual
0015 0015 0015 003f 0015 003f 0015 0015 0015 003f 0015 0015 0015 0015 0015 003f 0015 003f 0015
0015 0015 0015 0015 003f 0015 0015 0015 003f 0015 003f 0015 0015 0015 05d5
vertex_edidcustomtable60: NEC 0x70 0xcc
0000 006e 0000 0022 0156 00ab 0015 0015 0015 0015 0015 0015 0015 0015 0015 003f 0015 003f 0015
003f 0015 0015 0015 003f 0015 003f 0015 003f 0015 003f 0015 0015 0015 0015 0015 0015 0015 003f
0015 0015 0015 0015 0015 003f 0015 003f 0015 0015 0015 0015 0015 003f 0015 003f 0015 003f 0015
003f 0015 0015 0015 0015 0015 003f 0015 003f 0015 0015 0015 0015 0015 05d5
vertex_edidcustomtable61: NEC 0x70 0xcd
0000 006e 0000 0022 0156 00ab 0015 0015 0015 0015 0015 0015 0015 0015 0015 003f 0015 003f 0015
003f 0015 0015 0015 003f 0015 003f 0015 003f 0015 003f 0015 0015 0015 0015 0015 0015 0015 003f
0015 003f 0015 0015 0015 003f 0015 003f 0015 0015 0015 0015 0015 003f 0015 003f 0015 0015 0015
003f 0015 0015 0015 0015 0015 003f 0015 003f 0015 0015 0015 0015 0015 05d5
vertex_edidcustomtable62: NEC 0x70 0xce
0000 006e 0000 0022 0156 00ab 0015 0015 0015 0015 0015 0015 0015 0015 0015 003f 0015 003f 0015
003f 0015 0015 0015 003f 0015 003f 0015 003f 0015 003f 0015 0015 0015 0015 0015 0015 0015 003f
0015 0015 0015 003f 0015 003f 0015 003f 0015 0015 0015 0015 0015 003f 0015 003f 0015 003f 0015
0015 0015 0015 0015 0015 0015 003f 0015 003f 0015 0015 0015 0015 0015 05d5
vertex_edidcustomtable63: NEC 0x70 0xcf
0000 006e 0000 0022 0156 00ab 0015 0015 0015 0015 0015 0015 0015 0015 0015 003f 0015 003f 0015
003f 0015 0015 0015 003f 0015 003f 0015 003f 0015 003f 0015 0015 0015 0015 0015 0015 0015 003f
0015 003f 0015 003f 0015 003f 0015 003f 0015 0015 0015 0015 0015 003f 0015 003f 0015 0015 0015
0015 0015 0015 0015 0015 0015 003f 0015 003f 0015 0015 0015 0015 0015 05d5
vertex_edidcustomtable64: NEC 0x70 0xd0
0000 006e 0000 0022 0156 00ab 0015 0015 0015 0015 0015 0015 0015 0015 0015 003f 0015 003f 0015
003f 0015 0015 0015 003f 0015 003f 0015 003f 0015 003f 0015 0015 0015 0015 0015 0015 0015 003f
0015 0015 0015 0015 0015 0015 0015 0015 0015 003f 0015 0015 0015 003f 0015 003f 0015 003f 0015
003f 0015 003f 0015 003f 0015 0015 0015 003f 0015 0015 0015 0015 0015 05d5
vertex_edidcustomtable65: NEC 0x70 0xd1
0000 006e 0000 0022 0156 00ab 0015 0015 0015 0015 0015 0015 0015 0015 0015 003f 0015 003f 0015
003f 0015 0015 0015 003f 0015 003f 0015 003f 0015 003f 0015 0015 0015 0015 0015 0015 0015 003f
0015 003f 0015 0015 0015 0015 0015 0015 0015 003f 0015 0015 0015 003f 0015 003f 0015 0015 0015
003f 0015 003f 0015 003f 0015 0015 0015 003f 0015 0015 0015 0015 0015 05d5
vertex_edidcustomtable66: NEC 0x70 0xd2
Disclaimer: 3rd party and/or custom firmware providing extra features are not covered in this manual.
Page 65

65
4K Vertex – User Manual
0000 006e 0000 0022 0156 00ab 0015 0015 0015 0015 0015 0015 0015 0015 0015 003f 0015 003f 0015
003f 0015 0015 0015 003f 0015 003f 0015 003f 0015 003f 0015 0015 0015 0015 0015 0015 0015 003f
0015 0015 0015 003f 0015 0015 0015 0015 0015 003f 0015 0015 0015 003f 0015 003f 0015 003f 0015
0015 0015 003f 0015 003f 0015 0015 0015 003f 0015 0015 0015 0015 0015 05d5
vertex_edidcustomtable67: NEC 0x70 0xd3
0000 006e 0000 0022 0156 00ab 0015 0015 0015 0015 0015 0015 0015 0015 0015 003f 0015 003f 0015
003f 0015 0015 0015 003f 0015 003f 0015 003f 0015 003f 0015 0015 0015 0015 0015 0015 0015 003f
0015 003f 0015 003f 0015 0015 0015 0015 0015 003f 0015 0015 0015 003f 0015 003f 0015 0015 0015
0015 0015 003f 0015 003f 0015 0015 0015 003f 0015 0015 0015 0015 0015 05d5
vertex_edidcustomtable68: NEC 0x70 0xd4
0000 006e 0000 0022 0156 00ab 0015 0015 0015 0015 0015 0015 0015 0015 0015 003f 0015 003f 0015
003f 0015 0015 0015 003f 0015 003f 0015 003f 0015 003f 0015 0015 0015 0015 0015 0015 0015 003f
0015 0015 0015 0015 0015 003f 0015 0015 0015 003f 0015 0015 0015 003f 0015 003f 0015 003f 0015
003f 0015 0015 0015 003f 0015 0015 0015 003f 0015 0015 0015 0015 0015 05d5
vertex_edidcustomtable69: NEC 0x70 0xd5
0000 006e 0000 0022 0156 00ab 0015 0015 0015 0015 0015 0015 0015 0015 0015 003f 0015 003f 0015
003f 0015 0015 0015 003f 0015 003f 0015 003f 0015 003f 0015 0015 0015 0015 0015 0015 0015 003f
0015 003f 0015 0015 0015 003f 0015 0015 0015 003f 0015 0015 0015 003f 0015 003f 0015 0015 0015
003f 0015 0015 0015 003f 0015 0015 0015 003f 0015 0015 0015 0015 0015 05d5
vertex_edidcustomtable7: NEC 0x70 0x97
0000 006e 0000 0022 0156 00ab 0015 0015 0015 0015 0015 0015 0015 0015 0015 003f 0015 003f 0015
003f 0015 0015 0015 003f 0015 003f 0015 003f 0015 003f 0015 0015 0015 0015 0015 0015 0015 003f
0015 003f 0015 003f 0015 003f 0015 0015 0015 003f 0015 0015 0015 0015 0015 003f 0015 0015 0015
0015 0015 0015 0015 003f 0015 0015 0015 003f 0015 003f 0015 0015 0015 05d5
vertex_edidcustomtable70: NEC 0x70 0xd6
0000 006e 0000 0022 0156 00ab 0015 0015 0015 0015 0015 0015 0015 0015 0015 003f 0015 003f 0015
003f 0015 0015 0015 003f 0015 003f 0015 003f 0015 003f 0015 0015 0015 0015 0015 0015 0015 003f
0015 0015 0015 003f 0015 003f 0015 0015 0015 003f 0015 0015 0015 003f 0015 003f 0015 003f 0015
0015 0015 0015 0015 003f 0015 0015 0015 003f 0015 0015 0015 0015 0015 05d5
vertex_edidcustomtable71: NEC 0x70 0xd7
0000 006e 0000 0022 0156 00ab 0015 0015 0015 0015 0015 0015 0015 0015 0015 003f 0015 003f 0015
003f 0015 0015 0015 003f 0015 003f 0015 003f 0015 003f 0015 0015 0015 0015 0015 0015 0015 003f
0015 003f 0015 003f 0015 003f 0015 0015 0015 003f 0015 0015 0015 003f 0015 003f 0015 0015 0015
0015 0015 0015 0015 003f 0015 0015 0015 003f 0015 0015 0015 0015 0015 05d5
Disclaimer: 3rd party and/or custom firmware providing extra features are not covered in this manual.
Page 66

66
4K Vertex – User Manual
vertex_edidcustomtable72: NEC 0x70 0xd8
0000 006e 0000 0022 0156 00ab 0015 0015 0015 0015 0015 0015 0015 0015 0015 003f 0015 003f 0015
003f 0015 0015 0015 003f 0015 003f 0015 003f 0015 003f 0015 0015 0015 0015 0015 0015 0015 003f
0015 0015 0015 0015 0015 0015 0015 003f 0015 003f 0015 0015 0015 003f 0015 003f 0015 003f 0015
003f 0015 003f 0015 0015 0015 0015 0015 003f 0015 0015 0015 0015 0015 05d5
vertex_edidcustomtable73: NEC 0x70 0xd9
0000 006e 0000 0022 0156 00ab 0015 0015 0015 0015 0015 0015 0015 0015 0015 003f 0015 003f 0015
003f 0015 0015 0015 003f 0015 003f 0015 003f 0015 003f 0015 0015 0015 0015 0015 0015 0015 003f
0015 003f 0015 0015 0015 0015 0015 003f 0015 003f 0015 0015 0015 003f 0015 003f 0015 0015 0015
003f 0015
vertex_edidcustomtable74: NEC 0x70 0xda
0000 006e 0000 0022 0156 00ab 0015 0015 0015 0015 0015 0015 0015 0015 0015 003f 0015 003f 0015
003f 0015 0015 0015 003f 0015 003f 0015 003f 0015 003f 0015 0015 0015 0015 0015 0015 0015 003f
0015 0015 0015 003f 0015 0015 0015 003f 0015 003f 0015 0015 0015 003f 0015 003f 0015 003f 0015
0015 0015 003f 0015 0015 0015 0015 0015 003f 0015 0015 0015 0015 0015 05d5
vertex_edidcustomtable75: NEC 0x70 0xdb
0000 006e 0000 0022 0156 00ab 0015 0015 0015 0015 0015 0015 0015 0015 0015 003f 0015 003f 0015
003f 0015 0015 0015 003f 0015 003f 0015 003f 0015 003f 0015 0015 0015 0015 0015 0015 0015 003f
0015 003f 0015 003f 0015 0015 0015 003f 0015 003f 0015 0015 0015 003f 0015 003f 0015 0015 0015
0015 0015 003f 0015 0015 0015 0015 0015 003f 0015 0015 0015 0015 0015 05d5
vertex_edidcustomtable76: NEC 0x70 0xdc
0000 006e 0000 0022 0156 00ab 0015 0015 0015 0015 0015 0015 0015 0015 0015 003f 0015 003f 0015
003f 0015 0015 0015 003f 0015 003f 0015 003f 0015 003f 0015 0015 0015 0015 0015 0015 0015 003f
0015 0015 0015 0015 0015 003f 0015 003f 0015 003f 0015 0015 0015 003f 0015 003f 0015 003f 0015
003f 0015 0015 0015 0015 0015 0015 0015 003f 0015 0015 0015 0015 0015 05d5
vertex_edidcustomtable77: NEC 0x70 0xdd
0000 006e 0000 0022 0156 00ab 0015 0015 0015 0015 0015 0015 0015 0015 0015 003f 0015 003f 0015
003f 0015 0015 0015 003f 0015 003f 0015 003f 0015 003f 0015 0015 0015 0015 0015 0015 0015 003f
0015 003f 0015 0015 0015 003f 0015 003f 0015 003f 0015 0015 0015 003f 0015 003f 0015 0015 0015
003f 0015 0015 0015 0015 0015 0015 0015 003f 0015 0015 0015 0015 0015 05d5
vertex_edidcustomtable78: NEC 0x70 0xde
0000 006e 0000 0022 0156 00ab 0015 0015 0015 0015 0015 0015 0015 0015 0015 003f 0015 003f 0015
003f 0015 0015 0015 003f 0015 003f 0015 003f 0015 003f 0015 0015 0015 0015 0015 0015 0015 003f
Disclaimer: 3rd party and/or custom firmware providing extra features are not covered in this manual.
Page 67

67
4K Vertex – User Manual
0015 0015 0015 003f 0015 003f 0015 003f 0015 003f 0015 0015 0015 003f 0015 003f 0015 003f 0015
0015 0015 0015 0015 0015 0015 0015 0015 003f 0015 0015 0015 0015 0015 05d5
vertex_edidcustomtable79: NEC 0x70 0xdf
0000 006e 0000 0022 0156 00ab 0015 0015 0015 0015 0015 0015 0015 0015 0015 003f 0015 003f 0015
003f 0015 0015 0015 003f 0015 003f 0015 003f 0015 003f 0015 0015 0015 0015 0015 0015 0015 003f
0015 003f 0015 003f 0015 003f 0015 003f 0015 003f 0015 0015 0015 003f 0015 003f 0015 0015 0015
0015 0015 0015 0015 0015 0015 0015 0015 003f 0015 0015 0015 0015 0015 05d5
vertex_edidcustomtable8: NEC 0x70 0x98
0000 006e 0000 0022 0156 00ab 0015 0015 0015 0015 0015 0015 0015 0015 0015 003f 0015 003f 0015
003f 0015 0015 0015 003f 0015 003f 0015 003f 0015 003f 0015 0015 0015 0015 0015 0015 0015 003f
0015 0015 0015 0015 0015 0015 0015 003f 0015 003f 0015 0015 0015 0015 0015 003f 0015 003f 0015
003f 0015 003f 0015 0015 0015 0015 0015 003f 0015 003f 0015 0015 0015 05d5
vertex_edidcustomtable80: NEC 0x70 0xe0
0000 006e 0000 0022 0156 00ab 0015 0015 0015 0015 0015 0015 0015 0015 0015 003f 0015 003f 0015
003f 0015 0015 0015 003f 0015 003f 0015 003f 0015 003f 0015 0015 0015 0015 0015 0015 0015 003f
0015 0015 0015 0015 0015 0015 0015 0015 0015 0015 0015 003f 0015 003f 0015 003f 0015 003f 0015
003f 0015 003f 0015 003f 0015 003f 0015 0015 0015 0015 0015 0015 0015 05d5
vertex_edidcustomtable81: NEC 0x70 0xe1
0000 006e 0000 0022 0156 00ab 0015 0015 0015 0015 0015 0015 0015 0015 0015 003f 0015 003f 0015
003f 0015 0015 0015 003f 0015 003f 0015 003f 0015 003f 0015 0015 0015 0015 0015 0015 0015 003f
0015 003f 0015 0015 0015 0015 0015 0015 0015 0015 0015 003f 0015 003f 0015 003f 0015 0015 0015
003f 0015 003f 0015 003f 0015 003f 0015 0015 0015 0015 0015 0015 0015 05d5
vertex_edidcustomtable82: NEC 0x70 0xe2
0000 006e 0000 0022 0156 00ab 0015 0015 0015 0015 0015 0015 0015 0015 0015 003f 0015 003f 0015
003f 0015 0015 0015 003f 0015 003f 0015 003f 0015 003f 0015 0015 0015 0015 0015 0015 0015 003f
0015 0015 0015 003f 0015 0015 0015 0015 0015 0015 0015 003f 0015 003f 0015 003f 0015 003f 0015
0015 0015 003f 0015 003f 0015 003f 0015 0015 0015 0015 0015 0015 0015 05d5
vertex_edidcustomtable83: NEC 0x70 0xe3
0000 006e 0000 0022 0156 00ab 0015 0015 0015 0015 0015 0015 0015 0015 0015 003f 0015 003f 0015
003f 0015 0015 0015 003f 0015 003f 0015 003f 0015 003f 0015 0015 0015 0015 0015 0015 0015 003f
0015 003f 0015 003f 0015 0015 0015 0015 0015 0015 0015 003f 0015 003f 0015 003f 0015 0015 0015
0015 0015 003f 0015 003f 0015 003f 0015 0015 0015 0015 0015 0015 0015 05d5
vertex_edidcustomtable84: NEC 0x70 0xe4
Disclaimer: 3rd party and/or custom firmware providing extra features are not covered in this manual.
Page 68

68
4K Vertex – User Manual
0000 006e 0000 0022 0156 00ab 0015 0015 0015 0015 0015 0015 0015 0015 0015 003f 0015 003f 0015
003f 0015 0015 0015 003f 0015 003f 0015 003f 0015 003f 0015 0015 0015 0015 0015 0015 0015 003f
0015 0015 0015 0015 0015 003f 0015 0015 0015 0015 0015 003f 0015 003f 0015 003f 0015 003f 0015
003f 0015 0015 0015 003f 0015 003f 0015 0015 0015 0015 0015 0015 0015 05d5
vertex_edidcustomtable85: NEC 0x70 0xe5
0000 006e 0000 0022 0156 00ab 0015 0015 0015 0015 0015 0015 0015 0015 0015 003f 0015 003f 0015
003f 0015 0015 0015 003f 0015 003f 0015 003f 0015 003f 0015 0015 0015 0015 0015 0015 0015 003f
0015 003f 0015 0015 0015 003f 0015 0015 0015 0015 0015 003f 0015 003f 0015 003f 0015 0015 0015
003f 0015 0015 0015 003f 0015 003f 0015 0015 0015 0015 0015 0015 0015 05d5
vertex_edidcustomtable86: NEC 0x70 0xe6
0000 006e 0000 0022 0156 00ab 0015 0015 0015 0015 0015 0015 0015 0015 0015 003f 0015 003f 0015
003f 0015 0015 0015 003f 0015 003f 0015 003f 0015 003f 0015 0015 0015 0015 0015 0015 0015 003f
0015 0015 0015 003f 0015 003f 0015 0015 0015 0015 0015 003f 0015 003f 0015 003f 0015 003f 0015
0015 0015 0015 0015 003f 0015 003f 0015 0015 0015 0015 0015 0015 0015 05d5
vertex_edidcustomtable87: NEC 0x70 0xe7
0000 006e 0000 0022 0156 00ab 0015 0015 0015 0015 0015 0015 0015 0015 0015 003f 0015 003f 0015
003f 0015 0015 0015 003f 0015 003f 0015 003f 0015 003f 0015 0015 0015 0015 0015 0015 0015 003f
0015 003f 0015 003f 0015 003f 0015 0015 0015 0015 0015 003f 0015 003f 0015 003f 0015 0015 0015
0015 0015 0015 0015 003f 0015 003f 0015 0015 0015 0015 0015 0015 0015 05d5
vertex_edidcustomtable88: NEC 0x70 0xe8
0000 006e 0000 0022 0156 00ab 0015 0015 0015 0015 0015 0015 0015 0015 0015 003f 0015 003f 0015
003f 0015 0015 0015 003f 0015 003f 0015 003f 0015 003f 0015 0015 0015 0015 0015 0015 0015 003f
0015 0015 0015 0015 0015 0015 0015 003f 0015 0015 0015 003f 0015 003f 0015 003f 0015 003f 0015
003f 0015 003f 0015 0015 0015 003f 0015 0015 0015 0015 0015 0015 0015 05d5
vertex_edidcustomtable89: NEC 0x70 0xe9
0000 006e 0000 0022 0156 00ab 0015 0015 0015 0015 0015 0015 0015 0015 0015 003f 0015 003f 0015
003f 0015 0015 0015 003f 0015 003f 0015 003f 0015 003f 0015 0015 0015 0015 0015 0015 0015 003f
0015 003f 0015 0015 0015 0015 0015 003f 0015 0015 0015 003f 0015 003f 0015 003f 0015 0015 0015
003f 0015 003f 0015 0015 0015 003f 0015 0015 0015 0015 0015 0015 0015 05d5
vertex_edidcustomtable9: NEC 0x70 0x99
0000 006e 0000 0022 0156 00ab 0015 0015 0015 0015 0015 0015 0015 0015 0015 003f 0015 003f 0015
003f 0015 0015 0015 003f 0015 003f 0015 003f 0015 003f 0015 0015 0015 0015 0015 0015 0015 003f
0015 003f 0015 0015 0015 0015 0015 003f 0015 003f 0015 0015 0015 0015 0015 003f 0015 0015 0015
003f 0015 003f 0015 0015 0015 0015 0015 003f 0015 003f 0015 0015 0015 05d5
Disclaimer: 3rd party and/or custom firmware providing extra features are not covered in this manual.
Page 69

69
4K Vertex – User Manual
vertex_edidcustomtable90: NEC 0x70 0xea
0000 006e 0000 0022 0156 00ab 0015 0015 0015 0015 0015 0015 0015 0015 0015 003f 0015 003f 0015
003f 0015 0015 0015 003f 0015 003f 0015 003f 0015 003f 0015 0015 0015 0015 0015 0015 0015 003f
0015 0015 0015 003f 0015 0015 0015 003f 0015 0015 0015 003f 0015 003f 0015 003f 0015 003f 0015
0015 0015 003f 0015 0015 0015 003f 0015 0015 0015 0015 0015 0015 0015 05d5
vertex_edidcustomtable91: NEC 0x70 0xeb
0000 006e 0000 0022 0156 00ab 0015 0015 0015 0015 0015 0015 0015 0015 0015 003f 0015 003f 0015
003f 0015 0015 0015 003f 0015 003f 0015 003f 0015 003f 0015 0015 0015 0015 0015 0015 0015 003f
0015 003f 0015 003f 0015 0015 0015 003f 0015 0015 0015 003f 0015 003f 0015 003f 0015 0015 0015
0015 0015 003f 0015 0015 0015 003f 0015 0015 0015 0015 0015 0015 0015 05d5
vertex_edidcustomtable92: NEC 0x70 0xec
0000 006e 0000 0022 0156 00ab 0015 0015 0015 0015 0015 0015 0015 0015 0015 003f 0015 003f 0015
003f 0015 0015 0015 003f 0015 003f 0015 003f 0015 003f 0015 0015 0015 0015 0015 0015 0015 003f
0015 0015 0015 0015 0015 003f 0015 003f 0015 0015 0015 003f 0015 003f 0015 003f 0015 003f 0015
003f 0015 0015 0015 0015 0015 003f 0015 0015 0015 0015 0015 0015 0015 05d5
vertex_edidcustomtable93: NEC 0x70 0xed
0000 006e 0000 0022 0156 00ab 0015 0015 0015 0015 0015 0015 0015 0015 0015 003f 0015 003f 0015
003f 0015 0015 0015 003f 0015 003f 0015 003f 0015 003f 0015 0015 0015 0015 0015 0015 0015 003f
0015 003f 0015 0015 0015 003f 0015 003f 0015 0015 0015 003f 0015 003f 0015 003f 0015 0015 0015
003f 0015 0015 0015 0015 0015 003f 0015 0015 0015 0015 0015 0015 0015 05d5
vertex_edidcustomtable94: NEC 0x70 0xee
0000 006e 0000 0022 0156 00ab 0015 0015 0015 0015 0015 0015 0015 0015 0015 003f 0015 003f 0015
003f 0015 0015 0015 003f 0015 003f 0015 003f 0015 003f 0015 0015 0015 0015 0015 0015 0015 003f
0015 0015 0015 003f 0015 003f 0015 003f 0015 0015 0015 003f 0015 003f 0015 003f 0015 003f 0015
0015 0015 0015 0015 0015 0015 003f 0015 0015 0015 0015 0015 0015 0015 05d5
vertex_edidcustomtable95: NEC 0x70 0xef
0000 006e 0000 0022 0156 00ab 0015 0015 0015 0015 0015 0015 0015 0015 0015 003f 0015 003f 0015
003f 0015 0015 0015 003f 0015 003f 0015 003f 0015 003f 0015 0015 0015 0015 0015 0015 0015 003f
0015 003f 0015 003f 0015 003f 0015 003f 0015 0015 0015 003f 0015 003f 0015 003f 0015 0015 0015
0015 0015 0015 0015 0015 0015 003f 0015 0015 0015 0015 0015 0015 0015 05d5
vertex_edidcustomtable96: NEC 0x70 0xf0
0000 006e 0000 0022 0156 00ab 0015 0015 0015 0015 0015 0015 0015 0015 0015 003f 0015 003f 0015
003f 0015 0015 0015 003f 0015 003f 0015 003f 0015 003f 0015 0015 0015 0015 0015 0015 0015 003f
Disclaimer: 3rd party and/or custom firmware providing extra features are not covered in this manual.
Page 70

70
4K Vertex – User Manual
0015 0015 0015 0015 0015 0015 0015 0015 0015 003f 0015 003f 0015 003f 0015 003f 0015 003f 0015
003f 0015 003f 0015 003f 0015 0015 0015 0015 0015 0015 0015 0015 0015 05d5
vertex_edidcustomtable97: NEC 0x70 0xf1
0000 006e 0000 0022 0156 00ab 0015 0015 0015 0015 0015 0015 0015 0015 0015 003f 0015 003f 0015
003f 0015 0015 0015 003f 0015 003f 0015 003f 0015 003f 0015 0015 0015 0015 0015 0015 0015 003f
0015 003f 0015 0015 0015 0015 0015 0015 0015 003f 0015 003f 0015 003f 0015 003f 0015 0015 0015
003f 0015 003f 0015 003f 0015 0015 0015 0015 0015 0015 0015 0015 0015 05d5
vertex_edidcustomtable98: NEC 0x70 0xf2
0000 006e 0000 0022 0156 00ab 0015 0015 0015 0015 0015 0015 0015 0015 0015 003f 0015 003f 0015
003f 0015 0015 0015 003f 0015 003f 0015 003f 0015 003f 0015 0015 0015 0015 0015 0015 0015 003f
0015 0015 0015 003f 0015 0015 0015 0015 0015 003f 0015 003f 0015 003f 0015 003f 0015 003f 0015
0015 0015 003f 0015 003f 0015 0015 0015 0015 0015 0015 0015 0015 0015 05d5
vertex_edidcustomtable99: NEC 0x70 0xf3
0000 006e 0000 0022 0156 00ab 0015 0015 0015 0015 0015 0015 0015 0015 0015 003f 0015 003f 0015
003f 0015 0015 0015 003f 0015 003f 0015 003f 0015 003f 0015 0015 0015 0015 0015 0015 0015 003f
0015 003f 0015 003f 0015 0015 0015 0015 0015 003f 0015 003f 0015 003f 0015 003f 0015 0015 0015
0015 0015 003f 0015 003f 0015 0015 0015 0015 0015 0015 0015 0015 0015 05d5
vertex_ediddvoff: NEC 0x70 0x6d
0000 006e 0000 0022 0156 00ab 0015 0015 0015 0015 0015 0015 0015 0015 0015 003f 0015 003f 0015
003f 0015 0015 0015 003f 0015 003f 0015 003f 0015 003f 0015 0015 0015 0015 0015 0015 0015 003f
0015 003f 0015 0015 0015 003f 0015 003f 0015 0015 0015 003f 0015 003f 0015 0015 0015 0015 0015
003f 0015 0015 0015 0015 0015 003f 0015 0015 0015 0015 0015 003f 0015 05d5
vertex_ediddvon: NEC 0x70 0x6c
0000 006e 0000 0022 0156 00ab 0015 0015 0015 0015 0015 0015 0015 0015 0015 003f 0015 003f 0015
003f 0015 0015 0015 003f 0015 003f 0015 003f 0015 003f 0015 0015 0015 0015 0015 0015 0015 003f
0015 0015 0015 0015 0015 003f 0015 003f 0015 0015 0015 003f 0015 003f 0015 0015 0015 003f 0015
003f 0015 0015 0015 0015 0015 003f 0015 0015 0015 0015 0015 003f 0015 05d5
vertex_edidfixed: NEC 0x70 0x23
0000 006e 0000 0022 0156 00ab 0015 0015 0015 0015 0015 0015 0015 0015 0015 003f 0015 003f 0015
003f 0015 0015 0015 003f 0015 003f 0015 003f 0015 003f 0015 0015 0015 0015 0015 0015 0015 003f
0015 003f 0015 003f 0015 0015 0015 0015 0015 0015 0015 003f 0015 0015 0015 0015 0015 0015 0015
0015 0015 003f 0015 003f 0015 003f 0015 0015 0015 003f 0015 003f 0015 05d5
vertex_edidhdr10off: NEC 0x70 0x28
Disclaimer: 3rd party and/or custom firmware providing extra features are not covered in this manual.
Page 71

71
4K Vertex – User Manual
0000 006e 0000 0022 0156 00ab 0015 0015 0015 0015 0015 0015 0015 0015 0015 003f 0015 003f 0015
003f 0015 0015 0015 003f 0015 003f 0015 003f 0015 003f 0015 0015 0015 0015 0015 0015 0015 003f
0015 0015 0015 0015 0015 0015 0015 003f 0015 0015 0015 003f 0015 0015 0015 0015 0015 003f 0015
003f 0015 003f 0015 0015 0015 003f 0015 0015 0015 003f 0015 003f 0015 05d5
vertex_edidhdr10on: NEC 0x70 0x29
0000 006e 0000 0022 0156 00ab 0015 0015 0015 0015 0015 0015 0015 0015 0015 003f 0015 003f 0015
003f 0015 0015 0015 003f 0015 003f 0015 003f 0015 003f 0015 0015 0015 0015 0015 0015 0015 003f
0015 003f 0015 0015 0015 0015 0015 003f 0015 0015 0015 003f 0015 0015 0015 0015 0015 0015 0015
003f 0015 003f 0015 0015 0015 003f 0015 0015 0015 003f 0015 003f 0015 05d5
vertex_edidhlgoff: NEC 0x70 0x2a
0000 006e 0000 0022 0156 00ab 0015 0015 0015 0015 0015 0015 0015 0015 0015 003f 0015 003f 0015
003f 0015 0015 0015 003f 0015 003f 0015 003f 0015 003f 0015 0015 0015 0015 0015 0015 0015 003f
0015 0015 0015 003f 0015 0015 0015 003f 0015 0015 0015 003f 0015 0015 0015 0015 0015 003f 0015
0015 0015 003f 0015 0015 0015 003f 0015 0015 0015 003f 0015 003f 0015 05d5
vertex_edidhlgon: NEC 0x70 0x2b
0000 006e 0000 0022 0156 00ab 0015 0015 0015 0015 0015 0015 0015 0015 0015 003f 0015 003f 0015
003f 0015 0015 0015 003f 0015 003f 0015 003f 0015 003f 0015 0015 0015 0015 0015 0015 0015 003f
0015 003f 0015 003f 0015 0015 0015 003f 0015 0015 0015 003f 0015 0015 0015 0015 0015 0015 0015
0015 0015 003f 0015 0015 0015 003f 0015 0015 0015 003f 0015 003f 0015 05d5
vertex_edidtopfollow: NEC 0x70 0x90
0000 006e 0000 0022 0156 00ab 0015 0015 0015 0015 0015 0015 0015 0015 0015 003f 0015 003f 0015
003f 0015 0015 0015 003f 0015 003f 0015 003f 0015 003f 0015 0015 0015 0015 0015 0015 0015 003f
0015 0015 0015 0015 0015 0015 0015 0015 0015 003f 0015 0015 0015 0015 0015 003f 0015 003f 0015
003f 0015 003f 0015 003f 0015 0015 0015 003f 0015 003f 0015 0015 0015 05d5
vertex_edidyuvremoveoff: NEC 0x70 0x3d
0000 006e 0000 0022 0156 00ab 0015 0015 0015 0015 0015 0015 0015 0015 0015 003f 0015 003f 0015
003f 0015 0015 0015 003f 0015 003f 0015 003f 0015 003f 0015 0015 0015 0015 0015 0015 0015 003f
0015 003f 0015 0015 0015 003f 0015 003f 0015 003f 0015 003f 0015 0015 0015 0015 0015 0015 0015
003f 0015 0015 0015 0015 0015 0015 0015 0015 0015 003f 0015 003f 0015 05d5
vertex_edidyuvremoveon: NEC 0x70 0x3c
0000 006e 0000 0022 0156 00ab 0015 0015 0015 0015 0015 0015 0015 0015 0015 003f 0015 003f 0015
003f 0015 0015 0015 003f 0015 003f 0015 003f 0015 003f 0015 0015 0015 0015 0015 0015 0015 003f
0015 0015 0015 0015 0015 003f 0015 003f 0015 003f 0015 003f 0015 0015 0015 0015 0015 003f 0015
003f 0015 0015 0015 0015 0015 0015 0015 0015 0015 003f 0015 003f 0015 05d5
Disclaimer: 3rd party and/or custom firmware providing extra features are not covered in this manual.
Page 72

72
4K Vertex – User Manual
vertex_hdcp14: NEC 0x70 0x1f
0000 006e 0000 0022 0156 00ab 0015 0015 0015 0015 0015 0015 0015 0015 0015 003f 0015 003f 0015
003f 0015 0015 0015 003f 0015 003f 0015 003f 0015 003f 0015 0015 0015 0015 0015 0015 0015 003f
0015 003f 0015 003f 0015 003f 0015 003f 0015 003f 0015 0015 0015 0015 0015 0015 0015 0015 0015
0015 0015 0015 0015 0015 0015 0015 0015 003f 0015 003f 0015 003f 0015 05d5
vertex_hdcp22: NEC 0x70 0x20
0000 006e 0000 0022 0156 00ab 0015 0015 0015 0015 0015 0015 0015 0015 0015 003f 0015 003f 0015
003f 0015 0015 0015 003f 0015 003f 0015 003f 0015 003f 0015 0015 0015 0015 0015 0015 0015 003f
0015 0015 0015 0015 0015 0015 0015 0015 0015 0015 0015 003f 0015 0015 0015 0015 0015 003f 0015
003f 0015 003f 0015 003f 0015 003f 0015 0015 0015 003f 0015 003f 0015 05d5
vertex_hdrcustomoff: NEC 0x70 0x2d
0000 006e 0000 0022 0156 00ab 0015 0015 0015 0015 0015 0015 0015 0015 0015 003f 0015 003f 0015
003f 0015 0015 0015 003f 0015 003f 0015 003f 0015 003f 0015 0015 0015 0015 0015 0015 0015 003f
0015 003f 0015 0015 0015 003f 0015 003f 0015 0015 0015 003f 0015 0015 0015 0015 0015 0015 0015
003f 0015 0015 0015 0015 0015 003f 0015 0015 0015 003f 0015 003f 0015 05d5
vertex_hdrcustomon: NEC 0x70 0x2c
0000 006e 0000 0022 0156 00ab 0015 0015 0015 0015 0015 0015 0015 0015 0015 003f 0015 003f 0015
003f 0015 0015 0015 003f 0015 003f 0015 003f 0015 003f 0015 0015 0015 0015 0015 0015 0015 003f
0015 0015 0015 0015 0015 003f 0015 003f 0015 0015 0015 003f 0015 0015 0015 0015 0015 003f 0015
003f 0015 0015 0015 0015 0015 003f 0015 0015 0015 003f 0015 003f 0015 05d5
vertex_hdrdisableoff: NEC 0x70 0x18
0000 006e 0000 0022 0156 00ab 0015 0015 0015 0015 0015 0015 0015 0015 0015 003f 0015 003f 0015
003f 0015 0015 0015 003f 0015 003f 0015 003f 0015 003f 0015 0015 0015 0015 0015 0015 0015 003f
0015 0015 0015 0015 0015 0015 0015 003f 0015 003f 0015 0015 0015 0015 0015 0015 0015 003f 0015
003f 0015 003f 0015 0015 0015 0015 0015 003f 0015 003f 0015 003f 0015 05d5
vertex_hdrdisableon: NEC 0x70 0x17
0000 006e 0000 0022 0156 00ab 0015 0015 0015 0015 0015 0015 0015 0015 0015 003f 0015 003f 0015
003f 0015 0015 0015 003f 0015 003f 0015 003f 0015 003f 0015 0015 0015 0015 0015 0015 0015 003f
0015 003f 0015 003f 0015 003f 0015 0015 0015 003f 0015 0015 0015 0015 0015 0015 0015 0015 0015
0015 0015 0015 0015 003f 0015 0015 0015 003f 0015 003f 0015 003f 0015 05d5
vertex_inputsel1: NEC 0x70 0x0f
0000 006e 0000 0022 0156 00ab 0015 0015 0015 0015 0015 0015 0015 0015 0015 003f 0015 003f 0015
003f 0015 0015 0015 003f 0015 003f 0015 003f 0015 003f 0015 0015 0015 0015 0015 0015 0015 003f
Disclaimer: 3rd party and/or custom firmware providing extra features are not covered in this manual.
Page 73

73
4K Vertex – User Manual
0015 003f 0015 003f 0015 003f 0015 003f 0015 0015 0015 0015 0015 0015 0015 0015 0015 0015 0015
0015 0015 0015 0015 0015 0015 003f 0015 003f 0015 003f 0015 003f 0015 05d5
vertex_inputsel2: NEC 0x70 0x10
0000 006e 0000 0022 0156 00ab 0015 0015 0015 0015 0015 0015 0015 0015 0015 003f 0015 003f 0015
003f 0015 0015 0015 003f 0015 003f 0015 003f 0015 003f 0015 0015 0015 0015 0015 0015 0015 003f
0015 0015 0015 0015 0015 0015 0015 0015 0015 003f 0015 0015 0015 0015 0015 0015 0015 003f 0015
003f 0015 003f 0015 003f 0015 0015 0015 003f 0015 003f 0015 003f 0015 05d5
vertex_inputsel3: NEC 0x70 0x11
0000 006e 0000 0022 0156 00ab 0015 0015 0015 0015 0015 0015 0015 0015 0015 003f 0015 003f 0015
003f 0015 0015 0015 003f 0015 003f 0015 003f 0015 003f 0015 0015 0015 0015 0015 0015 0015 003f
0015 003f 0015 0015 0015 0015 0015 0015 0015 003f 0015 0015 0015 0015 0015 0015 0015 0015 0015
003f 0015 003f 0015 003f 0015 0015 0015 003f 0015 003f 0015 003f 0015 05d5
vertex_inputsel4: NEC 0x70 0x12
0000 006e 0000 0022 0156 00ab 0015 0015 0015 0015 0015 0015 0015 0015 0015 003f 0015 003f 0015
003f 0015 0015 0015 003f 0015 003f 0015 003f 0015 003f 0015 0015 0015 0015 0015 0015 0015 003f
0015 0015 0015 003f 0015 0015 0015 0015 0015 003f 0015 0015 0015 0015 0015 0015 0015 003f 0015
0015 0015 003f 0015 003f 0015 0015 0015 003f 0015 003f 0015 003f 0015 05d5
vertex_logoledoff: NEC 0x70 0x37
0000 006e 0000 0022 0156 00ab 0015 0015 0015 0015 0015 0015 0015 0015 0015 003f 0015 003f 0015
003f 0015 0015 0015 003f 0015 003f 0015 003f 0015 003f 0015 0015 0015 0015 0015 0015 0015 003f
0015 003f 0015 003f 0015 003f 0015 0015 0015 003f 0015 003f 0015 0015 0015 0015 0015 0015 0015
0015 0015 0015 0015 003f 0015 0015 0015 0015 0015 003f 0015 003f 0015 05d5
vertex_logoledon: NEC 0x70 0x36
0000 006e 0000 0022 0156 00ab 0015 0015 0015 0015 0015 0015 0015 0015 0015 003f 0015 003f 0015
003f 0015 0015 0015 003f 0015 003f 0015 003f 0015 003f 0015 0015 0015 0015 0015 0015 0015 003f
0015 0015 0015 003f 0015 003f 0015 0015 0015 003f 0015 003f 0015 0015 0015 0015 0015 003f 0015
0015 0015 0015 0015 003f 0015 0015 0015 0015 0015 003f 0015 003f 0015 05d5
vertex_oledfadeoff: NEC 0x70 0x31
0000 006e 0000 0022 0156 00ab 0015 0015 0015 0015 0015 0015 0015 0015 0015 003f 0015 003f 0015
003f 0015 0015 0015 003f 0015 003f 0015 003f 0015 003f 0015 0015 0015 0015 0015 0015 0015 003f
0015 003f 0015 0015 0015 0015 0015 0015 0015 003f 0015 003f 0015 0015 0015 0015 0015 0015 0015
003f 0015 003f 0015 003f 0015 0015 0015 0015 0015 003f 0015 003f 0015 05d5
vertex_oledfadeon: NEC 0x70 0x30
Disclaimer: 3rd party and/or custom firmware providing extra features are not covered in this manual.
Page 74

74
4K Vertex – User Manual
0000 006e 0000 0022 0156 00ab 0015 0015 0015 0015 0015 0015 0015 0015 0015 003f 0015 003f 0015
003f 0015 0015 0015 003f 0015 003f 0015 003f 0015 003f 0015 0015 0015 0015 0015 0015 0015 003f
0015 0015 0015 0015 0015 0015 0015 0015 0015 003f 0015 003f 0015 0015 0015 0015 0015 003f 0015
003f 0015 003f 0015 003f 0015 0015 0015 0015 0015 003f 0015 003f 0015 05d5
vertex_oledoff: NEC 0x70 0x39
0000 006e 0000 0022 0156 00ab 0015 0015 0015 0015 0015 0015 0015 0015 0015 003f 0015 003f 0015
003f 0015 0015 0015 003f 0015 003f 0015 003f 0015 003f 0015 0015 0015 0015 0015 0015 0015 003f
0015 003f 0015 0015 0015 0015 0015 003f 0015 003f 0015 003f 0015 0015 0015 0015 0015 0015 0015
003f 0015 003f 0015 0015 0015 0015 0015 0015 0015 003f 0015 003f 0015 05d5
vertex_oledon: NEC 0x70 0x38
0000 006e 0000 0022 0156 00ab 0015 0015 0015 0015 0015 0015 0015 0015 0015 003f 0015 003f 0015
003f 0015 0015 0015 003f 0015 003f 0015 003f 0015 003f 0015 0015 0015 0015 0015 0015 0015 003f
0015 0015 0015 0015 0015 0015 0015 003f 0015 003f 0015 003f 0015 0015 0015 0015 0015 003f 0015
003f 0015 003f 0015 0015 0015 0015 0015 0015 0015 003f 0015 003f 0015 05d5
vertex_oledpage1: NEC 0x70 0x71
0000 006e 0000 0022 0156 00ab 0015 0015 0015 0015 0015 0015 0015 0015 0015 003f 0015 003f 0015
003f 0015 0015 0015 003f 0015 003f 0015 003f 0015 003f 0015 0015 0015 0015 0015 0015 0015 003f
0015 003f 0015 0015 0015 0015 0015 0015 0015 003f 0015 003f 0015 003f 0015 0015 0015 0015 0015
003f 0015 003f 0015 003f 0015 0015 0015 0015 0015 0015 0015 003f 0015 05d5
vertex_oledpage2: NEC 0x70 0x72
0000 006e 0000 0022 0156 00ab 0015 0015 0015 0015 0015 0015 0015 0015 0015 003f 0015 003f 0015
003f 0015 0015 0015 003f 0015 003f 0015 003f 0015 003f 0015 0015 0015 0015 0015 0015 0015 003f
0015 0015 0015 003f 0015 0015 0015 0015 0015 003f 0015 003f 0015 003f 0015 0015 0015 003f 0015
0015 0015 003f 0015 003f 0015 0015 0015 0015 0015 0015 0015 003f 0015 05d5
vertex_oledpage3: NEC 0x70 0x73
0000 006e 0000 0022 0156 00ab 0015 0015 0015 0015 0015 0015 0015 0015 0015 003f 0015 003f 0015
003f 0015 0015 0015 003f 0015 003f 0015 003f 0015 003f 0015 0015 0015 0015 0015 0015 0015 003f
0015 003f 0015 003f 0015 0015 0015 0015 0015 003f 0015 003f 0015 003f 0015 0015 0015 0015 0015
0015 0015 003f 0015 003f 0015 0015 0015 0015 0015 0015 0015 003f 0015 05d5
vertex_oledpage4: NEC 0x70 0x74
0000 006e 0000 0022 0156 00ab 0015 0015 0015 0015 0015 0015 0015 0015 0015 003f 0015 003f 0015
003f 0015 0015 0015 003f 0015 003f 0015 003f 0015 003f 0015 0015 0015 0015 0015 0015 0015 003f
0015 0015 0015 0015 0015 003f 0015 0015 0015 003f 0015 003f 0015 003f 0015 0015 0015 003f 0015
003f 0015 0015 0015 003f 0015 0015 0015 0015 0015 0015 0015 003f 0015 05d5
Disclaimer: 3rd party and/or custom firmware providing extra features are not covered in this manual.
Page 75

75
4K Vertex – User Manual
vertex_oledpage5: NEC 0x70 0x75
0000 006e 0000 0022 0156 00ab 0015 0015 0015 0015 0015 0015 0015 0015 0015 003f 0015 003f 0015
003f 0015 0015 0015 003f 0015 003f 0015 003f 0015 003f 0015 0015 0015 0015 0015 0015 0015 003f
0015 003f 0015 0015 0015 003f 0015 0015 0015 003f 0015 003f 0015 003f 0015 0015 0015 0015 0015
003f 0015 0015 0015 003f 0015 0015 0015 0015 0015 0015 0015 003f 0015 05d5
vertex_oledrotateoff: NEC 0x70 0x35
0000 006e 0000 0022 0156 00ab 0015 0015 0015 0015 0015 0015 0015 0015 0015 003f 0015 003f 0015
003f 0015 0015 0015 003f 0015 003f 0015 003f 0015 003f 0015 0015 0015 0015 0015 0015 0015 003f
0015 003f 0015 0015 0015 003f 0015 0015 0015 003f 0015 003f 0015 0015 0015 0015 0015 0015 0015
003f 0015 0015 0015 003f 0015 0015 0015 0015 0015 003f 0015 003f 0015 05d5
vertex_oledrotateon: NEC 0x70 0x34
0000 006e 0000 0022 0156 00ab 0015 0015 0015 0015 0015 0015 0015 0015 0015 003f 0015 003f 0015
003f 0015 0015 0015 003f 0015 003f 0015 003f 0015 003f 0015 0015 0015 0015 0015 0015 0015 003f
0015 0015 0015 0015 0015 003f 0015 0015 0015 003f 0015 003f 0015 0015 0015 0015 0015 003f 0015
003f 0015 0015 0015 003f 0015 0015 0015 0015 0015 003f 0015 003f 0015 05d5
vertex_osdaudiooff: NEC 0x70 0x5e
0000 006e 0000 0022 0156 00ab 0015 0015 0015 0015 0015 0015 0015 0015 0015 003f 0015 003f 0015
003f 0015 0015 0015 003f 0015 003f 0015 003f 0015 003f 0015 0015 0015 0015 0015 0015 0015 003f
0015 0015 0015 003f 0015 003f 0015 003f 0015 003f 0015 0015 0015 003f 0015 0015 0015 003f 0015
0015 0015 0015 0015 0015 0015 0015 0015 003f 0015 0015 0015 003f 0015 05d5
vertex_osdaudioon: NEC 0x70 0x5f
0000 006e 0000 0022 0156 00ab 0015 0015 0015 0015 0015 0015 0015 0015 0015 003f 0015 003f 0015
003f 0015 0015 0015 003f 0015 003f 0015 003f 0015 003f 0015 0015 0015 0015 0015 0015 0015 003f
0015 003f 0015 003f 0015 003f 0015 003f 0015 003f 0015 0015 0015 003f 0015 0015 0015 0015 0015
0015 0015 0015 0015 0015 0015 0015 0015 003f 0015 0015 0015 003f 0015 05d5
vertex_osdcustomtextoff: NEC 0x70 0x8e
0000 006e 0000 0022 0156 00ab 0015 0015 0015 0015 0015 0015 0015 0015 0015 003f 0015 003f 0015
003f 0015 0015 0015 003f 0015 003f 0015 003f 0015 003f 0015 0015 0015 0015 0015 0015 0015 003f
0015 0015 0015 003f 0015 003f 0015 003f 0015 0015 0015 0015 0015 0015 0015 003f 0015 003f 0015
0015 0015 0015 0015 0015 0015 003f 0015 003f 0015 003f 0015 0015 0015 05d5
vertex_osdcustomtexton: NEC 0x70 0x8f
0000 006e 0000 0022 0156 00ab 0015 0015 0015 0015 0015 0015 0015 0015 0015 003f 0015 003f 0015
003f 0015 0015 0015 003f 0015 003f 0015 003f 0015 003f 0015 0015 0015 0015 0015 0015 0015 003f
Disclaimer: 3rd party and/or custom firmware providing extra features are not covered in this manual.
Page 76

76
4K Vertex – User Manual
0015 003f 0015 003f 0015 003f 0015 003f 0015 0015 0015 0015 0015 0015 0015 003f 0015 0015 0015
0015 0015 0015 0015 0015 0015 003f 0015 003f 0015 003f 0015 0015 0015 05d5
vertex_osdfadeoff: NEC 0x70 0x52
0000 006e 0000 0022 0156 00ab 0015 0015 0015 0015 0015 0015 0015 0015 0015 003f 0015 003f 0015
003f 0015 0015 0015 003f 0015 003f 0015 003f 0015 003f 0015 0015 0015 0015 0015 0015 0015 003f
0015 0015 0015 003f 0015 0015 0015 0015 0015 003f 0015 0015 0015 003f 0015 0015 0015 003f 0015
0015 0015 003f 0015 003f 0015 0015 0015 003f 0015 0015 0015 003f 0015 05d5
vertex_osdfadeon: NEC 0x70 0x53
0000 006e 0000 0022 0156 00ab 0015 0015 0015 0015 0015 0015 0015 0015 0015 003f 0015 003f 0015
003f 0015 0015 0015 003f 0015 003f 0015 003f 0015 003f 0015 0015 0015 0015 0015 0015 0015 003f
0015 003f 0015 003f 0015 0015 0015 0015 0015 003f 0015 0015 0015 003f 0015 0015 0015 0015 0015
0015 0015 003f 0015 003f 0015 0015 0015 003f 0015 0015 0015 003f 0015 05d5
vertex_osdhdrdetailoff: NEC 0x70 0x5a
0000 006e 0000 0022 0156 00ab 0015 0015 0015 0015 0015 0015 0015 0015 0015 003f 0015 003f 0015
003f 0015 0015 0015 003f 0015 003f 0015 003f 0015 003f 0015 0015 0015 0015 0015 0015 0015 003f
0015 0015 0015 003f 0015 0015 0015 003f 0015 003f 0015 0015 0015 003f 0015 0015 0015 003f 0015
0015 0015 003f 0015 0015 0015 0015 0015 003f 0015 0015 0015 003f 0015 05d5
vertex_osdhdrdetailon: NEC 0x70 0x5b
0000 006e 0000 0022 0156 00ab 0015 0015 0015 0015 0015 0015 0015 0015 0015 003f 0015 003f 0015
003f 0015 0015 0015 003f 0015 003f 0015 003f 0015 003f 0015 0015 0015 0015 0015 0015 0015 003f
0015 003f 0015 003f 0015 0015 0015 003f 0015 003f 0015 0015 0015 003f 0015 0015 0015 0015 0015
0015 0015 003f 0015 0015 0015 0015 0015 003f 0015 0015 0015 003f 0015 05d5
vertex_osdhdrifoff: NEC 0x70 0x5c
0000 006e 0000 0022 0156 00ab 0015 0015 0015 0015 0015 0015 0015 0015 0015 003f 0015 003f 0015
003f 0015 0015 0015 003f 0015 003f 0015 003f 0015 003f 0015 0015 0015 0015 0015 0015 0015 003f
0015 0015 0015 0015 0015 003f 0015 003f 0015 003f 0015 0015 0015 003f 0015 0015 0015 003f 0015
003f 0015 0015 0015 0015 0015 0015 0015 003f 0015 0015 0015 003f 0015 05d5
vertex_osdhdrifon: NEC 0x70 0x5d
0000 006e 0000 0022 0156 00ab 0015 0015 0015 0015 0015 0015 0015 0015 0015 003f 0015 003f 0015
003f 0015 0015 0015 003f 0015 003f 0015 003f 0015 003f 0015 0015 0015 0015 0015 0015 0015 003f
0015 003f 0015 0015 0015 003f 0015 003f 0015 003f 0015 0015 0015 003f 0015 0015 0015 0015 0015
003f 0015 0015 0015 0015 0015 0015 0015 003f 0015 0015 0015 003f 0015 05d5
vertex_osdhdrrxonlyoff: NEC 0x70 0x48
Disclaimer: 3rd party and/or custom firmware providing extra features are not covered in this manual.
Page 77

77
4K Vertex – User Manual
0000 006e 0000 0022 0156 00ab 0015 0015 0015 0015 0015 0015 0015 0015 0015 003f 0015 003f 0015
003f 0015 0015 0015 003f 0015 003f 0015 003f 0015 003f 0015 0015 0015 0015 0015 0015 0015 003f
0015 0015 0015 0015 0015 0015 0015 003f 0015 0015 0015 0015 0015 003f 0015 0015 0015 003f 0015
003f 0015 003f 0015 0015 0015 003f 0015 003f 0015 0015 0015 003f 0015 05d5
vertex_osdhdrrxonlyon: NEC 0x70 0x49
0000 006e 0000 0022 0156 00ab 0015 0015 0015 0015 0015 0015 0015 0015 0015 003f 0015 003f 0015
003f 0015 0015 0015 003f 0015 003f 0015 003f 0015 003f 0015 0015 0015 0015 0015 0015 0015 003f
0015 003f 0015 0015 0015 0015 0015 003f 0015 0015 0015 0015 0015 003f 0015 0015 0015 0015 0015
003f 0015 003f 0015 0015 0015 003f 0015 003f 0015 0015 0015 003f 0015 05d5
vertex_osdmaskoff: NEC 0x70 0x47
0000 006e 0000 0022 0156 00ab 0015 0015 0015 0015 0015 0015 0015 0015 0015 003f 0015 003f 0015
003f 0015 0015 0015 003f 0015 003f 0015 003f 0015 003f 0015 0015 0015 0015 0015 0015 0015 003f
0015 003f 0015 003f 0015 003f 0015 0015 0015 0015 0015 0015 0015 003f 0015 0015 0015 0015 0015
0015 0015 0015 0015 003f 0015 003f 0015 003f 0015 0015 0015 003f 0015 05d5
vertex_osdmaskon: NEC 0x70 0x46
0000 006e 0000 0022 0156 00ab 0015 0015 0015 0015 0015 0015 0015 0015 0015 003f 0015 003f 0015
003f 0015 0015 0015 003f 0015 003f 0015 003f 0015 003f 0015 0015 0015 0015 0015 0015 0015 003f
0015 0015 0015 003f 0015 003f 0015 0015 0015 0015 0015 0015 0015 003f 0015 0015 0015 003f 0015
0015 0015 0015 0015 003f 0015 003f 0015 003f 0015 0015 0015 003f 0015 05d5
vertex_osdoff: NEC 0x70 0x50
0000 006e 0000 0022 0156 00ab 0015 0015 0015 0015 0015 0015 0015 0015 0015 003f 0015 003f 0015
003f 0015 0015 0015 003f 0015 003f 0015 003f 0015 003f 0015 0015 0015 0015 0015 0015 0015 003f
0015 0015 0015 0015 0015 0015 0015 0015 0015 003f 0015 0015 0015 003f 0015 0015 0015 003f 0015
003f 0015 003f 0015 003f 0015 0015 0015 003f 0015 0015 0015 003f 0015 05d5
vertex_osdon: NEC 0x70 0x51
0000 006e 0000 0022 0156 00ab 0015 0015 0015 0015 0015 0015 0015 0015 0015 003f 0015 003f 0015
003f 0015 0015 0015 003f 0015 003f 0015 003f 0015 003f 0015 0015 0015 0015 0015 0015 0015 003f
0015 003f 0015 0015 0015 0015 0015 0015 0015 003f 0015 0015 0015 003f 0015 0015 0015 0015 0015
003f 0015 003f 0015 003f 0015 0015 0015 003f 0015 0015 0015 003f 0015 05d5
vertex_osdsourcenameoff: NEC 0x70 0x54
0000 006e 0000 0022 0156 00ab 0015 0015 0015 0015 0015 0015 0015 0015 0015 003f 0015 003f 0015
003f 0015 0015 0015 003f 0015 003f 0015 003f 0015 003f 0015 0015 0015 0015 0015 0015 0015 003f
0015 0015 0015 0015 0015 003f 0015 0015 0015 003f 0015 0015 0015 003f 0015 0015 0015 003f 0015
003f 0015 0015 0015 003f 0015 0015 0015 003f 0015 0015 0015 003f 0015 05d5
Disclaimer: 3rd party and/or custom firmware providing extra features are not covered in this manual.
Page 78

78
4K Vertex – User Manual
vertex_osdsourcenameon: NEC 0x70 0x55
0000 006e 0000 0022 0156 00ab 0015 0015 0015 0015 0015 0015 0015 0015 0015 003f 0015 003f 0015
003f 0015 0015 0015 003f 0015 003f 0015 003f 0015 003f 0015 0015 0015 0015 0015 0015 0015 003f
0015 003f 0015 0015 0015 003f 0015 0015 0015 003f 0015 0015 0015 003f 0015 0015 0015 0015 0015
003f 0015 0015 0015 003f 0015 0015 0015 003f 0015 0015 0015 003f 0015 05d5
vertex_osdvideofieldoff: NEC 0x70 0x56
0000 006e 0000 0022 0156 00ab 0015 0015 0015 0015 0015 0015 0015 0015 0015 003f 0015 003f 0015
003f 0015 0015 0015 003f 0015 003f 0015 003f 0015 003f 0015 0015 0015 0015 0015 0015 0015 003f
0015 0015 0015 003f 0015 003f 0015 0015 0015 003f 0015 0015 0015 003f 0015 0015 0015 003f 0015
0015 0015 0015 0015 003f 0015 0015 0015 003f 0015 0015 0015 003f 0015 05d5
vertex_osdvideofieldon: NEC 0x70 0x57
0000 006e 0000 0022 0156 00ab 0015 0015 0015 0015 0015 0015 0015 0015 0015 003f 0015 003f 0015
003f 0015 0015 0015 003f 0015 003f 0015 003f 0015 003f 0015 0015 0015 0015 0015 0015 0015 003f
0015 003f 0015 003f 0015 003f 0015 0015 0015 003f 0015 0015 0015 003f 0015 0015 0015 0015 0015
0015 0015 0015 0015 003f 0015 0015 0015 003f 0015 0015 0015 003f 0015 05d5
vertex_osdvideoifoff: NEC 0x70 0x58
0000 006e 0000 0022 0156 00ab 0015 0015 0015 0015 0015 0015 0015 0015 0015 003f 0015 003f 0015
003f 0015 0015 0015 003f 0015 003f 0015 003f 0015 003f 0015 0015 0015 0015 0015 0015 0015 003f
0015 0015 0015 0015 0015 0015 0015 003f 0015 003f 0015 0015 0015 003f 0015 0015 0015 003f 0015
003f 0015 003f 0015 0015 0015 0015 0015 003f 0015 0015 0015 003f 0015 05d5
vertex_osdvideoifon: NEC 0x70 0x59
0000 006e 0000 0022 0156 00ab 0015 0015 0015 0015 0015 0015 0015 0015 0015 003f 0015 003f 0015
003f 0015 0015 0015 003f 0015 003f 0015 003f 0015 003f 0015 0015 0015 0015 0015 0015 0015 003f
0015 003f 0015 0015 0015 0015 0015 003f 0015 003f 0015 0015 0015 003f 0015 0015 0015 0015 0015
003f 0015 003f 0015 0015 0015 0015 0015 003f 0015 0015 0015 003f 0015 05d5
vertex_poweroff: NEC 0x70 0x15
0000 006e 0000 0022 0156 00ab 0015 0015 0015 0015 0015 0015 0015 0015 0015 003f 0015 003f 0015
003f 0015 0015 0015 003f 0015 003f 0015 003f 0015 003f 0015 0015 0015 0015 0015 0015 0015 003f
0015 003f 0015 0015 0015 003f 0015 0015 0015 003f 0015 0015 0015 0015 0015 0015 0015 0015 0015
003f 0015 0015 0015 003f 0015 0015 0015 003f 0015 003f 0015 003f 0015 05d5
vertex_poweron: NEC 0x70 0x16
0000 006e 0000 0022 0156 00ab 0015 0015 0015 0015 0015 0015 0015 0015 0015 003f 0015 003f 0015
003f 0015 0015 0015 003f 0015 003f 0015 003f 0015 003f 0015 0015 0015 0015 0015 0015 0015 003f
Disclaimer: 3rd party and/or custom firmware providing extra features are not covered in this manual.
Page 79

79
4K Vertex – User Manual
0015 0015 0015 003f 0015 003f 0015 0015 0015 003f 0015 0015 0015 0015 0015 0015 0015 003f 0015
0015 0015 0015 0015 003f 0015 0015 0015 003f 0015 003f 0015 003f 0015 05d5
vertex_reset: NEC 0x70 0x0d
0000 006e 0000 0022 0156 00ab 0015 0015 0015 0015 0015 0015 0015 0015 0015 003f 0015 003f 0015
003f 0015 0015 0015 003f 0015 003f 0015 003f 0015 003f 0015 0015 0015 0015 0015 0015 0015 003f
0015 003f 0015 0015 0015 003f 0015 003f 0015 0015 0015 0015 0015 0015 0015 0015 0015 0015 0015
003f 0015 0015 0015 0015 0015 003f 0015 003f 0015 003f 0015 003f 0015 05d5
vertex_scaleauto: NEC 0x70 0x05
0000 006e 0000 0022 0156 00ab 0015 0015 0015 0015 0015 0015 0015 0015 0015 003f 0015 003f 0015
003f 0015 0015 0015 003f 0015 003f 0015 003f 0015 003f 0015 0015 0015 0015 0015 0015 0015 003f
0015 003f 0015 0015 0015 003f 0015 0015 0015 0015 0015 0015 0015 0015 0015 0015 0015 0015 0015
003f 0015 0015 0015 003f 0015 003f 0015 003f 0015 003f 0015 003f 0015 05d5
vertex_scalecustom: NEC 0x70 0x07
0000 006e 0000 0022 0156 00ab 0015 0015 0015 0015 0015 0015 0015 0015 0015 003f 0015 003f 0015
003f 0015 0015 0015 003f 0015 003f 0015 003f 0015 003f 0015 0015 0015 0015 0015 0015 0015 003f
0015 003f 0015 003f 0015 003f 0015 0015 0015 0015 0015 0015 0015 0015 0015 0015 0015 0015 0015
0015 0015 0015 0015 003f 0015 003f 0015 003f 0015 003f 0015 003f 0015 05d5
vertex_scalenone: NEC 0x70 0x06
0000 006e 0000 0022 0156 00ab 0015 0015 0015 0015 0015 0015 0015 0015 0015 003f 0015 003f 0015
003f 0015 0015 0015 003f 0015 003f 0015 003f 0015 003f 0015 0015 0015 0015 0015 0015 0015 003f
0015 0015 0015 003f 0015 003f 0015 0015 0015 0015 0015 0015 0015 0015 0015 0015 0015 003f 0015
0015 0015 0015 0015 003f 0015 003f 0015 003f 0015 003f 0015 003f 0015 05d5
vertex_vsicustomoff: NEC 0x70 0x1e
0000 006e 0000 0022 0156 00ab 0015 0015 0015 0015 0015 0015 0015 0015 0015 003f 0015 003f 0015
003f 0015 0015 0015 003f 0015 003f 0015 003f 0015 003f 0015 0015 0015 0015 0015 0015 0015 003f
0015 0015 0015 003f 0015 003f 0015 003f 0015 003f 0015 0015 0015 0015 0015 0015 0015 003f 0015
0015 0015 0015 0015 0015 0015 0015 0015 003f 0015 003f 0015 003f 0015 05d5
vertex_vsicustomon: NEC 0x70 0x1d
0000 006e 0000 0022 0156 00ab 0015 0015 0015 0015 0015 0015 0015 0015 0015 003f 0015 003f 0015
003f 0015 0015 0015 003f 0015 003f 0015 003f 0015 003f 0015 0015 0015 0015 0015 0015 0015 003f
0015 003f 0015 0015 0015 003f 0015 003f 0015 003f 0015 0015 0015 0015 0015 0015 0015 0015 0015
003f 0015 0015 0015 0015 0015 0015 0015 003f 0015 003f 0015 003f 0015 05d5
vertex_vsidisableoff: NEC 0x70 0x6b
Disclaimer: 3rd party and/or custom firmware providing extra features are not covered in this manual.
Page 80

80
4K Vertex – User Manual
0000 006e 0000 0022 0156 00ab 0015 0015 0015 0015 0015 0015 0015 0015 0015 003f 0015 003f 0015
003f 0015 0015 0015 003f 0015 003f 0015 003f 0015 003f 0015 0015 0015 0015 0015 0015 0015 003f
0015 003f 0015 003f 0015 0015 0015 003f 0015 0015 0015 003f 0015 003f 0015 0015 0015 0015 0015
0015 0015 003f 0015 0015 0015 003f 0015 0015 0015 0015 0015 003f 0015 05d5
vertex_vsidisableon: NEC 0x70 0x6a
0000 006e 0000 0022 0156 00ab 0015 0015 0015 0015 0015 0015 0015 0015 0015 003f 0015 003f 0015
003f 0015 0015 0015 003f 0015 003f 0015 003f 0015 003f 0015 0015 0015 0015 0015 0015 0015 003f
0015 0015 0015 003f 0015 0015 0015 003f 0015 0015 0015 003f 0015 003f 0015 0015 0015 003f 0015
0015 0015 003f 0015 0015 0015 003f 0015 0015 0015 0015 0015 003f 0015 05d5
Disclaimer: 3rd party and/or custom firmware providing extra features are not covered in this manual.
Page 81

81
4K Vertex – User Manual
FAQ
What is the difference between Splitter and Matrix option, what are the options for each mode?
The below picture represents the available options for both mode.
Can we pass-through 4K60 4:4:4 or any HDR signal and have one output at lower resolution ?
Yes, when connected correctly to the right downscale output port, Vertex will automatically scale down
UHD to FHD if required by the connected SINK (Display, AVR or others). Similarly it can scale up FHD to
UHD if required by the connected SINK to the upscale port.
What is the Bluetooth working range with GoBlue?
You can connect and use the Bluetooth APP for iOS and Android with Vertex and GoBlue even when no
signals are going through the Vertex. With or without any signals, in all cases, the Bluetooth range is
over >10m.
My display is supposed to accept 4K60 4:4:4 signals but it does not work?
For most UHD TV set we tried, there are always extra configuration options to active in order to achieve
a 4K60 4:4:4 600MHz link. For ex, on samsung: in order to enable the 444 colorspace for 4k in Samsung
TV’s you must go to "settings" and "hdmi" and "UHD color" and enable it. Then also you must assign the
HDMI port1 as "PC" in the tools menu. Only after these two steps will 600MHz be accepted. Similar
activation tricks are required on most UHD TV’s. Additionally, most UHD TV’s only have specific ports
that are 600MHz capable.
I have a PC mode on my TV (or a PC monitor) what resolutions are supported for graphics mode?
All PC graphics mode within the 600MHz bandwidth are supported, including ultra high resolution such
as WQSXGA, QUXGA, QFHD, WQUXGA, 4K.
Disclaimer: 3rd party and/or custom firmware providing extra features are not covered in this manual.
Page 82

82
4K Vertex – User Manual
What output resolution does the Vertex support in HDTV mode?
All known SD, HD, Full HD and UHD formats are supported including: 480i50,480i60, 480p50, 480p60,
576p50, 576p60, 720p50, 720p60, 720p100, 720p120, 1080i25, 1080i30, 1080p24, 1080p25, 1080p30,
1080p48, 1080p50, 1080p60, 1080p72, 1080p75, 1080p96, 1440p50, 1440p60, 2160p24, 2160p25,
2160p30, 2160p50, 2160p60 (these are examples only, anything within the 600MHz bandwidth is
supported.)
What version of HDMI does the Vertex work with? Do I need HDMI 1.3/1.4a/2.0a/2.0b? Does it
matter?
It does not matter. HDfury Vertex works with any version of HDMI from 1.0 and up.
Do I need to set anything special in my HDMI source device to set the resolution correctly?
No. The HDfury Vertex will be detected as 2160p60 4:4:4 capable device by your source and it will
always accept and process the highest quality stream from your source devices. There is no need to set
the HDMI source to any specific resolution.
Is there any latency (delay) introduced to the signal?
Virtually none. The latency added is in the order of a few pixel clocks only. Nothing noticeable at all.
What is the USB port for?
To provide power from the supplied USB power unit and for firmware upgrades when new (additional)
functions and enhancements are offered.
What about long HDMI cable runs? Can I expect issues?
For 600MHz users must use "high speed" cables, or 600MHz/18Gbps certified, ideally the length should
be between 6ft and 12ft for proper 600MHz/18Gbps pass-thru. For 4K30, 1080p or less almost all cables
are ok. HDfury Vertex acts as a HDMI repeater device. So having a HDfury Vertex in the path will amplify
and recover the signal. You should not need any passive (or active) HDMI amplifiers, especially if you put
the HDfury Vertex in the middle of your cable run. If you previously had to use an amplifier, the HDfury
Vertex can most likely take its place. The HDfury Vertex has been used with 50 foot (and longer) HDMI
cables without issues.
How are the new lossless audio formats via HDMI input handled? E.g. DTS-HD/MA and DD/E-AC3: Are
they stripped down to DTS core or Dolby Digital respectively to fit the requirements of the S/PDIF
standard?
Lossless audio is transmitted through HDMI output only. HDfury Vertex does not compress or otherwise
downconvert the incoming audio. Only stereo and 5.1 sound can be output via SPDIF output. The analog
output supports stereo only.
Disclaimer: 3rd party and/or custom firmware providing extra features are not covered in this manual.
Page 83

83
4K Vertex – User Manual
How do I hook up the audio from the Vertex?
The Vertex has both analog and digital (TOSLINK) audio output in one connector labeled "D/A" along
with a headphone symbol. It's a 2-in-1 connector meaning that you can plug in either a 3.5mm stereo
analog jack or a digital mini-TOLINK (3.5mm mini-jack) cable and get stereo analog sound or 5.1
Dolby/DTS digital sound out of the Vertex. See further below for pictures of both types of
connectors/cables.
Vertex 3.5mm mini-TOSLINK digital audio cable:
If you'd like to use a "regular" TOSLINK cable, use a 3.5mm Mini-TOSLINK to regular TOSLINK adapter:
A 3.5mm stereo audio cable can be used for connecting the Vertex to a TV if you do not have a home
theater setup (you only have 2 speakers in your TV):
Disclaimer: 3rd party and/or custom firmware providing extra features are not covered in this manual.
Page 84

84
4K Vertex – User Manual
Do I need to use the USB power supply?
Yes. Due to the advanced features, the Vertex draws more power than previous HDfury models. The
Vertex power supply must be used at all times.
Is the Vertex power supply the same as that used by the HDfury1, HDfury2, and GammaX?
No. The power supply for the HDfury1, HDfury2 and GammaX kits are 0.5A max current. The HDfury3 is
1A max current. The Vertex power supply can supply up to 2.0A. Do not use an HDfury1, HDfury2, or
GammaX power supplies with the Vertex.
What sort of power supply does the Vertex use?
Vertex power supply adheres to these requirements:
- Provides REGULATED (+/- 5%) 5VDC power with 2.0A min DC current
- Delivers the power through a mini usb connector.
Trying to use an AC/DC adaptor that doesn't adhere to these three requirements may destroy the
Vertex. Do not use the power supply from the HDfury1, HDfury2, or GammaX with the Vertex.
I tried to update my unit, it failed and Vertex is shown as USBBOOT under Windows?
Some users are reporting Vertex as USBBOOT USBXPRESS under windows after firmware update
attempt. USBBOOT means Vertex is in the booltoader state, waiting for the actual FW
It means that the update of MCU FW failed or was not even launched properly or cut in between. That
leaves the device in bootloader ready to accept the FW update again. Make sure the PC Windows GUI is
closed (not running), unplug/replug Vertex, eventually reboot your computer and launch the FW update
again.
Make sure you are using the right Silabs driver for your Windows version and USB port version in use as
per explanations on p.19
Disclaimer: 3rd party and/or custom firmware providing extra features are not covered in this manual.
Page 85

85
4K Vertex – User Manual
Highlight Features:
Signal info is everywhere!
Whether it is on OLED, OSD, Windows GUI or via Android/iOS APP with the optional GoBlue, your setup
info is always available at first sight.
Unique HDCP Doctor
Providing a total of 6 HDCP 1.4 and 2.2 engines for decryption/encryption, HDfury Vertex offers a total
HDCP workaround solution including HDCP 2.2 > HDCP 1.4 and HDCP 1.4 > HDCP 2.2 both ways
conversion within the same unit. It is capable of connecting any HDCP1.x or HDCP2.x source devices to
any HDCP1.x or HDCP 2.x sink devices. Each RX block decrypts the input first whether its 1.x or 2.x. Then
each output port can individually encrypts it to 1.4(both) or 2.2(only top port) or not encrypt it at all if it
was not encrypted initially. Dual conversion can be operated on both channels simultaneously.
Ultra-Scaling up to 4K60 4:4:4 600MHz
HDfury Vertex offers impressive scaling modes to ensure that any HDMI/HDCP revision sink device get
fed at its max capabilities ALWAYS and GUARANTEED.
Featuring Upscale, Downscale, Passthru and Bypass mode as well as Chroma Conversion and Color
Space and Color Depth modification on the fly at 8, 10, 12 and 16bit for FHD, UHD and DCI 4096x2160p.
Each output can be set with individual scaling rules.
Display HDCP 2.2 Content with Non-HDCP2.2 Compliant Devices
HDCP 2.2 is the new copy-protection scheme for 4K UHD content. Not only it is not backward
compatible but many recent 4K devices don’t even support it. Source devices, including media servers
and head-ends like Netflix, will encode their 4K content with this new scheme. TVs must be HDCP 2.2enabled to play it, and everything in the video chain including switches and receivers must be compliant
as well, or the display will go dark and/or display a HDCP error message. Bad news for consumers who
have purchased expensive, high-bandwidth, processor-rich switchers, receivers and displays to
accommodate 4K. While the newer products may support the bandwidth needs of 4K, they won’t play
copy-protected works until Vertex is an active part of the setup.
2×2 Splitter up to 4K60 4:4:4 600MHz 18Gbps
Splitting any signal up to 4K60 4:4:4 600MHz signal is now a reality, thanx to IR/USB/RS232/ push
buttons or Bluetooth (with GoBlue), you can easily switch between 2 inputs that will be replicated to 2
outputs. HDCP conversion can be configured and applied on the fly in order to always output the type of
HDCP signal encryption that your display or sink device is expecting.
Disclaimer: 3rd party and/or custom firmware providing extra features are not covered in this manual.
Page 86

86
4K Vertex – User Manual
2×1 Switcher up to 4K60 4:4:4 600MHz 18Gbps
Switching between 2 inputs up to 4K60 4:4:4 600MHz signal and scaling through all HDMI levels and
revision is now a reality, thanx to IR/USB/RS232/ push buttons or Bluetooth (with GoBlue), you can
easily switch between 2 inputs that will be scaled to one or more output. HDCP conversion can be
configured and applied on the fly in order to always output the type of HDCP signal encryption that your
display or sink device is expecting.
HDR and Infoframe Metadata Live Injector and Extractor
The Vertex is capable of injecting and extracting live Infoframe and HDR metadata at any resolution and
also in real time. Incoming metadata and self-generated metadata can be built and deciphered in real
time. Additionally Vertex also support AVI infoframe, VSIF and others infoframes manipulation.
HDMI Audio Extracting
HDfury Vertex can extract HDMI audio up to 5.1 and pass-thru any sound format including Atmos and
DD+ via HDMI while downscaling the video for older AVRs, it have a simultaneous output of analog L/R
stereo and up to 5.1 optical S/PDIF via 3.5mm combo jack connector.
RS232 Control for MAC/Linux/Windows
All Vertex GUI controls are available via RS232 commands in order to ensure a total control from any
serial based computer.
Advanced EDID Management
The most advanced EDID Management solution we ever done is now available from the Vertex with
either: A Selected EDID bank, a Custom uploaded EDID, a Self-generated Automix EDID or a Fixed basic
EDID. Sniff EDID from connected sink devices, Save, Edit, Load any custom EDID table at any time.
Select and pick any EDID of your choice from a preloaded list of 100 EDID tables, it loads and reset HPD
to present your chosen one automatically. AutoMix EDID feature will create a custom EDID by mixing
both sink EDID connected to the output ports. Mixing rules in AutoMix mode can be selected through 4
different algorithms. Some EDID flags can be forced in Automix such as: 2.0 Stereo, 5.1 Multi, 7.1 Full
Sound, Native, BT.2020/xvYcc, HDR10+, HLG, Dolby Vision, 3D Remove, YCbCr Remove
Vertex also offers the possibility to have a specific/individual EDID per input.
Vertex automatically sniff DV mandatory string from connected capable DV sink.
HDMI/CEC TOTAL COMMANDER
HDfury Vertex offers a unique CEC command manager, with CEC compatible equipment.
CEC commands allow a HDMI source to send commands to connected HDMI devices.
TOTAL CONTROL
Vertex can be controlled via IR/USB/RS232/ push buttons or Bluetooth (with GoBlue).
4K Vertex Total Control APP is available on Google Market for mobile and tablet running Android and
Disclaimer: 3rd party and/or custom firmware providing extra features are not covered in this manual.
Page 87

87
4K Vertex – User Manual
from the Apple store for iOS. RS232 is compatible for any serial based computer, USB GUI Utility for
Windows PC, IR control and various physical buttons for configurations are also available. Thanks to the
community, IR pronto code list is added to iRule and Logitech Harmony for even easier and seamless
integration
2×2 Matrix to 4K60 4:4:4 600MHz 18Gbps
Matrix solution is available for HDMI stream up to 4K60 4:4:4 8b, 4K60 4:2:2 12b, 4K120 4:2:0 8b or
8K30 4:2:0 8b.
Disclaimer: 3rd party and/or custom firmware providing extra features are not covered in this manual.
Page 88

88
4K Vertex – User Manual
Main Specifications
2x Input / 2x Output Splitter/Matrix/Scaler (HDMI2.0b/HDMI1.4/DVI1.0 compatible)
■ 4K60 4:4:4 600MHz 18Gbps Pass through
■ 4K24/25/30/50/60 <> 1080p24/25/30/50/60 Upscale/Downscale with or without colordepth
maintained and with or without chroma conversion.
■ Video Bandwidth - 18 GBP/sec.
■ HDR10+/Dolby Vision Support.
■ 4K 10, 12, 16 Bit Support
■ 16 Bit Per Pixel Deep Color Depth Available (48 Bit)
■ Max Res: 4K60 4:4:4 8b, 4K60 4:2:2 12b, 4K120 4:2:0 8b or 8K30 4:2:0 8b
■ Signal Conversion: Resolution, Chroma Subsampling, Color Space, Color Depth, HDCP
HDCP Doctor (HDCP Workaround solution to any HDCP error)
■ HDCP 2.2 > HDCP 1.4 conversion
■ HDCP 1.4 > HDCP 2.2 conversion
■ HDCP x.x > HDCP x.x conversion
■ Dual HDMI2.0b & HDMI 1.4 combined
■ Dual HDCP 1.4 & HDCP 2.2 combined
CEC Support: For inter-device control between both inputs and the primary output (BOT) HDMI
channel.
OLED infoscreen and OSD to provide useful and insight view of signal information
Audio Extracting: Audio De-Embedder of Optical & Analog L/R
Advanced EDID management via USB, IR or Bluetooth APP
■ Improved EDID Management solution with either a Selected EDID bank, Custom uploaded EDID, Selfgenerated Automix EDID or a Fixed basic EDID.
■ Sniff EDID from connected sink devices, Save, Edit, Load any custom EDID table at any time.
■ Select and pick any EDID of your choice from a preloaded list of EDID tables, it loads and reset HPD to
present your chosen one automatically.
■ AutoMix EDID feature will create a custom EDID by mixing both sink EDID connected to the splitter
output ports.
■ Some EDID flags can be forced in Automix such as: Stereo/5.1/Full/YCbCr/BT2020/HDR/3D
■ Each input can run a specific/individual EDID.
Infoframe Modes: Capture, edit, block or replace HDR metadata, AVI & VSIF.
Read SPD, Audio, HDMI Vendor, HDMI Forum
Control Modes: IR, Windows GUI, RS232 for Linux/MAC/Win, Android/iOS with GoBlue.
HDMI Booster/Extender: Capable of extending 1080p resolution up to 15m. in and 15m. out (30m.
total for 1080p), UHD resolution up to 10m.
Disclaimer: 3rd party and/or custom firmware providing extra features are not covered in this manual.
Page 89

89
4K Vertex – User Manual
HDMI Doctor: Solves most HDMI integration issues such as HDCP, EDID, HPD, and audio breakout.
HDMI Equalevel: Precise signal equalization for both input and output signals delivers the best
possible picture quality with no dropouts.
Hot-Plug control: Force the input device to always see an active connection.
Deep Color Support
xvYCC Color Support
Flexible/Portable/Plug’n Play
3D Ready: Capability to pass 3D stereoscopic signal formats.
Public API/DLL access and extensive control to extract, edit and inject HDR metadata, AVI and VSIF
Infoframe. Read SPD, Audio, Vendor Specific and more.
Share your config with the community, display any text on OSD, set your start page, remove visually
annoying or lamp consuming artifacts like TV channel logo and more.
Supported Audio/Video Signals
Supported Format: SD/HD/FullHD/UHD/4K30/4K60, basically INPUT/OUTPUT any video format up to
4K60 4:4:4 600MHz 18Gbps.
Supported Resolution examples:
480p/720p/1080i/1080p24/1080p25/1080p30/1080p50/1080p60/1440p50/1440p60/2160p24/2160p2
5/2160p30/2160p50/2160p60 and DCI
Support all UHD/BR and HDR standard resolution: 4K60 4:2:2 12bit BT2020 HDR, 4K60 4:2:0 10bit
BT2020 HDR, 4K60 4:2:0 12bit, 4K30 4:4:4 12bit, ..
Support all VESA mode video formats (PC Resolutions) up to ultra-high resolution such as WQSXGA,
QUXGA, QFHD, WQUXGA, 4K
Support any Audio format such as PCM at up to 192kHz, compressed audio (IEC61937), DSD, DST,DTS,
DTS-HD, Dolby True HD, DTS-MA, HBR, DD+, DTS:X and Dolby Atmos.
Technical Specifications
I/O: 2 HDMI In, 2 HDMI Out, IR, RS232, USB, Analog Mini Jack, Optical S/PDIF Out.
OLED Display: 3.12″ diagonal, 256×64, 32 green colors
Audio: PCM at up to 192kHz, compressed audio (IEC61937), DSD, DST, DTS, DTS-HD, Dolby True HD,
DTS-MA and HBR.
DDC Signal: 5V p-p (TTL)
Power Supply: External 5 Volt 2 Amp USB (same as most smartphone/tablet PSU)
Power Consumption: <2Watts
Product Dimensions: 3.9″L x 2.4″W x 0.8″H – in CM: 10 x 6 x 3 Weight: 130g – 0.3 LBS
Shipping Dimensions: 6.3” x 4.2” x 3.3”, Weight: 16 oz
Enclosure: Black PVC/Silver metal with Green Led
Regulation: CE, FCC, RoHS, WEEE
Disclaimer: 3rd party and/or custom firmware providing extra features are not covered in this manual.
Page 90

90
4K Vertex – User Manual
Certifications
Vertex CE Certification
Vertex RoHS Certification
Vertex FCC Certification
Disclaimer: 3rd party and/or custom firmware providing extra features are not covered in this manual.
Page 91

91
4K Vertex – User Manual
Pro Tips
- Bot Output is CEC capable
- Ex of AVI InfoFrame:
BT.2020 RGB 00:E8:64:5D:00
BT.2020 YCbCr 4:2:2 20:E8:64:5D:00
BT.2020 YCbCr 4:4:4 40:E8:64:5D:00
BT.2020 YCbCr 4:2:0 60:E8:64:5D:00
4k24 422 709 ycbcr no-bt2020 20:88:00:00
4k24 422 ycbcr bt2020 20:c8:60:00
4k24 444 709 ycbcr no-bt2020 40:88:00:00
4k24 444 ycbcr bt2020 40:c8:60:00
1080p 422 709 ycbcr no-bt2020 20:88:00:10
1080p 422 ycbcr bt2020 20:c8:60:10
- Some sources like X1S or K8500 might need to have powercord removed/reconnected between EDID
changes.
- You can read one, or mix two, connected Sink EDIDs, apply forced flags and algo to it and then save it
as an EDID file, thus creating your own EDID variation.
- Any 4:2:2 signals is always processed at 12b and never clipped. That’s why it mentions “up to 12b”.
- Source VS Vertex frame rate reported: Actually very few devices will report the correct frame rate. It is
all about the clock frequency, the theory is 24/1.001 = 23.976023976
BUT there is no PLL (https://en.wikipedia.org/wiki/Phase-locked_loop) at the source that actually gives a
corresponding clock which would yield that. So once a signal leaves the source, the clock is always off
and usually ebbs and flows, means changes all the time. We just decided to show what it really is from
the particular source rather than approximating what it should be as many are doing since they cannot
report exact frame rate like we are doing with Vertex.
Disclaimer: 3rd party and/or custom firmware providing extra features are not covered in this manual.
Page 92

92
4K Vertex – User Manual
Team HDfury thanks you for your support
For help visit our support server or contact us.
Vertex was built with love and passion for our Xth Anniversary.
We hope that it will please creators, hobbyists, calibrators and integrators.
Disclaimer: 3rd party and/or custom firmware providing extra features are not covered in this manual.
www.HDfury.com
 Loading...