

Page 1
U.S. Patent Number 7,914,338
hd EZ lock™ Universal HDMI™ Lock
Quick Start Installation Guide
Below are the most common methods of installing hd EZ lock.
Identify the proper install method for your component(s) and
then go to the proper section for detailed instructions.
To view the online version, visit:
www.blueechosolutions.com/info/hd-ez-lock-installationguides/
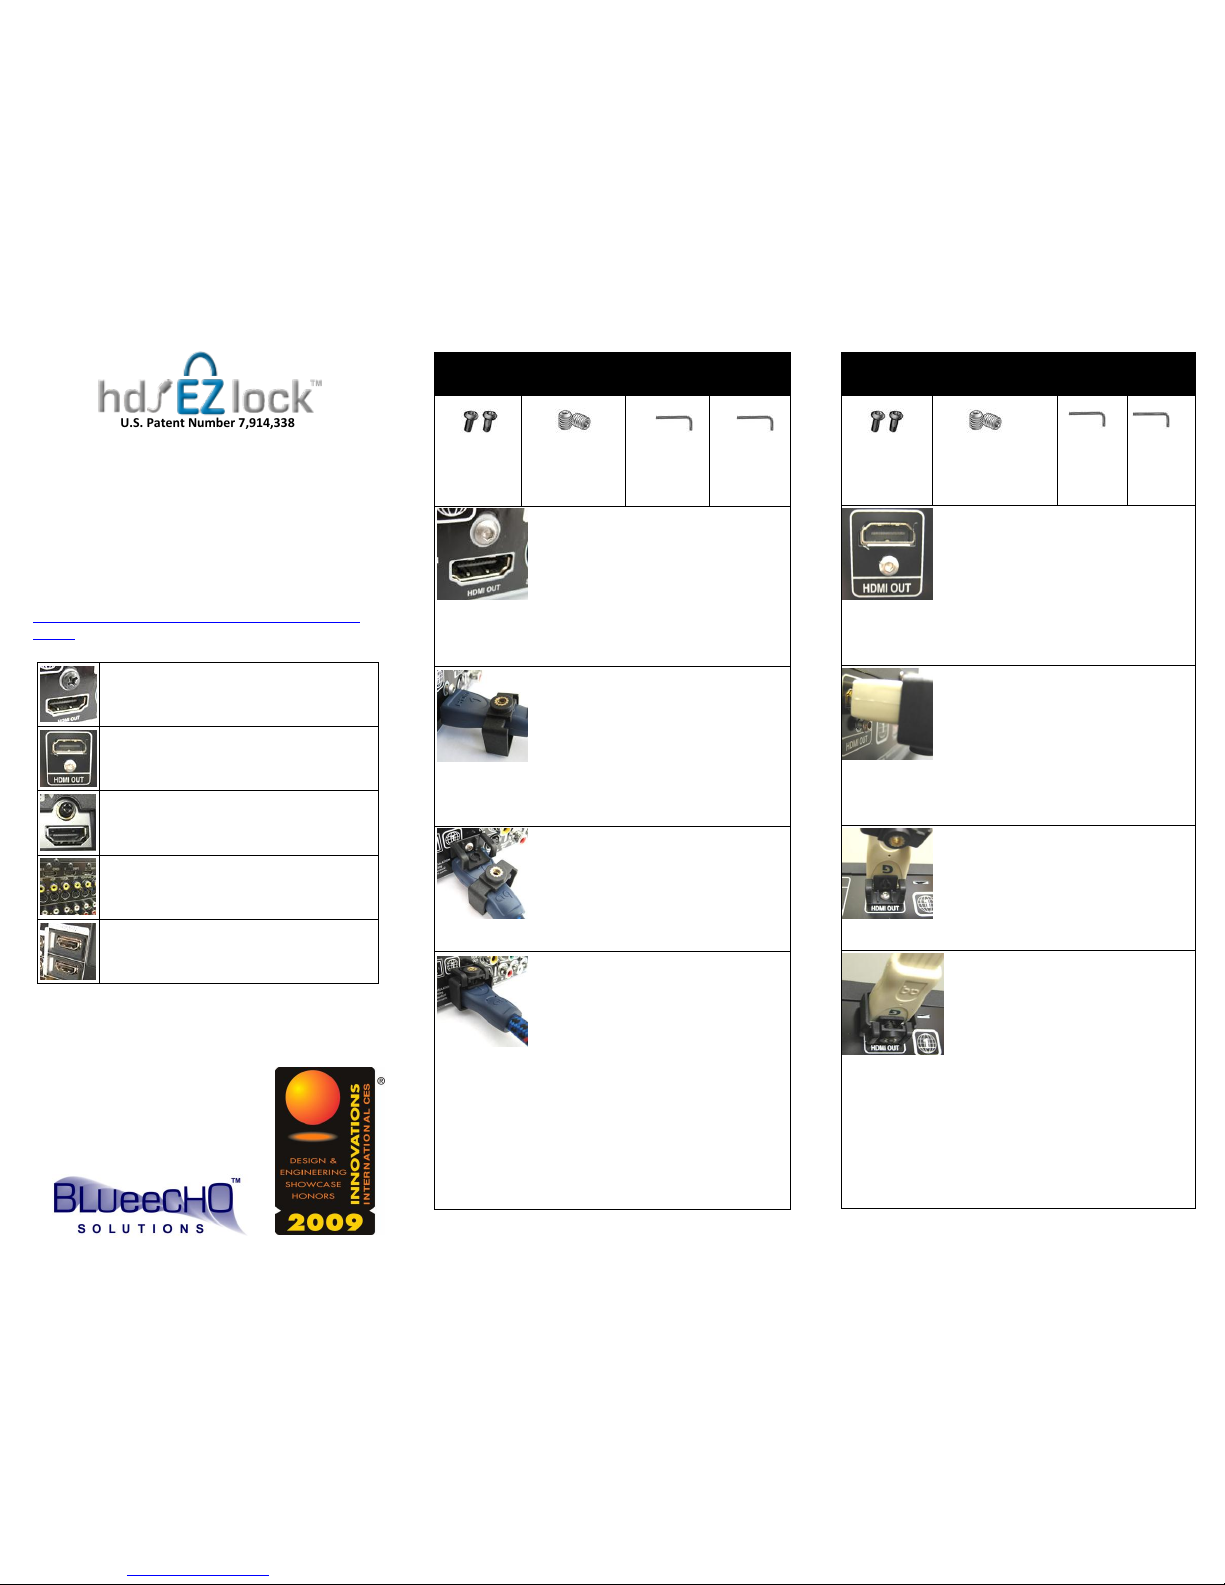
Method 1 – Install using the existing screw
above your HDMI Input.
Method 2 – Install using the existing screw
below your HDMI Input.
Method 3 – Install using Standoff Adapter
when HDMI Input is recessed.
Method 4 – Install multiple hd EZ lock™ in a
staggered configuration when HDMI Inputs
are too close.
Method 5 – Install using Adhesive when there
is no screw above or below HDMI Input.
To reduce risk of electronic shock to yourself or others, or
damage to your equipment, unplug all components from
their power source before beginning to install hd EZ lock™.
Do not use hd EZ lock™ if you are not
comfortable making the necessary
Modifications to your equipment.
hd EZ lock™ is manufactured in the USA.
U.S. Patent Number 7,914,338.
Method 1: Standard Installation – Using the
existing screw ABOVE your HDMI Input.
M3x.5 6mm
Socket Cap
Screw (x2)
6/32” x 3/8”
Set Screw (x2)
2mm Hex
Key (x1)
1/16” Hex
Key (x1)
Step 1: With your HDMI Cable unplugged,
replace Screw above HDMI Input with
supplied M3x.5 6mm Screw. Tighten with
2mm Hex Key.
Make sure M3x.5 Screw thread pattern
matches existing screw thread. If not, you may be able to
use the existing screw. If you have problems with this,
contact us for assistance.
Step 2: Slide the Main Body over the end
of your HDMI Cable. Plug your HDMI
Cable into the HDMI Input and loosen the
screw above your HDMI Cable enough to
slide the Mounting Adapter in place
(approximately 1/8").
Make sure the notches on the Main Body are facing away
from the chassis.
Step 3: Slide the Mounting Adapter over
the screw above your HDMI Input and
tighten using the supplied 2mm hex key.
Make sure the bottom of the Mounting
Adapter is against the top of your HDMI
Cable.
Step 4: Slide the Main Body into the gap
in the Mounting Adapter. Insert the
included 6/32" set screw into the
threaded insert in the Main Body and,
using your fingers to guide the Main Body,
use the 1/16" hex key to tighten the set
screw tight enough to grip your HDMI Cable.
Do not over tighten. Tighten until you feel resistance, then
an additional two to three turns is enough to hold firmly in
place.
Method 2: Standard Installation – Using the
existing screw BELOW your HDMI Input.
M3x.5 6mm
Socket Cap
Screw (x2)
6/32” x 3/8”
Set Screw (x2)
2mm
Hex Key
(x1)
1/16”
Hex Key
(x1)
Step 1: With your HDMI Cable unplugged,
replace Screw below HDMI Input with
supplied M3x.5 6mm Screw. Tighten with
2mm Hex Key.
Make sure M3x.5 Screw thread pattern
matches existing screw thread. If not, you may be able to
use the existing screw. If you have problems with this,
contact us for assistance.
Step 2: Slide Main Body over the end of
your HDMI Cable. Plug HDMI Cable into
the HDMI Input and loosen the screw
below your HDMI Cable enough to slide
the Mounting Adapter in place
(approximately 1/8").
Make sure the notches on the Main Body are facing away
from the chassis.
Step 3: Slide the Mounting Adapter over
the screw below your HDMI Input and
tighten using the supplied 2mm hex key.
Make sure the upper surface of the
Mounting Adapter is against the bottom
of your HDMI Cable.
Step 4: Slide Main Body into gap in the
Mounting Adapter. Insert the included
6/32" set screw into the threaded insert
in the Main Body and, using your fingers
to guide the Main Body, use the 1/16"
hex key to tighten the set screw tight
enough to grip HDMI Cable.
Do not over tighten. Tighten until you feel resistance, then
additional two to three turns is enough to hold firmly in
place.
Page 2
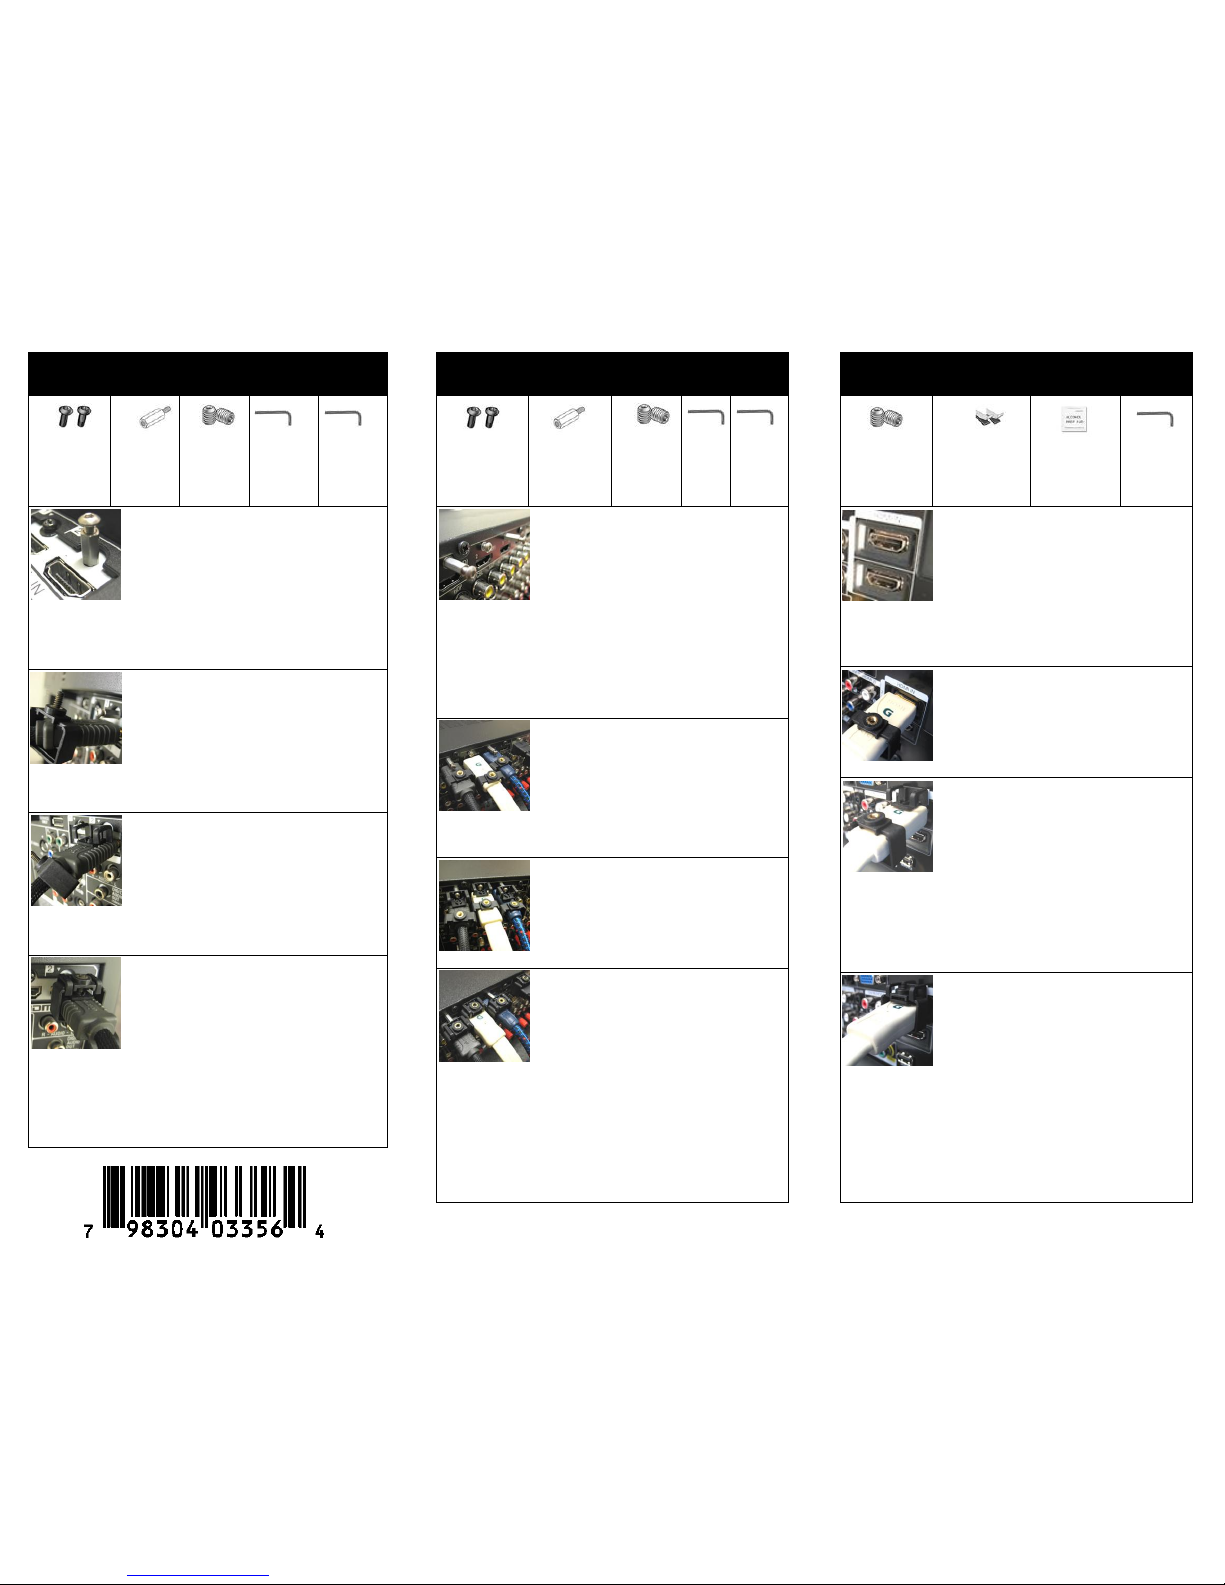
Method 3: Standoff Installation – Using the
existing screw with a recessed HDMI Input.
M3x.5
6mm
Socket Cap
Screw (x2)
M3x.5
Standoff
Adapter
(x2)
6/32” x
3/8” Set
Screw
(x2)
2mm
Hex Key
(x1)
1/16”
Hex Key
(x1)
Step 1: Remove existing screw above
/below HDMI Input and replace with
M3x.5 10mm Standoff Adapter. Screw
M3x.5 6mm Screw into end of Standoff
Adapter, Leave about 1/8" gap).
Make sure supplied M3 Screw/Standoff Adapter matches
the thread pattern of the existing screw before replacing it.
If the thread pattern is different, contact us for assistance.
Step 2: Slide Main Body over end of HDMI
Cable. Plug HDMI Cable into HDMI Input
and make sure screw above HDMI Cable
has enough space to slide the Mounting
Adapter in place (approximately 1/8").
Make sure the notches on the Main Body are facing away
from the chassis.
Step 3: Slide the Mounting Adapter over
the screw on the end of the Standoff
Adapter, above your HDMI Input and
tighten the screw using the supplied 2mm
hex key.
Make sure the bottom of the Mounting Adapter is against
the top of your HDMI Cable.
Step 4: Slide Main Body into gap in the
Mounting Adapter. Insert included 6/32"
set screw into threaded insert in the Main
Body. Using your fingers to guide the Main
Body, use 1/16" hex key to tighten set
screw tight enough to grip HDMI Cable.
Do not over tighten. Tighten until you feel resistance, then
an additional two/ three turns is enough to hold firmly in
place.
U.S. Patent Number 7,914,338
Method 4: Staggered Installation – Using
multiple hd EZ locks™ with close HDMI Input.
M3x.5 6mm
Socket Cap
Screw (x2)
M3x.5
Standoff
Adapter
(x2)
6/32” x
3/8” Set
Screw
(x2)
2mm
Hex
Key
(x1)
1/16”
Hex
Key
(x1)
Step 1: Remove the existing screw above
your HDMI Input and replace with
(alternating with each HDMI Input) an
M3x.5 Standoff Adapter OR a M3x.5
6mm Screw (use 2mm Hex key to
tighten). Screw an M3x.5 6mm Screw
into the end of the Standoff Adapter, but do not tighten
completely (leave about 1/8" gap).
Make sure supplied M3 Screw/Standoff Adapter matches
the thread pattern of the existing screw before replacing it.
If the thread pattern is different, contact us for assistance.
Step 2: Slide the Main Body over the end
of your HDMI Cable. Plug your HDMI
Cable into the HDMI Input and loosen the
screw above your HDMI Cable enough to
slide the Mounting Adapter in place
(approximately 1/8").
Make sure the notches on the Main Body are facing away
from the chassis.
Step 3: Slide the Mounting Adapter over
the screw above your HDMI Input and
tighten using the supplied 2mm hex key.
Make sure bottom of the Mounting
Adapter is against top of HDMI Cable.
Step 4: Slide Main Body into gap in the
Mounting Adapter. Insert included 6/32"
set screw into threaded insert in the
Main Body and, using fingers to guide the
Main Body, use 1/16" hex key to tighten
set screw tight enough to grip HDMI
Cable.
Do not over tighten. Tighten until you feel resistance, then
an additional two to three turns is enough to hold firmly in
place.
Method 5: Adhesive Installation – Using with
no screw above or below your HDMI Input.
6/32” x 3/8”
Set Screw
(x2)
3M VHB
Adhesive
Strips (x2)
IPA Alcohol
Prep Pad
(x1)
1/16”
Hex Key
(x1)
Step 1: Using the supplied IPA Prep Pads,
thoroughly clean both the back of the
Mounting Adapter and the area on your
component where the adhesive will be
applied. Dry with a clean cloth.
Preparation is very important for adhesive to work
properly. Make sure surface is dry before proceeding.
Do not touch either surface after cleaning.
Step 2: Slide Main Body over end of
HDMI Cable. Plug HDMI Cable into the
HDMI Input.
Make sure the notches on the Main Body
are facing away from the chassis.
Step 3: Remove one side of adhesive
lining and apply to the back of Mounting
Adapter. Apply firm pressure for 30-60
seconds. Remove second lining and apply
Mounting Adapter to chassis, applying
firm pressure for 30-60 seconds.
Center Mounting Adapter on your HDMI Cable and make
sure bottom of Mounting Adapter is directly against top of
your HDMI Cable. For best results, allow the adhesive to sit
for 24 hours before proceeding to the next step.
Step 4: Slide the Main Body into the gap
in the Mounting Adapter. Insert the
included 6/32" set screw into the
threaded insert in the Main Body and,
using your fingers to guide the Main
Body, use the 1/16" hex key to tighten
the set screw tight enough to grip your HDMI Cable.
Do not over tighten. Tighten until you feel resistance, then
an additional two to three turns is enough to hold firmly in
place.
 Loading...