

Page 1

HD 7.1 USB AUDIO V3.0
AS372
7.1 USB High Definition
Audio BOX
User’s Manual
1
Page 2

HD 7.1 USB AUDIO V3.0
Table of Contents
OVERVIEW.................................................................................................................. 5
PACKAGE CONTENTS ............................................................................................... 5
SYSTEM REQUIREMENTS ........................................................................................ 5
FIGURE OF AS372 AND CONNECTIONS ................................................................ 6
CONNECTIONS ........................................................................................................... 6
HARDWARE INSTALLATION................................................................................... 7
INSTALL AS372 HD 7.1 USB AUDIO BOX ............................................................................................
7
ADJUST VOLUME....................................................................................................... 7
SOFTWARE INSTALLATION AND UN-INSTALLATION ....................................... 8
INSTALLATION ...................................................................................................................................... 8
UN-INSTALLATION ................................................................................................................................
9
XEAR AUDIO CENTER INTRODUCTION ............................................................. 10
OPEN USB AUDIO DEVICE SOFTWARE CPL ....................................................................................... 10
XEAR AUDIO CENTER FUNCTION INTRODUCTION............................................................................... 14
Select a Default Device ........................................................................................................ 14
Master Volume / Mute & Un-Mute....................................................................................... 16
Xear 3D EX .......................................................................................................................... 17
Xear Pro (ASIO).................................................................................................................. 18
Function Pop Menu............................................................................................................. 19
Function Page Area ............................................................................................................. 20
Audio Status Panel ............................................................................................................... 21
Profile Panel ........................................................................................................................ 23
SPEAKER DEVICE FUNCTION INTRODUCTION ...................................................................................... 24
Volume control Page ............................................................................................................ 24
Speaker Setting Page ........................................................................................................... 25
Sample Rate Page ................................................................................................................ 26
Equalizer.............................................................................................................................. 27
Environment Effect............................................................................................................... 29
Virtual Speaker Shifter ......................................................................................................... 30
Flex Bass II .......................................................................................................................... 32
Xear SingFX......................................................................................................................... 34
Xear Surround Headphone ................................................................................................. 35
Xear Surround Speaker ........................................................................................................ 36
Xear Audio Brilliant............................................................................................................. 37
Xear Dynamic Bass.............................................................................................................. 38
Xear Smart Volume.............................................................................................................. 39
Xear Voice Clarity................................................................................................................ 40
Xear Surround Max.............................................................................................................. 41
2
Page 3

HD 7.1 USB AUDIO V3.0
SPDIF-OUT DEVICE FUNCTION INTRODUCTION ................................................................................. 42
Volume control Page ............................................................................................................ 42
Sample Rate Page ................................................................................................................ 43
MIC, LINE-IN DEVICE FUNCTION INTRODUCTION................................................................................ 44
Volume control Page ............................................................................................................ 44
Sample Rate Page ................................................................................................................ 45
Xear SingFX Page (Microphone device only)...................................................................... 46
Xear AGC Control (Microphone device only)...................................................................... 47
SPDIF-IN DEVICE FUNCTION INTRODUCTION..................................................................................... 48
Volume control Page ............................................................................................................ 48
Sample Rate Page ................................................................................................................ 49
STEREO MIX DEVICE FUNCTION INTRODUCTION ................................................................................ 50
Volume control Page ............................................................................................................ 50
Sample Rate Page ................................................................................................................ 51
INFORMATION PAGE INTRODUCTION................................................................................................... 52
TRAY ICON FUNCTION INTRODUCTION......................................................................................................... 53
APPENDIX A - MULTI-LINGUAL SUPPORTING LIST ......................................... 58
APPENDIX B – TROUBLE SHOOTING .................................................................. 59
3
Page 4
HD 7.1 USB AUDIO V3.0
FCC and CE Radiation Norm
FCC
This equipment has been tested and found to comply with limits for a
Class B digital device pursuant to Part 15 of Federal Communication
Commission (FCC) rules.
CE
This equipment has been tested and found to comply with the limits of
the European Council Directive on the approximation of the law of the
member states relating to electromagnetic compatibility (89/336/EEC)
according to EN 55022 class B.
FCC and CE Compliance Statement
These limits are designed to provide reasonable protection against
frequency interface in residential installation. This equipment generates
uses and can radiate radio frequency energy, and if not installed or used in
accordance with the instructions, may cause harmful interference to radio
communication. However, there is no guarantee that interference will not
occur in a television reception, which can be determined by turning the
equipment off and on, the user is encouraged to try and correct the
interference by one or more of the following measures:
Reorient or relocate the receiving antenna
Increase the separation between the equipment and the receiver
Connect the equipment into an outlet on a circuit different from
that to which the receiver is connect to
CAUTION!
The Federal Communication Commission warns the user that
changes or modifications to the unit not expressly approved by the
party responsible for compliance could void the user’s authority to
operate the equipment.
4
Page 5

HD 7.1 USB AUDIO V3.0
Overview
AS372 is a portable multi-channel device with USB AUDIO 2.0
compliance. It has built-in real 7.1 output channels and every channel
can support 24-bit/192kHz, 100dB SNR high quality audio. With
supporting of the highest playback audio specification from Blu-ray
disc, it lets audiophiles enjoy the amazing audio when they are
watching the best video. AS372 comes with Line-in, standalone
Microphone Input, Headphone Output, Optical Input and Output.
Users can use it as a portable USB AUDIO DAC to upgrade notebook
audio quality anytime and anywhere!
Package Contents
AS372 7.1 USB HD Audio
USB 2.0 Cable (mini USB to Type A USB)
Audio Cable (Stereo RCA to Stereo 3.5mm Jack)
Quick Installation Guide
Installation CD
USB Audio 2.0 drivers for Windows 10/8/7/Vista/XP
English User’s Manual
USB Audio Q&A Note for Mac OS
System Requirements
Compatible with Microsoft ® Windows ® 10,Windows ® 8, Windows ® 7,
Windows Vista ®, Windows XP, Mac and Linux*
For Mac & Linux, you could only use build in drivers and without Xear Audio features
Intel ® Core™ 2 Duo or AMD ® equivalent processor, 2.2 GHz or
faster
Available USB port
10MB Hard Disk space
1GB System Memory
Available CD-ROM or DVD-ROM Drive
5
Page 6
HD 7.1 USB AUDIO V3.0
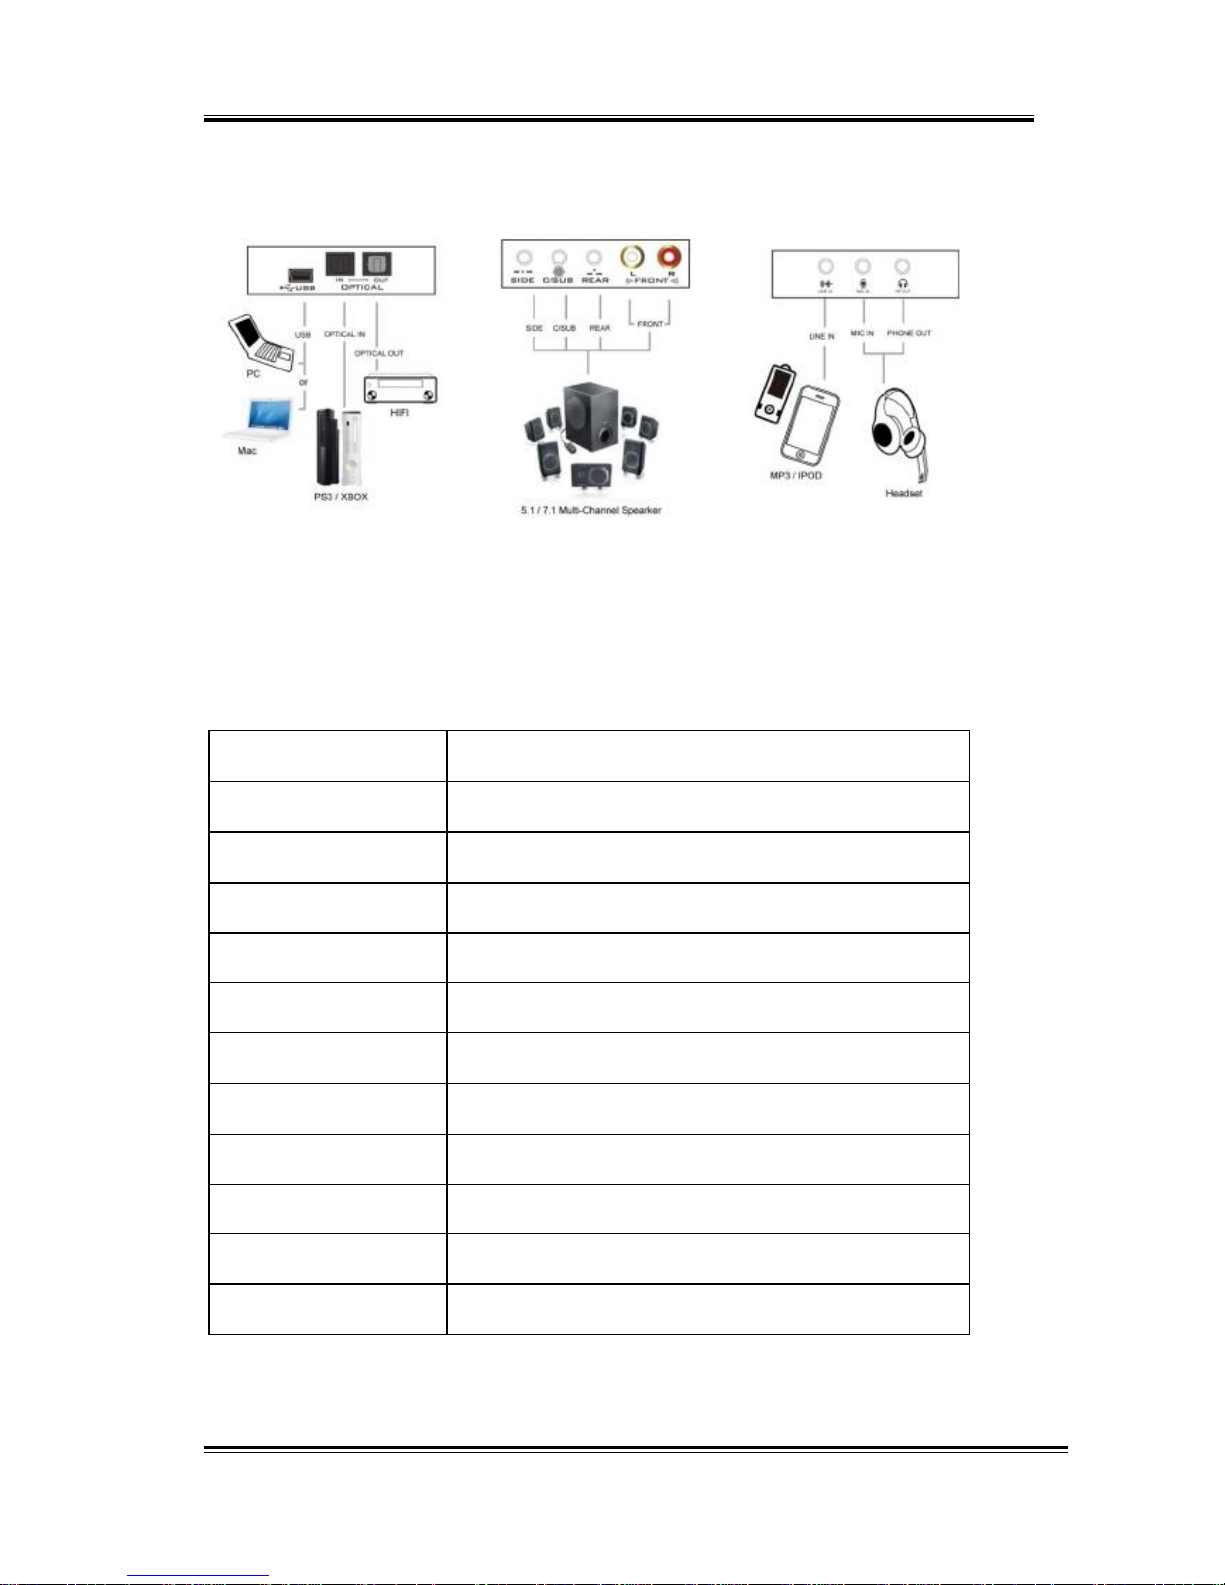
Figure of AS372 and Connections
Connections
Most of the audio devices, such as Speakers, Headphones and Hi-Fi
Amplifier can be connected to the connectors of AS372. Below table
shows the connectors and their descriptions:
6
Connector
Connections
Phone Out (3.5mm)
to stereo Headphones
Line In (3.5mm)
to MP3 player or any audio players
Mic In (3.5mm)
to Microphones
Line Out (RCA Left)
to RCA connector of Speaker (Left Channel)
Line Out (RCA Right)
to RCA connector of Speaker (Right Channel)
Rear Out (3.5mm)
to Rear Left and Right Speakers
C/Sub Out (3.5mm)
to Center and Subwoofer Speakers
Side Out (3.5mm)
to Side Left and Right Speakers
S/PDIF Output (Optical)
to the optical input of Digital Amplifier or Decoder
S/PDIF Input (Optical)
to the optical output of Digital Player
Mini USB
to the USB port of PC/NB System
Page 7
HD 7.1 USB AUDIO V3.0
Hardware Installation
Install AS372 HD 7.1 USB Audio Box
First, make sure that Windows 10, Windows 8, Windows 7, Vista or XP in your
system is running properly. Then follow the following steps while
installing your AS372:
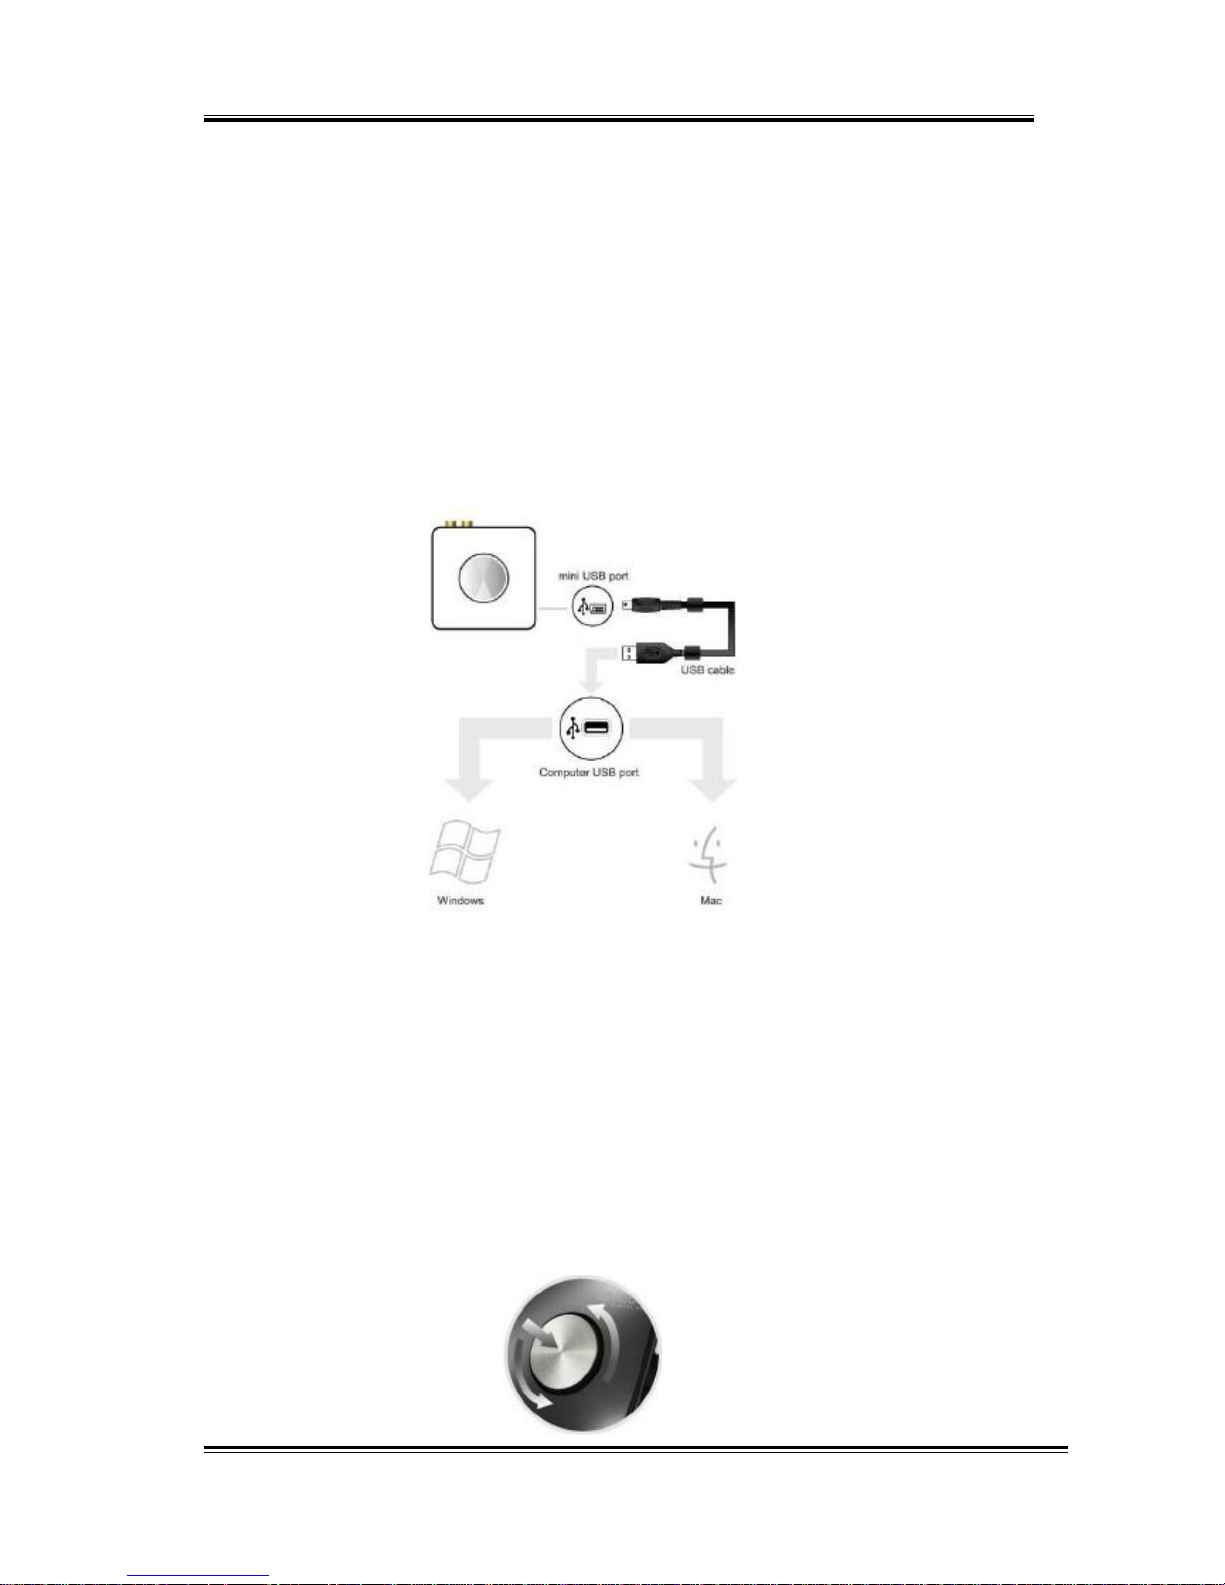
1. Plug AS372 into any free USB port of the computer with the
bundled USB cable.
2. Wait for OS to process the identification process. If you are
running Windows System, please refer to the “Software
Installation and Removal” section to install the drivers.
Adjust volume
Rotate the wheel to adjust volume, clockwise to increase volume, and
counterclockwise to decrease volume. Pushing the button down can
mute the audio output, pushing down again can restore the volume.
7
Page 8
HD 7.1 USB AUDIO V3.0
Software Installation and Un-Installation
Notice:
Ensure that you have plugged-in the USB HD Audio before installing the USB 2.0
High-Speed True HD Audio driver. Otherwise, driver installation error may occur.
Before installing/Uninstalling, you should close all audio programs to avoid the driver
installation failure.
Please make sure your USB 2.0 High-Speed True HD Audio hardware device
is plugged-in and then double click the setup.exe file.
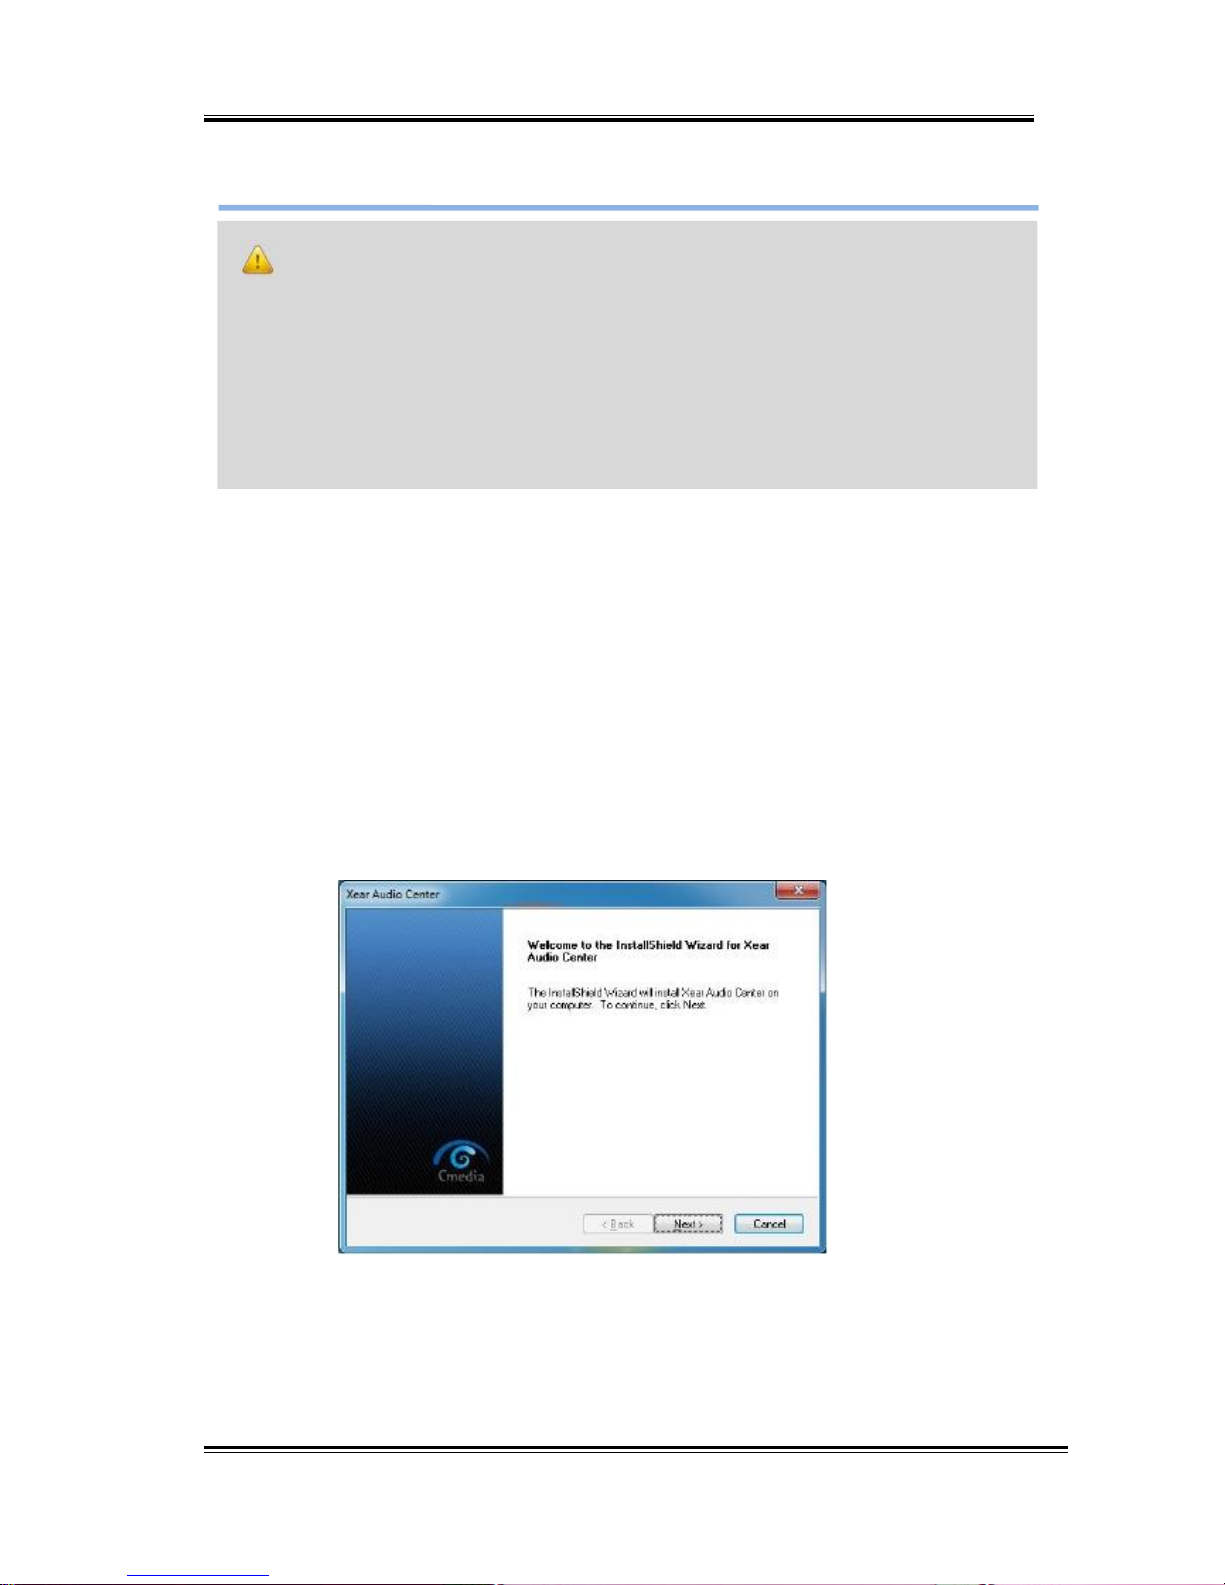
Installation
Start Driver installation, you can see a welcome window. Press “Next”
button and follow the instruction of the popped windows until the end.
Allow Computer restart to activate the driver.
8
Page 9
HD 7.1 USB AUDIO V3.0
Un-Installation
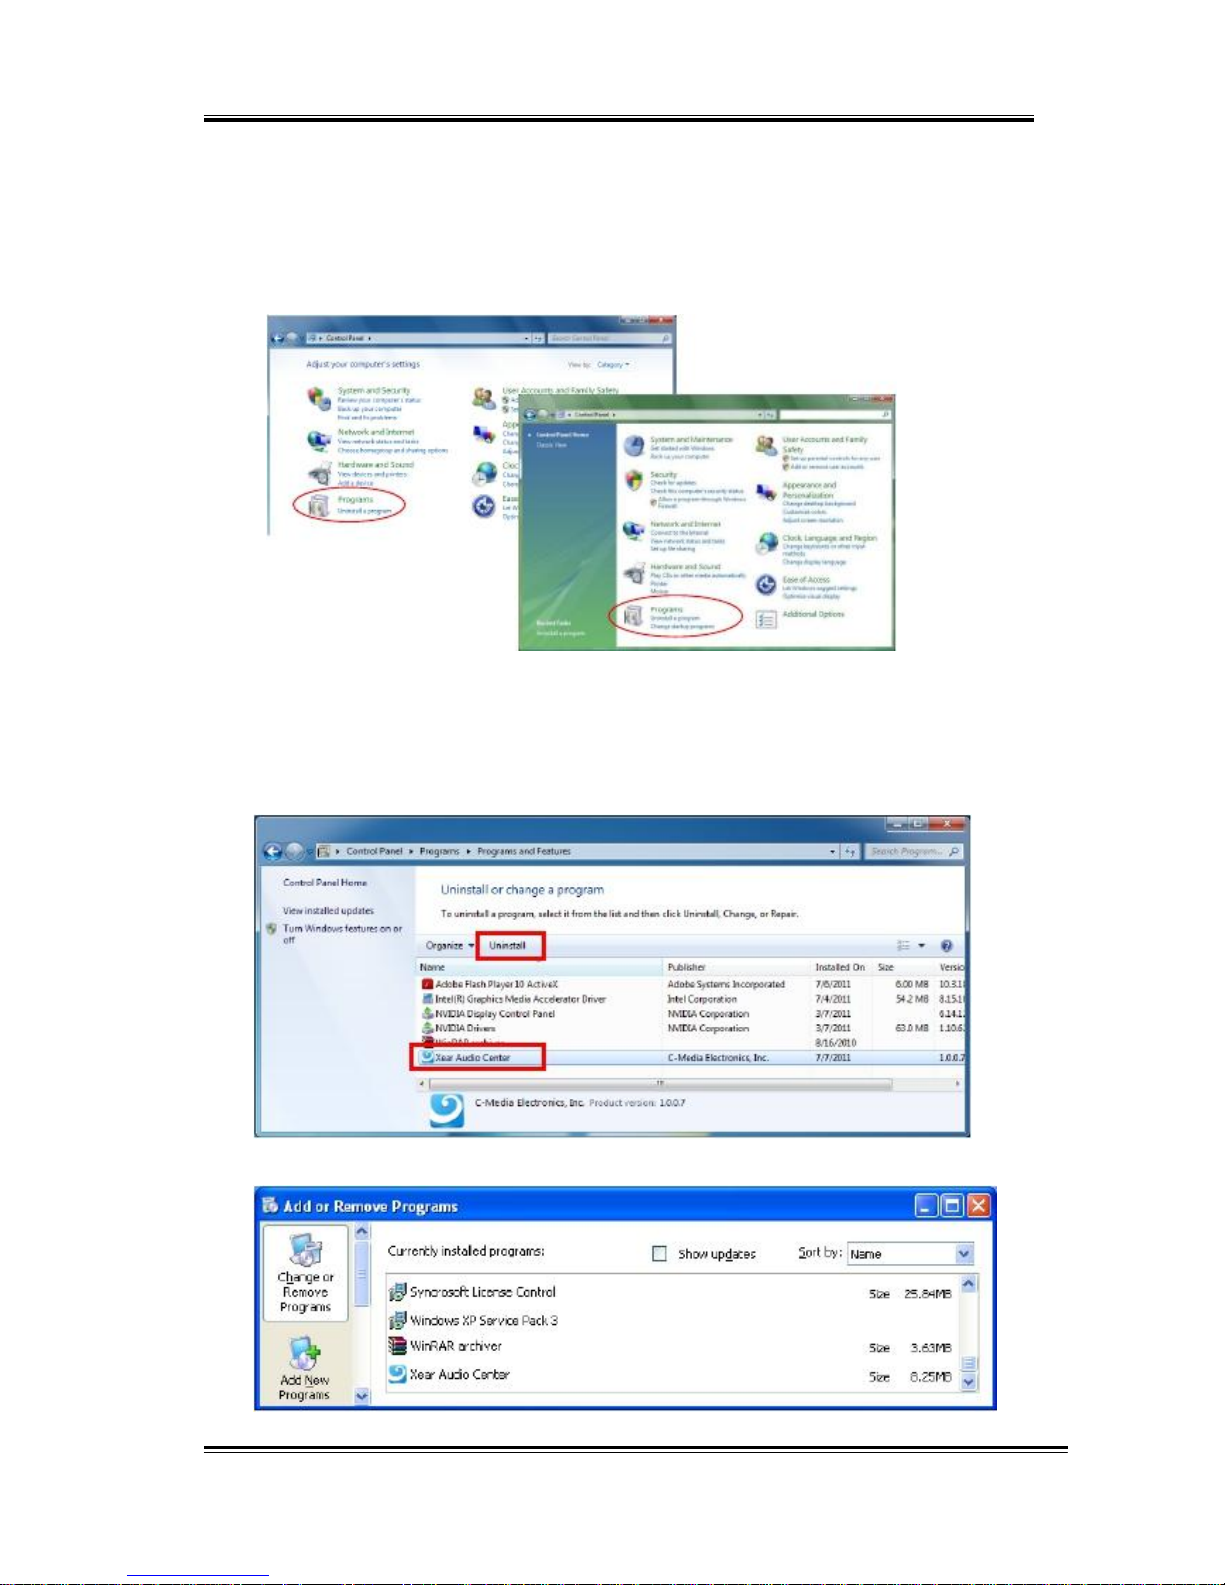
Close all audio programs. Double click the “Programs/Uninstall a program”
item from Windows Control Panel.
Win7 o r above
Vista
Select “Xear Audio Center” item, then click the “Uninstall” button.
For
Win10/
Win8/Win7/Vista.
Follow the instructions of the popped windows until
the uninstallation finishes. Restart your computer to completely remove
driver.
For Windows XP
9
Page 10
HD 7.1 USB AUDIO V3.0
Xear Audio Center Introduction
Open USB Audio Device Software CPL
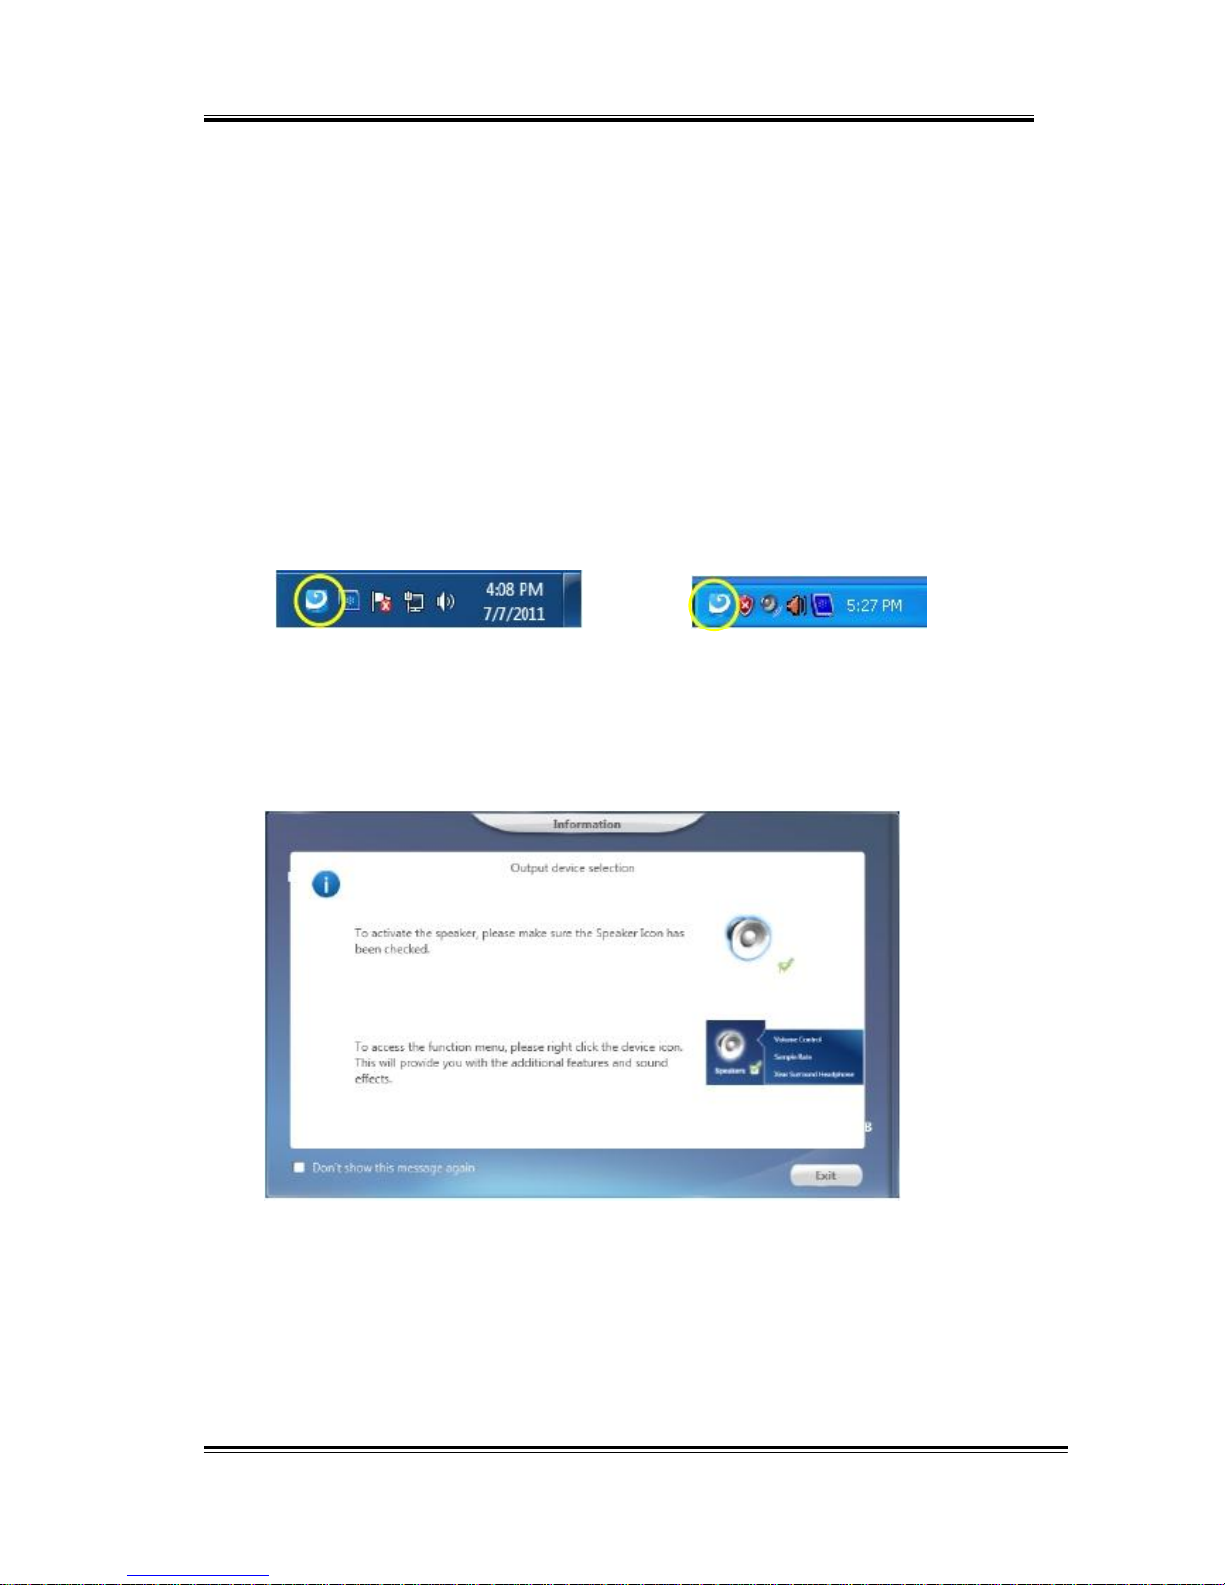
After the driver is installed and the system is rebooted, you will find the USB
Advanced Audio Device CPL (Xear Audio Center) icon on the system tray bar.
Double-clicking on the icon to open CPL software.
Win10/Win8/Win7/Vista Tray Icon XP Tray Icon
The first time Xear Audio Center is opened, you can see a message as
shown below. You can get the information about how to use Xear Audio
Center.
If you don’t want to see this window next time, check the “Don’t show
this message again” option.
10
Page 11
HD 7.1 USB AUDIO V3.0
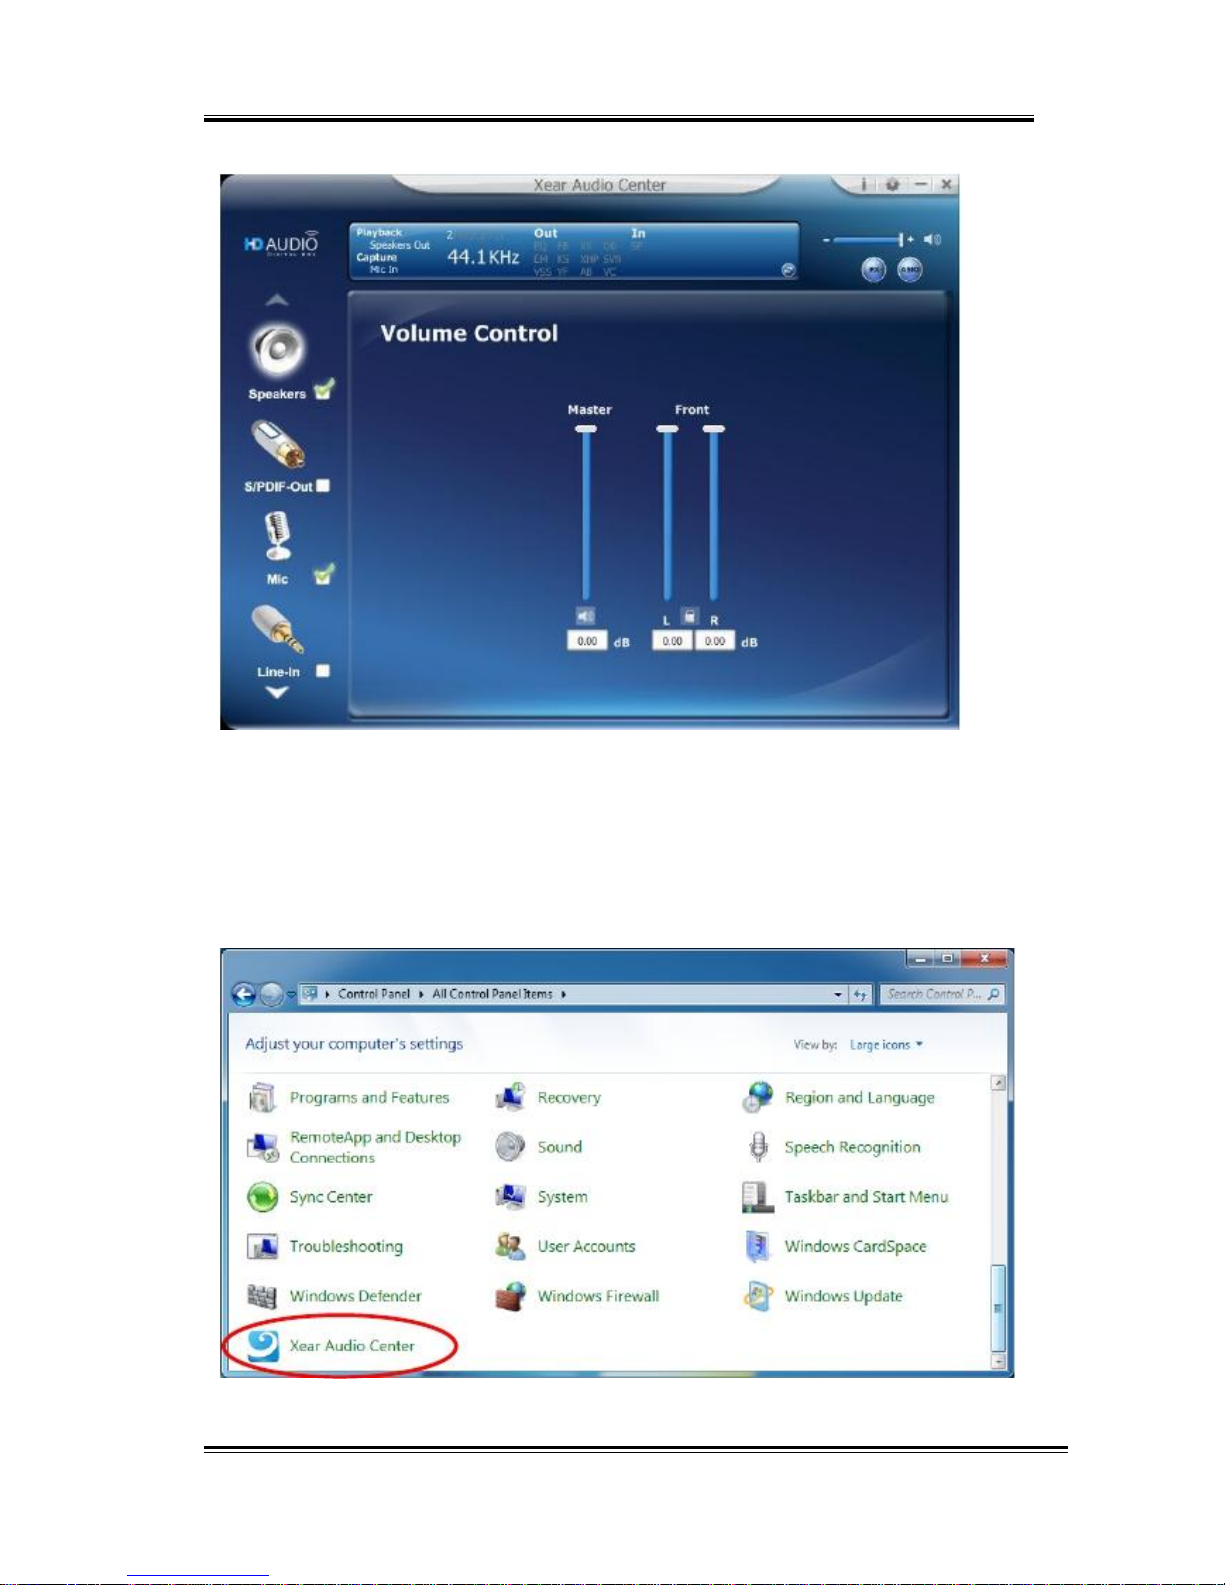
The “Xear Audio Center” will appear as the below diagram.
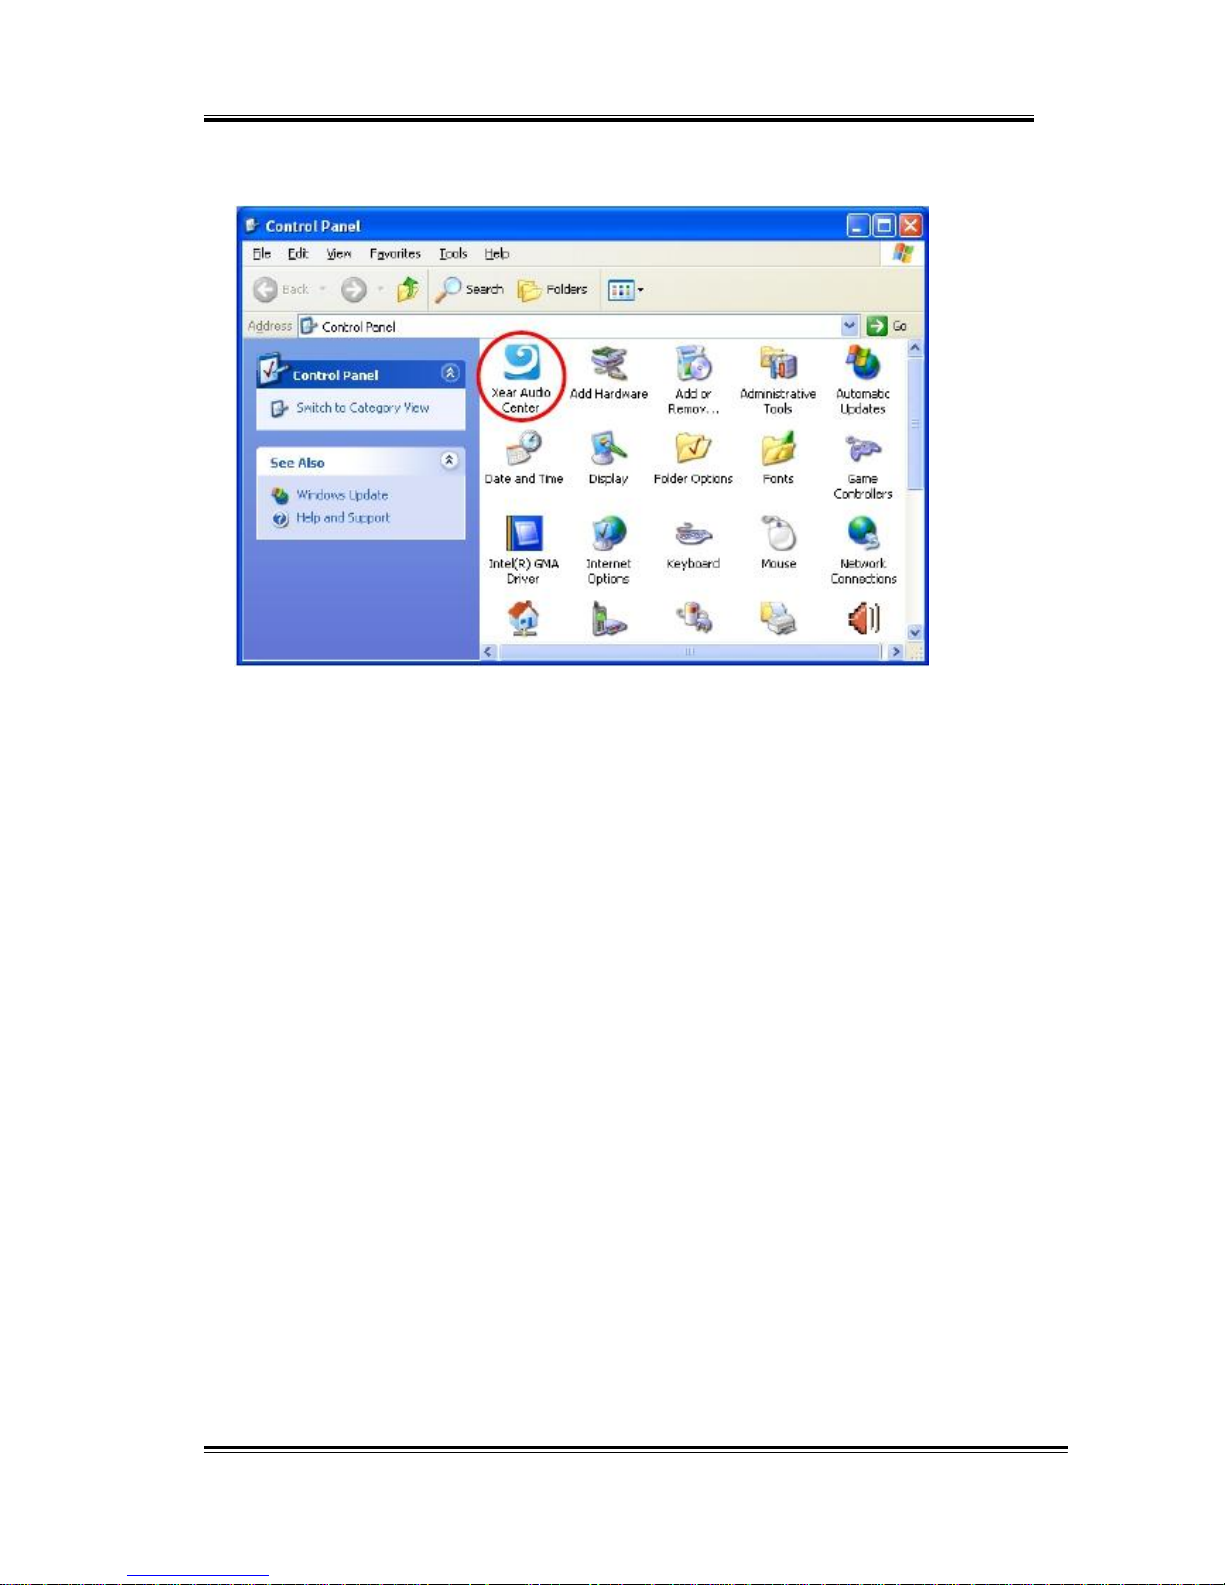
If the tray icon does not appear in your system tray, please go to the
Windows control panel and double click the “Xear Audio Center” CPL icon to
open it.
For Windows
10 / 8 / 7 /
Vista
11
Page 12
HD 7.1 USB AUDIO V3.0
For XP
12
Page 13
HD 7.1 USB AUDIO V3.0
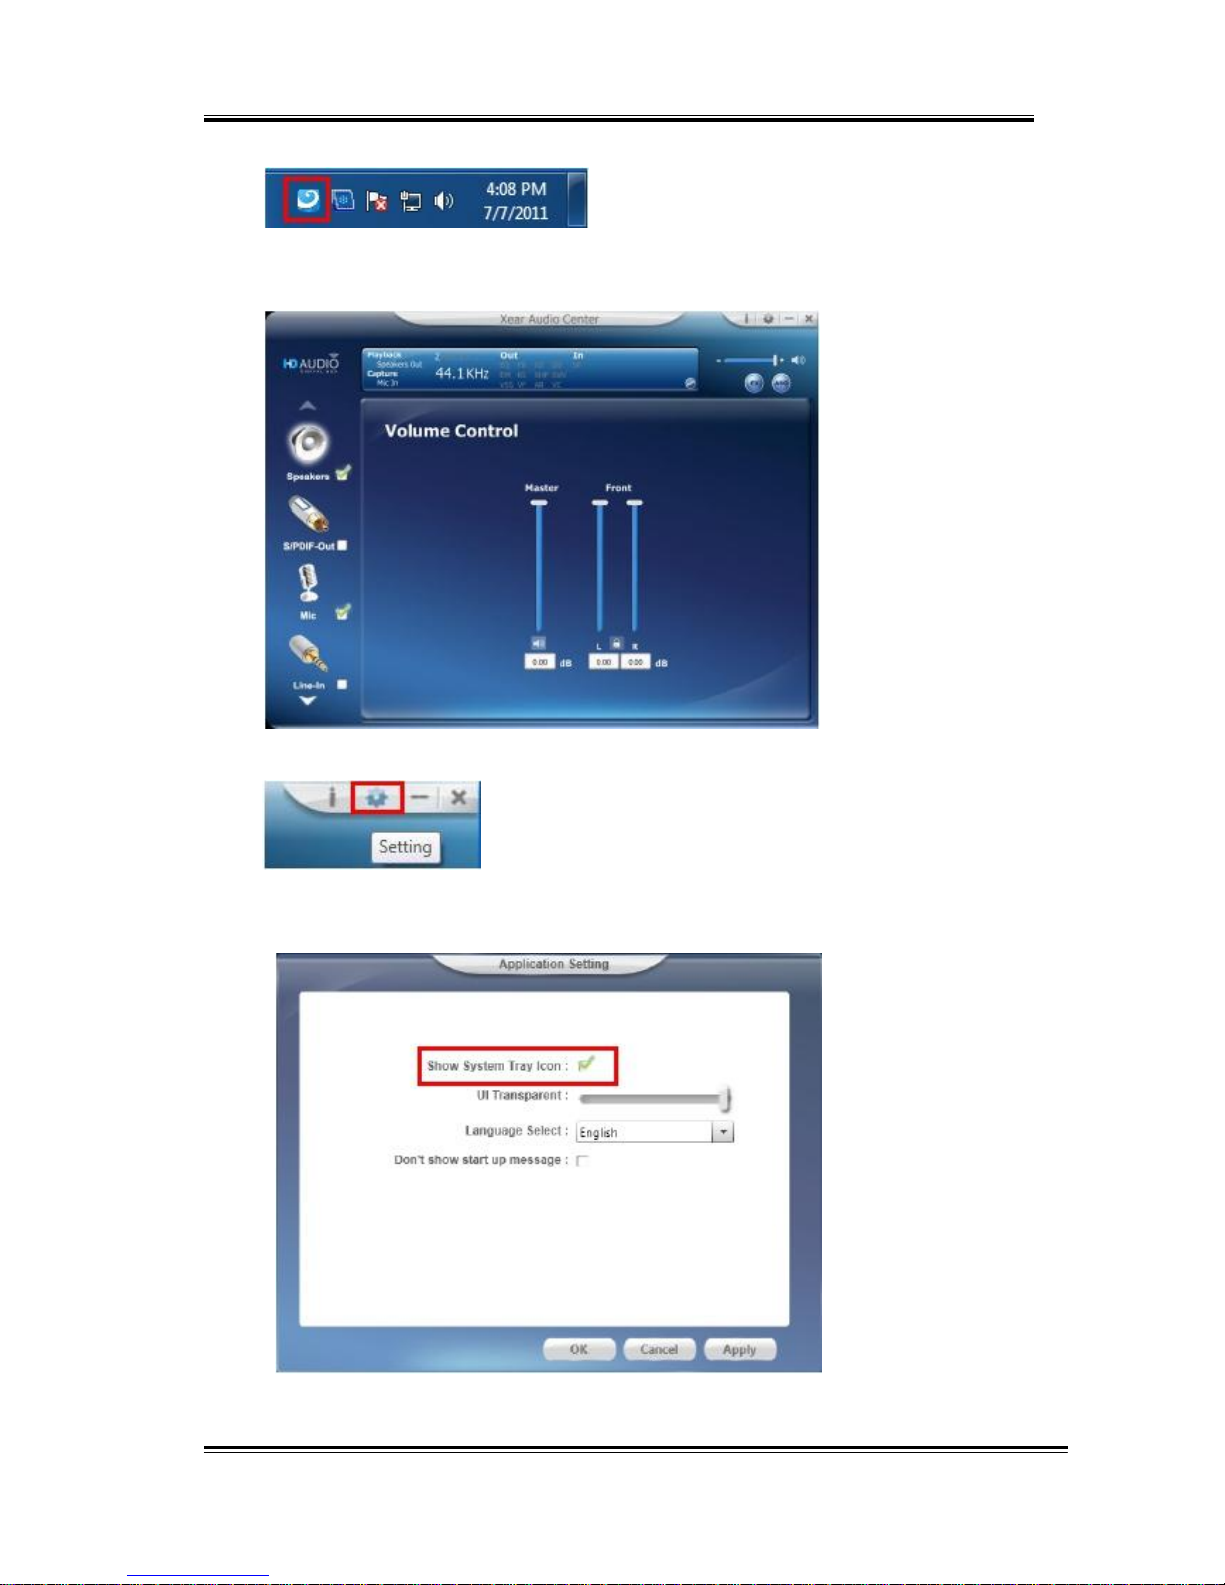
How to make CPL icon visible in the system tray?
1. Open Xear Audio Center
2. Click on the “setting” button to open the setting window.
3. Check “Show System Tray Icon”. The Xear Audio center icon will be shown
in the system tray.
13
Page 14
HD 7.1 USB AUDIO V3.0
Xear Audio Center Function Introduction
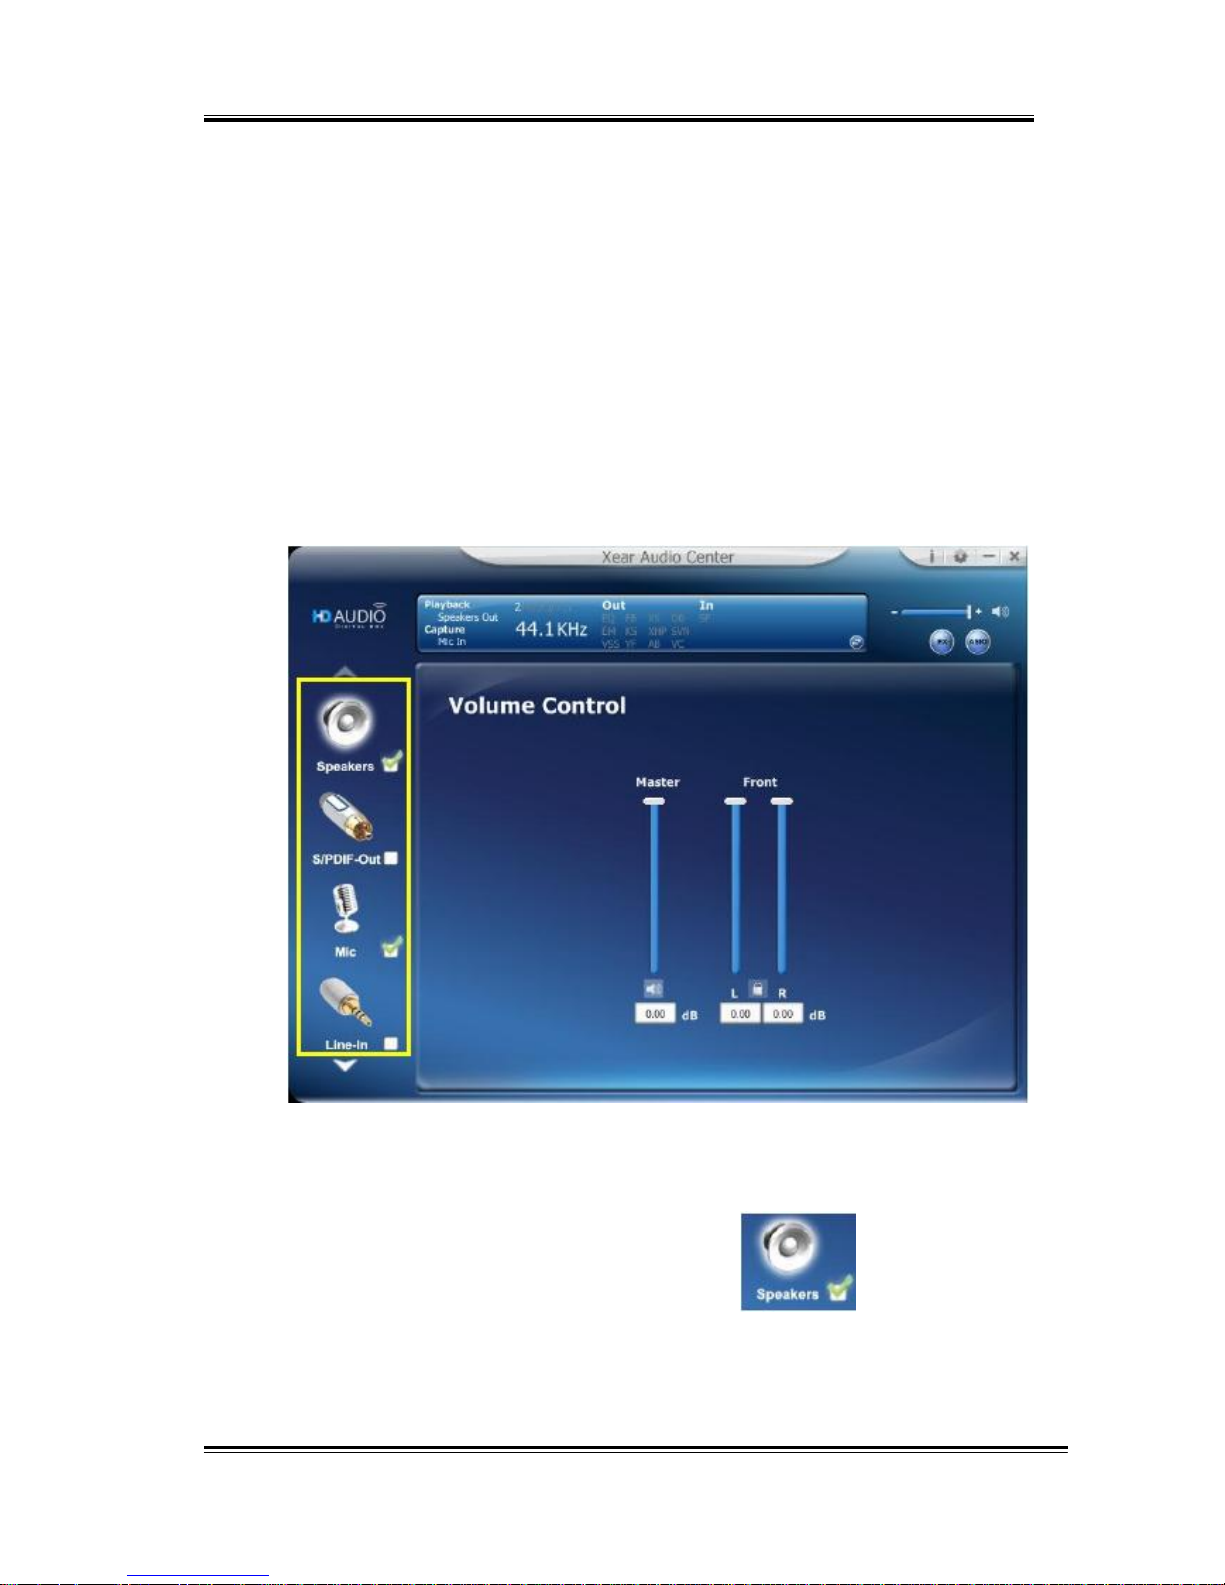
You can control the USB Audio device configuration as shown in the
diagram below.
Select a Default Device
Before the Audio device playback or recording operation starting, it
needs to select a device as the default device. Windows OS will assign
the system resource to the default device.
Set Default Output Device (Speaker)
Click mouse left button on the
check box
( ) of the
speaker device icon
to set the default device is “Speakers”.
14
Page 15

HD 7.1 USB AUDIO V3.0
Set Default Input Device (Mic)
Check on the
check box
( )to set the default
device in “Mic”.
Function Behavior
Only one
audio output device
(Speaker or SPDIF-Out)
can be set as the default audio output device.
There is only one
audio Input device
(Mic-in, Line-in,
SPDIF-In or Stereo Mix) can be set as the default
audio input device.
15
Page 16
HD 7.1 USB AUDIO V3.0
Master Volume / Mute & Un-Mute
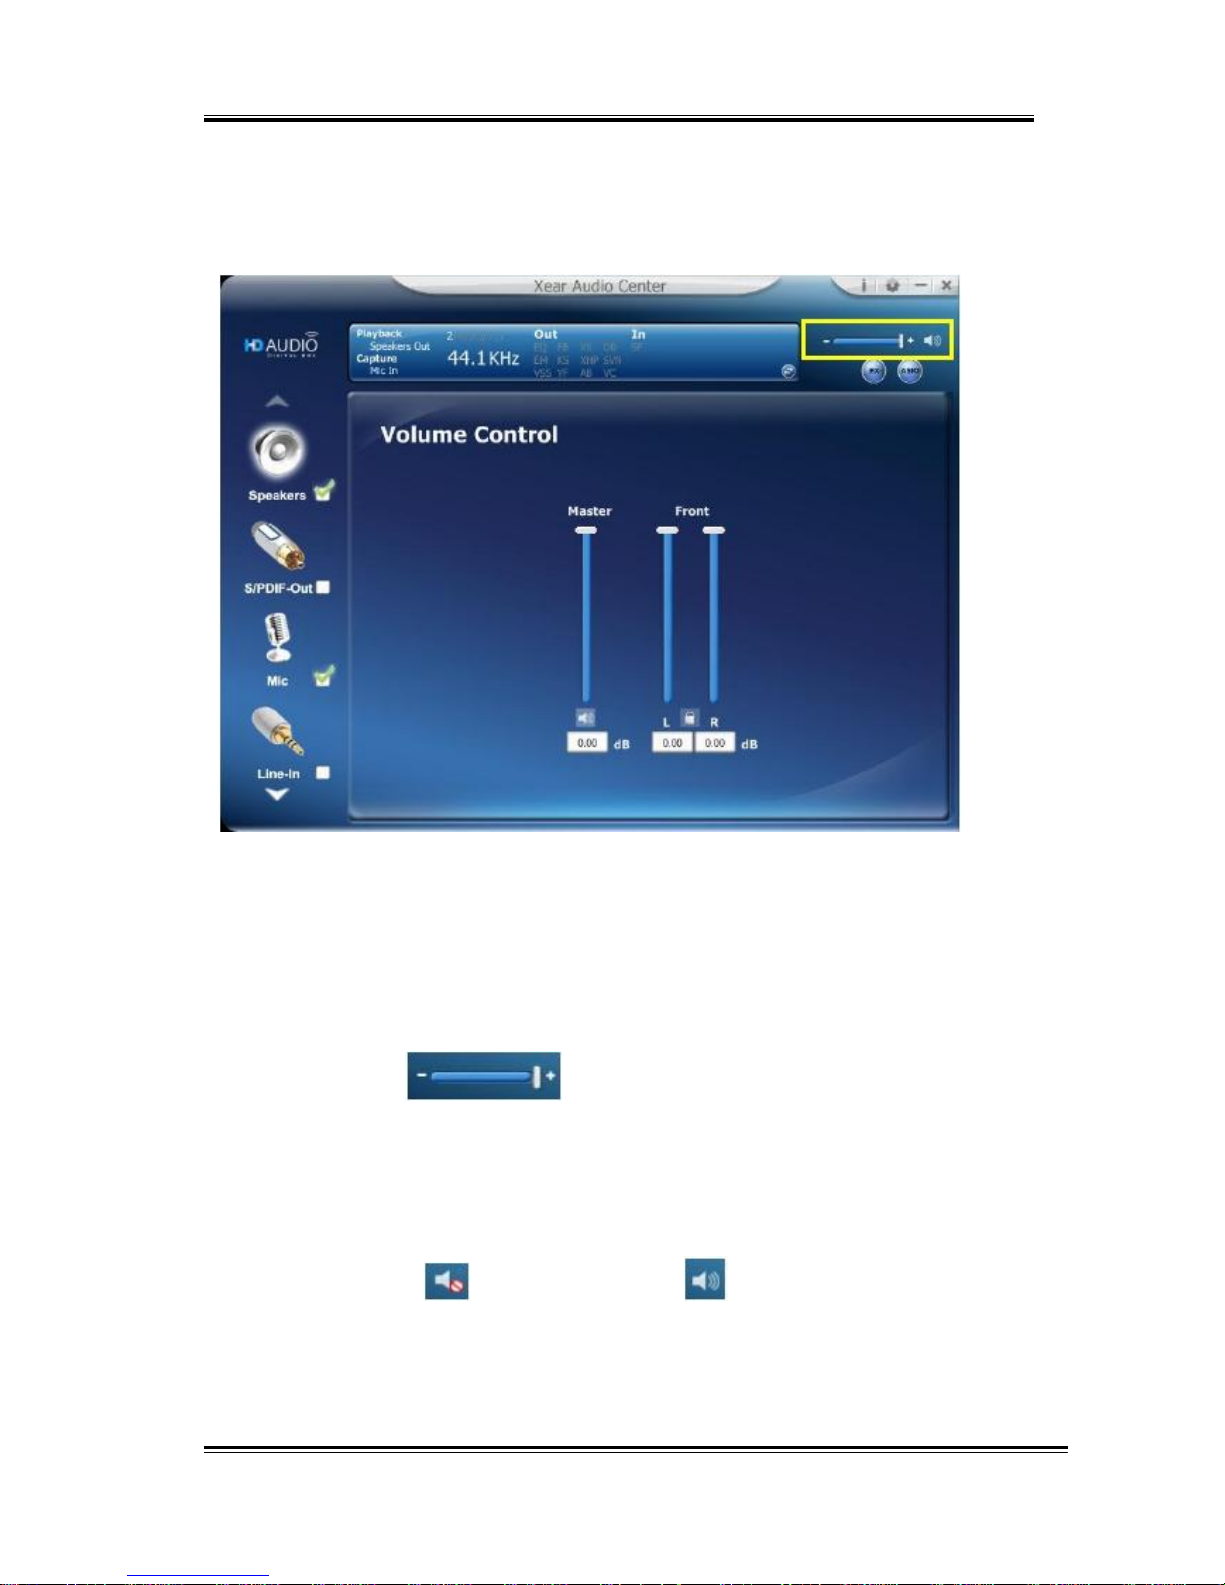
Volume Adjusting
You can increase or decrease the volume of all output device
(Speaker, Headphone and SPDIF-Out etc.) by this master volume
bar ( ).
Mute/ Un-Mute the volume
You can mute/un-mute volume of default output device by the
mute ( ) or Un-mute button ( ).
16
Page 17
HD 7.1 USB AUDIO V3.0
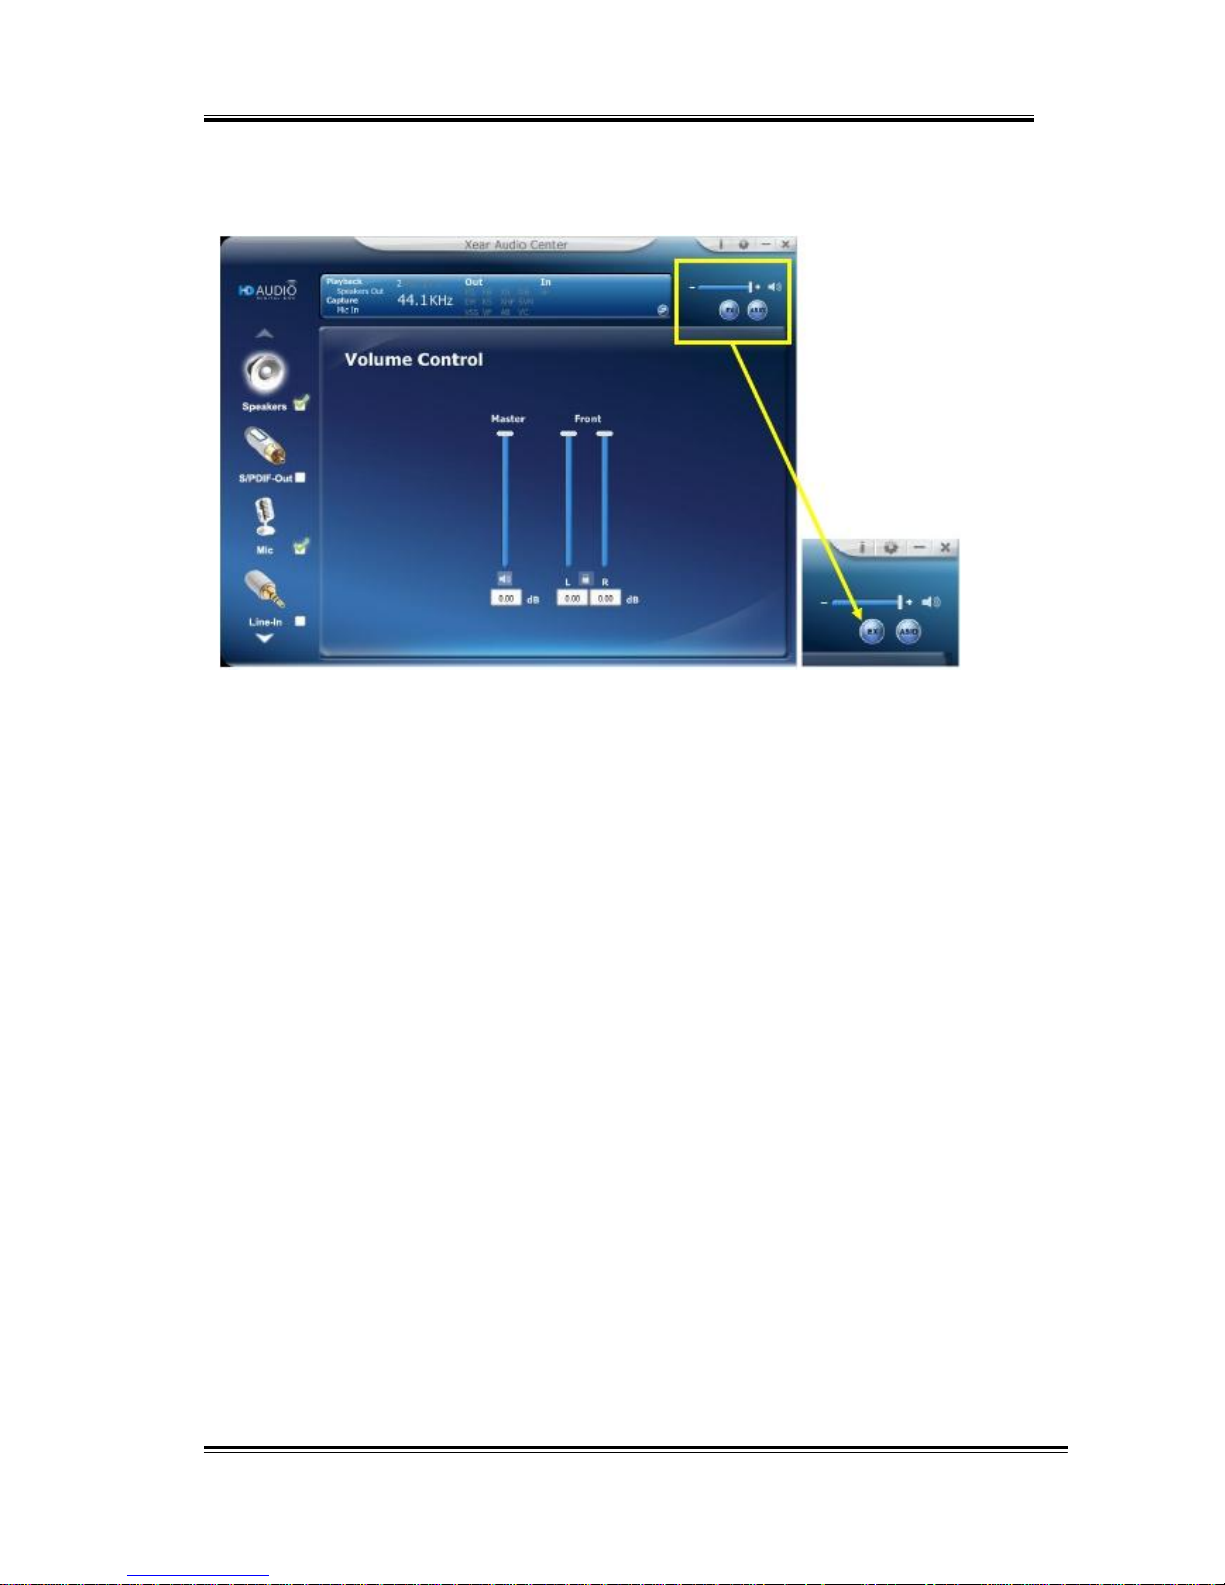
Xear 3D EX
Function Introduction
C-Media Xear3D EX technology provides a complete and fully
backward compatible 3D audio interface for Windows 10, Windows 8,
Windows 7 and Vista.
17
Page 18
HD 7.1 USB AUDIO V3.0
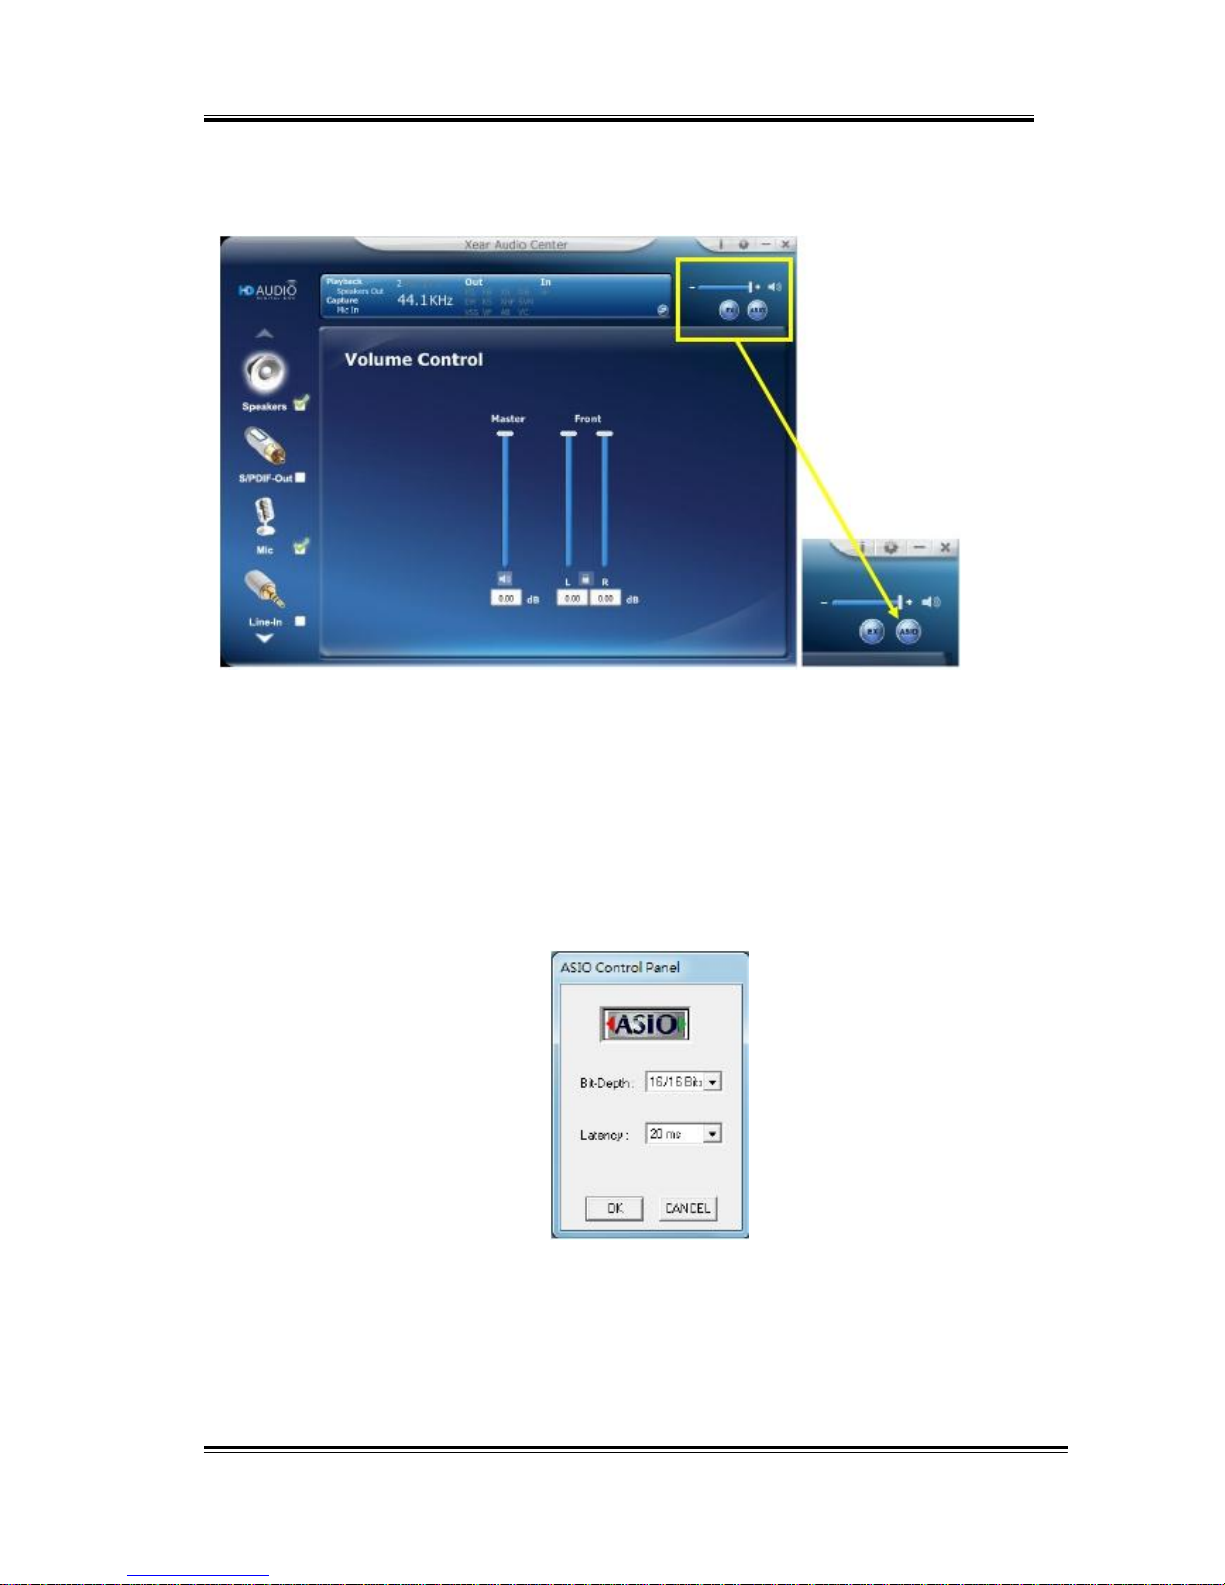
Xear Pro (ASIO)
Function Introduction
Xear Pro (ASIO) providing a low-latency and high fidelity
interface between a software application and a computer's
sound card. (Recommend player: Foobar2000).
Face-Lift CPL supports launch ASIO 2.2 control panel.
(ASIO is abbreviated from “Audio Stream Input Output”; Audio Stream Input / Output (ASIO)
are a computer sound card driver protocol for digital audio specified by Steinberg.)
18
Page 19
HD 7.1 USB AUDIO V3.0
Function Pop Menu
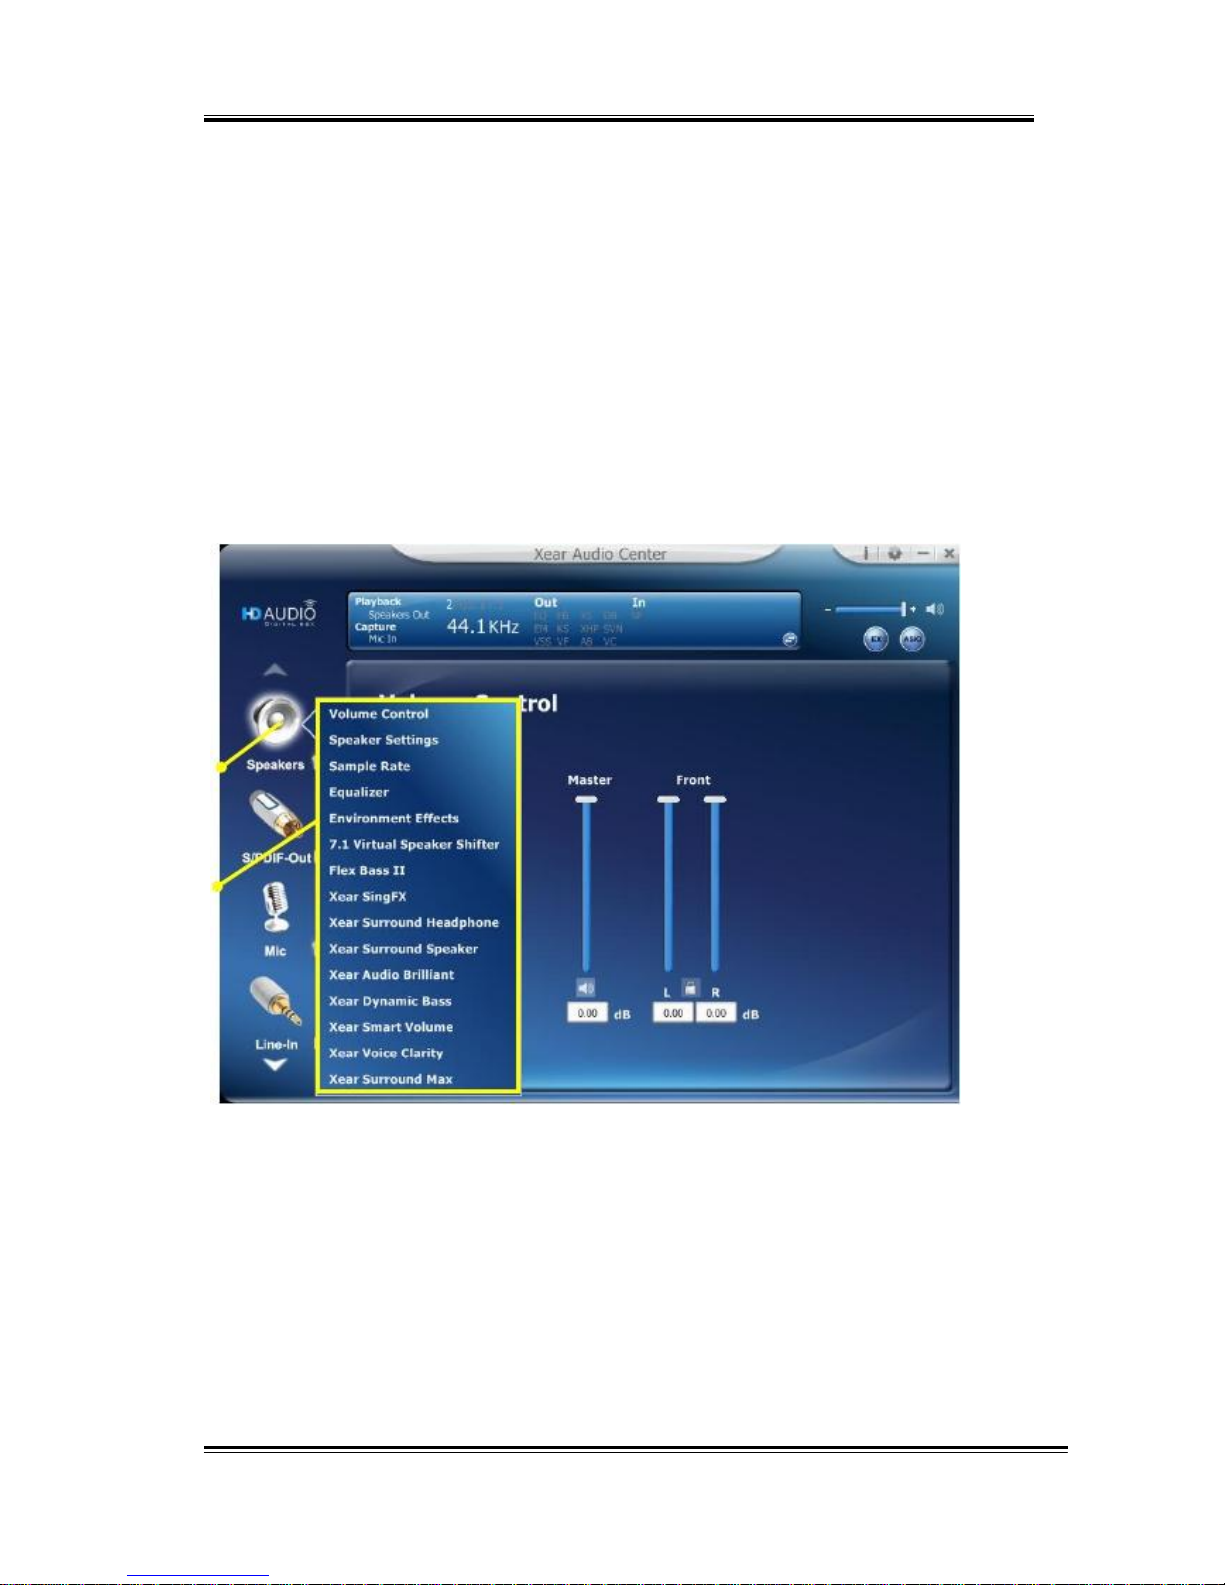
Xear Audio Center provides several sound effects. Each output/input
device comes with a pop menu and you can enter into the sound effect
page to enjoy your music, movies and gaming.
How to open the pop menu:
I. Double click left mouse button on the Device Icon.
II. One click right mouse button on the Device Icon.
Device Icon
Pop Menu
19
Page 20
HD 7.1 USB AUDIO V3.0
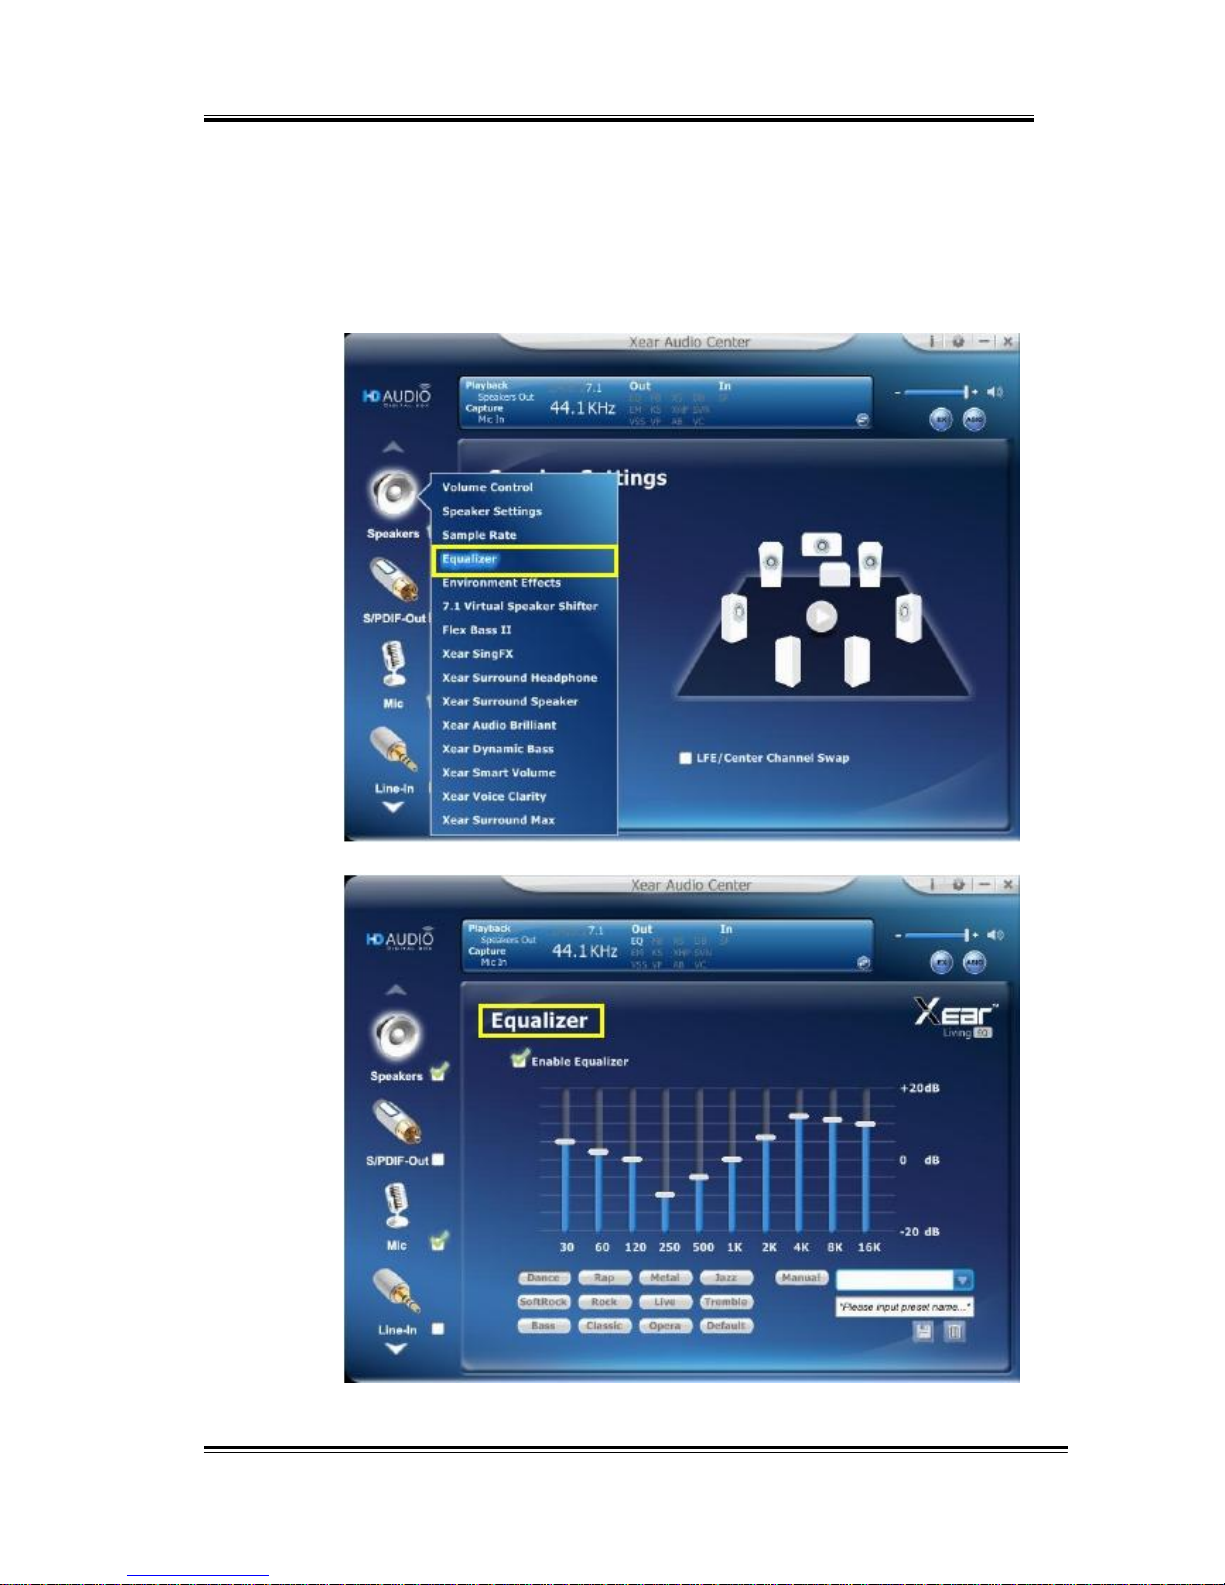
Function Page Area
When you click one of the function items in a pop menu, a function page
as below will be shown as below.
Choose the Equalizer Page
Pop up the Equalizer Function Page
20
Page 21
It indicates the playback sound effect status.
HD 7.1 USB AUDIO V3.0
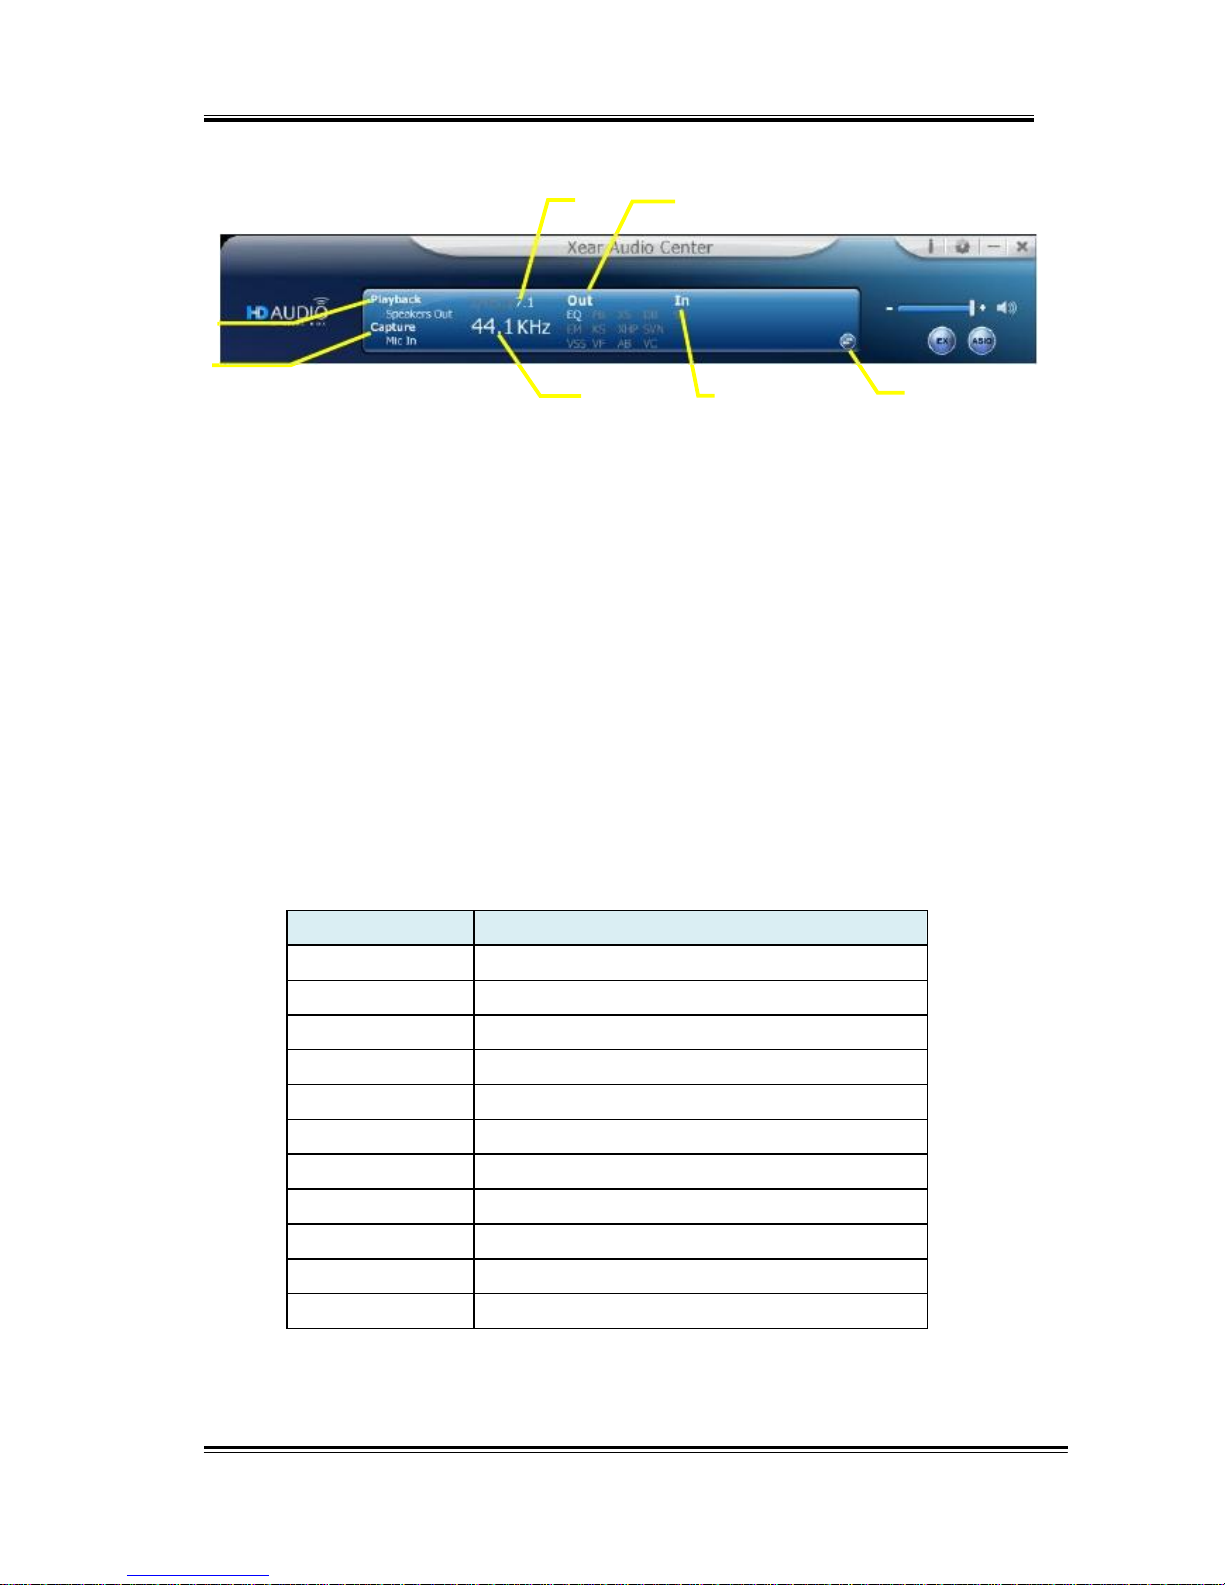
Audio Status Panel
3
5
1
2
4
6
7
1. Playback (Speakers Out)
It indicates that Speaker is the output default device.
2. Capture (Mic In)
It indicates that Mic In is the input default device.
3. Speaker Numbers (2/ 4 / 5.1 / 7.1)
It indicates the speaker numbers (for Speaker device only).
4. Sample Rate
It indicates the Playback sample rate for default output device.
5. Audio Output effect indicator
21
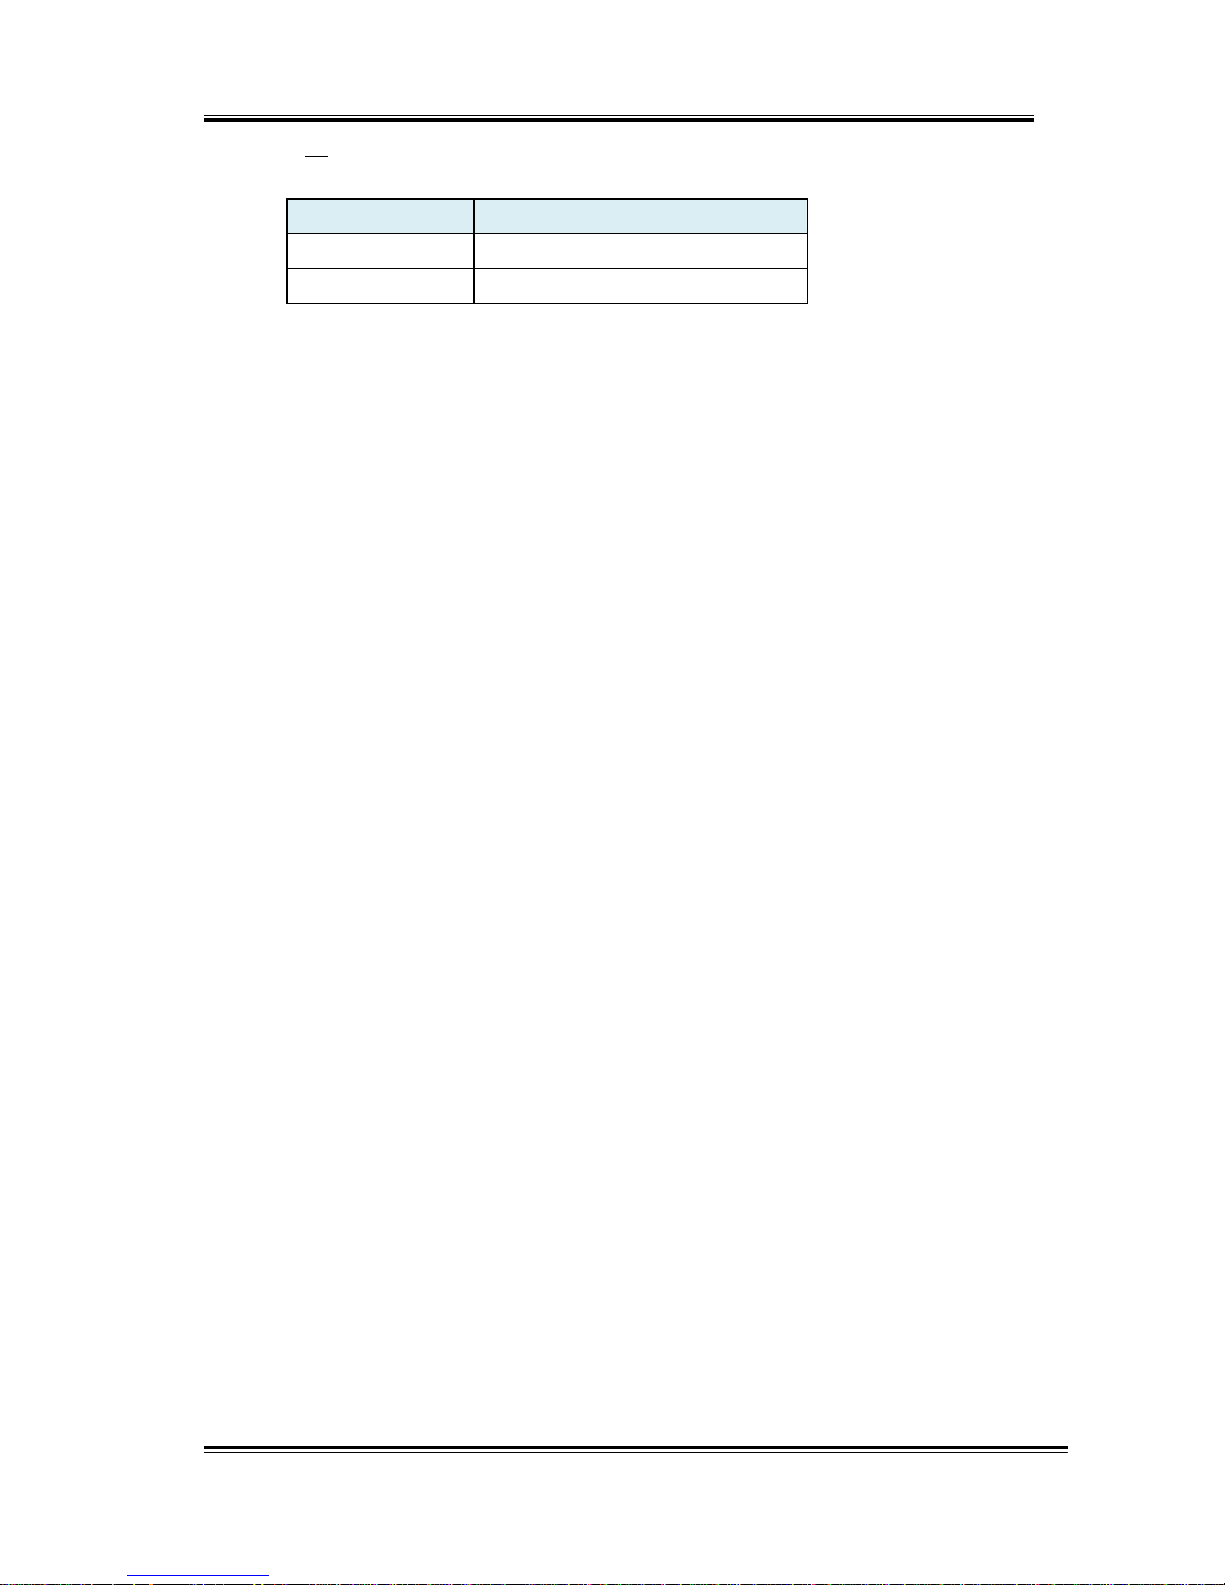
Abbreviation
Sound effect
EQ Equalizer
EM Environment Effects
VSS 7.1 Virtual Speaker Shifter
FB Flex Bass II
KS Xear SingFX Key Shifting
VF Xear SingFX Vocal Fading
AB Xear Audio Brilliant
DB Xear Dynamic Bass
SVN Xear Smart Volume
VC Xear Voice Clarity
SMX
Xear Surround Max
Page 22
It indicates the playback sound effect status.
HD 7.1 USB AUDIO V3.0
6. In effect indicator
7. Switch to Profile Panel button
Click on this button will switch status bar to Profile panel.
(Refer to Profile Panel)
22
Abbreviation
Sound effect
SF Xear SingFX Microphone Echo
SF Xear SingFX Magic Voice
Page 23
HD 7.1 USB AUDIO V3.0
Profile Panel
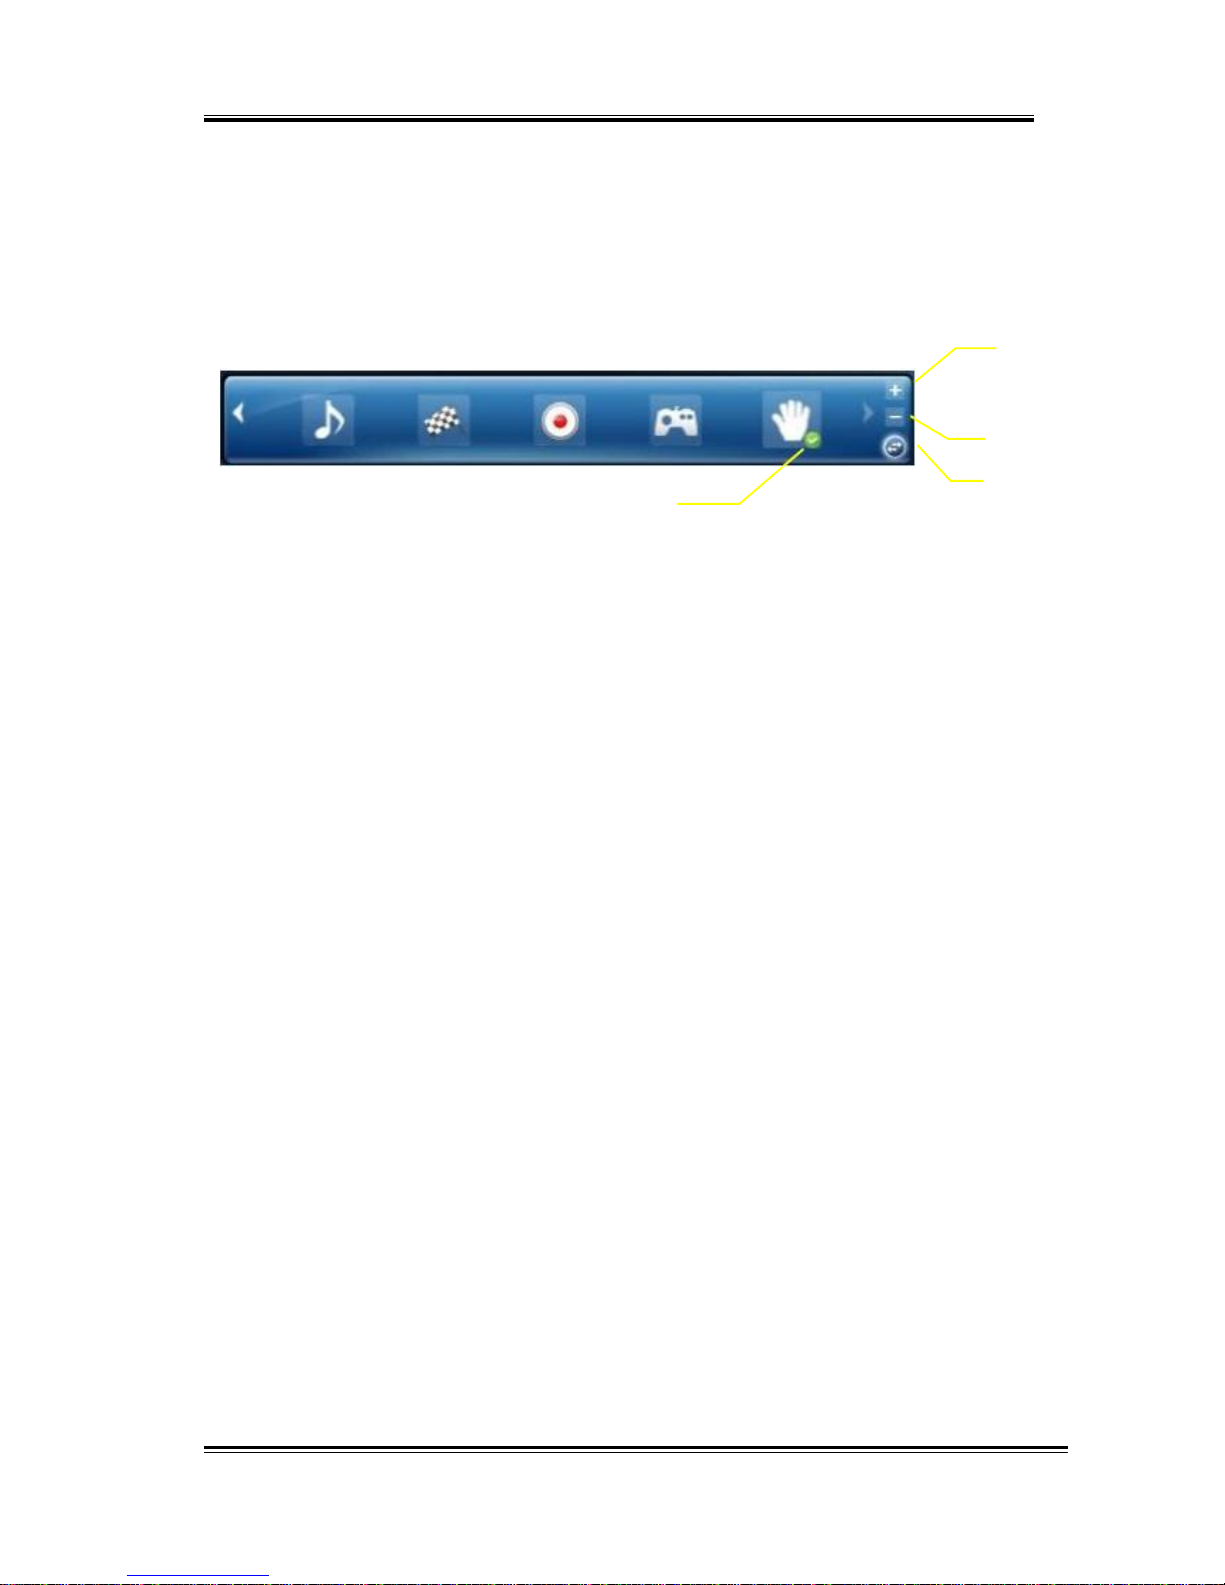
This is the profile for sound effect setting; it has the preset mode and the
user define mode. The user define mode can be customized.
2
3
4
1
1. Profile Mode:
You can set the preset profile mode by these profile buttons. When
the preset mode is active, there is a Green-check symbol shown on
the right-down corner.
2. Add Profile:
You can adjust specific sound effects (Ex: EQ, EM etc…) settings and
click this “+” add profile button to name and to create a user-define
mode.
3. Delete Profile:
You can click this “-“button to delete the user-define mode.
4. Switch Button:
This switches the Profile panel to Audio Status Panel.
23
Page 24
HD 7.1 USB AUDIO V3.0
Speaker Device function introduction
Volume control Page
2
1
4
3
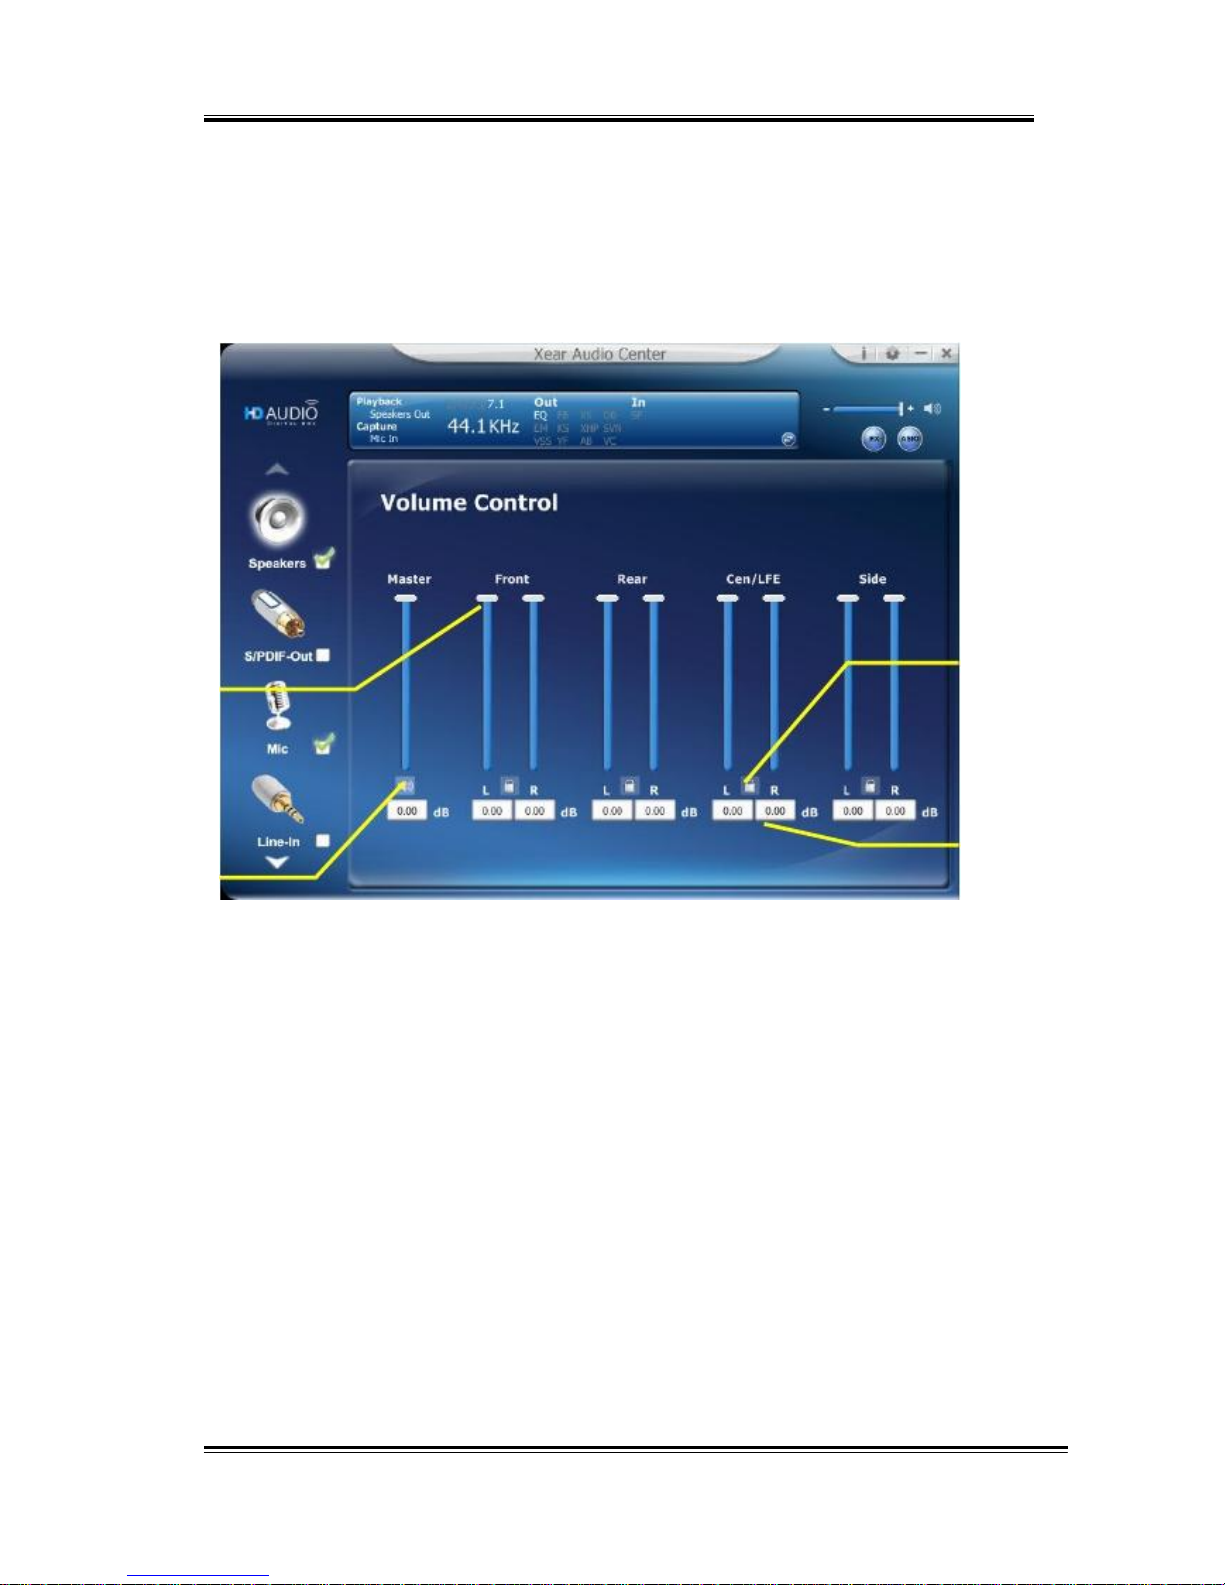
Function Introduction
This function page provides a volume control for Speaker device.
1. Volume control bar:
Master
– It can adjust volume level for all channels.
Front
- It can adjust volume level for front channel.
2. Left/ Right Channel Lock (Front, Cen/LFE, Rear, Side):
Clicking on the lock/ un-lock button can sync left-channel and
right-channel.
3. Mute / Un-mute:
Clicking on the mute/ un-mute button can mute all channels.
4. dB Input Area (Front, Cen/LFE, Rear, Side):
You can directly fill-in a dB value into this text box to set the
volume level.
24
Page 25
HD 7.1 USB AUDIO V3.0
Speaker Setting Page
1
2
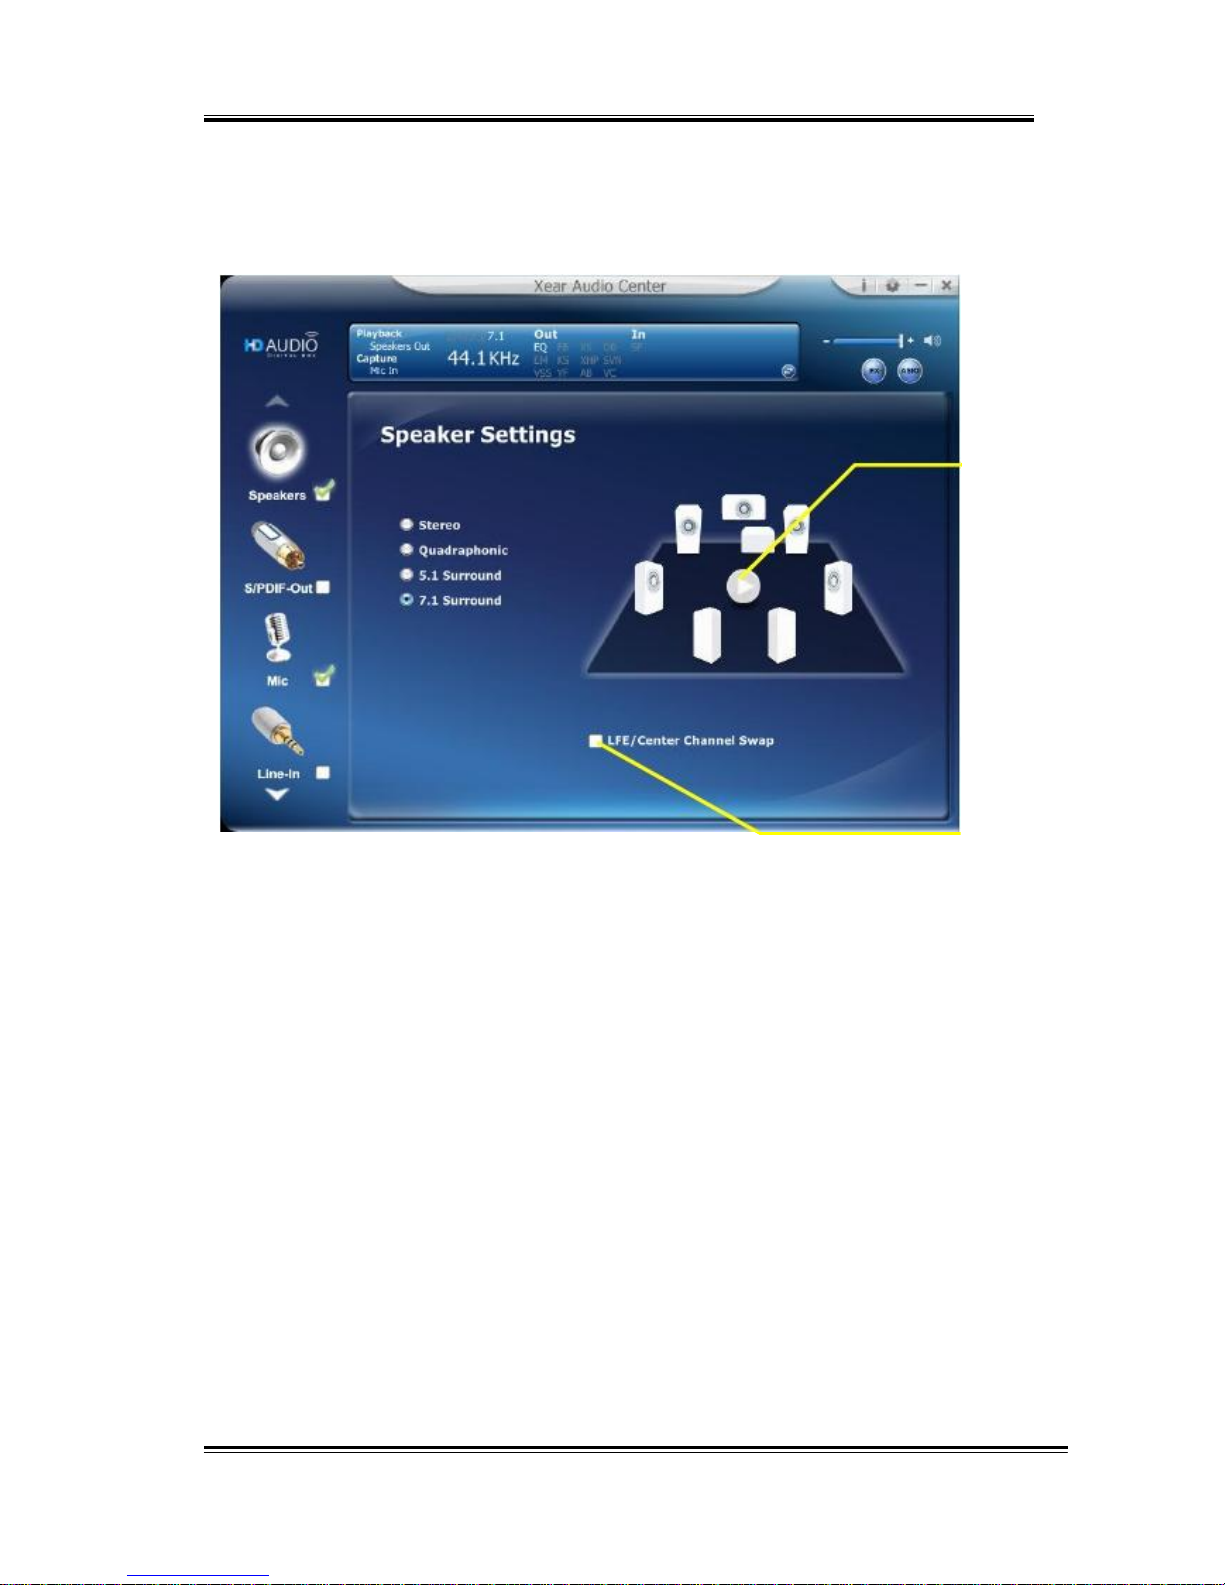
Function Introduction
You can set the speaker numbers (Stereo/ Quadraphonic /5.1
Surround /7.1 Surround) in this page.
1. LFE/Center Channel Swap
When this item enable, it can swap the audio stream
between Center/LFE
.
2. Speaker Test
Click the “Speaker Test” button, the CPL will auto play
test sound in order
.
Front-Left > Front-Right > Back-Left > Back-Right >
Center > Bass
25
Page 26
HD 7.1 USB AUDIO V3.0
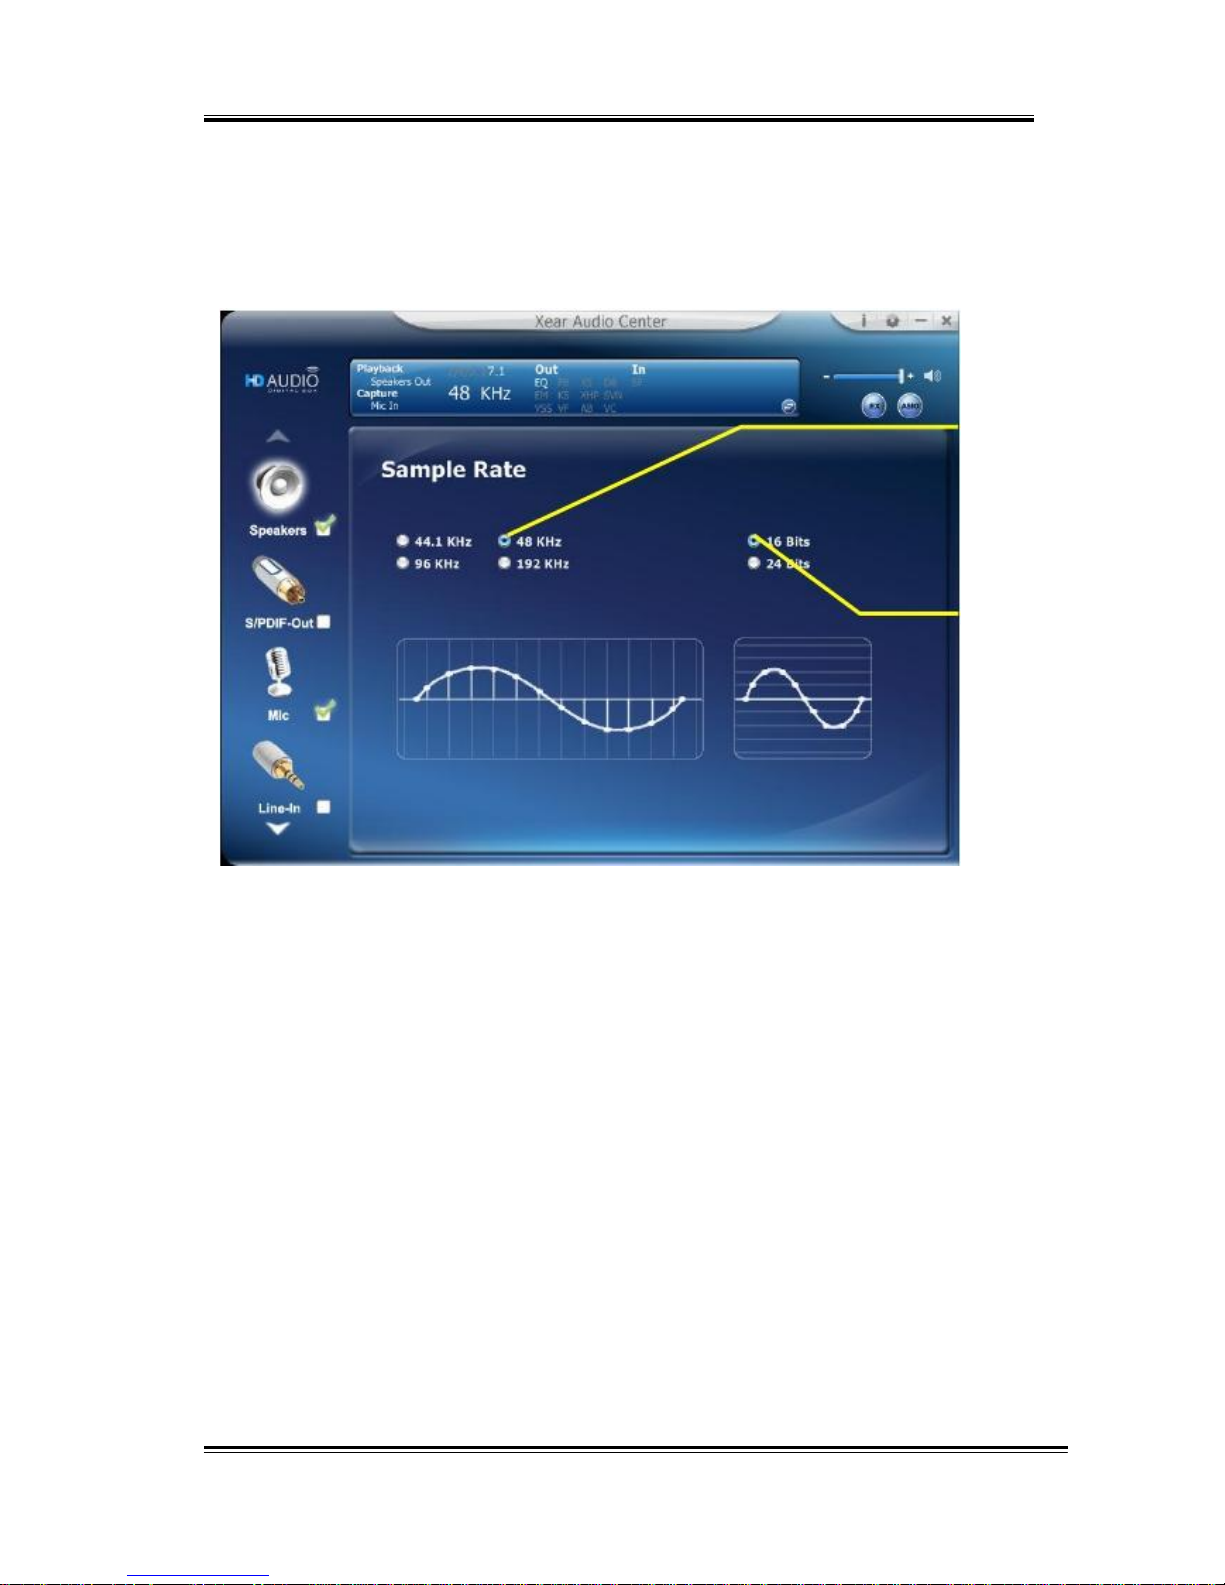
Sample Rate Page
1
2
Function Introduction
This function page provides a sample rate setting for Speaker
device.
1. Sample Rate button
44.1 KHz -
set playback sample rate to 44.1 KHz
48 KHz -
set playback sample rate to 48 KHz
96 KHz -
set playback sample rate to 96 KHz
192 KHz -
set playback sample rate to 192 KHz
2. Bit Depth button
16 bit -
set playback bit depth to 16 bit
24 bit -
set playback bit depth to 24 bit
26
Page 27
HD 7.1 USB AUDIO V3.0
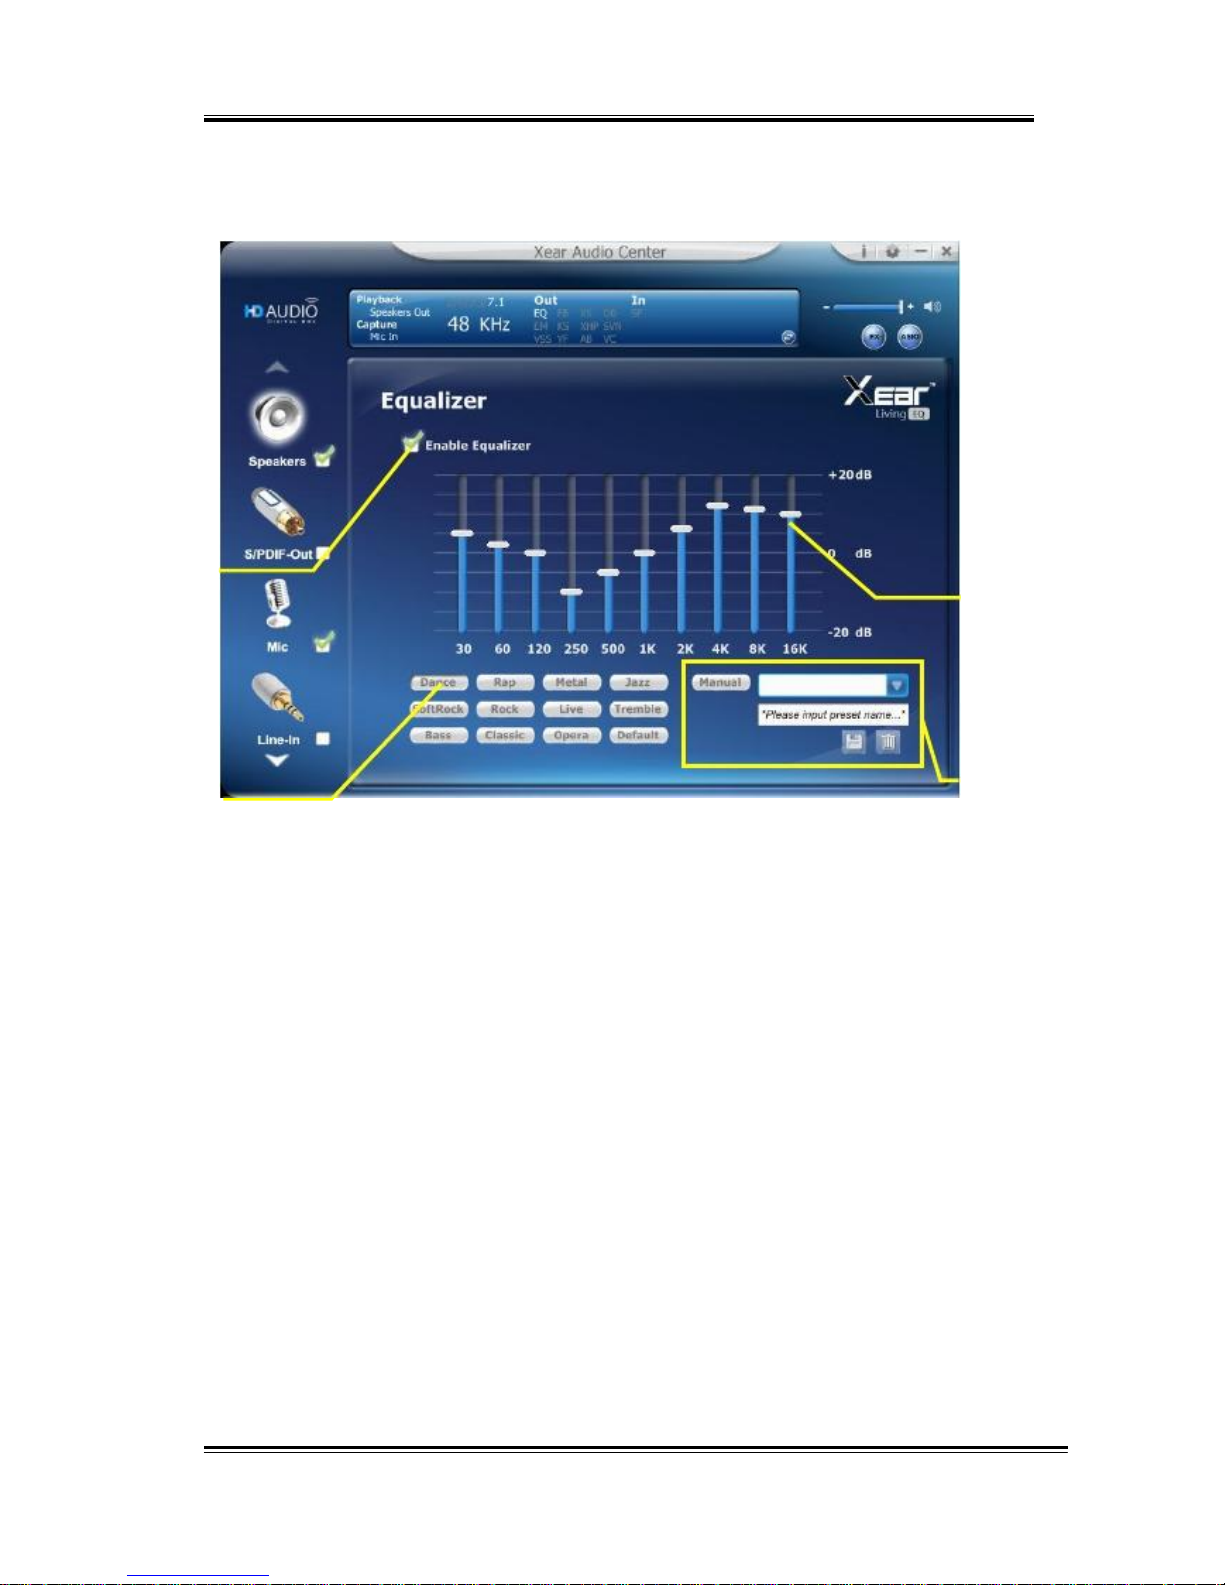
Equalizer
1
3
2
4
Function Introduction
It provides a 10-band EQ function; you will be able to adjust the EQ
band manually and create customized preset items or click on the
preset EQ mode.
1. EQ enable/disable switch
Click this check box to enable/disable EQ
2. Preset mode
Select a pre-set mode of the equalizer that is designed
accordingly. There are 12 preset modes such as Bass, Treble,
Live, Rock, Jazz, etc.
3. EQ band controller
You can change the gain setting for each band
(30/ 60/ 120/ 250/ 500/ 1K/ 2K/ 4K/ 8K/ 16 KHz)
27
Page 28
HD 7.1 USB AUDIO V3.0
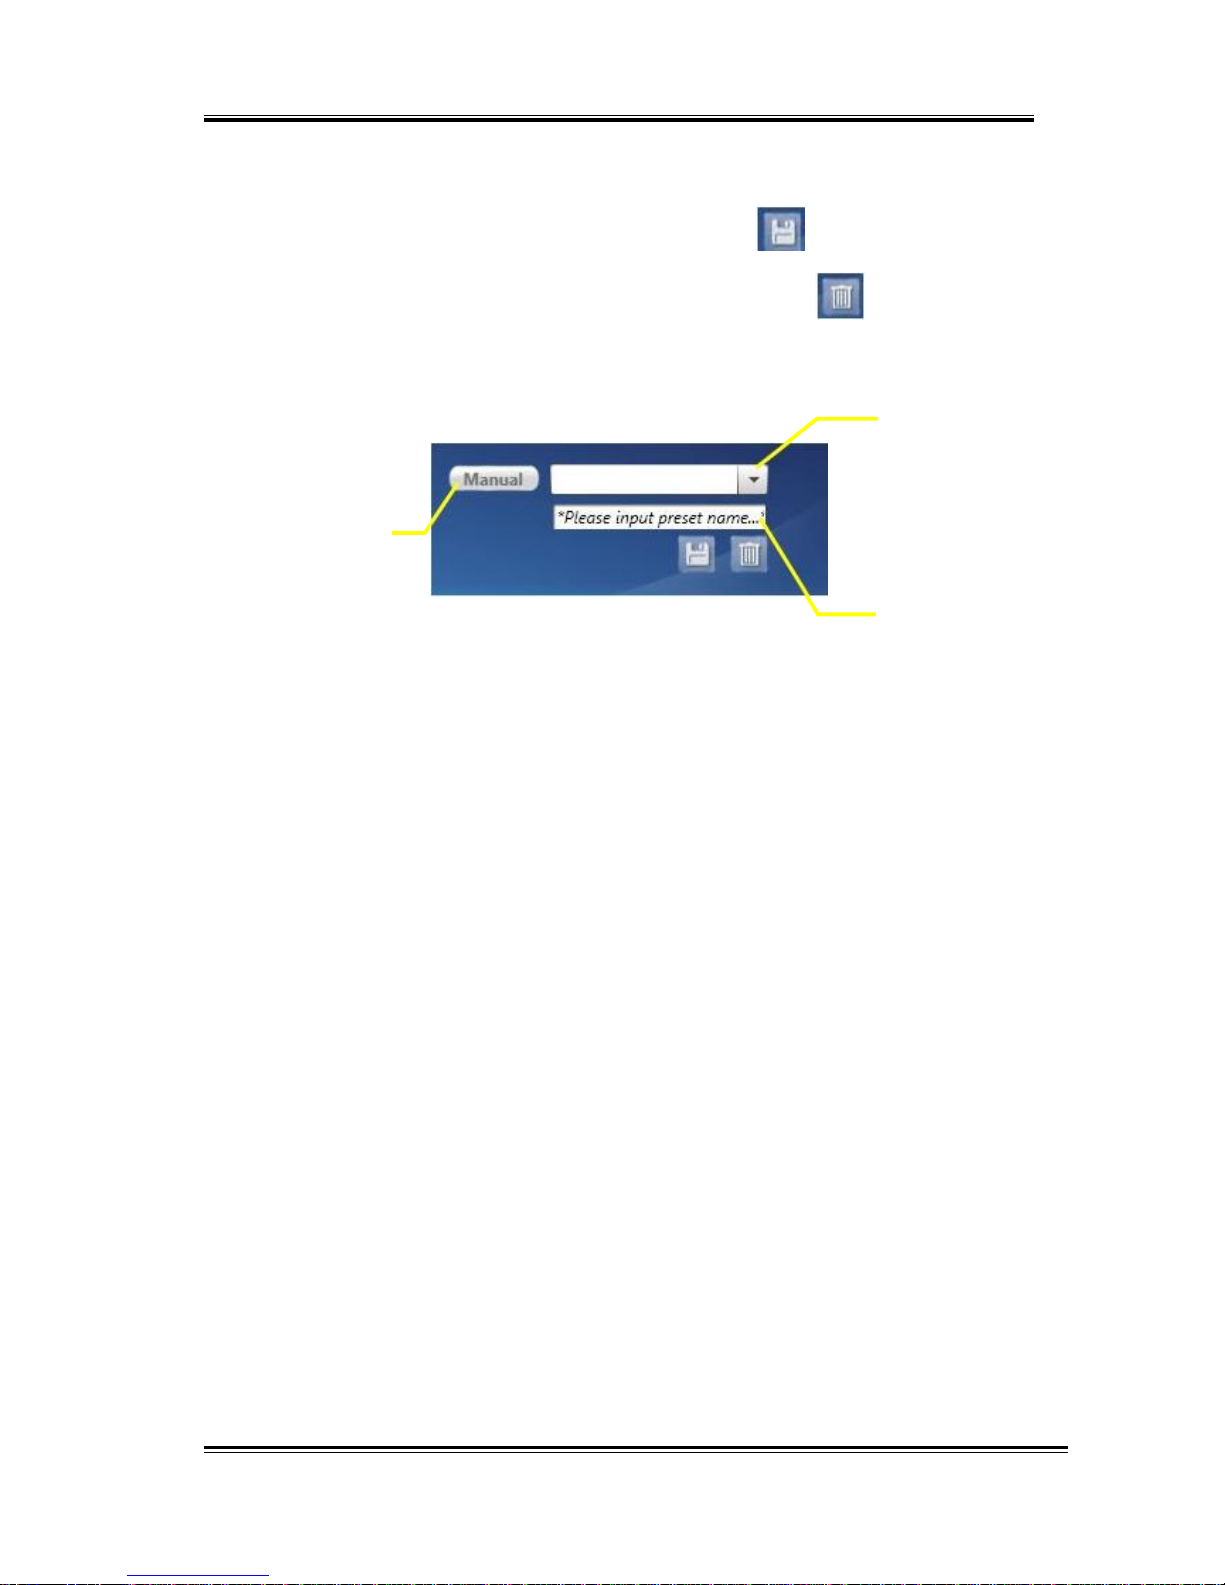
4. Manual mode
You can change the gain setting for each band and then give it a
name in the “A. Input Field” and then click “ ” to add your
new setting into the “B. Manual Mode List”. Click “ ” to
delete settings.
B. Manual mode List
Set to Manual Mode
A. Input Field
28
Page 29
HD 7.1 USB AUDIO V3.0
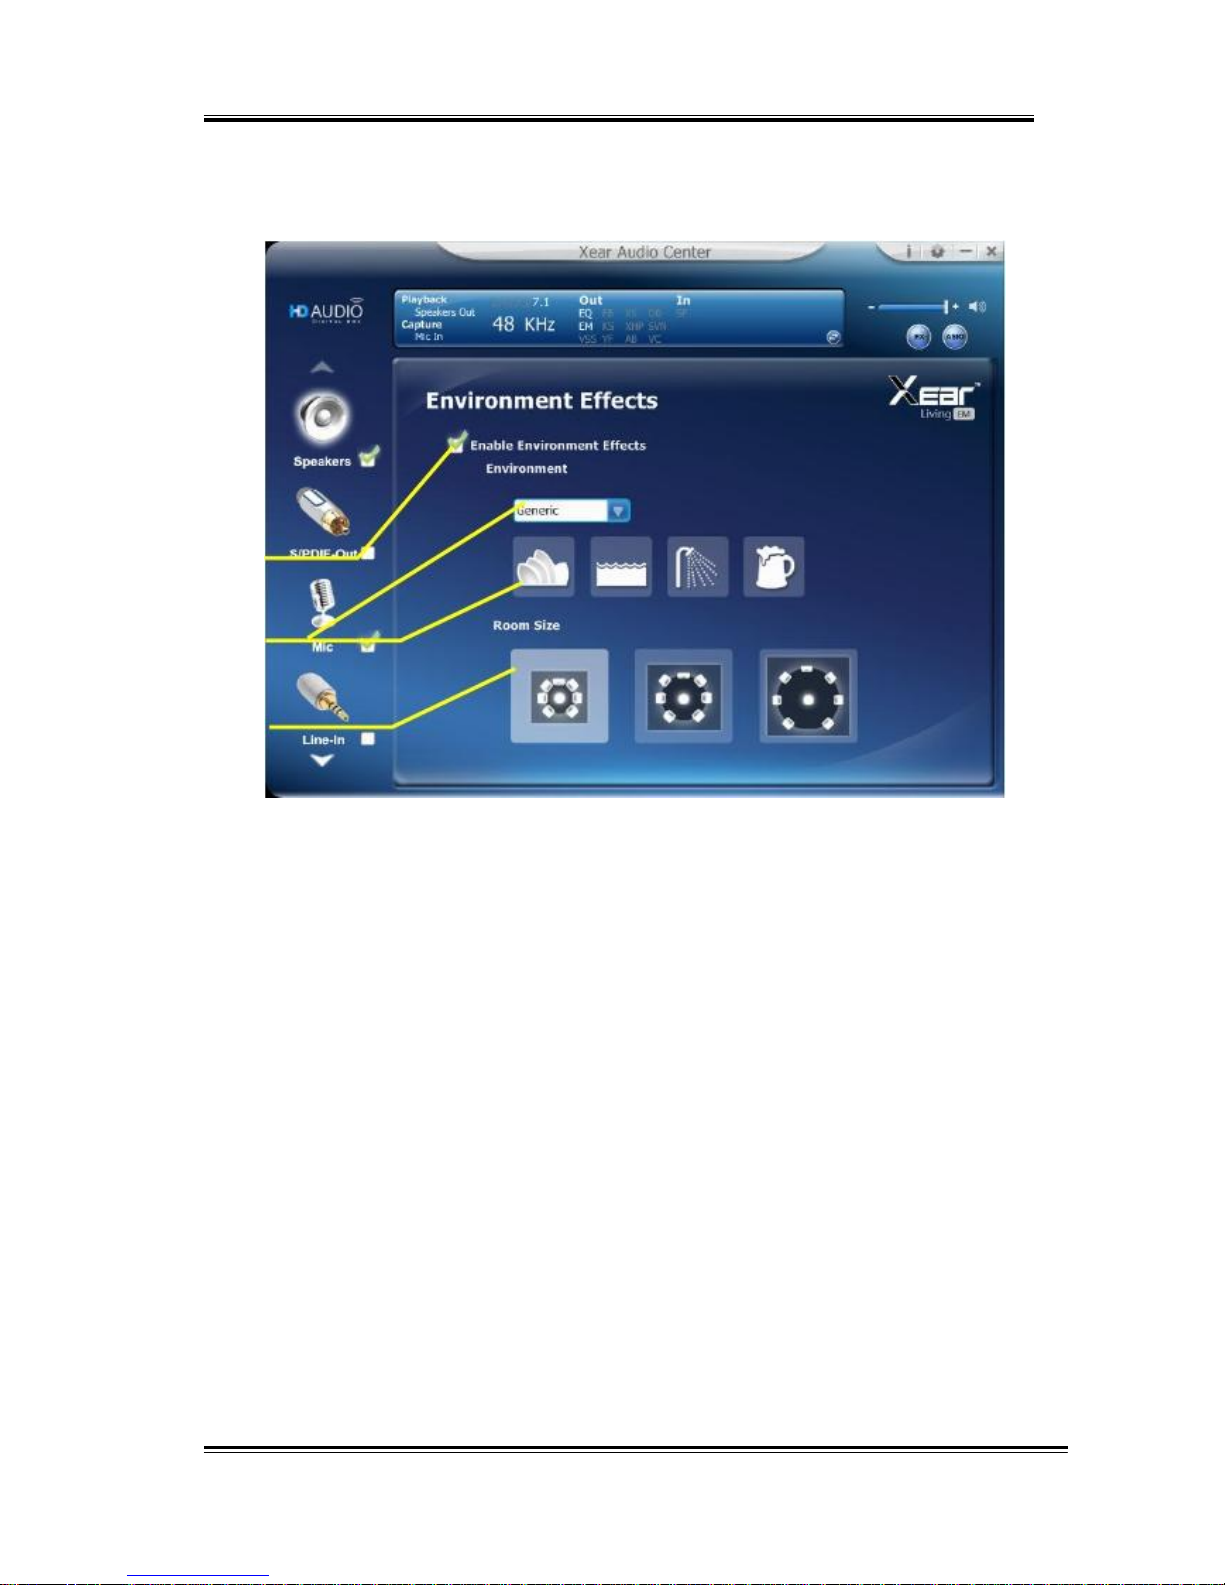
Environment Effect
1
2
3
Function Introduction
It provides 28 special environment emulations; you can hear
different sound reflection and reverberation.
1. Environment Effect enable/disable switch
Click on this check box to enable/disable Environment Effect.
2. Environment Effect mode
Click on an Environment effect button or pull the dropdown list
to choose an Environment effect.
3. Zoom Size
You can change the “Room Size” to simulate a larger or smaller
space.
29
Page 30
HD 7.1 USB AUDIO V3.0
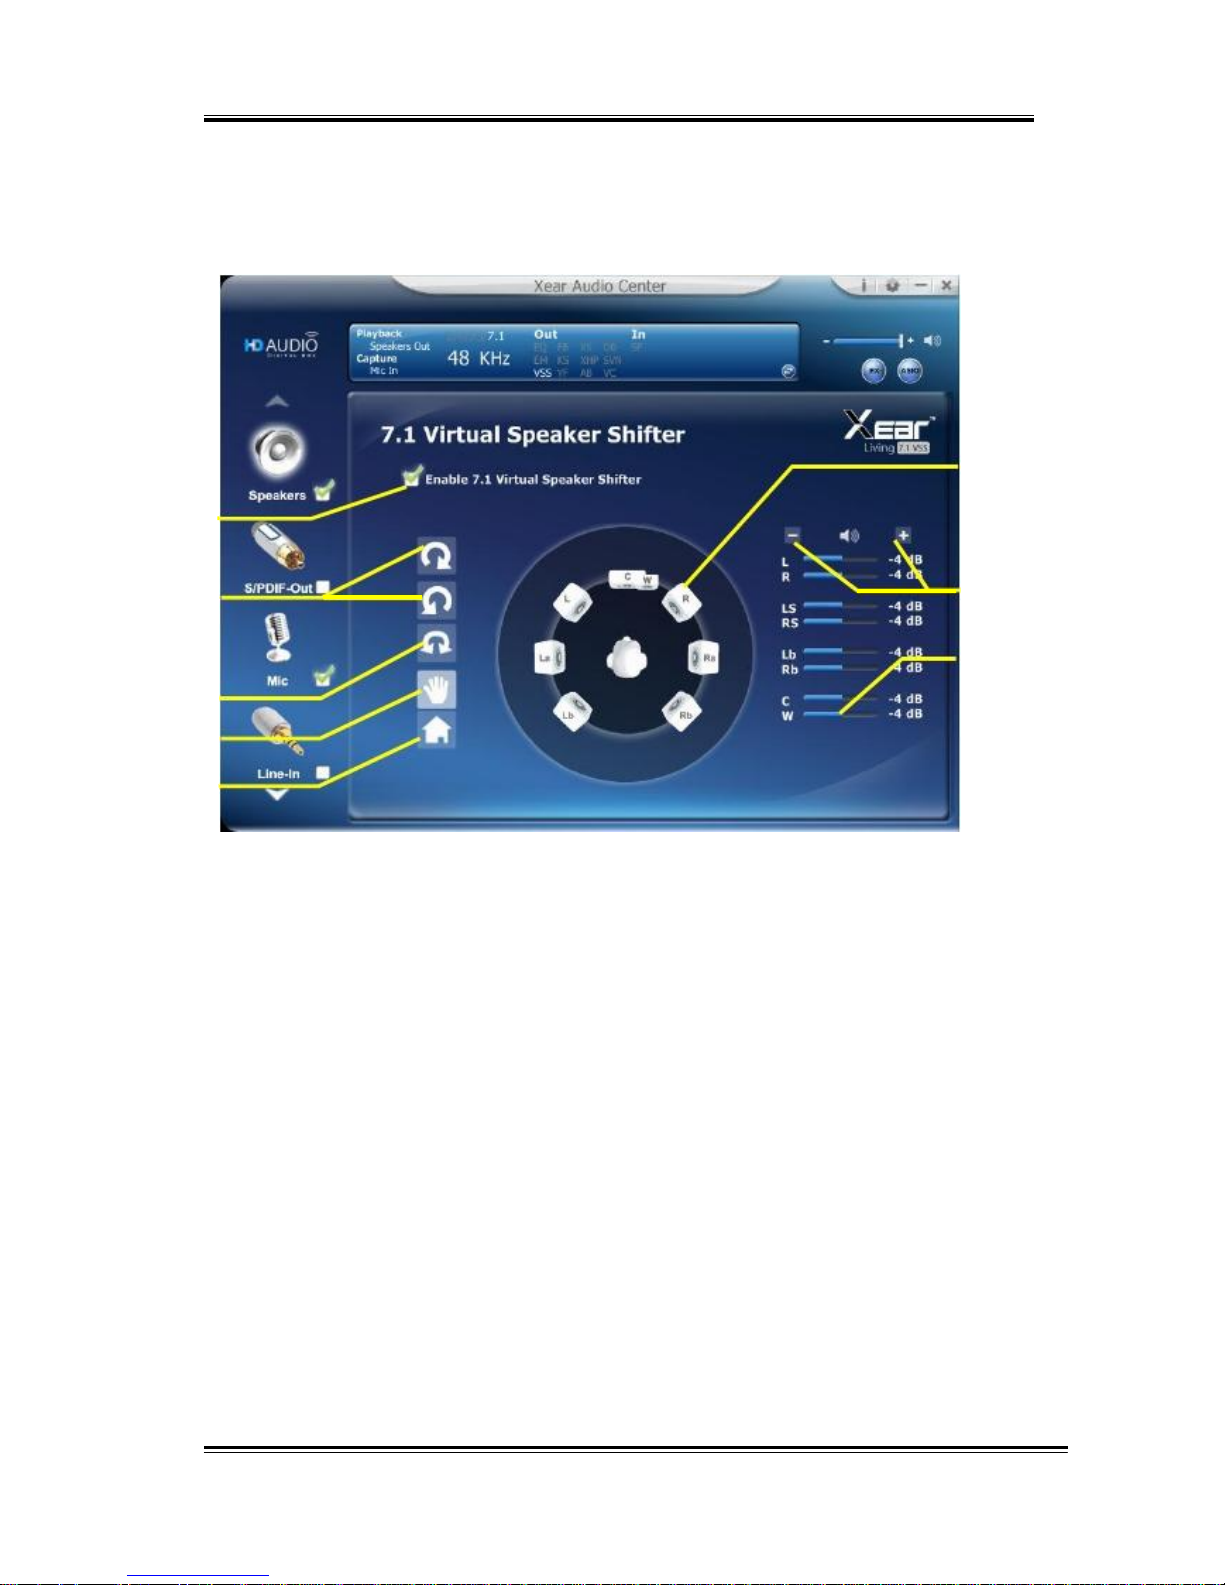
Virtual Speaker Shifter
1
2
3
4
5
6
7
8
Function Introduction
You can use this page to simulate the speaker direction and distance.
1. 7.1 Virtual speaker shifter enable/disable switch
Click on this check box to enable/disable 7.1 Virtual Speaker.
2. Auto Rotation Mode
The virtual speakers rotate clockwise or counterclockwise
slowly.
3. Manually Rotation Mode
Use mouse to rotate the virtual speakers on the screen
manually.
4. Manual Shifting (Free Moving Mode)
Use pointer and click-and-drag to move the locations of the
individual virtual speakers.
30
Page 31

HD 7.1 USB AUDIO V3.0
5. Reset
Reset the location of virtual speakers / virtual listener to default.
6. Virtual Speaker (L/R/Ls/Rs/Lb/Rb/C/W)
Each virtual speaker virtualizes one channel of the 7.1 channel
speakers in the real world.
7. Volume Control
Each virtual speaker virtualizes one channel of the 7.1 channel
speakers in the real world.
8. Volume indicator
Indicate value for each channel.
31
Page 32
HD 7.1 USB AUDIO V3.0
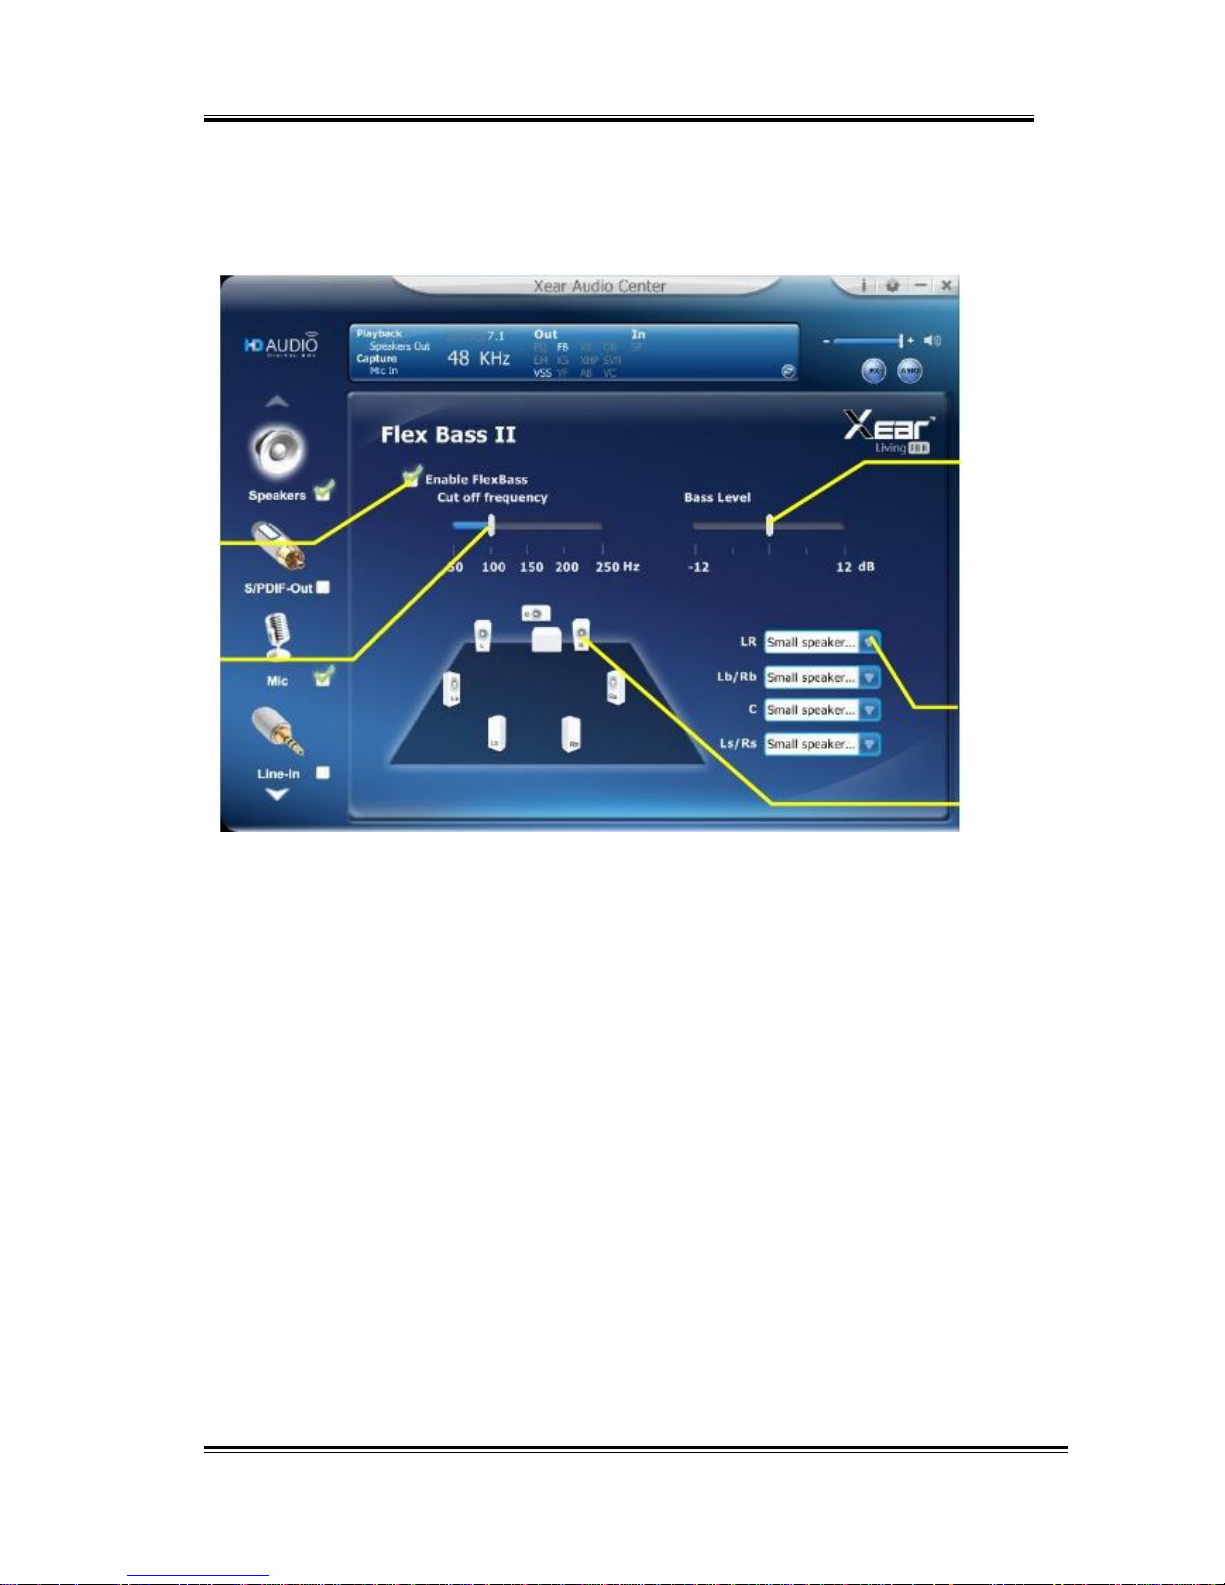
Flex Bass II
3
1
2
4
5
Function Introduction
You can use this function to increase/decrease the LFE strength.
This function can cut the low frequency band (50~250Hz) of stereo
music content (ex. Mp3, WMA, CD Audio) and transfer to
subwoofer or each speaker.
1. Flex Bass II enable/disable switch
Click on this check box to enable/disable Flex Bass II.
2. Cut Off Frequency:
The cutting range of low frequency is from 50Hz to 250Hz.
3. Bass Level:
The bass level range is from -12 to 12dB.
32
Page 33
HD 7.1 USB AUDIO V3.0
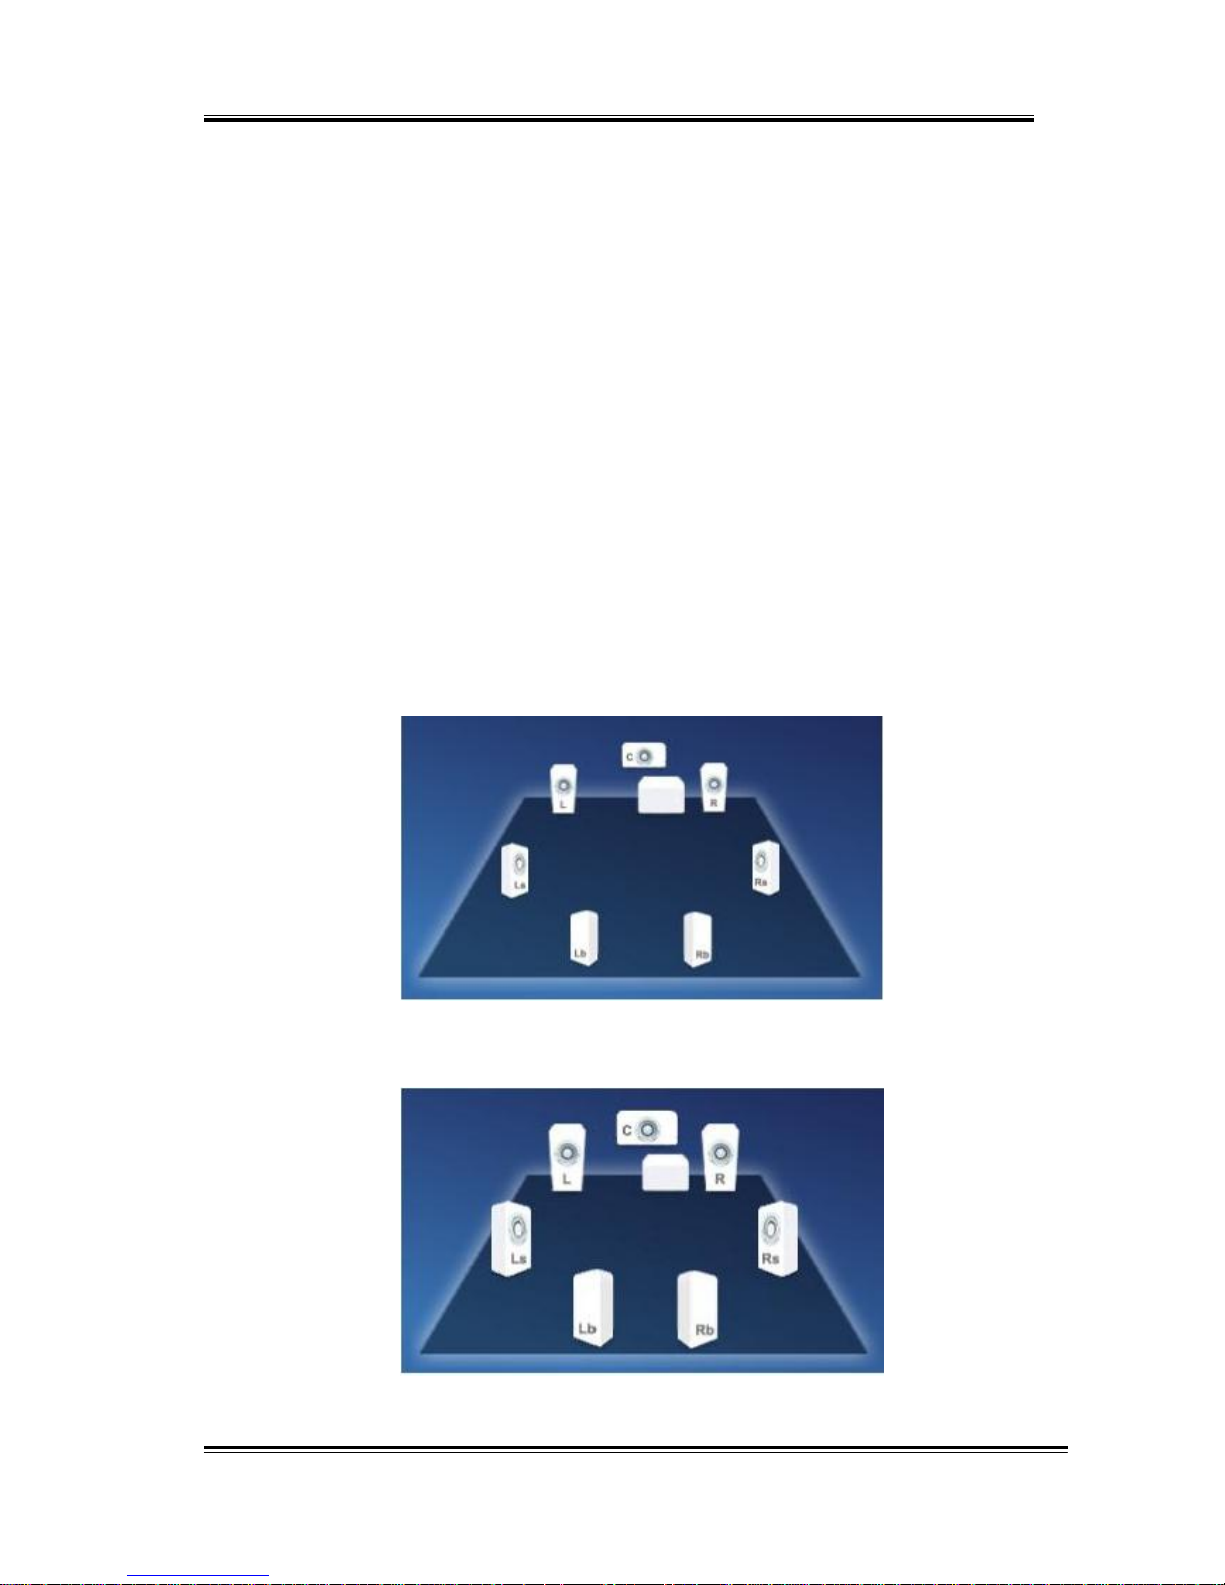
4. Speaker Size (L/R/Ls/Rs/Lb/Rb/C/W)
Small Speaker w/o bass
When the speaker size is set to small, you can hear the
sound resonance more obvious and reverberation from
subwoofer.
Large Speaker w/ bass:
When the speaker size is setting to large, you can hear the
sound resonance more obvious and reverberation from
itself.
5. Speaker Diagram
You also can check the speaker size from this home
theater diagram.
Small Speaker
Large Speaker
33
Page 34
HD 7.1 USB AUDIO V3.0
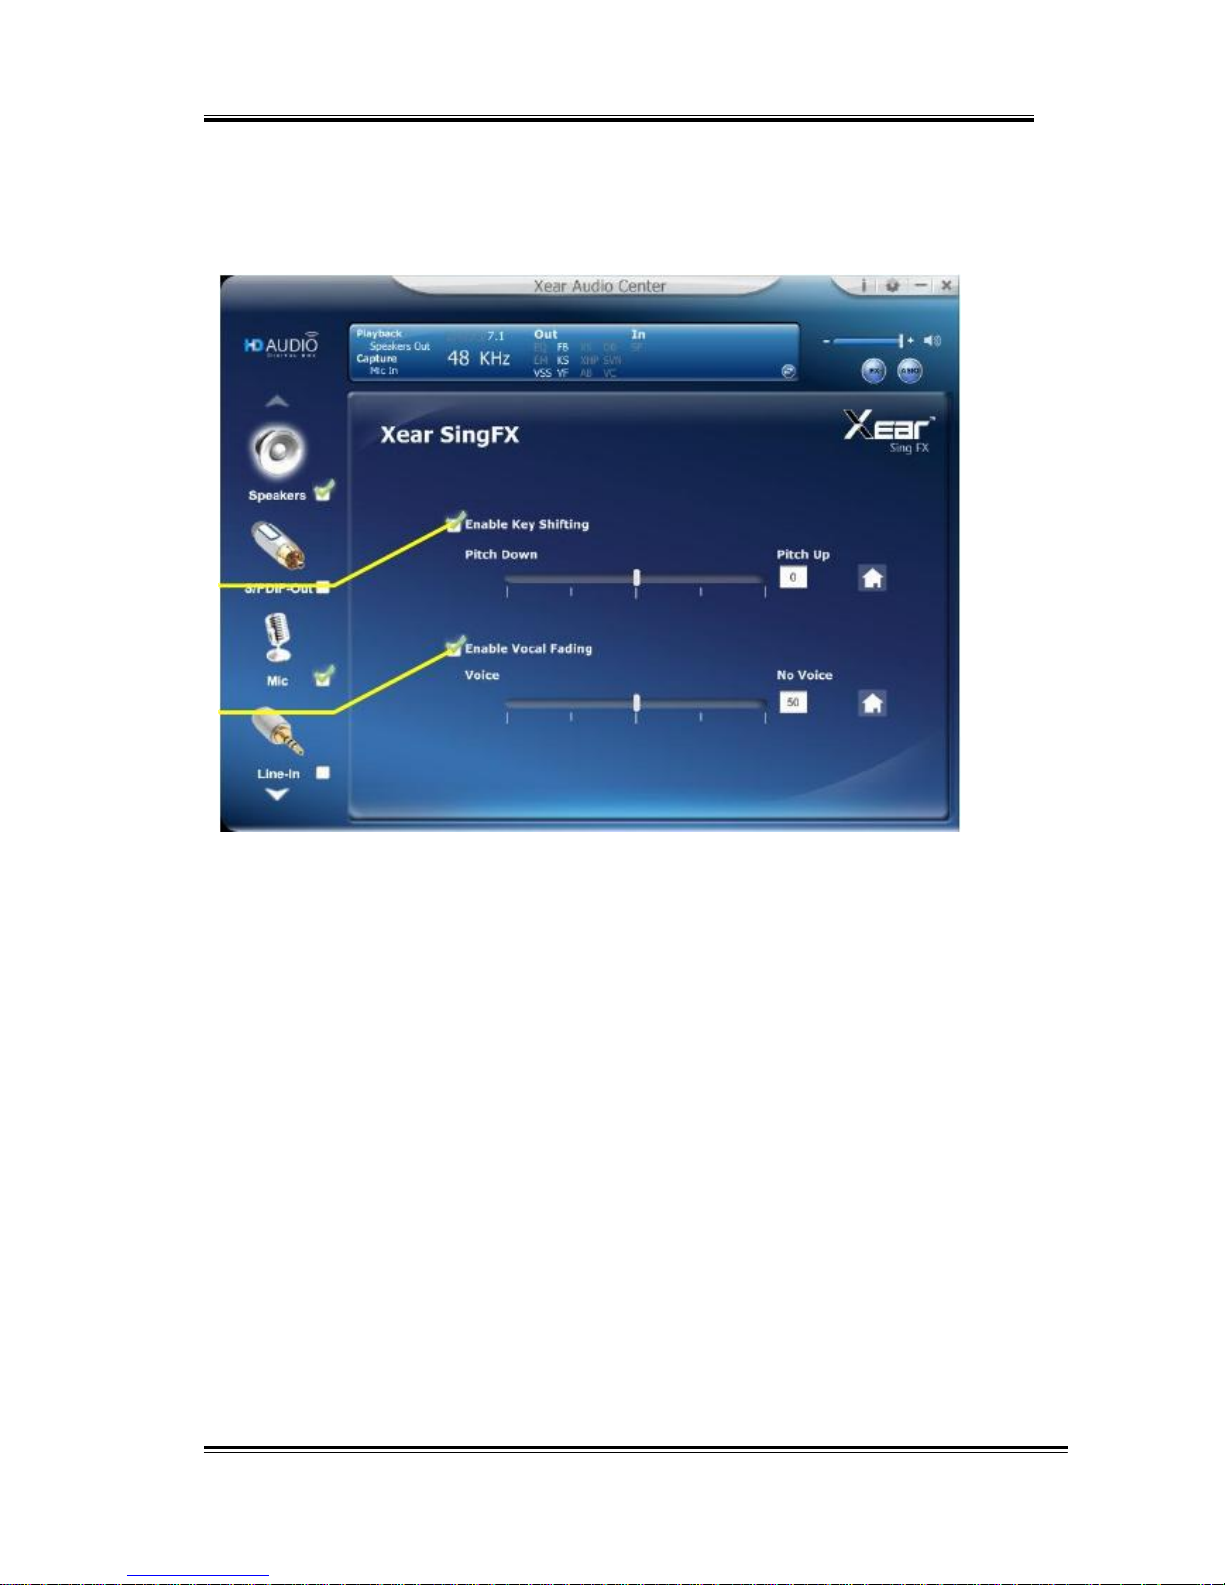
Xear SingFX
1
2
Function Introduction
Xear SingFX page provides 2 features for karaoke application.
1. Key Shifting switch
It provides the key change function, there are 4 shifting-up
steps and 4 shifting-down steps, you can use slide bar to change
the key level.
2. Vocal Fading:
It provides the vocal removal function for any stereo music
content (ex. Mp3、WMA、CD), you can use slider bar to change
the vocal fading level.
34
Page 35
HD 7.1 USB AUDIO V3.0
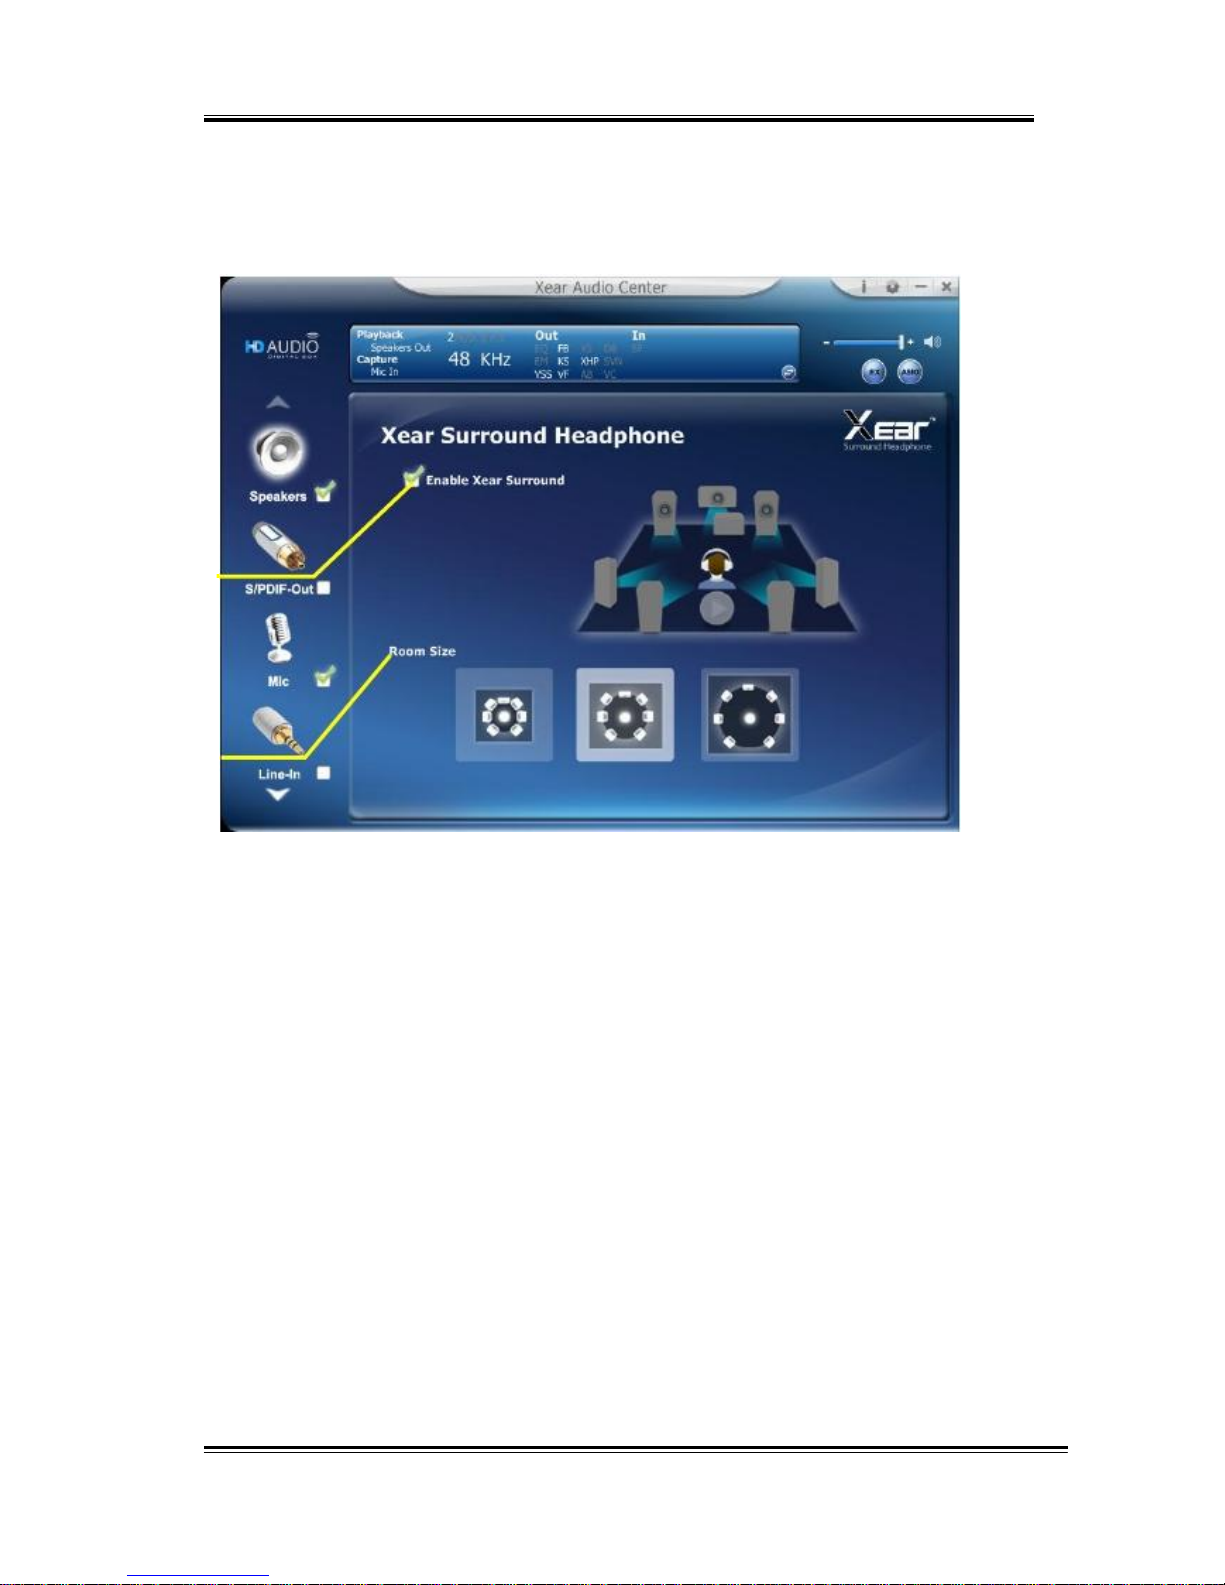
Xear Surround Headphone
1
2
Function Introduction
You can use this function to simulate a multi-speaker home theater
surround listening experience by 2 channel (Stereo) Headphone
device.
1. Enable Xear Surroud
Click this check box to enable the Xear Surround sound
effect.
2. Room Size
Xear Surround Headphone provides 3 room size modes
and one anechoic room. You can change “Room Size
Button” to simulate the difference room size and room
type.
35
Page 36
HD 7.1 USB AUDIO V3.0
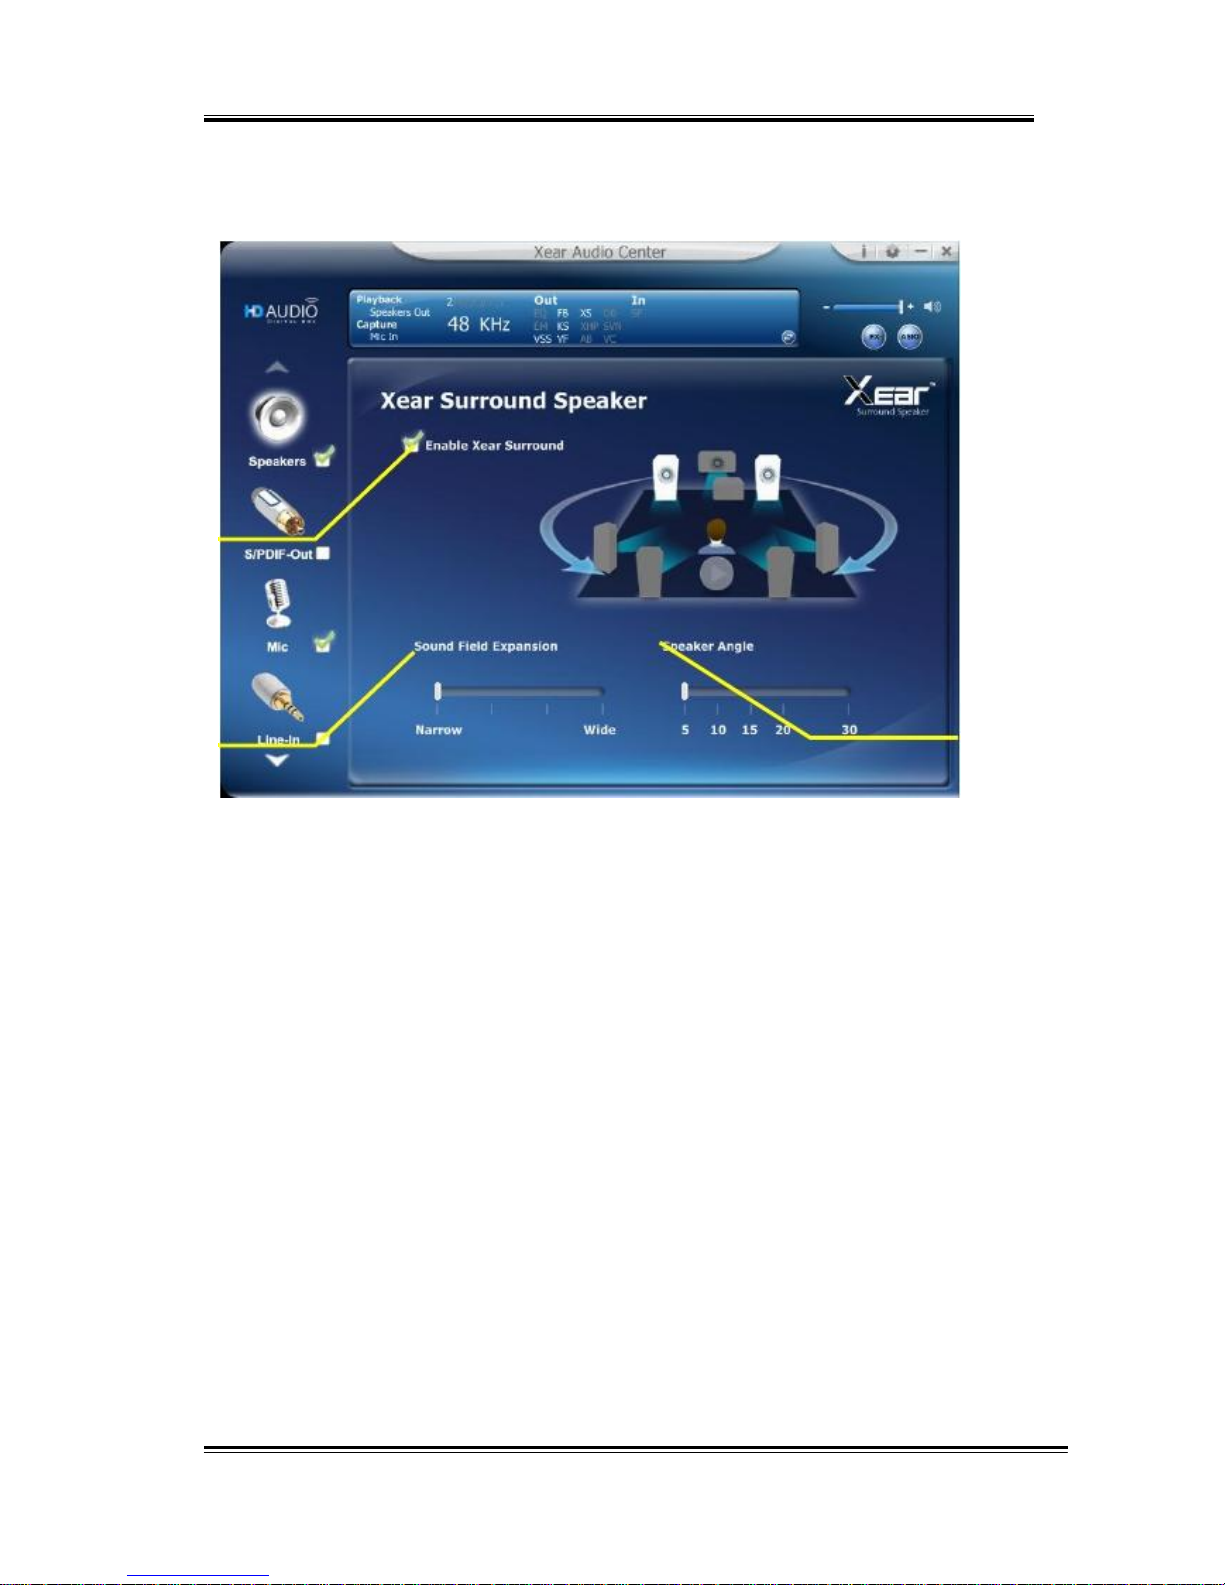
Xear Surround Speaker
1
2
2
Function Introduction
You can use this function to simulate a multi-speaker home theater
surround listening experience by 2 channel (Stereo) Speaker device.
1. Enable Xear Surround
Click this check box to enable the Xear Surround sound
effect.
2. Sound Field Expansion / Speaker Angle
Xear Surround Speaker provides the Sound Filed Expansion
and Speaker Angle for user fine tune and it can improve
the Listening experience.
36
Page 37
HD 7.1 USB AUDIO V3.0
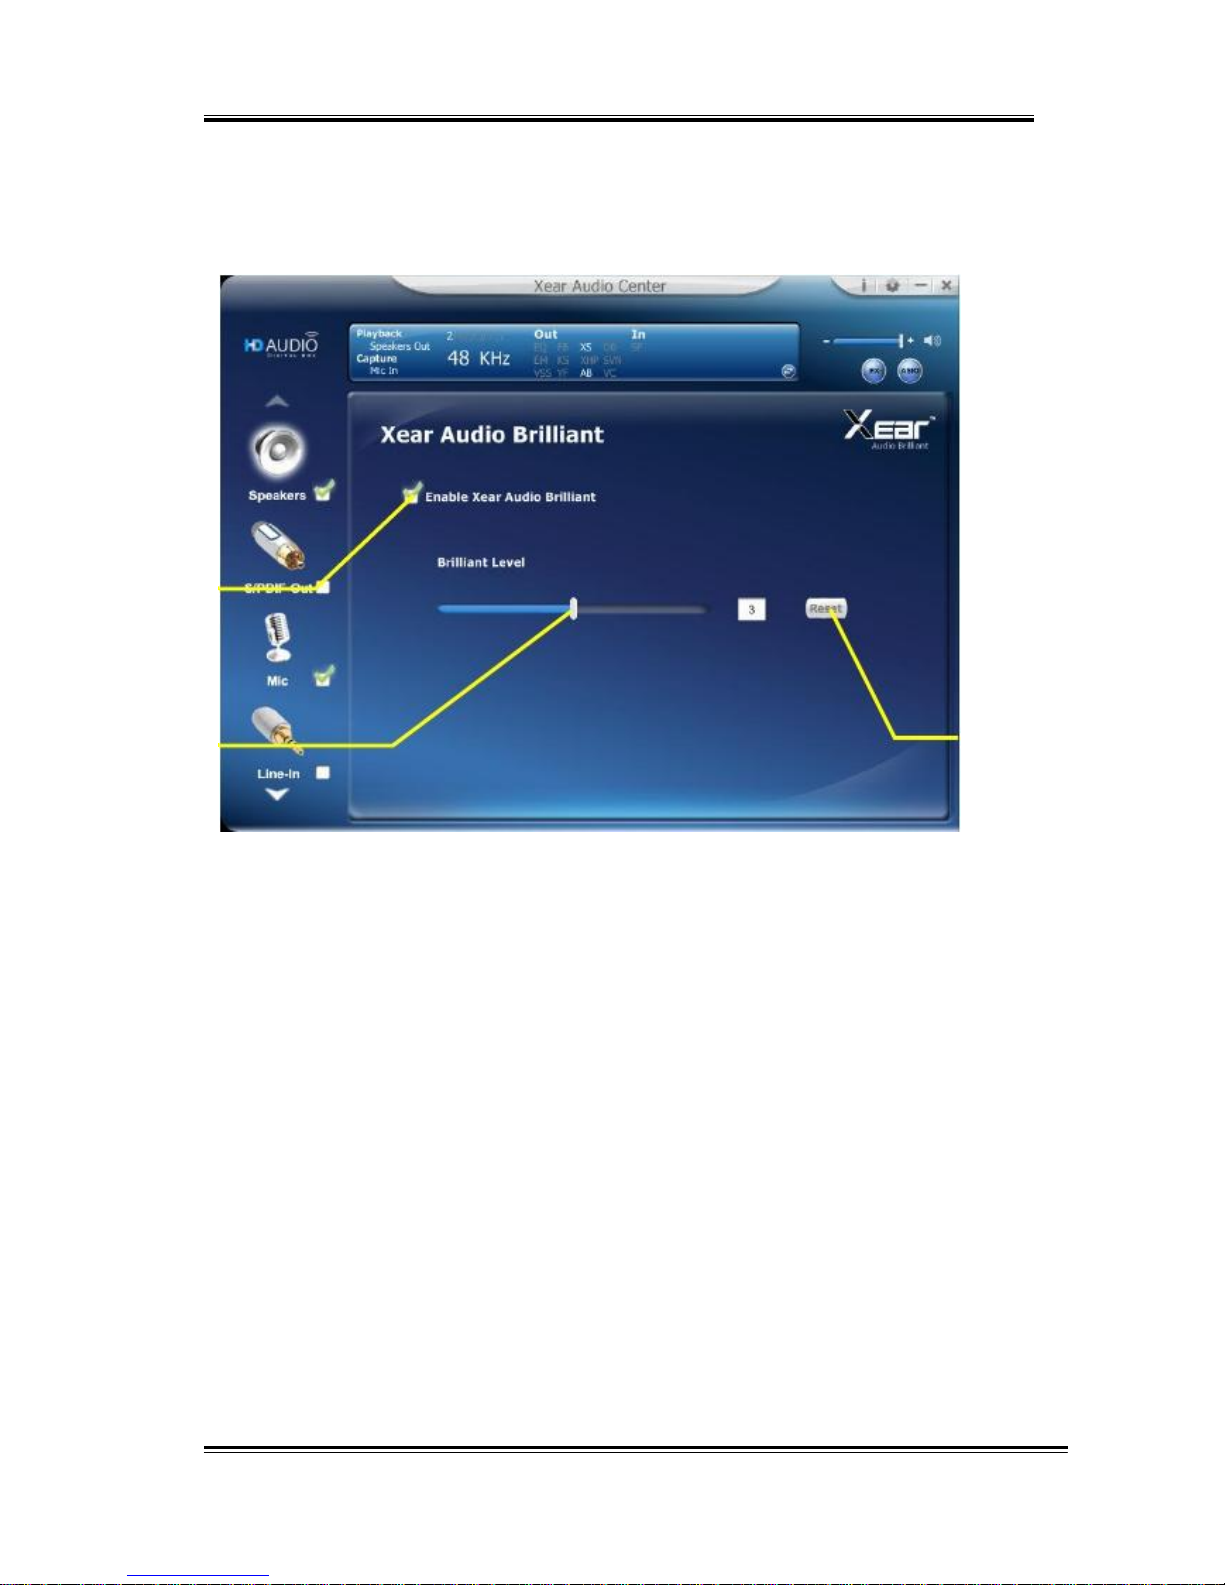
Xear Audio Brilliant
1
2
3
Function Introduction
Xear Audio Brilliant can restore the clarity and details of
compressed audio in music, movies and games (MP3, WMA, AAC,
AC3, etc.).
1. Enable Audio Brilliant
Click this check box to enable the Xear Audio Brilliant.
2. Brilliant Level
You can increase/decrease the Brilliant Level.
3. Reset
Return to default value.
37
Page 38
HD 7.1 USB AUDIO V3.0
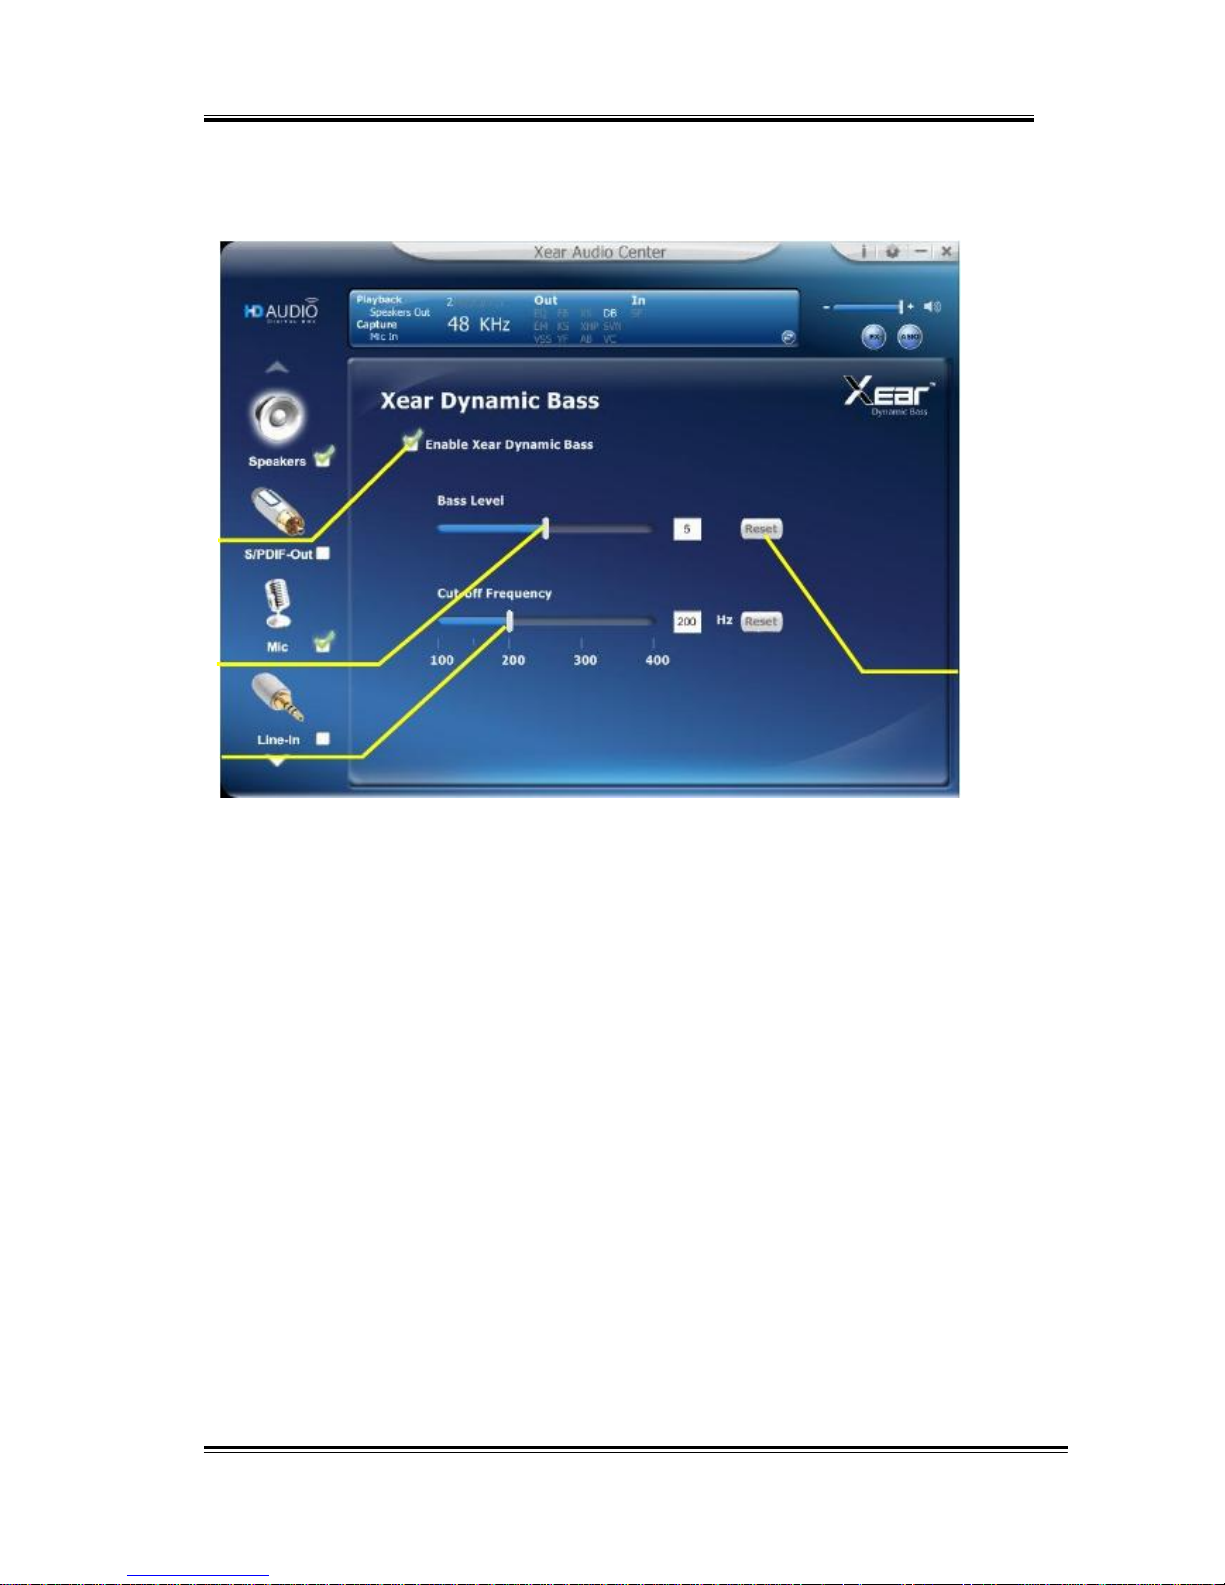
Xear Dynamic Bass
1
2
3
4
Function Introduction
Xear Dynamic Bass can increases the bass reproduction capability of
small speaker drivers by applying psychoacoustic techniques.
1. Enable Dynamic Bass
Click this check box to enable the Xear Dynamic Bass
effect.
2. Bass Level
You can increase/decrease the Bass Level.
3. Cut-Off Frequency
You can adjust the Cut-Off Frequency range, to make the
bass effect more strong.
4. Reset
Return to default value.
38
Page 39
HD 7.1 USB AUDIO V3.0
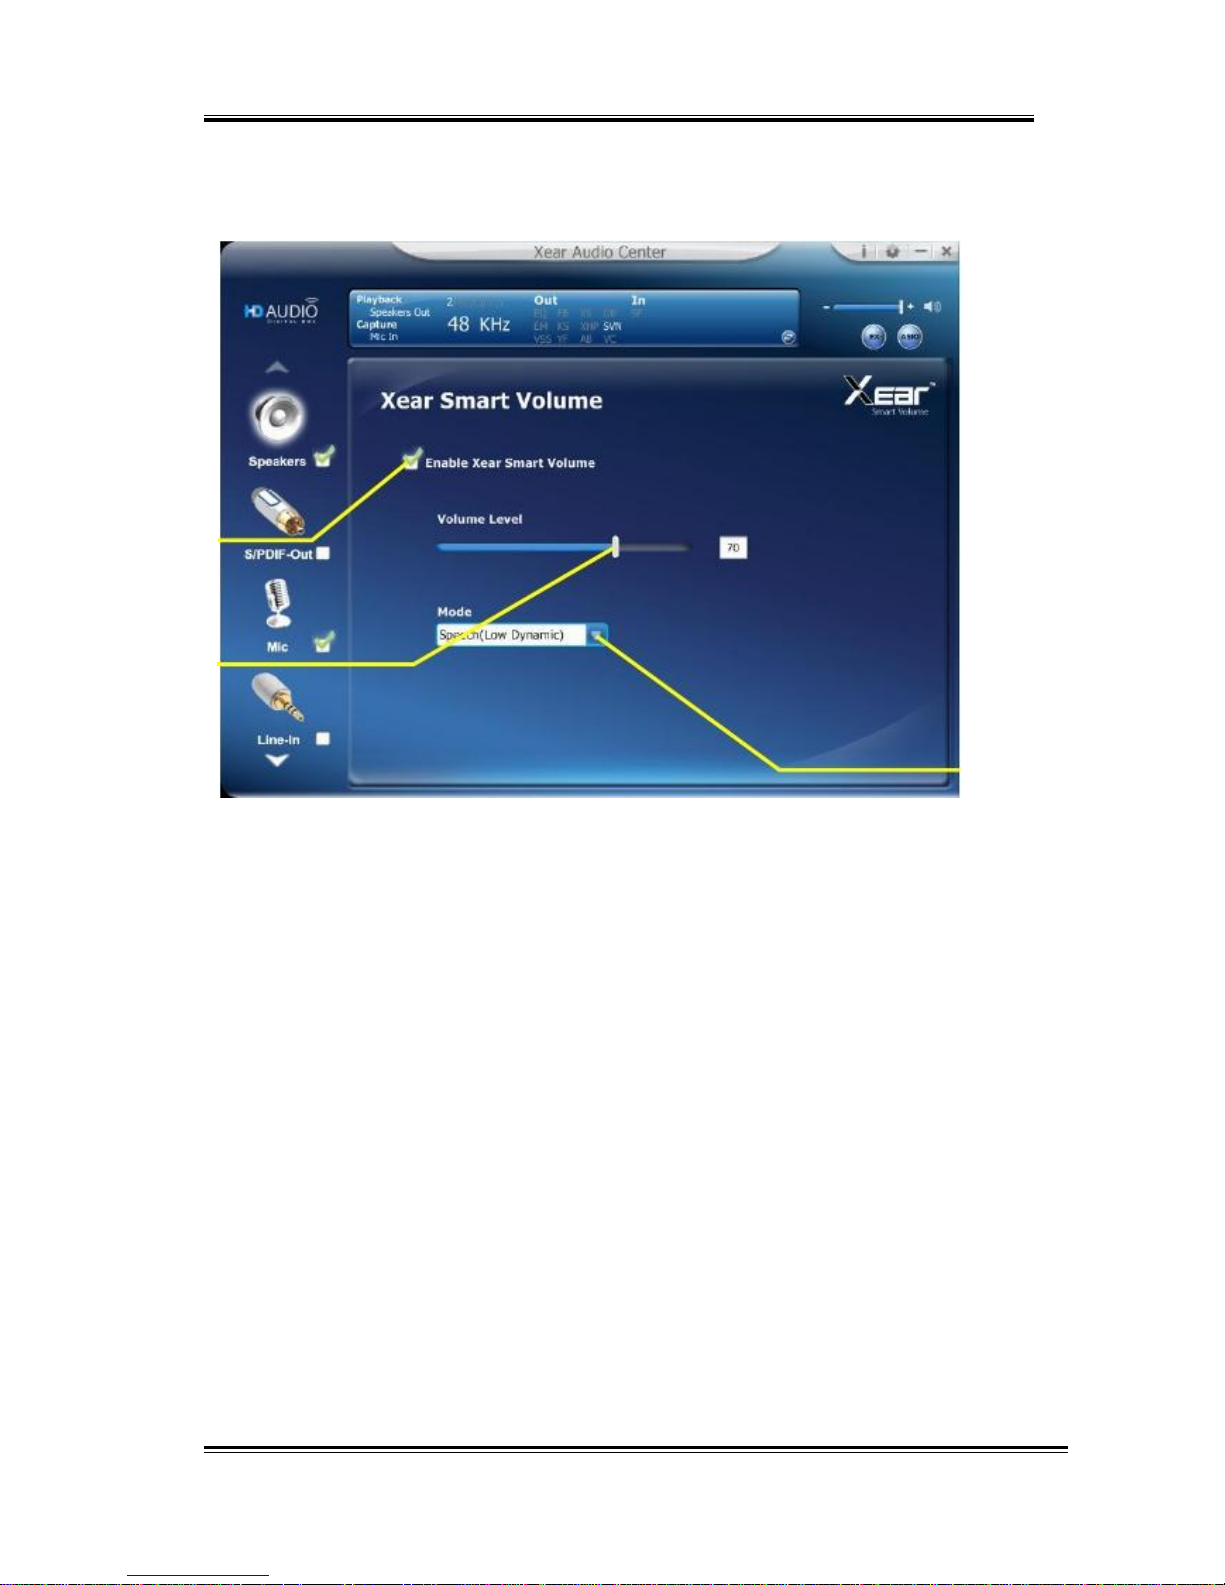
Xear Smart Volume
1
2
3
Function Introduction
Xear Smart Volume can normalize sound levels of music to reduce
the frequencies required for volume adjustments on Televisions,
Docking Speakers, PCs and other consumer products.
1. Enable Smart Volume
Click this check box to enable the Xear Smart Volume
2. Volume Level
You can set normalize sound level.
3. Mode
You can choose Music mode and Speech Mode for your needs.
39
Page 40
HD 7.1 USB AUDIO V3.0
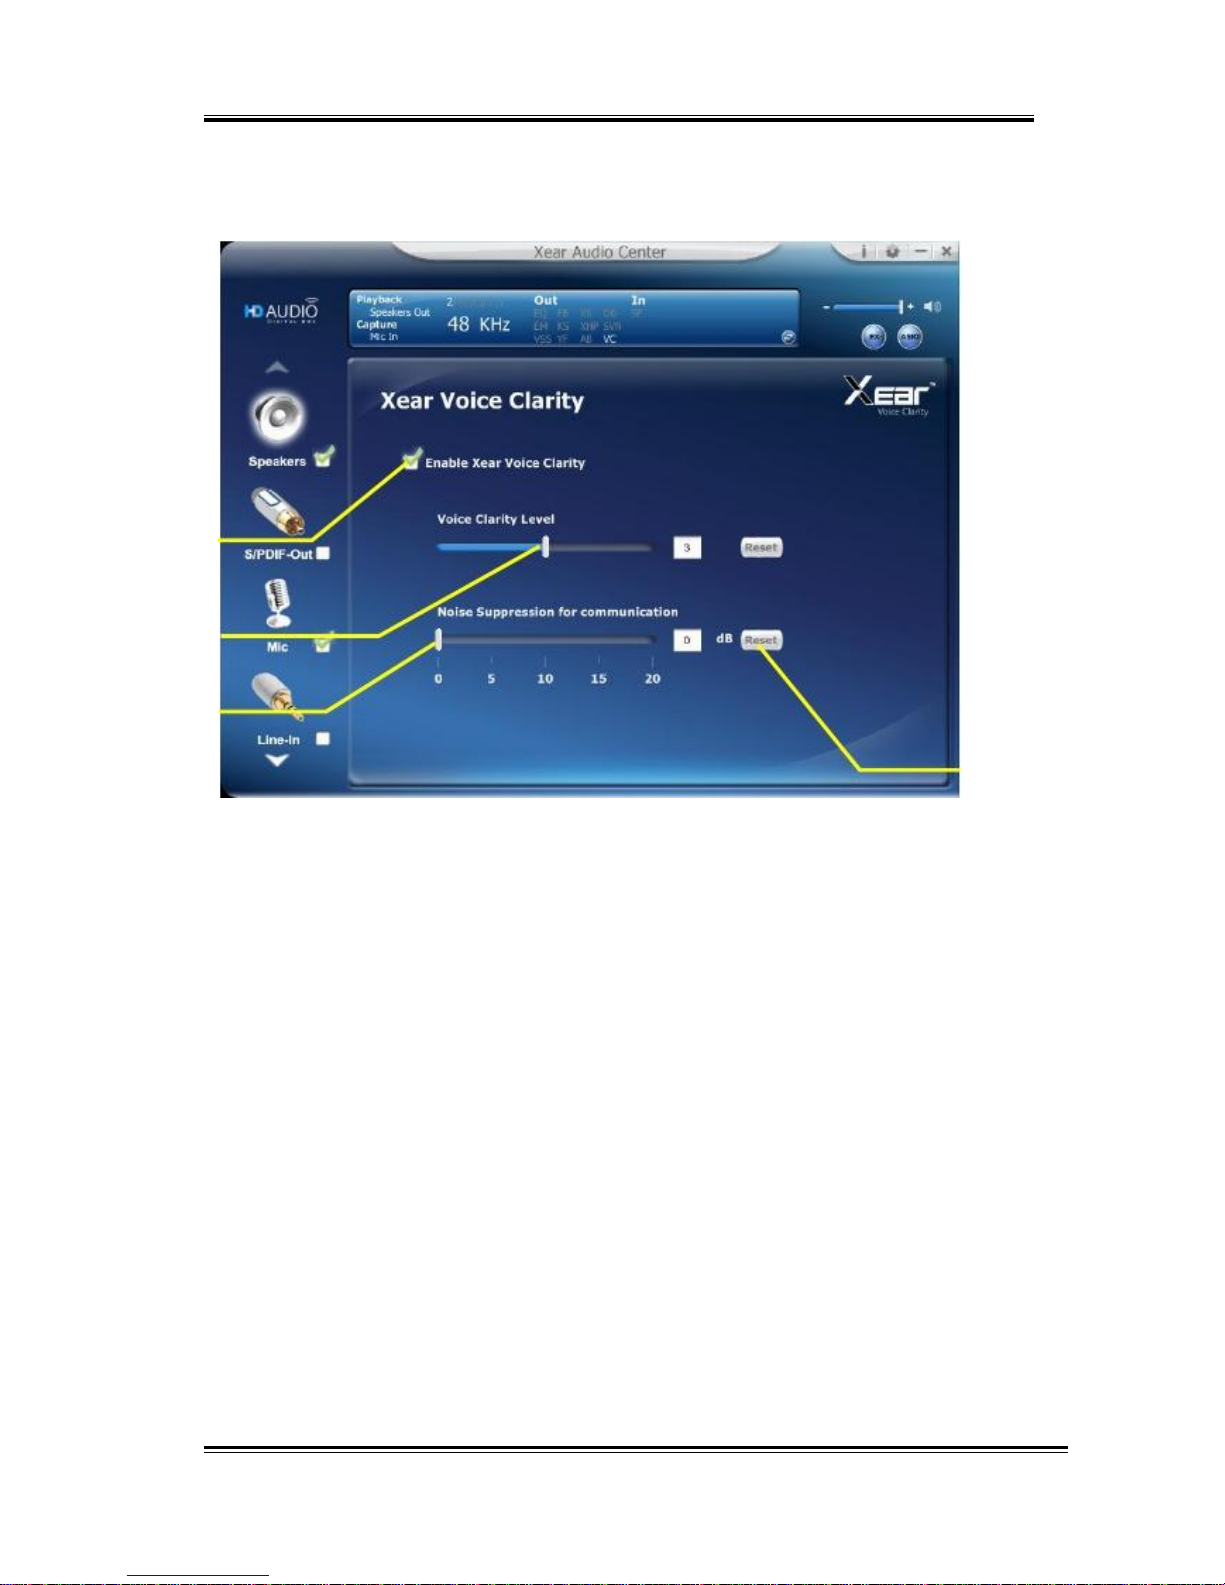
Xear Voice Clarity
1
2
3
4
Function Introduction
Xear Voice Clarity can Increases clarity, intelligibility, and
prominence of receiving voice in VOIP, game, music, or movies
without suppressing or changing other audio.
1. Enable Voice Clarity
Click this check box to enable the Xear Voice Clarity effect.
2. Voice Clarity Level
You can increase the volume Level to make the voice more clear.
3. Noise Suppression for communication
You can eliminate the background noise.
4. Reset
Return to default volume.
40
Page 41
HD 7.1 USB AUDIO V3.0
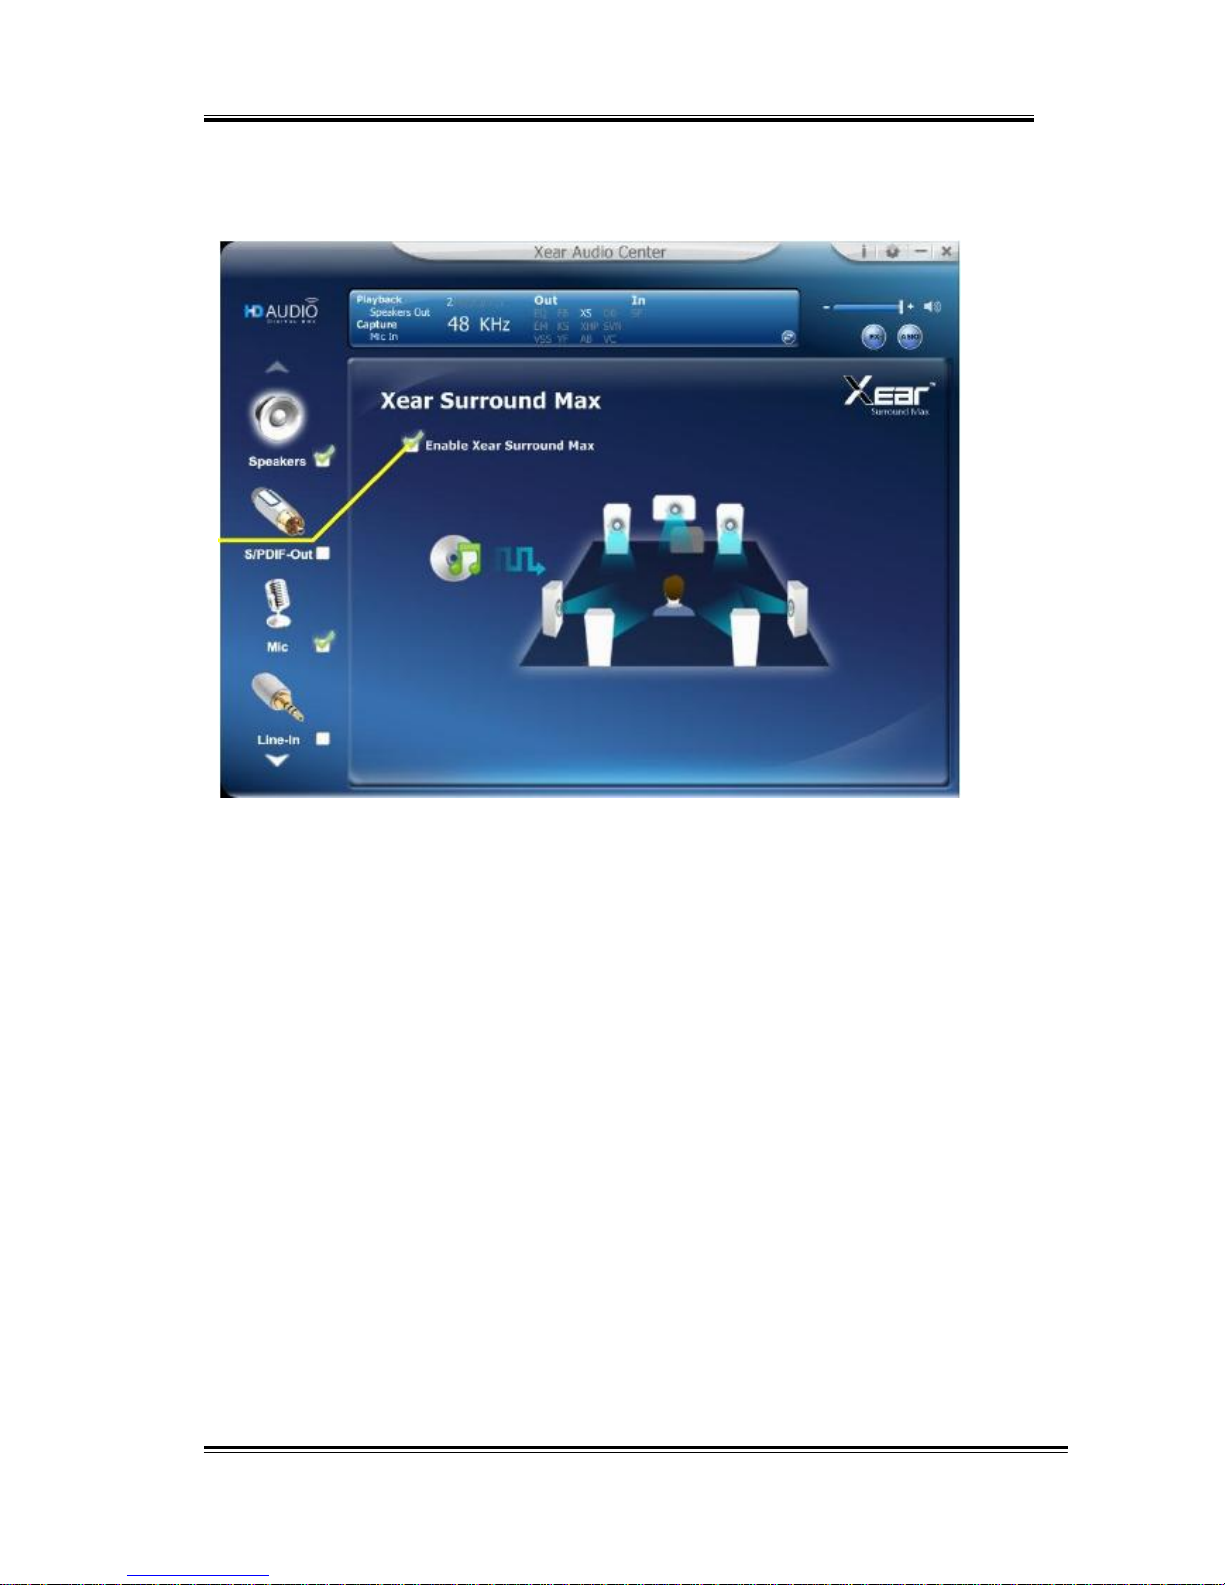
Xear Surround Max
1
Function Introduction
Xear Surround Max can expand stereo audio content to each
output channel, when you playing mp3 music file and enable this
function, you can hear music from each speaker (8 speakers).
1. Enable Surround Max
Click this check box to enable the Xear Surround Max.
41
Page 42
HD 7.1 USB AUDIO V3.0
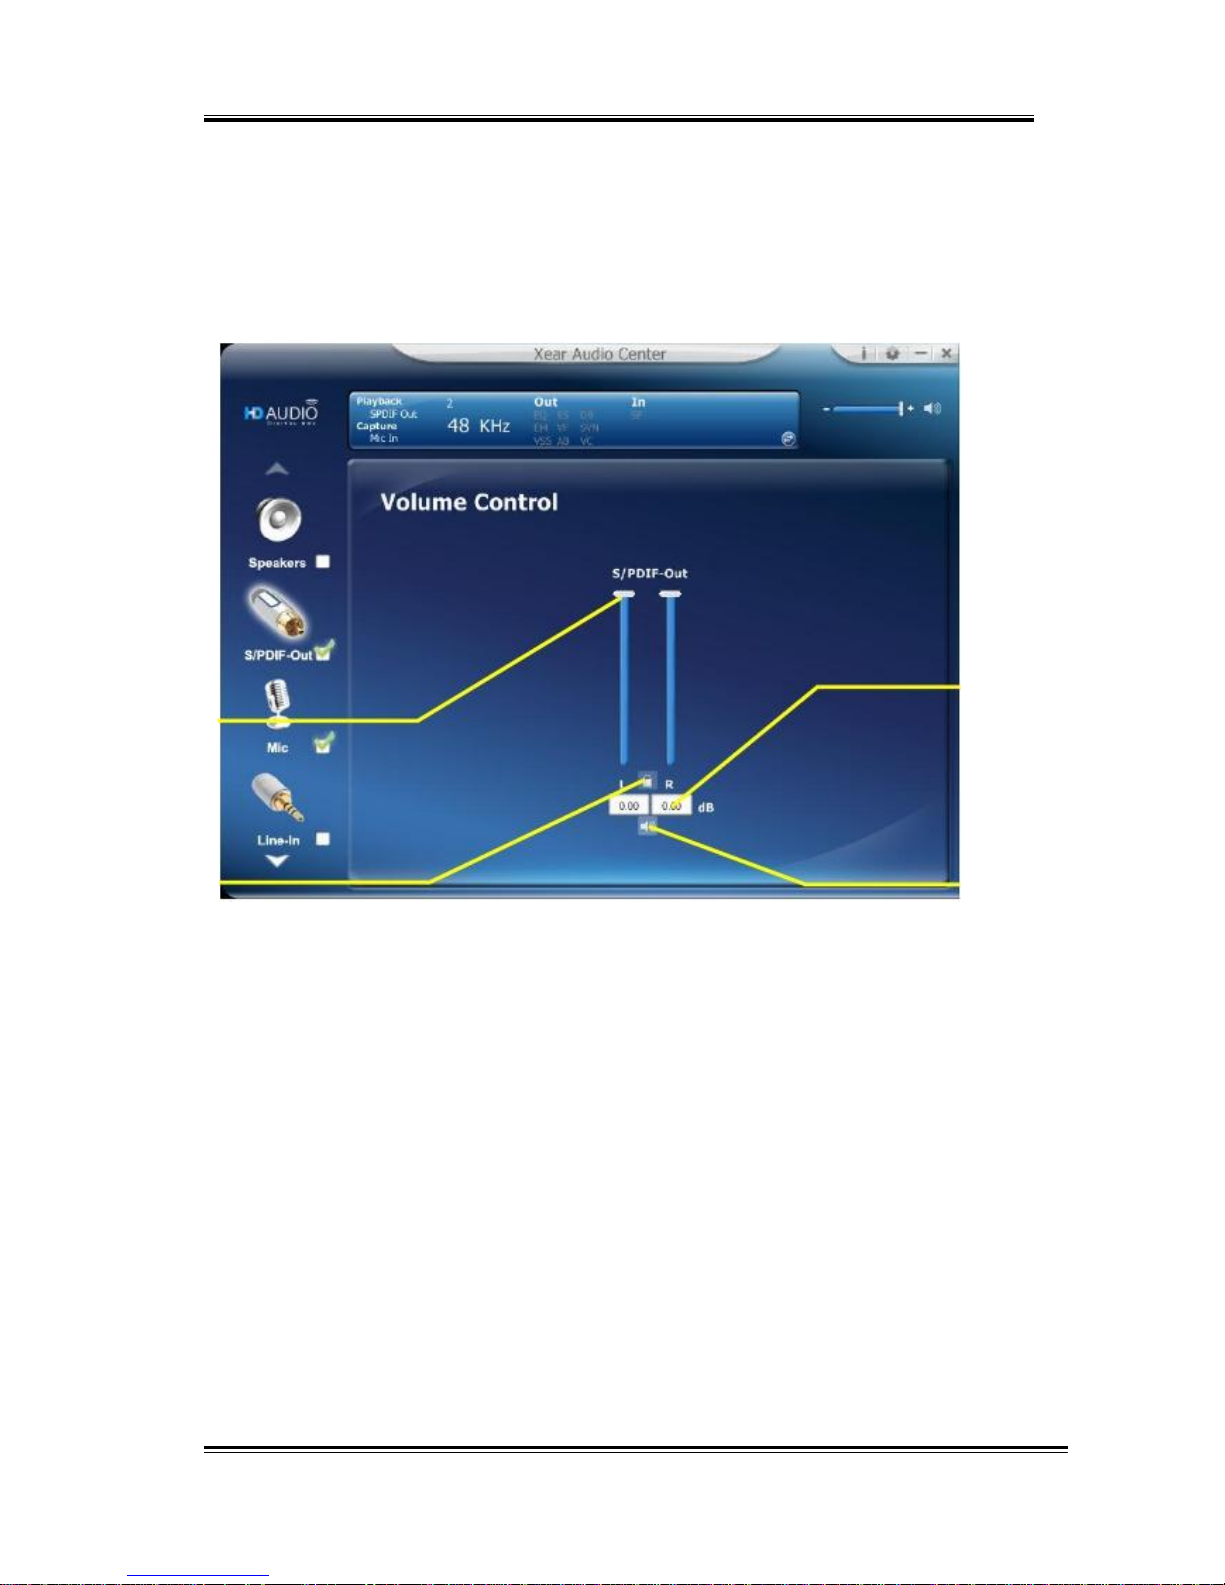
SPDIF-Out Device function introduction
Volume control Page
3
1
2
4
Function Introduction
This function page provides a volume control for SPDIF-Out device.
1. Volume control bar:
SPDIF-Out
– You can use this bar to increase/decrease volume
level.
2. Left/ Right Channel Lock:
Clicking on the Lock/ Un-Lock button can sync the left-channel
and right-channel volume.
3. dB Input Area:
You can directly fill-in a dB value into this text box to set the
volume level.
4. Mute / Un-mute:
Clicking on the mute/ un-mute button can mute SPDIF-Out.
42
Page 43
HD 7.1 USB AUDIO V3.0
Sample Rate Page
1
2
Function Introduction
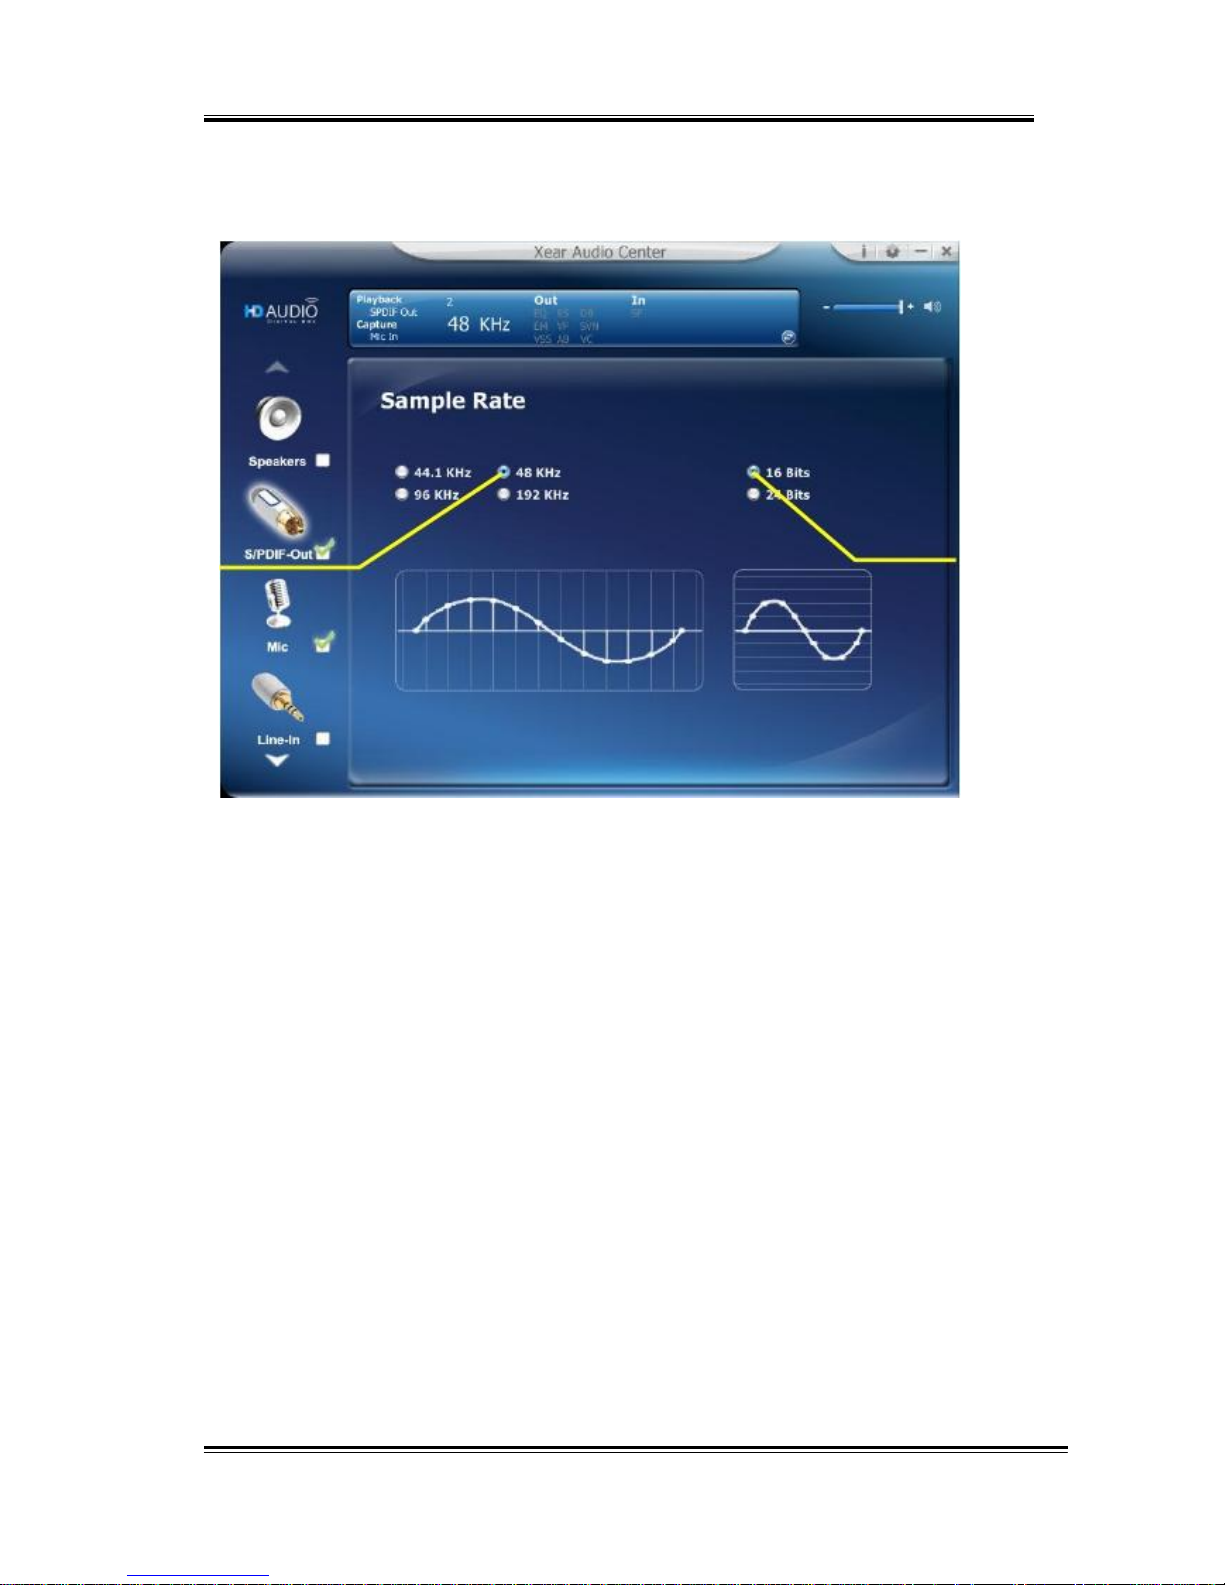
This function page provides a sample rate setting for SPDIF-Out
device.
1. Sample Rate button
44.1 KHz -
set playback sample rate to 44.1 KHz
48 KHz -
set playback sample rate to 48 KHz
96 KHz -
set playback sample rate to 96 KHz
192 KHz -
set playback sample rate to 192 KHz
2. Bit Depth button
16 bit -
set playback bit depth to 16 bit
24 bit -
set playback bit depth to 24 bit
43
Page 44
HD 7.1 USB AUDIO V3.0
Mic, Line-in Device function introduction
Volume control Page
3
1
2
4
Function Introduction
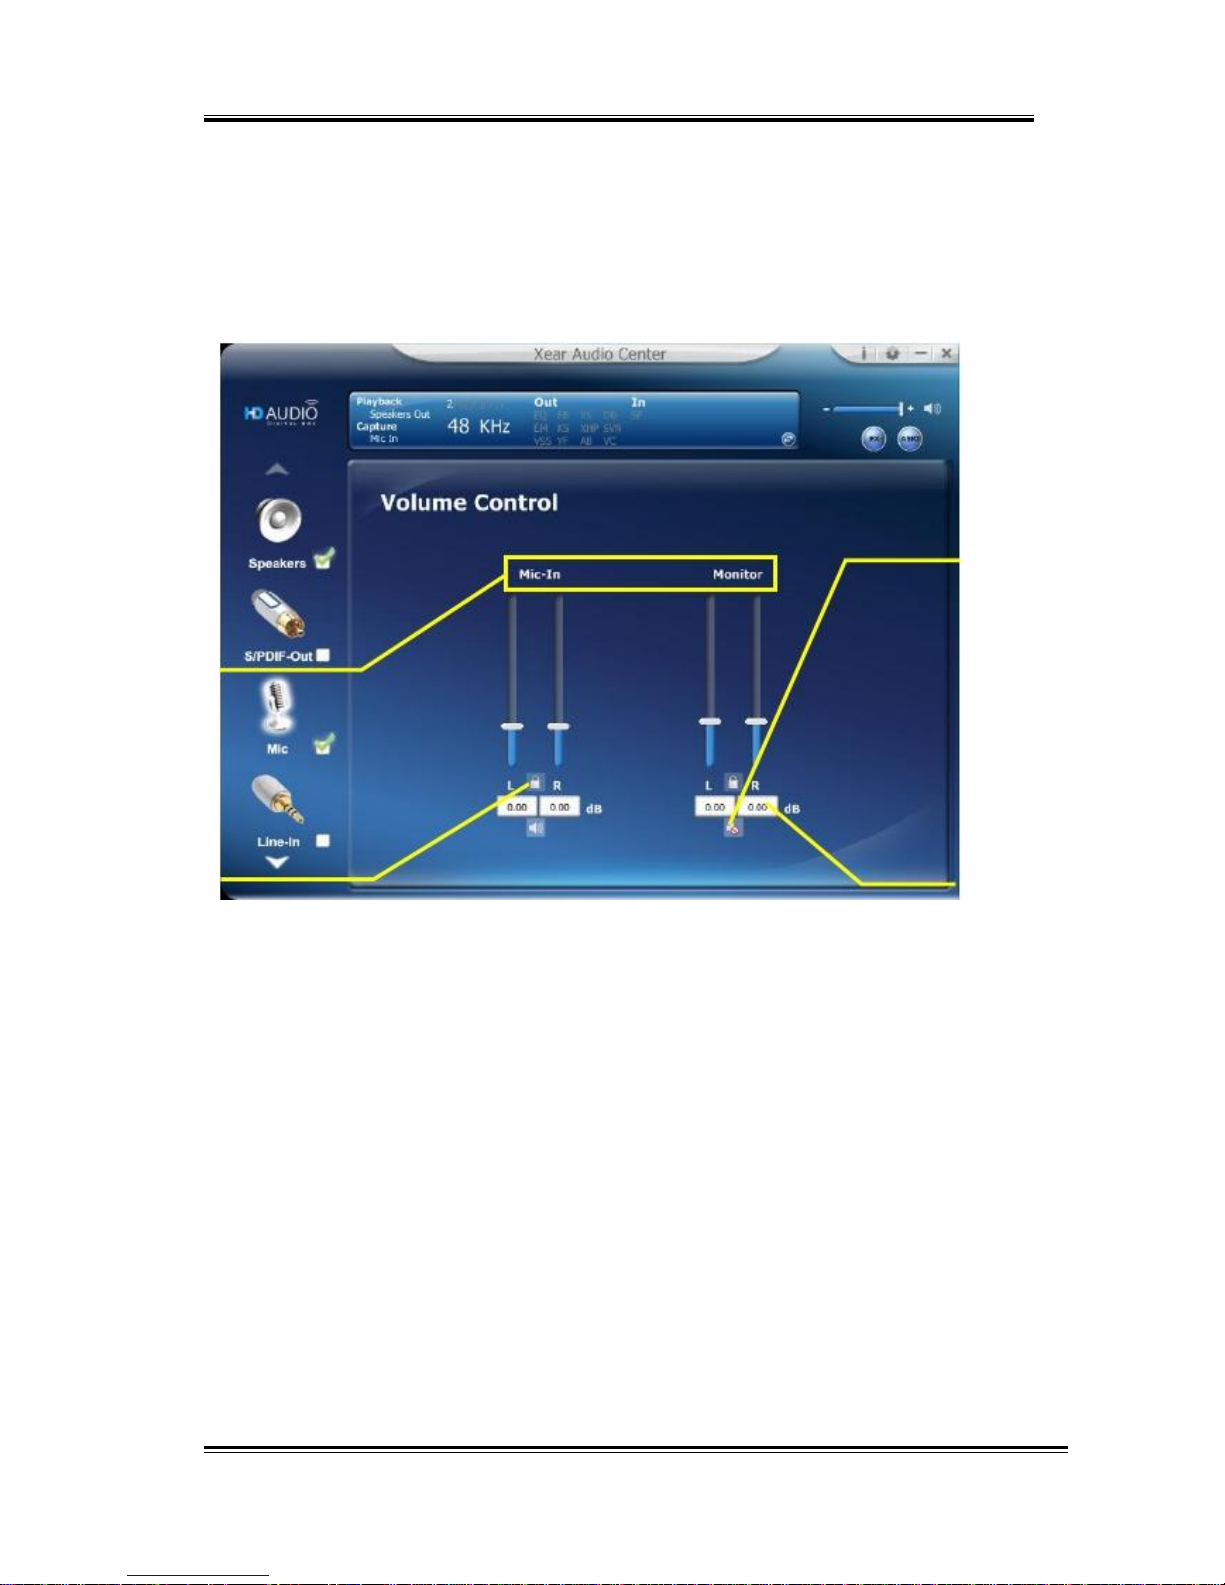
This function page provides the recording volume and monitor the
volume control of Microphone device. (Same as Line-in device.)
1. Volume control bar:
Mic-In
– It can adjust the volume level of recording.
Monitor
- It can adjust the volume level of Mic-in monitor.
2. Left/ Right Channel Lock:
Clicking on the Lock/ Un-Lock button can sync the left-channel
and right-channel volume.
3. Mute / Un-mute:
Clicking on the Mute/ Un-Mute button can mute all channels.
4. dB Input Area
You can directly fill-in a dB value into this text box to set the
volume level.
44
Page 45
HD 7.1 USB AUDIO V3.0
Sample Rate Page
1
2
Function Introduction
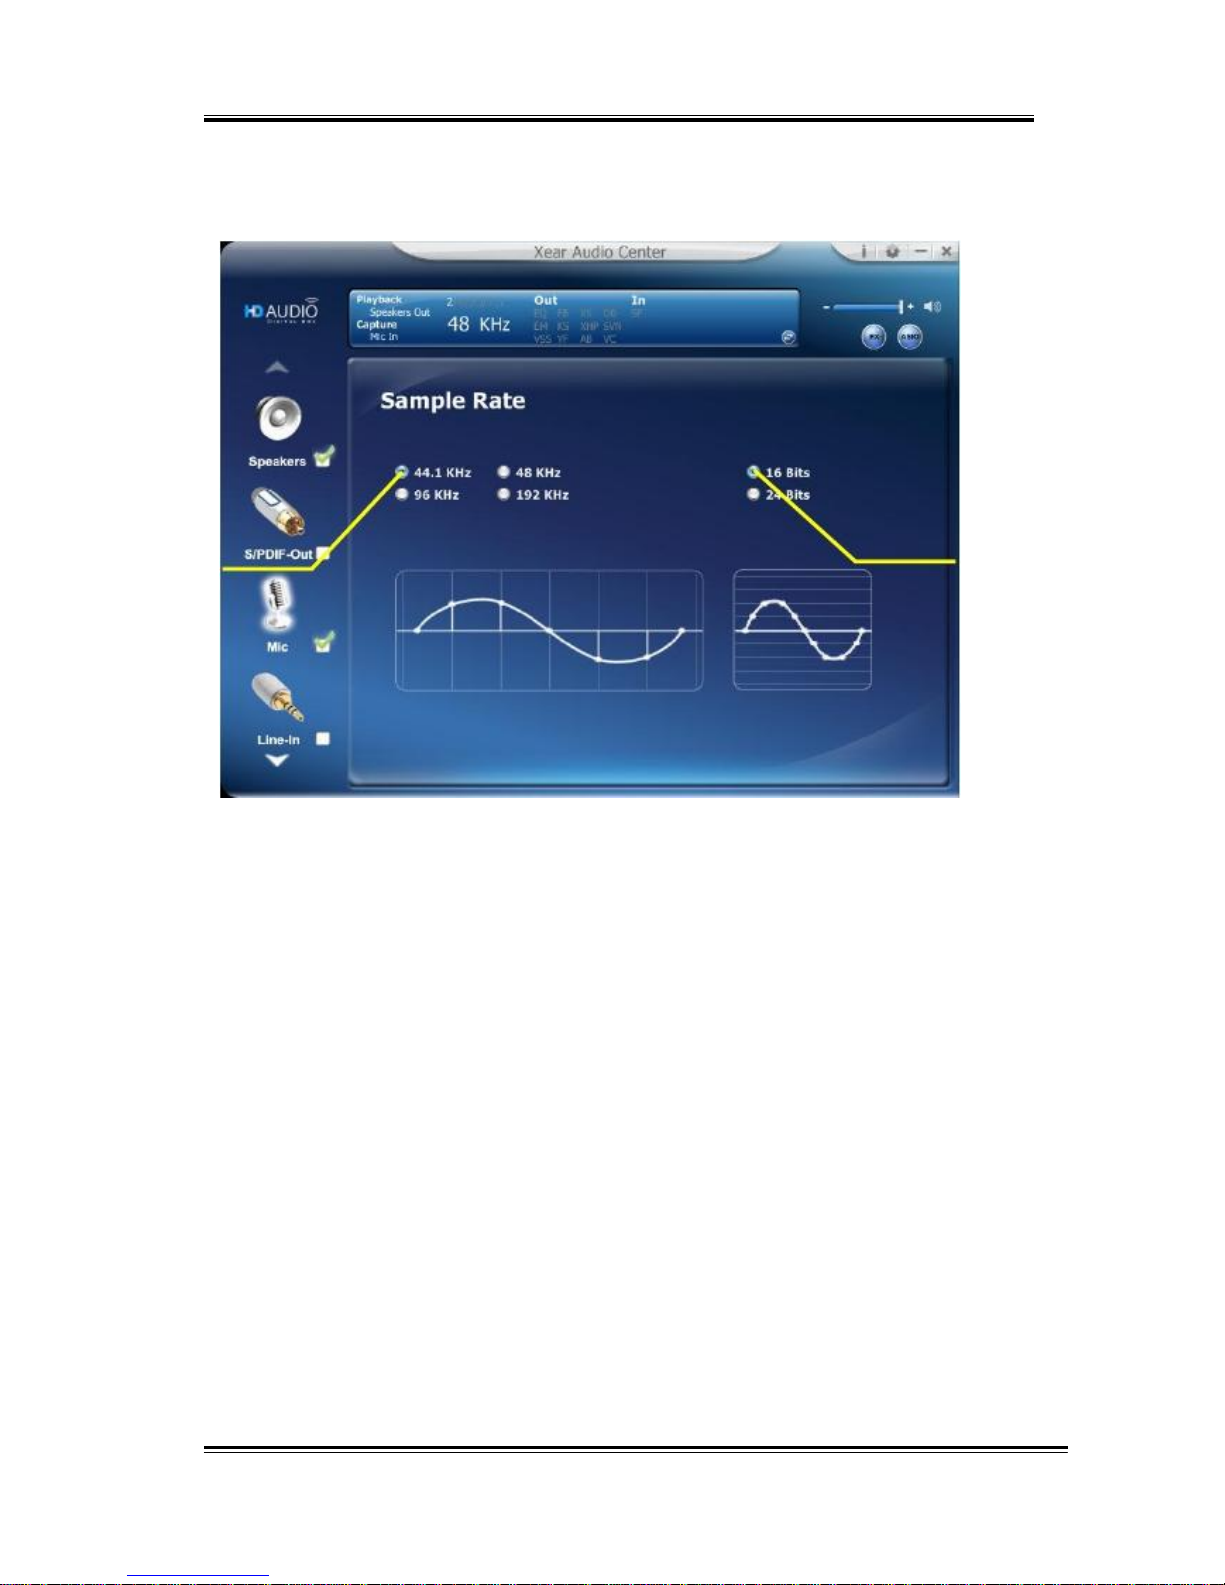
This function page provides a sample rate setting for Microphone
device.
1. Sample Rate button
44.1 KHz -
set Mic recording sample rate to 44.1 KHz
48 KHz -
set Mic recording sample rate to 48 KHz
96 KHz -
set Mic recording sample rate to 96 KHz
192 KHz -
set Mic recording sample rate to 192 KHz
2. Bit Depth button
16 bit -
set playback bit depth to 16 bit
24 bit -
set playback bit depth to 24 bit
45
Page 46
HD 7.1 USB AUDIO V3.0
Xear SingFX Page
(Microphone device only)
1
2
Function Introduction
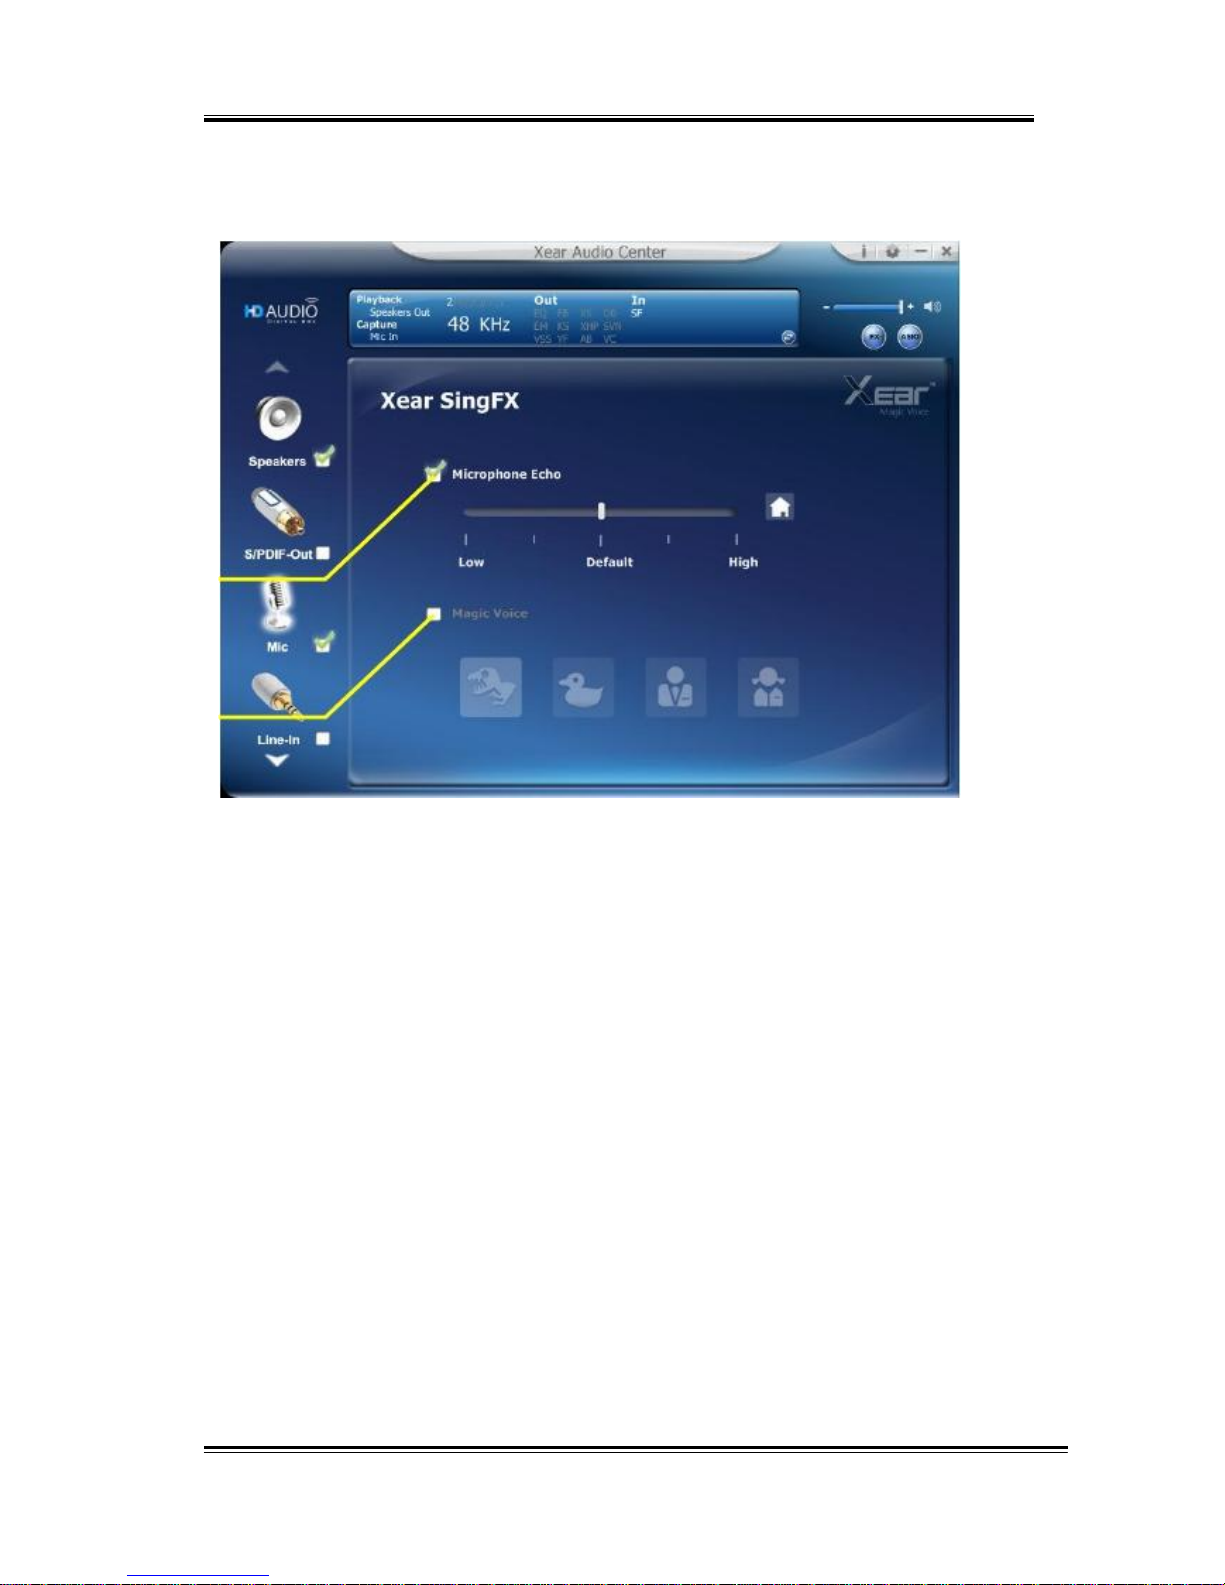
When you are talking to your friends over the network like
messenger, VOIP, online game applications, you can use “Magic
Voice” effects to simulate some funny voice. Only one voice type can
be chosen at one time.
1. Microphone Echo,
Click this check box to enable the Microphone echo effect; you
can use the slide bar to change the echo level.
2. Magic Voice mode (Monster/Carton/Male/Female)
Click this check box to enable the Magic Voice effect; you can
click on the any button to select the magic voice mode.
46
Page 47
HD 7.1 USB AUDIO V3.0
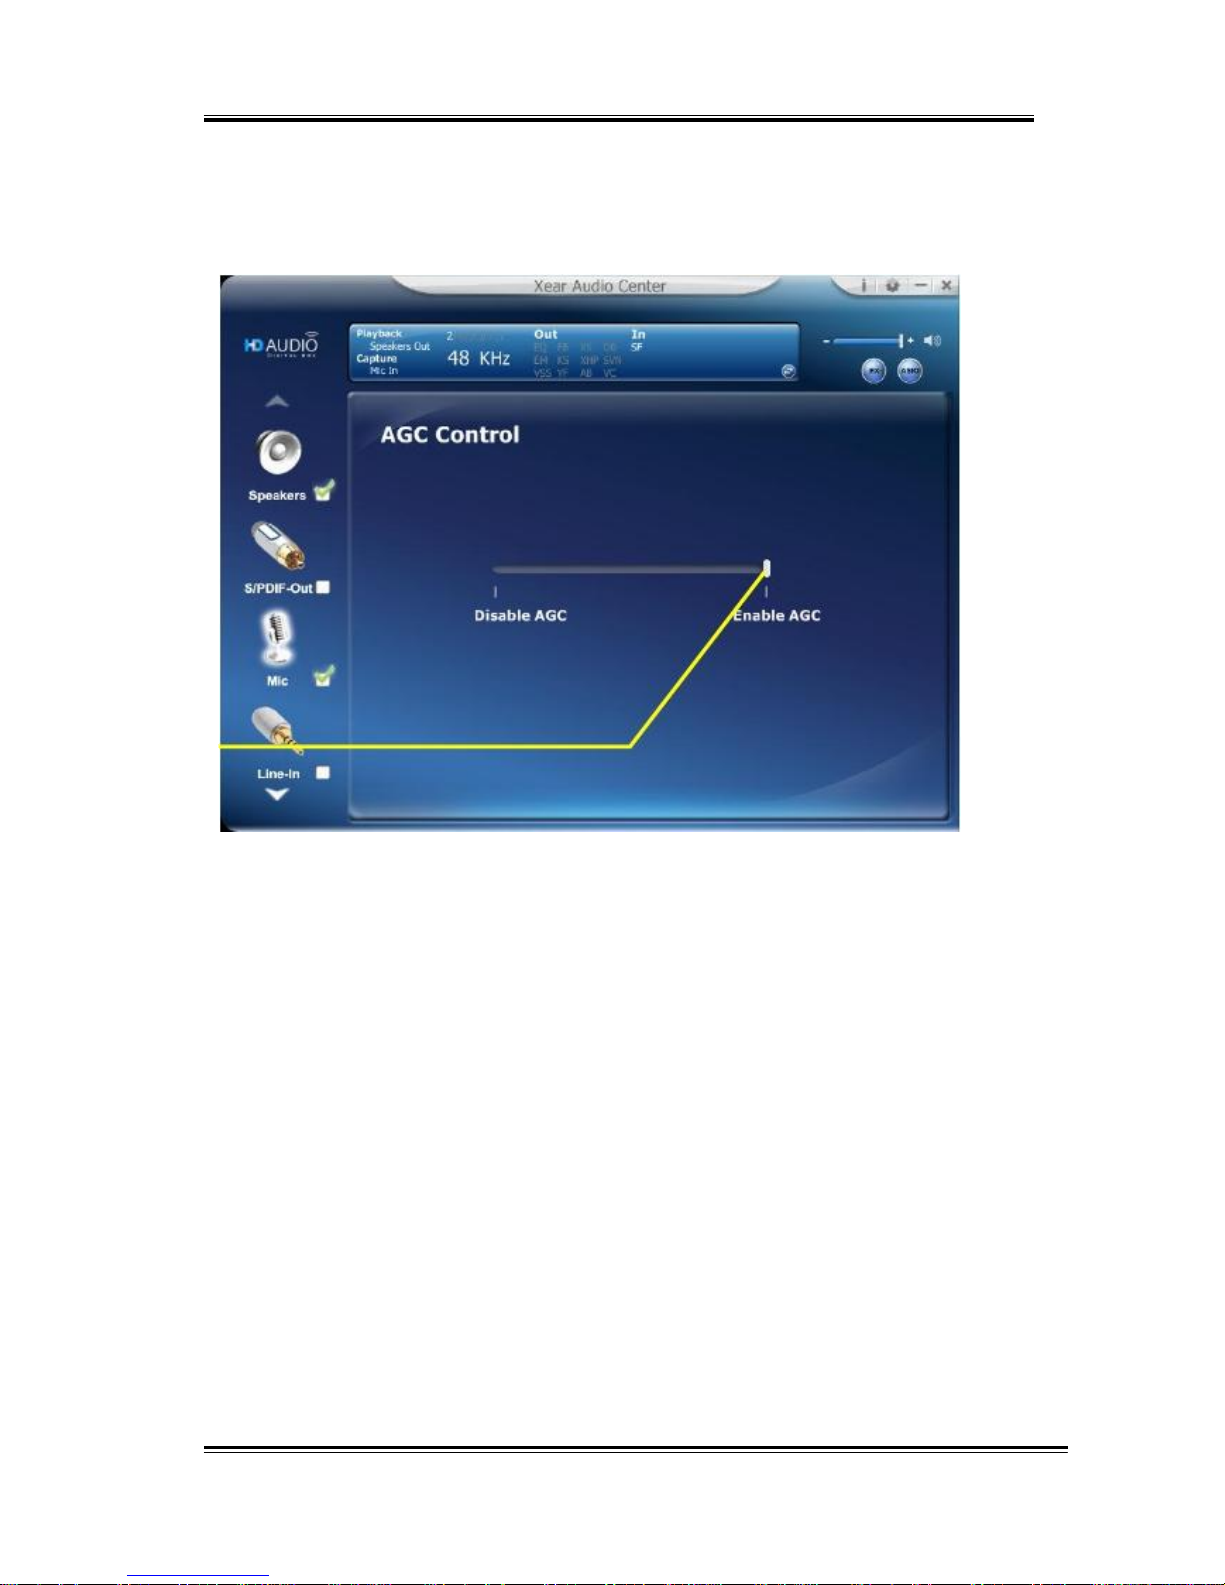
Xear AGC Control
(Microphone device only)
1
Function Introduction
You can enable or disable AGC (auto Gain Control) of the
microphone recording.
1. Enable/Disable AGC,
Move the slide to enable AGC or disable AGC.
47
Page 48
HD 7.1 USB AUDIO V3.0
SPDIF-In Device function introduction
Volume control Page
3
1
2
4
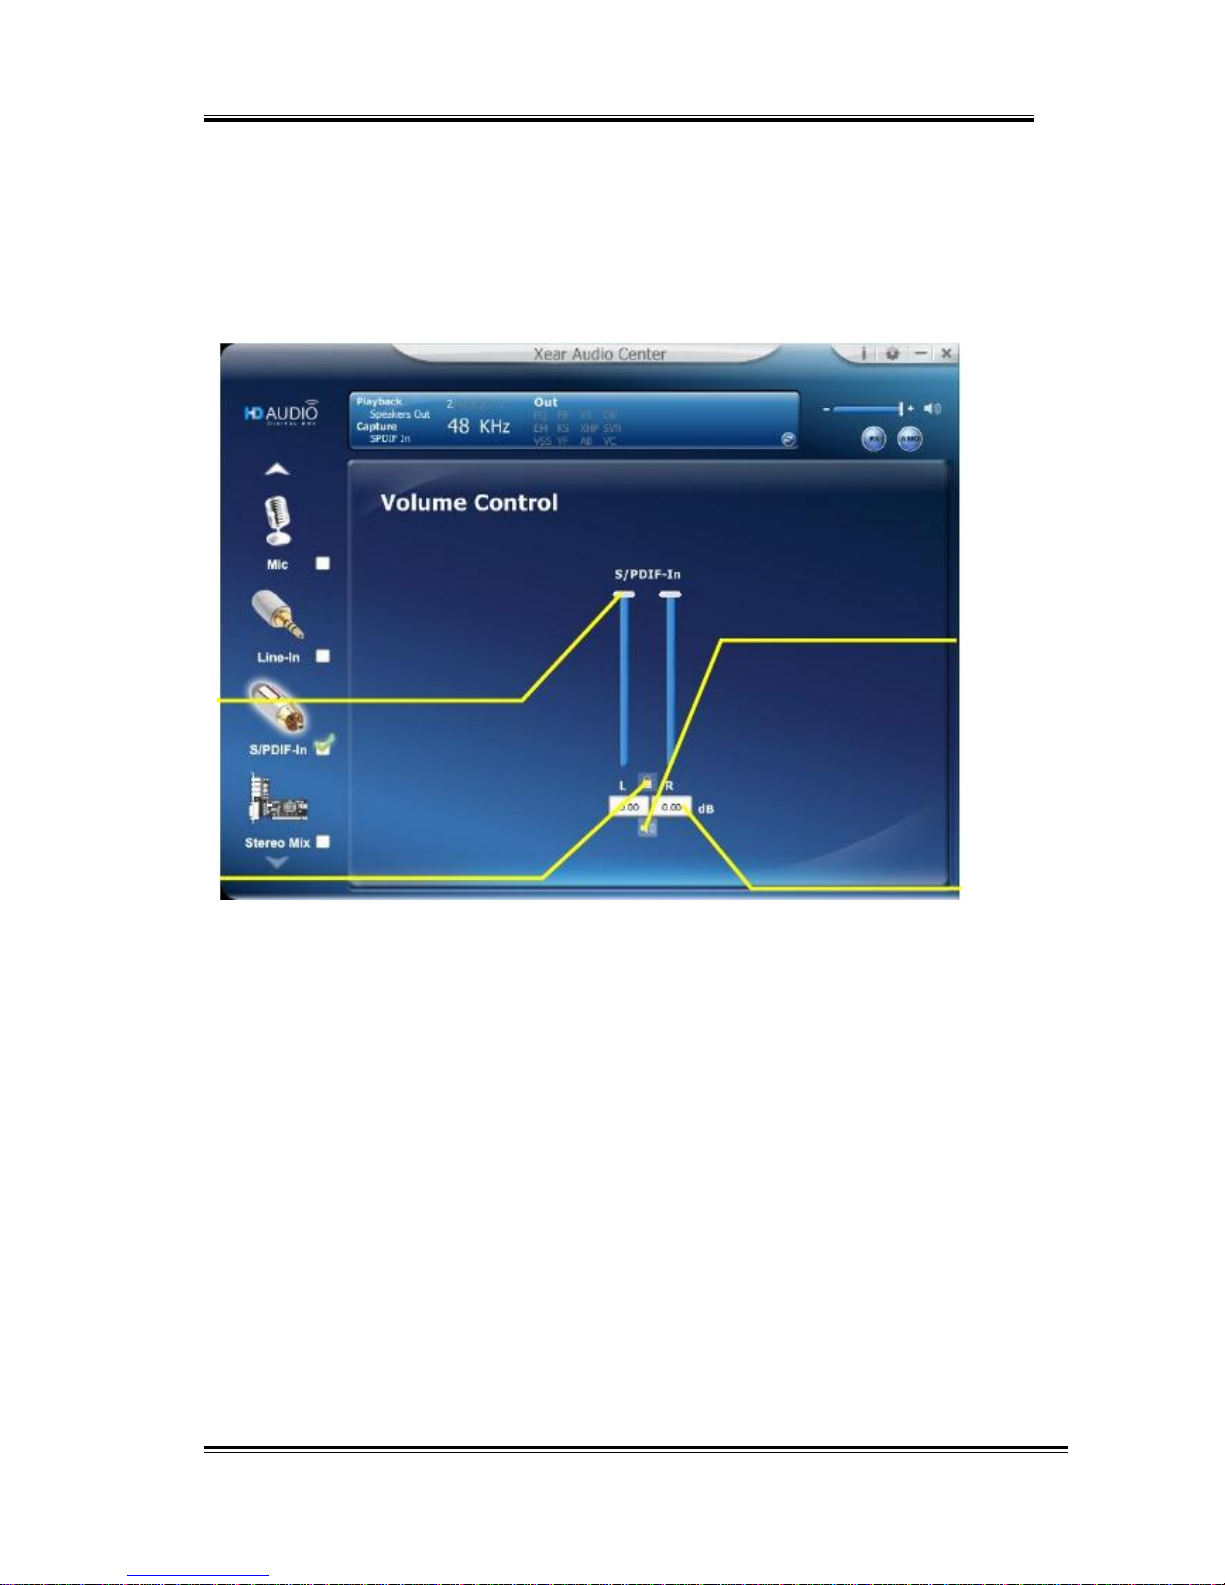
Function Introduction
This function page provides the adjustment of recording volume of
SPDIF-In device.
1. Volume control bar:
SPDIF-In
– It can adjust volume level for recording.
2. Left/ Right Channel Lock:
Clicking on the Lock/ Un-Lock button can sync the left-channel
and right-channel volume.
3. dB Input Area
You can directly fill-in a dB value into this text box to set the
volume level.
4. Mute / Un-Mute:
Clicking on the mute/ un-mute button can mute all channels.
48
Page 49
HD 7.1 USB AUDIO V3.0
Sample Rate Page
1
2
Function Introduction
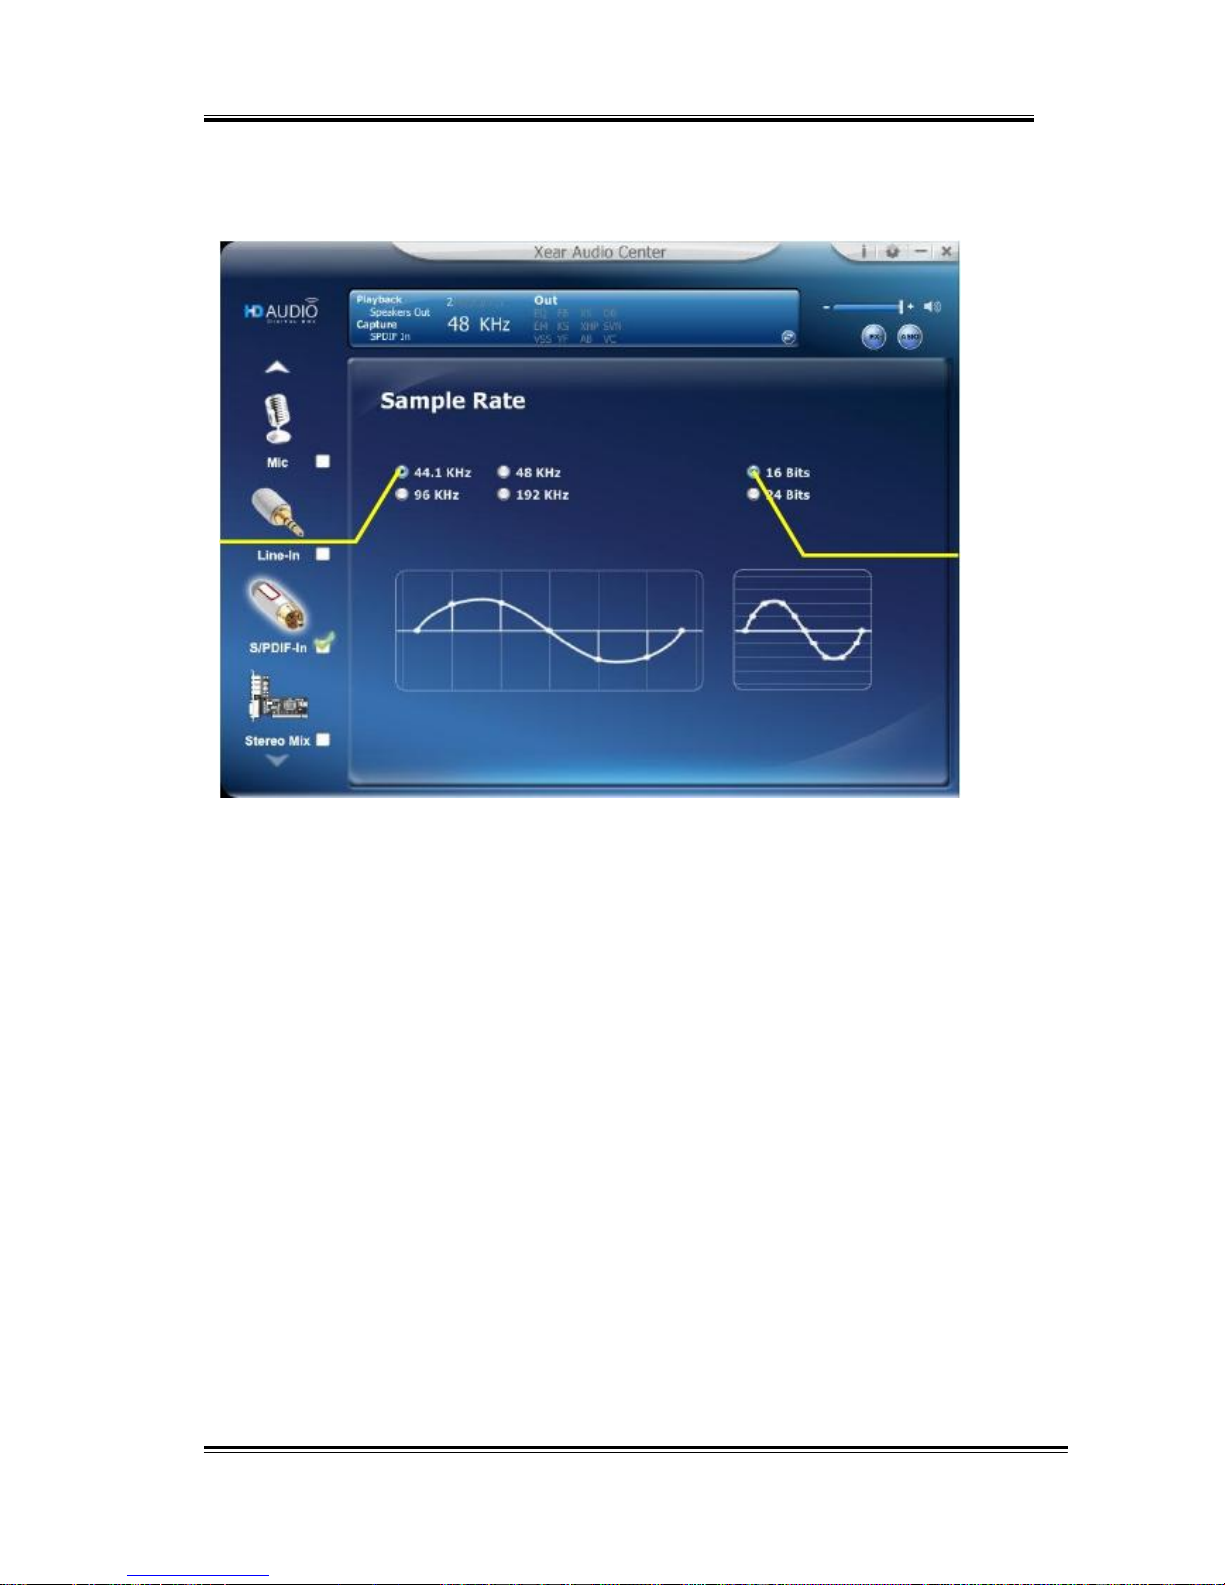
This function page provides a sample rate setting.
1. Sample Rate button
44.1 KHz -
set recording sample rate to 44.1 KHz
48 KHz -
set recording sample rate to 48 KHz
96 KHz -
set recording sample rate to 96 KHz
192 KHz -
set recording sample rate to 192 KHz
2. Bit Depth button
16 bit -
set recording bit depth to 16 bit
24 bit -
set recording bit depth to 24 bit
49
Page 50
HD 7.1 USB AUDIO V3.0
Stereo Mix Device function introduction
Volume control Page
1
3
2
4
Function Introduction
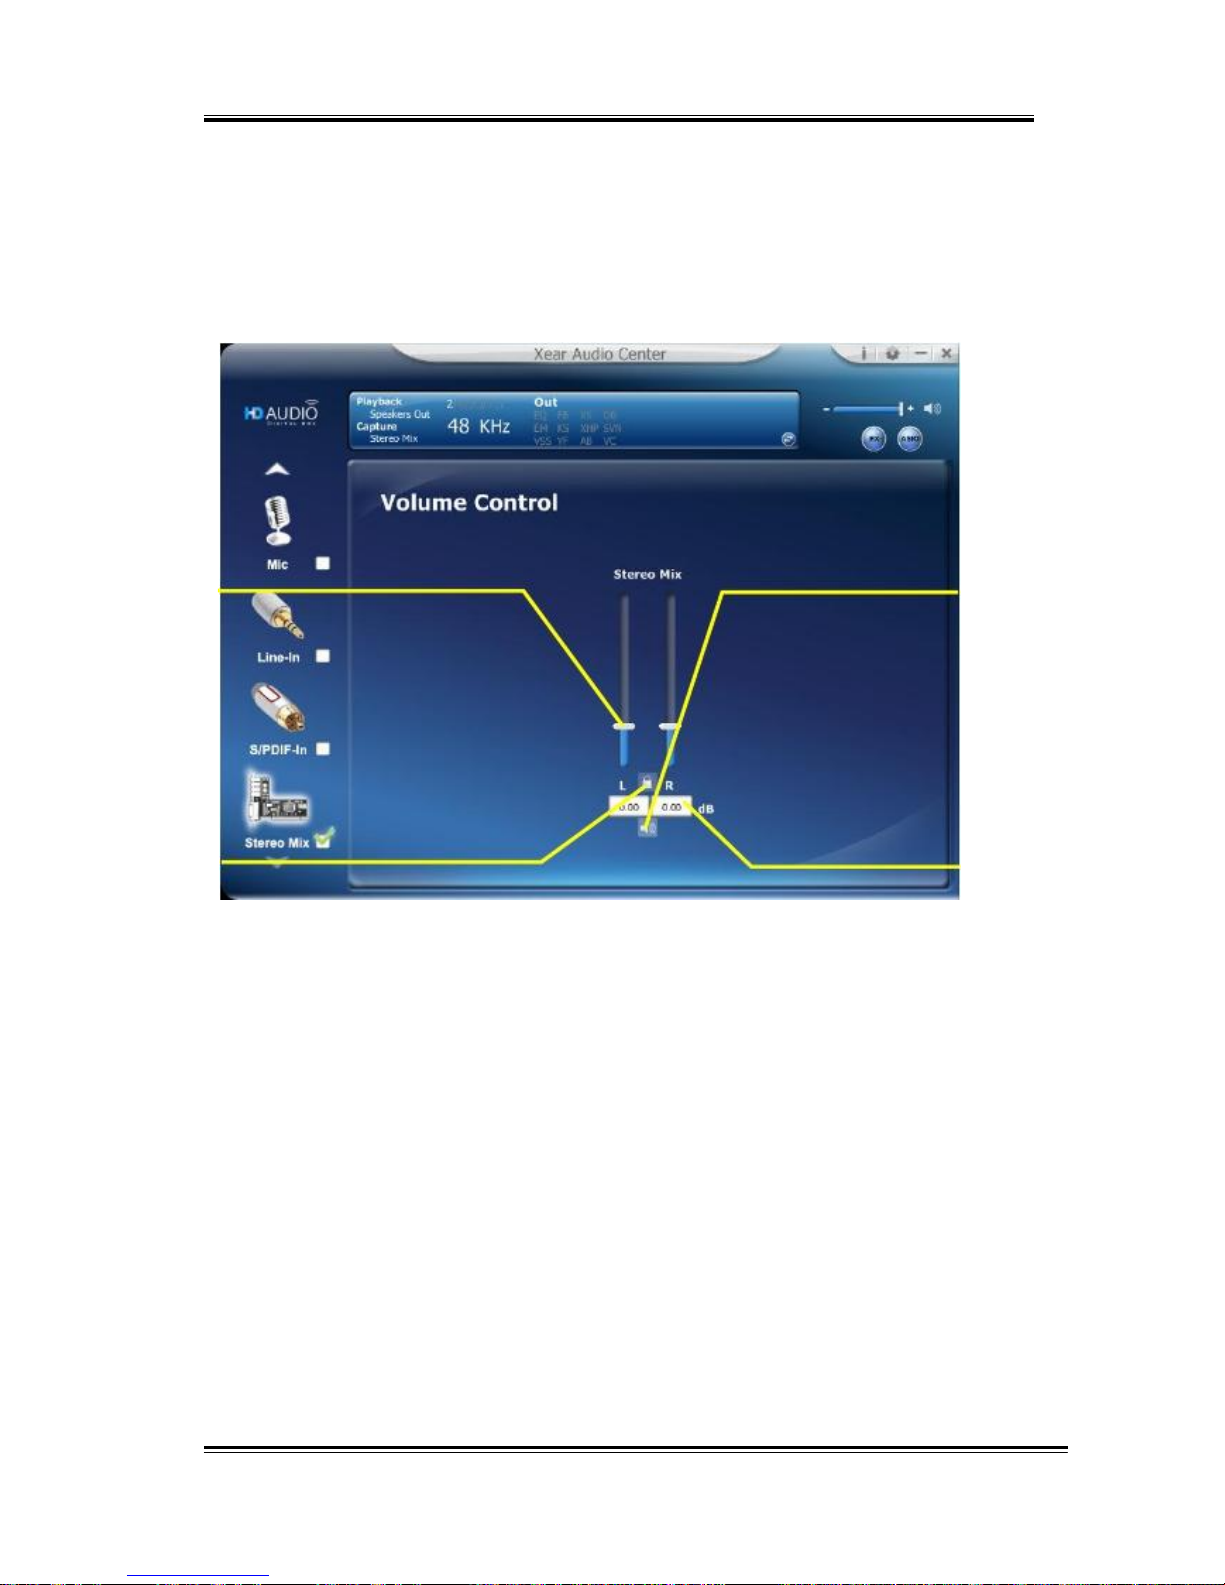
This function page provides the adjustment of recording volume of
SPDIF-In device.
1. Volume control bar:
Stereo Mix
– It can adjust volume level for recording.
2. Left/ Right Channel Lock:
Clicking on the Lock/ Un-Lock button can sync the left-channel
and right-channel volume.
3. dB Input Area
You can directly fill-in a dB value into this text box to set the
volume level.
4. Mute / Un-Mute:
Clicking on the mute/ un-mute button can mute all channels.
50
Page 51
HD 7.1 USB AUDIO V3.0
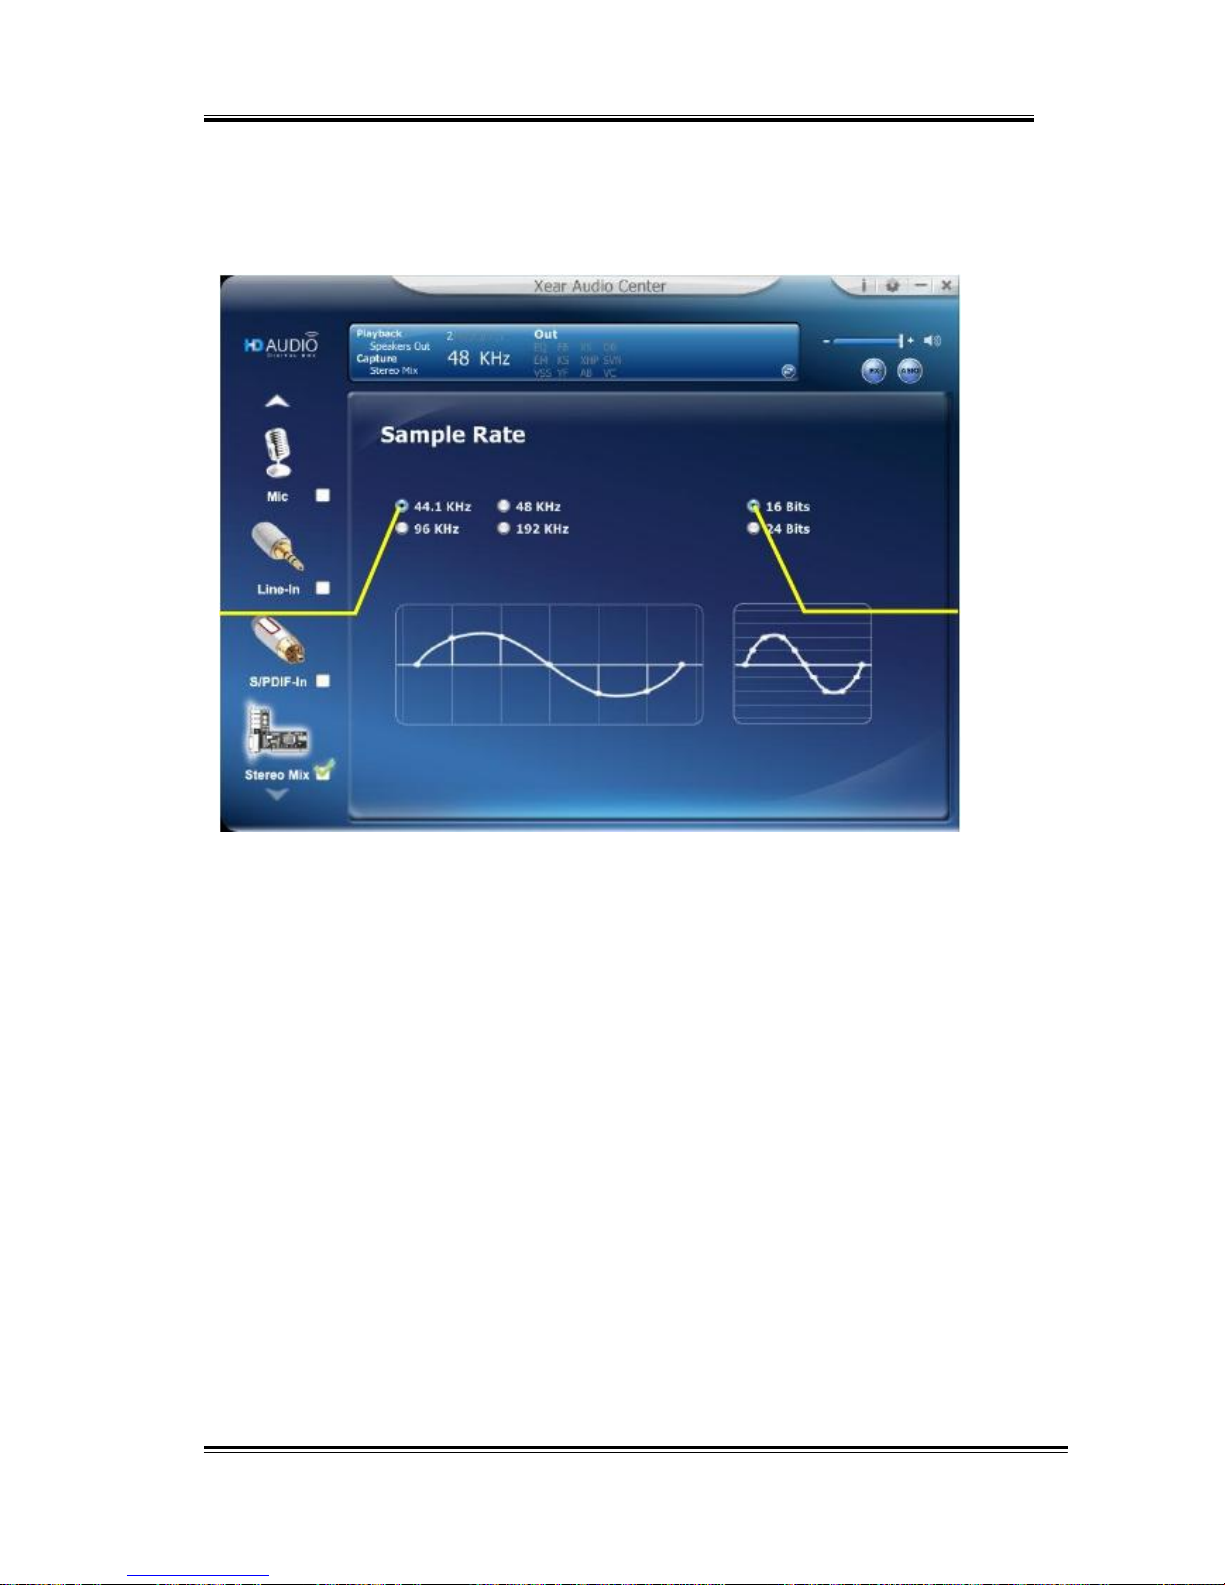
Sample Rate Page
1
2
Function Introduction
This function page provides a sample rate setting.
3. Sample Rate button
44.1 KHz -
set recording sample rate to 44.1 KHz
48 KHz -
set recording sample rate to 48 KHz
96 KHz -
set recording sample rate to 96 KHz
192 KHz -
set recording sample rate to 192 KHz
4. Bit Depth button
16 bit -
set recording bit depth to 16 bit
24 bit -
set recording bit depth to 24 bit
51
Page 52
HD 7.1 USB AUDIO V3.0
Information Page Introduction
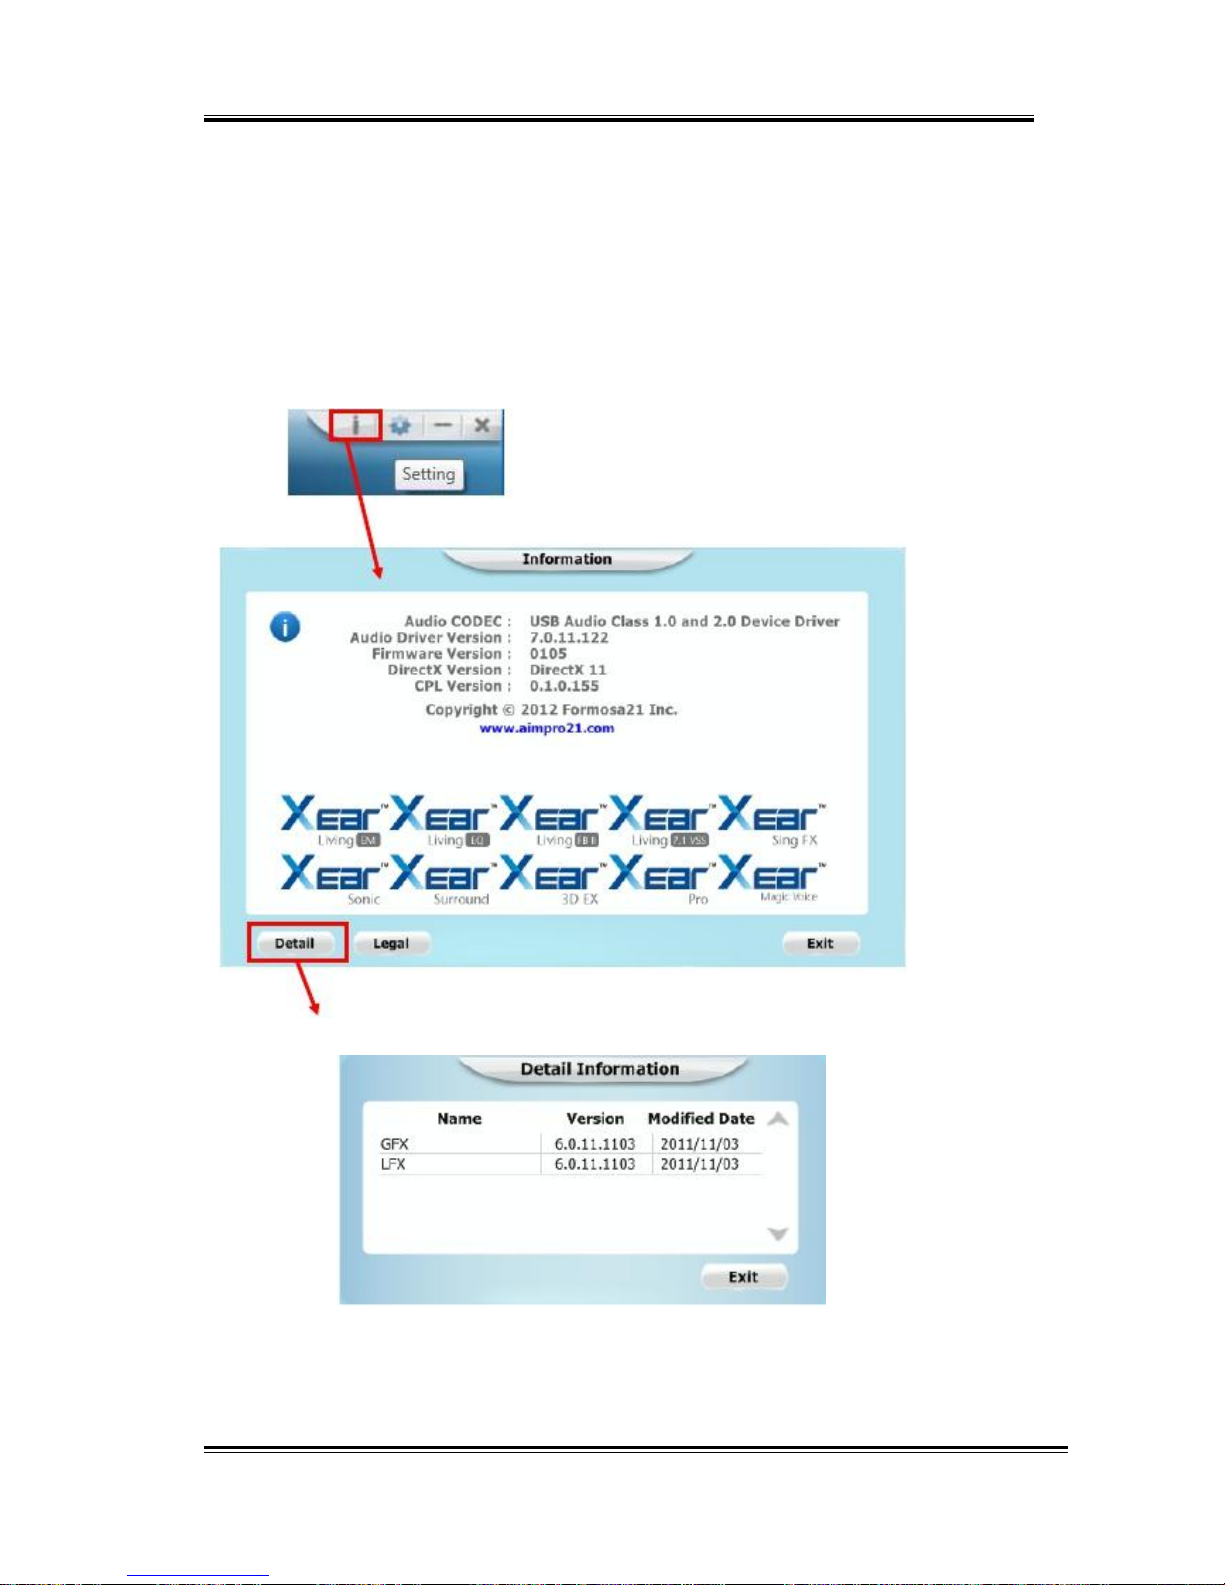
This page lists the driver information and the technology trademark
logo. You can get both hardware/software details and also the legal
information references.
Detail:
52
Page 53
HD 7.1 USB AUDIO V3.0
Tray Icon Function Introduction
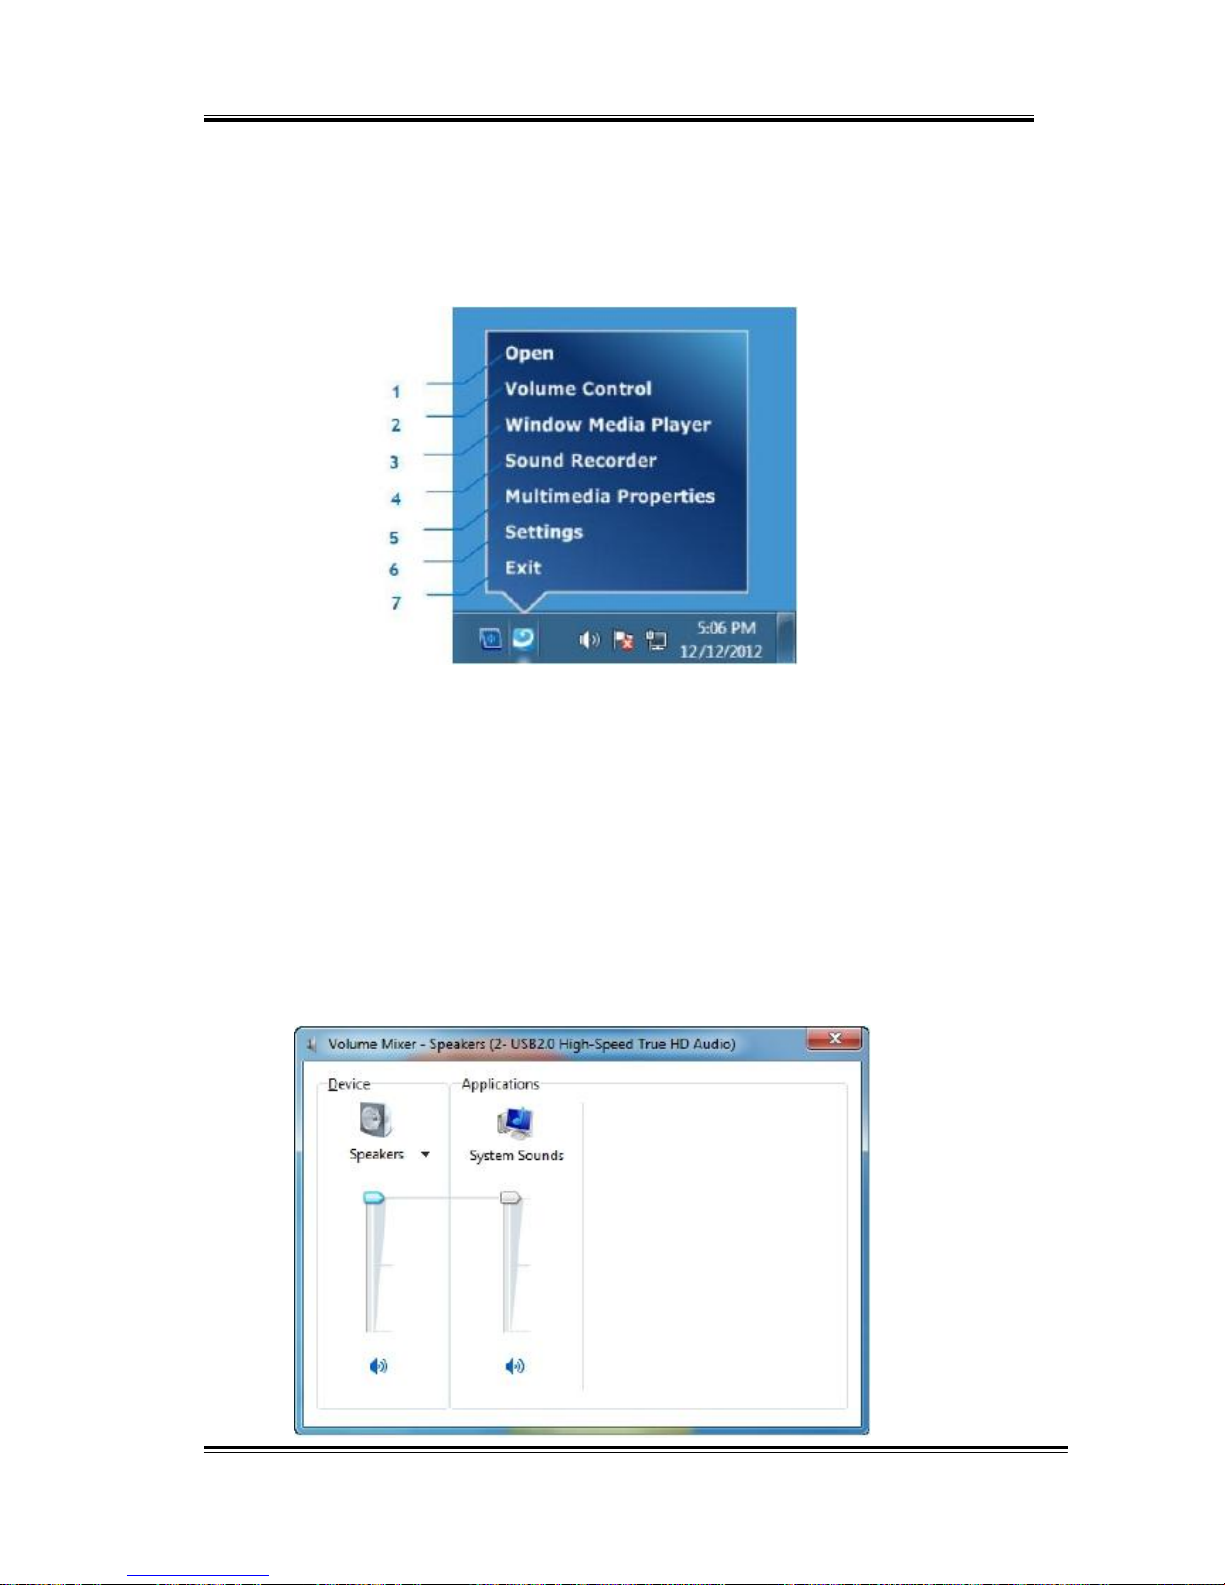
Open the “CPL Tray Icon Function List” by right-clicking the tray Icon on system
tray.
1. Open:
Clicking the “Open” item will restore the USB Audio Software CPL.
2. Volume Control:
Clicking the “Volume Control” item will open the Volume Mixer of
Windows OS. If you want to separately control the volume of your
speakers and other sound devices or programs, use this Volume
Mixer.
53
Page 54
HD 7.1 USB AUDIO V3.0
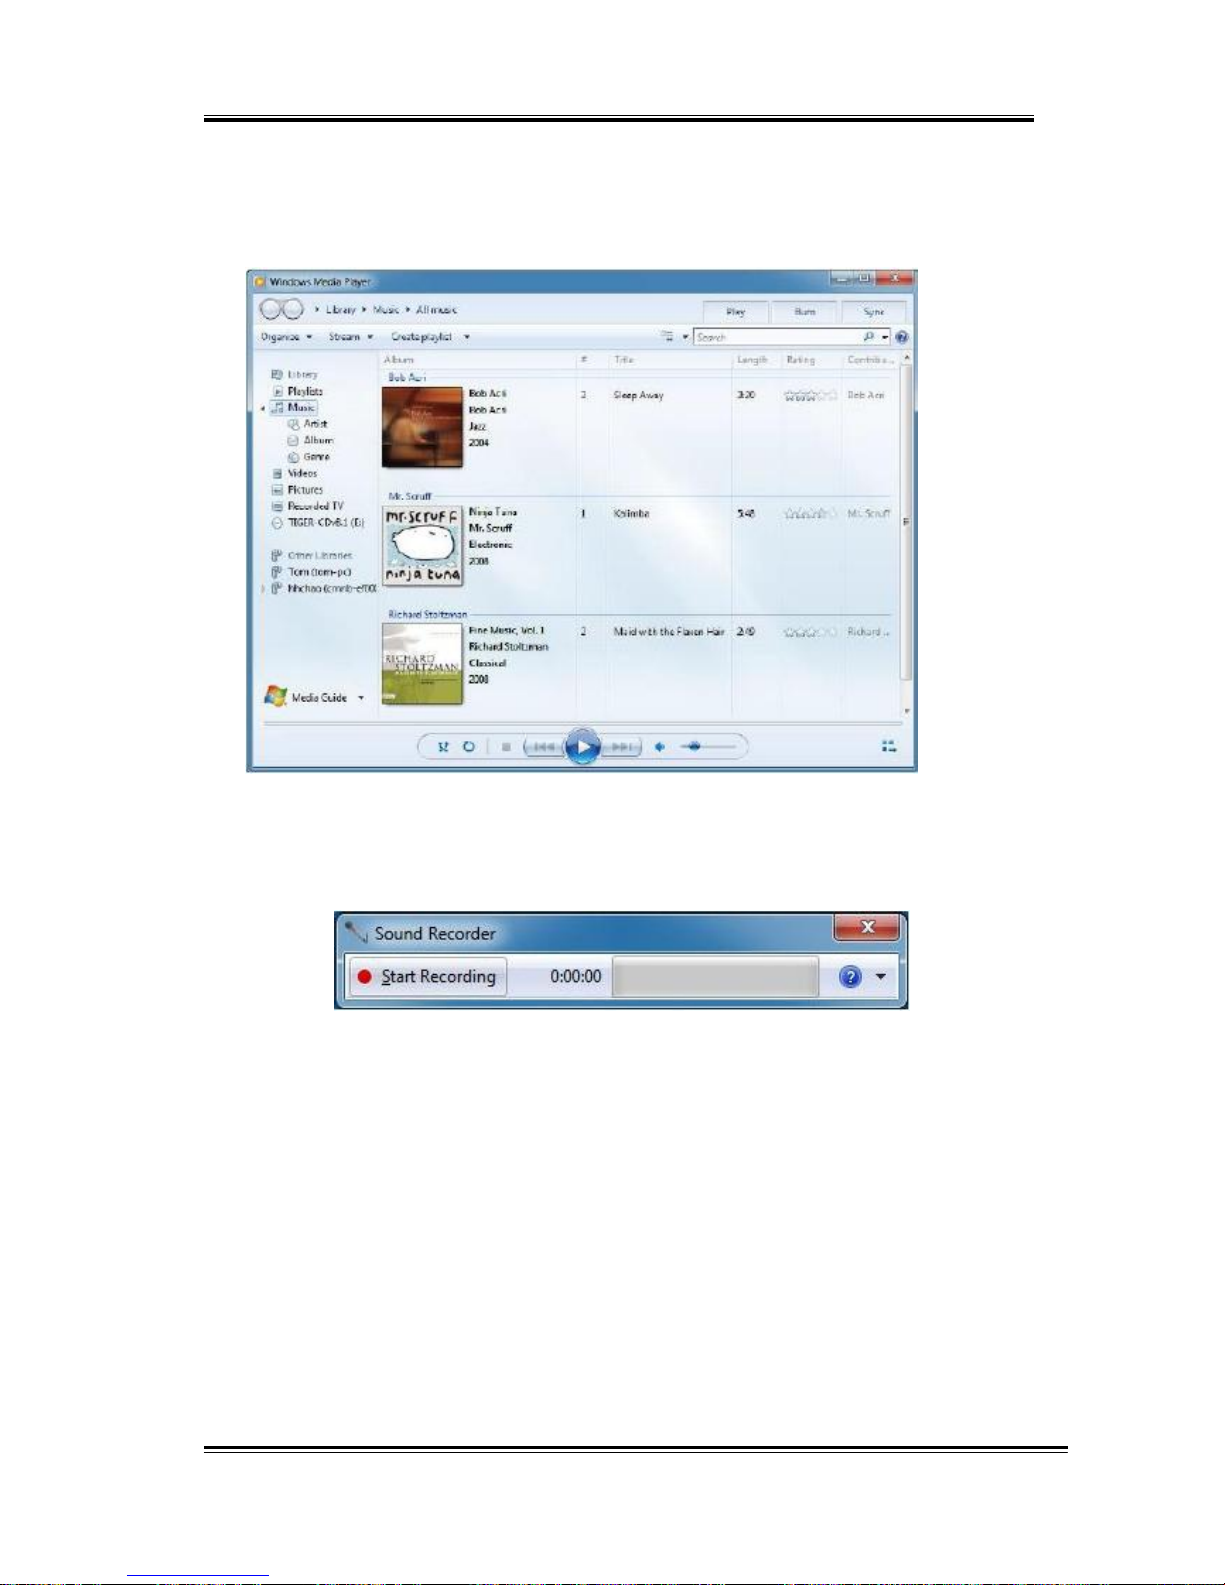
3. Windows Media Player:
Clicking the “Windows Media Player” item will open the Microsoft
Windows Media Player.
4. Sound Recorder:
Click the “Sound Recorder” item to open the Windows Sound
recorder.
54
Page 55
HD 7.1 USB AUDIO V3.0
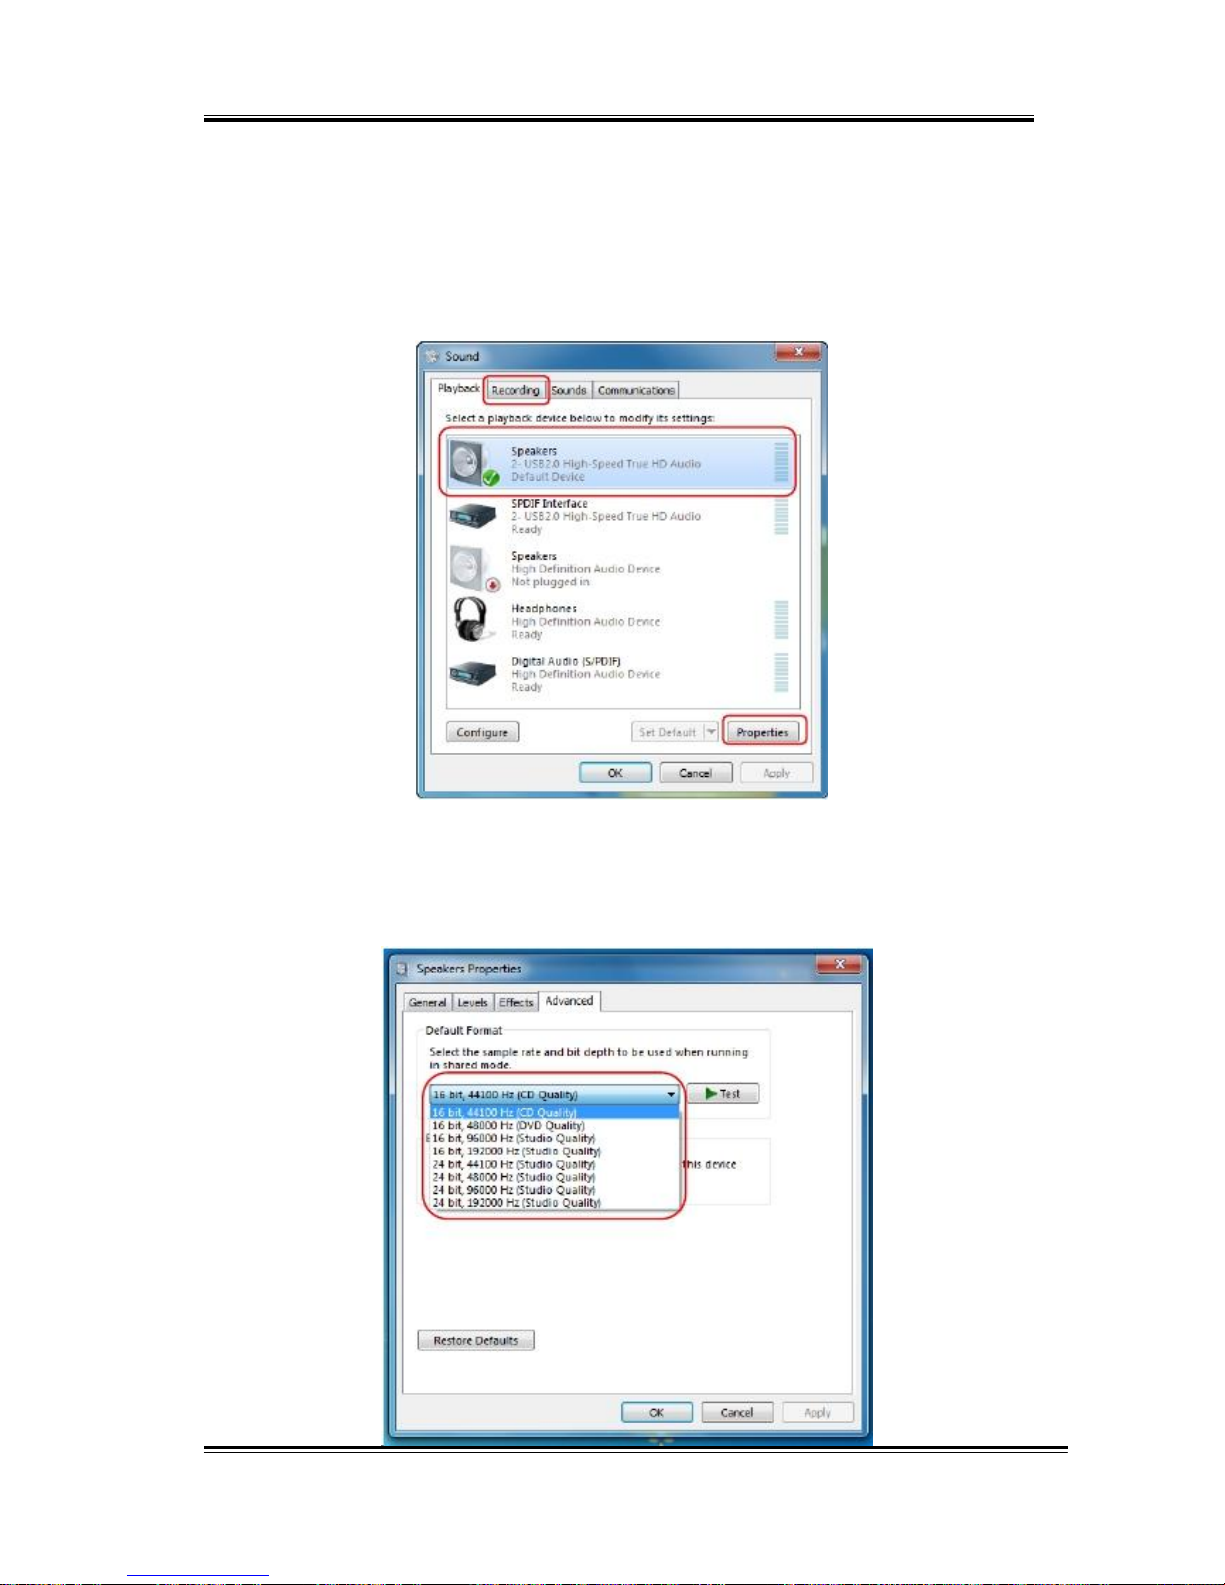
5. Multimedia Properties:
Open the Multimedia Properties page of Windows OS, you can select
the working sample rate & bit rate.
I. Select the “Speakers” device and then click the “properties”
button.
II. Click the “Advanced” tag, enter the advanced page, and pull the
dropdown list to open default format support list as shown in
the below diagram.
55
Page 56
HD 7.1 USB AUDIO V3.0
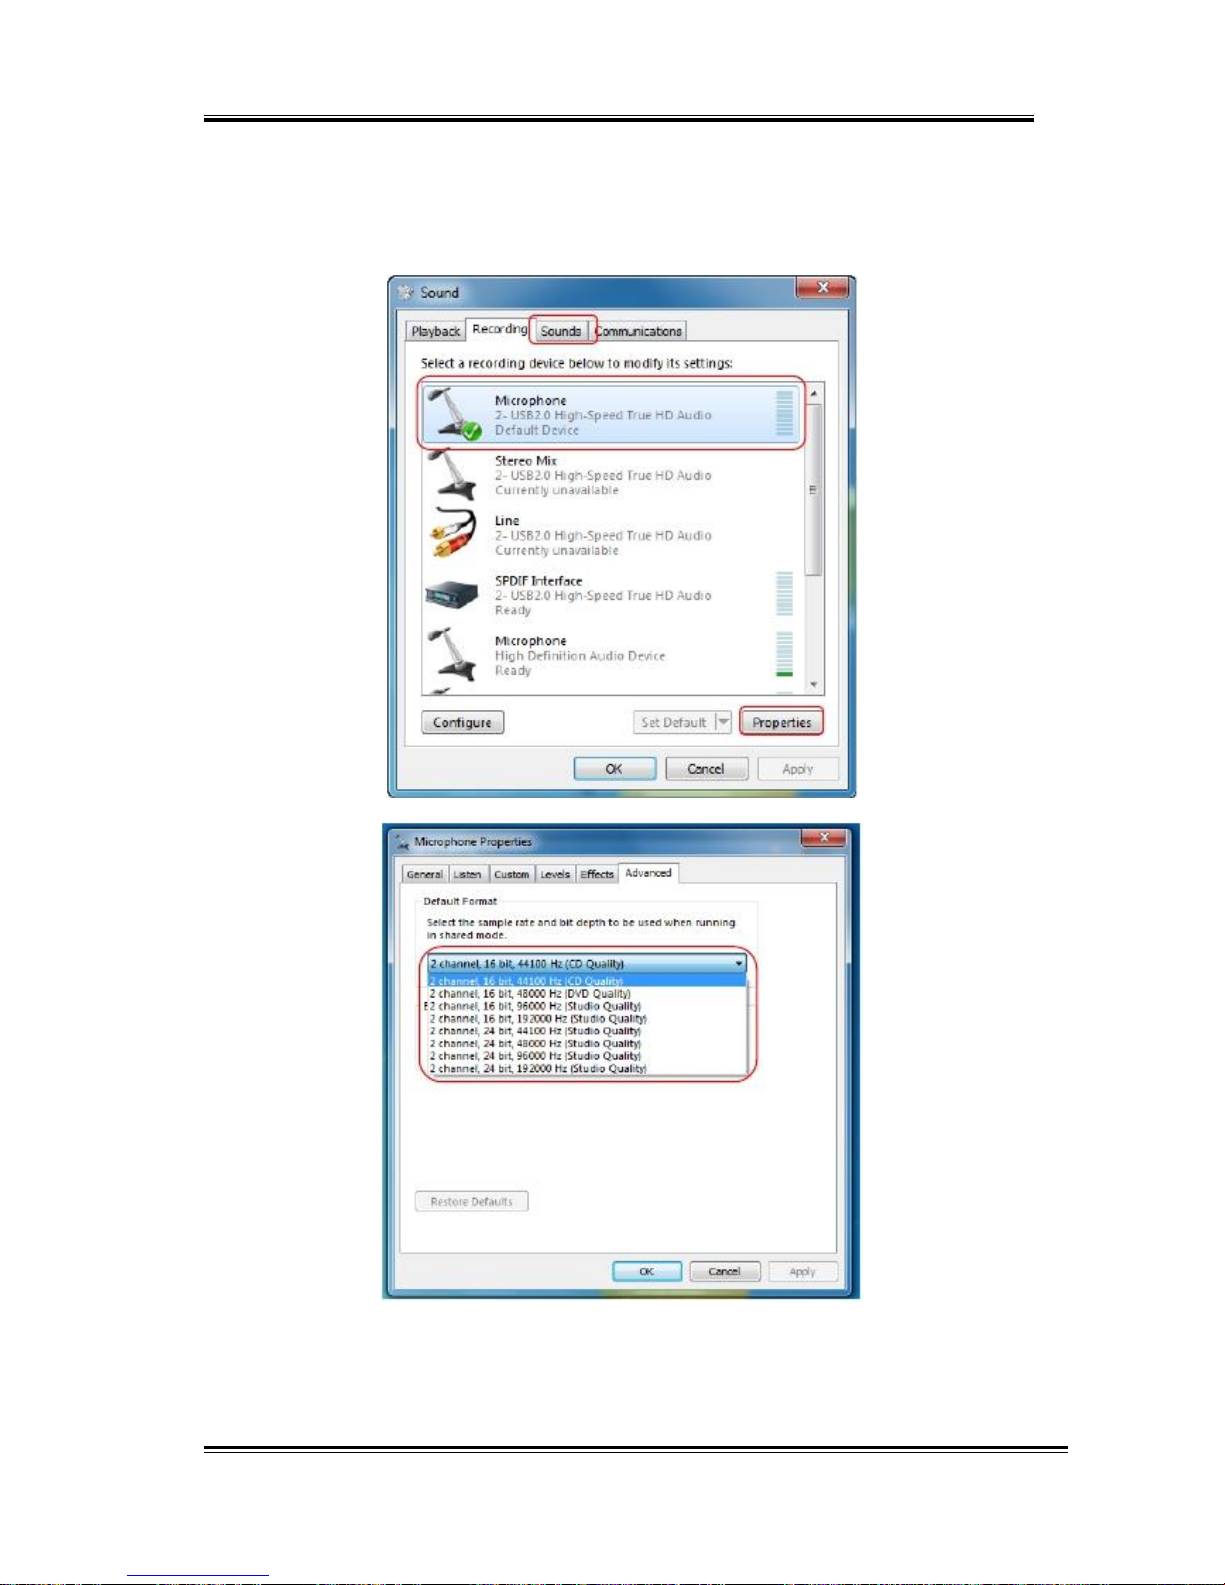
III. Follow the same procedure to change the Sample Rate & Bit
Rate of “Microphone” device on recording tag.
56
Page 57
HD 7.1 USB AUDIO V3.0
6. Setting
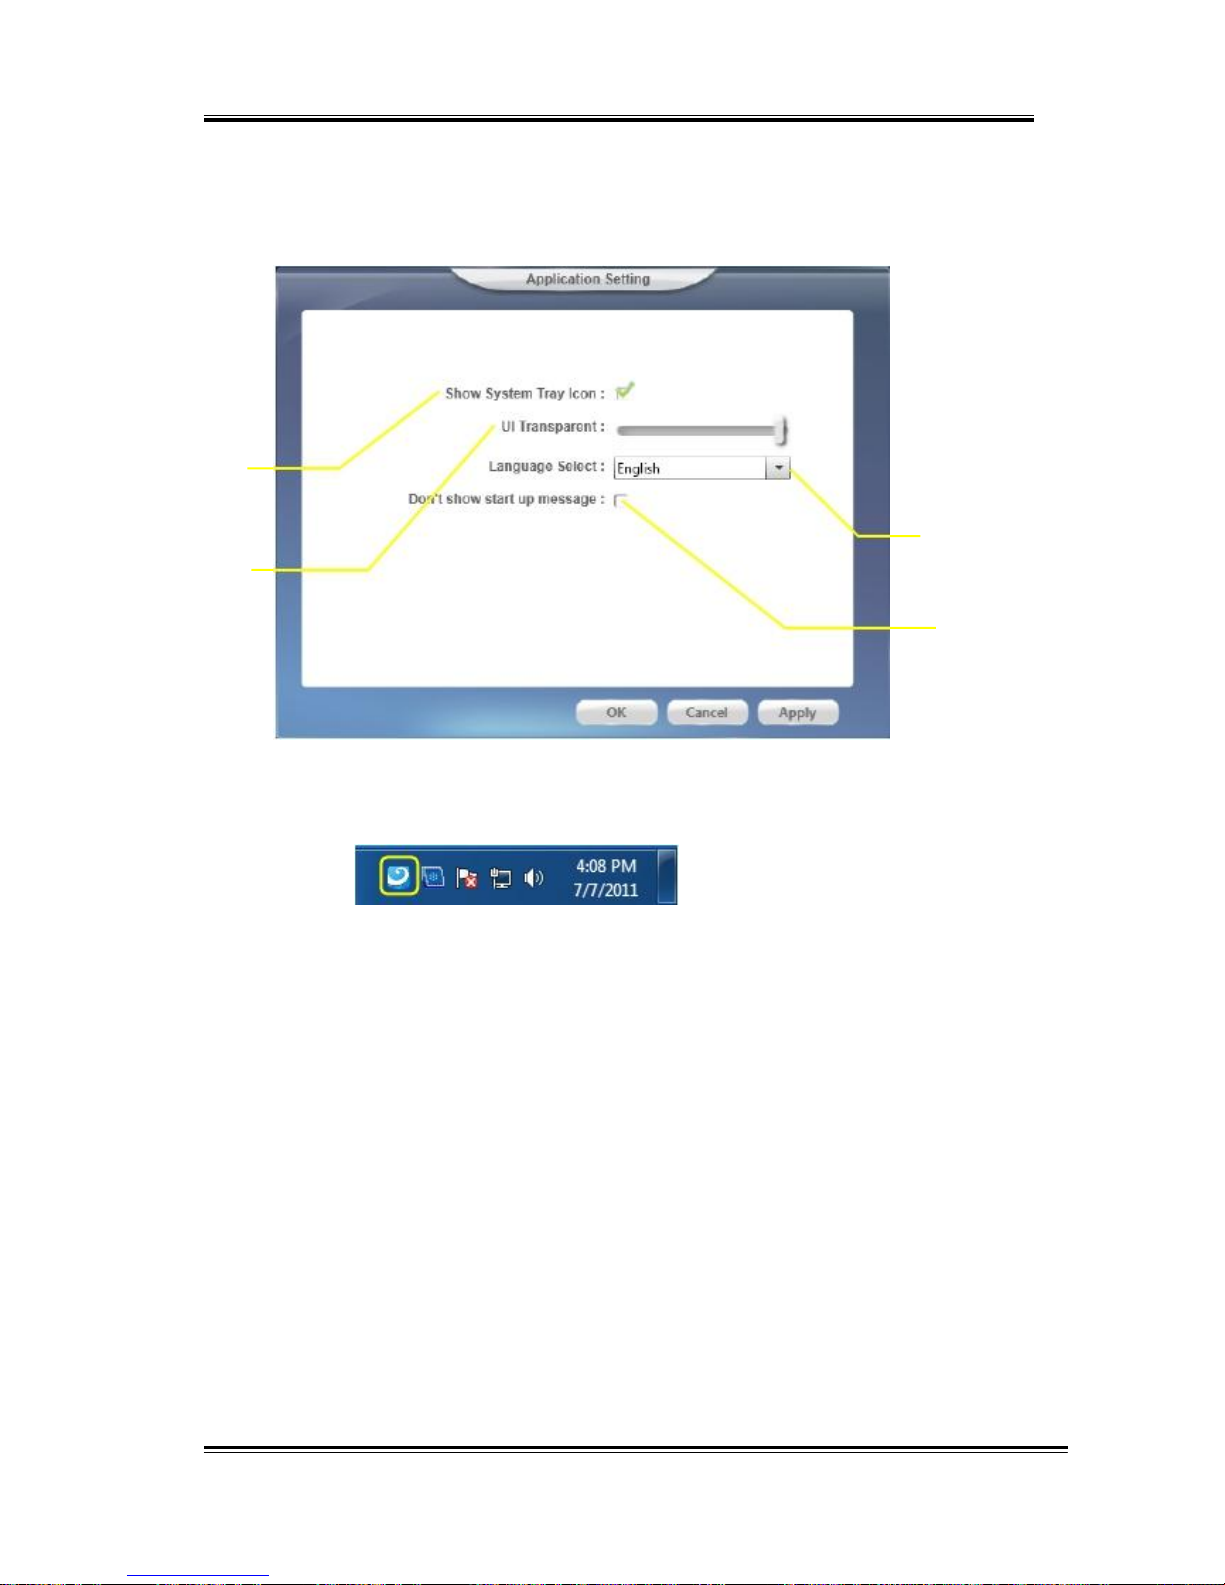
Click setting item to open the “Xear Audio Center” setting page as
below.
I
II
II
I
IV
I. Show System Tray Icon – Check “Show System Tray Icon” box,
the Xear Audio center icon will be shown in the system tray.
II. UI Transparent – It can adjust transparent of the UI vision.
III. Language Select – it can change the UI language. (Refer to
Appendix A )
IV. Don’t show start up message – it can enable/disable the UI
start-up message.
7. Exit:
Clicking the “Exit” item will exit the tray Icon from system tray.
57
Page 58

HD 7.1 USB AUDIO V3.0
Appendix A - Multi-Lingual Supporting List
AS372 USB HD Audio Driver Multi-Lingual Supporting List
Support 17 lingual versions:
1 English - English
2 German - Deutsch
3 French - Français
4 Portuguese - Português
5 Spanish - Español
6 Russian - русский язык
7 Italian - Italiano
8 Dutch - Nederlands
9 Indonesian - Bahasa Indonesia
10 Danish - Dansk
11 Chinese - Traditional
12 Chinese - Simplified
13 Korean -
한국어 (韓國語)
14 Japanese-日本語
15 Swedish - Svenska
16 Turkish - Türkçe
17 Thai- ไทย
Installing to different country version of operation system can auto
detect the language version and show a correct version.
58
Page 59

HD 7.1 USB AUDIO V3.0
Appendix B – Trouble Shooting
1. Why I cannot enjoy the 24-bit/192kHz high definition audio quality from
AS372?
You may use AS372 under USB Audio mode 1.0, and it only delivers
16-bit/48kHz audio quality. Adjust the slide switch on the bottom of AS372
to U2 position and setup AS372 in USB Audio Device 2.0 mode. Unplug and
re-plug AS372 USB cable to computer system.
2. Why I need to install drivers under Windows environment?
Windows does not have the native drivers for gears which comply with
USB Audio device 2.0. Therefore, you have to install the drivers from the
bundled installation CD.
On the other hand, if you are running the latest Mac or Linux OS, they
already have built-in native drivers for USB Audio Device 2.0. AS372 is a
real plug and play device to execute the drivers automatically.
3. System advises to install Microsoft Frame Network during installation.
.NET Framework 3.5 builds incrementally on the new features added
in .NET Framework 3.0. For example, feature sets in Windows Workflow
Foundation (WF), Windows Communication Foundation (WCF), Windows
Presentation Foundation (WPF) and Windows CardSpace. In addition, .NET
Framework 3.5 contains a number of new features in several technology
areas which have been added as new assemblies to avoid breaking changes.
You can download it from
http://www.microsoft.com/download/en/confirmation.aspx?id=25150
4. If I do not install the drivers, can I use AS372 as a multi-channel USB Audio
device?
Yes, you still can use AS372 without any installation. Please switch the
button slide switch to U1 and setup AS372 in USB Audio Device 1.0 mode.
5. Why I cannot use my AS372 when it connects to a 4-port USB HUB.?
AS372 needs fully 500mA from the USB port. The HUB might not provide
such big current to AS372. Please connect AS372 to a PC system USB port
directly, or connect it to USB HUB that has power adaptor.
59
Page 60

 Loading...