

Page 1
=======================
DVB-S2 High Definition
Set Top Box
=======================
1
Page 2
SAFETY PRECAUTION
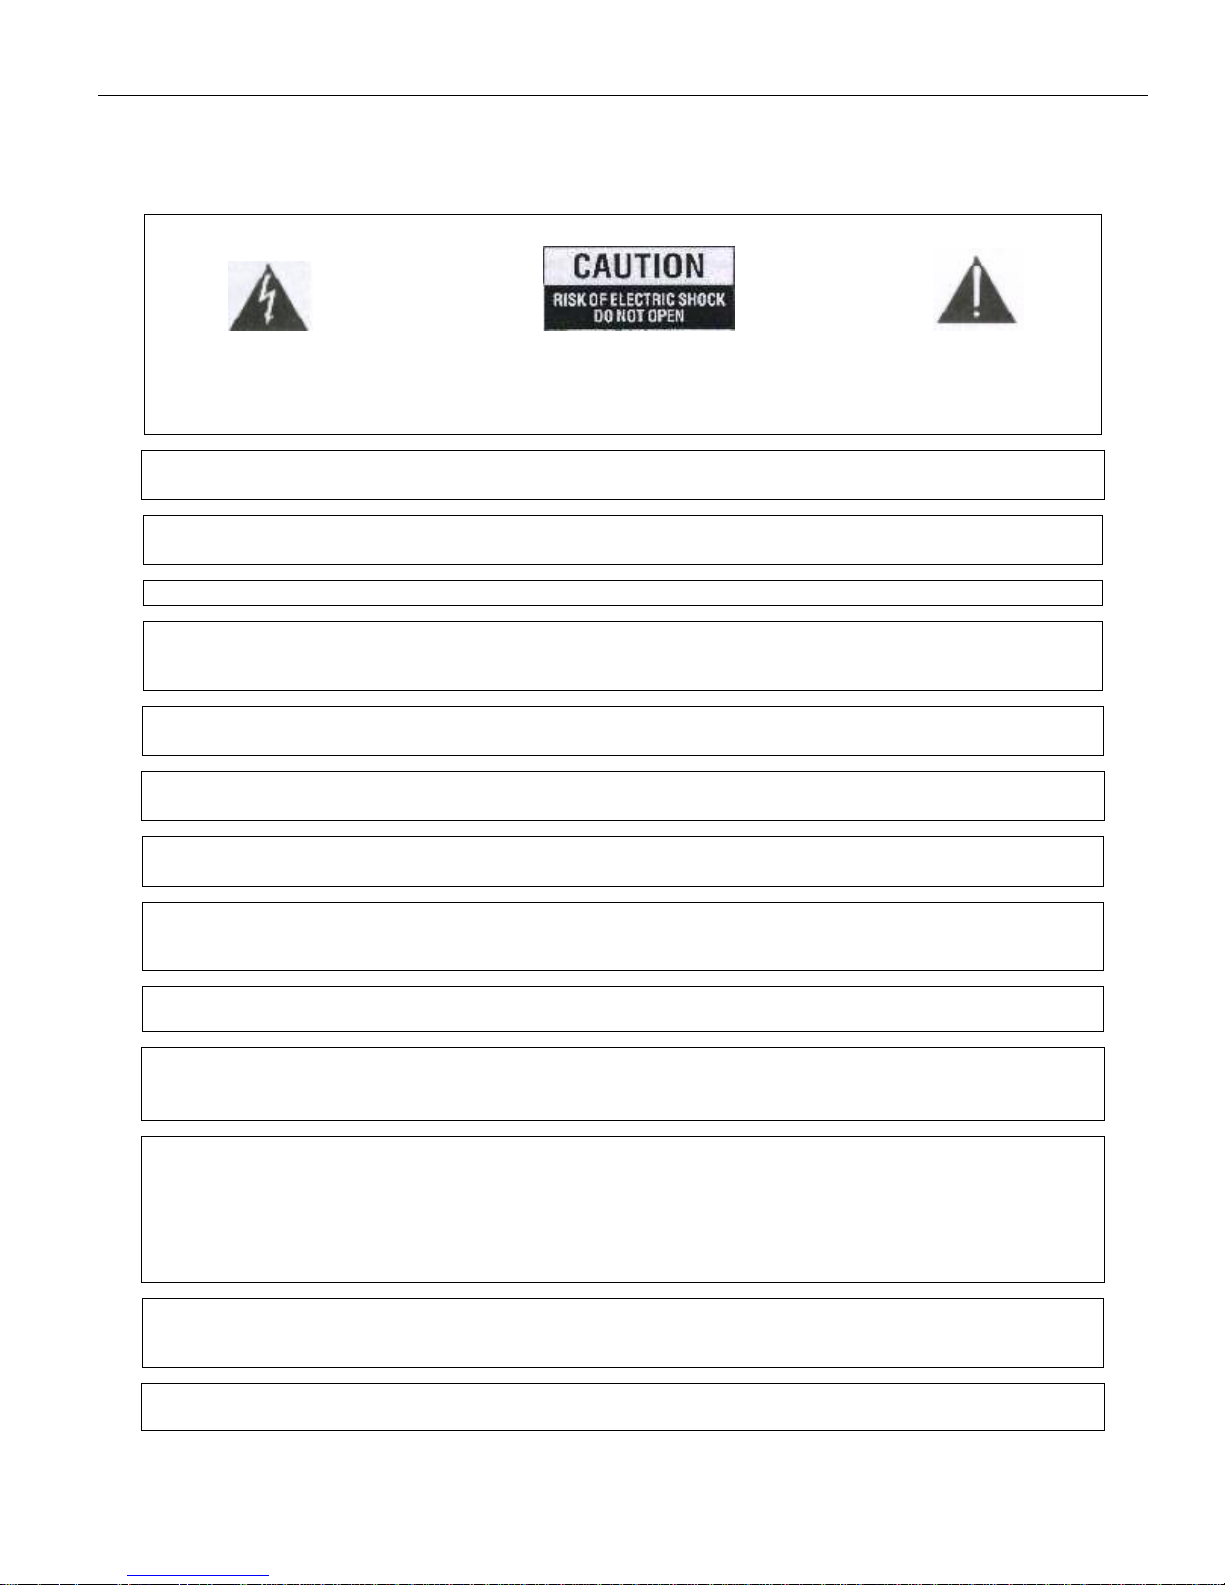
CAUTION:
The lightning flash with arrowhead Warning: The exclamation point within an
symbol, within an equilateral triangle, To reduce the risk of electric shock, equilateral triangle is intended to
is intended to alert the user to don't open the cabinet. Refer alert the user to important operating
"dangerous voltage" and to prevent servicing to qualified personnel only. and maintenance (servicing).
from a risk of electric shock.
Note: To ensure proper use of this product, please read this User manual carefully and
retain for further reference.
WARNING:
Do not use this STB where contact with or immersion in water is a possibility.
Do not use near flower vase, washbowls, kitchen sinks, laundry tubs, swimming pools, etc.
WARNING:
WARNING:
instructions or as marked on the unit. If you are not sure of the type of power supply (for example, 120 or
230 V) to your home, consult your local dealer or local power company.
WARNING: This product installs diodes. Do not open the cabinet or touch any parts in the inner
Do not put the candle or lamp stand on the cabinet; otherwise, there is the danger of fire.
The unit should be connected to a power supply only of the type described in the operating
mechanism. Consult your local dealer for technical service if the opening is required.
Unit Cleaning: After the unit power is turned off, you can clean the cabinet, panel and remote control
With a soft cloth lightly moistened with a mild detergent solution.
Attachments:
Never add any attachments and/or equipment without the manufacturer consent; as such
additions may result in the risk of fire, electric shock, or other personal injury.
Locating:
block these openings or allow them to be blocked by placing the STB on a bed, sofa, or other similar surface,
nor should it be placed over a radiator or heat
Power-Cord Protection:
take special attentions to cords at plugs,
Object and Liquid Entry:
Slots and openings in the cabinet are provided for ventilation to protect it from overheating. Do not
register.
Place the power-supply cord out of the way, where it will not be walked on. Please
convenience receptacles, and the point where they exit from the unit.
Never put objects of any kind into this STB through openings, as they may
Touch dangerous voltage points or short-out parts that could result in a fire or electric shock.
Never spill any liquid on the STB.
Moisture may be formed on the lens In the following conditions:
Note:
when the unit suddenly move from a cold environment or an aircondition room to a warm place.
immediately after a heater has been turned on.
in a steamy or very humid room.
If the moisture forms inside the unit, it may not operate properly. To correct this problem, turn on the
power and wait about two hours
Parts Replacement:
use the replacement parts specified by the manufacturer or having the same characteristics as the original
part. Unauthorized replacement may put
Safety Check:
technician to conduct the overall safety check to
When the unit parts need to be replaced, user should make sure the service technician
After all the maintenances and repairs are done, user is required to request the service
the moisture to evaporate.
for
the unit In the risk of fire, electric shock or other hazards.
ensure the machine is In the proper condition.
2
Page 3

SPEC
Accessories Main board (DB-M3602-02V01), 48 Keys IR controller, USB HDD BOX(customer option)
Board configuration 396MHz MIPS CPU, 128MB DDR400 RAM, Memory Clock 198Mhz, 4MB Serial
Flash, Single Tuner,D VB-S2 demodulator,
Power Supply Input 100V ~ 240V 50/60Hz
Power Consumption 30W Max / 1W Standby (it’s optional by customer’s board)
RS232 For FW Upgrading.
Standard Receiver
Standard
Input Frequency Range 950MHz ~ 2150Mhz
Input Signal Level -25dBm ~ -65dBm
Demodulation QPSK, 8PSK, 16APSK
Transport Stream MPEG-2 ISO/IEC 13818 Transport Stream Specification
MPEG Profile Level MPEG2 SD, MPEG2 HD, H.264/AVC SD, H.264/AVC HD
LNB Power & Polarisation Vertical +13.5V, Horizontal 18V, Current: MAX 500ma,
Multi Satellite receiving 22K switcher, DiSEqC1.0, DiSEqC1.1, Unicable , DiSEqC1.2, USAL
Conditional Access system 1 Common Interface Slots ; 1 CA card reader Slots
A/V Output ports YPrPb, RCA with CVBS, SCARTwith CVBS, HDMI(HDCP), Left/Right analog audio
Aspect Ratio Auto, 16:9 Pillar box, 4:3 Pan & Scan, 4:3 Letter Box.
Audio Decoding MPEG1 layer I, MPEG1 layer II, MPEG1 layer III, MPEG2, AC3.
Audio Mode Stereo/MONO/Left/Right
DVB-S2 Standard (ETSI EN 302 307)
output(RCA), Digital audio output(SPDIF with coaxial or fiber)
DVR supporting DVR with USB HDD, Time shifting with USB HDD
USB2.0 High Speed HOST 1 USB2.0 Port, USB media player to playback the media in USB flash disk or USB
HDD or USB card reader with memory card or FW Upgrading.
File system FAT12, FAT16, FAT32, NTFS (only support first partition)
Media Supporting JPG, BMP, MP3, WMA
Ethernet Interface 10/100Mbit
Storage Temperature 0℃ to +50℃
3
Page 4
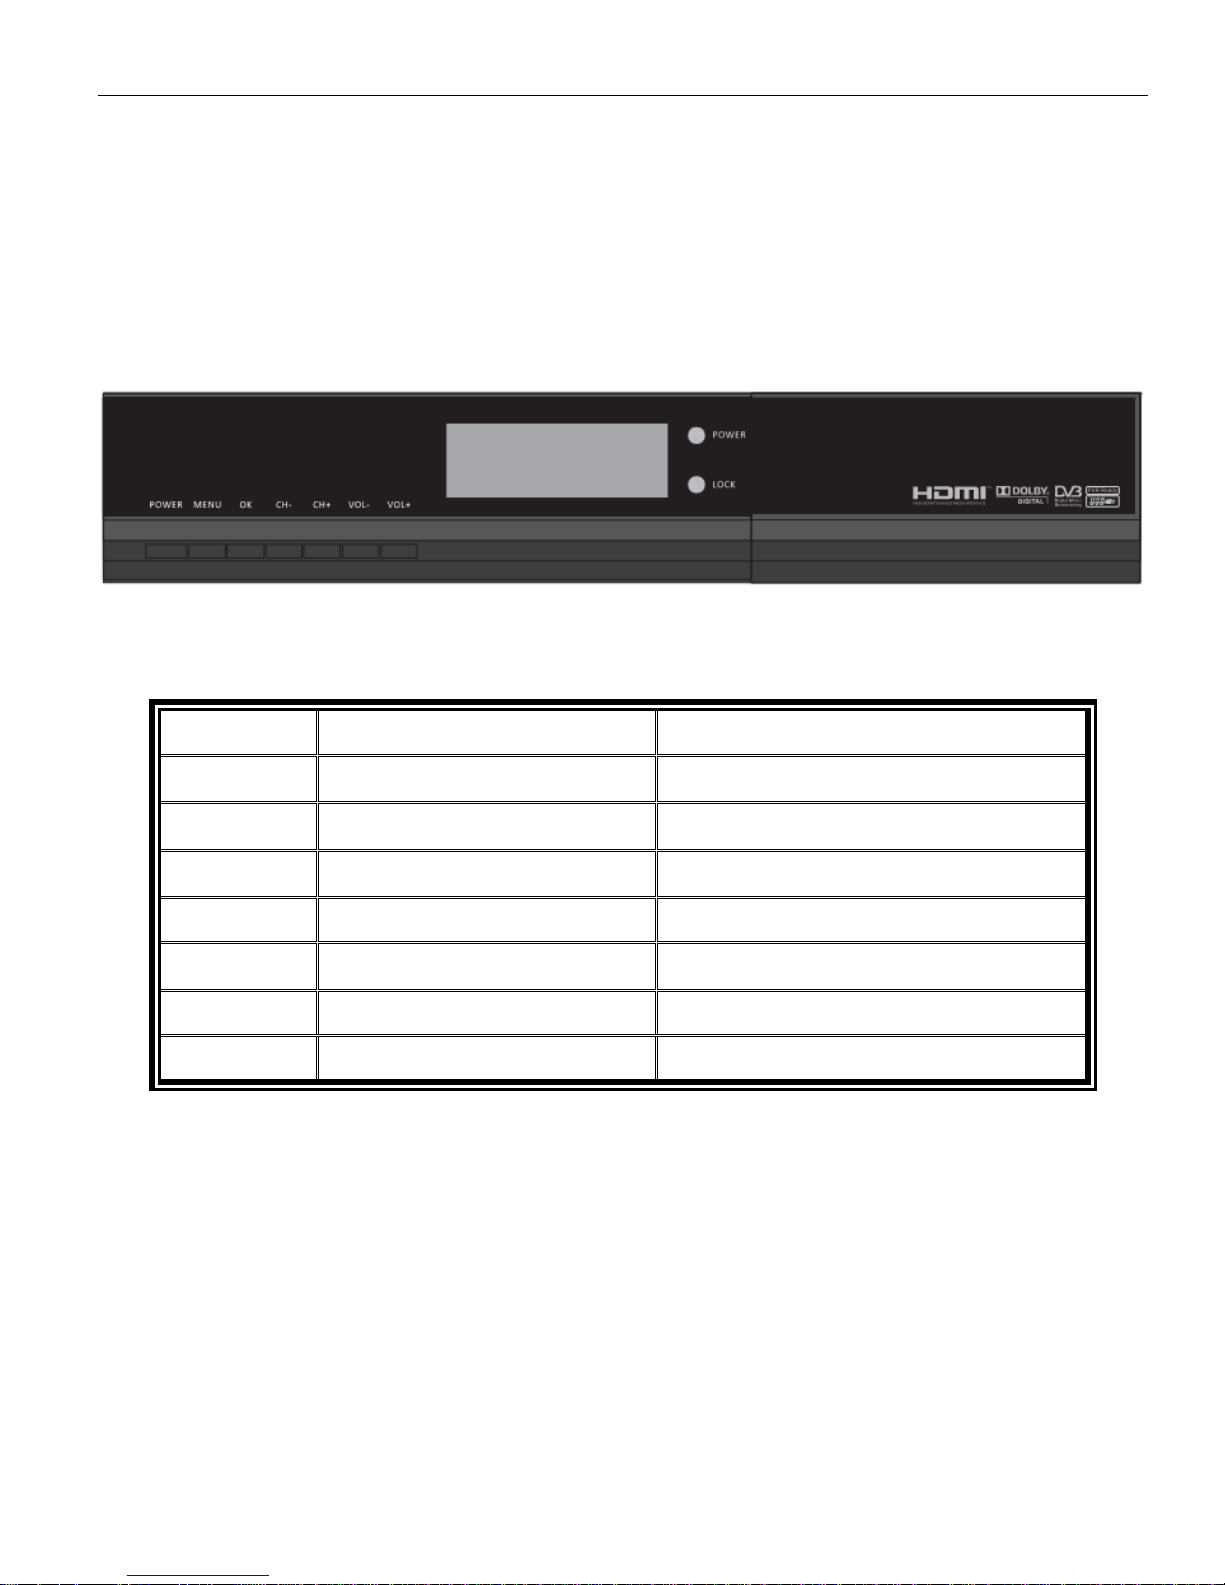
Front Panel
Bottom Name Function
STAND BY Stand by Switch standby/play mode
MENU Main Menu Enter into main menu
OK OK confirm
-VOL Volume - Volume down
+VOL Volume + Volume up
-CH Channel - Channel down
+CH Channel + Channel up
4
Page 5
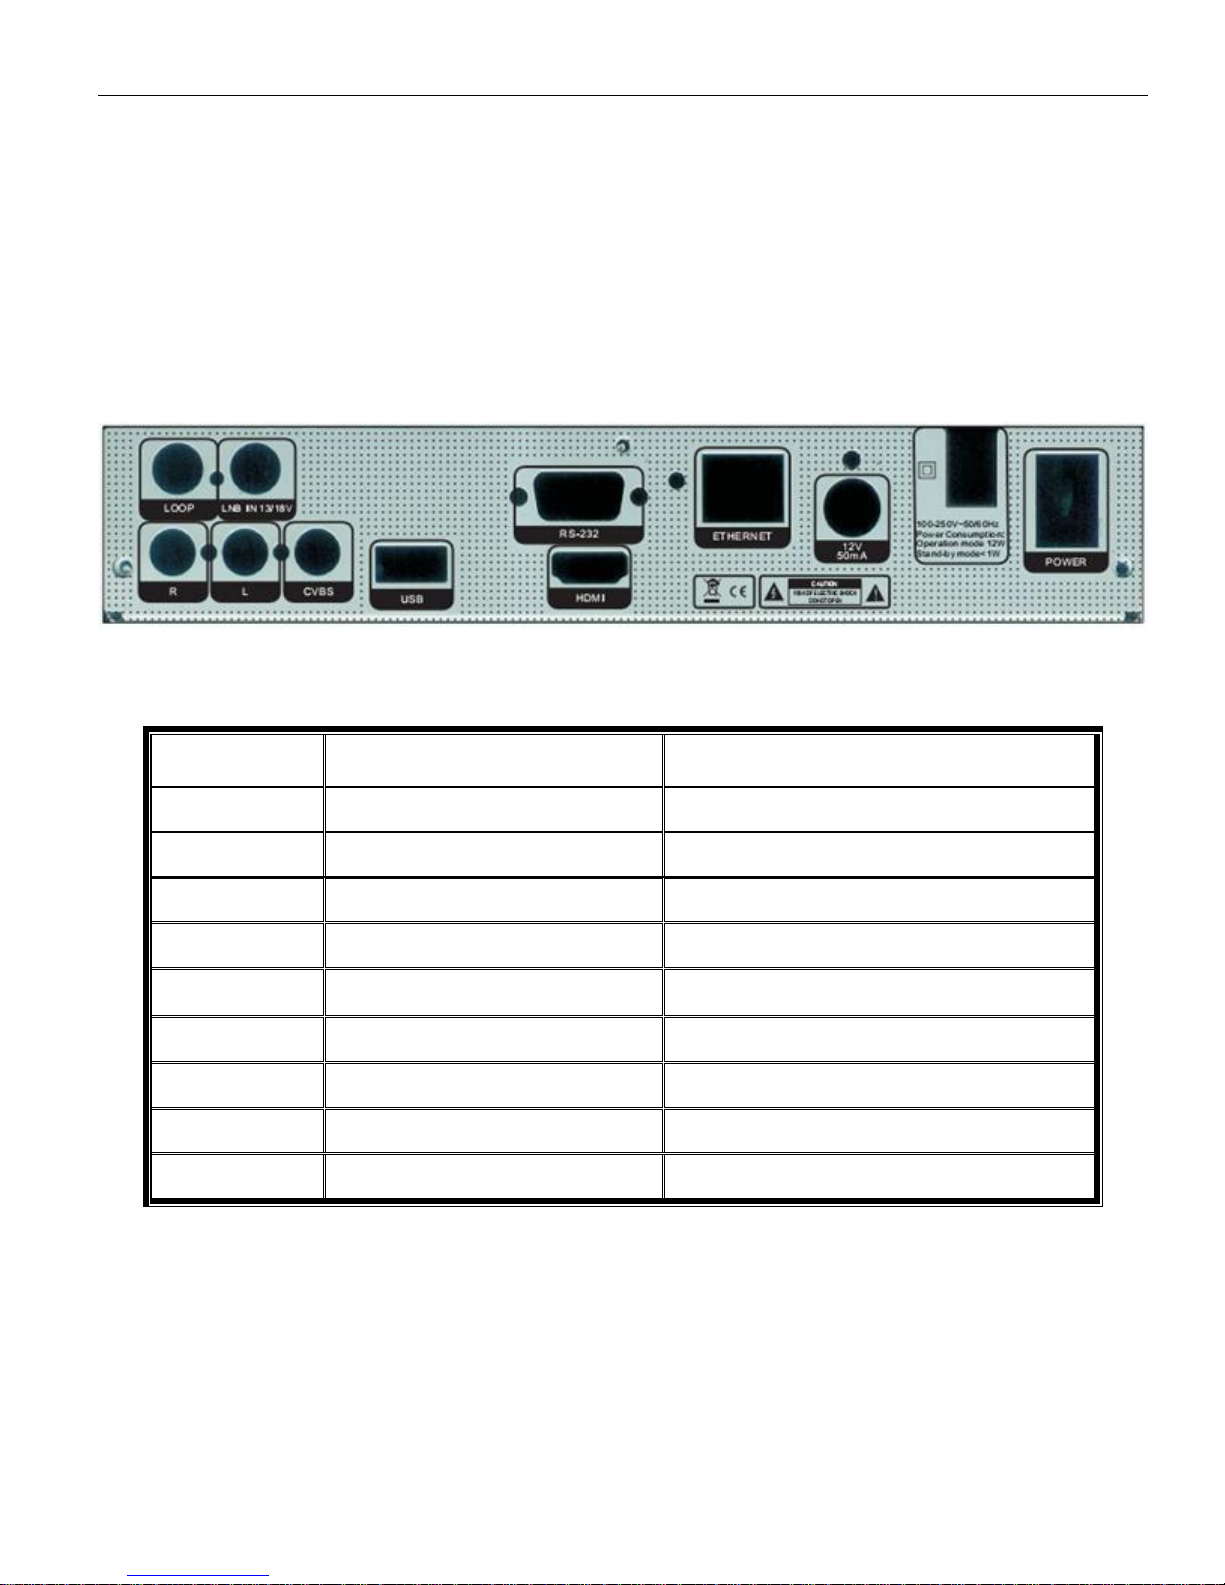
Rear Panel
Bottom Name Function
POWER Power swicth On/off
ETHERNET ETHERNET RJ-45(to ethernet)
RS-232 RS-232 Connect to a PC fro SW upgrade
HDMI HDMI port HDMI 1.3output
PVR USB port Connect to usb
CVBS CVBS Connect TV t hrough RCA
AUDIOR/L AUDIOR/L Connect to audio R/L to TV/ Audio
LNB IN LNB IN Connect to satellite antenna
LNB OUT LNB OUT Connect to the other receiver
5
Page 6

CONTENTS
QuickStart
............................................................................................................................................................................................................
RemoteController
.........................................................................................................................................................................................
BasicOperation
1.Edit Channel
1.1TV Channel List
1.2Radio Channel List
1.3Favorite
1.4Delete All
2.Installation
2.1AntennaAntenna&satellite Quick Setting
2.2SatelliteList
2.3Antenna Setup
2.4Single Satellite Scan
2.5MultiSatellite Scan
2.6Transponder L ist
2.7LNB PowerSetting
3.System Setting
3.1Language
3.2TV system
3.3Display Setting
3.4Local Time Setting
3.5Timer Setting
3.6Parental Lock
3.7OSD Setting
4.Tools
5.Media
6.NetworkSetup
....................................................................................................................................................................................................................
4.1Information
4.2Factory Default
4.3Common Interface
4.4CASlot Setting
4.5Upgrade By USB
4.6Dump By USB
4.7Remove USB Device Safely
5.1HDD Information
5.2PVR Setting
5.3Media Player
6.1Network Setup
6.2Cccam Client Setup
6.3MGCamd Plug Setup
6.4Twin Protocol Setup
6.5Newcamd Sever Setup
s
......................................................................................................................................................................................................
.................................................................................................................................................................................................
............................................................................................................................................................................................
............................................................................................................................................................................................
...................................................................................................................................................................................................
...............................................................................................................................................................................................
..........................................................................................................................................................................................
..........................................................................................................................................................................................
.............................................................................................................................................................................................
...............................................................................................................................................................................................
.................................................................................................................................................................................................................
..............................................................................................................................................................................................
.............................................................................................................................................................................................
..................................................................................................................................................................................
.....................................................................................................................................................................................
.................................................................................................................................................................................
...........................................................................................................................................................................
...................................................................................................................
.....................................................................................................................................................................................
.......................................................................................................................................................................
...........................................................................................................................................................................
................................................................................................................................................................................
............................................................................................................................................................................
.................................................................................................................................................................................
......................................................................................................................................................................................
.............................................................................................................................................................................
.....................................................................................................................................................................................
..............................................................................................................................................................................
......................................................................................................................................................................................
.................................................................................................................................................................................
.......................................................................................................................................................................................
.......................................................................................................................................................
.................................................................................................................................................................................
...................................................................................................................................................................................
........................................................................................................................................................................................
.............................................................................................................................................................................
.........................................................................................................................................................................
............................................................................................................................................................................
........................................................................................................................................................ ..............
7
9
12
12
12
14
14
14
15
15
15
16
17
17
17
18
19
19
19
19
20
20
20
20
21
21
21
21
22
22
22
23
23
23
23
23
25
26
26
27
28
28
6
Page 7
Quick Start
Turn on STB
Connect the STB’s main power and turn on the power switch.
When the first time turn on the STB there’s no channels in the system. So the STB will enter into mainmenu directly.
1. If user connect STB with TV by A/V cable the TV will show”no OSD, pls press V.Format” when the first time you turn on the
STB. Pls press “V.Format” button of the remote then the STB will enter into mainmenu.
2. If user connect STB with TV by HDMI cable, the STB will enter into mainmenu directly .
Q&A
Q1:The power the STB w as turned on and not in standby mode, but there’s nothing showed on the TV screen.
A1: Make sure the TV set has benn set to the correct video input(not the TV channels). For example, if you have connected the
unit with the video1 input of the TV set, the TV set has to be switched to Video 1.
Q2.The power of my STB has been turn on and not in standby mode, but the TV screen showed nothing except”No
signal”.
A2:That means the channel, which you select, is no signal. It could be several causes:
1 .The channel which you select is not in your allocate satellite. The simply solution is to change channel.
2 .The signal of current Tv channel is too weak. You can try to change channel to other strong signal channels. If the problems
still exist, please consult your local dealer or other professionals for technical service.
3 .Y ouuse the Dual LNB and you need modify LNB type.
Channel scan
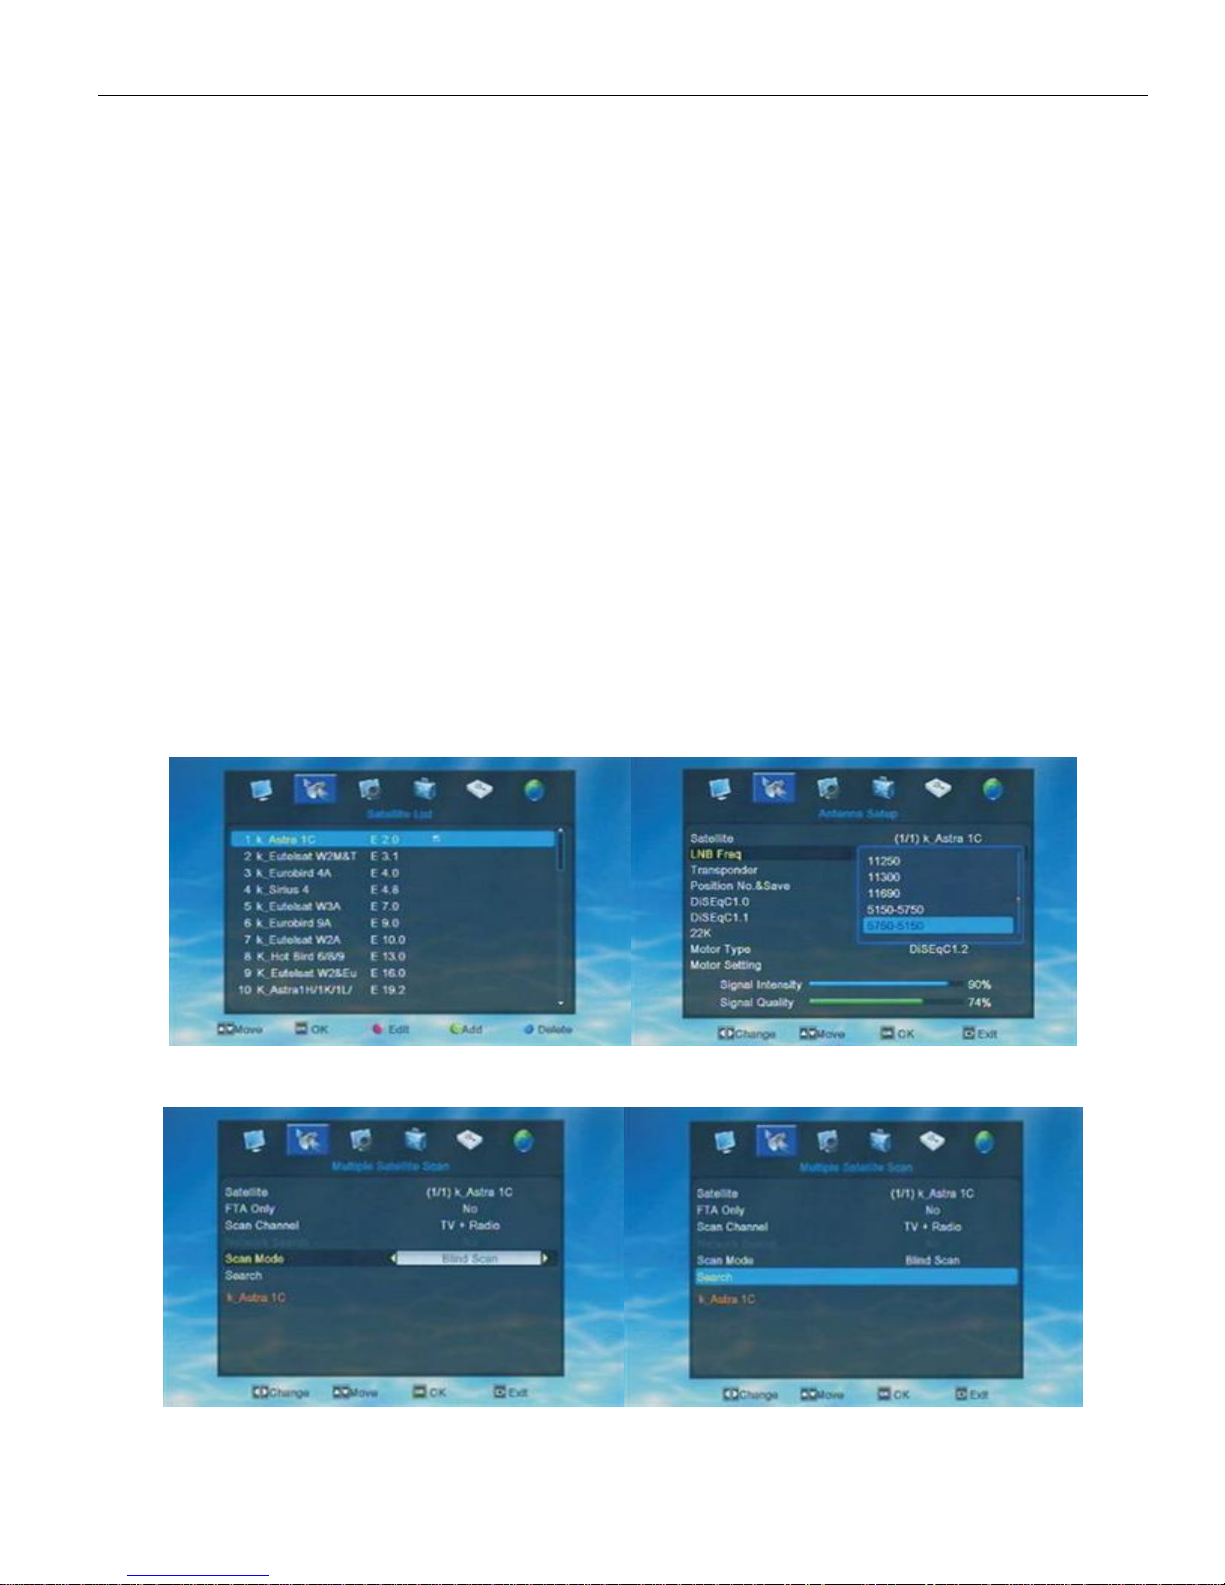
1 .In Main menu we can see “Installation”. Press UP/DOWN to move the highlight to “Installation” and then press OK to enter into
Installation menu. In Installation menu pls choose to enter Satellite List.
MENU-Installation-Satellite List
2 .In satellite list user need to select satellite according to their needs.
3 .After user chose satellite, we need to go back to Installation menu and then choose Antenna Setup.
4 .User need to set exact parameters of the antenna he/she chose.
5 .After user set the parameters, we need to goback to Installation menu and choose Sigle/Multi Sat.Search.
If user only selected one satelltethen pls select Single Satellite Search and select auto scan to search programs. If user
selected more than one satellite in the satellite list then pls select Multi satellite search and auto scan to search programs.(for Multi
satellite search, user need to set DiSEqC/USALS in Antenna setup first)
the above picture shows the steps of Multi saellite searh
7
Page 8
Record
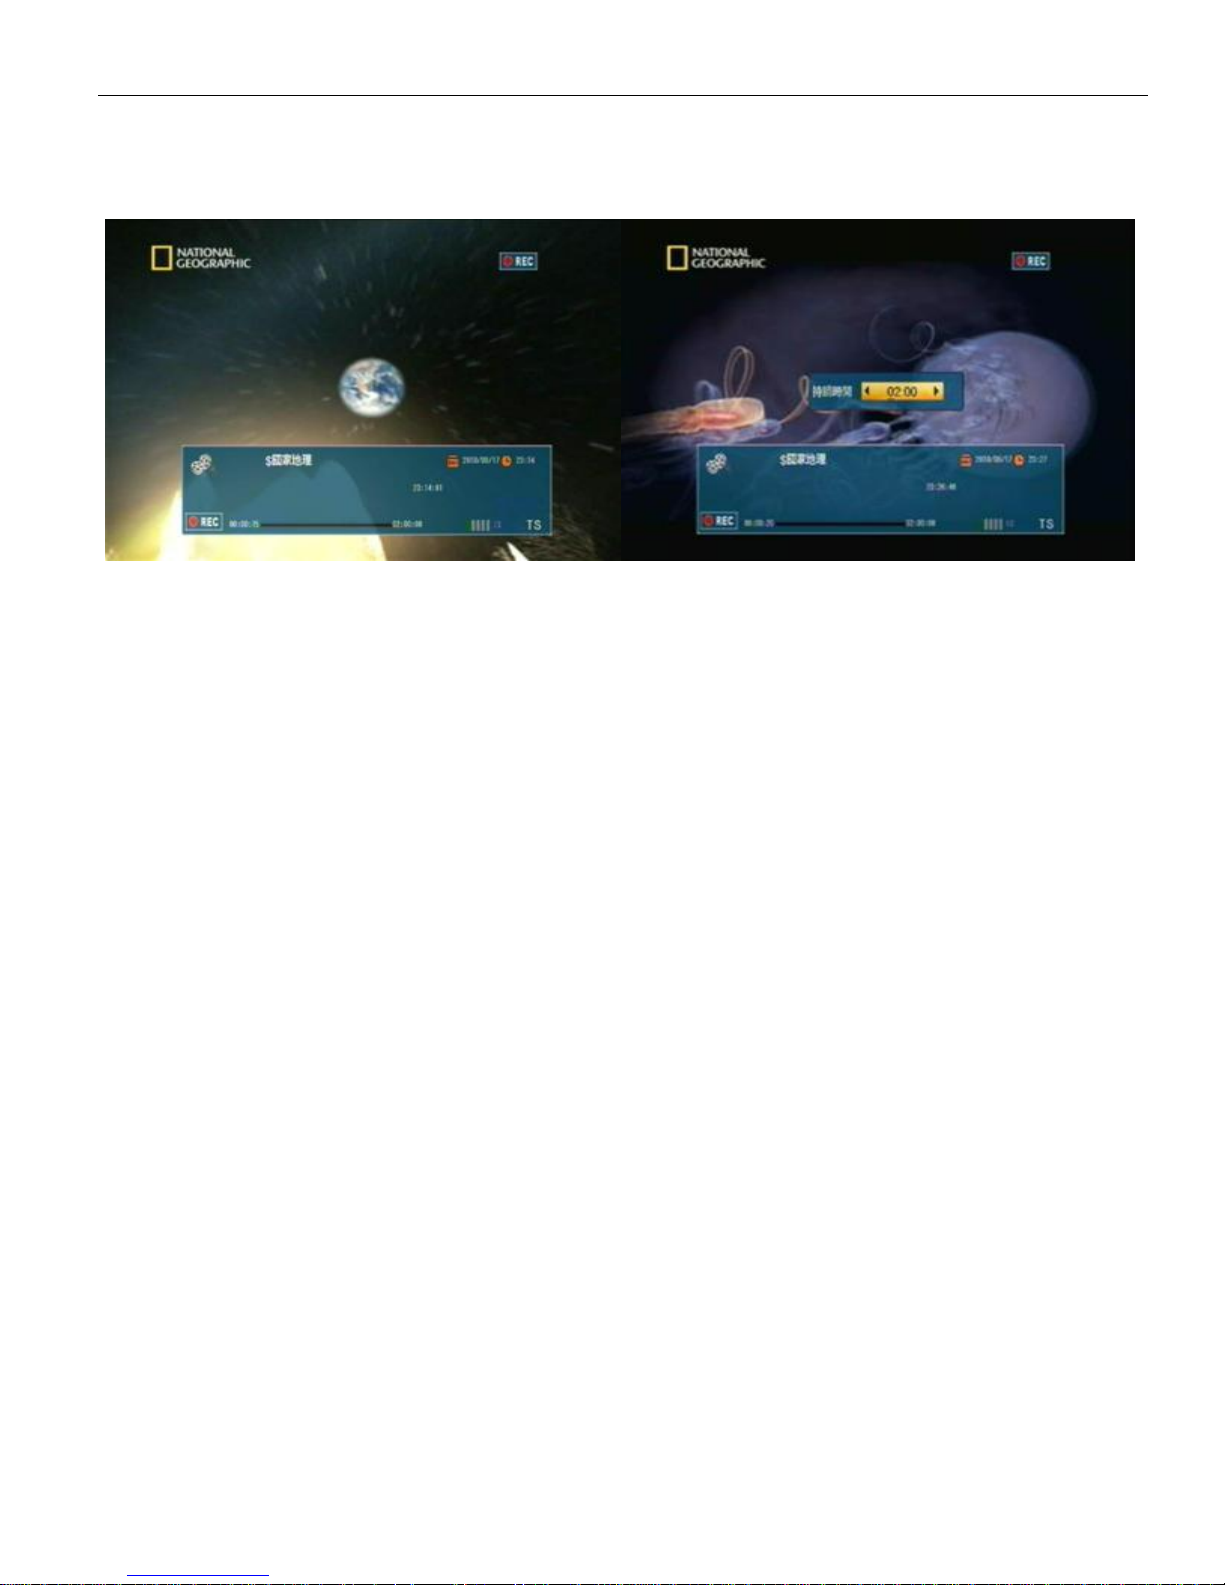
In recording mode, there will show a window on the screen. Like below pic. Shows.
In recording mode, user can press RECORD again to set Duation.
In playing mode, press RECORD can record the current playing show.After user press RECORD there will show a symbol on
the right side of the screen, llike “REC”.
*The recorded file will save to U-disk directly. So before we start to record, user need to connect a U-disc with the STB. user
cann’t apply the record function if no U-disk found by the STB.
In recording mode, there will show a window on the screen. Like the above pic. Shows.
User can find some informations of the recording program, the name, date, time...and how long the program has been recorded.
User can pause or stop recording the program according to their own needs.
When press PAUSE, the STB will pause recording. User can press PLAY to go on recording or press STOP to stop recording
and exit from Record. When exit from recording the STB will ask user “Are you sure to exit recording?”. Here user need to choose
YSE or NO according to their own need.
When press STOP, the STB will stop recording.There will show a dialogue, asking user”whether to save the recorded file.” User
need to choose YSE or NO according to their own need.
Q&A
Q1: Why my record files cann’t not be saved?
A 1 : The recorded program can only be saved when it’s recorded for more than 2 minutes.
Q2 : How long can a program been record?
A 2 : It depends on the storage of user’s U-disk.
Q 3:The record files will be saved in what format?
A 3: All record files will be saved as *.ts.
8
Page 9
RemoteController
9
Page 10
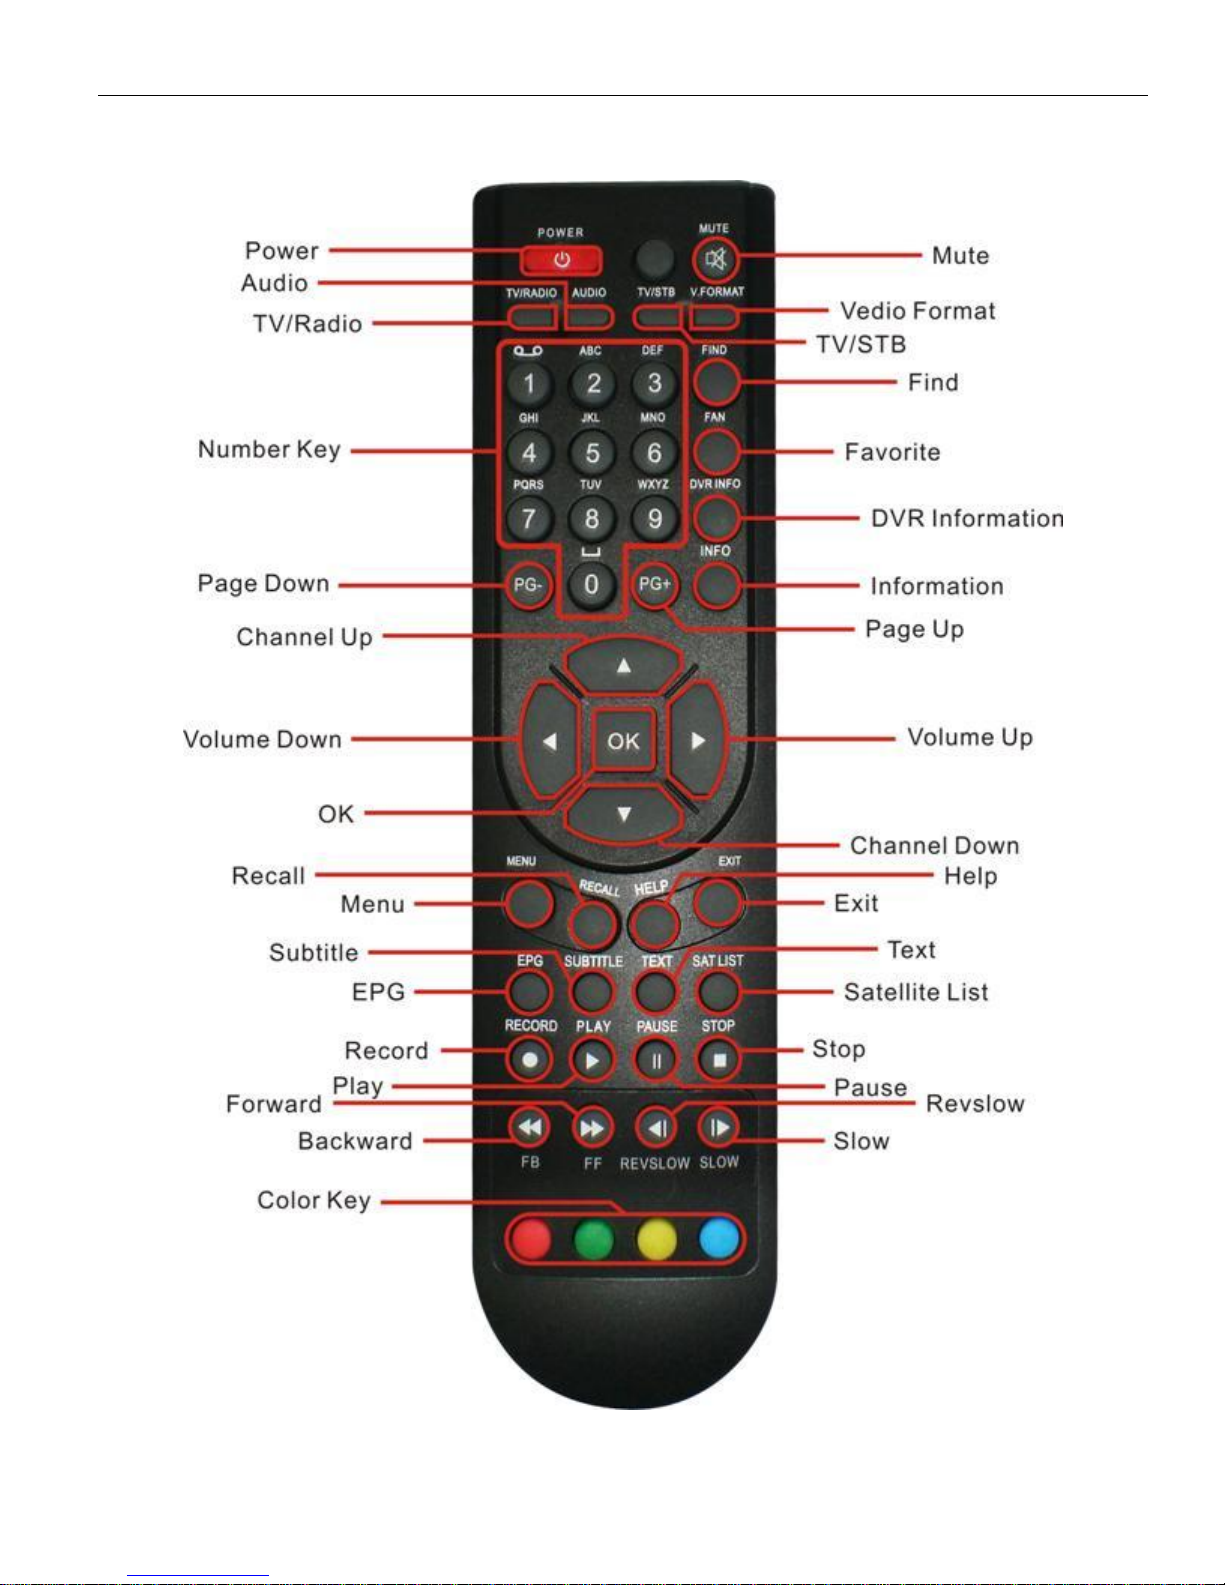
Power
Switch the STB between standby and play mode.
AUDIO
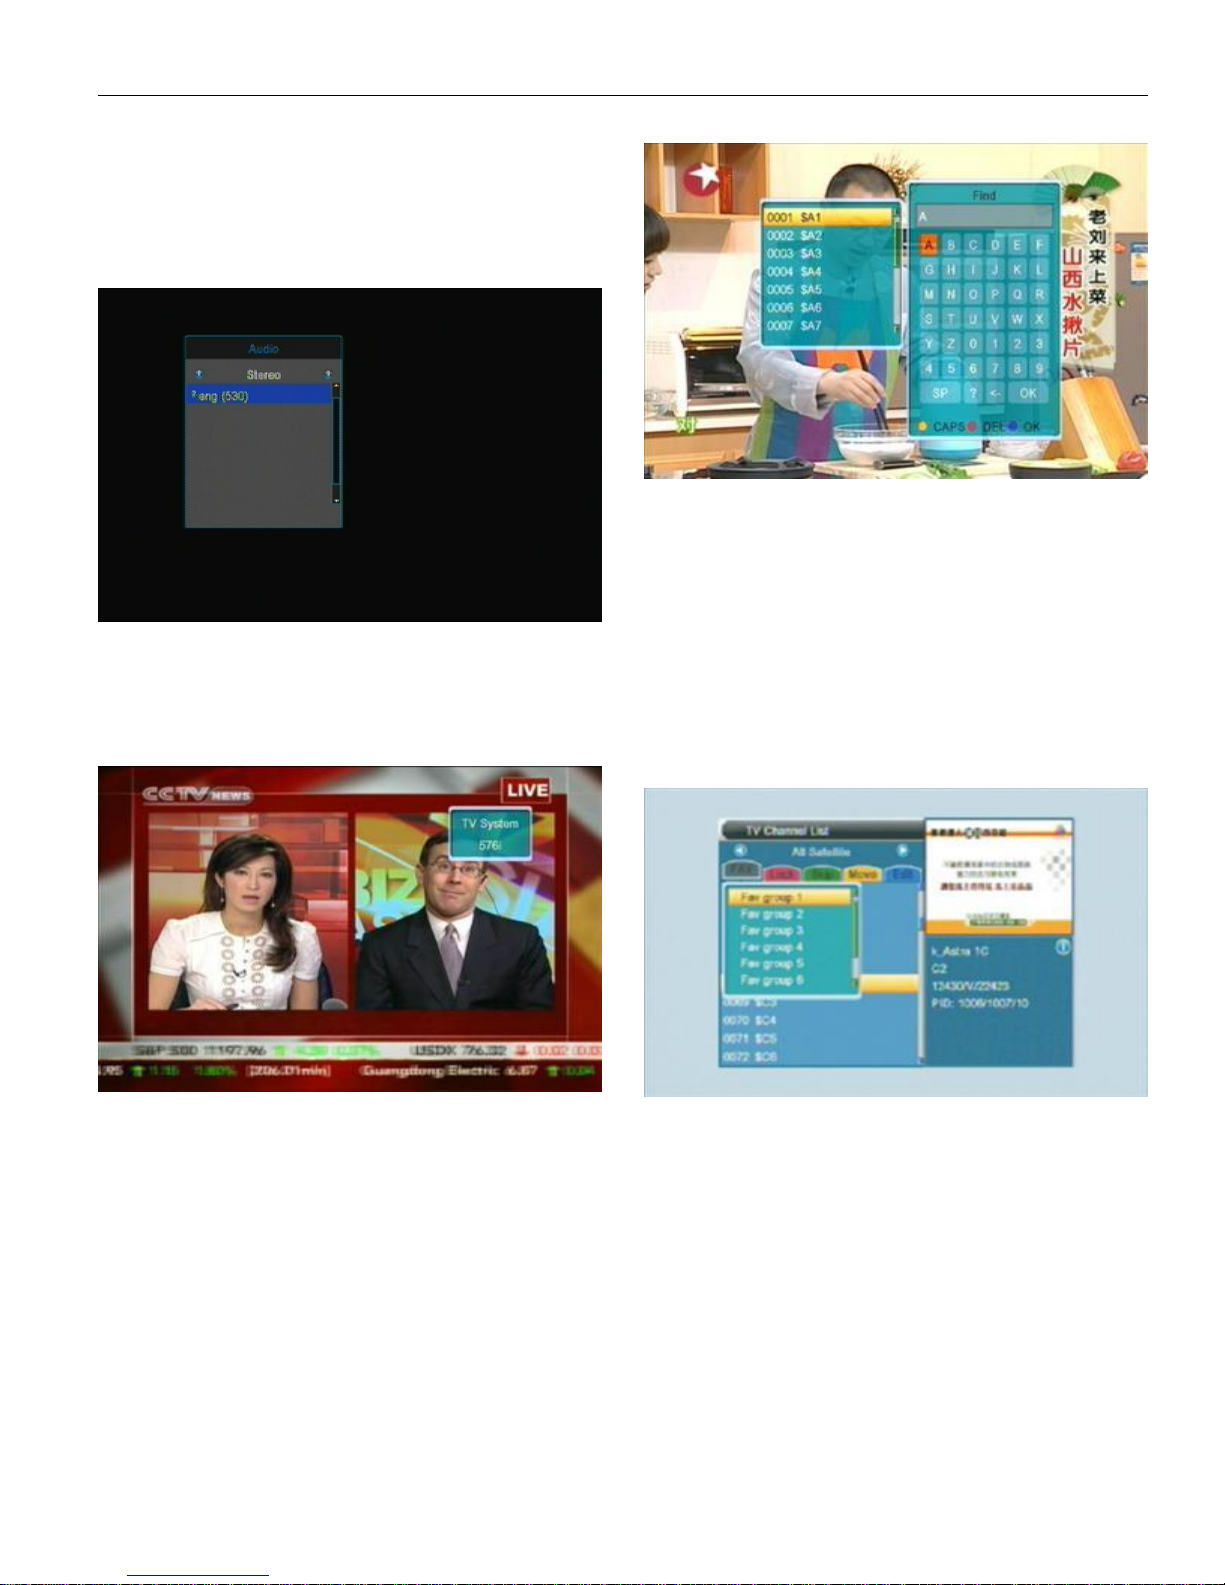
In full screen, press AUDIO there will show a window of
“Audio”.
User can press Left/Right/Up/Down to move hightlight to
choose the letter and press OK to input the selected letter into
the dialogue. The searching result will display on the right of
this window. When enter the letters user can press Red color
key to elete the char, Blue color key to confirm and Green color
key or EXIT to cancel and exit from FIND window.
User can modify the audio track by press UP/DOWN and
press LEFT/RIGHT to change the audio mode ( Left/ Right/
Stereo/ Mono ).
V.FORMAT
In full screen, press V.FORMAT one time can check the
current video output resolution.
Press V.FORMAT continuously, the system will switch the
Video output resolution.( 576P -> 480P 576i -> 480i ->
720P_50 -> 720P_60->1080i_50 -> 1080i_60)
TV/RADIO
Press TV/RADIO to switch between TVandRADIO playing.
MUTE
In play mode, press MUTE one time to mute the sound.
Press again to restore the sound.
TV/STB
Switch between TV mode and RADIO mode.
PG-/PG+
In Channel list, press PG-/PG+ can page up/down the
channel list.
In full screen, press PG-/PG+ can switch satellite directly.
FAN/FAV
In full screen, press FAN/FAV then there will show a
window of “Favorite Group” on the left of the screen.
User can move highlight to choose favorite group by press
UP/DOWN and press OK to check the channels in the chose
group. In the chose group user can press UP/DOWN to choose
the channel he/she want then press OK to switch to the chose
channel.
*If user didn’t add/set any favorite channel, there will no
channles available in each group.)
User can go to Chapter1. Edit Channel-TV Channel
list-FAV to check how to add the Favorite channel.
DVR INFO
In full screen, press DVR INFO can check current program’s
informations.
FIND
In full screen, press FIND can open the “Find” window.
EXIT
Press EXIT to exit from present window / menu / dialogue.
10
Page 11
SATLIST
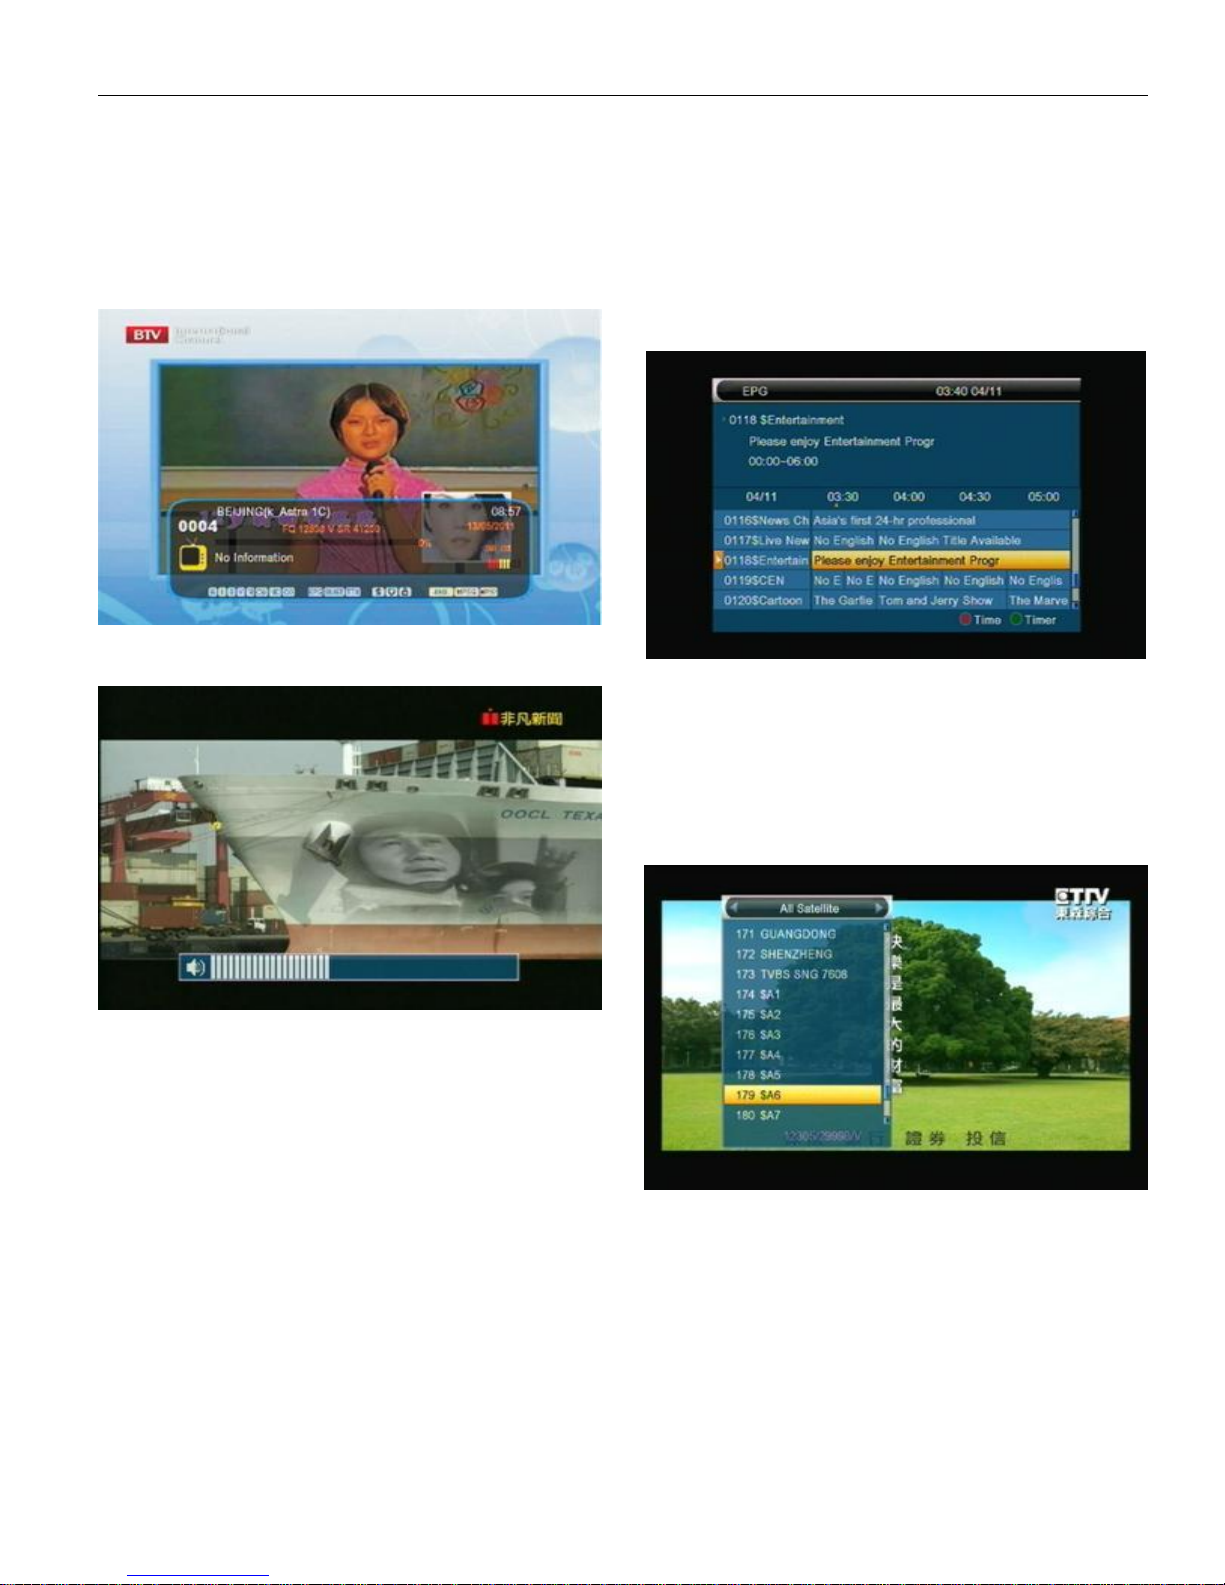
In full screen, press SATLIST can open satellite list. User
can find all the scaned satellite in the list.
RECALL
In full scree, press RECALL the STB will switch to the
previous channel from the current one.
INFO
In full screen, press INFO there will show a window on the
bottom of the screen. User can see the parameters of current
channel, like name of the channel, date...
Volume up/Volume down(LEFT/RIGHT)
In full screen, press LEFT/RIGHT to adjust the volume.
TEXT
In full screen press TEXT can open teletext page on the
channel which has teletext information. If the channel you
chose don’t have teletext information, the STB will show “No
Teletext Date” on the screen.
PAUSE
In play mode, press PAUSE one time the picture will be
paused., but the sound of the channel will still continue. Press
PAUSE again, the playing show will skip over to the paused
pictures and corresponding with the sound.
In record playing mode, press PAUSE can pause the
current playing show.
MENU
Press MENU one time can enter into main menu. Press
MENU again or press EXIT can exit from the main menu and
enter into playing mode.
EPG
The STB has an Electronic Program Guide(EPG) to help
you navigate channels through all the possible viewing
options.The EPG supplies information such as channel listings
and strarting and ending times for all available channels.
Press EPG the EPG window will show on the screen.
SUBTITLE
In full screen, press SUBTITLE can switch aubtitle on or off.
If the channel you chose don’t have abubtitle informations, the
STB will show “No Date” on the screen.
PLAY
Press PLAYto play the program or the recorded show.
Channel List
RECORD
In playing mode, press RECORD can record the current
playing show. After user press RECORD there will show a
symbol liek “REC” on the right side of the screen.
STOP
In record playing mode, press STOP can stop playing the
current show.
11
Page 12
Basic Operations
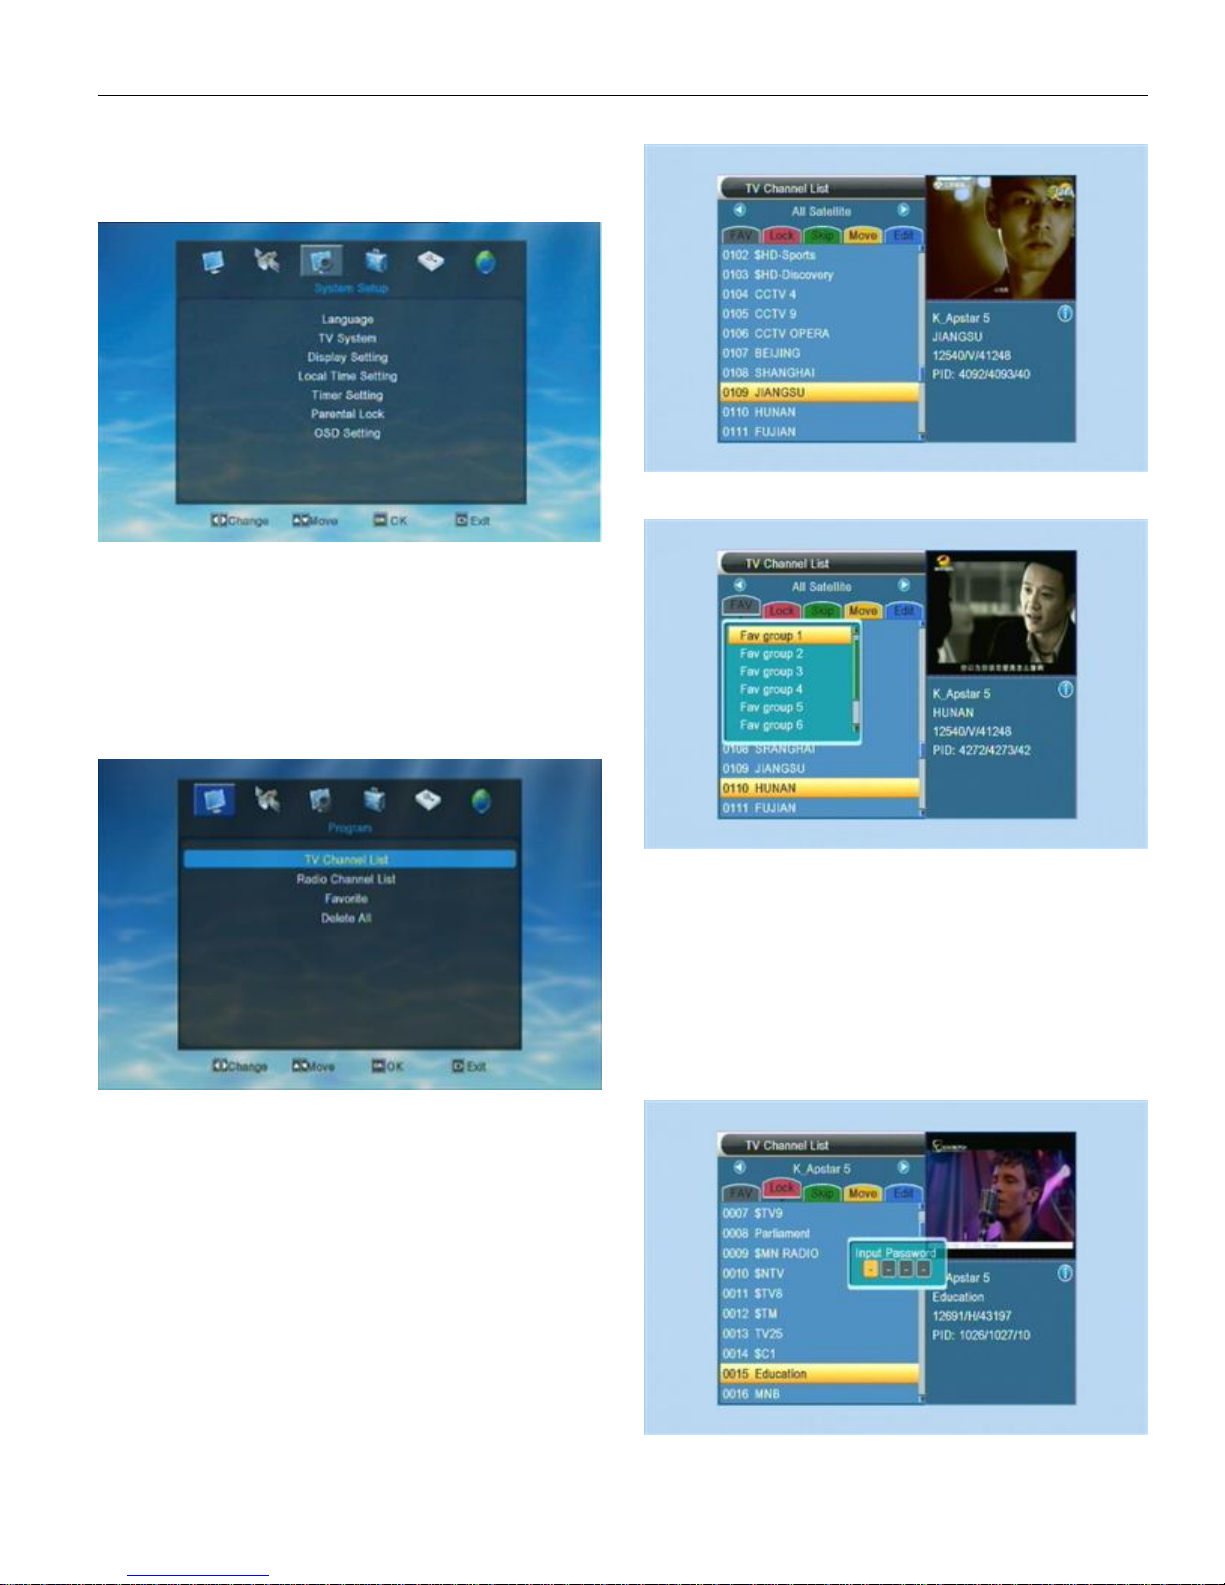
When first time turn on the STB, the system will enter into
the Main Menu, as following shows.
There are six symbols on the left side of Main Menu.
Choose different symbol, user can enter into different menus,
like Edit Channel, Installation, System Setting, Tool, Media and
Network Setup.
Users can press LEFT/RIGHT key to move the highlight
and press OK to choose the menu.
1.EditChannel
Choose the 1stsymbol “Edit Channel”on the main menu,
then press OK to enter into the Edit Channel menu.
1.1.1 Favorite
Press UP/DOWN to move highlight and press OK to enter
into the choice. If the menu has been locked, the STB will ask
user to input password. The default password is “0000”
Press EXIT to exit form the current menu.
1.1TV Channel List
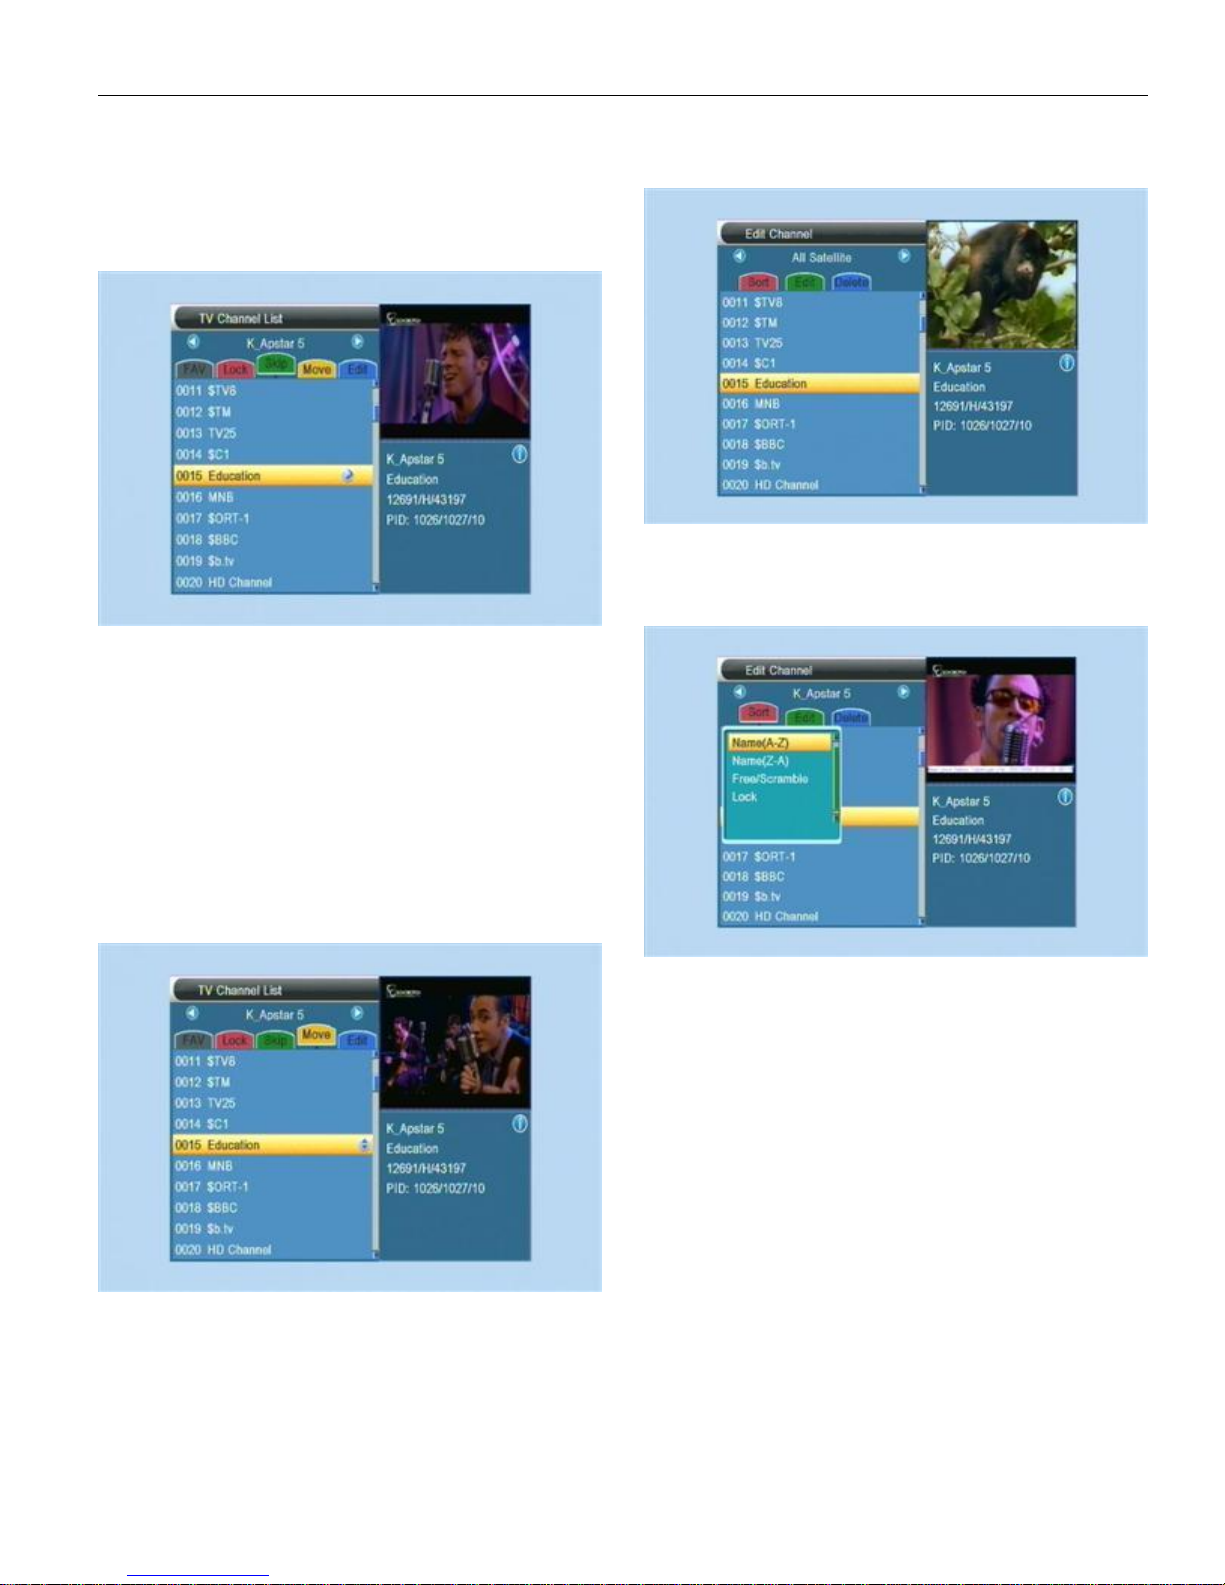
When enter into “TV Channel List” menu, the system
will show a menu as below.
In TV Channel List menu user can find all the available
channels in the list. User can press UP/DOWN to choose the
channel and then press OK to perview. Right below the preview
window, user can find some detail informations of the playing
channel. Such as the name of the satellite, the name of the
channel, then parameter and the PID.
1 . In TV Channel List menu press FAV/FAN can open
“Favorite” window ,like above pic. shows.
2 . There’s 8 groups in Favorite window. User can
press UP/DOWN to choose the group and press OK to add the
highlighted channel into the channel list.
Then user can check all the channels in that group.
1.1.2.Lock
User can set channel/channels to be locked.
1 . Press Red key to enter into Lock setting mode.
2 . Press UP/DOWN to move highlight and press OK
to confirm the choice. After that there will show a “lock” mark on
the right side of the chose channel.
12
Page 13
3 . Press EXIT to exit from the current mode.
After exit from the window, the STB will ask user to
input password if he/she want to watch the locked channel.
The default password is “0000”.
1.1.3.Skip
1 . Press Green color key can enter into Skip mode.
2 . In Skip mode, press UP/DOWN to move highlight
and press OK to make a “skip” mark on the right side of the
chose channel.
3 . Press EXIT to exit from the current mode.
After exit from the window and go back to playing
mode. The STB will skip the marded channel while user change
channels in full screen.
1.1.5.Edit
Press Blue color key can enter into Edit mode.
1.Sort
In Edit mode, press Red color key can open the
window of “Sort“. As the pic. Shows.
User can press UP/DOWN to move hightlight and
press OK to choose.
1.1.4.Move
1 . Press Yellow color key can enter into Move mode.
2 . In Move mode, press UP/DOWN to move highlight
and press OK to make a “Move” mark on the right side of the
chose channel.
As the pic. Shows.
3 . User can press UP/DOWN to move the marked
channel to the position he/she want and press OK to confirm.
4 . . Press EXIT to exit from the current mode.
There’s 4 ways for sorting.
Name (A-Z): Sorting in Alphabetical Order. Ignore
“$” symbol.
Name (Z-A): Sorting in Alphabetical Order . Ignore
“$” symbol.
FTA: Sorting channel through free and scramble
sequence. Free channels will in the front of the channel list
while scrambled channels will in the end of the channel list.
Lock: Accumulated all locked channels and list in
the last of TV channel list.
2.Edit
In Edit mode, press Green color key can enter into
“Edit” mode. User can rename the channels in the channel list.
Press UP/DOWN to choose the channel, which need to be
renamed and press OK to open the Rename window.
13
Page 14
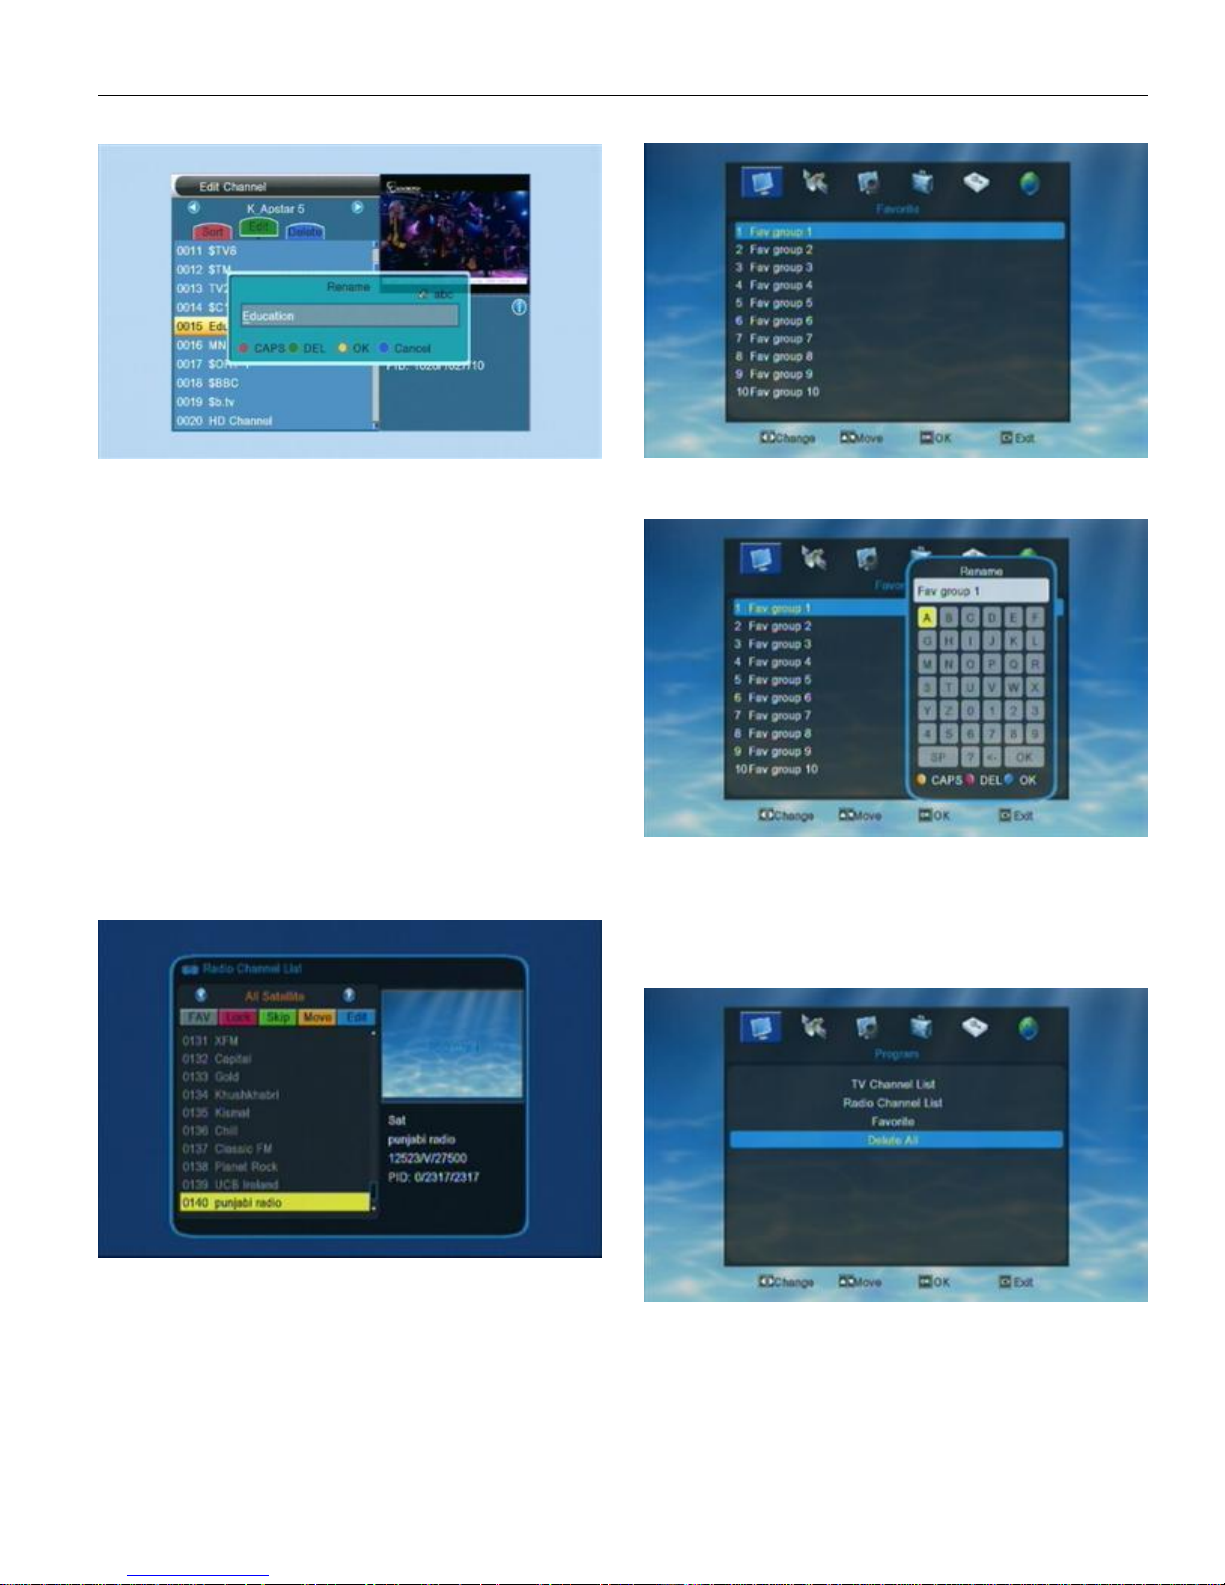
The above pic. is the “Rename window”.
Red color key can switch between capital letter and
small letter.
Green key can delete the char on the cursor.
Yellow key can save the modification.
Blue key can cancel the operation.
Press Bule key or EXIT to exit from current mode.
3.Delete
In Edit mode, press Blue color key can enter into
“Delete” mode.
Press UP/DOWN to move highlight and press OK to
make a deleted mark on the right side of the channel. When
user exit from the delete mode, the marked channel will be
deleted .
1.2.Radio Channel list
Basically, the operation of “Radio Channel List” is the
same with “TV Channel List”. There’s only one difference
between the operation of the two list.
In “Radio Channel List” there’s no video date, so when
playing Radio there’s no preview show on the window.
Press OK on any of the Fav group can open a rename
window, as below shows.
Yellow key to switch between capital/small letter
Red key to delete input character
Blue key to save the edition and close the window
Press EXIT to exit from current window.
1.4.Delect All
Press UP/DOWN to move the highlight to “Delect All”
1.3.Favorite
When enter into “Favoritet” menu, the system will
show a menu as below.
Press OK ON “Delete All” there will show a warning
dialogue. The dialogue shows “ Warning! Do you really wanto to
delete all channels?”.
User can press LEFT/RIGHT to move the highlight
between YES and NO and press OK to confirm their
choice.Choose YES to delete all channels.
14
Page 15
Q&A
Q : If I incautiously delete all channels, what should I do?
A : 1. User can go to Installation menu and scan the satellite
once again.
2. If there’s channel in the STB since the first time user get
it, then user can restore the channels by “Factory Setting”.
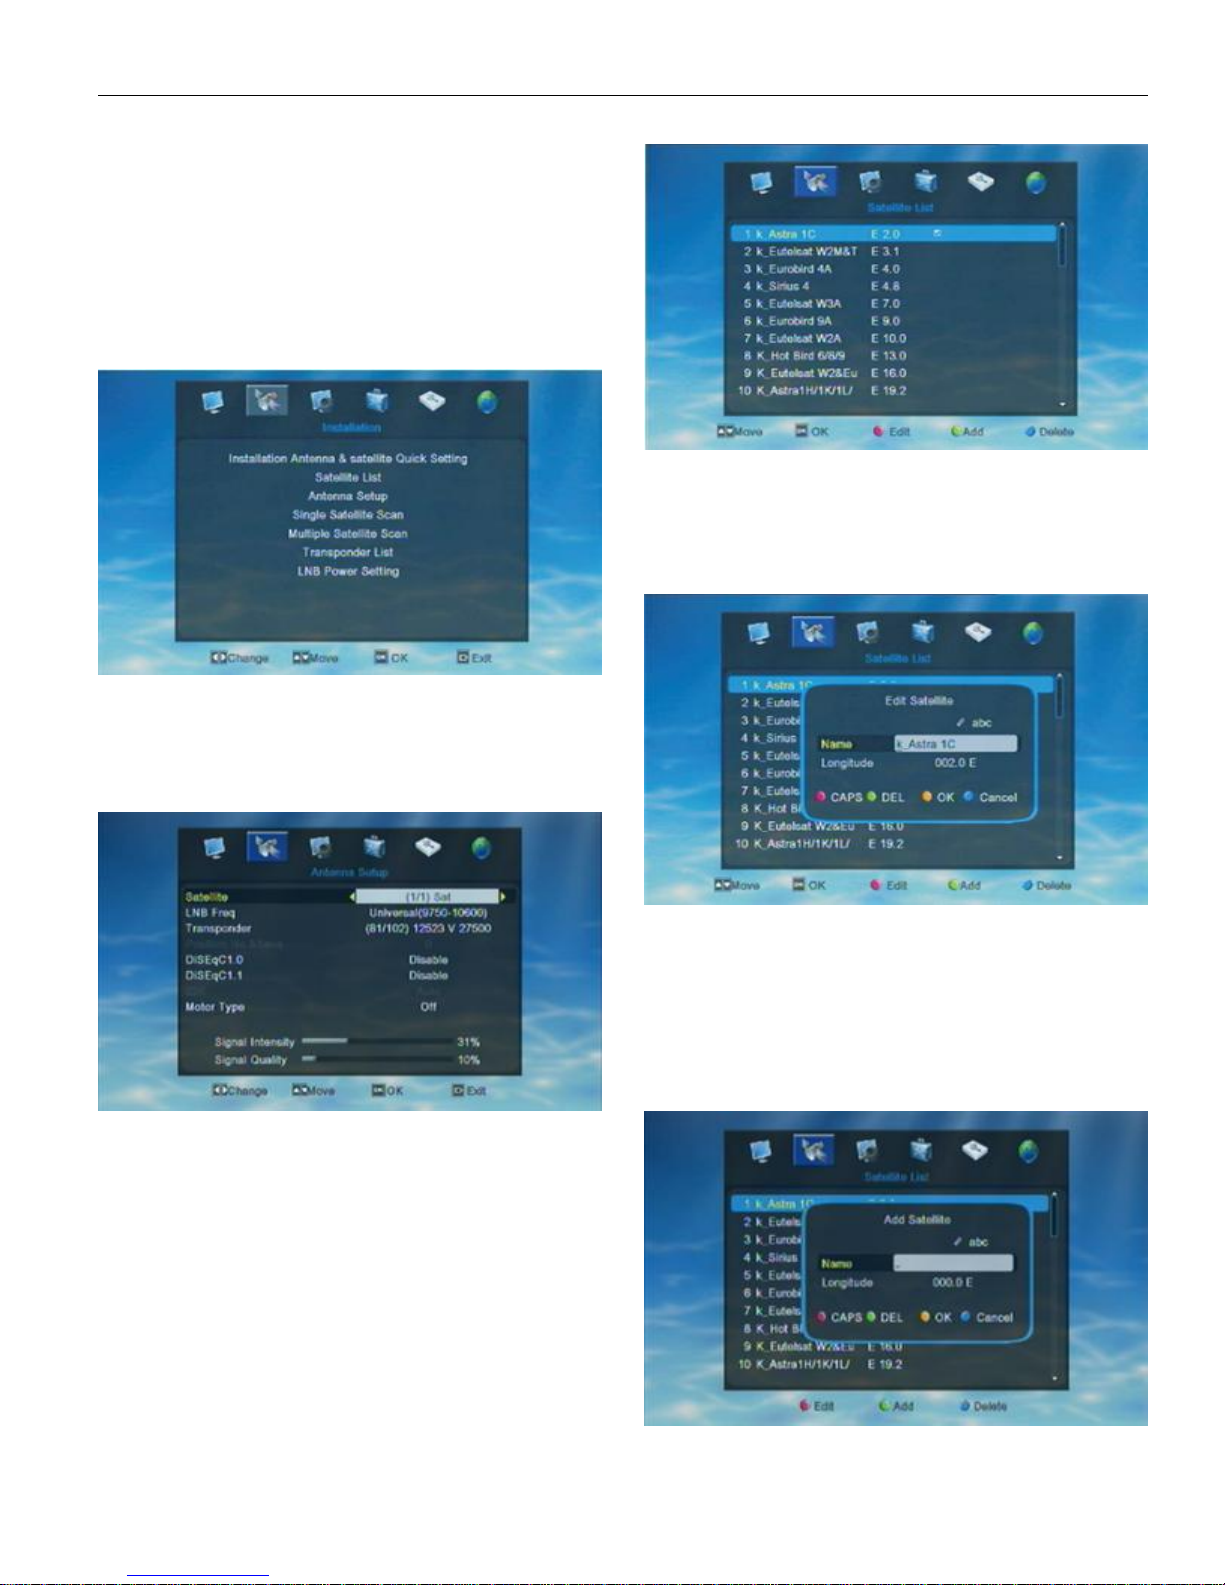
2. Installation
Choose the 2nd symbol “Installation” on the main menu,
then press OK to enter into the Installation menu.
In Installation menu, user can press UP/DOWN to move
highlight and press OK to confirm the choice.
Red key can open the Edit window.
Green key can open the Add window.
Blue key can delete the chose satellite.
User can rename and Edit the satellite.
In Satellite list menu press Red key to open the “Edit”
window and then edit the satellite information according to
user’s needs.
2.1.InstallationAntenna&Satellite QuickSetting
When enter into “Installation Antenna&Satellite Quick
setting” menu, the system will show a menu as below.
In “Installation Antenna&Satellite Quick Setting” menu
user can press Left/ Right to select “Local Longitude” and
“Local Latitude”. User can set USALS, DiSEqC1.2 and Motor
by press UP/DOWN and press OK to confirm the choice.
Set Motor AS USALS ON ALL Satellites
Set Motor AS DisEqC1.2 ON ALL Satellites
Disable Motor Setting on ALL Satellites
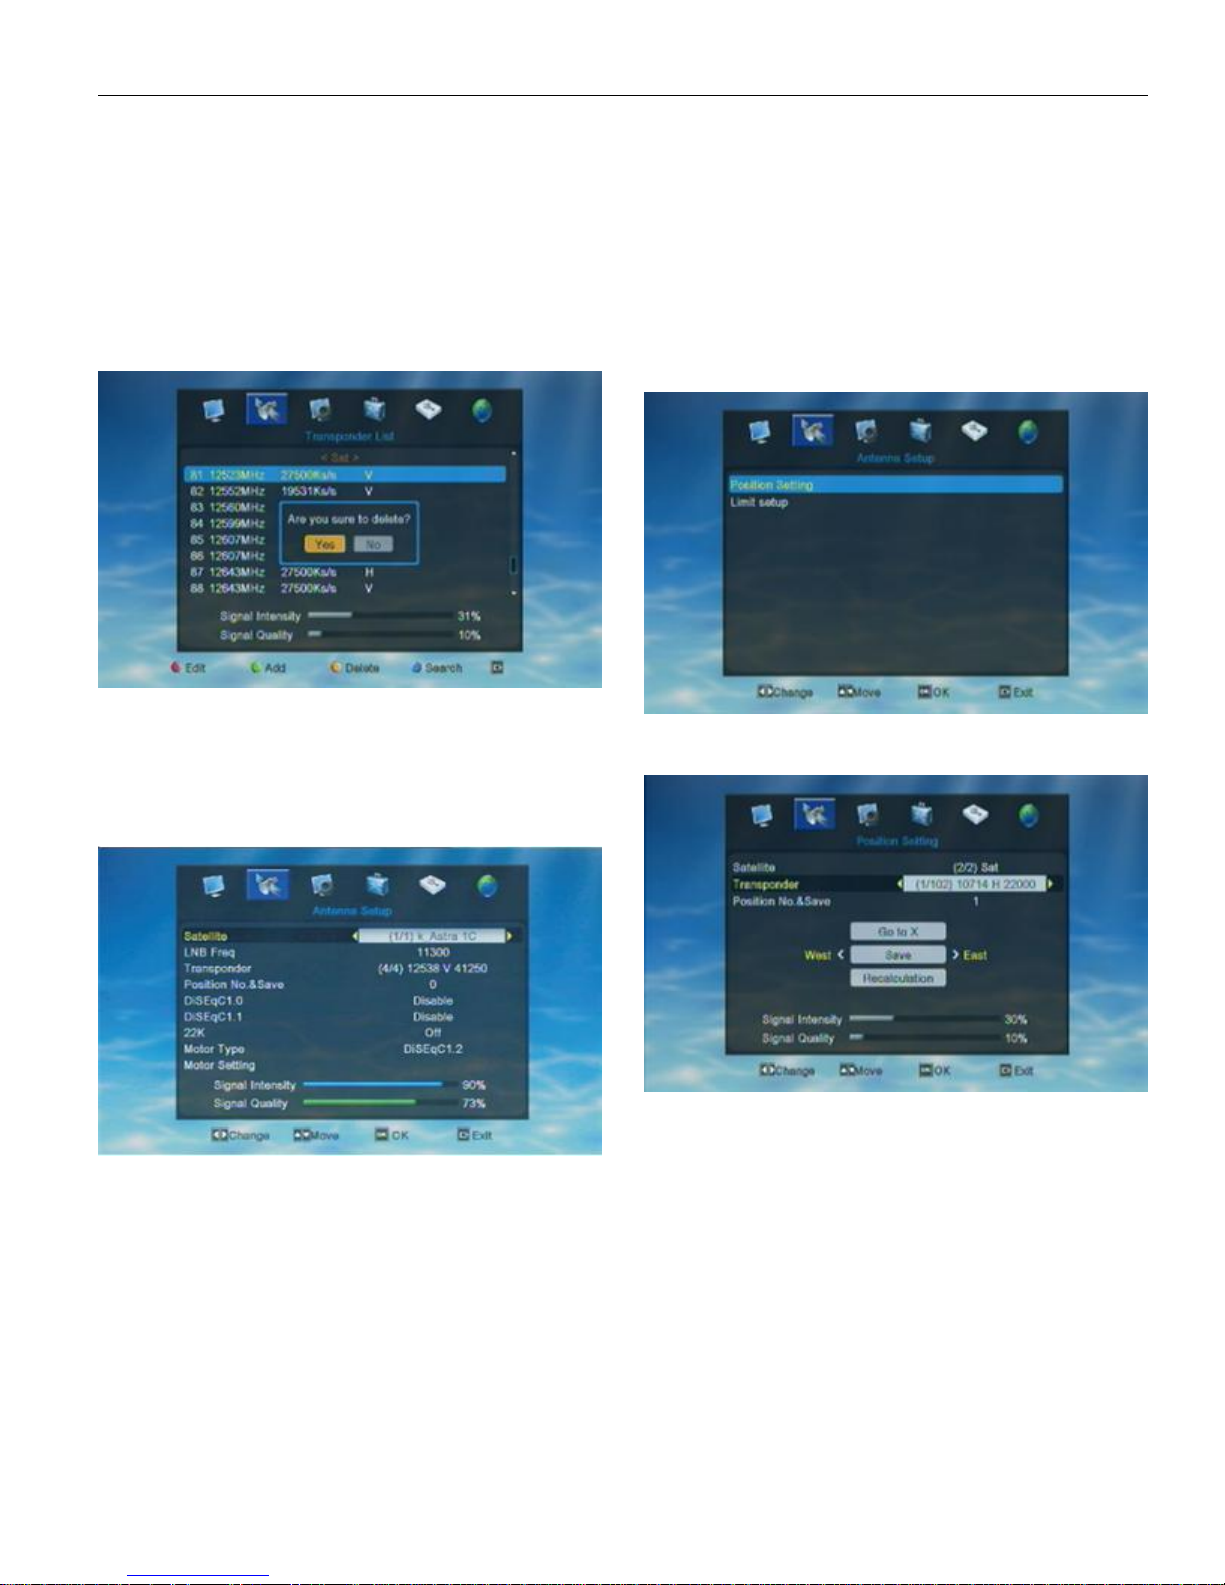
2.2. Satellite List
When enter into “Satellite List” menu, the system will
show a menu as below.
User can edit all the satellite of the satellite list, add
new satellite to the satellite list or delete satellite from the
satellite list.
Red key to switch between capital/small letter
Green key to delete input character
Yellow key to save the edition and close the
window
Blue key to cancel adition operation and exit from
the window
If user didn’t find the satellite he/she need, user can
add new satellite into the satellite list. Add new satellite user
only need to input a name and the longitude of the satellite. As
following shows.
15
Page 16
Red key to switch between capital/small letter
Green key to delete input character
Yellow key to save the edition and close the
window
Blue key to cancel adition operation and exit from
the window
User can delete the satellite from the satellite list by
pressing the yellow key in Transponder List menu.
Press UP/DOWN to move highlight to choose the
satellite and then press Blue color key to delete the chose
satellite.
After user press the Blue key, there will show a
dialogue asking “Are you sure to delete?”. User can choose
YES or No according to their needs.
2.3. Antenna Setup
When enter into “Antenna Setup” menu, the system
will show a menu as below.
Option: Disable/ Port 1/2/3/4
6 . DiSEqC1.1: press Left/Right to choose
Option: Disable/ 1 Cascade M1 Port 1,2,3,4/ 1
Cascade M2 Port 1,2,3,4/1 Cascade M3 Port 1,2,3,4/2
Cascade Port 1,2,3,4.5….16.
7 . 22K: press Left/Right to switch ON/OFF.
8 . Motor Type: press Left/Right to choose
Option: OFF/ DiSEqC1.2/ USALS.
When the Motor Type set as DiSEqC1.2/ USALS,
then user can do the Motor Setting. Press OK on “Motor
setting” there will show a new window as the below picture
shows.
Position Setting
Press OK on “Position Setting” can enter into it’s
setting window as below.
1 . Satellite: press Left/Right to choose satellites or
press OK and enter into satellite list then press UP/DOWN to
choose the satellite directly.
2 . LNB Freq: press Left/Right to choose parameter or
press OK and enter into the parameter list to choose directly.
Options: 5150/ 5750/ 5950/ 9750/ 10000/ 10050/ 10450
/ 10600/ 10700/ 10750/ 11250/ 11300/ 5150-5750 /5750-5150/
Universal (9750-10550)/ Universal (9750-10600)/ Universal
(9750-10700)/ Universal (9750-10750).
3 . Transponder: press Left/Right to choose the TP or
press OK to enterinto TP list to choose directly.
4 . Position No.$Save: press Left/Right to choose.
5 . DiSEqC1.0: press Left/Right to choose
User can set the Satellite, Transponder, Position
NO.& Save…in this window by press Left/Right.
Press OK on “Go to X” can enter into the choice list.
User can set accrording to their needs. After user finished this
setting there will show a dialogue “Want to move the position”.
User can choose “Stop” to stop move or EXIT to exit from the
dialogue.
If the position is properly set, there will show a
dialogue “Are you sure to change this satellite’s Position?
when user press OK on “Save”. But if the position is not
preperly set, there will show a dialogue “Position not specified
(1-63)”. User need to reset the position and then save the
setting.
Press OK on “Recalculation”, there will show a
dialogue “Are you sure re-calculate all satellite positions?”.
User can choose YES or NO according to their needs.
16
Page 17
Limit setup
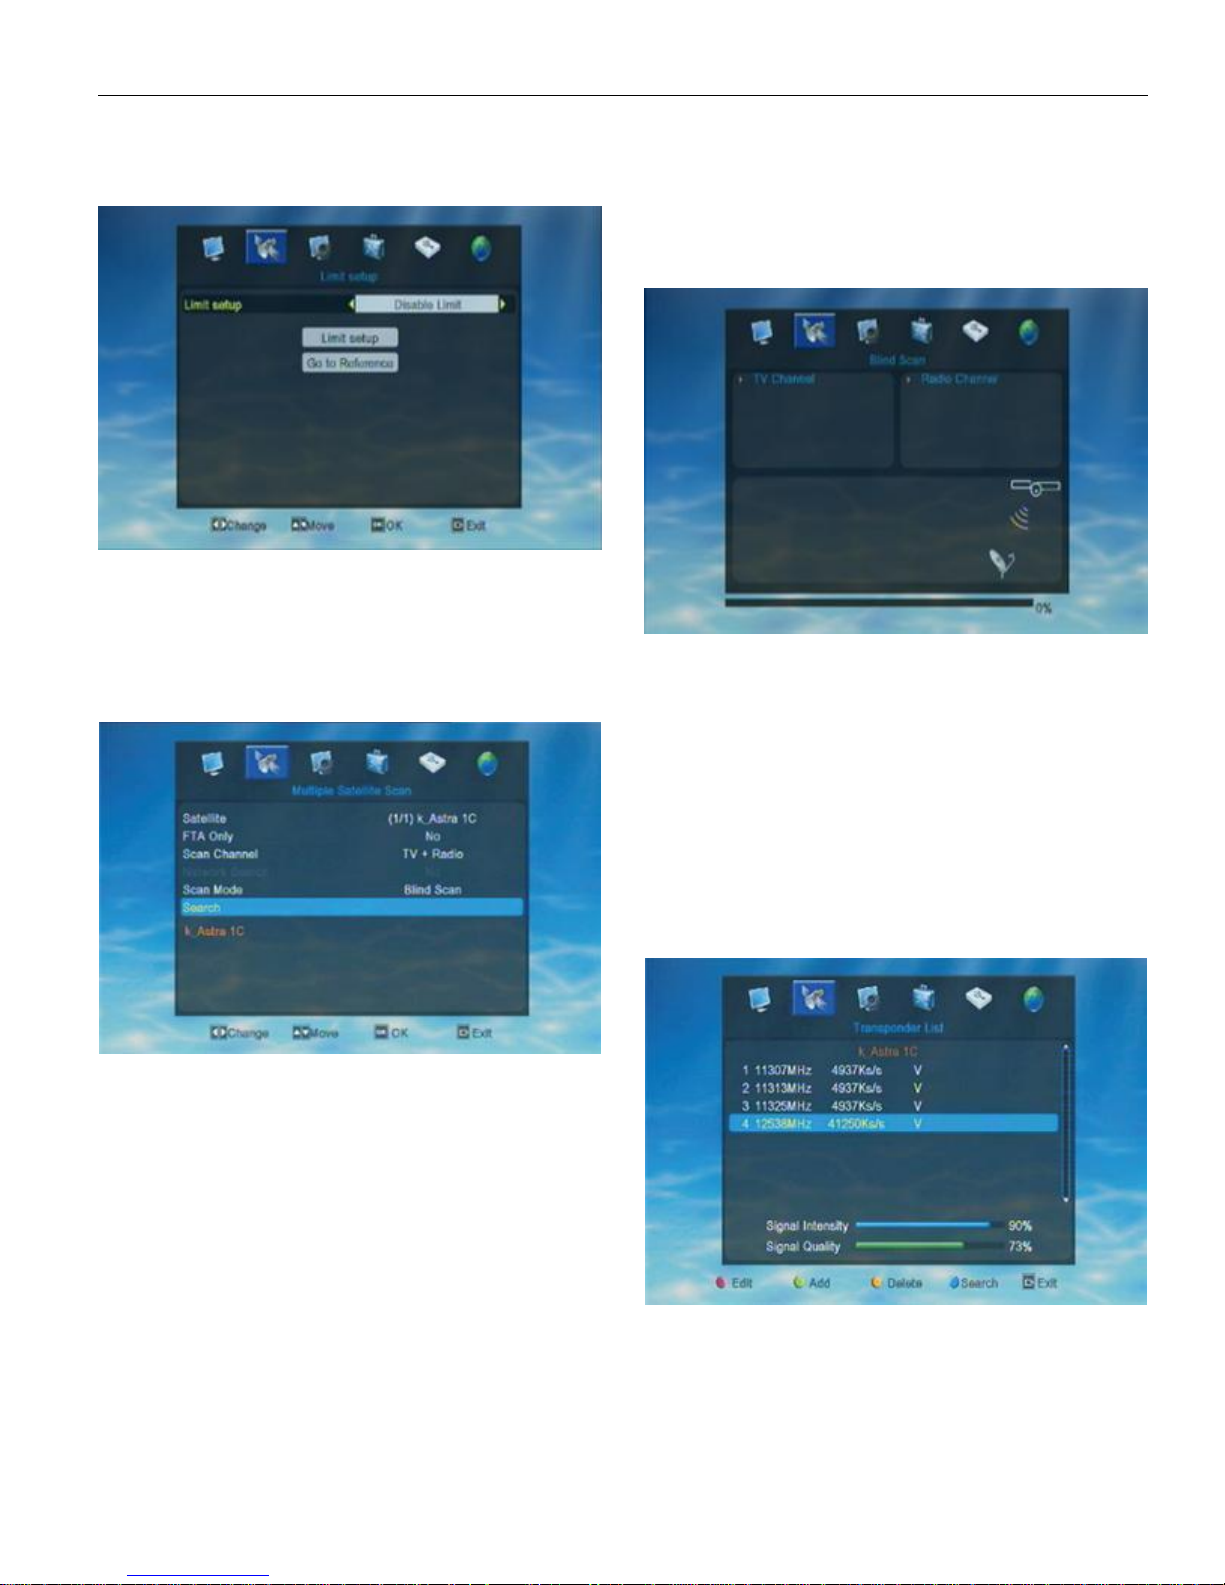
Press OK on “Limit seup” can enter into it’s setting
window as below.
Press Left/Right to make choice.When the “Limit
setup” set as West Limit or East Limit, user can switch “Limit
setup” or “Stop”. When press OK on “ Go to Reference” there
will show a dialogue “ Please wait for moving dish to reference
point”. User can wait for the dish moving or choose “stop”
/EXIT to exit from the dialogue.
2.4. Single Satellite Scan
search”)
5 . Scan Mode: press Left/Right to choose “Blind scan”
/”Preset Scan”.
6 . Search: press OK on “Search” the STB will start to
scan the set satellite.
When the STB finished blind scan, there will show a
window as below.
2.5. Multi Satellite Search
Basically, the operation of “Multi Satellite Search” is
the same with “Single satellite search”. But before user start to
apply Multi Satellite Search, he/she needs to set and switch on
the DiSEqc or USALS first. If user didn’t set or switch DiSEqc or
USALS, the STB will only scan one satellite when user apply
the Multi Satellite Search Auto/Blind scan.
If DiSEqc or USALS has prpperly set, user can see the
name of satellite right below the “Search”.
Press Left/Right to select the choice.
press Left/Right to select the choice.
1. Satellite: press Left/Right to select the choice or
press OK to enter into the satellite list to choose directly.
2 . FAT Only: press Left/Right to select the choice.
Option: YES/ NO
Choose YES, the STB will only scan free channles
from the satellite. Choose NO, the STB will scan all available
channels from the satellite (free channels and scrambled
channels).
3 .Scan Channel: press Left/Right to select the choice.
Option: TV+Radio/TV Channel/ Radio
Choose TV Channel, the STB will only scan TV
channles from the satellite. Choose Radio, the STB will only
scan radio channels only. Choose TV+Radio the STB will scan
all available channels from the satellite (all TV and Radio
channels).
4 . Network Search: press Left/Right to choose
YES/NO.(only in “Preset scan” mode needs to set “Network
2.6. Transponder List
When enter into “Transponder List” menu, the system
will show a menu as below.
Red color key can open “Edit” window.
Green color key can open “Add TP”.
Yellow color key can Delete.
Blue color key can open “Search” window.
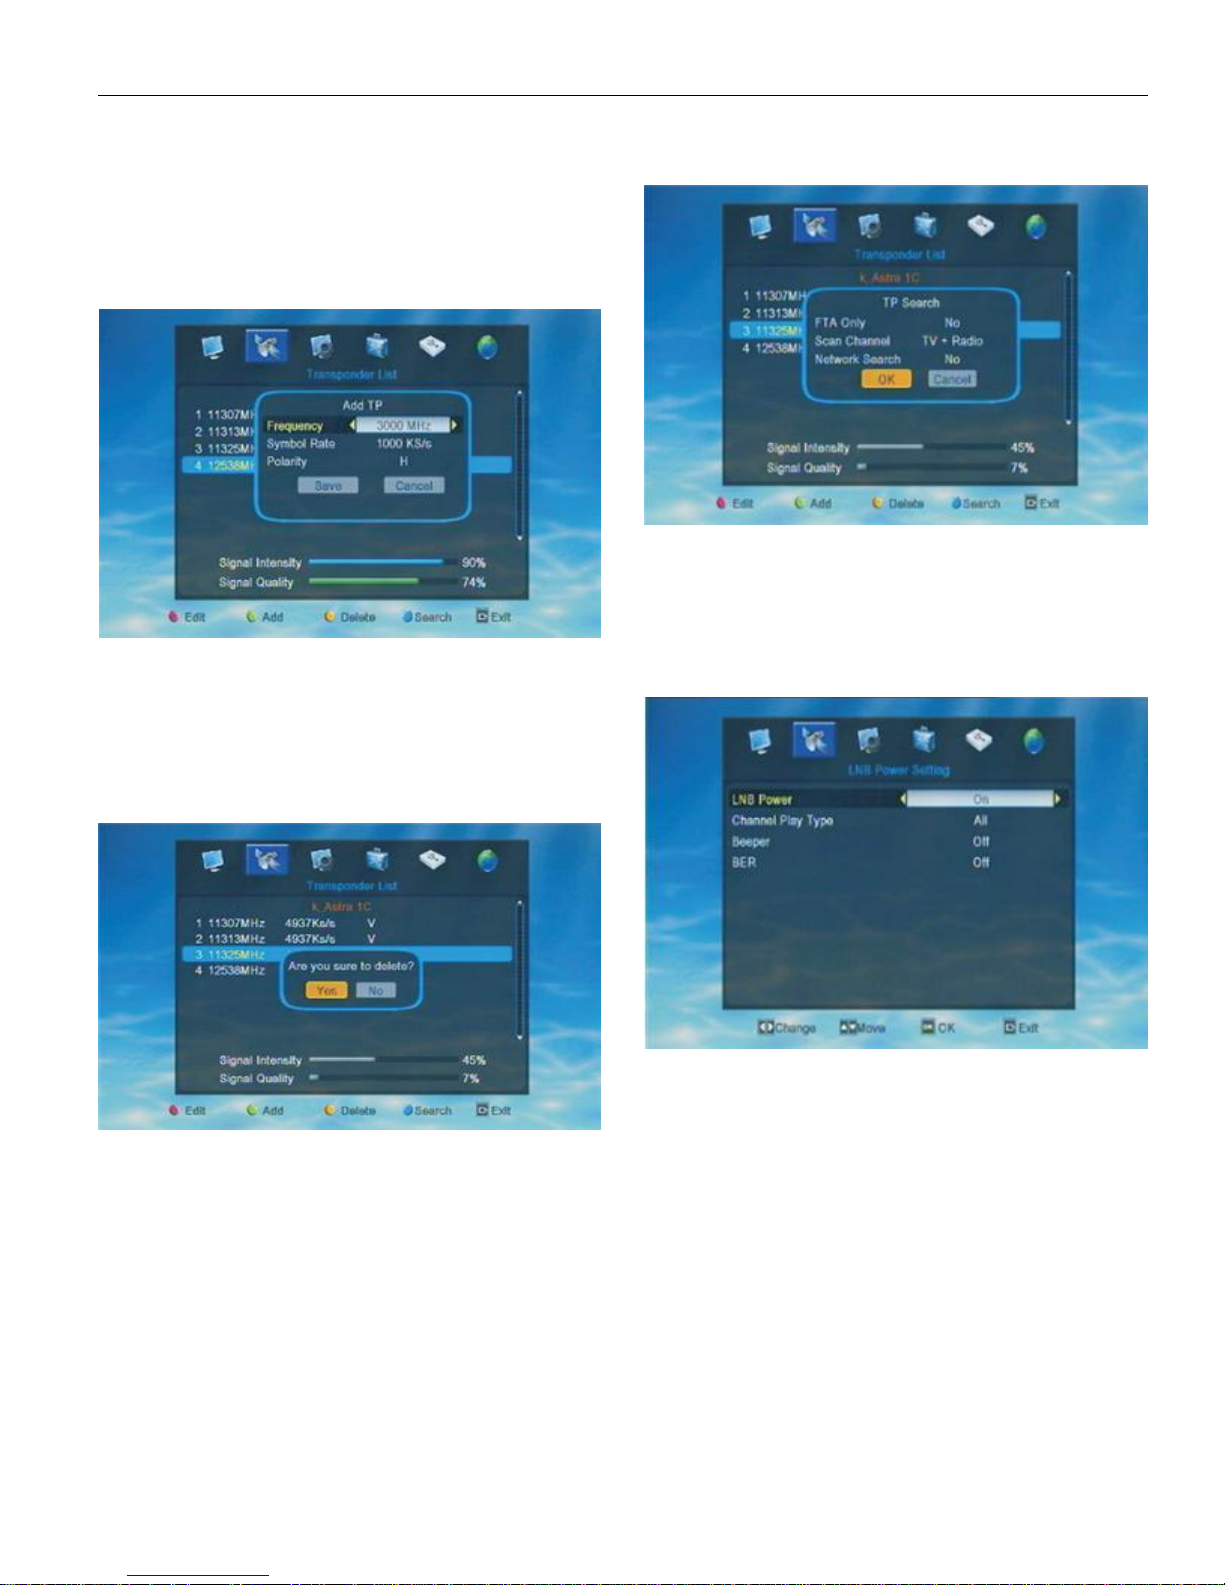
After user chose the TP he want to edit, he/she can
press Red color key to open the window of “TP Edit”. As the
17
Page 18
picture shows.
In “TP Edit” user can edit the chose TP. Like the
Frequency, Symblo Rate and Polarity. After finished the setting
pls press OK on “Save ” to save the settings.If user don’t want
to save the setting, he/she can press OK on “Cancel” or EXIT to
exit form the current window without saving any settings.
In TP list nenu, press Green color key to open the
window of “Add TP”. As the picture shows.
In TP list menu, press Blue color key to open “TP
search” window.As the picture shows.
Press OK on “OK” in the “TP search” window the STB
will start to scan the TP.
Press OK on “Cancel’ or press EXIT can exit from
current window without scanning TP.
In “Add TP” user can add a new TP into the TP list. To
add a new TP, user need to set the Frequency, Symblo Rate
and Polarity of the TP.After finished all the setting pls press OK
on “Save” to save the setting.
If user don’t want to save the setting, he/she can press
OK on “Cancel” or EXIT to exit form the current window without
saving any settings.
In TP list menu, press Yellow color key to delete the
chose channel. As the picture shows.
After press Yellow color key there will show a dialogue
“Are you sure to delete”. User need to choose YES or NO
according to their needs.
Choose YES to delete the TP.
Choose NO or press EXIT will exit from this dialogue
and the TP will not be deleted.
Q&A
Q : How can I restore the deleted TP?
A : User can press Green color key to add a new TP.
Input the deleted TP’s Frequency, Symblo Rate and Polarity in
“Add TP” window and press OK on “Save” to save the settings.
Then user can find the deleted TP on TP list again.
2.7. LNB Power Setting
When enter into “LNB Power Setting” menu, the
system will show a menu as below.
1 . LNB Power: ON/ OFF
When the LNB is set ON, the STB will supply power to
satellite antenna. When the LNB is set OFF, the STB will not
supply power to satellite antenna.
2 . Channel Play Type:All/ Free/ Scrambled
If user choose “Free”, the STB will skip all scrambled
channel when user press CH+/CH- to change channels in full
screen.
If user choose “Scrambled”, the STB will skip all free
channels when user press CH+/CH- to change channels in full
screen.If user choose “All”, the user can find all the available
channels when user press CH+/CH- to change channels in full
screen.
3 . Beeper: ON/ OFF
4 . BER: ON/OFF
Press EXIT to exit from current window.
18
Page 19
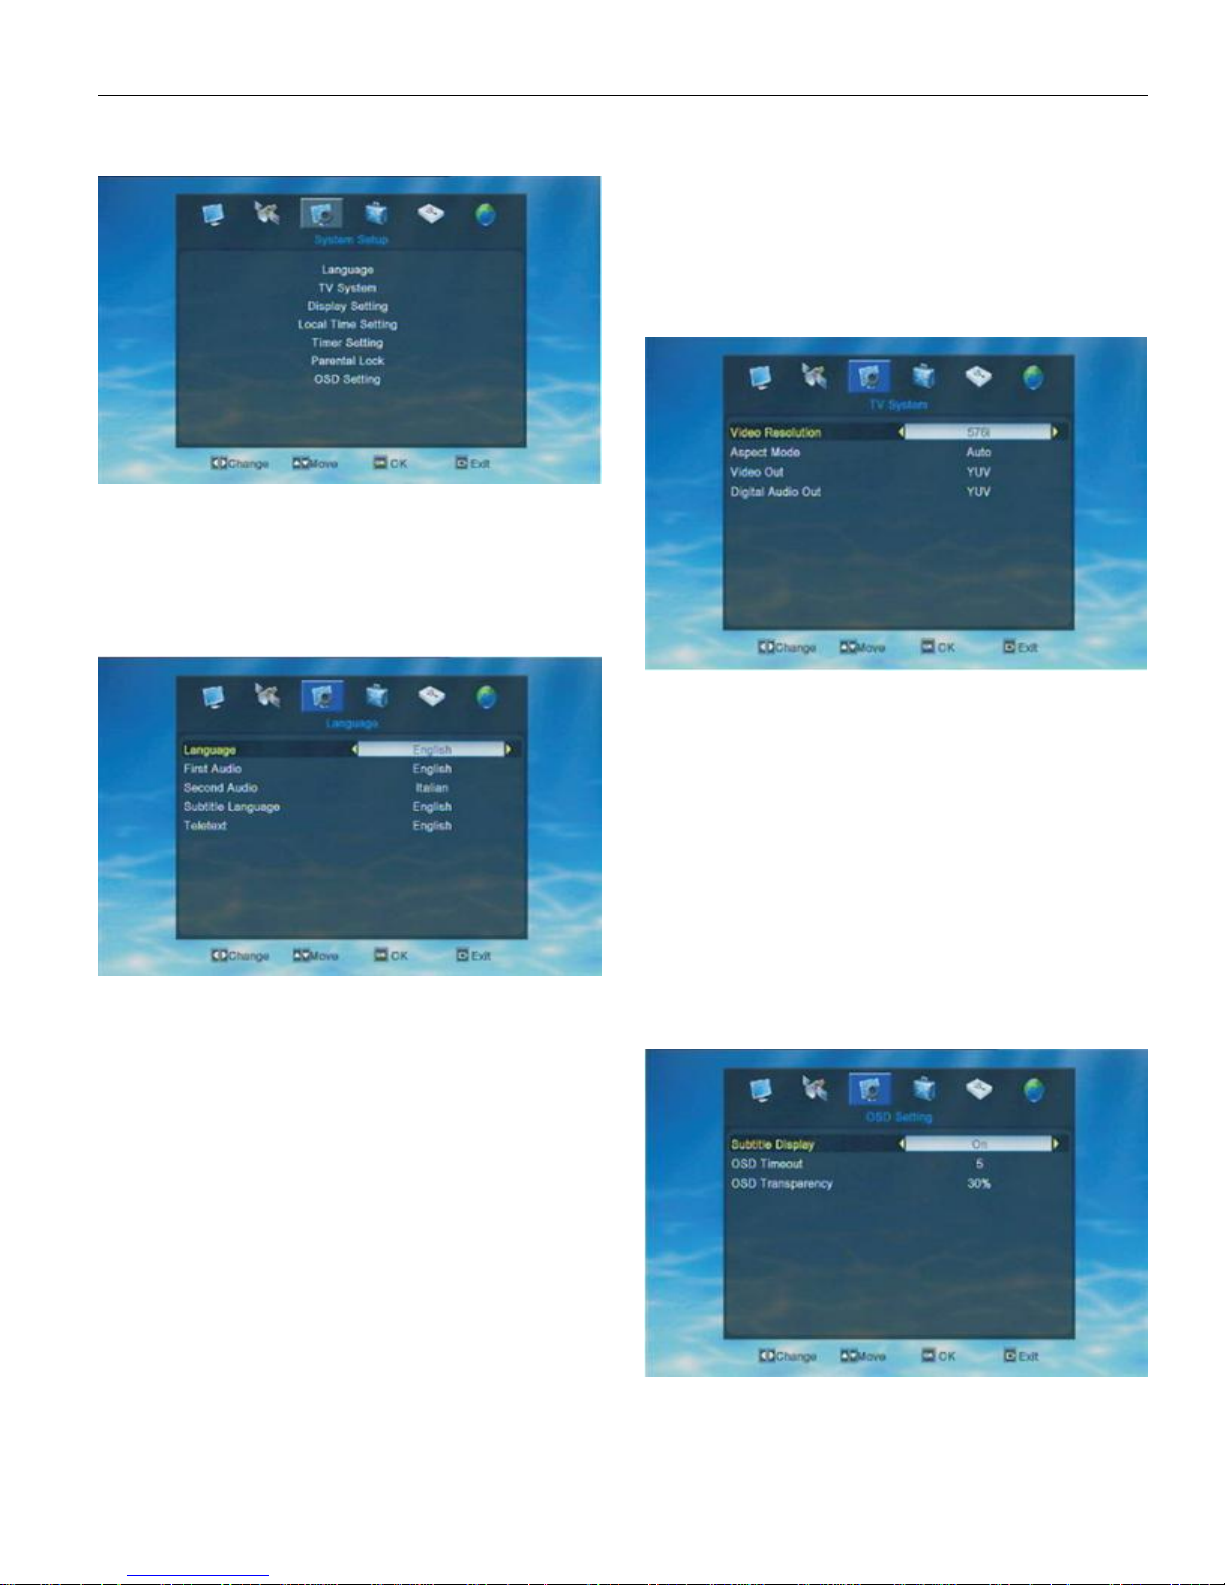
3 . System Setup
In system setup menu, user can press UP/DOWN to
move highlight and press OK to confirm the choice. If the STB
has been set a menu lock, the system will ask user to input
password. The default password is “0000”
3.1. Language
When enter into “Language” menu, the system will
show a menu as below.
to he/her needs. If the channel streams have the set language,
then user can see the teletext in set language. If there’s no set
language in the channel stream, then STB will not show the
teletext in set language but in the default language of the
channel.
3.2. TV System
When enter into “TV System ” menu, the system will
show a menu as below.
1 . Video Resolution: press Left/Right to change the
resolution one by one or press OK on “Video Resolution” to
enter into the resolution list to choose directly. Option: 1080i_
60 /480i/480p/576i/576p/720p_50/720p_60/ 1080i_60.The
above resolutions is the one STB can support. If the STB cann’t
work properly on any of the above resolutions, maybe it’s the
user’s TV don’t support the applied resolution. So before user
set the Video resolution, pls check the TV’s best resolution first.
2 . Aspect Mode: press Left/Right to choose.
Option: Auto/ 4:3PS/4:3LB/16:9
3 . Video Out: press Left/Right to choose
Option: YUV/RGB
4 . Digital Audio Out: press Left/Right to choose.
Option: LPCM out/BS out
1 . Language: the STB can support languages like
English, French, German, Russian, Arabic, Portuguese,Turkish,
Spanish, Polish and Italian.
2 . First Audio: some channels have more than one
audio language for choosing, so user can set a first audio for
the channel. If the playing channel has the same audio as the
“First language” user set, then the STB will play this audio
language as default.
3 . Second Audio: if the channel has no correspond
audio with “First Audio”, but have corresponded audio with
“Second Audio”, system will play the second audio language as
default. If there’s no audio language correspond with “Second
Audio” then the STB will play the default language of the
current playing channel.
4 . Subtitle Language: user can set subtitle language
according to he/her needs. If the channel stream have the
language user chose as the subtitle language then user can
see the subtitle when watch the channel.If the channel stream
don’t have the language user chose as the subtitle language
then user can’t see the subtitle. When user press SUBTITLE
there will show a dialogue as “No date!”.
5 . Teletext: user can set teletext language according
3.3. Display Setting
When enter into “Display Setting ” menu, the system
will show a menu as below.
User can set Brightness, Contrast and Saturation in
this menu.Use UP/DOWN to choose Brightness/Contrast.
Saturation and press Left/Right to set each of them.
19
Page 20
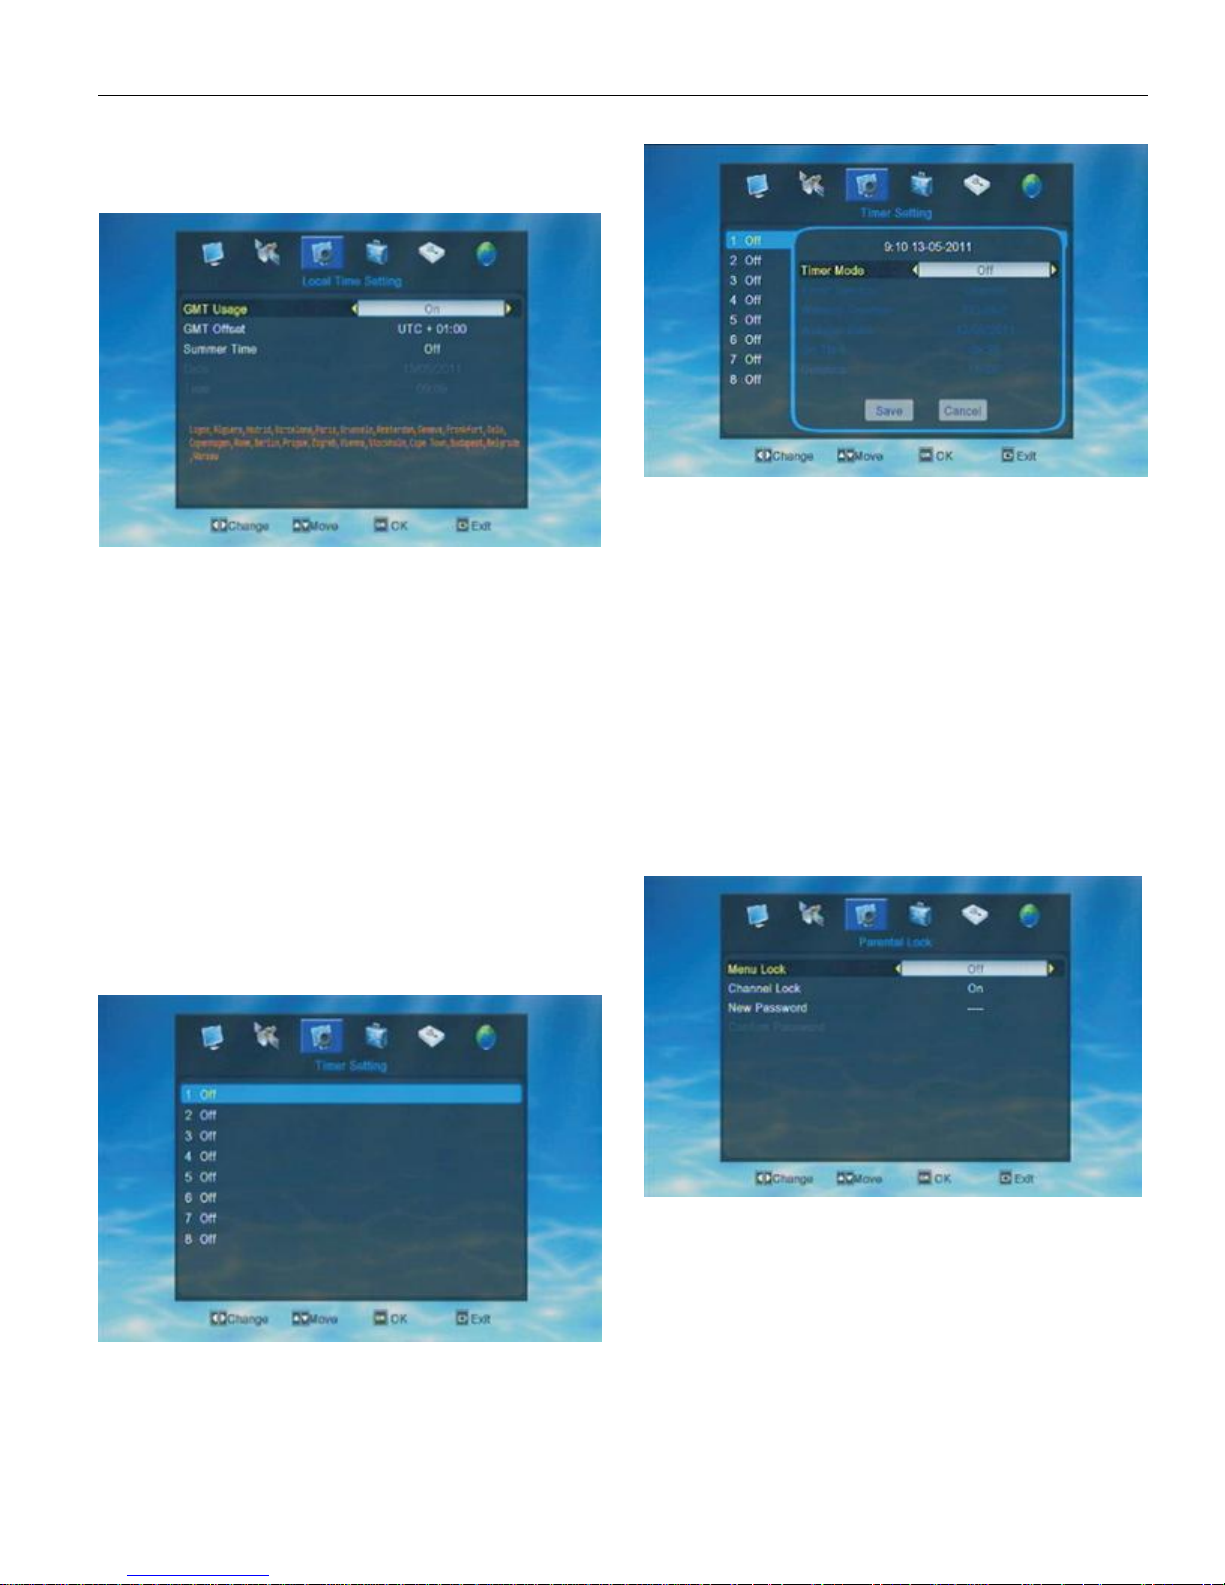
3.4. Local Time Setting
When enter into “Local Time Setting” menu, the
system will show a menu as below.
1 . GMT Usage: press Left/Right to switch ON/OFF
When GMT is ON, user can set the “GMT offset” and
“ Summer Time”. While when GMT is OFF, user cann’t set
“GMT offset” and “ Summer Time”, but “Date” and “Time”.
2 . GMT offset: press Left/Right to choose. User need
to set the GMT according to he/her own location.
3 . Summer Time: press Left/Right to switch ON/OFF
4 . Date: user need to input the date by press the
number key and press Left/Right to move the highlight to the
next position.
5 . Time: user need to input the date by number key
and press Left/Right to move the highlight to the next position.
After user finished local time setting press EXIT to exit
form the current window. If the user didn’t input the time/date
properly, there will show a dialogue as “Invalid input! Continue
to edit?”. Choose YES to continue to edit, choose No to exit
from the window without saving any settings.
Once the Timer is ON, the timer will work not matter
the STB is in standby mode or playing mode.
1 . Timer Mode: press Left/Right to choose
Option: OFF/ Once/ Daily
2 . Timer Service: press Left/Right to choose
Option: Channel/ Record
3 . Wakeup Channel: press Left/Right to choose one
by one or press OK to enter into the channel list to choose .
4 . Wakeup Date: use number key to input the wakeup
date according to user’s needs.
5 . On Time: use number key to input
6 . Duration: use number key to input
Once the time’s up, the STB will automatically switch
to standby mode. If user don’t want this function work, he/she
can set the duration as “00:00”.
3.6. Parental Lock
When enter into “Parental Lock” menu, the system will
show a menu as below.
3.5. Timer Setting
When enter into “Timer Setting” menu, the system will
show a menu as below.
There’re 8 timer in “Timer Setting” window. User can
set each timer according to their own needs.
1. Menu Lock: press Left/Right to switch ON/OFF.
2. Channel Lock: press Left/Right to switch ON/OFF.
3.NewPassword: input4numbers as the new password.
4. Confirm Password: input the new password again.
If the password entered in “New Password” and
“Confirm Password” is the same, there will show a dialogue
“Change password successfully”, then the new password will
be saved by STB. If the password entered in “New Password”
and “Confirm Password” is not the same, the highlight will turn
back to “New Password” automaticlly. User need to input the
new password again.
20
Page 21
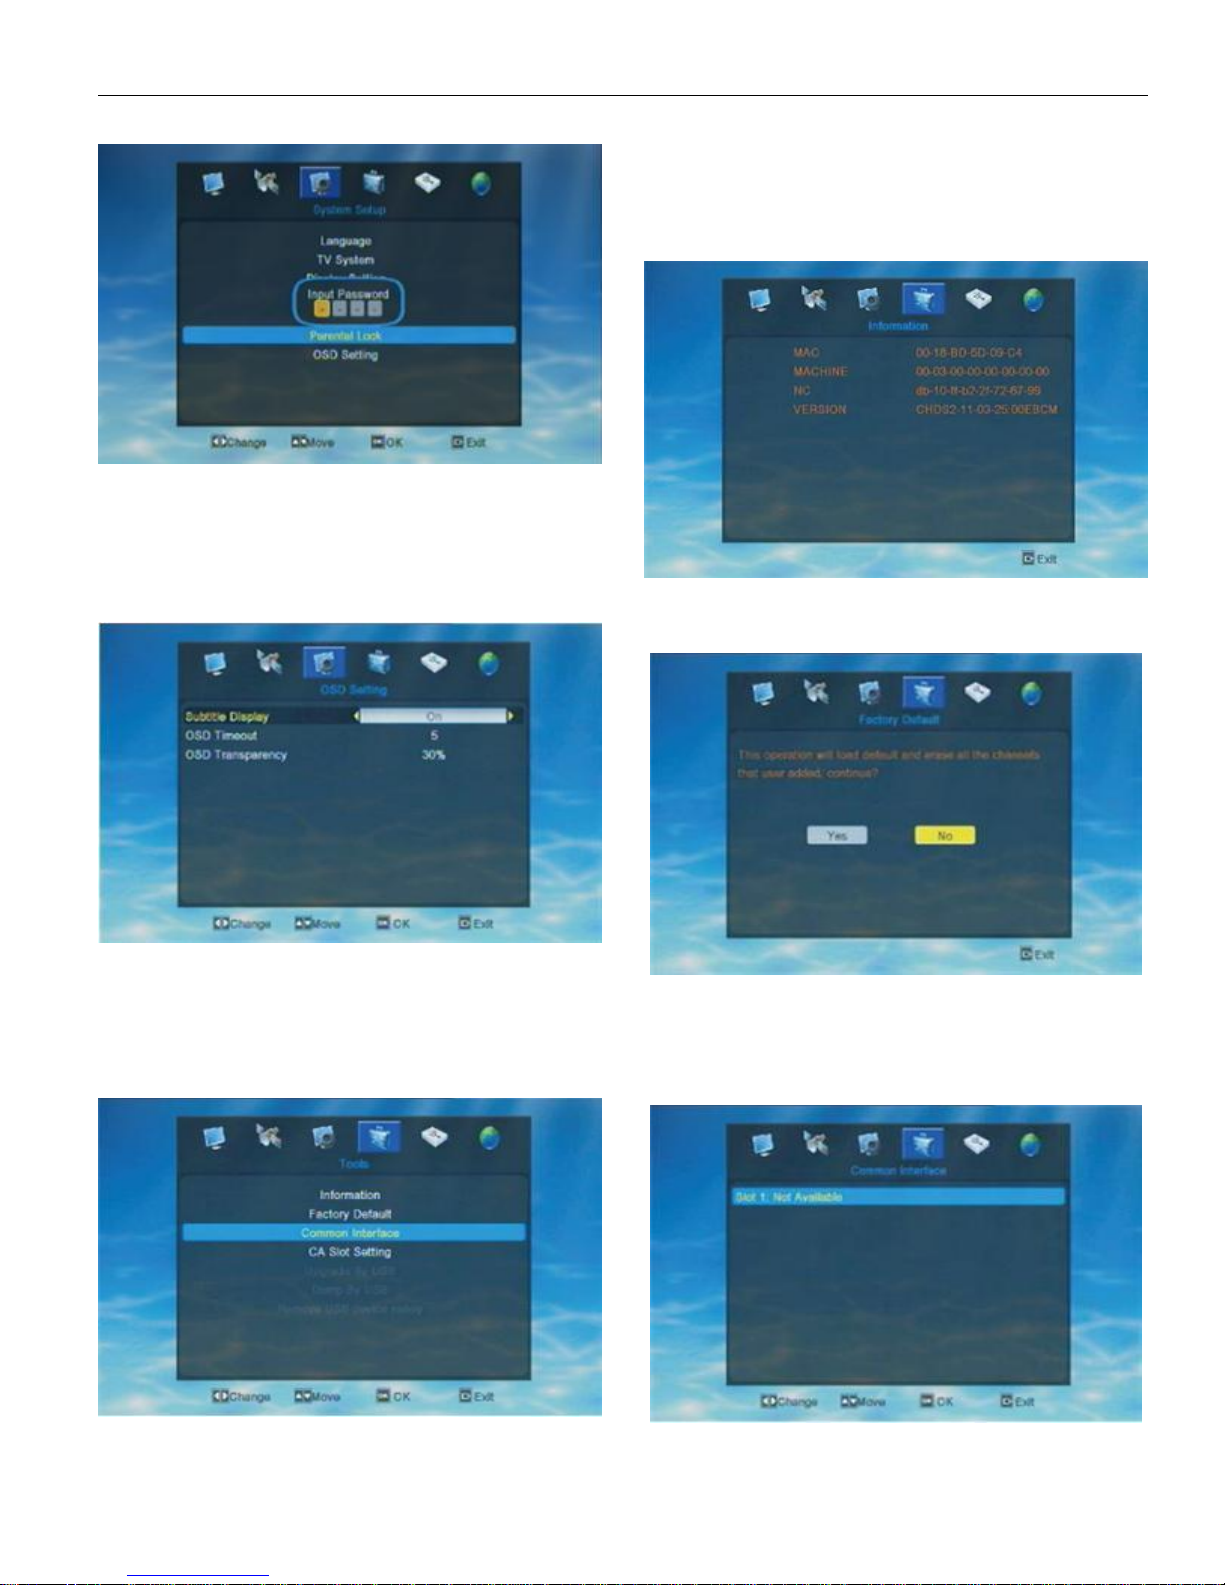
If the STB has been set a menu lock, there will show a
dialogue asking user to input password before user enter into
the Parental Lock menu. The default password is “0000”.
and press OK to open a new windon like Information, Factory
Setting, Common Interface, CA Slot Setting, Upgrade By USB,
Dump By USB, Remove USB device safely.
4.1. Information
3.7. OSD Setting
When enter into “OSD Setting” menu, the system will
show a menu as below.
If the STB has been set a menu lock, there will show a
dialogue asking user to input password before user enter into
the Parental Lock menu. The default password is “0000”.
4.Tools
Choose the 4th symbol “Tools” on the main menu, then
press OK to enter into the Edit Channel menu.
User can check the detail informations of the STB.
4.2. Factory Default
When enter into Factory Setting menu, user will see
“this operation will load default and erase all the channels that
user added, ontinue? ”. User need to choose YES or NO
according to his/her own needs.
4.3. Common Interface
In Tool menu, user can press UP/DOWN to move highlight
21
Page 22
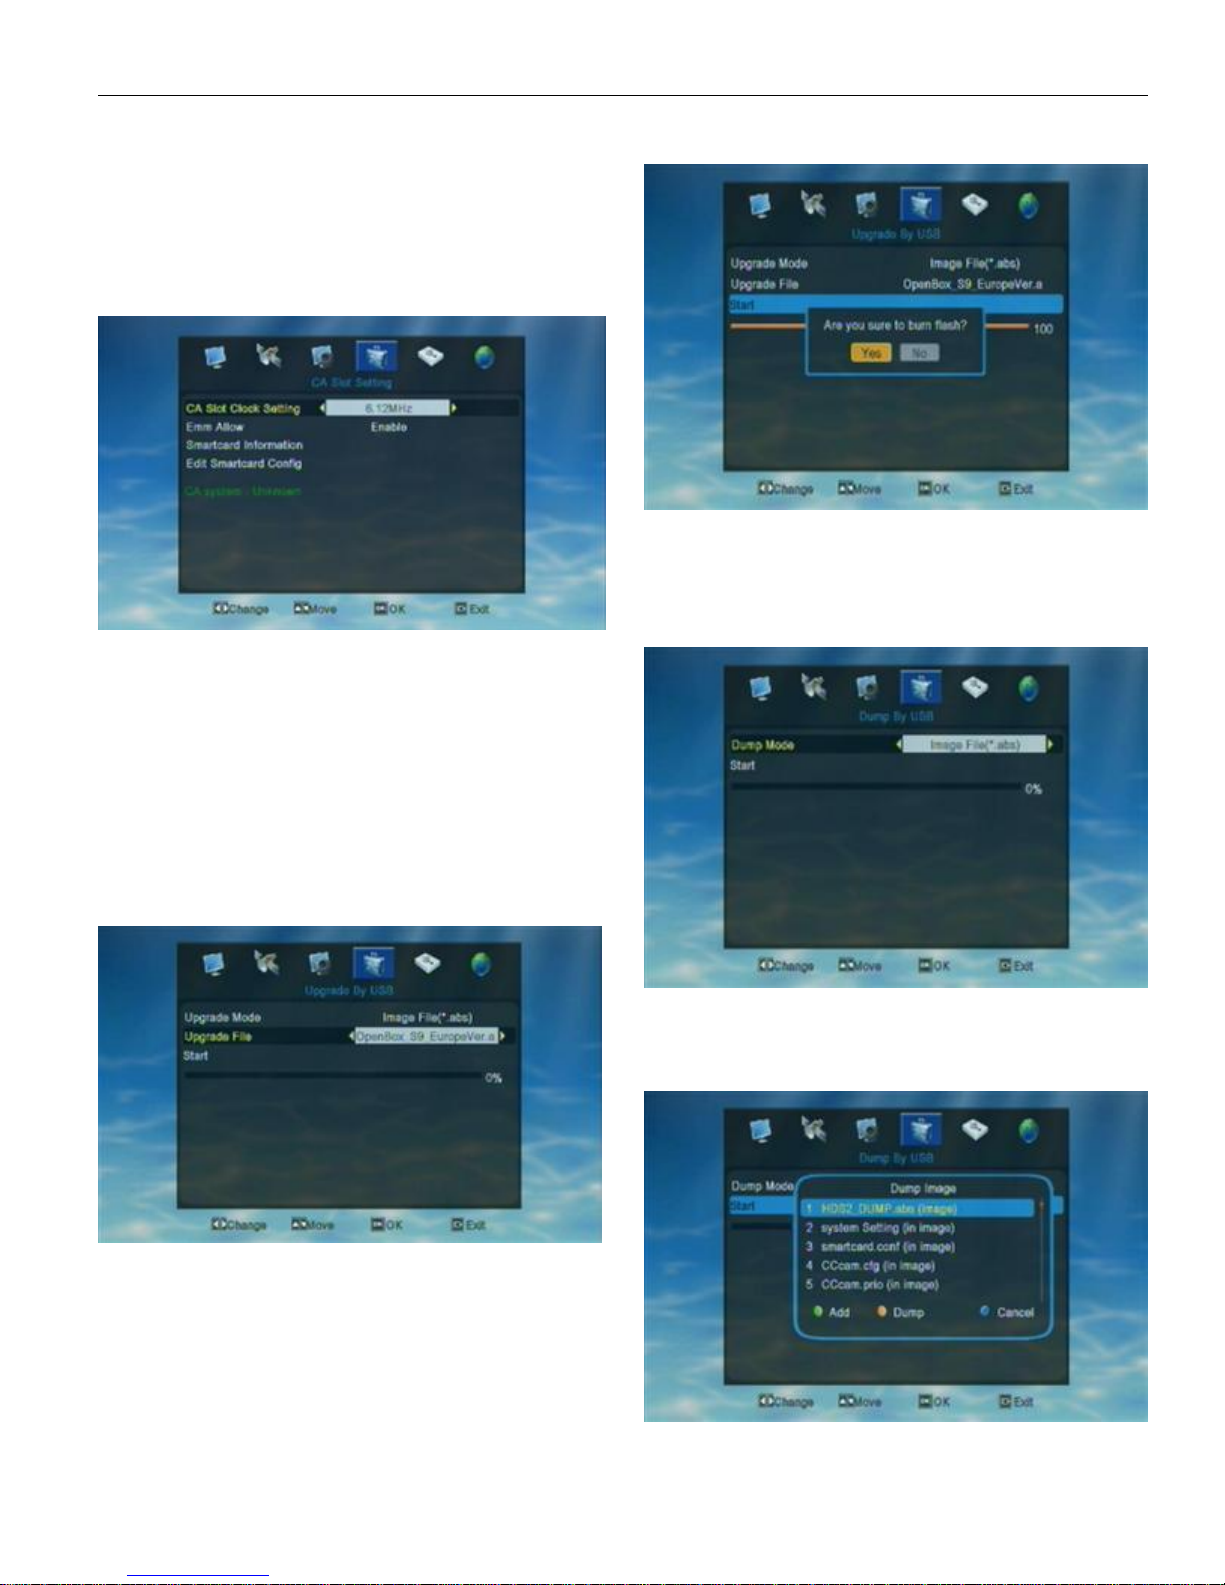
When the STB don’t insert CI modual, the Common
Interface menu will show “Slot 1: Not Available ”
When the STB insert a CI modual, user can press OK
on “slot 1: XXXX” to enter into the card information menu.In the
card information menu, user can check the detail informations.
4.4. CA Slot Setting
When enter into “CA slot Setting” menu, the system
will show a menu as below.
1 . CA Slot Clock Setting: 6.12MHz/ 3.57MHz
User can set the CA Slot Clock Setting according to
his/her smart card.
2.CASystem
When the STB insert a smart card into the CA slot,
there will show the informations of the inserted smart card on
CA System. When the STB don’t insert any smart card, there
will show “Unknown” on CA System.
After user finished the setting, press EXIT to exit from
current menu. There will show “Clock wil be valid after restart!
"Start"---press OK on "start" to the upgrading
4. when finished the upgrde, receiver will restart
automaticly.
4.6. Dump by USB
When enter into “Dump by USB” menu, the system will
show a menu as below.
4.5. Upgrade by USB
When enter into “Upgrade by USB” menu, the system
will show a menu as below.
1. Copy the firmware into you U-disk, then connect it
with the receiver.
2.
Open the menu of the receiver, Find Tools then you
can see "upgrade by USB".
3.
When in Upgrade by USB window, you can see
"Upgrade Mode", "Upgrade File" and "Start"
"Upgrade Mode"---choose "image Fil(*.abs)"
"Upgrade File" ---choose the name of the new
firmware
If user want to dump a image file, pls chooose the
Dump Mode as "Image File*.abs". Then you'll see the below
window. User can choose the files he/she want to dump by
press green key, then press yellow key to start to Dump.
22
Page 23
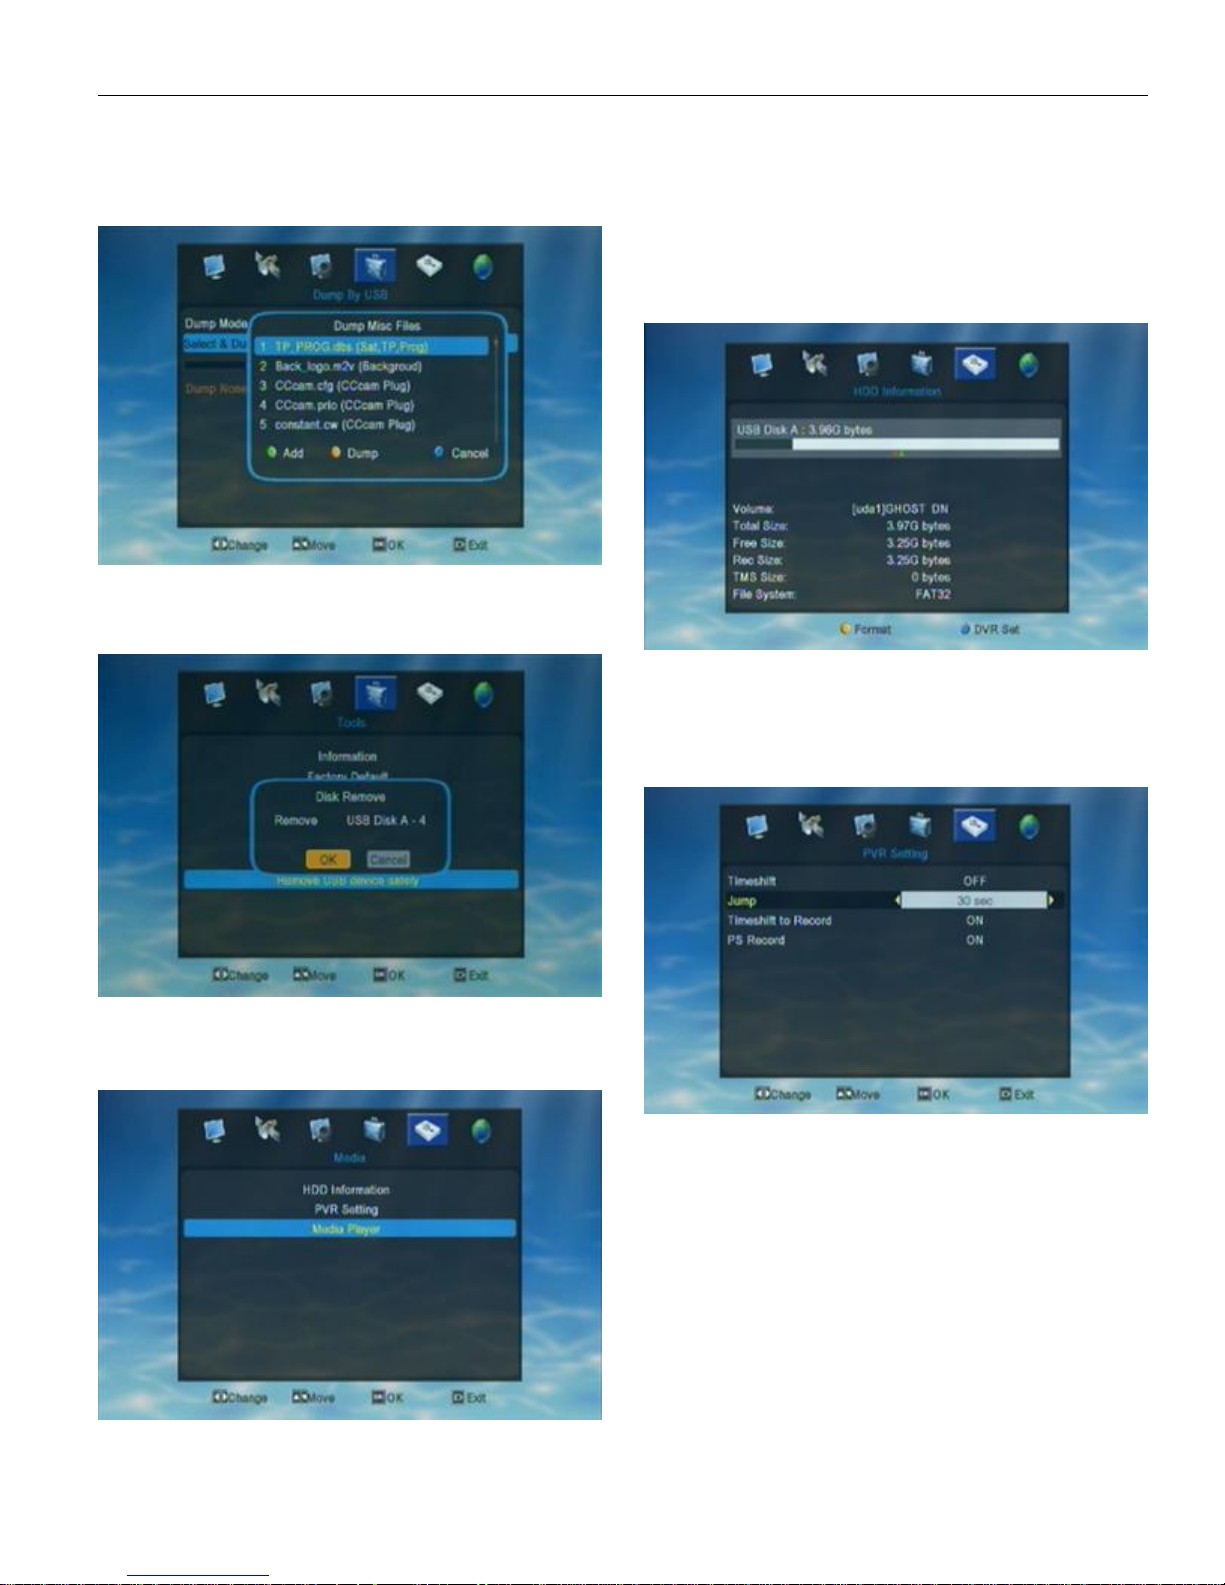
If user want to dump a Misc file, pls chooose the Dump
Mode as "Misc Files". Then you'll see the below window. User
can choose the files he/she want to dump by press green key,
then press yellow key to start to Dump.
4.7. Remove USB device safely
When press OK on “Dump by USB” menu, user will
see a new window as below.
In Media menu, user can press UP/DOWN to move
highlight and press OK to open a new window like HDD
Information, PVR Setting or Media Player.
5.1. HDD Information
In Media menu, press UP/DOWN to move highlight to
“HDD Information” then press OK to confirm the choice and
enter into “HDD Information” menu.
User can check HDD detail informations in this menu.
5.2. PVR Setting
In Media menu, press UP/DOWN to move highlight to
“PVR Setting” then press OK to confirm the choice and enter
into “PVR Setting” menu as below.
5. Media
Choose the 5th symbol “Media” on the main menu, then
press OK to enter into the Media menu.
Jump
Move the highlight to"Jump" and press[OK] Key.
It will display"Jump" as below.
Press[Left/Right] to switch the Jump time.The option is
30second,1min,5min,10min,30min.
When you play the record program,press the[PREV/
NEXT] Key can Jump to previous and next program to see it.
5.3. Media Player
In Media menu, press UP/DOWN to move highlight to
“Media Player” then press OK to confirm the choice and enter
into “Media Player” menu as below.
23
Page 24
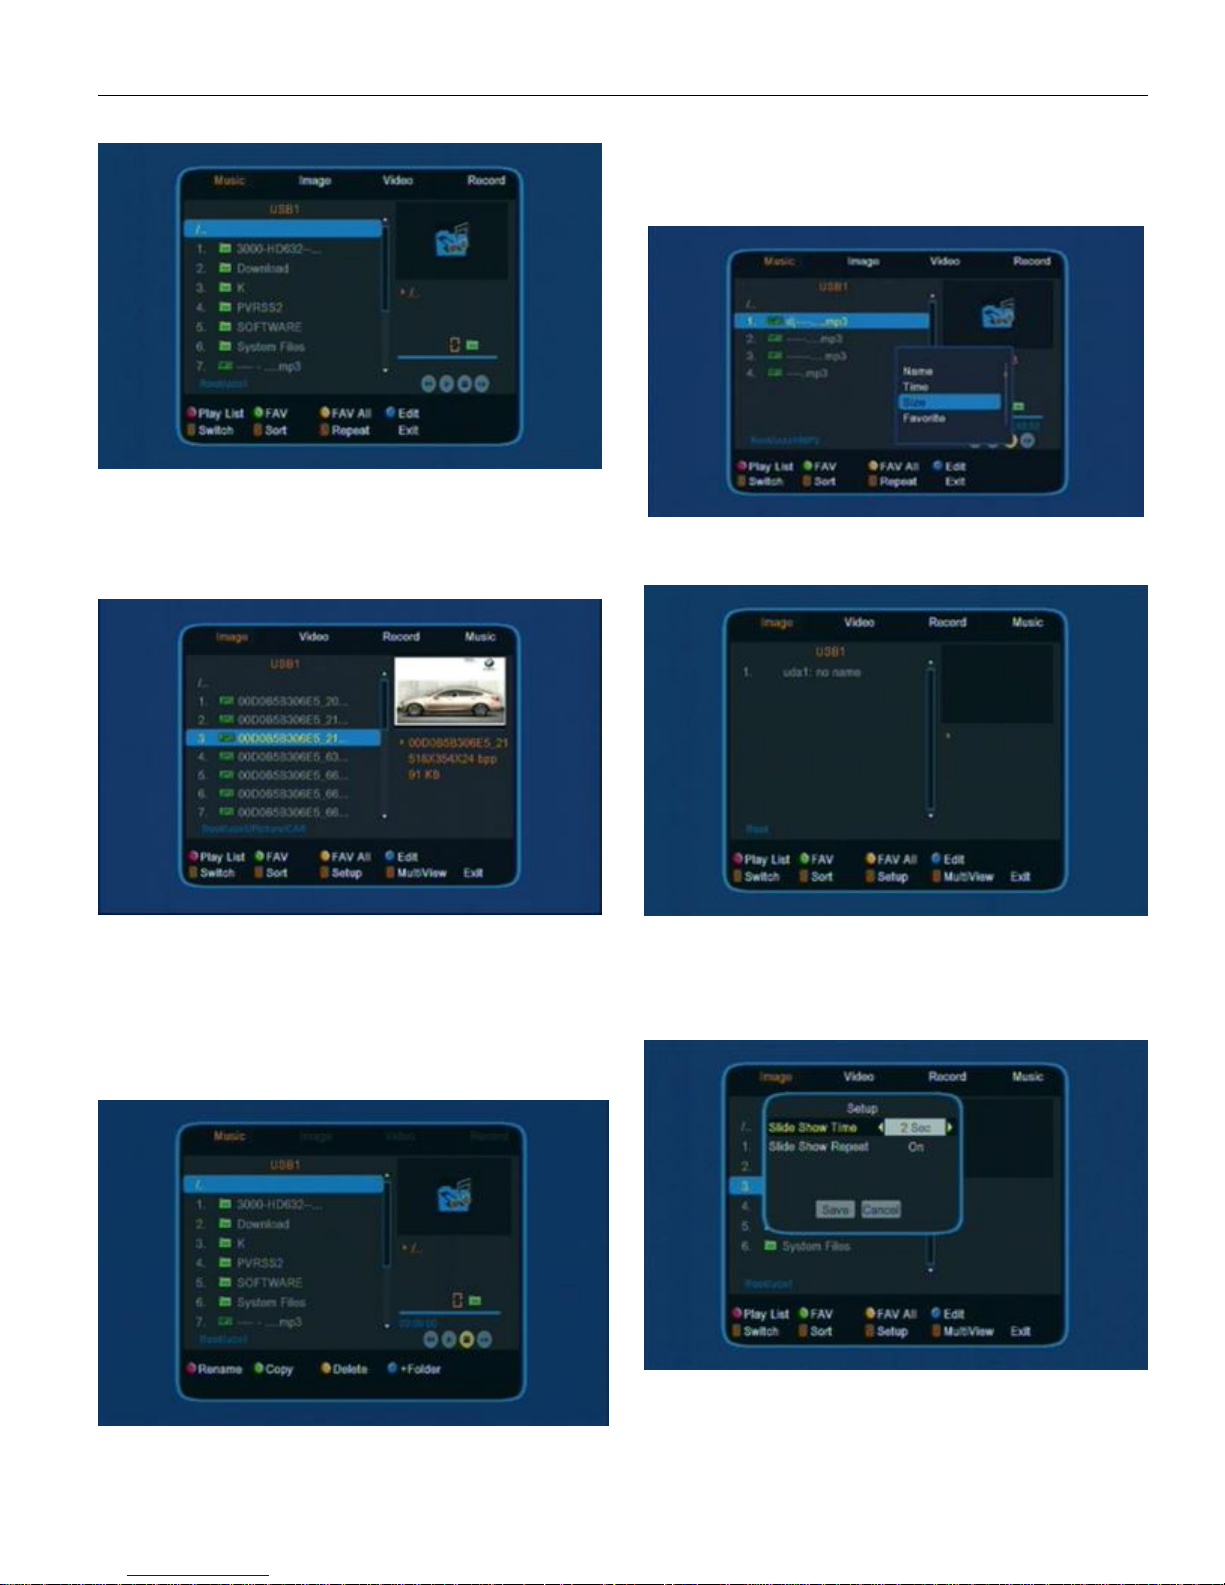
User can see Music, Image, Video and Record and
the top of the above window.
press 1 to to switch media format
Press 2 to open the sort window
5.3.1 Music
Sort
User can press UP/DOWN to movehighlight to choose
Default/Name (A-Z)/ Name (Z-A)/ Image list/Music list the press
OK on any of the choice to sort the list.
Press EXIT to exit form the window.
5.3.2 Image
press 1 to switch media format.
press 2 to open sort window
press 3 to open setup window
Red color key to open the play list
Green color key to make a favor mark on the choice
Yellow color key to make favor mark on all the choice
Bule key color key to enter edit window
Edit
press 1 to switch media format
press 2 to open sort window
press 3 to open setup window
press 4 to open multiView window
Setup
24
Page 25
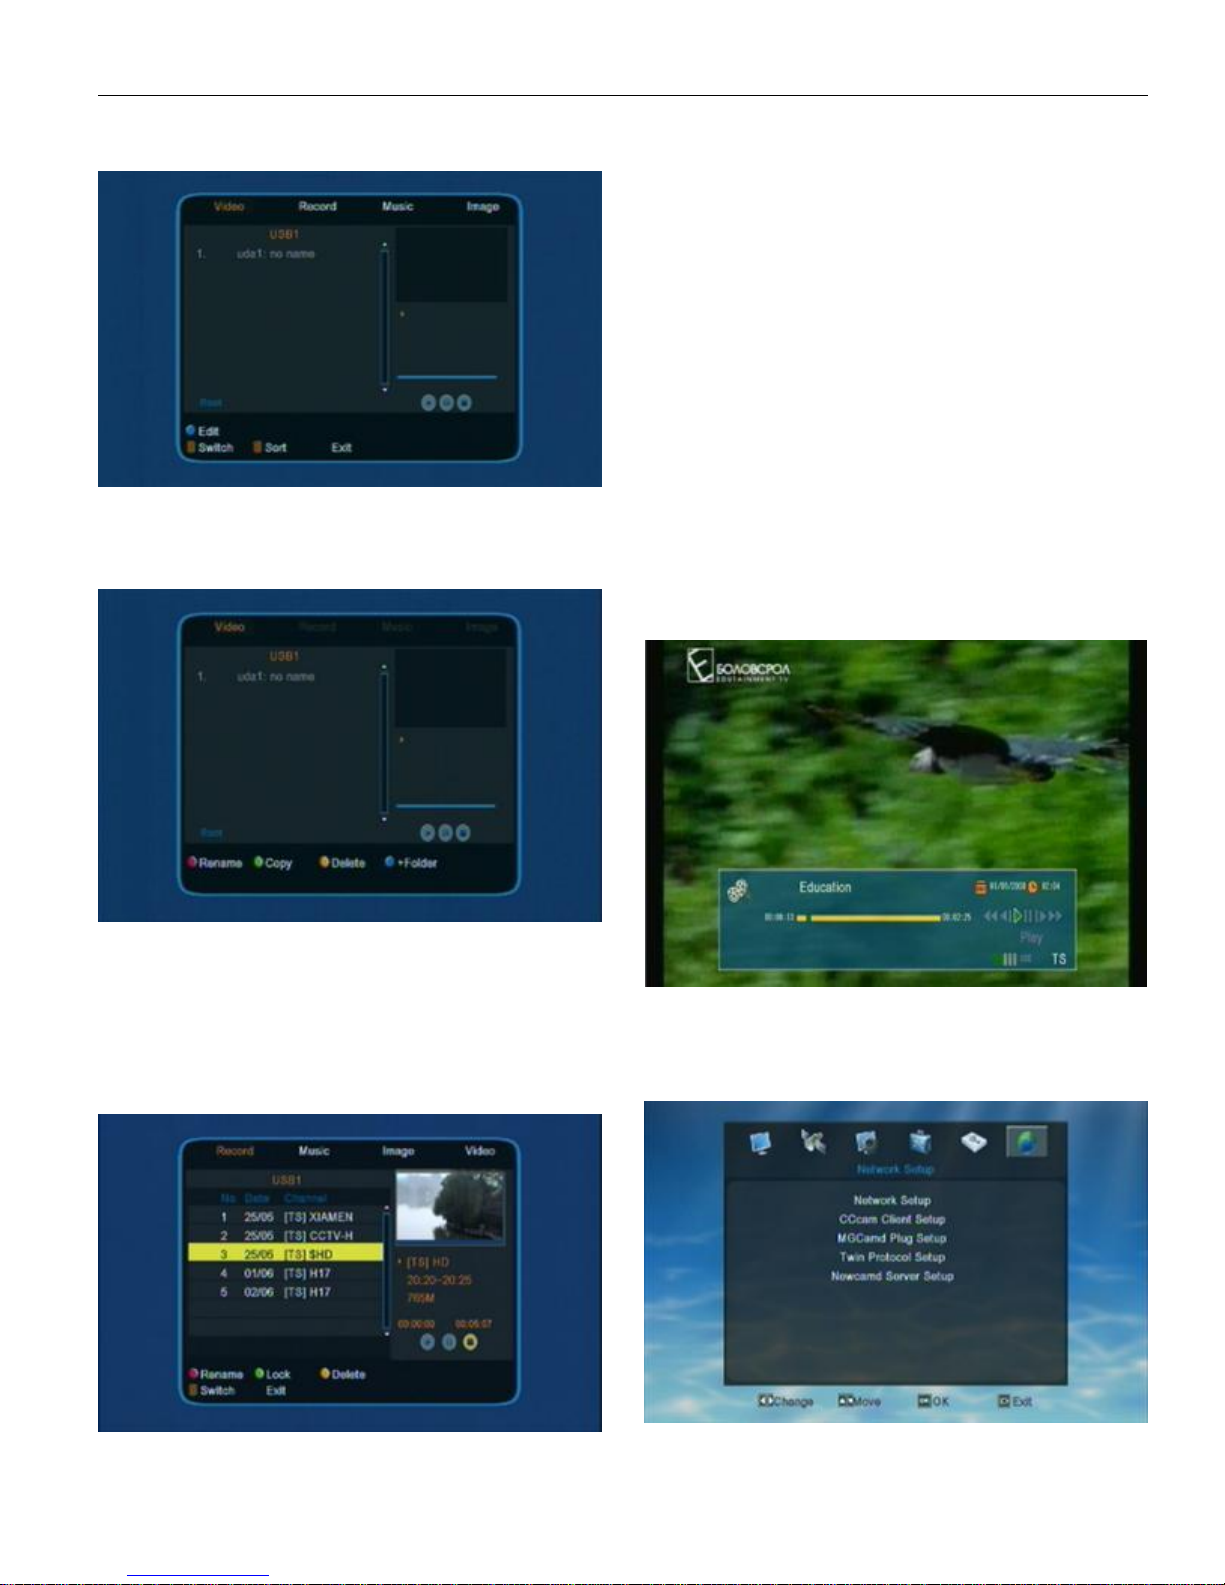
5.3.3 Video
press 1 to switch media format
press 2 to open sort window
Blue key to open edit window
Edit
In Record menu, user can check all the available
record in HDD or U-disk.Red key to rename,Green key to lock,
Yellow key to delete.
Lock
Press UP/DOWN to move highlight in the record list to
choose the one user want to lock. When a record has been
locked there will show a lock mark on the right side of the
record. Afer finish this setting, the STB will ask user to input
password when he/she want to play the locked record. Once
user input the correct password, the STB will cancel the lock
mark of the record.
The default password is “0000”.
Rename
Red color key to switch capital/small letter
Green color key to delete the inputted char
Yellow color key to make confirm
Blue color key to cancel the operation and exit .
Play
Press UP/DOWN to move highlight in the record list
and press OK/PLAYto play the chose record. When playing the
record, the screen will show like the below picture.
Red key to rename
Green key to copy
Yellow key to delete
Blue key to create a new folder
5.3.4 Record
In Media menu, press UP/DOWN to move highlight to
“Record Manager” then press OK to confirm the choice and
enter into “Record Manager” menu.
Press Stop to exit from playing.
6 . Network Setup
Choose the 6th symbol “Network Setup” on the main menu,
then press OK to enter into the Network Setup menu.
25
Page 26
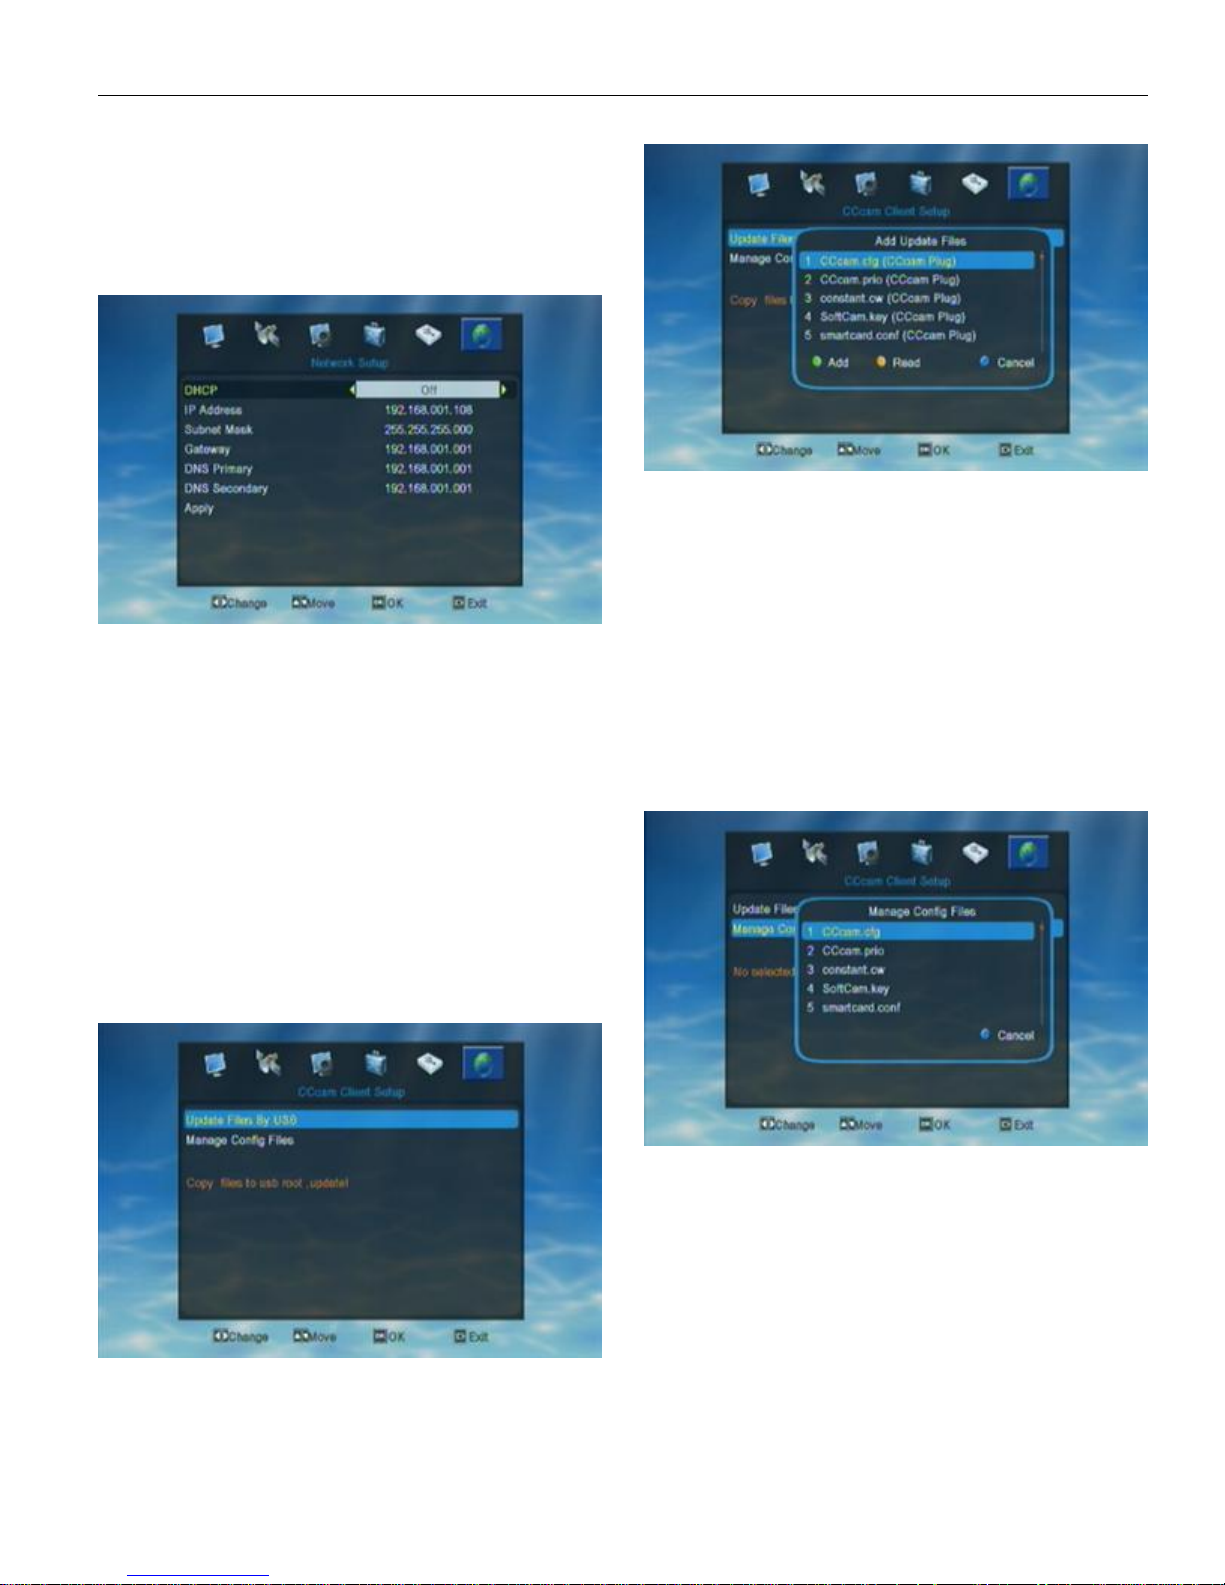
In “Network Setup” menu,user can press UP/DOWN to
move highlight and press OK to open a new window like
Network local setting and Twin Protocal setting.
6.1. Network Set up
When enter into “Network Local Setting” menu, the
system will show a menu as below.
User can check the IP Address, Subnet Mask,
Gateway, DNS Primary and DNS Secondary informations in
this window. Press Left/Right can switch “DHCP” ON/OFF
when the highlight is on “DHCP”.
When “DHCP” is ON, the STB will load all the network
settings automatically. If the loaded net work setting is not
correct, user need to switch OFF the “DHCP” and input the
settings by hand.
After finished all the settings, user need to move the
highlight to “Apply” and press OK to apply all the new settings.
Before the new setting to be applied, the STB will show a
dialogue “Apply Network Local setting?”. User can choose YES
to apply the new sttings or choose NO to exit from the dialogue
without applying any new settings.
Press EXIT to exit from current menu.
In“Add update Files” window, user need to choose the
format of their C-line (Option: Cccam.cfg, constant.cw.) then
press the yellow key to start to read the C-line from connected
U-disk.If use don’t want to load C-line, press Blue key/EXIT to
cancel the operation/exit from the current window.
Q&A
Q1: Why the STB cann’t read anything when
start to read?
A 1: pls check whether U-disk has been connected to the
STB
A 2: check to see whther user has copied the C-line into
the U-disk
A 3: check to see whether the format of C-line is correct
In“ManageConfigFiles”, user can check the loaded C-line.
6.2. Cccam Client Setup
When enter into “Cccam Client Setup” menu, the
system will show a menu as below.
In “Update Files By USB”, user can load the C-line into
the STB. When enter into “Update Files By USB” there will
show a window “Add update Files”, as below.
In “Manage Config Files”, user need to choose the C-line
format, then STB will show you the C-line which has been
already load into the STB.
*If use didn’t load any C-line into STB, there will show
nothing when user check on “manage Config Files”.
Press blue key/EXIT to exit from current window.
If use don’t like to load C-line from U-disk, he/she can
add the C-line manually. User need to input the informations
like Protocol type, Host/Port/User name/Password of the C-line.
26
Page 27
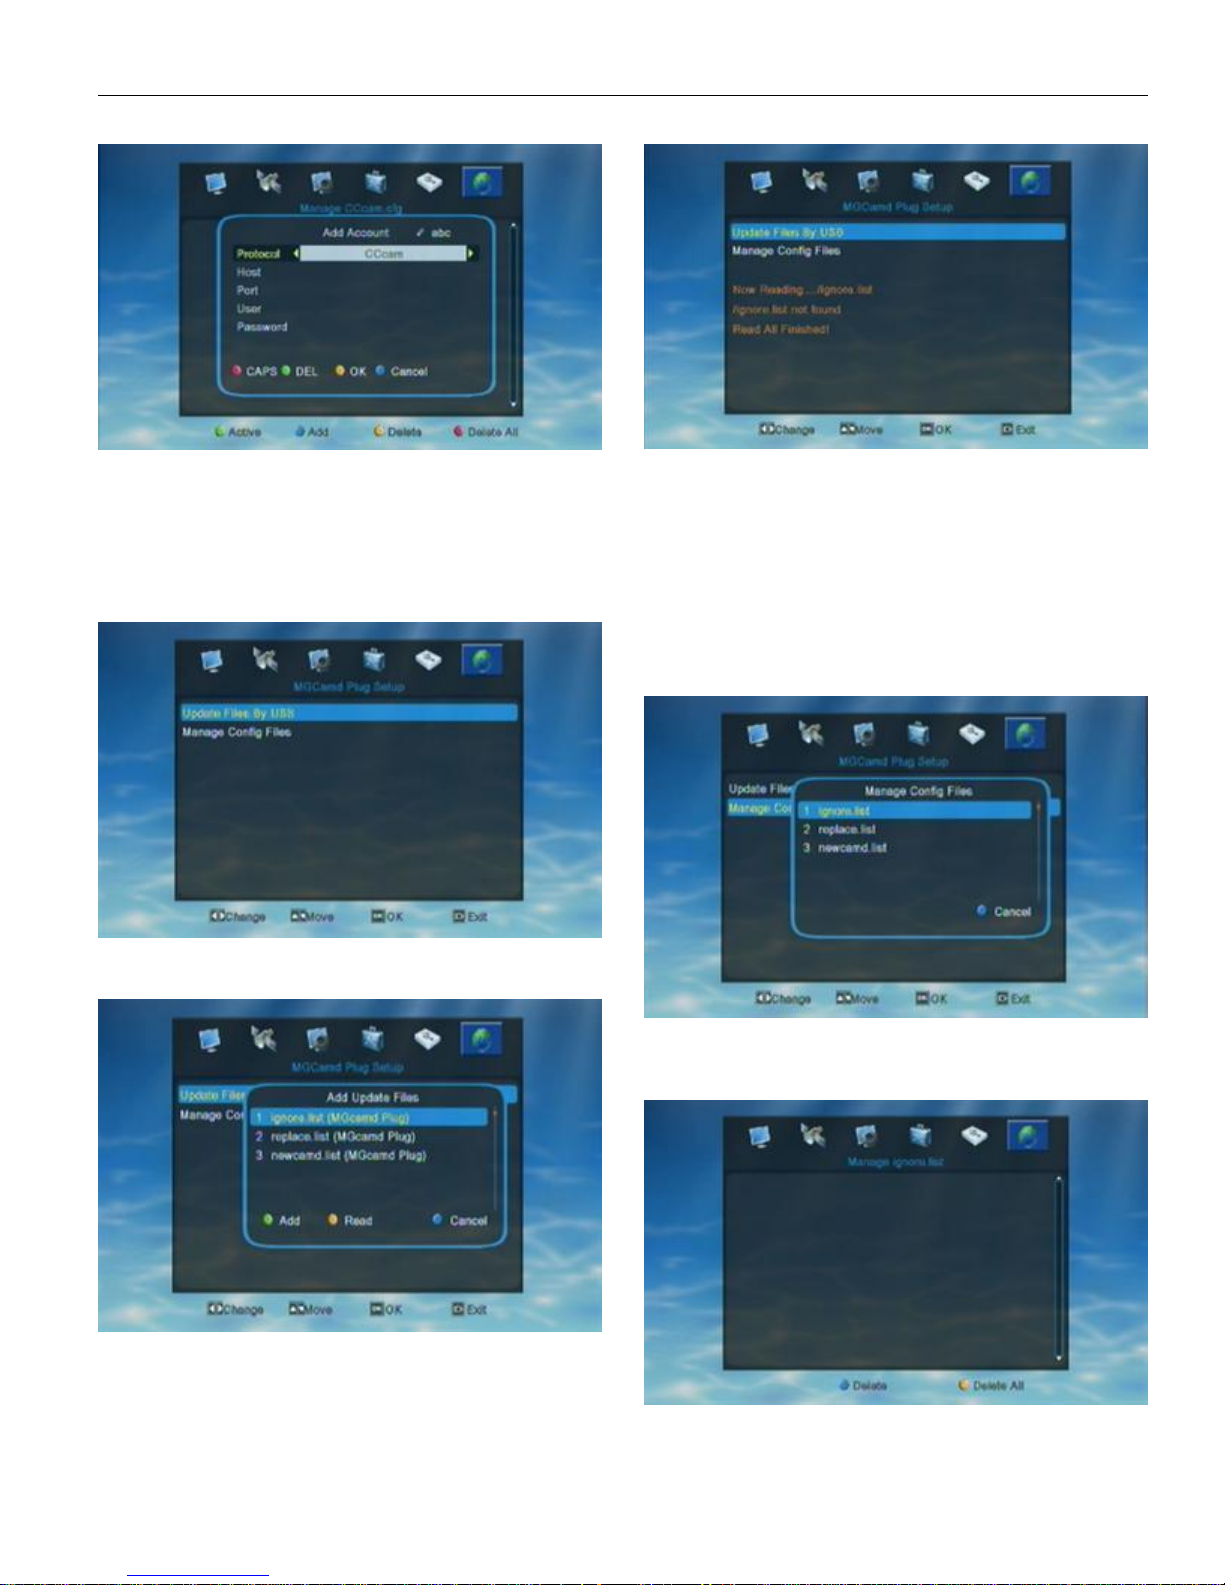
Red color key to switch capital/small letter
Green color key to delete the inputted char
Yellow color key to make confirm
Blue color key to cancel the operation and exit.
6.3. MGCamd Plug Setup
When enter into “MGCamd Plug Setup” menu, the
system will show a menu as below.
First user need to enter into “Update Files By USB”
window to load the informations from U-disk.Then go to
“Manage Config Files” to manage the loaded informations.
If STB cann’t read any MGcamdIf use don’t want to
load C-line, press Blue key/EXIT to cancel the operation/exit
from the current window.
Q&A
Q1: Why the STB cann’t read the C-line?
A 1: pls check whther U-disk has been connected to STB
A 2: check to see whther user has copied the MGCamd
informations into the U-disk
A 3: check to see whether the format of MGCamd
informations is correct. After user load the MGCamd
informations into STB, he/she can go to “manage Config Files”
to check and manage the loaded informations.
In“Add update Files” window, user need to press Blue/OK
key to choose the format of which files to add.. and Yellow key
to start to read from connected U-dosk.
When start to read, the window will show as below.
If there is no MGCamd informations loaded in STB, user
will see nothing when entering into “manage ignore list” as
following shows.
27
Page 28
6.4. Twin Protocol Setup
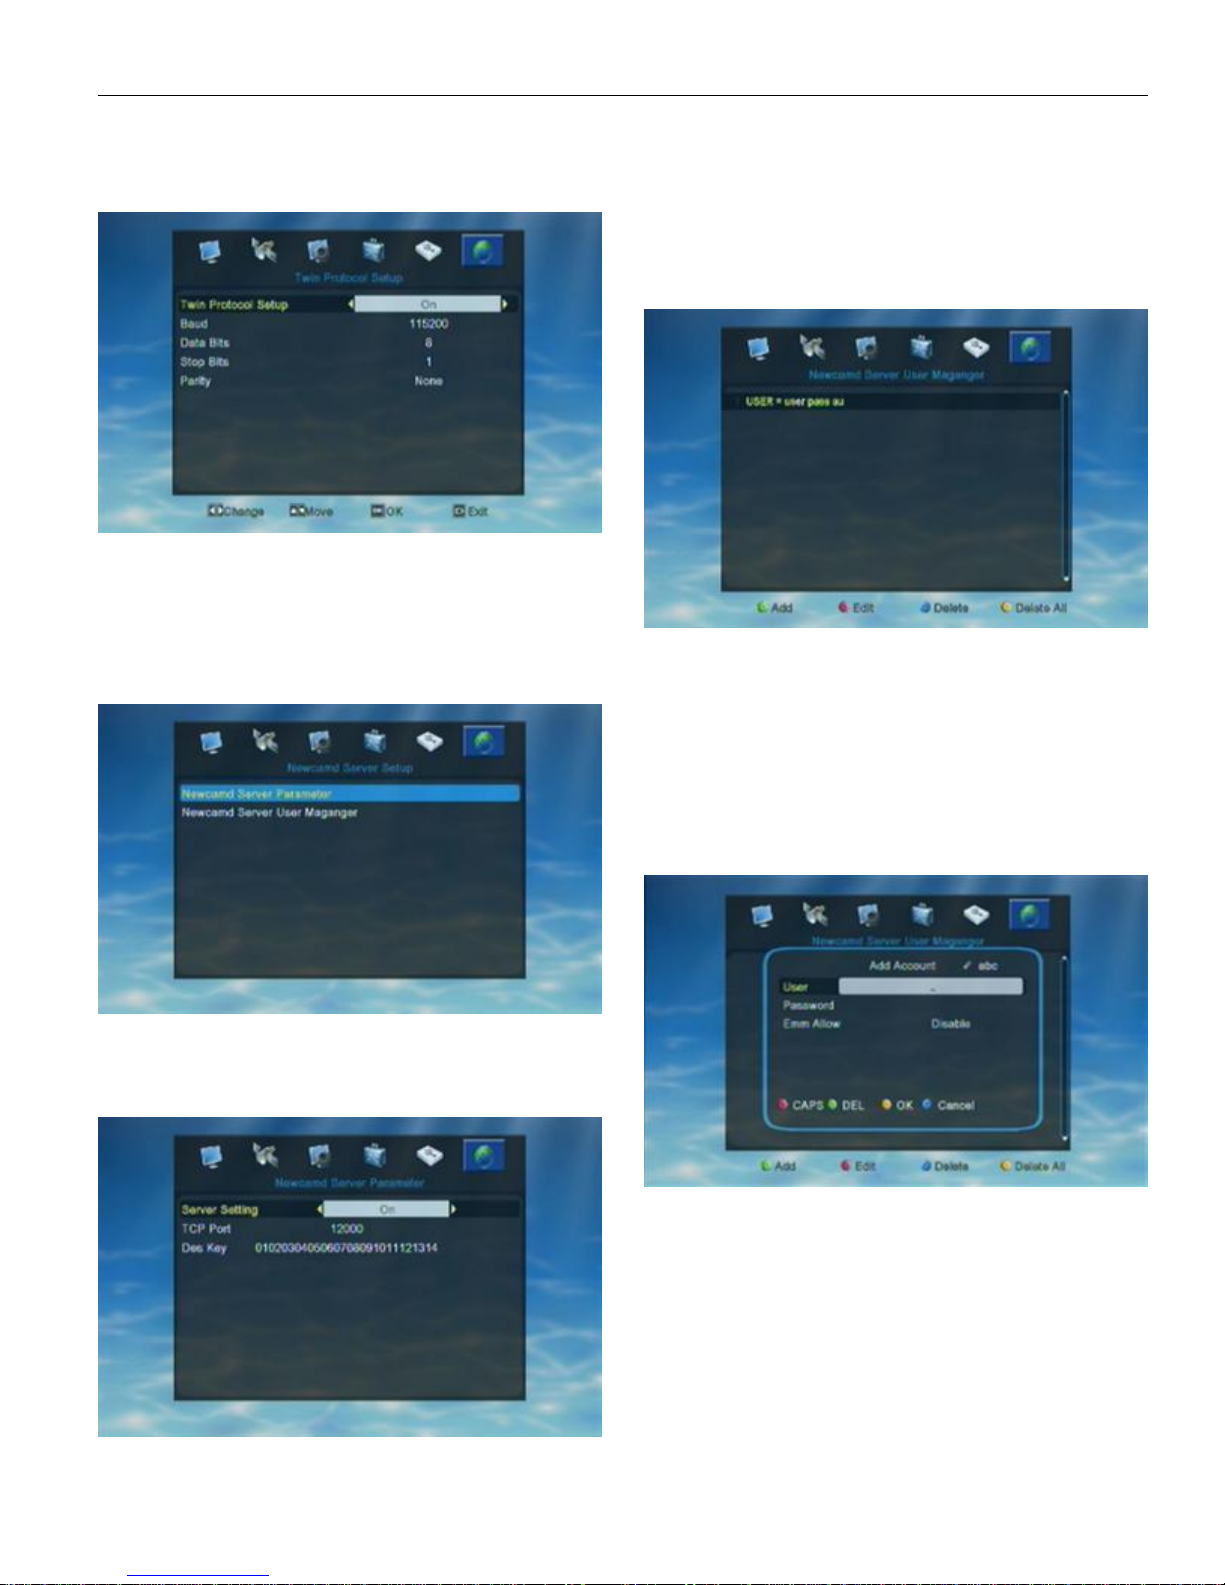
When enter into “Twin Protocol Setup” menu, the
system will show a menu as below.
1. Twin Protocol Setting: ON/OFF
2. Band: 9600/ 14400/ 19200/ 38400/ 57600/ 115200/
128000/ 256000
3. Date Bits: 8
4. Stop Bits: 1/2
5. Parity: None/ Even/ Odd
6.5. NewCamd Sever Setup
User can switch server setting ON/OFF by pressing
Left/Right when hight is on “Server Setting”. When highlight is
on “TCP Port” or “Des Key” user can input informations by
pressing the number key.After finished all settings press EXIT
to save the new settings and exit from current menu.
When enter into “Newcamd server User Manager”
window, the system will show a menu as below.
If user didn’t input any Newcamd information in STB,
there will show nothing in “Newcamd Server User Manager”
window. Just like the above pic. shows.
User can add/edit/delete Newcamd informations by
pressing color key
Green key to add new Newcamd informations
Red key to edit the input Newcamd informations
Blue key to delete the highlighted Newcamd
Yellow key to delete all the input Newcamd
In “Newcamd Server Parameter” user can set the
Newcamd informations. In “Newcamd Server User Manager”
user can manage the input Newcad informations.
When enter into “Newcamd server Parameter” menu,
the system will show a menu as below.
When user opened “Add Account” window by pressing
Green key, the window will show as below.
User need to input the Newcamd informationa
manually, like user name, password and Emm Allow.
Red color key to switch capital/small letter
Green color key to delete the inputted char
Yellow color key to make confirm
Blue color key to cancel the operation and exit from
the window.
Press EXIT to exit from current window without save
all the added informatons.
28
 Loading...