

Page 1

Order Number : GETEC-C1-09-146 FCC Class B Certification
Test Report Number : GETEC-E3-09-080 Page 1 / 1
EUT Type: PDP TV/Monitor
FCC ID.: TGEPT50U7
APPENDIX G
: USER’S MANUAL
Page 2

50” PDP TV USER’S GUIDE
KPP-50SAT
PLEASE READ CAREFULLY BEFORE USE
Before Connecting, operating or adjusting this product, please read the instructions completely.
Please keep this manual for future reference.
For future reference, record the serial number of your PDP TV.
SERIAL NO.
The serial number is located on the rear of PDP TV.
Page 3

Warning / Caution
3
TO REDUCE THE RISK OF FIRE AND ELECTRIC SHOCK, DO NOT EXPOSE THIS PRODUCT TO RAIN OR
MOISTURE.
WARNING/CAUTION
This reminder is provided to call the CATV system installer’s attention to Article 820-40 of the National Electric
Code (U.S.A.). The code provides guidelines for proper grounding and, in particular, specifies that the cable ground
shall be connected to the grounding system of the building, as close to the point of the cable entry as practical.
NOTE TO CABLE/TV INSTALLER
Do not attempt to modify this product in any way without written authorization from the dealer.
Unauthorized modification could void the user’s authority to operate this product.
CAUTION
WARNING/CAUTION
TO REDUCE THE RISK OF ELECTRIC
SHOCK DO NOT REMOVE COVER (OR
BACK). NO USER SERVICEABLE PARTS
INSIDE. REFER TO QUALIFIED SERVICE
PERSONNEL.
The lightning flash with arrowhead
symbol, within an equilateral triangle,
is intended to alert the user to the
presence of uninsulated “dangerous
voltage” within the product’s enclosure
that may be of sufficient magnitude to
constitute a risk of electric shock to
persons.
RISK OF ELECTRIC SHOCK
DO NOT OPEN
The exclamation point within an equilateral triangle is intended to alert the
user to the presence of important
operating and maintenance (servicing)
instructions in the literature accompanying the appliance.
WARNING / CAUTION
Page 4

Warning / Caution
4
WARNING / CAUTION
Class B digital device
This equipment has been tested and found to comply with the limits for a Class B digital device, pursuant to Part 15
of the FCC Rules.
These limits are designed to provide reasonable protection against harmful interference in a residential installation.
This equipment generates, uses and can radiate radio frequency energy and, if not installed and used in accordance with the instructions, may cause harmful interference to radio communications.
However, there is no guarantee that interference will not occur in a particular installation.
If this equipment does cause harmful interference to radio or television reception, which can be determined by turning the equipment off and on, the user is encouraged to try to correct the interference by one or more of the following measures:
- Reorient or relocate the receiving antenna.
- Increase the separation between the equipment and receiver.
- Connect the equipment to an outlet on a circuit different from that to which the receiver is connected.
- Consult the dealer or an experienced radio/TV technician for help.
FCC NOTICE
Changes or modification not expressly approved by the party responsible for compliance could void the user’s
authority to operate the equipment.
Caution
a. The fluorescent lamp used in this product contains a small amount of mercury.
b. Do not dispose of this product with general household waste.
c. Disposal of this product must be carried out in accordance to the regulations of your local authority.
On Disposal
The nationwide transition to digital television broadcasting by full-power TV stations will be completed by June 12,
2009, but your local television stations may switch sooner. After the switch, analog-only television sets that receive
TV programming through an antenna will need a converter box to continue to receive over-the-air TV. Watch your
local stations to find out when they will turn off their analog signal and switch to digital-only broadcasting. Analogonly TVs should continue to work as before to receive low-power, Class A or translator television stations and with
cable and satellite TV services, gaming consoles, VCRs, DVD players, and similar products.
Information about the DTV transition is available from your local television stations, www.DTV.gov, or 1-888-CALLFCC (TTY 1-888-TELL-FCC). Information about government coupons for eligible digital-to-analog converter boxes
is available from www.dtv2009.gov or 1-888-DTV-2009 (TTY 1-877-530-2634).
Digital Television Transition Notice
To prevent fire or shock hazards, do not expose this product to rain or moisture.
Page 5

Important Safety Instructions
5
Important Safety Instructions
1. Read these instructions.
2. Keep these instructions.
3. Heed all warnings.
4. Follow all instructions.
5. Do not use this apparatus near water.
6. Clean only with dry cloth.
7. Do not block any ventilation openings.
Install in accordance with the manufacturer's instructions.
8. Do not install near any heat sources such as radiators, heat registers, stoves, or other apparatus (including
amplifiers) that produce heat.
9. Do not defeat the safety purpose of the polarized or grounding-type plug. A polarized plug has two blades with
one wider than the other. A grounding type plug has two blades and a third grounding prong. The wide blade or
the third prong are provided for your safety. If the provided plug does not fit into your outlet, consult an electrician for replacement of the obsolete outlet.
10. Protect the power cord from being walked on or pinched particularly at plugs, convenience receptacles, and
the point where they exit from the apparatus.
11. Only use attachments/accessories specified by the manufacturer.
12. Use only with the cart, stand, tripod, bracket, or table specified by the manufacturer, or sold with the apparatus.
When a cart is used, use caution when moving the cart/apparatus combination to avoid injury from tip-over.
13. Unplug this apparatus during lightning storms or when unused for long periods of time.
14. Refer all servicing to qualified service personnel. Servicing is required when the apparatus has been damaged
in any way, such as power-supply cord or plug is damaged, liquid has been spilled or objects have fallen into
the apparatus, the apparatus has been exposed to rain or moisture, does not operate normally, or has been
dropped.
15. Do not expose this apparatus to dripping or splashing and ensure that no objects filled with liquids, such as
vases, are placed on the apparatus.
16. To completely disconnect this apparatus from the AC Mains, disconnect the mains plug from the AC receptacle.
17. The mains plug of the power supply cord shall remain readily operable.
18. This apparatus shall be connected to a Mains socket outlet with a protective earthing connection.
Page 6
Important Safety Instructions
6
The lightning flash with arrowhead symbol within an equilateral triangle, is intended to alert the user to
the presence of uninsulated "dangerous voltage" within the product's enclosure that may be of sufficient
magnitude to constitute a risk of electric shock to persons.
The exclamation point within an equilateral triangle is intended to alert the user to the presence of
important operating and maintenance (servicing) instructions in the literature accompanying the product.
WARNING: To reduce the risk of fire or electric shock, do not expose this apparatus to rain or moisture.
Prolonged use of headphones at a high volume may cause health damage on your ears.
NNNNOOOOTTTTEE
EE
Page 7

Contents
7
Contents
3WARNING / CAUTION
5 Important Safety Instructions
WARNING
CAUTION
Controls
And
Connectors
Setting up
TV
Channel
Picture
Controls
Installation
Connection
Basic
Operation
On Screen
Menus
10 Front Panel
11 Rear Panel
12 Remote Control
14 Wall mount Installation
14 Desktop Pedestal Installation
15 Antenna Connection
16 VCR Connection
18 DVD Connection
20 HDSTB Connection
22 External A/V Source
22 Digital Audio Out
23 USB in setup
24 PC Connection
25 Resolution
26 Turning On or Off
26 Channel Selection
26 Volume Adjustment
26 Sound Mute
26 Quick View
27 Input Selection
27 Language Selection
28 On Screen Menus
29 Auto Scan
30 Find Channel
31 Add/Delete Channel
32 EPG(Electronic Program Guide)
33 Auto Picture Controls
34 Manual Picture Controls
35 Color Temperature
36 Dynamic Contrast
37 Noise Reduction
38 Flesh Tone Correction
39 Blue Stretch
40 Film Mode
41 Aspect Ratio
42 Reset Picture Mode
43 Auto Sound Controls
44 Manual Sound Controls
45 Speaker On/Off
46 Auto Volume Control
Sound
Controls
Page 8

Contents
8
47 Digital Output
48 Reset Audio Mode
48 Stereo/SAP Broadcast Setup
Parental
Control
Setting the
PC Mode
Special
Functions
Sound
Controls
Time
Setting
49 Auto Time Setting
50 Manual Time Setting
51 Auto On/Off Time Setting
52 Sleep Timer
Option
Menus
53 Audio Language
54 Input Label
55 Caption Mode
56 Closed Caption-Analog
57 Closed Caption-Digital
58 Closed Caption Options
60 Menu Opacity
61 Enter your password
61 Lock System
62 Set Password
63 Channel Blocking
64 TV Ratings for USA
65 TV (FCC) Age Categories
66 Movie Ratings
67 TV Rating English for Canada
67 TV Rating French for Canada
69 Downloadable Rating
70 Auto Picture Controls
71 Manual Picture Controls
72 Watching PIP(Picture in Picture)
73 Moving the sub picture
74 PIP Audio Output
75 Input Source Selection for sub picture (*Option)
75 Swapping between Main and Sub pictures (*Option)
75 Swapping between Main and Sub pictures audio
75 Channel Selection for Sub Picture
75 Sub Picture Size Adjustment (*Option)
Photos
Functions
76 Before using the Photos Mode
76 Screen Components
77 Slide Show
78 Setup the Slideshow
Music
Functions
79 Before using the Music Mode
79 Screen Components
80 Listen to music
81 Specification
82 Troubleshooting
83 CHILD SAFETY
84 Warranty
Page 9
Accessories
9
Accessories
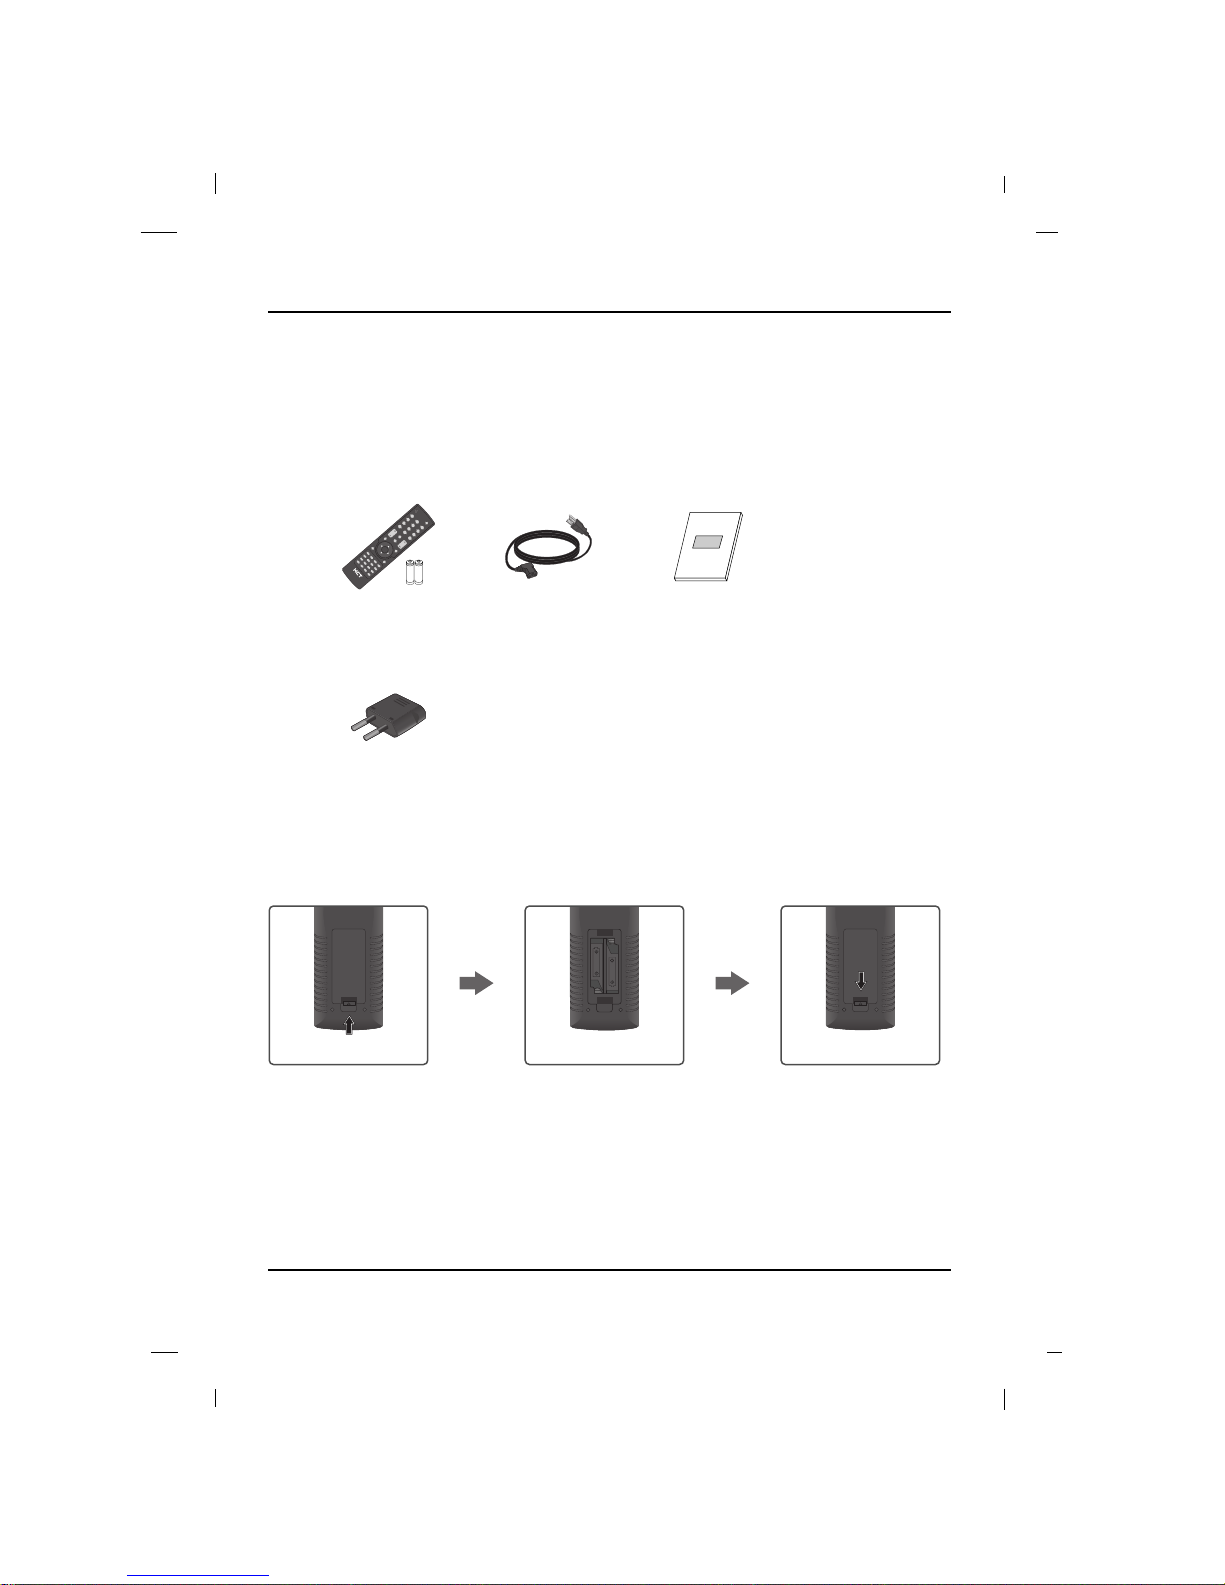
Ensure that the following accessories are included with your product.
If an accessory is missing, please contact the dealer where you purchased the product.
User must use shielded signal interface cables with ferrite cores to maintain standard compliance for the product.
Supplied Accessories
Installing Batteries
1
Open the battery cover on
the back side.
2
Insert two batteries in
correct polarity, match
(+ with +), and match
(- with -).
Don't mix old batteries
with new batteries.
3
Close the battery cover.
1.5V
1.5V
1
2
3
4
5
6
7
8
9
_
0
P
R
E
.
C
H
F
A
V
.
C
H
M
U
T
E
E
P
G
S
LE
EP
M
E
NU
E
X
IT
V
O
L
C
H
IN
FO
M
T
S
R
AT
IO
C
C
P
IC
T
U
R
E
S
O
U
N
D
P
H
O
T
O
M
US
IC
PIP
P
IP
IN
P
U
T
S
W
AP
P
I
P
C
H
-
AU
D.S
W
A
P
S
IZ
E
P
O
S
IT
IO
N
P
I
P
C
H
+
S
O
UR
CE
O
K
Remote &
Batteries
Power cord
Owner’s Manual
Adaptor Plug
(UL to VDE)
Page 10
Controls And Connectors
10
Controls And Connectors
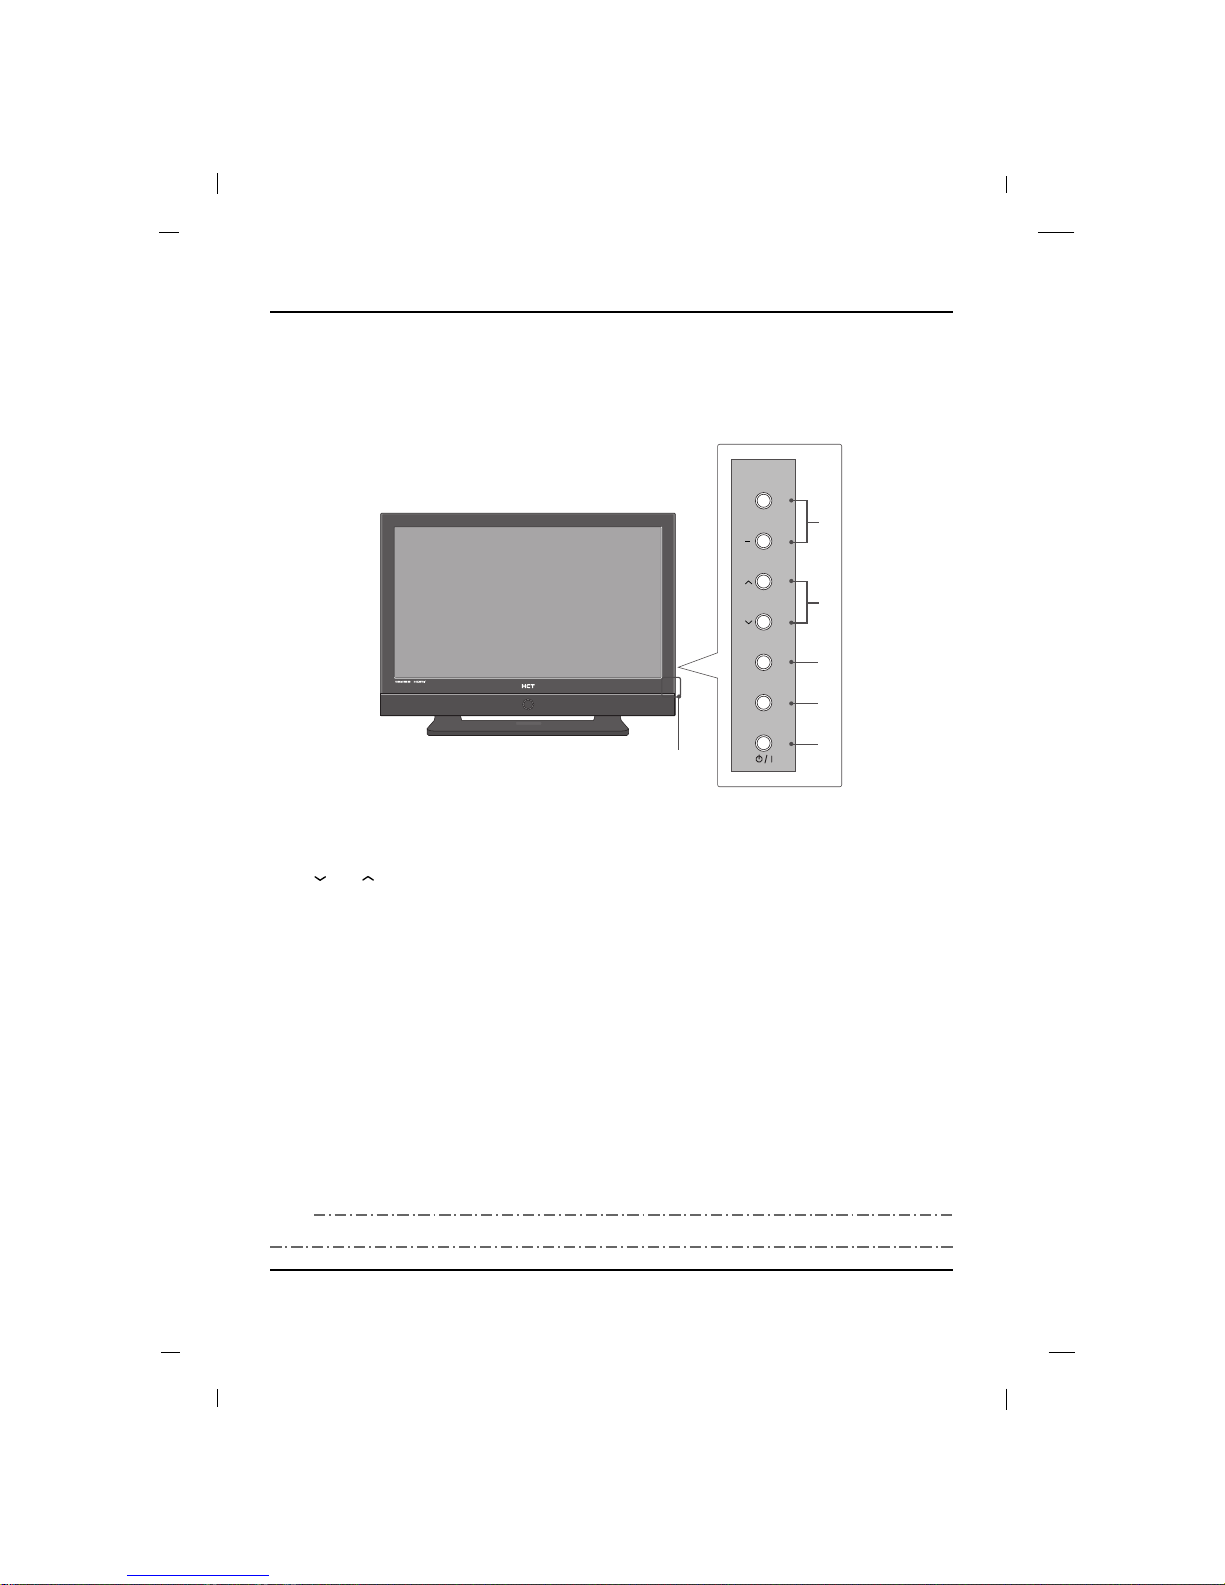
Front Panel
6
SOURCE
MENU
+
VOL
CH
1
2
3
4
5
1. VOL + / VOL -
Adjusts menu setting.
Adjusts sound level.
2. CH / CH
Select a channel.
3. SOURCE
Selects the TV, AV /S-Video, Component-1, Component-2, HDMI 1, HDMI 2, HDMI 3 or VGA mode.
4. MENU
Display on screen menus.
5. POWER
Switches the set on or off.
6. Power Indicator
Illuminates in bright blue when the TV is in standby mode.
Illuminates in dark blue when the TV is switched on.
Remote control sensor
Accepts the IR signal of remote controller.
Here shown may be somewhat different from your set.
NNNNOOOOTTTTEE
EE
Page 11

Controls And Connectors
11
Rear Panel
!"#
!"#
$
%
Here shown may be somewhat different from your set.
NNNNOOOOTTTTEE
EE
1. RGB IN (PC)
Connect to the video output jack on your PC.
2. AUDIO IN (RGB/DVI)
Connect to the audio output jack on your PC.
3. HDMI/DVI1 IN
Connect to the HDMI jack for device with HDMI output. (This input can also be used as a DVI connection with an HDMI to DVI adaptor and separate analog audio inputs.)
4. HDMI2 IN
Connect to the HDMI jack for device with HDMI output.
5. HDMI3 IN
Connect to the HDMI jack for device with HDMI output.
6. COMPONENT1 IN (YPbPr1)
Video/Audio inputs for Component1.
7. COMPONENT2 IN (YPbPr2)
Video/Audio inputs for Component2.
8. AV IN
Connect RCA cable to an appropriate external A/V
device such as VCR, DVD or Camcorder.
9. S-VIDEO IN
Connect the output of an S-VIDEO device to the SVIDEO input.
10. USB IN
Connect the USB memory stick.
11. DIGITAL AUDIO OUT(OPTICAL)
Connect digital audio to various types of equipment.
12. ANTENNA/CABLE IN
Connect to your antenna or cable box for TV signal.
13. SERVICE
14.EXTERNAL SPEAKER OUT
External Speaker outputs.
15. AC IN
This TV operates on an AC power.
Page 12

Controls And Connectors
12
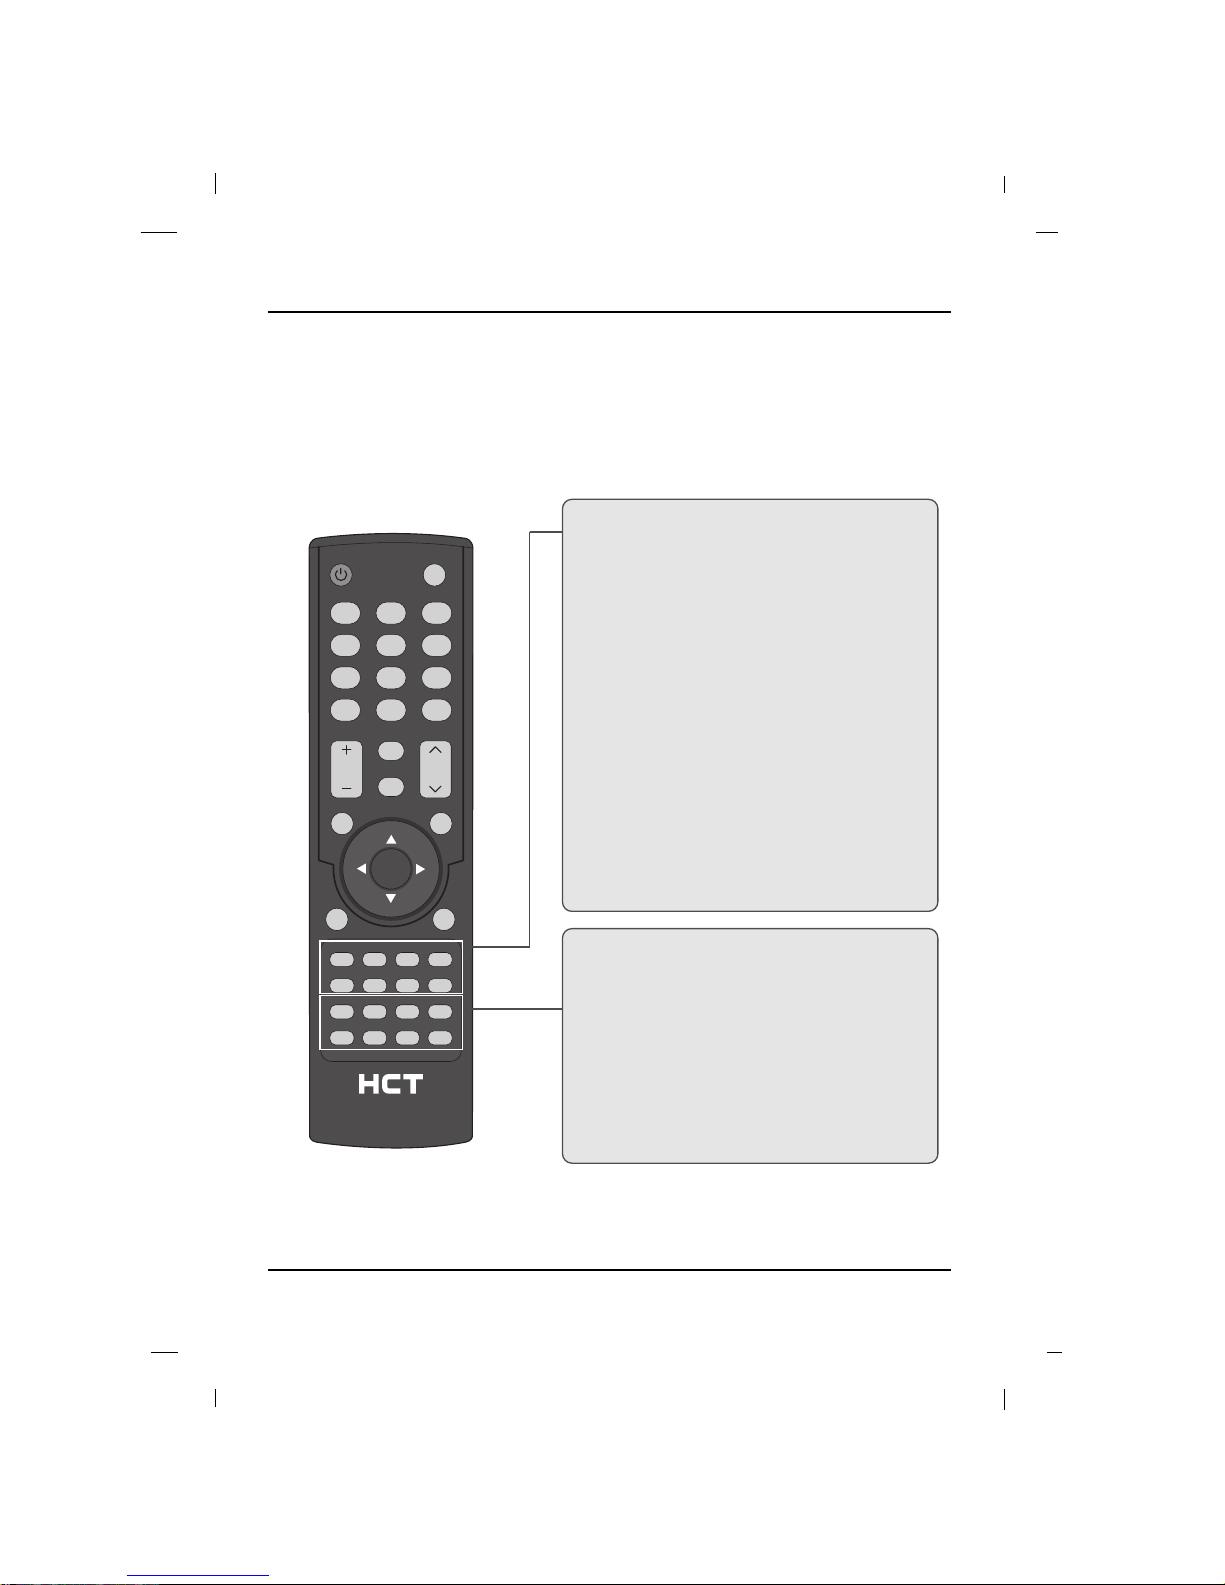
- All the functions can be controlled with the remote control handset.
- Some functions can also be adjusted with the buttons on the side panel of the set.
- Before using remote control handset, please install the batteries.
Remote Control
1 2 3
4 5 6
7 8 9
_
0
PRE.CH
FAV.CH
MUTE
EPG SLEEP
MENU EXIT
VOL CH
INFO MTS RATIO CC
PICTURE SOUND
PHOTO MUSIC
PIP
PIPINPUT
SWAP
PIPCH+
AUD.SWAP SIZE
POSITION PIPCH-
SOURCE
OK
NUMBER BUTTONS
Selects channel numbers.
Hyphen( )
Press to select DTV channels.
For example, to select channel ‘10-1’, press ‘10’ then
press ‘ ’ and ‘1’.
PRE.CH
Switch to the previous channel number.
VOL + / VOL -
Adjusts sound level.
CH + / CH -
Select a channel.
FAV.CH
Display the favorite channel list.
MUTE
Switches the sound on or off.
MENU
Display on screen menus.
EXIT
Clear all on-screen menus and return to TV viewing from any
menu.
Navigational Controls
Adjusts menu settings.
Selects menu item.
OK
Accepts your selection.
EPG
Displays the program guide.
SLEEP
Sets the sleep timer.
POWER
Switches the set on or off.
SOURCE
Selects the TV, AV/S-Video, Component-1, Component-2,
HDMI 1, HDMI 2, HDMI 3 or VGA mode.
Page 13
Controls And Connectors
13
1 2 3
4 5 6
7 8 9
_
0
PRE.CH
FAV.CH
MUTE
EPG SLEEP
MENU EXIT
VOL CH
INFO MTS RATIO CC
PICTURE SOUND
PHOTO MUSIC
PIP
PIPINPUT
SWAP
PIPCH+
AUD.SWAP SIZE
POSITION PIPCH-
SOURCE
OK
INFO
Display the current channel information.
MTS
Select MTS sound : Mono, Stereo and SAP in Analog
Channel.
Change the audio language in DTV Channel.
RATIO
Selects your desired picture format.
CC
Select the Caption menu directly.
PICTURE
Recalls your preferred picture setting.
SOUND
Recalls your preferred sound setting.
PHOTO
Select the Photos mode directly.
MUSIC
Select the Music mode directly.
PIP
Switches the sub picture on or off.
PIP INPUT
Not Support.
SWAP
Not Support.
AUD.SWAP
Alternates between main and sub picture audio.
SIZE
Not Support.
POSITION
Moves the sub picture position.
PIP CH +/PIP CH -
Select a channel for the sub picture.
Page 14

Installation
14
Installation
Wall mount Installation
4 inches
4 inches
4 inches
4 inches
4 inches
The set can be installed on a wall as shown above.
For proper ventilation, allow a clearance of 4 inches on all four sides from the wall.
Detailed instructions are available from your dealer, refer to the optional Wall Mounting Bracket Installation and
Setup Guide. (Wall Mount Sold Separately)
Desktop Pedestal Installation
4 inches
4 inches
4 inches
4 inches
The set can be mounted on a desk as shown above.
For proper ventilation, allow a clearance of 4 inches on each side from the wall.
Detailed instructions are available from your dealer, refer to the optional Desktop Stand Installation and Setup
Guide.
- Do not install the Wall-Mount except the Qualified Service Personnel.
NNNNOOOOTTTTEE
EE
Page 15

Connections
15
Connections
Antenna Connection
ANTENNA/
CABLE IN
VIDEO
AV
AUDIO
L
R
S-VIDEO
USB
DIGITAL AUDIO
OUT(OPTICAL)
SERVICE
Multi-family Dwellings/ Apartments
(Connect to wall antenna socket)
Single-family Dwellings /Houses
(Connect to wall jack for outdoor antenna)
Wall Antenna Socket
RF Coaxial Wire (75 ohm)
VHF
UHF
Outdoor Antenna
Turn clockwise to tighten.
Be careful not to bend the bronze wire when
connecting to an antenna port.
* Separately purchase a RF Coaxial Wire(75 ohm)
-To improve the picture quality in a poor signal
area, please purchase a signal amplifier and
install properly.
- If the antenna is not installed properly, contact
your dealer for assistance.
NNNNOOOOTTTTEE
EE
ANTENNA/
CABLE IN
VIDEO
AV
AUDIO
L
R
S-VIDEO
USB
DIGITAL AUDIO
OUT(OPTICAL)
SERVICE
VHF UHF
Signal
Amplifier
Rear panel of the set
Rear panel of the set
Page 16
Connections
16
- To avoid picture noise (interface), leaves an adequate distance between the TV and the VCR.
VCR Connection
ANTENNA/
CABLE IN
VIDEO
AV
AUDIO
L
R
S-VIDEO
USB
DIGITAL AUDIO
OUT(OPTICAL)
SERVICE
ANT IN
ANT OUT S-VIDEO
IN
OUT
(R) AUDIO (L) VIDEO
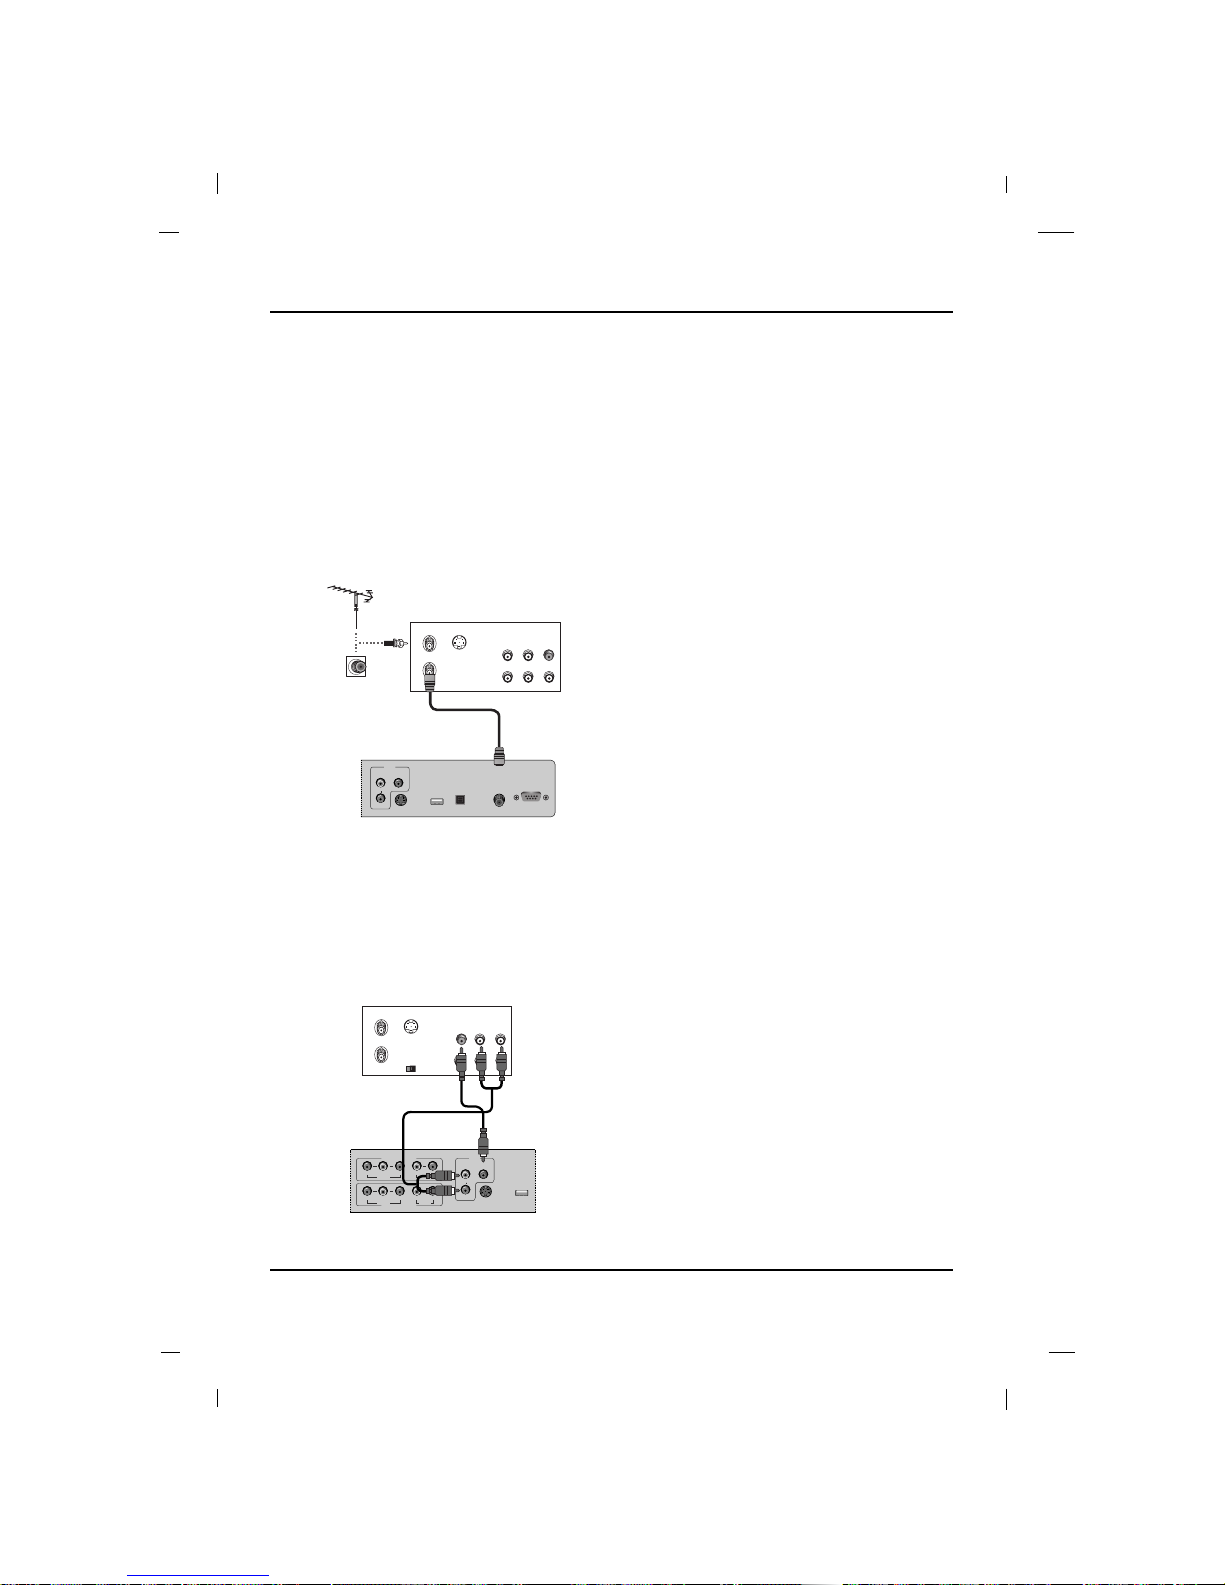
1. Connect the Antenna out socket of the VCR to the
Antenna input socket on the TV.
2. Press the POWER button on the VCR and match
the appropriate input selection between the TV
and VCR for viewing.
AA When connecting with an antenna
VIDEO
AV
AUDIO
L
R
S-VIDEO
USB
COMPONENT 1
LR
VIDEO
YPbPr
AUDIO
COMPONENT 2
LR
VIDEO
YPbPr
AUDIO
ANT IN
ANT OUT S-VIDEO
IN
OUT
(L) AUDIO (R)VIDEO
OUTPUT
SWITCH
1. Connect the AUDIO/VIDEO jacks between TV
and VCR. Match the jack colors (Video = yellow,
Audio Left = white, and Audio Right = red)
2. Insert a video tape into the VCR and press PLAY
on the VCR.
3. Select the AV/S-Video input source with using the
SOURCE button on the remote
control.
4. Refer to the VCR manual for operating instructions.
AA When connecting with a RCA cable
VCR
Rear panel of the set
VCR
Rear panel of the set
Page 17

Connections
17
VIDEO
AV
AUDIO
L
R
S-VIDEO
USB
COMPONENT 1
LR
VIDEO
YPbPr
AUDIO
COMPONENT 2
LR
VIDEO
YPbPr
AUDIO
ANT IN
ANT OUT S-VIDEO
IN
OUT
(L) AUDIO (R)VIDEO
OUTPUT
SWITCH
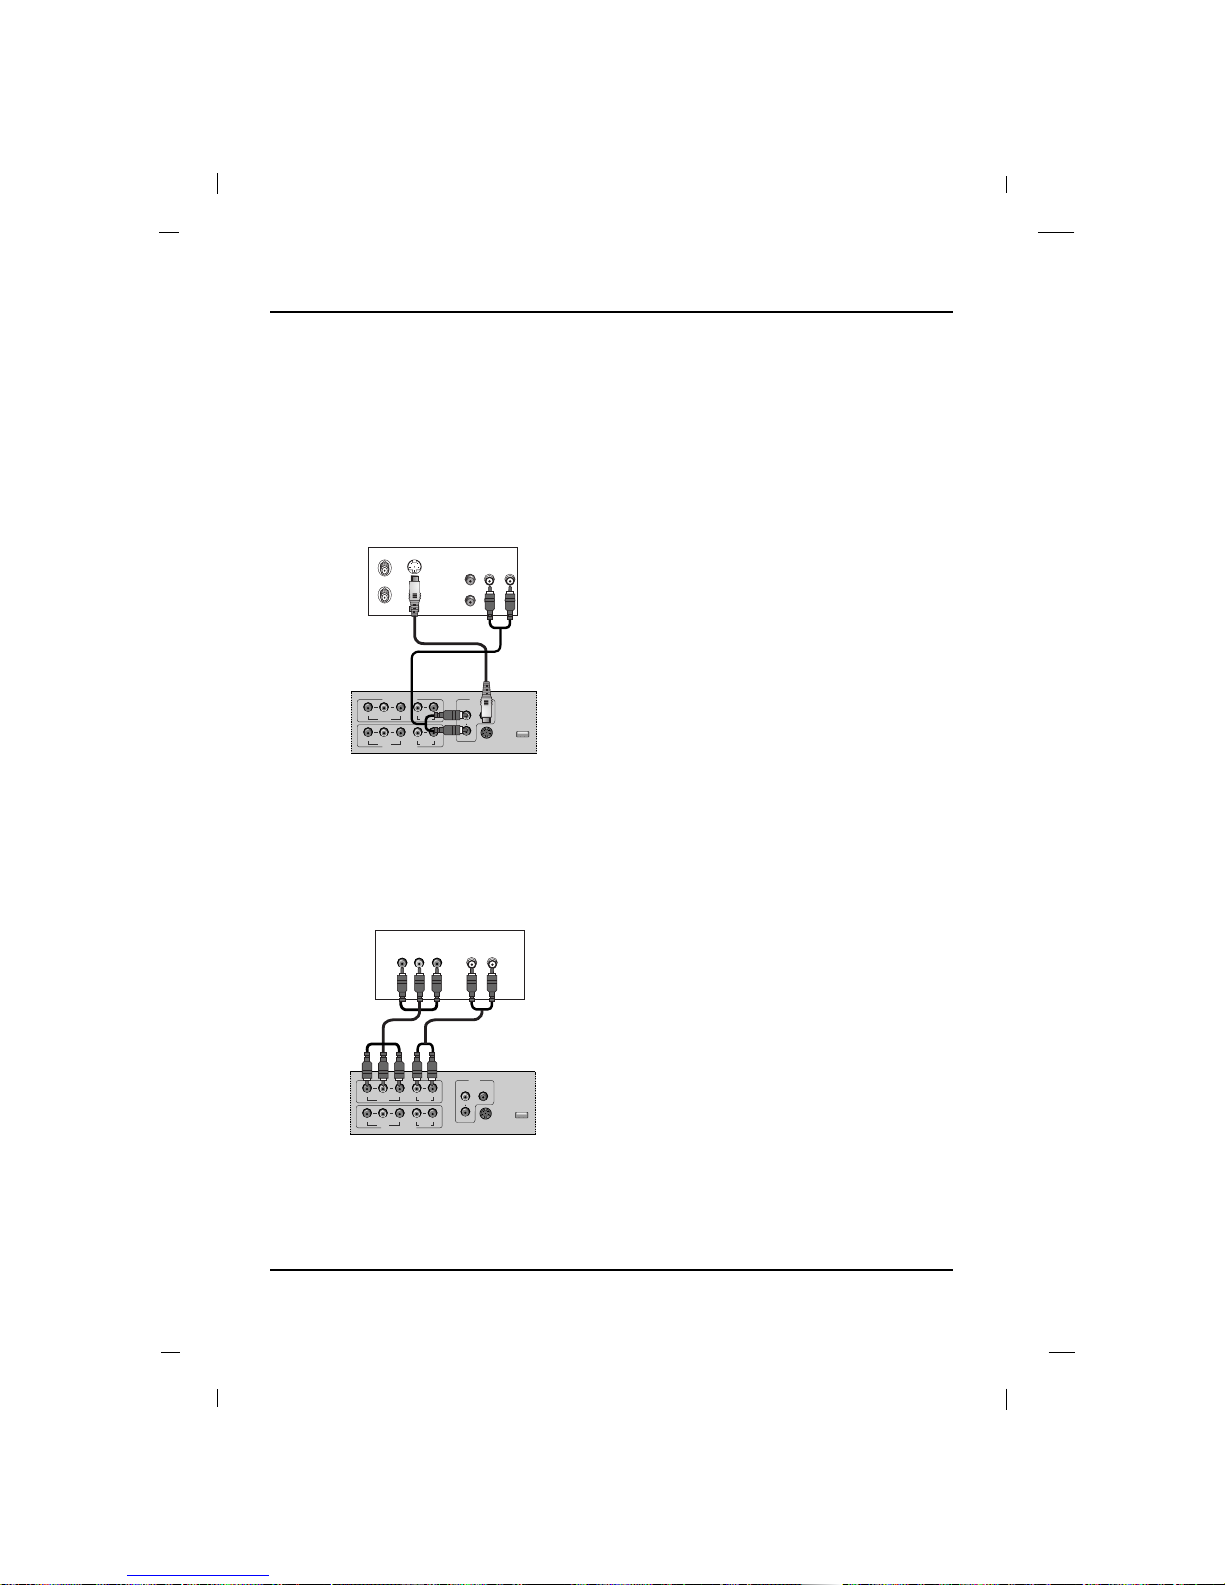
1. Connect the S-VIDEO output of the VCR to the SVIDEO input on the set. The picture quality is
improved; compared to normal composite (RCA
cable) input.
2. Connect the audio outputs of the VCR to the AV
AUDIO L, R input jacks on the set.
3. Insert a video tape into the VCR and press PLAY
on the VCR.
4. Select the AV/S-Video input source with using the
SOURCE button on the remote
control.
5. Refer to the VCR manual for operating
instructions.
AA When connecting with a S-Video cable
VCR
Rear panel of the set
Page 18
Connections
18
DVD Connection
VIDEO
AV
AUDIO
L
R
S-VIDEO
USB
COMPONENT 1
LR
VIDEO
YPbPr
AUDIO
COMPONENT 2
LR
VIDEO
YPbPr
AUDIO
ANT IN
ANT OUT S-VIDEO
IN
OUT
(L) AUDIO (R)VIDEO
OUTPUT
SWITCH
1. Connect the S-VIDEO output of the DVD to the
S-VIDEO input on the set.
2. Connect the audio outputs of the DVD to the AV
AUDIO L, R input jacks on the set.
3. Turn on the DVD player, insert a DVD.
4. Select AV/S-Video input source with using the
SOURCE button on the remote control.
5. Refer to the DVD player's manual for operating
instructions.
AA When connecting with a S-Video cable
DVD
Rear panel of the set
VIDEO
AV
AUDIO
L
R
S-VIDEO
USB
COMPONENT 1
LR
VIDEO
YPbPr
AUDIO
COMPONENT 2
LR
VIDEO
YPbPr
AUDIO
(L) AUDIO (R)
Y
Pb Pr
1. Connect the video outputs (Y, PB, PR) of the DVD
to the COMPONENT1 VIDEO(Y, Pb, Pr1) or
COMPONENT2 VIDEO(Y, Pb, Pr2) jacks on the
set.
2. Connect the audio outputs of the DVD to the
COMPONENT1 AUDIO L, R or COMPONENT2
AUDIO L, R jacks on the set.
3. Turn on the DVD player, insert a DVD.
4. Select Component-1 or Component-2 source
with using the SOURCE button on the remote
control.
5. Refer to the DVD player's manual for operating
instructions.
AA When connecting with a Component Cable
DVD
Rear panel of the set
Page 19
Connections
19
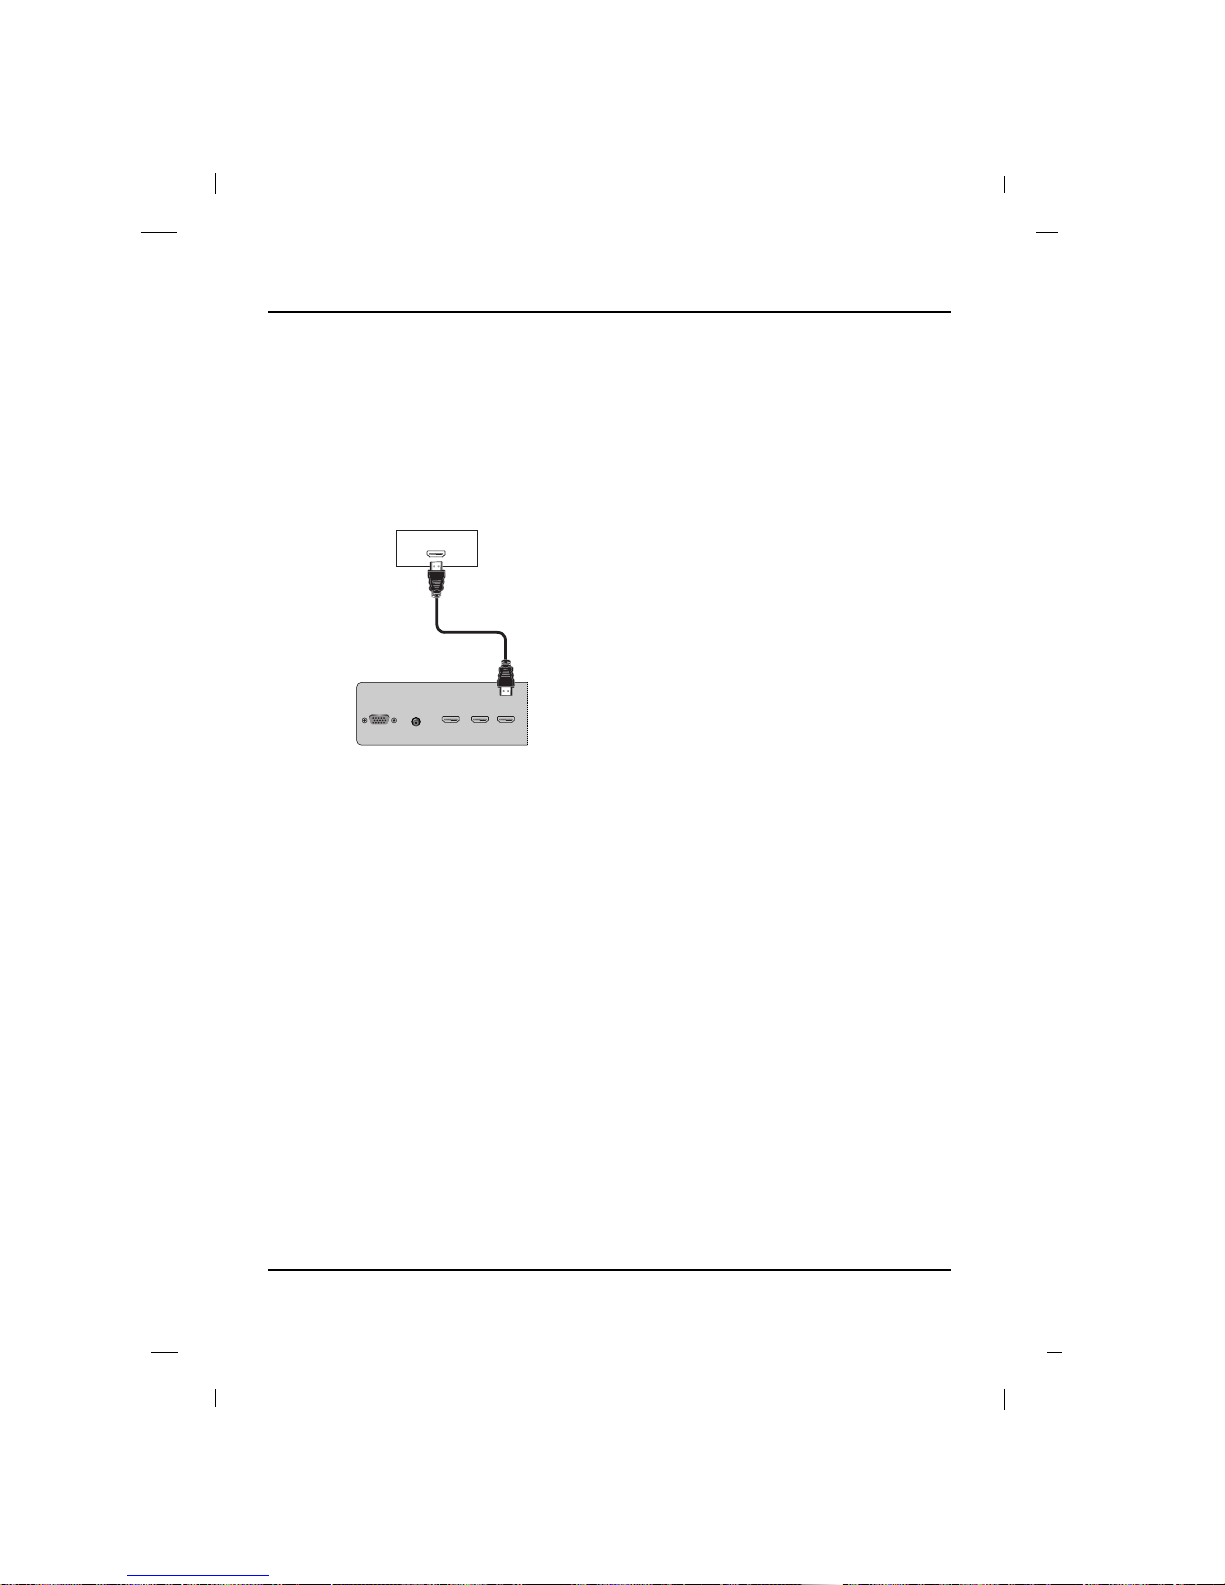
1. Connect the HDMI output of the DVD to the
HDMI/DVI1 IN, HDMI2 IN or HDMI3 IN jack on
the set.
2. Select HDMI 1, HDMI 2 or HDMI 3 input source
with using the SOURCE button on the remote
control.
3. Refer to the DVD player's manual for operating
instructions.
AA When connecting with a HDMI cable
HDMI IN2HDMI IN
3
RGB IN
(PC)
AUDIO IN
(RGB/DVI)
HDMI/DVI IN
1
HDMI-DVD OUTPUT
DVD
Rear panel of the set
Page 20
Connections
20
- This TV can receive Digital Over-the-air/Cable signals without an external digital set-top box.
However, if you do receive Digital signals from a digital set-top box or other digital external device, refer to the
figure as shown below.
HDSTB Connection
HDMI IN2HDMI IN
3
RGB IN
(PC)
AUDIO IN
(RGB/DVI)
HDMI/DVI IN
1
(R) AUDIO (L) RGB-DTV OUTPUT
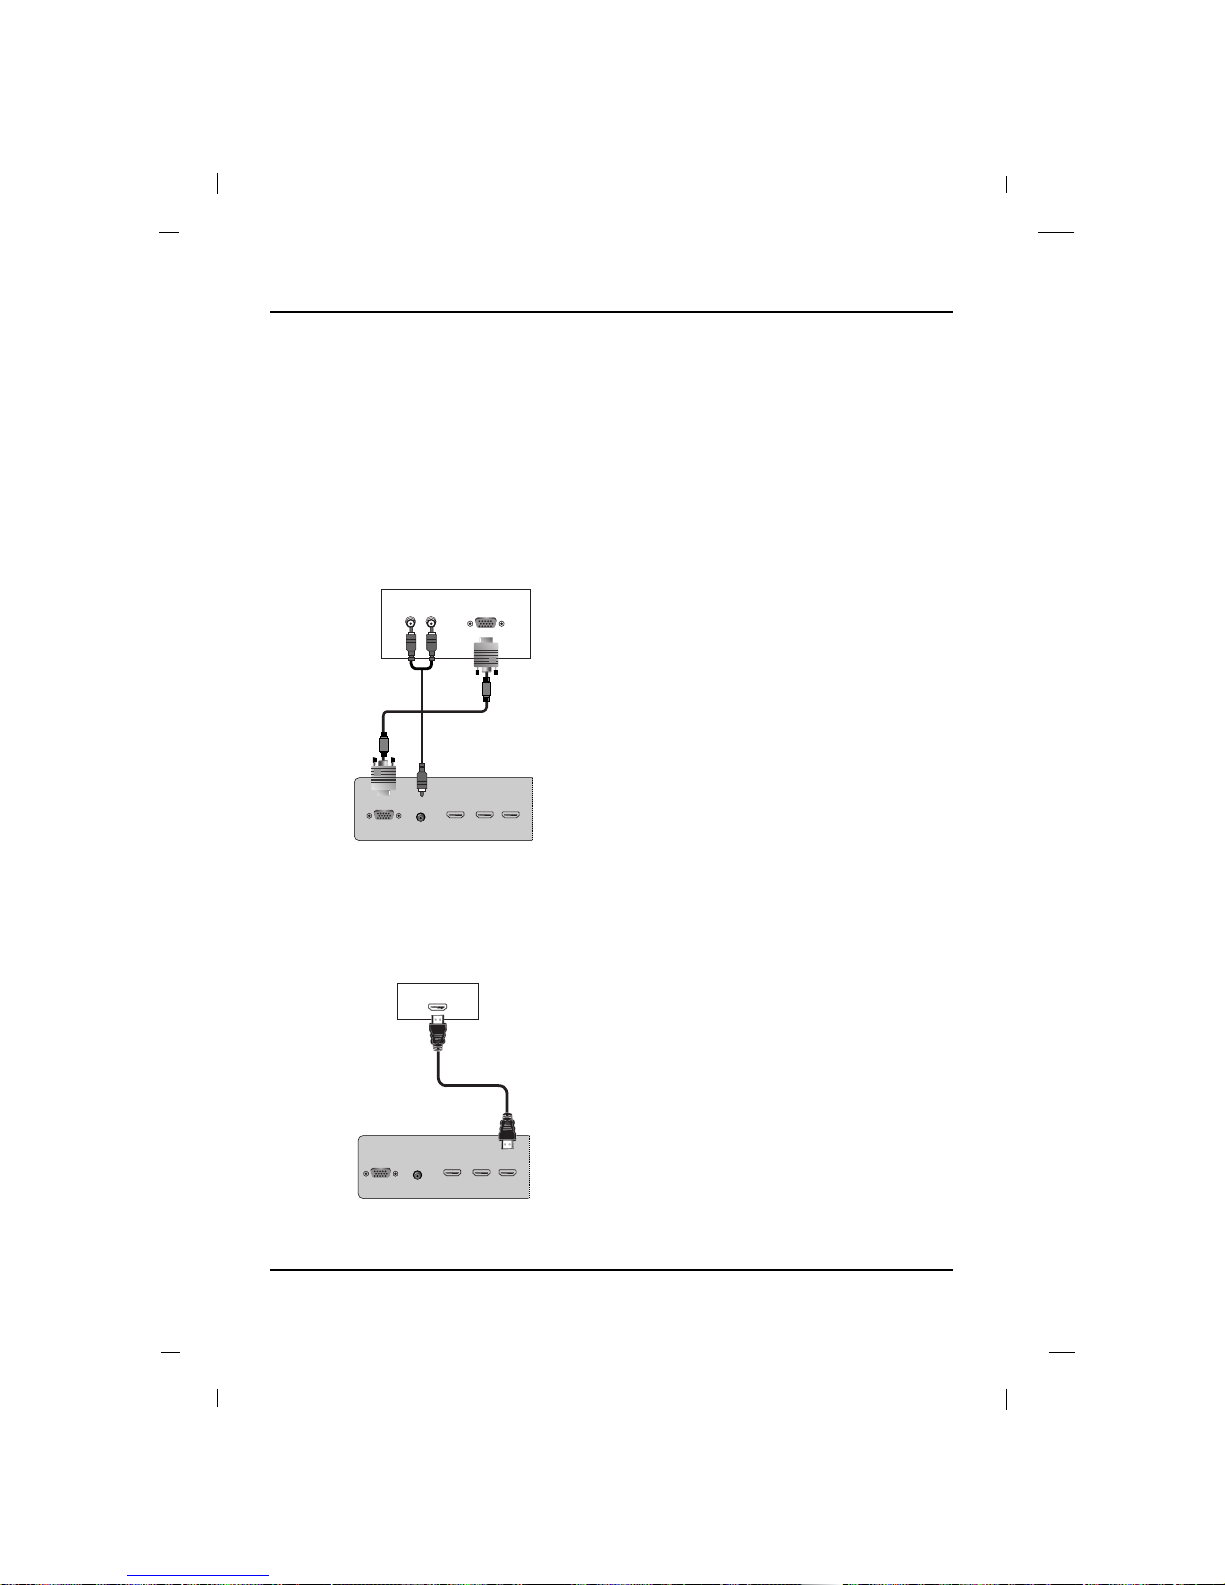
1. Connect the RGB output of the digital set-top box
to the RGB IN (PC) jack on the set.
2. Connect the audio outputs of the set-top box to
the AUDIO IN (RGB/DVI) jack on the set.
3. Turn on the digital set-top box.
4. Select VGA input source with using the SOURCE
button on the remote control.
5. Refer to the digital set-top box manual for operating instructions.
AA When connecting with a D-Sub 15 pin cable
Digital Set-top Box
Rear panel of the set
1. Connect the HDMI output of the digital set-top
box to the HDMI/DVI1 IN, HDMI2 IN or HDMI3 IN
jack on the set.
2. Turn on the digital set-top box.
3. Select HDMI 1, HDMI 2 or HDMI 3 input source
with using the SOURCE button on the remote
control.
4. Refer to the digital set-top box manual for operating instructions.
AA When connecting with a HDMI cable
HDMI IN2HDMI IN
3
RGB IN
(PC)
AUDIO IN
(RGB/DVI)
HDMI/DVI IN
1
HDMI-DVD OUTPUT
Digital Set-top Box
Rear panel of the set
Page 21
Connections
21
VIDEO
AV
AUDIO
L
R
S-VIDEO
USB
COMPONENT 1
LR
VIDEO
YPbPr
AUDIO
COMPONENT 2
LR
VIDEO
YPbPr
AUDIO
(L) AUDIO (R)
Y
Pb Pr
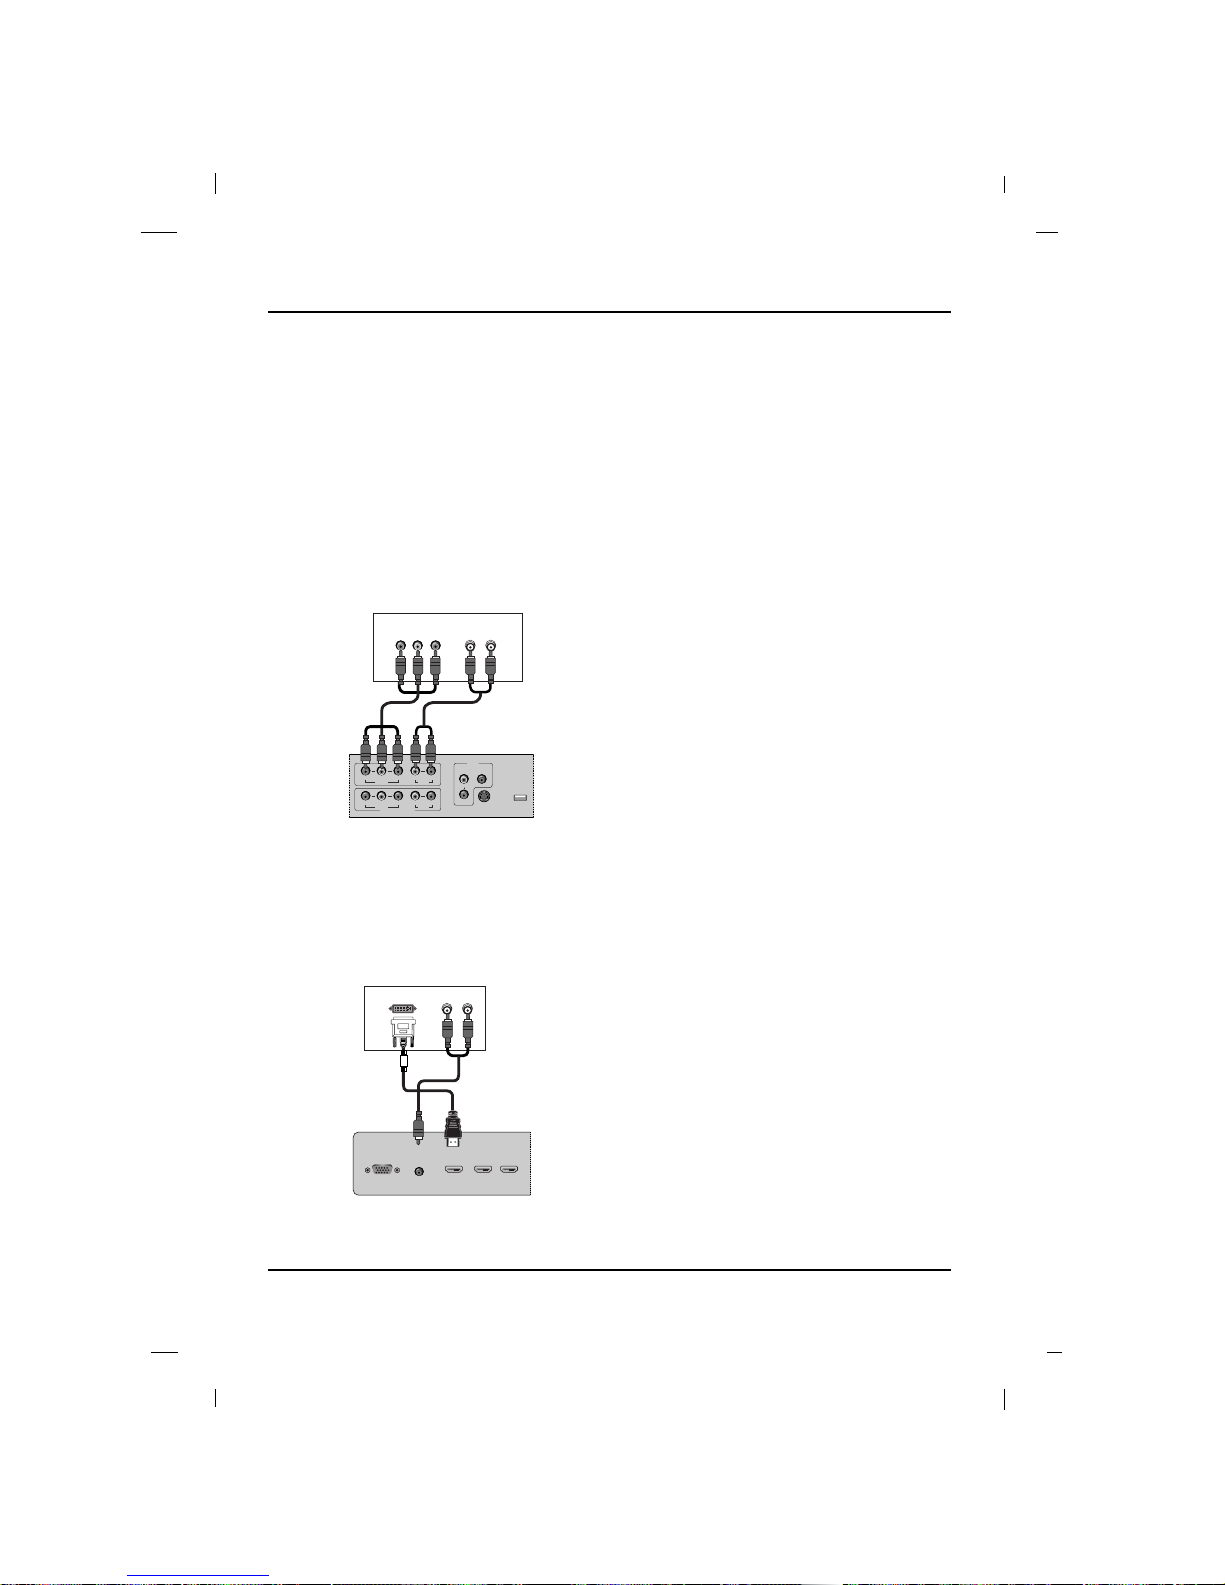
1. Connect the video outputs (Y, PB, PR) of the digital set-top box to the COMPONENT1 VIDEO(Y,
Pb, Pr1) or COMPONENT2 VIDEO(Y, Pb, Pr2)
jacks on the set.
2. Connect the audio outputs of the digital set-top
box to the COMPONENT1 AUDIO L, R or COM-
PONENT2 AUDIO L, R jacks on the set.
3. Turn on the digital set-top box.
4. Select Component-1 or Component-2 source
with using the SOURCE button on the remote
control.
5. Refer to the digital set-top box manual for operating instructions.
AA When connecting with a Component cable
Digital Set-top Box
Rear panel of the set
DVI-DTV OUTPUT
(R) AUDIO (L)
HDMI IN2HDMI IN
3
RGB IN
(PC)
AUDIO IN
(RGB/DVI)
HDMI/DVI IN
1
1. Connect the DVI output of the digital set-top box
to the HDMI/DVI1 IN jack on the set.
2. Connect the audio outputs of the set-top box to
the AUDIO IN (RGB/DVI) jack on the set.
3. Turn on the digital set-top box.
4. Select HDMI 1 input source with using the
SOURCE button on the remote control.
5. Refer to the digital set-top box manual for operating instructions.a
AA When connecting with a HDMI to DVI cable
Rear panel of the set
Digital Set-top Box
Page 22
Connections
22
External A/V Source
L-AUDIO-RVIDEO
OUT
VIDEO
AV
AUDIO
L
R
S-VIDEO
USB
COMPONENT 1
LR
VIDEO
YPbPr
AUDIO
COMPONENT 2
LR
VIDEO
YPbPr
AUDIO
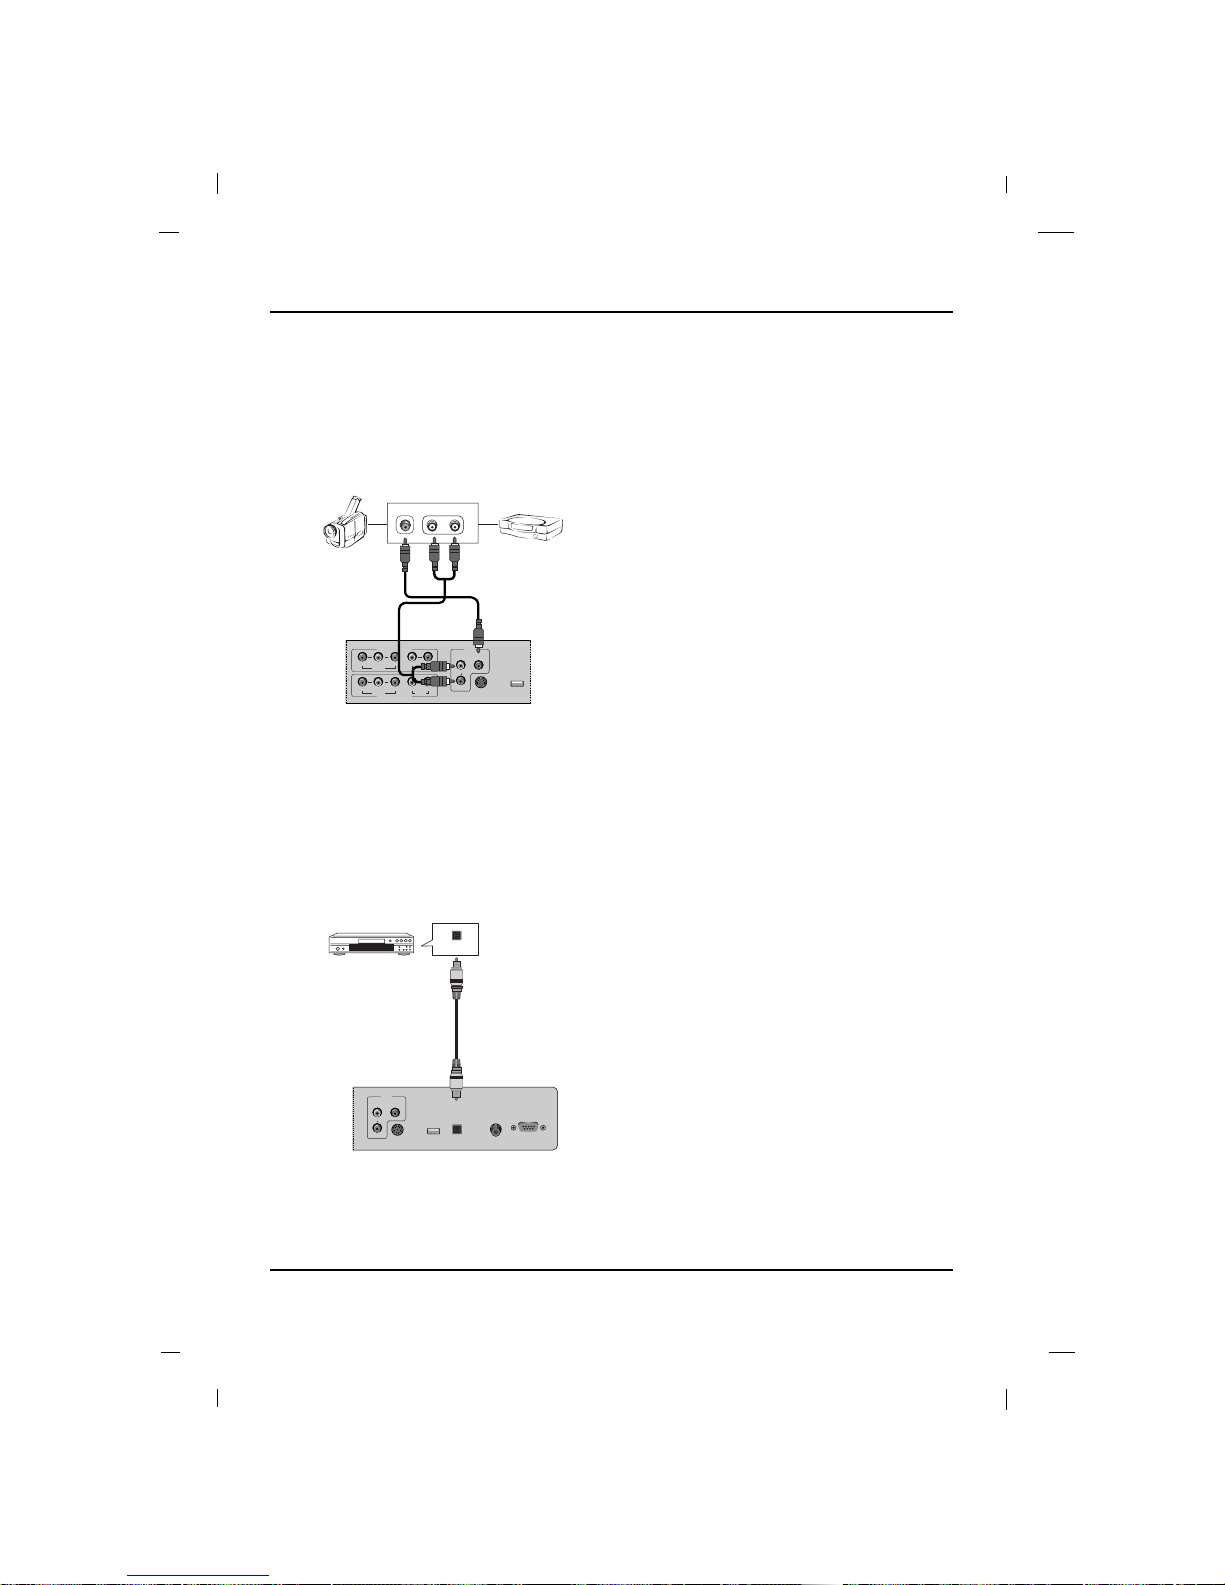
1. Connect the AUDIO/VIDEO jacks between TV
and external equipment. Match the jack colors
(Video = yellow, Audio Left = white, and Audio
Right = red)
2. Select the AV/S-Video input source with using the
SOURCE button on the remote control.
3. Operate the corresponding external equipment.
4. Refer to the external equipment manual for operating instructions.
Camcorder Video game set
Rear panel of the set
Digital Audio Out
ANTENNA/
CABLE IN
VIDEO
AV
AUDIO
L
R
S-VIDEO
USB
DIGITAL AUDIO
OUT(OPTICAL)
SERVICE
DIGITAL AUDIO
IN(COAXIAL)
1. Connect one end of the optical cable to the TV’s
DIGITAL AUDIO OUT(OPTICAL) port.
2. Connect the other end of the optical cable to the
digital audio input on the audio equipment.
3. Refer to the external audio equipment manual for
operation.
Audio Equipment
Rear panel of the set
Page 23

Connections
23
USB in setup
ANTENNA/
CABLE IN
VIDEO
AV
AUDIO
L
R
S-VIDEO
USB
DIGITAL AUDIO
OUT(OPTICAL)
SERVICE
1. Connect the USB device to the USB IN jack on
the set.
2. After connecting the USB IN jack, you can use
the Photos/Music function.
3. Select the Photos or Music input source with
using the PHOTO or MUSIC button on the remote
control.
Rear panel of the set
USB Memory
Page 24

Connections
24
PC Connection
HDMI IN2HDMI IN
3
RGB IN
(PC)
AUDIO IN
(RGB/DVI)
HDMI/DVI IN
1
AUDIO OUT PC OUTPUT
1. Connect the RGB output of the PC to the RGB
IN(PC) jack on the set.
2. Connect the PC audio outputs to the AUDIO IN
(RGB/DVI) jack on the set.
3. Turn on the PC and the set.
4. Select VGA input source with using the SOURCE
button on the remote control.
AA When connecting with a D-Sub 15 pin cable
PC
Rear panel of the set
DVI OUTPUT
AUDIO OUT
HDMI IN2HDMI IN
3
RGB IN
(PC)
AUDIO IN
(RGB/DVI)
HDMI/DVI IN
1
1. Connect the DVI output of the PC to the
HDMI/DVI IN jack on the set.
2. Connect the PC audio outputs to the AUDIO IN
(RGB/DVI) jack on the set.
3. Turn on the PC and the set.
4. Select HDMI 1 input source with using the
SOURCE button on the remote control.
AA When connecting with a HDMI to DVI cable
PC
Rear panel of the set
Page 25
25
Connections
Resolution
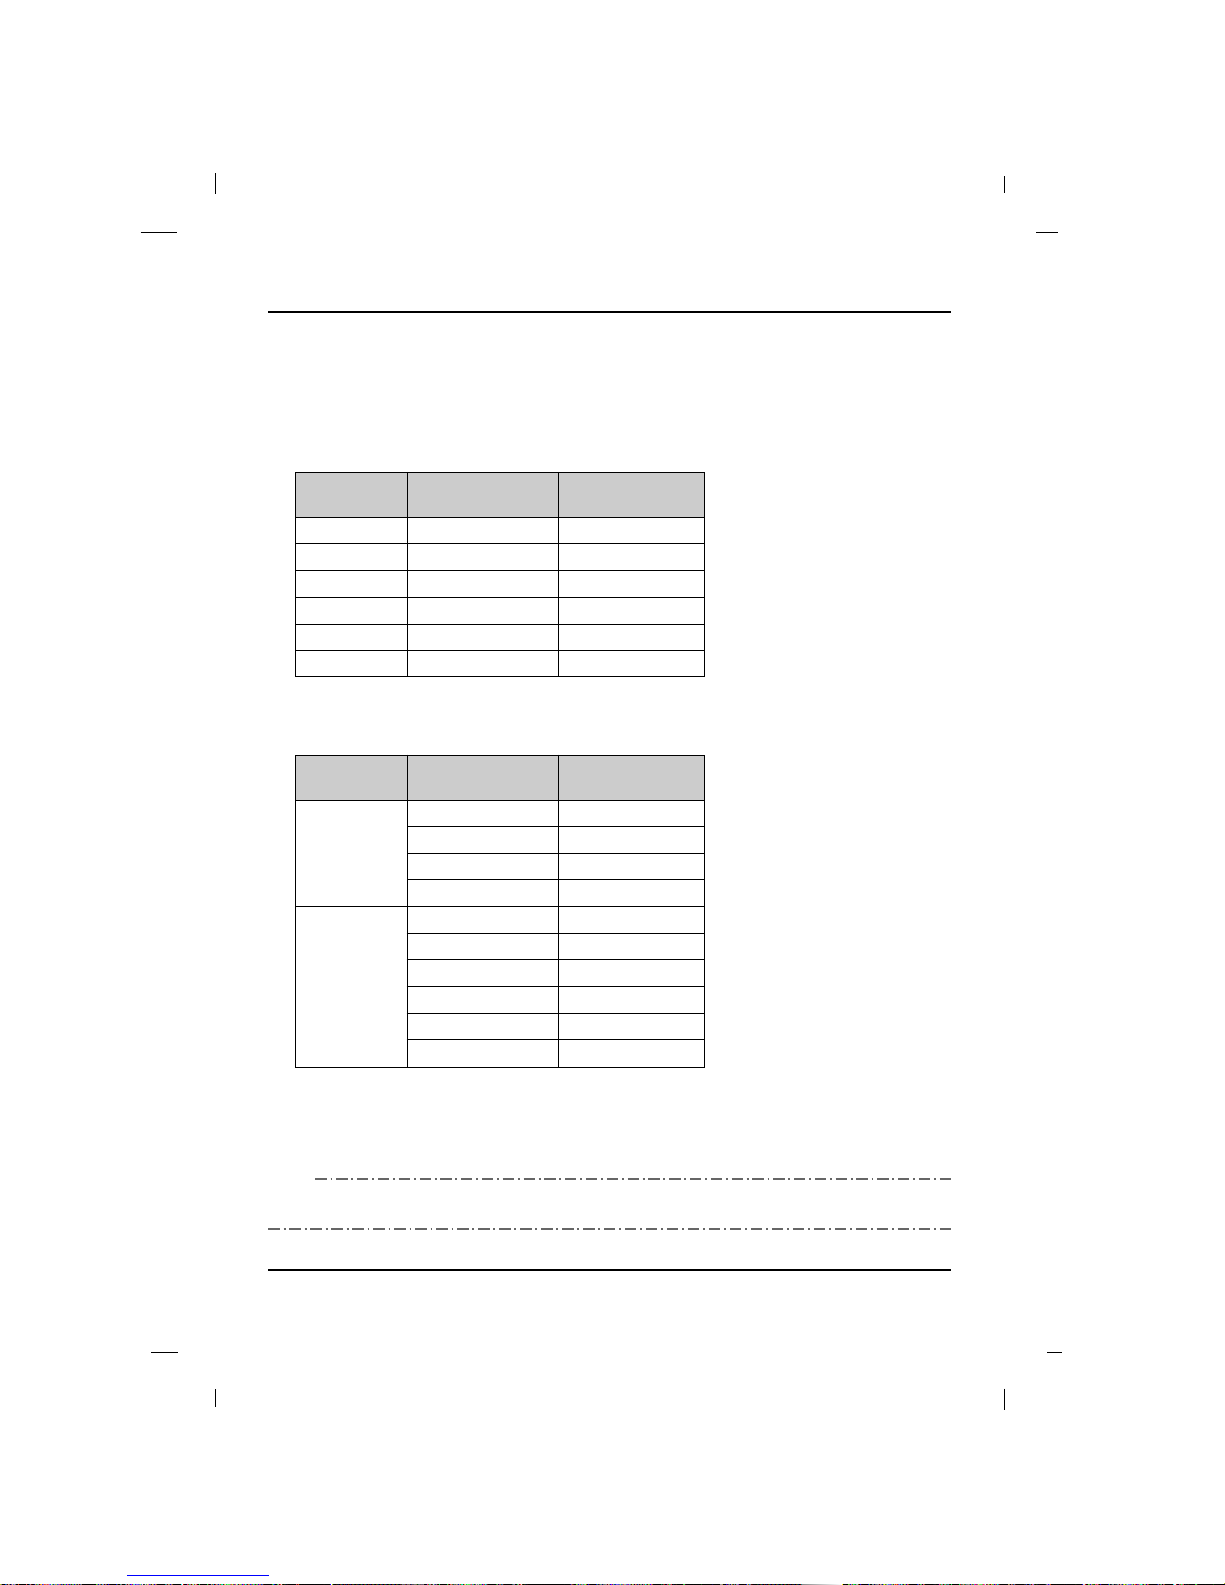
a. The synchronization input form is separated.
b. If the resolution is not supported, ‘Not Support!’ message will be displayed.
NNNNOOOOTTTTEE
EE
31.469
37.879
48.363
47.776
47.712
47.130
59.941
60.317
60.004
59.870
60.015
59.650
Horizontal
Frequency (kHz)
Vertical
Frequency (Hz)
640 x 480
800 x 600
1024 x 768
1280 x 768
1360 x 768
1366 x 768
Resolution
480/60P
720/60P
1080/60I
1080/60P
640 x 480
800 x 600
1024 x 768
1280 x 768
1360 x 768
1366 x 768
60.000
60.000
60.000
60.000
59.940
61.317
60.004
59.995
60.015
59.650
Resolution
Vertical
Frequency (Hz)
VIDEO
PC
AA PC
AA HDMI
Page 26

26
Basic Operation
Tur ning On or Off
Standby Setup: The AC power cord must be connected to have the TV in standby mode and ready to
be turned on. Press the ON/OFF button on the side panel of the TV to go into standby mode.
1. If the TV is in standby mode, press the POWER button on the remote or the TV itself to turn the TV on.
2. Press the POWER button again on the remote controller or the TV itself to turn the TV off.
Channel Selection
You can select a channel number with the CH / CH button or NUMBER buttons.
Sound Mute
Press the MUTE button. The sound is switched off and the mute display appears.
To cancel mute mode, press the MUTE or VOL+ / VOL- button again.
Quick View
Press the PRE.CH button to view the last channel you were watching.
Volume Adjustment
Press the VOL+ / VOL- button to adjust the sound level.
Basic Operation
Page 27

Basic Operation
27
Input Selection
1. Press the SOURCE button to display the Source
Selection.
2. Press the Down or Up button to select your desired
mode.
3. Press the OK button to change your selected mode.
Language Selection
1. Press the MENU button and then press the Down or Up
button to select the Option.
2. Press the OK button and then press the Down or Up
button to select Menu Language.
3. Press the Down or Up button to select your desired language and then press the OK button.
(Select between English, French, Spanish, German)
4. The on screen menu will then appear in the
selected language.
Source Selection
TV
AV/S-Video
Component-1
Component-2
HDMI 1
HDMI 2
HDMI 3
VGA
Option
Menu Language
Audio Language
Input Label
Caption
PC Setting
PIP Setting
Menu Opacity
English
English
Medium
Move Select
OK
Close
Menu
FFGGDDEE
Option
Menu Language
Audio Language
Input Label
Caption
PC Setting
PIP Setting
Menu Opacity
English
English
Medium
Move Select
OK
Close
Menu
FFGGDDEE
English
French
Spanish
German
Page 28
On Screen Menus
28
On Screen Menus
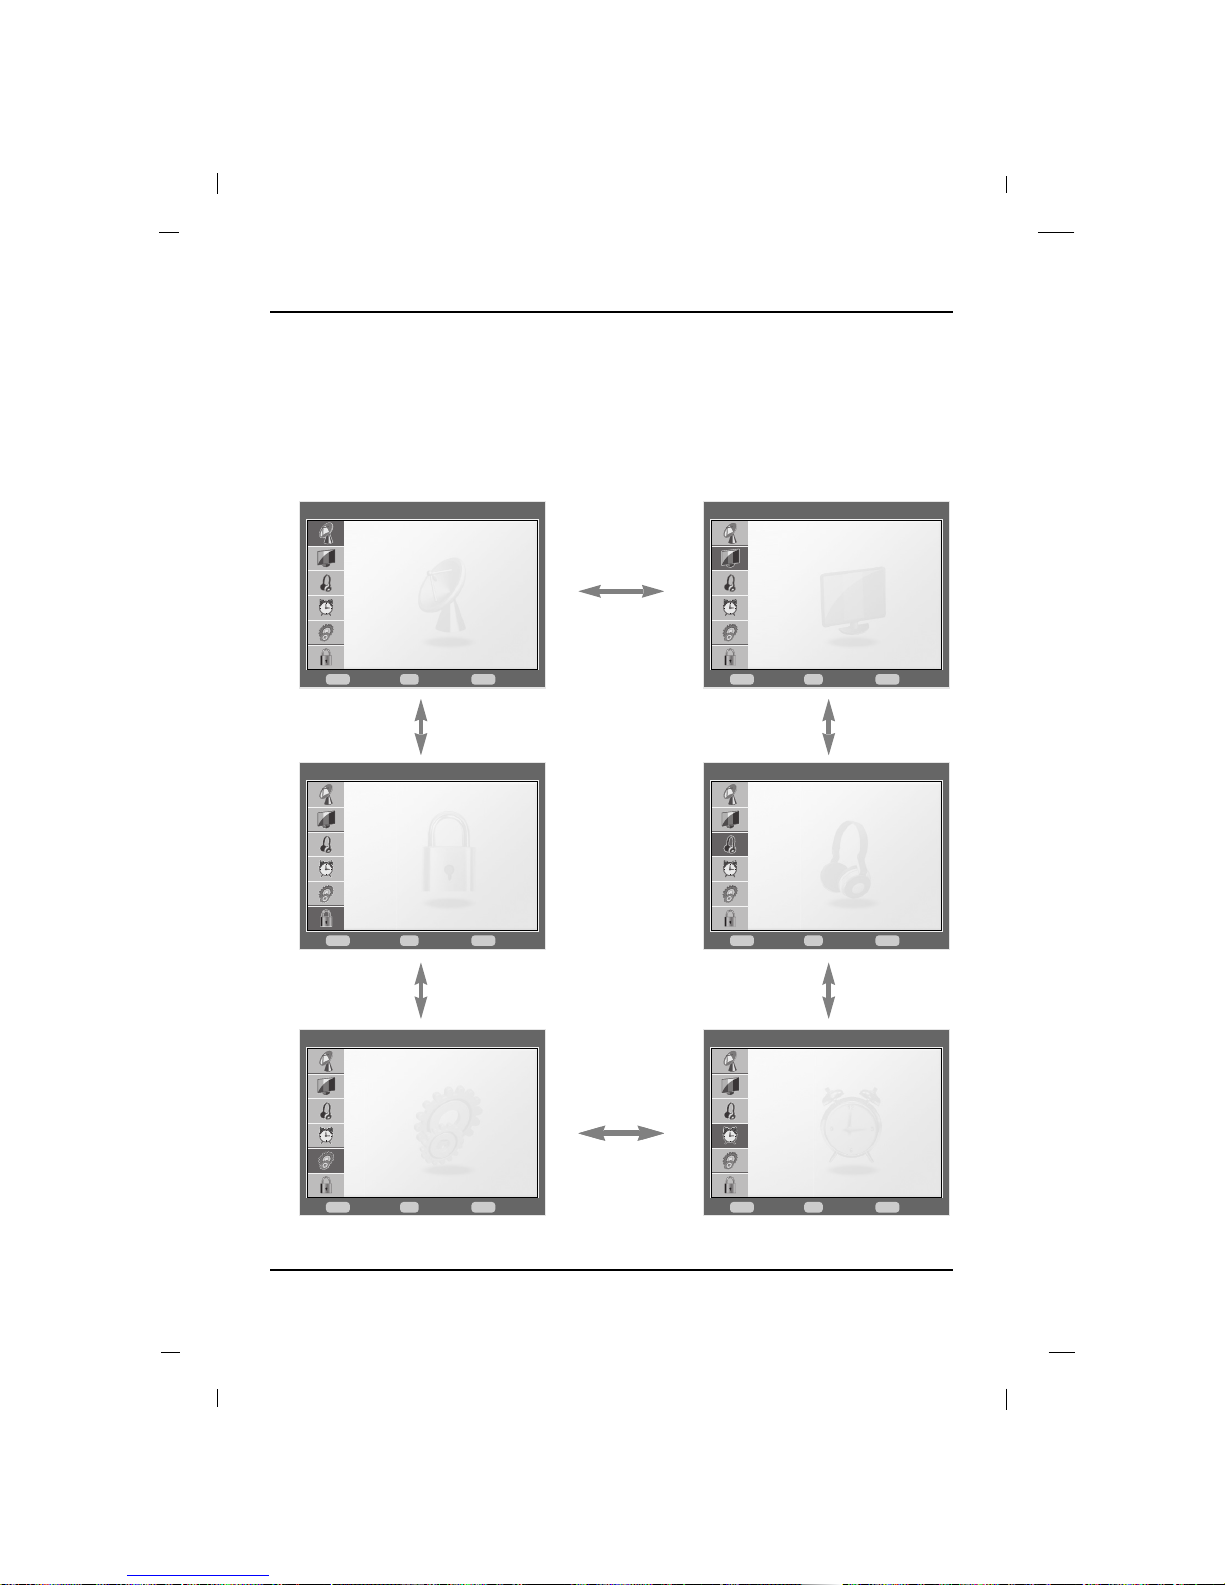
Your TV’s OSD (On Screen Display) may differ slightly from what is shown in this manual.
1. Press the MENU button on enter the on-screen menu and then use either the Down or Up button to select each
sub-menu.
2. Press the OK button and then use Down, Up, Left and Right buttons to navigate to the available menus.
Channels
Channel Scan
Find Channel
Channel Edit
Move Select
OK
Close
Menu
FF GG
DDEE
Channels MENU
Picture
Picture Mode
User Setting
Dynamic Contrast
Advanced Picture
Aspect Ratio
Picture Reset
Standard
Off
Wide
Move Select
OK
Close
Menu
FF GG
DDEE
Picture MENU
Lock
Lock System
Set Password
Block Channel
Rating
Off
Move Select
OK
Close
Menu
FF GG
DDEE
Lock MENU
Audio
Sound Mode
User Setting
Speaker
Auto Volume
Digital Output
Audio Reset
Standard
On
On
PCM
Move Select
OK
Close
Menu
FF GG
DDEE
Audio MENU
Option
Menu Language
Audio Language
Input Label
Caption
PC Setting
PIP Setting
Menu Opacity
English
English
Medium
Move Select
OK
Close
Menu
FF GG
DDEE
Option MENU
Timer
Clock
Timer
Sleep Timer Off
Move Select
OK
Close
Menu
FF GG
DDEE
Timer MENU
Page 29
Setting up TV Channel
29
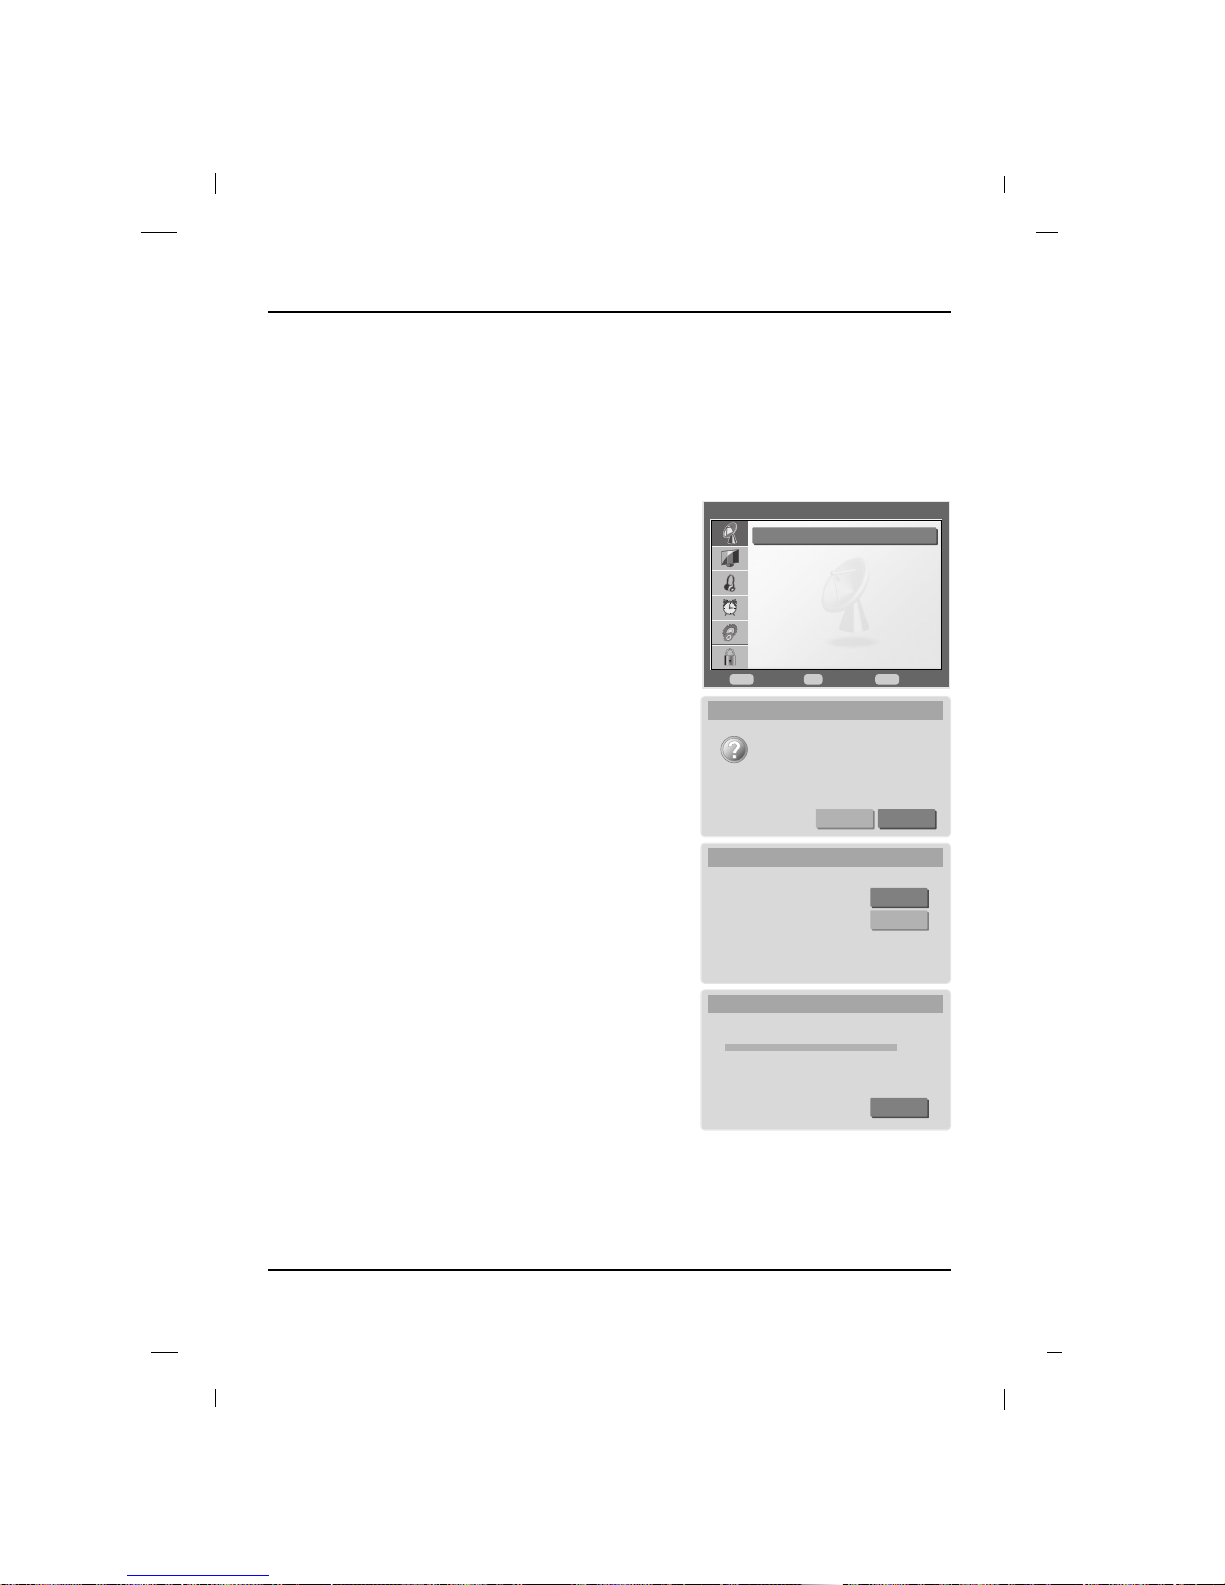
Setting up the TV Channels
Automatically finds all channels available through the Antenna or Cable and stores them in memory on
the channel list.
Auto Scan
1. Press the MENU button and then press the Down or
Up button to select the Channels.
2. Press the OK button and then press the Down or Up
button to select Channel Scan.
3. Press the OK button and then press the Left or Right
button to select OK or Cancel.
4. Press the OK button and then press the Down or Up
button to select Antenna or Cable.
5. Press the OK button to start auto search.
The TV will begin memorizing all of the available channels.
6. Select the Cancel and then press the OK button at any
time to interrupt the memorization process.
Channels
Move Select
OK
Close
Menu
FF GG
DDEE
Channel Scan
Find Channel
Channel Edit
Start full channel scan process.
This will erase entire existing channels.
Are you sure to continue?
Channel Scan
OK Cancel
Select the source for your
television signal
Channel Scan
Cable
Antenna
Now Scanning..
Channel Scan
Cancel
Channels Found
Digital: 0
Analog: 1
1%
Page 30

30
Setting up TV Channel
You can directly enter the channel number you want to find and find the entered channel.
Find Channel
1. Press the MENU button and then press the Down or
Up button to select the Channels.
2. Press the OK button and then press the Down or Up
button to select Find Channel.
3. Press the OK button and then press the number button
to select channel number you want to find.
4. Press the Left or Right button to select Find or Done.
If you want to add selected channel, select Find with
using Left button.
Then press the OK button. Otherwise select Done.
5. Press the MENU button to return to the previous menu.
Channels
Move Select
OK
Close
Menu
FF GG
DDEE
Channel Scan
Find Channel
Channel Edit
Enter the RF
Channel Number.
Contact your local
station or cable
operator for this
information.
Find Channel
Find Done
Move Select
OK
Enter
Num
Close
Menu
FF GG
-
Enter the RF
Channel Number.
Contact your local
station or cable
operator for this
information.
Find Channel
Find Done
9-0
Move Select
OK
Enter
Num
Close
Menu
FF GG
-
Page 31

31
Setting up TV Channel
You can manually store or remove channels in whatever order you desire.
From the default channel list created from the Channel Scan channel search, you can create two different types of
channel lists in memory: Channel List and Favorite Channel List.
Add / Delete a Channel
1. Press the MENU button and then press the Down or
Up button to select the Channels.
2. Press the OK button and then press the Down or Up
button to select Channel Edit.
3. Press the OK button and then press the Down or Up
button to select channel you want to add or delete.
Channel List:
Press the OK button to add or delete channel to the
Channel List.
When the icon is shown, the channel will be deleted.
Favorite Channel List:
Press the FAV.CH button to add or delete channel to
the Favorite Channel List.
The icon will appear.
When the icon is displayed, the selected
channel is set as favorites.
4. Save the other channels in the same method.
5. Press the MENU button to return to the previous menu.
DEL
FAV
FAV
Channels
Move Select
OK
Close
Menu
FF GG
DDEE
Channel Scan
Find Channel
Channel Edit
Channel Edit
Move
Close
Menu
DDEE
Toggle Delete
OK
Toggle Favorite
Fav
Move Page
CH
DDEE
9-0
10-0
11-0
12-0
DEL
Channel Edit
Move
Close
Menu
DDEE
Add/Delete
OK
Toggle Favorite
Fav
Move PageCH DDEE
9-0
10-0
11-0
12-0
FAV
Page 32

32
Setting up TV Channel
Displays Broadcasting guide of received channel.
EPG (Electronic Program Guide)
1. Press the EPG button to display the Electronic Program Guide.
2. To exit the Electronic Program Guide, press the EPG button again.
International News
23:00
23:10
24:30
06:30
08:30
09:00
Hurricane like is forecast to make landfall
in Texas early Saturday morning as a
dangerous
Program Guide
Move Close
EPG
DDEE
International News
No Info Available
No Info Available
Page 33
33
Picture Controls
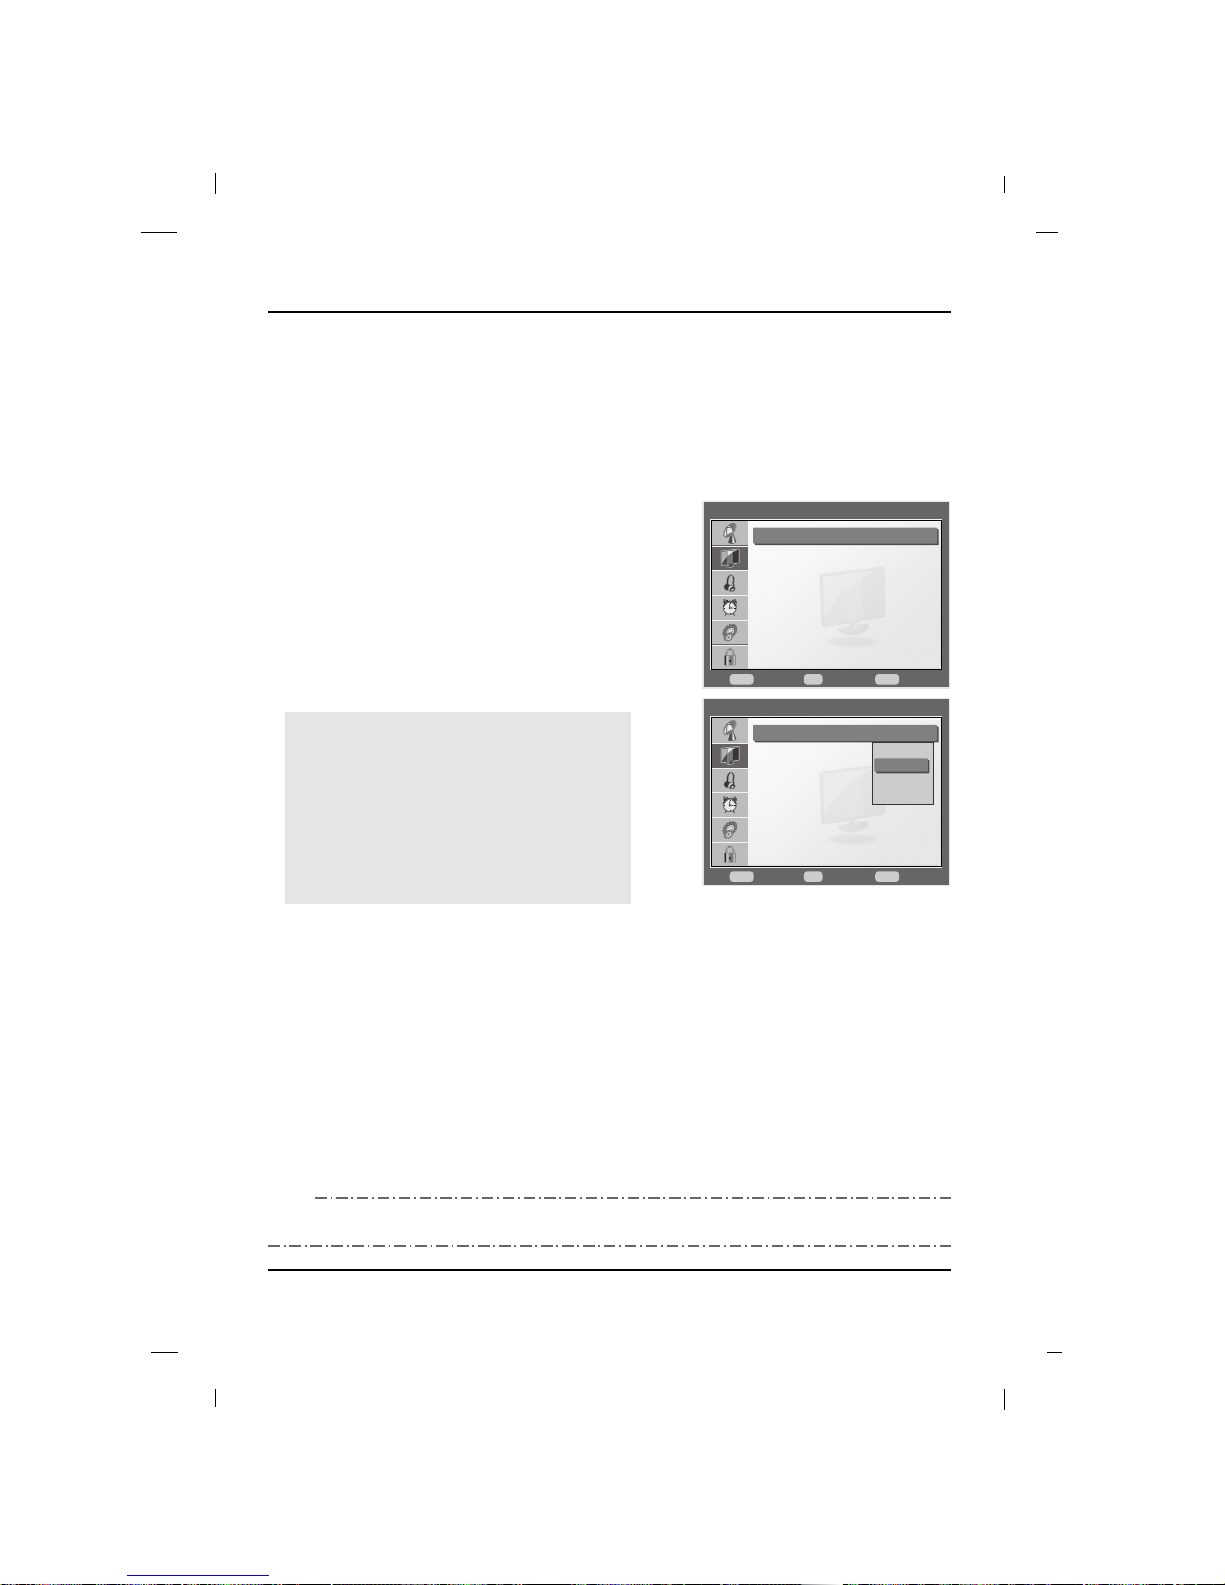
Picture Mode adjusts the set for the best picture appearance.
Select the preset value in the Picture Mode menu.
Auto Picture Controls
1. Press the MENU button to display the menu.
2. Press the Down or Up buttons to select the Picture,
then press the OK button.
3. Press the Down or Up button to select Picture Mode,
then press the OK button.
4. Press the Down or Up button to select Mild, Standard,
Dynamic or User, then press the OK button.
5. Press the MENU button to return to the previous menu.
Mild
Select this option to display with a soft image.
Standard
The most general and natural screen display status.
Dynamic
Select this option to display with a sharp image.
User
Select this option to use the user-defined setting.
- If you want to select Picture Mode directly, press the PICTURE button.
- Every time you press the button, it will switch between Mild, Standard, Dynamic or User.
NNNNOOOOTTTTEE
EE
Picture Controls
Picture
Move Select
OK
Close
Menu
FF GG
DDEE
Picture Mode
User Setting
Dynamic Contrast
Advanced Picture
Aspect Ratio
Picture Reset
Standard
Off
Wide
Picture
Move Select
OK
Close
Menu
FF GG
DDEE
Picture Mode
User Setting
Dynamic Contrast
Advanced Picture
Aspect Ratio
Picture Reset
Standard
Off
Wide
Mild
Standard
Dynamic
User
Page 34
34
Picture Controls
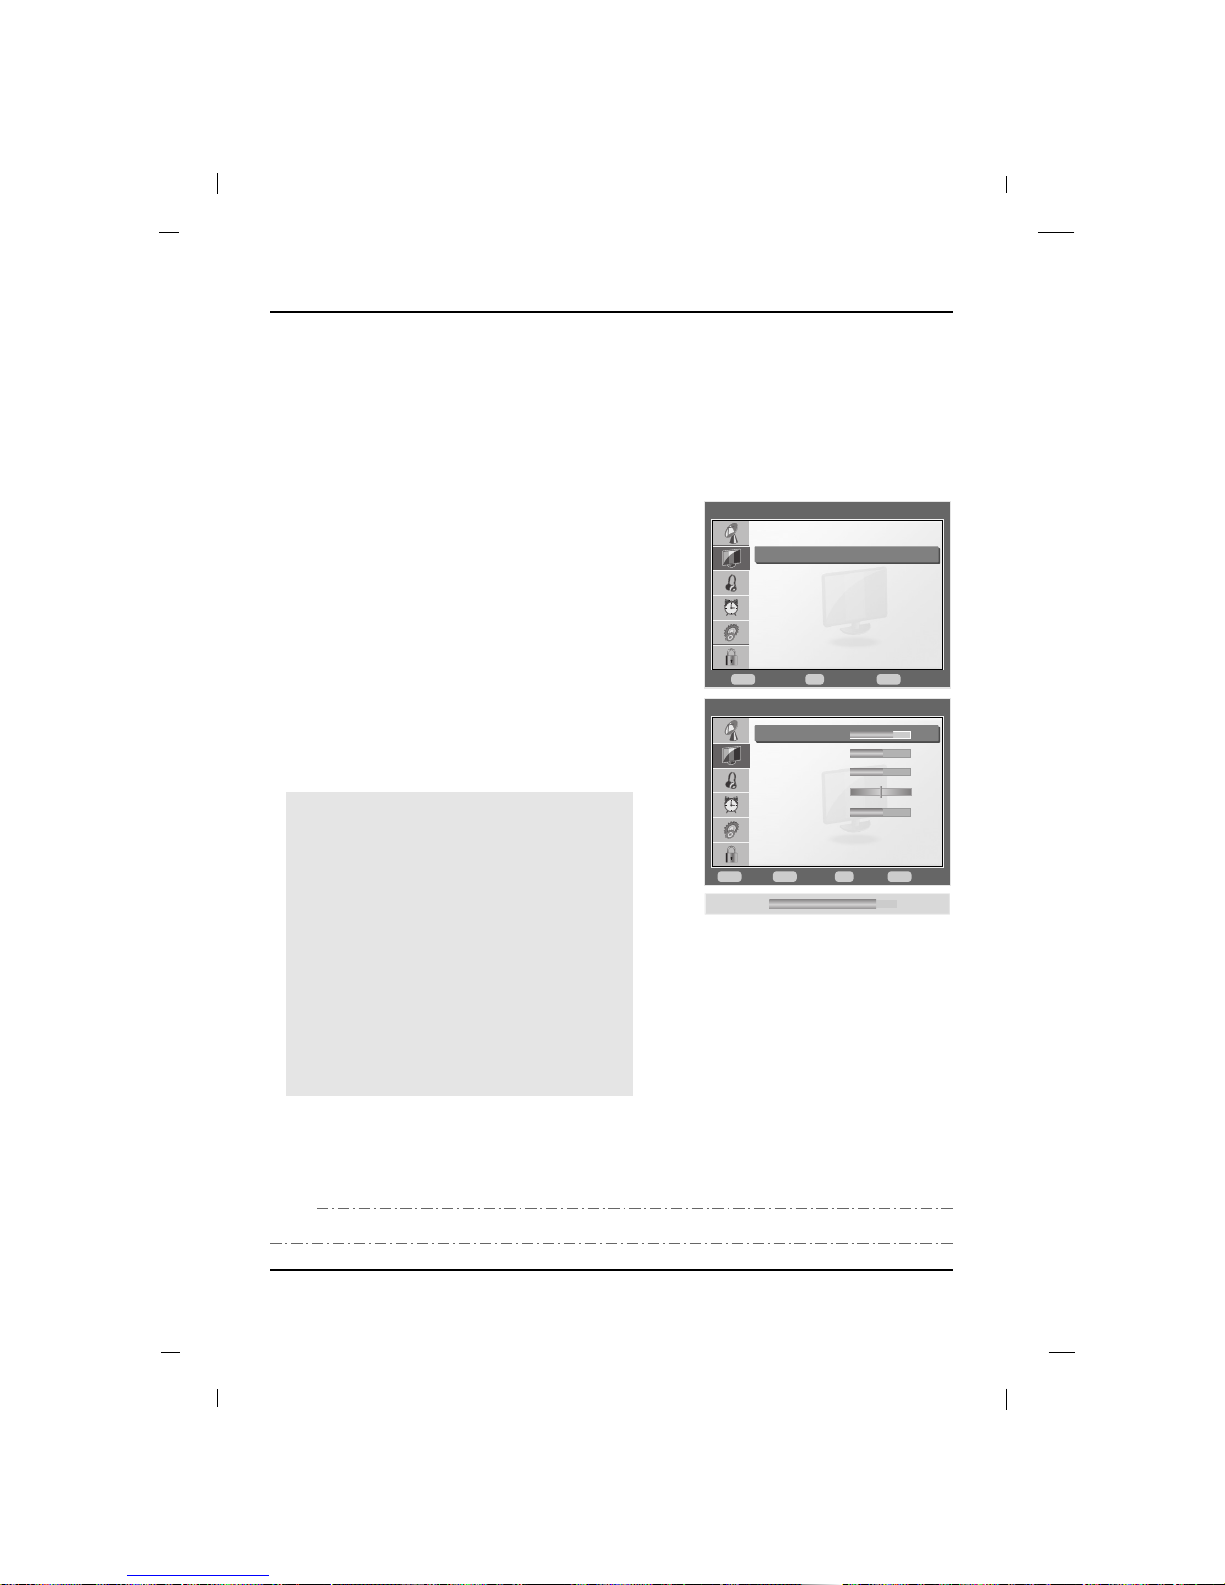
You can adjust picture Contrast, Brightness, Color, Tint and Sharpness to the levels you prefer.
Manual Picture Controls
1. Press the MENU button to display the menu.
2. Press the Down or Up buttons to select the Picture,
then press the OK button.
3. Press the Down or Up button to select User Setting,
then press the OK button.
4. Press the Down or Up button to select desired picture
option.
(Contrast, Brightness, Color, Tint, Sharpness)
5. Press the OK button and then press the Left or Right
button to make appropriate adjustments.
6. Press the MENU button to return to the previous menu.
Contrast
Adjusts the difference between the light and dark levels in the picture.
Brightness
Increases or decreases amount of white in the your
picture.
Color
Adjusts intensity of all colors.
Tint
Adjusts the balance between red and green levels.
Sharpness
Adjusts the level of sharpness in the edges between
the light and dark areas of the picture. The lower the
level, the softer the image.
Picture
Move Select
OK
Close
Menu
FF GG
DDEE
Picture Mode
User Setting
Dynamic Contrast
Advanced Picture
Aspect Ratio
Picture Reset
Standard
Off
Wide
Picture > User Setting
Adjust SelectOKGo Back
Menu
FF GG
Move
DDEE
Contrast
Brightness
Color
Tint
Sharpness
Color Temperature
80
50
50
50
50
Neutral
Contrast 80
- The adjustment of Color, Tint and Sharpness is not allowed when the current source is VGA.
NNNNOOOOTTTTEE
EE
Page 35
35
Picture Controls
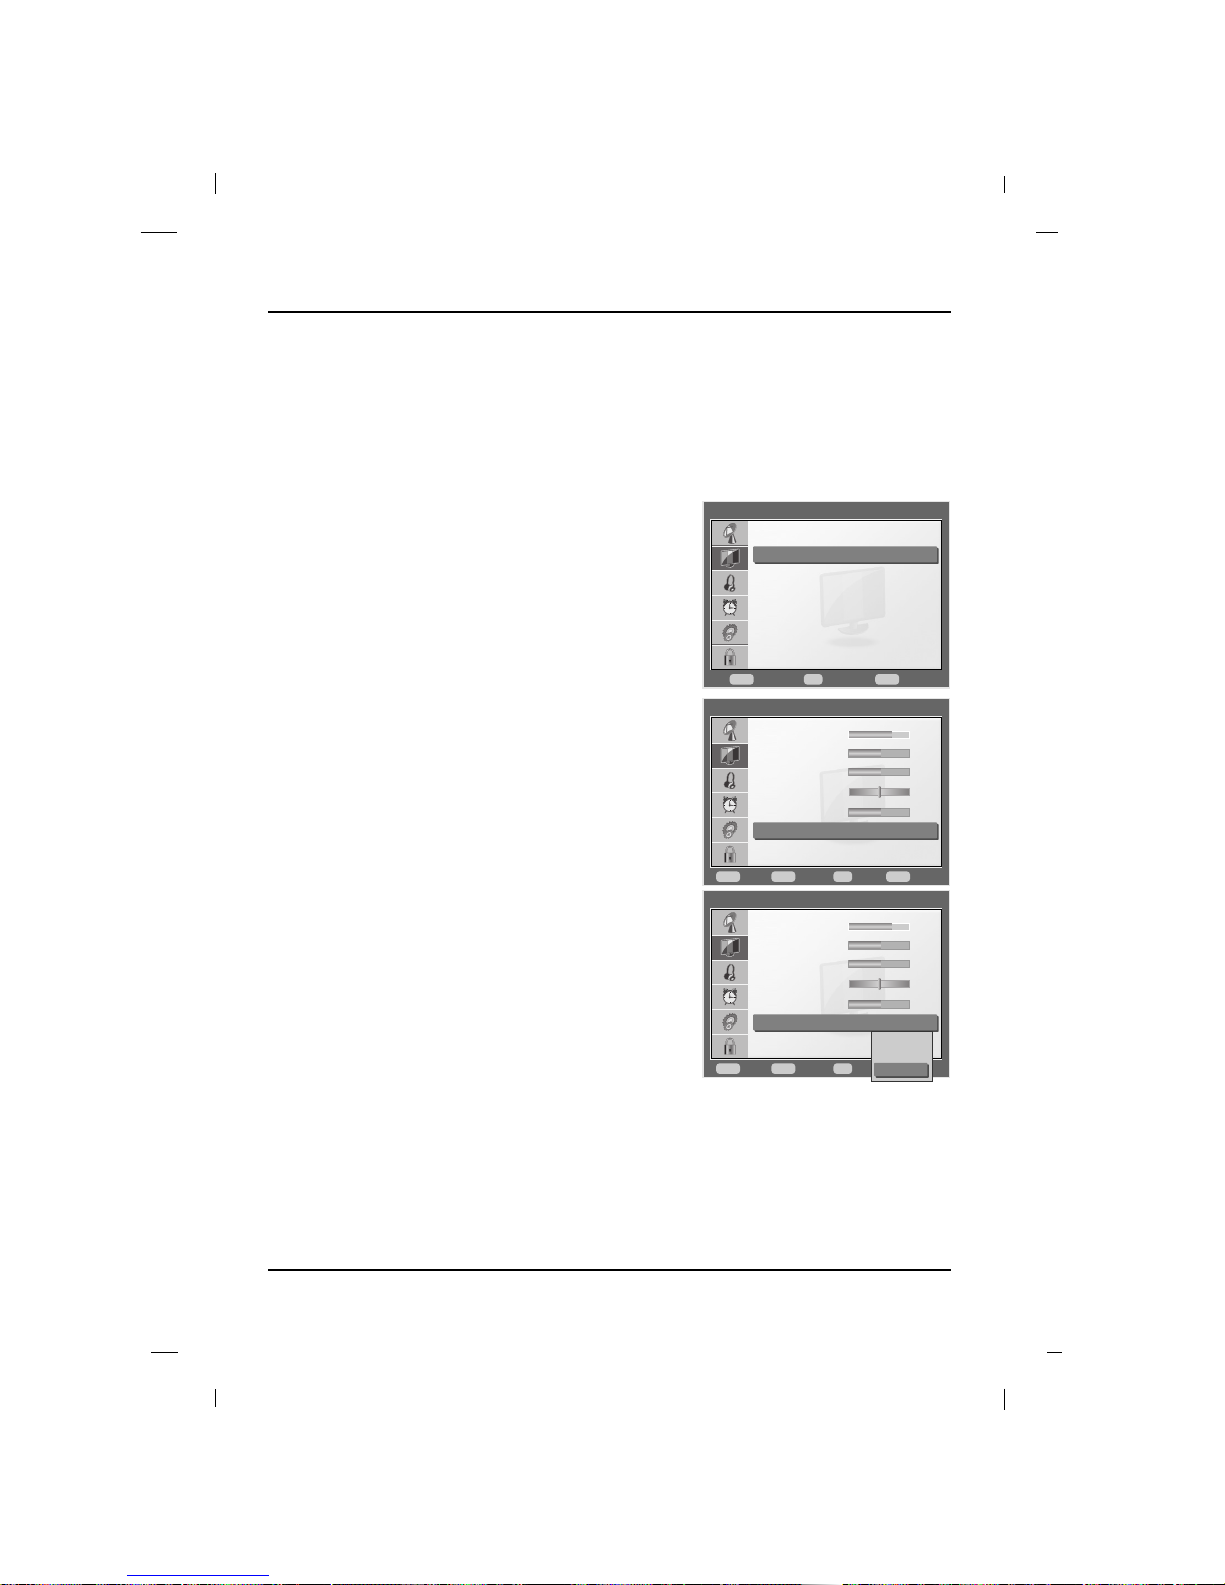
You can adjust to color temperature you prefer.
Color Temperature
1. Press the MENU button to display the menu.
2. Press the Down or Up buttons to select the Picture,
then press the OK button.
3. Press the Down or Up button to select User Setting,
then press the OK button.
4. Press the Down or Up button to select Color
Temperature, then press the OK button.
5. Press the Down or Up button to select Cool, Warm or
Neutral, then press the OK button.
6. Press the MENU button to return to the previous menu.
Picture > User Setting
Adjust SelectOKGo Back
Menu
FF GG
Move
DDEE
Contrast
Brightness
Color
Tint
Sharpness
Color Temperature
80
50
50
50
50
Neutral
Picture > User Setting
Adjust SelectOKClose
Menu
FF GG
Move
DDEE
Contrast
Brightness
Color
Tint
Sharpness
Color Temperature
80
50
50
50
50
Neutral
Picture
Move Select
OK
Close
Menu
FF GG
DDEE
Picture Mode
User Setting
Dynamic Contrast
Advanced Picture
Aspect Ratio
Picture Reset
Standard
Off
Wide
Cool
Warm
Neutral
Page 36
36
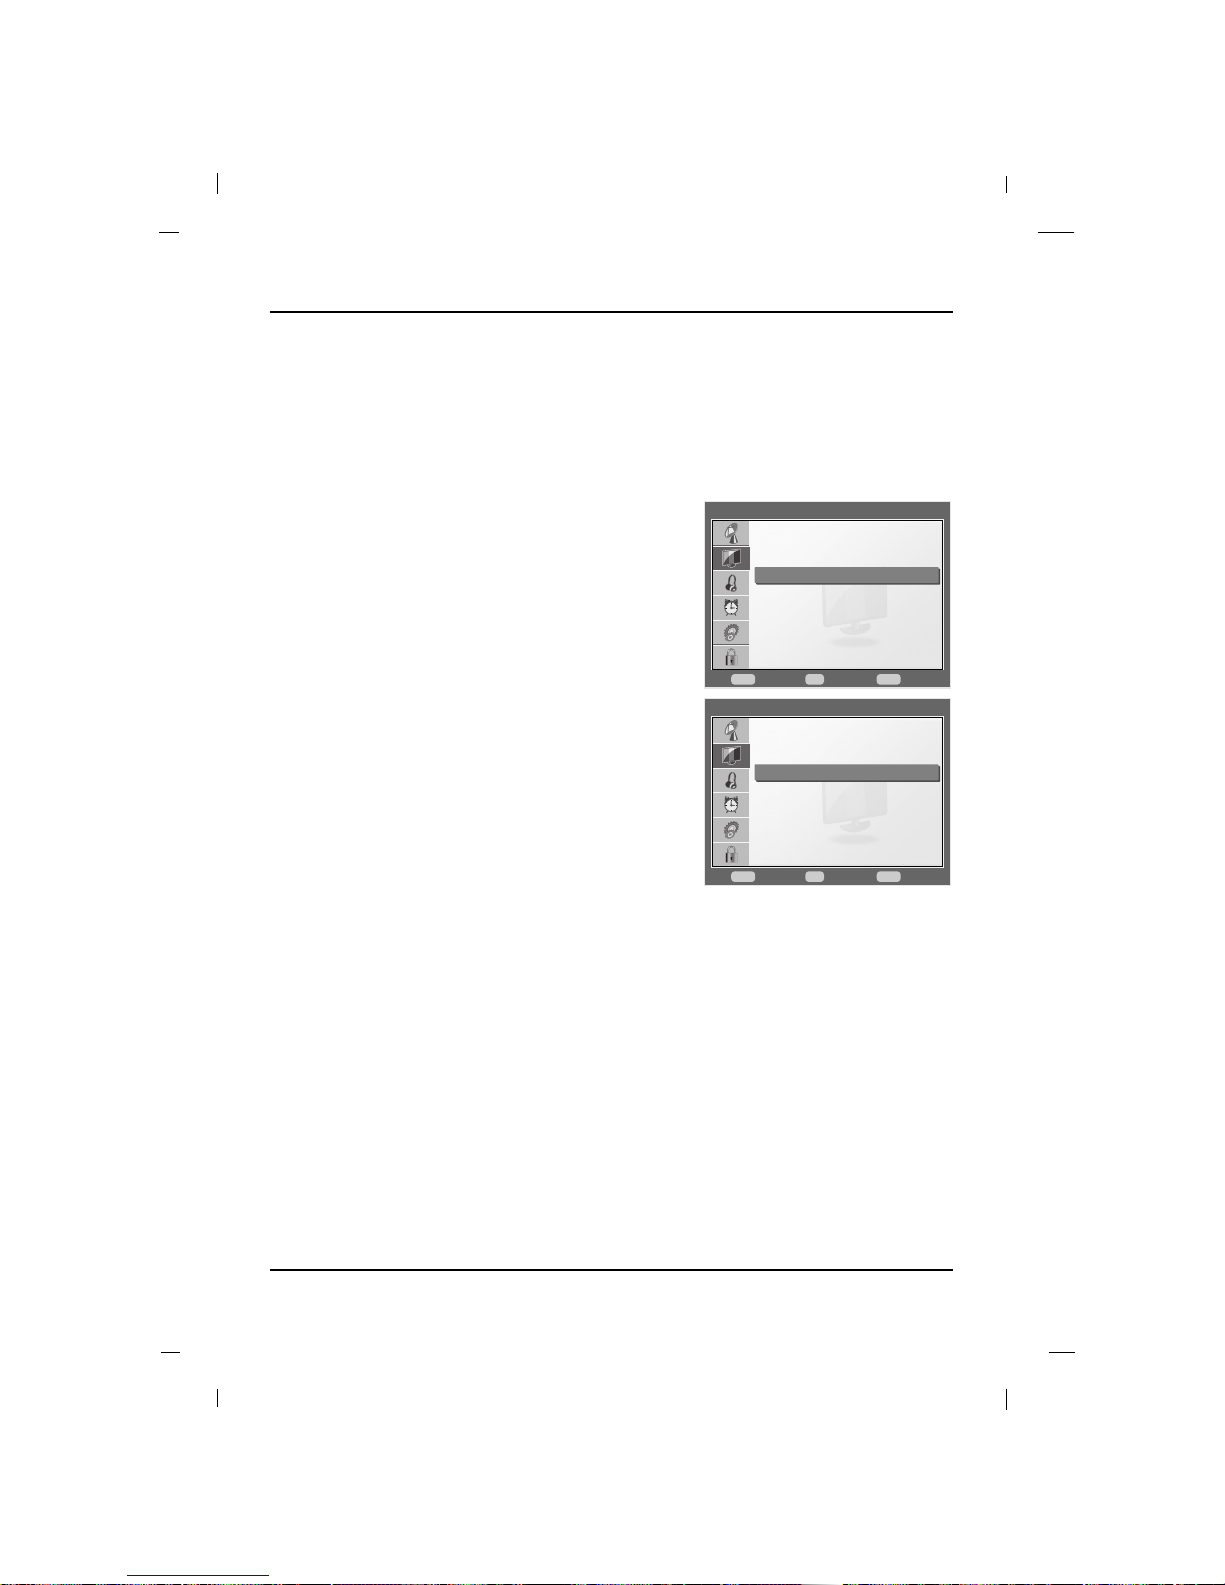
Optimizing the contrast automatically according to the video signal.
Dynamic Contrast
1. Press the MENU button to display the menu.
2. Press the Down or Up buttons to select the Picture,
then press the OK button.
3. Press the Down or Up button to select Dynamic
Contrast.
4. Press the OK button to select On or Off.
5. Press the MENU button to return to the previous menu.
Picture Controls
Picture
Move Select
OK
Close
Menu
FF GG
DDEE
Picture Mode
User Setting
Dynamic Contrast
Advanced Picture
Aspect Ratio
Picture Reset
Standard
Off
Wide
Picture
Move Select
OK
Close
Menu
FF GG
DDEE
Picture Mode
User Setting
Dynamic Contrast
Advanced Picture
Aspect Ratio
Picture Reset
Standard
On
Wide
Page 37
Picture Controls
37
Picture > Advanced Setting
Move Select
OK
Go Back
Menu
FF GG
DDEE
Noise Reduction
Flesh Tone Correction
Blue Stretch
Film Mode
On
Off
Off
Off
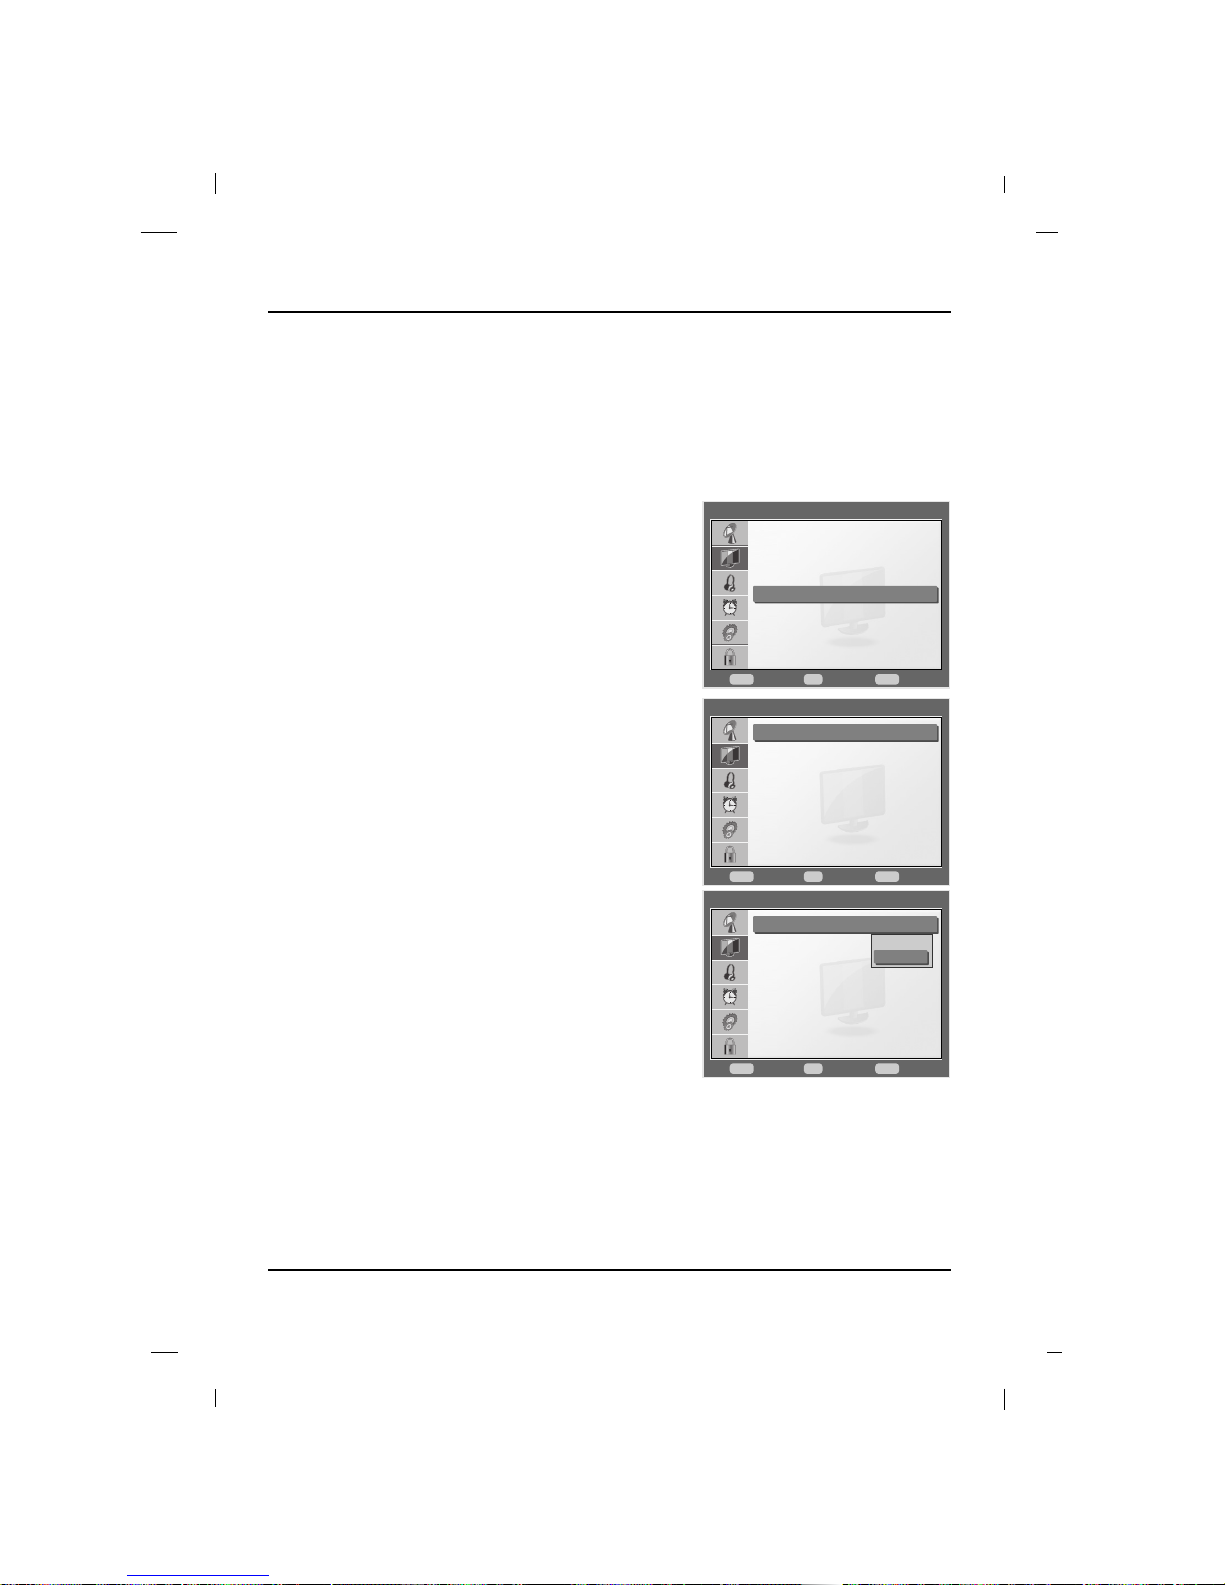
Use this feature to reduce picture artifacts caused by the digitizing of image motion content that may be present in
the picture.
Noise Reduction
1. Press the MENU button to display the menu.
2. Press the Down or Up buttons to select the Picture,
then press the OK button.
3. Press the Down or Up button to select Advanced
Picture, then press the OK button.
4. Press the Down or Up button to select Noise
Reduction, then press the OK button.
5. Press the Down or Up button to select Off or On, then
press the OK button.
6. Press the MENU button to return to the previous menu.
Picture
Move Select
OK
Close
Menu
FF GG
DDEE
Picture Mode
User Setting
Dynamic Contrast
Advanced Picture
Aspect Ratio
Picture Reset
Standard
On
Wide
Off
On
Picture > Advanced Setting
Move Select
OK
Go Back
Menu
FF GG
DDEE
Noise Reduction
Flesh Tone Correction
Blue Stretch
Film Mode
On
Off
Off
Off
Page 38
Picture Controls
38
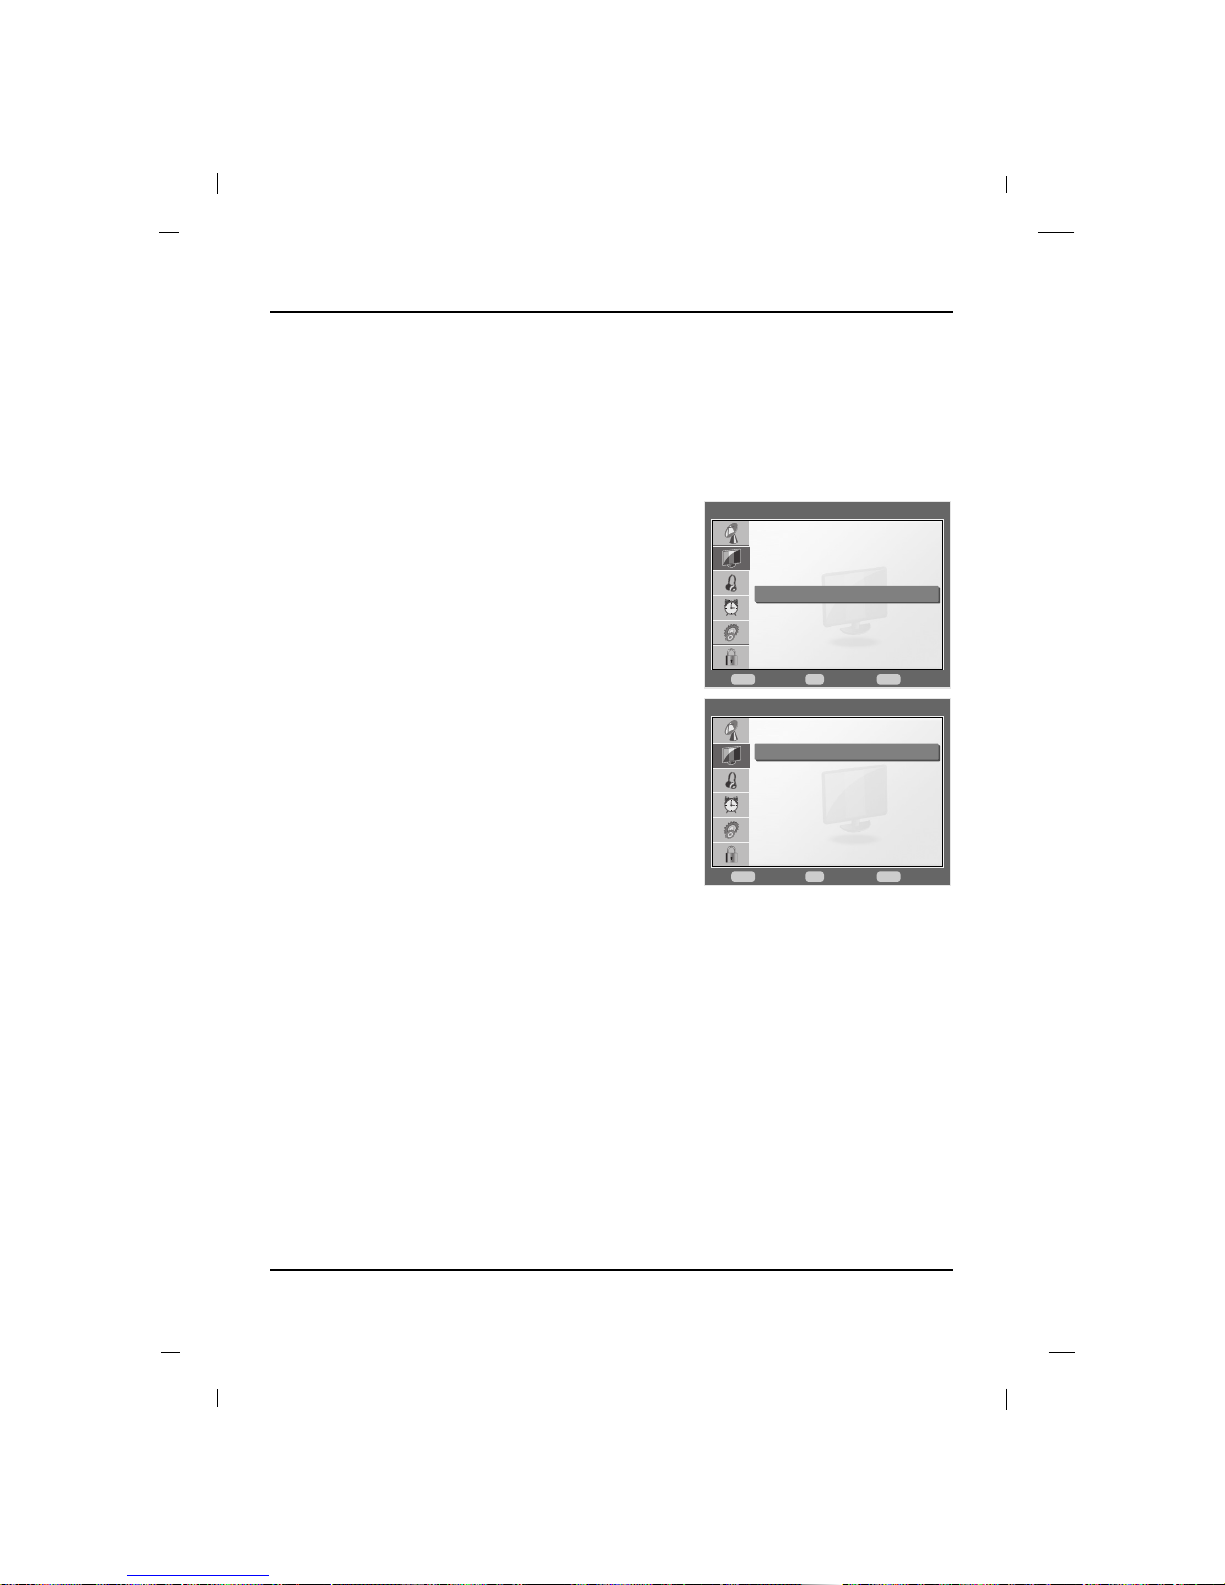
In some cases, activation of this feature can result in a more pleasing production of sky and flesh color.
For example, the skin color of human will be shown more naturally.
Flesh Tone Correction
1. Press the MENU button to display the menu.
2. Press the Down or Up buttons to select the Picture,
then press the OK button.
3. Press the Down or Up button to select Advanced
Picture, then press the OK button.
4. Press the Down or Up button to select Flesh Tone
Correction.
5. Press the OK button to select On or Off.
6. Press the MENU button to return to the previous menu.
Picture
Move Select
OK
Close
Menu
FF GG
DDEE
Picture Mode
User Setting
Dynamic Contrast
Advanced Picture
Aspect Ratio
Picture Reset
Standard
On
Wide
Picture > Advanced Setting
Move Select
OK
Go Back
Menu
FF GG
DDEE
Noise Reduction
Flesh Tone Correction
Blue Stretch
Film Mode
On
Off
Off
Off
Page 39

Picture Controls
39
This is the function to make the white color look bluer.
Blue Stretch
1. Press the MENU button to display the menu.
2. Press the Down or Up buttons to select the Picture,
then press the OK button.
3. Press the Down or Up button to select Advanced
Picture, then press the OK button.
4. Press the Down or Up button to select Blue Stretch.
5. Press the OK button to select On or Off.
6. Press the MENU button to return to the previous menu.
Picture
Move Select
OK
Close
Menu
FF GG
DDEE
Picture Mode
User Setting
Dynamic Contrast
Advanced Picture
Aspect Ratio
Picture Reset
Standard
On
Wide
Picture > Advanced Setting
Move Select
OK
Go Back
Menu
FF GG
DDEE
Noise Reduction
Flesh Tone Correction
Blue Stretch
Film Mode
On
Off
Off
Off
Page 40
Picture Controls
40
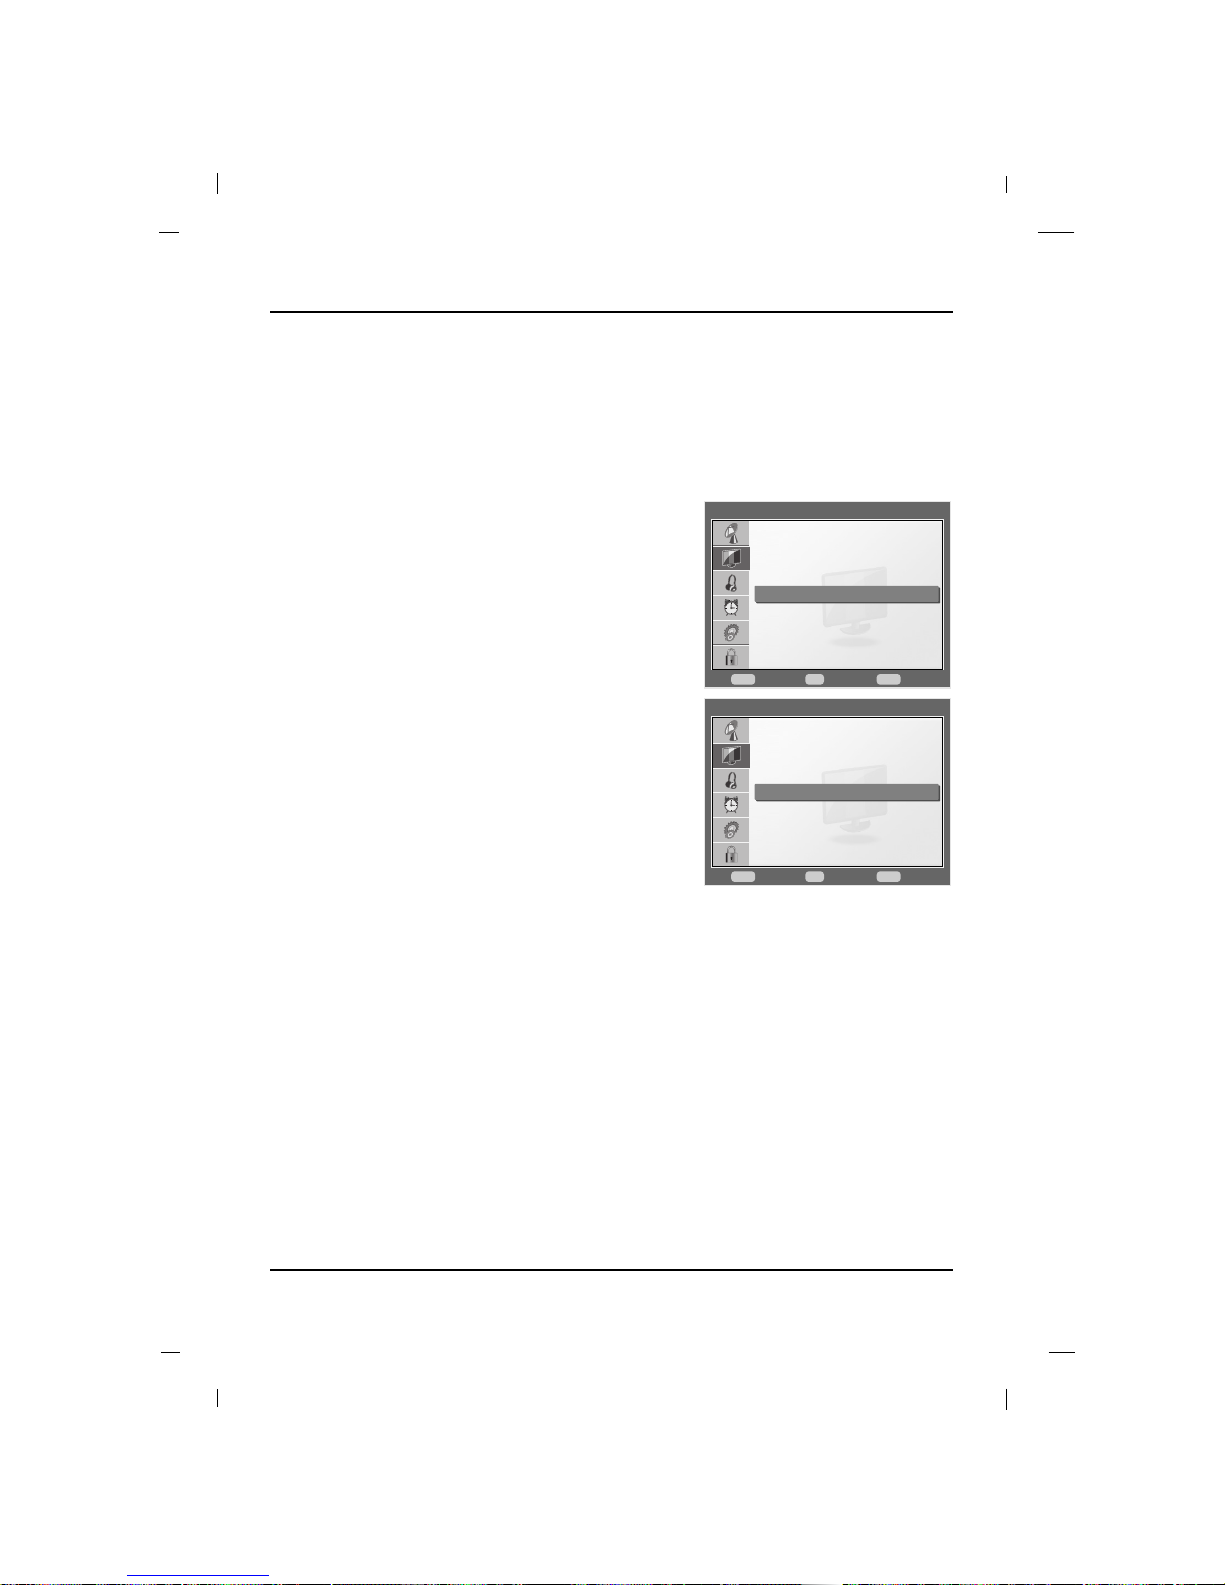
By controlling Film Mode for the screen lag or shaking that can occur during the conversion from movie to TV video
signal, you can view the movie in as good condition as master copy through your TV.
Film Mode
1. Press the MENU button to display the menu.
2. Press the Down or Up buttons to select the Picture,
then press the OK button.
3. Press the Down or Up button to select Advanced
Picture, then press the OK button.
4. Press the Down or Up button to select Film Mode.
5. Press the OK button to select On or Off.
6. Press the MENU button to return to the previous menu.
Picture
Move Select
OK
Close
Menu
FF GG
DDEE
Picture Mode
User Setting
Dynamic Contrast
Advanced Picture
Aspect Ratio
Picture Reset
Standard
On
Wide
Picture > Advanced Setting
Move Select
OK
Go Back
Menu
FF GG
DDEE
Noise Reduction
Flesh Tone Correction
Blue Stretch
Film Mode
On
Off
Off
Off
Page 41
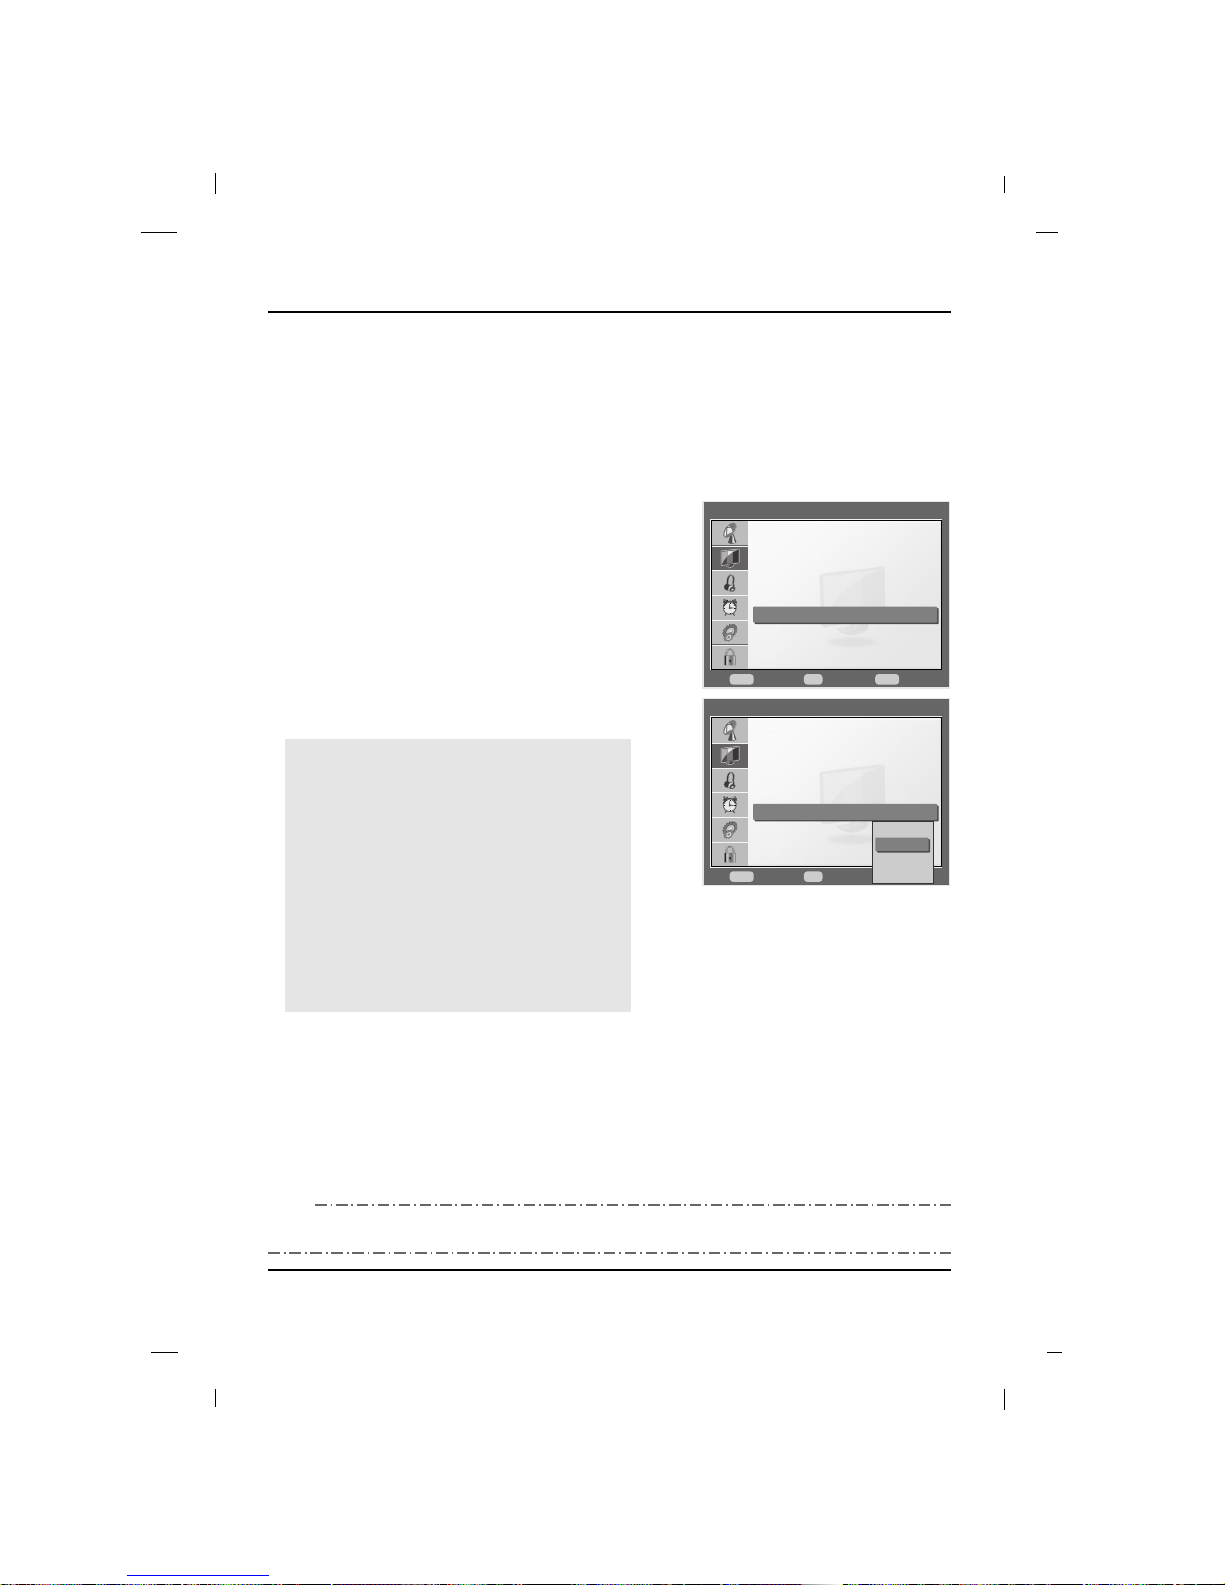
Picture Controls
41
You can watch the screen in various picture formats.
Screen size selection depends on the type of video input.
Aspect Ratio
1. Press the MENU button to display the menu.
2. Press the Down or Up buttons to select the Picture,
then press the OK button.
3. Press the Down or Up button to select Aspect Ratio,
then press the OK button.
4. Press the Down or Up button to select Auto, Wide,
Zoom1 or Zoom2, then press the OK button.
5. Press the MENU button to return to the previous menu.
Auto
When your set receives the wide screen signal, it will
change automatically the picture format that has been
sent.
Wide
You can enjoy the cinema or general TV program
through the 16:9 mode.
ZOOM1
The screen size when Wide screen is vertically
enlarged.
ZOOM2
This is the function to enlarge the screen size
vertically than ZOOM1.
Picture
Move Select
OK
Close
Menu
FF GG
DDEE
Picture Mode
User Setting
Dynamic Contrast
Advanced Picture
Aspect Ratio
Picture Reset
Standard
On
Wide
Picture
Move Select
OK
Close
Menu
FF GG
DDEE
Picture Mode
User Setting
Dynamic Contrast
Advanced Picture
Aspect Ratio
Picture Reset
Standard
On
Wide
Auto
Wide
Zoom1
Zoom2
- If you want to select Aspect Ratio directly, press the RATIO button.
- Every time you press the button, it will switch between Auto, Wide, Zoom1 or Zoom2.
NNNNOOOOTTTTEE
EE
Page 42
Picture Controls
42
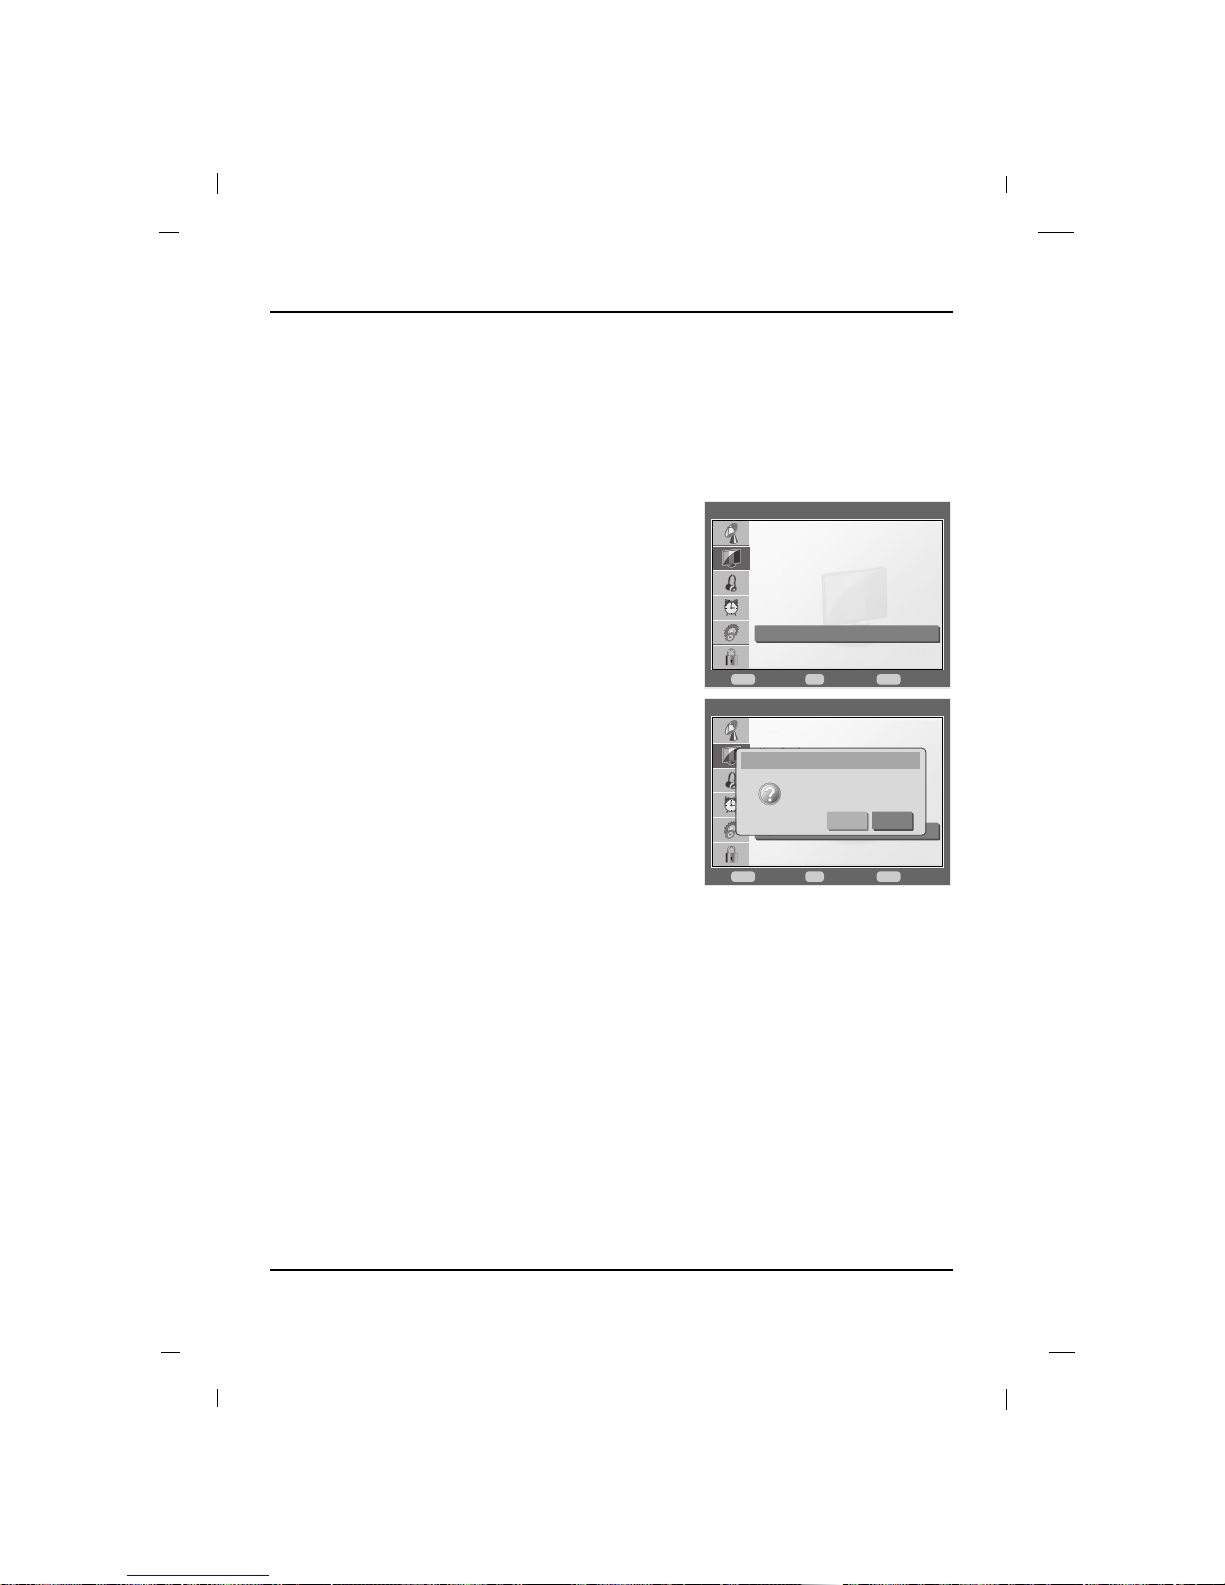
Use to quickly reset all the Picture menu options to their original factory preset values.
Reset Picture Mode
1. Press the MENU button to display the menu.
2. Press the Down or Up buttons to select the Picture,
then press the OK button.
3. Press the Down or Up button to select Picture Reset,
then press the OK button.
4. Confirmation OSD will appear.
If you want to return the picture setting to factory
default you can select OK button and then press the
OK button.
5. Press the MENU button to return to the previous menu.
Picture
Move Select
OK
Close
Menu
FF GG
DDEE
Picture Mode
User Setting
Dynamic Contrast
Advanced Picture
Aspect Ratio
Picture Reset
Standard
On
Wide
Picture
Move Select
OK
Close
Menu
FF GG
DDEE
Picture Mode
User Setting
Dynamic Contrast
Advanced Picture
Aspect Ratio
Picture Reset
Standard
On
Wide
Picture Reset
Are you sure to continue?
Yes No
Page 43
Sound Controls
43
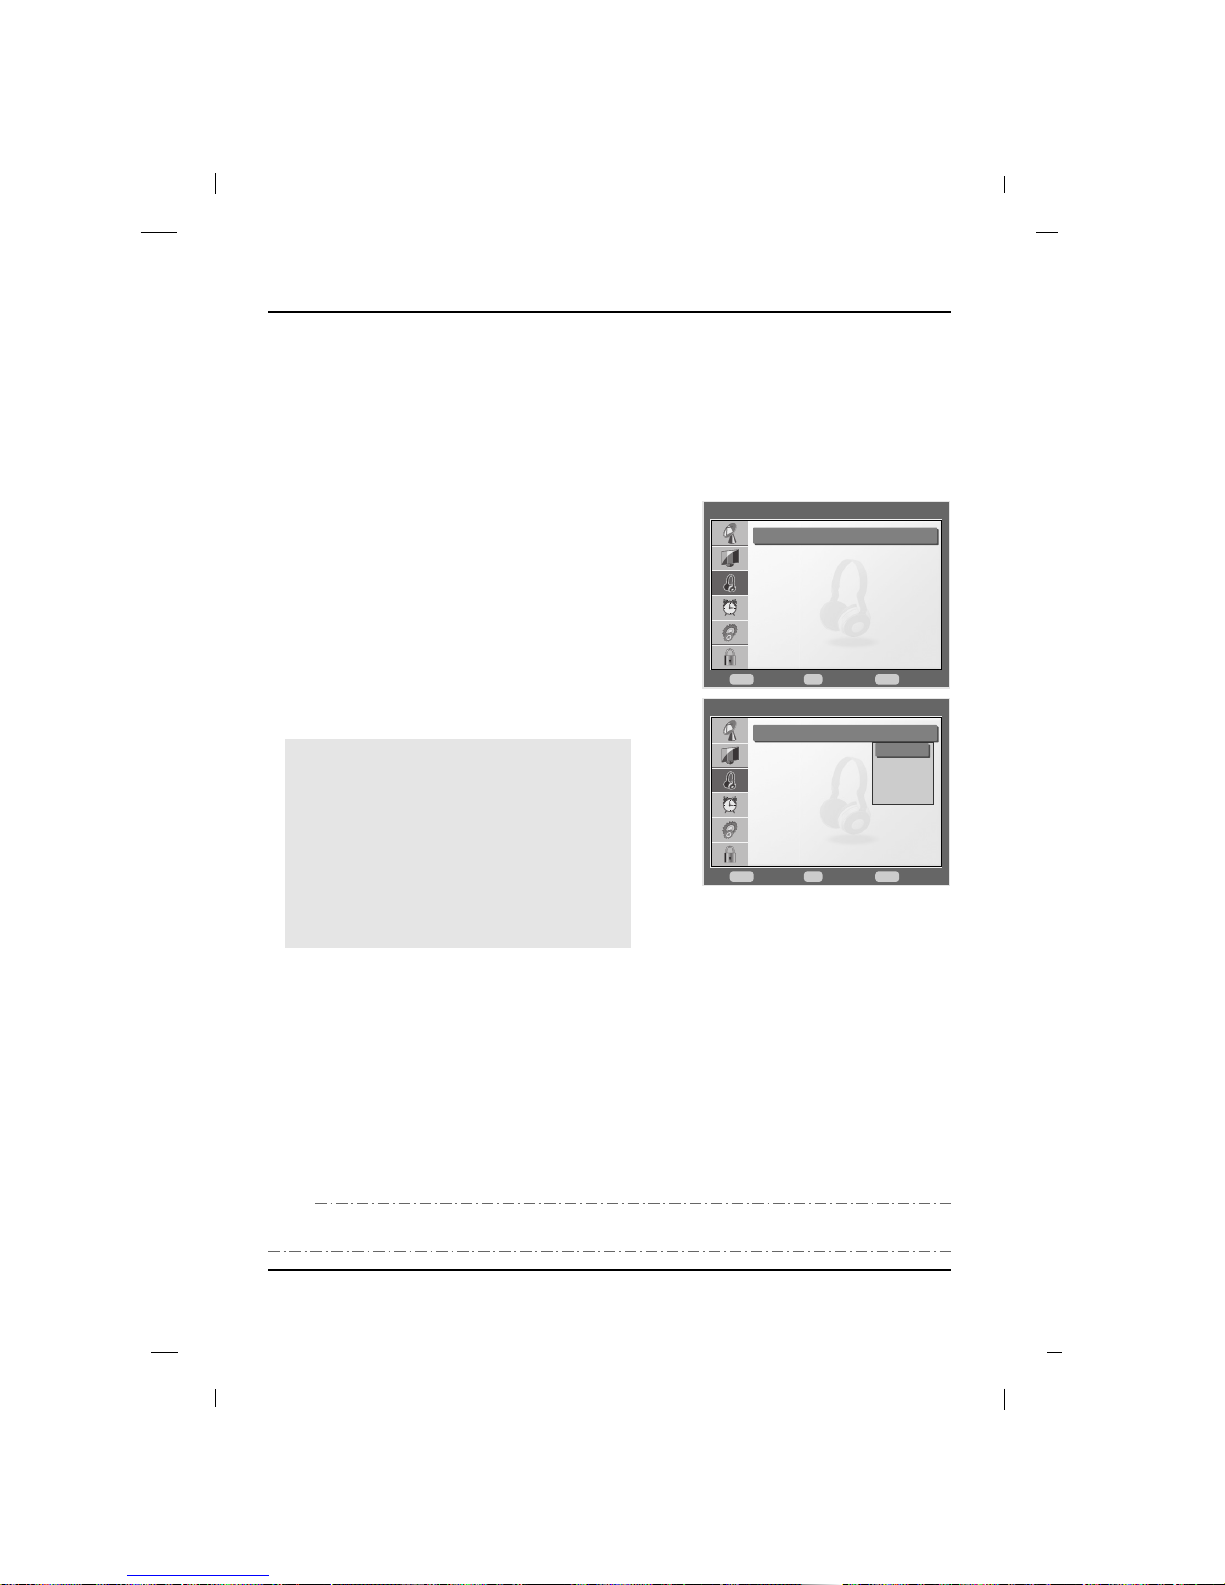
This Sound Mode automatically adjusts the sound controls to the recommended settings.
Auto Sound Controls
1. Press the MENU button to display the menu.
2. Press the Down or Up buttons to select the Audio,
then press the OK button.
3. Press the Down or Up button to select Sound Mode,
then press the OK button.
4. Press the Down or Up button to select Standard,
Music, Movie or User, then press the OK button.
5. Press the MENU button to return to the previous menu.
Standard
The most commanding and natural audio.
Music
Select this option to enjoy the original sound when
listening to the music.
Movie
Select this option to enjoy sublime sound.
User
Select this option to manually adjust the audio settings.
Sound Controls
Audio
Move Select
OK
Close
Menu
FF GG
DDEE
Sound Mode
User Setting
Speaker
Auto Volume
Digital Output
Audio Reset
Standard
On
On
PCM
Audio
Move Select
OK
Close
Menu
FF GG
DDEE
Sound Mode
User Setting
Speaker
Auto Volume
Digital Output
Audio Reset
Standard
On
On
PCM
Standard
Music
Movie
User
- If you want to change the Sound Mode without entering the menus, press the SOUND button.
- Each time you press the button, it will switch between Standard, Music, Movie and User.
NNNNOOOOTTTTEE
EE
Page 44
44
Sound Controls
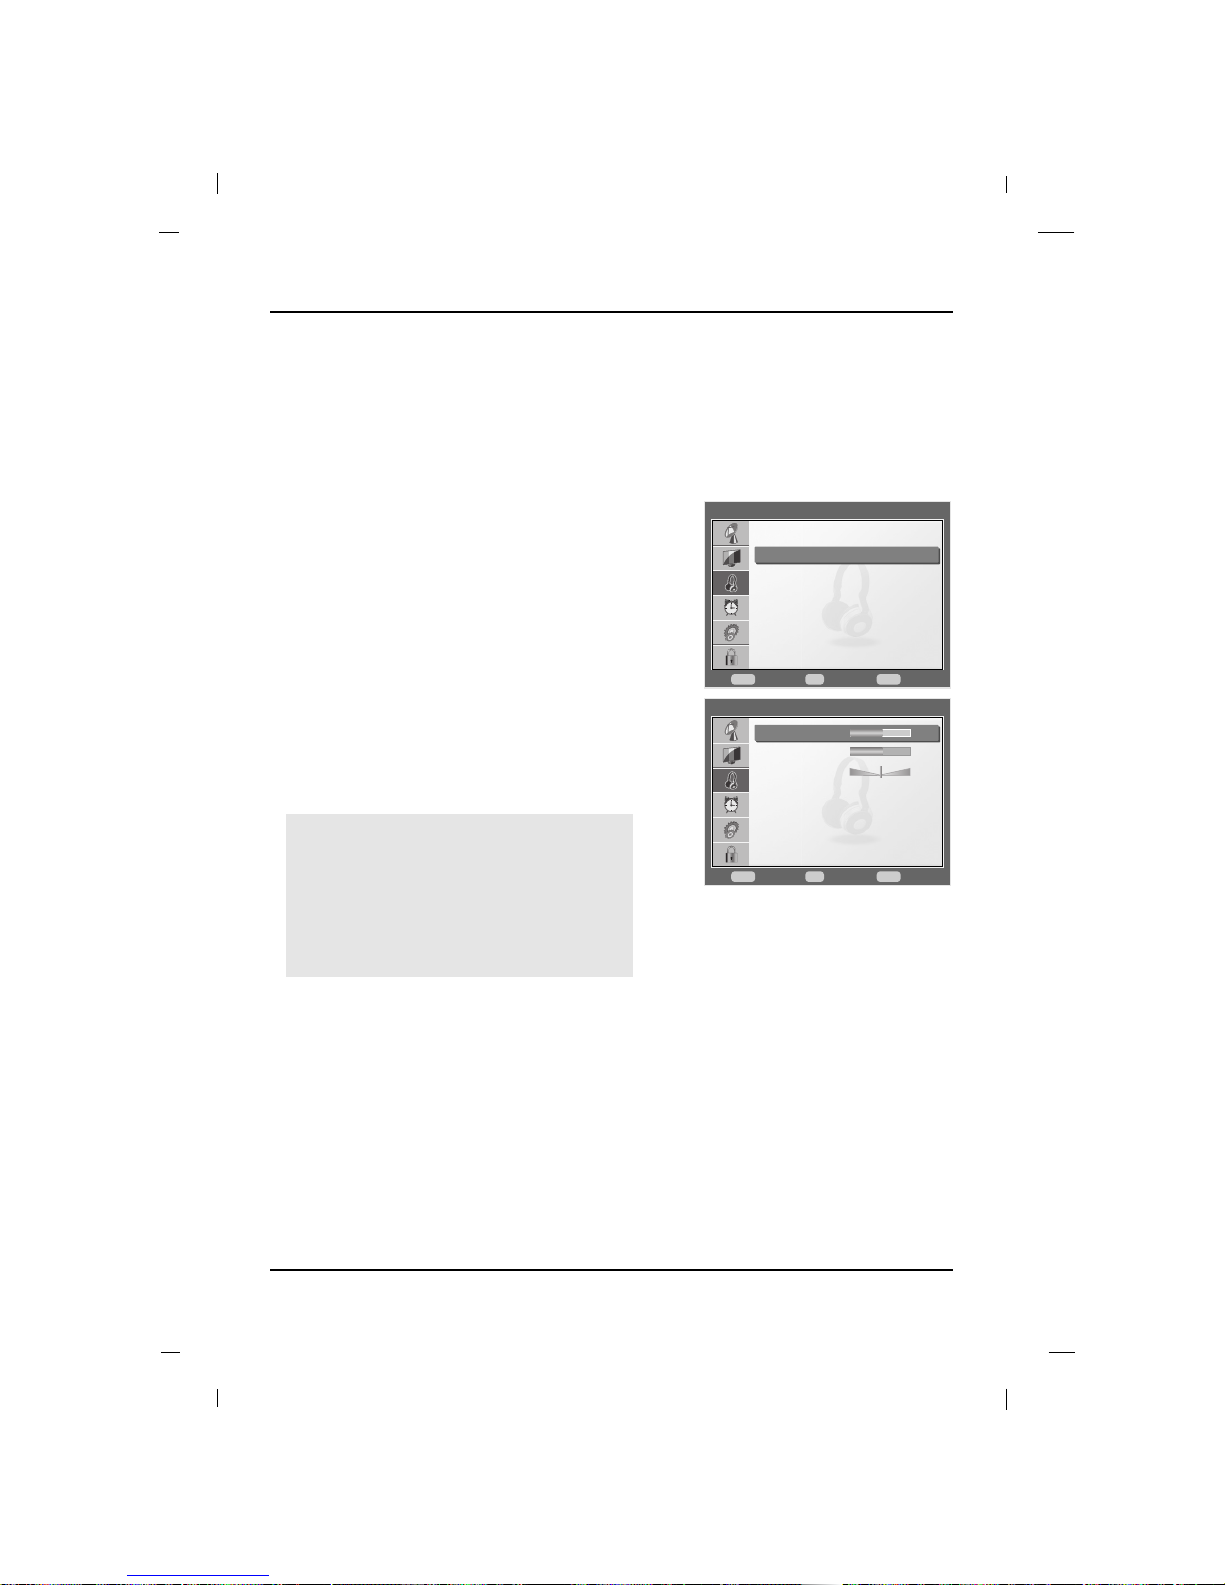
This function allows you to manually adjust the audio settings to your preferred levels.
Manual Sound Controls
1. Press the MENU button to display the menu.
2. Press the Down or Up buttons to select the Audio,
then press the OK button.
3. Press the Down or Up button to select User Setting,
then press the OK button.
4. Press the Down or Up button to select desired picture
option.
(Treble, Bass, Balance)
5. Press the Left or Right button to make appropriate
adjustments.
6. Press the MENU button to return to the previous menu.
Treble
This adjusts the range of the high pitch sound.
Bass
This adjusts the range of the low pitch sound.
Balance
Adjusts the left to right sound balance between the
built-in speakers.
Audio
Move Select
OK
Close
Menu
FF GG
DDEE
Sound Mode
User Setting
Speaker
Auto Volume
Digital Output
Audio Reset
Standard
On
On
PCM
Audio > User Setting
Move Adjust
FF GG
Go Back
Menu
DDEE
Treble
Bass
Balance
25
25
0
Page 45
45
Sound Controls
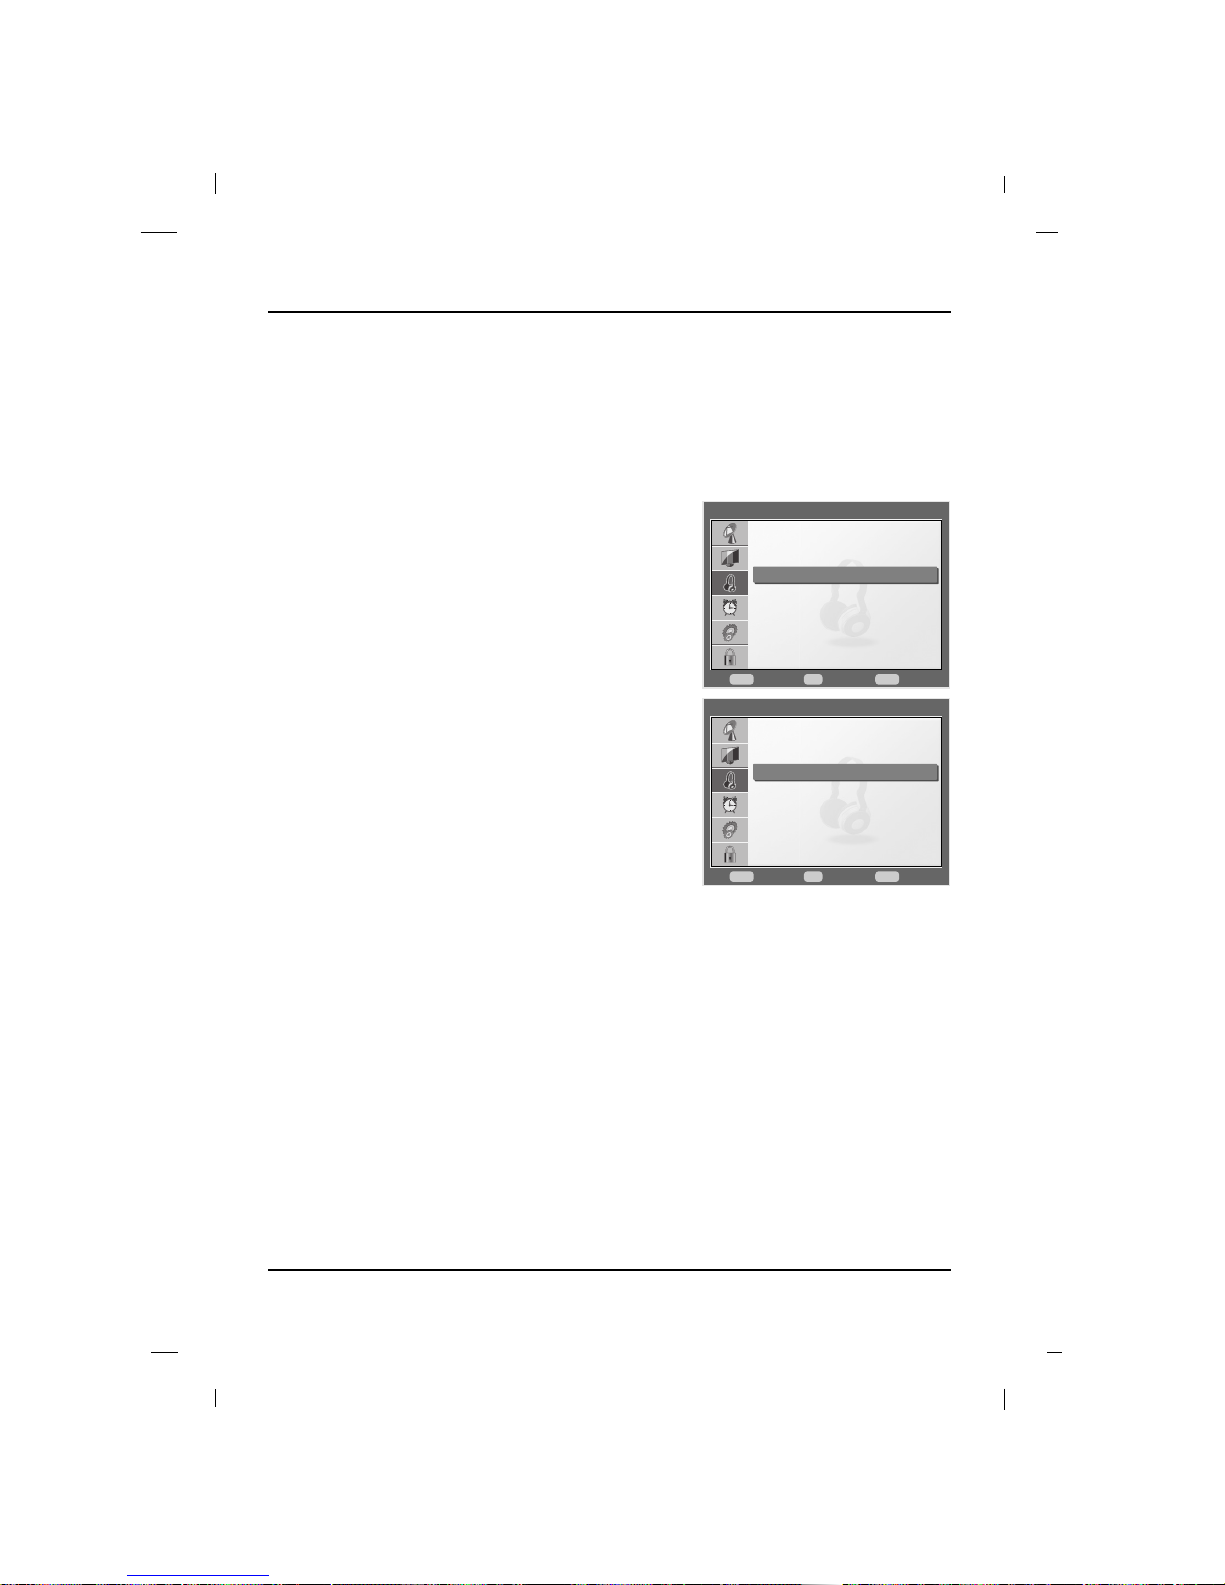
Turn the TV speakers off if using external audio equipment.
Feature turns the Speaker option On or Off.
Speaker On/Off
1. Press the MENU button to display the menu.
2. Press the Down or Up buttons to select the Audio,
then press the OK button.
3. Press the Down or Up button to select Speaker.
4. Press the OK button to select On or Off.
5. Press the MENU button to return to the previous menu.
Audio
Move Select
OK
Close
Menu
FF GG
DDEE
Sound Mode
User Setting
Speaker
Auto Volume
Digital Output
Audio Reset
Standard
On
On
PCM
Audio
Move Select
OK
Close
Menu
FF GG
DDEE
Sound Mode
User Setting
Speaker
Auto Volume
Digital Output
Audio Reset
Standard
Off
On
PCM
Page 46
46
Sound Controls
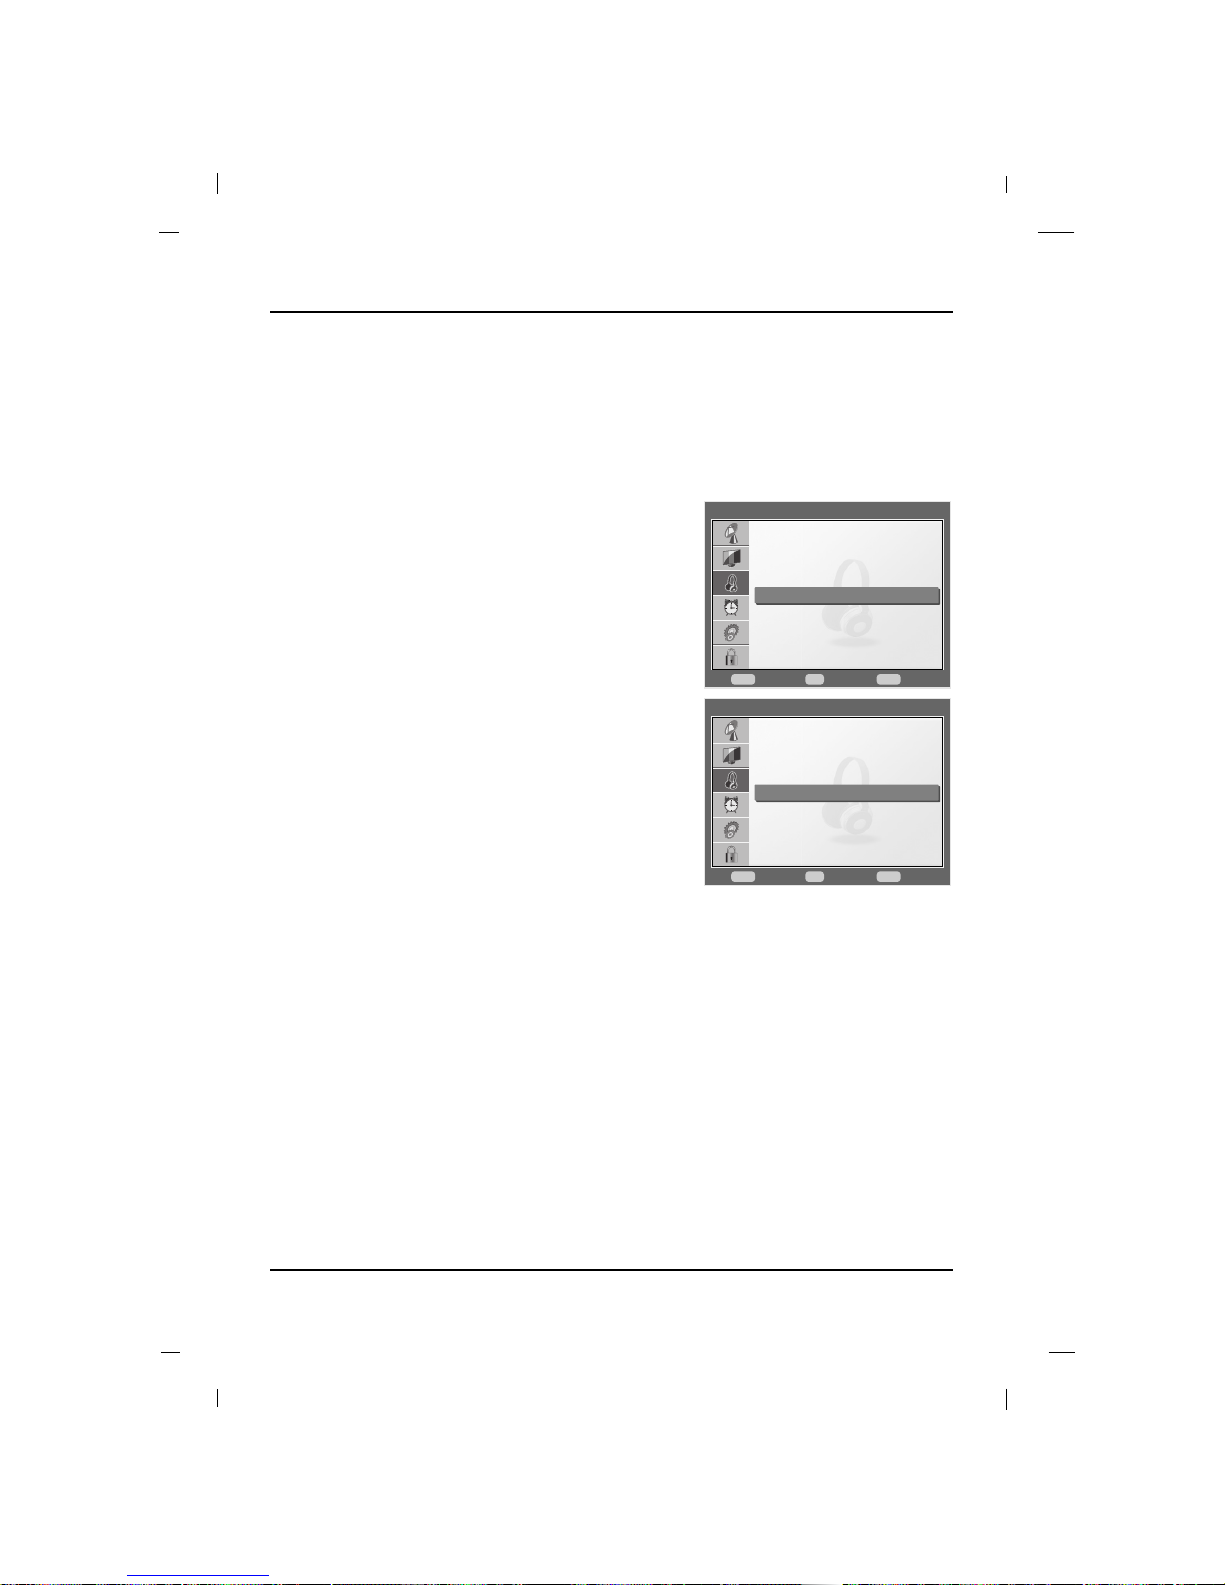
This function automatically stabilizes the volume level while changing to channels with different audio levels.
Auto Volume Control
1. Press the MENU button to display the menu.
2. Press the Down or Up buttons to select the Audio,
then press the OK button.
3. Press the Down or Up button to select Auto Volume.
4. Press the OK button to select On or Off.
5. Press the MENU button to return to the previous menu.
Audio
Move Select
OK
Close
Menu
FF GG
DDEE
Sound Mode
User Setting
Speaker
Auto Volume
Digital Output
Audio Reset
Standard
On
On
PCM
Audio
Move Select
OK
Close
Menu
FF GG
DDEE
Sound Mode
User Setting
Speaker
Auto Volume
Digital Output
Audio Reset
Standard
On
Off
PCM
Page 47
47
Sound Controls
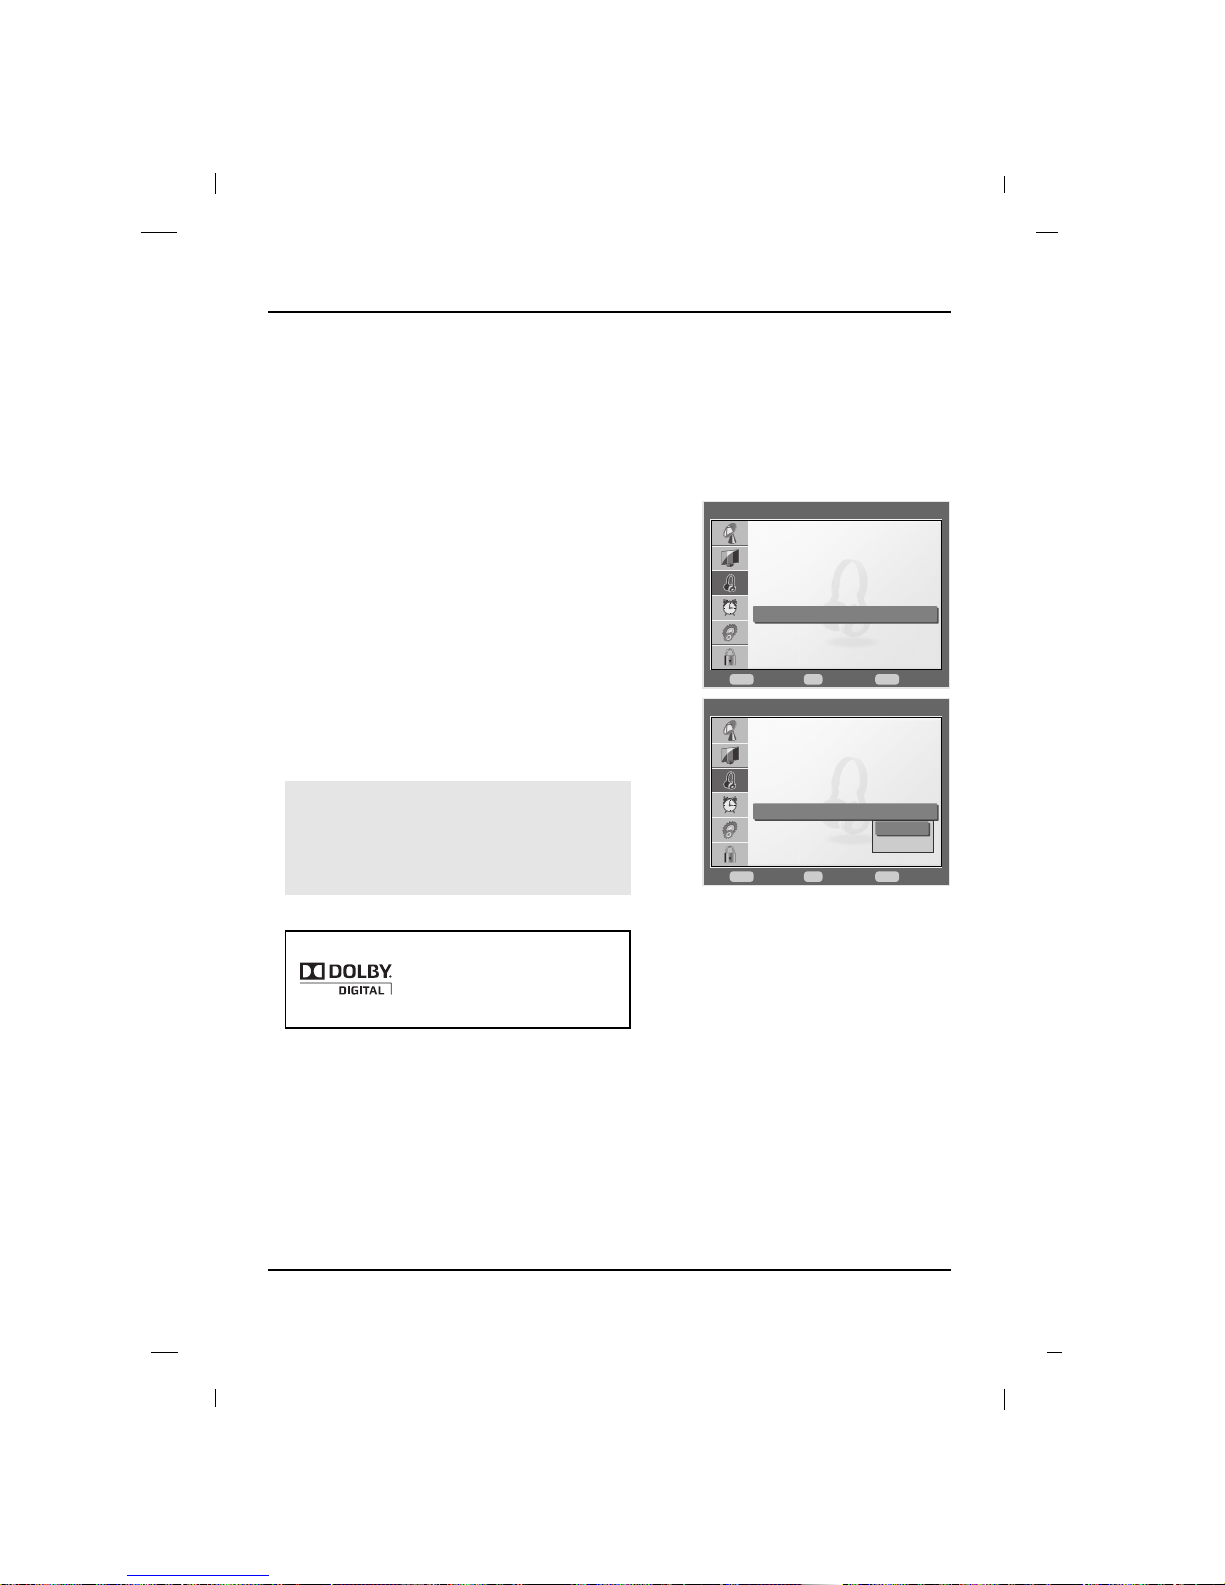
PCM (Pulse-code modulation)
This mode creates a digital representation of an analog siginal and is only used with an audio CD signal.
Dolby Digital
Television will output a digital audio signal.
Manufactured under license from
Dolby Laboratories.
“ Dolby “and the double-D symbol
are trademarks of Dolby
Laboratories.
This option activates Digital Audio Output. This is recommended for use with other devices capable of receiving digital audio signals. (This mode is set to Off by default)
Digital Output
1. Press the MENU button to display the menu.
2. Press the Down or Up buttons to select the Audio,
then press the OK button.
3. Press the Down or Up button to select Digital
Output, then press the OK button.
4. Press the Down or Up button to select PCM or
Dolby, then press the OK button.
5. Press the MENU button to return to the previous menu.
Audio
Move Select
OK
Close
Menu
FF GG
DDEE
Sound Mode
User Setting
Speaker
Auto Volume
Digital Output
Audio Reset
Standard
On
On
PCM
Audio
Move Select
OK
Close
Menu
FF GG
DDEE
Sound Mode
User Setting
Speaker
Auto Volume
Digital Output
Audio Reset
Standard
On
On
PCM
PCM
Dolby
<Dolby Digital>
Page 48
48
Sound Controls
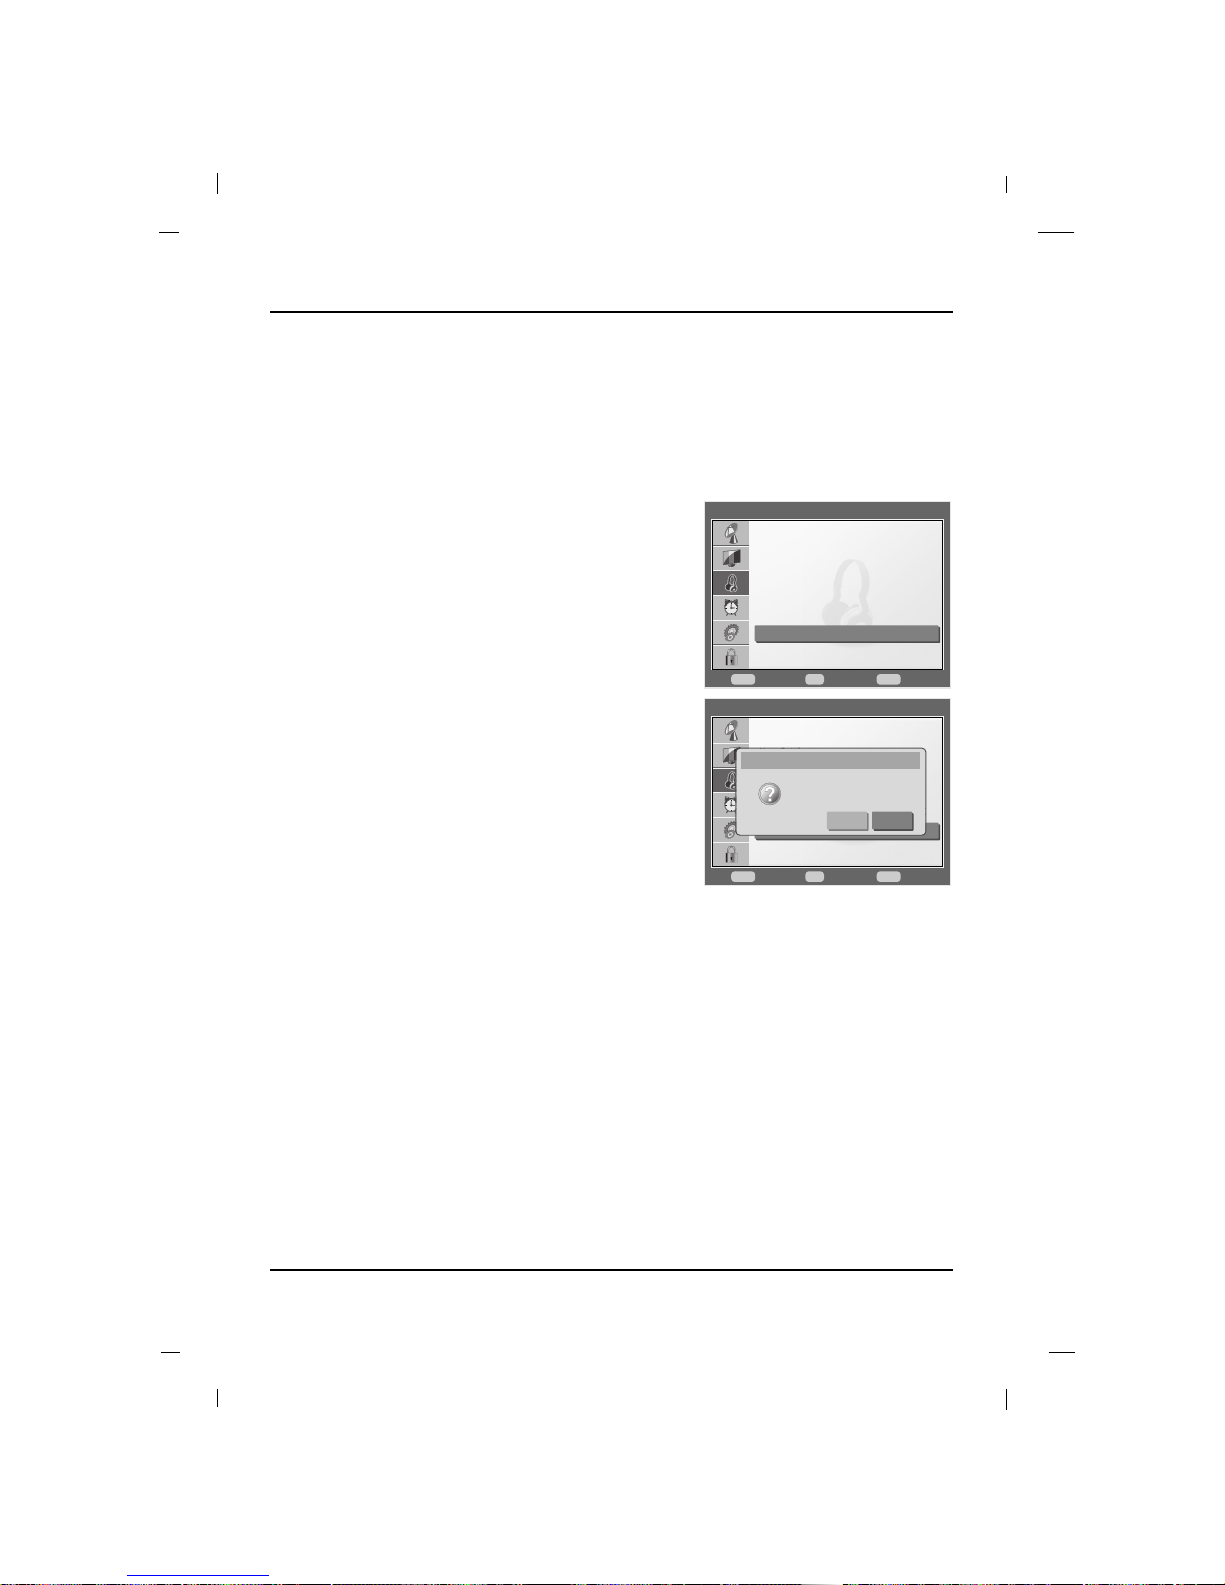
Use to quickly reset all the Audio menu options to their original factory preset values.
Reset Audio Mode
1. Press the MENU button to display the menu.
2. Press the Down or Up buttons to select the Audio,
then press the OK button.
3. Press the Down or Up button to select Audio Reset,
then press the OK button.
4. Confirmation OSD will appear.
If you want to return the audio setting to factory default
you can select OK button and then press the OK but-
ton.
5. Press the MENU button to return to the previous menu.
Audio
Move Select
OK
Close
Menu
FF GG
DDEE
Sound Mode
User Setting
Speaker
Auto Volume
Digital Output
Audio Reset
Standard
On
On
PCM
Audio
Move Select
OK
Close
Menu
FF GG
DDEE
Sound Mode
User Setting
Speaker
Auto Volume
Digital Output
Audio Reset
Standard
On
On
PCM
Audio Reset
Are you sure to continue?
Yes No
This TV can receive MTS stereo programs and any SAP (Secondary Audio Program) that the station may transmit.
The television will automically switch to Mono sound if the broadcasted channel is transmitted in Mono.
Also, you can manually select Mono if you want to listen to a stereo or SAP broadcasted channel in Mono.
1. Use the MTS button to select your desired MTS mode in analog signal.
Each time you press the MTS button, Mono, Stereo, or SAP appear in turn.
If other languages available on the digital signal, select them with the MTS button.
2. Press EXIT button to save and return to TV viewing.
Stereo/SAP Broadcast Setup
Page 49
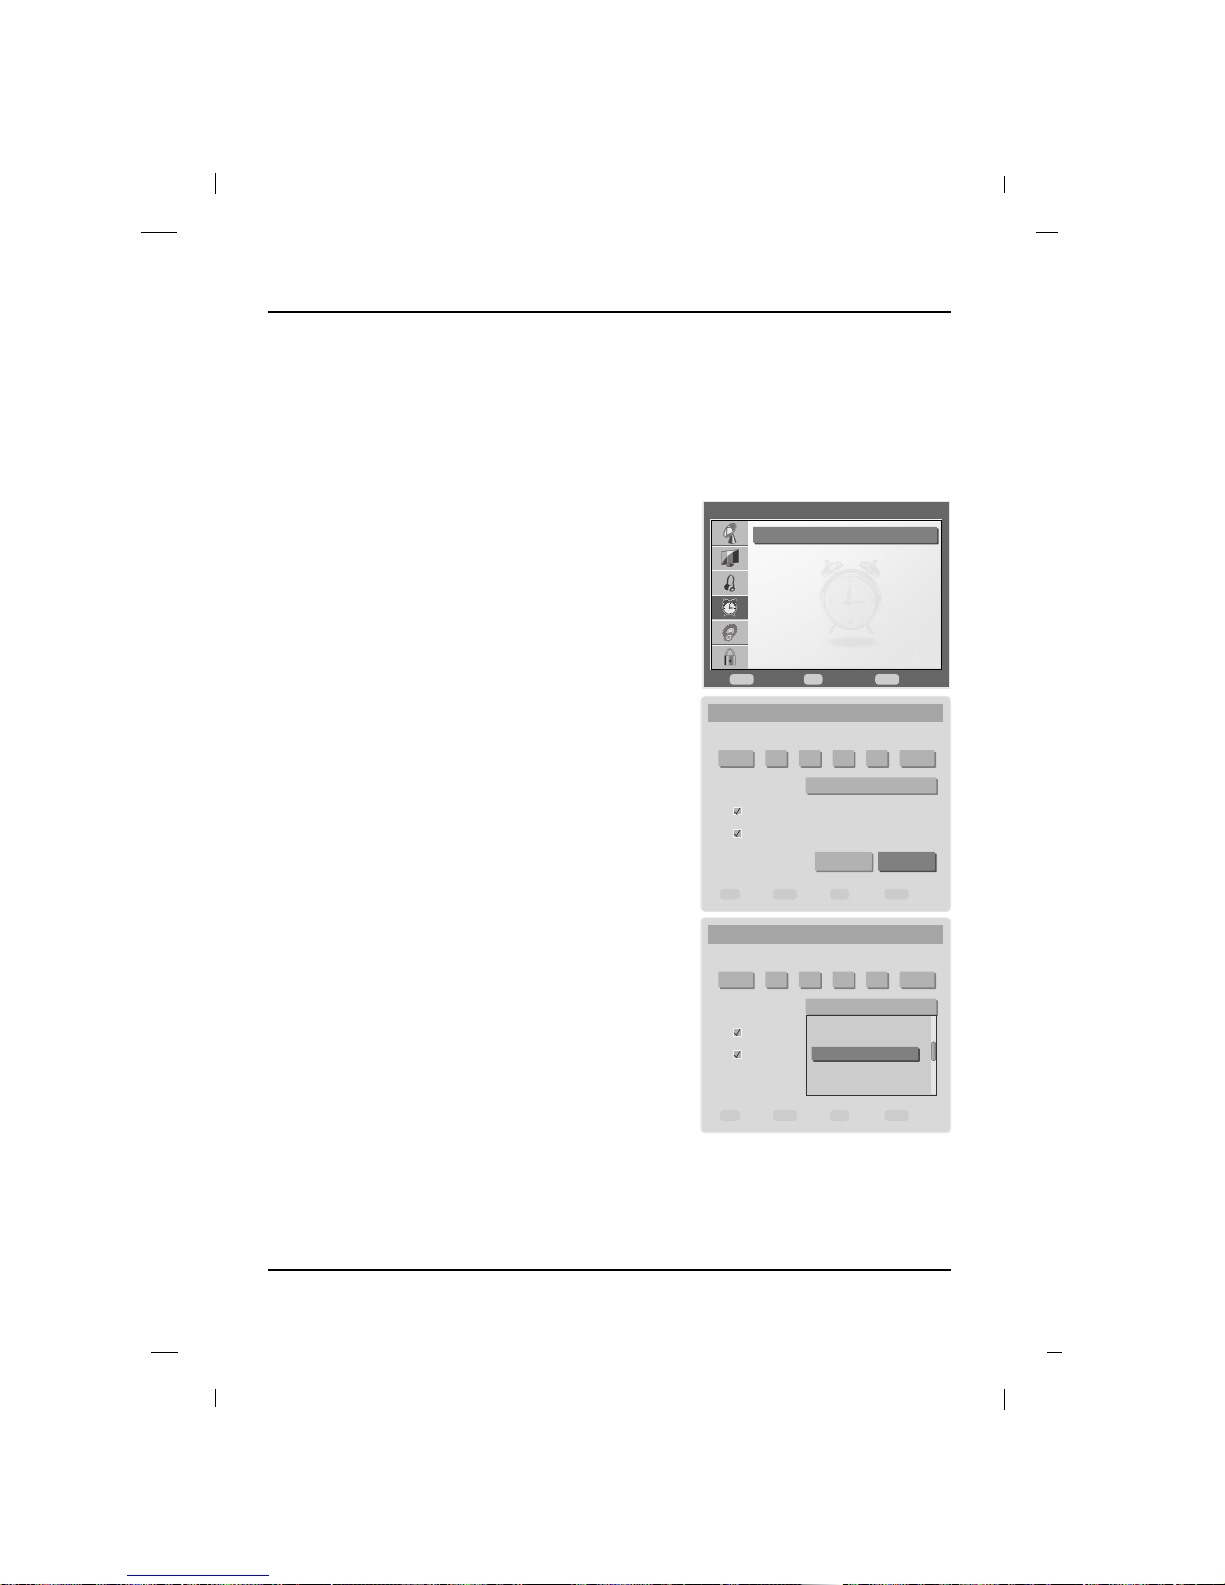
49
Time Setting
The time is set automatically from a digital channel signal.
The digital channel signal includes information for the current time provided by the broadcasting station. Set the
time manually if the current time is set incorrectly by the Auto Synchronization function.
Auto Time Setting
1. Press the MENU button to display the menu.
2. Press the Down or Up buttons to select the Timer,
then press the OK button.
3. Press the Down or Up button to select Clock, then
press the OK button.
4. Press the Up button to select Time Zone, then press
the OK button.
5. Press the Down or Up button to select your viewing
area time zone, then press the OK button.
(Alaska, Hawaii, Pacific, Mountain, Central, Eastern,
Atlantic, Newfoundland, Samoa)
6. Press the Down or Up button to select Automatic
Time, then press the OK button.
7. Press the Down or Up button to select Daylight
Saving Time, then press the OK button, depending on
whether or not your viewing area observes Daylight
Saving Time.
8. Press the Left or Right button to select OK or Cancel,
then press the OK button.
If you want to save the setting, select OK and if not,
select Cancel.
9. Press the MENU button to return to the previous menu.
Time Setting
Timer
Move Select
OK
Close
Menu
FF GG
DDEE
Clock
Timer
Sleep Timer Off
Clock
OK Cancel
Move Select
OK
Enter
Num
Close
Menu
FF GG
DDEE
Year Month
Time Zone
Automatic Time
Daylight Saving Time
Day Hour Minute
2009 2 10 9 47 PM
E
Pacific(US/CAN)
E
Clock
OK Cancel
Move Select
OK
Enter
Num
Close
Menu
FF GG
DDEE
Year Month
Time Zone
Automatic Time
Daylight Saving Time
Day Hour Minute
2009 2 10 9 47 PM
E
Pacific(US/CAN)
E
Alaska (US)
Hawaii (US)
Pacific (US/CAN)
Mountain (US/CAN)
Central (US/CAN)
Page 50
50
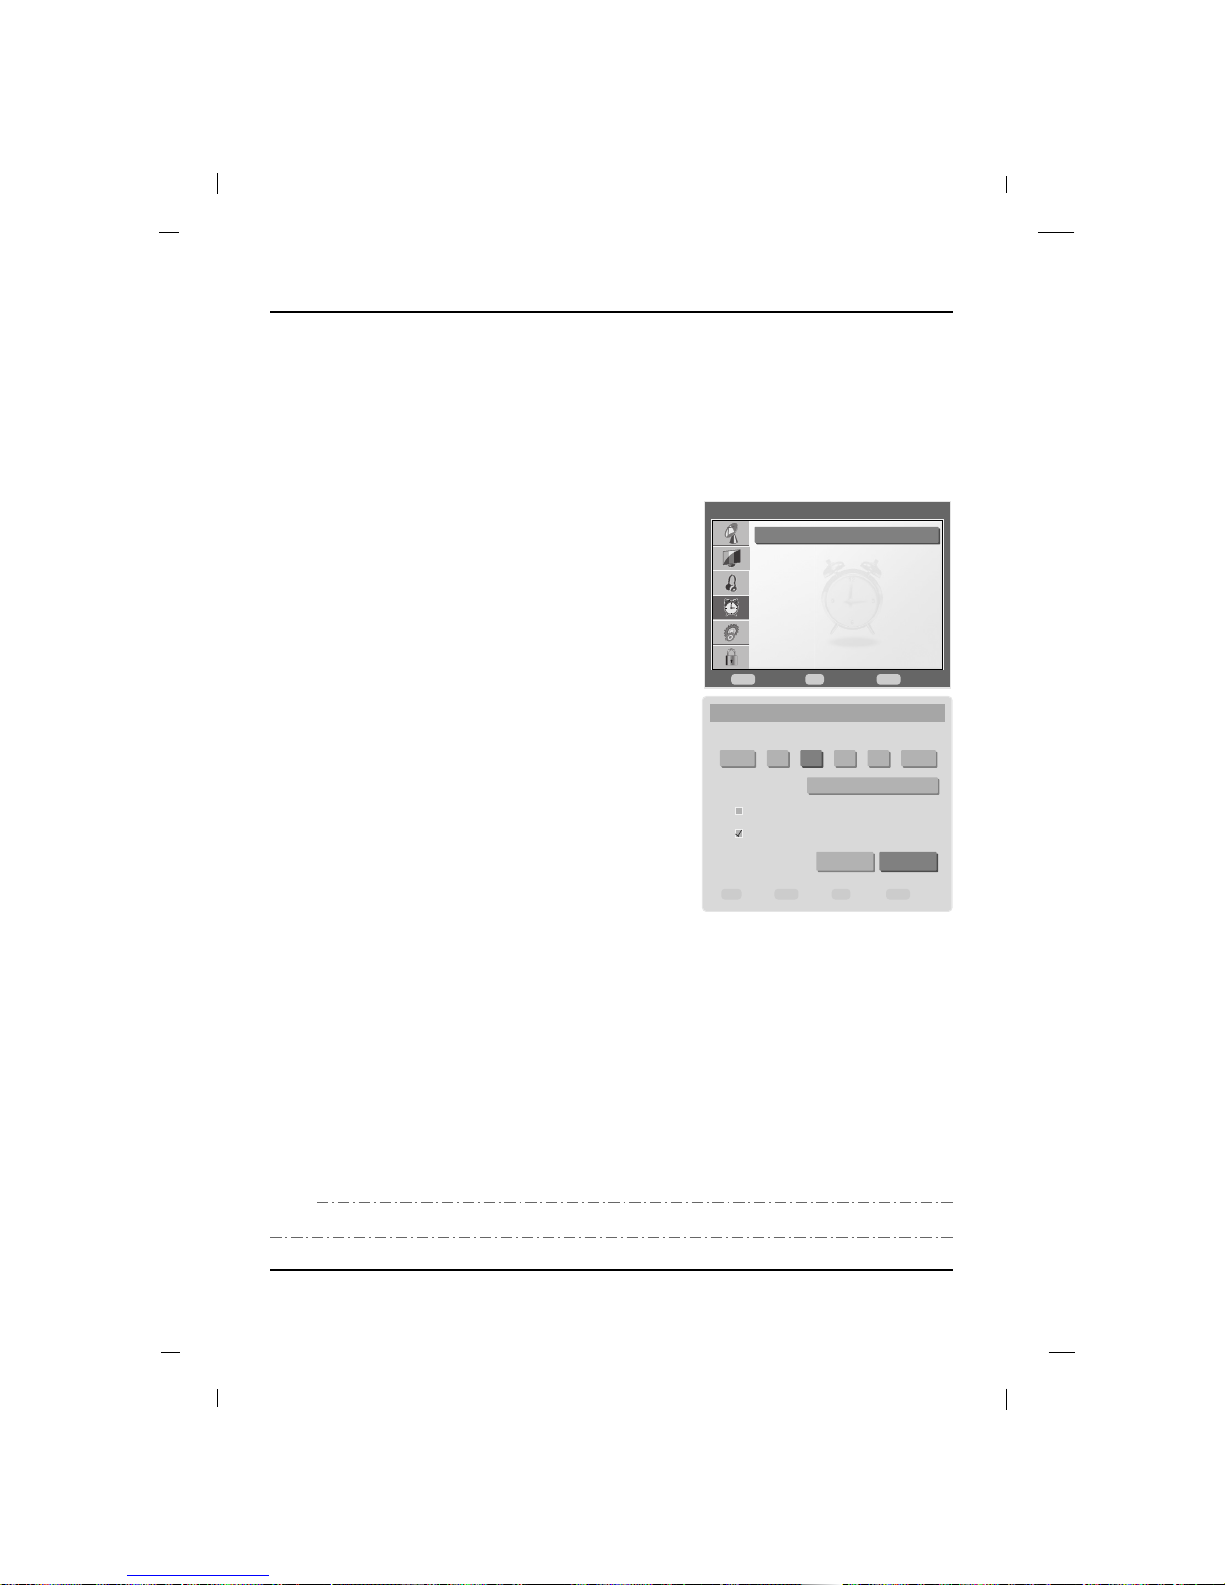
If the current time setting is wrong, this function allows you to set the clock manually.
Manual Time Setting
1. Press the MENU button to display the menu.
2. Press the Down or Up buttons to select the Timer,
then press the OK button.
3. Press the Down or Up button to select Clock, then
press the OK button.
4. Press the Left or Right button to select either the Year,
Month, Day, Hour or Minute option.
Once selected, use the number button to set the Year,
Month, Day, Hour and Minute options.
5. Press the Left or Right button to select AM/PM, then
press the OK button.
6. Press the Down or Up button to select AM or PM, then
press the OK button.
7. Press the Left or Right button to select OK or Cancel,
then press the OK button.
If you want to save the setting, select OK and if not,
select Cancel.
8. Press the MENU button to return to the previous menu.
- If Automatic Time is marked, Year, Month, Day, Hour and Minute are cannot be adjusted.
NNNNOOOOTTTTEE
EE
Timer
Move Select
OK
Close
Menu
FF GG
DDEE
Clock
Timer
Sleep Timer Off
Clock
OK Cancel
Move Select
OK
Enter
Num
Close
Menu
FF GG
DDEE
Year Month
Time Zone
Automatic Time
Daylight Saving Time
Day Hour Minute
2009 2 10 9 47 PM
E
Pacific(US/CAN)
E
Time Setting
Page 51
51
Time Setting
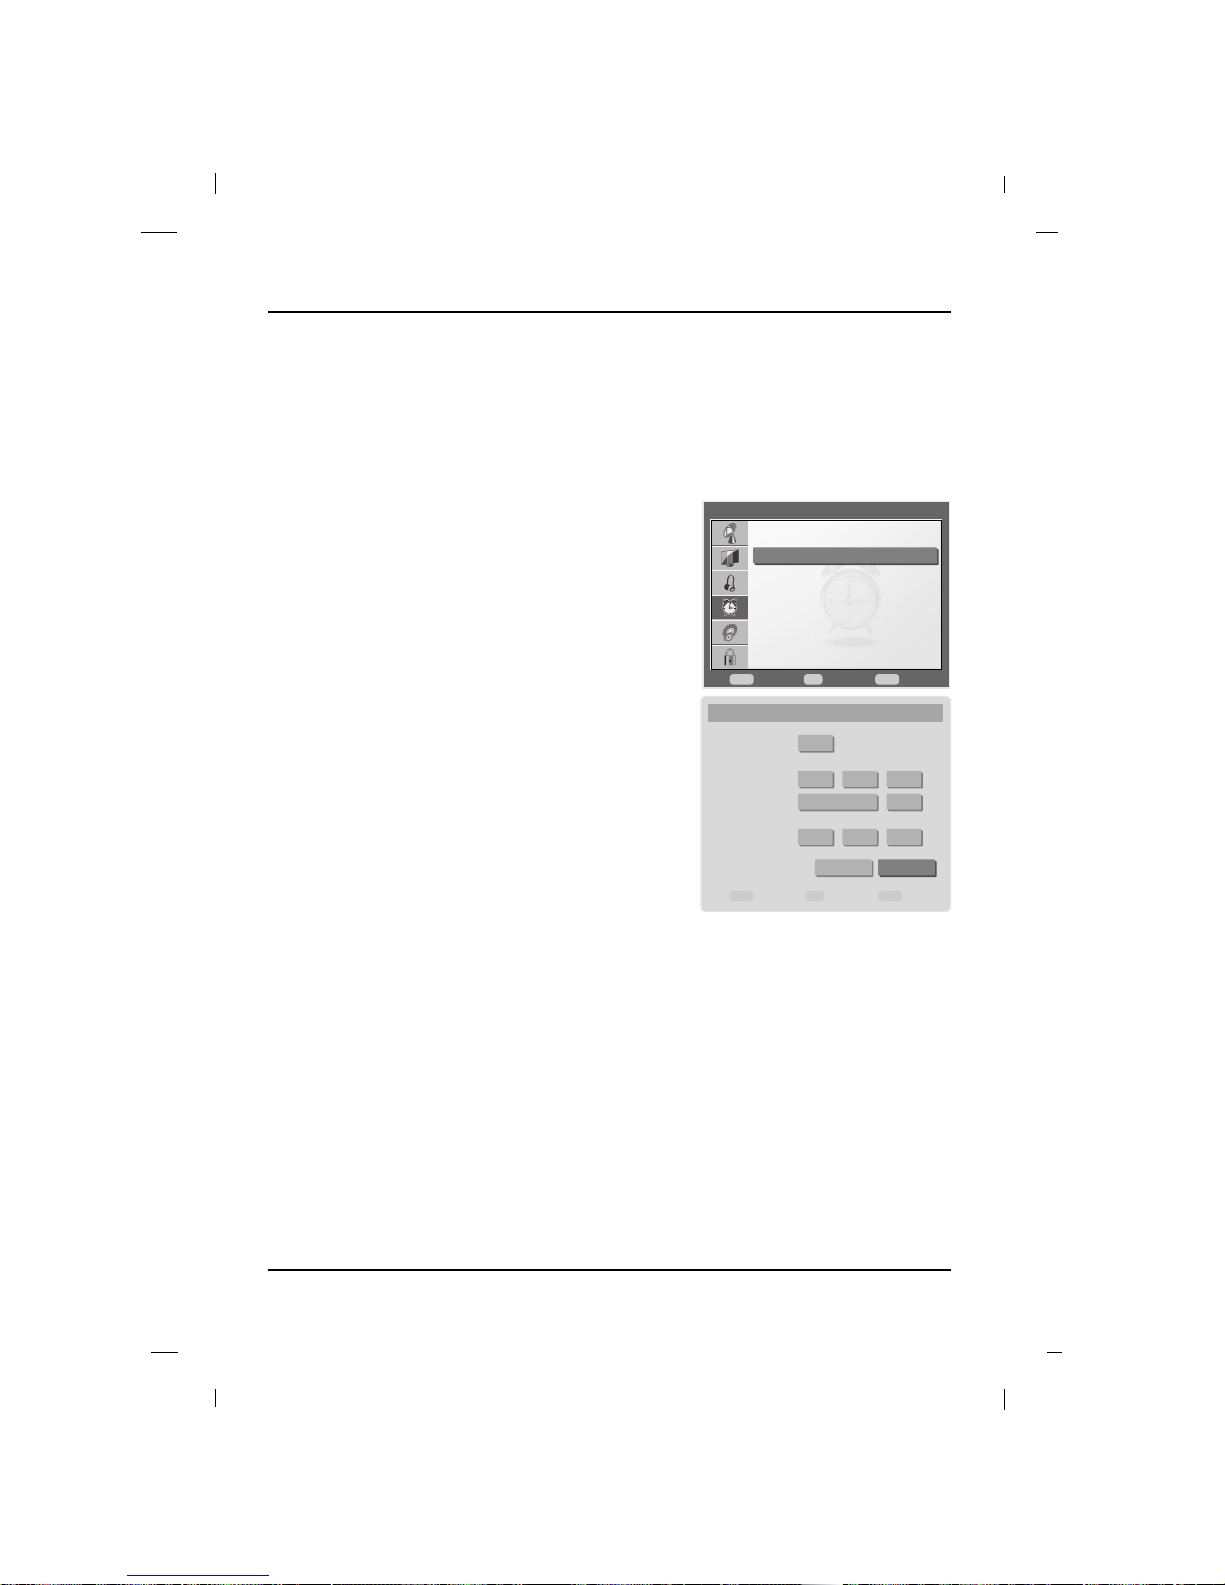
The timer function operates only if the current time has been set.
The TV turns on automatically with the Timer function.
Auto On/Off Time Setting
1. Press the MENU button to display the menu.
2. Press the Down or Up buttons to select the Timer,
then press the OK button.
3. Press the Down or Up button to select Timer, then
press the OK button.
4. Press the Left or Right button to select day option.
Once selected, use the OK button to set the day.
5. Press the Down or Up button to select Time On, On
Time, Source/Channel or Off Time.
Time On: Set the Timer function On or Off.
On Time: Set the start time at turn-on.
Source/Channel: Set the source and channel at turn-
on.
Off Time: Set the start time at turn-off.
6. Press the Left or Right button to move the position
and then press the OK button.
7. Once selected, use the Down or Up buttons to set the
On Time, Source/Channel or Off Time, then press the
OK button.
8. Press the Left or Right button to select OK or Cancel.
9. Press the MENU button to return to the previous menu.
Timer
Move Select
OK
Close
Menu
FF GG
DDEE
Clock
Timer
Sleep Timer Off
Timer
OK Cancel
Move Select
OK
Close
Menu
FF GG
DDEE
On Time
Source/Channel
12 E00 EAM
E
Off Time
12 E00 EAM
E
Timer On
Off
E
TV
E
7-0
Page 52
52
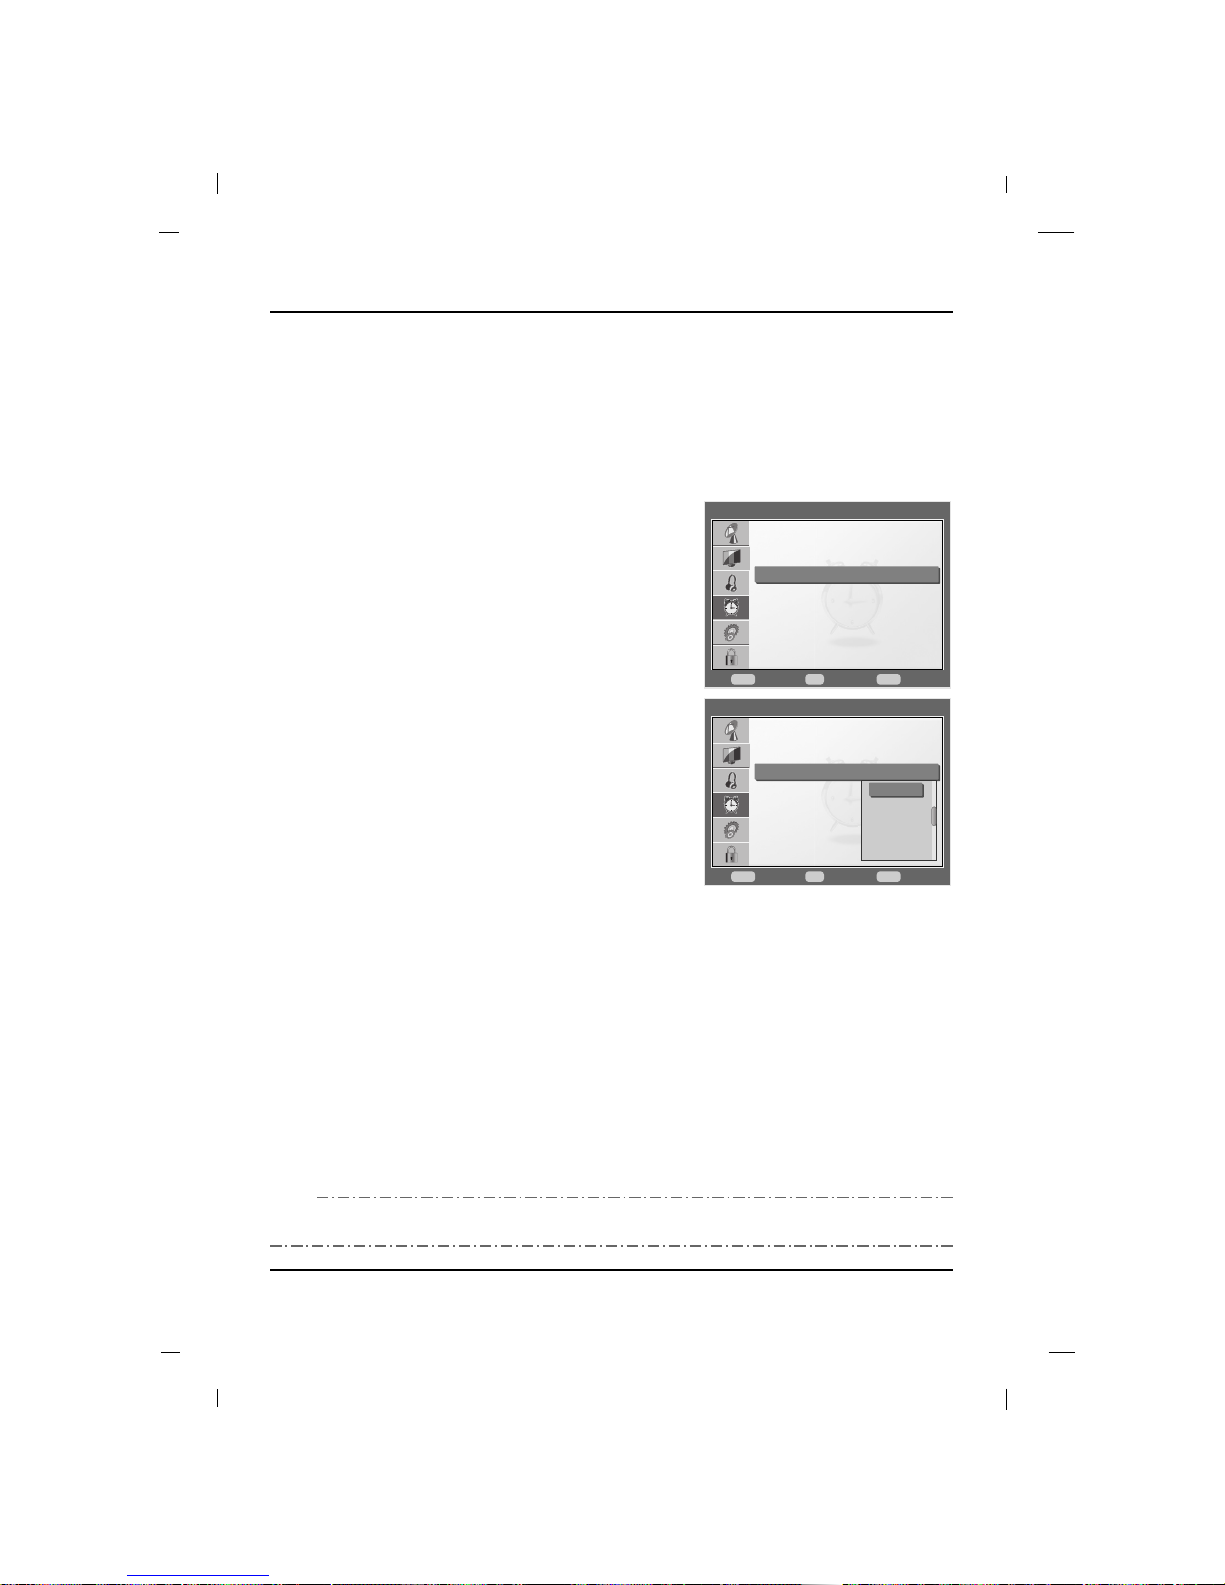
The sleep timer automatically switches the set to standby after the preset time elapses.
Sleep Timer
1. Press the MENU button to display the menu.
2. Press the Down or Up buttons to select the Timer,
then press the OK button.
3. Press the Down or Up button to select Sleep Timer,
then press the OK button.
4. Press the Down or Up button to select desired sleep
time, then press the OK button.
The timer begins to count down from the number of
minutes selected.
5. Press the MENU button to return to the previous
menu.
Timer
Move Select
OK
Close
Menu
FF GG
DDEE
Clock
Timer
Sleep Timer Off
Timer
Move Select
OK
Close
Menu
FF GG
DDEE
Clock
Timer
Sleep Timer Off
Off
10 min
30 min
60 min
90 min
- If you want to select Sleep Timer directly, press the SLEEP button.
- Every time you press the button, it will switch between Off, 10, 30, 60, 90 and 120.
NNNNOOOOTTTTEE
EE
Time Setting
Page 53
53
Option Menus
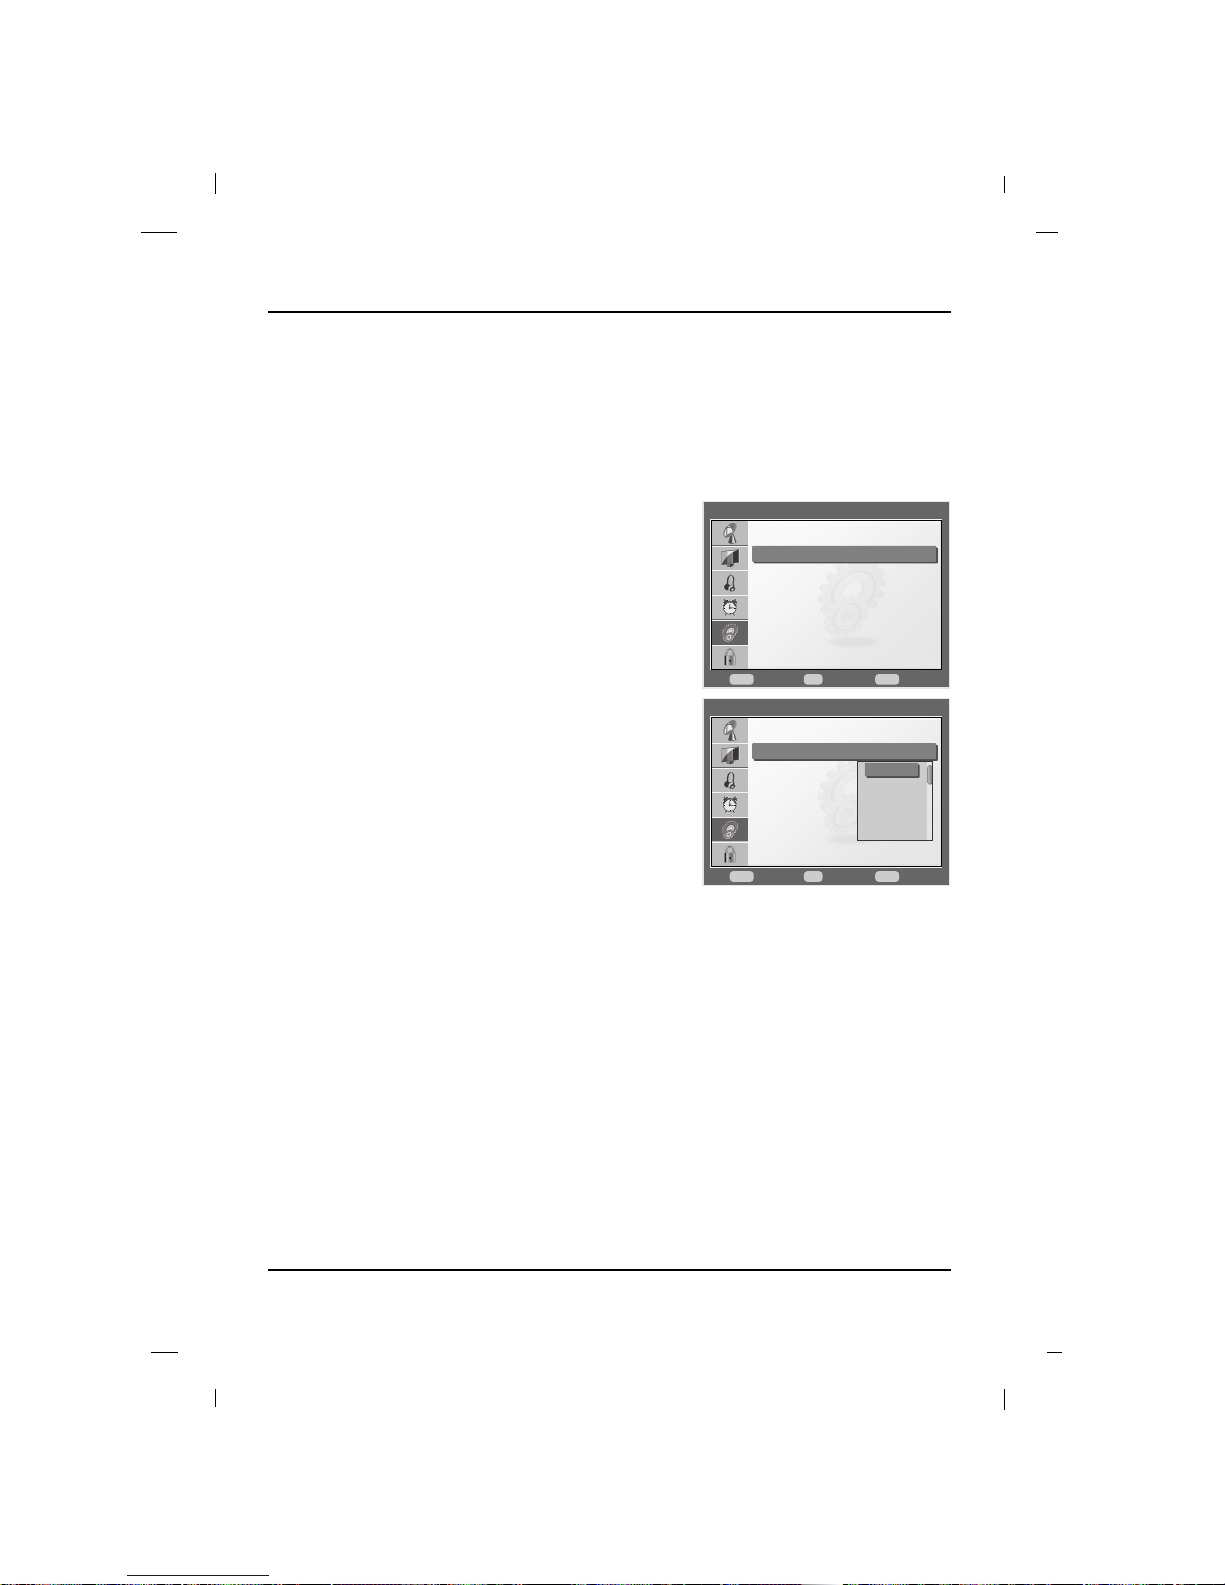
Other languages may be available if a digital signal is provided by the broadcasting station.
Audio Language
1. Press the MENU button to display the menu.
2. Press the Down or Up buttons to select the Option,
then press the OK button.
3. Press the Down or Up button to select Audio
Language, then press the OK button.
4. Press the Down or Up button to select your desired
language and then press the OK button.
(Select between English, French, Spanish, German,
Korean, Chinese, Japanese)
5. Press the MENU button to return to the previous menu.
Option Menus
Option
Menu Language
Audio Language
Input Label
Caption
PC Setting
PIP Setting
Menu Opacity
English
English
Medium
Move Select
OK
Close
Menu
FFGGDDEE
Option
Menu Language
Audio Language
Input Label
Caption
PC Setting
PIP Setting
Menu Opacity
English
English
Medium
Move Select
OK
Close
Menu
FFGGDDEE
English
French
Spanish
German
Korean
Page 54

54
Sets a label to each input source which is not in use when you press SOURCE button.
Input Label
1. Press the MENU button to display the menu.
2. Press the Down or Up buttons to select the Option,
then press the OK button.
3. Press the Down or Up button to select Input Label,
then press the OK button.
4. Press the Down or Up button to select the input source
to rename, then press the OK button.
5. Press the Down button to select the predefined name
and then press the OK button.
6. Or when you want to directly rename it yourself, press
the Down or Up or Left or Right button, select the
characters shown on the screen and press the OK
button.
7. Press the Left or Right button to select OK or Cancel.
If you want to confirm the assigned new name, select
OK.
Then press the OK button. Otherwise select Cancel.
8. Press the MENU button to return to the previous menu.
- When you want to enter lower case characters, select the Shift button and then select the character you
want after pressing the OK button
- If you want to reset the entered character, select the Reset to Default button and then the OK button.
- If you want to delete the entered character, select the BS button and then press the OK button.
NNNNOOOOTTTTEE
EE
Input Label
Tuner
E
TV
E
1 2 3 4 5 6 7 8 9 0
A B C D E F G H I J
K L M N O P Q R S T
U V W X Y Z - BS
Cancel
Shift
OKReset to Default
_
Move Select
OK
Close
Menu
FF GG
DDEE
Option
Menu Language
Audio Language
Input Label
Caption
PC Setting
PIP Setting
Menu Opacity
English
English
Medium
Move Select
OK
Close
Menu
FFGGDDEE
Option Menus
Page 55
55
Option Menus
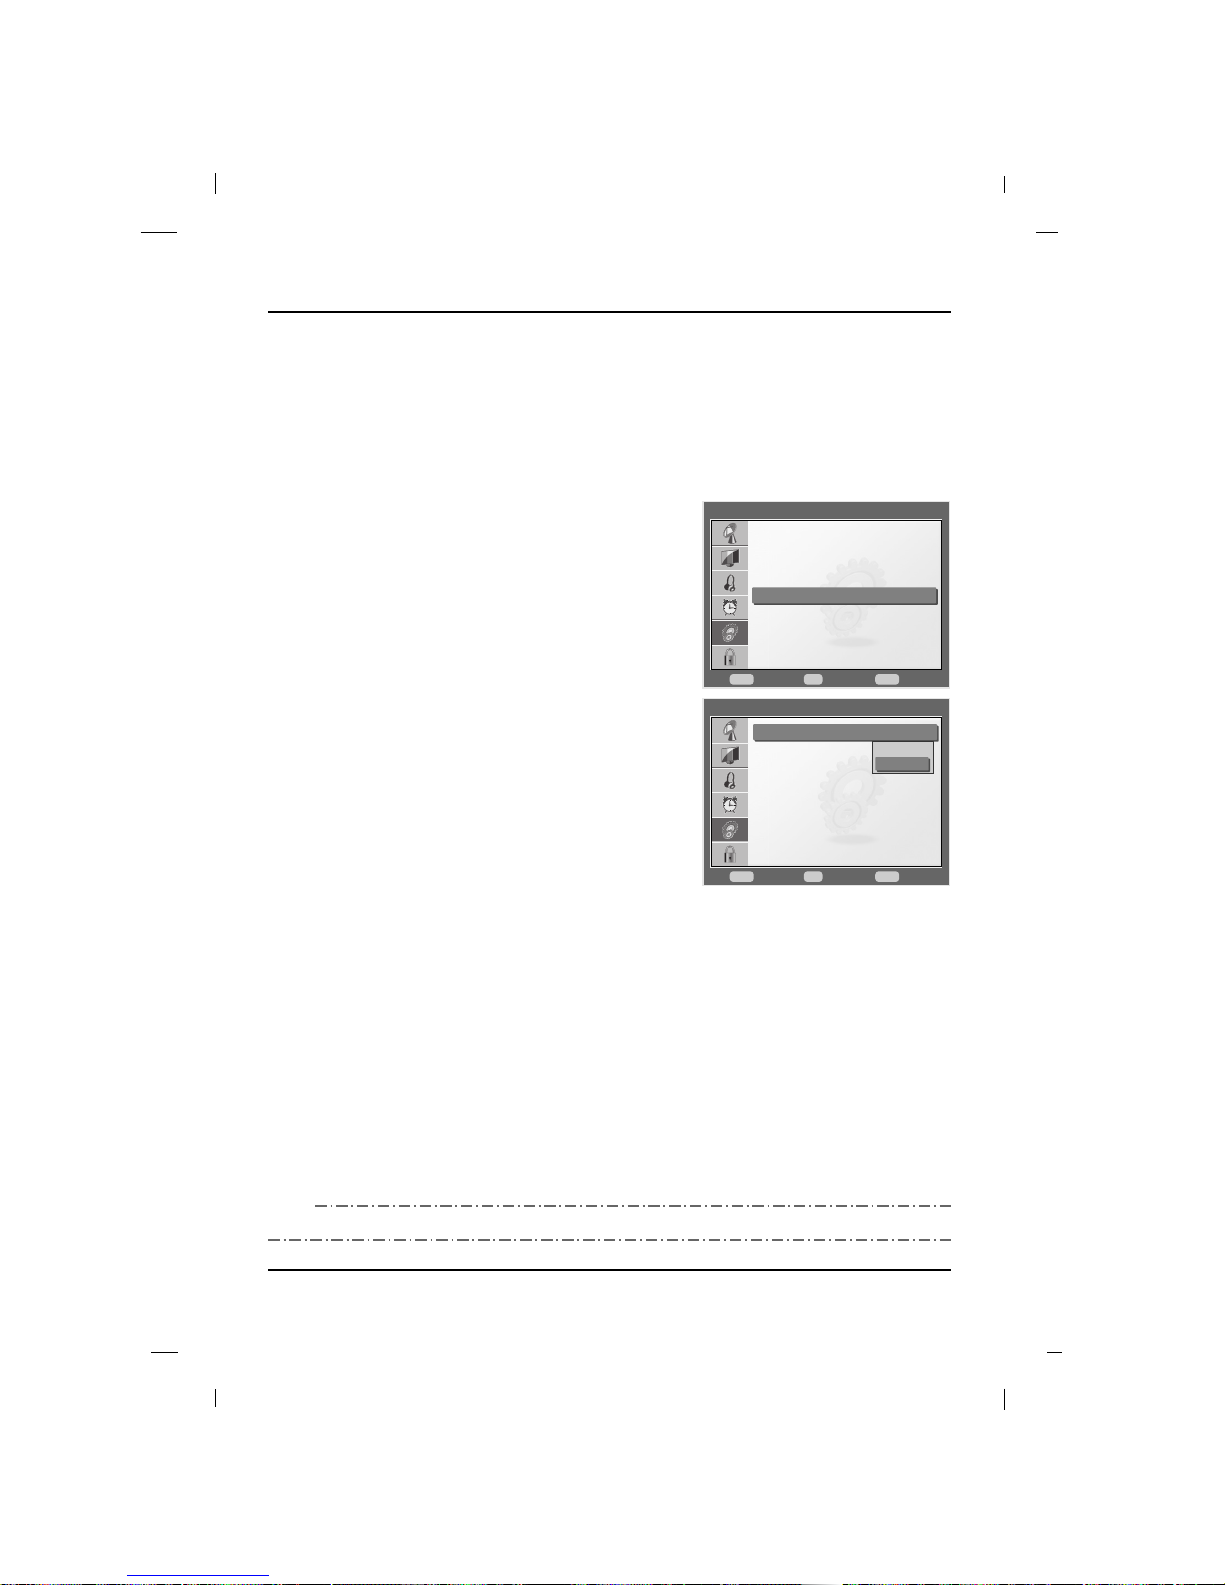
Caption must be provided to help people with hearing loss watch TV.
Caption Mode
1. Press the MENU button to display the menu.
2. Press the Down or Up buttons to select the Option,
then press the OK button.
3. Press the Down or Up button to select Caption, then
press the OK button.
4. Press the Down or Up button to select Display, then
press the OK button.
5. Press the Down or Up button to select On or Off, then
press the OK button.
6. Press the MENU button to return to the previous menu.
Option > Caption
Move Select
OK
Go Back
Menu
FF GG
DDEE
Display
Basic Selection
Advanced Selection
Advanced Appearance
On
CS1
Off
On
Option
Menu Language
Audio Language
Input Label
Caption
PC Setting
PIP Setting
Menu Opacity
English
English
Medium
Move Select
OK
Close
Menu
FFGGDDEE
- If you want to select Caption directly, press the CC button.
NNNNOOOOTTTTEE
EE
Page 56

56
The Analog Caption function operates when watching regular analog channels.
Analog caption displays information at any position on the screen and is usually the program’s dialog.
Closed Caption-Analog
1. Press the MENU button to display the menu.
2. Press the Down or Up buttons to select the Option,
then press the OK button.
3. Press the Down or Up button to select Caption, then
press the OK button.
4. Press the Down or Up button to select Basic
Selection, then press the OK button.
5. Press the Down or Up button repeatedly to select CC1,
CC2, CC3, CC4, Text1, Text2, Text3 or Text4, then
press the OK button.
6. Press the MENU button to return to the previous menu.
Caption
The term for the words that scroll across the bottom of
the TV screen; usually the audio portion of the program provided for the hearing impaired.
TEXT
The term for the words that appear in a large black
frame and almost cover the entire screen; usually messages provided by the broadcaster.
- If you want to select Caption directly, press the CC button.
NNNNOOOOTTTTEE
EE
Option > Caption
Move Select
OK
Go Back
Menu
FF GG
DDEE
Display
Basic Selection
Advanced Selection
Advanced Appearance
On
CC1
CC1
CC2
CC3
CC4
Text1
Option
Menu Language
Audio Language
Input Label
Caption
PC Setting
PIP Setting
Menu Opacity
English
English
Medium
Move Select
OK
Close
Menu
FFGGDDEE
Option Menus
Page 57
57
Option Menus
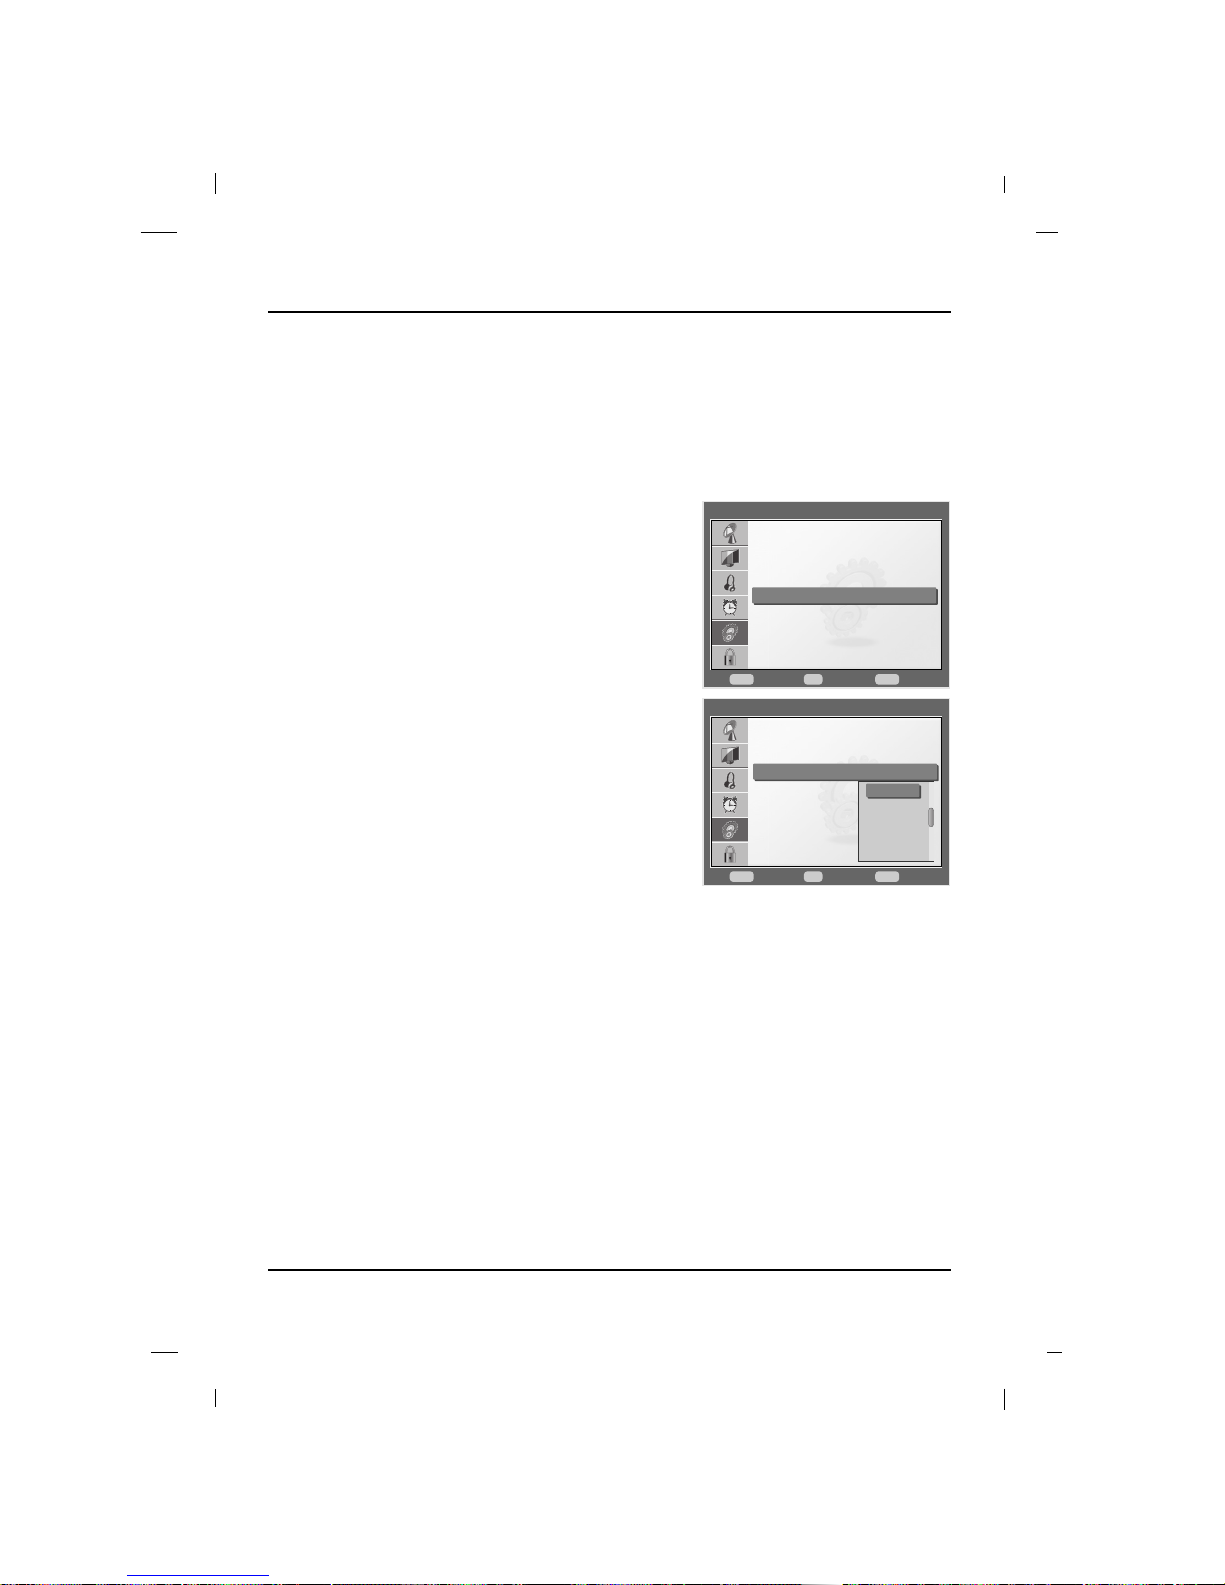
The Digital Caption function only operates on digital channels.
Choose the language you want the DTV captions to appear in.
Closed Caption-Digital
1. Press the MENU button to display the menu.
2. Press the Down or Up buttons to select the Option,
then press the OK button.
3. Press the Down or Up button to select Caption, then
press the OK button.
4. Press the Down or Up button to select Advanced
Selection, then press the OK button.
5. Press the Down or Up button repeatedly to select CS1,
CS2, CS3, CS4, CS5 or CS6, then press the OK
button.
6. Press the MENU button to return to the previous menu.
Option > Caption
Move Select
OK
Go Back
Menu
FF GG
DDEE
Display
Basic Selection
Advanced Selection
Advanced Appearance
On
CC1
CS1
CS1
CS2
CS3
CS4
CS5
Option
Menu Language
Audio Language
Input Label
Caption
PC Setting
PIP Setting
Menu Opacity
English
English
Medium
Move Select
OK
Close
Menu
FFGGDDEE
Page 58
58
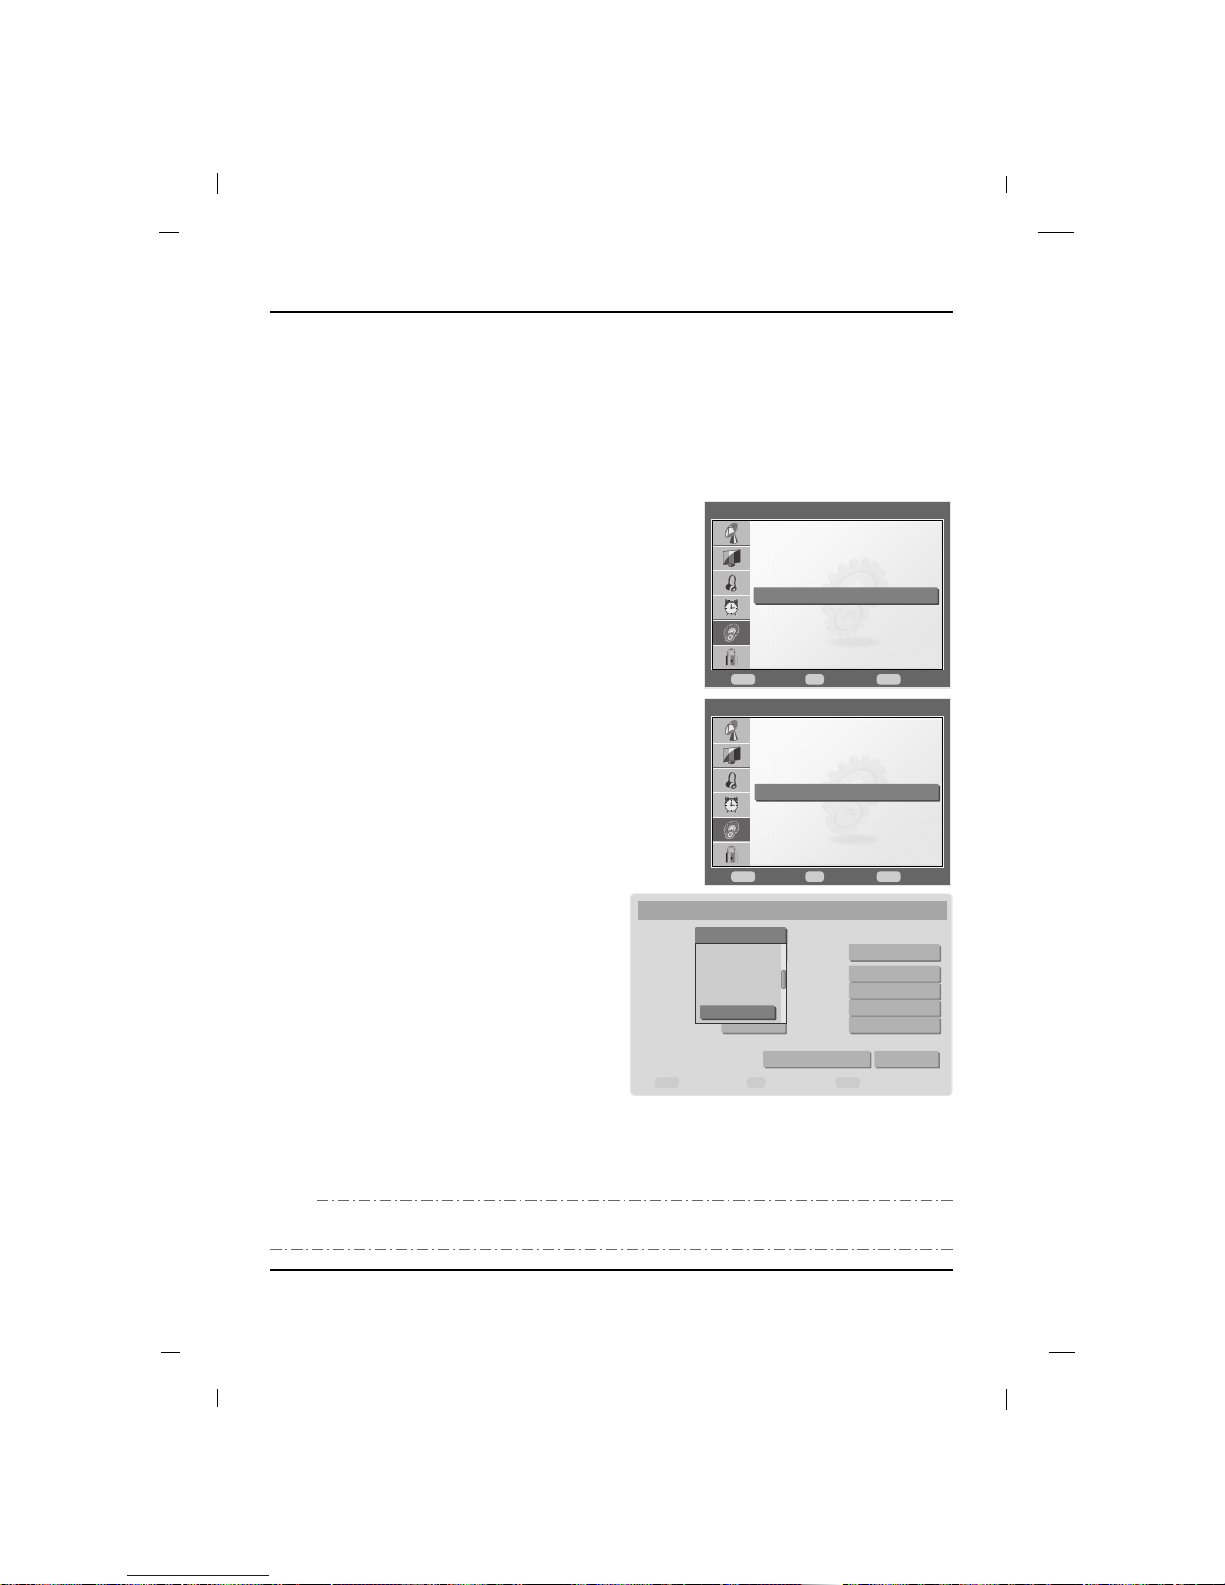
Customize the DTV captions that appear on your screen.
Closed Caption Options
Option > Caption
Move Select
OK
Go Back
Menu
FF GG
DDEE
Display
Basic Selection
Advanced Selection
Advanced Appearance
On
CC1
CS1
Advanced Appearance
Move Select
OK
Close
Menu
FF GG
DDEE
Font Style
As Broadcast
E
Text Size
Standard
E
Color
Default
Edge Color
Default
Background Color
Default
Frame Color
Default
Reset to Default OK
Align
Standard
E
Opacity
As Broadcast
E
Style
As Broadcast
E
Opacity
As Broadcast
E
Opacity
As Broadcast
E
Storybook
Cursive
Casual
Formal
As Bradcast
1. Press the MENU button to display the menu.
2. Press the Down or Up buttons to select the Option,
then press the OK button.
3. Press the Down or Up button to select Caption, then
press the OK button.
4. Press the Down or Up button to select Advanced
Appearance, then press the OK button.
5. Press the Down or Up or Left or Right button to select
desired caption option.
(Font Style, Text Size, Align, Color, Color Opacity,
Edge Color, Edge Color Style, Background Color,
Background Color Opacity, Frame Color, Frame
Color Opacity)
6. Press the Down or Up button and then press the OK
button to customize your preference.
7. To complete the setting, press the Down or Up
or Left or Right button, select OK button and then
press the OK button.
8. Press the MENU button to return to the previous
menu.
- If caption options are selected to As Broadcast, Caption Options are cannot be adjusted.
-
If you select the Reset to Default, reset all the caption options to their original factory preset values.
NNNNOOOOTTTTEE
EE
Option
Menu Language
Audio Language
Input Label
Caption
PC Setting
PIP Setting
Menu Opacity
English
English
Medium
Move Select
OK
Close
Menu
FFGGDDEE
Option Menus
Page 59

59
Option Menus
Font Style
Select a typeface for the words.
Text Size
Set the size the words will appear in.
Text Align
Select a align for the words.
Text Color
Choose a color for the text.
Text Opacity
Select the opacity for the text color.
Edge Color
Select a color for the edges.
Edge Style
Select an edge type.
Background Color
Select a background color.
Background Opacity
Select the opacity for the background color.
Frame Color
Select a color for the frame.
Frame Opacity
Select the opacity for the frame.
Page 60

60
You can set the transparency of the menu box.
Menu Opacity
1. Press the MENU button to display the menu.
2. Press the Down or Up buttons to select the Option,
then press the OK button.
3. Press the Down or Up button to select Menu Opacity,
then press the OK button.
4. Press the Down or Up button to select Low, Medium
or High, then press the OK button.
5. Press the MENU button to return to the previous menu.
Option
Move Select
OK
Close
Menu
FF GG
DDEE
Menu Language
Audio Language
Input Label
Caption
PC Setting
PIP Setting
Menu Opacity
English
English
Medium
Low
Medium
High
Option
Menu Language
Audio Language
Input Label
Caption
PC Setting
PIP Setting
Menu Opacity
English
English
Medium
Move Select
OK
Close
Menu
FFGGDDEE
Option Menus
Page 61

61
Parental Control
Parental Control can be used to block specific channels, ratings and other viewing sources.
Set up blocking schemes to block specific channels, ratings, and external viewing sources.
A password is required to gain access to this menu.
Enter your password
1. Press the MENU button to display the menu.
2. Press the Down or Up buttons to select the Lock, then
press the OK button.
3. Enter password as requested.
The TV is set up with the initial password
“0-0-0-0”.
Enables or disables the blocking scheme you set up previously.
Lock System
1. After inputting the password, press the Down or Up
button to choose Lock System.
2. Press the OK button to select On or Off.
When you select On, the Lock menus are enable.
3. Press the MENU button to return to the previous menu.
- When Lock System is On, you cannot use the PIP function.
NNNNOOOOTTTTEE
EE
Parental Control
Lock
Move Select
OK
Close
Menu
FF GG
DDEE
Lock System
Set Password
Block Channel
Rating
Off
Enter Password
* * *
Lock
Move Select
OK
Close
Menu
FF GG
DDEE
Lock System
Set Password
Block Channel
Rating
Off
Page 62

62
Change the password by inputting a new password twice.
Set Password
1. After inputting the password, press the Down or Up
button to select Set Password.
2. Press the OK button and then re-enter the same 4 digits.
3. Select any 4 digits for your new password and enter
the them on the New.
4. As soon as the 4 digits are entered, re-enter the same
4 digits on the Confirm.
5. Press the Left or Right button to select OK, then press
the OK button.
Then your changed password has been
memorized.
6. Press the MENU button to return to the previous menu.
Lock
Move Select
OK
Close
Menu
FF GG
DDEE
Lock System
Set Password
Block Channel
Rating
Off
Enter Password
* * *
Set Password
* * *
New :
Confirm :
OK Cancel
Parental Control
Page 63
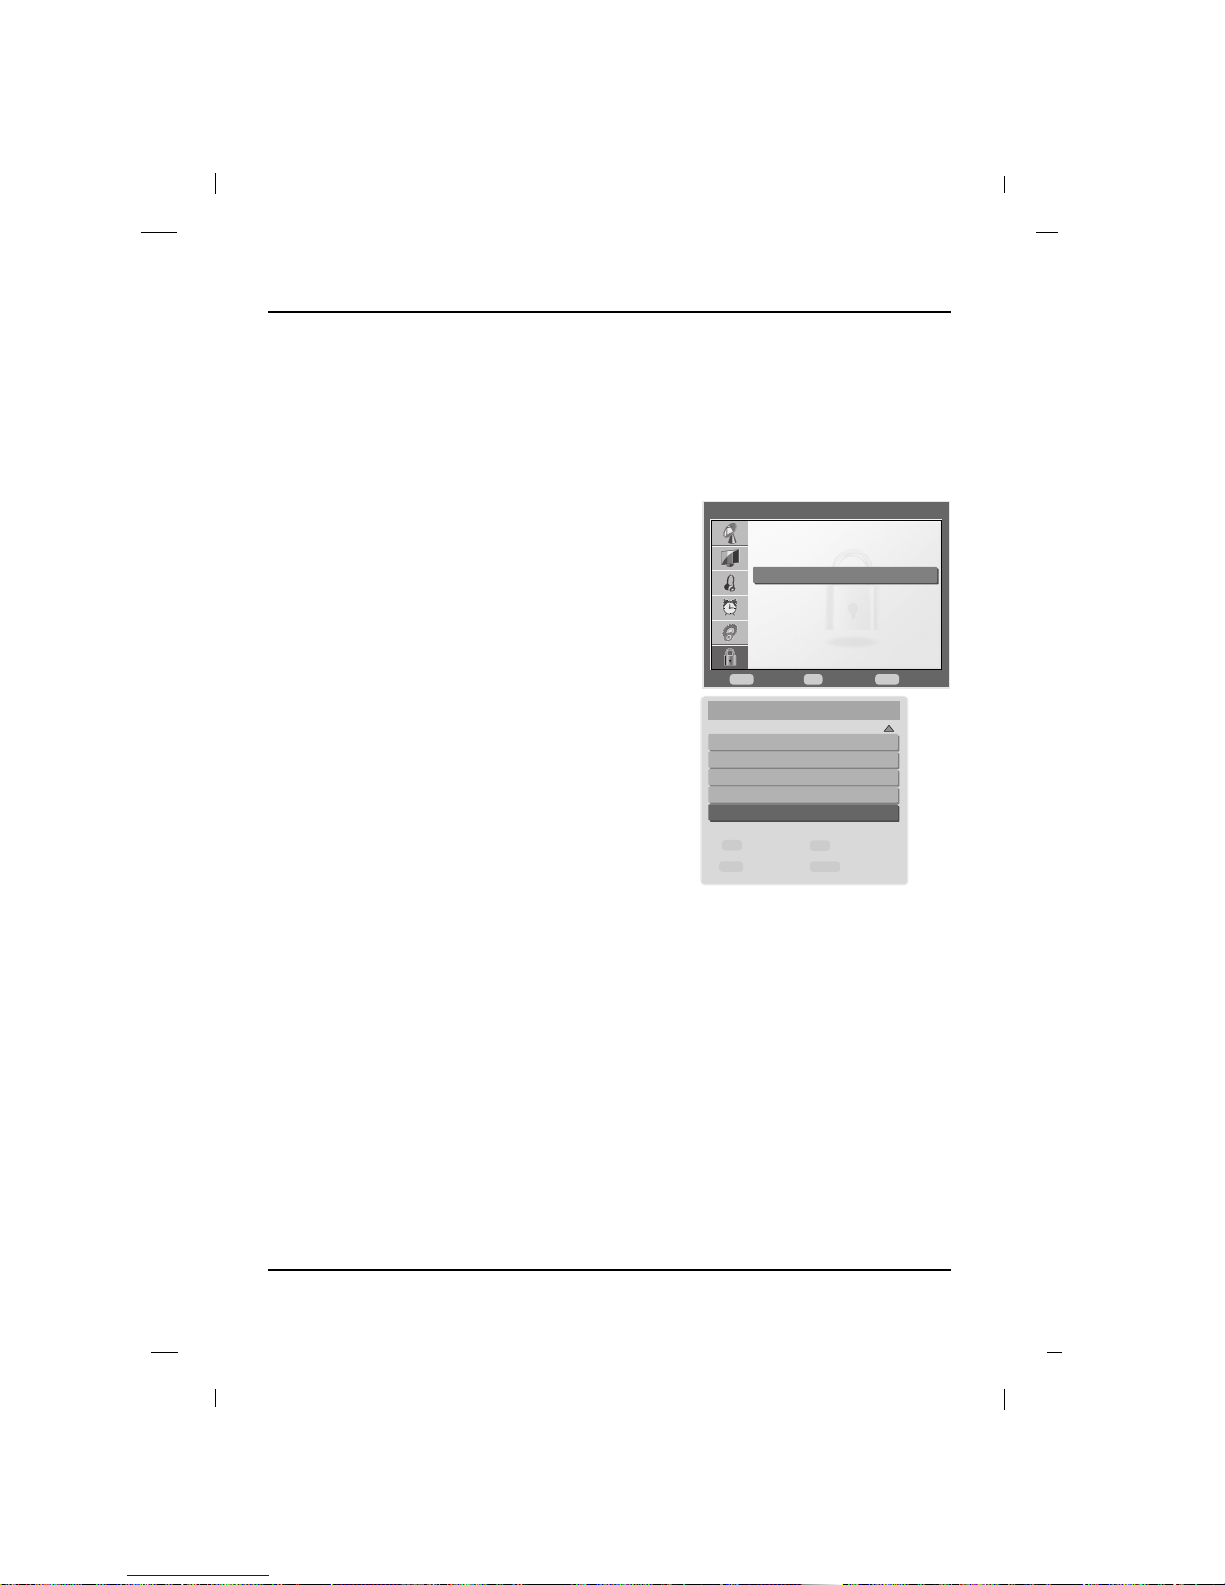
63
Parental Control
Blocks any channels that you do not want to watch or that you do not want your children to watch.
Channel Blocking
1. After inputting the password, press the Down or Up
button to choose Block Channel.
Then display a list of all channels.
2. Press the Down or Up button to select a channel and
then press the OK button to block or unblock it.
3. Press the MENU button to return to the previous menu.
Lock
Move Select
OK
Close
Menu
FF GG
DDEE
Lock System
Set Password
Block Channel
Rating
Off
Block Channel
Move
Close
Menu
DDEE
Toggle Lock
OK
Move PageCH DDEE
9-0
10-0
11-0
12-0
13-0
Page 64

64
Prevents children from watching certain TV programs, according to the rating limits set.
The children rating will not apply to TV programs until you select the ratings you want to be blocked.
TV Ratings for USA
1. After inputting the password, press the Down or Up
button to choose Rating.
2. Press the OK button and then press the Down or Up
button to select USA - TV.
3. Press the OK button.
4. Press the Down or Up or Left or Right buttons to
choose and OK button to set up the menu options for
USA TV Ratings.
5. Press the Left or Right or Down or Up button to select
OK, then press the OK button.
6. Press the MENU button to return to the previous menu.
Lock
Move Select
OK
Close
Menu
FF GG
DDEE
Lock System
Set Password
Block Channel
Rating
Off
Lock > Rating
Move Select
OK
Go Back
Menu
FF GG
DDEE
USA - TV
USA - Movie
Canada - English
Canada - French
Downloadable RRT
USA - TV
TV-Y
TV-Y7
TV-G
TV-PG
TV-14
TV-MA
FV D L S V
Move Select
OK
Close
Menu
FF GG
DDEE
Lock All
Unlock All OK
- When you select Lock All, all options will be locked and when you select Unlock All, all options will be
unlocked.
NNNNOOOOTTTTEE
EE
Parental Control
Page 65

65
Parental Control
TV (FCC) Age Categories
D: Dialog...sexual innuendo.
L: Offensive language.
S: Sexual Situation
V: Violence.
FV: Fantasy or cartoon violence.
TV (FCC) Content Sub-Categories:
TV-MA
Mature audiences only.
This program may contain mature themes,
profane language, graphic violence and explicit
sexual content.
TV-14
Parents strongly cautioned.
This program may contain sophisticated themes,
sexual content, strong language and more intense
violence.
TV-PG
Parental guidance suggested.
The program may contain infrequent coarse
language, limited violence, some suggestive
sexual dialog and situations.
TV-G
General audience.
This contains little or no violence, no strong
language, and little or no sexual dialog or
situations.
TV-Y7
Directed for older children.
Themes and elements in this program may
include mild physical or comedic violence, or
may frighten children under the age of seven.
TV-Y
All children.
The themes and elements in this program are
specifically designed for a very young audience,
including children from ages two – six.
Page 66

66
Blocks movies according to the movie ratings limits specified so children cannot view certain movies.
Applies to movies broadcasted on TV and allows you to select which ratings you want blocked.
Movie Ratings
1. After inputting the password, press the Down or Up
button to choose Rating.
2. Press the OK button and then press the Down or Up
button to select USA - Movie.
3. Press the OK button.
4. Press the Down or Up buttons to choose and OK but-
ton to set up the menu options for USA Movie Ratings.
5. Press the Down or Up button to select OK, then press
the OK button.
6. Press the MENU button to return to the previous menu.
The MP
AA Rating System (Movies)
G
General Audience.
PG
Parental guidance suggested.
PG-13
Parents strongly cautioned.
R
Restricted.
NC-17
No one 17 and under admitted.
X
Adults only.
Lock
Move Select
OK
Close
Menu
FF GG
DDEE
Lock System
Set Password
Block Channel
Rating
Off
Lock > Rating
Move Select
OK
Go Back
Menu
FF GG
DDEE
USA - TV
USA - Movie
Canada - English
Canada - French
Downloadable RRT
USA - Movie
G
PG
PG-13
R
NC-17
X
Move Select
OK
Close
Menu
DDEE
OK
- If you set PG-13 : G and PG movies will be available, PG-13, R, NC-17 and X will be blocked.
NNNNOOOOTTTTEE
EE
Parental Control
Page 67

67
Parental Control
Selecting canadian english language rating system.
TV Rating English for Canada
1. After inputting the password, press the Down or Up
button to choose Rating.
2. Press the OK button and then press the Down or Up
button to select Canada - English.
3. Press the OK button.
4. Press the Down or Up buttons to choose and OK but-
ton to set up the menu options for Canadian English
Ratings.
5. Press the Down or Up button to select OK, then press
the OK button.
6. Press the MENU button to return to the previous menu.
Canadian English Ratings
C
Children
C8+
Children eight years and older
G
General programming, suitable for all audiences
PG
Parental Guidance
14+
Viewers 14 years and older
18+
Adult programming
Lock
Move Select
OK
Close
Menu
FF GG
DDEE
Lock System
Set Password
Block Channel
Rating
Off
Lock > Rating
Move Select
OK
Go Back
Menu
FF GG
DDEE
USA - TV
USA - Movie
Canada - English
Canada - French
Downloadable RRT
Canada - English
C
C8+
G
PG
14+
18+
Move Select
OK
Close
Menu
DDEE
OK
Page 68

68
Selecting canadian french language rating system.
TV Rating French for Canada
1. After inputting the password, press the Down or Up
button to choose Rating.
2. Press the OK button and then press the Down or Up
button to select Canada - French.
3. Press the OK button.
4. Press the Down or Up buttons to choose and OK but-
ton to set up the menu options for Canadian French
Ratings.
5. Press the Down or Up button to select OK, then press
the OK button.
6. Press the MENU button to return to the previous menu.
Canadian French Ratings
G
General
8 ans+
General-Not convenient for little children
13 ans+
Not convenient for children of 13 years and younger
16 ans+
Not convenient for children of 16 years and younger
18 ans+
This programs is only for adult
Lock
Move Select
OK
Close
Menu
FF GG
DDEE
Lock System
Set Password
Block Channel
Rating
Off
Lock > Rating
Move Select
OK
Go Back
Menu
FF GG
DDEE
USA - TV
USA - Movie
Canada - English
Canada - French
Downloadable RRT
Canada - French
G
8 ans+
13 ans+
16 ans+
18 ans+
Move Select
OK
Close
Menu
DDEE
OK
Parental Control
Page 69
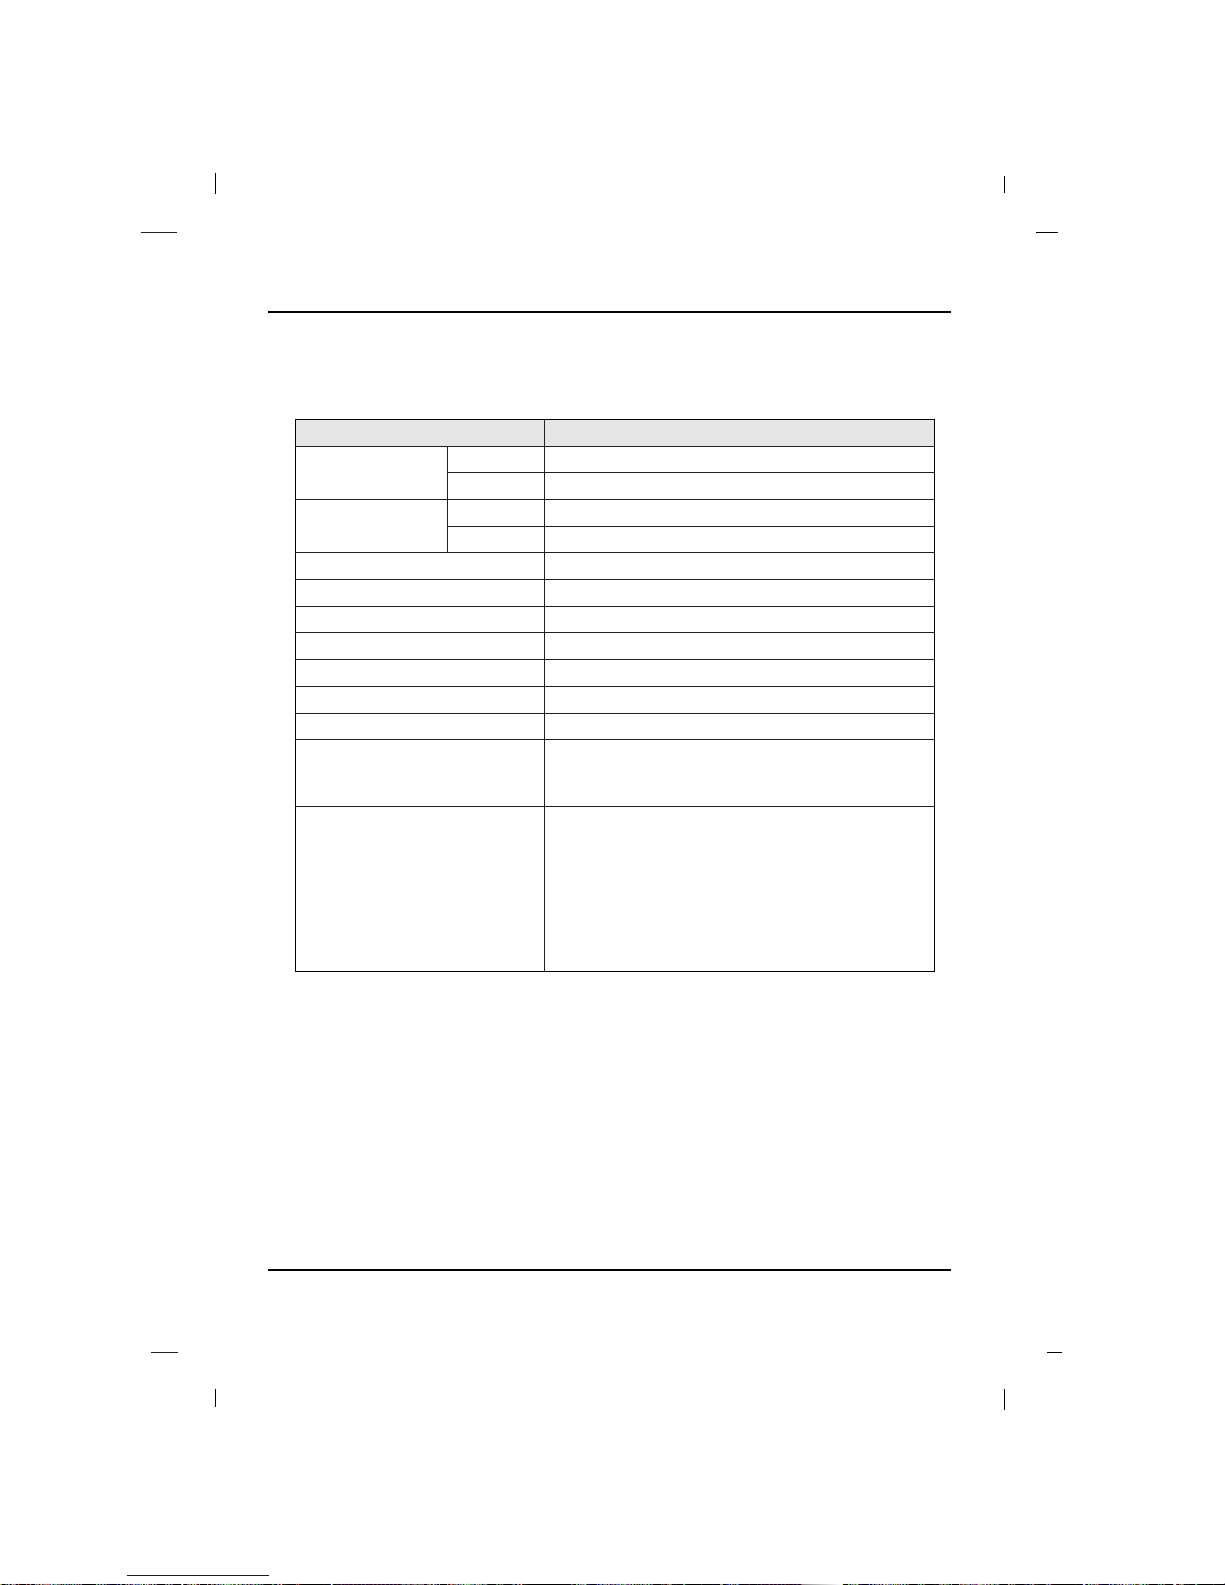
81
Specification
Broadcast Signal System
Contrast Ratio
Brightness
Power Rating
Consumption
Audio Output
Operating Temperature
Accessories
External Port
Weight
(kg / lbs)
Model
1241.0 mm (48.86") x 841.0 mm (33.11") x 399.0 mm (15.71")
1241.0 mm (48.86") x 900.0 mm (35.43") x 774.0 mm (30.47")
45.0 kg (99.20 lbs)
50.3 kg (110.89 lbs)
ATSC / NTSC
30,000:1
1,500 cd/m
2
AC100-240V ~50/60Hz
430W
10W + 10W
0°C ~ 40°C
KPP-50SAT
•3 x HDMI
• RGB IN (PC)
• AUDIO IN (RGB / DVI)
•AV IN
• S-VIDEO
• COMPONENT 1
• COMPONENT 2
• USB IN
• DIGITAL AUDIO OUT
(OPTICAL)
• ANTENNA / CABLE IN
• AC IN
• SERVICE
• The Specification shown above may be changed without prior notice for quality important.
Dimension
(Width x Hight x Depth)
Without Stand
With Stand
Without Stand
With Stand
• Batteries & Remote
• Power Cord
• Owner’s Manual
• Plug Adaptor(UL to VDE)
Specification
Page 70
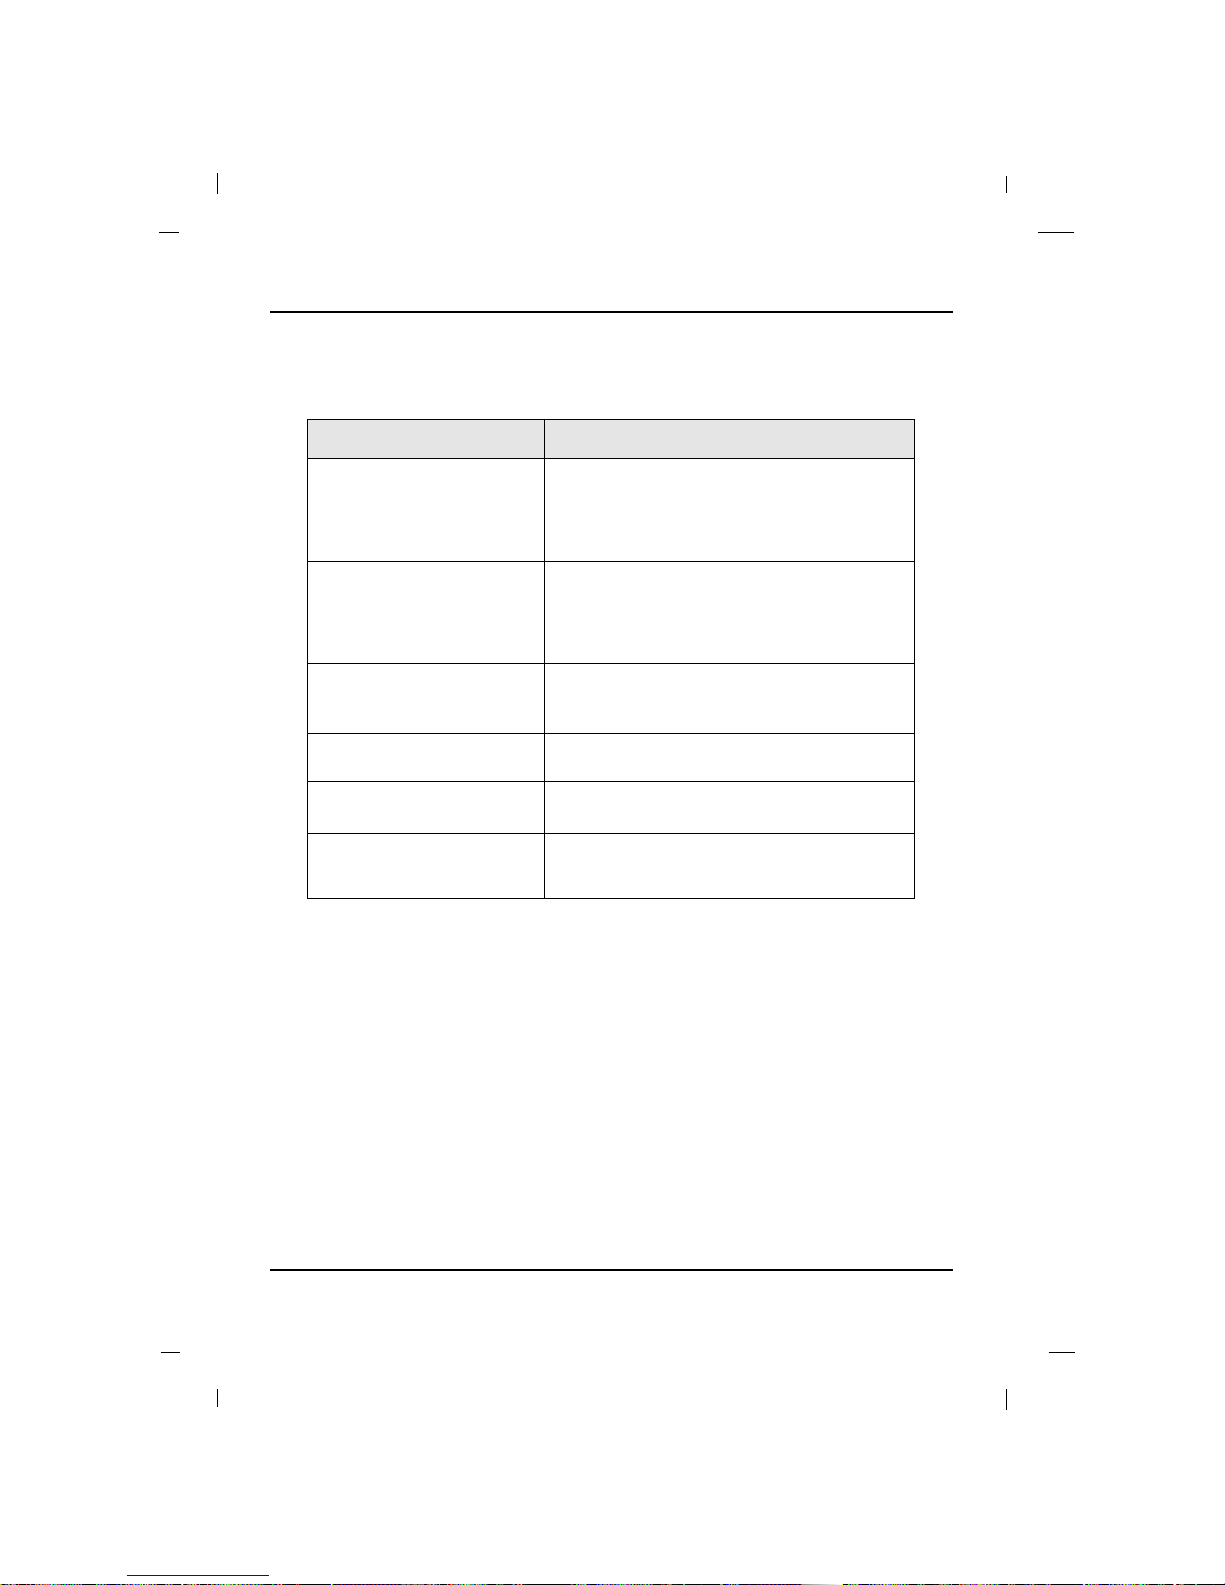
82
Troubleshooting
Troubleshooting
No picture on screen.
The remote control doesn’t work.
Picture appears slowly, after
switching on.
No or Poor color
Horizontal/Vertical bars or picture
shaking
Unusual sound from inside the set.
Problem Solution
• Check whether the set is turned on.
• Make sure the power cord is plugged into the wall.
• Test if there is power coming from the wall outlet by
plugging in another product into the same wall outlet
where the set’s power cord was plugged in.
• Check to see if there is any object between the set and
the remote control causing obstruction.
• Check to see if the batteries are installed with the
correct polarities.
• Install new batteries.
• This is normal as the image is muted during the start up
process of the set. Please contact your service center, if
the picture has not appeared after five minutes.
• Select color in the Picture menu and press the Left or
Right button.
• Check for local interference such as a nearby electrical
appliance or power tool.
• A change in ambient humidity or temperature may result
in an unusual noise at the time of switching off or on of
the set and does not indicate a fault with the set.
Page 71

Page 72

Page 73
Page 74

P/NO : 3350GDKM0094A
GPN09MA001Z
 Loading...