

Page 1
REVISION 1.0
3
Page 2

Page 3

-------------------------------------------------
--------------------------RM22A/RM22D
OPERATIONS MANUAL
HealthCare Information, LLC
3
TABLE OF CONTENTS
SAFETY INSTRUCTIONS
4-6
PACKAGE CONTENTS
7
PRODUCT INTRODUCTION
8-11
IR Remote Control
8
I/O
Panels
9
DVD
10
Keypad
11
INSTALLATION
12
-13
BASIC CONNECTIONS
12
Audio/Video
12
Component
12
PC
12
External Speakers
12
Pillow Speaker/
Sip
&
Puff
12
Software Updates
12
SETUP AND OPERATION
13
Remote
Batteries
13
Function Codes
13
Pillow Speaker/
Sip
&
Puff
13
Scan
13
Date & Time
13
ADVANCED SETUP
14-20
Picture Menu
14, 15
Advanced
14
Zoom Mode
14
Noise Reduction
14
DLC
14
Picture Mode
14
Contrast
14
Brightness
14
Color
15
Tint
15
Sharpness
15
Color Mode
15
Audio Menu
15, 16
Advanced
15
TV Max Vo
lume
15
PS Max Volume
15
Speaker Mode
15
MTS
15
Audio Language
15
Sound Mode
16
Bass
16
Treble
16
Balance
16
Surround
16
AVC
16
Time Menu
16
Sleep Timer
16
Operation On Time
16
Operation Off Time
16
Time Zone
16
Daylight Savings Time
16
Clock
16
Setup Menu
16
-19
Menu Language
16
Transparency
16
Closed Caption
17
CC Mode
17
Basic Selection
17
Advanced Selection
17
FM Setup
17
Channel No
.
17
Frequency
17
Channel Label
17
Favorite
17
Scr
een Mode
17
FM Level
17
Search
17
Save
17
USB Clone
18
Power On Setup
18, 19
Input Source
18
No. On
18
Volume On
18
IR Band
18
Power On Mode
18
LED Control
18
KeyPad Lock
19
OSD Timer
19
Restore Default
19
Lock Menu
19
P
arental Control
19
Change Password 22
System Lock
19
US
19
Canada
19
RRT Setting
19
Reset RRT
19
OP Password
19
Input Source
19
Device
19
Keypad Define
19
Input Auto-Det
19
Information
19
Channel Menu
20
Air/Cable
20
Auto
Scan
20
Cable System
20
Start Scan
20
Bank Control
20
Bank
20
Save/Restor
e Bank
20
Bank Edit
20
Favorite
20
Channel
20
Channel Label
20
DTV Signal
20
FAVORITES
21
PATIENT FUNCTIONS
21
Informat
ion
21
Basic Selec
tion
21
Zoom Mode
21
MTS
21
Channel No.
21
Sound Mode
21
Picture Mode
21
Bank
21
Clear Fav List
21
Show Ch Info
21
PILLOW SPEAKER/
22
SIP & PUFF OPERATION
PARENTAL CONTROL
23-26
TV Ratings
23-25
Setup
25, 26
KEY D
EFINE
26
BANKS
27
Editing Banks
27
CLONING
27
DVD PLAYER
28
-31
Basic Operation
28
Advanced DVD Operation
29
-31
Play
29
Forward/Reverse
29
Pause
29
Language
29
Subtitle
30
Zoom
30
DVD/USB/SD
30
MP3/JPEG Playback
30
General
Setup
30
TV Display
30
OSD
30
Screen Saver
30
Last Memory
30
Preference Page
31
TV TYPE
31
AUDIO
31
SUBTITLE
31
DISC MENU
31
PASSWORD
31
DEFAULT
31
SPECIFICATIONS
32-34
WARRANTY
35
Page 4
-------------------------------------------------
--------------------------RM22A/RM22D
OPERATIONS MANUAL
HealthCare Information, LLC
4
WARNING
To r
educe the risk of fire or electric shock, do not expose this apparatus to rain or moisture and this apparatus shall not be exposed to dripping or splashing and
no objects filled with liquids, such as vases, shall be placed on the apparatus.
Do not use thi
s LCD TV Monitor near water. For example: avoid placing it near a bathtub, washbowl, kitchen sink, or laundry tub, in a wet basement, or near a
swimming pool, etc.
This apparatus shall be connected to a mains socket outlet with a protective earthing con
nection.
The mains plug of this apparatus must remain readily operable.
Advertisement:
Pour réduire le risque du feu ou de décharge électrique, n’exposez pas cet appareil à la pluie ou à l’humidité. L’appareil ne sera pas exposé à l’égoutture ou
l’éclabo
ussement et aucun objet remplis de liquides, tels que des vases, ne seront placés sur l’appareil.
NOTE TO CABLE TV INSTALLER
This reminder is provided to call the cable TV installer’s attention to Article 820-40 of the National Electric Code (U.S.A.). Th
is code provides guidelines for
proper grounding and, in particular, specifies that the cable ground shall be connected to the grounding system of the building as close to the point of the cable
entry as practical.
REGULATORY INFORMATION
Th
is equipment generates, uses and can radiate radio frequency energy, and if not installed in accordance with this instruction manual, may cause harmful
interference to radio communications. However, there is no guarantee that interference will not occur i
n a particular installation. If this equipment does cause
harmful interference to radio or television reception, which can be determined by turning the equipment off and on, the user is encouraged to try to correct the
interference by one or more of the f
ollow measures:
1. Increase the separation between the equipment and receiver.
2. Consult the dealer or an experienced radio/TV technician for help.
CAUTION
Do not attempt to modify this product in any way without written authorization from HealthCare
Information, LLC. Unauthorized modification will void the
warranty of the product.
CAUTION
Danger of explosion if battery is incorrectly replaced. Replace only with the same or equivalent type
.
Page 5

-------------------------------------------------
--------------------------RM22A/RM22D
OPERATIONS MANUAL
HealthCare Information, LLC
5
CAUTION
*
THIS PRODUCT UTILIZES A LASER. USE OF CONTROLS
OR ADJUSTMENTS OR PERFORMANCE OF PROCEDURES OTHER THAN THOSE
SPECIFIED HEREIN MAY RESULT IN HAZARDOUS RADIATION EXPOSURE. DO NOT OPEN COVER AND REPAIR YOURSELF. REFER
SERVIVING TO QUALIFIED PERSONNEL.
CAUTION
Danger of explosion if battery is incorrec
tly replaced. Replace only with the same or equivalent type.
CAUTION
Use only the following UL Listed arms with the BedMate II Model numbers BM15II
and BM15IIDVD.
Model Arm X
CAUTION
Use only the following UL Listed power supplies with the BedMate II Model numbers BM15II
and BM15IIDVD.
PS10, PSI, WM-PSI-LB-ER, WM-PSI-LB, OR WM-PSI-SB
COMPLIANCE
The party responsible for this product’s compliance is:
HealthCare Information, LLC, 113 Commerce Blvd., Loveland, OH 45140, USA.
Phone 513-271
-8100
*Model BM15IIDVD only
Page 6

-------------------------------------------------
--------------------------RM22A/RM22D
OPERATIONS MANUAL
HealthCare Information, LLC
6
IMPORTANT SAFETY INSTRUCTIONS
1)
Read these instructions.
2)
Keep these instructions.
3)
Heed all warnings.
4)
Follow all instructions.
5)
Do not use this apparatus near water.
6)
Clean only with dry cloth.
7)
D
o not block any ventilation openings. Install in accordance with the manufacturer’s instructions.
8)
Do not install near any heat source such as radiators, heat registers, stoves, or other apparatus (including amplifiers)
that produce heat.
9)
Do not def
eat the safety purpose of the polarized or grounding type plug. A polarized plug has two blades with one
wider than the other. A grounding type plug has two blades and a third grounding prong. The wide blade or third
prong are provided for your safety.
If the provided plug does not fit into your outlet, consult an electrician for
replacement of the obsolete outlet.
10)
Protect the power cord from being walked on or pinched particularly at plugs, convenience
receptacles, and the point where they exit fr
om the apparatus.
11)
Only use attachments/accessories specified by the manufacturer.
12)
Use only with the cart, stand, tripod, bracket, or table specified by the manufacturer, or sold
with the apparatus. When a cart is used, use caution when moving the
cart/apparatus
combination to avoid injury from tip-over.
13)
Unplug this apparatus during lightning storms or when unused for long periods of time.
14)
Refer all servicing to qualified service personnel. Servicing is required when the
apparatu
s has been damaged in any way, such as power-supply cord or plug is
damaged, liquid has been spilled or objects have fallen into the apparatus, the
apparatus has been exposed to rain or moisture, does not operate normally, or has
been dropped.
---------
------------------------------------------------------------------------------------------------------------------------
IMPORTANT SAFEGUARDS FOR YOU AND YOUR NEW PRODUCT
YOUR NEW PRODUCT HAS BEEN MANUFACTURED AND TESTED WITH YOUR SAFETY IN MIND. HOWEVER
,
IMPROPER USE CAN RESULT IN POTENTIAL ELECTRICAL SHOCK OR FIRE HAZARDS. TO AVOID DEFEATING
THE SAFEGUARDS THAT HAVE BEEN BUILT INTO YOUR NEW PRODUCT, PLEASE READ AND OBSERVE THE
FOLLOWING SAFETY POINTS WHEN INSTALLING AND USING YOUR NEW PRODUCT, AND SAVE
THEM FOR
FUTURE REFERENCE. OBSERVING THE SIMPLE PRECAUTIONS DISCUSSED IN THE MANUAL CAN HELP YOU
GET MANY YEARS OF ENJOYMENT AND SAFE OPERATION THAT ARE BUILT INTO YOUR NEW PRODUCT.
Page 7

-------------------------------------------------
--------------------------RM22A/RM22D
OPERATIONS MANUAL
HealthCare Information, LLC
7
PACKAGE CONTENTS
After opening, carefully check the package co
ntents:
22 Inch
LCD-TV
IR Remotes are shipped per order.
Manuals are shipped per order*
*The latest version of this manual can be downloaded from www.hci-
tv.com
Page 8
-------------------------------------------------
--------------------------RM22A/RM22D
OPERATIONS MANUAL
HealthCare Information, LLC
8
PRODUCT INTRODUCTION
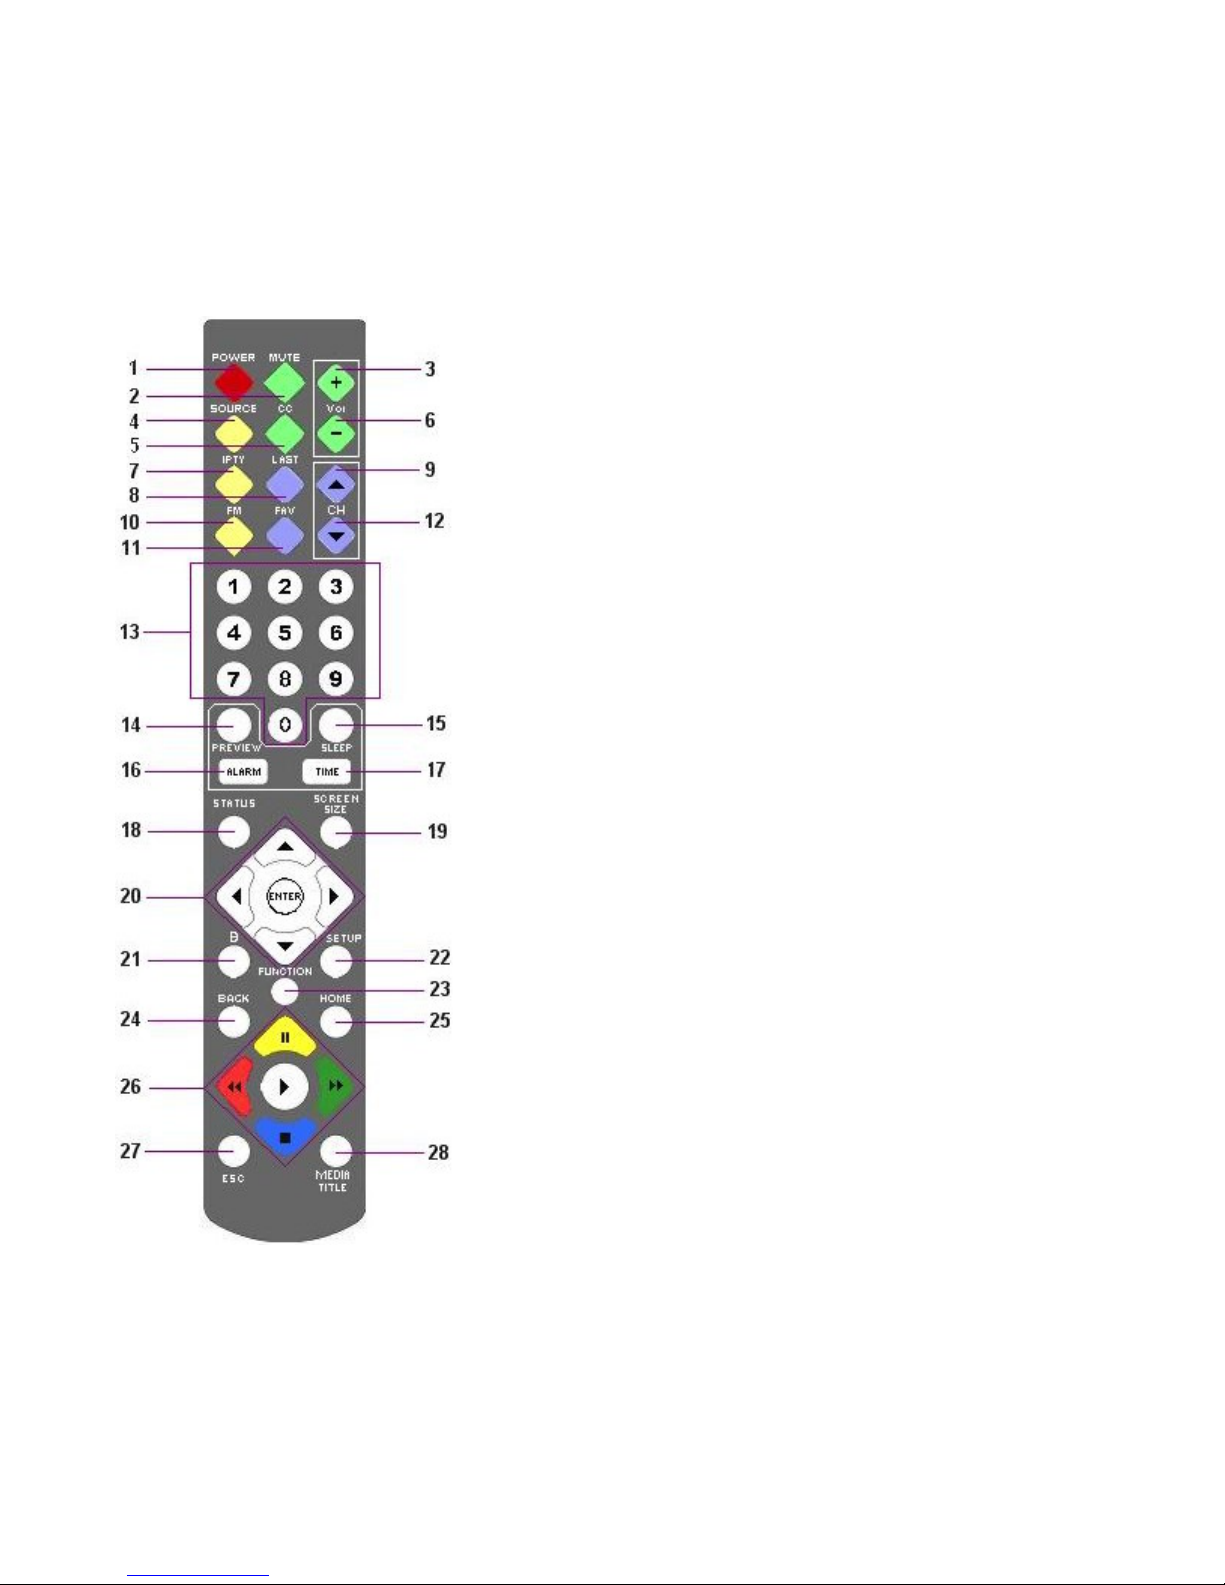
IR Remote Control
1.
POWER
TURNS SET ON AND OFF
2.
MUTE
TURNS SOUND ON AND OFF
3.
VOLUME UP
INCREASES SOUND LEVEL
4.
SOURCE
SELECTS INPUT SOURCE
5.
CC
TURNS CLOSED CAPTIONS ON AND OFF
6.
VOLUME DOWN
DECREASES SOUND LEVEL
7.
IPTV
NO FUNCTION
8.
LAST
CHANG
ES TO LAST CHANNEL OR SOURCE
9.
CHANNEL UP
CHANGES CHANNEL TO THE NEXT
HIGHER PROGRAMMED CHANNEL
10. FM
SELECTS FM MODE
11. FAVORITES
FAVORITES FUNCTION
12. CHANNEL DOWN
CHANGES CHANNEL TO THE NEXT
LOWER PROGRAMMED CHANNEL
13. NUMBER BUTTON
S
DIRECT ACCESS TO CHANNELS
14. PREVIEW
ENTERS PREVIEW MODE (PIP)
15. SLEEP
SETS SLEEP TIMER
16. ALARM
SETS ALARM(S)
17. TIME
DISPLAYS DATE AND TIME
18. STATUS
DISPLAYS TV STATUS
19. SCREEN SIZE
SETS SCREEN SIZE (ZOOM)
20. NAVIGATION
USE
D TO NAVIGATE SETUP MENUS
AND IPTV MENUS
21. BANK
CHANGE BANKS
22. SETUP
USED TO ENTER SETUP MENU
23. FUNCTION
USED ENTER FUNCTION CODES
AND USER FUNCTIONS
24. BACK
NO FUNCTION
25. HOME
NO FUNCTION
26. MEDIA CONTROL
CONTROLS MEDIA PL
AYBACK
27. ESC
28. MEDIA TITLE
DISPLAYS INFORMATION ABOUT
CURRENT SELECTION
NOTE: All HCI BedMate and RoomMate sets use the same IR remote control.
Page 9
-------------------------------------------------
--------------------------RM22A/RM22D
OPERATIONS MANUAL
HealthCare Information, LLC
9
PRODUCT INTRODUCTION
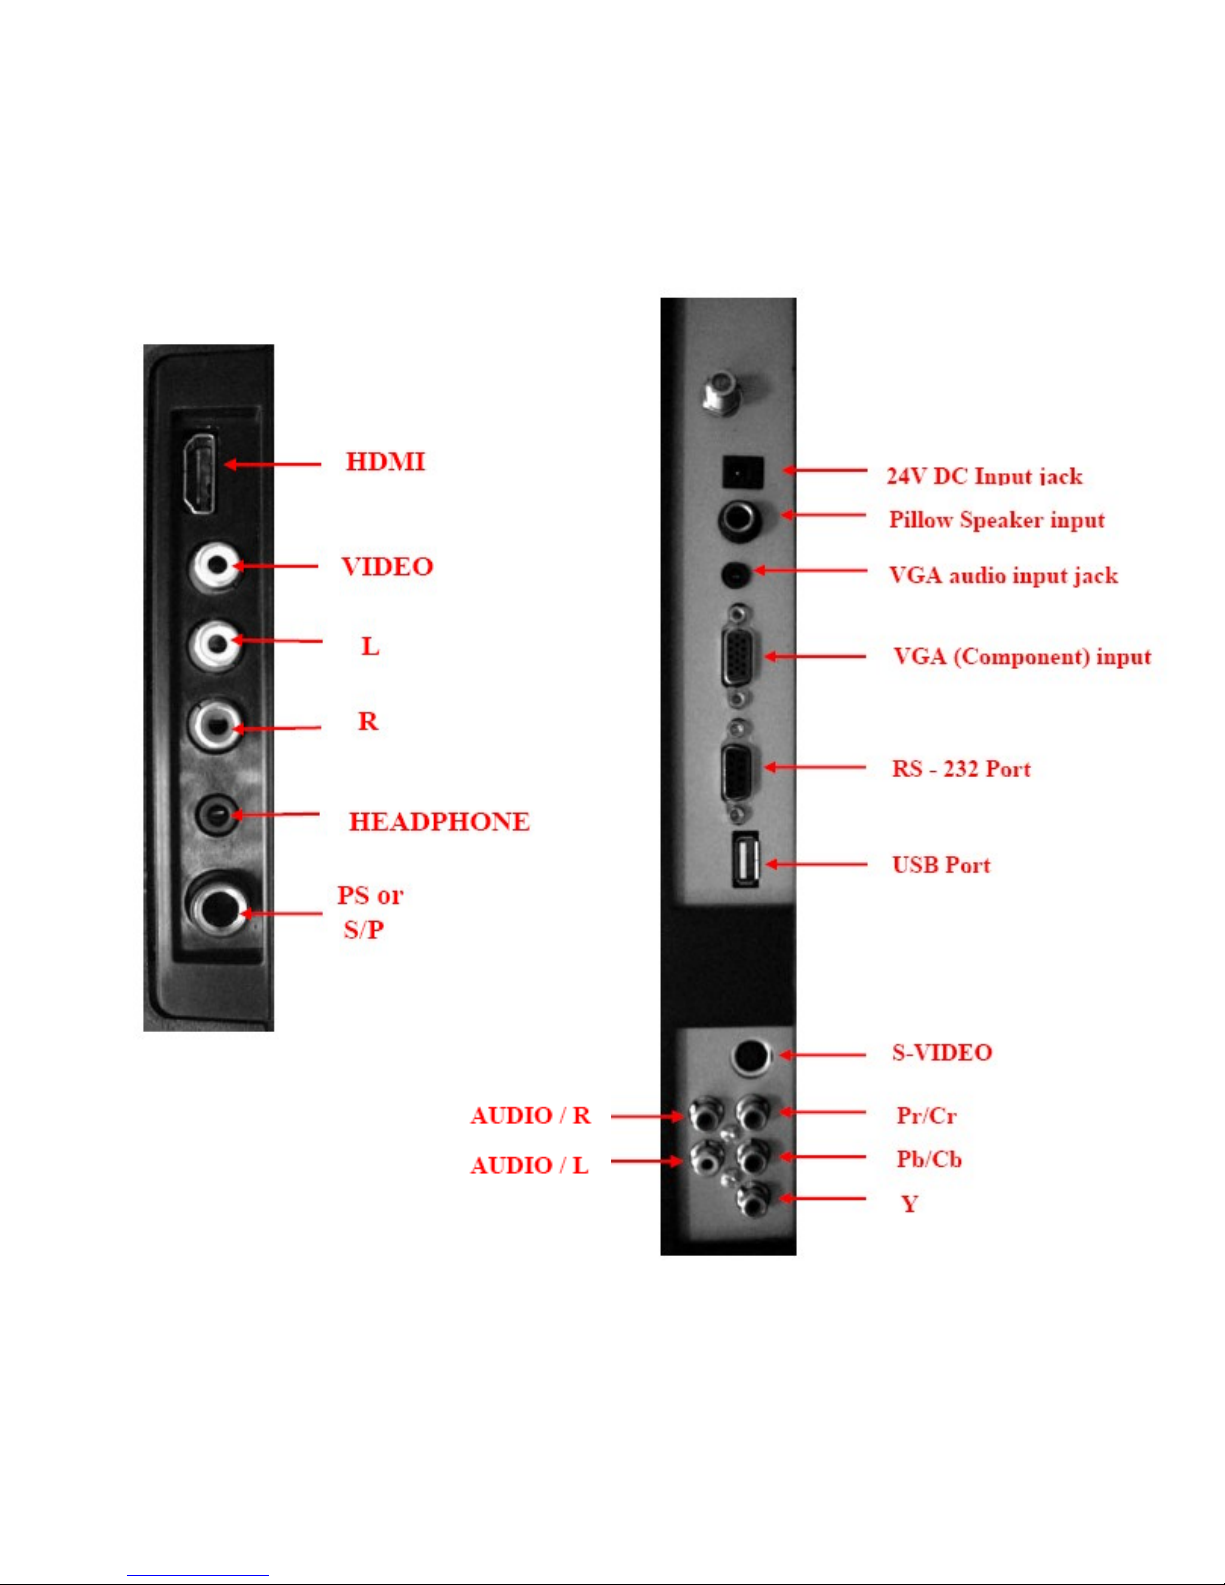
LEFT SIDE INPUT PANEL
REAR I/O PANEL
Page 10
-------------------------------------------------
--------------------------RM22A/RM22D
OPERATIONS MANUAL
HealthCare Information, LLC 10
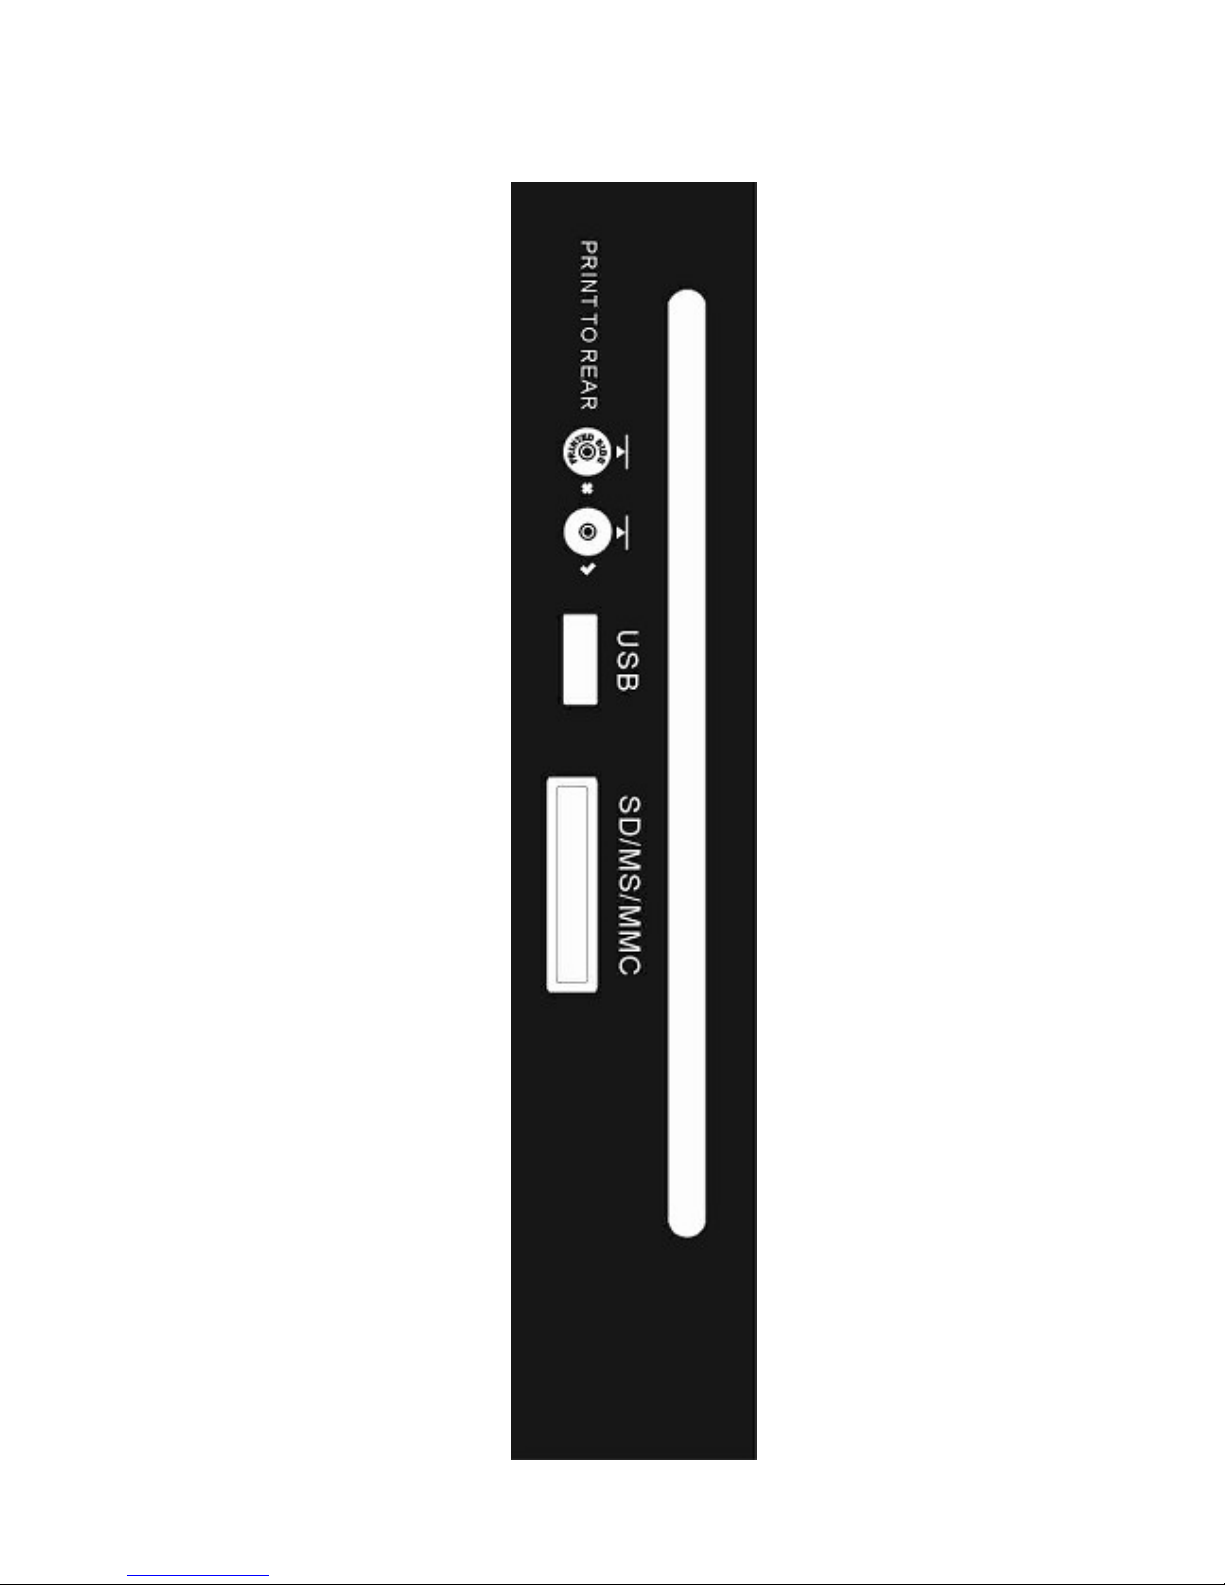
OPTIONAL DVD PLAYER
Page 11
-------------------------------------------------
--------------------------RM22A/RM22D
OPERATIONS MANUAL
HealthCare Information, LLC 11
PRODUCT INTRODUCTION
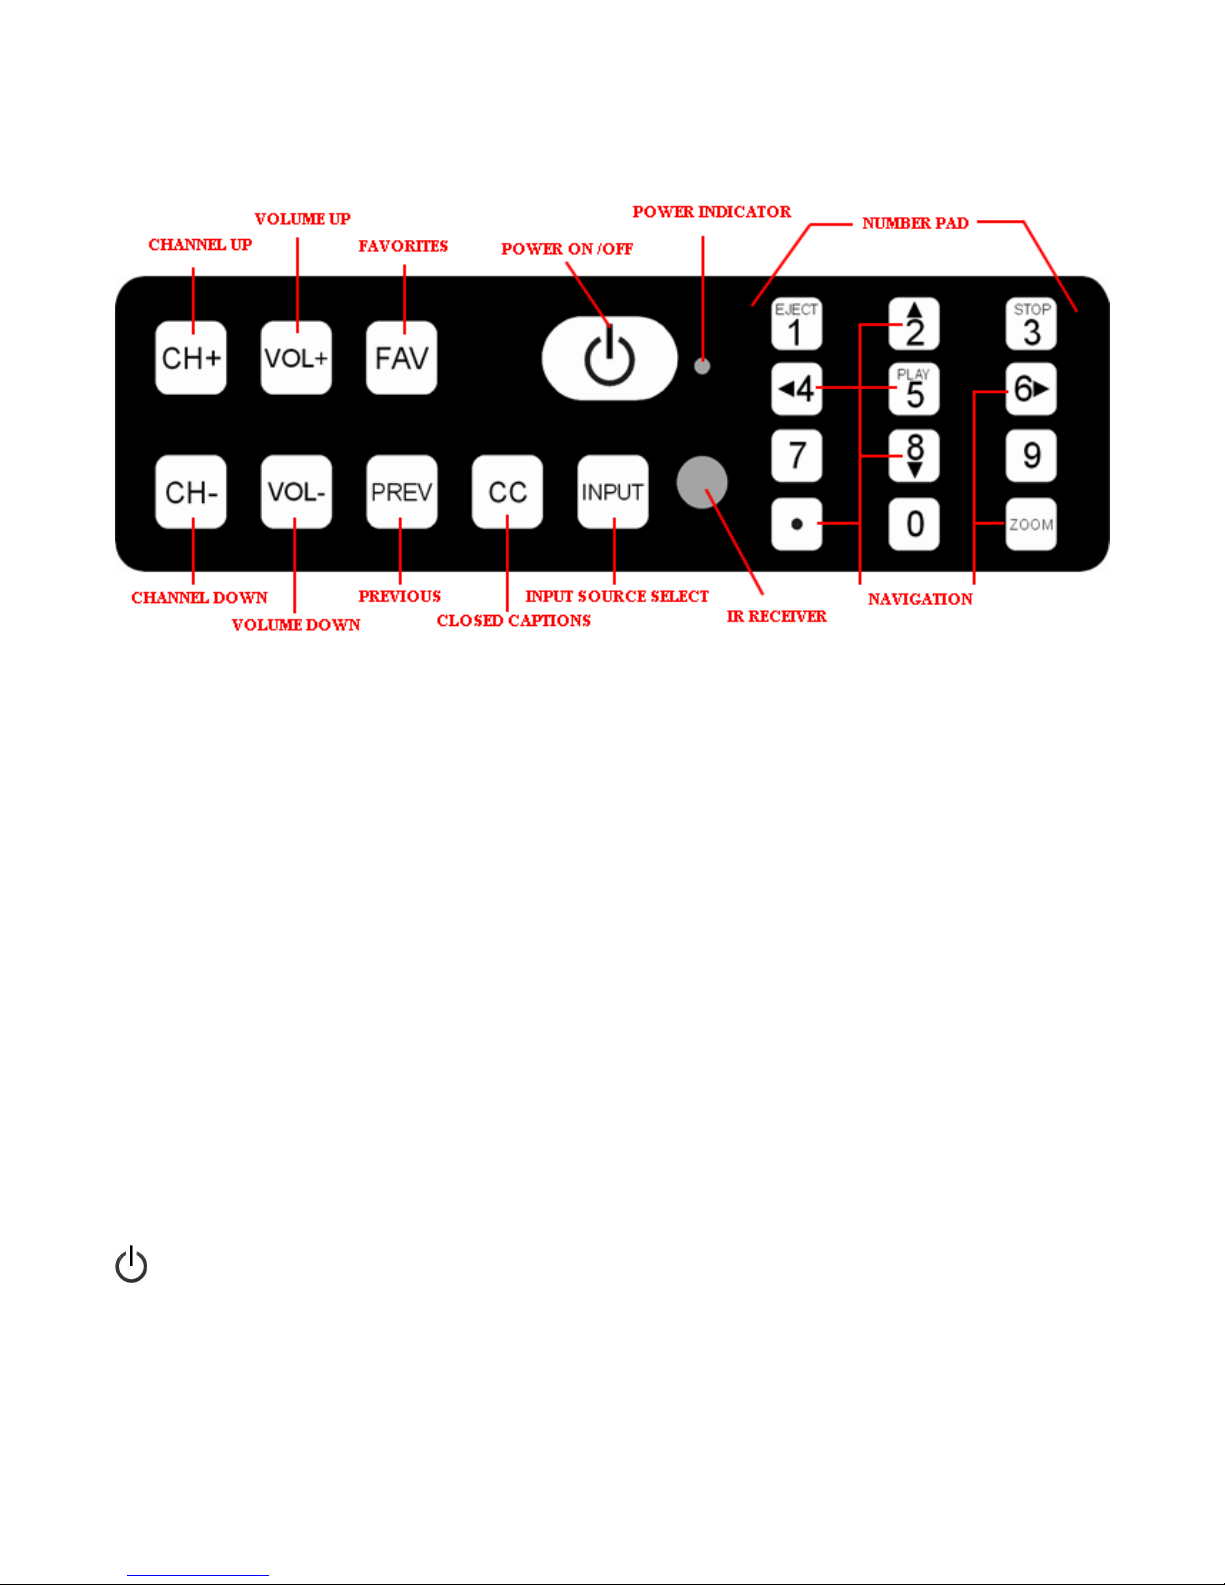
FRONT PANEL
Button Definitions
CH+
CHANNEL UP - Goes to the next higher p
rogrammed channel. If TV is on the
highest programmed channel, goes to lowest programmed channel.
CH
-
CHANNEL DOWN - Goes to the next lower programmed channel. If TV is on the
lowest programmed channel, goes to highest programmed channel.
VOL+
VOLUM
E UP – Increases sound level.
VOL
-
VOLUME DOWN – Decreases sound level.
FAV
FAVORITES –
Change channels stored in favorites list and add channels to favorites
list.
PREV
PREVIOUS – Changes to the previous channel.
CC
CLOSED CAPTIONS – Selects
closed captions mode.
INPUT
INPUT SOURCE SELECT - Selects input source.
Turns set on and off and power indicator.
NUMBER PAD
Direct entry of channels.
NAVIGATION
Navigate
buttons.
Page 12

-------------------------------------------------
--------------------------RM22A/RM22D
OPERATIONS MANUAL
HealthCare Information, LLC 12
BASIC CONNECTIONS
.
Equipment with Composite Audio and Video O
utputs
You can connect a device with composite audio/video outputs such as a DVD or VCR player to the composite input jacks on the
left side of the monitor. Connect the video out
put of the device to the yellow
jack, the right audio output of the device to
the
white jack and the left video output of the device to the red jack. Change the source to AV to use the device.
Equipment with Component Audio and Video Outputs
You can connect a device with component audio/video outputs such as a DVD player to the component input jacks on the
backside of the monitor. Connect as follows:
Device Output
TV Input
Y
Red Y Input Jack
Cb/Pb
Blue Cb/Pb Input Jack
C
r/Pr
Green Cr/Pb Input Jack
Right Audio
Red Component Audio Input Jack
Left Audio
White Component Audio Input J
ack
PC (to use TV as a monitor)
Use a male to male VGA cable to connect a computer monitor output to the PC input on the back of the set. Make sure the
computer resolution is set equal to or lower than 1280 x 800.
External Speakers
You can drive an ext
ernal amplifier and speakers by connecting the composite audio output jacks to the line input jacks of the
external amplifier. The composite audio output level is variable and controlled by the TV volume control and can also be muted.
You can access the se
tup menu and turn the internal speakers off without affecting the composite audio output jacks.
NOTE: Lower the TV volume all the way before connecting an external amplifier and speakers. Once the amplifier and
speakers are connected and turned on, rais
e the TV volume slowly and adjust the amplifier volume as necessary.
Pillow Speakers/Sip-puff device
Before connecting the pillow speaker or sip-puff device to the set, you must plug the set in and enter the setup menu to set the set
for the proper devic
e you are going to use.
The BedMate II
will operate with any digital pillow speaker using Zenith code or any
1-
button analog pillow speaker. A ¼” jack is provided on the side of the set to connect a pillow speaker.
Software Updates
Connect an USB port
on a PC or laptop transfer to the RS-232 port on the TV to update the TV operating software. Your vendor
will supply the necessary software and files to update the software.
Page 13

-------------------------------------------------
--------------------------RM22A/RM22D
OPERATIONS MANUAL
HealthCare Information, LLC 13
SETUP AND OPERATION
Installing the IR Remote Control Batteries
1.
Turn the IR
Remote over. Press down on the arrow and slide the battery cover off the bottom.
2.
Install the two included AAA batteries. The polarity is indicated on the bottom of the battery
compartment. Make sure the batteries are installed correctly.
3.
Slid
e the battery cover back onto the remote and snap into place.
Function Codes
Setup features are accessed using function codes. You will need an IR remote control to enter function codes. To enter a function
code using an IR remote control, press the “FUN
CTION” button followed by the“0”button then enter the function code. The
following codes are available.
CODE
FUNCTION
9999
ACCESS TV OR DVD SETUP MENU
10086
TURN TV ON DURING OFF HOURS
11111
DISPLAY SOFTWARE VERSION
13218
DISPLAY DATE
14
568
TEST MODE
15311
SET IR BAND TO BED ONE
15322
SET IR BAND TO BED TWO
15709
RESET
15428
SERVICE MODE
N
ote: If you change the IR band, your IR remote will no longer function until it is set to the same IR band as the TV. To
change the
IR band of the remote, point the IR remote at the TV and press and hold the power button until the set turns
off.
Press the setup button on the IR remote after entering the “9999” code to access the TV / DVD setup menu.
Enter function code “15428” to ke
ep the setup menu active until the TV is turned off. Once this code is entered you will not have
to enter the “9999” code until the set is turned off.
Only one button analog or digital pillow speakers set for Zenith codes may be
used.
Pillow Speaker/Sip-puff Setup
Access the setup menu. Use the right arrow button to select the “LOCK” menu. Press the down arrow button to select “PILLOW
SPEAKER / SIP-PUFF”. Use the left and right arrow keys to select pillow speaker / SIP-PUFF you wish to use. See page 25 for
additional information.
Auto Scan
Access the setup menu. Use the right / left arrow button to select the “CHANNEL” menu. Press the right arrow button to enter
the "CHANNEL" submenu, press up / down arrow button to select “AUTO SCAN" item. Press the r
ight arrow button to start the
auto scan process. The TV will scan all channels and store active channels in the program list.
Setting Date and Time
Certain features such as the “ALARM” require the proper date and time to function properly. To set the da
te and time:
1.
Enter function code “9999” and press the “SETUP” button on the IR remote to enter the main setup menu.
2.
Access "TIME" menu by using right / left arrow button, use up / down arrow button to select "CLOCK" item.
3.
Use the left and ri
ght navigation buttons to select the number to be changed. Use the up and down arrow keys or the
number keys to set the correct date and time.
4.
Press the “ENTER” button on the IR remote after all fields have been set.
Page 14

-------------------------------------------------
--------------------------RM22A/RM22D
OPERATIONS MANUAL
HealthCare Information, LLC 14
ADVANCED SETUP
Enter function co
de “9999” and press the “
SETUP
” button on the IR remote to enter
the main setup menu. See page 26
for a full
menu tree. Use the navigation buttons to select and change menu items. Press the "
BACK
" button to go back one menu level,
press "ENTER" or "
" butt
on to access the next menu level.
P
icture
Advanced
Selects advanced source. Selections are:
Z
oom Mode - Noise Reduction - DLC
Z
oom Mode
Selects the scale of the picture. Also called screen size. Selections
are:
W
ide - Zoom - Cinema - Normal
W
ide
Adjusts picture size to fill screen. Horizontal and vertical adjustment
may not be proportional.
Z
oom
Adjusts the picture to fill the screen horizontally. The top and bottom
of the picture may be cu
t off.
C
inema Adjusts the picture to fill the screen horizontally and vertically.
The
edges
of the picture may be cut off.
N
ormal Adjusts picture to standard broadcast size. There will be a vertical bank
area on the left and right s
ide of the picture.
N
oise
Comb filter setting. Sets the level of
dynamic noise reduction
R
eduction
for
the
picture.
Selections are:
Off – Low – Medium – High
Noise reduction can help improve a low quality picture. However, if used on
a good
quality picture, the picture quality may decrease. Set for best picture.
DLC
Dynamic Light Control – Turns DLC on or off.
P
icture
Selects the picture mode. Each mode except u
ser is a pre-defined setting
contrast, brightness,
M
ode
tint an
d color mode. Selections are:
S
tandard - Dynamic - Soft – Personal
S
tandard
Default factory setting
D
ynamic
Default factory setting for viewing movies.
S
oft
Default factory setting.
P
ersonal
Uses user settings for contras
t, brightness, tint and color mode.
N
ote
:
If the contrast, brightness, hue or color level ar
e adjusted manually, “personal”
mode is automatically set.
C
ontrast
Adjusts the difference between light and dark areas of the display.
B
rightness
Adjusts the overall brightness of the display.
Page 15

-------------------------------------------------
--------------------------RM22A/RM22D
OPERATIONS MANUAL
HealthCare Information, LLC 15
C
olor
Adjusts the color level of the display.
T
int
Adjusts color balance.
S
harpness
Adjusts sharpness of the display.
C
olor Mode
Adjusts the over all color scheme.
Selections are:
W
arm-Cool-Normal
A
udio Menu
A
dvanced
Selects advanced source. Selections are:
TV Max V
olume – PS Max V
olum
e – Speaker Mode - MTS - Audio Language
TV Max Volume
Sets the maximum allowed volume for the sets internal speakers.
PS Max Volume
Sets the maximum allowed volume for the pillow speaker.
Speaker Mode Switch speakers on and of. Selections are:
Both - Off - TV- Pillow Speaker
B
oth
Internal speakers and pillow speaker.
Off
No sound from internal sp
eakers or pillow speaker.
TV
Internal speakers only.
P
illow Speaker
Pillow speaker only
N
ote: TV Max-Vol
setting
is
used when the Speaker Mode is set for TV or Both
.
P
illow Max-Vol setting is
used when the Speaker Mode
is set fo
r Pillow
.
MTS
Selects sound source. Selections are:
Stereo - Mono - SAP
S
tereo
2 Channel sound. Sound from each speaker may be different. Default
factory setting.
M
ono
Single channel sound. Both speakers pr
oduce the same sound. This setting
may produce better quality sound with weak signals.
SAP
SECOND AUDIO
PROGRAM - Use this setting to listen to an
alternative audio broadcast. This is usually a second language for the
program such
as Spanish. Not all stations broadcast SAP.
A
udio
Selects sound language in DTV mode. Selections are:
L
anguage
E
nglish- French - Spanish
Page 16

-------------------------------------------------
--------------------------RM22A/RM22D
OPERATIONS MANUAL
HealthCare Information, LLC 16
S
ound Mode
Selects the audio mode. Selections are:
P
ersonal - S
tandard – M
usic – M
ovie
P
ersonal
Allows user to adjust sound settings. Selections are:
S
tandard
Default factory setting.
M
usic
Default setting for music.
M
ovie
Default setting for movie.
B
ass
Adjusts low frequency sound levels.
T
reble
Adjusts high frequency sound levels.
B
alance
Adjusts
left and right sound levels.
S
urround
Turns Surround Sound On or Off.
AVC
Automatic Volume Control – Turns automatic volume control on or off. When on, sound
level is adjusted automatically to maintain a constant sound level.
Time Menu
S
leep Timer
Sets amount of time in minutes when TV will turn off. Selections are:
OFF
– 5 -
10 - 15 – 30 – 45 – 60 - 90
- 120 -
180 - 240
O
peration
Sets the
time the TV can be turned on
.
On Time
O
peration
Sets
the time the
TV can not be turned on
.
Off Time
NOTE: TV
can be operated between the “On Time
” setting and “Off T
ime
setting. Set can
not be operated between the “O
ff Time” and “On Time” settings.
If TV is turned on during
non-operating time a message will be dis
played and the TV will shut off automatically.
To
turn set on during “OFF TIME” press the power button on an IR remote and then quickly
enter function code “10086”. See page 16.
T
ime Zone
Sets the
time zone.
D
aylight
Turns Daylight Savings T
ime
on or off
.
S
avings Time
C
lock
Sets clock time.
S
etup Menu
Menu
Selects language the set used for the Menu. Selections are:
L
anguage
E
nglish – French – Spanish
T
ransparency
Turns setup menu transparency on or off
.
Page 17

-------------------------------------------------
--------------------------RM22A/RM22D
OPERATIONS MANUAL
HealthCare Information, LLC 17
C
losed
Se
ts Closed Caption mode.
Ca
ption
CC M
ode
Sets Closed Caption mode. Selections are.
Off – ON – CC on & Mute – CC off & Mute
Off
Closed Captions off.
ON
Closed Captions on.
CC on & Mute
CC off & Mute
Basic
Sets which closed caption mode wil
l be used when CC Mode is set on.
Selection
s
Selection
are:
CC1 - CC2 - CC3 - CC4 - Text1 - Text2 - Text3 - Text4
A
dvanced
Sets which closed caption mode will be used when
CC Mode is set on in DTV
Selection
mode.
Selections are:
Service1
- S
ervice2 - Service3 - Service4 - S
ervice5 - S
ervice6
FM S
etup
Settings for FM reception. NOTE: FM signals must be available on the coax feeding TV
channels to the set.
C
hannel No.
Selects
the favorite FM channel to edit.
Up to 10 favorites
may be
stored.
F
requency
Used to enter the frequency of the selected C
hannel
NO. Use the right / left arrow
keys to select the digit to enter and the up / down arrow keys or the number keys to
change.
C
hannel
Used to enter a station ID label for the selected Channel
NO. This label will be
L
abel
displayed if
the On Screen Display is set on. See SCR Mode
. Use the right / left
arrow keys to select the character to enter and the up / down arrow keys to change.
F
avorite
Turns
favorite function on and off.
S
creen
Mode
Set the background screen mode during FM operation. Selections are:
B
lack Screen -Blue Screen – B
acklight Off
–
B
lack Screen + OSD -Blue Screen + OSD
B
lack Screen
Black screen only.
B
lue Screen
Blue screen only.
B
acklight Off
S
creen off. LCD back light turned off.
B
lack Screen
+ OSD
Black background with FM On Screen
Display.
Blue Screen + OSD
Blue background with FM On
Screen Display.
FM L
evel
Sets the minimum FM signal strength the set will stop at when scanning. This
allows weak channels to be skipped.
S
earch
Auto searches for FM channels.
S
ave
Saves the current FM setup into permanent memory. The TV will store all settings
into operating memory. These settings will not be lost if there is a power outage.
This func
tion allows the saved settings to be reloaded into operating memory should
someone change t
he settings accidentally. Any previous saved settings will be lost.
Page 18

-------------------------------------------------
--------------------------RM22A/RM22D
OPERATIONS MANUAL
HealthCare Information, LLC 18
USB C
lone
Stores or reads TV setup using a USB flash drive.
Read Loads TV setup data from a US
B drive.
Write Saves TV setup data to a USB drive.
Power On
Determines TV setti
ngs used when TV is turned on.
Setup
Input Source
Sele
cts the input source the TV uses
when turned on. Selections are:
N
one - TV - AV - S-Video - DVD - Component - HDMI - FM - VGA.
N
one
TV turns on to same source being used at turn off.
TV
Rear panel F connecter.
AV
Left side audio / video jacks.
S-V
ideo
Rear panel YC signal input.
DVD
Side panel DVD interface.
C
omponent
Rear panel component audio / video input.
HDMI
Side panel high definition multimedia interface.
FM
FM Radio.
VGA
Rear panel computer monitor input.
Note:
The names of these sources can be changed in the source menu
.
Ch No. On
Set channel TV will tune to when turned on. 000.000 turns on to same channel TV was
on when tur
ned off. INPUT SOURCE must be set to TV.
V
olume On
Sets the turn on volume level the set will use at turn on.
If set to 0, volume will be the
same as when set was turned off.
IR B
and
Sets the IR band for the IR remote control. The IR BAND of the remo
te control
must
be
set to match the TV.
Selections are:
Band 1 – Band 2 – Band 3 – Band 4
NOTE: To change the IR band of the IR remote, press and hold the power button on the IR
remote for 10 seconds. The HCI remote can use Band 1 and Band 2.
Band 3 and Band
4 are for universal remotes. Off disables the IR receiver. You can use the front panel
left/right arrow buttons to change this selection also.
P
ower On
Sets power mode of the set. Selection are:
OFF – Mode 1 – Mode 2 – Mode 3
Of
f
Normal Operation
MODE 1 Set turns on when AC power is applied, can not be turn off.
MODE 2 Set turns on when AC power is applied, can be turned off.
MODE 3 Quick Start, same as OFF but set turns on faster.
LED C
ontrol
Sets the status of the power LED when the set is on or off.
Selections are:
Normal – Reverse – OFF-ALL – OFF
-BLK
Normal
Power LED is off when the set is on and on when the set is off.
Reverse
Power LED is on when the set is on and off when the set is off.
OFF-ALL
Power
LED is off whether the set is on or off.
OFF
-BLK
Power LED is off but blinks
when the IR Remote Control is working.
Page 19

-------------------------------------------------
--------------------------RM22A/RM22D
OPERATIONS MANUAL
HealthCare Information, LLC 19
K
eypad
Disables the front panel keypad on models equipped with keypad.
Selections are:
L
ock
Off – Lock 1 – Lock 2
Off
Keypad fu
nctions normally.
L
ock
1
Only POWER button functions.
L
ock
2
CH+, CH-,
VOL+, VOL- and POWER button function.
OSD T
imer
Determines how long
in seconds
the on screen display stay on the screen.
Selections are.
10 – 20 – 30 – 40 - 50 – 60 – Alway
s
If “Always”
is selected. The display will remain on
the screen until the "ENTER" button is
pressed on the IR remote.
Restore
Resets all settings to
factory default.
Default
L
ock Menu
P
arental
Sets the password for
parental control. To access en
ter the proper password. Default
Control
password is “9999”.
See pages 27
-28
for ratings explanation.
Selections are:
C
hange Password -System Lock - US - C
anada - RRT S
etting - R
eset
RRT.
C
hange
Change parental control password.
Password
S
ystem
Tu
rns parental control on or off. Must be on to set ratings
L
ock
US
Settings for US ratings.
C
anada
Settings for Canadian ratings.
RRT
Rating Region Table –
set
according to your region and
requirements.
Setting
R
eset
RRT Resets the
RRT.
OP
Change t
he password
used to access the setup menus. D
efault password is "9999"
P
assword
I
nput
Locks the various inputs so they can not be selected. Highlight the source and press
Source
the “ENTER” button to lock or unlock. Locked sources will not appear in
the source
selection menu.
D
evice
Sets the TV for Pillow Speaker or Sip & Puff functions
K
eypad
Changes the functions of the f
ront panel buttons. See Page 29.
D
efine
I
nput
When on, the TV will return to the previous input source if
there is
no video or the
A
uto-Det
video is lost for the selected input.
Serial Control When on allows TV to be controlled via an RS-232 device through the serial port.
I
nformation
Displays current information about input source and software
version.
Page 20

-------------------------------------------------
--------------------------RM22A/RM22D
OPERATIONS MANUAL
HealthCare Information, LLC 20
C
hann
el Menu
Air
/ C
able
Selects signal source. Selections are:
Air – Cable
Air
Select if using off air antenna.
Cable Select if connected to cable system.
A
uto Scan
Automatically scans for available channels.
Cable
Determines type of c
able system being used. Selections are:
System
AUTO – STD – IRC – HRC
A
UTO Automatically determines cable type. Default setting.
STD Standard cable systems. Most US.
IRC IRC Cable systems.
HRC HRC Cable systems.
Start
Scan
Starts
auto scan process.
NOTE: To manually add and delete channels, see BAN
KS on page 30
.
B
ank Control
Bank control and editing. See page 30
.
B
ank
Sets the active bank.
Save/Restore Saves
or restores
bank to
or from
permanent memory
.
Ba
nk
Bank Edit
Manually add and delete channels from the
program
banks.
F
avorite
Displays a list of all channels. Highlight any channel and press “ENTER” to add or
delete selected channel to or from the favorites list. A check mark on the
right
indicates the selected channel has been added to the favorites list.
C
hannel
Displays current channel number.
Use right and left arrow buttons to change
c
hannel.
Selected channel will be displayed behind the menu.
C
hannel Label Used to enter a channel label for the currently selected channel. See
“CHANNEL”
above.
Use the left and right
arrow buttons to select the character
and the up and down arrow keys to change the selected character. Press and hold
the up or down arrow buttons to scroll th
rough the characters at a fast rate. Press
the "BACK" button when done.
DTV S
ignal
Displays current quality of DTV input signal.
Page 21

-------------------------------------------------
--------------------------RM22A/RM22D
OPERATIONS MANUAL
HealthCare Information, LLC 21
FAVORITES
The set BM15II can store
10
favorite channels for quick access. To set up and access the favorite channels:
1. Tune to the channel you wish to add to or erase from the favorites list.
2. Press and hold the FAV button on the IR remote until ADDING..OK or ERASING..OK appears on the upper left of
the display.
Adding a channel to the favorites list after 10 channels
have been added will cause the first channel
added to be dropped from the list.
3. To quickly tune a favorite channel, press and release the FAV button. The TV will step through the stored list of
favorite channels with each press.
You can also manually ad
d and delete channels from the favorites list in the setup menu. See page 23.
NOTE: In newer version sets the FAVORITES function (FAV) has been changed to EDUCATION (EDU). Operation is the
same.
PATIENT FUNCTIONS
TIENT FUNCTIONS
There are several func
tions that the patient can access by pressing the "FUNCTION" button on
the IR remote. Available functions a
re:
Information – Clear Favorites List – Show Channel Information
I
nformation
Displays current TV/FM
information
(TV and FM mode o
nly).
Basic Selection
Displays current closed caption
mode.
Zoom Mode
D
isplays current zoom mode.
MTS
Displays current audio of channel.
Channel No.
Displays current channel number.
Sound Mode
Displays current sound mode.
Picture Mode
Displays current picture mode.
B
ank
Displays current program
bank.
(tier
)
C
lear Fav List
Clears the favorite channel list
. Select “Yes” to clear the favorites channel list.
S
how Ch Info
Turns channel display on or off. When on the time
and channel number are displayed briefly
when the channel is changed.
Page 22
-------------------------------------------------
--------------------------RM22A/RM22D
OPERATIONS MANUAL
HealthCare Information, LLC 22
PILLOW SPEAKER & SIP / PUFF DEVICE OPERATION
For pillow speakers with an analog (rotary) type volume control, you may wish to lock the TV volume at a preset level to assure
proper volume to the pillow speaker at all times. Some digital pillow speakers have rotary volume controls.
See page 15 for information on connecting pillow speakers & SIP/PUFF DEVICE.
See page 18
to disab
le the TV’s internal speakers.
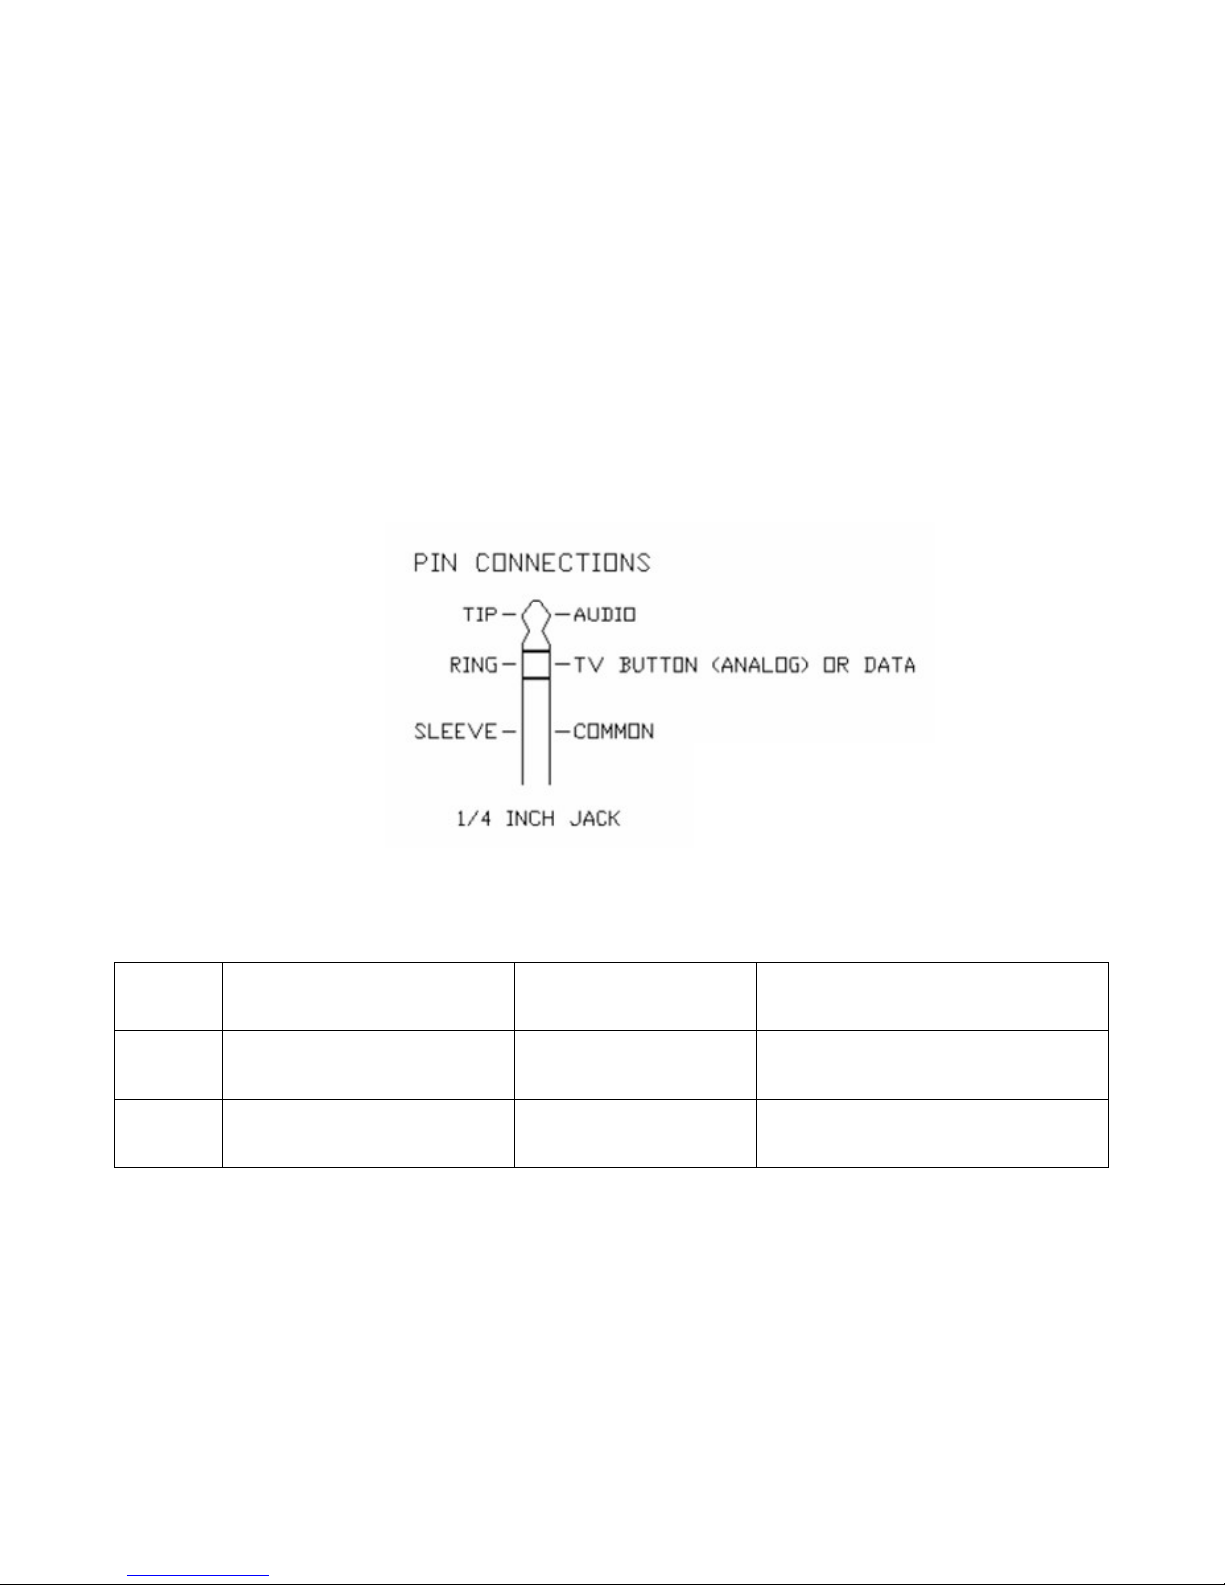
The BedMate II has a ¼” jack for pillow speaker connection. A one button analog pillow speaker or a digital pillow speaker set
for Zenith code may be used.
Make sure the TV is setup for the proper pillow speaker or S/P dev
ice being used before connecting the pillow speaker or S/P
device.
Pin Out
SIP/PUFF function:
Action
Less than 2 seconds
More than 2 seconds, less
than 3 seconds
More than 4 seconds
SIP
CH up / down
CH up / down direction
switching
Power on / off
PUFF
VOL up / down
VOL up / down direction
switching
Mute
Page 23
-------------------------------------------------
--------------------------RM22A/RM22D
OPERATIONS MANUAL
HealthCare Information, LLC 23
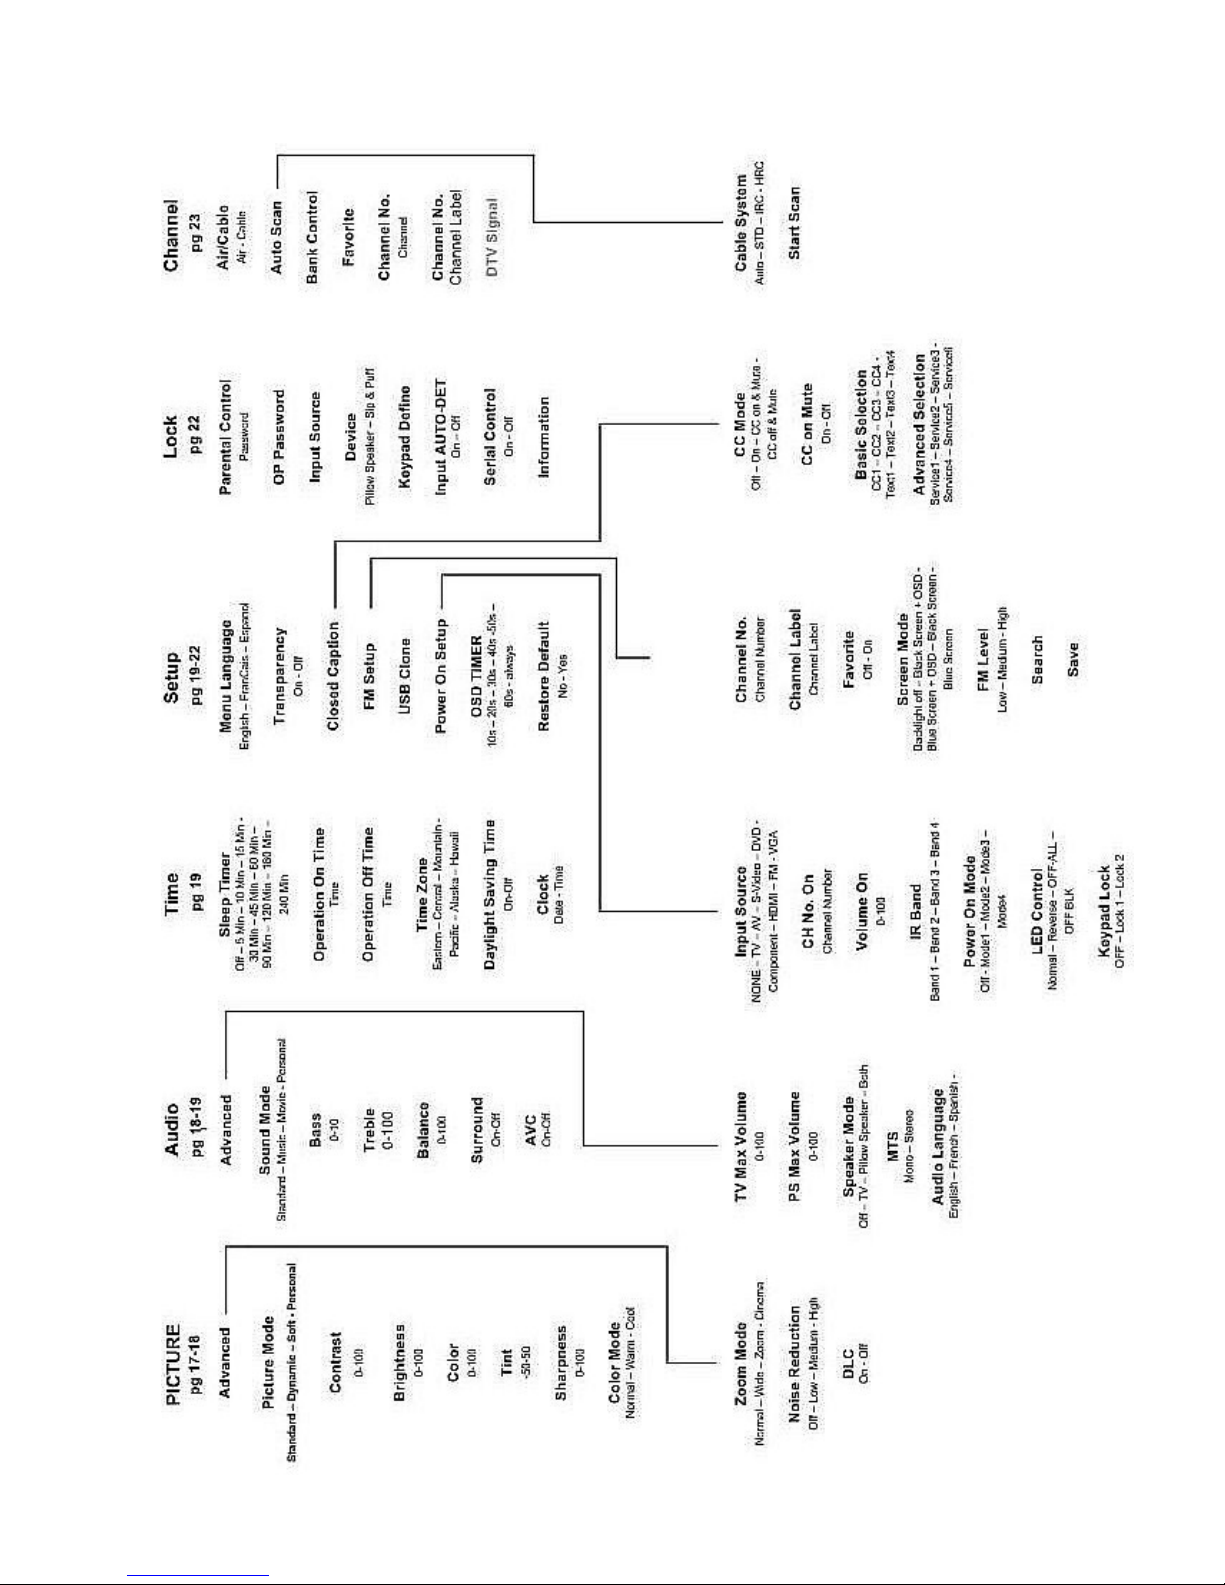
MENU TREE
Page 24
-------------------------------------------------
--------------------------RM22A/RM22D
OPERATIONS MANUAL
HealthCare Information, LLC 24
PARENTAL CONTROL
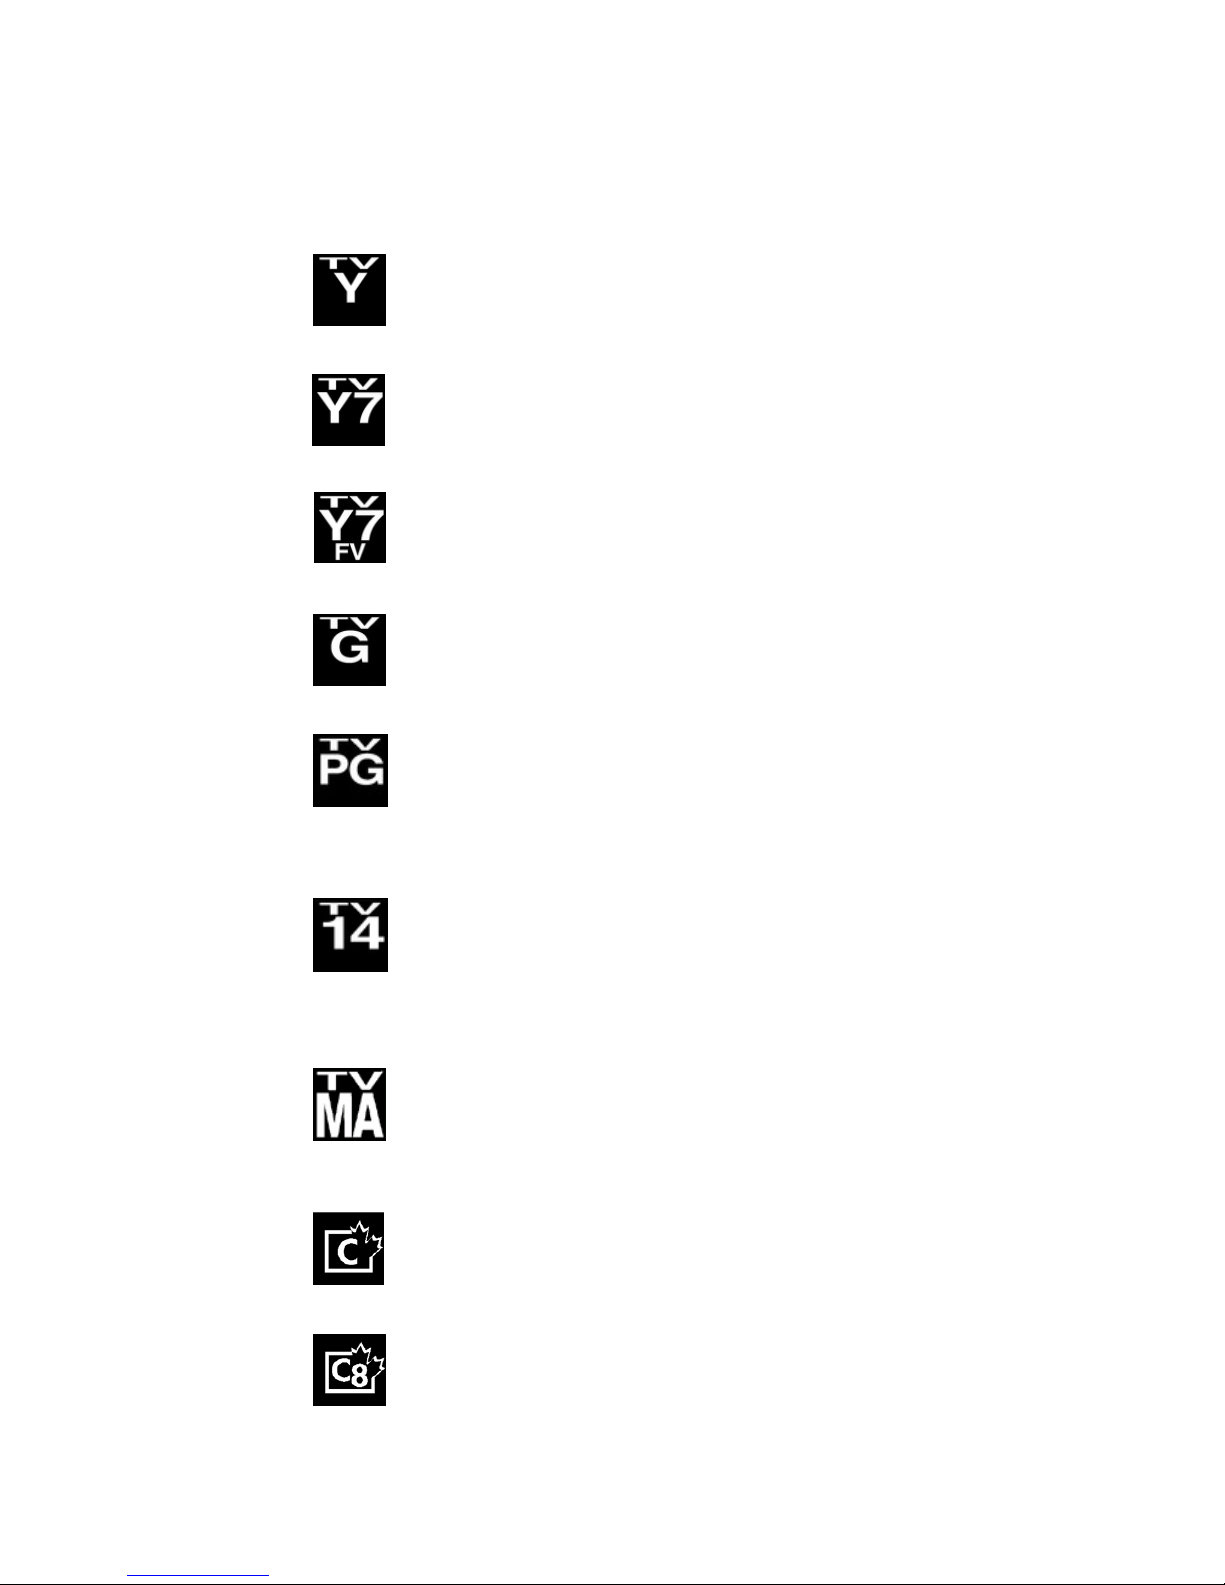
TV RATINGS
United States
TV
-Y
Content appropriate for all ages.
TV-Y7
Content ma
y not be suitable for children under 7 years of age.
TV-Y7-FV
Content may not be suitable for children under 7 years of age. Contains
fantasy violence.
TV
-G
General Audiences
TV-PG
Content may not be suitable for young children
V
Moderat
e Violence
S
Mild Sexual Situations
L
Mild Coarse Language
D
Suggestive Dialogue or Drama
TV
-14
Content may not be suitable for children under the age of 14.
V
Intense Violence
S
Moderate Sexual Situations
L
Coarse Language
D
Highly Suggestive Dialogue
TV-MA
Content intended for mature audiences only.
Canadian Ratings
C
Content suitable for children under 8 years of age. No profanity or sexual
content. Minimal comedic violence.
C8
Content suitable for
children over 8 years of age. No profanity.
Occasional “socially offensive and discriminatory” language allowed if in
the content of the story. Little or no sex or nudity.
Page 25
-------------------------------------------------
--------------------------RM22A/RM22D
OPERATIONS MANUAL
HealthCare Information, LLC 25
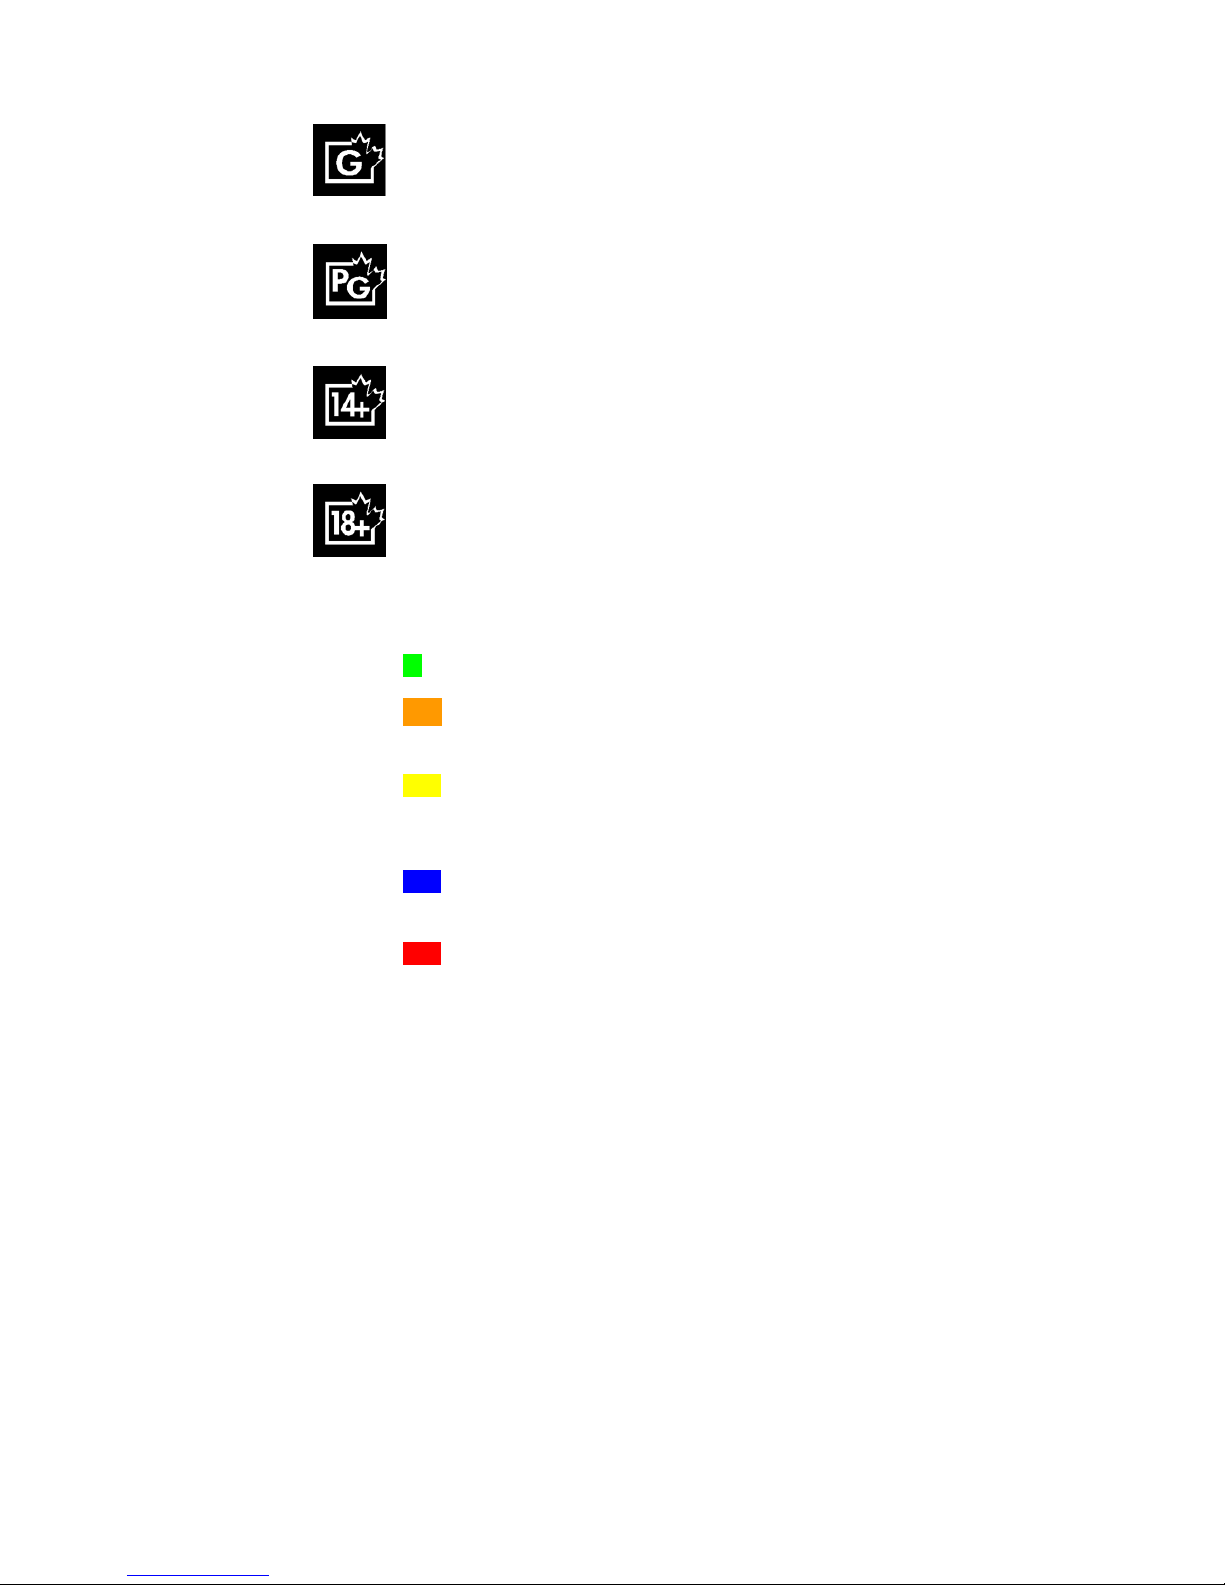
G
Content suitable for the entire family. Minimal violence, no profanity or
sexual content.
PG
Parental guidance suggested. Moderate violence, mild profanity, brief
nudity and sexual references allowed if important to the story line.
14+
Content intended for viewers over 14 years of age.
18+
Content intended fo
r viewers over the age of 18. May contain strong
violence, language and sexual activity.
Quebec Ratings
G
Content appropriate for all ages. Little or no violence or sexual content.
8+
Content appropriate for children over the age of 8. May cont
ain little
violence, some foul language and little or no sexual content.
13+
Content appropriate for teenagers over the age of 13. May contain
moderate violence, language and some sexual situations. Children under
the age of 13 should be accompanied by
an adult.
16+
Content appropriate for teenagers over the age of 16. May contain strong
violence, language and sexual content.
18+
Content for adults over the age of 18 only. May contain extreme violence,
graphic sexual content and pornography.
E
Ex
empt programming. No rating will appear on screen.
Setup
1.
Enter the setup menu. See page 16.
2.
Go to the LOCK MENU and select PARENTAL CONTROL. Press the right arrow button.
3.
Enter password. Default password is “9999”.
4.
Select CHANGE PAS
SWORD if you wish to change the password. Follow the on-screen prompts to change
the password.
5.
Select RRT SETTING. Use the right arrow button to select the highest rating you wish to
allow. You can reset the RRT SETTING to factory default.
6.
Sel
ect TV RATING. Press the right arrow button.
Page 26
-------------------------------------------------
--------------------------RM22A/RM22D
OPERATIONS MANUAL
HealthCare Information, LLC 26
7.
Use the arrow buttons to select rating levels. Press the ENTER button to block or unblock each rating. Some
ratings will effect the rating below them. Press the BACK button when finished.
8.
Select MPA
A. Use the right arrow button to select the highest rating you wish to
allow. The selected rating and all ratings below will be allowed. All rating above will be blocked.
9.
Select Canada English. Use the right arrow button to select the highest rat
ing you wish to allow. The selected
rating and all ratings below will be allowed. All rating above will be blocked.
10.
Select Canada French. Use the right arrow button to select the highest rating you wish to allow. The selected
rating and all rating
s below will be allowed. All ratings above will be blocked.
KEY DEFINE
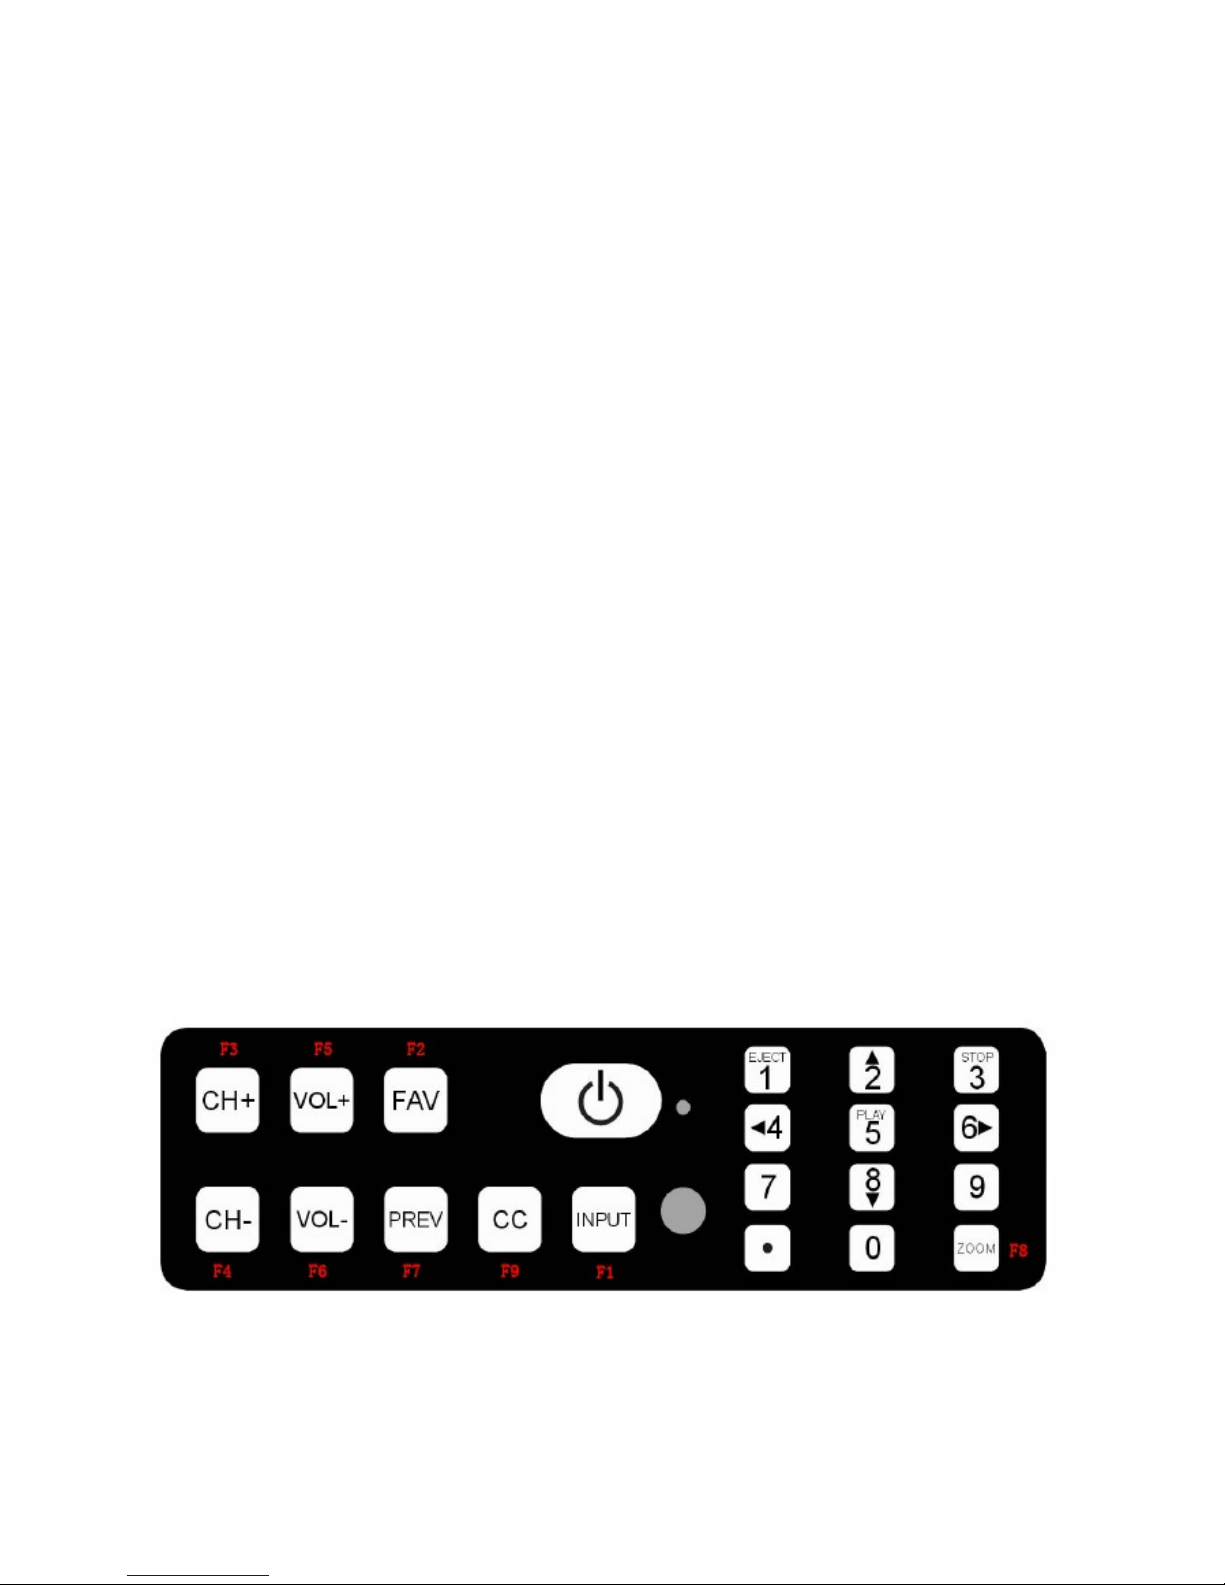
The functions of the front or side panel buttons can be redefined. To change the functions:
1.
Enter the setup menu.
2.
Select KEY DEFINE in the LOCK menu and press the right
arrow button.
3.
Select the button you wish to change.
Not all buttons can be changed.
See diagram for
button locations.
4.
Use the right and left arrow button to change the function.
5.
Repeat steps 2 and 3 for all buttons you wish to change.
6.
Press the "BACK" button when finished.
FRONT PANEL ONLY
Page 27

-------------------------------------------------
--------------------------RM22A/RM22D
OPERATIONS MANUAL
HealthCare Information, LLC 27
BANKS
The TV has four banks (also know as tiers) to store active channel lists.
When an auto scan is preformed, all channels found are
set to active in BANK 1. The default bank is BANK1. Using the bank edit function, the active channels can be enabled or
disabled in each bank. Banks can also be copied from one to another. All channels in a bank can also be completely cleared or
set.
A typical use for banks would be for a simple
rental system. Bank 1 could have only free and patient education channels active.
Bank 2 could have free, basic and patient channels active. Bank 3 could have free, basic, premium and patient channels active.
Bank 4 could have only staff channels active.
In this way a single distribution system can deliver all channels to each TV, but
only the active channels in the selected bank can be viewed on the TV.
EDITING BANKS
1.
Select BANK CONTROL under the CHANNEL setup menu.
2.
Press the right arrow butto
n to enter BANK EDIT.
3.
Use the right,
left
, up and down
arrow buttons to select which bank you wish to change.
4.
Press the "ENTER" button to toggle the channels status. A check mark indicates
active. Use this feature to
add missing channels or t
o delete unwanted channels from the program list.
5.
Repeat steps 3-5 for all channels you wish to change.
6.
To copy a bank use the left and right arrow keys to select the bank you wish to copy from. The channel
selection does not matter. Press the yellow key. Use the left and right arrow keys to select the bank you wish
to copy to and press the yellow button again.
7.
To clear a bank, use the left and right arrow keys to select the bank you wish to clear. The channel selection
does not matter. Pre
ss the green button. All channels in that bank will be set to inactive.
8.
To set a bank, use the left and right arrow keys to select the bank you wish to clear. The channel selection does
not matter. Press the dark red button. All channels in that bank will be set to active.
9.
To edit the AIR or CABLE press the blue button and follow the above instructions.
10.
When finished, press the BACK button to exit the bank edit screen.
11.
If you wish to save or restore the bank setup in memory, select SA
VE OR RESTORE BANK in the
CHANNEL menu and press the right arrow button.
CLONING
Once one TV is completely setup you may clone (copy) the settings to another set. To clone:
1. Insert a USB flash drive in to the USB port located on the rear jack panel. NO
TE: This port can only be used for
cloning.
2. En
ter the setup menu. See page 16
.
3. Go to the “Setup” menu and select “USB Clone”.
4. Select “Write” and press the enter button. Screen will display “Operating, Please wait…”. The write process will
take a cou
ple of minutes.
5. When finished, remove the USB flash drive and install it into the set to be copied to.
6. En
ter the setup menu. See page 16
.
7. Go to the “Setup” menu and select “USB Clone”.
8. Select “Read” and press the enter button. Screen will displa
y
Page 28
-------------------------------------------------
--------------------------RM22A/RM22D
OPERATIONS MANUAL
HealthCare Information, LLC 28
D
VD PLAYER (OPTIONAL)
NOTE: The TV must be in DVD mode to access the DVD functions. Use the “INPUT button on the front panel or the “Source”
button on the IR remote control to select the DVD source.
Basic operation
1.
Turn on the LCD TV and then press "SOURCE
" button repeatedly to select DVD mode.
2.
Insert disc into the DVD player. Printed side
should face towards back of set. Screen will display “CLOSE”
then “READ” Player will switch to play mode automatically after content is loaded.
CAUTION, USE ONL
Y
12CM (STANDARD SIZE) DISCS IN THE DVD PLAYER, SMALLER DISCS WILL NOT PLAY AND
WILL BECOME STUCK INSIDE THE DVD PLAYER.
3.
Some discs will not go into play mode automatically. If the disc does not play automatically, to press "
" or
select from the disc menu to start.
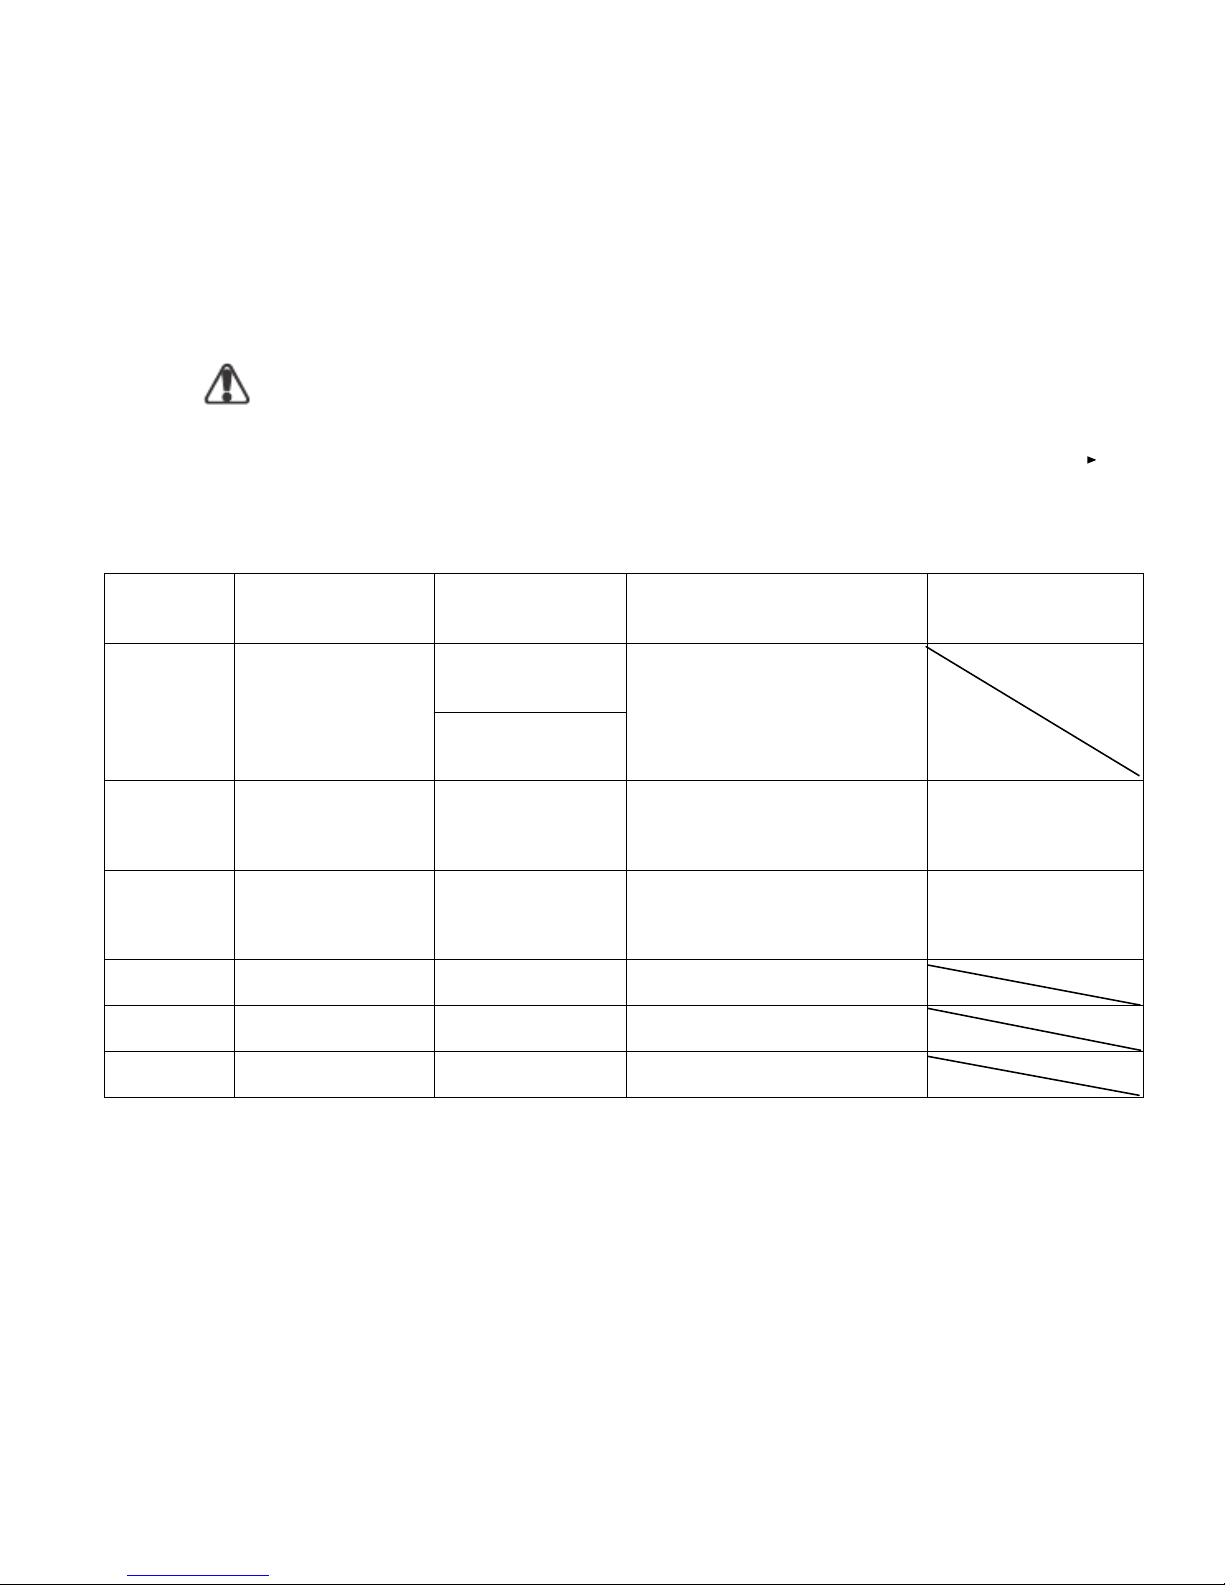
The DVD player will play the following formats.
Disc Type
Disc Size (Diameter) Recorded Time
Recorded Content
Remarks
Single side:
120mins. Approx
DVD
12cm
Double side:
240mins. Approx
DVD format:
Compressed digital
audio and video
Super VCD 12cm
45mins. Approx
MPEG2
Compressed digital
audio and video
Include SVCD
VCD
12cm
74mins. Approx
MPEG1
Compressed digital
audio and video
Include:
VCD2.0/ VCD1.1
VCD1.0/ DVCD
CD
12cm
74mins. Approx
CD-DA: Digit
al audio
HD-CD
12cm
74mins. Approx
HD-DA: Digital audio
MP3/JPEG 12cm
600mins. Approx
Digital audio
Page 29

-------------------------------------------------
--------------------------RM22A/RM22D
OPERATIONS MANUAL
HealthCare Information, LLC 29
ADVANCED DVD OPERATION
Play
P
ress "
" button on the remote control or
the
"5 ENTER" button on front monitor from
the
title
menu;
while playing the DV
D, you may play your favorite title directly with title selection by pressing the
"SETUP" button on remote control or the "9" button on front monitor.
F
or Super VCD & VCD discs, while playing the Disc, you may play your favorite tracks by numeric
buttons.
For CD, CD-G & HD-CD discs, while playing the Disc, you may play your favorite tracks by numeric
buttons.
For MP3 / JPEG Disc, you may play your favorite tracks by numeric buttons from the content menu.
If input track number is not valid, it will not f
unction.
Previous/Next (ON FRONT MONITOR)
While playing the disc; press "
4" button on front monitor to play to the last Title / Chapter / track.
Press "6
" button on front monitor to play to the next Title / Chapter / track
.
Forward/
Reverse
Th
ere are 5 forward and 5 reverse speeds. Use the (2) button for fast forward and the (8)
button for reverse. Each press of the button goes to the next speed.
FORWARDx2-FORWARDx4-FORWARDx8-FORWARDx16-FORWARDx32-Play).
BACKWARDx2-BACKWARDx4-BACKWARDx8-BACKWARDx16-BACKWARDx32-Play
While in
reverse, you may press
to resume normal speed.
For CD, HD-CD, MP3, backward also has audio output.
For DVD discs, if backward to first title / chapter, it will start from the beginning.
For S
uper VCD & VCD discs, if backward to the first track, it will start from the beginning.
N
ote
: During f
orward or
reverse operation, the sound will be off except CD, HD-CD and MP3 which
will have sound in reverse.
Pause
Press the button to pause p
laying and press again to resume playing.
Language (Only for DVD and Super VCD discs)
Press the
AUDIO button once to display current language
.
Press again to tog
gle between different
languages.
Page 30

-------------------------------------------------
--------------------------RM22A/RM22D
OPERATIONS MANUAL
HealthCare Information, LLC 30
Subtitle (Only for DVD and Super VCD discs)
Press CC but
ton once to display current sub-title. Press again to toggle between different subtitle
modes
ZOOM (Only for DVD/ Super VCD/ VCD / Mp3 and JPEG discs)
There are six zoom modes. Press the “ZOOM” button of the front panel or the “SCREEN SIZE”
button on
the IR remote control to switch between the different zoom modes. Selections are:
(Zoom2 - Zoom3 - Zoom4 - Zoom OFF)
NOTE:
In Zoom 2, 3 and 4
you may use the navigatio
n buttons to pan the picture.
DVD/ USB/ SD
Press "0" button (on front monitor) to
switch between DVD/ USB/ SD mode.
MP3/JPEG Playback
After
loading the MP3 / JPEG disc, the player will scan for stored MP3 /JPEG files. When finished,
the contents will be displayed and the first file will start playing. Use the navigation buttons to s
elect
files for immediate play back. If using the number buttons for make a selection you must press “0”
first for any number under 10. Example, 5 would be entered as “05”
There is no video display for MP3 playback.
DVD Setup
1.
The TV must be in DVD
mode. See page 32.
2.
Press "SETUP" button to enter the DVD menu, then press right / left button to select the page which you want
to adjust.
3.
Press navigation buttons to adjust the items which you want.
4.
Press
the "BACK" button to return to t
he previous menu.
GENERAL
SETUP PAGE
TV DISPLAY Selects TV display mode, selections are:
4:3 PAN SCAN - 4:3 LETTER BOX- 16:9
.
OSD
Sets the OSD (ON - SCREEN DISPLAY) language,
Selections Are:
ENGLISH – FRENCH – SPANISH - DUTCH
SCREEN
Turns the scre
en saver on or off.
SAVER
LAST
Turns LAST MEMORY on or off. When on, and the set is turned off, the DVD player will
MEMORY
resume playing at the point the set was turned off.
Page 31

-------------------------------------------------
--------------------------RM22A/RM22D
OPERATIONS MANUAL
HealthCare Information, LLC 31
PREFERENCE
PAGE
TV TYPE
Selects TV type, selections are:
PAL - MULTI - NTSC.
AUDIO
Selects the audio language. Selections are:
ENGLISH - FRENCH - SPANISH - GERMAN - PORTUGUESE - ITALIAN - DUTCH
SUBTITLE
Sets subtitle language. Selections are:
ENGLISH - FRENCH - SPANISH - GERMAN - PORTUGUESE - ITALIAN - DUTCH
DISC
MENU Selects language of disc menu.
PARENTAL Parental control set
up for
the DVD
player. Ratings are:
KID SAFE / G / PG 13 / PGR / R / NC17 / ADULT.
PASSWORD Used to change the password
DEFAULT
Resets the DVD player to factory defaults.
Page 32
-------------------------------------------------
--------------------------RM22A/RM22D
OPERATIONS MANUAL
HealthCare Information, LLC 32
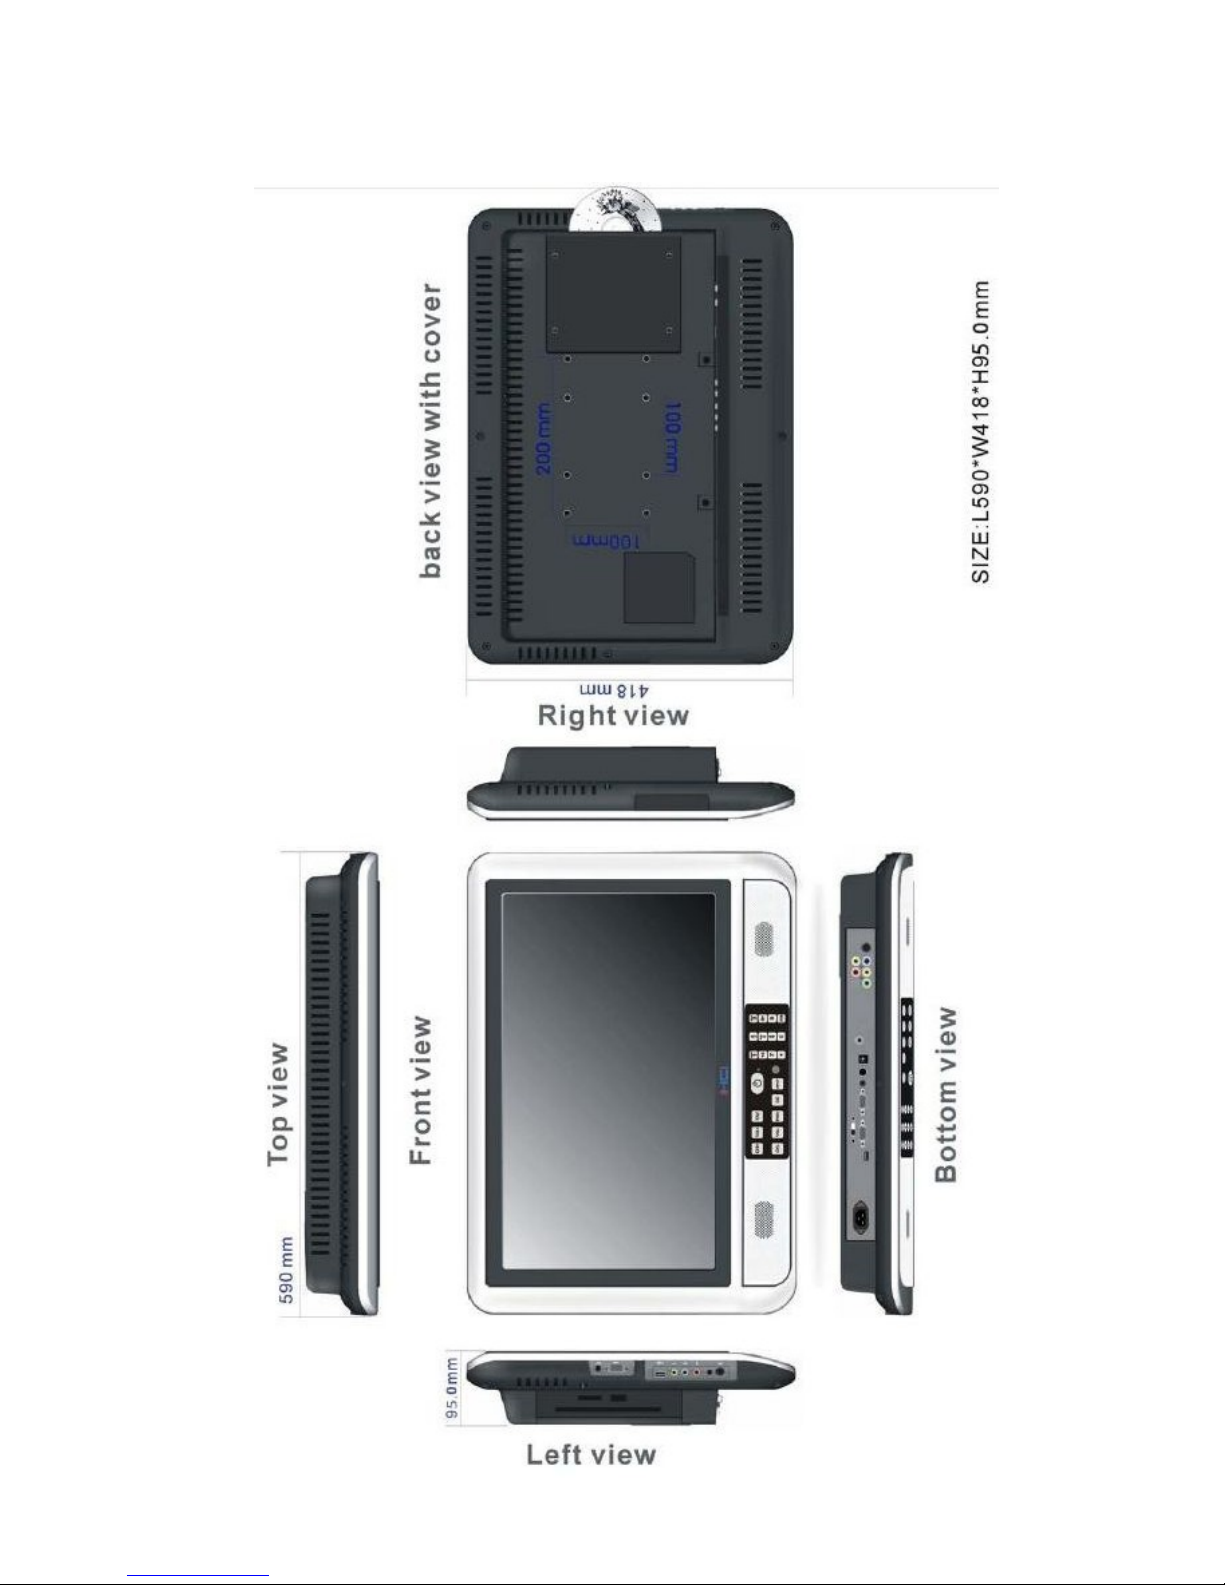
SPECIFICAT
IONS
DIMENSIONS
Page 33

-------------------------------------------------
--------------------------RM22A/RM22D
OPERATIONS MANUAL
HealthCare Information, LLC 33
GENERAL SPECIFICATION
S
Cabinet Color
Standard color -
silver / black bezel Custom color
s available
Dimensions
L453 x W94 x H356 m
m
W
eight (L
bs)
11 Lbs
Shipping Weight (L
bs)
16.7 Lbs
Shipping Dimensions (mm) (L) 604 x (W) 225 x (H) 517 mm
Power
Source 28V AC 60Hz / 24 V DC
Consumption
50W
Video Screen Size (mm) 331.2 (H) x 207.0 (V) mm
Display Type
LCD Twin Inverter, 2 CCFL
Resolution
1280 x 800 pixels
Color Depth
262144 colors
Aspect Ratio
16:10
Luminance (brightness)
500cd/m 2
Contrast Ratio
600:1
Viewing Angle (vert & horz) 140
(H),
135
(V)
Response
Time
16 ms
Digital Progressive Scan Yes
Black Level Expansion
Yes
White Level Expansion
Yes
Display Modes
ATSC, NTSC, PC, HDTV
Quick
Video Setup
Standard, Dynamic, Soft, Personal
Audio On-
Screen Equalizer/Balance Yes
MST
Mon
o, Stereo, SAP
Audio Power to Speakers 3W x 2
Quick Audio Setup
Standard, Movie, Music, Personal
Level
Programmable Maximum Levels
Audio Control
TV Speaker, Pillow Speaker, Both, Off
Inputs
Input RF Signals
ATSC, Clear QAM64, Clear QAM256, NTSC
(VHF/UHF/CATV/FM)
Physical Inputs
F, Composite, Component, HDMI, USB, Computer Monitor, RS232,
Pillow Speaker
1/4" Jack
Outputs
Stereo Headphone
Pillow Speaker Types
Digital –
Zenith
, 1 button and Sip & Puff.
Page 34

-------------------------------------------------
--------------------------RM22A/RM22D
OPERATIONS MANUAL
HealthCare Information, LLC 34
Digital Media
Video Formats Supported
MPEG - 1, MPEG - 2, MPEG
- 4, WMV, WMV -
HD, AVI
Photo Formats Supported JPEG, BMP, GIF, PNG
Music Formats Supported
MP2, MP3, WMA, WMA -
Pro
Special Features
Favorites
10 Channels
Power supply
Built In
Power o
n Settings
Input, Channel, Volume
Menu Languages
English, Spanish, French
Parental Control
V - Chip
Sleep Timer
15 Minutes Intervals up to 4 hours
Alarm
7 Programmable On / Off Times
Clock
Real Time Clock with Battery Backup
Closed Captions
On, Off, On with Mute
Closed caption Formats
CC1, CC2, CC3, CC4, Text1,Text2, Text3, Text4
Bed Selection
1, 2
IR Remote
User Programmable for Bed 1 or 2
Setup Menus
Password protected (only for remote required)
Keypad Disable
Off, Power
Only, Power Channel and Volume
Clone Programmer
Copy All Settings from one TV
to Another
Power on / off time
Yes
Approvals
FCC (B), C-UL
Warranty
Two Years Parts & Labor
Page 35

-------------------------------------------------
--------------------------RM22A/RM22D
OPERATIONS MANUAL
HealthCare Information, LLC 35
WARRANTY
HCI Television product
Limited Warranty
HCI warrants, to the
original purchaser only that all new HCI televisions (excluding any equipment
manufactured by others and included in HCI shipment) are free from defects in material for a period of two
years from the date of shipment.
The dealer your product was purchased through must receive notice of a defect or malfunction occurring
during the warranty period, HCI will repair or replace goods returned to its Loveland, Ohio office, at its
discretion, free of charge to the original purchaser, the whole or any component p
art of any product
manufactured by HCI found to be defective.
As a condition to obtaining warranty service, notification must be given to the dealer the product was
purchased through within at least 10 days after defect is first observed. Repair of produc
t requires it to be
shipped to HCI in Loveland, Ohio. All shipping and freight charges to HCI shall be paid for by the
customer and will not be accepted without a Return Authorization Number (RA#). The dealer can provide
you information on how to obtain th
e RA#.
This warranty does not apply to any HCI products subjected to improper use, negligence or accident; nor to
tampering, alterations, or
repairs by others, without HCI’s written prior notice. For more information
pertaining to this warranty, please contact the dealer you purchased your product from.
HCI’
s liability under this warranty is limited to repair or replacement of defective products and parts as
provided above.
HCI shall not be liable for incidental or cons
equential damages.
Page 36

-------------------------------------------------
--------------------------RM22A/RM22D
OPERATIONS MANUAL
HealthCare Information, LLC 36
Page 37

Page 38

DID WE MENTION THE ROOMMATE SERIES OF TVS?
AVAILABLE IN 20”, 26”, 32
, & 42” SIZES
HealthCare Information, LLC
113 Commerce Blvd.
Lovelan
d, OH 45140
800-783-8105
©Copyright
2009, HealthCare Information, L
Page 39

Page 40

 Loading...