

HB Optoelectronic HBP503D User Manual

HBP503D
3D DLP Pico Projector
User Guide

Contents
Chapter 1 Important Safety Information 1
Chapter 2 Getting Started 6
Product Overview 6
Package Overview 7
Remote Control 8
Device Connectivity 9
Operation Instruction 11
Using the Tripod 14
Function Keys 15
OSD Menu 17
Chapter 3 Using Your Projector: 3D Projection 18
Playing Blu-ray 3D from HDMI Interface Device 19
Creating 3D Image from Half Side by Side or Top and Bottom Video/Image Files 21
Creating 3D Image from 2D Files 25
Chapter 4 Using Your Projector: 2D Projection 29
Using AV/HDMI/VGA Devices 29
Using USB Drive/Micro SD Card 31
Watching Videos 33
Playing Music 36
Viewing Photos 39
Browsing Text Files 42
Chapter 5 Adjusting Setting 44
OSD Menu 1 46
OSD Menu 2 60

HBP503D 3D DLP Pico Projector User Guide
Chapter 1 Important Safety Information
FCC Notice
1. Caution: Modification not expressly approved by the company could void the user’s authority to operate the equipment.
2. NOTE: This equipment has been tested and found to comply with the limits for a Class B digital device, pursuant to Part 15 of the
FCC Rules. These limits are designed to provide reasonable protection against harmful interference in a residential installation. This
equipment generates, uses, and can radiate radio frequency energy and, if not installed and used in accordance with the
instructions, may cause harmful interference to radio communications. However, there is no guarantee that interference will not
occur in a particular installation. If this equipment does cause harmful interference to radio or television reception, which can be
determined by turning the radio or television off and on, the user is encouraged to try to correct interference by one or more of the
following measures:
A. Reorient or relocate the receiving antenna.
B. Increase the separation between the equipment and receiver.
C. Connect the equipment into an outlet on another circuit.
D. Consult the dealer or an experienced radio/TV technician for help.
1

HBP503D 3D DLP Pico Projector User Guide
Important Safety Information
<Projector>
1. To ensure reliable operation of the projector and prevent overheating, make sure the projector is properly ventilated during use
and that all ventilation openings on the projector remain unobstructed and kept free from obstacles. For example, do not place the
projector on a sofa, carpet or bed during operation and do not use the projector is an enclosed place, such as a book cabinet or
steel cabinet.
2. Do not expose the projector to moisture or rain. (i.e. using the projector near a bathroom sink, kitchen, laundry room, damp
corners of a wall or a swimming pool can be very dangerous)
3. Do not operate the projector near sources of heat or equipment that will generate high temperatures. (i.e. heater, cooler, furnace
and so forth)
4. Before cleaning the projector, be sure to unplug the power cord from the wall outlet. Do not spray cleaning solvent directly onto
the projector, but apply the cleaning solvent on a piece of soft fabric to clean the projector.
5. Be sure to read all instructions printed on the labels on the projectors.
6. In order to prevent short circuit caused by lightning, be sure to turn off the projector’s power and unplug the power supply when it
will not be attended or used for a long time.
2

HBP503D 3D DLP Pico Projector User Guide
7. Do not attempt to force any objects into the openings of the projector case. It will cause a fire hazard or electric shock caused by
direct contact with the high voltage. Do not connect the projector with any cables or connectors that are not compatible with its
connectors. Do not spill any liquid onto the projector.
8. If the projector emits strange noise or odors, usually caused by inappropriate operation, turn off the projector immediately and
seek assistance from your dealer. Do not attempt to open the case or repair the projector by yourself as you may get an electrical
shock.
9. Should any of the following situations occur, unplug the power supply immediately and contact your dealer to solve the problem:
10. The power cord is damaged or frayed.
11. Liquid has been spilled onto the projector and it seeps through the projector case or when the projector has been exposed to
rain or water.
A. The projector has been dropped from a high location.
B. Display from the projector shows a noticeable difference.
C. The product fails to function normally when you operate it as instructed in this user’s guide.
12. To ensure the projector functions normally, do not attempt to use the power adapter or battery other than the power adapter and
battery in the accessory package. We will not be responsible for the damages caused by using the power supply from other
3

HBP503D 3D DLP Pico Projector User Guide
manufacturers.
<3D Glasses>
13. The 3D glasses are only intended for 3D content viewing. Do not use them as sunglasses or general eyewear, as such use may
result in injury.
14. The 3D glasses include a rechargeable battery. For the best performance of the glasses, please fully charge the 3D glasses
before the first time use. Also, please charge and discharge the 3D glasses one time at least every three months when you don’t
use the 3D glasses.
15. Do not place the 3D glasses in a location exposed to direct sunlight, heat, fire, or water. This may cause product malfunction
or fire.
16. Clean the 3D glasses with a clean, lint free, dry and soft cloth. Any chemical cleaning agent spray on the 3D glasses may
damage the lens or cause product malfunction.
17. Do not damage the 3D glasses by twisting, bending, dropping, or pressing.
18. Do not place anything fragile near you when you are watching 3D content. Involuntary movement or surprised reaction may
occur as a result of certain 3D content may break the surrounding object or hurt yourself.
19. Please watch 3D content in clear view of the screen, and do not place any object before the front of IR emitter.
4

HBP503D 3D DLP Pico Projector User Guide
20. 50HZ or 60Hz magnetic fluorescent lamp may cause flicker to your 3D glasses. Turn off the lamp when you see this.
21. Do not use the 3D glasses when you have found the wire is exposed or the lens is cracked.
22. The following groups of people should not watch 3D content: (1) pregnant women; (2) people with heart disease or epilepsy;
(3) people who are easily nauseous (4) children under 3 years old.
23. If you don’t feel comfortable while watching the 3D content, please stop watching and take off the 3D glasses. Please consult a
doctor if you still feel ill after you stop watching the 3D content.
24. People who have a family history of seizure or epilepsy should consult a doctor before watching 3D content.
5
HBP503D 3D DLP Pico Projector User Guide
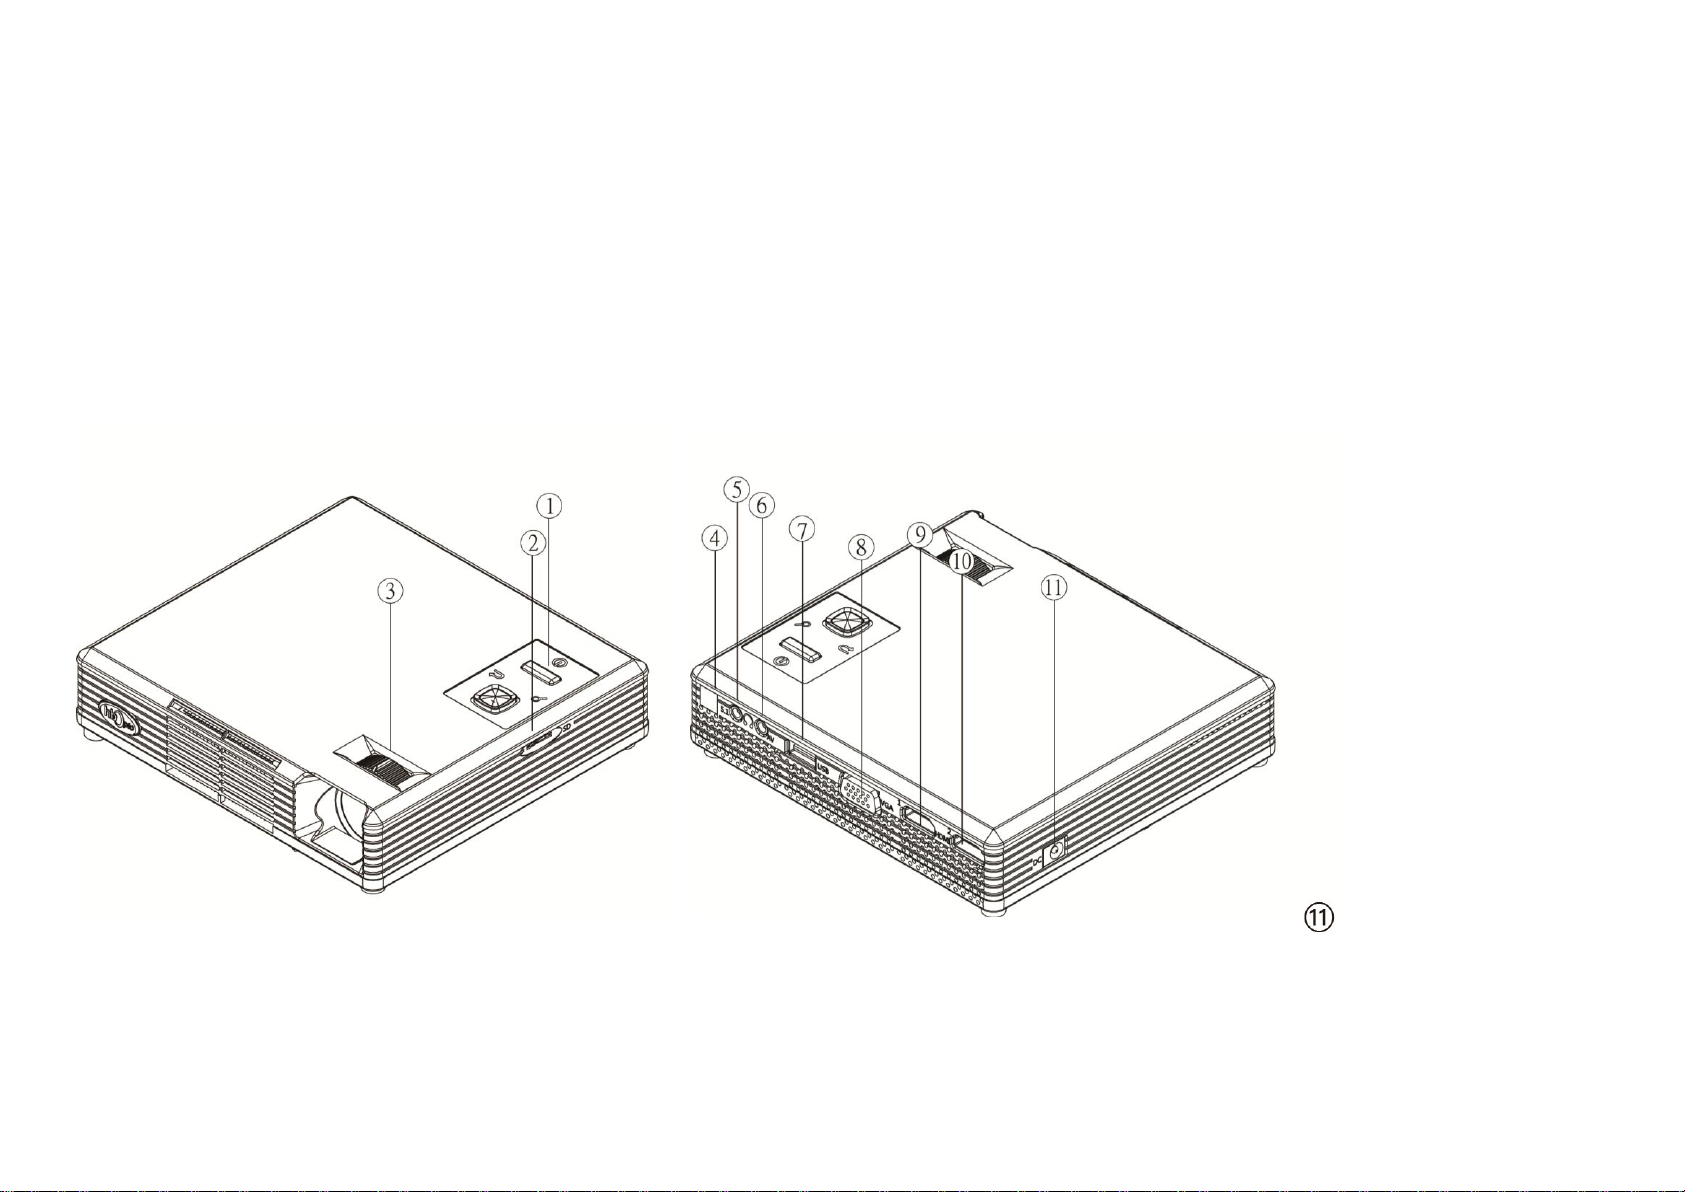
①Power Switch
②Micro SD
③Focus Ring
④IR Sensor
⑤5.1 Surround
Sound/Earphone
⑥AV in
⑦ USB
⑧VGA
⑨ HDMI – 1
⑩ HDMI – 2
DC in
Chapter 2 Getting Started
Product Overview
6

HBP503D 3D DLP Pico Projector User Guide
Package Overview
The following items are the standard accessories of the projector. Please check to see that you have received all items before you start
using the projector. If there is any item missing, please contact your dealer immediately.
Power Adapter with AC plug Remote Control
AV cable HDMI Cable
5.1 CH Cable 3D Glasses (2 pairs)
Tripod Quick Start Guide
Warranty Card Battery Pack (Optional Accessory)
Android 4.0 Mini PC with 2.4G Wireless Mouse
(Optional Accessory)
7

HBP503D 3D DLP Pico Projector User Guide
IR Sensor
Remote Control
1. Remove the plastic tab from the battery compartment before using the remote control.
2. Point the remote control toward the IR sensor at the back of the projector to make the remote control function normally.
3. Remote Control Key Function
8

HBP503D 3D DLP Pico Projector User Guide
Micro SD Card
USB Drive
● DVD Player and Other AV Interface Device ● USB Drive
5.1 Surround Sound Device
Earphone
DVD Player and Other
AV Interface Device
Device Connectivity
The projector can be connected to various multimedia devices through the connectors on the back and right side of the projector.
Connect ● Micro SD Card ●Earphone/5.1 Surround Sound Device
Note: Insert your Micro SD card while the side with flash contacts is faced upward.
9
HBP503D 3D DLP Pico Projector User Guide
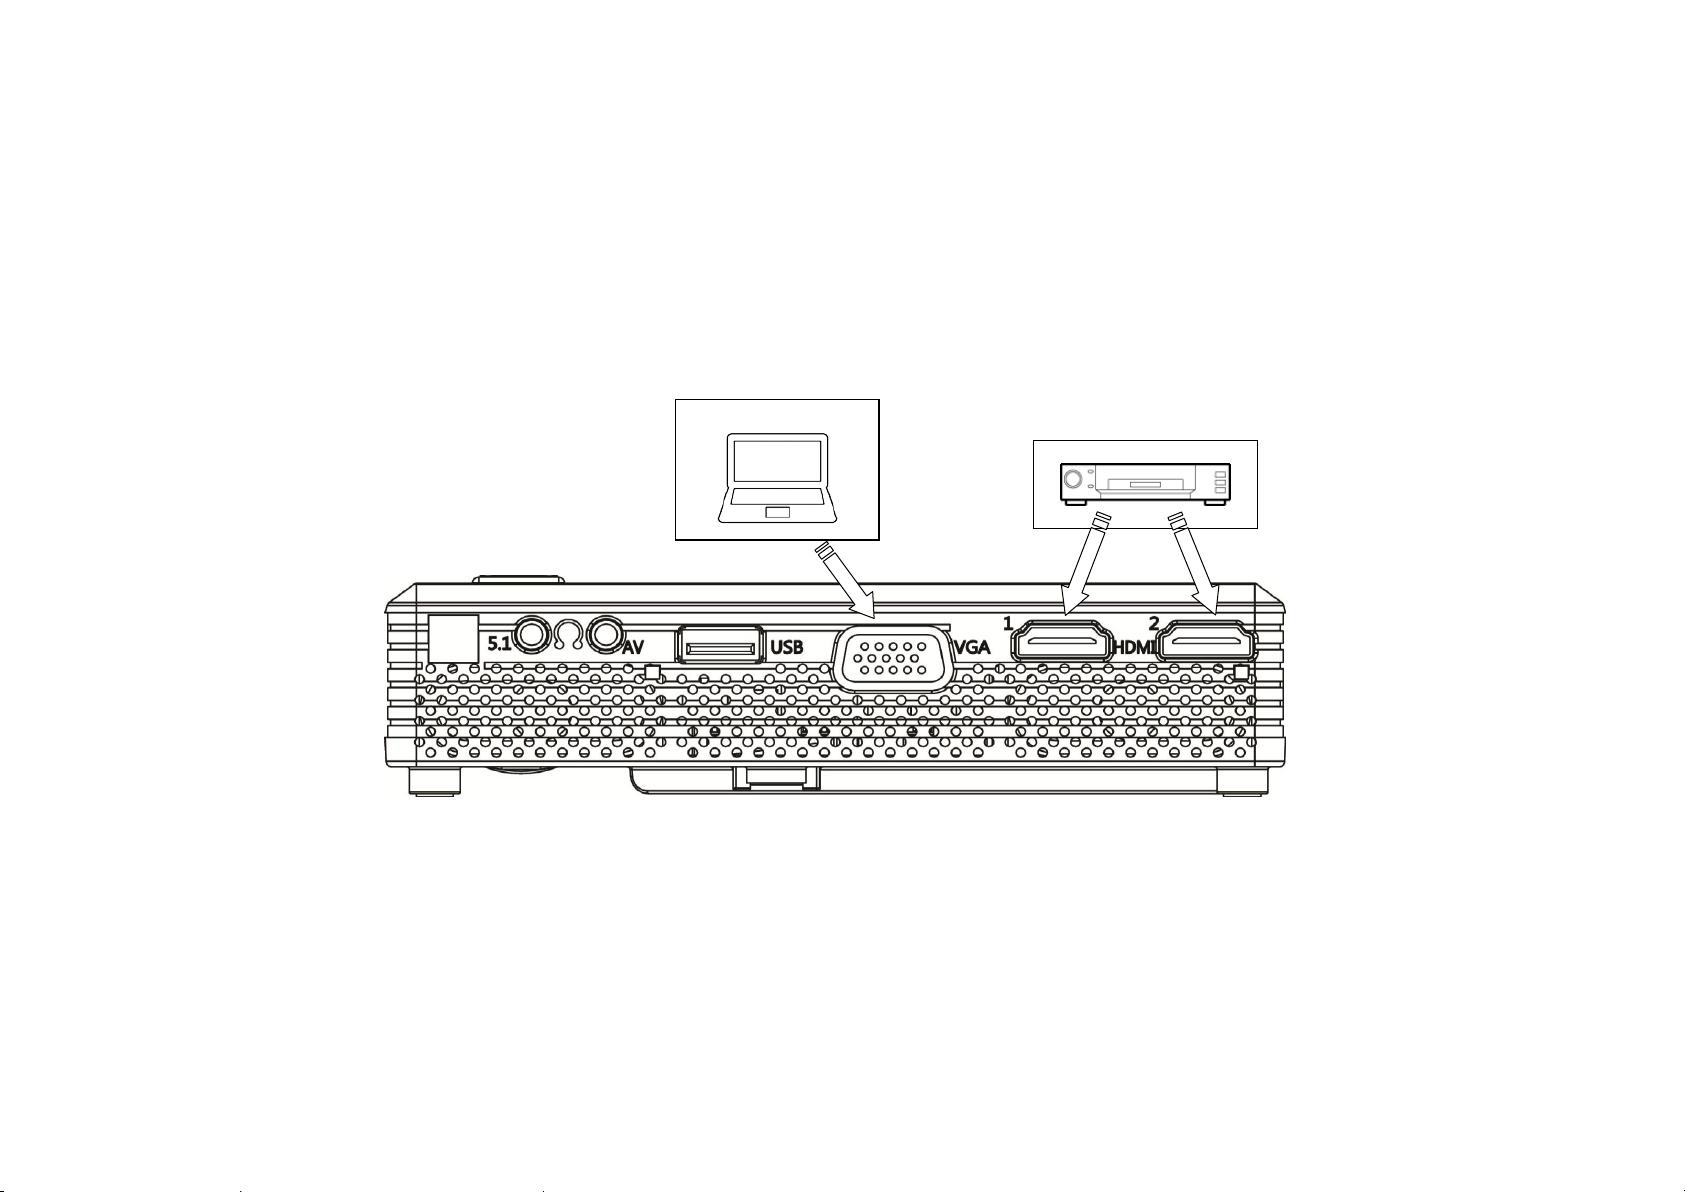
Blu-ray DVD Player and Other HDMI
Interface Multimedia Device
Personal Computer
● Blu-ray Player and Other HDMI Interface Multimedia
Connect ● Personal Computer
10
HBP503D 3D DLP Pico Projector User Guide
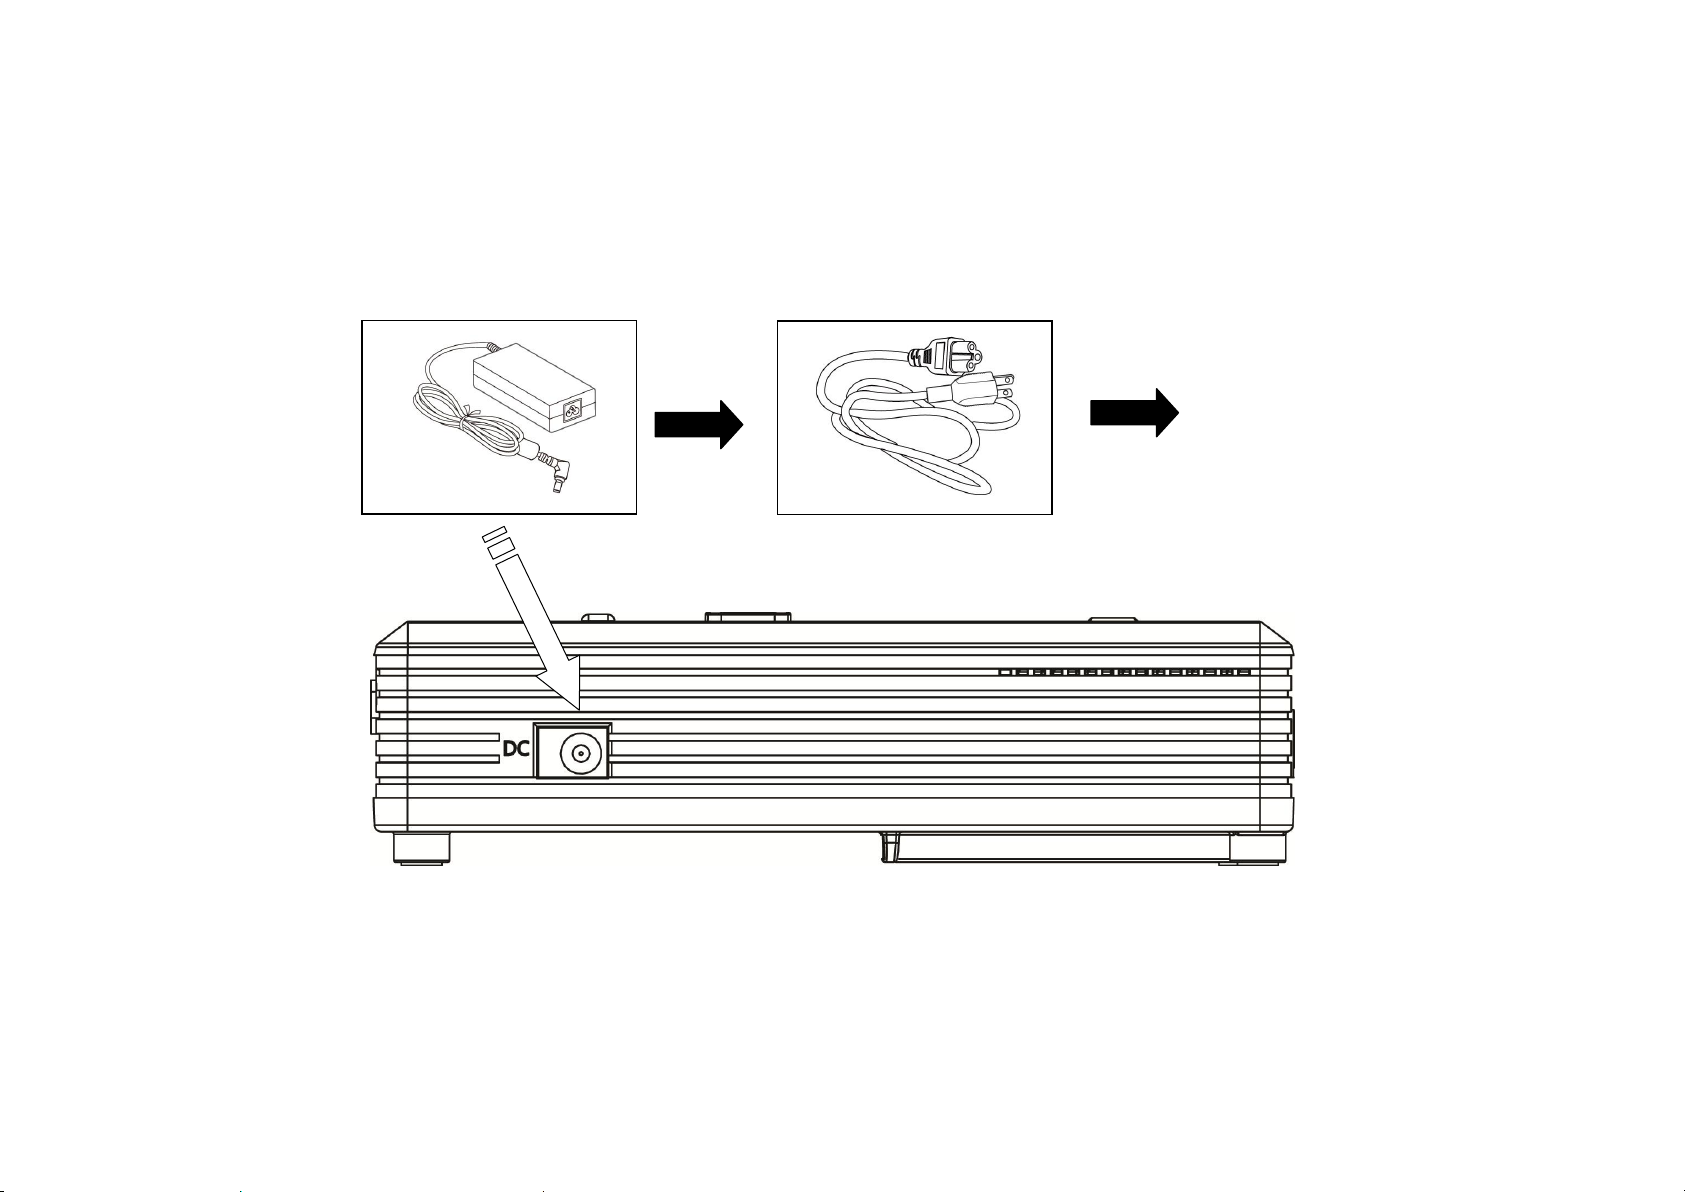
一、
Power Adapter
AC Socket
Power Cord
Operation Instruction
1. Connection
11
HBP503D 3D DLP Pico Projector User Guide
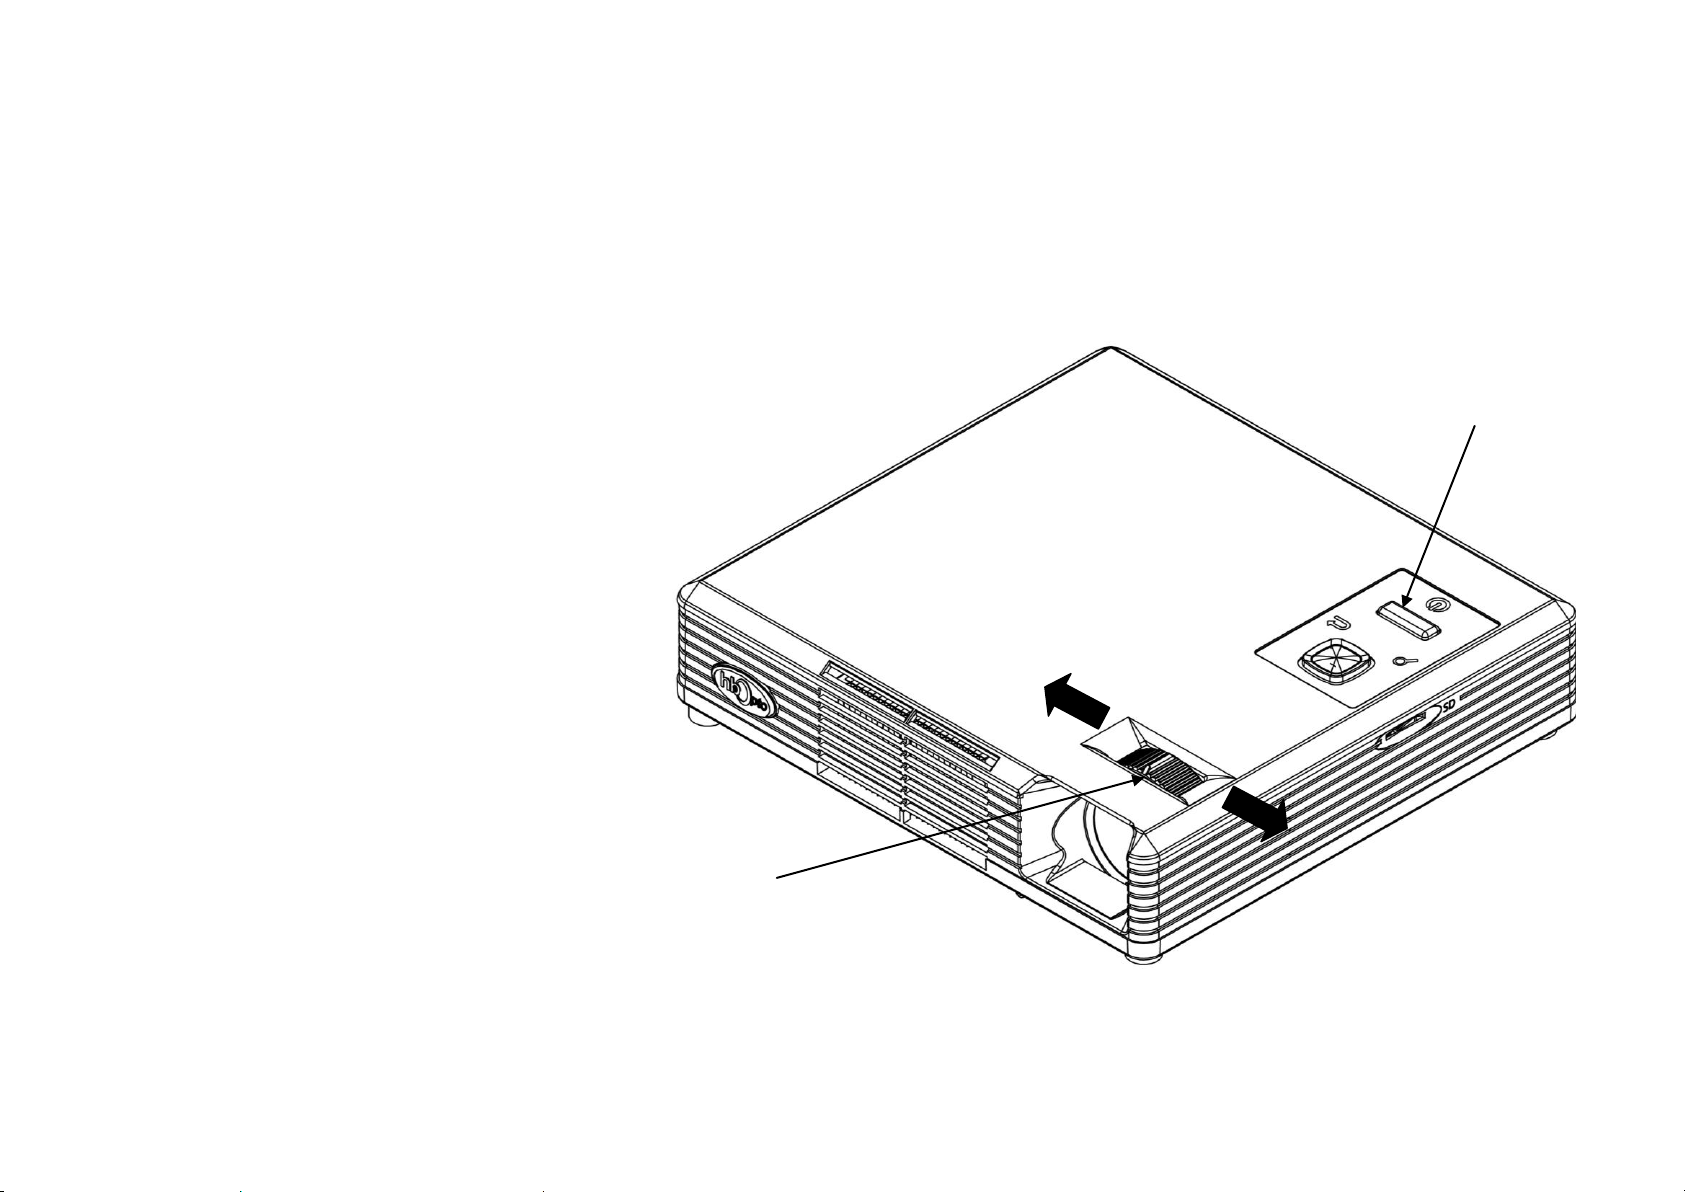
Power Switch
Focus Ring
2. Power On/Off
Press the power switch button to turn on the projector. The LED indicators will be blinking for 7-8 seconds and stay on during
operation. To power off the projector, press the power switch button again and the LED indicator will go off. Then you can pull off the
power cord from the wall socket.
3. Adjust Focus
Rotate the focus ring left or right to focus the image.
12
HBP503D 3D DLP Pico Projector User Guide
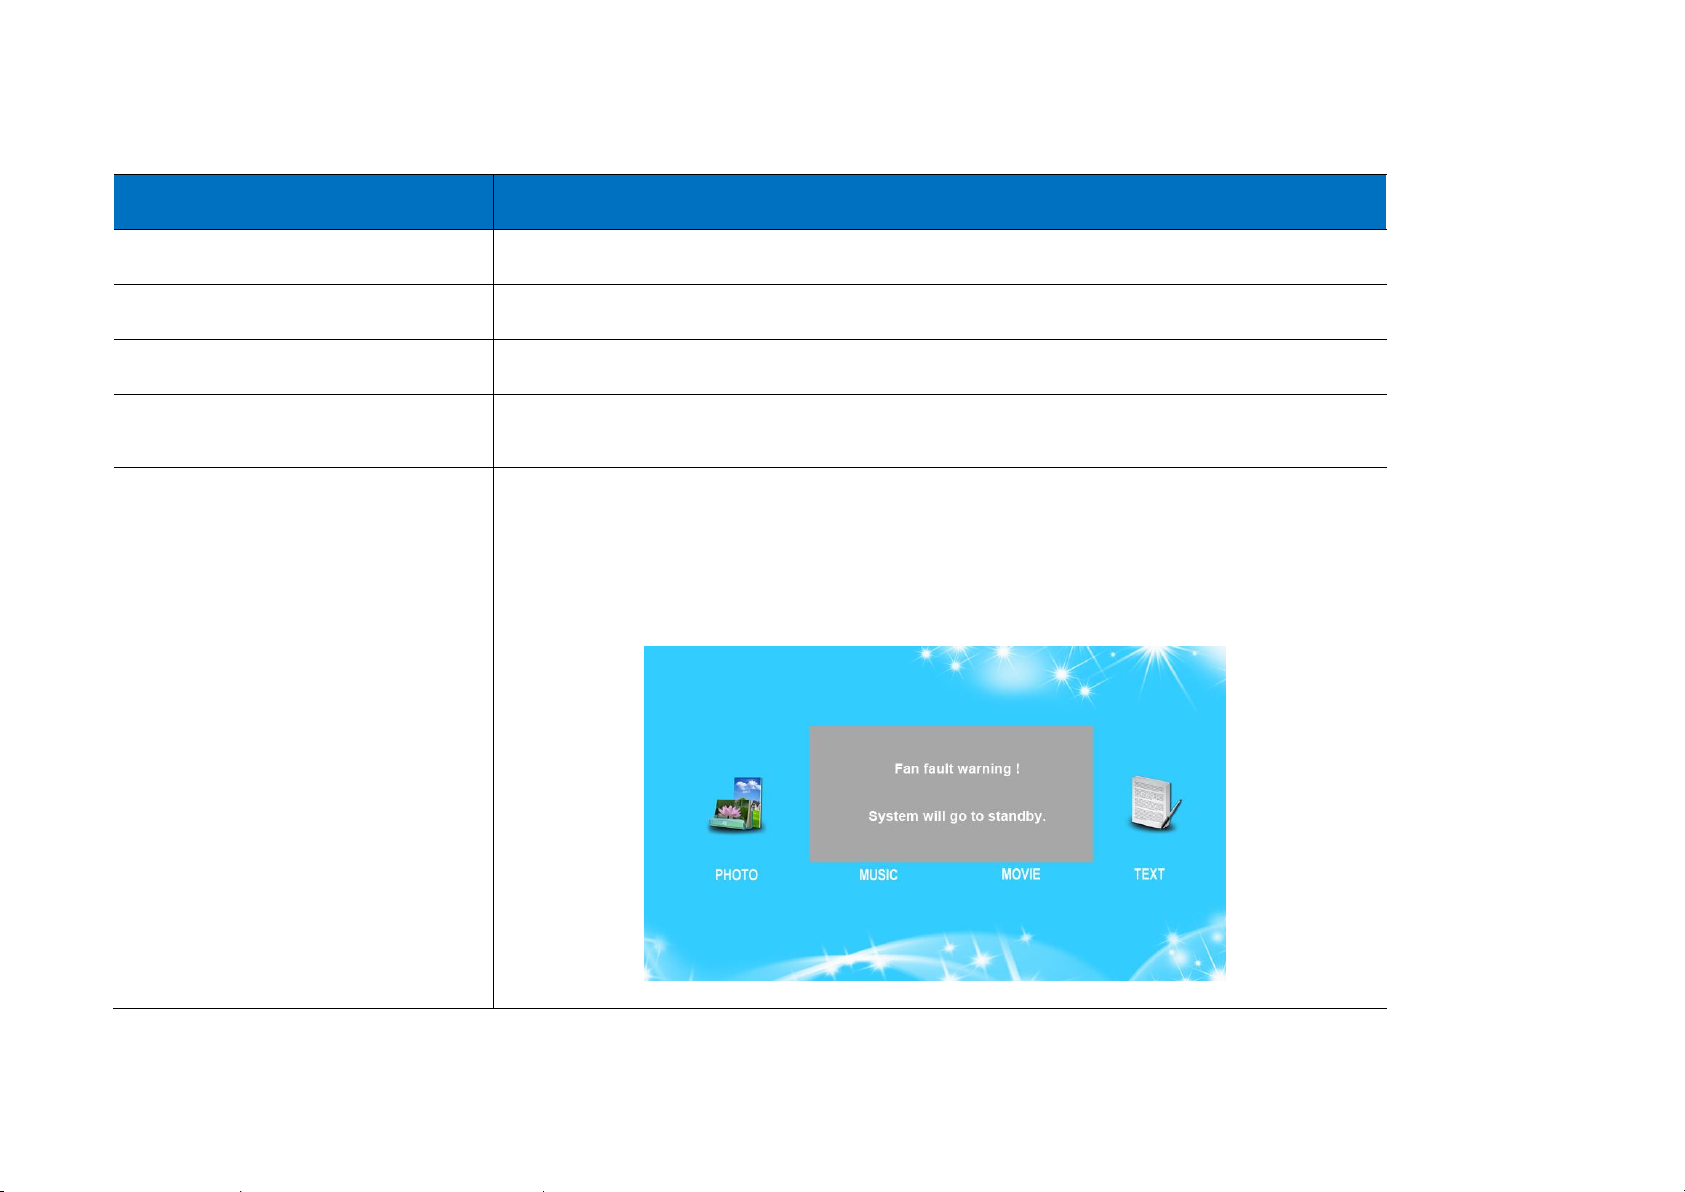
Message
LED Indicator Status
Power Button On
Flashing (7-8 seconds)
Ready to Use/Normal Operation
On
Power Button Off
Off
Error (Fan Fault/ Machine
Overheated)
Quick Flashing (10 seconds) and Off
Blinking—Circuit Protection: The LED indicator will be blinking when the
temperature of the projector is too high. You will see a warning message as
below. The indicator will be blinking for 10 seconds and then the projector will
be off.
4. LED Indicator Message
13
HBP503D 3D DLP Pico Projector User Guide
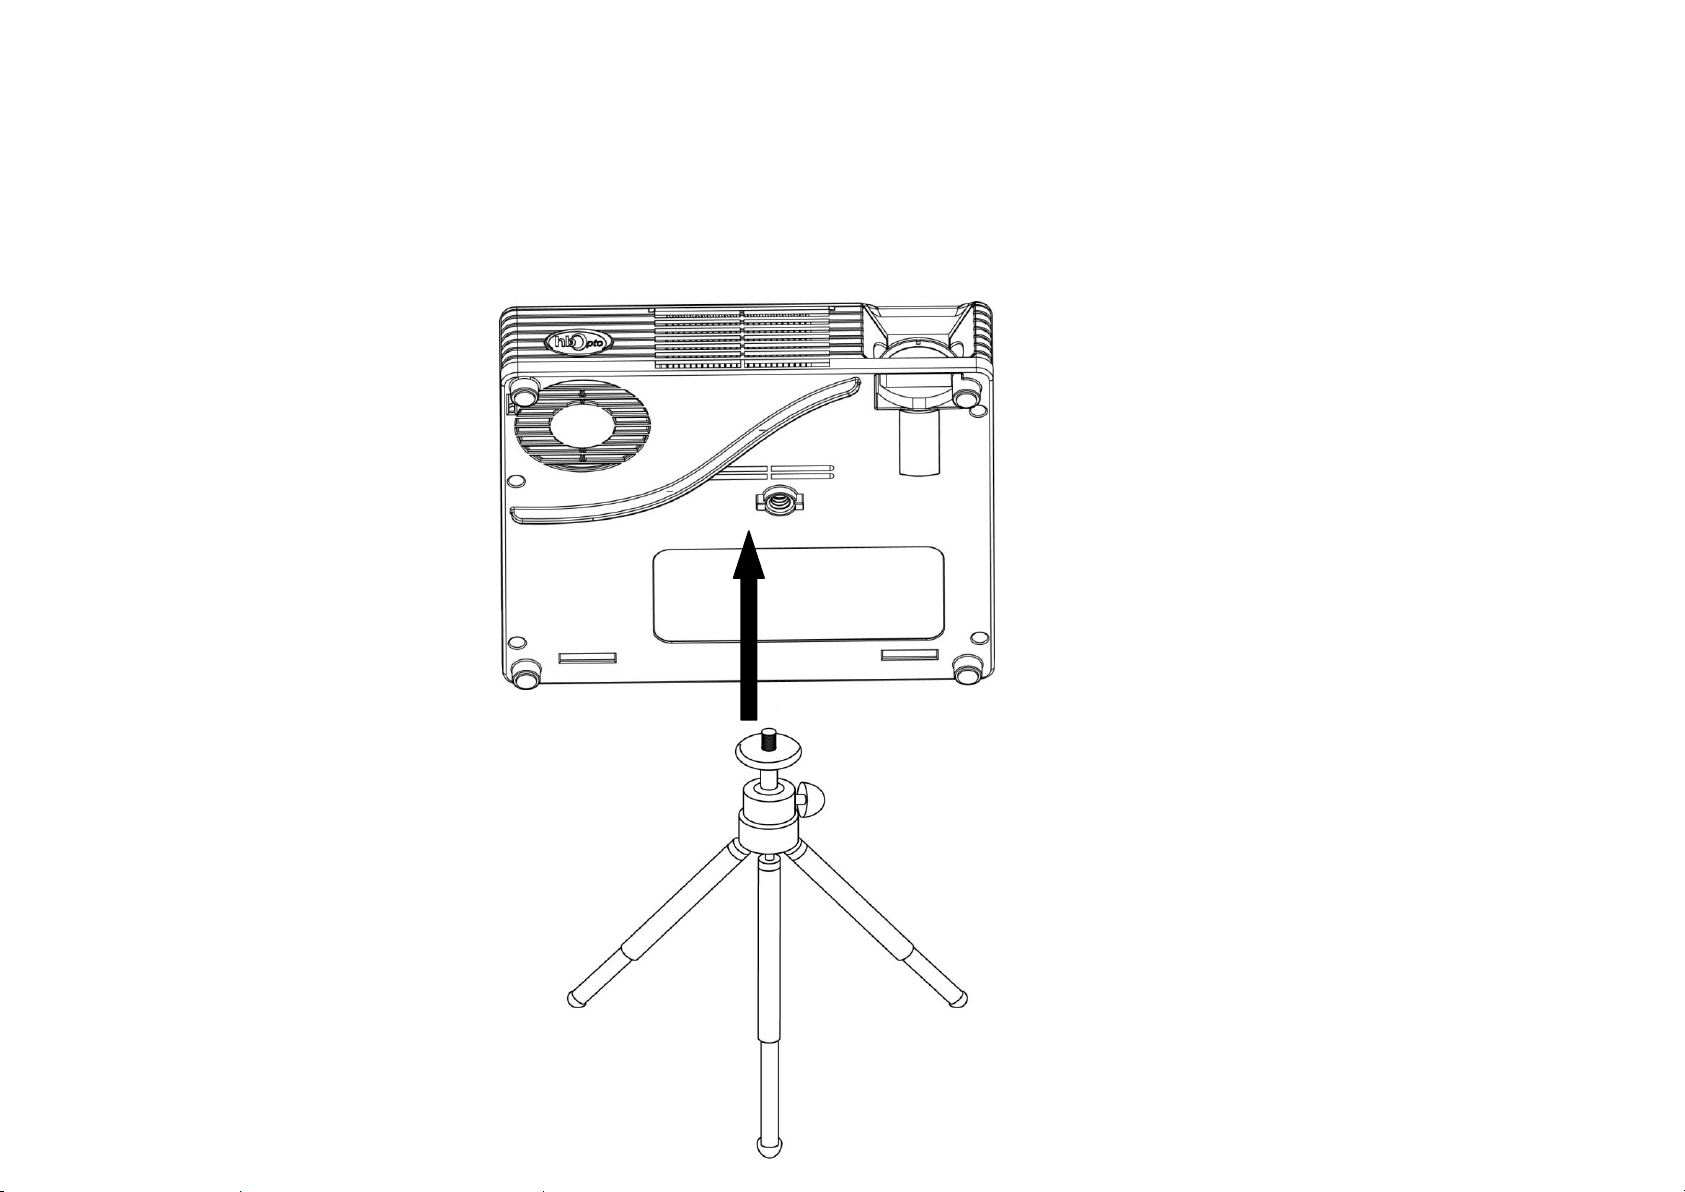
Using the Tripod
The projector can be used with the tripod by connecting the tripod to the bottom of the projector. Many typical tripods can be
compatible.
14

HBP503D 3D DLP Pico Projector User Guide
Function Keys
15
HBP503D 3D DLP Pico Projector User Guide
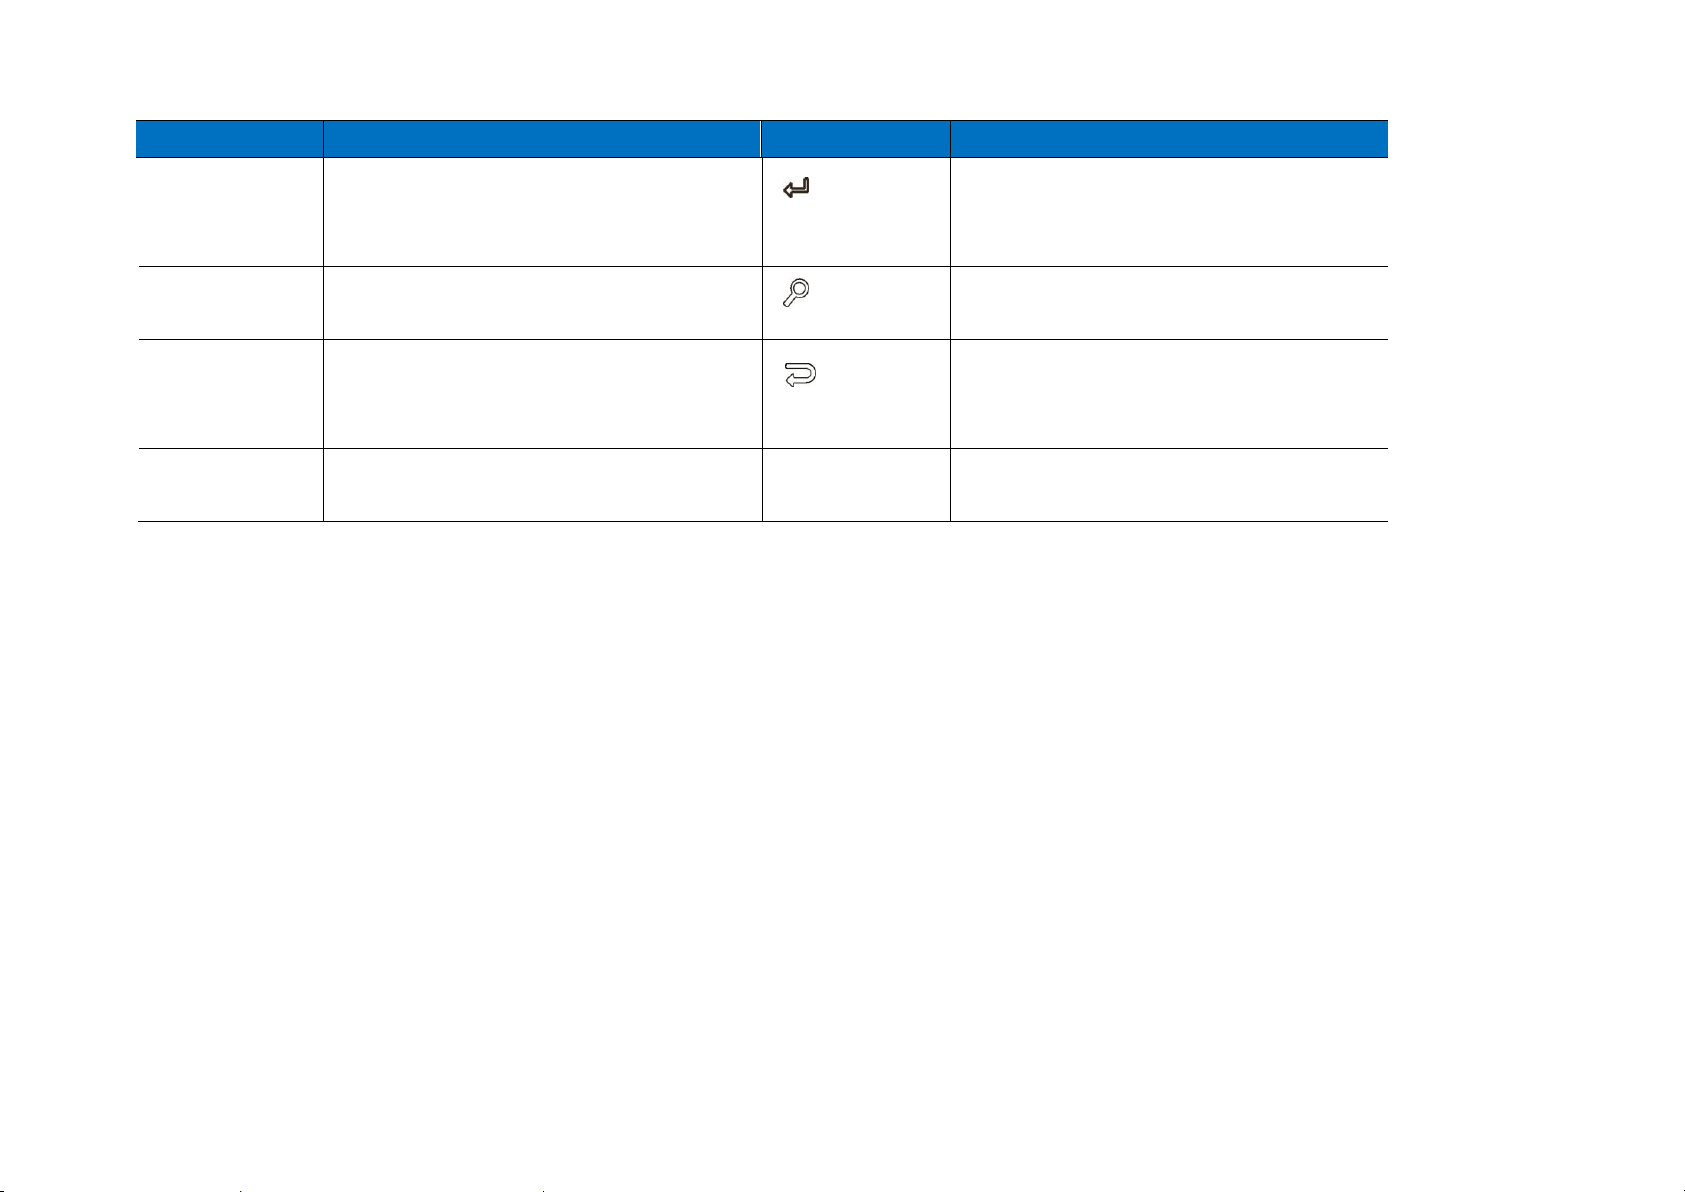
Options
Description
Options
Description
Move the cursor up.
1. Confirm your choice.
2. Press it for 3 seconds: enter the
OSD menu.
Move the cursor down.
Select your input source.
1. Move the cursor left.
2. Press it for 3 seconds: Volume
Down
Leave the current menu page.
1. Move the cursor right.
2. Press it for 3 seconds: Volume Up
16
HBP503D 3D DLP Pico Projector User Guide
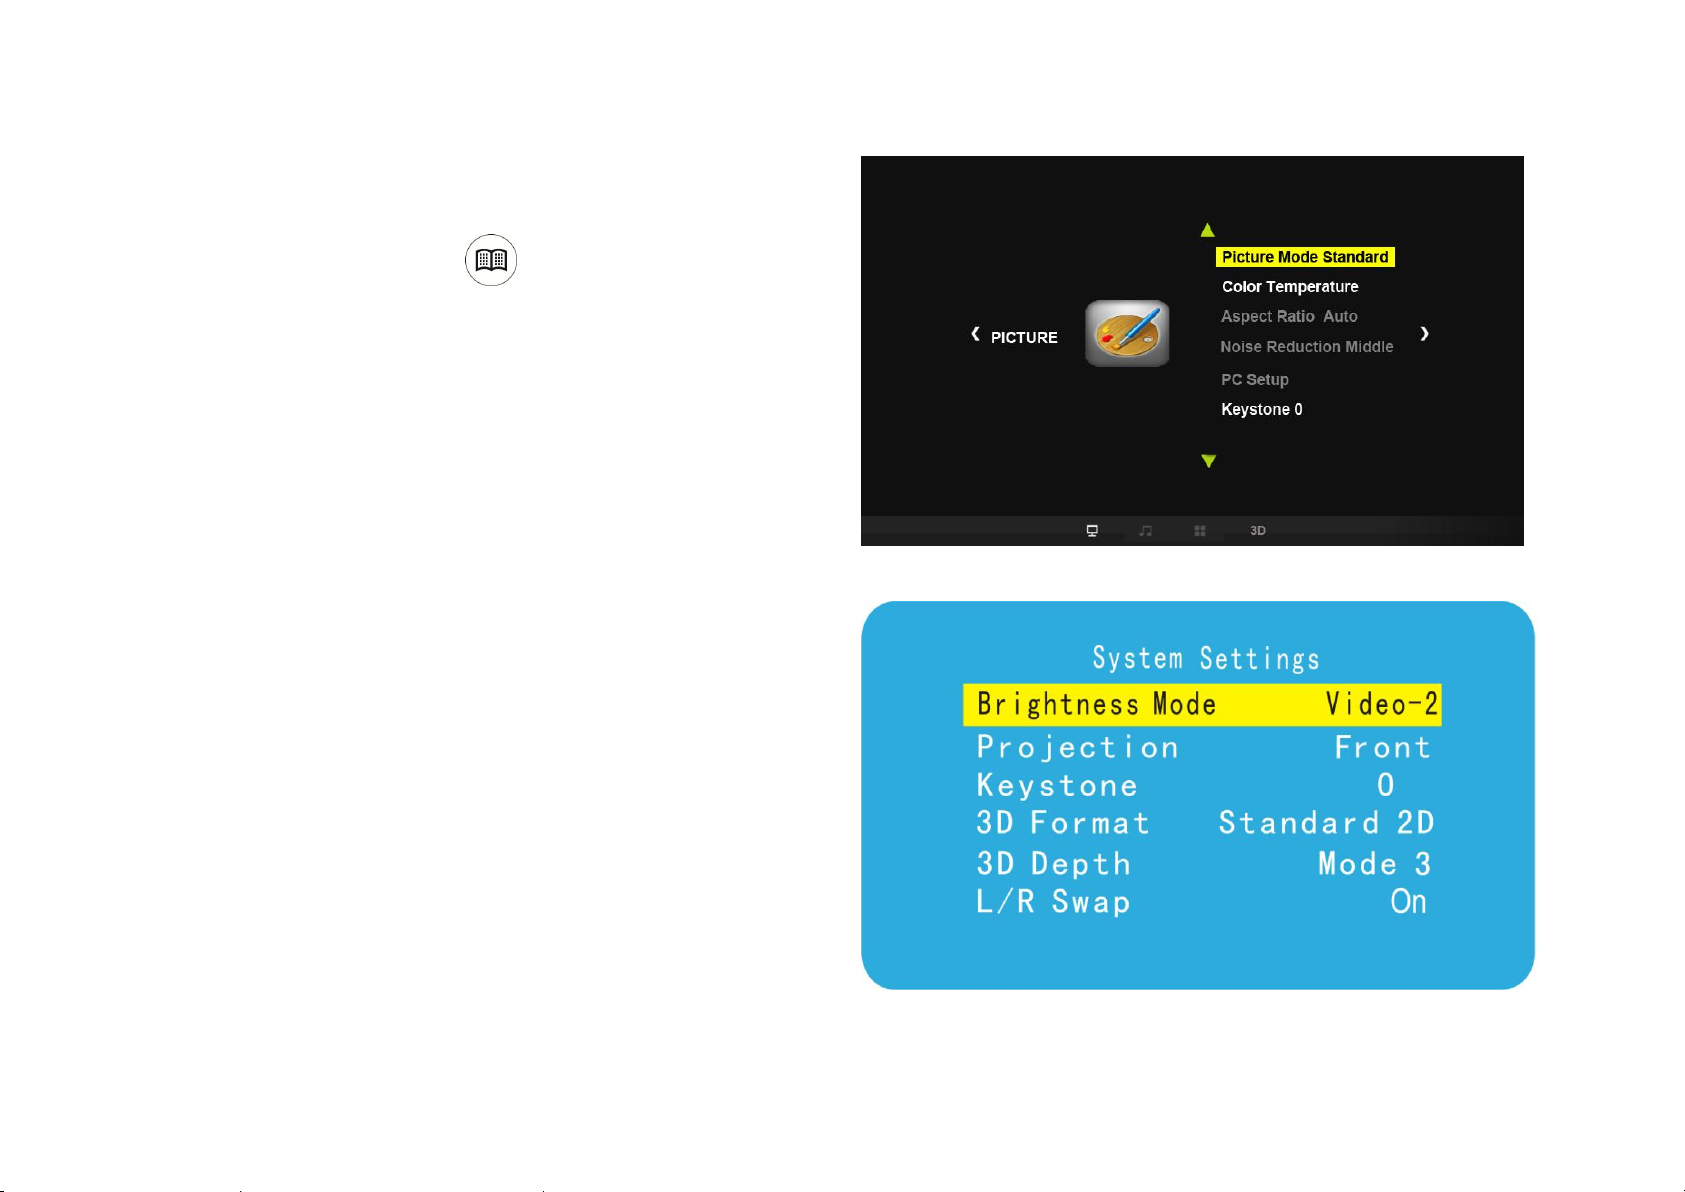
OSD Menu 2: HDMI – 2
OSD Menu 1: USB Drive/Micro SD Card/VGA/HDMI– 1/AV
OSD Menu
Press Enter for 3 seconds ( or on the remote control) to
enter the OSD menu. You will see OSD Menu 1 or OSD Menu 2.
1. OSD Menu 1
You will see OSD Menu 1 when your source is USB drive/Micro
SD Card/VGA/HDMI-1/AV. Use to choose the item
you want to adjust. See more details in Chapter 5 “Adjusting
Settings.”
2. OSD Menu 2
You will see OSD menu 2 when your source is HDMI 2. Use
to choose the item you want to adjust. See more
details in Chapter 5 “Adjusting Settings.”
17

HBP503D 3D DLP Pico Projector User Guide
File Format
Accepted Input Source
Page
Blu-ray 3D
HDMI – 1/ HDMI-2
p. 19
Half Side by Side or
Top and Bottom video/image files
USB Drive/Micro SD Card/VGA/HDMI – 1/ HDMI-2/AV
p. 21
2D file
USB Drive/Micro SD Card/VGA/HDMI – 1/ HDMI-2/AV
p. 25
Chapter 3 Using Your Projector: 3D Projection
You can enjoy 3D images by:
Playing Blu-ray 3D Disc from HDMI Interfaced Multimedia Equipments (eg., Blu-ray player, Sony PS3).
Creating 3D image from Half Side by Side or Top and Bottom video/image files.
Creating 3D image from 2D files.
Please see the corresponding page for further information.
18
 Loading...