

Page 1
Operating Manual
Bedienungsanleitung
QuantumX CX22‐W
CX22‐W Data Recorder
CX22‐W‐Datenrekorder
A3169‐1.0 en/de
Page 2

English Seite 3 - 42. . . . . . . . . . . . . . . . . . . . . . . . . . . . . . . . . . . . . . . . . . . . . . . . .
Deutsch Page 43 - 84. . . . . . . . . . . . . . . . . . . . . . . . . . . . . . . . . . . . . . . . . . . . . . .
Page 3

QuantumX Data Recorder CX22‐W
3
Contents Page
English
Safety information 5. . . . . . . . . . . . . . . . . . . . . . . . . . . . . . . . . . . . . . . . . . . . . . .
1 Markings used 8. . . . . . . . . . . . . . . . . . . . . . . . . . . . . . . . . . . . . . . . . . . . . . .
1.1 The markings used in this document 8. . . . . . . . . . . . . . . . . . . . . . . .
1.2 Symbols on the module and their meaning 9. . . . . . . . . . . . . . . . . .
2 Introduction 11. . . . . . . . . . . . . . . . . . . . . . . . . . . . . . . . . . . . . . . . . . . . . . . . .
3 CX22‐W connections 12. . . . . . . . . . . . . . . . . . . . . . . . . . . . . . . . . . . . . . . . .
4 Changing the CompactFlash card 14. . . . . . . . . . . . . . . . . . . . . . . . . . . . .
4.1 Procedure for removing the CF card 14. . . . . . . . . . . . . . . . . . . . . . . .
4.2 Procedure for inserting the CF card 15. . . . . . . . . . . . . . . . . . . . . . . .
5 Connecting the CX22‐W Data Recorder 16. . . . . . . . . . . . . . . . . . . . . . . .
5.1 Operation with monitor and keyboard/mouse 16. . . . . . . . . . . . . . . .
5.2 Connecting to a PC 17. . . . . . . . . . . . . . . . . . . . . . . . . . . . . . . . . . . . . .
5.3 Connecting QuantumX modules 17. . . . . . . . . . . . . . . . . . . . . . . . . . .
5.4 Connecting other devices 18. . . . . . . . . . . . . . . . . . . . . . . . . . . . . . . . .
6 Connecting a PC with the CX22‐W Data Recorder 19. . . . . . . . . . . . . . .
6.1 Direct connection of PC and CX22‐W 19. . . . . . . . . . . . . . . . . . . . . . .
6.2 Connecting the CX22‐W and PC via a network 21. . . . . . . . . . . . . .
6.3 Connection via WLAN (CX22‐W only) 23. . . . . . . . . . . . . . . . . . . . . .
6.3.1 Preparing the CX22‐W for WLAN connections 23. . . . . . . . .
6.3.2 Preparing the CX22‐W for an existing WLAN
(Access Point) 24. . . . . . . . . . . . . . . . . . . . . . . . . . . . . . . . . . . . .
6.3.3 Setting up connection via WLAN 24. . . . . . . . . . . . . . . . . . . . .
6.3.4 Preparing the CX22‐W for the Adhoc network 25. . . . . . . . . .
6.3.5 Preparing the PC for connection via an Adhoc network 26. .
6.3.6 Setting up a connection via WLAN and Adhoc network 27. .
7 The CX22‐W Data Recorder start screen 29. . . . . . . . . . . . . . . . . . . . . . .
[
8 Configure measurements with catman
AP 30. . . . . . . . . . . . . . . . . . . .
8.1 Set up device scan 30. . . . . . . . . . . . . . . . . . . . . . . . . . . . . . . . . . . . . . .
8.2 Create a DAQ (measurement) project 30. . . . . . . . . . . . . . . . . . . . . .
9 Configuring the CX22‐W for automatic measurements 33. . . . . . . . . .
10 Other CX22‐W connections 35. . . . . . . . . . . . . . . . . . . . . . . . . . . . . . . . . . .
10.1 Digital inputs and outputs 35. . . . . . . . . . . . . . . . . . . . . . . . . . . . . . . . .
10.2 START/STOP button 35. . . . . . . . . . . . . . . . . . . . . . . . . . . . . . . . . . . . .
A3169-1.0 en/de HBM
Page 4

4
QuantumX Data Recorder CX22‐W
10.3 LED displays 36. . . . . . . . . . . . . . . . . . . . . . . . . . . . . . . . . . . . . . . . . . .
10.3.1 Module LED 36. . . . . . . . . . . . . . . . . . . . . . . . . . . . . . . . . . . . . . .
10.3.2 LEDs in the Ethernet connection 36. . . . . . . . . . . . . . . . . . . . .
10.3.3 Status LEDs for operating status 36. . . . . . . . . . . . . . . . . . . . .
10.3.4 Status LEDs for digital outputs 36. . . . . . . . . . . . . . . . . . . . . . .
10.3.5 LED for operating state of CF card 37. . . . . . . . . . . . . . . . . . .
10.4 Microphone input, loudspeaker output 37. . . . . . . . . . . . . . . . . . . . . .
10.5 USB connections 38. . . . . . . . . . . . . . . . . . . . . . . . . . . . . . . . . . . . . . . .
10.6 RS‐232 38. . . . . . . . . . . . . . . . . . . . . . . . . . . . . . . . . . . . . . . . . . . . . . . . .
11 System settings, update and restoration 39. . . . . . . . . . . . . . . . . . . . . . .
11.1 Changing system settings (Settings) 39. . . . . . . . . . . . . . . . . . . . . . . .
11.2 System restoration (Recovery) 39. . . . . . . . . . . . . . . . . . . . . . . . . . . . .
[
11.3 Updating catman
AP 41. . . . . . . . . . . . . . . . . . . . . . . . . . . . . . . . . . . .
11.4 Installing Windows software 41. . . . . . . . . . . . . . . . . . . . . . . . . . . . . . .
12 Waste disposal and environmental protection 42. . . . . . . . . . . . . . . . . .
A3169-1.0 en/deHBM
Page 5
QuantumX Data Recorder CX22‐W
Safety information
Appropriate use
The QuantumX Data Recorders CX22 and CX22‐W (with WLAN) are to be
used exclusively for measurement tasks and directly related control tasks
within the application limits detailed in the specifications. Use for any purpose
other than the above is deemed to be non‐designated use.
In the interests of safety, the module should only be operated as described in
the Operating Manuals. It is also essential to comply with the legal and safety
requirements for the application concerned during use. The same applies to
the use of accessories.
The module is only to be installed and used by qualified personnel, strictly in
accordance with the specifications and the safety rules and regulations.
Each time, before commissioning the module, you must first run a project
planning and risk analysis that takes into account all the safety aspects of
automation technology. This particularly concerns personal and machine pro
tection.
5
Additional safety precautions must be taken in plants where malfunctions
could cause major damage, loss of data or even personal injury. In the event
of a fault, these precautions must establish safe operating conditions. This
can be done, for example, by mechanical interlocking, error signaling, etc.
NOTE
The module must not be connected directly to the power supply system. Sup
ply voltage 10 V ... 30 V (DC).
The supply connection and all other connections must be installed in such a
way that electromagnetic interference does not adversely affect device func
tionality (see also HBM Greenline Information, brochure i1577).
When devices are working in a network, these networks must be designed in
such a way that malfunctions in individual nodes can be detected and shut
down.
Automation equipment and devices must be designed in such a way that
adequate protection or locking against unintentional actuation is provided (e.g.
access checks, password protection, etc.).
Safety precautions must be taken both in terms of hardware and software, so
that a line break or other interruptions to signal transmission, e.g. via the bus
interfaces, do not cause undefined states or loss of data in the automation
A3169-1.0 en/de HBM
Page 6

6
QuantumX Data Recorder CX22‐W
device. After making settings and carrying out activities that are password‐
protected, you must make sure that any controls that may be connected
remain in safe condition until the switching performance of the module has
been tested.
Ambient conditions on site
• Protect the module from direct contact with water.
• Protect the module from moisture or weather conditions such as rain,
snow, etc. The protection class under the IP standard DIN EN 60529 is
IP20.
• Please observe the permissible maximum ambient temperatures stated in
the specifications.
• Make sure that the side ventilation openings are not covered.
• The permissible relative humidity at 31°C is 80% (non condensing); linear
reduction up to 50% at 40°C.
• Do not expose the device to direct sunlight.
Conversions and modifications
The module must not be modified from the design or safety engineering point
of view except with our express agreement. Any modification shall exclude all
liability on our part for any resultant damage.
In particular, any repair or soldering work on motherboards (replacement of
components) is prohibited. When exchanging complete modules, use only ori
ginal parts from HBM.
The module is delivered from the factory with a fixed hardware and software
configuration. Changes can only be made within the possibilities documented
in the manuals.
Working safely
Error messages should only be acknowledged once the cause of the error is
removed and no further danger exists.
Qualified personnel
Qualified persons means persons entrusted with the installation, fitting, com
missioning and operation of the product who possess the appropriate qualific
ations for their function.
This includes people who meet at least one of the three following require
ments:
- Knowledge of the safety concepts of automation technology is a require
ment and, as project personnel, you must be familiar with these concepts.
A3169-1.0 en/deHBM
Page 7

QuantumX Data Recorder CX22‐W
7
- As automation plant operating personnel, you have been instructed how to
handle the machinery. You are familiar with the operation of the modules
and technologies described in this documentation.
- As commissioning engineers or service engineers, you have successfully
completed the training to qualify you to repair the automation systems.
You are also authorized to activate, ground and label circuits and equip
ment in accordance with safety engineering standards.
General dangers of failing to follow the safety instructions
The QuantumX Data Recorders CX22 and CX22‐W are state‐of‐the‐art and
fail‐safe. The modules may give rise to dangers if they are inappropriately
installed and operated by untrained personnel. Any person instructed to carry
out installation, commissioning, maintenance or repair of the modules must
have read and understood the Operating Manuals and in particular the tech
nical safety instructions.
The scope of supply and performance of the modules only covers a small
area of measurement technology. In addition, equipment planners, installers
and operators should plan, implement and respond to the safety engineering
considerations of measurement technology in such a way as to minimize
remaining dangers. Prevailing regulations must be complied with at all times,
draw the attention of users to the remaining dangers connected with measure
ment technology.
Maintenance and cleaning
The modules are maintenance‐free. Please note the following points when
cleaning the housing:
• Before cleaning, disconnect all connections.
• Clean the housing with a soft, slightly damp (not wet!) cloth. Never use
solvent as this could damage the labeling or the housing.
• When cleaning, ensure that no liquid gets into the module or connections.
A3169-1.0 en/de HBM
Page 8
8
QuantumX Data Recorder CX22‐W
1 Markings used
catman is a registered trademark of HOTTINGER BALDWIN
MESSTECHNIK GMBH.
All trademarks and brands used in this document are trade names and/or
trademarks belonging to the respective product or the manufacturer/owner.
HOTTINGER BALDWIN MESSTECHNIK GMBH does not lay claim to any
other than their own trade names/trademarks.
1.1 The markings used in this document
Important instructions for your safety are specifically identified. It is essential
to follow these instructions, in order to prevent accidents and damage to prop
erty.
Safety instructions are structured as follows:
Signal word
Description of danger
Possible consequences of non‐compliance with specified measures
Measures to avoid/prevent the danger
Danger classes as per ANSI
Warning sign, signal word Significance
Warns of a potentially dangerous situation
WARNING
CAUTION
in which failure to comply with safety re
quirements can result in death or serious
physical injury.
Warns of a potentially dangerous situation
in which failure to comply with safety re
quirements can result in slight or moderate
physical injury.
NOTE
The marking below warns of a situation in
which failure to comply with safety require
ments can lead to damage to property.
A3169-1.0 en/deHBM
Page 9
QuantumX Data Recorder CX22‐W
The marking below draws your attention to important information about the
product or about handling the product.
Important
Important information
The marking below contains application tips or other information that is useful
to you.
Tip
Information/Application instructions
9
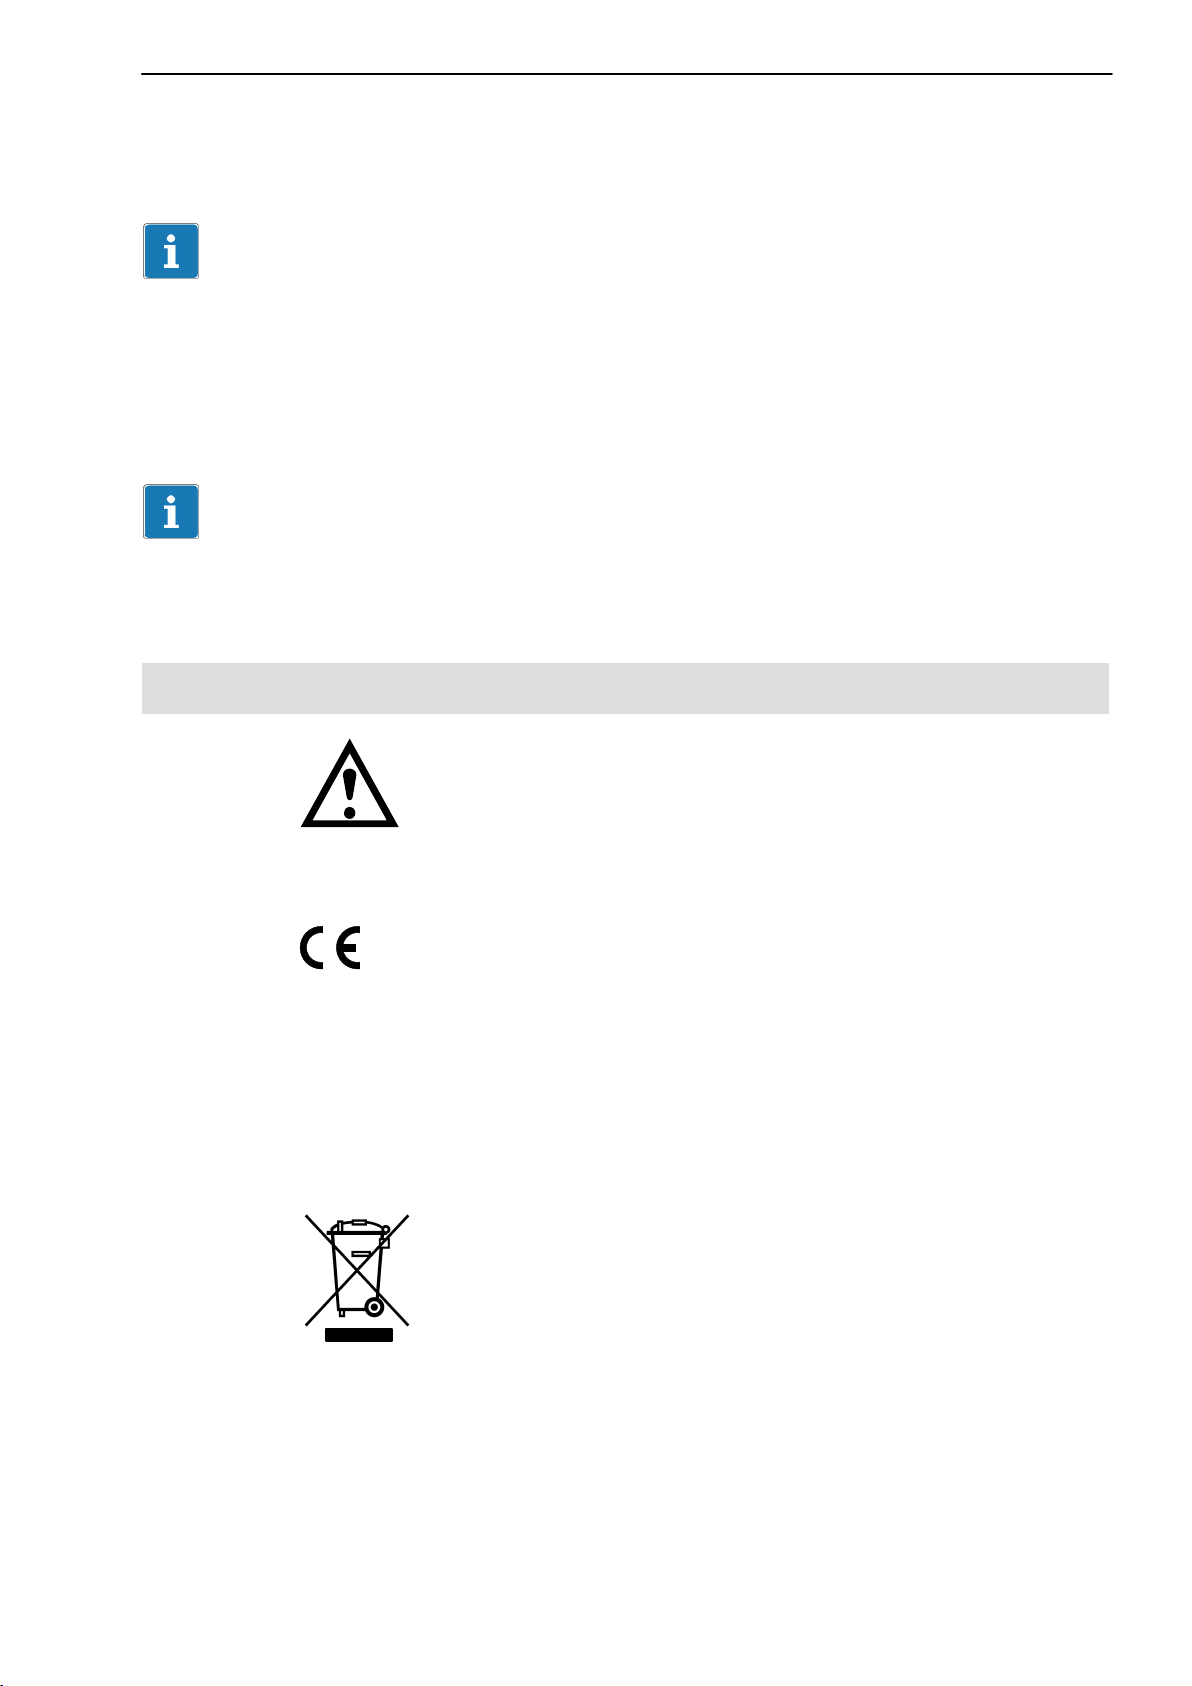
1.2 Symbols on the module and their meaning
Symbol:
Meaning: Read and note the data in this manual
Symbol:
Meaning: CE mark
The CE mark enables the manufacturer to guarantee that the product com
plies with the requirements of the relevant EC directives (the Declaration of
Conformity can be found on the HBM website at www.hbm.com under Sup
port -> HBMdoc).
Symbol:
Meaning: Statutory waste disposal mark
The electrical and electronic devices that bear this symbol are subject to the
European waste electrical and electronic equipment directive 2002/96/EC.
The symbol indicates that the device must not be disposed of as household
garbage, see also Chapter 12, Page 42.
A3169-1.0 en/de HBM
Page 10
10
QuantumX Data Recorder CX22‐W
Symbol:
Meaning: USB connections, e.g. for keyboard, mouse, external
memory
Symbol:
Meaning: Microphone connection
Symbol:
Meaning: Loudspeaker connection
Symbol:
Meaning: Connection for earthing the housing
The connection must be connected to the grounded conductor potential.
A3169-1.0 en/deHBM
Page 11

QuantumX Data Recorder CX22‐W
11
2 Introduction
This manual is intended to support you in setting the basic settings of your
QuantumX Data Recorder. The CX22 Data Recorder is available in two
versions: CX22 and CX22‐W. The CX22‐W version also has a WLAN module
with a WLAN antenna on the front of the module.
All measurement technology settings are implemented using the catman
software, which has an extensive online Help.
This manual shows you:
• How to connect the module.
• What options are available for connecting to the module.
• How to connect to the module.
QuantumX modules are connected to the CX22‐W Data Recorder via
FireWire in the same way as is the case with other QuantumX modules,
alternatively, you can connect QuantumX modules via Ethernet.
AP
The complete QuantumX documentation comprises:
• This operating manual
• QuantumX operating manual with pin assignments
• The QuantumX Data Recorder data sheet
• QuantumX module data sheets
• Online Help in the software
• catmanAP
• QuantumX Assistant
• Sensor database
• TEDS Editor
• Programming interface API (.NET/COM)
• LabVIEWt library (VIs)
• DIAdemt driver
• Examples for LabVIEWt and API (.NET/COM)
A3169-1.0 en/de HBM
Page 12
12
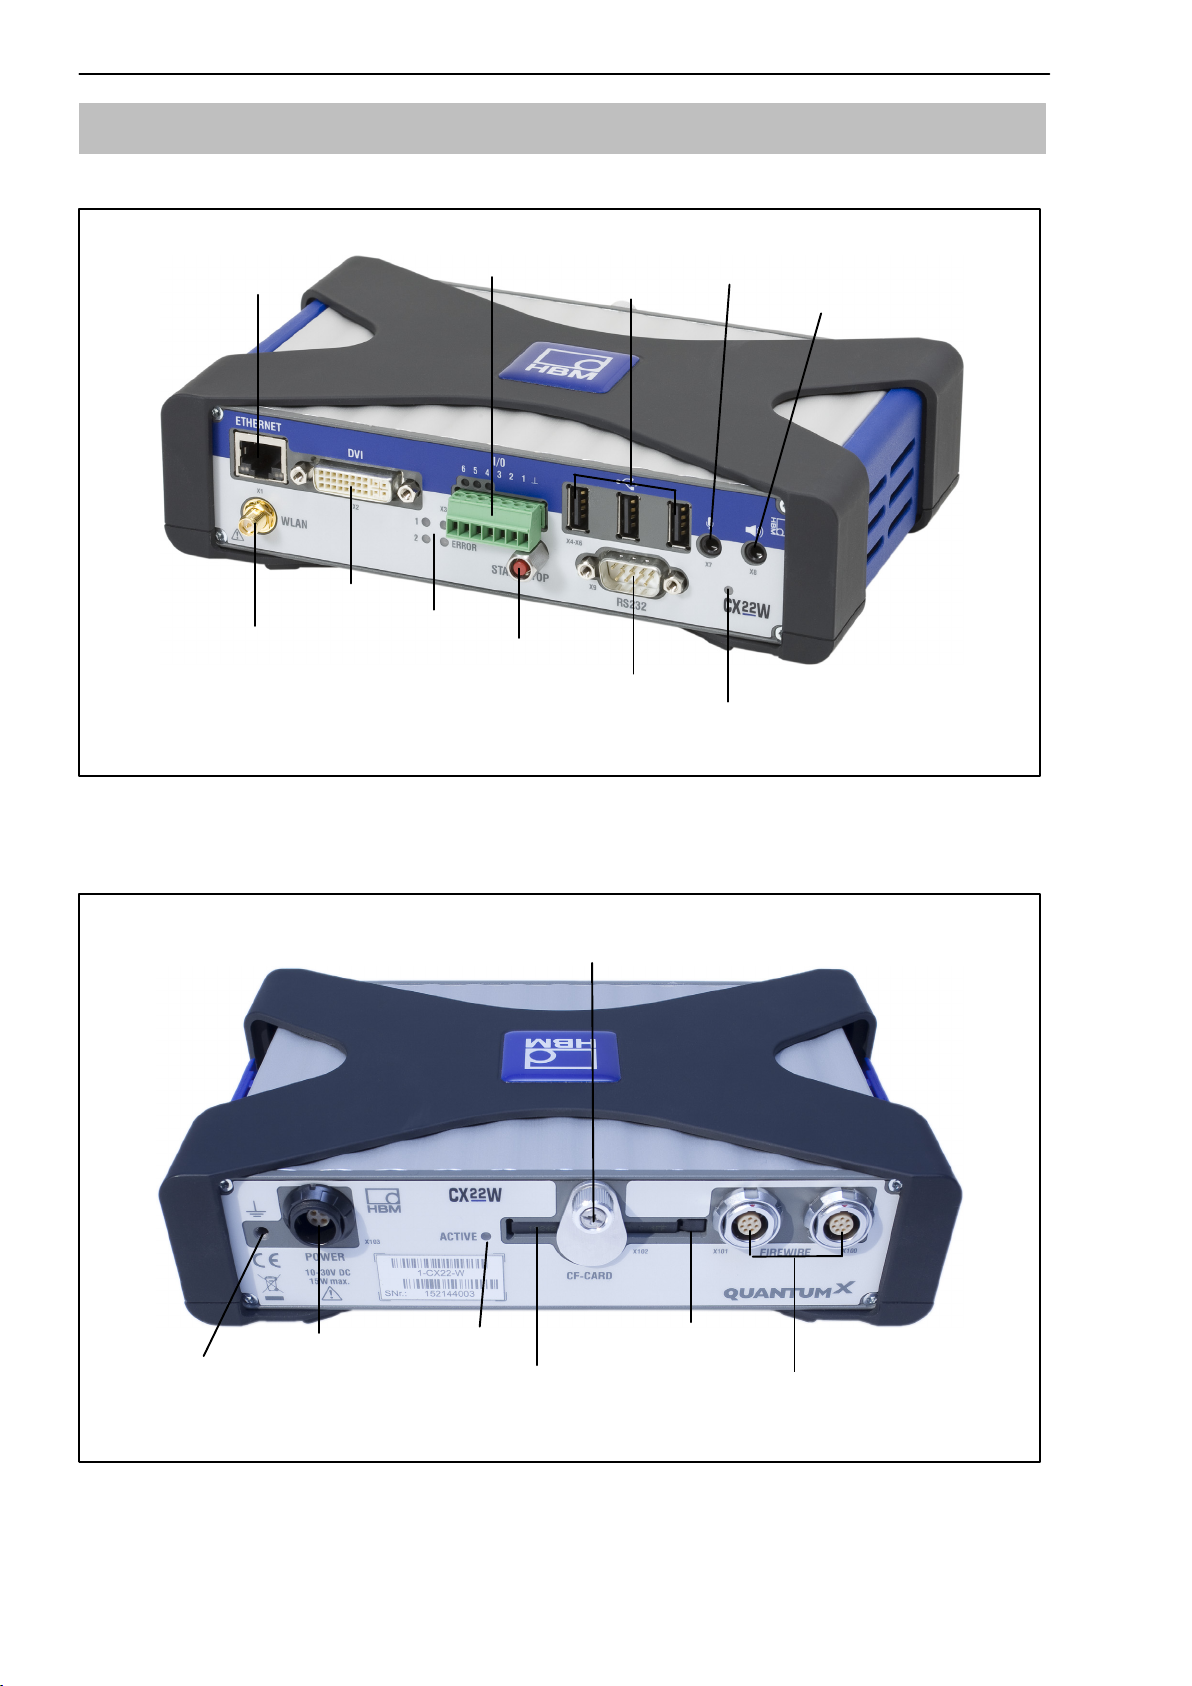
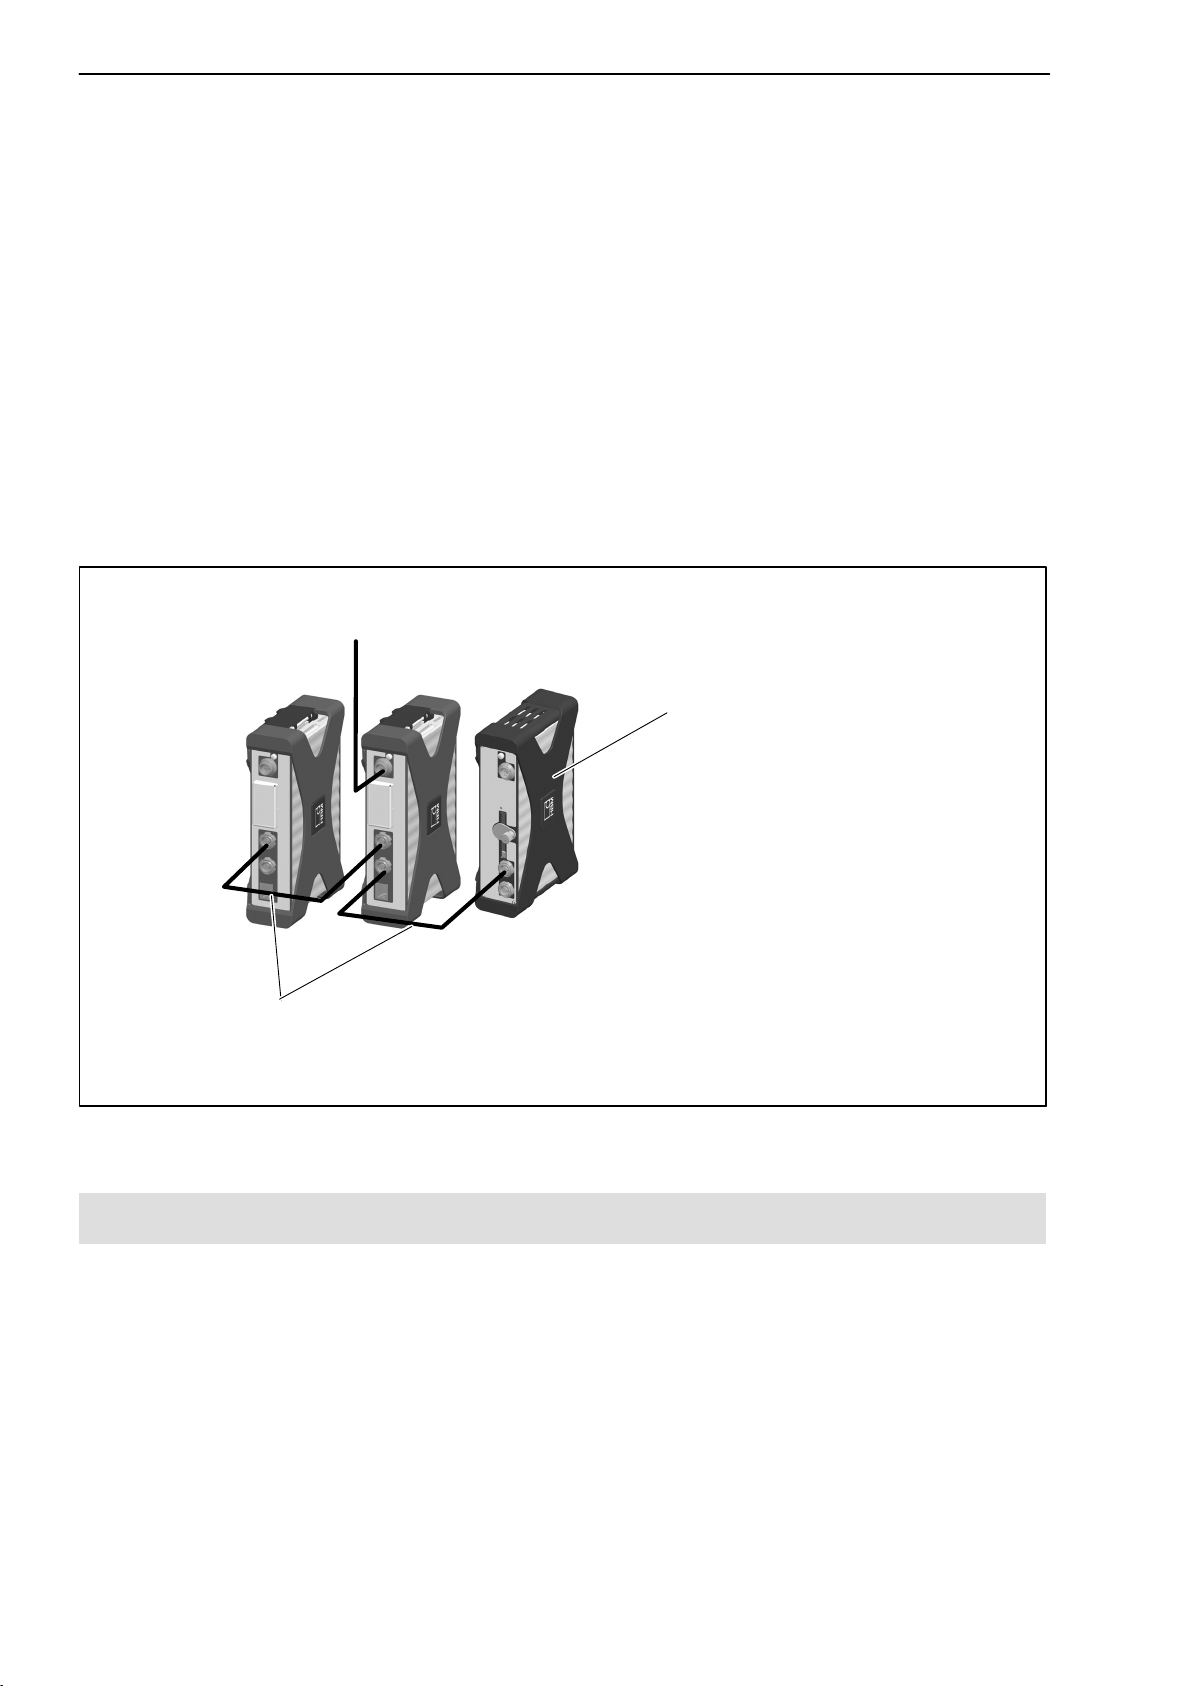
3 CX22‐W connections
QuantumX Data Recorder CX22‐W
Ethernet
(Network)
WLAN antenna
(CX22‐W only)
Monitor
Status LEDs
Digital I/Os
Start/Stop button
Fig. 3.1: CX22‐W connections on the front
USB
RS‐232‐C
Microphone
Loudspeaker
Module LED
Lock for CF card
LED
CF card, type 1
Grounding
Supply voltage
10 … 30V
DC
Fig. 3.2: CX22‐W connections on the rear
Ejection button for CF
card
FireWire
A3169-1.0 en/deHBM
Page 13

QuantumX Data Recorder CX22‐W
13
Ground connection and grounding
Lay signal and data leads separately from current‐carrying power lines. Cable
ducts made of sheet metal with an internal partition are ideal.
A potential equalization line must be laid if there are potential differences in or
to the connected measurement system (reference value: Highly flexible stran
2
ded wire, wire cross section 10mm
).
A3169-1.0 en/de HBM
Page 14

14
QuantumX Data Recorder CX22‐W
4 Changing the CompactFlash card
Important
CompactFlash cards (CF cards) only have a limited number of write cycles,
i.e., they age (typically 1,000,000 write cycles). You should therefore check
the CF card regularly for errors in Windows and replace with a new card
where necessary. The service life of a CF card depends on the loading and
the manufacturer.
Ensure that a current, high quality CF card, type 1, CF version 4.1 is used
with at least 8 GBytes so that a high data rate can be achieved; older CF
cards usually have lower data rates. The card must be formatted with the
NTFS file system before insertion.
An 8 GByte CF card is included in the scope of delivery of the CX22‐W Data
Recorder.
4.1 Procedure for removing the CF card
NOTE
Do not replace the CF card when the CX22‐W is switched on.
This could damage the CX22‐W or the CF card or, if measurement data are
being recorded, this could cause all the data of the test to be lost.
Switch the CX22‐W off before replacing the CF card.
1. Undo the retaining screw for the CF card (Fig. 3.2 on Page 12). The
screw must not be removed, it should just be loosened.
2. Swivel the cover plate upwards to expose the slot for the CF card.
3. Use a blunt object, e.g. a ball‐point pen to press the ejection button on the
right in the CF card slot (Fig. 3.2).
4. Remove the CF card.
5. Read Section 4.2, this describes the insertion of the CF card. The
CX22‐W should not be operated without a CF card, as no data can be
stored.
A3169-1.0 en/deHBM
Page 15
QuantumX Data Recorder CX22‐W
15
4.2 Procedure for inserting the CF card
The CF card must be formatted with the NTFS file system. You can carry out
this formatting with any PC that has a CF card slot or a CF card adapter and
uses Windows XP or higher.
NOTE
Switch the CX22‐W off before replacing the CF card. Otherwise the CX22‐W
or the CF card could be damaged or, if measurement data are being recorded,
this could cause all the data of the test to be lost.
1. Unless otherwise already implemented, undo the retaining screw of the
CF card slot (Fig. 3.2 on Page 12) and swivel the cover plate upwards.
The screw must not be removed, it should just be loosened.
2. Hold the CF card with the top facing upwards.
3. Slide the CF card into the slot until you feel a slight resistance at the end
when the contacts slide into the internal contact strip. The CF card must
disappear completely inside the slot.
4. Swivel the cover plate down until it engages in the protective casing
recess and the slot is covered.
5. Tighten the retaining screw by hand.
A3169-1.0 en/de HBM
Page 16
16
QuantumX Data Recorder CX22‐W
5 Connecting the CX22‐W Data Recorder
Apply a supply voltage of 10V - 30V (DC) to the X103 connection (see
Fig. 5.1). Use a supply voltage with sufficient power if any QuantumX modules
connected to the CX22‐W also need to be supplied. The NTX001 power
packs available from HBM can supply a CX22‐W and two further modules.
Set up the connection to a PC first before connecting the QuantumX modules.
Implement the configuration either directly via the CX22‐W Data Recorder
(Section 5.1) or via a Remote Desktop Connection from your PC (Section 5.2
and Chapter 6). Then connect the QuantumX modules e.g. via FireWire with
the CX22‐W Data Recorder, see Section 5.3.
5.1 Operation with monitor and keyboard/mouse
This type of operation is the simplest. It does not require any configuration,
but you will need a monitor with digital input (DVI) and a mouse and keyboard
with USB connection.
Connect the mouse and keyboard to the USB sockets of the CX22‐W. The
monitor is connected with a commercial DVI monitor cable to the DVI socket
(see Fig. 3.1 on Page 12 for all connections). Connection via VGA is not pos
sible, not even with a DVI/VGA adapter connector as the leads required for
VGA are not assigned.
Switch on the power supply and wait until the boot process is complete and
the module is ready.
Important
The CX22‐W factory setting for the input language (keyboard layout) is EN
(English). If you connect a keyboard with a different layout, select Exit to
Windows in the start screen and then press Shift‐Alt or change the input lan
guage via the language bar in the task bar.
Set the location for your country if necessary using the Windows Control
Panel (“Regional and Language Options”). The setting influences, e.g. digit
settings and the time.
Set other settings via the start screen (CX22 Start Screen), see Chapter 7.
Tip
See also Chapter 9, Configuring the CX22‐W for automatic measurements,
from Page 33.
A3169-1.0 en/deHBM
Page 17
QuantumX Data Recorder CX22‐W
17
5.2 Connecting to a PC
The CX22‐W Data Recorder is connected to the PC via Ethernet. There are
different variants, depending on your PC/network configuration, and the con
nection procedure depends on the variant:
1. CX22‐W and PC are connected directly via an Ethernet cable.
2. The CX22‐W Data Recorder is connected with an Ethernet network
(generally automatic assignment of network configuration via DHCP,
Dynamic Host Configuration Protocol).
3. The CX22‐W Data Recorder is connected via WLAN (CX22‐W only).
The initial configuration of a CX22‐W with WLAN must be implemented either
with monitor and keyboard (see Section 5.1) or via a connection with Ethernet
cable. You can then also activate the WLAN interface during this configuration
and enter the parameters for a WLAN connection.
Important
Wait approx. 1 minute after switching on the CX22‐W before setting up a con
nection so that the boot process is complete and the module is ready. Other
wise you may receive an error message that the device could not be found.
To facilitate setting up a CX22‐W connection with unknown settings, you can
use the HBM program “QuantumX Data Recorder Assistant”. The settings
required are described in the following chapter. If you already know the IP
address of the CX22‐W, you can also directly set up a Remote Desktop Con
nection (standard program in the Windows operating system). You can find
the Remote Desktop Connection program under All programs -> Accessor
ies (Windows XP: Programs -> Accessories).
5.3 Connecting QuantumX modules
Important
If you are already using QuantumX modules and want to connect them with a
CX22‐W Data Recorder, install the latest module firmware. If you want to add
new modules at a later date, please install the latest software on the CX22‐W
using the Recovery function, see Section 11.2 on Page 39. The latest soft
ware is always installed during restoring. You may receive a request, after
starting catman
A3169-1.0 en/de HBM
AP, to update the firmware of older QuantumX modules.
Page 18
18
QuantumX Data Recorder CX22‐W
QuantumX modules are connected to the CX22‐W Data Recorder via
FireWire in the same way as is the case with other QuantumX modules: e.g.
1‐KAB269‐x, connection X100 of the CX22‐W to X101 on the first module, this
module with connection X102 to X101 on the next module, etc. Alternatively,
you can also connect all QuantumX modules via Ethernet to the CX22‐W. If
you have more than one module, you will require an Ethernet Switch.
In the configuration shown below, the supply voltage of the modules is looped
through FireWire (maximum 1.5A via FireWire; power consumption for a
module or the CX22‐W, see the Technical Data Section in the data sheet).
You can connect up to 12 modules via FireWire to the CX22‐W Data
Recorder, supply feed required for every 4 modules. The QuantumX operating
manual contains more detailed data on this.
10V ... 30V
FireWire connection
1‐Kab269‐x: Connection cable with various lengths (x m)
Fig. 5.1: Connecting QuantumX modules to the CX22‐W Data Recorder
DC
CX22(‐W)
5.4 Connecting other devices
Only QuantumX modules can currently be connected to the CX22‐W Data
Recorder. If you want to connect other devices, e.g. MGCplus, please contact
HBM Support.
A3169-1.0 en/deHBM
Page 19
QuantumX Data Recorder CX22‐W
19
6 Connecting a PC with the CX22‐W Data Recorder
If you know the IP address of the CX22‐W, you can also directly set up a
Remote Desktop Connection to this address. You can find the Remote
Desktop Connection program under All programs -> Accessories (Windows
XP: Programs -> Accessories).
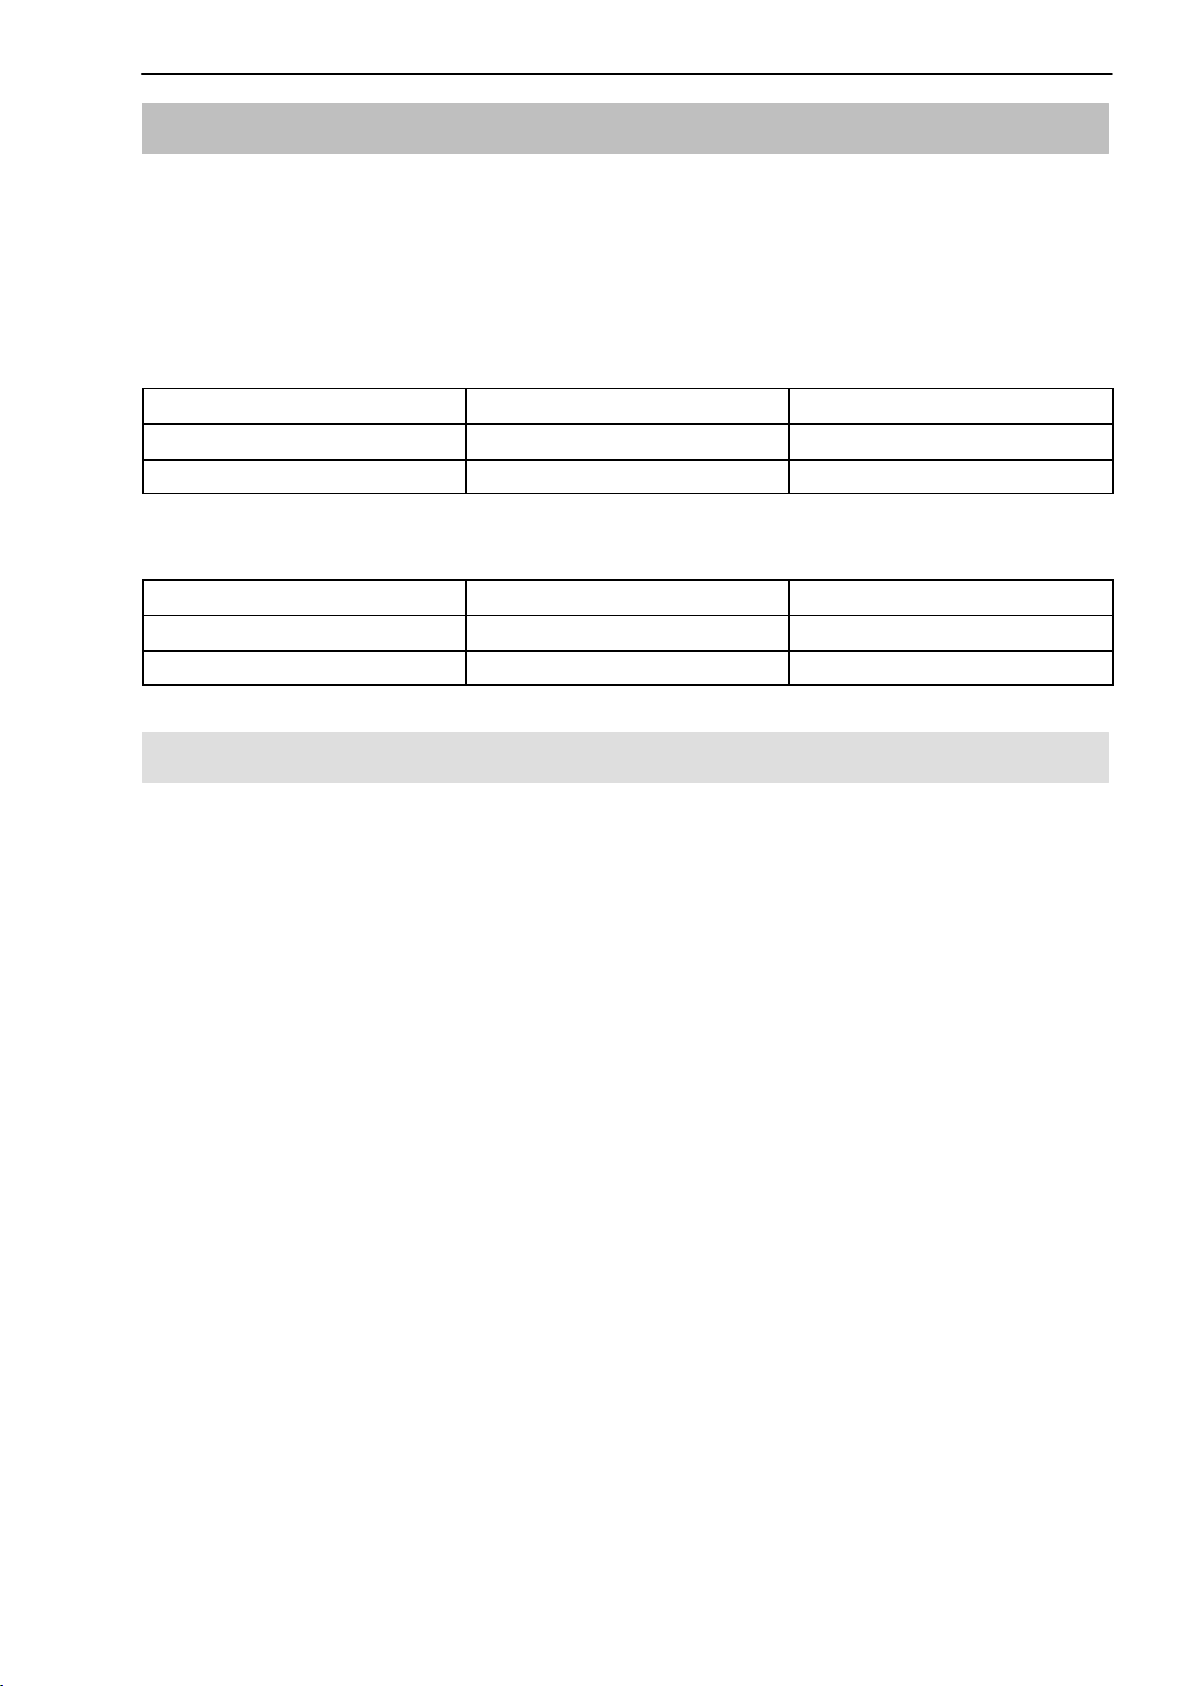
Factory settings for the interfaces:
IP address Subnet mask
Ethernet 172.191.1.30 255.255.0.0
WLAN (deactivated) DHCP
Your settings:
IP address Subnet mask
Ethernet
WLAN
6.1 Direct connection of PC and CX22‐W
Procedure
1. Connect the PC and CX22‐W via an Ethernet cable, category CAT5 or
higher.
2. Install the program “QuantumX Data Recorder Assistant” from the Quan
tumX System CD.
3. Start the “QuantumX Data Recorder Assistant” program: Windows Start
button -> All programs -> HBM -> QuantumX Data Recorder Assist
ant (Windows
QuantumX Data Recorder Assistant).
4. Click on Find CX22.
5. The CX22‐W Data Recorder appears in the top list, the current
address(es) of the interface (WLAN only with CX22‐W) are also displayed
(Fig. 6.1).
XP: Windows Start button -> Programs -> HBM ->
A3169-1.0 en/de HBM
Page 20
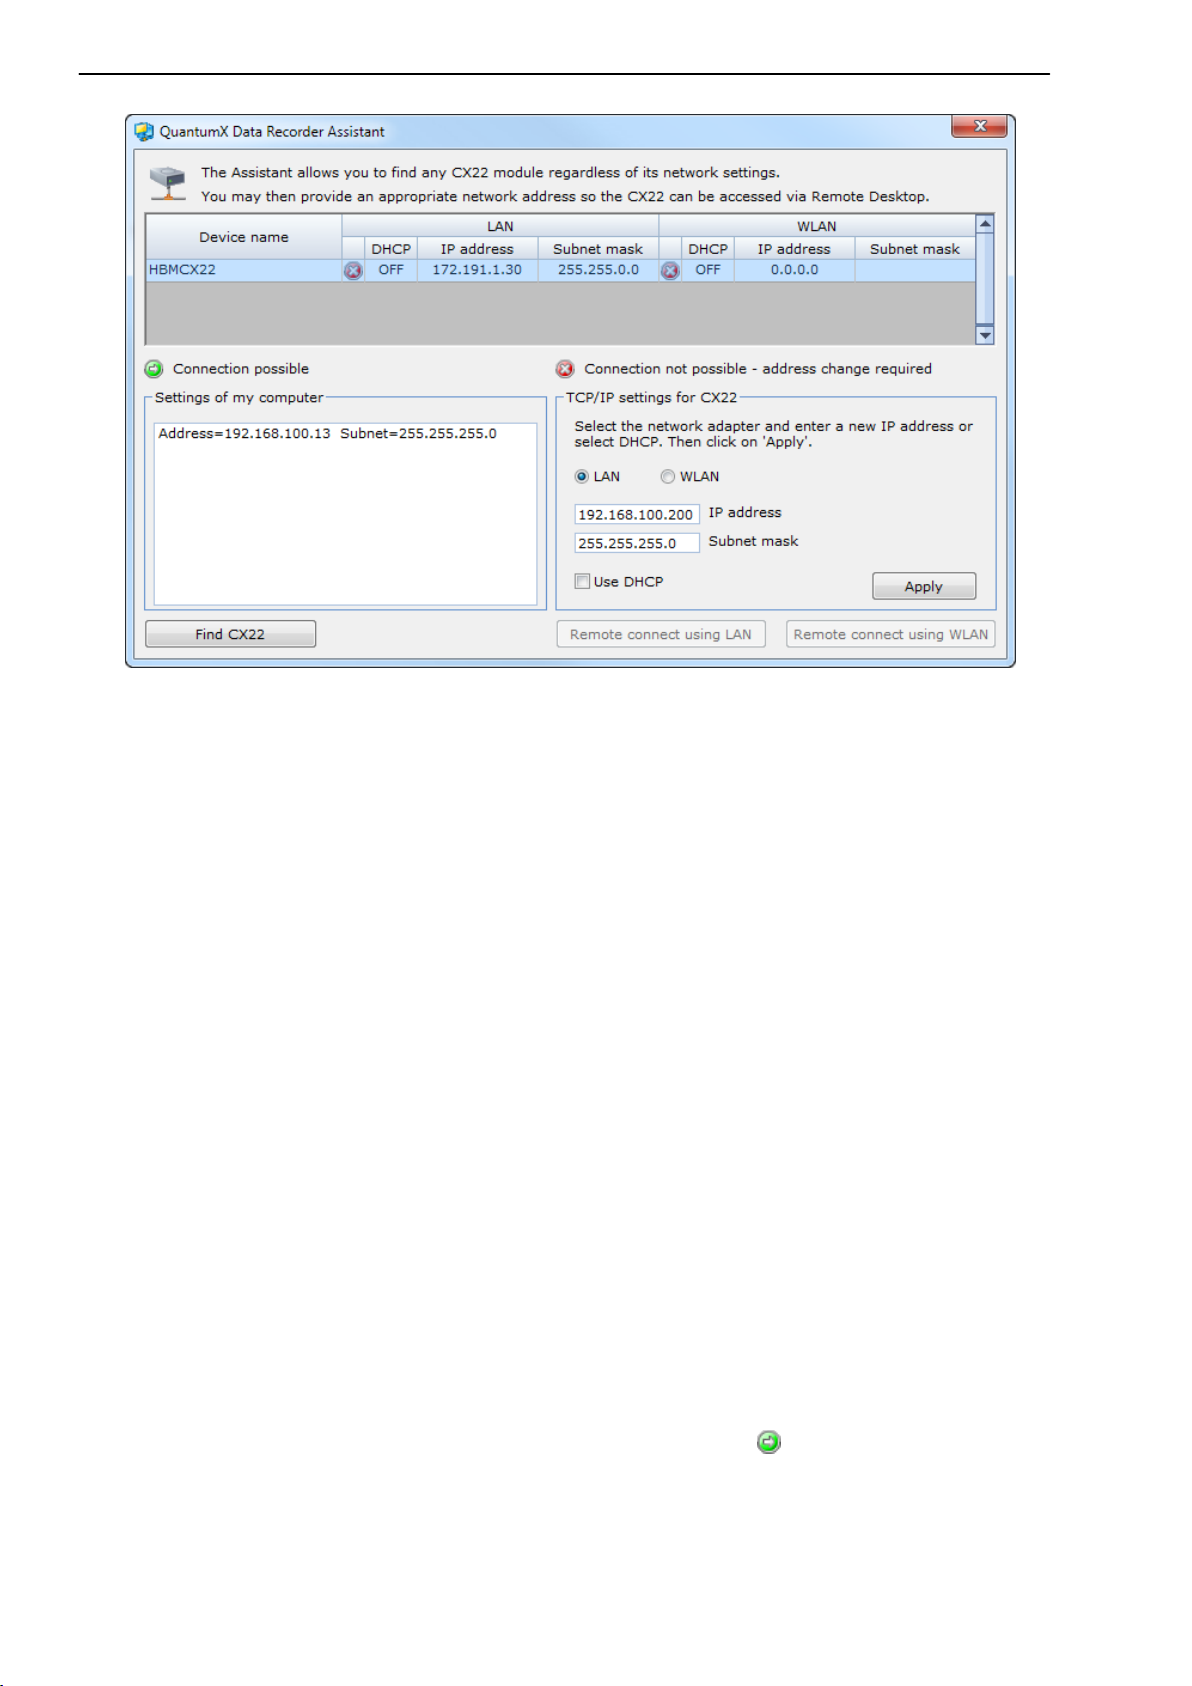
20
QuantumX Data Recorder CX22‐W
Fig. 6.1: Display in QuantumX Data Recorder Assistant after a network search
(example with connection via LAN)
6. The IP addresses and subnet masks of the PC interfaces are displayed in
the Settings of my computer section on the left side.
Depending on the configuration of your PC, both the PC and the CX22‐W
can be set to DHCP, then suitable addresses are set up (renewed)
between the two devices and you can continue next time with step 10.
Alternatively you can use permanent addresses for both devices. In this
case, you have two options: You can either change the PC address (Win
dows control panel) or the address of the CX22‐W. The latter is described
below.
7. Select the CX22‐W in the top list.
8. Click in the field TCP/IP‐Settings for CX22 on LAN and enter the
required IP address and subnet mask or select Use DHCP.
An address and subnet mask that lie within the address range of your PC
are automatically proposed, you can however change this proposal. Enter
an IP address in which the first three digit groups match the digit groups of
the PC and only the last digit group contains a different number between 1
and 254. The last digit group must not match the digit group in the PC!
Also see the example below.
9. Click on Apply and wait until the new address and
are shown at the
top. The symbol indicates that a connection is possible.
10. If necessary, select the CX22‐W again in the top list and then click on
Remote connect using LAN.
A3169-1.0 en/deHBM
Page 21
QuantumX Data Recorder CX22‐W
11. If Windows queries whether a connection to the remote computer should
be set up, confirm the connection. We recommend activating the option
Do not ask about connection to this computer again. Depending on
the configuration of your Windows operating system, another query as to
whether the connection should be set up may be displayed (identity of the
remote computer). If necessary, activate the option to prevent the query.
The connection with the CX22‐W Data Recorder will now be implemented
and you must register with the device via Windows. Enter HBMCX22 as
the User name and hbm as the Password. The text for the Password
must be in lower case.
21
Important
The IP address and subnet mask are not yet saved. In the start screen, click
on Commit changes and reboot to permanently save the new settings. The
CX22‐W is then rebooted, you must therefore set up the connection again
after the new start. (Wait approx. 1 minute until the CX22‐W has rebooted
before clicking on Remote connect using LAN.)
Example for IP address and subnet mask
The IP address of the PC is 169.254.27.81, the subnet mask is 255.255.0.0.
Enter 169.254.27.254 as the IP address and 255.255.0.0 as the subnet mask.
6.2 Connecting the CX22‐W and PC via a network
The settings for the CX22‐W Data Recorder also depend in this case on your
network configuration. Please contact your network administrator to obtain the
correct settings.
1. Connect the CX22‐W via an Ethernet cable, category CAT5 or higher, with
your network.
2. Install the program “QuantumX Data Recorder Assistant” from the Quan
tumX System CD.
3. Start the “QuantumX Data Recorder Assistant” program: Windows Start
button -> All programs -> HBM -> QuantumX Data Recorder Assist
ant (Windows
QuantumX Data Recorder Assistant).
XP: Windows Start button -> Programs -> HBM ->
4. Click on Find CX22.
5. The CX22‐W Data Recorder appears in the top list, the current
address(es) of the interface (WLAN only with CX22‐W) are also displayed
(Fig. 6.1).
A3169-1.0 en/de HBM
Page 22
22
6. The IP addresses and subnet masks of the PC interfaces are displayed in
the Settings of my computer section on the left side.
You now have two options, dependent on your network: You can either
give the CX22‐W a permanent address or set the CX22‐W Data Recorder
to DHCP.
7. Select the CX22‐W in the top list.
8. Click in the field TCP/IP‐Settings for CX22 on LAN and enter the
required IP address and subnet mask or select Use DHCP.
An address and subnet mask that lie within the address range of your PC
are automatically proposed, you can however change this proposal.
Please note the specifications of your network administrator.
9. Click on Apply and wait until the new setting is shown at the top. The
QuantumX Data Recorder CX22‐W
symbol
nection is possible.
10. If necessary, select the CX22‐W again in the top list and then click on
Remote connect using LAN.
11. If Windows queries whether a connection to the remote computer should
be set up, confirm the connection. We recommend activating the option
Do not ask about connection to this computer again. Depending on
the configuration of your Windows operating system, another query as to
whether the connection should be set up may be displayed (identity of the
remote computer). If necessary, activate the option to prevent the query.
The connection with the CX22‐W Data Recorder will now be implemented
and you must register with the device via Windows. Enter HBMCX22 as
the User name and hbm as the Password. The text for the Password
must be in lower case.
should change to the symbol and thereby indicate that a con
Important
The IP address and subnet mask or the DHCP setting are not yet saved. In
the start screen, click on Commit changes and reboot to permanently save
the new settings. The CX22‐W is then rebooted, you must therefore set up the
connection again after the new start. (Wait approx. 1 minute until the CX22‐W
has rebooted before clicking on Remote connect using LAN.)
A3169-1.0 en/deHBM
Page 23

QuantumX Data Recorder CX22‐W
23
6.3 Connection via WLAN (CX22‐W only)
Important
The permissible WLAN settings differ from country to country, various chan
nels in the individual frequency ranges are permissible in the different coun
tries. The standard setting of the WLAN interface activates channels 1 to 11
for the frequency range 2.4GHz and channels 36 to 64 and 149 to 165 for the
frequency range 5GHz. You may therefore need to set other ranges depend
ing on the site, see Section 6.3.1.
Connection via WLAN can be implemented in two different ways:
1. You can integrate the CX22‐W in an existing WLAN (requires a configured
Access Point).
2. You can set up a direct connection between the WLAN of the CX22‐W and
your PC. This type of connection is called an Adhoc network.
To configure the connections, you need to either work with monitor and mouse
as described in Section 5.1 or you need to use one of the connections “via
cable” as described in Sections 6.1 and 6.2. The following description
assumes that you have already set up one of the above connections.
6.3.1 Preparing the CX22‐W for WLAN connections
1. Click in the start screen of the CX22‐W on Exit to Windows.
2. Call up the Network Connections window via the Windows Start button
and Settings.
3. Right‐click on “Wireless Network Connection” and select Enable.
4. Right‐click on “Wireless Network Connection” again and select Proper
ties.
5. Click on Configure at the top of the the dialog.
6. Go to the Advanced tab and set the channels available for your country
under Country Region. The range data for the possible channels can be
greater than for the channels permitted, see table below.
Further procedures depend on the required connection type, please refer
to the applicable section: 6.3.2 (next section) or 6.3.4 on Page 25.
A3169-1.0 en/de HBM
Page 24

24
QuantumX Data Recorder CX22‐W
Permitted WLAN channels, status 2011
Country/Region Frequency band Permitted channels
Europe 2.4GHz
5GHz
USA 2.4GHz
5GHz
Japan 2.4GHz
5GHz
1 - 13
36 - 64, 100 - 140
1 - 11
36 - 64, 147 - 155
1 - 13
36 - 48
6.3.2 Preparing the CX22‐W for an existing WLAN (Access Point)
1. Exit the dialog with OK.
2. Right‐click on “Wireless Network Connection” and select View Available
Wireless Networks.
3. Select the network of your Access Point and click on Connect.
4. If necessary, enter the network key.
5. Close the Wireless Network Connection dialog once the connection has
been set up.
6. Then double‐click on “CX22 Start Screen”.
7. Click on Commit changes and reboot to permanently save the new set
tings.
The connection is automatically restored if the network is in range, even if the
CX22‐W has previously been switched off.
6.3.3 Setting up connection via WLAN
1. Start the “QuantumX Data Recorder Assistant” program: Windows Start
button -> All programs -> HBM -> QuantumX Data Recorder Assist
ant (Windows
XP: Windows Start button -> All programs -> HBM ->
QuantumX Data Recorder Assistant).
2. Click on Find CX22.
3. The CX22‐W Data Recorder appears in the top list, the current addresses
of the interface are also displayed (Fig. 6.2).
A3169-1.0 en/deHBM
Page 25
QuantumX Data Recorder CX22‐W
25
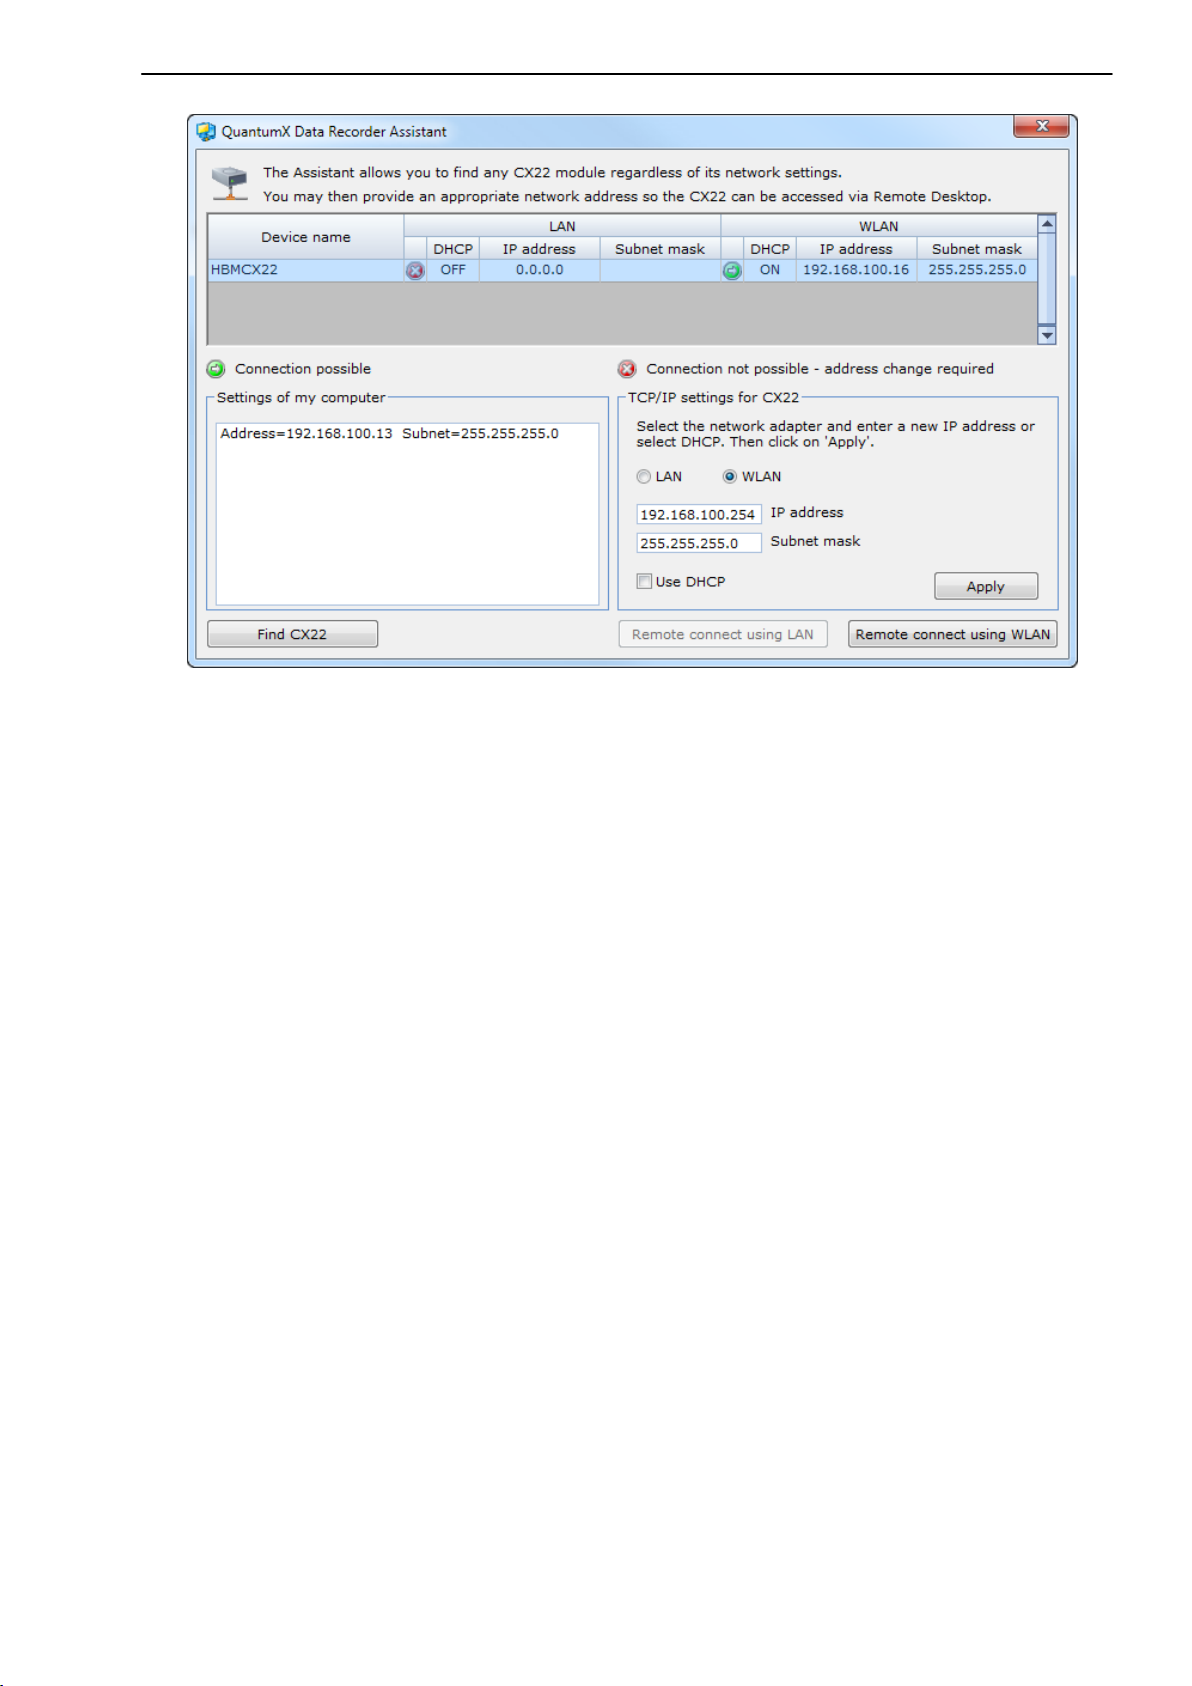
Fig. 6.2: Display in QuantumX Data Recorder Assistant after a network search
(WLAN example)
4. Select the CX22‐W in the top list.
5. Click on Remote desktop connection via WLAN.
6. If Windows queries whether a connection to the remote computer should
be set up, confirm the connection. We recommend activating the option
Do not ask about connection to this computer again. Depending on
the configuration of your Windows operating system, another query as to
whether the connection should be set up may be displayed (identity of the
remote computer). If necessary, activate the option to prevent the query.
The connection with the CX22‐W Data Recorder will now be implemented
and you must register with the device via Windows. Enter HBMCX22 as
the User name and hbm as the Password. The text for the Password
must be in lower case.
6.3.4 Preparing the CX22‐W for the Adhoc network
1. Activate Adhoc support in the Advanced tab: Adhoc support 802.11n:
Enable.
2. Exit the dialog with OK.
3. Call the first dialog again: Right‐click on “Wireless Network Connection”
and select Properties.
4. Go to the Wireless Networks tab.
A3169-1.0 en/de HBM
Page 26

26
QuantumX Data Recorder CX22‐W
5. Create a network if the “CX22” network has been deleted: Click on Add
and enter a name for the network in the following dialog: Network name
(SSID): CX22.
6. Otherwise click on the “CX22” network and click on Properties.
7. Go to the Association tab and activate Connect even if network is not
broadcasting.
8. We recommend setting up encryption for the network, even if only the less
secure WEP is possible for Adhoc networks: Enter Open under Network
Authentication and WEP under Data encryption.
9. Enter a network key: Network key. You may need to deactivate the option
The key is provided for me automatically.
The network key must consist of either 5 or 13 ASCII characters. A longer
key is theoretically more secure, but a really secure connection is currently
only possible with WPA2. However, this encryption method is not available
for Adhoc networks in the CX22‐W.
10. Go to the Connection tab and activate Connect when this network is in
range.
11. Exit the dialog with OK.
If you have just created the network, it should now appear in the network
list. In all cases, (Automatic) should appear after the network name
CX22.
12. Go to the General tab, select Internet Protocol (TCP/IP) in the list and
click on Properties.
13. In the following dialog, activate Obtain an IP address automatically and
Obtain DNS server address automatically.
14. Close all dialogs for Wireless Network Connection with OK or Close.
15. Then double‐click on “CX22 Start Screen”.
16. Click on Commit changes and reboot to permanently save the new set
tings.
Even after the CX22‐W is switched off, the WLAN connection will be automat
ically set up when a PC that wants to connect to the network is within range
(the name given under 5. is displayed on the PC).
6.3.5 Preparing the PC for connection via an Adhoc network
1. Start the PC from where the connection is to be set up.
2. Call up the Network Connections window via the Windows Start button
and Settings.
3. Right‐click on “Wireless Network Connection” and select Properties.
4. Go to the Wireless Networks tab.
A3169-1.0 en/deHBM
Page 27

QuantumX Data Recorder CX22‐W
27
5. Set up the network for the CX22: Click on Add and enter a name for the
network in the following dialog: Network name (SSID): CX22.
6. In the Association tab, activate the option Connect even if network is
not broadcasting.
7. Activate the option This is a computer‐to‐computer network (Ad‐hoc);
wireless access points are not used.
8. We recommend setting up encryption for the network, even if only the less
secure WEP is possible for Adhoc networks: Enter Open for Network
authentication and WEP for Data encryption.
9. Enter the Network key that you assigned to the CX22.
10. Go to the Connection tab and activate Connect when this network is in
range.
11. Exit the dialog with OK.
The network should now appear in the network list and it should (auto
matically) appear behind the network name CX22.
12. Go to the General tab, select Internet Protocol (TCP/IP) in the list and
click on Properties.
13. In the following dialog, activate Obtain an IP address automatically and
Obtain DNS server address automatically.
14. Close all dialogs for Wireless Network Connection with OK or Close.
6.3.6 Setting up a connection via WLAN and Adhoc network
1. Start the PC from where the connection is to be set up.
2. Right‐click on the symbol for WLAN displayed in the notification area of
the Windows task bar and select Display available wireless networks.
3. Check that the PC is connected with the “CX22” network or with the net
work with the name given above under Network name (SSID). If neces
sary, wait for two minutes after switching on the CX22‐W until the connec
tion is set up.
4. Start the “QuantumX Data Recorder Assistant” program: Windows Start
button -> All programs -> HBM -> QuantumX Data Recorder Assist
ant (Windows
XP: Windows Start button -> All programs -> HBM ->
QuantumX Data Recorder Assistant).
5. Click on Find CX22.
6. The CX22‐W Data Recorder appears in the top list, the current addresses
of the interfaces are also displayed (Fig. 6.2).
7. Select the CX22‐W in the top list.
8. Click on Remote desktop connection via WLAN.
A3169-1.0 en/de HBM
Page 28

28
9. If Windows queries whether a connection to the remote computer should
be set up, confirm the connection. We recommend activating the option
Do not ask about connection to this computer again. Depending on
the configuration of your Windows operating system, another query as to
whether the connection should be set up may be displayed (identity of the
remote computer). If necessary, activate the option to prevent the query.
The connection with the CX22‐W Data Recorder will now be implemented
and you must register with the device via Windows. Enter HBMCX22 as
the User name and hbm as the Password. The text for the Password
must be in lower case.
QuantumX Data Recorder CX22‐W
Tip
If setting up the connection in the Adhoc network takes too long for you, you
can also assign permanent IP addresses to the CX22 and PC. Refer to Sec
tion 6.1 on Page 19 (contains an example of permanent IP addresses). This
makes connection set up faster.
A3169-1.0 en/deHBM
Page 29

QuantumX Data Recorder CX22‐W
29
7 The CX22‐W Data Recorder start screen
In the CX22 start screen you can:
1. Start the catman
Also refer to Chapter 9 for automatic start.
2. Change important CX22‐W settings: Settings.
You can use this to change, e.g. the device name and password, as well
as the catman
installed software and hardware. See Section 11.1 on Page 39.
3. Permanently store configuration changes: Commit changes and reboot.
You must always click on this button if you have implemented any
changes via the Settings button or in System (Windows).
4. Terminate the Remote Desktop Connection: Terminate remote session.
You can also terminate a connection by closing the Remote Desktop win
dow.
AP program: Start DAQ software.
AP language. The Info tab contains information about the
5. Switch to the system level (Windows): Exit to Windows.
This is necessary, e.g. when you want to activate the CX22‐W WLAN. See
Section 6.3 on Page 23.
6. Switch off the CX22‐W Data Recorder: Shutdown.
This switches off the CX22‐W. Interrupt the power supply for approx. 5
seconds to switch it back on again.
A3169-1.0 en/de HBM
Page 30

30
QuantumX Data Recorder CX22‐W
8 Configure measurements with catman[ AP
Start catman AP via Start DAQ software in the start screen of the CX22‐W
Data Recorder. The default language for catman
select German or French via Settings in the start screen, see Section 11.1 on
Page 39.
If you do not connect the QuantumX modules via FireWire, you must first spe
cify how the connected devices can be found (device scan).
Detailed information about using catman
Help. Please also note that HBM offers seminars on catman
-> Seminars).
AP can be found in the Online
AP is English, you can also
(www.hbm.com
8.1 Set up device scan
The device scan options can be called up in the start window of catman AP
and Configure device scan.
Activate the Ethernet interface in Search ports and enter the address range
of the search (Scan range for TCP/IP device scan).
Tip
Only search the interfaces which have devices connected. Use the QuantumX
device manager to make the necessary settings for the initial setting with
QuantumX and Ethernet. No address is required for QuantumX and FireWire.
8.2 Create a DAQ (measurement) project
A DAQ (data acquisition) project contains all settings for the devices used,
transducers (sensors), real‐time calculations, how the measurement is to be
performed and which data should be saved. You can also configure a visualiz
ation if a monitor is connected to the CX22 Data Recorder.
Procedure
1. Click in the start screen of the CX22‐W Data Recorder on Start DAQ soft
ware.
2. Select New DAQ project.
When a new DAQ project is started, the interfaces activated in the device
scan are searched for. The devices must be switched on and ready for
operation, otherwise they will not be found. You must therefore wait after
switching on the devices before carrying out a device scan.
A3169-1.0 en/deHBM
Page 31

QuantumX Data Recorder CX22‐W
31
3. If you are not using transducers with TEDS, assign the connected sensors
(transducers) to the channels: Find your sensors in the sensor list (Com
ponent window Sensor database), then Drag&Drop each sensor to the
channel it is connected to. If necessary, set up your sensors in the sensor
database.
4. Assign unique channel names.
You can generate channel names with sequential numbering or accept the
sensor designation via the context menu Rename. Each channel is identi
fied in catman
AP by its name, you should therefore use meaningful
names where possible.
5. Mark the channels to be set to zero and run a zero adjustment (Zero bal
ance, group Zero balance).
6. Deactivate unused channels if necessary (group General, Active: Deac
tivate all channels without sensor).
7. Define - if required - calculations: Create in the group Computation
channels.
8. Activate Live readings (tab DAQ channels, group General) to display
continuous measured values and check that all channels are working cor
rectly.
9. Go to the DAQ jobs tab.
10. Select your measurement conditions: Sample rate, DAQ start and stop.
Select DAQ start via Trigger and Digital input in Trigger mode in order
to use the digital inputs or the START/STOP button of the CX22‐W (also
see Sections 10.1 and 10.2 on Page 35).
11. Click on Data storage (group Settings) and set the settings for saving the
data after or during measurement. We recommend using the setting Auto
matically on DAQ termination for Data saving. Otherwise a monitor
must be connected during measurement in order to save the data.
12. Create visualization if a monitor is connected.
13. Save your measurement project: File menu -> Save -> Project.
14. Start your measurement project via Start DAQ in the group Measure
ment.
If you have not created a visualization you will be asked if one of the
default settings for visualization should be used. Click on Measure
without visualization if a monitor is not connected during measurement.
The measurement mode of the CX22‐W is activated and - if you have
defined a start trigger, e.g. the START/STOP button - waits for the trigger.
The “RECORDING” LED flashes while waiting for the start trigger and
lights up continuously as soon as measurement starts.
A3169-1.0 en/de HBM
Page 32

32
QuantumX Data Recorder CX22‐W
Important
The “ERROR” LED lights up yellow if there is an error in catman[ AP, e.g.
when the connection to devices at project start cannot be set up or if the DAQ
job cannot be started. The “ERROR” LED flashes if the available free memory
drops below 1 GByte.
A3169-1.0 en/deHBM
Page 33

QuantumX Data Recorder CX22‐W
33
9 Configuring the CX22‐W for automatic measurements
Settings in two areas must be implemented to configure the CX22‐W for
autonomous measuring:
1. You must implement the applicable settings in DAQ jobs and Options in
catman
DAQ job after startup.
2. You must ensure that catman
switched on.
Measurement start and stop can be implemented as usual immediately or via
a trigger. You can also use the START/STOP button of the CX22‐W, see Sec
tion 10.2 on Page 35.
Procedure
1. Configure the DAQ (data acquisition) project as described in Section 8.2.
Set up the DAQ jobs so that the data are saved with the Automatically
on DAQ termination setting (Data storage in the group Settings, para
meter Data saving).
AP so that catman AP loads a DAQ project and launches the
AP is started when the CX22‐W is
2. Save the DAQ project.
3. Call up the catman
AP Options (File menu) and go to Program start
(group System).
4. Select an Existing DAQ project for the Start mode and select the project
created above in the DAQ project line.
5. Activate the option Execute first DAQ job automatically.
6. Go to DAQ channels in the group Channels and sensors.
7. Activate the option Deactivate defective channels and continue with
DAQ (If channel initialization fails).
8. Exit the dialog by clicking on OK.
9. Exit catman
AP.
10. In the start screen, click on Settings.
11. In the General tab, activate the option Launch DAQ software (cat
manAP) at startup and click on OK.
12. Click on Commit changes and reboot to permanently save the new set
tings.
This project will then be automatically started when the CX22‐W is switched
on again. If the power supply is interrupted during measurement, the project
will be reloaded and measurement continued when the power supply is
restored. The new start of the module up to continuation of measurement will
require approx. 3 minutes, dependent on the number of connected devices
and channels.
A3169-1.0 en/de HBM
Page 34

34
QuantumX Data Recorder CX22‐W
The data already present in the catman AP temporary measurement data
memory are not lost if the power supply is interrupted. Where necessary, addi
tional files will be assigned a counter at the end of the file name.
A3169-1.0 en/deHBM
Page 35

QuantumX Data Recorder CX22‐W
35
10 Other CX22‐W connections
10.1 Digital inputs and outputs
Three inputs at terminals 1, 2 and 3 and 3 outputs at terminals 4, 5 and 6 are
available. The status of the outputs is indicated by LEDs, see Section 10.3.3.
The level for the inputs is 5Volt in open condition (HIGH), as it is pulled up to
HIGH via a Pull‐up resistance (active LOW). The maximum LOW level for the
inputs is 0.7Volt. The level for the outputs is 5Volt (HIGH), when the corres
ponding output is set, otherwise 0Volt (LOW). The inputs and outputs are
TTL‐compatible, the line lengths at the outputs must not exceed 3m.
Important
The START/STOP button is switched parallel to the input on terminal 3. If you
want to use the button, do not connect input 3. Otherwise the condition “Act
ive” (LOW) will be triggered by pressing the button and by a LOW signal at
terminal 3.
Tip
At the start of a DAQ job, outputs are reset to LOW if you activate the setting
Reset all CX22 digital outputs on DAQ start in the Options for the CX22
(group System) in catman
AP.
10.2 START/STOP button
You can start and/or stop a DAQ job with the START/STOP button. To do this
use a trigger for the start and/or stop of the DAQ job and assign CX22 Digital
input 3 - Start/Stop push button as the trigger channel. If you control the
start and stop of the DAQ job via the button, the DAQ job is started with the
first press and stopped with the next press of the button.
Important
The START/STOP button is switched parallel to the input on terminal 3. If you
want to use the button, do not connect input 3. Otherwise the condition “Act
ive” (LOW) will be triggered by pressing the button and by a LOW signal at
terminal 3.
A3169-1.0 en/de HBM
Page 36

36
QuantumX Data Recorder CX22‐W
10.3 LED displays
The following LED displays exist:
1. Module LED
2. LEDs in the Ethernet connection
3. Status LEDs for operating status
4. Status LEDs for digital outputs
5. LED for operating state of CF card (rear of module)
10.3.1Module LED
The module LED (see Fig. 3.1 on Page 12) lights up green when the power
supply of the CX22‐W is present. The module requires approx. 2 minutes after
switch on before the boot process is complete. The start of the boot process is
signaled by beep sounds.
10.3.2LEDs in the Ethernet connection
The left LED (see Fig. 3.1 on Page 12) indicates whether the network connec
tion is working with 10/100MBit (LED off) or with 1GBit (LED green).
The right LED indicates that data is being transmitted by flashing yellow.
10.3.3Status LEDs for operating status
The “RECORDING” LED lights up continuously yellow when measured data
are being recorded. If a start trigger was set, the LED flashes yellow while
waiting for the trigger event.
The “ERROR” LED lights up yellow if there is an error in catman
AP, e.g.
when the connection to devices at project start cannot be set up or if the DAQ
job cannot be started. The LED flashes if the available free memory drops
below 1 GByte.
All LEDs can also be triggered via Limit values and events in catman
AP.
To do this, select Set digital output: CX22 digital output in the dialog Con
figure limit value and event monitoring and enter the required LED under
Bit/Condition. The corresponding digital output is simultaneously triggered
with LEDs 4 to 6. The LEDs light up when the relevant output is set to HIGH.
10.3.4Status LEDs for digital outputs
The LEDs show the state of the digital outputs 4 to 6. The outputs are
addressed via LEDs 4 to 6 in catman
AP.
A3169-1.0 en/deHBM
Page 37

QuantumX Data Recorder CX22‐W
37
Set the outputs via the limit value and event monitoring: Enter 0 HIGH (LED4)
under Bit/Condition if output 4 should become active when the event occurs
(LED 4 lights up green). Outputs 5 and 6 are activated via Bit 1 (LED 5) and
Bit 2 (LED 6).
Tip
At the start of a DAQ job, outputs are reset to LOW if you activate the setting
Reset all CX22 digital outputs on DAQ start in the Options for the CX22‐W
(group System) in catman
10.3.5LED for operating state of CF card
The LED on the rear of the module flashes yellow when data are written to or
read from the CF card.
AP.
10.4 Microphone input, loudspeaker output
The microphone input allows you to connect a standard PC microphone
(powered by the CX22‐W).
Microphone power supply
Microphone signal
Ground
Fig. 10.1: Microphone input pin assignment
You can either connect an active PC loudspeaker/headphones to the loud
speaker output or you can feed the signal as Line‐Out to a (HiFi) amplifier.
Left
Right
Ground
Fig. 10.2: Loudspeaker output pin assignment
A3169-1.0 en/de HBM
Page 38

38
QuantumX Data Recorder CX22‐W
You can then play a WAVE file (*.wav) as a signal via catman AP, for
instance when a limit value is reached.
10.5 USB connections
You can use the USB connections to connect keyboard and mouse if working
without a PC or you can connect other devices, e.g. storage media such as
USB memory sticks or USB hard drives. The connections are identical, it does
not matter which of the three connections you connect a device to.
10.6 RS‐232
This interface (COM1) allows you to e.g. connect an NMEA‐compatible GPS
device. The location data can then be recorded in catman
the measurement values. The settings for such devices is implemented as
usual via the Device scan dialog and Manual devices tab, see Online Help
for catman
AP.
AP together with
A3169-1.0 en/deHBM
Page 39

QuantumX Data Recorder CX22‐W
39
11 System settings, update and restoration
11.1 Changing system settings (Settings)
Important
All changes in the Settings dialog are only permanently saved and active after
the next switch on if you click on Commit changes and reboot in the start
screen after making any changes.
The following settings can be changed:
• Device name (CX22‐W name, General tab)
This name is displayed, e.g. in the network.
• Password (Remote access password tab)
The password is required for registration (Log On).
• Start catman
(catmanAP) at startup, General tab)
Automatically starts catman
See also Chapter 9 on Page 33.
• The language version in catman
tab)
Select EN for the English interface, DE for the German interface and FR
for the French version of catman
In the start screen, click on Settings and go to the appropriate tab to change
the settings.
AP after switching on the CX22‐W (Launch DAQ software
AP as soon as the system is operational.
AP (DAQ software language, General
AP.
Important
Store the password safely after changing it. If you lose it you will need to
restore the system to obtain access to the CX22‐W again.
The Info tab contains information about the CX22 hardware and firmware.
Changes are not possible here.
11.2 System restoration (Recovery)
If you have made changes to the system leading to the system becoming
inoperable, you can restore the delivery condition of the system. Neither the
data saved to the CF card nor the partition D of the internal memory contain
A3169-1.0 en/de HBM
Page 40

40
ing catman AP‐data will be overwritten during recovery. You will need a spe
cially prepared USB memory stick, a keyboard and, where possible, a (digital)
monitor that you can connect directly to the CX22‐W (DVI output) in order to
recover the system. Load the program to implement recovery over the Internet
from HBM, see www.hbm.com/Software -> Data acquisition systems.
QuantumX Data Recorder CX22‐W
Important
During recovery, Partition C of the internal memory will be deleted and rewrit
ten. Make sure that the CX22‐W has a power supply during the entire recov
ery process.
Tip
Restoring the system with the latest software is equivalent to a system
update.
Procedure
1. Connect a (new) USB memory stick with at least 1GByte capacity to your
PC.
The USB memory stick will be reformatted, i.e. all data on the stick will be
lost. Create a backup of your data beforehand if necessary.
2. Start the program “CX22_Recovery_Setup.exe”.
3. After the USB memory stick has been written to, click on Finish in the last
dialog and eject the USB memory stick via Windows.
4. Switch off the CX22‐W and connect the USB memory stick, keyboard and
monitor (if available).
5. Switch on the CX22‐W.
6. Wait for the beep sounds of the CX22‐W during booting and then press
F11 several times (four to five times within 10 seconds is sufficient).
7. If a monitor is connected, the boot menu will appear, otherwise wait for
another 30 seconds.
8. Press the down arrow key once and then the return key. This selects the
boot medium (boot device) on the USB connection.
If the USB memory stick has an LED, this will show that data transmission
is taking place. A special program is started to implement the recovery
procedure.
9. If a monitor is connected, click in the next dialog on Recovery. Otherwise,
wait approx. 3 minutes and then press the return key.
A3169-1.0 en/deHBM
Page 41

QuantumX Data Recorder CX22‐W
The actual recovery process takes approx. 12 minutes, but is dependent
on the data transmission speed of your USB memory stick.
10. If a monitor is connected, disconnect the USB memory stick as soon as
the message indicating that recovery was successful appears (“... suc
cessfully recovered”). Otherwise wait another 2 to 5 minutes (depending
on the speed of your USB memory stick).
11. In the next dialog, click on Reboot or press the return key.
The CX22‐W is restarted twice and is then ready for operation again. If the
second start does not occur automatically, do not implement a new start (click
on No following the query “Do you want to restart your computer now?”),
instead click on Commit changes and reboot in the start screen.
41
11.3 Updating catman[ AP
Updating catman AP is not proposed. Where necessary, carry out a recovery
with the latest software (Section 11.2), this will also bring catman
date.
AP up to
11.4 Installing Windows software
The installation of other software packages is possible in principle, however
we do not recommend this in order not to endanger the stability of the CX22
Data Recorder. If further software is installed, the warranty for the CX22 Data
Recorder function is rendered void and no support can be provided by HBM
for any errors resulting therefrom.
Important
Changes to the system must be permanently saved before a new start. In the
start screen, click on Commit changes and reboot.
A3169-1.0 en/de HBM
Page 42

42
QuantumX Data Recorder CX22‐W
12 Waste disposal and environmental protection
All electrical and electronic products must be disposed of as hazardous
waste. The correct disposal of old equipment prevents ecological damage and
health hazards.
Symbol:
Meaning: Statutory waste disposal mark
The electrical and electronic devices that bear this symbol are subject to the
European waste electrical and electronic equipment directive 2002/96/EC.
The symbol indicates that, in accordance with national and local environ
mental protection and material recovery and recycling regulations, old devices
that can no longer be used must be disposed of separately and not with nor
mal household garbage.
As waste disposal regulations may differ from country to country, we ask that
you contact your supplier to determine what type of disposal or recycling is
legally applicable in your country.
Packaging
The original packaging of HBM devices is made from recyclable material and
can be sent for recycling. For ecological reasons, empty packaging should not
be returned to us.
A3169-1.0 en/deHBM
Page 43

QuantumX‐Datenrekorder CX22‐W
43
Inhalt Seite
Deutsch
Sicherheitshinweise 45. . . . . . . . . . . . . . . . . . . . . . . . . . . . . . . . . . . . . . . . . . . . .
1 Verwendete Kennzeichnungen 48. . . . . . . . . . . . . . . . . . . . . . . . . . . . . . . .
1.1 In dieser Kurzanleitung verwendete Kennzeichnungen 48. . . . . . . .
1.2 Auf dem Modul angebrachte Symbole und ihre Bedeutung 49. . . .
2 Einleitung 51. . . . . . . . . . . . . . . . . . . . . . . . . . . . . . . . . . . . . . . . . . . . . . . . . . .
3 Anschlüsse des CX22‐W 52. . . . . . . . . . . . . . . . . . . . . . . . . . . . . . . . . . . . . .
4 CompactFlash‐Karte wechseln 54. . . . . . . . . . . . . . . . . . . . . . . . . . . . . . . .
4.1 Vorgehensweise zum Entfernen der CF‐Karte 54. . . . . . . . . . . . . . .
4.2 Vorgehensweise zum Einsetzen der CF‐Karte 55. . . . . . . . . . . . . . .
5 Anschließen des CX22‐W‐Datenrekorders 56. . . . . . . . . . . . . . . . . . . . . .
5.1 Bedienen mit Bildschirm und Tastatur/Maus 56. . . . . . . . . . . . . . . . .
5.2 Anschließen an einen PC 57. . . . . . . . . . . . . . . . . . . . . . . . . . . . . . . . .
5.3 Anschließen von QuantumX‐Modulen 58. . . . . . . . . . . . . . . . . . . . . .
5.4 Anschließen anderer Geräte 59. . . . . . . . . . . . . . . . . . . . . . . . . . . . . .
6 PC mit CX22‐W‐Datenrekorder verbinden 60. . . . . . . . . . . . . . . . . . . . . .
6.1 Direkte Verbindung von PC und CX22‐W 60. . . . . . . . . . . . . . . . . . .
6.2 Verbindung von CX22‐W und PC über ein Netzwerk 62. . . . . . . . . .
6.3 Verbindung über WLAN (nur CX22‐W) 64. . . . . . . . . . . . . . . . . . . . . .
6.3.1 CX22‐W für WLAN‐Verbindungen vorbereiten 64. . . . . . . . . .
6.3.2 CX22‐W für bestehendes WLAN (Access Point)
vorbereiten 65. . . . . . . . . . . . . . . . . . . . . . . . . . . . . . . . . . . . . . . .
6.3.3 Verbindung über WLAN herstellen 66. . . . . . . . . . . . . . . . . . . .
6.3.4 CX22‐W für Adhoc‐Netzwerk vorbereiten 67. . . . . . . . . . . . . .
6.3.5 PC für die Verbindung über Adhoc‐Netzwerk vorbereiten 68
6.3.6 Verbindung über WLAN und Adhoc‐Netzwerk herstellen 69.
7 Der Startbildschirm des CX22‐W‐Datenrekorders 70. . . . . . . . . . . . . . .
[
8 Messung mit catman
AP konfigurieren 71. . . . . . . . . . . . . . . . . . . . . . . .
8.1 Geräte‐Scan einrichten 71. . . . . . . . . . . . . . . . . . . . . . . . . . . . . . . . . . .
8.2 Messprojekt erstellen 71. . . . . . . . . . . . . . . . . . . . . . . . . . . . . . . . . . . . .
9 CX22‐W für automatische Messungen konfigurieren 74. . . . . . . . . . . .
10 Weitere Anschlüsse des CX22‐W 76. . . . . . . . . . . . . . . . . . . . . . . . . . . . . .
10.1 Digitale Ein‐ und Ausgänge 76. . . . . . . . . . . . . . . . . . . . . . . . . . . . . . .
10.2 START/STOP‐Taste 76. . . . . . . . . . . . . . . . . . . . . . . . . . . . . . . . . . . . . .
A3169-1.0 en/de HBM
Page 44

44
QuantumX‐Datenrekorder CX22‐W
10.3 LED‐Anzeigen 77. . . . . . . . . . . . . . . . . . . . . . . . . . . . . . . . . . . . . . . . . . .
10.3.1 Modul‐LED 77. . . . . . . . . . . . . . . . . . . . . . . . . . . . . . . . . . . . . . . .
10.3.2 LED im Ethernet‐Anschluss 77. . . . . . . . . . . . . . . . . . . . . . . . .
10.3.3 Status‐LEDs für den Betriebszustand 77. . . . . . . . . . . . . . . . .
10.3.4 Status‐LEDs für die digitalen Ausgänge 78. . . . . . . . . . . . . . .
10.3.5 LED für den Betriebszustand der CF‐Karte 78. . . . . . . . . . . .
10.4 Mikrofoneingang, Lautsprecherausgang 78. . . . . . . . . . . . . . . . . . . .
10.5 USB‐Anschlüsse 79. . . . . . . . . . . . . . . . . . . . . . . . . . . . . . . . . . . . . . . .
10.6 RS‐232 79. . . . . . . . . . . . . . . . . . . . . . . . . . . . . . . . . . . . . . . . . . . . . . . . .
11 Systemeinstellungen, Update und Wiederherstellen 80. . . . . . . . . . . .
11.1 Systemeinstellungen ändern (Settings) 80. . . . . . . . . . . . . . . . . . . . .
11.2 System wiederherstellen (Recovery) 81. . . . . . . . . . . . . . . . . . . . . . .
[
11.3 catman
AP aktualisieren 82. . . . . . . . . . . . . . . . . . . . . . . . . . . . . . . . .
11.4 Installieren von Windows‐Software 83. . . . . . . . . . . . . . . . . . . . . . . . .
12 Entsorgung und Umweltschutz 84. . . . . . . . . . . . . . . . . . . . . . . . . . . . . . . .
A3169-1.0 en/deHBM
Page 45

QuantumX‐Datenrekorder CX22‐W
45
Sicherheitshinweise
Bestimmungsgemäße Verwendung
Die QuantumX‐Datenrekorder CX22 und CX22‐W (mit WLAN) dürfen aus
schließlich für Messaufgaben und direkt damit verbundene Steuerungsaufga
ben im Rahmen der durch die technischen Daten spezifizierten Einsatzgren
zen verwendet werden. Jeder darüber hinausgehende Gebrauch gilt als nicht
bestimmungsgemäß.
Zur Gewährleistung eines sicheren Betriebes darf das Modul nur nach den
Angaben in den Bedienungsanleitungen betrieben werden. Bei der Verwen
dung sind zusätzlich die für den jeweiligen Anwendungsfall erforderlichen
Rechts‐ und Sicherheitsvorschriften zu beachten. Sinngemäß gilt dies auch
bei der Verwendung von Zubehör.
Das Modul ist nur von qualifiziertem Personal ausschließlich entsprechend
der technischen Daten in Zusammenhang mit den Sicherheitsbestimmungen
und Vorschriften einzusetzen bzw. zu verwenden.
Vor jeder Inbetriebnahme des Moduls ist eine Projektierung und Risikoana
lyse vorzunehmen, die alle Sicherheitsaspekte der Mess‐ und Automa
tisierungstechnik berücksichtigt. Insbesonders betrifft dies den Personen‐ und
Anlagenschutz.
Bei Anlagen, die aufgrund einer Fehlfunktion größere Schäden, Datenverlust
oder sogar Personenschäden verursachen können, müssen zusätzliche Si
cherheitsvorkehrungen getroffen werden. Im Fehlerfall müssen diese Vorkeh
rungen einen sicheren Betriebszustand herstellen. Dies kann z.B. durch me
chanische Verriegelungen, Fehlersignalisierung usw. erfolgen.
HINWEIS
Ein Modul darf nicht unmittelbar ans Stromversorgungsnetz angeschlossen
werden. Die Versorgungsspannung darf 10 V ... 30 V (DC) betragen.
Der Versorgungsanschluss sowie alle anderen Anschlüsse müssen so instal
liert werden, dass elektromagnetische Einstreuungen keine Beeinträchtigung
der Gerätefunktionen hervorrufen (siehe auch HBM‐Greenline‐Information,
Druckschrift i1577).
Bei Geräten, die in einem Netzwerk arbeiten, sind diese Netzwerke so auszu
legen, dass Störungen einzelner Teilnehmer erkannt und abgestellt werden
können.
A3169-1.0 en/de HBM
Page 46

46
QuantumX‐Datenrekorder CX22‐W
Geräte und Einrichtungen der Automatisierungstechnik müssen so verbaut
werden, dass sie gegen unbeabsichtigte Betätigung ausreichend geschützt
bzw. verriegelt sind (z.B. Zugangskontrolle, Passwortschutz o.Ä.).
Es müssen hard‐ und softwareseitig Sicherheitsvorkehrungen getroffen wer
den, damit ein Leitungsbruch oder andere Unterbrechungen der Signalüber
tragung, z.B. über Busschnittstellen, nicht zu undefinierten Zuständen oder
Datenverlust in der Automatisierungseinrichtung führen. Nach Einstellungen
und Tätigkeiten, die mit Passworten geschützt sind, ist sicherzustellen, dass
evtl. angeschlossene Steuerungen in einem sicheren Zustand verbleiben, bis
das Schaltverhalten des Moduls geprüft ist.
Umgebungsbedingungen am Einsatzort
• Schützen Sie das Modul vor direktem Kontakt mit Wasser.
• Schützen Sie das Modul vor Schmutz und Feuchtigkeit oder
Witterungseinflüssen wie beispielsweise Regen, Schnee usw. Die
Schutzklasse laut DIN EN60529 beträgt IP20.
• Beachten Sie die in den technischen Daten angegebenen maximal
zulässigen Umgebungstemperaturen.
• Achten Sie darauf, dass die seitlichen Lüftungsöffnungen nicht zugedeckt
sind.
• Die zulässige relative Luftfeuchte bei 31°C beträgt 80% (nicht
kondensierend); lineare Reduzierung bis 50% bei 40°C.
• Schützen Sie das Modul vor direkter Sonneneinstrahlung.
Umbauten und Veränderungen
Das Modul darf ohne unsere ausdrückliche Zustimmung weder konstruktiv
noch sicherheitstechnisch verändert werden. Jede Veränderung schließt eine
Haftung unsererseits für resultierende Schäden aus.
Insbesondere sind jegliche Reparaturen, Lötarbeiten an den Platinen (Aus
tausch von Bauteilen) untersagt. Bei Austausch gesamter Baugruppen sind
nur Originalteile von HBM zu verwenden.
Das Modul wurde ab Werk mit fester Hard‐ und Softwarekonfiguration ausge
liefert. Änderungen sind nur im Rahmen der in den Handbüchern dokumen
tierten Möglichkeiten zulässig.
Sicherheitsbewussten Arbeiten
Fehlermeldungen dürfen nur quittiert werden, wenn die Ursache des Fehlers
beseitigt ist und keine Gefahr mehr existiert.
A3169-1.0 en/deHBM
Page 47

QuantumX‐Datenrekorder CX22‐W
47
Qualifiziertes Personal
Qualifizierte Personen sind Personen, die mit Aufstellung, Montage, Inbetrieb
setzung und Betrieb des Produktes vertraut sind und über die ihrer Tätigkeit
entsprechende Qualifikationen verfügen.
Dazu zählen Personen, die mindestes eine der drei folgenden Voraussetzun
gen erfüllen:
- Ihnen sind die Sicherheitskonzepte der Automatisierungstechnik bekannt
und Sie sind als Projektpersonal damit vertraut.
- Sie sind Bedienpersonal der Automatisierungsanlagen und sind im Um
gang mit den Anlagen unterwiesen. Sie sind mit der Bedienung der in die
ser Dokumentation beschriebenen Module und Technologien vertraut.
- Sie sind Inbetriebnehmer oder für den Service eingesetzt und haben eine
Ausbildung absolviert, die Sie zur Reparatur der Automatisierungsanlagen
befähigt. Außerdem haben Sie die Berechtigung, Stromkreise und Geräte
gemäß den Normen der Sicherheitstechnik in Betrieb zu nehmen, zu er
den und zu kennzeichnen.
Allgemeine Gefahren bei Nichtbeachten der Sicherheitshinweise
Die QuantumX‐Datenrekorder CX22 und CX22‐W entsprechen dem Stand
der Technik und sind betriebssicher. Von den Modulen können Restgefahren
ausgehen, wenn sie von ungeschultem Personal unsachgemäß eingesetzt
und bedient wird. Jede Person, die mit Aufstellung, Inbetriebnahme, Wartung
oder Reparatur des Moduls beauftragt ist, muss die Bedienungsanleitungen
und insbesondere die sicherheitstechnischen Hinweise gelesen und verstan
den haben.
Der Leistungs‐ und Lieferumfang der Module deckt nur einen Teilbereich der
Messtechnik ab. Sicherheitstechnische Belange der Messtechnik sind zusätz
lich vom Anlagenplaner/Ausrüster/Betreiber so zu planen, zu realisieren und
zu verantworten, dass Restgefahren minimiert werden. Jeweils existierende
Vorschriften sind zu beachten, auf Restgefahren im Zusammenhang mit der
Messtechnik ist hinzuweisen.
Wartung und Reinigung
Die Module sind wartungsfrei. Beachten Sie bei der Reinigung des Gehäuses
folgende Punkte:
• Trennen Sie vor der Reinigung die Verbindung zu allen Anschlüssen.
• Reinigen Sie das Gehäuse mit einem weichen und leicht angefeuchteten
(nicht nassen!) Tuch. Verwenden Sie auf keinen Fall Lösungsmittel, da
diese die Beschriftung oder das Gehäuse angreifen könnten.
• Achten Sie beim Reinigen darauf, dass keine Flüssigkeit in das Modul
oder an die Anschlüsse gelangt.
A3169-1.0 en/de HBM
Page 48

48
QuantumX‐Datenrekorder CX22‐W
1 Verwendete Kennzeichnungen
catman ist ein eingetragenes Warenzeichen der HOTTINGER BALDWIN
MESSTECHNIK GMBH.
Alle in diesem Dokument verwendeten Warenzeichen oder Marken weisen
nur auf das jeweilige Produkt oder den Inhaber des Warenzeichens oder der
Marke hin. HOTTINGER BALDWIN MESSTECHNIK GMBH erhebt damit
keinen Anspruch auf andere als die eigenen Warenzeichen oder Marken.
1.1 In dieser Kurzanleitung verwendete Kennzeichnungen
Wichtige Hinweise für Ihre Sicherheit sind besonders gekennzeichnet. Beach
ten Sie diese Hinweise unbedingt, um Unfälle und Sachschäden zu vermei
den.
Sicherheitshinweise sind wie folgt aufgebaut:
Signalwort
Beschreibung der Gefahr
Mögliche Folgen bei Nichtbeachtung der genannten Maßnahmen
Maßnahmen zur Vermeidung/Abwendung der Gefahr
Gefahrenklassen nach ANSI
Warnzeichen, Signalwort Bedeutung
weist auf eine mögliche gefährliche Situa
tion hin, die – wenn die Sicherheitsbestim
WARNUNG
VORSICHT
mungen nicht beachtet werden – Tod oder
schwerste Körperverletzung zur Folge
haben kann.
weist auf eine mögliche gefährliche Situa
tion hin, die – wenn die Sicherheitsbestim
mungen nicht beachtet werden – leichte
oder mittlere Körperverletzung zur Folge
haben kann.
HINWEIS
weist auf eine Situation hin, die – wenn die
Sicherheitsbestimmungen nicht beachtet
werden – Sachschäden zur Folge haben
kann.
A3169-1.0 en/deHBM
Page 49

QuantumX‐Datenrekorder CX22‐W
Die folgende Kennzeichnung weist auf wichtige Informationen zum Produkt
oder zur Handhabung des Produktes hin.
Wichtig
Wichtige Hinweise
Die folgende Kennzeichnung enthält Anwendungstipps oder andere für Sie
nützliche Informationen.
Tipp
Information/Anwendungshinweis
1.2 Auf dem Modul angebrachte Symbole und ihre
49
Bedeutung
Symbol:
Bedeutung: Angaben in dieser Anleitung nachlesen und berücksichtigen
Symbol:
Bedeutung: CE‐Kennzeichnung
Mit der CE‐Kennzeichnung garantiert der Hersteller, dass sein Produkt den
Anforderungen der relevanten EG‐Richtlinien entspricht (die Konformitätser
klärung finden Sie auf der Website von HBM www.hbm.com unter Support ->
HBMdoc).
Symbol:
Bedeutung: Gesetzlich vorgeschriebene Kennzeichnung zur Entsorgung
Elektrische und elektronische Geräte, die dieses Symbol tragen, unterliegen
der europäischen Richtlinie 2002/96/EG über elektrische und elektronische
Altgeräte. Das Symbol weist darauf hin, dass das Gerät nicht im Hausmüll
entsorgt werden darf, siehe auch Kapitel 12, Seite 84.
A3169-1.0 en/de HBM
Page 50

50
QuantumX‐Datenrekorder CX22‐W
Symbol:
Bedeutung: USB‐Anschlüsse, z.B. für Tastatur, Maus, externen Speicher
Symbol:
Bedeutung: Mikrofon‐Anschluss
Symbol:
Bedeutung: Lautsprecher‐Anschluss
Symbol:
Bedeutung: Anschluss zur Erdung des Gehäuses
Der Anschluss sollte auf Schutzleiterpotenzial liegen.
A3169-1.0 en/deHBM
Page 51

QuantumX‐Datenrekorder CX22‐W
51
2 Einleitung
Diese Anleitung unterstützt Sie bei den Grundeinstellungen Ihres
QuantumX‐Datenrekorders. Den CX22‐Datenrekorder gibt es in zwei
Ausführungen: CX22 und CX22‐W. Die Ausführung CX22‐W besitzt zusätzlich
ein WLAN‐Modul mit WLAN‐Antenne auf der Vorderseite des Moduls.
Alle messtechnischen Einstellungen erfolgen über die Software catman
die über eine ausführliche Onlinehilfe verfügt.
Diese Anleitung zeigt Ihnen:
• Wie Sie das Modul anschließen.
• Welche Möglichkeiten Sie haben, sich mit dem Modul zu verbinden.
• Wie Sie sich mit dem Modul verbinden.
QuantumX‐Module werden mit dem CX22‐W‐Datenrekorder entweder über
FireWire genauso verbunden, wie dies bei den anderen QuantumX‐Modulen
üblich ist, oder Sie können QuantumX‐Module über Ethernet anschließen.
AP,
Die gesamte QuantumX‐Dokumentation besteht aus:
• Dieser Bedienungsanleitung
• Bedienungsanleitung QuantumX mit der Anschlussbelegung
• Datenblatt des QuantumX‐Datenrekorders
• Datenblättern der QuantumX‐Module
• Onlinehilfen in der Software
• catman
AP
• QuantumX‐Assistent
• Sensordatenbank
• TEDS‐Editor
• Programmierschnittstelle API (.NET/COM)
• LabVIEWt‐Bibliothek (VIs)
• DIAdemt‐Treiber
• Beispiele für LabVIEWt und API (.NET/COM)
A3169-1.0 en/de HBM
Page 52

52
3 Anschlüsse des CX22‐W
QuantumX‐Datenrekorder CX22‐W
Ethernet
(Netzwerk)
Monitor
WLAN‐Antenne
(nur CX22‐W)
Status‐LEDs
Digitale I/Os
Start/Stopp‐Taste
Mikrofon
USB
RS‐232‐C
Modul‐LED
Abb. 3.1: Anschlüsse des CX22‐W auf der Vorderseite
Lautsprecher
Sicherung für CF-Karte
Auswurftaste für
CF‐Karte
Erdung
Versorgungs
spannung
10 … 30V
DC
LED
CF-Karte, Typ 1
Abb. 3.2: Anschlüsse des CX22‐W auf der Rückseite
FireWire
A3169-1.0 en/deHBM
Page 53

QuantumX‐Datenrekorder CX22‐W
53
Masseverbindung und Erdung
Verlegen Sie Signal‐ und Datenleitungen getrennt von stromführenden Stark
stromleitungen. Ideal sind Kabelkanäle aus Blech mit interner Trennwand.
Bei Potenzialunterschieden im oder zum angeschlossenen Messsystem
müssen Sie eine Potenzial‐Ausgleichsleitung (PA) verlegen (Richtwert: hoch
2
flexible Litze, Leitungsquerschnitt 10mm
).
A3169-1.0 en/de HBM
Page 54

54
QuantumX‐Datenrekorder CX22‐W
4 CompactFlash‐Karte wechseln
Wichtig
CompactFlash‐Karten (CF‐Karten) haben nur eine begrenzte Anzahl von
Schreibzyklen, d.h., sie altern (typisch 1.000.000 Schreibzyklen). Daher soll
ten Sie die CF‐Karte regelmäßig unter Windows auf Fehler überprüfen und
ggf. gegen eine neue Karte tauschen. Die Lebensdauer einer CF‐Karte hängt
von der Beanspruchung und dem Hersteller ab.
Achten Sie darauf, dass eine aktuelle, qualitativ hochwertige CF‐Karte vom
Typ 1, CF‐Version 4.1, mit mindestens 8GByte eingesetzt wird, damit eine
hohe Datenrate erzielt werden kann; ältere CF‐Karten haben meist geringere
Datenraten. Die Karte muss vor dem Einsetzen mit dem Dateisystem NTFS
formatiert werden.
Im Lieferumfang des CX22‐W‐Datenrekorders ist eine 8GByte CF‐Karte ent
halten.
4.1 Vorgehensweise zum Entfernen der CF‐Karte
HINWEIS
Wechseln Sie die CF‐Karte nicht, wenn der CX22‐W eingeschaltet ist.
Andernfalls kann der CX22‐W oder die CF‐Karte beschädigt werden oder es
können - falls eine Aufzeichnung von Messdaten läuft - die Daten des
gesamten Versuchs verloren gehen.
Schalten Sie den CX22‐W aus, bevor Sie die CF‐Karte wechseln.
1. Lösen Sie die Sicherungsschraube für die CF‐Karte (Abb. 3.2 auf
Seite52). Die Schraube sollte nicht entfernt werden, es genügt, die
Schraube zu lösen.
2. Drehen Sie das Abdeckblech nach oben, so dass der Schacht für die
CF‐Karte frei liegt.
3. Drücken Sie mit einem stumpfen Gegenstand, z.B. einem Kugelschreiber,
auf die Auswurftaste rechts im CF‐Kartenschacht (Abb. 3.2).
4. Entnehmen Sie die CF‐Karte.
A3169-1.0 en/deHBM
Page 55

QuantumX‐Datenrekorder CX22‐W
5. Lesen Sie Abschnitt 4.2, dort ist das Einsetzen der CF‐Karte beschrieben.
Der CX22‐W sollte nicht ohne CF‐Karte betrieben werden, da dann keine
Daten gespeichert werden können.
55
4.2 Vorgehensweise zum Einsetzen der CF‐Karte
Die CF‐Karte muss mit dem Dateisystem NTFS formatiert werden. Sie
können die Formatierung mit jedem PC vornehmen, der über einen
CF‐Kartensteckplatz oder einen CF‐Karten‐Adapter verfügt und Windows XP
oder höher verwendet.
HINWEIS
Schalten Sie den CX22‐W aus, bevor Sie die CF‐Karte wechseln. Andernfalls
kann die CX22‐W oder die CF‐Karte beschädigt werden oder es können falls eine Aufzeichnung von Messdaten läuft - die Daten des gesamten Ver
suchs verloren gehen.
1. Lösen Sie die Sicherungsschraube für die CF‐Karte (Abb. 3.2 auf
Seite52), falls dies nicht bereits geschehen ist, und drehen Sie das
Abdeckblech nach oben. Die Schraube sollte nicht entfernt werden, es
genügt, die Schraube zu lösen.
2. Halten Sie die CF‐Karte so, dass die Oberseite nach oben zeigt.
3. Schieben Sie die CF‐Karte in den Schacht soweit ein, dass Sie einen
leichten Widerstand gegen Ende spüren, wenn die Kontakte in die Kon
taktleiste im Inneren eintauchen. Die CF‐Karte muss komplett im Schacht
verschwinden.
4. Drehen Sie das Abdeckblech nach unten, so dass es in die Vertiefung der
Abdeckblende einrastet und den Schacht wieder überdeckt.
5. Ziehen Sie die Sicherungsschraube handfest an.
A3169-1.0 en/de HBM
Page 56

56
QuantumX‐Datenrekorder CX22‐W
5 Anschließen des CX22‐W‐Datenrekorders
Schließen Sie eine Versorgungsspannung von 10V - 30V (DC) an den An
schluss X103 an (siehe Abb. 5.1). Verwenden Sie eine Spannungsversor
gung, die genügend Leistung liefern kann, falls an den CX22‐W ange
schlossene QuantumX‐Module ebenfalls versorgt werden sollen. Die von
HBM erhältlichen Netzteile NTX001 können einen CX22‐W und zwei weitere
Module speisen.
Stellen Sie zuerst eine Verbindung zu einem PC her, bevor Sie Quan
tumX‐Module anschließen. Die Konfiguration nehmen Sie entweder direkt
über den CX22‐W‐Datenrekorder vor (Abschnitt 5.1) oder über eine Remote
desktopverbindung von Ihrem PC aus (Abschnitt 5.2 und Kapitel 6). Ver
binden Sie danach Ihre QuantumX‐Module z.B. über FireWire mit dem
CX22‐W‐Datenrekorder, siehe Abschnitt 5.3.
5.1 Bedienen mit Bildschirm und Tastatur/Maus
Diese Art der Bedienung ist die einfachste. Sie erfordert keinerlei Konfigura
tion, allerdings benötigen Sie einen Bildschirm mit digitalem Eingang (DVI)
sowie Maus und Tastatur mit USB‐Anschluss.
Schließen Sie Maus und Tastatur an die USB‐Buchsen des CX22‐W an. Der
Bildschirm wird mit einem handelsüblichen DVI‐Monitorkabel an die Buchse
DVI angeschlossen (alle Anschlüsse siehe Abb. 3.1 auf Seite 52). Der
Anschluss über VGA ist nicht möglich, auch nicht mit einem Adapter‐Stecker
von DVI auf VGA, da die für VGA benötigten Leitungen nicht belegt sind.
Schalten Sie die Stromversorgung ein und warten Sie, bis der Bootvorgang
vollständig abgeschlossen und das Modul bereit ist.
Wichtig
Die Werkseinstellung des CX22‐W für die Eingabesprache (Tastaturlayout) ist
EN (Englisch). Falls Sie eine Tastatur mit anderem Layout anschließen, soll
ten Sie im Startbildschirm Exit to Windows wählen und dann Shift und Alt
drücken oder über die Sprachenleiste in der Taskleiste die Eingabesprache
ändern.
Stellen Sie ggf. über die Systemsteuerung von Windows („Regional and
Language Options“) den Aufenthaltsort (Location) auf Ihr Land ein. Die Ein
stellung beeinflusst z.B. die Zahlendarstellung und die Uhrzeit.
Die weiteren Einstellungen nehmen Sie über den Startbildschirm (CX22 Start
Screen) vor, siehe Kapitel 7.
A3169-1.0 en/deHBM
Page 57

QuantumX‐Datenrekorder CX22‐W
57
Tipp
Siehe auch Kapitel 9, CX22‐W für automatische Messungen konfigurieren, ab
Seite 74.
5.2 Anschließen an einen PC
Der CX22‐W‐Datenrekorder wird über Ethernet mit dem PC verbunden. Dabei
gibt es abhängig von Ihrer PC‐ bzw. Netzwerkkonfiguration verschiedene Vari
anten, von denen die Vorgehensweise bei der Verbindung abhängt:
1. CX22‐W und PC werden direkt über ein Ethernet‐Kabel verbunden.
2. Der CX22‐W‐Datenrekorder wird mit einem Ethernet‐Netzwerk ver
bunden (in der Regel automatische Zuweisung der Netzwerkkonfigura
tion über DHCP, Dynamic Host Configuration Protocol).
3. Der CX22‐W‐Datenrekorder wird über WLAN verbunden (nur CX22‐W).
Die erste Konfiguration eines CX22‐W mit WLAN muss entweder mit Bild
schirm und Tastatur erfolgen (siehe Abschnitt 5.1) oder über einen Anschluss
mit Ethernet‐Kabel. Während dieser Konfiguration können Sie dann auch die
WLAN‐Schnittstelle aktivieren und die Parameter für eine WLAN‐Verbindung
eingeben.
Wichtig
Warten Sie nach dem Einschalten des CX22‐W ca. 1 Minute, bevor Sie eine
Verbindung aufbauen, damit der Bootvorgang vollständig abgeschlossen und
das Modul bereit ist. Andernfalls erhalten Sie evtl. eine Fehlermeldung, dass
das Gerät nicht gefunden werden konnte.
Um das Herstellen einer Verbindung bei unbekannten Einstellungen des
CX22‐W zu erleichtern, können Sie das HBM‐Programm „QuantumX Datenre
korder Assistent“ verwenden. Die benötigten Einstellungen werden im
folgenden Kapitel erläutert. Falls Sie die IP‐Adresse des CX22‐W bereits
kennen, können Sie auch direkt eine Remotedesktopverbindung (Standard
programm des Windows Betriebssystems) aufbauen. Sie finden das Pro
gramm Remotedesktopverbindung unter Alle Programme -> Zubehör
(Windows XP: Programme -> Zubehör).
A3169-1.0 en/de HBM
Page 58

58
QuantumX‐Datenrekorder CX22‐W
5.3 Anschließen von QuantumX‐Modulen
Wichtig
Falls Sie bereits QuantumX‐Module im Einsatz haben und diese mit einem
CX22‐W‐Datenrekorder verbinden möchten, installieren Sie bitte die aktuelle
Modul‐Firmware. Falls Sie zu einem späteren Zeitpunkt neue Module hinzu
fügen möchten, installieren Sie bitte die aktuelle Software auf dem CX22‐W
über die Wiederherstellen‐Funktion, siehe Abschnitt 11.2 auf Seite 81. Bei der
Wiederherstellung wird immer auch die aktuelle Software installiert. Ggf.
erhalten Sie dann beim Start von catman
älterer QuantumX‐Module zu aktualisieren.
Die QuantumX‐Module werden mit dem CX22‐W‐Datenrekorder entweder
über FireWire genauso verbunden, wie dies bei den anderen Quan
tumX‐Modulen üblich ist: z.B. 1-KAB269-x, Anschluss X100 des CX22‐W
auf X101 am ersten Modul, dieses Modul mit Anschluss X102 auf X101 am
nächsten Modul usw. Alternativ können Sie auch alle QuantumX‐Module über
Ethernet an den CX22‐W anschließen. Bei mehr als einem Modul benötigen
Sie dabei zusätzlich einen Ethernet‐Switch.
AP die Aufforderung, die Firmware
In der unten dargestellten Konfiguration wird die Versorgungsspannung der
Module über FireWire durchgeschleift (maximal 1,5A über FireWire; Leis
tungsaufnahme für ein Modul bzw. den CX22‐W siehe Abschnitt Technische
Daten im Datenblatt).
Sie können bis zu 12 Module über FireWire mit dem CX22‐W‐Datenrekorder
verbinden, die Einspeisung der Speisespannung kann alle 4 Module erfolgen.
Ausführliche Angaben dazu enthält die Bedienungsanleitung des QuantumX.
A3169-1.0 en/deHBM
Page 59

QuantumX‐Datenrekorder CX22‐W
59
10V ... 30V
FireWire‐Anschluss
1-Kab269-x: Verbindungskabel in unterschiedlichen Längen (x m)
DC
CX22(-W)
Abb. 5.1: Anschluss von QuantumX‐Modulen an den CX22‐W‐Datenrekorder
5.4 Anschließen anderer Geräte
An den CX22‐W‐Datenrekorder lassen sich zur Zeit nur QuantumX‐Module
anschließen. Falls Sie andere Geräte anschließen möchten, z.B. MGCplus,
kontaktieren Sie bitte den HBM Support.
A3169-1.0 en/de HBM
Page 60

60
QuantumX‐Datenrekorder CX22‐W
6 PC mit CX22‐W‐Datenrekorder verbinden
Falls Sie die IP‐Adresse des CX22‐W kennen, können Sie auch direkt eine
Remotedesktopverbindung zu dieser Adresse aufbauen. Sie finden das Pro
gramm Remotedesktopverbindung unter Alle Programme -> Zubehör
(Windows XP: Programme -> Zubehör).
Werkseinstellungen der Schnittstellen:
IP‐Adresse Subnetzmaske
Ethernet 172.191.1.30 255.255.0.0
WLAN (deaktiviert) DHCP
Ihre Einstellungen:
IP‐Adresse Subnetzmaske
Ethernet
WLAN
6.1 Direkte Verbindung von PC und CX22‐W
Vorgehensweise
1. Verbinden Sie PC und CX22‐W über ein Ethernet‐Kabel der Kategorie
CAT5 oder besser.
2. Installieren Sie das Programm „QuantumX Datenrekorder Assistent“ von
der QuantumX‐System‐CD.
3. Starten Sie das Programm „QuantumX Datenrekorder Assistent“:
Windows‐Startmenü -> Alle Programme -> HBM -> QuantumX Daten
rekorder Assistent (Windows
-> HBM -> QuantumX Datenrekorder Assistent).
4. Klicken Sie auf CX22 suchen.
5. Der CX22‐W‐Datenrekorder erscheint in der oberen Liste, die aktuelle(n)
Adresse(n) der Schnittstelle (WLAN nur bei CX22‐W) werden ebenfalls
angezeigt (Abb. 6.1).
XP: Windows‐Startmenü -> Programme
A3169-1.0 en/deHBM
Page 61

QuantumX‐Datenrekorder CX22‐W
61
Abb. 6.1: Anzeige im QuantumX Datenrekorder Assistent nach einer Suche im
Netzwerk (Beispiel bei Verbindung über LAN)
6. Im Bereich Einstellungen meines Computers auf der linken Seite
werden die IP‐Adressen und Subnetzmasken der Schnittstellen Ihres PCs
angezeigt.
Je nach Konfiguration Ihres PCs können entweder sowohl PC als auch
CX22‐W auf DHCP eingestellt werden, dann werden geeignete Adressen
zwischen beiden Geräten jeweils (erneut) ausgehandelt und Sie können
beim nächsten Mal mit Schritt 10. weitermachen. Alternativ können Sie
feste Adressen für beide Geräte verwenden. In diesem Fall haben Sie
zwei Möglichkeiten: Sie können entweder die Adresse Ihres PCs ändern
(Systemsteuerung von Windows) oder die Adresse des CX22‐W. Letz
teres ist im Folgenden beschrieben.
7. Wählen Sie den CX22‐W in der Liste oben aus.
8. Klicken Sie im Bereich TCP/IP‐Einstellungen für CX22 auf LAN und
geben Sie die gewünschte IP‐Adresse und Subnetzmaske ein oder wäh
len Sie DHCP verwenden.
Es wird automatisch eine Adresse und Subnetzmaske vorgeschlagen, die
im Adressbereich Ihres PCs liegt, Sie können den Vorschlag jedoch
ändern. Geben Sie eine IP‐Adresse ein, bei der die ersten drei Ziffern
gruppen mit den Zifferngruppen des PCs übereinstimmen und nur die
letzte Zifferngruppe eine andere Zahl zwischen 1 und 254 enthält. Die
letzte Zifferngruppe darf nicht mit der Zifferngruppe am PC überein
stimmen! Siehe auch Beispiel unten.
A3169-1.0 en/de HBM
Page 62

62
9. Klicken Sie auf Übernehmen und warten Sie, bis die neue Adresse und
oben angezeigt wird. Das Symbol zeigt an, dass eine Verbindung mög
lich ist.
10. Markieren Sie ggf. den CX22‐W noch einmal oben in der Liste und klicken
Sie dann auf Remotedesktopverbindung über LAN.
11. Falls Windows fragt, ob die Verbindung zu diesem Remotecomputer
hergestellt werden soll, lassen Sie die Verbindung zu. Wir empfehlen, die
Option Nicht erneut nach Verbindungen mit diesem Computer fragen
zu aktivieren. Je nach Konfiguration Ihres Windows‐Betriebssystems
erfolgt evtl. noch eine weitere Nachfrage, ob die Verbindung hergestellt
werden soll (Identität des Remotecomputers). Aktivieren Sie ggf. auch hier
die Option, nicht erneut nachzufragen.
Die Verbindung mit dem CX22‐W‐Datenrekorder wird nun hergestellt und
Sie müssen sich über Windows am Gerät anmelden. Geben Sie
HBMCX22 als User name und hbm als Password ein. Bei Password ist
die Schreibweise mit Kleinbuchstaben wichtig.
QuantumX‐Datenrekorder CX22‐W
Wichtig
Die IP‐Adresse und Subnetzmaske ist noch nicht gesichert. Klicken Sie daher
im Startbildschirm auf Commit changes and reboot, um die neuen Einstel
lungen dauerhaft zu sichern. Der CX22‐W wird dann neu gestartet, Sie
müssen die Verbindung nach dem Neustart daher erneut aufbauen. (Warten
Sie ca. 1 Minute, bis der Neustart des CX22‐W erfolgt ist, bevor Sie auf
Remotedesktopverbindung über LAN klicken.)
Beispiel für IP‐Adresse und Subnetzmaske
Die IP‐Adresse des PCs beträgt 169.254.27.81, die Subnetzmaske beträgt
255.255.0.0.
Geben Sie 169.254.27.254 als IP‐Adresse und 255.255.0.0 als Subnetz
maske ein.
6.2 Verbindung von CX22‐W und PC über ein Netzwerk
Die Einstellungen des CX22‐W‐Datenrekorders hängen in diesem Fall auch
von Ihrer Netzwerkkonfiguration ab. Kontaktieren Sie deshalb Ihren Netzwerk
administrator, um die richtigen Einstellungen zu erhalten.
1. Verbinden Sie den CX22‐W über ein Ethernet‐Kabel der Kategorie CAT5
oder besser mit Ihrem Netzwerk.
A3169-1.0 en/deHBM
Page 63

QuantumX‐Datenrekorder CX22‐W
63
2. Installieren Sie das Programm „QuantumX Datenrekorder Assistent“ von
der QuantumX‐System‐CD.
3. Starten Sie das Programm „QuantumX Datenrekorder Assistent“:
Windows-Startmenü -> Alle Programme -> HBM -> QuantumX Daten
rekorder Assistent (Windows
XP: Windows-Startmenü -> Programme
-> HBM -> QuantumX Datenrekorder Assistent).
4. Klicken Sie auf Find CX22.
5. Der CX22‐W‐Datenrekorder erscheint in der oberen Liste, die aktuelle(n)
Adresse(n) der Schnittstelle (WLAN nur bei CX22‐W) werden ebenfalls
angezeigt (Abb. 6.1).
6. Im Bereich Einstellungen meines Computers auf der linken Seite
werden die IP‐Adressen und Subnetzmasken der Schnittstellen Ihres PCs
angezeigt.
Abhängig von Ihrem Netzwerk haben Sie nun zwei Möglichkeiten: Sie
können dem CX22‐W entweder eine feste Adresse geben oder den
CX22‐W‐Datenrekorder auf DHCP stellen.
7. Wählen Sie den CX22‐W in der Liste oben aus.
8. Klicken Sie im Bereich TCP/IP‐Einstellungen für CX22 auf LAN und
geben Sie entweder die gewünschte IP‐Adresse und Subnetzmaske ein
oder wählen Sie DHCP verwenden.
Es wird automatisch eine Adresse und Subnetzmaske vorgeschlagen, die
im Adressbereich Ihres PCs liegt, Sie können den Vorschlag jedoch
ändern. Beachten Sie die Vorgaben Ihres Netzwerkadministrators.
9. Klicken Sie auf Übernehmen und warten Sie, bis die neue Einstellung
oben angezeigt wird. Außerdem sollte sich das Symbol
in das Symbol
ändern und damit anzeigen, dass eine Verbindung möglich ist.
10. Markieren Sie ggf. den CX22‐W noch einmal oben in der Liste und klicken
Sie dann auf Remotedesktopverbindung über LAN.
11. Falls Windows fragt, ob die Verbindung zu diesem Remotecomputer
hergestellt werden soll, lassen Sie die Verbindung zu. Wir empfehlen, die
Option Nicht erneut nach Verbindungen mit diesem Computer fragen
zu aktivieren. Je nach Konfiguration Ihres Windows‐Betriebssystems
erfolgt evtl. noch eine weitere Nachfrage, ob die Verbindung hergestellt
werden soll (Identität des Remotecomputers). Aktivieren Sie ggf. auch hier
die Option, nicht erneut nachzufragen.
Die Verbindung mit dem CX22‐W‐Datenrekorder wird nun hergestellt und
Sie müssen sich über Windows am Gerät anmelden. Geben Sie
HBMCX22 als User name und hbm als Password ein. Bei Password ist
die Schreibweise mit Kleinbuchstaben wichtig.
A3169-1.0 en/de HBM
Page 64

64
QuantumX‐Datenrekorder CX22‐W
Wichtig
Die IP‐Adresse und Subnetzmaske bzw. die Einstellung DHCP ist noch nicht
gesichert. Klicken Sie daher im Startbildschirm auf Commit changes and
reboot, um die neuen Einstellungen dauerhaft zu sichern. Der CX22‐W wird
dann neu gestartet, Sie müssen die Verbindung nach dem Neustart daher
erneut aufbauen. (Warten Sie ca. 1 Minute, bis der Neustart des CX22‐W
erfolgt ist, bevor Sie auf Remotedesktopverbindung über LAN klicken.)
6.3 Verbindung über WLAN (nur CX22‐W)
Wichtig
Die erlaubten WLAN‐Einstellungen unterscheiden sich von Land zu Land, in
den verschiedenen Ländern sind unterschiedliche Kanäle in den einzelnen
Frequenzbändern zulässig. Die Standardeinstellung der WLAN‐Schnittstelle
aktiviert die Kanäle 1 bis 11 für den Frequenzbereich 2,4GHz und die Kanäle
36 bis 64 und 149 bis 165 für den Frequenzbereich 5GHz. Je nach Einsatzort
müssen Sie deshalb evtl. andere Bereiche einstellen, siehe Abschnitt 6.3.1.
Die Verbindung über ein WLAN kann auf zwei verschiedene Arten erfolgen:
1. Sie können den CX22‐W in ein bestehendes WLAN integrieren (erfordert
einen konfigurierten Access Point).
2. Sie können eine direkte Verbindung zwischen dem WLAN des CX22‐W
und Ihrem PC aufbauen. Diese Verbindungsart wird Adhoc‐Netzwerk
genannt.
Zur Konfiguration der Verbindungen müssen Sie zunächst entweder mit Bild
schirm und Tastatur arbeiten wie in Abschnitt 5.1 beschrieben oder Sie
müssen eine der Verbindungen „über Kabel“ verwenden, die in den
Abschnitten 6.1 und 6.2 beschrieben sind. Die folgende Beschreibung geht
davon aus, dass Sie bereits eine dieser Verbindungen hergestellt haben.
6.3.1 CX22‐W für WLAN‐Verbindungen vorbereiten
1. Klicken Sie im Startbildschirm des CX22‐W auf Exit to Windows.
2. Rufen Sie das Fenster Network Connections über das Windows‐Start
menü und Settings auf.
3. Klicken Sie mit der rechten Maustaste auf „Wireless Network Connection“
und wählen Sie Enable.
A3169-1.0 en/deHBM
Page 65

QuantumX‐Datenrekorder CX22‐W
65
4. Klicken Sie erneut mit der rechten Maustaste auf „Wireless Network
Connection“ und wählen Sie Properties.
5. Klicken Sie auf Configure oben im Dialog.
6. Gehen Sie zum Register Advanced und stellen Sie die für Ihr Land zuge
lassenen Kanäle unter Country Region ein. Die Angabe des Bereichs für
die möglichen Kanäle kann dabei größer sein als der erlaubte Bereich,
siehe untenstehende Tabelle.
Das weitere Vorgehen richtet sich nach der gewünschten Verbindungsart,
lesen Sie dazu den entsprechenden Abschnitt: 6.3.2 (nachfolgender
Abschnitt) oder 6.3.4 auf Seite67.
Erlaubte WLAN‐Kanäle, Stand 2011
Land/Region Frequenzband Erlaubte Kanäle
Europa 2,4GHz
5GHz
USA 2,4GHz
5GHz
Japan 2,4GHz
5GHz
1 - 13
36 - 64, 100 - 140
1 - 11
36 - 64, 147 - 155
1 - 13
36 - 48
6.3.2 CX22‐W für bestehendes WLAN (Access Point) vorbereiten
1. Verlassen Sie den Dialog mit OK.
2. Klicken Sie mit der rechten Maustaste auf „Wireless Network Connection“
und wählen Sie View Available Wireless Networks.
3. Wählen Sie das Netzwerk Ihres Access Points aus und klicken Sie auf
Connect.
4. Geben Sie - falls erforderlich - den Netzwerkschlüssel ein.
5. Schließen Sie den Dialog Wireless Network Connection, nachdem die
Verbindung hergestellt ist.
6. Doppelklicken Sie dann auf „CX22 Start Screen“.
7. Klicken Sie auf Commit changes and reboot, um die neuen Einstel
lungen dauerhaft zu sichern.
Die Verbindung wird auch nach einem Ausschalten des CX22‐W automatisch
wieder hergestellt, wenn das Netzwerk in Reichweite ist.
A3169-1.0 en/de HBM
Page 66

66
QuantumX‐Datenrekorder CX22‐W
6.3.3 Verbindung über WLAN herstellen
1. Starten Sie das Programm „QuantumX Datenrekorder Assistent“:
Windows-Startmenü -> Alle Programme -> HBM -> QuantumX Daten
rekorder Assistent (Windows
XP: Windows-Startmenü -> Programme
-> HBM -> QuantumX Datenrekorder Assistent).
2. Klicken Sie auf Find CX22.
3. Der CX22‐W‐Datenrekorder erscheint in der oberen Liste, die aktuellen
Adressen der Schnittstellen werden ebenfalls angezeigt (Abb. 6.2).
Abb. 6.2: Anzeige im QuantumX Datenrekorder Assistent nach einer Suche im
Netzwerk (Beispiel WLAN)
4. Wählen Sie den CX22‐W in der Liste oben aus.
5. Klicken Sie auf Remotedesktopverbindung über WLAN.
6. Falls Windows fragt, ob die Verbindung zu diesem Remotecomputer
hergestellt werden soll, lassen Sie die Verbindung zu. Wir empfehlen, die
Option Nicht erneut nach Verbindungen mit diesem Computer fragen
zu aktivieren. Je nach Konfiguration Ihres Windows‐Betriebssystems
erfolgt evtl. noch eine weitere Nachfrage, ob die Verbindung hergestellt
werden soll (Identität des Remotecomputers). Aktivieren Sie ggf. auch hier
die Option, nicht erneut nachzufragen.
Die Verbindung mit dem CX22‐W‐Datenrekorder wird nun hergestellt und
Sie müssen sich über Windows am Gerät anmelden. Geben Sie
HBMCX22 als User name und hbm als Password ein. Bei Password ist
die Schreibweise mit Kleinbuchstaben wichtig.
A3169-1.0 en/deHBM
Page 67

QuantumX‐Datenrekorder CX22‐W
67
6.3.4 CX22‐W für Adhoc‐Netzwerk vorbereiten
1. Aktivieren Sie die Adhoc‐Unterstützung auf dem Register Advanced:
Adhoc support 802.11n: Enable.
2. Verlassen Sie den Dialog mit OK.
3. Rufen Sie den ersten Dialog erneut auf: Klicken Sie mit der rechten Maus
taste auf „Wireless Network Connection“ und wählen Sie Properties.
4. Gehen Sie zum Register Wireless Networks.
5. Erzeugen Sie ein Netzwerk, falls das Netzwerk „CX22“ gelöscht wurde:
Klicken Sie auf Add und geben Sie im folgenden Dialog einen Namen für
das Netzwerk an: Network name (SSID): CX22.
6. Wählen Sie andernfalls das Netzwerk „CX22“ aus und klicken Sie auf
Properties.
7. Gehen Sie zum Register Association und aktivieren Sie Connect even if
network is not broadcasting.
8. Wir empfehlen, für das Netzwerk eine Verschlüsselung festzulegen, auch
wenn bei Adhoc‐Netzwerken nur das wenig sichere WEP möglich ist:
Geben Sie Open bei Network Authentication und WEP bei Data
encryption ein.
9. Geben Sie einen Netzwerkschlüssel ein: Network key. Evtl. müssen Sie
dazu die Option The key is provided for me automatically deaktivieren.
Der Netzwerkschlüssel muss aus entweder 5 oder 13 ASCII‐Zeichen
bestehen. Ein längerer Schlüssel ist theoretisch sicherer, eine wirklich
sichere Verbindung ist zur Zeit aber nur bei WPA2 gegeben. Diese
Verschlüsselungsart steht allerdings beim CX22‐W für Adhoc‐Netzwerke
nicht zur Verfügung.
10. Gehen Sie zum Register Connection und aktivieren Sie Connect when
this network is in range.
11. Verlassen Sie den Dialog mit OK.
Falls Sie das Netzwerk neu angelegt haben, sollte es nun in der Liste der
Netzwerke erscheinen. In jedem Fall sollte (Automatic) hinter dem Netz
werknamen CX22 stehen.
12. Gehen Sie zum Register General, wählen Sie Internet Protocol (TCP/IP)
in der Liste aus und klicken Sie auf Properties.
13. Aktivieren Sie im folgenden Dialog Obtain an IP address automatically
und Obtain DNS server address automatically.
14. Schließen Sie alle Dialoge zur Wireless Network Connection mit OK bzw.
Close.
15. Doppelklicken Sie dann auf „CX22 Start Screen“.
A3169-1.0 en/de HBM
Page 68

68
QuantumX‐Datenrekorder CX22‐W
16. Klicken Sie auf Commit changes and reboot, um die neuen Einstel
lungen dauerhaft zu sichern.
Die WLAN‐Verbindung wird auch nach einem Ausschalten des CX22‐W auto
matisch wieder hergestellt, wenn ein PC in Reichweite ist, der sich mit dem
Netzwerk verbinden möchte (der unter 5. angegebene Name wird am PC
angezeigt).
6.3.5 PC für die Verbindung über Adhoc‐Netzwerk vorbereiten
1. Starten Sie den PC, von dem aus eine Verbindung hergestellt werden soll.
2. Rufen Sie das Fenster Netzwerk Verbindungen über das Windows‐Start
menü und Einstellungen auf.
3. Klicken Sie mit der rechten Maustaste auf „Drahtlose Netzwerkver
bindung“ und wählen Sie Eigenschaften.
4. Gehen Sie zum Register Drahtlosnetzwerke.
5. Erzeugen Sie das Netzwerk für die CX22: Klicken Sie auf Hinzufügen
und geben Sie im folgenden Dialog den Namen des Netzwerkes an: Netz
werkname (SSID): CX22.
6. Aktivieren Sie im Register Zuordnung die Option Verbindung auch her
stellen, wenn kein Broadcast gesendet wird.
7. Aktivieren Sie die Option Dies ist ein Computer‐zu‐Computer‐Netzwerk
(Ad‐hoc); Drahtloszugriffspunkte werden nicht verwendet.
8. Wir empfehlen, für das Netzwerk eine Verschlüsselung festzulegen, auch
wenn bei Adhoc‐Netzwerken nur das wenig sichere WEP möglich ist:
Geben Sie Offen bei Netzwerkauthentifizierung und WEP bei Datenver
schlüsselung ein.
9. Geben Sie den Netzwerkschlüssel ein, den Sie am CX22 vergeben
haben.
10. Gehen Sie zum Register Verbindung und aktivieren Sie Verbindung her
stellen, wenn das Netzwerk in Reichweite ist.
11. Verlassen Sie den Dialog mit OK.
Das Netzwerk sollte nun in der Liste der Netzwerke erscheinen und es
sollte (Automatisch) hinter dem Netzwerknamen CX22 stehen.
12. Gehen Sie zum Register Allgemein, wählen Sie Internetprotokoll (TCP/
IP) in der Liste aus und klicken Sie auf Eigenschaften.
13. Aktivieren Sie im folgenden Dialog IP‐Adresse automatisch beziehen
und DNS‐Serveradresse automatisch beziehen.
14. Schließen Sie alle Dialoge zur drahtlosen Netzwerkverbindung mit OK
bzw. Schließen.
A3169-1.0 en/deHBM
Page 69

QuantumX‐Datenrekorder CX22‐W
69
6.3.6 Verbindung über WLAN und Adhoc‐Netzwerk herstellen
1. Starten Sie den PC, von dem aus eine Verbindung hergestellt werden soll.
2. Klicken Sie mit der rechten Maustaste auf das Symbol für WLAN, das im
Infobereich der Taskleiste von Windows angezeigt wird und wählen Sie
Verfügbare Drahtlosnetzwerke anzeigen.
3. Kontrollieren Sie, dass der PC mit dem Netzwerk „CX22“ bzw. dem Netz
werk mit dem oben unter Network name (SSID) bzw. Netzwerkname
(SSID) vergebenen Namen verbunden ist. Warten Sie nach dem Anschal
ten des CX22‐W ggf. zwei Minuten, bis die Verbindung hergestellt wurde.
4. Starten Sie das Programm „QuantumX Datenrekorder Assistent“:
Windows-Startmenü -> Alle Programme -> HBM -> QuantumX Daten
rekorder Assistent (Windows
XP: Windows-Startmenü -> Programme
-> HBM -> QuantumX Datenrekorder Assistent).
5. Klicken Sie auf Find CX22.
6. Der CX22‐W‐Datenrekorder erscheint in der oberen Liste, die aktuellen
Adressen der Schnittstellen werden ebenfalls angezeigt (siehe auch
Abb. 6.2).
7. Wählen Sie den CX22‐W in der Liste oben aus.
8. Klicken Sie auf Remotedesktopverbindung über WLAN.
9. Falls Windows fragt, ob die Verbindung zu diesem Remotecomputer
hergestellt werden soll, lassen Sie die Verbindung zu. Wir empfehlen, die
Option Nicht erneut nach Verbindungen mit diesem Computer fragen
zu aktivieren. Je nach Konfiguration Ihres Windows‐Betriebssystems
erfolgt evtl. noch eine weitere Nachfrage, ob die Verbindung hergestellt
werden soll (Identität des Remotecomputers). Aktivieren Sie ggf. auch hier
die Option, nicht erneut nachzufragen.
Die Verbindung mit dem CX22‐W‐Datenrekorder wird nun hergestellt und
Sie müssen sich über Windows am Gerät anmelden. Geben Sie
HBMCX22 als User name und hbm als Password ein. Bei Password ist
die Schreibweise mit Kleinbuchstaben wichtig.
Tipp
Falls Ihnen das Herstellen der Verbindung im Adhoc‐Netzwerk zu lange dau
ert, können Sie auch feste IP‐Adressen für CX22 und PC vergeben. Siehe
dazu auch Abschnitt 6.1 auf Seite 60 (enthält ein Beispiel für feste
IP‐Adressen). Das Herstellen der Verbindung erfolgt dann schneller.
A3169-1.0 en/de HBM
Page 70

70
QuantumX‐Datenrekorder CX22‐W
7 Der Startbildschirm des CX22‐W‐Datenrekorders
Im Startbildschirm (CX22 Start Screen) des CX22‐W können Sie:
1. Das Programm catman
Siehe auch Kapitel 9 für den automatischen Start.
2. Wichtige Einstellungen des CX22‐W ändern: Settings.
Hierüber können Sie z.B. den Gerätenamen und das Passwort sowie die
Sprache von catman
zur Installierten Soft‐ und Hardware. Siehe Abschnitt 11.1 auf Seite 80.
3. Änderungen an der Konfiguration dauerhaft sichern: Commit changes
and reboot.
Diese Schaltfläche müssen Sie immer dann anklicken, wenn Sie
Änderungen über die Schaltfläche Settings oder im System (Windows)
durchgeführt haben.
AP starten: Start DAQ software.
AP ändern. Das Register Info enthält Informationen
4. Die Remotedesktop‐Verbindung beenden: Terminate remote session.
Sie können die Verbindung auch dadurch trennen, dass Sie das Fenster
des Remotedesktops schließen.
5. Auf die Systemebene (Windows) umschalten: Exit to Windows.
Dies ist z.B. nötig, wenn Sie das WLAN des CX22‐W aktivieren möchten.
Siehe dazu auch Abschnitt 6.3 auf Seite 64.
6. Den CX22‐W‐Datenrekorder herunterfahren: Shutdown.
Damit wird der CX22‐W ausgeschaltet. Unterbrechen Sie für ca. 5 Sekun
den die Stromzufuhr, um ihn wieder einzuschalten.
A3169-1.0 en/deHBM
Page 71

QuantumX‐Datenrekorder CX22‐W
8 Messung mit catman[ AP konfigurieren
Starten Sie catman AP über Start DAQ software im Startbildschirm des
CX22‐W‐Datenrekorders. Die voreingestellte Sprache für catman
AP ist
Englisch, Sie können über Settings im Startbildschirm auch Deutsch oder
Französisch wählen, siehe Abschnitt 11.1 auf Seite 80.
Falls Sie Ihre QuantumX‐Module nicht über FireWire anschließen, müssen
Sie zunächst festlegen, wie die angeschlossenen Geräte gefunden werden
können (Geräte‐Scan).
Ausführliche Informationen zum Umgang mit catman
AP finden Sie in der
Online‐Hilfe. Bitte beachten Sie auch das Seminarangebot von HBM zu cat
man
(www.hbm.com -> Seminare).
8.1 Geräte‐Scan einrichten
71
Die Optionen des Geräte‐Scans erreichen Sie über das Startfenster von cat
man
AP und Geräte‐Scan einrichten.
Aktivieren Sie bei Schnittstellen durchsuchen die Ethernet-Schnittstelle
und geben Sie den zu durchsuchenden Adressbereich an (Suchbereich für
IP‐Geräte‐Scan).
Tipp
Lassen Sie nur die Schnittstellen durchsuchen, an denen Sie auch ein Gerät
angeschlossen haben. Verwenden Sie zur ersten Einstellung bei QuantumX
und Ethernet den QuantumX‐Gerätemanager, um die benötigten Einstel
lungen zu sehen. Bei QuantumX und FireWire wird keine Adresse benötigt.
8.2 Messprojekt erstellen
Ein Messprojekt enthält alle Einstellungen zu den verwendeten Geräten, Auf
nehmern (Sensoren), Echtzeitberechnungen, wie die Messung durchzuführen
ist und welche Daten gespeichert werden sollen. Falls ein Bildschirm am
CX22‐Datenrekorder angeschlossen ist, können Sie auch eine Visualisierung
konfigurieren.
Vorgehensweise
1. Klicken Sie im Startbildschirm des CX22‐W‐Datenrekorders auf Start
DAQ software.
2. Wählen Sie Neues Messprojekt.
A3169-1.0 en/de HBM
Page 72

72
QuantumX‐Datenrekorder CX22‐W
Beim Start eines neuen Messprojekts werden die im Geräte‐Scan
aktivierten Schnittstellen durchsucht. Die Geräte müssen eingeschaltet
und betriebsbereit sein, sonst werden sie nicht gefunden. Warten Sie
daher nach dem Einschalten der Geräte lange genug, bevor Sie einen
Geräte‐Scan durchführen.
3. Falls Sie keine Aufnehmer mit TEDS verwenden, weisen Sie den Kanälen
die angeschlossenen Sensoren (Aufnehmer) zu: suchen Sie Ihre Senso
ren in der Sensorliste (Komponentenfenster Sensordatenbank) und zie
hen Sie jeden Sensor per Drag&Drop auf den Kanal, an dem er ange
schlossen ist. Erstellen Sie ggf. Ihre Sensoren in der Sensordatenbank.
4. Vergeben Sie eindeutige Kanalnamen.
Über das Kontextmenü Umbenennen können Sie Kanalnamen mit
laufender Nummerierung erzeugen oder die Sensorbezeichnung über
nehmen lassen. Jeder Kanal wird in catman
AP über seinen Namen
identifiziert, verwenden Sie deshalb möglichst aussagekräftige Namen.
5. Markieren Sie die Kanäle, die auf null gestellt werden sollen, und führen
Sie einen Nullabgleich (Nullstellen, Gruppe Nullstellen) durch.
6. Deaktivieren Sie ggf. nicht benutzte Kanäle (Gruppe Allgemein, Aktiv:
Kanäle ohne Sensor deaktivieren).
7. Definieren Sie - falls gewünscht - Berechnungen: Erzeugen in der
Gruppe Berechnungskanäle.
8. Aktivieren Sie Live‐Messwerte (Register Messkanäle, Gruppe Allge
mein), um kontinuierlich Messwerte anzuzeigen und zu prüfen, ob alle
Kanäle einwandfrei arbeiten.
9. Gehen Sie zum Register Messjobs.
10. Wählen Sie Ihre Messbedingungen: Messrate, Start und Stopp der
Messung.
Wählen Sie Start der Messung über Trigger und Digitaleingang bei
Triggermodus, um die digitalen Eingänge oder den START/STOP‐Taster
des CX22‐W verwenden zu können (siehe auch Abschnitte 10.1 und 10.2
auf Seite 76.
11. Klicken Sie auf Datenspeicherung (Gruppe Einstellungen) und legen
Sie die Einstellungen zur Sicherung der Daten nach oder während der
Messung fest. Wir empfehlen, die Einstellung Automatisch am Ende des
Jobs für die Datensicherung zu verwenden. Andernfalls muss während
der Messung ein Bildschirm angeschlossen sein, damit Sie die Daten
speichern können.
12. Erzeugen Sie - falls ein Bildschirm angeschlossen ist - eine
Visualisierung.
13. Speichern Sie ihr Messprojekt: Dateimenü -> Speichern -> Projekt.
14. Starten Sie ihr Messprojekt über Start in der Gruppe Messung.
A3169-1.0 en/deHBM
Page 73

QuantumX‐Datenrekorder CX22‐W
Falls Sie keine Visualisierung erzeugt haben, werden Sie gefragt, ob eine
der Voreinstellungen für die Visualisierung verwendet werden sollen. Kli
cken Sie hier auf Ohne Anzeige messen, wenn während der Messung
kein Bildschirm angeschlossen sein wird.
Der Messmodus des CX22‐W wird aktiviert und - falls Sie einen Starttrig
ger definiert haben, z.B. die START/STOP‐Taste - wird auf diesen
gewartet. Die LED „Recording“ blinkt, solange auf den Starttrigger
gewartet wird, sie leuchtet kontinuierlich, sobald die Messung läuft.
Wichtig
Die LED „ERROR“ leuchtet gelb, wenn ein Fehler in catman[ AP vorliegt,
z.B. wenn die Verbindung zu Geräten beim Projektstart nicht hergestellt
werden kann oder wenn der Messjob nicht gestartet werden kann. Die LED
„ERROR“ blinkt, wenn der verfügbare freie Speicher unter 1GByte fällt.
73
A3169-1.0 en/de HBM
Page 74

74
QuantumX‐Datenrekorder CX22‐W
9 CX22‐W für automatische Messungen konfigurieren
Um den CX22‐W für eine autarke Messung zu konfigurieren, sind Einstel
lungen in zwei Bereichen nötig:
1. Sie müssen in catman
jobs und Optionen vornehmen, damit catman
Messprojekt lädt und den Messjob startet.
2. Sie müssen dafür sorgen, dass catman
CX22‐W gestartet wird.
Start und Stopp der Messung kann wie üblich sofort oder über einen Trigger
erfolgen. Sie können jedoch auch die START/STOP‐Taste des CX22‐W
verwenden, siehe Abschnitt 10.2 auf Seite 76.
Vorgehensweise
1. Konfigurieren Sie Ihr Messprojekt wie in Abschnitt 8.2 beschrieben.
Lassen Sie bei den Messjobs die Daten Automatisch am Ende des Jobs
sichern (Datenspeicherung in der Gruppe Einstellungen, Parameter
Datensicherung).
AP die entsprechenden Einstellungen bei Mess
AP nach dem Start ein
AP beim Einschalten des
2. Speichern Sie das Messprojekt.
3. Rufen Sie die Optionen von catman
AP auf (Dateimenü) und gehen Sie
zu Programmstart (Gruppe System).
4. Wählen Sie für den Start‐Modus ein Bestehendes Messprojekt und
wählen Sie das oben erstellte Projekt in der Zeile Messprojekt aus.
5. Aktivieren Sie die Option Ersten Messjob automatisch ausführen.
6. Gehen Sie zu Messkanäle in der Gruppe Kanäle und Sensoren.
7. Aktivieren Sie die Option Fehlerhafte Kanäle automatisch deaktivieren
und Messung fortsetzen (Verhalten bei Initialisierungsfehlern vor der
Messung).
8. Verlassen Sie den Dialog mit Klick auf OK.
9. Beenden Sie catman
AP.
10. Klicken Sie im Startbildschirm auf Settings.
11. Aktivieren Sie auf dem Register General die Option Launch DAQ
recorder program at startup und klicken Sie auf Ok.
12. Klicken Sie auf Commit changes and reboot, um die neuen Einstel
lungen dauerhaft zu sichern.
Beim nächsten Einschalten des CX22‐W wird dann dieses Projekt auto
matisch gestartet. Falls während der Messung die Stromversorgung unter
brochen wird, wird nach der Wiederherstellung der Stromversorgung auch das
Projekt wieder geladen und die Messung wird fortgesetzt. Der Neustart des
A3169-1.0 en/deHBM
Page 75

QuantumX‐Datenrekorder CX22‐W
75
Moduls bis zur Fortsetzung der Messung benötigt ca. 3 Minuten, abhängig
von der Anzahl der angeschlossenen Geräte und Kanäle.
Die bereits im temporären Messdatenspeicher von catman
AP vorhanden
Daten gehen bei einer Unterbrechung der Stromversorgung nicht verloren.
Ggf. werden zusätzliche Dateien mit einem Zähler am Ende des Dateinamens
versehen.
A3169-1.0 en/de HBM
Page 76

76
QuantumX‐Datenrekorder CX22‐W
10 Weitere Anschlüsse des CX22‐W
10.1 Digitale Ein‐ und Ausgänge
Es stehen Ihnen 3 Eingänge an den Klemmen 1, 2 und 3 sowie 3 Ausgänge
an den Klemmen 4, 5 und 6 zur Verfügung. Der Status der Ausgänge wird
über LEDs angezeigt, siehe Abschnitt 10.3.3.
Der Pegel für die Eingänge ist 5Volt im offenen Zustand (HIGH), da er über
einen Pull‐up‐Widerstand auf HIGH gezogen wird (aktiv LOW). Der maximale
LOW‐Pegel für die Eingänge beträgt 0,7Volt. Der Pegel für die Ausgänge ist
5Volt (HIGH), wenn der entsprechende Ausgang gesetzt wird, sonst 0Volt
(LOW). Die Ein‐ und Ausgänge sind TTL‐kompatibel, die Leitungslänge an
den Ausgängen darf maximal 3m betragen.
Wichtig
Die Taste START/STOP ist parallel zum Eingang an Klemme 3 geschaltet.
Falls Sie den Taster verwenden möchten, sollten Sie deshalb den Eingang 3
nicht beschalten. Andernfalls wird der Zustand „Aktiv“ (LOW) sowohl von
einem Tastendruck als auch von einem LOW‐Signal an Klemme 3 ausgelöst.
Tipp
Beim Start eines Messjobs werden die Ausgänge auf LOW zurückgesetzt,
wenn Sie in catman
Einstellung Bei Start eines Messjobs alle Digitalausgänge der CX22‐W
zurücksetzen aktivieren.
AP bei den Optionen für die CX22 (Gruppe System) die
10.2 START/STOP‐Taste
Mit der Taste START/STOP können Sie einen Messjob starten und/oder
stoppen. Verwenden Sie dazu einen Trigger für den Start und/oder den Stopp
des Messjobs und legen Sie CX22 Digitaleingang 3 - Start/Stopp‐Taster
als Triggerkanal fest. Falls Sie sowohl Start als auch Stopp des Messjobs
über den Taster steuern, wird beim ersten Drücken der Messjob gestartet und
beim nächsten Drücken gestoppt.
A3169-1.0 en/deHBM
Page 77

QuantumX‐Datenrekorder CX22‐W
77
Wichtig
Die Taste START/STOP ist parallel zum Eingang an Klemme 3 geschaltet.
Falls Sie den Taster verwenden möchten, sollten Sie deshalb den Eingang 3
nicht beschalten. Andernfalls wird der Zustand „Aktiv“ (LOW) sowohl von
einem Tastendruck als auch von einem LOW‐Signal an Klemme 3 ausgelöst.
10.3 LED‐Anzeigen
Folgende LED-Anzeigen existieren:
1. die Modul‐LED,
2. die LEDs im Ethernet‐Anschluss,
3. die Status‐LEDs für den Betriebszustand,
4. die Status‐LEDs für die digitalen Ausgänge,
5. die LED für den Betriebszustand der CF‐Karte (Rückseite des Moduls).
10.3.1Modul‐LED
Die Modul‐LED (siehe Abb. 3.1 auf Seite 52) leuchtet grün, wenn die Strom
versorgung des CX22‐W vorhanden ist. Das Modul benötigt nach dem Ein
schalten jedoch noch ca. 2 Minuten, bis der Bootvorgang vollständig abge
schlossen ist. Der Start des Bootvorgangs wird durch Beep‐Töne signalisiert.
10.3.2LED im Ethernet‐Anschluss
Die linke LED (siehe Abb. 3.1 auf Seite 52) zeigt an, ob der Netzwerkan
schluss mit 10/100MBit (LED aus) oder mit 1GBit arbeitet (LED grün).
Die rechte LED zeigt durch Blinken in Gelb an, dass Daten übertragen
werden.
10.3.3Status‐LEDs für den Betriebszustand
Die LED „RECORDING“ leuchtet kontinuierlich gelb, wenn Messdaten aufge
zeichnet werden. Falls ein Start‐Trigger festgelegt wurde, blinkt die LED gelb,
solange noch auf das Triggerereignis gewartet wird.
Die LED „ERROR“ leuchtet gelb, wenn ein Fehler in catman
z.B. wenn die Verbindung zu Geräten beim Projektstart nicht hergestellt
werden kann oder wenn der Messjob nicht gestartet werden kann. Die LED
blinkt, wenn der verfügbare freie Speicher unter 1GByte fällt.
A3169-1.0 en/de HBM
AP vorliegt,
Page 78

78
QuantumX‐Datenrekorder CX22‐W
Alle LEDs können auch über Grenzwerte und Ereignisse von catman AP
angesteuert werden. Wählen Sie dazu Digitalausgang setzen: CX22 Digital
ausgang im Dialog Grenzwert‐ und Ereignisüberwachung einrichten und
geben Sie bei Bit/Zustand die gewünschte LED an. Bei den LEDs 4 bis 6
wird gleichzeitig der entsprechende digitale Ausgang angesteuert. Die LEDs
leuchten, wenn der betreffende Ausgang auf HIGH gesetzt wird.
10.3.4Status‐LEDs für die digitalen Ausgänge
Die LEDs zeigen den Zustand der digitalen Ausgänge 4 bis 6 an. In catman
AP werden die Ausgänge über die LEDs 4 bis 6 angesprochen.
Setzen Sie die Ausgänge über die Grenzwert‐ und Ereignisüberwachung:
Geben Sie 0 HIGH (LED 4) bei Bit/Zustand an, wenn der Ausgang 4 beim
Eintreten des Ereignisses aktiv werden soll (LED 4 leuchtet grün). Die Aus
gänge 5 und 6 werden über Bit 1 (LED 5) und Bit 2 (LED 6) aktiviert.
Tipp
Beim Start eines Messjobs werden die Ausgänge auf LOW zurückgesetzt,
wenn Sie in catman
die Einstellung Bei Start eines Messjobs alle Digitalausgänge der CX22‐W
zurücksetzen aktivieren.
10.3.5LED für den Betriebszustand der CF‐Karte
AP bei den Optionen für die CX22‐W (Gruppe System)
Die LED an der Rückseite des Moduls blinkt gelb, wenn Daten auf die
CF‐Karte geschrieben oder von ihr gelesen werden.
10.4 Mikrofoneingang, Lautsprecherausgang
Der Mikrofoneingang bietet Ihnen die Möglichkeit, ein handelsübliches
PC‐Mikrofon (mit Speisung durch den CX22‐W) anzuschließen.
Mikrofon‐Stromversorgung
Mikrofonsignal
Masse
Abb. 10.1: Steckerbelegung Mikrofoneingang
A3169-1.0 en/deHBM
Page 79

QuantumX‐Datenrekorder CX22‐W
79
An den Lautsprecherausgang können Sie entweder aktive PC-Lautsprecher
oder einen Kopfhörer anschließen oder Sie können das Signal als Line‐Out in
einen (HiFi‐)Verstärker einspeisen.
Links
Rechts
Masse
Abb. 10.2: Steckerbelegung Lautsprecherausgang
Über catman AP können Sie dann eine WAVE‐Datei (*.wav) abspielen
lassen, z.B. wenn ein Grenzwert erreicht wird.
10.5 USB‐Anschlüsse
Sie können die USB‐Anschlüsse für den Anschluss von Tastatur und Maus
bei Betrieb ohne PC verwenden oder Sie können andere Geräte anschließen,
z.B. Speichermedien wie USB‐Speichersticks oder USB‐Festplatten. Die
Anschlüsse sind gleichwertig, es spielt keine Rolle, an welchen der drei
Anschlüsse Sie etwas anschließen.
10.6 RS‐232
Diese Schnittstelle (COM1) ermöglicht Ihnen z.B. den Anschluss eines
NMEA‐kompatiblen GPS‐Gerätes, dessen Standortdaten dann in catman
zusammen mit den Messwerten erfasst werden können. Die Einstellungen
erfolgen wie für solche Geräte üblich über den Dialog Geräte‐Scan und das
Register Manuelle Geräte, siehe Online‐Hilfe zu catman
AP.
AP
A3169-1.0 en/de HBM
Page 80

80
QuantumX‐Datenrekorder CX22‐W
11 Systemeinstellungen, Update und Wiederherstellen
11.1 Systemeinstellungen ändern (Settings)
Wichtig
Alle Änderungen im Dialog Settings werden nur dann dauerhaft gespeichert
und sind nach dem nächsten Einschalten aktiv, wenn Sie nach der Änderung
im Startbildschirm auf Commit changes and reboot klicken.
Sie können folgende Einstellungen ändern:
• Gerätename (CX22‐W name, Register General)
Dieser Name wird z.B. im Netzwerk angezeigt.
• Passwort (Register Remote access password)
Das Passwort wird für die Anmeldung (Log On) benötigt.
• catman
AP nach dem Einschalten des CX22‐W ausführen lassen
(Launch DAQ software (catmanAP) at startup, Register General)
Startet automatisch catman
AP, sobald das System betriebsbereit ist.
Siehe auch Kapitel 9 auf Seite 74.
• Die Sprachversion von catman
AP (DAQ software language, Register
General)
Wählen Sie EN für die englische Oberfläche, DE für die deutsche und FR
für die französische Version von catman
AP.
Klicken Sie im Startbildschirm auf Settings und gehen Sie zum Ändern auf
das entsprechende Register.
Wichtig
Bewahren Sie das Passwort bei einer Änderung gut auf. Bei Verlust müssen
Sie sonst das System wiederherstellen, um wieder Zugang zum CX22‐W zu
erhalten.
Das Register Info enthält Informationen zur CX22‐Hardware und Firmware.
Änderungen sind hier nicht möglich.
A3169-1.0 en/deHBM
Page 81

QuantumX‐Datenrekorder CX22‐W
81
11.2 System wiederherstellen (Recovery)
Sollten Sie Änderungen am System vorgenommen haben, die dazu geführt
haben, dass das System nicht mehr bedienbar ist, können Sie den Ausliefe
rungszustand des Systems wieder herstellen. Weder die auf der CF‐Karte
gespeicherten Daten noch die Partition D des internen Speichers mit catman
AP‐Daten werden dabei überschrieben. Sie benötigen zur Wiederherstellung
einen speziell vorbereiteten USB‐Speicherstick, eine Tastatur und nach Mög
lichkeit auch einen (digitalen) Bildschirm, den Sie direkt an den CX22‐W
anschließen können (DVI‐Ausgang). Laden Sie das Programm zum Durchfüh
ren einer Wiederherstellung über das Internet von HBM herunter, siehe
www.hbm.com/Software -> Datenerfassungssysteme.
Wichtig
Bei einer Wiederherstellung wird die Partition C des internen Speichers
gelöscht und dann neu geschrieben. Stellen Sie deshalb sicher, dass der
CX22‐W während der gesamten Wiederherstellung mit Spannung versorgt
wird.
Tipp
Das Wiederherstellen des Systems mit der neuesten Software entspricht
einem Update des Systems.
Vorgehensweise
1. Verbinden Sie einen (neuen) USB‐Speicherstick mit mindestens 1GByte
Kapazität mit Ihrem PC.
Der USB‐Speicherstick wird neu formatiert, d.h. alle Daten des Sticks
gehen verloren. Erstellen Sie daher bei Bedarf vorher ein Backup Ihrer
Daten.
2. Starten Sie das Programm „CX22_Recovery_Setup.exe“.
3. Klicken Sie nach dem Beschreiben des USB‐Speichersticks auf Finish im
letzten Dialog und werfen Sie den USB‐Speicherstick über Windows aus.
4. Schalten Sie den CX22‐W aus und schließen Sie USB‐Speicherstick,
Tastatur und Bildschirm (falls vorhanden) an.
5. Schalten Sie den CX22‐W ein.
6. Warten Sie auf die Beep‐Töne des CX22‐W beim Booten und drücken Sie
dann mehrfach auf F11 (vier bis fünf Mal innerhalb von 10 Sekunden
genügt).
A3169-1.0 en/de HBM
Page 82

82
QuantumX‐Datenrekorder CX22‐W
7. Wenn ein Bildschirm angeschlossen ist, erscheint das Bootmenü, andern
falls warten Sie weitere 30 Sekunden.
8. Drücken Sie 1 Mal die Pfeil‐abwärts‐Taste, danach die Eingabe‐Taste
(Return). Dies wählt das Bootmedium (boot device) am USB‐Anschluss
aus.
Falls der USB‐Speicherstick über eine LED verfügt, zeigt diese an, dass
eine Datenübertragung läuft. Es wird ein spezielles Programm gestartet,
dass die Wiederherstellung vornehmen kann.
9. Wenn ein Bildschirm angeschlossen ist, klicken Sie im nächsten Dialog
auf Recovery. Andernfalls warten Sie ca. 3 Minuten und drücken Sie dann
die Eingabe‐Taste (Return).
Die eigentliche Wiederherstellung dauert ca. 12 Minuten, dies ist jedoch
von der Geschwindigkeit der Datenübertragung Ihres USB‐Speichersticks
abhängig.
10. Wenn ein Bildschirm angeschlossen ist, ziehen Sie den USB‐Speicher
stick ab, sobald die Meldung erscheint, dass die Wiederherstellung durch
geführt wurde („... successfully recovered“). Andernfalls warten Sie wei
tere 2 bis 5 Minuten (je nach Geschwindigkeit Ihres USB‐Speichersticks).
11. Klicken Sie im nächsten Dialog auf Reboot oder drücken Sie die Ein
gabe‐Taste (Return).
Der CX22‐W wird normalerweise zwei Mal neu gestartet und ist danach
wieder betriebsbereit. Sollte der zweite Start nicht automatisch erfolgen,
lassen Sie nach dem ersten Start keinen Neustart ausführen (bei der Frage
„Do you want to restart your computer now?“ auf No klicken), sondern klicken
Sie im Startbildschirm auf Commit changes and reboot.
11.3 catman[ AP aktualisieren
Eine Aktualisierung von catman AP ist nicht vorgesehen. Führen Sie bei
Bedarf eine Wiederherstellung mit der neuesten Software durch (Abschnitt
11.2), dabei wird auch catman
AP auf den neuesten Stand gebracht.
A3169-1.0 en/deHBM
Page 83

QuantumX‐Datenrekorder CX22‐W
83
11.4 Installieren von Windows‐Software
Die Installation anderer Softwarepakete ist prinzipiell möglich, wir empfehlen
jedoch, dies nicht vorzunehmen, um die Stabilität des CX22‐Datenrekorders
nicht zu gefährden. Bei der Installation weiterer Software erlischt die Gewähr
leistung für die Funktion des CX22‐Datenrekorders und es kann kein Support
von HBM für damit im Zusammenhang stehende Fehler erfolgen.
Wichtig
Änderungen am System müssen vor einem Neustart dauerhaft gesichert
werden. Klicken Sie dazu im Startbildschirm auf Commit changes and
reboot.
A3169-1.0 en/de HBM
Page 84

84
QuantumX‐Datenrekorder CX22‐W
12 Entsorgung und Umweltschutz
Alle elektrischen und elektronischen Produkte müssen als Sondermüll ent
sorgt werden. Die ordnungsgemäße Entsorgung von Altgeräten beugt Um
weltschäden und Gesundheitsgefahren vor.
Symbol:
Bedeutung: Gesetzlich vorgeschriebene Kennzeichnung zur Entsorgung
Elektrische und elektronische Geräte, die dieses Symbol tragen, unterliegen
der europäischen Richtlinie 2002/96/EG über elektrische und elektronische
Altgeräte. Das Symbol weist darauf hin, dass nicht mehr gebrauchsfähige Alt
geräte gemäß den europäischen Vorschriften für Umweltschutz und Rohstoff
rückgewinnung getrennt von regulärem Hausmüll zu entsorgen sind.
Da die Entsorgungsvorschriften von Land zu Land unterschiedlich sind, bitten
wir Sie, im Bedarfsfall Ihren Lieferanten anzusprechen, welche Art von Ent
sorgung oder Recycling in Ihrem Land vorgeschrieben ist.
Verpackungen
Die Originalverpackung der HBM‐Geräte besteht aus recyclebarem Material
und kann der Wiederverwertung zugeführt werden. Aus ökologischen Grün
den sollte auf den Rücktransport der leeren Verpackungen an uns verzichtet
werden.
A3169-1.0 en/deHBM
Page 85

QuantumX‐Datenrekorder CX22‐W
85
A3169-1.0 en/de HBM
Page 86

86
QuantumX‐Datenrekorder CX22‐W
A3169-1.0 en/deHBM
Page 87

Page 88

E Hottinger Baldwin Messtechnik GmbH.
All rights reserved.
All details describe our products in general form only.
They are not to be understood as express warranty and do
not constitute any liability whatsoever.
Änderungen vorbehalten.
Alle Angaben beschreiben unsere Produkte in allgemeiner
Form. Sie stellen keine Beschaffenheits- oder Haltbarkeitsgarantie im Sinne des §443 BGB dar und begründen keine
Haftung.
Hottinger Baldwin Messtechnik GmbH
Im Tiefen See 45 S 64293 Darmstadt S Germany
Tel. +49 6151 803-0 S Fax: +49 6151 803-9100
Email: info@hbm.com
S www.hbm.com
A3169-1.0 en/de 7-2001.3169
 Loading...