

Page 1
HAZET-WERK
HÖCHSTE TECHNOLOGIE IN DER WERKZEUGFERTIGUNG SEIT 1868
HIGHEST TECHNOLOGY IN TOOL MANUFACTURE SINCE 1868
NEJVYŠŠÍ TECHNOLOGIE PŘI VÝROBĚ NÁŘADÍ OD ROKU 1868
NAJVEĆA KVALITETA U PROIZVODNJI ALATA JOŠ OD 1868
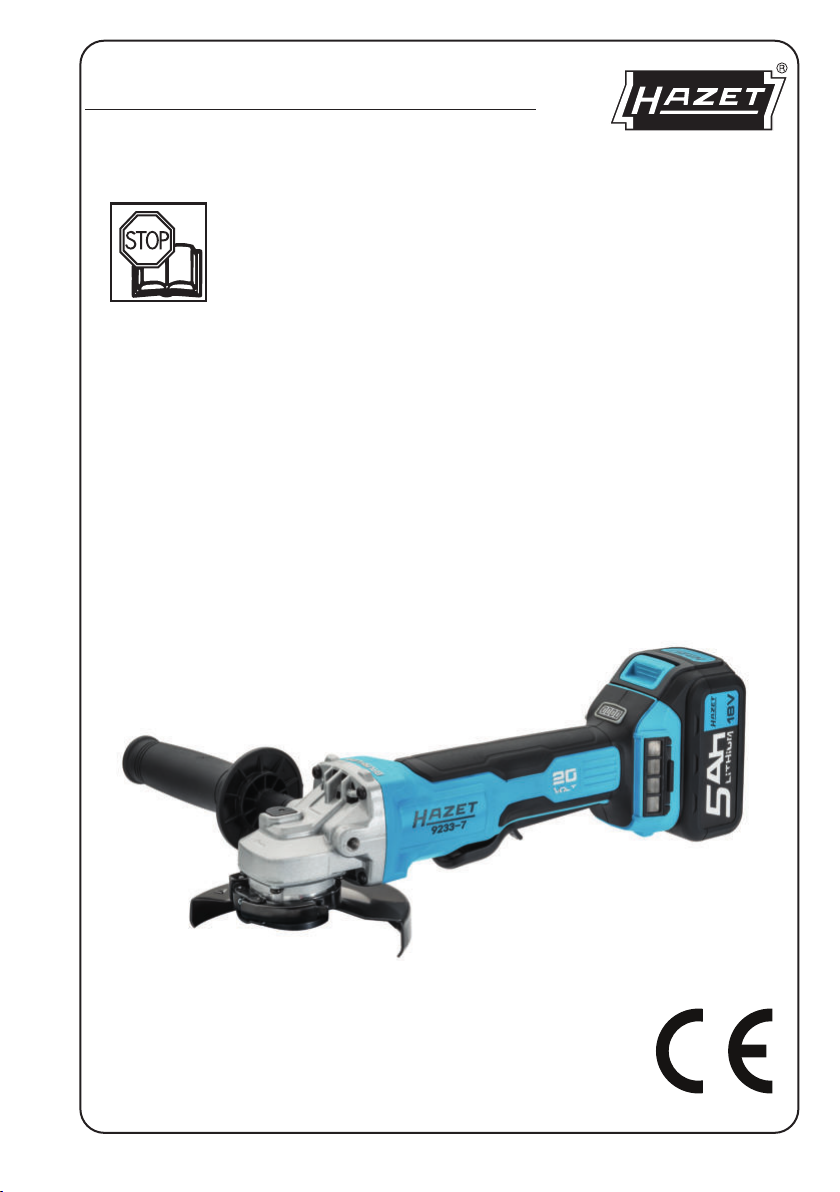
Betriebsanleitung
Akku-Winkelschleifer
Operating Instructions
Cordless right-angle grinder
Návod k obsluze
Akumulátorová úhlová bruska
Upute za upotrebu
Baterijska kutna brusilica
9233-7
9233-7 BA IV
Page 2
Inhaltsverzeichnis
1 Zu Ihrer Information ............ 3
2 Zu Ihrer Sicherheit ............... 4
3 Aufbau und Funktion ............ 9
4 Wartung und Pflege ............. 21
Table of contents
1 For your information ............ 23
2 For your safety .................. 24
3 Design and Function ............ 29
4 Maintenance and care ......... 41
Obsah
1 Pro Vaši informaci ............... 43
2 Pro Vaši bezpečnost ........... 44
3 Konstrukce a funkce ............ 49
4 Údržba a péče .................. 62
Sadržaj
1 Za Vašu informaciju ............ 63
2 Za Vašu sigurnost ............... 64
3 Struktura i funkcija ............... 69
4 Održavanje i njega................ 81
Ursprungsprache deutsch – original language: German
– Původní jazyk němčina – Izvorni jezik njemački
HAZET-WERK Hermann Zerver GmbH & Co. KG
; Güldenwerther Bahnhofstrasse 25-29
[ +49 (0) 21 91 / 7 92-0 · \ +49 (0) 21 91 / 7 92-375 (National)
\
+49 (0) 21 91 / 7 92-400 (International) · ^ hazet.de · ] [email protected]
2
^ hazet.com • ] [email protected]
·
42857 Remscheid
· GERMANY
Page 3
Zu Ihrer Information
1
1. Allgemeine Informationen
• Bitte stellen Sie sicher, dass der Benutzer
dieses Werkzeugs die vorliegende Betriebsanleitung vor der ersten Inbetrieb nahme
gründlich durchgelesen und verstanden hat.
• Diese Betriebsanleitung enthält wichtige
Hinweise, die zum sicheren und störungs
freien Betrieb Ihres HAZET Werkzeuges
erforderlich sind.
• Zum bestimmungsgemäßen Gebrauch
des Werkzeuges gehört die vollständige
Beachtung aller Sicherheitshinweise und
Informationen in dieser Betriebsanleitung.
• Bewahren Sie deshalb diese Betriebs an leitung immer bei Ihrem HAZET Werkzeug auf.
• Dieses Werkzeug wurde für bestimmte
An wendungen entwickelt. HAZET weist aus
drücklich darauf hin, dass dieses Werkzeug
nicht verändert und/oder in einer Weise eingesetzt werden darf, die nicht seinem vorgesehenen Verwendungs zweck entspricht.
• Für Verletzungen und Schäden, die
aus unsach gemäßer, zweckentfrem
deter und nicht bestimmungsgemäßer
Anwendung bzw. Zuwiderhandlung gegen
die Sicherheitsvorschriften resultieren,
übernimmt HAZET keine Haftung oder
Gewährleistung.
• Darüber hinaus sind die für den Einsatzbereich des Werkzeugs geltenden
Unfallverhütungs vorschriften und allgemei
nen Sicherheits bestimmungen einzuhalten.
-
-
-
-
2. Symbolerklärung
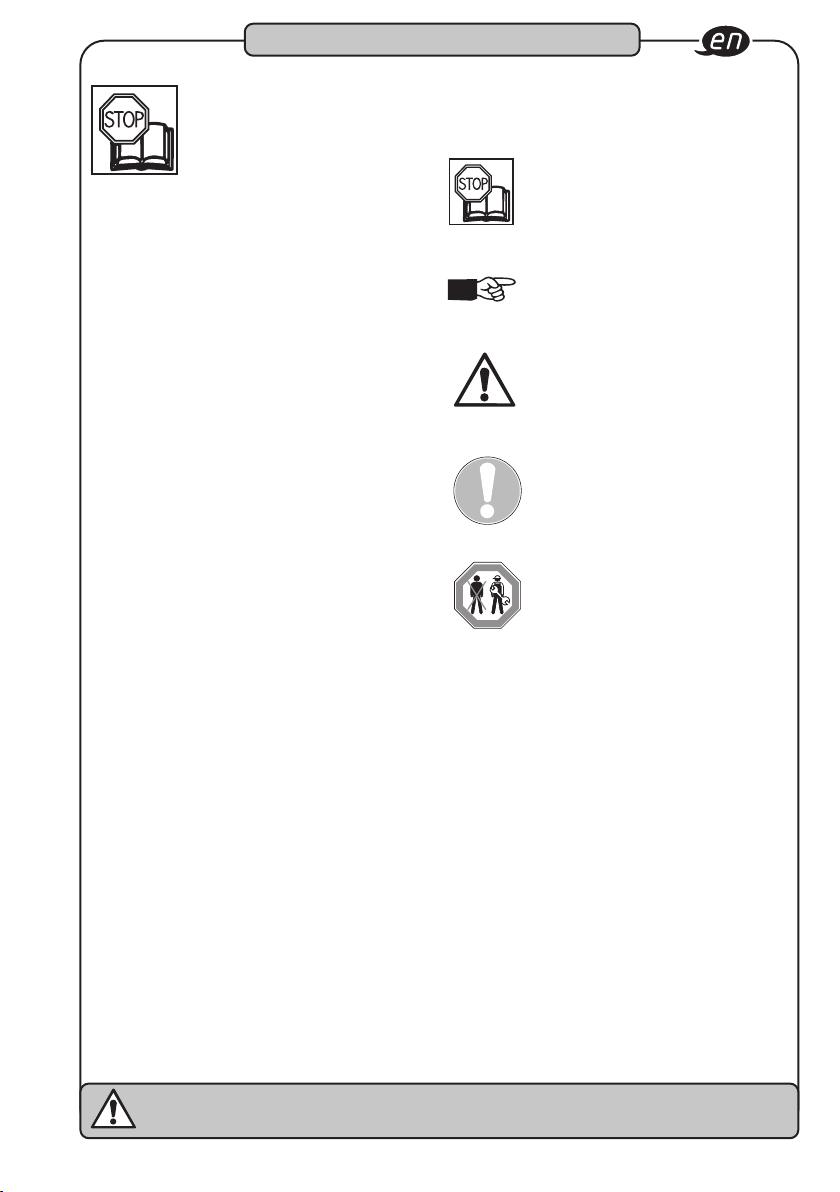
ACHTUNG: Schenken Sie diesen Symbolen
höchste Aufmerksamkeit!
Betriebsanleitung lesen!
Der Betreiber ist verpflichtet die
Betriebsanleitung zu beachten
und alle Anwender des Werkzeugs
gemäß der Betriebs anleitung zu
unterweisen.
HINWEIS!
Dieses Symbol kennzeichnet
Hinweise, die Ihnen die Handhabung
erleichtern.
WARNUNG!
Dieses Symbol kennzeichnet wich
tige Beschreibungen, gefährliche
Bedin gungen, Sicherheitsgefahren
bzw. Sicherheitshinweise.
ACHTUNG!
Dieses Symbol kennzeichnet Hinwei se, deren Nichtbeachtung
Be schä digungen, Fehlfunktionen
und/ oder den Ausfall des Gerätes
zur Folge haben.
FACHLEUTE!
Werkzeug nur für die Verwendung
durch Fachleute geeignet,
Handhabung durch Laien kann zu
Verletzungen oder Zerstörung des
Werkzeugs oder des Werkstücks
führen.
-
Elektrische Energien können schwere Verletzungen verursachen!
Immer persönliche Schutzausrüstung tragen!
[
+49 (0) 21 91 / 7 92-0 • \ +49 (0) 21 91 / 7 92-375 • ^ hazet.de • ] [email protected]
3
Page 4
Zu Ihrer Sicherheit
2
1. Verantwortung des
Betreibers
• Das Gerät ist zum Zeitpunkt seiner Ent wick lung und Fertigung nach geltenden, anerkannten Regeln der Technik gebaut und gilt
als betriebssicher. Es können vom Gerät
jedoch Gefahren ausgehen, wenn es von
nicht fachgerecht ausgebildetem Per sonal,
unsachgemäß oder nicht bestimmungsge
mäß, verwendet wird. Jede Per son, die mit
Arbeiten am oder mit dem Gerät beauftragt
ist, muss daher die Betriebsanleitung vor
Beginn der Arbeiten gelesen und verstan
den haben.
• Veränderungen jeglicher Art sowie An- oder
Umbauten am Gerät sind untersagt.
• Alle Sicherheits-, Warn- und Bedienungshin weise am Gerät sind stets in gut les
barem Zustand zu halten. Beschädigte
Schil der oder Aufkleber müssen sofort
erneuert werden.
• Angegebene Einstellwerte oder -bereiche
sind unbedingt einzuhalten.
• Betriebsanleitung stets in unmittelbarer
Nähe des Geräts aufbewahren.
• Gerät nur in technisch einwandfreiem und
betriebssicherem Zustand betreiben.
• Sicherheitseinrichtungen immer frei er reichbar vorhalten und regelmäßig prüfen.
-
-
-
2. Bestimmungsgemäße
Verwendung
• Die Betriebssicherheit ist nur bei
bestimmungsgemäßer Verwendung
entsprechend der Angaben in der
Betriebsanleitung gewährleistet. Neben
den Arbeitssicherheits-Hinweisen in die
ser Betriebsanleitung sind die für den
Einsatz bereich des Gerätes allgemeingül
tigen Sicherheits-, Unfallverhütungs- und
Umwelt schutz-Vorschriften zu beachten
und einzuhalten.
• Die Benutzung und Wartung muss immer
entsprechend den lokalen staatlichen
Landes- oder Bundes bestim mungen erfol
gen.
• Der HAZET Akku-Winkelschleifer ist zum
Schleifen/Trennen von harten Werkstücken,
z.B. Schweißnähten, Stahlnieten, Blechen
o.a.
• Gerät nur in technisch einwandfreien und
betriebssicheren Zustand betreiben.
• Sicherheitseinrichtungen immer frei erreich
bar vorhalten und regelmäßig prüfen.
• Der unsachgemäße Gebrauch des AkkuWinkelschleifers oder der Gebrauch nicht
entsprechend der Sicherheitshinweise kann
zu schweren Verletzungen oder zum Tode
führen.
• Jede über die bestimmungsgemäße
Verwendung hinausgehende und/oder
andersartige Verwendung des Gerätes ist
untersagt und gilt als nicht bestimmungsgemäß.
• Ansprüche jeglicher Art gegen
den Herstellerund / oder seine
Bevollmächtigten wegenSchäden aus nicht
bestimmungsgemäßer Verwendung des
Gerätes sind ausgeschlossen.
• Für alle Schäden bei nicht bestimmungsgemäßer Verwendung haftet allein der
Betreiber.
-
-
-
-
-
Elektrische Energien können schwere Verletzungen verursachen!
Immer persönliche Schutzausrüstung tragen!
4
Page 5
Zu Ihrer Sicherheit
2
3. Gefahren die vom
Gerät ausgehen
• Vor jeder Benutzung ist der HAZET AkkuWinkelschleifer auf seine volle Funktionsfähigkeit zu prüfen. Ist die Funktionsfähigkeit
nach dem Ergebnis dieser Prüfung nicht
gewährleistet oder werden Schäden festge
stellt, darf der Winkelschleifer nicht verwendet werden. Ist die volle Funktionsfähigkeit
nicht gegeben und der Winkelschleifer wird
dennoch verwendet, besteht die Gefahr
von erheblichen Körper-, Gesundheits- und
Sachschäden.
• Elektrische Energien können schwe
re Verletzungen verursachen. Zum Schutz
gegen elektrischen Schlag, Verletzungs- und
Brandgefahr sind folgende grundsätzliche
Sicherheitsmaßnahmen zu beachten:
• Anschlusskabel und Gehäuse dürfen nicht
beschädigt sein. Werkzeuge/Ladegeräte, die
fallen gelassen wurden oder beschädigt
sind, müssen vor Wiederinbetriebnahme von
Fachpersonal geprüft werden.
• Keine Werkzeuge verwenden, bei denen der
Ein-/Aus-Schalter defekt ist. Werkzeuge, die
nicht mehr mit dem Ein-/Aus-Schalter einbzw. ausgeschaltet werden können, sind
gefährlich und müssen repariert werden.
• Verlegte Kabel dürfen keine heißen oder
scharfen Teile berühren oder in einer ande
ren Weise beschädigt werden. Kabel sind
so zu verlegen, dass sie für Personen keine
Stolpergefahr darstellen.
• Ladegerät und Winkelschleifer nicht Wasser
oder anderen Flüssigkeiten aussetzen. Dabei
können gefährliche Spannungsentladungen
entstehen.
• Nicht in Gebrauch befindlichen Akku
von metallenen Gegenständen wie
Büroklammern, Münzen, Schlüsseln,
Nägeln, Schrauben usw. fern halten. Diese
Gegenstände können eine Verbindung
zwischen den Polen herstellen und so
einen Kurzschluss verursachen, der zu
Funkenschlag, Feuer oder Bränden führen
kann.
-
-
-
• Ladegerät und/oder den Winkelschleifer nicht
selbst zerlegen/öffnen. Unsachgemäßer
Zusammenbau kann zur Beeinträchtigung
der Funktionstüchtigkeit, zu Feuer, zu
einem elektrischen Schlag und/oder zu
Verletzungen führen.
• Alle Service- oder Reparaturarbeiten immer
durch Fachpersonal ausführen lassen. Um
die Betriebssicherheit auf Dauer zu gewähr
leisten, dürfen nur Originalersatzteile verwendet werden.
• Schutzvorrichtungen und/oder Gehäuseteile
dürfen nicht entfernt werden.
• Betätigen Sie das Werkzeug nie, wenn eine
Schutzabdeckung fehlt oder wenn nicht alle
Sicherheitseinrichtungen vorhanden und in
einwandfreiem Zustand sind.
• Verlängerungskabel müssen für das
Ladegerät ausreichend dimensioniert sein.
Kabel, die nicht für die benötigte Stromstärke
ausgelegt sind, können überhitzen.
• Der Akku darf nur mit dem ausdrücklich
dafür vorgesehenen Ladegerät aufgeladen
werden. Ein Ladegerät, das für einen ande
ren Akku-Typ vorgesehen ist, kann bei diesem Akku-Typ Feuer auslösen.
• Das Werkzeug nur mit dem vorgesehenen
Akku verwenden. Die Verwendung eines
anderen Akkus kann Feuer verursachen.
• Der Akku und das Ladegerät erwärmen sich
während des Ladevorganges leicht. Dies
stellt keine Beeinträchtigung der Funktion
dar. Bei der Handhabung ist entsprechende
Vorsicht geboten.
• Die Akku-Winkelschleifer nur an Orten ver
wenden, die durch geltende Verordnungen
für Arbeitsbereiche und elektrische Anlagen
bestimmt und vorgeschrieben werden.
• Aus Sicherheitsgründen sind Veränderungen
an der HAZET Akku-Winkelschleifer unter
sagt. Die Vornahme von Veränderungen
am Gerät führt zum sofortigen
Haftungsausschluss.
-
-
-
-
Elektrische Energien können schwere Verletzungen verursachen!
Immer persönliche Schutzausrüstung tragen!
[
+49 (0) 21 91 / 7 92-0 • \ +49 (0) 21 91 / 7 92-375 • ^ hazet.de • ] [email protected]
5
Page 6

Zu Ihrer Sicherheit
2
Arbeitshandschuhe und
Schutzbrille tragen.
Werkzeuge mit elektrischem
Antriebkönnen Späne, Staub
und anderen Abriebmit
hoher Geschwindigkeit auf
wirbeln, waszu schweren
Augenverletzungen führen
kann.
Gehörschutz tragen.
Lange Belastung, durch die
Arbeitsgeräusche eines
Winkelschleifers, kann zu dau
erhaftem Gehörverlust führen.
Gesichtsmaske oder
Atemschutz tragen.
Materialabtragende Werkzeuge erzeugenStaub und
anderen Abrieb, der zu
Schädigungen der Lunge und
Atemwege führen kann. Einige
Materialien, wie Klebstoffe und
Teer enthalten Chemikalien,
deren Dämpfe, über einen län
geren Zeitraum eingeatmet,
schwere Schädigungen verur
sachen können.
Enganliegende Arbeitsschutzkleidung tragen.
Werkzeuge mit drehbaren
Teilen oder Werkzeuge, die
andere Werkzeuge antreiben,
wie z.B. Trennscheiben etc.,
können sich in den Haaren,
der Kleidung, Schmuck oder anderen losen
Gegenständen verfangen, was zu schweren
Verletzungen führen kann. Tragen Sie niemals
weite und/oder mitBändern oder Schlaufen
etc. verseheneKleidung, die sich in den dre
henden Werkzeugteilen verfangen kann.
Legen Sie bei der Arbeit sämtlichen Schmuck,
Uhren,Identifikationsmarken, Armbänder,
Halsketten etc. ab, die sich am Werkzeug
verfangen könnten. Fassen Sie niemals
Werkzeugteile an, die in Bewegung sind. Lange
Haare zusammenbinden oder bedecken.
-
-
-
-
-
-
•
Elektrowerkzeuge gehören nicht
in Kinderhände.
Werkzeugekönnen von nicht autorisierten
Personenbenutzt werden und zu deren oder
zur Verletzung dritter Personen führen.
Nur einwandfreie Trennscheiben
•
und Schruppscheiben verwenden.
Minderwertige, unpassende oder beschädigte Werkzeuge wie Trennscheiben, etc.
können sich lockern oder abbrechen
und weggeschleudert werden und den
Bediener oder dritte Personen treffen, die
sich im Arbeitsbereich aufhalten.
• Auf Reaktionsmoment achten. Auf die
Bildung von Reaktionsmomenten und den
möglichen Bruch des zu betätigenden
Werkzeuges achten. An engen Stellen kön
nen Reaktionsmomente zu Verletzungen führen. Gegen unerwartete Reaktionsmomente
müssen Gegenmaßnahmen getroffen wer
den.
Gerät nicht in explosionsgefährdeten
•
Räumen verwenden.
der Winkelschleifer können Funkenschlag
verursachen oder zur Entzündung brenn
barer Materialien führen. Werkzeuge nie in
der Nähe von brennbaren Substanzen wie
Benzin, Naphtha oder Reinigungsmitteln etc.
betätigen. Nur in sauberen, gut gelüfteten
Bereichen arbeiten, in denen sich keine
brennbaren Materialien befinden.
Gerät nicht auf andere Personen richten.
•
Bei Betrieb des Werkzeuges Kinder und
andere Personen aus dem Arbeitsbereich
fernhalten.
Gerät mit Trenn- oder Schruppscheiben
•
nicht im Leerlauf drehen lassen. Die
Trenn- oder Schruppscheiben können
sich lockern
•
Die Verwendung jedes Werkzeuges
sofort abbrechen, wenn man sich unwohl
oder kribbelig fühlt oder wenn Schmerzen
auftreten.
•
Vibration, sich wiederholende
Bewegungen oder unbequeme Stellung
können schädlich für Hände und Arme
sein.
•
Elektrisch betriebene Werkzeuge können
bei der Verwendung vibrieren.
Unbeaufsichtigte
-
-
Elektrowerkzeugewie
-
Elektrische Energien können schwere Verletzungen verursachen!
Immer persönliche Schutzausrüstung tragen!
6
Page 7
Zu Ihrer Sicherheit
2
•
Vor dem Wechsel von Zubehör, dem
Einstellen und der Einlagerung Akku vom
Werkzeug abnehmen oder den Schalter
auf AUS bzw. in gesicherte Position stellen. Mit solchen präventiven SicherheitsMaßnahmen kann die unbeabsichtigte
Betätigung vermieden werden.
•
Verwenden Sie nur vom Hersteller empfohlene Teile, Befestigungen und Zubehör.
•
Das Werkzeug niemals mit dem Finger
am Auslöseknopf tragen.
•
Unbeabsichtigte Betätigung vermeiden.
•
Den Griff trocken, sauber, öl- und fettfrei
halten.
•
Achten Sie auf einen sauberen, gut
gelüfteten und stets gut beleuchteten
Arbeitsbereich.
•
Das Werkzeug niemals unter Alkoholoder
Drogeneinfluss benutzen.
•
Reparaturen nur von autorisiertem
Fachpersonal durchführen lassen.
• Kunststoffteile nicht mit Lösungsmitteln reinigen.
• Lösungsmittel wie Benzin, Waschbenzin,
Kohlenstofftetrachlorid und Alkohol können
Kunststoffteile verformen oder reißen las
sen. Nicht mit den o.g. Lösungsmitteln in
Berührung bringen.
• Bei Arbeiten an erhöhten Stellen immer
darauf achten, dass sich niemand unter dem
Arbeitsfeld befindet, bevor Sie mit der Arbeit
beginnen.
-
Wichtige Sicherheitshinweise
für das Schnellladegerät:
Dieser Abschnitt enthält wichtige
Sicherheitsund Betriebshinweise für das
Schnellladegerät:.
Vor der Inbetriebnahme des Ladegerätes
lesen Sie alle Anweisungen und
Markierungen auf:
1. dem Ladegerät
2. dem Akku,
• Arbeitstemperatur für Li-Ion Batterien:
10 bis +40° C für Entladung 0 bis +40°
C für Ladung
• Arbeitstemperatur für Ladegerät:
0 bis +40° C
• Zur Vermeidung von elektrischem Schlag,
Ladegerät von der Steckdose trennen,
bevor Wartungs- oder Reinigungsarbeiten
begonnen
werden. Das Entfernen des Akkus reduziert
die Gefahr nicht.
• Der nicht vorschriftsmäßige Gebrauch
des Ladegerätes kann zu schweren
Verletzungen führen.
Elektrische Energien können schwere Verletzungen verursachen!
Immer persönliche Schutzausrüstung tragen!
[
+49 (0) 21 91 / 7 92-0 • \ +49 (0) 21 91 / 7 92-375 • ^ hazet.de • ] [email protected]
7
Page 8
Zu Ihrer Sicherheit
2
Zur Vermeidung dieser Gefahren:
• Akku niemals auseinanderbauen.
• Akku nie ins Feuer werfen, selbst wenn er
beschädigt oder vollständig abgenutzt ist.
Explosionsgefahr!
• Akku niemals kurzschließen.
• Niemals Gegenstände in die Belüftungslöcher
des Ladegerätes stecken, da sonst die Gefahr
eines Stromschlages oder der Beschädigung
des Ladegerätes besteht.
• Akku niemals im Freien aufladen.
• Akku niemals direkter Sonneneinstrahlung
aussetzen.
• Aufladen nur in gut belüfteten Räumen mit
geringer Feuchtigkeit.
• Akku niemals aufladen, wenn die Temperatur
unter 0°C (32°F) oder über 40°C (104°F) liegt.
• Niemals zwei Ladegeräte zusammenschlie
ßen.
• Niemals Gegenstände in die Akkuaufnahme
stecken.
• Niemals einen Verstärker-Transformator
beim Aufladen benutzen.
• Niemals einen Motorgenerator oder
Gleichstrom zum Aufladen verwenden.
• Akku und Ladegerät niemals an Orten
lagern, an denen die Temperatur 40°C
(104°F) erreichen kann.
• Ladegerät immer bei 230 V StandardElektroanschlüssen benutzen. Die Benutzung
des Ladegerätes bei höheren Spannungen
kann zur Überhitzung und Beschädigung
des Ladegerätes führen.
• Zwischen mehreren Ladevorgängen immer
mindestens 15 Minuten Wartezeit einhalten,
um eine Überhitzung des Ladegerätes zu
vermeiden.
• Ladegerät immer von der Stromquelle
trennen, wenn es nicht in Gebrauch ist.
-
Elektrische Energien können schwere Verletzungen verursachen!
Immer persönliche Schutzausrüstung tragen!
8
Page 9

Aufbau und Funktion
3
1. Technische Daten / Geräteelemente:
Akku-Winkelschleifer HAZET 9233-7
Spindelgewinde
Akku Leistung
Leerlauf
Gewicht ohne Akku /
Schalldruckpegel LpA /
Schall-Leistungspegel LpW /
Vibrationsbeschleunigung
Trennscheibe
Schruppscheibe
Ladegerät HAZET 9212-03
Eingangsspannung 100 - 240 V~ 50/60 Hz 110 W
Ausgangsspannung 12 - 18 V - 4,0 A
Sicherheitszulassung CB, ETL, GS, ICES, PSE
Akku-Typ Li-Ion
Ladezeit 80 min
M14
18V - 5Ah
8.000 U/min
1,53kg
89 dB(A)
100 dB(A)
7,9 m/s²
125 mm x 1,0
125 mm x 6,0
Zubehör optional Lieferumfang
HAZET Nr. Bezeichnung Der HAZET Akku-Winkelschleifer wird in einem Kunstoffkoffer
9212-02 Ersatz-Akku 2Ah Zum Lieferumfang gehören:
9212-05 Ersatz-Akku 5Ah HAZET 9233-7
ausgeliefert
HAZET 9212-02 18V / 5.0 Ah Li-Ion Akku
HAZET 9212-03 Schnellladegerät
Elektrische Energien können schwere Verletzungen verursachen!
Immer persönliche Schutzausrüstung tragen!
[
+49 (0) 21 91 / 7 92-0 • \ +49 (0) 21 91 / 7 92-375 • ^ hazet.de • ] [email protected]
9
Page 10
(
Aufbau und Funktion
3
10
/
"
!
%
&
§
$
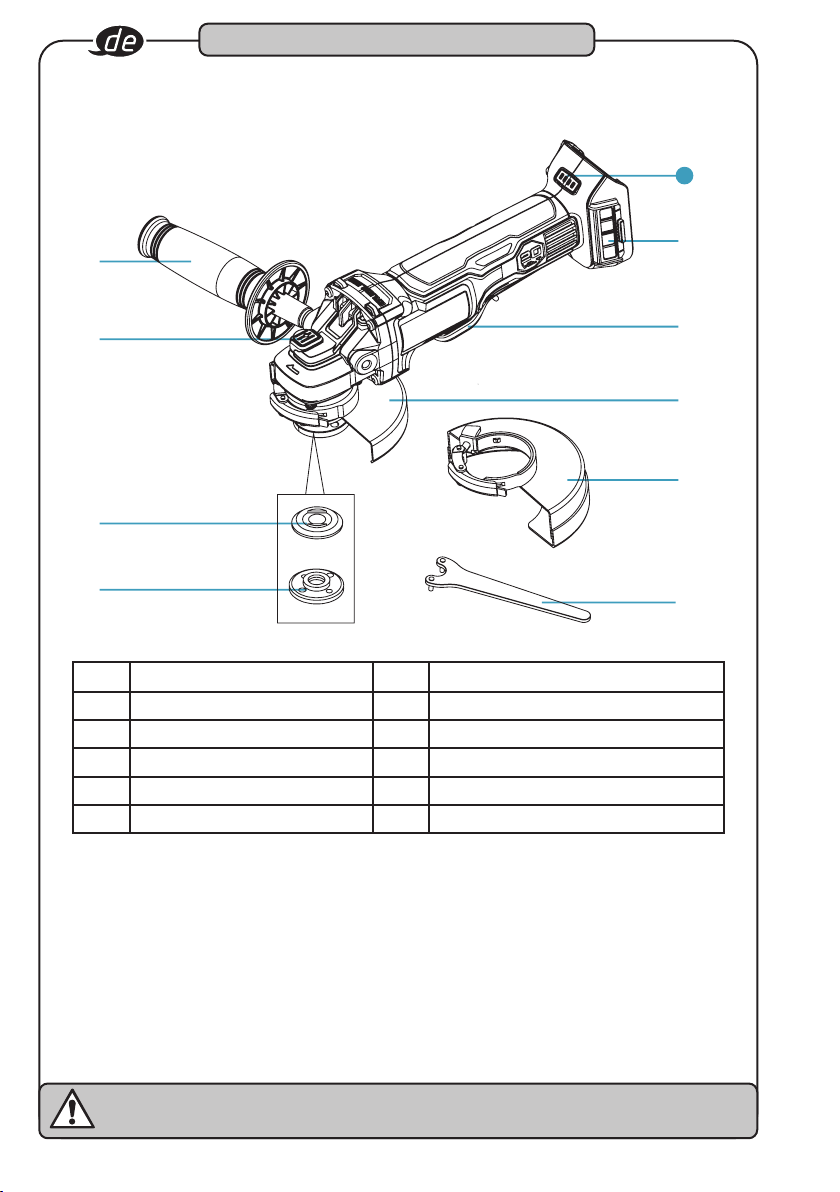
Pos.
Bezeichnung
1 Schalterwippe 6 Funkenschutz (Trennscheiben)
2 Spindelarretierung 7 Abnehmbare Maschenfilterabdeckung
3 Hinterlegeflansch 8 Stützhandgriff
4 Spannmutter 9 Schlüssel
5 Funkenschutz (Schleifscheiben) 10 Ladestandanzeige
Pos.
Bezeichnung
)
10
Elektrische Energien können schwere Verletzungen verursachen!
Immer persönliche Schutzausrüstung tragen!
^ hazet.com • ] [email protected]
Page 11
Aufbau und Funktion
3
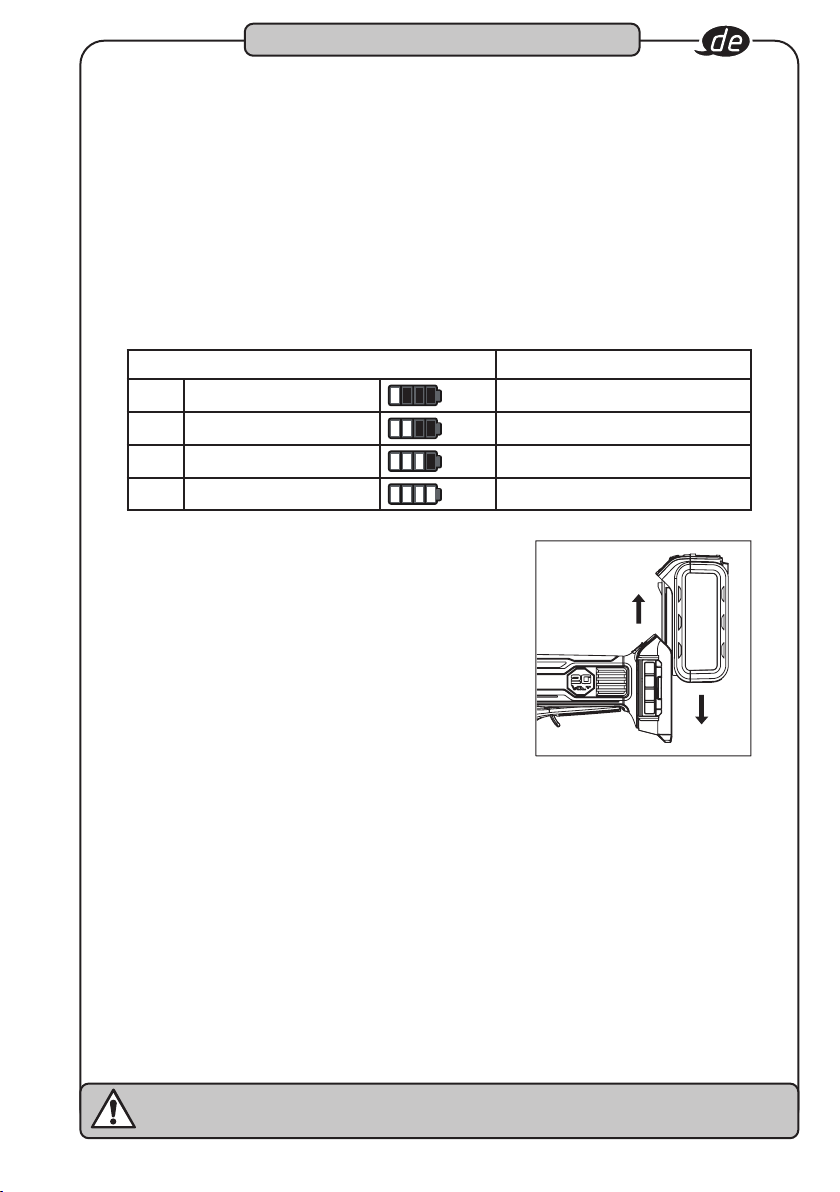
Befestigung des Akkus:
• Akku einschieben bis er mit einem Klick einrastet.
• Nicht eingerastet kann der Akku vom Werkzeug abfallen, zerstört werden und/oder Sie
oder umstehende Personen verletzen.
• Der Akku verfügt über eine Ladestandanzeige. Die (grünen) 4-Stufen-LEDs zeigen die
Restkapazität an.
• Wird der Betätigungsknopf gedrückt, erscheint für 5 Sek. der Akku-Ladezustand.
• Der Akku verfügt über einen Überhitzungsschutz und schützt die HAZET AkkuWinkelschleifer und den Akku vor Überhitzung. Wird die max. Temperatur von 70°C
erreicht, schaltet der Akku automatisch ab, und die HAZET Akku-Winkelschleifer kann
nicht weiter betrieben werden.
Anzeige der Ladekapazität Status
1 LED 1 0 - 25 %
2 LED 1, 2
3 LED 1, 2, 3
4 LED 1, 2, 3, 4
26 - 50 %
51 - 75 %
76 - 100 %
Lösen des Akkus:
• Sicherheitsverschluss gedrückt halten und Akku
vom Werkzeuggriff abziehen.
Vor Inbetriebnahme:
• Arbeitsbereich aufräumen.
• Unbefugte Personen vom Arbeitsbereich fernhalten.
• Für ausreichende Beleuchtung und Belüftung am Arbeitsplatz sorgen.
• Sicherstellen, dass der Akku richtig eingesetzt und eingerastet ist.
Einstellen der Drehrichtung:
• Die Drehrichtung wird durch den Umschaltknopf eingestellt.
• Vorlauf und Rücklauf sind durch Pfeile dargestellt, die am Gehäuse eingefräst sind.
• Mit Vorlauf dreht das Werkzeug im Uhrzeigersinn.
• Mit Rücklauf wird die Drehrichtung gegen den Uhrzeigersinn eingestellt.
Elektrische Energien können schwere Verletzungen verursachen!
Immer persönliche Schutzausrüstung tragen!
[
+49 (0) 21 91 / 7 92-0 • \ +49 (0) 21 91 / 7 92-375 • ^ hazet.de • ] [email protected]
11
Page 12
Aufbau und Funktion
3
Überlastschutz
Dieser Winkelschleifer ist mit einem Überlastschutz ausgestattet. Bei übermäßiger
Belastung des Winkelschleifers oder wenn die Arbeit mit dem Werkzeug nicht ausgeführt
werden kann, wird das Werkzeug automatisch in den Überlastmodus geschaltet, das
heißt, das Werkzeug hält automatisch und unvermittelt an. Um den Überlastmodus zu
beenden, einfach die Schalterwippe loslassen. Wird die Schalterwippe anschließend
erneut gedrückt, startet das Werkzeug wieder.
Sicherheitstemperaturbegrenzer
Solange der Winkelschleifer bestimmungsgemäß betrieben wird, kommt es zu keiner
Überlast. Wird er dagegen über längere Zeit bei Volllast betrieben, überhitzt der Akku.
Bei einer Überschreitung des zulässigen Akku-Temperaturbereichs schaltet sich der
Akku automatisch aus. Das Werkzeug kann dann erst wieder in Betrieb genommen
werden, wenn eine sichere Betriebstemperatur erreicht ist.
Niederspannungsbegrenzer
Der mit diesem Werkzeug betriebene Akku verfügt über einen elektronischen
Niederspannungsbegrenzer. Der Niederspannungsbegrenzer wird aktiviert, wenn die
Spannung unter den eingestellten Wert fällt. Diese Funktion schaltet das Werkzeug
automatisch aus. In einem solchen Fall müssen Sie entweder einen anderen Akku
einsetzen oder den vorhandenen Akku aufladen.
Blockiersicherung
Während des Betriebs kann das Werkzeug unter Umständen plötzlich blockieren. Würde
der Motor dann nicht sofort anhalten, könnte die Blockierung schwere Verletzungen zur
Folge haben. Aber das Werkzeug erkennt die Blockierung sofort und schaltet sich
automatisch aus.
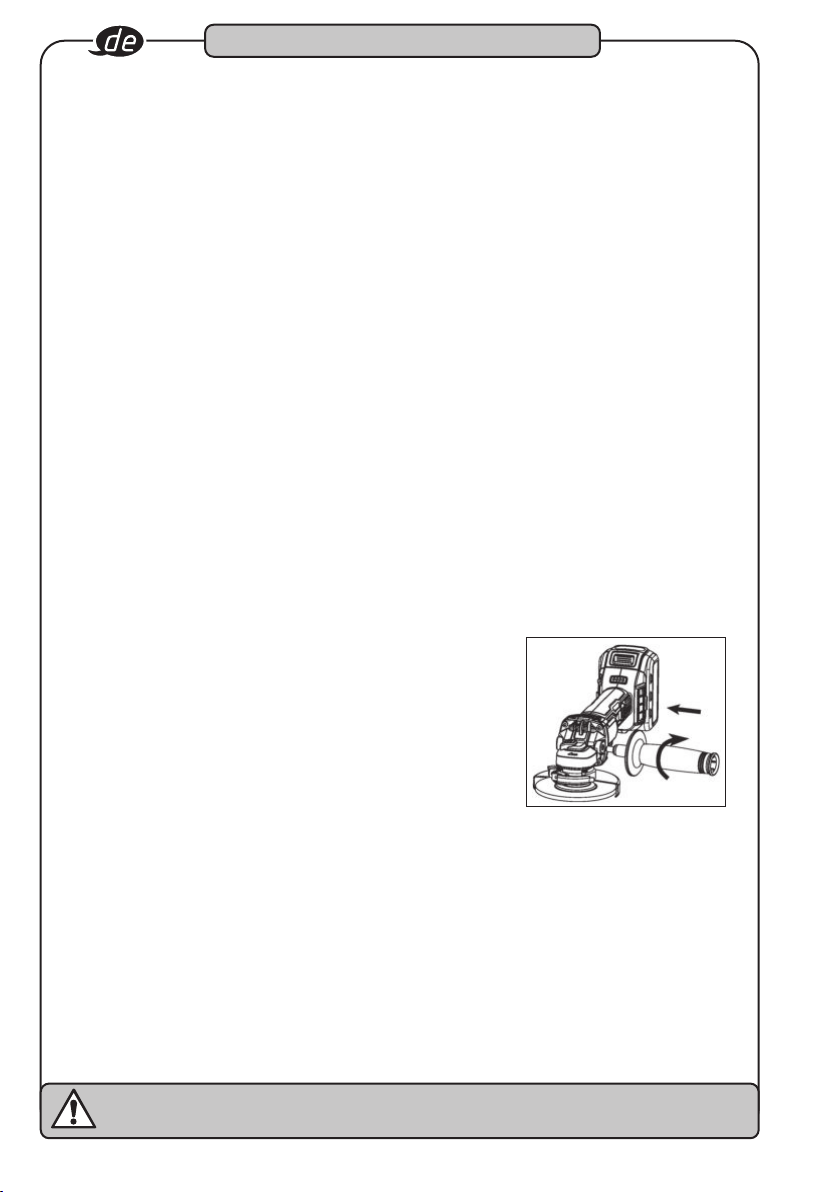
Anbringen des Stützhandgriffs
• Vor dem Anbringen oder Abnehmen des Stützhandgriffs
den Akku abziehen.
• Den Stützhandgriff in das Getriebegehäuse einschrauben.
• Den Stützhandgriff festziehen.
Elektrische Energien können schwere Verletzungen verursachen!
Immer persönliche Schutzausrüstung tragen!
12
Page 13
Aufbau und Funktion
3
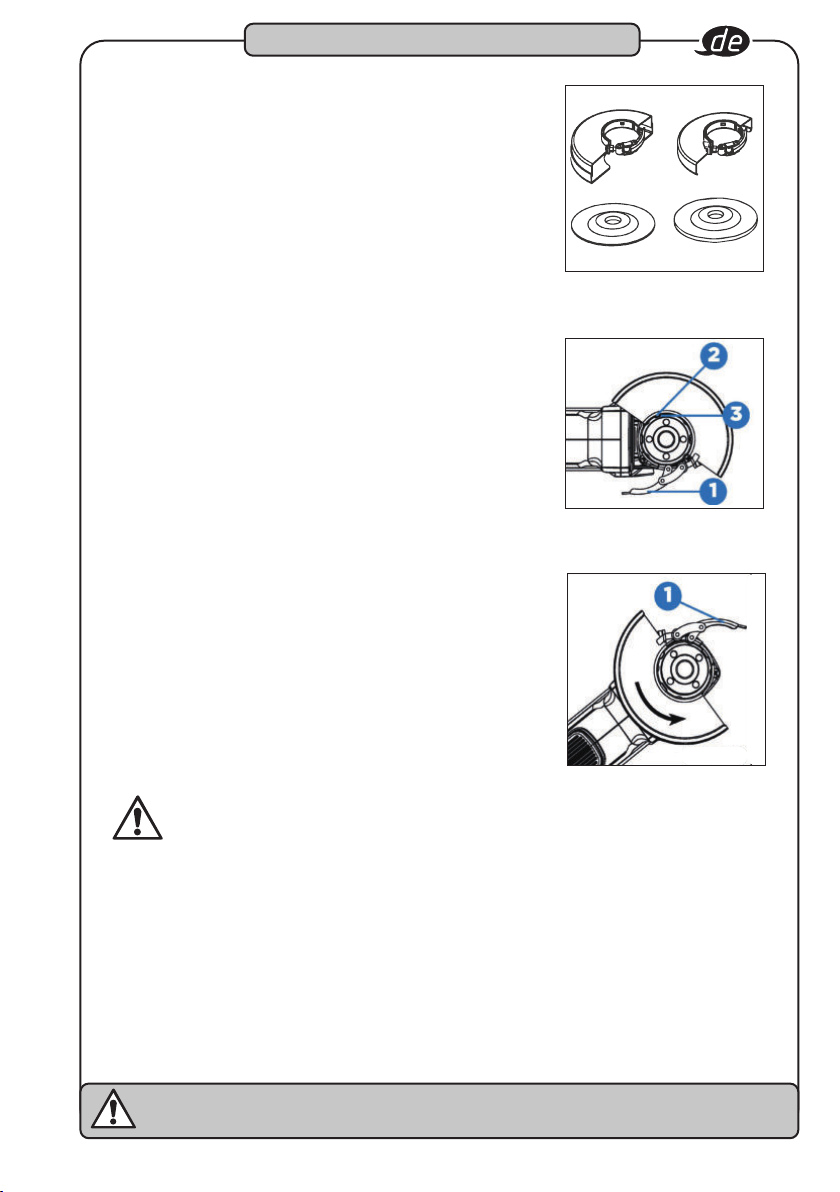
Anbringen des Funkenschutzes
Es muss unbedingt darauf geachtet werden, dass
für das Trenn- und Schleifzubehör stets der jeweils
richtige Funkenschutz verwendet wird. Siehe Abb. E für
Informationen zur Auswahl des richtigen Zubehörs.
Die Funkenschutze für Schleif- und Trennscheiben
werden beide mithilfe der folgenden Schritte angebracht
und abgenommen:
• Die Funkenschutzverriegelung (1) öffnen und die
Laschen (2) des Funkenschutzes an den Schlitzen (3)
der Getriebegehäuseabdeckung ausrichten.
• Den Funkenschutz nach unten drücken, bis die Laschen
des Funkenschutzes einrasten und sich frei in der Nut
der Getriebegehäusenabe drehen.
• Den Funkenschutz bei geöffneter Verriegelung in die
gewünschte Arbeitsposition drehen. Für den besten
Schutz des Bedieners sollte der Funkenschutz
zwischen der Spindel und dem Bediener positioniert
werden.
• Die Funkenschutzverriegelung (1) schließen, um den
Funkenschutz am Getriebegehäuse zu befestigen.
Der Funkenschutz darf sich nicht von Hand drehen
lassen, solange die Verriegelung geschlossen ist. Der
Winkelschleifer darf nicht betrieben werden, wenn der
Funkenschutz locker oder die Verriegelung offen ist.
• Um den Funkenschutz abzunehmen, die Verriegelung
öffnen, den Funkenschutz so drehen, dass die Laschen
und Schlitze ausgerichtet sind und den Funkenschutz
dann nach oben abziehen.
Trennscheibe Schleifscheibe
Trennscheibe Schleifscheibe
(Abb. E)
Funkenschutz für
Vorsicht!
Der Stützhandgriff kann nach den Wünschen des Bedieners entweder links oder rechts
am Schleifwerkzeug angebracht werden. Der Stützhandgriff muss aber in jedem Fall
angebracht werden, um Kontrollverlust über das Werkzeug und mögliche schwere
Verletzungen zu vermeiden.
Vor dem Betrieb darauf achten, dass der Stützhandgriff ordnungsgemäß festgezogen ist.
Auf den Stützhandgriff wirkt während des Betriebs unter Umständen eine große Kraft ein.
Das Lösen des Stützhandgriffs hat möglicherweise schwere Verletzungen zur Folge.
Elektrische Energien können schwere Verletzungen verursachen!
Immer persönliche Schutzausrüstung tragen!
[
+49 (0) 21 91 / 7 92-0 • \ +49 (0) 21 91 / 7 92-375 • ^ hazet.de • ] [email protected]
13
Page 14
Aufbau und Funktion
3
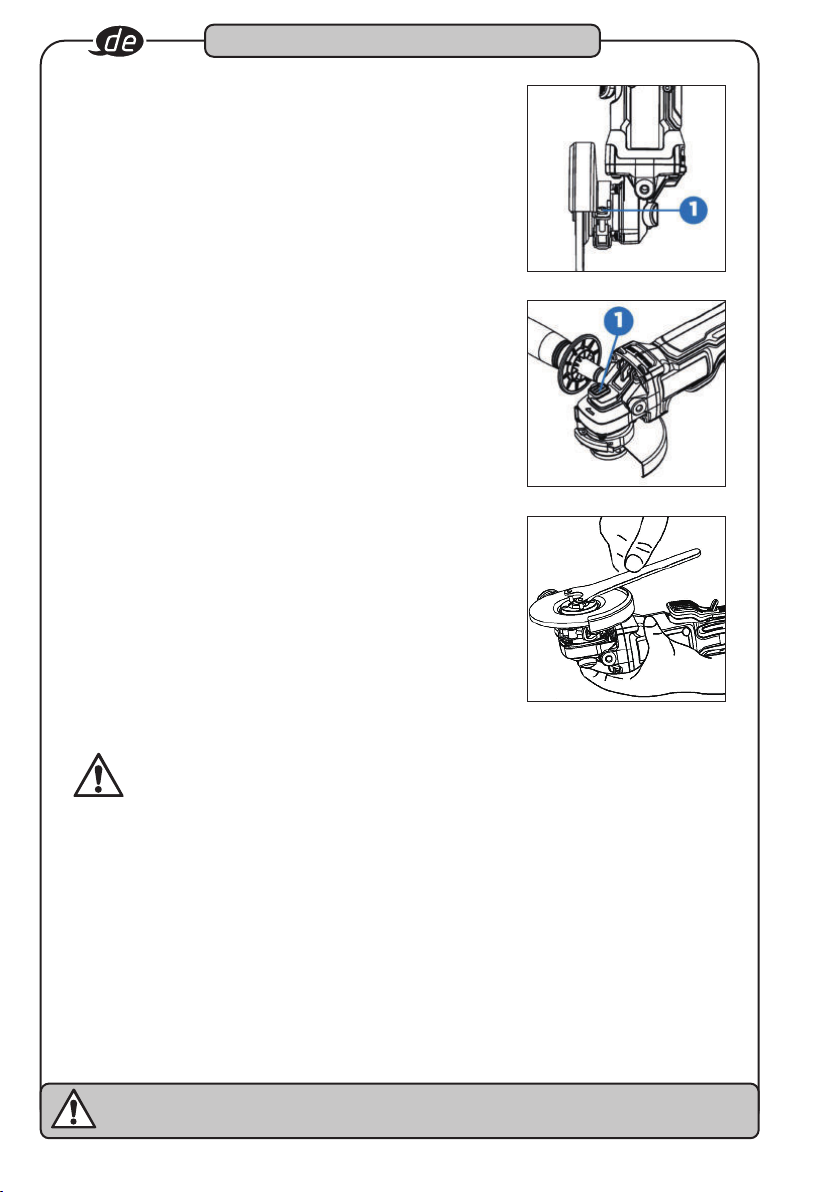
Einstellen des Funkenschutzes
Der Funkenschutz ist werkseitig auf den Durchmesser
der Getriebegehäusenabe eingestellt. Falls sich
der Funkenschutz nach einiger Zeit löst, muss die
Einstellschraube (1) bei geschlossener Verriegelung und
angebrachtem Funkenschutz festgezogen werden.
Spindelarretierung
Mit der Spindelarretierungstaste (1) soll verhindert
werden, dass sich die Spindel dreht, wenn Trenn- oder
Schleifscheiben eingesetzt oder entfernt werden. Die
Spindelarretierung darf nur dann betätigt werden, wenn
das Werkzeug ausgeschaltet ist und die Scheibe völlig
zum Stillstand gekommen ist.
Um die Spindel zu arretieren, die Spindelarretierungstaste
(1) drücken und die Spindel drehen, bis sie nicht weiter
gedreht werden kann.
Vorsicht!
Bei der Verwendung von Trenn- oder Schleifscheiben muss immer mit Funkenschutz
gearbeitet werden. Die Schleifmaschine ist mit je einem Funkenschutz für Trenn- und
Schleifscheiben ausgestattet. Es muss stets der richtige Funkenschutz verwendet werden.
Es ist darauf zu achten, dass der Funkenschutz im richtigen Winkel ordnungsgemäß
verriegelt ist. Andernfalls kann eine gebrochene Scheibe unter Umständen schwere
Verletzungen verursachen.
Zur Vermeidung des versehentlichen Betriebs muss vor der Durchführung der folgenden
Schritte das Werkzeug ausgeschaltet und der Akku abgezogen werden. Andernfalls kann
es unter Umständen zu schweren Verletzungen kommen.
Falls sich der Funkenschutz nicht mithilfe der Verriegelung befestigen lässt, darf das
Werkzeug nicht verwendet werden. Werkzeug und Funkenschutz müssen dann zur Reparatur
oder zum Austausch des Funkenschutzes zu einem Service Center gebracht werden.
Elektrische Energien können schwere Verletzungen verursachen!
Immer persönliche Schutzausrüstung tragen!
14
Page 15
Aufbau und Funktion
3
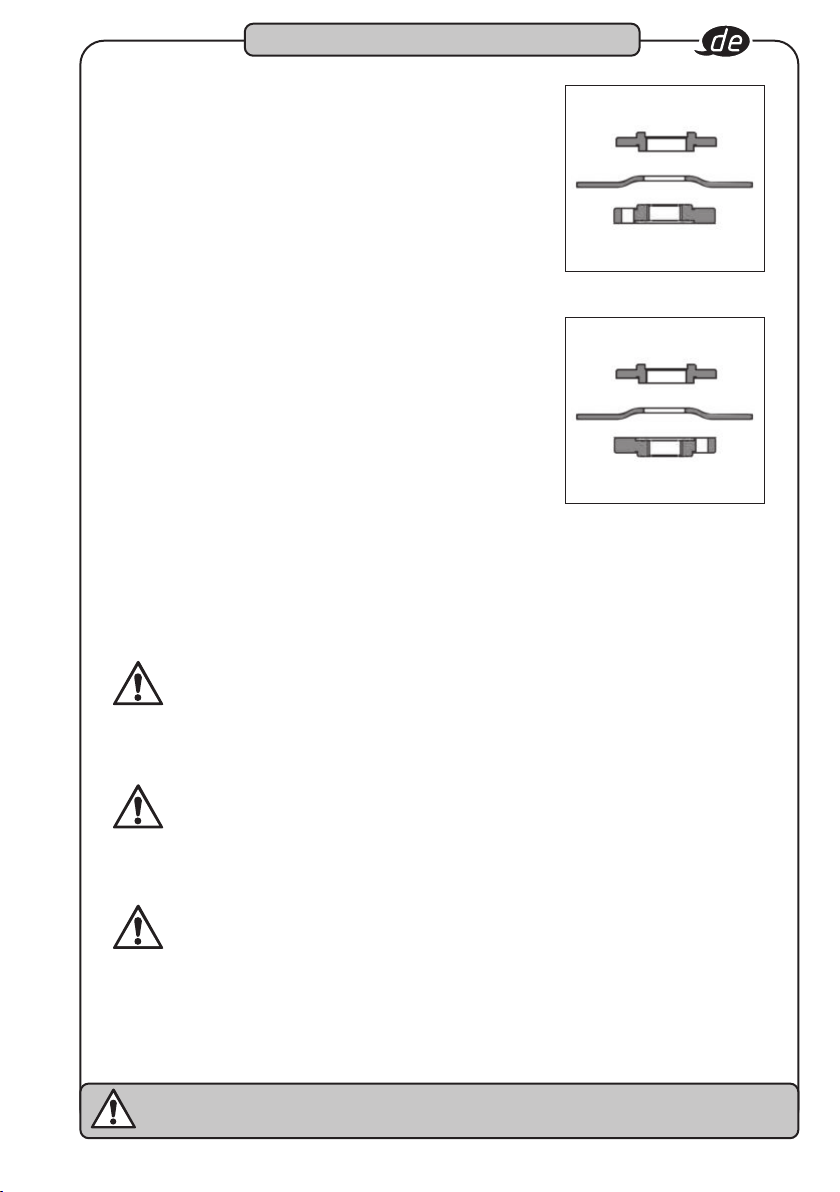
Einsetzen und Entfernen von Trennoder Schleifscheiben
Hinterlegeflansch
Gekröpfte Trenn- oder Schleifscheiben müssen mit den
beigelegten Flanschen verwendet werden.
• Das Werkzeug ausschalten und den Akku abziehen.
• Den gewindelosen Hinterlegeflansch auf die Spindel aufset
zen. Der erhöhte Teil (die Führung) zeigt dabei zur Scheibe.
• Die Scheibe gegen den Hinterlegeflansch setzen und auf
dem erhöhten Teil (der Führung) des Hinterlegeflanschs
zentrieren.
• Die Spindelarretiertaste drücken und die Spannmutter auf
die Spindel schrauben.
Wenn die einzusetzende Scheibe über 1/8” (3 mm) dick ist,
wird die Spannmutter so auf die Spindel gesetzt, dass der erhöhte
Teil (die Führung) in die Mitte der Scheibe passt.
Bei Scheiben mit einer Dicke von bis zu 1/8” (3 mm) wird die
Spannmutter so auf die Spindel gesetzt, dass der erhöhte Teil
(die Führung) nicht an der Scheibe anliegt.
• Die Spindelarretiertaste drücken und die Spannmutter mit
dem beigelegten Schlüssel festziehen.
• Um die Scheibe zu entfernen, die Spindelarretiertaste drücken
und die Spannmutter mit dem beigelegten Schlüssel lösen.
Scheibe mit 1/4” (6 mm) Dicke
-
Spannmutter
Hinterlegeflansch
Scheibe mit 1/8” (3 mm) Dicke
Spannmutter
Hinweis:
Falls sich die Scheibe nach dem Festziehen der Spannmutter dreht, muss die Ausrichtung
der Spannmutter geprüft werden. Wurde die Spannmutter bei einer dünnen Scheibe mit
gegen die Scheibe zeigender Führung aufgeschraubt, dann lässt sich die Scheibe drehen,
da die Höhe der Führung verhindert, dass die Spannmutter die Scheibe festhält.
Vorsicht!
Die Einstellschraube darf nicht bei offener Funkenschutzverriegelung festgezogen werden.
Am Funkenschutz oder der Nabe können nicht erkennbare Schäden auftreten.
Warnung!
Die Spindelarretierung nicht aktivieren, solange das Werkzeug in Betrieb ist. Dies würde
zu Schäden am Werkzeug führen, und das eingesetzte Zubehör könnte sich lösen und
Verletzungen verursachen.
Warnung!
Vor dem Wechsel des Zubehörs stets den Akku vom Werkzeug abziehen. Andernfalls kann
es unter Umständen zu schweren Verletzungen kommen.
Nur solches Zubehör verwenden, dessen sichere Betriebsdrehzahl höher ist als die
Nenndrehzahl des Werkzeugs.
Elektrische Energien können schwere Verletzungen verursachen!
Immer persönliche Schutzausrüstung tragen!
[
+49 (0) 21 91 / 7 92-0 • \ +49 (0) 21 91 / 7 92-375 • ^ hazet.de • ] [email protected]
15
Page 16
Aufbau und Funktion
3
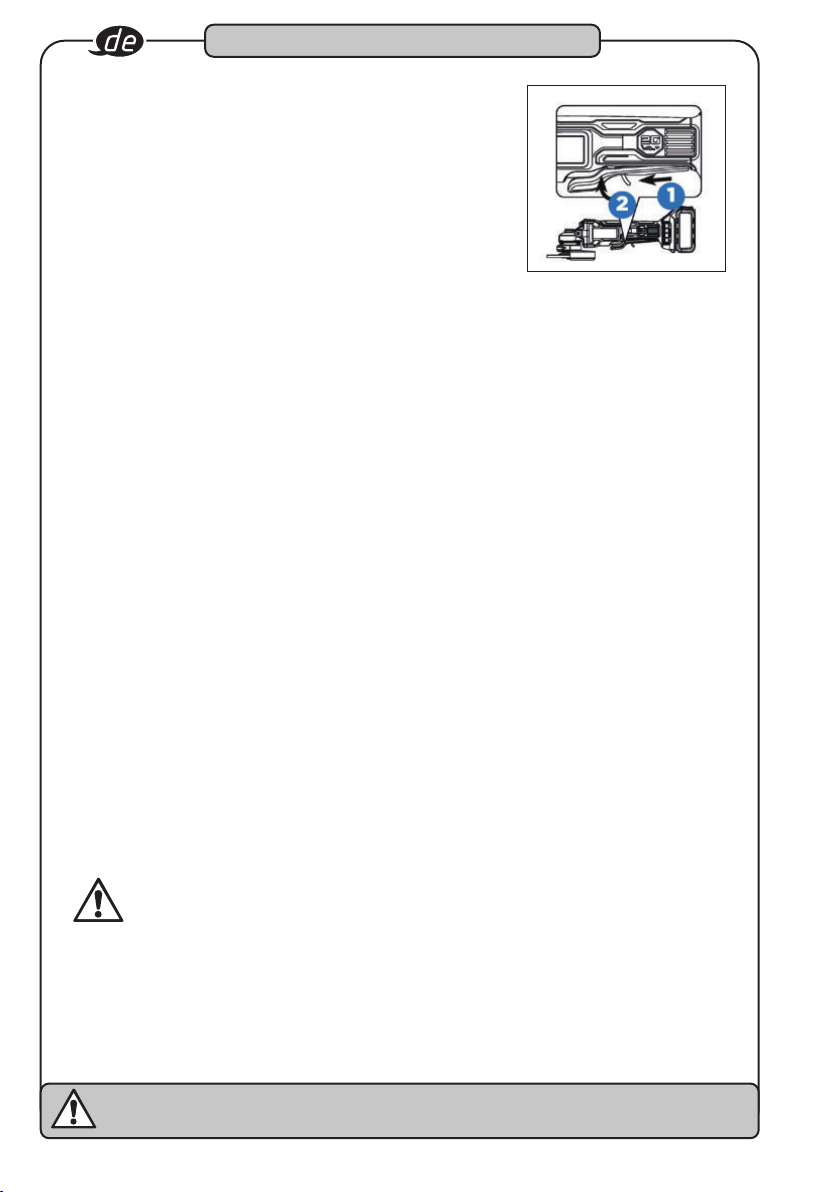
Schalterwippe
Das Werkzeuggehäuse und den Stützhandgriff fest ergreifen.
Zum Starten des Werkzeugs den Sicherungshebel (1) nach
vorne drücken und die Schalterwippe (2) betätigen. Zum
Anhalten des Werkzeuges die Schalterwippe loslassen.
Sanfter Anlauf
Bei dieser Funktion läuft das Werkzeug allmählich an, was
zu einem erhöhten Arbeitskomfort führt.
Elektrische Bremse
Die elektrische Bremse wird betätigt, sobald die Schalterwippe losgelassen wird. Dadurch
hält die Trenn- oder Schleifscheibe an. Im Allgemeinen dauert dies zwei Sekunden. Es kann
allerdings nach dem Loslassen der Schalterwippe zu einer Verzögerung der Aktivierung
der Bremse kommen. Gelegentlich kann es auch vorkommen, dass die Bremse gar nicht
aktiviert wird. Wenn dies häufiger passiert, muss die Schleifmaschine in einer autorisierten
Servicestelle gewartet werden.
Hinweis:
Dieses Werkzeug verfügt über keine Vorrichtung, um die Schalterwippe in eingeschalteter Position zu halten. Das Werkzeug sollte niemals mithilfe irgendeiner Vorrichtung in
eingeschalteter Position gehalten werden.
Hinweis:
Dieses Werkzeug ist mit einer elektrischen Bremse ausgestattet. Wenn diese Bremse ordnungsgemäß funktioniert, sind durch die Lüftungsschlitze des Gehäuses unter Umständen
Funken sichtbar. Dies ist normal und auf die Funktion der Bremse zurückzuführen.
Vorsicht!
Wenn die Schalterwippe losgelassen wird, läuft die Trenn- oder Schleifscheibe 3 Sekunden
lang nach. Es ist darauf zu achten, dass das Werkzeug nur bei völlig stillstehender Scheibe
abgelegt wird.
Elektrische Energien können schwere Verletzungen verursachen!
Immer persönliche Schutzausrüstung tragen!
16
Page 17
Aufbau und Funktion
3
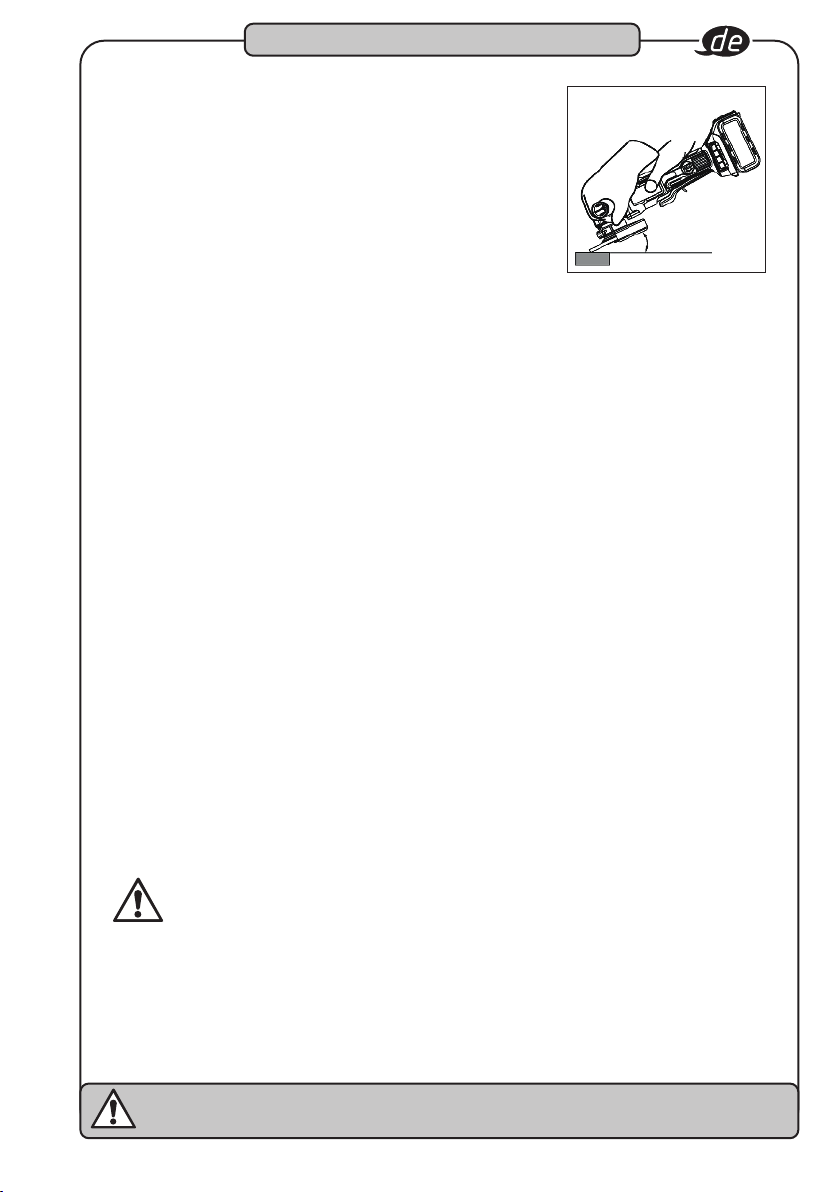
Schleifen mit Schleifscheiben
Es sollten stets nur solche Schleifscheiben ausgewählt
und verwendet werden, die für das zu schleifende Material
empfohlen werden. Es ist darauf zu achten, dass die
Betriebsdrehzahl jeder gewählten Zubehörscheibe bei
einer Nenndrehzahl von mindestens 7.500 1/min liegt.
Außerdem muss auf die Maße der Schleifwerkzeuge
geachtet werden. Der Innenlochdurchmesser muss ohne
Spiel auf den Montageflansch passen. Reduzierungen
oder Adapter dürfen nicht verwendet werden.
20 – 30 º
• Alle Werkstücke in einen Schraubstock einspannen oder an einer Werkbank
festklemmen.
• Die Schleifmaschine mit beiden Händen vor den Körper und vom Körper weg halten.
Die Schleifscheibe darf das Werkstück nicht berühren.
• Die Schleifmaschine einschalten und warten, bis der Motor und die Schleifscheibe die
volle Drehzahl erreicht haben.
• Die Schleifmaschine allmählich auf das Werkstück absenken, bis die Schleifscheibe
Kontakt mit dem Werkstück hat.
• Die Schleifscheibe stets in einem Winkel von 20 – 30 ° zur Oberfläche des Werkstücks
halten.
• Die Schleifmaschine stetig mit gleichbleibender angemessener Geschwindigkeit über
das Werkstück bewegen.
• Gerade soviel Druck aufbringen, dass die Schleifmaschine nicht flattert oder springt.
• Die Schleifmaschine vor dem Ausschalten vom Werkstück weg bewegen.
Hinweis:
Wenn die Schleifmaschine zu lange an einem Punkt gehalten wird, ergeben sich Rillen und
Kerben im Werkstück. Ist der Winkel zwischen Werkstückoberfläche und Schleifscheibe zu
spitz, kommt es ebenfalls zu Kerben, da der Druck dabei auf eine kleine Stelle konzentriert
wird.
Hoher Druck verringert die Drehzahl der Schleifmaschine und belastet den Motor.
Normalerweise ist allein das Gewicht der Schleifmaschine für die meisten Schleifarbeiten
ausreichend. Beim Schleifen von rauen Kanten oder losen Schrauben muss mit gerin
gen Druck gearbeitet werden, sofern die Gefahr besteht, dass die Schleifmaschine
Unebenheiten in die Metallkante schleift.
-
Gefahr!
Die Schleifmaschine darf niemals ohne den Funkenschutz bzw. mit einem nicht ordnungsgemäß befestigten Funkenschutz betrieben werden. Sie wurde so konstruiert,
dass sie nur mit montiertem Funkenschutz verwendet werden darf. Bei dem Versuch die
Schleifmaschine ohne Funkenschutz zu betreiben, werden lose Metallstücke gegen den
Bediener geschleudert, was zu schweren Verletzungen führt.
Elektrische Energien können schwere Verletzungen verursachen!
Immer persönliche Schutzausrüstung tragen!
[
+49 (0) 21 91 / 7 92-0 • \ +49 (0) 21 91 / 7 92-375 • ^ hazet.de • ] [email protected]
17
Page 18
Aufbau und Funktion
3
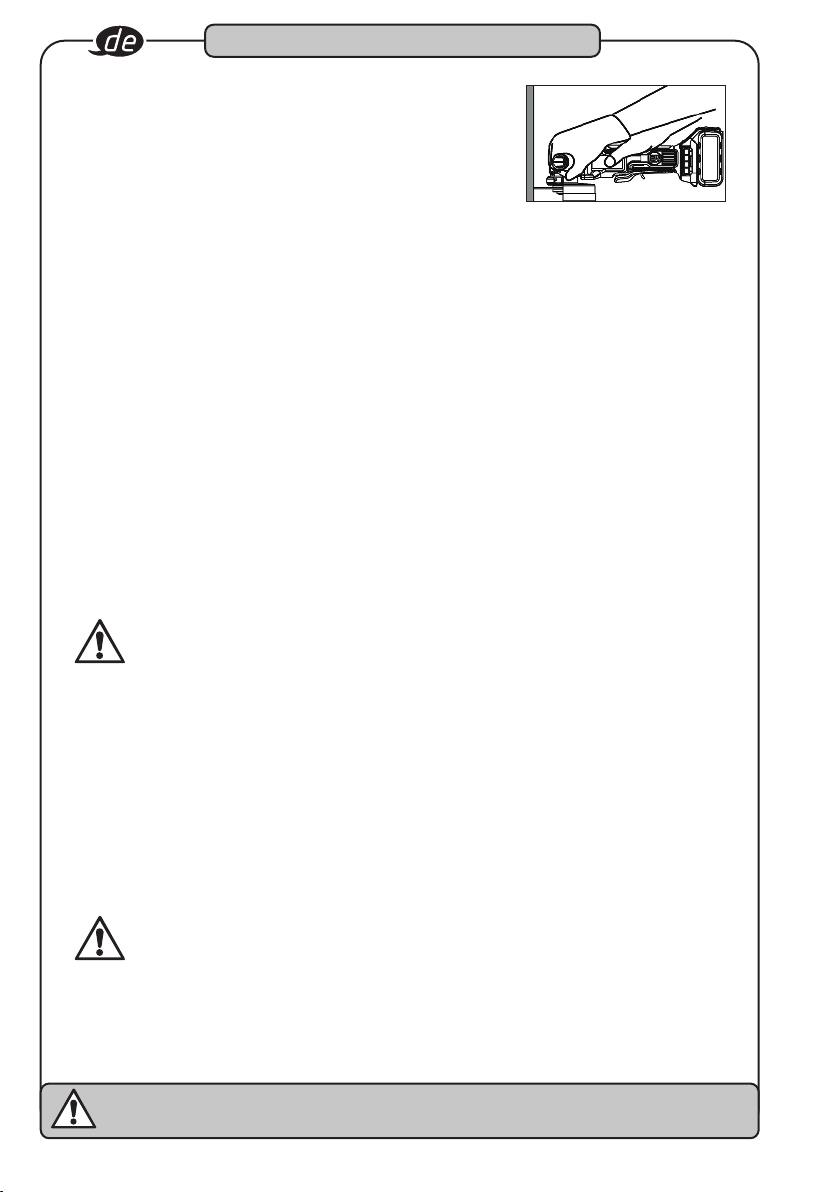
Schneiden mit Trennscheiben
Es sollten stets nur solche Trennscheiben ausgewählt und
verwendet werden, die für das zu schleifende Material
empfohlen werden. Es ist darauf zu achten, dass die
Betriebsdrehzahl jeder gewählten Zubehörscheibe bei
einer Nenndrehzahl von mindestens 7.500 1/min liegt.
Außerdem muss auf die Maße der Schleifwerkzeuge
geachtet werden. Der Innenlochdurchmesser muss ohne
Spiel auf den Montageflansch passen. Reduzierungen
oder Adapter dürfen nicht verwendet werden.
• Alle Werkstücke in einen Schraubstock einspannen oder an einer Werkbank festklemmen.
• Die Schleifmaschine mit beiden Händen vor den Körper und vom Körper weg halten.
Die Trennscheibe darf das Werkstück nicht berühren.
• Die Schleifmaschine einschalten und warten, bis der Motor und die Trennscheibe die
volle Drehzahl erreicht haben.
• Vor dem Absenken des Werkzeugs auf die Oberfläche des Werkstücks warten, bis das
Werkzeug die volle Drehzahl erreicht hat.
• Nur geringen Druck auf die Oberfläche des Werkstücks ausüben, damit die Maschine
mit hoher Drehzahl laufen kann. Die Schneidleistung ist am höchsten, wenn das
Werkzeug mit hoher Drehzahl betrieben wird.
• Wenn der Schnitt begonnen wurde und sich eine Kerbe im Werkstück gebildet hat, darf
der Winkel des Schnitts nicht mehr verändert werden. Eine Änderung des Schnittwinkels
führt dazu, dass sich die Trennscheibe verbiegt, was möglicherweise zu einem Bruch
der Trennscheibe führt.
• Die Schleifmaschine vor dem Ausschalten vom Werkstück weg bewegen und darauf
achten, dass sie nur bei völlig stillstehender Scheibe abgelegt wird.
Warnung!
Um Kontrollverlust über das Werkzeug und mögliche schwere Verletzungen zu vermeiden,
muss das Werkzeug stets mit beiden Händen bedient werden. Dabei bleibt eine Hand
immer am Stückhandgriff.
Das Werkzeug darf nicht auf dem Werkstück liegend gestartet werden. Um ordnungs
gemäß arbeiten zu können, muss das Werkzeug zunächst die volle Drehzahl erreichen.
Wird es auf dem Werkstück liegend gestartet, kann es zum Rückschlag kommen und
Verletzungen verursachen.
Es ist darauf zu achten, dass das Werkzeug nur bei völlig stillstehender Scheibe abgelegt
wird. Ansonsten kann es zu schweren Verletzungen kommen.
Auf die Trennscheibe darf kein übermäßiger Druck ausgeübt werden, da zuviel Druck die
Möglichkeit erhöht, dass die Trennscheibe bricht bzw. der Motor überhitzt.
Warnung!
Bei der Verwendung von Trennscheiben muss der Funkenschutz für Trennscheiben
montiert werden.
Während der Arbeit darf der Winkel des Schnitts niemals geändert werden. Durch eine
Korrektur des Winkels könnte die Trennscheibe brechen oder reißen.
Elektrische Energien können schwere Verletzungen verursachen!
Immer persönliche Schutzausrüstung tragen!
18
-
Page 19
Aufbau und Funktion
3
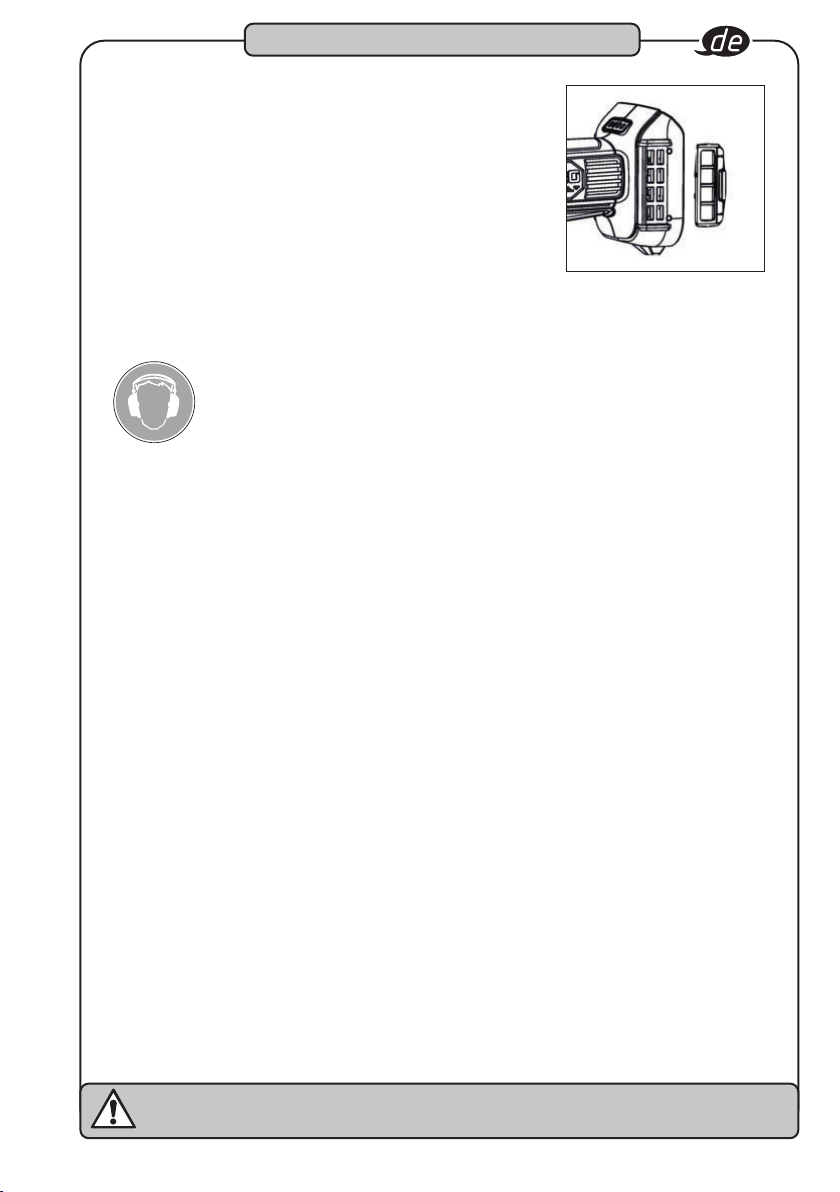
Abnehmbare Maschenfilterabdeckung
Durch die abnehmbare Maschenfilterabdeckung soll
verhindert werden, dass das Innere der Maschine im Lauf
der Zeit verschmutzt. Um die Maschine vom Staubzu reini
gen, wird die Maschenfilterabdeckung herausgenommen.
-
Anmerkung:
Lautes Betriebsgeräusch! Unbedingt
Gehörschutz tragen!
Vor Beginn des Ladevorganges:
• Die Spannung der Stromquelle mit der zugelassenen Spannung auf der
Bezeichnungsplakette des Ladegerätes vergleichen.
• Beim Laden mit höherer als der zugelassenen Spannungen besteht Brandgefahr für das
Ladegerät.
• Kabel auf Beschädigungen prüfen. Beschädigte Kabel müssen vor der Anwendung
erneuert werden.
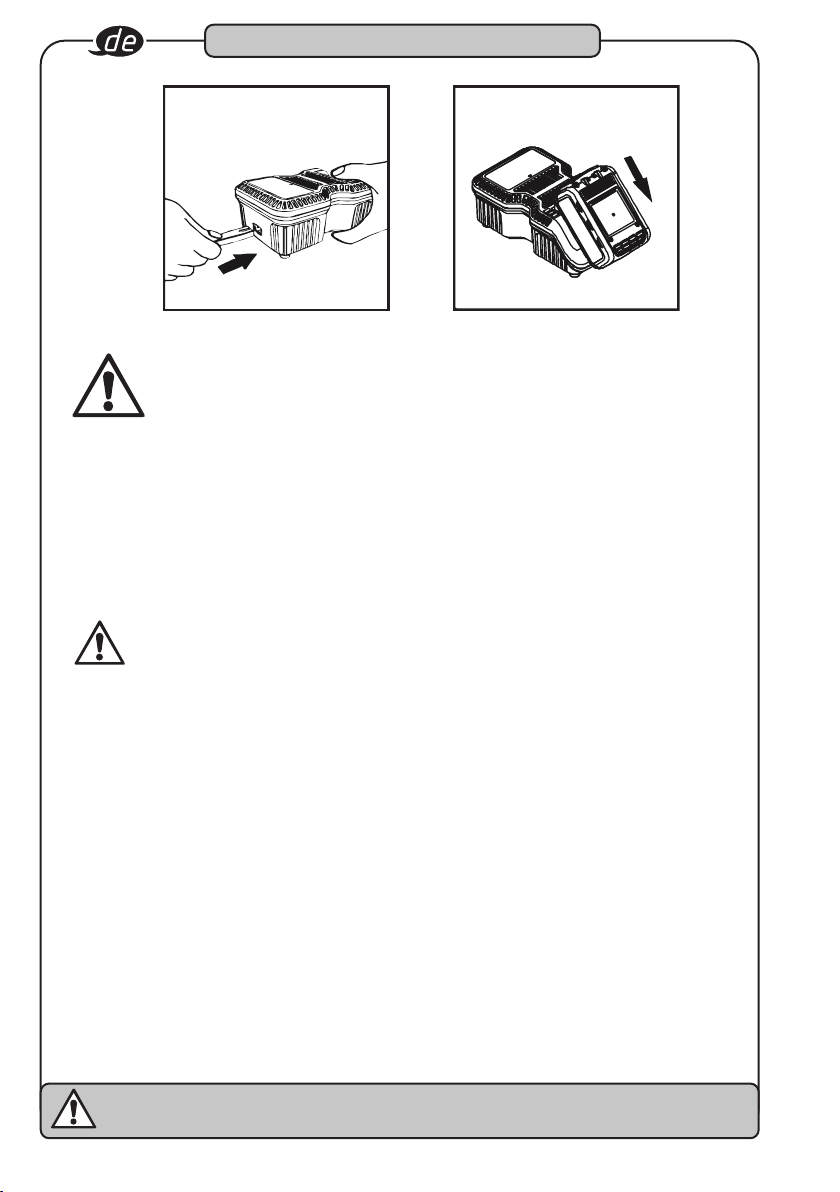
• Ladegerät mit der Stromquelle verbinden. Alle 3 Lade-LED‘s leuchten für 1 - 2 Sekunden
auf.
• Akku kopfüber mit der Anschluss-Seite in das Ladegerät einschieben. Darauf achten,
dass der Akku an der Bahn des Ladegerätes anliegt und die Kontakte einrasten.
• Erkennt das Ladegerät eine Überhitzung des Akkus, blinken alle 3 Lade-LED‘s zur
selben Zeit. Entfernen Sie den Akku und lassen Sie das Ladegerät für ca. 80 Minuten
abkühlen, bevor Sie den Ladevorgang fortsetzen.
Elektrische Energien können schwere Verletzungen verursachen!
Immer persönliche Schutzausrüstung tragen!
[
+49 (0) 21 91 / 7 92-0 • \ +49 (0) 21 91 / 7 92-375 • ^ hazet.de • ] [email protected]
19
Page 20
Aufbau und Funktion
3
Wird der Akku falsch in das Ladegerät eingesetzt, können die Anschlüsse des
Ladegerätes verbiegen oder zerstört werden.
• Während des Ladevorganges wird der Ladezustand angezeigt:
- Weniger als 30% geladen: Alle 3 Lade-LED‘s blinken.
- Weniger als 60% geladen: Eine Lade-LED leuchtet, die anderen beiden blinken.
- Über 60% geladen: 2 LED‘s leuchten und eine blinkt.
- 100% geladen: Alle 3 Lade-LED‘s leuchten.
• Der Ladevorgang kann ungefähr 65 Minuten dauern. Wenn alle 3 Lade-LED‘s leuchten,
ist der Ladevorgang abgeschlossen.
Nach Bei Funktionsstörungen Ladegerät sofort von der Stromquelle
trennen! Akku ggf. neu einsetzen.
Fehlerbeseitigung / Vermeidung:
• Stecker niemals am Kabel aus der Steckdose ziehen.
• Immer am Stecker heraus ziehen, um Beschädigungen des Kabels zu vermeiden
• Ladegerät mit der Hand festhalten und Akku aus dem Ladegerät entnehmen.
• Der Akku und das Ladegerät erwärmen sich während des Ladevorganges leicht. Dies
stellt keine Beeinträchtigung der Funktion dar. Bei der Handhabung ist entsprechende
Vorsicht geboten.
• Nach Beendigung eines Ladevorganges bis zum Start eines neuen Ladevorganges 15
Minuten Wartezeit einhalten.
• Erkennt das Ladegerät eine Überhitzung des Akkus, blinken alle 3 Lade-LED‘s zur sel
ben Zeit. Entfernen Sie den Akku und lassen Sie das Ladegerät für ca. 15 - 30 Minuten
abkühlen, bevor Sie den Ladevorgang fortsetzen.
• Wird vom Ladegerät eine Störung des Akkus festgestellt, blinken 2 Lade-LED’S zur
selben Zeit. Bitte entfernen Sie den Akku und lassen ihn für 15 – 30 Minuten abkühlen.
Sollten beide Lade-LED’s danach weiter blinken, könnte ein Defekt am Akku vorliegen.
Bitte senden Sie den Akku umgehend zur Analyse ein.
Elektrische Energien können schwere Verletzungen verursachen!
Immer persönliche Schutzausrüstung tragen!
20
-
Page 21
Aufbau und Funktion
3
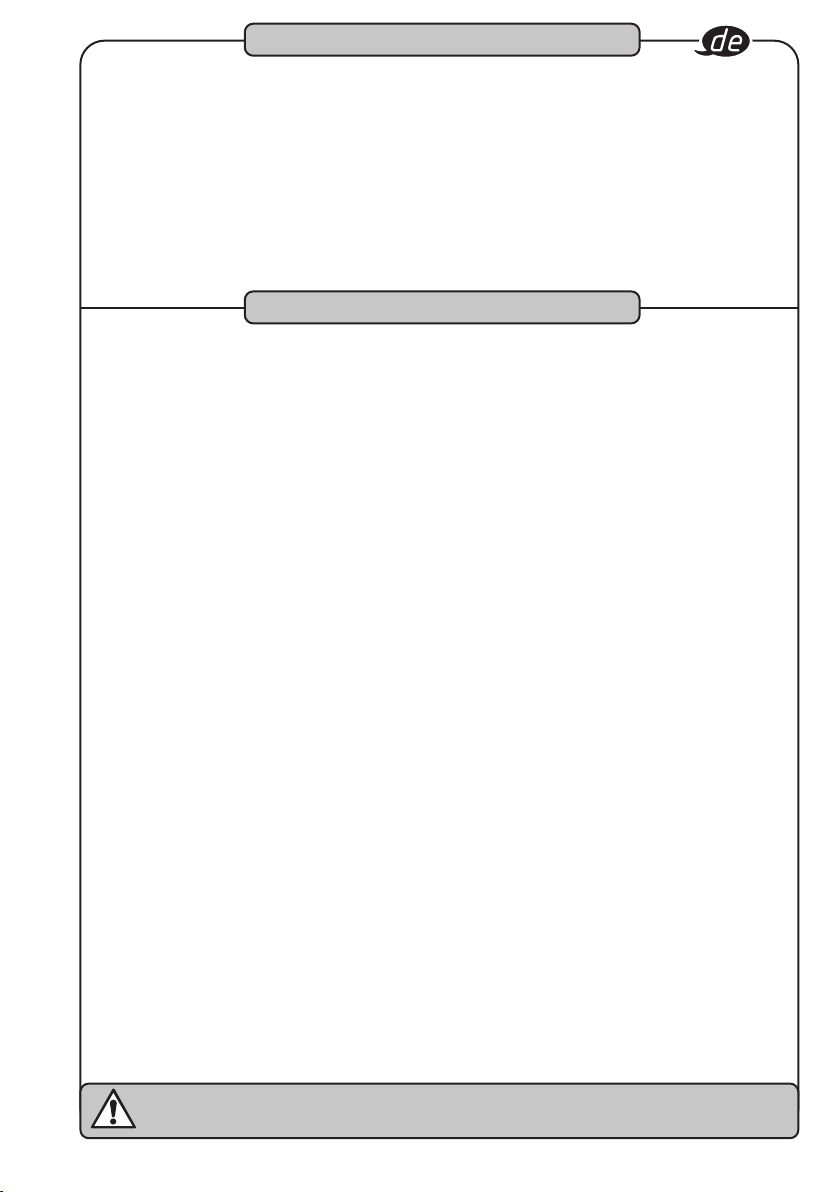
• Wenn das Ladegerät ein Defekt hat, blinken alle 3 Lade-LED’s zur selben Zeit. Bitte entfernen Sie den Akku und nehmen Sie das Ladegerät vom
Stromnetz. Nach 2 Minuten stecken Sie den Stecker wieder in die Steckdose
und legen den Akku ein. Sollten immer noch alle 3 Lade-LED’s blinken, sen
den Sie das Ladegerät umgehend zur Analyse ein..
Wartung und Pflege
4
• Vor jeder Wartungs- oder Reparaturarbeit den Akku vom Werkzeug trennen.
• Steckschlüssel-Einsätze regelmäßig kontrollieren. Abgenutzte oder beschädigte
Steckschlüssel-Einsätze können vom Werkzeug abrutschen oder die Effizienz herab
setzen und so den Motor schädigen.
Wartung und Pflege:
-
-
Wartung des Motors:
• Die Motoreinheit-Windung / Wicklung / Spule ist der wichtigste Teil des ElektroWerkzeugs. Werkzeug pfleglich behandeln, um sicher zu stellen, dass
die Wicklung / Spule nicht beschädigt oder durch Wasser oder Öl nass wird.
Pflege:
• Der HAZET Akku-Schlagschrauber sollte in regelmäßigen Abständen mit einem
handelsüblichen lösemittelfreien Reiniger ohne Schleifzusätze behandelt werden.
Auf Staub kontrollieren:
• Staub kann mit einem weichen Tuch oder mit einem mit Seifenwasser befeuchteten
Tuch entfernt werden.
• Keine Bleiche, chlorhaltige Reinigungsmittel, Benzin oder Verdünnung verwenden,
da diese den Kunststoff beschädigen können.
• Kunststoffteile mit einem weichen, in Seifenwasser angefeuchteten Lappen reinigen
und abtrocknen.
Ersatzteile:
• Nur Original-Ersatzteile des Herstellers verwenden.
• Falsche oder fehlerhafte Ersatzteile können zu Beschädigungen, Fehlfunktionen oder
Totalausfall des Gerätes führen.
• Bei Verwendung nicht freigegebener Ersatzteile verfallen sämtliche Garantie-, Service-,
Schadenersatz und Haftpflichtansprüche gegen den Hersteller oder seine Beauftragten,
Händler und Vertreter.
Elektrische Energien können schwere Verletzungen verursachen!
Immer persönliche Schutzausrüstung tragen!
[
+49 (0) 21 91 / 7 92-0 • \ +49 (0) 21 91 / 7 92-375 • ^ hazet.de • ] [email protected]
21
Page 22
Wartung und Pflege
4
Aufbewahrung und Lagerung:
Das Gerät ist unter folgenden Bedingungen zu lagern
und aufzubewahren:
• Gerät trocken und staubfrei lagern.
• Gerät keinen Flüssigkeiten und / oder aggressiven Substanzen aussetzen
• Gerät nicht im Freien aufbewahren.
• Gerät für Kinder unzugänglich aufbewahren.
• Lagertemperatur -10°C bis +40°C.
• Relative Luftfeuchtigkeit max. 60%.
Entsorgung:
• Alt-Akkus (Li Ion) und elektrische Geräte gehören nicht in den Hausmüll und sind über
geeignete Sammelstellen zu entsorgen.
• Elektroschrott, Elektronikkomponenten, Schmier- und andere Hilfsstoffe unterliegen
der Sondermüllbehandlung und dürfen nur von zugelassenen Fachbetrieben entsorgt
werden!
• Die Verringerung von Umweltbelastungen und die Bewahrung der Umwelt stehen im
Mittelpunkt unserer Aktivitäten!
22
Elektrische Energien können schwere Verletzungen verursachen!
Immer persönliche Schutzausrüstung tragen!
Page 23
For your information
1
1. General information
• Please make sure that the user of this tool
carefully reads these operating instructions
and fully understands all information given
before it is used.
• These operating instructions contain impor
tant advice that is necessary for the safe
and trouble-free operation of your HAZET
tool.
• For intended use of the tool, it is essential
that all safety precautions and other infor
mation in these operating instructions are
adhered to.
• For this reason, always keep these opera
ting instructions together with your HAZET
tool.
• This tool has been designed exclusively for
specific applications. HAZET emphasises
that any modification to the tool and/or use
in a way that does not correspond to its
intended application is strictly forbidden.
• HAZET will not be liable for any injuries to
persons or damage to property originating
from improper or inappropriate application,
misuse of the tool or a disregard of the safe
ty instructions.
• Furthermore, the general safety regulations
and regulations for the prevention of acci
dents in the application range of this tool
must be observed and respected.
-
-
-
-
-
2. Explanation of symbols
ATTENTION: Pay strict attention to these
symbols!
Read the operating instructions!
The owner is obliged to observe the
operating instructions and instruct
all users of this tool according to
the operating instructions.
NOTE!
This symbol indicates advice that is
helpful when using the tool.
WARNING!
This symbol indicates important
specifications, dangerous
conditions, safety risks and safety
advice.
CAUTION!
This symbol marks advice which
if disregarded results in damage,
malfunction and/or functional failure of the tool.
QUALIFIED PERSONNEL!
The tool may be used by qualified
personnel only. Handling by nonqualified people may lead to injuries
to persons or damage to the tool or
the workpiece.
Electrical energy may cause serious injuries!
Always wear personal protective equipment!
[
+49 (0) 21 91 / 7 92-0 • \ +49 (0) 21 91 / 7 92-375 • ^ hazet.de • ] [email protected]
23
Page 24
For your safety
2
1. Owner's
liability
• The tool was developed and manufactured
according to the technical norms and stan
dards valid and recognised at the time and
is considered to be operationally reliable.
Nevertheless, the tool may present a dan
ger when it is not used as intended or in an
inappropriate way by non-qualified person
nel. Please make sure that any person using
this tool or carrying out maintenance work
carefully reads and fully understands these
operating instructions before using the tool.
• Any modification of the tool is strictly for
bidden.
• All safety, warning and operating instruc
tions on the tool must be kept legible at all
times. All damaged labels or stickers must
be replaced immediately.
• All specified set values or ranges must be
observed.
• Always keep the operating instructions
close to the tool.
• The tool must only be used if it is in good
working condition.
• All safety equipment must always be within
easy reach and should be checked regu
larly.
-
-
-
-
-
-
2. Intendeduse
Operational reliability is only guaranteed if the
tool is used as intended in accordance with
the information in the operating instructions. In
addition to the safety advice in these operating
instructions, the general safety regulations,
regulations for the prevention of accidents and
regulations for environmental protection valid
for this tool's application range must be obser
ved and respected.
Use and maintenance of the tool must always
comply with relevant local and national regu
lations.
• The HAZET cordless right-angle grinder is
for grinding/separating hard workpieces,
e.g. welded joints, steel rivets, plates or
similar.
• The device must only be used if it is in good
working condition.
• All safety equipment must always be within
reach and should be checked regularly.
• Any incorrect use of the cordless
right-angle grinder or use that fails to
comply with the safety precautions can
result in serious injury or even death.
• Any other kind of use and/or use that goes
beyond the intended use of the tool is
prohibited and is deemed to be improper.
• Any claims against the manufacturer
and/or its authorised agents because of
damage caused by improper use of the tool
are void.
• Any personal injury or material losses
caused by improper use of the tool are the
sole responsibility of the operator.
-
-
24
Electrical energy may cause serious injuries!
Always wear personal protective equipment!
^ hazet.com • ] [email protected]
Page 25
For your safety
2
3. Dangers that may arise
from using the tool
Before each use, check the HAZET cordless
right-angle grinder for full functionality. Do not
use the right-angle grinder if its functionality
cannot be ensured or if damage is detected.
If the right-angle grinder is used without its full
functionality being guaranteed, there is a risk
of serious injury, health problems and material
damage.
Electric energy may cause serious injuries to
persons. The following safety instructions must
be observed and adhered to in order to avoid
electric shock, injuries or fire:
• Ensure cable and housing are not damaged.
Tools/chargers that have been dropped or
damaged must be checked by qualified per
sonnel before restarting operation.
• Do not use tools with a defective On/Off
switch. Any tools that cannot be switched on
or off with the On/Off switch are dangerous
and must be repaired immediately.
• When laying the power supply lead, ensure it
does not come into contact with hot or sharp
parts and that it cannot be damaged in ano
ther way. The lead is to be laid in such a way
that it does not constitute a trip hazard.
• The charger and right-angle grinder must
not be exposed to water or other liquids.
Dangerous voltage discharge may occur.
• Keep unused rechargeable batteries
away from metallic objects such as paper
clips, coins, keys, nails, screws, etc. These
objects can establish a connection between
the poles and cause a short-circuit, which
can cause sparks, flames or fires.
• The charger and/or the right-angle grinder
must not be disassembled. Inappropriate
assembly can lead to a reduction of the
functionality, to fire, to electric shocks and/
or to injury.
• All service or repair work must be carried
out by qualified personnel only. Only use
original spare parts so as to guarantee its
long-term operational safety.
• Do not remove safety devices and/or hou
sing parts.
-
-
-
• Never operate the tool when a protective
cover is missing or when not all of the safety
devices are fitted and in perfect condition.
• If an extension cord is necessary, it must
be sufficiently dimensioned for the charger.
Cables which are not appropriate for the
necessary amperage may overheat.
• The battery may only be recharged with the
explicitly intended charger. A charger that is
designed for a different type of rechargea
ble battery can cause a fire in this type of
rechargeable battery.
• Only use the tool with the specified battery.
Use of any other battery may cause a fire.
• The rechargeable battery and the charger
heat up slightly during charging. This does
not reduce their functionality. Appropriate
caution is required for operation.
• Only use the cordless right-angle grinder
at places that are governed and regulated
by applicable provisions for work areas and
electrical systems.
• For safety reasons, any modification to
HAZET cordless right-angle grinders is
strictly forbidden. Any modification of the
tool will result in immediate exclusion from
warranty and liability.
-
Electrical energy may cause serious injuries!
Always wear personal protective equipment!
[
+49 (0) 21 91 / 7 92-0 • \ +49 (0) 21 91 / 7 92-375 • ^ hazet.de • ] [email protected]
25
Page 26
For your safety
2
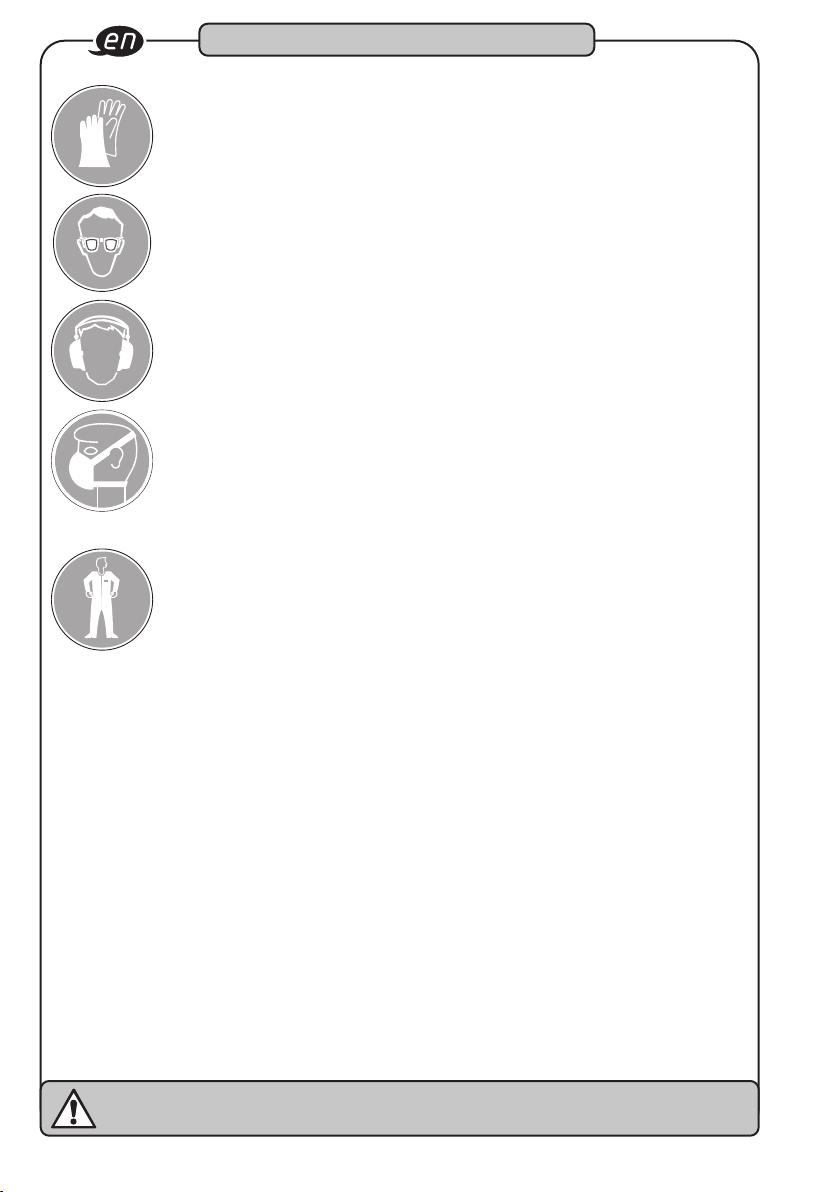
• Wear working gloves and
safety glasses. Electric
tools can raise chips, dust
and other abraded particles
at high speed, which may
result in severe eye injuries.
• Wear hearing protection.
Long exposure to the working noise of a right-angle
grinder may result in per
manent hearing loss.
• Wear a face mask or brea-
thing protection.
Material abrasive tools
generate dust and other
debris that can cause
damage to your lungs and
airways. Breathing in the
vapours of some materials
like adhesives and tar that
contain dangerous che
micals can, over a longer
period of time, cause serious harm to the lungs and
respiratory tracts.
• Wear tight-fitting protec-
tive clothing. Tools with
rotating parts or tools that
drive other tools, such as
discs, etc., can get caught
lery, or other loose objects, which can lead
to serious injury. Never wear loose clothing
and/or
clothing with bands or loops, etc. which
may get caught in the moving parts of the
tool. During the work, take off jewellery,
watches, identification tags, bracelets,
necklaces, etc. that could get caught in
the tool. Never touch the moving parts of a
tool. Tie or cover long hair.
• Keep electric tools out of the hands of
children. Unattended tools could be used
by unauthorised persons and could cause
injury to them or to other persons.
• Only use cut-off wheels and grinding
wheels in good working condition.
Substandard, inappropriate or damaged
tools, such as cut-off wheels, etc., may
come loose, break off and be hurled
around and may cause severe injury to
the user or to third persons in the work
in your hair, clothes, jewel
-
area.
• Please observe the reaction torque. Pay
attention to the reaction moment and
to a possible breakage of the tool to
be actuated. In confined spaces, reac
tion torques may lead to severe injuries.
Countermeasures must be taken against
unexpected reaction torques.
• Do not use the tool in rooms with an
explosive atmosphere. Power tools such
as the right-angle grinder can cause sparks
or ignite combustible materials. Never
operate tools in proximity to combustible
substances like petrol, naphtha, detergents,
etc. Work in well-cleaned and well-ventila
ted areas only. Keep combustible materials
out of the work area.
• Do not point the tool at another person.
Keep children and other persons out of the
work area when operating the tool.
• Do not let the tool with cut-off wheels or
grinding wheels idle. The cut-off wheels
or grinding wheels may come loose
• Stop using any tool immediately if you
feel unwell or jittery or if you start feeling
pain.
• Vibrations, repetitive movements or
uncomfortable posture may be harmful
to the hands and arms.
-
• Electric tools may vibrate when in use.
• Before changing the accessories, adju-
sting and storage, remove the rechargeable battery from the tool or set the
switch to OFF or in the locked positi
on. These kinds of preventive safety
measures may prevent accidental actua
tion.
• Only use parts, attachments and acces
sories recommended by the manufacturer.
• Never carry the tool with your finger on
the quick-release press-button.
• Avoid unintentional activation.
• Keep the grip dry, clean and free of oil
and grease.
• Ensure that the working area is clean,
well ventilated and always well lit.
-
-
-
-
-
26
Electrical energy may cause serious injuries!
Always wear personal protective equipment!
^ hazet.com • ] [email protected]
Page 27
For your safety
2
• Never use the tool whilst under the
influence of alcohol or drugs.
• Repairs may be performed by authorised
personnel only.
• Do not clean plastic parts with solvents.
• Solvents such as petrol, benzene,
carbon tetrachloride and alcohol can deform
or crack the plastic parts. Do not come in
contact with the above-mentioned solvents.
• When working on elevated places always
make sure that no one is located below the
work area before you commence work.
Important safety precautions
for the quick charger:
This section contains important safety and
operating instructions for the quick charger:
Before commissioning the charger, please
read all instructions and markings on the:
1. charger
2. battery,
• Operating temperature for Li-Ion batteries:
10 to +40 °C for discharging,
0 to +40 °C
for charging
• Operating temperature for charger:
0 to +40 °C
• To avoid electric shock, disconnect the
charger from the socket before cleaning or
beginning maintenance
work. Removing the battery does not reduce the hazard.
• Any non-approved use of the charger may
result in serious injury.
Electrical energy may cause serious injuries!
Always wear personal protective equipment!
[
+49 (0) 21 91 / 7 92-0 • \ +49 (0) 21 91 / 7 92-375 • ^ hazet.de • ] [email protected]
27
Page 28
For your safety
2
To avoid these hazards:
• Never disassemble the battery.
• Never throw the battery into a fire even if it is
damaged or completely depleted. Explosion
hazard!
• Never short-circuit the battery.
• Never push objects into the ventilation holes
of the charger, otherwise you risk electric
shock or damage to the charger.
• Never recharge the battery outdoors.
• Never expose the battery to direct sunlight.
• Recharge only in well-ventilated areas with
low humidity.
• Never recharge the battery when the tempe
rature is below 0 °C (32 °F) or above 40 °C
(104 °F).
• Never combine two chargers.
• Never plug objects into the battery holder.
• Never use an amplifier transformer when
charging.
• Never use a motor generator or DC power to
recharge.
• Never store the battery and charger
where the temperature can reach 40 °C
(104 °F).
• Always use the charger with 230 V standard
electrical connections. Using the charger at
higher voltages can overheat and damage
the charger.
• Always take at least 15 minutes of wait time
between multiple recharges to avoid overhe
ating the charger.
• Always disconnect the charger from the
power source when not in use.
-
-
28
Electrical energy may cause serious injuries!
Always wear personal protective equipment!
^ hazet.com • ] [email protected]
Page 29
Design and function
3
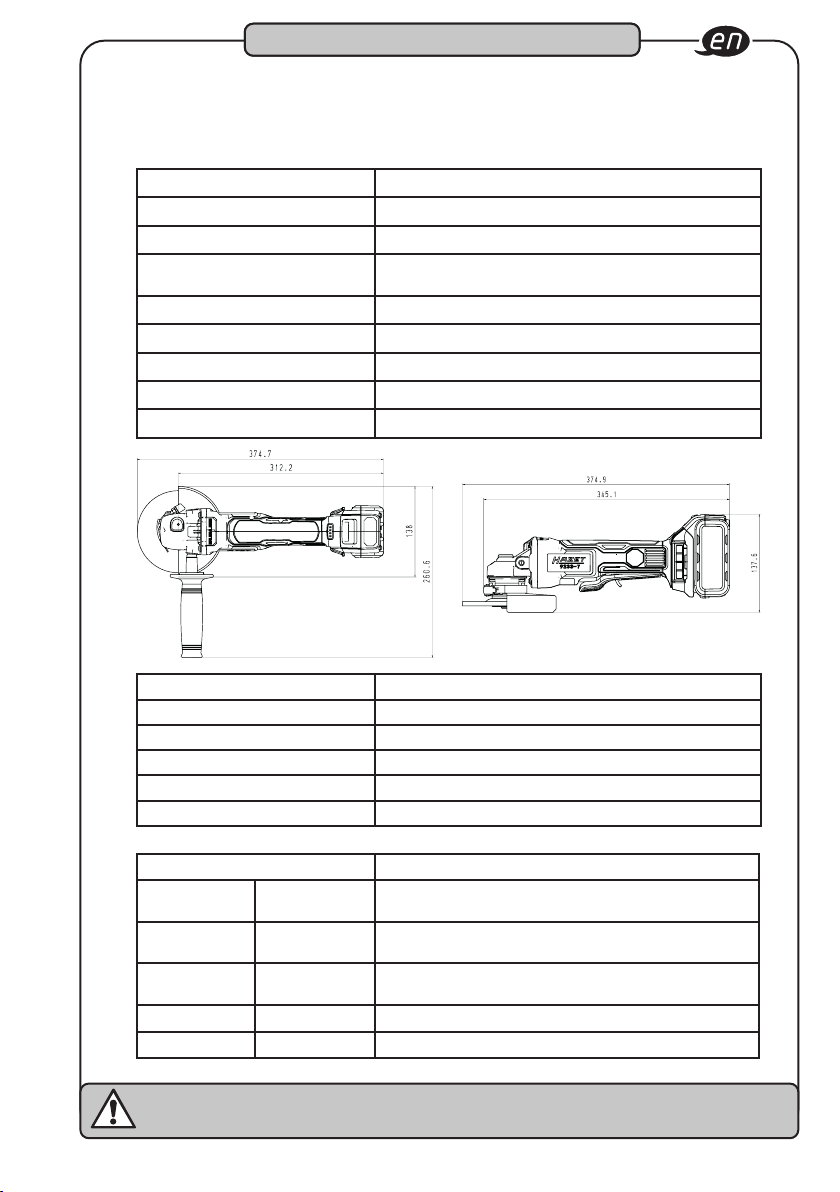
1. Technical data / tool components:
Cordless right-angle grinder HAZET 9233-7
Spindle thread
Battery power
Idle speed
Weight without battery pack /
Sound pressure level LpA /
Sound power level LpW /
Vibration acceleration
Cut-off wheel
Grinding wheel
Battery charger HAZET 9212-03
Input voltage 100 - 240 V~ 50/60 Hz 110 W
Output voltage 12 - 18 V - 4.0 A
Safety approval CB, ETL, GS, ICES, PSE
Battery type Li-Ion
Charging time 80min
M14
18V - 5Ah
8,000 rpm
1.53 kg
89 dB(A)
100 dB(A)
7.9 m/s²
125 mm x 1.0
125 mm x 6.0
Accessories (optional) Included in delivery
HAZET No. Designation The HAZET cordless right-angle grinder is delivered in a plastic
9212-02 Replacement
9212-05 Replacement
battery 2 Ah
battery 5 Ah
case
The package includes:
HAZET 9233-7
HAZET 9212-02 18V / 5.0 Ah Li-Ion battery
HAZET 9212-03 quick charger
Electrical energy may cause serious injuries!
Always wear personal protective equipment!
[
+49 (0) 21 91 / 7 92-0 • \ +49 (0) 21 91 / 7 92-375 • ^ hazet.de • ] [email protected]
29
Page 30
(
Design and function
3
10
/
"
§
$
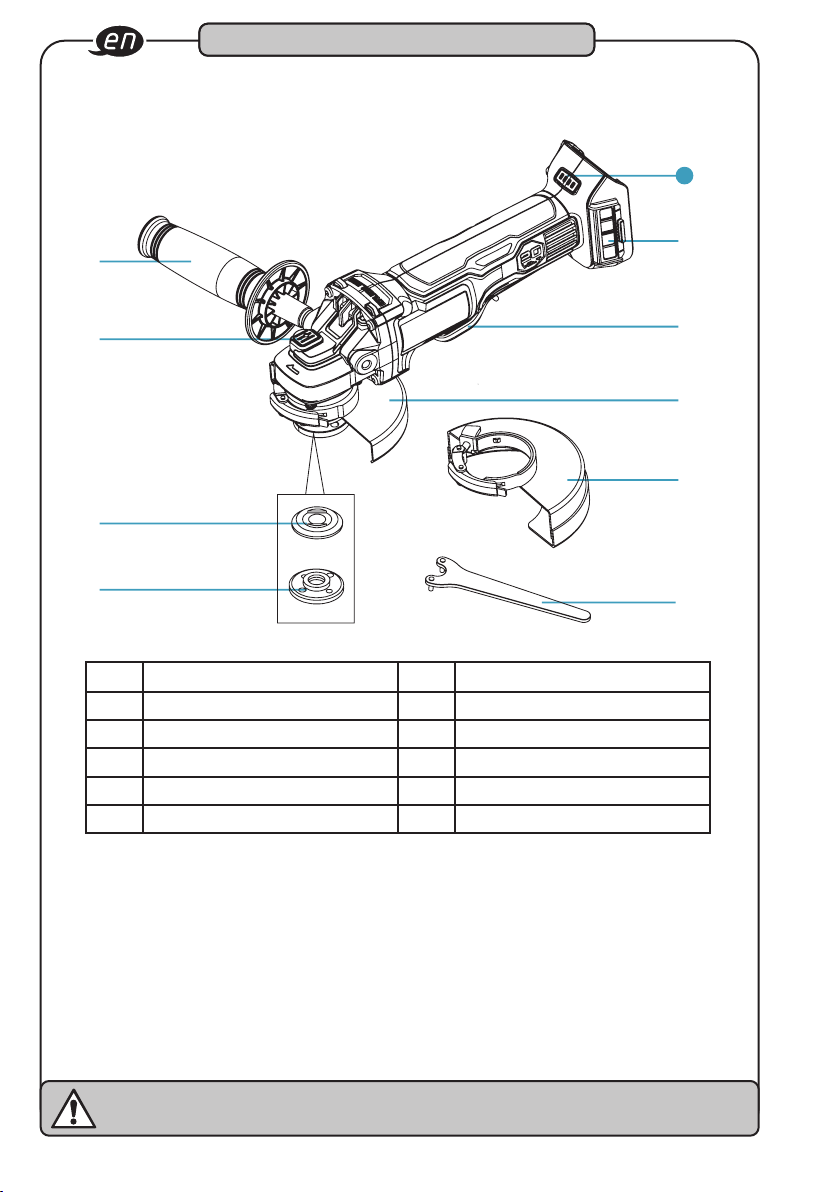
Pos. Bezeichnung Pos. Bezeichnung
1 Paddle switch 6 Cutting wheel guard
2 Spindle lock 7 Removable mesh filter cover
3 Backing flange 8 Auxiliary handle
4 Threaded clamp nut 9 Wrench
5 Grinding wheel guard 10 Charge level indicator
!
%
&
)
30
Electrical energy may cause serious injuries!
Always wear personal protective equipment!
^ hazet.com • ] [email protected]
Page 31
Design and function
3
Attaching the rechargeable battery:
• Insert the battery until it locks with a click.
• If it is not engaged, the battery can fall off the tool, become destroyed and/or cause
injury to you or bystanders.
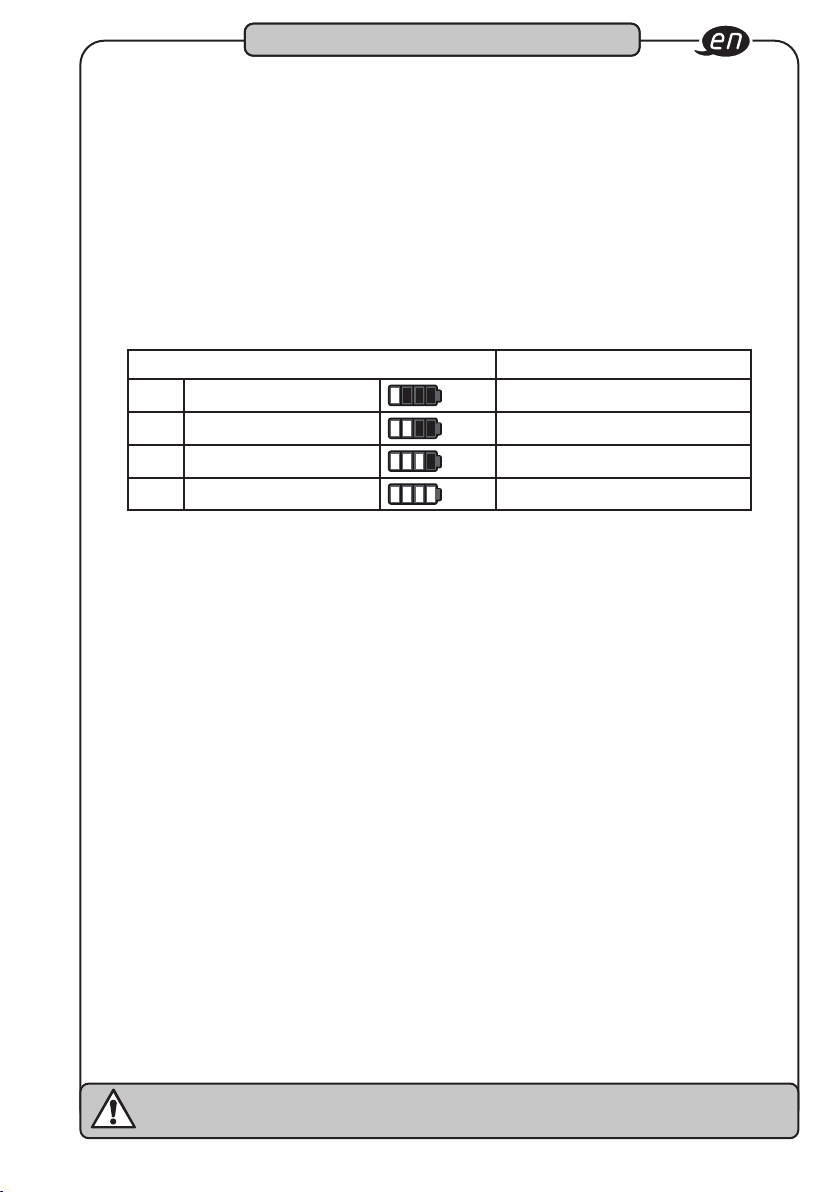
• The rechargeable battery is equipped with a charge indicator. The 4-stage LEDs
(green) display the remaining capacity.
• Pressing the control button displays the battery's state of charge for 5 seconds.
• The battery has built-in overheating protection and protects the HAZET cordless rightangle grinder and the battery from overheating. When the max. temperature of 70 °C
is reached, the battery automatically shuts down and the HAZET cordless right-angle
grinder can no longer be operated.
Charge capacity indicator Status
1 LED 1 0 - 25 %
2 LED 1, 2
3 LED 1, 2, 3
4 LED 1, 2, 3, 4
26 - 50 %
51 - 75 %
76 - 100 %
Disconnecting the battery:
• Press the safety lock and pull the battery from
the tool handle.
Before starting operation:
• Clean up the work area.
• Keep unauthorised persons out of the work area.
• Ensure adequate lighting and ventilation in the workplace.
• Make sure that the battery is properly installed and locked into place.
Adjusting the direction of rotation:
• The direction of rotation is set by the reversing switch.
• Forward and reverse are indicated by arrows, which are milled on to the body.
• In forward, the tools rotates clockwise.
• In reverse, the direction of rotation is set to counterclockwise.
Electrical energy may cause serious injuries!
Always wear personal protective equipment!
[
+49 (0) 21 91 / 7 92-0 • \ +49 (0) 21 91 / 7 92-375 • ^ hazet.de • ] [email protected]
31
Page 32
Design and function
3
Overload protection
This angle grinder is fitted with overload protection. lf the grinder is excessively forced, or
the task being performed is too great, it will automatically go into overload mode. When
it goes into overload mode, the tool will automatically and suddenly stop. To reset the
overload, simply release the switch. When the paddle switch is pressed again, the tool
will restart.
Temperature cut-out
When used as intended, the angle grinder cannot be subjected to overload. But running
continuously at full load for a long time will cause the battery pack to overheat. lf the
allowable battery temperature range is exceeded, the battery pack will automatically stop
operating and will not restart until it has cooled to a safe level.
Low-voltage cut-out
The battery pack used on this tool is fitted with a low voltage cut-out feature within the
circuitry. The low-voltage cut-out feature operates when the voltage drops below a preset value. This feature automatically stops the tool from operating. When this condition
occurs, you will need to either insert another battery pack into the tool or recharge the
existing battery pack.
Stuck protection
During operation, the tool may suddenly become stuck. lf the motor does not stop on
time, this would result in stuck and could cause serious injury. This tool detects the
change instantly and automatically shuts off the tool safely.
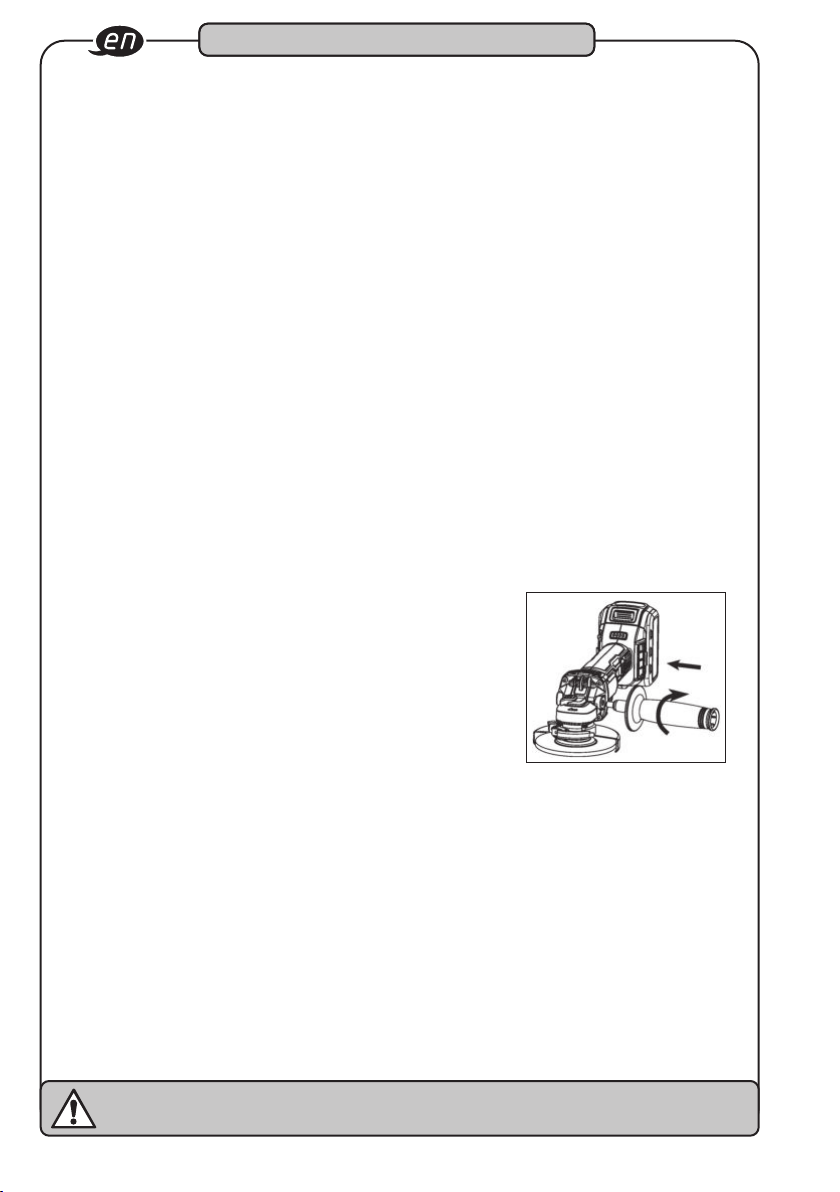
Installing the auxiliary handle
• Remove the battery pack before installing or removing
the auxiliary handle.
• Screw the auxiliary handle into the gear housing.
• Tighten the auxiliary handle securely.
Electrical energy may cause serious injuries!
Always wear personal protective equipment!
32
^ hazet.com • ] [email protected]
Page 33
Design and function
3
Mounting the wheel guard
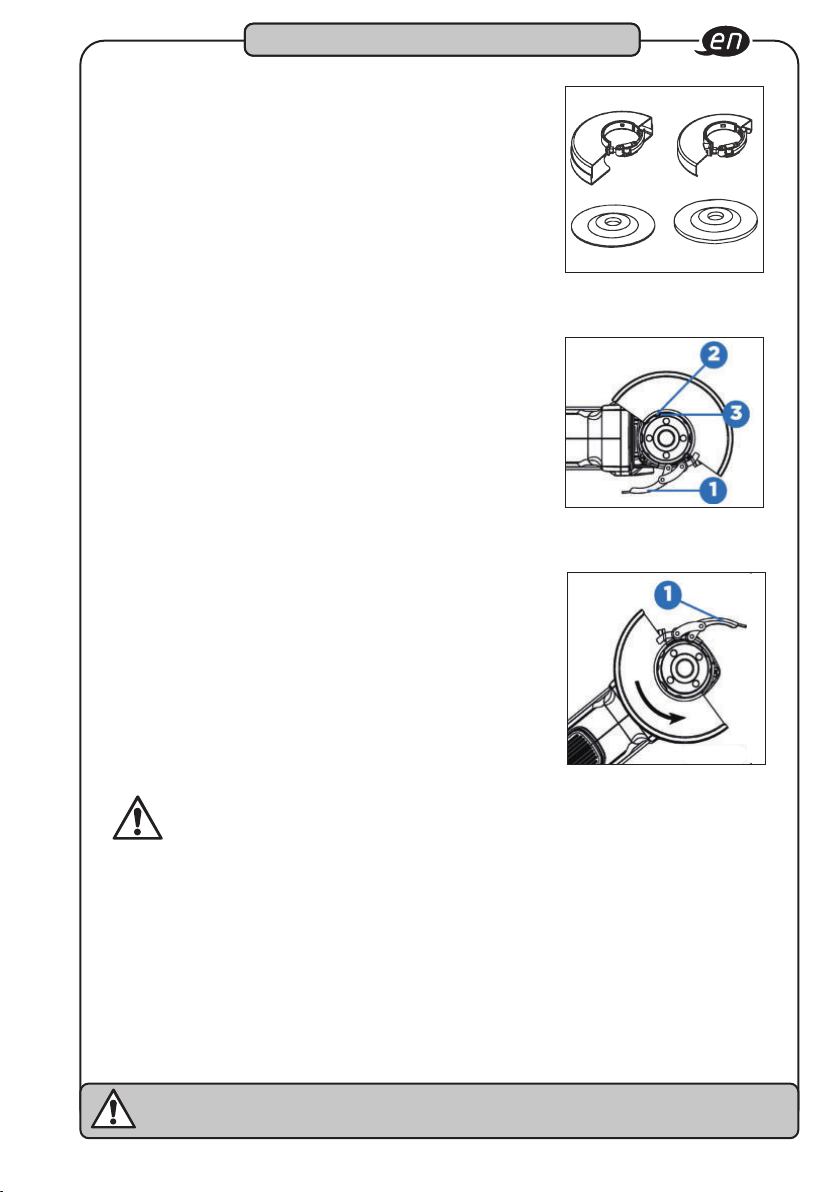
lt is important to choose the correct guards to use
with grinder accessories. See Fig. E for information on
choosing the correct accessories.
The grinding wheel guard and the cutting wheel guard are
both attached and removed using the same steps:
• Open the guard latch (1), and align the lugs (2) on the
guard with the slots (3) on the gear case cover.
• Push the guard down until the guard lugs engage and
rotate freely in the groove on the gear case hub.
• With the guard latch open, rotate the guard into the
desired working position. The guard body should be
positioned between the spindle and the operator to
provide maximum operator protection.
• Close the guard latch (1) to secure the guard on the
gear case. You should not be able to rotate the guard
by hand when the latch is closed. Don't operate the
grinder with a loose guard or with the guard latch in an
open position.
• To remove the guard, open the guard latch, rotate the
guard so that the lugs and slots are aligned, and pull up
on the guard.
Cutting wheel guard Grinding wheel guard
Cutting wheel Grinding wheel
(Fig. E)
Caution!
You can install the auxiliary handle on the left or right side of the grinder, depending on
operator preference. lt must always be used to prevent loss of control and possible serious
injury.
Make sure the handle is tightened before operation. There could be large pressure applied
to the handle during operation. Loosening the handle might result in serious injury.
Electrical energy may cause serious injuries!
Always wear personal protective equipment!
[
+49 (0) 21 91 / 7 92-0 • \ +49 (0) 21 91 / 7 92-375 • ^ hazet.de • ] [email protected]
33
Page 34
Design and function
3
Adjusting the wheel guard
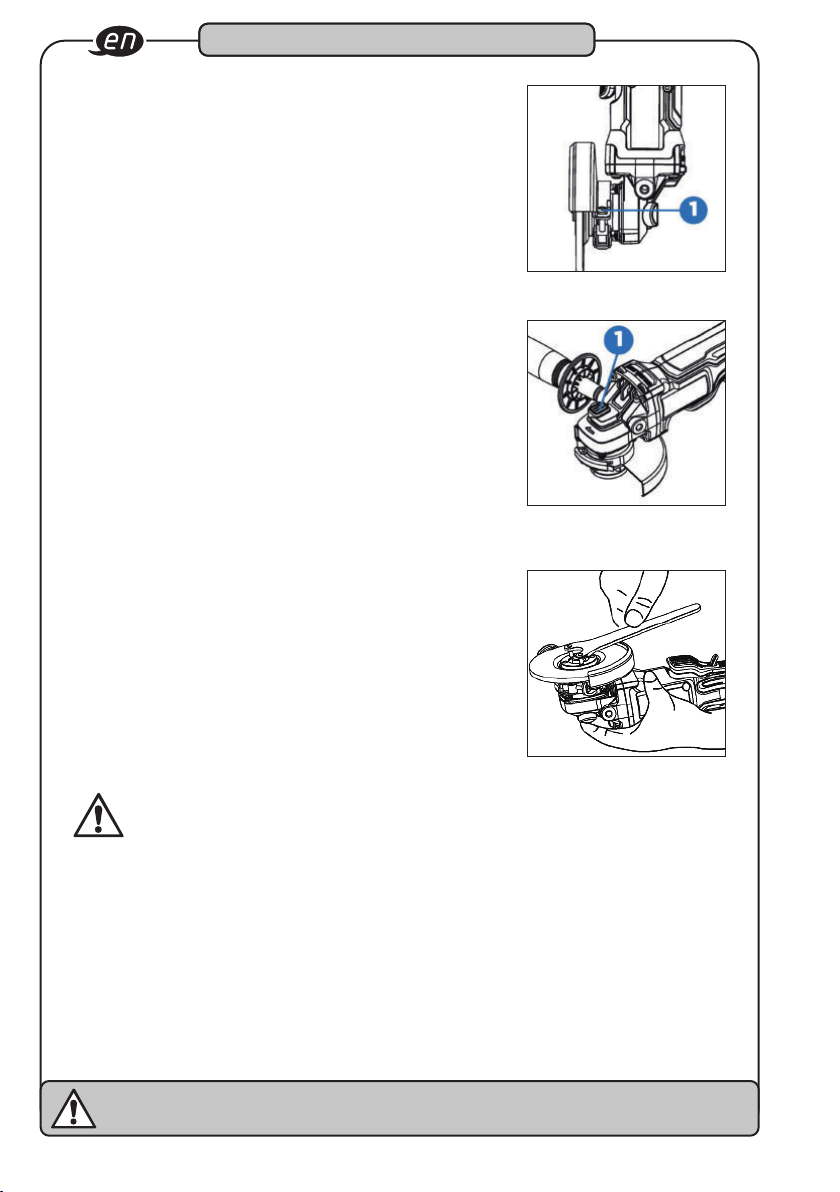
The guard is pre-adjusted to the diameter of the gear case
hub at the factory. lf, after a period of time, the guard
becomes loose, tighten the adjusting screw (1) with the
latch in the closed position and the guard installed on the
tool.
Spindle lock
The spindle lock button (1) is provided to prevent the
spindle from rotating when installing or removing wheels.
Operate the spindle lock only when the tool is turned off
and the wheel has come to a complete stop .
To engage the lock, press the spindle lock button (1) and
rotate the spindle until you are unable to rotate the spindle
further.
Caution!
Guards must be used with grinding wheels and cut-off wheels. The grinder is provided with
a grinding guard intended for use with grinding wheels and a cutting guard intended for
use with cutting wheels.
Make sure the wheel guard is locked properly and in protection angle position, otherwise a
broken blade might cause serious injury.
To prevent accidental operation, turn off the tool and remove the battery pack before per
forming the following operations. Failure to do this could result in serious personal injury.
lf the guard cannot be tightened by the guard latch, do not use the tool and take the tool
and guard to a service centre to repair or replace the guard.
Electrical energy may cause serious injuries!
Always wear personal protective equipment!
34
^ hazet.com • ] [email protected]
-
Page 35
Design and function
3
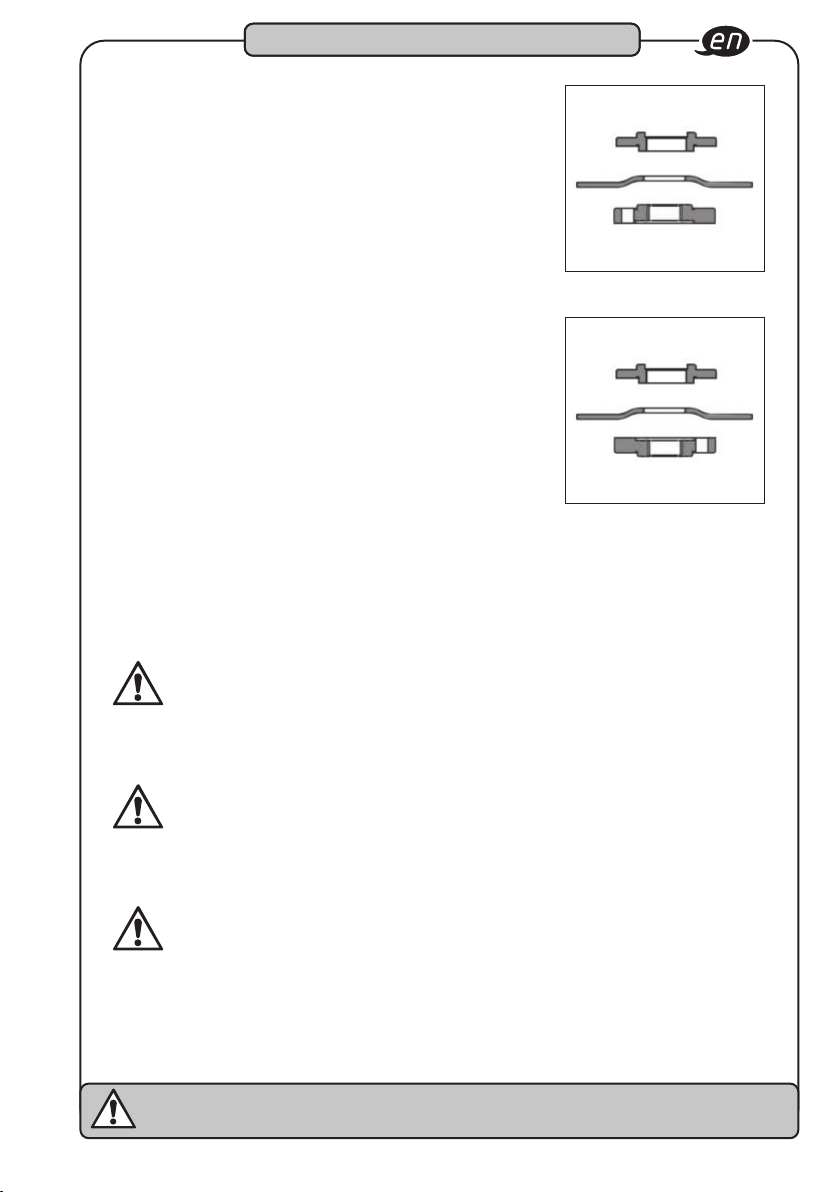
Installing and removing the wheel
Depressed centre wheel must be used with the
included flanges.
• Turn off the tool and remove the battery pack.
• lnstall the unthreaded backing flange on the spindle
with the raised section (pilot) against the wheel.
• Place the wheel against the backing flange, centring the
wheel on the raised section (pilot) of the backing flange.
• While pressing the spindle lock button, thread the
threaded clamp nut on the spindle.
lf the wheel you are installing is more than 1/8" (3 mm)
thick, place the threaded clamp nut on the spindle so that
the raised section (pilot) fits into the centre of the wheel.
lf the wheel you are installing is 1/8" (3 mm) thick or less,
place the threaded clamp nut on the spindle so that the
raised section (pilot) is not against the wheel.
• While pressing the spindle lock button, tighten the
threaded clamp nut with the included wrench.
• To remove the wheel, press the spindle lock button
and loosen the threaded clamp nut with the included
wrench.
Backing flange
1/4" (6 mm) wheel
Threaded clamp nut
Backing flange
1/8" (3 mm) wheel
Threaded clamp nut
Note:
lf the wheel spins after the threaded clamp nut is tightened, check the orientation of the
threaded clamp nut. lf a thin wheel is installed with the pilot on the clamp nut against the
wheel, it will spin because the height of the pilot prevents the clamp nut from holding the
wheel.
Caution!
Do not tighten the adjusting screw with the latch in the open position. Undetectable
damage to the guard or the mounting hub may result.
Warning!
Do not engage the spindle lock while the tool is operating. Damage to the tool will result
and the attached accessory may spin off, possibly resulting in injury.
Warning!
Always take off and remove the battery before changing the accessories. Failure to do this
could result in serious personal injury.
Only use accessories with a safe operating speed higher than rated speed of the tool.
Electrical energy may cause serious injuries!
Always wear personal protective equipment!
[
+49 (0) 21 91 / 7 92-0 • \ +49 (0) 21 91 / 7 92-375 • ^ hazet.de • ] [email protected]
35
Page 36
Design and function
3
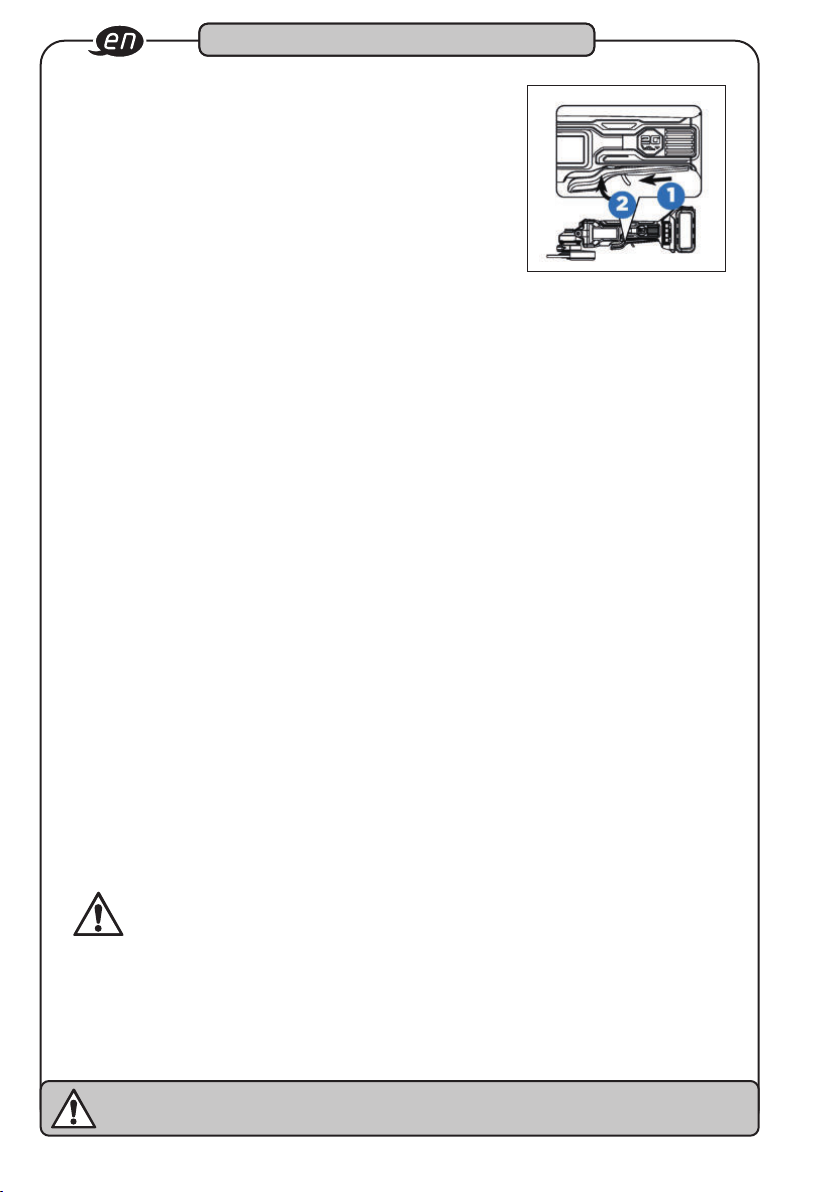
Paddle switch
Grasp the tool body and the auxiliary handle firmly. Push
the lock-up button forward (1) and press the paddle (2) to
start the tool.
To stop it, release the paddle.
Soft start
With this feature, the tool starts gradually and increases
the comfort level.
Electric brake
The electric brake engages when the switch is released, causing the wheel to stop.
Generally, the wheel stops within two seconds. However, there may be a delay between
the time you release the switch and when the brake engages. Occasionally the brake
may miss completely. lf the brake misses frequently, the grinder needs servicing by an
authorized service facility.
Note:
This tool has no provision to lock the switch in the ON position. The tool should never be
locked ON by any means.
Note:
This tool is equipped with an electric brake. When the brake is functioning properly, sparks
may be visible through the vent slots in the housing. This is normal and is the action of the
brake.
Caution!
After the paddle is released, the wheel will still rotate for 3 seconds. Make sure the wheel
stops before laying down the tool.
Electrical energy may cause serious injuries!
Always wear personal protective equipment!
36
^ hazet.com • ] [email protected]
Page 37

Design and function
3
Grinding with grinding wheels
Always carefully select and use grinding wheels that are
recommended for the material to be ground. Make sure
that the operating speed of any accessory wheel selected
is rated at 7500 RPM or more. Pay attention to the dimen
sions of the grinding tools. The mounting hole diameter
must fit the mounting flange without play. Do not use
reducers or adaptors.
• Secure all work in a vise or clamp to a workbench.
• Hold the grinder in front and away from you with both hands, keeping the grinding wheel
clear of the workpiece.
• Turn on the grinder and let the motor and grinding wheel build up to full speed.
• Lower the grinder gradually until the grinding wheel contacts the workpiece.
• Maintain a 20 to 30° angle between the tool and the work surface.
• Move the grinder continuously at a steady, consistent pace.
• Use just enough pressure to keep the grinder from chattering or bouncing.
• Lift the grinder away from the workpiece before turning off the grinder.
-
20 – 30 º
Note:
lf the grinder is held in one spot too long, it will gouge and cut grooves in the workpiece.
lf the grinder is held at too sharp an angle, it will also gouge the workpiece because of
concentration of pressure on a small area.
Heavy pressure will decrease the grinder's speed and put strain on the motor. Normally
the weight of the tool alone is adequate for most grinding jobs. Use light pressure when
grinding jagged edges or loose bolts where there is the potential for the grinder to snag
on the metal edge.
Danger!
Never use the grinder with the wheel guard removed and always be sure the wheel guard
is locked into place. lt has been designed for use only with the wheel guard installed.
Attempting to use the grinder with the wheel guard removed will result in loose particles
being thrown against the operator resulting in serious personal injury.
Electrical energy may cause serious injuries!
Always wear personal protective equipment!
[
+49 (0) 21 91 / 7 92-0 • \ +49 (0) 21 91 / 7 92-375 • ^ hazet.de • ] [email protected]
37
Page 38
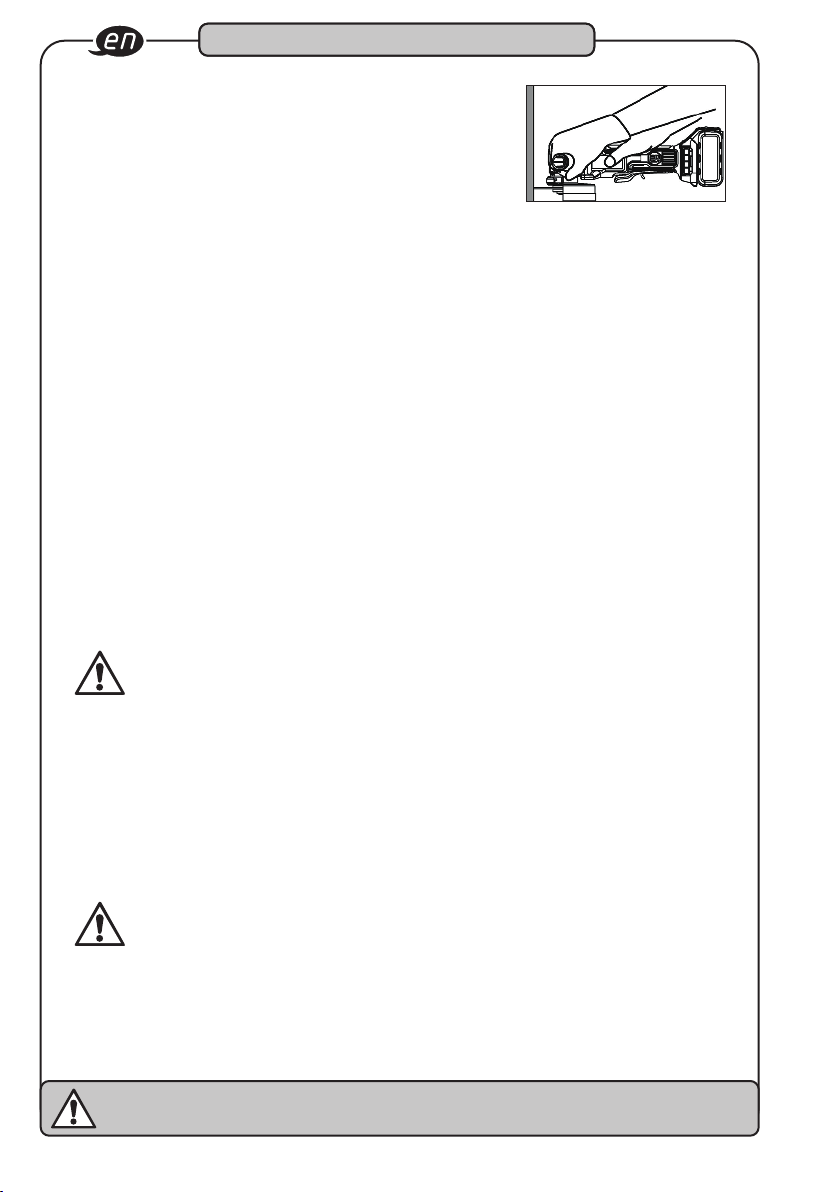
Design and function
3
Cutting with cutting wheels
Always carefully select and use cutting wheels that are
recommended for the material to be ground. Make sure
that the operating speed of any accessory wheel selected
is rated at 7500 RPM or more. Pay attention to the dimen
sions of the grinding tools. The mounting hole diameter
must fit the mounting flange without play. Do not use
reducers or adaptors.
• Secure all work in a vise or clamp to a workbench.
• Hold the grinder in front and away from you with both hands, keeping the cutting wheel
clear of the workpiece.
• Turn on the grinder and let the motor and cutting wheel build up to full speed.
• Allow the tool to reach full speed before touching the tool to the work surface.
• Apply minimum pressure to the work surface, allowing the tool to operate at high speed.
The cutting rate is greatest when the tool operates at high speed.
• Once a cut is begun and a notch is established in the workpiece, do not change the
angle of the cut. Changing the angle will cause the wheel to bend and may cause wheel
breakage.
• Remove the tool from the work surface before turning the tool off. Allow the tool to stop
rotating before setting it down.
-
Warning!
To prevent loss of control and possible serious personal injury, always operate the tool with
both hands, keeping one hand on the auxiliary handle.
Do not start the tool on the work piece. Let the wheel reach full speed to work. lf started on
the work piece, the wheel could kick back and might result in injury.
Make sure the tool stops rotating before laying it down. Otherwise it might cause
serious injury.
Avoid placing excessive pressure on the tool. Heavy pressure increases the possibility of
the wheel breaking and the motor overheating.
Warning!
The cutting wheel guard must be used while using cutting wheels.
Never change the cutting angle during operation. The change might result in a break or
crack in the cut-off wheel.
Electrical energy may cause serious injuries!
Always wear personal protective equipment!
38
^ hazet.com • ] [email protected]
Page 39
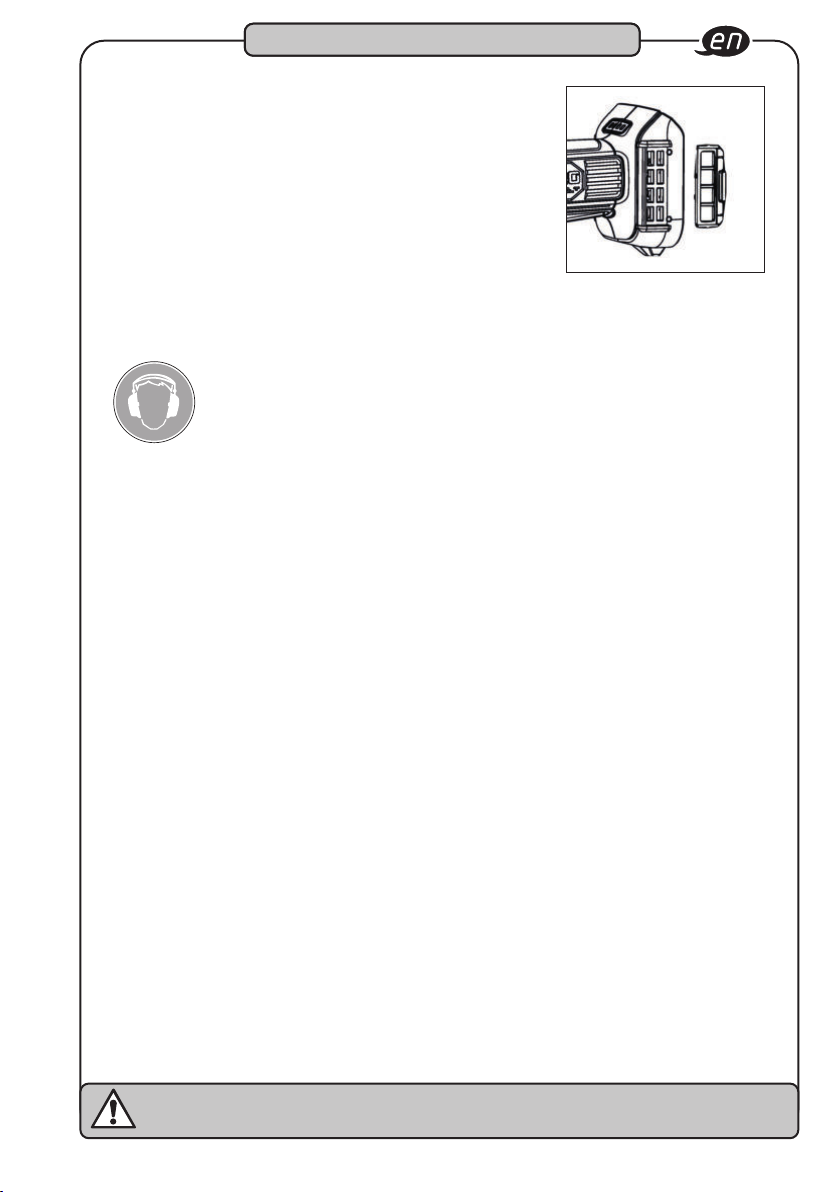
Design and function
3
Removable mesh filter cover
The removable mesh filter cover is designed to prevent
debris contamination overtime. Take the mesh filter cover
out to clean the dust.
Note:
High operating noise level! Always
wear hearing protection!
Before charging:
• Check the power source voltage against the permissible voltage on the charger's
name badge.
• Loading voltages higher than allowed represents a fire hazard to the charger.
• Check the cables for damage. Replace any damaged cables prior to use.
• Connect the charger to the power source. All 3 charging LEDs light up for 1 - 2 seconds.
• Slide the battery headfirst with the terminal side into the charger. Make sure that the
battery fits in the charger slide and that the contacts snap into position.
• If the charger detects an overheated battery, all 3 charging LEDs flash at the same time.
Remove the battery and let the charger cool for about 80 minutes before you continue
charging.
Electrical energy may cause serious injuries!
Always wear personal protective equipment!
[
+49 (0) 21 91 / 7 92-0 • \ +49 (0) 21 91 / 7 92-375 • ^ hazet.de • ] [email protected]
39
Page 40
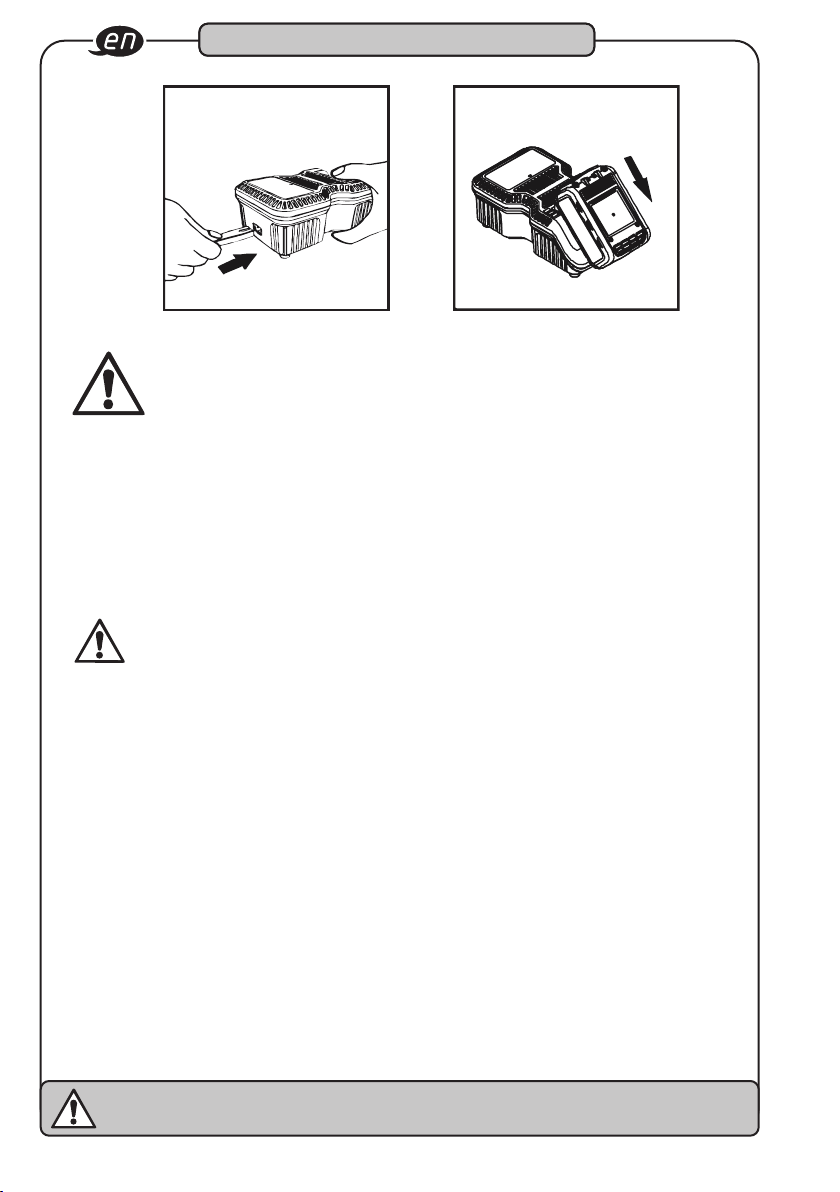
Design and function
3
If the rechargeable battery is improperly inserted into the charger, then the
terminals of the charger can become bent or damaged.
• The state of charge is displayed while charging:
- Less than 30 % charged: all 3 charging LEDs are flashing.
- Less than 60 % charged: one charging LED lights up, the other two are flashing.
- Over 60 % charged: 2 LEDs light up and one is flashing.
- 100 % charged: all 3 charging LEDs light up.
• Charging may take about 65 minutes. Charging is completed when all 3 charging LEDs
light up.
Always disconnect the charger from the power source in the event
of malfunctions! Reinsert the battery if necessary.
Troubleshooting / Avoidance:
• Never pull the plug from the socket using the cable.
• Always pull the plug to avoid damaging the cable.
• Firmly hold the charger with your hand and remove the battery from the charger.
• The rechargeable battery and the charger heat up slightly during charging. This does not
impair its functionality. Appropriate caution is required for operation.
• After charging, take the required 15 minutes of wait time before charging again.
• If the charger detects an overheated battery, all 3 charging LEDs flash at the same
time. Remove the battery and let the charger cool for about 15 - 30 minutes before you
continue charging.
• If the charger detects a malfunctioning battery, 2 charging LEDs flash at the same time.
Please remove the battery and allow it cool for about 15 - 30 minutes. Should both
charging LEDs continue to flash afterwards, the battery may be defective. Please send
us the battery immediately for analysis.
Electrical energy may cause serious injuries!
Always wear personal protective equipment!
40
^ hazet.com • ] [email protected]
Page 41
Design and function
3
• If the charger has a defect, all 3 charging LEDs flash at the same time. Please remove
the battery and disconnect the charger from the mains. After 2 minutes, insert the plug
into the socket outlet again and insert the battery. Should all 3 charging LEDs still be
flashing, send the charger immediately to us for analysis.
Maintenance and Care
4
Maintenance and care:
• Disconnect the battery from the tool before any maintenance or repair work.
• Check sockets regularly. Worn or damaged sockets can slip off the tool or reduce its
performance and thus damage the motor.
Motor maintenance:
• The motor unit winding/coil is the most important part of the electric tool. Handle the tool
with care to ensure that the winding/coil is not damaged or gets wet with water or oil.
Care:
• The HAZET cordless impact wrench should be regularly
treated with a commercial solvent-free cleaning agent without grinding additives.
Checking for dust:
• Dust can be removed with a soft cloth or a cloth moistened with soapy water.
• Do not use bleach, chlorine-based cleaning agents, benzene or thinner since these
can damage the plastic.
• Wash and dry plastic parts with a soft cloth dampened with soapy water.
Spare parts:
• Only use the manufacturer’s original spare parts.
• Unsuitable or defective spare parts may cause damage, malfunction or total failure
of the device.
• The use of non-approved spare parts will void all warranty, service and liability
claims as well as all claims for compensation against the manufacturer or its agents,
distributors and sales representatives.
Electrical energy may cause serious injuries!
Always wear personal protective equipment!
[
+49 (0) 21 91 / 7 92-0 • \ +49 (0) 21 91 / 7 92-375 • ^ hazet.de • ] [email protected]
41
Page 42
Storage:
Maintenance and Care
4
The device must be stored under the following
conditions:
• Keep the device in a dry and dust-free place.
• Do not expose the device to liquids and/or aggressive substances.
• Do not store the device outdoors.
• Keep the device out of reach of children.
• Storage temperature: -10 °C to +40 °C.
• Relative air humidity: max. 60%.
Disposal:
• Worn-out rechargeable batteries (Li-Ion) and electric devices must not be disposed of
in domestic waste, but at suitable collecting points.
• Electronic waste, electronic components, lubricants and other auxiliary materials
must be treated as hazardous waste and may only be disposed of by authorised
specialists!
• Reducing environmental pollution and preserving the environment are at the heart of
our activities!
42
Electrical energy may cause serious injuries!
Always wear personal protective equipment!
^ hazet.com • ] [email protected]
Page 43
Pro Vaši informaci
1
1. Obecné informace
• Zajistěte prosím jistě, že si uživatel toho-
to nářadí důkladně přečetl tento návod k
obsluze před prvním použitím a pochopil
ho.
• Tento návod k obsluze obsahuje důležitá
upozornění, která jsou nutná k bezpečnému
a bezproblémovému provozu Vašeho nářadí
HAZET.
• Pro správné používání tohoto nářadí je
nutné dodržovat všechna bezpečnostní
upozornění a informace uvedené v tomto
návodu k obsluze.
• Zajistěte proto, aby tento Návod k obsluze
byl vždy u Vašeho nářadí HAZET.
• Toto nářadí bylo vyvinuto pro specifické
použití. HAZET výslovně poukazuje na to,
že toto nářadí nesmí být změněno a/nebo
nesmí být použito jinak, než je v souladu s
jeho zamýšleným použitím.
• Za zranění nebo škody způsobené jiným
nebo nesprávným použitím, které neodpoví
dá návodu resp. porušením bezpečnostních
předpisů, nepřebírá HAZET žádnou
zodpovědnost nebo záruku.
• Dodržujte k tomu ještě při použití nářadí
platná protiúrazová nařízení a obecné
bezpečnostní předpisy.
-
2. Vysvětlení symbolů
POZOR: Věnujte nejvyšší pozornost těmto
symbolům!
Přečtěte si návod k obsluze!
Provozovatel je povinen dodržovat
návod k obsluze a všichni uživatelé
nářadí pokyny podle tohoto návodu
k obsluze.
UPOZORNĚNÍ!
Tento symbol označuje informace,
které Vám usnadní manipulaci.
VAROVÁNÍ!
Tento symbol označuje důležité
popisy, nebezpečné
podmínky, bezpečnostní rizika resp.
bezpečnostní upozornění.
POZOR!
Tento symbol označuje upozornění,
jehož nedodržení může přivodit
poškození, špatnou funkci a nebo
selhání přístroje.
ODBORNÍCI!
Nářadí je určeno pro odborníky,
použití laikem může vést ke zranění
nebo k poruše nářadí či poškození
obrobku.
Elektrická energie může zapříčinit těžké úrazy!
Noste vždy osobní ochranné vybavení!
[
+49 (0) 21 91 / 7 92-0 • \ +49 (0) 21 91 / 7 92-375 • ^ hazet.de • ] [email protected]
43
Page 44
Pro Vaši bezpečnost
2
1. Odpovědnost
provozovatele
• Přístroj je v době svého vývoje a zhotovení
zkonstruován podle aktuálně platných zná
mých technických norem a je považován
za provozně spolehlivý. Přesto však může
vzniknout od přístroje nebezpečí, když je
používán neodborně vyškoleným personá
lem a používán nesprávně nebo k jinému
účelu. Každá osoba, která je oprávněna
pracovat na nebo se zařízením, musí před
zahájením práce přečíst návod a porozu
mět mu.
• Změny jakéhokoliv druhu či úpravy přístroje
jsou zakázány.
• Všechny bezpečnostní, výstražné a provoz
ní upozornění na přístroji musí být udržovány v dobrém a čitelném stavu. Poškozené
štítky nebo nálepky musí být ihned vymě
něny za nové.
• Uvedené hodnoty nastavení nebo rozsahy
musí být bezpodmínečně dodrženy.
• Návod k obsluze mějte vždy v blízkosti pří
stroje.
• Provozujte přístroj jen v technicky dokona
lém a provozně bezpečném stavu.
• Bezpečnostní zařízení mějte vždy volně
dosažitelná a pravidelně je kontrolujte.
-
-
-
-
-
-
-
2. Zamýšlené
použití
Spolehlivost je zaručena jen při odpovídajícím
použití podle specifikací uvedených v návo
du. Kromě upozornění k bezpečnosti práce v
tomto návodu sledujte a dodržujte při použití
přístroje obecně platná nařízení a předpisy
bezpečnostní, protiúrazové a pro ochranu
přírody.
Použití a údržba musí být vždy prováděna v
souladu s místními, státními nebo federálními
předpisy.
• Akumulátorová úhlová bruska HAZET je
určena k broušení /oddělování tvrdých
obrobků, např. svarových švů, ocelových
nýtů, plechů apod.
• Provozujte přístroj jen v technicky dokona
lém a provozně bezpečném stavu.
• Bezpečnostní zařízení mějte vždy volně
dosažitelná a pravidelně je kontrolujte.
• Nesprávné použití akumulátorové úhlové
brusky nebo použití neodpovídající bez
pečnostním pokynům může vést k vážným
zraněním až k úmrtí.
• Jakékoliv jiné použití než zamýšlené použití
a nebo jiné využití přístroje je zakázáno a je
považováno za nesprávné.
• Jakékoliv nároky vůči výrobci a/nebo jeho
oprávněné osobě za škody při nesprávném
použití přístroje jsou vyloučeny.
• Za všechny škody způsobené nesprávným
používáním zodpovídá samotný provozo
vatel.
-
-
-
-
44
Elektrická energie může zapříčinit těžké úrazy!
Noste vždy osobní ochranné vybavení!
^ hazet.com • ] [email protected]
Page 45
Pro Vaši bezpečnost
2
3. Nebezpečí vycházející
z přístroje
Před každým použitím akumulátorové úhlo
vé brusky HAZET prověřte, zda má plnou
funkčnost. Nemůže-li být po výsledku této
zkoušky zajištěna plná funkčnost nebo je
zjištěno poškození, nesmí se akumulátorová
úhlová bruska používat. Není-li zajištěna plná
funkčnost a akumulátorová úhlová bruska je
přesto použita, vzniká tím nebezpečí vážného
poškození těla, zdraví a věcí.
Elektrická energie může zapříčinit těžké úrazy.
Na ochranu před úderem elektrickým prou
dem, nebezpečím úrazu a požáru je nutné
respektovat následující zásadní bezpečnostní
opatření:
• Připojovací kabel a kryt nesmí být poškozeny. Nářadí/nabíječky, které spadly nebo
jsou poškozené, musí být před opětovným
uvedením do provozu překontrolovány kvali
fikovaným personálem.
• Nepoužívejte nářadí, u kterého je vadný spí
nač Zap/Vyp. Nářadí, které již nelze zapnout
resp. vypnout pomocí spínače Zap/Vyp, je
nebezpečné a musí se opravit.
• Položené kabely se nesmí dotýkat horkých
nebo ostrých dílů nebo být poškozeny jiným
způsobem. Kabely je třeba položit tak, aby
pro osoby nepředstavovaly nebezpečí klo
pýtnutí.
• Nabíječka a úhlová bruska nesmí přijít do
styku s vodou nebo jinými kapalinami. Při
tom mohou vzniknout nebezpečné výboje
napětí.
• Nepoužívaný akumulátor udržujte v dosta
tečné vzdálenosti od kovových předmětů
jako jsou kancelářské svorky, mince, klíče,
jehly, šrouby atd. Tyto předměty mohou
vytvořit spojení mezi póly a tak zapříčinit
zkrat, který může vést k jiskrovému výboji,
ohni nebo požáru.
-
-
-
-
-
-
• Nabíječku a/nebo úhlovou brusku sami nero
zebírejte/neotevírejte. Neodborné smontování může vést k ovlivnění funkčnosti, k
požáru, k elektrickému úderu a/nebo k úra
zům.
• Všechny servisní a opravářské práce smí
provádět vždy jen kvalifikovaný personál.
Aby byla zajištěna bezpečnost v dlouhodo
bém horizontu, je nutné používat jen originální náhradní díly.
• Ochranné prvky a/nebo díly tělesa nesmí být
odstraněny.
• Nemanipulujte s nářadím, když chybí kryt
nebo když všechny bezpečnostní prvky,
které jsou k dispozici, nejsou v pořádku.
• Prodlužovací kabely musí být pro nabíječ
ku dostatečně dimenzované. Kabely, které
nejsou dimenzované pro potřebnou intenzitu
proudu, se mohou přehřát.
• Akumulátor se smí nabíjet pouze k tomu
výslovně určenou nabíječkou. Nabíječka,
ketrá je určena pro jiný typ akumulátoru,
může u tohoto typu akumulátoru zapříčinit
požár.
• Nářadí používejte pouze s k tomu určeným
akumulátorem. Použití jiného akumulátoru
může zapříčinit požár.
• Akumulátor a nabíječka se během nabíje
ní mírně zahřejí. To nepředstavuje žádné
ovlivnění funkce. Při zacházení je nařízena
příslušná opatrnost.
• Akumulátorovou úhlovou brusku používejte
pouze na místech, která jsou určena a pře
depsána platnými ustanoveními pro pracovní oblasti a pro elektrická zařízení.
• Z bezpečnostních důvodů jsou zakázány
změny na akumulátorové úhlové brusce
HAZET. Provedení změn na přístroji vede k
okamžitému vyloučení zodpovědnosti.
-
-
-
-
-
-
Elektrická energie může zapříčinit těžké úrazy!
Noste vždy osobní ochranné vybavení!
[
+49 (0) 21 91 / 7 92-0 • \ +49 (0) 21 91 / 7 92-375 • ^ hazet.de • ] [email protected]
45
Page 46
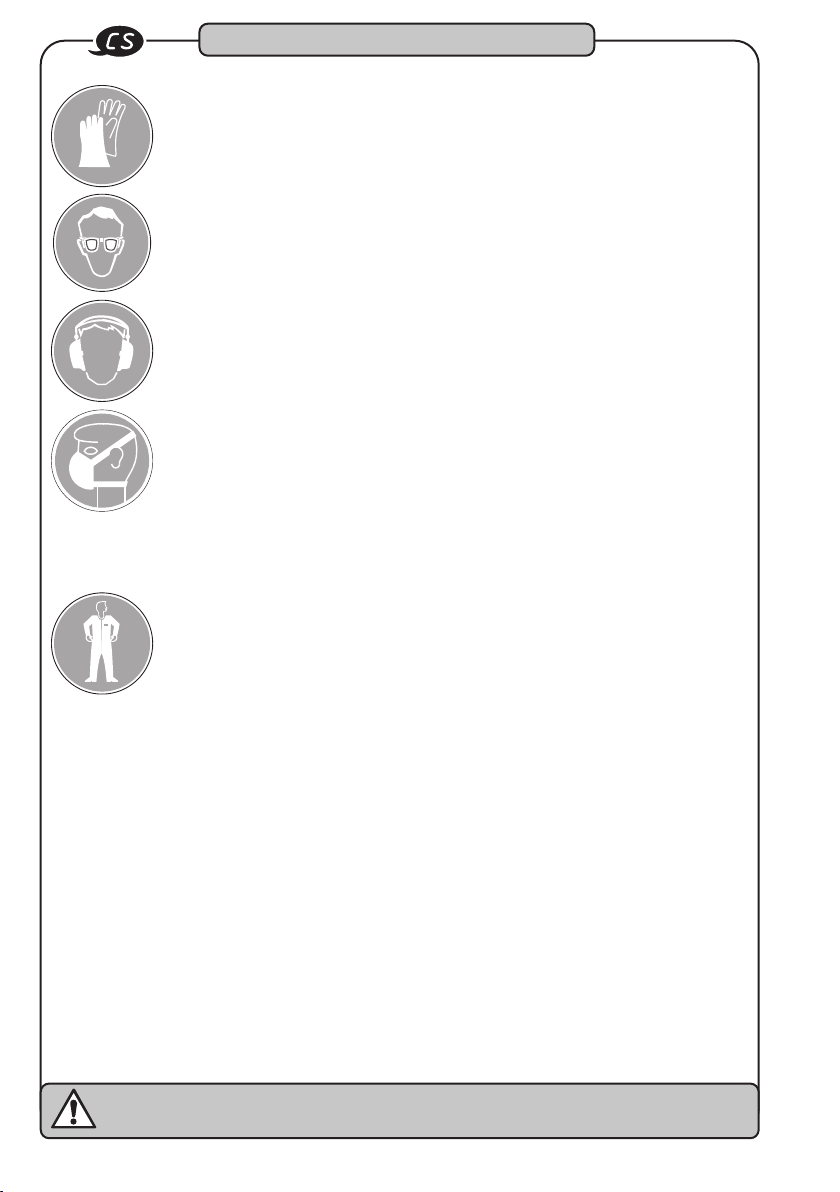
Pro Vaši bezpečnost
2
Noste pracovní rukavice a
ochranné brýle.
Nářadí s elektrickým pohonem
může vířit s velkou rychlostí
špony, prach a jiný obrus,
který může vést k těžkému
poranění očí.
Noste ochranu sluchu.
Dlouhé zatížení pracovním
hlukem úhlové brusky může
vést k trvalé ztrátě sluchu.
Noste ochrannou masku
nebo ochranu dýchacích
cest.
Nářadí odstraňující materiál
vytváří prach a jiný oděr, který
může vést k poškození plic
a dýchacích cest. Některé
materiály jako lepidla nebo
asfalt obsahují chemikálie,
jejichž výpary vdechované po
delší dobu mohou způsobit
vážná poškození.
Noste přiléhavý ochranný
pracovní oděv.
Nářadí s otočnými díly
nebo nářadí, které pohání
jiné nářadí, jako např.
rozbrušovací kotouče atd.,
se mohou zaplést do vlasů, oděvu, šperků
nebo jiných volných předmětů, což může
vést k vážným zraněním. Nenoste nikdy
příliš široký a/nebo pásky nebo smyčkami
atd. opatřený oděv, který se může zaplést
do otáčejících se dílů nářadí. Odložte při
práci veškeré šperky, hodinky, identifikační
známky, náramky, řetízky atd. které se
mohou zaplést do nářadí. Nesahejte nikdy
na díly nářadí, které jsou v pohybu. Dlouhé
vlasy svažte nebo zakryjte.
•
Elektro nářadí nepatří do rukou dětem.
Nářadí bez dozoru může v rukou nepovola
ných osob přivodit zranění jim nebo třetím
osobám.
Používejte pouze bezvadné rozbrušovací
•
kotouče a uběrací kotouče. Méně kvalitní, nevhodné nebo poškozené nářadí
jako rozbrušovací kotouče atd. se mohou
uvolnit nebo ulomit a být odmrštěny a
zasáhnout obsluhu nebo třetí osoby,
které se zdržují v pracovní oblasti.
• Dbejte na reakční moment. Dbejte na vznik
reakčních momentů a možné zlomení nářadí.
V úzkých místech mohou reakční momen
ty vést k poranění. Proti neočekávaným
reakčním momentům musí být učiněna pro
tiopatření.
Nepoužívejte nářadí v prostorách s
•
nebezpečím exploze.
úhlová bruska může zapříčinit jiskrový výboj
nebo vést ke vznícení hořlavých materiálů.
Nikdy nepoužívejte nářadí v blízkosti hořla
vých látek jako jsou benzín, nafta nebo čisticí prostředky apod. Pracujte jen v čistých,
dobře větraných prostorech, ve kterých se
nenacházejí žádné hořlavé materiály.
Nářadí nikdy nesměřujte na jiné osoby.
•
Při provozu nářadí zabraňte přístupu dětí a
jiných osob na pracoviště.
Přístroj s dělicími kotouči nebo uběracími
•
kotouči nenechávejte otáčet v chodu
naprázdno. Dělicí kotouče nebo uběrací
kotouče se mohou uvolnit
•
Používání každého nářadí okamžitě
přerušte, když se cítíte špatně nebo
podrážděně nebo když se vyskytnou
bolesti.
•
Vibrace, opakující se pohyby nebo nepohodlná poloha mohou být škodlivé pro
ruce a paže.
•
Elektricky poháněné nářadí může při
používání vibrovat.
Elektro nářadí jako
-
-
-
-
46
Elektrická energie může zapříčinit těžké úrazy!
Noste vždy osobní ochranné vybavení!
^ hazet.com • ] [email protected]
Page 47
Pro Vaši bezpečnost
2
•
Před výměnou příslušenství, nastavením
a uložením vyjměte akumulátor z nářadí
nebo spínač nastavte na polohu VYP
příp. do zajištěné polohy. Takovými preventivními bezpečnostními opatřeními lze
zabránit neúmyslnému spuštění.
•
Používejte jen díly, upevňovací prvky a
příslušenství doporučené výrobcem.
•
Nářadí nikdy nenoste s prstem na
spouštěcím tlačítku.
•
Zabraňte neúmyslnému spuštění.
•
Rukojeť udržujte vždy suchou, čistou,
zbavenou oleje a mastnoty.
•
Dbejte na čisté, dobře odvětrané a vždy
dobře osvětlené pracoviště.
•
Nikdy nepoužívejte nářadí pod vlivem
alkoholu nebo drog.
•
Opravy nechte provádět pouze autorizovaný kvalifikovaný personál.
• Plastové díly nečistěte rozpouštědly.
Rozpouštědla jako benzín, čisticí ben-
•
zín, tetrachlorid uhličitý a alkohol mohou
plastové díly zdeformovat nebo zapříčinit
jejich ulomení.
tědly nesmí nářadí být v kontaktu.
S výše uvedenými rozpouš-
• Při pracích na vyvýšených místech vždy
dříve než začnete s prací dbejte na to, aby
se nikdo nenacházel pod pracovní oblastí.
Důležité bezpečnostní pokyny
pro rychlonabíječku:
Tento oddíl obsahuje důležité
bezpečnostní a provozní pokyny pro
rychlonabíječku:.
Před uvedením nabíječky do provozu si
přečtěte všechny pokyny a označení na:
1. nabíječce
2. akumulátoru,
• Pracovní teplota pro Li-Ion baterie:
10 až +40° C pro vybíjení 0 až +40°
C pro nabíjení
• Pracovní teplota pro nabíječku:
0 až +40° C
• Aby se zabránilo úderu elektrického prou
du, nabíječku odpojte ze zásuvky před
prováděním údržbářských nebo čisticích
prací. Odstranění akumulátoru nesnižuje
nebezpečí.
• Používání nabíječky v rozporu s předpisy
může vést k vážným poraněním.
-
Elektrická energie může zapříčinit těžké úrazy!
Noste vždy osobní ochranné vybavení!
[
+49 (0) 21 91 / 7 92-0 • \ +49 (0) 21 91 / 7 92-375 • ^ hazet.de • ] [email protected]
47
Page 48
Pro Vaši bezpečnost
2
Aby se zabránilo těmto
nebezpečím:
• Akumulátor nikdy nerozebírejte.
• Akumulátor nevhazujte do ohně, ani když
je poškozený nebo úplně opotřebovaný.
Nebezpečí výbuchu!
• Akumulátor nikdy nezkratujte.
• Nikdy nestrkejte předměty do větracích
otvorů nabíječky, protože jinak existuje
nebezpečí úderu el. proudu nebo poškození
nabíječky.
• Akumulátor nikdy nenabíjejte venku.
• Akumulátor nikdy nevystavujte přímému
slunečnímu záření.
• Nabíjejte pouze v dobře větraných prosto
rech s nízkou vlhkostí.
• Akumulátor nikdy nenabíjejte, když je teplota
pod 0°C (32°F) nebo nad 40°C (104°F).
• Nikdy nespojujte dvě nabíječky.
• Nikdy nestrkejte předměty do uchycení aku
mulátoru.
• Nikdy při nabíjení nepoužívejte zesilující
transformátor.
• Nikdy k nabíjení nepoužívejte motorový
generátor nebo stejnosměrný proud.
• Akumulátor a nabíječku nikdy neskladujte na
místech, na kterých teplota může dosáhnout
40°C (104°F).
• Nabíječku vždy používejte u standardního
elektrického připojení 230 V. Používání
nabíječky při vyšším napětí může vést k
přehřátí a poškození nabíječky.
• Mezi několika nabíjecími postupy vždy
dodržujte přestávku minimálně 15 minut,
aby se zabránilo přehřátí nabíječky.
• Nabíječku vždy odpojte od zdroje el. proudu,
když není používána.
-
-
48
Elektrická energie může zapříčinit těžké úrazy!
Noste vždy osobní ochranné vybavení!
^ hazet.com • ] [email protected]
Page 49
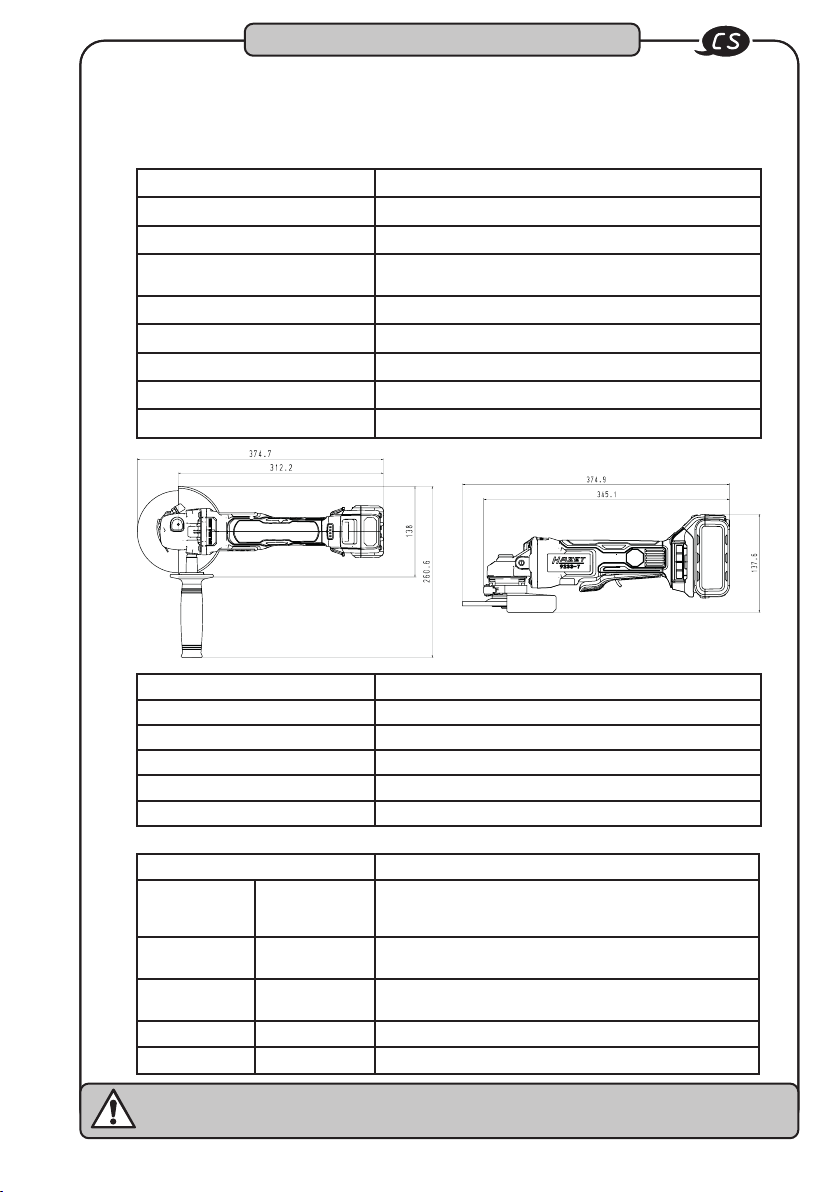
Konstrukce a funkce
3
1. Technická data / Části přístroje: Akumulátorová
úhlová bruska HAZET 9233-7
Závit vřetena
Výkon akumulátoru
Volnoběh
Hmotnost (bez akumulátoru) /
Hladina akustického tlaku LpA /
Hladina akustického výkonu LpW /
Vibrační zrychlení
Rozbrušovací kotouč
Uběrací kotouč
Nabíječka HAZET 9212-03
Vstupní napětí 100 - 240 V~ 50/60 Hz 110 W
Výstupní napětí 12 - 18 V - 4,0 A
Bezpečnostní schválení CB, ETL, GS, ICES, PSE
Typ akumulátoru Li-Ion
Doba nabíjení 80 min
M14
18V - 5Ah
8.000 ot./min
1,53kg
89 dB(A)
100 dB(A)
7,9 m/s²
125 mm x 1,0
125 mm x 6,0
Příslušenství - volitelně Rozsah dodávky
Č. HAZET Označení Akumulátorová úhlová bruska HAZET se dodává v plastovém
9212-02 Náhradní akumu-
9212-05 Náhradní akumu-
látor 2Ah
látor 5Ah
kufříku
K rozsahu dodávky patří:
HAZET 9233-7
HAZET 9212-02 18V / 5.0 Ah Li-Ion akumulátor
HAZET 9212-03 rychlonabíječka
Elektrická energie může zapříčinit těžké úrazy!
Noste vždy osobní ochranné vybavení!
[
+49 (0) 21 91 / 7 92-0 • \ +49 (0) 21 91 / 7 92-375 • ^ hazet.de • ] [email protected]
49
Page 50
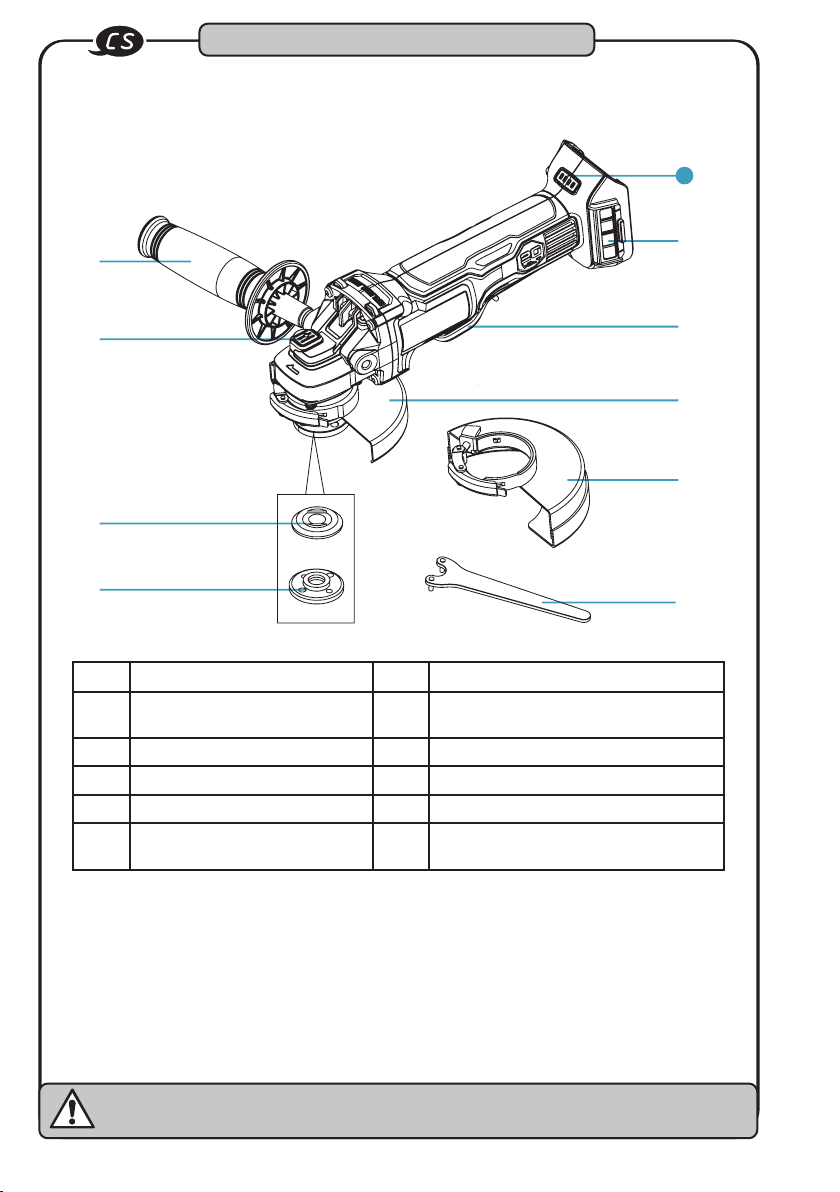
(
Konstrukce a funkce
3
10
/
"
!
%
&
§
$
Pol.
Označení
1 Kolébkový spínač 6 Ochrana proti jiskrám(rozbrušovací
2 Aretace vřetene 7 Odnímatelný kryt síťového filtru
3 Opěrná příruba 8 Opěrná rukojeť
4 Upínací matice 9 Klíč
5 Ochrana proti jiskrám (brusné
kotouče)
Pol.
Označení
kotouče)
10 Signalizace stavu nabití
)
50
Elektrická energie může zapříčinit těžké úrazy!
Noste vždy osobní ochranné vybavení!
^ hazet.com • ] [email protected]
Page 51
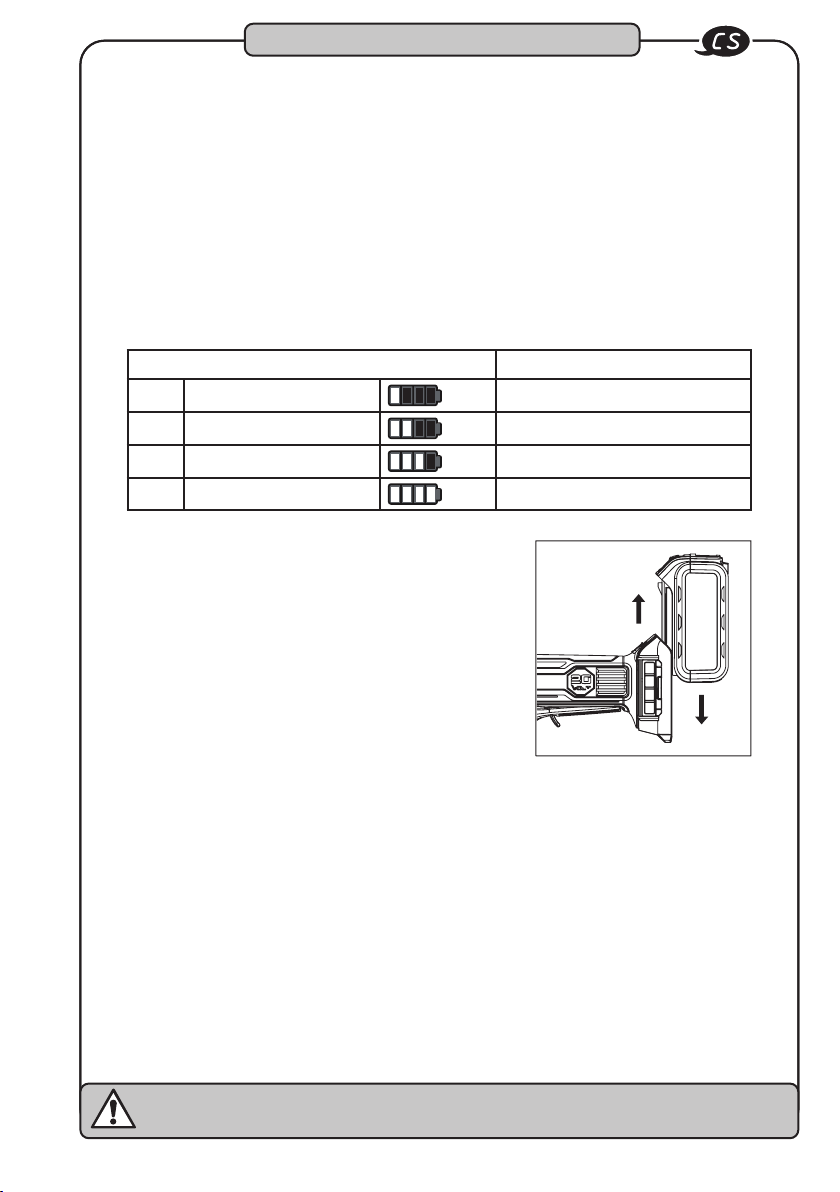
Konstrukce a funkce
3
Připevnění akumulátoru
• Akumulátor zastrčte, až s kliknutím zapadne.
• Když nezapadne, může akumulátor spadnout z nářadí, rozbít se a/nebo poranit Vás a
okolo stojící osoby.
• Akumulátor má signalizaci stavu nabití. (Zelené) 4-stupňové-LEDy zobrazují zbývající
kapacitu.
• Stisknutý ovládací knoflík, objeví se na 5 sek. stav nabití akumulátoru a lze jej přečíst.
• Akumulátor má ochranu proti přehřátí a chrání akumulátorovou úhlovou brusku HAZET a
akumulátor před přehřátím. Když bude dosaženo max. teploty 70°C, akumulátor auto
maticky přepne a akumulátorová úhlová bruska HAZET nemůže být dále provozována.
Signalizace kapacity nabití Stav
1 LED 1 0 - 25 %
2 LED 1, 2
3 LED 1, 2, 3
4 LED 1, 2, 3, 4
26 - 50 %
51 - 75 %
76 - 100 %
Uvolnění akumulátoru:
• Bezpečnostní uzávěr držte stisknutý a při tom
akumulátor stáhněte z nářadí.
-
Před uvedením do provozu:
• Vykliďte pracovní oblast.
• Neoprávněné osoby udržujte mimo pracovní oblast.
• Na pracovišti zajistěte dostatečné osvětlení a větrání.
• Zajistěte, aby akumulátor byl správně nasazený a byl zapadlý.
Nastavení směru otáčení:
• Směr otáčení se nastaví přepínacím tlačítkem.
• Chod vpřed a chod zpět jsou zobrazeny šipkami, které jsou vyfrézovány na krytu.
• Se směrem vpřed se nářadí otáčí ve směru hodinových ručiček.
• Se směrem zpět je nastaven směr otáčení proti směru hodinových ručiček.
Elektrická energie může zapříčinit těžké úrazy!
Noste vždy osobní ochranné vybavení!
[
+49 (0) 21 91 / 7 92-0 • \ +49 (0) 21 91 / 7 92-375 • ^ hazet.de • ] [email protected]
51
Page 52
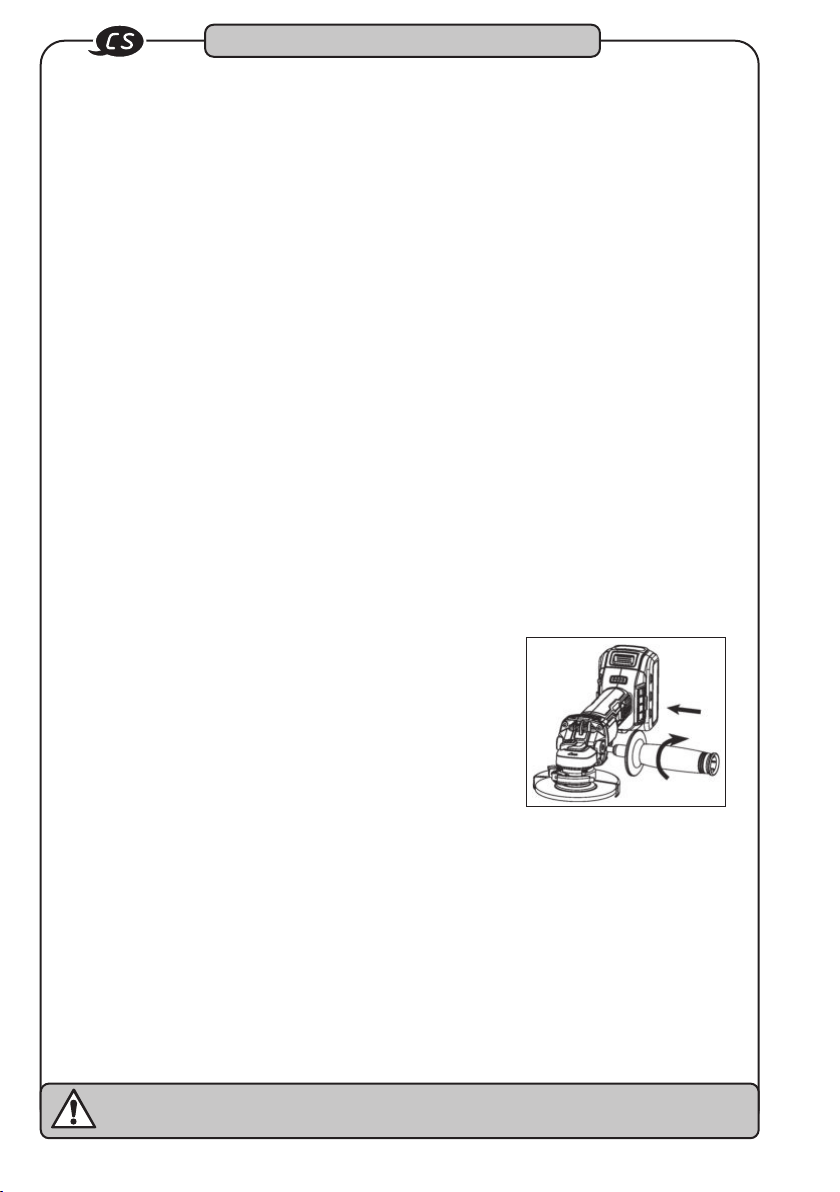
Konstrukce a funkce
3
Ochrana proti přetížení
Tato úhlová bruska je vybavena ochranou proti přetížení. Při nadměrném zatížení úhlové
brusky nebo když práci s nářadím nelze provést, se nářadí automaticky přepne do režimu
přetížení, to znamená, že se nářadí automaticky a znenadání zastaví. K ukončení režimu
přetížení jednoduše pusťte kolébkový spínač. Když bude kolébkový spínač následně
znovu stisknut, nářadí se opět uvede do chodu.
Bezpečnostní omezovač teploty
Dokud je úhlová bruska provozována v souladu s určeným použitím, nedojde k žádnému
přetížení. Když je oproti tomu po delší dobu provozována při plném zatížení, akumulátor
se přehřeje. Při překročení přípustného rozsahu teploty akumulátoru se akumulátor
automaticky vypne. Nářadí lze potom uvést do provozu teprve tehdy, když je dosaženo
bezpečné provozní teploty.
Omezovač nízkého napětí
Akumulátor provozovaný s tímto nářadím má elektronický omezovač nízkého napětí.
Omezovač nízkého napětí se aktivuje, když napětí klesne pod nastavenou hodnotu. Tato
funkce nářadí automaticky vypne. V takovém případě musíte buď použít jiný akumulátor
nebo nabít stávající akumulátor.
Jištění blokování
Během provozu se může nářadí za určitých okolností najednou zablokovat. Kdyby se
motor potom okamžitě nezastavil, mohlo by blokování mít za následek těžké úrazy. Ale
nářadí okamžitě rozezná blokování a automaticky se vypne.
Nasazení opěrné rukojeti
• Před nasazením nebo odejmutím opěrné rukojeti je třeba
vyjmout akumulátor.
• Opěrnou rukojeť našroubujte do krytu převodovky.
• Opěrnou rukojeť pevně dotáhněte.
Elektrická energie může zapříčinit těžké úrazy!
Noste vždy osobní ochranné vybavení!
52
^ hazet.com • ] [email protected]
Page 53
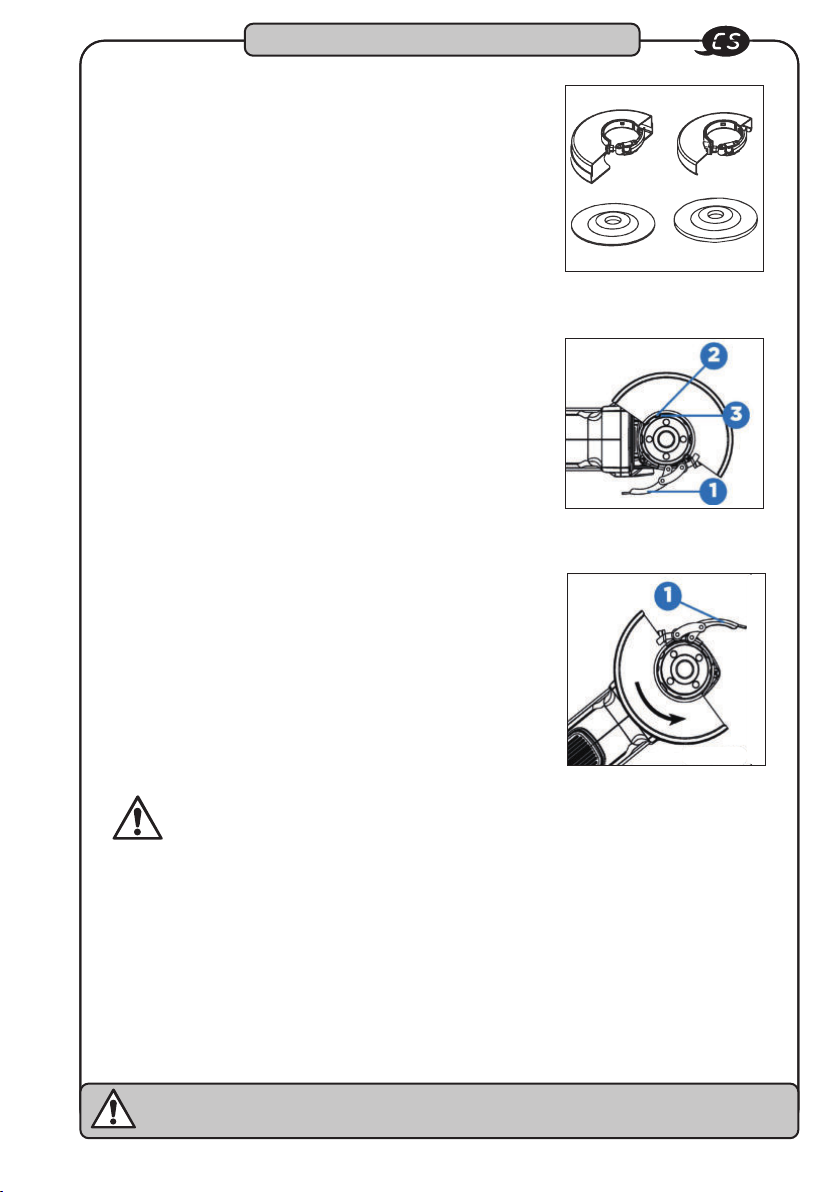
Konstrukce a funkce
3
Namontování ochrany proti jiskrám
Bezpodmínečně je nutné dbát na to, aby pro příslušenství
k oddělování a broušení byla vždy používána správná
ochrana proti jiskrám. Viz obr. E pro informace k výběru
správného příslušenství.
Ochrany proti jiskrám pro brusné a rozbrušovací kotouče
se obě namontují a odmontují pomocí následujících kroků:
• Otevřít zablokování proti jiskrám (1) a jazýčky (2) ochrany proti jiskrám nasměrovat k drážkám (3) krytu převodovky.
• Ochranu proti jiskrám tlačit směrem dolů, až jazýčky
ochrany proti jiskrám zapadnou a volně se točí v drážce
náboje krytu převodovky.
• Ochranu proti jiskrám při otevřeném zabloková
ní otočit do požadované pracovní polohy. Pro nejlepší ochranu obsluhy by měla být ochrana
proti jiskrám umístěna mezi vřeteno a obsluhu.
• Zavřít zablokování proti jiskrám(1), aby se ochra
na proti jiskrám připevnila ke krytu převodovky. Ochrana proti jiskrám se nesmí dát otáčet
rukou, dokud je zablokování zavřené. Úhlová bruska
nesmí být provozována, když je ochrana proti jiskrám
uvolněná nebo je otevřené zablokování.
• K odmontování ochrany proti jiskrám otevřete zabloko
vání, ochranou proti jiskrám otáčejte tak, aby jazýčky a
drážky byly vyrovnány a ochranu proti jiskrám potom
stáhněte směrem nahoru.
-
-
-
Ochrana proti jiskrámpro
rozbrušovací kotouč brusný kotouč
rozbrušovací kotouč brusný kotouč
(Obr. E)
Opatrně!
Opěrnou rukojeť lze podle přání obsluhy u brusného nářadí namontovat buď nalevo nebo
napravo. Opěrná rukojeť ale musí být v každém případě namontována, aby se zabránilo
ztrátě kontroly a možným těžkým úrazům.
Před provozem dbejte na to, aby opěrná rukojeť byla řádně dotažena. Na opěrnou rukojeť
za určitých okolností působí během provozu velká síla. Uvolnění opěrné rukojeti má možná
za následek těžké úrazy.
Elektrická energie může zapříčinit těžké úrazy!
Noste vždy osobní ochranné vybavení!
[
+49 (0) 21 91 / 7 92-0 • \ +49 (0) 21 91 / 7 92-375 • ^ hazet.de • ] [email protected]
53
Page 54
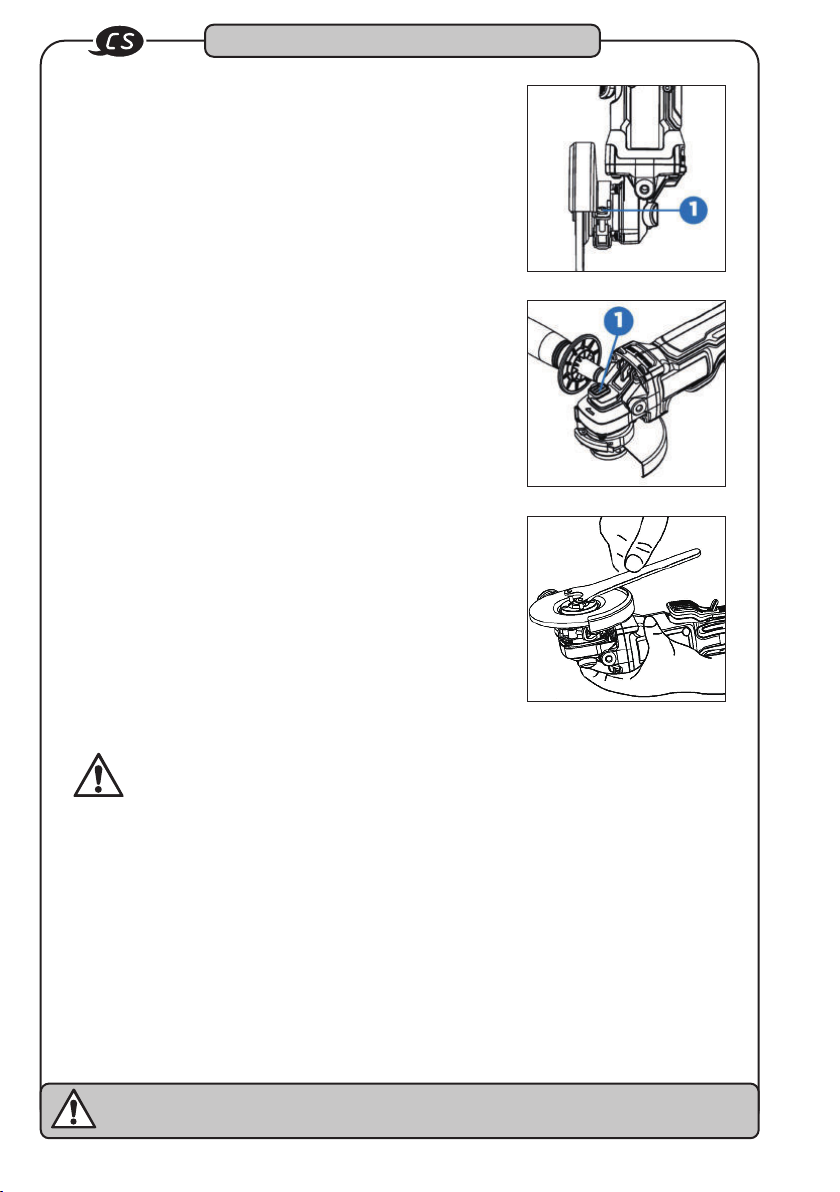
Konstrukce a funkce
3
Nastavení ochrany proti jiskrám
Ochrana proti jiskrám je ze závodu nastavena na průměr
náboje krytu převodovky. Pokud se ochrana proti jiskrám
po určité době uvolní, musí být dotažen stavěcí šroub (1)
při uzavřeném zablokování a namontované ochraně proti
jiskrám.
Aretace vřetene
Tlačítkem k aretaci vřetene (1) se má zabránit, aby se
vřeteno točilo, když jsou nasazovány nebo odstraňovány
rozbrušovací a brusné kotouče. Aretace vřetene smí být
stisknuta pouze tehdy, když je nářadí vypnuté a kotouč se
zcela dostal do klidového stavu.
K aretaci vřetene stisknout tlačítko k aretaci vřetene (1) a
otáčet vřetenem, až se již nemůže otáčet.
Opatrně!
Při používání rozbrušovacích a brusných kotoučů je nutné vždy pracovat s ochranou proti
jiskrám. Bruska je vybavena ochranou proti jiskrám pro rozbrušovací a brusné kotouče.
Musí být vždy používána správná ochrana proti jiskrám.
Je třeba dbát na to, aby ochrana proti jiskrám byla řádně zablokována ve správném úhlu.
Jinak může za určitých okolností zlomený kotouč způsobit těžké úrazy.
Aby se zabránilo provozu nedopatřením, musí být před prováděním následujících kroků
nářadí vypnuto a vyjmut akumulátor. Jinak může za určitých okolností dojít k těžkým
úrazům.
Pokud ochranu proti jiskrám nelze připevnit pomocí zablokování, nesmí být nářadí
používáno. Nářadí a ochrana proti jiskrám musí být potom k opravě nebo výměně ochrany
proti jiskrám dány do servisního střediska.
Elektrická energie může zapříčinit těžké úrazy!
Noste vždy osobní ochranné vybavení!
54
^ hazet.com • ] [email protected]
Page 55
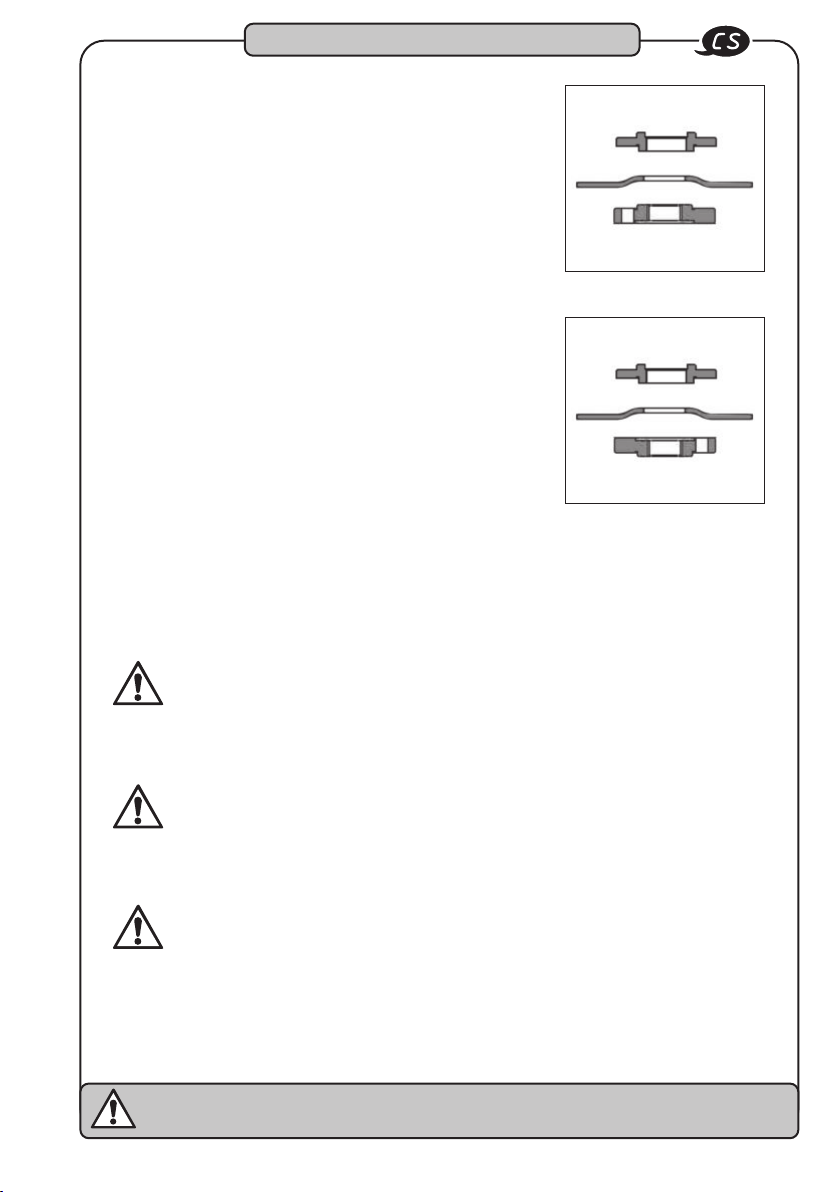
Konstrukce a funkce
3
Nasazení a odstranění rozbrušovacích a brusných kotoučů
Opěrná příruba
Zahnuté rozbrušovací a brusné kotouče musí být používány s
přiloženými přírubami.
• Nářadí vypnout a vyjmout akumulátor.
• Opěrnou přírubu bez závitů nasadit na vřeteno. Vyvýšený díl
(vedení) při tom směruje ke kotouči.
• Kotouč nasadit proti opěrné přírubě a vycentrovat na
vyvýšený díl (vedení) opěrné příruby.
• Stisknout tlačítko k aretaci vřetene a upínací matici
našroubovat na vřeteno.
Když je nasazovaný kotouč silnější než 1/8” (3 mm), nasadí se
upínací matice na vřeteno tak, aby vyvýšený díl (vedení) pasoval
na střed kotouče.
U kotoučů o tloušťce do 1/8” (3 mm) se upínací matice na
vřeteno nasadí tak, aby vyvýšený díl (vedení) nedoléhal ke
kotouči.
• Stisknout tlačítko k aretaci vřetene a upínací matici dotáhn
out přiloženým klíčem.
• K odstranění kotouče stisknout tlačítko k aretaci vřetene a
upínací matici povolit přiloženým klíčem.
Kotouč tloušťky 1/4” (6 mm)
Kotouč tloušťky 1/8” (3 mm)
-
Upínací matice
Opěrná příruba
Upínací matice
Upozornění:
Pokud se kotouč po dotažení upínací matice točí, musí být zkontrolováno vyrovnání. Pokud
byla upínací matice u tenkého kotouče přišroubována s vedením směřujícím proti kotouči,
potom lze kotoučem otáčet, protože výška vedení zabrání, aby upínací matice přidržovala
kotouč.
Opatrně!
Stavěcí šroub nesmí být dotahován při otevřeném zablokování ochrany proti jiskrám. U
ochrany proti jiskrám nebo náboje se mohou vyskytnout nerozeznatelná poškození.
Varování!
Aretaci vřetene neaktivovat, dokud je nářadí v provozu. To by vedlo k poškození nářadí a
používané příslušenství by se mohlo uvolnit a způsobit úrazy.
Varování!
Před výměnou příslušenství vždy vyjměte akumulátor z nářadí. Jinak může za určitých
okolností dojít k těžkým úrazům.
Používat pouze takové příslušenství, jehož bezpečný provozní počet otáčet je vyšší než
jmenovitý počet otáček nářadí.
Elektrická energie může zapříčinit těžké úrazy!
Noste vždy osobní ochranné vybavení!
[
+49 (0) 21 91 / 7 92-0 • \ +49 (0) 21 91 / 7 92-375 • ^ hazet.de • ] [email protected]
55
Page 56
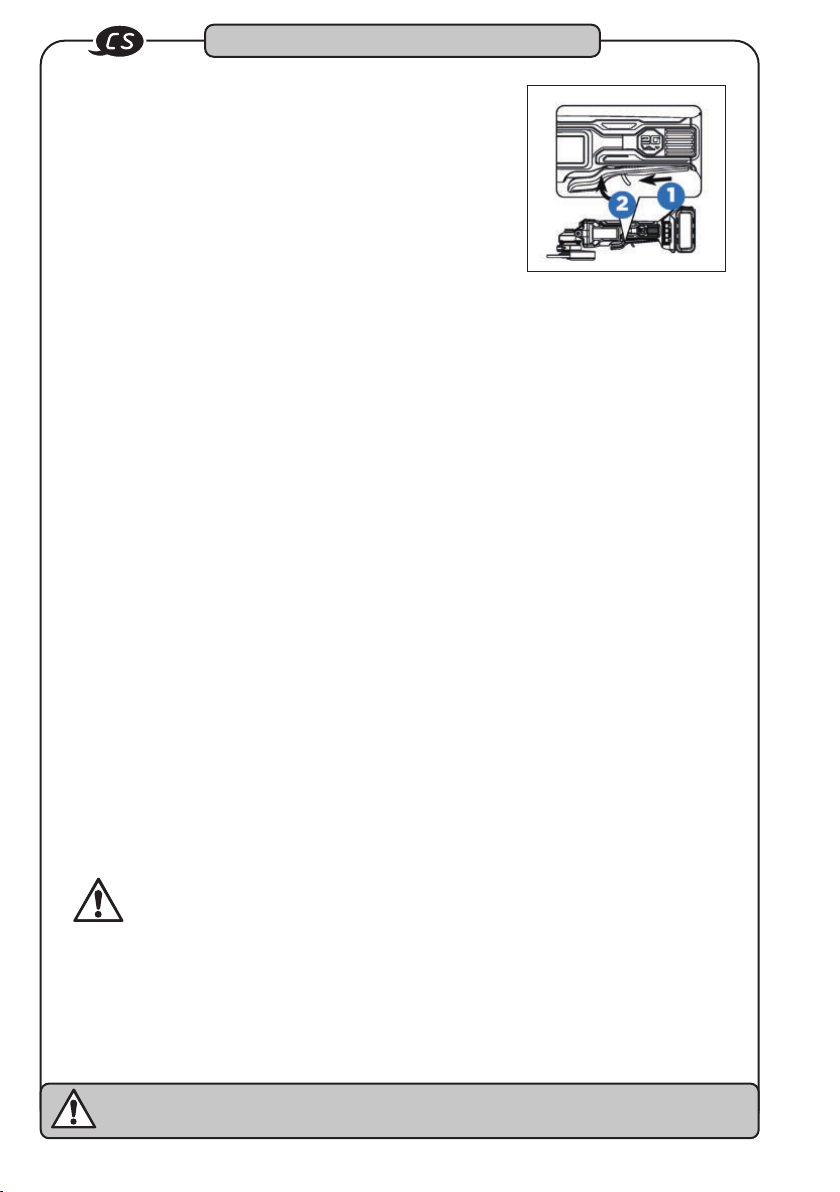
Konstrukce a funkce
3
Kolébkový spínač
Kryt nářadí a opěrnou rukojeť pevně uchopit. Ke spuštění
nářadí pojistnou páku (1) stisknout směrem dopředu a
stisknout kolébkový spínač (2). K zastavení nářadí pustit
kolébkový spínač.
Mírný rozběh
U této funkce se nářadí pozvolna rozběhne, což vede ke
zvýšenému komfortu práce.
Elektrická brzda
Elektrická brzda bude stisknuta, jakmile bude uvolněn kolébkový spínač. Tím se zastaví
rozbrušovací a brusný kotouč. Obecně to trvá dvě sekundy. Každopádně může dojít po
uvolnění kolébkového spínače ke zpoždění aktivace brzdy. Příležitostně se také může stát,
že brzda vůbec nebude aktivována. Když se to stane častěji, musí být bruska dána na
údržbu do autorizovaného servisu.
Upozornění:
Toto nářadí nemá žádné zařízení, které by kolébkový spínač drželo v zapnuté poloze.
Nářadí by nikdy nemělo být pomocí nějakého zařízení drženo v této zapnuté poloze.
Upozornění:
Toto nářadí je vybaveno elektrickou brzdou. Když tato brzda řádně funguje, jsou větracími
štěrbinami krytu za určitých okolností viditelné jiskry. To je normální a souvisí to s funkcí
brzdy.
Opatrně!
Když je kolébkový spínač uvolněn, rozbrušovací nebo brusný kotouč dobíhá 3 sekundy. Je
třeba dbát na to, aby nářadí bylo odkládáno pouze s úplně zastaveným kotoučem.
Elektrická energie může zapříčinit těžké úrazy!
Noste vždy osobní ochranné vybavení!
56
^ hazet.com • ] [email protected]
Page 57
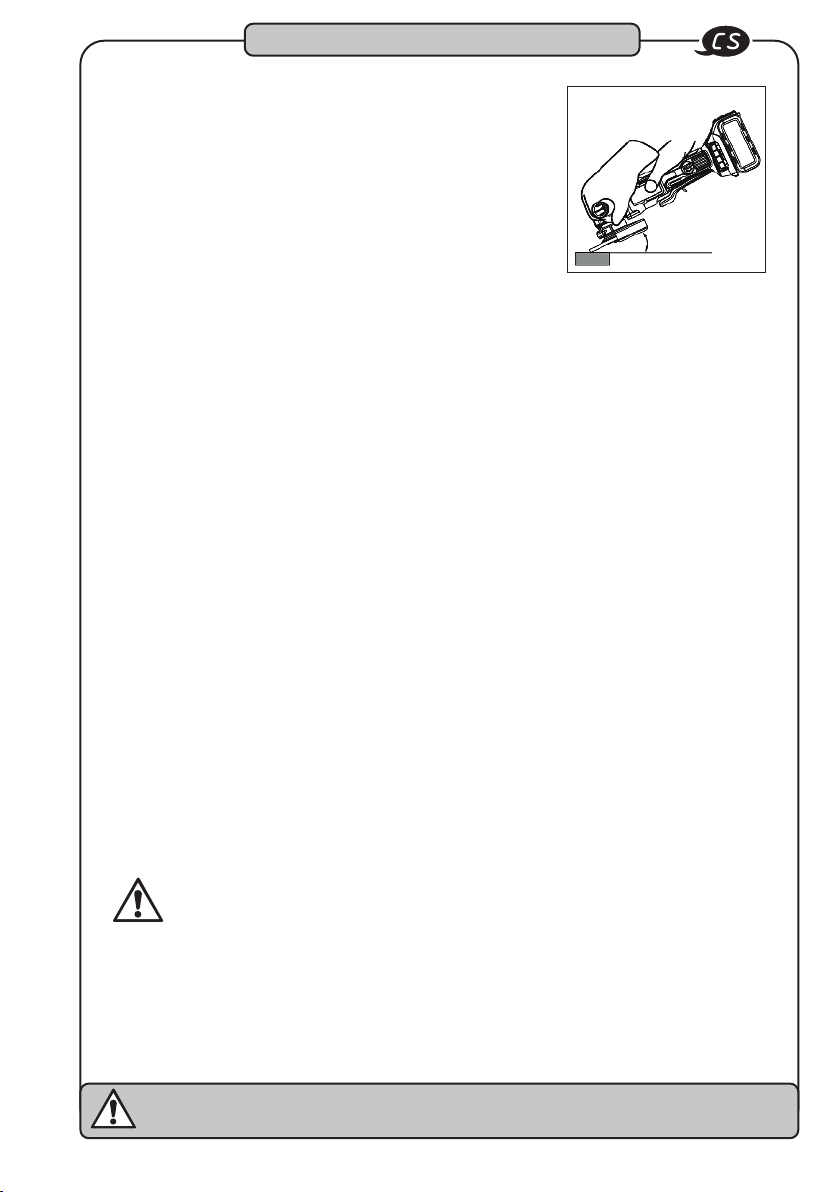
Konstrukce a funkce
3
Broušení s brusnými kotouči
Vždy by měly být vybírány a používány pouze takové
brusné kotouče, které jsou doporučovány pro broušený
materiál. Je třeba dbát na to, aby provozní počet otáček
každého vybraného kotouče příslušenství měl jmenovitý
počet otáček minimálně 7.500 1/min. Kromě toho musí
být dbáno na rozměry brusného nářadí. Vnitřní průměr
otvoru musí pasovat bez vůle u montážní příruby. Nesmí
se používat redukce nebo adaptéry.
• Veškeré obrobky upnout do svěráku nebo připevnit k pracovnímu stolu.
• Brusku držet oběma rukama před tělem a směrem od těla. Brusný kotouč se nesmí
dotýkat obrobku.
• Zapnout brusku a počkat, až motor a brusný kotouč dosáhl plného počtu otáček.
• Brusku pozvolna snižovat k obrobku, až brusný kotouč má kontakt s obrobkem.
• Brusný kotouč vždy držet pod úhlem 20 – 30 ° k povrchu obrobku.
• Bruskou plynule pohybovat nad obrobkem přiměřenou stále stejnou rychlostí.
• Vyvíjet právě takový tlak, aby se bruska netřásla nebo neodskakovala.
• Brusku před vypnutím dát pryč od obrobku.
20 – 30 º
Upozornění:
Když je bruska příliš dlouho držena na jednom bodu, na obrobku se vytvoří rýhy a zářezy.
Pokud je úhel mezi povrchem obrobku a brusným kotoučem příliš úzký, rovněž vzniknou
zářezy, protože tlak je při tom soustředěn na jednom místě.
Vysoký tlak snižuje počet otáček brusky a zatěžuje motor. Normálně je vlastní hmotnost
brusky dostatečná pro většinu prací při broušení. Při broušení drsných okrajů nebo voln
ých šroubů je třeba pracovat s malým tlakem, pokud existuje nebezpečí, že bruska brousí
nerovnosti v kovovém okraji.
Nebezpečí!
Bruska nesmí být nikdy provozována bez ochrany proti jiskrám příp. s ochranou proti jiskrám, která není řádně připevněna. Byla zkonstruována tak, aby mohla být používána pouze
s namontovanou ochranou proti jiskrám. Při pokusu provozovat brusku bez ochrany proti
jiskrám, budou volné kovové kusy vymrštěny proti obsluze, což vede k těžkým úrazům.
Elektrická energie může zapříčinit těžké úrazy!
Noste vždy osobní ochranné vybavení!
[
+49 (0) 21 91 / 7 92-0 • \ +49 (0) 21 91 / 7 92-375 • ^ hazet.de • ] [email protected]
-
57
Page 58
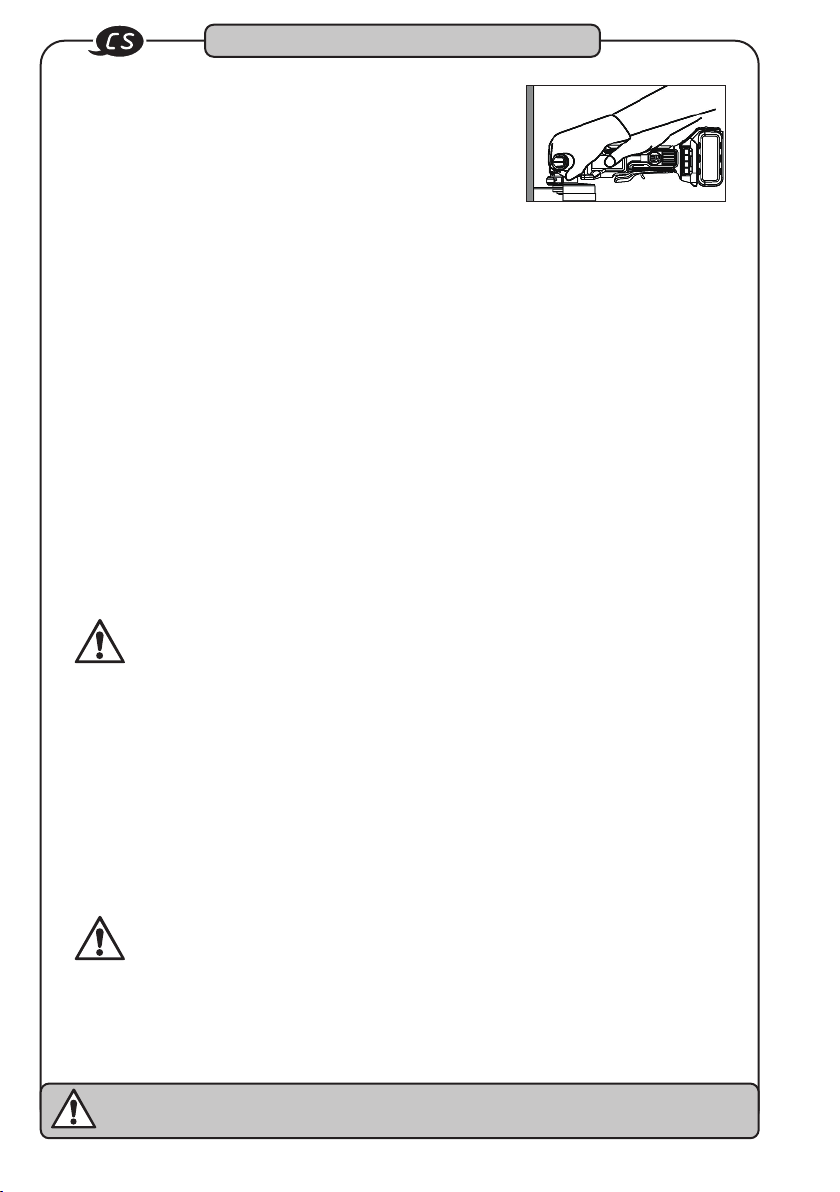
Konstrukce a funkce
3
Řezání s rozbrušovacími kotouči
Vždy by měly být vybírány a používány pouze takové rozbrušovací kotouče, které jsou doporučovány pro
broušený materiál. Je třeba dbát na to, aby provozní
počet otáček každého vybraného kotouče příslušenství
měl jmenovitý počet otáček minimálně 7.500 1/min. Kromě
toho musí být dbáno na rozměry brusného nářadí. Vnitřní
průměr otvoru musí pasovat bez vůle u montážní příruby.
Nesmí se používat redukce nebo adaptéry.
• Veškeré obrobky upnout do svěráku nebo připevnit k pracovnímu stolu.
• Brusku držet oběma rukama před tělem a směrem od těla. Rozbrušovací kotouč se
nesmí dotýkat obrobku.
• Zapnout brusku a počkat, až motor a rozbrušovací kotouč dosáhl plného počtu otáček.
• Před snížením nářadí k povrchu obrobku počkat, až nářadí dosáhlo plného počtu otáček.
• Na povrch obrobku vyíjet pouze nízký tlak, aby stroj mohl běžet s vysokým počtem
otáček. Brusný výkon je nejvyšší, když je nářadí provozováno s vysokým počtem otáček.
• Když byl započat řez a vytvořil se zářez v obrobku, nesmí již být změněn úhel řezu.
Změna úhlu řezu vede k tomu, že se rozbrušovací kotouč ohne, což možná vede ke
zlomení rozbrušovacího kotouče.
• Brusku před vypnutím dát pryč od obrobku a dbát na to, aby nářadí bylo odkládáno
pouze s úplně zastaveným kotoučem.
Varování!
Aby se zabránilo ztrátě kontroly u nástroje a možným těžkým úrazům, musí být nářadí vždy
obsluhováno oběma rukama. Při tom jedna ruka vždy zůstává na rukojeti nářadí.
Nářadí nesmí být spuštěno, když je položeno na obrobku. Aby bylo možno řádně pracovat,
musí nářadí nejdříve dosáhnout plného počtu otáček. Pokud je nářadí spuštěno, když leží
na obrobku, může dojít ke zpětnému rázu a způsobit tak úrazy.
Je třeba dbát na to, aby nářadí bylo odkládáno pouze s úplně zastaveným kotoučem. Jinak
může dojít k těžkým úrazům.
Na rozbrušovací kotouč nesmí být vyvíjen nadměrný tlak, protože přílišný tlak zvyšuje
možnost, že se rozbrušovací kotouč zlomí příp. se přehřeje motor.
Varování!
Při použití rozbrušovacích kotoučů musí být namontována ochrana proti jiskrám pro
rozbrušovací kotouče.
Během práce nesmí bý nikdy změněn úhel řezu. Korekcí úhlu by se mohl zlomit rozbrušovací
kotouč nebo prasknout.
Elektrická energie může zapříčinit těžké úrazy!
Noste vždy osobní ochranné vybavení!
58
^ hazet.com • ] [email protected]
Page 59
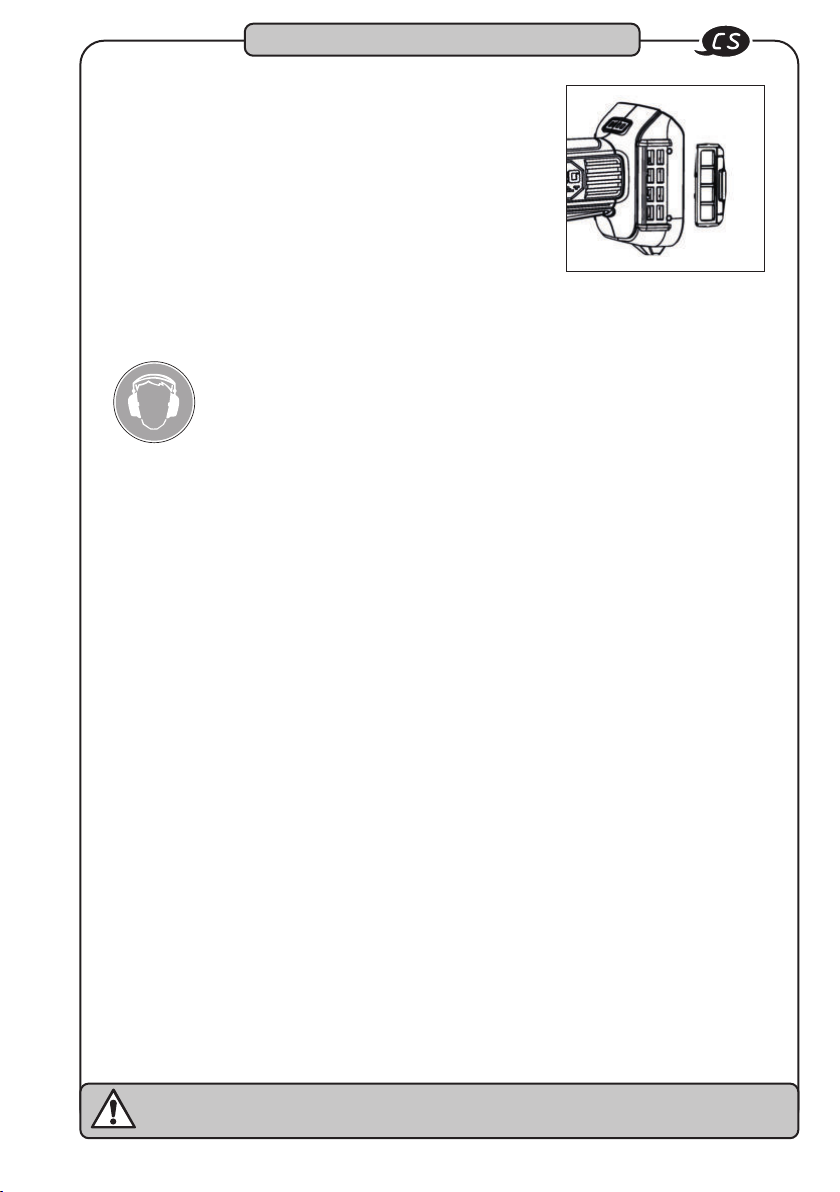
Konstrukce a funkce
3
Odnímatelný kryt síťového filtru
Pomocí odnímatelného krytu síťového filtru se má zabránit
tomu, aby za chodu byla znečištěna vnitřní část stroje.
K očištění stroje od prachu se vyjme odnímatelný kryt
síťového filtru.
Poznámka:
Hlasitý provozní hluk! Bezpodmínečně
noste ochranu sluchu!
Před začátkem nabíjení:
• Napětí zdroje el. proudu porovnejte s povoleným napětím na označovacím štítku
nabíječky.
• Při nabíjení s vyšším než povoleným napětím existuje pro nabíječku nebezpečí požáru.
• Kabel zkontrolujte z hlediska poškození. Poškozené kabely musí být před použitím
vyměněny za nové.
• Nabíječku spojte se zdrojem el. proudu. Všechny 3 nabíjecí LEDy se rozsvítí na 1 - 2
sekundy.
• Akumulátor horní stranou směrem dolů vsuňte připojovací stranou do nabíječky. Dbejte
na to, aby akumulátor doléhal u nabíječky a aby zapadly kontakty.
• Když nabíječka rozezná přehřátí akumulátoru, blikají všechny 3 nabíjecí LEDy ve stejnou
dobu. Odstraňte akumulátor a nechte nabíječku vychladnout na cca 80 minut, dříve než
budete pokračovat v nabíjení.
Elektrická energie může zapříčinit těžké úrazy!
Noste vždy osobní ochranné vybavení!
[
+49 (0) 21 91 / 7 92-0 • \ +49 (0) 21 91 / 7 92-375 • ^ hazet.de • ] [email protected]
59
Page 60
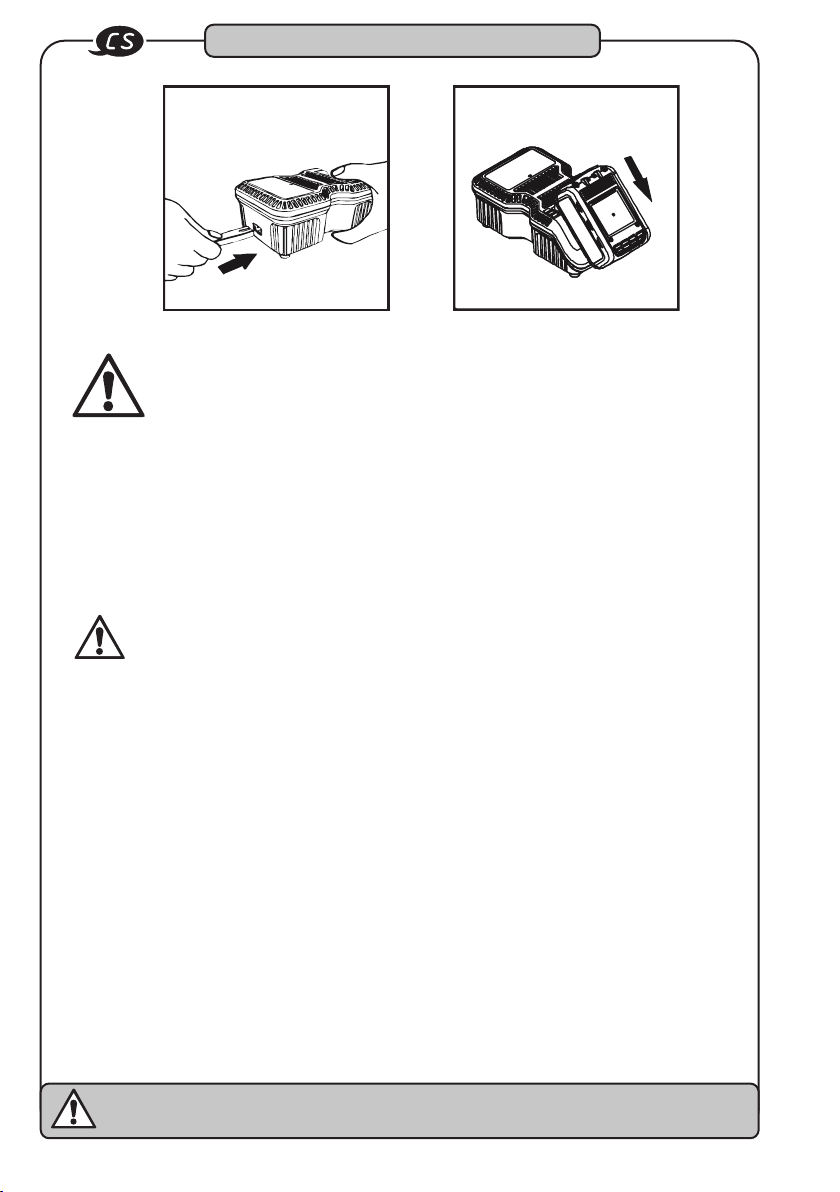
Konstrukce a funkce
3
Když je akumulátor chybně nasazen do nabíječky, mohou se přípoje nabíječky
ohnout nebo poškodit.
• Během nabíjení je zobrazován stav nabití:
- Nabití na méně než 30%: Všechny 3 nabíjecí LEDy blikají.
- Nabití na méně než 60%: Jeden nabíjecí LED svítí, oba ostatní blikají.
- Nabití na 60%: 2 LEDy svítí a jeden bliká.
- Nabití na 100%: Všechny 3 nabíjecí LEDy svítí.
• Nabíjení může trvat asi 65 minut. Když svítí všechny 3 nabíjecí LEDy, je nabíjení
ukončeno.
Při poruchách funkce nabíječku okamžitě odpojte od zdroje
el. proudu. Akumulátor příp. znovu nasaďte.
Odstraňování chyb / zamezení:
• Zástrčku nikdy nevytahujte za kabel ze zásuvky.
• Vždy vytáhněte za zástrčku, aby se zabránilo poškození kabelu.
• Nabíječku rukou pevně držte a akumulátor vyjměte z nabíječky.
• Akumulátor a nabíječka se během nabíjení mírně zahřejí. To nepředstavuje žádné
ovlivnění funkce. Při zacházení je nařízena příslušná opatrnost.
• Po ukončení nabíjení až do začátku nového nabíjení dodržovat přestávku 15 minut.
• Když nabíječka rozezná přehřátí akumulátoru, blikají všechny 3 nabíjecí LEDy ve stejnou
dobu. Odstraňte akumulátor a nechte nabíječku vychladnout na cca 15 - 30 minut, dříve
než budete pokračovat v nabíjení.
• Když nabíječka zjistí poruchu, blikají všechny 2 nabíjecí LEDy ve stejnou dobu. Odstraňte
akumulátor a nechte jej vychladnout na cca 15 - 30 minut. Pokud by oba nabíjecí LEDy
potom dále blikaly, mohla by být závada u akumulátoru. Zašlete akumulátor okamžitě
k analýze.
60
Elektrická energie může zapříčinit těžké úrazy!
Noste vždy osobní ochranné vybavení!
^ hazet.com • ] [email protected]
Page 61
Konstrukce a funkce
3
• Když nabíječka rozezná závadu, blikají všechny 3 nabíjecí LEDy ve stejnou dobu. Odstraňte akumulátor a nabíječku vyjměte z elektrické sítě. Po
2 minutách zástrčky opět zastrčte do zásuvky a vložte akumulátor. Pokud by
stále ještě blikaly všechny 3 nabíjecí LEDy, zašlete nabíječku okamžitě k analýze.
Údržba a péče
4
Údržba a péče:
• Před prováděním veškerých prací na údržbě a opravách akumulátor odpojte od nářadí.
• Nástrčné hlavice pravidelně kontrolujte. Opotřebované nebo poškozené nástrčné hla
vice mohou z nářadí sklouznout nebo snížit efektivitu a tak poškodit motor.
-
Údržba motoru:
• Motorová jednotka - závity/vinutí/cívka jsou nejdůležitějšími díly elektro nářadí. O nářadí
pečujte, abyste zajistili, že vinutí/cívka nejsou poškozeny nebo namočeny vodou nebo olejem.
Péče:
• Aku rázový utahovák HAZET by měl být v pravidelných intervalech čištěn čisticím
prostředkem bez obsahu rozpouštědel a brusných přísad.
Kontrola ohledně prachu:
• Prach lze odstranit měkkým hadříkem nebo hadříkem navlhčeným mýdlovou vodou.
• Nepoužívejte žádné bělicí čisticí prostředky obsahující chlór, benzín nebo ředidlo,
protože ty mohou poškodit plast.
• Plastové díly očistěte měkkou utěrkou namočenou do mýdlové vody a osušte.
Náhradní díly:
• Používejte jen originální náhradní díly výrobce.
• Nesprávné nebo vadné náhradní díly mohou způsobit poškození, špatnou funkci nebo
úplné selhání přístroje.
• Při použití neschválených náhradních dílů zanikají veškeré nároky na záruku,
servis, poškození a odpovědnost vůči výrobci a jeho zástupců, obchodníků a distributorů.
Elektrická energie může zapříčinit těžké úrazy!
Noste vždy osobní ochranné vybavení!
[
+49 (0) 21 91 / 7 92-0 • \ +49 (0) 21 91 / 7 92-375 • ^ hazet.de • ] [email protected]
61
Page 62
Údržba a péče
4
Uschování a skladování:
Přístroj je třeba skladovat a uschovávat
za následujících podmínek:
• Přístroj skladujte v suchém a bezprašném prostředí.
• Přístroj nevystavujte žádným kapalinám a / nebo agresívním látkám.
• Přístroj neskladujte venku.
• Přístroj udržujte mimo dosah dětí.
• Teplota skladování -10°C až +40°C.
• Relativní vlhkost vzduchu max. 60%.
Likvidace:
• Staré akumulátory (Li Ion) a elektrické přístroje nepatří do domovního odpadu a je nutné
je zlikvidovat přes vhodná sběrná místa.
• Elektro šrot, elektronické komponenty, mazací a jiné pomocné látky podléhají zacházení
se speciálním odpadem a smí být zlikvidovány pouze schválenými odbornými provozy!
• Snížení znečištění životního prostředí a ochrana životního prostředí, stojí uprostřed
našich aktivit!
62
Elektrická energie může zapříčinit těžké úrazy!
Noste vždy osobní ochranné vybavení!
^ hazet.com • ] [email protected]
Page 63
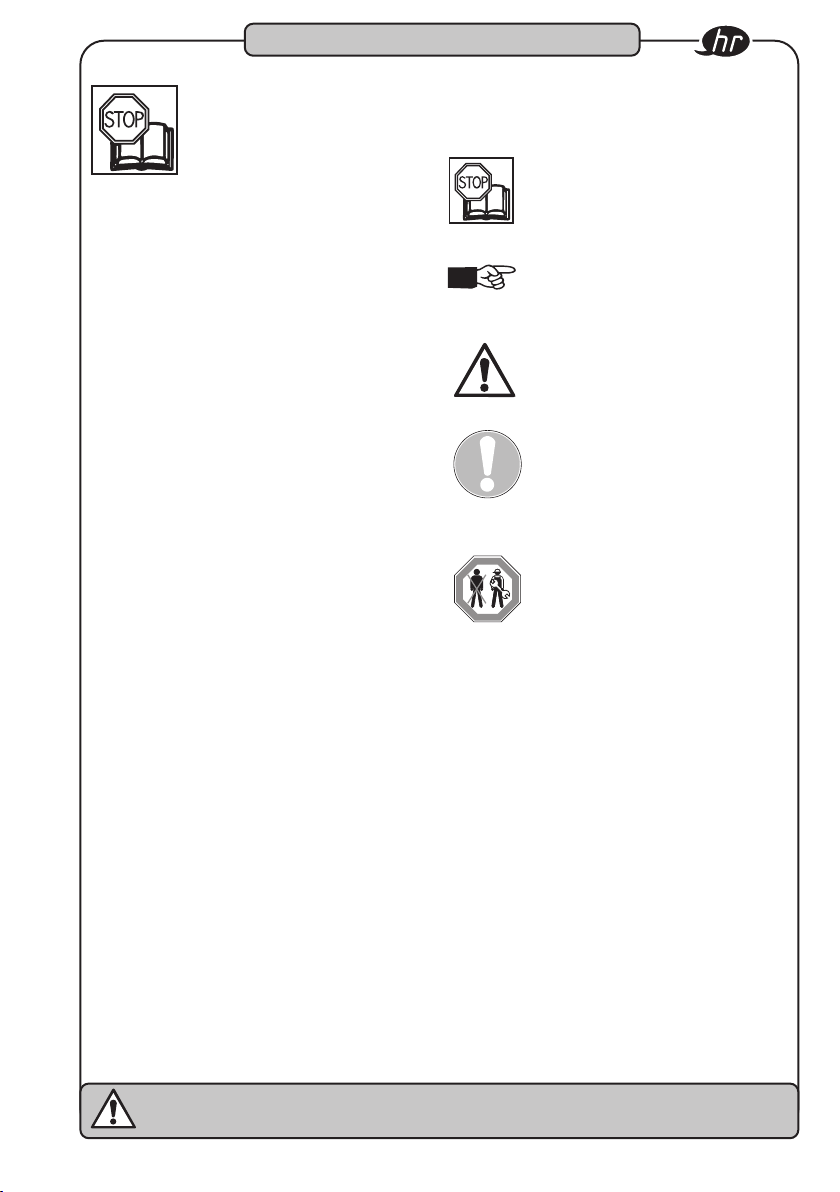
Zua Vašu informaciju
1
1. Opće informacije
• Molimo osigurajte da je korisnik ovog alata
prije prve uporabe temeljito pročitao i razumio ovaj priručnik za uporabu.
• Ove upute za uporabu sadrže važne
podatke potrebne za siguran i siguran rad
vašeg alata HAZET.
• Pravilna uporaba alata uključuje potpunu
sukladnost sa svim sigurnosnim uputama
i podacima u ovom priručniku za uporabu.
• Stoga uvijek držite ove upute za uporabu s
vašim alatom HAZET.
• Ovaj je alat razvijen za određene aplikacije.
HAZET izričito ističe da se ovaj alat ne smije
mijenjati i / ili koristiti na način koji ne odgo
vara njegovoj osnovnoj uporabi.
• HAZET ne preuzima nikakvu odgovornost
za ozljede i štete nastale uslijed nepravilne,
zloupotrebe ili nepravilne uporabe ili kršenja
sigurnosnih propisa.
• Uz to se moraju poštivati propisi o
sprečavanju nesreća i opći sigurnosni pro
pisi koji se primjenjuju na područje primjene
alata.
-
-
2. Objašnjenje simbola
PAŽNJA: Obratite pažnju na ove simbole!
Pročitajte upute za upotrebu!
Operator je dužan poštivati upute za
uporabu i uputiti sve korisnike alata
u skladu s uputama za uporabu
NAPOMENA!
Ovaj simbol označava upute koje
olakšavaju rukovanje
UPOZORENJE!
Ovaj simbol označava važne opise,
opasne uvjete, sigurnosne opasnosti
i upute.
PAŽNJA!
Ovaj simbol označava informacije
koje će , ako se ignoriraju, dovesti
do oštećenja , neispravnosti i/ili
kvara uređaja.
PROFESIONALCI!
Alat je prikladan samo za upotrebu
od strane stručnjaka, rukovanje ama
terima može dovesti do ozlijeda ili
oštećenja alata .
-
Električni udar struje može uzrokovati ozbiljne ozljede
Uvijek koristite osobna sredstva za zaštitu!
[
+49 (0) 21 91 / 7 92-0 • \ +49 (0) 21 91 / 7 92-375 • ^ hazet.de • ] [email protected]
63
Page 64
Za Vašu sigurnost
2
1. Odgovornost
operatera
• U vrijeme svog razvoja i proizvodnje, uređaj
je izrađen prema primjenjivim, priznatim
tehnološkim pravilima i smatra se pouz
danim. Međutim, uređaj može biti opasan
ako ga koristi nepropisno obučeno osoblje,
nepropisno ili nepravilno. Svaka osoba koja
je dodijeljena za rad na ili s uređajem mora
stoga pročitati i razumjeti upute za uporabu
prije početka rada
• Zabranjene su bilo kakve promjene, kao i
nadogradnje ili preinake uređaja.
• Sve sigurnosne upute, upozorenja i upute
za uporabu na uređaju uvijek moraju biti čit
ljive. Oštećene znakove ili naljepnice moraju
se odmah zamijeniti.
• Navedene vrijednosti podešavanja ili raspo
ni moraju se pridržavati.
• Upute za uporabu uvijek držite u neposred
noj blizini uređaja.
• Koristite se uređajem samo ako je u tehnički
ispravnom i sigurnom stanju.
• Uvijek osigurajte sigurnosne uređaje slo
bodno dostupnim i redovito ih pregledavajte.
2. Namjena
uporabe
Radna sigurnost zajamčena je samo ako se
koristi onako kako je predviđeno u skladu s
podacima u uputama za uporabu. Uz podat-
ke o zaštiti na radu u ovim uputama za rad,
potrebno je poštivati i poštivati opće propise
o sigurnosti, sprečavanju nesreća i zaštiti okoliša koji se primjenjuju na područje primjene
uređaja.
Korištenje i održavanje moraju se uvijek obav
ljati u skladu s lokalnim državnim ili saveznim
propisima.
-
• HAZET akumulatorska kutna brusilica nami
jenjena je brušenju / rezanju tvrdih komada,
npr. varovi, čelične zakovice, lim ili slično
-
• Upravljajte uređajem samo u tehnički isprav
nom i sigurnom stanju.
-
• Uvijek osigurajte sigurnosne uređaje slo
bodno dostupnim i redovito ih pregledavajte.
• Nepravilna uporaba baterijske kutne brusi
-
lice ili uporaba koja nije u skladu s sigurnosnim uputama može dovesti do ozbiljnih
ozljeda ili smrti.
• Zabranjena je svaka upotreba uređaja koja
nadilazi osnovnu upotrebu i / ili na bilo koji
drugi način i ne smatra se namjenom.
• Zahtjevi bilo koje vrste prema proizvođaču i
/ ili njegovom ovlaštenom zastupniku zbog
oštećenja uslijed nepravilne uporabe uređa
ja nisu uključeni.
• Operater je odgovoran za svu štetu nastalu
nepropisnom uporabom.
-
-
-
-
-
-
64
Električni udar struje može uzrokovati ozbiljne ozljede
Uvijek koristite osobna sredstva za zaštitu!
Page 65
Za Vašu sigurnost
2
3. Opasnosti koje proizlaze
iz uređaja
Prije svake uporabe, HAZET baterijske kutne
brusilice mora biti provjerena radi njene pune
funkcionalnosti. Ako nakon ovog ispitivanja
nije zajamčena funkcionalnost ili je pronađeno
oštećenje, kutna brusilica ne smije se koristiti.
Ako nije osigurana potpuna funkcionalnost
i još uvijek se koristi kutna brusilica, postoji
opasnost od znatnih fizičkih, zdravstvenih i
imovinskih šteta.
Udar električne energije može uzrokovati
ozbiljne ozljede. Za zaštitu od strujnog udara,
ozljeda i požara moraju se poštivati sljedeće
osnovne sigurnosne mjere:
• Priključni kabel i kućište ne smiju se oštetiti.
Alate / punjače baterija koji su oštećeni prili
kom pada ili udara moraju provjeriti stručno
osoblje prije ponovnog pokretanja.
• Ne koristite alate gdje je prekidač za uključi
vanje / isključivanje neispravan. Alati koji se
više ne mogu uključiti ili isključiti prekidačem
za uključivanje i isključivanje su opasni i
moraju se popraviti.
• Produžni kablovi ne smiju dodirivati vruće ili
oštre dijelove ili ih oštetiti na bilo koji drugi
način. Kablovi moraju biti položeni tako
da ne predstavljaju opasnost da se na njih
netko spotakne
• Nemojte izlagati punjač i kutnu brusilicu
vlazi, vodi ili drugim tekućinama. To može
rezultirati opasnim pražnjenjem napona.
• Neiskorištenu bateriju držite podalje od
metalnih predmeta kao što su spajalice
za papir, novčići, ključevi, čavli, vijci itd.
Ovi objekti mogu stvoriti vezu između polova baterije, uzrokujući na taj način kratki spoj
koji može rezultirati iskrom ili vatrom.
• Nemojte sami rastavljati / otvarati punjač i /
ili kutnu brusilicu. Nepravilna montaža može
rezultirati lošom funkcionalnošću, požarom,
električnim udarom i / ili ozljedom.
• Sve poslove održavanja ili popravaka treba
uvijek izvodi stručno osoblje. Da bi se osi
-
-
-
gurala dugoročna sigurnost u radu, smiju se
koristiti samo originalni rezervni dijelovi.
• Ne smije se uklanjati zaštitne uređaje i / ili
dijelove kućišta.
• Nikada ne upotrebljavajte alat ako nedostaje
zaštitni poklopac ili nisu svi sigurnosni ure
đaji prisutni i u besprijekornom su stanju.
• Produžni kabeli moraju biti odgovarajuće
dimenzionirani za punjač. Kabeli koji nisu
dizmenzionirani za potrebnu amperažu
mogu se pregrijati.
• Bateriju možete puniti samo punjačem
posebno namijenjenim za ovu svrhu. Punjač
koji je dizajniran za drugu vrstu baterija može
uslijed punjenja baterije dovesti do pregrija
vanja i uzrokovati požar.
• Koristite alat samo s originalnom baterijom.
Korištenje druge baterije može uzrokovati
požar.
• Baterija i punjač se tijekom rada malo zagri
javaju. To ne utječe na funkciju. Pri rukovanju
je potreban odgovarajući oprez.
• Koristite baterijsku kutnu brusilicu samo na
mjestima koja su određena i propisana važe
ćim propisima za radna područja i električne
sustave.
• Iz sigurnosnih razloga zabranjene su bilo
kakve promjene ili preinake na baterisjkoj
kutnoj brusilici HAZET. Promjene uređaja
rezultiraju trenutnim odricanjem odgovor
nosti.
-
-
-
-
-
Električni udar struje može uzrokovati ozbiljne ozljede
Uvijek koristite osobna sredstva za zaštitu!
[
+49 (0) 21 91 / 7 92-0 • \ +49 (0) 21 91 / 7 92-375 • ^ hazet.de • ] [email protected]
65
Page 66
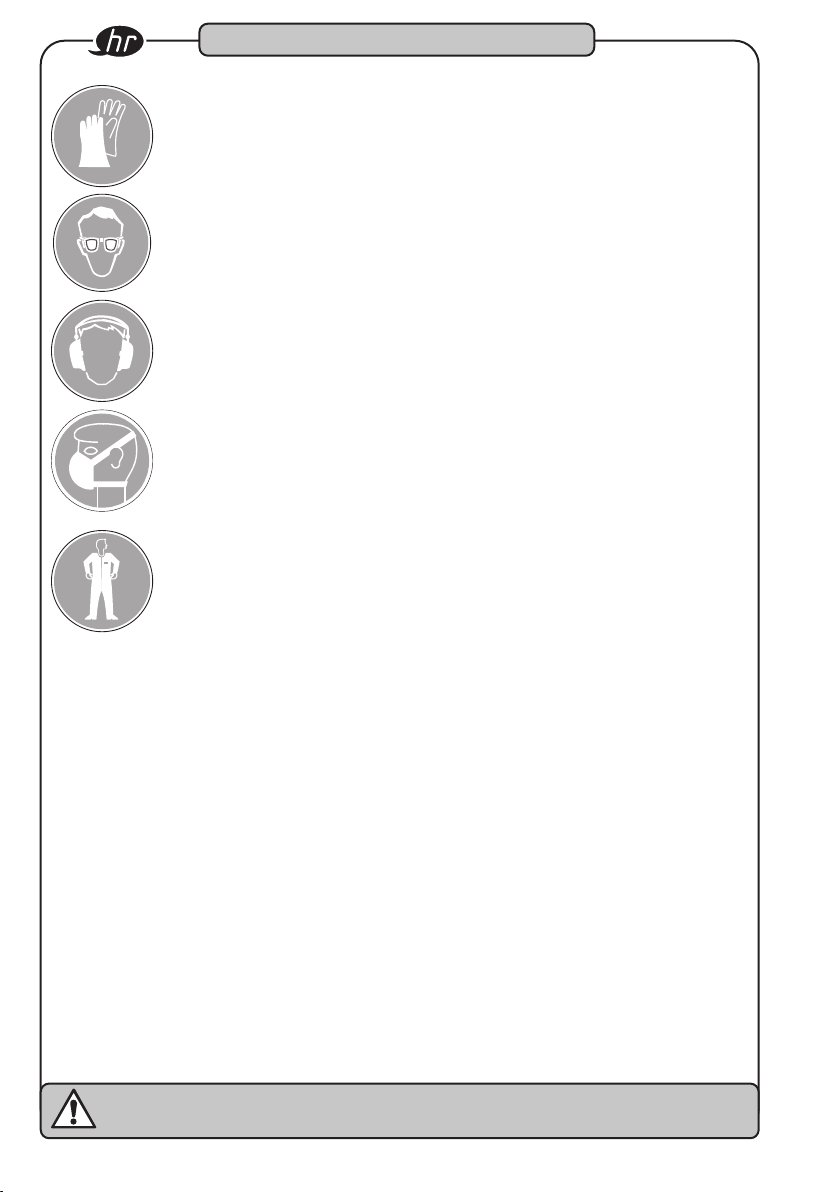
Za Vašu sigurnost
2
Nosite radne rukavice i
zaštitne naočale.
Električni rotacijski alati mogu
velikom odbaciti strugotinu,
prašinu i druge sitnice, što
može rezultirati ozbiljnim
ozljedama oka.
Nosite štitnike za uši
Dugo izlaganje radnoj buci
kutne brusilice može dovesti
do oštećenja ili trajnog gubit
ka sluha.
Nosite masku za lice ili
zaštitu dišnog sustava.
Alat za obradu materijala
stvara prašinu i druge abrazi
je, koje mogu oštetiti pluća i
dišne puteve. Neki materijali,
poput ljepila i katrana, sadrže
kemikalije čije pare, ako se
udišu duže vrijeme, mogu
prouzrokovati ozbiljnu štetu.
Nosite usku zaštitnu radnu
odjeću.
Alati s rotirajućim dijelovima ili
alati koji pokreću druge alate,
kao što su rezne ili brusne
ploče itd. Mogu se zapeti za
kosu, odjeću, nakit ili druge labave predmete
što može dovesti do ozbiljnih ozljeda. Nikada
ne nosite široku odjeću i / ili trake za kosu itd.
Koje se mogu zaglaviti u rotirajućim dijelovima
alata. Tijekom rada uklonite sav nakit, satove,
identifikacijske oznake, narukvice, ogrlice itd.
Koji bi se mogli uhvatiti na alatu. Nikada ne
dirajte dijelove alata koji su u pokretu. Vezati ili
prekriti dugu kosu.
-
-
• Električni alati nisu igračke za djecu.
Alate bez nadzora mogu koristiti neovlaštene
osobe i mogu dovesti do osobnih ozljeda ili
ozljeda trećih strana.
• Koristite samo ispravne rezne i brusne
ploče. Neispravni, neprikladni ili oštećeni
alati kao što su rezne ploče itd. Mogu se
otpustiti ili odlomiti i odbaciti te udariti u
operatera ili treće osobe koje su u rad
nom području.
• Obratite pažnju na trenutak reakcije. Obratite
pozornost na formiranje reakcijskih sila
i moguće lomove alata kojim se rukuje.
Reakcijski momenti mogu dovesti do ozlje
da u uskim mjestima. Protiv nepredviđenih
trenutaka reakcije moraju se poduzeti kon
tramjere.
• Ne koristite uređaj u potencijalno
eksplozivnim područjima. Električni alati
poput kutne brusilice mogu proizvesti iskre i
zapaliti zapaljive materijale. Nikada nemojte
koristiti alate u blizini zapaljivih tvari kao
što su benzin, nafta ili sredstva za čišćenje.
Radite samo u čistim, dobro prozračenim
prostorima gdje nema zapaljivih materijala.
• Ne usmjeravajte uređaj prema drugim
ljudima. Tijekom rukovanja alatom držite
djecu i druge ljude podalje od radnog pod
ručja.
• Ne dopustite da alat s reznim ili brusnim
pločama radi u praznom hodu. Rezni ili
brusni diskovi mogu se otpustiti
• Odmah prestanite koristiti bilo koji alat
ako se osjećate nelagodno ili slabo ili
ako osjetite bol.
• Vibracije, ponavljajući pokreti ili neugo
dan položaj mogu biti štetni za šake i
ruke.
• Alati na električni pogon mogu vibrirati
kada se koriste.
-
-
-
-
-
66
Električni udar struje može uzrokovati ozbiljne ozljede
Uvijek koristite osobna sredstva za zaštitu!
Page 67
Za Vašu sigurnost
2
• Prilokom zamjene alata , postavljanja
ili odlaganja izvadite bateriju iz alata ili
postavite prekidač u poziciju OFF ili u
zaštićenom položaju. Takvim preventiv
nim mjerama sigurnosti može se izbjeći
nenamjerno djelovanje.
• Koristite samo dijelove, elemente za pri
čvršćivanje i pribor koji je preporučio
proizvođač
• Nikada ne nosite alat sa prstom na
gumbu za pokretanje.
• Izbjegavajte nenamjerno aktiviranje.
• Održavajte ručku alata suhom, čistom,
bez ulja i masti.
• Pazite da je radni prostor čist, dobro
prozračen i uvijek dobro osvijetljen.
• Nikada ne koristite alat pod utjecajem
alkohola ili opojnih droga.
• Popravke treba obavljati samo ovlašteno
osoblje.
• Ne čistite plastične dijelove otapalima.
• Otapala poput benzina, benzena, nitro razre
đivača mogu deformirati ili uništiti plastične
dijelove. Sa gore navedenim otapalima ne
dovodite u kontakt sa alatom.
• Prilikom rada na dizalici uvijek prije početka
rada pazite da nitko ne bude ispod radnog
područja.
-
-
-
Važne sigurnosne informacije
za brzi punjač:
Ovaj odjeljak sadrži važne sigurnosne i
radne upute za brzoi punjač.
Prije pokretanja punjača pročitajte sve
upute i oznake na:
1. na punjaču
2. na bateriji,
• Radna temperatura za Li-Ion baterije:
10 do +40° C za pražnjenje 0 do +40°
C za punjenje
• Radna temperatura za punjač:
0 do +40° C
• Da biste izbjegli strujni udar, isključite
punjač iz zidne utičnice prije početka bilo
kakvih radova na održavanju i čišćenju.
Uklanjanje baterije ne smanjuje rizik.
• Nepravilna uporaba punjača može dovesti
do ozbiljnih ozljeda.
Električni udar struje može uzrokovati ozbiljne ozljede
Uvijek koristite osobna sredstva za zaštitu!
[
+49 (0) 21 91 / 7 92-0 • \ +49 (0) 21 91 / 7 92-375 • ^ hazet.de • ] [email protected]
67
Page 68
Za Vašu sigurnost
2
Kako biste izbjegli ove opasnosti:
• Nikada ne rastavljajte bateriju.
• Nikada ne bacajte bateriju u vatru, čak i ako
je oštećena ili potpuno istrošena. Opasnost
od eksplozije!
• Nikad nemojte kratko spajati bateriju.
• Nikada nemojte stavljati predmete u venti
lacijske otvore na punjaču, jer u suprotnom
postoji opasnost od strujnog udara ili ošte
ćenja.
• Nikada ne punite bateriju vani.
• Nikada ne izlažite bateriju izravnom suncu.
• Puniti samo u dobro prozračenim prostorija
ma sa niskom vlagom.
• Nikada ne punite bateriju ako je temperatura
niža od 0 ° C (32 ° F) ili iznad 40 ° C (104 ° F).
• Nikada ne spajajte dva punjača zajedno.
• Nikada ne stavljajte predmete u držač bate
rije.
• Nikada ne koristite transformatorsko pojača
lo prilikom punjenja.
• Za punjenje nikada ne koristite motorni agre
gat ili istosmjernu struju.
• Nikada ne pohranjujte bateriju i punjač na
mjestima gdje temperatura može doseći
40 ° C (104 ° F).
• Uvijek koristite punjač sa 230 V standardnim
električnim priključcima. Upotreba punjača
na većim naponima može dovesti do pregri
javanja i oštećenja punjača.
• Između nekoliko postupaka punjenja uvijek
pričekajte najmanje 15 minuta da se punjač
ne pregrijava.
• Uvijek isključite punjač iz izvora napajanja
kada ga ne koristite.
-
-
-
-
-
-
-
68
Električni udar struje može uzrokovati ozbiljne ozljede
Uvijek koristite osobna sredstva za zaštitu!
Page 69
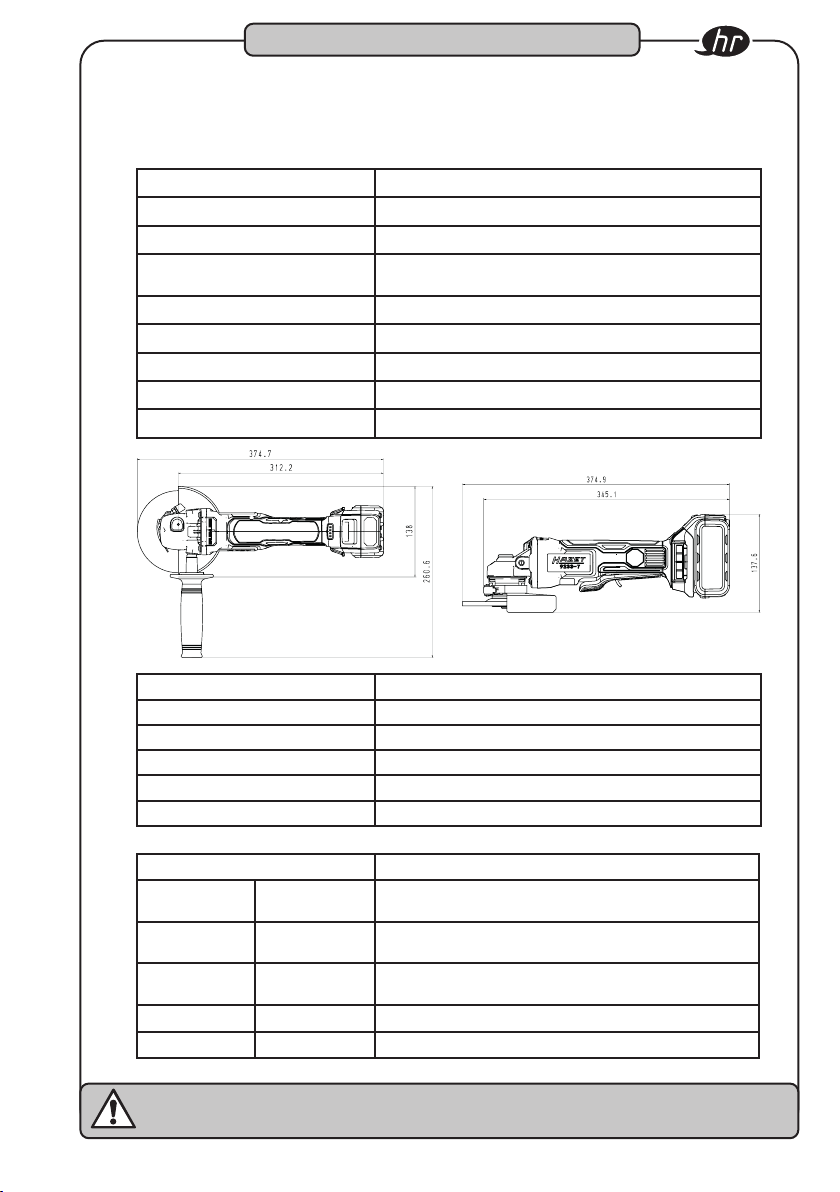
Struktura i funkcija
3
1. Tehnički podaci / uređaj
Baterijska kutna brusilica HAZET 9233-7
Navoj prihvata
Performanse baterije
Broj okretaja
Težina bez baterije /
Razina zvučnog tlaka LpA /
Razina zvučne snage LpW /
Ubrzanje vibracija
Rezna ploča
Brusna ploča
Brzi punjač HAZET 9212-03
Ulazni napon 100 - 240 V~ 50/60 Hz 110 W
Izlazni napon 12 - 18 V - 4,0 A
Sigurnosno odobrenje CB, ETL, GS, ICES, PSE
Tip baterije Li-Ion
Vrijeme punjenja 80 min
M14
18V - 5Ah
8.000 okr/min
1,53kg
89 dB(A)
100 dB(A)
7,9 m/s²
125 mm x 1,0
125 mm x 6,0
Dodatni pribor Opseg isporuke
HAZET Nr. Oznaka HAZET baterijska kutna brusilica isporučuje se u plastičnom
9212-02 Zamjenska
9212-05 Zamjenska
baterija 2Ah
baterija 5Ah
koferu
Opseg isporuke uključuje:
HAZET 9233-7
HAZET 9212-02 18V / 5.0 Ah Li-Ion baterija
HAZET 9212-03 Brzi punjač
Električni udar struje može uzrokovati ozbiljne ozljede
Uvijek koristite osobna sredstva za zaštitu!
[
+49 (0) 21 91 / 7 92-0 • \ +49 (0) 21 91 / 7 92-375 • ^ hazet.de • ] [email protected]
69
Page 70
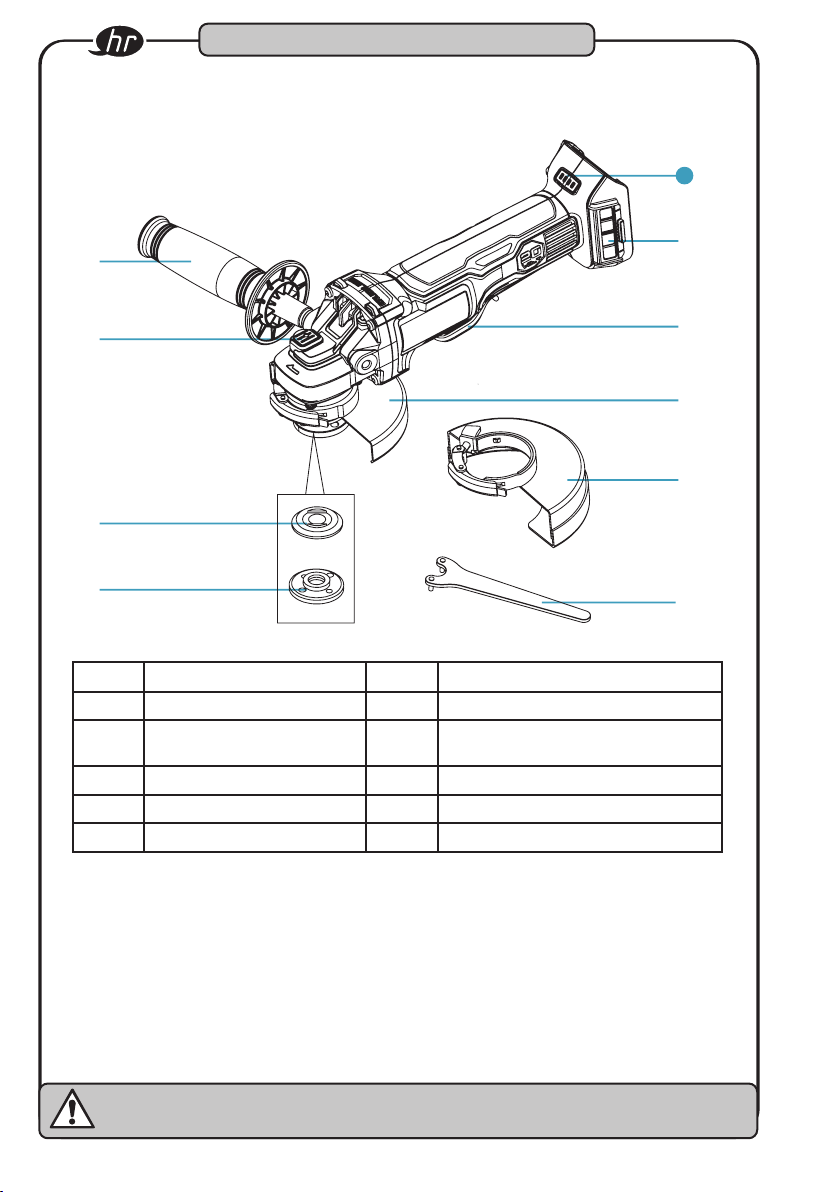
(
Struktura i funkcija
3
10
/
"
!
%
&
§
$
Pozicija
1 Prekidač 6 Zaštita od iskre (rezne ploče)
2 Zaključavanje osovine 7 Poklopac sa mrežicom filtra koji se
3 Stražnja prirubnica 8 Drška sa zaštitom
4 Stezna matica 9 Ključ
5 Zaštita od iskrenja (brušenje) 10 Indikator punjenja
Oznaka
Pozicija
Oznaka
može mijenjati
)
70
Električni udar struje može uzrokovati ozbiljne ozljede
Uvijek koristite osobna sredstva za zaštitu!
Page 71
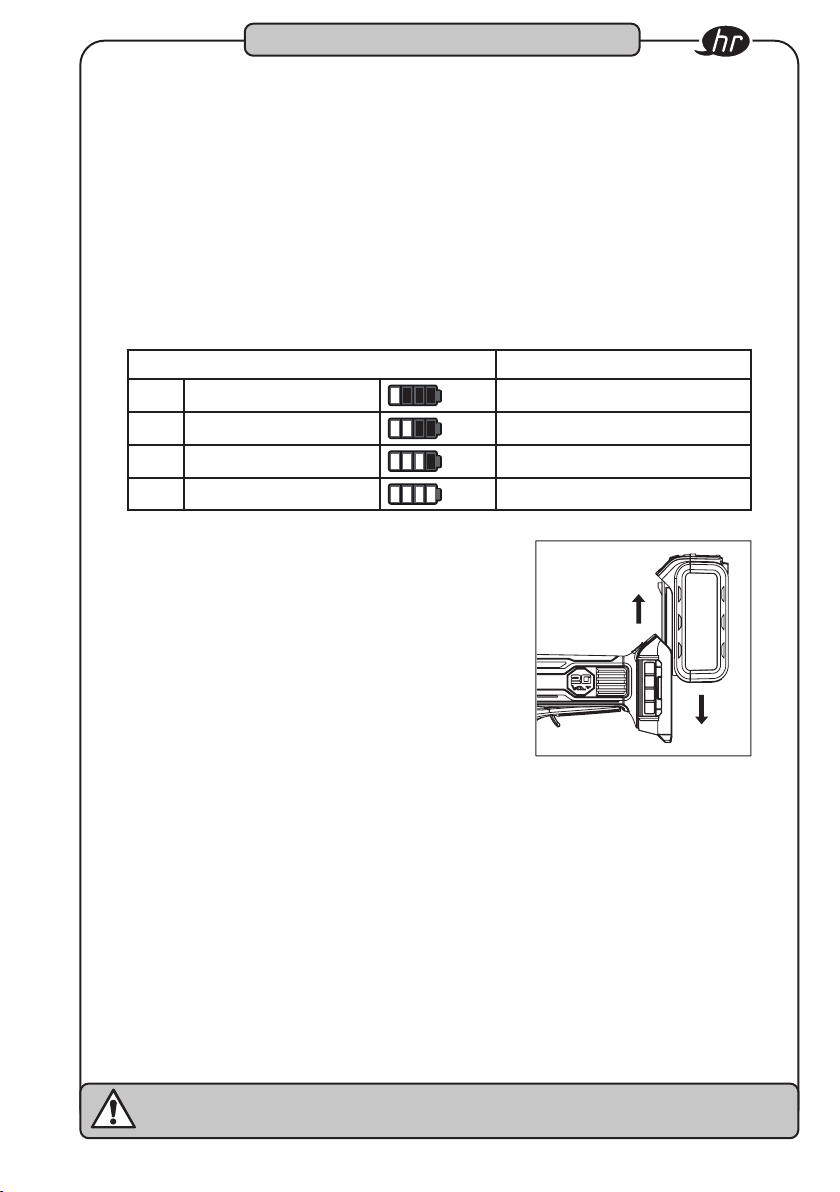
Struktura i funkcija
3
Pričvršćivanje baterije:
• Umetnite bateriju dok ne sjedne na svoje mjesto.
• Ako alat nije uključen, alat može pasti, uništiti i / ili ozlijediti vas ili prolaznike.
• Baterija ima indikator razine napunjenosti. (Zelene) 4-stupanjske LED indikacije
označavaju preostali kapacitet baterije.
• Ako pritisnete gumb za aktiviranje, prikazuje se stanje napunjenosti baterije za 5 sekundi.
• Baterija ima zaštitu od pregrijavanja i štiti HAZET bežičnu kutnu brusilicu i bateriju od
pregrijavanja. Kada maks. radna temperatura dosegne 70 ° C, baterija se automatski
isključuje i HAZET baterijska kutna brusilica se više ne može koristiti.
Prikaz napunjenosti Status
1 LED 1 0 - 25 %
2 LED 1, 2
3 LED 1, 2, 3
4 LED 1, 2, 3, 4
26 - 50 %
51 - 75 %
76 - 100 %
Otpustite bateriju:
• Držite sigurnosnu bravu i izvucite bateriju s ručke
alata
Prije pokretanja:
• Očistite radni prostor.
• Neovlaštene osobe držite dalje od radnog područja.
• Osigurajte odgovarajuću rasvjetu i ventilaciju na radnom mjestu.
• Provjerite je li baterija pravilno postevljena i umetnuta na svoje mjesto.
Postavljanje smjera vrtnje:
• Smjer vrtnje postavlja se pomoću prekidača.
• Napred i natrag predstavljeni su strelicama koje su utisnute u kućište.
• Alat se okreće unaprijed u smjeru kazaljke na satu.
• S obrnutim dijelom, smjer vrtnje postavlja se u smjeru suprotnom od kazaljke na satu.
Električni udar struje može uzrokovati ozbiljne ozljede
Uvijek koristite osobna sredstva za zaštitu!
[
+49 (0) 21 91 / 7 92-0 • \ +49 (0) 21 91 / 7 92-375 • ^ hazet.de • ] [email protected]
71
Page 72
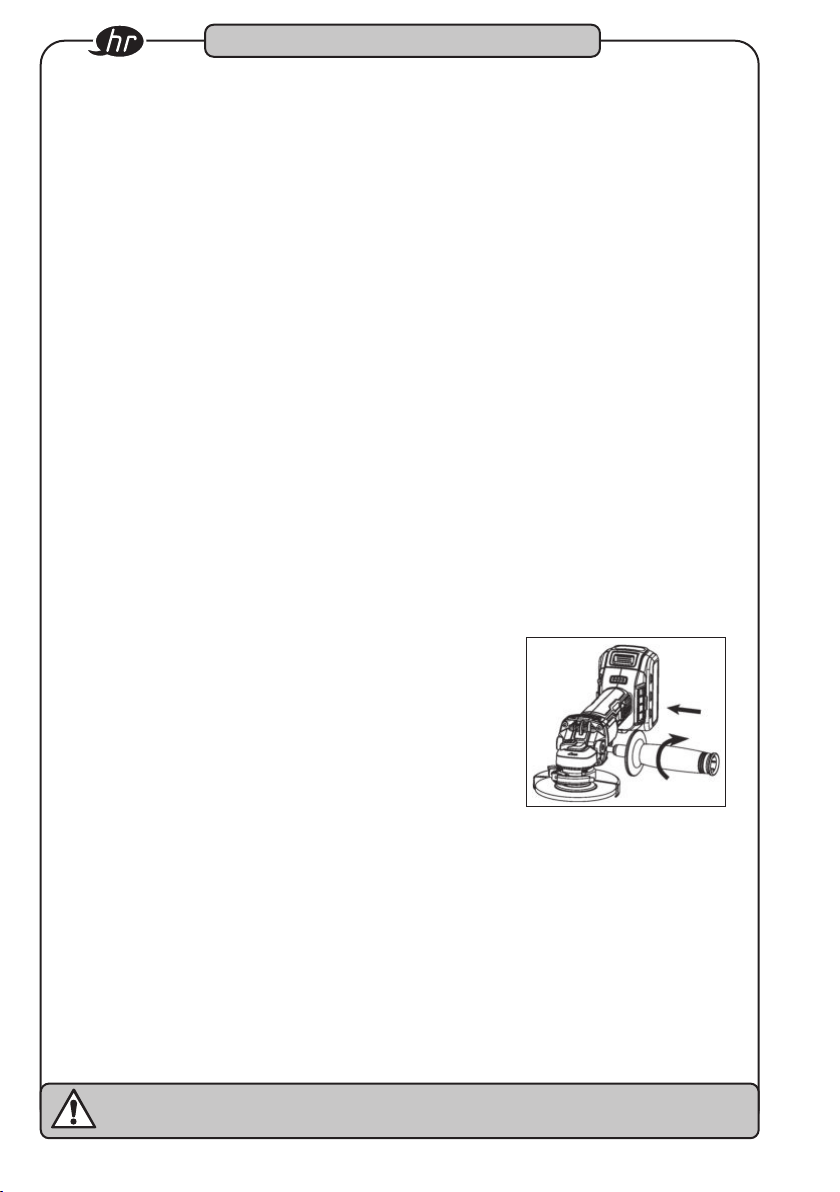
Struktura i funkcija
3
Zaštita od preopterećenja
Ova kutna brusilica opremljena je zaštitom od preopterećenja Ako se kutna brusilica prekomjerno napuni ili ako se rad s alatom ne može provesti, alat se automatski prebacuje
u način preopterećenja, što znači da se alat automatski i iznenada zaustavlja. Za prekid
načina preopterećenja, jednostavno otpustite prekidač. Ako ponovno pritisnete sklopku,
alat se ponovo pokreće.
Sigurnosni ograničivač temperature
Sve dok se kutna brusilica radi kako treba, nema preopterećenja. Ako se s druge strane
dugo radi sa punim opterećenjem, baterija se pregrijava. Ako se prekorači dopušteno
područje temperature, baterija se automatski isključuje
Alat se može ponovno pokrenuti samo kada je postignuta sigurna radna temperatura
Ograničivač niskog napona
Baterija kojom se koristi ovaj alat ima elektronički ograničivač niskog napona. Ograničivač
niskog napona se aktivira kada napon padne ispod postavljene vrijednosti. Ova funkcija
automatski isključuje alat. U takvom slučaju morate koristiti ili drugu bateriju ili napuniti
postojeću bateriju.
Uređaj protiv blokiranja
Alat se tijekom rada može iznenada zablokirati. Ako se motor ne zaustavi odmah, blokada može rezultirati ozbiljnim ozljedama. No, alat odmah otkriva blokadu i automatski se
isključuje.
Učvrstite dršku
• Izvadite bateriju prije stavljanja ili uklanjanja potporne
ručke.
• Pričvrstite dršku na kućište alata
• Zategnite dršku
Električni udar struje može uzrokovati ozbiljne ozljede
Uvijek koristite osobna sredstva za zaštitu!
72
Page 73
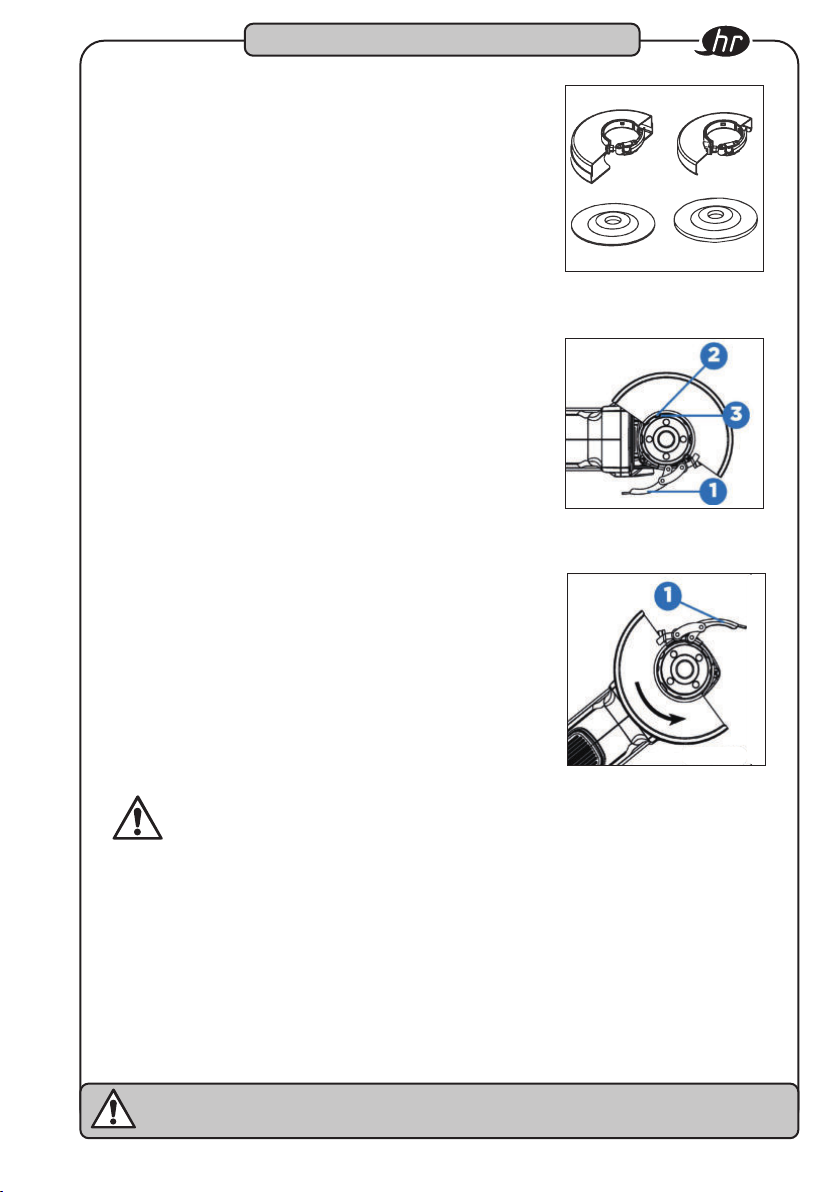
Struktura i funkcija
3
Pričvrstite zaštitu od iskrenja
Važno je osigurati da se za pribor za rezanje i brušenje
uvijek koristi odgovarajuća zaštita od iskrenja. Pogledajte
za informacije o odabiru odgovarajuće opreme.
Važno je osigurati da se za pribor za rezanje i brušenje
uvijek koristi odgovarajuća zaštita od iskrenja.
• Otvorite osigurač za iskrenje (1) i jezičke (2) zaštite od
iskrenja poravnajte s utorima (3) na poklopcu mjenjača.
• Gurnite štitnik iskre dolje dok se jezičci na štitniku za
iskre ne uskoče na mjesto i slobodno se okreću u utoru
na glavčini kućišta mjenjača.
• Ako je brava otvorena, okrenite osigurač iskrenja
u željeni radni položaj. Für den besten Schutz des
Bedieners sollte der Funkenschutz
zwischen der Spindel und dem Bediener positioniert
werden.
• Zatvorite bravicu zaštite od iskrenja (1) da biste osigu
rali zaštitu od iskrenja. Zaštita od iskrenja ne smije se
ručno okretati dok je bravica zatvorena Kutna brusilica
ne smije se pokretati ako je zaštita od iskrenja labava
ili je brava otvorena.
• Da biste uklonili zaštitu od iskrenja, otvorite bravu, okre
nite zaštitu od iskrenja jer su jezičci i prorezi poravnani,
a zatim povucite zaštitu iskrenja.
-
-
Zaštita od iskrenja
Rezne ploče Brusne ploče
Rezne ploče Brusne ploče
(Slika E)
Pažnja!
Ručka za držanje može se pričvrstiti na alat , bilo s lijeve ili desne strane, prema želji operatera.
Držač ručke mora uvijek biti pričvršćen kako bi se izbjegao gubitak kontrole nad alatom i
mogućih ozbiljnih ozljeda.
Prije rada provjerite je li ručka za držanje pravilno zategnuta. Tijekom rada može se
stvoriti velika kontra sila na ručki. Otpuštanje potporne ručke može rezultirati ozbiljnim
ozljedama.
Električni udar struje može uzrokovati ozbiljne ozljede
Uvijek koristite osobna sredstva za zaštitu!
[
+49 (0) 21 91 / 7 92-0 • \ +49 (0) 21 91 / 7 92-375 • ^ hazet.de • ] [email protected]
73
Page 74
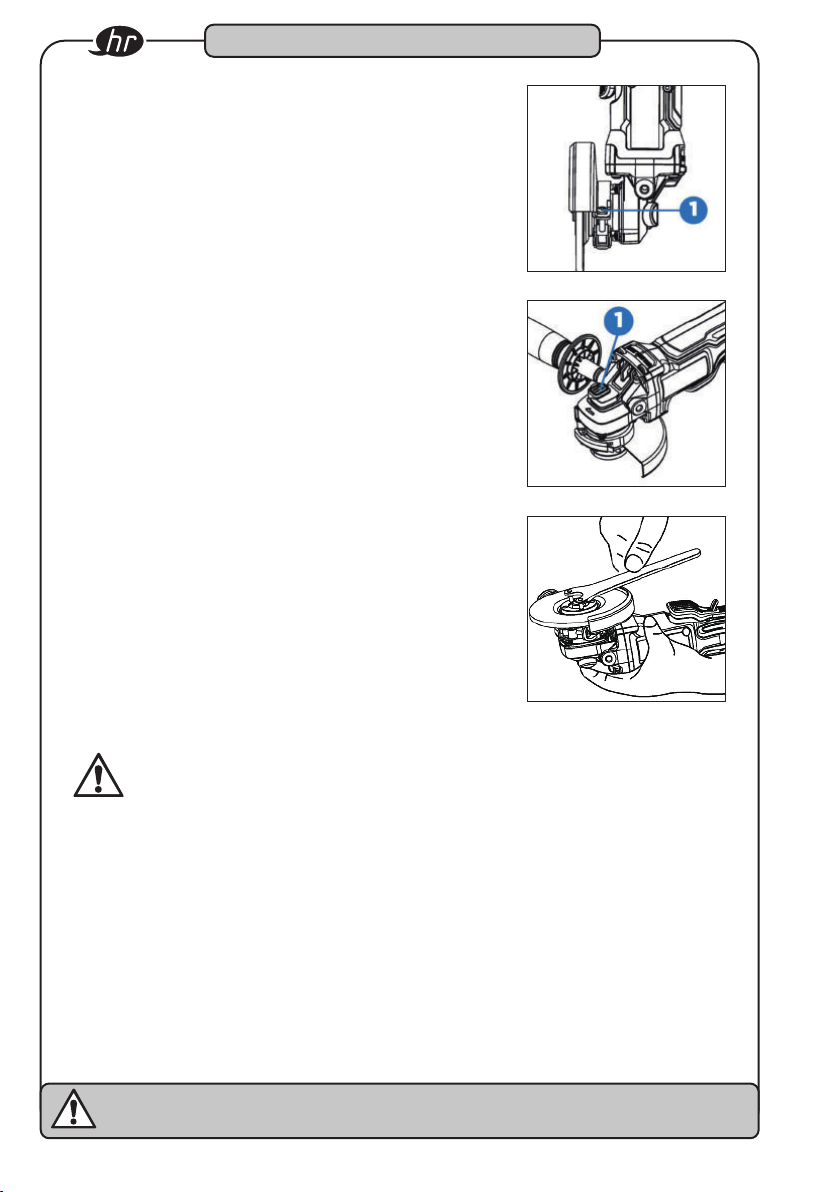
Struktura i funkcija
3
Postavljanje zaštite od iskrenja
Zaštita od iskrenja tvornički je postavljena na promjer
glavčine mjenjača.
Ako se uređaj za zaštitu iskrenja nakon nekog vremena otpusti, vijak za podešavanje (1) mora biti stegnut
zatvorenom bravom i pričvršćenim uređajem za zaštitu
iskrenja.
Zaključavanje osovine
Gumb za zaključavanje osovine (1) koristi se za sprečavanje rotacije osovine prilikom umetanja ili uklanjanja ploče
za rezanje ili brušenja. Blokada osovine može se aktivirati
samo kad je alat isključen i disk potpuno zaustavljen.
Za zaključavanje osovine pritisnite gumb za zaključavanje
osovine (1) i okrećite osovinu sve dok ju više ne možete
okrenuti.
Pažnja!
Kad koristite ploče za rezanje ili brušenje, uvijek se mora koristiti zaštita od iskrenja. Alat
za brušenje opremljen je zaštitom od iskrenja za rezanje i brušenje kotača. Uvijek se mora
koristiti ispravna zaštita od iskrenja.
Mora se osigurati da je zaštita od iskrenja pravilno zaključana pod pravim kutom. U
suprotnom, slomljena ploča može uzrokovati ozbiljne ozljede.
Da biste izbjegli slučajni rad, alat morate isključiti i izvaditi bateriju prije nego što izvršite
sljedeće korake. U suprotnom može doći do ozbiljnih ozljeda.
Ukoliko se zaštita od iskrenja ne može montirati pomoću bravice tada, se alat ne smije
koristiti. već se alat i zaštita od iskrenja moraju zamijeniti ili odnijeti u servisni centar
Električni udar struje može uzrokovati ozbiljne ozljede
Uvijek koristite osobna sredstva za zaštitu!
74
Page 75
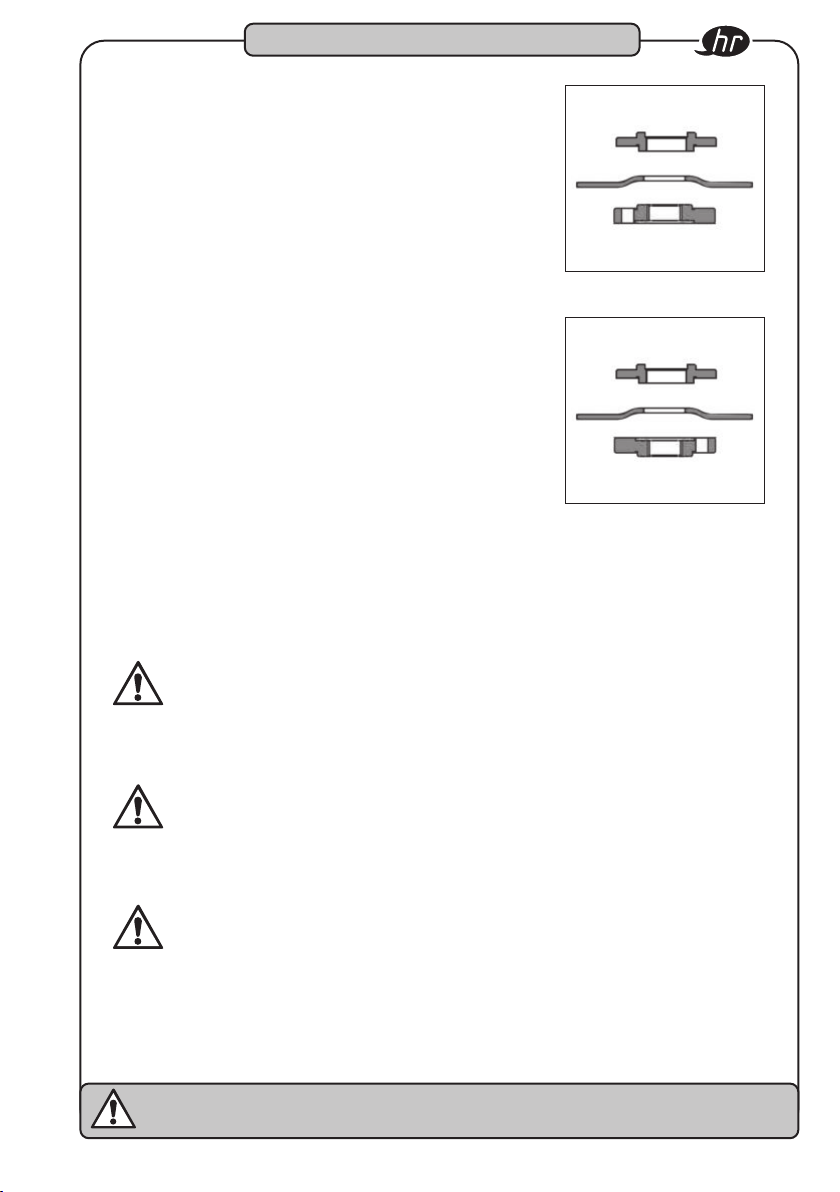
3
Montaža i skidanje reznihili brusnih ploča
Struktura i funkcija
Stražnja prirubnica
Koristeći zatvorene prirubnice možete koristiti razne diskove
za rezanje ili brušenje.
• Isključite alat i uklonite bateriju.
• Na osovinu postavite potpornu prirubnicu bez navoja.
Podignuti dio (vodilica) okrenut je oknu.
• Postavite podlošku na podlogu i centrirajte je na podignuti
dio (vodilicu) potporne prirubnice.
• Pritisnite tipku za zaključavanje osovine i pričvrstite steznu
maticu na vreteno.
Ako podložna pločica koristi više od 1/8” (3 mm) debljine,
tada se stezna matica postavlja na osovinu tako da se povišeni
dio (vodilica) uklapa u sredinu podloške.
Kod podmetača debljine do 3 mm (3 mm), stezna matica se
postavlja na osovinu tako da podignuti dio (vodilica) nije u
kontaktu s podloškom.
• Pritisnite tipku za zaključavanje osovine s priloženom tip
kom i zategnite maticu za stezanje.
• Da biste zamijenili disk pritisnite gumb za zaključavanje oso
vine i otpustite steznu maticu s priloženom tipkom
Disk ploča 1/4” (6 mm) debljine
Disk ploča 1/8” (3 mm) debljine
-
-
Stezna matica
Stražnja prirubnica
Stezna matica
Savjet:
Ako se podloška okreće nakon pritezanja zatezne matice, mora se provjeriti poravnavanje
zatezne matice. Ako je zatezna matica bila zavrtana na tanku podlošku s vodilicom koja je
usmjerena prema podlošku, podmetač se može zakrenuti jer visina vodilice sprečava da
zatezna matica drži podlošku na mjestu.
Pažnja!
Vijak za podešavanje ne smije se zategnuti s otvorenim zaključavanjem zaštite od iskrenja
Zaštita od iskrenja može spriječiti i ozlijede od krhotina
Upozorenje!
Ne aktivirajte zaključavanje osovine dok alat radi. To bi moglo oštetiti alat, a korišteni pribor
može se otpustiti i uzrokovati ozljede.
Upozorenje!
Uvijek izvadite bateriju iz alata prije promjene pribora. U suprotnom može doći do ozbiljnih
ozljeda.
Koristite samo pribor čija je sigurna brzina rada veća od nazivne brzine alata.
Električni udar struje može uzrokovati ozbiljne ozljede
Uvijek koristite osobna sredstva za zaštitu!
[
+49 (0) 21 91 / 7 92-0 • \ +49 (0) 21 91 / 7 92-375 • ^ hazet.de • ] [email protected]
75
Page 76
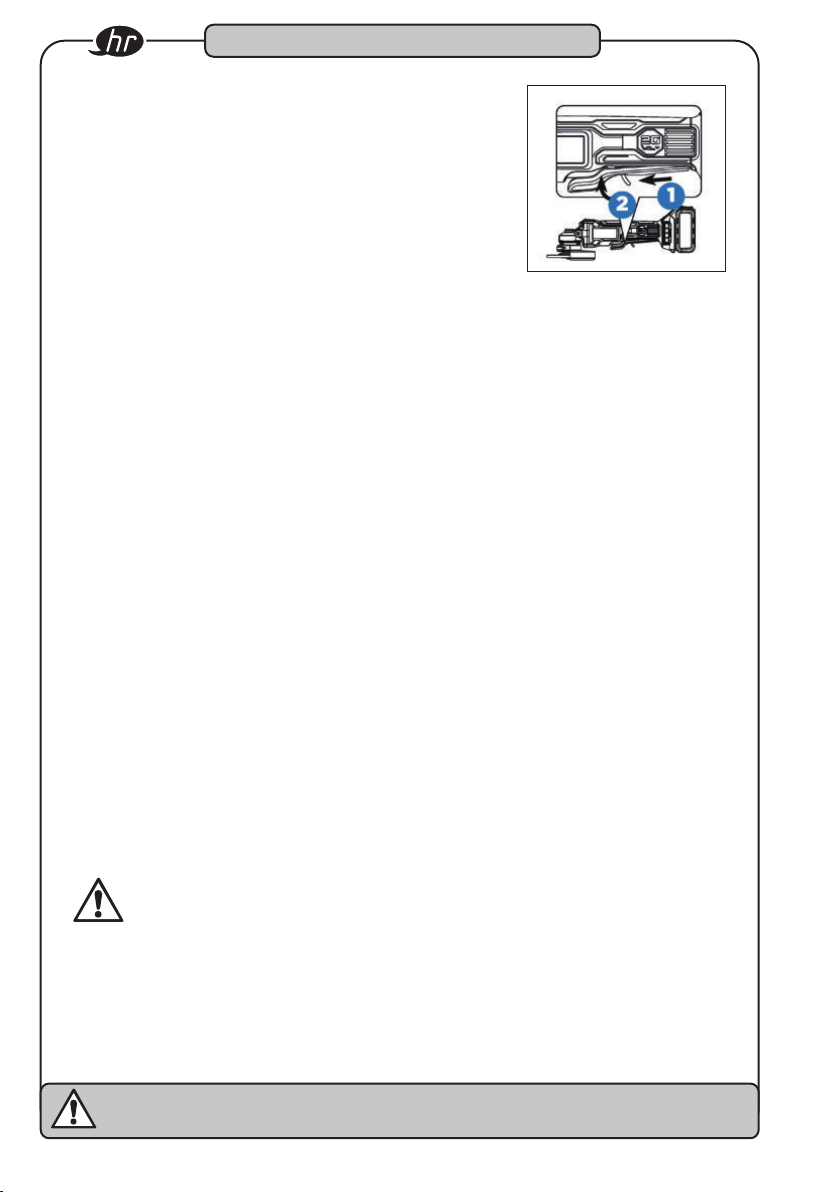
Struktura i funkcija
3
Prekidač
Čvrsto uhvatite kućište alata i držač Za pokretanje alata
gurnite sigurnosnu polugu (1) prema naprijed i pritisnite
prekidač (2) Otpustite prekidač za zaustavljanje alata.
Lagani start
S ovom funkcijom alat se pokreće postupno, što dovodi
do povećanja udobnosti rada.
Električna kočnica
Električna kočnica se aktivira čim otpustite prekidač. To će zaustaviti ploču za rezanje ili
brušenje. Obično to traje dvije sekunde. Međutim, aktiviranje kočnice može se odgoditi
nakon otpuštanja prekidača. Povremeno se kočnica možda uopće neće aktivirati. Ako se
to često događa, brusilica se mora servisirati u ovlaštenom servisu.
Savjet:
Ovaj alat nema opciju za držanje prekidača u položaju uključeno. Alat se nikada ne smije
držati u položaju za uključivanje na bilo kojem uređaju.
Savjet:
Ovaj je alat opremljen električnom kočnicom. Ako ova kočnica ispravno djeluje, kroz ventilacijske otvore u kućištu mogu se vidjeti iskre. To je normalno i to zbog rada kočnica.
Pažnja!
Nakon otpuštanja prekidača, ploča za rezanje ili brušenje nastavlja raditi za cca 3 sekunde.
Mora se paziti da se alat odloži samo kad je ploča potpuno zaustavljena.
Električni udar struje može uzrokovati ozbiljne ozljede
Uvijek koristite osobna sredstva za zaštitu!
76
Page 77
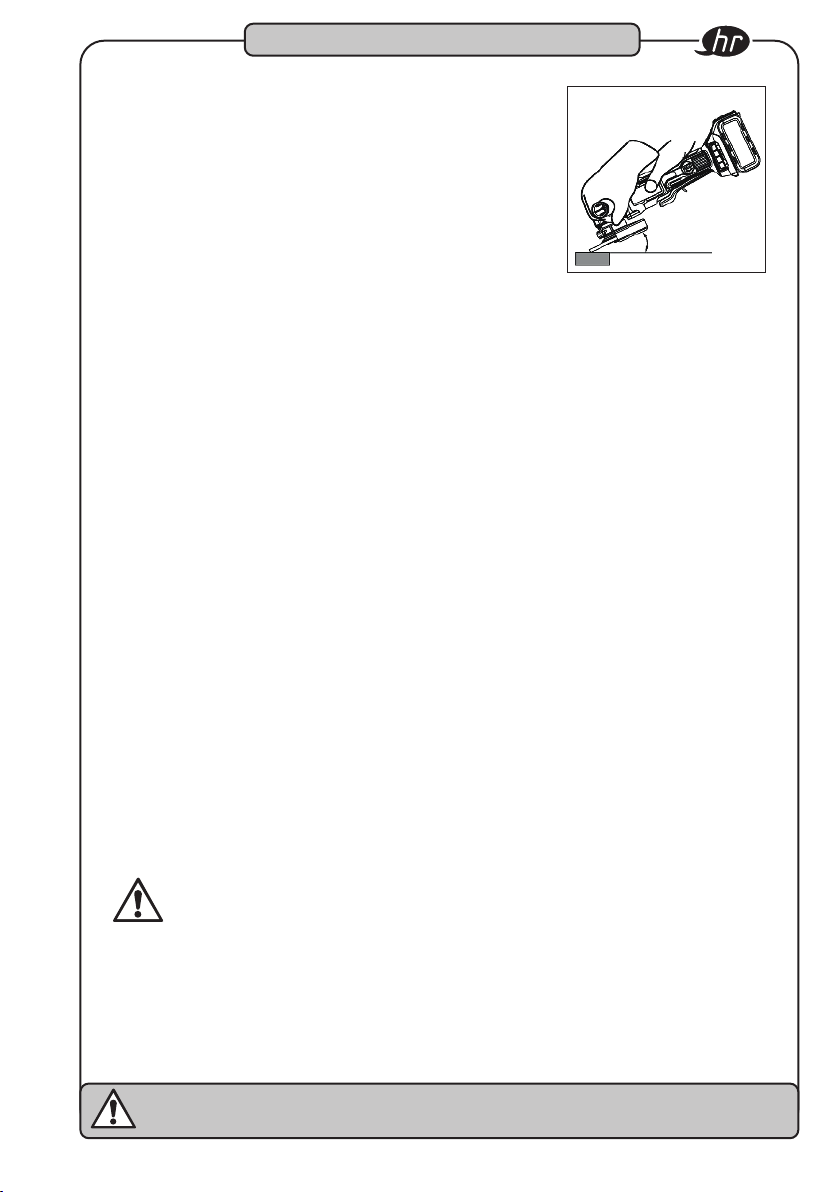
Struktura i funkcija
3
Brušenje sa brusnim pločama
Treba odabrati i koristiti brusne ploče koji se preporučuju
za brušenje materijala. Važno je osigurati da se radna
brzina svake odabrane rezne ploče nalazi na nominalnoj
brzini od najmanje 7.500 o / min. Pored toga, potrebno
je obratiti pozornost na dimenzije brusnih alata. Unutarnji
promjer rupe radne ploče mora se montirati na montažnoj
prirubnici da bude čvrst. Ne smiju se koristiti reduktori ili
adapteri.
• Sve radne dijelove stegnite u škripac ili ih pričvrstite na radnoj površini.
• Brusilicu držite čvrsto sa obje i dalje od tijela.
Brusna ploča se ne smije se dodirivati prstima.
• Uključite brusilicu i pričekajte da motor i brusni disk postignu punu brzinu.
• Postupno spustite brusilicu na radnu površinu dok brusni disk ne dođe u dodir s matri
jalom.
• Brusni disk uvijek držite pod kutom od 20 do 30 ° prema radnoj površini koju obrađu
jete.
• Uvijek brusilicu držite pritisnutu konstantno, odgovarajućom silom.
• Pritisnite dovoljnim pritiskom da brusilica ne vibrira ili odskače.
• Odmaknite brusilicu od materijala koji obrađujete prije isključivanja.
20 – 30 º
-
-
Savjet:
Ako se brusilica predugo drži u jednoj točki, na radnom matrijalu bit će žljebovi i zarezi.
Ako je kut između površine radnog materijala i brusnog diska previše oštar, također će
doći do zareza jer će se tlak koncentrirati na malom području.
Visoki pritisak alata smanjuje brzinu brusilice i opterećuje motor. Obično je težina same
brusilice dovoljna za većinu poslova brušenja Pri brušenju grubih rubova ili labavih vijaka
mora se koristiti niski pritisak alatom jer postoji opasnost da će brusilica usitniti izbočine
u metalni rub.
Opasnost!
Kutna brusilica nikada ne smije raditi bez zaštite od iskrenja ili s nepravilno pričvršćenom
zaštitom iskrenja. Dizajniran je na takav način da se može koristiti samo s ugrađenim štit
nikom iskrenja.
Pri pokušaju rada brusilice bez zaštite od iskrenja labavi komadi metala mogu se odbaciti
na korisnika alata, što dovodi do ozbiljnih ozljeda.
Električni udar struje može uzrokovati ozbiljne ozljede
Uvijek koristite osobna sredstva za zaštitu!
[
+49 (0) 21 91 / 7 92-0 • \ +49 (0) 21 91 / 7 92-375 • ^ hazet.de • ] [email protected]
-
77
Page 78
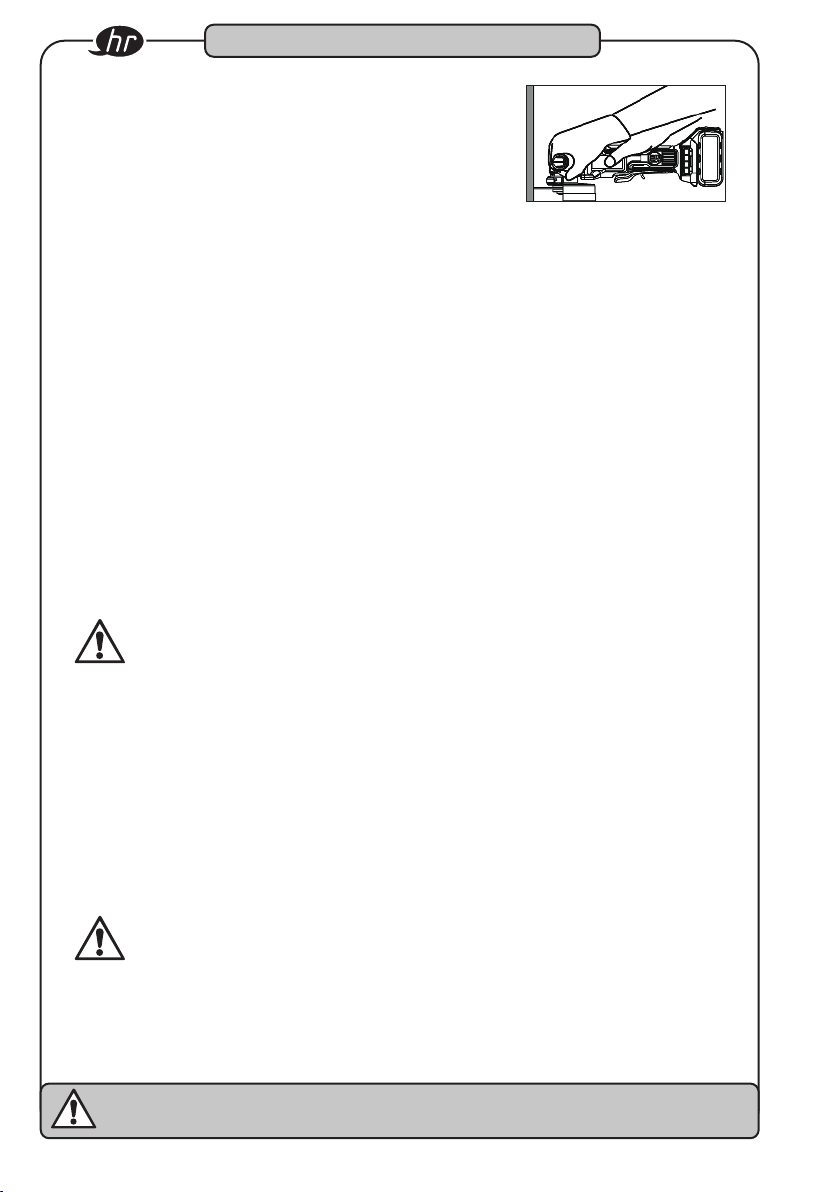
Struktura i funkcija
3
Rezanje sa reznim pločama
Treba odabrati i koristiti samo brusne ploče koje se preporučuju za brušenje materijala. Važno je osigurati da
se radna brzina svake odabrane rezne ploče nalazi na
nominalnoj brzini od najmanje 7.500 o / min. Pored toga,
potrebno je obratiti pozornost na dimenzije brusnih alata.
Unutarnji promjer rupe radne ploče mora se montirati na
montažnoj prirubnici da bude čvrst. Ne smiju se koristiti
reduktori ili adapteri.
• Sve radne dijelove stegnite u škripac ili ih pričvrstite na radnu površinu.
• Brusilicu držite čvrsto sa obje i dalje od tijela.Rezni disk ne smije u radu strugati ili
dodirivati štitnik iskrenja .
• Uključite brusilicu i pričekajte da motor i ploča za rezanje postignu punu brzinu.
• Prije spuštanja alata, na radnu površinu materijala koji se obrađuje,sačekajte trenutak
sve dok alat ne postigne punu brzinu
• Pritisnite samo blagi pritisak na površinu materijala koji se obrađuju kako bi stroj mogao
raditi pri velikim brzinama. Učinkovitost rezanja je najveća kada se alat koristi velikom
brzinom.
• Kad je rez počeo, a na obradi se stvorio zarez, kut reza više se ne smije mijenjati.
Promjena kuta rezanja dovodi do savijanja reznog diska, što može rezultirati pucanjem
reznog diska.
• Prije isključivanja brusilice, odmaknite je od radnog materijala i može se odložiti samo
kada je disk potpuno zaustavljen.
Upozorenje!
Da biste izbjegli gubitak kontrole nad alatom i mogućih ozbiljnih ozljeda, alatom se mora
uvijek rukovati objema rukama. Jednu ruku uvijek držite na ručki alata.
Alat se ne smije pokrenuti dok je prislonjen na površinu koja se obrađuje. Da bi ispravno
radio, alat prvo mora dostići punu brzinu. Ako se alat drži na na radnom komadu koji se
obrađuje, može doći do povratnog udarca i ozljeda.
Mora se paziti da se alat odloži samo kad je ploča potpuno zaustavljena. U suprotnom
može doći do ozbiljnih ozljeda.
Nemojte vršiti prekomjerni pritisak na rezni disk jer preveliki pritisak povećava mogućnost
da se rezni disk pokvari ili da se motor pregrijava.
Upozorenje!
Pri uporabi reznih diskova mora se instalirati zaštita od iskrenja za rezanje diskova.
Kut reza nikada se ne smije mijenjati tijekom rada. Ispravljanje kuta moglo bi slomiti ili
rastrgati rezni disk.
Električni udar struje može uzrokovati ozbiljne ozljede
Uvijek koristite osobna sredstva za zaštitu!
78
Page 79
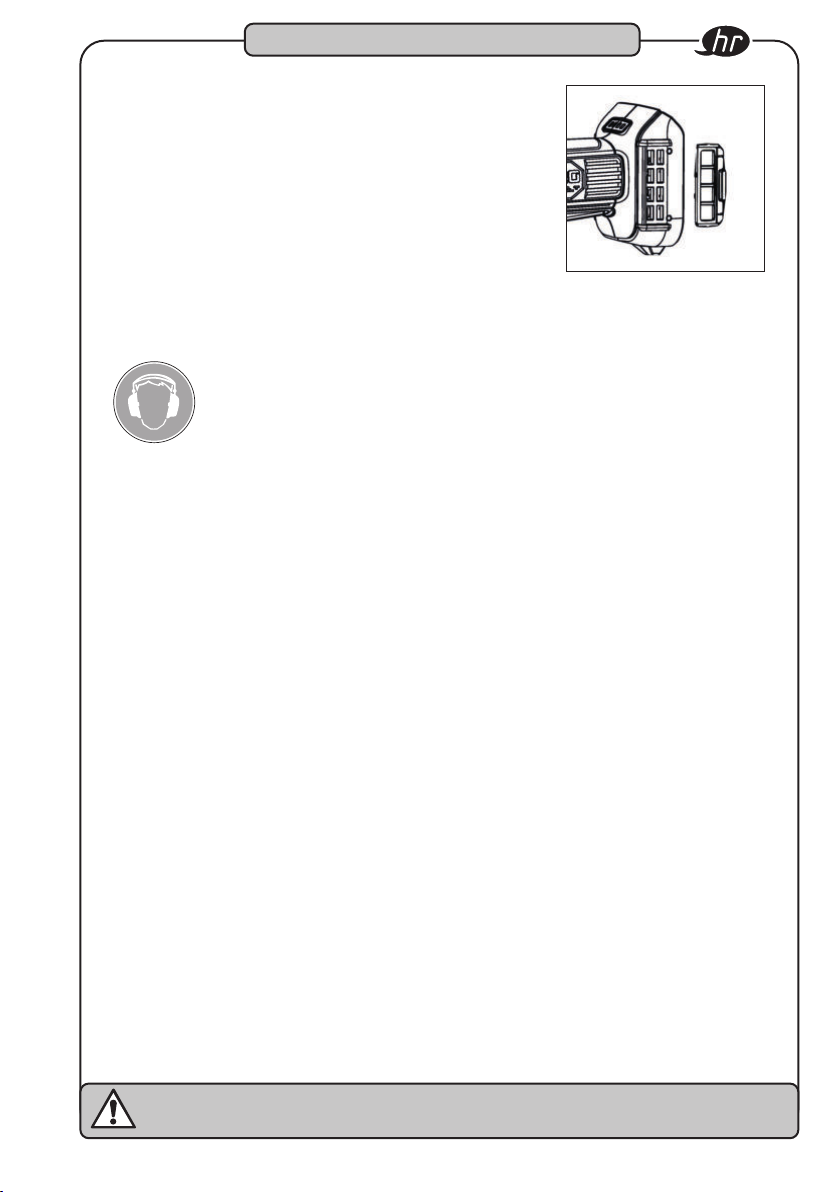
Struktura i funkcija
3
Poklopac sa mrežicom filtra koji se može
mijenjati
Poklopac mrežnog filtra koji se može ukloniti dizajniran je
tako da spriječi da unutrašnjost stroja vremenom postane
prljava. Kako biste očistili stroj od prašine, skida se pokrov
mrežastog filtra.
Bilješka:
Glasan radni šum! Apsolutno
Nosite štitnike za uši!
Prije početka postupka punjenja
• Usporedite napon izvora napajanja s dopuštenim naponom na naljepnici na punjaču.
• Pri punjenju s naponima većim od dopuštenih, postoji rizik od oštećenja punjača.
• Provjerite ima li kabela oštećenja. Oštećene kabele prije uporabe morate zamijeniti.
• Priključite punjač na izvor napajanja. Sve 3 LED lampice za punjenje svijetle 1 - 2
sekunde.
• Gurnite bateriju naopako s priključnom stranom u punjač. Provjerite je li baterija naslo
njena na stanicu punjača i da li kontakti stoje na svom mjestu.
• Ako punjač otkrije pregrijavanje baterije, sve će 3 LED-ice za punjenje istovremeno
bljeskati. Izvadite bateriju i ostavite da se punjač ohladi oko 80 minuta prije nastavka
postupka punjenja.
-
Električni udar struje može uzrokovati ozbiljne ozljede
Uvijek koristite osobna sredstva za zaštitu!
[
+49 (0) 21 91 / 7 92-0 • \ +49 (0) 21 91 / 7 92-375 • ^ hazet.de • ] [email protected]
79
Page 80
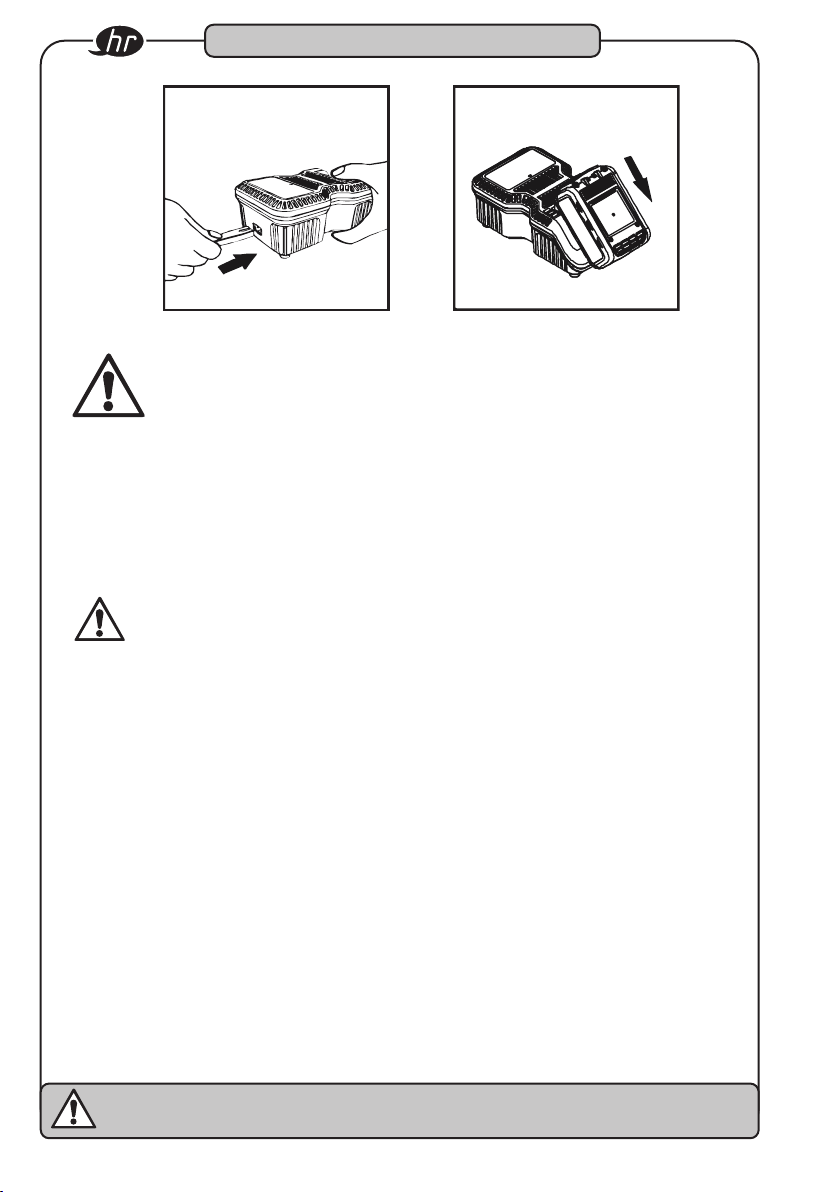
Struktura i funkcija
3
Ako je baterija nepravilno umetnuta u punjač, spojnice
pinovi na punjaču se mogu saviti ili čak i puknuti
• Status punjenja prikazuje se tijekom postupka punjenja:
- Napunjeno manje od 30%: trepere sve 3 LED žarulje.
- Napunjeno manje od 60%: jedna lampica za punjenje svijetli, a druge dvije bljeskaju.
- Više od 60% napunjeno: dvije LED lampice svijetle i jedna treperi.
- 100% napunjeno: sve 3 LEDice svijetle.
• Postupak punjenja može trajati oko 65 minuta. Ako su uključene sve tri LED lampice za
punjenje, postupak punjenja je dovršen.
U slučaju kvara, odmah isključite punjač iz izvora napajanja!
Po potrebi zamijenite bateriju.
Otklanjanje problema / izbjegavanje:
• Nikada ne izvlačite utikač iz utičnice kablom.
• Uvijek izvucite utikač kako ne biste oštetili kabel
• Držite punjač rukom i izvadite bateriju iz punjača.
• Baterija i punjač se tijekom postupka punjenja malo zagrijavaju. Ta činjenica ne utječe
na ispravno funkcioniranje. Pri rukovanju je potreban odgovarajući oprez.
• Nakon završetka postupka punjenja, pričekajte 15 minuta prije pokretanja novog
postupka punjenja.
• Ako punjač otkrije pregrijavanje baterije, sve će 3 LED-ice za punjenje istovremeno
bljeskati. Izvadite bateriju i ostavite da se punjač ohladi otprilike 15 - 30 minuta prije
nastavka postupka punjenja.
• Ako punjač prepozna grešku u bateriji, 2 LED-ice za punjenje istovremeno bljeskaju.
Izvadite bateriju i ostavite je da se ohladi 15 - 30 minuta. Ako oba LED-a za punjenje i
dalje bljeskaju, znači da je moguće da je došlo do oštećenja u bateriji. Molimo odmah
pošaljite bateriju u servis.
80
Električni udar struje može uzrokovati ozbiljne ozljede
Uvijek koristite osobna sredstva za zaštitu!
Page 81
Struktura i funkcija
3
Ako punjač ima kvar, sve 3 LED-ice za punjenje bljeskaju istovremeno. Izvadite bateriju i
odspojite punjač iz mreže. Nakon 2 minute, umetnite utikač u utičnicu i umetnite bateriju.
Ako sva 3 LED-ice za punjenje i dalje treptaju, odmah pošaljite punjač na servis.
Održavanje i čišćenje
4
Održavanje i njega:
• Isključite bateriju iz alata prije bilo kakvih radova na održavanju i popravcima.
• Redovito provjeravajte osovinu za prihvat alata. Istrošeni ili oštećeni pribor (svrdla,
adapteri..) mogu oštetiti alat ili smanjiti učinkovitost i oštetiti motor.
Održavanje motora
• Električni namotaj elektor motora najvažniji je dio električnog alata. Pažljivo postupajte
s alatom kako biste osigurali da električni namotaj ne bude oštećen ili namočen vodom
ili uljem.
Održavanje:
• HAZET baterijski alat treba redovito tretirati komercijalno dostupnim sredstvom za
čišćenje bez otapala.
Provjerite ima li prašine::
• Prašina se može ukloniti mekom krpom ili krpom natopljenom sapunom.
• Ne koristite izbjeljivače, sredstva za čišćenje na bazi klora, benzina ili nitro razrjeđivača,
jer mogu oštetiti plastiku.
• Očistite i osušite plastične dijelove mekom krpom navlaženom u sapunici.
Rezervni dijelovi:
• Koristite samo originalne rezervne dijelove proizvođača.
• Neispravni ili neorginalni rezervni dijelovi mogu dovesti do oštećenja, neispravnosti ili
potpunog kvara uređaja.
• Ako se koriste rezervni dijelovi koji nisu odobreni od strane proizvođača, istječu svi
zahtjevi jamstva, servisa, naknade štete i odgovornosti prema proizvođaču ili njegovim
zastupnicima, trgovcima i predstavnicima.
Električni udar struje može uzrokovati ozbiljne ozljede
Uvijek koristite osobna sredstva za zaštitu!
[
+49 (0) 21 91 / 7 92-0 • \ +49 (0) 21 91 / 7 92-375 • ^ hazet.de • ] [email protected]
81
Page 82
Održavanje i čišćenje
4
Odlaganje i skladištenje:
Uređaj se mora pohraniti u sljedećim uvjetima
koji trebaju biti:
• suhi prostori bez prašine za skladištenje uređaja
• Ne izlažite uređaj tekućinama i / ili agresivnim tvarima
• Ne čuvajte uređaj na otvorenom.
• Držite uređaj izvan dohvata djece.
• Temperatura skladištenja alata -10°C do +40°C.
• Relativna vlažnost zraka max. 60%.
Odlaganje/recikliranje:
• Stare baterije (Li Ion) i električni uređaji ne spadaju u kućni otpad i moraju se odlagati
na prikladna mjesta za prikupljanje.
• Elektronički otpad, elektroničke komponente, maziva i drugi pomoćni materijali pod
vrgavaju se posebnoj obradi otpada i odlagati ih mogu isključivo ovlaštene specijalne
tvrtke!
• Smanjenje onečišćenja okoliša i očuvanje okoliša su fokus naših aktivnosti!
-
82
Električni udar struje može uzrokovati ozbiljne ozljede
Uvijek koristite osobna sredstva za zaštitu!
Page 83
Notizen / Notes / Poznámky / Bilješke
[
+49 (0) 21 91 / 7 92-0 • \ +49 (0) 21 91 / 7 92-375 • ^ hazet.de • ] [email protected]
83
Page 84

HAZET-WERK Hermann Zerver GmbH & Co. KG • ; Güldenwerther Bahnhofstrasse 25-29
42857 REMSCHEID • } 10 04 61 • 42804 REMSCHEID • GERMANY • [ +49 (0) 21 91 / 7 92-0
9233-7 BA IV. 09.2020 / ∞ cb / 114
 Loading...