Hayward Industrial Products TB Installation Manual

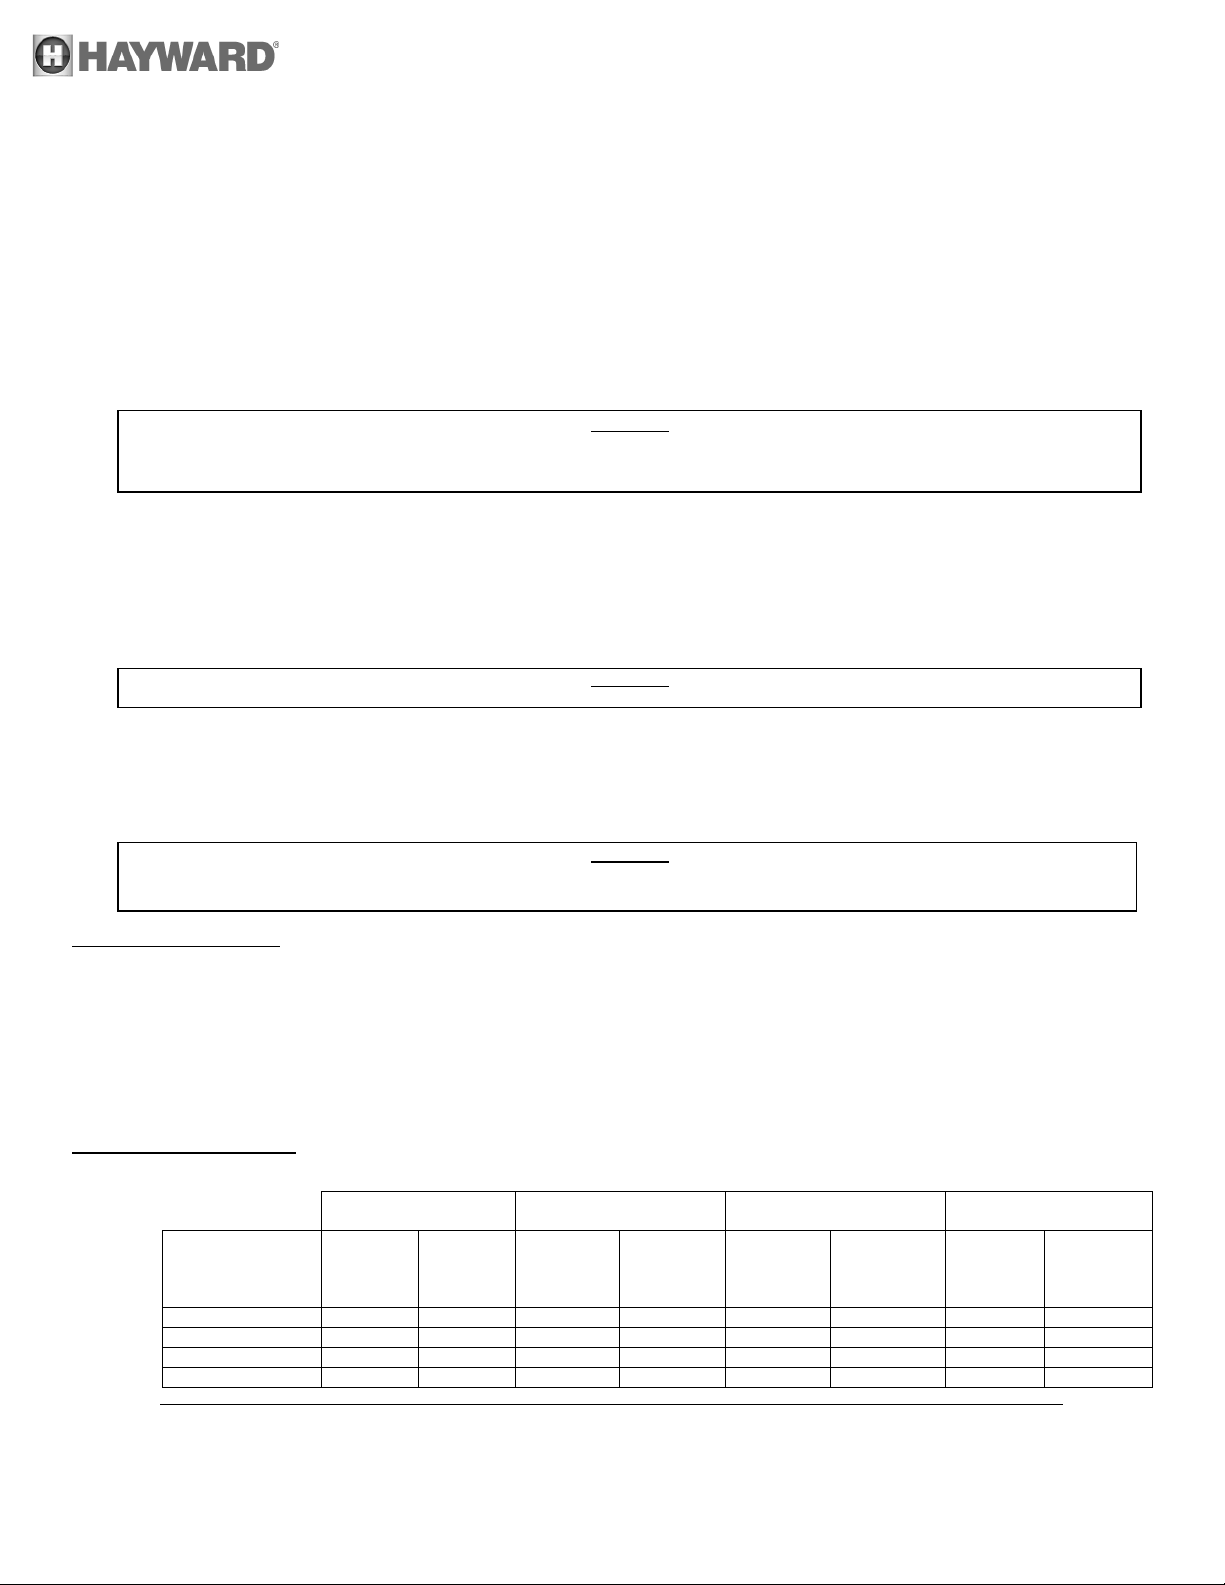
Test Pressures for Pipe
Sizes ½” to 1-1/4”
Test Pressures for Pipe
Sizes 1-1/2” to 3”
Test Pressures for Pipe
Sizes 4” & 5”
Test Pressures for Pipe
Sizes 6” t o 8”
Temperature
ºF(ºC)
Up to
Above 180
2550 kPa)
Up to
Above 180
2172 kPa)
Up to
Above 180 to
kPa)
Up to
Above 180
2172 kPa)
60 to 100 (15 to 40)
1 hour
6 hours
2 hours
12 hours
6 hours
18 hours
8 hours
1 day
40 to 60 ( 5 to 15)
2 hours
12 hours
4 hours
1 day
12 hours
36 hours
16 hours
4 days
20 to 40 (-7 to 5)
6 hours
36 hours
12 hours
3 days
36 hours (A)
4 days (A)
3 days (A)
9 days (A)
10 to 20 (-15 to 7)
8 hours
2 days
16 hours
4 days
3 days (A)
8 days (A)
4 days (A)
12 days (A)
HAYWARD FLOW CONTROL
TB SERIES TRUE UNION BALL VALVE
INSTALLATION, OPERATION AND MAINTENANCE INSTRUCTIONS
PLEASE READ THE FOLLOWING INFORMATION PRIOR TO INSTALLING AND USING ANY HAYWARD PRODUCT. FAILURE
TO FOLLOW THESE INSTRUCTIONS MAY RESULT IN PRODUCT DAMAGE, PROPERTY DAMAGE, PERSONAL INJURY, OR
EVEN DEATH.
1. Hayward Flow Control (Hayward), a division of Hayward Industries, guarantees its products agains t defective material and workmanship only.
Hayward assumes no responsibilit y for property damage or personal injury resulting from i mproper installation, mis application, or abuse of any
product.
2. Hayward assumes no responsibilit y for property damage or personal injury resulting from chemical incom patibility between its products and the
process fluids to which they are exposed. Determining whether a particular PVC, CPVC, or PP product is suitable for an application is the
responsibility of the user. Chemical compatibil ity charts provided in Hayward literature are based on ambient temperatures of 70°F and are for
reference only.
3. Hayward products are designed for use with non-compres sible liquids.
Hayward PVC and CPVC products should NEVER be used or tested with compressible fluids such as compressed air or
nitrogen. Use of PVC and CPVC products in compressible fluid applications may result in product damage, property damage,
personal injury, or even death.
4. The maximum recommended fluid velocity through any Hayward product is eight feet per second (8 ft/s). Higher fluid velocity can result in
damage due to the water hammer ef fect.
5. Piping systems m us t be des igned and s upported t o prevent excess m echanic al l oading on Hayward products due to system mis ali gnm ent , weight,
shock, vibration, and the effects of therm al expansion and contraction.
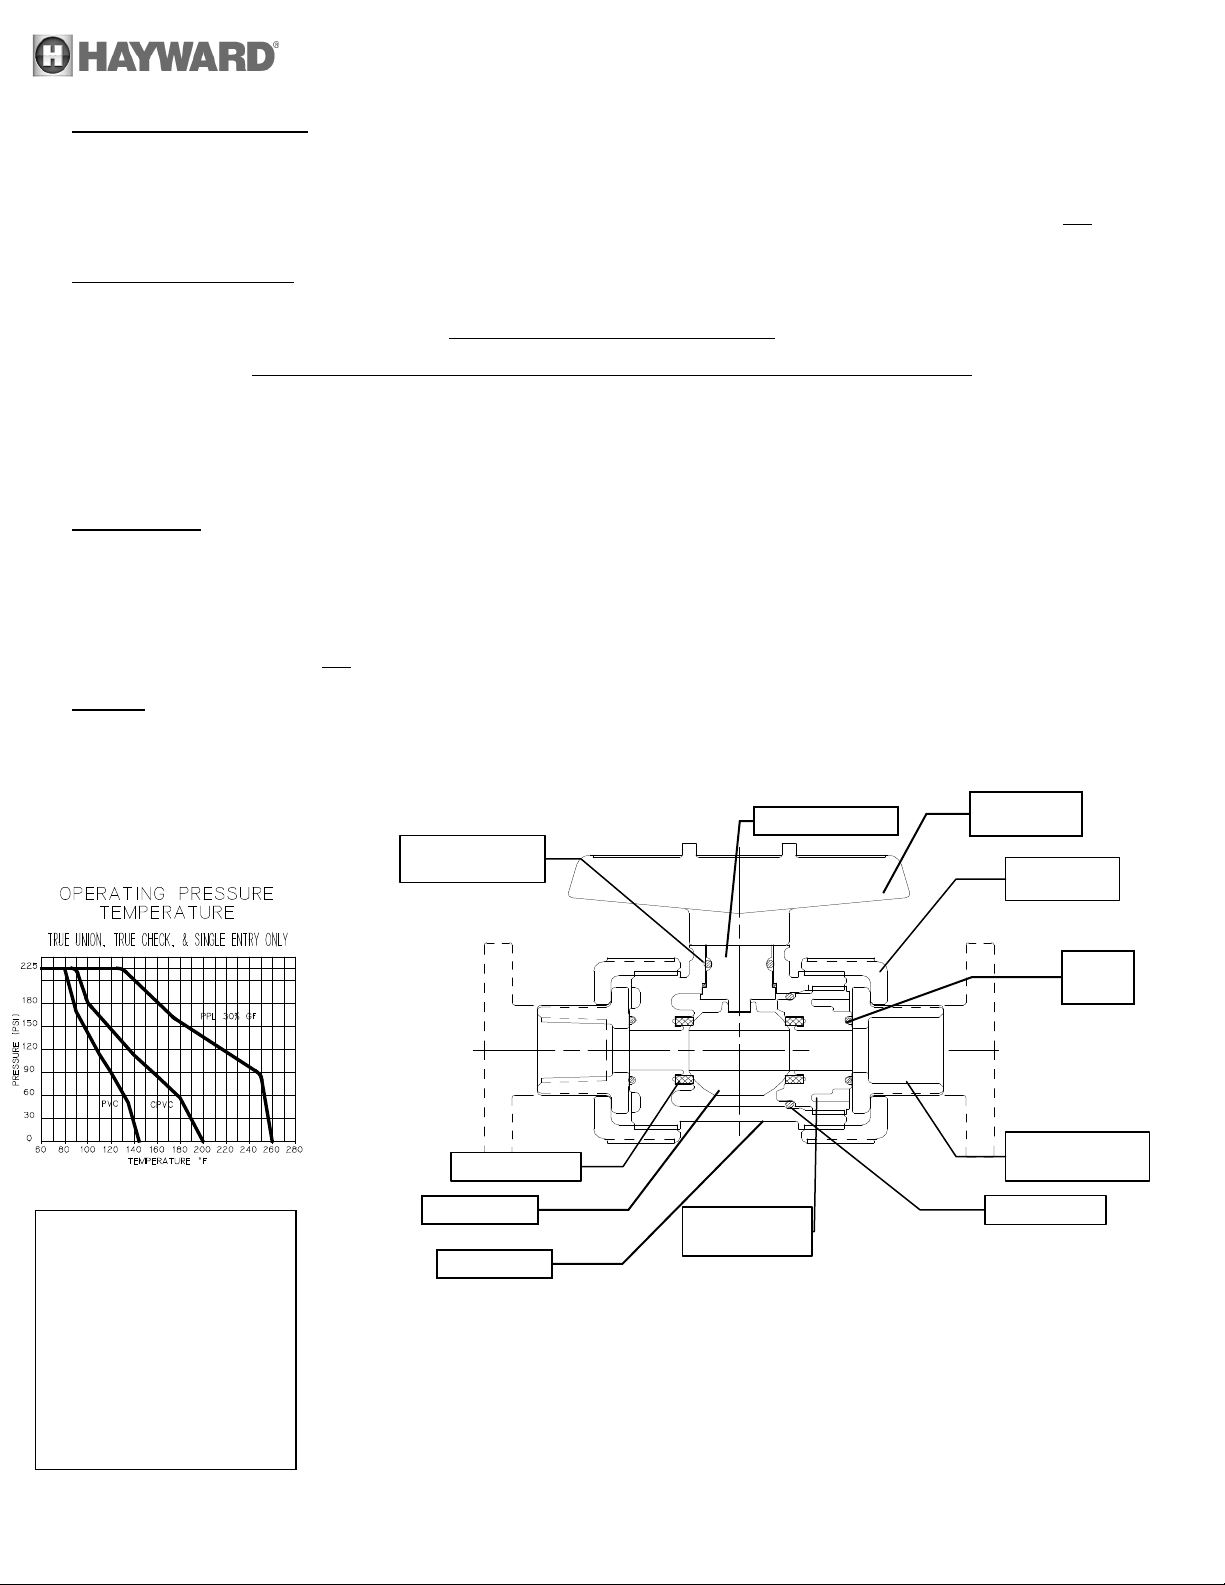
6. The effect of tem perature on plastic piping syst ems must be cons idered when the systems are initially designed. The pressure rating of plast ic
systems m ust be reduced with i ncreasing temperature. Maximum operating pressure is dependent upon material sel ection as well as operating
temperature. Before ins talling any Hayward product, consult Hayward product literature for pressure vs. temperature curves to determine any
operating pressure or temperature li mitations.
7. PVC and CPVC plastic produc t s become brittle bel ow 40°F. Us e caution in their install at i on and operation below this temperature.
Hayward PVC and CPVC products should not be used in services with operating temperature below 34°F.
8. Due to differential thermal expansion rates between metal and plastic, transmittal of pipe vibration and pipe loading forces, DIRECT
INSTALLATION OF HAYWARD FLOW CONTROL PRODUCTS INTO METAL PIPING SYSTEMS IS NOT RECOMMENDED. Wherever
installation of Hayward product i nto metal pi ping system s is neces sary, it is recom mended that at leas t 10 pipe diam eters in l ength of plas tic pipe
be installed upstream and downst ream of the product to c ompensate for the fact ors mentioned above.
9. Published operating requirements are based on testing of new products using clean water at 70°F. Performance is af fected by many factors
including fluid chem i s try, viscosity, s pecific gravity, flow rate, and temperature. These should be considered when sizing Hayward products.
10. Systems should always be depres surized and drained prior to installing or maintaining any Hayward product.
Failure to depressurize and drain system prior to installing or maintaining any Hayward product may result in product damage,
property damage, personal injury, or even death.
SOCKET CONNECTION:
Socket end connections are manufactured to AS T M D2467-94. S ol vent cementing of sock et end connections to pipe s houl d be perf ormed per ASTM
specifications D2855-87. Cut pipe square. Chamfer and deburr pipe. Surfaces must be c l eaned and f ree of dirt, moist ure, oi l and other foreign
material. Remove assembly nuts and end connect ors from valve body. Slide ass embly nuts, with threads fac i ng val ve, ont o pi pe to which the end
connector is to be cemented. Apply primer to inside socket surfac e of end connector. Never allow primer or cement to contact valve bal l or end
connector o-ring sealing surfac es, as leaking may resul t. Use a scrubbing mot i on. Repeat applications m ay be nec essary to soften the s urf ace of the
socket. Next, liberally apply primer to the male end of the pi pe to the length of the sock et depth. Again apply to the soc ket, without delay apply cement
to the pipe while the surface is still wet with primer. Next apply cem ent lightly, but uniform l y t o the inside of the socket. Apply a second coat of cement
to the pipe, and assembl e t he end connector to the pipe, rotat ing the end connector 1/4 turn in one direction as it is slipped to full depth on to the pipe.
The end connector should be held in position for approx. 30 seconds to allow the connec t i on to “set”. After ass embly wipe off excess cement . Full set
time is a mini mum of 30 minut es at 60 to 100 F. Full cure ti me should be based on the chart below.
JOINT CURE SCHEDULE:
The cure schedules are suggest ed as guides. They are based on laboratory test data, and should not be taken to be the recommendations of all
cement manufac turers. Individual manufacturer’s recomm endations for their particular cement should be followed.
WARNING
WARNING
WARNING
A: It is important to note that at temperatures colder than 20ºF on sizes that exceed 3 in., test results indicate that many variables exist in the actual cure rate of the joint. The
data expressed in these categories represent only estimated averages. In some cases, cure will be achieved in less time, but isolated test results indicate that even longer
periods of cure may be required.
B: These cure schedules are based on laboratory test data obtained on Net Fit Joints (NET FIT=in a dry fit the pipe bottoms snugly in the fitting socket without meeting
interference).
Range During
Cure Period(B)
Colder than 10 (-15) Extreme care should be exercised on all joints made where pipe, fittings or cement is below 10ºF.
180 PSI
(1240 kPa)
to 370 PSI
(1240 to
180 PSI
(1240 kPa)
to 315 PSI
(1240 to
180 PSI
(1240 kPa)
315 PSI
(1240 to 2172
180 PSI
(1240 kPa)
to 315 PSI
(1240 to

TORQUE
ASSEMBLY
NUT (2) REQ
END CONNECTOR
SEAL RETAINER
O-RINGS TWO (2)
SEAT (2) REQ
O-RING (1) REQ
STEM (1) REQ
HANDLE (1)
REQ
O-RING
BALL (1) REQ
BODY (1) REQ
TUIS REV E
THREADED CONNECTION:
Threaded end connections are manuf actured to ASTM specifi c ations D2464-88. F437-88 and ANSI B2.1. Wrap threads of pipe with PTFE tape of 3 to
3-1/2 mil thicknes s . The tape should be wrapped in a clockwise direc tion starting at the first or second full thread. Overl ap each wrap by, 1/2 the width
of the tape. The wrap should be applied with suff i cient tension to allow the threads of a single wrapped area to show through without cutting the tape.
The wrap should continue for the full effective length of the thread. P i pe sizes 2” and greater will not benefit with more than a second wrap, due to the
greater thread depth. To provide a leak proof joint, the pipe should be threaded into the end connection “hand tight”. Usi ng a strap wrench only.
(Never use a stillson type wrench) tighten t he j oi nt an additional 1/2 to 1-1/2 turns past hand tight. Tightening beyond t hi s point may induce excessive
stress that could cause failure.
FLANGED CONNECTION:
Flange bolts should be tight enough t o slightly compress the gasket and make a good seal, without distorting or putting excessive stress on t he f l anges.
Suitable washers should be used between the bolt head and flange and the nut and flange. Bolts should be tightened in alternati ng sequence.
RECOMMENDED FLANGE B O LT TORQUE
FLANGE BOLT TORQUE FLANGE BOLT TORQUE
SIZE DIA. FT. LBS. SIZE DIA. FT. LBS.
1/2 1/2 10-15 2 5/8 15-25
3/4 1./2 10-15 2-1/2 5/8 20-25
1 1/2 10-15 3 5/8 20-25
1-1/4 1/2 10-15 4 5/8 20-25
1-1/2 1/2 10-15 6 3/4 30-40
NOTE: USE WELL LUBRICATED METAL BOLTS AND NUTS. USE SOFT RUBBER GASKETS.
ADJUSTMENT:
EXTREME CAUTION MUST BE TAKEN WHEN WORKING ON THIS VALVE.
THE PIPING SYSTEM MUST BE DEPRESSURIZED AND DRAINED. PROPER CARE MUST B E T AKEN. CONSULT M.S.D.S.
(MATERIAL SAFETY DATA SHEETS) INFORM AT ION REGARDING YOUR SPE CIFIC APPLICATION.
Remove the assembly nut and end c onnector from the “adjust ” end of the body, or the complete valve body from the piping system. The front face of
the seal retainer indicates which di rection of rotation tightens or loosens the seal retainer, with the word “tighten” and a directional arrow, and the word
“loosen” and a directional arrow. Direction of rot ation may vary depending on date of manufacture. The Assem bl y nut should be installed on the valve
“hand tight”. Using a strap wrench only the j oi nt may be tightened 1/2 to 3/4 of a turn past hand tight.
REPAIR:
Follow the adjustment sequence and information above, but rotating the seal retainer com pl etely in the “loosen” direction and remove it from valve
body. The o-rings and seals are now access i bl e for replacement using a “seal ” repai r kit. Carefully remove the o-rings from their respect i ve locations
taking care not to scrat ch their sealing surfaces. Insert o-rings and re-assemble. See table below.
Recommended valve stem torque
to rotate the ball 360º when valve
is reassembled.
VALVE
SIZE IN*LB
1/2” 40
3/4” 50
1” 60
1 1/2” 70
2” 80
3” & 2 1/2” 140
4” & 6” 170
REQUIRED
(2) REQ
(2) REQ
(1) REQ
APRIL 30, 2013
ECR 800U
File: 08H7.DOC
 Loading...