

Hayward Viio Turbo 5500TC Owner's Manual


Important Safety Instructions
Warning
Read this entire Owner’s Guide before installing the Viio
cleaner. Failure to follow safety warnings and owner’s
guide instructions can result in severe injury, death or
property damage.
For additional free copies of the Owner’s Guide you can
download them from www
(908) 351-5400 ext. 4700.
.haywardnet.com or call
Warning – Risk of Electrical Shock
The Hayward Viio Turbo Automatic Pool Cleaner is designed to
connect to a threaded 1-1/2 inch female pipe fitting on a
dedicated return line that is powered by a 3/4 H.P. Booster
Pump. You should have a licensed electrician install the
cleaner’s booster pump. The Booster Pump must be
installed in accordance with the National Electrical
Code and all local code requirements. Failure to do so
can result in serious injury or death.
Warning – Risk of Injury
Failure to follow the safety warnings below may result
in severe injury, death or property damage.
• Always disconnect and remove the cleaner and pressure
hose before entering the pool.
• Always handle with care. Do not let children or pets play
with the cleaner; it is not a toy.
• Always turn the Booster Pump
• Do not operate outside the pool. The Viio Turbo Cleaner
and hoses contain high-pressure wa
cause injury.
• Disconnect pressure hose from the universal wall fitting
before removing the cleaner from the pool.
•
Never point any of the cleaner’s high-pressure jets,
pressure hose or sweep hose at any person or pets.
OFF before handling cleaner
y
ter jets tha
t ma
Important Information
Caution – Risk of Equipment Damage
Always turn the Filtration Pump on
•
booster pump on. Running the booster pump dry will
damage the booster pump and is not covered by the
Hayward warranty.
before turning the
• Always disconnect and remove the Viio cleaner and
hoses from the pool before cleaning or backwashing
he pool filter.
t
• After cleaning or backwashing the pool filter, allow the
filtration system to run for a minimum of five minutes or
until all debris has been flushed from plumbing lines before
reconnecting the Viio cleaner.
• New plumbing lines must be flushed out before connecting
the Viio cleaner.
• The Viio cleaner should not be used to remove plaster dust or
construction debris from new or renovated pools.
• The Viio cleaner should not be used to remove excessive
sand (dense debris) following wind or sandstorm.
• Always disconnect and remove the Viio cleaner and hoses
before chemically shocking the pool.
• Only operate the Viio cleaner for the period of time necessary
to clean the pool. Excessive use is unnecessary and will
cause cleaner parts to prematurely wear.
• Regularly inspect the cleaner and hoses; do not use if
damaged or if any rough edges are visible on the cleaner;
this can cause damage to the pool.
• Only pick-up the Viio cleaner by its wing (Part A, page 4),
never by the hose or bag.
Disclaimer
• Pool plaster is affected by age, water chemistry, etc.
• Pool plaster can deteriorate over a period of time.
• The integrity of “good” pool plaster is such that a pool
vacuum cleaner – automatic or manual – cannot remove
the plaster
The integ
•
will cause wear on the cleaner, the cleaner will not wear out
“good” pool plaster.
• Vinyl pool liners are affected by age, sunlight, and water
chemistry.
• Vinyl pool liners can become brittle and weak.
Vin
•
pool's surroundings.
Pa
•
When installing the
•
the condition of the pool and the pool's surroundings and
chemistry.
.
rity of “good” pool plaster is such that the plaster
yl pool liners can be affected by the installation and the
tterns on vin
yl pool liners vary in quality.
Viio cleaner, you assume responsibility for
Use Only Genuine Hayward Replacement Parts.
1

Contents
Important Safety Instructions . . . . . . . . . . . . . . . . . . . . . . . . . . . . . . . . . . . . . . . .1
Disclaimer . . . . . . . . . . . . . . . . . . . . . . . . . . . . . . . . . . . . . . . . . . . . . . . . . . . . . . . .1
Introduction . . . . . . . . . . . . . . . . . . . . . . . . . . . . . . . . . . . . . . . . . . . . . . . . . . . . . .3
For Your Records . . . . . . . . . . . . . . . . . . . . . . . . . . . . . . . . . . . . . . . . . . . . . . . . . .3
Principal Parts . . . . . . . . . . . . . . . . . . . . . . . . . . . . . . . . . . . . . . . . . . . . . . . . . . . .4
Preparing the Pool . . . . . . . . . . . . . . . . . . . . . . . . . . . . . . . . . . . . . . . . . . . . . . . . .5
Tools Needed for Installation . . . . . . . . . . . . . . . . . . . . . . . . . . . . . . . . . . . . . . . . . .5
Connecting Viio Turbo Cleaner to Pool . . . . . . . . . . . . . . . . . . . . . . . . . . . . . . . . .6
Installing the Universal Wall Fitting . . . . . . . . . . . . . . . . . . . . . . . . . . . . . . . . . . . . .6
Assembling & Sizing the Rigid Pressure Hose . . . . . . . . . . . . . . . . . . . . . . . . . . .7
Connecting the Rigid Pressure Hose . . . . . . . . . . . . . . . . . . . . . . . . . . . . . . . . . . . . .7
Connecting Hose to Wall . . . . . . . . . . . . . . . . . . . . . . . . . . . . . . . . . . . . . . . . . . . . .7
Operating the Viio Cleaner . . . . . . . . . . . . . . . . . . . . . . . . . . . . . . . . . . . . . . . . . . .9
Setting Pressure . . . . . . . . . . . . . . . . . . . . . . . . . . . . . . . . . . . . . . . . . . . . . . . . . .9
Large Capacity Debris Bag . . . . . . . . . . . . . . . . . . . . . . . . . . . . . . . . . . . . . . . . . .10
Correctly Operating Cleaner . . . . . . . . . . . . . . . . . . . . . . . . . . . . . . . . . . . . . . . . .11
Cleaner Adjustments . . . . . . . . . . . . . . . . . . . . . . . . . . . . . . . . . . . . . . . . . . . . . . .12
Changing Spin-Out Frequency . . . . . . . . . . . . . . . . . . . . . . . . . . . . . . . . . . . . . . . .12
Adjusting Spin-Out Duration . . . . . . . . . . . . . . . . . . . . . . . . . . . . . . . . . . . . . . . . . .12
Adjusting Sweep Hose Power . . . . . . . . . . . . . . . . . . . . . . . . . . . . . . . . . . . . . . . . .13
Maintenance . . . . . . . . . . . . . . . . . . . . . . . . . . . . . . . . . . . . . . . . . . . . . . . . . . . . .14
Removing the Viio Cleaner from Pool . . . . . . . . . . . . . . . . . . . . . . . . . . . . . . . . . . . .14
Emptying Debris Bag . . . . . . . . . . . . . . . . . . . . . . . . . . . . . . . . . . . . . . . . . . . . . . .14
Cleaning the Cleaner Connector Screen . . . . . . . . . . . . . . . . . . . . . . . . . . . . . . . . . .14
Sweep Hose . . . . . . . . . . . . . . . . . . . . . . . . . . . . . . . . . . . . . . . . . . . . . . . . . . . . .14
Replacing Parts . . . . . . . . . . . . . . . . . . . . . . . . . . . . . . . . . . . . . . . . . . . . . . . . . . . .15
Sweep Hose . . . . . . . . . . . . . . . . . . . . . . . . . . . . . . . . . . . . . . . . . . . . . . . . . . . . .15
Debris Bag . . . . . . . . . . . . . . . . . . . . . . . . . . . . . . . . . . . . . . . . . . . . . . . . . . . . . .15
Swivels . . . . . . . . . . . . . . . . . . . . . . . . . . . . . . . . . . . . . . . . . . . . . . . . . . . . . . . . . .15
Storing the Viio Cleaner . . . . . . . . . . . . . . . . . . . . . . . . . . . . . . . . . . . . . . . . . . . . .15
Winterizing . . . . . . . . . . . . . . . . . . . . . . . . . . . . . . . . . . . . . . . . . . . . . . . . . . . . . .15
Periodic Freezing Conditions . . . . . . . . . . . . . . . . . . . . . . . . . . . . . . . . . . . . . . . . . .15
Troubleshooting . . . . . . . . . . . . . . . . . . . . . . . . . . . . . . . . . . . . . . . . . . . . . . . . . . .16
Booster Pump . . . . . . . . . . . . . . . . . . . . . . . . . . . . . . . . . . . . . . . . . . . . . . . . . . . . .17
iio Parts Diagram and Replacement Parts List . . . . . . . . . . . . . . . . . . . . . . . . . .18
V
Limited Warranty . . . . . . . . . . . . . . . . . . . . . . . . . . . . . . . . . . . . . . . . . . . . . . . . . .19
2
Use Only Genuine Hayward Replacement Parts.

Introduction
Congratulations on your purchase of the Hayward Viio Turbo
Automatic Pool Cleaner. The Hayward Viio is designed to clean
our pool faster than other automatic pool cleaners so you and
y
your family spend your time enjoying your pool, not
maintaining it.
This revolutionary design offers the following features:
• Faster Cleaning
- Wider Vacuum Nozzle
- Powerful Sweep Hose
• Complete Pool Coverage
- Patented AquaDrive™ water jet propulsion
- Randomized Cleaning, Backup & Spin-out
• Large Debris Pick-up
- Larger Suction Inlet
- Three High Pressure Water Jets
• Less Frequent Bag Cleaning
- Larger Capacity Bag
- Easy to remove, clean and replace debris bag
• Less Wear on Pool Surface
- Patented AquaDrive water jet propulsion: no powered
wheels wearing pool surfaces
• Easy Installation
Important
This manual is for Viio owners who want to install their
Automatic Pool Cleaner. However, we recommend that an
Authorized Hayward Dealer install the cleaner.
The Hayward 6060 Booster Pump purchased separately as
part of the Viio Automatic Pool Cleaner package offers
optimum cleaner performance. Use of other booster pumps
will provide acceptable performance if they deliver 35 Pounds
per Square Inch (PSI) at 12 Gallons Per Minute (GPM) at the
dedicated line pool wall fitting. For electrical and plumbing
installation procedures for the Hayward Booster Pump, refer
to the Owner's Guide that comes with the Hayward 6060
Booster Pump.
Warning – Risk of Electrical Shock
You should have a licensed electrician install the cleaner’s
booster pump.
accordance with the National Electrical Code and all
local code requirements.
The Booster Pump must be installed in
A limited warranty program protects your Hayward Viio
cleaner. To take full advantage of this limited warranty, please
read, complete and
Registration Card within 14 days of purchase date or go
to www.haywardnet.com/warranty to fill out online.
Your warranty card is packed in the Owner’s Guide and
Accessory Pack.
return the Limited Warranty
For Your Records
Purchase Date
Serial Number
(located on back of cleaner)
Length of Hose Used
Water Pressure Reading
Use Only Genuine Hayward Replacement Parts.
3
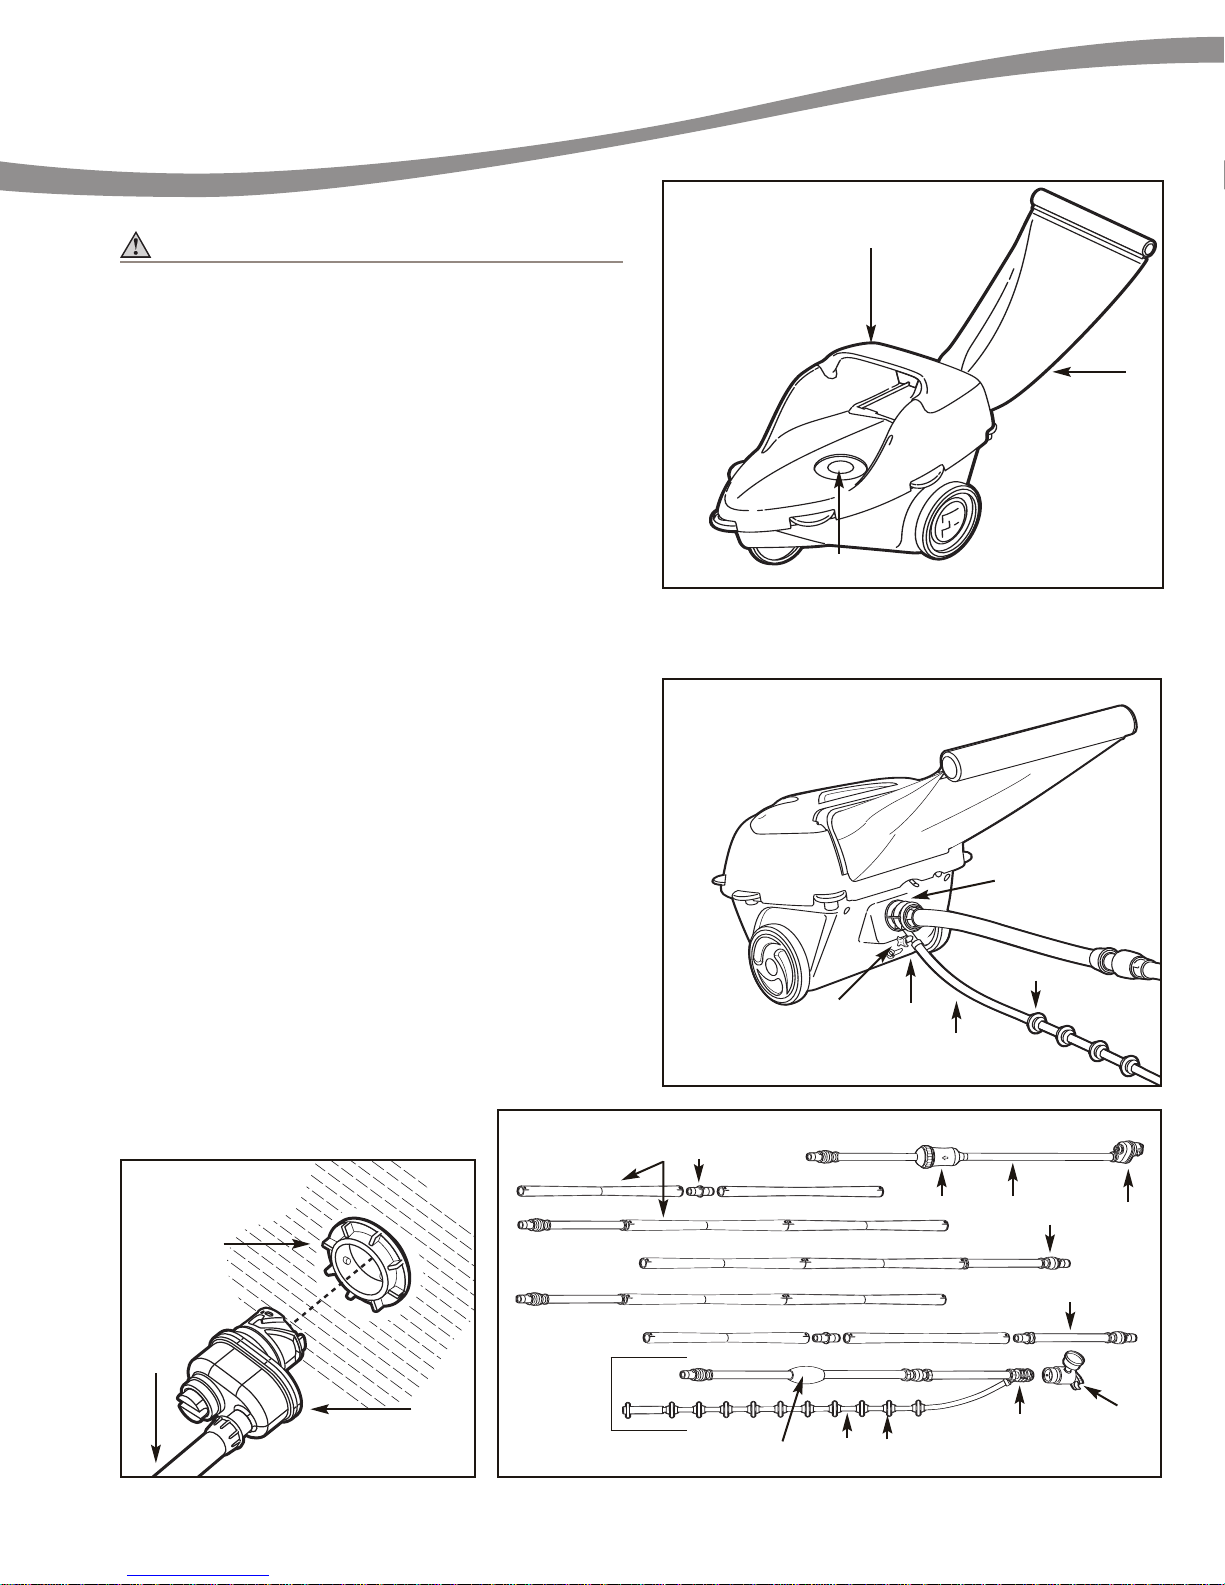
Principle Parts
ront view Product
F
CCaauuttiioonn -- RRiisskk ooff EEqquuiippmmeenntt DDaammaagge
ose may be stored folded pipe-to-pipe. Only first 3-foot hose section
H
and sweep hose must be stored straight,
nnoott ccooiilleedd.
e
.
A. Wing
B. Large Capacity Debris Bag with Float Closure
C. Cleaner Connector
D. Sweep Hose Connector
E. Sweep Hose Adjustment Knob
F. Cam Cap
G. Rigid Pressure Hose
H. Hose Float
I. Hose Pipe Coupling
J. Hose Swivel - (See special installation instructions in this manual)
K. Adjustable Wall Quick Connect
L. Sweep Hose
M. Wear Roller
N. Rigid Hose Pipe
O. Universal Wall Fitting
Q. In-Line Filter
R. Hose Swivel Assembly
S. Hose Cleaner End Assembly
T. Hose Wall End Assembly
U. Setup Pressure Gauge
RReeaarrvviieeww PPrroodduucct
A
B
F
t
WWaallll QQuuiicckk CCoonnnneecct
O
G
C
M
E
RRiiggiidd PPrreessssuurree HHoossee PPaarrttss ((GG)
N
t
K
S
)
I
H
L
D
L
Q
M
T
J
C
K
R
U
4

Preparing the Pool
The Viio cleaner should not be used to clean the
pool for spring start-up until the following steps
ave been taken:
h
1. Clear the pool of any large objects that might interfere
with the cleaner’s operation.
2. Check to see that the water is at the recommended level.
3. Check the water chemistry. The water should be properly
balanced (pH level) and the pool free from algae.
Note: Algae can adversely affect the operation and
performance of the cleaner.
4. Clean or backwash the filtration system without the Viio
cleaner in the pool.
Caution – Risk of Equipment Damage.
Always disconnect the Viio cleaner and hoses from
the Universal Wall Fitting and remove from pool before
backwashing or cleaning the filtration system. Failure
to do so can damage the Booster Pump and Cleaner.
5. Clean the filtration system pump’s strainer basket.
Note: Following the installation of the Viio cleaner,
clean the system at regular intervals according to
individual pool conditions.
New Pool Construction
Brush newly constructed pool surface and vacuum new
1.
surface debris
Pools with Excessive Sand
Pools with excessive amounts of sand (dense debris)
should be vacuumed manually before installing the Viio.
The Viper Bag has a larger mesh area toward the bottom
of the bag that allows sand in excess of 1 cup to pass
through the bag. This feature enables the Viio to continue
to operate picking up leaves, acorns, grasses etc. without
falling on its side like other pressure cleaners.
before
installing the Viio.
Dedicated Booster Pump Return Line
The Viio cleaner is designed to connect to a 1-1/2 inch
dedicated return line that is approximately 6 inches below the
normal water level and have 1-1/2 inch female threads. If the
dedicated return line has 3/4 inch female threads, you will
need to purchase a 1-1/2 inch NPTF x 3/4 inch NPTM adapter.
Tools Needed for Installation
• Flat blade screwdriver for adjusting the regulator on the
wall quick connect.
• Rigid pressure hose measuring tape (included in bag #1).
Sand (dense debris)
Always empty the V
debris) fills the bag up to the “Empty Sand Line”.
Pools with excessive amounts of sand should be manually
vacuumed before installing the Viio.
Viper is designed to opera
The
and the remainder of its bag filled with leaves, acorns,
grasses. etc.
Use Only Genuine Hayward Replacement Parts.
iio bag when sand (or heavy
te with 1 cup of sand
5
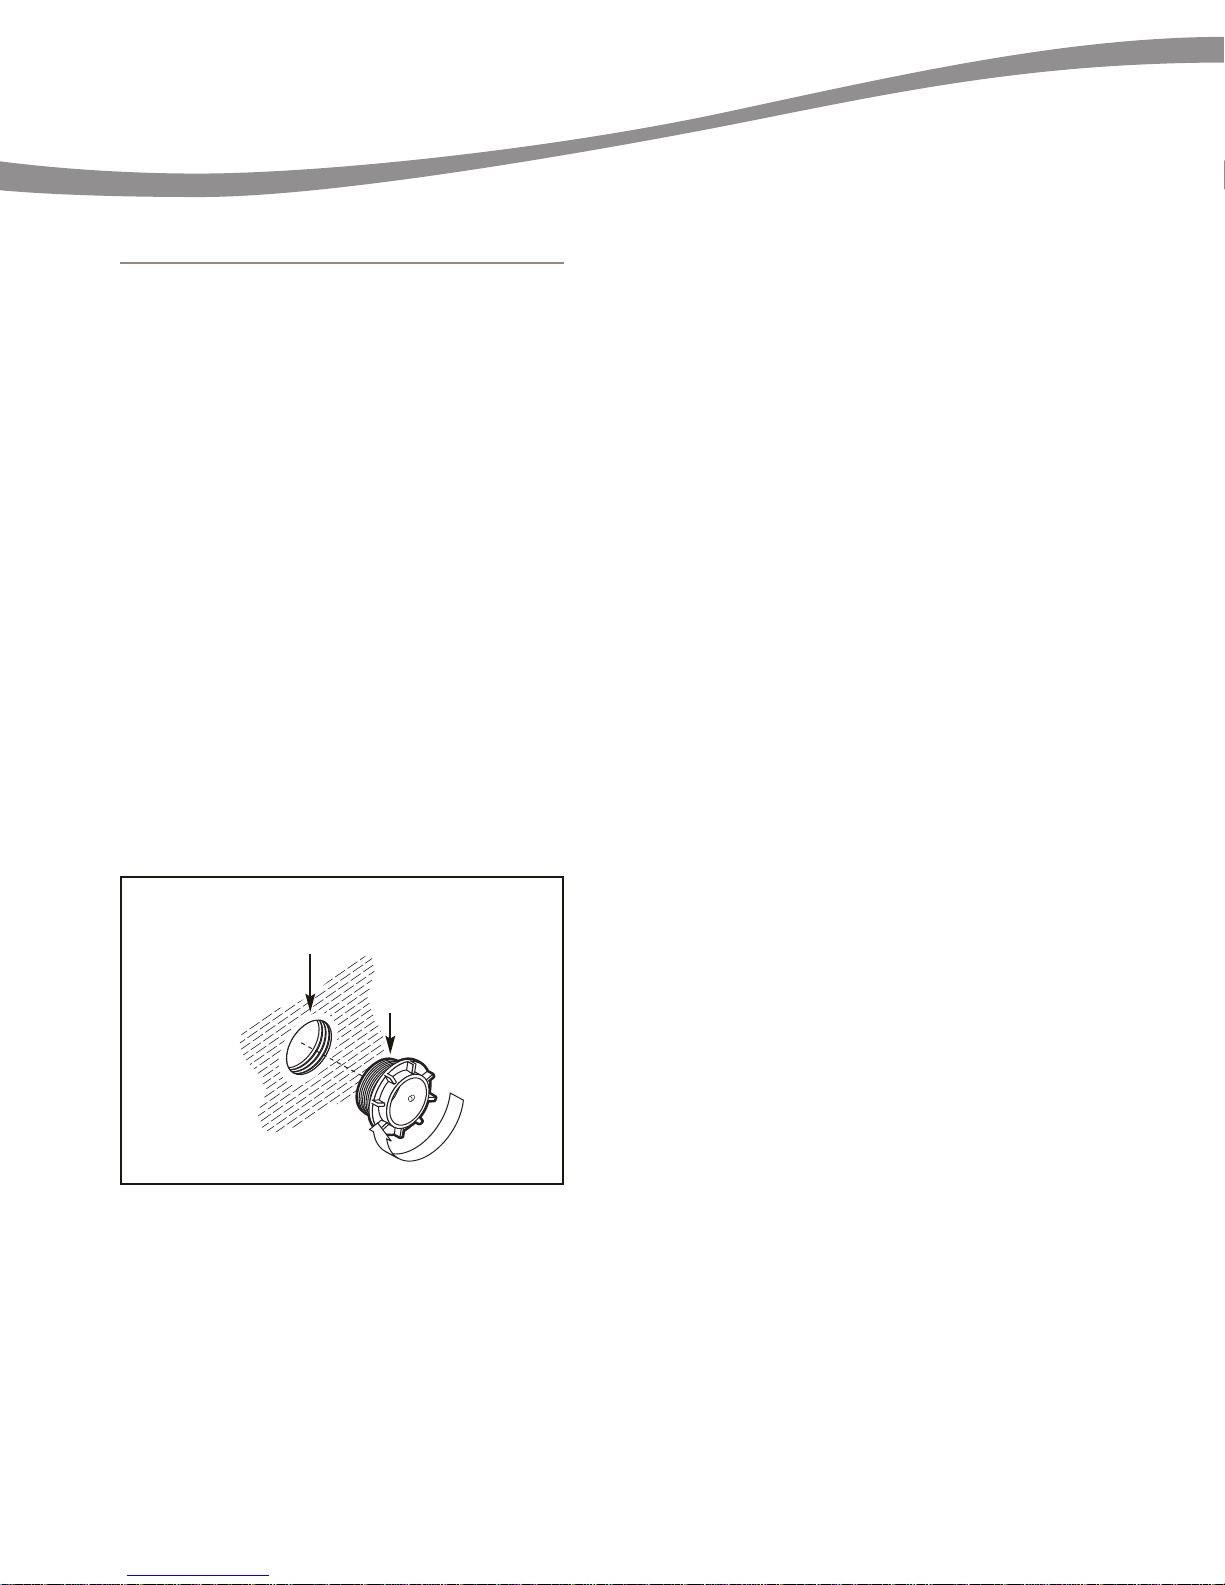
Connecting The Viio Cleaner To Pool
IInnssttaalllliinngg UUnniivveerrssaall WWaallll FFiittttiinngg
BBuuiillddeerrss::
midpoint of the pool’s long wall.
SSppeecciiffiiccaattiioon
DDeepptthh:
SSiizzee:
11.
.
22.
.
33.
.
44.
.
55.
.
66.
.
nstall the Dedicated Return Line at the
I
n
: Dedicated Return Line in Pool Wall.
:
At least 6 inches below water level.
:
1-1/2 inch NPT Female Threaded.
Flush plumbing lines before proceeding.
OOFFF
Turn Booster Pump and Main Filtration Pump
Remove plug or existing Universal Wall Fitting from
previously installed pool cleaner (if any).
Remove the Universal Wall Fitting (part O) and Teflon®tape
from Bag #1.
When installing or re-installing the Universal Wall Fitting
use Teflon
threads on the end of the Universal Wall Fitting un-taped.
Screw the Universal Wall Fitting into the Dedicated
Return Line.
IImmppoorrttaanntt:
right to engage starting threads. Be sure both parts are
started properly (not cross threaded) then resume tightening
– hand tighten only.
ssccrreeww aallll tthhee wwaayy iinnttoo tthhee DDeeddiiccaatteedd RReettuurrnn LLiinnee.
DDoo nnoott oovveerr ttiigghhtteenn.
®
tape on its plastic threads. Leave two starting
:
Turn the Universal Wall Fitting 1 full turn to the
TThhee UUnniivveerrssaall WWaallll FFiittttiinngg mmaayy nnoot
.
F
.
.
t
UUnniivveerrssaall WWaallll FFiittttiinng
g
Dedicated Return Line
Universal
all Fitting (O)
W
Teflon®is a registered trademark of E.I. du Pont de Nemours
and Company.
6
Use Only Genuine Hayward Replacement Parts.
 Loading...