

Hayward TRX-20 Owner's Manual
TRX20-13
TRX-20
TRX-20
OWNERS MANUAL
2 WHEEL SUCTION-SIDE
POOL CLEANER
Hayward Pool Products Canada
2880 Plymouth Drive
Oakville, ON L6H 5R4
888.238.7665 / haywardpool.ca

THANK YOU FOR PURCHASING A TRX-20 CLEANER
TRX-20 works so that you can experience pool pleasure.
The rst thing you will notice when you look at the TRX-20 is that it is of highest quality.
The TRX-20 is robust and if maintained properly will result in many years of pool
cleaning. We use only the highest quality materials to ensure the best pool cleaning
products. The TRX-20 is proudly made in the usa. This cleaner was invented, designed
and built with years of experience in the pool industry. Every cleaner is tested to ensure the
nest quality.
The TRX-20 uses your existing pump and lter for power. The cleaners plug into either
your designated suction port or the skimmer.
FEATURES
SELF ADJUSTING TURBINE VANES
The TRX-20 cleaner has the patented self-adjusting turbines, which maximize the power from the water ow. This turbine is similar to a
paddle wheel with blades that are adjustable. This feature allows the TRX-20 to still move at low suction and low pressure. In addition the
folding vanes of the turbine allow for the easy passage of larger debris through the cleaner.
STEERING SYSTEM
The 2x Suction TRX-20 has an internal programmed steering system, that causes the left wheel to periodically reverse, allowing the
TRX-20 to turn and then move into another direction. For the 2x Suction TRX-20 there are ve different programmed turns ranging from 90
to 450 degrees. This feature allows the TRX-20 to cover not only the deep end, but also the shallow end.
This steering system allows for the 2x Suction TRX-20 to travel 8 to 10 ft. before it turns. The TRX-20 cleans more in the shallow end than any
other cleaner and has no problem with uneven surfaces or strange shapes. It won’t stick in a corner, or get hung up by a main drain.
ROBUST TIRE TREADS
One look and you will see that the patented tire treads give the TRX-20 better climbing ability and obstacle maneuverability. The tires come
with tread wear markers that show you when to replace your tires. The front tires of the TRX-20 have humps (raised treads) that allow the
TRX-20 to overcome any reasonable obstacles such as the main drain and uneven surfaces. This makes the TRX-20 ideal for all pool
surfaces and shapes.
SELF-CLEANING SWIVEL
This is a feature that allows the TRX-20 to turn freely without interference from the hose due to debris buildup in the swivel hose cone. By
self-cleaning, the swivel prevents the hose from coiling.(Note: Sometimes with severe debris one needs to hold it under a water faucet
for cleaning).
ADJUSTABLE SKIRT
The TRX-20 has patented adjustable skirts that allow the cleaner to maintain optimal suction under the machine even when it encounters
obstacles. When the TRX-20 encounters an obstacle one (or more) of the skirts will lift up (adjust) over the obstacle while maintaining suction
under the cleaner.
2

IMPORTANT FACTS
• The TRX-20 should NEVER be used to remove plaster debris in new pools
• ALWAYS remove the TRX-20 before you chemically shock your pool
• ALWAYS remove the TRX-20 when swimmers enter the pool
• When removed from the pool, store the TRX-20 in a shaded safe area
• When removed from the pool DO NOT coil the hoses. THEY MUST BE STORED STRAIGHT
• The TRX-20 is NOT a toy and not intended for children
• Keep the TRX-20 and hoses away from chewing pets
• REMOVE the TRX-20 when performing backwash
• Remember Safety First
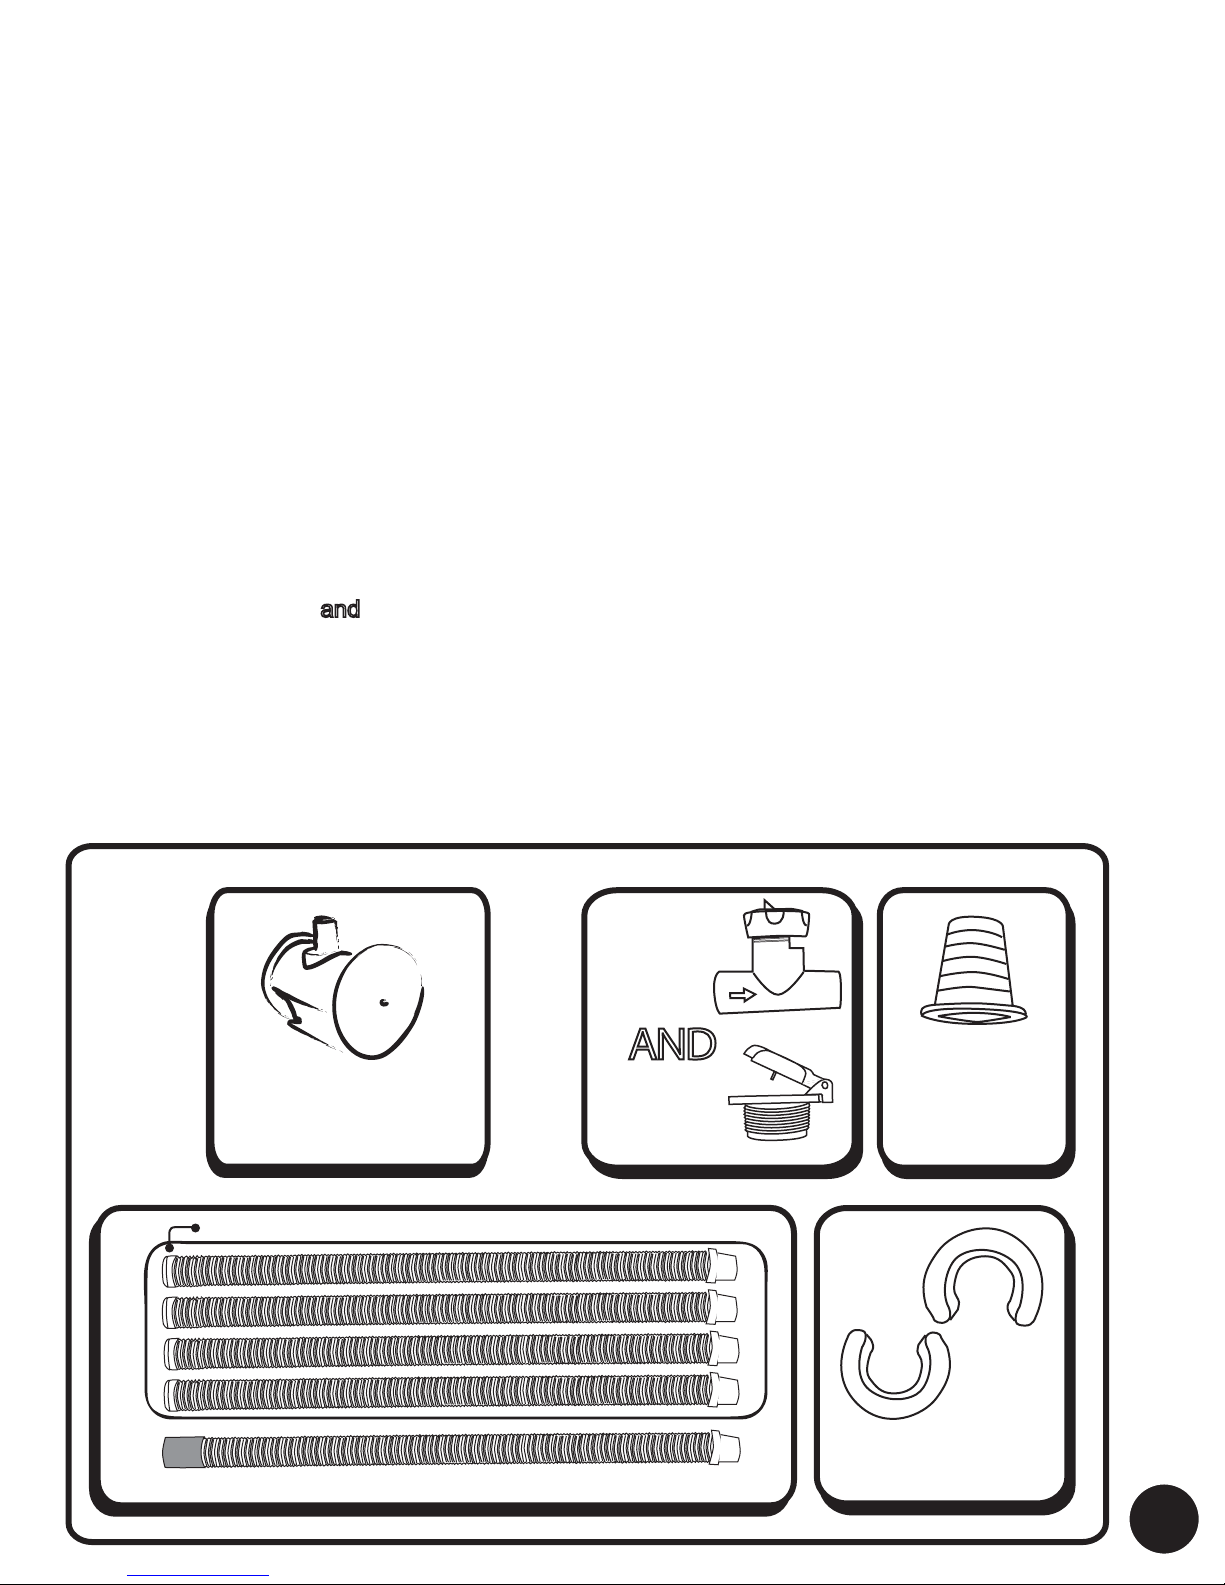
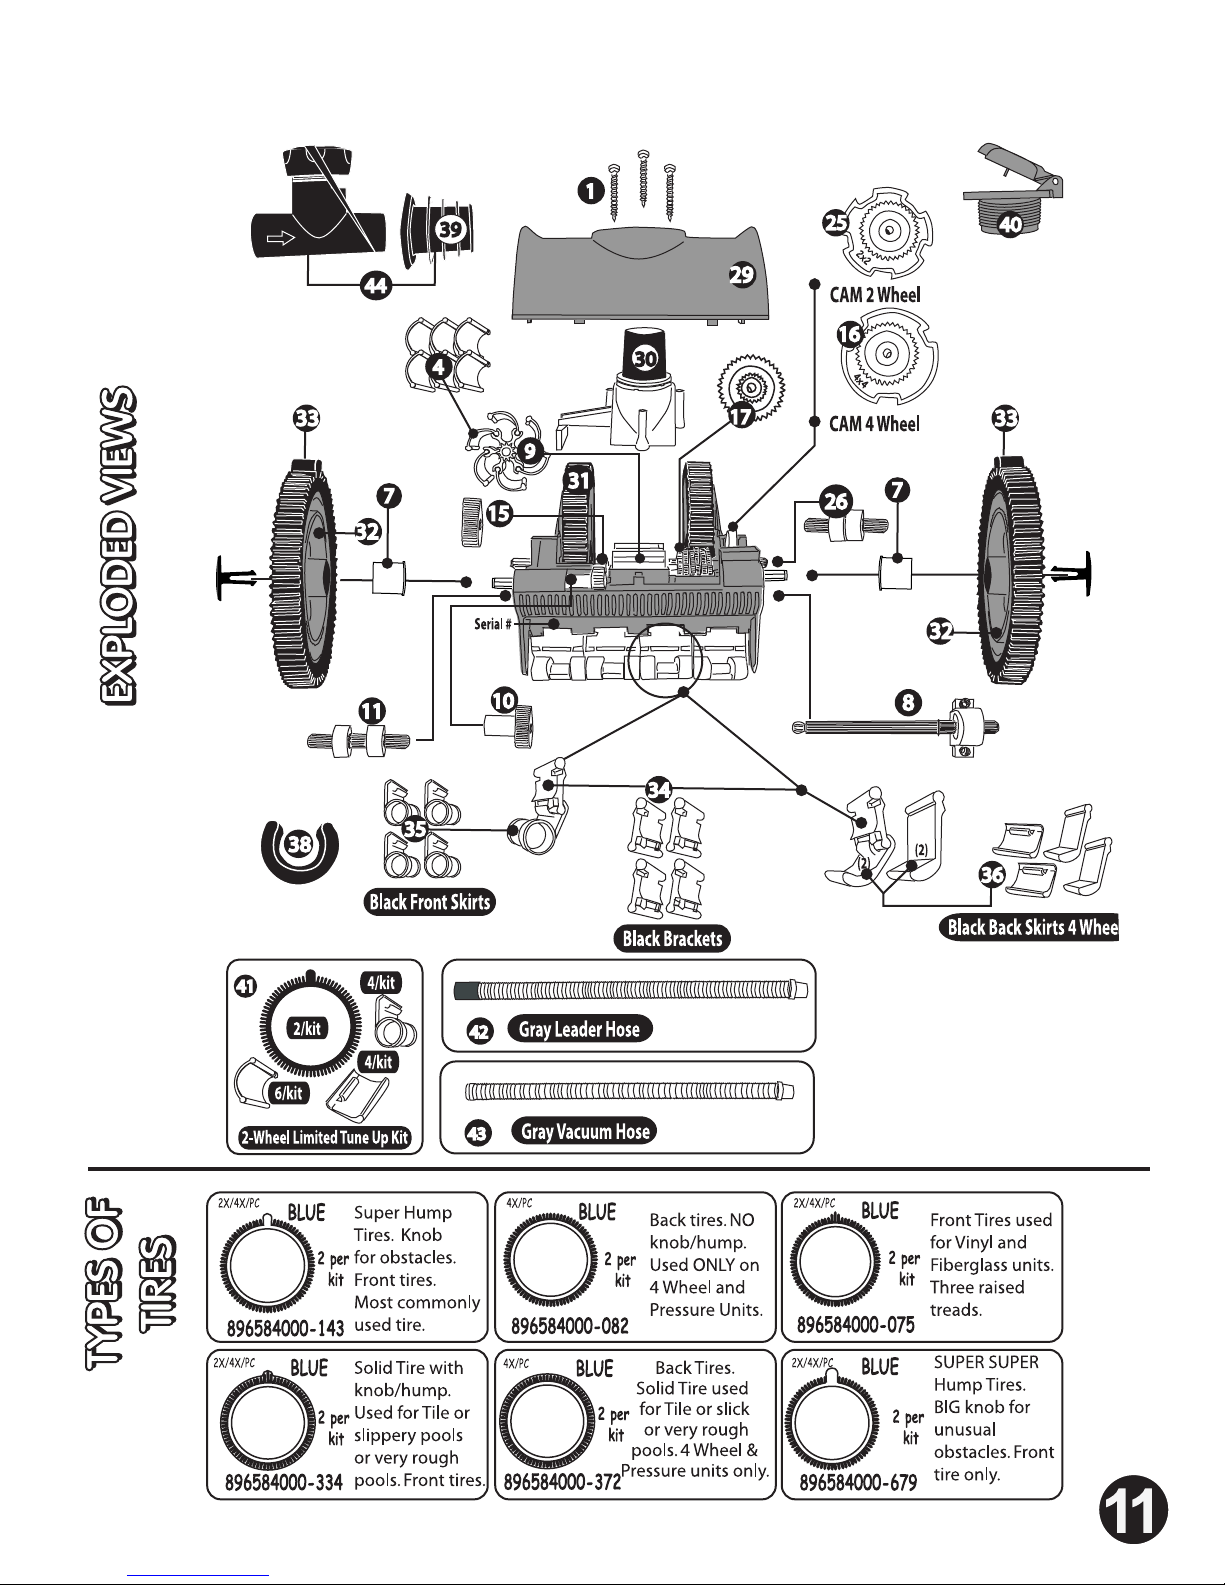
INCLUDED WITH YOUR 2 WHEEL MODEL
1 2X Suction TRX-20
1 Regulator Valve and
1 Hose Cone (Valve adapter)
9 Sections of hose
1 Leader Hose (with gray adapter)
2 Snap On Floats (already on hose)
Water Gate
INCLUDED COMPONENTS
2 WHEEL
MODEL
NORMAL HOSES (9 sections (2 Wheel) OR 11 sections (4 Wheel))
REGULATOR
VALVE
AND
WATER
GATE
HOSE CONE
( valve
adapter )
one LEADER HOSE (note the grey cu)
2 SNAP
ON FLOATS
3
IMPORTANT FACTS
• The TRX-20 should NEVER be used to remove plaster debris in new pools
• ALWAYS remove the TRX-20 before you chemically shock your pool
• ALWAYS remove the TRX-20 when swimmers enter the pool
• When removed from the pool, store the TRX-20 in a shaded safe area
• When removed from the pool DO NOT coil the hoses. THEY MUST BE STORED STRAIGHT
• The TRX-20 is NOT a toy and not intended for children
• Keep the TRX-20 and hoses away from chewing pets
• REMOVE the TRX-20 when performing backwash
• Remember Safety First
INCLUDED WITH YOUR 2 WHEEL MODEL
1 2X Suction TRX-20
1 Regulator Valve and
1 Hose Cone (Valve adapter)
9 Sections of hose
1 Leader Hose (with gray adapter)
2 Snap On Floats (already on hose)
Water Gate
INCLUDED COMPONENTS
2 WHEEL
MODEL
NORMAL HOSES (9 sections (2 Wheel) OR 11 sections (4 Wheel))
REGULATOR
VALVE
AND
WATER
GATE
HOSE CONE
( valve
adapter )
one LEADER HOSE (note the grey cu)
2 SNAP
ON FLOATS
3
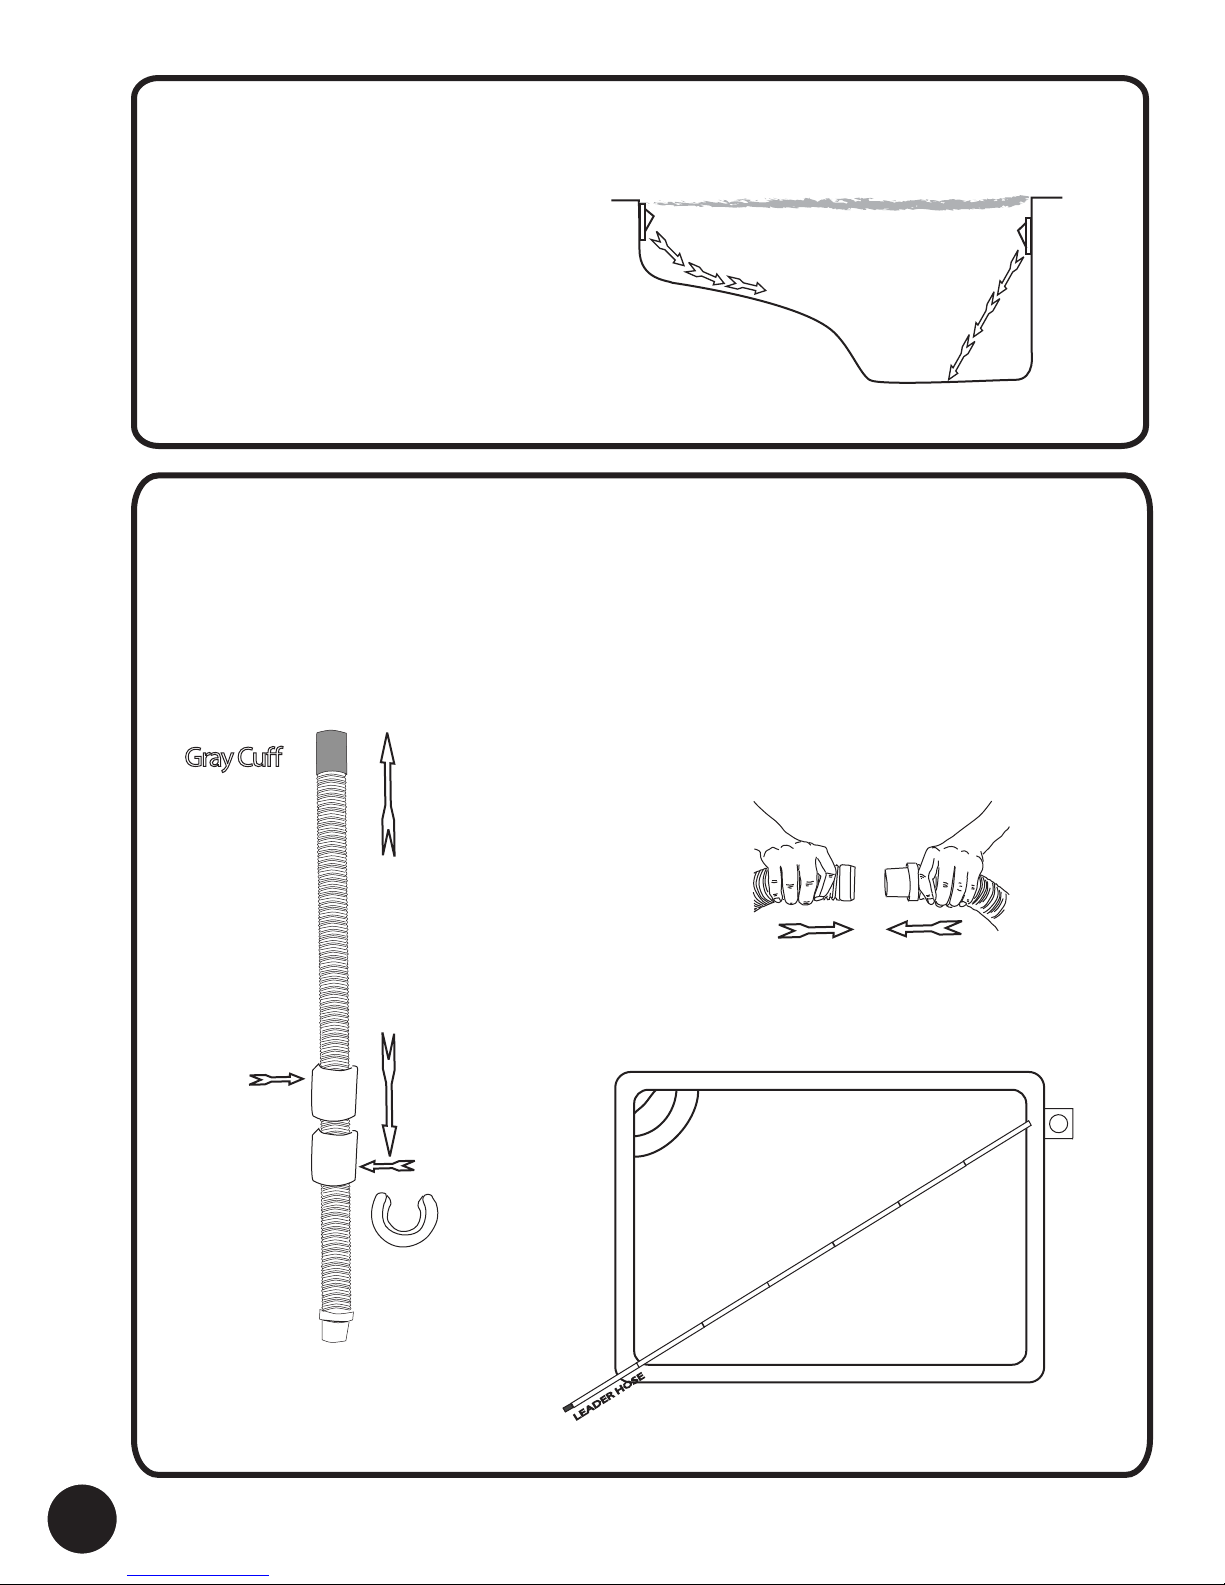
STEP 1
Preparing your pool . . .
1. Manually clean/vacuum your pool.
POINT RETURN FITTINGS DOWN
2. Perform a backwash, clean your filter,
skimmer baskets and pump basket.
3. Make sure your chemical balance is
correct. If not, now is the time to correct it. If you
chemically shock the pool, wait a day or two before continuing.
4. Point all your return fittings downward.
STEP 2
Connecting the hoses . . .
1. Take the Leader Hose (the one with the gray cuff) and attach the float halves 24 inches
(60 cm) from the gray end. OR if you have the 2 snap on floats snap them at 20 to 25
inches from the gray cuff. This is the section of hose that attaches to the TRX-20
in Step 3. (We have already done this step for you).
2. Connect all the hoses (except the Leader Hose).
Gray Cu
Connect male to female. If need be wet the hoses
for easier assembly. Now connect Leader Hose to
the end.
20-25" (50-60cm)
Float 1
2 Snap On
Floats
4
Float 2
3. The connected hoses should be one to two
lengths longer than the furthest point from the
vacuum source (skimmer or wall fitting).
One to two
LEADER HOSE
lengths over
wall fitting
or
skimmer

STEP 3
1. Connect the TRX-20 to the gray
cuff end on the leader hose.
2. Connect the opposite end (end of all the
hoses NOT gray) to the Adjustable
Regulator Valve. (This is needed for
skimmer applications and where there
is no 3-way valve for suction control).
See pg 6.
3. Connect the Adjustable Regulator Valve
to the Hose Cone (Valve Adapter) .
Attaching the TRX-20
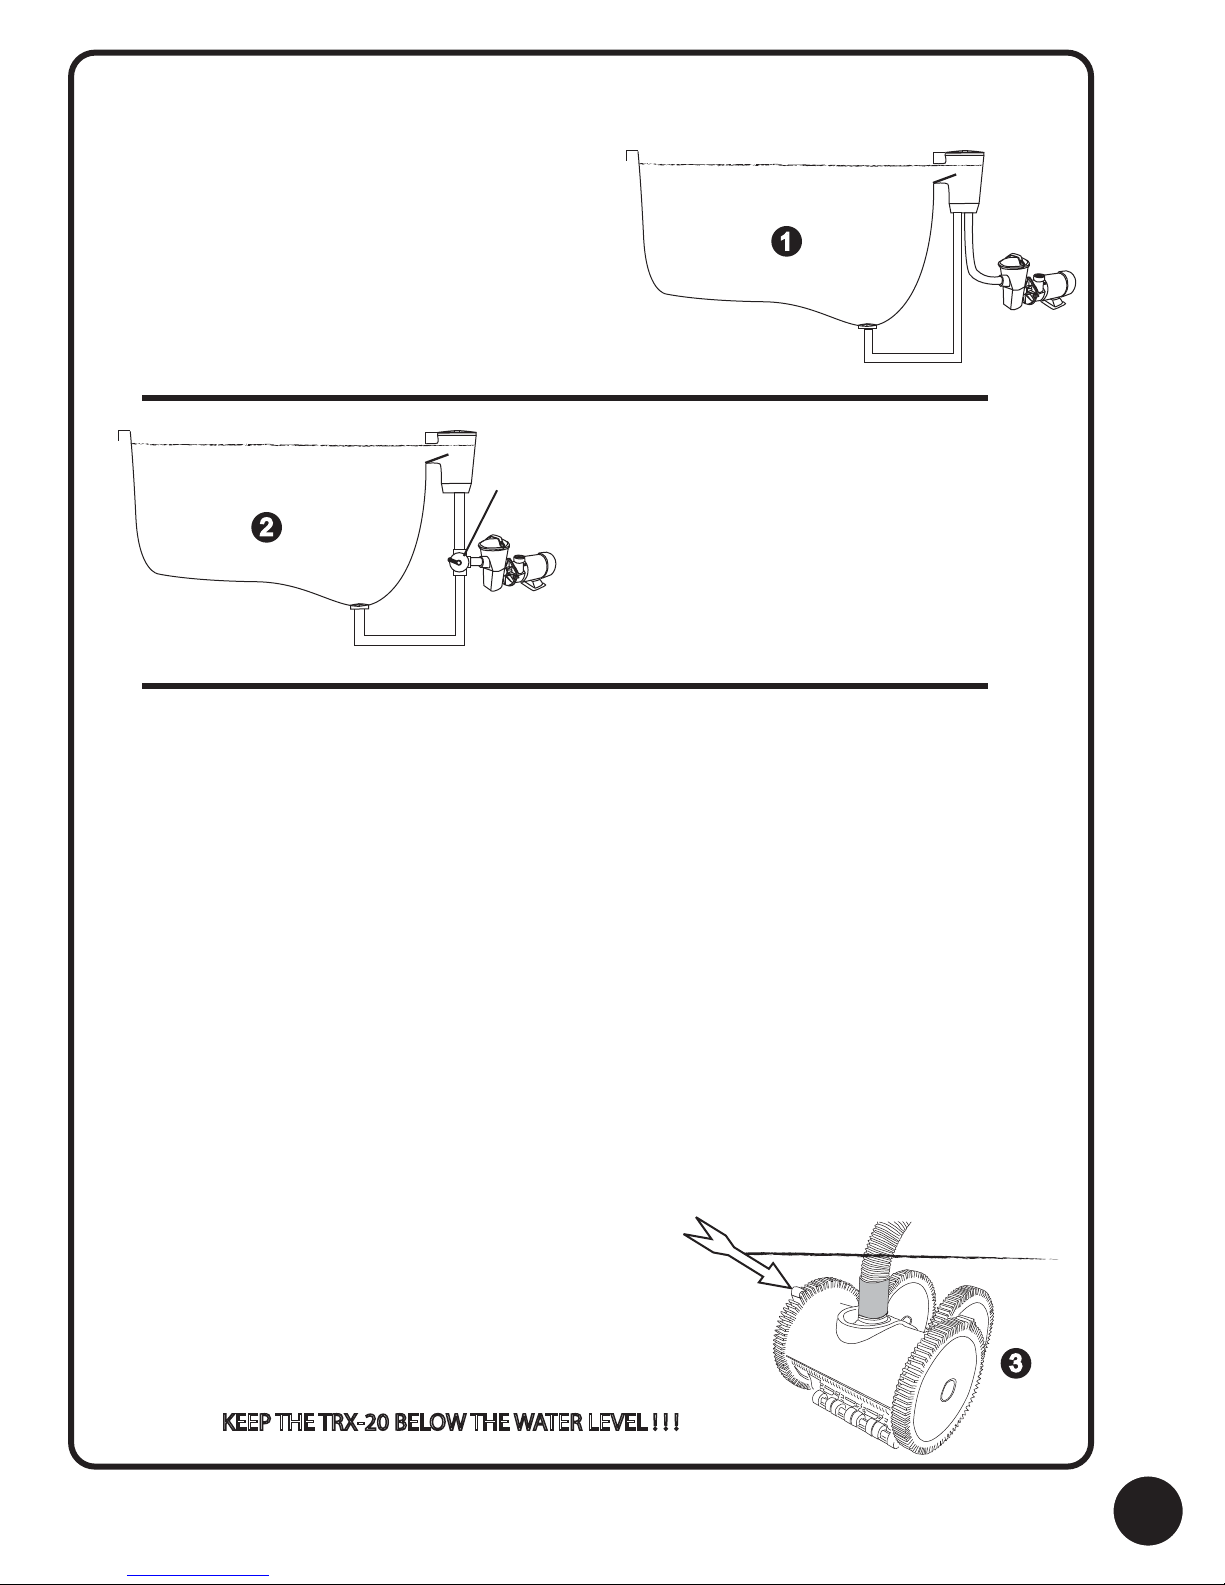
STEP 4
Getting your TRX-20 wet
AIR
Lower the TRX-20 into the
water. While your pump is running,
take the end of the hose with the
Adjustable Regulator Valve (if you need it)
and hold it against one of the return fittings
to expunge all of the air in the hose
and the TRX-20.
OR
With the pump turned off, lower the
TRX-20 and then vertically push
the hose down into the water until the hose is
completely filled with water.
AIR
push
hose
down
YOU DO NOT WANT ANY AIR TO REMAIN
IN THE HOSE AND THE TRX-20
5
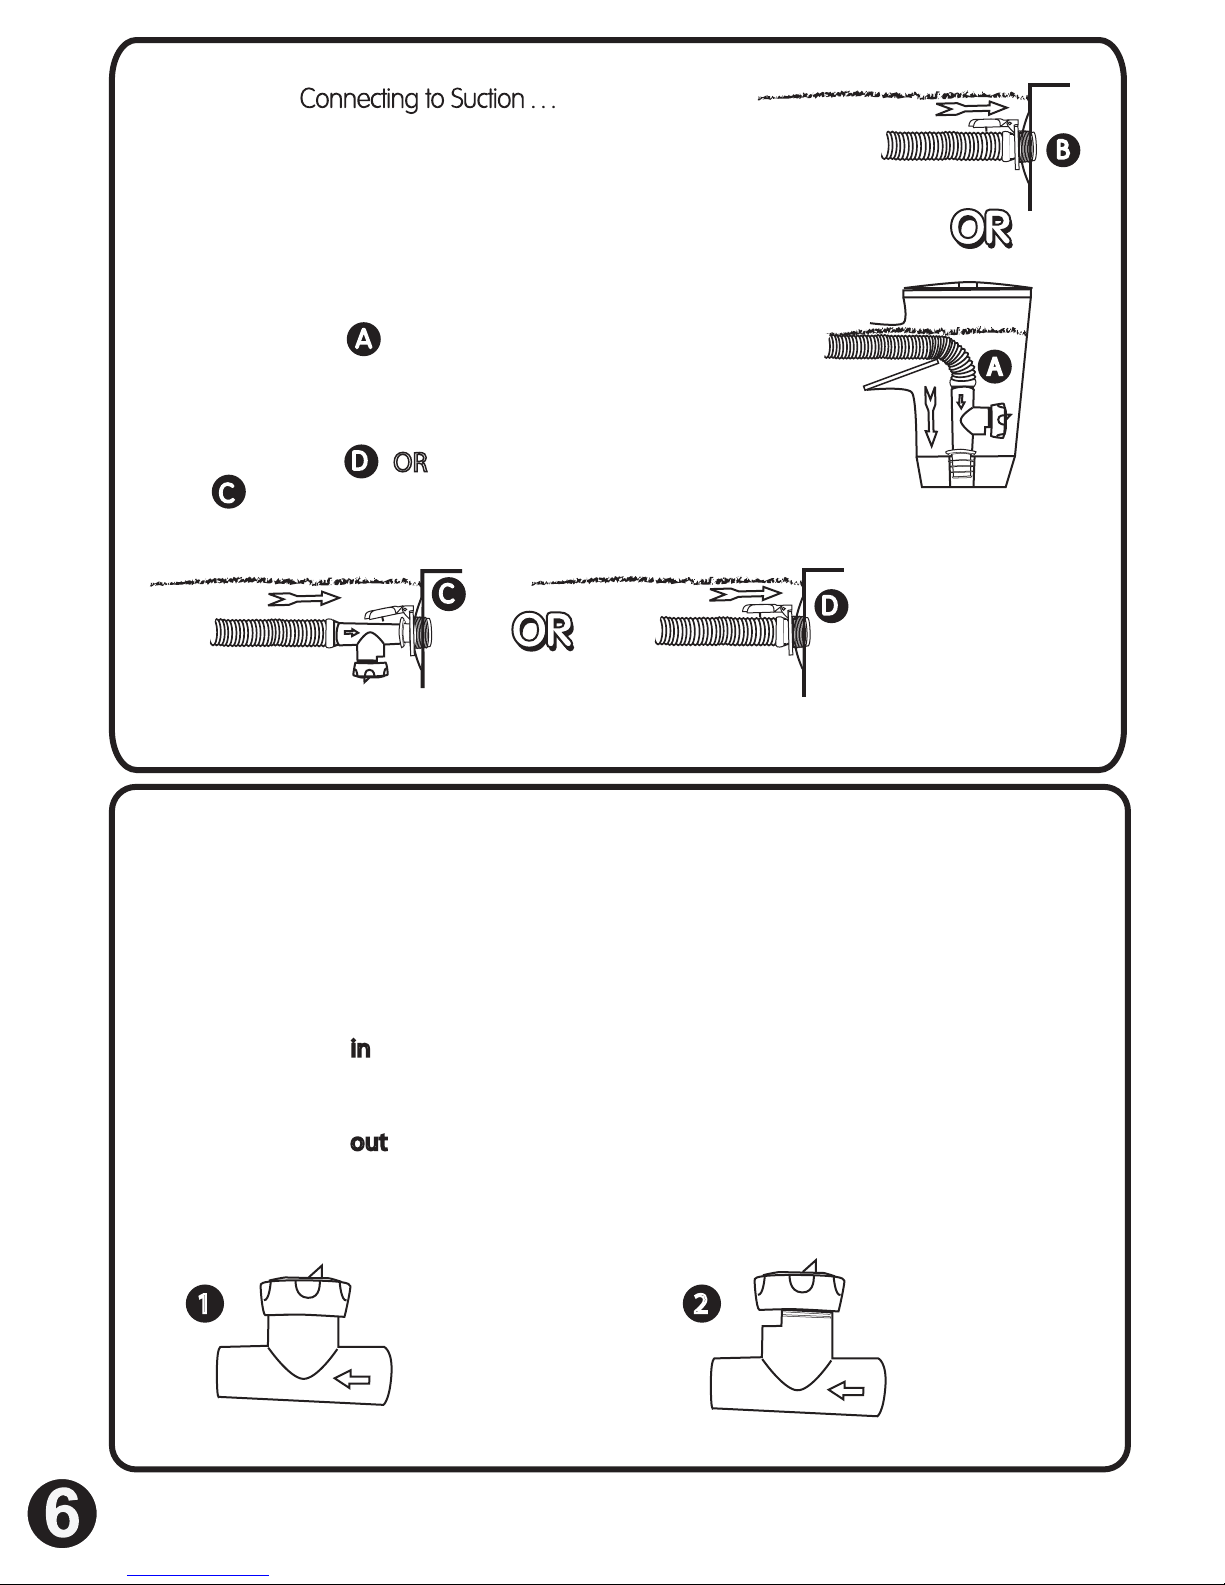
STEP 5
1. MAKE SURE THE POWER SUPPLY TO YOUR PUMP
IS OFF. SUCTION CAN BE VERY DANGEROUS!!!
Your cleaner came with both a Regulator Valve and a Water Gate.
2. If you are hooking into a skimmer tightly press the Regulator
Valve and the Hose Cone (Valve Adapter) end into the bottom
of your skimmer.
3. If you are hooking into a designated threaded suction
port/line (1 1/2”) then screw in the Water Gate and insert the
Regulator Valve OR
Gate (you will probably have to adjust 3-way or ball valve
to get the correct performance when the Regulator Valve is not used).
insert the hose directly into the Water
A
3. Switch the pump power back ON.
STEP 6
This valve regulates the suction so that the TRX-20 does not exceed the optimal
11-13 RPM(revolutions per minute). It does so by opening to bypass water when
necessary. This will ensure the best possible performance from your TRX-20.
The valve can be adjusted by:
1. Screwing the top in you will bypass less water, increasing the RPM (speed). If it is all
the way in and you still are below 11 RPM adjust the 3-way valve for more suction
and/or clean the lter. Remove the valve.
2. Screwing the top out
all the way out and you still are above 14 RPM adjust the 3-way valve to give less suction.
Note: If the line you are hooked to (skimmer or inlet) has a 3-way valve or ball valve you
may have to adjust the 3-way valve or ball valve even if you are using the regulator valve.
Adjusting your TRX-20 (Adjusting your Regulator Valve) . . .
you will bypass more, decreasing the RPM (speed). If it is screwd
1 2
MIN
MAX
Screw top in.
Bypass less water.
Speed cleaner up.
MIN
MAX
Unscrew top.
Bypass more water.
Slow cleaner down.
In general there are 2 plumbing styles that will determine
STEP 6
1. The First Plumbing System: Single Line Suction.
This is when you have only one pipe
coming from your pool to your pump. If
this is the case there are no added
adjustments necessary, as the Automatic
Bypass Valve will regulate your
TRX-20. You are done with step 6!
CONT’D. . .
whether or not you need to make any adjustments.
3 W AY
VALVE
2
1
2. The Second Plumbing System:
Adjustable three-way valve.
This is when you have a three-way valve
regulating flow between the pump and the
main drain and the skimmer(s). This allows
you to adjust your system while ensuring
the best possible performance from your
TRX-20. (See next step).
3. ADJUSTING WHEEL RPM (Optimal setting 11-14 RPM)
For the TRX-20 to run optimally the revolutions per minute should be between 11
and 13 (Note it will still clean as low as 8 RPM but will NOT climb walls).
While the TRX-20 is running take it by the leader hose so that the TRX-20
is just below the water. (KEEP THE CLEANER BELOW THE WATER LEVEL or else it will suck air).
Now count the number of revolutions made per minute by the RIGHT FRONT WHEEL by using
the hump (raised treads) as your marker. If it is between 11 and 13 RPM you are done.
If it is above 14 RPM adjust your three-way valve toward the main drain until the RPM drops
below 13. Once it has dropped below 14 RPM, you are done with Step 6.
If it is below 11 RPM adjust your three-way valve so that more water flows through the
TRX-20 and skimmer until it is above 11 RPM. Once it is above 11 RPM, you are
done with Step 6.
NOTE: This is equivalent to 7 to 10 inches of mercury on a vacuum gauge. A vacuum gauge
is NOT included with the TRX-20
but is available at your local pool store.
BACK
RPM=revolutions per minute
Count RPM here
at the hump on the
RIGHT FRONT WHEEL
R
3
KEEP THE TRX-20 BELOW THE WATER LEVEL ! ! !
FRONT
L
7

TRX-20 OBSTRUCTION
(or turbine vane replacement)
F
R
O
N
T
1 2 3 4 5
1. Rotate the right front wheel forward (the grill is the front) . If it wont move there is an obstruction. 2. Remove the
three screws that hold the Shroud ( Top Cover ). 3. Remove the Shroud. 4. Remove the turbine cover ( wiggle it up and off ).
5. Visually inspect the cleaner. Remove any debris found in the turbine, reduction gears, wheel hubs etc.. If you remove
the turbine vanes/blades please be sure to replace them correctly (see below). Replace the turbine cover and repeat
step one before placing the shroud back on, drop 3 screws into slots and secure.
TURBINE VANES/BLADES
G
R
I
L
L
F
R
O
N
T
TIRES
(wear indicators)
wear marks
The turbine vanes have to be placed in the turbine hub a certain
B
direction. We use the following mnemonic “ The turbine vanes
A
are like a wave breaking on the grill”. In the front of the unit
C
the vanes are convex ( like a mountain ) in the back they
K
are concave ( like a valley ). NOTE: The large elliptical end of
the vanes is placed into the turbine.
wear marks
The tires must be replaced when they are worn
down to the tread wear indicators. Note: if you cant
see them you are worn past them.
Please note: in order to replace
back tires you will first have to remove
the shroud, then remove the wheel
and only then can you take the tires
off the wheel hub.
larger elliptical
round
TIRE REMOVAL & REPLACEMENT
1. Place the cleaner on a work surface. Using only
your hands (other tools may damage the cleaner)
simply fold the tire off from top to bottom.
Note: The front tires always have humps and the
back tires do not. To remove back tires you will need
to remove the shroud and the wheels (see next page).
2. To replace stretch the tire over the wheel hub (starting from one side and
1
folding it back on). Make sure it is on correctly. If need be do this closer to your
body for better leverage.
BEFORE YOU DO ANYTHING, TURN THE PUMP OFF. SUCTION CAN BE DANGEROUS!!!
2
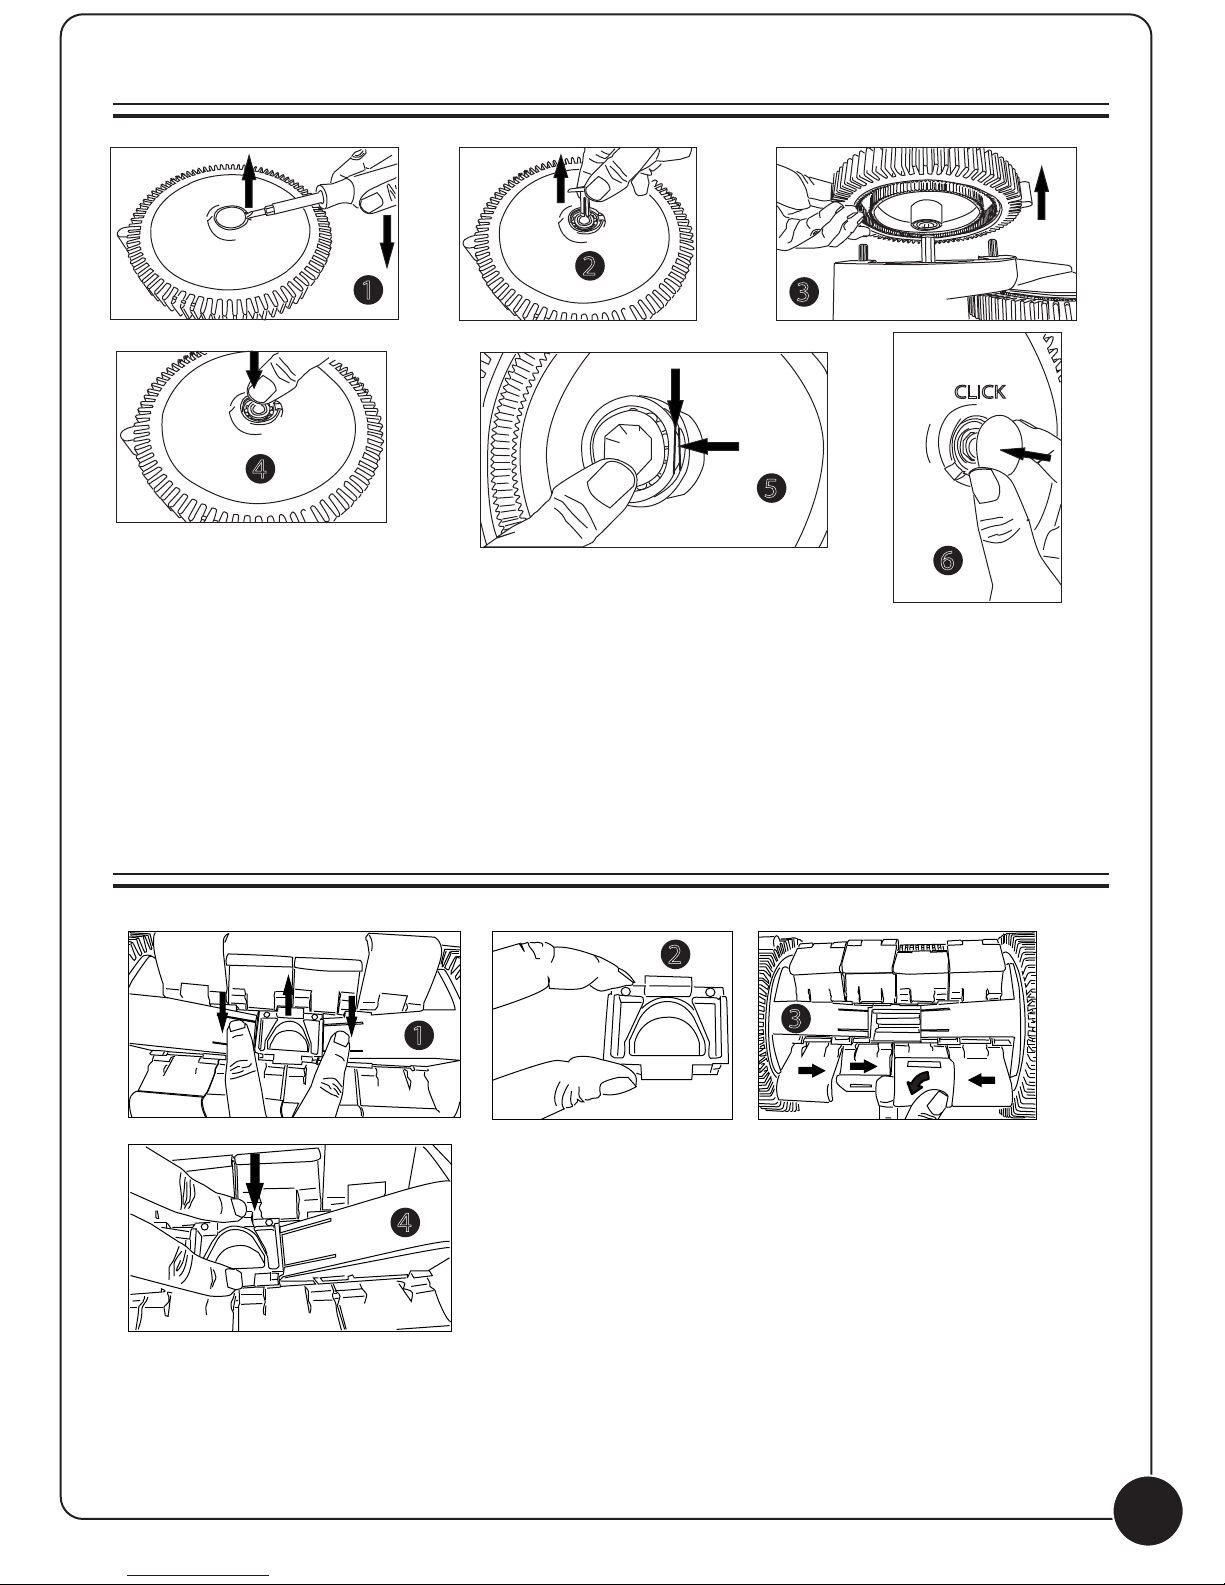
WHEEL OR BEARING REMOVAL & REPLACEMENT
2
1
3
CLICK
4
5
6
1. Align a flat head screwdriver into the slot at the center of the wheel and pop out the
clip holding the wheel. 2. Remove the the clip holding the wheel and place it aside.
3. Remove the wheel hub (Rim). 4. (Only if bearing is worn) Remove the bearing by pushing it from the outside
to the inside of the wheel. 5. (Only if bearing is worn) Replace the bearing by pushing the new bearing from
the inside of the wheel until it bottoms out. MAKE SURE THAT THE FLAT PARTS OF BOTH THE BEARING AND
WHEEL HUB ALIGN. 6. Place the wheel hub back onto the TRX-20 body and take the clip and clip it
back in. Make sure you hear it clip. If not you didnt align the flat parts in step 5. When the unit is reassembled
turn the right front wheel (looking from behind) and make sure everything turns smoothly.
SKIRT AND INLET REMOVAL & REPLACEMENT
(can also be used to remove debris)
2
3
1
L R
4
BEFORE YOU DO ANYTHING, TURN THE PUMP OFF. SUCTION CAN BE DANGEROUS!!!
1. Turn the unit upside down and press with both finders on both sides
of the inlet. While pushing down pull up on the inlet. 2. Remove the inlet.
3. Once the inlet is removed you can remove any debris that is in the
turbine chamber. You can also remove and replace the skirt/bracket
assemeblies. One of the middle skirt/brackets can be easily pulled out.
Once one assembly is out you can slide the others out easily to replace.
4. Once any debris has been removed or the skirts have been replaced
replace the inlet. Note it can only be inserted in one direction and once it is
in it should clip on both sides. Note: if it does not clip in then you have it
the wrong way around (it is marked L and R).
9

PROBLEM SOLUTION
The TRX-20 does not move.
The TRX-20 moves too slow.
(see also “does not move” above)
The right wheel will not turn when
rotated by hand.
(looking from behind)
The right wheel skips teeth when rotated
forward by hand.
(looking from behind)
The loops in the hoses won’t come out.
Check wheel RPM.
Obstruction in the TRX-20 itself. If there was an
obstruction make sure vanes are replaced correctly
The pump may be turned off or on low speed.
The pump may not be primed. Check for leaks in the
system (symptoms--bubbles from the returns ?) Possible other
problem or obstruction in the system. Pump impeller blocked?
Filter needs backwashing. Clean pump basket, skimmers.
Turbine vanes/blades in wrong direction and/or wrong side.
Problem or obstruction in the system.
Obstruction in the TRX-20 itself.
Low wheel RPM (insufficient flow).
Obstruction in the TRX-20 itself.
Wheel hub or right drive gear worn/damaged.
The hoses have been stored in a coiled position. Lay them
straight in the sunlight.
Clean swivel on cleaner head by running it under a tap.
If using a leafcanister it may be in wrong place or not floating.
The TRX-20 turns in circles, it
wont go straight at all.
The TRX-20 does not clean the
entire pool.
The TRX-20 climbs the wall too
much or climbs out.
The TRX-20 won’t climb the wall.
(see also “moves too slow” above)
When the pump turns off the hoses pop
out of the skimmer or suction inlet.
(another symptom of air is a cleaner floating )
Wheels are wobbly.
Wheel hub and/or large drive gear and/or steering slide
assembly and/or right drive gear are worn or damaged.
The hose is too short.
The float(s) may be in the wrong position. Should be 22-24”
from cleaner head.
The Hose Cone Swivel (on the turbine cover) may be dirty.
The return fittings may be pushing the TRX-20
hoses away. Point them down.
The tire treads and skirts may be worn down.
Too much suction or flow.
You are not using the Bypass Valve (if hook up is in skimmer).
Auto skim plate/vac plate needs adjustment.
Too little suction or flow.
Float may be in the wrong position.
Make sure hose cone is properly placed into inlet/port/watergate.
Air in system. When pump shuts off air goes path of least
resistance and pops out the hose. Fix air leak.
Bearings are worn please replace.
The TRX-20 falls on its side
and takes too long to recover.
Turbine vanes /blades pop out of
turbine.
ALWAYS TURN OFF THE SYSTEM BEFORE PERFORMING ANY REPAIRS.
The float(s) may be in the wrong position or missing.
The hose is too short.
The return fittings may be pushing the TRX-20 hoses away.
Check wheel RPM.
Wrong side of vane in the turbine hub. Large eliptical side
should be in turbine.
Turbine hub possibly worn.
2 WHEEL SUCTION TRX-20
 Loading...