

Hayward Pro-Grid DE2420EURO, Pro-Grid DE4820EURO, Pro-Grid DE6020EURO, Pro-Grid DE3620EURO, Pro-Grid DE7220EURO User Manual
Thank you for choosing a HAYWARD D.E. filter. Your appliance
has been designed, manufactured and checked with great care to
make sure it gives you every satisfaction. Before using it, please
read these user’s guide carefully. Follow the information given.
Use the operating instructions to get acquainted with proper
use of your diatomaceous filter.
Following the operating instructions supplied by the manufacturer
is a prerequisite for the proper use of the filter.
For safety reasons, people who are not familiar with this user’s
guide should not use this filter.
Vous venez d’acquérir un filtre à diatomée HAYWARD. Nous
vous remercions pour votre confiance et nous sommes certains
qu’il vous apportera toute satisfaction. Nous vous invitons à lire
attentivement ce mode d’emploi avant de l’utiliser. Conservez-le
précieusement et suivez les indications qui y figurent. Il vous permettra une utilisation parfaite et en toute sécurité de votre appareil.
L’observation par l’utilisateur des consignes indiquées dans ce
document est une condition nécessaire au bon fonctionnement et
à un entretien satisfaisant de votre appareil.
Pour des raisons de sécurité, les personnes n’ayant pas lu et
compris les informations données dans ce mode d’emploi ne
doivent pas utiliser cet appareil.
Acaba de comprar usted un filtro de diatomeas HAYWARD. Le
agradecemos la confianza que deposita en nosotros estando
seguros de que le aportará muchas satisfacciones. Le invitamos a
que lea atentamente este manual de instruccionnes antes de utilizarlo. Consérvelo cuidadosamente y sigas las indicaciones que
contiene. Le permitirán utilizarlo perfectamente con total seguridad.
La oservación por el utilizador de las consignas indicadas en este
documento es una condición necesaria para el buen funcionamiento y el mantenimiento satisfactorio del aparato.
Por motivos de seguridad, las personas que desconozcan el presente manual de instruccionnes no deben utilizar el filtro.
Sie haben einen Kieselgurfilter der Marke HAYWARDerworben.
Wir danken Ihnen für Ihr Vertrauen und sind sicher, daß Sie mit
diesem Produkt zufrieden sein werden. Wir bitten Sie, diese
Gebrauchsanweisung vor der Benutzung aufmerksam zu lesen
und die unterschiedlichen Hinweise zu befolgen, so daß Sie Ihr
Gerät sicher und zuverlässig nutzen können. Bewahren Sie
sorgfältig diese Betriebsanleitung.
Die Beachtung der in dieser Betriebsanleitung aufgeführten
Hinweise durch den Benutzer ist eine Grundbedingung für den ordnungsgemäßen Betrieb und für die sachgemäße Bedienung des
Filters.
Aus Sicherheitsgründen ist es Personen, welche die Hinweise
dieser Betriebsanleitung nicht gelesen und nicht verstanden
haben, untersagt, das Gerät zu bedienen.
Avete acquistato un filtro a diatomee HAYWARD. Vi ringraziamo
per la vostra fiducia e siamo certi che vi darà totale soddisfazione.
Vi raccomandiamo di leggere attentamente il presente manuale
d’uso prima di utilizzare il filtro. Conservatelo con cura e seguite le
indicazioni che vi figurano. Vi permetterà una utilizzazione perfetta
ed in totale sicurezza del vostro apparecchio.
L’osservanza da parte dell’utilizzatore delle raccomandazioni pre-
sentate nel presente documento è condizione necessaria al buon
funzionamento ed a soddisfacente manutenzione del vostro
apparecchio.
Per ragioni di sicurezza, le persone che non avranno letto e compreso le informazioni date nel presente manuale d’uso non
devono utilizzare il presente apparecchio.
U heeft zojuist een HAYWARD diatomeeënaardefilter aangeschaft. Wij danken u voor het in ons gestelde vertrouwen en zijn
ervan overtuigd dat u er veel plezier van zult hebben. Wij verzoeken
u voor gebruik deze gebruiksaanwijzing aandachtig door te lezen.
Bewaar hem goed en volg de erin genoemde aanwijzingen. Zo zult
u dit apparaat zo goed mogelijk en zonder risico kunnen gebruiken.
De aanwijzingen die in dit document worden gegeven dienen
nageleefd te worden om een goede werking en een juist onderhoud
te garanderen van deze filter.
Om veiligheidsredenen, is het personen die de informatie in deze
gebruiksaanwijzing niet gelezen of begrepen hebben, niet
toegestaan dit apparaat te gebruiken.
Acaba de adquirir um filtro com diatomite HAYWARD.
Agradecendo-lhe a confiança demonstrada, acreditamos que esta
escolha lhe dará plena satisfação. Previamente a qualquer utilização, recomendamos uma leitura cuidadosa do presente guia de utilização. Queira guardá-lo preciosamente e siga as instruções aqui
presentes. Este guia permitir-lhe-á utilizar o seu equipamento nas
melhores condições e com toda a segurança.
A observância das medidas indicadas no presente documento
constitui uma condição indispensável para um funcionamento correcto e uma manutenção satisfatória do seu equipamento.
Por motivos de segurança, deve-se evitar qualquer utilização
deste aparelho enquanto não se tiverem lido ou não se tiverem
compreendido as informações fornecidas no presente guia de
utilização.
VERTICAL GRID ELEMENT D.E. FILTERS
FILTRE A DIATOMÉE À CADRE FILTRANT VERTICAL
FILTRO VERTICAL DE DIATOMEAS
KIESELGURFILTER MIT VERTIKALEM GITTER
FILTRI CON SUPPORTI VERTICALI A TERRA DI DIATOMEE
VERTICALE DIATOMEEENAARDEFILTER
FILTRO VERTICAL COM DIATOMITE
Pro-Grid
TM
DE2420EURO - DE3620EURO - DE4820EURO
DE6020EURO - DE7220EURO
USER’S GUIDE
GUIDE DE L’UTILISATEUR
GUÍA DEL USUARIO
ANWENDER-HANDBUCH
GUIDA DELL’UTILIZZATORE
GEBRUIKERSHANDBOEK
GUIA DO UTILIZADOR
IS DE2420 EURO
GB
F
SP
D
I
NL
P
SPECIFICATIONS - SPECIFICATIONS - ESPECIFICACIONES - SPECIFIKATIONEN
SPECIFICHE - SPECIFICATIES - ESPECIFICAÇÕES
HAYWARD POOL EUROPE HAYWARD Iberica S.A. HAYWARD Deutschland GmbH
Z.A. de l'Observatoire Calle Aguilla, 24-26 BrettergartenstraBe 14-16
2, avenue des Chaumes Poligono industrial los gallegos 90427 Nürnberg
78182 St Quentin en Yvelines Cedex 28946 Fuenlabrada (Madrid) Deutschland
France España
http://www.hayward.fr
Safety parts use HAYWARDgenuine pats only.
1-Air relief valve 2-Pressure gauge 3-O-Ring kit (set of 2) 4-Filter sleeve 5-Automatic
air relief assembly 6-Filter head 7-Clamp assembly 8-Clamp tool 9-Retainer nut 10-
Washer (2 required) 11-Clamp bolt kit - Washer with small hole - Spring - Washer with
large hole - Brass sleeve nut 12-Filter tank O-Ring 13-Top collector manifold 14-
Retainer 15-Filter element cluster assembly (complete set of elements, collector,
locators, etc) 17-Outlet elbow O-Ring 18-Outlet elbow 19-Filter element (7 grade
required) 20-Filter element short one required (1 grade required) 21-Inlet diffuser 22-
Filter element locator 23-O-Ring 24-1”1/2 drain plug with O-Ring 25-Element spacer
26-Bulkhead O-Ring 27-O-Ring 28-Multiport valve (optional) 29-Filter body 30-Strap
kit (optional 2 straps, 2 screws) 31-Bulkhead fitting (2 required)
Utiliser exclusivement des pièces détachées HAYWARD.
1-Vis de la purge automatique avec joint torique 2-Manomètre 3-Lot de 2 joints
toriques pour purge d’air 4-Manchon du filtre 5-Purge automatique complète 6-
Couvercle du filtre 7-Collier de serrage 8-Manette de serrage 9-Ecrou d’arrêt 10-
Rondelle (par 2) 11-Kit de serrage complet - Rondelle avec petit orifice - Ressort Rondelle avec orifice large - Tige de serrage 12-Joint torique du couvercle du filtre
13-Collecteur supérieur 14-Axe de montage 15-Ensemble des cadres filtrants (com-
plet avec collecteur, positionneur, etc) 17-Joint torique du coude de refoulement
18-Coude de refoulement 19-Cadre filtrant (par 7) 20-Cadre filtrant étroit (1 seul) 21-
Diffuseur d’entrée 22-Positionneur des cadres filtrants 23-Joint torique vanne d’entrée 24-Bouchon de vidange 1”1/2 avec joint torique 25-Ecarteur pour cadres filtrants (sur DE2420 uniquement) 26-Joint torique raccord cuve (lot de 2) 27-Joint
torique vanne refoulement 28-Vanne multi-position (en option) 29-Corps du filtre
30-Kit de fixation (en option 2 pattes et 2 vis) 31-Traversée de paroi (par 2)
Utilizar exclusivamente respuestos de HAYWARD.
1-Tuerca de la purga automática para la junta tórica 2-Manómetro 3-Lote de 2
juntas tóricas para la purga de aire 4-Manguito del filtro 5-Purga automática completa 6-Tapa del filtro 7-Abrazadera 8-Llave par abrazadera 9-Tuerca de fijación
10-Arandela 11-Cierra junta completa - Arandela con un pequeño orificio Muelle/resorte - Arandela con orificio largo - Varilla de abrazadera 12- Junta tórica de la tapa del filtro 13- Colector superior 14- Eje de montaje 15-Conjunto de
cuadros filtrantes (completo con colector, posicionador, etc.) 17- Junta tóri-
ca del codo de descarga 18-Codo de descarga 19-Cuadro filtrante (par 7) 20-
Cuadro filtrante estrecho (1 solo) 21-Difusor de entrada 22- Posicionador de
cuadros filtrantes 23- Juntas tóricas válvulas de entradas 24-Tapón de vaciado
1”1/2 - con junta tórica 25-Separador por cuadro filtrantes (sobre DE2420 únicamente) 26-Junta tórica para el racord de la cuba 27- Junta tórica de la válvula de
descarga 28-Válvula en multi-posición (en opción) 29- Cuerpo del filtro 30-Kit de
fijación (en opciones 2 y 2 tuercas) 31- Pasamuros (por 2)
Bitte ausschließlich Hayward-Ersatzteile verwenden:
1-Schraube des Entlüftungsventiles mit O-Ring 2-Druckmanometer 3-Satz O-Ringe
f. Entlüftungsanschlußverbindung 4-Distanzhülsenfilteranschluß 5-Kompletter
automatischer Entlüftungsset 6-Filterdeckel 7-Klemmring 8-Spannhebel 9-
Kontermutter 10-Unterlegscheibe (jeweils 2) 11-Kompletter Spannsatz bestehend
aus - Unterlegscheibe mit kleiner Bohrung - Feder Unterlegscheibe mit großer
Bohrung - Spannfutter 12-O-Ring des Filterkessels 13-Obere RohwasserSammelleitung 14-Montageachse 15-Filterrahmenset (Filterplattenset) (Komplett
mit Sammelleitung und Positionsregler) 16-Entlüftungszubehör 17-O-Ring für
den Druckstutzen 18-Druckstutzen 19-Filterrahmen (Filterplatten) jeweils 7 Stück
20-Enger Filterrahmen (nur 1 Teil) 21-Einlauf-Verteilerstück 22-Positionsregler der
Filterrahmen 23-O-Ring für die Rohwasserverbindung 24-Ablaßnippel 1”1/2 mit ORing 25-Arretierung für Filterrahmen (nur für DE2420) 26-O-Ring für
Wannenanschluß (jeweils 2 Stück) 27-O-Ring für Reinwasserverbindung 28-
Mehrwegeventil (Option) 4 oder 6 Positionen 29-Früher verwendetes Regelventil
30-Filterkörper 31-Befestigungsset (2 Bügel und 2 Schrauben)
Utilizzare esclusivamente pezzi di ricambio HAYWARD.
1-Vite di scarico automatico con o-ring 2-Manometro 3-Serie di 2 o-ring con
spurgo d’aria 4-Manicotto del filtro 5-Spurgo automatico completo 6-
Coperchio del filtro 7-Collare di serraggio 8-Manetta di serraggio 9-Dado di
arresto 10-Rondella (a 2) 11-Kit di serraggio completo - Rondella con piccolo orifizio - Molla - Rondella con ampio orifizio - Asta di serraggio 12-O-
ring del coperchio del filtro 13-Collettore superiore 14-Asse di montaggio
15-Insieme degli elementi filtranti (completo con collettore, posizionatore,
ecc) 17-O-ring del gomito di mandata 18-Gomito di mandata 19Elemento filtrante (a 7) 20-Elemento filtrante stretto (1 solo) 21-Diffusore di
entrata 22-Posizionatore degli elementi filtranti 23-O-ring valvola di entrata
24-Tappo di scarico 1"1/2 con o-ring 25-Divaricatore per elementi filtranti
(su DE2420 unicamente) 26-O-ring raccordo serbatoio (serie di 2) 27-O-ring
valvola di mandata 28-Valvola multivia (optional) 29-Corpo del filtro 30-Kit
di fissaggio (optional 2 flangie e 2 viti) 31-Traversata di parete (a 2)
Gebruik uitsluitend HAYWARD-onderdelen.
1-Schroef van de automatische ontluchter met O-ring 2-Manometer 3-Set van 2
O-ringen voor het ontluchten 4-Filtermof 5-Volledige set van het automatisch
ontluchtsysteem 6-Filterdeksel 7-Klemring 8-Aanspanner 9-Tegenmoer 10-
Ringetje (per 2) 11-Volledige klemset - Ringetje met kleine opening - Veer Ringetje met grote opening - Klemstang 12-O-ring van het filterdeksel 13-
Bovenste collector 14-Montage-as 15-Filterroosterset (compleet met collector,
houder, enz.) 17-O-ring van de uitlaatpijp 18-Uitlaatpijp 19-Filterrooster (per
7) 20-Smal filterrooster (slechts 1) 21-Inlaatpijp 22-Houders voor de filterroosters 23-O-ring inlaatklep 24-Leegmaakdop 1"1/2 met O-ring 25-Afstandhouder
voor filterroosters (uitsluitend op DE2420) 26-O-ring aansluiting filterbak (set
van 2) 27-O-ring uitlaatklep 28-Meerstandenklep (optioneel) 29-Filterbehuizing
30-Bevestigingsset (optioneel 2 haken en 2 schroeven) 31-Doorboring van de
wand (per 2)
Utilizar exclusivamente as peças originais da HAYWARD.
1-Parafuso do purgador automático com junta tórica 2-Manómetro 3-Lote de 2
juntas tóricas para purgador de ar 4-Manga do filtro 5-Purgador automático completo 6-Tampa do filtro 7-Colar de montagem 8-Chave (de aperto) 9-Porca de
bucha 10-Anilha (par) 11-Dispositivo de aperto completo - Anilha com abertura
pequena - Mola - Anilha com abertura grande - Haste de aperto 12-Junta tórica
da tampa do filtro 13-Colector superior 14-Eixo de montagem 15-Conjunto de
quadros filtrantes (completo com colector, posicionador, etc) 17-Junta tórica do
tubo curvo de retorno 18-Tubo curvo de retorno 19-Quadro filtrante (lotes de
7) 20-Quadro filtrante (1 único) 21-Difusor de entrada 22-Posicionador dos
quadros filtrantes 23-Junta tórica da válvula de entrada 24-Bujão de esvaziamento de 1”1/2 com junta tórica 25-Distensor para quadros filtrantes (no
DE2420 exclusivamente) 26-junta tórica da união da cuba (lotes de 2) 27-Junta
tórica da válvula de retorno 28-Válvula multi-posição (em opção) 29-Corpo do filtro 30-Dispositivo de fixação (em opção, 2 patilhas e 2 parafusos) 31-Travessas
de parede (lotes de 2)
GB
F
SP
D
I
NL
P
Model Design flow rate D.E.required Effective filtration area Pressure loss at design flow rate Required clearance
Model Capacité de filtration Charge de diatomee nécessaire Surface de filtration Perte de charge au débit nominal Dégagement requis
Modelo
Capacidad de filtración
Carga de diatomeas Superficie de filtracion
Perdida de presión con el caudal nominal
Distancia de seguridad
Modell Filterleistung Kieselgurfülung Filterfläsche
Druckverlust bei Nennflußgeschwirdigheit
Erfordlicher abstand
Modello Portata nominale
Quantita consigliata di terra diatomacea
Area efficace di filtrazione
Caduta di pressione alla portata nominale
Spazio dl manoura richlesto
Model Filter vermogen
Benodigde hoeveelheid diatomeeënaarde
Filteroppervlakte Drukverlies nominaal debiet Benodigde vrije ruimte
Modelo
Capacidade de filtração
Carga necessária de diatomite Superficie de filtração Perda de carga ou caudal nominal distância de segurança
(cm)
(m
3
/h) (kg) (m
2
) (bars) Side - Côté Above - Dessus
Lateral - Seitlich Superior - Oben
Laterale Superiore
Zijdelings Bovenaan
Lateral Superior
DE2420
11 1,5 2,2 0,07 46 38
DE3620
16 2 3,3 0,13 46 38
DE4820
22 3 4,4 0,21 46 46
DE6020
27 3,5 5,5 0,35 46 55
DE7220 33 4 6,6 0,73 46 63
Max. working Pressure - Pression max. de fonctionnement - Presión max. de funcionamiento - Max. Betriebsdruck - Pressione max. di funzionamento - Max werkdruk - Pressão máxima de funcionamento = 3,5 BAR
Your Hayward Pro-GridTMVertical Grid D.E. filter combines
superior water filtration with ease of operation and totally
corrosion-free construction. It uses diatomaceous earth
(D.E.) which is the most efficient dirt remover and filter
medium known
The D.E. is usually fed through the skimmer at initial startup, uniformly coats the curved vertical filter elements which
are covered with a custom fitted monofilament polypropylene filter cloth. As pool water is pumped through the control
valve into the bottom of the filter tank, the D.E. surface, or
coating, filters out even the most minute particles resulting
in clear, clean, sparkling water.
After a period of time, the accumulated dirt in the filter causes a resistance to flow, the pressure rises, and flow diminishes. This means the dirt holding capacity of the D.E. has
been reached, and it is time to clean (backwash) your filter.
With the control valve in the Backwash position, the water is
automatically reversed through the filter, flushing the
trapped dirt, debris and D.E. out the waste line. Once the filter is backwashed (cleaned) of D.E and dirt, the control valve
is manually re-sequenced to Filter position and a fresh
charge of D.E is added to resume normal filtering.
IMPORTANT SAFETY INSTRUCTION
A. Carefully read and follow all instructions.
B. When installing and using this equipment, basic safety
precautions must always be followed. This filter operates
under high pressure. Failure to follow instructions may result
in serious injury.
C. Remove clamp tape before installation. Do not leave tape
exposed to sun. Make sure clamp is located properly over
the filter flange. The clamp must be tightened firmly and
evenly until spring coils touch each other (see illustration
No.18)
D. Caution: All suction and discharge valves must be open
when starting the system. Failure to do so could result in
severe personal injury and/or property damage.
E. We strongly recommend having your filter installed by a
qualified pool professional.
INSTALLATION
The filter should be placed on a level concrete slab, very
firm ground, or equivalent, as recommended by your pool
dealer. Position the filter so that the piping connections,
Filter Control Valve and drain are convenient and accessible
for operation, service and winterizing. Assemble pump and
pump mounting base (if supplied) to the filter.
Assemble Vari-FloTMFilter Control Valve to filter.
Lubricate the O-ring first . Align the two (2) valve pipe connections, with O-rings in place, with the two openings in the
side of the filter tank and press in firmly. Secure the assembly to the tank connections with the two bulkhead lock nuts.
Do not over-tighten.
Note: your filter comes with the AAR pre-installed in the
factory. Install Automatic Air Relief (AAR).
Warning: The Automatic Air Relief should be serviced
only by qualified pool professionals. For qualified pool
professional only: If AAR needs to be re-installed, follow
this instruction carefully:
(A) Shut off pump.
(B) Turn the manual air vent screw on the side of the AAR
a few turns to let the air vent out.
(C) Grasp the AAR (auto air relief) body at the flats, turn the
AAR counterclockwise (as the arrow indicated) until the
notch on the AAR flange is aligned with the“Unlock” position
as shown on the filter head.
(D) Pull out the AAR carefully
.
For re-installation: Align the notch in the AAR flang with the
notch on the AAR port of the filter head. Turn the AAR clockwise (as the arrow indicated) until the notch is aligned with
the "Lock" position as shown on the filter head. Note: If rigid
piping is used, installation of a pipe union is recommended
for ease of future servicing.
VALVE FUNCTIONS
Six-Position Vari-FloTMFilter Control Valve:
(A) FILTER - Set valve to Filter for normal filtering. Also use
for regular vacuuming.
(B) BACKWASH - For cleaning filter.
(C) RINSE - Water flows through the filter the same as in
Filter position, except that water goes to Waste. An optional
position used for pre-coating if a large cloud (pre-coat puff)
is observed returning to pool during the pre-coating process.
(D) WASTE - To bypass filter for draining or lowering water
level and for vacuuming heavy debris directly to Waste.
(E) RECIRCULATE - Spa boost water is re-circulated through
the pool system, bypassing the filter.
(F) CLOSED - Shuts off flow from pump to filter.
OPERATION
Before Starting the Filter.
Obtain a supply of operating chemicals, D.E., and a pool test
kit. Use only swimming pool grades of D.E. Balance the pool
water by adding chemicals in accordance with the instructions provided by the chemicals' manufacturer.
Initial Start-Up of the Filter.
Make sure filter clamp and AAR are secure. Be sure filter
drain plug is closed. Open manual air vent screw at the side
of AAR a few turns. Set Filter Control Valve to FILTER position. Open suction and return valves (when used).
Follow the manufacturer's instructions to prime and start the
pump. Air in the system will vent out of the Air Relief Valve.
Close manual air vent screw when a steady stream of water
emerges. When a steady flow of water returns to the pool,
the filter is ready for pre-coating. DO NOT operate the filter
for more than a minute or two without the D.E. pre-coat to
avoid damages to the grid elements.
Pre-coating
Add the correct amount of D.E. (see specifications on the
back page of this manual or on the filter label) into the system through the skimmer - as fast as the plumbing will take
it. Record the pressure gauge reading after the diatomite has
been added. This is the "pre-coat" or "clean" pressure.
Filtering
Filtration starts as soon as the filter has been pre-coated. As
the filter removes dirt from the pool water, the accumulated
dirt causes a resistance to flow. As a result, the gauge pressure will rise and the flow will decrease. When the pressure
rises 8-10 PSI (.56-.69 Bar) above the pre-coat pressure, it
is time to backwash (clean) the filter. Note: During initial
clean-up of the pool, particularly with a new pool or a very
GB
1
5
4
6
7
8
2
3
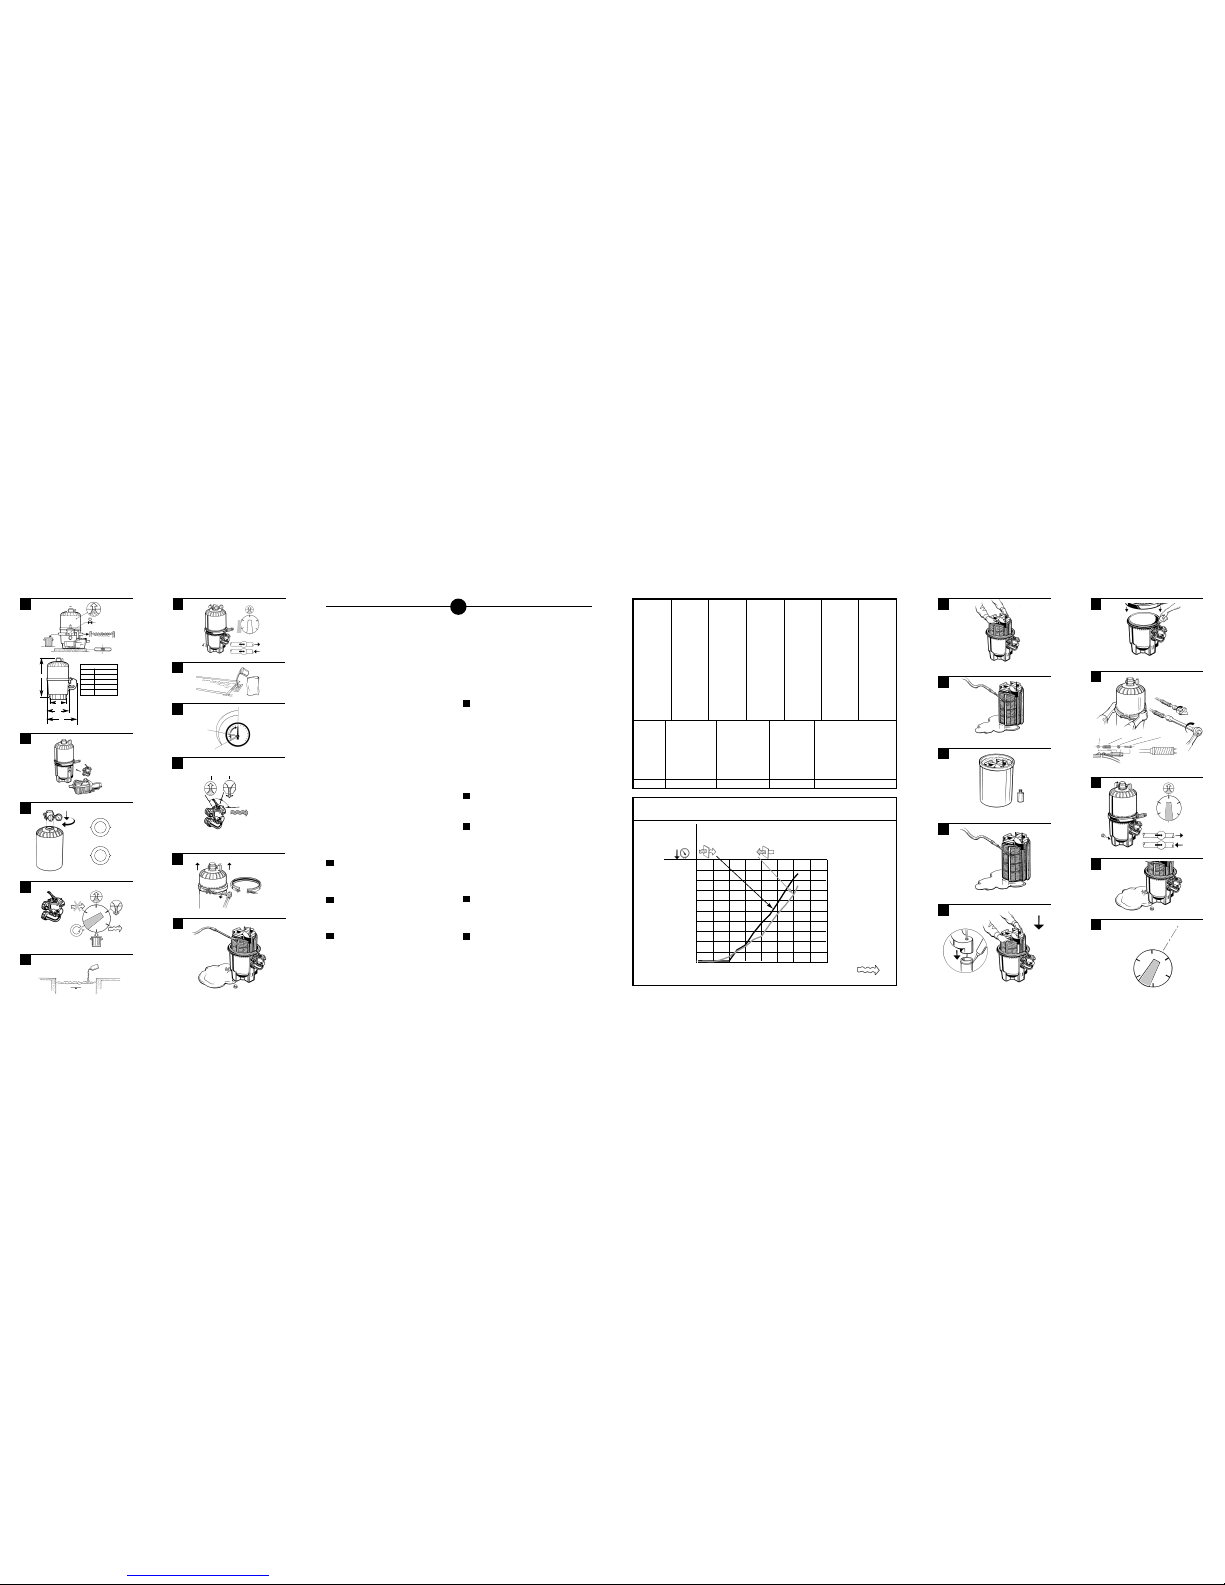
0 20 40 60 80 100 120 140 GPM
0 35 151 227 302 378 454 529 LPM
Backwash - Contre-lavage - Lavado en contracorriente
Rückspülung - Controlavaggio - Uitwassen - Contra-lavagem
Filtration - Filtration
Filtración - Filtration
Filtrazione - Filteren - Filtração
BAR PSI
1.3 20
1.24 18
1.10 16
0.96 14
0.82 12
0.68 10
0.55 8
0.41 6
0.27 4
0 0
A
DE2420 32" (81cm)
DE3620 34J" (87cm)
DE4820 40J" (102cm)
DE6020 46J" (107cm)
DE7220 52" (132 cm)
A
18"
(381mm)
(584mm)
(838mm)
23"
33"
(C)
(F)
(A)
(B)
(E)
(D)
H2O
8-10 PSI
56-64 BAR
Clean Pressure
Pression normale
Presión Limpia
0 PSI
Time to Backwash
Moment du contre-lavage
Y a es tiempo de lavar en
contracorrieente
Filter
Filtration
Filtrado
Rinse
Rincage
Enjuague
Backwash
Contre-Lavage
Lavado En Contracorriente
Multiport Valve
Valve Selectrice
Vávula Multiple
12 17
DE2400J4 DE2400JS DE2400J3 DE24OOJN
(A)
(B)
(A)
13
14
15
16
1 6
7
8
9
10
2
3
4
5
11
18
19
20
21
U
N
L
O
C
K
L
O
C
K
(C)
(D)
Balance pool water
Equilibrer chimiquement l’eau de la piscine
Balancear el agua de la piscina
To properly sanitize
your pool, maintain a
free chlorine level of
1 to 3 ppm and a pH
range of 7.2 to 7.6.
Insufficient chlorine
or an out of balance
pH level will permit
algae and bacteria to
grow in your pool and
make it difficult for
your filter to properly
clean the pool water.
Check with your pool
professional and follow instructions.
pH
7.2 - 7.6 100 - 130 ppm 0.3 - 1.0 ppm
1.0 - 3.0 ppm
40 - 70 ppm
Total alkaline
Titre alcalin complet
Alcalinidad total
Alkalität
Totale alkaliteit
Titolo alcalino completo
Título alcalino completo
Chlorine (unstabilized)
Chlore (non stabilisé)
Cloro (desestabilizado)
Anorganisches Chlor
Chloor (niet in evenwicht)
Cloro (non stabilizzato)
Cloro (não estabilizado)
Chlorine (stabilized)
Chlore (stabilisé)
Cloro (estabilizado)
Organisches Chlor
chloor (in evenwicht)
Cloro stabilizzato
Cloro estabilizado
Chlorine stabilizer (Cyanuric Acid)
Stabilisant du chlore (acide cyanurique)
Estabilizador de cloro (ácido cianúrico)
Stabilisator (Isocyanursäure)
Chloorstabilisator (cyanuurzuur)
Stabilizzante del cloro (acido cianurico)
Estabilizador de cloro (ácido cianúrico)
General Pool
Chemistry
Guidelines
Pour désinfecter correctement votre
piscine, maintenez
un niveau de chlore
libre de 1 à 3 ppm et
un pH compris entre
7.2 et 7.6. Une concentration en chlore
insuffisante ou un
déséquilibre du pH
favorisera la croissance des algues et
des bactéries dans
votre piscine et votre
filtre aura des difficultés à nettoyer correctement l’eau de la
piscine.
Recommandations
Chimiques Qénérales
Pour la Piscine
Para higienizar correctamente su piscina, mantenga un
nivel de cloro libre
de 1 a 3 ppm en una
escala de pH de 7.2
a 7.6. La insuficiencia de cloro o un
nivel de pH fuera de
balance permitirá el
crecimiento de
algas y bacterias en
su piscina y hará
difícil para su filtro
limpiar adecuadamente el agua de la
piscina.
Guía General de
Química de las
Piscinas
Für eine ordnungsgemäße
Desinfektion des Badewassers ist ein frei aktiver
Chlorwert von 0,3–1.00
mg/l und ein pH-Wert von
7.2 – 7.5 zu gewährleisten.
Unzureichende Chlorwerte
oder unausgeglichene pHWerte verlängern die Keimtötungsgeschwindigkeit
und sorgen für die unerwünschte Zunahme von
Algen, Bakterien und
Keimen. In solchen Fällen
hat der Filter Schwierigkeiten, das Wasser Ihres
Schwimmbeckens
angemessen zu reinigen.
Allgemeine Empfehlung
für die Desinfektion des
Schwimmbeckens.
Per disinfettare correttamente l’acqua,
mantenere un livello
di cloro libero da 1 a
3 ppm ed un pH
compreso fra 7,2 e
7,6. Una concentrazione di cloro
insufficiente o uno
squilibrio del pH
favorirà la crescita
delle alghe e dei batteri nella piscina. Il
filtro avrà difficoltà a
pulire convenientemente l’acqua della
piscina.
Raccomandazioni
generali per disinfettare la piscina
Om het water op de
juiste wijze te desinfecteren dient het
niveau van vrij chloor
op 1 tot 3 ppm te
worden gehouden en
de pH tussen 7,2 en
7,6. Een te lage
chloorconcentratie en
een onevenwichtige
pH-balans kunnen
algen- en bacteriegroei in het zwembad
met zich meebrengen. Het zal dan lastig
worden voor de filter
om het zwembad
optimaal te reinigen.
Algemene aanbevelingen
voor het desinfecteren
van het zwembad
Para desinfectar correctamente a água,
mantenha de cloro
livre de 1 até 3 ppm
e um pH situado
entre 7,2 e 7,6. Uma
concentração insuficiente de cloro ou
um desequilíbrio do
pH irá contribuir
para o aumento de
algas e de bactérias
na piscina. Isto fará
com que filtro tenha
dificuldades para
limpar convenientemente a água da
piscina.
Recomendações
gerais para a desinfecção da piscina
Head Loss With Multiport Valve - Perte de Pression Due à la Valve multiposition - Caída de Presión con Válvula Múltiple
Druckverlust des Mehrwegenventiles bei - Perdita di pressione dovuta alla valvola multivia
Drukverlies door de meerstandenklep - Perda de pressão devido à válvula multi-posições
FLOW - FLUX - FLUJO - VOLUMENSTROM - PORTATA - DEBIET - CAUDAL
Head Loss
Perte de charge
Pérdida de altura de elevación
Zirkulation
Perdita di carica
Verlies waterdruk
Perda de carga
 Loading...