

Page 1
INSTALLATION INSTRUCTIONS OPERATING INSTRUCTIONS
CUT-OUT FOR SKIMMER
(If Pool Wall is Not Factory Pre-Cut)
Locate skimmer face plate against metal wall at desired position
(average water level should be approximately at the mid point of
the face plate). Make sure that the face plate and the skimmer
will not interfere with top coping or lip border of the pool structure.
Drill or punch (22) 1/4” holes in pool wall per drawing.
Make rectangular cut-out per drawing.
CUT-OUT FOR OUTLET FITTING
(If Pool Wall is Not Factory Pre-Cut)
Cut out 2-7/16” circle at desired position. Cut out should be
approximately 8” below desired water level.
SKIMMER INSTALLATION
Place the protective tape (white vinyl 1”) over the edge of the
skimmer cut-out.
Place one sealing gasket on skimmer face, making sure holes in
gasket align with holes in skimmer face (a very light application
of adhesive cement will assist in holding gasket in place).
Align skimmer face and sealing gasket with drilled holes and
fasten to exterior wall panel with the (4) 5/8” pan head screws
provided.
Install vinyl liner and fill pool to approximately 2” below lowest
wall opening.
Align second sealing gasket and face plate and fasten tightly to
skimmer face on the interior wall panel with the (18) 1” screws
provided (pierce liner through face plate holes one at a time prior
to inserting each screw). Use a large Phillips head screwdriver
to drive these heavy duty screws. Screw securely through:
1. Face Plate; 2. Sealing Gasket; 3. Vinyl Liner; 4. Wall Panel;
5. Sealing Gasket; 6. Into Skimmer Face.
Screw hose adapter (with pipe tape) into skimmer bottom port.
Connect filter suction hose to skimmer hose adapter and secure
with a clamp.
Cut out vinyl liner along inside edges of face plate with razor
blade or sharp knife. Some pool manufacturers
recommend waiting until water level is up to bottom of skimmer
before cutting liner. Follow pool instructions.
OUTLET FITTING INSTALLATION
Gently press vinyl liner at circular outlet fitting opening to locate
exact opening. Make a circular cut-out in the vinyl liner
approximately 3/4” smaller than the circular opening in the wall.
Screw hose adapter (with pipe tape) into small end of
outlet fitting.
Place one gasket on the fitting and insert through the vinyl liner
and wall panel from the interior panel. Place other gasket over
fitting hub and screw locknut, with fiber washer, up tightly.
Screw directional flow outlet fitting into face of outlet
fitting. Opening should face away from wall skimmer opening.
To adjust inlet flow direction, loosen knurled outer ring of
directional flow outlet fitting. Move ball to desired position and
tighten knurled ring hand tight.
Connect filter return hose to fitting hose adapter and secure with
clamp.
1.
2.
3.
1.
2.
3.
4.
5.
6.
7.
8.
1.
2.
3.
4.
5.
TO CLEAN SKIMMER BASKET
Where deck or ledge does not cover skimmer, use the
convenient full size access top cover. When skimmer is installed
under pool deck or wide ledge, basket removal is easily performed
through front of skimmer.
TO VACUUM WITH VACUUM ADAPTER
Remove cover from top of skimmer.
Attach vacuum hose to vacuum head and fill hose with water
(place over pool outlet fitting). When full, place hose end on
vacuum adapter and place vacuum adapter over skimmer basket.
Hold vacuum adapter in place until any air is evacuated by
pump. Once air is removed, the pump suction will hold the
vacuum adapter firmly in place.
If access is available only through the front weir, use the
optional elbow adapter (SPX1090WMEA).
TO ATTACH VACUUM CLEANER HOSE
(without Vacuum Adapter)
Remove top cover; or pull weir forward and squeeze pins toward
center to remove weir.
Remove skimmer basket.
Fill hose with water and insert vacuum hose cuff into
skimmer outlet.
RECOMMENDED WINTERIZING PROCEDURE
Drain pool level approximately 2” below skimmer opening. Remove
directional flow outlet fitting and securely plug wall fitting (1-1/2”
threaded plugs are available from your dealer). Disconnect filter
hoses from skimmer and outlet fitting. Be sure that the skimmer is
kept free from water accumulation. Warranty does not include
damage caused by the formation of ice in the skimmer.
1.
2.
3.
4.
1.
2.
3.
PARTS INCLUDED IN
THIS PACKAGE
SPX1090WMW
SPX1090WMFP
SPX1090WMSB
SPX1090WMCV
SPX1090WMVA
SP1023
SP1419D
SPX1091Z7
SPX1090WMSG
SPX1090Z11
SPX1090Z12
SP1090Z4
Skimmer Body*
Weir
Face Plate
Skimmer Basket
Cover
Vacuum Adapter
Outlet fitting
Directional Flow Outlet Fitting
Hose Adapter
Sealing Gasket
Panhead Slotted Retainer Screws
#12x5/8”
Flat Head Phillips Screws #12x1”
Pipe Tape*
NO.
REQ’D.
1
1
1
1
1
1
1
1
2
2
4
18
1
*Not procurable as spare part
IS1090WM-99
OWNER’S GUIDE
HAYWARD POOL PRODUCTS, INC.
900 FAIRMOUNT AVENUE, ELIZABETH, NEW JERSEY 07207 / Phone: (908) 351-5400
DESCRIPTIONPART NO.
MODEL SP1090WM
WIDE MOUTH SKIMMER
Page 2
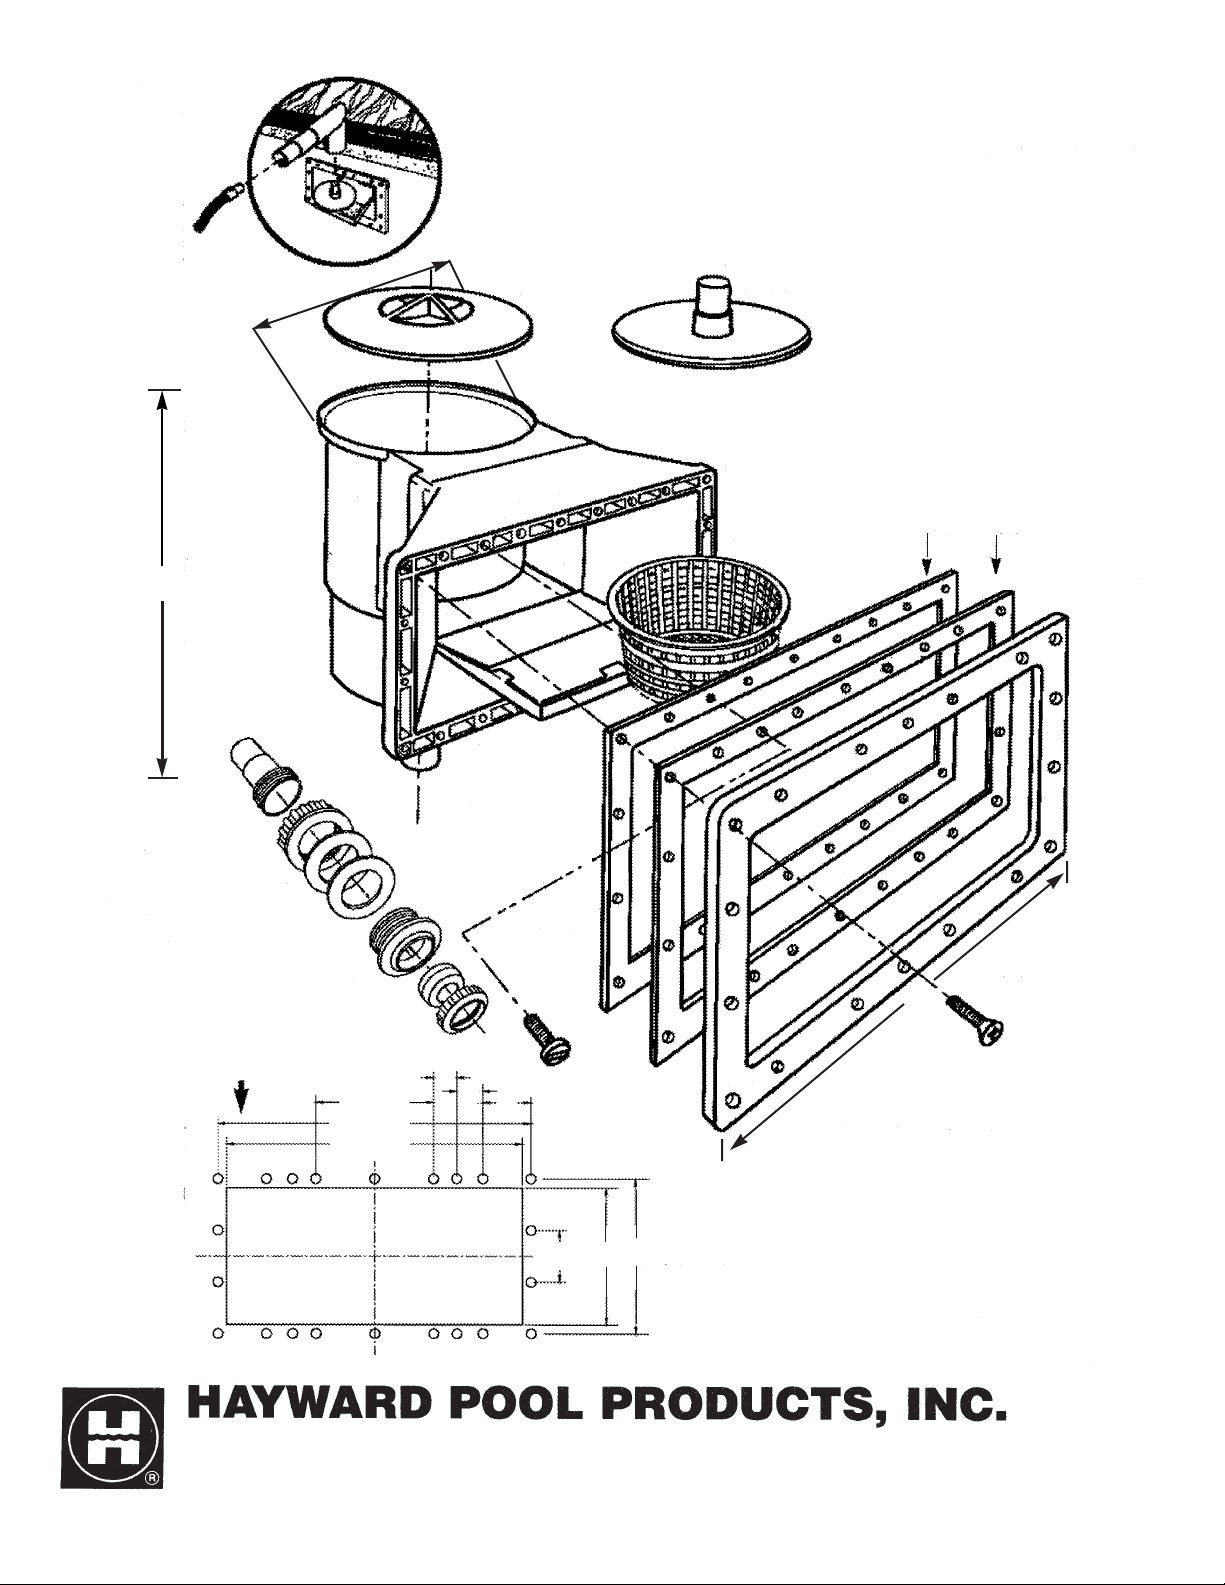
Elbow Adapter
SPX1090WMEA
Optional for
Pool with Deck
Cover
SPX1090WMCV
8” (20.3 cm)
Vacuum Adapter
SPX1090WMVA
Skimmer Basket
SPX1090WMSB
Sealing Gasket (2)
SPX1090WMSG
Rear
Front
Hose Adapter
SPX1091Z7
Weir
SPX1090WMW
[4] Panhead slotted
retainer screws
No. 12 x5/8”
SPX1090Z11
Outlet
SP1023
Panel cut out
pattern
Directional Flow Outlet Fitting
SP1419D
4-3/4” (12.1cm)
12” (30.5cm)
12-23/32”
(32.3cm)
2” (5.0cm)
1-1/16” (2.7cm)
15/16” (2.4cm)
2-1/8”
(5.4cm)
5-5/8”
(14.3cm)
6-11/32”
(16.2cm)
14”
Face Plate
SPX1090WMFP
[18] Flat head Phillips screw No. 12 x 1”
SPX1090Z12
© 1999 Hayward Printed in U.S.A.
14-1/4”
(36.2cm)
SP1090WM PARTS DIAGRAM
Hayward Pool Products, Inc.
900 Fairmount Avenue
Elizabeth, NJ 07207
Hayward Pool Products, Inc.
2875 Pomona Boulevard
Pomona, CA 91768
Hayward Pool Products Canada
2880 Plymouth Drive
Oakville, Ontario L6H 5R4
Hayward Pool Products Europe
ZA del’Observatoire
2, Avenue des Chaumes
78182 St. Quentin en Yvelines Cedex
France
 Loading...