

Hayward Jiffy Niche, Jiffy Niche SP0608U Owner's Manual
IS0608UA_Rev B
OWNER’S MANUAL
INSTALLATION & PARTS
FOR MODEL NUMBERS:
SP0608U - FOR VINYL OR
FIBERGLASS POOLS & SPAS
Jiffy Niche
TM
Series Niches
Unlike metallic niches, Jiffy NicheTM niches are injection-molded of PVC for superior performance, non-corrosive durability, and
plumbing versatility – plus the lowest installed cost.
The ability to accept PVC over expensive metal conduit enables Jiffy Niche
time to install.
Jiffy Niche
light fixture, you have the best quality and value in a lighting system available anywhere. To facilitate installation, all Jiffy Niche
fixture housings are packed with U.L. listed conduit fittings (elbow and reducer).
TM
currently comes in 1 model for vinyl/fiberglass pools and spas. When paired with Hayward AstroliteTM or Astrolite IITM
TM
to offer true bottom line savings in materials, as well as
SAVE THIS INSTRUCTION MANUAL
TM
USE ONLY HAYWARD GENUINE REPLACEMENT PARTS

Page 2 of 8
Jiffy Niche
TM
SERIES NICHES
IS0608UA_Rev B
IMPORTANT SAFETY INSTRUCTIONS
Before installing or servicing this electrical equipment, turn power supply OFF.
Basic safety precautions should always be followed, including the following: Failure to follow instructions may result in injury.
This is the safety-alert symbol. When you see this symbol in this manual, look for one of the following signal words. And,
be alert to the potential for personal injury.
WARNING
ignored, presents a potential hazard.
CAUTION
and, if ignored, presents a potential hazard. It can also make consumers aware of actions that are unpredictable and unsafe.
The NOTICE label indicates special instructions that are important but not related to hazards.
warns about hazards that could cause serious personal injury, death or major property damage and, if
warns about hazards that will or can cause minor or moderate personal injury and/or property damage
WARNING
– Read and follow all instructions in this
owner’s manual and on the equipment. Failure to follow
instructions can cause severe injury and/or death.
WARNING – This product should be installed and serviced only by a qualified professional.
CAUTION – All electrical wiring MUST be in conformance with all applicable local codes, regulations, and the
National Electric Code (NEC).
Use of non-Hayward replacement parts voids warranty.
ATTENTION INSTALLER – THIS MANUAL CONTAINS IMPORTANT INFORMATION ABOUT THE INSTALLATION,
OPERATION, AND SAFE USE OF THIS NICHE, THAT MUST BE FURNISHED TO THE END USER OF THIS
PRODUCT. FAILURE TO READ AND FOLLOW ALL INSTRUCTIONS COULD RESULT IN SERIOUS INJURY.
WARNING –
severe injury and/or death. All electrical wiring MUST be in conformance with all applicable local c
regulations, and the National Electric Code (NEC).
WARNING –
Locate conduit to prevent abuse from lawn mowers, hedge trimmers and other equipment.
WARNING –
circuit, however, all electrical wiring MUST be in conformance with all applicable local codes, regulations, and the National Electric
Code (NEC).
Risk of Electric Shock.
To reduce the risk of electric shock replace damaged wiring immediately.
It is recommended to install a Ground Fault Circuit Interrupter (GFCI) in the
Hazardous voltage can shock, burn, and cause
odes,
WARNING –
National Electric Code (NEC). Ground and bond ALL niches before connecting lighting to electrical power supply. Failure to ground
and bond niches can cause serious or fatal electrical shock hazard. Do NOT ground to a gas supply line.
All electrical wiring MUST be in conformance with all applicable local codes, regulations, and the
USE ONLY HAYWARD GENUINE REPLACEMENT PARTS
Page 3 of 8
Jiffy Niche
TM
SERIES NICHES
IS0608UA_Rev B
GENERAL INFORMATION:
Introduction:
This manual contains information for the proper installation and operation of the Hayward Jiffy NicheTM series niches. A qualified
professional should do installation of the Hayward Jiffy Niche
TM
. Failure to install according to the instructions will void the warranty.
Features:
1. Attractive, injection molded DuralonTM face rim assembly, for corrosion-free performance.
2. Fast and simple installation. Minimal tools required.
3. Specially designed wire sealing system, for sealing pool water from conduit pipe.
Important Information Regarding All Models:
1. Jiffy NicheTM underwater lighting fixture housings (Niche) are Underwriters Laboratories (UL) Listed under File E 39338Category WBDT. These niches are New York City (NYC) Bureau of Electrical Control approved for use with low voltage (12
volt) lighting fixtures. U.L. Listed for fresh water, which includes salt pools with a maximum of 3700ppm salt content, and
complies with 1999 National Electrical Code (NEC).
2. Jiffy Niche
Fixtures: SP0590SL, SP0590HSL, SP0591SL, SP0591HSL, SP0592HSL, SP0532( S)LED, SP0533(S)LED, SP0534(S)LED,
SP0535(S)LED.
TM
model SP0608U underwater fixture housings (Niche) are UL Listed only for use with Hayward Submersible Light
INSTALLATION INSTRUCTIONS:
GENERAL INSTRUCTIONS COMMON FOR ALL MODELS:
1. The National Electrical Code (NEC) requires that the top of the light lens be at least 18” below the water level. Be sure to
position the niche so that it is in compliance with this requirement. Some installers position the niche 24” below the
anticipated water level to avoid any inspection authority issu es with this requirement.
SP0608U
A. For Vinyl Lined Metal Wall, Vinyl Lined Fiberglass Panel, Or Non-Lined
Fiberglass Pools:
1. If not pre-punched by the factory, drill & cut out the wall panel sections as per dimensions below:
a. CIRCULAR PANEL CUTOUT: 6” minimum to 6-1/8“ maximum diameter hole.
2. After unpacking the niche carton, remove the large lock ring on the ba ckside of the housing assembly.
3. For non-lined pools only, install the flange gasket to the backside of the flange on the housing
assembly by peeling off the paper exposing the adhesive, and pressing it firmly onto the flange.
4. If desired, caulk the backside of the housing flange (lined pool) or housing flange gasket (non-lined
pool) with silicone or other suitable sealing compound.
5. Insert the housing assembly through the wall panel section from the interior of the poo l.
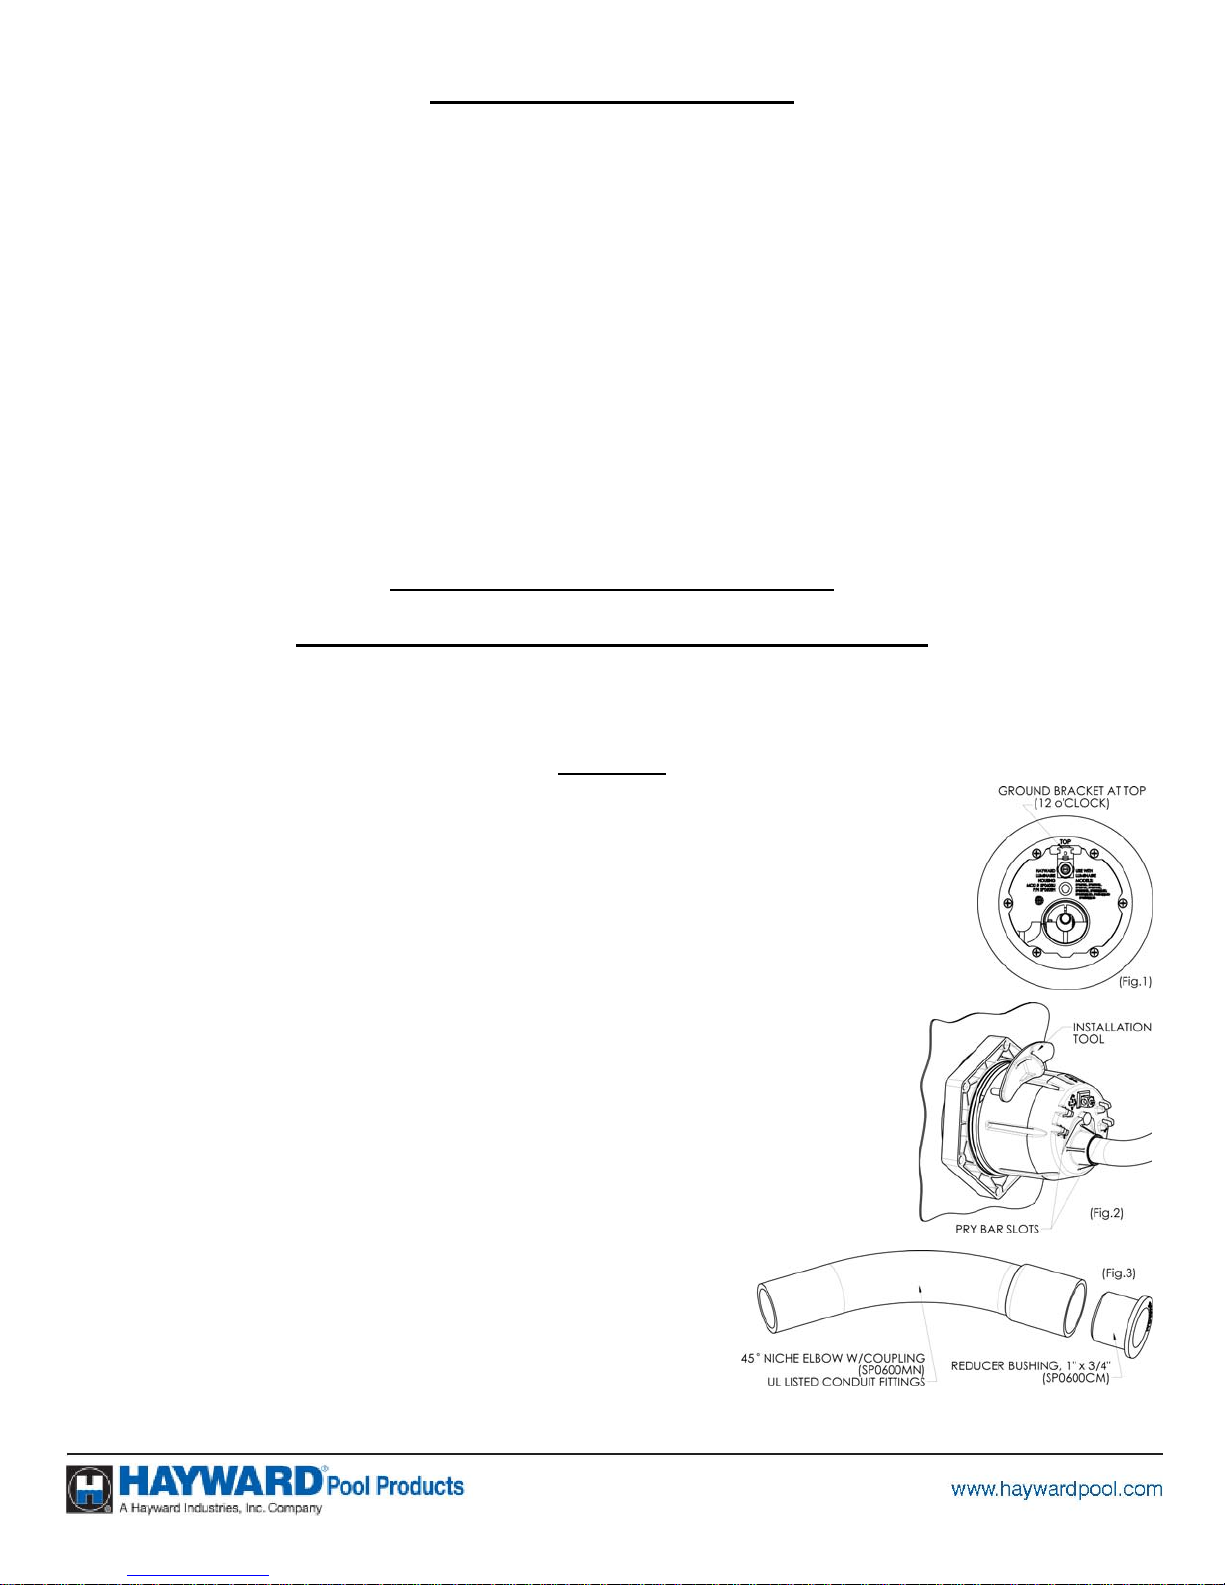
6. Position the grounding bracket towards the TOP (12 O’clock). (Fig.1)
7. Install the large lock ring from the exterior of the pool, with the six (6) holes facing away from
the pool wall (outward).
8. Snug the lock ring by hand while being careful to keep the word “TOP” on the outside of the
housing towards the TOP (12 O’clock).
9. Insert the posts of the installation tool (Hayward P/N SP0608UT) into any two (2) adjacent
holes on the lock ring. (Fig.2)
10. Insert a screwdriver (or similar tool) into either of the two (2) pry-bar slots. This will be used
to prevent the housing assembly from rotating during final tightening. (Fig.2)
11. While firmly holding the screwdriver in the previous step, use a small
rubber mallet to strike the tab of the installation tool, rotating the lock
ring in the clockwise direction to tighten.
12. Install conduit fittings as needed. All Jiffy Niche
with two (2) UL Listed Conduit Fittings. A 1” trade size, 45° sweep
elbow is provided for the purpose of directing the conduit pipe towards
the SP0680/SP0681 Listed Junction Box location. A 1” x ¾” reducer
TM
niches are provided
USE ONLY HAYWARD GENUINE REPLACEMENT PARTS
 Loading...