

Hayward HP40BEE, HP65BEE1, HP50BEE Installation And User Manual
VARIABLE-SPEED
VARIABLE-SPEED
Swimming Pool Heat Pump
Swimming Pool Heat Pump
[ HP50BEE ]
[ HP40BEE ]
[ HP50BEE ]
[ HP65BEE1 ]
[ HP50BEE ]

Content
I. Application ...................................................................................... 4
II. Features ......................................................................................... 4
III. Technical Parameter ...................................................................... 5
IV. Dimension ...................................................................................... 6
V. Installation instruction ..................................................................... 7
VI. Operation instruction .................................................................... 11
VII. Testing .......................................................................................... 12
VIII. Precautions .................................................................................. 13
IX. Maintenance ................................................................................. 14
X. Trouble shooting for common faults ............................................. 15
2

Thank your choosing a Hayward heat pump. Please read this instruction
manual carefully and operate strictly according to the user manual
before starting the heat pump, otherwise the heat pump may be
damaged or cause you unnecessary harm.
Special Attention:
A. This product is only for swimming pool water heating applications and
can’t be used for the heating for any other liquid materials.
B. The inlet and outlet water nozzles can’t bear the weight of external
pipes.
C. The main power switch should be out of the reach of children.
D. Make sure the power is switched off before opening the case.
NOTE:
A. The swimming pool heat pump must be installed by a qualified
electrician.
B. To maximize your swimming comfort, set proper heating temperature.
C. Don’t put obstacles near the air inlet and outlet of the heat pump.
D. This heat pump has power-off memory function.
E. When the ambient temperature is below 0 degree, make sure to
switch off the main power, and drain off the water from heat exchanger.
F. Never place your hand or any other object in the air inlet or outlet of
the heat pump.
G. If any abnormal circumstances discovered, ex: abnormal noise,
smells, smokes and leakage of electricity, switch the main power off
immediately and contact your local dealer/installer. Do not try to repair
the heat pump yourself.
3

I. Application
1- Set swimming pool water temp efficiently and economically to
provide you comfort and pleasure.
2- User may choose the model technical parameter according to
professional guide, this series of swimming pool heater has been
optimized in factory (refer to technical parameter table).
II. Features
1-
Sensitive and accurate temp control and water temp display.
2-
High pressure and low pressure protection.
3-
Protection in case of too low or no water flow
4-
Exceeding low temp auto stop protection.
5-
Temp control compulsory defrosting.
6-
International brand compressor.
7-
High efficient titanium heat exchanger
8-
Easy installation and operation.
4
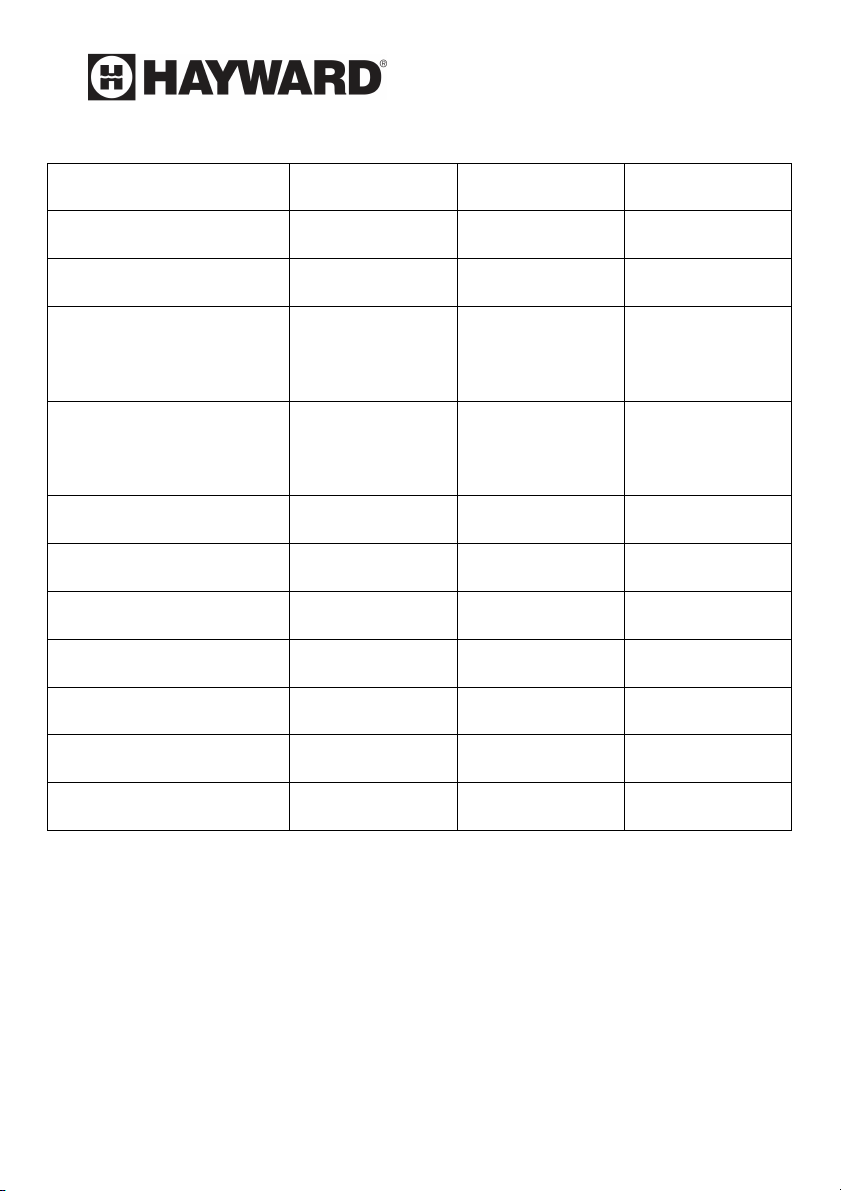
III. Technical Parameter
Model HP40BEE HP50BEE HP65BEE1
Voltage 208-230V 208-230V 208-230V
Frequency/phase 60Hz/1Ph 60Hz/1Ph 60Hz/1Ph
Heating current
1.4-7.5A 1.6-10.2A 2.5-13.1A
(air80°F,water80°F)
Heating power
0.28-1.75kW 0.30-2.3kW 0.56-3kW
(air80°F,water80°F)
Design pressure(High)
Design pressure(Low) ≤261 PSIG ≤261 PSIG ≤261 PSIG
Refrigerant(R410A) 31.7oz 38.8oz 45.9oz
Net weight 48KG 52KG 62KG
Water circulation flow 67-100L/min 83-117L/min 108-142L/min
Noise ≤50 dB(A) ≤50 dB(A) ≤50 dB(A)
Waterproof class IPX4 IPX4 IPX4
≤609 PSIG ≤609 PSIG ≤609 PSIG
Notice:
1.
This product works well under water temp 80oF to104oF, air temp 32oF to 109oF,
efficiency will not be guaranteed out of this range. Please take into consideration that
the pool heater performance and parameters are different under various conditions.
2.
Related parameters are subject to adjustment periodically for technical
improvement without further notice. For details please refer to nameplate.
5
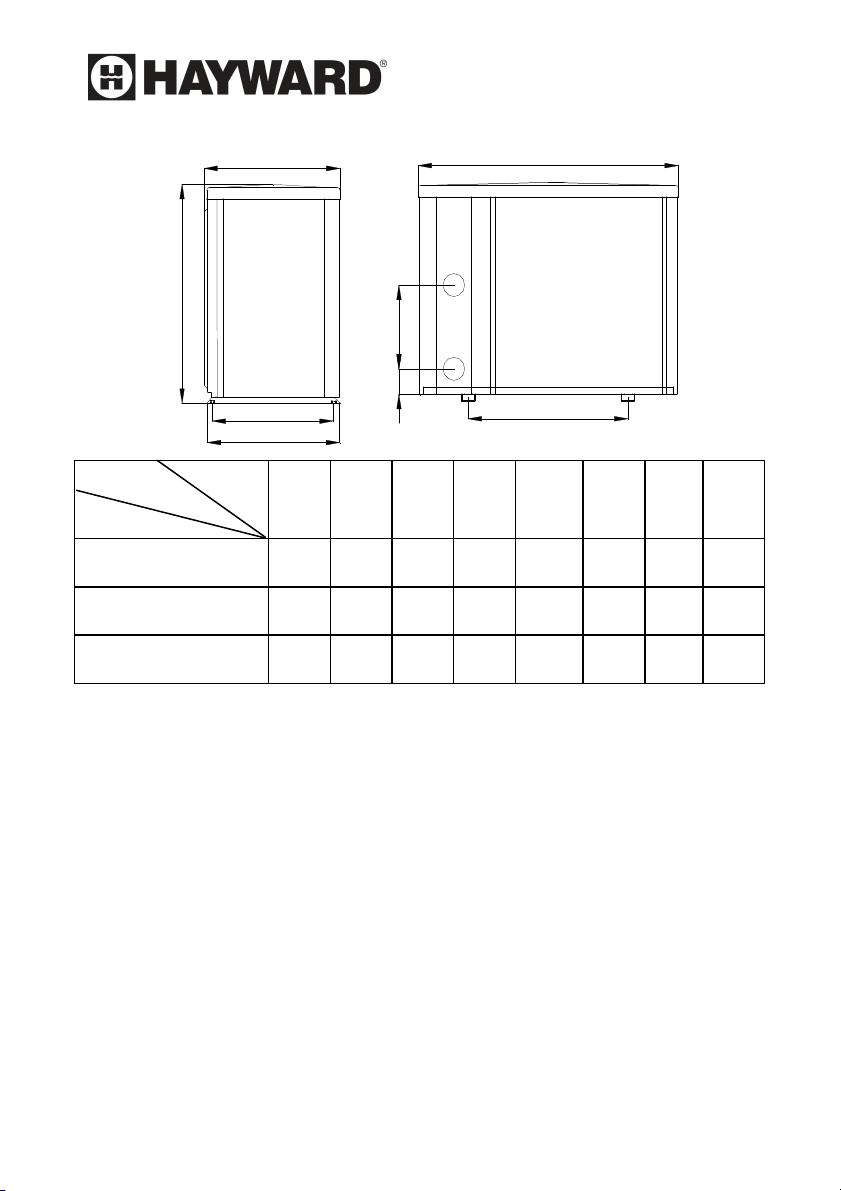
IV. Dimension
C
E
H
A
D
FG
B
Size(mm)
Model
Name
A B C D E F G H
HP40BEE 315 590 312 340 961 290 74 658
HP50BEE 315 590 312 340 961 330 74 658
HP65BEE1
395 590 390 420 961 360 74 658
※ Above data is subject to modification without notice.
Note:
The picture above is the specification diagram of the pool heater, for
technician’s installation and layout reference only. The product is subject
to adjustment periodically for improvement without further notice.
6

V. Installation instruction
1. Drawing for water pipes connection.
(Notice:The drawing demonstration and layout of the pipes is only for reference.)
2. Electric Wiring Diagram
Note:The swimming pool heater must be grounded.
7
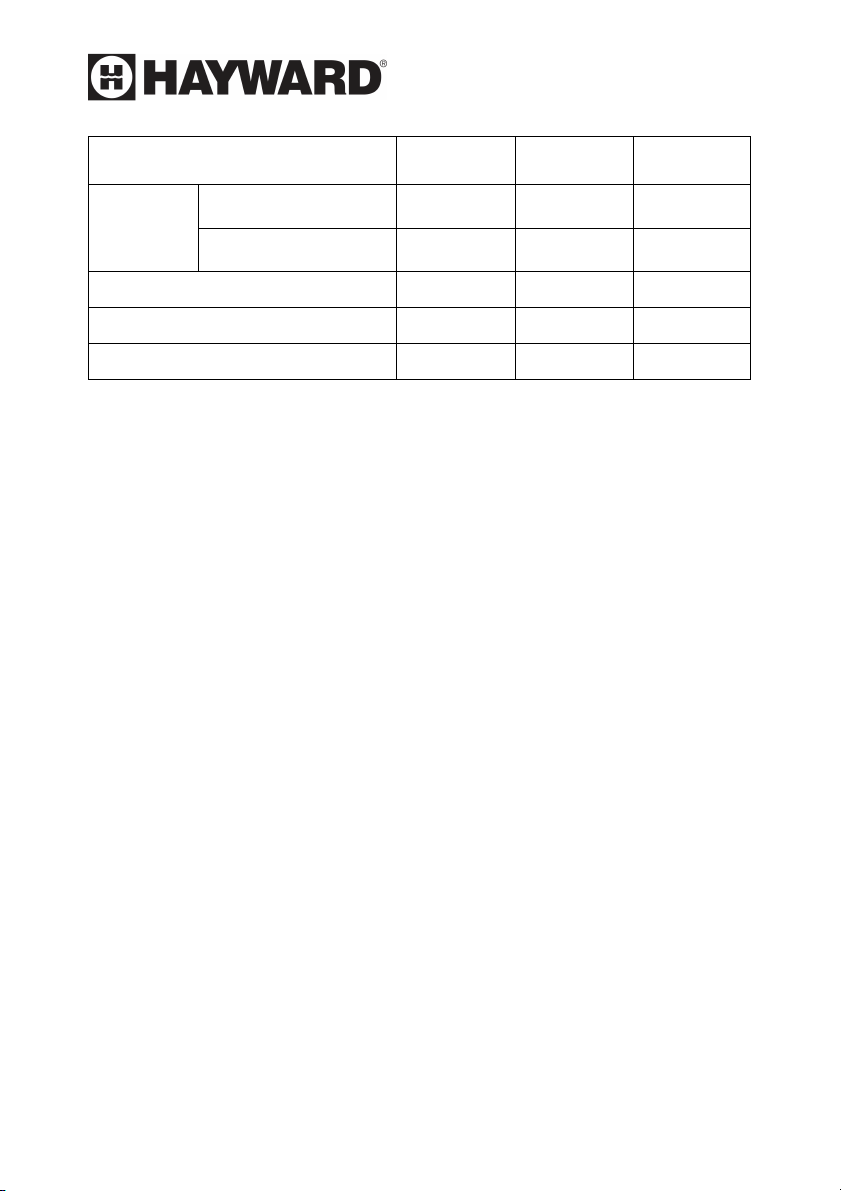
Rated Residual
Options for protecting devices and cable specification
MODEL
Rated Current A
Breaker
Action Current mA
Fuse A
Power Cord
Signal cable (mm²)
(mm²)
HP40BEE HP50BEE HP65BEE1
12 15 18
30 30 30
12 15 18
3×2.5 3×2.5 3×4
3×0.5 3×0.5 3×0.5
※ Above data is subject to modification without notice.
Note: The above data is adapted to power cord ≤ 10 m. If power cord is
>10 m, wire diameter must be increased. The signal cable can
be extended to 50 m at most.
2. Installation and Requirements
The swimming pool heater must be installed by a pool professional. End
users are not qualified to install the heater. Damage may occur to the
heater or threaten the safety of the user.
A. Installation
1) The swimming pool heater should be installed in a location with good
ventilation;
2) The frame must be fixed by bolts (M10) to concrete foundation or
brackets. The concrete foundation must be solid and fastened; the
bracket must be strong and antirust treated;
3) Don’t stack substances that will block air flow near inlet or outlet area,
and no barrier within 20in behind the main heater, or the efficiency of the
heater will be reduced or even haulted;
4) The heater needs an appended pump (Supplied by the user). The
recommended pump specification-flux: refer to Technical Parameter,
Max. lift ≥10m;
8

5) When the heater is running, there will be condensation water
discharged from the bottom. Please hold the drainage nozzle
(accessory) into the hole and attach it well, then connect a pipe to
drain the condensation water out.
Wiring
B.
1) Connect to appropriate power supply; the voltage should comply
with the rated voltage of the products.
2) Heater must be grounded.
3) Wiring must be handled by a professional technician according to
the circuit diagram.
4) Set leakage protector according to the local code for wiring (leakage
operating current ≤ 30mA).
5) The layout of power cable and signal cable should be orderly and
not interfere with each other.
C.Switch on after finishing all wiring construction and
re-checking.
9

Pay attention to the following points:
1. The heat pump must be installed OUTSIDE in a well ventilated area to avoid air
recirculation, or in a place with adequate room for both installation and
maintenance. Please refer to the following illustration:
A minimum of 300mm of clearance from walls, shrubbery, equipment, etc. is required around the
entire pump circumference. This allows for ample air intake. No less than 800mm clearance on
the air outlet is required to prevent recirculation of air. We recommend to not place the unit
underneath eaves, decks, or porches, as this causes recirculation of discharged air, or the
efficiency of the heater will be reduced or even stopped.
10
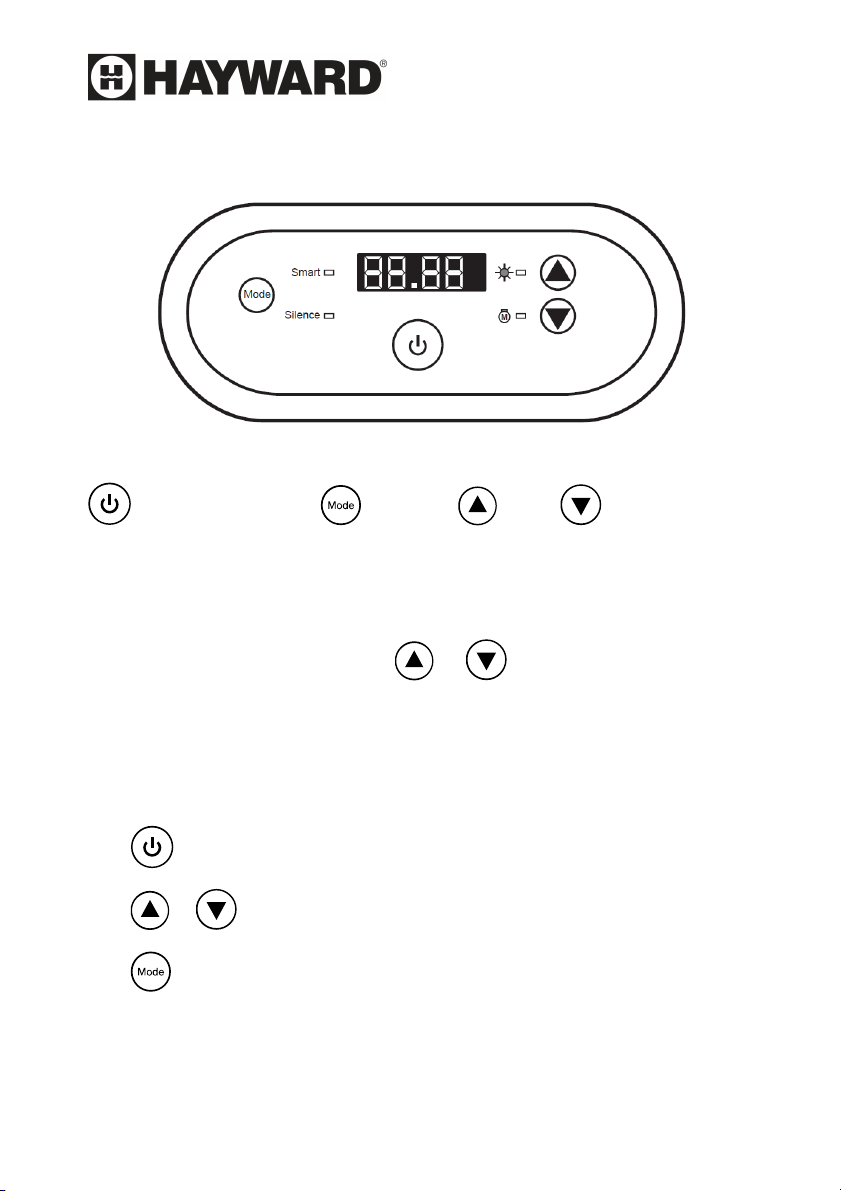
VI. Operation instruction
Picture for keys
1. Key Notes :
Power ON/OFF Mode UP DOWN
a. When the heat pump is on, “Smart” mode will be selected
automatically, the “Smart” mode light will be on.
b. The LED screen shows the inlet water temperature, it will show the
set temperature by pressing or button.
c. When the heat pump is turned on, the screen will display barcode for
10 seconds.
2. Operation
A. -- Power On/Off
B. an -- Display and Adjust Water Temperature
C. -- Mode Selection (Smart, Silence modes)
3. Mode Selection
A. There are 2 modes: “Smart” mode, “Silence” mode. “Smart” mode
11

will display automatically when the heat pump is turned on, the light
of “Smart” mode will be on.
B. Press to switch to “Silence” mode, the light of “Silence” mode
will be on.
C. Press again to switch back to “Smart” mode, the light of “Smart”
mode will be on.
VII. Testing
Inspection before use
1.
A. Check installation of the entire heater and pipe connections
according to the pipe connecting drawing;
B. Check the electric wiring according to the electric wiring diagram;
and grounding connection;
C. Make sure that the main heater power switch is off;
D. Check the temperature setting;
E. Check the air inlet and outlet.
Trial
2.
A. The user must Start the water pump before the heat pump, and
turn off the heat pump before the water pump, or the heat pump will
be damaged;
B. The user should start the water pump, and check for any leakage
of water; Power on and press the ON/OFF bottom of the heat
pump, and set suitable temperature in the thermostat.
C. In order to protect the pool heat pump, the heater is equipped with
a time lag starting function, when starting the heater; the blower will
run 1 minute earlier than the compressor;
D. After the pool heat pump starts up, check for any abnormal noise
from the heater.
12

VIII. Precautions
. Attention
1
A. Set proper temperature in order to get comfortable water
temperature; to avoid overheating;
B. Please don’t stack substances that can block air flow near inlet or
outlet area, or the efficiency of the heater will be reduced or even
stopped;
C. Please don’t put hands into outlet of the swimming pool heater,
and don’t remove the screen of the fan at any time;
D. If there are abnormal conditions such as noise, smell, smoke and
electrical leakage, please switch off the machine immediately and
contact the local dealer. Don’t try to repair it yourself;
E. Don’t use or stock combustible gas or liquid such as thinners,
paint and fuel to avoid fire;
F. In order to optimize the heating effect, please install heat
preservation insulation on pipes between swimming pool and the
heater. During running period of the swimming pool heater, please
use a recommended cover on the swimming pool;
G. Connecting pipes of the swimming pool and the heater should be
≤10m, or the heating effect of the heater cannot be ensured;
. Safety
2
A.Please keep the main power supply switch far away from the
children;
B.When a power cut happens during running, and later the power is
restored, the heater will start up automatically. So please switch
off the power supply when there is a power cut, and reset temp
when power is restored;
C.Please switch off the main power supply in lightning and storm
weather to prevent from machine damage that caused by
lightning;
D.If the machine is stopped for a long time, please cut off the power
13

turn off.
supply and drain water clear of the machine by opening the tap of
inlet pipe.
IX. Maintenance
Caution: Danger of electric shock
1. “Cut off”
2. Do not touch the electronic components until the LED indication lights on PCB is off/
power supply of the heater before cleaning, examination and repairing
A. In winter season when you don’t swim:
1. Cut off power supply to prevent any heater damage
2. Drain water clear of the heater.
3. Cover the heater body when not in use.
!!Important:
Unscrew the water nozzle of inlet pipe to
let the water flow out.
When the water in machine freezes in winter
season, the titanium heat exchanger may be
damaged.
B.Please clean the heater with household detergents or clean water,
NEVER use gasoline, thinners or any similar fuel.
C.Check bolts, cables and connections regularly.
14
 Loading...