

Hayward HP50B, HP65B, HP40B Installation & User Manual

SWIMMING POOL HEAT PUMP
Installation & User Manual
Model HP50B
HP65B
Hayward Pool Products Canada, Inc.
T: 1-888-238-7665
www.haywardpool.ca

CONTENT
I. Application 4
II. Features 4
III. Technical Parameters 5
IV. Dimension 6
V. Installation Guide 7
VI. Controller Operation 10
VII. Testing 11
VIII. Precautions 12
IX. Maintenance 13
X. Troubleshooting 13

WARNING
A) The Swimming Pool Heat Pump Unit is intended to heat the swimming pool water and regulate
the temperature. Use in any other application will void the warranty.
B) The inlet & outlet connections cannot support any load from another piping system.
C) Make sure outlet air does not hurt any person, animal & plant.
D) The unit must always be powered off before opening the access panel. Always cut the unit’s
main power whenever the access panel is open or removed.
PRECAUTIONS
A) All electrical connections must be done by a qualified electrician and according to national and
local electrical codes. We have provided important safety messages in this manual and on your
heater. Always read and obey all safety messages.
B) You will need to set the water temperature you desire.
C) Always install the machine outdoors, while respecting the minimal clearances needed for proper
operation and heating. DO NOT place the unit next to shrubs, fences, etc. which can block
the air inlet. These locations deny the unit a continuous source of fresh air which reduces its
efficiency and may prevent adequate heat delivery.
D) All Hayward Heat Pumps must be installed in accordance with all applicable National and Local
codes. In the absence of local codes, refer to the latest edition of the Canadian Electrical Code
(CEC).
E) The unit will automatically start up when there is proper flow and available power.
F) If the unit is stopped for an extended period of time or winterized, it must be drained of all water.
You will need to disconnect the IN and OUT water connections. Then the unit must then be tilted
or blown out with air until all water is out.
G) Do not insert any objects into the air outlet. Do not attempt to disassemble the fan at any time.
H) If at any time there is an abnormal noise, smell, smoke, electricity leakage, please switch off
power immediately and contact your local dealer. All repairs must be performed by a qualified
technician.
I) Do not store combustible or flammable material near unit.
3

I. APPLICATION
1. For your comfort and pleasure, set swimming pool water temperature efficiently and economically.
2. All technical parameters are factory set. Please refer to technical parameter table.
II. FEATURES
1. Highly efficient titanium heat exchanger.
2. Sensitive and accurate temperature control and water temp display.
3. Environment-friendly R410A refrigerant.
4. High pressure, low pressure & water flow protection system.
5. Exceeding low temperature auto stop protection.
6. Temperature controlled compulsory defrosting.
7. International brand compressor.
8. Easy installation and operation.
4

III. TECHNICAL PARAMETERS
Remarks:
This product has been tested at air temperature of 32°F ~109°F. Efficiency cannot be guaranteed out of
these ranges. All parameters will differ under various conditions.
5
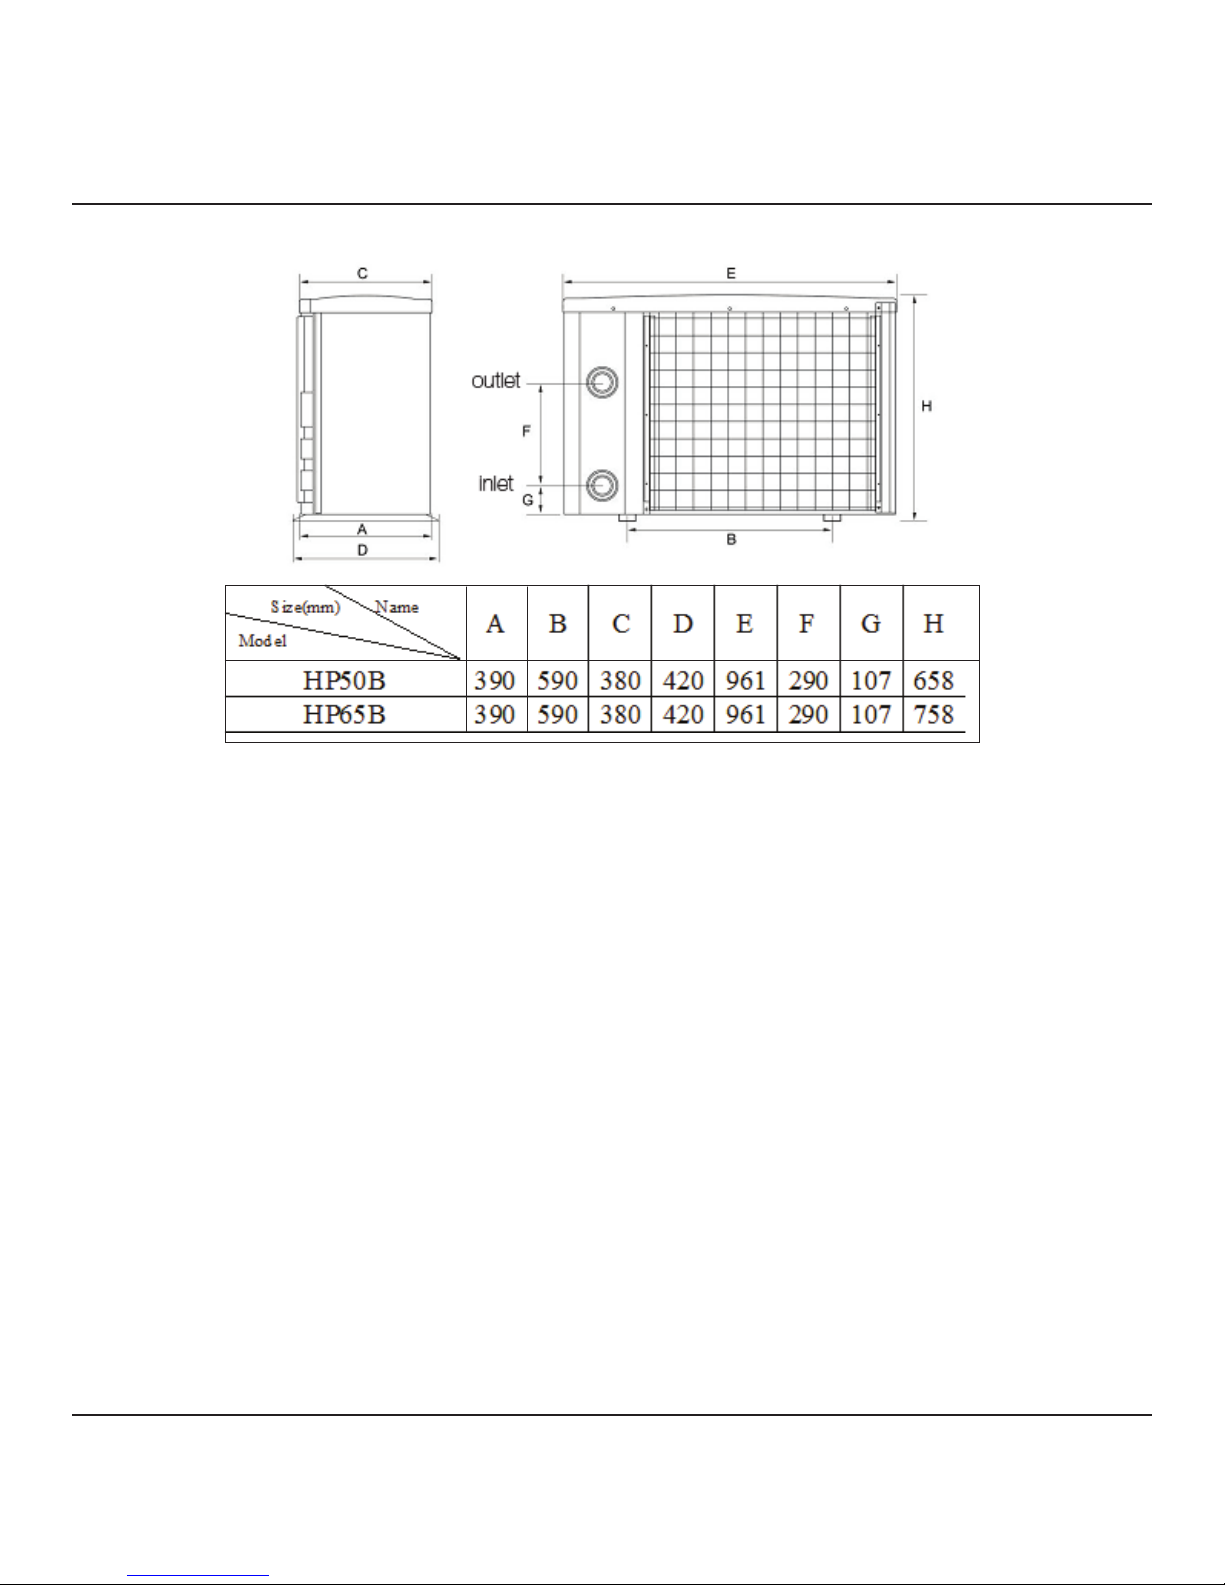
IV. DIMENSIONS
Note: The above diagram is the specification diagram of the pool heater, for technician’s
installation and layout reference only.
6
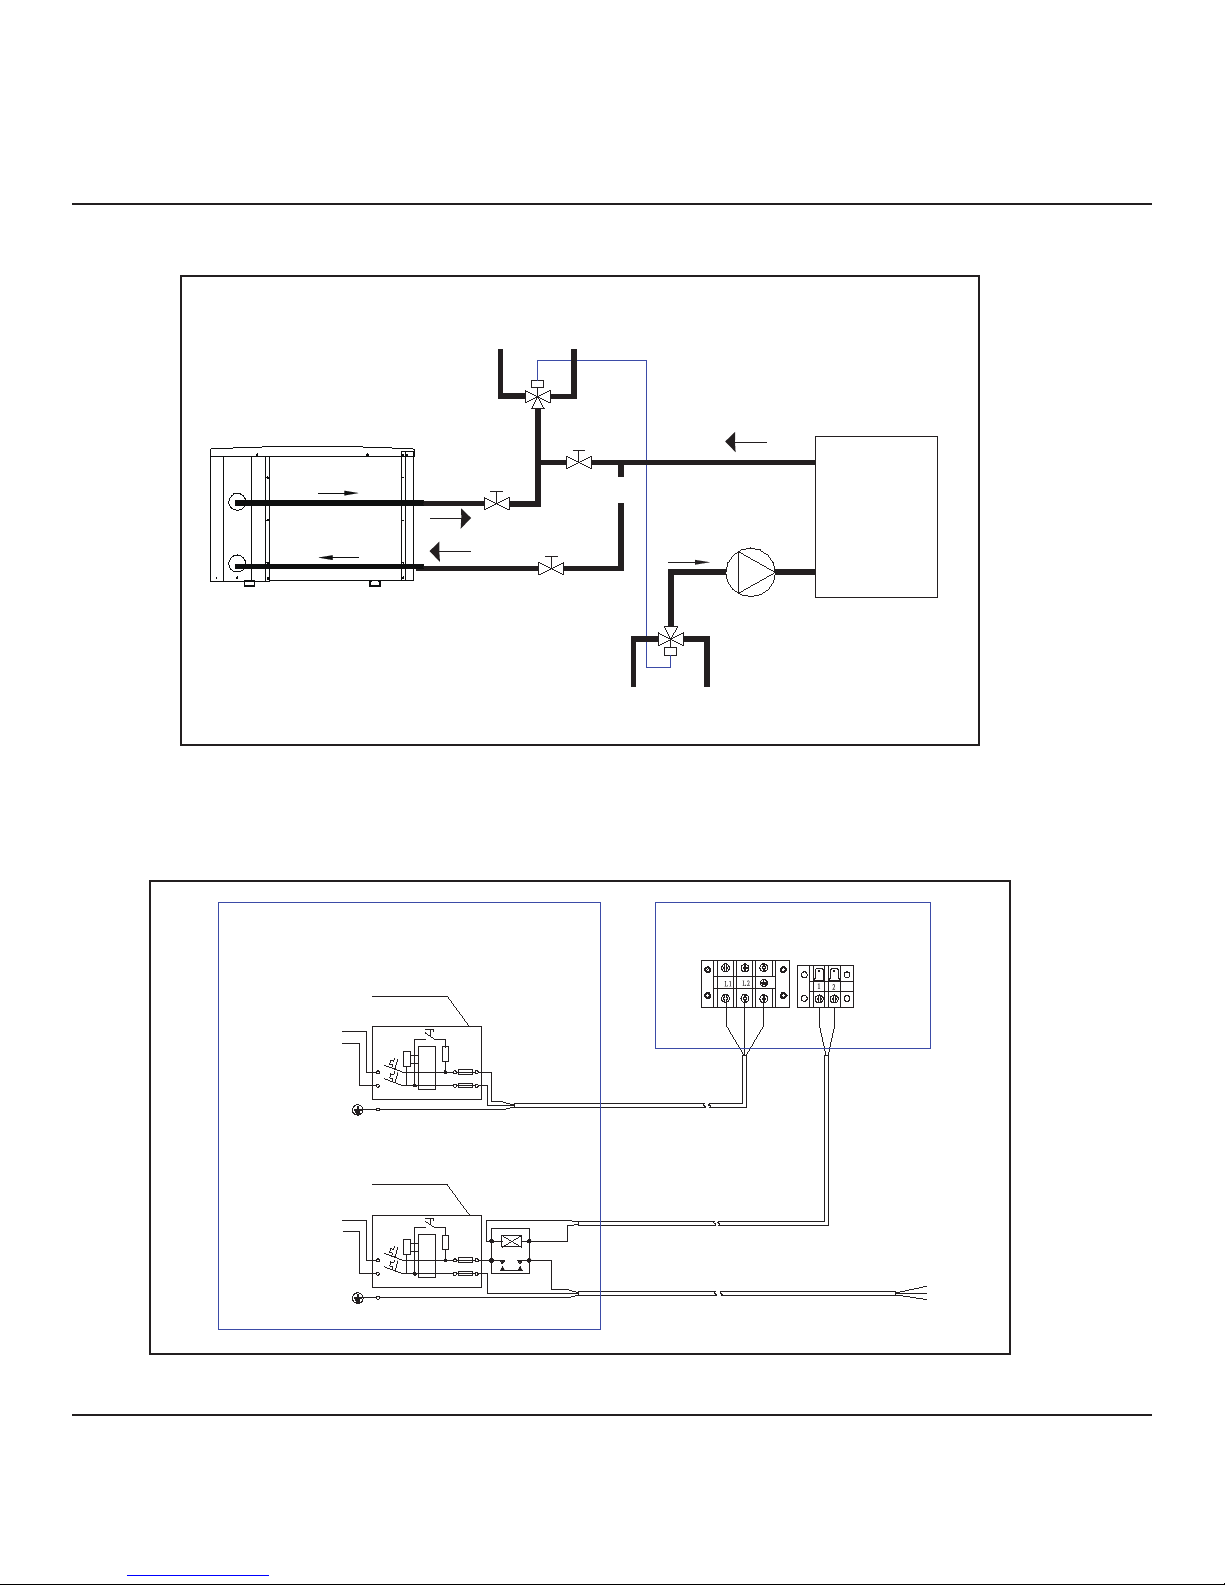
V. INSTALLATION GUIDE
Pump
WATER TO SWIMMING POOL
STOP VALVE
THREE WAY
VALVE
Filter
work together
STOP VALVE
1. Diagram for Water Piping Connections
WATER TO SWIMMING POOL
THREE WAY
VALVE
STOP VALVE
OUTLET
INLET
Outlet Valve
STOP VALVE
By-Pass Valve
STOP VALVE
Inlet Valve
POOL WATER IN
work together
Pump
THREE WAY
VALVE
SWIMMING
POOL WATER
FILTER
TREATMENT
SYSTEM
Note: The diagram is for demonstration purposes only, and layout of the pipes is for reference only.
2. Electric Wiring Diagram
Users'Electric Box
Power Supply
230V/ 60Hz
Earthing
Ground
Heat Pump
Power Supply
230V/ 60Hz
Earthing
Ground
Breaker/fuse
(Customer prepare)
L1
L2
Breaker/fuse
(Customer prepare)
L1
L2
contactor
Terminals
Terminal Board
Pump
Note: The swimming pool heat pump must be grounded.
7
V. INSTALLATION GUIDE
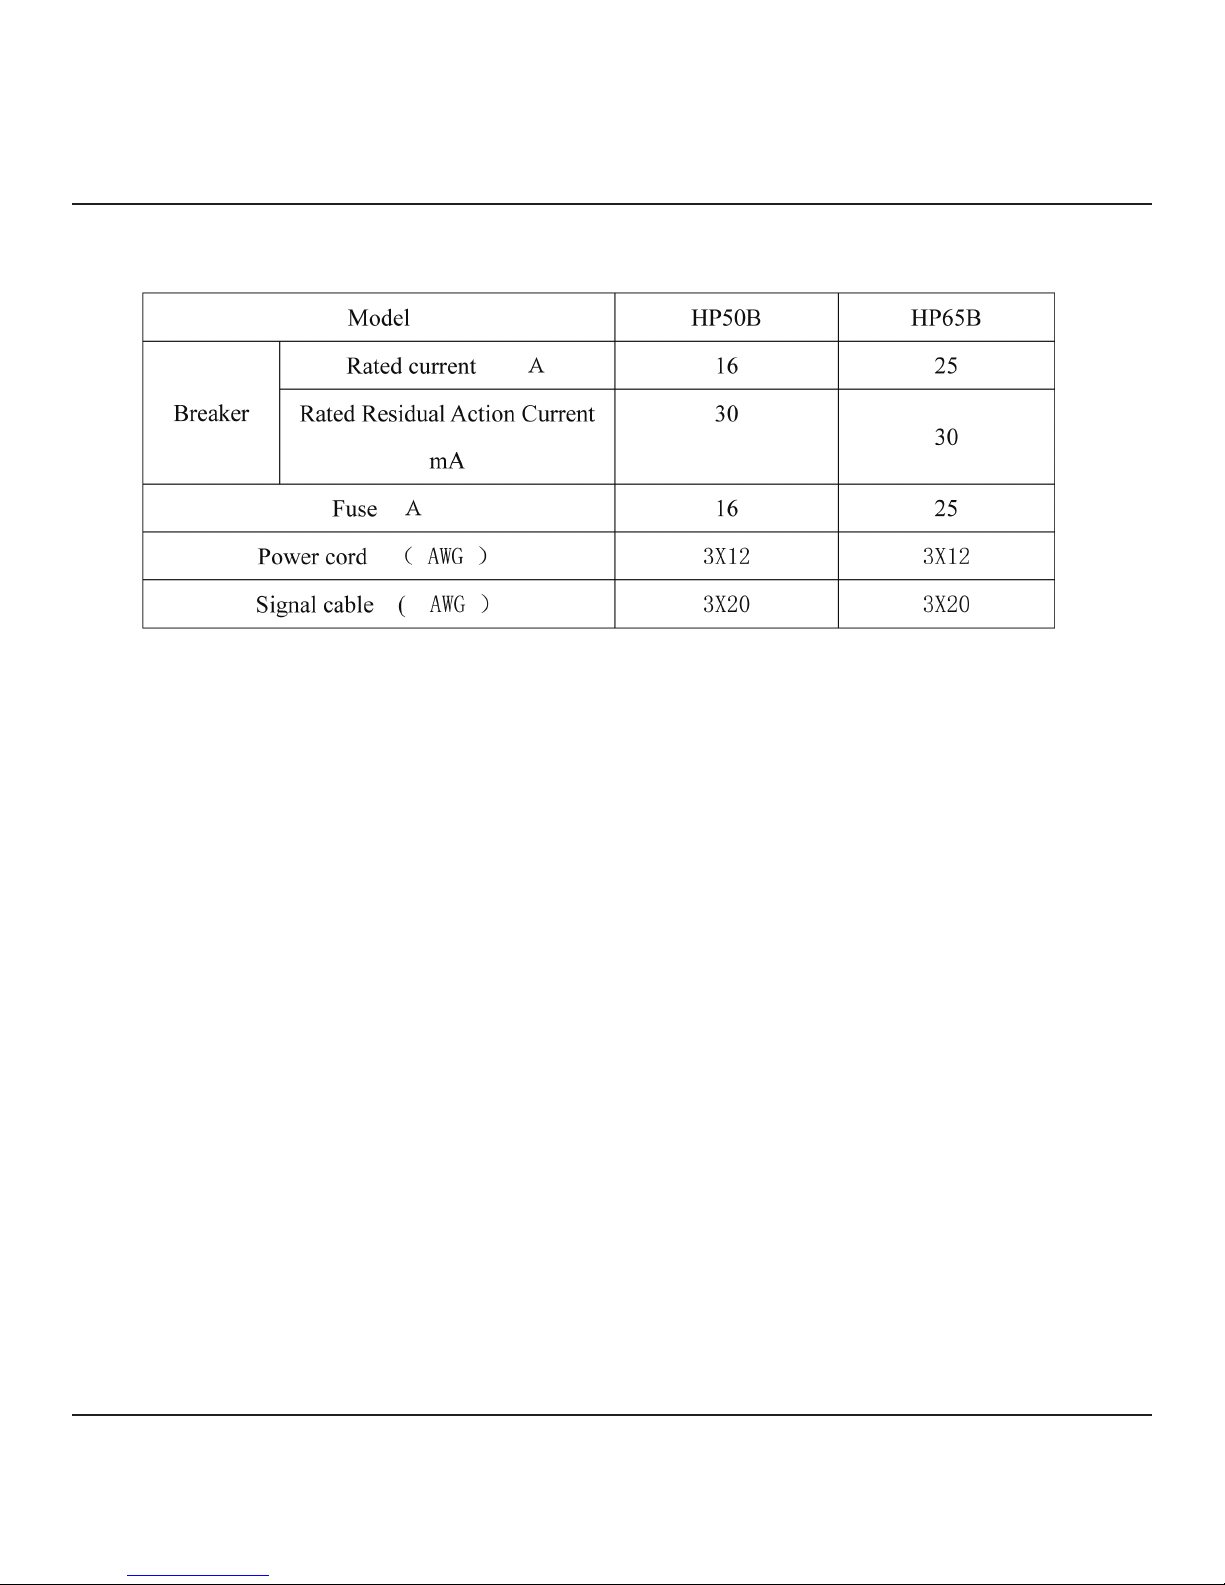
Options for protecting devices and cable specification.
Note: The above data is for an electrical cord of less than 10 m. If electrical cord is > 10 m, wire diameter must
be increased. The signal cable can be at maximum 50 m.
Pump protecting device, cable specification is subject to user’s option.
1. Installation Instruction and Requirements:
All electrical connections must be done by a qualified electrician and according to national and local electrical
codes. We have provided important safety messages in this manual and on your heater. Always read and
obey all safety warnings. All Hayward Heat Pumps must be installed in accordance with all applicable National
and Local codes. In the absence of local codes, refer to the latest edition of the Canadian Electrical Code
(CEC).
A. Installation
1. Always install the machine outdoors, while respecting the minimal clearances needed for proper operation
and heating. DO NOT place the unit next to shrubs, fences, etc. which can block the air inlet. These
locations deny the unit a continuous source of fresh air which reduces its efficiency and may prevent
adequate heat delivery.
2. Mount the unit on a sturdy base, preferably a concrete slab. The base should be completely isolated from
the building foundation wall to prevent the possibility of sound or vibration transmission into the building.
3. The pool heat pump is designed for outdoor installation and should not be installed in a fully
enclosed area, such as a shed, garage, etc. Recirculation of cold discharged air back into the evaporator
coil will greatly reduce unit heating capacity and efficiency.
8

V. INSTALLATION GUIDE
Air is pulled through the evaporator coil and discharged through the side grille. A minimum clearance of 98
inches should be allowed on the air outlet side for unrestricted air discharge. The unit must not be installed
under a porch. Any other side of the unit should be located at least 28 inches from a wall or from any other
obstruction for unrestricted air intake and service access.
4. The piping sequence is as follows: pool > pool pump > filter > heater > check valve > chemical feeder
> pool. Automated chlorine distribution systems, if used, must be placed downstream of the heater to
minimize harm to the pool equipment. Use rigid PVC piping if possible (SCH40 or SCH80). All joints should
be glued with PVC glue. When the piping installation is complete, operate the pool pump and check the
system for leaks. Then, check the filter pressure gauge to verify that there isn’t any indication of excessive
pump head pressure.
You can also make the connections using high-pressure flexible hose, but make sure the hose can
withstand high pressure. The installation of a heat pump bypass is not necessary unless the water flow
exceeds 75 GPM.
5. It is also normal to see water dripping from the drain at the base pan of the unit. While your pool heat
pump is in the heating mode, a large volume of warm and humid air passes over the evaporator and
causes condensation. To check if there really is a leak, you must stop the heat pump and leave the pool
pump running for at minimum 5 hours. If water is still coming out of your heat pump after this period, then
call your dealer for service.
B. Wiring
1. The wiring of your pool heat pump should be performed by a qualified electrician in accordance with local
requirements. A properly-sized breaker and copper wire must be used. Check the heat pump data
label for required maximum breaker size. Because all metals have different electrical potentials, all
metal and electrical components of the pool system must be bonded together. This includes the metal
framework of the pool, the light, the pump, the filter (if made out of metal), the heater, any automatic
chlorine generator, and any other metal or electrical equipment. On some older pools, this substructure
bond wire may not exist. In these cases, a 6 to 8 foot solid copper rod must be driven into the ground
near the equipment. All electric and metal components must then be bonded to each other, and then to
the copper rod.
2. The wiring of your pool heat pump must be performed by a qualified electrician in accordance with national
and local requirements.
3. Set leakage protector according to the local code for wiring (leakage operating current ≤ 30mA).
4. The layout of power cable and signal cable should be orderly and not affecting each other.
C. Switch on after finishing all wiring, installation and double checking.
9

VI. OPERATION INSTRUCTION
1. Operation Display
a. The display shows the Time when the machine is off.
b. The display shows the Temperature of the swimming pool water when the machine is on.
2. Water Temperature Setting
a. Press MODE key to switch between HEAT-COOL modes.
b. Water temperature setting is available whether unit is running or not. Press HEAT or COOL
to start Heat Pump.
c. Press either to adjust water temperature. The controller indicates flashing
temp. Press to adjust to your desired water temp.
d. After 5 seconds, the display will return to its normal mode.
3. Time Setting
a. Time setting is available whether unit is running or not.
b. Press key to set time, when the clock on the screen is flashing, press again to
set hour. Use to adjust hour. Before the flashing stops, press again
to set minute. Use to adjust. After adjusting, press and water
temperature will be displayed. 30 seconds later, the controller display will be back to
normal mode.
10
 Loading...