

Page 1
POOL AND SPA/HOT TUB HEATERS
H150, H200, H210, H250, H300,
H350 & H400 MODELS
INSTALLATION, OPERATION, & SERVICE MANUAL
FOR YOUR SAFETY
WARNING: If the information in these
instructions is not followed exactly, a re or
explosion may result causing property
damage, injury, or death.
- Do not store or use gasoline or other
ammable vapors or liquids in the
vicinity of this or any other appliance.
WHAT TO DO IF YOU SMELL GAS:
• Do not try to light any appliance.
• Do not touch any electrical switch; do
not use any phone in your building.
• Immediately call your gas supplier
from a neighbor’s phone. Follow the
gas supplier’s instructions.
• If you cannot reach your gas
supplier, call the re department.
- Installation and service must be
performed by a qualied installer,
service agency, or the gas supplier.
FOR YOUR SAFETY
This product must be installed and serviced by authorized personnel, qualied in pool/spa
heater installation. Improper installation and/or operation can create carbon monoxide gas
and ue gases that can cause serious injury, property damage, or death.
U.S. PATENT NOS. 6,026,804 & 6,321,833
1301371801 Rev A 0413
Page 2

CONTENTS
SECTION 1 GENERAL INFORMATION......................................................................... 2
SECTION 2 HEATER SIZING......................................................................................... 4
SECTION 3 INSTALLATION........................................................................................... 5
Introduction.................................................................................................. 2
Hayward Heaters........................................................................................ 3
Selecting the Correct Size Heater............................................................... 4
For A Swimming Pool................................................................................. 4
For A Spa Or Hot Tub................................................................................. 4
Equipment Inspection................................................................................. 5
Conformance With Codes........................................................................... 5
Sea Level/High Altitude Installation............................................................. 5
Location Of Heater...................................................................................... 5
Flooring........................................................................................................ 5
Outdoor/Indoor Vents.................................................................................. 6
Outdoor Heater - High Wind Conditions..................................................... 6
Reversible Water Connections.................................................................... 7
Outdoor Installation And Venting................................................................. 8
Indoor Installation And Venting.................................................................... 9
Air Supply.................................................................................................... 9
Equipment Located in Conned Spaces..................................................... 9
Venting......................................................................................................... 10
Gas Supply And Piping................................................................................ 11
Gas Pipe Size............................................................................................. 11
All Gas Installations..................................................................................... 12
Water Piping................................................................................................ 12
Installation Above Pool/Spa Surface........................................................... 14
Automatic Chlorinators And Chemical Feeders.......................................... 14
Pressure Relief Valve.................................................................................. 14
Millivolt System........................................................................................... 15
Electronic Ignition System........................................................................... 14
Remote Control Connection........................................................................ 17
SECTION 4 INSTALLER CHECK-OUT & START-UP.................................................... 19
General........................................................................................................ 19
Gas Line Testing.......................................................................................... 19
Gas Pressure Test Procedure..................................................................... 19
Installation Below Pool/Spa Surface........................................................... 20
Two Speed Pump....................................................................................... 20
SECTION 5 CONSUMER OPERATION & MAINTENANCE PROCEDURES ............... 21
General........................................................................................................ 21
Pool/Spa Water Chemistry.......................................................................... 21
Using Chlorinators And Chemical Feeders................................................. 21
Facts About Water Chemistry...................................................................... 21
Page 3

SECTION 5 (CONT.) CONSUMER OPERATION & MAINTENANCE PROCEDURES.............. 21
Heater Operation......................................................................................... 21
Lighting Instructions - Millivolt..................................................................... 22
Operating Instructions - Electronic Ignition................................................. 23
Temperature Controls.................................................................................. 24
Periodic Inspection...................................................................................... 24
Winterization................................................................................................ 25
Spring Start-up............................................................................................ 25
SECTION 6 QUALIFIED TECHNICIAN - MAINTENANCE/SERVICING....................... 26
General........................................................................................................ 26
Maintenance................................................................................................ 26
Control Access............................................................................................ 26
External Heat Exchanger Inspection And Cleaning.................................... 26
Heat Exchanger Removal........................................................................... 27
Combustion Chamber.................................................................................. 27
Internal Heat Exchanger Inspection And Cleaning..................................... 27
Burner Inspection And Cleaning.................................................................. 28
Burner Assembly Removal.......................................................................... 28
Burner Assembly Installation....................................................................... 28
Gas Valve Replacement.............................................................................. 29
Pilot Assembly Removal.............................................................................. 29
Igniter Assembly Removal........................................................................... 30
Main Burner Orices.................................................................................... 30
Gas Conversion........................................................................................... 30
Control Locations........................................................................................ 31
Electrical Wiring........................................................................................... 31
System Switch............................................................................................. 31
Temperature Controls.................................................................................. 31
High Limits................................................................................................... 31
Temperature Limiter Switches..................................................................... 32
Pressure Switch.......................................................................................... 32
By-pass Valve.............................................................................................. 32
Thermal Control Valve................................................................................. 33
Transformer................................................................................................. 34
Thermistor.................................................................................................... 34
CONTENTS
SECTION 7 TROUBLESHOOTING................................................................................ 34
Troubleshooting Chart................................................................................. 35
Troubleshooting Chart - Millivolt.................................................................. 36
Troubleshooting Chart - Electronic.............................................................. 38
PARTS LIST - MILLIVOLT.................................................................................................................. 40
PARTS ILLUSTRATION - MILLIVOLT................................................................................................ 41
PARTS LIST - ELECTRONIC IGNITION............................................................................................ 43
PARTS ILLUSTRATION - ELECTRONIC IGNITION......................................................................... 44
Page 4

SECTION I. GENERAL INFORMATION
Introduction:
This manual contains instructions for installation, oper-
ation, maintenance, troubleshooting and parts lists for the
safe use of the Model H150, H200, H210, H250, H300,
H350 and H400 swimming pool/ spa/hot tub heaters.
Hayward strongly recommends that the manual be read
by the installer before installing the swimming pool/spa/
hot tub heater. If after reviewing the manual, any ques-
tions still remain unanswered, contact the factory or local
representative. Following heater installation, the installer
should leave the manual with the consumer for future
reference.
The H-Series pool/spa heaters are so similar in design
that many operating controls and other components are
interchangeable. For this reason, the procedures in this
manual pertain to all 7 models unless otherwise noted.
Hayward heaters:
The H-Series gas-red pool/spa heater is the result of
nearly 50 years in the engineering and production of the
nest in water heating equipment. The direct red nnedtube design of the pool /spa heater is the most advanced
in the industry, offering highly efcient, economical pool/
spa heating and scale free operation. No effort has been
spared in making the pool /spa heater the most rugged,
highly dependable, easy-to-maintain pool/spa heater
available.
The H-Series heaters are suitable only for heating of
swimming pools, spas, or hot tubs. These heaters should
not be used as space heating boilers, general purpose
water heaters or for heating salt water pools and sh
ponds. When installed and operated in accordance with
the manual’s instructions, the H-Series heater will provide
many years of trouble-free service and increased pool/spa
enjoyment.
2
Page 5

SECTION I. GENERAL INFORMATION
Failure to Maintain Proper Water Chemistry May Cause
This additional information is intended to provide the most current and up-to-date information to the customer.
Please refer the the below text, in add
ition to the manual for information and warnings about your product.
Models H150, H200, H250, H300, H350, H400
Addendum to H-Series Heater Manual
WARNING:
Failure to Maintain Proper Water Chemistry May Cause
Premature Heat Exchanger Damage or Failure
The heat exchanger in your Hayward pool heater is made from the highest quality of copper and nickel (Cupronickel) materials. The
premium materials and the exacting processes used in the manufacture of the heat exchanger is state of the art in pool heater design and
manufacture. Yet, it remains vital that the heat exchanger be protected from damaging or corrosive chemicals, insufficient water flow
or improperly balanced water chemistry. Heat exchanger damage or failure resulting from improper flow, improperly balanced pool
water or the improper addition of sanitizers into the water is NOT covered under the terms of your warranty.
The following factors are critical to heat exchanger protec
tion. Follow these guidelines to help prevent pre-mature damage or failure to
your heater and heat exchanger.
1. WATER FLOW THROUGH HEATER
Water must be flowing through the heater at the minimum rated flow rate during operation. Check that the pump is operating and the
system is filled with water and purged of all air prior to starting the heater. The minimum rated flow rates are listed in the i
nstallation
manual on page 13. Some installations may require an adjustment to the water pressure switch for proper low-flow protection. Test
your system and if necessary, adjust the water pressure switch as described in the installation manual on page 32.
2. POOL/SPA WATER CHEMISTRY
The chemistry balance and mineral content of swimming pool water changes daily due to the addition of pool and san
itizing chemicals,
bather loads, rain, runoff and the amount of sun - to name a few. Improper chemistry balance and mineral content can cause scaling and
deposits to form on pool walls, in the filtration system, in the heat exchanger tubes and additionally can promote corrosive action to all
metals in the water path. Changing spa water regularly and maintaining the correct chemical balance in you
r pool/spa will keep the
pool/spa safe and sanitary, and will help protect the heat exchanger. Use a 4-way pool/spa water test kit to check your water frequently
(at least weekly). Use the following guidelines to help protect your heater's heat exchanger:
This additional information is intended to provid
e the most current and up-to-date information to the customer.
Please refer the the below text, in addition to the manual for information and warnings about your product.
Models H150, H200, H250, H300, H350, H400
Addendum to H-Series Heater Manual
Level
Chlorine
1 - 3 ppm
Bromine
2 - 4 ppm
swimmer irritation
reduced sanitizer effectiveness
large fluctuations in pH
Calcium Hardness
200 - 400 ppm corrosive to heat exchanger scaling of heat exchanger
WARNING:
Premature Heat Exchanger Damage or Failure
The heat exchanger in your Hayward pool heater is made from the highest quality of copper and nickel (Cupronickel)
materials. The premium materials and the exacting processes used in the manufacture of the heat exchanger is state
of the art in pool heater design and manufacture. Yet, it remains vital that the heat exchanger be protected from damaging or corrosive chemicals, insufcient water ow or improperly balanced water chemistry. Heat exchanger damage or
failure resulting from improper ow, improperly balanced pool water or the improper addition of sanitizers into the water
is NOT covered under the terms of your warranty.
The following factors are critical to heat exchanger protection. Follow these guidelines to help prevent pre-mature damage or failure to your heater and heat exchanger.
1. WATER FLOW THROUGH HEATER
Water must be owing through the heater at the minimum rated ow rate during operation. Check that the pump is operating and the system is lled with water and purged of all air prior to starting the heater. The minimum rated ow rates
are listed on page 13 of this manual. Some installations may require an adjustment to the water pressure switch for
proper low-ow protection. Test your system and if necessary, adjust the water pressure switch as described on page
32 of this manual.
2. POOL/SPA WATER CHEMISTRY
The chemistry balance and mineral content of swimming pool water changes daily due to the addition of pool and
sanitizing chemicals, bather loads, rain, runoff and the amount of sun - to name a few. Improper chemistry balance and
mineral content can cause scaling and deposits to form on pool walls, in the ltration system, in the heat exchanger
tubes and additionally can promote corrosive action to all metals in the water path. Changing spa water regularly and
maintaining the correct chemical balance in your pool/spa will keep the pool/spa safe and sanitary, and will help protect
the heat exchanger. Use a 4-way pool/spa water test kit to check your water frequently (at least weekly). Use the following guidelines to help protect your heater’s heat exchanger:
3. SKIMMER CHLORINATION
Water must be owing through the heater at the minimum rated ow rate during operation. Check that the pump is
operating and the system is lled with water and purged of all air prior to starting the heater. The minimum rated ow
rates are listed on page 13 of this manual. Some installations may require an adjustment to the water pressure switch
for proper low-ow protection. Test your system and if necessary, adjust the water pressure switch as described in the
installation manual on page 32.
4. CHLORINATOR INSTALLATION
Chlorinators must be installed downstream of the heater, and a check valve must be installed between the heater and
chlorinator to prevent high chemical concentrations from back owing into the heater. Make sure your piping arrangement meets the chlorinator installation requirements shown on page 14 of this manual.
pH
Total Alkalinity
Salt
Recommended
80 - 120 ppm
2700 - 5000 ppm
2700 - 3400 ppm poor salt chlorinator performance corrosive to heat exchanger
7.4 - 7.6
Effect of Low Levels Effect of High Levels
hazy water, algea growth,
bacteria causing infections
corrosive to heat exchanger,
corrosive to heat exchanger,
swimmer irritation, bleaching of clothes/hair,
corrosive to heat exchanger
cloudy water, scaling of heat exchanger,
scaling of heat exchanger
5. BYPASS
Until water chemistry is properly balanced, and if your piping has a bypass valve installed for the heater, open the
bypass so that corrosive and potentially damaging water will not ow through the heater and therefore the heat exchanger. Close the bypass valve once the water is properly balanced. Failure to close the bypass valve when attempting to operate the heater will result in extensive damage to the heat exchanger. Ensure water ow through the heater
is restored before operating the heater. A bypass feature is also advantageous for service needs and for the ability to
remove the heater from the water path when not heating. Refer to page 13 in this manual for further information.
3
Page 6
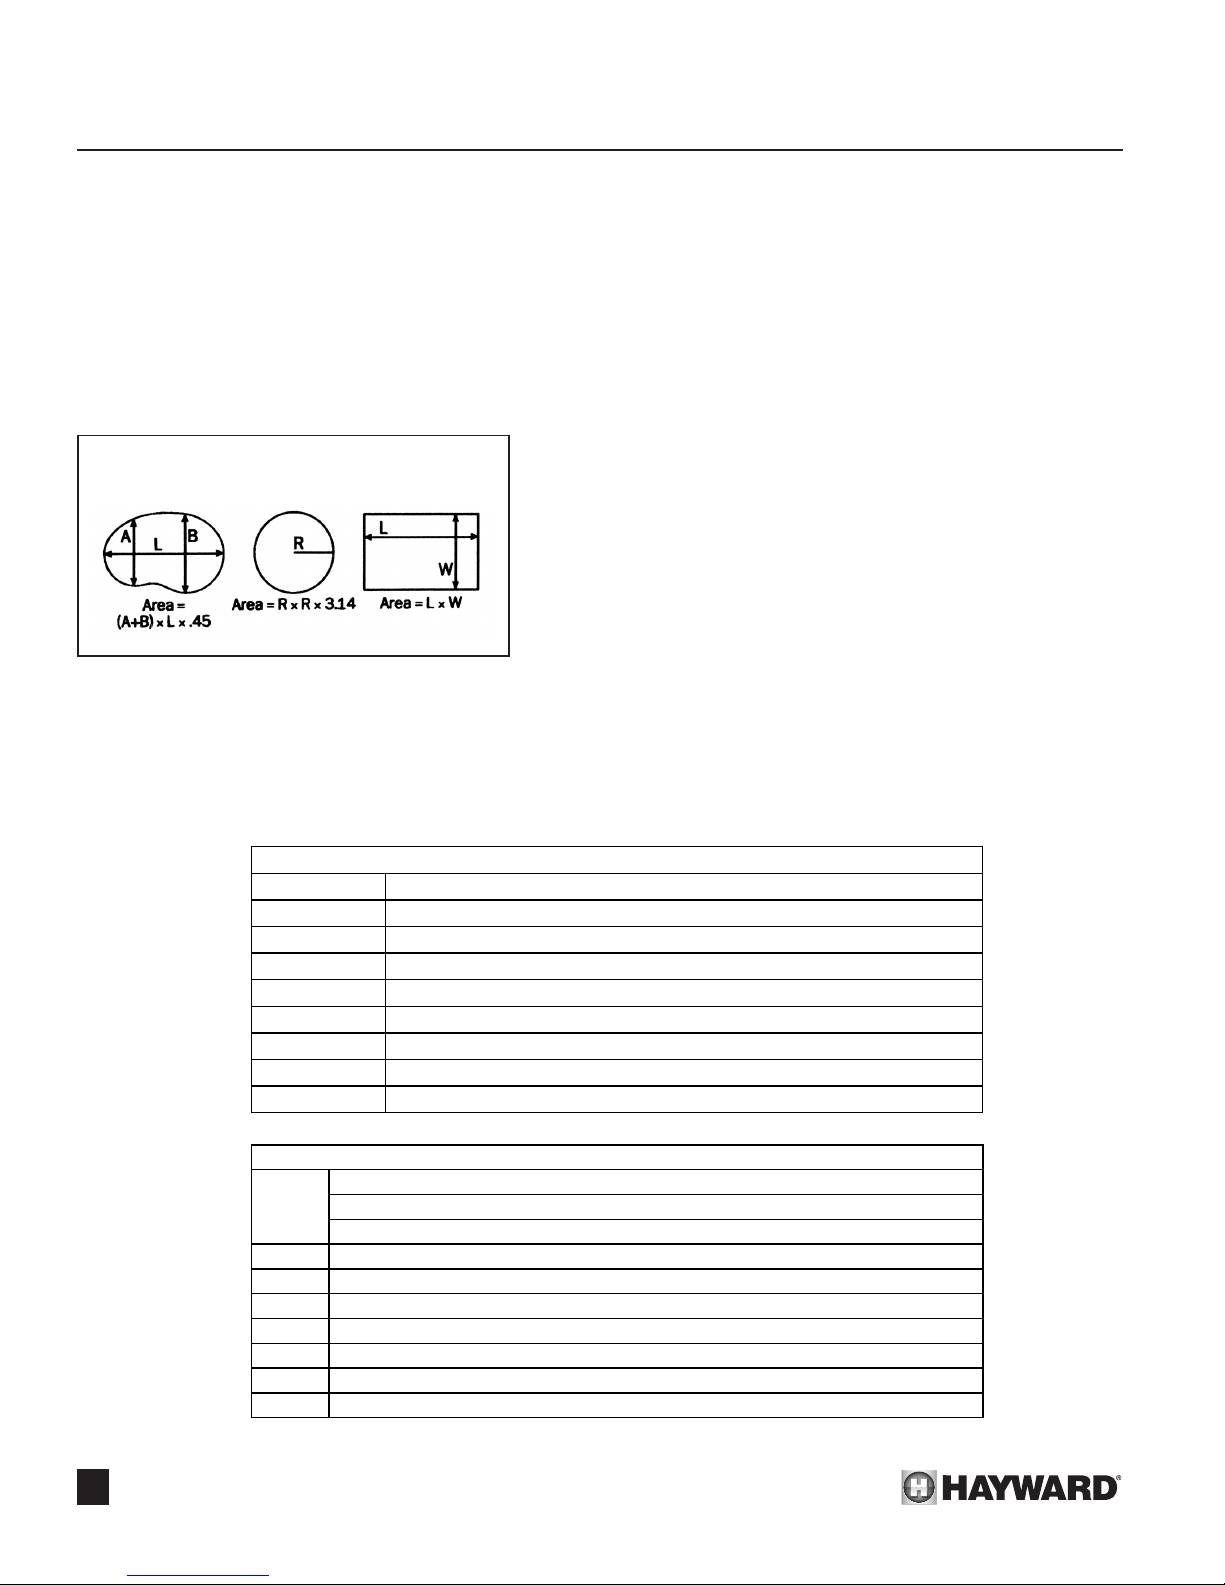
SECTION 2. HEATER SIZING
H150 1,385 924 693 554 462 396
New Figure 2 for Manual 1302704001 rev F, page 4
VEW 2/7/2013
200 300 400 500 600 700 800 900 1,000
H400 9 14 19 23 28 33 37 42 47
H350 11 16 21 27 32 37 43 48 54
H300 12 19 25 31 37 44 50 56 62
H250 15 22 30 37 45 52 60 67 75
H210 17 26 35 44 52 61 70 78 87
H200 19 28 37 47 56 66 75 84 94
H150 25 37 50 62 75 87 100 112 125
VEW 2/7/2013
New Figure 3 for Manual 1302704001 rev F, page 4
Figure 3 - Recommended Heater Model
Selecting the correct size heater:
Factors inuencing heater sizing include pool/ spa size, average wind velocity, ambient temperature and desired increase in
temperature over ambient. A pool/spa in a warm area with little
or no wind will not require as large a heater as one in a cool,
windy location. Detailed sizing information is provided below.
For a swimming pool:
1. Determine pool’s surface area in square feet. For indoor pool
installations divide the pool’s surface area by 3.
Pool Surface Area:
Figure 1
2. Determine desired pool water temperature
(usually 78 -82°F).
3. Determine average air temperature of coldest month of use.
4. The temperature rise is the difference between
2 & 3.
5. Locate in Figure 2 the surface area equal to or just greater
than the pool’s surface area and the temperature degree rise
and select the appropriate heater model.
Figure 2 is based on 3 1/2 MPH wind velocity and elevation of
up to 2,000 feet above sea level.
When not in use, keep pool covered to reduce heat loss,
chemical usage and dirt load on the ltering system.
For a spa or hot tub:
Determine spa capacity in gallons (surface area x average
depth x 7 1/2).
The reference table lists the time required in minutes to raise
the temperature of the spa/hot tub by 30°F. Locate in the table
below the spa/hot tub size in gallons equal to or just greater than
the spa/hot tub size in gallons. Select the desired time to raise
the spa/hot tub temperature 30°F, read to the left and select the
appropriate heater model.
This guide can be adjusted for other temperatures rises. For
example, if a 15°F increase in temperature is desired, simply
divide the time for 30°F rise by the ratio of 30/15 = 2.
! NOTE: Heat losses and/or heat absorbed by spa walls
(such as concrete) or other objects will add to the heat-up time.
Spa sizing is based on an insulated and covered spa. Always
cover spa or hot tub when not in use to minimize heat loss and
evaporation.
Figure 2 - Recommended Heater Model
Temp. Rise °F 10° 15° 20° 25° 30° 35°
Model
H200 1,848 1,232 924 739 616 528
H210 1,988 1,326 994 795 663 568
H250 2,309 1,540 1,155 924 770 660
H300 2,771 1,848 1,386 1,109 924 792
H350 3,233 2,156 1,617 1,293 1,078 924
H400 3,695 2,463 1,848 1,478 1,232 1,056
Model
Time in Minutes to Raise Spa/Tub Temperature 30°F
Pool Surface Area in Square Feet
Spa/Hot Tub Size in Gallons
4
Page 7
SECTION 3. INSTALLATION
Sea level/high altitude installation:
The H-Series heaters may be installed up to
2000 feet of elevation above sea level. For eleva-
tions from 2000 to 4500 feet above sea level,
heater shall be a high altitude model which has a
suffix "H" in the heater model designation (Example:
Model H400H1). For elevations above 4500 feet,
consult customer service at Hayward.
Location of heater:
Locate the pool/spa heater in an area where
leakage of heat exchanger or connections will not
result in damage to the area adjacent to the heater
or to the structure. When such locations cannot be
avoided, it is recommended that a suitable drain
pan, with drain outlet, be installed under the heater.
The pan must not restrict air flow. .
This heater must be installed at least five feet
from the inside wall of a pool/spa unless separated
from the pool/spa by a solid fence, wall or other per-
manent solid barrier. This heater must be installed
also at least five feet from the wall of an above-
ground pool.
Flooring:
The H-Series pool/spa heaters must be
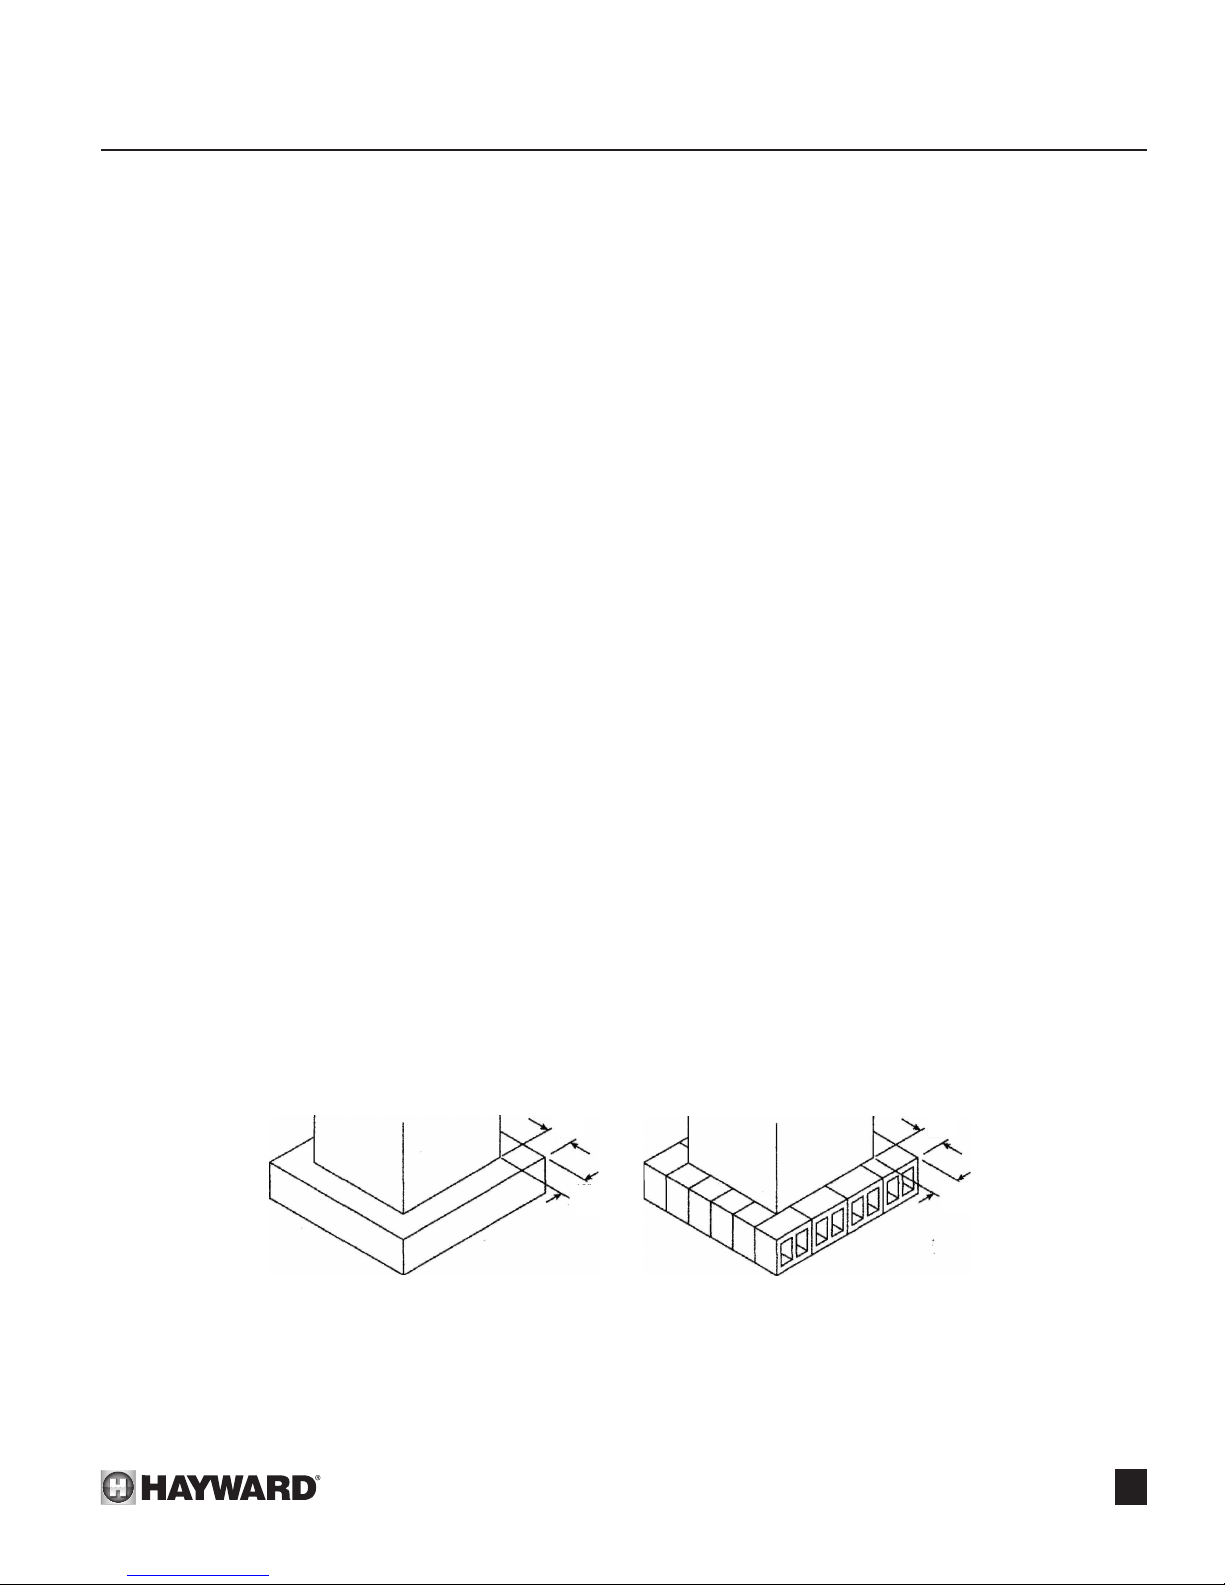
installed on a non-combustible floor or slab. Installa-
tion on other floors may be accomplished provided
the floor under the appliance is protected with
hollow masonry not less than 4 inches thick covered
with sheet metal of not less than 24 gauge. Such
masonry must be laid with ends unsealed and joints
matched in such a way as to provide a free circula-
tion of air from side to side through masonry. The
masonry must extend a minimum of 12 inches
beyond the heater to all sides. See Figure 4. In all
cases, floor protection is the responsibility of the
installer and the installer must check to be certain
that the floor is not exposed to excessive heat
during extended periods of operation.
12"
MiN.
12"
MIN.
Equipment inspection:
On receipt of the heater equipment, inspect the heater carton
and optional DHI or HWS vent (if used) carton for damage. If
any carton is damaged, note it when signing for it. Remove the
equipment from the carton(s) and advise the carrier of any damages at once.
Important notice:
The instructions herein are intended for the use of a qualied
technician, specically trained and experienced in the installation
of this type of heating equipment. Some states or provinces require that installation and service people performing the installa-
tion be licensed. If this is the case in the state or province where
heater is located the contractor must be properly licensed.
! WARNING; Failure to comply with the appliance and
vent package Installation Instructions and service instruc-
tions In this manual may result in equipment damage, re,
asphyxiation, or carbon monoxide poisoning. Exposure to
products of incomplete combustion (carbon monoxide) can
cause cancer and birth defects or other reproductive harm.
Conformance with codes:
The heater shall be installed in accordance with all local and
state codes. The heater installation and vent sizing, installation
and termination shall conform with the National Fuel Gas Code
ANSI Z223.1 (latest edition) and with the requirements of the
authority having jurisdiction. Design Certication in the United
States is in compliance with American National Standard Z21.56
(latest edition).
For Canadian installations, the heater is to be installed in
accordance with standards CAN/CGA -B149.1 and B149.2 - INSTALLATION CODES FOR GAS-BURNING APPLIANCES AND
EQUIPMENT and/or Local Codes, and, if applicable, Standard
CSA C22.1 - CANADIAN ELECTRICAL CODE, Part 1.
12”
MIN.
12”
MIN.
Sea level/high altitude installation:
The H-Series heaters may be installed up to 2000 feet of
elevation above sea level. For elevations from 2000 to 4500 feet
above sea level, heater shall be a high altitude model which has
a sufx “H” in the heater model designation (Example: Model
H400H1). For elevations above 4500 feet, consult customer
service at Hayward.
Location of heater:
Locate the pool/spa heater in an area where leakage of heat
exchanger or connections will not result in damage to the area
adjacent to the heater or to the structure. When such locations
cannot be avoided, it is recommended that a suitable drain pan,
with drain outlet, be installed under the heater. The pan must not
restrict air ow.
This heater must be installed at least ve feet from the inside
wall of a pool/spa unless separated from the pool/spa by a solid
fence, wall or other permanent solid barrier. This heater must be
installed also at least ve feet from the wall of an above-ground
pool.
Flooring:
The H-Series pool/spa heaters must be installed on a noncombustible oor or slab. Installation on other oors may be
accomplished provided the oor under the appliance is protected
with hollow masonry not less than 4 inches thick covered with
sheet metal of not less than 24 gauge. Such masonry must be
laid with ends unsealed and joints matched in such a way as to
provide a free circulation of air from side to side through masonry. The masonry must extend a minimum of 12 inches beyond
the heater to all sides. See Figure 4. In all cases, oor protection
is the responsibility of the installer and the installer must check
to be certain that the oor is not exposed to excessive heat during extended periods of operation.
12”
MIN.
12”
MIN.
INSTALLATION ON CONCRETE SLAB
Figure 4
INSTALLATION ON BLOCKS
5
Page 8
SECTION 3. INSTALLATION
Outdoor/Indoor vents:
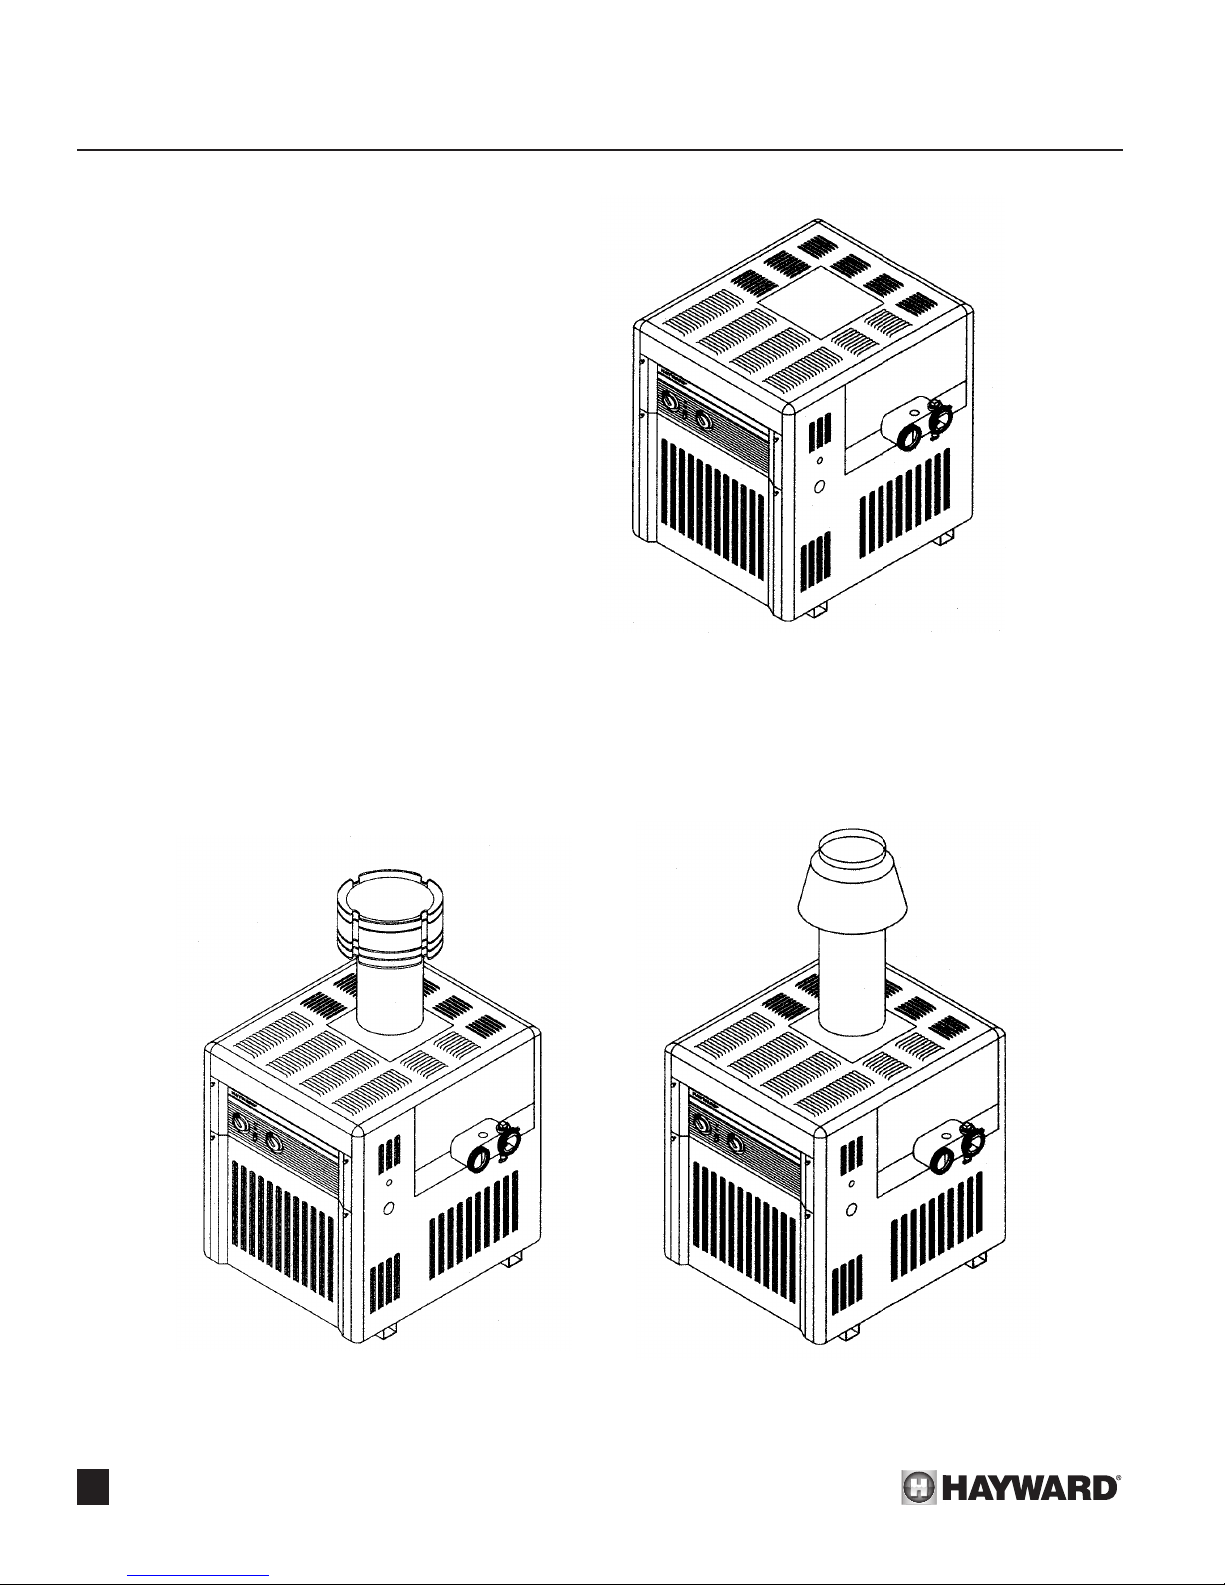
The H-Series heaters may be installed
outdoors when equipped with the integral vent
(Figure 5) or the optional high wind HWS vent
(Figure 6). For indoor installations, a DHI vent
(Figure 7) must be used. All models except the
H210 may be installed indoor using a DHI vent.
The H210 cannot be installed indoor.
! NOTE: For Canadian indoor installations,
these heaters can only be installed in an enclosure that is not normally occupied and does not
directly communicate with occupied areas; i.e.
outdoor shelter.
Check to be sure that the vent supplied with
the heater is the correct one for the installation
location.
Outdoor heater-high
wind conditions:
In areas where high winds are a daily occurrence, or where severe downdrafts are present
due to surrounding structures, it may be necessary to install the HWS high wind vent (Figure
6). Installation instructions are provided in the
carton with the HWS vent.
Figure 5: Integral Vent
Figure 6: High Wind Vent (HWS) Figure 7: Indoor Drafthood (DHI)
6
Page 9
SECTION 3. INSTALLATION
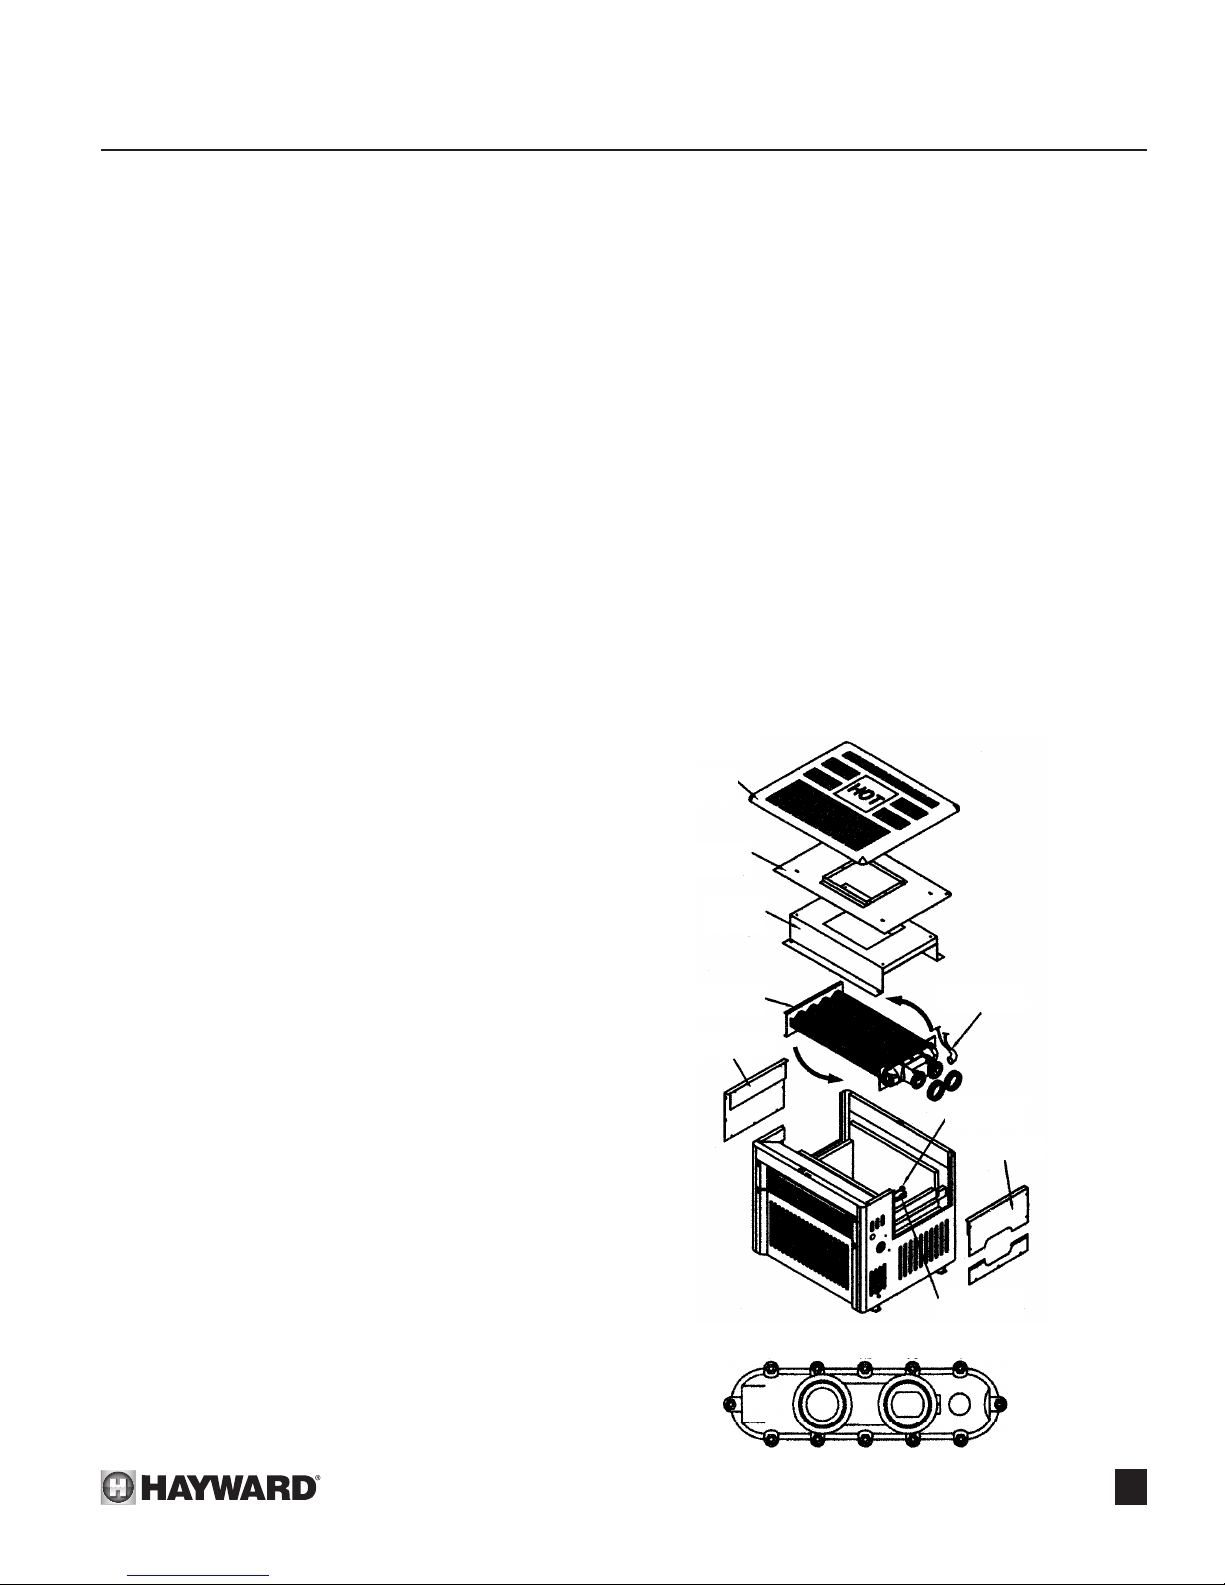
Reversible water connections:
The H-Series heater is designed so that it can be installed with
the water connections located on either the left or right side of the
heater. Heaters are shipped from the factory with the water con-
nections on the right side. To bring the water connections to the
left side, follow the step-by-step instructions below and refer to the
illustration in Figure 8. A trained service technician should perform
these procedures before the heater is installed.
1. Lift up and remove heater integral vent.
2. Remove screws from left and right side access panels and re-
move the panels.
3. Remove screws from rear heat shield and remove heat shield.
4. Remove screws from top rain guard and remove rain guard.
5. Disconnect high limit wires from the main harness and/or terminal
block. Pull the high limit wires through oval slot in the intermediate
panel. Disconnect wires from the pressure switch. Reroute the
disconnected main harness wires to opposite side of heater.
6. Remove the pressure switch tube and pull through oval slot in the
intermediate panel.
7. Millivolt Heaters Only - Remove the thermostat bulb from the
front header and reroute to opposite side of heater.
! NOTE: Using needle nose pliers to pull out copper strip makes
bulb removal easier. Pull thermostat capillary tube and bulb through
oval slots in the intermediate panel.
! CAUTION: Be careful not to crimp capillary tube as they could
break from mishandling.
8. Electronic Heaters Only - Disconnect thermistor leads from
control panel and pull through intermediate panel.
9. Remove the drain valve and brass plug from the front header and
save for reinstallation.
10. Remove the four screws from the ue collector and remove ue
collector from heater.
11. Remove 12 nuts retaining front header and carefully remove
header. CAUTION: By-pass and thermal governor may become
dislodged when removing front heater. They must be reinstalled
properly prior to reinstallation of front header. CAUTION: Header
O-rings may be reused if not permanently deformed. If installing
new O-rings, Jack’s 327 Lube may be liberally applied to O-rings
to keep them in place during header installation.
12. Lift out heat exchanger and rotate it 180 degrees horizontally.
CAUTION: DO NOT FLIP IT OVER. THE HEAT EXCHANGER
WILL BE DAMAGED IF INSTALLED INCORRECTLY. CAUTION: Care must be taken not to damage top corners of com-
bustion chamber panels.
13. Reinstall front header on heat exchanger (TOP marking on
header should now be on the bottom).
14. Torque nuts from 5 to 7 ft.-lbs. in the sequence shown in
Figure 8. Install drain previously removed into the bottom
header, and install brass plug into the top. Use new sealant on
the threads of these parts before reinstalling. Do over tighten.
15. Move the pressure switch tube over to the left side of the heater
and route through hole in the intermediate panel. Insert tube in
tting and tighten the ferrule down with the nut.
16. Replace the ue collector and secure with the four screws. Make
sure insulation strips on ue collector remain in place.
17. Millivolt Heaters Only - Carefully route the thermostat capillary
tube and bulb to the heater left side and route bulb through the
oval slot in the intermediate panel. Place thermostat bulb back in
the bulbwell using the copper strip to hold the bulbs all the way
into the bulb-well.
18. Electronic Heaters Only - Route thermistor leads through intermediate panel and plug into control panel.
19. Pull high limit wires through oval slot in the intermediate panel.
Reattach the main harness wires to the limit switches wires.
Reattach wires to pressure switch.
20. Replace the heater front door.
21. Replace the top rain guard and secure with screws removed in
step 4.
22. Replace the rear heat shield and secure with screws
removed in step 3.
23. Place access covers on the opposite sides and secure with
screws removed in step 2.
24. Replace heater top.
25. Check for any possible leaks after initial ltration system
start-up.
Heater
Top
Rain
Guard
Flue
Collector
101275
Hi-Limit
Wire Harness
Pressure
Switch Tube
Right Access
Panels
Thermostat
Bulbs
4
2
Heat
Exchanger
Left Access
Panel
1
3 9 11 8 6
Figure 8
7
Page 10
SECTION 3. INSTALLATION
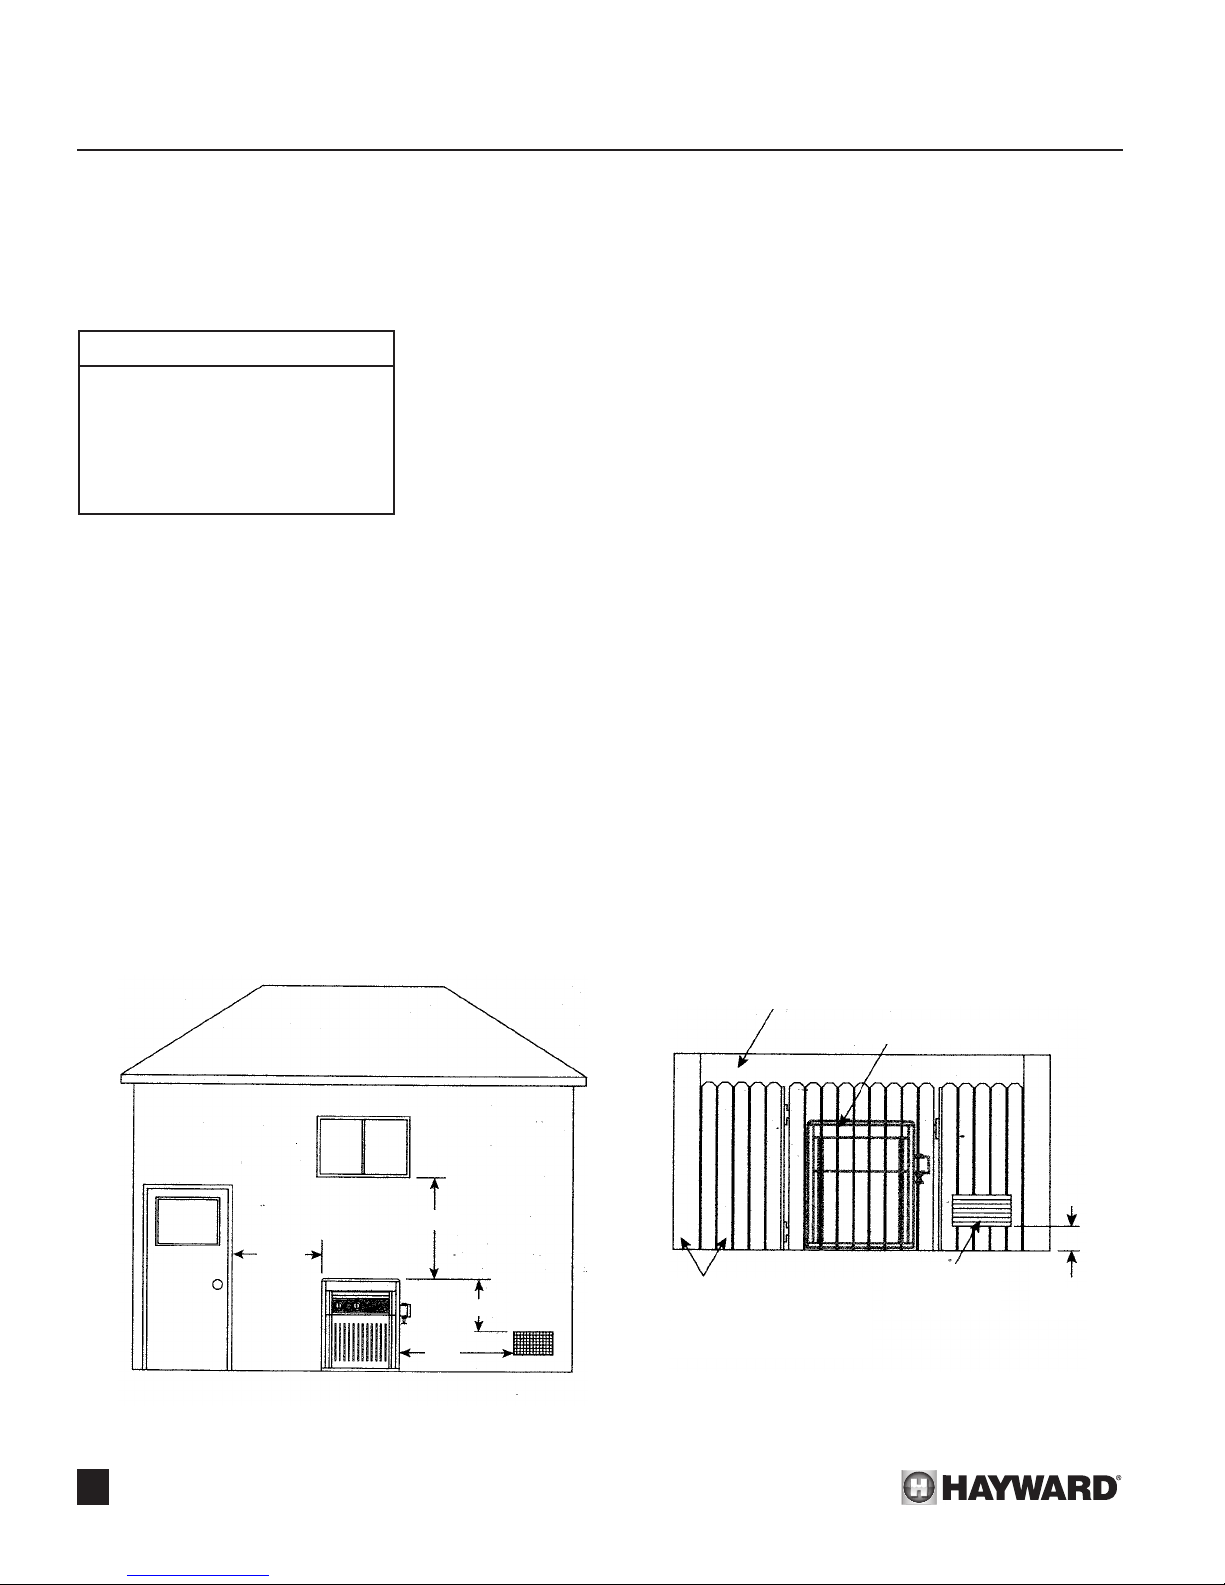
Outdoor installation and venting:
The following installation and service clearances must
be maintained from surfaces to provide adequate air ow to
the heater.
Outdoor Installations
Top - Open and unobstructed
Front - Unobstructed
Back - 6”
Non-combustible oor
Right side (Water side) - 12”
Left side - 6”
Figure 9
1. Outdoor models with integral vent or HWS vent are
self-venting and do not require additional vent piping.
2. Do not install in a location where growing shrubs may in time
obstruct a heater’s combustion air and venting areas.
3. When locating an outdoor model consider that high winds can
roll over or deect off adjacent buildings, walls, and shrubbery
to create a negative draft causing ame rollout and sooting, reducing combustion efciency and damaging controls.
Normally, placing the heater at least 2 feet from any wall will
prevent this condition.
A venting system shall terminate at least 3 feet above any
forced air inlet located within 10 feet. See Figure 10.
! WARNING: (Canadian Installations Only) - The venting
system shall not be installed with the top of the vent assembly
within 10 feet below or to either side of any opening into the
building.
5. Do not install this appliance under an overhang less than 3
feet from the top of the appliance. The area under the over-
hang must be open on three sides.
6. Do not install heater directly under a roof overhang edge that
is not equipped with a rain gutter. Cascading rain water off the
roof edge could otherwise cause pilot outage or other operating problems.
7. Do not install heater where water spray from ground sprinklers
can contact heater. Sprinkler water could cause pilot outage
or other operating problems.
8. Do not install within 3 feet of an air conditioning condensing unit. Blown air from a condensing unit adjacent to heater
could cause pilot outage, poor combustion, or other operating
problems.
9. Do not install under a deck.
10. Any enclosure around the heater must provide a combustion
air vent commencing within 12 inches of the bottom of the
enclosure. The vent opening shall have a minimum free area
of 1 square inch per 4,000 BTU per hour of total input rating
of all heaters in the enclosure. See Figure 11.
4. The venting system shall terminate at least 4 feet below, 4
feet horizontally from, or 1 foot above any door, window, or
gravity air inlet into any building. The bottom of the vent terminal shall be located at least 12 inches above grade.
4’ MIN.
4’ MIN.
FORCED
AIR
3’ MIN.
INTAKE
10’
MIN.
OUTDOOR
EQUIPMENT ENCLOSURE
(BLOCK WALL
OR OTHER FENCING)
OPEN OR GRATED TOP
HEATER INSIDE ENCLOSURE
COMBUSTION
AIR VENT
12”
OR
LESS
Figure 10: Outdoor Installation Figure 11: Outdoor Enclosure
8
Page 11

SECTION 3. INSTALLATION
Indoor installation and venting:
The following installation and service clearances must be
maintained from combustible materials.
Indoor Installations*
Top - 36”
Non-combustible oor
Front - Unobstructed
Vent - 6”
Back - 6”
Right side (Water side) - 12”
Left side - 6”
Figure 12
*Canada outdoor shelters
Do not Install In a closet!
Do not install an H210 indoor!
For alcove installations, the drafthood (DHI) shall be installed
so as to be in the same atmospheric pressure zone as the combustion air inlet to the pool heater.
Air supply:
Indoor installations and outdoor shelters must be provided
with adequate combustion and ventilation air vents to assure
proper heater operation. These vents must be sized according
to the requirements stated in A. and B. below and must never be
obstructed when heater is in operation.
When air blowers are used in spa/hot tub installations, caution must be observed to insure sufcient combustion air is available to the gas heater for proper combustion. A separate blower
air duct is recommended.
Equipment located in conned spaces:
A. All Air Supply From Inside The Building: The conned
space shall be provided with two permanent openings communicating directly with an additional room(s) of sufcient
volume so that the combined volume of all spaces meets the
criteria for an unconned space (a space whose volume is
not less than 50 cubic feet per 1000 BTUH). The total input
of all gas utilization equipment installed in the combined
space shall be considered in making this determination. Each
opening shall have a minimum free area of 1 square inch per
1,000 BTU per hour of the total input rating of all gas utilization equipment in the conned space, but not less than 100
square inches. See Figure 13. One opening shall be within
12 inches of the top and one within 12 inches of the bottom of
the enclosure.
B. All Air Supply From Outdoors: The conned space shall
be provided with two permanent openings, one commencing within 12 inches of the top and one commencing within
12 inches of the bottom of the enclosure. The openings shall
communicate directly, or by ducts, with the outdoors or spac-
es (crawl or attic) that freely communicate with the outdoors.
1. When directly communicating with the outdoors, each opening
shall have a minimum free area of 1 square inch per 4,000
BTU per hour of total input rating of all equipment in the enclosure. See Figure 13.
2. When communicating with the outdoors through vertical ducts,
each opening shall have a minimum free area of 1 square
inch per 4,000 BTU per hour of total input rating of all equipment in the enclosure. See Figure 13.
3. When communicating with the outdoors through horizontal
ducts, each opening shall have a minimum free area of 1
square inch per 2,000 BTU per hour of total input rating of all
equipment in the enclosure. See Figure 13.
4. When ducts are used, they shall be of the same cross-sectional area as the free area of the openings to which they connect. The minimum dimension of rectangular air ducts shall be
not less than 3 inches.
! NOTE: For more detailed methods of providing air for com-
bustion and ventilation, refer to latest edition of the National Fuel
Gas Code, ANSI Z223.1.
Free Area per Btu
Requirement
1 sq. in. per
1,000 btu/hr
(paragraph A)
1 sq. in. per
2,000 btu/hr
(paragraph B-3)
1 sq. in. per
4,000 btu/hr
(paragraph B-1)
1 sq. in. per
250 btu/hr
(below-ground
installation)
Total Input
(btu/hr)
150,000 150 150
200,000 200 200
250,000 250 250
300,000 300 300
350,000 350 350
400,000 400 400
150,000 75 75
200,000 100 100
250,000 125 125
300,000 150 150
350,000 175 175
400,000 200 200
150,000 37.5 37.5
200,000 50 50
250,000 62.5 62.5
300,000 75 75
350,000 87.5 87.5
400,000 100 100
150,000 600 600
200,000 800 800
250,000 1000 1000
300,000 1200 1200
350,000 1400 1400
400,000 1600 1600
Combustion Air
Free Area
Required
(sq. in.)
Figure 13
Ventilation Air
Free Area
Required
(sq. in.)
9
Page 12
SECTION 3. INSTALLATION
INDOOR MODELS
TYPICAL INSTALLATION
VENTILATION
AIR
Figure 16: Vent Top Installation
VENT CAP
DOUBLE WALL
VENT PIPE
THRU APPROVED
ROOF JACK
VENTILATION
AIR
SEDIMENT TRAP
Figure 17: Indoor Installation
NATURAL GAS ONLY
BELOW GROUND
INSTALLATION
GRILL SIZE FOUR SQUARE INCHES
PER 1000 BTUH
FOR EACH GRILLE
DHI VENT BACKDRAFT
DIVERTER MUST BE INSTALLED
DIRECTLY ON HEATER
WATER CONNECTIONS
DO NOT RESTRICT
OR REDUCE PIPE SIZE
GAS SUPPLY
SEE CHART
FOR SIZE
SEDIMENT TRAP
CHECK VALVE
10’
2’
DRIP TEE
GAS COCK
VENTILATION
AIR
OUTLET
DRIP TEE
DHI VENT
BACKDRAFT
DIVERTER
DO NOT ALTER
OR CUT NECK
GAS COCK
VENT PIPE
DO NOT ALTER
OR CUT NECK
GAS COCK
(OPTIONAL)
GRADUAL RISE
OF ONE INCH
PER FOOT
LEVEL NON-COMBUSTIBLE
10’
2’
LEVEL
NON-COMBUSTIBLE
FLOORING OR SLAB
DHI VENT
BACKDRAFT
DIVERTER
DO NOT ALTER
OR CUT NECK
FLOORING OR SLAB
VENT CAP
GROUND LEVEL
RISE OF ONE
INCH PER FOOT
VENT CAP
DOUBLE WALL
VENT PIPE
THRU APPROVED
ROOF JACK
COMBUSTION
AIR
PLASTIC PIPE
(PVC, ETC.)
COMBUSTION
AIR
COMBUSTION
AIR
TO BASE
AIR DUCT
FROM GROUND
INLET
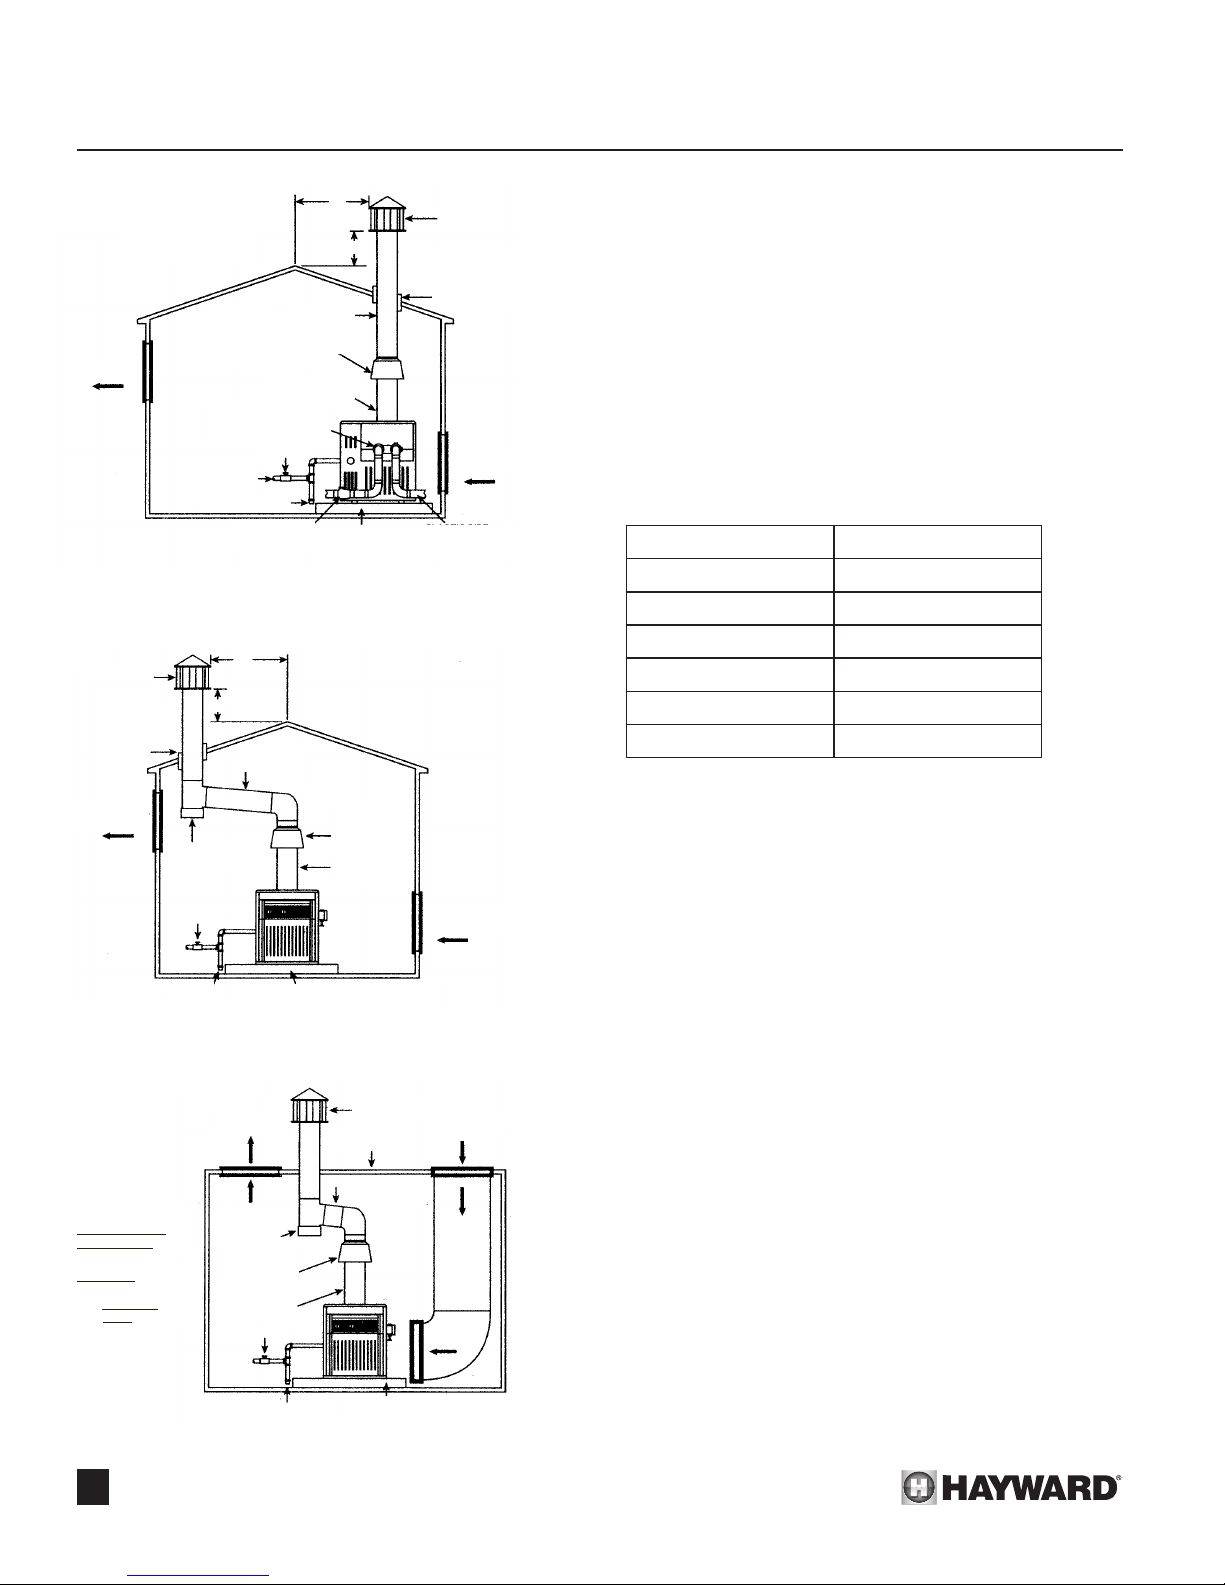
Venting:
Locate the pool/spa heater as close as practical to a chimney
or gas vent. See Figures 16,17 and 18. Do not alter back draft
diverter (DHI) in any way. Install draft diverter (DHI) on top of
heater.
Vent material should be of blued steel or galvanized steel
with double wall construction when passing through walls or a
ceiling. Vent size diameters for the H-Series heaters are as per
Figure 19.
Vent Size Diameters
Model Vent Diameter
H150 6”
H200 7”
H250 7”
H300 8”
H350 9”
H400 9”
Figure 19
The discharge opening of the vent must be at least three
feet above the roof surface and at least two feet higher than any
portion of a building within ten feet horizontally. The vent stack
shall be at least ve feet in height above the drafthood outlet.
The vent cap location shall have a minimum clearance of 4 feet
horizontally from electric meters, gas meters, regulators and
relief openings.
The weight of the vent or chimney must not rest on the heater
drafthood. Support must be provided in accordance with the applicable codes. The DHI drafthood must be easily removable for
maintenance and inspection. The vent pipe must be supported
to maintain proper clearances from combustibles.
Venting extending above the roof by more than ve feet
should be guyed or braced above or below the roof to protect
the vent from wind and/or snow damage.
SEDIMENT TRAP
LEVEL NON-COMBUSTIBLE
FLOORING OR SLAB
Figure 18: Below Ground Installation
10
Page 13

SECTION 3. INSTALLATION
Model
btu/hr
Line
Material
Model
btu/hr
input
Line
Iron
Iron
Iron
Iron
Iron
Iron
Iron
¾" ⅞" ¾" ⅞" 1" 1⅛" 1" 1⅛" 1" 1⅛" 1" 1⅛" 1"
¾" 1⅛" 1" 1⅛" 1" 1⅛" 1" 1⅛" 1" 1¼" 1¼"
1" 1⅛" 1" 1¼" 1¼" 1¼" 1¼" 1¼"
1" 1¼" 1¼" 1¼" 1¼" 1¼" 1½"
Model
btu/hr
input
Line
Second
Stage**
Model
btu/hr
input
Line
Iron
Iron
Iron
Iron
Iron
Iron
Iron
½" ½" ½" ½" ½" ½" ½" ½" ½" ½" ½" ½" ½" ½"
½" ½" ½" ½" ½" ½" ½" ½" ½" ½" ½" ⅝" ½" ⅝"
½" ½" ½" ½" ½" ½" ½" ½" ½" ⅝" ½" ⅝" ½" ⅝"
Second
MetertoHeaterGas
H150
H200
H250
H300
H350
H400
IronorPlastic
IronorPlastic
IronorPlastic
IronorPlastic
IronorPlastic
IronorPlastic
1¼"
50to100ft
1"1"1¼"
1¼"
1¼"
1¼"
0to50ft
¾"1"1"
1¼"
1¼"
1½"
200to300ft
1¼"
1¼"
1½"2"2"
2"
100to200ft
1¼"
1¼"
1¼"
1½"
1½"
0to50ft
DistancefromTank
H150
H200
H250
H300
H350
H400
50to100ft
100to200ft
200to300ft
Baseduponaninletgaspressureof11inwcatapressuredropof0.5inwc
RegulatortoInletof
IronorPlastic
IronorPlastic
IronorPlastic
IronorPlastic
IronorPlastic
IronorPlastic
IronorPlastic
FirstStage
0to50ft
½"½"½"
½"
100to150ft
½"½"½"
½"
½"
½"
¾"¾"¾"
*Baseduponaninletgaspressureof2psigatapressuredropof1psi
**Baseduponaninletgaspressureof10inwcatapressuredropof0.5inwc
DistancefromTank
H150
H200
H250
H300
H350
H400
½"
H210
New Figure 20 for Manual 1302704001 rev F, page 11
VEW 2/7/2013
H210
IronorPlastic
1"
1¼"
1¼"
1½"
H210
FirstStage
0to50ft
50to100ft
100to150ft
*Baseduponaninletgaspressureof10psigatapressuredropof1psi
Gas supply and piping:
Refer to the charts on Figure 20 for gas pipe sizing for low pressure natural gas, low pressure single propane gas and high pressure two stage propane gas systems.
Gas Pipe Size: Follow local gas codes for proper gas Hoe material selection (copper, Iron or plastic pipe etc.)
Natural Gas Pipe Sizing, Low-Pressure, Single-Stage Regulation
DistancefromGas
ValveInlet
Baseduponaninletgaspressureof0.5psigorlessatapressuredropof0.5inwc
RegulatorOutletto
HeaterGasValve
Inlet
Distancefrom
Outletof1stStage
2ndStageRegulator
input
Material
Material
150,000 200,000 250,000 300,000 350,000 400,000
Pipe
Propane Gas Pipe Sizing, Low-Pressure, Single-Stage Regulation
150,000
Tubing
Pipe
Natural Gas Pipe Sizing, High-Pressure, 2-Stage Regulation
H150 H200 H250 H300
150,000 200,000 250,000 300,000 350,000 400,000
Pipe
Pipe
200,000 250,000 300,000 350,000 400,000
Tubing
Pipe
Pipe
210,000
Pipe
210,000
Pipe
H210
210,000
Pipe
Tubing
Pipe
Pipe
Pipe
Tubing
Pipe
Pipe
Pipe
Tubing
Pipe
Tubing
Pipe
H350 H400
Pipe
Pipe
Pipe
Tubing
Pipe
*
RegulatorOutletto
*
Stage**
**Baseduponaninletgaspressureof11inwcatapressuredropof0.5inwc
50to100ft ½" ½" ½" ½" ¾" ¾"
0to10ft ¾" ¾" ¾" ¾" ¾" ¾"
HeaterGasValve
Inlet
0to10ft
Material
150,000
Tubing
Pipe
½" ⅝" ½" ⅝" ½" ¾" ½" ¾" ¾" ¾" ¾" ⅞" ¾" ⅞"
½"
¾"
Propane Gas Pipe Sizing, High-Pressure, 2-Stage Regulation
200,000 250,000 300,000 350,000 400,000
Tubing
Pipe
Pipe
210,000
Tubing
Pipe
Tubing
Pipe
Tubing
Pipe
Tubing
Pipe
Tubing
11
Page 14
SECTION 3. INSTALLATION
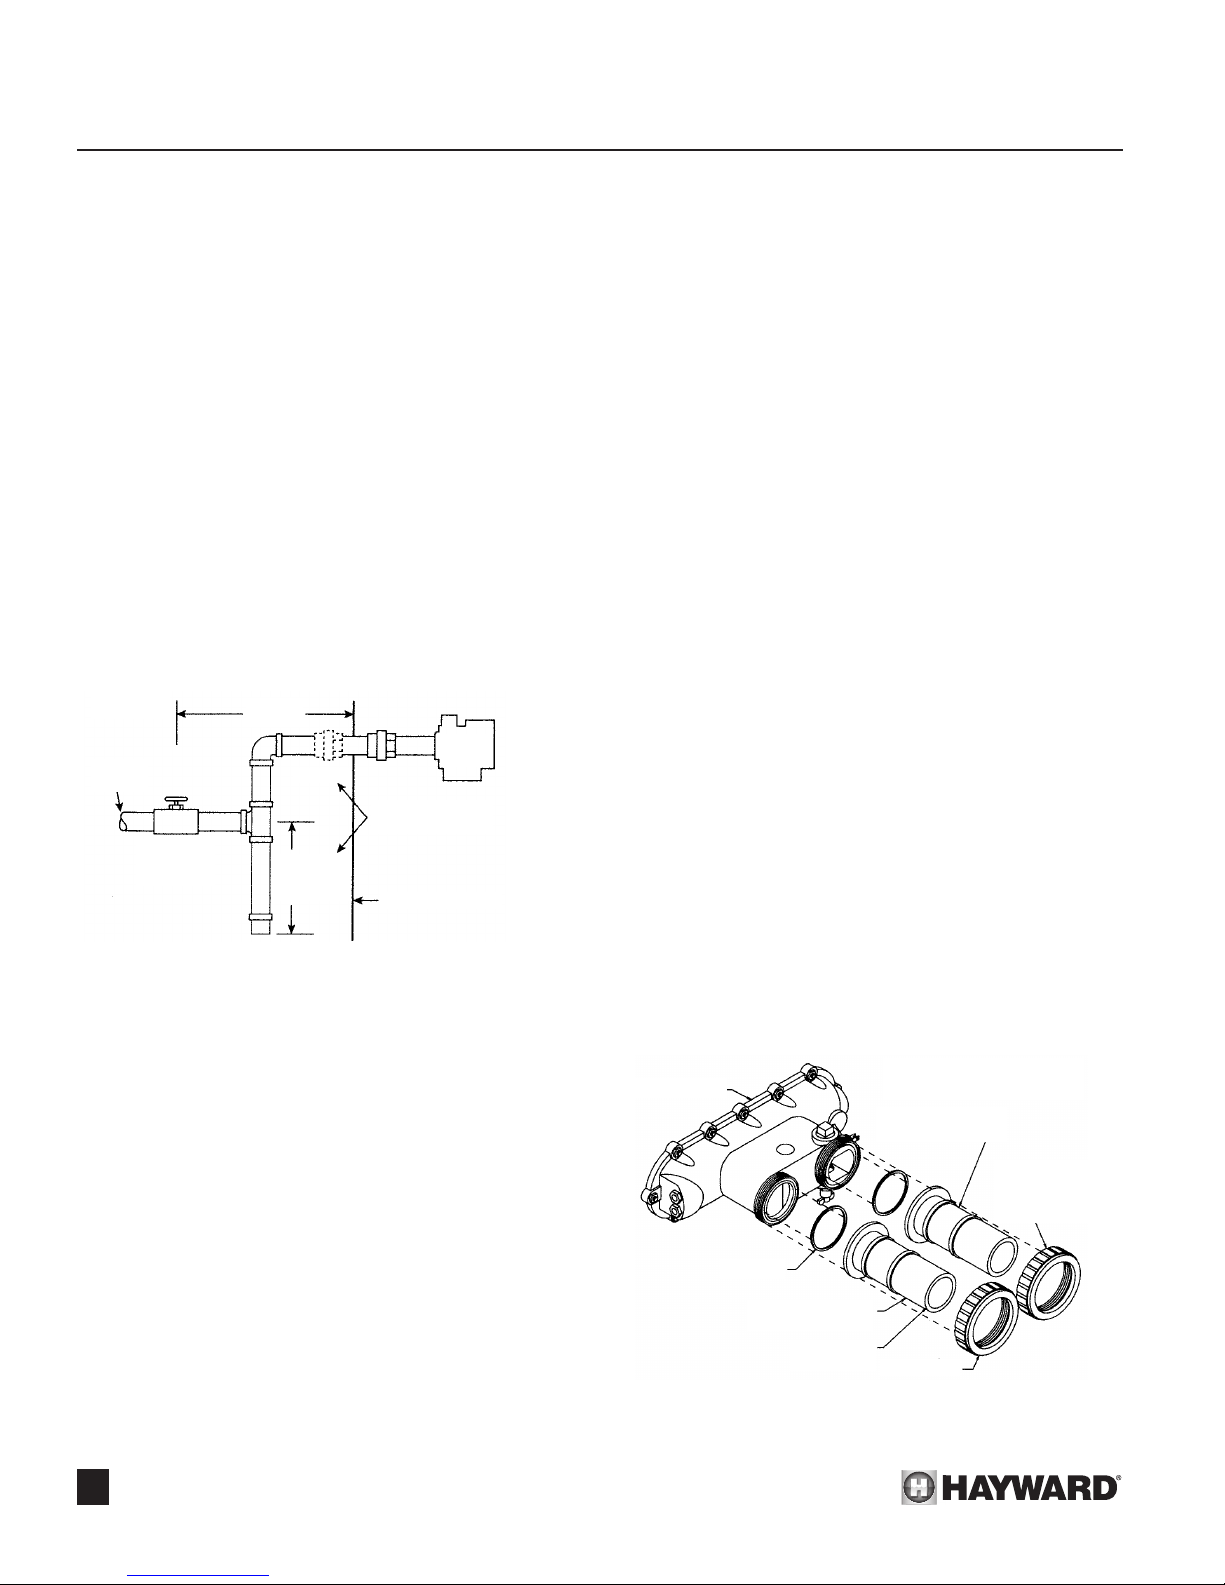
All gas installations:
The H-Series heater is to be installed with a gas connection
located on the left side (or right side, if necessary). Insert the
pipe to the gas valve through the star-slit black plastic cap in
the cabinet side. It is recommended that a ground-joint union be
installed inside (or outside if space does not allow) the heater
cabinet to facilitate servicing the burner assembly tray. See
Figure 21.
An A.G.A Certied main gas valve shutoff must be installed
outside of cabinet and within 6 feet of the heater. Gas shutoff
valve must have an l.D. large enough to supply the proper
amount of gas volume to the heater.
! NOTE: Apply joint compounds (pipe dope) sparingly and
only to the male threads of pipe joints. Do not apply joint compound to the rst two threads. Use joint compounds resistant to
the action of liqueed petroleum gas. Do not over tighten the gas
inlet pipe or damage may result. See Figure 21.
To prevent dirt and moisture from entering gas valve, a sediment trap should be installed in the gas line close to the valve.
See Figure 21.
6’ MAX.
GAS
GAS
SUPPLY
MANUAL
SHUT OFF
VALV E
UNION
3” TYPICAL
SEDIMENT
TRAP
SUBJECT TO
LOCAL CODES
HEATER CABINET
Figure 21: Sediment Trap
Do not use exible appliance connectors on any gas
connections unless the connector is A.G.A. approved for
outdoor installation, is marked with the BTUH capacity
(which must be equal to or greater than the heater rated
input), and the type of gas (Natural or LP) to be used.
Reduction of the gas supply pipe or tubing to the inlet of
the heater gas valve must be made at the valve only and must
match the valve inlet size (3/4”).
If more than one appliance is installed on the gas line, consult
the local gas company for the proper gas line size.
Any questions concerning the installation of the proper gas
line size can be directed to Hayward Technical Service. Tele-
phone numbers can be found in Troubleshooting Guide Section.
NATURAL GAS
The gas meter must have the capacity to supply enough
gas to the pool heater and any other gas appliances if they are
on the same pipe-line (Example: 225 meter = 225,000 BTUH).
VALV E
If doubt exists as to the meter size, consult local gas utility for
assistance. Hayward will not be responsible for heaters that
soot up due to improper meter and gas line sizing resulting in
improper gas volume.
PROPANE GAS
All propane gas tanks must be located outdoors and away
from pool/spa structure and in accordance with the standard for
storage and handling of propane gas ANSI/NFPA 58 (latest edition) and applicable local codes. If propane gas tank is installed
underground, the discharge of the regulator vent must be above
the highest probable water level.
Propane tanks must be sufcient capacity to provide ad-
equate vaporization for the full capacity of the equipment at the
lowest expected temperatures. Consult a propane company
expert for correct sizing.
! NOTE: Whenever a high pressure double regulation system is utilized for propane gas, consult a propane professional
for accurate pipe and pressure sizing. Make sure that 1st and
2nd stage regulators are large enough to handle the BTUH input
listed for the heater(s) being used.
Hayward will not be responsible for heaters that soot up due
to improper gas line or Propane tank sizing resulting in improper
gas volume.
Water piping:
The H-Series heater is designed for use with pool and spa/
hot tub water only, as furnished by municipal water distribution
systems and puried by an automatic chlorinator or salt chlorine
generator. The warranty does not cover heater use with mineral
water, sea water, salt or other non-potable waters.
Do not install any restriction in the water pipe between heater
outlet and pool/spa with the exception of a three-way switching valve and an in-line chlorinator and associated check valve.
Blockage of water ow from heater return to pool may result in
re or explosion causing property damage, personal injury or
loss of life.
FRONT HEADER
O-RINGS
INLET - TOWARDS
FRONT OF HEATER
FLANGE PIPE
NIPPLES
Figure 22: Pipe Nipple Installation
OUTLET - TOWARDS
BACK OF HEATER
UNION NUTS
TURN CLOCKWISE
TO TIGHTEN. HAND
TIGHTEN ONLY.
12
Page 15
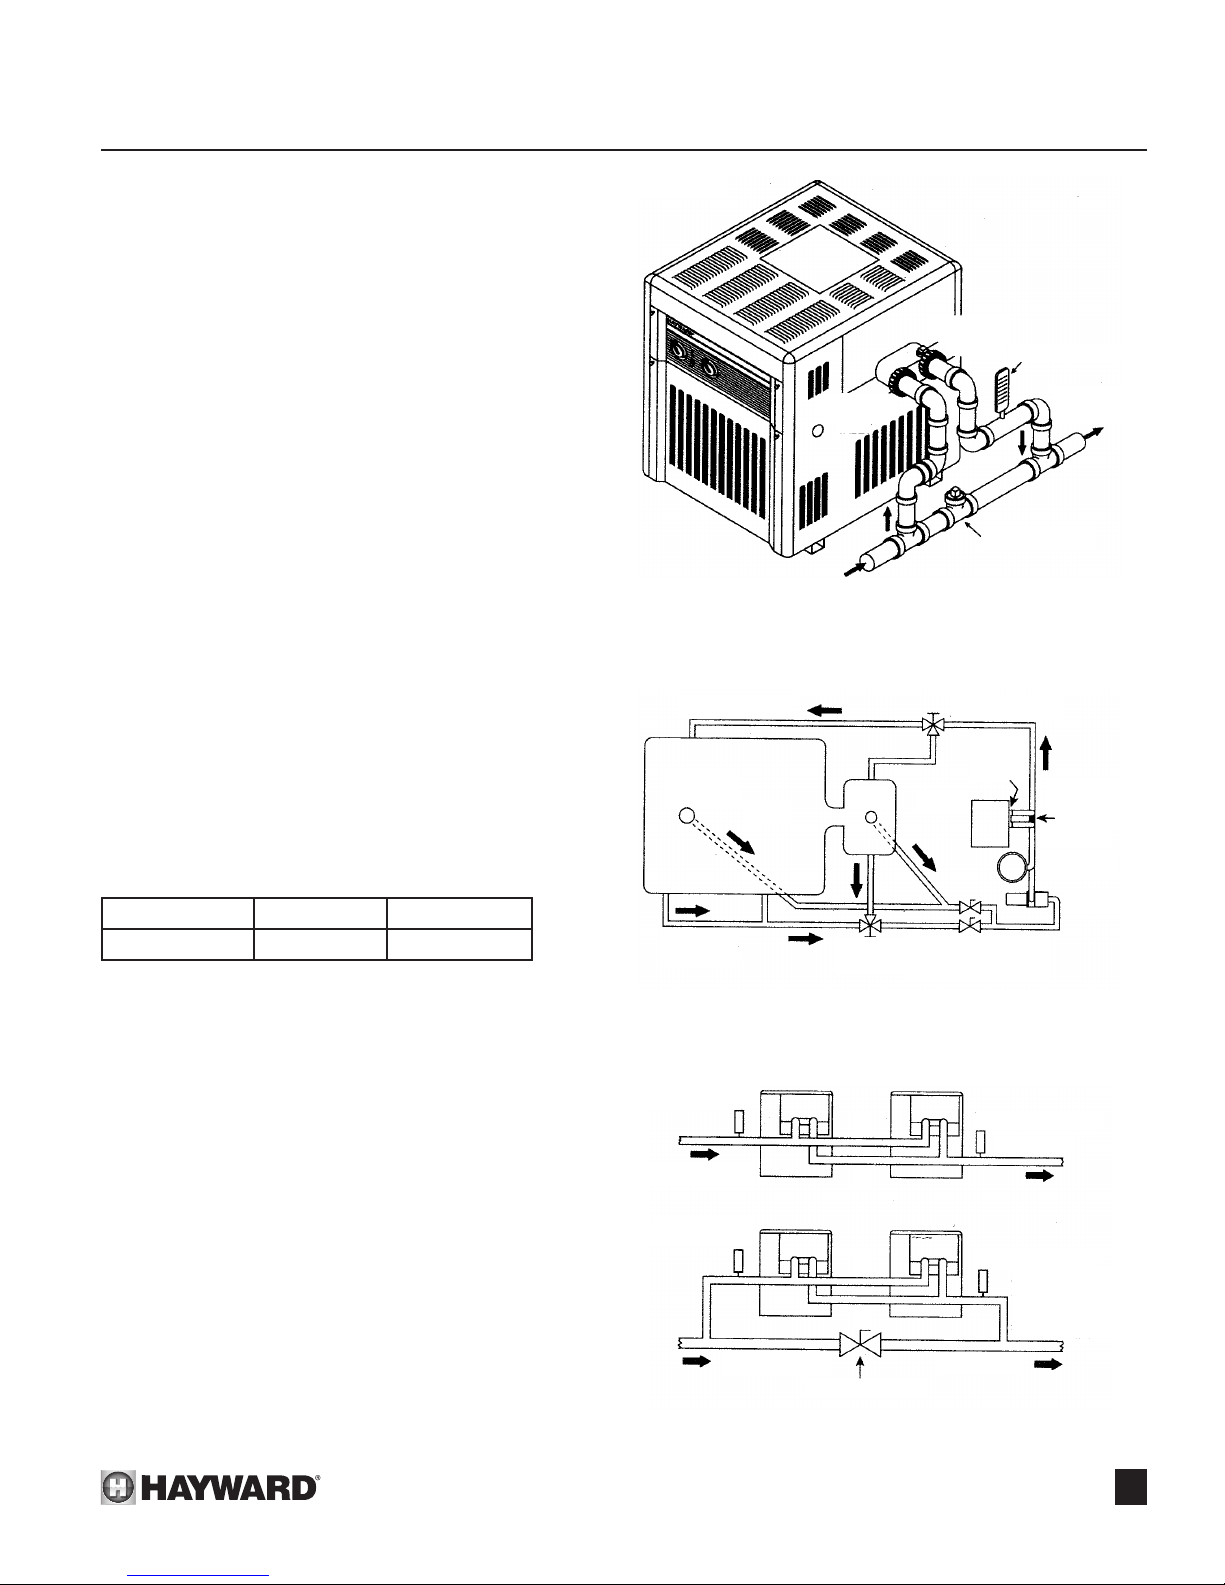
Plumbing connections:
1. The H-Series heater is equipped with CPVC SCH-80
anged pipe nipples, union nuts, neoprene O-rings
for use with 2” pipe connections. Figure 22 shows the
method for installing these parts on the front header.
! NOTE: Assemble these parts to heater prior to plumb-
ing. Tighten union nuts securely before gluing ttings to
ends of pipe nipples.
2. The CPVC SCH-80 anged pipe nipples must be
installed on the heater inlet and outlet without modication. CPVC SCH-80 plastic has an ASTM rating of F441
and is NSF approved. The opposite ends of the pipe
nipples should be attached to the ltration system as
particular installation dictates.
3. Pipe, ttings, valves and any other element of the lter
system may be made of plastic materials, if acceptable
by the authority having jurisdiction. 1 1/2” plastic pipe if
used, will slide directly into the anged pipe ends.
4. Heat sinks (heat traps), reman switches and check
valves are not necessary on the H-Series heaters.
However, if there is any chance of “back-siphoning” of
hot water when the pump stops running, it is suggested
that a check valve be used on the heater inlet pipe.
5. The vari-o by-pass that is built into the front header
will maintain proper ow through the heat exchanger
if the ow rate is within the range for the heater. See
Figure 23.
RECOMMENDED FLOW RATE IN GPM
Model Minimum Maximum
H150-H400 25 125
Figure 23
SECTION 3. INSTALLATION
CONNECTION
TO HEATER
OUTLET
CONNECTION
TO HEATER
INTLET
FROM PUMP
AND FILTER
Figure 24: Manual By-pass Valve
TO POOL
MAIN
DRAIN
FROM
POOL
POOL
SPA
3-WAY
VALV E
Figure 25: Typical Plumbing To Pool
3-WAY VALVE
RELIEF
VALV E
OPTION
HEATER
BALANCING VALVES
FOR SKIMMER
AND DRAIN
FLOW METER
VALV E
RETURN TO
POOL/SPA
MANUAL
BY-PASS
VALV E
(if necessary)
FILTER
PUMP
6. If the normal pump and lter system ow rate exceeds
125 gpm then a manual by-pass valve, as shown in
Figure 24, must be installed as follows: Install a ow
meter on the outlet line of the heater. Adjust the manual
by-pass valve until the ow rate is within the rates re-
quired for the heater. Once the valve is set, the position
should be noted and the valve handle removed to avoid
further adjustment.
7. Figure 25 shows a typical pool piping diagram and layout for pool equipment. Figure 26 shows multiple heater
usage for very large pools with and without an external
by-pass (balancing) valve.
THERMOMETER
2”
FROM FILTER
THERMOMETER
2”
2”
2”
FROM FILTER
BALANCING VALVE
TO POOL
Figure 26: Multiple Heater Hookups
THERMOMETER
TO POOL
THERMOMETER
ADJUST
BALANCING VALVE
TO OBTAIN A
20ºF DIFFERENTIAL
ACROSS
THERMOMETERS
13
Page 16
SECTION 3. INSTALLATION
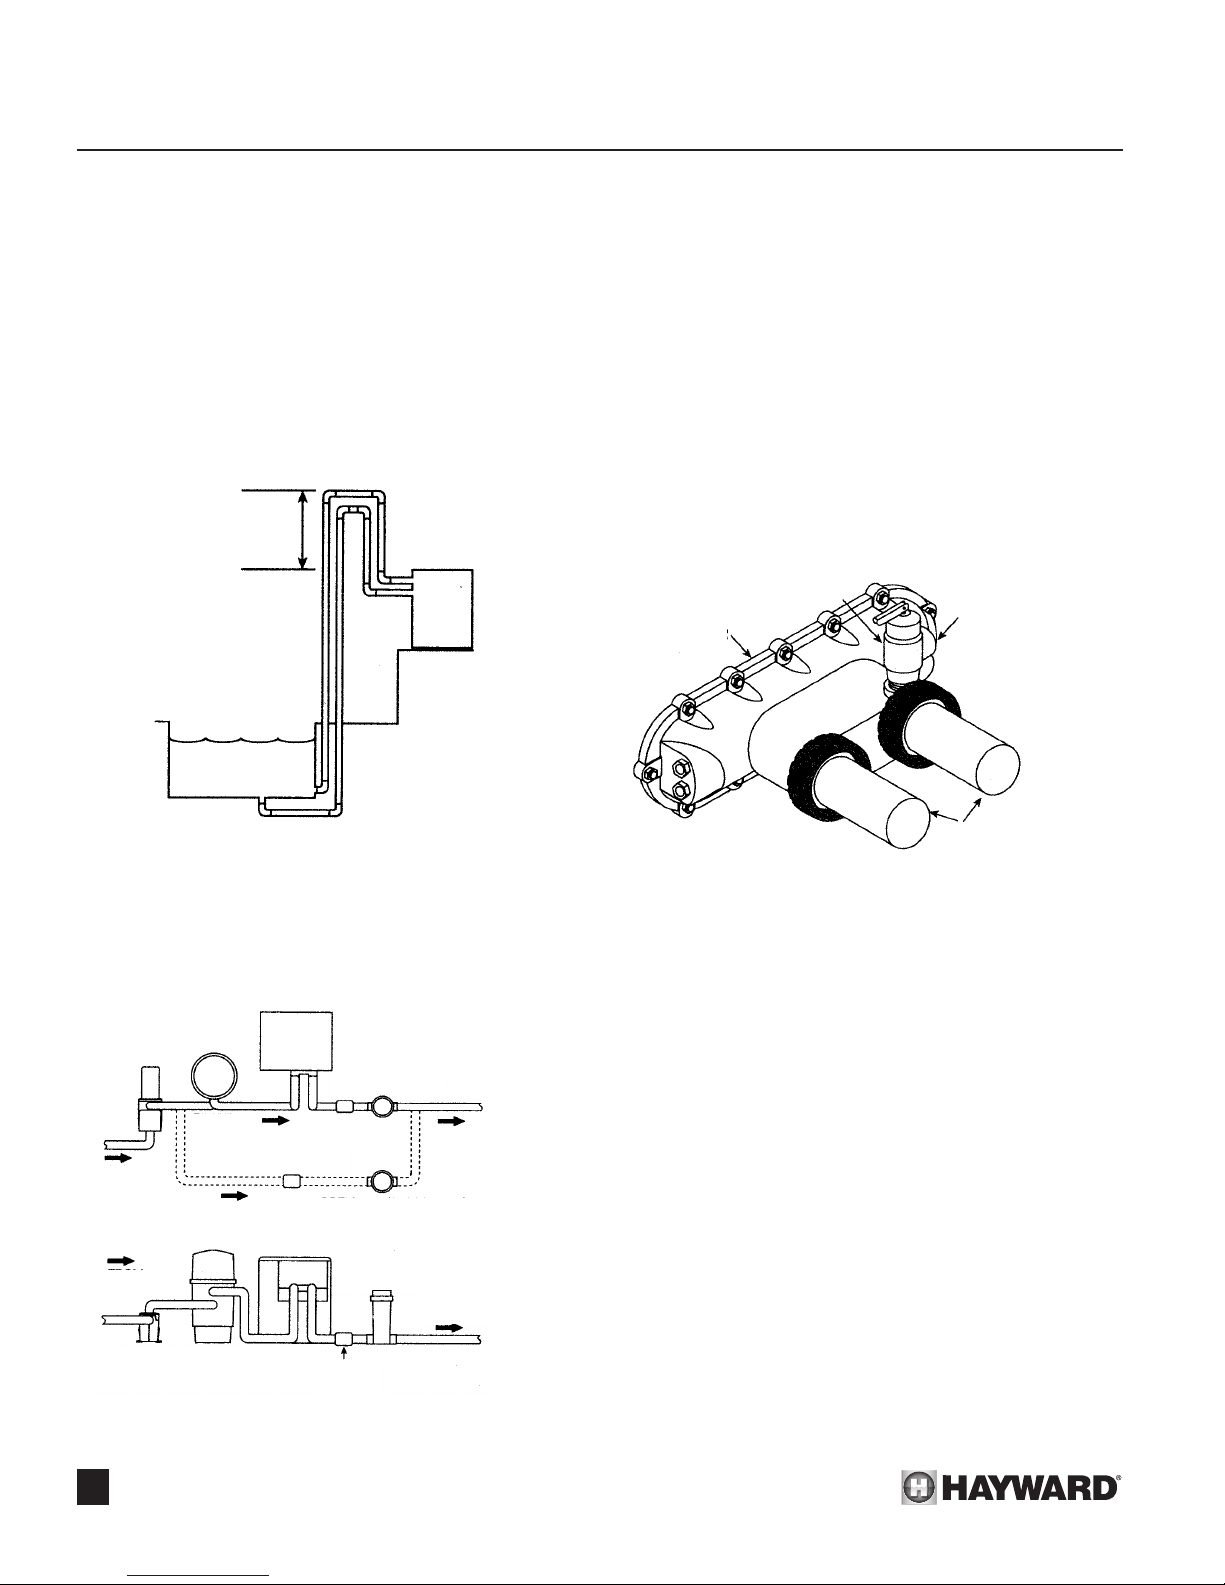
Installation above pool/spa surface:
If heater is installed less than three (3) feet above the surface
of the pool/spa water, install eyeball ttings or directional ow ttings on the end of the return water line to the pool/spa to create
adequate back pressure at the heater to operate the pressure
safety switch when lter pump is running.
If heater is installed more than three (3) feet above surface of
pool/spa water, install a loop as shown on Figure 27 to prevent
drainage of water in heater during lter change.
For installation below pool/spa surface, refer to Section 4.
HIGHER THAN
TOP OF HEATER
HEATER
WATER LEVEL
If used, a chlorinator must be installed down stream from the
heater in the pool return line and at a lower elevation than the
heater outlet connection. See Figure 28. Install a separate positive seal, corrosion resistant check valve (EXAMPLE: Rainbow
Plastics #17288 or #172323) between the heater outlet and chlorinator to prevent highly concentrated sanitizers from back-siphoning into the heater. Back-siphoning usually occurs when the
pump is shut off and a pressure-suction differential is created.
Pressure relief valve:
It may be necessary to install a pressure relief valve to con-
form with local building codes. A 3/4” pressure relief valve with
a discharge capacity greater than or equal to the BTUH input of
the heater and a pressure relief rating less than the heater working pressure is recommended (see rating plate).
PRESSURE RELIEF VALVE
FRONT HEADER
DISCHARGE
CONNECTION
Figure 27: Heater Installation Above Pool
Automatic chlorinators and
chemical feeders:
TOP VIEW
PUMP
FILTER
FROM
POOL
SIDEVIEW
FROM
POOL
PUMP FILTER HEATER
Figure 28: Automatic Chlorinator
HEATER
CHECK
VALV E
CHECK VALVE
OPTIONAL (PREFERRED)
CHLORINATOR HOOKUP
CHECK
VALV E
CHLORINATOR
RETURN
TO POOL
CHLORINATOR
RETURN
TO POOL
PLUMBING
CONNECTIONS
Figure 29: Pressure Relief Valve
A 3/4” NPT connection is provided in the front header for
installation of a pressure relief valve. See Figure 29. The valve
shall be installed directly to the header in a vertical position. To
avoid scalding or water damage due to relief valve operation,
connect a drain pipe to the valve outlet and run the line to a safe
place of discharge. The drain pipe must be at least the same
size as the valve discharge connection throughout its entire
length and must pitch downward from the valve. No shutoff valve
or restriction shall be installed between the relief valve and the
discharge of the drainline. The valve lever should be lifted at
least once a year to ensure that the waterway is clear.
14
Page 17
WIRING DIAGRAM - MILLIVOLT - SINGLE THERMOSTAT
LIMIT SWITCH LIMIT SWITCH
R
TERMINAL BLOCK
REMOTE CONTROL
BK
JUMPER
SYSTEM SWITCH
ON
Y
OFF
IF ANY OF THE ORIGINAL WIRE AS SUPPLIED WITH THE HEATER
MUST BE REPLACED, IT MUST BE REPLACES WITH APPLIANCE
WIRING MATERIAL SUITABLE FOR 105ºC (STYLE 1015 OR 1230)
OR ITS EQUIVALENT.
PRESSURE SWITCH
BLV
TEMPERATURE
LIMITER (MANUAL)
SWITCH
SPA/POOL
T’STAT
GY
TEMPERATURE
LIMITER SWITCH
BKR
P
BK
GENERATOR
SECTION 3. INSTALLATION
GAS
VALV E
ROBERTSHAW
TH
TP
TH
TP
GAS
VALV E
HONEYWELL
OFF
PILOT
ON
THPP
TH
PP
W
R
Figure 30: Wiring Diagram - Millivolt
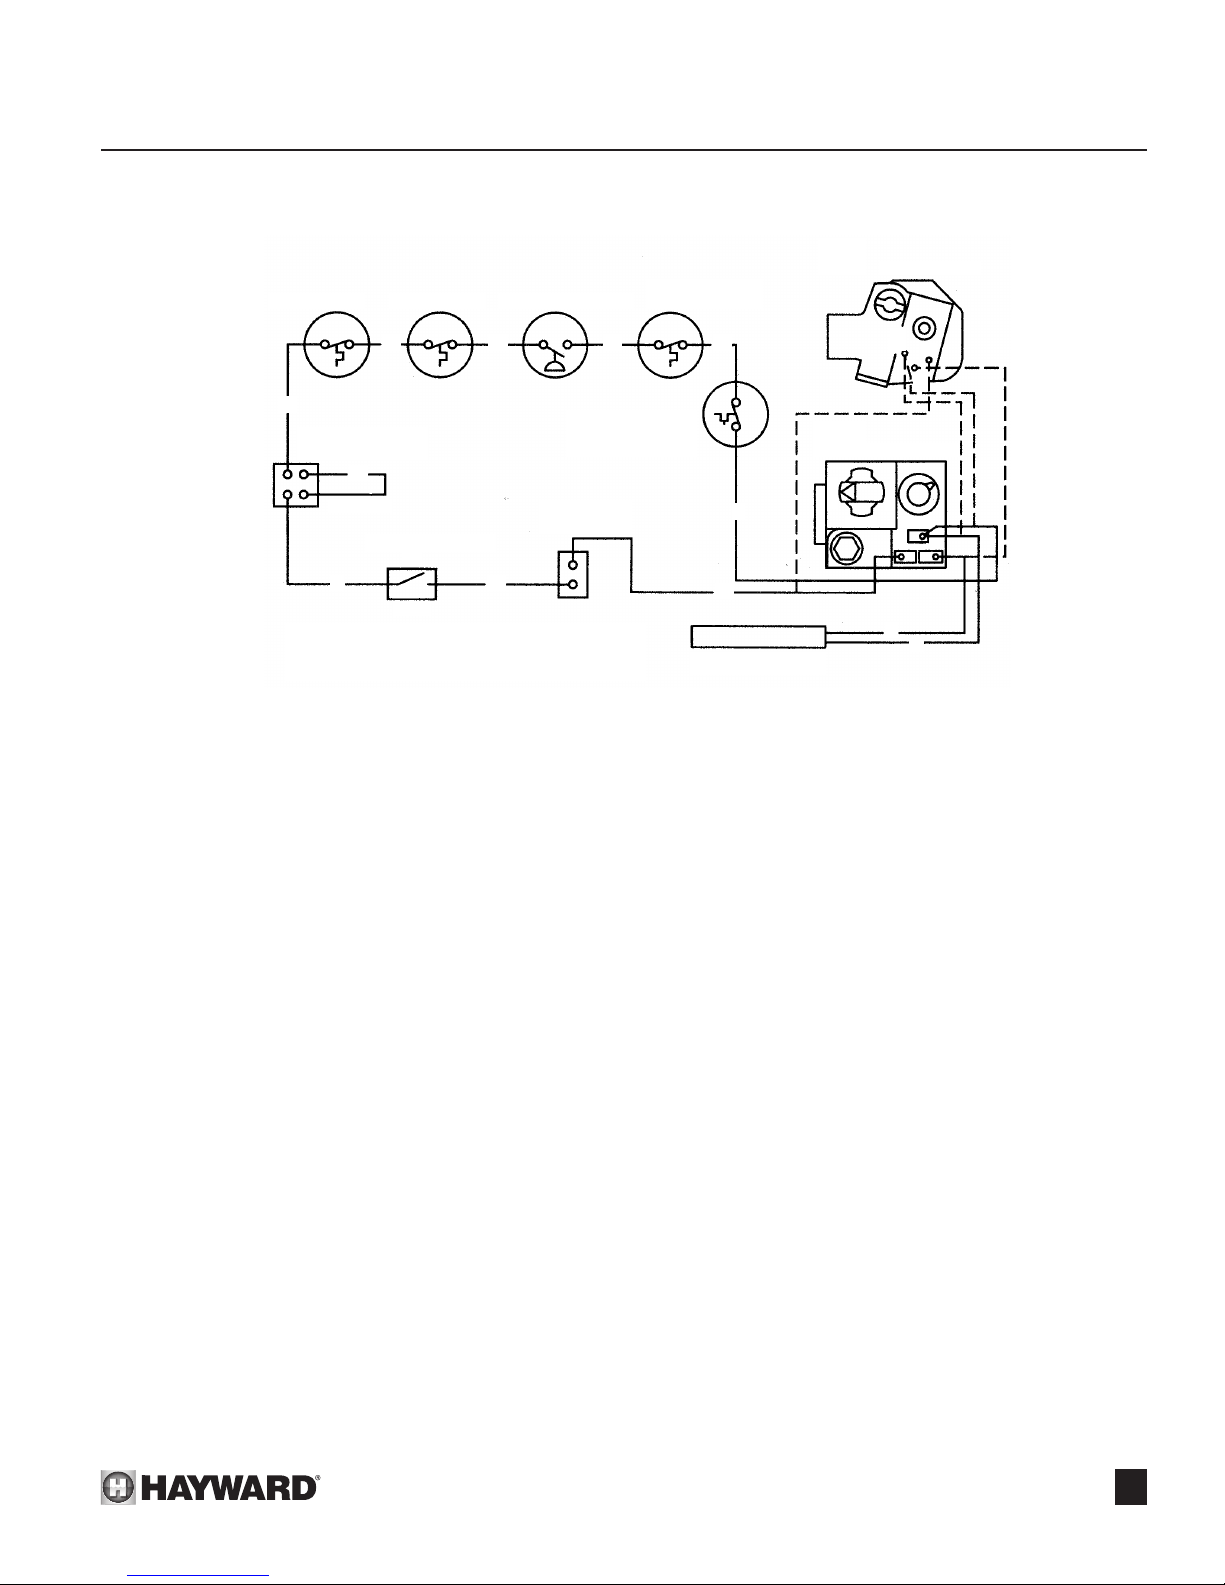
Millivolt System:
The millivolt operated heater is equipped with a standing
pilot and a thermopile (pilot generator). All of the electric current
required to operate the controls within the heater is provided by
the pilot generator. No external wiring or electrical connections
are required. The system consists of seven separate controls
wired in series with the gas valve. All switches in these controls
must be “closed” for the main gas valve to open and allow the
heater to operate. The individual controls are described in the
Maintenance/Servicing section of this manual. Figure 30 shows
the heater wiring for millivolt operated systems.
Electronic Ignition System:
The electronic ignition system is equipped with the same
basic controls as the millivolt operated heater but a direct spark
ignition device (DS) is used to automatically light the main burners on each call for heat. With the DS module these controls
operate on 24 volts so an external power source is required.
All wiring connections to the heater must be made in accordance with the latest edition of the National Electrical Code
ANSI/NFPA 70, unless local code requirements specify otherwise. In Canada, follow CSA C22.1 - CANADIAN ELECTRICAL
CODE, Part 1.
Since an external electrical source is utilized, the heater,
when installed, must be electrically grounded and bonded in ac-
cordance with local codes, or in the absence of local codes, with
the National Electrical Code, ANSI/NFPA 70.
The H-Series heater can be installed with the electrical con-
nections, service entry/remote control, located on either the left
or right side of the heater. Punch out the knockout slug adjacent
to the controls compartment on either or both sides as necessary.
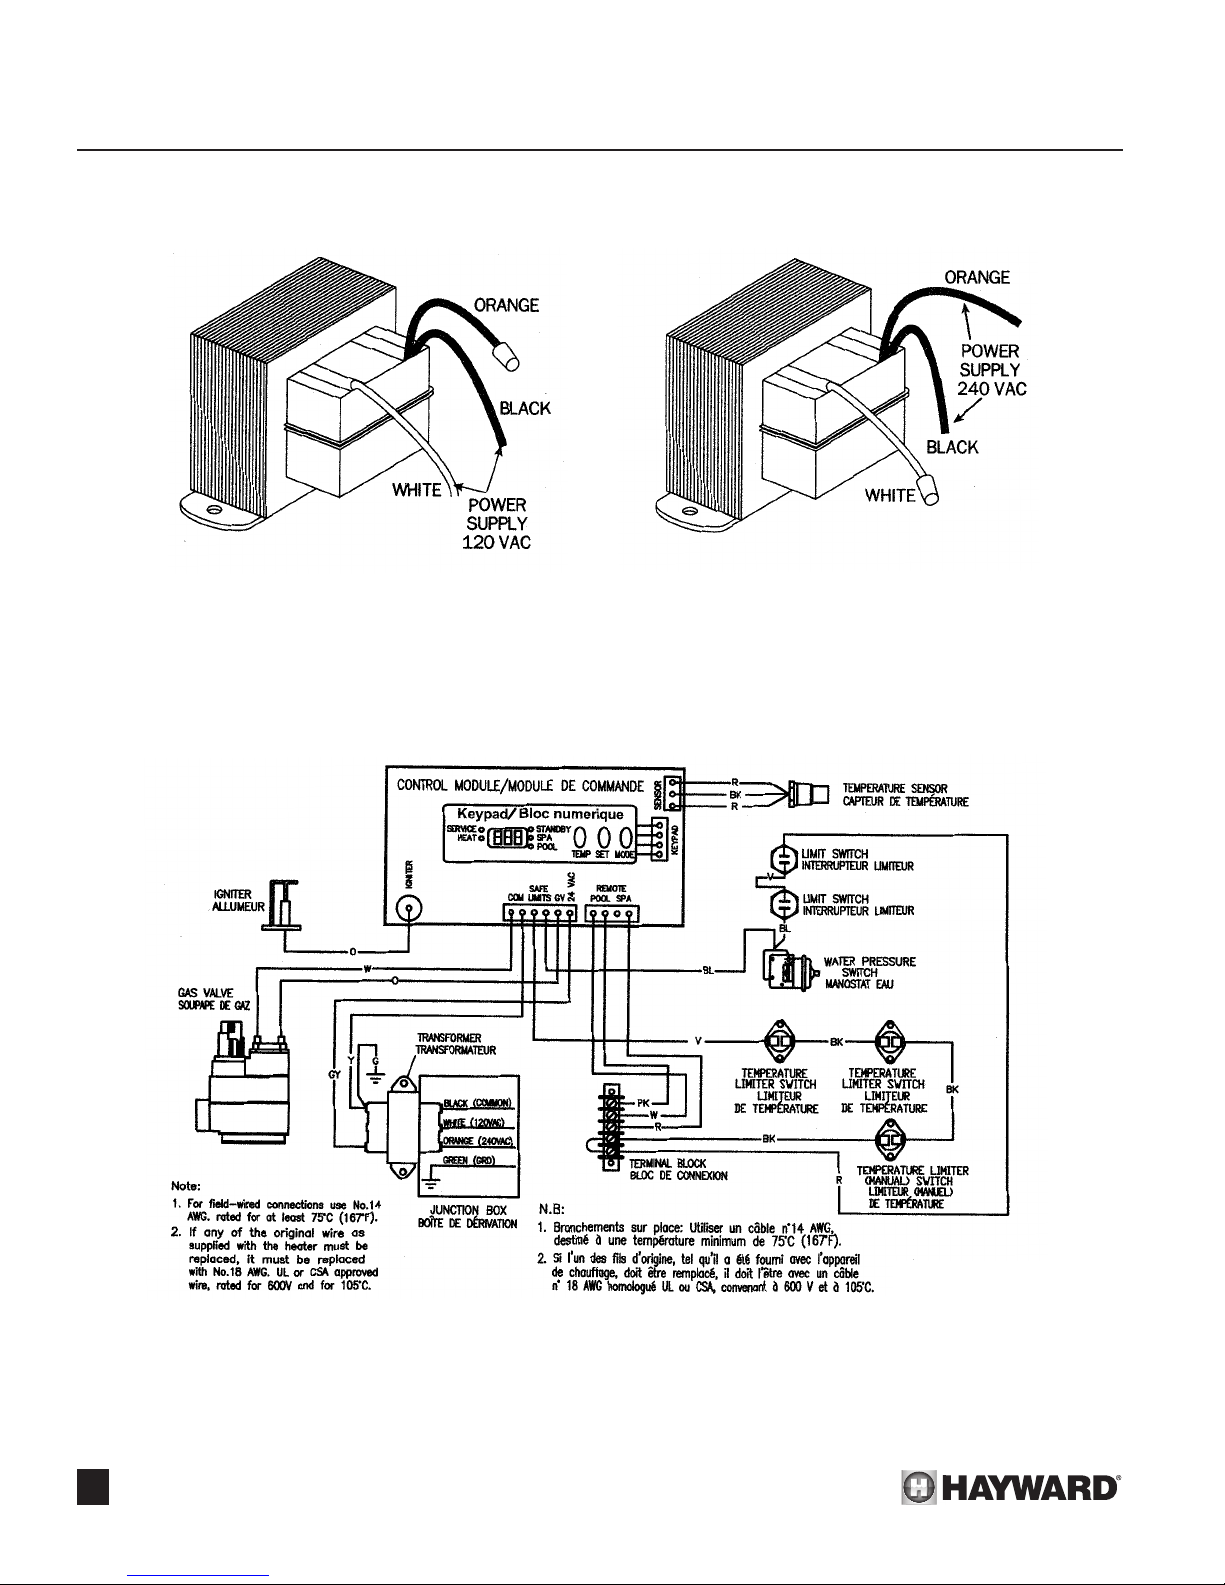
The heater is supplied with a dual voltage transformer for
either 120 volt or 240 volt power supply. If the heater is to be
wired in series with the pump, the electrical circuit draws only
0.3 amps. Use a 15 amp circuit breaker if heater is wired to a
separate circuit.
Field wiring connections are to be made inside the junction
box located behind the control access door. For a heater powered by a 120V source, refer to the wiring diagram and connect
the power supply to the black (common) lead and the white
(120V) lead. See Figure 31. For a pool heater powered by a
240V source, refer to the wiring diagram and connect the power
supply to the black (common) lead and the orange (240V) lead.
See Figure 32. A ground lead is provided inside the junction box
for connection of green insulated ground wire. Replace junction box cover and close access panel upon completion of eld
wiring.
Figure 33 shows the heater wiring for electronic ignition
systems.
15
Page 18
SECTION 3. INSTALLATION
Figure 31: VAC Connection
Figure 32: 240 VAC Connection
Figure 33: Wiring Connection Diagram
16
Page 19

SECTION 3. INSTALLATION
REMOTE CONTROL CONNECTIONS:
A terminal block is provided in the H-Series heater control
compartment for connection of a remote control system. Remote
wiring should be run in a separate conduit. Do not run remote
wiring parallel to high voltage wires.
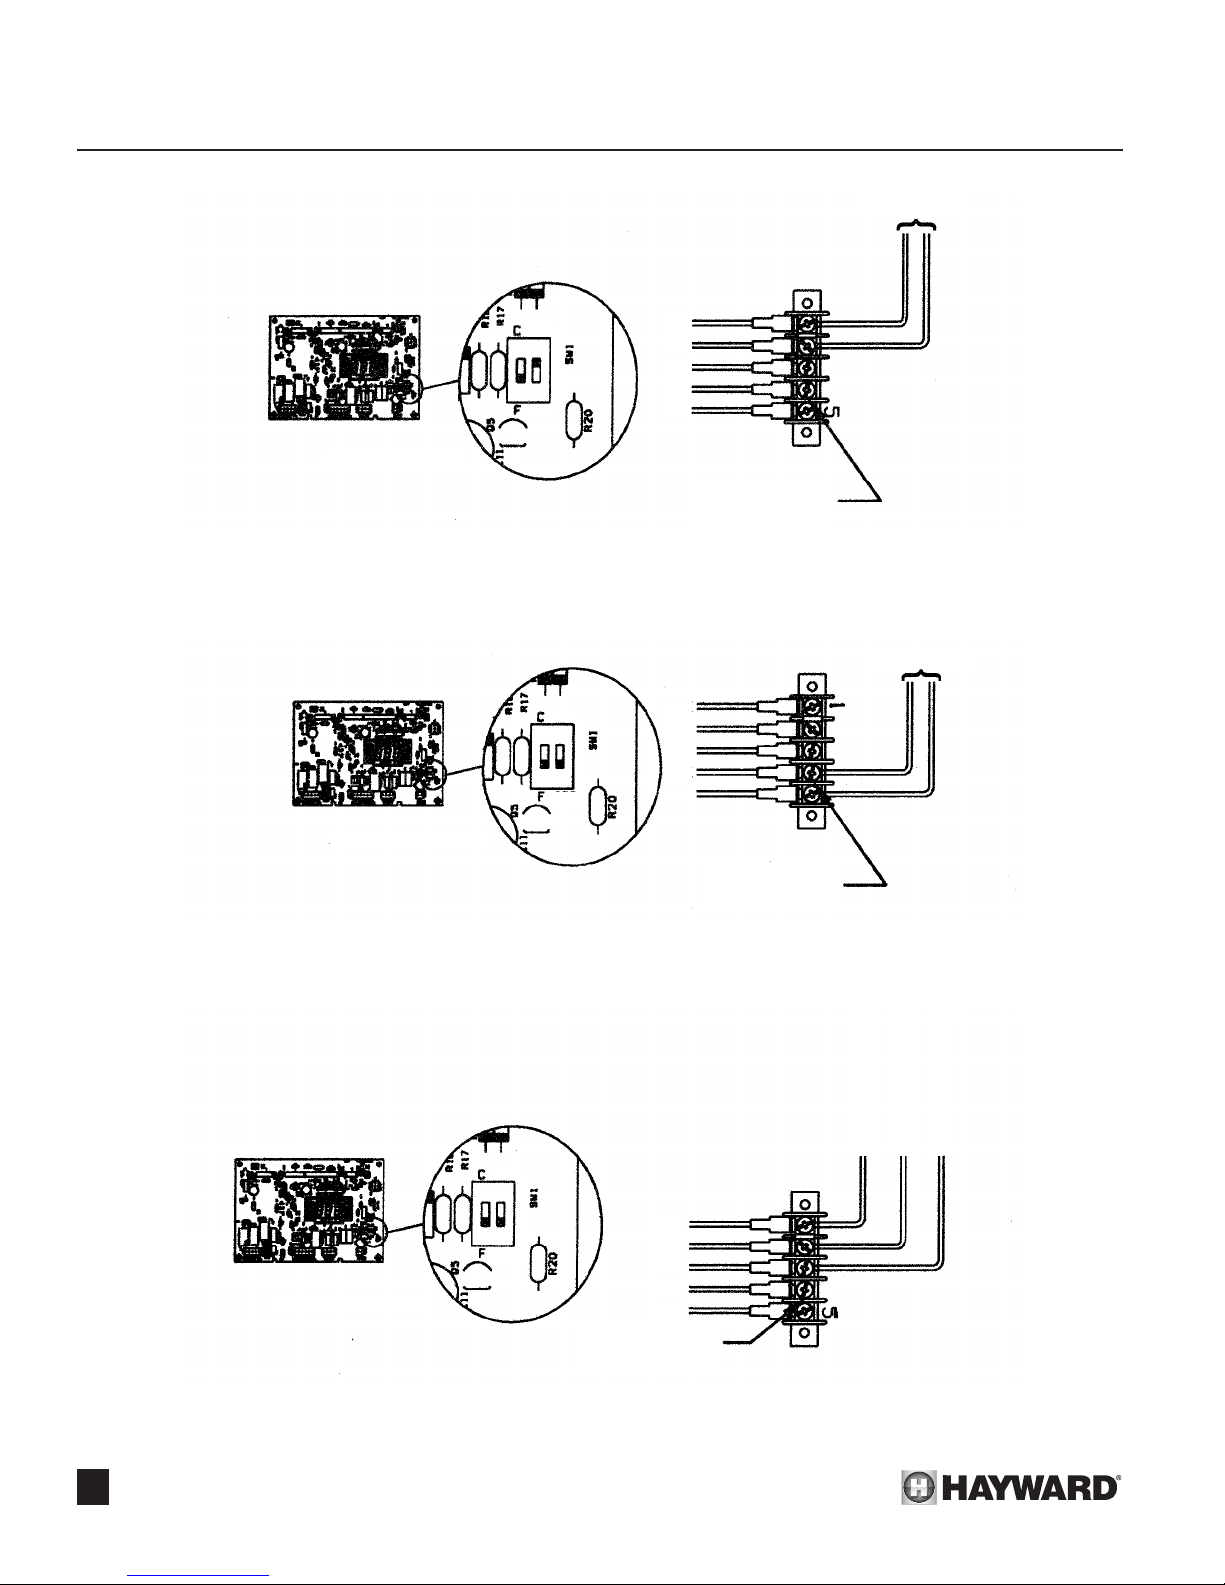
ELECTRONIC HEATERS:
Use 22 AWG wire for runs less than 30 feet. For run over 30
feet, use 20 AWG wire. Runs should not exceed 200 feet.
The terminal block for connecting remote switches is located
to the right of the electrical junction box. The dipswitch for disabling the heater’s temperature thermostat is located on the circuit board. The setting of this dipswitch may need to be changed
depending on the type of remote that is connected to the heater.
2-Wire Remote Thermostat:
This type of remote has its own temperature sensor for regulating the water temperature. To disable the heater’s thermostat,
set the bypass dipswitch to the “on” position. Wire the remote to
terminals 1 & 2 of the terminal block. Do not remove the jumper
clip on terminals 4 & 5.
To operate the heater by remote thermostat, the heater’s control must be in either the “Pool” or “Spa” mode. The heater’s display will show “bO”. The “Pool” or “Spa” LED will be illuminated.
The heater will re when instructed by the remote thermostat.
The heater’s thermostat will function to limit the water temperature to a maximum of 104° F.
3-Wire Remote Switch:
A 3-wire remote allows for the “Pool” or “Spa” modes of the
heater to be remotely selected. The heater uses its internal ther-
mostat to regulate the water temperature.
Connect Pool/Low of the remote to terminal 1, Common
to terminal 2, and Spa/High to terminal 3. Do not remove the
jumper clip on terminals 4 & 5. The bypass dipswitch should be
kept in the off position.
To operate the heater with a remote 3-wire switch, the
heater’s control must be in the “Standby” mode. The Standby
LED will be illuminated. When the remote switch is set to “Pool/
Low”, the Pool LED will be energized and the display will show
the Pool water temperature. When the remote switch is set to
“Spa/High”, the Spa LED will be energized and the display will
show the Spa water temperature. The heater will use its internal
thermostat to regulate the water temperature to the set point of
the mode selected.
MILLIVOLT HEATERS:
A terminal block for connecting 2-wire remote thermostats or
switches is located on the Intermediate Panel.
Use a high quality 22 AWG wire with corrosion resistant connections. Runs should not exceed 25 feet.
After hook-up is complete, turn thermostat to its maximum
setting and move the system switch to on.
2-Wire Remote Switch:
This type of remote allows for the heater to be remotely
turned off or on. The heater uses its internal thermostat to regulate the water temperature.
Connect this type of remote to terminals 4 & 5. Remove the
jumper clip from 4 & 5. The bypass dip-switch should be kept in
the off position.
The heater’s internal thermostat will regulate the water
temperature. Whenever the remote switch is off, heater will be
disabled and the display will show “LO”.
17
Page 20
SECTION 3. INSTALLATION
To Remote
ON
BYPASS
OFF
Bypass Switch (On)
PK
W
R
BK
P
Connection to 2-wire Remote Thermostat
ON
BYPASS
OFF
Bypass Switch (Off)
PK
W
BK
R
R
Jumper Clip
Do not remove
Jumper Clip
Remove
To Remote
18
Connection to 2-wire Remote On/Off Switch
Bypass Switch (Off)
ON
BYPASS
OFF
PK
W
R
BK
R
Jumper Clip
Do not remove
Connection to 3-wire Remote
To remote common
To remote pool/low
To remote spa/high
Page 21
SECTION 4. INSTALLER CHECKOUT & START-UP
GENERAL:
Some of the following procedures will require the heater to be
operating. Full lighting and shutdown instructions are included
on the lighting instructions label secured inside the cabinet. The
instruction labels are shown in Figures 39 and 40. The millivolt
heater must be lit manually. The electronic ignition models are lit
automatically on each call for heat.
Water must be owing through the heater during operation.
Check that the pump is operating and the system is lled with
water and purged of all air, prior to starting heater.
GAS LINE TESTING:
The appliance and its gas connection shall be leak tested
before placing the appliance in operation. The heater and its
individual shutoff valve must be disconnected from the gas
supply piping system during any pressure testing of that system
at test pressures in excess of 1/2 psig (3.45 kPa). The heater
must be isolated from the gas supply piping system by closing
its individual manual shutoff valve during any pressure testing of
the gas supply piping system at test pressures equal to or less
than 1/2 psig (3.45 kPa).
Gas supply line must be capped when not connected. After
pressure testing, reconnect the gas piping to the gas valve. Turn
gas supply on and test all pipe and pilot tubing joints for leaks.
Use a soap and water solution. Bubbles forming indicate a leak.
Never use an open ame (match, lighter, torch, etc.) as a
leak could cause an explosion or injury. Shut off gas and
x even the smallest leak right away. Be sure to leak test main
burner and pilot tube ttings using above procedure once heater
is in operation.
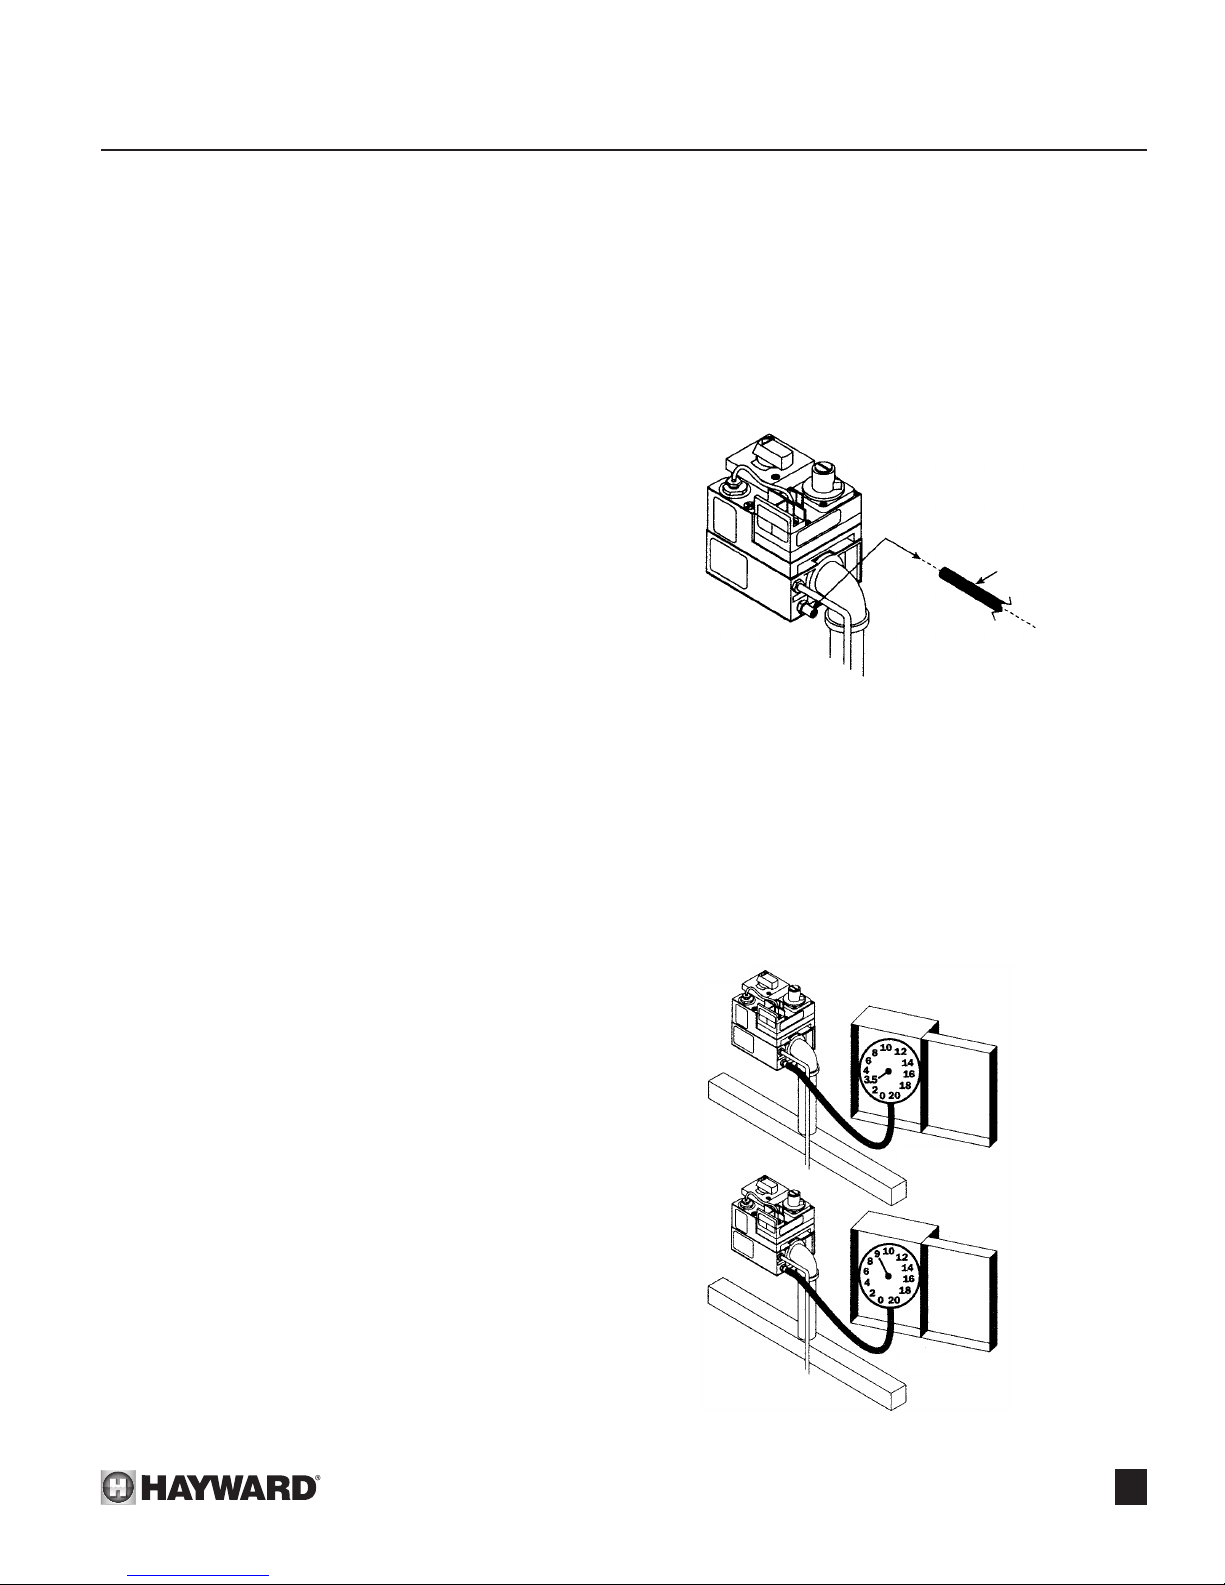
GAS PRESSURE TEST PROCEDURE:
The following gas pressure requirements are important to
the proper operation of the burners and pilots in gas heaters.
Improper gas pressure or gas volume will create the following
conditions:
! SAFETY WARNING: Do not remove the 1/8” plug with the
gas valve in the “ON” position. The gas valve must be in the
“PILOT” or “OFF” position when the plug is removed.
2. Remove 1/8” plug from gas valve.
3. Install 1/8” pipe nipple into gas valve.
4. Attach manometer to the 1/3” pipe nipple. See Figure 34.
MANOMETER
TUBE
Figure 34: Gas Pressure
5. Turn on water system and start heater following the light-
ing instructions on the label inside the cabinet. If there is
more than just the pool/spa heater connected to the gas
supply line, turn each of those appliances on while testing
the heater.
6. Take pressure reading with the heater running. Propane
gas must have 9” W.C. (water column pressure). Natural
gas must have 3.5” W.C. See Figure 35.
1. Flame burns totally yellow.
2. Flame lifts off burner.
3. Heat exchanger soots up.
4. Pilot outage on millivolt heaters.
The pressure regulator on all H-Series heaters is preset at
the factory and normally needs no adjustment. If gas pressure
is inadequate, check for undersized piping between meter and
heater or for low capacity gas meter.
A. GAS PRESSURE TEST PROCEDURE:
1. Obtain necessary equipment:
a. Manometer to read pressure in inches
of water column.
b. 1/8” nipple (1/8” pipe thread x 1” long).
c. 5/16” open end wrench.
d. Screwdriver.
NATURAL
PROPANE
Figure 35: Gas Pressure Reading
19
Page 22
SECTION 4. INSTALLER CHECKOUT & START-UP
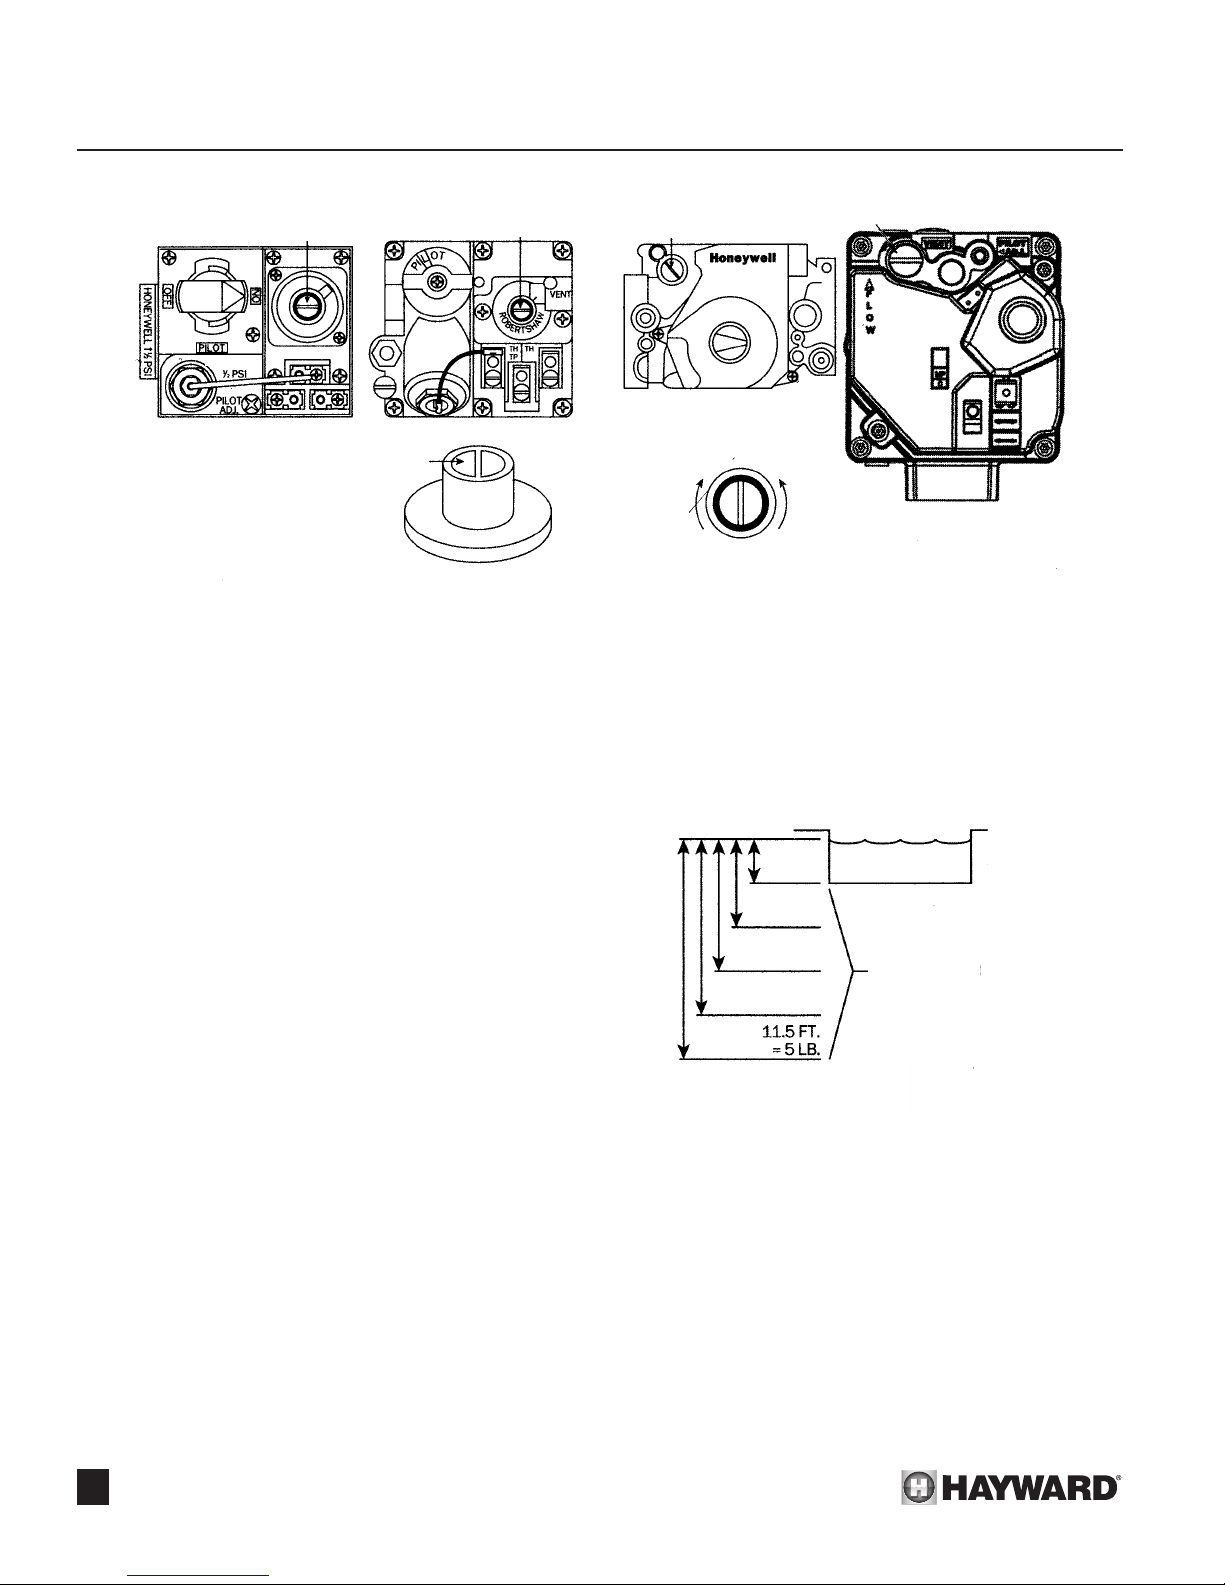
MILLIVOLT ELECTRONIC
HONEYWELL
ADJUSTMENT
SCREW
ROBERTSHAW
ON
OFF
ADJUSTMENT
SCREW
ADJUSTMENT
SCREW
HONEYWELL
ADJUSTMENT SCREW WHITE-RODGERS 36H
HONEYWELL
ACCESS SCREW
Figure 36: Valve Adjustment Screw
7. If the gas pressure does not meet the above require-
ments the regulator must be adjusted.
B. GAS PRESSURE REGULATOR
ADJUSTMENT PROCEDURE:
1. Remove access screw from the pressure regulator.
2. Turn regulator adjustment screw clockwise to increase
pressure and counterclockwise to decrease pressure.
Replace access screw. See Figure 36.
! SAFETY WARNING: Do not remove the 1/8” pipe nipple with
the valve in the “ON” position. The valve must be in the “PILOT”
or “OFF” position when the plug is removed.
3. Remove 1/8” pipe nipple and replace 1/8” plug. If proper
pressure cannot be achieved by adjusting the regulator,
the installer must contact the gas supplier and request
that the inlet pressure to the heater be set as follows:
Natural gas - 7” W.C., Propane gas -11” W.C. The inlet
gas pressure must not exceed 10.5” W.C. (water column pressure) for Natural gas or 13” W.C. for Propane
gas. Exposure to higher pressures can damage the gas
control valve, causing leaks or diaphragm rupture. This
damage could result in re, explosion or burner overring
leading to carbon monoxide poisoning. Minimum inlet gas
pressure is 5.0”W.C. for Natural and 10” W.C. for Propane
for the purpose of input adjustment.
ON
OFF
OFF
ON
INCREASE
PRESSURE
DECREASE
PRESSURE
4. Turn lter pump off, adjust pressure switch control. (See
“Pressure Switch” on Page 32.)
5. Check pressure switch function by turning lter pump on and
off causing heater to respond on or off. If heater is installed
beyond pressure limits, a ow switch must be installed in
water line to heater.
WATER LEVEL
2.3 FT.
= 1 LB.
4.6 FT.
= 2 LB.
6.9 FT.
= 3 LB.
9.2 FT.
= 4 LB.
1 FT. HEIGHT = 0.4331 LBS.
1 LB. = 2.31 FT. HEIGHT
HEATER
INSTALLATION
LEVELS
Figure 37: Heater Installation Below Pool
TWO SPEED PUMP:
INSTALLATION BELOW
POOL/SPA SURFACE:
1. Clean lter thoroughly.
2. Set heater thermostat to highest setting.
3. Start lter pump. Make sure all air is out of water lines and
complete system is full of water.
20
In a few cases, the pressure from a two speed pump is below
the one pound minimum required to operate the heater. This is
apparent when the pressure switch cannot be further adjusted.
In these cases the pump must be run at high speed to operate
heater. If the pump and piping arrangements are such that the
required one pound minimum pressure cannot be obtained, do
not attempt to operate the heater. Correct the installation.
Heater installation, check-out and start-up should now
be completed. BE SURE to leave Installation, Operation &
Service Procedures Manual with consumer.
Page 23

SECTION 5. CONSUMER OPERATION & MAINTENANCE PROCEDURES
Failure to Maintain Proper Water Chemistry May Cause
This additional information is intended to provide the most current and up-to-date information to the customer.
Please refer the the below text, in add
ition to the manual for information and warnings about your product.
Models H150, H200, H250, H300, H350, H400
Addendum to H-Series Heater Manual
FOR YOUR SAFETY - READ BEFORE OPERATING
WARNING:
The heat exchanger in your Hayward pool heater is made from the highest quality of copper and nickel (Cupronickel) materials.
The premium materials and the exacting processes used in the manufacture of the heat exchanger is state of the art in pool heater
design and manufacture. Yet, it remains vital that the heat exchanger be protected from damaging or corrosive chemicals, insufcient water ow or improperly balanced water chemistry. Heat exchanger damage or failure resulting from improper ow, improperly
balanced pool water or the improper addition of sanitizers into the water is NOT covered under the terms of your warranty.
The factors outlined on page 3 of this manual are critical to heat exchanger protection. Follow these guidelines to help prevent
premature damage or failure to your heater and heat exchanger.
Premature Heat Exchanger Damage or Failure
HEATER OPERATION:
Full lighting and shutdown instructions are included on the Sighting instructions label secured inside the cabinet. The instruction
labels are shown in Figures 39 and 40. The millivolt heater must be lit manually. The electronic ignition models are lit automatically
on each call for heat.
! WARNING: If you smell gas in the appliance area or near the oor (PROPANE IS HEAVIER THAN AIR AND HENCE SETTLES
ON THE FLOOR), stop and follow instructions on front cover. Since propane can accumulate in conned areas, extra care should be
taken when lighting propane heaters. It is always a safe practice to keep your head well away from the lower rebox opening when
lighting the heater.
! NOTE: Do not use the unit below 40°F temperature with out adequate temperature protection. Do not operate heater while
an automatic pool cleaner is in use unless the ow rate has been checked as correct under operation with the pool cleaner and a
dirty lter.
21
Page 24
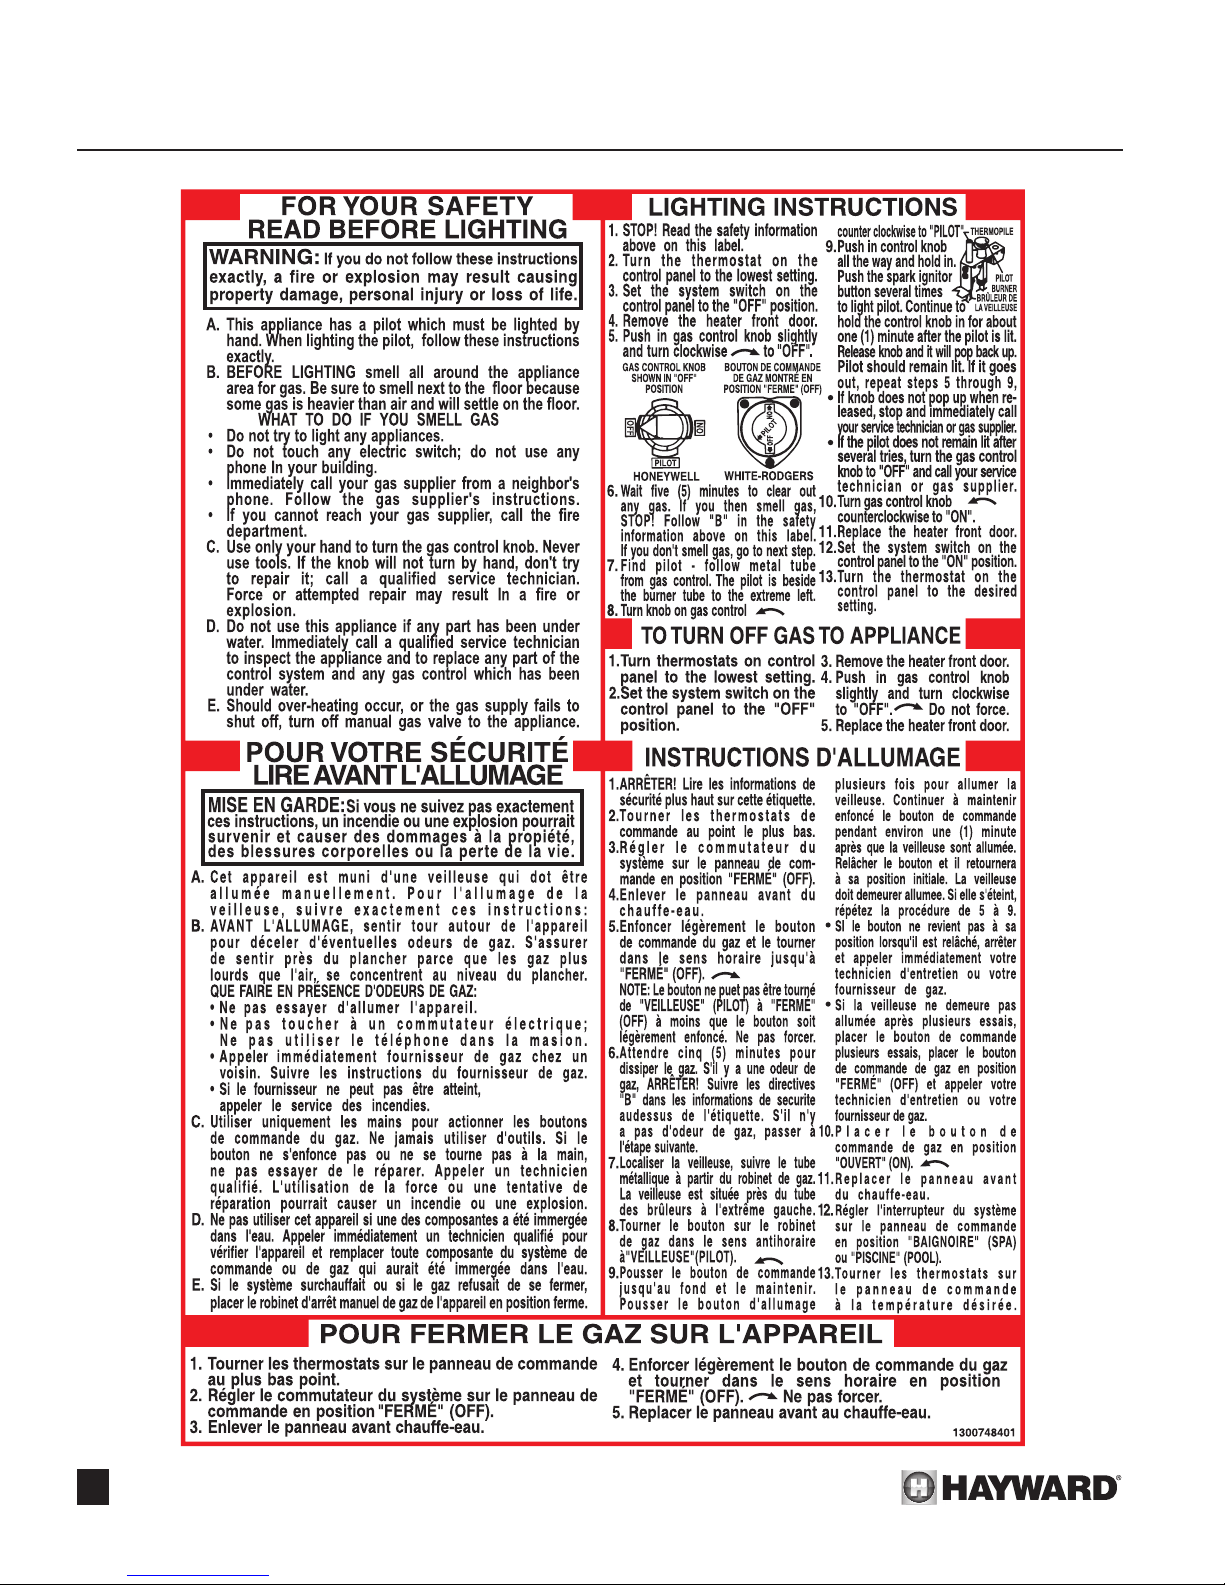
Please mark up any changes below. Your approval indicates your complete
acceptance of the decal produced. PLEASE sign and e-mail or fax to 630-325-9860
NOTE: YOUR DELIVERY DATE IS CONTINGENT UPON OUR RECEIPT.
Proof approved
Proof approved with changes/corrections
Resubmit proof
Signature / Date
NOTE: THIS IS NOT A COLOR PROOF - ACTUAL COLORS MAY VARY BASED ON MATERIAL SPECIFIED
COLOR IS FOR SEPARATIONS ONLY - PLEASE SEE YOUR COLOR SWATCH FOR EXACT COLORS.
10.00”
SECTION 5. CONSUMER OPERATION & MAINTENANCE PROCEDURES
22
Page 25
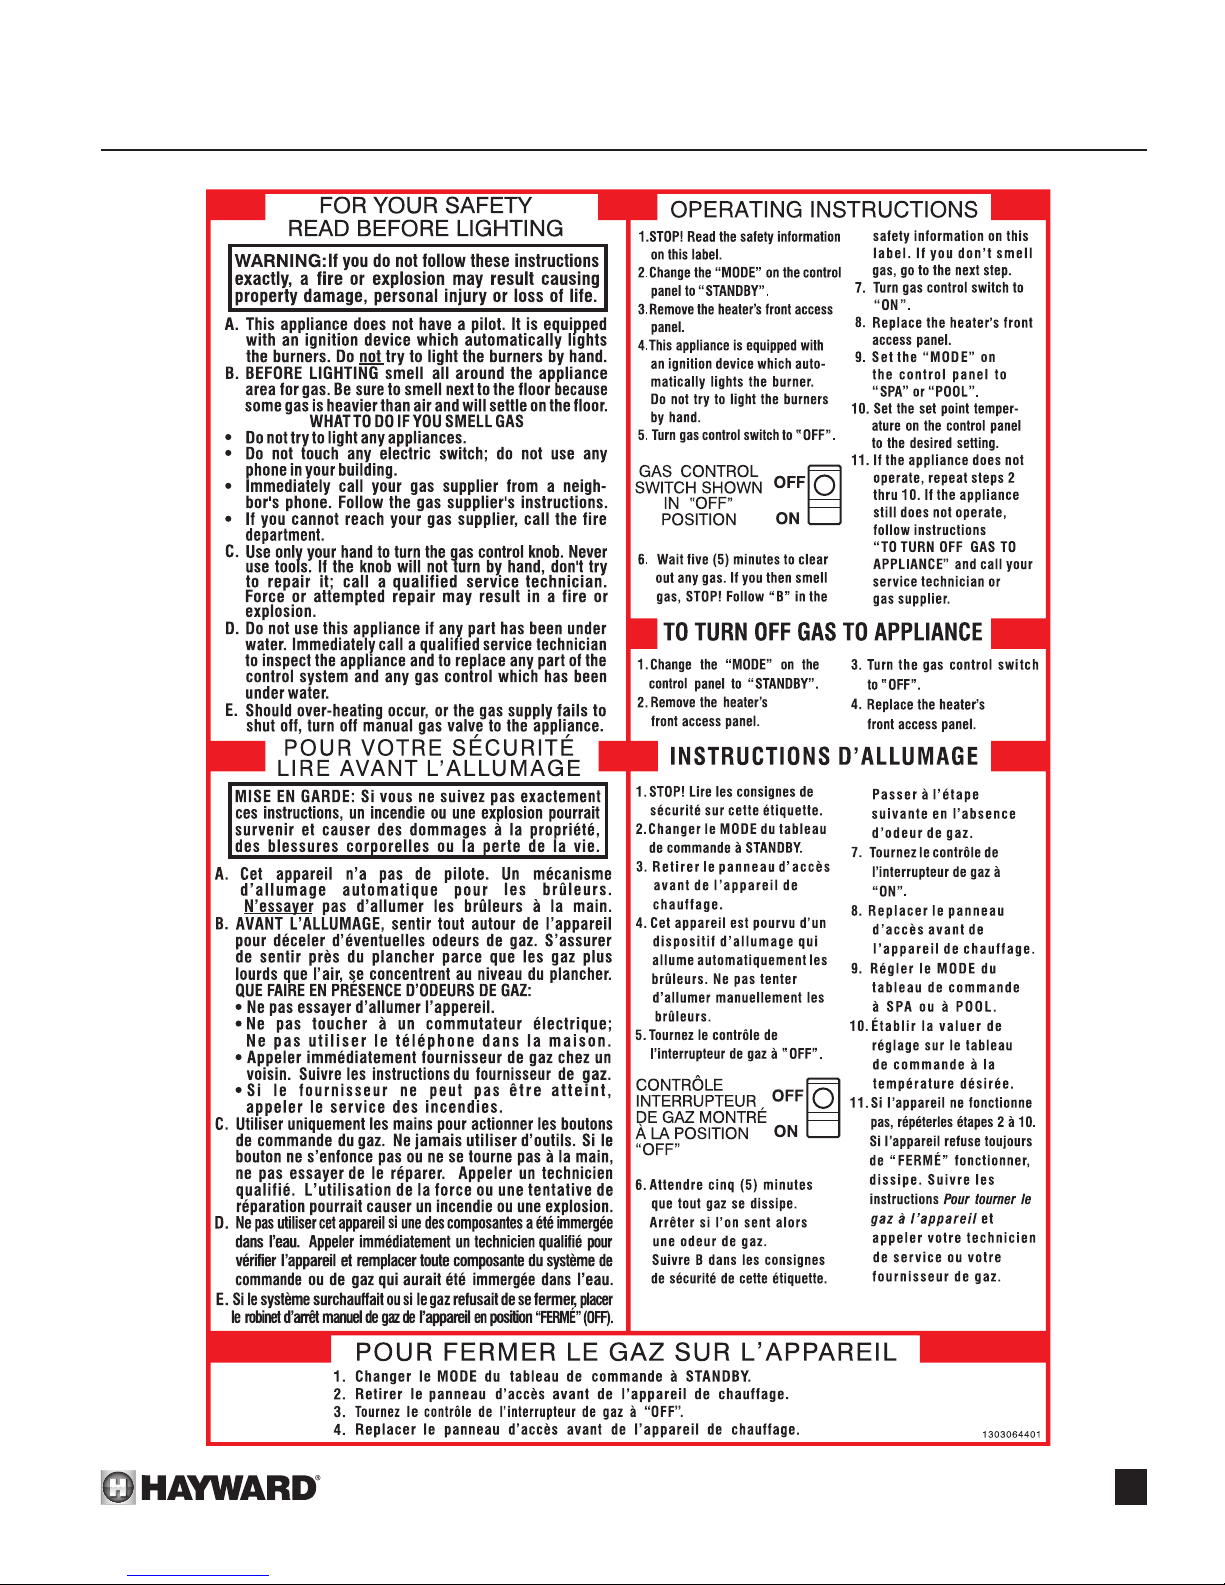
PROOF APPROVAL
Please mark up any changes below. Your approval indicates your complete
acceptance of the decal produced. PLEASE sign and e-mail or fax to 630-325-9860
NOTE: YOUR DELIVERY DATE IS CONTINGENT UPON OUR RECEIPT.
Proof approved
Proof approved with changes/corrections
Resubmit proof
Signature / Date
NOTE: THIS IS NOT A COLOR PROOF - ACTUAL COLORS MAY VARY BASED ON MATERIAL SPECIFIED
COLOR IS FOR SEPARATIONS ONLY - PLEASE SEE YOUR COLOR SWATCH FOR EXACT COLORS.
10.00”
SECTION 5. CONSUMER OPERATION & MAINTENANCE PROCEDURES
23
Page 26
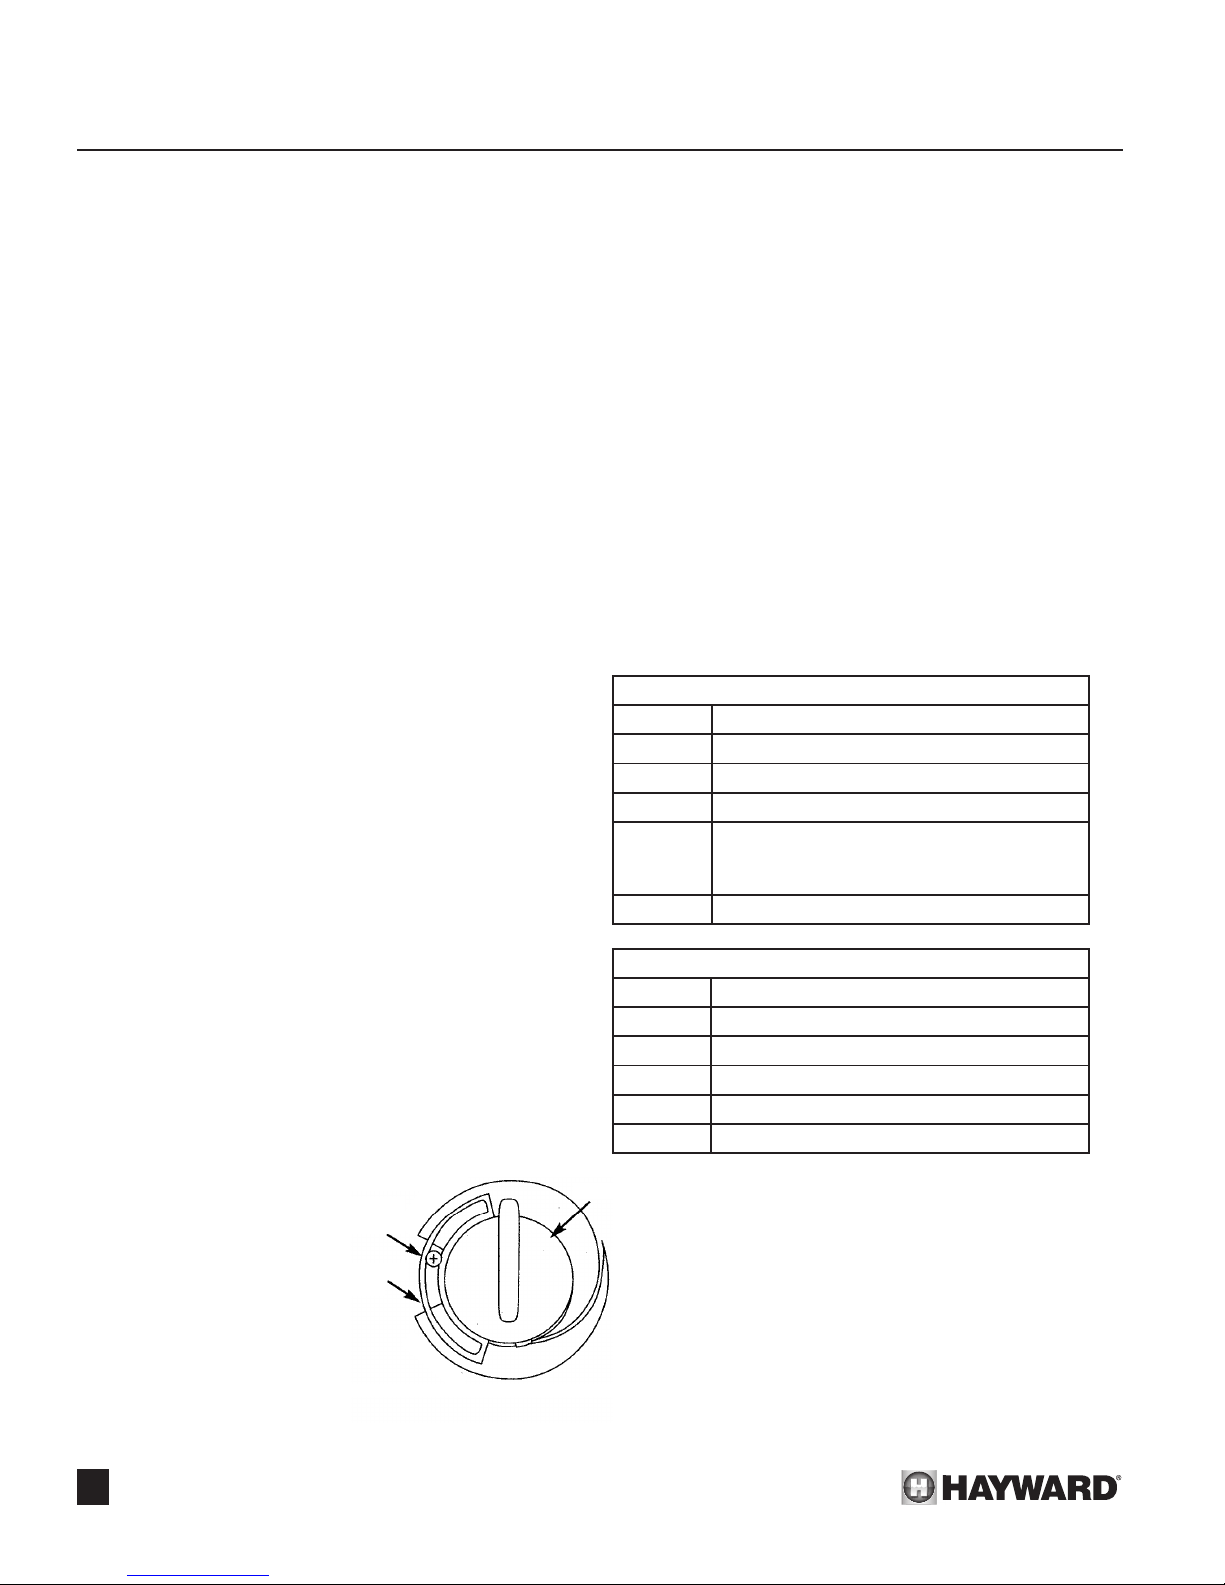
SECTION 5. CONSUMER OPERATION & MAINTENANCE PROCEDURES
! Warning:
Do not ingest alcohol or drugs during use or prior to using
pool, spa or hot tub. Ingestion of such intoxicants can cause
drowsiness which can lead to unconsciousness, and subse-
quently result in drowning.
Do not heat pool, spa or hot tub water in excess of 102°F.
A temperature of 100°F is considered safe for a healthy adult.
Hotter water increases the risk of hyperthermia. Special caution
is suggested for younger children.
Pregnant women beware! Soaking in water above 102°F
(39°C) can cause fetal damage during rst three months of
pregnancy (resulting in the birth of a brain-damaged or deformed
child). Pregnant women should adhere to the 100°F (38°C)
maximum rule.
Before entering the spa or hot tub, users should check the
water temperature with an accurate thermometer; spa or hot
tub thermostats may err in regulating water temperatures by as
much as four degrees Fahrenheit (2.2°C).
Persons with medical history of heart disease, circulatory
problems, diabetes, or blood pressure problems should obtain
their physician’s advice before using spas or hot tubs.
Persons taking medications which induce drowsiness, such
as tranquilizers, antihistamines or anticoagulants, should not use
spas or hot tubs.
If the pool/spa is used for therapy, it should be done with the
advice of a physician. Always stir pool/spa water before entering
the pool/spa to mix in any hot surface layer of water that might
exceed healthful temperature limits and cause injury.
Do not tamper with controls, because scalding can result if
safety controls are not in proper order.
Electronic Heaters
Electronic heaters are provided with a digital temperature
control that can be set to heat either the pool or spa. The digital
temperature control is located on the control panel. The digital
thermostat contains a mode key, up and down temperature
adjustment keys, a LED display, and ve status LED’s.
To turn the heater on, toggle the “MODE” key to “POOL:’
or “SPA”. The water temperature will be displayed. To display
the “POOL” or “SPA” set point, press the UP or DOWN key.
The set point will ash while being displayed. To adjust the set
point, press the UP or DOWN key until the desired set point
is displayed. The display will revert back to showing the water
temperature after about 15 seconds. The temperature can be
displayed in either Fahrenheit or Celsius. To change to Celsius,
move the position of the #1 “Dip Switch” (located on the back of
the circuit board) to “C”.
In the POOL or SPA modes, the actual water temperature is
shown on the display. The Heating LED illuminates whenever
the heater res. If an abnormal condition is detected, the Service
LED illuminates and a diagnostic code is displayed. Lists of the
indicator LED’s and diagnostic codes are shown below:
Status LED
LED Explanation
STANDBY Illuminates when the heater is “off”.
SPA Illuminates when the heater is in the SPA mode.
POOL Illuminates when the heater is in the POOL mode.
SERVICE Illuminates when an abnormal condition has been
detected. A diagnostic code will be shown on the
display.
HEATING Illuminates when the heating is in progress.
Temperature Controls:
Millivolt Heaters
Millivolt heaters are provided with a mechanical thermostat.
The thermostat and system switch are mounted on the control
panel. The thermostat controls the pool or spa temperature.
The system switch allows one to turn the heater on or off. See
Figure 41.
The memory stop provides
a manual means of locking the
desired maximum temperature setting of the pool or spa.
Once the desired temperature
setting of the knob has been
determined, the memory stop
is adjusted by loosening a set
screw, rotating the memory stop
to the knob setting, and retightening the set screw. The water
temperature should be set
and checked with an accurate
thermometer immersed in the
pool or spa.
24
SET
SCREW
MEMORY
STOP
Temperature Controls
M
U
M
I
N
I
M
MAXIMUM
Figure 41:
Diagnostic Codes
Code Explanation
SF Thermistore failure.
HS Maximum water temperature exceeded.
LO Limit string open.
IF Ignition Failure
HF Flame sense failure
KNOB
Periodic inspection:
The H-Series heater is designed and built for long
performance life when installed and operated according
to the manufacturer’s directions. Regular inspection by
qualied service personnel is recommended to keep the
heater operating properly. The following inspection points
are suggested to help maximize heater life:
Page 27
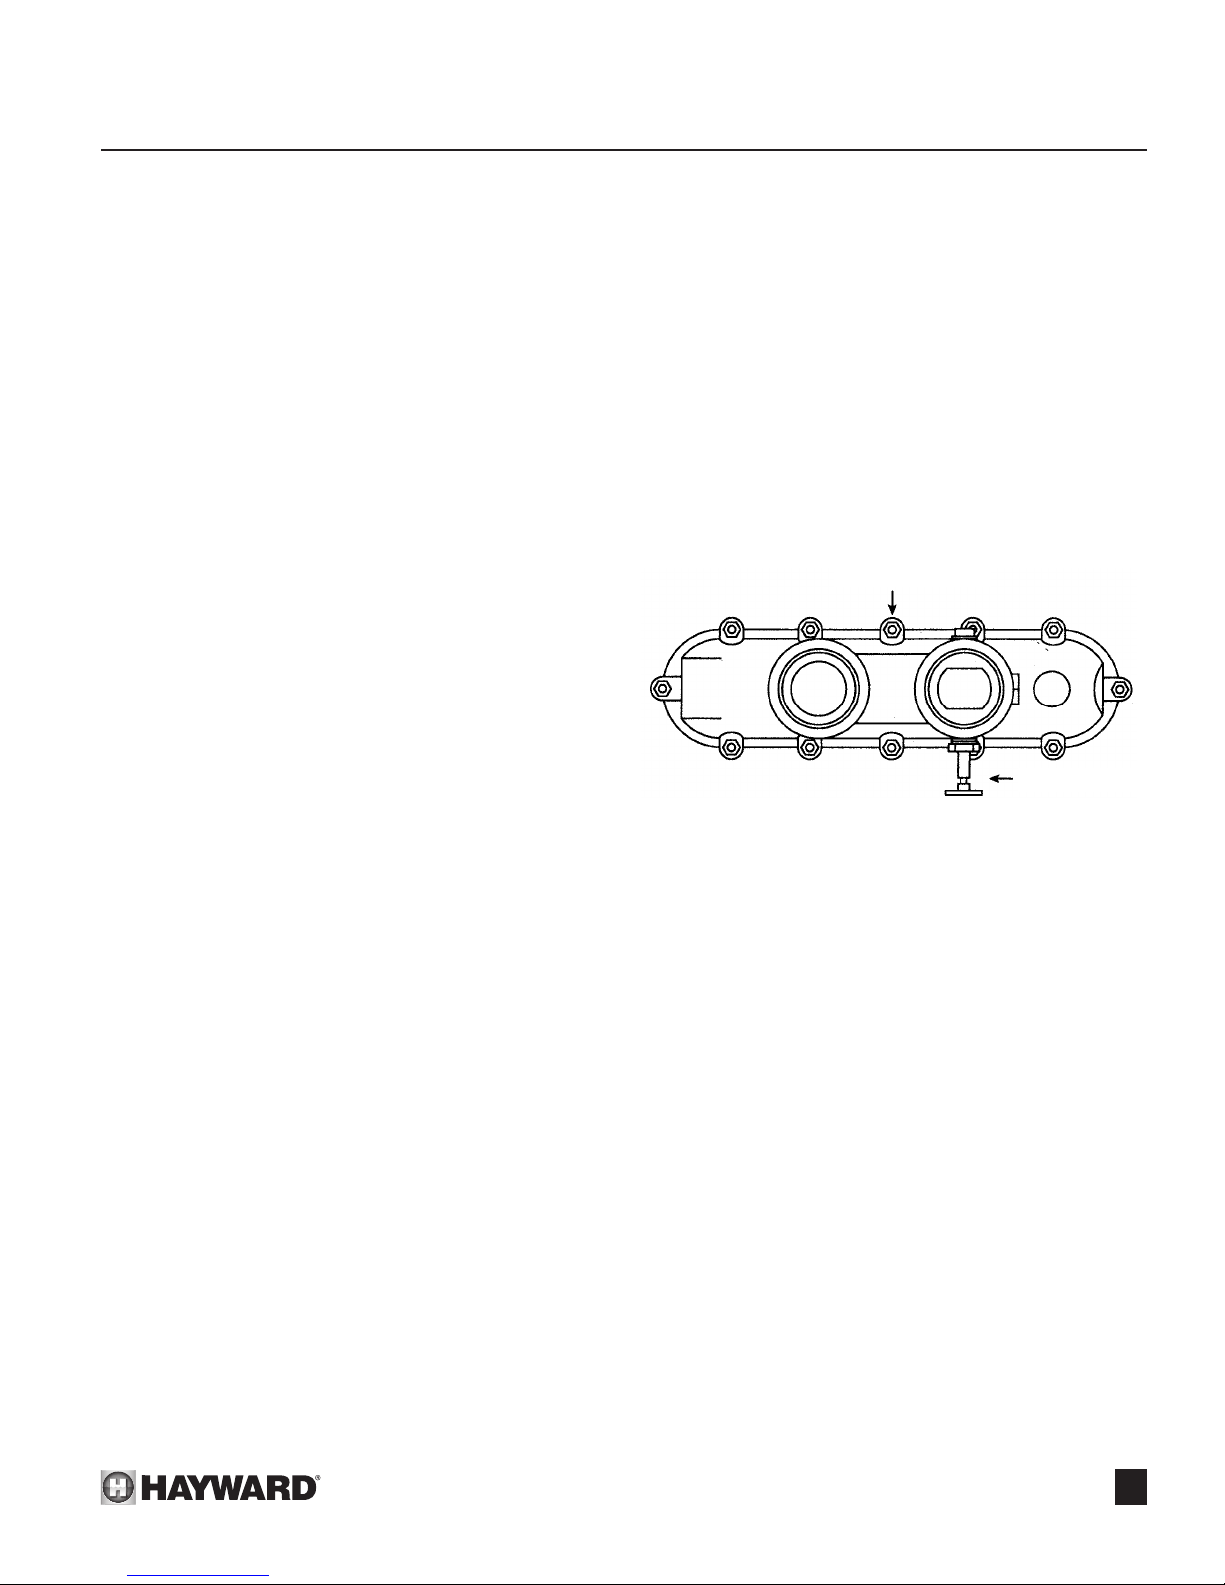
SECTION 5. CONSUMER OPERATION & MAINTENANCE PROCEDURES
1. Periodically check the venting system on outdoor heaters. The
heater’s venting areas must never be obstructed in any way
and minimum clearances must be observed to prevent restric-
tion of combustion and ventilation air. Remember shrubs grow
and in time may obstruct a heater’s venting areas.
2. Check the venting on indoor heaters for looseness and possible leaks. Keep all openings for combustion and ventilation
air clear and unobstructed.
3. Keep the entire pool heater area clean and free of all debris,
combustible materials, gasoline and other ammable vapors
and liquids. Remove any leaves or paper from around the
heater.
4. Do not store chlorine, other pool chemicals, or other corrosives in the vicinity of the heater.
5. If heater is operating on Propane gas, Propane tank must not
fall below 30% full or damage to the heater may occur. Hay-
ward will not be responsible for heaters that soot up due to
improper gas level in tank resulting in inadequate gas volume.
6. If another appliance is added to the gas line at a later date,
consult local gas company to be sure the gas line will have
the capacity to supply both units at full capacity at the same
time.
7. Do not use the heater if any part has been under water.
Contact a qualied service technician to inspect the entire
heater and replace any part of the control system or gas valve
that was under water. If heater has been totally submerged in
water, replace the entire heater.
8. An inspection program is a good preventative maintenance
measure. Keep this manual in a safe place for future reference and also for a service technician when inspecting or
servicing heater. Additional inspection procedures to be
performed by a qualied service technician are covered in
Section VI. of this manual.
Opening drain valve: (see Figure 42.)
(Above Pool Installations Only)
1. Turn heater thermostat(s) down to minimum setting. Set system switch to “OFF” position. Turn electricity off if heater has
electronic ignition.
2. Turn heater gas valve to “OFF” position.
3. Turn manual gas valve outside of heater to off position.
4. Be sure circulating pump is off.
5. Open drain valve on front header and allow all water to drain
from heater.
6. Leave drain valve open until spring startup.
FRONT HEADER
DRAIN VALVE
Figure 42: Drain Valve Location
Spring start-up:
Winterization:
In moderate climate, the heater can continue to operate dur-
ing short term cold spells. Do not use the heater to maintain the
water temperature just above freezing or for freeze protection.
Care must be taken to avoid freeze-ups in the heater. When it is
used during freezing weather, the pump must run continuously.
The heater is not warranted against freeze-ups.
In regions where freezing temperatures are encountered,
all water must be drained from the heater when out of service,
to prevent damage to the heater and piping. Draining heat
exchanger is recommended as part of the season’s shut-down
procedures.
A HEATER DAMAGED BY FREEZING IS NOT COVERED
UNDER THE MANUFACTURER’S WARRANTY.
1. Inspect and clean heater, being sure heater is free of leaves
and debris prior to startup.
2. Be sure inlet and outlet piping are properly attached to the
unit and the drain valve is closed.
3. Turn ltration system pump on and allow system to run long
enough to purge all air from the lines.
4. Turn manual gas valve outside of heater to on position.
5. MILLIVOLT HEATERS: Follow heater lighting instructions for
lighting pilot and turn heater gas valve to “ON” position.
ELECTRONIC IGNITION HEATERS: Turn electricity on, follow heater operating instructions and turn gas valve to the
“ON” position.
6. Set system switch to “ON” for single thermostat heaters or to
“POOL” or “SPA” position for dual thermostat heaters and turn
thermostat(s) to desired temperature setting. Keep water at a
safe temperature.
7. If operating difculties are encountered, contact a qualied
service company for assistance.
25
Page 28
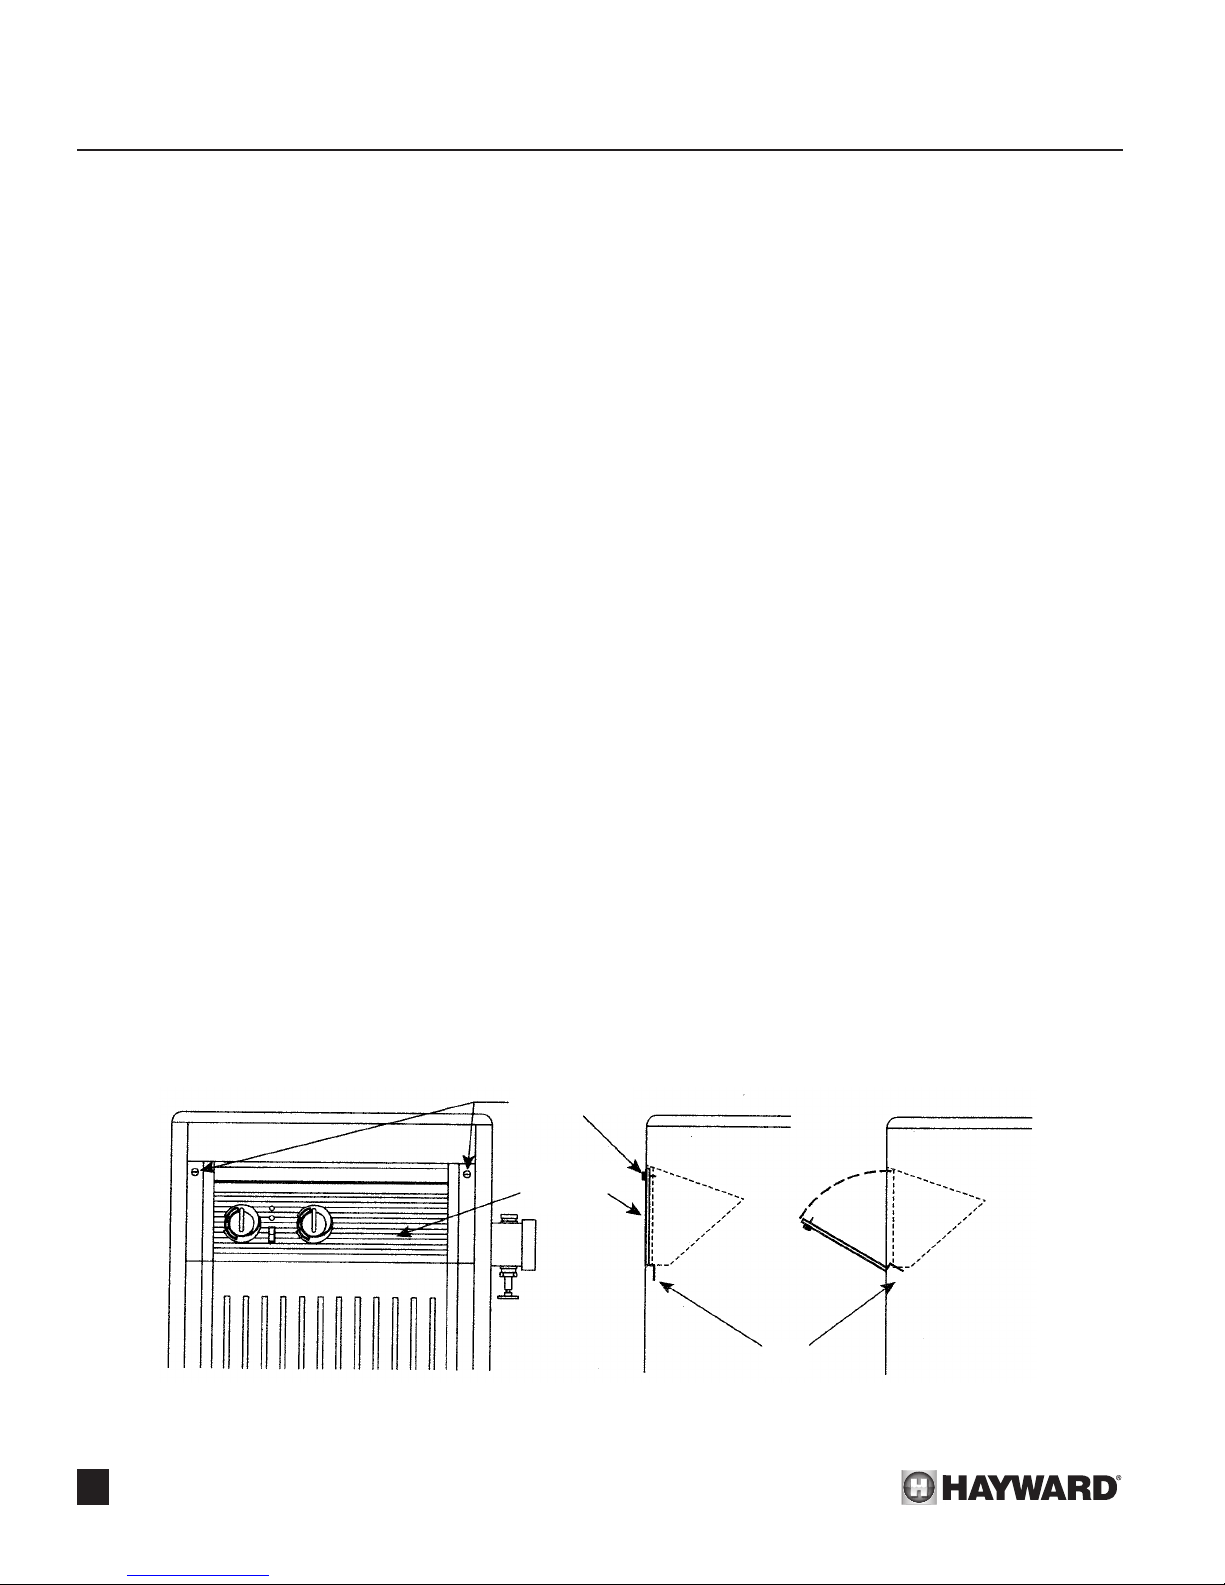
SECTION 6. QUALIFIED TECHNICIAN - MAINTENANCE/SERVICING
General:
! lMPORTANT: Only qualied service technicians, having
appropriate test equipment, should be allowed to service the
heater. Bear in mind that all of the components that comprise the
system have an effect on the heater operation. Before proceed-
ing with heater related troubleshooting tips covered in Section
VII, be certain that the pump is operating correctly, the lters and
strainers are not blocked, the valves in the piping are properly
positioned and the time clocks are properly set.
! WARNING: Do not attempt to repair any components of
heater. Do not modify heater in any manner. To do so may result
in a malfunction which could result in death, personal injury, or
property damage. Check with consumer to see if any part of
heater has been under water. Replace any part of the control
system and any gas control which has been under water. Never
use or attempt to use parts that have previously been used.
Maintenance:
The following inspection procedures are recommended to be
performed as part of annual heater maintenance and to assure
safe operation.
1. External heat exchanger.
2. Internal heat exchanger.
3. Main burner and pilot (millivolt heater only) ame patterns.
4. Main burner orices and pilot orice (millivolt heater only).
5. Operating controls.
Inspection procedures are covered below. Some of the
procedures will require disconnecting and removing wires in the
control compartment. See Control Access below.
Control Access:
Access to some of the operating controls is gained by removing the control panel on the front of the heater. See Figure 43.
1. Turn the two screws counterclockwise which secure the
control panel door.
2. Open the control panel to access the operating controls.
3. ! CAUTION: Label all wires prior to disconnection when
servicing controls. Wiring errors can cause improper and
dangerous operation.
4. Verify proper operation after servicing.
5. After servicing is complete close control panel door and
secure by turning screws clockwise.
External heat exchanger inspection
and cleaning:
Inspect the external surfaces of the heat exchanger for soot
accumulation. If soot has accumulated on the tubes it must be
removed and its cause must be corrected.
Soot on a heat exchanger may be ignited by a random spark
or open ame. To prevent this from occurring, dampen any soot
deposits with a wet brush or water spray before servicing or
cleaning the heat exchanger. The soot can be removed with a
wire brush or a high velocity water spray after the heat exchanger has been removed. (See removal procedure below.) Although
the heat exchanger should be cleaned of soot and reinstalled in
the heater, the fact that sooting occurred should be investigated
as it may be indicative of some other problems, such as:
• Insufcient air supply.
• Inadequate venting.
• High or low gas pressure.
• Blockage of secondary air openings.
• Improper location of heater.
• Incorrect gas supply pipe size.
• Excessive water ow through heat exchanger.
• Low LP tank (below 30% full).
26
2 SCREWS
CONTROL
PANEL
TAB
Figure 43: Control Access
Page 29

SECTION 6. QUALIFIED TECHNICIAN - MAINTENANCE/SERVICING
Heat exchanger removal:
1. Shut off water, gas and electricity to the heater. See gure 8.
Drain heat exchanger.
2. Lift up and remove heater integral vent.
3. Remove screws from left and right side access panels and
remove the panels.
4. Remove screws from rear heat shield and remove heat shield.
5. Remove screws from top rain guard and remove rain guard.
6. Disconnect wires from limit switches on front header.
7. Remove the pressure switch tube and pull through oval slot in
the intermediate panel.
8. Millivolt Heaters Only - Remove the thermostat bulb from the
front header and reroute to opposite side of heater.
! NOTE: Using needle nose pliers to pull out copper strip
makes bulb removal easier.
9. Electronic Heaters Only - Remove thermistor from front
header.
10. Remove the four screws from the ue collector and remove
ue collector from heater.
11. Loosen union nuts and detach pool plumbing from front
header.
12. Lift heat exchanger off heater and desoot or replace as
necessary.
13. Reverse the above procedure for reassembly.
Combustion chamber:
! IMPORTANT: Inspect the FireTile™ refractory for dam-
age with the heat exchanger removed. Replace refractory as
needed. Pull out the refractory boards individually, front and
back rst, then sides. Reverse procedure for reassembly.
27
Page 30
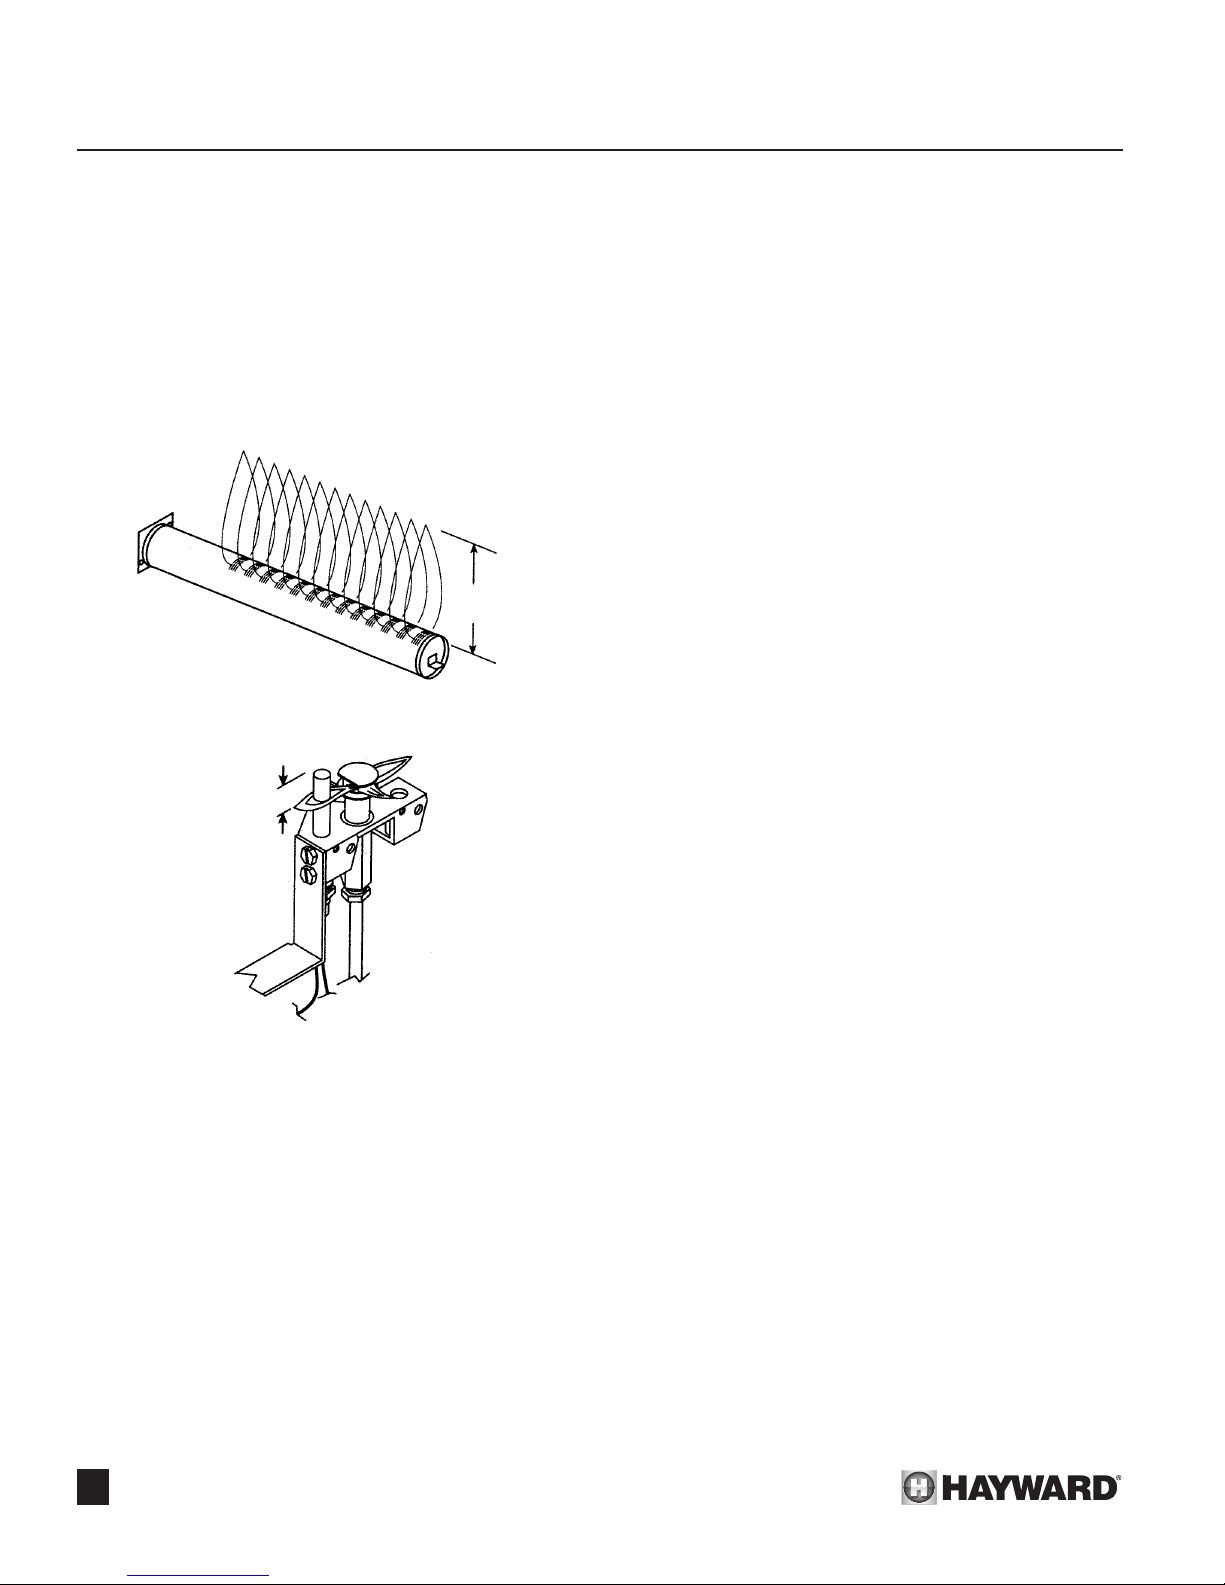
SECTION 6. QUALIFIED TECHNICIAN - MAINTENANCE/SERVICING
Burner inspection and cleaning:
With the heater on, remove the front door and make a visual
inspection of the pilot and main burners. A mirror, placed on the
heater bottom below the burners, may be necessary to view the
main burner ames. The main burner ames should be about
8-10 inches in height and should not “lift” off the ports of the
burners. See Figure 45. The ames should have well-dened
mantles with the bottom 2-3 inches blue changing over to yellow
upwards. A totally yellow or “lazy” ame may be an indication of
a fuel-rich mixture due to restricted air openings, including spider
nests in the burners and/or orices.
8”-10”
HEIGHT
Figure 45: Main Burner Flame Characteristics
3/8”
-1/2”
Burner assembly installation: (see Figure 47)
1. Guide burner assembly through intermediate panel. Lift up,
and place burner mounting bracket on the three retaining
hooks on the intermediate panel.
2. Secure the burner mounting bracket to the intermediate panel
with three bolts.
3. Reconnect wires to the gas valve and ignition module (electronic ignition only) according to the wiring diagram.
4. Reconnect gas line to gas valve. Turn on gas and check for
gas leaks. Use a soapy water solution. Bubbles forming indicate a leak. Never use an open ame (match, lighter, torch,
etc.) as a leak could cause explosion or injury.
5. To start heater, follow the lighting instructions on the label
inside the cabinet.
Gas valve replacement: (see Figure 47)
! WARNING: Do not attempt to repair gas valve. If found to be
defective replace entire valve. Attempts to repair it will void
the warranty.
1. Follow “Burner Assembly Removal” procedure.
2. Disconnect wires to gas valve including pilot generator wires
(millivolt only).
3. Disconnect pilot tubing from gas valve (millivolt only).
4. Unscrew gas valve from manifold pipe.
Figure 46: Pilot Flame Characteristics
All burners should be brushed with a wire brush and be free
of lint, dust and spider webs before each season of use. Burners
with damaged ports must be replaced. See Figure 46 for pilot
ame characteristics (millivolt heater only).
1. Shut off water, gas and electricity to the pool heater.
2. Turn gas valve knob to “OFF” and set system switch to “OFF”.
3. Remove wires and gas line from the heater gas valve.
Remove the electrode/sensor wire (electronic ignition only)
from the ignition module.
4. Remove the three bolts securing the burner mounting bracket
to the intermediate panel.
5. Lift burner assembly up and out of the three retaining hooks
on the intermediate panel and pull assembly out of heater.
5. Replace gas valve. Only use liquid pipe dope on the male
threads of the manifold. Do not place pipe dope on the rst
two threads of the pipe.
6. Reconnect wires to gas valve, including pilot generator wires
and pilot tubing (millivolt only).
7. Follow “Burner Assembly Installation Procedure”.
Pilot assembly removal: (see Figure 48)
(Millivolt Heater Only)
1. Disconnect pilot generator wires and pilot tubing from gas
heater gas valve.
2. Disconnect electrode ignitor wire from Clicklite™.
3. Remove screw securing pilot bracket to burner mounting
bracket. Lower pilot bracket to clear locating stud and remove
assembly from heater.
4. To service or replace pilot, remove two screws securing pilot
to pilot bracket and disconnect pilot tubing from pilot.
! CAUTION: Never enlarge the opening in the pilot orice.
5. Reverse the above procedures for installation. Be sure there
are no gas leaks at pilot tubing connections.
28
Page 31
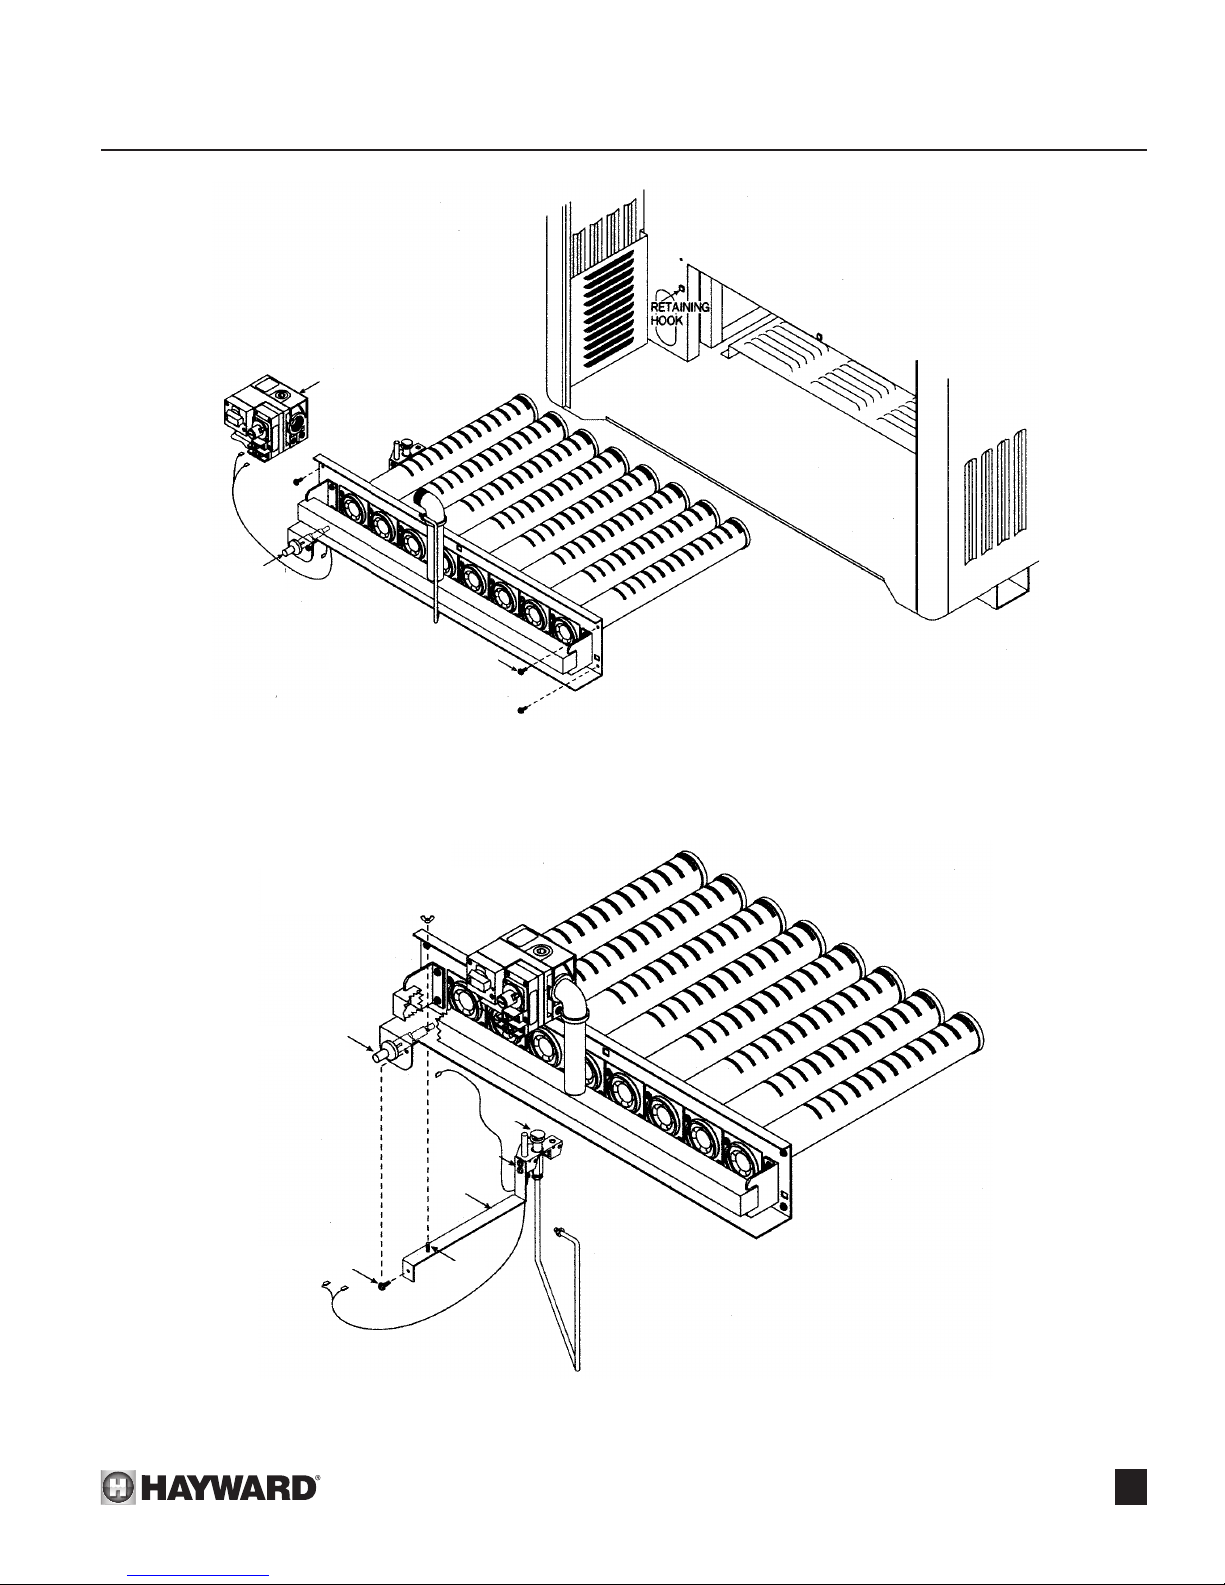
SECTION 6. QUALIFIED TECHNICIAN - MAINTENANCE/SERVICING
GAS VALVE
CLICKLITE
CLICKLITE
TM
SECURING SCREW
Figure 47: Burner Removal
SHOWN WITHOUT SURROUNDING
HEATER CABINET FOR CLARITY
TM
PILOT
2 SCREWS
BRACKET
SECURING SCREW
CLINCH
STUD
Figure 48: Pilot Assembly Removal
29
Page 32
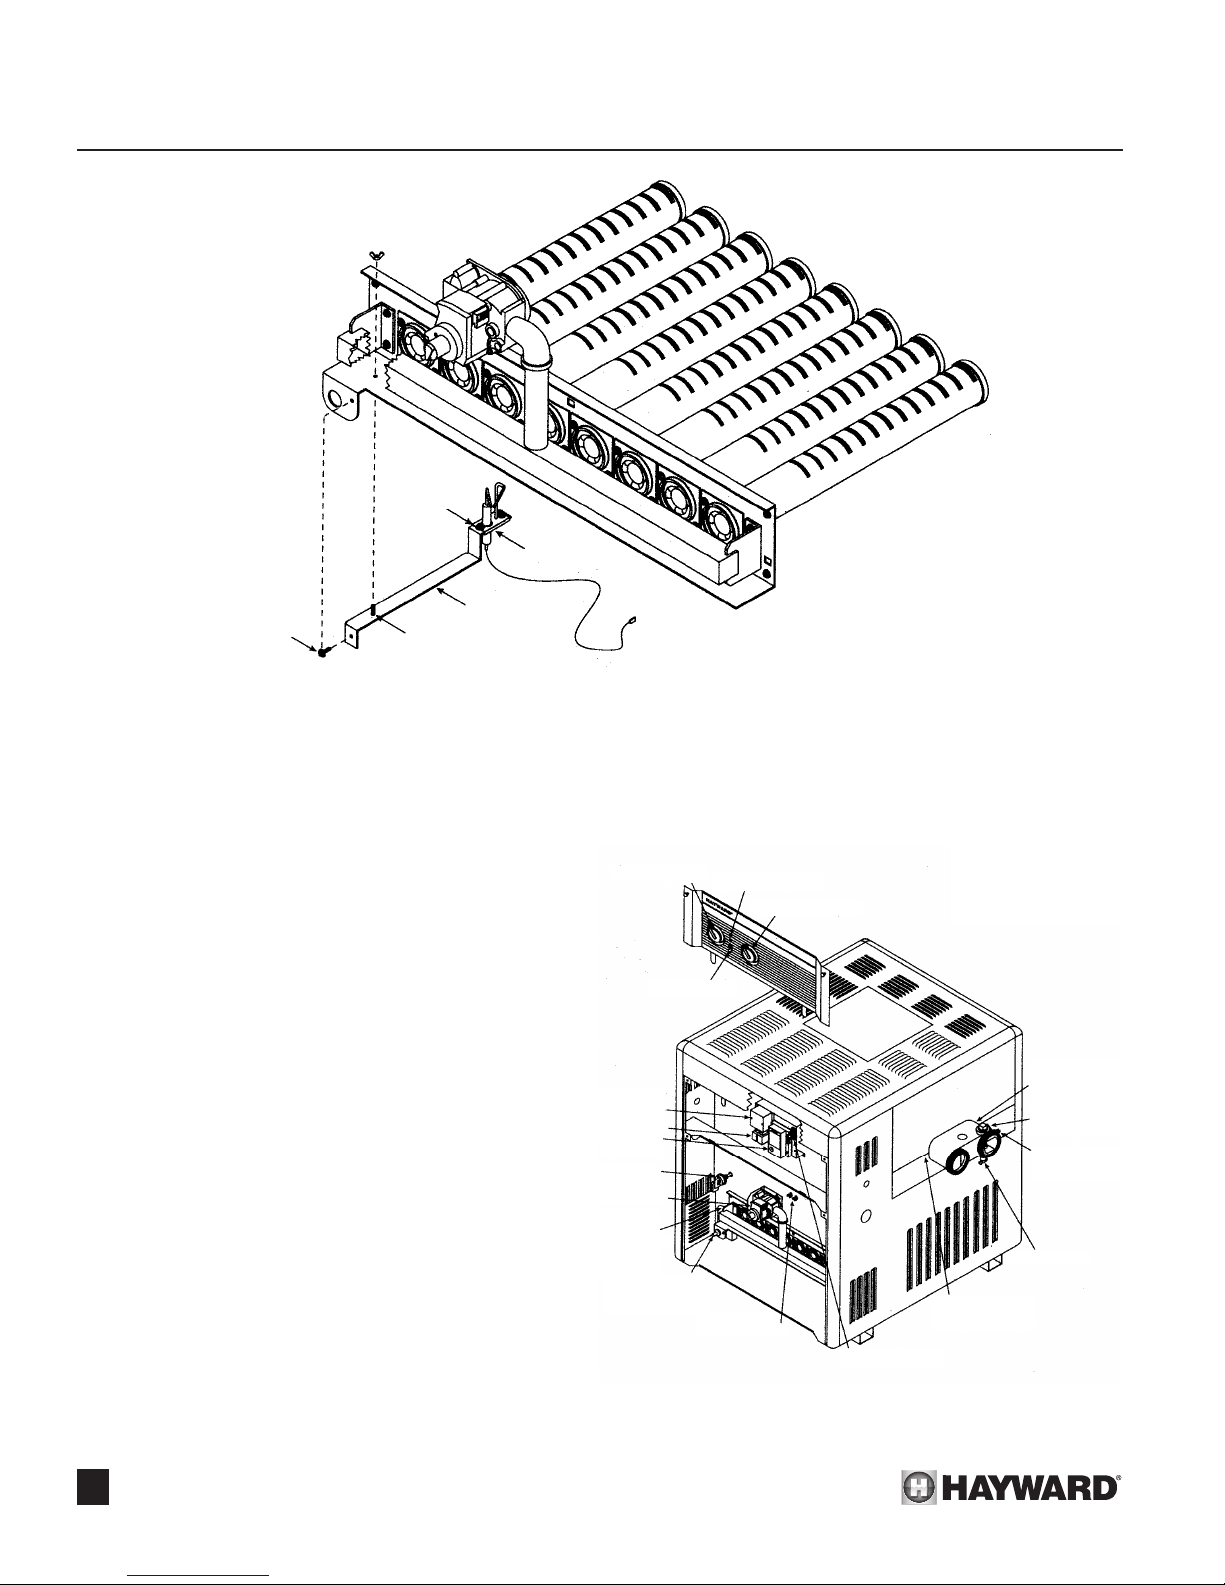
SECTION 6. QUALIFIED TECHNICIAN - MAINTENANCE/SERVICING
SHOWN WITHOUT SURROUNDING
HEATER CABINET FOR CLARITY
2 SCREWS
IGNITOR
SECURING SCREW
CLINCH STUD
Figure 49: Ignitor Assembly Removal
Ignitor assembly removal: (Electronic Ignition Heater Only) (See Figure 49.)
BRACKETS
1. Disconnect the electrode/sensor wire from the ignition module.
2. Remove screw securing ignitor bracket to clear locating
stud and remove assembly from heater.
3. To service or replace ignitor remove two screws securing ignitor to ignitor bracket and disconnect electrode ignitor wire.
SPA THERMOSTAT
LED LIGHTS
POOL THERMOSTAT
4. Recheck spark gap (9/64”).
5. Reverse the above procedures for installation.
SYSTEM SWITCH
Main burner orices:
The main burner orices can be removed from the manifold with a 7/16” wrench without having to remove the burner
assembly from the heater. After cleaning or replacing orices
re-install in manifold being careful not to overtighten as a leak
may result.
! CAUTION: Do not enlarge orice holes.
Gas conversion:
The factory installed gas train, where appropriate, may
be changed from natural gas to propane or from propane to
natural gas, using the appropriate conversion kit, available
from the factory. Gas conversions are to be performed only
by a qualied agency. Detailed instructions are included with
each kit.
FIELD WIRING
JUNCTION BOX
TRANSFORMER
CONTROL
MODULE
PRESSURE
SWITCH
GAS VALVE
PILOT
ASSEMBLY
(ON LEFT SIDE
OF BURNER
ASSEMBLY)
CLICKLITE
(MILLIVOLT
UNITS ONLY)
TM
TEMPERATURE
LIMITER SWITCHERS
TERMINAL BLOCK
DRAIN VALVE
THERMOSTAT
BULB WELL(S)
ON FRONT HEADER
BY-PASS VALVE
(INSIDE FRONT
HEADER)
FLOW CONTROL
THERMOSTAT
(ON FRONT HEADER)
HIGH LIMITS
(ON FRONT AND
REAR HEADER)
! NOTE: Conversion kits are not available in Canada.
Conversions must be done by the conversion station at Hayward Pool Products Canada, Inc.
30
Figure 50: Control Locations
Page 33
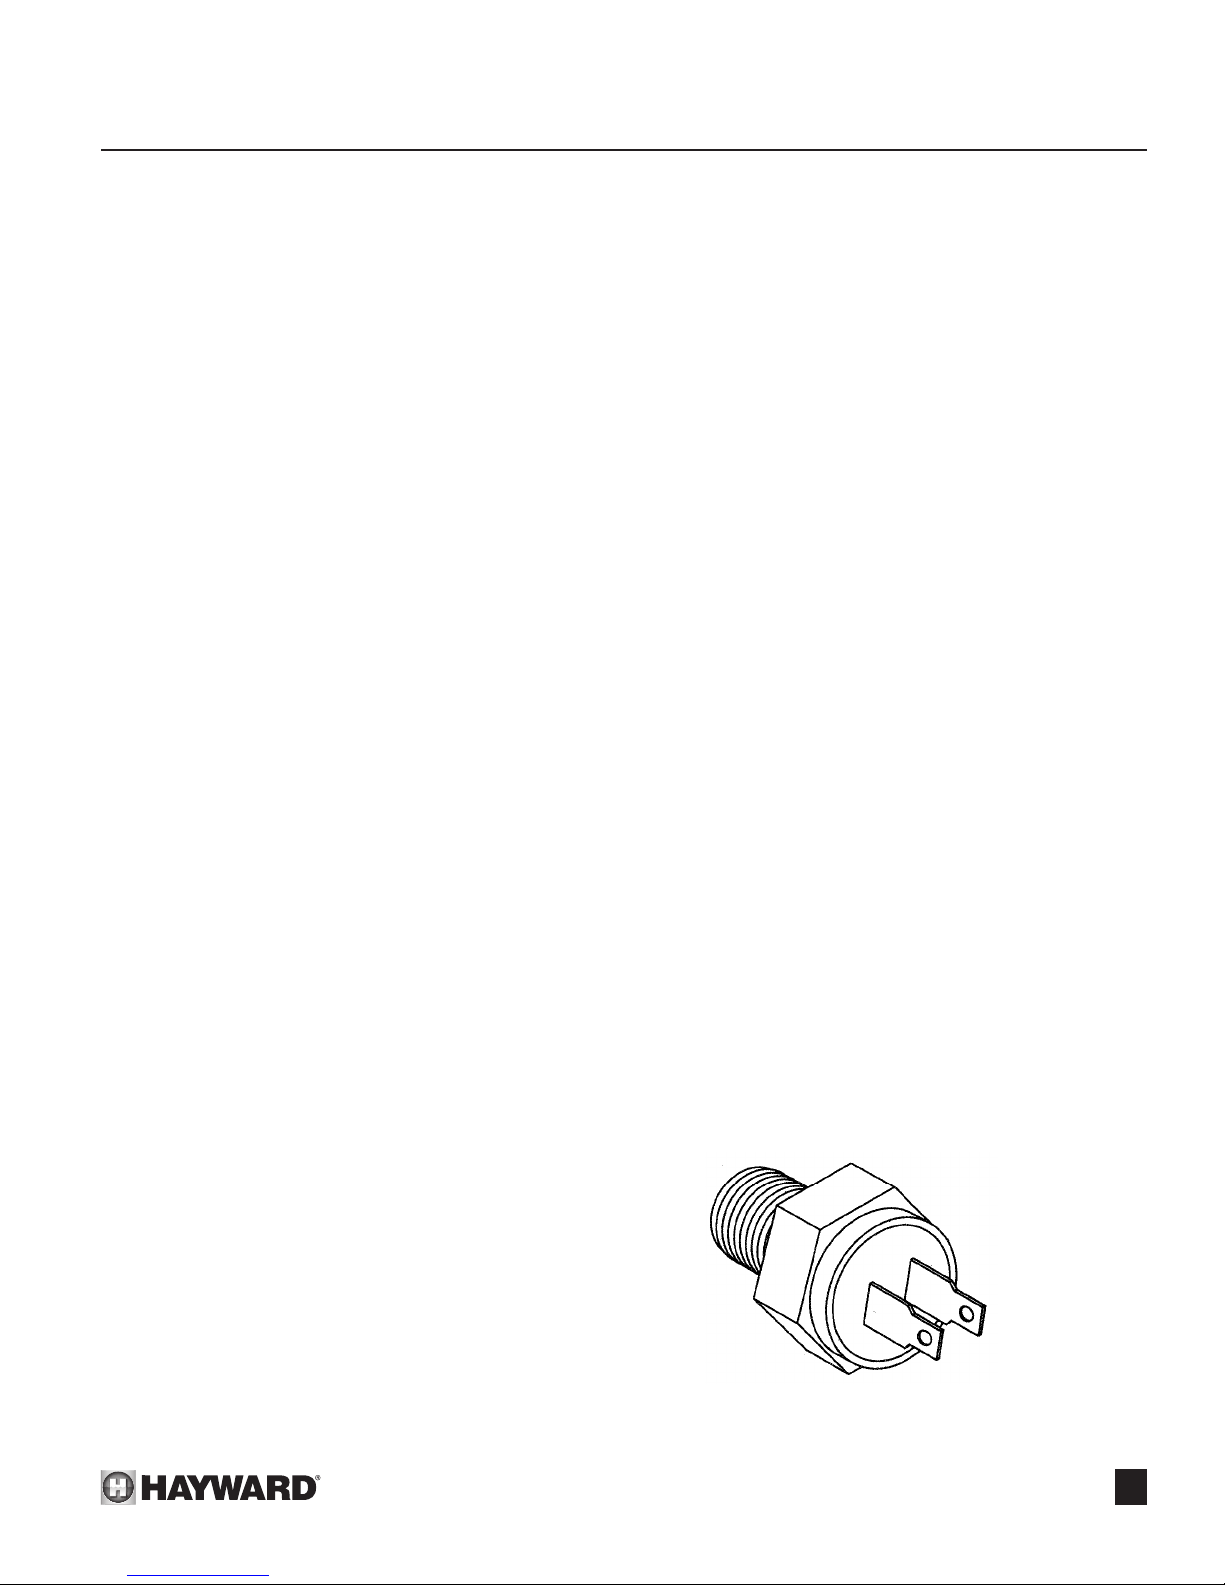
SECTION 6. QUALIFIED TECHNICIAN - MAINTENANCE/SERVICING
Control Locations:
The following sections give a brief overview of the various
heater controls and service/replacement procedures. The text
describes the intended purpose of the controls. See Figure 50
for general location of the controls.
Electrical wiring:
! NOTE: If it is necessary to replace any of the original
wiring, it must be replaced with wiring suitable for 105°C {Style
1015 or 1230) or its equivalent.
System Switch:
A two-way “ON/OFF” rocker switch is provided for single thermostat heaters and a three-way “POOL/OFF/SPA” rocker switch
is provided on dual thermostat heaters.
To replace system switch:
1. Turn pump and main gas valve off. Turn thermostat to
lowest setting.
2. Turn electricity off on electronic ignition heaters.
3. Open control panel and remove wires from system switch.
4. Press the ends of system switch in and remove from panel.
5. Replace system switch and reverse above procedure.
Temperature controls:
Millivolt Heaters
Millivolt heaters are manufactured with a mechanical thermo-
stat models. To replace thermostat:
1. Turn pump, main gas valve and system switch off.
2. Remove thermostat knob, open control panel and remove
right side access panels.
3. Remove the thermostat bulb from the front header.
! NOTE: Using needle nose pliers to pull out copper strip
makes bulb removal easier. Pull thermostat capillary tube and
bulb through the oval slot in the intermediate panel.
! CAUTION: Be careful not to crimp capillary tube as it could
break from mishandling.
4. Remove wires from thermostat.
5. Remove screws that secure thermostat mounting bracket to
control panel.
1. Turn pump, main gas valve and electricity off.
2. Unplug wires from rear circuit board.
3. Remove four screws retaining the plastic bezel to the
sheet metal.
4. Pull entire assembly through the front panel.
5. Replace control panel assembly and reverse above
procedures.
High limits:
The high limit is an automatically resetting safety device
wired in series with the thermostat, pressure switch, temperature
limiter switches, and main gas valve. See Figure 51. The pool
heater is equipped with two automatic high limits. The limits are
located on the front and rear headers
! CAUTION: The two limit switches have different tempera-
ture settings (check Parts List).
If the water temperature at the location of the limit should
exceed the limit set point, the main gas valve will shut off gas
supply to the burners.
An erratic high limit is often an indication of a problem with
water ow. Reduced ow may be caused by:
1. Clogged lter or strainer.
2. Excessive ow through the external bypass valve if one
is used.
3. Lime scale accumulation in the heat exchanger.
To replace high limits:
1. Turn pump, main gas valve and system switch off.
2. Turn electricity off on electronic ignition heater.
3. Drain heat exchanger of all water.
4. Remove side access panels.
5. Remove wires from high limits.
6. Unscrew the defective high limit.
7. Replace the high limit and reverse above procedures.
6. Replace thermostat and reverse above procedures.
Electronic Heaters
Electronic heaters are manufactured with an integrated
thermostat and ignition control that operates the heater. The
replacement part is available as an assembly only. To replace
control panel assembly:
Figure 51: High Limit
31
Page 34
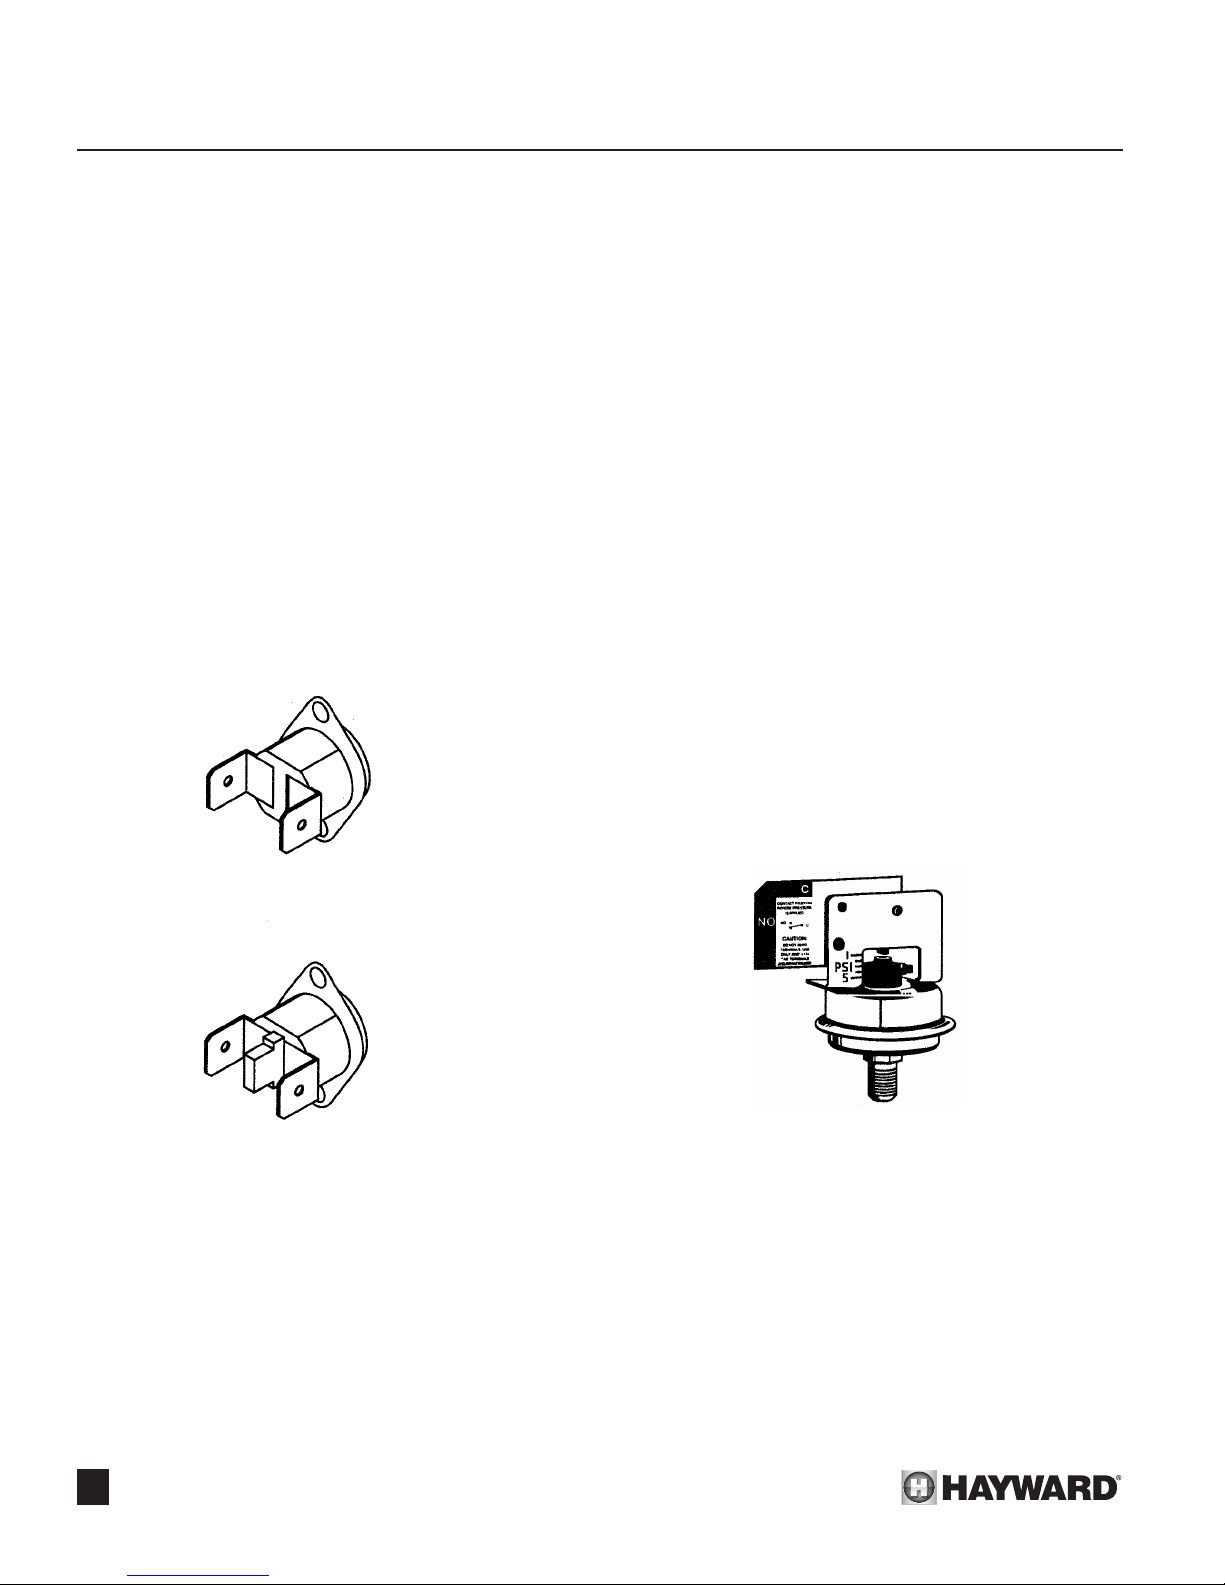
SECTION 6. QUALIFIED TECHNICIAN - MAINTENANCE/SERVICING
Temperature limiter switches:
These controls will shut the heater off in the event that temperatures outside the combustion chamber and inside the heater
cabinet become to hot. Possible causes for switch function include downdraft wind conditions or a blocked vent or drafthood.
Technician should evaluate unit to determine cause.
The left switch is an automatic reset type while right backup
switch is manual reset. See Figure 52. The manual reset switch
is resettable by removing the heater front door and then pressing
the center button on the switch which will reactivate it. Replace
the front door and restart heater.
To replace switch(s):
1. Turn pump, main gas valve and system switch off.
2. Turn electricity off on electronic ignition heater.
3. Remove heater front door.
4. Remove the two wires and screws securing the switch(s).
5. Replace with new switch(s) and reverse the above
procedures.
2. With the pump and heater system switch on, turn the adjust-
ment dial on the pressure switch clockwise, until a click is
heard from the gas valve.
3. Turn the adjustment dial counterclockwise 1/4 turn.
4. Turn the pump off and on several times. The heater should
shut off immediately when pump is shut off. If the heater fails
to shut down with pump, repeat the steps above until the
switch is adjusted properly.
! CAUTION: Do not operate the pool heater without the func-
tion of a properly adjusted pressure switch or ow switch.
To replace pressure switch:
1. Turn pump, main gas valve and system switch off.
2. Turn electricity off on electronic ignition heater.
3. Open front header drain and drain heat exchanger of
all water.
4. Remove heater front door.
5. Remove wires from pressure switch.
6. Using two 1/2” open end wrenches disconnect the pressure
switch from pressure switch tube.
7. Replace pressure switch and reverse above procedures. Use
new sealant on pressure switch threads before reinstalling.
AUTOMATIC
RESET SWITCH
MANUAL
RESET SWITCH
Figure 52: Limiter Switches
Pressure switch:
The pressure switch (Figure 53) is preset at the factory for
deck level installations. When the heater is located below the
level of the spa or pool, the pressure switch may require an ad-
justment to compensate for the no-ow static head. The following procedure is recommended when the switch needs adjustment and/or is replaced:
1. Be sure the lter is clean before making the adjustment.
8. Check for any possible leaks after start-up of unit.
Figure 53: Pressure Switch
By-pass valve:
The front header houses an automatic by-pass valve. The
valve provides proper water ow through the heat exchanger as
the lter system water pressure varies. The valve assembly consists of a plunger, a spring and a shaft. The plunger glides along
the shaft as system water pressure compresses the spring. Very
high acid or chlorine concentrations may damage the valve parts
or very hard water may leave deposits on the shaft causing the
valve to stick. If the valve sticks open, very little water will pass
through the heat exchanger causing overheating and possibly
opening the high limit throughout the heat exchanger causing
condensation to occur. Either situation may result in insufcient
heating of the pool or spa.
32
Page 35
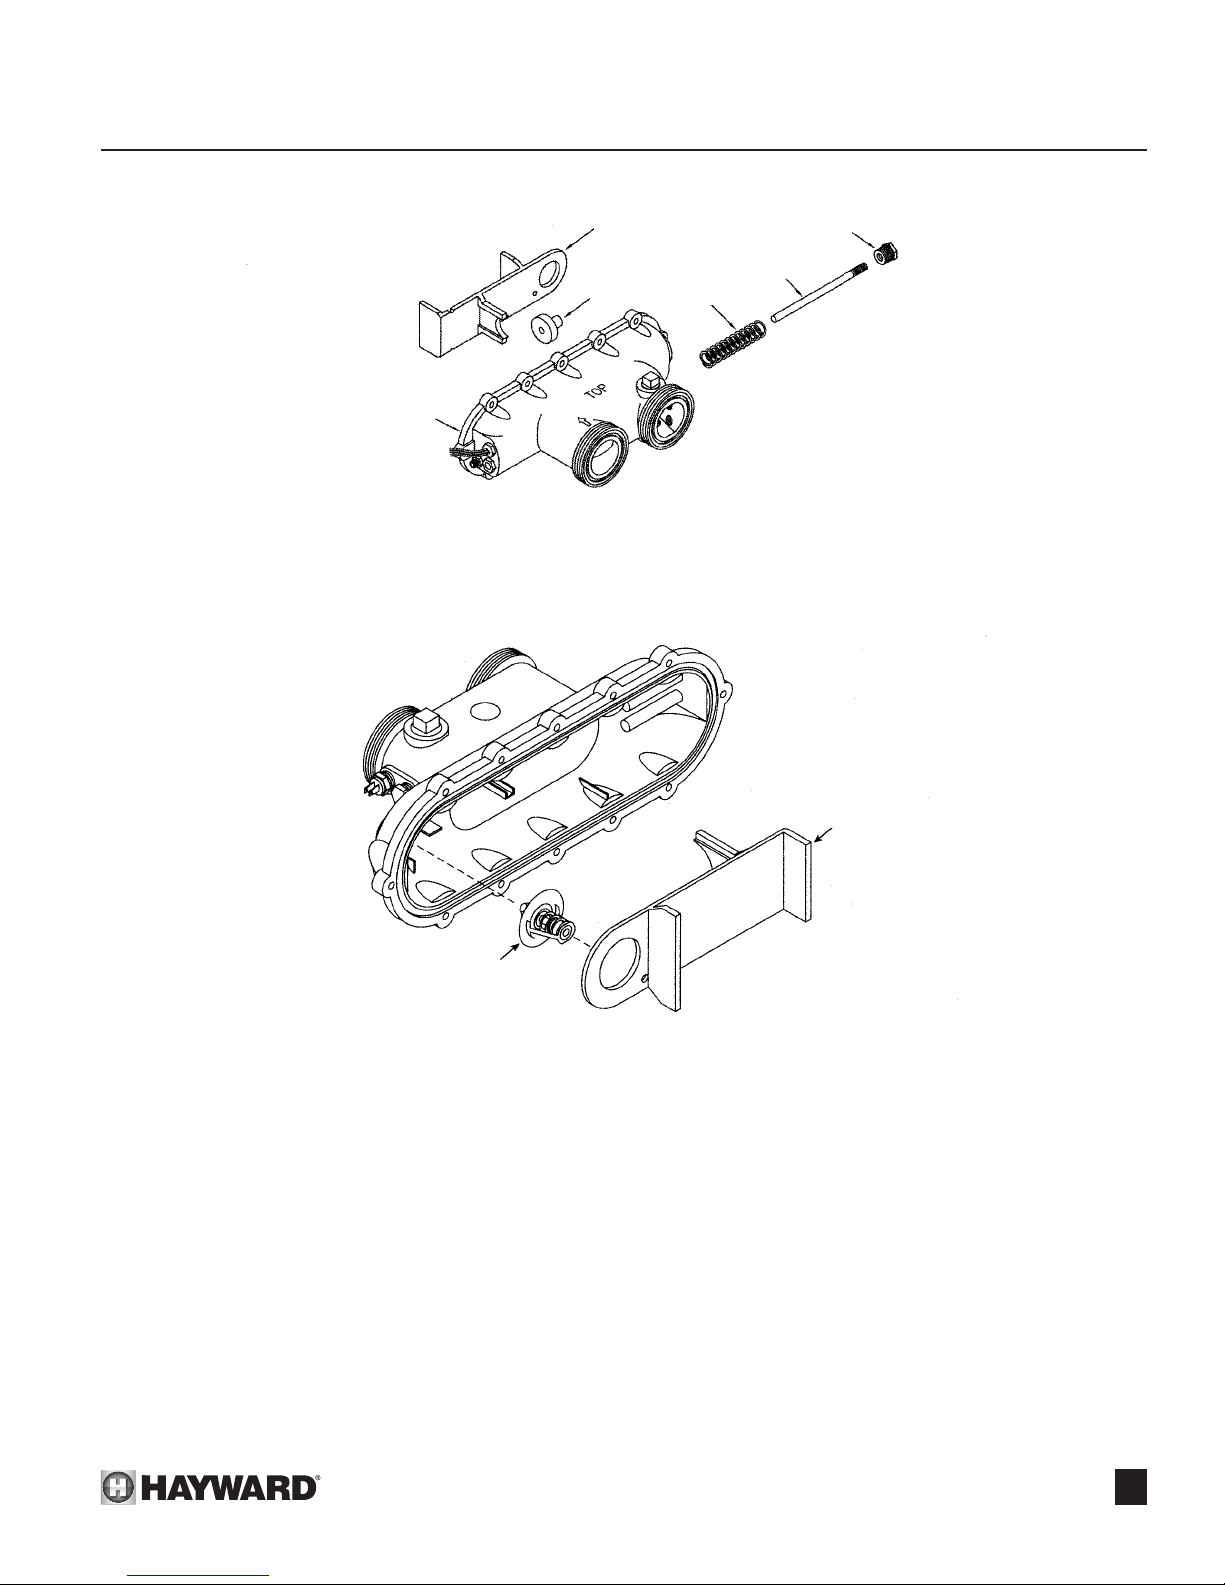
SECTION 6. QUALIFIED TECHNICIAN - MAINTENANCE/SERVICING
HEADER
BYPASS INSERT
VALV E
VALVE SPRING
Figure 54: By-pass Valve
ADAPTER
SHAFT
THERMAL CONTROL
VALV E
Figure 55: Thermal Control Valve
Thermal control valve:
The front header also houses a thermal control valve. This
valve helps to control condensation off the heat exchanger by
not allowing water to ow throughout the heat exchanger until
the water reaches a temperature of 105°F. Very hard water may
leave deposits on the valve plunger causing the valve to stick.
If the valve sticks open, cold water can ow through the heat
exchanger causing condensation to occur. If the valve sticks
closed, very little water will ow through the by-pass hole which
will open the high limit contacts on the rear header.
BY-PASS INSERT
To replace thermal control valve and/or bypass valve parts:
1. Turn pump, main gas valve and heater power off.
2. Remove drain plug and drain water out of heat exchanger.
3. Remove screws from right access panels and remove.
4. Remove wires from high limit switches on header.
5. Millivolt Heaters Only: Remove the thermostat bulb from the
header. Note: Using needle nose pliers to pull out copper strip
makes bulb removal easier.
6. Electronic Heaters Only: Unplug thermistor wire lead from
control board.
33
Page 36

SECTION 6. QUALIFIED TECHNICIAN - MAINTENANCE/SERVICING
7. Remove pressure switch tube from header.
8. Loosen union nuts and detach pool plumbing from header.
9. Remove (12) nuts from the header.
10. Remove the header and header o-ring from the heat
exchanger.
To replace bypass valve parts:
11. The adapter/shaft assembly and spring are removed
by unscrewing the adapter as shown in Figure 54.
12. Remove the plastic bypass insert and valve disk from
header.
13. Replace parts with new plastic bypass insert, adapter, shaft,
spring, and plastic valve disk.
14. Inspect and ensure valve disk slides freely on the shaft. See
Figure 54.
15. Re-install by reversing above procedure.
To replace thermal control valve:
11. Remove plastic bypass insert from header.
12. Remove the thermal control valve from header.
13. Test the thermal control valve by placing it into a hot water
bath (above 108°F) and watching for movement that compresses the spring and opens the annular area in the center
of the valve. If this action does not take place, replace the
valve with a new one that has been tested as above. See
Figure 55.
14. Inspect and ensure valve disk slides freely on the shaft. See
Figure 54.
15. Re-install by reversing above procedure.
Transformer: (Electronic ignition only)
The transformer reduces the main power supply of 120V or
240V down to 20-26 volts. This is the voltage range in which the
heater operates.
To replace the transformer:
1. Turn pump, main gas valve, system switch and main
power off.
2. Remove two screws and open front control panel
3. Disconnect two slip-on terminal wires from the transformer.
4. Detach main power wires from transformer.
5. Remove the screws securing transformer to the mounting
bracket and remove the transformer.
6. Replace the transformer and reverse the above procedures.
Rewire according to the wiring diagram on the heater.
Thermistor: (Electronic ignition only)
The thermistor monitors the return water temperature.
To replace pressure thermistor:
1. Turn pump, main gas valve and heater power off.
2. Turn electricity off.
3. Drain heat exchanger of all water
4. Remove side access panels.
5. Disconnect thermistor leads from circuit board.
6. Unscrew the thermistor.
7. Replace the thermistor and reverse above procedures.
SECTION 7. TROUBLESHOOTING
General:
! NOTE: These instructions are intended for the use of
qualied personnel trained and experienced in the installation
and servicing of this type of heating equipment and its related
system components. Some states may require installation and
service personnel to be licensed. Persons not qualied should
not attempt to repair this equipment according to these instruc-
tions.
! WARNING: Never leave a jumper wire connected to keep
a heater running. A jumper wire should be used as a test device
only, as it is not a cure for a defective control.
34
! CAUTION: Never allow the main burner to operate more
than ve seconds with the lter system shut off. Serious damage
to the heater will result. Anytime the heater bangs or knocks, it
indicates a water void or lack of water ow. Shut off heater im-
mediately if this occurs.
! Wiring:
As a preliminary check, make sure that ail wire connections
are clean and tight and that all wiring conforms to the wiring
diagrams. See Figures 30 and 33.
Page 37
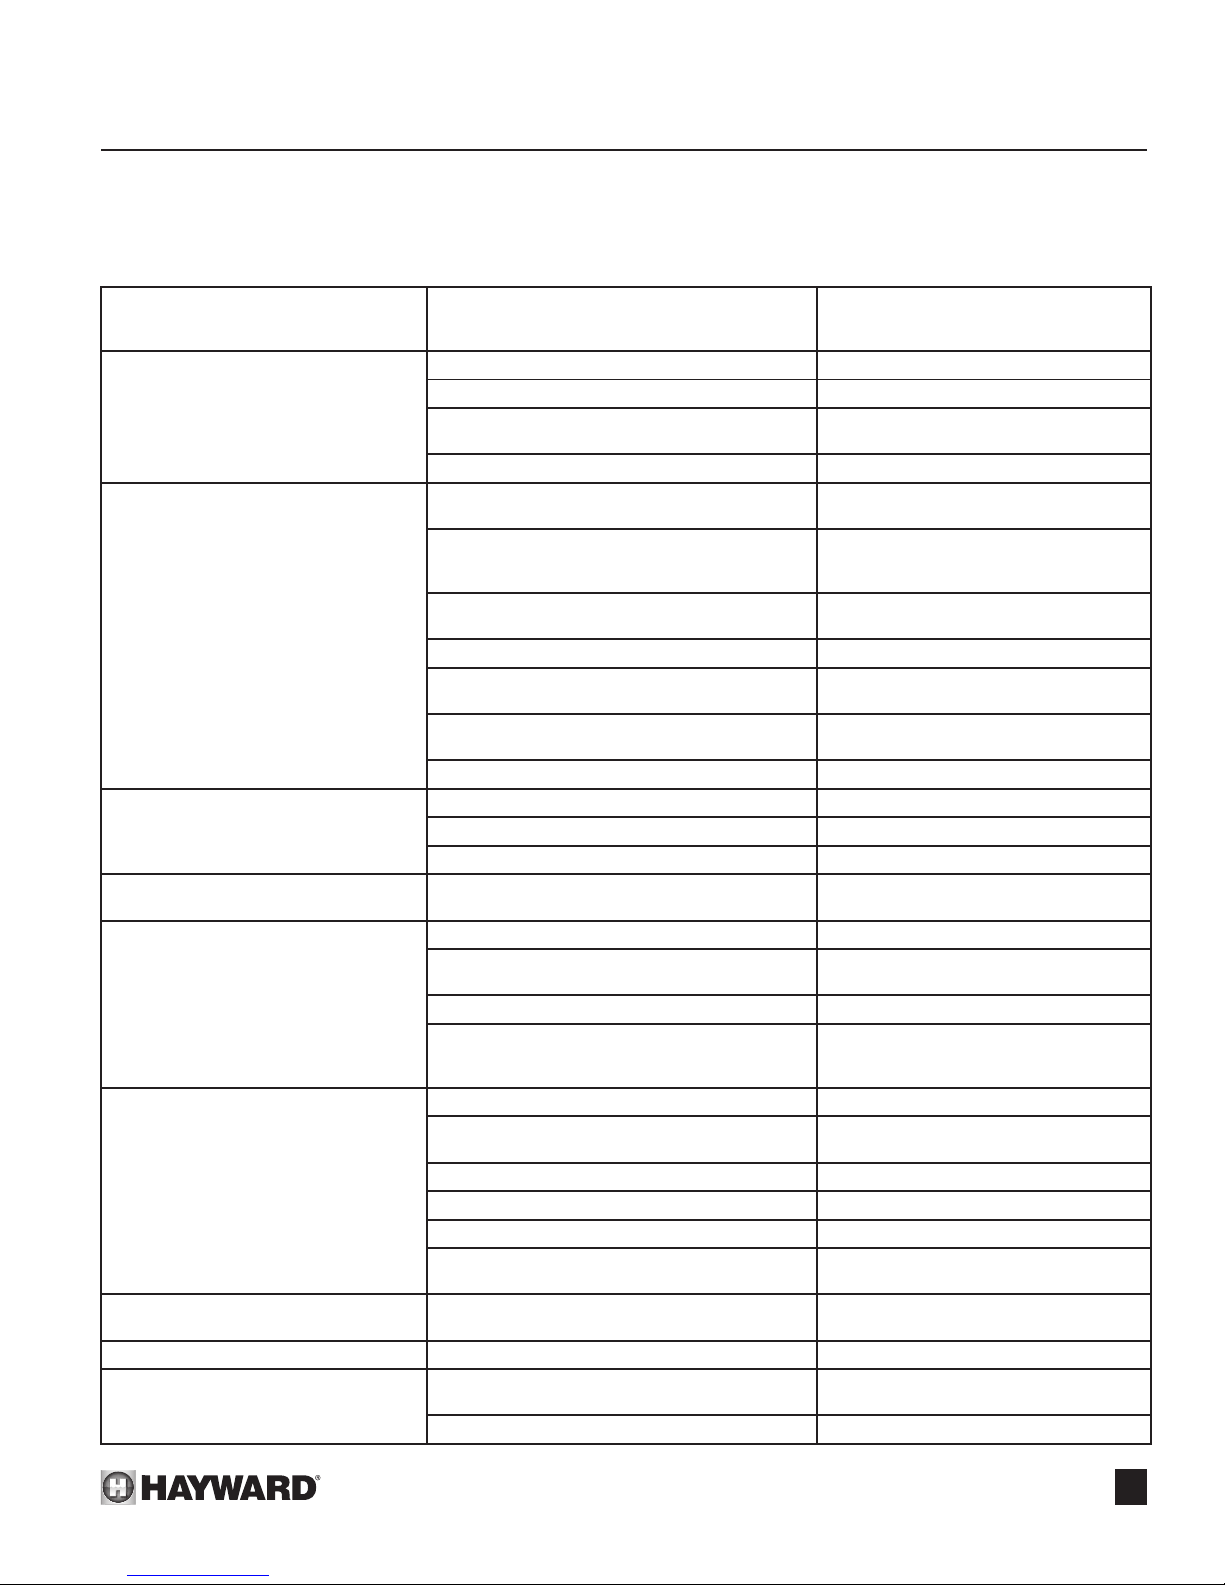
SECTION 7. TROUBLESHOOTING
Troubleshooting Chart:
PROBLEM POSSIBLE CAUSES REMEDY
HEATER WILL NOT FIRE UP
HEATER CYCLING ON AND OFF CONTINUOUSLY.
SOOTING OF THE HEAT
EXCHANGER.
PILOT OUTAGE (MILLIVOLT ONLY)
JACKET SURFACE
TEMPERATURES EXCESSIVE.
LIME SCALE.
HEATER WILL NOT BRING POOL
TO DESIRED TEMPERATURE.
LEAKING HEAT EXCHANGER.
LEAKING AT WELL. Overly Acid Water Or Freeze-Up. Replace Well. Maintain Water Chemistry.
LEAKING AT UNION NUT
CONNECTIONS. OVERHEATED
O-RINGS (BRITTLE).
This chart may be used as a quick reference guide for maintenance and service problems.
FOR QUALIFIED SERVICE PERSONNEL ONLY.
See Troubleshooting Procedure That
Pertains To Your Heater, (Millivolt or
Electronic Ignition).
Time Clock Set Wrong. Reset Clock.
Filter Is Dirty. Clean Filter.
External By-Pass Out Of Adjustment, (Where
Used).
Pressure Switch Out Of Adjustment. Adjust Pressure Switch.
High Water Flow Rates (Above 125 GPM). Reduce Flow Rate By Adding A Manual
Internal By-Pass Stuck Open. Check For Excessive Hardness Or
Lack Of Air For Combustion. Provide Adequate Air. See Venting
Low Fuel Volume. Correct With Proper Gas Line Sizing.
Improper Venting. Provide By Proper Venting. See Section
Burner Inlet Throat Blocked. High Pressure/Low
Pressure.
Collapsed Combustion Chamber. Replace Combustion Chamber.
Low Gas Pressure. Increase Pressure.
Restricted Gas Flow. Clean Pilot Orice Or Tubing.
Weak Thermopile. Replace Thermopile.
Broken Refactory. Replace Refactory.
By-Pass Valve Stuck Open. Inspect By-Pass Movement And Repair.
Thermal Control Valve Not Working. Check For Movement. Replace If Not
Water Chemistry Out Of Balance. See Section On Pool Water Chemistry.
Unnecessary External Manual By-Pass Installed
Or Out Of Adjustment.
Gas Line Too Small. Check Gas Pipe Size in Figure 20.
Heater Too Small. Check Sizing Chart. Install Larger
Time Clock Is Set Incorrectly. Reset Time Clock.
Filter Not Cleaned Often Enough. Clean Filter More Frequently.
Thermostat Out Of Adjustment Or Defective. Test Thermostat. Replace If Necessary.
Pressure Switch Inoperative. Test Pressure Switch. Replace If Neces-
Overly Acid Water Or Freeze-Up. Replace Heat Exchanger And Maintain
Heater Continues To Run After Pump Shuts Off. See Pressure Switch Adjustment. Re-
Refactory Damage. Replace Refactory.
Adjust By-Pass.
By-Pass Valve.
Acidity That May Have Damaged Valve.
Repair Or Replace.
Installation.
II.
Clean Burners Adjust Gas Pressure.
Movement.
Close Manual By-Pass Valve And Remove Or Adjust Properly. See Section
on By-Pass Valve.
Heater If Necessary.
sary.
Water Chemistry Properly.
place leaking O-Rings.
35
Page 38
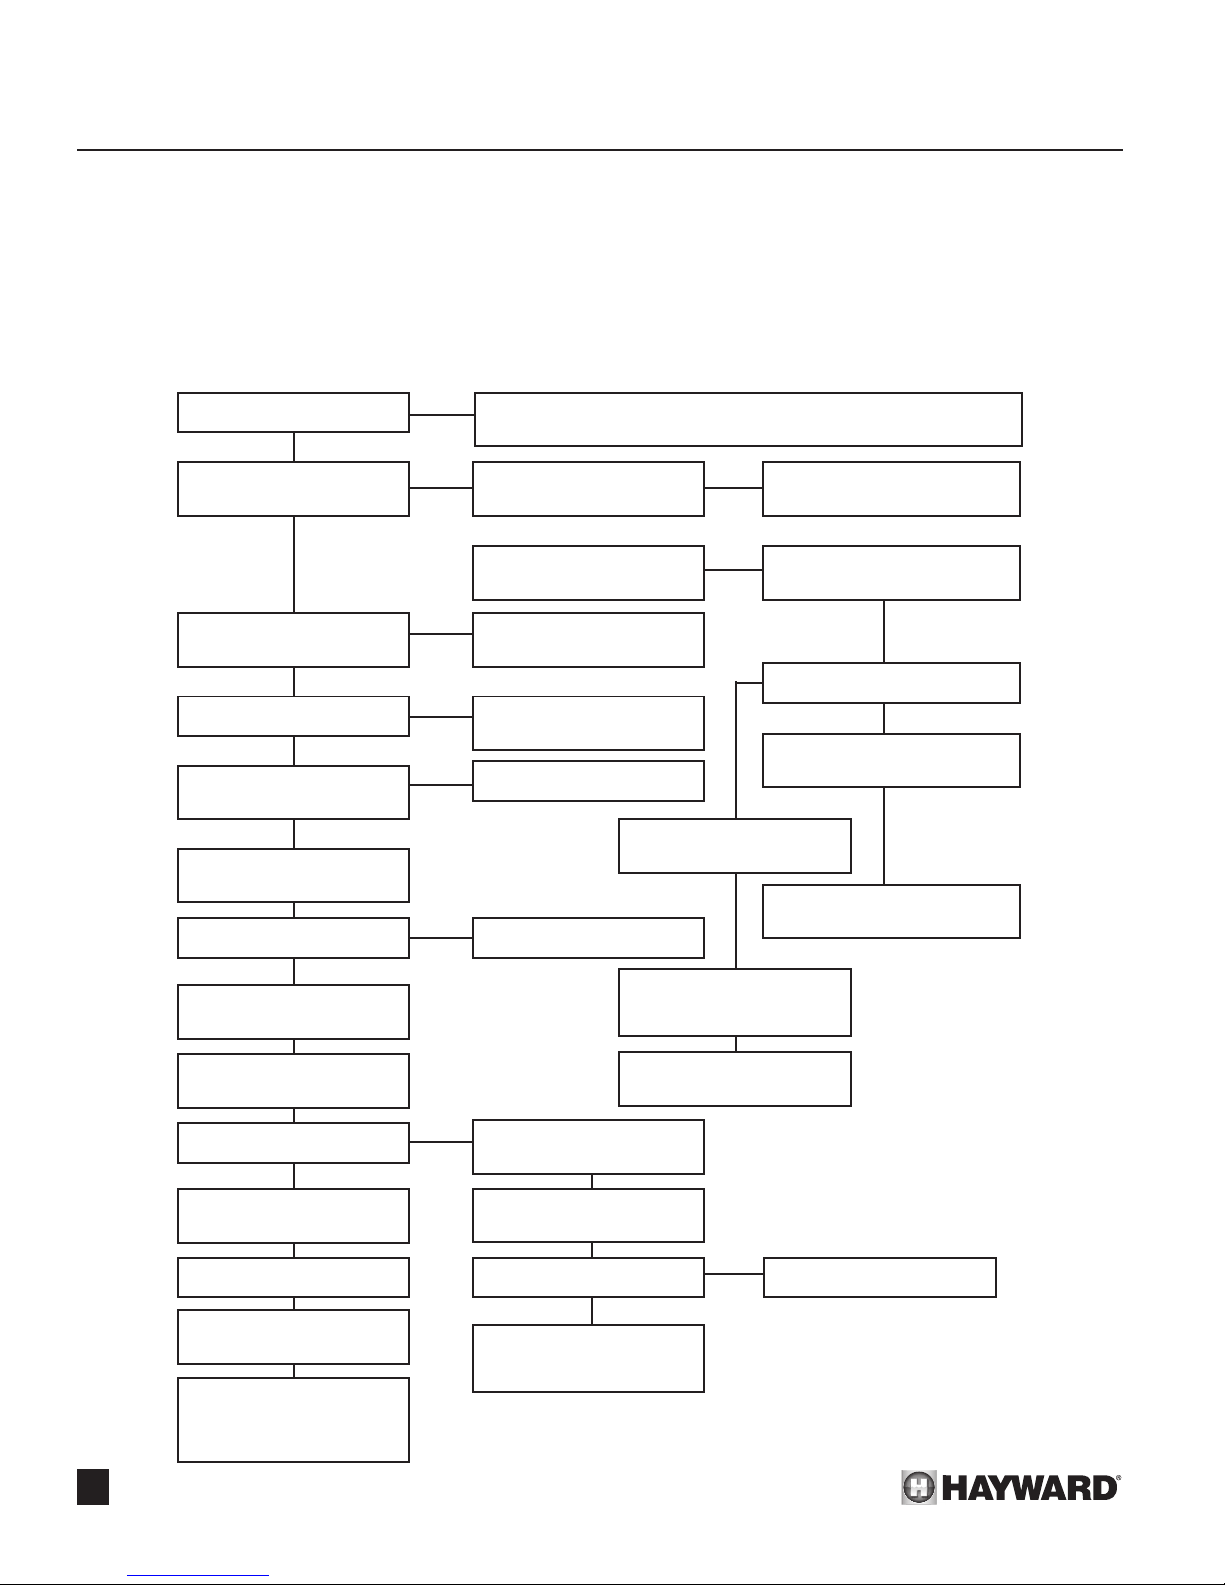
SECTION 7. TROUBLESHOOTING
Heater Will Not Fire (Millivolt):
! WARNING: For qualied service personnel ONLY!
This procedure assumes that the lter system is operating. Jumper wires are used for system checkout
only. Remove all jumper wires following system checkout or damage to heater may result.
NO
Is the pilot lit?
YES
Does the pilot stay lit when the
knob is released?
YES
Check for inadequate gas supply, pressure, pipe size. See Gas Piping Section. Check for blockage of pilot orice.
NO
Is tip of the thermopile
engulfed by the pilot ame?
Check thermopile output using
a millivolt meter as follows:
YES
NO
Check the orice for blockage or
adjust thermopile.
Remove both “TH” wires from the
gas valve and relight the pilot.
Is gas valve knob in “ON”
position?
YES
Is system switch “ON”?
YES
Is thermostat set higher than
pool temperature?
YES
Jump across both “TH”
terminals on gas valve.
Is main burner lit?
YES
Remove jumper wire from
“TH” terminals on valve.
Jump across pressure switch
terminals.
Is main burner lit?
YES
Remove jumper wire from
pressure switch.
NO
Turn gas valve to “ON”
position.
NO
Set system switch to “ON”
position.
NO
Turn thermostat up.
NO
Replace gas valve.
NO
Remove jumper wire from
pressure switch.
Jump across thermostat
terminals.
Does pilot burner stay lit?
YES
Attach millivolt meter to read
thermopile output.
Problem may be a bad wire or
low gas pressure.
If thermopile is about 500mV,
replace gas valve.
If thermopile is below 400mV,
check gas pressure or blockage of orice.
If output is still low, replace
thermopile.
NO
Clean the lter? Does the main burner re? See page 37.
Check for adequate water ow
rate.
Readjust or replace pressure
switch. See section on
“Pressure Switch” under
Section VI.
36
YES
Remove the jumper wire from
the thermostat and replace the
thermostat.
NO
Page 39
SECTION 7. TROUBLESHOOTING
! WARNING: For qualied service personnel ONLY!
This procedure assumes that the lter system is operating. Jumper wires are used for system checkout
only. Remove all jumper wires following system checkout or damage to heater may result.
From page 36.
Remove jumper from thermostat
terminals.
Jump across each of the high
limits.
Does the main burner re?
YES
Replace the high limit that caused
the heater to re.
NO
Jump across system switch
terminals.
Does the main burner re?
Replace the system switch.
Call Hayward Technical Service:
Pomona, CA (909) 594-1600
Elizabeth, NJ (908) 351-5400.
YES
NO
NO
Jump across each of the high
temperature limiter terminals.
Does the main burner re?
Be sure the manual reset
high temperature limiter is not
thrown.
Does the main burner re?
Replace the high temperature
limiter switch that caused the
heater to re.
YES
YES
37
Page 40
SECTION 7. TROUBLESHOOTING
Troubleshooting Chart (Electronic):
H-SERIES HEATER DIAGNOSTIC GUIDE
CODE FAU LT DIAGNOSIS STEP REMEDY
LO
Water Pressure
Switch Fault
Automatic
Temperature
Limiter Switch Fault
Manual
Temperature
Limiter Switch Fault
Limit Switch Fault
1. Verify that pump is running. This is a normal display when the pump is off. Turn pump on. LO code
2. Check for faulty wiring or
connection.
3. Verify state of water pressure switch contacts.
4. Ensure that low pump pres-
sure does not exist.
5. Check for correct water
pressure switch setting.
6. Water pressure switch is
defective.
1. Check for faulty wiring or
connection.
2. Verify state of temperature
limiter switch’s contacts.
3. Check for high winds or
severe downdrafting.
4. Check for restricted or
blocked vent on indoor units.
5. Check for sooted or damaged heat exchanger.
6. Temperature limiter switch
is defective.
1. Check for faulty wiring or
connection.
2. Verify state of temperature
limiter switch’s contacts.
3. Check for high winds or
severe downdrafting.
4.Check for restricted or
blocked vent on indoor units.
5. Check for sooted or damaged heat exchanger.
6. Reset switch. Reset switch. If switch trips again, proceed to step 7.
7. Temperature limiter switch
is defective.
1. Check for faulty wiring or
connection.
2. Verify state of temperature
limits’ contacts.
3. Verify that water ow is
adequate.
4. Temperature limit switch is
defective.
should clear. If LO does not clear, proceed to step 2.
Inspect water pressure switch wiring. Ensure wire harness terminals are
securely fastened to spade terminals. If OK, proceed to step 3.
Remove wire leads from switch and jumper leads. Measure continuity
across switch with pump on. If closed, LO code is not caused by water
pressure switch fault. If open, proceed to step 4. Remove jumper from
wire leads and reconnect wire leads.
Clean lter or clear blockages. Check position of valves in plumbing
system. If OK, proceed to step 5.
Adjust switch setting per installation manual. If LO does not clear, pro-
ceed to step 6.
Replace water pressure switch.
Inspect switch wiring. Ensure wire harness terminals are securely fastened to spade terminals. If OK, proceed to step 2.
Remove wire leads from switch and jumper leads. Operate heater.
Measure continuity across switch. If closed, LO code is not caused by
temperature limiter switch fail. If open, proceed to step 3 for outdoor
units, and step 4 for indoor units. Remove jumper from leads and reconnect leads to temperature limiter.
Check for high winds or severe downdrafts. If present, install HWS High
Wind Stack. Otherwise proceed to step 5.
Check for restricted or blocked vent. If OK, proceed to step 5.
Check for sooted or damaged heat exchanger. If OK, proceed to step 6.
Replace temperature limiter switch.
Inspect switch wiring. Ensure wire harness terminals are securely fastened to spade terminals. If OK, proceed to step 2.
Remove wire leads from temperature limiter switch and jumper leads.
Operate heater. Measure continuity across temperature limiter switch. If
closed, LO code is not caused by temperature limiter switch fault. If open,
proceed to step 3 for outdoor units, and step 4 for indoor units. Remove
jumper from leads and reconnect leads to temperature limiter.
Check for high winds or severe downdrafts. If present, install HWS High
Wind Stack. Otherwise proceed to step 5.
Check for restricted or blocked vent. If OK, proceed to step 5.
Check for sooted or damaged heat exchanger. If OK, proceed to step 6.
Replace temperature limiter switch.
Inspect limit switch wiring. Ensure wire harness terminals are securely
fastened to spade terminals. If OK, proceed to step 2.
Remove wire leads from limit switches and jumper leads. Operate heater.
Measure continuity across limit switches. If closed, LO code is not caused
by temperature limit switch fault. If open, proceed to step 3. Remove
jumper from leads and reconnect leads to temperature limits.
Verify that water ow rate to heater is above minimum required (25
GPM). If OK, proceed to step 4.
Replace limit switch.
38
Page 41
SECTION 7. TROUBLESHOOTING
Troubleshooting Chart:
H-SERIES HEATER DIAGNOSTIC GUIDE
CODE FAU LT DIAGNOSIS STEP REMEDY
BO Bypass Operation
IF Ignition Failure
SF
HS
HF Flame Sense Fault 1. Flame sense failure. Replace igniter.
Temperature Sensor
Input Failure
Maximum Return
Water Temperature
Exceeded
1. Check state of #2 dip
switch on back of control
module.
1. Ensure gas supply shutoff
valves are open.
2. Check for low gas supply
pressure.
3. Check for faulty igniter wiring or connection.
4. Check for faulty gas valve
wiring or connection.
5. Check for gas valve failure
or gas valve relay failure.
1. Check for faulty wiring or
connection.
2. Sensor is defective. Replace temperature sensor.
1. Pool water temperature
exceeds 104ºF.
2. Verify that water ow is
adequate.
This is a normal display when heater is being controlled by a remote thermostat. No service is required. If heater is not being controlled by remote
thermostat, change setting of #2 dip switch to “Off” position.
Ensure that main gas shutoff installed adjacent to heater is open. Ensure
that knob on gas valve inside unit is in “On” position. If OK, proceed to
step 2.
Ensure inlet gas supply pressure exceeds minimum value indicated on
rating plate. If OK, proceed to step 3.
Inspect igniter wiring. Ensure igniter plug is securely plugged into back of
control module. If OK, proceed to step 4.
Inspect gas valve wiring. Ensure wire harness terminals are securely
fastened to spade terminals on gas valve. If OK, proceed to step 5.
1. Measure voltage across gas valve during trial for ignition. If 24 vac is
present and gas valve does not open, gas valve is defective. Replace
gas valve.
2. If 24 vac is not present, gas valve relay on control module is defective.
Replace control module.
Inspect sensor wiring. Ensure sensor is plugged into back of control
module. If OK, proceed to step 2.
Verify set point setting of remote thermostat is at or below 104ºF. If set
point setting of remote thermostat is OK, or if heater is not congured for
remote thermostat proceed to step 2.
Verify that water ow rate to heater is above minimum required.
39
Page 42

SECTION 7. TROUBLESHOOTING
Parts List - Millivolt
ITEM NO. ITEM NO.PART NO. PART NO.DESCRIPTION DESCRIPTION
1. HAXJKT1150 Jacket Top Asy. -150
1. HAXJKT1200 Jacket Top Asy. - 200
1. HAXJKT1251 Jacket Top Asy. - 210/250
1. HAXJKT1301 Jacket Top Asy. - 300
1. HAXJKT1351 Jacket Top Asy. - 350
1. HAXJKT1401 Jacket Top Asy. - 400
2. HAXDH01930 DHO Insert
3. DHI150 Indoor Drafthood -150
3. DHI200 Indoor Drafthood - 200
3. DHI250 Indoor Drafthood - 250
3. DHI300 Indoor Drafthood - 300
3. DHI350 Indoor Drafthood - 350
3. DHI400 Indoor Drafthood - 400
3. HWS150 High Wind Stack -150 (Not Shown)
3. HWS200 High Wind Stack - 200 (Not Shown)
3. HWS250 High Wind Stack - 210/250 (Not Shown)
3. HWS300 High Wind Stack - 300 (Not Shown)
3. HWS350 High Wind Stack - 350 (Not Shown)
3. HWS400 High Wind Stack - 400 (Not Shown)
4. HAXHXA1150 Heat Exchanger Asy. -150
4. HAXHXA1200 Heat Exchanger Asy. - 200
4. HAXHXA1210 Heat Exchanger Asy. - 210
4. HAXHXA1250 Heat Exchanger Asy. - 250
4. HAXHXA1300 Heat Exchanger Asy. - 300
4. HAXHXA1350 Heat Exchanger Asy. - 350
4. HAXHXA1400 Heat Exchanger Asy. - 400
5. HAXWHA0006 Rear Wire Harness, MV
6. HAXF0R1930 O-Rings
7. HAXNIP1930 Flange Pipe Nipples
8. HAXNUT1930 Union Nuts
10. HAXFCT1930 Flow Control Thermostat
11. CHXPLG1930 3/4” NPT Brass Plug
12. HAXBPK1932 By Pass Valve Kit
16. HAXHLI1930 Hi-Limit 135° F
17. HMXHLI2932 Hi-Limit 160° F
18. CHXDRV1930 Drain Valve Asy.
19. CHXPSA1930 Pressure Switch Adapter
20. HAXTBW1930 Bulb Well
21 HAXFHA1931 Front Header Asy.
22. HAXLAC1930 Left Access Cover
23. HAXURA1930 Upper Right Access Cover
24. HAXLRA1931 Lower Right Access Cover
25. HAXPHK1930 Plastic Hardware Kit
26. HAXTLK1930 Temperature Limiters Kit
27. HAXTBK1931 2-Pole Terminal Block
28. HAXPLG1931 3/8" Brass Plug
29. CHXGRL1930 TA-2 Ground Lug
32. HAXPSA1930 Pressure Switch Asy.
33. CHXTST1930 Thermostat
35. CHXTSW1930 System Switch Single
36. HAXCPA2150 Control Panel Asy. -150 MV
36. HAXCPA2200 Control Panel Asy. - 200 MV
36. HAXCPA2250 Control Panel Asy. - 210/250 MV
36. HAXCPA2300 Control Panel Asy. - 300 MV
36. HAXCPA2350 Control Panel Asy. - 350 MV
36. HAXCPA2400 Control Panel Asy. - 400 MV
37. HAXGSV0001 Gas Valve, MV Natural Gas
37. HAXGSV0003 Gas Valve, MV Propane
38. HAXMAN1150 Gas Manifold -150
38. HAXMAN1200 Gas Manifold - 200
38. HAXMAN1250 Gas Manifold - 210/250
38. HAXMAN1300 Gas Manifold - 300
38. HAXMAN1350 Gas Manifold - 350
38. HAXMAN1400 Gas Manifold - 400
39. HAXBRN1930 Burner Tube
40. HAXB0N1930 Burner Orice Natural Gas
40. HAXBON1931 Burner Orice Natural Gas HA
40. HAXBOP1932 Burner Orice Propane
40. HAXBOP1931 Burner Orice Propane HA
44. HAXPLT1931 Pilot Natural Gas
44. HAXPLT1932 Pilot Propane
45. HAXTRK1930 Pilot Tube Replacement Kit
46. HAXHOR1930 Header O-Ring
48. HAXPLG1931 1/4” Brass Plug
49. HAXCIA1930 Corner Piece Kit (4)
HAXWHA0001 Wire Harness Main MV (not shown)
40
Page 43
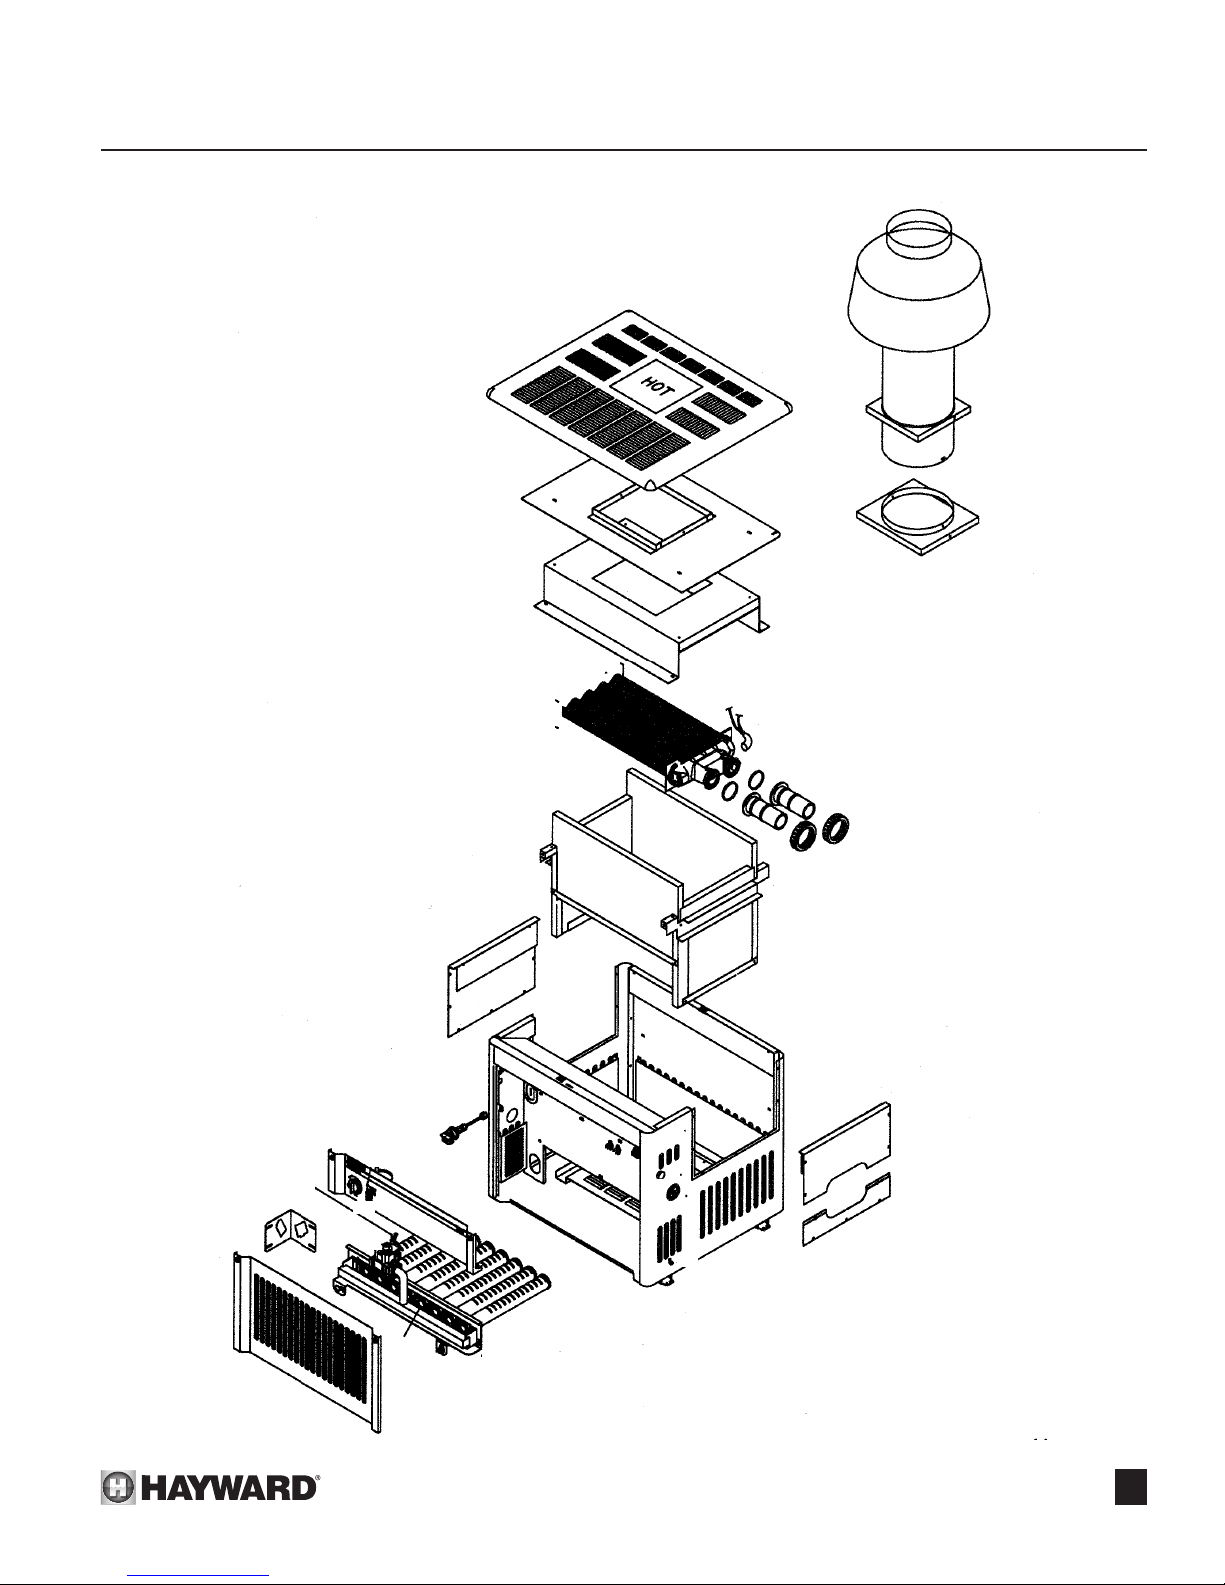
Parts Illustration - Millivolt
SECTION 7. TROUBLESHOOTING
3
1
38
35
37
33
36
32
22
25
4
26
27
25
25
29
5
6
7
8
25
23
24
40
39
26
41
Page 44
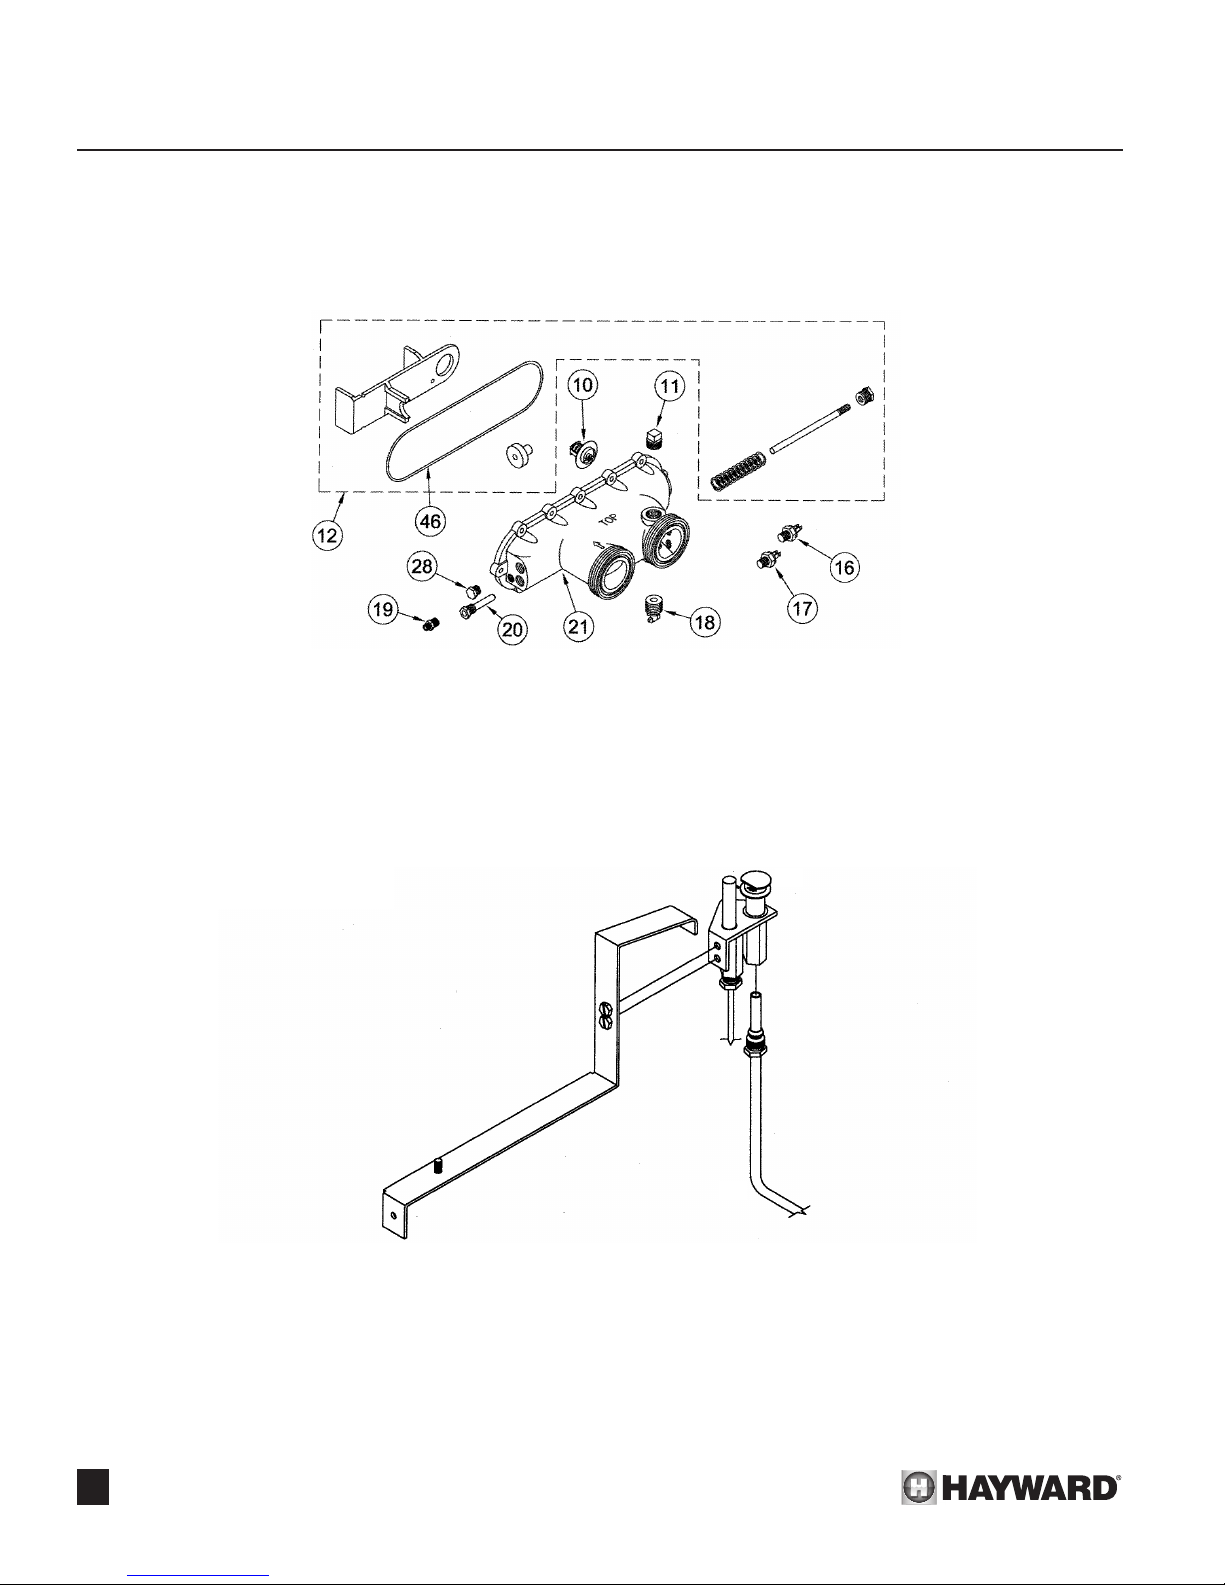
SECTION 7. TROUBLESHOOTING
Parts Illustration - Millivolt
Front Header Parts
44
45
42
Millivolt Pilot Parts
Page 45

SECTION 7. TROUBLESHOOTING
Parts List - Electronic Ignition
ITEM NO. ITEM NO.PART NO. PART NO.DESCRIPTION DESCRIPTION
1. HAXJKT1150 Jacket Top Asy. -150
1. HAXJKT1200 Jacket Top Asy. - 200
1. HAXJKT1251 Jacket Top Asy. - 210/250
1. HAXJKT1301 Jacket Top Asy. - 300
1. HAXJKT1351 Jacket Top Asy. - 350
1. HAXJKT1401 Jacket Top Asy. - 400
2. HAXDH01930 DHO Insert
3. DHI150 Indoor Drafthood -150
3. DHI200 Indoor Drafthood - 200
3. DHI250 Indoor Drafthood - 250
3. DHI300 Indoor Drafthood - 300
3. DHI350 Indoor Drafthood - 350
3. DHI400 Indoor Drafthood - 400
3. HWS150 High Wind Stack -150 (Not Shown)
3. HWS200 High Wind Stack - 200 (Not Shown)
3. HWS250 High Wind Stack - 210/250 (Not Shown)
3. HWS300 High Wind Stack - 300 (Not Shown)
3. HWS350 High Wind Stack - 350 (Not Shown)
3. HWS400 High Wind Stack - 400 (Not Shown)
4. HAXHXA1150 Heat Exchanger Asy. -150
4. HAXHXA1200 Heat Exchanger Asy. - 210
4. HAXHXA1250 Heat Exchanger Asy. - 250
4. HAXHXA1300 Heat Exchanger Asy. - 300
4. HAXHXA1350 Heat Exchanger Asy. - 350
4. HAXHXA1400 Heat Exchanger Asy. - 400
5. HAXWHA0007 Rear Wire Harness, DS
6. HAXF0R1930 O-Rings
7. HAXNIP1930 Flange Pipe Nipples
8. HAXNUT1930 Union Nuts
10. HAXFCT1930 Flow Control Thermostat
11. CHXPLG1930 3/4” NPT Brass Plug
12. HAXBPK1932 By Pass Valve Kit
16. HAXHLI1930 Hi-Limit 135° F
17. HMXHLI2932 Hi-Limit 160° F
18. CHXDRV1930 Drain Valve Asy.
19. CHXPSA1930 Pressure Switch Adapter
20. IDXLTER1930 Thermistor
21 HAXFHA1931 Front Header Asy.
22. HAXHOR1930 Header O-Ring
23. HAXPLG1931 3/8” Brass Plug
24. HAXURA1930 Upper Right Access Cover
24. HAXLRA1931 Lower Right Access Cover
26. HAXLAC1930 Left Access Cover
27. HAXPHK1930 Plastic Hardware Kit
28. HAXTLK1930 Temperature Limiters Kit
29. IDXLTMB1931 5-Pole Terminal Block
30. CHXTRF1930 Transformer
31. CHXGRL1930 TA-2 Ground Lug
32. HAXPSA1930 Pressure Switch Asy.
33. HAXCPA3151 Control Panel Asy. -150 DS
33. HAXCPA3201 Control Panel Asy. - 200 DS
33. HAXCPA3251 Control Panel Asy. - 250 DS
33. HAXCPA3301 Control Panel Asy. - 300 DS
33. HAXCPA3351 Control Panel Asy. - 350 DS
33. HAXCPA3401 Control Panel Asy. - 400 DS
34. HAXCPA1930 Control Bezel Asy.
35. HAXGSV0004 Gas Valve, DS Propane
35. HAXGSV0005 Gas Valve, DS Natural Gas
36. HAXMAN1150 Gas Manifold -150
36. HAXMAN1200 Gas Manifold - 200
36. HAXMAN1250 Gas Manifold - 210/250
36. HAXMAN1300 Gas Manifold - 300
36. HAXMAN1350 Gas Manifold - 350
36. HAXMAN1400 Gas Manifold - 400
37. HAXBRN1930 Burner Tube
38. HAXB0N1930 Burner Orice Natural Gas
38. HAXBON1931 Burner Orice Natural Gas HA
38. HAXBOP1932 Burner Orice Propane
38. HAXBOP1931 Burner Orice Propane HA
41. HAXIGN1931 Igniter Asy.
- HAXWHA0008 Wire Harness, Main DS
(Not Shown)
43
Page 46
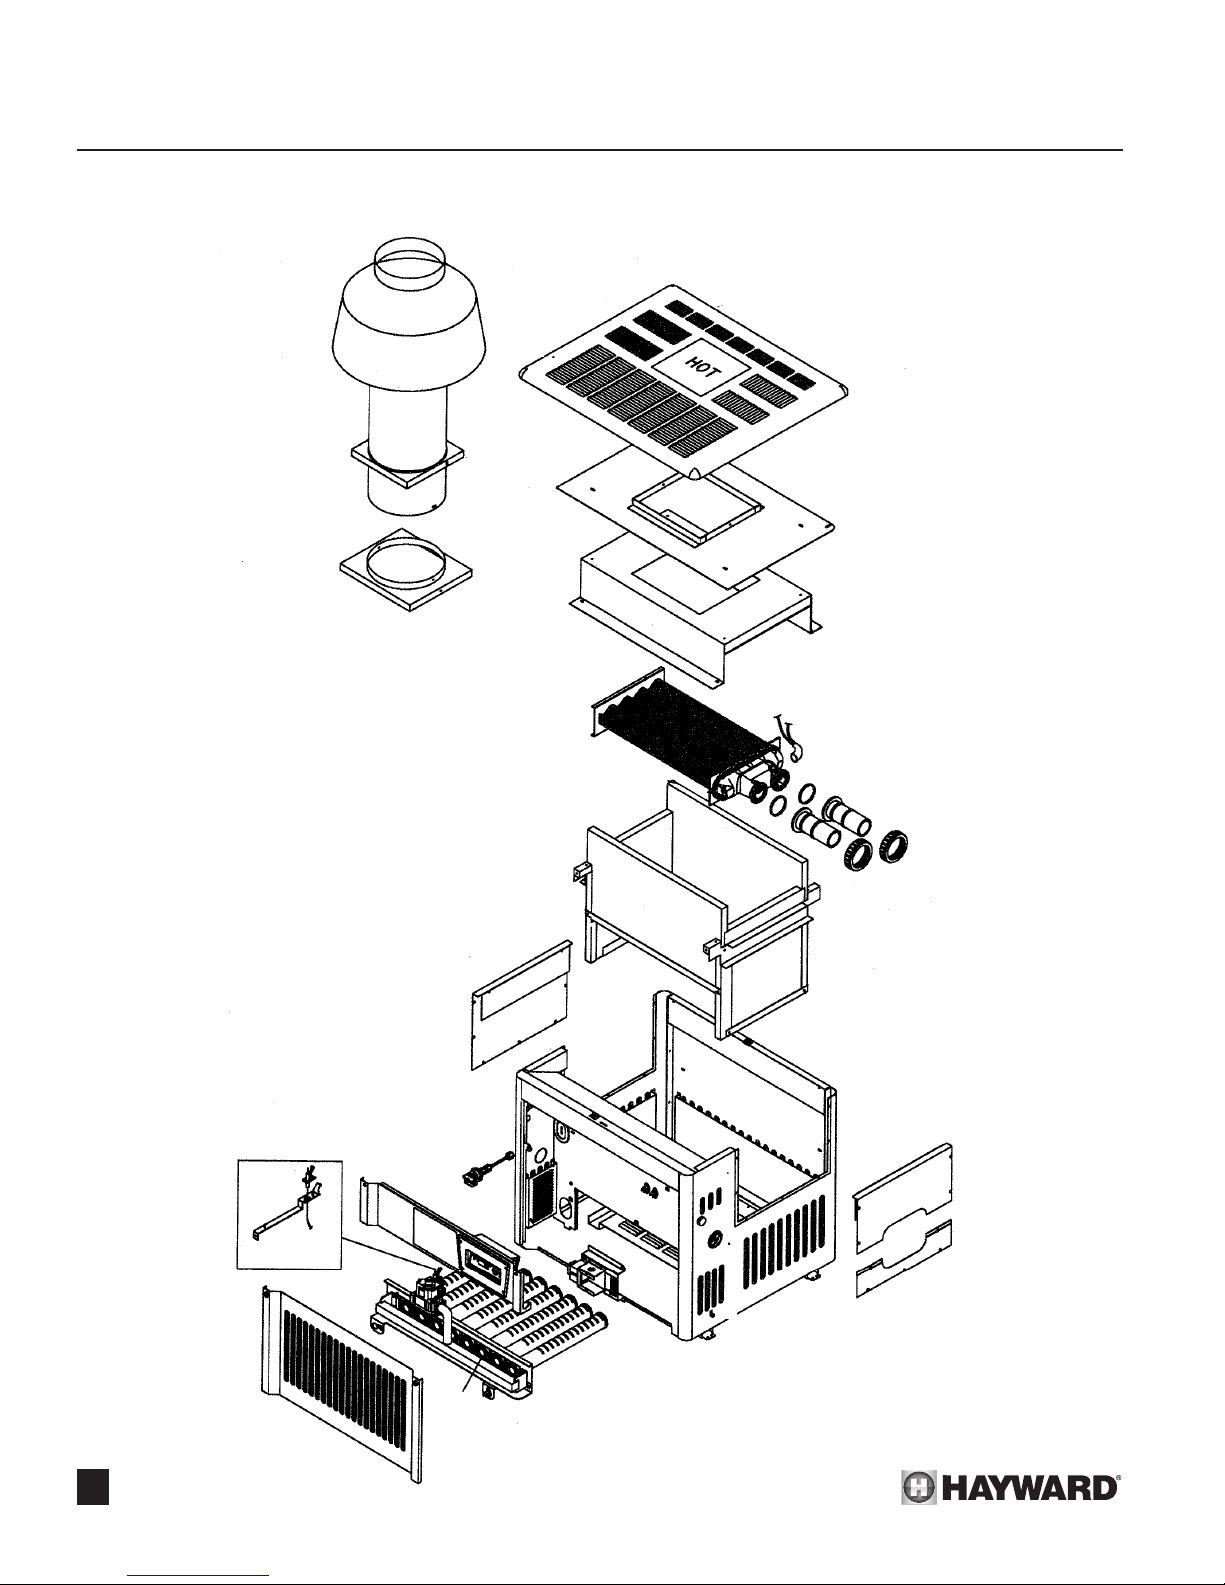
SECTION 7. TROUBLESHOOTING
Parts Illustration - Electronic Ignition
3
1
2
41
36
33
35
34
26
32
27
30
4
28
29
37
25
25
31
5
6
7
8
27
24
25
44
38
28
Page 47
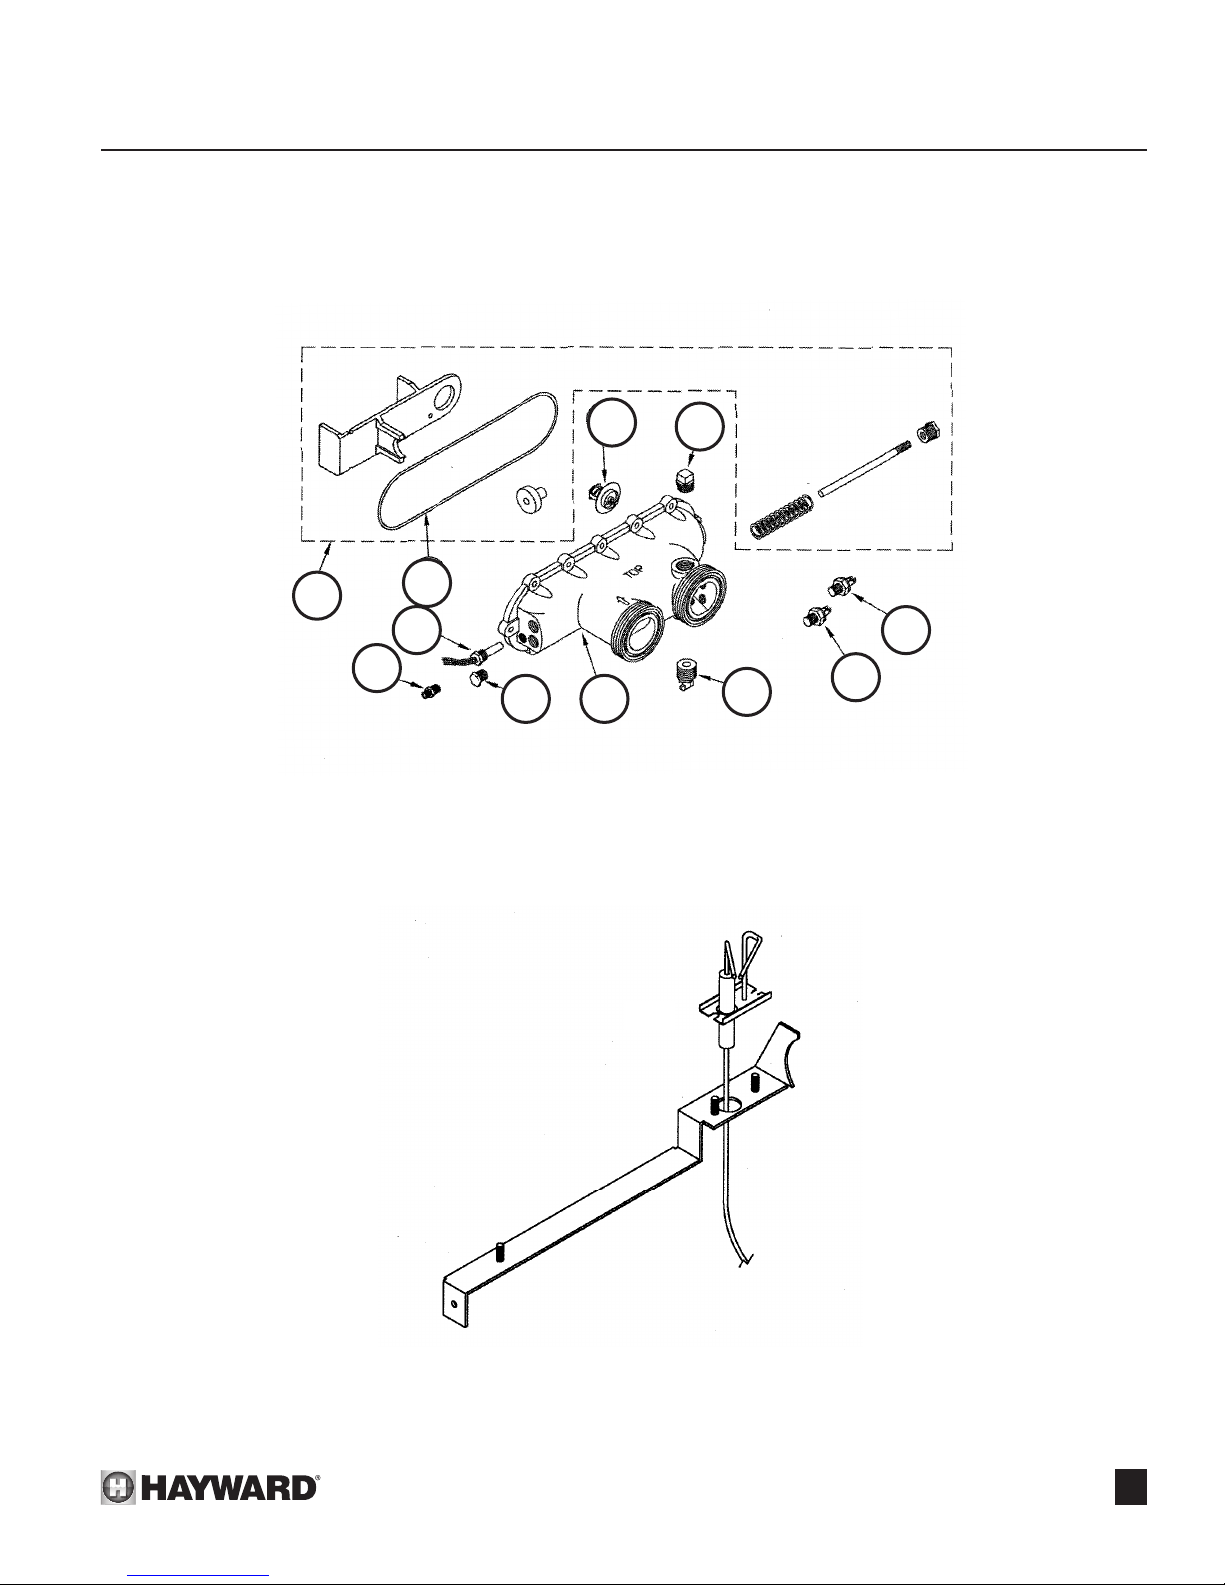
Parts Illustration - Electronic Ignition
SECTION 7. TROUBLESHOOTING
12
19
22
20
10
11
23 21
Front Header Parts
41
18
16
17
Spark Igniter Parts
45
Page 48

SECTION 7. TROUBLESHOOTING
Limited heater warranty:
TERMS AND COVERAGE: We warrant our pool heater to be
free from defects in workmanship and materials under normal
use and service. Pursuant to this warranty and subject to the
Conditions and Exceptions indicated below:
1. We will replace (cost of freight, installation, cost of fuel, and
service labor at user’s expense) with the prevailing comparable model, or, at our option, repair any pool/spa heater that
leaks under normal use and service within one year from the
date of original installation for all users.
2. In addition, we will replace (cost of freight, installation, cost
of fuel, and service labor at user’s expense) or, at our option,
repair any part or parts of the pool/spa heater which malfunc-
tions under normal use and service within one year from the
date of original installation for all users.
LIMITATION ON IMPLIED WARRANTIES: WE ARE NOT LIABLE FOR ANY CONSEQUENTIAL DAMAGES FOR BREACH
OF ANY WRITTEN OR IMPLIED WARRANTY OF THIS PRODUCT, implied warranties, including the WARRANTY of MERCHANTABILITY and all other implied warranties that may arise
from course of dealing or usage of trade imposed on the sale of
this heater under laws of the state are limited in duration to the
term of one (1) year for all users. There are no warranties which
extend beyond the description on the face hereof. We shall not
in any event be held liable for any special, indirect, or conse-
quential damages.
EXPENSE OF DELIVERY AND INSTALLATION: Each pool
heater or replacement part to be furnished under this warranty
shall be furnished at our nearest distribution center. We shall
not pay, nor be responsible for shipping or delivery charges to
the place of installation, nor for labor charges or other costs of
removal or installation. Every defective heater or part replaced
under this warranty shall become our property, and as such,
must be returned to our distribution center with transportation
charges paid by the user. Any replacement pool heater furnished
under this warranty shall remain in warranty only for the unex-
pired portion of this warranty.
CONDITIONS AND EXCEPTIONS: This warranty applies only
to the pool/spa at its original place of installation and only for the
original owner, it does not apply if the pool heater is installed in
violation of any applicable code or ordinance, or is not installed,
operated and maintained in accordance with our instructions, or
is misused, damaged by accident, weather, act of God, freezing,
water void and/or excess pressure, altered or disconnected. It
does not apply with respect to:
1. A heater not equipped with Certied C.S.A. limit controls or
equivalent pressure relief valve.
2. A heater operated with settings in excess of, and/or with fuel
not conforming to those shown on rating plate;
3. A heater on which the serial numbers have been altered,
defaced, or removed.
4. Leaks arising from defective installation;
5. Production of noise, odors, or discolored (rusty, etc.) water;
6. Leakage substantially contributed to by sediment, lime precipi-
tate and/or higher than normal dissolved solids (pH above 7.8)
in the tank, copper tubes, or water ways;
7. Leakage caused substantially contributed to by corrosive elements in the atmosphere (such as the storage of chlorine or
other chemicals);
8. Leakage caused substantially or contributed to by corrosive
pool water in an acid condition (pH below 7.2);
9. Damage caused substantially or contributed to by an external
source of energy;
10. A pool/spa heater is a water containing device. Leakage of
water from this device can be expected at some time due
to malfunction or the limitations of the service life of various
components.
Do not install this product where such leakage can cause
damage. MANUFACTURER IS NOT RESPONSIBLE OR LIABLE FOR ANY COSTS INCURRED BY SUCH DAMAGE.
IN NO CASE ARE WE TO HELD LIABLE FOR DAMAGE TO
SURROUNDING AREA OR PROPERTY CAUSED BY LEAKAGE OR MALFUNCTION.
HOW TO CLAIM UNDER THIS WARRANTY: The original
owner, upon discovering the defect, must present the attached
completed warranty claim card with proof of purchase either to
the dealer or notify the Company in writing at either address:
Hayward Pool Products, Inc.
900 Fairmont Avenue
Elizabeth, NJ 07207
or
Hayward Pool Products, Inc.
2875 Pomona Boulevard
Pomona, CA 91768
Upon receipt of such notication we shall decide whether to
repair such parts or replace any pool heater, reserving at all
times the right to inspect in order to verify any claimed defect.
We also reserve the right to have our representatives make any
inspections, repairs, or to furnish replacements. This warranty is
intended as a legally binding obligation of the Company, enforceable in the courts. This warranty may give you specic legal
rights which may vary from state to state.
LIMITATION ON LIABILITY: All intended representations have
been expressly set forth in this document. This warranty may not
be extended by oral or any other additional representations, written sales information, drawings, or other malfunction, is strictly
limited to repair or replacement of the defective heater or part,
46
Page 49
SECTION 7. TROUBLESHOOTING
as provided herein and the Company is not responsible hereunder for incidental or consequential or incidental costs or
damages. The company neither assumes, nor authorizes any
person or rm to assume for us, any further liability or obligation
in connection with the sale, installation, use, maintenance, or
existence of the heater.
SAFETY WARNING: Pool heaters are heat producing appliances and to avoid damage or injury in the event of possible
overheating of the outer jacket (1) no materials should be stored
against the jacket and (2) care should be taken to avoid unnecessary contact (especially by children) with the jacket. When
lighting a gas heater, the lighting instructions must be followed
exactly to prevent “ashback” of excess gas in the heater.
Electronic ignition heaters and electric heaters must have the
power shut off when making adjustments to, servicing, or coming
into contact with the heater. UNDER NO CIRCUMSTANCES
SHOULD FLAMMABLE MATERIALS, SUCH AS GASOLINE
OR PAINT THINNERS, BE USED OR STORED IN THE VICINITY OF THE HEATER OR IN ANY LOCATION FROM WHICH
FUMES COULD REACH THE HEATER. For your comfort, enjoyment and safety, please read the enclosed operating instruc-
tions carefully.
Cut on line
FireTile™ ve year limited warranty:
TERMS AND COVERAGE: This warranty is an extended
warranty applicable to the FireTile™ components used in the
conditions, limitations, and exceptions of the regular pool heater
limited warranty remain in force, apply to this warranty, and are
incorporated herein by reference.
Under the terms of this special FireTile™ limited warranty, we
will replace (cost of freight, installation, cost of fuel, and service labor at user’s expense) any components of your pool/spa
heater made of FireTile™ which fail from defects in workmanship
and materials under normal use and service in a single family
residential application for a period of ve (5) years.
USE THIS FORM ONLY FOR MAKING A CLAIM
LIMITED 1 YEAR POOL/SPA/HOT TUB HEATER CLAIM FORM
Model No. _______________________________ Serial No. ______________________________________
Purchaser’s Name _______________________________________________________________________
Installation Address _______________________________________________________________________
City/State/Zip ___________________________________________________________________________
Single Family Residential Use
Dealer’s Name __________________________________________________________________________
Address ________________________________________________________________________________
Date of Installation _______________________________________________________________________
Note to Dealer: Fill in the following information on replacement heater.
Yes No If no, fill in use _____________________________________
Model No. _______________________ Serial No. __________________ Date Installed ________________
47
Page 50

NOTES
48
Page 51

NOTES
49
Page 52

NOTES
50
 Loading...