

Hayter Solar Mower Workshop Manual

101 88 90-26
Workshop Manual
Solar Mower
Eng-SOL VERK front 98-01-15, 10.061
LIST OF CONTENTS
!
!
!
!
WARNING!
This tool can be dangerous if used incorrectly.
Warnings and safety instructions in this
Workshop Manual must be followed carefully
for the tool to be used safely and efficiently.
WARNING!
Keep hands and feet away from the rotating
blades.
Never place your hands or feet close to, or
under the cutting deck’s cover before you
have checked that the power switch is off and
that the motor has stopped.
WARNING!
Do not permit anyone who does not know how
the lawn mower works or behaves to carry out
repairs on the lawn mower.
WARNING!
Under no circumstances may the lawn mower’s original design be modified without the
permission of the manufacturer. Always use
genuine spare parts. Non authorised modifications and/or components can result in serious
disruptions and the risk of personal injury.
List of Contents
Safety instructions
User safety .......................................................................... 2
Tool safety ........................................................................... 2
Working safety..................................................................... 2
Technical data
Technical data ..................................................................... 3
What is what?...................................................................... 3
Trouble shooting
General trouble shooting tips .............................................. 4
Solar panels ........................................................................ 4
Motor and cutting disc ......................................................... 5
Drive motors ........................................................................ 6
Sensors ............................................................................... 6
Moisture sensor................................................................... 6
Microswitches (Collision detectors) ..................................... 7
Cables ................................................................................. 7
Batteries .............................................................................. 7
Keyboard .............................................................................8
Generator and loop cable.................................................... 8
Circuitboard with CPU ......................................................... 9
Buzzer ................................................................................. 9
Main power switch............................................................... 9
Magnetic switch................................................................... 9
Start-up sequence ............................................................. 10
Trouble shooting chart....................................................... 11
Circuit diagram
Circuit diagrams ................................................................ 13
IMPORTANT!
Read through the Workshop Manual carefully and understand the contents before
starting to carry out any repairs. Follow all
directions.
English – 1
SAFETY INSTRUCTIONS
User safety
• Read carefully through this Workshop Manual to understand
all the repair directions.
• Check that there are no stones, twigs, tools or other objects,
which can damage the blades, on the lawn to be used as a
test surface.
• Those not familiar with how the lawn mower works or behaves
should not be allowed to repair the tool. They should not be
allowed to be within the vicinity of, or in the lawn mowers
working area when the mower is activated.
• Never permitted anyone to touch the lawn mower when in use.
• Never use the lawn mower
with damaged panels,
covers or cables.
• Never use the lawn
mower if the power
switch does not work.
Working safety
WARNING! Always switch off the lawn mower
using the power switch before inspecting,
!
• Never move the lawn mower with the rear panels folded down.
Switch off the lawn mower using the power switch when
moving outside of the cutting area or if maintenance shall be
carried out.
• Always wait until the blades have stopped. Carry it by using
the handle and with the rear panels folded up.
• When moving over short distances the lawn mower can be
switched off by folding up the rear solar panel and waiting until
the blades have stopped. Carry it by using the handle and with
the rear panel folded up.
• Never use the lawn mower with defective covers, screws, nuts
or cables.
• Start the lawn mower according to the instructions. Keep
hands and feet away from the rotating blades. Never place
your hands or feet under the solar panels.
• Do not stand in front of the lawn mower when you start it, also
ensure than no one else is standing in front of the lawn
mower.
cleaning or carrying out repairs.
Tool safety
WARNING!
Always switch off the lawn mower using the
!
• Replace damaged parts. Check especially that the blades and
cutting disc are not damaged. Change all the blades at the
same time so that rotating parts are balanced.
• The lawn mower contains environmentally hazardous batteries. In accordance with applicable laws regarding spent
batteries: These must not be thrown in household waste or
mixed with industrial waste. Those who professionally sell
batteries or such equipment where such batteries are included, are obliged to accept spent batteries and thereafter
leave then to an approved authority for disposal.
power switch before inspecting, cleaning or
carrying out repairs. The batteries should
always be disconnected when carrying out
maintenance or repairs to the lawn mower’s
internal components. The only exception is
when current or voltage needs to be measured. Extra care should then be exercised.
• Never lift up the lawn mower or carry it around when it is
running.
• Always switch off the lawn mower using the power switch
before inspecting or cleaning the underside or carrying out
repairs.
Care and storage safety
• Store the lawn mower in an area that is dry but not too warm,
otherwise damage can be caused to the solar panels and
batteries.
• During the winter the lawn mower should be stored in a dry
place, preferably in the original packaging or parked on all four
wheels, with the power switch off and the batteries disconnected.
Transport safety
• Fold up the rear section of the solar panel and switch off the
power switch when transporting the lawn mower. Use the
original packaging when transporting the lawn mower over
longer distances.
2 – English
TECHNICAL DATA
Technical data
Batteries NiCd
Cutting system Cutting disc with three flexible blades
Wheels Front wheels with stainless steel bearings
Height control Variable, 30 - 60 mm
Weight 6.5 kg
Length/Width/Height 105cm/63cm/22cm
2
Working capacity 1200 m
+- 20%
7
18
2
3
1
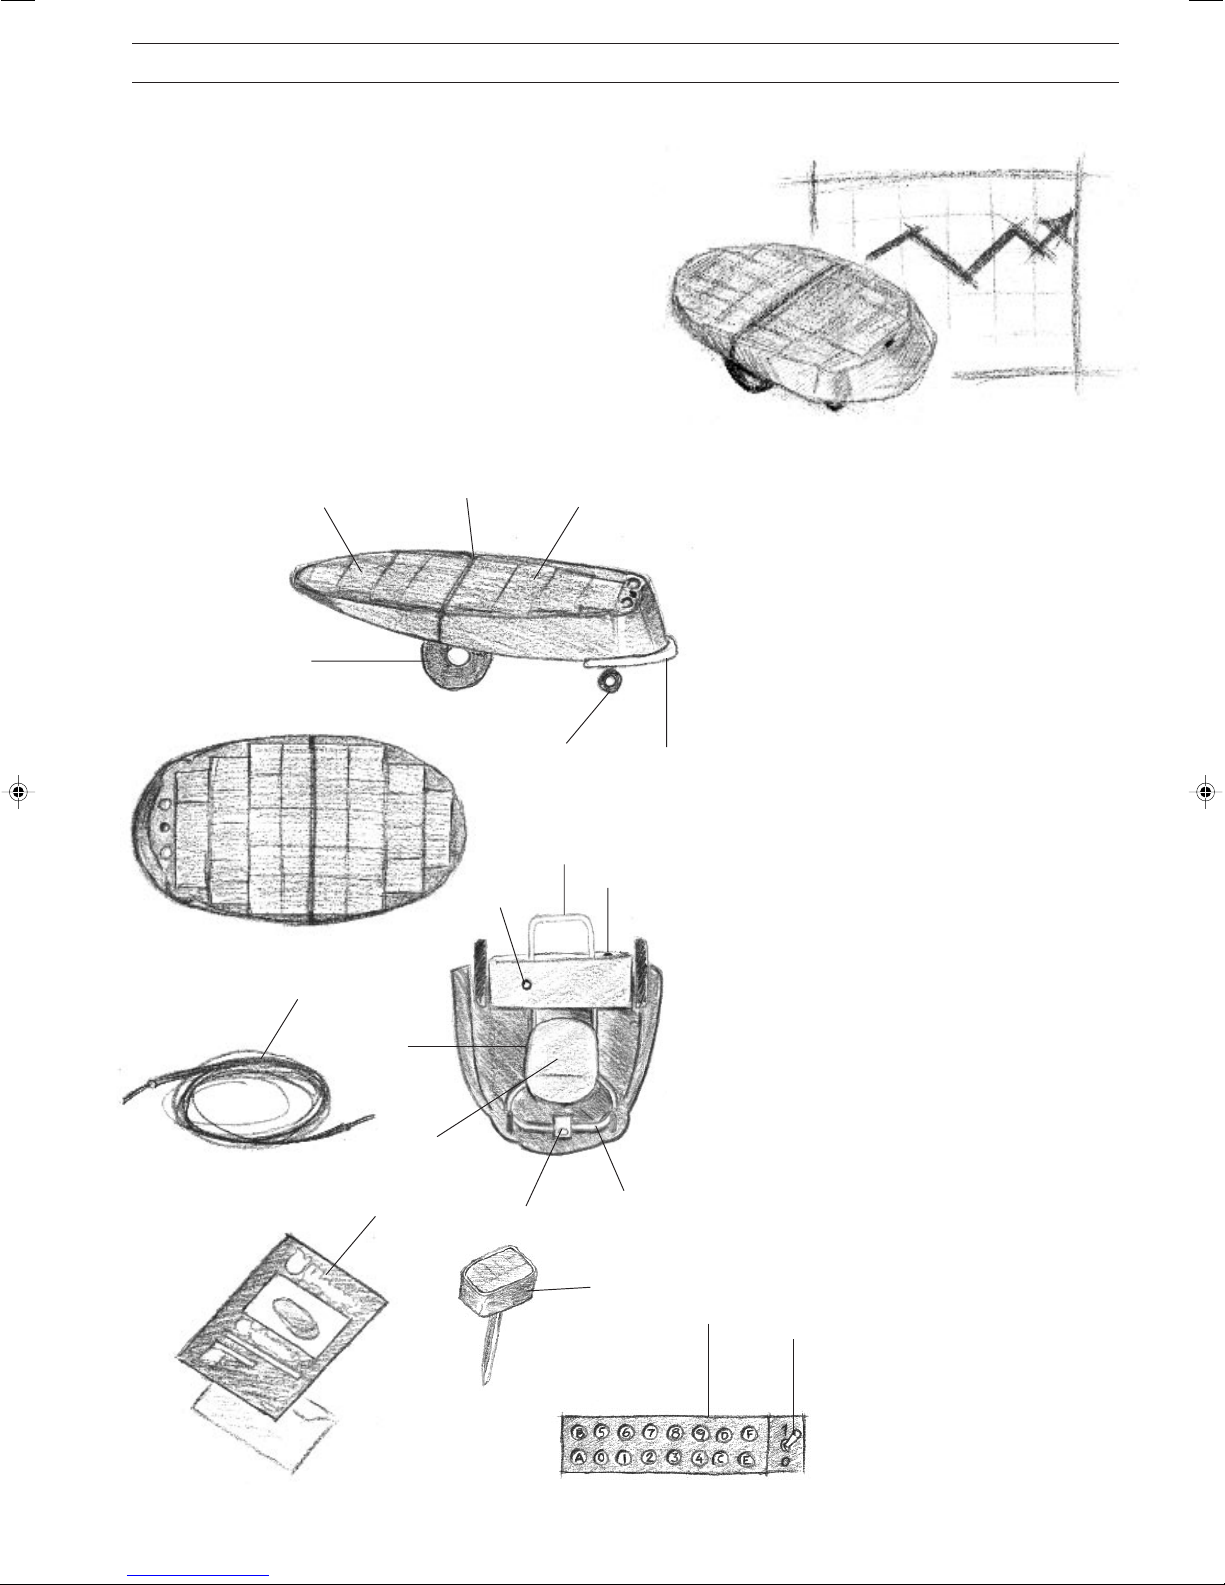
What is what?
1. Front solar panel
2. Rear solar panel
3. Hinge
4. Bumper
5
8
10
9
6
4
5. Front wheels
6. Cutting disc
7. Drive wheel
8. Handle and rear panel support
9. Moisture sensor
10. Electronic controller with microprocessor
11. Protective plate
12. Frame
13. Keyboard
11
17
15
16
12
13
14. Power switch
15. Sensor
16. Generator
17. Operator’s Manual with code
18. Loop cable
14
English – 3
TROUBLE SHOOTING
General trouble shooting tips
The dealer should have a test lawn of a least 5 x 5 m, surrounded by a loop cable and generator. This test lawn can be
used in those cases where the customer has a problem with
the lawn mower not detecting signals from the loop cable.
Thereby making it possible to determine whether the operating
disruptions are due to metal objects or electrical power lines in
the customer's garden.
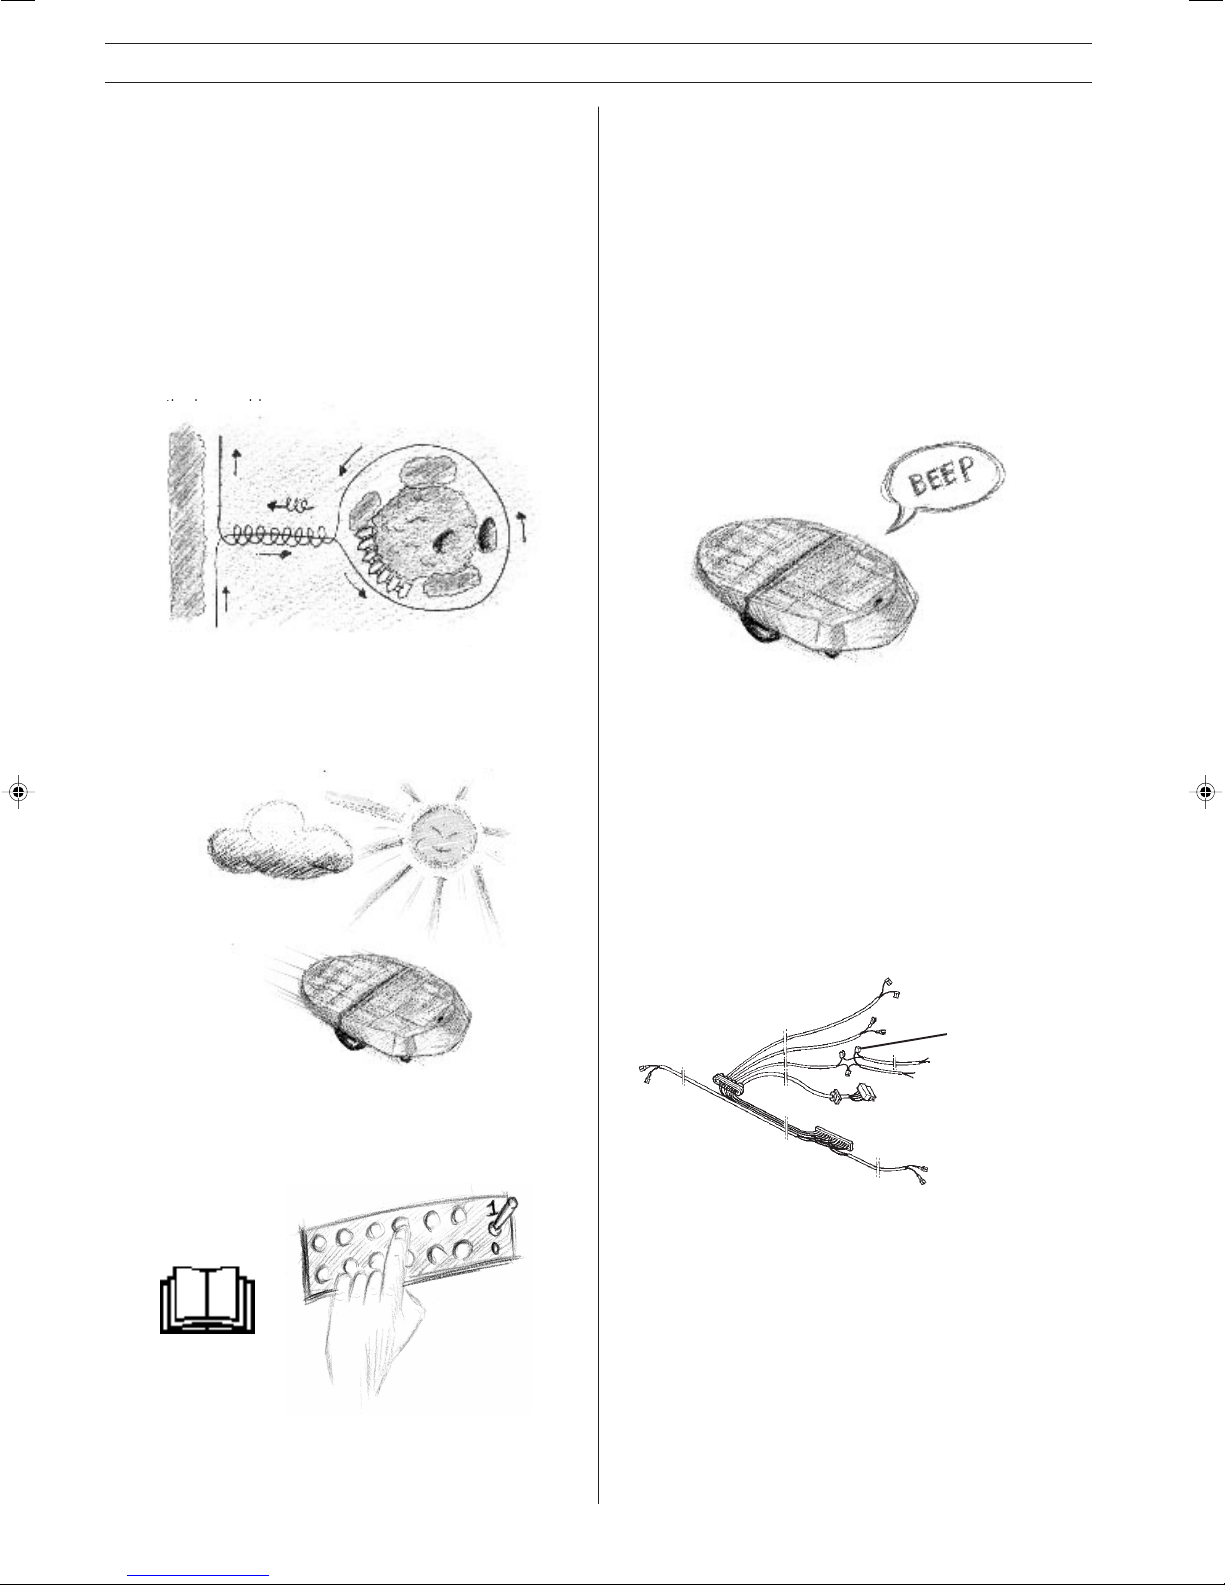
So called “islands“ (see the diagram below), which are formed
with a loop around flowerbeds, fountains, etc. should be routed
in the loop cable’s direction and have a diameter of at least 2 m
(see the Operator’s Manual) to ensure its function. If the
commands F1-9 are changed to increase sensitivity then
smaller “islands“ can also be made, carry out tests before
burying the loop cable.
Solar panels
A number of solar panels connected together transform daylight
into electrical energy. This electrical energy drives the lawn
mower and charges the batteries.
When the lawn mower is in the sun its rays are sufficient to
drive the lawn mower and charge the batteries.
The microprocessor is also used to measure the voltage levels
from the solar panels, and thereby determine whether the lawn
mower has gone into the shade or whether dusk is approaching.
In the evening, when the light intensity is too low, the lawn
mower stops and signals with 1 beep every 10 seconds. This
indicates the night mode.
All trouble shooting should be preceded by at least 1 hour of
charging (with the switch in the off position) outdoors in the
middle of the day, to eliminate the fault being badly charged
batteries.
Read through the entire Workshop Manual and the Operator’s
Manual to determine whether the fault is easily rectified via the
keyboard or with the main power switch.
If the lawn mower avoids the shade during the day, it is because the batteries at the present time do not have sufficient
capacity and to also ensure a long operating time. Large
amounts of sun (sunny weather) allow the mower to charge fully
before it starts to move, while small amounts of sun (cloudy)
means that it charges a little and then moves hoping to find a
sunnier part of the lawn.
If the lawn mower frequently stops to charge in the shadow, this
is a sign that the batteries are deficient.
To check the operation of the solar panels the jointing sleeves
535 03 86-01 should be dismantled and the current from the
front and rear solar panels should be measured.
535 03 86-01
The panel's connection cables should be connected as follows:
The red cable from the box to the red cable from the front of the
body (suitable length 85 mm).
The black cable from the box to the black cable from the rear of
the body (suitable length 55 mm).
The black cable from the front of the body to the red cable from
the rear of the body (suitable length 70 mm).
4 – English
When the panels are connected together (in series) the cable
runs to the box and is connected to the connector X1 at terminals
6 (black) and 7 (red). See the circuit diagram on the last page.
As the light intensity can vary a great deal it is difficult to specify
an exact current, however, if a different current is measured from
the front and rear solar panels at the same time, you may
presume that the panel that generates the lowest current is faulty.
 Loading...