

Hayter R48 445E, R48 446E, R48 447E Operator's Manual

Operator ’sManual
R48RecyclingMower
G008079
Code445E,446E,447E
SerialNo.280R00001,280S00001,or280T00001and
Up
ManualPartNo.111-2087RevB

Introduction
Readthisinformationcarefullytolearnhowtooperate
andmaintainyourproductproperlyandtoavoidinjury
andproductdamage.Youareresponsibleforoperating
theproductproperlyandsafely.
Wheneveryouneedservice,genuineparts,oradditional
information,contactanAuthorizedServiceDealerand
havethemodelandserialnumbersofyourproduct
ready.Figure1identiesthelocationofthemodeland
serialnumbersontheproduct.
Figure1
1.Modelandserialnumberplate
Thismanualidentiespotentialhazardsandhas
safetymessagesidentiedbythesafetyalertsymbol
(Figure2),whichsignalsahazardthatmaycauseserious
injuryordeathifyoudonotfollowtherecommended
precautions.
Figure2
1.Safetyalertsymbol
Thismanualuses2wordstohighlightinformation.
Importantcallsattentiontospecialmechanical
informationandNoteemphasizesgeneralinformation
worthyofspecialattention.
Contents
Introduction.................................................................2
Safety...........................................................................3
GeneralLawnMowerSafety.................................3
SoundPressure.....................................................4
SoundPower........................................................4
Vibration,Hand/arm...........................................4
SafetyandInstructionalDecals.............................5
Setup............................................................................6
UnfoldingtheHandle...........................................6
FillingtheEnginewithOil....................................6
InstallingtheFuse(Model447EOnly)..................7
ChargingtheBattery(Model447EOnly)...............7
ProductOverview........................................................8
Operation.....................................................................8
FillingtheFuelTank.............................................8
CheckingtheEngineOilLevel..............................8
AdjustingtheCuttingHeight................................9
StartingtheEngine...............................................9
UsingtheSelf-propelDrive(Models446Eand
447EOnly)....................................................10
StoppingtheEngine...........................................10
RecyclingtheClippings.......................................10
BaggingtheClippings.........................................10
Rear-dischargingtheClippings............................11
OperatingTips...................................................11
Maintenance...............................................................13
RecommendedMaintenanceSchedule(s)................13
PremaintenanceProcedures....................................13
PreparingforMaintenance.................................13
Lubrication.............................................................14
LubricatingtheWheelGears...............................14
EngineMaintenance...............................................14
ReplacingtheAirFilter.......................................14
ChangingtheEngineOil....................................14
ElectricalSystemMaintenance................................15
ChargingtheBattery(Model447E
Only)..............................................................15
ReplacingtheFuse(Model447EOnly)...............15
DriveSystemMaintenance.....................................16
AdjustingtheSelf-propelDrive...........................16
BladeMaintenance.................................................17
ReplacingtheBlade............................................17
Cleaning.................................................................18
CleaningtheMower............................................18
Storage.......................................................................18
PreparingtheMowerforStorage........................18
RemovingtheMowerfromStorage.....................18
©2008—HayterLimited
2
PrintedintheUSA.
AllRightsReserved

Safety
Improperlyusingormaintainingthismowercan
resultininjury.Toreducethepotentialforinjury,
complywiththesesafetyinstructions.
Thismowerwasdesignedandtestedforreasonablysafe
service;however,failuretocomplywiththefollowing
instructionsmayresultinpersonalinjury.
Toensuremaximumsafety,bestperformance,and
togainknowledgeoftheproduct,itisessential
thatyouandanyotheroperatorofthemowerread
andunderstandthecontentsofthismanualbefore
theengineiseverstarted.Payparticularattention
tothesafetyalertsymbol(Figure2)whichmeans
Caution,Warning,orDanger—“personalsafety
instruction.”Readandunderstandtheinstruction
becauseithastodowithsafety.Failuretocomply
withtheinstructionmayresultinpersonalinjury.
GeneralLawnMowerSafety
Thefollowinginstructionshavebeenadaptedfromthe
ISO5395.
Thiscuttingmachineiscapableofamputatinghands
andfeetandthrowingobjects.Failuretoobservethe
followingsafetyinstructionscouldresultinserious
injuryordeath.
Training
•Readtheinstructionscarefully.Befamiliarwiththe
controlsandtheproperuseoftheequipment.
•Neverallowchildrenorpeopleunfamiliarwiththese
instructionstousethemower.Localregulationscan
restricttheageoftheoperator.
•Keepinmindthattheoperatororuserisresponsible
foraccidentsorhazardsoccurringtootherpeopleor
theirproperty.
•Understandexplanationsforallpictogramsusedon
themowerorintheinstructions.
Petrol
WARNING-Petrolishighlyammable.Takethe
followingprecautions.
•Storefuelincontainersspecicallydesignedforthis
purpose.
•Refueloutdoorsonlyanddonotsmokewhile
refueling.
•Addfuelbeforestartingtheengine.Neverremove
thecapofthefueltankoraddpetrolwhilethe
engineisrunningorwhentheengineishot.
•Ifpetrolisspilled,donotattempttostarttheengine
butmovethemowerawayfromtheareaofspillage
andavoidcreatinganysourceofignitionuntilpetrol
vaporshavedissipated.
•Replaceallfueltankandcontainercapssecurely .
Preparation
•Whilemowing,alwayswearsubstantialfootwearand
longtrousers.Donotoperatetheequipmentwhen
barefootorwearingopensandals.
•Thoroughlyinspecttheareawheretheequipmentis
tobeusedandremoveallstones,sticks,wires,bones
andotherforeignobjects.
•Beforeusing,alwaysvisuallyinspecttoseethat
guards,andsafetydevices,suchasdeectorsand/or
grassbags,areinplaceandworkingcorrectly.
•Beforeusing,alwaysvisuallyinspecttoseethatthe
blades,bladeboltsandcutterassemblyarenotworn
ordamaged.Replacewornordamagedbladesand
boltsinsetstopreservebalance.
Starting
•Disengageallbladeanddriveclutchesandshiftinto
neutralbeforestartingtheengine.
•Donottiltmowerwhenstartingtheengineor
switchingonthemotor,unlessthemowerhastobe
tiltedforstarting.Inthiscase,donottiltitmorethan
absolutelynecessaryandliftonlythepart,whichis
awayfromtheoperator.
•Starttheengineorswitchonthemotorcarefully
accordingtoinstructionsandwithfeetwellaway
fromtheblade(s)andnotinfrontofthedischarge
chute.
Operation
•Nevermowwhilepeople,especiallychildren,orpets
arenearby.
•Mowonlyindaylightoringoodarticiallight.
•Stayalertforholesintheterrainandotherhidden
hazards.
•Donotputhandsorfeetnearorunderrotatingparts.
Keepclearofthedischargeopeningatalltimes.
•Neverpickuporcarryalawnmowerwhilethe
engineisrunning.
•Useextremecautionwhenreversingorpullinga
pedestriancontrolledlawnmowertowardsyou.
•Walk,neverrun.
•Slopes:
3

–Donotmowexcessivelysteepslopes.
–Exerciseextremecautionwhenonslopes.
–Mowacrossthefaceofslopes,neverupand
downandexerciseextremecautionwhen
changingdirectiononslopes.
–Alwaysbesureofyourfootingonslopes.
•Uselowthrottlesettingswhenengagingthe
traction-clutch,especiallyinhighgears.Reduce
speedonslopesandinsharpturnstoprevent
overturningorlossofcontrol.
•Stopthebladeifthelawnmowerhastobetiltedfor
transportationwhencrossingsurfacesotherthan
grassandwhentransportingthelawnmowertoand
fromtheareatobemowed.
•Donotoperatetheengineinaconnedspacewhere
dangerouscarbonmonoxidefumescancollect.
•Stoptheengine
–wheneveryouleavethelawnmower.
–beforerefueling.
–beforeremovingthegrassbag.
–beforemakingheightadjustmentunless
adjustmentcanbemadefromtheoperator’s
position.
•Stoptheengineanddisconnectthespark-pluglead.
–beforeclearingblockagesoruncloggingchute.
–beforechecking,cleaningorworkingonthelawn
mower.
–afterstrikingaforeignobject,inspectthelawn
mowerfordamageandmakerepairsbefore
restartingandoperatingthelawnmower.
–iflawnmowerstartstovibrateabnormally(check
immediately).
•Watchoutfortrafcwhencrossingornearroadways.
MaintenanceandStorage
•Keepallnuts,boltsandscrewstighttobesurethe
equipmentisinsafeworkingcondition.
•Donotusepressurecleaningequipmentonmachine.
•Neverstoretheequipmentwithpetrolinthetank
andinsideabuildingwherefumescanreachanopen
ameorspark.
•Allowtheenginetocoolbeforestoringinany
enclosure.
•Toreducetherehazard,keeptheengine,silencer,
batterycompartmentandpetrolstorageareafreeof
grass,leaves,orexcessivegrease.
•Checkgrassbagcomponentsandthedischarge
guardfrequentlyandreplacewithmanufacturer’s
recommendedparts,whennecessary.
•Replacewornordamagedpartsforsafety.
•Replacefaultysilencers.
•Ifthefueltankhastobedrained,dothisoutdoors.
•Donotchangetheenginegovernorsettingsor
overspeedtheengine.Operatinganengineat
excessivespeedcanincreasethehazardofpersonal
injury.
•Onmultibladedlawnmowers,takecareasrotating
oneblademaycauseotherstorotate.
•Becarefulduringadjustmentofthelawnmowerto
prevententrapmentofthengersbetweenmoving
bladesandxedpartsofthelawnmower.
•Toensurethebestperformanceandsafety ,
purchaseonlygenuinereplacementparts
andaccessories.Donotuse
will t
partsand
accessories;theymaycauseasafetyhazard.
SoundPressure
ThisunithasanequivalentcontinuousA-weighted
soundpressurelevelattheoperatorearof85dBA,
basedonmeasurementsofidenticalmachinesperEN
ISO11201andEN836.
SoundPower
ThisunithasanequivalentcontinuousA-weighted
soundpowerlevelof96dBA,basedonmeasurements
ofidenticalmachinesperISO11094.
Vibration,Hand/arm
Thisunitdoesnotexceedahand/armvibrationlevelof
4.9m/s
2
,basedonmeasurementsofidenticalmachines
perEN1033andEN836.
4
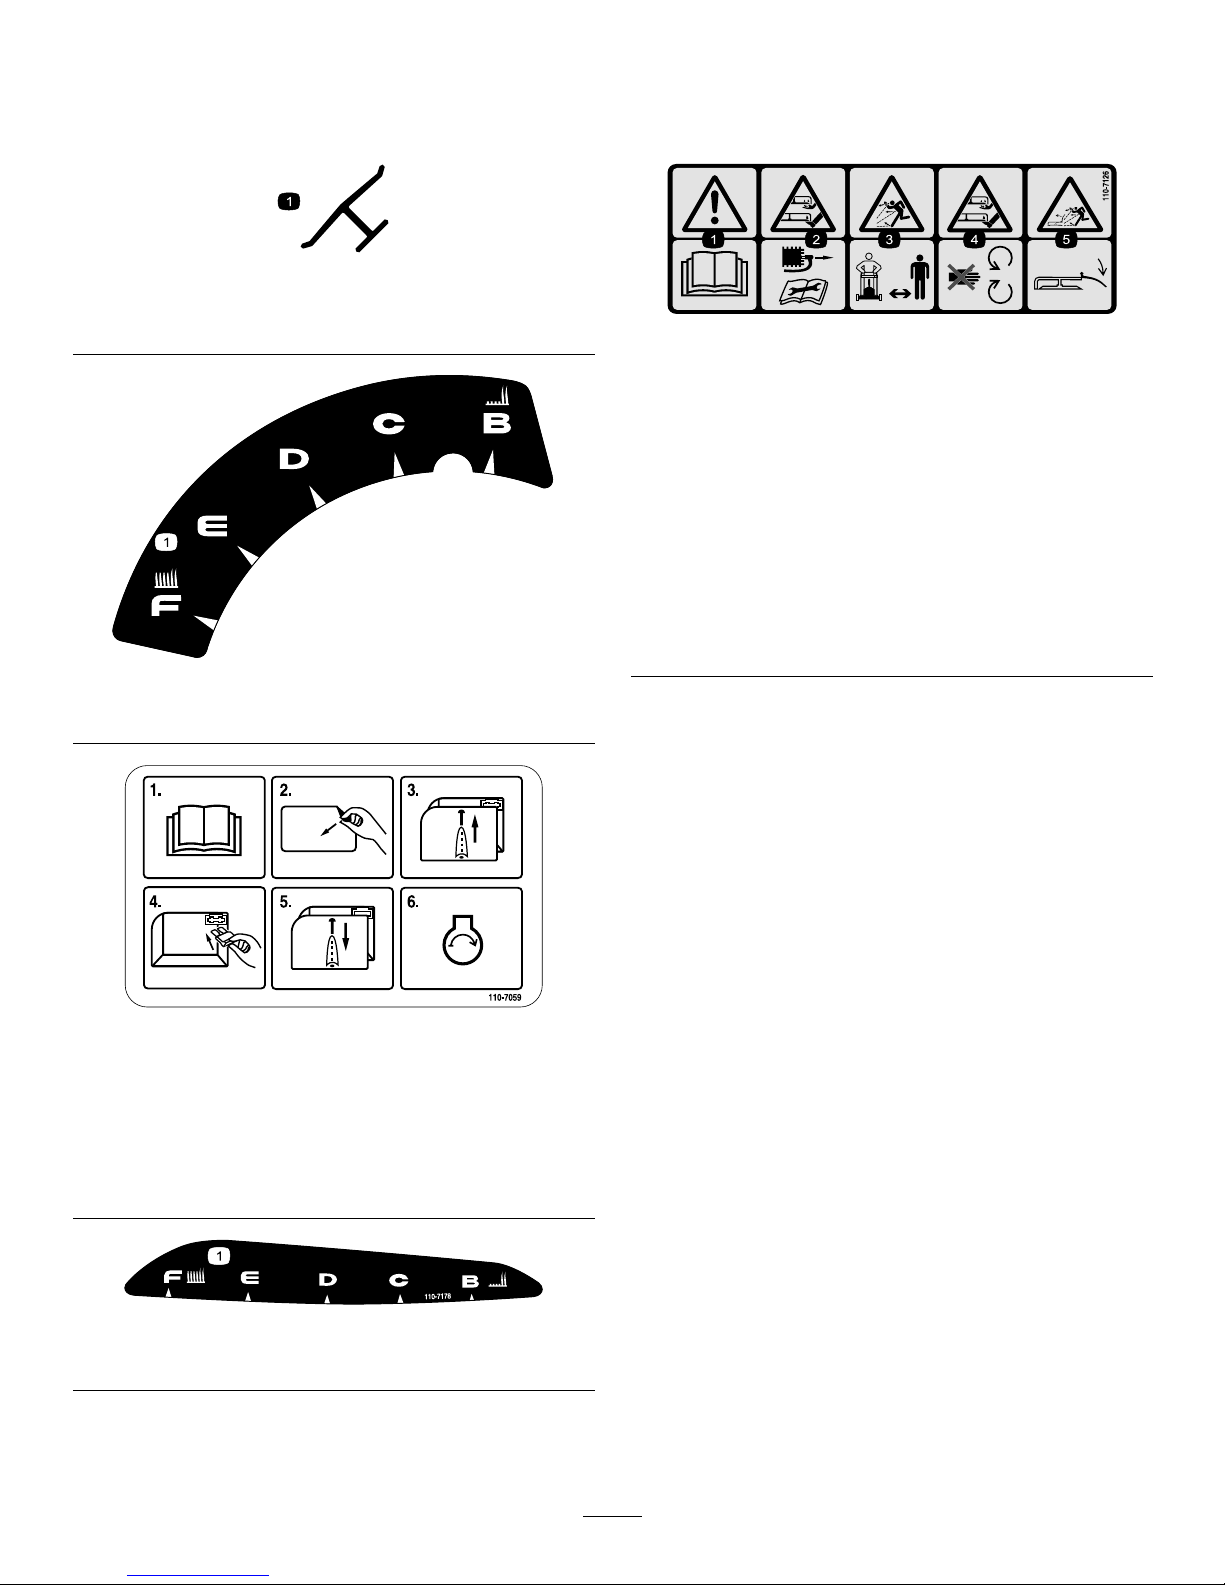
SafetyandInstructionalDecals
Important:Safetyandinstructiondecalsarelocatednearareasofpotentialdanger.Replacedamaged
decals.
Manufacturer’sMark
1.Indicatesthebladeisidentiedasapartfromtheoriginal
machinemanufacturer.
110-7058
1.Heightofcut
110-7059
Model447Eonly
1.ReadtheOperator’s
Manual.
4.Installthefuse.
2.Removethefusebox
decal.
5.Replacethefusebox
cover.
3.Removethefusebox
cover.
6.Starttheengine.
110-7178
1.Heightofcut
110-7126
1.Warning—readthe
Operator’sManual.
4.Cutting,dismemberment
hazardofhandor
foot—stayawayfrom
movingparts.
2.Cutting,dismemberment
hazardofhandor
foot—removethe
sparkpluglead
beforeperformingany
maintenanceonthe
machine.
5.Thrownobject
hazard—keepdeectorin
place.
3.Thrownobject
hazard—keepbystanders
asafedistancefromthe
machine.
5
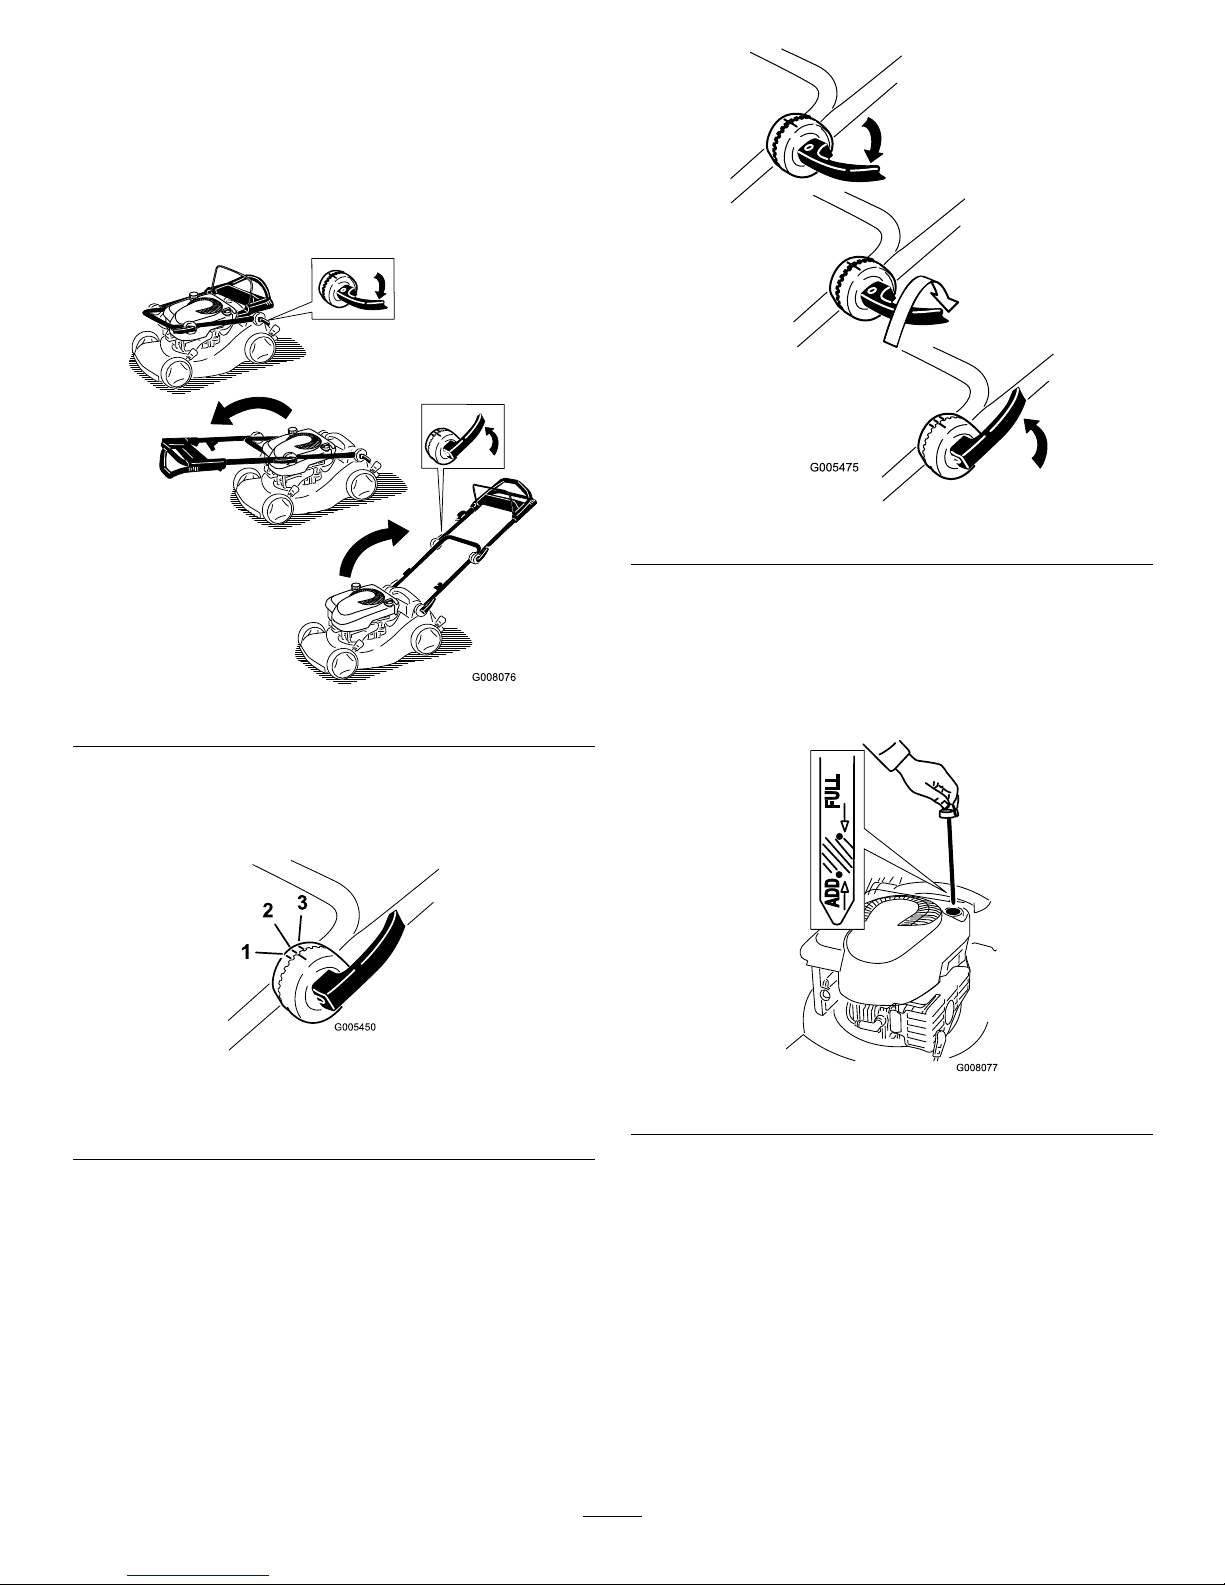
Setup
UnfoldingtheHandle
1.Unlockthehandlelocks,movethehandlesections
intotheoperatingposition,andlockthehandlelocks
(Figure3).
Figure3
2.Unlocktheupperhandlelocksandrotatetheupper
handleupwardandlockitintoapositionthatis
comfortabletoyou(Figure4).
Figure4
1.Highestposition3.Lowestposition
2.Middleposition
Note:Youcansettheupperhandleto1of3handle
positions.Lineupthemarktooneofthe3markson
theinnersideoftheupperhandlelocks(Figure4).
Note:Ifahandleleverisloose,openthelever,
rotateitclockwise1or2turnstotightenit,then
closethelever(Figure5).
Figure5
FillingtheEnginewithOil
Yourmowerdoesnotcomewithoilintheengine.
1.Removethedipstick(Figure6).
Figure6
2.Slowlypouroilintotheoillltubeuntiltheoil
levelreachestheFulllineonthedipstick(Figure6).
Donotoverll.(Max.ll:0.59l,type:SAE30W
detergentoilwithanAPIserviceclassicationofSF ,
SG,SH,SJ,SL,orhigher.)
3.Installthedipsticksecurely.
Important:
Change the engine oil after the r st
5 operating hour s
;changeityearlythereafter.
RefertoChangingtheEngineOil.
6

InstallingtheFuse(Model
447EOnly)
Yourmowercomeswitha40-ampfusethatprotectsthe
electricstarter.
Important:Y oucannotstartthemowerwiththe
electricstarterorchargethebatteryunlessyou
installthefuse.
1.Removethebatterycoverandthebatteryandlocate
thefuseholder(Figure7).
Figure7
1.Screw
3.Fuseholder
2.Batterycover4.Battery
2.Insertthefuse(fromtheloosepartsbag)intothe
fuseholder(Figure8).
Figure8
Note:Yourmowercomeswithafuseintheowner’ s
packetandanotherfuseinthebatterybox.
3.Installthebatteryandthebatterycover.
ChargingtheBattery(Model
447EOnly)
RefertoChargingtheBatteryintheMaintenance
section.
7
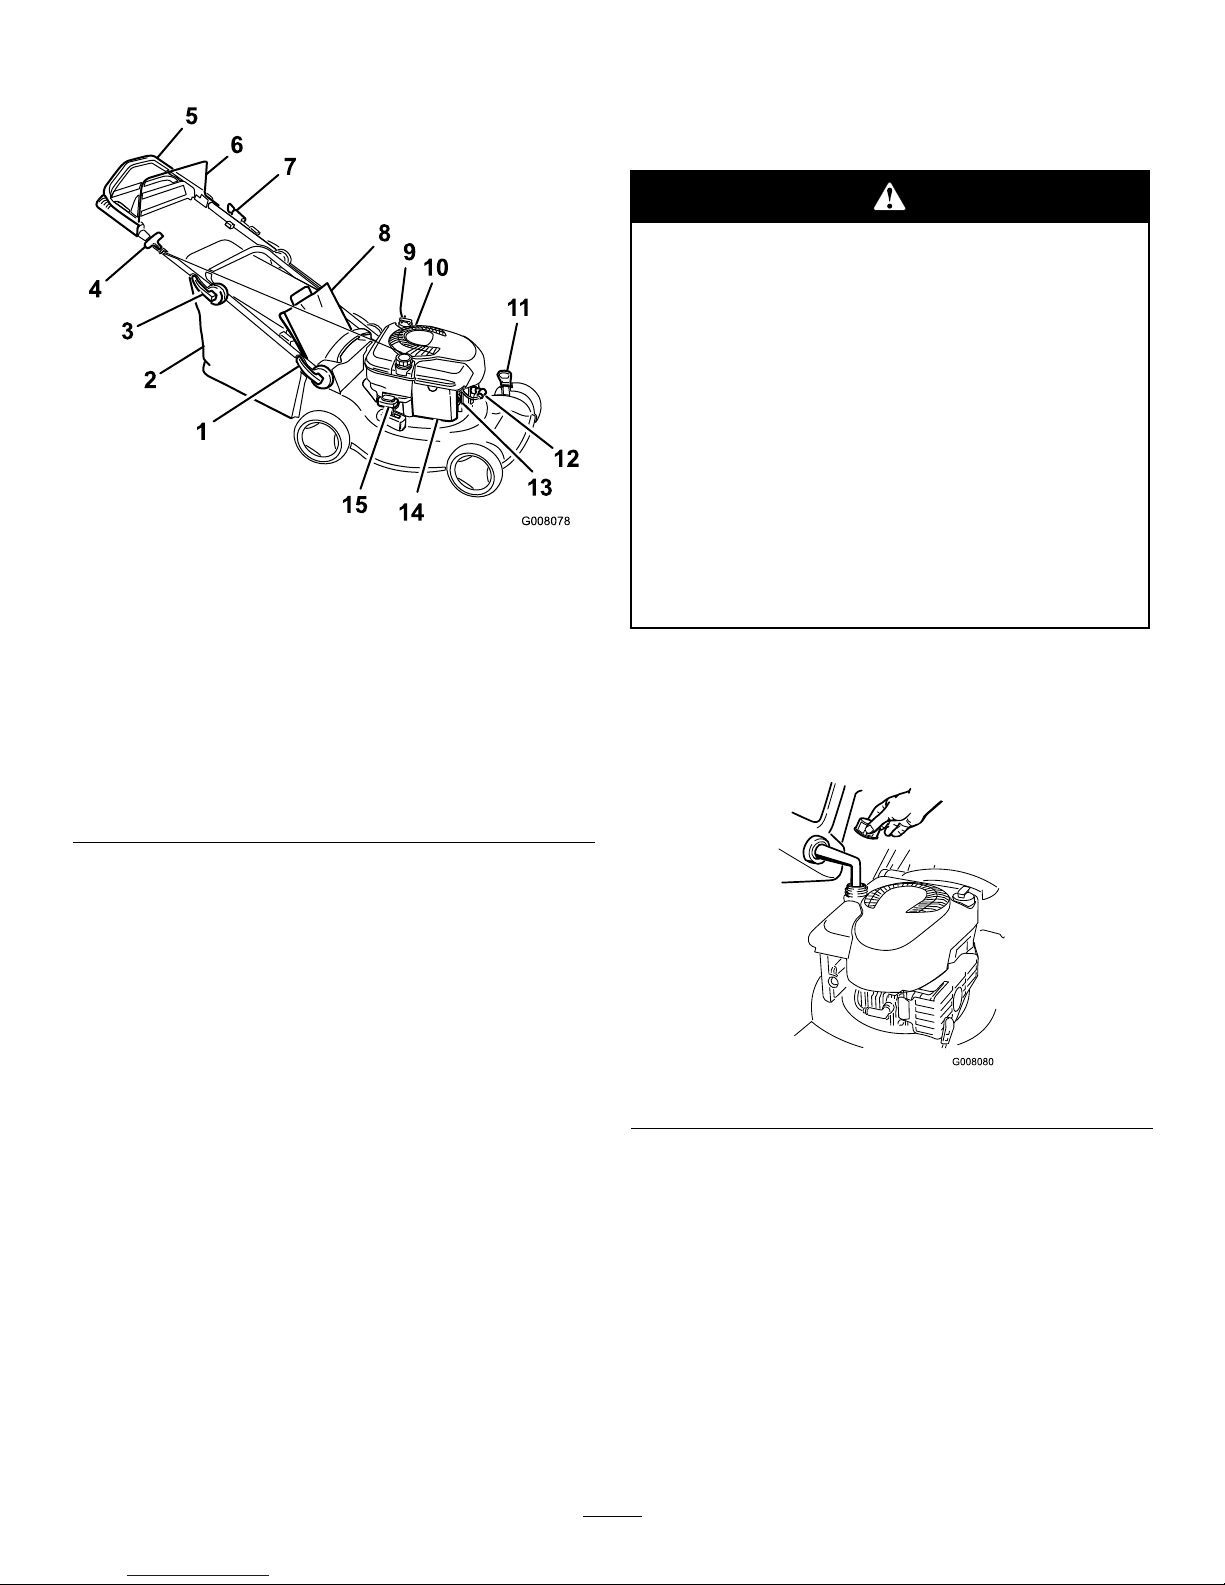
ProductOverview
G008078
1
2
3
4
5
6
7
8
9
10
11
12
13
14
15
Figure9
Model447Eshown
1.Lowerhandlelock
9.Oilll/Dipstick(notshown)
2.Grassbag
10.Fueltankcap
3.Upperhandlelock
11.Cuttingheightlever(2)
4.Recoilstarthandle
12.Sparkplug
5.Upperhandle(Models
446Eand447Eonly)
13.Primer
6.Bladecontrolbar
14.Airlter
7.Electricstart(model447E
only)
15.Recycling/bagginglever
8.Reardoor
Operation
FillingtheFuelTank
Petrolisextremelyammableandexplosive.A
reorexplosionfrompetrolcanburnyouand
others.
•Topreventastaticchargefromignitingthe
petrol,placethecontainerand/ormower
directlyonthegroundbeforelling,notina
vehicleoronanobject.
•Fillthetankoutdoorswhentheengineis
cold.Wipeupspills.
•Donothandlepetrolwhensmokingor
aroundanopenameorsparks.
•Storepetrolinanapprovedfuelcontainer,
outofthereachofchildren.
Fillthefueltankwithfreshunleadedpetrol(Figure10).
Important:Toreducestartingproblems,add
fuelstabilizertothefuelallseason,mixingitwith
petrollessthan30daysold.
Figure10
CheckingtheEngineOilLevel
ServiceInterval:Beforeeachuseordaily—Checkthe
engineoillevel.
1.Removethedipstick,wipeitclean,andfullyinstall
thedipstick(Figure6).
2.Removethedipstickandchecktheoillevel
(Figure6).IftheoillevelisbelowtheAddmarkon
thedipstick,slowlypouroilintotheoillltubeto
raisetheoilleveltotheFullmarkonthedipstick.
Donotoverll.(Max.ll:0.59l,type:SAE30W
8
 Loading...