

Page 1

Operator ’sManual
21inHeavy-DutyWalk-BehindRotaryMower
Code455E
SerialNo.310000001
ManualPartNo.3364-824RevA
Page 2

Introduction
Thisrotary-blade,walk-behindlawnmoweris
intendedtobeusedbyresidentialhomeowners
orprofessional,hiredoperators.Itisdesigned
primarilyforcuttinggrassonwell-maintainedlawns
onresidentialorcommercialproperties.Itisnot
designedforcuttingbrushorforagriculturaluses.
Readthisinformationcarefullytolearnhowtooperate
andmaintainyourproductproperlyandtoavoidinjury
andproductdamage.Youareresponsibleforoperating
theproductproperlyandsafely.
Wheneveryouneedservice,genuineparts,oradditional
information,contactanAuthorizedServiceDealerand
havethemodelandserialnumbersofyourproduct
ready.Figure1identiesthelocationofthemodeland
serialnumbersontheproduct.
Figure1
1.Modelandserialnumberlocation
Thismanualidentiespotentialhazardsandhas
safetymessagesidentiedbythesafetyalertsymbol
(Figure2),whichsignalsahazardthatmaycauseserious
injuryordeathifyoudonotfollowtherecommended
precautions.
Figure2
1.Safetyalertsymbol
Thismanualuses2wordstohighlightinformation.
Importantcallsattentiontospecialmechanical
informationandNoteemphasizesgeneralinformation
worthyofspecialattention.
Contents
Introduction.................................................................2
Safety...........................................................................3
GeneralLawnMowerSafety.................................3
SoundPressure.....................................................5
SoundPower........................................................5
Vibration,Hand/arm...........................................5
SafetyandInstructionalDecals.............................6
Setup............................................................................7
1InstallingtheHandle..........................................7
2InstallingtheFuelTankandtheFuel
Line..................................................................7
3FillingtheCrankcasewithOil.............................8
ProductOverview........................................................9
Controls...............................................................9
Specications.......................................................9
Operation...................................................................10
CheckingtheEngineOilLevel............................10
FillingtheFuelTank...........................................11
StartingtheEngine.............................................12
StoppingtheEngine...........................................12
OperatingtheBlade............................................12
OperatingtheTractionDrive..............................13
CheckingtheBladeBrakeClutch........................13
AdjustingtheCuttingHeight..............................13
UsingtheGrassBag...........................................14
OperatingTips...................................................15
Maintenance...............................................................17
RecommendedMaintenanceSchedule(s)................17
Lubrication.............................................................17
LubricatingthePivotArms.................................17
LubricatingtheGearCase...................................18
EngineMaintenance...............................................18
ServicingtheAirFilter........................................18
ChangingtheEngineOil....................................19
ChangingtheOilFilter.......................................19
ServicingtheSparkPlug.....................................20
FuelSystemMaintenance.......................................21
EmptyingtheFuelTankandCleaningthe
FuelFilter.......................................................21
DriveSystemMaintenance.....................................21
AdjustingtheSelf-propelDrive...........................21
ServicingtheWheels..........................................22
ControlsSystemMaintenance.................................23
AdjustingtheBladeBrakeCable.........................23
BladeMaintenance.................................................25
MaintainingtheCuttingBlade.............................25
Cleaning.................................................................26
CleaningundertheMowerHousing....................26
CleaningtheBladeBrakeClutchShield...............27
Storage.......................................................................28
PreparingtheFuelSystem...................................28
©2009—HayterLimited
2
PrintedintheUSA
AllRightsReserved
Page 3

PreparingtheEngine..........................................28
GeneralInformation..........................................28
RemovingtheLawnMowerfromStorage............28
Troubleshooting.........................................................29
Safety
Improperlyusingormaintainingthismowercan
resultininjury.T oreducethepotentialforinjury,
complywiththesesafetyinstructions.
Thismowerwasdesignedandtestedforreasonablysafe
service;however,failuretocomplywiththefollowing
instructionsmayresultinpersonalinjury.
Toensuremaximumsafety,bestperformance,and
togainknowledgeoftheproduct,itisessential
thatyouandanyotheroperatorofthemowerread
andunderstandthecontentsofthismanualbefore
theengineiseverstarted.Payparticularattention
tothesafetyalertsymbol(Figure2)whichmeans
Caution,Warning,orDanger—“personalsafety
instruction.”Readandunderstandtheinstruction
becauseithastodowithsafety.Failuretocomply
withtheinstructionmayresultinpersonalinjury.
GeneralLawnMowerSafety
Thefollowinginstructionshavebeenadaptedfrom
CENstandardEN836:1997.
Thiscuttingmachineiscapableofamputatinghands
andfeetandthrowingobjects.Failuretoobservethe
followingsafetyinstructionscouldresultinserious
injuryordeath.
Training
•Readtheinstructionscarefully.Befamiliarwiththe
controlsandtheproperuseoftheequipment.
•Neverallowchildrenorpeopleunfamiliarwiththese
instructionstousethemower.Localregulationscan
restricttheageoftheoperator.
•Keepinmindthattheoperatororuserisresponsible
foraccidentsorhazardsoccurringtootherpeopleor
theirproperty.
•Understandexplanationsforallpictogramsusedon
themowerorintheinstructions.
Petrol
WARNING-Petrolishighlyammable.Takethe
followingprecautions.
•Storefuelincontainersspecicallydesignedforthis
purpose.
•Refueloutdoorsonlyanddonotsmokewhile
refueling.
•Addfuelbeforestartingtheengine.Neverremove
thecapofthefueltankoradpetrolwhiletheengine
isrunningorwhentheengineishot.
3
Page 4

•Ifpetrolisspilled,donotattempttostarttheengine
butmovethemowerawayfromtheareaofspillage
andavoidcreatinganysourceofignitionuntilpetrol
vaporshavedissipated.
•Replaceallfueltankandcontainercapssecurely .
Preparation
•Whilemowing,alwayswearsubstantialfootwearand
longtrousers.Donotoperatetheequipmentwhen
barefootorwearingopensandals.
•Thoroughlyinspecttheareawheretheequipmentis
tobeusedandremoveallstones,sticks,wires,bones
andotherforeignobjects.
•Beforeusing,alwaysvisuallyinspecttoseethat
guards,andsafetydevices,suchasdeectorsand/or
grassbags,areinplaceandworkingcorrectly.
•Beforeusing,alwaysvisuallyinspecttoseethatthe
blades,bladeboltsandcutterassemblyarenotworn
ordamaged.Replacewornordamagedbladesand
boltsinsetstopreservebalance.
Starting
•Disengageallbladeanddriveclutchesandputinto
neutralbeforestartingtheengine.
•Donottiltmowerwhenstartingtheengineunless
themowerhastobetiltedforstarting.Inthiscase,
donottiltitmorethanabsolutelynecessaryandlift
onlythepart,whichisawayfromtheoperator.
•Starttheengineorswitchonthemotorcarefully
accordingtoinstructionsandwithfeetwellaway
fromtheblade(s)andnotinfrontofthedischarge
chute.
Operation
•Nevermowwhilepeople,especiallychildren,orpets
arenearby.
•Mowonlyindaylightoringoodarticiallight.
•Avoidoperatingthelawnmowerinwetgrass,where
feasible.
•Stayalertforholesintheterrainandotherhidden
hazards.
•Donotputhandsorfeetnearorunderrotatingparts.
Keepclearofthedischargeopeningatalltimes.
•Neverpickuporcarryalawnmowerwhilethe
engineisrunning.
•Useextremecautionwhenreversingorpullinga
pedestriancontrolledlawnmowertowardsyou.
•Walk,neverrun.
•Slopes:
–Donotmowexcessivelysteepslopes.
–Exerciseextremecautionwhenonslopes.
–Mowacrossthefaceofslopes,neverupand
downandexerciseextremecautionwhen
changingdirectiononslopes.
–Alwaysbesureofyourfootingonslopes.
•Uselowthrottlesettingswhenengagingthe
traction-clutch,especiallyinhighgears.Reduce
speedonslopesandinsharpturnstoprevent
overturningorlossofcontrol.
•Stopthebladeifthelawnmowerhastobetiltedfor
transportationwhencrossingsurfacesotherthan
grassandwhentransportingthelawnmowertoand
fromtheareatobemowed.
•Donotoperatetheengineinaconnedspacewhere
dangerouscarbonmonoxidefumescancollect.
•Stoptheengine
–wheneveryouleavethelawnmower.
–beforerefueling.
–beforeremovingthegrassbag.
–beforemakingheightadjustmentunless
adjustmentcanbemadefromtheoperator’s
position.
•Stoptheengineanddisconnectthespark-plugwire.
–beforeclearingblockagesoruncloggingchute.
–beforechecking,cleaningorworkingonthelawn
mower.
–afterstrikingaforeignobject,inspectthelawn
mowerfordamageandmakerepairsbefore
restartingandoperatingthelawnmower.
–iflawnmowerstartstovibrateabnormally(check
immediately).
•Reducethethrottlesettingduringengineshutdown,
andclosethefuelvalveattheconclusionofmowing.
•Lightningcancausesevereinjuryordeath.Ifyousee
lightningorhearthunderinthearea,donotoperate
themachine;seekshelter.
•Watchoutfortrafcwhencrossingornearroadways.
MaintenanceandStorage
•Keepallnuts,boltsandscrewstighttobesurethe
equipmentisinsafeworkingcondition.
•Donotusepressurecleaningequipmentonmachine.
•Neverstoretheequipmentwithpetrolinthetank
andinsideabuildingwherefumescanreachanopen
ameorspark.
4
Page 5

•Allowtheenginetocoolbeforestoringinany
enclosure.
•Toreducetherehazard,keeptheengine,silencer,
batterycompartmentandpetrolstoragearefreeof
grass,leaves,orexcessivegrease.
•Checkgrassbagcomponentsandthedischarge
guardfrequentlyandreplacewithmanufacturer’s
recommendedparts,whennecessary.
•Replacewornordamagedpartsforsafety.
•Replacefaultysilencers.
•Ifthefueltankhastobedrained,dothisout-doors.
•Donotchangetheenginegovernorsettingsor
overspeedtheengine.Operatinganengineat
excessivespeedcanincreasethehazardofpersonal
injury.
•Becarefulduringadjustmentofthelawnmowerto
prevententrapmentofthengersbetweenmoving
bladesandxedpartsofthelawnmower.
•Toensurethebestperformanceandsafety,
purchaseonlygenuineHayterreplacement
partsandaccessories.Donotuse
will t
parts
andaccessories;theymaycauseasafetyhazard.
SoundPressure
Thisunithasasoundpressurelevelattheoperator’s
earof87dBA,whichincludesanUncertaintyValue(K)
of1dBA.Thesoundpressurelevelwasdetermined
accordingtotheproceduresoutlinedinEN836.
SoundPower
Thisunithasaguaranteedsoundpowerlevelof98dBA,
whichincludesanUncertaintyValue(K)of1dBA.The
soundpowerlevelwasdeterminedaccordingtothe
proceduresoutlinedinISO11094.
Vibration,Hand/arm
Thisunitdoesnotexceedhand/armvibrationlevelsof
2.5m/s
2
fortherighthandand2.0m/s
2
fortheleft
hand,eachincludinganUncertaintyValue(K)of1.3
m/s
2
.Themeasuredvaluesweredeterminedaccording
totheproceduresoutlinedinEN836.
5
Page 6

SafetyandInstructionalDecals
Safetydecalsandinstructionsareeasilyvisibletotheoperatorandarelocatednearanyareaof
potentialdanger.Replaceanydecalthatisdamagedorlost.
110-2115
1.ReadtheOperator’sManual.3.Toengagethetractioncontrol,liftthelowerbailupward.
2.Toengagetheblade,rstmovethesafetylatchforwardand
thenpulltheupperbailtotherear.
4.Todisengagetheblade,releasetheupperbail.
110-4978
1.Warning—readtheOperator’sManual.
2.Thrownobjecthazard—keepbystandersasafedistancefromthemachine.
3.Cutting,dismembermenthazardofhandorfoot—stoptheengineandremovethesparkplugwirebeforeperformingany
maintenanceonthemachine.
4.Cutting,dismembermenthazardofhandorfoot—stayawayfrommovingparts.
5.Warning—stoptheenginebeforeleavingthemachine.
112-8760
1.Thrownobjecthazard—keepbystandersasafedistance
fromthemachine.
2.Cutting/dismembermentofhandorfoot—stayawayfrom
movingparts.
98-4387
1.Warning—wearhearingprotection.
110-4977
1.Thrownobjecthazard—donotoperatethemowerwithout
abaginplace.
Manufacturer’sMark
1.Indicatesthebladeisidentiedasapartfromtheoriginal
machinemanufacturer.
6
Page 7
Setup
LooseParts
Usethechartbelowtoverifythatallpartshavebeenshipped.
ProcedureDescription
Qty.
Use
Handle1
Bolt(5/16x7/8inch)
2
Bolt(5/16x1-1/2inches)
2
Washer4
Locknut(5/16inch)
4
1
Cabletie
3
Installthehandle.
Self-tappingscrew
2
2
Fueltank1
Installthefueltankandfuelline.
3
Nopartsrequired
–
Fillthecrankcasewithoil.
Note:Determinetheleftandrightsidesofthemachine
fromthenormaloperatingposition.
1
InstallingtheHandle
Partsneededforthisprocedure:
1Handle
2
Bolt(5/16x7/8inch)
2
Bolt(5/16x1-1/2inches)
4Washer
4
Locknut(5/16inch)
3
Cabletie
Procedure
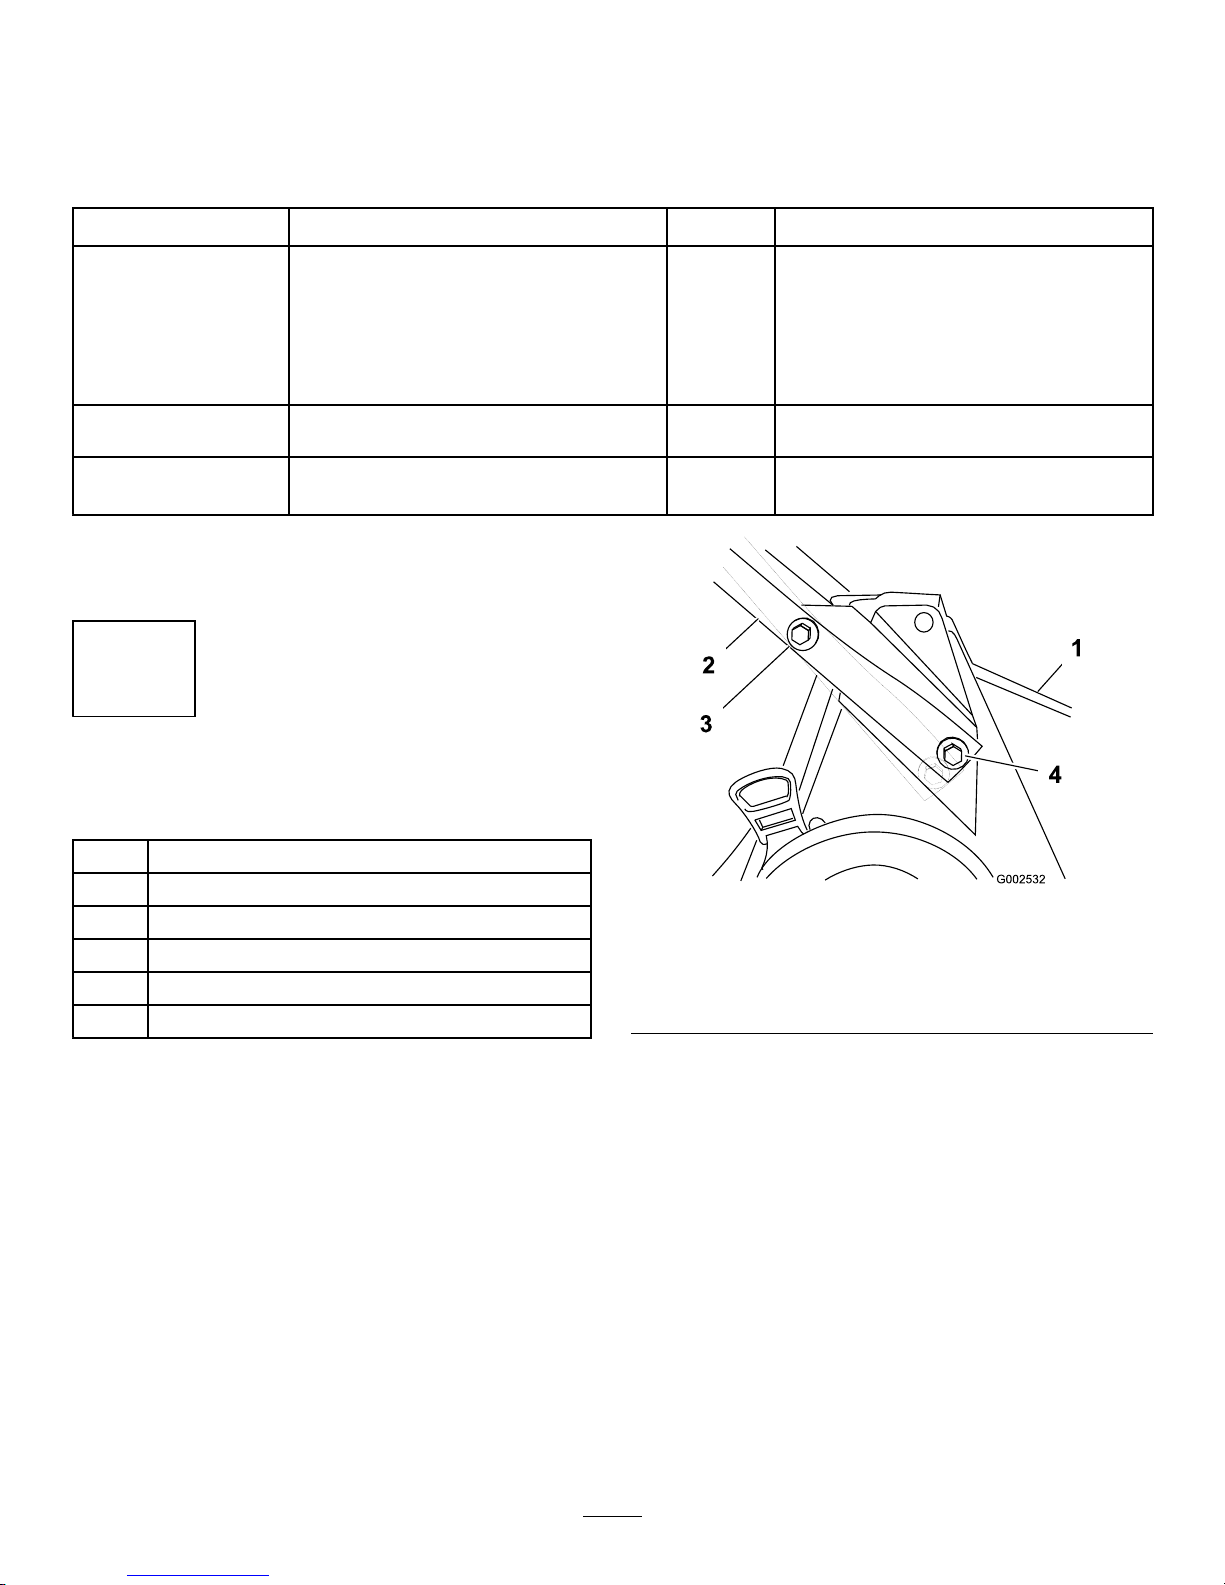
1.Mountthehandletothemowerhousingwith2bolts
(5/16x7/8inch),2bolts(5/16x1-1/2inches),4
washers,and4locknuts(Figure3).
Figure3
1.Housing
3.Bolt(5/16x1-1/2inches),
washer,andlocknut
2.Handle
4.Bolt(5/16x7/8inch),
washer,andlocknut
Note:Installthewasherswiththecupsidefacing
thehandle.
Note:Youcanadjustthehandleheightformore
comfortableoperation.Securingthelowerhandle
endintheupperholelowersthehandle;securingthe
lowerhandleendinthelowerholeraisesthehandle.
2.Usethecabletiesprovidedtosecurethecontrol
cablestothehandle.
7
Page 8
2
InstallingtheFuelTankand
theFuelLine
Partsneededforthisprocedure:
2
Self-tappingscrew
1Fueltank
Procedure
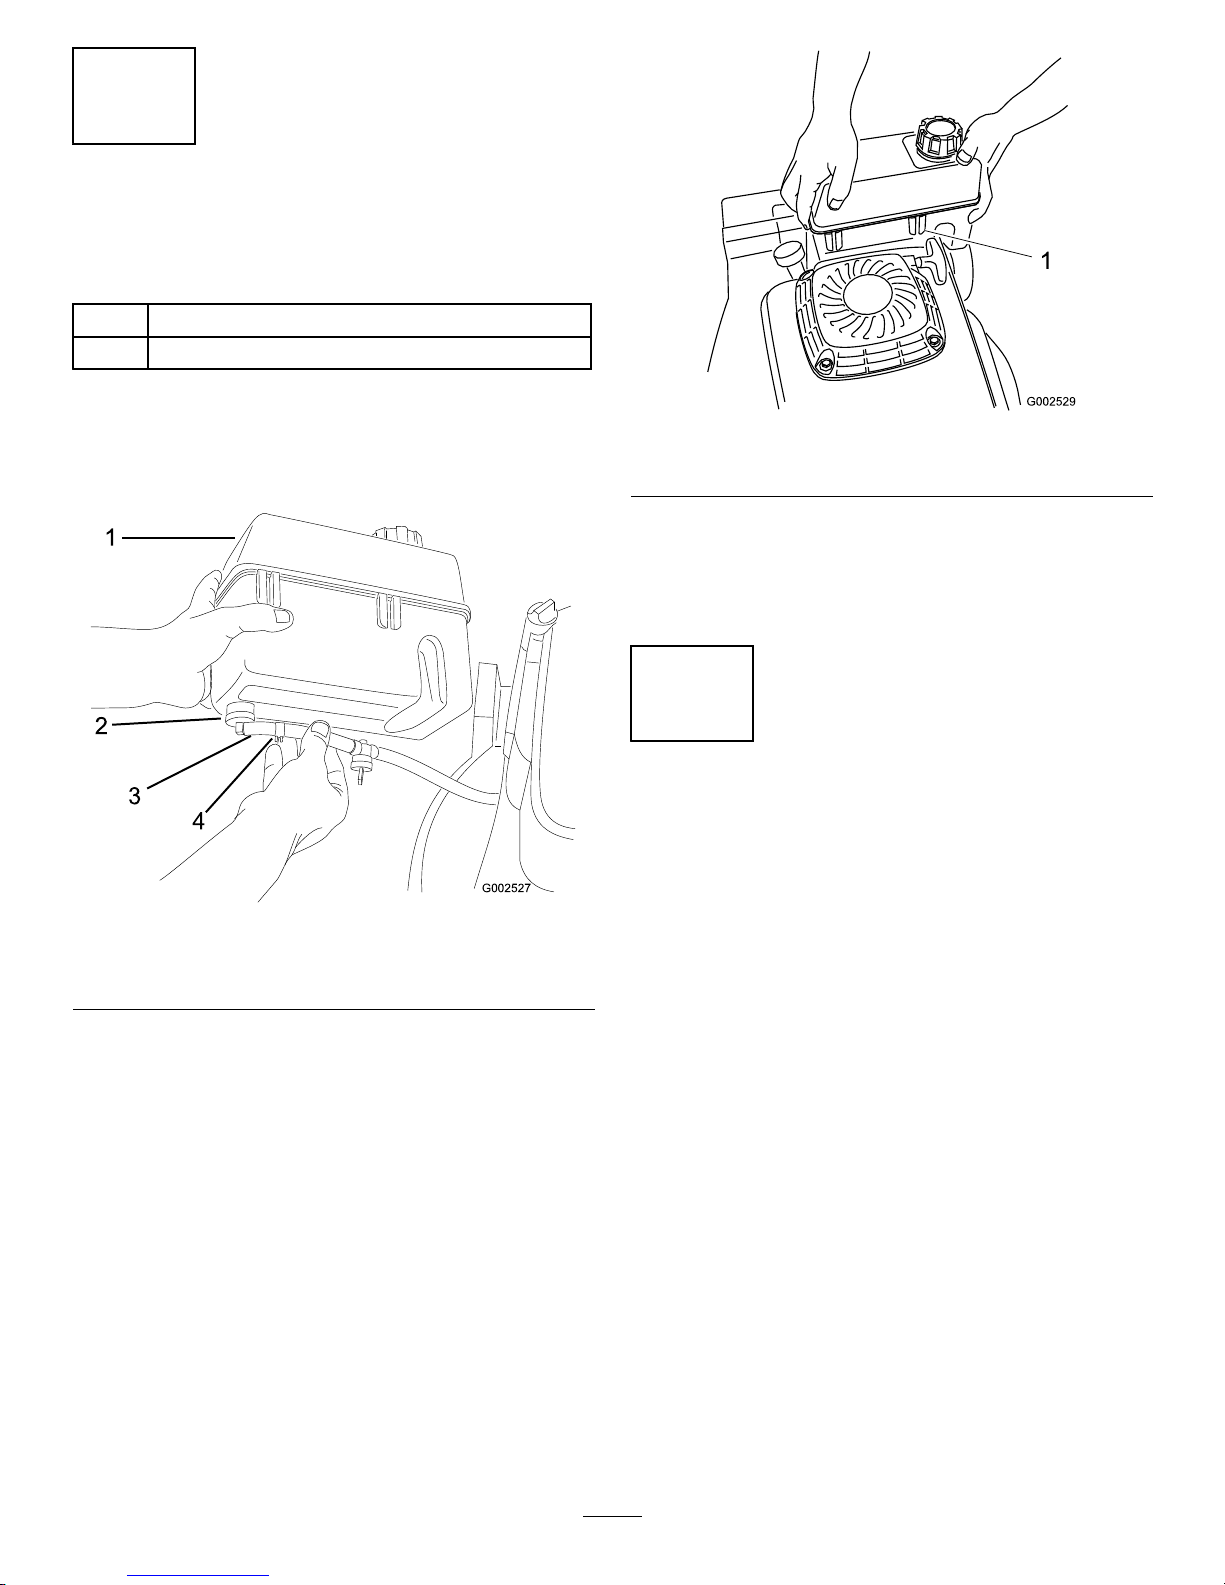
1.Slidetheendofthefuellineontotheelbowtting
(Figure4).
G002527
1
2
3
4
Figure4
1.Fueltank3.Fuelline
2.Elbowtting
4.Fuellineclamp
2.Securethefuellineinplacewiththefuellineclamp
(Figure4).
3.Slidetheplasticclipsonthefrontofthefueltank
ontothefueltankmount(Figure5).
Figure5
1.Plasticclip(2)
4.Securethebottomofthefueltanktothefueltank
bracketbyinstallingtheself-tappingscrewsfromthe
bottom.Torquethescrewsto40to50in-lb(4.5
to5.6N-m).Donotovertightenthescrews.
3
FillingtheCrankcasewithOil
NoPartsRequired
Procedure
Theenginecrankcaseisshippedwithoutoil.Youmust
llitwithapproximately30oz.(0.88L)ofoilbefore
startingtheengine.RefertoCheckingtheEngineOil
LevelintheOperationsectionforoilspecicationsand
instructions.
8
Page 9
ProductOverview
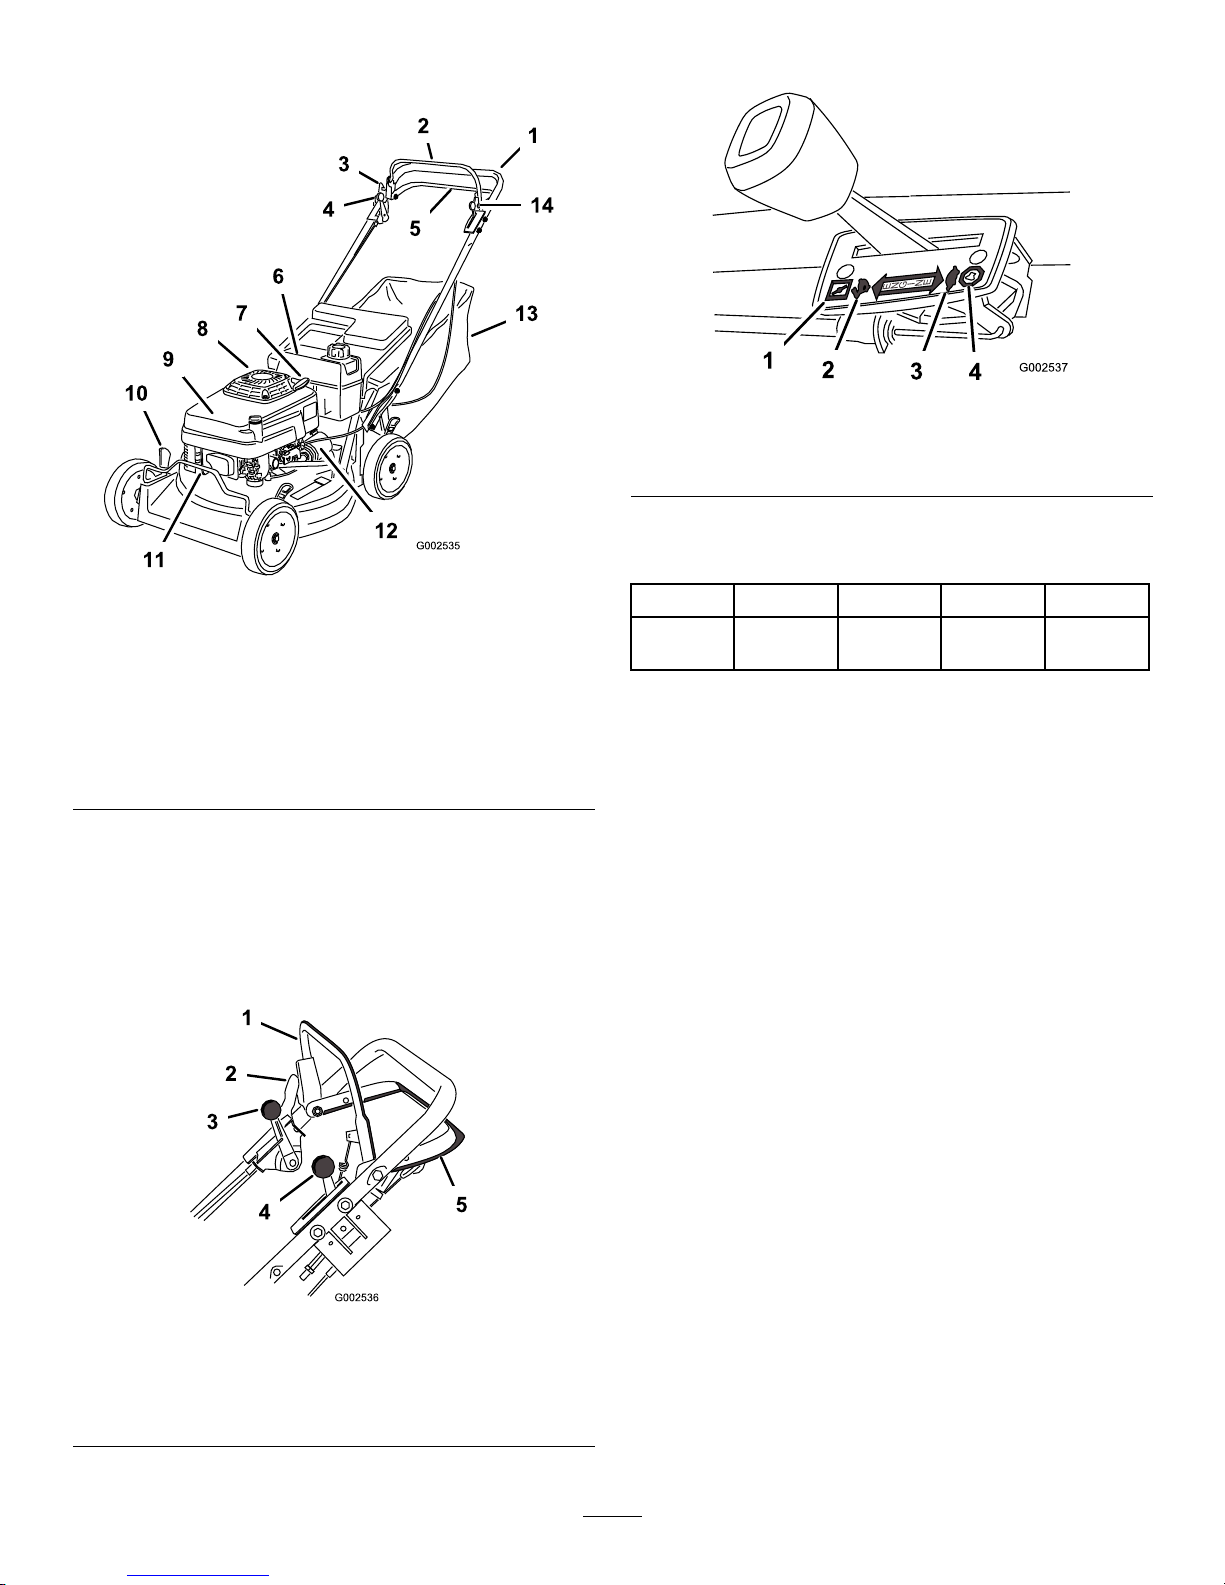
Figure6
1.Handle
8.Oilll/dipstick(notshown)
2.Bladecontrolbar
9.Airlter
3.Controlbarlock10.Cuttingheightlever
4.Groundspeedcontrol
lever
11.Sparkplug
5.Tractioncontrolbar
12.Oillter
6.Fueltank
13.Grassbag
7.Starterhandle
14.Throttlecontrollever
Controls
Thebladecontrolbar,controlbarlock,groundspeed
controllever,throttlecontrollever,andtractioncontrol
barareontheupperhandleasshowninFigure7.
Figure7
1.Bladecontrolbar4.Throttlecontrollever
2.Controlbarlock
5.Tractioncontrolbar
3.Groundspeedcontrol
lever
ThethrottlesettingsareshowninFigure8.
Figure8
1.Choke3.Slow
2.Fast
4.Stop
Specications
ModelWeightLengthWidthHeight
455E124lb
(56kg)
59in
(149cm)
23in
(57cm)
38in
(97cm)
9
Page 10
Operation
Note:Determinetheleftandrightsidesofthe
machinefromthenormaloperatingposition.
Eachtimebeforeyoumow,makesurethatthe
self-propeldriveandthebladecontrolbaroperate
properly.Whenyoureleasethebladecontrolbar,the
bladeshouldstop.Ifitdoesnot,contactanAuthorized
ServiceDealer.
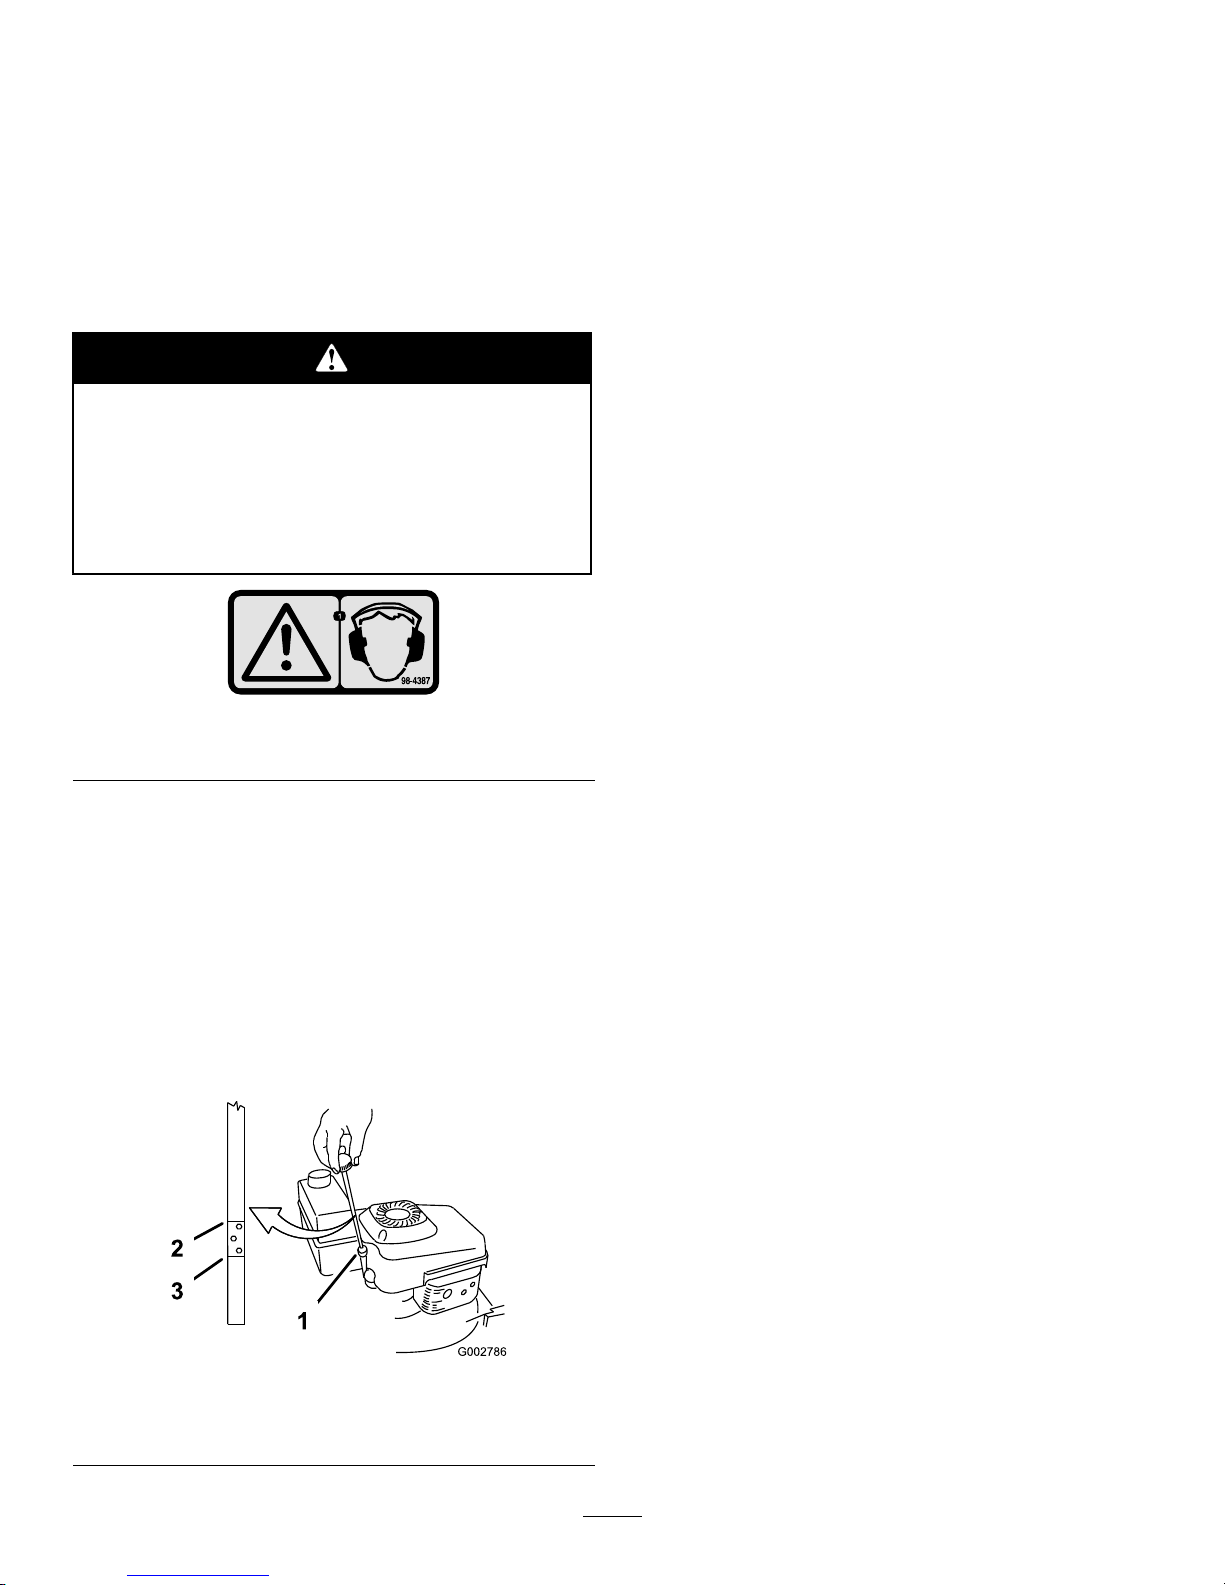
Thismachineproducessoundlevelsinexcess
of85dBAattheoperator’searandcancause
hearinglossthroughextendedperiodsof
exposure.
Wearhearingprotectionwhenoperatingthis
machine.
Figure9
1.Warning—wearhearingprotection.
CheckingtheEngineOilLevel
ServiceInterval:Beforeeachuseordaily
Initially,llthecrankcasewith30ounces(0.88liters)
ofoil.Useonlyhigh-qualitySAE30orSAE10W30
weightdetergentoilthathastheAmericanPetroleum
Institute(API)serviceclassicationSF,SG,SH,orSJ .
Beforeeachuse,ensurethattheoillevelisbetweenthe
AddandFullmarksonthedipstick(Figure10).
Figure10
1.Dipstick3.Add
2.Full
Note:Whenthecrankcaseisempty,pourabout3/4
ofthecrankcasecapacityofoilinthecrankcase,then
followtheprocedureinthissection.
1.Movethelawnmowertoalevelsurface.
2.Cleanaroundthedipstick(Figure10).
3.Removethedipstickbyrotatingthecap
counterclockwiseandpullingitout.
4.Wipethedipstickcleanwithacleancloth.
5.Insertthedipstickintothellerneck,butdonot
screwitin.
6.Removethedipstickandreadtheoillevelonthe
dipstick(Figure10).
7.IftheoillevelreadingisbelowtheAddmarkon
thedipstick,slowlypouronlyenoughoilintothe
llerholetoraisetheoilleveltotheFullmarkon
thedipstick.
Important:Donotoverllthecrankcasewith
oilandruntheengine;enginedamagewill
result.Draintheexcessoiluntiltheoillevelon
thedipstickreadsFull.
8.Insertthedipstickintothellerneckandrotatethe
capclockwiseuntilitistight.
10
Page 11

FillingtheFuelTank
Forbestresults,useclean,fresh,lead-freepetrolwith
anoctaneratingof87orhigher.Toensurefreshness,
purchaseonlythequantityofpetrolthatyouexpectto
usein30days.Usingunleadedpetrolresultsinfewer
combustiondepositsandlongerenginelife.Youmay
useleadedpetrolifunleadedpetrolisnotavailable.
Important:Donotaddoiltothepetrol.
Important:Donotusepetrolthathasbeenstored
sincethelastmowingseasonorlonger.
Whenfueling,undercertaincircumstances,a
staticchargecandevelop,ignitingthepetrol.A
reorexplosionfrompetrolcanburnyouand
othersanddamageproperty.
•Alwaysplacepetrolcontainersonthe
groundandawayfromyourvehiclebefore
lling.
•Donotllpetrolcontainersinsideavehicle
oronatruckortrailerbedbecauseinterior
carpetsorplastictruckbedlinersmay
insulatethecontainerandslowthelossof
anystaticcharge.
•Whenpractical,removepetrol-powered
equipmentfromthetruckortrailerand
refueltheequipmentwithitswheelsonthe
round.
•Ifthisisnotpossible,thenrefuelsuch
equipmentonatruckortrailerfrom
aportablecontainer,notfromapetrol
dispensernozzle.
•Ifyoumustuseapetroldispensernozzle,
keepthenozzleincontactwiththerimof
thefueltankorcontaineropeningatall
timesuntilfuelingiscomplete.
Useafuelstabilizer/conditionerregularlyduring
operationandstorage.Astabilizer/conditionercleans
theengineduringoperationandpreventsgum-like
varnishdepositsfromformingintheengineduring
periodsofstorage.
Important:Donotusefueladditivesotherthan
afuelstabilizer/conditioner.Donotusefuel
stabilizerswithanalcoholbasesuchasethanol,
methanol,orisopropanol.
Incertainconditions,petrolisextremely
ammableandhighlyexplosive.Areor
explosionfrompetrolcanburnyouandothers
andcandamageproperty.
•Fillthefueltankoutdoors,inanopenarea,
andwhentheengineiscold.Wipeupany
petrolthatspills.
•Donotllthefueltankcompletelyfull.Add
petroltothefueltankuntilthelevelis1/4
to1/2in.(6to13mm)belowthebottomof
thellerneck.Thisemptyspaceinthetank
allowsthepetroltoexpand.
•Neversmokewhenhandlingpetrol,andstay
awayfromanopenameorwhereaspark
mayignitethepetrolfumes.
•Storepetrolinanapprovedfuelcontainer
andkeepitoutofthereachofchildren.
•Neverbuymorethana30-daysupplyof
petrol.
1.Cleanaroundthefueltankcap(Figure11).
Figure11
1.Oilll/dipstick
3.Aircleaner
2.Fueltankcap
2.Removethecapfromthetank.
3.Fillthefueltankwithunleadedpetroltowithin1/4
to1/2inch(6to13mm)fromthetopofthetank.
Donotllintothellerneck.
11
Page 12

Important:Donotllthetankmorethan1/4
inch(6mm)fromthetopofthetankbecause
thepetrolmusthaveroomtoexpand.
4.Installthefueltankcapandwipeupanyspilled
petrol.
StartingtheEngine
1.Connectthewiretothesparkplug(Figure12).
Figure12
1.Spark-plugwire
2.Openthefuelvalve(Figure13)
Figure13
1.Fuelvalve
3.MovethethrottlecontrollevertotheChoke
position(Figure8).
4.MovethegroundspeedcontrollevertotheNeutral
(N)position.
5.Pullthestarterhandlelightlyuntilyoufeel
resistance,thenpullitsharply.
6.Regulatethethrottleandthegroundspeedcontrol
asdesiredwhentheenginestarts.
Note:Iftheenginefailstostartafter3pulls,repeat
steps3through6.
StoppingtheEngine
1.MovethethrottlecontroltotheStopposition.
2.Disconnectthewirefromthesparkplugifyoudo
notusethelawnmowerorleaveitunattended.
OperatingtheBlade
EngagingtheBlade
Whenyoustartyourengine,thebladedoesnotturn.
Youmustengagethebladetomow .
1.Pushthecontrolbarlockforward(Figure14).
Figure14
2.Pullthebladecontrolbartothehandleandhold
it(Figure15).
Figure15
12
Page 13
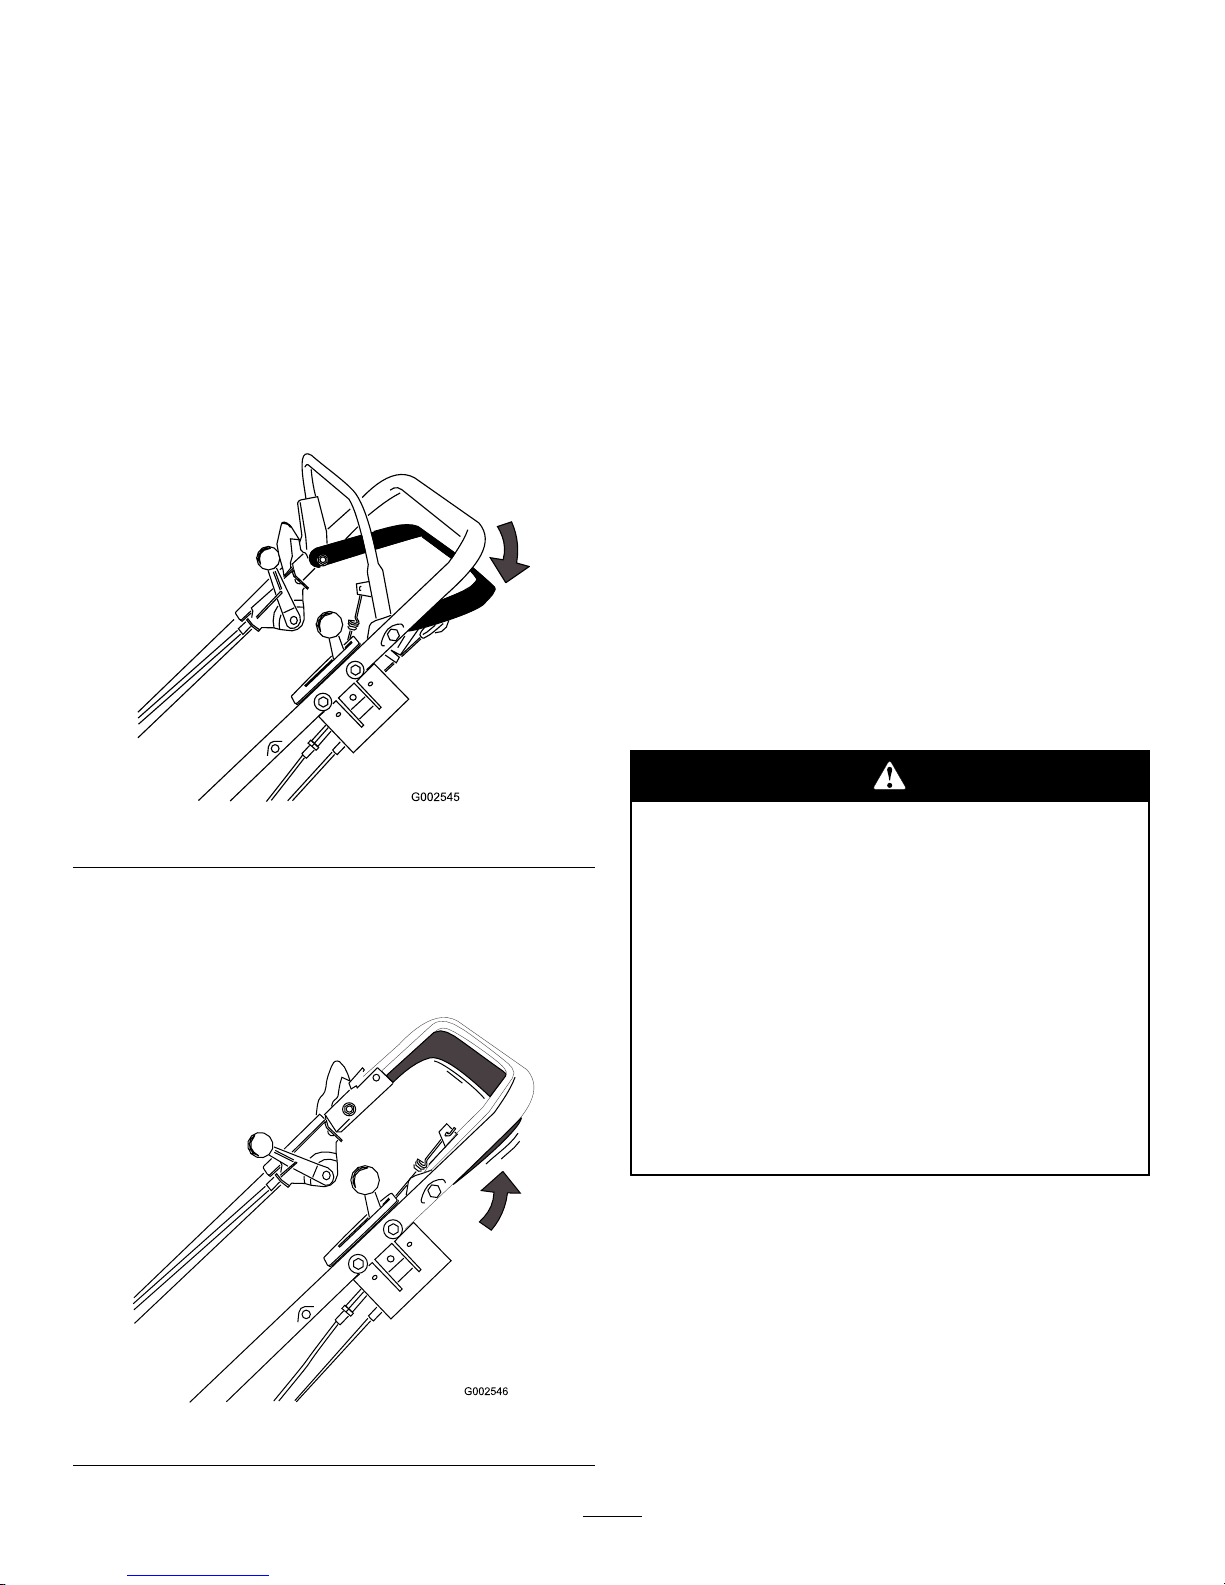
DisengagingtheBlade
Releasethebladecontrolbar.
Important:Whenyoureleasethebladecontrol
bar,thebladeshouldstopwithin3seconds.Ifit
doesnotstopproperly,stopusingyourmower
immediatelyandcontactanAuthorizedService
Dealer.
OperatingtheTractionDrive
EngagingtheTractionDrive
1.Releasethetractioncontrolbar(Figure16).
Figure16
2.Movethegroundspeedcontrollevertothedesired
gearposition.
3.Squeezethetractioncontrolbaragainstthehandle
(Figure17).
Figure17
DisengagingtheTractionDrive
Releasethetractioncontrolbar.
CheckingtheBladeBrake
Clutch
Checkthebladecontrolbarbeforeeachusetoensure
thatthebladebrakeclutchsystemisoperatingproperly.
Youcanusethegrassbagtoperformanadditionaltest
tocheckthebladebrakeclutchmechanism:
1.Installtheemptygrassbagonthedischargetunnel.
2.Starttheengine.
3.Pullthebladecontrolbartothenormalblade
engagedposition.Thebagshouldbegintoinate,
indicatingthatthebladeisengagedandrotating.
4.Releasethebladecontrolbail.Ifthebagdoesnot
immediatelydeate,itindicatesthatthebladeisstill
rotating.Thebladebrakeclutchmechanismmay
bedeteriorating,and,ifignored,couldresultinan
unsafeoperatingcondition.Havethelawnmower
inspectedandservicedbyanAuthorizedService
Dealer.
Ifthebladebrakeclutchsystemisinoperative,
thebladewillcontinuetorotatewhenyou
releasethebladecontrolbail.Contactwith
bladecouldoccur,causingseriousinjury.
•Checkthebladebrakeclutchoperation
beforeeachuse.
•Neveruseamowerequippedwithablade
brakeclutchthathasaninoperativesafety
system.
•TakeyourmowertoanAuthorizedService
Dealerforrepairifthesafetysystemfailsto
operateproperly.
AdjustingtheCuttingHeight
Eachwheelisadjustedindividuallywithawheelheight
adjustmentlever.Cuttingheightsare1inch(25mm),
1-1/2inches(38mm),2inches(51mm),2-1/2inches
(64mm),3inches(76mm),and3-1/2inches(89mm),
and4inches(102mm).
13
Page 14

Adjustingthecuttingheightleverscouldbring
yourhandsintocontactwithamovingblade
andresultinseriousinjury.
•Stoptheengineandwaitforallmovement
tostopbeforeadjustingthecuttingheight.
•Donotputyourngersunderthehousing
whenadjustingthecuttingheight.
1.Pullthewheelheightadjustmentlevertowardthe
wheel(Figure18)andmoveittothedesiredsetting.
Figure18
1.Wheelheightadjustmentlever
2.Releasethewheelheightadjustmentleverandseat
itsecurelyinthenotch.
3.Adjustallthewheelstothesamecuttingheight
setting.
UsingtheGrassBag
InstallingtheGrassBag
1.Waitforallmovingpartstostop.
2.Raiseandholdupthereardoor(Figure19).
Figure19
1.Reardoor
3.Installthebagonthebagmountingposts
(Figure20).
Figure20
1.Bagmountingposts
4.Lowerthereardoor.
RemovingtheGrassBag
Toremovethebag,reversethestepsabove.
Themowercanthrowgrassclippingsandother
objectsthroughanopendischargetunnel.
Objectsthrownwithenoughforcecouldcause
seriouspersonalinjuryordeathtotheoperator
orbystander.
Donotoperatethemowerwithoutagrassbag
installed.
14
Page 15

MowingwiththeGrassBag
Aworngrassbagcouldallowsmallstones
andothersimilardebristobethrowninthe
operator’sorbystander’sdirectionandresultin
seriouspersonalinjuryordeathtotheoperator
orbystanders.
Checkthegrassbagfrequently.Ifitisdamaged,
installanewHayterreplacementbag.
OperatingTips
GeneralTips
•Maintainasharpbladethroughoutthecutting
season.Periodicallyledownnicksontheblade.
•Replacethebladewhennecessarywithanoriginal
Hayterreplacementblade.
•Mowonlydrygrassorleaves.Wetgrassandleaves
canbuildupandcloginthechuteorcausethe
enginetostall.
Wetgrassorleavescancauseseriousinjuryif
youslipandcontacttheblade.
Mowonlyindryconditions.
•Cleanunderthemowerhousingaftereachmowing.
SeeCleaningundertheMowerHousing.
•Keeptheengineingoodrunningcondition.
•Settheenginespeedtothefastestpositionforthe
bestcuttingresults.
Operatingamowerwithitsenginerunningat
aspeedgreaterthanthefactorysettingcan
causethemowertothrowapartofthebladeor
engineintotheoperator’sorbystander’sarea
andresultinseriouspersonalinjuryordeath.
–Donotchangetheenginespeedsetting.
–Ifyoususpecttheenginespeedisfaster
thannormal,contactanAuthorizedService
Dealer.
•Cleantheairlterfrequently.Mulchingstirsup
moreclippingsanddustwhichclogstheairlter
andreducesengineperformance.
CuttingGrass
•Grassgrowsatdifferentratesatdifferenttimes
oftheyear.Inthesummerheat,itisbesttocut
grassatthe2-1/2inch(64mm),3inch(76mm),
or3-1/2inch(89mm)cuttingheightsettings.Cut
onlyaboutathirdofthegrassbladeatatime.Do
notcutbelowthe2-1/2inch(64mm)settingunless
thegrassissparseoritislatefallwhengrassgrowth
beginstoslowdown.
•Whencuttinggrassover6inches(15cm)tall,rst
mowatthehighestcuttingheightsettingandwalk
slower;thenmowagainatalowersettingforthe
bestlawnappearance.Ifthegrassistoolongand
theleavesclumpontopofthelawn,themowermay
clogandcausetheenginetostall.
•Alternatethemowingdirection.Thishelpsdisperse
theclippingsoverthelawnforevenfertilization.
Ifthenishedlawnappearanceisunsatisfactory,try
oneormoreofthefollowing:
•Sharpentheblade.
•Walkataslowerpacewhilemowing.
•Raisethecuttingheightonyourmower.
•Cutthegrassmorefrequently.
•Overlapcuttingswathsinsteadofcuttingafull
swathwitheachpass.
•Setthecuttingheightonthefrontwheelsonenotch
lowerthantherearwheels.Forexample,setthe
frontwheelsat2-1/2inches(64mm)andtherear
wheelsat3inches(76mm).
CuttingLeaves
•Aftercuttingthelawn,ensurethathalfofthelawn
showsthroughthecutleafcover.Youmayneedto
makemorethanonepassovertheleaves.
15
Page 16

•Forlightleafcoverage,setallthewheelsatthesame
cuttingheightsetting.
•Iftherearemorethan5inches(12.7cm)ofleaves
onthelawn,setthefrontcuttingheight1or2
notcheshigherthantherearcuttingheight.This
makesiteasiertofeedtheleavesunderthemower
housing.
•Slowdownyourmowingspeedifthemowerdoes
notcuttheleavesnelyenough.
•Ifyoumowoveroakleaves,youcanaddlimeto
thegrassinthespringtoreducetheacidityofthe
oakleaves.
16
Page 17

Maintenance
Note:Determinetheleftandrightsidesofthemachinefromthenormaloperatingposition.
RecommendedMaintenanceSchedule(s)
MaintenanceService
Interval
MaintenanceProcedure
Aftertherst8hours
•Changetheengineoil.
Beforeeachuseordaily
•Checktheengineoillevel.
•Inspectthemowerbladesforwearordamage.
•Cleanunderthemowerhousing.
Every25hours
•Cleanthefoampre-cleaner(morefrequentlyindustyconditions).
Every50hours
•Changetheengineoil(moreoftenindustyconditions).
•Cleanthebladebrakeclutchshield.
Every100hours
•Lubricatethegearcase.
•Changetheoillter.
•Checkthesparkplug.
Every300hours
•Replacethepaperairlter(morefrequentlyindustyconditions).
Yearly
•Cleanthefuellter.
Important:Refertoyour
Engine Operator’ s Man ual
foradditionalmaintenanceprocedures.
Ifyouleavethewireonthesparkplug,someonecouldaccidentlystarttheengineandseriouslyinjure
youorotherbystanders.
Disconnectthewirefromthesparkplugbeforeyoudoanymaintenance.Setthewireasidesothatit
doesnotaccidentlycontactthesparkplug.
Lubrication
LubricatingthePivotArms
Afterevery50operatinghoursorwhentheseasonends,
lubricatethepivotarms.
1.Movetherearwheelcuttingheightleverstothe
centersetting.
2.Wipethegreasettingswithacleanrag(Figure21).
Figure21
3.Installagreasegunontothettingandgentlyapply2
or3pumpsof#2multi-purposelithiumbasegrease.
Important:Excessivegreasepressuremay
damagetheseals.
17
Page 18

LubricatingtheGearCase
ServiceInterval:Every100hours
Afterevery100operatinghours,greasethegearcase.
1.Removethegrassbag.
2.Installagreasegunontothettingthroughthebelt
coveropening(Figure22).
Figure22
3.Gentlyapplyoneto2pumpsof#2multi-purpose
lithium-basegrease.
4.Installthegrassbag.
EngineMaintenance
ServicingtheAirFilter
ServiceInterval:Every25hours—Cleanthefoam
pre-cleaner(morefrequentlyindusty
conditions).
Every300hours—Replacethepaper
airlter(morefrequentlyindusty
conditions).
Important:Donotoperatetheenginewithoutthe
airlterassembly;extremeenginedamagewill
occur.
1.Stoptheengineandwaitforallmovingpartstostop.
2.Disconnectthewirefromthesparkplug(Figure12).
3.Removethescrewthatsecurestheaircleanercover
(Figure23).
Figure23
1.Screw3.Paperairlter
2.Cover
4.Removethecoverandcleanitthoroughly(Figure23).
5.Removethepaperairlteranddiscardit(Figure24).
Figure24
1.Paperairlter
2.Foampre-cleaner
Important:Donottrytocleanapaperlter.
18
Page 19

6.Removethefoampre-cleanerandwashitwitha
milddetergentandwater,thenblotitdry.
7.Saturatethepre-cleanerwithoil,thensqueezeit(do
nottwist)toremovetheexcessoil.
8.Installthefoampre-cleaner.
9.Installthenewpaperairlter.
10.Installthecoverandsecureitwiththescrew.
ChangingtheEngineOil
ServiceInterval:Aftertherst8hours
Every50hours
OilCapacity
Withoillter29ounces(0.85liters)
Withoutoillter22ounces(0.65liters)
Note:Theoilcapacitiesinthetableaboveaccount
fortheemptycrankcasetocontainasmallamountof
residualoil.
1.Runtheenginetowarmtheengineoil.
Note:Warmoilowsbetterandcarriesmore
contaminants.
Oilmaybehotafterenginehasbeenrun,and
contactwithhotoilcancauseseverepersonal
injury.
Avoidcontactingthehotengineoilwhenyou
drainit.
2.Stoptheengineandwaitforallmovingpartstostop.
3.Disconnectthewirefromthesparkplug(Figure12).
4.Placeasuitabledrainpanundertherightsideof
themower.
5.Removethedipstickbyrotatingthecap
counterclockwiseandpullingitout.
6.Tipthemowerontoitsrightsidetodraintheoil
intothedrainpan.
Note:Youcanalsoremovetheoilfromthe
crankcaseusinganoilextractor.
7.Returnthemowertoitsoperatingposition.
8.Insertthedipstickintothellerneckandrotatethe
capclockwiseuntilitistight.
9.Recycletheusedoilaccordingtolocalcodes.
10.FillthecrankcasetotheFulllineonthedipstickwith
freshoil.RefertotheFillingtheCrankcasewithOil.
11.Wipeupanyspilledoil.
ChangingtheOilFilter
ServiceInterval:Every100hours
Replacetheoillter(Figure25)afterevery100operating
hoursoryearly,whichevercomesrst.
Figure25
1.Oillter
2.Fuelline
1.Runtheenginetowarmtheoil.
Oilmaybehotaftertheenginehasbeenrun,
andcontactwithhotoilcancausesevere
personalinjury.
Avoidcontactingthehotengineoilwhenyou
drainit.
2.Stoptheengineandwaitforallmovingpartstostop.
3.Disconnectthewirefromthesparkplug.
4.Draintheengineoil;refertoChangingtheEngine
Oil.
5.Placearagundertheoilltertocatchanyoilthat
mayleakoutasyouremovethelter.
6.Removetheoillter.
7.Useyourngertocoatthegasketonthenewlter
withoil(Figure26).
19
Page 20

Figure26
1.Gasket
8.Installthenewlterandhandtightenit2/3turn
only.
9.FillthecrankcasetotheFulllineonthedipstickwith
freshoilRefertoFillingtheCrankcasewithOil.
10.Connectthewiretothesparkplug.
11.Runtheengineforabout3minutes.
12.Stoptheengine,waitforallmovingpartstostop,
andcheckforoilleakagearoundthelter.
13.Addoiltocompensatefortheoilintheoillter.
RefertoCheckingtheEngineOilLevel.
14.Recycletheusedoillteraccordingtolocalcodes.
ServicingtheSparkPlug
ServiceInterval:Every100hours—Checkthespark
plug.
UseanNGKBPR5ESsparkplugorequivalent.
1.Stoptheengineandwaitforallmovingpartstostop.
2.Disconnectthewirefromthesparkplug(Figure12).
3.Cleanaroundthesparkplug.
4.Removethesparkplugfromthecylinderhead.
Important:Replaceacracked,fouled,or
dirtysparkplug.Donotcleantheelectrodes
becausegritenteringthecylindercandamage
theengine.
5.Setthegapontheplugto0.030in.(0.76mm)
(Figure27).
Figure27
1.Centerelectrodeinsulator
2.Sideelectrode
3.Airgap(nottoscale)
6.Installthesparkplugandthegasketseal.
7.Torquetheplugto17ft-lb(23N-m).
8.Connectthewiretothesparkplug.
20
Page 21

FuelSystem
Maintenance
EmptyingtheFuelTankand
CleaningtheFuelFilter
ServiceInterval:Yearly
Thefuellter(screen)elementislocatedinsidethefuel
tank.Cleanthefuellterelementyearly .
1.Stoptheengineandwaitforittocooldown.
Note:Drainpetrolfromacoldengineonly.
2.Disconnectthewirefromthesparkplug.
3.Disconnectthefuellinebylooseningthetubeclamp
atthecarburetor.
4.Openthefuelvalve.
5.Drainthepetrolcompletelyfromthetankandfuel
lineintoanapprovedfuelcontainer.
6.Removethefueltankfromthemower.
7.Pourasmallamountoffuelinthefueltank,move
thefuelaroundinthetank,andpouritoutintoan
approvedfuelcontainer.
8.Installthefueltankandfuelline;refertoInstalling
theFuelTankandtheFuelLine.
DriveSystem
Maintenance
AdjustingtheSelf-propelDrive
Ifthemowerdoesnotself-propelorhasatendencyto
creepforwardwhenthecontrolbarismorethan1-1/2
inches(3.8cm)fromthehandle,adjusttheself-propel
drive.
1.Loosenthenutthatsecurestheadjuster(Figure28).
Figure28
1.Adjuster
3.Cable
2.Nut
4.1-1/2inches(3.8cm)
2.Turntheadjusteruntilyouremovetheslackinthe
exposedcable(Figure28).
3.Tightenthenut.
Note:Tochecktheadjustment,slowlypullthe
mowerbackwardwhileyougraduallymovethe
controlbartowardthehandle.Theadjustmentis
correctwhentherearwheelsstopturningandthe
topofthecontrolbarisabout1-1/2inches(3.8cm)
fromthebottomofthehandle.
Note:Iftheadjusterisfullyextendedandthe
mowerdoesnotself-propelwhenthebladecontrol
baris1-1/2inches(3.8cm)fromthehandle,you
willneedtoadjusttheloweranchorbracket.Refer
tosteps4to9.
4.Movetheadjustertoobtainthemaximumslackin
thecable.
5.Removethefueltank.
Note:Youdonotneedtodisconnectthefuelline
fromthefueltank.
6.Removetheupperbeltcover(Figure29).
21
Page 22

G012156
1
Figure29
1.Upperbeltcover
7.Removethescrewsfromtheloweranchorbracket
(Figure30).
Figure30
1.Loweranchorbracket2.Notches
Note:ThelowerbelthasbeenremovedinFigure30
forthepurposeforclarity.Itisnotnecessary
toremovethelowerbeltcovertoperformthis
procedure.
8.Movetheloweranchorbracketuponehole
(Figure30).
9.Repeatsteps1through3toadjustthecontrolbar.
Note:Whenyouinstallanewbelt,movethelower
anchorbrackettoitsoriginalfactoryposition,which
isindicatedbythenotchesnexttotheholesinthe
bracket(Figure30).
ServicingtheWheels
RemovingtheWheels
1.Stoptheengineandwaitforallmovingpartstostop.
2.Disconnectthewirefromthesparkplug(Figure12).
3.Removethebolt,thewheelspacer,andthelocknut
mountingthewheeltothepivotarm(Figure31).
4.Separatethewheelhalvesfromthetyrebyremoving
4capscrewsand4locknuts(Figure31).
Note:Ifyouremovethebearingsfromthe
bearing/hubassembly,removethembypressingon
thebearingspacer(Figure31).
Figure31
1.Locknuts
6.Plasticcover(rearwheels
only)
2.Wheelspacer7.Lug
3.Bearing/hubassembly8.Bearing(2)
4.Bearingspacer9.Bolt
5.Wheelhalf
AssemblingtheWheels
1.Positionthetyreontoonewheelhalf,aligningthe
lugsoneach(Figure31).
2.Placethebearing/hubassemblyintothecenterhole
ofthewheelhalf.Ensurethatthelegsofthehubare
positionedovertheangeofthehole(Figure31).
3.Placetheotherwheelhalfontothebearing/hub
assembly,aligningthewheelandthetyrelugsand
themountingholes(Figure31).
4.Using2fullythreadedscrewsorbolts(1/4-20x1.50
inch)andnon-lockingnuts,looselysecurethewheel
22
Page 23

halvestogether.Mountthescrewsorboltsinthe
opposingholes(Figure31).
5.Checkthealignmentofallpartsandtightenthe
screws,alternatingfromsidetosideforauniformt,
untilthewheelhalvesaredrawntogether(Figure31).
6.Installthe2boltsand2locknutspreviouslyremoved
intheremainingholesinthewheelhalvesand
tighten.Removethe2longscrewsorboltsand
replacethemwith2boltsand2locknuts(Figure31).
7.Installthewheeltothepivotarmwiththebolts,
aspacer,andalocknut.Ensurethatthespaceris
positionedbetweenthewheelhubandthepivotarm
(Figure31).
ControlsSystem
Maintenance
AdjustingtheBladeBrake
Cable
Wheneveryouinstallanewbladebrakecableassembly
orreplacethebelt,adjustthebladebrakecable.
1.Stoptheengineandwaitforallmovingpartstostop.
2.Disconnectthewirefromthesparkplug(Figure12).
3.Removethefueltankfromthetankbracket.
Note:Youdonotneedtodisconnectthefuelline
fromthefueltank.
4.Resetthecableadjusteronthehandlesothat1/4
inch(6mm)ofthethreadsshow ,thentightenthe
nut(Figure32).
Figure32
1.Adjuster
3.1/4inch(6mm)ofthreads
2.Nut
5.Loosenthecableclampscrewuntilthebrakecable
conduitslides(Figure33).
23
Page 24

Figure33
1.Spring3.Cableclampscrew
2.Brakecableconduit
6.Holdthebladecontrolbarsothattheoutsideofthe
baris5-1/2inches(14cm)fromtheoutsideofthe
handle,andpullthecabletotheremovetheslack,
butdonotputtensiononthespring(Figure34).
Figure34
1.5-1/2inches(14cm)
3.Bladecontrolbar
2.Handle
7.Torquethecableclampscrewto100to120in-lb(11
to14N-m)tolocktheadjustmentinplace.
Donotovertightenthebladebrakecable.
Overtighteningthebladebrakecablecould
preventthebladebrakefromcontactingthe
brakedrumwhenyoureleasethecontrolbar.
Ifthebladebrakedoesnotcontactthebrake
drum,thebladewillnotstoprotating,which
couldcauseseriouspersonalinjury.
•Eachtimeyouadjustthebrakecable,ensure
thatthebrakestopsthebladein3seconds
orless.
•Ifthebladedoesnotstoprotatingin3
secondsorless,bringthemowertoan
AuthorizedServiceDealerforinspection
andrepair.
24
Page 25

BladeMaintenance
MaintainingtheCuttingBlade
Alwaysmowwithasharpblade.Asharpbladecuts
cleanlyandwithouttearingorshreddingthegrassblades.
Completethefollowingprocedurebefore
inspecting,removing,orinstallingtheblade:
1.Stoptheengineandwaitforallmovingpartstostop.
2.Disconnectthewirefromthesparkplug(Figure12).
3.Drainthepetrolfromthefueltank;referto
EmptyingtheFuelTankandCleaningtheFuelFilter.
4.Tipthemowerontoitsrightside(Figure35).
Figure35
1.Blade3.Anti-scalpcup
2.Bladenuts
InspectingtheBlade
ServiceInterval:Beforeeachuseordaily
Carefullyexaminethebladeforsharpnessandwear,
especiallywheretheatandthecurvedpartsmeet
(Figure36A).Becausesandandabrasivematerialcan
wearawaythemetalthatconnectstheatandcurved
partsoftheblade,checkthebladebeforeusingthe
mower.Ifyounoticeaslotorwear(Figure36Band
Figure36C),replacetheblade;refertoRemovingthe
Blade.
Figure36
1.Sail
3.Wear
2.Flatpartoftheblade4.Slotformed
Note:Forthebestperformance,installanewblade
beforethecuttingseasonbegins.Duringtheyear,le
downanysmallnickstomaintainthecuttingedge.
Awornordamagedbladecanbreak,anda
pieceofthebladecouldbethrownintothe
operator’sorbystander’sarea,resultingin
seriouspersonalinjuryordeath.
•Inspectthebladeperiodicallyforwearor
damage.
•Replaceawornordamagedblade.
RemovingtheBlade
Grasptheendofthebladeusingaragorathickly
paddedglove.Removethebladenuts,theanti-scalpcup,
andtheblade(Figure35).
SharpeningtheBlade
Filethetopsideofthebladetomaintainitsoriginal
cuttingangle(Figure37A)andinnercuttingedgeradius
(Figure37B).Thebladewillremainbalancedifyou
removethesameamountofmaterialfrombothcutting
edges.
Figure37
1.Sharpenatthisangleonly.
2.Maintaintheoriginalradius
here.
25
Page 26

BalancingtheBlade
1.Checkthebalanceofthebladebyplacingthecenter
holeofthebladeoveranailorscrewdrivershank
clampedhorizontallyinavise(Figure38).
Figure38
Note:Youcanalsocheckthebalanceusinga
commerciallymanufacturedbladebalancer.
2.Ifeitherendofthebladerotatesdownward,lethat
end(notthecuttingedgeortheendnearthecutting
edge).Thebladeisproperlybalancedwhenneither
enddrops.
InstallingtheBlade
1.Installasharp,balancedHayterblade,theanti-scalp
cup,andthebladenuts.Thesailoftheblademust
pointtowardthetopofthemowerhousingfor
properinstallation.Torquethebladenutsto23to
27ft-lb(32to37N-m).
2.Returnthemowertoitsoperatingposition.
3.Connectthewiretothesparkplug.
Cleaning
CleaningundertheMower
Housing
Toensurethebestperformance,keeptheundersideof
themowerhousingclean.
WashingMethod
ServiceInterval:Beforeeachuseordaily
1.Positionthemoweronaatconcreteorasphalt
surfacenearagardenhose.
2.Starttheengine.
3.Holdtherunninggardenhoseathandleleveland
directthewatertoowonthegroundjustinfront
oftherightreartyre(Figure39).
Figure39
1.Rightrearwheel
Note:Thebladewilldrawinwaterandwashout
clippings.Letthewaterrununtilyounolongersee
clippingsbeingwashedoutfromunderthehousing.
4.Stoptheengineandwaitforallmovingpartstostop.
5.Turnoffthegardenhose.
6.Startthemowerandletitrunforafewminutes
todryoutthemoistureonthemowerandits
components.
ScrapingMethod
Ifwashingdoesnotremovealldebrisfromunderthe
mower,scrapeitclean.
1.Disconnectthewirefromthesparkplug(Figure12).
2.Drainthefuelfromthefueltank.RefertoEmptying
theFuelTankandCleaningtheFuelFilter.
26
Page 27

Tippingthemowermaycausethefueltoleak
fromthecarburetororthefueltank.Petrolis
extremelyammable,highlyexplosive,and,
undercertainconditions,cancausepersonal
injuryorpropertydamage.
Avoidfuelspillsbyrunningtheenginedryorby
removingthepetrolwithahandpump;never
siphon.
3.Tipthemowerontoitsrightside.
4.Removethedirtandgrassclippingswithahardwood
scraper.Avoidburrsandsharpedges.
5.Returnthemowertoitsoperatingposition.
6.Fillthefueltank.
7.Connectthewiretothesparkplug.
CleaningtheBladeBrake
ClutchShield
ServiceInterval:Every50hours
Cleaninsidethebladebrakeclutchshieldwhenyou
changetheengineoiltoensurethebestperformance
andtopreventpartsfromdegradingorwhenyou
sharpenthebladebecauseyouneedtoremovetheblade
inordertoremovetheshield.
1.Stoptheengineandwaitforallmovingpartstostop.
2.Disconnectthewirefromthesparkplug(Figure12).
3.Drainthepetrolfromthefueltank;referto
EmptyingtheFuelTankandCleaningtheFuelFilter.
4.Tipthemoweronitsrightside.
Tippingthemowermaycausethefueltoleak
fromthecarburetororthefueltank.Petrolis
extremelyammable,highlyexplosive,and,
undercertainconditions,cancausepersonal
injuryorpropertydamage.
Avoidfuelspillsbyemptyingthefueltankas
directed;neversiphon.
5.Remove2bladenuts,theanti-scalpcup,andthe
blade(Figure35).
6.Loosenthe4screwsthatholdtheshieldinplace
(Figure40)..
Figure40
1.Screws(4)
2.Bladebrakeclutchshield
7.Removetheshieldandbrushorblowallthedebris
fromundertheshieldandaroundthebladebrake
clutchsystem.
8.Installtheshield.
9.Installtheblade,theanti-scalpcup,andthe2blade
nuts.
10.Returnthemowertoitsoperatingposition.
11.Connectthewiretothesparkplug.
27
Page 28

Storage
Topreparethemowerforoff-seasonstorage,perform
therecommendedmaintenanceprocedures.Referto
Maintenance.
Storethemowerinacool,clean,dryplace.Coverthe
mowertokeepitcleanandprotected.
PreparingtheFuelSystem
Petrolcanvaporizeifyoustoreitoverlong
periodsoftimeandexplodeifitcomesinto
contactwithanopename.
•Donotstorepetroloverlongperiodsoftime.
•Donotstorethemowerwithpetrolinthe
fueltankorthecarburettorinanenclosure
withanopename.(Forexample,afurnace
orawaterheaterpilotlight.)
•Allowtheenginetocoolbeforestoringitin
anyenclosure.
Emptythefueltankwhenmowingthelasttimebefore
storingthemower.
1.Runthemoweruntiltheenginestopsfromrunning
outoffuel.
2.Primetheengineandstartitagain.
3.Allowtheenginetorununtilitstops.Whenyoucan
nolongerstarttheengine,itissufcientlydry.
PreparingtheEngine
1.Whiletheengineisstillwarm,changetheoilfrom
thecrankcase.RefertoChangingtheEngineOil.
2.Removethesparkplug.
3.Usinganoilcan,addaboutonetablespoonofoilto
thecrankcasethroughthesparkplughole.
4.Slowlyrotatetheengineseveraltimes,usingthe
starterrope,todistributetheoil.
5.Installthesparkplugbutdonotconnectthewireto
thesparkplug.
GeneralInformation
1.Cleanthemowerhousing.RefertoCleaningunder
theMowerHousing.
2.Cleananydirtandchafffromthecylinder,cylinder
headns,andblowerhousing.
3.Removegrassclippings,dirt,andgrimefromthe
externalpartsoftheengine,theshrouding,andthe
topofthemowerhousing.
4.Checktheconditionoftheblade.Referto
MaintainingtheCuttingBlade.
5.CleantheBBCshield;refertoCleaningtheBlade
BrakeClutchShield.
6.Servicetheairlter;refertoServicingtheAirFilter.
7.Lubricatethepivotarms;refertoLubricatingthe
PivotArms.
8.Tightenallnuts,bolts,andscrews.
9.Touchupallrustedorchippedpaintsurfaceswith
paintavailablefromanAuthorizedServiceDealer.
RemovingtheLawnMower
fromStorage
1.Checkandtightenallfasteners.
2.Removethesparkplugandspintheenginerapidly
usingthestartertoblowexcessoilfromthecylinder.
3.Cleanthesparkplugorreplaceitifitiscracked,
broken,oriftheelectrodesareworn.
4.Installthesparkplugandtorqueitto17ft-lb(23
N-m).
5.Performanyneededmaintenanceprocedures;refer
toMaintenance.
6.Fillthefuelinthefueltankwithfreshpetrol.
7.Checktheengineoillevel.
8.Connectthewiretothesparkplug.
28
Page 29

Troubleshooting
Problem
PossibleCauseCorrectiveAction
1.Thefueltankisemptyorthefuel
systemcontainsstalefuel.
1.Drainand/orllthefueltankwithfresh
petrol.Iftheproblempersists,contact
anAuthorizedServiceDealer .
2.ThethrottleleverisnotintheChoke
position.
2.MovethethrottlelevertotheChoke
position.
3.Thewireisnotconnectedtothespark
plug.
3.Connectthewiretothesparkplug.
Enginedoesnotstart
4.Thesparkplugispitted,fouled,orthe
gapisincorrect.
4.Checkthesparkplugandadjustthe
gapifnecessary.Replacethespark
plugifitispitted,fouled,orcracked.
1.Thefueltankcontainsstalefuel.1.Drainandllthefueltankwithfresh
petrol.
2.Thefuelcapventholeisplugged.2.Cleanthefuelcapventholeorreplace
thefuelcap.
3.Theairlterelementisdirtyandis
restrictingtheairow.
3.Cleantheairlterpre-cleanerand/or
replacethepaperairlter.
4.Theundersideofthemowerhousing
containsclippingsanddebris.
4.Cleanunderthemowerhousing.
5.Thesparkplugispitted,fouled,orthe
gapisincorrect.
5.Checkthesparkplugandadjustthe
gapifnecessary.Replacethespark
plugifitispitted,fouled,orcracked.
Enginestartshardorlosespower
6.Theengineoillevelislowortheoilis
dirty.
6.Checktheengineoil.Changetheoilif
itisdirtyoraddoilifitislow
1.Thewireisnotconnectedtothespark
plug.
1.Connectthewiretothesparkplug.
2.Thesparkplugispitted,fouled,orthe
gapisincorrect.
2.Checkthesparkplugandadjustthe
gapifnecessary.Replacethespark
plugifitispitted,fouled,orcracked.
3.ThethrottleleverisnotintheFast
position.
3.MovethethrottlelevertotheFast
position.
Enginerunsrough
4.Theairlterelementisdirtyandis
restrictingtheairow.
4.Cleantheairlterpre-cleanerand/or
replacethepaperairlter.
1.Thebladeisbentorisoutofbalance.1.Balancetheblade.Ifthebladeisbent,
replaceit.
2.Theblademountingnutsareloose.2.Tightentheblademountingnuts.
3.Theundersideofthemowerhousing
containsclippingsanddebris.
3.Cleanunderthemowerhousing.
Lawnmowerorenginevibrates
excessively
4.Theenginemountingboltsareloose.4.Tightentheenginemountingbolts.
1.All4wheelsarenotatthesameheight.1.Placeall4wheelsatthesameheight.
2.Thebladeisdull.
2.Sharpenandbalancetheblade.
3.Youaremowinginthesamepattern
repeatedly.
3.Changethemowingpattern.
Unevencuttingpattern
4.Theundersideofthemowerhousing
containsclippingsanddebris.
4.Cleanunderthemowerhousing.
1.Theself-propeldrivecableisoutof
adjustmentorisdamaged.
1.Adjusttheself-propeldrivecable.
Replacethecableifnecessary.
Mowerdoesnotself-propel
2.Thereisdebrisunderthebeltcover.
2.Cleanthedebrisfromunderthebelt
cover.
29
Page 30

Notes:
30
Page 31

LIMITED WARRANTY
Hayter Limited warrants to the original user/purchaser that this unit shall be free from defects in
material and workmanship under normal use and service for a period of one year from the date
of purchase. The manufacturers of the engine furnish their own warranty and services are
provided through their authorised network (Refer to "Engine Warranty Statement"). To qualify
for the full benefit of the warranty, the Warranty Registration Card must be returned to Hayter
Limited within 14 days of purchase. If the selling dealer has not returned the Warranty
Registration Card which is attached to the rear of the Owners Handbook please complete and
return. Subject to the conditions and exclusions noted in this limited warranty, we shall at our
option, repair or replace any warranted part during the applicable period. If you are in doubt or
experience any difficulty, please consult a Hayter Authorised Service Dealer for clarification.
A 90 day warranty period applies to those items which are subject to normal wear and tear e.g.
wheels, cutterbars, cables, grassbags and other consumable wearing parts.
All machines which are fitted with a genuine Hayter Friction Disc or Crankshaft Support
Bearing as original equipment before use, are covered by a Lifetime Warranty against the
engine crankshaft bending. Note: friction washers, Blade Brake Clutch (B.B.C.) units and other
such devices are not applicable. Only machines fitted with a genuine Hayter friction disc or
crankshaft support bearing, which are used in accordance with the recommended operating and
maintenance procedures, are covered.
This warranty does not apply to any unit that has been tampered with, altered, misused, abused or
used for hire, and will become invalid if non genuine Hayter parts are fitted. This warranty does
not cover for minor mechanical adjustments unless they are due to defective material or
workmanship. Consult the Owner's Handbook or a Hayter Authorised Service Dealer for
assistance when making these adjustments.
To make a warranty claim, return the unit to a Hayter Authorised Service Dealer along with proof
of purchase stating the machine serial number and date of purchase. Subject to the conditions and
exclusions in this limited warranty, the authorised dealer will, at our option, repair or replace any
warranted part within the duration of the warranty period.
This limited warranty gives you specific legal rights and is in addition to any statutory rights to
which you may be entitled and your statutory rights are not affected by this warranty. If you need
additional information concerning this written warranty, or assistance in obtaining services,
please write to : HAYTER LIMITED, Service Department, Spellbrook, Bishop's Stortford,
Hertfordshire CM23 4BU
UK ONLY: Details of your local Hayter authorised dealer are contained in Yellow Pages and the
Hayter Website www.hayter.co.uk or contact:- Freephone 0800 616298.
Issue: 26.03.99
Warranty 070199 (Harrier)
Page 32

Date of Sale:Your Local Dealer:-
Code Serial No.
 Loading...