

Page 1

DIVA T/A ISDN Modem
User’s Guide
Page 2

Fourth Edition (July 1998) 206-152-04
DIVA T/A ISDN Modem i s a trademark of Eicon Technology Corporation.
Microsoft, Windows, and Windows NT ar e registered trademarks of Micr osoft Corporat ion.
CompuServe is a r egistered trademark of CompuServe Incorporated.
Hayes is a registered trademark of Ha yes Microcomputer P roducts, Inc.
Changes are periodically made to the information herein; these changes will be incorporated
into new editions of the publi cation. Eicon Technology may make improvements and/or
changes in the products and/or programs described in this publication at any time.
A Product Comme nt Form is provided at the back of this publication. If the form has been
removed, address your com me nts to: Ei con Technology Corporation, Attn.: Corporate
Publications, 9800 Cavendish B lvd., Mont real, Quebec, Canada H 4M 2V9. Eicon
Technology may use or di s tribute whatever information you s upply in any way it believes
appropriate w ithout incurr ing any obligations to you.
Copyright © 1998 Eicon Technology Cor poration. Al l rights res e rved, including those to
reproduce this publication or parts thereof in any f or m w ithout permis s ion in writing from
Eicon Technology Corporation.
Page 3

Table of Contents
Introduction.......................................................................................... 5
What You Need ....................................................................................7
Using EZ-ISDN or ISDN Ordering Code ( IO C) t o order y our ISDN
Line ....................................................................................................... 8
Connecting the Cables.......................................................................... 9
Installing the DIVA T/A Software.....................................................25
The Windows 95/98/NT Eicon DIVA Terminal Adapters Program. 30
Getting Help..................................................................................... 30
Menu Options...................................................................................31
Using the Windows 95/98/NT Configuration Tool............................ 33
Using the Windows 3.x/WFW 3.11 Configuration Tool ....................49
Using the VT100 Configuration Tool................................................. 60
Updating the DIVA T/A Firmware.................................................... 70
Updating Firmware under Windows 3.x/WFW 3.11 ..... . . . . . . . . . . . . . . . . . . . . 70
Updating Firmware under Windows NT and 95/98...........................70
Updating Firmware under DOS, and OS/2........................................71
Updating the DIVA T/A INF file (Windows 3.x/Windows NT 3.51). 72
Using the DIVA T/A........................................................................... 73
SecurID Connectivity....................................................................... 74
Dialing with Multilink PPP.............................................................. 77
Dialing with AO/DI..........................................................................78
Establishing a Connection................................................................80
Connecting to the World Wide Web................................................. 94
RVS-COM Support .......................................................................... 95
Automated SPID Selection................................................................. 96
Non-Initializing Terminal Mode........................................................ 97
Analog Device Support....................................................................... 98
Calling Features............................................................................. 100
Feature Key Values......................................................................... 102
Appendix A: ISDN Line Termination.............................................. 104
Single ISDN Device ....................................................................... 104
Multiple ISDN Devices...................................................................105
Page 4

Appendix B: Troubleshooting the DIVA T/A.................................. 106
LED Status Indicators on the DIVA T/A........................................ 106
ISDN LEDs.................................................................................... 106
Common Problems......................................................................... 109
Dumping the DIVA T/A Memory................................................... 113
DIVA T/A Firmware Specifications................................................. 114
DIVA T/A Hardware Specifications................................................ 116
Customer Service.............................................................................. 117
Eicon Technology on the World Wide Web................................... 117
Internati onal Re g ulat ory Inf ormation and Conditions of Use... .... . . 118
Limited Warranty............................................................................ 121
Page 5

Introduction
DIVA T/A is an external ISDN modem available in S/T and U
interface versions. It provides easy and affordable high-speed Basic
Rate Interface (BRI) ISDN connection to the Internet or to your office
LAN. With the DIVA T/A, Small Office Home Office (SOHO) users
and telecommuters can combine the higher performance of ISDN with
the simplicity of a terminal adapter. The DIVA T/A supports all
standard modem AT commands.
You can connect the DIVA T/A to a serial port on your computer that
complements your TCP/IP application (without the need for additional
device drivers).
Internet Access
The DIVA T/A allows you to connect to the Internet over an ISDN
line at speeds of up to 128 kilobits per second. Without virtually any
delays, you can access online services or browse the World Wide
Web to download high-resolution graphics, video clips, interactive
games, music, etc.
Work-at-Home Access
The DIVA T/A provides the telecommuter with fast access to network
resources back at the office. You can access applications such as
email or download data from a remote database in a fraction of the
time it would take using a conventional analog modem.
Analog Device Ports
(Certain models only)
Analog device ports (also referred to as Plain Old Telephone
Service--POTS) let you connect regular telephones, modems or fax
machines to your DIVA T/A. Calls to and from these devices are
carried over your ISDN line. This can save you the expense of
installing a separate analog phone line.
Analog device users get a variety of calling features such as Call
Forward, Call Waiting, Caller ID, 3-way call conferencing, and
VoiceMail. See the section “Analog Device Support” on page 98 for
details.
DIVA T/A ISDN Modem User’s Guide 5
Page 6

Note: The DIVA T/A can work independently from your PC. If the
DIVA T/A is turned on, your analog devices can use your ISDN line
regardless of whether the DIVA T/A is connected to your PC.
Ease of Use
You can connect the DIVA T/A to any computer (PC or notebook)
equipped with a serial port. You can easily configure it using the
Setup Wizard (under all versions of Windows), using a VT100
interface (under DOS and OS/2), and using AT commands (under all
platforms).
In North America the Configuration Wizard can automatically detect
your Service Profile Identifiers (SPIDs). SPIDs are addresses assigned
by your ISDN provider; the ISDN switch uses SPIDs to identify your
equipment.
DIVA T/A ISDN Modem User’s Guide 6
Page 7

What You Need
To install the DIVA T/A, you need the following:
Item Description
DIVA T/A
Package
PC or Notebook DIVA T/A can be attached to any PC or Notebook computer.
•
DIVA T/A IS DN M o d e m
•
DIVA T/A so f tware (CD)
•
ISDN cable (RJ-45)
•
Serial cable (RS-232)
•
A/C Adapt e r
•
Phone Adapters (RJ11) for France and UK only
•
DIVA T/A Qui c k S tart Gu ide
•
DIVA T/A Rel ease Not es
Remote Access
Client Software
ISDN Basi c
Rate Line ( BRI)
Terminal
Emulation
Program
Internet Access
Operating
System
Supplied as part of operat i ng pl atf or m or by I nte rnet Ser vic e
Provider (ISP).
Must be installed by your t el ephone com pany.
See the section “Ordering your ISDN Line Using EZISDN/IOC” on page 8 for more information.
(Required for non-Windows users onl y)
terminal-emulation program for DOS or OS/2 platforms to use
the VT100 Configuration Tool.
(Optional)
you will require the following:
•
•
•
•
•
•
•
•
To establish an ISDN connection to the Internet,
ISP that provides ISDN Basic Rate Interface service
PPP and TCP/IP communications prot ocol s for access i ng
your Internet subscri pti on ( e. g. Wi ndows 95/98/ NT DialUp Networking)
TCP/IP clients (Web br owser, FTP, Tel net )
Microsoft® Windows® 95/98
Microsoft Windows NT® (3.51/4. 0)
Windows 3.
DOS
OS/2
x
VT100-compatible
COM Port
•
UART 16650 (230.4 kbps) recommended for maxim um
throughput
•
UART 16550
DIVA T/A ISDN Modem User’s Guide 7
Page 8

Using EZ-ISDN or ISDN Ordering
Code (IOC) to order your ISDN
Line
(North America only)
We highly recommend that you use our toll free ISDN ordering
service to make sure you get the correct ISDN line the first time. This
service is free to our customers. Dial 1-888-800-DIVA.
EZ-ISDN / IOC simplifies the ordering of your ISDN line. It lets you
use simple codes to order pre-configured packages of ISDN features
and services.
The North American ISDN User’s Forum (NIUF) and Local
Exchange Carriers (LEC) administer the assignment of codes.
Bellcore administers the National ISDN Ordering Code (IOC)
process.
We recommend the use of the following ISDN Ordering codes:
• IOC “S” offers basic voice/data features without the advanced
calling features described below. If you select this option, make
sure to get Additional Call (ACO). ACO is required for Call
Bumping (also known as Dynamic Bandwidth Allocation-DBA) and Call Waiting to work correctly. IOC “S1” includes
ACO, however it is not supported everywhere.
• EZ-ISDN 1 (or IOC: “U”) adds voice/data to both B-channels.
The Advanced calling features such as Call Conference, Call
transfer, etc., are only available on one B-channel.
Note: Calling Features only apply to DIVA T/A models
equipped with analog ports. For more information on Calling
Features, see page 100. For more information on analog device
support, see page 98.
• EZ-ISDN 1A (or IOC: “V”) adds VoiceMail to EZ-ISDN.
• EZ-ISDN 3 or 3A adds Always On/Dynamic ISDN (AO/DI)
support.
Note: If you want to use the DIVA T/A’s Calling Features, ask your
ISDN service provider for the values of the Feature Keys. You need
these values to ensure that the DIVA T/A has full access to these
features. Refer to the section “Feature Key Values” on page 102 for
more information.
DIVA T/A ISDN Modem User’s Guide 8
Page 9

Connecting the Cables
To connect the cables to your DIVA T/A:
Turn off your computer before you connect the cables.
1
Connect the RJ45 end of the ISDN cable (see ➀ in Figure 1 on
2
page 11) to the jack labeled ISDN on the rear of the DIVA T/A.
See below to complete the connection:
• Integrated NT1 (U) model
Connect the other smaller end (RJ11) of the ISDN cable to
your ISDN wall jack.
• S/T Interface model
Connect the other end of the ISDN cable to an NT1
interface, whether part of the ISDN service (e.g. corporate
phone switch) or external.
You might have to change the setting of the termination
resistor switch (see “Appendix A: ISDN Line Termination”
on page 104 for more information).
(This step is optional) Connect cables (see ➁ and ➂ in the figure
3
below) from analog devices (telephone, fax machine, modem,
etc.) to the jacks labeled PHONE on the rear of the DIVA T/A. It
is recommended that you use PHONE 1 for voice, and PHONE 2
for Data (modem or fax). In France and the United Kingdom you
must attach the analog devices to the phone adapters (see
Figure 1) before connecting them to the DIVA T/A. Note that
Phone ports and adapters are only available on certain models.
⑥ in
Connect one end of the serial cable (see ➃ in Figure 1 on page
4
11) to the port labeled SERIAL on the rear of the DIVA T/A,
and the other end to the appropriate serial port on your PC.
Connect the A/C adapter connector (see ➄ in Figure 1 on page
5
11) to the power jack on the rear of the DIVA T/A, and plug the
adapter into an AC power outlet.
DIVA T/A ISDN Modem User’s Guide 9
Page 10
Termination Switch available
on S/T models for Australia only
À
ISDN
Phone 1 Phone 2 Serial
100
On
Off
Reset
ISDN Jack
Å
ÁÂ ÃÄ
Phone
Fax
Desktop computer
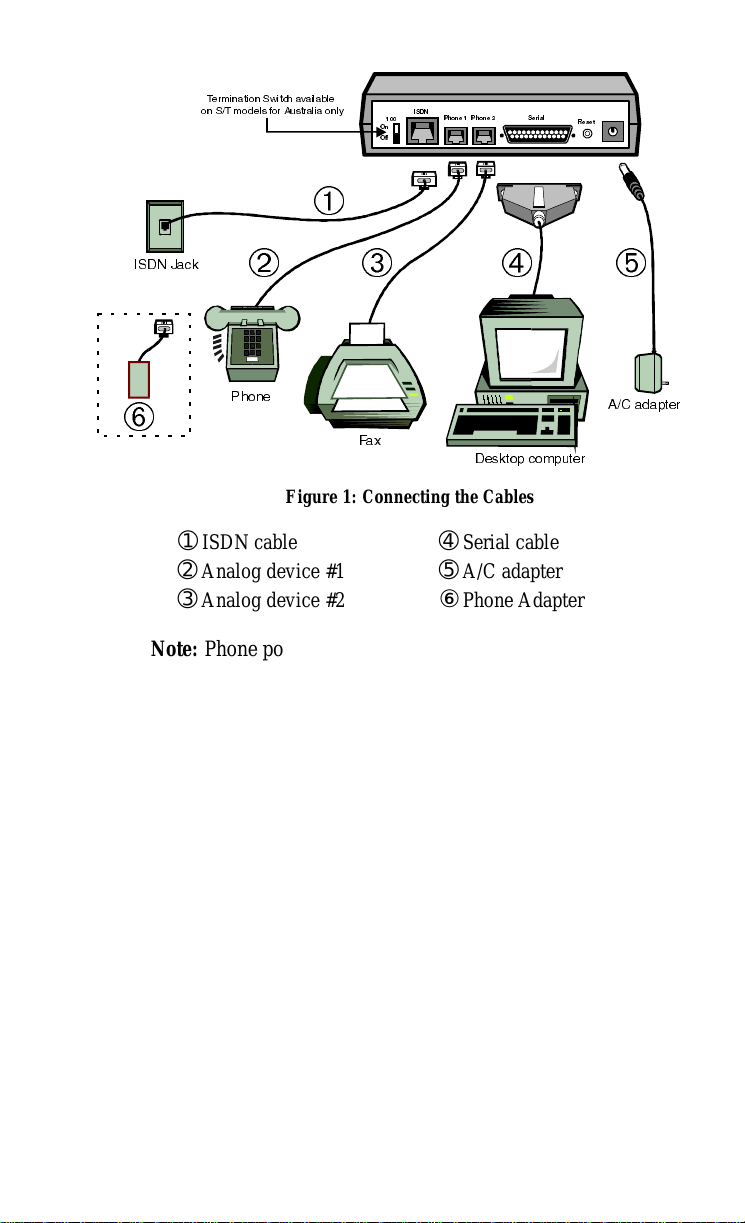
Figure 1: Connecting the Cables
A/C adapter
➀ ISDN cable ➃ Serial cable
➁ Analog device #1 ➄ A/C adapter
➂ Analog device #2 ⑥ Phone Adapter
Note:
Phone ports and adapters are only available on certain
models.
After Connecting the Cables
After connecting the power and the ISDN cable to the DIVA T/A,
wait at least 10 seconds for the DIVA T/A to initialize and then check
the “D” and “LINK” LEDs. If they are both glowing steadily, then
your DIVA T/A is operational (either from a previous configuration
or because your line supports AutoSPID). Go to the section “What’s
Next?” on page 12 and continue.
Note:
Where AutoSPID is supported, the DIVA T/A installation
is totally Plug and Play.
If the “LINK” LED is not glowing steadily, this indicates a problem
with the ISDN line. Recheck all your cable connections.
DIVA T/A ISDN Modem User’s Guide 10
Page 11

"D" LED not glowing steadily (International
Firmware)
If the “D” LED is not glowing steadily, your ISDN cables may be
improperly connected, the ISDN line is not activated, or may indicate
an idle condition. Please check all of these items, and, if the “D” LED
is still not glowing steadily, refer to the “Customer Service” section
on page 117 for information on contacting Eicon Technology.
If the "D" LED is glowing steadily, go to the section “What’s Next?”
on page 12 and continue.
"D" LED not glowing steadily (North American
Firmware)
If the “D” LED is not on and glowing steadily, your ISDN line
probably does not support AutoSPID. In this instance you will require
the following information from your ISDN service provider, before
you continue with the DIVA T/A installation:
• ISDN number(s).
Your ISDN service provider should have provided you with one,
and maybe even two, ISDN numbers. These numbers are
required to configure the DIVA T/A.
• SPIDs
If you are installing the DIVA T/A under Windows 95/98 or
Windows NT, the ISDN numbers are all that you require as the
SPID Wizard, used for configuring the DIVA T/A, will
automatically configure the SPIDs.
If you are not using Windows 95/98 or Windows NT, you must
get your SPID information from your ISDN provider. SPID(s)
are numbers usually consisting of your 3-digit Area Code plus 7digit ISDN Number followed by some digits. For new ISDN
lines your local telephone company will likely follow the generic
SPID format (Area Code and ISDN phone number) followed by
0101. For example: 51455512340101.
DIVA T/A ISDN Modem User’s Guide 11
Page 12

You may not have to enter SPID information for the DIVA T/A
to function properly if your ISDN line is configured for noninitializing mode. The DIVA T/A features automatic noninitializing mode support, which enables the interface to operate
without programming a SPID, or to retain basic service if SPID
initialization fails. However, your local telephone company has
to turn this feature on. As you lose functionality, we do not
recommend this operation mode.
Go to the section “What’s Next?” on page 12 and continue.
What’s Next?
After you have finished connecting the cables and gathering the
required information, go to the section that corresponds to your
platform and continue the installation.
Platform
Windows 95
Windows 95 OSR2
Windows 98
Windows NT 4.0
Windows NT 3.51
Windows 3.x/WFW 3.11
DOS and OS/2
What to do
Continue on page 13
Continue on page 15
Continue on page 17
Continue on page 20
Continue on page 23
Continue on page 24
Continue on page 60
DIVA T/A ISDN Modem User’s Guide 12
Page 13
Windows 95
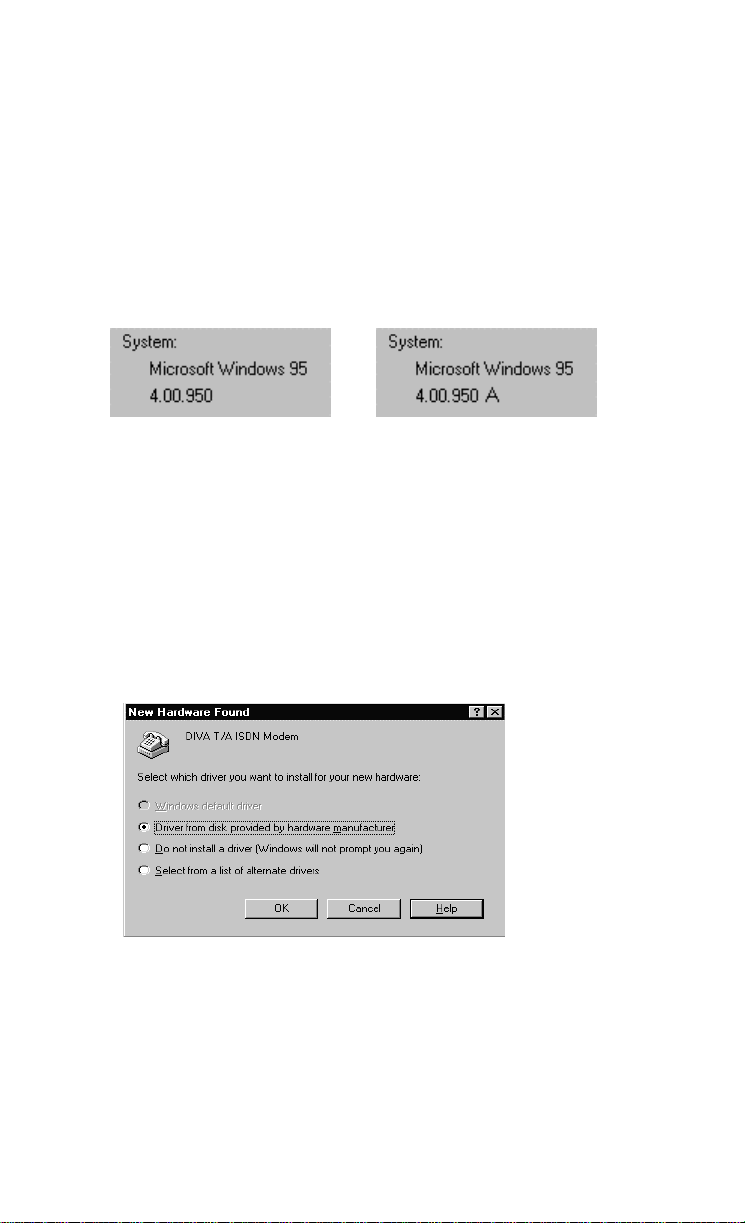
Note: This install procedure is for the original release and Service
Pack 1 (SP1) version of Windows 95. If you are using Windows 95
Service Release 2 (OSR2), go to “Windows 95 (OSR2)” on page 15.
To verify the version installed on your machine, go to Control
Panel/System Properties and select the General tab. If you have the
original or SP1 version of Windows 95 installed, one of the following
screens appears:
Note: If you are using Dial-Up Networking, make sure you are using
version 1.2. If you are running a previous version, you must upgrade
to Dial-Up Networking 1.2, before you begin installing the DIVA T/A.
Dial-Up Networking 1.2 is located on the DIVA T/A CD under the
\MSDUN12 directory. Refer to your Windows 95 online help for
information on how to install Dial-Up Networking.
Power on your PC with the DIVA T/A modem connected (see
1
the section “Connecting the Cables” on page 9). Windows 95
automatically detects the DIVA T/A and the New Hardware
Found Window appears.
Insert the DIVA T/A CD into your computer’s CD drive.
2
In the New Hardware Found Screen, select
3
provided by hardware manufacturer
From Disk window appears.
, and click OK; the Install
DIVA T/A ISDN Modem User’s Guide 13
Driver from disk
Page 14

4
In the Install From Disk window, enter the drive letter of your
CD drive (or use the Browse button to locate your CD drive) and
click OK.
5
Go to page 25 and continue at the section “Installing the DIVA
T/A Software.”
DIVA T/A ISDN Modem User’s Guide 14
Page 15
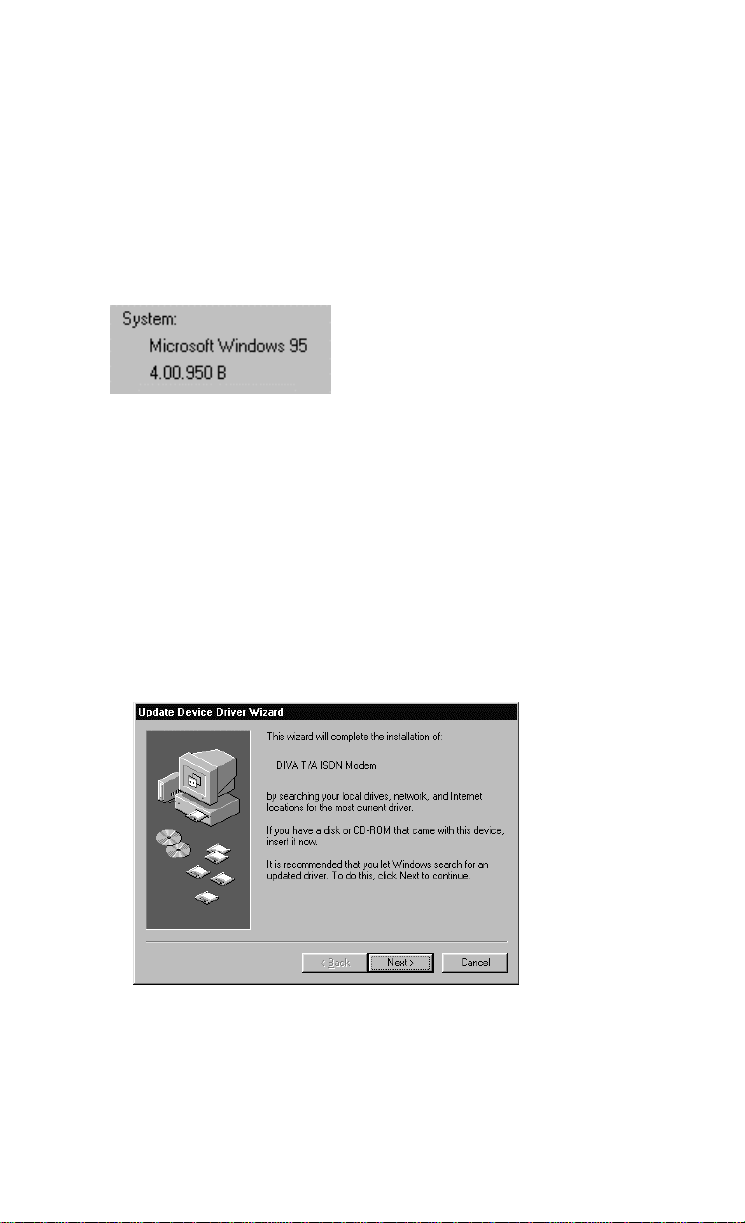
Windows 95 (OSR2)
Note: This install procedure is for Windows 95 Service Release 2
(OSR2). If you are using original release or Service Pack 1 (SP1)
version of Windows 95, go to “Windows 95” on page 13.
To verify the version installed on your machine, go to Control
Panel/System Properties and select the General tab. If you have
Windows 95 OSR2 installed, you should see the letter “B”, as below:
Note: If you are using Dial-Up Networking, make sure you are using
version 1.2. If you are running a previous version, you must upgrade
to Dial-Up Networking 1.2, before you begin installing the DIVA T/A.
Dial-Up Networking 1.2 is located on the DIVA T/A CD under the
\MSDUN12 directory. Refer to your Windows 95 online help for
information on how to install Dial-Up Networking.
Power on your PC with the DIVA T/A modem connected (see
1
the section “Connecting the Cables” on page 9. Windows 95
automatically detects the DIVA T/A and the New Hardware
Found Window appears followed by the Update Device Driver
Wizard.
Insert the DIVA T/A CD into your computer’s CD drive.
2
From the Update Device Driver Wizard window, click Next.
3
Click Other Location.
4
DIVA T/A ISDN Modem User’s Guide 15
Page 16
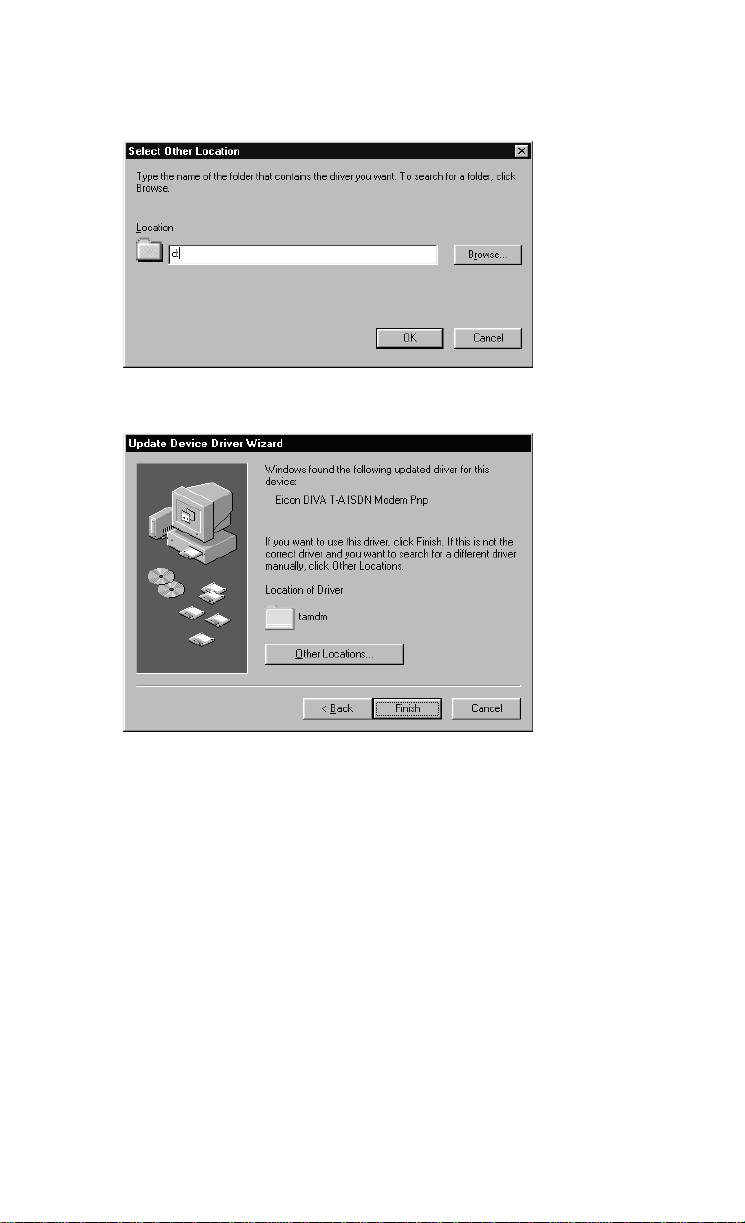
5
Enter the drive letter of your CD drive (or use the Browse button
to locate your CD drive) and click OK.
6
In the update Device Driver Window, click Finish.
7
Go to page 25 and continue at the section “Installing the DIVA
T/A Software.”
DIVA T/A ISDN Modem User’s Guide 16
Page 17
Windows 98
WARNING! It is very important to follow the steps, exactly as
described below, to install the DIVA T/A software. The setup file for
ISDN modems (mdmisdn.inf), supplied on the Microsoft Windows 98
CD, contains incorrect information about the DIVA T/A ISDN
Modem (incorrectly referred to as Eicon T-A External). Using this
setup file will cause the DIVA T/A to operate incorrectly. DO NOT
use the Add New Hardware applet (found in Control Panel) to install
the DIVA T/A.
To add your DIVA T/A to the system:
1
Power on your PC with the DIVA T/A modem connected (see
the section “Connecting the Cables” on page 9. Windows 98
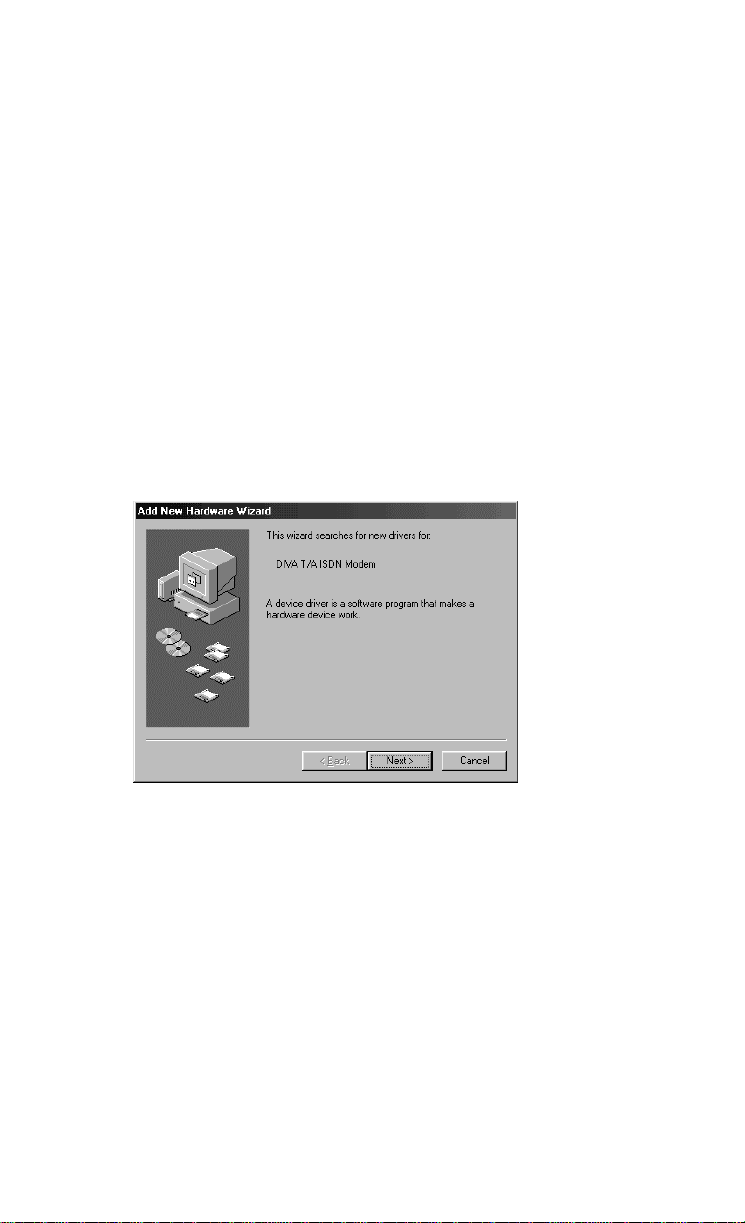
automatically detects the DIVA T/A and the New Hardware
Found Window appears followed by the Add New Hardware
Wizard.
2
Insert the DIVA T/A CD into your computer’s CD drive.
3
From the Add New Hardware Wizard window, click Next.
DIVA T/A ISDN Modem User’s Guide 17
Page 18
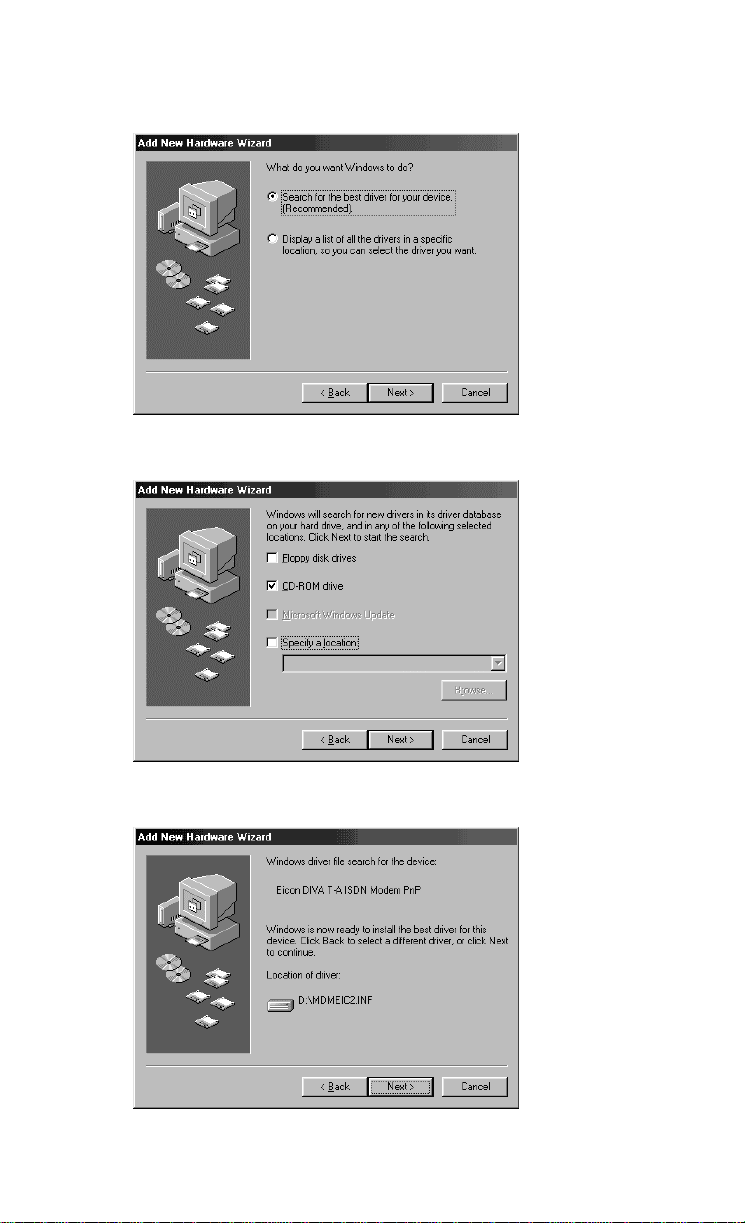
4
Select the Search for the best driver for your device option and
click Next.
5
Select “CD-ROM drive” and click Next.
6
Click Next.
DIVA T/A ISDN Modem User’s Guide 18
Page 19

7
Click Finish and go to page 25 and continue at the section
“Installing the DIVA T/A Software.”
DIVA T/A ISDN Modem User’s Guide 19
Page 20
Windows NT 4.0
Note: Before you begin installing the DIVA T/A, we suggest that the
Remote Access Service (RAS), also known as Dial-Up Networking, be
installed with at least one modem (any modem will do; it is only
needed to install the DIVA T/A and can later be removed).
1
Power on your PC with the DIVA T/A ISDN Modem connected
(see “Connecting the Cables” on page 9).
2
Insert the DIVA T/A CD into your computer's CD drive.
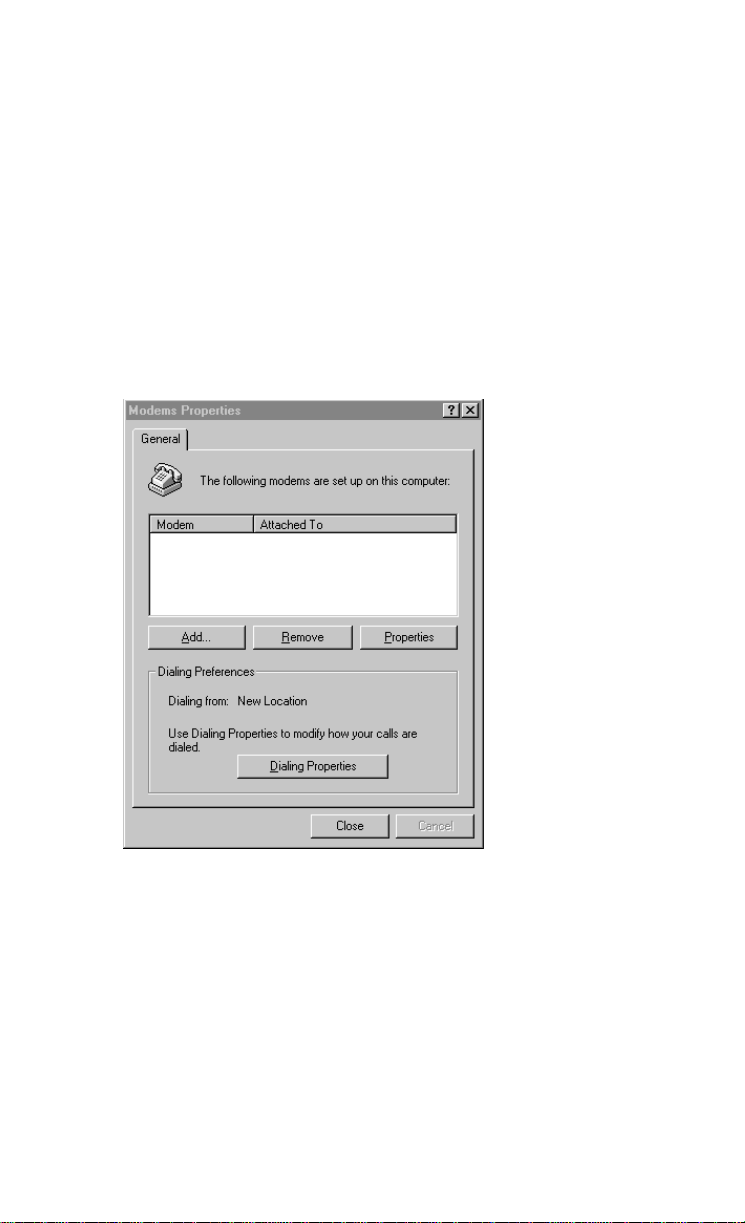
3
From the Start menu, go to Settings, then Control Panel. The
Modem Properties screen opens. Click Add.
DIVA T/A ISDN Modem User’s Guide 20
Page 21
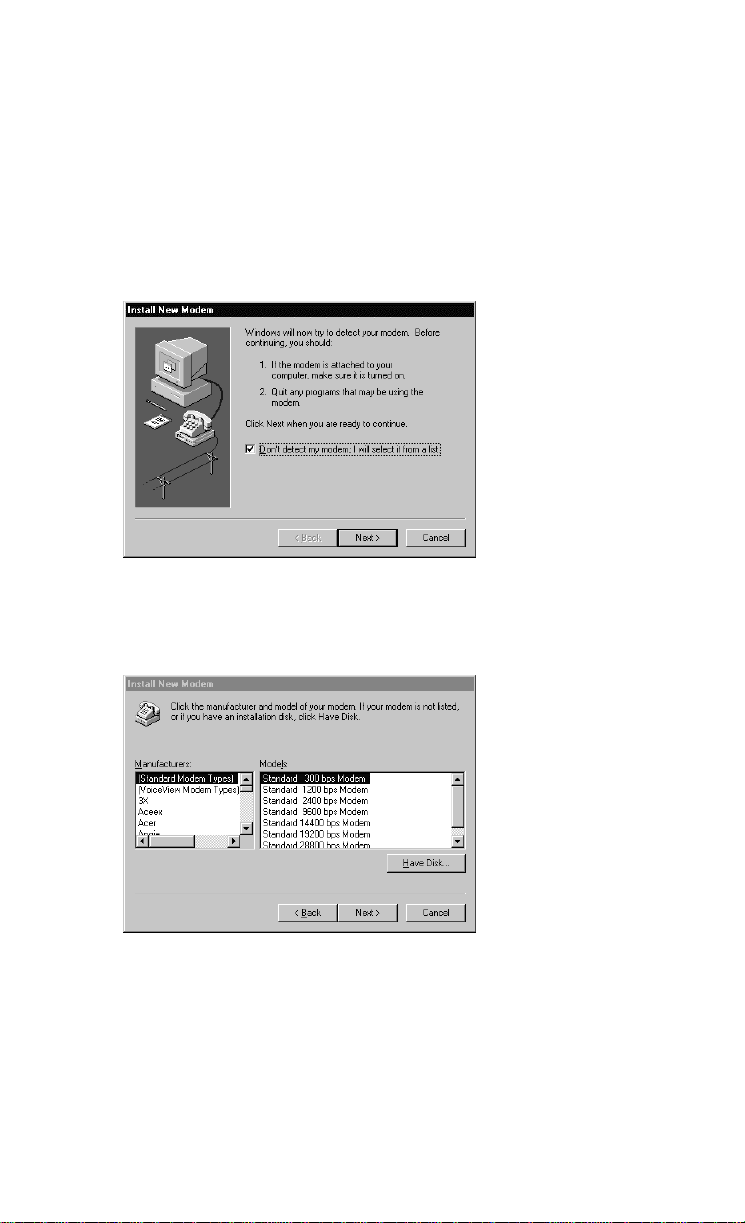
4
Select Don’t detect my modem; I will select it from a list, then
click Next.
Important: Make sure that you select the choice above and do
not let Windows NT choose its own modem driver. If you let
Windows NT select the modem driver, you will not be able to
communicate with the DIVA T/A. You will then have to delete the
Windows NT installed modem and begin the install process again
from Step 3.
5
From the Install New Modem windows, click Have Disk; when
prompted, enter the path to the CD (or use the Browse button to
locate your CD drive), then click OK. The DIVA T/A will be
detected.
DIVA T/A ISDN Modem User’s Guide 21
Page 22
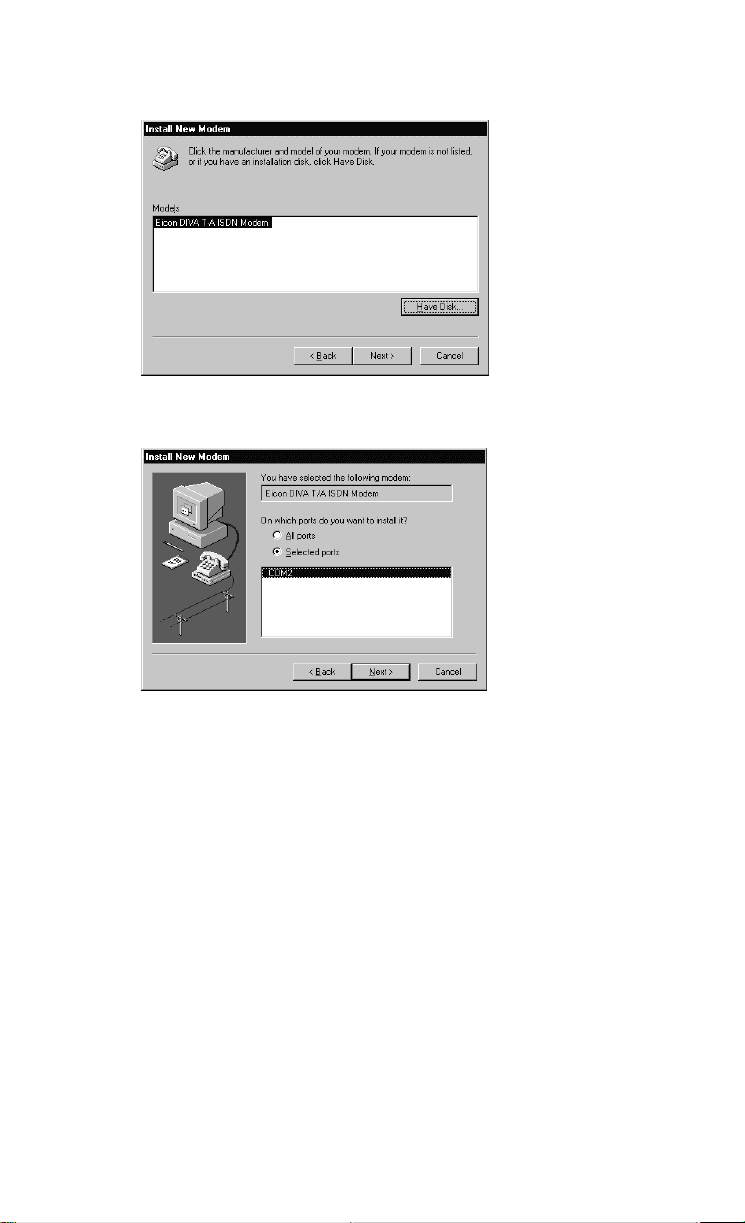
6
Select the Eicon DIVA T/A ISDN Modem, then click Next.
7
Select the appropriate COM Port the DIVA T/A is connected
to. Click Next, then click finish.
8
Close the Modem Properties window.
9
After closing the Modem Properties window, you are
prompted to configure Dial-Up Networking, as the install
Modem list has changed. Click Yes to configure Dial-Up
Networking.
10
From the Remote Access Setup window, remove any unused
devices that use the same COM port as the DIVA T/A, and
then click Add.
11
In the Add RAS Device window, select the Eicon DIVA T/A
ISDN Modem from the drop-down list and click OK.
12
From the Remote Access Setup window, click Continue. You
will be prompted to shutdown and restart your computer. Click
No. Do not restart your system.
13
Go to page 25 and continue at the section “Installing the DIVA
T/A Software.”
DIVA T/A ISDN Modem User’s Guide 22
Page 23

Windows NT 3.51
If you are going to use the DIVA T/A with RAS, RAS must already
be installed with at least one modem (any modem will do, it is only
needed to install the DIVA T/A and will later be removed). If this is
the case, follow the steps below. If you do not want to use RAS,
continue at “Installing the DIVA T/A Software” on page 25.
1
Power on your PC with the DIVA T/A connected (see
“Connecting the Cables” on page 9).
2
Insert the DIVA T/A CD into your computer’s CD drive.
3
Open any text editor.
4
Using your text editor, open the file MODEM.INF found in the
Windows\System32\RAS directory.
5
Open the file WFWNTEI2.INF found on the DIVA T/A CD
(\WIN 32).
6
Copy the contents of WFWNTEI2.INF and append it to the end
of the MODEM.INF file; save the appended MODEM.INF file,
and exit your text editor.
7
You must now start the RAS setup program. From the Control
Panel, double-click the Network icon. From the Installed
Network Software list, select Remote Access Service and click
Configure.
8
From the RAS setup, remove the unused modem or any other
devices that use the same COM port as the DIVA T/A, add the
DIVA T/A, and then exit RAS. Refer to the RAS online help for
removing and adding modems.
9
After exiting the RAS setup, you are prompted to reboot your
PC. Click OK and allow your PC to reboot and Windows NT to
restart. To shutdown the RAS server, double-click the Remote
Access Admin icon in the Remote Access Service program
group. From the Remote Access Admin Server menu select
“Stop Remote Access Server”, and then exit the Remote Access
Admin program.
Go to page 25 and continue the section “Installing the DIVA T/A
Software.”
DIVA T/A ISDN Modem User’s Guide 23
Page 24

Windows 3.x/WFW 3.11
If you are installing the DIVA T/A ISDN Modem on a system without
a CD drive, it is possible to make disks from the DIVA T/A CD. To
create the disks, follow the instructions in the MAKEDISK.TXT file
located in the \WIN16\MAKEDISK directory of your DIVA T/A CD.
If you are going to use the DIVA T/A with RAS for WFW, RAS must
already be installed with at least one modem (any modem will do, it is
only needed to properly install the DIVA T/A and will later be
removed). If you do not want to use RAS, continue at “Installing the
DIVA T/A Software” on page 25.
1
Power on your PC with the DIVA T/A connected (See
“Connecting the Cables” on page 9).
2
Insert the DIVA T/A CD into your computer's CD drive, or the
DIVA T/A Win 3.x Setup disk 1 into your diskette drive.
3
With any text editor, open the file MODEM.INF found in the
Windows/System directory.
4
Open the file WFWNTEI2.INF found on the DIVA T/A CD
(\WIN16) or diskette.
5
Copy the contents of WFWNTEI2.INF to the end of the
MODEM.INF file; save the appended MODEM.INF file, and
exit your text editor.
6
Start the RAS setup program.
7
From the RAS setup, change the unused modem to the
DIVA T/A. Refer to the RAS online help to change modems.
Go to the section “Installing the DIVA T/A Software” on page 25.
DIVA T/A ISDN Modem User’s Guide 24
Page 25

Installing the DIVA T/A Software
Before you proceed, make sure you have completed the preinstallation procedure relevant to your software platform. To
find the procedure relevant to your platform, see page 12.
Note: There is no Setup Wizard for DOS or OS/2. If you are using
DOS or OS/2, go to the section “Using the VT100 Configuration
Tool” on page 60.
The DIVA T/A Setup Wizard installs all necessary DIVA T/A files on
your system. These include:
•
the DIVA T/A on-line documentation
•
the Eicon DIVA Terminal Adapters Program, which includes
the Configuration Wizard (Windows 95/98 and NT only)
•
the Windows Configuration Tool (Windows 3.x & WFW 3.11)
•
the DIVA T/A Uninstall Utility
To install the DIVA T/A Software:
Insert the DIVA T/A CD, and enter d:\SETUP.EXE in the Run
1
field of the Start menu or File menu (where d: is the drive letter
of your CD drive). The CD Setup screen appears, go to step 2
and continue.
Note: If you are using disks to install the software on a
3.x/WFW 3.11 system, type a:\Setup.exe (where a: is your
diskette drive). Skip to step 3 and continue. For more
information on creating disks, read the Makedisk.txt file
included on your CD.
DIVA T/A ISDN Modem User’s Guide 25
Page 26
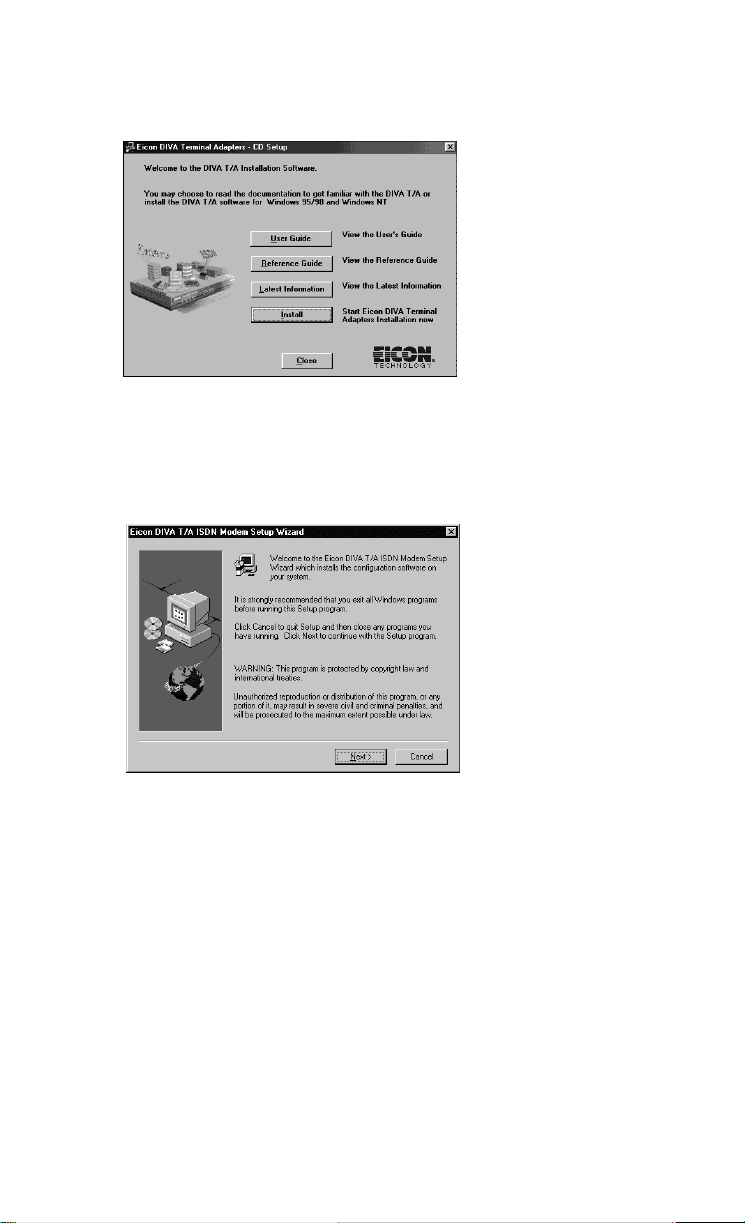
2
From the CD Setup screen, select “Start DIVA Terminal
Adapters Installation Now”; this starts the Setup Wizard.
Note: The CD Setup screen also gives you the choice to view the
online DIVA T/A User’s Guide, Reference Guide, or Release
Notes, before installing the DIVA T/A software.
3
Click Next in the Setup Wizard’s “Welcome” screen.
DIVA T/A ISDN Modem User’s Guide 26
Page 27
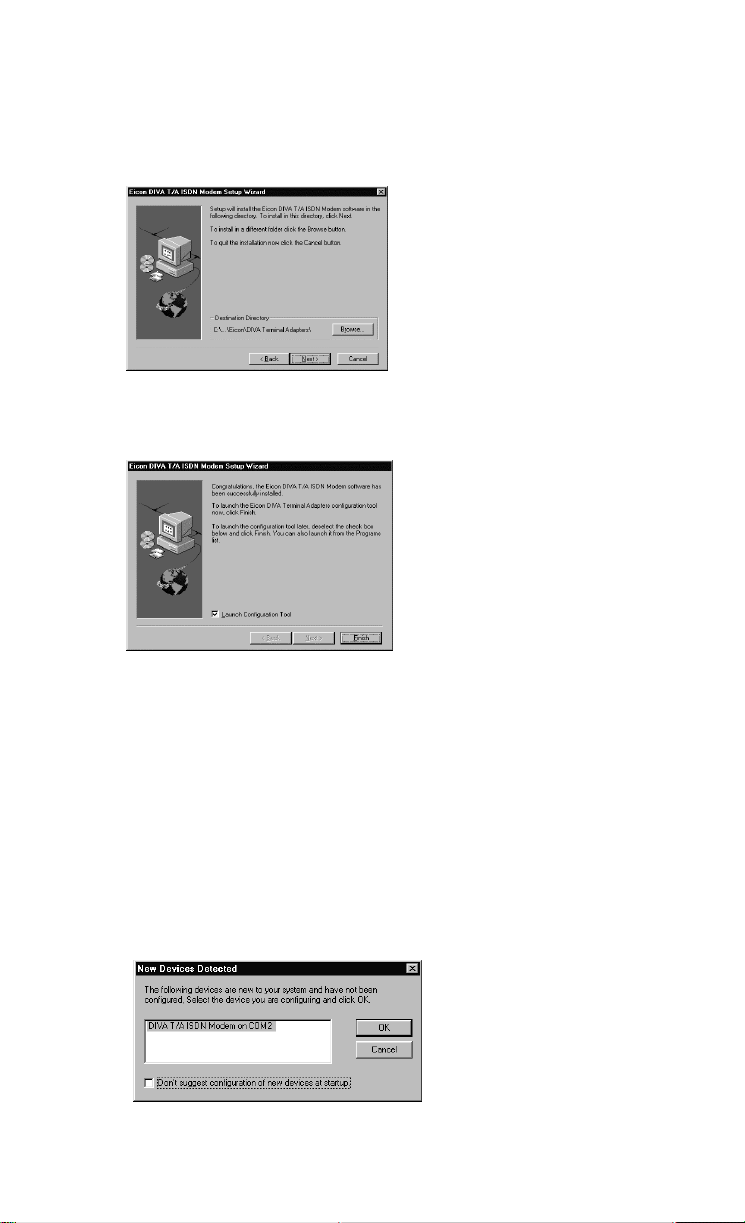
4
Specify where you want to install the DIVA T/A software. Click
next to install in the default directory (the default directory
differs according to your platform); otherwise, click the browse
button and select a directory, then click Next.
The Setup Wizard installs all necessary files.
5
Click Finish.
The software installation is complete. You must now configure your
DIVA T/A with one or more configuration profiles. Do one of the
following:
• Windows 3.x users. If you are using Window’s 3.x, the
Windows 3.x Configuration tool appears. Go to the Section
Using the Windows 3.x/WFW 3.11 Configuration Tool on page
49.
• Windows 95/98 and NT users. If you are using Windows 95/98
or NT, the New Devices Detected window appears. Select the
DIVA T/A ISDN Modem. Click OK to start the Windows
95/98/NT Configuration Wizard; continue at step 6 below.
DIVA T/A ISDN Modem User’s Guide 27
Page 28
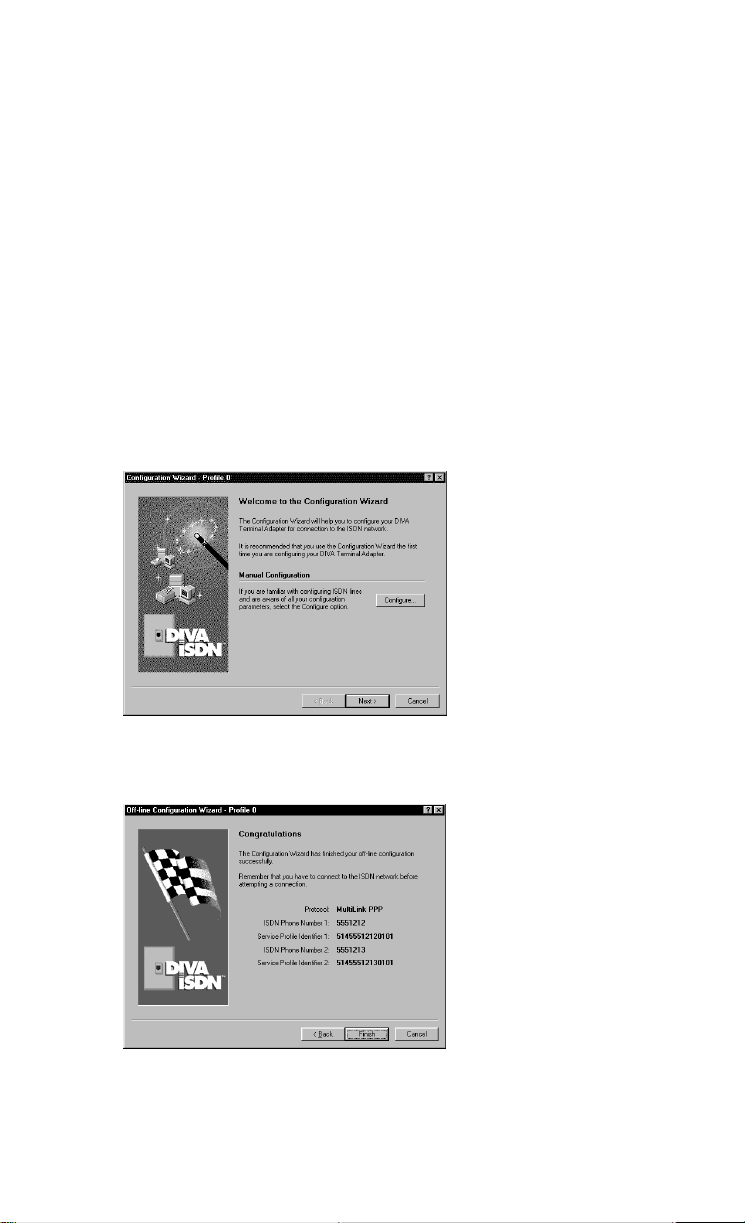
6
On the Configuration Wizard, click Next; follow the
Configuration Wizard’s on-screen instructions (if a working
configuration is detected, you are notified and allowed to skip
the Wizard).
Note: Context sensitive help is available on all the Configuration
Wizard’s screens. For more details about a particular field
displayed on the screen, click the Question Mark “?” icon at the
top right corner of the screen, then click on the field you’re
having trouble with.
Note: You should not click the Configure button unless you
know all of your ISDN parameters and want to configure them
manually. If you click Configure, the Wizard closes and the
Windows 95/98/NT Configuration Tool starts. If you select this
option go to step 3 of the section “Configuring Profiles under
Windows 95/98/NT” on page 35.
7
When the “Congratulations” screen appears the installation is
complete. Click Finish.
DIVA T/A ISDN Modem User’s Guide 28
Page 29

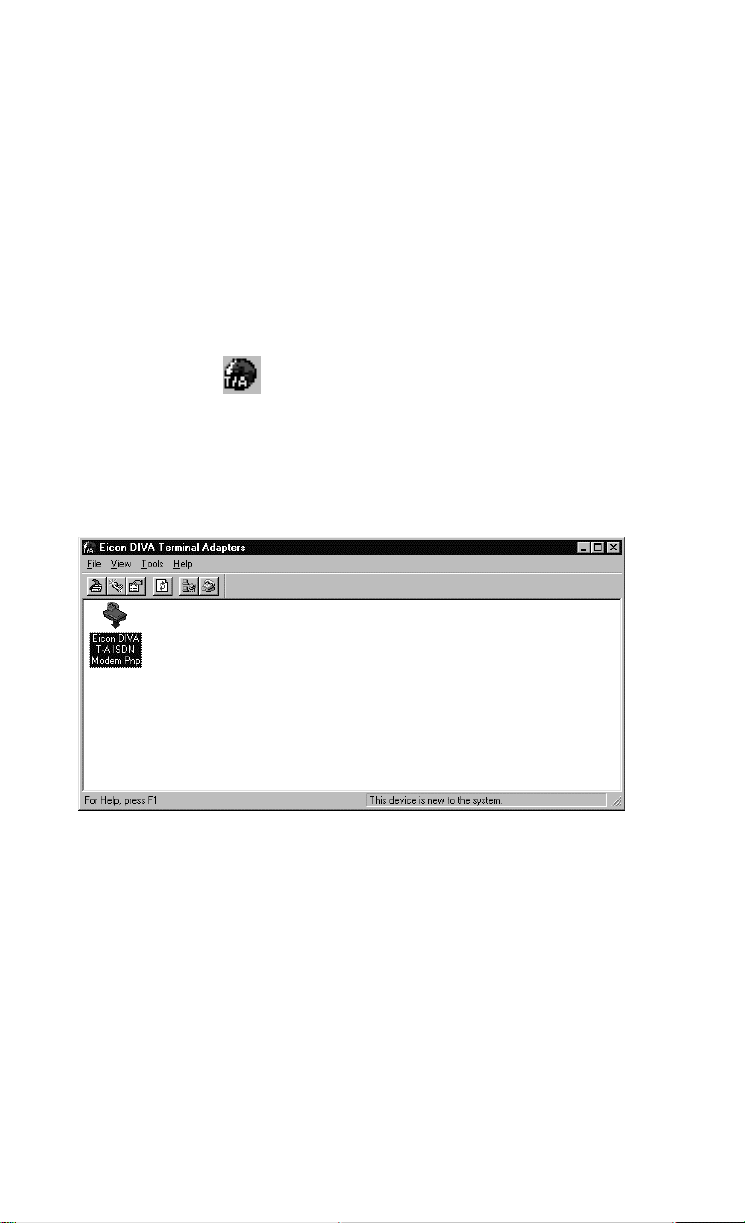
The Wizard closes and the Eicon DIVA Terminal Adapters
program appears (see “The Windows 95/98/NT Eicon DIVA
Terminal Adapters Program” on page 30 for more details).
The installation under Windows 95/98/NT is complete and your
DIVA T/A is ready to use.
•
If you want to configure additional profiles or configure advanced
ISDN parameters for the profile you created a bove , go to the section
“Using the Windows 95/98/NT Configuration Tool” on page 33.
•
If you want t o use your DIVA T/ A, go the section “Usin g the DIVA
T/A” on page 73.
DIVA T/A ISDN Modem User’s Guide 29
Page 30
The Windows 95/98/NT Eicon DIVA
Terminal Adapters Program
Note: This section applies to Windows 95/98 and NT users only.
The Eicon DIVA Terminal Adapters Program provides you with a
variety of convenient utilities.
To access the Eicon DIVA Terminal Adapters program, do one of the
following:
• Click the
•
From the Windows taskbar click Start, then select
Progra m s\E i con DI VA T / A I SDN Modem\Eicon DIVA Termina l
Adapter s.
The Eicon DIVA Terminal Adapters Program appears as below.
Getting Help
The Eicon DIVA Terminal Adapters program includes extensive on-
line help. To get help, select Help\Help Topics from the menu bar.
icon on your taskbar (Windows 95/98 only).
DIVA T/A ISDN Modem User’s Guide 30
Page 31

Menu Options
The menu bar provides you with a variety of shortcuts and utilities.
You can launch commands from drop-down menus or by clicking
icons.
Displaying Icons on the Toolbar
To display icons on the Menu bar select View\Toolbar (some icons
appear by default).
The Toolbar pick list displays four options: Basic, Advanced, View,
and Tools. Click an option to have its associated icons displayed on
the tool bar (a check mark to the left of an option indicates the
option is selected). Click Enable to display or hide icons associated
with the particular options.
The following table describes the action that each icon performs (to
ensure you can see all the icons, select View\Toolbar; select all the
options).
Click or Select To perform this Action
File\Configure
File\Configure
Active
File\Download
Firmware
File\Reset
Open Windows 95/98/ NT Prof iles
Window. Use it when you want to
configure, modify, or select a profile.
See the section “ The Windows
95/98/NT Configurat i on Tool” on
page 33 for more details.
Opens the Windows 95/98/NT
Configuration Tool (with the Active
Profile selected). See the section
“The Windows 95/98/ NT
Configuration Tool” on page 33 for
more details.
Downloads new Firmwa re. See the
section “
page 70 for more details.
Resets your DIVA T/A to the original
factory settings.
Updating Firmware
DIVA T/A ISDN Modem User’s Guide 31
” on
Page 32

Click or Select To perform this Action
File\Details
File\Delete
Displays a panel that contains detai l s
about your DIVA T/A. Use it if you
need to determine details about your
configurati on ( such as your f irmware
version).
Deletes the device currently selected.
File\Import Profiles Imports a profile file (.PRF), which
Files\Export
Profiles
View\Refresh
Tools\Connect
contains three profiles plus other
configurati on par ameters. The file is
import ed to the selected device.
Exports the device configuration,
which includes three profiles, to a
profiles file (.PRF). Before updating
firmware, it is strongly recommended
that you export your current profiles.
Refreshes information about t he
selected device.
Opens the Make New Connection
dialog box. Configured Dial- Up
Networking connection are available
from t he drop down li s t . I f you are
using W i ndows NT, you can use this
option to run RAS.
Tools\Modem
Opens the Windows Modem
Properties box.
Note: You can also open a terminal emulation program by selecting
Tools\Terminal from the menu bar. The tool is used primarily for
troubleshooting.
DIVA T/A ISDN Modem User’s Guide 32
Page 33

Using the Windows 95/98/NT
Configuration Tool
This section shows you how to use the Windows 95/98/NT
Configuration Tool to configure one or more configuration profiles.
About Configuration Profiles
A profile is a set of parameters that define a particular ISDN setup.
When you run the Windows 95/98/NT Configuration Wizard for the
first time, you configure a profile with the default name Profile 0. In
addition to this profile, you can configure two other profiles that
define different ISDN setups (corresponding to the needs of different
applications). You might, for example, configure profiles to match the
ISDN setup needed to connect to your office, your Internet Service
Provider (ISP), and CompuServe. When you need a particular ISDN
configuration, you simply select the appropriate profile. This saves
you the trouble of reconfiguring all your ISDN parameters each time
you switch applications.
Note: When you use the Configuration Wizard to configure a profile,
you cannot set Phone Line and Advanced ISDN parameters (default
settings are implemented). If you want to modify these parameters, use
the Configuration Tool.
A profile contains information about the following:
•
Protocol.
implemented at the other end of the connection. Always On /
Dynamic ISDN (AO/DI ) i s a lso available if you have subscribed
to it.
•
Location.
number(s), and SPID(s), as requir ed.
•
Phone Lines.
This information is only required if your DIVA T/A is equipped
with analog device ports. (See also, “Analog Device Support” on
page 98).
•
X.25.
ISDN D-channel X.25 packet service, the X.25 Version an d
X.25 facilities can be configured.
•
BACP.
Reduction Parameters.
Your ISD N protocol. It mus t match the p rotoc ol
The location’s ISDN switch type, telephone
Information about the location’s phone line(s).
(Only available with AO/DI support). As AO/DI uses the
Bandwidth Allocation Control Protocol and ISDN Cost
DIVA T/A ISDN Modem User’s Guide 33
Page 34

• Advanced. Advanced ISDN parameter s su ch as Dynamic
Bandwidth Allocation (DBA), an d Da ta Over Voice (DOV).
This information is optional.
Using Context Sensitive Help
Context sensitive help is available on all the Configuration Tool’s
screens. For more details about a particular field, click the Question
Mark “?” icon at the top right corner of the screen, then click on the
field you’re having trouble with.
DIVA T/A ISDN Modem User’s Guide 34
Page 35

Configuring Profiles under Windows 95/98/NT
Follow the steps below to configure a profile:
1
Do one of the following:
• Click the
•
From the windows taskbar click Start, then select
Progra m s\E i con DI VA T / A I SDN Modem\Eicon DIVA
Terminal Adapters.
2
From the Eicon DIVA Terminal Adapter Program, click the
icon on your taskbar (Windows 95/98 only).
DIVA T/A icon; the Profiles Window appears.
3
From the Profiles window, select a profile from the Profiles list
(three default names appear: Profile 0, Profile 1, Profile 2). Click
Configure.
Note:
If you want to change the default name of a profile, select the
profile and click Rename. Change the n a me and continue.
Note: If y ou have a North A merican v e rsion of the DIVA T/A, t he
Configuration Wizard can automatically dete c t y our SPIDs (ISDN
number(s) can also be detected if your line feat ures AutoSPID). If
you want to use the Configuration Wizard, click the Wizard button.
Follow the Wizard’s o n - sc re en instructions. (Se e a l so A u t o S PID o n
page 96).
DIVA T/A ISDN Modem User’s Guide 35
Page 36

4 From the Protocol tab, select the ISDN connection protocol that
you want to use (it must match the protocol on the receiving
system). Follow the guidelines below.
the sample above depicts the Int ernati onal ve rsion of t he
Note:
DIVA T/A Configuration Tool. If you’re using the North Ame rican
version the V.110 option is not accessible.
the Enable Always On / Dynamic ISDN (AO/DI) option is only
Note:
available if the f irmware you are using supports it and you have
subscribed to it with your ISDN Service Provider.
Protocol Guidelines:
• For most connections, Multilink PPP is used (PPP is the
default for International Firmware). If it is not supported, use
PPP (for single B-channel connections), V.120, or V.110
(International Firmware only).
• Both PPP and Multilink PPP require that a PPP
communications stack be installed on your computer (for
example, Dial-Up Networking).
Notes:
•
To obtain maximum Multilink PPP performance, you need a
PC equipped with a UART 16650 (you might need to install a
fast com port card), which supports COM port speed of 230.4
kbps (versus 115.2 kbps with 16550).
DIVA T/A ISDN Modem User’s Guide 36
Page 37

• Multilink PPP does not support the callback feature used by
some servers.
• When using Multilink PPP for incoming calls, only SPAP or
PAP authentication is supported.
• (Windows NT only) If you want to support incoming calls
with Windows NT RAS Server, you must enable the parameter
“Allow clear text authentication” in the RAS Server setup.
Refer to the RAS online help for information on how to
configure this parameter.
Select the Location tab.
5
Note: The screen above depicts the North American version of
the configuration tool; if you are using an international version
of the software, the screen does not contain Service Profile ID
fields.
DIVA T/A ISDN Modem User’s Guide 37
Page 38

Specify your ISDN Switch Type, Telephone Number(s), and Service
Profile ID (SPID). Use the table below as a guideline.
Parameter
Description and Values
Switch Type Specifies the ISDN switch type used by your
ISDN service provider.
North America: For most locations use
Auto-Detect (Default). If auto-detection is
not possible, specify Nationa l ISDN-1 (NI-1)
or AT&T ( 5 E SS)
International (Excluding Nort h America) :
Europe (Euro ISDN), Japan (INS-Net64),
Australia - Microlink (TPH1962/TS013), and
Australia - OnRamp (Telstra' s ET SI service ).
The default setti ng i s Europe.
Use 2 Numbe rs Activates the “2nd Number tab”. Use the
second number tab if your ISDN provider
assigns two numbers.
Telephone
Number
st
Number/2
(1
Number)
Specifies your ISDN number(s).
Note: If you are using a North A meric an
nd
version of the DIVA T/A and your line
supports AutoSPID, ISDN numbers are
automatically dete c te d. F or more
information on AutoSPID, refer to page 96.
Service
Profile ID
(SPID)
st
Number/2
(1
Number)
North Ame rica
only
Specifies your SPID Number(s). The ISDN
switch uses the SPID number to identify your
ISDN equipment. Your ISDN provider
nd
assigns your SPID number(s).
Notes:
If your line supports AutoSPID, SPID
numbers are automatically detect e d. For
more information on AutoSPID, refer to page
96.
Deselecting the SPID che c k box di sable s
SPID terminal initialization and configures
the port as a Non-Initializing Terminal. See
Non-Initializing Terminal mode, on page 97.
DIVA T/A ISDN Modem User’s Guide 38
Page 39

Parameter
X.25 DTE
Address
Available with
AO/DI support
only
If your DIVA T/A is equipped with analog device ports, select
6
Description and Values
An X.25 DTE Address identifies a node on
an X.25 network. The address is a serie s of
one to fifteen digit s. E ver y X.25 node has an
X.25 address.
Your service provider assigns this value at
subscription time.
the Phone Lines tab; otherwise go to step 7.
Note:
The screen above depicts the North American version of
the configuration tool; if you are using an international version
of the software, the screen does not contain Enable voice mail
fields and there is an additional field available, Region.
DIVA T/A ISDN Modem User’s Guide 39
Page 40

Specify information about Phone 1 and Phone 2. Use the tabl e
below as a guideline.
Parameter
This phone line is
used for a
fax/modem only
Enable distinctive
ring
Enable VoiceMail
(North America
only)
Region
(International/Euro
firmware only)
Description
Selecting this option:
• Enables “3.1KHz Audio”. T hi s
specifies that the ISDN network has
to preserve the quality of the 3.1KHz
voice band that is requi re d for dat a
audio signals such as Faxes and
Modems.
• Disables calling features such as: Call
Forward, Call waiting, Caller ID, and
3-Way Conferencing. (North America
only)
• Disables Dial Access (North America
only)
Changes the sound of the phone’s ring.
This lets you distinguish calls received on
Phone Line 1 from calls received on
Phone Line 2.
Notes:
• Selec t Disti nc ti v e R i ng on only one
phone, otherwise both will ring the
same.
If your modem, fax, or telephone has
difficulty detecting incoming voice calls,
try toggling the distinc t iv e ring fe at ure.
Enable this option to ensure all incoming
calls are forwarded to your Voice Mai l
box.
Specifies the country where you a re
located. This ensures that the DIVA T/A
implements the ri ng pa tt ern (a nd ot he r
analog device para m et e rs) suited t o your
country. If your country is not liste d, use
the default, International.
If problems persist, try configuring t hi s
parameter using the AT c om ma nds AT*F
and AT!L. See the DIVA T/A ISDN
Modem Reference Guide.
DIVA T/A ISDN Modem User’s Guide 40
Page 41

7 If you have enabled AO/DI, select the X.25 tab, otherwise go to
step 8.
Configure the X.25 options you want implemented on your DIVA
T/A. Use the table below as a guideline.
Parameter Description
X.25 Versi o n There are two X.25 CCITT recommendations
available for sele c ti on, 1984 a nd 1988. Thi s
information is provided by your Servic e Provide r
and should match the X.25 re com m enda t ion
supported on the switch you are connec t ing t o.
Request
Reverse
Charging
Determines who is charged by the X. 25 ne twork
for the call. Select No to pay for the call locally,
or select Yes to charge the remote DTE. Select
Yes only if the remote system accepts reverse
charging, otherwise the ca l l m a y not be
accepted.
Throughput
class
negotiation
Assigns a Throughput Class for the virtual
circuit. The throughput c la ss specifie s the
effective throughput of t he virt ua l c i rcui t in bi ts
per second (bps). Effective throughput m ay be
limited by a numbe r of fa ct ors such as le vel of
link utilization, network congestion, and host
processing.
DIVA T/A ISDN Modem User’s Guide 41
Page 42

Parameter Description
Select Default to use t he Throughput Cl ass
specified in your network subscription, or sel ec t
one of the values between 75 a nd 9, 600 bps. If
you select a bps value, the l oca l a nd rem ot e
DTEs can negotiate to use a lower value on a
per-call basis.
Fast sel ectio n Increases the amount of Ca ll User Data tha t you
can include in the Call Request packet to 128
bytes, and specifies the type of re sponse
requested from the host. Fast sele c ti on i s
designed for short-duration, low-volume ,
transaction-oriente d a ppli c at i ons.
• NO: Turns off Fast Sele c ti on.
• WITH O UT REST RICTION: Host replies
with a Call Accept packet that can contain
up to 128 bytes of data. The conne c ti on i s
established and data transfer can occur.
• WITH REST RICTION: Host replies with
a Call Clear packet that can contain up to
128 bytes of data. The c onnec t ion i s
terminated.
Closed user
group
selection
Specifies the type of cl osed user group (CUG)
subscribed to. CUGs can restrict the set of DTEs
calls can be made to or accepted from. Select the
option that corresponds to the CUG specifi c at ion
in your network subscription.
• NONE: Does not subscribe t o a ny CUG.
• STANDARD: Subscribes to a CUG. Enter
the CUG number in the Group Number box.
• OUTG OING ACCESS: Can receive calls
only from members of the CUG, but c an
make calls to any DTE.
• BILATERAL: Can receive calls from or
make calls to only a specific DTE.
DIVA T/A ISDN Modem User’s Guide 42
Page 43

Parameter Description
Group
number
Others Lets you request additional facilities that are not
Select the BACP tab.
8
Specifies the number of the c losed user group
you have subscribed to. Obtain t his numbe r from
your system administrator or net work
subscription.
listed in the Common Facilities group box.
Specifies the code for additional facilities that
you want to request each time the destination
makes an X.25 call. Enter facilities as
hexadecimal oc t et s (ei ght-bi t byte s).
DIVA T/A ISDN Modem User’s Guide 43
Page 44

Configure the BACP options you want impl emented on your DIVA
T/A. Use the table below as a guideline.
Parameter Description
BACP/BOD
(Bandwidth
Allocation
Control
Protocol/
Bandwidth on
Demand)
Note: Only appli c able i f y our ISDN connec ti on
protocol is Multilink PPP.
Activates the DIVA T/A's automatic traffic
monitor for Multilink PPP connections. W h e n
activated, this DIVA T/A function monitors the
send-and-receive traffic volume.
Without AO/DI support: BACP opens or
closes the second B-channel a s the tra ffi c
volume warrants. Activa te t his funct ion t o
ensure that two B-channels are never active
when one is sufficient.
With AO/DI suppo r t : when addi t iona l
bandwidth is required, BACP automatically
adds B-channels of 64 Kbps each (for a total of
128 Kbps speed when both B-channels are in
use) to the connection. When the additional
bandwidth is no longer required, one or bot h Bchannels are dropped, l e avi ng t he D-cha nne l
connection in place.
Note: Be sure to confi gure the Cost Re duct i on
Timers to avoid numerous first i nte rva l c ha rges.
If you select BACP, but do not set the Cost
Reduction Timers, you could incur unnecessary
expense as your second B-channel m ight ope n
and close frequently, costi ng you t he fi rstinterval amount each time the second B-channel
connects.
Default: BACP/BOD disabled
ISDN Cost
Reduction
Timers
Note: Only appli c able i f y our ISDN connec ti on
protocol is Multilink PPP.
Note: You must activate BACP/BOD before
setting the timers.
Set these timers if your ISDN Service Provider
charges one rate for the first interval of time online (a fixed period, for e xa mpl e t he first 5
minutes), and a diffe rent ra te for subsequent
time on-line. Sett ing t he se ti m ers ensures your
second B-channel is used most econom i ca l ly.
DIVA T/A ISDN Modem User’s Guide 44
Page 45

Parameter Description
Initial Billing Interval: Specifies the length of
the first billing interval (in seconds). For
example, if your provi der c ha rges a fi xe d $X for
the first 5 minutes ente r 300.
Note: Set the timer to 0 disables it. The Billing
Interval timer is also, effectively disabled.
Default: 60 seconds.
Billing Interval: Specifies the increment s your
Service Provider uses to bill subsequent usage of
your ISDN line (usage after the initial Billing
Interval expires). For exa mpl e if your Provide r
charges $Y per minute for each minute
following the Initial Billing Interval, enter 60.
Note: Setting the timer to 0 disables it. The
Initial Billing Interval remains in effect.
Default: 60 seconds.
1st B-channel Delay before opening: Specify the a mount of
time (in seconds) the throughput on your Dchannel must exceed the Opening Threshold
before the 1st B-channel i s adde d to t he AO/DI
connection.
For example, if you spec i fy 5 sec onds, a nd the
Opening Threshold is 70%, once the throughput
on the D-channel reaches 70%, there will be a
delay of 5 seconds before the 1st B-cha nne l is
added to the AO/DI connection. If t he
throughput drops below 70% during the 5
seconds, the 1st B-channel will not be added to
the connection.
Opening Threshold: Specify the threshold
(percentage) that t he t hroughput on your Dchannel must exceed before the 1st B-channel is
added to the AO/DI connection.
Closing Threshold: Specify the threshold
(percentage) that t he t hroughput on your Bchannel must be below before t he 1st B-cha nne l
is dropped from the AO/DI connection.
Note: This option i s only a vai l abl e with AO/DI
support.
DIVA T/A ISDN Modem User’s Guide 45
Page 46

Parameter Description
2nd Bchannel
Delay before opening: Specify the am ount of
time (in seconds) the throughput on your 1st Bchannel must exceed the Opening Threshold
before the 2nd B-channel i s adde d to t he AO/DI
connection.
For example, if you spec i fy 5 sec onds, a nd the
Opening Threshold is 70%, once the throughput
on the 1st B-channel reaches 70%, there will be
a delay of 5 seconds before the 2nd B-cha nne l i s
added to the AO/DI connection. If t he
throughput drops below 70% during the 5
seconds, the 2nd B-channel will not be added to
the connection.
Opening Threshold: Specify the threshold
(percentage) that t he t hroughput on your 1st Bchannel must exceed before the 2nd B-channel is
added to the AO/DI connection.
Closing Threshold: Specify the threshold
(percentage) that t he t hroughput on your 2nd Bchannel connecti on m ust be be l ow before the
2nd B-channel is dropped from the AO/DI
connection.
Note: This option i s ava il a ble wit hout AO/DI
support. If you have BACP configured, you can
configure this option to speci fy when t he 2nd Bchannel will be added to the connection as the
traffic volume warrant s.
DIVA T/A ISDN Modem User’s Guide 46
Page 47

9 Select the Advanced tab.
Note:
The above screen depicts the North American version of
the software; if you are using an International version of the
software, the Data Over Voice (DOV) field does not appear.
Configure the advanced options you want implemented on your
DIVA T/A. Use the table below as a guideline.
Parameter Description and Values
Note:
DBA
(Dynamic
Bandwidth
Allocation)
Only applicable if y our ISDN connec ti on
protocol is Multilink PPP.
Note:
Only available on models equippe d wi th
analog device ports.
When activated this function lets you initiate or
receive telephone calls on your regular (nonISDN) telephone without interrupti ng your
current connection. It releases one B-channel, as
required for analog devic e ca l ls, without
interrupting the dat a li nk. Afte r you hang up, t he
B-channel is automat i ca l ly brought ba ck up for
your current connection.
Default: DBA Enabled.
DIVA T/A ISDN Modem User’s Guide 47
Page 48

Parameter Description and Values
Data Ove r
Voice
Update Time Resets the DIVA T/A’s clock and calendar.
Click OK or Apply to save the selections made in steps 1-9. The
10
Note: Availa bl e on North Ame ri ca n m odel s
only.
Specifies Data Over Voice Bearer Capability as
the outgoing call t ype .
If voice calls are less expensive than data calls in
your tariff area, you c an sel e ct t his opti on. DOV
calls are data calls made over a BRI line using
Voice Bearer Capability.
For DOV to work, the re m o t e devic e to which
you are connecting must support i nc omi ng DOV
calls.
Click the button if you ha ve a t e le phone with
call display, and receive calls with the incorrect
time or date. The DIVA T/A uses the PC clock
to update its date/time.
Tip: If you power off your DIVA T/A, click
Update Time when you turn it ba ck on. T hi s
ensures that the correct date and time are set.
Profiles window opens.
If you want the profile to be active when you restart the DIVA
11
T/A, select its name from the Active Profiles pick list. If you
want a different profile to be implemented, select it from the list.
Click OK to save the selection. The DIVA T/A restarts
12
automatically; the profile you selected in step 11 is implemented.
Your DIVA T/A is ready for use.
After the DIVA T/A has restarted, check the D LED and Link LED
on the front panel of the DIVA T/A. If the LEDs are steady, the
DIVA T/A is working correctly; if they are not steady, check your
configuration and try again. For more details on the LEDs, refer to
“LED Status Indicators on the DIVA T/A” on page 106.
For more information on using your DIVA T/A go to the section
“Using the DIVA T/A” on page 73.
DIVA T/A ISDN Modem User’s Guide 48
Page 49

Using the Windows 3.x/WFW 3.11
Configuration T ool
The DIVA T/A Windows Configuration Tool allows you to view the
DIVA T/A version and firmware properties, download updated
versions of the firmware, and configure dialing and communication
information.
Note: AO/DI is not supported on the Windows 3.x/WFW 3.11
configuration tool. To configure AO/DI, you should use the AO/DI
AT commands as described in the Reference Guide.
Verifying Firmware
This section describes how to verify the firmware version currently
loaded on your DIVA T/A, download a newer version, and to update
the time.
From the DIVA T/A ISDN Modem Properties screen, select a
1
DIVA T/A and click Properties.
DIVA T/A ISDN Modem User’s Guide 49
Page 50

2
The Properties screen opens. From this screen, verify the
firmware version currently loaded on your DIVA T/A.
3
To download a new firmware version, see the section “Updating
the DIVA T/A Firmware” on page 70.
Update Time
The DIVA T/A supports Caller ID (North America only). If you have
a phone with call display and are receiving calls with the incorrect
time or date, click the Update Time button. The DIVA T/A uses the
PC clock to update its date/time.
If you power off your DIVA T/A, click Update Time when you turn it
back on. This ensures that the correct date and time are set.
DIVA T/A ISDN Modem User’s Guide 50
Page 51

Profile Configuration
The DIVA T/A configuration settings are organized into profiles and
saved in the unit’s non-volatile memory. Your DIVA T/A comes
equipped with a factory profile which requires only your ISDN
information to establish a Multilink PPP connection.
After configuring the profiles, you must specify which profile is to be
the default profile. The default profile automatically loads upon
startup of the DIVA T/A.
Follow the steps below to configure a profile:
1
From the DIVA T/A ISDN Modem Properties screen, select a
DIVA T/A and click Profile Properties.
DIVA T/A ISDN Modem User’s Guide 51
Page 52

2
Select a profile from the list (Profile 0, Profile 1, or Profile 2),
and click Configure Profile.
Note: You can change a profile name by clicking Rename
Profile, then typing the new name.
3
The Profile Configuration Tool appears:
Note: The screen above depicts the North American version of
the configuration tool; if you are using an international version
of the software, the screen does not contain Service Profile ID
fields.
DIVA T/A ISDN Modem User’s Guide 52
Page 53

Configure the following parameters:
Parameter Description
Local Switch Type Speci fie s the ISDN switch type used by your
ISDN service provider.
North American firmware:
For most
locations, the de faul t North Ameri c a (AutoDetect) should be used. If the ISDN Switch
Type cannot be autom a ti c a ll y de te c te d,
specify National ISDN-1 (NI-1) or AT&T
(5ESS)
International (Excluding Nort h America)
firmware:
Europe (Euro ISDN), Japan
(INS-Net64), and Australia (TPH1962).
Note:
Australia has two switch types
available: T PH1962 (Microli nk) and E uro
ISDN (Onramp); indicate the appropri a te
type.
Connect using this
protocol
Specifies the ISDN connection protoc ol you
want to use (it must matc h t he prot oc ol on
the receiving system). For most connections,
Multilink PPP should be used. If it is not
supported, PPP for single B-c ha nne l
connections, V.120 and V.110 c an be used.
Both PPP and Mu ltilink PPP requ i r e that a
PPP commun icati o ns stack be i n stalle d on
your computer.
If your workstation is configured as a
Windows for Workgroups Remote Access
Service (RAS) client, you m ust confi gure
the V.120 rate adapt ion prot oc ol on bot h t he
DIVA T/A workstation a n d o n t h e r e m o t e
device (RAS Server ISDN adapter).
Continued next page…
DIVA T/A ISDN Modem User’s Guide 53
Page 54

Parameter
Connect using this
protocol
(Continued)
Telephone Number
st/2nd
Number)
(1
nd
Enable 2
Number Permit s t h e DI VA T /A to use 2nd Number
Description and Values
Note: To obtain maximum Multilink PPP
performance, you need a PC equi ppe d wit h
a UART 16650 (you might need to install a
fast com port card), which supports COM
port speed of 230.4 kbps (versus 115.2 kbps
with 16550).
Note: Multilink PPP does not support the
callback feature used by some servers.
Warning: When using Multilink PPP for
incoming calls, only SPAP or PAP
authentication is supported.
Specifies your ISDN number(s).
Note: If you are using a North A meric an
version of the DIVA T/A and your line
supports AutoSPID, ISDN numbers are
automatically dete c te d. F or more
information on AutoSPID, refer to page 96.
information. If your ISDN provider assigns
you two different numbers, sele ct E nabl e 2
Number.
nd
Servic e Pr of i le ID
(SPID)
st/2nd
Number)
(1
Specifies your SPID Number(s). The ISDN
switch uses the SPID number to identify
your ISDN equipment. Your ISDN provider
assigns your SPID number(s).
Notes:
If your line supports AutoSPID, SPID
numbers are automatically detect e d. For
more information on AutoSPID, refer to
page 96
Deselecting the SPID che c k box di sable s
SPID terminal initialization and configures
the port as a Non-Initializing Terminal. For
more information on Non-Initializing
Terminal mode, re fe r to pa ge 97.
DIVA T/A ISDN Modem User’s Guide 54
Page 55

4
If your DIVA T/A is equipped with analog ports, click the Phone
Lines button to open the Phone Lines window; otherwise go to
step 5 and continue. (See also, “Analog Device Support” on page
98.)
Note: The above screen depicts the International Version of the
Configuration Tool; if you are using the North American
version of the software, the Region field does not appear on
your screen.
Configure the parameters as required.
Parameter Description
This phone line is
used for a
fax/modem only
Enabling this option causes the following:
•
Enables “3.1KHz Audio”. T his
specifies that the ISDN network has
to preserve the quality of the 3.1KHz
voice band that is requi re d for dat a
audio signals such as Faxes and
Modems.
•
Disables calling features such as: Call
Forward, Call waiting, Caller ID, and
3-Way Conferencing.
only)
•
Disables Dial Access
only).
DIVA T/A ISDN Modem User’s Guide 55
(North America
(North America
Page 56

Parameter Description
Enable distinctive
ring
Changes the sound of the phone’s ring.
This lets you distinguish calls received on
Phone line 1 from calls received on Phone
Line 2.
Notes:
• Selec t Disti nc ti v e R i ng on only one
phone, otherwise both will ring the
same.
• If your modem, fax, or te l ephone has
difficulty detecting incoming voice
calls, try toggling the distinctive ring
feature.
Region
(International/Euro
firmware only)
Specifies the country where you a re
located. This ensures that the DIVA T/A
implements the ri ng pa tt ern (a nd ot he r
analog device para m et e rs) suited t o your
country. If your country is not liste d, use
the default, International.
If problems persist, advance d users might
also want try and configure thi s para me t er
using the AT commands AT*F and AT!L.
The DIVA T/A ISDN Modem Reference
Guide documents these commands.
When you complete your configuration, click OK to return to
the Profile Window.
From the Profile Window, click Advanced to open the Advanced
5
window.
DIVA T/A ISDN Modem User’s Guide 56
Page 57

6
In the Advanced window, configure the advanced parameters.
Use the table below as a guideline.
Note: The above screen depicts the North American version of
the software; if you are using an International version of the
software, the Data Over Voice (DOV) field does not appear.
Parameter Description
BACP/BOD
(Bandwidth
Allocation
Control
Protocol/
Bandwidth
on Demand)
Note:
Only applicable if y our ISDN connec ti on
protocol is Multilink PPP.
Activates the DIVA T/A’s automatic traffic
monitor for Multilink PPP Connections. Whe n
activated, this function monitors the send-andreceive traffic volume, and opens or closes your
second B-channel as the tra ffi c vol um e warra nt s.
Activate this function to ensure that two Bchannels are never active when one is sufficient,
thus reducing the chargea bl e ti me pa ya ble t o
your ISDN provider.
Note:
Be sure to configure the Cost Reduc t ion
Timers to avoid numerous first i nte rva l c ha rges.
If you select BACP, but do not set the Cost
Reduction Timers, you could incur unnecessary
expense as your second B-channel m ight ope n
and close frequently, costi ng you t he fi rstinterval amount each time the second B-channel
connects.
Default: BACP/BOD disabled.
DIVA T/A ISDN Modem User’s Guide 57
Page 58

Parameter Description and Values
DBA
(Dynamic
Bandwidth
Allocation)
Note: Only appli c able i f y our ISDN connec ti on
protocol is Multilink PPP.
Note: Only avai l able on model s equippe d wi th
analog device ports.
When activated this function lets you initiate or
receive telephone calls on your regular (nonISDN) telephone without interrupti ng your
current connection. It releases one B-channel, as
required for analog devic e ca l ls, without
interrupting the dat a li nk. Afte r the phone ca l l i s
completed and you hang up, t he B-c hanne l is
automatical l y brought ba c k up for your curre nt
connection.
Default: DBA Enabled.
ISDN Cost
Reduction
Timers
Note: Only appli c able i f y our ISDN connec ti on
protocol is Multilink PPP.
Note: You must activat e BA CP /B OD before
setting the timers.
Set these timers if your ISDN Service Provider
charges one rate for the first interval of time online (a fixed period, for e xa mpl e the first 5
minutes), and a diffe rent ra te for subsequent
time on-line. Sett ing t he se ti m ers ensures your
second B-channel is used most econom i ca l ly.
Initial Billing Interval: Specifies the length of
the first billing interval (in seconds). For
example, if your provi der c ha nges a fi xe d $X for
the first 5 minutes, ent e r 300.
Note: Setting the timer to 0 disables it. The
Billing Interval timer is also disabled.
Default: 60 seconds.
DIVA T/A ISDN Modem User’s Guide 58
Page 59

Parameter Description
ISDN Cost
Reduction
Timers
(Continued)
Billing Interval: Specifies the increment s your
Service Provider uses to bill subsequent usage of
your ISDN line (usage after the initial Billing
Interval expires). For exa mpl e if your Provide r
charges $Y per minute for each minute
following the Initial Billing Interval, enter 60.
Note: Setting the timer to 0 disables it. The
Initial Billing Interval remains in effect.
Default: 60 seconds.
Data Ove r
Voice
(North
America only)
Click OK to close the Advanced window.
8
Click OK to close the Configuration screen.
9
If you want the profile you just configured to be active click
10
Specifies Data Over Voice Bearer Capability as
the outgoing call t ype .
If voice calls are less expensive than data calls in
your tariff area, you c an sel e ct t his opti on. DOV
calls are data calls made over a BRI line using
Voice Bearer Capability.
For DOV to work, the re m o t e devic e to which
you are connecting must support i nc omi ng DOV
calls.
OK; if you want another profile to be active, select it from the
Default profile list and then click OK. The DIVA T/A restarts
automatically and implements the profile you have selected.
After the DIVA T/A has restarted, check the D LED and Link LED
on the front panel of the DIVA T/A. If the LEDs are steady, the
DIVA T/A is working correctly; if they are not steady, check your
configuration and try again. For more details on the LEDs, refer to
“LED Status Indicators on the DIVA T/A” on page 106.
You are ready to use your ISDN connection. Continue at “Using the
DIVA T/A” on page 73.
DIVA T/A ISDN Modem User’s Guide 59
Page 60

Using the VT100 Configuration Tool
The section below describes how to configure your DIVA T/A under
DOS and OS/2.
The VT100 Configuration Tool is incorporated in the DIVA T/A
firmware. Use it to configure basic ISDN-specific parameters.
Note: AO/DI is not supported on the DOS/OS/2 VT100 configuration
tool. To configure AO/DI, you should use the AO/DI AT commands
as described in the Reference Guide.
Activating the VT100 Configuration Tool
To activate the VT100 Configuration tool:
Start the VT100-compatible terminal-emulation program. Set up
1
your VT100 terminal-emulation program (for example, Telix or
HyperAccess), using the table below as a guideline:
Parameter Setting
Terminal Emul a ti on T ype VT100/VT102
Local Echo Off
CR Translation CR
LF after CR Off
Verify that the terminal-emulation program uses the same COM
2
port as that assigned to the DIVA T/A.
DIVA T/A ISDN Modem User’s Guide 60
Page 61

3
Enter the following command at the prompt and press Enter:
AT@MENU
The main VT100 Configuration Tool screen opens:
*-----------------------------------------------------------------------------*
| DIVA T/A ISDN Modem – North American Version 1.7.0 |
| Copyright © 1997 Eicon Technology Corporation |
+-------------------------------------------------------------+---------------+
|MENU: Main menu |Choice: |
| |Current profile|
| Open Profile: Current profile |Profile 0 |
| |Profile 1 |
| ISDN Parameters: < press Enter > |Profile 2 |
| Protocol: Multilink PPP |Factory profile|
| Phone Line: < press Enter > | |
| Advanced: < press Enter > | |
| | |
| Powerup Profile: Profile 0 | |
| Save Profile: Profile 0 | |
| Restart Unit: Profile 0 | |
| Quit | |
|<ESC> Quit | |
+-----------------------------------HELP----------------------+---------------+
| Selects which profile to open: current, stored (0,1,2) or factory. |
| -Loads the current profile. |
*-----------------------------------------------------------------------------*
Navigating in the VT100 Configuration Tool Screen
The following table describes the function keys that let you
navigate the VT100-Configuration-Tool screen:
Key Function
Up arrow Moves the cursor to the previous field.
Down arrow Moves the cursor to the next field.
Right arrow Displays the sub-menu level. In a te xt fie l d, it
moves the cursor one character to the right.
Left arrow Displa ys the previ ous me nu le ve l. In a t ext fi el d, i t
moves the cursor one character to the left.
Enter Validates the configura t ion set t ing a nd di splays the
next field, or displa ys the ne xt me nu.
Tab Displays the next field.
Space bar Displays the next choice available (in fields
offering multiple choices).
DIVA T/A ISDN Modem User’s Guide 61
Page 62

Key Function
F2 Selects a specific field. Press F2, and enter the letter
corresponding to the field you want t o edi t.
F4 Toggle s bet ween t e xt (de fa ult ) a nd gra phic s mode s.
ESC Cancels your configuration setting (if a change was
made) or moves to the previ ous me nu le ve l (i f no
change was made).
From Open Profile in the Main Menu, use the pull-down list to
4
select the profile you want to configure.
In the Protocols field of the Main Menu, specify the B-channel
5
protocol you want to use (note: the protocol must match the
protocol on the receiving system). For most connections,
Multilink PPP should be used. If it is not supported, PPP for
single B-channel connections, V.120 and V.110 can be used.
Both PPP and Multilink PPP require that a PPP communications
stack be installed on your computer.
Note: To obtain maximum Multilink PPP performance, you need
a PC equipped with a UART 16650 (you might need to install a
fast com port card), which supports COM port speed of 230.4
kbps (versus 115.2 kbps with 16550).
Note: Multilink PPP does not support the callback feature used
by some servers.
Warning: When using Multilink PPP for incoming calls, only
SPAP or PAP authentication is supported.
Select ISDN Parameters and press Enter.
6
*-----------------------------------------------------------------------------*
| DIVA T/A ISDN Modem – North American Version 1.7.0 |
| Copyright © 1997 Eicon Technology Corporation |
+-------------------------------------------------------------+---------------+
|MENU: ISDN Parameters |Choice: |
| |National ISDN-1|
| Switch Type: Auto-Detect |AT&T 5ESS |
|FIRST NUMBER |Auto-Detect |
| SPID: | |
| Directory Number: | |
| Non-Initializing: No | |
| | |
|SECOND NUMBER | |
| SPID: | |
| Directory Number: | |
| Non-Initializing: No | |
| | |
|<ESC> Previous menu | |
+-----------------------------------HELP----------------------+---------------+
| Sets the appropriate primary switch type to use during unit initialization. |
| Used with primary SPID and number.subaddress. |
| -Automatically selects National ISDN-1 or AT&T 5ESS. |
*-----------------------------------------------------------------------------*
DIVA T/A ISDN Modem User’s Guide 62
Page 63

Configure the following parameters:
Parameter Description
Switch Type Specifies the ISDN switch type used by your
ISDN service provider.
North American firmware:
For most
locations, Auto-dete ct should be used. If the
ISDN Switch Type cannot be automat i ca l ly
detected, spec ify Nat i onal ISDN-1 (NI-1) or
AT&T (5ESS).
International (Excluding Nort h America)
firmware:
Europe (Euro ISDN), Japan
(INS-Net64), and Australia (TPH1962).
Note:
Australia has two switch types
available: T PH1962 (Microli nk) and E uro
ISDN (Onramp); indicate the appropri a te
type.
SPID
st/2nd
(1
Number)
Applies to North American firmware only.
Service Profile Identifier (SPID). A number,
specified by your ISDN provider, which
identifies your ISDN equipment to t he
switch, and in most instances, is
automatically detected with AutoSPID. For
more information on AutoSPID, refer to
page 96.
DIVA T/A ISDN Modem User’s Guide 63
Page 64

Parameter Description
Directory Number
st/2nd
Number)
(1
Specifies your ISDN number(s). You can
specify either one or two ISDN numbers
st
and 2nd). Specify two numbers if your
(1
ISDN provider assigns two different
numbers.
(North America only) In most instances,
Directory Numbers will be automatically
detected with AutoSPID. For more
information on AutoSPID, refer to page 96.
Non-Initializing Setting this parameter to Yes explicitly
disables SPID initialization and instructs the
DIVA T/A to start up in Non-Initializing
Terminal mode. For more on NonInitializing Terminal mode, refer to page 97.
After configuring the ISDN parameters, press Escape to exit the
7
ISDN Parameters menu.
From the Main menu, select Phone Line and press Enter to open
8
the configuration screen (units equipped with analog device
ports only).
*-----------------------------------------------------------------------------*
| DIVA T/A ISDN Modem – International Version 1.7.0 |
| Copyright © 1997 Eicon Technology Corporation |
+-------------------------------------------------------------+---------------+
| MENU: Phone Line |Choice: |
| |Yes |
| Phone 1 |No |
| Use modem/fax only: No | |
| Enable distinctive ring: No | |
| | |
| Phone 2 | |
| Use modem/fax only: No | |
| Enable distinctive ring: No | |
| | |
| | |
| | |
| Region: International | |
| | |
| | |
|<ESC> Previous menu | |
+-----------------------------------HELP----------------------+---------------+
| Set supplementary services for this Phone port. |
| -ISDN Bearer Capability is set for Speech during voice calls |
| on the Phone ports. |
| |
*-----------------------------------------------------------------------------*
DIVA T/A ISDN Modem User’s Guide 64
Page 65

The following parameters can be configured:
Parameter Description
Use modem/fax only
(Phone 1 and 2)
Enabling this option causes the
following:
•
Enables “3.1KHz Audio”. Thi s
specifies that the ISDN network
has to preserve the quality of the
3.1KHz voice band that i s
required for data audio signa l s
such as Faxes and Modems.
•
Disables calling features such as:
Call Forward, Call waiting, Caller
ID, and 3-Way Conferencing.
(North America only)
•
Disables Dial Access
America only).
(North
Enable distinctive ring
(Phone 1 and 2)
Changes the sound of the phone’s ring.
This lets you distinguish calls received
on Phone line 1 from calls received on
Phone Line 2.
Notes:
• Selec t Disti nc ti v e R i ng on only
one phone, otherwise both wil l
ring the sa me .
• If your modem, fax, or te l ephone
has difficulty detecting incoming
voice calls, try toggling the
distinctive ring fe at ure.
DIVA T/A ISDN Modem User’s Guide 65
Page 66

Parameter Description
Region
(Internationa l/Euro
firmware only)
Specify the country in which you a re
situated. This ensures that the DIVA
T/A implements the ring pattern (and
other analog device pa ram e te rs) suite d
to your country. If your country is not
listed, use the default,
International
If problems persist, advance d users
might also want to try and c onfi gure
this parameter using the AT c omm a nds
AT*F and AT!L. The
Modem Reference Guide
DIVA T/A ISDN
documents
these commands.
After configuring the parameters, press Esc to exit the Phone
9
Line menu.
From the Main menu, select Advanced and press Enter to open
10
the configuration screen.
*-----------------------------------------------------------------------------*
| DIVA T/A ISDN Modem – North American Version 1.7.0 |
| Copyright © 1997 Eicon Technology Corporation |
+-------------------------------------------------------------+---------------+
|MENU: Advanced |Choice: |
| |Yes |
| Enable DOV: No |No |
| Enable DBA: Yes | |
| Enable BACP/BOD: No | |
| | |
| Initial Billing Interval: 60 | |
| Billing Interval: 60 | |
| | |
| Update Date: ( 01-01-1980 ) | |
| Update Time: ( 20:02:49 ) | |
| | |
| | |
|<ESC> Previous menu | |
+-----------------------------------HELP----------------------+---------------+
| ISDN Settings: |
| Specifies Data Over Voice as the default outgoing call type. |
| |
| |
*-----------------------------------------------------------------------------*
.
DIVA T/A ISDN Modem User’s Guide 66
Page 67

The following parameters can be configured:
Parameter Description
Enable DOV
(Data Over
Voice)
(North America
only)
Specifies Data Over Voice Bearer
Capability as the outgoing call type.
If voice calls are less expensive than data
calls in your tariff are a , you ca n sel ec t thi s
option. DOV call s a r e d a ta cal l s m ade over
a BRI line using Voice Bearer Capability.
For DOV to work, the re mote de vice to
which you are connecting m ust support
incomi n g DOV c a lls.
Enable DBA
(Dynamic
Bandwidth
Allocation)
Note: Only appli c able i f y our ISDN
connection protocol is Multilink PPP.
Note: Only avai l able on model s equippe d
with analog device ports.
When activated this function lets you
initiate or receive telephone calls on your
regular (non-ISDN) telephone without
interrupting your current c onne ct i on. It
releases one B-channel, a s requi red for
analog device ca l ls, without i nte rrupt ing
the data link. After t he phone c a ll i s
completed and you hang up t he B-cha nne l
is automatical l y brought ba c k up for your
current connection.
Default: DBA disabled.
DIVA T/A ISDN Modem User’s Guide 67
Page 68

Parameter Description
Enable
BACP/BOD
(Bandwidth
Allocation
Control
Protocol/
Bandwidth on
Demand)
Note: Only appli c able i f y our ISDN
connection protocol is Multilink PPP.
Activates the DIVA T/A’s automatic traffic
monitor for Multilink PPP Connections.
When activated, this function monitors the
send-and-receive traffic volume, and opens or
closes your second B-channel as the t ra ffic
volume warrants.
Activate this function to ensure that two Bchannels are never active when one is
sufficient, thus reducing the chargeable time
payable to your ISDN provider.
Note: Be sure to activate the Cost Reduction
Timers to avoid numerous first i nte rva l
charges. If you select BACP, but do not set
the Cost Reduction Tim e rs, you c ould i nc ur
unnecessary expense as your second Bchannel might open a nd c lose fre que nt ly,
costing you the first-interval amount each
time the second B-cha nne l c onne c ts.
Default: BACP/BOD disabled
Initial Billing
Interval
Billing Interval
Note: Only appli c able i f y our ISDN
connection protocol is Multilink PPP.
Note: You must activate BACP/BOD before
setting the timers.
Set these timers if your ISDN Service
Provider charges one rate for the fi rst int erva l
of time on-line (a fi xe d peri od, for e xam pl e
the first 5 minutes), and a di ffere nt rat e for
subsequent time on-line. Set t ing t he se ti m ers
ensures your second B-channel is used most
economically.
Initial Billing Interval: Specifies the length
of the first billing interval (in seconds). For
example, if your provi der c ha nges a fi xe d $X
for the first 5 minutes ente r 300.
Note: Setting the timer to 0 disables it. The
Billing Interval timer is also, effectively
disabled.
DIVA T/A ISDN Modem User’s Guide 68
Page 69

Parameter
Initial Billing
Interval
Billing Interval
(Continued)
Description and Values
Billing Interval: Specifies the increments
your Service Provider uses to bill subsequent
usage of your ISDN line (usage after the
initial Billing Interval expires). For example
if your Provider charges $Y per minute for
each minute following the Initial Billing
Interval, ente r 60.
Note: Setting the timer to 0 disables it. The
Initial Billing Interval remains in effect.
Default: 60 seconds.
Update Date
Update Time
After completing the advanced parameters configuration, press
11
Note: Mode ls equi ppe d wit h anal og dev i ce
ports.
The DIVA T/A supports Caller ID (North
America only). If you have a phone wit h ca l l
display and are receiving calls with the
incorrect time or date, use Update Time to
reset the date and c a le nda r.
If you power off the DIVA T/A, click Update
Time when you turn it bac k on. T his ensures
that the correct date and time are set on the
DIVA T/A.
Escape to exit the Advanced menu.
From the Main menu, select Save Profile and press Enter to save
12
the changes made to the profile.
Select Restart. Verify that the correct startup profile is specified,
13
and then press Enter.
After the DIVA T/A has restarted, check that the D LED and Link
LED on the DIVA T/A’s front panel. If the LEDs are steady, the
DIVA T/A is working correctly; if they are not steady, check your
configuration and try again. For more details on the LEDs, refer to
“LED Status Indicators on the DIVA T/A” on page 106.
Your DIVA T/A is configured for ISDN. Close your VT-100
application. Continue at the section “Using the DIVA T/A on page
73.”
DIVA T/A ISDN Modem User’s Guide 69
Page 70

Updating the DIVA T/A Firmware
This section contains procedures for loading new firmware.
Updating Firmware under Windows
3.x/WFW 3.11
Warning: When you update your DIVA T/A firmware, the current
profile configurations might get erased. It is recommended, therefore,
that you record your current settings and SPID numbers before
updating (use the Windows Configuration Tool to view your current
settings).
Follow these steps:
Start the DIVA T/A Configuration Tool.
1
Select the DIVA T/A and click Properties.
2
Click Download and specify the appropriate path.
3
Confirm the request.
4
Verify the configuration of your DIVA T/A.
5
Updating Firmware under Windows NT
and 95/98
Note: When you download new firmware, DIVA T/A will ask you if
you want to export your current profiles. It is recommended that you
export the profiles. This assures you have a backup available in the
event the profiles are lost during the download. If the profiles do get
lost, use the Import Profile command and copy the exported profiles
back to the device.
To update your firmware:
From the DIVA Eicon Terminal Adapters Program, select the
1
DIVA Terminal Adapter to which you are going to download
new firmware.
From the File menu, select Download Firmware (or right click
2
your mouse, and then select Download Firmware).
DIVA T/A ISDN Modem User’s Guide 70
Page 71

3
Click Yes when prompted if you want to continue.
4
Select the device with the required firmware and click OK (if
necessary click Have Firmware, and specify the path to the
firmware; click Open).
5
Click Yes when prompted if you want to continue. The new
firmware will download to the device. This will take a few
minutes.
6
Click OK when the download is complete. The device will
automatically be refreshed.
Updating Firmware under DOS, and OS/2
Warning: When you update your DIVA T/A firmware, the current
profile configurations might get erased. It is recommended, therefore,
that you record your current settings and SPID numbers before
updating (use the AT command AT&V or AT@MENU with any
terminal emulation program to view the current settings).
To update your DIVA T/A:
1
Start a terminal-emulation software application capable of XModem or 1K-Xmodem (faster) transfer.
2
Configure the terminal to talk to the DIVA T/A ISDN Modem.
3
Type AT$Z.
4
Type at@load (this command is case sensitive).
5
Start the X-Modem transfer and select either the updated
TABOXNA.ELM or TABOXROW.ELM from wherever it is
located, for example: your \TEMP directory.
6
Wait for the reply that denotes successful transfer. The DIVA
T/A will restart automatically.
Warning: Powering off the DIVA T/A immediately following
the transfer could damage your DIVA T/A. Wait a few moments
before powering off your DIVA T/A.
7
If required, reconfigure your DIVA T/A (use the settings you
recorded, prior to performing the download).
DIVA T/A ISDN Modem User’s Guide 71
Page 72

Updating the DIVA T/A INF file (Windows
3.x/Windows NT 3.51)
Note: This section only applies if you are using RAS.
To update the DIVA T/A INF file:
1
Open any text editor.
2
Open the file MODEM.INF found in the Windows/System
directory for Windows 3.x or Windows\System32\RAS directory
for Windows NT 3.51, and remove all sections relating to the
DIVA T/A ISDN Modem.
3
Open the updated file WFWNTEI2.INF.
4
Copy the contents of WFWNTEI2.INF and append it to the end
of the MODEM.INF file; save the appended MODEM.INF file,
and exit your text editor.
5
(Windows NT only). From the RAS setup, remove the Eicon
DIVA T/A ISDN Modem and then restore it. Refer to RAS
online help for information on removing and adding modems.
DIVA T/A ISDN Modem User’s Guide 72
Page 73

Using the DIVA T/A
g
Once you have installed and configured DIVA T/A, you can dial into
your office LAN or access the Internet. Before attempting this, make
sure that your PC is equipped with remote-access client software such
as Dial-Up Networking, Shiva PPP client, or Microsoft RAS client
software.
DIVA T/A ISDN Modem
DIVA T/A ISDN M odem
Device Support
Analo
(Av a ila ble on s o me m od els)
ISDN
Internet
Online Datab ase
DIVA T/A ISDN Modem User’s Guide 73
Page 74

SecurID Connectivit y
To connect using SecurID, refer to the section appropriate to the
protocol and operating system you are using.
Using V.120 on Windows 95/98
The following example demonstrates how to use V.120 on
Windows 95/98 to connect using SecurID:
1
Ensure you have configured V.120 on your DIVA T/A.
2
From the Dial-Up Networking group, right-click the connection
on which you want to implement SecurID, and select Properties.
3
Under the “Using” field, click Configure.
4
Click the Options tab and enable “Bring up terminal window
after dialing.”
When you connect to the SecurID server, a terminal window will popup that prompts for your user name and password.
Using V.120 on Windows NT 4.0
The following example demonstrates how to use V.120 on
Windows NT 4.0 to connect using SecurID:
1
Ensure you have configured V.120 on your DIVA T/A.
2
Click the Start button on the taskbar.
3
Point to Programs, then point to Accessories, and click on DialUp Networking.
4
If your Dial-Up Networking entry already exists, continue with
step 6.
5
If your Dial-Up Networking entry does not exist, click on "New"
and enter all your configuration parameters.
6
Click on "More", and select the "Edit entry and modem
properties" option.
7
Select the Script Tab and make sure the "Pop up a terminal
window" option is enabled.
When you connect to the SecurID server, a terminal window will popup that prompts for your user name and password.
DIVA T/A ISDN Modem User’s Guide 74
Page 75

Using PPP and Multilink PPP
If you want to use PPP or Multilink PPP to access a SecurID server,
ask your administrator:
• what type of remote access server device they use (Shiva or
Ascend)
• if the server supports PPP or Multilink PPP
If these conditions are not met, you cannot use PPP or Multilink PPP
with SecurID. If the conditions are met, refer to the server type you
are using below
Shiva Server
If you want to use PPP or Multilink PPP to access a Shiva SecurID
server, you may have to install one of the following:
• Shiva’s “Security Pack” (a special patch for Windows 95/98 and
Windows NT 4.0)
• Shiva’s “DialIn” (replacement software for Windows 95/98 and
Windows NT 4.0 Dial-Up Networking)
These patches are either available from your system administrator or
at Shiva’s ftp site: ftp://ftp.shiva.com/software/client/dial-in/. They
add SPAP functionality to Windows. You require this added
functionality to make a SecurID connection.
If you have trouble logging into a SecurID server, contact your
administrator or Internet Service Provider (ISP).
Ascend Server
The Ascend Remote Access Server uses the PAP Token / CHAP
protocol and does not require the installation of a patch.
When using PAP Token / CHAP, your administrator will give you a
username and two passwords. One of the passwords is static and the
other is your token.
You should configure Dial-Up Networking as normal and when
prompted for your password, enter the static password.
DIVA T/A ISDN Modem User’s Guide 75
Page 76

Each time you attempt to make your connection, there is one more
step to complete. You have to add the command "&%n" after the
phone number entry, where n is your token, as shown below:
If you have trouble logging into a SecurID server, contact your
administrator or Internet Service Provider (ISP).
DIVA T/A ISDN Modem User’s Guide 76
Page 77

Dialing with Multilin k PPP
When you establish a Multilink PPP connection, each B-channel
connects to a remote-directory number. In some ISDN
implementations each B-channel connects to a unique number. If this
is the case, enter both numbers and separate them with the character
“~” or “&”. For example, to make a Multilink PPP connection to the
numbers 1-514-555-2345 and 1-514-555-2346 enter the numbers as
follows:
Note: If your ISDN implementation requires two numbers and
BACP/BOD is enabled (on both your DIVA T/A and the remote ISDN
device), you have the option of entering only one number. BACP will
try to discover the second number and connect to it. If you know the
two numbers, however, it is recommended that you enter both.
For Windows 95/98 only. If you use “~” or “&” to separate the
Phone-Numbers, deselect the “Use Country and area code” parameter
on the Properties tab of Dial-Up Networking. Manually enter the
Country Code, Area Code, and PBX Prefix (if required) for both
numbers.
If both B-channels connect to the same number, the number need only
be entered once.
Contact your Internet Service Provider (ISP) if you are not sure
whether you need one or two remote numbers.
DIVA T/A ISDN Modem User’s Guide 77
Page 78

Dialing with AO/DI
When you establish a Multilink PPP connection, each B-channel
connects to a remote-directory number. In some ISDN
implementations each B-channel connects to a unique number. If this
is the case, you should enter both numbers and separate them with the
character “~” or “&”.
To establish a Multilink PPP connection using AO/DI, you also need
to enter your X.25 DTE Address.
For example, to make a Multilink PPP connection to the numbers 1514-555-2345 and 1-514-555-2346, with an X.25 DTE Address
2141111234, enter the numbers as follows:
Note: If your ISDN implementation requires two numbers and
BACP/BOD is enabled (on both your DIVA T/A and the remote
ISDN device), you have the option of entering only one number.
BACP will try to discover the second number and connect to it. If you
know the two numbers, however, it is recommended that you enter
both.
DIVA T/A ISDN Modem User’s Guide 78
Page 79

For Windows 95/98 only. If you use “~” or “&” to separate the
Phone-Numbers, deselect the “Use Country and area code” parameter
on the Properties tab of Dial-Up Networking. Manually enter the
Country Code, Area Code, and PBX Prefix (if required) for both
numbers.
If both B-channels connect to the same number, the number need only
be entered once.
Contact your Internet Service Provider (ISP) if you are not sure
whether you need one or two remote numbers.
DIVA T/A ISDN Modem User’s Guide 79
Page 80

Establishing a Connection
Go to the section that corresponds to your platform and follow the
procedure.
Windows 95/98
1
Double-click the Dial-Up Networking icon.
2
Double-click Make New Connection. The Make New
Connection Wizard opens:
Select the Eicon DIVA T/A ISDN Modem from the Select a
modem field, and then click Next.
3
Enter the ISDN number and Country Code of the location you
wish to call, click Next, then click Finish.
4
Double-click the newly created My Connection icon.
DIVA T/A ISDN Modem User’s Guide 80
Page 81

5
Enter your user name and password, and click Connect.
6
If you successfully establish the connection, you can
communicate with the remote host. If you do not establish the
connection, verify your Server Type and TCP/IP settings and
alter them as required.
Windows NT 4.0
1
In the Dial-Up Networking folder, double-click the Make
Connection icon.
2
Click New.
DIVA T/A ISDN Modem User’s Guide 81
Page 82

3
The Phonebook Entry Wizard opens. Click Next.
4
Check each applicable statement, then click Next.
5
Enter the phone number you want to call, then click Next.
DIVA T/A ISDN Modem User’s Guide 82
Page 83

6
Click Finish.
7
Click Dial.
8
Enter your user name and password, then click OK.
9
If you successfully establish the connection, you can
communicate with the remote host. If you do not establish the
connection, verify your configuration and TCP/IP settings and
alter them as required.
DIVA T/A ISDN Modem User’s Guide 83
Page 84

Windows NT 3.51
Note: The following example assumes you are using RAS.
1
In the Remote Access Service group, double-click Remote
Access.
2
Click Add.
3
Enter the name and phone number you want to call, then click
OK.
DIVA T/A ISDN Modem User’s Guide 84
Page 85

4 Click Dial.
5
Enter your user name and password, then click OK.
6
If you successfully establish the connection, you can
communicate with the remote host. If you do not establish the
connection, verify your configuration and TCP/IP settings, and
alter them as required.
DIVA T/A ISDN Modem User’s Guide 85
Page 86

Windows 3.x
The following example assumes you are using the Shiva PPP protocol
stack.
Note: If your workstation is configured as a Windows for Workgroups
Remote Access Service (RAS) client, you must configure the V.120
rate adaption protocol on both the DIVA T/A workstation and on the
remote device (RAS Server ISDN adapter).
If you are using the Shiva PPP protocol stack (or similar), then you
can use PPP or MLPPP.
1
Ensure that the ShivaRemote connection software is installed on
your computer.
2
Double-click ShivaRemote Connect.
3
Enter your Dial-in Name, Password, and the phone number you
want to.
DIVA T/A ISDN Modem User’s Guide 86
Page 87

4
Select the Tools menu, and choose Port Setup. Select the DIVA
T/A as the modem, then click OK.
5
Click Options.
DIVA T/A ISDN Modem User’s Guide 87
Page 88

6
Ensure that IPX and/or IP are enabled, then click OK.
7
Click Connect.
8
If you successfully establish the connection, you can
communicate with the remote host. If you do not establish the
connection, verify your configuration and TCP/IP settings, and
alter them as required.
DIVA T/A ISDN Modem User’s Guide 88
Page 89

DOS
1
Ensure that the ShivaRemote connection software (or similar) is
installed on your computer.
2
Enter the following command:
C:\SHIVA\CONNECT
3
From the Tools menu, choose Port Setup and select the COM
port.
4
Select Modems. Enter “Eicon DIVA T/A ISDN Modem” in the
Modem Name field and set the speed to 115200 bps (or 230400
if your COM port supports it), then select OK.
5
Click Options.
6
Enable IP and/or IPX (as required), then select OK.
DIVA T/A ISDN Modem User’s Guide 89
Page 90

7
Enter your user name, password, and the phone number you
want to dial, then click Connect.
8
If you successfully establish the connection, you can
communicate with the remote host. If you do not establish the
connection, verify your configuration and TCP/IP settings, and
alter them as required.
DIVA T/A ISDN Modem User’s Guide 90
Page 91

OS/2
1
Double-click Programs, then double-click Internet Modems.
2
Double-click Dial Other Internet Providers.
3
Click Add Entry.
DIVA T/A ISDN Modem User’s Guide 91
Page 92

4
Enter your Login ID, Password, and the Phone Number you
want to dial.
5
Click Connect Info, then enter your Domain Name server, your
Host Name, and your Server Name.
6
Click Modem Info. Select a Modem from the drop-down list, and
then select the COM port assigned to the DIVA T/A ISDN
Modem.
DIVA T/A ISDN Modem User’s Guide 92
Page 93

7
Click Dial to place your call.
8
If you successfully establish the connection, you can
communicate with the remote host. If you do not establish the
connection, verify your configuration and TCP/IP settings, and
alter them as required.
DIVA T/A ISDN Modem User’s Guide 93
Page 94

Connecting to the World Wide Web
To connect to the World Wide Web, follow the instructions in the
section “Establishing a Connection” on page 80; when the procedure
instructs you to enter a dial-up number, enter the number of your
Internet Service Provider (ISP).
Once you are successfully connected to your ISP, go to your desktop
and click the icon representing the “Browser” you want to use. The
“Browser” opens and you are ready to explore the World Wide Web.
Note: If you need help using your Browser or exploring the Web,
consult your Browser’s on-line help.
DIVA T/A ISDN Modem User’s Guide 94
Page 95

RVS-COM Support
(For Windows 95/98 and Windows NT only)
The DIVA T/A supports both the Lite and Full versions of RVS-COM
1.38. RVS-COM adds the following features to your DIVA T/A:
• File Transfer/ISDN Eurofile Transfer. Easy file transfer and
Eurofile transfer.
• Fax/Softfax. Fax Group 3 reception/transmission integrated
into the Windows e-mail systems using fax modems.
• E-mail. Direct e-mailing from the Windows e-mail systems
between PCs including all mail contents.
• Host Mode/Answerphone. Reception of e-mail, data, fax and
voice. Incoming e-mail, fax or voice messages are
automatically posted to the Inbox of the Windows e-mail
systems. Additionally, the complete host mode/BBS functions
are available for file transfer and e-mail.
• Terminal Emulation. Changes your PC into an ‘intelligent’
terminal (e.g. VT52, VT100, VT220, IBM 3101, ANSI or
TTY). All standard transfer protocols (X-, Y-, Z-Modem,
Kermit, etc.) are supported.
• Telephony. Turns the PC in an ISDN Telephone. Phone
connections can be established directly from the address book
of the Windows e-mail systems. By incoming calls the phone
of the caller is automatically searched for in the address book.
For more information on these features see the documentation
included in your RVS-COM package.
DIVA T/A ISDN Modem User’s Guide 95
Page 96

Automated SPID Selection
(AutoSPID) (North America only)
AutoSPID is a new National ISDN protocol feature that enables the
DIVA T/A to download a list of Service Profile Identifiers (SPIDs),
Directory Number (DN) and Call Type (CT) information from the
ISDN line. It also enables the DIVA T/A to determine whether other
devices currently initialize the SPIDs.
Note:
Check with your ISDN service provider to determine if they
support the AutoSPID feature.
This feature eliminates the need for you to configure any ISDN
parameters.
AutoSPID works in the following manner:
•
If th ere are no SPI D s configured, or if current SPI D s are incor rectl y
configured, then AutoSPID attempts to determine and then assign
SPIDs and DNs to the location designated to store the AutoSPID
parameters.
•
If AutoSPID fails to detect the SPIDs, try entering the DNs (in a 10digit format) and the DIVA T/A will attempt to perform generic
SPID guessing .
•
Unless the SPIDs and DNs are configured correctly (whether through
AutoSPID, SPID guessing, or manually) ISDN will fail to initialize
(the D-LED flashes).
The only way to use the DIVA T/A without using SPIDs is to
configure the port as a Non-Initializing Terminal. Refer to the next
section “Non-Initializing Terminal Mode”, for more information.
DIVA T/A ISDN Modem User’s Guide 96
Page 97

Non-Initializing T erminal Mode
(North America only)
Non-Initializing Terminal (NIT) mode is a new ISDN protocol feature
that enables the DIVA T/A to operate without SPIDs. You can use
NIT only if your ISDN provider supports it.
To configure the DIVA T/A for Non-Initializing Terminal mode,
deselect the SPID checkbox in the Windows Configuration Tool, or
specify “Yes” for the Non-Initializing parameter in the VT-100
Configuration Tool.
Note: Check with your ISDN service provider to determine if they
support Non-Initializing Terminal mode.
DIVA T/A ISDN Modem User’s Guide 97
Page 98

Analog Device Support
(Only available on some models)
The DIVA T/A has two analog device ports that let you connect
analog devices such as ordinary telephones, answering machines, fax
machines, and modems. Calls to and from these analog devices are
carried over your ISDN line. You also get additional calling features
such as Call Forwarding etc. For more information on these calling
features see page 100.
Since ISDN uses two B-channels, the DIVA T/A can support up to 2
concurrent analog device connections (depending on whether there is
a data call in place or not).
Whenever possible, you should use Multilink PPP (MLPPP) since it
provides maximum throughput with the remote device. You can also
use PPP, V120 or V110 protocols. In these cases, one B-channel is
always available for voice.
Multilink PPP without AO/DI support
In the case of Multilink PPP, one analog device can still be used if
Dynamic Bandwidth Allocation (DBA) is enabled.
For example, while a MLPPP data connection is in progress, one of
your telephones rings. As soon as the phone rings, the MLPPP
connection automatically drops one of the B-channels, reducing the
data connection from 128 kbps to 64 kbps, and the voice call is then
connected. After hanging up the voice call, the data connection reestablishes the second B-channel and brings the data connection back
up to 128 kbps. The same holds true if you decide to pick up the
phone for an outgoing call.
While a data connection is in progress, only one voice connection can
be established to retain the data connection.
To use DBA, verify that Dynamic Bandwidth Allocation (DBA) is
enabled using the Windows Configuration Tool, or the VT100
Configuration Tool.
Two Voice Calls
When both B-channels are used for voice calls, data calls are not
allowed. The user is responsible for any new attempt at placing a data
call.
DIVA T/A ISDN Modem User’s Guide 98
Page 99

Multilink PPP with AO/DI support
In the case of Multilink PPP with AO/DI support, both analog devices
can still be used as AO/DI uses the ISDN D-channel X-25 packet
service to maintain an "always on" connection between you and your
Service Provider. Low bandwidth requirements can be met using this
constant connection, such as sending and receiving e-mail, credit card
verification, etc.
For example, while a MLPPP data connection is in progress using
both B-channels, one of your telephones rings. As soon as the phone
rings, the MLPPP connection automatically drops one of the Bchannels, reducing the data connection from 128 kbps to 64 kbps, and
the voice call is then connected. If a fax call then comes in, the data
call is passed to the D-channel, reducing the data connection from 64
kbps to 9.6 kbps and the fax call is connected.
After hanging up the voice calls, if the bandwidth is required the data
connection re-establishes the B-channel and brings the data
connection back up to 64 kbps. If the fax call is then hung up, the
second B-channel will be re-established if the bandwidth is required.
The same holds true if you decide to pick up the phone for an
outgoing call.
DIVA T/A ISDN Modem User’s Guide 99
Page 100

Calling Featu res
(North America only)
Note: If you did not use EZ-ISDN or IOC to order your line, verify
that the DIVA T/A’s default settings are compatible with those of your
ISDN provider before using this feature. Refer to the section “Feature
Key Values” on page 102 for more information.
Note: To use Calling Features, your ISDN line must support the
following: Additional Call Offering (ACO) and Flexible Calling (FC).
If you ordered your ISDN line using the proper EZ-ISDN code, you
should have access to these features. See also, “Using EZ-ISDN or
ISDN Ordering Code (IOC)” on page 8.
If your DIVA T/A is equipped with analog device ports, you can use
the following calling features during voice calls:
Call Forwarding
Call Forwarding automatically transfers incoming calls to wherever
you are so you never miss a customer call even when you're away
from your home office. Call Forwarding is accessed by dialing a
simple code (e.g. 72#). Not all ISDN Service Providers use the same
dial codes. Ask your ISDN Service Provider for the codes relevant to
you.
If your ISDN service conforms to EZ-ISDN 1A (see page 8), you will
also have VoiceMail. If the number to which you have forwarded
your calls is busy or does not answer, the call will automatically be
forwarded to your VoiceMail. With VoiceMail, the DIVA T/A also
supports Visual Message Waiting Indicator. See “VoiceMail” on page
101 for more information.
Call Forwarding supports Reminder Ring. Reminder Ring causes your
telephone to ring once (for about ½ a second) whenever it forwards a
call. If your phone has Caller ID (see next page), it will display details
of the forwarded call.
Call Waiting
Call Waiting alerts you to an incoming call when you're already on
the phone. You can put one call on hold while you accept another, so
you'll never miss a customer call. It works as follows:
If you receive a second call while on a call, a beep sounds. To answer
the second call, press the receiver button. The first call is then put on
DIVA T/A ISDN Modem User’s Guide 100
 Loading...