

Page 1
Sunbubble (Large size)
Set-up Instructions
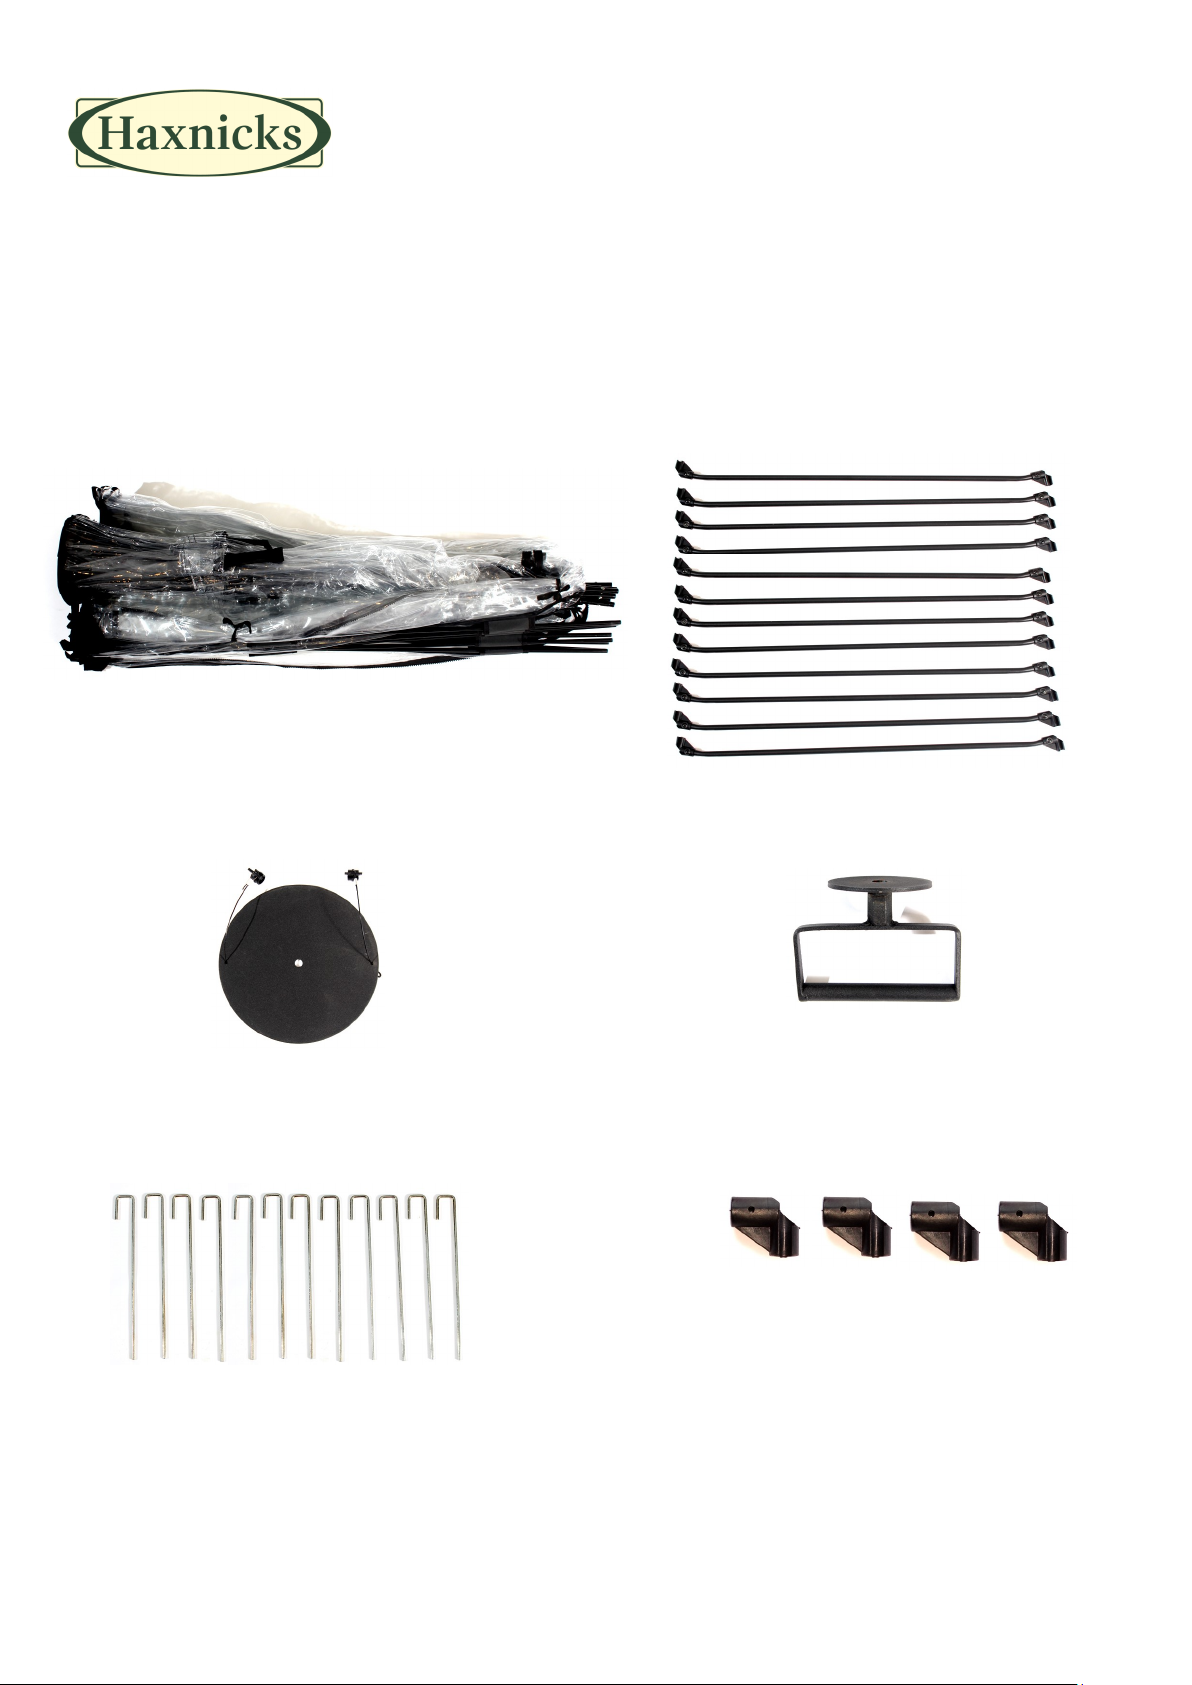
Components
The main Sunbubble structure comprises a PVC cover with
12 integral fibreglass rods which are split into 2 sections to
allow the Sunbubble to be folded in half. 12 Steel tube struts
1 Steel disc with 2 safety clips 1 Steel handle (attached to the inside top of the structure)
12 Ground pegs 4 Spare end clips for Steel tube struts
Siting
Site your Sunbubble on firm, flat ground in an area that is sheltered from the wind. The pegs will not be as effective when secured into
soft ground, so you need to consider this when deciding where to site your Sunbubble and where to secure it. If you site your Sunbubble on concrete or paving and in an area which may be exposed to some wind, then you will have to secure it to the ground by drilling
into the surface and using rawl plugs with screws or hooks.
Alternatively, if the siting is temporary and you do not wish to drill into the surface, you can tie extra lengths of cord to the fabric loops at
the base and secure them to weights or heavy objects such as building blocks.
In case of accidental damage the end clips
can be replaced using a screwdriver.
Page 2
Putting up your Sunbubble
NB: The PVC cover is more flexible at higher temperatures and it is therefore easier to put up in warm weather.
1. Unfold the main structure and lay it out on the ground. The zipped doorway in the lower part of the Sunbubble should be open
and facing upwards.
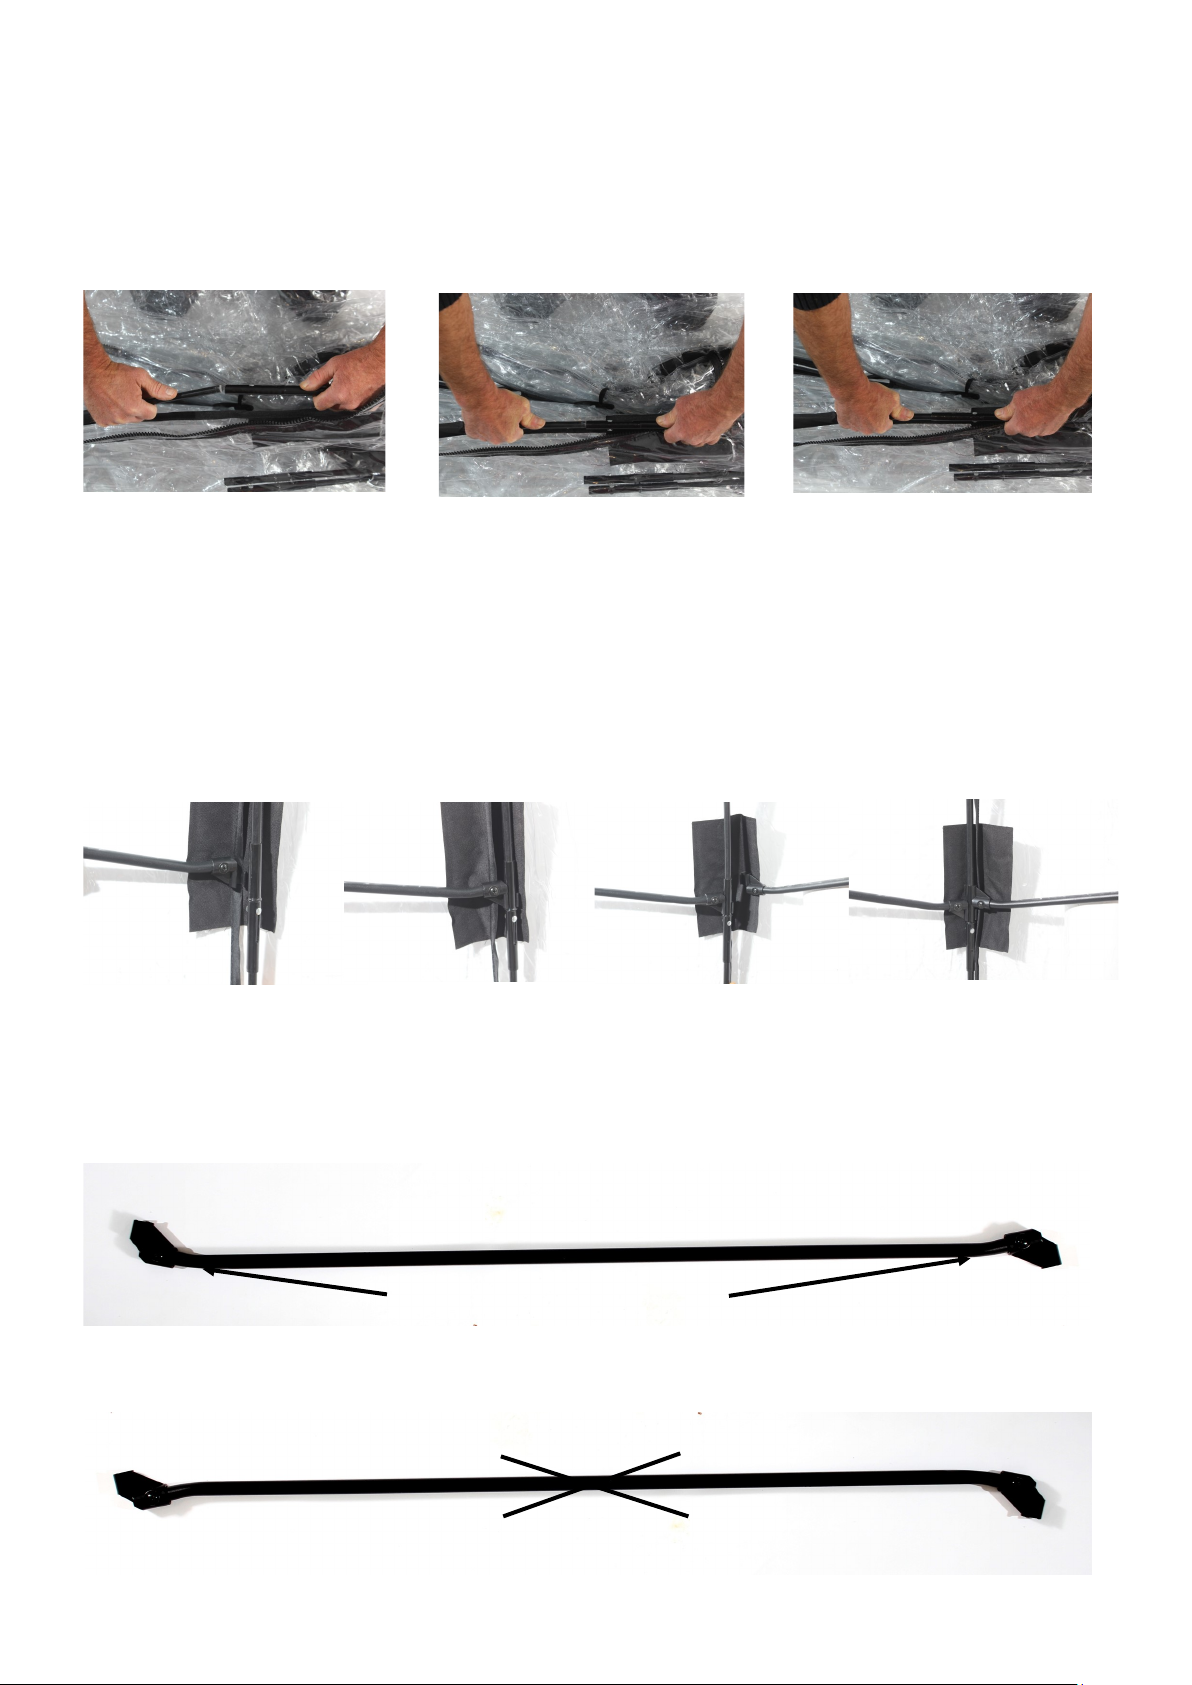
2. Through the open doorway connect the lower half of each fibreglass rod to the corresponding upper half.
Line up the upper and lower rod Fit the lower rod into the steel joint Slide the steel joint over the lower rod
3. Lift the Sunbubble up by holding it around the middle and stand it vertically upright, holding it securely to make sure that it
does not topple over.
4. Spread the fibreglass rods out at the base and step through the doorway into the Sunbubble. From inside push the base out
further by repositioning the bottom of the rods further apart.
5. Take the 12 steel struts into the Sunbubble and fit them one at a time into position between the fibreglass rods, starting with
the one over the doorway. The end of the struts clip onto the steel joints on the fibreglass rods from the outside inwards, which
means that you need to slide each strut between the PVC cover and the fibreglass rod before pulling it inwards to clip the
plastic end into place on the steel joint. Add one strut at a time working your way around the Sunbubble. Take care to push
the fibreglass rods far enough apart before fitting the strut in place in between them.
Strut end clips fit onto the steel joint just above the protruding steel ring, one above the other
The steel struts need to be fitted the right way up, with their ends angled upwards (not downwards) - if you try to fit
them the wrong way up you may damage the plastic joints at the ends.
Right way up
Wrong way up
Steel tube bends upwards at each end
Page 3

When fitting the last strut in place the combined pressure of the other 11 struts means that you will need to firmly push
apart the last two fibreglass rods to fit the strut into place.
6. Once all 12 struts are in place, adjust the positions of the fibreglass rods on the ground to make sure that they form a regular
circle.
7. Take the steel disc and fit the 2 clips onto 2 of the fibreglass rods approximately 10cm out from the central hinge plate so that
the disc hangs safely from the 2 clips. Fit the disc onto the threaded bar in the centre of the top joint. Hold the disc in position
and screw the handle in clockwise from underneath onto the threaded bar. Keep holding the disc until the handle is secured by
several turns on the threaded bar.
8. Pulling the handle firmly downwards, continue to turn it clockwise until it is fully tightened with the disc firmly in place.
Caution! Turn the handle by hand only- Do not use any other tool to gain leverage. If necessary, ask another person to
pull downwards on the entire top joint while you tighten the handle.
9. Peg the Sunbubble to the ground, pushing the pegs all the way in through the fabric loops at the base of each fibreglass rod.
The ground pegs supplied with the Sunbubble are designed for use in firm, compacted ground such as a well established lawn.
You need to consider the best way of securing your Sunbubble according to the ground conditions, since any damage due to
inadequate securing will not be covered by the warranty.
10. If you are expecting windy conditions and are not sure if the ground fixings are enough on their own, you can use a spiral
ground anchor in the centre of the Sunbubble and attach a rope or strap to it with the other end tied tightly (and under a little
tension) to the handle.
You can see a demonstration of Sunbubble being put up on our Youtube channel.
hps://www.youtube.com/watch?v=4ktuqgOEqLc
Page 4

In Use
The vents can be positioned open or closed by adjusting the position of the opening struts with hook and loop fabric tabs.
For further ventilation or for easy access the doorway can be rolled back and fastened.
Sunbubble has been designed and tested to withstand winds of up to 40mph. To avoid damage, take your Sunbubble
down in very windy conditions
Taking down your Sunbubble
WARNING!– DO NOT REMOVE THE STEEL TUBE STRUTS BEFORE UNDOING THE HANDLE. IT IS NECESSARY FOR
ALL 12 STRUTS TO BE IN PLACE TO UNDO THE HANDLE AND REMOVE THE STEEL DISC SAFELY.
1. Make sure that the doorway is open, rolled back and fastened into place
2. Remove all ground pegs and other fixings
3. Make sure the safety cables on the steel disc are clipped to 2 of the fibreglass rods above before you start to undo the
handle
4. Carefully undo the handle and remove the steel disc
5. Remove the first steel struts opposite the doorway taking particular care to hold the two fibreglass rods apart while
removing the strut in between, so as not to damage the PVC cover.
6. Carefully remove the rest of the struts
7. Gather the fibreglass rods together in the centre of the Sunbubble until they can all be held in one hand with your arm
positioned through the doorway.
8. Pick up the Sunbubble and lay it gently on the ground with the doorway facing upwards.
9. Slide each of the 12 steel tube joints upwards and disconnect the lower fibreglass rods from the top rods.
10. Fold the Sunbubble in half taking care to keep both upper and lower ends of the fibreglass rods clear of the PVC cover.
Avoid crumpling the cover when folding it by raising the ends of the fibreglass rods slightly to allow the PVC cover to hang
down neatly. Folding it like this will make it easier to fit into the bag.
11. Pack the Sunbubble into the bag followed by the other components and store in a dry place until next needed.
Warranty
Your Sunbubble comes with a 12 month warranty from the date of purchase covering the issue of replacement product or
parts for any damage or problems due to defective or poor manufacture. The warranty does not cover accidental damage or
damage caused by miss-use. The Sunbubble has been designed and tested to withstand winds of up to 40mph. To avoid
damage, take your Sunbubble down in very windy conditions.
The ground pegs supplied with the Sunbubble are designed for use in firm, compacted ground such as a well established
lawn. You need to consider the best way of securing your Sunbubble according to the ground conditions, since any damage
due to inadequate securing will not be covered by the warranty.
We hope your Sunbubble will give you many years of valuable use and sunny entertainment.
 Loading...