

Hawkins PRO 224, PRO 524, PRO 324 Operating Instructions Manual
1. DETAILED SPECIFICATIONS:
Specifications may change without notice in the interests of product improvement
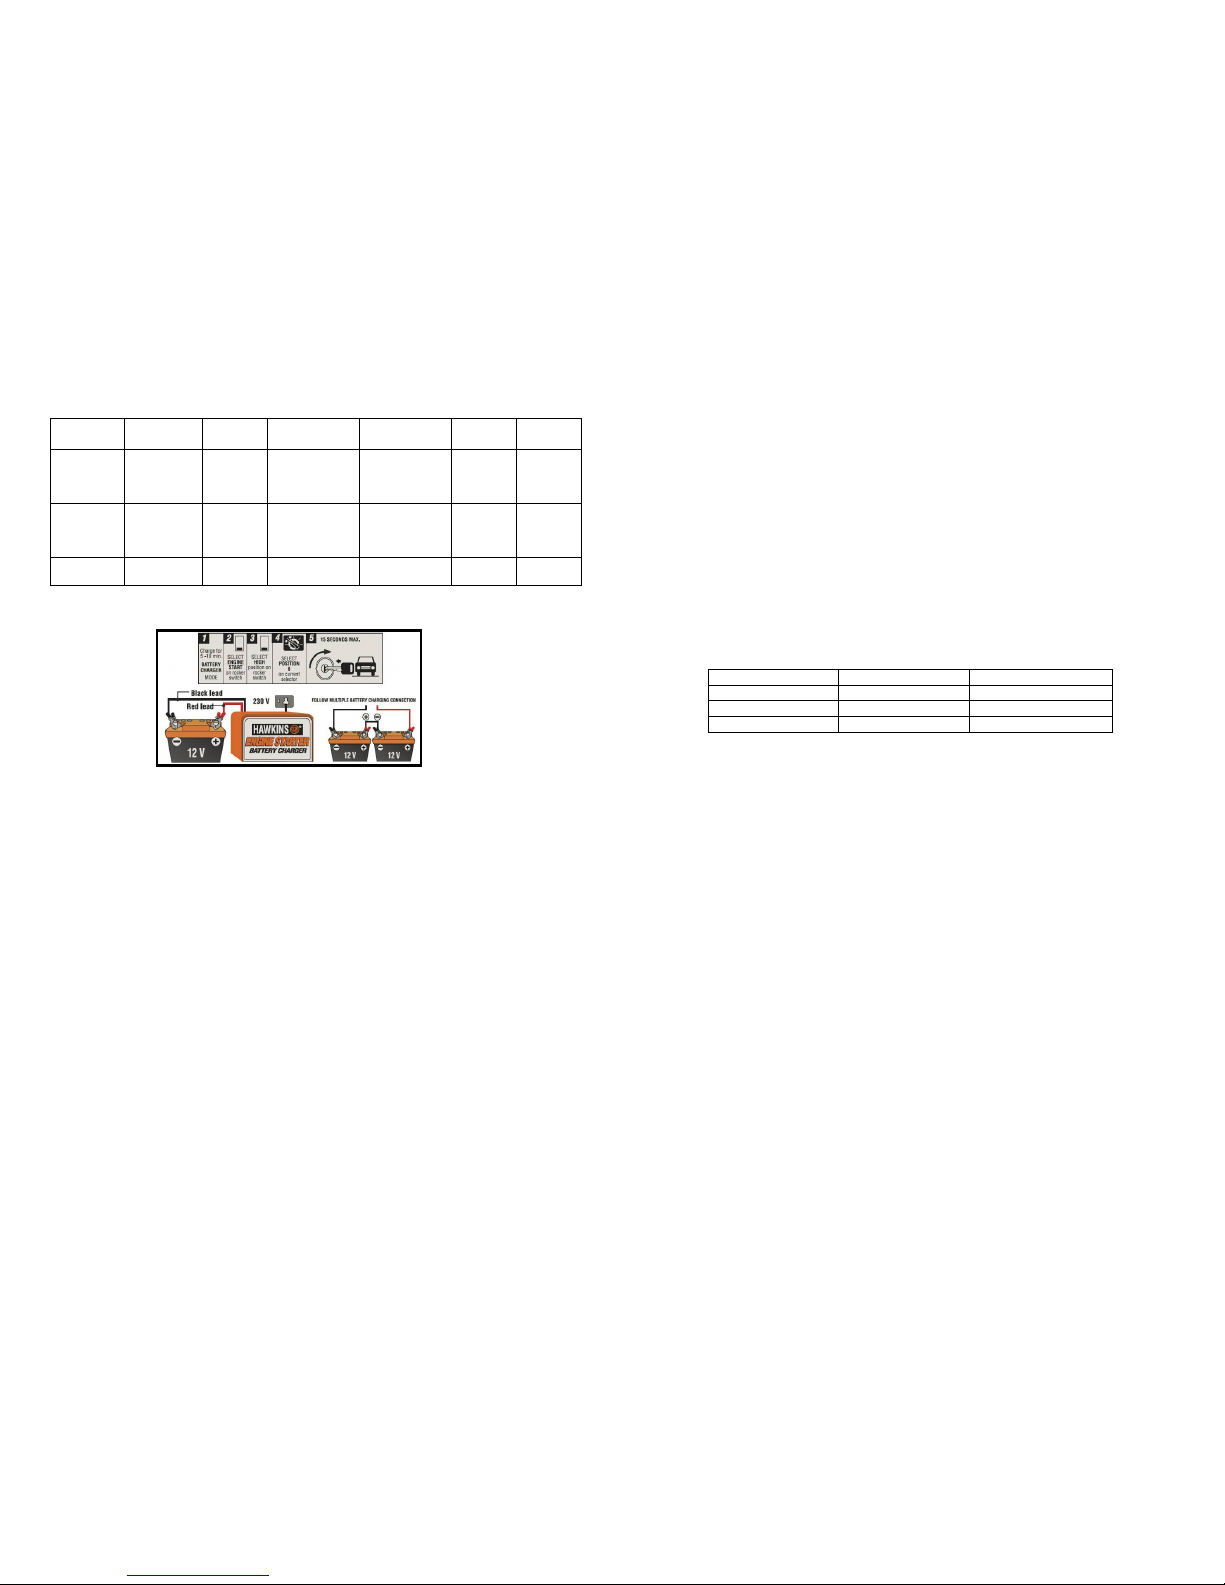
2. CONNECTION DIAGRAM:
3. IMPORTANT SAFETY INSTRUCTIONS:
WARNING – Risk of explosive gases. Working in the vicinity of a battery is dangerous.
Batteries generate explosive gasses during charging. Keep the battery and charger away from
flames and sparks. Battery chargers contain switches and circuit breakers that produce arcs or sparks.
CAUTION – Charge only rechargeable vented / flooded lead / calcium batteries.
Never recharge dry cell or non-rechargeable or defective batteries. These may explode and cause
personal injury and property damage. If you are uncertain as to the type of battery you are
attempting to charge, or the correct procedure for checking the battery’s rate of charge, contact
your battery supplier or battery manufacturer. Always follow the battery manufacturer’s instructions.
Use the charger in a well ventilated room only
4. INSTRUCTIONS:
• Connect and disconnect battery leads only when AC supply cord is disconnected.
• Charge batteries in a dry well ventilated area only.
• Do not obstruct the flow of air through the charger cabinet.
• Never place the charger on a heated surface.
• If the supply cord is damaged, it must be replaced.
• The charger must not be exposed to liquids in any form. Use indoors only.
5. PERSONAL PRECAUTIONS:
• Wear complete eye and clothing protection and wear rubber soled shoes. When the ground
is wet or covered in snow, wear rubber boots. Avoid touching the eyes while working with batteries.
• Battery acid is corrosive. If battery acid contacts skin or clothing, wash immediately with soap and
water or a solution of Bicarbonate of Soda and water. If acid enters the eye, immediately flush eye
with running cold water for at least 10 minutes and then consult a doctor.
• NEVER smoke or allow a spark or flame in the vicinity of a battery or engine.
Charger Input
Voltage
Volt
Selector
Charge Rate
Selector
Current
Selector Pos
Output
Voltage
Output
Current
PRO 224 230Vac
230Vac
230Vac
230Vac
12 Volts
12 Volts
24 Volts
24 Volts
Battery Charge
Engine Start
Battery Charge
Engine Start
High
High
High
High
12V dc
12V dc
24V dc
24V dc
19 Adc
56 Adc
19 Adc
62 Adc
PRO 324 230Vac
230Vac
230Vac
230Vac
12 Volts
12 Volts
24 Volts
24 Volts
6
Engine Start
6
Engine Start
High
High
High
High
12.5V dc
25 V dc
49 Adc
54 Adc
PRO 524 230Vac
230Vac
12 Volts
24 Volts
6
6
12.5V dc
25V dc
68Adc
91Adc
• Be careful not to drop a metal tool onto the battery. It might spark or short circuit the battery or
other electrical part that may cause an explosion.
• Before working with any battery, remove any jewellery. A battery can produce a short-circuit
current high enough to weld such items causing severe burns.
• NEVER charge a frozen battery – thaw it out first. Charging will then be safer and more efficient.
6. CHARGING AUTOMOBILE BATTERIES:
• Ensure that the mains supply to the charger is disconnected before connecting any battery terminals.
• Connect the RED clamp to the positive terminal of the battery and the BLACK clamp to the negative
terminal of the battery.
• Connect the charger to the mains supply and switch ON.
• After charging, disconnect charger from mains supply first before disconnecting any battery charger
clamps.
7. MULTIPLE BATTERY CHARGING / ENGINE STARTING:
The Hawkins PRO Charger range is designed to allow Single or Multiple charging of lead acid or
calcium batteries connected in series and away from a vehicle.
These units are NOT RECCOMMENDED FOR SEALED BATTERIES.
BATTERY SIZE & COMBINBATION CONNECTED IN SERIES
CHARGER 6 V Battery 12 V Battery
PRO 224 2 or 4 1 or 2
PRO 324 2 or 4 1 or 2
PRO 534 2 or 4 1 or 2
• Select the desired number of batteries you wish to charge, that your charger is capable of charging as
indicated in the above table.
• Select the correct voltage setting for that number of batteries. (eg 2 x 6V batteries = 12V
setting)
• Turn all other selection switches off or to their minimum setting positions.
• Check polarity of each battery’s posts. POSITIVE (marked POS. or +) usually has larger diameter
than NEGATIVE (marked NEG. or -) post.
• Arrange the batteries close together.
• Use Hawkins inter-battery connectors (Note: Not included with charger) and connect POSITIVE
(RED) connector clip to POSITIVE (marked POS. or +) post of first battery. Connect NEGATIVE
(marked NEG. or -) post of second battery and so on. Continue joining batteries in series until all
batteries are connected and you left with NEGATIVE post not connected on the first battery and a
POSITIVE post not connected on the last battery.
• Connect the POSITIVE (RED) clip from the charger to the unoccupied POSITIVE (marked POS. or
+) post of the battery. Connect the NEGATIVE (Black) Clip from the charger to unoccupied
NEGATIVE (marked NEG. or -) post of remaining battery.
• Connect the AC power cord to the wall plug socket.
• Switch the AC power outlet on and select the current control switches to give the desired ammeter
reading.
• The charge process must be continually monitored to prevent over charging.
• A battery is fully charged when the voltage, on a 12V battery, approaches 15V (use a Digital Multi-
Meter to confirm this) or the SG levels of the cell is 1.225 or higher.
• Occasional bubbles will appear on the surface of the battery acid as the battery nears full charge.
Vigorous bubbling is a sign of overcharging and must be avoided.
• After charging is complete, SWITCH OFF AND DISCONNECT THE AC CORD FROM THE
WALL PLUG SOCKET. TO DISCONNECT THE BATTERIES, REVERSE THE ABOVE
CONNECTION PROCEDURE. NEVER DISCONNECT LIVE CHARGER CLIPS FROM THE
BATTERY TERMINALS.

• ENGINE STARTING: Follow the above steps for battery charging except as follows: Connect
the NEGATIVE (Black) Clip from the charger to the chassis of the vehicle.
•
Charge the battery for at least 15 minutes before charging.
•
When ready to start, select ENGINE START and HIGH then simultaneously crank the engine for 5
seconds. On the PRO 524 a second person needs to press the Start By-Pass button before cranking
the engine. Let the engine starter cool off for at least 10 minutes between engine starts. If your
vehicle has not started after the third attempt, remove the engine starter from the vehicle in reverse
sequence to the connection procedure and check for a fault in the vehicle’s engine or battery.
WARNINIG! – A sign of overcharging is a battery that is hot to the touch.. This is an indication of a
problem battery and/or an incorrect match between the battery and charger. A hot and/or a bubbling
battery must not be left unattended. If the condition persists, disconnect the charger and have the
battery checked at your local automotive service centre.
Hawkins Manual Controlled Chargers should never be left connected to a battery once the battery is
fully charged.
8. MAINTENANCE
Locate and operate your charger as specified in these instructions. Always keep cabinet exterior, leads
and clips clean and free of corrosion. Protect from adverse weather and environment at all times.
Never disassemble your charger. If it requires repair, take it to a qualified serviceman.
This charger should not be used with damaged cords!
9. BEFORE RETURNING FOR REPAIR
When a charging problem arises, make certain the battery is capable of accepting a normal charge –
use a good battery to double check charger. Check all connections, the AC outlet for voltage, charger
clips for correct polarity, and the quality of connections from cable to clips and clips to battery system.
CLIPS MUST BE CLEAN.
When a battery is very cold, partially charged or sulphated, it will not draw full rated current from the
charger. This is a safety factor. It can be both dangerous and damaging to a battery to force a higher
amperage into it than it can effectively use in recharging.
When the charger requires repair take it to a qualified serviceman. If the unit is still under warranty
then take unit and purchase receipt together with warranty slip to your retailer.
10. WARRANTY / REPAIRS
We warrant that this HAWKINS BATTERY CHARGER is free from defective materials and
workmanship, and agree to remedy any such defect or to furnish new parts should this unit fail within
two years from date of purchase. No charge will be made for parts or labour involved, subject to the
following conditions. This warranty is only valid upon presentation of the purchase invoice, date of
purchase clearly indicated, together with this warranty.
• Hawkins product support policy is that a standard repair charge per product line will apply,
regardless what the fault is.
• Shipping costs related to any repair to and from Hawkins is for your own account.
• If it is a warranty claim, shipping the product to Hawkins is for your account, while Hawkins will
pay the shipping costs returning the product to you.
PLEASE NOTE:
• Hawkins reserves the right to refuse repairing any product that has been modified, tampered with or
in a poor condition due to misuse, damage, mishandling or operating it outside of specification.
Ensuring that the product is in a condition worth repairing may save you unnecessary shipping costs.
• Products not collected within 60 days of notification will be sold to defray any expenses.
File: Engine Starter Instructions – 14 May 2010.PDF
OPERATING
INSTRUCTIONS
MODELS:
PRO 224, PRO 324
PRO 524
Hawkins manufactures and markets power solutions in the
form of battery chargers and inverters since 1961. The
Hawkins brand is not only the oldest, but is the market leader
in the field of power solutions in South Africa.
HAWKINS MANUFACTRURING (PTY) LTD
PO BOX 74077, ROCHDALE PARK, DURBAN, 4034
Tel : +2731 579 2813, Fax : +27 579 4642
Web: www.hawkins.co.za email: info@hawins.co.za
 Loading...