

Page 1
1
Page 2

Trademarks & Copyright
Windows 95/98/ME and Windows NT/2000/XP are registered trademarks of Microsoft Corp. All other brands and
product names are trademarks of their respective companies.
No part of this publication may be reproduced in any form or by any means or used to make any derivative (such as
translation, transformation or adaptation) without the express written consent of the manufacturer as stipulated by
the United States Copyright Act of 1976.
FCC Certifications
This equipment has been tested and found to comply with the limits for a Class B digital device, pursuant to Part 15
of the FCC Rules. These limits are designed to provide reasonable protection against harmful interference in a
residential installation. This equipment generates, uses and can radiate radio frequency energy and, if not installed
and used in accordance with the instructions, may cause harmful interference to radio communications. However,
there is no guarantee that interference will not occur in a particular installation. If this equipment does cause
harmful interference to radio or television reception, which can be determined by turning the equipment off and on,
the user is encouraged to try to correct the interference by one or more of the following measures:
x Reorient or relocate the receiving antenna.
x Increase the separation between the equipment and receiver.
x Connect the equipment into an outlet on a circuit different from that to which the receiver is connected.
x Consult the dealer or an experienced radio/TV technician for help.
Shielded interface cables must be used in order to comply with emission limits.
You are cautioned that changes or modifications not expressly approved by the party responsible for compliance
could void your authority to operate the equipment.
This device complies with Part 15 of the FCC rules. Operation is subject to the following two conditions: (1) This
device may not cause harmful interference, and (2) This device must accept any interference received, including
interference that may cause undesired operation.
CE Mark Warning
This is a Class B product. In a domestic environment, this product may cause radio interference, in which case the
user may be required to take adequate measures.
All trademarks and brand names are the property of their respective proprietors.
Specifications are subject to change without prior notification.
HAWKING LIMITED WARRANTY
Hawking Technology guarantees that every Net-StorTMHNAS1 Network Storage Center is free from physical
defects in material and workmanship under normal use for (1) year from the date of purchase. If the product
proves defective during this one-year warranty period, call Hawking Customer Service in order to obtain a
Return Authorization number. Warranty is for repair or replacement only. Hawking Technology does not
issue any refunds. BE SURE TO HAVE YOUR PROOF OF PURCHASE. RETURN REQUESTS CANNOT
BE PROCESSED WITHOUT PROOF OF PURCHASE. When returning a product, mark the Return
Authorization number clearly on the outside of the package and include your original proof of purchase.
IN NO EVENT SHALL HAWKING TECHNOLOGY’S LIABILTY EXCEED THE PRICE PAID FOR THE
PRODUCT FROM DIRECT, INDIRECT, SPECIAL, INCIDENTAL OR CONSEQUENTIAL DAMAGES
RESULTING FROM THE USE OF THE PRODUCT, ITS ACCOMPANYING SOFTWARE OR ITS
DOCUMENTATION. Hawking Technology makes no warranty or representation, expressed, implied or
statutory, with respect to its products or the contents or use of this documentation and all accompanying
software, and specifically disclaims its quality, performance, merchantability, or fitness for any particular
purpose. Hawking Technology reserves the right to revise or update its products, software, or documentation
without obligation to notify any individual or entity. Please direct all inquiries to:
techsupport@hawkingtech.com
.
2
Page 3

Introduction 4
Package Contents 5
Hardware Description 6
IP Protocol Setup 7
Hard Drive Installation 17
Quick Setup Wizard 19
Access the Device 27
Management Guide 28
Set Up the Network Storage Center 28
Homepage 29
Status Details 30
Network Settings 31
Host Name 31
IP Address 32
Superuser/Password 33
Administration 34
RestartSystem 34
HD Format 35
Factory Default Reset 36
SystemTime 37
Character Set 37
Share 38
User Configuration 41
Folder Configuration 41
FTP 44
FTP Configuration 44
FTP Password 45
Setup Tip 46
Applications for the Device 49
Troubleshooting 51
Specifications 53
3
Page 4

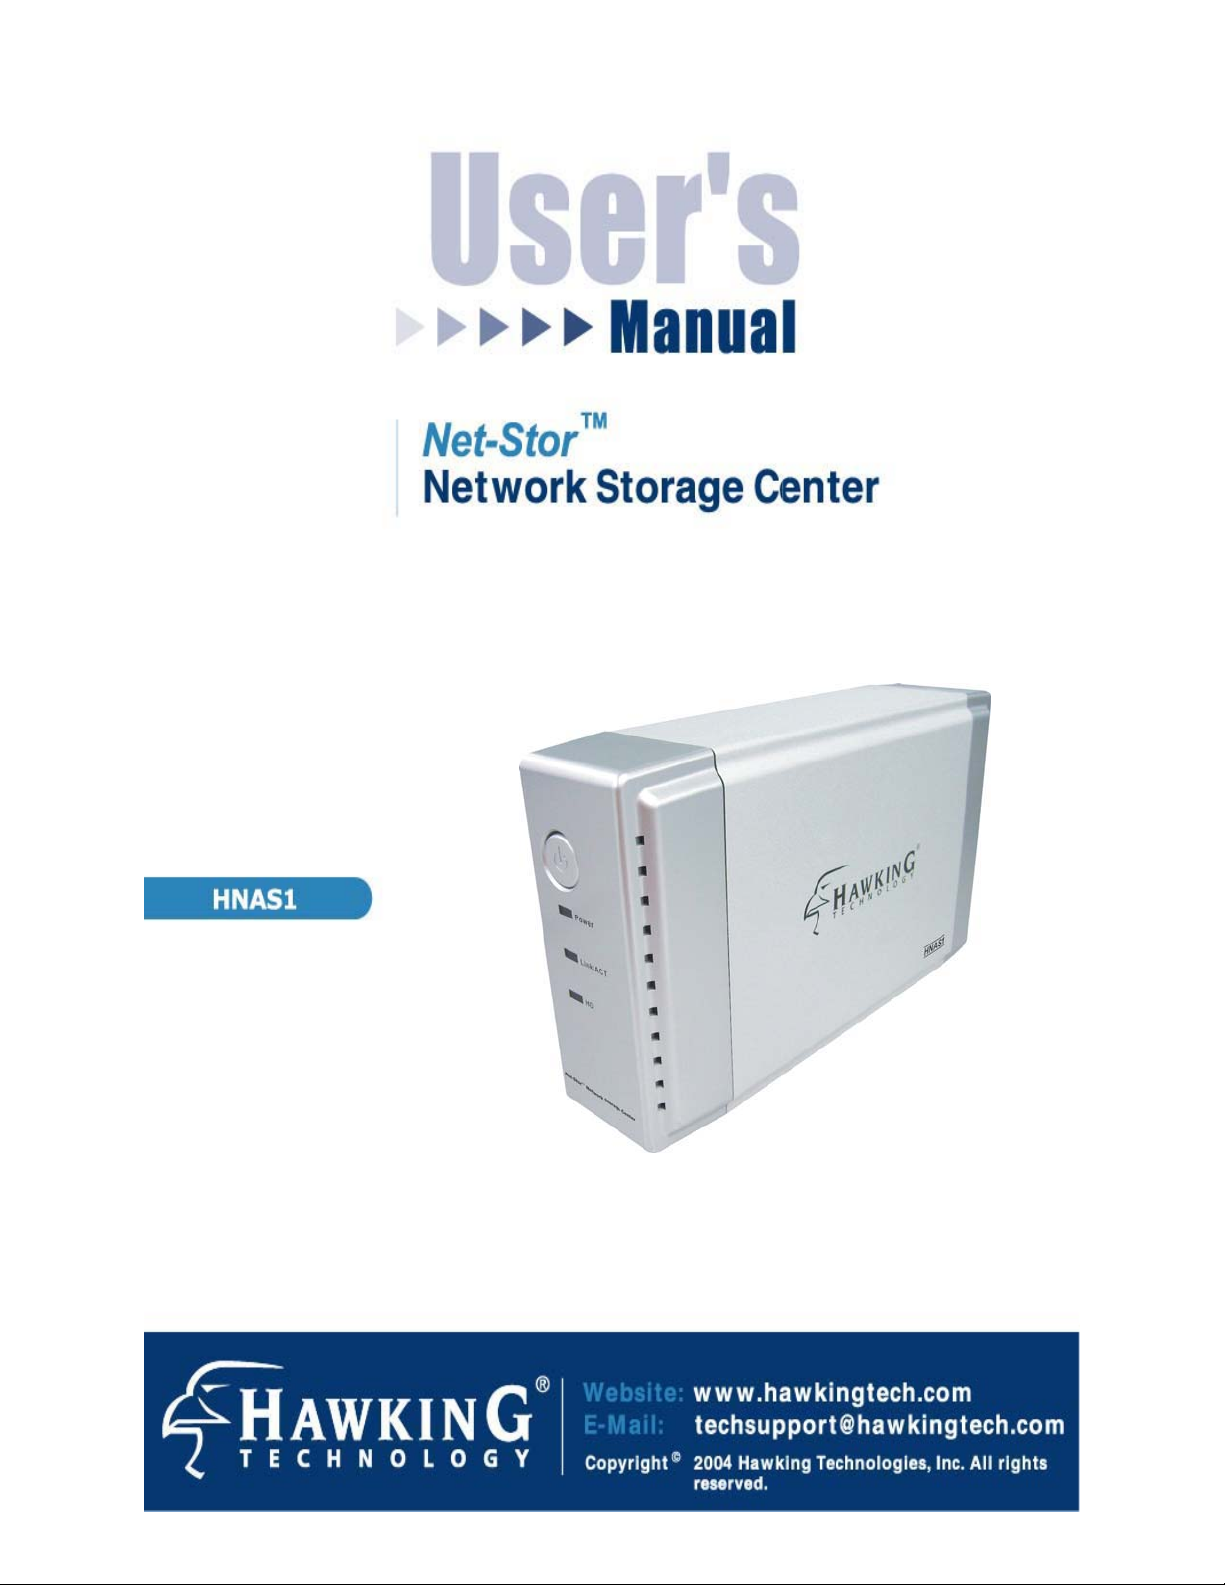
Powerful and Easy
The compact Hawking HNAS1 Net-Stor
TM
Network Storage Center is an economical and powerful
device, and provides an ideal solution for small business and small office/home office users. The HNAS1
functions as both a file server and FTP server, and can be used to easily share video, music, and data files.
It can also be configured to allow the transfer or backup of files directly over the Internet via the web
browser or FTP. The HNAS1 is compatible with Windows95/98/98SE/ME/XP/2000/NT4.0 network
environments. It supports all standard 3.5” IDE Hard Drives of up to 250GB (hard drive not included).
The Smart Setup Wizard makes installation of the Network Storage Center simple and the user-friendly
web interface makes it easy to manage.
Smart Wizard
The HNAS1 features a smart Setup Wizard that makes installation easy. Powerful auto-installation
features, hard drive auto-detection, pre-defined user accounts, and auto-networking settings all provide
the user with a simple and convenient way to install and set up the Network Storage Center. All the user
has to do is plug in the device and turn it on, utilize the Setup Wizard, and the Network Storage Center is
ready for use.
Key Features
x Supports one 10/100Mbps Ethernet port (Auto MDI/MDIX) for network connection
x Web-based user interface for easy configuration and management
x Supports one user-selectable high speed ATA/ATAPI-6 hard drive
x Supports all standard 3.5” IDE hard drives up to 250GB (hard drive not included)
x Replaceable hard-drive feature
x Auto-Networking Configuration Utility for Windows OS
x Supports CIFS/SMB for Microsoft Network remote users, allowing them to easily retrieve files using
“My Neighborhood”
x Built-in FTP server, allowing users to conveniently transfer files via FTP client
x Compatible with Windows 95/98/98SE/ME/XP/2000/NT4.0
x Built-in hardware button for Factory Default Reset (if necessary)
x Firmware upgrade via web interface page
x Features three pre-defined user levels: all/power/guest, for access accounts.
x Allows for five online SAMBA users (concurrently connected) and five online FTP users
(concurrently connected)
x Auto-detects Network Storage Centers for newly installed Network Storage Centers (only for the 1
st
FAT32 partition)
x Supports static IP addresses
x Provides password security for web management & Network Storage Center access
x FCC, CE, VCCI Class B
4
Page 5

Unpack and Inspect
Open the package and carefully remove all items. The complete HNAS1 package consists of:
x One HNAS1 Network Storage Center (hard drive not included)
x One CD with utility, user’s manual, and quick installation guide
x One quick installation guide
x One power adapter (12V/3A)
x Four rubber feet
x Four screws for fastening/securing the hard drive
Please check to make sure that the unit was not damaged during shipping and that no items are missing. If
you encounter a problem, please contact your dealer.
Please read this manual thoroughly, and follow the installation and operation procedures contained
within.
5
Page 6
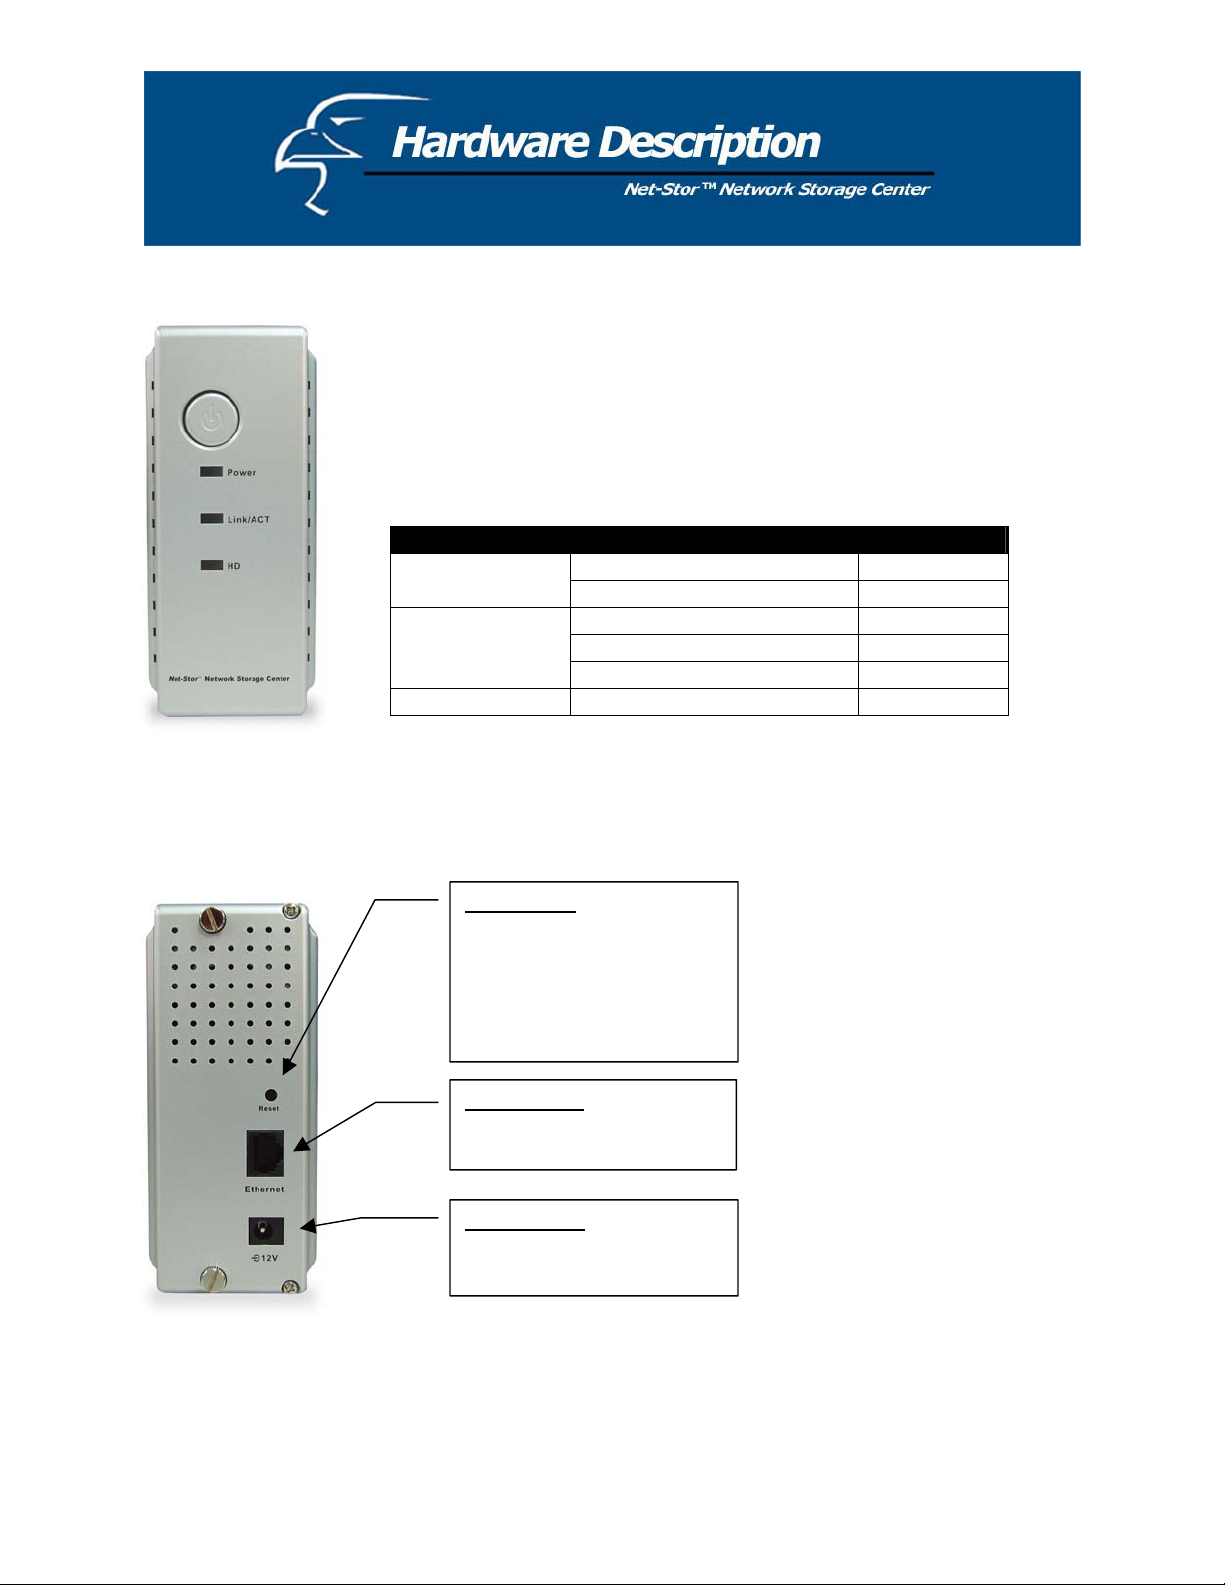
Front Panel
Rear Panel
Power Button
To activate the Network Storage Center, press this Power button located on
the front panel of the device. To power off the unit, press the Power button
for two seconds until the Power LED starts to blink.
LED Definitions
LED Status
ON /OFF Green/DarkPower
Boot/Shutdown: Blinking
Link/ACT
Ethernet Connected Green
Ethernet Not Connected Dark
Ethernet Data Transfer Blinking
HD
Hard Drive Data Transfer Amber/Blinking
Reset Button
To restore the default settings,
use the tip of a ballpoint pen or
paper clip to hold this button
down for at least five seconds.
This will cause the default reset
to begin.
Ethernet Port
Use an RJ-45 Ethernet cable to
connect the device.
Power Supply
External power adapter:
DC 12V/3A.
6
Page 7

Configuring the Network Protocols
Please Note: If your PC obtains its IP address automatically, the Setup Wizard will not be able to get the
PC’s IP in order to setup its network configuration, etc. To solve this problem, you will need to connect
your PC to a router with a DHCP Server, or set a static IP address in your Windows Network dialog box.
How to Configure the TCP/IP Network Protocol
Regardless of what version of Windows you are using, TCP/IP will be the most appropriate protocol to
use because it is typically installed automatically when first installing the drivers. If it is not installed
automatically, it can easily be added to your system. Please Note: if it is already installed, you can
proceed directly to the Hard Drive Installation section, and Quick Setup Wizard section that follows it.
You need to configure a unique IP address for each PC on the network in order to complete the setup
process successfully. To do this, follow the instructions below:
An IP address is a set of numbers consisting of four segments (or octets), with each segment separated by
periods. The number in the last segment must always be between 0 and 255. The first three segments can
be set to something such as 192.168.1. These three segments must be the same for all clients. The last
segment is the one that applies specifically to your PC (or other client) and should be a number between 2
to 255 (for example, 192.168.1.2) so that it does not conflict with the Network Storage Center’s default IP
address of “192.168.1.1”.
7
Page 8

How to Configure the TCP/IP Network Protocol
Windows 98/Me:
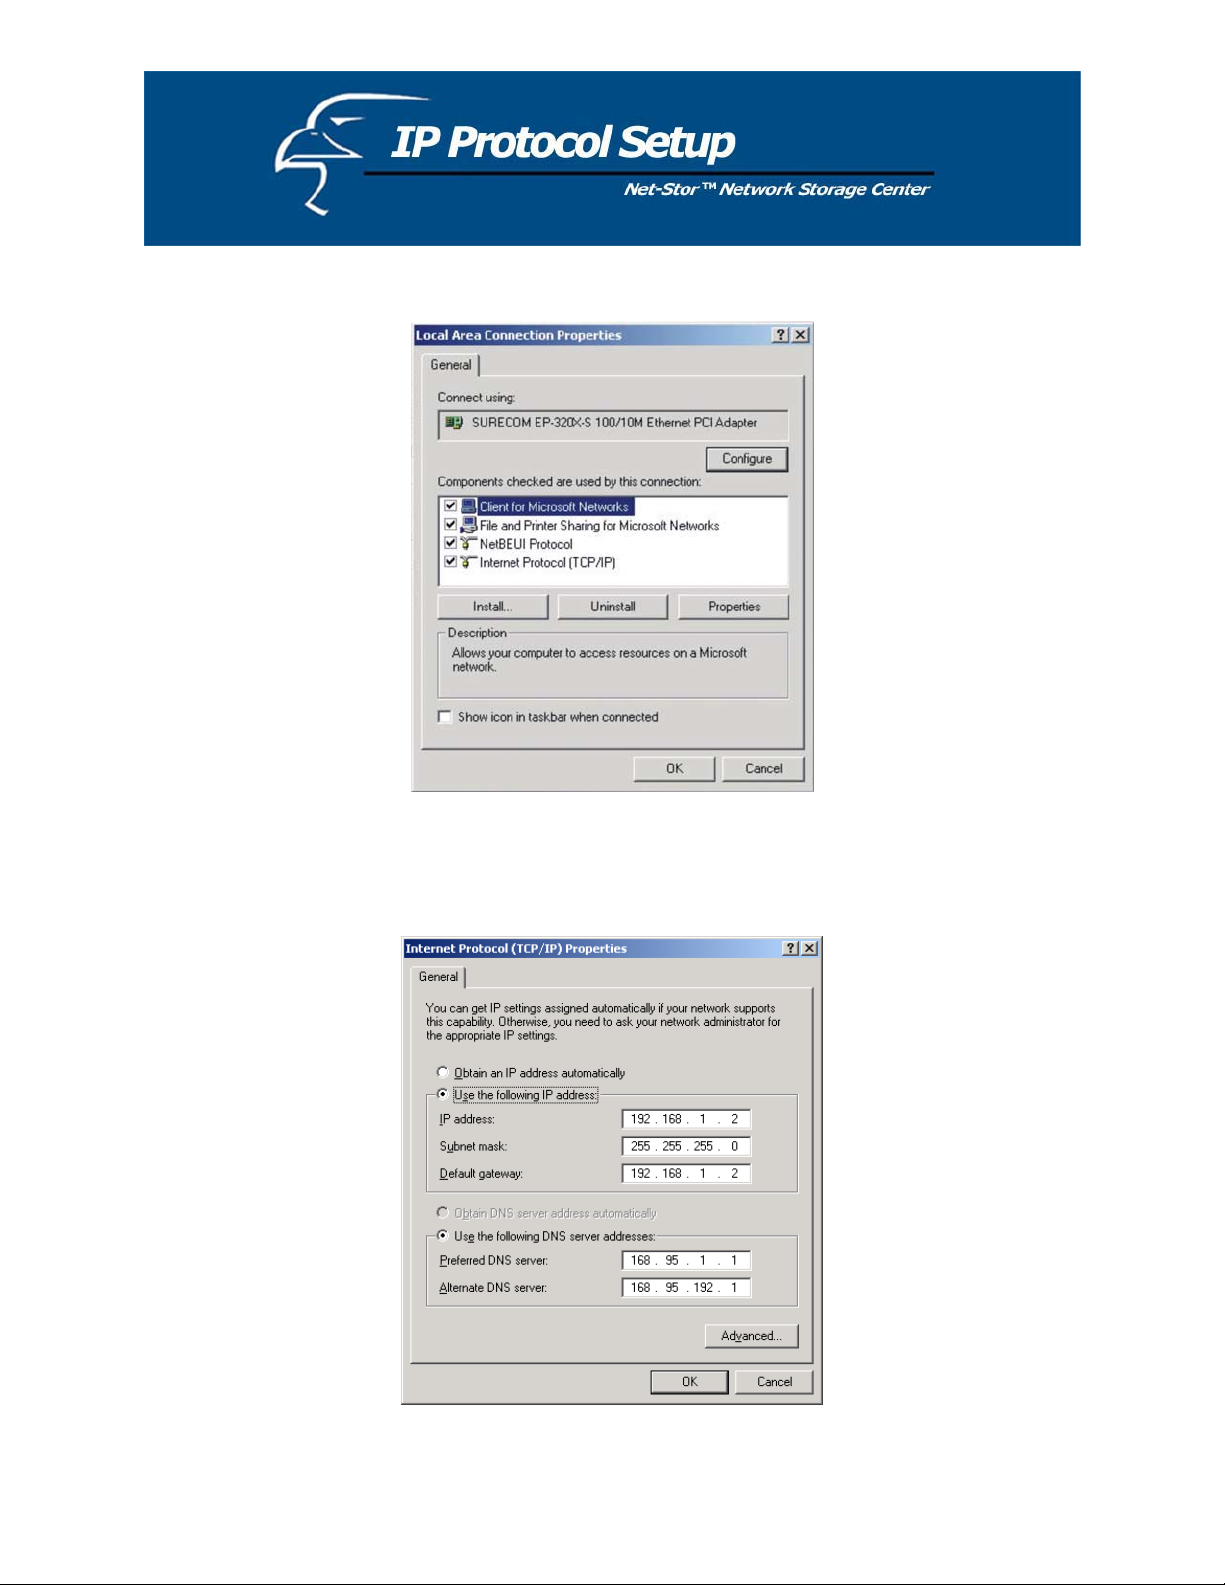
1. Click on Start-> Settings-> Control Panel-> Network.
2. Click TCP/IP -> Ethernet Adaptor and click Properties.
8
Page 9
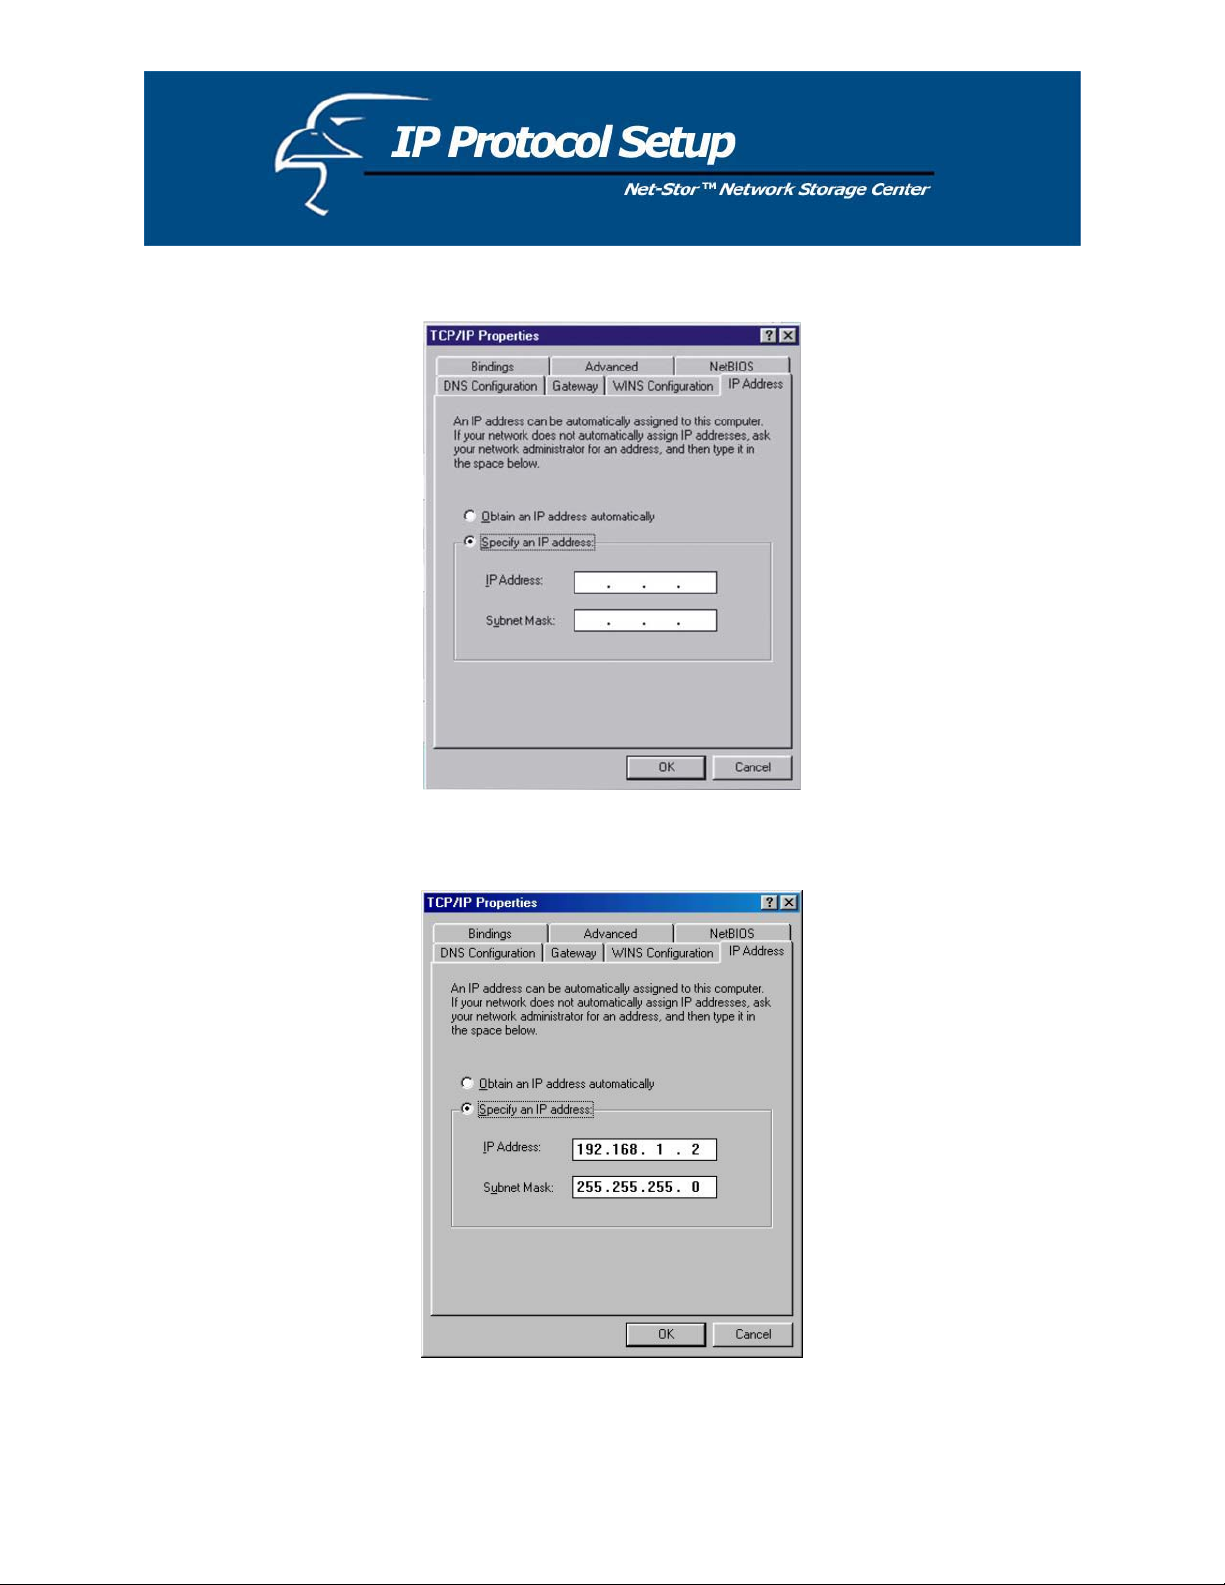
3. Click IP Address and click on Specify IP Address.
4. Type in the IP Address. Make sure you set the Subnet Mask to 255.255.255.0.
5. Click OK. At this point, you may be asked for your Windows disk. Follow the on-screen displays and
then restart your computer.
9
Page 10
How to Configure the TCP/IP Network Protocol
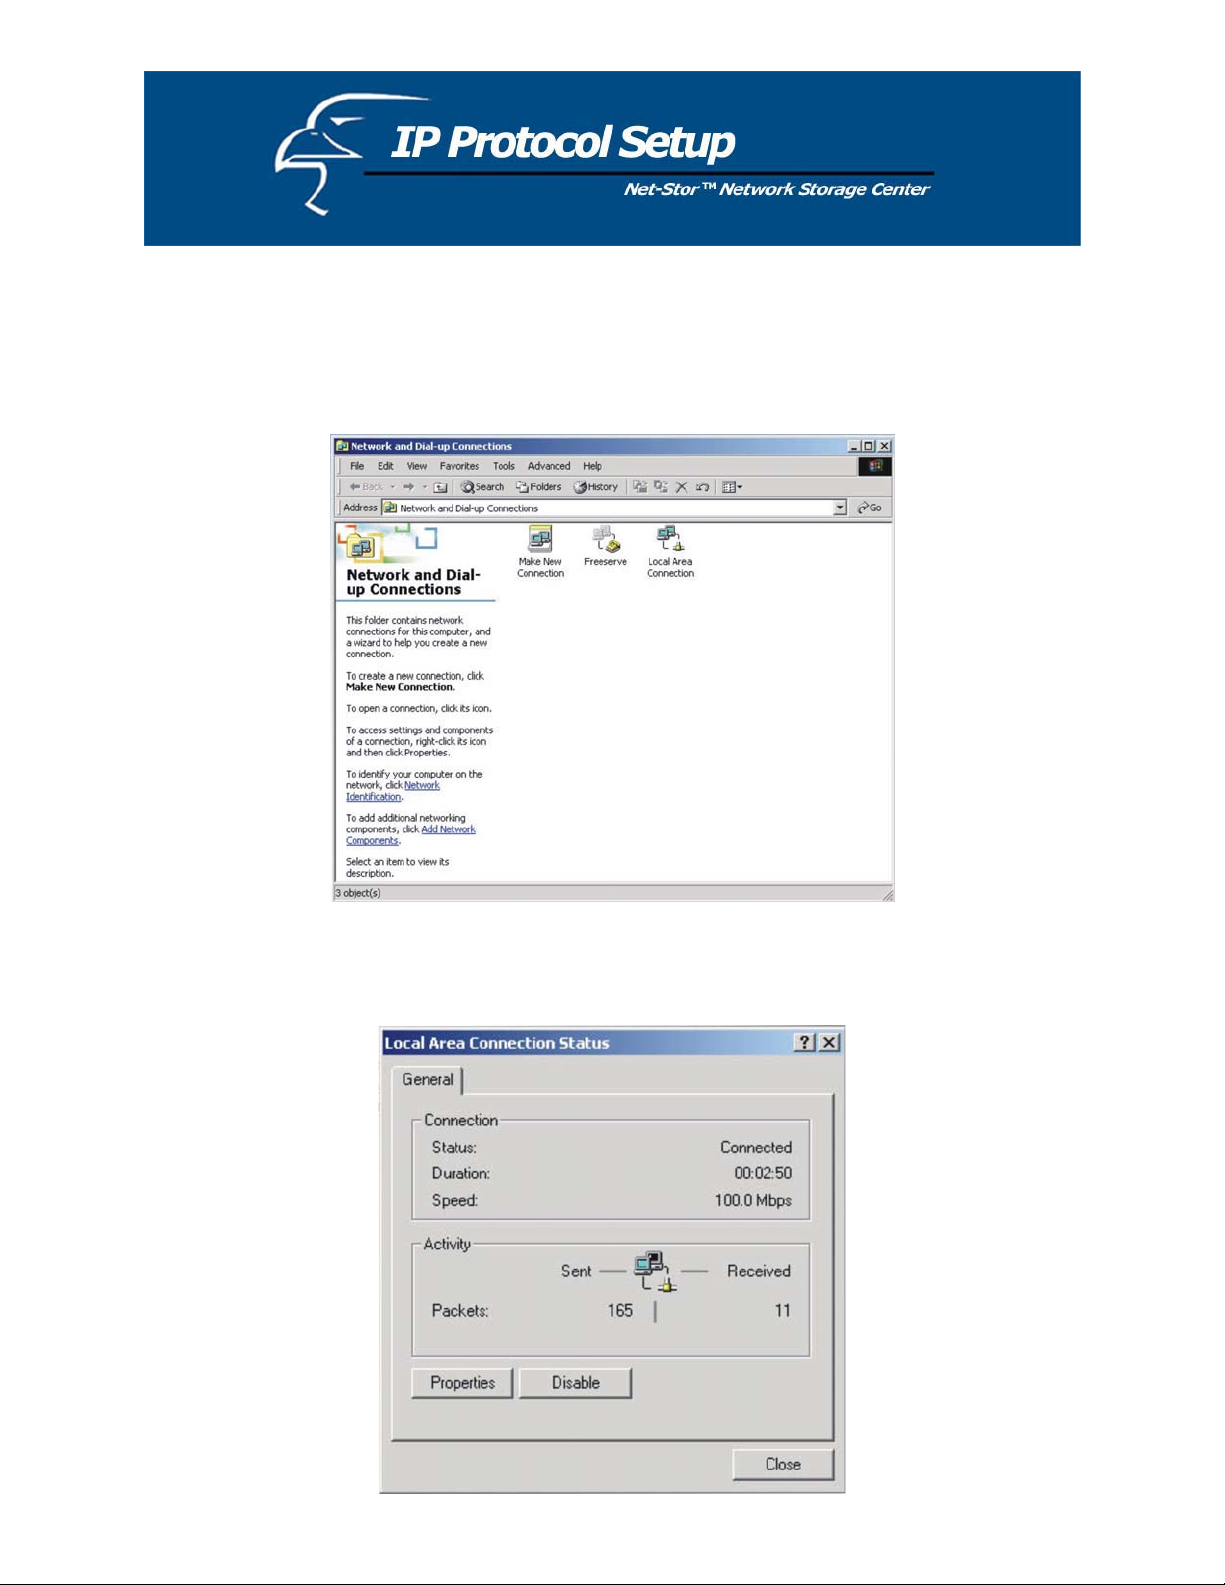
Windows 2000:
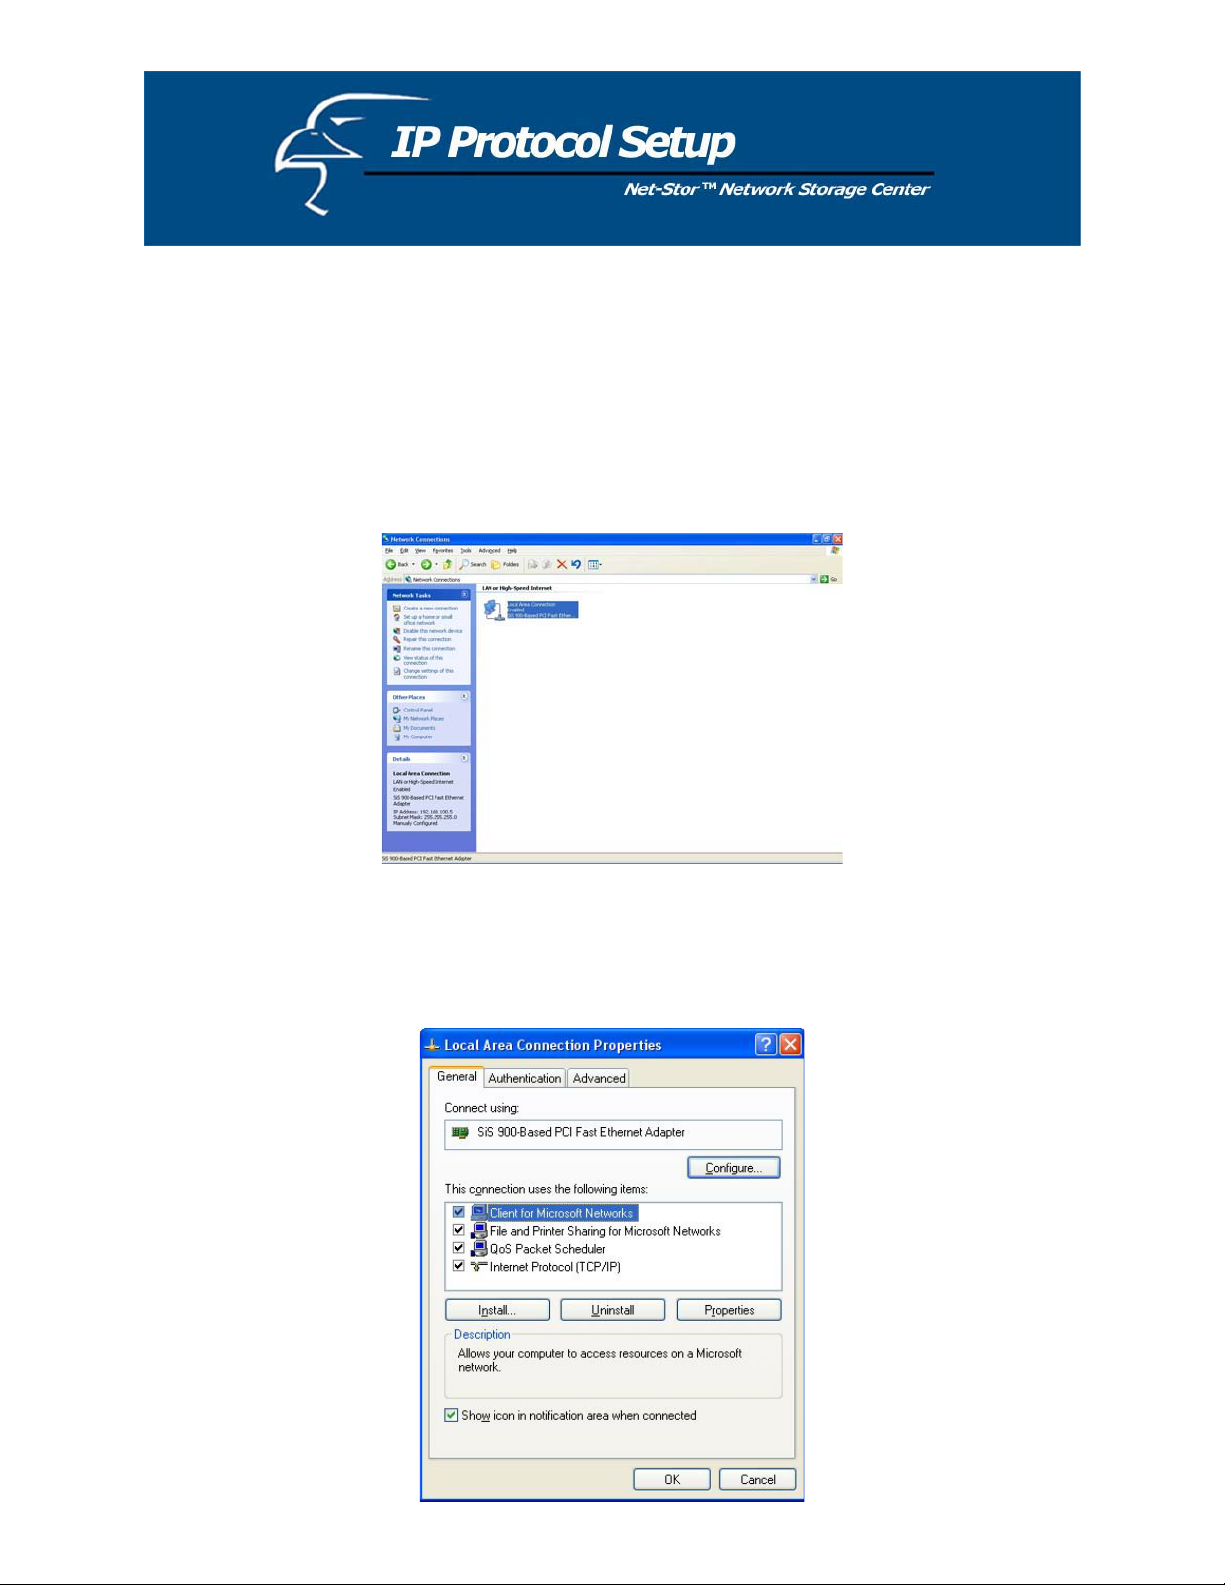
1. Click on Start-> Settings-> Network and Dial-up Connections.
2. Choose Local Area Connection and click on Properties.
10
Page 11
3. Click on Internet Protocol (TCP/IP) and then click on Properties.
4. Click on Use the following IP address. Make sure you set the Subnet mask to 255.255.255.0.
Click OK and then OK, and restart your computer.
11
Page 12
How to Configure the TCP/IP Network Protocol
Windows XP:
1. If you are in classic Start menu view, click on Start->Settings->Control Panel->Network
Connections. If you are in standard Start menu view, click on Start->Control Panel->Network
Connections.
2. Double click on Local Area Connection.
3. Choose Internet Protocol (TCP/IP) and then click on Properties. Click on Use the following IP
Address.
12
Page 13
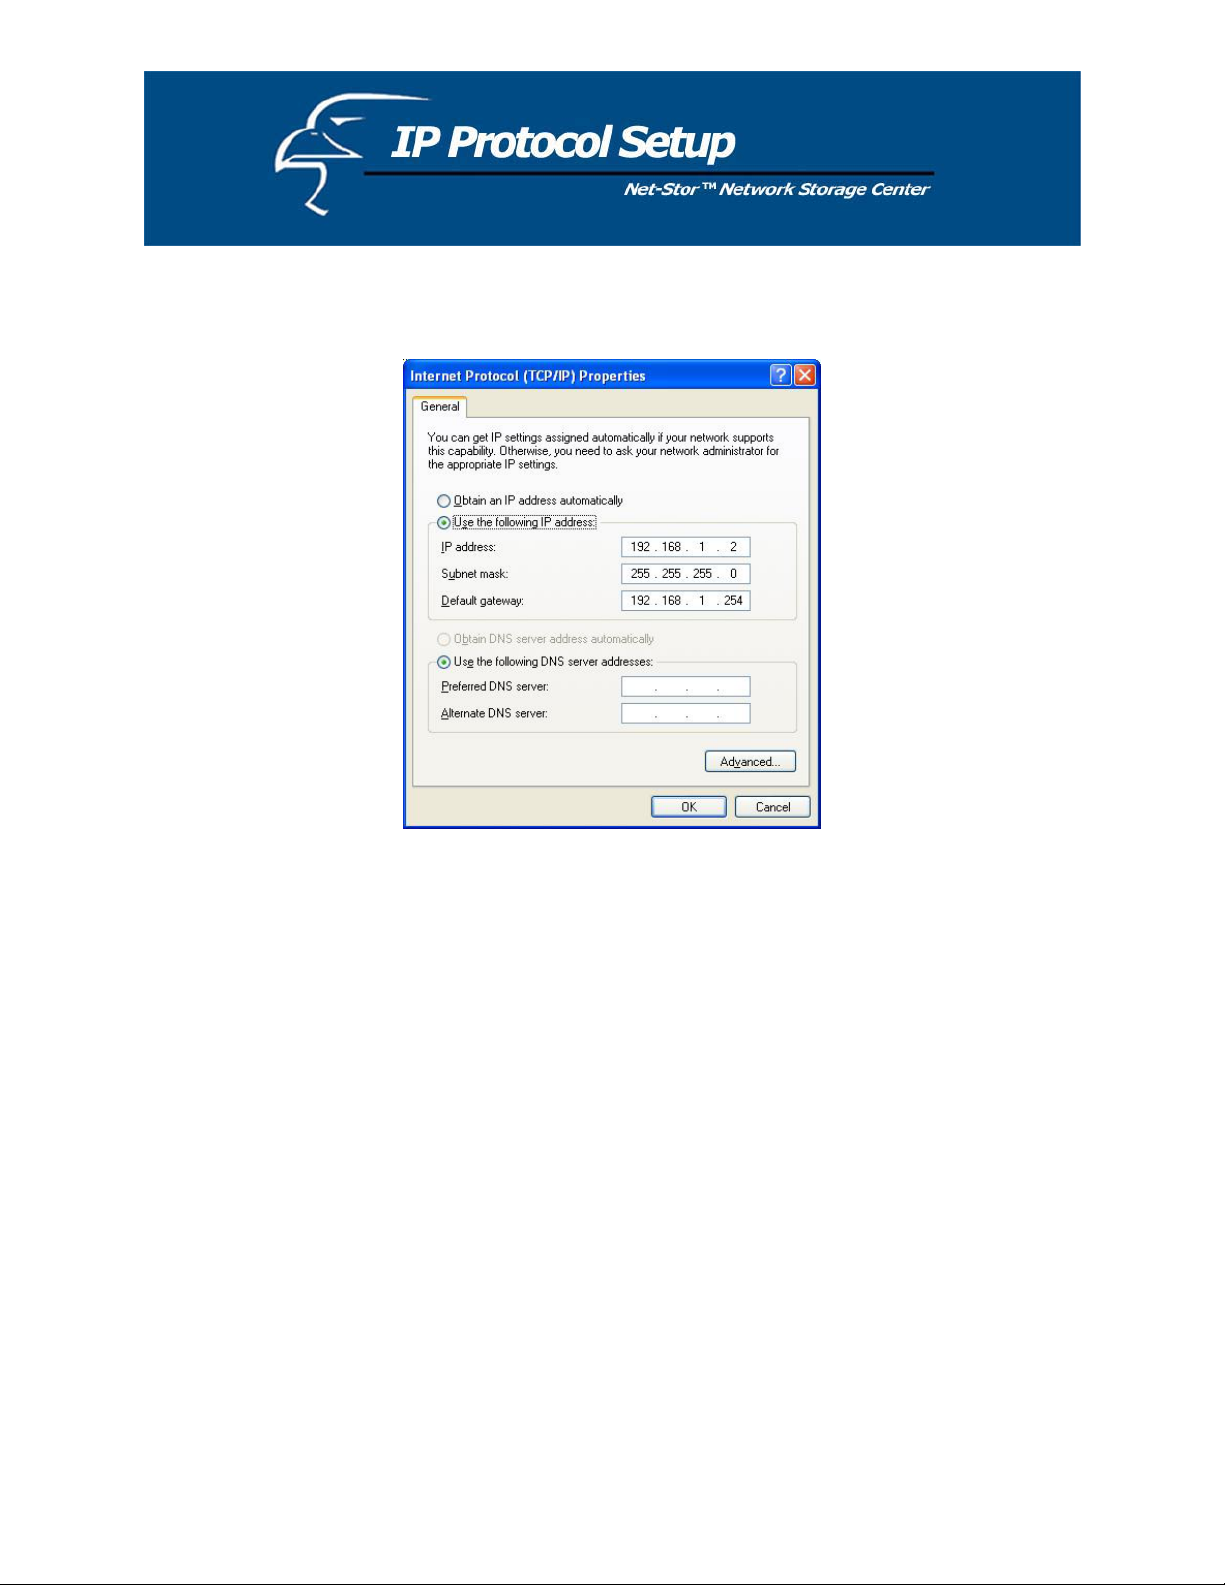
4. Key in the IP Address that you chose earlier. The subnet mask is entered automatically in Windows
XP. Click OK.
Now the configuration of your PC’s IP settings is complete. Please review the sections that follow to
complete the hard drive installation and Quick Setup Wizard.
13
Page 14
If you already have an established local area network, the following steps will allow you to determine the
m
n
three common segments that the IP addresses of all devices on the network share.
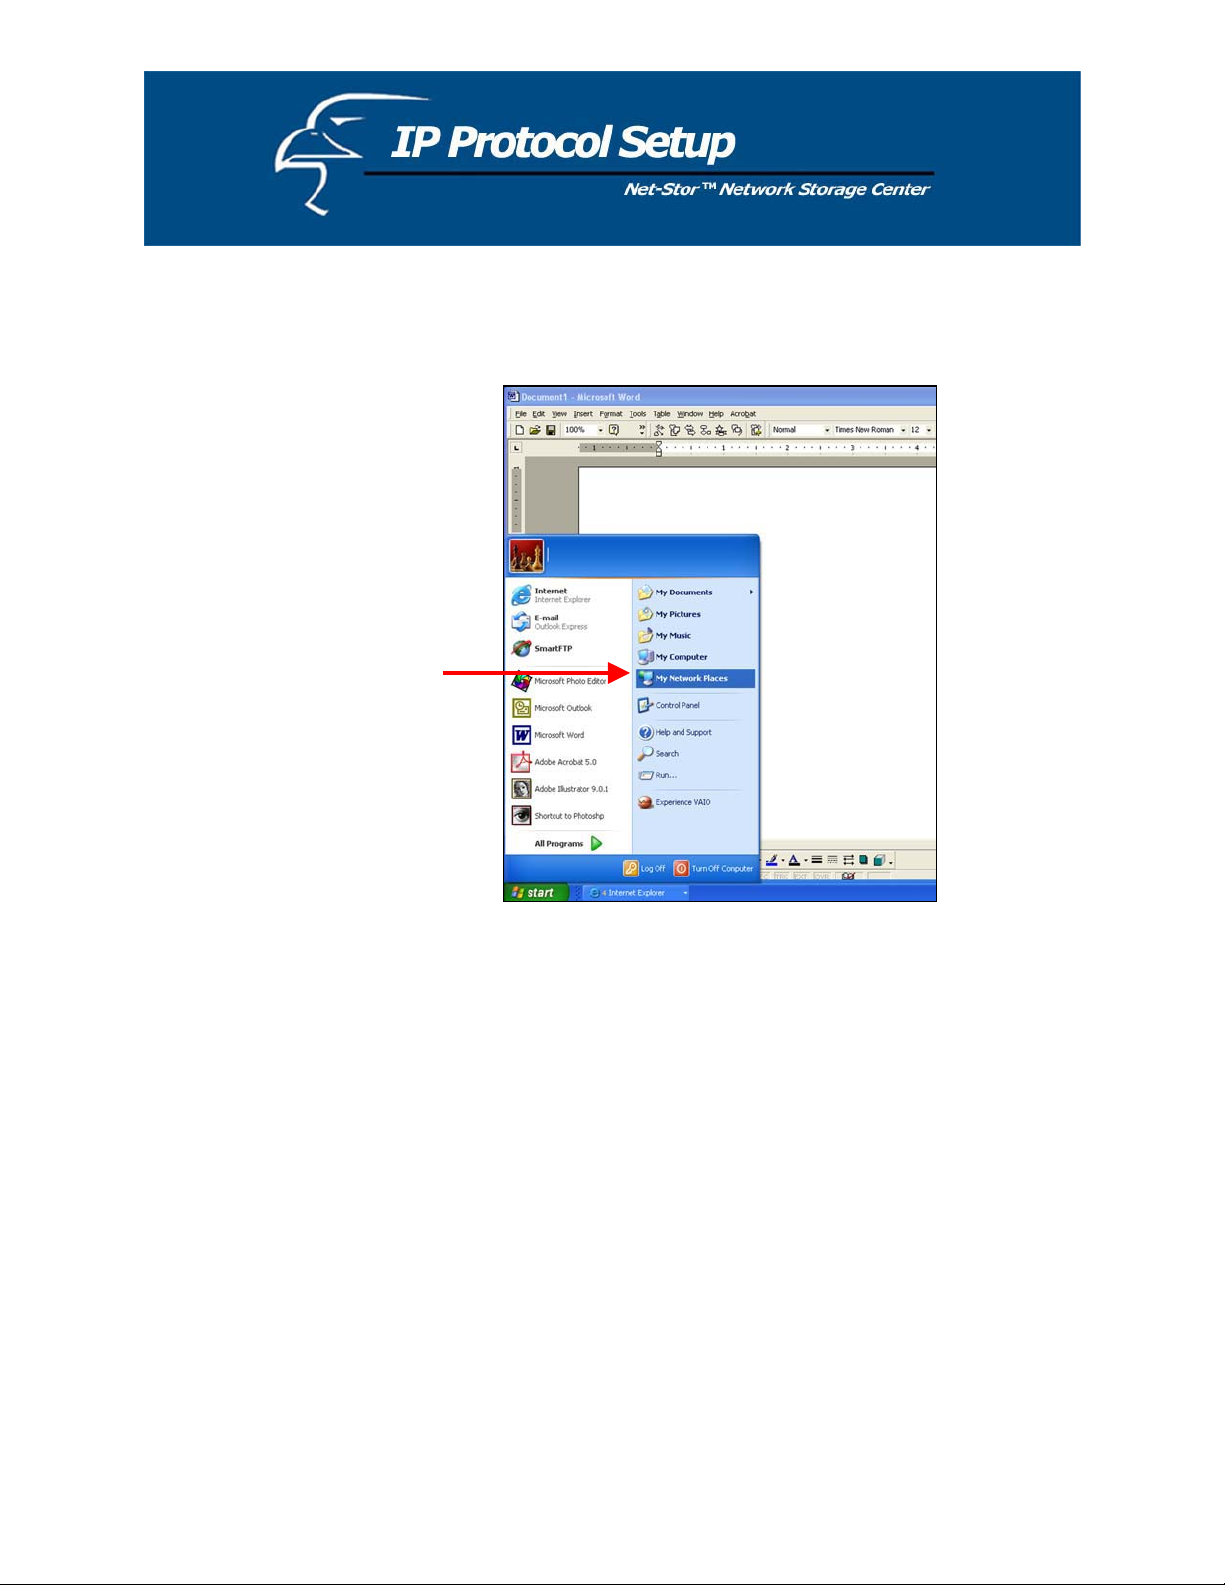
a. Click on Start in the botto
left corner of your screen. The
click on My Network Places.
a
14
Page 15
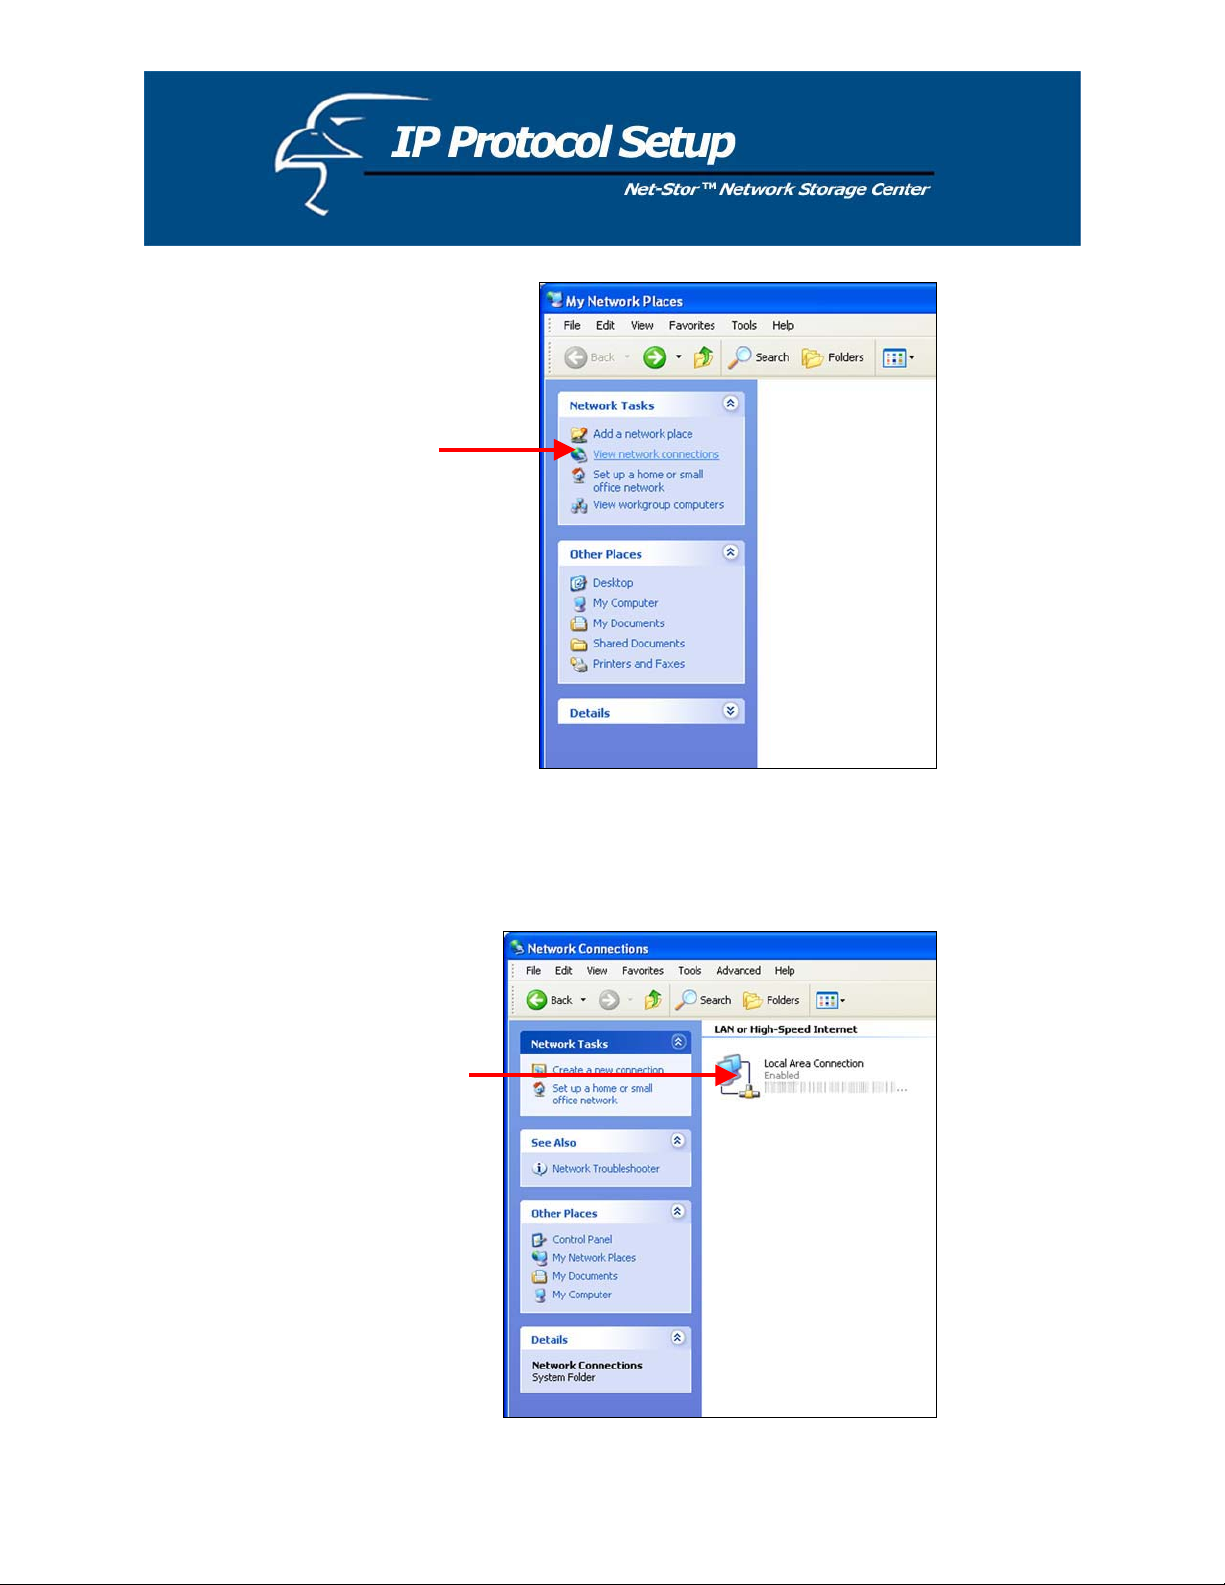
b. Click on View Networ
k
n
r
n
y
r
n
Connections.
b
c. In the Network Connections
window, you should see an ico
titled Local Area Connection (o
something similar). You ca
access this icon in two ways: a. b
clicking or double-clicking on it, o
b. by right-clicking on it and the
clicking on Status from the
resulting menu.
c
15
Page 16
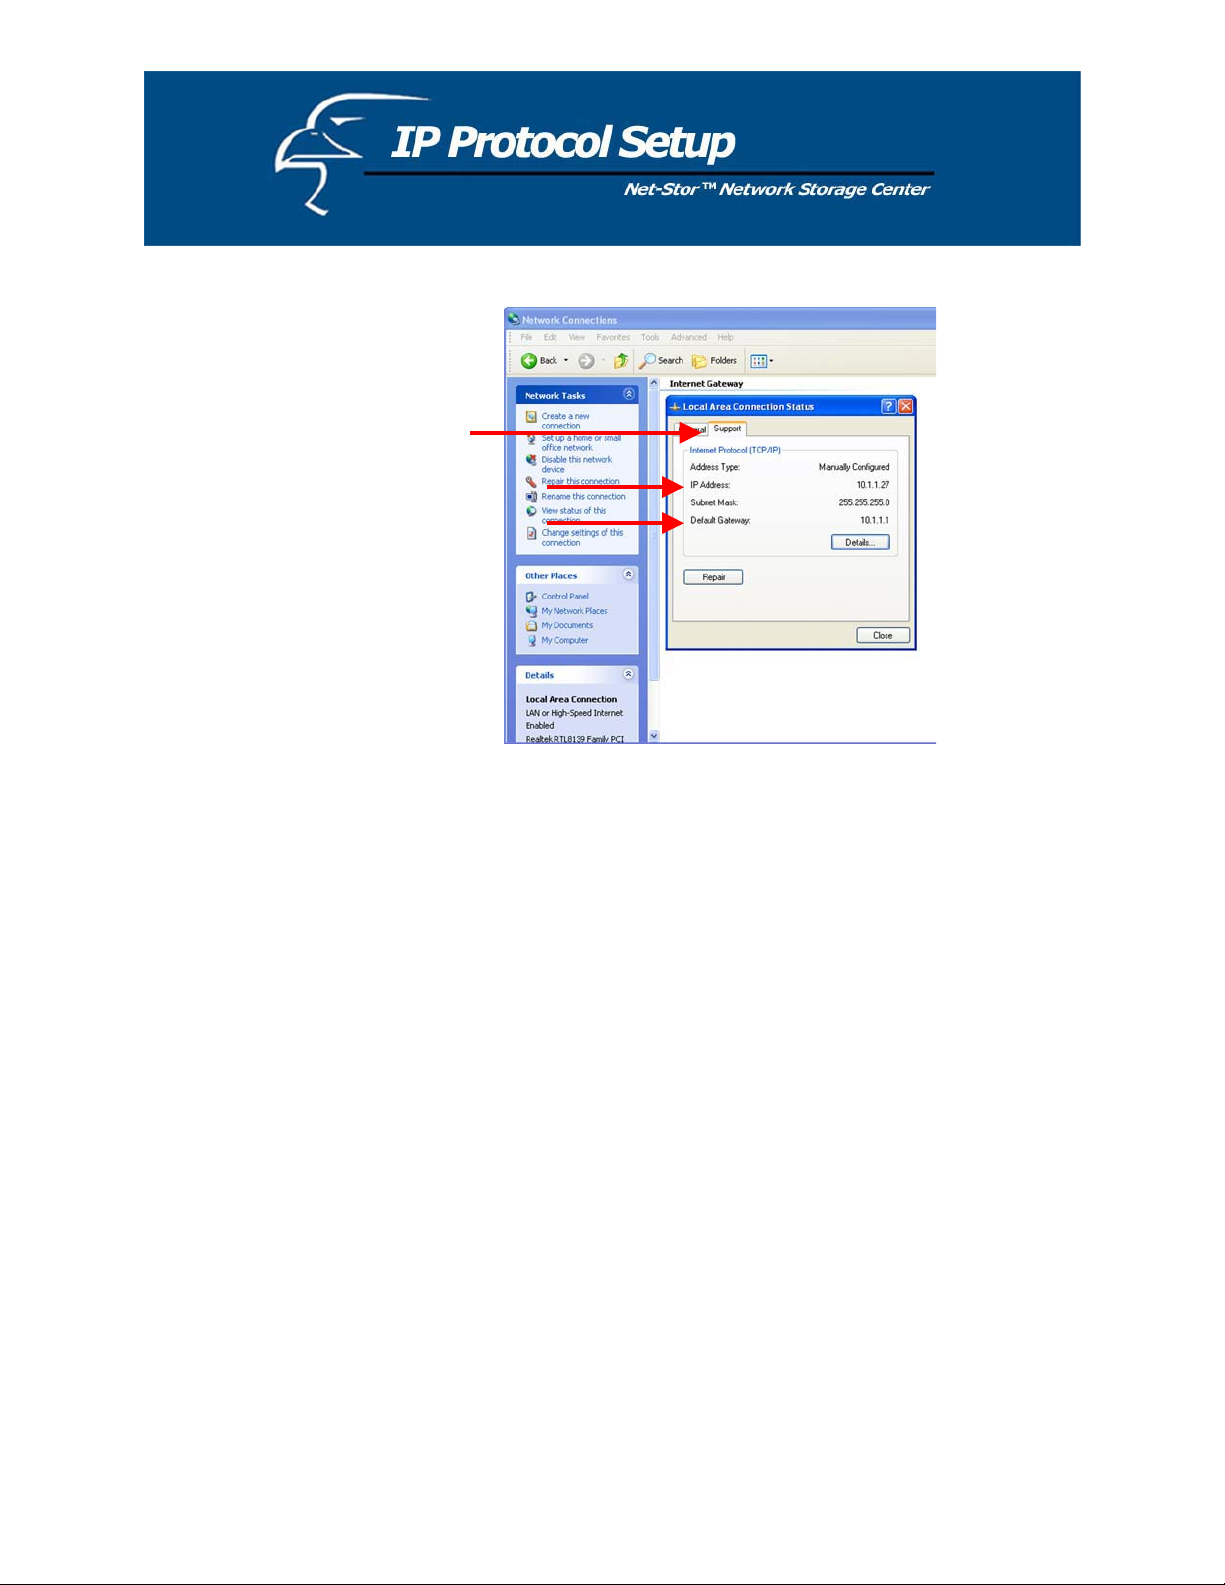
d. A window with the title Loca
l
r
r
u
a
h
r
k
a
Area Connection Status (o
something similar) will appear.
Click on the Support tab. Unde
the heading Address Type, yo
will find an IP Address line and
Default Gateway line. These two
lines will have IP addresses wit
the first three octets in common.
Use this information to set the IP
address for your network camera.
You will use these same three
octets as the first three octets fo
the IP address of your networ
camera. The final octet will be
number between 0 and 254.
d
16
Page 17

How to Connect Your Hard Drive to the Network Storage Center:
1. Loosen the two screws on the rear panel either using a screwdriver or by hand.
Screws
2. Grab the front panel and separate the hard drive holder from the case.
3. Your hard drive jumper should be set to Master. Different hard drives have different jumper settings.
Please refer to your hard drive’s user’s manual for more information.
4. Insert the IDE connector into the IDE socket of the hard drive. Make sure Pin 1 on the cable is
connected to Pin 1 on the hard drive socket. Pin 1 is the red or pink strip on the edge of an IDE cable.
The IDE cables are designed to fit in only one direction, which will correspond to pin 1.
IDE Connector
17
Page 18

5. Push the power connector into the power socket of the hard drive, as shown. The power cable is
designed to go in one way, to avoid any potential errors.
Power Connector
6. Secure the hard drive using the provided screws.
7. Push the hard drive and its holder back into the box and secure it with the two screws provided.
18
Page 19

If you are using the Network Storage Center for the first time, the Setup Wizard will provide you with a
N
simple and easy way to set up the device. The Setup Wizard will guide you through the connections of
the necessary cables as well as the settings for network configuration.
ote: In the Setup Wizard, as well as the Network Storage Center’s web user interface, you will frequently see
the term “Network HD”. It is interchangeable with the term “Network Storage Center” and both are used to
describe the HNAS1. Please note, however, that “Network HD” is different from the term “HD” or “hard drive”.
“HD” or “hard drive” is used to describe a basic 3.5” IDE hard drive, not the Network Storage Center.
Please follow the steps outlined below:
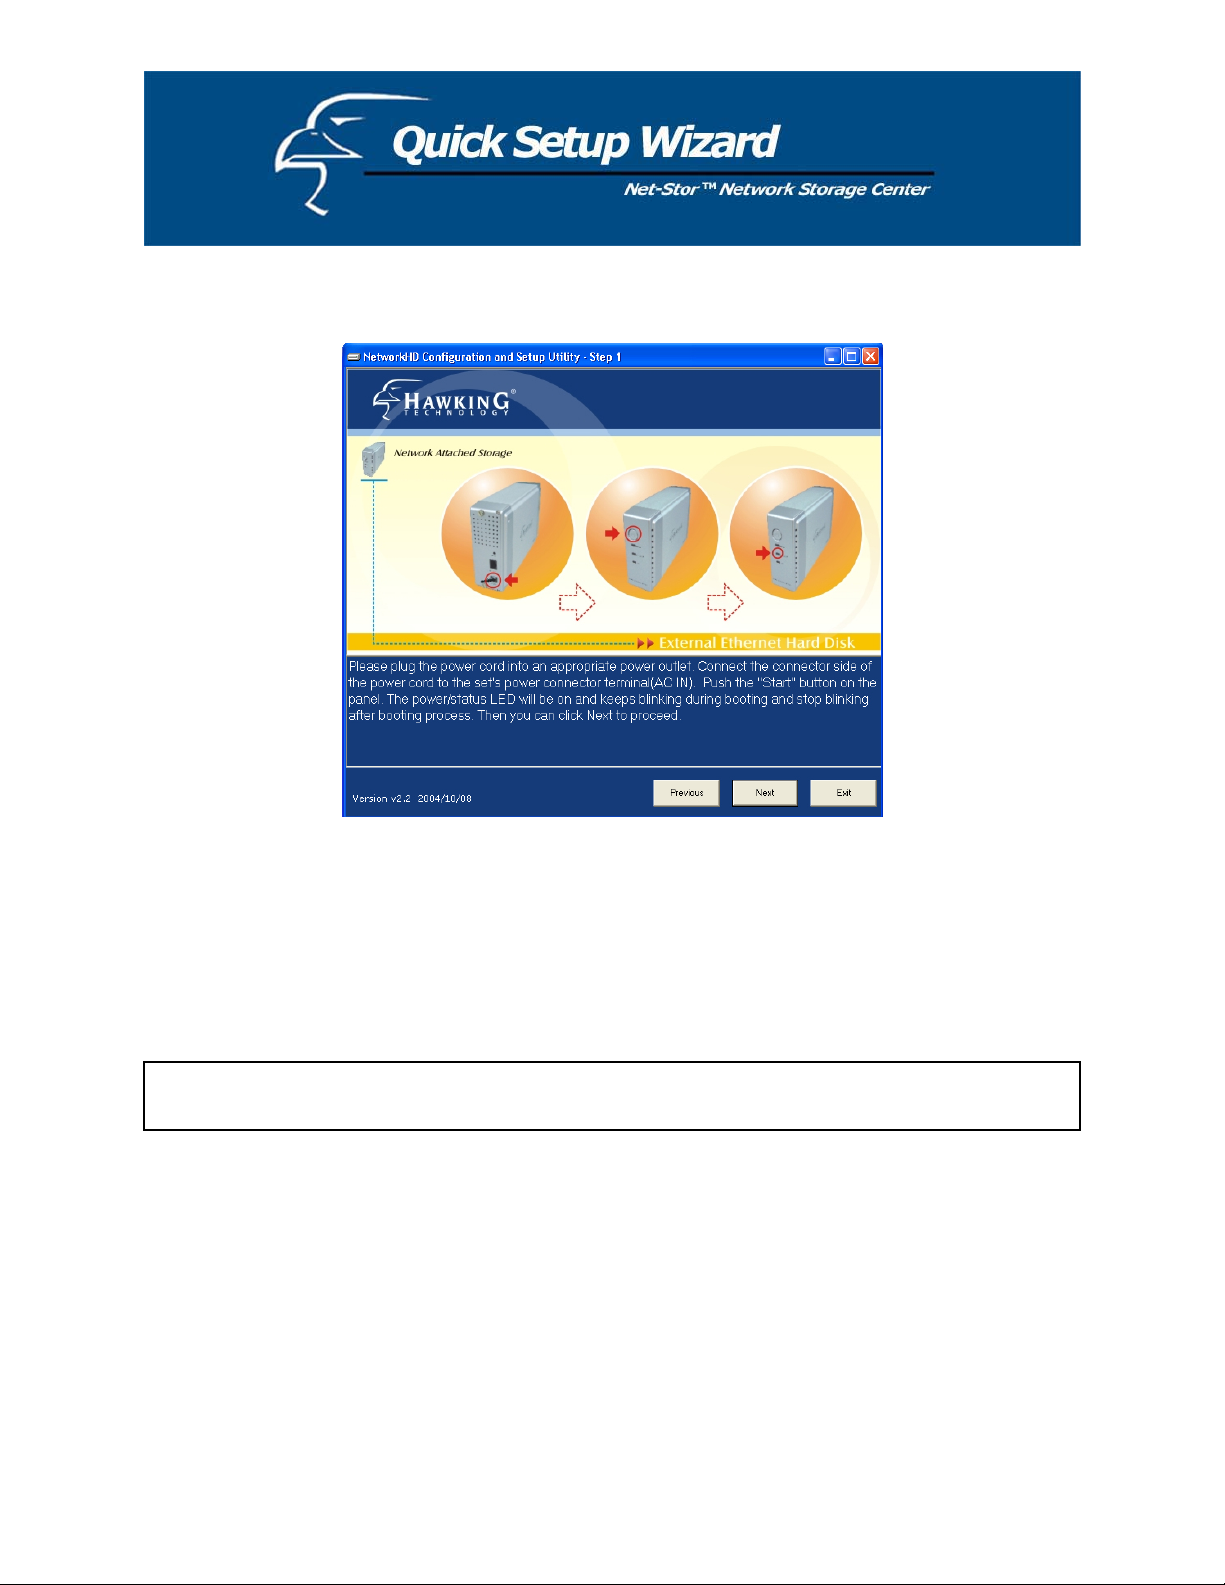
1: Activate The Utility Software
Place the utility CD (included with the HNAS1 package) into your CD-ROM drive and wait for the Autorun menu to appear on your screen. Then click on Quick Setup Wizard. If the utility does not activate
automatically, click the Start button in the lower left corner of your screen, select Run, type
D:\autorun.exe (where D is the letter of your CD-ROM drive) into the open window and click Enter.
Welcome Page
The figure shown above is the Welcome page for the Quick Setup Wizard. Follow the program, as
shown in the pages that follow, to complete the LED check, installation of basic cables, and network
configuration.
Click Next to continue.
19
Page 20
2: Follow the Setup Wizard to Complete Installation
N
Power On
Connect the power cord and press the “Power” button on the front panel of the Network Storage
Center.
Ensure that the “Power” LED is lit green.
ote: To power off the device, hold down the “Power” button for at least five seconds until the “Power” LED
starts blinking and then turns off.
20
Page 21

LAN Connection
Connect the Network Storage Center and router/switch (or PC) with an RJ-45 Ethernet cable.
Ensure that the “Link/Act” LED is lit green.
21
Page 22

3: Click “Next” to start the Scan
Prepare to Scan
Scan Hard Drives on the Network
The Setup Wizard will scan your network to locate all available Network Storage Centers (or
Network HDs)
22
Page 23

Refer to the figure on the following page. Select the Device you want to set up and Click “Next”.
Reachable Status Action
NO The Network HD’s
network settings are not
compatible with your LAN.
Changes the network
settings and creates two
shortcuts to access and set
up the Network HD
YES The Network HD’s
network settings are
compatible with your LAN
Creates two shortcuts to
access and set up the
Network HD
Hard Drive(s) Found
The Setup Wizard should automatically assign to the device an IP address that is consistent with your
existing network settings.
23
Page 24

User name/Password Reminder
When the box shown above appears, please input “admin” in both fields, as these are the default
values for both the User Name and Password. For more information, please refer to the user’s
manual.
Settings
24
Page 25

The Setup Wizard should complete successfully. This will be indicated by the red check marks in the
figure on the previous page.
If the Setup Wizard does not complete successfully, please try the following:
x Check your network or PC settings to make sure that they are configured properly
x Re-start and proceed through the Setup Wizard again
x Refer to the user’s manual (on the CD) for help
Please read this carefully.
If the Setup Wizard completes successfully, the message shown above will appear. Please read it
carefully and click OK.
o The shortcut “Setup My Network HD” will connect you to the device’s web user interface
when you double-click on it. Again, the default User Name and Password are both “admin”.
o The shortcut “Access My Network HD” will allow you to access the drive and shared folders
when you double-click on it.
25
Page 26

Click OK to set up your Network Storage Center
g
N
r
Click OK to access the device’s web-based user interface, or click Cancel to close the Setup Wizard
program without opening the webpage.
Setup my Network HD Setup the Network
Stora
e Center by Web-Browser Ex I.E.
Access My Network Storage Center.
Icons Created
When you see that the two icons have been created on the desktop of your PC, you can start using the
Network Storage Center or configure additional settings via the web-based user interface. Regarding the
ettings, please refer to the “Management Guide” in the user’s manual.
s
ote: It is recommended (but not necessary) that you map the Network HD to your PC as a network drive. The
device will then automatically reconnect and always be available as a network drive whenever you re-start you
PC. For more details, please see the “Setup Tip” that follows the “Management Guide” section of this user’s
manual.
Regarding the steps for access and setup, please follow the instructions in the pages that follow.
26
Page 27
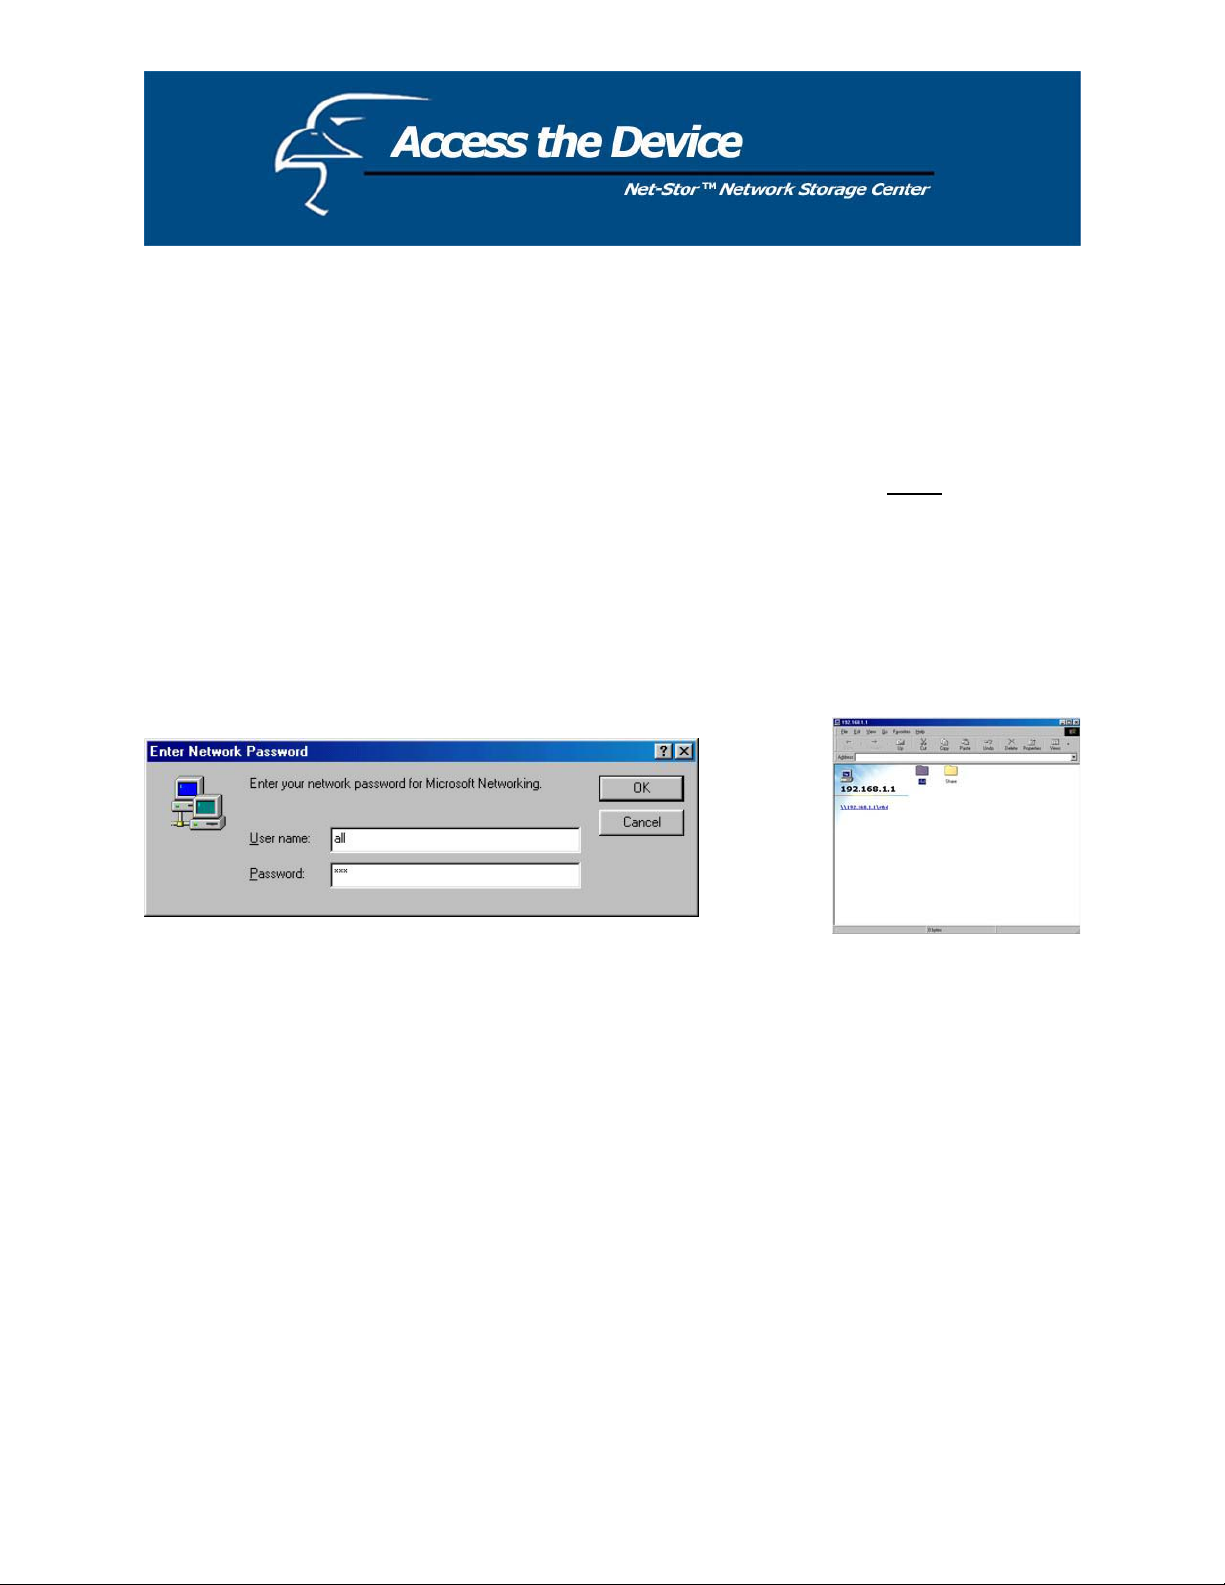
1. Click the “Access my Network HD” icon to access the Network Storage Center. There are three pre-
defined accounts for you to use: all, power, guest. By default, their authorization levels are set as
follows:
a. ALL=Read/Write
b. Power=Read/Write
c. Guest=Read Only
The user can adjust the authorization levels of these accounts by clicking on Share in the “Folder
Configuration” page within the “Share” section of the device’s webpage.
By default, you can enter “all”, “power”, or “guest” for the Username and Password. For example:
2.
x Username: all
x Password: all
27
Page 28

Set Up the Network Storage Center
In order to configure the Network Storage Center via your computer using a web browser, please follow
the steps listed below:
1. Double click the “Setup my Network HD” icon on your desktop
screen.
2. Type the device’s new IP address into the URL web address
location and press Enter.
The Username and Password window will appear.
x Enter admin in the User Name location (default value).
x Enter admin in the Password location (default value).
x Click the “OK” button.
28
Page 29
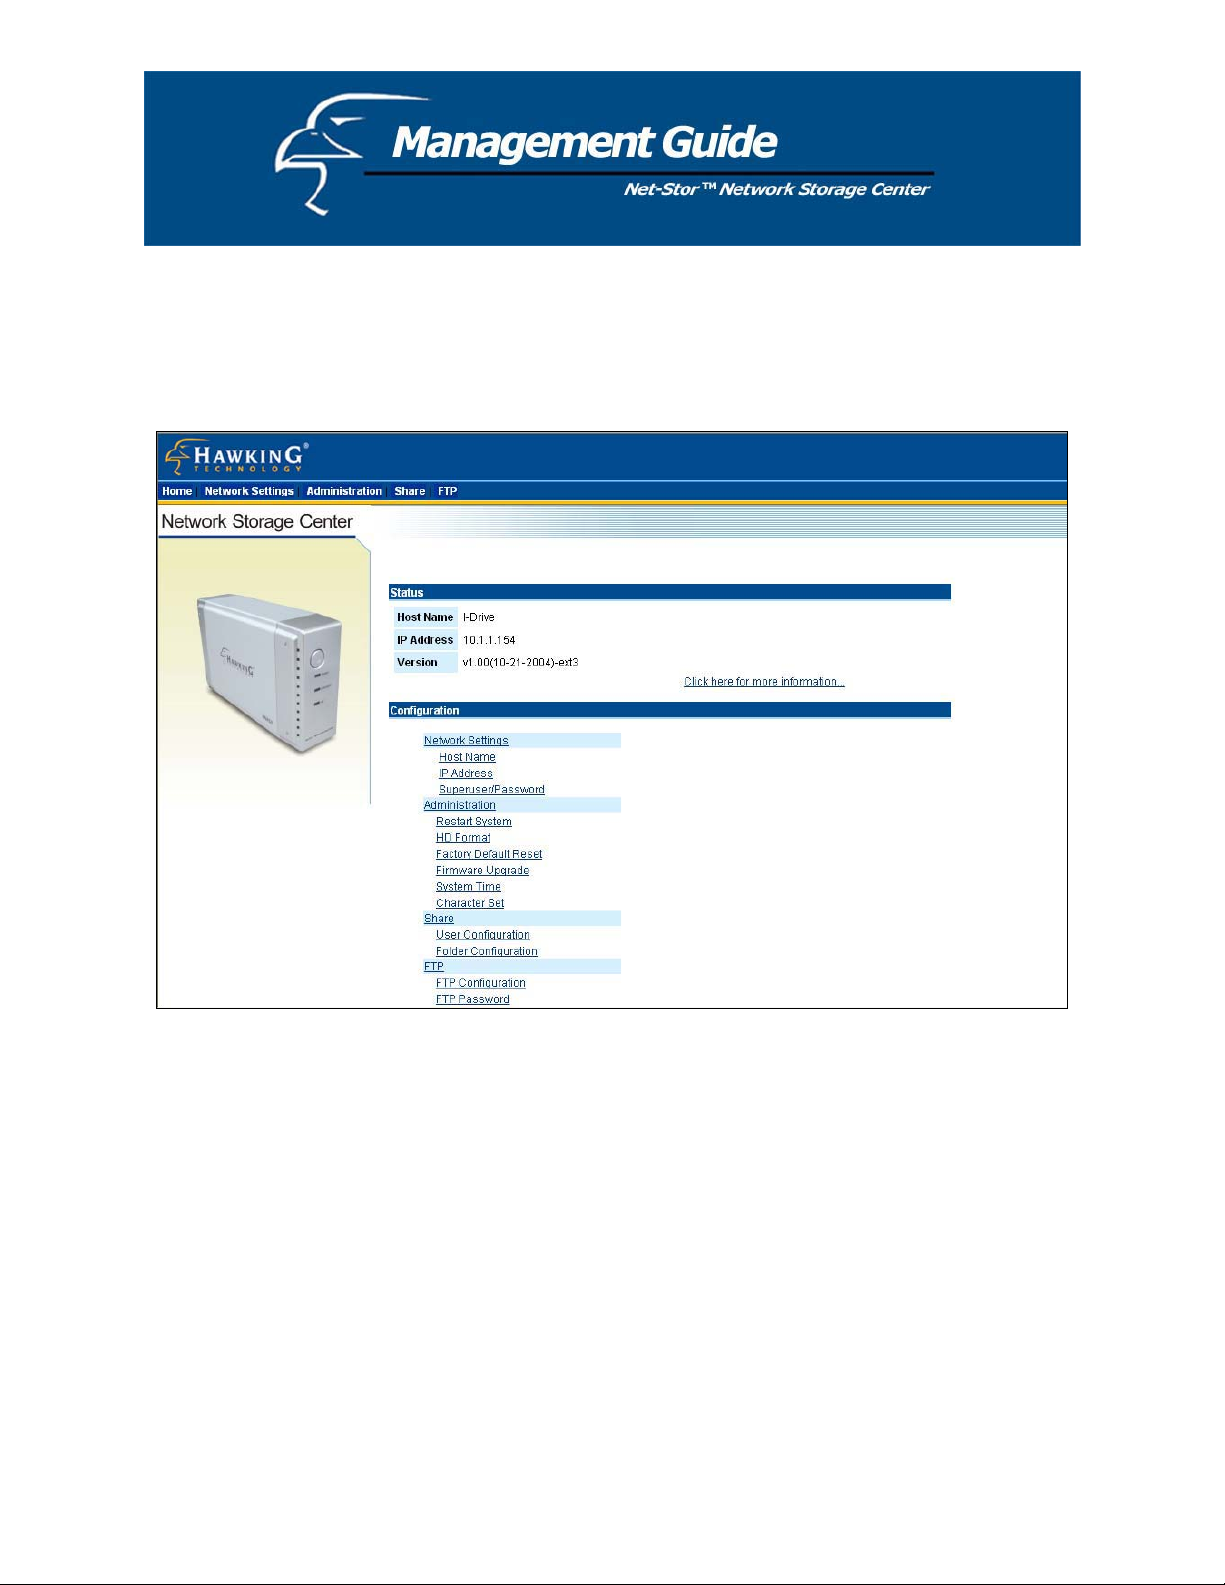
Homepage
The Network Storage Center has a web-based graphical user interface (GUI) that can be accessed using a
standard HTML (HTTP v1.0) compliant browser.
The Network Storage Center’s Homepage
Home
Status
Host name: the term used to identify the Network Storage Center in “My Neighborhood”
IP-address: the Network Storage Center’s IP address
Version: the current version of the firmware
Configuration
To link to the item you want, click on the appropriate link.
29
Page 30

Status Details
To see more info about the Network Storage Center, such as percent of hard drive used, “up-time”, Samba
users, and FTP users, please click on “Click here for more information…” on the homepage.
HD used (%): the percentage of the total hard drive space that is currently in use
Up-time: the amount of time your Network Storage Center has been in use
Samba (SMB) Users: the number of members using the Network Storage Center
FTP Users: the number of members using the Network Storage Center by FTP client
Note: The Network Storage Center allows up to a maximum of five online Samba (SMB) users and up to
a maximum of five online FTP users.
30
Page 31
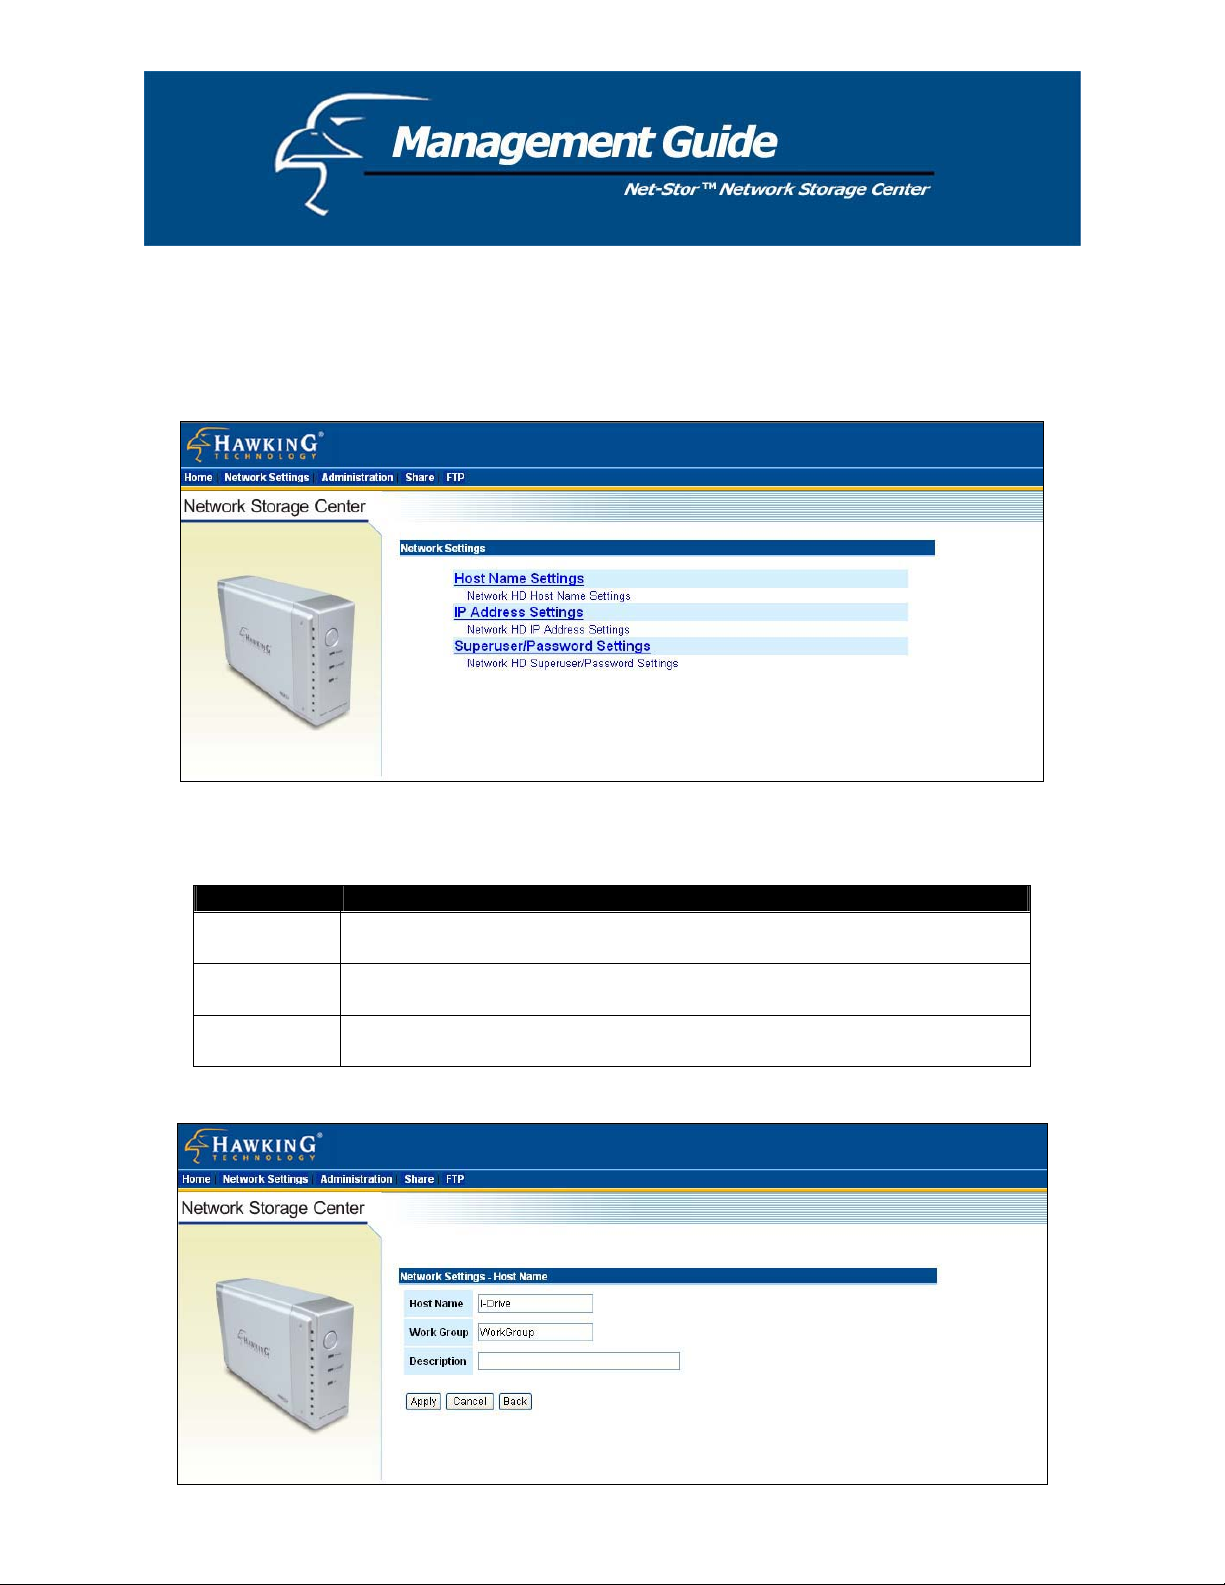
Network Settings
In the Network Settings page, you can set up or change the networking configurations for the device,
including Host Name, IP Address and SuperUser/Password. After you finish configuring the settings, the
Network Storage Center will appear in “My Neighborhood”.
Host Name
Item Configuration
Host Name Network Storage Center’s identification in “Workgroup” or “My
Neighborhood”
Work Group Shows name of the workgroup in which the Network Storage Center is
located
Description Brief description of the Network Storage Center (i.e., IP address, location,
etc.)
31
Page 32

IP Address
Item Configuration
IP Address The Network Storage Center’s IP Address
Subnet Mask The Subnet Mask must be compatible with the other devices on your network
Gateway Enter the Router’s or Gateway’s IP Address on your network
DNS Server Please specify the domain name server IP address that your Internet Service
Provider (ISP) gave you
32
Page 33
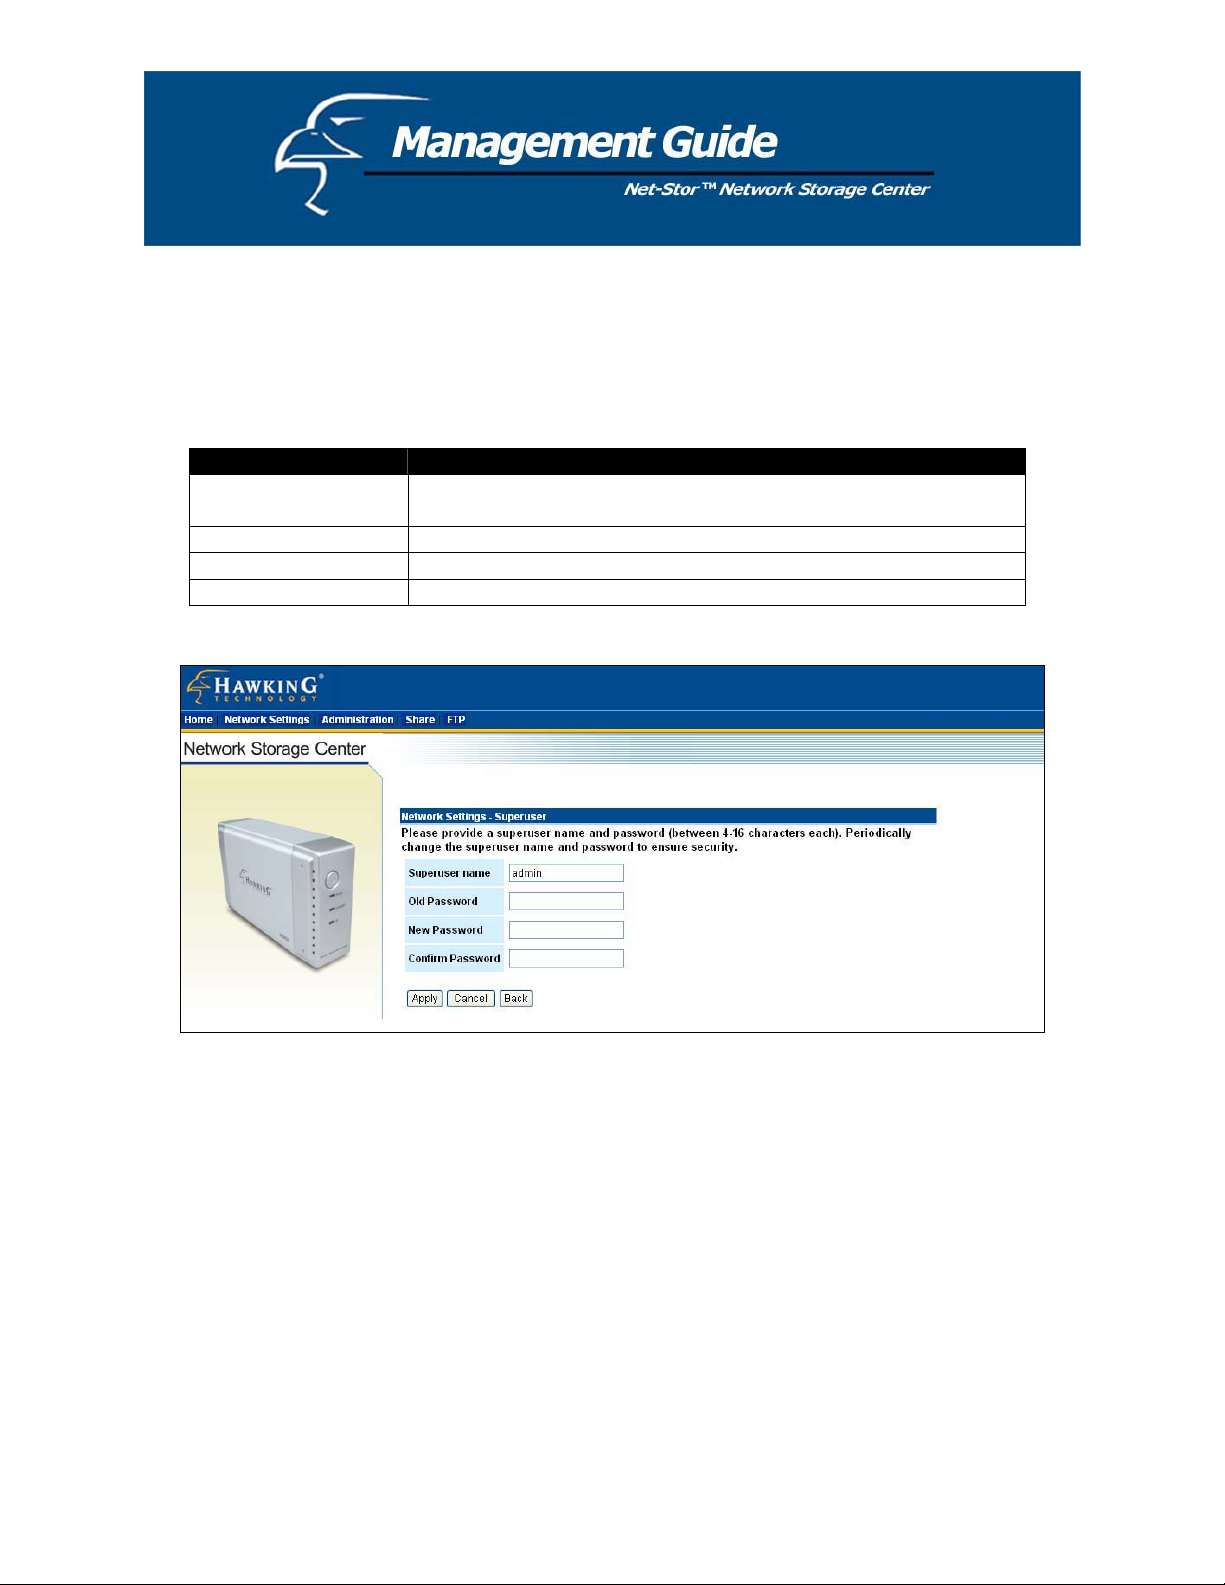
Superuser/Password
In this page, you can set up the administrator’s User Account/Password. You will need this to access
the web-based UI to set up and configure the Network Storage Center. Only the administrator or
“superuser” has access rights to change the Network Storage Center’s configuration.
Item Configuration
SuperUser name Username of the Network HD administrator to access the Web-based
UI
Old Password Enter your old password here
New Password Enter the New Password here
Confirm Password Enter the New Password again to confirm
33
Page 34

Administration
On this page, you can manage the Network Storage Center using the following tools:
System Restart
HD Format
Factory Default Reset
Firmware Upgrade
System Time
Character Set
Restart System
To Restart the Network Storage Center, Click “Yes” (see figure below). Do not power off the device
before the system restart is completed.
34
Page 35

HD Format
When you see this message “HD Unable to use” in the “(%) of HD used” field (see figure below), it
means that your hard drive is a new, unformatted hard drive or it is not formatted to EXT3. In this case,
you will need to format it.
Caution: When you click “Yes” to the question “Do you want to format the hard drive”, partitions (if
any) on your hard drive will be formatted and all your data will be erased.
To format the hard drive, click “Yes” (see figure below).
Please wait during the formatting process. Do not power off the system or close the browser. During the
formatting process, a status bar will appear that displays what percentage of the formatting has been
completed. After the format process completes, the system will restart automatically.
35
Page 36

Factory Default Reset
To restore the Network Storage Center to its default configuration, click “Yes” (see figure below). Do not
power off the device before the system is ready.
Firmware Upgrade
To upgrade the Firmware:
1. Click Browse…
2. Select the firmware file you want to you for the upgrade process.
3. Click Apply
Caution: Do not power off the device during the upgrade process, as this could damage it.
36
Page 37
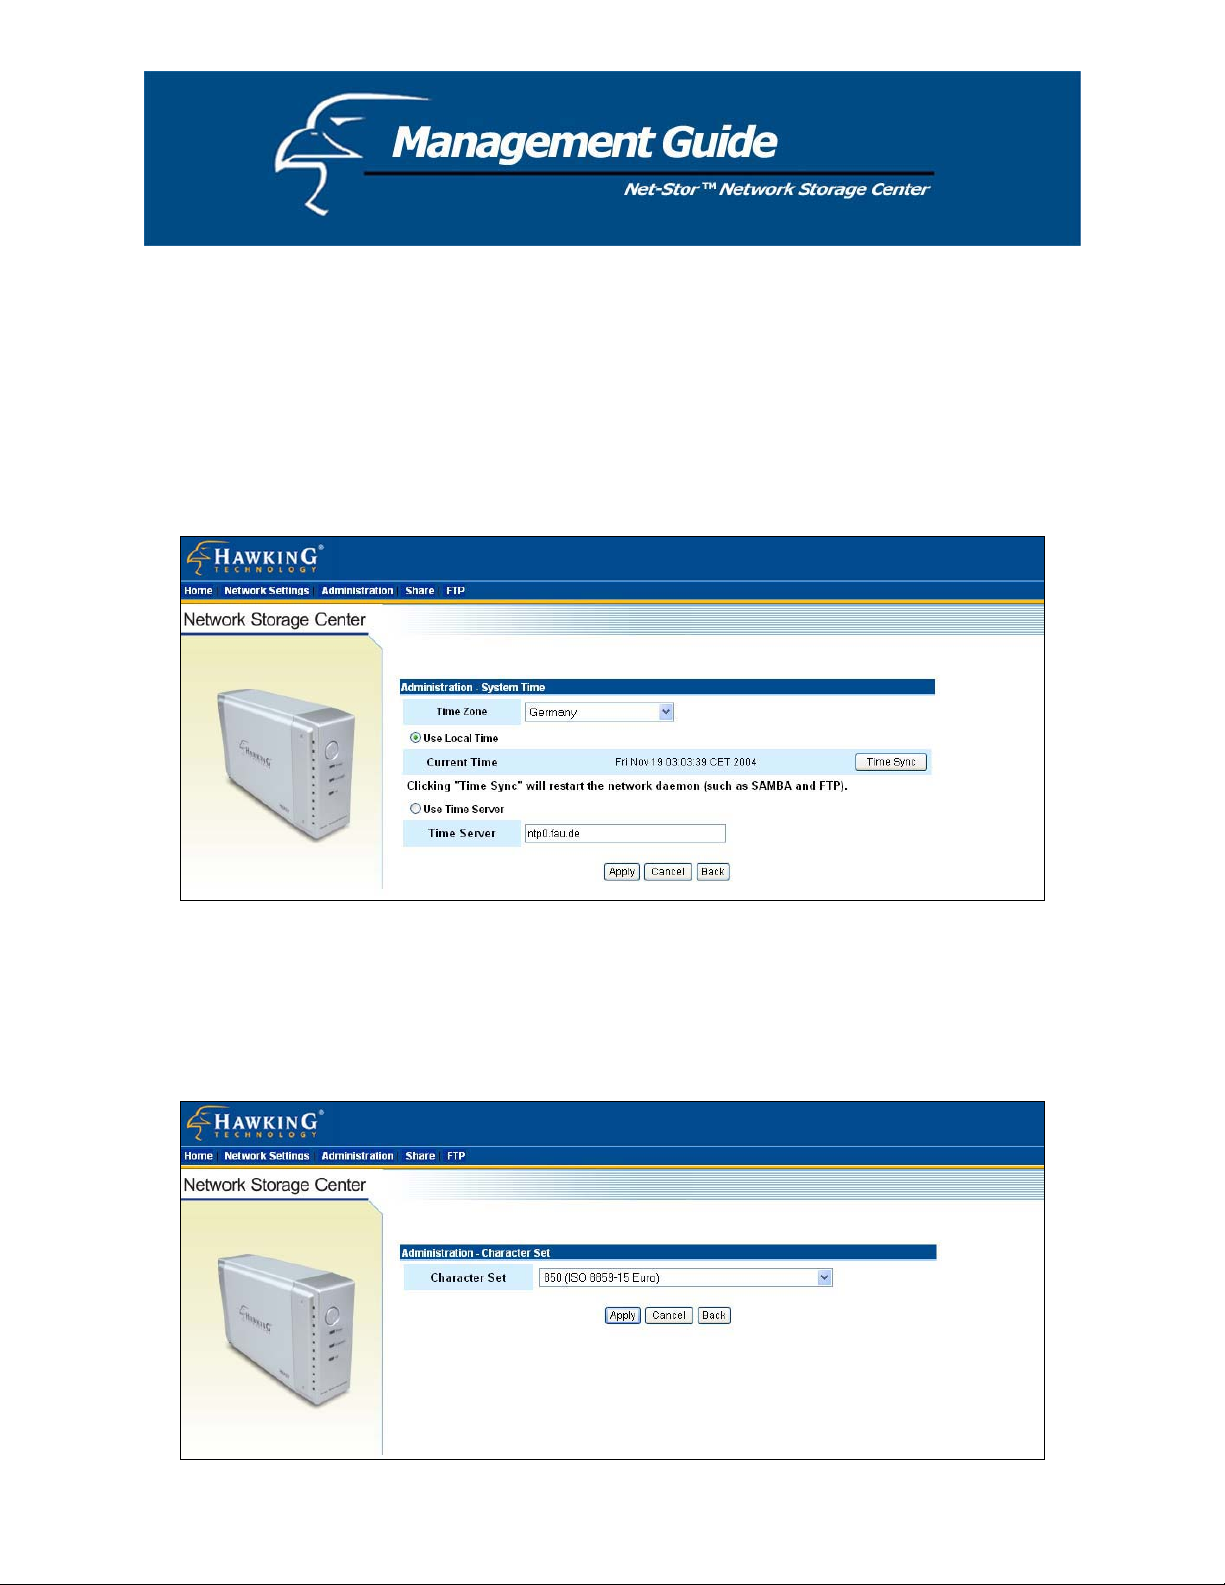
System Time
1. If your system is not connected to the Internet, click “Time Sync” to synchronize the current
time with your PC’s.
2. If your system is connected to the Internet, you can use “Time Server” and select “Time
Zone” to perform the time synchronization. Please remember to click “Save”. You will see
the changes at the next system boot.
Character Set
If you need to make changes to the character set, you can choose the correct character set for your file
system by scrolling down the menu, selecting the appropriate set, and the clicking “Save”.
37
Page 38
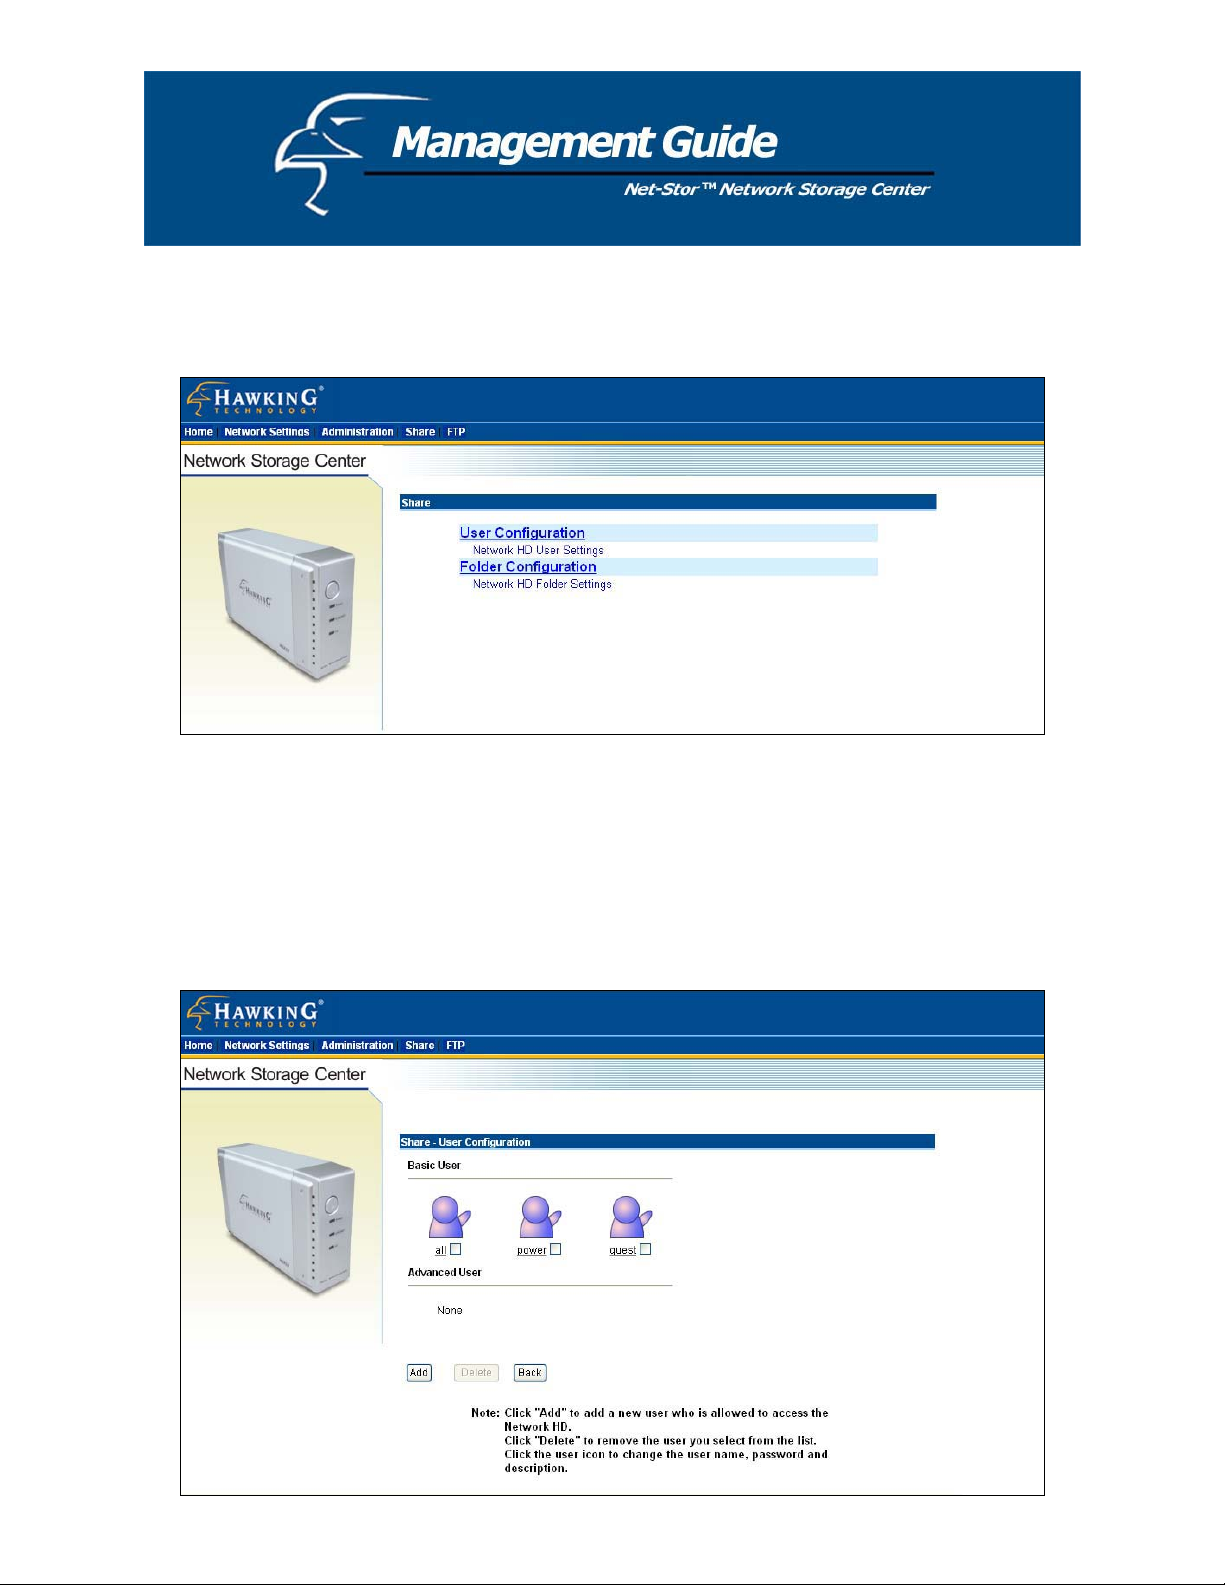
Share
From this section, you can manage the Network Storage Center’s users and folders.
User configuration
On this page, you can add and remove users, and set up the user configuration. You can add as many
users as you need; the restriction on the number of users only applies to five concurrently connected
users. The three default accounts cannot be removed.
Add User
38
Page 39

1. Click the Add button.
2. Enter the appropriate information for: User Name, New Password, Confirm Password, and User
Description
3. Decide on the FTP Access and Access Level (Supervisor is for a web-master or someone similar;
General User is for an end-user or someone similar). When FTP Access is enabled, this user can
access the FTP with his/her user name and password
4. Choose the default folder for this user.
5. Click Apply to save.
Note: To change a user’s configuration, click on the User Name link in the “User Configuration” page
(see figure on previous page). Then enter the new information in all the desired fields except for “User
Name” (see figure above).
39
Page 40

Delete User
To remove the user’s account to stop the right of using the Network HD,
1. Select the User you want to remove by clicking the check box next to the user name.
2. Click Delete to remove.
40
Page 41

Folder Configuration
In this section, you can add and delete folders, as well as set up the authentication of users.
Add Folder
To add a new folder for users to share:
1. Click Add to add a new folder.
2. Enter the Folder Name and Description
3. Click Apply to save.
41
Page 42

Delete Folder
To remove a folder and files inside
1. Select the folder you want to remove by clicking on the check box next to the folder’s name.
2. Click Delete to remove.
42
Page 43
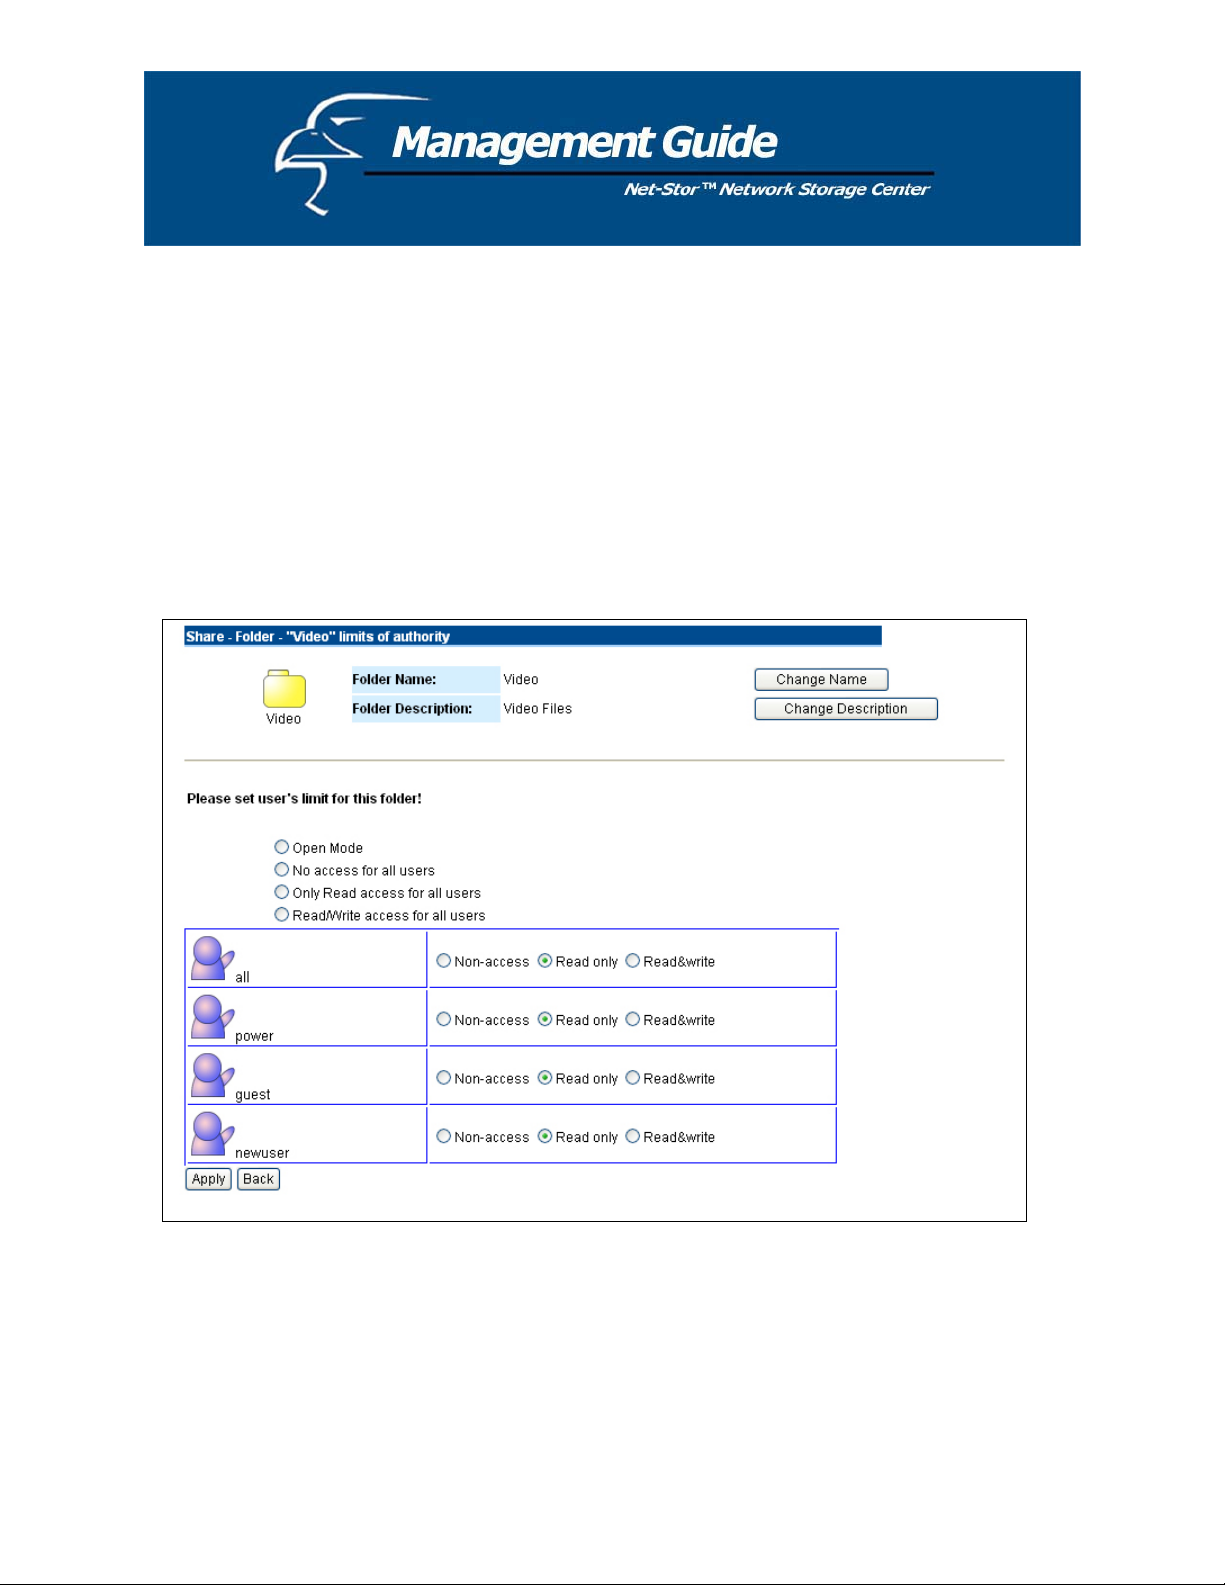
Change the User Authentication for a Folder
Every user has a certain type of access privilege to use the Network Storage Center. This access privilege
decides what kinds of actions a user can take, for example reading or re-writing files and folders on the
Network Storage Center. There are three privilege mode options for each user:
Non-access
The User cannot access the folder
Read-only
The User can only read files from this folder
Read & write
The User is able to read and write files to and from this folder
43
Page 44
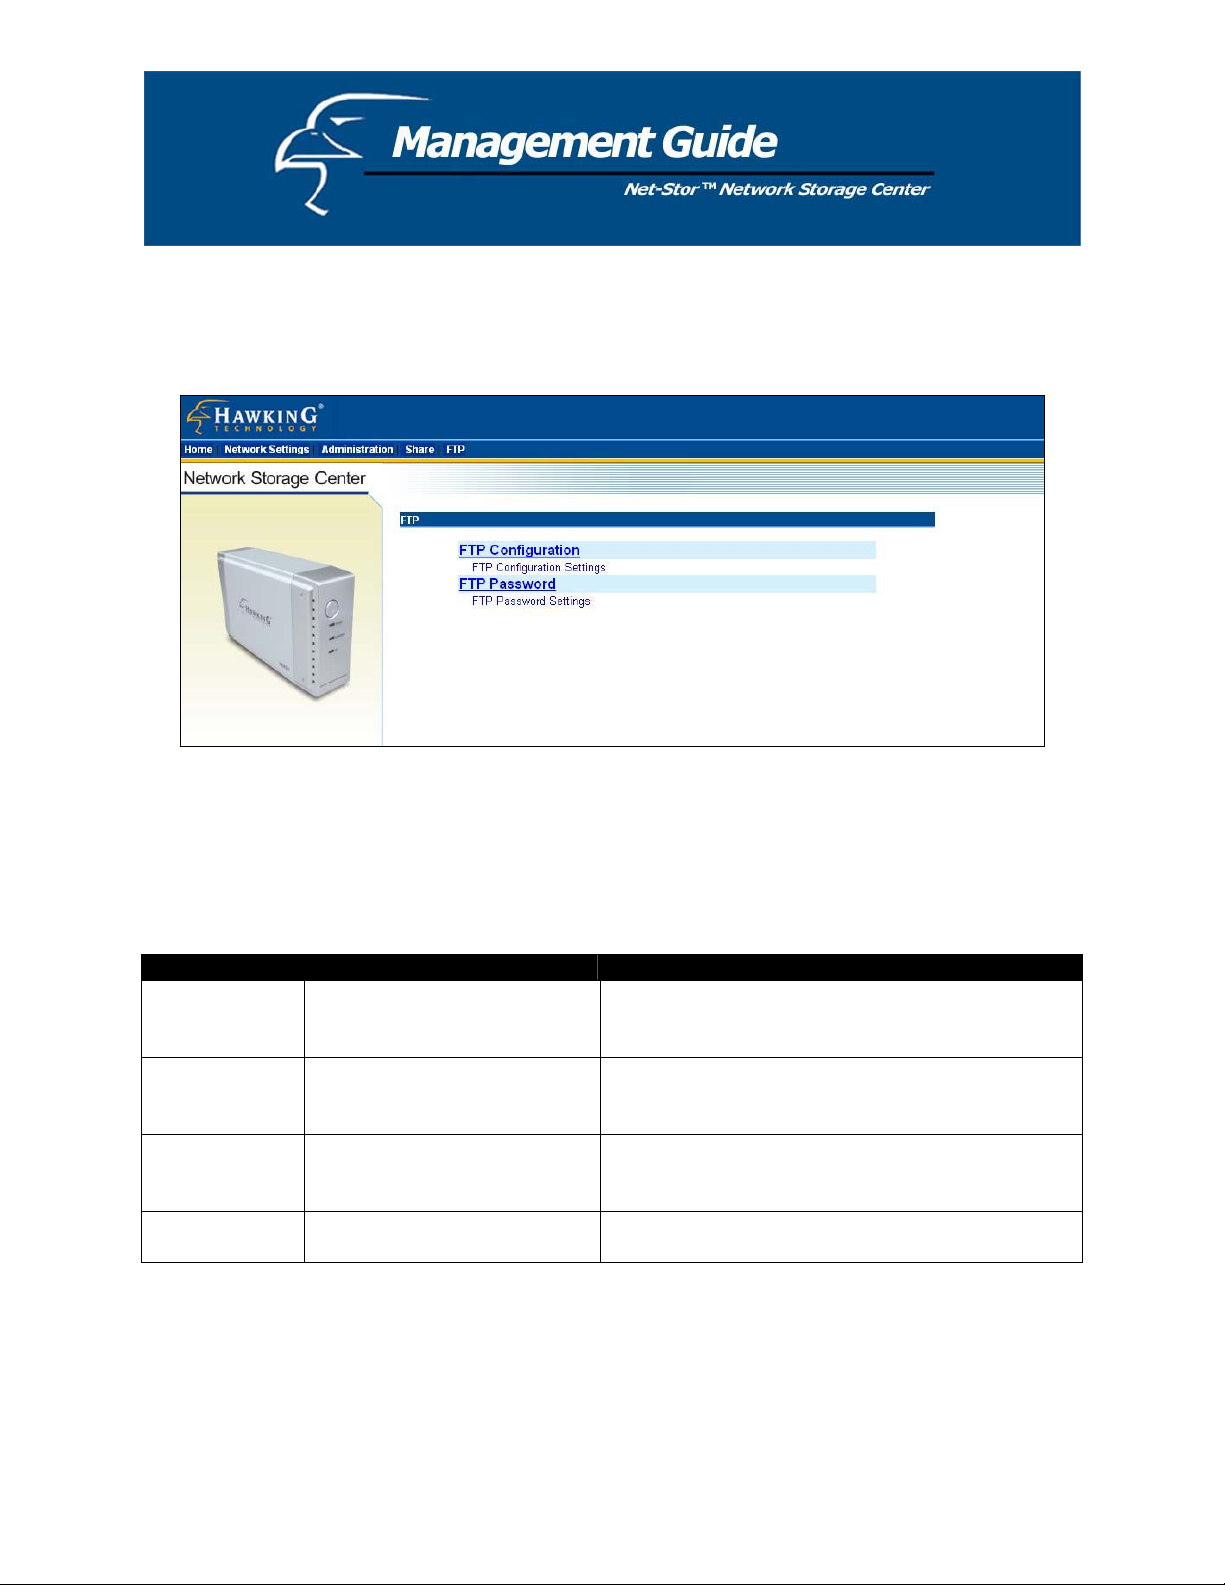
FTP
For remote access or backup, you can utilize FTP Client software to use the Network Storage Center.
FTP Configuration
To change configurations such as user limitation, service port number, length for timeout, and anonymous
user restrictions, click on FTP Configuration.
Items Meaning How to…
Maximum Unit
number
Maximum number of
concurrently connected FTP
Enter the member number.
users, from 1 to 5
Port Number Decide on the FTP Service port
Number you need
Enter the FTP Port number.
The default number is 21, if you do not make any
changes to this field or leave it blank.
Timeout The length of time (in minutes)
before the FTP connection times
out
Allow
Allow anonymous user accounts Choose Yes to enable or No to disable
Enter the length of time you want (in minutes). The
default is 15 minutes, if you do not make any changes
to this field or leave it blank.
Anonymity
44
Page 45

FTP Password
In this section, you can set up the FTP account password. The Default User name is “ftpuser”, and the
default password is “abc123”. Please note that there are three rules for setting the password:
1. You cannot include the word “FTP”.
2. You must use at least one number in the password string.
3. The new password must be at least 6 characters up to a maximum of 16 characters.
45
Page 46

It is recommended (but not necessary) that you map the Network Storage Center to your PC as a network drive. The
device will then automatically reconnect and always be available as a network drive whenever you re-start your PC.
You can do this by following the steps below:
1. From the Start menu, click on My Computer. When the window appears, click on Tools in the menu at
the top of the window.
46
Page 47

2. A new window will appear and will ask you to specify a drive letter for connection, and the folder
that you would like to connect to. An example is shown below.
3. Click Finish. You will be prompted to enter a user name and password. In these fields, please
enter the access information for one of the advanced users you added earlier. (Please refer to the
“Management Guide” section of this user’s manual. This will complete the mapping process.
47
Page 48

4. An icon similar to the one indicated by the red arrow in the figure below will appear. You will
now always be able to access the drive from “My Computer”.
48
Page 49

There are several applications for the Network Storage Center.
Individual users can back up important files from their PCs.
Backup Data
Individual User
For Multiple users, the Network Storage Center provides a convenient way for file sharing and backup.
All users have to do is connect the Network Storage Center to a router or switch to enjoy its easy and
robust features.
File-Sharing
&
Remote Backup
PC
Backup
For Windows 2000/XP users, the OS provides an accessory system tool for data backup: “Backup”.
Please follow the steps below as reference to complete data backup:
1. Activate the program: click Start > Programs >
Accessory > System Tools, and click Backup.
2. Click the “Schedule Jobs” tab, and Select a date that y
want to activate the Backup job. Click the “Add Job”
button.
3. When The Wizard appears, Select “Create a new Job”
and Click OK.
PC
Multiple Users
ou
49
Page 50

4. Select “Back up My Computer” to back up your whole
system or “Back up Selected files, folders and Driver”. If
you want to backup “C:\”, select “Back up Selected files,
folders and Driver”
5. If you want to backup one Drive, ex. “C:\”, select the
drive by clicking the check box in front of the drive letter.
6. Decide the destination of the backup file.
7. Type a name for this backup job and click Start.
8. Wait for the program to process the status of the backup
progress.
For certain applications, the Network Storage Center’s FTP function provides the option of remote
backup. For example, if you have an IP camera (or multiple IP cameras), such as a Hawking Net-
TM
Vision
Network Camera, that provides an FTP feature and you want to transfer video data from the IP
camera back to the Network Storage Center for remote monitoring purposes, the HNAS1 allows you to do
so.
IP Camera
Remote Backup (FTP)
To use the FTP function, please use the FTP supported by your browser, for example Internet Explorer
6.0. Type “ftp://domain name” or “ftp://Ipaddress/” in the brower’s address field and press Enter. The
authentication windows will appear and you can input the username and password. The default User
Account is “ftpuser”, and the password is “abc123”. You may change the password in the FTP settings
section, but the user account is fixed. For more information, please refer to the “FTP” section in this
user’s manual.
To use the Network Storage Center as an FTP server without a fixed IP or domain name, please set up
your router’s DDNS and port mapping (Virtual Sever) first. As for the settings, please refer to the DDNS
and port mapping sections in your router’s user’s manual.
50
Page 51

1. How do I shut down the Network Storage Center properly?
Ans. To shut down the system properly, hold the Power button on the front of the unit down for at least
five seconds until the Power LED blinks and then turns off.
2. The Express Setup Wizard cannot configure my network settings.
Ans.
Make sure that your RJ-45 Ethernet cable is connected on both ends, to the Network Storage
Center on one end and the Router/Switch/PC on the other end.
Check the Link/ACT LED on the Network Storage Center and make sure that it is lit green.
Check the power on the Network Storage Center, and Router/Switch/PC and make sure that it is
on on both ends.
Check your PC’s IP address, and make sure that it has a static IP address or connects to the
router with a DHCP Client. As for the settinsg, Please refer to the “IP Protocol Setup” Chapter
in this user’s manual.
The system may be down. Reboot the system with the web-based UI or press the Reset button to
restore the factory default settings and reboot.
Check your network or PC settings to make sure that they are configured properly.
3. The Network Storage Center cannot find my hard drive and the homepage of web-based UI displays
the message “HD unable to use”.
Ans. There could be several reasons for this:
The hard drive jumper is not set to “Master”. Your hard drive jumper needs to be set to
“Master”. Different hard drives have different jumper settings. Therefore, you will need to refer
to your hard drive’s user’s manual.
The hard drive is unformatted. Please format it with our HD Format tool in the “Administration”
section of the Network Storage Center’s web UI.
The partition format for the hard drive is not set to EXT3 (for example, it may be NTFS). Please
format it with the Format tool in the “Administration” section of the Network Storage Center’s
web UI.
The hard drive may be defective, in which case, you would need a new hard drive.
4. My Network Storage Center will not work when it was not properly shut down (for example, from
unplugging the adapter or a blackout while it was working).
Ans. When the Network Storage Center is not shut down properly, the system will automatically check
and repair the MS-DOS file system of the device to ensure the system is working normally. Please
wait for the system to complete the process.
Note. The average time for the checking and repairing tool complete is: 20GB / 1 minute. Therefore,
with 250GB, the process would take 12 minutes.
51
Page 52

5. I use my Network Storage Center as an FTP server, but the users outside the local area network (LAN)
cannot access it.
Ans. To use the Network Storage Center as an FTP server without a fixed IP or domain name, please
set up DDNS and port mapping on your router (IP Sharing) first. As for the settings, please refer to
the DDNS and port mapping sections in your router’s user’s manual.
6. I cannot access the Network Storage Center.
Ans.
Check the Network Storage Center’s Link/Act LED and make sure that it is lit green.
The system may be down. Reboot the system with the web-based UI or press the Reset button to
restore the factory default settings and reboot.
When more than five users are concurrently connected to the system, the system will block other
users who want to access. Please check the number of Samba Users / FTP Users by clicking the
“Click here for more information…” link on the web-based UI.
52
Page 53

Standards
IEEE 802.3, IEEE 802.3u
Supported Protocols
TCP/IP, HTTP, SMB, FTP
Number of Concurrently Supported Users
Samba: Five Users; FTP: Five Users
Interface
One 10/100Mbps RJ-45 Ethernet port
One Default Reset Button
Connection Speed
10/100Mbps
Support Hard Drive(s)
One removable 3.5” IDE hard Drive (ATA) of up to 250GB
Diagnostic LEDs
Power: On/Boot or Shutdown (Green/Blinking)
Link/ACT: Ethernet Act/Link (Green)
HD: Hard Drive Data Transfer (Amber/Blinking)
Dimensions
8.66” x 2.36” x 5.20” (L x W x H); 220mm x 60mm x 132mm (L x W x H)
Operating Temperature
0q-50q C; (320 - 1220F)
Power Supply
DC 12V 3A External power adapter
Certifications
FCC (CISPR_22), CE (EN55022), VCCI Class B
53
 Loading...