

Page 1

1
Page 2

Trademarks & Copyright
Windows 95/98/ME and Windows NT/2000/XP are registered trademarks of Microsoft Corp. All other brands and product names are
trademarks of their respective companies.
No part of this publication may be reproduced in any form or by any means or used to make any derivative (such as translation,
transformation or adaptation) without the express written consent of the manufacturer as stipulated by the United States Copyright Act
of 1976.
FCC Certifications
This equipment has been tested and found to comply with the limits for a Class B digital device, pursuant to Part 15 of the FCC Rules.
These limits are designed to provide reasonable protection against harmful interference in a residential installation. This equipment
generates, uses and can radiate radio frequency energy and, if not installed and used in accordance with the instructions, may cause
harmful interference to radio communications. However, there is no guarantee that interference will not occur in a particular
installation. If this equipment does cause harmful interference to radio or television reception, which can be determined by turning the
equipment off and on, the user is encouraged to try to correct the interference by one or more of the following measures:
• Reorient or relocate the receiving antenna.
• Increase the separation between the equipment and receiver.
• Connect the equipment into an outlet on a circuit different from that to which the receiver is connected.
• Consult the dealer or an experienced radio/TV technician for help.
Shielded interface cables must be used in order to comply with emission limits.
You are cautioned that changes or modifications not expressly approved by the party responsible for compliance could void your
authority to operate the equipment.
This device complies with Part 15 of the FCC rules. Operation is subject to the following two conditions: (1) This device may not
cause harmful interference, and (2) This device must accept any interference received, including interference that may cause undesired
operation.
CE Mark Warning
This is a Class B product. In a domestic environment, this product may cause radio interference, in which case the user may be
required to take adequate measures. All trademarks and brand names are the property of their respective proprietors. Specifications
are subject to change without prior notification.
HAWKING LIMITED WARRANTY
Hawking Technology guarantees that every H-BR49 Broadband Router is free from physical defects in material and
workmanship under normal use for two (2) years from the date of purchase. If the product proves defective during this twoyear warranty period, call Hawking Customer Service in order to obtain a Return Authorization number. Warranty is for
repair or replacement only. Hawking Technology does not issue any refunds. BE SURE TO HAVE YOUR PROOF OF
PURCHASE. RETURN REQUESTS CAN NOT BE PROCESSED WITHOUT PROOF OF PURCHASE. When returning a
product, mark the Return Authorization number clearly on the outside of the package and include your original proof of
purchase.
IN NO EVENT SHALL HAWKING TECHNOLOGY’S LIABILTY EXCEED THE PRICE PAID FOR THE PRODUCT
FROM DIRECT, INDIRECT, SPECIAL, INCIDENTAL OR CONSEQUENTIAL DAMAGES RESULTING FROM THE
USE OF THE PRODUCT, ITS ACCOMPANYING SOFTWARE OR ITS DOCUMENTATION. Hawking Technology makes
no warranty or representation, expressed, implied or statutory, with respect to its products or the contents or use of this
documentation and all accompanying software, and specifically disclaims its quality, performance, merchantability, or fitness
for any particular purpose. Hawking Technology reserves the right to revise or update its products, software, or
documentation without obligation to notify any individual or entity. Please direct all inquiries to:
techsupport@hawkingtech.com
.
2
Page 3

Package Contents 5
Introduction
Features 6
Minimum Requirements 7
Get to Know the Broadband Router
Back Panel 7
Front Panel 8
Setup Diagram 9
Getting Started 9
Chapter 1: Quick Setup (via web UI)
About Quick Setup 18
Step 1: Time Zone 18
Step 2: Broadband Type 19
1.1 Cable Modem 20
1.2 Fixed IP xDSL 21
1.3 PPPoE 22
1.4 PPTP 24
Chapter 2: General Setup
General Settings 26
2.1 System 27
2.1.1 Time Zone 28
2.1.2 Password Settings 29
2.1.3 Remote Management 30
2.2 WAN 31
2.2.1 Dynamic IP Address 33
2.2.2 Static IP Address 33
2.2.3 PPPoE 33
2.2.4 PPTP 33
2.2.5 L2TP 33
2.2.6 Telstra Big Pond 36
2.2.7 WAN Policy 37
2.2.8 DNS 38
2.2.9 DDNS 39
2.3 LAN 41
2.4 NAT 43
2.4.1 Port Forwarding 44
2.4.2 Virtual Server 46
2.4.3 Special Applications 48
2.4.4 UPnP 51
2.4.5 Protocol and Port Binding 52
3
Page 4

2.4.6 ALG Settings 54
2.4.7 Static Routing 55
2.5 Firewall 56
2.5.1 Access Control 58
2.5.2 URL Blocking 62
2.5.3 DoS (Denial of Service) 63
2.5.4 DMZ 65
Chapter 3: Status
Status 67
3.1 Status and Information 68
3.2 Internet Connection 69
3.3 Device Status 70
3.4 System Log 71
3.5 Security Log 72
3.6 Active DHCP Client 73
3.7 Statistics 74
Chapter 4: Tools
Tools 75
4.1 Configuration Tools 76
4.2 Firmware Upgrade 77
4.3 Reset 78
Appendix A 79
Glossary 80
4
Page 5

The complete H2BR4 package consists of:
• One H2BR4 Dual WAN 4-Port Firewall Router
• One Quick Installation Guide
• One CD with User’s Manual
• One Power Adapter
• Accessories
Check to make sure that the unit was not damaged during shipping and that no items are missing. If you encounter a
problem, please contact your dealer.
Please read this manual thoroughly, and follow the installation and operation procedures detailed in this user’s manual.
5
Page 6

The high performance Hawking H2BR4 Dual WAN Firewall Router with built-in 4-port 10/100M Ethernet Switch
provides an easy-to-use, cost-effective means of sharing two broadband Internet connections with your LAN (Local Area
Network). With the H2BR4’s two WAN ports, users experience significantly faster data rates as a result of increased and
more efficient use of bandwidth. The dual WAN ports also provide: an easy way to utilize two different types of
broadband Internet connections on the same network (i.e., DSL, Cable, T1, etc.), a method for selectively managing traffic
between Internet connections (i.e., by port or IP address), and a back-up method that activates the second WAN if the first
WAN should get disconnected.
The H2BR4 features high-level security and is equipped with true, hardware-based firewall protection. The firewall
utilizes Stateful Packet Inspection (SPI) technology, Network Address Translation, and prevents against Denial of Service
(DoS) attacks from outside intruders. In addition, the VPN (Virtual Private Network) pass-through feature allows for fast,
reliable, and secure access to your corporate network via a public Internet network.
The H2BR4 includes a full set of powerful features. It utilizes Network Address Translation (NAT) to expand your
existing network without affecting existing IP based account schemes. The router supports DSL, Cable, and other
broadband modem connections that connect to an RJ-45 Ethernet port. The H2BR4 also features Virtual Server and DMZ
functions, which allow the user to protect clients on the network behind the router while permitting specified traffic to be
opened up outside the network. The router has a built-in DHCP server, which eliminates the need to configure each IP
address manually. The user-friendly web management interface provides the user with an easy way to configure the
router from anywhere in the world using a web browser. The H2BR4 can easily be firmware upgraded and is compatible
with all standard Internet applications. It provides a complete solution for small/medium business and small office/home
office users.
Features
• Superb throughput of up to 50Mbps
• Allows multiple users to share a single Internet line or two Internet lines
• Supports up to 253 users
• Internet Access via Cable or xDSL modem
• Can Access Private LAN Servers from the Public Network
• Equipped with two WAN ports (10/100M) and four LAN ports (10/100M)
• Supports DHCP (Server/Client) for easy setup
• Supports advanced features such as:
o Special Applications (i.e., Port Triggers, etc.)
o DMZ
o Virtual Servers
o Network Access Control
o Firewall
o Bridge mode
o DDNS (DynDNS/TZO)
o Content Filtering
• Allows you to monitor the router’s status via: DHCP Client Log, Security Log and Device/Connection Status
• Easy-to-use Web-based user interface for configuration and management purposes
• Remote management allows configuration and upgrades from a remote site (over the Internet)
6
Page 7
Minimum Requirements
• One External xDSL (ADSL) or Cable modem with an Ethernet port (RJ-45)
• Network Interface Card (NIC) for each Personal Computer (PC)
• PCs with a Web-Browser (Internet Explorer 4.0 or higher, or Netscape Navigator 4.7 or higher)
Note
The WAN “idle timeout” auto-disconnect function may not work due to abnormal activities of some network application
software, computer viruses or hacker attacks from the Internet. For example, some types of software send network packets
to the Internet in the background, even when you are not using the Internet. This function also may not work with some
ISPs. Please make sure this function works properly when you use this function for the first time, especially if your ISP
charges you according to time used. Due to such issues, we cannot guarantee that the WAN “idle timeout” autodisconnect function will work in all situations. In order to prevent an extra fee from being charged by the ISP, if your ISP
uses such a fee structure, please turn off the router when you are finished using the Internet.
Get to Know the Broadband Router
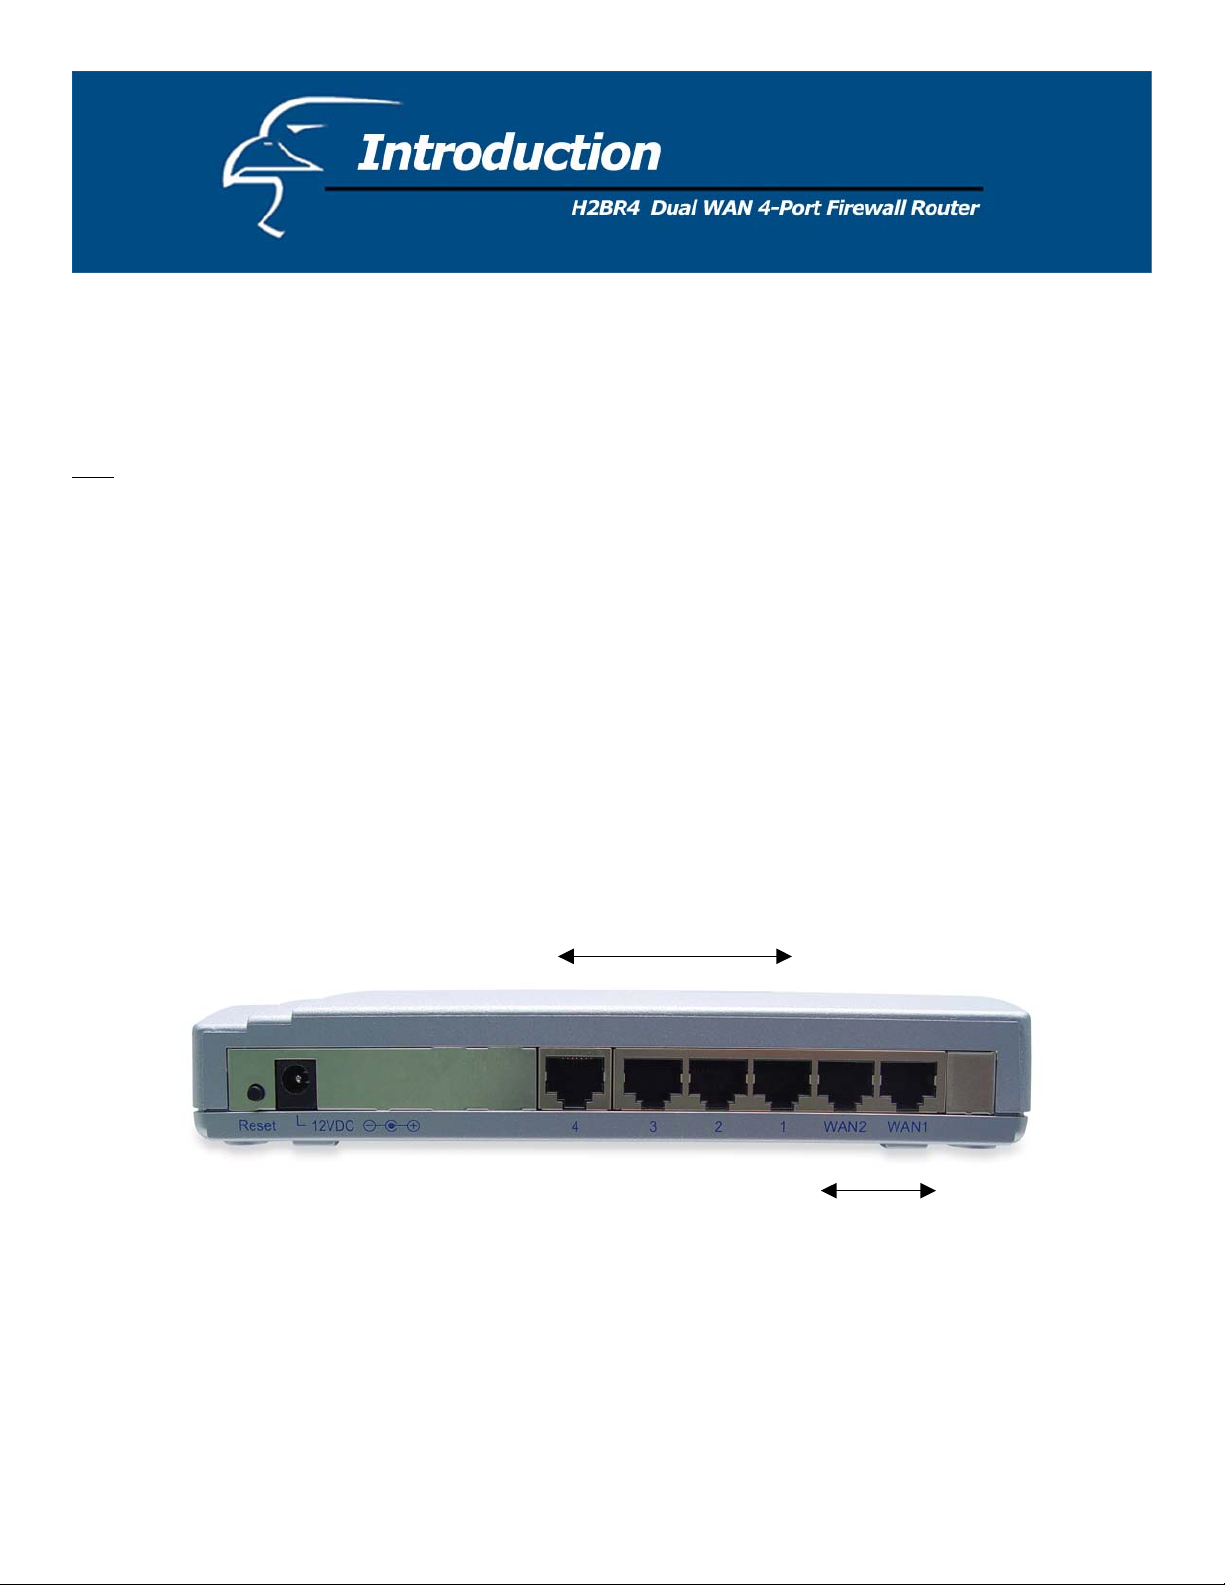
Back Panel
The diagram below (Figure 1.0) shows the router’s back panel. The router’s back panel is divided into three sections,
LAN, WAN and Reset:
LAN
Figure 0.0
WAN
7
Page 8

1) Local Area Network (LAN)
The router’s four LAN ports are what you will use to connect your PCs, print servers, switches, etc.
2) Wide Area Network (WAN)
The WAN ports are the segments that connect to your xDSL or Cable modems and are linked to the Internet.
3) Reset
The Reset button allows you to do one of two things:
i. If problems occur with your router, press the router’s reset button with a narrow pen tip (for less than four
seconds) and the router will re-boot itself, keeping your original configurations.
ii. If problems persist or become serious, or if you forget your password, press the reset button for longer
than four seconds and the router will reset itself to the factory default settings. Warning: Your original
configurations will be replaced with the factory default settings.
Front Panel
The LED lights located on the router’s front/top panel provide you with information on the device’s status at any given
time. Below is a detailed description of the LEDs.
Figure 0.1
LED Light Status Description
PWR ON Router’s power supply is on
WAN 10/100M (Port 1-2) ON 100Mbps connection
Off 10Mbps connection
WAN LNK/ACT (Port 1-2) ON WAN is connected
Off No WAN connection
Flashing WAN port has Activity (ACT); data being sent
LAN 10/100M (Port 1-4) ON 100Mbps connection
Off 10Mbps connection
LAN LNK/ACT (Port 1-4) ON LAN is connected
Off No LAN connection
Flashing LAN port has Activity (ACT); data being sent
8
Page 9
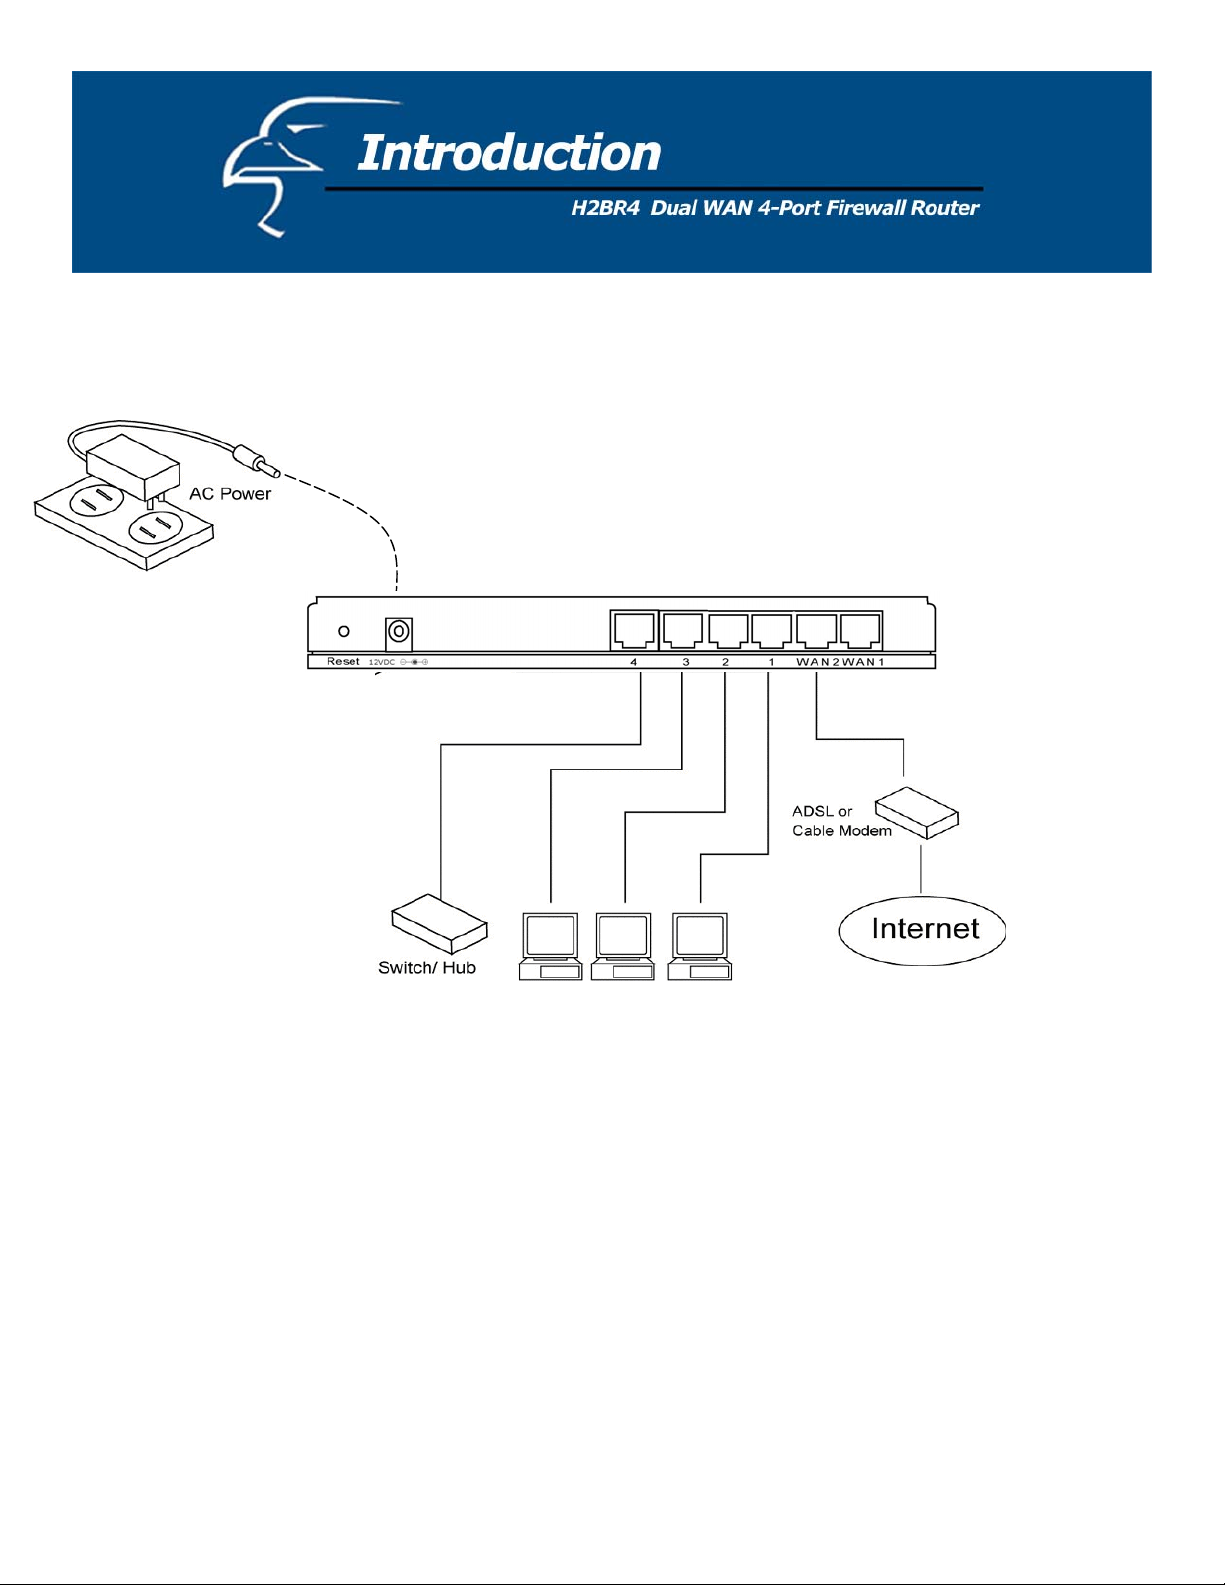
Setup Diagram
Figure 1.2 below shows a typical setup for a Local Area Network (LAN).
Figure 0.2
Getting started
The following are step-by-step instructions on how to start using the router and get connected to the Internet.
1) Set up your network as shown in the setup diagram above (Figure 1.2).
2) You then need to set your LAN PC clients so that they can obtain an IP address automatically. All LAN clients
require an IP address. Just like a street address, it allows LAN clients to find one another. (If you have already
configured your PC to obtain an IP address automatically then proceed to step 3, page 11.)
Configure your PC to obtain an IP address automatically
By default, the router’s DHCP is on (enabled). This means that you can obtain an IP address automatically once
you’ve configured your PC to obtain an IP address automatically. This section will show you how to configure
your PC so that it can obtain an IP address automatically for either Windows 95/98/Me, 2000 or NT operating
9
Page 10

systems.
For other operating systems (Macintosh, Sun, etc.), follow the manufacturer’s instructions. The
following is a step-by-step illustration on how to configure your PC to obtain an IP address automatically for: 2a)
Windows 95/98/Me, 2b) Windows 2000 and 2c) Windows NT.
2a) Windows 95/98/Me
i: Click the Start button and select Settings, then click Control Panel. The Control Panel window will appear.
ii: Double-click Network icon. The Network window will appear.
iii: Check your list of Network Components. If TCP/IP is not installed, click the Add button to install it now. If
TCP/IP is installed, go to step 6.
iv: In the Network Component Type dialog box, select Protocol and click Add button.
v: In the Select Network Protocol dialog box, select Microsoft and TCP/IP and then click the OK button to start
installing the TCP/IP protocol. You may need your Windows CD to complete the installation.
vi: After installing TCP/IP, go back to the Network dialog box. Select TCP/IP from the list of Network
Components and then click the Properties button.
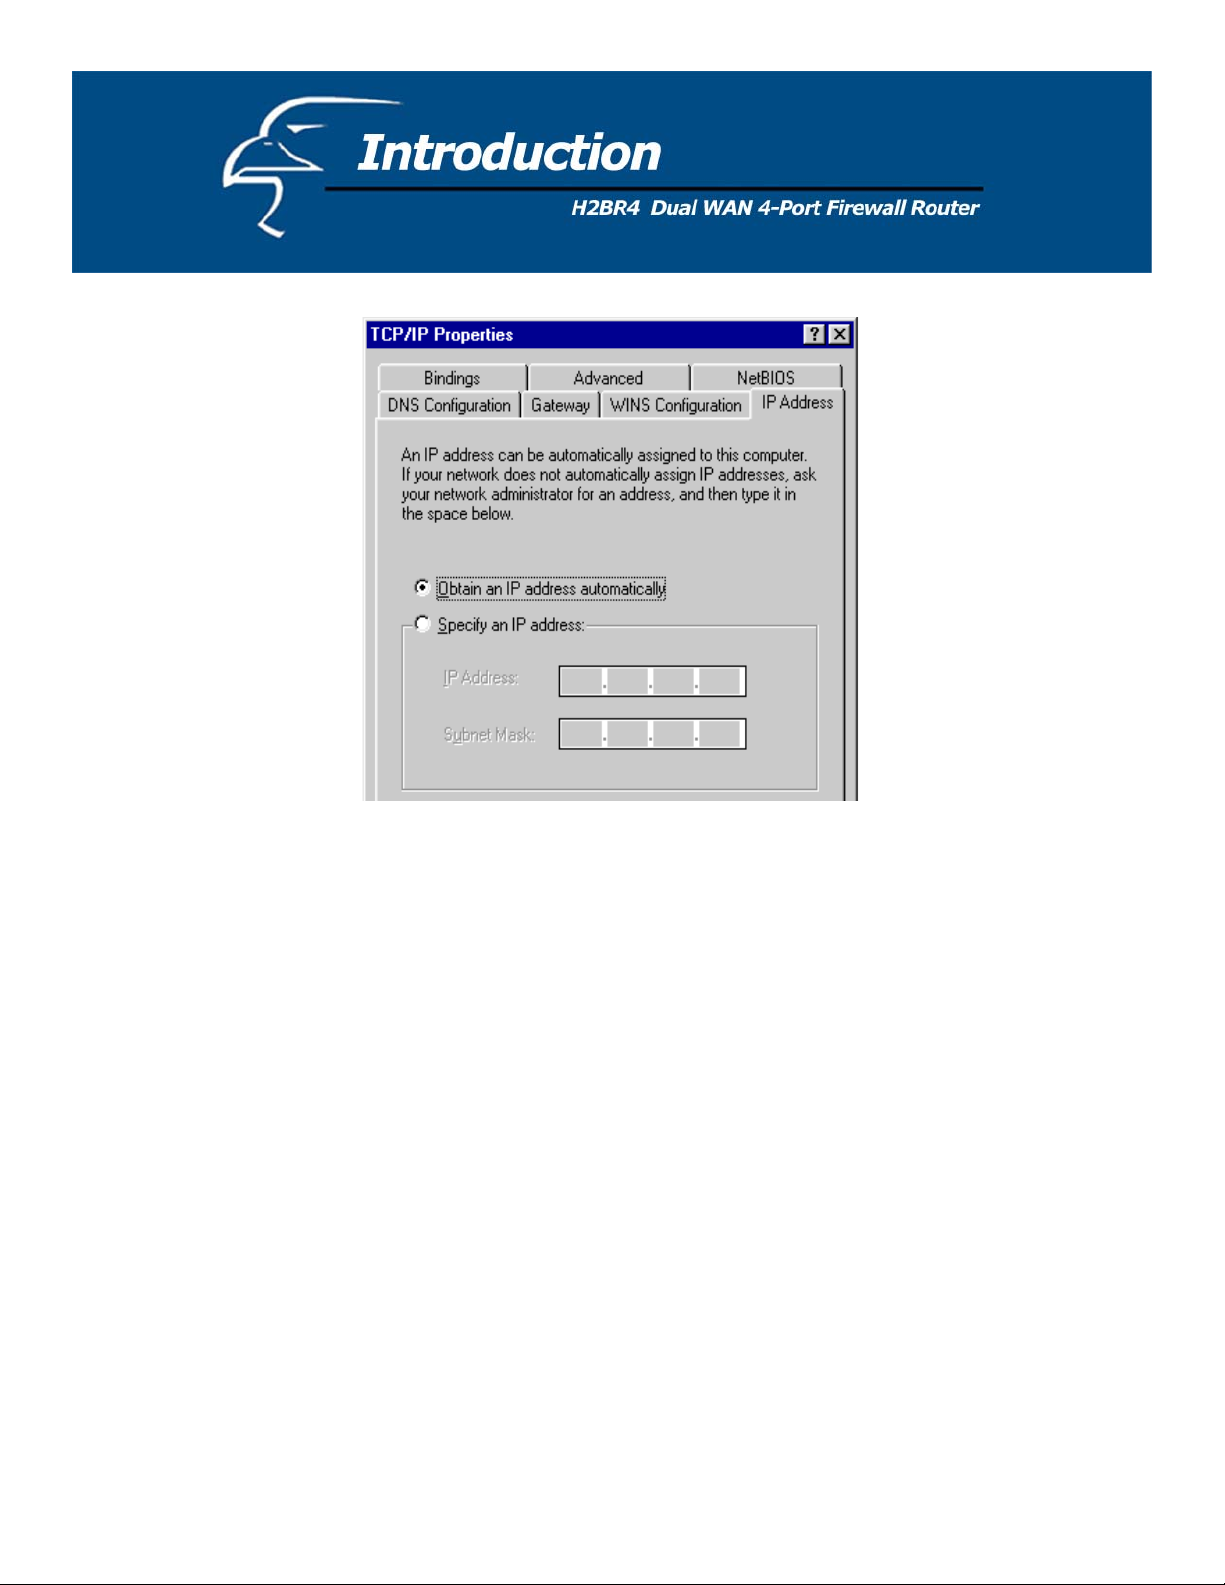
vii: Check each of the tabs and verify the following settings:
• Bindings: Check Client for Microsoft Networks and File and printer sharing for Microsoft Networks.
• Gateway: All fields are blank.
• DNS Configuration: Select Disable DNS.
• WINS Configuration: Select Disable WINS Resolution.
• IP Address: Select Obtain IP address automatically.
10
Page 11
vi R
ii: eboot the PC. Your PC will now obtain an IP address automatically from your router’s DHCP server.
Note server is the only DHCP server available on your LAN. Once
: Please make sure that the router’s DHCP
y v , please proceed to Step 3.
ou’ e configured your PC to obtain an IP address automatically
2b) Windows 2000
i: Click the Start button and select Settings, then click Control Panel. The Control Panel window will appear.
ii: Double-click the Network and Dial-up Connections icon. In the Network and Dial-up Connection window,
double-click the Local Area Connection icon. The Local Area Connection window will appear.
iii: In the Local Area Connection window, click the Properties button.
iv: Check your list of Network Components. You should see Internet Protocol [TCP/IP] on your list. Select it
and click the Properties button.
v: In the Internet Protocol (TCP/IP) Properties window, select Obtain an IP address automatically and Obtain
DNS server address automatically as shown on the following screen.
Figure 0.3
11
Page 12
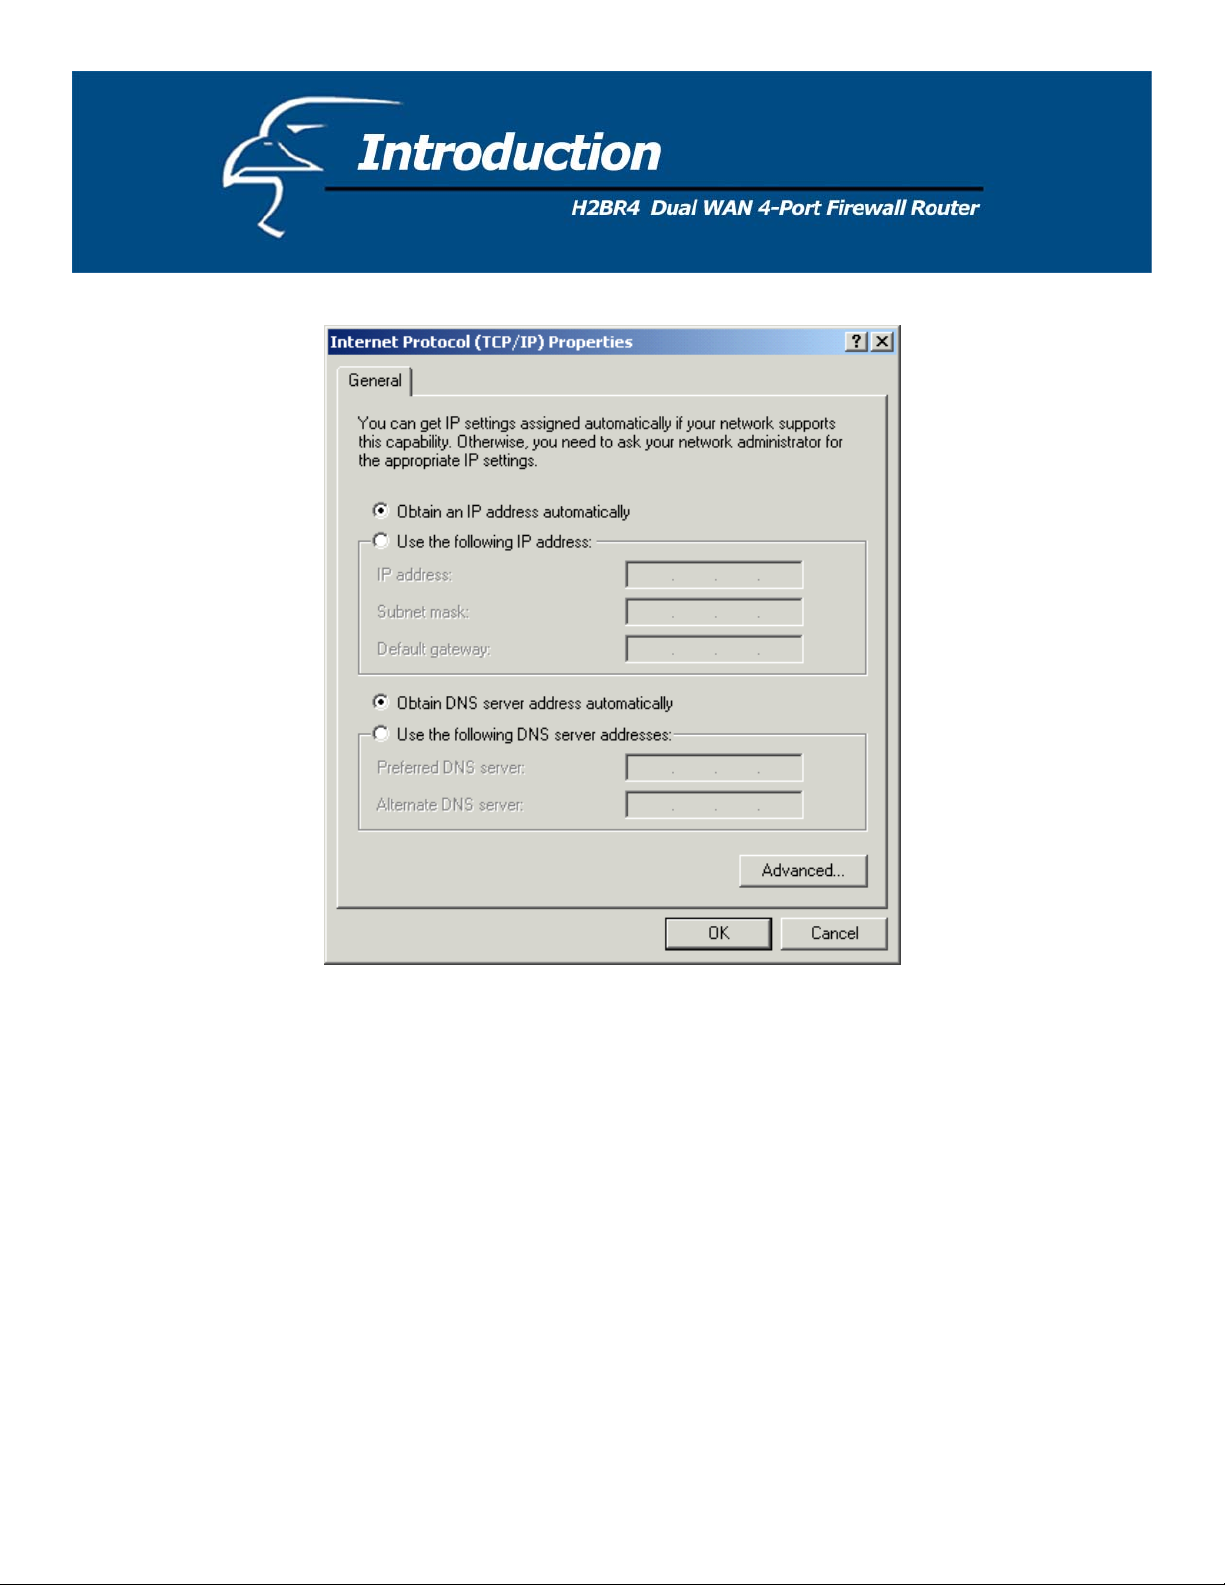
Figure 0.4
vi: Click OK to confirm the settings. Your PC will now obtain an IP address automatically from your rout
DHCP server.
Note: Please make sure that the router’s DHCP server is the only DHCP server available on y
our LAN. Once
you’ve configured your PC to obtain an IP address automatically, please proceed to Step 3.
2c) Windows NT
i: Click the Start button and select Settings, then click Control Panel. The Control Panel window will appear.
ii: Double-click the Network icon. The Network window will appear.
Select the Protocol tab from the Network
window.
er’s
12
Page 13
iii: Check if the TCP/IP Protocol is on your list of Network Protocols. If TCP/IP is not installed, click the Add
button to install it now. If TCP/IP is installed, go to step 5.
iv: In the Select Network Protocol window, select the TCP/IP Protocol and click the Ok button to start installing
the TCP/IP protocol. You may need your Windows CD to complete the installation.
v: After you install TCP/IP, go back to the Network window. Select TCP/IP from the list of Network Protocols
and then click the Properties button.
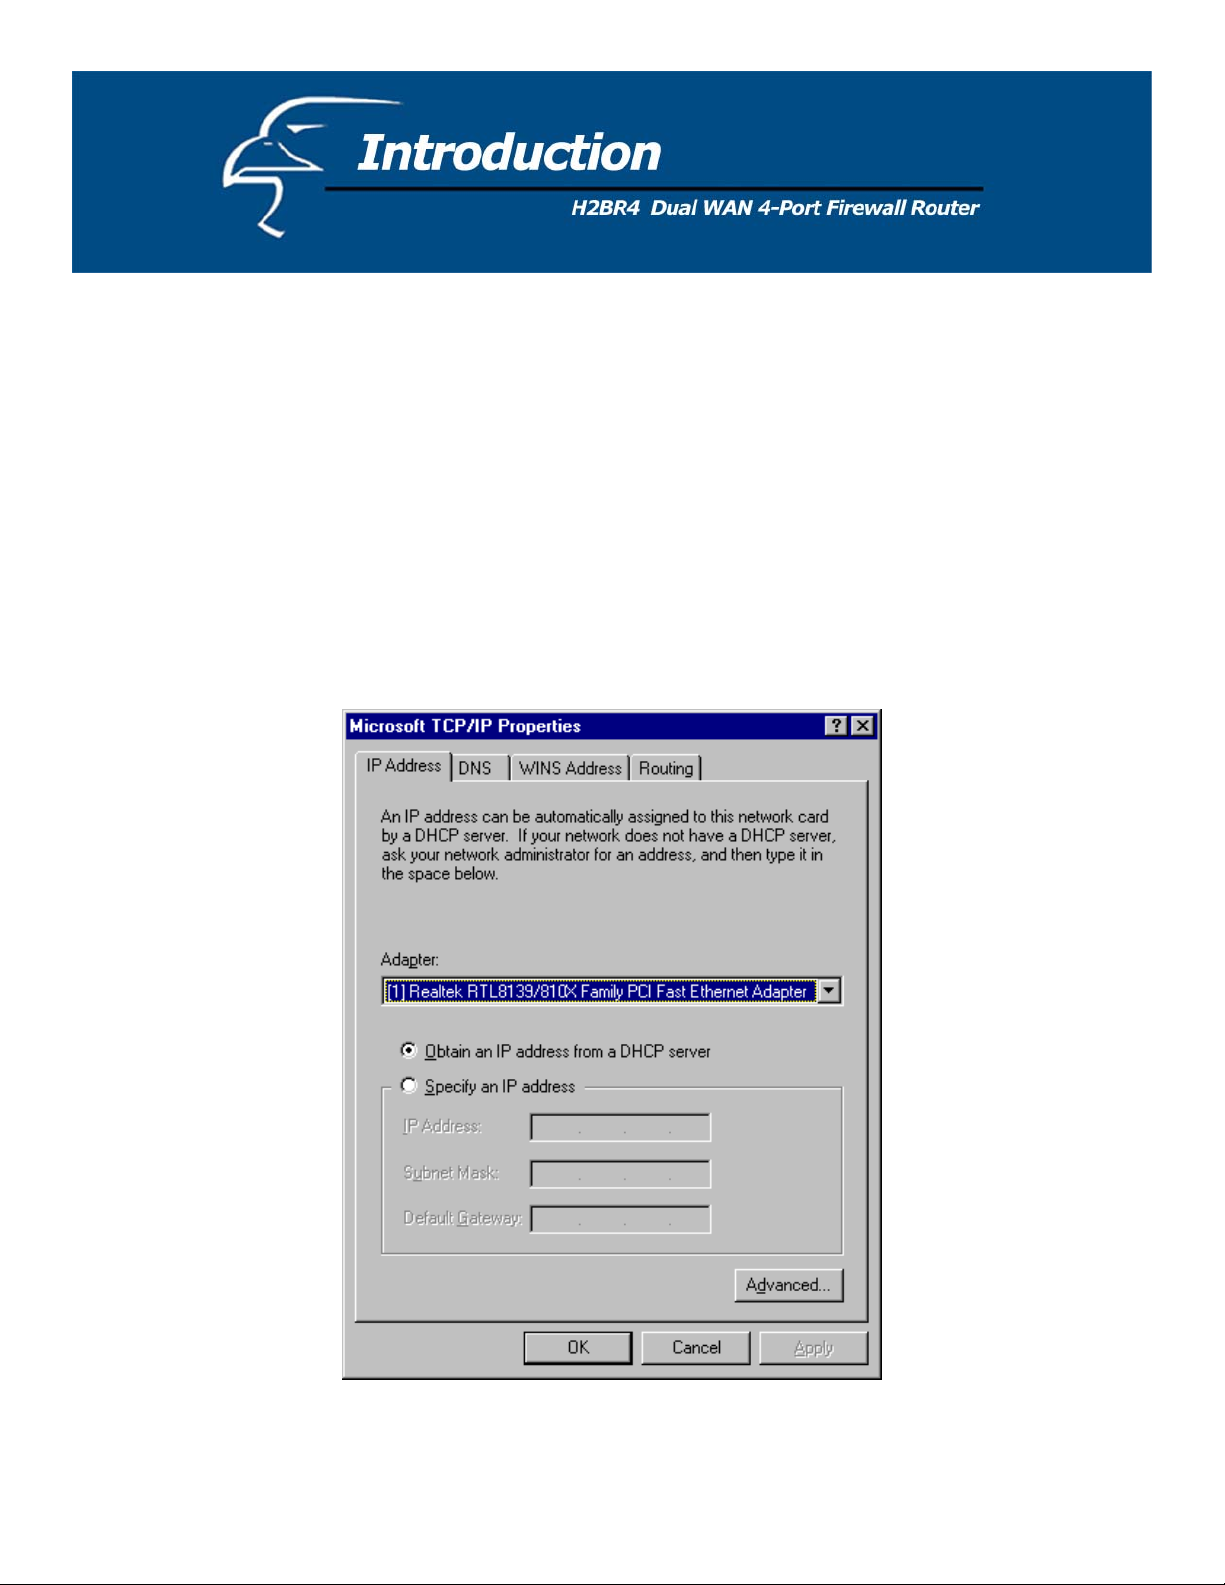
vi: Check each of the tabs and verify the following settings:
• IP Address: Select Obtain an IP address from a DHCP server.
• DNS: all fields are blank.
• WINS: all fields are blank.
• Routing: all fields are blank.
Figure 0.4
13
Page 14
vii: Click OK to confirm the settings. Your PC will now obtain an IP address automatically from your router’s
DHCP server.
Note: Please make sure that the router’s DHCP server is the only DHCP server available on your LAN. Onc
you’ve configured your PC to obtain an IP address automatically, please proceed to Se tep 3.
) Once you have configured your PCs to obtain an IP address automatically, the router’s DHCP server will
3
automatically give your LAN clients IP addresses. By defau
an obtain an IP address automatically. To see if you have obtained an IP address, see Appendix A.
c
Note: Please ma CP server is the only DHCP server available on your LAN. If there is
another D P s you’ll need to switch one of the DHCP servers off. (To disable the
router’s DHCP server, see Chapter 2: LAN Port.)
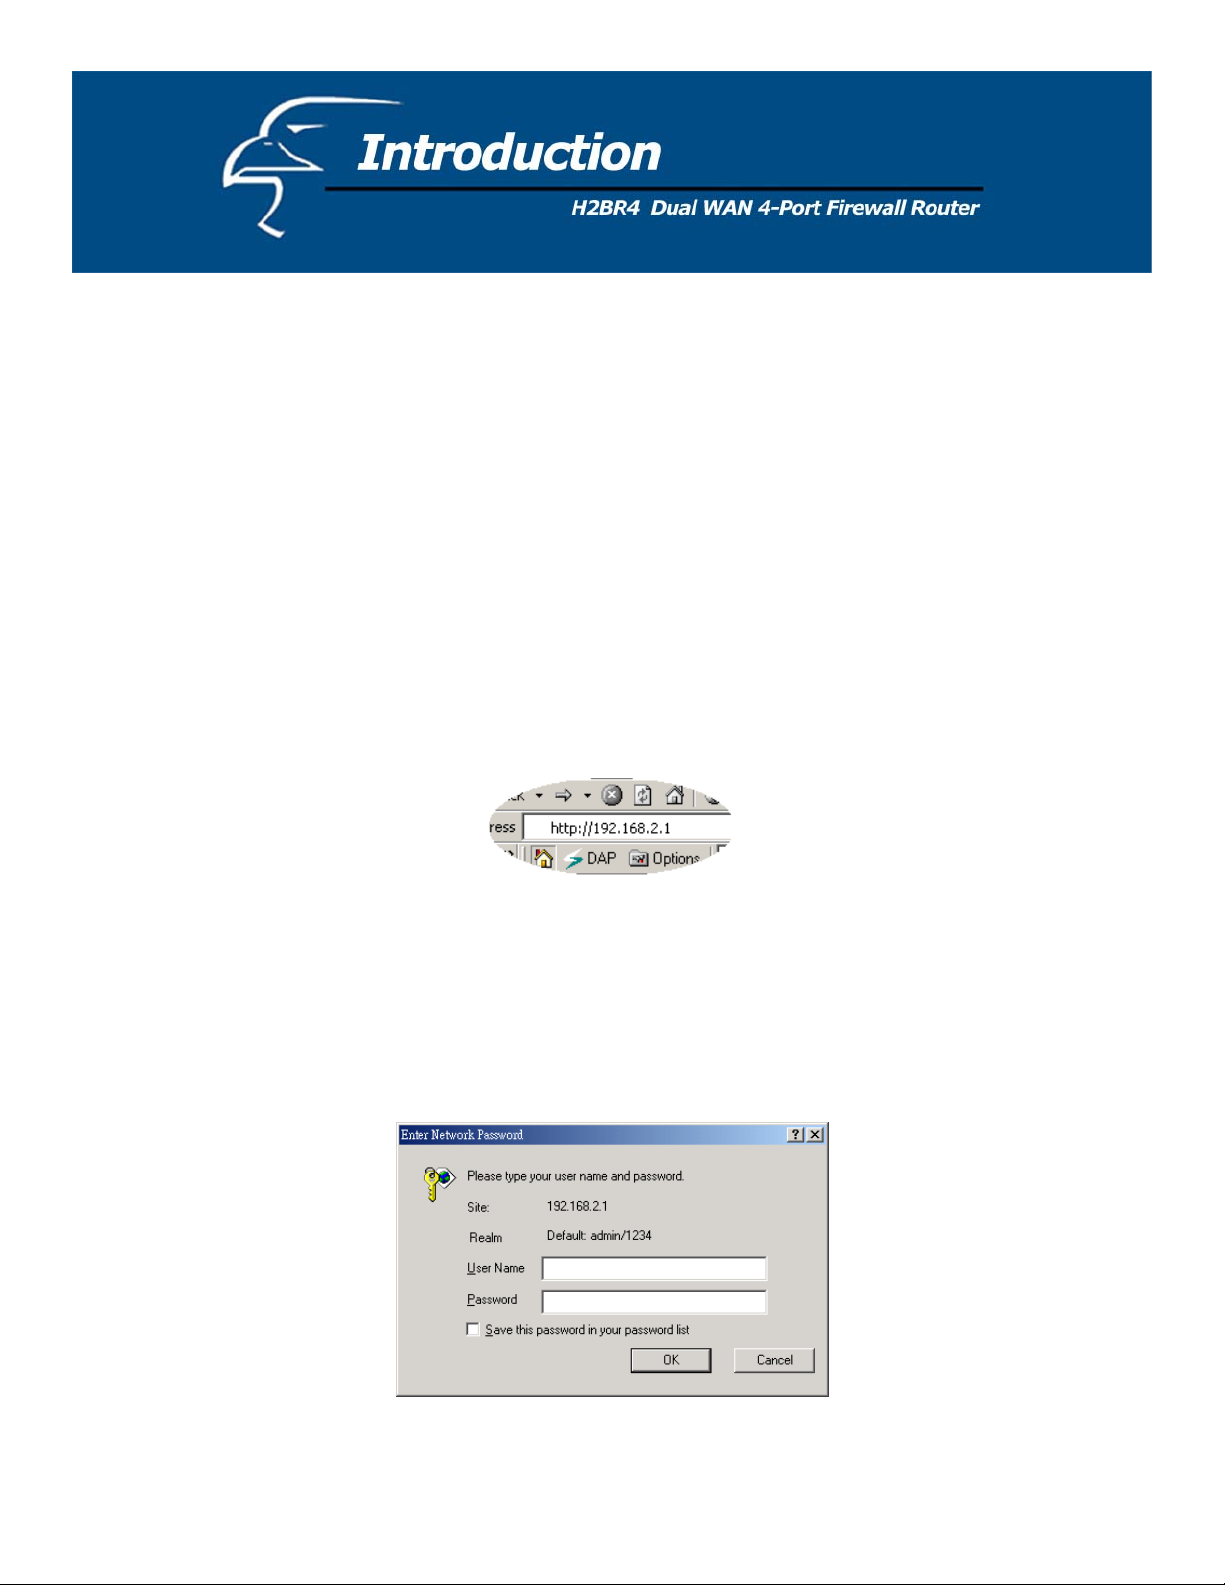
4) Once your PC has obtained an IP address from your router, enter the router’s default IP address of “192.168.2.1”
into your PC’s web browser and press Enter.
ke sure that the router’s DH
HC erver on your network, then
lt, the router’s DHCP server is enabled so that you
Figure 0.5
5) The login screen below will appear. Enter the “User Name” and “Password” and then click <OK> to login.
Note: By default the user name is “admin” and the password is “1234”. For security reasons it is recommended
that you change the password as soon as possible (in General setup/system/password, see chapter 2)
Figure 0.6
14
Page 15
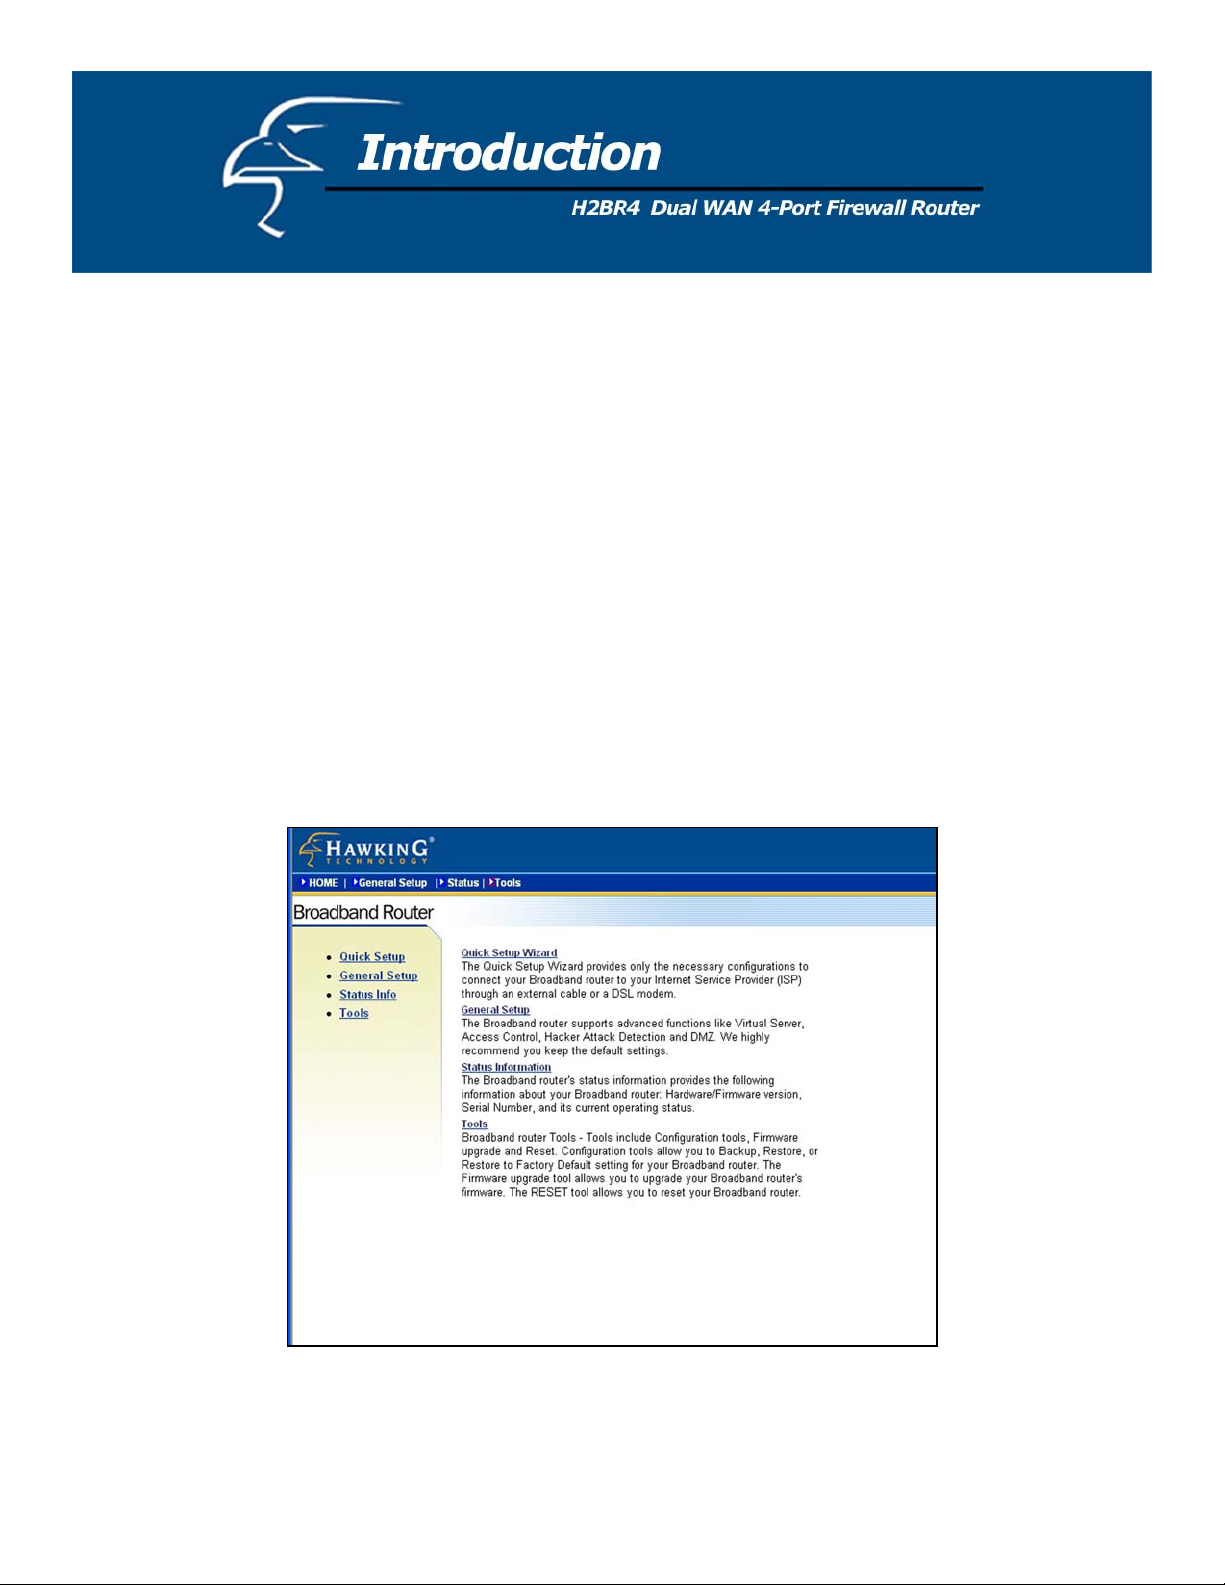
6)
The HOME page screen below will appear. The Home Page is divided into four sections, Quick Setup Wizard,
General Setup, Status Information and Tools.
Quick Setup Wizard (Chapter 1)
o configure the
If you only want to start using the router as an Internet Access device then you ONLY need t
screens in the Quick Setup Wizard section.
General Setup (Chapter 2)
uick
If you want to use more advanced features that the router has to offer, then you will need to configure the Q
Setup Wizard and the General Setup section. Alternatively, you can just configure the General Setup section,
since the General Setup/WAN and the Quick Setup Wizard contain the same configurations.
Status Information (Chapter 3)
The Status Information section is for you to monitor the router’s status information at any point in time.
Tools (Chapter 4)
If you want to Reset the router (because of prob
lems) or save your configurations or upgrade the firmware then
you will need to go to the Tools section.
Figure 0.7
15
Page 16

Menu Descri
ption
Quick S Select your Internet connection type and then input the configurations
etup Wizard (Chapter 1)
needed to connect to your Internet Service Provider (ISP).
General Setup (Chapter 2) This section contains configurations for the Broadband router’s advanced
functions such as: Bridge, Address Mapping, Virtual Server, Access
Control, Hacker Attack Prevention, DMZ, Special applications and other
functions to meet your LAN requirements.
Status Information (Chapter 3) In this section you can see the Broadband router's system information,
Internet Connection, Device Status, Security Log and DHCP client Log
information.
Tools (C This section contains the router’s Tools - Tools include Configuration
hapter 4)
tools, Firmware upgrade and Reset. Configuration tools allow you to
Backup (save), Restore, or Restore to Factory Default configuration for
our Broadband router. The Firmware upgrade tool allows you to
y
upgrade your router's firmware. The RESET tool allows you to reset your
Broadband router.
ogout Selecting logout will return you to the LOGIN page
L
7) Click on Quick Setup Wizard (see Chapter 1) to start configuring settings required by your ISP so that you can
start accessing the Internet. The other sections (General Setup, Status Information and Tools) do not need to be
configured unless you wish to implement/monitor more advanced features/information.
Select the section (Quick Setup Wizard, General Setup, Status Information and Tools) you wish to configure and
proceed to the corresponding chapter. Use the selections on the web management’s top right hand page (see
below) to navigate around the web-based management User Interface.
16
Page 17
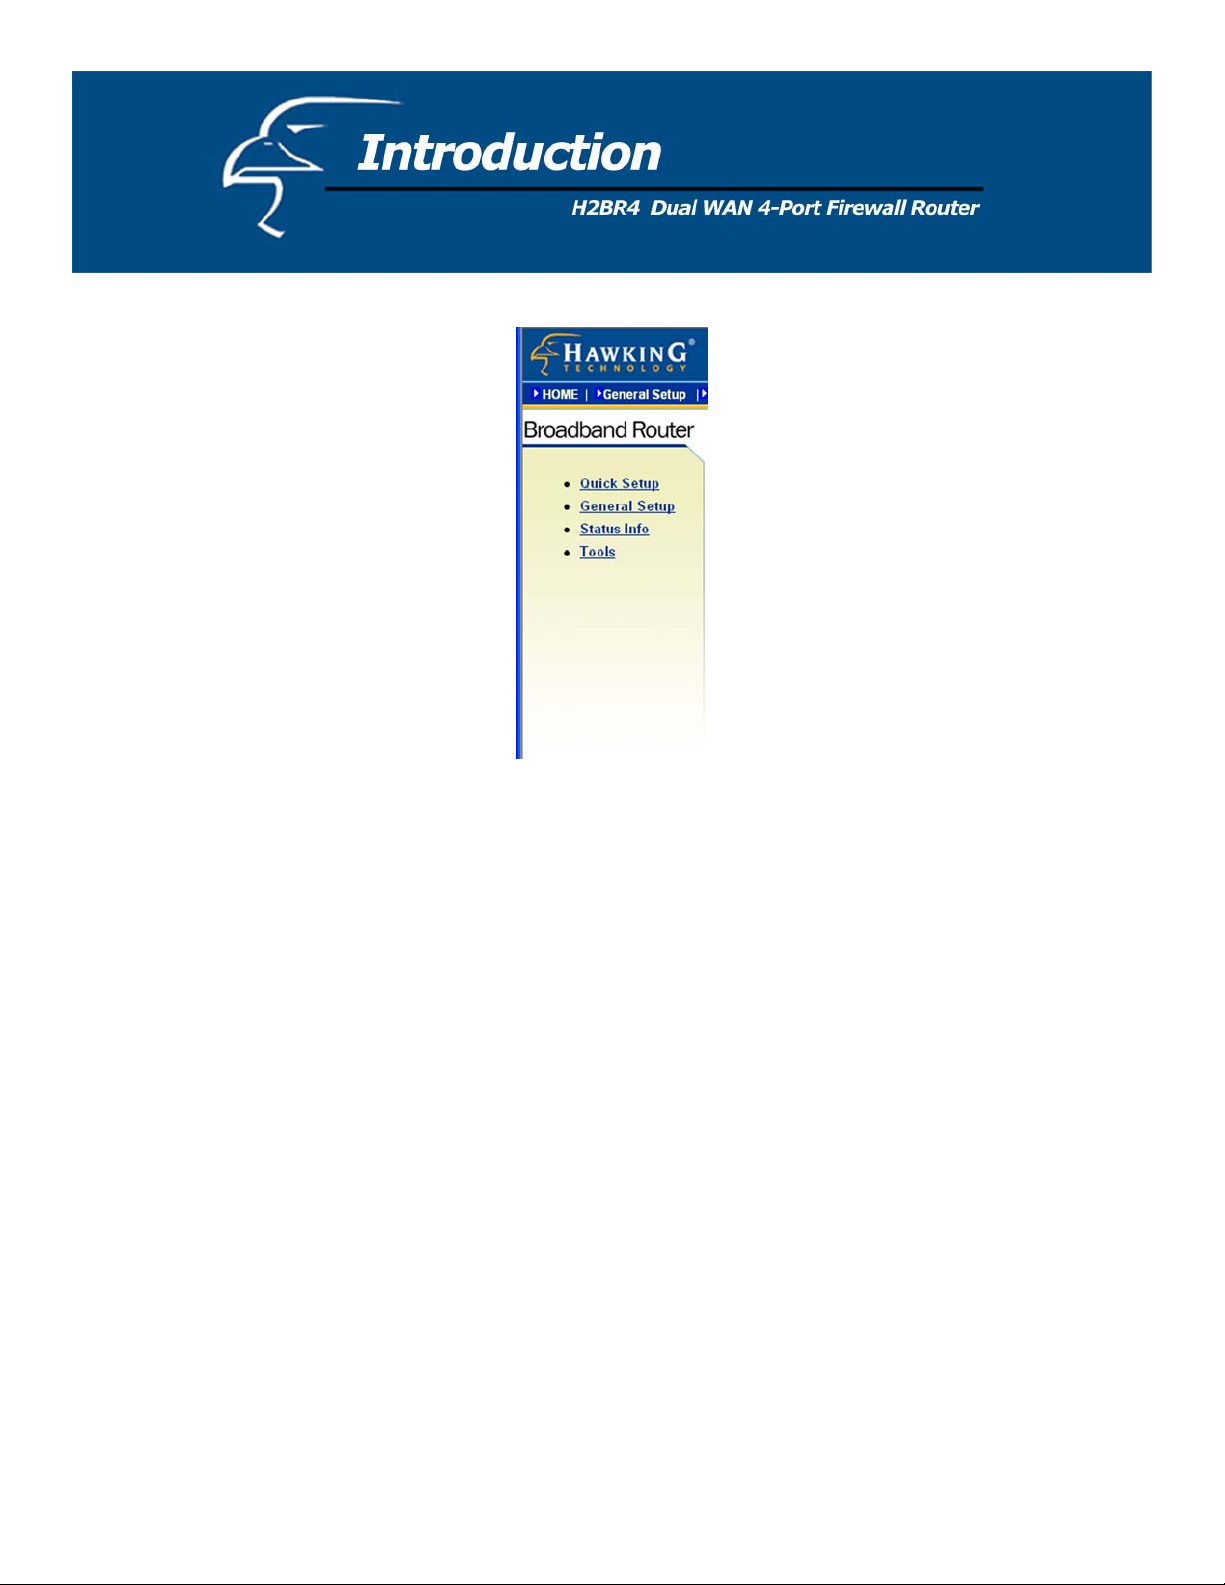
Figure 0.8
17
Page 18
About Quick Setup
he Quick Setup section is designed to let you set up the router as quickly as possible. In the Quick Setup, you are
T
required to fill in only the information necessary to access the Internet. Once you click on the Quick Setup Wizard in
e homepage, you will see the screen below.
th
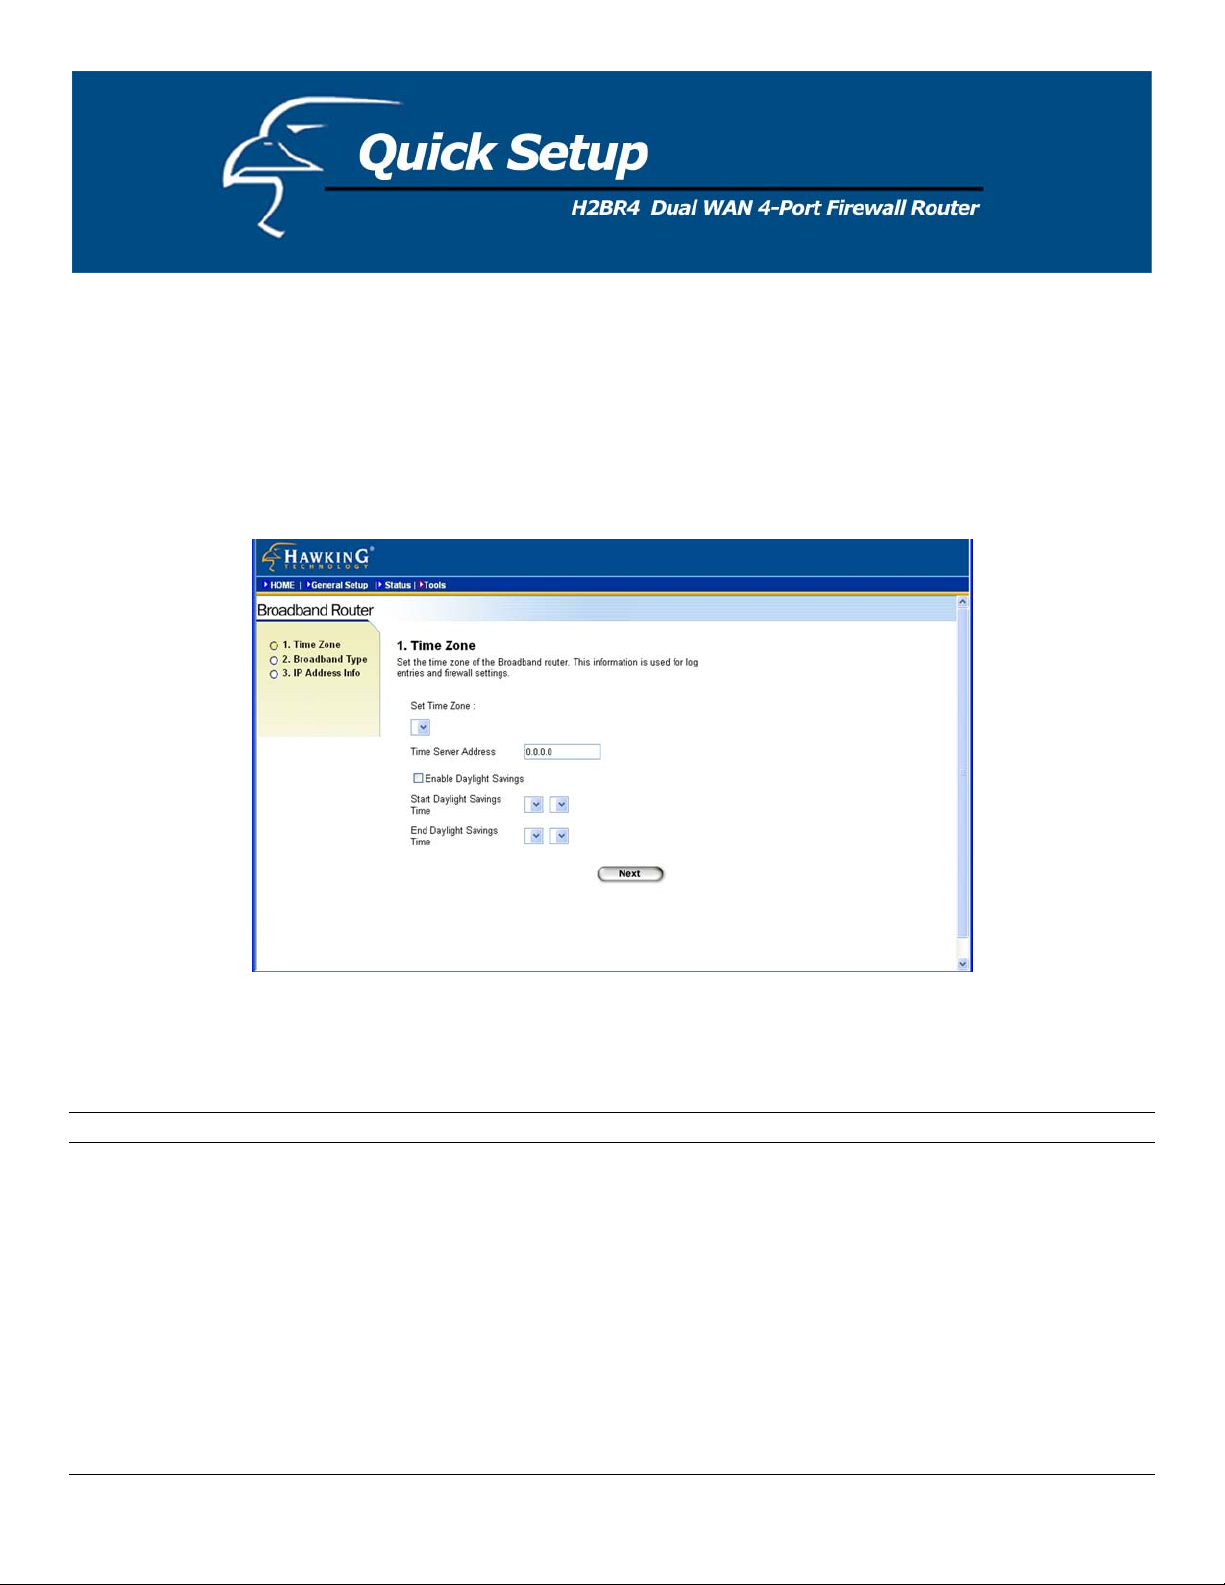
Step 1) Time Zone
The Time Zone allows y e on the settings configured here, this will affect functions such as Log
entries and Firewall settings.
our router to base its tim
Figure 1.1
Parameter Description
Set Time Zone Select the time zone of the country you are currently in. The router will set its
time based on your selection.
Time Server Address You can manually assign the time server address if the default time server does
not work.
Enable Daylight Savings The router can also take Daylight savings into account. If you wish to use this
function, you must check the “Enable Daylight Savings” box to enable your
daylight savings configuration (below).
Start Daylight Savings Time Select the period in which you wish to start daylight Savings Time
End Daylight Savings Time Select the period in which you wish to end daylight Savings Time
18
Page 19
Click on NEXT to proceed to the next page (step 2).
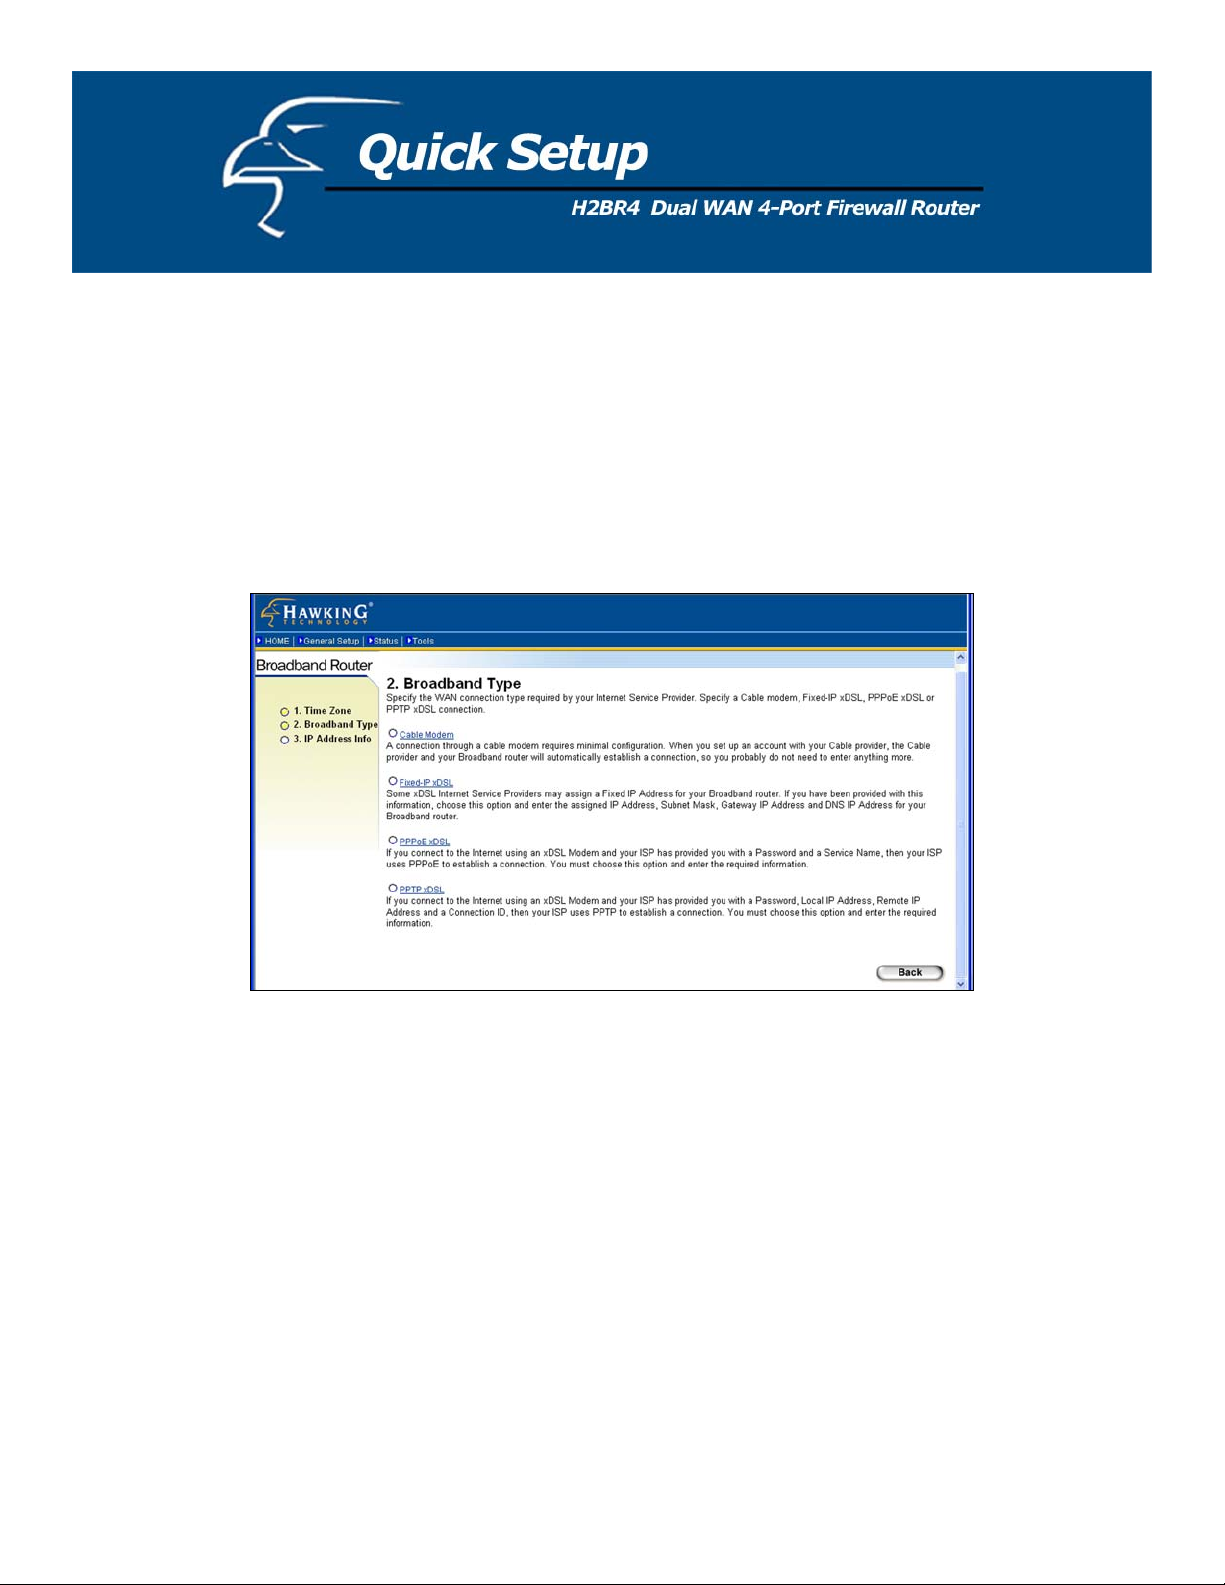
Step 2) Broadband Type
this section, you have to select one of four types of connections that you will be using to connect your router’s WAN
In
port to your ISP (see
screen below).
Note: Different ISP’s require
onnection it requires.
c
different methods of connecting to the Internet. Please check with your ISP as to the type of
Figure 1.2
19
Page 20

Menu Description
1.1 Cable Modem Your ISP will automatically give you an IP address
1.2 Fixed-IP xDSL Your
ISP has given you an IP address already
1.3 PPPoE Your ISP requires you to use a Point-to-Point Protocol over Ethernet (PPPoE)
connection.
.4 PPTP Your ISP requires you to use a Point-to-Point Tunneling Protocol (PPTP) connection.
1
Click on one of the WAN types and then proceed to the manual’s relevant sub-section (1.1, 1.2, 1.3 or 1.4). Click on
ack to return to the previous screen.
B
.1 Cable Modem
1
hoose Cable Modem if your ISP will automatically give you an IP address. Some ISP’s may also require that you fill in
C
dditional information such as Host Name and MAC address (see screen below).
a
ote: The Host Name and MAC address section is optional and you can skip this section if your ISP does not require
N
ese settings for you to connect to the Internet.
th
Figure 1.3
20
Page 21
Parameters Description
Host Name If your ISP requires a Host Name, type in the host name provided by your ISP; otherwise
leave it blank if your ISP does not require a Host Nam
e.
MAC Address Your ISP may require a particular MAC address
in order for you to connect to the
Internet. This MAC address is the PC’s MAC address that your ISP had originally
connected your Internet connection to. Type in this MAC address in this secti
the “Clone M
AC Address” button to replace the WAN MAC address with the MAC
on or use
address of that PC (you have to be using that PC for the Clone MAC Address button to
work). To find out the PC’s MAC address see Appendix A. (See Glossary for an
explanation on MAC addresses.)
Click OK when you have finished the configuration above. You have now completed the configuration for the Cable
odem connection. You can start using the router now. If you wish to use some of the advanced features supported by
M
this router, see Chap
ters 2, 3, 4.
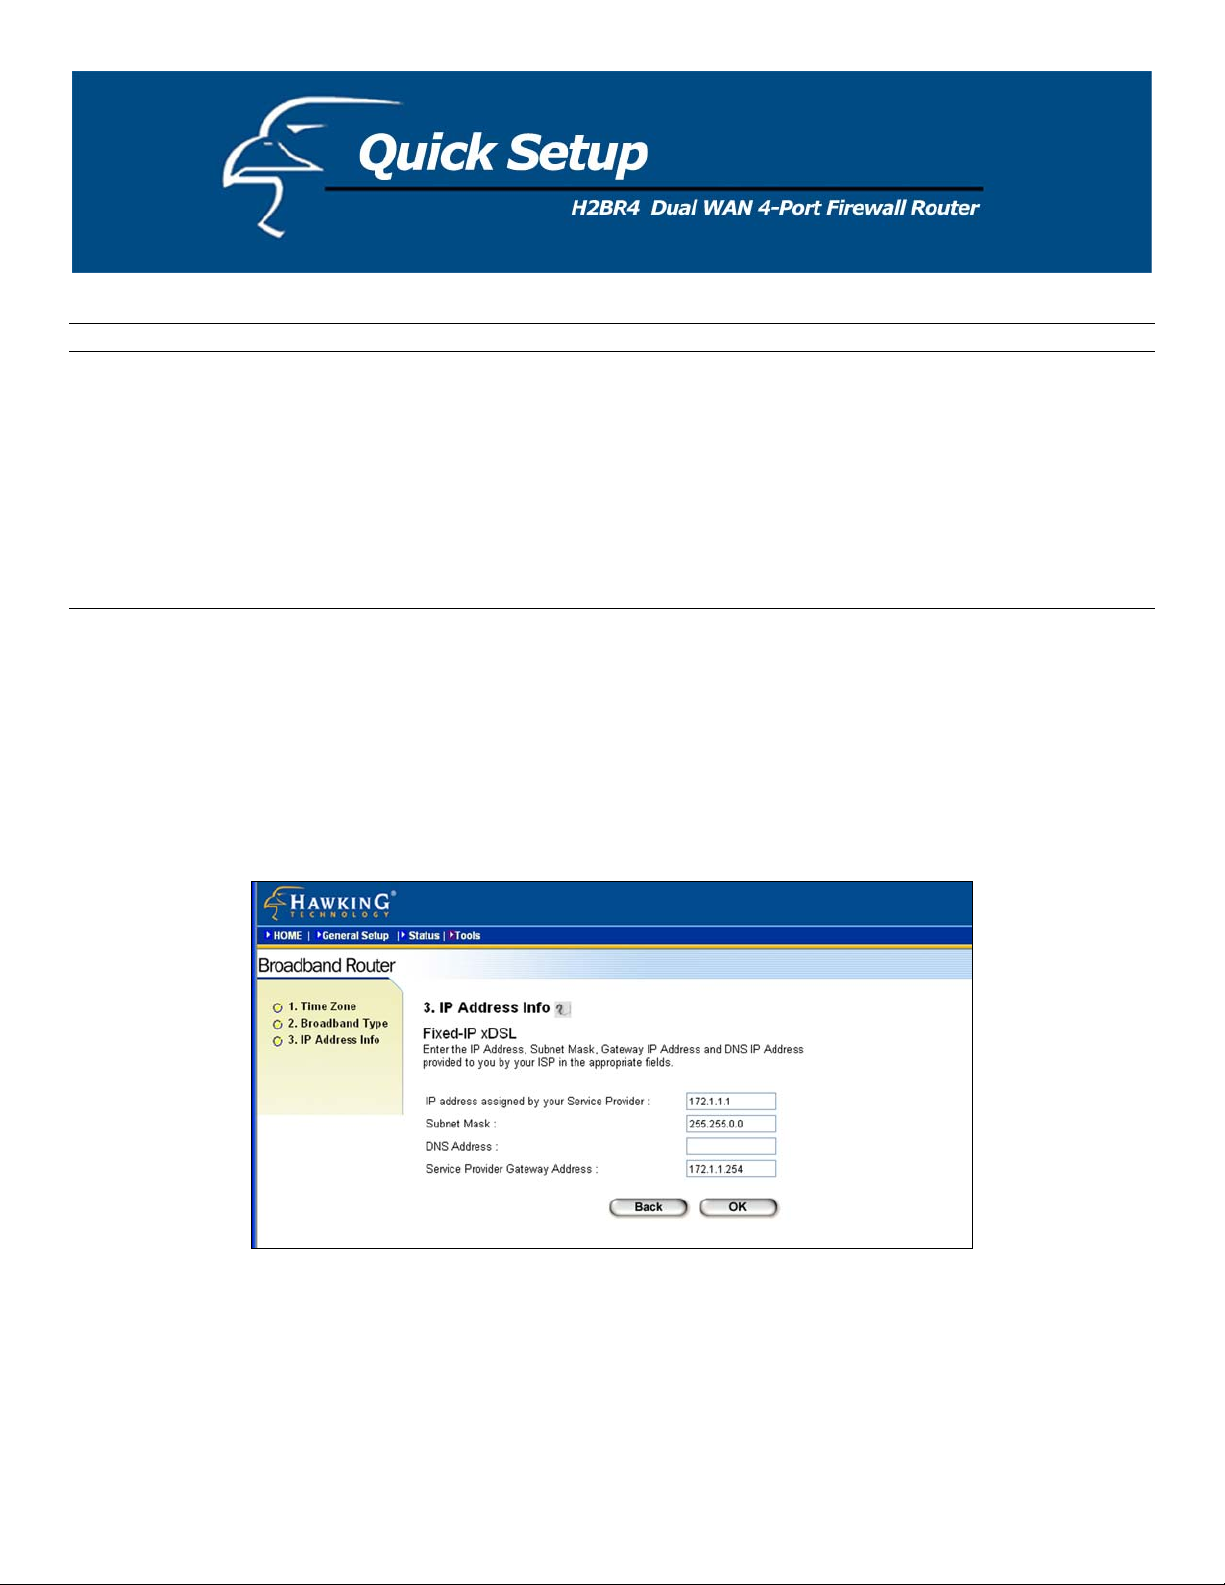
1.2 Fixed-IP xDSL
Select “Fixed-IP xDSL” if your ISP has given you a specific IP address for you to use. Your ISP should provide all the
information required in this section.
Figure 1.4
21
Page 22
Parameters Description
This is the IP address that your ISP has given youIP .
Gateway IP This is the ISP’s IP address gateway
DNS
This is the ISP’s DNS server IP address
Subnet Mask
Enter the Subnet Mask provided by your ISP
(e.g. 255.255.255.0)
Click OK when you have finished the configuration above. You have now completed the configuration for the Fixed-I
P
xDSL connection. You can start using the router now. If you wish to use some of the advanced features supported by thi
router, see Chapters 2, 3, 4.
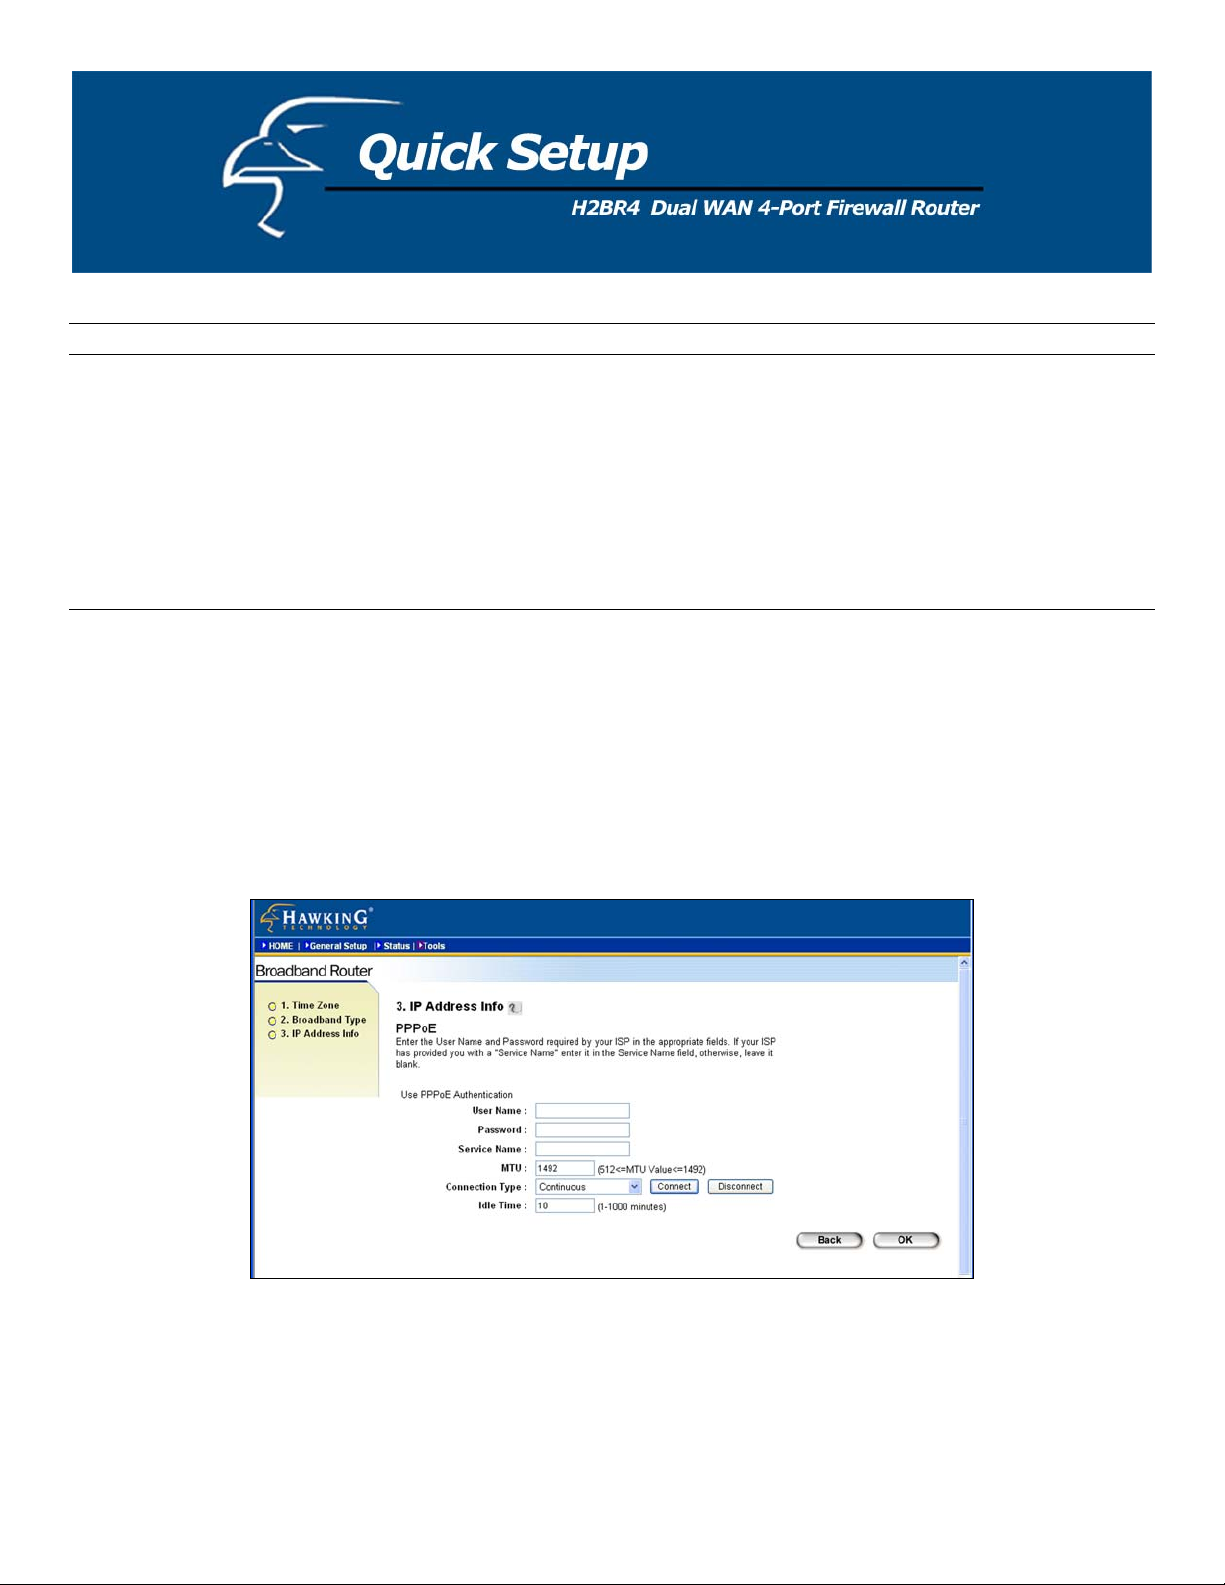
1.3 PPPoE
Select PPPoE if your ISP requires the PPPoE protocol to connect you to the Internet. Your ISP should provide all the
information required in this section.
Figure 1.5
s
22
Page 23

Parameter Description
Use m Enter the User Name provided by your ISP for the PPPoE cor Na e nnection
Password Enter the Password provided by your ISP for
the PPPoE connection
e Name This is o our ISP require it. Otherwise, leave it
Servic ptional. Enter the Service name should y
blank.
MTU This is optional. You can specify the maximum size of your transmission packet to the
Internet. Leave it as it is if you do not wish to set a maximum packet size.
Connection Type If you select “Continuous”, the router will always be connected to the ISP/Internet. If the
WAN line breaks down and links again, the router will auto-reconnect to the ISP. If you
select “Connect On Demand”, the router will auto-connect to the ISP when someone
wants to use the Internet and keep connected until the WAN idle timeout. The router will
close the WAN connection if the time period during which no one has been using the
Internet exceeds the “Idle Time”. If you select “Manual”, the router will connect to the
ISP only when you click “Connect” manually from the Web user interface. The WAN
ection will not get disconnected due to the idle timeout. If the WAN line breaks
conn
down and later links again, the router will not auto-connect to the ISP.
le Time You can specify an idle time threshold (in minutes) for the WAN port. This means if no
Id
packets have been sent (no one is using the Internet) during this specified period, the
router will automatically disconnect the connection to the ISP/Internet.
Note: The WAN "idle timeout" auto-disconnect function may not work due to abnormal
activities of some network application software, computer viruses or hacker attacks from
the Internet. For example, some software sends network packets to the Internet in the
background, even when you are not using the Internet. This function also may not work
with some ISPs. Please make sure this function can work properly when you use this
function the first time, especially if your ISP charges you by time used. Due to various
uncontrollable issues, we cannot guarantee the WAN "idle timeout" auto-disconnect
function will always work. In order to prevent an extra fee from being charged by your
ISP, please turn off the router when you are finished using the Internet.
Click OK when you have finished the configuration above. You have now completed the configuration for the PPPoE
connection. You can start using the router now. If y
ou wish to use some of the advanced features supported by this
router, see Chapters 2, 3, 4.
23
Page 24
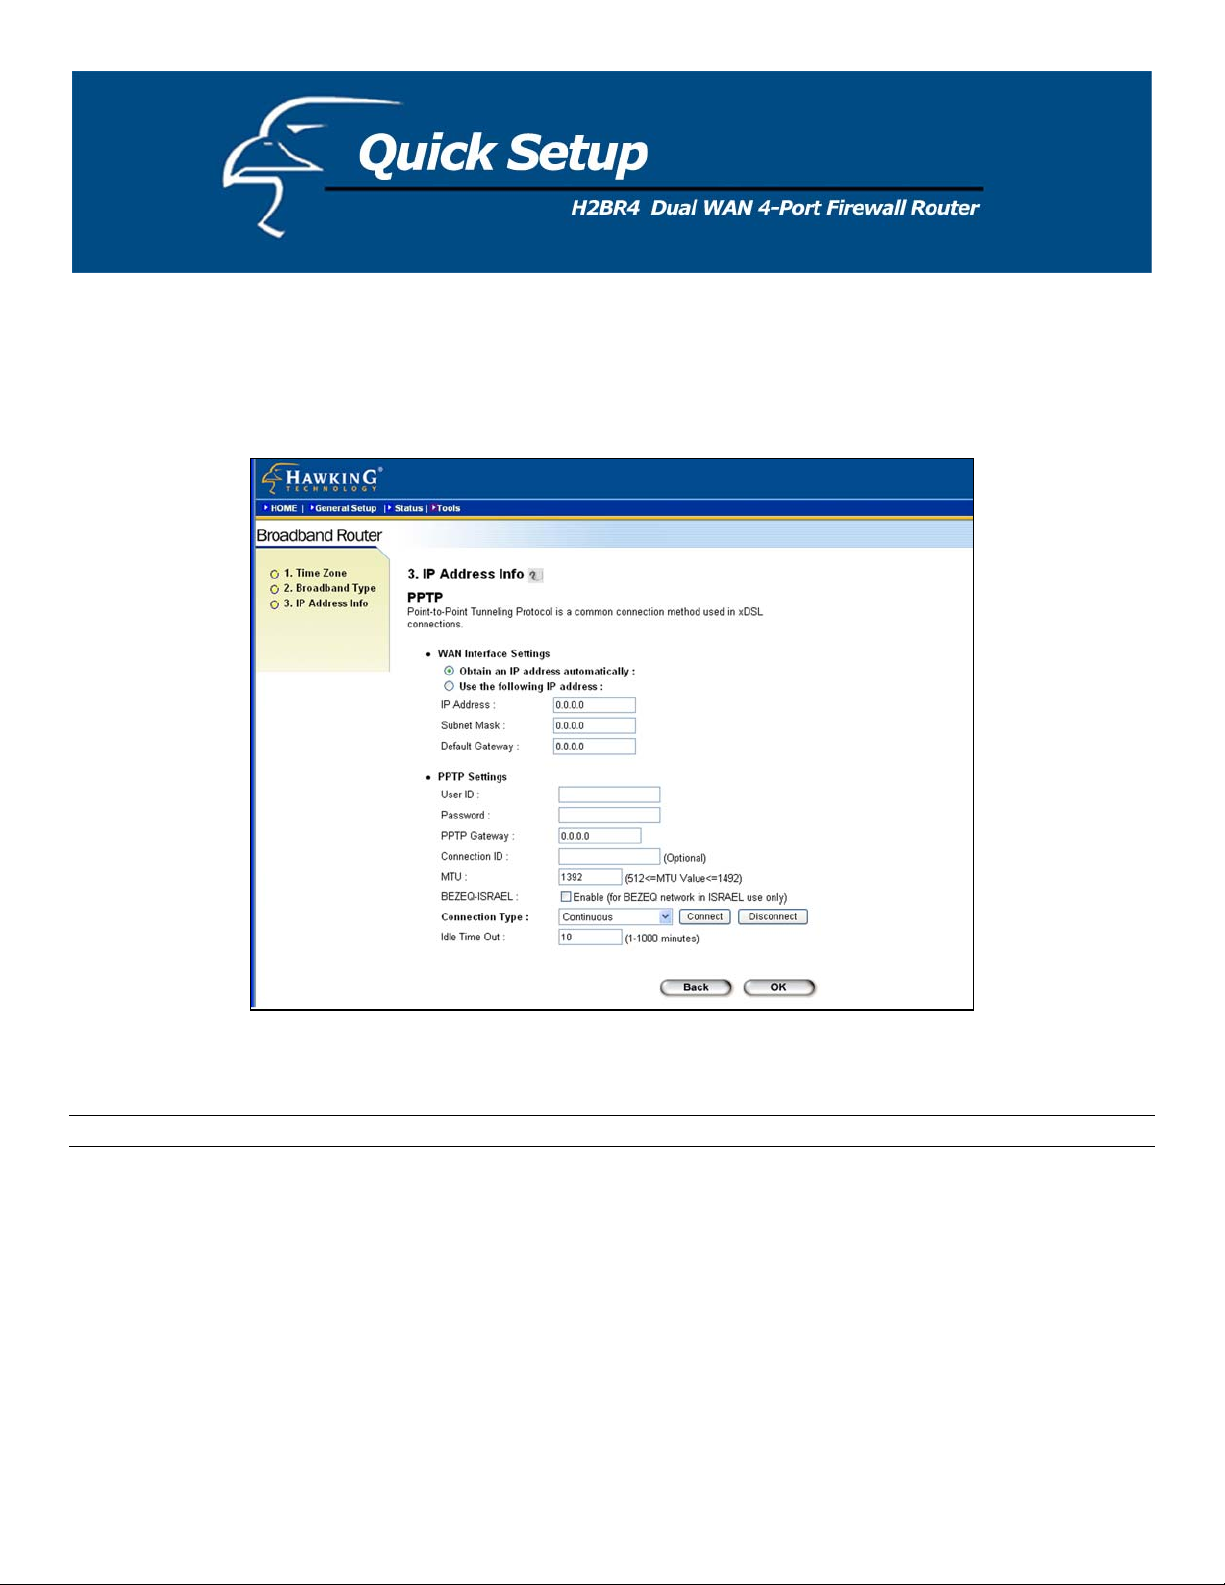
1.4 PPTP
elect PPTP if your ISP requires the PPTP protocol to connect you to the Internet. Your ISP should provide all the
S
information required in this section.
Figure 1.6
Parameter
Obtain an IP address
se the following IP address The ISP gives you a static IP to be used to connect to the PPTP server.
U
IP Address This is the IP address that your ISP has given you to establish a PPTP connection.
ubnet Mask Enter the Subnet Mask provided by your ISP (e.g. 255.255.255.0)
S
Default Gateway Enter the IP address of the ISP Gateway
Description
The ISP requires you to obtain an IP address by DHCP automatically before connecting
to the PPTP server.
24
Page 25

User ID Enter the User Name provided by your ISP for the PPTP connection (sometimes called a
Connection ID).
Password Ente
r the Password provided by your ISP for the PPTP connection.
PTP Gateway If your LAN has a PPTP gateway, then enter that PPTP gateway IP address here. If you
P
do not have a PPTP gateway then enter the ISP’s Gateway IP address above.
onnection ID This is the ID given by ISP. This is optional.
C
TU This is optional. You can specify the maximum size of your transmission packet to the
M
Internet. Leave it as it is if you do not wish to set a maximum packet size.
EZEQ-ISRAEL Select this item if you are using the service provided by BEZEQ in Israel.
B
onnection Type If you select “Continuous”, the router will always be connected to the ISP/Internet. If the
C
WAN line breaks down and links again, the router will auto-reconnect to the ISP. If you
select “Connect On Demand”, the router will auto-connect to the ISP when someone
wants to use the Internet and keep connected until the WAN idle timeout. The router will
close the WAN connection if the time period during which no one has been using the
Internet exceeds the “Idle Time”. If you select “Manual”, the router will connect to the
ISP only when you click “Connect” manually from the Web user interface. The WAN
connection will not get disconnected due to the idle timeout. If the WAN line breaks
down and later links again, the router will not auto-connect to the ISP.
le Time You can specify an idle time threshold (in minutes) for the WAN port. This means if no
Id
packets have been sent (no one is using the Internet) during this specified period, the
router will automatically disconnect the connection to the ISP/Internet.
Note: The WAN "idle to-disconnect function may not work due to abnormal
timeout" au
activities of some network application software, computer viruses or hacker attacks from
the Internet. For example, some software sends network packets to the Internet in the
background, even wh
with some ISPs. Ple
en you are not using the Internet. This function also may not work
ase make sure this function can work properly when you use this
function the first time, especially if your ISP charges you by time used. Due to various
uncontrollable issues, we cannot guarantee the WAN "idle timeout" auto-disconnect
function will always
work. In order to prevent an extra fee from being charged by your
ISP, please turn off the router when you are finished using the Internet.
lick OK w y e d the configuration above. You have now completed the configuration for the PPTPC hen ou hav finishe
connection. You can start using the router now. If you wish to use some of the advanced features su
ee Chapters 2, 3, 4.
s
pported by this router,
25
Page 26

General Settings
nce you click on the General Setup button on the homepage, you will see the screen below.
O
you have already configured the Quick Setup Wizard, you do NOT need to configure anything in the General Setup
If
screen in order to start using the Internet.
he General Setup contains advanced features that allow you to configure the router to meet your network’s needs such
T
as: Address Mapping, Virtual Server, Access Control, Hacker Attack Preventio
nctions.
fu
n, Special Applications, DMZ and other
Figure 2.1
26
Page 27

Below is a general description of what advanced functions are available for this broadband router.
Menu Description
2.1 System This section allows you to set the Broadband router’s system Time Zone, Password an
Remote Md anagement Administrator.
2.2 WAN This section allows you to select the connection method in order to establish a connectio
with your ISP (same as the Quick Setup Wizard section)
.3 LAN You can specify the LAN segment’s IP address, subnet Mask, enable/disable DHCP and
2
select an IP range for your LAN
.4 NAT
2 You can configure the Address Mapping, Virtual Server and Special Applications
functions in this section. This allows you to specify what user/packet can pass y
router’s NAT.
.5 Firewall
2
Select one of the Ge
1 System
2.
The system screen allows you to specify a time zone, to system password and to specify a remote management
ser for the broadband router.
u
neral Setup selections from above and proceed to the manual’s relevant sub-sections.
The Firewall section allows you to configure Access Control, Hacker Prevention and
DMZ.
change the
our
n
Figure 2.2
27
Page 28

Parameters Description
System Settings
2.1.1 Time Z Select the time zone of the country you are currently in. The router will set its
one
time based on your selection.
2.1.2 Passw Allows you to select a password in order to access the web-based management
ord Settings
website.
2.1.3 Rem You can specify a Host IP address that can perform remote management
ote Management
functions.
Select one tem settings selections and proceed to the manual’s relevant sub-sections. of the above three sys
2.1.1 Time Zone
he Time Zone allows your router to reference or base its time on the settings configured here, which will affect functions
T
such as Log entries and Firewall settings.
Figure 2.3
28
Page 29

arameter Description P
Set Time Zone Select the time zone of the country you are currently in. The router will set its
time based on your selection.
Time Server Addr You can manually assign time server address if the default time server dose not
ess
work.
Enable Daylight Savings The router can also take Daylight savings into account. If you wish to use this
function,
you must check/tick the enable box to enable your daylight saving
configuration (below).
Start Daylight Savings Time eriod in which you wish to start daylight Savings Time
Select the p
End Daylight Savings Time Select the period in which you wish to end daylight Savings Time
Click Apply at the bottom of the screen to save the above configurations. You can now configure other advance sections
or start using the router (with the advance settings in place)
.1.2 Password Settings
2
ou can change the nt. By default, the
Y password required to log into the broadband router's system web-based manageme
assword is “1234”
p
asswords can cont
P
. So please assign a password to the Administrator as soon as possible, and store it in a safe place.
ain 0 to 12 alphanumeric characters, and are case sensitive.
\
Figure 2.4
29
Page 30

Parameters Description
Current Password Enter your current password for the remote management administrator to log in to your
router.
Note: B ”
New Password ur new password
e-Enter Password Enter your new password again for verification purposes
R
for Verification
Note: If ault
Click Apply at the bottom of the screen to save the above configurations. You can now configure other advanced sections
or start using the router (with the advanced settings in place).
2.1.3 Remote Management
The remote management function allows you to provide a ho
remote site. Enter the designated host IP Address in the Host IP Address field.
a
Enter yo
(password is “1234”) with the reset button (see router’s back panel).
y default, the password is “1234
you forget your password, you will have to reset the router to the factory def
st on the Internet with the ability to configure the router from
Figure 2.5
30
Page 31

Parameters Description
Host Address This is the IP address of the host on the Internet that will have management/configuration access
to the Broadband router from a remote site. This m
eans if you are at home and your home IP
address has been designated the Remote Management host IP address for this router (located in
our co able to configure this router from your home. If the Host
y mpany office), then you are
Address is left 0.0.0.0 this means anyone can access the router’s web-based configuration from a
remote
location, provided that they know the password.
Click th
e Enabled box to enable the Remote Management function.
Note: When you want to access the web-based management from a remote site, you must enter
the router’s WAN IP address (e.g. 10.0.0.1) into your web-browser followed by port number
8080, e.g. 10.0.0.1:8080 (see below). You’ll also need to know the password set in the Password
Setting screen in order to access the ro
uter’s web-based management.
Colick Apply at the bottom of the screen to save the above configurations. You can now configure other advanced sections
r start using the router (with the advanced settings in place).
.2 WAN
2
se the WAN Settings screen if you have already configured the router via the Quick Setup Wizard section and you
U
ould like to change your Internet connection type. The WAN Settings screen allows you to specify the type of WAN
w
ort connection you want to establish with your ISP. In the WAN Settings screen, you can also configure the router to
p
t as a bridge. The WAN settings offer the following selections for the router’s WAN port: Dynamic IP, Static IP,
ac
PPoE, PPTP, L2TP, Telstra Big Pond, Policy, DNS and DDNS. You will need to select one of the two WAN ports
P
rst and configure one WAN port at a time.
fi
31
Page 32

Figure 2.6
aram Description
P eters
2.2.1 Dynamic IP address Your ISP will automatically give you an IP address
2.2.2 Static IP address Your ISP has given you an IP address already
.2.3 PPPo2
E Your ISP requires PPPoE connection.
2.2.4 PPTP Your ISP requires you to use a Point-to-Point Tunneling Protocol (PPTP)
connection.
2.2.5 L2TP Your ISP requires L2TP connection.
.2.6 Telstra Big Pond You2
r ISP requires Telstra Big Pond connection.
.2.7 Policy You can configure WAN policy.
2
.2.8 DNS You can specify a DNS server that you wish to use
2
.2.9 DDNS You can specify a DDNS server that you wish to use and configure the user name
2
and password provided by your DDNS service provider.
nce you have made a selection, click More Configuration at the bottom of the screen and proceed to the manual’s
O
levant sub-sections.
re
32
Page 33

2.2.1 Dynamic IP Address
hoose the Dynamic IP selection if your ISP will give you an IP address automatically. Some ISP’s may also require that
C
ou fill in additional information such as Host Name, Domain Name and MAC address. (See Chapter 1: “Cable Modem”
y
r more details.)
fo
.2.2 Static IP Address
2
hoose the Static IP selection if your ISP has given you a specific IP address for you to use. Your ISP should provide all
C
e information required in this section. (See Chapter 1: “Fixed IP” for more details.)
th
.2.3 PPPoE (PPP over Ethernet)
2
elect PPPoE if your ISP requires the PPPoE protocol to connect you to the Internet. Your ISP should provide all the
S
formation required in this section. (See chapter 1 “PPPoE” for more details.)
in
2.2.4 PPTP
elect PPTP if your ISP requires the PPTP protocol to connect you to the Internet. Your ISP should provide all the
S
information required in this section. (See chapter 1: “PPTP” f
or more details.)
2.2.5 L2TP
Select L2TP if P protocol to connect you to the Intern
formation required in this section.
in
your ISP requires the L2T et. Your ISP should provide all the
33
Page 34

Figure 2.7
34
Page 35

Parameter Description
Obtain an IP address The ISP requires you to obtain an IP address by DHCP automatically
before connecting to the L2TP server.
AC Address Your ISP may require a particular MAC address in order for you to connect to the
M
Internet. This MAC address is the PC's MAC address that your ISP had originally
connected your Internet connection to. Type in this MAC address in this section or use
the "Clone MAC Address" button to replace the WAN MAC address with the MAC
address of that PC (you have to be using that PC for the Clone MAC Address button to
work). To find out the PC's MAC address see Appendix A. (see Glossary for an
explanation on MAC address)
se the following IP address The ISP gives you a static IP address to be used to connect to the L2TP server.
U
Address This is the IP address that your ISP has given you to establish an L2TP connection.
IP
ubnet Mask Enter the Subnet Mask provided by your ISP (e.g. 255.255.255.0)
S
ateway Enter the IP address of the ISP Gateway
G
ser ID Enter the User Name provided by your ISP for the PPTP connection. Sometimes called a
U
Connection ID
assword Enter the Password provided by your ISP for the PPTP connection
P
L2TP Gateway If your LAN has an L2TP gateway, then enter that L2TP gateway IP address here. If you
do not have an L2TP gateway, then enter the ISP’s Gateway IP address above.
MTU This is optional. You can specify the maximum size of your transmission packet to the
Internet. Leave it as it is if you do not wish to set a maximum packet size.
Connection Type If you select “Continuous”, the router will always connect to the ISP. If the WAN line
breaks down and links again, the router will auto-reconnect to the ISP.
If you select “Connect On Demand”, the router will auto-connect to the ISP when
someone want to use the Internet and keep connected until the WAN idle timeout. The
router will close the WAN connection if the time period that no one is using the Internet
exceeds the “Idle Time”.
If you select “Manual”, the router will connect to ISP only when you click “Connect”
manually from the Web user interface. The WAN connection will not disconnected due
to the idle timeout. If the WAN line breaks down and latter links again, the router will not
auto-connect to the ISP.
35
Page 36

Idle Time Out Note: The WAN "idle timeout" auto-disconnect function may not work due to abnormal
activities of some ne
twork application software, computer viruses or hacker attacks from
the Internet. For example, some software sends network packets to the Internet in the
background, even when you are not using the Internet. This function a m
with some ISPs. Please make sure this
function can work properly when you use this
lso ay not work
function the first time, especially if your ISP charges you by time used. Due to various
uncontrollable issues, we cannot guarantee the WAN "idle timeout" auto-disconne
function will always work. In order to prevent an extra fee from being charged by y
ct
our
ISP, please turn off the router when you are finished using the Internet.
Click OK when you have finish
connection. You can start using is
ed the configuration above. You have now completed the configuration for the L2TP
the router now. If you wish to use some of the advanced features supported by th
router, see Chapters 2, 3, 4.
.2.6 Telstra Big Pond
2
elect Telstra Big Pond if your ISP requires the Telstra Big Pond protocol to connect you to the Internet. Your ISP should
S
provide all the nf o red in this section. Telstra Big Pond protocol is used by ISPs in Aus
i ormati n requi tralia.
ure 2.8
Fig
36
Page 37

Parameter
Description
User Name
Enter the User Name provided by your ISP for the Telstra Big Pond connection
Password
Enter the Password provided by your ISP for the Telstra Big Pond connection
User decide login server
server manually
Select if you want to assign the IP of Telstra Big Pond’s login
server manually.
Login Server The IP of the Login Server.
Click OK when you have finished the configuration above. You have now completed the configuration for the Telstra
ig Pond connection. You can start using the router now. If you wish to use some of the advanced features supported by
B
this router, see Chapters
2, 3, 4.
2.2.7 WAN Policy
he WAN policy for multi-homing can be setup here. You can set up policy for each WAN separately. The router will
T
alance the load between all active WAN ports according to the Send/Receive rate of the WAN ports. You can setup an
b
address for the router to detect if the WAN line is connected. If the router fails to ping the IP, it would recognize the
IP
AN line as not connected, and will stop directing the Internet traffic to this WAN port. The traffic will be redirected to
W
e other active WAN port. The Intranet users will not become aware of this change and keep surfing the Internet
th
moothly. You also can setup a WAN port as a backup WAN port. A backup WAN port would not be activated when the
s
uter starts up. When the other active WAN port fails to connect to the Internet, the backup WAN port will be activated
ro
nd take over all the traffic.
a
37
Page 38

Figure 2.9
Parameter Description
Speed The send/upstream and receive/downstream speed of the WAN line the
WAN port is connected to.
Connectivity check You can key in an IP. The router will ping that IP to verify if the WAN
line can access the Internet. You also can select “Ping Default Gateway”,
and the router will check if the WAN line is ok by ping the default
gateway of the WAN port.
Operation If you select “Enable”, the WAN port will be activated when the system
boot up. If you select “Backup”, the WAN port is disabled on start up.
But when other enabled WAN ports fail, the backup WAN port will be
activated and take over all the traffic.
2.2.8 DNS
A Domain Name System (DNS) server is like an index of IP addresses and Web addresses. If you type a Web address
into your browser, such as www.router.com, a DNS server will find that name in its index and the matching IP address.
Most ISPs provide a DNS server for speed and convenience. If your Service Provider connects you to the Internet with
38
Page 39

dynamic IP settings, it is likely that the DNS server IP address is provided automatically. However, if there is a DNS
erver that you would rather use, you need to specify the IP address of that DNS server here.
s
Figure 2.10
Parameters Des
cription
Domain This is the ISP’s DNS server IP address that they gave you; or you can
Name Server (DNS) Server
specify your own preferred DNS server IP address
Secondary DNS Add This is optional. You can enter another DNS server’s IP address as a
ress (optional)
backup. The secondary DNS will be used should the above DNS fail.
lick Apply at the bottom of the screen to save the above configurations. You can now configure other advanced sections
C
or start using the router (with the advanced settings in place).
2.2.9 DDNS
DNS allows you to map the static domain name to a dynamic IP address. You must get an account, password and your
D
tatic domain name from the DDNS service providers. You can assign a DDNS server for each WAN port. This router
s
supports som
e DDNS service providers, for example DynDNS and TZO.
39
Page 40

Figure 2.11
Parameters Default Description
WAN Port Select the WAN por
t that you want to configure the DDNS for
Enable/Disable Disable
Enable/Disable the DDNS function of this router
Provider DynDNS Select a DDNS service provider
omain name Your static domain name that use DDNS
D
Account/E-mail The account that your DDNS service provider assigned to you
assword/Key The passwordP
you set for the DDNS service account above
Click Apply at the bottom of the screen to save the above configurations. You can now configure other advanced sections
or start using the router (with the advanced settings in place).
40
Page 41

2.3 LAN
he LAN Port screen below allows you to specify a private IP address for your router’s LAN ports as well as a subnet
T
ask for your LAN segment.
m
Figure 2.12
41
Page 42

Parameters Default Description
LAN
IP address 192.168.2.1 This is the router’s LAN port (private) IP address (Your LAN clients’
default gateway IP address)
Subnet Mask 255.255.255.0 Specifies a Subnet Mask for your LAN segment
IP
02.1d Spanning Disabled If the 802.1d Spanning Tree function is enabled, this router will use the
8
ree spanning tree protocol to prevent network loops from occurring among
T
the LAN ports.
HCP Server Enabled You can enable or disable the DHCP server. By enabling the DHCP
D
server, the router will automatically give your LAN clients an IP address.
If the DHCP is not enabled then you’ll have to manually set your LAN
clients’ IP addresses; make sure the LAN Client is in the same subnet as
the router if you want the router to be your LAN clients’ default gateway
ease Time When DHCP is enabled, it will temporarily give your LAN clients an IP
L
address. In the Lease Time setting you can specify the time period that
the DHCP lends an IP address to your LAN clients. The DHCP will
change your LAN client’s IP address when this time threshold period is
reached
IP Address Pool You can select a particular IP address range for your DHCP server to
issue IP addresses to your LAN Clients.
Note: By default the IP range is from: Start IP 192.168.2.100 to End IP
192.168.2.199. If you want your PC to have a static/fixed IP address then
you’ll have to choose an IP address outside this IP address Pool
Domain Name You can specify a Domain Name for your LAN
Click Apply at the bottom of the screen to save the above configurations. You can now configure other advanced sections
or start using the router (with the advanced settings in place).
42
Page 43

2.4 NAT
etwork Address Translation (NAT) allows multiple users at your local site to access the Internet through a single Public
N
IP Add
to allow you to map Private IP Addresses to Public IP Addresses for key services such as Websites and FTP. You also c
disable NAT function and use the static route.
Parameter Description
Enable or Disab enable NAT to let the router provide the IP sharle NAT You can ing function or disable
Click Apply at the bottom of the screen to save the above configurations. You can now configure other advanced sections
ress or multiple Public IP Addresses. NAT provides Firewall protection from hacker attacks and has the flexibility
Figure 2.13
NAT to use the static routing function.
r start using the router (with the advanced settings in place). o
an
43
Page 44

2.4.1 Port Forwarding
The Port Forwarding allows you to re-direct a particular range of service port numbers (from the Internet/WAN Ports) to a
particular LAN IP address. It helps you to host some servers behind the router NAT firewall.
Figure 2.14
44
Page 45

Parameter Description
Enable Port Forwarding Enable Port Forwarding
Private IP This is the private IP of the server behind the NAT firewall.
Note: You need to give your LAN PC clients a fixed/static IP address for
Port Forwarding to work properly.
ype This is the protocol type to be forwarded. You can choose to forward
T
“TCP” or “UDP” packets only or select “both” to forward both “TCP”
and “UDP” packets.
ort Range The range of ports to be forward to the private IP.
P
AN Port Assign the WAN port that requires port forwarding. All the packets sent
W
from this WAN port with the assigned port range will be directed to the
assigned private IP addresses.
omment The description of this setting.
C
dd Port Forwarding into the table Fill in the "Private IP", “Type”, “Port Range”, “WAN Port” and
A
"Comment" of the settings to be added and then click "Add". Then this
Port Forwarding setting will be added into the "Current Port Forwarding
Table" below. If you find any errors before adding it and want to type it
in again, just click "Clear" and the fields will be cleared.
emove Port Forwarding into the table If you want to remove some Port Forwarding settings from the " Current
R
Port Forwarding Table", select the Port Forwarding settings you want to
remove in the table and then click "Delete Selected". If you want to
remove all Port Forwarding settings from the table, just click the "Delete
All" button. Clicking "Reset" will clear your current selections.
Click Apply at the bottom of the screen to save the above configurations. You can now configure other advanced sections
or start using the router (with the advanced settings in place).
45
Page 46

2.4.2 Virtual Server
se the Virtual Server function when you want different servers/clients in your LAN to handle different service/Internet
U
application type (e.g. Em c.) from the Internet. Com
cognize a particular service/Internet application type. The Virtual Server allows you to re-direct a particular service port
re
number (fro ular LAN private IP address and its service port number. (See
r an explanation on Port number)
fo
m the Internet/WAN Port) to a partic Glossary
ail, FTP, Web server et puters use numbers called port numbers to
Figure 2.15
46
Page 47

arameters Description P
Enable Virtual Server Enable Virtual Server.
Private IP This is the LAN client/host IP address that the Public Port number packet will be sent to.
Not e: You need to give your LAN PC clients a fixed/static IP address for the Virtual
Server function to work properly.
Private Port This is the port number (of the above Private IP host) that the below Public Port number
will be changed to when the packet enters your LAN (to the LAN Server/Client IP)
Type Select the port number protocol type (TCP, UDP or both). If you are unsure, then leave it
to the default “Both” protocol.
Public Port Enter the service (service/Internet application) port number from the Internet that will be
re-directed to the above Private IP address host in your LAN
Note: Virtual Server function will have priority over the DMZ function if there is a
conflict between the Virtual Server and the DMZ settings.
WAN Port Assign the WAN port that you want to bind to the virtual server. All the packets sending
from this WAN port with the assigned public port will be directed to the assigned private
IP and private port.
Comment The description of this setting.
Add Virtual Server Fill in the "Private IP", "Private Port", "Type", “Public Port”, “WAN Port” and
"Comment" of the setting to be added and then click "Add". Then this Virtual Server
setting will be added into the "Current Virtual Server Table" below. If you find any
errors before adding it and want to retype again, just click "Clear" and the fields will be
cleared.
Remove Virtual Server If you want to remove some irtual Server settings from the "Current Virtual Server
V
Table", select the Virtual Server settings you want to remove in the table and then click
"Delete Selected". If you want remove all Virtual Server settings from the table, just
click the "Delete All" button. Clicking "Reset" will clear your current selections.
Click Apply at the bottom of the screen to save the above configurations. You can now configure other advanced sections
or start using the router (with the advanced settings in place).
Example: Virtual Server
The diagram below demonstrates one of the ways you can use the Virtual Server function. Use Virtual Server when you
want the web server located in your private LAN to be accessible to Internet users from WAN 2. The configuration below
means that any request coming form the Internet to access your web server will be translated to your LAN’s web server
(192.168.2.2). Note: For the virtual server to work properly Internet/remote users must know your global IP
47
Page 48

address for WAN 2. (For websites, you will need to have a fixed/static global/public IP address or use DDNS with
dynamic IP and domain name mapping.)
Figure 2.16
2.4.3 Special Applications
Some applications require multiple connections, such as Internet games, video conferencing, Internet telephony and
others. In this section you can configure the router to support multiple connections for these types of applications.
48
Page 49

Figure 2.17
arameters Description
P
Enable Trigger Port Enables the Special Application function.
rigger Port This is the outgoing (Outbound) range of port numbers for this particular application
T
rigger Type Select whether the outbound port protocol is “TCP”, “UDP” or both.
T
ublic Port Enter the In-coming (Inbound) port or port range for this type of application (e.g. 2300-
P
2400, 47624)
Note: Individual port numbers are separated by a comma
(e.g. 47624, 5775, 6541 etc.). To input a port range use a “dash” to separate the two port
number range (e.g. 23
00-2400)
Public Type Select the Inbound port protocol type: “TCP”, “UDP” or both
The description of this setting. Comment
49
Page 50

Popular applications This section lists the more popular applications that require multiple connections. Select
an application from the Popular Applications selection. Once you have selected an
application, select a location (1-10) in the Copy to selection box and then click the Copy
to button. This will automatically list the Public Ports required for this popular
application in the location (1-10) you had specified.
dd Special Application Fill in the "Trigger Port", "Trigger Type”, “Public Port”, "Public Type", and "Comment"
A
of the setting to be added and then click "Add". This Special Application setting will
then be added into the "Current Trigger-Port Table" below. If you find any errors before
adding it and want to retype it again, just click "Clear" and the fields will be cleared. If
you want to add a popular application, select one “Popular Application” and then click
“Add”.
emove Special Application If you want to remove some Special Application settings from the "Current Trigger-Port
R
Table", select the Special Application settings you want to remove in the table and then
click "Delete Selected". If you want to remove all Special Application settings from the
table, just click the "Delete All" button. Clicking "Reset" will clear your current
selections.
Click Apply at the bottom of the screen to save the abo ions. You can now configure other advanced sections
r start using the router (with the advanced settings in place).
o
ve configurat
xample: Special Applications
E
f you need to run applications that require multiple connections, then specify the port (outbound) normally associated
I
with that application in the "Trigger Port" field. Then select the protocol type (TCP or UDP) and enter the public ports
associated with the trigger port to open them up for inbound traffic
.
xample:
E
Tr
ID Trigger Port
igger
T
ype
Public Port Public Type Comment
1 28800 UDP 2300-2400, 47624 TCP MSN Game Zone
2 6112 UDP 6112 UDP Battle.net
In the example above, when a user triggers port 28800 (outbound) for MSN Game Zone then the router will allow
coming packets for ports 2300-2400 and 47624 to be directed to that user. Note: Only one LAN client can use a
in
particular special application at a time.
50
Page 51

2.4.4 UPnP
With UPnP, all PCs in your Intra
configuration procedures for you
net will discover/locate this router automatically. So you will not have to perform any
r PC and can access the Internet through this router easily.
Figure 2.18
Parameters Default Description
UPnP Feature Disable You can Enable or Disable the UPnP feature here. After you enable the
UPnP feature, all client systems that support UPnP, like Windows XP,
can discover/locate this router automatically and access the Internet
through this router without any configuration. The NAT Traversal
function provided by UPnP can let applications that support UPnP
sm ect to Intern ut any in ty problem
oothly conn et sites witho compatibili
due to the NAPT port translation.
Click Apply at the bottom of the screen to save the above configurations. You can now configure other advanced sections
r start using the router (with the advanced settings in place). o
51
Page 52

2.4.5 Protocol and Port Binding
Protocol and Port Binding let you manually bind an application to a WAN port. Only packets that match all the entered
criteria will be bound to the assigned WAN port. You will have to fill all the items. The item
e ignored.
b
Figure 2.19
Parameters Description
Enable Protocol & The “Protocol a
Port Binding enable the “Prot
nd Port Binding” function is disabled by default. You can select to
ocol and Port Binding” function.
Source IP Range Only packets w ll statically bind to the assigned WAN
ith this assigned source IP range wi
port.
s that you leave blank will
52
Page 53

Destination IP Range Only packets with this assigned destination IP range will statically bind to the assigned
WAN port.
Source Port Range Only packets with this assigned source port range will statically bind to the assigned
WAN port.
estination Port Range Only packets with this assigned destination port range will statically bind to the assigned
D
WAN port.
rotocol Only packets with this assigned protocol will statically bind to the assigned WAN port.
P
AN Port The WAN port that the packets matching this rule are statically bound to.
W
dd a Rule Fill in the "Source IP Range", "Destination IP Range”, “Source Port Range”, "Destination
A
Port Range", "Protocol" or "WAN Port" of the setting to be added and then click "Add".
This rule of Protocol and Port Binding will then be added into the "Protocol and Port
Binding Table" below. If you find any errors before adding it and want to retype it again,
just click "Clear" and the fields will be cleared.
emove a Rule If you want to remove a rule from the "Protocol and Port Binding Table", select the rules
R
you want to remove in the table and then click "Delete Selected". If you want to remove
all rules from the table, just click the "Delete All" button. Clicking "Reset" will clear your
current selections.
Click Apply at the bottom of the screen to save the above configurations. You can now configure other advanced sections
r start using the router (with the advanced settings in place). o
53
Page 54

2.4.6 ALG Settings
You can select applications that need “Application Layer Gateway
” to support.
Figure 2.20
Parameters Default Description
Enable You can enable the “Application Layer Gateway”. Then, the router will
let that application correctly pass though the NAT gateway.
Click Apply at the bottom of the screen to save the above configurations. You can now configure other advanced sections
or start using the router (with the advanced settings in place).
54
Page 55

2.4.7 Static Routing
This router provides a Static Routing function when NAT is disabled. With Stat
ccording to your routing rules.
a
ote: The DMZ function of the firewall will not work if static routing is enabled.
N
Figure 2.21
ic Routing, the router can forward packets
arameter Description
P
Enable Static Routing The Static Routing function is disabled by default. You have to enable the Static
Routing function before you
Destinat work address of the destination LAN.
ion LAN IP The net
ubnet Mask The subnet mask of the destination LAN.
S
Default Gateway The next stop gateway of the path toward the destination LAN. This is the IP
address of the neighbo
path to the destination LAN.
r routing rules take effect.
r router that this router should communicate with on the
55
Page 56

Hop Count The number of hops (routers) to pass through to reach the destination LAN.
Interface The interface that goes to the next hop (router).
dd a Rule Fill in the "Destination LAN IP", "Subnet Mask”, “Default Gateway”, "Hop
A
Count" and "Interface" of the rule to be ad
for Static Routing will then be added into the "Static Routing Table" below. If
you find any errors before adding it and want to retype it again, just click "Clear"
and the fields will be cleared.
emove a Rule the "Static Routing Table", select
R If you want to remove some routing rules from
the rules you want to remove in the table and then click "Delete Selected". If y
want to remove all the rules from the table, just click the "Delete All" button.
Clicking "Reset" will clear your current selections.
Click Apply at the bottom gure other advanced sections
r start using the ro
o
.5 Firewall
2
he Broadband rou iting the risk of
T
acker attacks, and defending against a wide array of common Internet attacks. However, for applications that require
h
nrestricted access to the Internet, you can configure a specific client/server as a Demilitarized Zone (DMZ).
u
ote: To enable the Firewall settings select Enable and click Apply.
N
of the screen to save the above configurations. You can now confi
uter (with the advanced settings in place).
ter provides extensive firewall protection by restricting connection parameters, thus lim
ded and then click "Add". This rule
ou
Figure 2.22
56
Page 57

Figure 2.23
Parameters Description
2.5.1 Access Control Access Control allows you to specify which hosts/users can have access to certain
Internet applications.
.5.2 URL Blocking URL Blocking allows you to specify which URLs cannot be accessed by users.
2
.5.3 DoS The router's firewall can block common hacker attacks and can log the attack activities.
2
.5.4 DMZ The DMZ function allows you to re-direct all packets going to your WAN port IP address
2
to a particular IP address in your LAN.
Click on one of the firewall selections and proceed to the manual’s relevant sub-sections.
57
Page 58

2.5.1 Access Control
you want to restrict users from ail, FTP etc.),
If accessing certain Internet applications/services (e.g. Internet websites, em
ou can change the relevant settings here. Access Control allows users to define the type of traffic perm
y
AN. You can con
L
trol which PC client can have access to these services.
itted on your
Figure 2.24
arameters Description
P
Filter client Fill “IP Filtering Table” to filter PC clients by IP. PCs by IP
Add PC You can click Add PC to add an access control rule for users by IP addresses.
emove PC from the "IP Filtering Table", select the PC you
Filter client PC by MAC address Check “Enable MAC Filtering” to enable MAC Filtering.
If you want to remove some PC R
want to remove in the table and then click "Delete Selected". If you want remove
all PCs from the table, just click the "Delete All" button.
58
Page 59

Add PC Fill in “Client PC MAC Address” and “Comment” for the PC that will be
allowed to access the Internet, and then click “Add”. If you find any errors
before adding it and want to retype it again, just click "Reset" and the fields will
be cleared.
emove PC If you want to remove a PC from the "MAC Filtering Table", select the PC you
R
want to remove in the table and then click "Delete Selected". If you want to
remove all PCs from the table, just click the "Delete All" button. If you want to
clear the selection and re-select again, just click “Reset”.
You can now configure other advanced sections or start using the router (with the advanced settings in place).
Figure 2.25
59
Page 60

Add PC
Parameters
Client PC Description ion for this client PC rule.
Client PC IP Enter the IP address that you wish to apply the Access Control rule to. This is the
Address
c IP address for the
Client PC Service You can block the clients from accessing some Internet services by ch
rotocol This allows you to select UDP, TCP or both protocol types you want to block.
P
ort Range You can assign up to five port ranges. The router will block clients from
P
pply Changes Click “Apply Changes” to save the settings.
A
eset Click “Reset” to clear all fields.
R
Click Apply Changes at the bottom of the screen to save the above configurations. You can now configure other
dvanced sections or start using the router (with the advanced settings in place). a
Description
The descript
user’s IP address for which you wish to setup an Access Control rule.
Note: You need to give your LAN PC clients a fixed/stati
Access Control rule to work properly.
ecking the
services you want to block.
accessing Internet services that use these ports.
60
Page 61

Example: Access Control
In the example below, LAN client A can only access websites
websites and any other service that uses ports between 80 and 999.
that use Port 80. However, LAN client B is able to access
Figure 2.26
61
Page 62

2.5.2 URL Blocking
You can block access to some Web sites from particular PCs by entering a full URL address or just a keyword of the web
site.
Figure 2.27
arameters Description
P
Enable URL Blocking Enables/disables URL Blocking.
dd URL Keyword Fill in the “URL/Keyword” and then click “Add”. You can enter the full URL
A
address or the keyword of the web site you want to block. If you find any errors
before adding it and want to retype it again, just click "Reset" and the field will
be cleared.
Remove URL Keyword If you want to remove a URL keyword from the "Current URL Blocking Table",
select the URL u want to remove in the table and then click "Delete
Selected". If you want to remove all URL keywords from the table, just click the
"Delete All" button. If you want to clear the selection and re-select again, just
click “Reset”.
You can now configure other advanced sections or start using the router (with the advanced settings in place).
keyword yo
62
Page 63

2.5.3 DoS (Denial of Service)
The Broadband router's firewall can block common hacker attacks, including Ping of Death, Discard Ping from WAN,
can, and Sync Flood. If Internet attacks occur the router can log the events.
Port S
Figure 2.28
63
Page 64

Figure 2.29
arameters Description
Intrusion Detection Features
Ping of Death Protections from Ping of Death attacks. From the Advanced Settings
page, you can configure a threshold for the frequency of packet occurrence.
Discard Ping From WAN The router’s WAN port will not respond to any Ping requests
Port Scan Protection from any Port Scan attacks. If you go to the Advanced Settings
page, you can configure the pattern of Port Scan you want to prevent.
Sync Flood Protection from any Sync Flood attacks. If you go to the Advanced
Settings page, you can configure a threshold for the frequency of packet
occurrence.
Click Apply at the bottom of the screen to save the above configurations. You can now configure other advanced sections
or start using the router (with the advanced settings in place).
P
64
Page 65

2.5.4 DMZ
you have a local client PC that cannot run an Internet application (e.g. Games) properly from behind the NAT firewall,
If
en you can open the client up to unrestricted two-way Internet access by defining a DMZ Host. The DMZ function
th
lows you to re-direct all packets going to your WAN port IP address to a particular IP address in your LAN. The
al
ifference between the virtual server and the DMZ function is that the virtual server re-directs a particular service/Internet
d
plication (e.g. FTP, websites) to a particular LAN client/server, whereas DMZ re-directs all packets (regardless of
ap
rvices) going to your WAN IP address to a particular LAN client/server.
se
ote: DMZ function works only when the NAT function is enabled.
N
Figure 2.30
65
Page 66

Description Parameters
Enable DMZ Enables/disables DMZ.
Note: If there is a conflict between the Virtual Server and the DMZ setting, then the
Virtual Server function will have priority over the DMZ function.
WAN Port The WAN port that the local client PC’s IP address will bind to.
ublic IP Address The IP address of the WAN port or any other Public IP addresses given to you by your
P
ISP. The WAN port may use dynam
ic IP or static IP given by your ISP. If your ISP
gives you more than one dynamic IP address, you have to assign the session number that
you want to apply.
Client PC IP Address Input the IP address of a particular host in your LAN that will receive all the packets
originally going to the WAN port/Public IP address above.
Note: You need to give your LAN PC clients a fixed/static IP address for the DMZ
function to work properly.
Add DMZ Fill in the "WAN Port", "Public IP Address” and “Client IP Address” of the DMZ to be
added and then click "Add". This DMZ entry will then be added into the "DMZ Table"
below. If you find any errors before adding it and want to retype it again, just click
"Clear" and the fields will be cleared.
Remove DMZ If you want to remove a DMZ from the "DMZ Table", select the DMZ entries you want to
remove in the table and then click "Delete Selected". If you want to remove all DMZ
entries from the table, just click the "Delete All" button. Clicking "Reset" will clear your
current selections.
You can now configure other advanced sections or star uter (with the advanced settings in place).
t using the ro
66
Page 67

Status
The Status section allows you to monitor the current status of your router. You can use the Status page to monitor: the
connection status of the router's l
attempts to access your network ur network.
WAN/LAN interfaces, the current firmware and hardware version numbers, any illega
, and information on all DHCP client PCs currently connected to yo
Parameters Description
3.1 Status and Infor Shows the router’s system information
mation
3.2 Internet Connection
View the router’s current Internet connection status and other related information
.3 Device Status View the router’s current setting status
3
3.4 System Log
View the router’s system log
.5 Security Log
3 View any attempts that have been made to illegally gain access to your network.
.6 Active DHCP Client View your LAN client's information that is currently linked to the router's DHCP server
3
3.7 Statistics
View the critical statistics
elect one of the above Status selections and proceed to the manual’s relevant sub-section.
S
67
Page 68

3.1 Status and Information
The Status and Information section allows you to view the router’s system information.
Figure 3.1
arameters Description
P
Information You can see the router’s system information, including the router’s: Hardware version,
Boot code Version, and Runtime code Version
68
Page 69

3.2 Internet Connection
View the router’s current Internet connection status and other related information.
Figure 3.2
Parameters Description
ternet Connection This page displays whether the WAN ports are connected to Cable/DSL connections. It
In
also displays the router’s WAN port: WAN IP address, Subnet Mask, and ISP Gateway
as well as the Primary DNS and Secondary DNS being used.
69
Page 70

3.3 Device Status
View the router’s current configuration settings. The Device Status displays the configuration settings you have
configured in the Quick Setup Wizard/General Setup section.
Figure 3.3
Parameters Description
Device Status This page shows the router’s current device settings. This page displays the router LAN
port’s current LAN IP Address and Subnet Mask. It also shows whether the DHCP
Server is enabled.
70
Page 71

3.4 System Log
View the operation log of the system.
Figure 3.4
arameters Description
P
System Log This page shows the current system log of the Broadband router. It displays any event
occurred after system start up. At the bottom of the page, the system log can be saved
<Save> to a local file for further processing, or the system log can be cleared <Clear>,
or it can be refreshed <Refresh> to get the most updated status. When the system is
powered down, the
system log will disappear if not saved to a local file.
71
Page 72

3.5 Security Log
e to illegally gain access to your network. View any attempts that have been mad
Figure 3.5
arameters Description P
Security Log l
This page shows the current security log of the Broadband router. It displays any illega
attempts to access your network. At the bottom of the page, the security log can be saved
<Save> to a local file for further processing, or the security log can be cleared <Clea
or it can be refreshed <Refresh> to get the most updated status. When th
e system is
r>,
powered down, the security log will disappear if not saved to a local file.
72
Page 73

3.6 Active DHCP Client
View your LAN client's information that is currently linked to the Broadband rou
Figure 3.6
Parameters Description
DHCP Client Log
This page shows all DHCP clients (LAN PCs) currently connected to your network. The
“Active DHCP Client Table” displays the IP address and the MAC address and Time
Expired for each LAN Client. Use the Refresh button to get the most upd
ter's DHCP server
ated status.
73
Page 74

3.7 Statistics
iew the statistics of packets sent and received over each WAN and LAN interface.
V
arameters Description
P
Shows the counters for packets sent and received over the WAN and LAN interfaces. Statistics
Figure 3.7
74
Page 75

Tools
This page inclu
irmware Upgrade (upgrade system firmware) and Reset.
F
des the basic configuration tools, such as Configuration Tools (save or restore configuration settings),
Figure 4.1
arameters Description
P
4.1 Configuration Tools You can save the rou
files and restore the
ter’s current configuration, restore the router’s saved configuration
router’s factory default settings.
.2 Firmw This page allows you to upgrade the router’s firmware. 4
are Upgrade
.3 Reset You can reset the router’s system should any problems occur.
4
Select one of the above Tool Settings and proceed to the manual’s relevant sub-section.
75
Page 76

4.1 Configuration Tools
The Configuration Tools screen allows you to save (back up) the router’s current configuration settings. Saving
configuration settings provides an added protection and co
set to the factory default. When you save (back up) the configuration settings, you can re-load the saved configuration
re
to the router through the Restore selection. If more serious problems occur, you can use the Restore to Factory Defaults
in
election. This will
s set all configurations to their original default settings (i.e., when you first purchased the router).
nvenience if problems occur with the router and you have to
Figure 4.2
Parameters
Description
Configuration Tools Use the "Backup" tool to save the router’s current configuration to a file named
"config.bin" on your PC. You can then use the "Restore" tool to restore the saved
configuration to the router. Alternatively, you can use the "Re
store to Factory
Defaults" tool to force the router to perform a power reset and restore the original factory
settings.
the
76
Page 77

4.2 Firmware Upgrade
This page allows you to upgrade the router’s firmware
Figure 4.3
arameters Description
P
Firmware Upgrade This tool allows you to upgrade the router’s system firmware. To upgrade your router’s
firmware, you need t
file name and path in the appropriate field on this page. You can also use the Browse
button to find the firmware file on your PC.
Once you have selected the new
may have to wait a few minutes for the upgrade to complete). Once the upgrade is completed you can start using the
router.
firmware file, click Apply at the bottom of the screen to start the upgrade process. (You
o download the firmware file to your local hard disk, and enter that
77
Page 78

4.3 Reset
You can reset the router’s system if any problems occur. The reset function essentially re-boots your router’s system.
Figure 4.4
arameters Description
P
Reset
In the event that the system stops responding correctly or in some way stops functioning,
you can perform a reset. Your settings will not be changed. To perform the reset, cli
on the APPLY button. You will be asked to
complete
may start using the router again.
when the power light stops blinking. Once the reset process is complete you
confirm your decision. The reset will be
ck
78
Page 79

How to Manually Find Your PC’s IP and MAC Addresses
1) In Windows, open the Command Prompt program.
2) Type Ipconfig /all and click Enter.
• Your PC’s IP address is the one entitled IP address (192.168.1.77)
• The router’s IP address is the one entitled Default Gateway (192.168.1.254)
•
Your PC’s MAC Address is the one entitled Physical Address (00-50-FC-FE-02-DB)
79
Page 80

Bridge: A bridge is an intelligent, internetworking device that forwards or filters packets between different networks
b ased on data link layer (MAC) address information.
Def t ds to configure a default gateway’s IP address. When the
aicul Gateway (Router): Every non-router IP device nee
ev e sends out an IP packet, if the destination is not on the same network, the device has to send the packet to its default
d
ateway, hich will then send it out towards the destination.
g w
HCP: Dynamic Host Configuration Protocol. This protocol automatically gives every computer on your home network
D
n IP address.
a
NS Server IP Address: DNS stands for Domain Name System, which allows Internet servers to have a domain name
D
uch as www.Broadbandrouter.com) and one or more IP addresses (such as 192.34.45.8). A DNS server keeps a
(s
atabase of Internet servers and their respective domain names and IP addresses, so that when a domain name is requested
d
s in typing "Broadbandrouter.com" into your Internet browser), the user is sent to the proper IP address. The DNS
(a
erver IP address used by the computers on your home network is the location of the DNS server your ISP has assigned to
s
ou.
y
SL Modem: DSL stands for Digital Subscriber Line. A DSL modem uses your existing phone lines to transmit data at
D
igh speeds.
h
thernet: A standard for computer networks. Ethernet networks are connected by special cables and hubs, and move
E
data ts per second (Mbps).
around at up to 10/100/1000 million bi
Idle Timeout: Idle Timeout is designed so that if there is no traffic to the Internet for a pre-configured amount of time,
the connection w
ill automatically be disconnected.
P Address and Network (Subnet) Mask: IP stands for Internet Protocol. An IP address consists of a series of four
I
umbers separated by periods, that identifies a single, unique Internet computer host in an IP network. Example:
n
92.168.2.1. It consists of 2 portions: the IP network address, and the host identifier.
1
he IP address is a 32-bit binary pattern, which can be represented as four cascaded decimal numbers separated by “.”:
T
aa.aaa.aaa.aaa, where each “aaa” can be anything from 000 to 255, or as four cascaded binary numbers separated by “.”:
a
bbbbbbb.bbbbbbbb.bbbbbbbb.bbbbbbbb, where each “b” can either be 0 or 1.
b
network mask is also a 32-bit binary pattern, and consists of consecutive leading
A
’s followed by consecutive trailing 0’s, such as
1
1111111.11111111.11111111.00000000. Therefore sometimes a network mask can also be described simply as “x”
1
umber of leading 1’s.
n
hen both are represented side by side in their binary forms, all bits in the IP address that correspond to 1’s in the
W
etwork mask become part of the IP network address, and the remaining bits correspond to the host ID.
n
or example, if the IP address for a device is, in its binary form,
F
1011001.10110000.1001
1
1111111.11111111.11110000.00000000
1
means the device’s network address is
It
11011001.1 1
01 0000.1001
00000000.0 000 0000.00000000.00000111
0000.00000111, and if its network mask is,
0000.00000000, and its host ID is,
. This is a convenient and efficient method for routers to route IP packets to their
destination.
80
Page 81

ISP Gateway Address: (see ISP for definition). The ISP Gateway Address is an IP address for the Internet router loca
ted
at the ISP's office.
ISP: Internet Service Provider. An ISP is a business that provides connectivity to the Internet for individuals and other
businesses or organizations.
LAN: Local Area Network. A LAN is a group of computers and devices connected together in a relatively small area
(such as a house or an office). Your home network is considered a LAN.
MAC Address: MAC stands for Media Access Control. A MAC address is the hardware address of a device connected
to a network. The MAC address is a unique identifier for a device with an Ethernet interface. It is comprised of two
parts: 3 bytes of data that corresponds to the Manufacturer ID (unique for each manufacturer), plus 3 bytes that are
often
used as the product’s serial number.
NAT: Network Address Translation. This process allows all of the computers on your home network to use one IP
s. Using the router’s NAT capability, you can access the Internet from any computer on your home network without
addres
having to purchase more IP addresses from your ISP.
Port: Network
Clients (LAN PCs) use port numbers to distinguish one network application/protocol over another. Below
is a list of common applications and protocol/port numbers:
Application Protocol Port Number
Telnet TCP 23
FTP TCP 21
SMTP TCP 25
POP3 TCP 110
H.323 TCP 1720
SNMP UCP 161
SNMP Trap UDP 162
HTTP TCP 80
PPTP TCP 1723
PC Anywhere TCP 5631
PC Anywhere UDP 5632
PPPoE: Point-to-Point Protocol over Ethernet. Point-to-Point Protocol is a secure data transmission method originally
created for dial-up connections; PPPoE is for Ethernet connections. PP
Ethernet and the Point-to-Point Protocol. I
t is a communications protocol for transmitting information over Ethernet
PoE relies on two widely accepted standards,
between different manufacturers.
81
Page 82

Protocol: A protocol is a set of rules for interaction agreed upon between multiple parties so that when they interface with
each other based on
such a protocol, the interpretation of their behavior is well defined and can be made objectively,
without confusion or misunderstanding.
Router: A router is an intellig
ent network device that forwards packets between different networks based on network
layer address information such as IP addresses.
Subnet Mask: A subnet mask, which may be a part of the TCP/IP informa
tion provided by your ISP, is a set of four
numbers (e.g. 255.255.255.0) configured like an IP address. It is used to create IP address numbers used only within a
particular network (as opposed to valid IP address numbers recognized by the Internet, which must be assigned by
InterNIC).
TCP/IP, UDP: Transmission Contro
l Protocol/Internet Protocol (TCP/IP) and Unreliable Datagram Protocol (UDP).
TCP/IP is the standard protocol for data transmission over the Internet. Both TCP and UDP are transport layer protocols.
TCP performs proper error detection and error recovery, and thus is reliable. UDP on the other hand is not reliable. T
hey
both run on top of the IP (Internet Protocol), a network layer protocol.
WAN: Wide Area Network. A network that connects computers located in geographically separate areas (e.g. different
buildings, cities, countries). The Internet is a wide area network.
Web-based management Graphical User Interface (GUI):
Many devices support a graphical user interface that is
based on the web browser. This means the user can use the familiar Netscape or Microsoft Internet Explorer to
control/confi re or monitor the device
gu being managed.
82
 Loading...