

Page 1
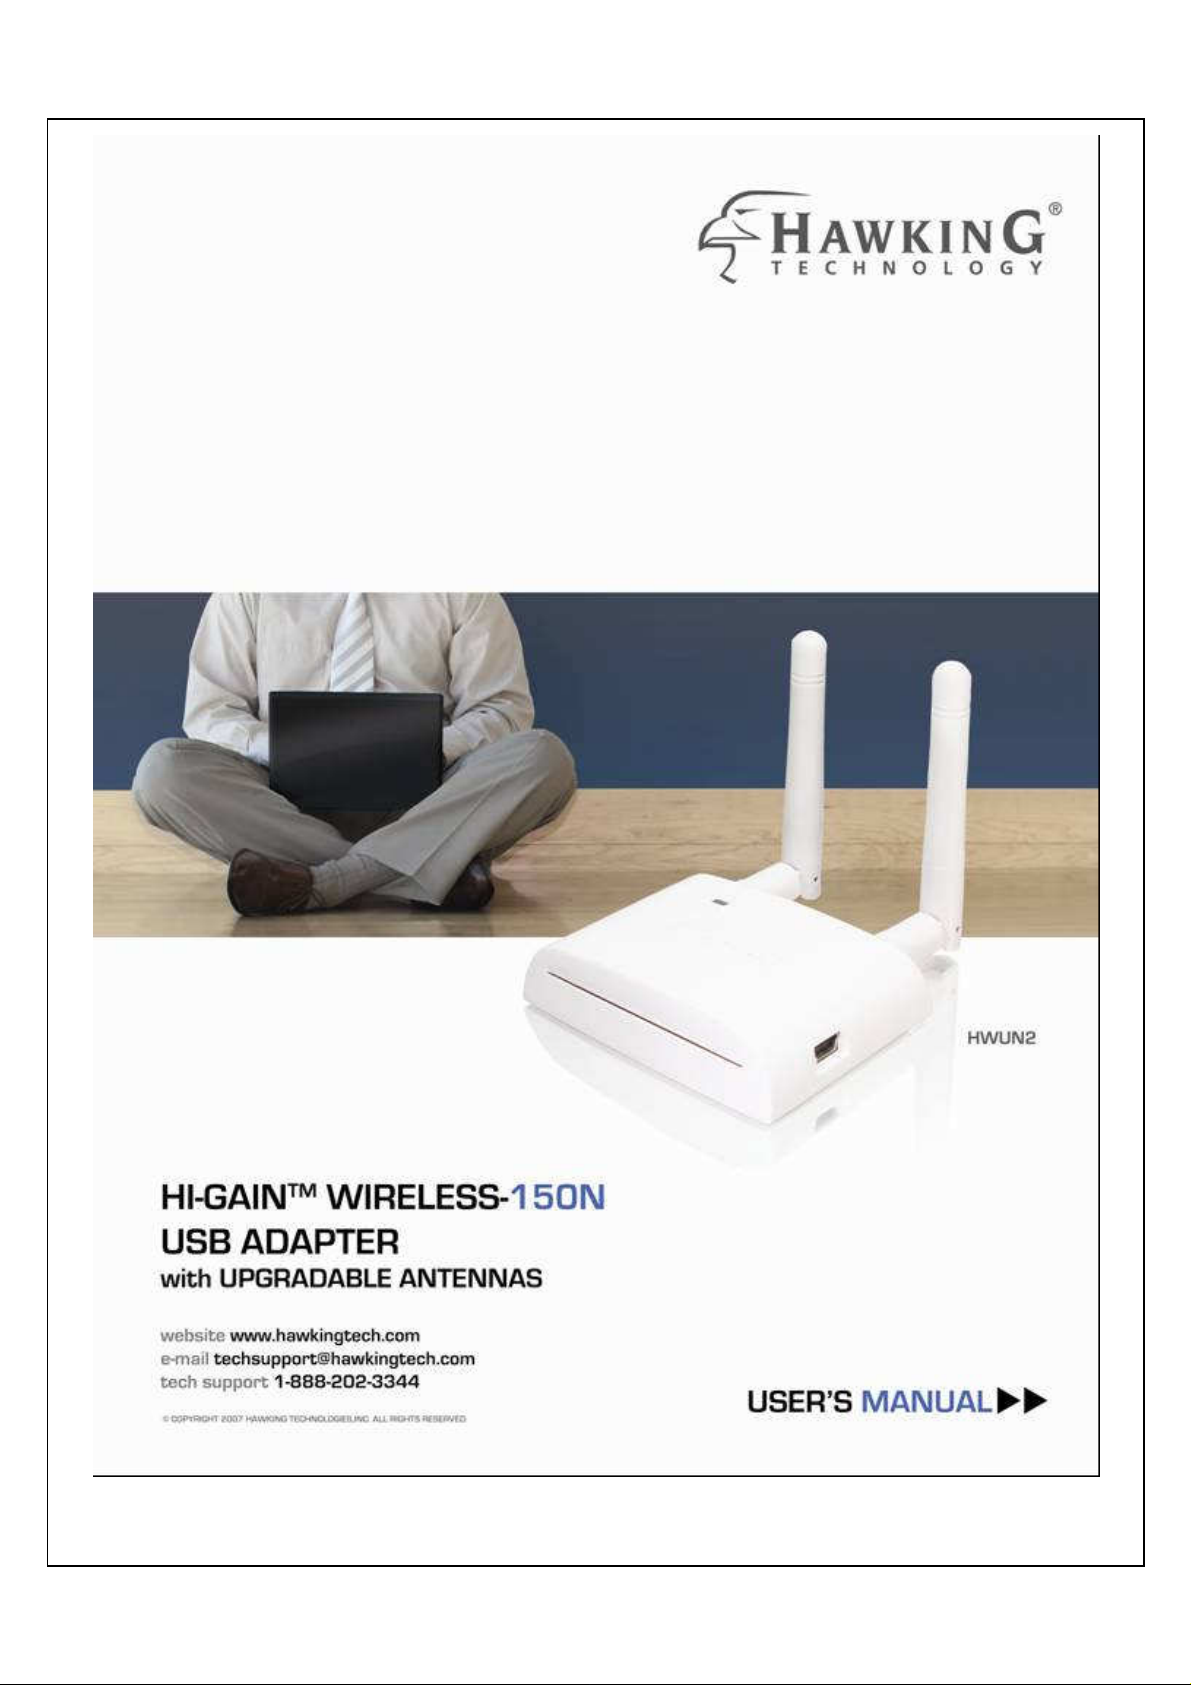
1
Page 2

LIMITED WARRANTY
Hawking Technology guarantees that every HWUN2 Wireless-150N USB Adapter with Upgradable Antennas is
free from physical defects in material and workmanship under normal use for one(1) year from the date of
purchase. If the product proves defective during this two-year warranty period, call Hawking Customer Service
in order to obtain a Return Authorization number. Warranty is for repair or replacement only. Hawking
Technology does not issue any refunds. BE SURE TO HAVE YOUR PROOF OF PURCHASE. RETURN
REQUESTS CAN NOT BE PROCESSED WITHOUT PROOF OF PURCHASE. When returning a product, mark
the Return Authorization number clearly on the outside of the package and include your original proof of
purchase.
IN NO EVENT SHALL HAWKING TECHNOLOGY’S LIABILTY EXCEED THE PRICE PAID
FOR THE PRODUCT FROM DIRECT, INDIRECT, SPECIAL, INCIDENTAL OR CONSEQUENTIAL DAMAGES
RESULTING FROM THE USE OF THE PRODUCT, IT IS ACCOMPANYING SOFTWARE OR ITS
DOCUMENTATION. Hawking Technology makes no warranty or representation, expressed, implied or
statutory, with respect to its products or the contents or use of this documentation and all accompanying
software, and specifically disclaims its quality, performance, merchantability, or fitness for any particular
purpose. Hawking Technology reserves the right to revise or updates its products, software, or documentation
without obligation to notify any individual or entity. Please direct all inquiries to: techsupport@hawkingtech.com
Trademarks & Copyright
All brands and product names are trademarks of their respective companies. No part of this publication may be
reproduced in any form or by any means or used to make any derivative (such as translation, transformation or
adaptation) without the express written consent of the manufacturer as stipulated by the United States
Copyright Act of 1976.
Warning Statement:
This equipment has been tested and found to comply with the limits for a Class B digital device, pursuant to
Part 15 of the FCC Rules. These limits are designed to provide reasonable protection against harmful
interference in a residential installation. This equipment generates uses and can radiate radio frequency energy
and, if not installed an used in accordance with the instructions, may cause harmful interference to radio
communications. However, there is no guarantee that interference will not occur in a particular installation. If
this equipment does cause harmful interference to radio or television reception, which can be determined by
turning the equipment off and on, the user is encouraged to try to correct the interference by one of following
measures:
1. Reorient or relocate the receiving antenna.
2. Increase the separation between the equipment and receiver.
3. Connect the equipment into an outlet on a circuit different from that to which the receiver is connected.
4. Consult the dealer or an experienced radio/TV technician for help. This device complies with Part 15 of the
FCC Rules. Operation is subject to the following two conditions:
(1) This device may not cause harmful interference.
(2) This device must accept any interference received, including interference that may cause undesired
operation.
FCC Caution:
FCC RF Exposure Statement:
This Transmitter must not be co-located or operating in conjunction with any other antenna or transmitter. This
equipment complies with FCC RF radiation exposure limits set forth for an uncontrolled environment. This
equipment should be installed and operated with a minimum distance of 20 centimeters between the radiator
and your body. Unauthorized antenna, modification, or attachments could damage the transmitter and may
violate FCC regulations.
Regulatory information/Disclaimers:
Any changes or modifications made to this device that are not expressly approved by the manufacturer may
void the user's authority to operate the equipment.
2
Page 3

T
ABLE OF CONTENTS
1. INTRODUCTION......................................................................................................................................4
2. FEATURES.................................................................................................................................................4
3. PACKAGE CONTENTS...........................................................................................................................5
4. SYSTEM REQUIREMENTS...................................................................................................................6
5. DRIVER INSTALLATION FOR WINDOWS VISTA.........................................................................6
5.1. USING WINDOWS CONFIGURATION (VISTA)..................................................................8
6. INSTALLATION (WINDOWS 2000/XP)............................................................................................11
6.1. VERIFY INSTALLATION (WINDOW 2000/XP)..................................................................14
6.2. NETWORK CONFIGURATION (WIN 2000/XP).................................................................15
7. SETUP WLAN (WIN 2000/XP).............................................................................................................16
– USING HAWKING CONFIGURATION-UTILITY.................................................................................16
7.1. NETWORK SECURITY (WEP, WPA…)................................................................................18
7.1.1. WEP S
7.1.2. WPA S
7.2. ADDING PROFILES..................................................................................................................22
7.3. WPS CONFIGURATION...........................................................................................................24
8. QOS............................................................................................................................................................25
9. ADVANCED SETTINGS........................................................................................................................26
ETUP
......................................................................................................................18
ETUP
......................................................................................................................19
10. STATISTICS.............................................................................................................................................27
11. LINK STATUS..........................................................................................................................................28
12. ABOUT......................................................................................................................................................29
13. UNINSTALLING HAWKING UTILITY/DRIVER...........................................................................30
APPENDIX A – SPECIFICATIONS...............................................................................................................33
PRODUCT SUPPORT INFORMATION.......................................................................................................38
3
Page 4
1. INTRODUCTION
Thank you for purchasing the Hawking HWUN2 Wireless-150N USB Adapter. Now you can
enjoy the latest Wireless-N technology with excellent speeds, of up to 150Mbps*. The
Wireless-N USB Adapter extends your wireless network coverage by up to 3 times and
boosts transmission throughput 12 times more than a standard Wireless-G Network. It allows
you to connect a notebook or desktop to any wireless network** using the USB port. Now,
you can stream HD video, play games online, download music, images and data while
maintaining your freedom of mobility.
In addition, the HWUN2 comes with an upgradable antenna option. Replace the default
antennas with Hawking Hi-Gain Antennas and you can enjoy extended wireless range.
The HWUN2 is also packed with security applications. For more security-sensitive
applications, the HWUN2 supports Hardware-based IEEE 802.11i encryption/decryption
engine, including 64-bit/128-bit WEP, TKIP, and AES. Also, it supports Wi-Fi alliance WPA and
WPA2 encryption. Cisco CCX V1.0, V2.0 and V3.0.
2. FEATURES
Features Advantages
High Speed Data Rate Up to 150Mbps*
IEEE 802.11b/g Compliant
Supports WPA/WPA2 (IEEE 802.11i),
WEP 64/128 bits
Dual Radios (1Tx * 2Rx)
WMM (IEEE 802.11e) standard support
Upgradable Antenna Design (2X)
* Theoretical wireless signal rate based on IEEE standard of 802.11a, b, g chipset used. Actual
throughput may vary. Network conditions and environmental factors lower actual throughput rate.
**Preferably Wireless-N network for maximum through pts.
** *All specifications are subject to change without notice.
Capable of handling heavy data payloads
such as MPEG video streaming
Fully Interoperable with IEEE 802.11b /
IEEE802.11g compliant devices with legacy
protection
Powerful & Robust data security.
Enables Smart Antenna for more range and
speed
Wireless Multimedia Enhancements Quality of
Service support (QoS) / enhanced power
saving for Dynamic Networking.
Flexible with SMA connector design
4
Page 5
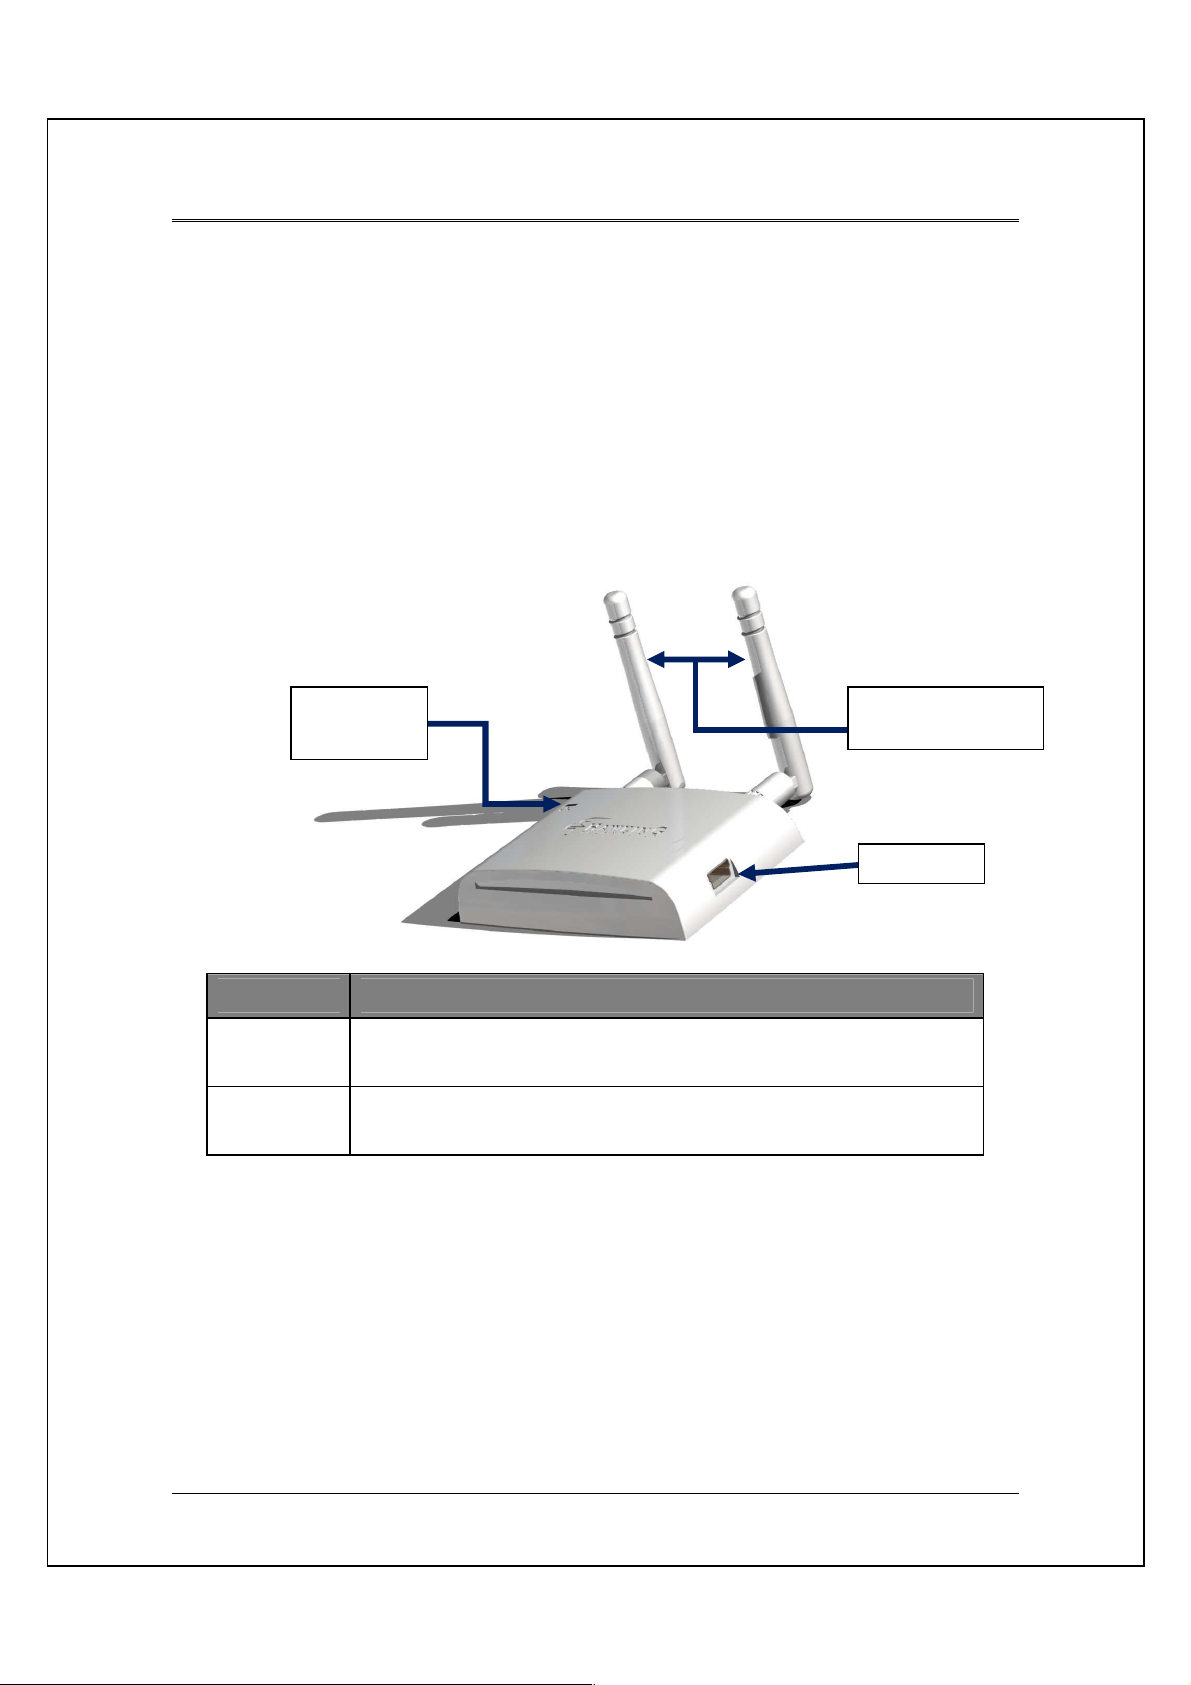
Upgradable
USB port
LED
3. PACKAGE CONTENTS
Before you begin the installation, please check the items of your package. The package
should include the following items:
•
One HWUN2 Wireless-150N USB network Adapter
•
One USB cable (39’’ or 3.25 ft.)
•
One CD-ROM with User’s Manual & Drivers
•
Quick Installation Guide
•
2 Dipole Antenna (SMA connector)
•
One Laptop Clip
indicator
LED Description
LINK
PWR
Blinks when active connection is available else remains switched OFF
Blinks rapidly when data communication in progress else remains
switched OFF
5
Page 6
4. SYSTEM REQUIREMENTS
To begin using the WLAN USB Adapter, your PC/Notebook must meet the following
minimum requirements:
•
Operating System – Microsoft Windows 2000/XP/Vista
•
An Available USB Port on your Laptop or Desktop
•
256MB system memory or larger
•
750MHz CPU or higher configuration
5. Driver Installation for Windows Vista
a.
Insert the included CD an auto load page will appear instantly on you screen.
b.
Select Driver & Utility Setup
6
Page 7
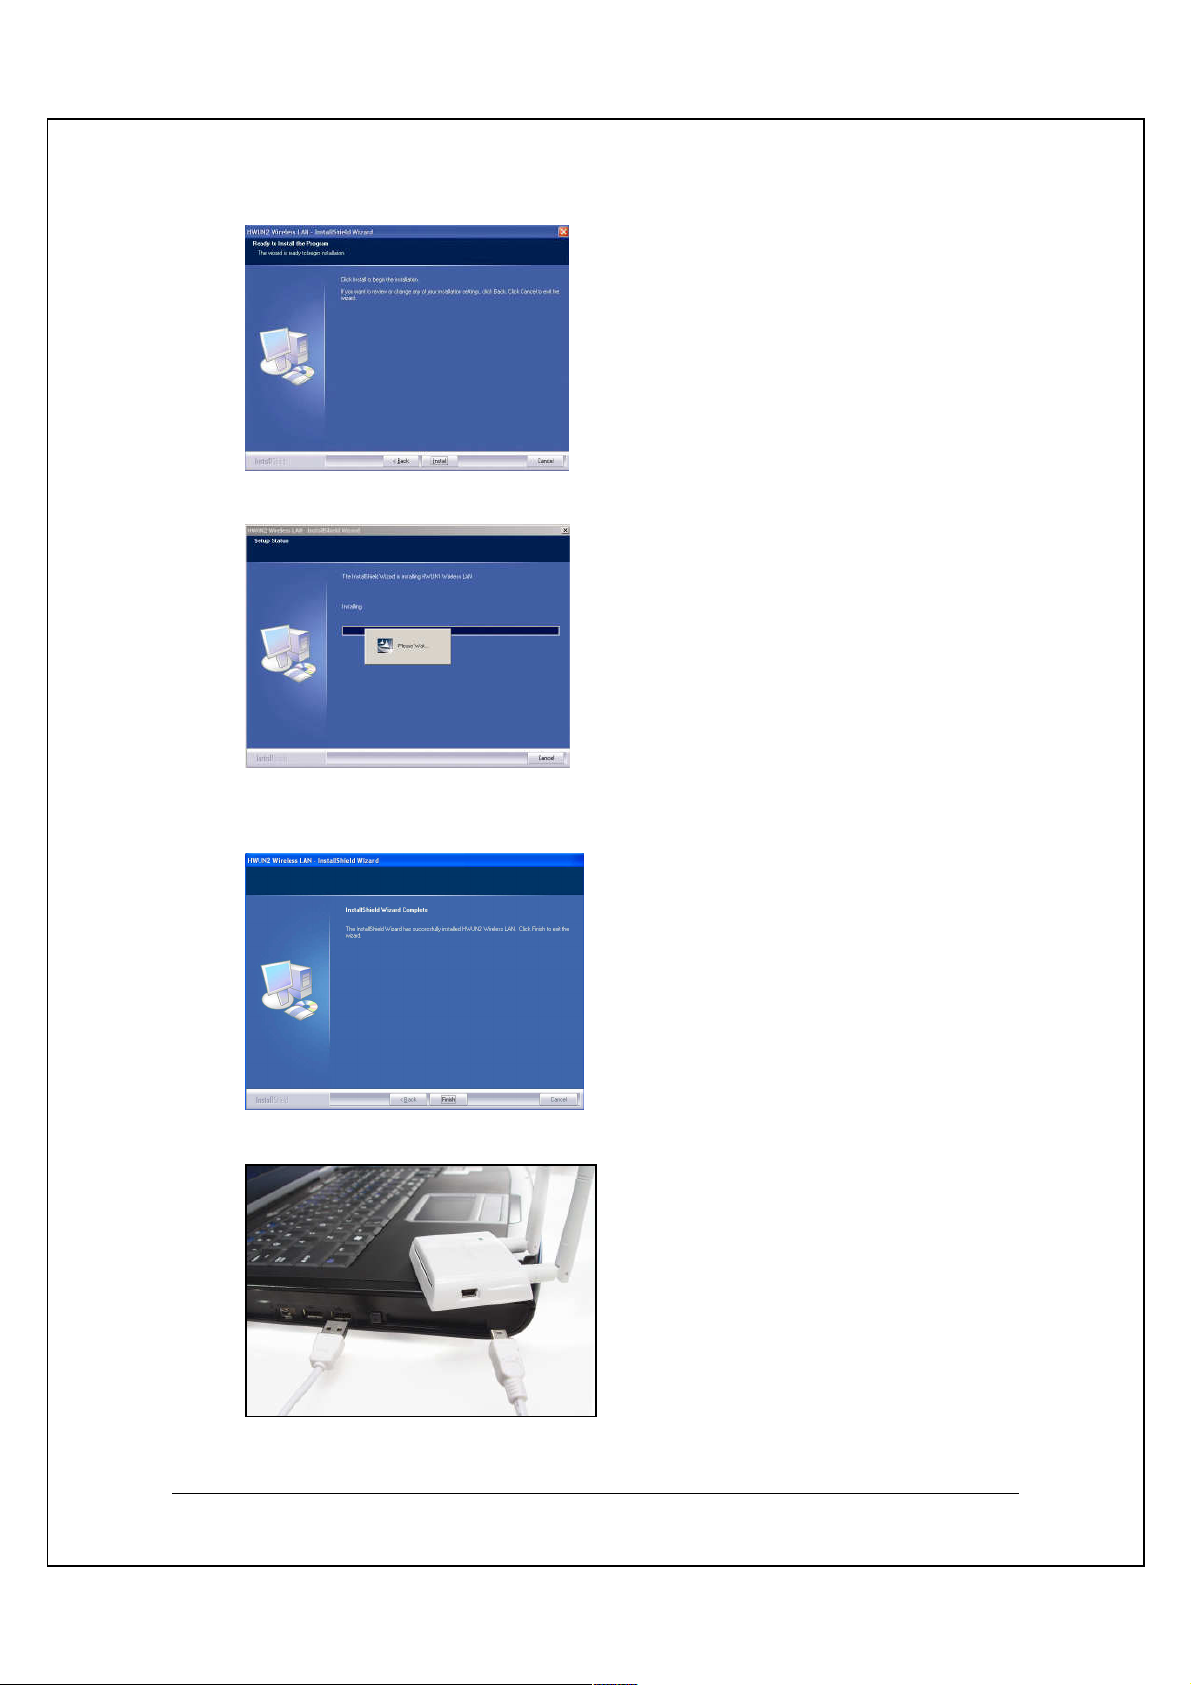
c.
Select Install to begin the Installation
d.
Please wait a while as the installation process take place.
e.
After installation is complete, exit the wizard by clicking on the Finish
button.
f.
Now, plug in your HWUN2 adapter.
7
Page 8
5.1.
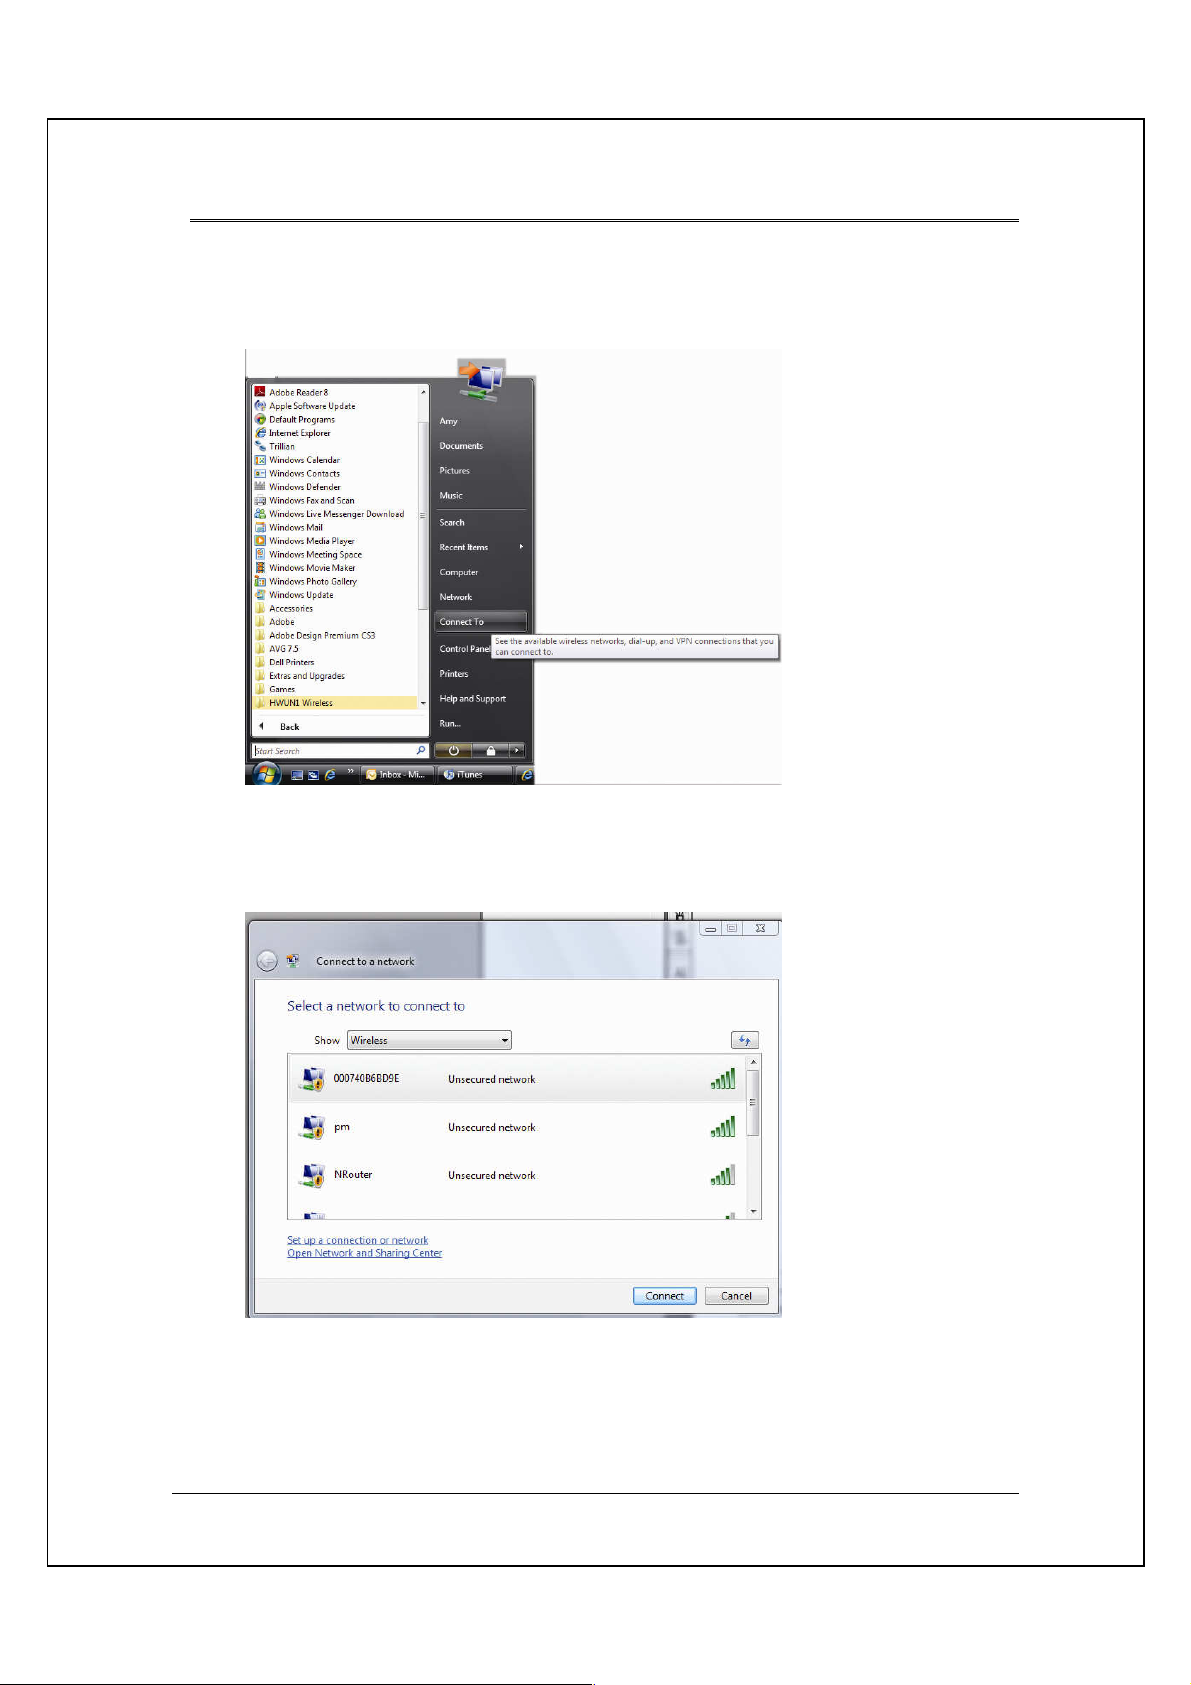
USING WINDOWS CONFIGURATION (VISTA)
It is recommended that you use the Windows Configuration for the Wireless-N
Adapter.
a. To open up the Windows Configuration, go to Start Connect To
b. Select the Network you wish to connect to. If you are connecting to an unsecure
network, go to step c. If you are connecting to a secured network, go to step d.
8
Page 9
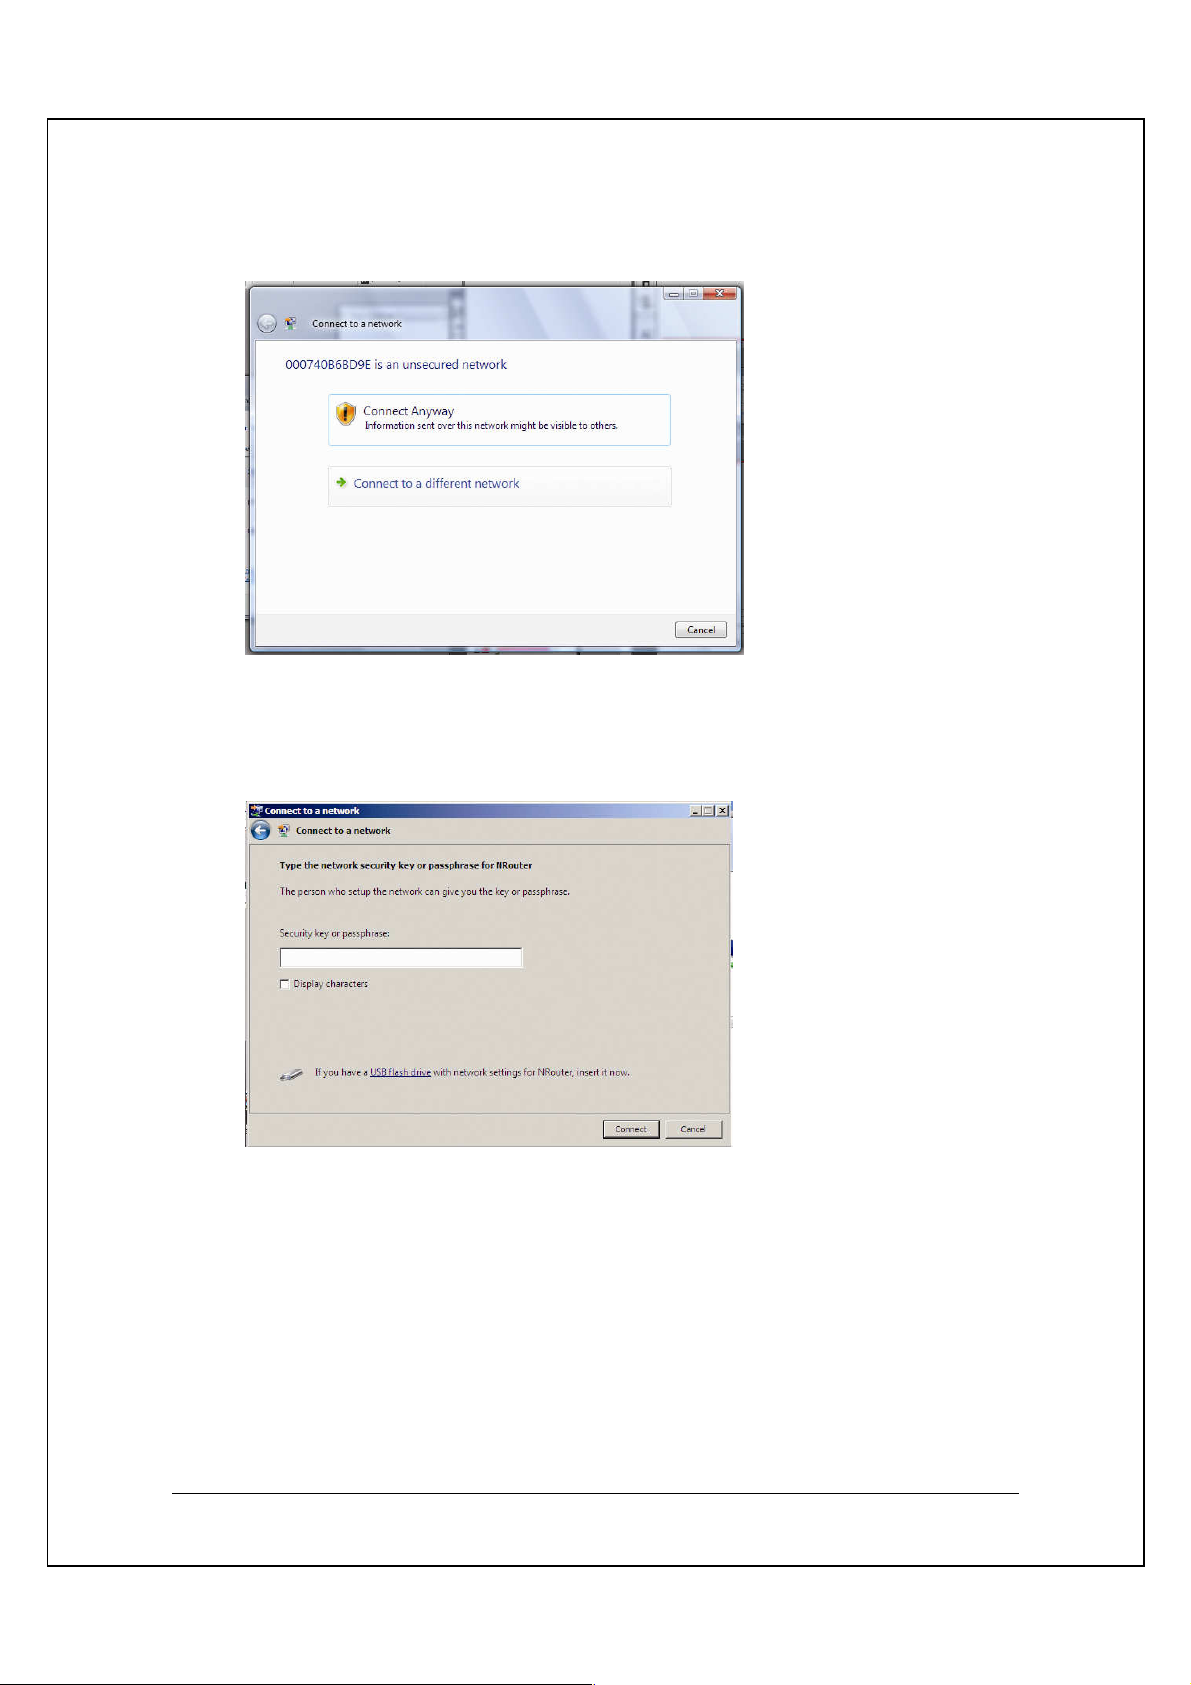
c. If you are connecting to an open network (unsecured network), a warning may
appear indicating that the network is an unsecured network. Select Connect
Anyway and skip step d.
d.
If your selected network is a secured (encryption) network, then a window will
prompt you to enter security key or passphrase. If you are connecting to a
network that is security enabled, but do not have the security key or passphrase,
please obtain the passphrase from your Network Administrator.
9
Page 10

Please wait while your HWUN2 is connecting.
e.
f.
The HWUN2 Wireless-150N USB Network Adapter is now connected, you may
save this network as your preferred network.
10
Page 11
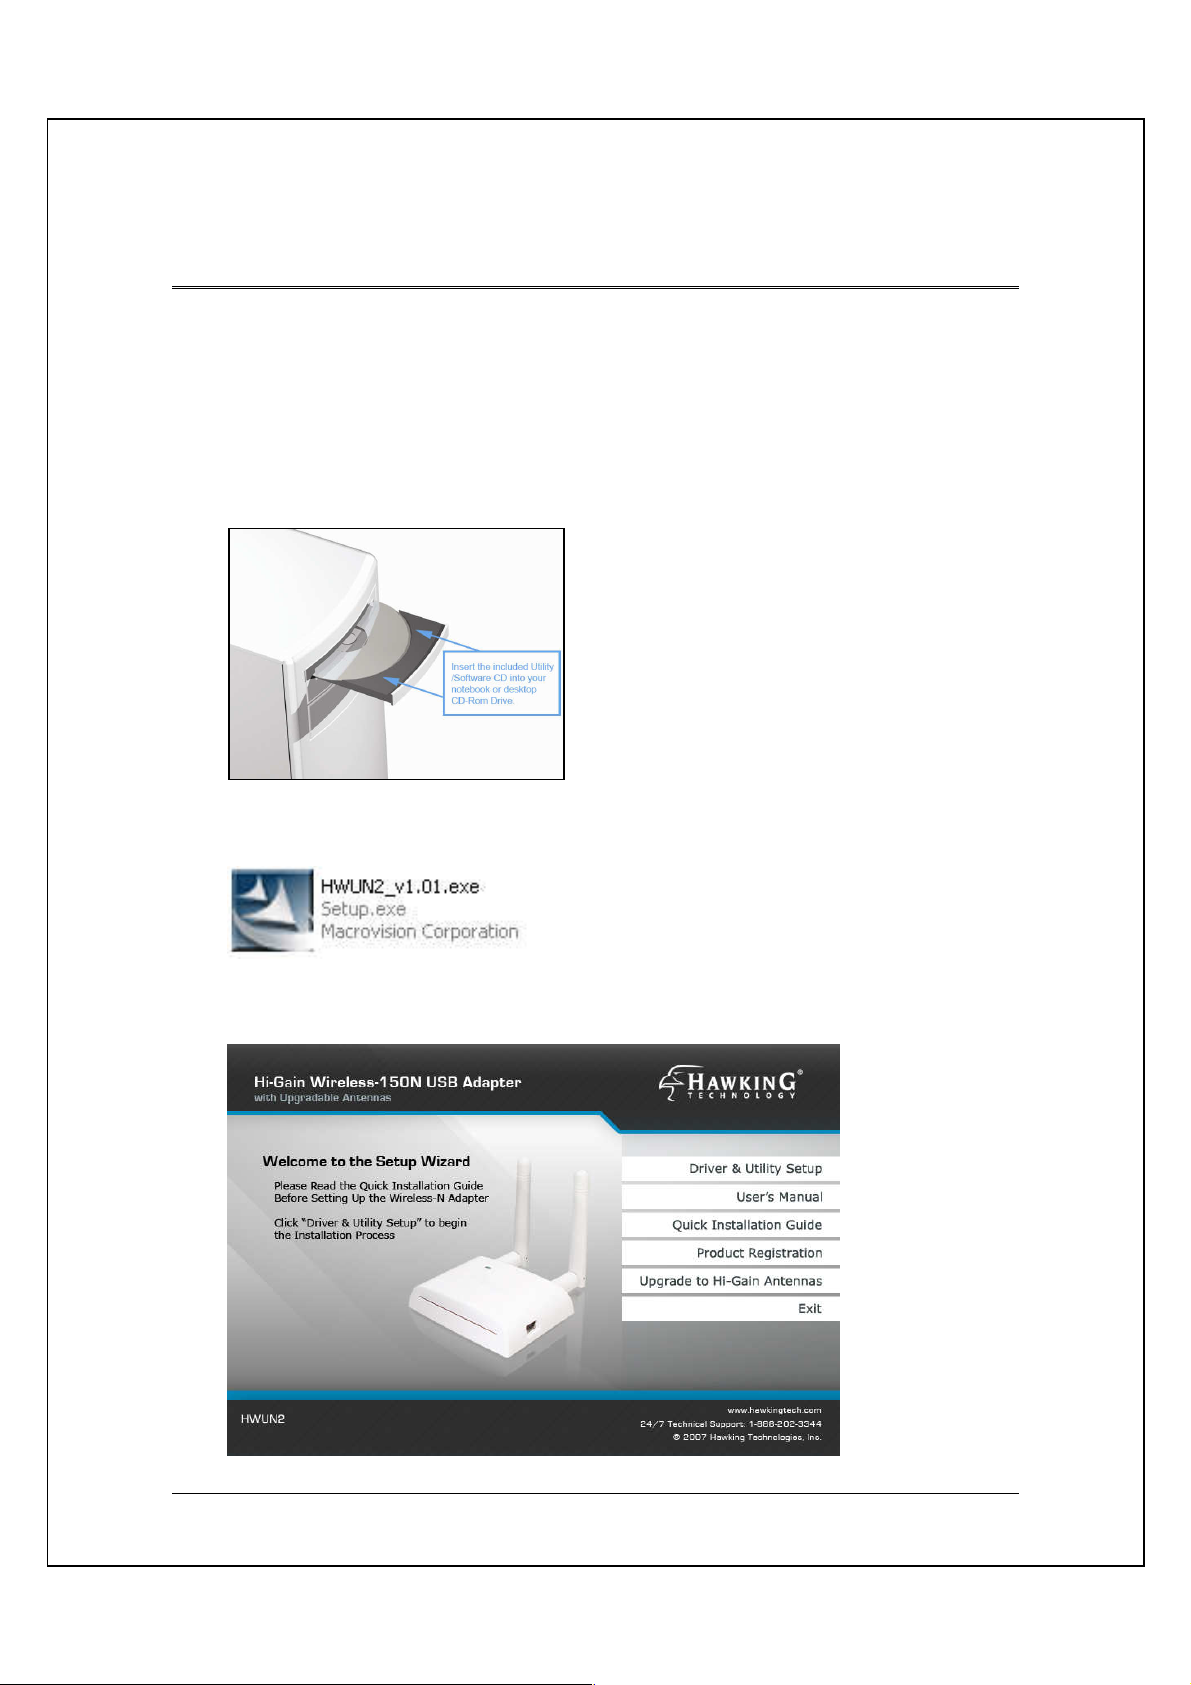
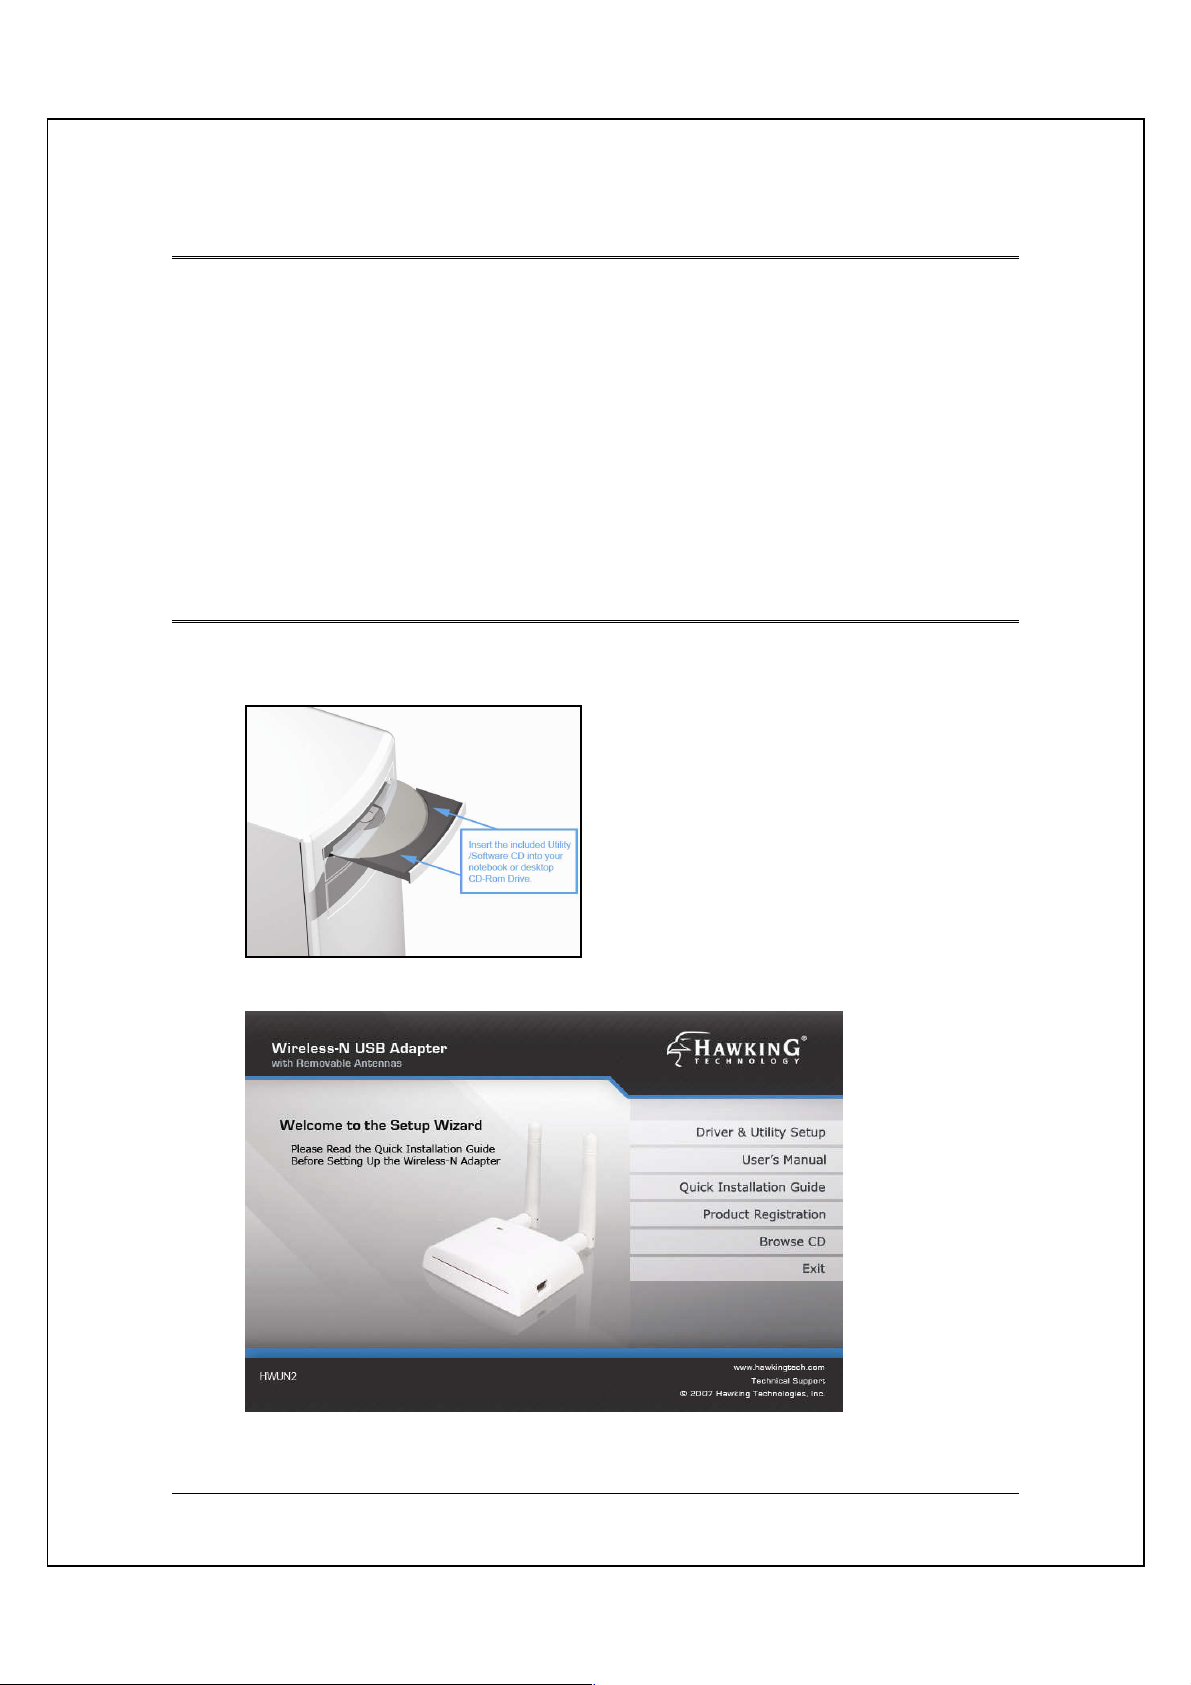
6. INSTALLATION (WINDOWS 2000/XP)
Important! Please Install the HWUN2 Driver & Utility before connecting the
HWUN2 into the USB port on your computer. The HWUN2 Driver & Utility is located
on the CD.
Insert the support CD into your CD Drive.
In the CD drive folder, you will see the following file.
Open the file to see the auto-load Setup Wizard and select Driver and Utility Setup
11
Page 12
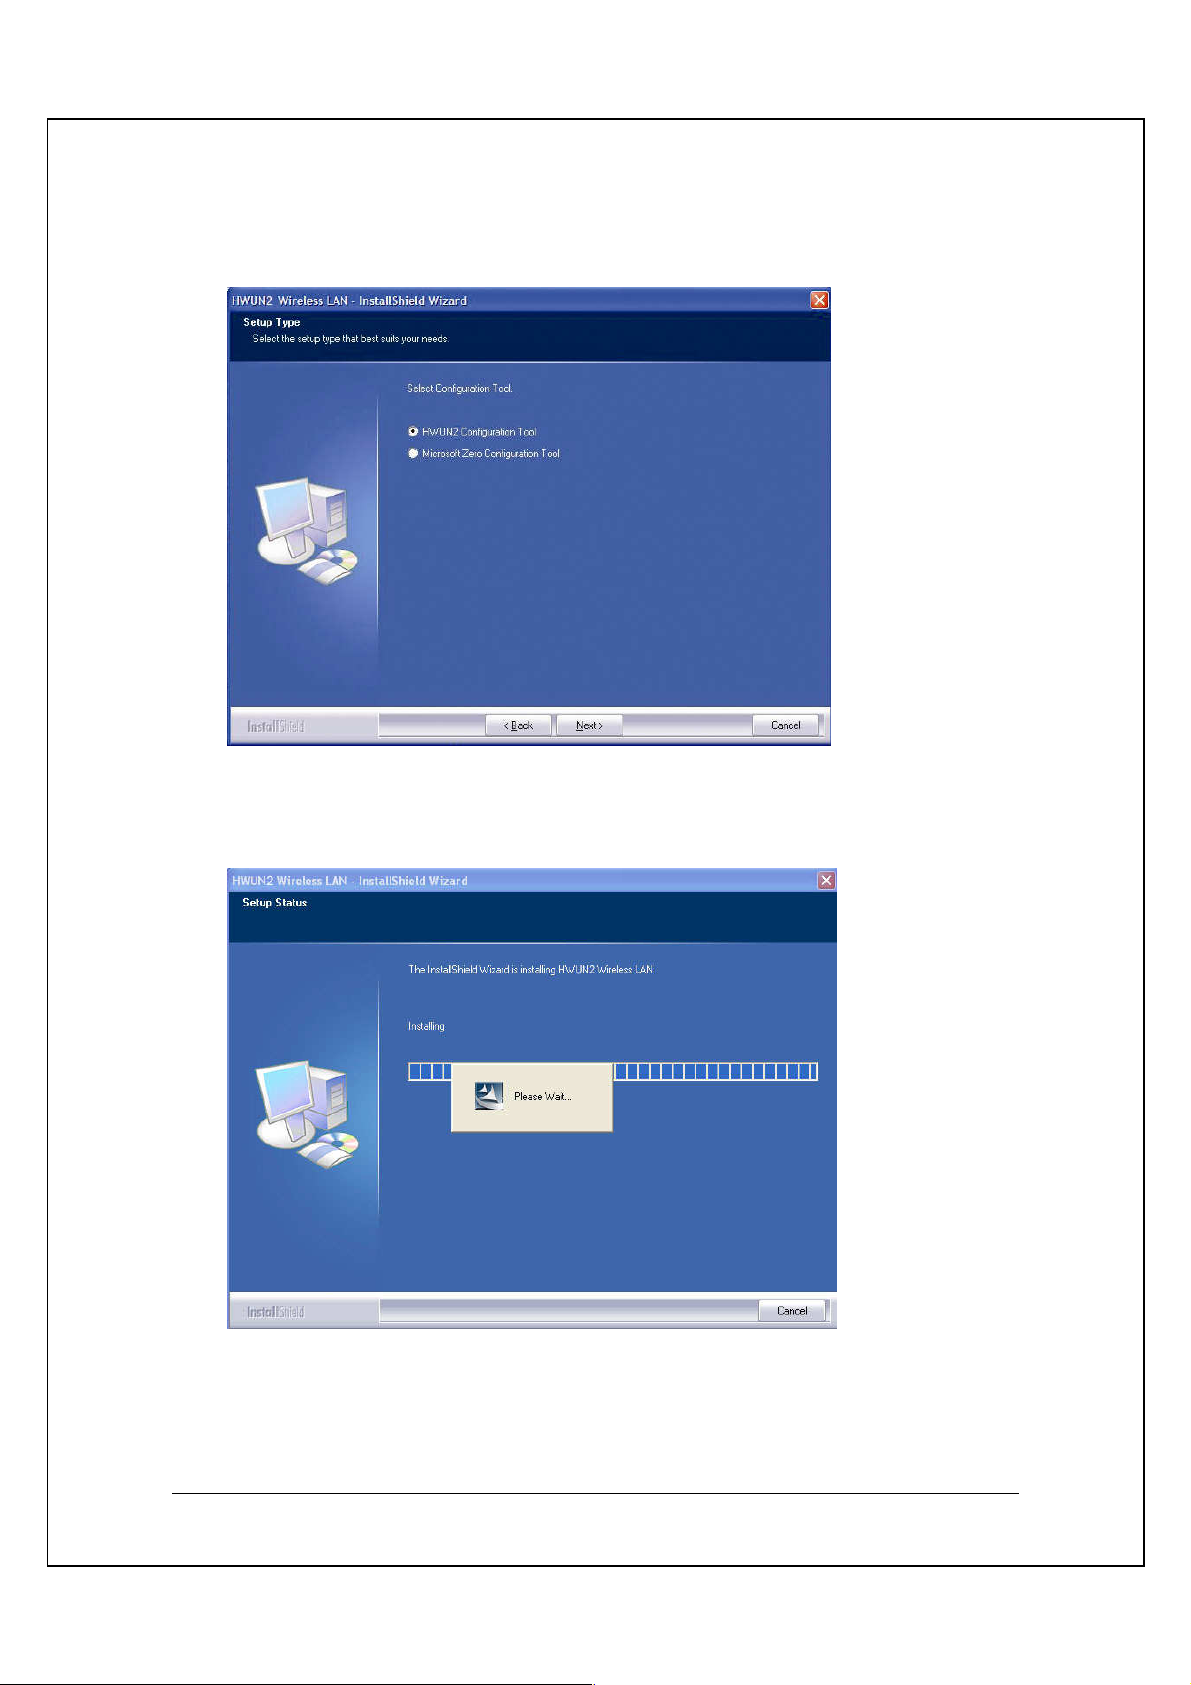
Choose HWUN2 Configuration Utility & click next and then click install.
Await instructions as you see the setup progress as shown below...
12
Page 13
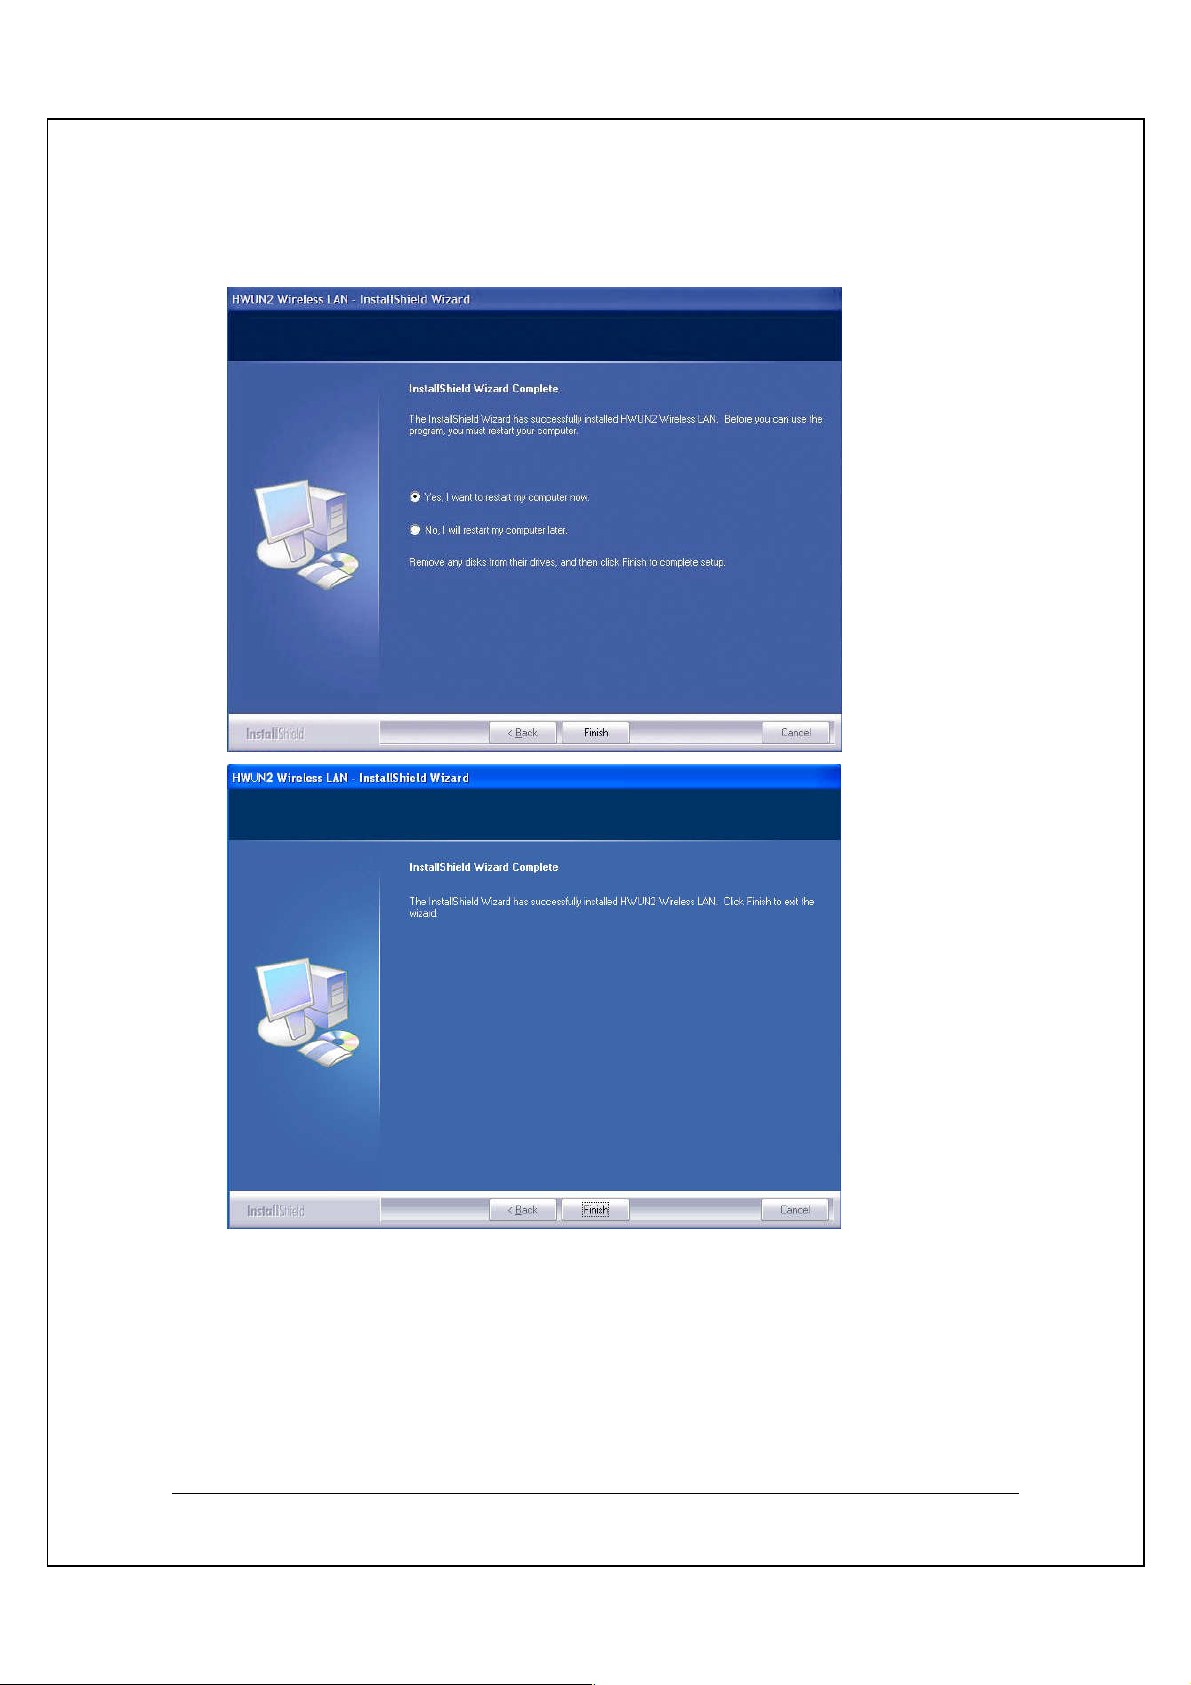
After a few seconds, the set up is complete and will show up as follows.
It may give you the option to restart. Click Finish to restart the PC/notebook.
Restart your computer if the wizard prompted you to do so. Otherwise, please plug
the Hawking HWUN2 Wireless-N Network Adapter into an available USB port on
your desktop or notebook.
13
Page 14
6.1. Verify installation (WINDOW 2000/XP)
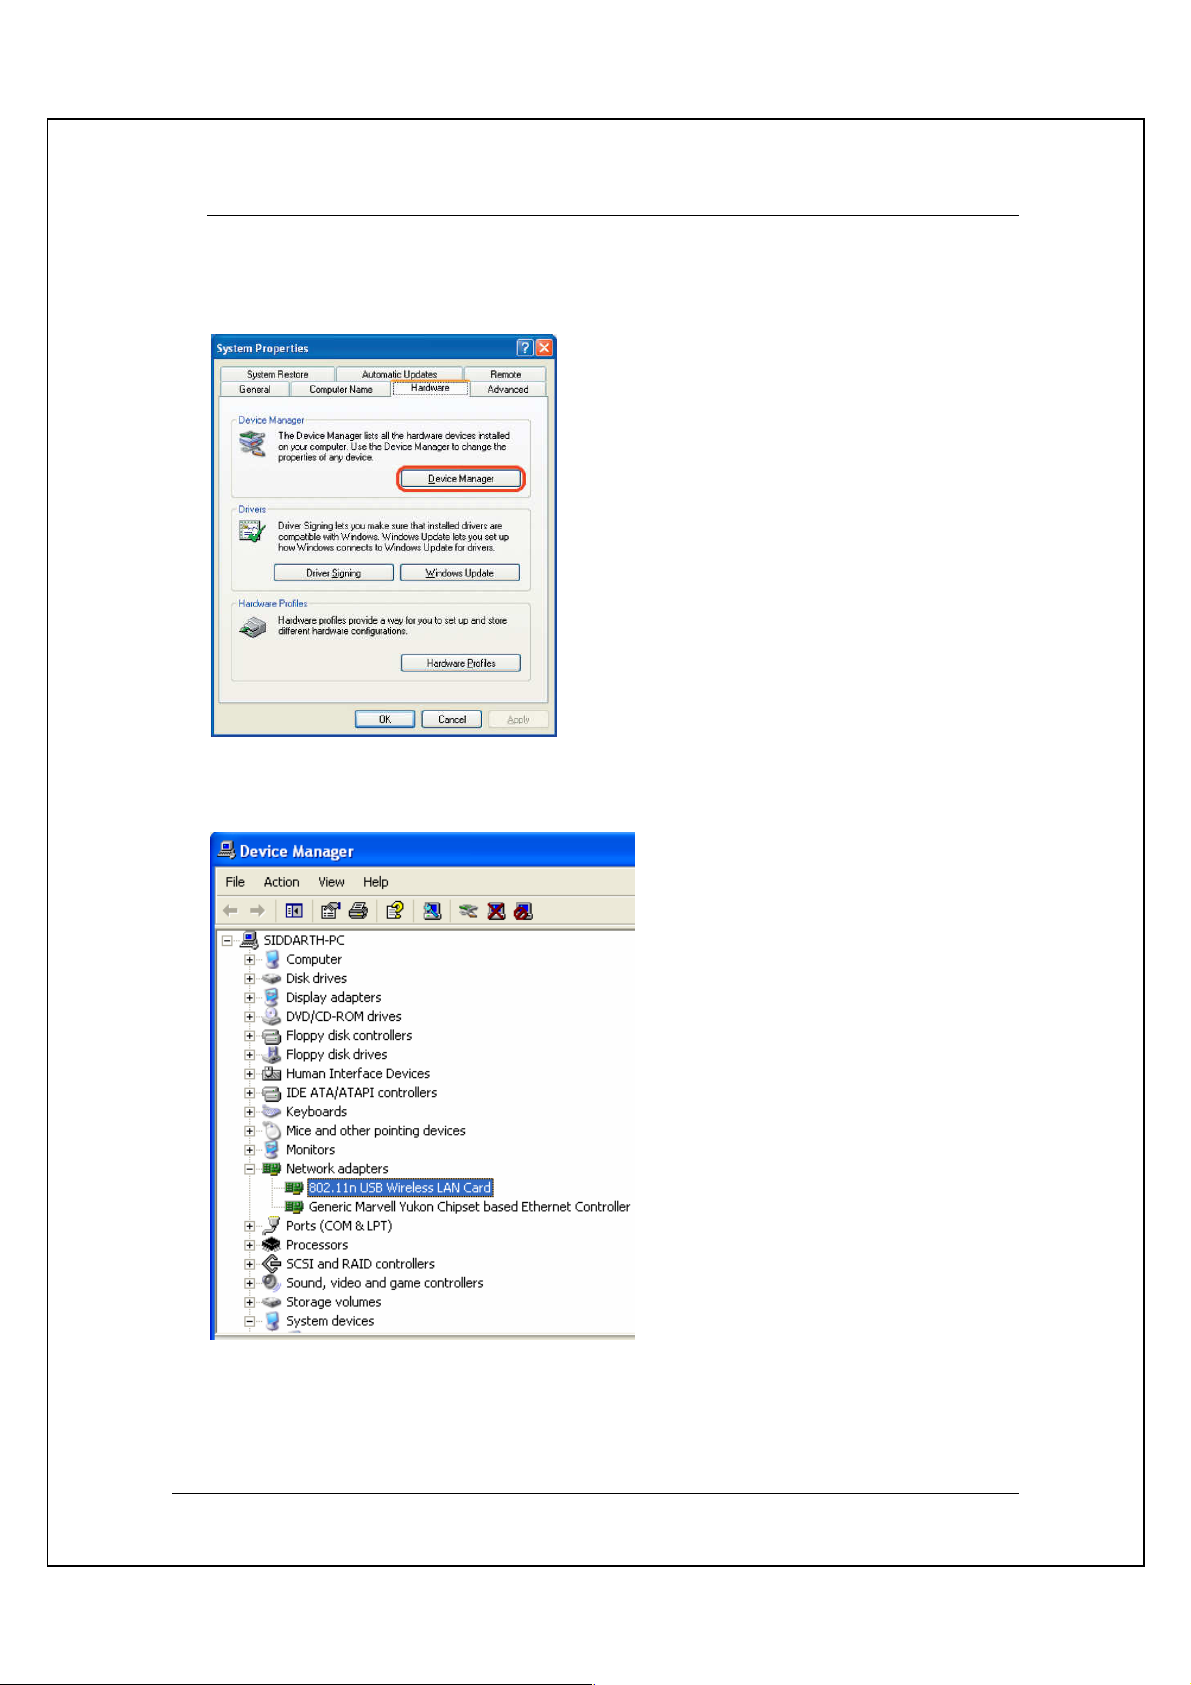
1. Open Control Panel Double-click on System.
2. Select Hardware tabClick on Device Manager.
Select and double-click on 802.11N USB wireless LAN card.
Verify the device status of the 802.11N USB Wireless LAN Card
This device is working properlyClick OK
14
Page 15
6.2. Network Configuration (WIN 2000/XP)
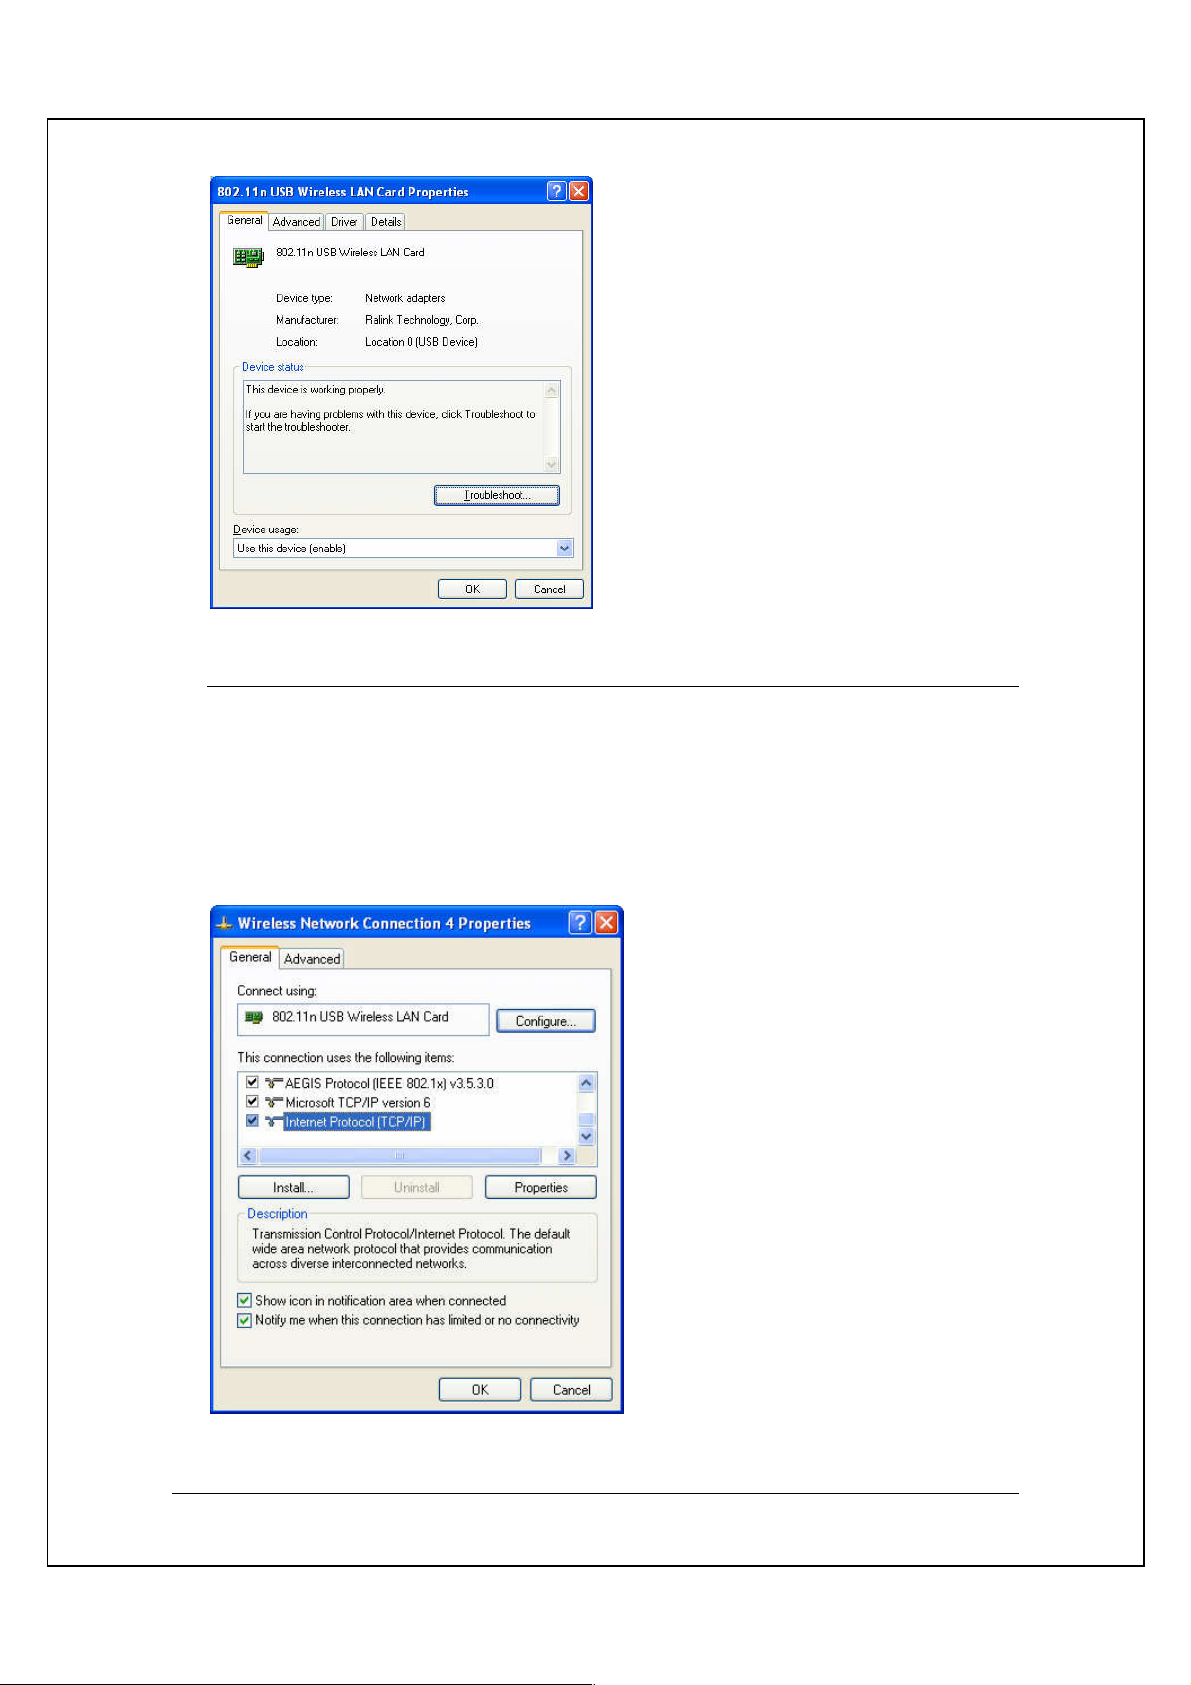
• Go to Start Menu Control Panel Network.
• Right-click on Wireless Network.
• Select Local Area Connection icon select Properties.
• Select Internet Protocol (TCP/IP) Click Properties.
15
Page 16
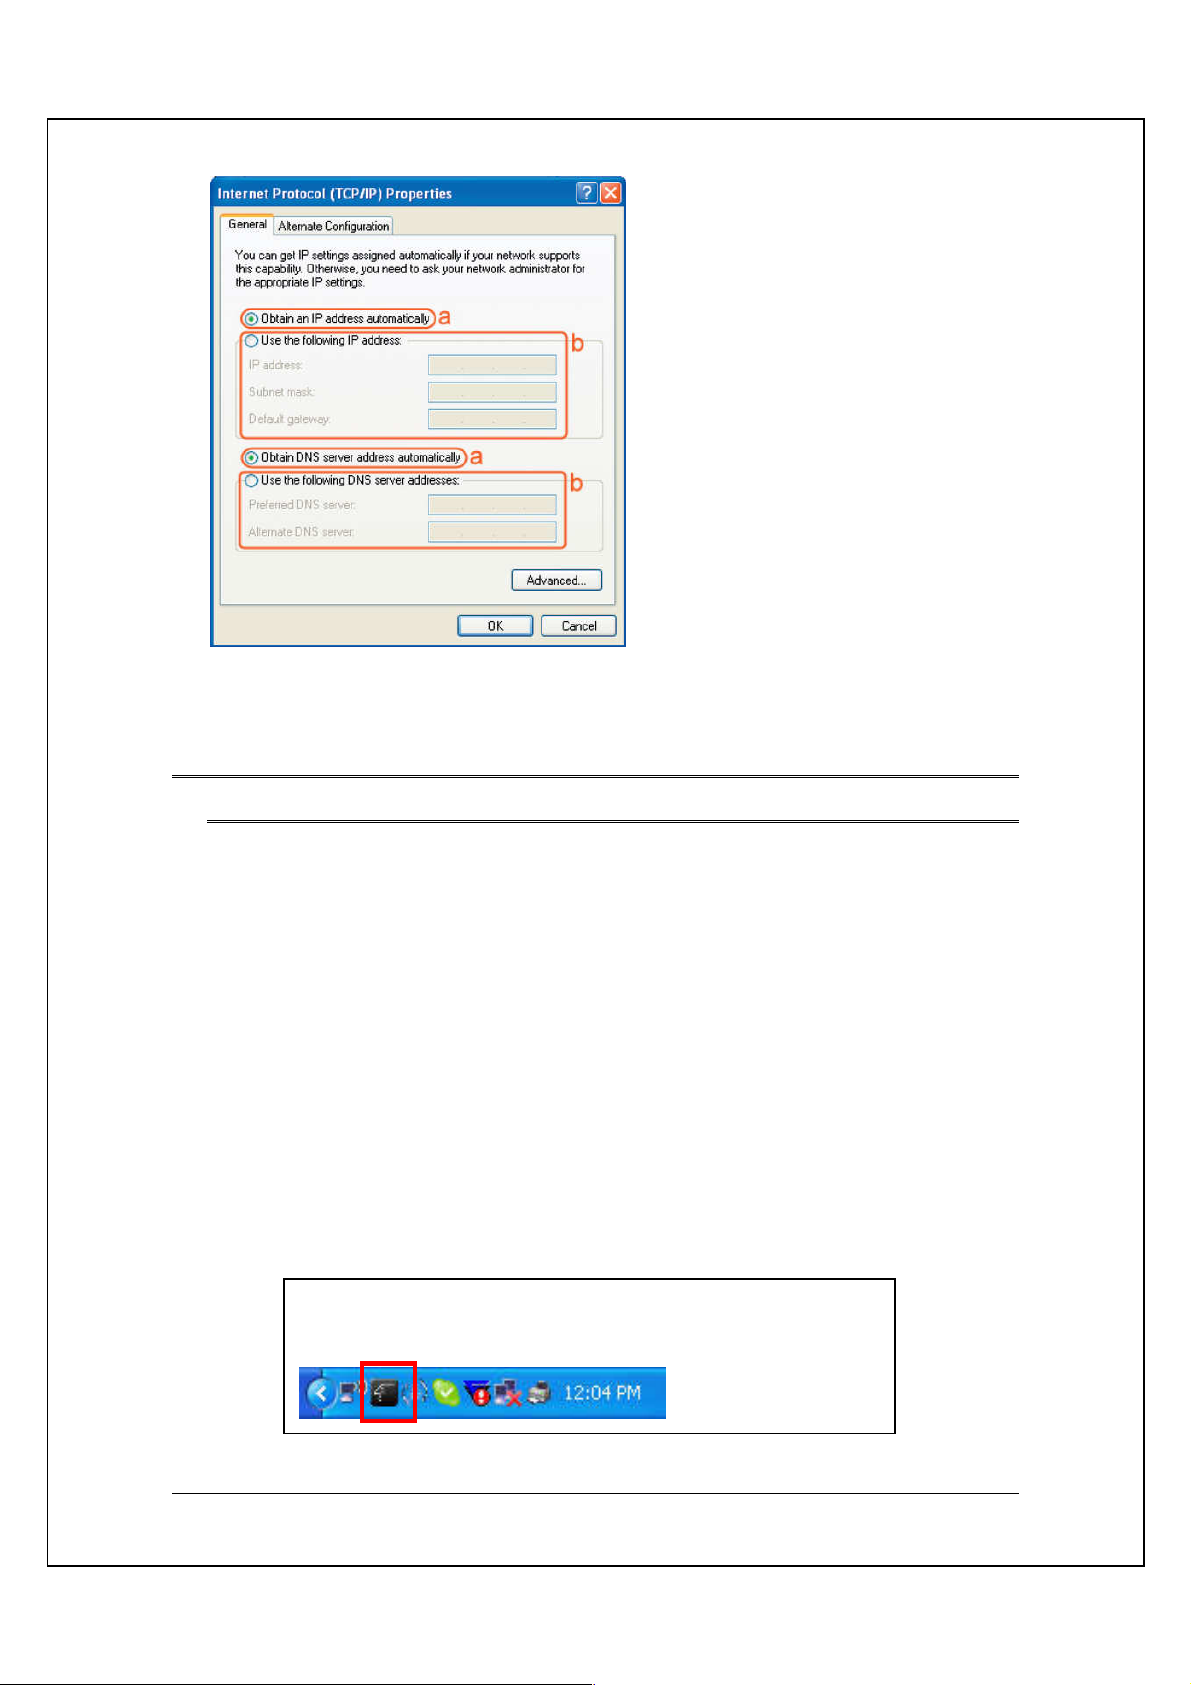
The Hawking Configuration Utility should appear on the
Select the [General] tab.
a. If your Wireless Router supports
[DHCP] function, please select
both [Obtain an IP address
automatically] and [Obtain DNS
server address automatically].
b. If the router does not support
[DHCP] function, you have to
configure the IP and DNS settings.
7. SETUP WLAN (WIN 2000/XP)
– Using Hawking Configuration-Utility
Prerequisite:
• Your home/office environment should have a wireless LAN Access Point
(AP) that is available for your use.
• You should readily have the (security keys) to connect to those Wireless
LAN Access Points (AP)
Configuration utility will first automatically link with the Wireless AP if there is no
security key required. If the connection is successful, a message will appear on
taskbar.
1. The following steps guide you on how to initially setup a wireless network
connection.
bottom right taskbar.
16
Page 17
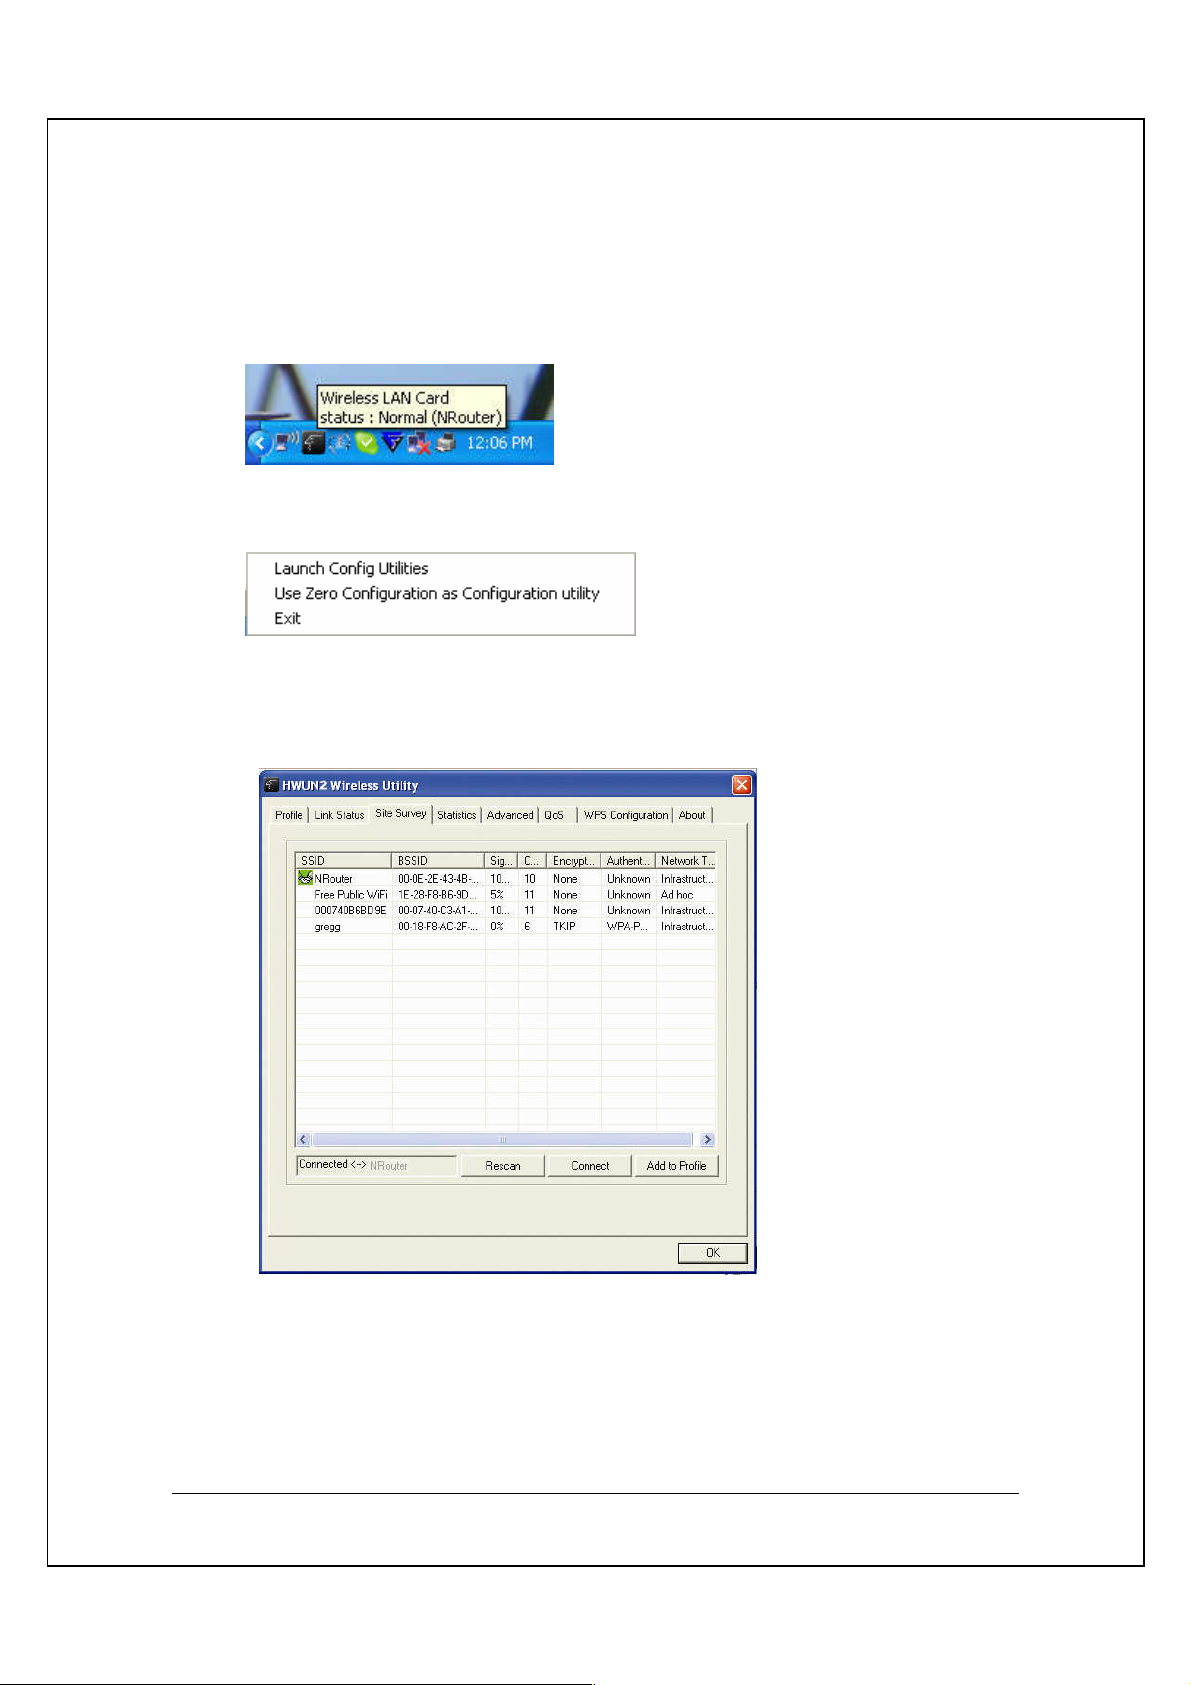
2. Mouse over the “Hawk” icon and you’ll get a brief description and status of your
WLAN. For example, the figure below shows the HWUN2 is connected to an
NRouter.
3. Right click on the “HAWK” icon and it will open up a menu as shown below
4. Click on Launch Config Utilities
Figure 6.4
To see a list of available wireless networks, click on Site Survey tab Press
Rescan. All detected service set identifiers
(SSID)
will be listed under SSID
column. Note: the SSID indicates an individual Access Point (AP).
17
Page 18
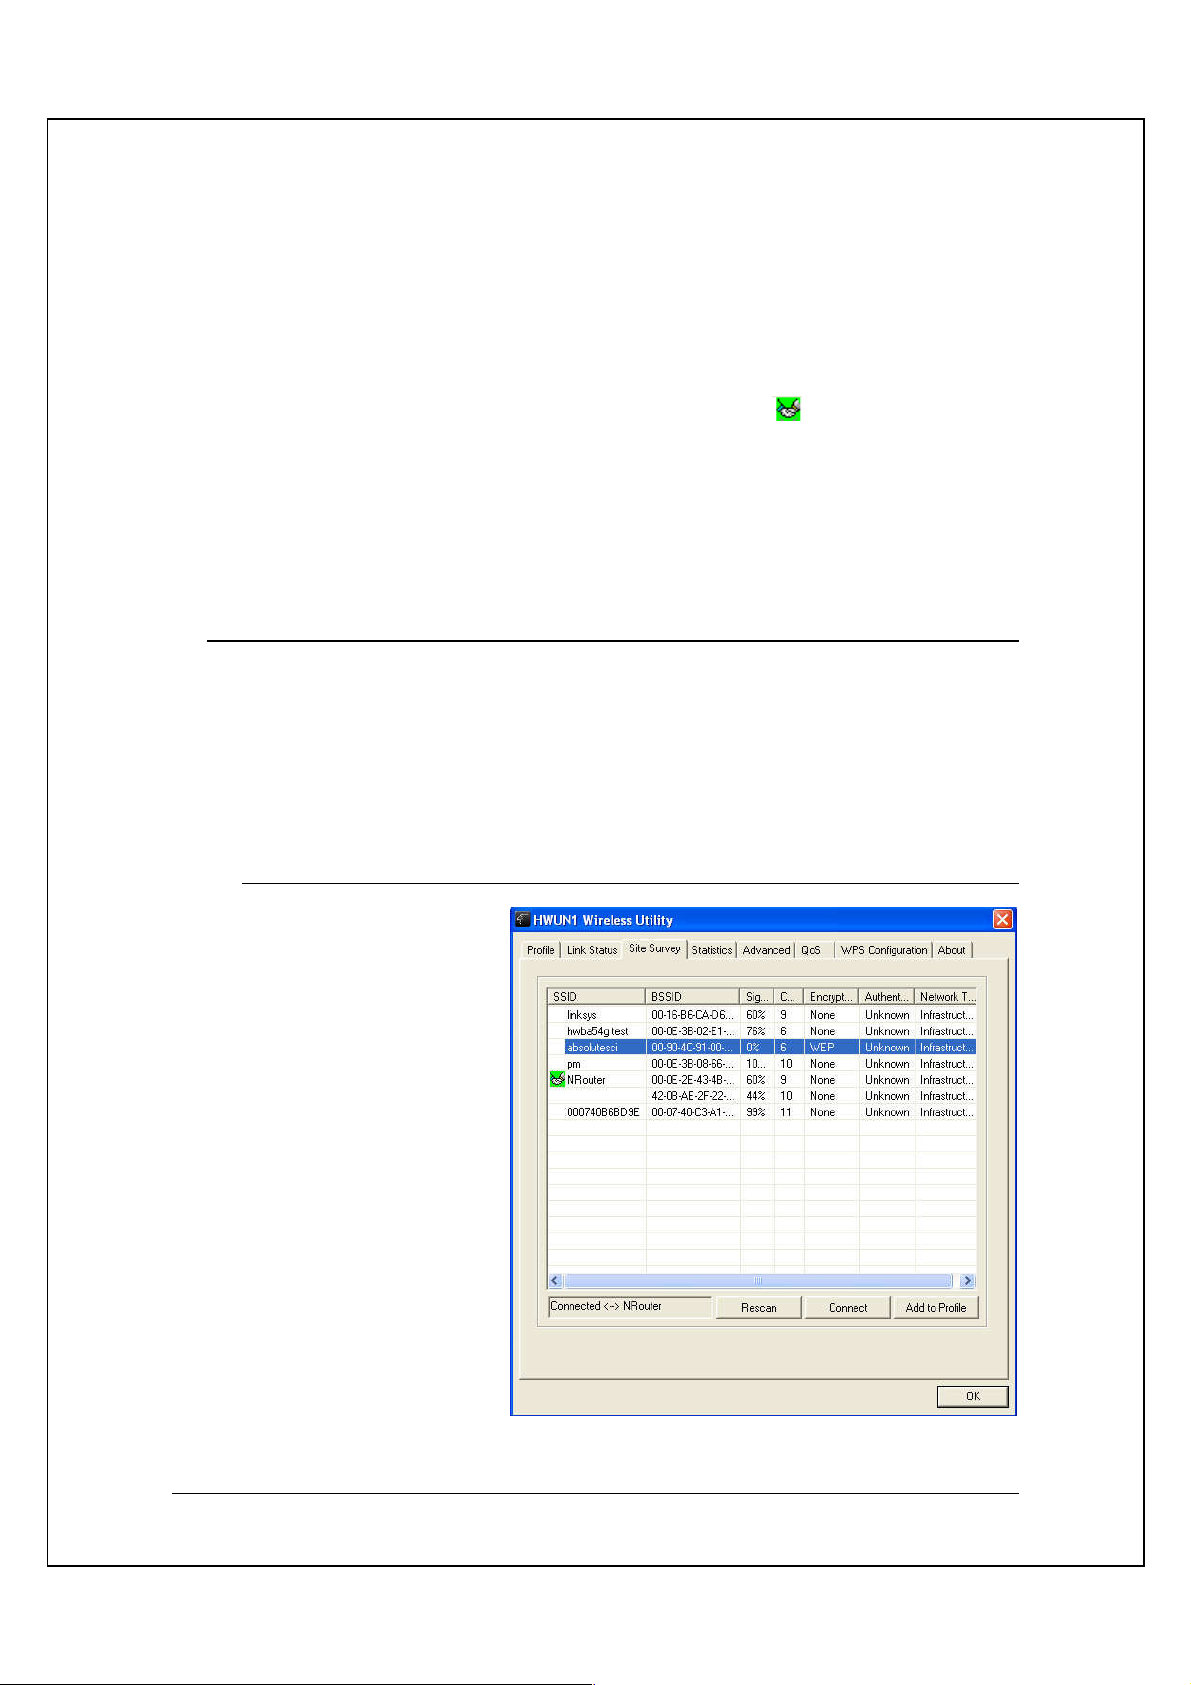
To connect, select a SSID or an AP that you wish to connect to and click Connect
and OK. (Note: if the selected SSID has encryption, you need to enter a security
key in order to connect (refer to Chapter 7 for network settings). If the selected SSID
is an open network or has no encryption, “none” will be listed under Encryption
column.)
When you are successfully connected, a handshake icon will appear on the left,
next to the selected AP.
When the HWUN2 fails to connect, the status bar (bottom left of the HWUN2
Wireless Utility) will show “Disconnected”.
7.1.
If your AP/Router has a networking security key, you must enter the same security
key and setting. If you do not have the Network Encryption key, please request it
from the Network Administrator or the person who set up your wireless network.
After you obtained the network security information, open up Hawking Wireless
Utility. Continue below to set up your Network Security Code.
7.1.1. WEP Setup
If the SSID or Access
Point you wish to connect
has WEP authentication,
select the SSID and click
on Connect.
NETWORK SECURITY (WEP, WPA…)
18
Page 19
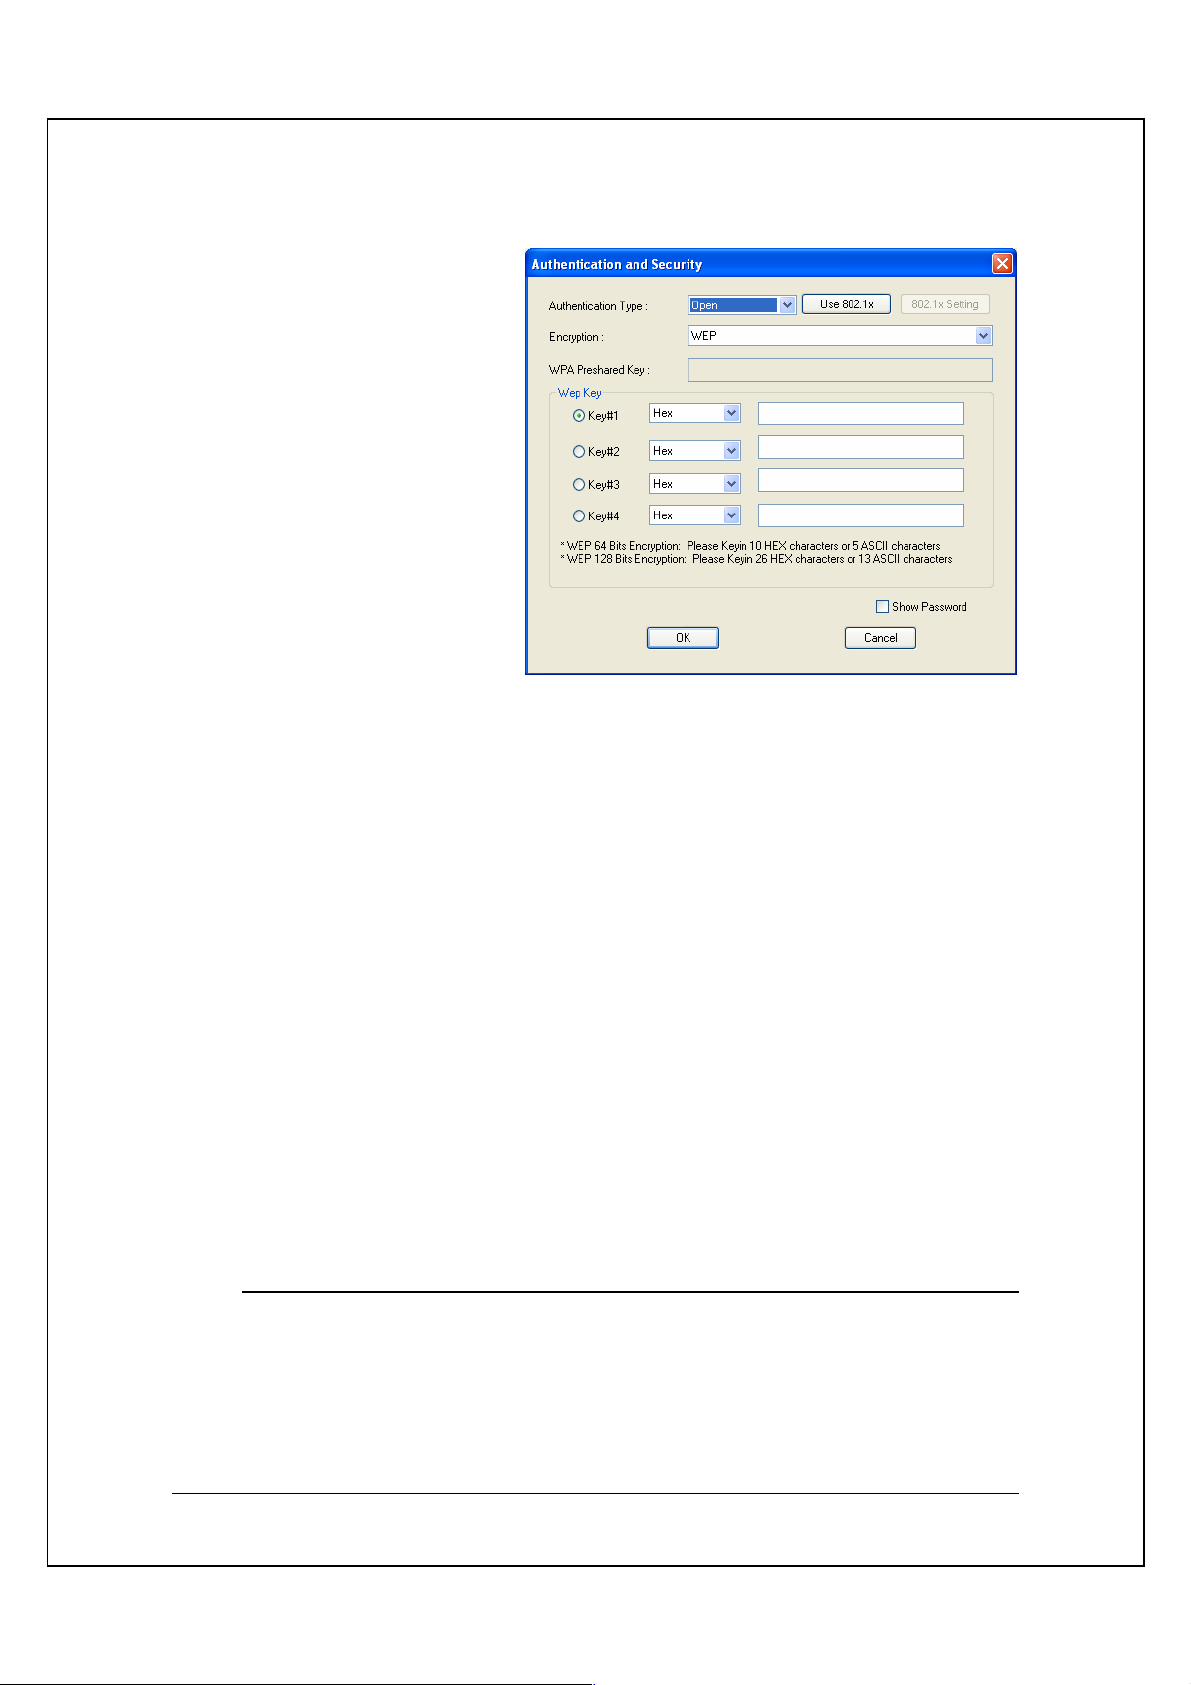
An Authentication and Security Window (figure 7.1b) should appear shortly.
Figure 7.1b
WEP Setup Instructions:
(All settings should correspond with settings of the wireless AP that you are connecting to.)
a. Authentication Type field: indicates the authentication type of the AP/Router.
Please confirm the setting of the AP/Router.
• Open: WEP open system is based on request and grant. It is essentially
no authentication.
• Shared: WEP shared key is based on request, challenge, challenge
response, grant/deny.
b. Encryption field: Select WEP
c. Enter in AP encryption keys (64/128bits) in the box Key1~Key4. Please accept
the auto selected setting of [Hex]/ [ASCII].
d. Select the current AP encryption keys from Key1~Key4.
e. Press [OK] to finish setting.
WPA encryption type can be divided into WPA-PSK, WPA2-PSK, WPA (also known
as WPA-EAP), and WPA2 (also known as WPA2-EAP). All settings should
correspond with the wireless AP that you wish to connect to.
7.1.2. WPA Setup
19
Page 20
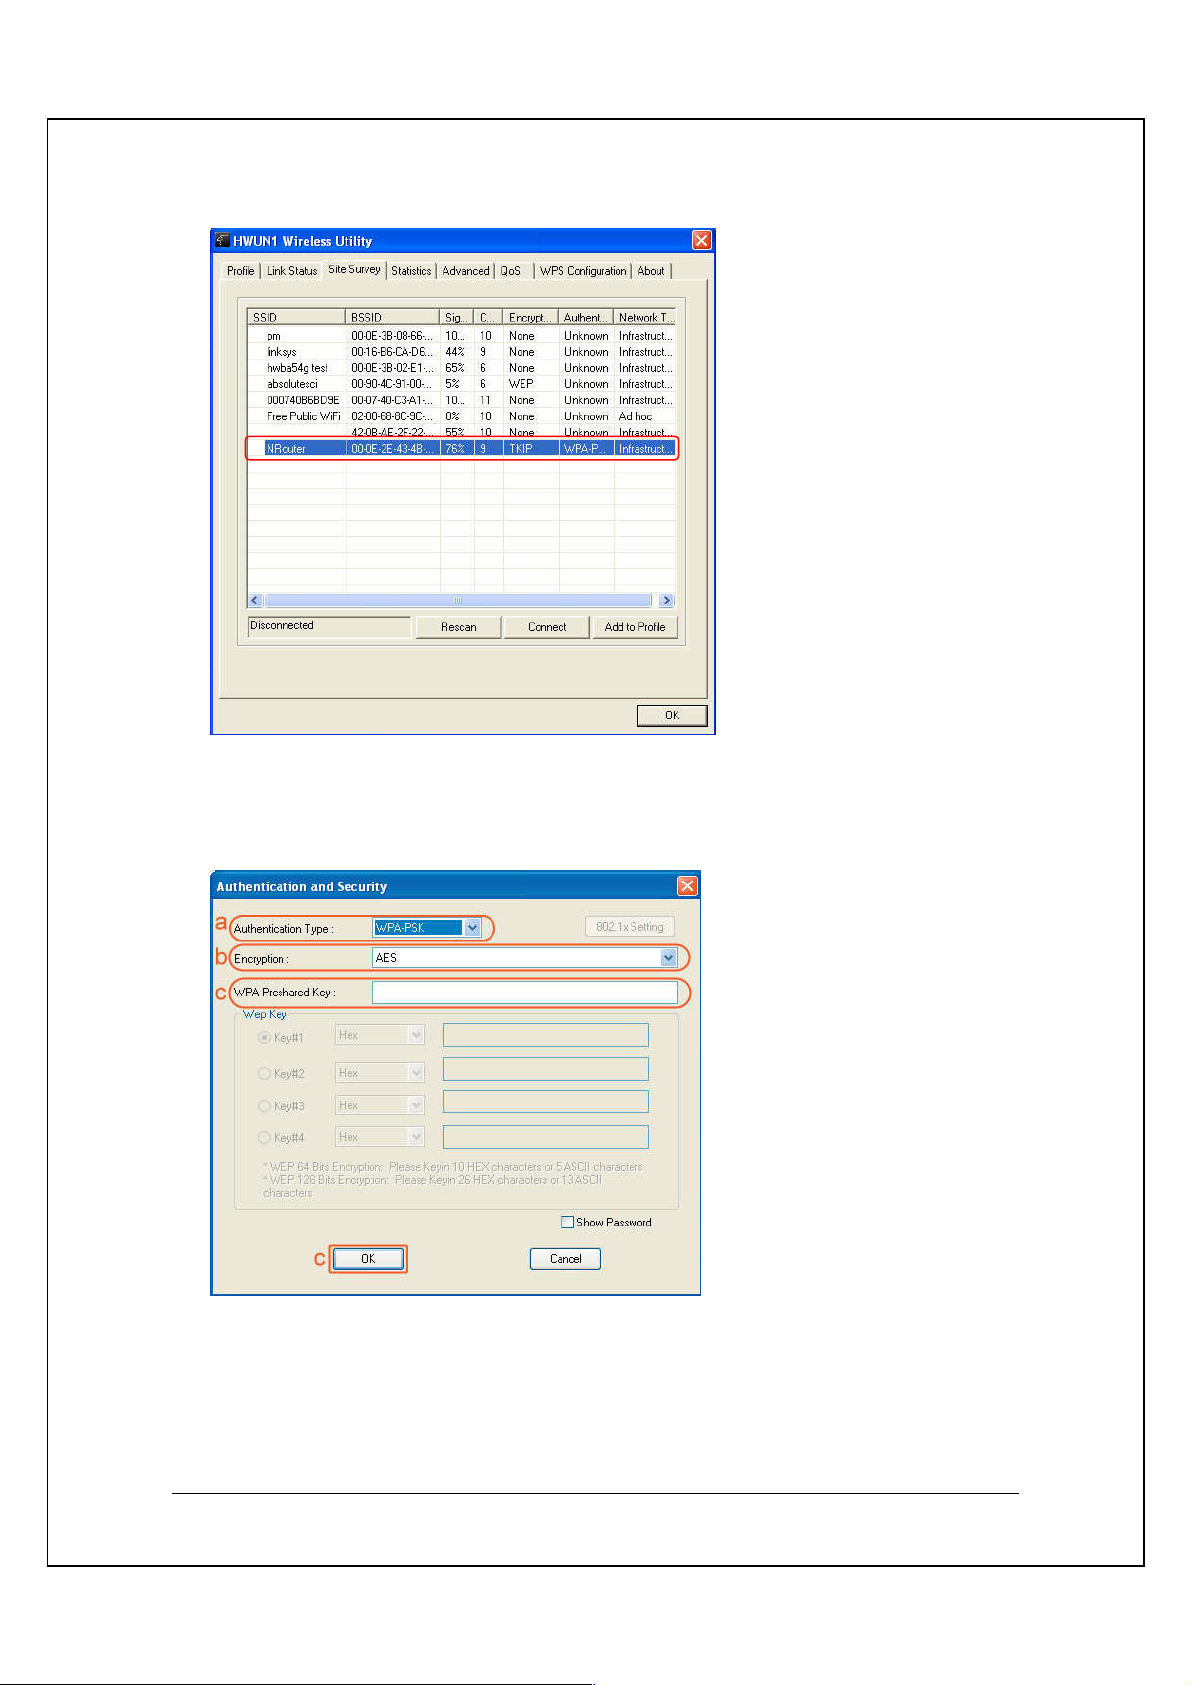
WPA-PSK and WPA2-PSK
Setting the Authentication and Security Page:
a. Authentication Type: Select
WPA-PSK or WPA2-PSK (note:
your AP must support this
function).
b. Encryption: Select TKIP or AES
in the drop down menu.(Must
Correspond to the Value on your
AP)
c. Enter the WAP Preshared Key
and click OK.
20
Page 21
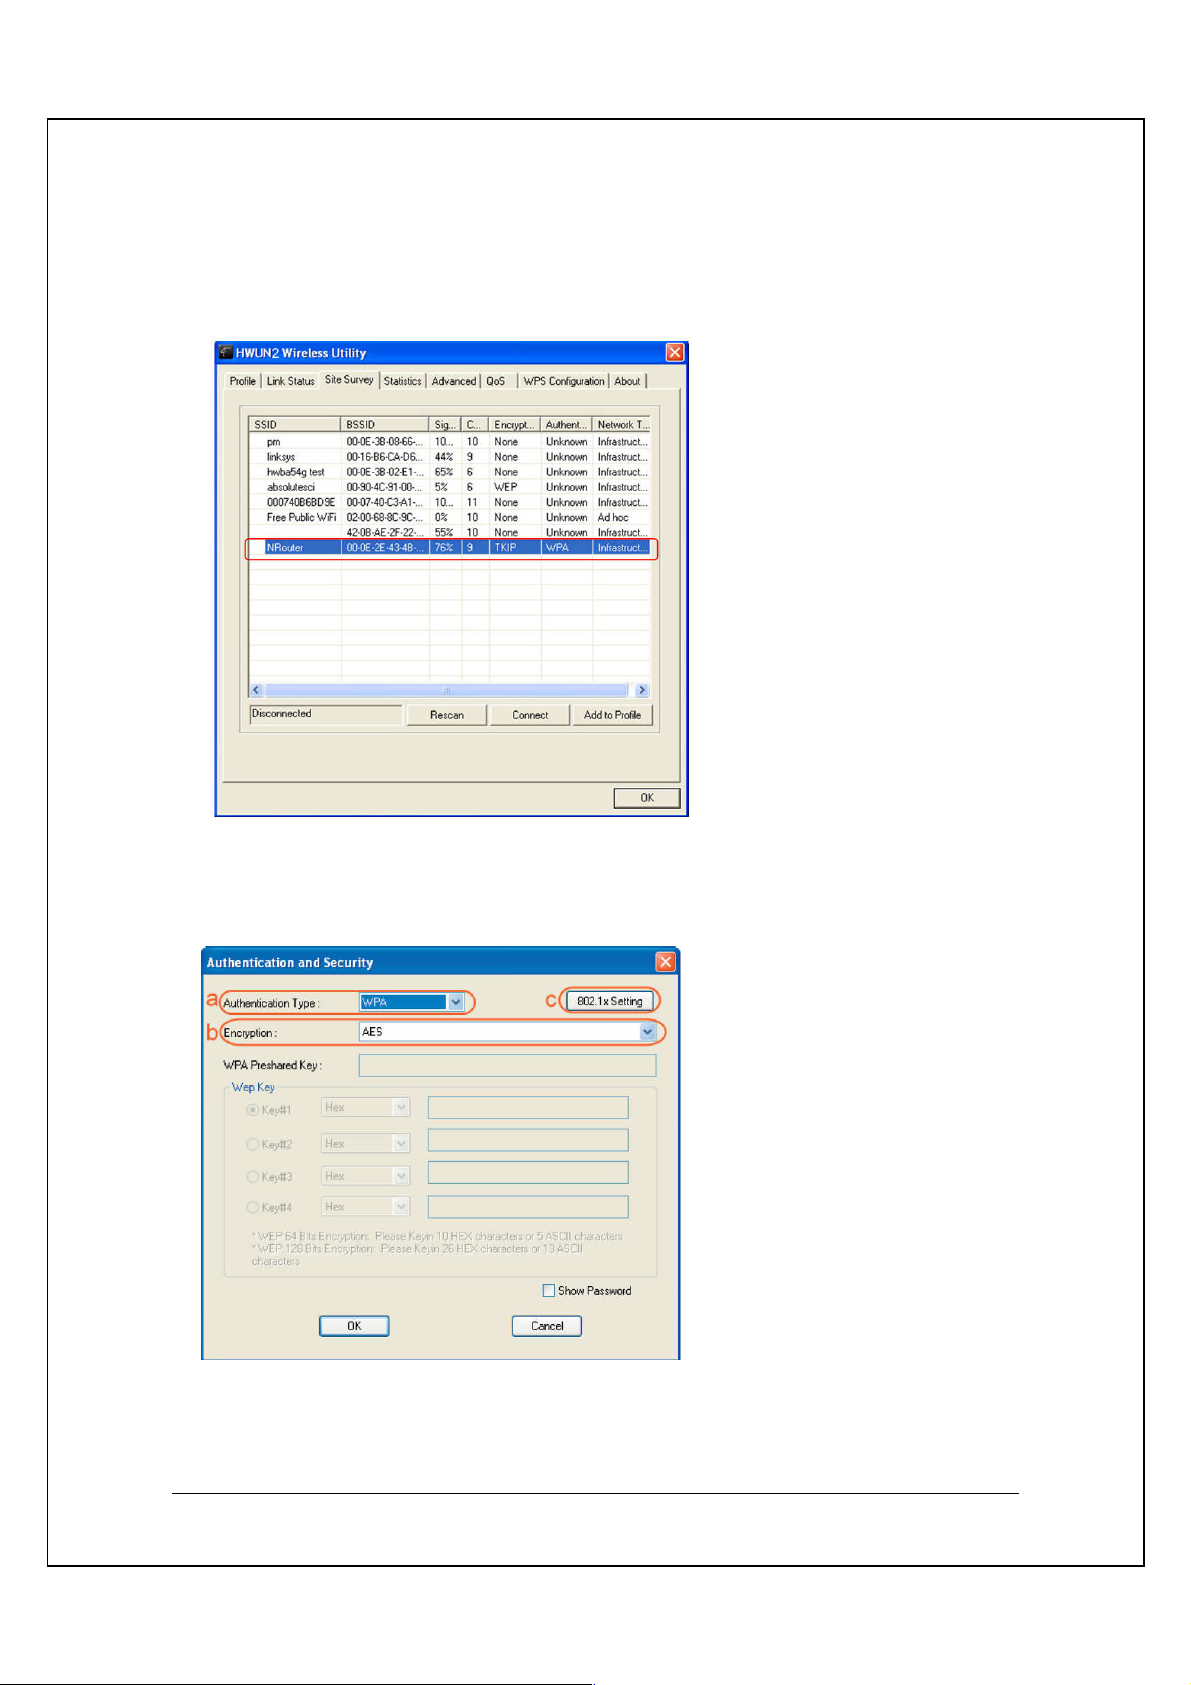
Authentication Type
WPA
WPA and WPA2
1. If you wish to connect to an AP with WPA or WPA2 authentication, select the AP
or SSID and select Connect. (For example the NRouter is being selected, the
security settings must correspond to Wireless Access Point)
2. Setting the Authentication and Security Page:
a.
: select
WPA2-PSK (AP must support the
function).
b. Encryption: select TKIP or AES
(Same as AP)
c. If the AP/router has 802.1x Setting
function, click it for advanced settings.
Please consult your network
administrator for details or check the
user manual of the Wireless Access
Point. (See the Screen shot on the
next page)
or
21
Page 22

Click OK to finish setting.
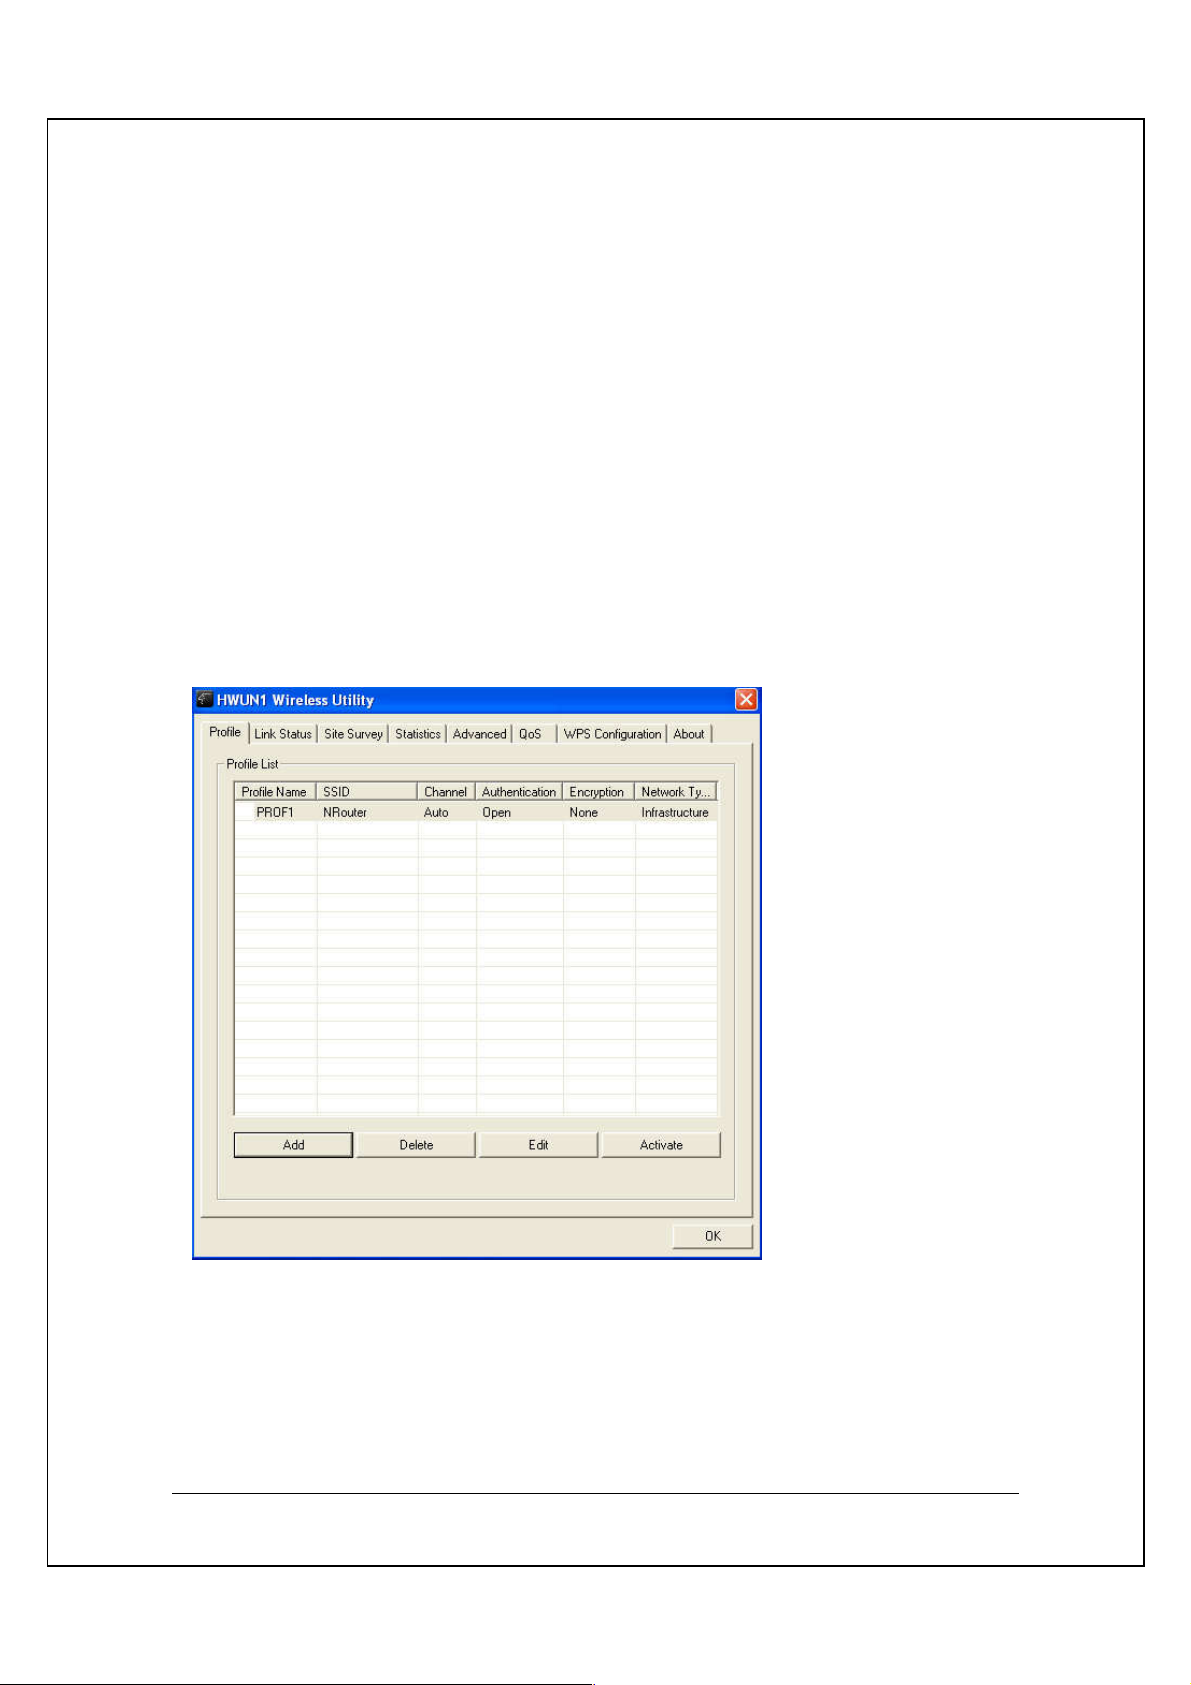
7.2.
1. Select an AP in the SSID column (example: NRouter Click Add to Profile and
the page shown below will appear.
Adding Profiles
2. Setting items in the configuration tab:
• Profile Name: Enter the connected AP profile, eg: PROF1.
22
Page 23
• SSID: Click the drop-down menu and select one AP. You can also enter the
AP manually.
• PSM: When CAM is selected, it indicates that the product is not in power
saving status. When PSM is selected, the product is in power saving status.
(Only select it under Infrastructure network type).
• Network Type: [Infrastructure] or [Ad Hoc] type. We recommend you to
select [Infrastructure].
• Transmit power: the amount of power used by a radio transceiver to send
the signal out. User can choose power value by sliding the bar.
• [RTS Threshold] and [Fragment Threshold]: We recommend you to use the
default value 2312. User can adjust threshold numbers by sliding the bars or
key in the values directly.
3. Click OK and the set AP will appear in the Profile tab.
• Add: Click Add to add a new profile.
• Delete: to delete a profile, select one profile name and click Delete.
• Edit: to edit the setting of a profile, select the profile and click Edit.
• Activate: to activate the selected profile, select the profile and click Activate.
23
Page 24
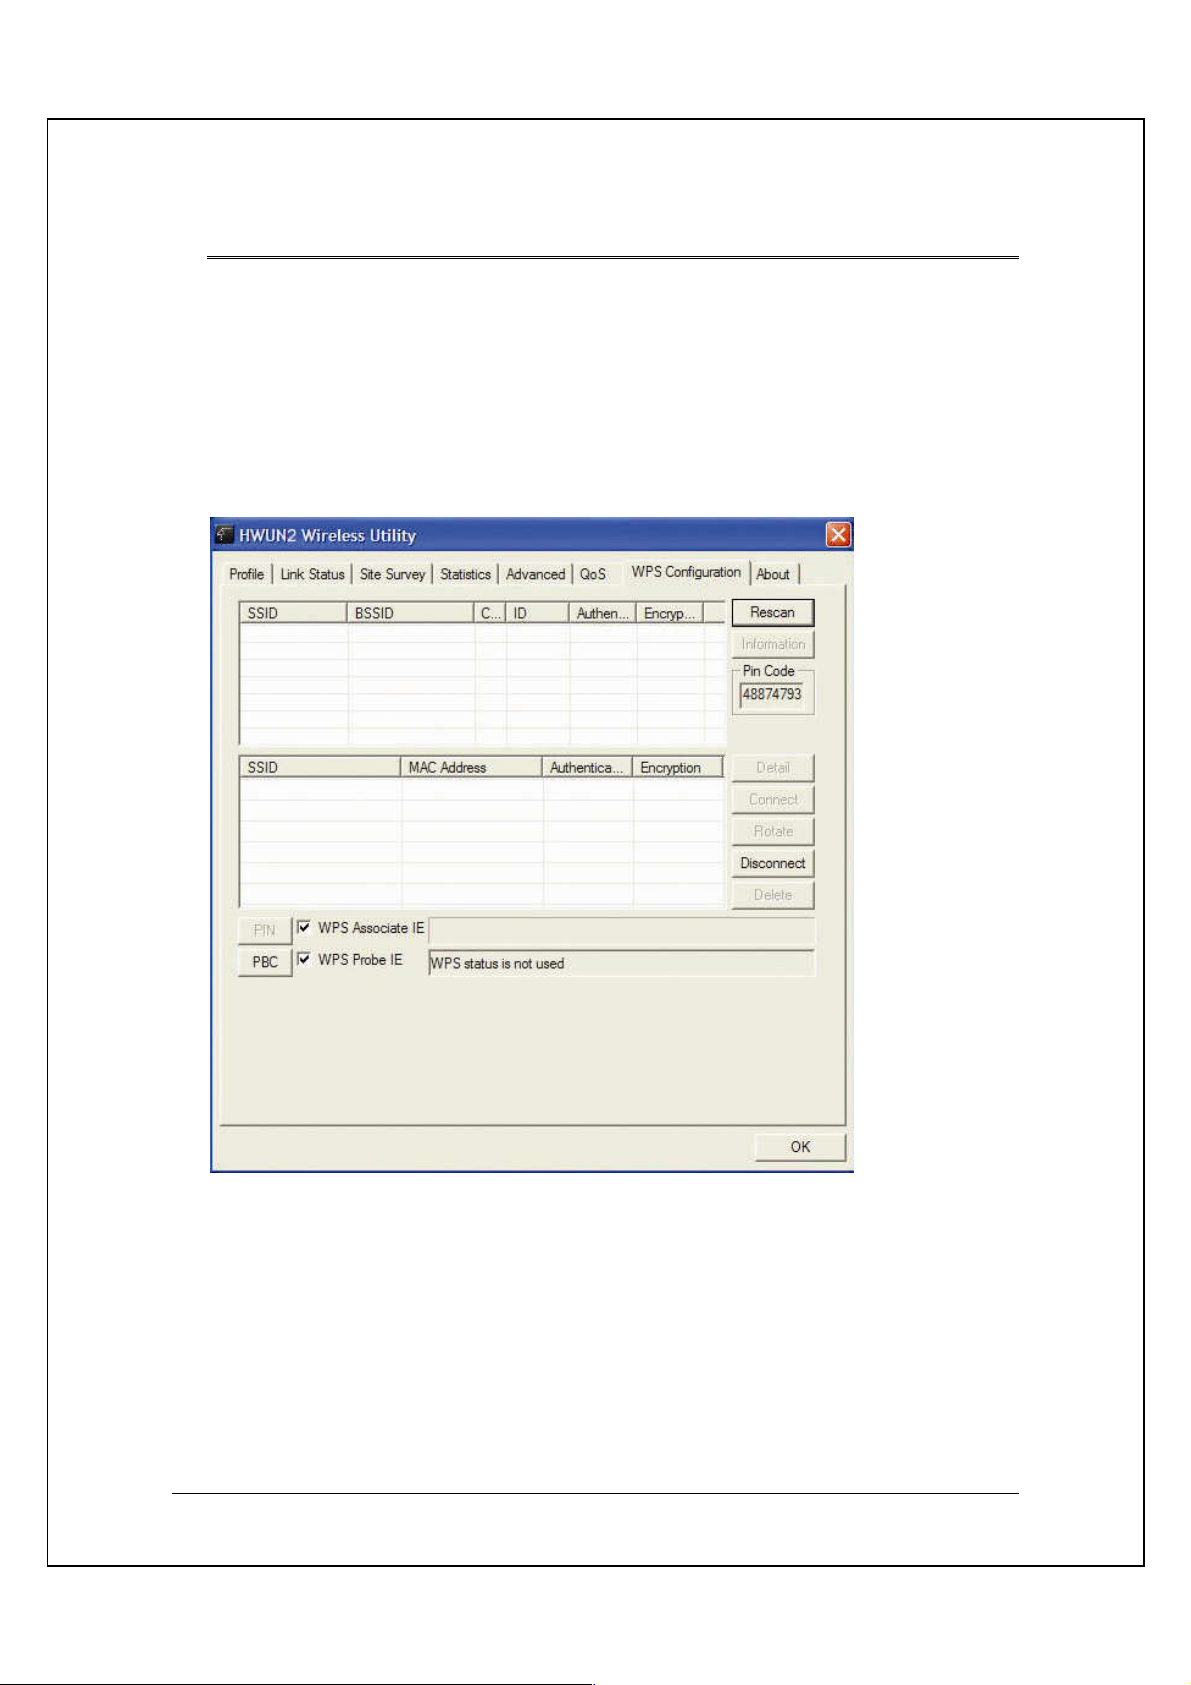
7.3.
Wi-Fi Protected Setup (WPS) configuration function - provides easy procedures to
set up wireless security. Wi-Fi Protected Setup gives you a variety of setup options.
It uses familiar methodologies such as typing in a Personal Identification Number
/numeric code (PIN method), and pushing a button (Push-Button Configuration, or
PBC) to enable users to automatically configure network names and strong WPA2
(Wi-Fi Protected Access 2TM) data encryption and authentication.
WPS Configuration
24
Page 25

8. QoS
Wi-Fi CERTIFIED™ for WMM (Wi-Fi Multimedia) provides multimedia enhancements
for Wi-Fi® networks that improve the user experience for audio, video, and voice
applications. WMM is a profile of the IEEE 802.11e Quality of Service (QoS)
extensions for 802.11 networks and started a certification program for WMM to
satisfy the most urgent needs of the industry for a QoS solution for Wi-Fi networks.
WMM provides prioritized media access and is based on the Enhanced Distributed
Channel Access (EDCA) method. Click WMM Enable to turn on the WMM
capability.
Click WMM – Power Save Enable and this can improve the power savings by
atleast 15% as far as the HWUN2 power consumption is concerned.
25
Page 26

9. Advanced Settings
Wireless mode: Select wireless
network mode (speed)
- 802.11b/g mixed: Automatically
detect 11b or 11g
- 802.11b only: Frequency only 11b
- 802.11b/g/n mixed: Automatically
detect 11b or 11g or 11n
In order to keep the connection
stable, please select [Auto] to
automatically confirm which mode
the wireless network is working.
TX-Burst: Turbo Mode. When it is checked and the HWUN2 Wireless N-Adapter is
connected to an Access Point with TX-Burst function, the transmission throughput
will be improved. (Note: This only works with Access Point that supports this function)
Enable TCP Window Size : When checked, the reception speed will improve.)
Fast Roaming at ___ dBm: Will enter roaming mode when dBm reaches defined
level.
CCX 2.0: Open CCX (supports Cisco Compatible Extensions function). Check it after
making sure the Wireless AP supports it.
Turn on CCKM: Open CCKM function (Cisco Key Management).
Enable Radio Measurements: Open the function of CCK Monitor AP Channel.
Non-Serving Channel Measurements: Select and start to monitor the channels on
which the AP is not transmitting
Turn off RF: Disable wireless radio.
Turn on RF: Enables wireless radio.
Apply: Click this when finished with the settings.
26
Page 27

10. Statistics
The Statistics tab displays detailed information about Wireless LAN TX/RX.
• Transmit Statistics: Statistic of transmitted frames.
• Receive Statistics: Statistic of received frames.
• [Reset Counters]: Click [Reset Counter] to start over at zero the statistic numbers
of transmitting and receiving data.
27
Page 28

11. Link Status
This tab displays the information of the Wireless connection status.
• Status: Displays the linked AP name and MAC address. When [Disconnect]
appears in this box, the connection is failed.
• Extra Info: link status and strength.
• Channel: Current channel in use.
• Link Speed: Shows current transmit rate and receive rate.
• Throughput: Displays transmit and receive throughput value.
• Link Quality: Displays connection quality based on signal strength and TX/RX
packet error rate.
• Signal Strength 1 & 2: Receive signal strength, user can choose to display
as percentage or dBm format
• Noise Level: Display noise signal strength.
28
Page 29

12. About
The About tab displays version information of
1. Driver
2. Utility
3. EEPROM binary
4. Firmware
5. IP Address (current)
6. MAC address of the PHY
7. Subnet MASK Address
8. Default Gateway
29
Page 30

13. Uninstalling Hawking Utility/Driver
Select Uninstall option from the start menu.
You can see the wizard preparing for uninstallation
Select Remove All. When asked if you are sure you want to remove application and
all its features, click Yes.
30
Page 31

Removing the utility is in progress. At any time you may press cancel to abort
uninstallation.
31
Page 32

You will need to restart your computer to ensure a clean removal of the Hawking
Utility.
32
Page 33

APPENDIX A – SPECIFICATIONS
Data Rates
1, 2, 5.5, 6, 9, 11, 12, 18, 24, 36, 48, 54, 72, 84, 150 (with 2-stream on both ends)
Standards / Compliance
IEEE802.3, IEEE802.3u, IEEE802.11b, IEEE802.11g, 802.11n 2.0
Regulation Certifications
FCC Part 15, ETSI 150/328/CE
Operating Voltage
5 V ± 0.25V
Status LEDs
LINK
Drivers
Windows 2000/XP/Vista
RF Information
Frequency Band
U.S., Europe and Japan product covering 2.4 to 2.484 GHz, programmable for different country regulations
Media Access Protocol
Carrier Sense Multiple Access with Collision Avoidance (CSMA/CA)
Modulation Technology
802.11g: OFDM (64-QAM, 16-QAM, QPSK, BPSK)
802.11b: DSSS (DBPSK, DQPSK, CCK)
Operating Channels
11 for North America, 14 for Japan, 13 for Europe
Receive Sensitivity
• 2.412~2.472G(IEEE802.11b)
-91dBm @ 1Mbps
-90dBm @ 11Mbps
• 2.412~2.472G(IEEE802.11g)
-90dBm @ 6Mbps
-74dBm @ 54Mbps
• 2.412~2.472G(IEEE802.11N)
-90 dBm @ MCS 8
-65 dBm @ MCS 15
(Typical)
Available transmit power
• 2.412~2.472G(IEEE802.11b)
17dBm @1~11Mbps
• 2.412~2.472G(IEEE802.11g)
19 dBm
• 2.412~2.472G(IEEE802.11N)
15dBm @ 40MHz
19dBm @ 20MHz
Antenna Configuration
1T2R Mode (detachable 2.4GHz antenna /2.0dBi gain)
Networking
Topology
33
Page 34

Ad-Hoc, Infrastructure
Security
WPA/WPA2 (AES, 64,128-WEP with shared-key authentication)
Cisco CCS V1.0, V2.0 and V3.0 compliant
Physical
Form Factor
USB 2.0/1.1
Dimensions (H x W x D)
70(L) mm x 57.5(W) mm x 16(H) mm
Weight
55 g/ 2.0oz
Environmental
Temperature Range
Operating: 0°C to 50°C
Storage: -10°Cto 75°C
Humidity (non-condensing)
5%~95% Typical
34
Page 35

INDEX
This chapter provides solutions to problems usually encountered during the installation and operation of the
adapter.
1. What is the IEEE 802.11n standard?
802.11n is an IEEE 802.11 wireless network standard that increases transmission speeds from a
traditional 11Mbps (802.11b) to over 100Mbps. Currently, the HWUN2 supports up to 150Mbps. 802.11n
can handle legacy 11b and 11g transmission in a mixed mode or only 11n nodes for maximum
performance. It supports the 2.4GHz frequency bands.
The key to the 802.11n standard is the use of multiple antennas, known as MIMO (Multiple input/multiple
output). MIMO technology enables two data streams, transmitter and receiver, to be sent simultaneously
over longer distances and to improve the overall system performance.
2. What does IEEE 802.11 feature support????
The product supports the following IEEE 802.11 functions:
CSMA/CA plus Acknowledge Protocol
Multi-Channel Roaming
Automatic Rate Selection
RTS/CTS Feature
Fragmentation
Power Management
3. What is Ad-hoc????
An Ad-hoc integrated wireless LAN is a group of computers, each has a Wireless LAN adapter,
Connected as an independent wireless LAN. Ad hoc wireless LAN is applicable at a departmental scale
for a branch or SOHO operation.
4. What is Infrastructure????
An integrated wireless and wireless and wired LAN is called an Infrastructure configuration. Infrastructure
is applicable to enterprise scale for wireless access to central database, or wireless application for mobile
workers.
5. What is BSS ID????
A specific Ad hoc LAN is called a Basic Service Set (BSS). Computers in a BSS must be configured with
the same BSS ID.
6. What is WEP????
WEP is Wired Equivalent Privacy, a data privacy mechanism based on a 40 bit shared key algorithm, as
described in the IEEE 802 .11 standard.
35
Page 36

7. What is TKIP?
TKIP is a quick-fix method to quickly overcome the inherent weaknesses in WEP security, especially the
reuse of encryption keys. TKIP is involved in the IEEE 802.11i WLAN security standard, and the
specification might be officially released by early 2003.
8. What is AES?
AES (Advanced Encryption Standard), a chip-based security, has been developed to ensure the highest
degree of security and authenticity for digital information, wherever and however communicated or stored,
while making more efficient use of hardware and/or software than previous encryption standards. It is
also included in IEEE 802.11i standard. Compare with AES, TKIP is a temporary protocol for replacing
WEP security until manufacturers implement AES at the hardware level.
9. Can Wireless products support printer sharing????
Wireless products perform the same function as LAN products. Therefore, Wireless products can work
with Netware, Windows 2000, or other LAN operating systems to support printer or file sharing.
10. Would the information be intercepted while transmitting on air?
WLAN features two-fold protection in security. On the hardware side, as with Direct Sequence Spread
Spectrum technology, it has the inherent security feature of scrambling. On the software side, WLAN
series offer the encryption function (WEP) to enhance security and Access Control. Users can set it up
depending upon their needs.
11. What is DSSS????What is FHSS????And what are their differences????
Frequency-hopping spread-spectrum (FHSS) uses a narrowband carrier that changes frequency in a
pattern that is known to both transmitter and receiver. Properly synchronized, the net effect is to maintain
a single logical channel. To an unintended receiver, FHSS appears to be short-duration impulse noise.
Direct-sequence spread-spectrum (DSSS) generates a redundant bit pattern for each bit to be
transmitted. This bit pattern is called a chip (or chipping code). The longer the chip is, the greater the
probability that the original data can be recovered. Even if one or more bits in the chip are damaged
during transmission, statistical techniques embedded in the radio can recover the original data withoutthe need for retransmission. To an unintended receiver, DSSS appears as low power wideband noise and
is rejected (ignored) by most narrowband receivers.
12. What is Spread Spectrum????
Spread Spectrum technology is a wideband radio frequency technique developed by the military for use in
reliable, secure, mission-critical communication systems. It is designed to trade off bandwidth efficiency for
reliability, integrity, and security. In other words, more bandwidth is consumed than in the case of
narrowband transmission, but the trade off produces a signal that is, in effect, louder and thus easier to
detect, provided that the receiver knows the parameters of the spread-spectrum signal being broadcast. If a
receiver is not tuned to the right frequency, a spread –spectrum signal looks like background noise. There
are two main alternatives, Direct Sequence Spread Spectrum (DSSS) and Frequency Hopping Spread
Spectrum (FHSS).
36
Page 37

13. What is Hi-Gain and dBi?
Hi-Gain is Hawking Technologies’ high performance wireless distance extending product line. It
encompasses a group of products and technologies used to help solve distance issues accompanied with
WiFi products. A unit of measurement on antenna strength and power is dBi. The higher the dBi or gain
level of an antenna the more powerful it is.
14. What is the difference between directional and omni-directional antennas?
Directional and omni-directional antennas determine the wireless output pattern of antennas. In standard
installations it is normally the wireless access point that uses the omni-directional antenna (360 degree
wireless output) whiles the clients (desktop or laptops) that use the directional antennas (concentrated
narrow wireless signal) to create a stronger link directly to the access point.
15. How do I get an Optimal Wireless Connection with the HWUN2?
If pointing the antenna directly at the access point is not providing a sufficient signal connection then you
can try bouncing the signals off walls. Wireless signals can reflect off walls or through windows to get to
their desired location so try different positions to find the best antenna orientation for your network. Pair the
HWUN2 with a Hawking Hi-Gain Wireless Antenna for extended range.
37
Page 38

PRODUCT SUPPORT INFORMATION
Thank you for choosing Hawking Technologies. Please do not hesitate to contact us if you have
any questions regarding the installation of your product. We’re here to help you 24 hours a day, 7
days a week!
PHONE SUPPORT
888.202.3344
•
Toll-Free 24/7 Technical Support Line (US & Canada Only)
WEBSITE SUPPORT
http://www.hawkingtech.com/support
•
You’ll find: (a) Firmware/Driver updates with the latest features and news on your product
(b) Frequently Asked Questions (FAQs) with answers to common asked questions about
your product.]
EMAIL SUPPORT
techsupport@hawkingtech.com
•
DOCUMENT SUPPORT
Product User’s Manual
•
(Normally located on the product CD)
You’ll find detail install instruction on your product and default user name and password.
RMA (RETURN MERCHANDISE AUTHORIZATION)
http://www.hawkingtech.com/support/customerservice.php
•
CUSTOMER SERVICE
Email: customerservice@hawkingtech.com
•
Tel: 949.790.0800 ext:1000
•
We want to hear from you! We hope you will have a wonderful experience using
our hawking product. If there is any concern, please email us at
customerservice@hawkingtech.com.
38
Page 39

39
Page 40

1
Page 41

LIMITED WARRANTY
Hawking Technology guarantees that every HWDN2 Hi-GainTM Wireless-150N USB Dish Adapter with
Upgradable Antennas is free from physical defects in material and workmanship under normal use for one (1)
year from the date of purchase. If the product proves defective during this one-year warranty period, call
Hawking Customer Service in order to obtain a Return Authorization number. Warranty is for repair or
replacement only. Hawking Technology does not issue any refunds. BE SURE TO HAVE YOUR PROOF OF
PURCHASE. RETURN REQUESTS CAN NOT BE PROCESSED WITHOUT PROOF OF PURCHASE. When
returning a product, mark the Return Authorization number clearly on the outside of the package and include
your original proof of purchase.
IN NO EVENT SHALL HAWKING TECHNOLOGY’S LIABILTY EXCEED THE PRICE PAID
FOR THE PRODUCT FROM DIRECT, INDIRECT, SPECIAL, INCIDENTAL OR CONSEQUENTIAL DAMAGES
RESULTING FROM THE USE OF THE PRODUCT, IT IS ACCOMPANYING SOFTWARE OR ITS
DOCUMENTATION. Hawking Technology makes no warranty or representation, expressed, implied or
statutory, with respect to its products or the contents or use of this documentation and all accompanying
software, and specifically disclaims its quality, performance, merchantability, or fitness for any particular
purpose. Hawking Technology reserves the right to revise or updates its products, software, or documentation
without obligation to notify any individual or entity. Please direct all inquiries to: techsupport@hawkingtech.com
Trademarks & Copyright
All brands and product names are trademarks of their respective companies. No part of this publication may be
reproduced in any form or by any means or used to make any derivative (such as translation, transformation or
adaptation) without the express written consent of the manufacturer as stipulated by the United States
Copyright Act of 1976.
Warning Statement:
This equipment has been tested and found to comply with the limits for a Class B digital device, pursuant to
Part 15 of the FCC Rules. These limits are designed to provide reasonable protection against harmful
interference in a residential installation. This equipment generates uses and can radiate radio frequency energy
and, if not installed an used in accordance with the instructions, may cause harmful interference to radio
communications. However, there is no guarantee that interference will not occur in a particular installation. If
this equipment does cause harmful interference to radio or television reception, which can be determined by
turning the equipment off and on, the user is encouraged to try to correct the interference by one of following
measures:
1. Reorient or relocate the receiving antenna.
2. Increase the separation between the equipment and receiver.
3. Connect the equipment into an outlet on a circuit different from that to which the receiver is connected.
4. Consult the dealer or an experienced radio/TV technician for help. This device complies with Part 15 of the
FCC Rules. Operation is subject to the following two conditions:
(1) This device may not cause harmful interference.
(2) This device must accept any interference received, including interference that may cause undesired
operation.
FCC Caution:
FCC RF Exposure Statement:
This Transmitter must not be co-located or operating in conjunction with any other antenna or transmitter. This
equipment complies with FCC RF radiation exposure limits set forth for an uncontrolled environment. This
equipment should be installed and operated with a minimum distance of 20 centimeters between the radiator
and your body. Unauthorized antenna, modification, or attachments could damage the transmitter and may
violate FCC regulations.
Regulatory information/Disclaimers:
Any changes or modifications made to this device that are not expressly approved by the manufacturer may
void the user's authority to operate the equipment.
2
Page 42

T
ABLE OF CONTENTS
1. INTRODUCTION......................................................................................................................................4
2. FEATURES.................................................................................................................................................4
3. PACKAGE CONTENTS...........................................................................................................................5
4. PRODUCT OVERVIEW..........................................................................................................................5
5. SYSTEM REQUIREMENTS...................................................................................................................6
6. DRIVER INSTALLATION FOR WINDOWS VISTA.........................................................................6
6.1.
USING WINDOWS CONFIGURATION (VISTA).........................................................................8
7. INSTALLATION (WINDOWS 2000/XP)............................................................................................11
7.1.
VERIFY INSTALLATION (WINDOW 2000/XP).........................................................................14
7.2.
NETWORK CONFIGURATION (WIN 2000/XP)........................................................................15
8. SETUP WLAN (WIN 2000/XP).............................................................................................................16
– USING HAWKING CONFIGURATION-UTILITY.................................................................................16
8.1.
NETWORK SECURITY (WEP, WPA…).......................................................................................18
8.1.1.
WEP S
ETUP
.................................................................................................................................18
8.1.2.
WPA S
ETUP
.................................................................................................................................19
8.2.
ADDING PROFILES.........................................................................................................................22
8.3.
WPS CONFIGURATION..................................................................................................................24
9. QOS............................................................................................................................................................25
10. ADVANCED SETTINGS........................................................................................................................26
11. STATISTICS.............................................................................................................................................27
12. LINK STATUS..........................................................................................................................................28
13. ABOUT......................................................................................................................................................29
14. UNINSTALLING HAWKING UTILITY/DRIVER...........................................................................30
APPENDIX A – SPECIFICATIONS...............................................................................................................33
INDEX..................................................................................................................................................................35
3
Page 43

1. INTRODUCTION
Thank you for purchasing the Hawking HWDN2 Hi-GainTM Wireless-150NUSB Dish Adapter.
Now you can enjoy the latest Wireless-N technology with excellent speeds, of up to
150Mbps*. Designed with Hi-Gain Dish Technology, the Wireless-150NUSB Adapter extends
your wireless network coverage by up to 6 times and boosts transmission throughput 12
times more than a standard Wireless-G Network. It allows you to connect a notebook or
desktop to any wireless network** using the USB port. Now, you can stream HD video, play
games online, download music, images and data while maintaining your freedom of mobility.
The HWDN2 is also packed with security applications. For more security-sensitive
applications, the HWDN2 supports Hardware-based IEEE 802.11i encryption/decryption
engine, including 64-bit/128-bit WEP, TKIP, and AES. Also, it supports Wi-Fi alliance WPA and
WPA2 encryption. Cisco CCX V1.0, V2.0 and V3.0.
2. FEATURES
Features Advantages
High Speed Data Rate Up to 150Mbps*
IEEE 802.11b/g Compliant
Supports WPA/WPA2 (IEEE 802.11i),
WEP 64/128 bits
Dual Radios (1Tx * 2Rx)
WMM (IEEE 802.11e) standard support
Dual Antenna Dish Technology
* Theoretical wireless signal rate based on IEEE standard of 802.11a, b, g chipset used. Actual
throughput may vary. Network conditions and environmental factors lower actual throughput rate.
**Preferably Wireless-N network for maximum through pts.
***All specifications are subject to change without notice.
Capable of handling heavy data payloads
such as MPEG video streaming
Fully Interoperable with IEEE 802.11b /
IEEE802.11g compliant devices with legacy
protection
Powerful & Robust data security.
Enables Smart Antenna for more range and
speed
Wireless Multimedia Enhancements Quality of
Service support (QoS) / enhanced power
saving for Dynamic Networking.
More wireless distance and speed
4
Page 44

USB port
LED
Dual Antenna
–
Dish Technology
3. PACKAGE CONTENTS
Before you begin the installation, please check the items of your package. The package
should include the following items.
•
One HWDN2 Hi-Gain Wireless-150NUSB Dish Adapter
•
One USB cable (39” or 3.25 ft.)
•
One CD-ROM with User’s Manual & Drivers
•
Quick Installation Guide
4. PRODUCT OVERVIEW
indicator
LED Description
LINK
PWR
Blinks when active connection is available else remains switched OFF
Blinks rapidly when data communication in progress else remains
switched OFF
5
Page 45

5. SYSTEM REQUIREMENTS
To begin using the HWDN2 Dish Adapter, your PC/Notebook must meet the following
minimum requirements:
•
Operating System – Microsoft Windows 2000/XP/Vista
•
An Available USB Port on your Laptop or Desktop
•
256MB system memory or larger
•
750MHz CPU or higher configuration
6. Driver Installation for Windows Vista
a.
Insert the included CD an auto load page will appear instantly on you screen.
b.
Select Driver & Utility Setup
6
Page 46

c.
Select Install to begin the Installation
d.
Please wait a while as the installation process take place.
e.
After installation is complete, exit the wizard by clicking on the Finish
button.
f.
Now, plug in your HWDN2 adapter.
7
Page 47

6.1.
USING WINDOWS CONFIGURATION (VISTA)
It is recommended that you use the Windows Configuration for the Wireless-N
Adapter.
a. To open up the Windows Configuration, go to Start Connect To
b. Select the Network you wish to connect to. If you are connecting to an unsecure
network, go to step c. If you are connecting to a secured network, go to step d.
8
Page 48

c. If you are connecting to an open network (unsecured network), a warning may
appear indicating that the network is an unsecured network. Select Connect
Anyway and skip step d.
d.
If your selected network is a secured (encryption) network, then a window will
prompt you to enter security key or passphrase. If you are connecting to a
network that is security enabled, but do not have the security key or passphrase,
please obtain the passphrase from your Network Administrator.
9
Page 49

e.
Please wait while your HWDN2 is connecting.
f. The HWDN2 Wireless Dish Adapter is now connected, you may save this
network as your preferred network.
10
Page 50

7. INSTALLATION (WINDOWS 2000/XP)
Important! Please Install the HWDN2 Driver & Utility before connecting the
HWDN2 into the USB port on your computer. The HWDN2 Driver & Utility is located
on the CD.
Insert the support CD into your CD Drive.
The CD drive should auto-load the following.
Open the file and you can briefly see the following…
11
Page 51

Choose HWDN2 Configuration Utility & click next and then click install.
Await instructions as you see the setup progress as shown below...
12
Page 52

After a few seconds, the set up is complete and will show up as follows.
It may give you the option to restart. Click Finish.
Restart your computer if the wizard prompted you to do so. Otherwise, please plug
the Hawking HWDN2 Wireless Dish Adapter into an available USB port on your
desktop or notebook.
13
Page 53

7.1. Verify installation (WINDOW 2000/XP)
1. Open Control Panel Double-click on System.
2. Select Hardware tabClick on Device Manager.
Select and double-click on 802.11N USB wireless LAN card.
14
Page 54

Verify the device status of the 802.11N USB Wireless LAN Card
This device is working properlyClick OK
7.2. Network Configuration (WIN 2000/XP)
• Go to Start Menu Control Panel Network.
• Right-click on Wireless Network.
• Select Local Area Connection icon select Properties.
• Select Internet Protocol (TCP/IP) Click Properties.
15
Page 55

The Hawking Configuration Utility should appear on the
Select the [General] tab.
a. If your Wireless Router supports
[DHCP] function, please select
both [Obtain an IP address
automatically] and [Obtain DNS
server address automatically].
b. If the router does not support
[DHCP] function, you have to
configure the IP and DNS settings.
8. SETUP WLAN (WIN 2000/XP)
– Using Hawking Configuration-Utility
Prerequisite:
• Your home/office environment should have a wireless LAN Access Point
(AP) that is available for your use.
• You should readily have the (security keys) to connect to those Wireless
LAN Access Points (AP)
Configuration utility will first automatically link with the Wireless AP if there is no
security key required. If the connection is successful, a message will appear on
taskbar.
1. The following steps guide you on how to initially setup a wireless network
connection.
bottom right taskbar.
16
Page 56

2. Mouse over the “Hawk” icon and you’ll get a brief description and status of your
WLAN. For example, the figure below shows the HWDN2 is connected to an
NRouter.
3. Right click on the “HAWK” icon and it will open up a menu as shown below
4. Click on Launch Config Utilities
To see a list of available wireless networks, click on Site Survey tab Press
Rescan. All detected service set identifiers
column. Note: the SSID indicates an individual Access Point (AP).
(SSID)
will be listed under SSID
17
Page 57

To connect, select a SSID or an AP that you wish to connect to and click Connect
and OK. (Note: if the selected SSID has encryption, you need to enter a security
key in order to connect (refer to Chapter 7 for network settings). If the selected SSID
is an open network or has no encryption, “none” will be listed under Encryption
column.)
When you are successfully connected, a handshake icon will appear on the left,
next to the selected AP.
When the HWDN2 fails to connect, the status bar (bottom left of the HWDN2
Wireless Utility) will show “Disconnected”.
8.1.
If your AP/Router has a networking security key, you must enter the same security
key and setting. If you do not have the Network Encryption key, please request it
from the Network Administrator or the person who set up your wireless network.
After you obtained the network security information, open up Hawking Wireless
Utility. Continue below to set up your Network Security Code.
8.1.1. WEP Setup
If the SSID or Access
Point you wish to connect
has WEP authentication,
select the SSID and click
on Connect.
NETWORK SECURITY (WEP, WPA…)
18
Page 58

An Authentication and Security Window (figure 7.1b) should appear shortly.
Figure 7.1b
WEP Setup Instructions:
(All settings should correspond with settings of the wireless AP that you are connecting to.)
a. Authentication Type field: indicates the authentication type of the AP/Router.
Please confirm the setting of the AP/Router.
• Open: WEP open system is based on request and grant. It is essentially
no authentication.
• Shared: WEP shared key is based on request, challenge, challenge
response, grant/deny.
b. Encryption field: Select WEP
c. Enter in AP encryption keys (64/128bits) in the box Key1~Key4. Please accept
the auto selected setting of [Hex]/ [ASCII].
d. Select the current AP encryption keys from Key1~Key4.
e. Press [OK] to finish setting.
WPA encryption type can be divided into WPA-PSK, WPA2-PSK, WPA (also known
as WPA-EAP), and WPA2 (also known as WPA2-EAP). All settings should
correspond with the wireless AP that you wish to connect to.
8.1.2. WPA Setup
19
Page 59

WPA-PSK and WPA2-PSK
Setting the Authentication and Security Page:
a. Authentication Type: Select
WPA-PSK or WPA2-PSK (note:
your AP must support this
function).
b. Encryption: Select TKIP or AES
in the drop down menu.(Must
Correspond to the Value on your
AP)
c. Enter the WAP Preshared Key
and click OK.
20
Page 60

Authentication Type
WPA
WPA and WPA2
1. If you wish to connect to an AP with WPA or WPA2 authentication, select the AP
or SSID and select Connect. (For example the PM SSID is being selected, the
security settings must correspond to this Wireless Access Point)
2. Setting the Authentication and Security Page:
a.
: select
WPA2-PSK (AP must support the
function).
b. Encryption: select TKIP or AES
(Same as AP)
c. If the AP/router has 802.1x Setting
function, click it for advanced settings.
Please consult your network
administrator for details or check the
user manual of the Wireless Access
Point. (See the Screen shot on the
next page)
or
21
Page 61

Click OK to finish setting.
8.2.
1. Select an AP in the SSID column (example: NRouter Click Add to Profile and
the page shown below will appear.
Adding Profiles
2. Setting items in the configuration tab:
• Profile Name: Enter the connected AP profile, eg: PROF1.
22
Page 62

• SSID: Click the drop-down menu and select one AP. You can also enter the
AP manually.
• PSM: When CAM is selected, it indicates that the product is not in power
saving status. When PSM is selected, the product is in power saving status.
(Only select it under Infrastructure network type).
• Network Type: [Infrastructure] or [Ad Hoc] type. We recommend you to
select [Infrastructure].
• Transmit power: the amount of power used by a radio transceiver to send
the signal out. User can choose power value by sliding the bar.
• [RTS Threshold] and [Fragment Threshold]: We recommend you to use the
default value 2312. User can adjust threshold numbers by sliding the bars or
key in the values directly.
3. Click OK and the set AP will appear in the Profile tab.
• Add: Click Add to add a new profile.
• Delete: to delete a profile, select one profile name and click Delete.
• Edit: to edit the setting of a profile, select the profile and click Edit.
• Activate: to activate the selected profile, select the profile and click Activate.
23
Page 63

8.3.
Wi-Fi Protected Setup (WPS) configuration function - provides easy procedures to
set up wireless security. Wi-Fi Protected Setup gives you a variety of setup options.
It uses familiar methodologies such as typing in a Personal Identification Number
/numeric code (PIN method), and pushing a button (Push-Button Configuration, or
PBC) to enable users to automatically configure network names and strong WPA2
(Wi-Fi Protected Access 2TM) data encryption and authentication.
WPS Configuration
24
Page 64

9. QoS
Wi-Fi CERTIFIED™ for WMM (Wi-Fi Multimedia) provides multimedia enhancements
for Wi-Fi® networks that improve the user experience for audio, video, and voice
applications. WMM is a profile of the IEEE 802.11e Quality of Service (QoS)
extensions for 802.11 networks and started a certification program for WMM to
satisfy the most urgent needs of the industry for a QoS solution for Wi-Fi networks.
WMM provides prioritized media access and is based on the Enhanced Distributed
Channel Access (EDCA) method. Click WMM Enable to turn on the WMM
capability.
Click WMM – Power Save Enable and this can improve the power savings by
atleast 15% as far as the HWDN2 power consumption is concerned.
25
Page 65

10. Advanced Settings
Wireless mode: Select wireless
network mode (speed)
- 802.11b/g mixed: Automatically
detect 11b or 11g
- 802.11b only: Frequency only 11b
- 802.11b/g/n mixed: Automatically
detect 11b or 11g or 11n
In order to keep the connection
stable, please select [Auto] to
automatically confirm which mode
the wireless network is working.
TX-Burst: Turbo Mode. When it is checked and the HWDN2 Wireless-N Adapter is
connected to an Access Point with TX-Burst function, the transmission throughput
will be improved. (Note: This only works with Access Point that supports this function)
Enable TCP Window Size : When checked, the reception speed will improve.)
Fast Roaming at ___ dBm: Will enter roaming mode when dBm reaches defined
level.
CCX 2.0: Open CCX (supports Cisco Compatible Extensions function). Check it after
making sure the Wireless AP supports it.
Turn on CCKM: Open CCKM function (Cisco Key Management).
Enable Radio Measurements: Open the function of CCK Monitor AP Channel.
Non-Serving Channel Measurements: Select and start to monitor the channels on
which the AP is not transmitting
Turn off RF: Disable wireless radio.
Turn on RF: Enables wireless radio.
Apply: Click this when finished with the settings.
26
Page 66

11. Statistics
The Statistics tab displays detailed information about Wireless LAN TX/RX.
• Transmit Statistics: Statistic of transmitted frames.
• Receive Statistics: Statistic of received frames.
• [Reset Counters]: Click [Reset Counter] to start over at zero the statistic numbers
of transmitting and receiving data.
27
Page 67

12. Link Status
This tab displays the information of the Wireless connection status.
• Status: Displays the linked AP name and MAC address. When [Disconnect]
appears in this box, the connection is failed.
• Extra Info: link status and strength.
• Channel: Current channel in use.
• Link Speed: Shows current transmit rate and receive rate.
• Throughput: Displays transmit and receive throughput value.
• Link Quality: Displays connection quality based on signal strength and TX/RX
packet error rate.
• Signal Strength 1 & 2: Receive signal strength, user can choose to display
as percentage or dBm format
• Noise Level: Display noise signal strength.
28
Page 68

13. About
The About tab displays version information of
1. Driver
2. Utility
3. EEPROM binary
4. Firmware
5. IP Address (current)
6. MAC address of the PHY
7. Subnet MASK Address
8. Default Gateway
29
Page 69

14. Uninstalling Hawking Utility/Driver
Select Uninstall option from the start menu.
You can see the wizard preparing for uninstallation
Select Remove All. When asked if you are sure you want to remove application and
all its features, click Yes.
30
Page 70

Removing the utility is in progress. At any time you may press cancel to abort
uninstallation.
31
Page 71

You will need to restart your computer to ensure a clean removal of the Hawking
Utility.
32
Page 72

APPENDIX A – SPECIFICATIONS
Data Rates
1, 2, 5.5, 6, 9, 11, 12, 18, 24, 36, 48, 54, 72, 84, 100 and 150Mbps (with 2-stream on both ends)
Standards / Compliance
IEEE802.3, IEEE802.3u, IEEE802.11b, IEEE802.11g, 802.11n 2.0
Regulation Certifications
FCC Part 15, ETSI 150/328/CE
Operating Voltage
5 V ± 0.25V
Status LEDs
LINK
Drivers
Windows 2000/XP/Vista
RF Information
Frequency Band
U.S., Europe and Japan product covering 2.4 to 2.484 GHz, programmable for different country regulations
Media Access Protocol
Carrier Sense Multiple Access with Collision Avoidance (CSMA/CA)
Modulation Technology
802.11g: OFDM (64-QAM, 16-QAM, QPSK, BPSK)
802.11b: DSSS (DBPSK, DQPSK, CCK)
Operating Channels
11 for North America, 14 for Japan, 13 for Europe
Receive Sensitivity
• 2.412~2.472G(IEEE802.11b)
-91dBm @ 1Mbps
-90dBm @ 11Mbps
• 2.412~2.472G(IEEE802.11g)
-90dBm @ 6Mbps
-74dBm @ 54Mbps
• 2.412~2.472G(IEEE802.11N)
-90 dBm @ MCS 8
-65 dBm @ MCS 15
(Typical)
Available transmit power
• 2.412~2.472G(IEEE802.11b)
17dBm @1~11Mbps
• 2.412~2.472G(IEEE802.11g)
19dBm
• 2.412~2.472G(IEEE802.11N)
15dBm @ 40MHz
19dBm @ 20MHz
Antenna Configuration
1T2R Mode (Dual Antenna – Dish Technology)
33
Page 73

Networking
Topology
Ad-Hoc, Infrastructure
Security
WPA/WPA2 (AES, 64,128-WEP with shared-key authentication)
Cisco CCS V1.0, V2.0 and V3.0 compliant
Physical
Form Factor
USB 2.0/1.1
Dimensions (H x W x D)
70(L) mm x 57.5(W) mm x 16(H) mm
Weight
55 g/ 2.0oz
Environmental
Temperature Range
Operating: 0°C to 50°C
Storage: -10°Cto 75°C
Humidity (non-condensing)
5%~95% Typical
34
Page 74

INDEX
This chapter provides solutions to problems usually encountered during the installation and operation of the
adapter.
1. What is the IEEE 802.11n standard?
802.11n is an IEEE 802.11 wireless network standard that increases transmission speeds from a
traditional 11Mbps (802.11b) to over 100Mbps. Currently, the HWDN2 supports up to 150Mbps. 802.11n
can handle legacy 11b and 11g transmission in a mixed mode or only 11n nodes for maximum
performance. It supports the 2.4GHz frequency bands.
The key to the 802.11n standard is the use of multiple antennas, known as MIMO (Multiple input/multiple
output). MIMO technology enables two data streams, transmitter and receiver, to be sent simultaneously
over longer distances and to improve the overall system performance.
2. What does IEEE 802.11 feature support????
The product supports the following IEEE 802.11 functions:
CSMA/CA plus Acknowledge Protocol
Multi-Channel Roaming
Automatic Rate Selection
RTS/CTS Feature
Fragmentation
Power Management
3. What is Ad-hoc????
An Ad-hoc integrated wireless LAN is a group of computers, each has a Wireless LAN adapter,
Connected as an independent wireless LAN. Ad hoc wireless LAN is applicable at a departmental scale
for a branch or SOHO operation.
4. What is Infrastructure????
An integrated wireless and wireless and wired LAN is called an Infrastructure configuration. Infrastructure
is applicable to enterprise scale for wireless access to central database, or wireless application for mobile
workers.
5. What is BSS ID????
A specific Ad hoc LAN is called a Basic Service Set (BSS). Computers in a BSS must be configured with
the same BSS ID.
6. What is WEP????
WEP is Wired Equivalent Privacy, a data privacy mechanism based on a 40 bit shared key algorithm, as
described in the IEEE 802 .11 standard.
35
Page 75

7. What is TKIP?
TKIP is a quick-fix method to quickly overcome the inherent weaknesses in WEP security, especially the
reuse of encryption keys. TKIP is involved in the IEEE 802.11i WLAN security standard, and the
specification might be officially released by early 2003.
8. What is AES?
AES (Advanced Encryption Standard), a chip-based security, has been developed to ensure the highest
degree of security and authenticity for digital information, wherever and however communicated or stored,
while making more efficient use of hardware and/or software than previous encryption standards. It is
also included in IEEE 802.11i standard. Compare with AES, TKIP is a temporary protocol for replacing
WEP security until manufacturers implement AES at the hardware level.
9. Can Wireless products support printer sharing????
Wireless products perform the same function as LAN products. Therefore, Wireless products can work
with Netware, Windows 2000, or other LAN operating systems to support printer or file sharing.
10. Would the information be intercepted while transmitting on air?
WLAN features two-fold protection in security. On the hardware side, as with Direct Sequence Spread
Spectrum technology, it has the inherent security feature of scrambling. On the software side, WLAN
series offer the encryption function (WEP) to enhance security and Access Control. Users can set it up
depending upon their needs.
11. What is DSSS????What is FHSS????And what are their differences????
Frequency-hopping spread-spectrum (FHSS) uses a narrowband carrier that changes frequency in a
pattern that is known to both transmitter and receiver. Properly synchronized, the net effect is to maintain
a single logical channel. To an unintended receiver, FHSS appears to be short-duration impulse noise.
Direct-sequence spread-spectrum (DSSS) generates a redundant bit pattern for each bit to be
transmitted. This bit pattern is called a chip (or chipping code). The longer the chip is, the greater the
probability that the original data can be recovered. Even if one or more bits in the chip are damaged
during transmission, statistical techniques embedded in the radio can recover the original data withoutthe need for retransmission. To an unintended receiver, DSSS appears as low power wideband noise and
is rejected (ignored) by most narrowband receivers.
12. What is Spread Spectrum????
Spread Spectrum technology is a wideband radio frequency technique developed by the military for use in
reliable, secure, mission-critical communication systems. It is designed to trade off bandwidth efficiency for
reliability, integrity, and security. In other words, more bandwidth is consumed than in the case of
narrowband transmission, but the trade off produces a signal that is, in effect, louder and thus easier to
detect, provided that the receiver knows the parameters of the spread-spectrum signal being broadcast. If a
receiver is not tuned to the right frequency, a spread –spectrum signal looks like background noise. There
are two main alternatives, Direct Sequence Spread Spectrum (DSSS) and Frequency Hopping Spread
Spectrum (FHSS).
36
Page 76

13. What is Hi-Gain and dBi?
Hi-Gain is Hawking Technologies’ high performance wireless distance extending product line. It
encompasses a group of products and technologies used to help solve distance issues accompanied with
WiFi products. A unit of measurement on antenna strength and power is dBi. The higher the dBi or gain
level of an antenna the more powerful it is.
14. What is the difference between directional and omni-directional antennas?
Directional and omni-directional antennas determine the wireless output pattern of antennas. In standard
installations it is normally the wireless access point that uses the omni-directional antenna (360 degree
wireless output) whiles the clients (desktop or laptops) that use the directional antennas (concentrated
narrow wireless signal) to create a stronger link directly to the access point.
15. How do I get an Optimal Wireless Connection with the HWDN2?
If pointing the antenna directly at the access point is not providing a sufficient signal connection then you
can try bouncing the signals off walls. Wireless signals can reflect off walls or through windows to get to
their desired location so try different positions to find the best antenna orientation for your network.
37
Page 77

PRODUCT SUPPORT INFORMATION
Thank you for choosing Hawking Technologies. Please do not hesitate to contact us if you have
any questions regarding the installation of your product. We’re here to help you 24 hours a day, 7
days a week!
PHONE SUPPORT
888.202.3344
•
Toll-Free 24/7 Technical Support Line (US & Canada Only)
WEBSITE SUPPORT
http://www.hawkingtech.com/support
•
You’ll find: (a) Firmware/Driver updates with the latest features and news on your product
(b) Frequently Asked Questions (FAQs) with answers to common asked questions about
your product.]
EMAIL SUPPORT
techsupport@hawkingtech.com
•
DOCUMENT SUPPORT
Product User’s Manual
•
(Normally located on the product CD)
You’ll find detail install instruction on your product and default user name and password.
RMA (RETURN MERCHANDISE AUTHORIZATION)
http://www.hawkingtech.com/support/customerservice.php
•
CUSTOMER SERVICE
Email: customerservice@hawkingtech.com
•
Tel: 949.790.0800 ext:1000
•
We want to hear from you! We hope you will have a wonderful experience using
our hawking product. If there is any concern, please email us at
customerservice@hawkingtech.com.
38
Page 78

39
 Loading...