

Page 1
HWRGM 1A Hawking Technologies, Inc. P 0
Page 2
HWRGM 1A Hawking Technologies, Inc. P 1
Page 3
HWRGM 1A Hawking Technologies, Inc. P 2
Page 4
HWRGM 1A Hawking Technologies, Inc. P 3
Page 5
1) POWER ON: After you have correctly connected your router to
your Computer and Cable/DSL modem, please power on all units.
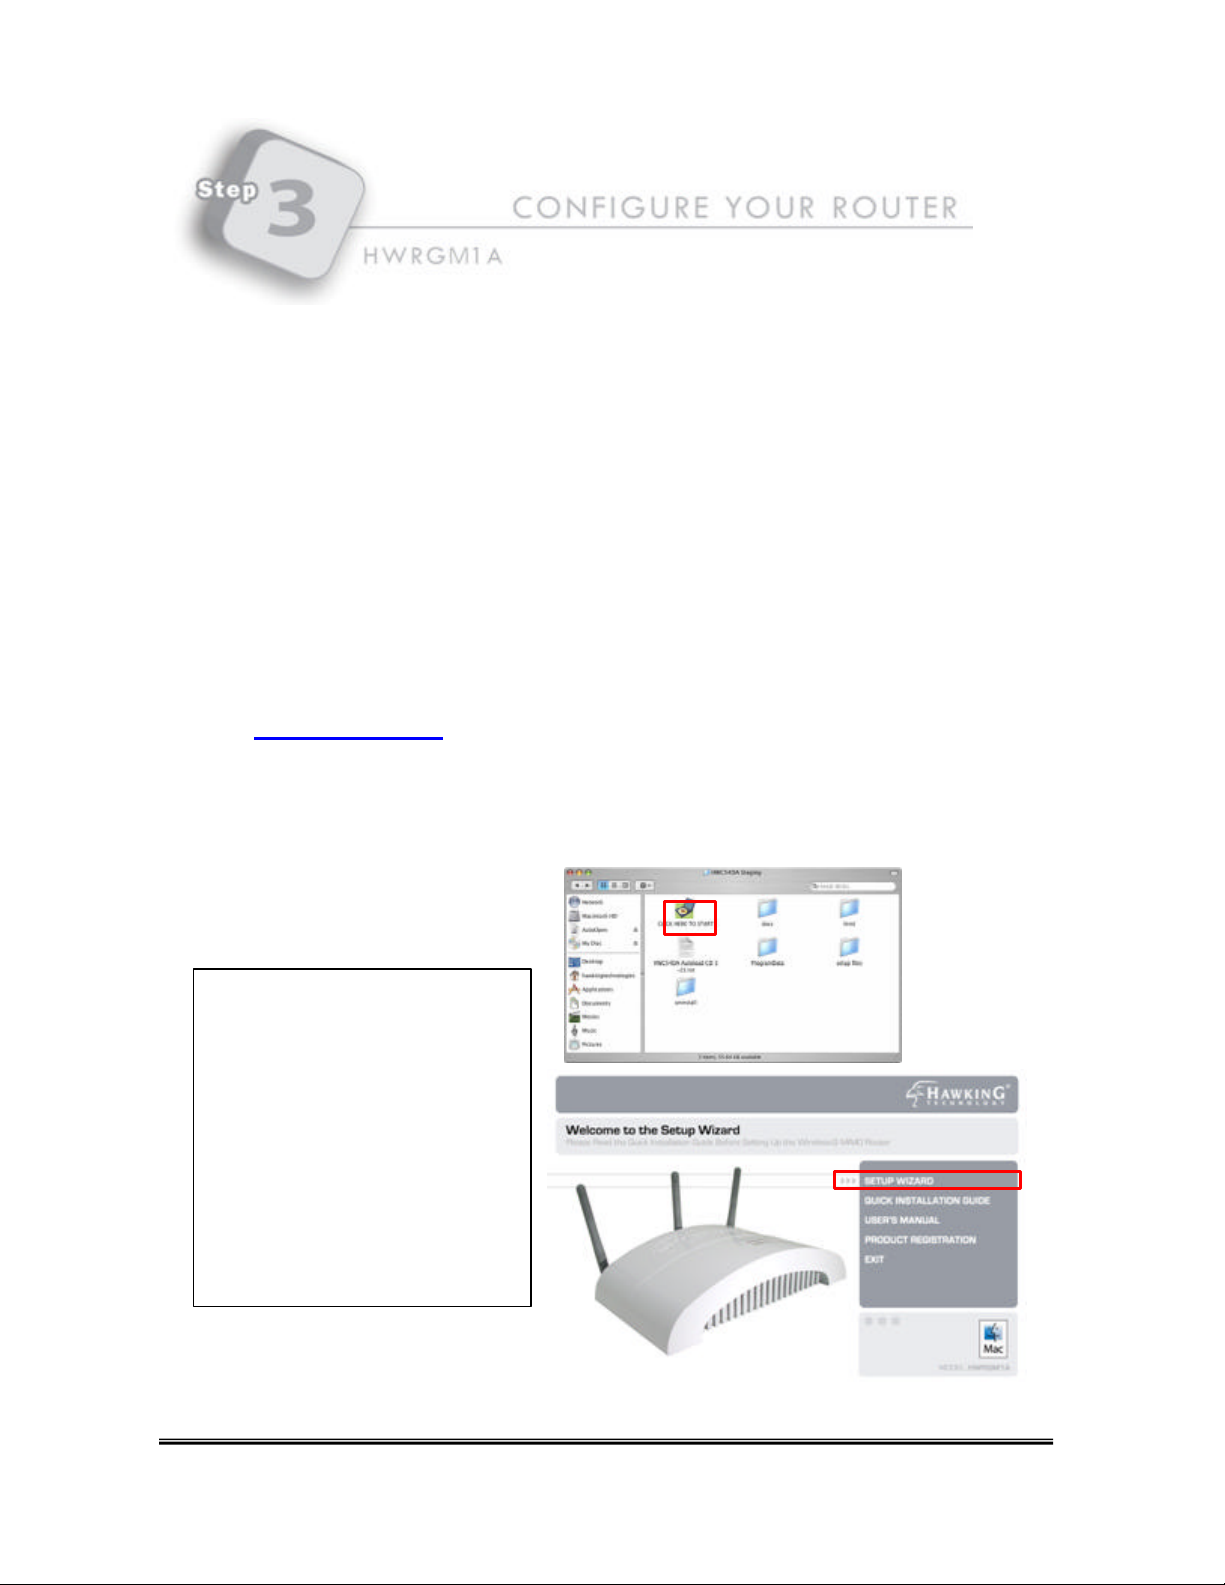
2) INSERT THE SETUP CD (FOR MAC OS X ONLY): Find the Setup-CD in your package and
insert it into your CD-Rom dr ive. Wait for the Auto-Load Folder to load. If the page does not
load, please click on the “HWRGM1A Setup CD” icon on your desktop to load the folder. Once
the folder is open, click on the file “CLICK HERE TO START.” This should open up the Setup
Wizard Window. If this still does not work you may open your web browser and enter the
following into the URL field:
- Type in http://192.168.1.254 in your URL section and hit ENTER.
Note: PC Users please skip this section and advance to the Windows installation instructions
directly following the Mac installation.
1-Insert CD and wait for the
Autoload page. If the autoload
page does not open double clic k
the CD-Rom Icon
2-Open the CLICK HERE TO
START file
3-Select SETUP WIZARD from
the menu
HWRGM 1A Hawking Technologies, Inc. P 4
Page 6

3) SETUP WIZARD:
Click on the “Setup Wizard” tab to begin configuration of your Router. If your web-browser
does not auto-load or cannot find the page, please skip to STEP 4, the Computer Configuration
page . You may return to this step after you have correctly configured your PC or Mac.
LOGIN AND PASSWORD
When the Login pop-up for the Router
appears, please enter “admin” for the
username and “1234” for the password to
access the configuration screen. (Note: By
default, the username and password is
admin/1234, if this does not work, reset the
router and try logging in again.)
When the menu bar on the left loads, select
the “SETUP WIZARD” option in the main
menu.
HWRGM 1A Hawking Technologies, Inc. P 5
Page 7
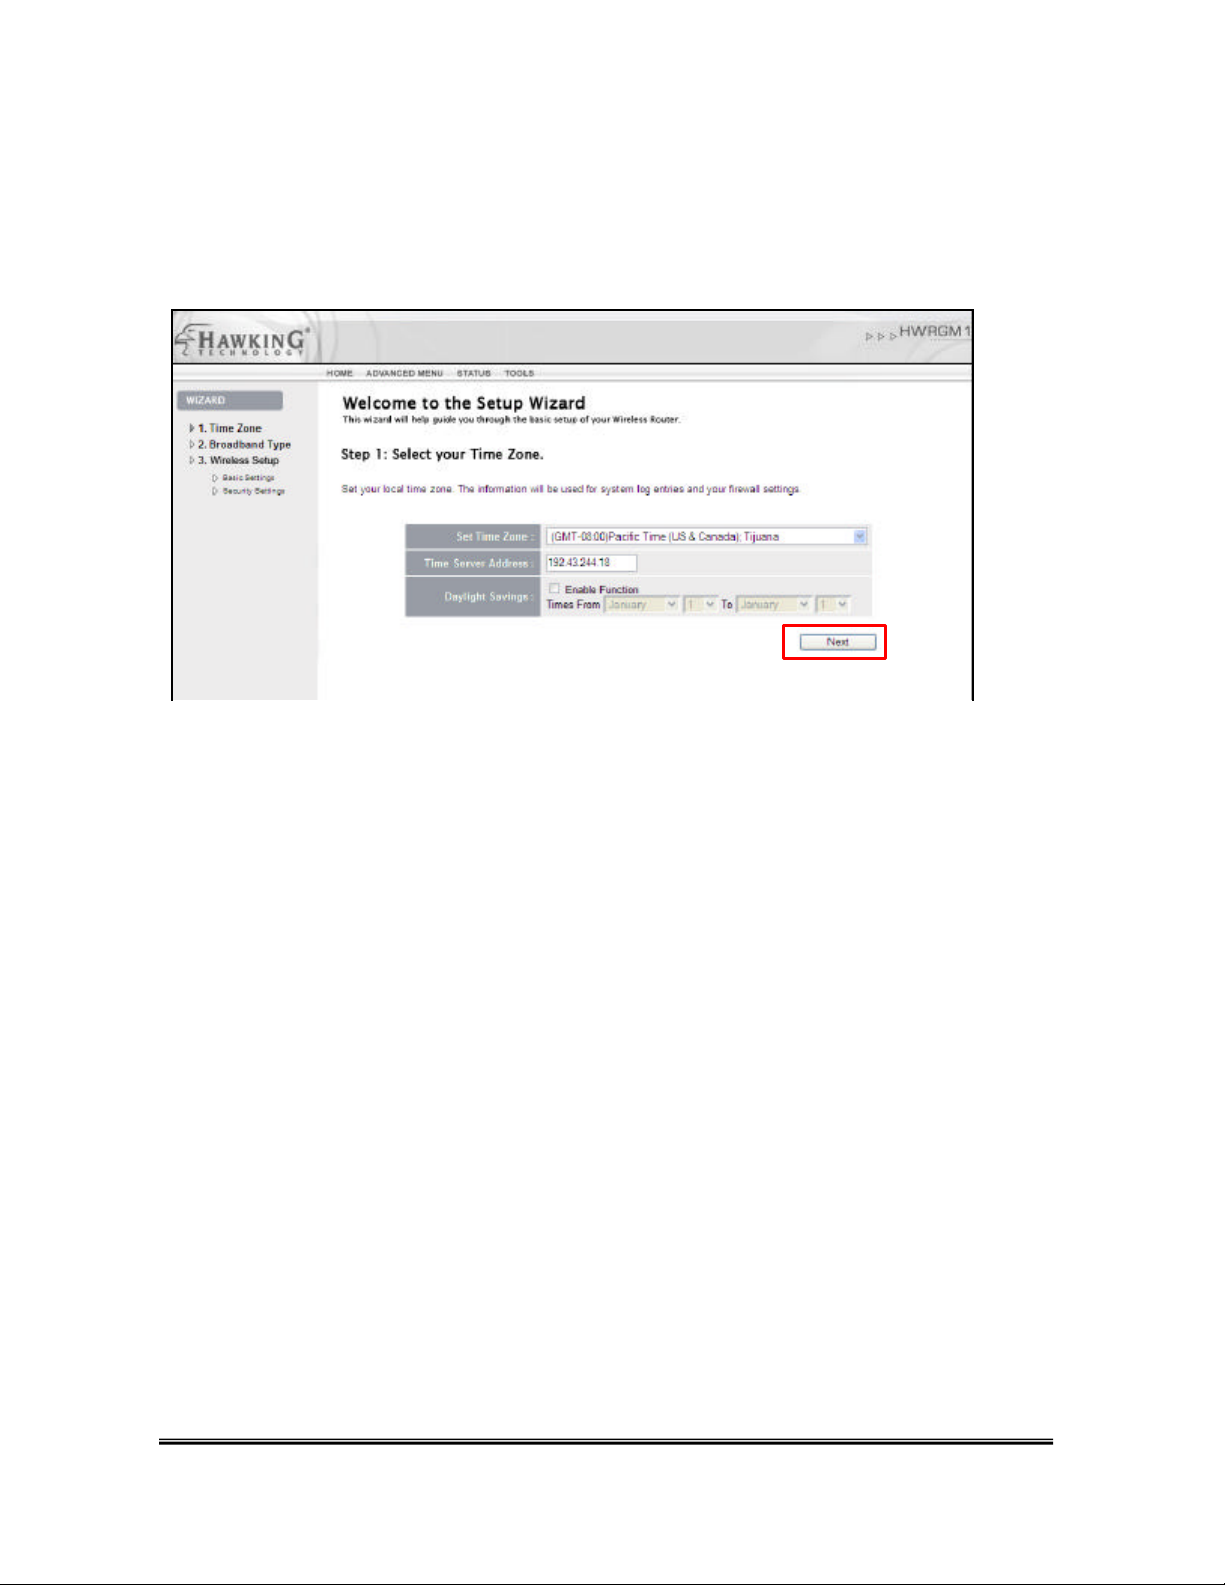
TIME ZONE SETTING
To setup the internal clock of your Router please select the appropriate Time Zone of your specific
geographical location. You do not need to change the Time Server Address.
You can also adjust your time settings to support Daylight Savings Time. To do so click Enable
and enter the correct times for Daylight Savings.
Select NEXT to continue.
HWRGM 1A Hawking Technologies, Inc. P 6
Page 8

WAN INTERFACE SETUP (BROADBAND CONNECTION TYPE)
The WAN Interface Setup configures your router to your specific Broadband Internet Connection
Type.
View the menu of Broadband Connections Types and select the one that applies to your connection.
If you do not know what type of Broadband Internet Service Provider you have please contact your
Internet Service Provider for this information.
After you have selected your broadband internet connection type you
will be taken to a page to complete the configuration of your specific
internet connection. Fill out the required information and select
NEXT to continue. If you are not sure of some of the requested
requirements please check with your network administrator or your
internet service provider.
HWRGM 1A Hawking Technologies, Inc. P 7
Page 9

WIRELESS SETTINGS
This page will guide you through your initial setup for wireless access. If you do not wish to use
wireless access in your network you may select “Disable”. Otherwise select “Enable” to allow
wireless access and click NEXT to continue with your wireless settings.
Mode: AP (Access Point) mode is the default setting for your Wireless Router. AP mode is for basic wireless access
and it is recommended that you do not change this setting unless you are familiar with advanced wireless modes.
Band: Hawking recommends using B+G for your band settings. The band settings let you set your wireless access for
802.11b, 802.11g or both networks.
ESSID: The SSID is the identification name of your wireless network. Your individual computers will us e this ID to
recognize and connect to your network. The default ID of your network is: Hawking.
Channel #: Lets you select the channel number your wireless network operates on. You will not need to change this
unless there is wireless interference within your network.
Select NEXT to continue
HWRGM 1A Hawking Technologies, Inc. P 8
Page 10

WIRELESS SECURITY SETUP
Hawking recommends that you enable wireless security within your network. Note that implementing wireless
security may have an impact on your network’s performance, but if you are transmitting sensitive data, enabling
wireless security should give you peace of mind that your network is safe from intruders.
This Quick Installation Guide will go over two types of wireless security. WEP and WPA. Please view the users
manual if you need a more detailed description of wireless security.
(Note: Airport Extreme Card Users: Later versions of Mac OSX will support more advanced security options, if you are
unaware of what Wireless Security setting your Mac is compatible with please check with Apple Support)
If you do not wish to add security in your network simply select Disable from the Encryption type and click FINISH.
Otherwise select WEP or WPA from the Encryption selection and continue to the instructions of your specific
encryption selection below.
HWRGM 1A Hawking Technologies, Inc. P 9
Page 11

Basic Wireless Security Settings: WEP Encyption
WEP encryption provides basic wireless security for your network.
1) Select “ WEP ” under Encryption
2) Key Length lets you choose the strength of your encryption key. A 128 -Bit key is more secure than a 64-Bit
Key.
3) Key Format choose HEX
4) Default Tx Key select Key 1
5) For the Encryption Key 1 field you will need to enter your specific WEP key. This Key functions similar to the
password into your network.
64-Bit Key: 10 digit key. Characters can be numerical (0-9) or letters (A -F) or a combination.
Sample 64Bit Key: 0A12B3C45D
128-Bit Key: 26 digit key. Same characters as 64Bit.
Sample 128Bit Key: 0000011111AAAAAFFFFF222222
5) Select APPLY to complete your installation. The router will reboot.
HWRGM 1A Hawking Technologies, Inc. P 10
Page 12

Advanced Security Settings: WPA Encyption
WPA is more advanced wireless security for your network.
1) Select “WPA -Pre-Shared Key” under Authentication
2) Select “ WPA (TKIP)” under Encryption
3) Key Format choose Passphrase
4) WPA Pre-Shared Key functions similar to a password into your wireless network. All wireless devices in your
network will need to have this key entered in order to function properly. The key mus t be at least 8 letters long.
Sample Passphrase Key: hawkingtech
5) Select FINISH to complete your installation. The router will reboot.
IMPORTANT: Always remember that each device in your wireless network MUST use the same encryption
method and key to function properly. Please save your encryption keys in a safe place. (If you happen to
forget your key you may reset the router to regain access)
Your router is now successfully setup for wired and wireless networking!
HWRGM 1A Hawking Technologies, Inc. P 11
Page 13

Windows Setup
1) Insert the Setup CD into your CD-Rom Drive
2) Wait for the Autoload page to appear
3) Select Setup Wizard from the Autoload CD menu
4) Follow the steps and fill in the correct information
1) Scan for your router 2) Select your Internet Service Provider Type
- Click Search to Scan for your device - View the list of ISP connection types
- Highlight the device and click NEXT - Select your ISP type and click NEXT
3) Adjust your LAN settings and Login 4) Setup your Wireless Network
- It is recommended that you do not - Enable wireless access to your network
Change your LAN IP Address settings - Select an ID for your wireless network
- You may choose a new password if you
HWRGM 1A Hawking Technologies, Inc. P 12
Page 14

do not wish to use the default “1234”
5) Setup Wireless Security 6) Setup Summary – Click “SET” to apply
- Enable or Disable wireless security - Wait for your router to reboot.
- View pg 9 -11 for Security setup information
HWRGM 1A Hawking Technologies, Inc. P 13
Page 15

IMPORTANT TEST – PLEASE COMPLETE
In order for all computers connected to the Wireless Router to work they must be configured
correctly. To test this, please open your web browser and type www.hawkingtech.com in your
web browser’s address bar. If this does not work, POWER OFF YOUR CABLE MODEM OR
DSL MODEM FOR 30 SECONDS. MAKE SURE YOUR WIRELESS ROUTER IS
TURNED ON AND CONNECTED TO THE CABLE/DSL MODEM BEFORE YOU
POWER-ON YOUR MODEM AGAIN. (This lets your ISP re-adjust its settings to your new
router) Now power on your PC and try going to www.hawkingtech.com again.
If the page opens with no problem then you may skip the rest of this section and enjoy your new
Wireless-108G MIMO Router. However, if it does not load, please follow the following steps to
complete the configuration process for each computer that fails the test.
Note: If your computer is not loading the Setup Wizard page during initial setup you may
also follow the following steps to correctly configure your Mac or PC.
HWRGM 1A Hawking Technologies, Inc. P 14
Page 16

Mac OSX SETUP (For OSX 10.3 and 10.4 – Using the Built-in Ethernet Port)
1.) Click the APPLE button in your OSX top right bar. Find the “Systems Preferences” tab and
select it.
2.) In the top bar of the Systems Preferences window select the NETWORK icon.
3.) In the Network bar select the drop down menu in the Show field and select Built-In Ethernet.
4.) Next select the TCP/IP in the navigation bar
5.) Drop down the Configure IPv4 window and select Using DHCP
6.) Click on Renew DHCP Lease and the select Apply Now.
Your Mac IP settings are now setup for dynamic networking. Please test your internet connection
again.
For OSX 10.3 and 10.4 – Using the Wireless Airport Cards
Follow the same steps as listed above for the “Built-In Ethernet” however for step 3 follow this step
instead:
3.) In the Network bar select the drop down menu in the Show field and select Airport.
The rest of the steps are exactly the same as those listed above.
HWRGM 1A Hawking Technologies, Inc. P 15
Page 17

PC SETUP (For Windows 98/ME/XP)
1.) Click the START button in your Windows tool bar. Find the “CONTROL PANEL” tab and
select it. Double click the Network Connections (XP) or if you are using 98/ME, right click the
Network Neighborhoods icon and select Properties. Find your “Local Area Connection” (XP),
right click the icon and select Properties.
2.) Select the TCP/IP protocol option associated with your Network Adapter. (If you do not have
the TCP/IP protocol please click “Add…” to add this protocol) Select the Properties tag after
you have highlighted your TCP/IP protocol associated w ith the Network Adapter as indicated in the
illustration above.
3.) Be sure to check the selection entitled “Obtain an IP address automatically” if it has not yet
been chosen. Select OK. Your computer may request for you to reboot at this time. If so,
reboot and test your connection.
HWRGM 1A Hawking Technologies, Inc. P 16
Page 18

Troubleshooting and Common Issues
Overview
This section covers some common problems that may be encountered while using the
Wireless Router and some possible solutions to them. If you follow the suggested steps
and the Wireless Router still does not function properly, contact your dealer for further
advice.
General Problems
Problem 1: Can't connect to the Wireless Router to configure it.
Solution 1: Check the following:
• The Wireless Router is properly installed, LAN connections are
OK, and it is powered ON.
• Ensure that your Mac or PC and the Wireless Router are on the
same network segment. (If you don't have a router, this must be
the case.)
• If your Mac or PC is set to "Obtain an IP Address automatically"
(DHCP client), restart it.
• If your Mac or PC uses a Fixed (Static) IP address, ensure that it
is using an IP Address within the range 192.168.1.1 to
192.168.1 .253 and thus compatible with the Wireless Router's
de fault IP Address of 192.168.1.254.
Also, the Network Mask should be set to 255.255.255.0 to match
the Wireless Router.
In Windows, you can check these settings by using Control
Panel-Network to check the Properties for the TCP/IP prot ocol.
• In OSX you can check this from the System
Preferences/Network/TCP/IP settings windows.
Internet Access
Problem 1: When I enter a URL or IP address I get a time out error.
Solution 1: A number of things could be causing this. Try the following
troubleshooting steps.
• Check if other computers work. If they do, ensure that your
computers IP settings are correct. If using a Fixed (Static) IP
Address, check the Network Mask, Default gateway and DNS as
HWRGM 1A Hawking Technologies, Inc. P 17
Page 19

well as the IP Address.
• If the computers are configured correctly, but still not working,
check the Wireless Router. Ensure that it is connected and ON.
Connect to it and check its settings. (If you can't connect to it,
check the LAN and power connections.)
• If the Wireless Router is configured correctly, check your Internet
connection (DSL/Cable modem etc) to see that it is working
correctly.
Problem 2: Some applications do not run properly when using the Wireless
Router.
Solution 2: The Wireless Router processes the data passing through it, so it is not
transparent.
Use the Special Applications feature to allow the use of Internet
appli cations which do not function correctly.
If this does solve the problem you can use the DMZ function. This
should work with almost every application, but:
• It is a security risk, since the firewall is disabled.
• Only one (1) PC can use this feature.
Wireless Access
Problem 1: My Mac or PC can't locate the Wireless Access Point.
Solution 1: Check the following.
• Your computer is set to Infrastructure Mode. (Access Points are
always in Infrastructure Mode)
• The SSID on your computer and the Wireless Access Point are
the same.
Remember that the SSID is case-sensitive. So, for example
"Workgroup" does NOT match "workgroup".
• Both your computer and the Wireless Router must have the same
setting for WEP. The default setting for the Wireless Router is
disabled, so your wireless station should also have WEP
disabled.
• If WEP is enabled on the Wireless Router, your PC must have
WEP enabled, and the key must match.
• If the Wireless Router's Wireless screen is set to Allow LAN
access to selected Wireless Stations only, then each of your
Wireless stations must have been selected, or access will be
blocked.
• To see if radio interference is causing a problem, see if
connection is possible when close to the Wireless Router.
HWRGM 1A Hawking Technologies, Inc. P 18
Page 20

Remember that the connection range can be as little as 100 feet
in poor environments.
Problem 2: Wireless connection speed is very slow.
Solution 2: The wireless system will connect at the highest possible speed,
depending on the distance and the environment. To obtain the highest
possible connection speed, you can experiment with the following:
• Wireless Router location.
Try adjusting the location and orientation of the Wireless Router.
• Wireless Channel
If interference is the problem, changing to another channel may
show a marked improv ement.
• Radio Interference
Other devices may be causing interference. You can experiment
by switching other devices Off, and see if this helps. Any "noisy"
devices should be shielded or relocated.
• RF Shielding
Your environment may tend to block transmission between the
wireless stations. This will mean high access speed is only
possible when close to the Wireless Router.
Common Issues for Mac Users
Check to See if ALL Computers are Affected
If you have more than one computer that connects through the Wireless -G Router, check to see if all clients
are affected. This may allow you to skip sections of this guide that are not relevant to you. Consider these
questions:
Is Only One Computer Affected?
If so, concentrate on troubleshooting client settings on that computer. Make sure that its AirPort card is
properly installed, with the antenna connected.
If All Computers are Affected:
1 Unplug the Wireless-G Router.
2 Wait 30 seconds.
3 Plug the base station back in.
4 Try to connect to the Internet from a client computer.
If it fails try:
1. Unplug the power to your Cable or DSL Modem
2. Make sure your Wireless-G Router is powered ON.
HWRGM 1A Hawking Technologies, Inc. P 19
Page 21

3. Wait 5 minutes
4. Plug the power of the Cable/DSL Modem Back in.
5. Try to connect to the Internet from a client computer.
This lets the Cable or DSL Modem associate itself correctly to the new Router.
If ONLY one Computer is Affected:
Concentrate on factors that affect wireless clients, such as:
- Network selection and security keys
- Hardware access control
- Client TCP/IP settings
- Signal strength
- Sources of interference
Check all settings, cable routing, connections, and power supplies of your Wireless-G Router.
How do I File Share without using Apple Talk?
Using standard TCP/IP methods, file sharing and local networking can be accomplished.
Connecting to a Server
To connect to a server (OS X 10.1 and above) using your Mac Keyboard hit the Apple Symbol and K
simultaneously. This will bring up a window to Connect to a Server. Enter the Server IP address here and
it will be added to your network.
Connecting to Mac Computers over the LAN
OS X will automatically find Mac OSX based computers in your network. You simply have to view your
Network from the Finder and you will see all local computers.
Connecting to Windows Based Computers via the LAN
Using OS X you will need to enter your System Preferences and open the Network page to change your
settings and allow for Windows Computers to be networked.
Can clients connect to the Wireless-108G MIMO Router but not make any IP connections?
If clients get a strong signal connection to the base station but cannot use the network (such as Web
browsing or local file sharing), check to see if you are experiencing a PPPoE scenario or if your computer is
set on the wrong IP settings, or if the Router is on Static IP and DHCP is off.
Lost network password
Hit the RESET button on the back panel of the Router for over 5 seconds and the Router will return to default
settings. (Login: Admin, Password: None).
HWRGM 1A Hawking Technologies, Inc. P 20
Page 22

I’ m having trouble with Wireless Security on my Mac
Use the latest version of the Mac OS that you can (later versions of OSX support more security types)
It is best to have the latest version of the Mac OS that you can use, whether you have Mac OS 9 or Mac OS X.
Use the Software Update control panel (Mac OS 9) or Software Update preferences (Mac OS X) to install
software updates. Because some updates are prerequisite f or others, repeatedly use Software Update until
there are no updates left to install.
View the Apple website for the latest information on your OS updates and AirPort Card Updates.
For Mac OS 9
AirPort versions 2.0 and 2.0.2 for Mac OS 9 work with Mac OS 9.0.4 or later, but Mac OS 9.1 or later is best.
For Mac OS X
To get the latest version of AirPort software that works with your version of Mac OS X, use Software Update
preferences.
Does my Airport Express work with the Hawking Wireless Router?
Yes, set up the Airport Express in Client mode and have it detect and connect to your wireless router using
the SSID you have chosen. (default hawking)
HWRGM 1A Hawking Technologies, Inc. P 21
Page 23

HWRGM 1A Hawking Technologies, Inc. P 22
 Loading...